

Thermador SM272B, SMW272B Care And Use Manual

CARE AND USE MANUAL
Convection Oven / Microwave / Warming Drawer
Models:
SM272B
SMW272B

A Special Message
to Our Customers
Thank you for buying a Thermador oven. We
recommend that you take the time to read this entire
booklet before using your new appliance.
Please see the
Manual
the Microwave Oven.
We hope that the information in this manual will help
you easily operate and care for your oven for years of
satisfaction.
Please contact us if you have any questions or
comments. Phone us at 1-800-735-4328 or reach us
through our website at www.thermador.com .
You may write to us at:
Always include the model number and serial number
with all communications.
for safe use and operating instructions of
Customer Support Call Center
Huntington Beach, CA 92649
Microwave Oven Care and Use
Thermador
5551 McFadden Avenue
Sincerely,
Thermador Test Kitchen Consumer Scientists

SM/SMW Oven Care and Use Manual
Table of Contents
Important Safety Instructions ............... 1-3
Safety For All Appliances .............................2
Convection Oven Safety ..............................2
Safety for the Self-Cleaning Mode...............2
Warming Drawer Safety Instructions............3
General Model Description ...................... 4
Convection Oven Section ......................... 5
Parts Identification ....................................... 5
Location of Model & Serial Number ............5
Description of Touch Pad Functions ...........6
What You Will Hear And See .......................7
Operating Instructions ........................ 8-26
Setting the Clock .........................................8
Setting the Timer ......................................... 9
General Oven Tips .....................................10
Oven Racks ................................................11
Bake, Convection or
Convection Roast Mode Operation .......12
Baking and Proofing Techniques ...............13
Convection Techniques .............................. 14
Dehydrating Techniques ............................14
Bake and Convection
Recommendations ........................... 15-17
Food Safety Guidelines..............................18
Convection Roast Techniques .................... 18
Meat Roasting Recommendations .............19
Poultry Roasting Recommendations ..........20
Broil Mode Operation ................................ 21
Broil Techniques ......................................... 22
Broiling Recommendations ........................ 23
Timed Cooking Feature Operation...... 24-26
Child Lockout Feature Operation ..............26
Oven Care & Cleaning ....................... 27-30
Self-Cleaning: Before and After ................. 27
Setting the Self-Clean Mode .....................28
General Oven Care ....................................29
Oven Finishes/Cleaning Methods..............30
Do-It-Yourself Maintenance ............... 31-33
Replacing the Oven Light ..........................31
24 Hour Clock or
Centigrade Format.................................31
Removing Oven Door ................................32
Oven Temperature Calibration ..................33
Signals and Control Panel Display .............33
If Connecting to 208/120 volts ..................33
Problem Solving .................................34-35
Solving Baking Problems ........................... 34
Solving Operational Problems ...................35
How to Obtain Service ............................... 35
Warming Drawer ................................36-39
Operating Instructions ...............................36
Warming Drawer ........................................37
Warming Drawer Parts and Removal .........38
Warming Drawer Care and Cleaning ......... 39
Thermador® Built-In Oven Warranty....... 40
Model Warranty ......................................... 40
Service Data Record................................... 40
Quick Operating Guide ............ Back Cover
Microwave Oven Care and Use Manual
for safe use and operating instructions
Precautions to Avoid Possible Exposure
to Excessive Microwave Energy
(a) Do not attempt to operate the microwave oven with
the door open since open-door operation can result
in harmful exposure to microwave energy. It is important not to defeat or tamper with the safety interIocks.
(b) Do not place any object between the microwave oven
front face and the door or allow soil or cleaner residue to accumulate on sealing surfaces.
Please see
(c) Do not operate the microwave oven if it is damaged.
It is particularly important that the oven door is closed
properly and that there is no damage to the:
(1) door (bent),
(2) hinges and latches (broken or loosened),
(3) door seals and sealing surfaces.
The microwave oven should not be adjusted or repaired
(d)
by anyone except properly qualified service personnel.
Page 1

SM/SMW Oven Care and Use Manual
Important Safety Instructions
Please read all instructions before using this appliance.
Safety Instructions
Important Safety Notice
• The California Safe Drinking Water and Toxic
Enforcement Act requires businesses to warn
customers of potential exposure to substances
which are known by the State of California to
cause cancer or reproductive harm.
• The elimination of soil during self-cleaning generates some by-products which are on this list of
substances.
• The fiberglass insulation in self-cleaning ovens
gives off a very small amount of formaldehyde
during the first several cleaning cycles.
• To minimize exposure to these substances, always operate this unit according to the instructions contained in this booklet and provide good
ventilation to the room during and immediately
after self-cleaning the oven.
Safety For All Appliances
• Use this unit only in the manner intended by the
manufacturer. If you have any questions, contact
the manufacturer.
• Be sure the oven is properly installed and
grounded by a qualified technician.
• Children and pets should not be left alone or
unattended in the area where the appliance is in
use. They should never be allowed to sit or stand
on any part of the appliance.
• Never use the oven to warm or heat a room. Such
use can damage the oven parts.
• For personal safety, wear proper apparel. Loose
fitting or hanging garments should never be worn
while using this appliance. Tie long hair so that
it doesn't hang loose.
• Do not repair or replace any part of the appliance unless specifically recommended in this
manual. All other servicing should be referred
to an authorized servicer.
• Do not store flammable materials in or near the
oven.
• Do not use water on a grease fire. Smother fire
or flame or use a dry chemical or foam-type extinguisher.
• Use only dry potholders. Moist or damp potholders on hot surfaces may result in burns from
steam. Do not let a potholder touch hot heating
elements. Do not use a towel or other bulky
cloth.
• In the event that personal clothing or hair
catches fire, DROP AND ROLL IMMEDIATELY to
extinguish flames.
• As a precaution, it is highly recommended that
a fire extinguisher be readily available and highly
visible next to any cooking appliance.
Convection Oven Safety
• Do not touch heating elements or interior surfaces of oven.
• The heating elements may be hot even though
they are dark in color. Interior surfaces of an
oven become hot enough to cause burns.
• During and after use, do not touch or let clothing or other flammable materials contact the
heating elements or the interior surfaces of the
oven until they have had sufficient time to cool.
• The trim on the top and sides of the oven door
may become hot enough to cause burns.
• Use care when opening the door. Open the door
slightly to let hot air or steam escape before removing or replacing food.
• Do not heat unopened food containers. Buildup of pressure may cause the container to burst
and result in injury.
• Always place oven racks in desired location while
oven is cool. If a rack must be moved while oven
is hot, do not let potholder contact the hot heating elements.
Safety for the Self-Cleaning Mode
• Confirm that the door locks and will not open
before starting self-clean mode. If door does not
lock, DO NOT RUN SELF-CLEAN. Call service.
• Do not clean the door gasket. It is essential for
a good seal. Care should be taken not to rub,
damage, move or remove the door gasket.
• Do not use commercial oven cleaners or oven
liner protective coatings of any kind in or around
any part of the oven.
• Clean only oven parts listed in this manual.
• Before self-cleaning the oven, remove the broiler
pan, oven racks, other utensils and excess spillage.
Page 2

SM/SMW Oven Care and Use Manual
Warming Drawer Safety Instructions
Please read all instructions before using this appliance.
Warming Drawer Safety Instructions
WARNING: The warming drawer is for keeping
hot food hot. Never use it to cook food. Never use
it to warm or heat a room.
• Do not repair or replace any part of the appliance unless specifically recommended in this
manual. All other servicing should be referred
to a qualified technician.
• Do not store flammable materials in the drawer.
• Use care when opening the drawer. Open just a
crack and let hot air or steam escape before removing or replacing food.
• Do not place food in unopened containers in the
drawer. Pressure could build up and cause container to burst.
• Do not touch the interior surface of the drawer
while it is in use. The interior of the drawer could
become hot enough to cause burns. Use hot
pads or oven mitts when using the warming
drawer.
• Do not use aluminum foil to line the drawer. Foil
is an excellent heat insulator and will trap heat
beneath it. This will upset the performance of
the drawer and it could damage the interior finish.
Page 3
SM/SMW Oven Care and Use Manual
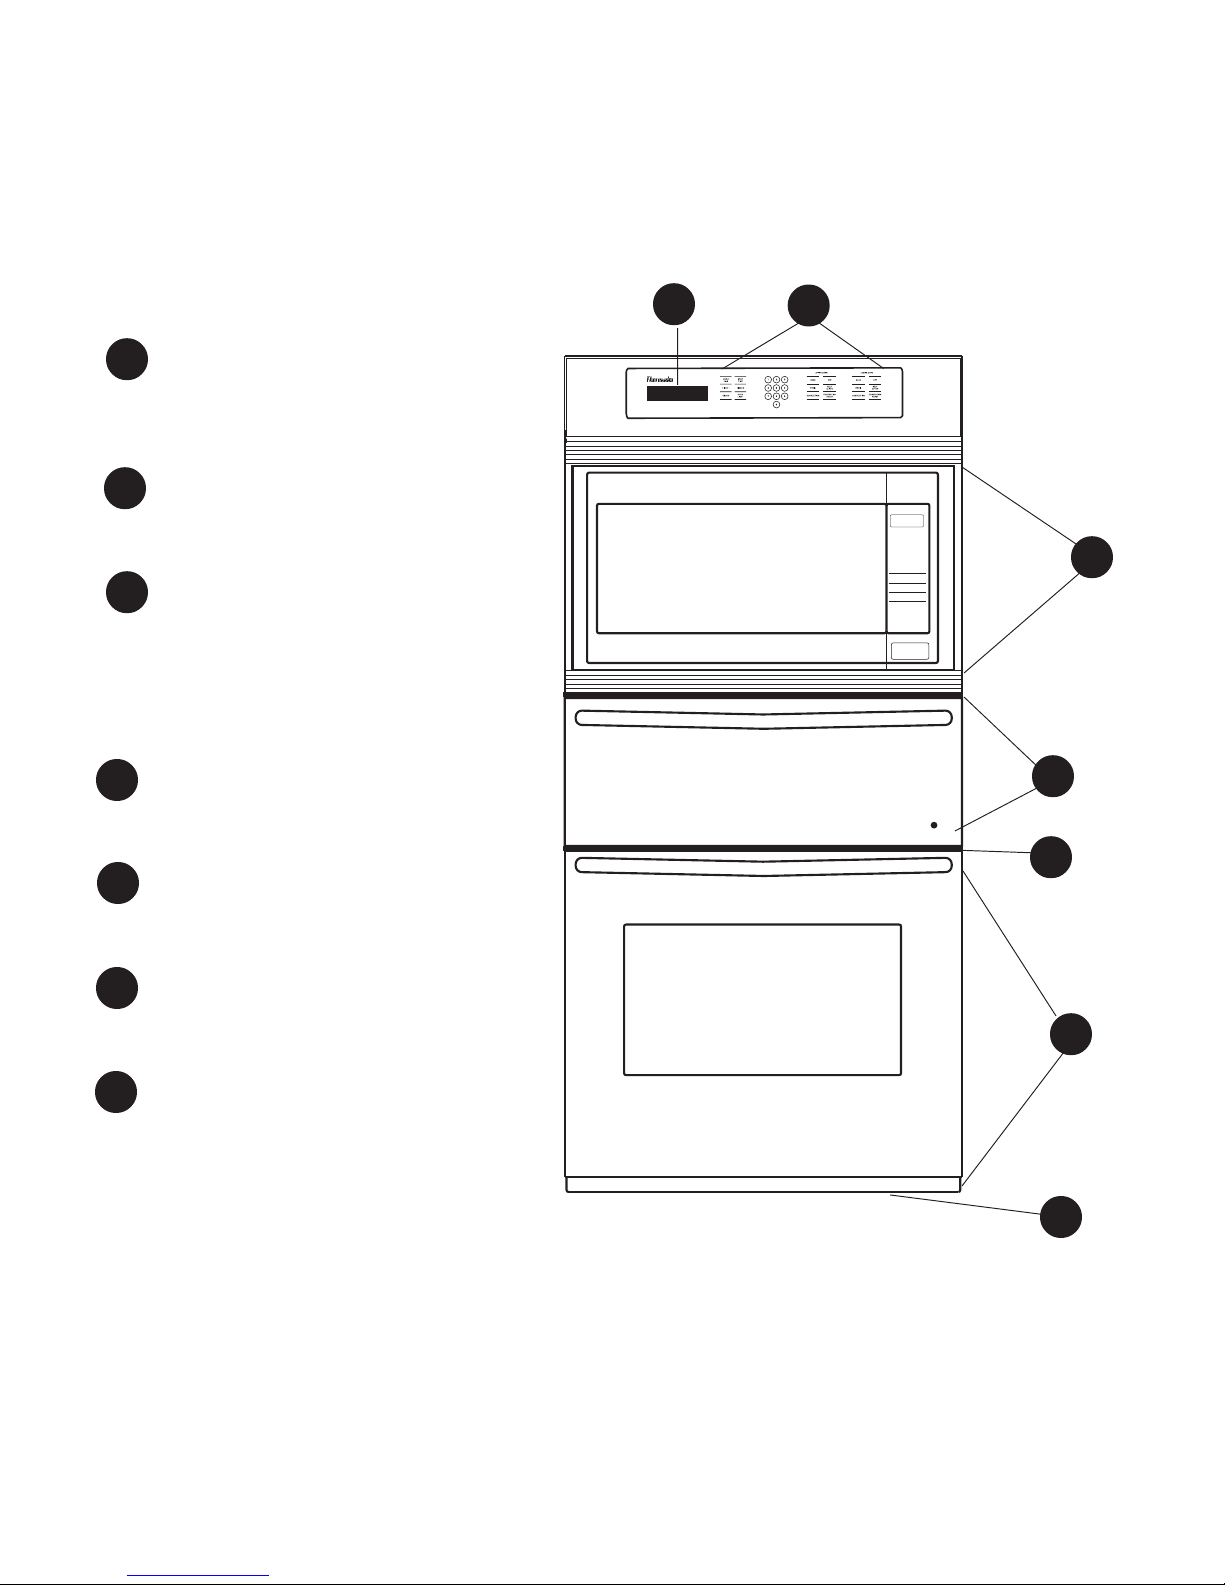
Models SM272B and SMW272B
Model Description
Model Description
Timer, Clock and Convection Oven
1
1
2
Display Window
2
Touch Pads for Convection Oven
Personal
Popcorn Reheat
Choice
Auto
Smart
Quick
Defrost
Sensor
Defrost
Cook
Timer
Clock
Time
Power
Auto
Level
3
Microwave Oven Section
Please see
Microwave Oven
Care and Use Manual
for safe
Cook
123
456
789
-0+
Plus
Start
Time
Stop
Clear
3
use and operating instructions.
4
Warming Drawer Section
4
(not included with SM272B model)
5
5
Oven Cooling Vents
6
6 Convection Oven Section
7
7 Oven Exhaust Vent
NOTE: For details of interior parts, refer to the specific section in the manual.
6
7
Page 4

SM/SMW Oven Care and Use Manual
Convection Oven Section
Feature Index
1
Door Handle
2
Oven Door Gasket
3
Window
Easy Lift Bake Element
4
5
Removable Oven Racks
7
Rack Supports
6
8
Broil Element
7
8
Display Window
9
Glass Touch Control Panel
10
Automatic Door Lock Latch
11
Oven Cooling Vents
Model & Serial No. Location
12
(look through vents)
15
13
Front Frame
16
14
Halogen Oven Lamps (2)
17
15
Convection Fan and Cover
16
Side Trim
17
Door Hinge
20
Removable Door
18
Door Vents
19
20
Exhaust Vent Trim
Broiler Pan and Lid
21
STOP
COOK
2
1
OFF
BAKE
3
TIME
TIME
TIMER 1 TIMER 2
OVEN
CLOCK
LIGHT
SELF
56
4
BROIL
CLEAN
CONVECTION
CONVECTION
9
8
7
ROAST
0
Personal
Popcorn Reheat
Choice
SENSOR
SENSOR
Auto
Smart
Quick
COOK
REHEAT
Defrost
Sensor
Defrost
POWER
POP
Cook
Timer
Clock
LEVEL
CORN
Time
Power
Auto
Level
Cook
123
4
5 6
123
708
9
456
CLOCK
TIMER
MORE
QUICK
FUNCTION
789
/LESS
MIN
KEY
SERVING
KEEP
TURBO
-0+
/WEIGHT
WARM
DEFROST
STOP/RESET START
Stop
Plus
Start
Clear
Time
Parts Identification
8
12
7
6
5
4
3
3
2
2
Convection Oven
9
STOP
COOK
2
1
BAKE
OFF
3
TIME
TIME
TIMER 1 TIMER 2
CLOCK
56
4
OVEN
8
LIGHT
7
0
9
BROIL
CONVECTION
CONVECTION
Personal
Choice
Quick
Defrost
Timer
Auto
Cook
123
456
789
-0+
Plus
Time
SELF
CLEAN
ROAST
Popcorn Reheat
Auto
Defrost
Clock
Start
Smart
Sensor
Cook
Time
Power
Level
Stop
Clear
10
11
13
13
14
15
16
17
18
18
19
Illustrations of
Oven Model
SMW272B
20
1
21
Page 5
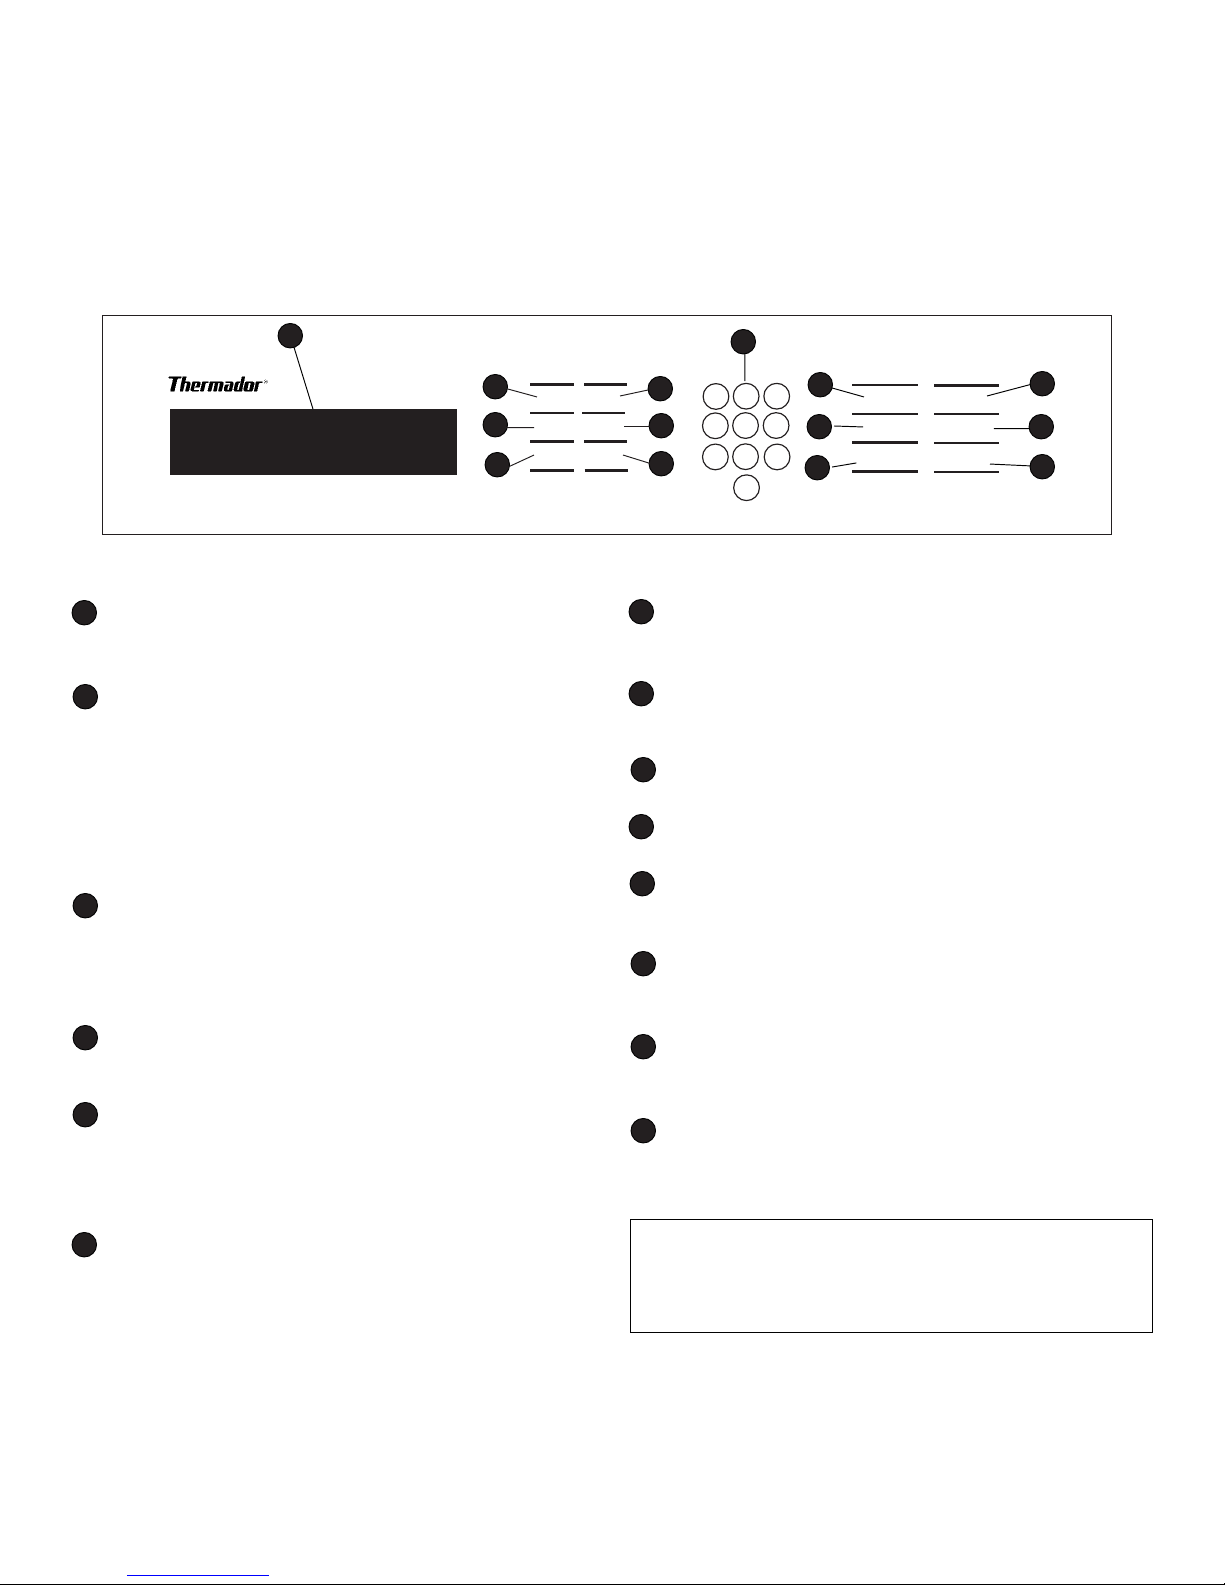
SM/SMW Oven Care and Use Manual Convection Oven Touch Pad
Description of Touch Pad Functions
The control panel contains a series of electronic touch pads that enable you to set the oven. As
you touch these control pads, you will notice that numbers and words appear in the display
window. These numbers and words are called prompts and show you what is set and what must
be done next.
Take a moment to familiarize yourself with these controls. To set the oven, touch only one
control pad at a time.
1
Oven Control Panel showing all functions.
Display
1
Window
Cook Time
2
Clock, timer and cooking mode
display.
Touch to set cooking time in
minutes or hours for Bake,
Convection or Convection Roast
modes. When this pad is used
instead of Timer 1 or 2, the oven
will turn off automatically after
the Cook Time has ended.
3
Timer 1
Touch to set as an audio
reminder kitchen timer. Press
again and hold to cancel the
minute timer.
2
3
4
STOP
COOK
TIME
TIME
TIMER 1 TIMER 2
OVEN
CLOCK
LIGHT
5
6
7
7
8
9
10
11
12
8
2
1
4
7
3
56
9
8
0
Oven
Light
Number
Pads
Bake
Broil
Convection
Off
12
13
14
10
11
9
BAKE
BROIL
CONVECTION
OFF
SELF
CLEAN
CONVECTION
ROAST
Touch to turn the oven light on
or off.
Touch numbers to set time and
temperature.
Touch to select the Bake Mode.
Touch to select the Broil Mode
Touch to select the Convection
Mode
Touch to cancel any mode
except Timer 1 and 2.
Clock
4
Touch to set the time of day on
the 12-hour clock.
5
Stop Time
Touch after setting Cook Time
or Self Clean to set the time of
day the oven will automatically
turn off.
6
Timer 2
Touch to set as a second audio
reminder. Press again and hold
to cancel the minute timer.
Page 6
13
Self Clean
Touch to select the Self-Clean
Mode.
14
Convection
Roast
Touch to select the Convection
Roast Mode.
If a code starting with “F” flashes in the display,
this indicates a function error code. Consult
“Solving Operational Problems” on Page 35.

SM/SMW Oven Care and Use Manual Convection Oven Functions
What You Will Hear And See
What You Will Hear
Convection Fan: Operates during any convection
mode. It turns off if the door is opened.
Component Cooling Fan: Activates during any cooking or self-cleaning mode to cool electronic components and outer door surfaces. It will stay on until
components have cooled sufficiently, even after the
oven is off. This air is exhausted through the vent
located below the lower oven.
Oven Audible Signals: Beeps & Chimes
1. Pad Touch Response: A single, short beep
whenever a function or number is pressed.
2. Invalid Entry: Three short beeps.
3. Self-Clean is Selected and Door is Not Closed:
Four short
4. Indicates a Failure: Continuous series of long
beeps.
5. Preheat tone: Single non-repeating
6. One minute left on timer: Single non-repeating
chime.
7. Timer Has Counted Down To Zero:
one second apart followed by
second apart every 30 seconds, up to 5 minutes.
8. End of Timed Cooking Cycle: Four chimes, one
second apart followed by one chime every 60
seconds, up to 10 minutes.
beeps.
chime.
Four chimes,
two chimes, one
What You Will See
Control Panel Flashing: Any flashing in the control
window indicates the selected function is not completely programmed and requires another step.
Power-up Flashing: The clock time flashes following
the initial application of power to the unit or after a
power failure.
Illuminated Number: These numbers indicate time of
day, time to cook, timers, or temperature. Digits will
move to the left as new digits are entered. Temperatures in Fahrenheit will adjust to the nearest 5°F.
Illuminated Lock:
played, the door will not open. Wait for the word to
disappear, indicating the automatic door latch is in the
open position.
Err: Flashes if invalid oven temperatures or times are
entered.
F Numbers: Various error codes of F1 to F9, FC, FF, Fand Fr may appear if there is a problem; please consult
"Solving Operational Problems," Page 35.
C: Will appear if Centigrade format is selected, see
Page 31.
1 and 2
: Indicate Timer 1 and Timer 2.
When the word "LOCK" is dis-
CONTROL PANEL DISPLAY WINDOW
4
DELAY
STOP
HR
START
TIMER
45
:
COOK
1 2
1 2
TIMED
U L
U L
0VEN
Page 7
3
CONVECT
CLEAN
LOCK
50
ROASTBAKE
BROIL
PREHEAT
c
°
ONON
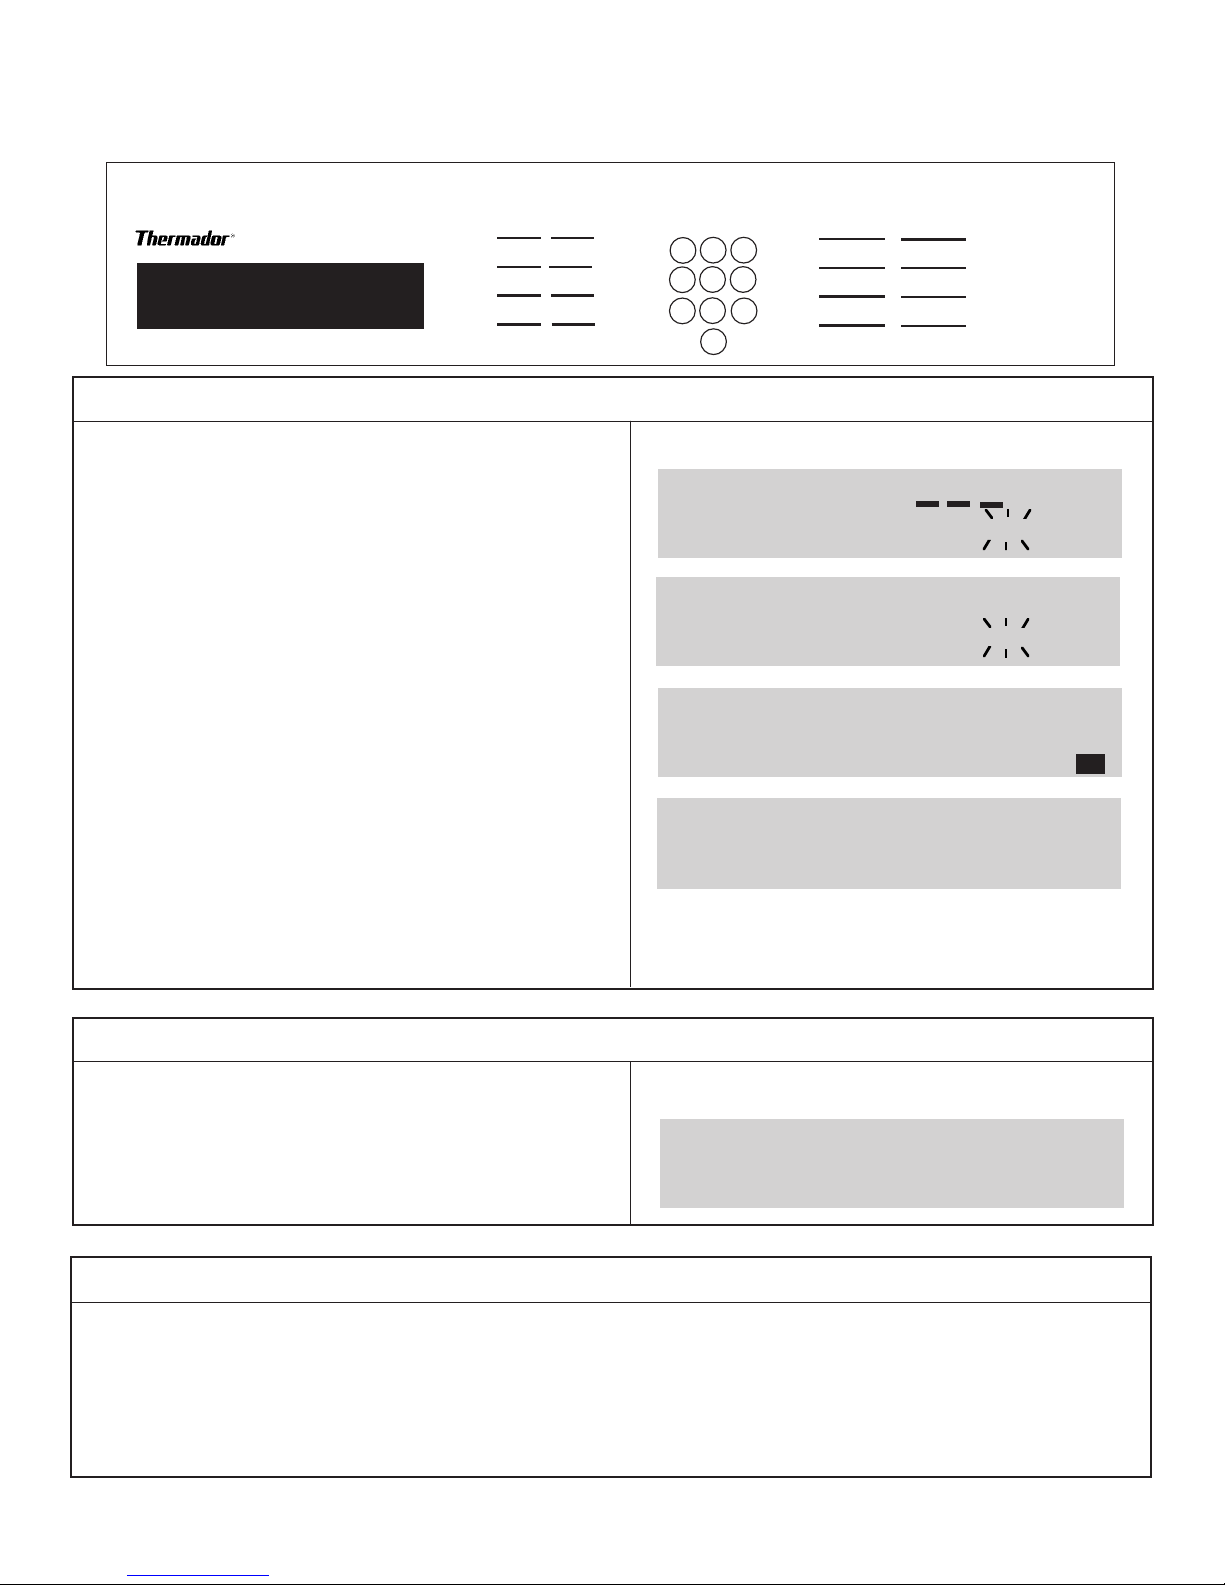
SM/SMW Oven Care and Use Manual Convection Oven Operations
Setting the Clock
STOP
COOK
TIME
TIME
TIMER 1 TIMER 2
OVEN
CLOCK
➝
LIGHT
Note: Your oven is preset to a 12-hour clock and does not indicate AM or PM. The time of day is
displayed in hours and minutes. A 24-hour clock format option may be selected. See "Do It Yourself Maintenance," Page 31.
To Set the Clock:
1
4
7
2
3
56
9
8
0
BAKE
BROIL
CONVECTION
OFF
SELF
CLEAN
CONVECTION
ROAST
WHAT YOU WILL DO
1. Touch CLOCK.
2. While TIME flashes, touch number pads.
Example: touch 5, 2, 9 to set correct
Time of Day to 5:29.
If more than 5 seconds elapses between
touching the CLOCK pad and touching each
number pad, you must start again with Step 1.
Three seconds after touching the last number,
time is set.
To Recall Time of Day:
WHAT YOU WILL DO
Touch CLOCK once to briefly display time of day
if another timed mode is showing.
WHAT YOU WILL SEE
2: 32
TIME
5: 29
TIME
5: 29
WHAT YOU WILL SEE
5 : 30
Note:
The Time of day cannot be changed if the
oven has been programed for timed Bake, timed
Convection, timed Convection Roast or Self Clean.
Cancel the program before reprograming clock.
Page 8
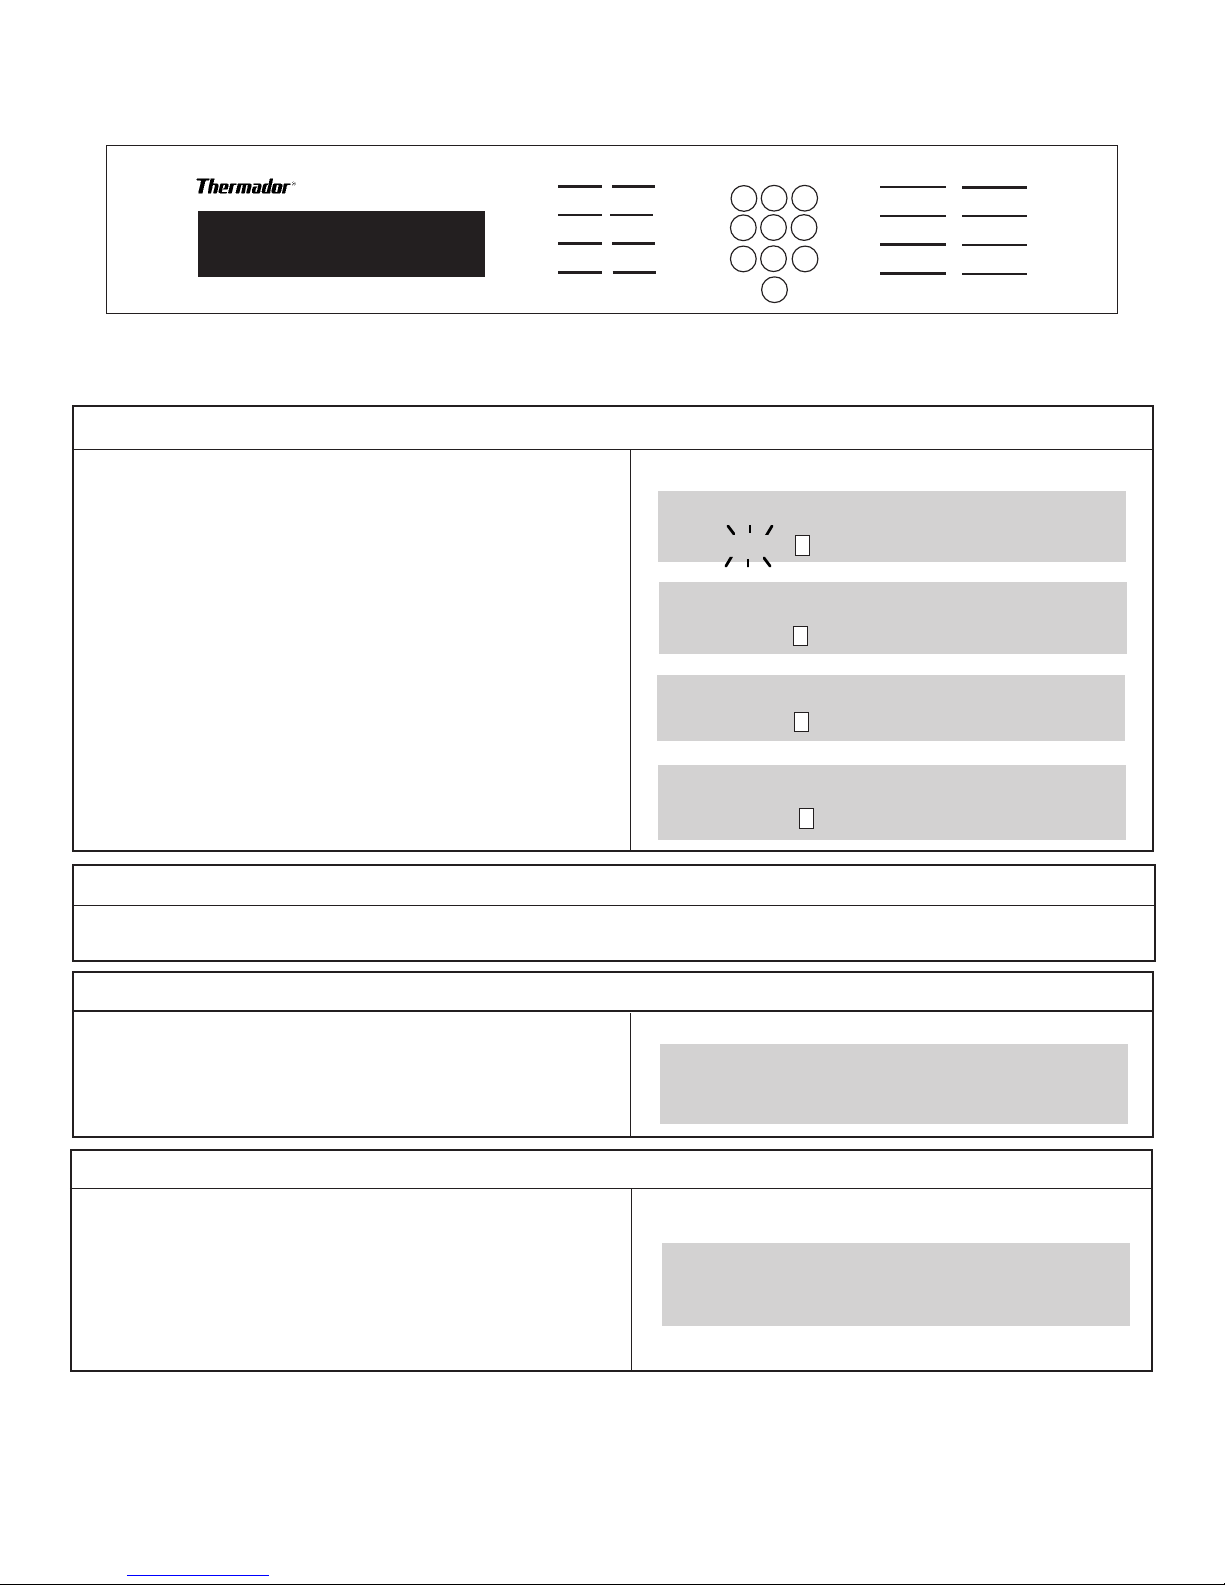
SM/SMW Oven Care and Use Manual Convection Oven Operations
Setting the Timer
STOP
COOK
TIME
TIME
TIMER 1 TIMER 2
➝
Your oven is equipped with two timers. Operating independently of each other, either timer can
be used to remind you when a period from 1 minute up to 11 hours and 55 minutes has expired.
The timers do not control oven operations.
CLOCK
OVEN
LIGHT
To Set the Timer:
1
4
7
2
3
56
9
8
0
BAKE
BROIL
CONVECTION
OFF
SELF
CLEAN
CONVECTION
ROAST
WHAT YOU WILL DO
1. Touch TIMER 1.
2. When TIMER flashes, touch number pad 5
to set 5 minutes.
After 3 seconds, the timer will stop flashing and
start the 5 minute countdown. When timer reaches
1 minute, a notification chime sounds and display
changes to a minutes/seconds mode.
IMPORTANT: Except for the last minute
countdown, the Timer counts in hours and
minutes.
Touch 1, 0, 0 (1:00) for 1 hour.
Example:
Touch 1, 0 (:10) for 10 minutes.
WHAT YOU WILL SEE
0:00
TIMER
1
: 05
TIMER
1
: 05
TIMER
TIMER
1
: 59
1
To Change Time After Starting:
1. Touch TIMER 1. 2. Touch number pads for new time.
When Time is Up:
WHAT YOU WILL DO
At the end of the time set, the Timer will chime 4
times. If not canceled, 2 chimes will sound every 30
seconds for 5 minutes.
WHAT YOU WILL SEE
End
TIMER 1
To Cancel Timer:
WHAT YOU WILL DO
Touch Timer 1 and then 0, or touch and hold
Timer 1 for 4 seconds.
Important: Touching OFF to cancel the chimes cancels
ALL selected oven programing, NOT the Timer!
This display shows time of day.
Note: To set timer for 2 hours and 30 minutes, touch the numbers 2, 3, 0. The display will show 2:30,
TIMER 1. A timer will always have display priority over the clock. The Timer with the least amount of time
remaining will have the first priority. Touching the CLOCK or other TIMER will briefly display the time of
day or the time remaining on the other timer.
WHAT YOU WILL SEE
6: 30
Page 9

SM/SMW Oven Care and Use Manual Convection Oven Operating Tips
General Oven Tips
Preheating the Oven
For best results, preheat the oven when using the
BAKE, CONVECTION or CONVECTION ROAST
modes.
• Place racks in the oven
• The oven is preheated when the oven chimes
and the selected temperature is displayed.
• Allow oven to preheat while preparing recipe or
food.
• Once oven is preheated, place food in the oven
as quickly as possible to minimize the loss of heat
and reduction of oven temperature.
before preheating.
For Best Results
• Use Baking, Roasting and Broiling Recommendations found on Pages 15-17, 19-20 and 23 for
suggested rack level and cooking time.
• Open the door as briefly as possible to avoid
oven temperature reduction.
• Use TIMER 1 or TIMER 2 as a reminder to check
food doneness.
• Use the interior oven light to view the food.
• Store the broiler pan or other utensils outside
the oven. An extra pan, without food, affects
the browning and cooking.
• Use pans that give you the desired browning:
- For tender, golden brown crusts, use light
nonstick/anodized or shiny metal utensils.
- For brown, crisp crusts, use dark nonstick/
anodized or dark, dull metal utensils or glass
bakeware.
High Altitude Baking
When baking at high altitudes in either BAKE, CONVECTION or CONVECTION ROAST mode, recipes
and baking times vary. For information to adjust recipes, write the Extension Service, Colorado State University, Fort Collins, Colorado 80521. There may be
a cost for the guides.
Specify which high altitude food preparation guide
you prefer: general information, cakes, cookies,
breads, etc. You can also visit their website at:
www.cerc.colostate.edu/title/P41.html
Condensation
It is normal for a certain amount of moisture to
evaporate from the food during any cooking process. The amount depends on the moisture content
of the food. The moisture may condense on any surface cooler than the inside of the oven.
Electronic Temperature Sensor
Your new Thermador® oven has an electronic temperature sensor which accurately maintains the
temperature selected. Your previous oven may
have had a mechanical thermostat that drifted to
a higher temperature with age. If you have adjusted your favorite recipes for use with in your
old oven, you may need to adjust the time and/
or temperature for best results in your Thermador
convection oven.
®
CAUTION: Never use aluminum foil to cover
the oven racks or to line the oven. It can
damage the oven if it touches the heating
element or damage the oven liner if heat is
trapped under it.
Page 10
SM/SMW Oven Care and Use Manual
Convection Oven Operating Tips
Oven Racks
Safety Stops
• The racks are designed with safety stops and a
back rail. When the racks are placed correctly
in the oven, they will stop before coming completely out from the oven. They will not tilt when
placing food on them.
• When placing food on a rack, pull the rack out
to the stop position. Place the food on the rack,
then slide the rack back into the oven. This will
eliminate reaching into a hot oven.
Self-Cleaning the Racks
• The racks may be cleaned in the oven during
the Self-Cleaning cycle; however, they will lose
their shiny finish and change to a metallic gray.
See Oven Care and Cleaning Recommendations
on Pages 29 and 30.
• Rack supports should not be removed.
Rack Levels
• Rack levels are numbered from the bottom rack
support to the top.
• The correct rack level for baking a food item
depends on the recipe and the cooking mode.
See Baking, Roasting and Broiling Recommendations on Pages 15-17, 19-20 and 23. Place
rack(s) in the proper level before turning on the
oven.
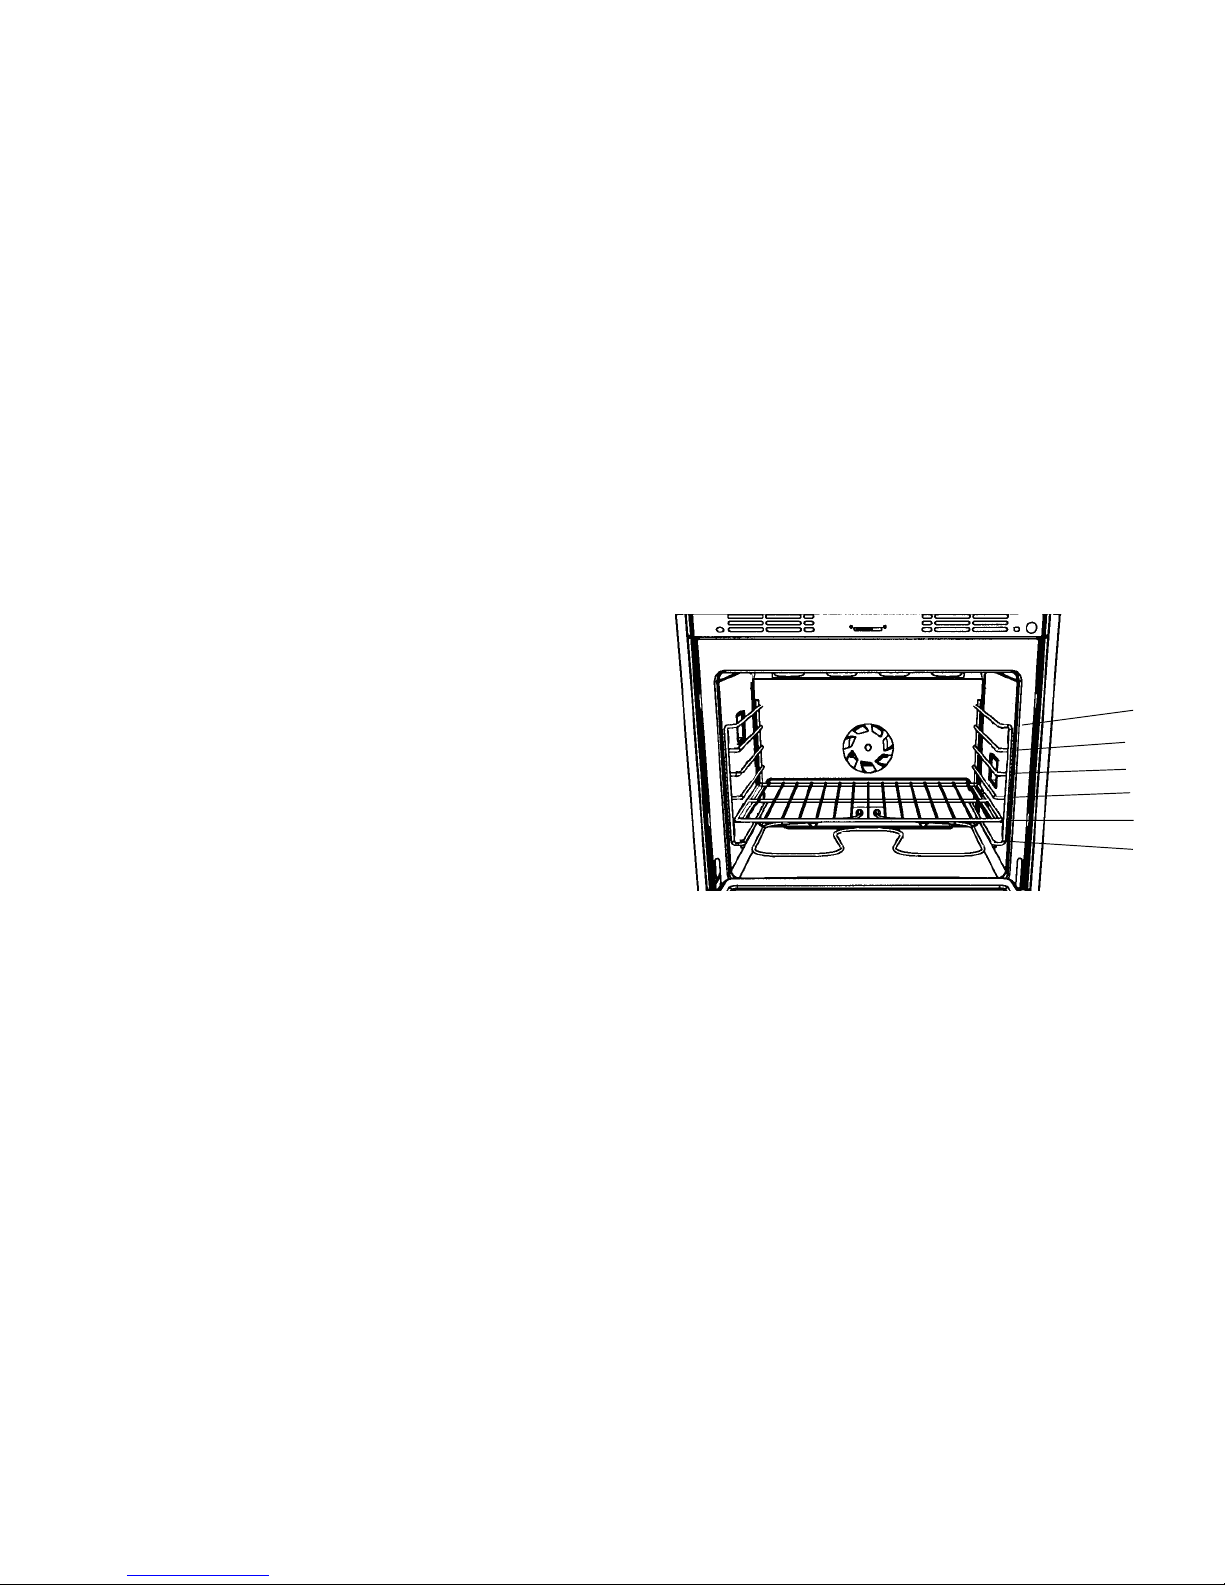
Insert The Rack As Follows:
1. Hold the rack with the back rail up and towards
the back of the oven. Rest the rear of the rack
on the desired rack slide.
2. Push the rack into the oven as far as it will go. It
will "drop" into position.
3. Pull the rack forward to confirm safety stops are
below rack guide.
Remove Or Reposition The Racks As Follows:
1. Slide the rack to the front of the oven.
2. Lift the front of the rack up so the safety stops
slide over the rack slides.
3. Pull the rack forward to remove.
6
5
4
3
2
1
Rack Levels
Page 11
SM/SMW Oven Care and Use Manual Convection Oven Operation
Bake, Convection or Convection Roast Mode Operation
STOP
COOK
TIME
TIME
TIMER 1 TIMER 2
OVEN
CLOCK
LIGHT
To Set Bake, Convection or Convection Roast:
1
4
7
2
3
56
9
8
0
➝
➝
WHAT YOU WILL SEEWHAT YOU WILL DO
BAKE
BROIL
CONVECTION
OFF
SELF
CLEAN
CONVECTION
ROAST
➝
1. Touch BAKE, CONVECTION or
CONVECTION ROAST.
The selected mode will flash in display.
2. While mode flashes, touch number pads to
select desired oven temperature from 200°F to
550°F (94º to 290ºC).
Example: touch 3,5,0 for 350°F.
The oven will start automatically in 6 seconds.
°
The display will show 100
°
(1ºC) increments until the temperature selected
in 5
is reached and displayed.
When the oven has reached the temperature
selected, a chime will sound.
Option:
doneness of the food. See Page 9.
Note:
during preheat, touch the mode pad once.
Set a TIMER as a reminder to check
To display the selected oven temperature
(38ºC) and will count up
To Cancel Bake, Convection or Convection Roast:
BAKE
350
BAKE
100
BAKE
PREHEAT
350
BAKE
°
°
°
ON
°
WHAT YOU WILL DO
1. Touch OFF pad.
The time of day displays.
To Change the Oven Mode and / or Temperature:
• Repeat Steps 1 and 2 above.
• If revising to a higher temperature, the oven
will continue to heat as in Step 2.
WHAT YOU WILL SEE
6 : 30
• If revising temperature to a lower setting, a
chime will sound briefly, indicating the selected temperature has been reached. The
PREHEAT and ON lights in the display will go
out.
Page 12
 Loading...