

Page 1
Use and care
GUIDE
Professional Series Pro Grand® Ranges
THERMADOR.COM
Page 2

Use and care
GUIDE
Professional Series Pro Grand® Ranges
Table of Contents (English) ............................................................... 5
Table de Matières (Français)............................................................ 57
Models |
Modèles :
PRD364WDGU/C
PRD364WIGU/C
PRD364WLGU/C
PRD366WGU/C
PRD484WCGU/C
PRD486WDGU/C
PRD486WIGU/C
PRD486WLGU/C
PRG364WDG
PRG364WLG
PRG366WG
PRG486WDG
PRG486WLG
THERMADOR.COM
Page 3

Home ConnectTM user’s information
Wi-Fi® module
FCC/IC statements
Model: COM2
FCC ID: 2AHES-COM2
IC: 21152-COM2
The Home Connect module is a communication
device designed to provide communication between
appliances and smart devices.
This module is integrated at the factory, under direct control of BSH Home
Appliances Corporation, and is not user serviceable or upgradable.
At least 20 cm separation distance should be maintained from device to user.
FCC COMPLIANCE STATEMENT
CAUTION: Changes or modifications not expressly approved could void your authority to use
this equipment.
This device complies with Part 15 of the FCC Rules. Operation to the following two conditions:
(1) This device may not cause harmful interference, and (2) This device must accept any
interference received, including interference that may cause undesired operation.
INDUSTRY CANADA STATEMENT
This device complies with Industry Canada licence-exempt RSS standard(s). Operation is
subject to the following two conditions: (1) this device may not cause interference, and (2) this
device must accept any interference, including interference that may cause undesired
operation of the device.
Operation in the band 5150-5250 MHz is only for indoor use to reduce the potential for harmful
interference to co-channel mobile satellite systems.
Le présent appareil est conforme aux CNR d’Industrie Canada applicables aux appareils radio
exempts de licence. L’exploitation est autorisée aux deux conditions suivantes : (1) l’appareil
ne doit pas produire de brouillage, et (2) l’utilisateur de l’appareil doit accepter tout brouillage
radioélectrique subi, même si le brouillage est susceptible d’en compromettre le
fonctionnement.
Le fonctionnement dans la plage de 5150 à 5250 MHz est uniquement pour une utilisation intérieure afin
de réduire le potentiel d’interférences nuisibles aux systèmes de satellites mobiles sur les canaux.
Page. 3
Page 4

Congratulations!
Félicitations!
Congratulations on your recent Thermador purchase!
Whether you are a dedicated chef or simply a connoisseur
of the art of cooking, owning a Thermador kitchen is the
ultimate expression of personal style, good taste and an
appreciation for the complete culinary experience. Our
award-winning products have been empowering culinary
enthusiasts for more than eleven decades.
Before you begin using your new Thermador product,
please take a moment to review the Use and Care Guide.
You will find the answers to all of your questions as well as
some very important safety information. Pay special
attention to the
the beginning of the manual. Your Thermador product is
ready and waiting to be used for your next gourmet
creation!
Our products are handcrafted with the highest quality
authentic materials to ensure years of reliable service. In
the unlikely event that you have a service question, please
have your model and serial numbers of your product
available (see the “
location).
We realize that you have made a considerable investment
in your kitchen. Please feel free to share your Thermador
kitchen photos and remodeling stories with us. Follow us
on Twitter or post your kitchen photos on Facebook. We
would love to hear from you!
Thermador wishes you many years of creative cooking.
Important Safety Instructions
Before Calling For Service”
located at
section for
Félicitations pour votre récent achat Thermador! Que vous
soyez un chef enthousiaste ou un simple connaisseur de
l’art culinaire, le fait de posséder une cuisine Thermador
représente l’expression ultime de votre style personnel,
de votre bon goût et de votre intérêt à vivre une
expérience culinaire complète. Nos produits primés
permettent à des adeptes de la bonne bouffe d’atteindre
de nouveaux sommets depuis plus de onze décennies.
Avant de commencer à utiliser votre nouveau produit
Thermador, veuillez prendre un moment pour examiner ce
guide d’utilisation et d’entretien. Vous trouverez des
réponses à toutes vos questions ainsi que quelques
renseignements essentiels en matière de sécurité. Portez
une attention particulière aux
importantes
Thermador est prêt et n’attend plus que vous l’utilisiez
pour votre prochaine création gastronomique!
Nos produits sont fabriqués à la main avec des matériaux
authentiques de haute qualité afin d’assurer des années
de service fiable. Dans l’éventualité improbable où vous
auriez une question relativement à l’entretien, veuillez
avoir à la portée de la main le numéro de série et de
modèle de votre produit (reportez vous “
le service technique
Nous savons bien que vous avez investi une somme
considérable dans votre cuisine. N’hésitez pas à partager
avec nous les photos de votre cuisine Thermador et les
anecdotes relatives au remodelage de votre cuisine.
Suivez-nous sur Twitter ou affichez des photos de votre
cuisine sur Facebook. Nous serions ravis d’avoir de vos
nouvelles!
se trouvant au début du guide. Votre produit
”).
Instructions de sécurité
Avant d’appeler
Page. 4
Thermador vous souhaite de nombreuses années de
gastronomie créative.
Page 5
Table of
CONTENTS
Safety ...................................................................................... 6
Important safety instructions........................................... 6
Description ............................................................................. 12
Appliance identification .................................................. 12
Before you begin ...................................................................17
Getting started ...............................................................17
Using the rangetop ................................................................19
Sealed STAR® burners .................................................... 19
ExtraLow® burners ......................................................... 20
POWERBOOST® ............................................................20
Electric griddle ................................................................ 26
Electric grill......................................................................29
Using the oven........................................................................ 32
Symbols and descriptions................................................32
Initial start-up...................................................................33
Setting the oven(s)........................................................... 34
Timers
Panel lock ................................................................... 35
Multi-point meat probe ............................................. 35
Sabbath ..................................................................... 36
Remote start .............................................................. 37
Getting the most out of your appliance ................................. 38
Oven rack positions......................................................... 38
Bake ........................................................................... 38
Broil ........................................................................... 39
Convection broil ........................................................40
Convection bake ........................................................42
True convection ......................................................... 42
Proof .......................................................................... 42
Roast .......................................................................... 42
Convection roast .......................................................42
Warm ......................................................................... 43
Fine tuning the oven........................................................43
Setting up Home Connect
Setup ...............................................................................44
Care and maintenance ........................................................... 46
Self-clean (some models) ...........................................46
Appliance cleaning tips ..................................................47
.....................................................34
TM
.................................................. 44
Do-it-yourself maintenance ....................................................52
Oven light bulb replacement ..........................................52
Before calling for service ........................................................53
Troubleshooting ..............................................................53
Service information .........................................................54
Remote costumer service connection ........................54
Product registration.........................................................54
Statement of limited product warranty ..................................55
Support, accessories, and parts.................................back page
Safety
DEFINITIONS
9 WARNING
This indicates that death or serious injuries may occur as a
result of non-observance of this warning.
9 CAUTION
This indicates that minor or moderate injuries may occur as a
result of non-observance of this warning.
NOTICE: This indicates that damage to the appliance or
property may occur as a result of non-compliance with this
advisory.
Note: This alerts you to important information and/or tips.
This THERMADOR® appliance is made by
BSH Home Appliances Corporation
1901 Main Street, Suite 600
Irvine, CA 92614
Questions?
1-800-735-4328
www.thermador.com
We look forward to hearing from you!
Page. 5
Page 6
Safety
9 IMPORTANT SAFETY INSTRUCTIONS
READ AND SAVE THESE INSTRUCTIONS
Please read carefully
Installer: Please leave this guide with this unit for the
owner.
Owner: Please retain this guide for future reference. Use
appliance only for its intended purpose as described in
this manual.
WARNING
When properly cared for, your new appliance has been
designed to be safe and reliable. Read all instructions
carefully before use. These precautions will reduce the
risk of burns, electric shock, fire, and injury to persons.
When using kitchen appliances, basic safety
precautions must be followed, including these in the
following pages.
WARNING
If the information in this manual is
not followed exactly, a fire or
explosion may result causing
property damage, personal injury or
death.
-- DO NOT store or use gasoline or other
flammable vapors and liquids in the
vicinity of this or any other appliance.
-- WHAT TO DO IF YOU SMELL GAS
WARNING
DANGER OF TIPPING:
All ranges can tip and injury can result. To
prevent accidental tipping of the range, attach
it to the floor, wall, or cabinet by installing the
anti-tip bracket supplied.
A child or adult can tip the range over and be
killed or seriously injured. Verify that the antitip bracket is securely installed. Ensure the antitip bracket is engaged when the range is
moved.
DO NOT operate the range
without the anti-tip bracket in
place. Failure to follow the
instructions in this manual can
result in death or serious burns to
children and adults.
If the range is pulled away from the wall for cleaning,
service, or any other reason, ensure that the anti-tip
bracket is properly reengaged when the range is
pushed back against the wall. In the event of
abnormal usage (such as a person standing, sitting, or
leaning on an open door), failure to take this
precaution can result in tipping of the range. Personal
injury might result from spilled hot liquids or from the
range itself.
Check for proper installation and use of anti-tip
bracket. Carefully tip range forward pulling from the
back to ensure that the anti-tip bracket engages the
range and prevents tip-over. Range should not move
more than 1'' (2.5 cm).
• DO NOT try to light any appliance.
• DO NOT touch any electrical switch.
• DO NOT use any phone in your
building.
• Immediately call your gas supplier
from a neighbor’s phone. Follow the
gas supplier’s instructions.
• If you cannot reach your gas supplier,
call the fire department.
-- Installation and service must be
performed by a qualified installer, service
agency or the gas supplier.
Page. 6
WARNING
Improper installation, adjustment, alteration, service
or maintenance can cause injury or property damage.
Refer to this manual. For assistance or additional
information consult a qualified installer, service
agency, manufacturer or the gas supplier.
WARNING
To provide proper ventilation of the range DO NOT
remove range feet.
Page 7
9 IMPORTANT SAFETY INSTRUCTIONS
READ AND SAVE THESE INSTRUCTIONS
WARNING
Before servicing or cleaning the unit, switch power off
at service panel and lock service panel. This will
prevent power from being switched on accidentally.
When the service panel cannot be locked, securely
fasten a prominent warning device, such as a tag to
the service panel.
Gas type verification
Natural gas – 7 in. column water (17.4 mb) min., 14 in.
(34.9 mb) maximum
Propane gas – 11 in. water column (27.4 mb) min., 14 in.
(34.9 mb) maximum
Verify the type of gas supplied to the location. Ensure that
the appliance is connected to the type of gas for which it
is certified. Refer to the data rating label.
WARNING
If a gas conversion kit is used, the kit shall be installed
by qualified technician in accordance with the
manufacturer’s instructions and all applicable codes
and requirements of the authority having jurisdiction.
If the information in the instructions is not followed
exactly, a fire, explosion or production of carbon
monoxide may result causing property damage,
personal injury or loss of life. The qualified technician
is responsible for the proper installation of the kit. The
installation is not proper and complete until the
operation of the converted appliance is checked as
specified in the manufacturer’s instructions supplied
with the kit.
CAUTION
When connecting the unit to propane gas, make
certain the propane gas tank is equipped with its own
high-pressure regulator in addition to the pressure
regulator supplied with the appliance. The maximum
gas pressure to this appliance must not exceed 14.0''
water column (34.9 mb) from the propane gas tank to
the pressure regulator.
For Massachusetts installations:
1. Installation must be performed by a qualified or
licensed contractor, plumber or gas fitter qualified or
licensed by the state, province or region where this
appliance is being installed.
2. Shut-off valve must be a “T” handle gas cock.
3. Flexible gas connector must not be longer than 36''
(914 mm).
Ensure proper installation and servicing. Follow the
Installation Manual provided with this product. Have the
appliance installed and electrically grounded by a
qualified technician.
In the event a burner goes out and gas escapes, open a
window or a door. DO NOT attempt to use the appliance
until the gas has had time to dissipate. Wait at least 5
minutes before using the appliance.
DO NOT repair or replace any part of the appliance unless
specifically recommended in this manual. All servicing
should be referred to an authorized servicer.
Electrical requirements
WARNING
IN CASE OF AN ELECTRICAL FAILURE
If for any reason a gas control knob is turned
ON and there is no electrical power to operate
the electronic igniters on the burners, turn OFF
the gas control knob and wait 5 minutes for the
gas to dissipate before lighting the burner
manually.
To light the burners manually, carefully hold a
lighted match to the burner ports and turn the
gas control knob to HI
you can use the standard burners, but each
must be lit with a match.
DO NOT attempt to light the XLO® burners
manually. These burners are equipped with the
ExtraLow® feature and cannot be lit manually.
The appliance must be electrically grounded in
accordance with local codes or, in the absence of local
codes, with the National Electrical Code, NFPA 70 or the
Canadian Electric Code, CSA C22.1-02.
. During a power failure,
Page. 7
Page 8

9 IMPORTANT SAFETY INSTRUCTIONS
READ AND SAVE THESE INSTRUCTIONS
It is the personal responsibility and obligation of you, the
user, to have this appliance connected to the electrical
power supply by a qualified electrician, in accordance with
the National Electrical Code and/or applicable local codes
and ordinances.
Service should only be done by an authorized servicer.
Always disconnect the electrical plug from the wall
receptacle before servicing this unit.
See the Installation Manual for electrical requirements and
grounding instructions.
Have the installer show you where the electric circuit
breaker and the gas supply shut off valve are located so
you know how and where to turn off the gas and electricity
to the appliance.
Installation and maintenance must be carried out correctly.
Follow the instructions in the Installation Manual supplied
with the product. Make sure that a qualified electrician
installs and performs grounding of the appliance.
This appliance complies with the following Safety
Codes and Standards:
• UL 858, The Standard for the Safety of Household
Electric Ranges
• ANSI Z21.1, The American National Standard for
Household Cooking Gas Appliances
• CAN1-1.1-M81, Domestic Gas Ranges
• CSA C22.2 No. 61, Household Cooking Ranges
Installation must conform with local codes or, in the
absence of local codes, with the National Fuel Gas Code,
ANSI Z223.1/NFPA 54 or, in Canada, the Natural Gas and
Propane Installation Code, CSA B149.1.
Installation of appliances designed for manufactured
(mobile) home installation must conform with the
Manufactured Home Construction and Safety Standard,
Title 24 CFR, Part 3280 [formerly the Federal Standard for
Mobile Home Construction and Safety, Title 24, HUD (Part
280)] or with local codes where applicable.
Installation of appliances designed for recreational park
trailers must conform with state or other codes or, in the
absence of such codes, with the Standard for Recreational
Park Trailers, ANSI A119.5.
Clearances from non-combustible materials are not part of
the ANSI Z21.1 scope and are not certified by
CSA. Clearances under 6 inches should be approved by
the local codes and/or by the local authority having
jurisdiction.
It is the responsibility of the owner and the installer to
determine if additional requirements and/or standards
apply to specific installations.
The maximum depth of cabinets installed above cooking
surface must be 13'' (330 mm).
Child safety
WARNING
DO NOT store items of interest to children above or
at the back of the appliance. If children should climb
onto the appliance to reach these items, they could be
seriously injured.
When children become old enough to use the appliance,
it is the responsibility of the parents or guardians to ensure
that they are instructed in safe operation of the appliance
by qualified persons.
DO NOT allow anyone to climb, stand, lean, sit, or hang
on any part of an appliance. This can damage the
appliance, and the unit may tip over, potentially causing
severe injury.
DO NOT allow children to use this appliance unless
closely supervised by an adult.
Children and pets should not be left alone or unattended
in the area where the appliance is in use. They should
never be allowed to play in its vicinity, whether or not the
appliance is in use.
General safety
State of California Proposition 65 Warning:
: WARNING
This product can expose you to chemicals including
vinyl chloride, which is known to the State of California
to cause cancer and birth defects or other
reproductive harm. For more information go to
www.P65Warnings.ca.gov.
Page. 8
Page 9

9 IMPORTANT SAFETY INSTRUCTIONS
READ AND SAVE THESE INSTRUCTIONS
WARNING
To reduce the risk of injury to persons, in the event
of a range top grease fire, observe the following:
• Smother flames with a close-fitting lid, cookie
sheet, or other metal tray, then turn off the gas
burner or the electric element. Be careful to
prevent burns. If the flames do not go out
immediately, evacuate and call the fire
department.
• Never pick up a flaming pan. You may be burned.
• DO NOT use water, including wet dish cloths or
towels, to extinguish flames – a violent steam
explosion will result.
• Use an extinguisher ONLY if:
• You know you have a class ABC extinguisher
and you already know how to operate it.
• The fire is small and contained in the area
where it started.
• The fire department is being called.
• You can fight the fire with your back to an exit.
WARNING
To eliminate risk of burns or fire caused by reaching
over heated surface units, cabinet storage located
above the surface units should be avoided.
WARNING
TO REDUCE THE RISK OF A GREASE FIRE:
• Never leave surface units unattended at high
settings. Boilovers cause smoking and greasy
spillovers that may ignite. Heat oils slowly on low
or medium settings.
• Always turn hood ON when cooking at high heat
or when flambéing food (i.e. Crepes Suzette,
Cherries Jubilee, Peppercorn Beef Flambé).
• Clean hood filters frequently. Grease should not
be allowed to accumulate on fan or filter.
• Use proper pan size. Always use cookware
appropriate for the size of the appliance burner.
If the appliance is near a window, be certain the curtains
do not blow over or near the appliance burners; they
could catch on fire.
ALWAYS have a working smoke detector near the kitchen.
In the event that personal clothing or hair catches fire,
drop and roll immediately to extinguish flames.
Have an appropriate fire extinguisher available nearby,
highly visible, and easily accessible near the cooking
appliance.
Smother flames from food fires, other than grease fires,
with baking soda. Never use water on cooking fires.
Whenever possible, do not operate the ventilation system
during a fire. However, DO NOT reach through fire to turn
it off.
NEVER let clothing, potholders, or other flammable
materials come in contact with or too close to any burner
or burner grate until it has cooled. Fabric may ignite and
result in personal injury.
Use only dry potholders: moist or damp potholders on hot
surfaces may cause burns from steam. DO NOT use a
towel or other bulky cloth in place of potholders. DO NOT
let potholders touch hot burners or burner grates.
For personal safety, wear proper apparel. Loose fitting
garments or hanging sleeves should never be worn while
using this appliance. Some synthetic fabrics are highly
flammable and should not be worn while cooking.
DO NOT use aluminum foil to line any part of the
appliance. Use of a foil liner could result in a shock or fire
hazard, or the obstruction of the flow of combustion and
ventilation air. Foil is an excellent heat insulator and heat
will be trapped beneath it. This will upset the cooking
performance and can damage the finish of the appliance.
WARNING
The appliance is for cooking. Based on safety
considerations, never use the appliance to warm or
heat a room. Doing so may result in carbon monoxide
poisoning and overheating of the unit. Also, such use
can damage the appliance parts.
NEVER use any part of the appliance for storage.
Flammable materials can catch fire and plastic items may
melt or ignite. DO NOT hang articles from any part of the
appliance. Some fabrics are quite flammable and may
catch on fire.
When using the appliance: DO NOT TOUCH THE
BURNER GRATES OR THE IMMEDIATE SURROUNDING
AREA. Areas adjacent to the burners may become hot
enough to cause burns.
Page. 9
Page 10
9 IMPORTANT SAFETY INSTRUCTIONS
READ AND SAVE THESE INSTRUCTIONS
Never leave the appliance unattended when using high
flame settings. Boil overs cause smoking and greasy
spillovers that may ignite. Also, if the burner flames and
igniter are smothered with spillage, unburned gas will
escape into the room. See page 6 regarding gas leaks.
Only certain types of glass, heatproof glass-ceramic,
ceramic, earthenware, or other glazed cookware are
suitable for cooking on the burners. This type of cookware
may break with sudden temperature changes. Use only on
low or medium heat settings according to the utensil
manufacturer’s directions.
DO NOT heat or warm unopened food containers. Buildup of pressure may cause the container to burst and cause
injury.
WARNING
During cooking, set the burner control so that the
flame heats only the bottom of the pan and does not
extend beyond the bottom of the pan. This instruction
is based on safety considerations.
Use caution to ensure that drafts like those from forced air
vents or fans do not blow flammable material toward the
flames or push the flames so that they extend beyond the
edges of the pot.
GREASE IS FLAMMABLE. Let hot grease cool before
attempting to handle it. Avoid letting grease deposits
collect. Clean after each use.
For proper lighting and performance of the burners, keep
the igniter ports clean. It is necessary to clean the ports
when there is a boil over or when the burner does not light
even though the electronic igniters activate.
Clean the appliance with caution. Avoid steam burns; DO
NOT use a wet sponge or cloth to clean the appliance
while it is hot. Some cleaners produce noxious fumes if
applied to a hot surface. Follow directions provided by the
cleaner manufacturer.
WARNING
After a spill or boil over, turn off the burner and using
caution due to possible hot surfaces, clean around the
burner and burner ports. After cleaning, check for
proper operation.
Be sure all controls are turned off and the appliance is cool
before using any type of aerosol cleaner on or around the
appliance. The chemical that produces the spraying action
could, in the presence of heat, ignite or cause metal parts
to corrode.
Always use pots and pans that have flat bottoms large
enough to cover the burner. The use of undersized pots
and pans could expose a portion of the flame and may
result in ignition of clothing.
WARNING
Avoid using high flame setting with a pan larger than
the grate or with one that spans more than one
burner, such as a griddle, for prolonged periods of
time. This can result in poor combustion that
generates harmful by-products.
DO NOT use pots or pans on the grill plate accessory
(purchased separately). Bakeware, such as large casserole
pans, cookie sheets, etc., should never be used on the
accessory.
DO NOT use flammable cleaners to clean the appliance.
Remove the optional cutting board or griddle cover
accessory, which is stored on top of the griddle plate,
before operating the griddle or any adjacent burners.
WARNING
DO NOT block or obstruct the flow of air
through the ventilation openings. The vent is
located at the back of the appliance. The
vent needs to be unobstructed and open to
provide necessary airflow that is important
for proper performance.
DO NOT touch vent area while the appliance is on
and for several minutes after the appliance is off.
Some parts of the vent and surrounding areas become
hot enough to cause burns. Allow appliance sufficient
time to cool before touching or cleaning vent areas.
DO NOT position plastic or other heat-sensitive items
on or near the vent. These items could melt or ignite.
DO NOT obstruct the flow of combustion or ventilation
air.
DO NOT use the grill plate accessory for cooking
excessively fatty meats or products which promote flareups.
Page. 10
Page 11

9 IMPORTANT SAFETY INSTRUCTIONS
READ AND SAVE THESE INSTRUCTIONS
When cooking fatty or oily foods on burners, the grill, or
the griddle, adjacent gas burners can ignite airborne
fumes. Use caution to avoid burns.
To avoid a fire hazard, grease accumulation must be
prevented by frequently cleaning the ventilation hood and
filters.
In case of fire or when intentionally “flaming” liquor or
other spirits on the appliance, follow manufacturer’s
instructions. Use caution when cooking foods with high
alcohol content (e.g. rum, brandy, bourbon). Alcohol
evaporates at high temperatures. There is a risk of burning
as the alcohol vapors may catch fire. Use only small
quantities of alcohol in foods.
DO NOT store or use corrosive chemicals, vapors,
flammables, or nonfood products in or near this appliance.
It is specifically designed for use when heating or cooking
food. The use of corrosive chemicals while heating or
cleaning will damage the appliance and could result in
injury.
WARNING
DO NOT leave food or cooking utensils, etc, in oven
during the self-cleaning mode of operation.
Before self-cleaning the oven (select models), remove
the broiler pan, oven racks, and any other utensils,
and excess spillage.
IMPORTANT: There is a possibility to discolor the back
wall under certain cooking conditions.
DO NOT clean, rub, damage, move or remove the door
gasket. It is essential for a good seal during baking. If the
gasket becomes worn or excessively soiled with food
particles, replace gasket to assure a tight seal.
Protect the self-cleaning feature. Clean only those parts
indicated in this booklet. DO NOT use commercial oven
cleaners or oven liner protective coatings of any kind in or
around the self-cleaning oven.
Place oven racks in desired position while oven is cool. If a
rack must be moved while the oven is hot, do not let the
potholders contact the broiler element.
DO NOT TOUCH HEATING ELEMENTS OR INTERIOR
SURFACES OF OVEN – Heating elements may be hot
even though they are dark in color. Interior surfaces of an
oven become hot enough to cause burns. During and
after use, do not touch, or let clothing or other flammable
materials contact heating elements or interior surfaces of
oven until they have had sufficient time to cool. Other
surfaces of the appliance may become hot enough to
cause burns - among these surfaces are oven vent
openings and surfaces near these openings, oven doors,
and windows of oven doors.
WARNING
WARNING
This appliance should not be installed with a
ventilation system that directs air in a downward
direction toward the appliance. This type of
ventilation system may cause ignition and combustion
problems with the appliance resulting in personal
injury, property damage, or unintended operation.
Ventilating systems that direct the air upwards do not
have any restriction.
An air curtain or other overhead range hood, which
operates by blowing a downward airflow onto a
range, shall not be used in conjunction with a gas
range unless the hood and range have been designed
and tested in accordance with the Standard for
Domestic Gas Ranges, ANSI Z21.1 • CSA 1.1, and
listed by an independent testing laboratory for
combination use.
NEVER cover any slots, holes or passages in the oven
bottom or cover an entire rack with materials such as
aluminum foil. Doing so blocks air flow through the
oven and may cause carbon monoxide poisoning.
Aluminum foil linings may also trap heat, causing a fire
hazard.
Use care when opening the oven door; let hot air or steam
escape before removing or replacing foods.
Please note that some pets or humans can be sensitive to
the odors created during the self-cleaning process
whether it is a manufacturing residue burn off or food. It is
recommended that those potentially affected be removed
from the kitchen area during the self-clean process.
Page. 11
Page 12
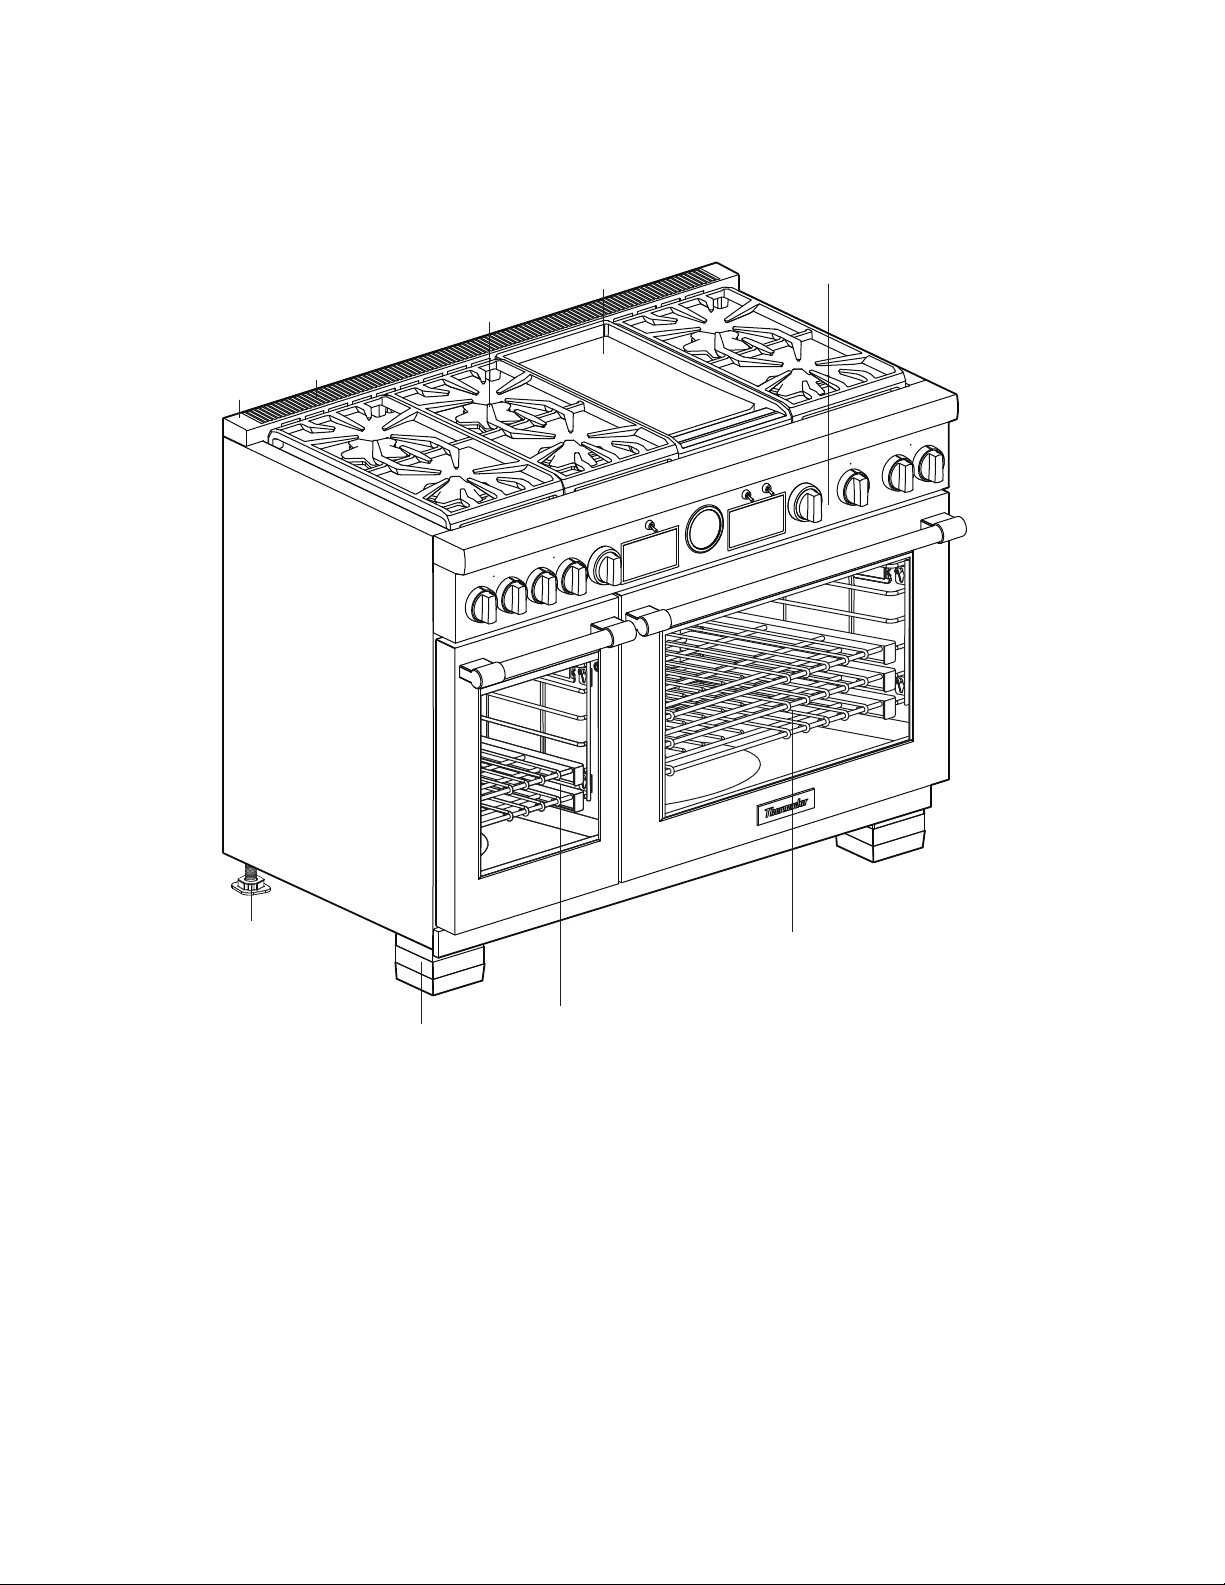
Description
1
2
3
5
4
7
8
6
9
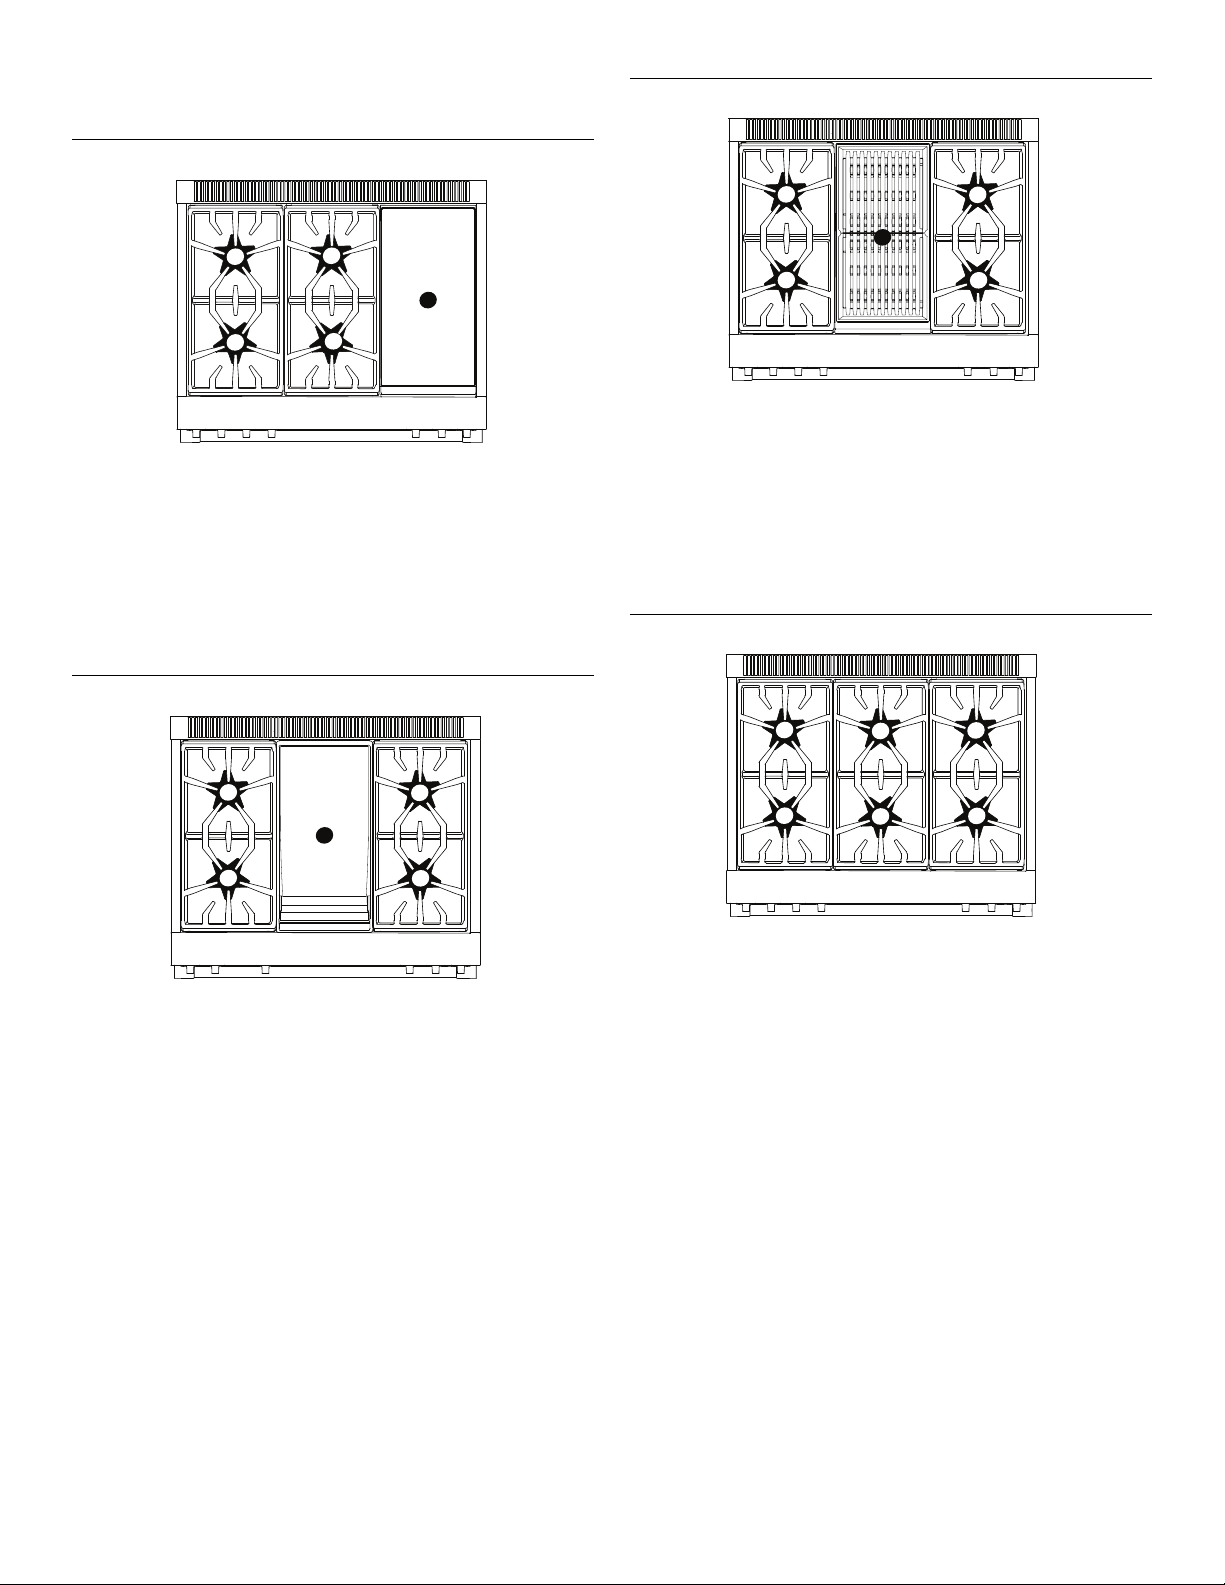
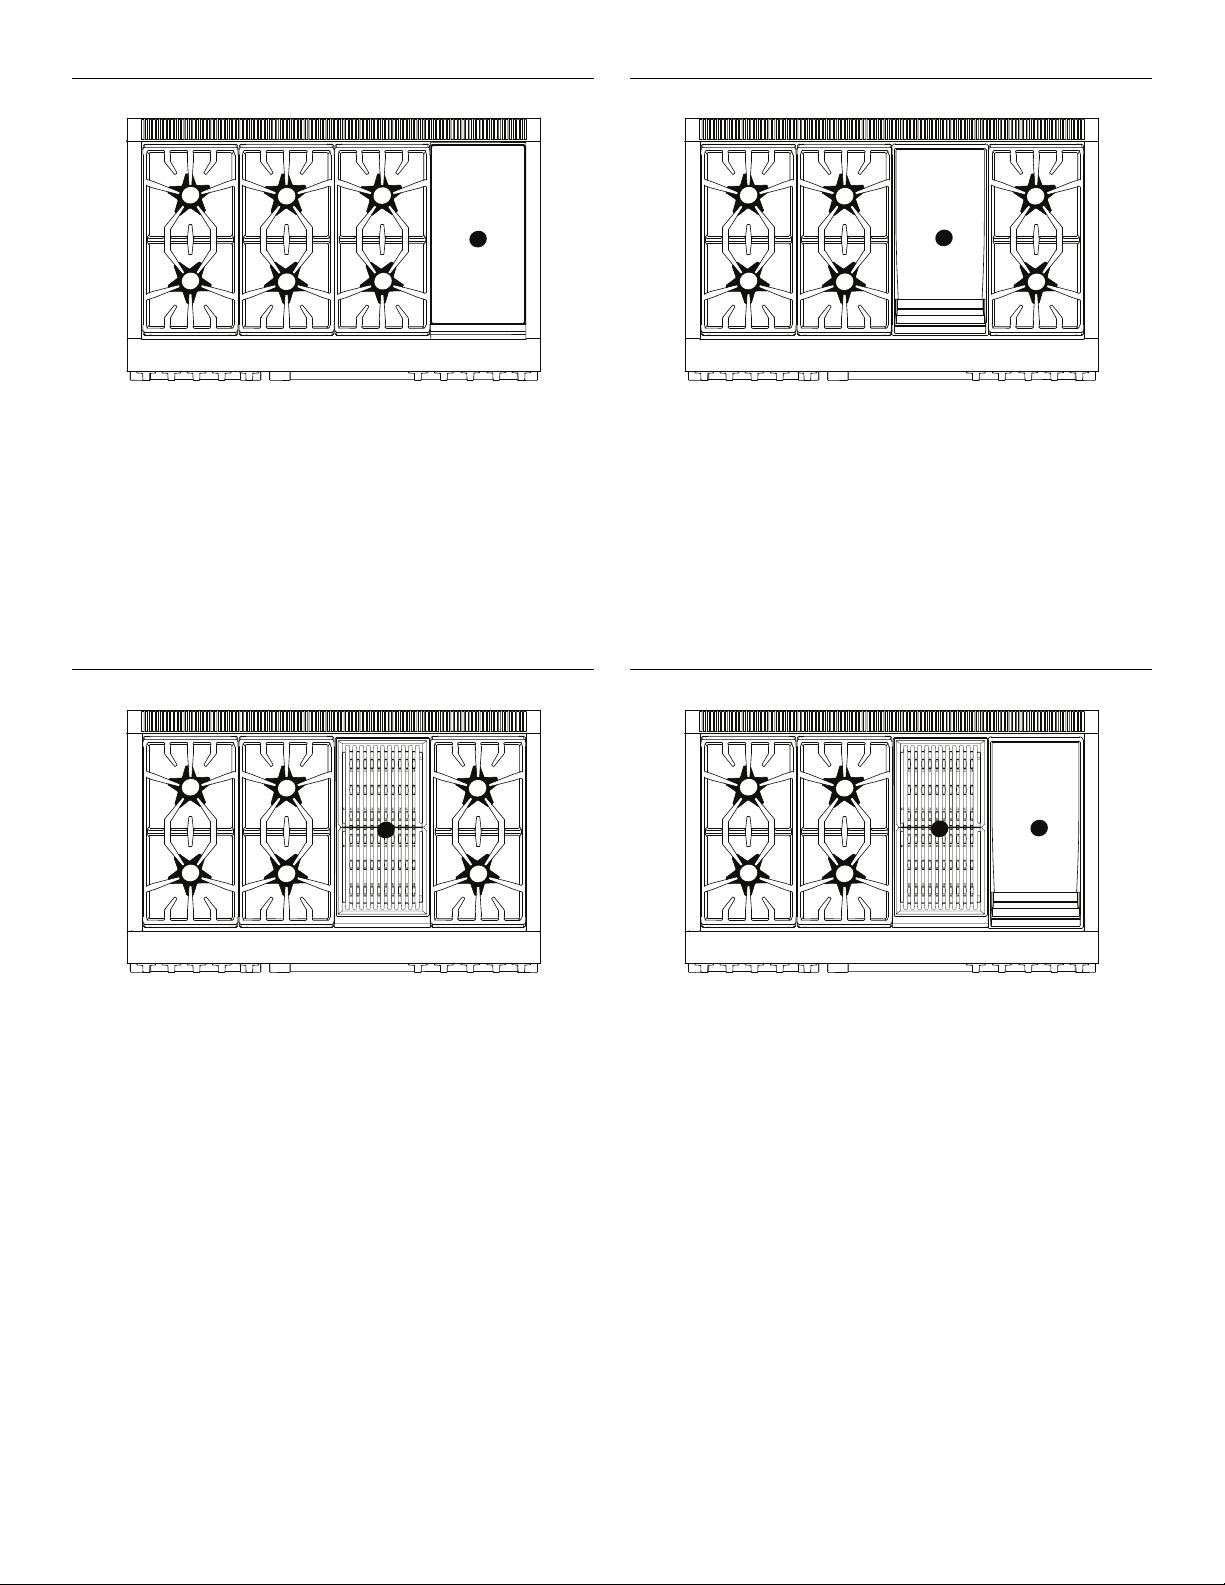
Appliance identification
Model shown is 48'' with griddle option (features will vary).
1 Island Trim included or Low Backguard ordered separately
(See Warning concerning spacing behind the range when using the range with the Island Trim.)
2 Oven vent (DO NOT obstruct!)
3STAR
4 Griddle option (options will vary)
5 Control panel
6 Main oven
7 Secondary auxiliary oven (select models)
8Leg covers
9Range feet
®
burners and grates
(If additional leg covers are required, they may be ordered from the service center by calling 1–800–735–4328 at
no charge for up to one year after purchase date of the appliance.)
Page. 12
Page 13
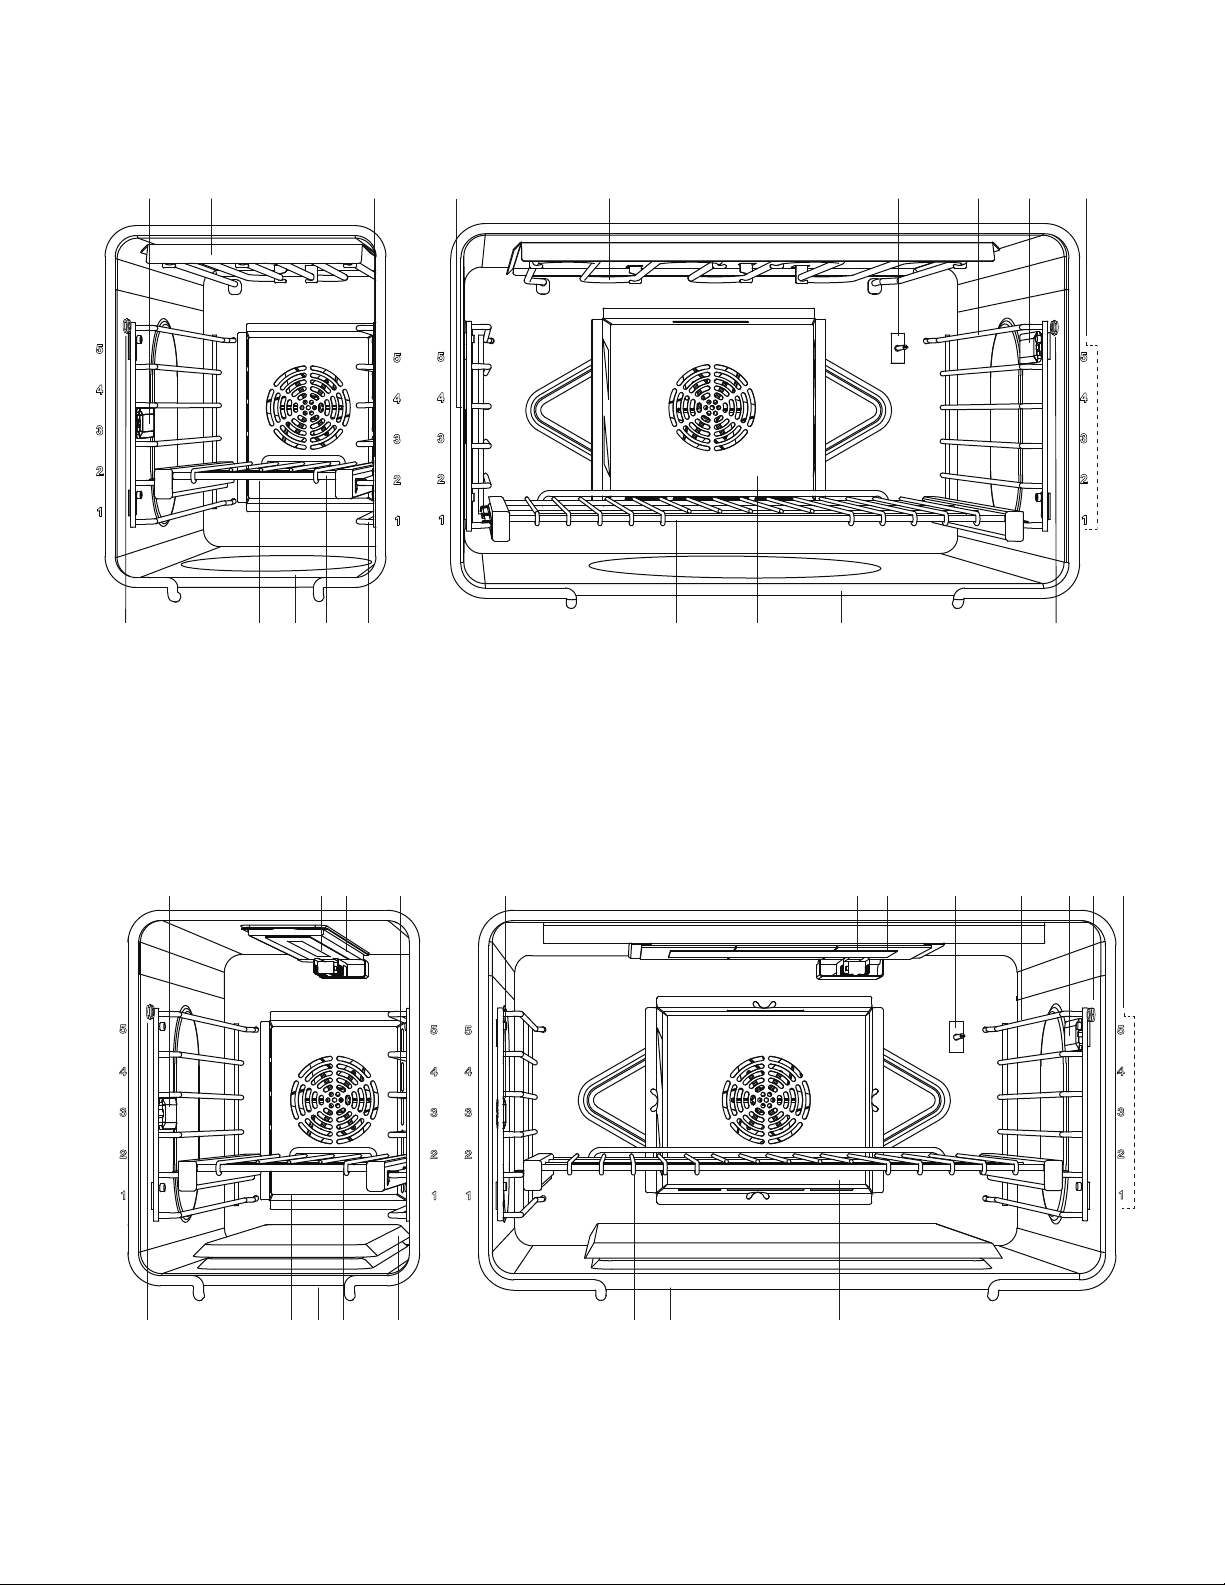
Oven interior identification
12 3
467565
7 8
8
12 341 9
DUAL FUEL oven interior
1 Oven interior light
2 Broil element
3 Oven thermostat
4Rack guides
5 Oven racks
GAS oven interior
124
6 Bake element (hidden)
7 Convection fan cover
8 Meat probe outlet
9Rack positions
3
612453 1 7
659 8
1 Oven interior light
2 Broil igniter
3 Infrared broil burner
4 Oven thermostat
5Rack guides
10 9108
6 Meat probe outlet
7Rack positions
8 Convection fan cover
9 Bake burner (hidden)
10 Oven racks
Page. 13
Page 14
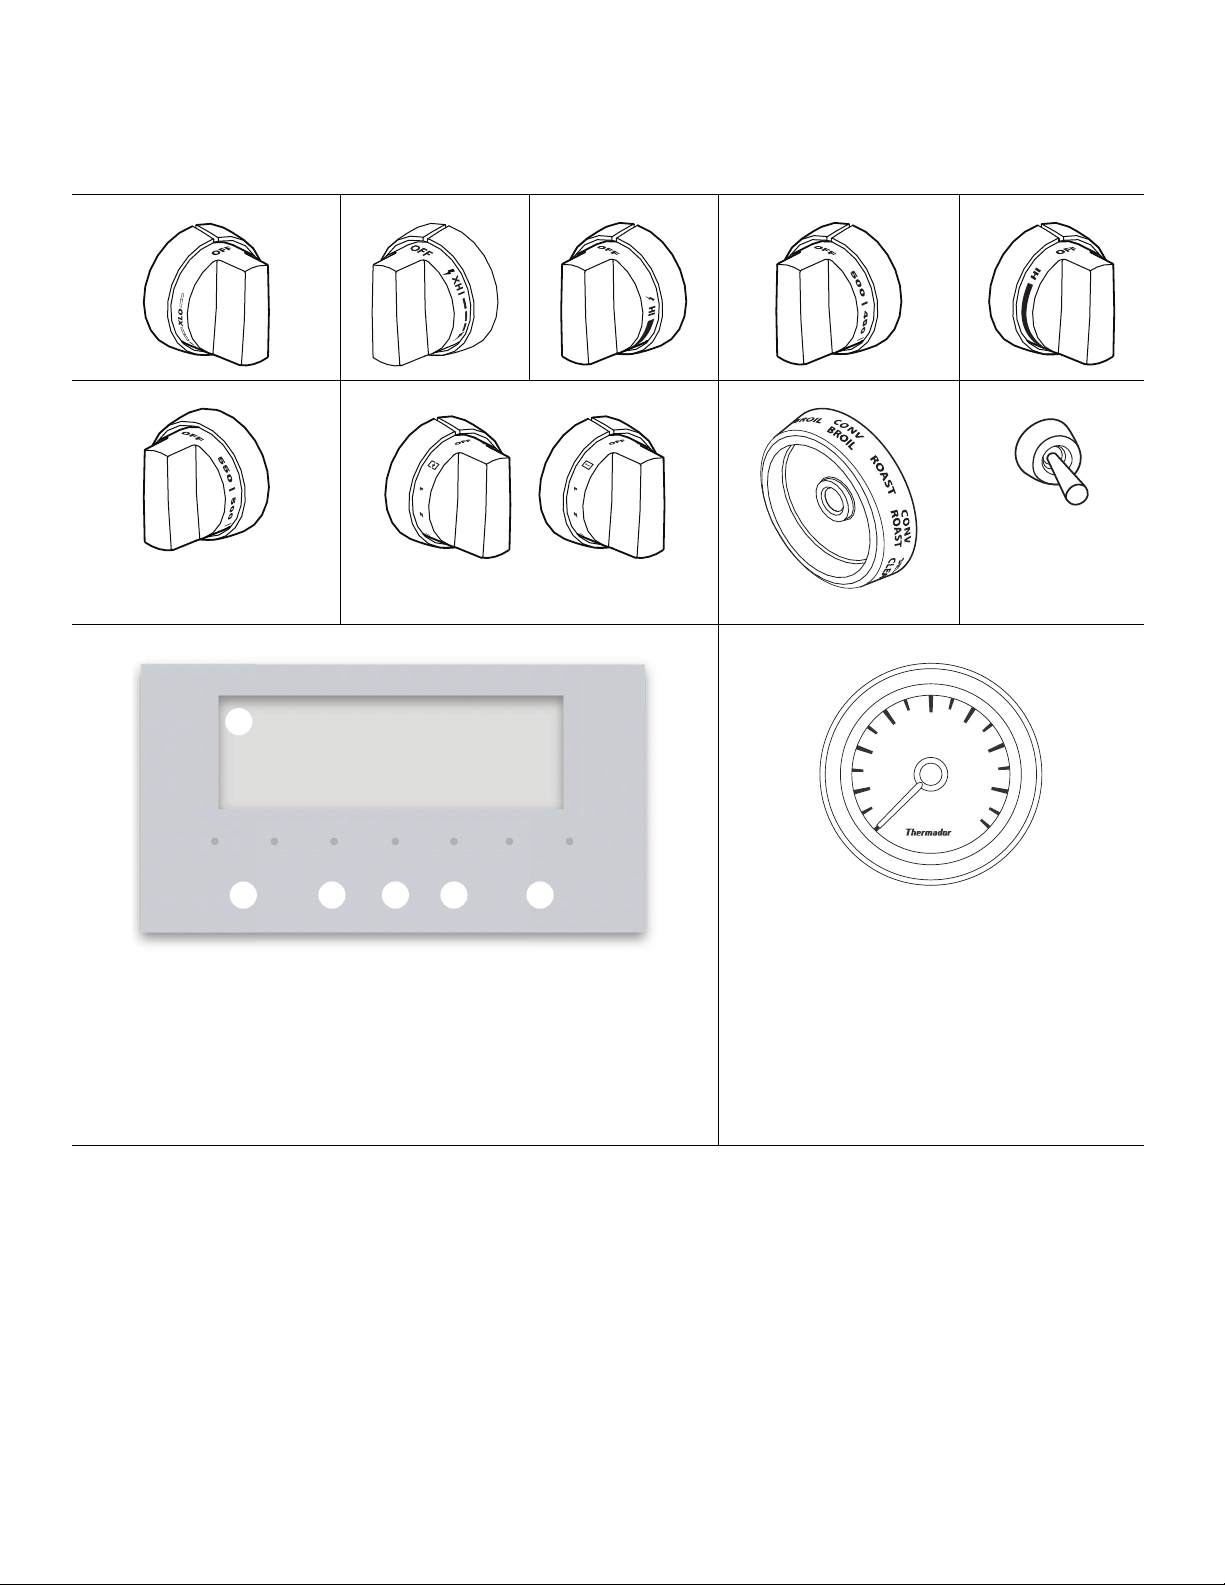
Control panel identification
OFF
OFF
TIMERS
SETTINGS ENTER
06:30
1
2 3 4 65
NOTE: Not all knobs, modes, and features are available to
all models.
ExtraLow
®
POWERBOOST
®
Standard Griddle Grill
Oven temp selector Induction Mode selector Oven light switch
Oven digital display
Oven temp gauge
350
300
250
200
100
400
CLEAN
450
500
BROIL
1 Digital display screen
2 Left navigation buttons
3 Access multiple timers
4 Access user settings
5 Confirm an entry
6 Right navigation buttons
Page. 14
Page 15
Top surface identification
55
44
11
22
33
33
55
11
22
44
33
44
66
11
22
55
Model 364 with induction
Model 364 with grill
1 ExtraLow burner Natural 15000, LP 12000 BTU
2 ExtraLow and
Natural 22000, LP 18000 BTU
PowerBoost burner
3 Standard burner Natural 15000, LP 12000 BTU
4 Standard burner Natural 18000, LP 15000 BTU
5 Induction 3,600W
Model 364 with griddle
11
33
22
44
55
1 ExtraLow burner Natural 15000, LP 12000 BTU
2 ExtraLow and
Natural 22000, LP 18000 BTU
PowerBoost burner
3 Grill 815W x 2
4 Standard burner Natural 15000, LP 12000 BTU
5 Standard burner Natural 18000, LP 15000 BTU
Model 366
1 ExtraLow burner Natural 15000, LP 12000 BTU
2 ExtraLow and
Natural 22000, LP 18000 BTU
PowerBoost burner
3 Griddle 1,630W
4 Standard burner Natural 15000, LP 12000 BTU
5 Standard burner Natural 18000, LP 15000 BTU
1 ExtraLow burner Natural 15000, LP 12000 BTU
2 ExtraLow and
Natural 22000, LP 18000 BTU
PowerBoost burner
3 Standard burner Natural 15000, LP 12000 BTU
4 Standard burner Natural 18000, LP 15000 BTU
5 Standard burner Natural 15000, LP 12000 BTU
6 Standard burner Natural 18000, LP 15000 BTU
Page. 15
Page 16
Model 486 with induction
33
44
66
11
22
55
77
33
44
77
11
22
66
55
Model 486 with griddle
1 ExtraLow burner Natural 15000, LP 12000 BTU
2 ExtraLow and
Natural 22000, LP 18000 BTU
PowerBoost burner
3 Standard burner Natural 15000, LP 12000 BTU
4 Standard burner Natural 18000, LP 15000 BTU
5 Standard burner Natural 15000, LP 12000 BTU
6 Standard burner Natural 18000, LP 15000 BTU
7 Induction 3,600W
Model 486 with grill
11
22
33
55
44
66
77
1 ExtraLow burner Natural 15000, LP 12000 BTU
2 ExtraLow and
Natural 22000, LP 18000 BTU
PowerBoost burner
3 Standard burner Natural 15000, LP 12000 BTU
4 Standard burner Natural 18000, LP 15000 BTU
5 Griddle 1,630W
6 Standard burner Natural 15000, LP 12000 BTU
7 Standard burner Natural 18000, LP 15000 BTU
Model 486 with grill and griddle
1 ExtraLow® burner Natural 15000, LP 12000 BTU
2 ExtraLow and
Natural 22000, LP 18000 BTU
PowerBoost burner
3 Standard burner Natural 15000, LP 12000 BTU
4 Standard burner Natural 18000, LP 15000 BTU
5 Grill 815W x 2
6 Standard burner Natural 15000, LP 12000 BTU
7 Standard burner Natural 18000, LP 15000 BTU
11
22
33
55
44
66
1 ExtraLow burner Natural 15000, LP 12000 BTU
2 ExtraLow and
Natural 22000, LP 18000 BTU
PowerBoost burner
3 Standard burner Natural 15000, LP 12000 BTU
4 Standard burner Natural 18000, LP 15000 BTU
5 Grill 815W x 2
6 Griddle 1,630W
Page. 16
Page 17
Before you begin
Getting started
Data rating label
• Record the model and serial number on page 54.
• The model and serial number must be provided when
calling customer support for assistance.
• Register your BSH product to ensure timely service
and access to your product related information. For
product registration information see page 54.
Surface burners
1. Ensure that the burner caps are correctly seated on
the burner bases of the range's cooktop (see
page 19).
2. Turn on each burner to check for proper flame color
(see “Flame description” on page 21 for details).
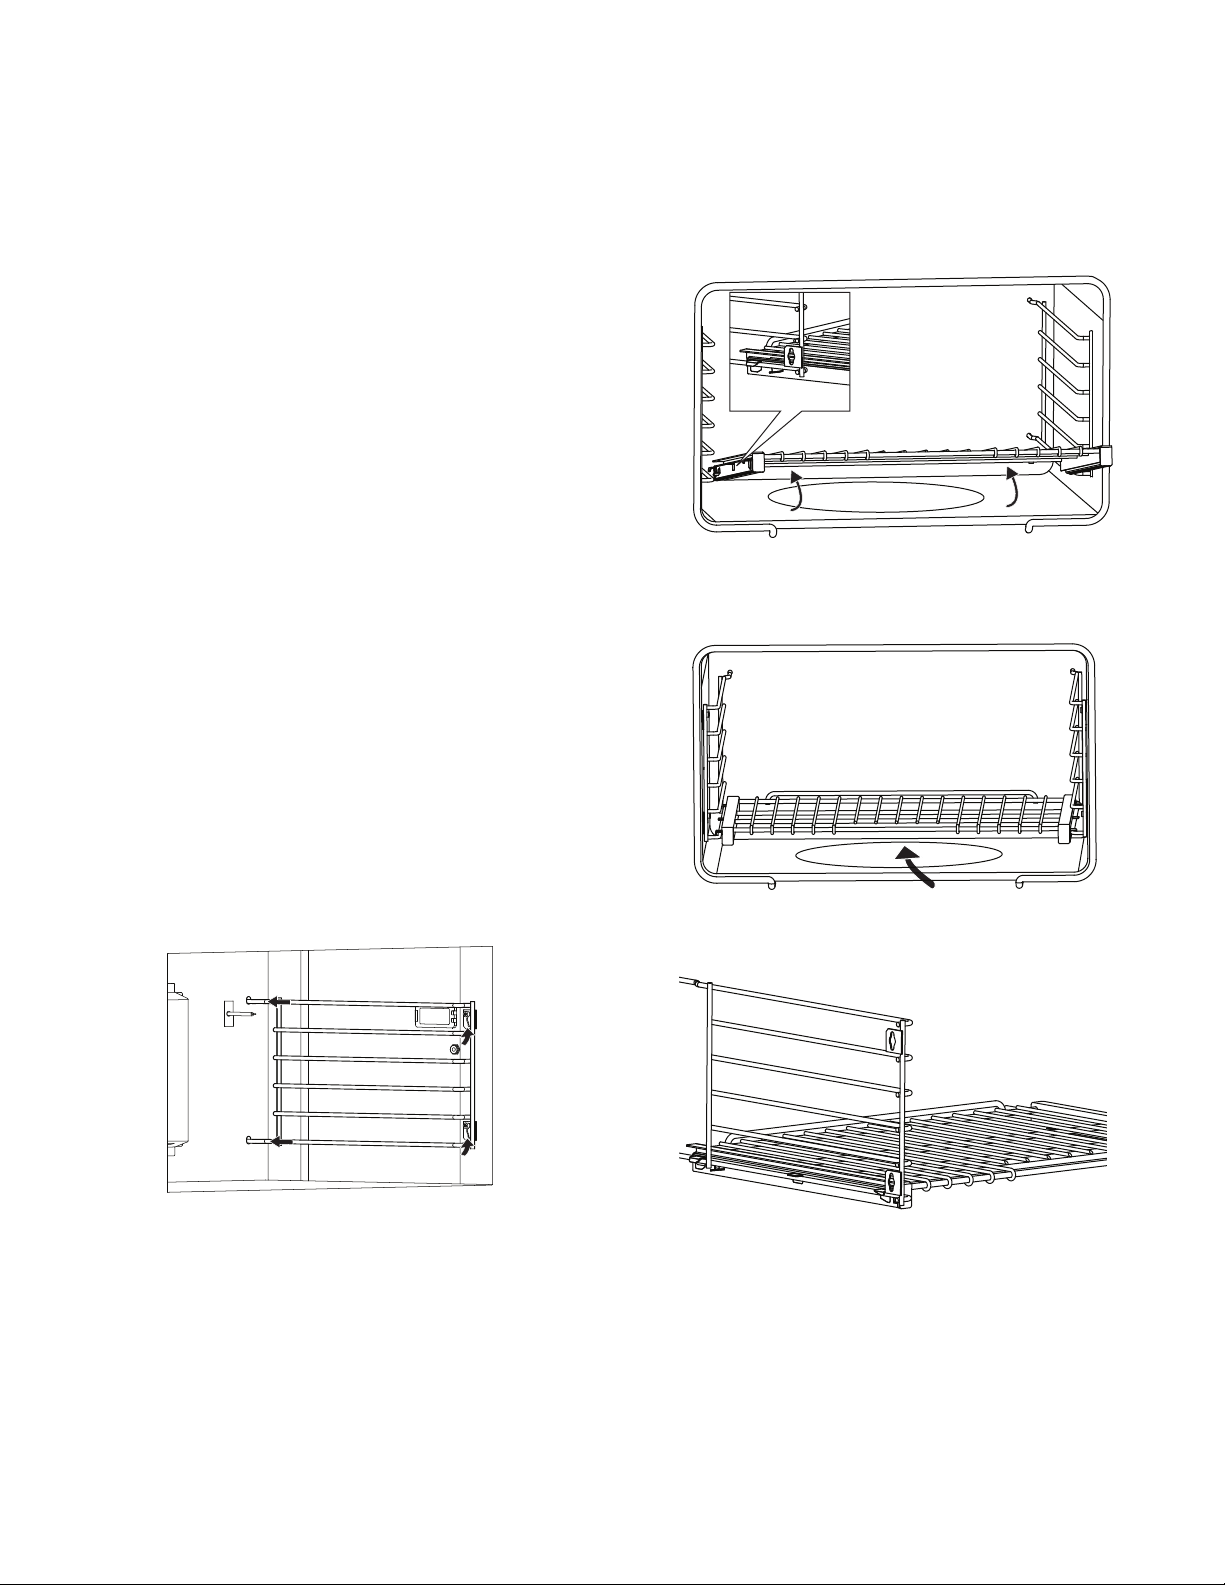
Oven racks
To install rack guides
To install Full Access
1. Hold the rack on a slight angle and place the safety
hooks under the front of the rack guides.
2. Push the rack into the oven, lifting the rack stops
over the front of the rack guides.
3. Hold the rack straight.
®
racks:
1. Push the two rails in the holes in the back of the oven
cavity.
2. Slide the guide's key slots over the shoulder bolts.
3. At the front of the oven cavity press down on the front
of rack guide to clear the heads of the two shoulder
bolts.
4. Push the rack in completely.
5. Engage the rack’s front hooks on the rack guides.
IMPORTANT: When placing the gliding rack in the oven,
make sure the front supports on the rack guides rest in
the large slots at the front corners of the rack. This is
necessary to keep the rack in the correct position while
fully inserted into the oven.
Page. 17
Page 18
To install flat racks
1. Grasp rack firmly on both sides and insert rack.
2. Tilt rack up to allow stop into rack guide.
Oven operation
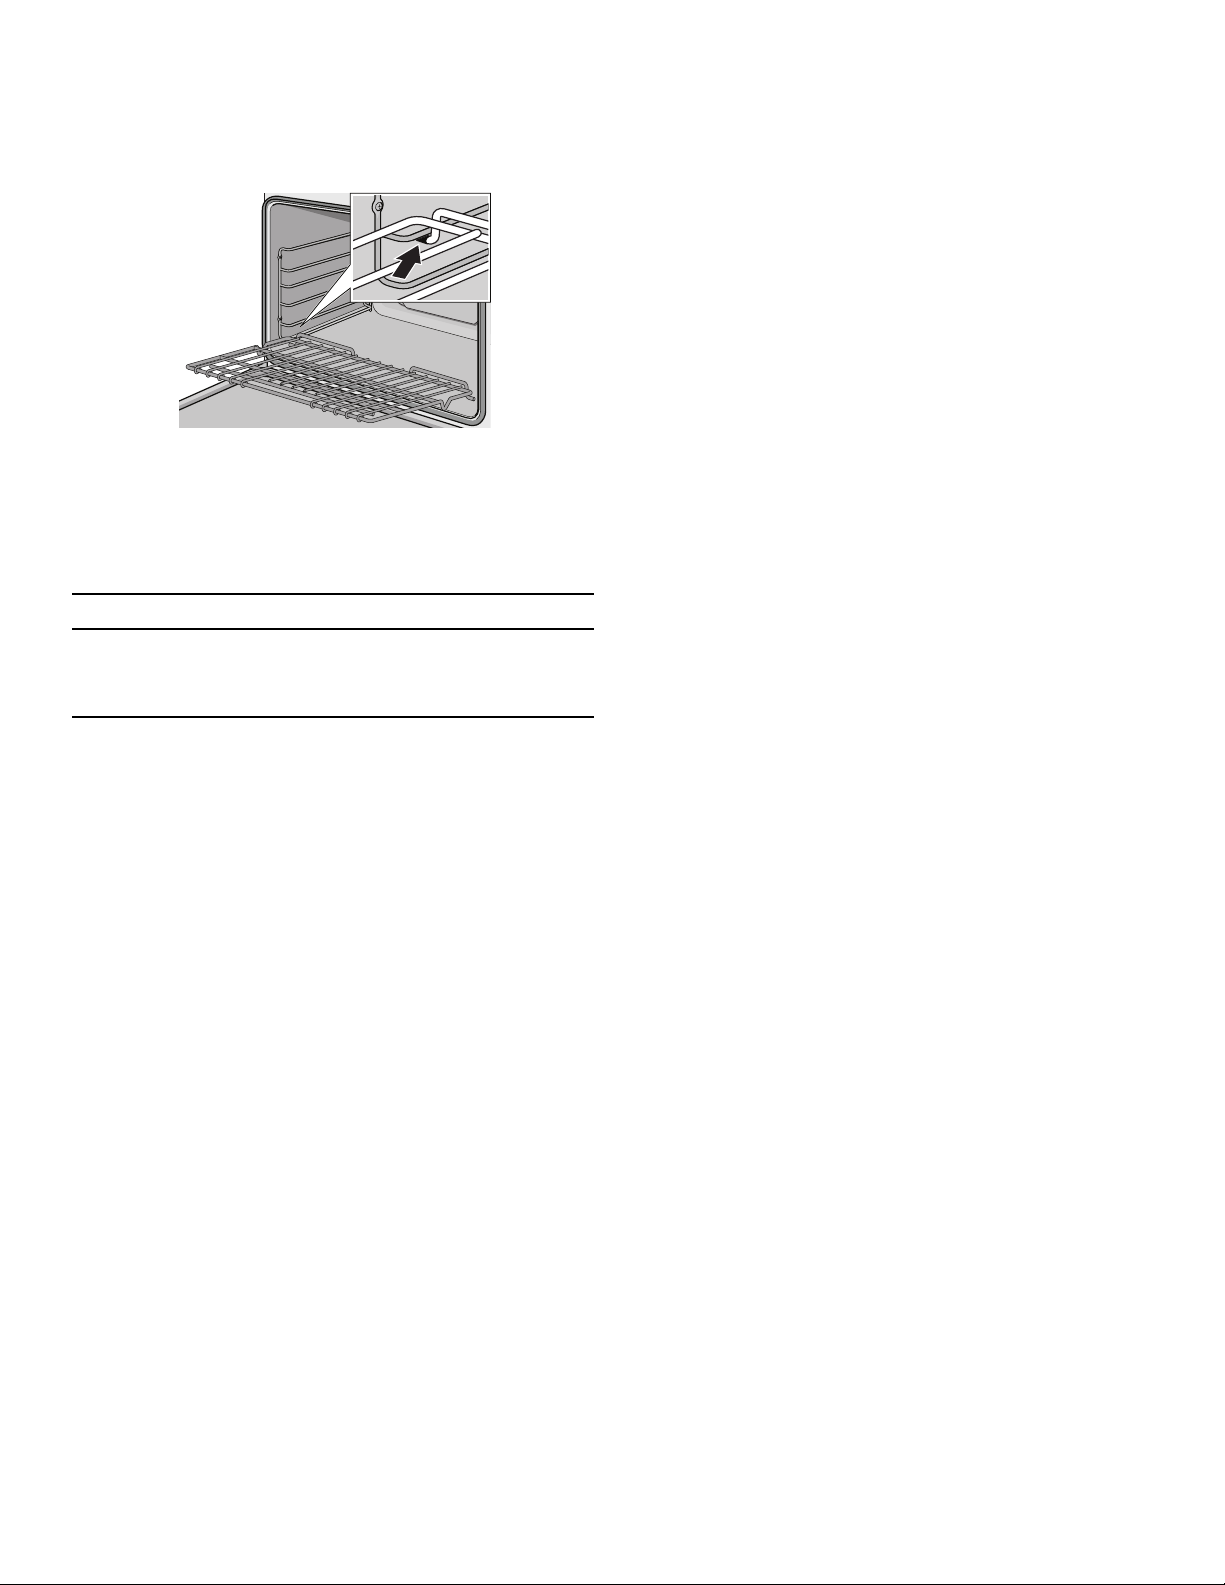
Positioning the oven racks
9 WARNING
To help prevent burns, never remove or reposition the
oven racks while the oven is ON or while the oven is
cooling.
• The correct rack position depends on the recipe and
the cooking mode.
• The rack positions are numbered from the bottom of
the oven, like an elevator.
• Rack position 3 is the most frequently used position.
• Place rack(s) in the proper position before turning on
the oven.
The range occasionally has an odor or smoke when first
used. These odors or smoke comes from the burning off of
manufacturing residues and is typical of any new oven
regardless of manufacturer.
IMPORTANT: ALWAYS remove the oven racks before selfcleaning the oven. If the gliding racks remain in the oven
during self-clean, lubricants in the glide mechanisms of
each rack will be lost and the finish will discolor.
Automatic operation of the cooling fan
The cooling fan runs during all cooking modes. The fan
can be heard when it is running, and warm air may be felt
as it is released from the oven vent. The fan may also run
after the oven is off.
Oven vent
The oven vent is located at the back of the unit. Warm air
may be released from the vent before, during and after
cooking. It is normal to see steam escaping from the vent,
and condensation may collect in this area. This area may
be warm when the oven is in use. Do not block the vent,
since it is important for air circulation.
Convection fan
The convection fan operates during all convection modes.
When the oven is operating in a convection mode, the fan
turns off automatically when the door is opened. The
convection fan may also run during self-clean.
Initial start-up
Before baking or broiling, the oven and broiler should be
turned on to burn off the manufacturing oils using one of
the two following methods:
1. Turn on kitchen ventilation (or if vent hood is a
recirculation type open a window).
2. Turn the oven on to 450ºF (230ºC) for 20 to 30
minutes; then turn the broiler to broil for the same
length of time.
or
1. Turn on kitchen ventilation (or if vent hood is a
recirculation type open a window).
2. Remove oven racks.
3. Set oven to self-clean (select models).
Page. 18
Page 19
Using the rangetop
Sealed STAR® burners
9 WARNING
To prevent flare-ups and avoid the creation of harmful
by-products, do not use the cooktop without all
burner caps and all burner grates properly positioned.
9 WARNING
To prevent burns, do not touch burner caps or grates
while hot. Turn the cooktop off and allow the burners
to cool.
The burner caps must be properly placed on the burner
bases for the cooktop to function properly. If the burner
cap is not properly placed, one or more of the following
problems may occur:
• Burner flames are too high.
• Flames shoot out of burners.
• Burners do not ignite.
• Burner flames light unevenly.
• Burner emits gas odor.
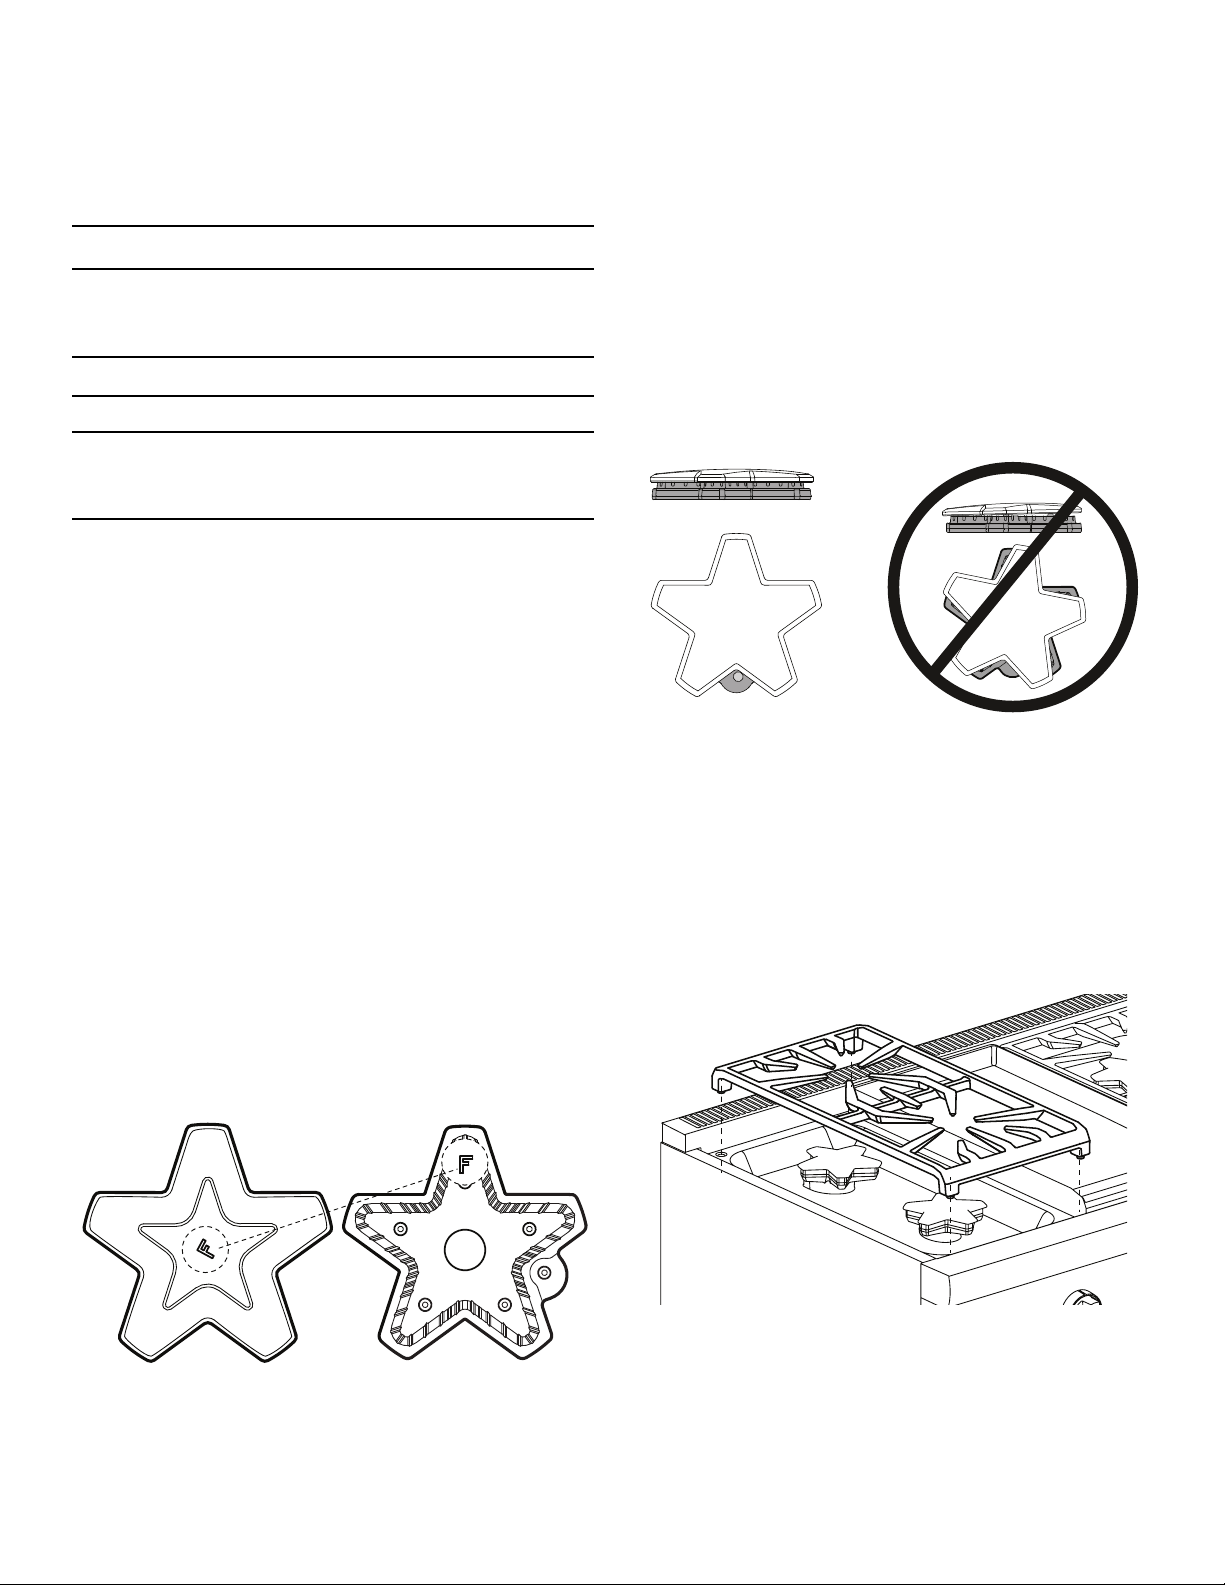
Burner cap placement
Each cap has a letter (B, D, or F) cast in the underside of
the cap that corresponds to a letter (B, D, or F) cast in the
burner base that is attached to the appliance.
Checking the burner cap placement
• Check each burner to make sure there is no gap
between the burner cap and burner base.
• You may gently try to move the burner caps from side
to side to check if the caps are properly placed on the
burner bases.
• When properly placed, each burner cap will rest flat
on top of its burner base, and completely cover the
star-shape of the burner base when viewed from the
top as shown below.
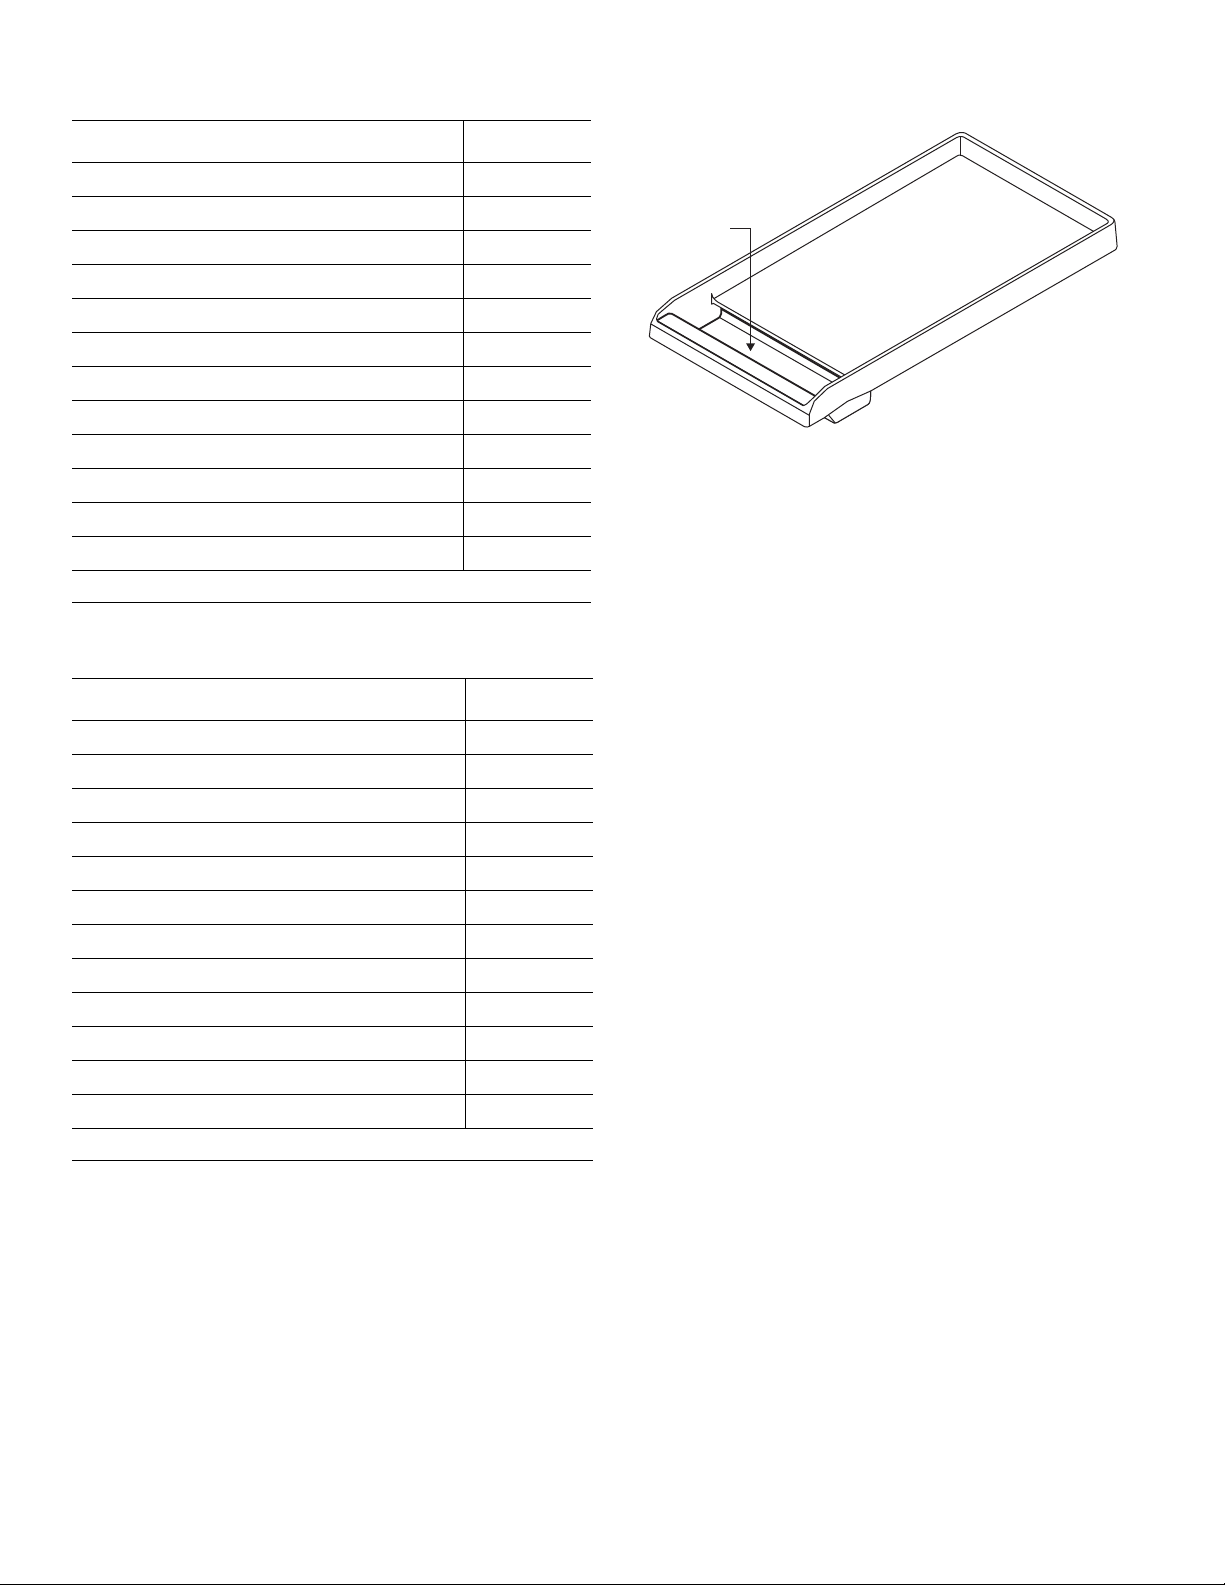
Burner grate placement
To install the burner grates
1. Place grates flat-side down and align into the
rangetop recess.
2. Grates should rest flush against each other and
against the sides of the recess.
To place the burner caps
1. Place each burner cap on its correct burner base per
its corresponding letter designation.
2. Place burner cap gently on top of base so that the
prongs of the burner base fit snugly into the groove of
the burner cap.
Page. 19
Page 20
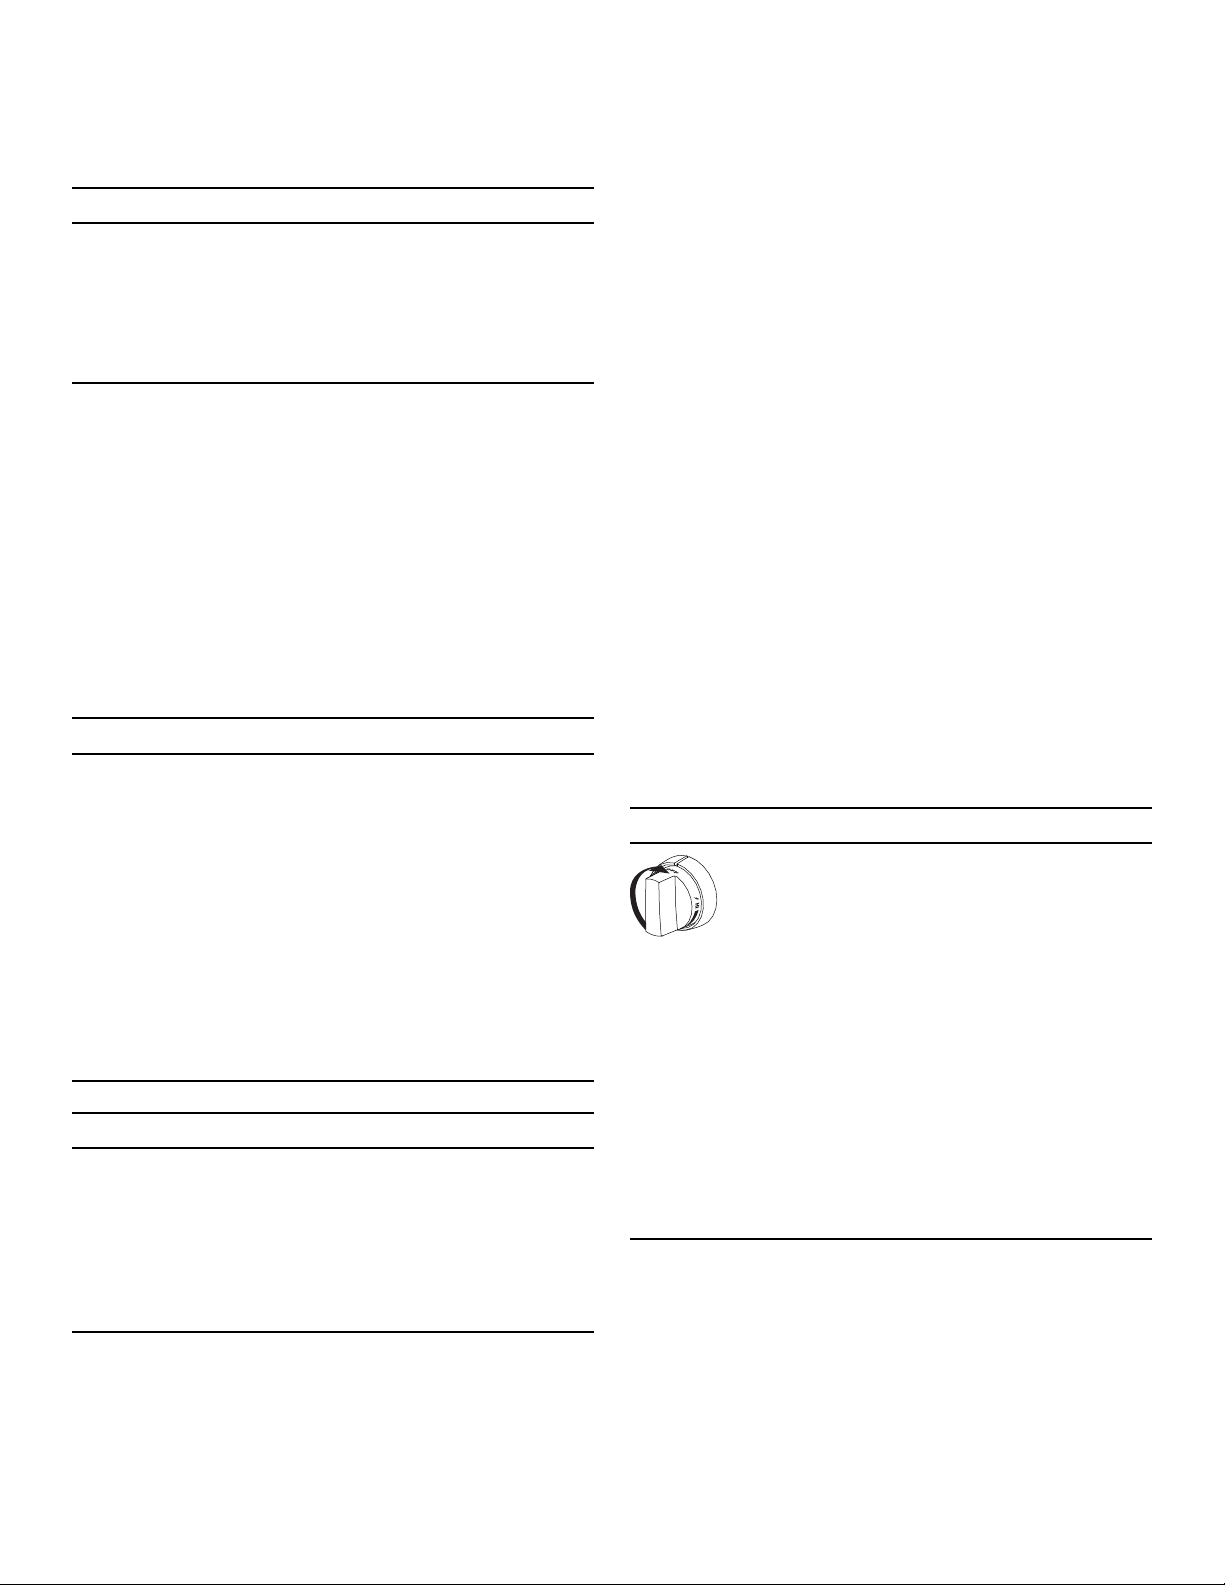
Control knobs
Operation of the ExtraLow
®
burners
The control knobs for two sealed gas burners, one in front
and one in the rear, are located directly in front of and
below the pair of burners on the control panel.
Operation of the burners
To turn on the burners
1. Press in on the knob and turn it counter-clockwise HI.
– The igniter for the selected burner clicks and
sparks.
– After burner ignition, the igniter stops clicking.
2. Rotate the knob to any flame setting between HI and
LO.
LED panel light (select models)
Positioned below the bullnose, the LED panel light
provides task lighting with a theatrical ambiance.
The panel light toggle switch on the control panel turns
the light ON and OFF.
• XLO, the very lowest setting, is achieved by cycling
the flame on for approximately 10 seconds and off for
50 seconds of each minute.
• When the knob is set just below the XLO setting, the
flame will cycle on for approximately 50 seconds and
off for 10 seconds of each minute.
• To vary the amount of low heat to suit the food and
quantity, the control can be set anywhere within the
XLO range marked on the knob.
ExtraLow
• To maintain a low or simmer heat, bring food to a
• If a large pan is used, the simmer action may occur
• It is normal to stir food occasionally while simmering.
®
techniques
rolling boil. Stir well, then cover the pan and lower the
heat to a setting just below XLO.
mainly in the center of the pan. To equalize the
temperature throughout the food, stir the food
around the outer edges of the pan into the food in the
center.
This is especially important when simmering for
several hours, such as for a homemade spaghetti
sauce or beans.
ExtraLow® burners
The controls for the
ExtraLow burners have flame
settings even lower than the
standard low settings.
The drawing shows that the control knob has an additional
range after the XLO setting. When the knob is set within
this range, the flame cycles off and on.
By varying the length of time the flame is off and on, the
heat is reduced even further to cook delicate foods. For
example, these very low settings are suitable for
simmering and poaching, melting chocolate and butter,
holding cooked foods at temperatures without scorching
or burning, etc.
• If the setting is too low to hold a simmer, bring the
food back to a boil before re-setting to a higher heat.
• There may be bubbling when the flame cycles on and
no bubbles when the flame is off. Even when the flame
is off, there will be steam and a slight quiver on the
liquid’s surface.
®
POWERBOOST
(select
models)
The POWERBOOST, or XHI, offers
the convenience to quickly boil
water, sear steaks, stir-fry
vegetables, etc. Use of the SIM
and XLO remains the same as the
other XLO knobs.
Page. 20
Page 21
Automatic re-ignition
Flame height
Each burner has its own electronic igniter that sparks
when the burner is turned on. Each burner should light in
4 seconds or less. If a burner does not light, check to see
that the cap is positioned correctly on the base.
If any one or more burners blow out, the electronic igniter
automatically activates to re-light the flame. Do not touch
the burners when the igniters are active.
9 CAUTION
DO NOT touch the burners when the igniters are
sparking.
IMPORTANT
• For proper combustion do not use the rangetop
without the burner grates in place.
• There is a slight sound associated with gas
combustion and ignition. This is a normal condition.
• On rangetops using propane gas (LP), a slight “pop”
sound may be heard at the burner ports a few seconds
after the burner has been turned off.
• The correct flame height depends on 1) size and
material of pan being used; 2) food being cooked; and
3) amount of liquid in the pan.
• Never extend the flame beyond the base of the pan.
• Use a low or medium flame for pan materials that
conduct the heat slowly, such as porcelain coated
steel or glass-ceramic.
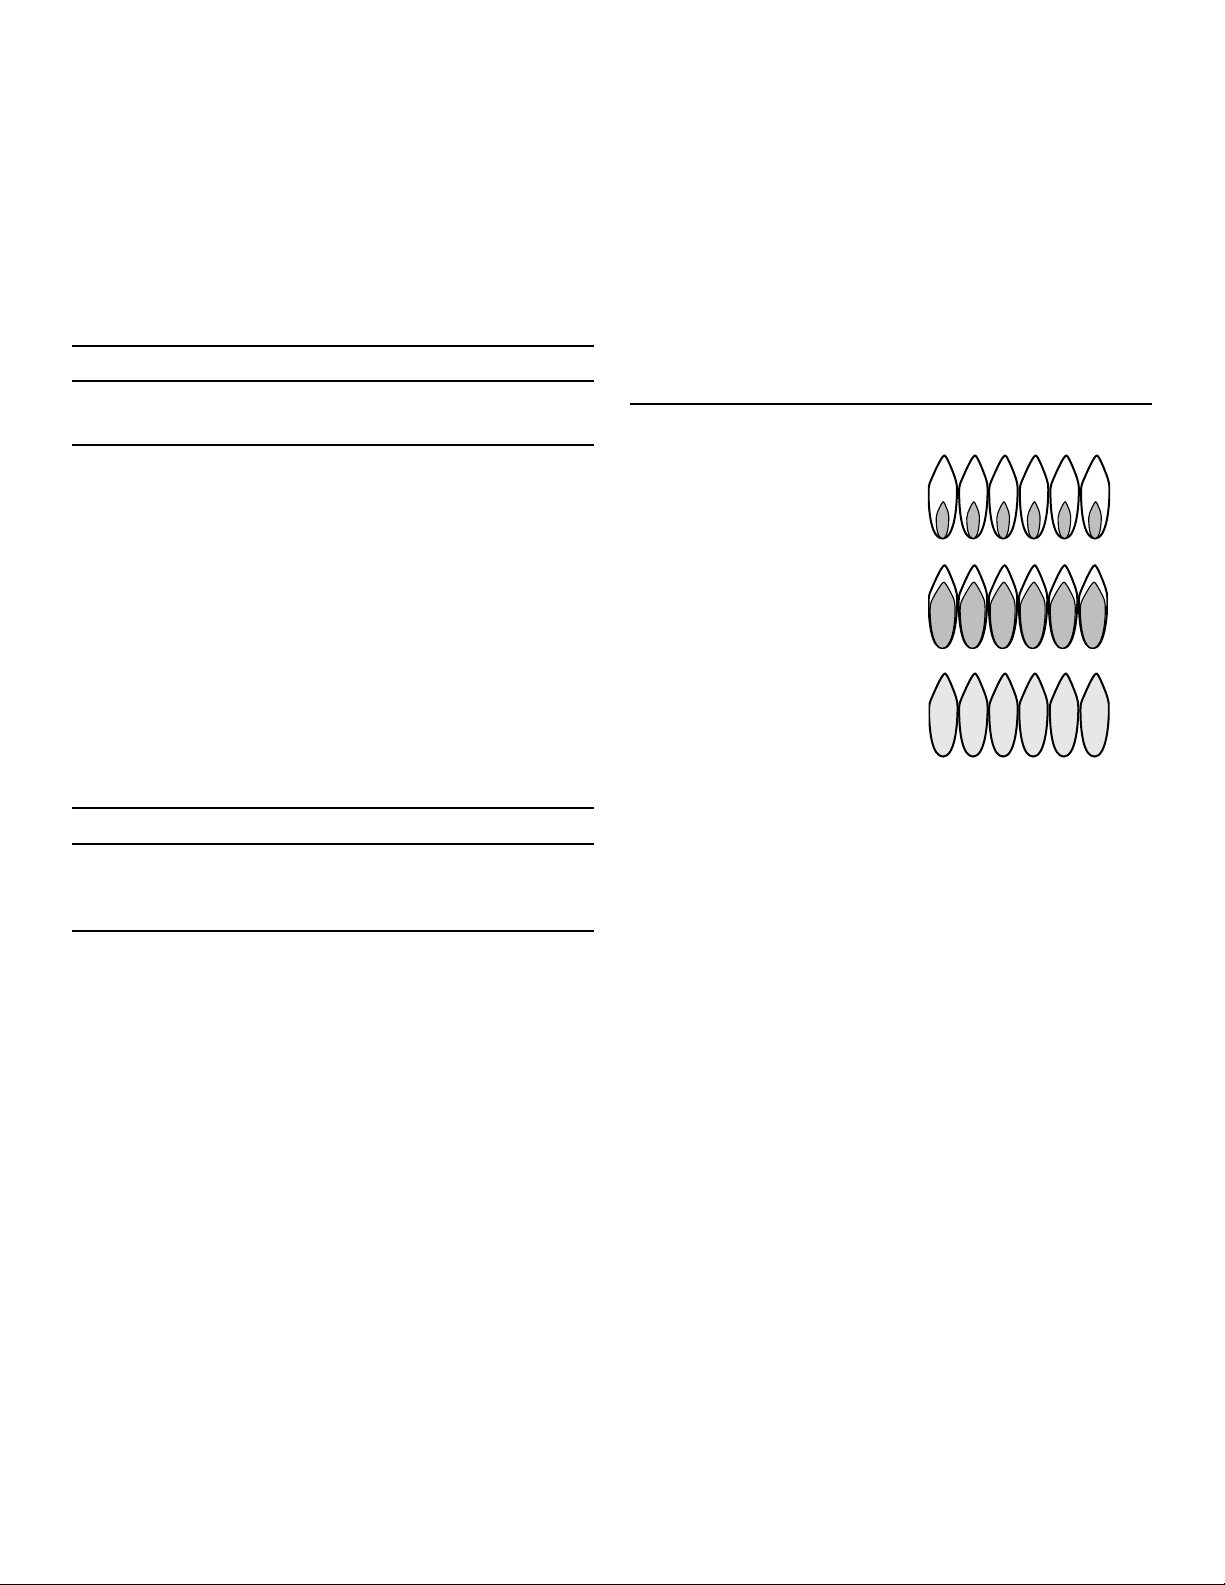
Flame description
Flame characteristics
Yellow flames:
Further adjustment is
required.
Yellow tips on outer cones:
Normal for LP Gas
Soft blue flames:
Normal for natural gas
Power failure
9 WARNING
In the event of a power failure, turn all knobs to the
OFF position. Only the standard burners can be lit
manually.
• In the event of a power failure, only the standard
burners can be manually lit. It is necessary to light
each one individually.
• If the rangetop is being used when the power failure
occurs, turn all knobs to the OFF position.
• The standard burners can be lit by holding a match at
the ports and turning the control knob to the HI
position. Wait until the flame is burning all around the
burner cap before adjusting the flame to the desired
height.
• The burners with the ExtraLow
used during a power failure. Be sure to turn them off.
• If a burner with ExtraLow is on when a power failure
occurs, it cannot be turned back on until the knob is
first turned off.
®
feature cannot be
• If the flame is completely or mostly yellow, verify that
the regulator is set for the correct fuel. After
adjustment, retest.
• Some orange-colored streaking is normal during the
initial start-up.
• Allow unit to operate 4-5 minutes and re-evaluate
before making adjustments.
• The burner flame color should be blue with no yellow
on the tips. It is not uncommon to see orange in the
flame color; this indicates the burning of airborne
impurities in the gas and will disappear with use.
• With propane (LP) gas, slight yellow tips on the
primary cone are normal.
• The flame should burn completely around the burner
cap. If it doesn’t, check that the cap is positioned
correctly on the base and that the ports are not
blocked.
• The flame should be stable with no excessive noise or
fluttering.
• If you smell gas, refer to safety precautions listed in
the Safety chapter.
Page. 21
Page 22

Cookware recommendations
9 WARNING
To avoid risk of serious injury, damage to appliance or
cookware, please observe the following:
• Bakeware, such as large casserole pans, cookie sheets,
etc. should never be used on the rangetop.
• Placement of large stock pots should be staggered
when used on the rangetop.
• Food packaged in aluminum foil should not be placed
directly on the burner grate. Aluminum foil can melt
during cooking.
• DO NOT let plastic, paper, or cloth come in contact
with a hot burner grate. They may melt or catch fire.
• Professional quality pans with metal handles are
recommended because plastic handles can melt or
blister if the flame extends up the side of the pan.
• All cookware should have these characteristics: good
heat conductivity, good balance, correctly sized base
diameter, a heavy, flat base, and a proper fitting lid.
• For best cooking results, the flame should be
contained under the bottom of the pan.
• Aluminum and copper are pan materials that conduct
the heat quickly and evenly. These metals are
sometimes attached to the base or in the core
between stainless steel.
• A heavy, flat base is more apt to remain flat when
heated. Pan bases that are warped, dented, ridged or
too lightweight will heat unevenly. Heat and cool pans
gradually to avoid sudden temperature changes which
tend to distort cookware. DO NOT add cold water to
a hot pan.
• Select the base diameter to match the diameter of the
flame. The diameter of the flame should be the same
size as the pan base or slightly smaller. Oversize or
under size pans sacrifice cooking performance. A 5½''
(140 mm) base size is generally the smallest
recommended.
• Avoid using high flame setting with a pan larger than
the grate or with one that spans more than one
burner, such as a griddle, for prolonged periods of
time. This can result in poor combustion that
generates harmful by-products.
• Balance is important for stability and even cooking.
The handle must not be heavier than the pan and tilt it
unevenly. A pan must sit level on the grate without
rocking or wobbling.
• A properly fitting lid will shorten cooking time and
make it possible to use lower heat settings.
Page. 22
Page 23

Specialty cookware
Woks
Canning tips
• A flat base pan is preferred to one with a concave,
convex or rippled base.
• Either flat-based or round-bottom woks with the
accessory ring can be used on all models. Round
bottom woks must be used with a support ring.
• The wok pan and the porcelain-coated cast iron wok
support ring must be purchased separately.
Canners and stock pots
• Select one with a base diameter that extends no more
than 2'' (51 mm) beyond the grate.
Standard size water bath canner
• 21 to 22 quarts (19.95 to 20.9 liters), with an 11'' to
12'' base (279 – 305 mm) and a 9'' to 11'' depth
(229 – 279 mm).
Standard size pressure canner
• 8 to 22 quarts (7.6 to 20.9 liters), with an 8'' to 11''
base (203 – 279 mm) and a 6½'' to 12'' depth
(165 – 305 mm).
• When using two canners at the same time, use
staggered burners. DO NOT block air to the burners.
A flame needs the right amount of air for complete
combustion.
• Use a cover on the canner when bringing the contents
to a boil.
• Once the contents have reached a boil on HI, use the
lowest flame possible to maintain the boil or pressure.
• Canning produces a large amount of steam. Take
precautions to prevent burns.
Suggestions for using the surface burner
cooking recommendations
• Use the chart beginning on page 24 as a guide. The
settings you use will vary depending on the pans
selected and the starting temperature of the food.
• On the chart, the “Finish setting” has been separated
for the standard and ExtraLow
may not be a change between the two burner
settings.
®
burners. There may or
• The ExtraLow setting can be either a cooking or a
holding setting.
• Raise or lower the flame setting gradually. Allow time
for the pan and the food to adjust to the new setting.
Page. 23
Page 24

Surface burner cooking recommendations
Food Start setting
Beverages
Cocoa
Breads
French toast, pancakes,
grilled sandwiches
Butter
Melting
Cereals
Cornmeal, grits,
oatmeal
Chocolate
Melting
Desserts
Candy
Pudding and pie filling
mix
Pudding LO to MED LO – bring milk
MED – heat milk, cover LO – finish heating XLO – keep warm, cover
MED – preheat skillet LO to MED – cook Same as for Standard Burners
LO – to start melting Allow 5 – 10 minutes to melt
HI – cover, bring water to a
boil, add cereal
XLO – may be stirred to
hasten melting
LO to MED – cook following
recipe
LO to MED LO
according to package
directions
to a boil
– cook
Finish setting
standard burners
LO to MED – finish
cooking according to
package directions
LO to MED Same as for Standard Burners
LO Same as for Standard Burners
LO Same as for Standard Burners
Finish setting XLO® burners
Same as for Standard Burners
XLO – to hold, cover
XLO – allow 10 – 15 minutes to
melt
XLO – to hold
Eggs
Cooked in shell
Fried, scrambled LO to MED – melt butter,
Poached HI – bring water to the
Meat, fish, poultry
bacon, sausage patties
Braising: Swiss steak,
pot roast, stew meat
Quick frying: Breakfast
steaks
Frying: Chicken MED HI – heat oil, then
Deep frying: Shrimp MED HI – heat oil MED to MED HI – to
Pan frying: Lamb chops,
thin steaks,
hamburgers, link
sausage
Poaching: Chicken,
whole or pieces, fish
MED HI – cover eggs with
water, add lid, bring to boil
add eggs
boiling point, add eggs
MED HI – until meat starts
to sizzle
MED HI – melt fat, then
brown on MED HI, add
liquid, cover
MED HI – preheat skillet MED HI – fry quickly Same as for Standard Burners
brown on MED
MED HI – preheat skillet MED – brown meat Same as for Standard Burners
MED HI – Cover, bring
liquids to a boil
LO finish cooking Same as for Standard Burners
LO to MED – finish heating Same as for Standard Burners
LO to MED – finish
cooking
LO – cover, finish cooking Same as for Standard Burners
maintain temperature
XLO – to hold for a short
period
Same as for Standard Burners
XLO – Simmer until tender
Same as for Standard Burners
XLO – to hold
To finish cooking
Page. 24
Page 25

Food Start setting
Finish setting
standard burners
Finish setting XLO
®
burners
Simmering: Stewed
chicken, corned beef,
HI – cover, bring liquid to a
boil
XLO – to simmer slowly
XLO – to hold, cover
tongue, etc.
Pastas
Macaroni, noodles,
HI – bring water to a boil,
add pasta
MED HI to HI – to maintain
a rolling boil
Same as for Standard Burners
spaghetti
Popcorn (use a heavy, flat
bottom pan)
Pressure cooker
Meat
Vegetables HI – build up pressure LO to MED – maintain
HI – cover, heat until kernels
start to pop
MED HI to HI – build up
pressure
MED HI – finish popping Same as for Standard Burners
LO to MED – maintain
Same as for Standard Burners
pressure
Same as for Standard Burners
pressure
Rice HI – cover, bring water and
rice to a boil
LO – to maintain Low Boil.
Cover and cook until water
Same as for Standard Burners
XLO – to hold, cover
is absorbed
Sauces
Tomato base
White cream, béarnaise MED – melt fat, follow
MED HI – cook meat/
vegetables, follow recipe
LO – to maintain simmer XLO – simmer to thicken sauce,
uncovered
LO – finish cooking XLO – to hold, cover
recipe
Hollandaise XLO XLO – to hold, lowest setting
for short period, stir frequently
Soups, stock HI – cover, bring liquid to a
LO to maintain simmer Simmer XLO – to hold, cover
boil
Vegetables
Fresh
Frozen HI – cover, bring water and
HI – cover, bring water and
vegetables to a boil
vegetables to a boil
LO to MED – cook 10
minutes, or until tender
LO to MED – cook
according to package
directions
Deep frying HI – heat oil MED to MED HI – maintain
frying temperature
In pouch HI – bring water and pouch
to a boil
LO to MED – cook
according to package
directions
Sauté HI – heat oil or melt butter,
add vegetables
Stir fry HI – heat oil, add
vegetables
LO to MED – cook to
desired doneness
HI to MED HI – finish
cooking
Same as for Standard Burners
XLO – to hold, cover
Same as for Standard Burners
Same as for Standard Burners
Same as for Standard Burners
Same as for Standard Burners
Same as for Standard Burners
Page. 25
Page 26
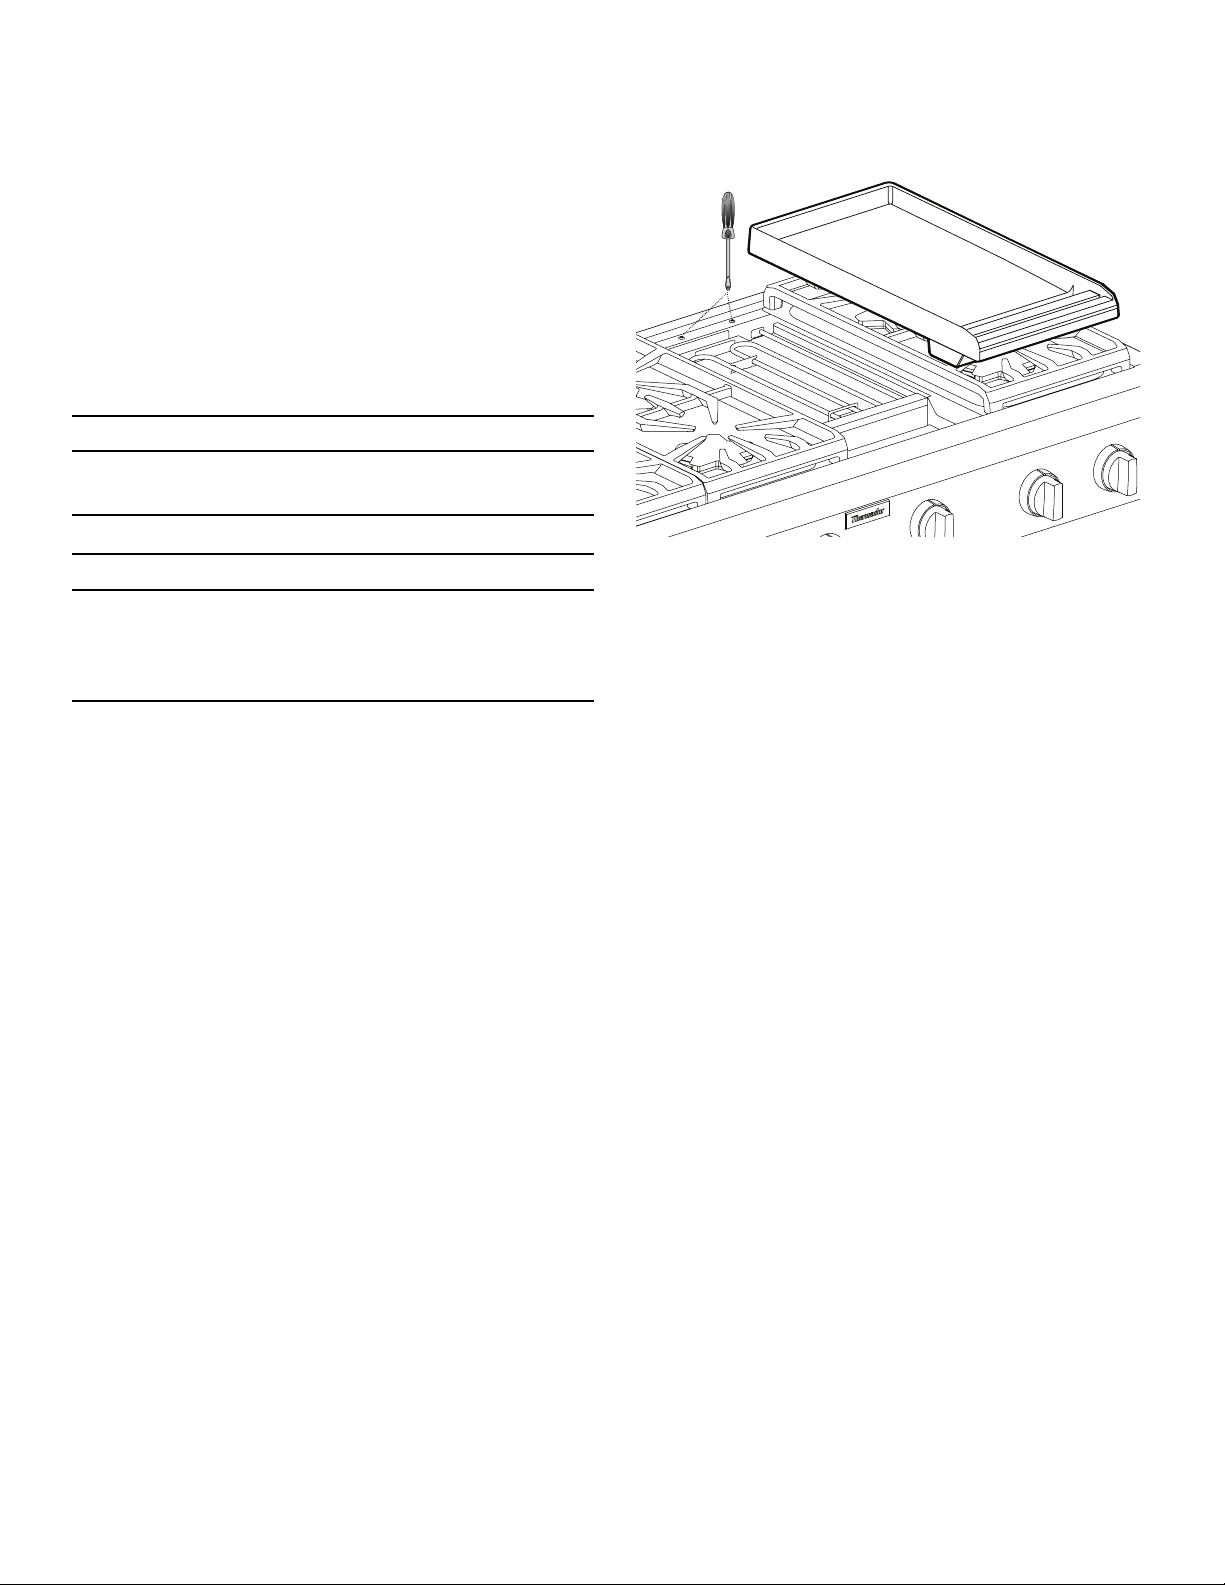
Electric griddle
NOTE: Not available on all models.
Description
Griddle widths vary.
A maple chopping block and stainless steel cover are
available as accessories and are purchased separately. The
maple chopping block and stainless steel cover must be
removed before turning the griddle on.
9 CAUTION
The griddle element is hot after use. Allow sufficient
time for griddle components to cool before cleaning.
4. Adjust the two screws under the back of the plate.
Start with one half turn counterclockwise of the screws
(below).
9 WARNING
To avoid risk of injury, never operate the griddle
without the griddle plate installed. Never use the
griddle in a manner that is not prescribed by the Use
and Care Guide.
The griddle plate must always be in place when the
griddle is turned on.
The griddle is electronically controlled with temperatures
marked on the knob from 150° – 500°F (66° – 260°C).
There are no fixed settings on the knob.
The 24'' griddle models have two heating elements that
can be regulated separately; one element for the left side
of the griddle and another for the right side. This allows
you to cook food with different temperature requirements
at the same time.
Preparing the griddle
To prepare the griddle
1. The griddle plate should be washed with warm soapy
water then rinsed with clear water prior to use.
2. Check the griddle plate adjustment by pouring two
tablespoons of water on the back of the griddle plate.
-- The water should slowly roll into the grease tray.
3. If water does not flow to the front of the griddle,
move the griddle plate to the side.
5. Further adjustment should be made by one-quarter
turn until water slowly flows into the grease tray.
The griddle may be used without any butter, margarine or
oil. However, a very small amount may be used to flavor
foods.
DO NOT use metal utensils on the griddle surface. Care
should be taken that the surface is not gouged when
utensils are used. DO NOT cut directly on the griddle
plate.
NOTICE: Performance may vary if there is an excessive
amount of airflow in the vicinity of the appliance. The
excessive airflow could be from an air-conditioning
register or ceiling fan blowing at the rangetop. This could
create longer than normal heat-up time, or it could cause
the temperature to be higher or lower than the knob
setting.
NOTE: Having a properly installed ventilation hood is not
considered a source of excessive airflow.
Cooking on the griddle
To cook on the griddle
1. Press and turn the knob clockwise to the appropriate
cooking temperature to preheat the griddle.
2. Preheat the griddle.
3. Add butter, margarine, oil or shortening if desired.
Page. 26
Use the lowest cooking temperature possible. Recipes
may need to be modified as the non-stick coating browns
and sears at lower temperatures.
Page 27
12'' griddle cooking recommendations
Food * Setting
Eggs 325° – 350°F
Bacon, breakfast sausage 450° – 475°F
Toasted sandwiches 375° – 400°F
Boneless chicken breasts 425° – 450°F
Boneless pork chops, 1" (25.4 mm) 425° – 450°F
Steaks, 1'' (25.4 mm) thick 450° – 475°F
Ground beef patties, 6 ounces 450° – 475°F
Ground turkey patties, 6 ounces 450° – 475°F
Hot dogs 350° – 375°F
Ham slices, ½'' (12.7 mm) thick 350° – 375°F
Pancakes, French toast 400° – 425°F
Potatoes, hash browns 400° – 425°F
* Level foods to a uniform thickness to ensure even cooking.
24'' griddle cooking recommendations
Food * Setting
Eggs 275° – 300°F
Bacon, breakfast sausage 400° – 450°F
Toasted sandwiches 350° – 375°F
Boneless chicken breasts 400° – 425°F
Boneless pork chops, 1'' (25.4 mm) 400° – 425°F
Steaks, 1'' (25.4 mm) 425° – 450°F
Ground beef patties, 6 ounces 400° – 425°F
Ground turkey patties, 6 ounces 400° – 425°F
Hot dogs 300° – 350°F
Ham slices, ½'' (12.7 mm) thick 350° – 375°F
Pancakes, French toast 350° – 375°F
Griddle grease tray
• Clean the tray after every use. When removing the
tray, use care when tipping it so that the contents do
not spill.
• The grease tray is dishwasher safe.
• After cooling, pour the grease into a grease-resistant
container for disposal.
Care and cleaning the griddle plate
• NEVER flood a hot griddle plate with cold water. This
can damage the griddle plate.
• DO NOT clean the griddle plate in a self-cleaning
oven.
• DO NOT heat cookware on the griddle surface.
• Care should be taken to avoid scratching or gouging
the surface.
• DO NOT cut food directly on the griddle plate.
• DO NOT use metal utensils.
• Use plastic or wood utensils to avoid scratching
the non-stick surface.
• The griddle plate is dishwasher safe, however, hand
washing the griddle plate is recommended.
Potatoes, hash browns 400° – 425°F
* Level foods to a uniform thickness to ensure even cooking.
Page. 27
Page 28
Seasoning the griddle plate
To season the griddle
If the griddle plate seems to lose its non-stick abilities over
time, the following instructions should help regain the
griddle’s non-stick properties. For optimal performance
and long life of your griddle plate, follow these simple
cleaning and seasoning instructions.
NOTE: 24'' griddles will not fit in the oven cavity for
seasoning. Therefore, care should be taken not to
overheat and damage their non-stick coatings while
preheating and cooking.
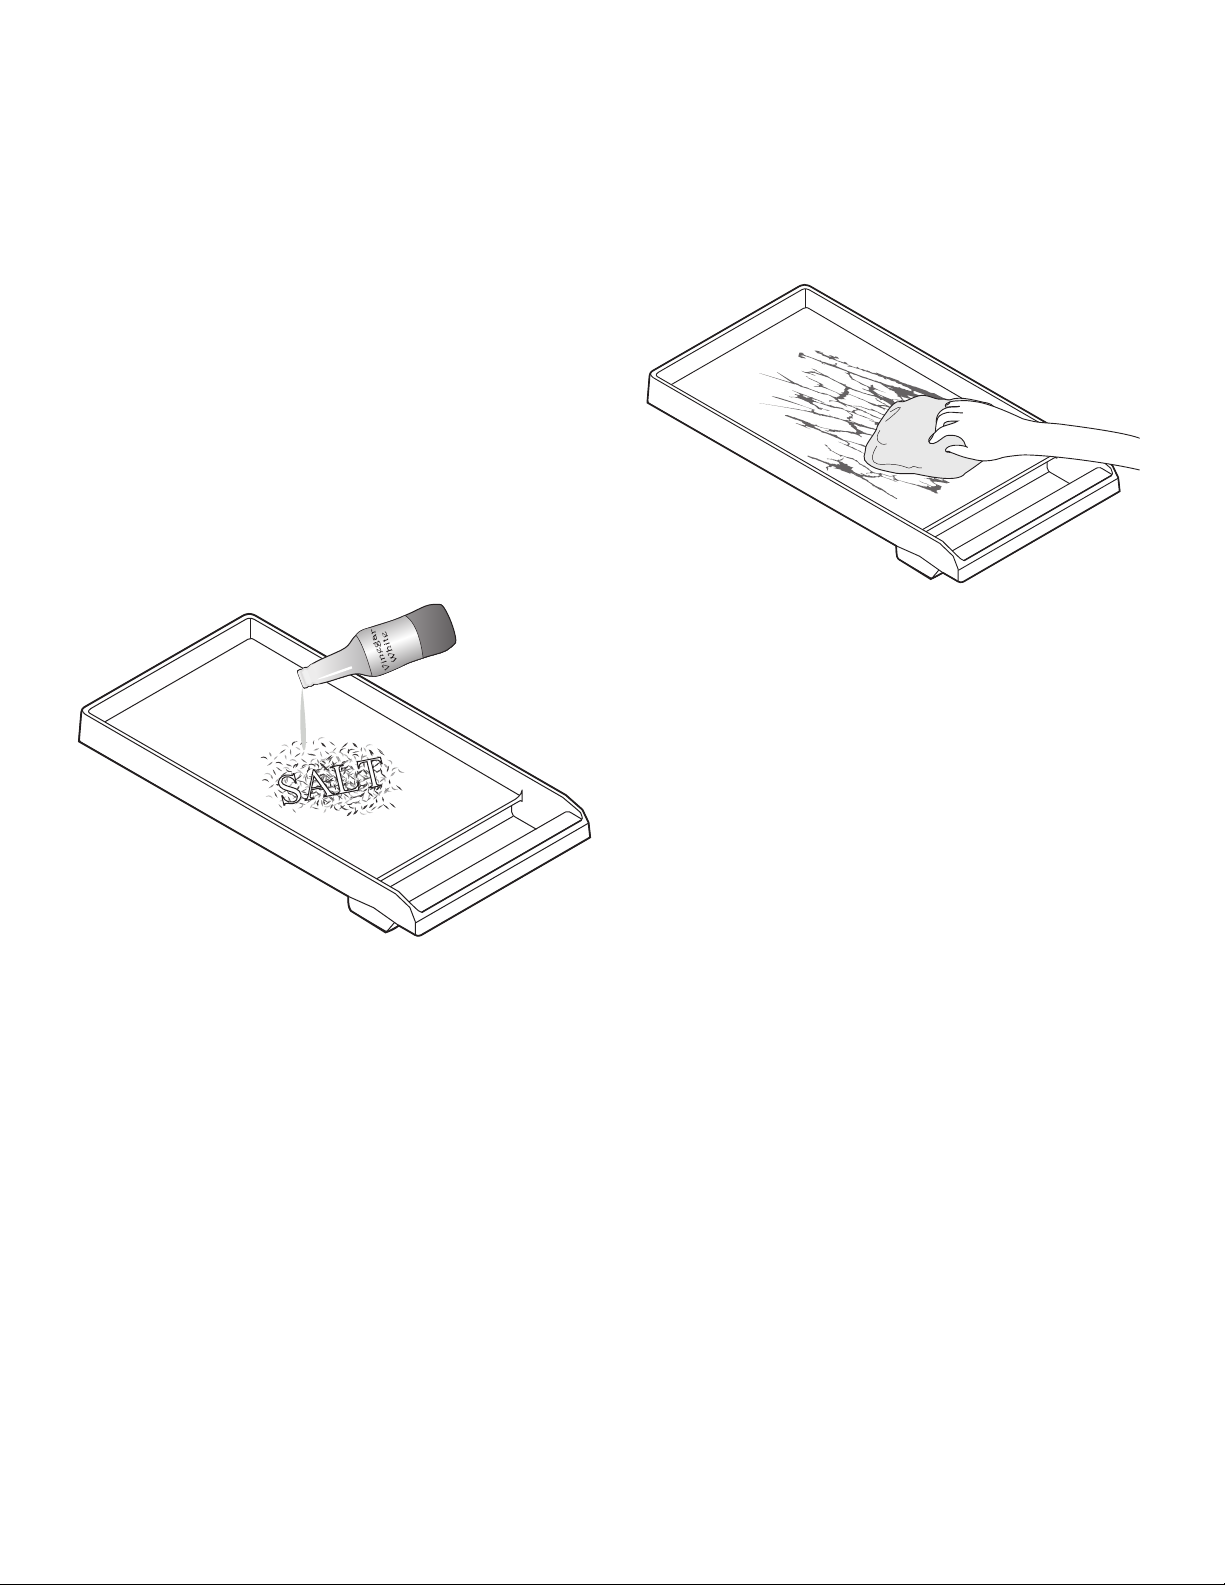
To prepare the griddle for seasoning
The griddle plate must be clean and all residue removed
before the griddle plate is seasoned.
1. Use a mixture of coarse salt and a small amount of
white vinegar to buff off any residue from the griddle
plate.
Seasoning is a process by which a layer of animal fat or
vegetable oil is applied and baked into the cookware. The
seasoning layer provides a non-stick surface for cooking.
1. Use a paper towel to apply a thin, even coating of
lard, Crisco
2. Bake the griddle plate in a 350°F oven for 1 hour.
3. Remove the griddle plate from the oven and allow to
cool to room temperature.
4. Apply a second layer of fat or oil and bake at 350°F for
1 hour.
5. Repeat process at least one additional time – making
3 coats of oil or fat.
®
, or olive oil to the griddle surface.
2. Rinse well with clean water.
3. Dry the griddle plate thoroughly.
After seasoning
1. After cooking on your seasoned griddle, allow to cool
and wipe clean with a damp cloth. Allow to dry.
2. Add a thin coating of oil or fat before storing your
griddle in a cool, dry place.
3. Repeating this process will season the griddle and
maintain non-stick properties. Performance will
improve over time with more seasoning.
4. To strip the griddle to re-season, a mixture of salt and
vinegar should be used to remove any oil layers from
the previous seasoning process.
Page. 28
Page 29
Electric grill
2
5
3
1
4
6
Description
NOTE: Not available on all models.
9 WARNING
• To avoid risk of injury, NEVER operate grill without
the grates or griddle plate accessory installed.
• NEVER leave grill unattended while cooking.
• Observe caution with oils and fats. Overheated
oils and fats can easily cause fires.
• DO NOT use wood chips, lava rocks, or charcoal
briquettes. Only use recommended ceramic
briquettes (PABRICKBKN).
• DO NOT use dishes, pans, pots, or other
cookware on the grill.
• NEVER use aluminum foil to cover the grates or to
line the grill. It can damage the grill and cause a
fire hazard if heat is trapped under it.
• Check drip tray before each use. Too much grease
in the tray may cause a fire hazard.
• If flames appear, grease should be cleaned from
grates, drip tray, briquette basket and other
surfaces.
• Grease build up encourages flame and smoke
development while cooking.
• Ceramic briquettes must be replaced when they
begin to turn black. This means that they are
saturated with fat and may smoke heavily during
operation or the fat may catch fire.
The built-in grill is made of restaurant-quality cast iron
grates. This produces a surface with even heat that is easy
to clean.
A non-stick cast iron griddle plate is available as an
accessory and may be purchased separately. See the
instructions that come with the griddle plate accessory for
more details.
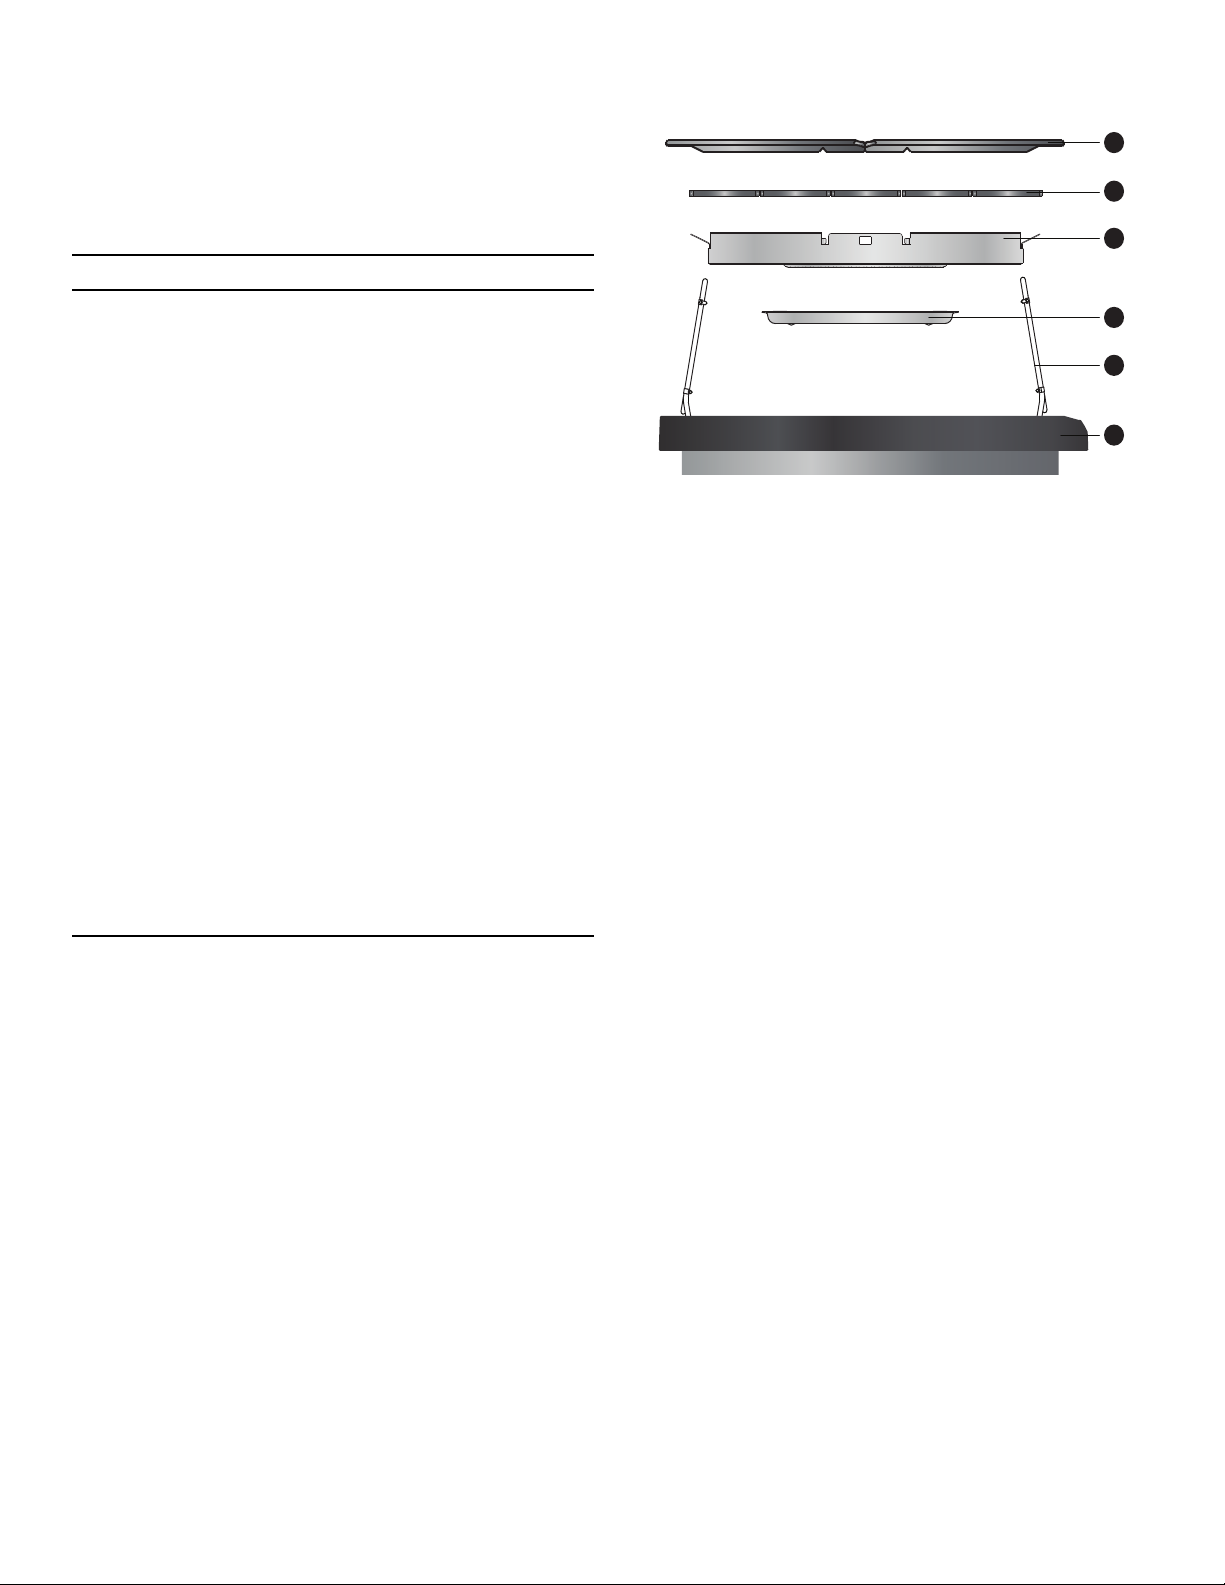
Assembling the grill
1 Grill housing
2 Drip tray
3 Briquette basket
4 Ceramic briquettes
5 Heating element (x2)
6 Grill grate (x2)
To assemble the grill
1. Rotate heating elements (5) up and remove the
briquette basket (3) stored inside the grill housing (1).
2. Place the drip tray (2) in the bottom of the grill
housing (1). (Drip tray is packaged in the large
cardboard box that was on top of the range.) Align
the embosses of the drip tray (2) with the depressions
on the bottom of the grill housing (1).
3. Place the briquette basket (3) in the grill housing (1).
4. Arrange the ceramic briquettes (4) on the briquette
basket (3), in a single layer. The ceramic briquettes
should not contact the heating elements.
5. Fold both grill heating elements (5) down. The grill
heating elements must lie flat. Supports should rest
inside of side notches.
6. Install the grill grates (6). Ensure grates are seated
level inside the grill housing (1).
Page. 29
Page 30

Operating the grill
Operation
IMPORTANT:
• If flames appear while grilling, turn off heat and
remove the food. Use caution to avoid any
potential injury while removing food.
• Often, such flames will extinguish themselves
within a few minutes once grease drippings have
burned up. DO NOT leave the grill unattended
until all flames are extinguished. If desired, flames
can be extinguished by generously shaking baking
soda or salt over them to smother the fire.
• If flames appear, ceramic briquettes should be
replaced and grease should be cleaned from
grates, grease tray, briquette basket, and other
surfaces before using the grill again. Built up
grease which is allowed to remain encourages
flame and smoke development while cooking.
• Moist food should be dried, before placing on
grill.
• Marinated food may cause more smoke to be
produced!
• During grilling, dripping fat may flare up briefly.
9 WARNING
TO AVOID RISK OF BURNS:
• Use proper utensils with long handles that allow
the chef plenty of clearance from the heat and
potential flare ups.
• DO NOT wear loose clothing while cooking.
• Never leave grill unattended while cooking.
• After each use, remove grease buildup from the
grill surfaces and the trays below the grill to avoid
risk of fire. Ventilation hoods should also be
cleaned periodically as needed and as
recommended by the Use and Care Guide as well
as surrounding surfaces.
• Keep a fire extinguisher nearby and accessible.
To operate the grill
1. Start overhead ventilation system 10 minutes prior to
grilling to begin air movement.
2. The grill grates should be washed with warm soapy
water then rinsed with clear water prior to use.
3. Before turning on, make sure that there are ceramic
briquettes in the appliance and both grill grates are
correctly fitted. Turn on ventilation hood.
4. Press and turn the knob to the desired temperature
setting.
• The two grill heating elements can be regulated
separately. This allows you to grill food with
different temperature requirements at the same
time, or you can use one area to grill and the
other to keep warm.
5. During the initial use, heat the grill for about 10
minutes to eliminate manufacturing residues and
smells.
6. For best results, allow the grill grates to preheat
before placing food on them.
9 CAUTION
Clean the grill after each use. Allow the appliance to
cool before cleaning.
Grilling tips
• The grill should be preheated a minimum of 10
minutes before cooking. Depending on browning
preference and the types of food being prepared, as
much as 15 minutes of preheat time may be required.
• Soak wooden skewers in water a minimum 20 minutes
before placing on the grill.
• Prior to grilling, you can coat the food with heatresistant oil (e.g. peanut oil) or marinate it. Make sure
not to use too much oil/marinade, as otherwise it may
catch fire and generate thick smoke.
• Lay the food directly on the grill grates. DO NOT use
aluminum foil or grill trays.
• Cured meat, such as ham or smoked pork chops, is
not suitable for grilling. Unhealthy chemical
compounds may form.
• To prevent flare-ups, remove excess fat from foods
prior to grilling.
• DO NOT use cleaners on the heating elements. Allow
grease to burn off the heating elements.
• To soak up fat on the grill plate, sprinkle coarse salt
onto the grilling surface after use.
Page. 30
Page 31

Grill cooking recommendations
IMPORTANT:
• GRILL SHOULD NOT BE OPERATED WITHOUT PROPER VENTILATION.
• Foods with excessive fat or grease should not be prepared on an indoor grill. Grilling foods with high fat content
(certain types of ground beef, sausage, etc) increases the chances of smoke and flames.
Food* Setting**
Beef
Hamburgers, ¾'' (2 cm) (medium) High 12 – 14 Ready to turn once juices appear on the
T-Bone steak, 1½'' (4 cm) (medium) High 20 – 22 Remove excess fat.
Ribeye or sirloin, 1'' (3 cm) (medium) High 10 – 12 Remove excess fat.
Kebabs, steak (medium) High 24 – 28 Turn occasionally.
Pork
Pork chops, ¾'' (2 cm) High 16 – 20 Remove excess fat.
Sausages or bratwurst Med high 16 – 20 Pierce before grilling.
Hot dogs High 6 – 8 Place on grill horizontally.
Poultry
Legs and thighs Med high 34 – 38 Turn occasionally, remove excess skin.
Chicken wings, whole Med high 18 – 22 Turn occasionally.
Chicken breasts, ½'' (1 cm), boneless Med high 20 – 24 Pound to an even thickness before cooking.
Kebabs, chicken High 30 – 33 Turn occasionally.
Seafood
Fish steak, 2'' (6 cm) Med high 18 – 20 Brush with oil before grilling.
Cook time
(minutes)
Notes
surface.
Fish fillet, ¾'' (2 cm) Med high 16 – 20 Brush with oil before grilling.
Shrimp skewers Med high 10 – 14 Turn occasionally.
Produce
Portobello mushrooms High 8 – 10 Brush with oil.
Bell peppers, quartered High 8 – 10 Turn occasionally.
Eggplant, sliced, ½'' (1 cm) High 8 – 10 Brush lightly with oil.
Tomatoes, halves High 8 – 10 Brush with oil.
Pineapple, sliced High 4 – 6 —
Peaches, halves High 4 – 6 —
Other
Hamburger or hot dog buns Med high 4 – 6 Brush with butter.
Tofu, extra firm, sliced Med high 8 – 12 Skewer for easier grilling.
* Level foods to a uniform thickness to ensure even cooking.
** The values in the settings table should only be regarded as guidelines, since more or less heat may be required
depending on the type and condition of the food.
Page. 31
Page 32

Using the oven
Symbols and descriptions
Symbol/mode Definitions and recommendations
Bake Cooks with dry, heated air. Variety of foods, such as cakes,
cookies, pastries, quick breads, quiche and casseroles.
Conv bake Similar to bake, but air is circulated by a fan at the back of the
oven. Best for baked goods such as cakes, cornbread, pies,
quick breads, tarts, and yeast breads.
True conv Cooks with heat from a third element at the back of the oven.
The heat is circulated throughout the oven by the convection
fan. Well suited for cooking individual serving-sized foods
such as cookies and pastries.
Broil Uses intense heat radiated from the upper element. Use for
tender cuts of meat (1'' or less), poultry, browning bread and
casseroles.
Conv broil Combines intense heat from upper element with fan
circulation. Tender cuts of meat (more than 1''), poultry and
fish. Not for browning.
Proof Proof (raises) yeast dough and sourdough.
Roast Uses more intense heat from upper element, more browning
of exterior. Best suited for meats, poultry, less tender cuts of
meats and roasting vegetables.
Electric
main
Gas
main
Electric
aux.
Gas
aux.
Conv roast Uses lower and more intense heat from upper element than
convection bake with air circulated by a fan. Use for tender
cuts of meat and poultry and roasting vegetables. Meats are
more juicy and moist than results with Roast mode.
Sabbath This cooking mode is for assisting the user for compliance to
Sabbath principles.
Warm* Maintains a low temperature in order to keep food hot. Best
for baked goods such as cakes, cornbread, pies, quick breads,
tarts, and yeast breads.
Self-clean The oven reaches a high temperature to burn off food soil.
Remote
start
Preheat
symbol
Temp probe Appears when a probe is detected.
Kitchen
timer
Cook time Shows the amount of time that the oven mode will run before
End time Used when delaying the start of a timed oven mode. Shows
Panel lock Prevents the oven from being turned on or its settings from
Allows user to start, pause, and abort oven programs
remotely via the Home ConnectTM app on a mobile device.
Symbol is displayed when oven is preheating.
The kitchen timer runs independently of the other appliance
functions.
turning off automatically.
the time of day that the oven mode will automatically end.
being changed accidentally.
Page. 32
Page 33

Symbol/mode Definitions and recommendations
TIMERS
SETTINGS ENTER
06:30Time o f Day
Press Enter to save
TIMERS
SETTINGS ENTER
englishLanguage
Press Enter to save
TIMERS
SETTINGS ENTER
frenchLanguage
Press Enter to save
TIMERS
SETTINGS ENTER
finished
fi8d
First start up
TIMERS
SETTINGS ENTER
06:30
Electric
main
Gas
main
Electric
aux.
Gas
aux.
Door
locking
Remote
service
Symbol is displayed during and after the self-clean mode
when the door is locked.
Symbol is displayed if customer service is connected during
remote access.
Initial start-up
Start-up settings
The time of day, language and time display settings may
be accessed at any time by pressing SETTINGS while the
appliance is in Standby mode.
1. Connect the appliance to the power supply.
2. Select a setting with the left
( or ).
– The screen changes to Standby mode.
Home ConnectTM assistant
About Home Connect
The Home Connect wizard is a part of the initial
installation of the appliance on certain models. If the
Home Connect is not installed during the first start-up of
the appliance it may be accessed in the settings menu.
3. Change the setting parameter with the right ( or ).
4. Press ENTER.
The Home Connect app must first be successfully installed
on a mobile device. See the section “Setting up Home
Connect™” on page 44 for full instructions on how to
install the Home Connect app.
About data protection
When your appliance is connected for the first time to a
WLAN network, which is connected to the Internet, your
appliance transmits the following categories of data to the
Home Connect server (initial registration):
• Unique appliance identification (consisting of
appliance codes as well as the MAC address of the
installed Wi-Fi communication module).
• Security certificate of the Wi-Fi communication
module (to ensure a secure IT connection).
• The current software and hardware version of your
domestic appliance.
• Status of any previous resetting to factory settings.
This initial registration prepares the Home Connect
functions for use and is only required when you want to
use these Home Connect functions for the first time.
Page. 33
Page 34

Setting the oven(s)
TIMERS SETTINGS ENTER
Bake
06:30
°
— — —
TIMERS
SETTINGS ENTER
Bake
06:30
°
350
°
TIMERS
SETTINGS ENTER
Bake
06:30
°
350
°
Oven timer
Setting the cooking mode and temperature
1. Place rack in desired rack position and shut the door.
2. Turn the MODE knob to BAKE, for example.
3. Turn the TEMPERATURE knob.
– The temperature gauge will start to move toward
the temperature setting. The temperature gauge
reflects the temperature setting.
– The needle of the temperature gauge will move to
the new selected temperature setting if the
temperature setting is increased or decreased.
The gauge is for reference only.
– The blue preheating bar moves to the right as the
oven heats up.
About the oven timer
• After the set time has elapsed, the appliance switches
off automatically when the desired cooking time is
complete.
• The oven timer function is available for all of the
primary cooking modes except for Self-Clean mode
and if a temperature probe is in use.
To set the kitchen or oven timer
1. Press TIMERS.
2. Press the left
( or ) to select your desired timer and
ENTER.
3. Press the right
( or ) to set your desired time and press
the ENTER.
– A beep sounds when the timer ends. Press ENTER
to terminate the beep and timer.
To change a running timer
1. Press TIMERS.
2. Press the right
( or ) to set your desired time and press
ENTER.
End timer
You can delay the cooking time end to a later time.
Example: it is 4:00 PM. The dish requires a cooking time of
40 minutes. You want it to be ready at 5:30. Enter the
cooking time and delay the cooking time end until 5:30.
The appliance starts automatically at 4:50 and switches off
at 5:30.
– After the oven has finished preheating, the
preheating bar and symbol fade out.
4. After oven has preheated, place food inside.
Kitchen timer
About the kitchen timer
• The kitchen timer can be set for up to 12 hours.
• It can be used despite whether the range is in
operation and independently of all other functions.
• The appliance does not switch on and off
Page. 34
automatically.
Bear in mind that food which spoils easily should not be
left in the oven for too long.
To set the end timer
1. Set the desired cooking mode and oven temperature.
2. Press TIMERS.
3. Press the left
( or ) and select OVEN TIMER.
4. Press the right ( or ) to set the oven time.
5. Press the left ( or ) and select END TIME.
6. Press the right
( or ) to set the end time and press
ENTER.
– After confirming the end time the waiting time
notification appears.
– After the waiting period the oven starts heating.
Page 35

Panel lock
a
b
c
d
TIMERS
SETTINGS ENTER
Bake
05:40
Oven temperature 375°
°
150
70°/
ƒ
¥
a
b
c
d
About the panel lock
• The panel lock is a child safety mechanism to prevent
children from accidentally turning on the oven or
changing an oven setting.
• Panel lock can only be activated in Standby.
• When panel lock is activated, all keys are locked
except for the cook timer, timer and on/off.
To set the panel lock
1. Press and hold TIMERS for four seconds.
– The panel lock symbol F and PANEL LOCKED
will appear in the display.
To deactivate the panel lock
1. Press and hold the TIMERS button for four seconds.
– The F icon in the display will disappear.
Multi-point meat probe
About the multi-point meat probe
To program the multi-point meat probe
1. Insert the plug end into the probe outlet in the oven
wall and insert probe end into the meat.
a. Probe
b. Plug
c. Outlet d. Cable
2. Close the oven door.
3. Turn the MODE and TEMPERATURE knobs to your
desired settings.
4. Press the right
( or ) to the desired internal
temperature.
The probe allows you more control over how your foods
are cooked by automatically disabling the specified
cooking mode when a dish's desired temperature, defined
by the cook, has been reached. The probe expresses the
current temperature of the meat as it cooks.
The following are the heating modes that work with the
temperature probe:
•Bake
• Convection bake
•Roast
•Convection roast
The temperature probe will not work with the oven timer
or with the end timer.
For best results
• To avoid damaging the probe, ensure that the meat is
fully defrosted before inserting the probe.
• Insert the probe until its tip is rested in the center of
the thickest, meatiest portion of the meat. Ensure that
the probe does not touch bone, fat, or gristle.
• For poultry, the meat probe should be inserted into
the interior thigh muscle.
• The probe should not touch any part of the cooking
dish or parts of the oven, as this will affect the
accuracy of the results.
a. Cooking mode b. Current probe temp
c. Set shut-off temp d. Set oven temp
– The oven display indicates the current
temperature of the meat as it cooks.
– The white progress bar moves to the right as the
internal cooking temperatures increase. When the
actual probe temperature reaches the desired set
temperature, the cooking mode will be finished
and the “end of cook timer” will beep to indicate
that the cooking process has concluded.
IMPORTANT:
• To avoid damaging your probe, DO NOT pull on the
cable when trying to remove it from a dish.
• DO NOT use tongs or other instruments to pry on the
probe when removing it or to ‘hammer’ the probe into
a food dish.
• To prevent possible burns, wait until the oven has
cooled before trying to remove the probe from the
outlet.
• DO NOT store the probe inside the oven.
Page. 35
Page 36

Sabbath
TIMERS
SETTINGS ENTER
06:30
TIMERS SETTINGS ENTER
Bake
06:30
°
— — —
TIMERS
SETTINGS ENTER
06:30
°
200
°
Bake
TIMERS
SETTINGS ENTER
06:30
°
°
200
Bake
TIMERS
SETTINGS ENTER
––min––sKitchen Timer
U
06:30
TIMERS
SETTINGS ENTER
––min––sSabbath Timer
›
06:30
TIMERS
SETTINGS ENTER
25h 00minSabbath Timer
›
06:30
TIMERS
SETTINGS ENTER
04min 59s
›
Sabbath Mode will start in:
About Sabbath mode
• With this function, the appliance maintains a constant
temperature between 150°F and 475°F (66°C and
246°C) with the BAKE heating function.
• You can keep dishes warm for up to 74 hours without
needing to switch the appliance on or off for
compliance to Sabbath “no work” principles. Please
note that easily perishable foodstuffs must not be left
in the oven for too long.
• The oven lamp is disabled in Sabbath mode to
prevent any action from occurring at any time the
door is opened.
• The gas burners and griddle on the cooktop are still
fully functional during Sabbath Mode.
• Sabbath Mode is only available when the appliance is
not already in another active mode.
• Temperature may not be adjusted for the duration of
the Sabbath mode.
To set Sabbath mode
– After a few seconds the oven begins preheating.
4. Press TIMERS.
5. Press the left
( or ) and select SABBATH TIMER.
1. Begin from the STANDBY mode.
2. Turn the mode knob to BAKE.
3. Turn the temperature knob to the desired temp.
6. Press the right ( or ) and enter the DURATION TIME in
30 minute increments.
-- The default time is 25 hours. The minimum time is 30
minutes and the maximum time is 74 hours.
7. Press ENTER.
– A delay notification appears.
Page. 36
Page 37

– During this time the user can adjust the
TIMERS
SETTINGS ENTER
24h 59minSabbath
›
06:31
TIMERS
SETTINGS ENTER
completed
›
Sabbath
TIMERS
SETTINGS ENTER
06:30
TIMERS
SETTINGS ENTER
switched on
F
Remote Start
TIMERS
SETTINGS ENTER
06:30
F
parameters. After the countdown the oven starts
heating. All buttons are disabled.
– After the countdown is completed a notification
appears.
8. Turn knobs to OFF.
IMPORTANT:
• Ensure that you follow the safety instructions in this
instruction manual and that you comply with these
even when you are away from home and are operating
the appliance via the Home Connect app. You must
also follow the instructions in the Home Connect app.
• Operating the appliance directly from the appliance
always has priority. During this time, it is not possible
to operate the appliance using the Home Connect
app.
• We are constantly working to improve the Home
Connect app, which may lead to differences in the
setup steps. Please rely on the instructions in the
latest version of the Home Connect app to guide you
through the setup process.
To set remote start
1. Turn the mode knob to REMOTE START.
Remote start
About remote start
Remote start allows you to start, pause, and abort oven
programs remotely via the Home ConnectTM app on a
mobile device. Some operating modes can only be started
on the oven itself.
The remote start can only be employed if the Home
Connect app has been successfully installed on a mobile
device. See the section “Setting up Home Connect™” on
page 44 for instructions on how to install the Home
Connect app.
If the appliance is not connected to the home network,
the appliance functions in the same way as an oven with
no network connection and can still be operated via the
appliance.
The availability of the Home Connect function depends on
the availability of Home Connect services in your country.
Home Connect services are not available in every country.
You can find more information on this at www.homeconnect.com
Remote start is automatically deactivated in the
following situations:
• The oven door is opened 15 minutes after Remote
Start is activated.
• The oven door is opened 15 minutes after the oven
operation has ended.
• 24 hours after Remote Start has been activated.
– DO NOT rotate the temperature knob to any
setting (leave in the OFF position).
– The displays turns to the Standby screen and
C
appears in the display.
2. Place the food in the oven and then close the door.
3. Continue with the Home Connect app installed on
your mobile device.
When you start the oven operation on the appliance,
Remote Start is automatically activated. You can then
make changes from your mobile device or start a new
operation.
Page. 37
Page 38

Getting the most out of your appliance
Oven rack positions
Rack level positions in the oven are numbered on the front
frame like an elevator. Number one level is the lowest and
number five level is at the top.
NOTE: Rack positions are general recommendations for
baking; however, if a recipe calls for a different rack
position than those given, then the recipe or package
directions should be followed.
Bake
Bake is cooking with dry, heated air. Both the upper and
lower elements cycle to maintain the oven temperature.
The bake mode can be used to prepare a variety of food
items, from pastries to casseroles. Refer to recipe or
package directions for oven temperature and baking time.
Main oven one rack baking
Main oven two rack baking
Levels Bake or conv bake mode
2 and 5 dual fuel
2 and 4 gas
Secondary oven (48" models)
Level Bake mode
1 -- Best used for most baked items.
Main oven three rack baking
If three-rack baking is desired, the Convection Bake mode
is best.
-- Casserole dishes
Getting the best results
• Minimize opening the oven door(s).
• Use the rack position recommended by the recipe.
• Use the bakeware recommended in the recipe.
• Store the broiler pan(s) outside the oven. An extra pan
without food affects the browning and cooking.
• The type of pan used affects the browning:
• For tender, golden brown crusts, use light
non-stick/anodized or shiny metal pans.
• For brown crisp crusts, use dark non-stick/
anodized or dark, dull metal pans or glass
bakeware. These may require lowering the bake
temperature 25°F.
Preheating the oven
Level Bake mode
3 -- Best used for most baked items.
2 -- If the item is tall, such as an angel food cake.
-- Pies are best baked on rack level 2 to make
certain the bottom of the crust is done
without over-browning the top.
-- When large pieces of meat or poultry are
roasted, such as a prime rib of beef or a
turkey.
Page. 38
• Most cooking times in recipes are designed for a
preheated oven and require that the oven already be
at a certain temperature before cooking starts. Refer
to your recipe for preheating recommendations
• Preheating time depends on the temperature setting
and the number of racks in the oven.
Bakeware type
• Metal bakeware (with or without a non-stick finish),
heat-proof glass, glass-ceramic, pottery, or other
utensils are suitable for the oven.
• Suitable cookie sheets have a small lip on one side.
Heavy sheets or those with more than one side may
affect the baking time.
.
Page 39

Pan placement
• Allow at least 1'' (25.4 mm) of space between the pans
and the oven walls so heat can circulate around each
pan.
• Stagger bakeware so that one is not directly above
another. Allow 1½'' (38 mm) above and below each
pan.
High altitude baking
When cooking at high altitudes, recipes and cooking times
will vary. For accurate information, write the Extension
Service, Colorado State University, Fort Collins, Colorado
80521. There may be a cost for the guides. Specify which
high altitude food preparation guide you prefer: general
information, cakes, cookies breads, etc.
Dual fuel main oven broil rack recommendations
Level Dual fuel broil mode
5 -- Beef steaks, ground meat patties, ham steak
and lamb chops 1'' (25.4 mm) or less in
thickness. Also use when top browning foods.
4 -- Meat 1-1/8'' (29 mm) or more in thickness or
fish, poultry, pork chops and ham steaks 1''
(25.4 mm) or more in thickness.
3 -- Chicken quarters or halves.
Gas main oven broil rack recommendations
Level Gas broil mode
4 -- Beef steaks, ground meat patties, ham steak
and lamb chops 1'' (25.4 mm) or less in
thickness.
3 -- Meat 1-1/8'' (29 mm) or more in thickness or
fish, poultry, pork chops and ham steaks 1''
(25.4 mm) or more in thickness. Use this rack
when broiling chicken quarters or halves. Also
use when top browning foods.
Secondary oven broil rack recommendations (48"
models only)
Levels Secondary broil mode
Condensation
It is normal for a certain amount of moisture to evaporate
from the food during any cooking process. The amount
depends on the moisture content of the food. The
moisture will condense on any surface cooler than the
inside of the oven, such as the control panel.
Broil
Before turning on the oven, place the rack in the desired
position. After preheating the broiler, center the broil pan
under the broil element.
Only the upper element heats in the Broil mode.
Successful broiling requires constant exposure to high,
intense heat.
3, 4, or 5 – dual fuel
1, 3, or 4 – gas
5 – Dual fuel
3 – Gas
-- Depending upon the type
and thickness of the food.
-- Top browning of foods.
Getting the best broil results
Tips:
• Defrost food before broiling.
• Door is to be closed during broiling.
• It is recommended that you preheat the broil element
before starting to cook. Preheat for 3 minutes then
place food in oven.
• Steaks should be more than 1'' (25.4 mm) thick if rare
meat is desired. Use convection broil if steaks are over
1½'' (38 mm) thick.
• Turn foods over only once, after half the total cooking
time. It is not necessary to turn very thin foods (ham
slices, fillets of fish, etc.). Liver slices must be turned
over regardless of thickness.
• Center foods directly under the broiling element for
best browning.
Page. 39
Page 40

Utensils
• Your appliance comes with a large two-piece broiler
pan. The slotted grid allows drippings to flow into the
lower pan, away from the intense heat of the broil
element, minimizing spattering, smoking, and the
chance of a grease fire. DO NOT cover the slotted
grid (top) with aluminum foil.
• Use metal or glass-ceramic bakeware when top
browning casseroles, main dishes, or bread.
• DO NOT use heat-proof glass or pottery. This type of
glassware cannot withstand the intense heat of the
broil element.
NOTE: It is not possible to use the bake mode and broil
mode simultaneously. When one mode is on, the other
mode cannot be turned on.
Convection broil
Convection broil is similar to broil. It combines intense
heat from the upper element with heat circulated by a
convection fan.
Convection broil mode is well suited for cooking thick,
tender cuts of meat, poultry and fish. Convection broil is
not recommended for browning breads, casseroles and
other foods. Always use convection broil with the door
closed.
In addition to the benefits of standard broiling, convection
broiling is faster.
Tips:
• Preheat oven 3-4 minutes. Do not preheat for more
than 5 minutes.
• Meat should be at least 1½'' thick. Use the broil pan
and grid included with your oven.
• Do not cover the broil grid with foil. It is designed to
drain fats and oils away from the cooking surface to
prevent smoking and spattering.
• Turn meats (other than fish) once during the
recommended cook time.
Convection bake
Convection bake is similar to bake. Heat comes from the
lower heating element. The main difference in convection
baking is that the heat is circulated throughout the
appliance by the convection fan.
Tips:
• To convert most recipes for baked items (cookies,
cakes, pies, etc.); reduce the oven temperature by
25°F.
• For meats and poultry, the temperature should not be
reduced. The same temperature recommended in
recipes and cooking charts for meats and poultry
should be used.
• Low, shallow bakeware should be used with
convection cooking. This allows the heated air to
circulate around the food.
• When baking on more than one rack, cookie sheets
should not be staggered; round cake pans should be
staggered.
• Any food cooked uncovered will brown evenly and
form a nice crust. Foods in covered dishes (casseroles,
pot roast) or delicate custards do not benefit from
convection cooking.
• For small items such as cookies, check to see if they
are done one to two minutes before the recipe time.
For larger baked items such as cakes, check five to six
minutes before the time indicated on the recipe.
• Large meat or poultry items may cook up to 30
minutes less than the suggested time so check them
so they will not be over baked.
Page. 40
Page 41

One rack convection baking
Level Conv bake mode
3 -- When baking on one rack, best results are
obtained in the bake mode.
2 -- Roasting a turkey or a large piece of meat.
• Racks 2 and 4 or 1, 3 and 5 can be used for multiple
rack dehydrating. Use rack 3 if only dehydrating one
rack.
• Dehydrating meat is not recommended due to food
safety concerns.
• Consult a food preservation book, county Cooperative
Extension Office or library for additional information.
Two rack convection baking
Levels Conv bake mode
2 and 4 -- Use for cakes, cookies, biscuits, and other
baked goods. Cake pans should be
staggered. Cookie sheets should be placed
on rack 2 directly under the one on rack 4.
-- To bake several casseroles, frozen pies, or
cakes.
-- These two racks can also be used for a large
oven meal.
Three rack convection baking
Levels Conv bake mode
1, 3, and 5
Dual Fuel
Gas
see note
-- When several sheets of cookies are to
be baked. Place the baking sheets
directly above each other on the
respective racks to allow air to flow
around the baking sheets.
-- Gas range rack levels for:
Cookies: 2, 3, and 4
Other foods: 1, 3, and 5
Dehydrating foods with convection bake
Use the convection bake to dry and preserve fruits and
vegetables.
Tips:
• Drying times vary depending on the moisture and
sugar content of the food, the size of the pieces, the
amount being dried and the humidity in the air.
• Dry most fruits and vegetables at 150°F (66°C).
• Check food at the minimum drying time.
• It is best to use drying racks (not included) so that air
can flow around the food. Do not place food directly
on a baking sheet or pan. Food needs to be elevated
to ensure even drying.
• Multiple drying racks can be used simultaneously.
Convection bake dehydration recommendations
Food Preparation
Apple, ¼''
slices
Bananas, ¼''
slices
Cherries Wash and towel
Orange peels Orange part of
Orange slices ¼'' slices of
Pineapple
rings
Strawberries Wash and towel
Peppers Wash and towel
Mushrooms Wash and towel
Tomatoes Wash and towel
Dipped in ¼ cup
lemon juice and 2
cups water
Dipped in ¼ cup
lemon juice and 2
cups water
dry. For fresh
cherries, remove
pits
skin thinly peeled
from oranges.
orange
Towel dried 7 – 12 Soft and
dry. Sliced ½''
thick, skin down
on rack
dry. Remove
membrane of
peppers, 1''
coarsely chopped
pieces
dry. Cut thin slices,
1/8'' thick
dry. Cut thin slices,
1/8'' thick, drain
well
Approx.
time
(hrs)
8 – 15 Slightly
8 – 15 Slightly
7 – 18 Pliable
1 – 4 Dry and
9 – 16 Skins are
9 – 17 Dry and
13 – 17 Leathery
5 – 12 Tough and
5 – 12 Dry, brick
Doneness
pliable
pliable
leathery,
chewy
brittle
dry and
brittle, fruit
is slightly
moist
pliable
brittle
with no
moisture
inside
leathery,
dry
red color
test
Page. 41
Page 42

True convection
About true convection
True convection cooks with heat from a third element
behind the back wall of the oven. The heat is circulated
throughout the oven by the convection fan.
Proofing time may be decreased when using the large
oven at the same time you are proofing. Check bread
product early to avoid over-proofing. If you are using the
large oven for extended periods of time we recommend,
for optimum results, that you complete the proofing
before using the large oven.
True convection is well suited for cooking individual
serving-sized foods such as cookies and pastries. It is also
good for cooking on multiple racks (2 or 3) at the same
time.
Tips:
• Reduce recipe temperature by 25°F.
• Place food in low-sided, uncovered pans such as
cookie sheets without sides.
• If baking more than one pan on a rack, allow at least
1'' to 1½'' of air space around the pan.
Proof
About proof
The proof feature maintains the warm, non-drafty
environment needed for proofing yeast leavened
products.
It is best to start with a cool oven when using the proofing
function.
To set the oven for proof
1. Allow dough to thaw if frozen.
2. Place dough in dish and loosely cover.
3. Use any rack level that accommodates the size of the
bowl or pan. Close the door.
4. Turn the mode knob to PROOF. DO NOT turn the
oven temperature knob.
Size Time
Roast
About roast
Roast uses both the upper and lower elements to maintain
the oven temperature. Roasting uses more intense heat
from the upper element than the lower element. This
results in more browning of the exterior while the inside
remains especially moist. Roast is best suited for large cuts
of meat and poultry.
Tips:
• Use a high-sided broil pan, or cover dish with a lid or
foil.
• Add liquids, such as water, juice, wine, bouillon or
stock for flavor and moisture.
• Roasting bags are suitable for use in this mode.
• When roasting whole chicken or turkey, tuck wings
behind back and loosely tie legs with kitchen string.
Roasting recommendations
Meat and poultry Temperature Level
Beef
Pot roast, 3 – 4 lbs.
Beef brisket
Beef chuck
Meatloaf
Poultry
Chicken, whole
Chicken, pieces
Turkey, whole
350°F (180°C)
350°F (180°C)
350°F (180°C)
350°F (180°C)
375°F (190°C)
375°F (190°C)
325°F (165°C)
1
2
1
3
2
2
2
Loaf, 1 lb (0.45 kg) 60 – 75 minutes
Rolls, 0.1 lb (0.05 kg) 30 – 45 minutes
The ideal temperature for proofing will be maintained
until the mode knob is turned off.
Dough has “proofed” when it has doubled in size.
Do not open the oven door unnecessarily. Opening the
door will lower the temperature of the air in the oven and
lengthen the proofing time. Use the oven light to check
the rising of the dough.
Page. 42
Pork
Shoulder
Smoked ham, half
325°F (165°C)
325°F (165°C)
1
1
Convection roast
About convection roast
Convection roast uses heat from the top and bottom
elements as well as heat circulated by the convection fan.
The convection roast mode is well suited for preparing
tender cuts of meat and poultry. The benefits of
convection roast mode include:
Page 43

• As much as 25% faster cooking than non-convection
modes.
• Rich, golden browning.
Tips:
• Use the same temperature as indicated in the recipe.
• Check doneness early, since roasting time may
decrease.
• Do not cover meat or use cooking bags.
• Use the broil pan and grid provided with the oven for
roasting. A shallow, uncovered pan can also be used.
• Use a meat thermometer to determine the internal
temperature of the meat.
• If the meat is browned to your liking, but is not yet
done, a small strip of foil can be placed over the meat
to prevent over-browning.
• Let meat stand covered with foil 10-15 minutes after
removing it from the oven.
Warm
About warm
Egg dishes, casseroles 160°F (72°C)
Leftovers 165°F (74°C)
Ground beef, veal, lamb, or pork 160°F (72°C)
Beef, veal, lamb roasts, steaks, or chops
Medium rare
Medium
Well done
Pork roasts, steaks, or chops
Medium
Well done
Ham
Cook before eating
Fully cooked, to reheat
Poultry
Ground chicken, turkey
Whole chicken, turkey
Breasts, roasts
Thighs and wings
Stuffing (cooked alone or in bird)
145°F (63°C)
160°F (71°C)
170°F (77°C)
160°F (72°C)
170°F (77°C)
160°F (72°C)
140°F (60°C)
165°F (74°C)
180°F (82°C)
170°F (77°C)
180°F (82°C)
165°F (74°C)
• The Warm mode will keep hot, cooked foods at
serving temperature. ALWAYS start with hot food. DO
NOT use this mode to heat cold food other than for
crisping crackers, chips and dry cereal.
• Serving dishes, plates and cups may be kept warm
with this mode.
• Warm mode temperatures range from 140°–150°F /
60°–66°C. Food should be at serving temperature
(above 140°F / 60°C) before being placed in the oven.
• Food may be kept hot in its cooking container or
transferred to a heat-safe serving dish.
• Aluminum foil may be used to cover food. Use only
heat-safe dishes.
• DO NOT open the oven door unnecessarily. Opening
the door will reduce the temperature of the oven.
• When keeping cooked food warm, allow time for the
oven to preheat before placing the item in the oven.
To set the warm mode
1. Turn the mode knob to WARM. DO NOT turn the
oven temperature knob.
2. Place warmed dish in the oven and close the door.
Minimum internal cooking temperatures
The minimum internal temperatures that foods must reach
to be considered safe to eat, as determined by the U. S
Department of Agriculture Food Safety and Inspection
Service, are as follows:
Fine tuning the oven
About offset
The offset feature allows the cook to further fine-tune
their cooking parameters to their own personal optimal
settings by allowing them to adjust the temperature offset
of the oven by +/-25°F in increments of 5°F.
For example, if the cook judges the oven temperature as
too hot and wants to lower it by 5°F, press the “
To increase the temperature by 5°F, press the “
feature is useful if you find that food is consistently either
too brown or too light for your tastes.
• The oven must be turned off in order to set an offset
value.
• The offset feature is available for all modes except
self-clean.
• By default, the temperature is set at 0°.
• The unit will continue to run the input offset value
indefinitely until the user manually changes it, or until
the unit loses power, in which case offset will need to
be reset.
To set offset
1. Press SETTINGS.
2. Press the left
3. Press the right
4. Press ENTER.
( or ) and select OFFSET.
( or ) to set the temperature.
( ” button.
) ”. This
Page. 43
Page 44

Setting up Home Connect™
With Home Connect™, the appliance is Wi-Fi capable and
can be remotely controlled using a mobile device (e.g.
tablet or smartphone). The Home Connect app offers
additional functions which are a perfect complement to
the networked appliance.
Home Connect does not work over Wi-Fi networks that
require browser registration, i.e. a user name and
password entered via a web browser.
You should have a stable wireless network with good
reception and access to the internet.
If the appliance is not connected to the WLAN network
(home network), it functions in the same way as a typical
appliance with no network connection and can be
operated as usual.
NOTE: Please ensure that you follow the safety
instructions given at the beginning of this instruction
manual and that these are also observed when operating
the appliance via the Home Connect app and when away
from home. Please also follow the instructions in the
Home Connect app.
NOTE: Operation on the appliance itself always takes
priority, and during this time it is not possible to operate
the appliance using the Home Connect app.
Setup
To implement settings via Home Connect you must have
installed the Home Connect app on a mobile device (e.g.
tablet or smartphone). Please observe the supplied Home
Connect documents that came with your appliance with
regard to this feature.
Follow the steps specified by the app to implement the
settings.
IMPORTANT INFORMATION ABOUT DATA SECURITY:
The transfer of data is always encrypted. Home Connect
meets the highest security standards, which are
continuously reviewed. For further information visit
www.home-connect.com.
Information:
We are constantly working to improve the Home
Connect app, which may lead to differences in the
setup steps. Please rely on the instructions in the
latest version of the Home Connect app to guide you
through the setup process.
Step 1: Download the Home Connect app
and create a user account
1. Open the App Store (Apple® devices) or Google
Play™ store (Android™ devices) on your smartphone
or tablet.
2. Search for the HOME CONNECT app in the store's
search and install it.
The Home Connect app:
3. Open the app and register to create a Home Connect
account.
4. Write down your Home Connect account credentials
(user account and password). You will need them later.
Save your Home Connect login details here:
Network name
(SSID):............................................................................
Password
(Key):..............................................................................
The app will guide you through the steps of adding
your appliance to Home Connect.
What do you need to connect your
appliance to Home Connect™?
1. Your appliance must be installed properly.
2. A smartphone or tablet equipped with the latest
version of iOS or Android operating system.
3. Your home appliance within the Wi-Fi signal of your
home network.
4. The name of your Wi-Fi network (SSID) and its
password (key).
Page. 44
Step 2: Connect your appliance to your
home network
1. Your appliance must be installed properly.
2. Open your Home Connect app to add an appliance.
3. Please follow the directions in the app and refer to this
guide only when prompted by the app.
Page 45

Step 2.1: Connect your appliance to your
home network with WPS
Please enter step 2.1 only when prompted to by the app.
The following steps describe operations at the appliance
itself.
1. Press SETTINGS and select HOME CONNECT.
2. Press ENTER.
-- A request to press the WPS button on the router
within 2 minutes appears in the display.
3. Press the WPS button on your router.
-- Please consult your router's manual to locate the
WPS button.
-- The app will get notified once your appliance has
been successfully connected to your Wi-Fi
network.
4. Press ENTER.
-- A message will appear in the display informing the
user if the network was connected successfully.
5. Press START PAIRING in the Home Connect app.
6. Follow the directions in the app.
Information:
If the connection could not be established within 5
minutes, make sure your appliance is within the range
of your Wi-Fi network.
Step 2.2: Connect your appliance to your
home network step-by-step
Please enter step 2.2 only when prompted by the app.
The following steps describe operations at the appliance
itself.
-- The app provides your home Wi-Fi network name
(SSID) and its password via this temporary Wi-Fi
network to the appliance enabling the appliance
to connect to your home Wi-Fi network.
6. Follow the directions in the app.
Step 3: Connect your appliance to the
Home Connect™ app
Please enter step 3 only when prompted by the app. The
following steps describe operations at the appliance itself.
1. Launch the app on your mobile device and follow the
instructions in the app.
2. The login process is complete once PAIRING
SUCCESSFUL is shown on the oven display.
3. Follow the directions in the app.
You have successfully connected your appliance. You can
now benefit from all the advantages of the Home
Connect™ app!
Information:
If the connection could not be established within 5
minutes, make sure your appliance is within the range
of your Wi-Fi network.
Software update
Using the software update function, your appliance's
software can be updated (e.g. for the purpose of
optimization, troubleshooting or security updates). To do
this, you need to be a registered Home Connect™ user,
have installed the app on your mobile device, and be
connected to the Home Connect™ server.
1. Select SETTINGS and scroll to HOME CONNECT.
2. Press ENTER.
– A request to press the WPS button on the router
within 2 minutes appears in the display.
3. Press ENTER.
4. Select CONNECT MANUALLY.
– Have your mobile device ready for manual
connection to network.
5. Press CONTINUE.
-- The appliance will open a temporary Wi-Fi
network called “HomeConnect” with the
password “HomeConnect” for 2 minutes.
As soon as a software update is available, you will be
informed through the Home Connect™ app and will be
able to start the software update via the app.
Once the update has been successfully downloaded, you
can start installing it via the Home Connect™ app if you
are on your local area network.
The Home Connect™ app will inform you once installation
is complete.
Notes:
• You can continue to use your appliance as normal
while updates are downloading.
• Depending on your personal settings in the app,
software updates can also be set to download
automatically.
• We recommend that you install security updates as
soon as possible.
Page. 45
Page 46

Care and maintenance
9 WARNING
• Children should not be left alone or unattended in
an area where appliances are in use.
• During the self-clean cycle, exterior surfaces may
become hotter than usual. Parts of the appliance
may become potentially harmful to children, and
to persons who lack adult knowledge of
appliances and lack adult reactions to potentially
harmful conditions. Keep these individuals away
during self-clean and while the appliance is in use.
• The elimination of soil during self-cleaning may
facilitate the emission of small amounts of
chemicals or other substances that may be
harmful upon sufficient exposure. To minimize
exposure to these substances, provide good
ventilation with an open window, or use a
ventilation fan or hood.
• For the self-cleaning cycle of your range, remove
small animals and birds from the kitchen and
surrounding areas. Open a nearby window for
additional ventilation. During self-clean, fumes are
released that may be harmful.
• At the end of the clean cycle, some gray ash or
burned residue may remain inside the oven. This is a
mineral deposit that does not burn or melt. The
amount of ash depends on how heavily soiled the
oven was before it was cleaned. When the oven is
cold, it is easily removed using a damp paper towel,
sponge, or cloth.
Before self-cleaning the oven
DO NOT USE OVEN CLEANERS – No commercial oven
cleaner or oven liner protective coating of any kind should
be used in or around any part of the oven.
To reduce flare ups and excess smoke wipe out puddles of
grease and any loose soil that can be easily removed.
Remove any soil that is outside the door seal area. This
appliance is designed to clean the oven interior and the
portion of the door that is inside the oven. The outer
edges of the door and the frame surrounding the front of
the oven are not in the cleaning zone. Wipe this area
clean.
BEFORE SETTING THE OVEN TO SELF-CLEAN
Brand names
• The use of brand names is intended only to indicate a
type of cleaner. This does not constitute an
endorsement.
• The omission of any brand name cleaner does not
imply its adequacy or inadequacy.
• Many products are regional in distribution and can be
found in local markets.
• It is imperative that all cleaning products be used in
strict accordance with the instructions on its package.
About self-clean
• The self-cleaning mode of your new range features
pyrolytic self-cleaning. When set to the self clean
mode, the oven reaches a high temperature,
approximately 850°F (454°C), that burns off the food
soil.
• When the oven is set for self clean, the standard
rangetop burners and the electric griddle and grill
may be used. The burners having the ExtraLow
feature cannot be used.
• It is common to see smoke and/or flames during the
clean cycle, depending on the content and amount of
soil remaining in the oven. If a flame persists, turn off
the oven and allow it to cool before opening the door
to wipe up the excessive food soil.
®
• Remove all utensils.
• Remove racks and rack guides.
• Clean the oven front frame and outer door edges.
• Wipe up large spillovers and grease.
• Be sure the light bulbs and glass covers are in place.
• Turn on the ventilator hood above the range and leave
it on until the oven has completed the self-clean cycle.
Self-clean
Self-cleaning (select models)
To set self-clean on 30'' dual fuel Harmony series
models
1. Remove all utensils, racks, and rack guides. Ensure the
oven door is shut.
2. Turn the mode knob to CLEAN.
3. Turn the temperature knob to CLEAN.
– Self-clean duration is 2 hours.
To set self-clean on dual fuel models with a display
1. Remove all utensils, racks, and rack guides. Ensure the
oven door is shut.
2. Turn the mode knob to CLEAN and the temperature
knob to CLEAN.
Page. 46
Page 47

3. Press the right ) to set the desired clean level and
press ENTER.
Soil level Duration (excluding cool off)
Light 1 ½ hours
Heavy 3 hours
4. After the information text, press ENTER.
NOTE: The door closing process takes
approximately 20 seconds to complete, at which
time the door becomes locked. Check to make
certain the door is locked.
NOTES:
• After self-clean completes its cycle, the self-clean
function will be prevented from running again for a
period of 24 hours.
• If the user tries to enable a self-clean function in an
oven where the self-clean function has been
restricted, the oven lights will blink on and off in 2second intervals to indicate to the user that the
function is not available. User must turn the knobs to
OFF to cease the blinking lights.
Appliance cleaning tips
At the end of the clean cycle
9 CAUTION
The interior of the oven will still be at baking
temperatures when the automatic lock cycles to its
open position and the oven door can be opened.
The door latch will open automatically when the oven is
below 500°F (260°C) and the automatic Door Lock
completes its 20 second cycle to the open position.
1. Turn the mode knob to OFF.
2. Turn the temperature knob to OFF.
To set end time of self-clean
1. Remove all utensils, racks, and rack guides. Ensure the
oven door is shut.
2. Turn the mode knob to CLEAN.
3. Press the right
press ENTER.
4. Press TIMERS, press the left ( or ), and select END
TIME.
5. Press the right
ENTER.
6. After the information text, press ENTER.
( or ) to set the desired clean level and
( or ) to set the END TIME, and press
9 CAUTION
Avoid cleaning any part of the range while it is hot.
• The porcelain enamel finish is acid resistant, but not
acid proof. Acidic foods, such as citrus juices,
tomatoes, rhubarb, vinegar, alcohol or milk, should be
wiped up and not allowed to bake onto the porcelain
during the next use.
• The heating elements in the oven do not require
cleaning. The elements burn themselves clean when
the oven is in use.
When cleaning this appliance
• Use the mildest cleaning procedure that will do the
job efficiently and effectively. Some cleaners of the
same type are harsher than others. Try on a small
inconspicuous area first.
• Always rub metal finishes in the direction of the polish
lines for maximum effectiveness and to avoid marring
the surface.
• Use only clean soft cloths, sponges, paper towels,
fibrous brushes, plastic, non-metal or steel wool soap
pads for cleaning and scouring, as recommended on
the chart.
• Most exterior parts of this appliance can be cleaned
with hot sudsy water (except the various items
specifically identified otherwise). When rinsing is
required, rinse thoroughly.
• Always wipe dry immediately to avoid water marks.
• DO NOT USE CHLORINE BASED CLEANERS.
Page. 47
Page 48

Cleaning recommendations
Part/material Cleaning notes
Burner base / brass
Burner cap / cast iron
Bezels and control
Knobs / chrome, metal
Broil pan / porcelain
enamel
• A stiff nylon bristle tooth brush can be used to clean port openings.
• After cleaning, make sure that the burner cap is correctly seated on the burner base.
• DO NOT scratch or gouge the port openings of burner cap.
• Suggested cleaners; rinse and dry immediately:
-- Hot water and detergent
-- Bon-ami
-- Barkeepers Friend
®
®
-- Wright's® All Purpose Brass Polish
-- Kleen King
®
• DO NOT soak knobs.
• DO NOT force knobs onto wrong valve shaft.
• Suggested cleaners; rinse and dry immediately:
-- Hot water and detergent
• To loosen cooked on food, squirt with liquid detergent and cover with wet paper towels.
Allow to stand.
• Suggested cleaners; rinse and dry immediately:
-- Hot water and detergent
-- Vinegar and water
-- Dishwasher safe
-- Bar Keeper’s Friend
-- Soft Scrub
-- Bon-ami
®
®
®
-- Soap-filled fiber or steel wool pads
Ceramic briquettes,
briquette basket, and
grill drip tray
• Suggested cleaning for ceramic briquettes;
1) Gently place grease-saturated ceramic briquettes in a 6 quart or larger pot.
2) Fill the pot with clean water so that all ceramic briquettes are covered at least ½''
deep.
3) Bring the water to a steady boil. Once reaching a steady boil, continue to boil for 10
minutes.
4) Remove heat and allow ceramic briquettes to cool to a safe temperature.
5) Pour water off of ceramic briquettes and pat them dry on old towels or paper towels.
6) Allow ceramic briquettes to air dry for at least two hours. Some visible grease stains
may remain on briquettes after cleaning.
7) Reassemble clean, dry briquettes back into the grill before using the grill again.
• New ceramic briquettes can be purchased from the Thermador eShop (order number
PABRICKBKN). See the back cover for support information.
9 CAUTION:
Ceramic briquettes must be replaced when they begin to turn black. This means that
they are saturated with fat and may smoke heavily during operation or the fat may catch
fire.
• Suggested cleaners for basket and drip tray; rinse and dry immediately:
-- Hot water and detergent
-- Dishwasher safe
Door(s) / stainless steel • Use care to keep cleaners and water away from the door vents. If water or cleaners spill
into the vents, water may streak the glass inside.
Page. 48
Page 49

Part/material Cleaning notes
Exterior finish / stainless
steel
• Stainless steel resists most food stains and pit marks providing the surface is kept clean
and protected. Never allow food stains or salt to remain on stainless steel for any length
of time.
• Wipe off any smoke residue that remains on the front frame with Fantastik® or Bar
Keeper’s Friend® cleaners. If stain remains, use a mild liquid cleanser. The amount of
smoke stain is directly related to the amount of food soil left in the oven at the time of
self-cleaning. Clean the oven often.
• Rub lightly in the direction of polish lines.
• Chlorine or chlorine compounds in some cleaners are corrosive to stainless steel. Check
ingredients on label.
• Suggested cleaners; rinse and dry immediately:
-- Hot water and detergent
-- Fantastik
®
-- Siege® Stainless Steel and Aluminum Cleaner
-- Kleen King® Stainless Steel Liquid Cleaner
-- Cleaner polish: Stainless Steel Magic® to protect the finish from staining and pitting;
enhances appearance.
-- Thermador Stainless Steel Conditioner (00576697)
-- For hard water spots use household vinegar.
• For heat discoloration; rinse and dry immediately:
-- Barkeepers Friend
®
-- Wright's® All Purpose Brass Polish
Grates / porcelain
enamel on cast iron
• The grates are heavy; use care when lifting. Place on a protected surface. DO NOT clean
grates in a self-cleaning oven.
• The rough texture of the grate can sometimes remove aluminum deposits from the
bottom of pans and fill in areas between the high spots on the surface of the grate. Use
special care when cooking with copper and aluminum pots and pans as this type of
cookware can sometimes leave metal deposits on the grates.
• Blisters/ crazing/ chips are common due to the extreme temperatures on grate fingers
and rapid temperature changes.
• Acidic and sugar-laden spills deteriorate the enamel. Remove soil immediately once the
grate has cooled.
• Abrasive cleaners, used too vigorously or too often can eventually mar the enamel.
• Suggested cleaners; rinse and dry immediately:
-- Hot water and detergent
-- Fantastik
-- Bon-ami
-- Soft Scrub
®
®
®
• Stubborn stains; rinse and dry immediately:
-- Soap-filled steel wool pad
-- Lestoil®
-- Other degreaser
• Metal deposits:
-- Scotch Brite
TM
scrub sponge
-- Course steel wool pad
Page. 49
Page 50

Part/material Cleaning notes
Griddle / aluminum with
non-stick coating
• NEVER flood a hot griddle with cold water. This can warp or crack the aluminum plate.
• DO NOT clean any part of the griddle in a self-cleaning oven.
• Wipe griddle surface with warm soapy water then rinse with warm water. Wipe dry with a
soft cloth.
• If food particles stick to the griddle plate, remove with a mild abrasive cleaner such as
Soft Scrub
®
.
• Suggested cleaners; rinse and dry immediately:
-- Hot water and detergent
-- Dishwasher safe
-- Soft Scrub
®
Griddle grease tray • Remove tray after grease has cooled. Be careful not to fill it so full that tipping to remove
it spills the grease. Discard grease into a grease resistant container for disposal.
• Clean the grease tray after each use.
• Suggested cleaners; rinse and dry immediately:
-- Hot water and detergent
-- Dishwasher safe
®
Grill grates / porcelain
enamel on cast iron
-- Soft Scrub
• Clean the grates after each use.
• Place the grill grate into a sink and pour boiling hot water over the grate. Lay a dish towel
on top of the grate and pour more hot water over the towel. Allow the water to soak into
the residue. Scrape away debris with a soap-filled scouring pad.
• Stubborn soil: Soft Scrub
®
.
• Suggested cleaners; rinse and dry immediately:
-- Hot water and detergent
-- Dishwasher safe
-- Soft Scrub
®
-- Soft brass wire brush for stubborn residues. Hard steel wire brushes could scratch the
porcelain grate coating and cause premature oxidation of the grate.
• Stubborn stains; rinse and dry immediately:
-- Soap-filled steel wool pad
-- Lestoil
®
-- Other degreaser
Igniters / ceramic • DO NOT use sharp tools to scrape the igniters. The igniters are fragile. If an igniter is
damaged, it may not light the burner.
• Suggested cleaners:
-- Cotton swab dampened with soapy water
-- Fantastik
Page. 50
®
Page 51

Part/material Cleaning notes
Oven cavity / porcelain
enamel on steel
• Porcelain enamel is acid resistant, but not acid proof. Acid foods such as citrus juices,
tomatoes, rhubarb, vinegar, alcohol or milk, should be wiped up and not allowed to bake
onto the porcelain during the next use. Over a period of time, the porcelain may craze
(get fine hairlike lines), this will not affect oven performance.
• Apply cleaner to a damp sponge or cloth. Rub lightly. Rinse thoroughly and dry. If food
has burned onto the oven and is difficult to remove, the spots can be soaked with a cloth
saturated in a suggested cleaner. Close the door and allow it to soak until the food soil
can be easily removed with a damp soapy cloth or mild abrasive.
• Suggested cleaners; rinse and dry immediately:
-- Hot water and detergent
-- Bar Keeper’s Friend
®
-- Vinegar and water
®
®
Oven racks and rack
guides
-- Soft Scrub
-- Bon-ami
• Some commercial oven cleaners cause darkening and discoloration. Test the cleaner on a
small part of the rack and check for discoloration before cleaning the entire rack.
• Oven racks will discolor if left in oven during self clean.
• If the racks do not slide easily after being cleaned, dampen a paper towel with a small
amount of cooking oil and rub it lightly over the side rails.
• Suggested cleaners; rinse and dry immediately:
-- Hot water and detergent
-- Vinegar and water
-- Dishwasher safe
-- Bar Keeper’s Friend
-- Soft Scrub
-- Bon-ami
®
®
®
• Stubborn stains; rinse and dry immediately:
-- Soap-filled fiber or steel wool pad
Surface spill trays /
porcelain enamel
• The porcelain enamel finish is acid resistant, but not acid proof. Acidic foods, such as
citrus juices, tomatoes, rhubarb, vinegar, alcohol or milk, should be wiped up and not
allowed to bake onto the porcelain during the next use.
• If mild abrasive cleaners are used, rub lightly as these cleansers may scratch the finish.
• For burned on foods, soap filled fiber or steel wool pads may be used but c are must be
taken as these may scratch the finish.
• Suggested cleaners; rinse and dry immediately:
-- Hot water and detergent
-- Soft Scrub
-- Bar Keeper’s Friend
-- Bon-ami
®
®
®
• Stubborn stains; rinse and dry immediately:
-- Soap-filled fiber or steel wool pad
Seal / door gasket • Spray on cleaner and blot dry with a cloth. DO NOT rub. Do not move, remove or
damage mesh.
• Suggested cleaners; rinse and dry immediately:
-- Hot water and detergent
-- Fantastik
®
Page. 51
Page 52

Do-it-yourself maintenance
A
B
C
D
Oven light bulb replacement
9 CAUTION
• Make sure the appliance and lights are cool and
power to the appliance has been turned off
before replacing the light bulb(s). Failure to do so
could result in electrical shock or burns.
• The covers must be in place when using the
appliance.
• The covers serve to protect the light bulb from
breaking.
• The covers are made of glass. Handle carefully to
avoid breaking. Broken glass could cause an
injury.
• The light socket is live when the door is open.
Replace only with a recommended light bulb designed for
appliance oven use. DO NOT use a standard household
light bulb in any oven. Call Thermador Customer Care
Center at 1-800-735-4328 or your nearest Thermador
dealer to determine the proper replacement bulb for your
range. You will need to know your range’s model number
and serial number.
5. Remove the glass lens cover.
6. Remove the bulb by grasping and sliding the bulb
straight back until the two prongs have cleared the
ceramic holder (figure, B).
7. DO NOT touch the glass of the new replacement bulb
with your fingers. It may cause the bulb to fail when it
first lights. Grasp the replacement bulb with a clean
dry cloth. Locate the two prongs in the ceramic
holder, gently poking until the two prongs locate in
the ceramic socket.
8. Press down to seat the bulb (figure, C).
9. Slide the protective lens into the holder clip and push
the other end until the fixing clip snaps back into the
housing (figure, D).
To replace the light bulb
Use only 10W, 12V G4 light bulbs. Use a clean, dry cloth to
handle halogen light bulbs. This will increase the life of the
bulb.
1. Turn off circuit breaker.
2. Remove the oven racks.
3. Slide the tip of a flat blade screw driver between the
holder clip and the lamp housing (figure, A).
4. Support the glass lens cover with fingers along the
bottom edge to prevent the cover from falling to the
bottom of the oven. Gently twist the flat blade screw
driver to loosen the glass lens cover.
10. Turn on circuit breaker.
Page. 52
Page 53

Before calling for service
Before calling for service, check the following to avoid
unnecessary service charges.
Troubleshooting
Symptom Possible cause Remedy
Intermittent igniter sparking • Ceramic igniter is wet or dirty. • Carefully dry or clean igniter.
• Burner ports are clogged. • Clean ports on burner cap with a wire, a
needle or straightened paper clip.
More than four clicks of
igniter before lighting
• Improper fit of burner cap onto
burner base.
• Align burner cap properly on burner
base.
Constant igniter sparking • Range is not properly grounded.
• Electrical power supply is
polarized.
Igniters sparking but no
flame ignition.
Range will not operate
(lights, oven, and surface
burners will not come on)
Oven operates on bake but
fails to operate on timed
bake
Oven light fails to come on. • Oven light burned out. • Replace the oven light as outlined in the
Door will not open. • Oven is still in self-clean mode. • If oven is hot, door latch will release when
Foods in oven are not
cooking sufficiently.
• Gas supply valve is in “OFF” position. • Restore gas supply to the unit.
• No power to the unit. • Check for open circuit breaker.
• Oven is in Sabbath Mode. • Verify that the oven is not in sabbath
• Timer improperly set. • Set timer as outlined in the Use and Care
• Rack position is incorrect. • See the ''Using the oven'' section of the
• Improper cookware. • Refer to ''Cookware recommendations''
• Oven door may not be sealing
properly.
• Appliance not level. • Refer to the Installation Instructions for
incorrectly
• Refer to the Installation Instructions. Have
a qualified electrician ground the range
properly.
• Check that power supply line connection
is connected to the proper voltage.
mode. See the ''Using the oven'' section
of the Use and Care Guide.
Guide.
Use and Care Guide.
safe temperature is reached.
Use and Care Guide.
in the Use and Care Guide.
• Clean the oven door gasket. Replace if
worn.
instructions on how to level the
appliance.
Hot air is coming from the
appliance.
• It is normal for the cooling process to
push heated air out into the room
when the oven is on.
• During different modes the fan
speed will increase and decrease.
• This is normal.
Page. 53
Page 54

Service information
TIMERS
SETTINGS ENTER
Do you want to grant access to
customer service?
Allow with Enter
9 CAUTION
Before removing the toe kick panel, disconnect the
range from the electrical power supply. Reinstall the
toe kick panel before reconnecting the range to the
power supply and operating the range.
Electric wiring diagrams and schematics
The electric wiring diagrams and schematics are attached
behind the toe kick, and should not be removed except by
a service technician, then replaced after service.
Data rating label
The data rating label shows the model and serial number
of your appliance. The slide-out plate can be accessed by
first removing the kick panel, as shown below.
Remote costumer service
connection
It is possible for customer service to access the appliance
via the Home ConnectTM connection in the event of an
error.
To grant customer service access to the appliance
1. Contact customer support (see back page). Follow the
instructions given to you by the technician.
– The display screen as customer support tries to
gain access to the appliance.
2. Press ENTER to allow the customer support access.
– Once connection is established the Wi-Fi icon is
shown in the status bar.
For handy reference, copy the information below from the
data rating label. Keep your invoice for Warranty
validation.
Model number _____________________________________
Serial number______________________________________
Date of purchase____________________________________
Product registration
Register your BSH product to ensure timely service and
access to your product related information.
You may register your product through one of the
following ways:
• Register with your phone (USA only).
1. Take a photo of the camera icon on the
registration card, including the points ( ).
SM
PHOTOREGISTER
THERMADOR
2. Text the photo to 21432. (USA only, text and
data rates may apply.)
• Mail in the completed product registration card to the
address printed on the card.
• Register your product online at www.thermador.com.
• Call Thermador customer service at 1-800-735-4328.
Page. 54
Page 55

Statement of limited product warranty
What this warranty covers and who it
applies to
The limited warranty provided by BSH Home Appliances
("Thermador") in this Statement of Limited Product
Warranty applies only to the Thermador appliance sold to
you, the first using purchaser, provided that the Product
was purchased:
• For your normal, household (non-commercial) use,
and has in fact at all times only been used for normal
household purposes.
• New at retail (not a display, “as is”, or previously
returned model), and not for resale, or commercial
use.
• Within the United States or Canada, and has at all
times remained within the country of original
purchase.
The warranties stated herein apply to the original
purchaser of the product warranted herein and to each
succeeding owner of the product purchased for ordinary
home use during the term of the warranty.
Please make sure to return your registration card; while
not necessary to effectuate warranty coverage, it is the
best way for Thermador to notify you in the unlikely event
of a safety notice or product recall.
How long the warranty lasts
Thermador warrants that the Product is free from defects
in materials and workmanship for a period of seven
hundred and thirty (730) days from the date of purchase.
The foregoing timeline begins to run upon the date of
purchase, and shall not be stalled, tolled, extended, or
suspended, for any reason whatsoever.
This Product is also warranted to be free from cosmetic
defects in material and workmanship (such as scratches of
stainless steel, paint/porcelain blemishes, chips, dents, or
other damage to the finish) of the Product, for a period of
sixty (60) days from the date of purchase or closing date
for new construction. This cosmetic
slight color variations due to inherent differences in
painted and porcelain parts, as well as differences caused
by kitchen lighting, product location, or other similar
factors. This cosmetic
display, floor, "As Is", or "B" stock appliances.
warranty specifically excludes any
warranty excludes
Repair/replace as your exclusive remedy
During this warranty period, Thermador or one of its
authorized service providers will repair your Product
without charge to you (subject to certain limitations stated
herein) if your Product proves to have been manufactured
with a defect in materials or workmanship. If reasonable
attempts to repair the Product have been made without
success, then Thermador will replace your Product
(upgraded models may be available to you, in
Thermador’s sole discretion, for an additional charge). All
removed parts and components shall become the
property of Thermador at its sole option. All replaced and/
or repaired parts shall assume the identity of the original
part for purposes of this warranty and this warranty shall
not be extended with respect to such parts.
Thermador's sole liability and responsibility hereunder is
to repair manufacturer-defective Product only, using a
Thermador authorized service provider during normal
business hours.
For safety and property damage concerns, Thermador
highly recommends that you do not attempt to repair the
Product yourself, or use an unauthorized servicer;
Thermador will have no responsibility or liability for repairs
or work performed by a non-authorized servicer. If you
choose to have someone other than an authorized service
provider work on your Product, THIS WARRANTY WILL
AUTOMATICALLY BECOME NULL AND VOID. Authorized
service providers are those persons or companies that
have been specially trained on Thermador products, and
who possess, in Thermador's opinion, a superior
reputation for customer service and technical ability (note
that they are independent entities and are not agents,
partners, affiliates or representatives of Thermador).
Notwithstanding the foregoing, Thermador will not incur
any liability, or have responsibility, for the Product if it is
located in a remote area (more than 100 miles from an
authorized service provider) or is reasonably inaccessible,
hazardous, threatening, or treacherous locale,
surroundings, or environment; in any such event, if you
request, Thermador would still pay for labor and parts and
ship the parts to the nearest authorized service provider,
but you would still be fully liable and responsible for any
travel time or other special charges by the service
company, assuming they agree to make the service call.
Page. 55
Page 56

Out of warranty product
Thermador is under no obligation, at law or otherwise, to
provide you with any concessions, including repairs, prorates, or Product replacement, once this warranty has
expired.
Warranty exclusions
The warranty coverage described herein excludes all
defects or damage that are not the direct fault of
Thermador, including without limitation, one or more of
the following:
In no event shall Thermador have any liability or
responsibility whatsoever for damage to surrounding
property, including cabinetry, floors, ceilings, and other
structures or objects around the Product. Also excluded
from this warranty are products on which the serial
numbers have been altered, defaced, or removed; service
visits to teach you how to use the Product, or visits where
there is nothing wrong with the Product; correction of
installation problems (you are solely responsible for any
structure and setting for the Product, including all
electrical, plumbing or other connecting facilities, for
proper foundation/flooring, and for any alterations
including without limitation cabinetry, walls, floors,
shelving, etc.); and resetting of breakers or fuses.
• Use of the Product in anything other than its normal,
customary and intended manner (including without
limitation, any form of commercial use, use or storage
of an indoor product outdoors, use of the Product in
conjunction with air or water-going vessels).
• Any party's willful misconduct, negligence, misuse,
abuse, accidents, neglect, improper operation, failure
to maintain, improper or negligent installation,
tampering, failure to follow operating instructions,
mishandling, unauthorized service (including selfperformed “fixing” or exploration of the appliance's
internal workings).
• Adjustment, alteration or modification of any kind.
• A failure to comply with any applicable state, local,
city, or county electrical, plumbing and/or building
codes, regulations, or laws, including failure to install
the product in strict conformity with local fire and
building codes and regulations.
• Ordinary wear and tear, spills of food, liquid, grease
accumulations, or other substances that accumulate
on, in, or around the Product.
• Any external, elemental and/or environmental forces
and factors, including without limitation, rain, wind,
sand, floods, fires, mud slides, freezing temperatures,
excessive moisture or extended exposure to humidity,
lightning, power surges, structural failures surrounding
the appliance, and acts of God.
TO THE EXTENT ALLOWED BY LAW, THIS WARRANTY
SETS OUT YOUR EXCLUSIVE REMEDIES WITH RESPECT
TO PRODUCT, WHETHER THE CLAIM ARISES IN
CONTRACT OR TORT (INCLUDING STRICT LIABILITY, OR
NEGLIGENCE) OR OTHERWISE. THIS WARRANTY IS IN
LIEU OF ALL OTHER WARRANTIES, WHETHER EXPRESS
OR IMPLIED. ANY WARRANTY IMPLIED BY LAW,
WHETHER FOR MERCHANTABILITY OR FITNESS FOR A
PARTICULAR PURPOSE, OR OTHERWISE, SHALL BE
EFFECTIVE ONLY FOR THE PERIOD THAT THIS EXPRESS
LIMITED WARRANTY IS EFFECTIVE. IN NO EVENT WILL
THE MANUFACTURER BE LIABLE FOR
CONSEQUENTIAL, SPECIAL, INCIDENTAL, INDIRECT,
“BUSINESS LOSS”, AND/OR PUNITIVE DAMAGES,
LOSSES, OR EXPENSES, INCLUDING WITHOUT
LIMITATION TIME AWAY FROM WORK, HOTELS AND/
OR RESTAURANT MEALS, REMODELLING EXPENSES IN
EXCESS OF DIRECT DAMAGES WHICH ARE
DEFINITIVELY CAUSED EXCLUSIVELY BY THERMADOR,
OR OTHERWISE. SOME STATES DO NOT ALLOW THE
EXCLUSION OR LIMITATION OF INCIDENTAL OR
CONSEQUENTIAL DAMAGES, AND SOME STATES DO
NOT ALLOW LIMITATIONS ON HOW LONG AN IMPLIED
WARRANTY LASTS, SO THE ABOVE LIMITATIONS MAY
NOT APPLY TO YOU. THIS WARRANTY GIVES YOU
SPECIFIC LEGAL RIGHTS, AND YOU MAY ALSO HAVE
OTHER RIGHTS WHICH VARY FROM STATE TO STATE.
Page. 56
No attempt to alter, modify or amend this warranty shall
be effective unless authorized in writing by an officer of
BSH.
Page 57

Table des
MATIÈRES
Sécurité................................................................................... 58
Instructions importants de sécurité................................. 58
Description ............................................................................. 65
Identification de la cuisinière........................................... 65
Avant d’appeler le service technique ..................................... 112
Plaque signalétique..........................................................113
Information pour le service technique.............................113
Dépannage ......................................................................112
Énoncé de garantie limitée du produit................................... 115
Entretien, pièces et accessoires ................................. page verso
Avant de commencer ............................................................. 70
Mise en route................................................................... 70
Utilisation de la table de cuisson ........................................... 72
Brûleurs STAR® scellés ................................................... 72
Brûleurs ExtraLow® ........................................................ 73
Plaque chauffante électrique........................................... 79
Gril électrique.................................................................. 82
Utilisation du four .................................................................. 85
Symboles et descriptions................................................. 85
Configuration utilisation.................................................. 87
Réglage de la four........................................................... 88
Minuteries
Sonde thermique ....................................................... 89
Sabbat ....................................................................... 90
Tirer le meilleur parti de l’appareil ......................................... 93
Position des grilles pour la cuisson.................................. 93
Cuisson ...................................................................... 93
Griller ......................................................................... 94
Gril à convection ........................................................ 95
Cuisson à convection .................................................95
Convection véritable ................................................. 97
Apprêt ....................................................................... 97
Rôtissage ................................................................... 98
Rôtissage par convection ..........................................98
Garder-au-chaud ....................................................... 99
Décalage de température ............................................... 99
Home Connect
Configuration...................................................................100
Entretien et nettoyage............................................................ 103
Autonettoyage du four (certains modèles) ............... 104
Conseils de nettoyage..................................................... 105
Entretien à faire soi-même .................................................... 111
Changement de l’ampoule du four ................................ 111
............................................... 88
TM
................................................................... 100
Définitions de
SÉCURITÉ
9 AVERTISSEMENT
Ceci indique que le non respect de cet avertissement peut
entraîner des blessures graves, voire la mort.
9 ATTENTION
Ceci indique que le non respect de cet avertissement peut
entraîner des blessures légères ou modérées.
NOTICE : Ceci indique que la non-conformité à cet avis de
sécurité peut entraîner des dégâts à l'appareil ou à la propriété.
Note : Ceci vous avertit que d'importantes informations et/ou
conseils sont fournis.
Cet appareil électroménager de THERMADORTM
est fait par BSH Home Appliances LtD
6696 Financial Drive, Unit 3
Mississauga, ON L5N 7J6
Des questions?
1-800-735-4328
www.thermador.ca
Nous attendons de vos nouvelles!
Page. 57
Page 58

Sécurité
9 INSTRUCTIONS IMPORTANTS DE SÉCURITÉ
LIRE TOUTES LES INSTRUCTIONS AVANT DE PROCÉDER
Lisez attentivement
INSTALLATEUR : Veuillez laisser ces instructions
d’installation avec l’appareil pour le propriétaire.
PROPRIÉTAIRE : Veuillez conserver ces instructions pour
consultation ultérieure. Utiliser cet appareil uniquement
aux fins indiquées dans ce manuel.
AVERTISSEMENT
L’information fournie dans le présent
manuel doit être très rigoureusement
respectée, sous peine d’incendie ou
d’explosion entraînant des
dommages, des blessures ou la mort.
-- Ne stockez pas et n’utilisez pas d’essence
ou autres ou la compagnie distributrice de
gaz.
-- SI VOUS SENTEZ UNE ODEUR DE GAZ :
• N’allumez aucun appareil.
• Ne touchez pas aux interrupteurs
électriques.
• N’utilisez pas les téléphones du
bâtiment.
• Appelez immédiatement votre
compagnie de gaz de chez un voisin.
Suivez les instructions de la
compagnie.
• Si vous n’arrivez pas à contacter la
compagnie de gaz, appelez les
pompiers.
-- L’installation et les réparations doivent
être réalisées par un installateur qualité,
un centre de réparation agréé ou la
compagnie de gaz.
AVERTISSEMENT
Correctement entretenu, votre électroménager neuf a
été conçu pour être sécuritaire et fiable. Lisez
attentivement toutes les instructions avant l’utilisation.
Ces précautions réduiront le risque de brûlure,
d'électrocution, d’incendie et de blessures
corporelles. Lorsque vous utilisez des appareils
électroménagers de cuisine, il importe de suivre des
précautions de sécurité de base, y compris celles
indiquées dans les pages suivantes.
AVERTISSEMENT
DANGER DE BASCULEMENT
Toutes les cuisinières peuvent basculer et
causer une blessure. Pour éviter le basculement
accidentel de la cuisinière, fixez-la au sol au
moyen du dispositif anti-bascule fourni.
L’appareil risque de basculer si le dispositif
n’est pas installé conformément aux présentes
instructions. Pour toutes les cuisinières, un
dispositif anti-bascule doit
conformément aux présentes instructions.
Un enfant ou un adulte pourrait faire basculer
l’appareil et perdre la vie.
Ne faites pas fonctionner l’appareil si le support antibascule n’est pas installé et qu’il ne retient pas
l’appareil. La non-observation de ces instructions peut
entraîner la mort ou causer de graves brûlures à des
enfants ou des adultes.
En déplaçant la cuisinière pour la
nettoyer, la réparer ou pour toute
autre raison, assurez-vous qu’elle
s’est bien enclenchée dans le
dispositif anti-bascule lorsque
vous la remettez en place. Autrement, si l’appareil est
utilisé de façon anormale (par exemple, si quelqu’un
monte, s’assoie ou s’appuie sur une porte ouverte), la
cuisinière risque de basculer. Le basculement de la
cuisinière ou d’un liquide chaud se trouvant sur la
surface de cuisson pourrait causer des blessures
corporelles.
être installé
Page. 58
Page 59

9 INSTRUCTIONS IMPORTANTS DE SÉCURITÉ
LIRE TOUTES LES INSTRUCTIONS AVANT DE PROCÉDER
AVERTISSEMENT
Tout installation, ajustement, modification, entretien
ou nettoyage inadéquat peut causer des blessures ou
des dommages matériels. Consultez le présent
manuel. Pour obtenir de l’assistance ou des
renseignements supplémentaires, consultez un
installateur qualifié, un centre de réparation, le
fabricant (ou le détaillant) ou une société gazière.
AVERTISSEMENT
Avant de procéder au nettoyage ou à l’entretien de
l’appareil, éteignez l’alimentation du panneau
électrique et bloquez le dispositif de déconnexion
pour éviter que l’alimentation électrique ne soit
accidentellement rallumée. Si le dispositif de
sectionnement d’électricité ne peut être bloqué,
attachez un avertissement (comme une étiquette) bien
en vue sur le tableau électrique.
Vérification du type de gaz
Gaz naturel — 7 po (17,4 mb) min. à 14 po (34,9 mb) max.
de colonne d’eau
Gaz propane — 11 po (27,4 mb) min. à 14 po (34,9 mb)
max. de colonne d’eau
Vérifiez le type de gaz fourni à votre emplacement.
Assurez-vous que l’appareil est raccordé au type de gaz
pour lequel il est certifié. Reportez-vous à l’étiquette de
données.
9 AVERTISSEMENT
Si un kit de conversion au gaz est utilisé, cette trousse
de conversion doit être installée par une agence de
réparation qualifiée en conformité aux directives du
fabricant et de tous les autres codes et exigences en
vigueur de l'autorité ayant juridiction. Si les directives
ne sont pas suivies à la lettre, il y a un risque
d'incendie, d'explosion ou de génération de
monoxyde de carbone pouvant entraîner des
dommages matériaux, des blessures ou une perte de
vie. L'agence de réparation qualifiée est responsable
de la bonne installation de cette trousse. L'installation
n'est pas jugée terminée jusqu'à ce que l'on ait testé
l'appareil converti comme précisé dans les directives
du fabricant fournies avec la trousse.
ATTENTION
Lorsque vous branchez l’appareil au gaz propane,
assurez-vous que le réservoir de gaz propane est muni
de son propre mécanisme régulateur à haute pression
en plus du régulateur à haute pression fourni avec
l’appareil. La pression de gaz maximale ne devrait pas
excéder 14,0 pouces de colonne d’eau (34,9 Mb)
entre le réservoir de gaz propane et le régulateur à
haute pression.
Pour les installations au Massachusetts
1. L’installation doit être réalisée par un entrepreneur
qualifié ou accrédité, un plombier ou un installateur
de gaz qualifié ou autorisée par l’État, la province ou
la région dans laquelle cet appareil est installé.
2. La vanne d’arrêt de gaz doit être pourvue d’une poignée en « T ».
3. La longueur du tuyau de gaz ne doit pas excéder
36 po (914 mm).
S’assurer que l’installation et l’entretien sont effectués
correctement. Suivre les instructions du Manuel
d’installation accompagnant ce produit. Confier
l’installation et la mise à la terre électrique de l’appareil à
un technicien qualifié.
Si le brûleur fuit et que du gaz s’en échappe, ouvrez une
fenêtre ou une porte. NE tentez PAS d’utiliser l’appareil
avant que le gaz ait eu le temps de se dissiper. Attendez
au moins 5 minutes avant d’utiliser l’appareil.
NE PAS réparer ni remplacer toute pièce de l’appareil à
moins que cela ne soit spécifiquement recommandé par
ce manuel. Toute réparation doit être effectuée par un
technicien qualifié.
Page. 59
Page 60

9 INSTRUCTIONS IMPORTANTS DE SÉCURITÉ
LIRE TOUTES LES INSTRUCTIONS AVANT DE PROCÉDER
Exigences électriques
AVERTISSEMENT
EN CAS DE PANNE ÉLECTRIQUE
Si, pour une raison quelconque, un bouton de
commande de gaz est allumé et qu’il n’y a pas
d’électricité pour actionner les allumeurs
électroniques des brûleurs, mettez le bouton à
OFF et attendez 5 minutes pour permettre au
gaz de se dissiper avant d’allumer
manuellement les brûleurs.
Pour allumer manuellement les brûleurs, tenez
une allumette allumée près des ports d’un
brûleur puis tournez le bouton de commande à
HI. Vous pouvez utiliser les brûleurs standards
pendant une panne d’électricité, mais vous
devez les allumer avec une allumette.
NE tentez PAS d’allumer manuellement les
brûleurs XLO. Ces brûleurs sont dotés de la
fonction Extralow
manuellement.
L'électroménager doit être mis à la terre en conformité
aux codes locaux, ou en l’absence de tels codes, au
National Electric Code ANSI/NFPA 70 ou, au Canada, au
code canadien de l’électricité CSA C22.1-02.
Débranchez toujours la fiche électrique de la prise murale
avant de procéder à l’entretien de l’appareil.
®
et ne peuvent être allumés
• La norme canadienne CAN/CGA1.1-M81 régissant les
cuisinières à gaz domestiques.
• La norme canadienne CAN/CSA-22.2 No. 61 régissant
les cuisinières domestiques.
L’installation doit être conforme aux codes locaux ou, en
l’absence de tels codes, au National Fuel Gas Code ANSI
Z223.1/NFPA 54 ou, au Canada, au code national CSA
B149.1 d’installation du gaz naturel et du propane.
Installation dans une maison préfabriquée (mobile) :
L’installation doit être conforme au Manufactured Home
Construction and Safety Standard, Titre 24 CFR, Partie
3280 (anciennement le Federal Standard for Mobile Home
Construction and Safety, Titre 24, HUD/Partie 280) ou,
lorsque cette norme n’est pas applicable, au Standard for
Manufactured Home Installations, ANSI/NCSBCS A225.1,
ou aux codes locaux, là où il y a lieu.
Installation dans une caravane de parc : L’installation doit
être conforme aux codes de l’État ou aux autres codes ou,
en l’absence de tels codes, au Standard for Recreational
Park Trailers, ANSI A119.5.
Il incombe au propriétaire et à l’installateur de déterminer
si des exigences ou des normes additionnelles
s’appliquent spécifiquement à l’installation.
Les espaces libres pour les matières non combustibles ne
font pas partie de la norme ANSI Z21.1 et ne sont pas
mentionnés par la CSA. Un dégagement de moins de 152
mm (6 po) doit être conforme aux codes locaux et/ou par
les autorités locales ayant juridiction.
Consultez les exigences d’alimentation électrique et de
mise à la terre dans les Instructions d’Installation.
Demandez à l’installateur de vous montrer où se trouvent
le disjoncteur et la vanne d’arrêt de gaz pour savoir où et
comment couper l’alimentation électrique et
l’approvisionnement en gaz de l’appareil.
L’installation et l’entretien doivent être correctement
effectués. Suivez les instructions du Instructions
d’Installation fourni avec le produit. Assurez-vous qu’un
électricien qualifié installe et effectue la mise à la terre de
l’appareil.
Cet appareil est conforme à une ou plusieurs des
normes et codes de sécurité :
• La norme américaine UL858 régissant les cuisinières
électriques domestiques.
• La norme américaine ANSI Z21.1 régissant les
appareils électroménagers à gaz.
Page. 60
La profondeur maximale de l’armoire installée au-dessus
de la table de cuisson est de 13 po (33 cm).
Sécurité des enfants
Lorsque les enfants sont assez âgés pour utiliser l’appareil,
il est de la responsabilité des parents ou des tuteurs de
veiller à ce que des personnes qualifiées leur enseignent
des pratiques sécuritaires.
AVERTISSEMENT
NE rangez PAS d’objets attirant l’attention d’enfants
au-dessus ou derrière l’appareil. Ils risqueraient d’y
monter pour s’en emparer et pourraient se blesser
gravement.
Page 61

9 INSTRUCTIONS IMPORTANTS DE SÉCURITÉ
LIRE TOUTES LES INSTRUCTIONS AVANT DE PROCÉDER
NE permettez PAS que quiconque grimpe, se mette
debout, s’assoit ou se pende à une pièce de l’appareil.
Cela pourrait endommager l’appareil et il pourrait
basculer, infligeant possiblement de graves blessures.
NE permettez PAS à des enfants d’utiliser l’appareil à
moins qu’ils ne soient surveillés de près par un adulte.
Les enfants et les animaux ne devraient pas être laissés
seuls ou sans surveillance dans la salle où l’appareil est en
cours d’utilisation. Ils ne devraient jamais avoir
l’autorisation de jouer près de l’appareil, qu’il soit en
cours d’utilisation ou non.
Générales de sécurité
AVERTISSEMENT
Pour éliminer le risque de brûlure ou d'incendie
lorsque vous étirez au-dessus des surfaces chauffantes
de l'électroménager, il faut éviter d'installer des
armoires de rangement au-dessus de la surface de
l'électroménager.
AVERTISSEMENT
Pour réduire les risques de blessure lors d’un feu de
friture, observez les consignes suivantes :
• Étouffez les flammes avec un couvercle, une
plaque à biscuits ou un plateau de métal et
éteignez ensuite le brûleur ou l’élément. Prenez
garde aux risques de brûlure. Si les flammes ne
disparaissent pas immédiatement, évacuez les
lieux et appelez le service d’incendie.
• Ne prenez jamais un poêlon en feu – Vous
pourriez vous brûler.
• N’UTILISEZ PAS D’EAU ou un linge à vaisselle
mouillé – une violente explosion de vapeur
s’ensuivra.
• Utilisez un extincteur seulement si :
• Vous savez que vous possédez un extincteur
de classe ABC et vous savez vous en servir.
• Le feu est faible et ne s’est pas répandu
depuis son point d’origine.
• Vous avez appelé le service d’incendie.
• Vous pouvez sortir facilement de l’endroit où
vous combattez le feu.
Avertissements de la Proposition 65 de l'État de la
Californie :
: AVERTISSEMENT
Ce produit vous exposez à des produits chimiques,
comme du chlorure de vinyle, reconnus par l'État de la
Californie comme causant le cancer, des
malformations congénitales ou d'autres effets nocifs
sur la reproduction. Pour de plus amples
renseignements, consulter
www.P65Warnings.ca.gov.
AVERTISSEMENT
POUR RÉDUIRE LES RISQUES DE FEU DE FRITURE :
• Ne laissez jamais l’appareil sans surveillance lors
de son utilisation à haute température. Les
débordements par bouillonnement causent de la
fumée et les déversements de graisse qui peuvent
prendre feu. Faites chauffer l’huile à des
températures basses ou moyennes.
• Allumez toujours la hotte lorsque vous cuisinez à
haute température ou que vous faites flamber des
aliments (c.-à-d. crêpes Suzette, cerises jubilé,
bœuf flambé au poivre).
• Nettoyez fréquemment les ventilateurs. Ne laissez
pas la graisse s’accumuler sur les ventilateurs ou
les filtres.
• Utilisez des poêlons aux dimensions adéquates.
Utilisez toujours une batterie de cuisine
correspondant aux dimensions de l’élément ou du
brûleur.
N’utilisez JAMAIS la appareil comme espace de
rangement. Les matières inflammables pourraient prendre
feu et les objets en plastique pourraient fondre ou
prendre feu. N’accrochez rien sur l’appareil. Certains
tissus peuvent facilement s’enflammer.
Si la appareil est placée près d’une fenêtre, assurez-vous
que les courants d’air ne peuvent pas pousser les rideaux
jusqu’au-dessus ou à proximité des brûleurs; ils pourraient
s’enflammer.
Assurez-vous qu’il y a TOUJOURS un détecteur de fumée
fonctionnel près de la cuisine. Si vos vêtements ou vos
cheveux prennent feu, jetez-vous immédiatement par
terre et roulez pour éteindre les flammes.
Ayez un extincteur approprié à portée de la main, visible
et facile d’accès, tout près de l’appareil de cuisson.
Page. 61
Page 62

9 INSTRUCTIONS IMPORTANTS DE SÉCURITÉ
LIRE TOUTES LES INSTRUCTIONS AVANT DE PROCÉDER
Étouffez les flammes provenant d’aliments en feu, autre
que les feux de friture, avec du bicarbonate de soude.
N’utilisez jamais de l’eau pour éteindre des aliments en
feu.
Dans la mesure du possible, ne faites pas fonctionner le
système de ventilation lorsqu’il y a un feu. Cependant, ne
tentez pas de l’éteindre en passant votre main dans le feu.
Les vêtements, poignées, mitaines ou toute autre matière
inflammable ne doivent JAMAIS toucher ni être placés à
proximité des brûleurs ou des grilles des brûleurs avant
que ceux-ci n’aient eu le temps de refroidir. Les tissus
pourraient prendre feu et provoquer des blessures.
N’utilisez que des poignées et mitaines sèches : la vapeur
qui se dégage de poignées et de mitaines mouillées ou
humides posées sur des surfaces chaudes peut provoquer
des blessures. N’utilisez PAS de serviettes ni de chiffons
volumineux au lieu de poignées et de mitaines. Ne laissez
pas de poignées ou de mitaines en contact avec des
grilles ou des brûleurs chauds.
Pour votre sécurité, lorsque vous utilisez l’appareil, portez
des vêtements adéquats et évitez ceux qui sont amples et
qui ont des manches tombantes. Certains tissus
synthétiques sont hautement inflammables. Vous ne
devriez pas en porter lorsque vous cuisinez.
N’enveloppez aucune pièce de l’appareil dans du papier
d’aluminium. L’utilisation de revêtement en aluminium
pourrait causer une décharge électrique ou un incendie,
ou encore obstruer la circulation d’air de la combustion et
de l’aération. Le papier d’aluminium est un excellent
isolateur et il retient la chaleur. Son utilisation aura une
incidence sur la cuisson et pourrait endommager le fini de
l’appareil.
Quand vous utilisez la table de cuisson : NE TOUCHEZ
PAS LES GRILLES DES BRÛLEURS OU LES ZONES
ADJACENTES. Les zones entourant les brûleurs peuvent
devenir assez chaudes pour causer des brûlures.
AVERTISSEMENT
L’appareil sert à cuisiner. N’utilisez jamais l’appareil
pour chauffer une pièce. Ceci peut causer un
empoisonnement au monoxyde de carbone et
surchauffer l’appareil en plus d’en endommager
certaines pièces.
Ne laissez jamais l’appareil sans surveillance quand vous
utilisez une flamme intense. Les débordements produisent
de la fumée et des éclaboussures de graisse qui peuvent
s’enflammer. Par ailleurs, si la flamme d’un brûleur
s’éteint, du gaz s’échappera dans la pièce.
Seuls certains types de casseroles en verre, en
vitrocéramique résistant à la chaleur, en céramique, en
terre cuite ou en céramique vitrifiée peuvent être utilisés
sur les brûleurs de la table de cuisson. Ce type de
récipients peut se casser lors de changements de
température brusques. N’utilisez que des réglages de
flamme bas ou moyen et respectez les directives du
fabricant.
Ne faites pas chauffer de récipients fermés. La pression
s’accumulant dans le récipient pourrait le faire éclater et
provoquer des blessures.
AVERTISSEMENT
Lorsque vous cuisinez, réglez les brûleurs de façon à
ce que la flamme ne chauffe que le fond du récipient
sans déborder sur les côtés. Cette instruction est
basée sur des considérations de sécurité.
Soyez prudent et assurez-vous que les courants provenant
de grilles d’aération ou de ventilateurs ne soufflent pas de
matière inflammable vers les flammes ou ne poussent pas
les flammes sur les côtés de la casserole ou du poêlon.
Utilisez toujours des casseroles et poêlons à fond plat et
suffisamment larges pour couvrir le brûleur. L’utilisation de
casseroles trop petites pourrait exposer une partie de la
flamme et enflammer des vêtements.
N’utilisez PAS de casseroles ou de poêlons sur l’accessoire
du gril (vendu séparément). Vous ne devriez jamais utiliser
de grandes casseroles, de plaques à biscuits, etc. sur
l’appareil.
AVERTISSEMENT
Évitez d’utiliser une flamme forte de façon prolongée
avec un récipient plus grand que la grille ou couvrant
plusieurs brûleurs, comme une plaque. Cela peut
nuire à la combustion et produire des émanations
dangereuses.
N’utilisez PAS de produits nettoyants inflammables pour
nettoyer l’appareil.
Page. 62
Page 63

9 INSTRUCTIONS IMPORTANTS DE SÉCURITÉ
LIRE TOUTES LES INSTRUCTIONS AVANT DE PROCÉDER
Avant d’utiliser la plaque chauffante ou les brûleurs à
proximité, enlevez la planche à découper optionnelle ou
l’accessoire de recouvrement de la plaque.
LA GRAISSE EST INFLAMMABLE. Laissez la graisse
chaude refroidir avant d’essayer de la manipuler. Évitez de
laisser de la graisse s’accumuler. Nettoyez après chaque
utilisation.
Pour que les brûleurs s’allument et fonctionnent
correctement, les orifices d’allumage doivent être gardés
propres. Il faut les nettoyer après un débordement ou
lorsque le brûleur ne s’allume pas même si le système
d’allumage électronique s’actionne.
Nettoyez l’appareil avec soin. Faites attention de ne pas
vous brûler avec la vapeur. N’utilisez PAS d’éponge ou de
chiffon mouillé pour nettoyer l’appareil quand elle est
chaude. Certains produits nettoyants dégagent des
vapeurs toxiques s’ils sont appliqués sur une surface
chaude. Suivez les indications fournies par le fabricant du
produit nettoyant.
AVERTISSEMENT
Après un renversement ou une éclaboussure, éteignez
le brûleur et nettoyez le pourtour et les orifices avec
soin. Assurez-vous du bon fonctionnement de
l’appareil après le nettoyage.
Assurez-vous que tous les boutons sont hors circuit et de
l’appareil est froide avant d’utiliser un produit nettoyant
en aérosol sur celle-ci ou à proximité de celle-ci. Certains
produits chimiques vaporisés peuvent, en présence de
chaleur, prendre feu ou corroder les pièces métalliques.
N’obstruez PAS la circulation d’air de combustion ou
d’aération.
Toutes les réparations doivent être effectuées par des
techniciens agréés, qui devront débrancher l’alimentation
électrique de l’appareil avant de le réparer.
Lors de la cuisson d’aliments gras ou huileux, les brûleurs
à gaz adjacents peuvent mettre feu aux vapeurs
aéroportées. Soyez prudent pour éviter les brûlures.
Pour éviter tout risque d’incendie, nettoyez fréquemment
la hotte et les filtres afin d’empêcher les accumulations de
graisse.
En cas d’incendie ou si vous faites flamber
intentionnellement de l'alcool sur la table de cuisson,
suivez les instructions du fabricant. Faites preuve de
prudence lorsque vous cuisinez avec de l’alcool (ex. :
rhum, brandy, bourbon). L’alcool s’évapore à haute
température. Les vapeurs d’alcool peuvent s’enflammer et
présenter un risque de brûlure. Utilisez seulement une
petite quantité d’alcool avec les aliments.
AVERTISSEMENT
NE bloquez PAS et n’obstruez PAS les
ouvertures du trou d’aération. Le trou
d’aération est situé à l’arrière de l’appareil. Il
doit être dégagé et ouvert pour fournir la
circulation d’air nécessaire au bon
fonctionnement de l’appareil.
NE touche PAS la zone entourant le trou d’aération
lorsque l’appareil est en marche ou plusieurs minutes
après son utilisation. Certaines pièces du trou
d’aération et de la zone l’entourant deviennent assez
chaudes pour causer des brûlures. Laissez passer
assez de temps pour que l’appareil ait le temps de
refroidir avant de toucher ou nettoyer le trou
d’aération.
NE placez PAS d’objets de plastique ou d’autre
matière sensible à la chaleur sur le trou d’aération ou
près de celui-ci. Ils pourraient prendre feu.
NE rangez PAS ou n’utilisez pas de produits chimiques,
corrosifs, inflammables, non alimentaires près ou dans cet
appareil, lequel est spécifiquement conçu pour réchauffer
ou faire cuire des aliments. L’utilisation de produits
chimiques corrosifs pendant le réchauffage ou la cuisson
peut endommager l’appareil et causer des blessures.
AVERTISSEMENT
NE laissez PAS d’aliments ou d’ustensiles de cuisson,
etc., dans le four au cours du processus
d’autonettoyage.Avant de passer à l’autonettoyage
du four (certains modèles), retirez le lèchefrite, les
grilles du four et tout autre ustensile ainsi que tous
dégâts excessifs d’aliments.
Page. 63
Page 64

9 INSTRUCTIONS IMPORTANTS DE SÉCURITÉ
LIRE TOUTES LES INSTRUCTIONS AVANT DE PROCÉDER
AVERTISSEMENT
Vous ne devriez pas installer cet appareil avec un
système de ventilation à aspiration descendante. Ce
type de système de ventilation peut présenter des
risques d’incendie et des problèmes de combustion et
ainsi entraîner des blessures corporelles, des
dommages matériels ou un fonctionnement
involontaire. Aucune restriction ne s’applique aux
systèmes de ventilation à aspiration ascendante.
Un rideau d’air ou une hotte au-dessus la cuisinière,
dont le débit d'air est orienté vers le bas en direction
de la cuisinière, ne peut pas être utilisé avec une
cuisinière au gaz à moins que la hotte et la cuisinière
ne soient conçues et testées en conformité à la norme
ANSI Z21.1 • CSA 1.1, cuisinière à gaz domestiques,
et classées par un laboratoire d’essai indépendant
pour une utilisation conjuguée.
IMPORTANT : Il est possible que la paroi arrière se
décolore sous certaines conditions de cuisson.
ÉVITEZ de nettoyer, frotter, endommager, déplacer ou
retirer le joint d’étanchéité de la porte. Il est
indispensable, car il assure une bonne étanchéité durant la
cuisson. Si le joint d’étanchéité devient excessivement usé
ou souillé de particules d’aliments, remplacez-le pour
assurer une bonne étanchéité.
Protégez la fonction d’autonettoyage. Ne nettoyez que
les pièces indiquées dans ce livret. N’utilisez PAS de
produits nettoyants commerciaux pour le four ou de
pellicule de protection de four dans ou autour du four
autonettoyant.
Placez les grilles dans la position désirée avant de faire
chauffer le four. Si une grille doit être déplacée alors que
le four est chaud, ne pas laisser les poignées isolantes
entrer en contact avec les éléments chauffants.
NE JAMAIS TOUCHER AUX SURFACES INTERNES DE
LA CAVITÉ DU FOUR NI LES ÉLÉMENTS CHAUFFANTS
– Les éléments de surface peuvent être chauds, même s'ils
sont foncés. Les parois intérieures d’un four peuvent
devenir suffisamment chaudes pour provoquer des
brûlures. Les parois intérieures d’un four peuvent devenir
suffisamment chaudes pour provoquer des brûlures. Avant
et après l’utilisation, ne pas toucher les éléments
chauffants ou les surfaces intérieures du four et ne pas
mettre des vêtements, des poignées ou d’autres
matériaux inflammables en contact avec les éléments ou
ses surfaces tant qu’ils n’ont pas suffisamment refroidis.
Les autres surfaces de l’appareil peuvent devenir
suffisamment chaudes pour provoquer des brûlures. Parmi
ces surfaces, on notera les ouvertures d’évent, les surfaces
situées près de ces ouvertures et les portes de four.
AVERTISSEMENT
NE couvrez JAMAIS les fentes, les orifices ou les
canaux de la sole du four, ni ne couvrez toute une
grille avec une matière comme du papier d'aluminium.
Une telle couverture bloque le débit d'air dans le four
et pourrait entraîner une intoxication par monoxyde
de carbone. Utiliser une feuille de papier aluminium
pourrait également emprisonner la chaleur, entraînant
un risque d’incendie.
Faites preuve de prudence lorsque vous ouvrez la porte
du four. Laissez l’air chaud et la vapeur s’échapper avant
d’introduire ou de retirer des aliments.
Veuillez noter que les oiseaux de compagnie peuvent être
sensibles aux odeurs créées durant l’utilisation du four à
température élevée, qu’elles proviennent de la
combustion de résidus de fabrication ou d’aliments. Il est
donc recommandé de sortir les oiseaux de compagnie de
la cuisine.
Page. 64
Page 65

Description
1
2
3
5
4
7
8
6
9
Identification de la cuisinière
Le modèle illustré est la cuisinière de 48" avec plaque chauffante (les modèles varient).
1 La garniture pour installation en îlot illustration ou le dosseret bas vendu séparément (Toutefois, consultez
l’avertissement concernant l’espace derrière la cuisinière lors de l’utilisation de la cuisinière avec cet accessoire.)
2 Évent de four (N'obstruez pas l'entrée d'air!)
3STAR
4 griles de brûleurs
5 Plaque chauffante (les modèles varient)
6 Éclairage du panneau de commande
7Four principal
8 Four auxiliaire (les modèles varient)
9 Assemblages des recouvrements de pattes
10 Pieds de cuisinière
®
brûleurs
(Des pièces de recouvrement supplémentaires sont requises, vous pouvez en commander sans frais au centre de
service à la clientèle en appelant au 1-800-735-4328 jusqu’à un an après la date d’achat de l’appareil.)
Page. 65
Page 66

Description des tableaux de commande
300
250
200
100
BROIL
CLEAN
400
450
500
350
TIMERS
SETTINGS ENTER
06:30
1
2 3 4 65
REMARQUE : Les molettes, les boutons, les modes et les
fonctionnalités ne sont pas offerts sur tous les modèles.
ExtraLow
®
Sélecteur de
température du
four
Sélecteur de
mode
OFF
OFF
Standard Plaque chauffante Gril Induction
Indicateur de
Affichage digital
température
Interrupteur de la
lampe
1 Écran numérique
2 Touches de navigation de gauche
3 Accès à plusieurs minuteries
4 Accès aux réglages de l’utilisateur
5 Confirmation d’une saisie
6 Touches de navigation de droite
Page. 66
Page 67

Identification de la surface supérieure
55
44
11
22
33
33
55
11
22
44
33
44
66
11
22
55
Modèle 364 avec induction
Modèle 364 avec gril
1 Brûleur ExtraLow Naturel 15000, GPL 12000 BTU
2 Brûleur ExtraLow
Naturel 22000, GPL 18000 BTU
et PowerBoost
3 Brûleur standard Naturel 18000, GPL 12000 BTU
4 Brûleur standard Naturel 18000, GPL 15000 BTU
5 Induction 3,600W
Modèle 364 avec plaque chauffante
11
33
22
44
55
1 Brûleur ExtraLow Naturel 15000, GPL 12000 BTU
2 Brûleur ExtraLow
Naturel 22000, GPL 18000 BTU
et PowerBoost
3 Gril 815W x 2
4 Brûleur standard Naturel 15000, GPL 12000 BTU
5 Brûleur standard Naturel 18000, GPL 15000 BTU
Modèle 366
1 Brûleur ExtraLow Naturel 15000, GPL 12000 BTU
2 Brûleur ExtraLow
Naturel 22000, GPL 18000 BTU
et PowerBoost
3 Plaque chauffante 1,630W
4 Brûleur standard Naturel 15000, GPL 12000 BTU
5 Brûleur standard Naturel 18000, GPL 15000 BTU
1 Brûleur ExtraLow Naturel 15000, GPL 12000 BTU
2 Brûleur ExtraLow
Naturel 22000, GPL 18000 BTU
et PowerBoost
3 Brûleur standard Naturel 15000, GPL 12000 BTU
4 Brûleur standard Naturel 18000, GPL 15000 BTU
5 Brûleur standard Naturel 15000, GPL 12000 BTU
6 Brûleur standard Naturel 18000, GPL 15000 BTU
Page. 67
Page 68

Modèle 486 avec Induction
33
44
66
11
22
55
77
33
44
77
11
22
66
55
Modèle 486 avec plaque chauffante
1 Brûleur ExtraLow Naturel 15000, GPL 12000 BTU
2 Brûleur ExtraLow et
Naturel 22000, GPL 18000 BTU
PowerBoost
3 Brûleur standard Naturel 15000, GPL 12000 BTU
4 Brûleur standard Naturel 18000, GPL 15000 BTU
5 Brûleur standard Naturel 15000, GPL 12000 BTU
6 Brûleur standard Naturel 18000, GPL 15000 BTU
7 Induction 3,600W
Modèle 486 avec gril
11
22
33
55
44
66
77
1 Brûleur ExtraLow Naturel 15000, GPL 12000 BTU
2 Brûleur ExtraLow
Naturel 22000, GPL 18000 BTU
et PowerBoost
3 Brûleur standard Naturel 15000, GPL 12000 BTU
4 Brûleur standard Naturel 18000, GPL 15000 BTU
5 Plaque chauffante 1,630W
6 Brûleur standard Naturel 15000, GPL 12000 BTU
7 Brûleur standard Naturel 18000, GPL 15000 BTU
Modèle 486 avec gril et plaque chauffante
11
33
1 Brûleur ExtraLow Naturel 15000, GPL 12000 BTU
2 Brûleur ExtraLow et
Naturel 22000, GPL 18000 BTU
PowerBoost
3 Brûleur standard Naturel 15000, GPL 12000 BTU
4 Brûleur standard Naturel 18000, GPL 15000 BTU
5 Gril 815W x 2
6 Brûleur standard Naturel 15000, GPL 12000 BTU
7 Brûleur standard Naturel 18000, GPL 15000 BTU
55
22
44
66
1 Brûleur ExtraLow Naturel 15000, GPL 12000 BTU
2 Brûleur ExtraLow et
Naturel 22000, GPL 18000 BTU
PowerBoost
3 Brûleur standard Naturel 15000, GPL 12000 BTU
4 Brûleur standard Naturel 18000, GPL 15000 BTU
5Gril 815W x 2
6 Plaque chauffante 1,630W
Page. 68
Page 69

Description de l’intérieur des fours
12 3
467
565
7 8
8
12 341 9
124
659 8
3
10 9108
612453 1 7
Intérieur du four ÉLECTRIQUE
1 Lumière du four
2 Élément du griloir
3 Capteur thermostat du four
4 Glissières des griles
5 Griles de four
Intérieur du four à GAZ
6 Élément de cuisson (dissimulé)
7 Couvercle du ventilateur à convection
8 Prise pour sonde thermique
9 Positions des griles
1 Lumière du four
2 Allumeur du griloir
3 Brûleur infrarouge du griloir
4 Capteur thermostat du four
5 Glissières des griles
6 Griles de four
7 Brûleur de cuisson (dissimulé)
8 Couvercle du ventilateur à convection
9 Prise pour sonde thermique
10 Positions des griles
Page. 69
Page 70

Avant de commencer
Mise en route
Plaque signalétique
• Notez les numéros de modèle et de série à la
page 113.
• La plaque de la fiche signalétique se trouve à la droite
de l’appareil, entre la cavité du four et le panneau
latéral.
• Vous pouvez utiliser ces renseignements lors de toutes
vos futures communications avec le service à la
clientèle. Pour plus d'informations sur
l'enregistrement du produit, voir page 113.
Brûleurs de surface
1. Assurez-vous que les chapeaux des brûleurs sont bien
posés sur leurs bases sur la table de cuisson
(“Vérification de la position des chapeaux des
brûleurs.” à la page 61).
2. Allumez chaque brûleur pour vous assurer que la
flamme est d’une couleur adéquate. Consultez la
section « “Description de la flamme” à la page 63 »
pour plus de détails.
Comment placer la grille Full Access
1. Tenez la grille dans un angle légèrement ouvert.
Placez les crochets sous la partie avant des fentes des
glissières.
2. Poussez la grille dans le four en la soulevant pardessus les butées de sûreté situées à l'avant des
glissières.
3. Tenez la grille bien droite.
®
dans le four
Grille plate
Retrait des guides pour le nettoyage
1. Soulevez le devant du guide pour libérer les têtes des
deux boulons à épaulement vers la partie avant de la
cavité du four.
2. Retirez la portion avant du guide en tirant les fentes
en forme de trou de clé par dessus les boulons
d'épaulement.
3. Sortez les deux rails des trous situés à l'arrière de la
cavité du four. Les guides sont conçus pour pouvoir
s'installer d'un côté ou d'un autre de la cavité du four.
4. Poussez la grille jusqu'au fond.
5. Engagez les crochets avant de la grille dans les
glissières.
IMPORTANT : Lorsque vous installez la grille coulissante
dans le four, assurez-vous que les supports frontaux des
glissières de la grille reposent dans les larges fentes des
coins avant de la grille. Cela est nécessaire pour que la
grille demeure dans la bonne position lorsqu’elles se
trouvent totalement à l’intérieur du four.
Page. 70
Page 71

Mise en place de la grille plate dans le four
1. Saisir fermement la grille par les côtés.
2. Incliner la grille vers le haut pour mettre la butée dans
le guide.
Utilisation du four
1. Allumez le système de ventilation de la cuisine (ou une
fenêtre si votre hotte est munie d’un système de
recirculation d’air).
2. Allumez le four à 450 ºF (230 ºC) pendant 20 à 30
minutes. Réglez ensuite le four à BROIL pour la même
période.
ou
1. Mettez le système de ventilation de la cuisine en
marche (si la hotte utilisée fonctionne avec un système
de reprise d’air, ouvrez une fenêtre).
2. Enlevez les grilles du four.
3. Réglez le four au mode d’autonettoyage et laissez-le
terminer son cycle (modèles sélectionnés seulement).
Les cuisinières dégagent parfois une odeur particulière ou
de la fumée lors de la première utilisation. Ces odeurs ou
cette fumée proviennent des résidus de fabrication qui
brûlent, ce qui est caractéristique de toute nouvelle
cuisinière, indépendamment du fabricant.
9 AVERTISSEMENT
Pour prévenir les risques de brûlure, n’enlevez ou ne
déplacez JAMAIS les grilles lorsque le four est en
marche ou lorsqu’il refroidit.
9 ATTENTION
N’utilisez jamais de papier d’aluminium pour recouvrir
les grilles du four ou chemiser le four. N’enlevez pas
l’élément du grilloir du four électrique. L’utilisation
inadéquate de papier d’aluminium peut endommager
le four.
Positionner les grilles du four
• Placez correctement les grilles dans le four. La position
adéquate des grilles dépend de la recette et du mode
de cuisson.
• Les positions des grilles dans le four sont numérotées
de bas en haut, comme un ascenseur.
• La position no 3 est la position la plus fréquemment
utilisée.
• Introduisez la ou les grilles à la position voulue avant
d’allumer le four.
IMPORTANT : Enlevez toujours les grilles avant de
procéder à l’autonettoyage du four. Si les grilles
coulissantes restent dans le four pendant l’autonettoyage,
les lubrifiants du mécanisme de glissement de chaque
grille seront endommagés et le fini se décolorera.
Fonctionnement automatique du ventilateur de
refroidissement
Le ventilateur de refroidissement tourne pendant tous les
modes de cuisson. On peut l'entendre fonctionner et
sentir parfois de l'air chaud s'échapper de l'évent du four.
Le ventilateur peut également fonctionner une fois le four
éteint.
Évent du four
L'évent du four se trouve au bas de l'unité. De l'air chaud
peut s'échapper de l'évent avant, pendant et après la
cuisson. Il est normal de voir de la vapeur s'échapper de
l'évent et de la condensation peut se former à cet endroit.
Cette zone peut devenir très chaude pendant l'utilisation
du four. Ne pas obstruer l'évent car il est indispensable à
la bonne circulation de l'air.
Ventilateur à convection
Première utilisation
Avant de faire cuire au four ou de rôtir, vous devriez
allumer le four et l’élément de voûte pour brûler les huiles
utilisées lors de la fabrication à l’aide de l’une des
méthodes suivantes :
Le ventilateur à convection fonctionne pendant tous les
modes de cuisson à convection. Lorsque le four est en
mode de cuisson par convection, le ventilateur s'arrête
automatiquement lorsque la porte est ouverte. Il
fonctionne également pendant l'autonettoyage.
Page. 71
Page 72

Utilisation de la table de cuisson
Brûleurs STAR® scellés
9 AVERTISSEMENT
Pour prévenir toute brûlure, éviter de toucher les
chapeaux et les grilles des brûleurs lorsqu’ils sont
chauds. Éteignez la table de cuisson et laissez les
brûleurs refroidir.
9 AVERTISSEMENT
Pour prévenir toute brûlure, éviter de toucher les
chapeaux et les grilles des brûleurs lorsqu’ils sont
chauds. Éteignez la table de cuisson et laissez les
brûleurs refroidir.
Pour assurer un fonctionnement approprié, les chapeaux
des brûleurs doivent être placés adéquatement sur leur
base. Si le chapeau n’est pas placé adéquatement, l’un ou
l’autre des problèmes suivants pourrait survenir :
• Les flammes du brûleur sont trop hautes.
• Des flammes excessives jaillissent du brûleur.
• Le brûleur ne s’allume pas.
• Les flammes du brûleur sont inégales.
• Le brûleur émet des odeurs.
2. Placer le capuchon de brûleur délicatement sur la
base de manière à ce que les pattes de la base du
brûleur s'ajustent parfaitement dans la fente du
capuchon de brûleur.
Vérification de la position des chapeaux des brûleurs
• Vérifiez chaque brûleur pour vous assurer qu’il n’y a
pas d’espace entre le chapeau et la base du brûleur.
Voir Figure pour des exemples de chapeau de brûleur
correctement ou incorrectement placés.
• Vous pouvez essayer de déplacer délicatement les
chapeaux des brûleurs latéralement pour vous assurer
qu’ils sont placés correctement sur leur base.
• Lorsqu’ils sont bien placés, les chapeaux des brûleurs
sont droits sur la base et couvrent complètement la
base du brûleur en forme d’étoile lorsque vous les
regardez d’en haut.
Mise en place des capuchons de brûleur
Chaque capuchon comporte une lettre (B, D, ou F) coulée
dans la partie inférieure du capuchon correspondant à une
lettre (B, D, ou F) coulée dans la base du brûleur solidaire
de l'appareil.
Placez sur les chapeaux de brûleurs
1. Placer chaque capuchon de brûleur sur la base du
brûleur correspondant selon la lettre marquée sur
chacun d'eux.
Positionnement des grilles des brûleurs
Pour installer les grilles des brûleurs
1. Positionnez-les avec le côté plat vers le bas et alignezles dans la partie enfoncée.
2. Les grilles doivent s’appuyer les unes contre les autres
et contre les côtés de la partie enfoncée.
Page. 72
Page 73

Boutons de commande
Le symbole au-dessus de chaque bouton identifie soit la
position du brûleur sur la surface de cuisson ou le contrôle
de la grille, selon le modèle.
Fonctionnement des brûleurs
1. Poussez sur le bouton et tournez-le dans le sens
antihoraire jusqu’au réglage HI.
– L’allumeur du brûleur sélectionné émet des
étincelles pour allumer le brûleur.
– Une fois le brûleur allumé, l’allumeur cesse
d’émettre des étincelles.
2. Tournez le bouton à n’importe quel réglage entre HI
et SIM.
Éclairage LED (modèles sélectionnés)
Positionné juste sous le chanfrein arrondi, le panneau
d'éclairage à DEL fournit un éclairage localisé pour une
ambiance théâtrale.
L'interrupteur à bascule du panneau d'éclairage situé sur
le panneau de commandes allume ou éteint les DEL.
®
Brûleurs ExtraLow
• Lorsque le bouton est réglé juste en dessous du
repère XLO, la flamme reste allumée pendant environ
50 secondes et s’éteint pendant environ 10 secondes.
• Pour faire varier la faible chaleur requise en fonction
de l’aliment et de la quantité, vous pouvez régler la
commande à n’importe quel point entre XLO sur le
bouton.
Techniques ExtraLow
• Pour maintenir une chaleur basse ou pour faire
mijoter, portez les aliments à ébullition. Remuez bien,
couvrez le récipient, puis baissez le réglage en plaçant
le bouton juste en dessous de XLO.
• Si vous utilisez un récipient surdimensionné, vos
aliments mijoteront principalement au centre de celuici. Pour homogénéiser la température de l'ensemble,
remuez pour ramener les aliments se trouvant sur les
bords vers le centre.
• Quand un plat mijote, il est normal de le brasser de
temps à autre, surtout s'il doit mijoter pendant
plusieurs heures, comme dans le cas de haricots ou
d'une sauce à spaghetti maison.
• Il est normal de ne pas voir de bulles à la surface après
avoir remué les aliments.
• Il peut y avoir des bulles quand la flamme est allumée,
qui disparaissent quand elle est éteinte. Même quand
elle est éteinte, de la vapeur et un léger frémissement
seront perceptibles à la surface du liquide.
®
Les contrôles pour les
brûleurs de gauche, avant et
arrière, ont les mêmes
réglages que les réglages
standards LO.
Le dessin montre la gamme supplémentaire de réglage du
bouton entre les repères XLO. Lorsque le bouton est placé
sur cette gamme, la flamme s’allume et s’éteint.
La modification des durées pendant lesquelles la flamme
reste allumée/éteinte permet de réduire davantage la
quantité de chaleur et de cuire des aliments délicats. Le
réglage très bas est utile pour faire mijoter, pocher, fondre
du chocolat et du beurre, maintenir la température des
plats préparés sans qu'ils roussissent ou brûlent, etc.
®
Fonctionnement du brûleur ExtraLow
• XLO, le réglage le plus bas, fonctionne par cycles
d’une minute avec alternance de flamme allumée
pendant environ 10 secondes suivies d’environ 50
secondes de flamme éteinte.
®
POWERBOOST
(modèles
sélectionnés)
Le bouton de commande
POWERBOOST, ou XHI, est
pratique pour rapidement faire
bouillir de l’eau, saisir des steaks,
faire sauter des légumes, etc. Les
fonctions SIM et XLO s’utilisent de
la même manière que sur les
autres brûleurs.
Rallumage automatique
Chaque brûleur STAR comporte son propre allumeur
électronique qui produit des étincelles lorsque le bouton
est activé. Les brûleurs doivent s’allumer en 4 secondes ou
moins. Si le brûleur ne s’allume pas, assurez-vous que le
chapeau est correctement posé sur sa base.
Si un ou plusieurs brûleurs s’éteignent, l’allumeur
électronique produit automatiquement des étincelles
pour rallumer la flamme. Ne touchez pas aux brûleurs
pendant que les allumeurs produisent des étincelles.
Page. 73
Page 74

9 ATTENTION
Ne touchez pas les brûleurs pendant que les allumeurs
produisent des étincelles.
IMPORTANT :
• Pour assurer une combustion adéquate, n'utilisez pas
la surface de cuisson si la grille des brûleurs n'est pas
en place.
• La combustion et l'allumage du brûleur produisent un
léger bruit. Cela est normal.
• Un bruit audible peut être entendu lorsque le brûleur
est mis hors circuit. Ce bruit peut être plus fort avec le
gaz LP que le gaz naturel. Ceci est normal.
Hauteur de la flamme
• La hauteur correcte de la flamme dépend : (1) de la
taille et du matériau du récipient utilisé; (2) des
aliments à cuire; et (3) de la quantité de liquide dans le
récipient.
• La flamme ne doit pas dépasser les côtés de la base
du récipient.
• Utilisez une flamme basse ou moyenne pour les
récipients dont le matériau conduit lentement la
chaleur, comme l’acier émaillé ou la vitrocéramique.
Description de la flamme
Caractéristiques de la flamme
Panne de courant
• En cas de panne de courant, seuls les brûleurs
standards peuvent être allumés manuellement.
Chacun d’eux doit être allumé individuellement.
• Si une panne de courant survient pendant que vous
utilisez la cuisinière, tournez tous les boutons à la
position OFF.
• Vous pouvez allumer les brûleurs STAR
approchant une allumette enflammée près des orifices
et en tournant le bouton à la position HI. Attendez
que la flamme soit allumée tout autour du chapeau du
brûleur avant de la régler à la hauteur voulue.
• N’essayez pas d’allumer les deux brûleurs XLO de
gauche et les deux brûleurs XLO de droite pendant
une panne de courant. Ces brûleurs sont munis de la
fonction ExtraLow et ne peuvent être allumés
manuellement.
• Si un brûleur ExtraLow est allumé pendant une panne
de courant, il ne peut être remis en circuit tant que le
bouton n’est pas réglé à la position OFF.
• La plaque chauffante et le gril ne peuvent être utilisés
pendant une panne de courant.
• Si vous détectez une odeur de gaz, consultez les
Instructions de Sécurité.
9 AVERTISSEMENT
En cas de panne de courant, mettez tous les boutons
à la position OFF. Seuls les brûleurs standards STAR
peuvent être allumés manuellement.
®
standards en
Flamme jaune :
Réglage nécessaire.
Pointe jaune sur cône
extérieur :
Normal pour gaz LP.
Flamme bleue :
Normal pour gaz naturel.
• Si la flamme est complètement ou presque jaune,
assurez-vous que le régulateur est réglé pour le
combustible approprié. Après le réglage, vérifiez de
nouveau.
• Des rayures de couleur orangée sont normales
pendant la mise en marche initiale.
• Laissez l'appareil fonctionner de 4 à 5 minutes et
évaluez de nouveau avant d'effectuer les réglages.
• La flamme des brûleurs doit être bleue sans pointe
jaune. Elle devient parfois partiellement orange : cela
indique que des impuretés flottant dans l’air sont en
train de se consumer. Elles disparaîtront avec l’usage.
• Avec le gaz propane, il est normal qu’il y ait un peu de
jaune dans le cône primaire.
• La flamme doit brûler tout autour du chapeau du
brûleur. Si ce n’est pas le cas, assurez-vous que le
chapeau est bien posé sur la base et que les orifices
ne sont pas bouchés.
• La flamme doit être stable, ne pas voltiger ni faire de
bruit excessif.
Page. 74
Page 75

Récipients recommandés
9 MISE EN GARDE
Pour éviter tout risque de dommages sérieux à
l’appareil ou à un récipient, observez les consignes
suivantes:
• Les grands récipients, les plaques à biscuits, etc. ne
doivent pas être utilisés sur la surface de cuisson.
• Placez les grandes casseroles de façon décalée
lorsque vous utilisez la surface de cuisson.
• Choisissez une casserole dont la base correspond au
diamètre de la flamme. La flamme doit être égale ou
légèrement plus petite que la base du récipient. Des
récipients surdimensionnés ou sous-dimensionnés
nuisent aux résultats de la cuisson. Une base d’un
diamètre de 5½ po (14 cm) est généralement la plus
petite taille conseillée.
• Évitez d’utiliser un réglage de flamme intense lors de
l’utilisation d’un poêlon plus grand que la grille ou qui
occupe plus que l’espace d’un seul brûleur, comme
une plaque, pour de longues périodes. Cela peut
générer une mauvaise combustion et des vapeurs
nocives.
• L’assise du récipient est un facteur important de
stabilité et d’uniformité de la cuisson. La poignée ne
doit pas être plus lourde que le récipient, car celui-ci
pourrait pencher sur un côté. Le récipient doit reposer
bien à plat sur la grille sans se balancer ni être
instable.
• Ne laissez pas du plastique, du papier ou du tissu
entrer en contact avec une grille de brûleur chaude. Ils
pourraient fondre ou s'enflammer.
• Des récipients de qualité professionnelle à poignée
métallique sont recommandés, car les poignées en
plastique risquent de fondre ou de se déformer si la
flamme déborde du récipient. Des récipients de
qualité professionnelle sont en vente dans les
magasins de fournitures pour restaurant et dans les
boutiques gastronomiques.
• Tous les récipients utilisés doivent posséder les
caractéristiques suivantes : bonne conductivité de la
chaleur, bonne assise, dimensions adéquates du
diamètre de la base, base lourde et fond plat, et
couvercle bien adapté.
• Pour de meilleurs résultats de cuisson, la flamme ne
doit pas déborder du fond de la casserole.
• L’aluminium et le cuivre sont des matériaux qui
conduisent la chaleur rapidement et uniformément. Le
fond des récipients est souvent fabriqué avec ces
métaux. Ils peuvent également être insérés entre des
couches d’acier inoxydable.
• Un fond plat et lourd est plus stable lorsque chauffé.
Les casseroles déformées, légères et bosselées ne
permettent pas une cuisson uniforme. Chauffez et
refroidissez les casseroles graduellement pour éviter
les changements soudains de température, qui
peuvent déformer les casseroles. Ne mettez pas d’eau
froide dans une casserole chaude.
• Un couvercle adapté au diamètre d’un récipient
raccourcit le temps de cuisson et permet l’utilisation
de réglages plus bas.
• Les aliments enveloppés dans du papier aluminium ne
doivent pas être placés directement sur la grille du
brûleur, car l’aluminium peut fondre pendant la
cuisson.
Page. 75
Page 76

Récipients pour spécialités
Woks
• Les woks à fond plat ou rond avec un anneau de
support peuvent être utilisés sur tous les modèles. Un
anneau de support doit être utilisé avec les woks à
fond rond.
• Le wok et l’anneau à wok en fonte revêtu d’une
couche de porcelaine sont vendus séparément.
Cocottes et marmites
• Choisissez une base dont le diamètre dépasse au
maximum de 2 po (51 mm) de la grille.
Bain-marie de dimensions standards
Conseils d’utilisation:
• Il est préférable d’utiliser un récipient à fond plat
qu’un récipient à fond concave, convexe ou ondulé.
• Si vous utilisez deux cocottes en même temps, placezles sur des brûleurs décalés. Ne bloquez pas la
circulation d’air autour des brûleurs. La flamme a
besoin d’une certaine quantité d’air pour bien brûler.
• Mettez un couvercle sur la cocotte lorsque vous
portez son contenu à ébullition.
• Quand le contenu bout au réglage HI, baissez la
flamme le plus possible pour maintenir à ébullition ou
maintenir la pression.
• La cuisson à la cocotte produit de grandes quantités
de vapeur. Faites attention pour ne pas vous brûler.
• 21 à 22 pintes (19,95 à 20,9 litres) avec une base de
11-12 po (279 à 305 mm) et une hauteur de 9 à 11 po
(229 à 279 mm).
Cocotte-Minute de dimensions standards
• 8 à 22 pintes (7,6 à 20,9 litres) avec une base de 8 à
11 po (20,3 à 27,9 cm) et une hauteur de 6,5 à 12 po
(165 à 305 mm).
Conseils de cuisson
• Consultez le tableau des page 77 pour vous guider.
Les réglages à utiliser varient selon l’ustensile choisi et
la température initiale des aliments.
• Dans le tableau, le « Réglage final » est séparé pour
les brûleurs standards et les brûleurs ExtraLow
Selon le cas, ce réglage sera identique ou différent.
• Le réglage ExtraLow des brûleurs peut être un
réglage de cuisson ou de maintien de température.
• Augmentez ou diminuez la flamme progressivement.
Laissez le temps au récipient et aux aliments de réagir
au nouveau réglage.
®
.
Page. 76
Page 77

Conseils de cuisson – brûleurs de la table
de cuisson
Aliments Réglage initial
Boissons
Cacao
Pain
Pain doré, Crêpes,
Sandwiches grillés
Beurre
À fondre
Céréales
Semoule de maïs,
gruau, avoine
Chocolat
À fondre
Desserts
Bonbons
Pouding et
mélange pour
garniture à tarte
Pudding LO à MED LO – Faire bouillir
Oeufs
À la coque
Frits, brouillés LO à MED – Faire fondre le
Pochés HI – Porter à ébullition,
Viande, poisson,
volailles
Bacon, Saucisses,
galettes
Braiser : steak
suisse, rôti à la
cocotte, ragoût
Grillade rapide au
poêlon; steaks
pour déjeuner
Friture : poulet MED HI – Faire chauffer
Grande friture :
crevettes
MED – Chauffer le lait,
couvrir
MED – Préchauffer le poêlon LO à MED – cuire Identique aux brûleurs standards
LO – pour commencer à faire
fondre
HI – Couvrir, porter l’eau à
ébullition, ajouter les
céréales
XLO – peut être remué pour
faire fondre plus vite
LO à MED – cuire selon la
recette
LO à MED LO – suivre les
indications sur l’emballage
le lait
MED HI – couvrir les œufs
avec de l’eau, couvrir, porter
l’eau à ébullition
beurre, ajouter les œufs
ajouter les œufs
HI – Jusqu’à ce que la viande
commence à grésiller
MED HI – Faire fondre la
graisse, faire revenir à
MED HI à HI, ajouter du
liquide, couvrir
MED HI– préchauffer le
poêlon
l’huile puis faire dorer à MED
MED HI – Faire chauffer
l’huile
Réglage final –
brûleurs standards
LO – Finir de chauffer XLO – Maintenir au chaud, couvrir
Laisser fondre
LO à MED – terminer la
cuisson selon les
instructions sur
l’emballage.
LO à MED Identique aux brûleurs standards
LO Identique aux brûleurs standards
LO Identique aux brûleurs standards
LO – pour terminer la
cuisson
LO à MED – pour
terminer la cuisson
LO à MED – pour
terminer la cuisson
MED à MED HI – frire
rapidement au poêlon
LO – couvrir pour
terminer la cuisson
MED à MED HI – pour
maintenir la température
XLO – Pour maintenir la
température, couvrir*
XLO – Laisser fondre
XLO – Pour maintenir la température
Identique aux brûleurs standards
Identique aux brûleurs standards
Identique aux brûleurs standards
XLO Laisser mijoter jusqu’à ce que la
viande soit tendre
Identique aux brûleurs standards
Identique aux brûleurs standards
Identique aux brûleurs standards
Réglage final –
brûleurs XLO
Page. 77
Page 78

Aliments Réglage initial
Réglage final –
brûleurs standards
Réglage final –
brûleurs XLO
Grillade au
poêlon :
MED HI – Préchauffer le
poêlon
MED – pour brunir la
viande
Identique aux brûleurs standards
XLO – pour maintenir
côtelettes
d’agneau, steaks
minces,
hamburgers,
saucisses en
chapelet
Pocher : poulet,
entier ou
MED HI – Couvrir, porter à
ébullition
Pour terminer la cuisson
morceaux, poisson
Faire mijoter :
poulet à
l’étouffée, corned-
HI – Couvrir, porter à
ébullition
XLO - Pour mijoter lentement
XLO - Pour maintenir la chaleur,
couvrir
beef, langue, etc.
Pâtes
Macaronis,
HI – Porter l’eau à ébullition,
ajouter les pâtes
MED à HI – pour
maintenir à ébullition
Identique aux brûleurs standards
nouilles,
spaghettis
Cocotte-minute
Viande
Légumes HI – faire monter la pression MED LO à MED –
MED HI à HI – faire monter la
pression
LO à MED – maintenir la
pression
Identique aux brûleurs standards
Identique aux brûleurs standards
maintenir la pression
Riz HI – Couvrir, porter l’eau et le
riz à ébullition.
Sauces
Sauce tomate
Sauce blanche, à
la crème,
MED HI – cuire la viande/les
légumes selon la recette
MED – Faire fondre la
graisse, suivre la recette
Réduire la chaleur à SIM.
Couvrir et faire cuire
jusqu’à ce que l’eau soit
absorbée
LO pour faire mijoter XLO – laisser mijoter sans couvercle
LO – pour terminer la
cuisson
Faire cuire selon les instructions du
sachet
XLO – Pour maintenir la
chaleur, couvrir
pour que la sauce épaississe
XLO – Pour maintenir la
chaleur, couvrir
béarnaise
Hollandaise XLO XLO – Pour maintenir la
chaleur, réglage le plus bas
Soupes, bouillons HI – Couvrir, porter à
ébullition
Légumes
Frais
HI – Couvrir, porter l’eau et
les légumes à ébullition
Congelés HI – Couvrir, porter l’eau et
les légumes à ébullition
LO pour faire mijoter Mijoter à XLO – Pour maintenir la
chaleur, couvrir
LO à MED – faire cuire
jusqu’à ce qu’ils soient
tendres
LO à MED – faire cuire
Identique aux brûleurs standards
XLO – pour maintenir la
chaleur, couvrir
Identique aux brûleurs standards
selon les instructions du
paquet
Grande friture HI – Faire chauffer l’huile MED à MED HI – pour
Identique aux brûleurs standards
conserver la température
de friture
Sautés MED HI – Faire chauffer
l’huile ou faire fondre le
beurre, ajouter les légumes
Revenus à la poêle HI – Faire chauffer l’huile,
ajouter les légumes
LO à MED – laisser cuire
jusqu’au point de
cuisson désiré
HI à HI – pour terminer la
cuisson
Identique aux brûleurs standards
Identique aux brûleurs standards
Page. 78
Page 79

Plaque chauffante électrique
NOTE : Seulement sur certains modèles.
Description
Les largeurs de la plaque varient.
Une planche à découper en érable, un couvercle en acier
inoxydable sont disponibles comme accessoires et
peuvent être achetés séparément. La planche à découper
et le couvercle doivent être enlevés avant d’utiliser la
plaque chauffante.
9 AVERTISSEMENT
L’élément de la plaque chauffante reste chaud après
utilisation. Prévoyez suffisamment de temps pour que
tous ses composants refroidissent avant de les
nettoyer.
9 MISE EN GARDE
Pour éviter tout risque de blessure, n’utilisez jamais la
plaque chauffante sans sa plaque. N’utilisez jamais la
plaque chauffante d’une manière non indiquée dans le
guide d'utilisation et d'entretien.
3. Déplacer de la plaque chauffante sur le côté.
4. Ajustez les deux vis situées sous la plaque, à l’arrière
de celle-ci. Commencez par dévisser les vis d’un demi-
tour.
5. Les ajustements subséquents devraient se faire par
quart de tour jusqu’à ce que l’eau coule dans les
collecteurs de graisse.
La plaque peut être utilisée sans beurre, margarine ou
huile. Toutefois, une petite quantité peut être utilisée pour
donner du goût aux aliments.
Le plateau (ou le gril) doit toujours être en place lors de
l’utilisation de la plaque chauffante.
La plaque chauffante est ajustée électroniquement aux
températures indiquées sur les boutons, de 150°F à 500°F
(66°C à 260°C).
Les modèles de 61 cm (24 po) disposent de deux
résistances chauffantes avec commande indépendante.
Cette fonction permet de cuire simultanément des
aliments à différentes températures.
Préparation de la plaque
Préparer la de la plaque
1. Avant d’être utilisée, la plaque chauffante doit être
lavée à l’eau chaude savonneuse, puis rincée à l’eau
claire.
2. Assurez-vous que la plaque chauffante est bien
ajustée en versant deux cuillerées d’eau à l’arrière de
la plaque.
• L’eau devrait lentement couler vers les collecteurs
de graisse.
N'utilisez PAS des ustensiles métalliques sur la surface de
la plaque chauffante. Prenez garde de ne pas
endommager la surface avec les ustensiles. Ne coupez pas
directement d’aliments sur la plaque chauffante.
AVIS : Le rendement de la plaque chauffante ou du gril
peut varier si la circulation d’air près de l’appareil est trop
élevée. Une circulation d’air excessive pourrait provenir
d’un ventilateur de plafond ou d’un appareil de
climatisation soufflant sur la surface de cuisson. Cela
pourrait prolonger le temps d’échauffement ou faire en
sorte que la température de la plaque chauffante ne
corresponde pas à ce que le réglage des boutons de
commande indique.
NOTE : Une hotte dûment installée n’est pas considérée
comme une source de circulation d’air excessive.
Page. 79
Page 80

Conseils de cuisson 12'' plaque chauffante
Cuisson sur la plaque chauffante
Aliment Réglage
Œufs 325° – 350°F
Bacon, saucisses à déjeuner 450° – 475°F
Sandwichs grillés 375° – 400°F
Poitrines de poulet désossées 425° – 450°F
Côtelettes de porc désossées de 1 po
(25,4 mm) d’épaisseur
Steaks de 1 po (25,4 mm) d’épaisseur 450° – 475°F
Boulettes de bœuf haché de 6 onces 450° – 475°F
Boulettes de dinde hachée, 6 onces 450° – 475°F
Hot Dogs 350° – 375°F
Tranches de jambon de 1/2 po (12,7 mm)
d’épaisseur
Crêpes, pain doré 400° – 425°F
Pommes de terre, pommes de terre
rissolées
* Pour garantir une cuisson uniforme, assurez-vous que
l'épaisseur des aliments est uniforme.
Conseils de cuisson 24'' plaque chauffante
Aliment Réglage
Œufs 275° – 300°F
Bacon, saucisses à déjeuner 400° – 450°F
Sandwichs grillés 350° – 375°F
Poitrines de poulet désossées 400° – 425°F
Côtelettes de porc désossées de 1 po
(25,4 mm) d’épaisseur
Steaks de 1 po (25,4 mm) d’épaisseur 425° – 450°F
425° – 450°F
350° – 375°F
400° – 425°F
400° – 425°F
1. Tournez le bouton à la température de cuisson
appropriée pour préchauffer la plaque chauffante.
2. Préchauffez le plaque chauffante.
3. Ajoutez du beurre, de la margarine, de l’huile ou de la
graisse végétale, si désiré.
Utilisez le réglage de température le plus bas possible.
Vous pourriez avoir à modifier les recettes, car le
revêtement antiadhérent brunit et saisit les aliments à de
basses températures.
Recommandations pour le nettoyage
• N’immergez JAMAIS une plaque chauffante chaude
dans l’eau froide. La plaque d’aluminium pourrait
gondoler ou se fissurer.
•Ne faites PAS chauffer d'ustensiles de cuisson sur la
plaque à griller.
•
Ne nettoyez
chauffante dans le four en mode autonettoyage
• Prenez garde de ne pas endommager la surface avec
les ustensiles.
• Ne coupez pas directement d’aliments sur la
plaque chauffante.
• Ne pas utiliser des ustensiles en métal.
• Utilisez des ustensiles de plastique ou de bois
pour éviter d'égratigner la surface antiadhérente.
• Vous pouvez laver la plaque chauffante au lavevaisselle. Cependant, nous recommandons de la laver
à la main.
AUCUNE
partie du gril ou de la plaque
.
Plateau à graisse de la plaque chauffante
Boulettes de bœuf haché de 6 onces 400° – 425°F
Boulettes de dinde hachée, 6 onces 400° – 425°F
Hot Dogs 300° – 350°F
Tranches de jambon de 1/2 po (12,7 mm)
d’épaisseur
Crêpes, pain doré 350° – 375°F
Pommes de terre, pommes de terre
rissolées
* Pour garantir une cuisson uniforme, assurez-vous que
l'épaisseur des aliments est uniforme.
Page. 80
350° – 375°F
400° – 425°F
Page 81

• Nettoyez le plateau à graisse après chaque utilisation.
Lorsque vous le retirez en l’inclinant, faites attention
pour ne pas que son contenu se déverse.
• Le plateau de la plaque chauffante et son plateau à
graisse sont lavables au lave-vaisselle.
• Lorsqu’elle a refroidi, versez la graisse dans un
contenant résistant à la graisse avant de la jeter.
Instructions de graissage de la plaque
chauffante
Si la plaque chauffante perd ses propriétés antiadhérentes
au fil du temps, suivez les instructions suivantes pour les
lui redonner. Pour assurer le rendement optimal et la
longévité de votre plaque chauffante, suivez ces
instructions simples de nettoyage et de graissage.
REMARQUE : Les plaques à frire de 24 po (61 cm) sont
trop grandes pour procéder à un conditionnement dans la
cavité du four. Par conséquent, prenez soin de ne pas
surchauffer le four ni d'endommager les revêtements antiadhésifs lors du préchauffage du four et de la cuisson.
Graissage de la plaque chauffante
Le graissage est un processus par lequel une couche de
graisse animale ou d’huile végétale est appliquée et cuite
sur un ustensile de cuisson. La couche d’huile fournit une
surface antiadhérente.
1. Utilisez un essuie-tout pour appliquer une couche
mince et uniforme de lard, de Crisco
d’olive sur la surface de la plaque chauffante.
®
, ou d’huile
Préparation de la plaque chauffante pour le graissage
La plaque chauffante doit être propre et tous les résidus
doivent être enlevés avant de procéder au graissage.
1. Utilisez un mélange de gros sel avec un peu de
vinaigre blanc pour déloger les résidus de la plaque
chauffante.
2. Rincez en profondeur avec de l’eau claire.
3. Séchez totalement la plaque chauffante.
2. Faites cuire la plaque chauffante à 350 °F pendant une
heure.
3. Retirez la plaque chauffante du four et laissez-la
refroidir à la température ambiante.
4. Appliquez une deuxième couche de graisse ou d’huile
et faites cuire la plaque chauffante à 350 °F pendant
une autre heure.
5. Répétez le processus au moins une autre fois pour un
total de trois couches d’huile ou de graisse.
Après le graissage
1. Après avoir fait cuire votre plaque chauffante, laissezla refroidir et nettoyez-la avec un chiffon humide.
Laissez-la sécher.
2. Ajoutez une mince couche d’huile ou de graisse avant
d’entreposer la plaque chauffante dans un endroit
frais et sec.
3. Ce processus redonnera à la plaque chauffante ses
propriétés antiadhérente. Le rendement de la plaque
chauffante s’améliorera avec d’autres graissages.
4. Pour dégraisser la plaque chauffante avant de
procéder à son graissage, utilisez un mélange de sel
et de vinaigre.
Page. 81
Page 82

Gril électrique
Assemblage du gril
Description
NOTE : Seulement sur certains modèles.
9 AVERTISSEMENT
• Pour éviter tout risque de blessure, ne faites JAMAIS
fonctionner le gril s'il n'y a pas de grilles ou de plaque
chauffante installées.
• Ne laissez JAMAIS le gril sans surveillance lorsque
vous cuisinez.
• Faites attention lorsque vous utilisez de l'huile et de la
graisse. Lorsqu'ils sont surchauffés, les huiles et la
graisse peuvent provoquer des incendies.
• N'utilisez PAS de copeaux de bois, pierres de lave, ou
de briquettes de charbon. N'utilisez que les briquettes
de céramique (PABRICKBKN) recommandées.
• N'utilisez PAS de plats, casseroles, poêlons ou autre
ustensile sur le gril.
• N'utilisez jamais du papier d'aluminium pour couvrir
les grilles ou envelopper le gril. Vous pourriez
endommager le gril et causer un incendie si de la
chaleur reste emprisonnée.
• Vérifiez le plateau à graisse avant chaque utilisation.
Une trop grande quantité de graisse dans le plateau
peut causer un risque d'incendie.
• Si des flammes apparaissent, nettoyez le gras
accumulé sur les grilles, le plateau à graisse, le panier
des briquettes de céramique et les autres surfaces.
• L'accumulation de graisse favorise la formation de
flammes et de fumée pendant la cuisson.
• Vous devez remplacer les briquettes de céramique
lorsqu'elles sont noires, ce qui signifie qu'elles sont
saturées de gras. Elles peuvent alors générer
beaucoup de fumée ou prendre feu pendant le
fonctionnement de l'appareil.
Les grilles du gril encastrable sont faites de fonte de
qualité professionnelle. Ce métal fait en sorte que les
grilles répartissent uniformément la chaleur et sont faciles
à nettoyer.
Il est possible d'installer une plaque chauffante de fonte
antiadhérente, vendue séparément. Consultez les
instructions de l'accessoire de la plaque chauffante pour
obtenir plus de détails.
6
4
3
2
5
1
1 Boîtier du gril
2 Plateau à graisse
3 Panier des briquettes de céramique
4 Briquettes de céramique
5 Éléments (x2)
6 Grilles du gril (x2)
Pour l'assemblage
1. Effectuez la rotation des éléments (5) et enlevez le
briquettes de céramique (3) se trouvant à l'intérieur du
boîtier du gril (1).
2. Installez le plateau à graisse (2) sous le boîtier du gril
(1). (Le plateau à graisse est emballé dans la grande
boîte en carton qui se trouvait sur le dessus de la
cuisinière.) Alignez les saillies du plateau à graisse (2)
avec les cavités situées sous le boîtier (1).
3. Mettez le briquettes de céramique (4) dans le boîtier
du gril (1).
4. Disposez les briquettes de céramique (4) dans le
panier à briquettes (3), en une seule couche, de façon
à ce que chacune d'elles touche les autres briquettes
adjacentes. Les briquettes de céramique ne doivent
pas entrer en contact avec les éléments chauffants.
5. Rabattez les deux éléments chauffants du gril vers le
bas (5). Les éléments chauffants du gril doivent être à
plat. Les supports doivent reposer à l'intérieur des
crans latéraux.
6. Installez les grilles du gril (6). Assurez-vous que les
grilles sont installées de niveau dans le boîtier du gril
(1).
Page. 82
Page 83

IMPORTANT :
• Si des flammes se forment pendant l’utilisation du gril,
éteignez l’appareil et retirez les aliments. Prenez
garde de ne pas vous blesser lorsque vous retirez les
aliments.
• Souvent, les flammes s’éteignent d’elles-mêmes en
quelques minutes une fois que les accumulations de
graisse se sont consumées. Ne laissez pas le gril sans
surveillance avant que les flammes ne se soient
éteintes. Vous pouvez étouffer les flammes en les
saupoudrant d’une généreuse couche de bicarbonate
de soude ou de sel.
• Si des flammes se forment, vous devriez remplacer les
pierres à lave ou les briquettes de céramique et
nettoyer le gras accumulé sur les grilles, le plateau à
graisse, le panier briquettes de céramique et les
autres surfaces avant d’utiliser à nouveau le gril. Les
accumulations de graisse favorisent la formation de
flammes et de fumée pendant la cuisson.
• Séchez les aliments humides avant de les mettre sur le
gril.
• Plus un aliment est humide, plus il est susceptible de
produire de la fumée.
• Lorsque vous utilisez le gril, la graisse qui s’échappe
des aliments peut s’enflammer brièvement.
9 AVERTISSEMENT
POUR ÉVITER TOUT RISQUE DE BRÛLURE :
• Utilisez les ustensiles appropriés avec de longues
poignées qui vous permettent de manier les
aliments loin de la chaleur et des flammes.
• NE portez PAS de vêtements amples lorsque vous
cuisinez.
• Ne laissez jamais le gril sans surveillance lorsque
vous cuisinez.
• Après chaque utilisation, enlevez les
accumulations de graisse sur la surface du gril et
dans les plateaux à graisse pour réduire les
risques d’incendie. Vous devriez également
nettoyer régulièrement la hotte et les surfaces
adjacentes au gril selon les recommandations du
manuel d’utilisation.
• Gardez un extincteur à portée de la main.
Fonctionnement du gril
1. Avant d'allumer l'appareil, assurez-vous qu'il y a des
briquettes de céramique l'appareil et que les deux
grilles du gril sont correctement installées.
2. Appuyez sur le bouton de réglage de température et
tournez-le à la température souhaitée.
• Les deux éléments chauffants du gril peuvent être
ajustés séparément. Cela vous permet de faire
griller des aliments à deux températures
différentes en même temps. Aussi, vous pouvez
utiliser une partie pour faire griller les aliments et
l'autre partie pour les garder chauds.
3. Lors de la première utilisation, faites chauffer le gril
pendant environ dix minutes pour éliminer les résidus
de fabrication et libérer les mauvaises odeurs.
4. Pour obtenir de meilleurs résultats, préchauffez le gril
avant de faire cuire des aliments.
9 ATTENTION
Nettoyez le gril après chaque utilisation. Laissez à
l'appareil le temps de refroidir avant de le nettoyer.
Conseils de grillade
• Préchauffez toujours le gril. Lorsque vous cuisinez à la
puissance maximale, préchauffez le gril à HIGH
pendant dix minutes. Lorsque vous cuisinez à intensité
moyenne, préchauffez le gril à HIGH pendant cinq
minutes, puis réduisez la température une fois que les
aliments sont sur le gril.
• Faites tremper les brochettes de bois dans de l'eau
pendant au moins 20 minutes avant de les mettre sur
le gril.
• Avant de faire griller des aliments, vous pouvez les
badigeonner d'huile résistant à la chaleur (comme de
l'huile d'arachides) ou les faire mariner. Assurez-vous
de ne pas utiliser trop d'huile ou de marinade, sans
quoi les aliments pourraient prendre feu et produire
beaucoup de fumée.
• Déposez les aliments directement sur les grilles du
gril. N'utilisez pas de papier d'aluminium ou de
plateaux.
• La viande salaisonnée, comme le jambon ou les
côtelettes de porc fumées, n'est pas faite pour être
grillée. Des composés chimiques mauvais pour la
santé peuvent se former lors de leur cuisson sur le gril.
• Pour éviter que les aliments ne s'enflamment, enlevez
l'excédent de gras avant de les faire griller.
• N'utilisez PAS de produits nettoyants sur les éléments.
S'il y a de la graisse sur les éléments, laissez-leur le
temps de brûler.
• Pour absorber le gras de la plaque chauffante,
saupoudrez-la avec du gros sel après chaque
utilisation.
Page. 83
Page 84

Recommandations pour la cuisson sur le gril
IMPORTANT :
• VOUS NE DEVRIEZ PAS UTILISER LE GRIL SANS UNE VENTILATION ADÉQUATE.
• Vous ne devriez pas préparer d’aliments à forte teneur en gras sur un gril intérieur. Le fait de faire griller des aliments
à forte teneur en gras (comme certains types de bœuf haché, saucisses, etc.) augmente les possibilités de formation
de fumées et de flammes.
Temps de
Aliment* Réglage**
Bœuf
Hamburgers, ¾'' (2 cm) (à point) HIGH 12 – 14 Tourner une fois que du jus apparaît à la
Steak d'aloyau, 1½'' (4 cm) (à point) HIGH 20 – 22 Enlever l'excédent de graisse.
cuisson
(minutes)
Notes
surface.
Faux-filet ou surlonge, 1" (3 cm) (à
point)
Brochettes, steak (à point) HIGH 24 – 28 Tourner de temps en temps.
Porc
Côtelettes de porc, ¾'' (2 cm) HIGH 16 – 20 Enlever l'excédent de graisse.
Saucisses ou Bratwurst MED HIGH 16 – 20 Percer avant de griller.
Hot Dogs HIGH 6 – 8 Placer horizontalement sur le gril.
Volaille
Cuisses et pilons MED HIGH 34 – 38 Tourner de temps en temps, enlever l'excédent
Ailes de poulet, entières MED HIGH 18 – 22 Tourner de temps en temps.
Poitrines de poulet sans os, ½'' (1 cm) MED HIGH 20 – 24 Couper en filets de la même épaisseur avant de
Brochettes, poulet HIGH 30 – 33 Tourner de temps en temps.
Fruits de mer
Darnes, 2" (6 cm) MED HIGH 18 – 20 Badigeonner d'huile avant de faire griller.
Filets de poisson, ¾'' (2 cm) MED HIGH 16 – 20 Badigeonner d'huile avant de faire griller.
Brochettes de crevettes MED HIGH 10 – 14 Tourner de temps en temps.
Fruits et légumes frais
Champignons portobello HIGH 8 – 10 Badigeonner d’huile.
HIGH 10 – 12 Enlever l'excédent de graisse.
de peau.
faire cuire.
Poivrons, quartiers HIGH 8 – 10 Tourner de temps en temps.
Aubergine en tranches, ½'' (1 cm) HIGH 8 – 10 Badigeonner avec un peu d’huile.
Tomates, coupées en deux HIGH 8 – 10 Badigeonner d’huile.
Ananas en tranches HIGH 4 – 6 —
Pêches, coupées en deux HIGH 4 – 6 —
Autre
Pains à hot dog ou hamburger MED HIGH 4 – 6 Badigeonner de beurre.
Tofu ferme en tranches MED HIGH 8 – 12 Mettre en brochette pour une grillade facile.
* Pour une cuisson uniforme, veuillez bien répartir les aliments sur la surface de cuisson.
** Les réglages apparaissant dans le tableau ne devraient être considérés que comme des lignes directrices puisque la quantité de
chaleur requise peut varier selon le type et l'état des aliments.
Page. 84
Page 85

Utilisation du four
Symboles et descriptions
Symbole/Mode Définitions et recommandations
Cuisson Cuit les aliments avec de l’air chaud et sec. Différents
types d’aliments comme des gâteaux, des biscuits, des
pâtisseries, des pains éclair, des quiches et des
casseroles.
Cuisson conv. Semblable au mode Cuisson, mais un ventilateur à
l’arrière du four fait circuler l’air. Idéal pour les produits
boulangers comme les gâteaux, les pains de maïs, les
tartes, les pains éclair, les tourtes et les pains à la
levure.
Conv. vérit. Utilise la chaleur diffusée par un troisième élément
situé à l’arrière du four. La chaleur circule à l'intérieur
du four grâce au ventilateur à convection. Convient
tout particulièrement aux aliments en portions
individuelles comme les biscuits et les pâtisseries.
Gril Utilise la chaleur intense diffusée par l’élément
supérieur. Pour des pièces tendres et épaisses de
viande (1 po/2,5 cm ou moins) ou de volaille; faire
dorer le pain et les casseroles.
Gril ê conv. Allie la chaleur intense diffusée par l’élément supérieur
à l'air chaud qui circule sous l'action d'un ventilateur.
Pour des pièces tendres de viande (plus de 1 po/
2,5 cm), de volaille et de poisson. Ne convient pas au
brunissage.
Apprêt Fait lever la pâte levée et le pain au levain.
Élec-
trique
princi-
pale
Princi-
pal
gazier
Élec-
trique
secon-
daire
Gazier
secon-
daire
Rôtir Utilise davantage la chaleur intense diffusée par
l’élément supérieur, brunissage plus intense de
l’extérieur du mets. Idéal pour la viande, la volaille, les
morceaux moins tendres de viande et les légumes
rôtis.
Rôtir conv. Allie la chaleur de la sole et la chaleur plus intense
diffusée par l'élément supérieur (que celle de la
cuisson avec convection) à l'air chaud qui circule sous
l'action d'un ventilateur. Pour les morceaux tendres de
viande et de volaille et les légumes rôtis. La viande est
plus tendre et juteuse qu’en mode Rôtir.
Sabbath/Cuisson
prolongée
Garder chaud* Maintien une faible température pour maintenir les
Autonettoyage Le four atteint une température très élevée d’environ
Ce mode de cuisson aide l’utilisateur à se conformer
aux principes du Sabbath.
aliments chauds. Idéal pour les produits boulangers
comme les gâteaux, les pains de maïs, les tartes, les
pains éclair, les tourtes et les pains à la levure.
850 °F (454 °C) pour brûler les débris alimentaires.
Page. 85
Page 86

Symbole/Mode Définitions et recommandations
Électrique
princi-
pale
Princi-
pal
gazier
Élec-
trique
secon-
daire
Gazier
secon-
daire
Démarrage à
distance**
La fonction permet à l’utilisateur de démarrer, faire une
pause et mettre fin à des programmes du four, et ce à
distance par l’appli Home Connect.
Symbole de
préchauffage*
Sonde
Ce symbole s’affiche lorsque le four est en mode
préchauffage.
S’affiche à la détection d’une sonde.
thermométrique*
Minuterie de
cuisine*
La minuterie de cuisine fonctionne de façon
indépendante des autres fonctionnalités de l’appareil
électroménager.
Temps de cuisson* Affiche le temps restant du fonctionnement du four
avant qu’il ne s’arrête automatiquement.
Heure de fin * S’utilise lorsque le démarrage programme du four est
reporté. Affiche l’heure du jour à laquelle le four
s’éteindra automatiquement.
Verrouillage du
panneau
Verrouillage de
porte
Réparations à
distance
** Offert seulement pour les 48 po modèles.
Empêche toute mis sous tension du four ou bloque
toute modification accidentelle des réglages.
Symbole affiché au cours du mode d’autonettoyage et
après celui-ci alors que la porte est verrouillée.
Ce symbole est affiché lorsque le service après-vente
est connecté pour un accès à distance.
Page. 86
Page 87

Configuration initiale
TIMERS
SETTINGS ENTER
06:30Time o f Day
Press Enter to save
TIMERS
SETTINGS ENTER
englishLanguage
Press Enter to save
TIMERS
SETTINGS ENTER
frenchLanguage
Press Enter to save
TIMERS
SETTINGS ENTER
finished
fi8d
First start up
TIMERS
SETTINGS ENTER
06:30
Paramètres de démarrage
Vous pouvez accéder aux réglages à tout moment un
appuyant sur RÉGLAGES (SETTINGS) alors que l’appareil
électroménager est en mode Veille.
1. Raccordez l’appareil électroménager à l’alimentation
secteur.
2. Sélectionnez le paramètre voulu avec les gauche
).
( ou
– L’écran passe en mode Veille.
Assistant Home Connect
À propos de Home Connect
Pour certains modèles, l’assistant Home Connect fait
partie de l’installation initiale de l’appareil
électroménager. Si on saute l’installation de
Home Connect au cours du premier démarrage de
l’appareil électroménager, on peut y accéder par le menu
des RÉGLAGES (SETTINGS).
Il faut d’abord réussir l’installation de l’application
Home Connect sur un appareil mobile. Consultez la
section “Setting up Home Connect™” on page 44 pour
connaître l’ensemble des directives d’installation de
l’application Home Connect.
3. Modifiez le paramètre de réglage avec les droite ( ou
).
4. Effleurez ENTRÉE (ENTER).
Protection des données
Les catégories suivantes de données sont transmises au
serveur Home Connect lors de la première connexion de
l'appareil électroménager à un réseau local (WLAN)
communicant avec Internet (première inscription) :
• Identifiant unique de l'appareil électroménager
(composé des codes de l'appareil de même que
l'adresse MAC du module de communication Wi-Fi
installé).
• Le certificat de sécurité du module de communication
Wi-Fi (pour assurer une connexion informatique
sécurisée).
• Les versions actuelles du logiciel et du matériel
informatique de l'appareil électroménager.
• L'état de toute réinitialisation antérieure des
préréglages faits en usine.
La première inscription de l'appareil prépare l'utilisation
des fonctions Home Connect et ne sont nécessaires que
lors de la première utilisation des fonctions Home
Connect.
Page. 87
Page 88

Réglage du four
TIMERS SETTINGS ENTER
Bake
06:30
°
— — —
TIMERS SETTINGS ENTER
Bake
06:30
°
350
°
TIMERS
SETTINGS ENTER
Bake
06:30
°
350
°
Kitchen timer (minuterie
Mode de cuisson et température
1. Insérez la grille au niveau désiré et fermez la porte.
2. Tournez le bouton mode à CUISSON (BAKE), par
exemple.
3. Tournez le bouton de TEMPÉRATURE du four.
cuisine)
À propos la minuterie de cuisine
• La Minuterie peut être réglée jusqu’à 12 heures.
• Elle peut être utilisée même si la cuisinière est en
marche et est indépendante de toutes les autres
fonctions.
• L’appareil électroménager ne s’allume pas et ne
s’éteint pas automatiquement.
Oven timer (minuterie de
four)
À propos la minuterie de four
• La minuterie du four sert à éteindre mécaniquement le
four lorsque le temps de cuisson désiré est complété.
• La minuterie du four n’est disponible que pour les
fonctions de cuisson au four, de cuisson par
convection et de rôtissage. Elle ne peut fonctionner
avec les fonctions de grilloir ou d’autonettoyage.
– L’indicateur de température commencera à
bouger vers le réglage de température désirée.
L’indicateur de température reflète le réglage de
température.
– L’aiguille de l’indicateur de température se
déplacera vers la nouvelle température choisie si
le réglage de température est plus haut ou plus
bas. La jauge ne sert qu’à des fins de référence.
– La barre de préchauffage se déplace vers la
droite.
– Ê la fin de préchauffage du four, la barre de
préchauffage et le symbole s’estompent.
4. Une fois le four chaud, insérez les aliments dans la
cavité.
Réglage des minuteries de cuisine ou de four :
1. Effleurez MINUTERIES (TIMERS).
2. Appuyez de gauche (ou) pour sélectionner la
minuterie souhaitée et effleurez ENTRÉE (ENTER).
3. Appuyez de droite (ou) pour sélectionner la durée
souhaitée et effleurez NTRÉE (ENTER).
– Un signal sonore retentit à la fin du temps écoulé.
Appuyez sur ENTRÉE (ENTER) pour interrompre
la sonnerie et la minuterie.
Modification d’une minuterie en cours de
fonctionnement :
1. Effleurez MINUTERIES (TIMERS).
2. Appuyez de droite (ou) pour sélectionner la durée
souhaitée.
3. Effleurez ENTRÉE (ENTER).
End timer (fin de la
minuterie)
Vous pouvez reporter le temps de cuisson à une heure
ultérieure. Par exemple : il est 16 h. Le plat doit cuire
pendant 40 minutes. Vous voulez qu’il soit prêt à 17 h 30.
Saisissez la durée du temps de cuisson et reportez l’heure
de fin jusqu’à 17 h 30. L’appareil électroménager se met
en marche automatiquement à 16 h 50 et s’éteint de luimême à 17 h 30.
Page. 88
Page 89

Rappelez-vous de ne pas laisser des aliments qui ne se
a
b
c
d
conservent pas très bien dans le four pour des périodes
prolongées.
Réglage de l’heure de fin :
1. Réglez le mode de cuisson désiré ainsi que la
température du four.
2. Appuyez MINUTERIES (TIMERS).
3. Appuyez de gauche (ou) pour sélectionnez
MINUTERIE DE FOUR (OVEN TIMER).
4. Appuyez de droite (ou) pour sélectionnez pour régler
l'heure du four.
5. Appuyez de gauche (ou) pour sélectionnez l’HEURE
DE FIN (END TIME).
6. Appuyez de droite (ou) pour sélectionnez pour régler
l’heure de fin (end time) et effleurez ENTRÉE
(ENTER).
– Après la confirmation de l’heure de fin, l’avis de
temps d’attente s’affiche à l’écran.
– Après la période d’attente, le four commence à
chauffer.
Probe (sonde thermique)
À propos de la sonde thermique
La sonde thermique vous permet de mieux contrôler la
façon dont vos aliments sont cuits en annulant
automatiquement le mode de cuisson choisi lorsque la
température désirée d’un plat, déterminée par
l’utilisateur, est atteinte. La sonde donne la température
actuelle de la viande à mesure qu’elle cuit.
Vous trouverez ci-dessous les modes de cuisson qui
fonctionnent avec la sonde thermométrique :
• Cuisson
• Cuisson à convection
• Rôtissage
• Rôtisserie à convection
La sonde thermométrique ne fonctionnera pas avec la
programmation de la minuterie de four ou de l’heure de
fin.
Pour de meilleurs résultats
Panel lock (verrouillage
panneau commande)
À propos du verrouillage panneau commande
• Le dispositif de verrouillage du tableau de commande
est un mécanisme de sécurité pour enfants afin
d'éviter que ces derniers n'allument le four par
mégarde ou qu'ils n'en modifient les paramètres.
• Le verrouillage du bandeau de commande ne peut
être activé qu'en mode de veille.
• Lorsque le dispositif de verrouillage du tableau de
commande est activé, toutes les touches sont
verrouillées à l'exception de l'heure de cuisson, de la
minuterie et de l'activation / désactivation.
Activer et désactiver le dispositif de verrouillage du
tableau de commande :
1. Appuyez et maintenez la TIMERS touche enfoncée
pendant 4 secondes.
– Le symbole de verrouillage du panneau F et
PANEL LOCKED (PANNEAU VERROUILLÉ)
s’afficheront à l’écran, deux signaux sonores
retentiront.
• Insérez la sonde jusqu’à ce que sa pointe se trouve au
centre de la portion la plus épaisse de la viande.
Veillez à ce que la sonde ne touche pas un os, du gras
ou du cartilage.
• Pour la volaille, insérez la sonde à l’intérieur du muscle
d’une cuisse.
• Pour éviter d’endommager la sonde, assurez-vous que
la viande est totalement dégelée avant de l’y insérer.
• Insérez la sonde jusqu’à ce que sa pointe repose au
centre de la portion la plus épaisse et la plus riche de
la viande. Assurez-vous que la sonde ne touche pas à
un os, à du gras ou à du cartilage.
• La sonde ne doit pas toucher le plat de cuisson ou des
parties du four, car cela affectera l’exactitude des
résultats.
Programmation de la sonde thermique
1. Insérez le bout de la fiche dans la prise et Insérez la
pointe de la sonde dans la viande.
Pour désactiver le verrouillage du panneau :
1. Appuyez et maintenez la TIMERS touche enfoncée
pendant 4 secondes.
– Le symbole de la clé sur l'affichage disparaîtra.
a. Sonde b. Fiche
c. Prise d. Câble
Page. 89
Page 90

2. Fermez la porte du four.
TIMERS
SETTINGS ENTER
Bake
05:40
Oven temperature 375°
°
150
70°/
ƒ
¥
a
b
c
d
TIMERS
SETTINGS ENTER
06:30
TIMERS
SETTINGS ENTER
Bake
06:30
°
— — —
TIMERS
SETTINGS ENTER
06:30
°
200
°
Bake
TIMERS
SETTINGS ENTER
06:30
°
°
200
Bake
3. Réglez le mode de cuisson désiré ainsi que la
température du four.
4. Appuyez de droite (ou) pour accroître la température
interne souhaitée.
a. Mode de cuisson b. Température actuelle de
la sonde thermométrique
• Les brûleurs au gaz et la plaque chauffante de la
surface de cuisson demeurent fonctionnels lors de
l’utilisation du mode sabbat.
• Le mode sabbat n’est disponible que lorsque la
cuisinière n’utilise pas déjà un autre mode, y compris
celui d’autonettoyage.
• Vous ne pouvez ajuster la température pendant
l’utilisation du mode Sabbat.
Réglage du Sabbat sur les modèles à écran numérique
1. Commencez à partir du mode VEILLE.
c. Réglage de la
température de coupure
d. Réglage de la
température du four
– L’écran du four affiche la température actuelle de
la viande en cours de cuisson.
– Lorsque la température actuelle de la sonde
atteint la température programmée souhaitée, la
cuisson cessera et la fin du temps de cuisson
retentira pour indiquer que le processus est
terminé.
IMPORTANT :
• Pour éviter d’endommager la sonde, ne tirez PAS sur
le câble lorsqu’il est temps de la retirer de l’aliment
cuit.
• N’utilisez PAS de pinces ou autres instruments
pour serrer la sonde lorsqu’il faut la retirer ou pour
l’enfoncer dans l’aliment.
• Pour prévenir les brûlures, attendez que le four soit
refroidi avant de débrancher la sonde.
• Ne rangez PAS la sonde dans le four.
2. Tournez le bouton Sélecteur de mode à CUISSON
(BAKE).
3. Réglez la température du four en utilisant le bouton
du sélecteur de température, 200 degrés par
exemple.
Sabbath (Sabbat)
À propos du mode Sabbat
• Grâce à cette fonction, l’appareil électroménager
maintient une température homogène entre 150 et
475°F (66 et 246°C) avec la fonction de chauffage
cuisson.
• Vous pouvez conserver les plats au chaud pendant
74 heures sans devoir mettre sous tension l’appareil
électroménager en conformité aux principes de repos
du Sabbat. Veuillez remarquer que les aliments
facilement périssables ne devraient pas être laissés
dans le four trop longtemps.
• La lampe du four ne fonctionne pas avec le mode
Page. 90
sabbat pour éviter toute action lors de l’ouverture de
la porte.
– Après quelques secondes, le four commence à
chauffer.
Page 91

4. Effleurez la touche MINUTERIES (TIMERS).
TIMERS
SETTINGS ENTER
––min––sKitchen Timer
U
06:30
TIMERS
SETTINGS ENTER
––min––sSabbath Timer
›
06:30
TIMERS
SETTINGS ENTER
25h 00minSabbath Timer
›
06:30
TIMERS
SETTINGS ENTER
04min 59s
›
Sabbath Mode will start in:
TIMERS
SETTINGS ENTER
24h 59minSabbath
›
06:31
TIMERS
SETTINGS ENTER
completed
›
Sabbath
5. Sélectionnez MINUTERIE SABBATH (SABBATH
TIMER) avec les touches de gauche (et) de navigation.
6. Saisissez une DURÉE (DURATION TIME) par
incréments de 30 minutes avec les touches de droite
(et) de navigation.
– Au cours de cette période, l’utilisateur peut
ajuster les paramètres. Après le décompte, le four
commence à chauffer. Toutes les touches sont
désactivées.
– Ê la fin du décompte, un avis apparaît à l’écran.
8. Tournez tous les boutons à la position ARRÊT (OFF).
-- Il est également possible de régler le mode Sabbath
en sélectionnant d’abord la minuterie Sabbath à partir
du mode Veille puis de régler le bouton de mode à
CUISSON (BAKE) et la température.
-- La durée par défaut est de 25 heures. La durée
minimum est de 30 minutes et maximum, 74 heures.
7. Effleurez ENTRÉE (ENTER) pour confirmer la
minuterie Sabbath. Un avis de délai s’affiche.
Annulation du fonctionnement de l’appareil
électroménager
1. Tournez les sélecteurs de température et de fonctions
à OFF (arrêt) pour annuler le fonctionnement de
l’appareil.
Page. 91
Page 92

Remote start (démarrage à
TIMERS SETTINGS ENTER
06:30
TIMERS
SETTINGS ENTER
switched on
F
Remote Start
TIMERS
SETTINGS ENTER
06:30
F
distance)
À propos démarrage à distance
Tourner le bouton de mode à démarrage à distance
(remote start) permet à l’utilisateur de démarrer, faire une
pause et mettre fin à des programmes du four, et ce, à
distance par l’appli Home Connect sur un appareil mobile.
Le champ « Démarrage à distance » est visible
uniquement après la réussite de la connexion à Home
Connect. Consultez la section « Home Connect™ » pour
connaître les directives d’installation de l’application
Home Connect.
Si l’appareil électroménager n’est pas connecté au réseau
domestique, il fonctionne de la même façon qu’un four
normal sans connexion réseautique et peut toujours être
commandé par l’écran.
• Nous travaillons sans relâche pour améliorer
l’application Home Connect. Les étapes de
configuration peuvent varier légèrement. Veuillez
suivre les directives de la dernière version de
l’application Home Connect pour vous guider lors du
processus de configuration.
Configuration du démarrage à distance
1. Placez les aliments dans la cavité du four et fermez la
porte.
2. Tournez le sélecteur de mode du four à DÉMARRAGE
À DISTANCE (REMOTE START).
La disponibilité de la fonction Home Connect dépend de
l’offre des services Home Connect dans votre pays. Home
Les services Home Connect ne sont pas offerts dans tous
les pays. Pour de plus amples renseignements, veuillez
consulter : www.home-connect.com.
Certaines commandes se lancent uniquement sur le four.
Le démarrage à distance est automatiquement
désactivé dans les situations suivantes :
• La porte du four est ouverte 15 minutes après
l’activation du démarrage à distance.
• La porte du four est ouverte 15 minutes après la fin du
fonctionnement du four.
• Vingt-quatre heures après l’activation du démarrage à
distance.
IMPORTANT :
• Assurez-vous de respecter les directives de sécurité
décrites au présent mode d’emploi et que ces
directives sont aussi respectées lors de la
télécommande de l’appareil électroménager par
l’appli Home Connect quand vous êtes absent de la
maison. Veuillez également respecter les directives de
l'application Home Connect.
• Les commandes données directement depuis
l’appareil électroménager ont toujours préséance sur
les autres. Au cours de cette période, il est impossible
de faire fonctionner l’appareil électroménager par
l’appli Home Connect.
– NE PAS tourner le bouton du sélecteur de
température à tout autre réglage (laissez à la
position ARRÊT [OFF]).
– L’écran passera en mode veille et «
affiché.
3. Poursuivez avec l’appli Home Connect installé sur
l’appareil mobile.
Quand vous démarrez le fonctionnement du four sur
l’appareil électroménager, le démarrage à distance est
automatiquement activé. Vous pouvez alors procéder à
des modifications depuis l’appareil mobile ou lancer une
nouvelle commande.
C » est
Page. 92
Page 93

Tirer le meilleur parti de l’appareil
Position des grilles pour la
cuisson
Les positions des grilles de four sont numérotées comme
un ascenseur. Le numéro un est la position la plus basse et
le numéro cinq est celle la plus haute.
NOTE : Les recommandations relatives à la position des
grilles s’appliquent à la cuisson au four; toutefois, si une
recette suggère une position de grille différente, vous
devriez suivre la recette ou les instructions de l’emballage.
Bake (cuisson)
Le mode Cuisson revient à faire cuire avec de l'air chaud
et sec. Les éléments supérieur et inférieur chauffent à
intervalles réguliers pour maintenir la température du four.
Le mode Cuisson peut être utilisé pour préparer toute
sorte d'aliments, depuis les pâtisseries jusqu'aux plats en
casserole. Consulter les conseils de préparation de la
recette ou de l'emballage pour connaître les températures
et les temps de cuisson.
Cuisson avec une seule grille – four principal
Niveau Mode cuisson
3 -- Les meilleurs résultats s’obtiennent avec la
position de grille numéro 3.
2 -- Si l'aliment occupe beaucoup de place,
comme un gâteau des anges.
-- Les tartes cuisent mieux à la position 2. Le
fond de la pâté devient ainsi croustillant sans
que le dessus de la tarte ne soit trop doré.
-- Pour faire rôtir de gros morceaux de viande
ou de volaille, comme une côte de bœuf ou
une dinde.
Cuisson avec deux grilles – principal du four
Niveau Mode cuisson or cuisson conv
2 et 5 mixtes
2 et 4 gaz
Four auxiliaire (modèle de 48 po)
Niveau Mode cuisson
1 -- Les meilleurs résultats s’obtiennent avec la
position de grille numéro 1.
Cuisson avec trois grilles dans le four principal
Pour la cuisson avec trois grilles, le mode convection bake
(cuisson par convection) doit être utilisé.
-- Casserole
Optimisation des résultats
• Réduisez au maximum le temps d’ouverture de la
porte.
• Utilisez le récipient recommandé dans la recette.
• Sortez la ou les lèchefrites du four. Une lèchefrite sans
aliments nuira au dorage et à la cuisson.
• Le dorage dépend du type d’ustensile utilisé :
• Pour obtenir des croûtes tendres et légèrement
dorées, utilisez des ustensiles antiadhésifs,
anodisés ou en métal brillant.
• Pour des croûtes croustillantes plus dorées,
utilisez des ustensiles métalliques antiadhésifs,
anodisés ou noirs étamés ou encore en verre
convenant aux fours. Vous pourriez avoir à
diminuer la température de cuisson de 25°F.
Préchauffer le four
• Plats en métal (avec ou sans revêtement antiadhésif),
verre résistant à la chaleur, vitrocéramique, terre cuite
ou autres récipients allant au four.
• Les plaques à biscuits adaptées ont un petit rebord
d'un seul côté. Les tôles épaisses ou celles qui ont
plus d'un côté peuvent modifier le temps de cuisson.
Page. 93
Page 94

Plats pour le four
• Plats en métal (avec ou sans revêtement antiadhésif),
verre résistant à la chaleur, vitrocéramique, terre cuite
ou autres récipients allant au four.
• Les plaques à biscuits adaptées ont un petit rebord
d'un seul côté. Les tôles épaisses ou celles qui ont
plus d'un côté peuvent modifier le temps de cuisson.
Placement des plats
• Laissez un espace d’au moins 25.4 mm (1 po) entre les
plats et les parois du four pour que la chaleur puisse
circuler.
• Espacez les plats de sorte qu'ils ne se trouvent pas
l'un au-dessus de l'autre. Laissez 38 mm (1½ po) au-
dessus et en dessous de chaque plat.
Four principal de cuisinière mixte
Niveau Mode gril - cuisinière mixte
5 -- Réglez à cette position pour griller des
steaks, des galettes de viande, du steak de
jambon et des côtelettes d'agneau de 1 po
(26 mm) ou moins d'épaisseur, ou pour
brunir des aliments.
4 -- Réglez à cette position pour griller des
pièces de viande de 1-1/8 po ou plus
d'épaisseur, du poisson, de la volaille, des
côtelettes de porc, du steak de jambon de 1
po (26 mm) ou plus d'épaisseur.
3 -- Réglez à cette position pour griller des
morceaux de poulet ou des demi-poulets.
Four principal au gaz
Niveau Mode gril - cuisinière au gaz
4 -- Réglez à cette position pour griller des
steaks, des galettes de viande, du steak de
jambon et des côtelettes d'agneau de 1 po
(26 mm) ou moins d'épaisseur.
Cuisson à haute altitude
Pour la cuisson à haute altitude, en mode cuisson ou
cuisson à convection, les recettes et les durées de cuisson
varient. Pour une information précise, écrivez à Extension
Service, Colorado State University, Fort Collins, Colorato
80521. Vous pourriez avoir à payer des frais pour obtenir
les bulletins. Précisez le type d’information désiré (ex. :
gâteaux, biscuits, pains, etc).
Broil (griller)
Avant d’allumer le four, placez la grille à la position
désirée. Centrez la lèchefrite sous le brûleur du grilloir.
Seul l’élément supérieur passe en mode GRIL (BROIL).
Bien griller ou brunir les aliments demande une exposition
constante à une chaleur intense élevée.
3 -- Réglez à cette position pour griller des
pièces de viande de 1-1/8 po ou plus
d'épaisseur, du poisson, de la volaille, des
côtelettes de porc, du steak de jambon de 1
po (26 mm) ou plus d'épaisseur.
Four auxiliaire (modèle de 48 po)
Niveau Mode gril - Four auxiliaire
3, 4, ou 5 – mixtes
1, 3, ou 4 – gaz
5 –mixtes
3 – gaz
-- Dépend de type d'aliment et
de son épaisseur.
-- Utilisez-la également pour faire
dorer le dessus des aliments.
Pour obtenir les meilleurs résultats
Conseils
• Décongelez les aliments avant de les faire griller.
• Assurez-vous que la porte du four est fermée pendant
la grillade.
Page. 94
Page 95

• Il est recommandé de préchauffer l’élément du grilloir
avant de commencer à cuisiner. Fait es préchauffer
pendant trois minutes, puis placez le plat dans le four.
• Pour obtenir un point de cuisson saignant, les steaks
doivent avoir une épaisseur d’au moins 25 mm (1 po).
• Ne retournez les aliments qu’une fois, au milieu du
temps total de cuisson. Il n’est pas nécessaire de
retourner les morceaux très fins (tranches de jambon,
filets de poisson, etc). Les tranches de foie doivent
être retournées indépendamment de leur épaisseur.
• Placez les aliments directement sous l’élément du
grilloir pour qu’ils soient bien dorés.
Ustensiles
• La lèchefrite de deux pièces en porcelaine émaillée
avec une grille est incluse avec la cuisinière. NE
recouvrez PAS
papier d’aluminium.
• La petite lèchefrite de deux pièces en porcelaine est
conçue pour être utilisée dans le four secondaire des
modèles de 48 pouces.
• Utilisez des plats en métal ou en vitrocéramique pour
faire gratiner les ragoûts, les plats ou le pain.
• N’utilisez PAS
ou en terre cuite. Ce type de plats ne résistera pas à
l’intense chaleur du grilloir à gaz.
la grille quadrillée (dessus) avec du
de plats en verre résistant à la chaleur
• Ne pas recouvrir le gril-lèchefrite de papier
d'aluminium. Il a été conçu pour faciliter l'écoulement
des matières grasses sans contact avec la surface et
éviter le dégagement de fumée et les éclaboussures.
• Tourner les viandes (autres que le poisson) une fois
pendant la durée de cuisson.
Convection bake (cuisson à
convection)
Conseils :
NOTE:
BAKE et le grilloir. Quand l’un d’eux est en marche, l’autre
ne peut pas être allumé.
Il est impossible d’utiliser simultanément le mode
Convection broil (gril à
convection)
Seuls les brûleurs de voûte chauffent au mode broil
(grilloir). Pour être réussie, une grillade doit être exposée
constamment à une chaleur intense.
Le mode Gril Convection est bien adapté à la cuisson des
coupes de viande épaisses et tendres, de la volaille et du
poisson. Le mode Gril Convection n'est pas recommandé
pour le brunissage des pains, des plats en casserole et
autres aliments. Utiliser toujours le mode Gril Convection
avec la porte fermée.
Conseils :
• Préchauffer le four pendant 3 à 4 minutes. Ne pas
préchauffer le four au-delà de 5 minutes.
• Le steak et les côtelettes doivent avoir au moins 1 po
(2,5 cm) d'épaisseur. Pour le rôtissage, utiliser un plat
à rôtir et une lèchefrite ou un plat profond doté d'une
plaque-gril en métal.
• Quand vous utilisez la cuisson par convection,
réduisez la température recommandée dans la recette
de 14°C (25°F), bien que vous n'ayez pas à réduire la
température lorsque vous faites cuire de la viande ou
de la volaille.
• Lorsque vous faites rôtir des viandes, vérifiez la
température intérieure avant d'enfourner votre plat
pour ajuster le temps de cuisson recommandé dans la
recette et éviter qu'il ne soit trop cuit.
• Les casseroles en aluminium offrent les meilleurs
résultats de brunissage.
• Les plaques à biscuits à un ou deux côtés donnent les
meilleurs résultats. Il est aussi possible d’utiliser des
demi-plaques de type commercial en aluminium, mais
cela augmente le temps de cuisson.
• Pour un meilleur brunissage, certains ustensiles,
comme les plaques à biscuits, les moules à gâteau
roulé et les plats rectangulaires doivent être placés sur
la largeur de la grille avec les côtés plus courts à
droite et à gauche. Ceci permet à l’air de circuler
librement.
• Au moment de faire cuire avec plus d’une grille, les
plaques à biscuit ne doivent pas être décalées,
contrairement aux moules à gâteau ronds.
• Il faut normalement de 10 à 20% moins de temps pour
faire rôtir de gros morceaux de viande. Vérifiez la
cuisson plus tôt.
Page. 95
Page 96

Cuisson à une grille
Niveau Mode conv bake
3 -- Pour la cuisson avec une grille, de meilleurs
résultats sont obtenus en mode cuisson.
2 -- Pour faire rôtir une dinde ou une grosse pièce
de viande.
Cuisson à deux grilles
Niveau Mode conv bake
2 et 4 -- Les plats ronds de gâteaux peuvent être
superposés sur les grilles 2 et 4. Les plaques
à biscuits et les plats de gâteaux
rectangulaires de 9 po x 13 po doivent être
placées directement sur la grille 2, sous
celle de la grille 4.
-- Ce mode convient pour les gâteaux, les
petits gâteaux secs et les biscuits.
-- Ces deux grilles peuvent également servir à
la préparation d'un copieux repas.
Cuisson à trois grilles
Niveau Mode conv bake
1, 3, et 5 –
mixtes
Gaz voir la
note
-- Lorsque vous devez faire cuire plusieurs
plaques à biscuits, placez-les
directement les unes au-dessus des
autres sur leur grille respective pour
laisser l'air circuler.
-- Niveaux de grille des cuisinières à gaz
pour :
Biscuits : 2, 3, et 4
Autres aliments: 1, 3, et 5
Séchage d'aliments avec le mode de
cuisson à convection
Utilisez le mode de cuisson à convection pour sécher et
conserver des fruits et légumes.
• Il vaut mieux utiliser les grilles de séchage (non inclus)
pour que l'air puisse circuler autour des aliments. Ne
placez pas les aliments directement sur une tôle à
biscuits ou une plaque. Les aliments doivent être assez
hauts dans le four pour sécher uniformément.
• Vous pouvez utiliser simultanément plusieurs grilles de
séchage.
• Pour sécher plusieurs grilles d'aliments en même
temps, vous pouvez placer les grilles aux niveaux 2 et
4, ou 1, 3 et 5. Pour une seule grille, utilisez seulement
le niveau 3.
• Pour des questions de salubrité alimentaire, il n'est
pas recommandé de faire sécher de la viande.
• Consultez un livre de conservation d'aliments, un
bureau régional de salubrité alimentaire ou des
ouvrages disponibles en bibliothèque pour obtenir de
plus amples renseignements.
Vérification
de la
tendreté
flexibles
flexibles
s et molles
cassantes
et cassante,
fruit
légèrement
humide.
Aliment Préparation
Pommes,
¼''
tranches
Bananes,
¼''
tranches
Cerises Nettoyez et séchez
Pelures
d’orange
Tranches
d’orange
Trempez les
morceaux dans ¼
de tasse de jus de
citron et 2 tasses
d’eau.
Trempez les
morceaux dans ¼
de tasse de jus de
citron et 2 tasses
d’eau.
avec un linge.
Dénoyautez les
cerises fraîches.
Coupez de fines
pelures de la peau
des oranges.
Tranches d’un quart
de pouce (1/4 po).
Temps
(H)
8 – 15 Légèrement
8 – 15 Légèrement
7 – 18 Parcheminée
1 – 4 Sèches et
9 – 16 Peau sèche
Conseils :
• Le temps de cuisson varie en fonction du degré
d'humidité et du contenu en sucre des aliments, de la
taille des pièces, de la quantité d'aliments à sécher et
du taux d'humidité de l'air.
• Faites sécher la plupart des fruits et légumes à 150°F
(66°C).
• Vérifiez les aliments une fois que le temps de séchage
minimum s'est écoulé.
Page. 96
Tranches
d’ananas
en
conserve
Tranches
d’ananas
frais
Séchez avec un
linge.
Séchez avec un
linge.
8 – 13 Tranches
molles et
flexibles.
7 – 12 Tranches
molles et
flexibles.
Page 97

Fraises Nettoyez et séchez
avec un linge.
Coupez des
tranches d’un demipouce d’épaisseur
(1/2 po). Placez-les
la peau contre la
grille.
Poivrons Nettoyez et séchez
avec un linge.
Enlevez la peau.
Coupez
grossièrement des
morceaux d’environ
un pouce.
Champign
ons
Tomates Nettoyez et séchez
Nettoyez et séchez
avec un linge.
Coupez de fines
tranches de 1/8 de
pouce.
avec un linge.
Coupez de fines
tranches de 1/8 de
pouce en prenant
soin de bien les
évider.
9 – 17 Sèches et
cassantes
13 – 17Parcheminés,
sans
humidité à
l’intérieur.
5 – 12 Durs et
parcheminés,
secs.
5 – 12 Sèches.
Couleur de
brique
rouge.
Proof (apprêt)
La fonction d’apprêt permet de maintenir l’environnement
chaud et sans courants d’air nécessaire pour le levage de
produits panifiés. La température d’apprêt est ajustée à
100°F (38°C).
Il vaut mieux utiliser la fonction Apprêt lorsque le four est
froid.
Comment ajuster le four à la fonction d’apprêt
1. Laissez à la pâte le temps de dégeler si elle est gelée.
2. Mettez la pâte dans un plat dans le four et couvrez
partiellement.
3. Utilisez n’importe quelle position de grille qui
correspond aux dimensions du bol ou du moule.
Fermez la porte.
4. Placez le sélecteur de mode à
pas au bouton de commande de la température du
four.
Grosseur Temps
Miches, 1 lb (0.45 kg) 60 – 75 minutes
Petits pains, 0.1 lb (0.05 kg) 30 – 45 minutes
La température idéale de levage sera maintenue jusqu’à
ce que le sélecteur de mode soit mis hors circuit.
PROOF
. Ne touchez
True convection (convection
véritable)
Le mode True Convection utilise la chaleur diffusée par un
troisième élément situé derrière la paroi arrière du four. La
chaleur circule à l'intérieur de la cavité du four grâce au
ventilateur à convection.
Le mode True Convection convient tout particulièrement
aux aliments en portions individuelles, tels les biscuits et
les biscottines. Il est également efficace pour la cuisson
sur plusieurs grilles (2 ou 3) en même temps.
Conseils :
• Réduire la température du four indiquée dans la
recette de 25° F (3,9 °C).
• Placer les aliments dans des plats peu profonds, non
couverts, telles des plaques à biscuit sans rebords.
• Si plus d'un plat cuit sur une grille, laisser environ 1 –
1,5 po (2 cm – 2,5 cm) d'espace entre les plats.
La fermentation de la pâte est terminée lorsqu’elle a
doublé de taille.
N’ouvrez pas la porte inutilement pour éviter que la
température du four ne diminue, ce qui allongera le temps
requis pour le levage. Utilisez plutôt la lumière du four
pour voir où en est le levage de la pâte.Le temps de
levage peut être réduit lorsque le four principal est utilisé
en même temps. Vérifiez l’état du produit panifié pour
éviter un levage excessif.
Pour obtenir des résultats optimaux, nous vous
conseillons, si vous utilisez le four principal durant de
longues périodes, de procéder au levage avant d’utiliser
le four principal.
Page. 97
Page 98

Roast (rôtissage)
Convection roast (rôtissage
La température de la fonction rôtissage est plus élevée
que la cuisson au four traditionnelle. Cette température
sert pour rôtir de façon traditionnelle, lorsque de la
graisse de cuisson est désirée, ou pour rôtir avec un plat
couvert.
Conseils avec le mode rôtissage
• Le mode rôtissage est excellent pour les viandes ou
les volailles plus tendres, lorsque la viande est braisée
et qu’un plat fermé est utilisé.
• Ajoutez du liquide, comme de l’eau, du jus, du vin, du
bouillon ou du fond de sauce pour des plats plus
savoureux et plus juteux.
• Vous pouvez utiliser un sac brunisseur avec ce mode.
• Lorsque vous faites rôtir un poulet entier ou une dinde
entière, repliez les ailes vers l’arrière et attachez les
cuisses avec une ficelle à cuisson.
Recommandations pour le rôtissage
Viande et volaille Température Position
Bœuf
Braisé, 3-4 libres
Pointe de poitrine
Bloc d’épaule
Pain de viande
Volaille
Poulet, entier
Poulet, morceaux
Dinde, entière
350°F (180°C)
350°F (180°C)
350°F (180°C)
350°F (180°C)
375°F (190°C)
375°F (190°C)
325°F (165°C)
1
2
1
3
2
2
2
par convection)
Le mode Rôtissage Convection utilise la chaleur diffusée
par les éléments supérieur et inférieur ainsi que la chaleur
qui circule dans la cavité grâce au ventilateur à convection.
Le mode Rôtissage Convection est bien adapté à la
préparation des coupes de viande tendres et de la volaille.
Les avantages du mode Rôtissage Convection
comprennent :
• Une cuisson jusqu'à 25% plus rapide que les modes
n'utilisant pas la Cuisson par Convection.
• Un brunissage riche, doré.
Conseils :
• Utiliser la température exacte indiquée sur la recette.
• Vérifier la cuisson au début car la durée de rôtissage
peut être écourtée.
• Pour des exemples, consulter le tableau de cuisson de
la viande/volaille.
• Utiliser un plat à rôtir avec une grille et une lèchefrite
ou un plat peu profond, à découvert, doté d'une grille
pour le rôtissage.
• Utiliser un thermomètre à viande pour déterminer la
température interne de celle-ci.
• Si la viande est dorée à souhait, mais qu'elle n'a pas
fini de cuire, vous pouvez la couvrir de papier
d'aluminium pour qu'elle ne dore pas trop.
• Une fois la viande sortie du four, la couvrir avec du
papier d'aluminium et laisser reposer de 10 à 15
minutes.
Porc
Épaule
Demi-jambon fumé
Page. 98
325°F (165°C)
325°F (165°C)11
Page 99

Warm (garder-au-chaud)
Réglage précis du four
Cette fonction conserve la température nécessaire pour
garder les plats cuisinés à la température de service.
Commencez toujours avec des aliments chauds. N’utilisez
PAS ce mode pour réchauffer des aliments froids autres
que des craquelins, des croustilles et des céréales sèches.
Vous pouvez conserver les plats à température de service
avec ce mode. N’utilisez pas le mode WARM pour faire
cuire des aliments.
Réglage de la fonction Chaud :
1. Pour préchauffer le four, tournez le bouton du mode
de cuisson à CHAUD (WARM) pendant environ 10
minutes.NE PAS tourner le bouton du sélecteur de
température à tout autre réglage (laissez à la position
ARRÊT [OFF]).
2. Placez le plat d’aliments chauds dans le four puis
fermez la porte.
– La température idéale pour maintenir les aliments
chauds sera conservée jusqu’à ce que vous
éteigniez l’appareil électroménager.
– N’ouvrez pas la porte du four inutilement. Vous
réduirez ainsi la température du four.
Températures de cuisson internes minimums
(décalage de température)
Elle donne à l’utilisateur la possibilité d’ajuster les
paramètres de cuisson selon les réglages personnels qu’il
désire obtenir en lui permettant de décaler la température
du four de +/- 25°F, à coup de 5°F par rapport à ce
qu’indique le tableau de commande.
Par exemple, si l’utilisateur juge que la température du
four est toujours trop élevée et qu’il souhaite la diminuer
de 5°F, il lui suffit d’appuyer sur la touche « ( », ou viceversa pour l’augmenter. Cette fonction est utile si vous
trouvez que les aliments sont continuellement trop brunis
ou trop pâles à votre goût.
• Le four doit être éteint pour régler un décalage de
température.
• La fonction de décalage est disponible à tous les
modes, sauf pour l’autonettoyage.
• Par défaut, la température est ajustée à 0°.
• L’appareil continuera d’appliquer la valeur de
décalage entrée indéfiniment jusqu’à ce que
l’utilisateur choisisse de la modifier ou jusqu’à ce qu’il
manque d’électricité. La fonction de décalage de
température devra alors être réinitialisée.
Les températures de cuisson internes recommandées
par le
U.S. Department of Agriculture Food Safety and
Inspection Service
sont les suivantes :
Restes de table 165°F (74°C)
Porc, agneau, veau, bœuf hachée 160°F (72°C)
Bœuf, veau, rôtis d’agneau, steaks,
côtelettes
Mi-saignant
À point
Bien cuit
Rôtis de porc, steaks, côtelettes
À point
Bien cuit
Jambon
Cuire avant consommation
Tout à fait cuit, réchauffé
Volaille
Dinde, poulet hachés
Dinde, poulet entiers
Poitrines, rôtis
Cuisses et ailes
Farces (cuite à part ou simultanément)
, pour la consommation sécuritaire,
145°F (63°C)
160°F (71°C)
170°F (77°C)
160°F (72°C)
170°F (77°C)
160°F (72°C)
140°F (60°C)
165°F (74°C)
180°F (82°C)
170°F (77°C)
180°F (82°C)
165°F (74°C)
Pour régler Offset
1. Appuyez sur
2. Utilisez les touches ( et ) pour choisir le mode
OFFSET.
3. Appuyez sur
SETTINGS
ENTER
.Plats avec œufs, plats en cocotte 160°F (72°C)
.
Page. 99
Page 100

Configuration de Home Connect™
L'appareil électroménager est entièrement automatique
et prend en charge le Wi-Fi. Il peut être télécommandé au
moyen d'un appareil mobile (par exemple, une tablette,
un téléphone intelligent). L'appli Home Connect™ offre
des fonctions supplémentaires qui complètent
parfaitement l'appareil électroménager en réseau.
Home Connect ne fonctionne pas sur des réseaux Wi-Fi
qui exigent l'enregistrement d’un navigateur notamment
en saisissant un nom d'utilisateur et un mot de passe par
un navigateur Web.
Vous devriez disposer d’un réseau sans fil stable ayant une
bonne réception et pouvant accéder à Internet.
Si l'appareil électroménager n'est pas connecté à un
réseau local sans fil (WLAN, réseau domestique), il
fonctionne de la même façon qu'une hotte typique sans
connexion réseautique et peut-être commandé comme
d'habitude par le panneau tactile.
REMARQUE : Veuillez vous assurer que vous respectez la
notice de sécurité décrite au début du présent manuel
d'instructions et que cette dernière sera aussi respectée
lors de la télécommande de l'appareil électroménager par
l’appli lorsque vous n'êtes pas la maison. Veuillez
également respecter les directives de l'appli Home
Connect.
REMARQUE : Le fonctionnement manuel de l'appareil
électroménager a toujours la priorité. À ce moment, il est
impossible de le faire fonctionner au moyen de l’appli
Home Connect.
4. Vous devez disposer du nom du réseau Wi-Fi (SSID) et
de son mot de passe (clé).
PROTECTION DES DONNÉES ET SÉCURITÉ DE
L'INFORMATION :
Le transfert de données est toujours crypté. Home
Connect satisfait aux normes de sécurité les plus strictes,
qui font continuellement l'objet de révisions. Consultez
www.home-connect.com pour de plus amples
renseignements.
Renseignements :
Nous travaillons sans relâche pour améliorer l’appli
Home Connect. Les étapes de configuration
pourraient varier légèrement. Veillez à respecter les
directives de la dernière version de l’appli
Home Connect pour vous guider lors des étapes de
configuration.
Étape 1 : Téléchargement de l’appli
Home Connect et création d’un compte
utilisateur
1. Depuis le téléphone intelligent ou la tablette, ouvrez
l’App Store (appareils AppleMC) ou Google PlayMC
Store (appareils AndroidMC).
2. Recherchez l’appli HOME CONNECT dans le champ
de recherche de la boutique et installez-le.
L’appli Home Connect :
Configuration
L'appli Home Connect doit être déjà installée et vous avez
déjà un compte Home Connect. Vous pouvez créer un
compte dans l'appli.
Respectez les étapes précisées par l’appli pour mettre en
œuvre les réglages.
Qu’avez-vous besoin pour connecter la
hotte à Home Connect™?
1. L’appareil électroménager doit être correctement
installé.
2. Un téléphone intelligent ou une tablette doté de la
dernière version du système d’exploitation iOS ou
Android.
3. L’appareil électroménager doit être à portée du signal
Wi-Fi du réseau domestique.
Page. 100
3. Ouvrez l’appli et inscrivez-vous pour créer un compte
Home Connect.
4. Notez vos données de connexion Home Connect
(compte utilisateur et mot de passe); vous en aurez
besoin plus tard.
Conservez vos données de connexion Home Connect
ici :
Nom du réseau
(SSID) :...........................................................................
Mot de passe
(clé) :..............................................................................
L’appli vous informera des prochaines étapes pour
ajouter un appareil électroménager à Home Connect.
 Loading...