

Page 1
Care & Use Man ual
for
Thermador Built-In Ovens
Models
C302, C272
C301, C271
© 2001 BSH Home Appliances Corp.
Page 2

A Special Message
to Our Customers
Thank you for buying a Thermador oven. We recommend
that you take the time to read this entire booklet before
using your new appliance.
We hope that the information in this manual will help you
easily operate and care for your oven for years of
satisfaction.
Please contact us if you have any questions or comments.
Phone us at 1-800-735-4328 or write to us at:
Customer Support Call Center
Thermador
5551 McFadden Avenue
Huntington Beach, CA 92649
Sincerely,
Thermador Test Kitchen Consumer Scientists
Page 3

Table of Contents
C Oven Care and Use Manual
Important Safety Instructions. 2-3
General Appliance and
Oven Safety Features ...............................2
Oven Features...................................... 4-9
Features of Your Ov en.............................4
Oven Control Features ...........................5
UsingThe Control Panel.......................... 6
Child Lockout / Panel Lock ...................... 6
Sights & Sounds ......................................... 7
Voltage Connection.................................. 7
Oven Modes...............................................8
General Oven Tips....................................9
Oven Operations ........................ 10 - 27
Setting the Clock ....................................10
Setting the Lights.....................................10
Setting the Timer.....................................11
Bake............................................................12
Baking Chart ............................................13
Convection Mode Operation...............14
Convection Chart...................................15
Convection Bake Mode Operation.....16
Convection Bake Chart.........................17
Roast Mode Operation .........................18
Roasting Chart.........................................19
Convection Roast Mode
and Probe Operation.......................20
Convection Roast Chart.......................21
Broil and Convection Broil
Mode Operation...............................22
Broil Chart ...............................................23
Convection Broil Chart.........................23
Proof Mode Operation..........................24
Dehydrate Mode Operation ................25
Timed Oven Feature Operation .........26
Setting the Sabbath Mode .....................27
Care and Cleaning.................28-31
Self Cleaning The Oven..........................28
Self Clean Mode ......................................29
Oven Cleaning Chart.............................30
Oven Finishes/Cleaning Method..........31
Do-It-Yourself Maintenance ..32-34
Removing the Oven Door....................32
Replacing the Oven Light......................33
Changing to 24-Hour Clock.................33
Changing to Centigrade ........................34
Calibrating Oven Temperature.............34
Problem Solving....................35-36
Solving Baking Problems........................35
Solving Operational Problems .............36
Consumer Service .................... 36
How to Obtain Service .........................36
Thermador® Warranty...........................37
Service Data Record ..............................37
Page 1
Page 4

Safety Precautions
C Oven Care and Use Manual
General Appliance and Oven
SAFETY PRECAUTIONS
Please read all instructions before using this appliance.
WARNING
!
▲
When properly cared for, your new Thermador
oven has been designed to be a safe, reliable appliance.
Read all instructions carefully before using this
oven. These precautions will reduce the risk of
burns, electric shock, fire, and injury to persons.
When using kitchen appliances, basic safety
precautions must be followed, including the
following:
• This appliance must be properly installed and
grounded by a qualified technician. Connect
only to properly grounded outlet. See
“Grounding Instructions” found in the Installation
Instructions.
• This appliance should be serviced only by qualified
service technician. Contact the nearest
authorized service center for examination,
repair or adjustment.
• Do not repair or replace any part of the oven
unless specifically recommended. Refer service
to an authorized servicer.
• Do not operate this appliance if it is not working
properly or if it has been damaged, until an
authorized servicer has examined it.
• Install or locate this appliance only in accordance
with the Installation Instructions.
• Use this oven only as intended by the
manufacturer. If you have any questions, contact
the manufacturer.
• Do not cover or block any openings on this
appliance.
• Use this appliance only for its intended use as
described in this manual. Do not use corrosive
chemicals, vapors, or nonfood products in this
appliance. This type of oven is specifically designed
to heat or cook. It is not designed for industrial
or laboratory use. The use of corrosive chemicals
in heating or cleaning will damage the appliance.
• In the event that personal clothing or hair catches
fire, DROP AND ROLL IMMEDIATELY to extinguish
flames.
• Do not allow children to use this appliance,
unless closely supervised by an adult. Children
and pets should not be left alone or unattended
in the area where the appliance is in use. Never
allow children to sit or stand on any part of the
oven.
• Do not store items of interest to children
above the oven. If children should climb onto
the appliance to reach these items, they could
be seriously injured.
To reduce the risk of fire in the oven cavity:
1. Do not store flammable materials in or near the
oven.
2. Do not use water on a grease fire. Smother fire
or use a dry chemical or foam-type extinguisher.
3. It is highly recommended that a fire extinguisher
be readily available and highly visible next to any
cooking appliance.
4. Do not overcook food. Carefully attend oven
if paper, plastic or other combustible materials
are placed inside the oven.
5. Do not use the cavity for storage purposes. Do
not leave paper products, cooking utensils or
food in the cavity when not being used.
6. If materials inside the oven should ignite, keep
oven door closed. Turn oven off and disconnect
the circuit at the circuit breaker box.
7. Do not block any vent openings.
8. Be sure the blower fan runs whenever the oven
is in operation. If the fan does not operate, do
not use the oven. Call an authorized service
center.
9. Never use the oven to warm or heat a room.
This can damage the oven parts.
10. For personal safety, wear proper clothing. Loose
fitting or garments with hanging sleeves should
never be worn while using this appliance.
Continued on next page
Page 2
Page 5

C Oven Care and Use ManualSafety Precautions
IMPORTANT SAFETY INSTRUCTIONS
Please read all instructions before using this appliance.
SAFETY FOR THE OVEN
• Tie long hair so that it doesn't hang loose.
• Do not touch heating elements or interior surfaces
of oven.
• The heating elements may be hot even though they
are dark in color. Interior surfaces of an oven
become hot enough to cause burns.
• During and after use, do not touch or let clothing or
other flammable materials contact the heating
elements or the interior surfaces of the oven until
they have had sufficient time to cool.
• The trim on the top and sides of the oven door may
become hot enough to cause burns.
• Use care when opening the door. Open the door
slightly to let hot air or steam escape before removing
or replacing food.
• Do not heat unopened food containers. Build-up of
pressure may cause the container to burst and
result in injury.
SAFETY FOR THE SELF-CLEANING OVEN
• Confirm that the door locks and will not open once
START is touched and the door lock icon appears.
If door does not lock, touch OVEN OFF and do not
run Self Clean. Phone 800/735-4328 for service (see
Page 36 for obtaining service).
• Do not clean the door gasket. It is essential for a
good seal. Care should be taken not to rub, damage,
move or remove the door gasket.
• Do not use commercial oven cleaners or oven liner
protective coatings of any kind in or around any part
of the oven.
• Clean only oven parts listed in this manual.
• Before self-cleaning the oven, remove the broiler
pan, oven racks, other utensils and excess soft
spillage.
• Listen for fan. A fan noise should be heard sometimes
during the cleaning cycle. If no fan is heard, call for
service.
• Always place oven racks in desired location while
oven is cool. If a rack must be moved while oven is
hot, do not let potholder contact the hot heating
elements.
• Use only dry pot holders. Moist or damp pot
holders on hot surfaces may result in burns from
steam. Do not let pot holder touch hot eating
elements. Do not use a towel or other bulky cloth.
!
▲
WARNING
The California Safe Drinking Water and
Toxic Enforcement Act requires
businesses to warn customers of potential
exposure to substances which are known
by the State of California to cause cancer
or reproductive harm.
The elimination of soil during selfcleaning generates some by-products
which are on this list of substances.
To minimize exposure to these
substances, always operate this oven
according to the instructions in this
manual and provide good ventilation to
the room during and immediately after
self-cleaning the oven.
Page 3
Page 6

Oven Features
C Oven Care and Use Manual
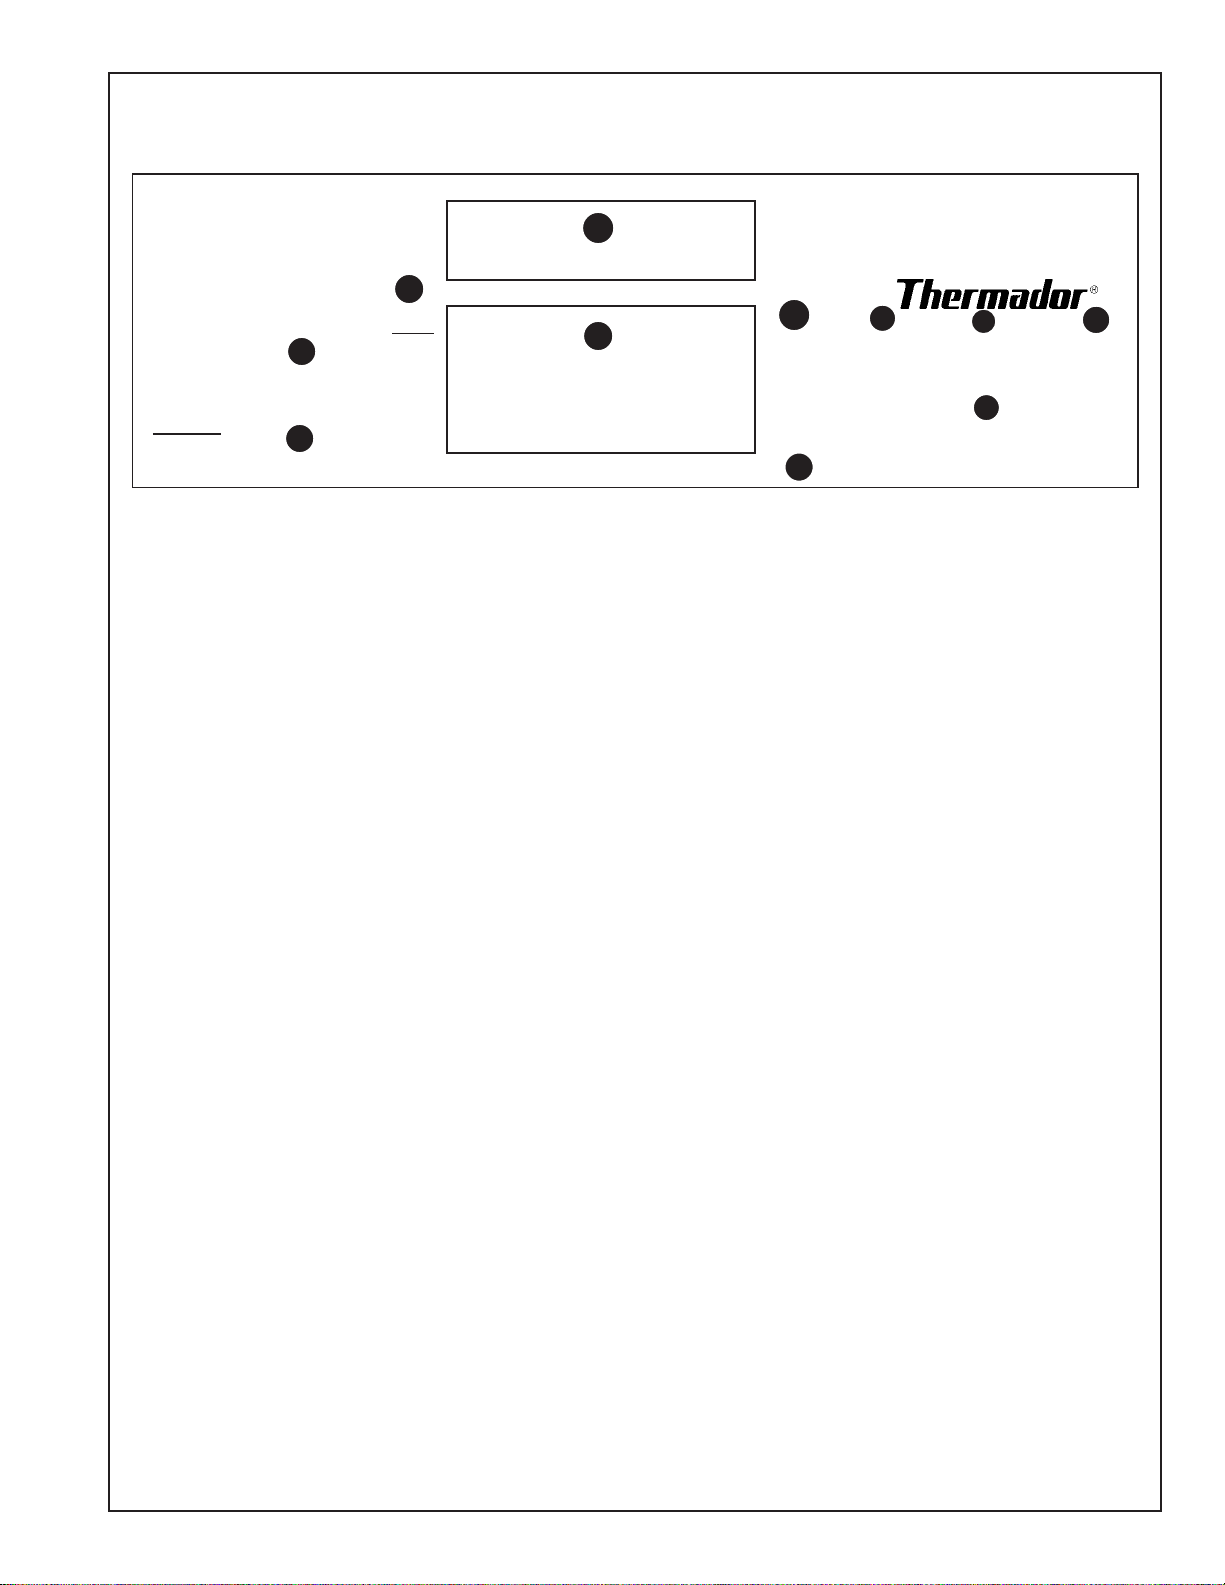
F eatur es of Your Oven
MODELS C301, C271
SINGLE OVENS
8
9
MODELS C302, C272
DOUBLE OVENS
10
11
12
13
7
6
14
20
5
15
16
4
17
3
2
18
19
1
23
# Item
1 Door Handle
2 Oven Door Gasket
3 Window
4 Bake Element, under oven floor
5 Removable Oven Racks
6 Rack Supports*
7 Broil Element
8 Glass Touch Control Panel
9 Clock/Time Display & Control Display
Model & Serial No. Location,
10
11 Oven Cooling Vents
*Rack support positions are numbered from the bottom rack
support(#1) to the top (#6). Cooking charts in this manual refer to
the recommended rack positions.
(look through slot)
21
22
# Item
12 Front Frame
13 Automatic Door Lock Latch
14 Halogen Oven Lamps (2)
15 Convection Fan and Cover
16 Side Trim
17 Door Hinge
18 Removable Door
19 Door Cooling Vents
20 Probe Receptacle
21 Vent Trim
22 Probe
23 Broiler Pan and Grid
Page 4
Page 7
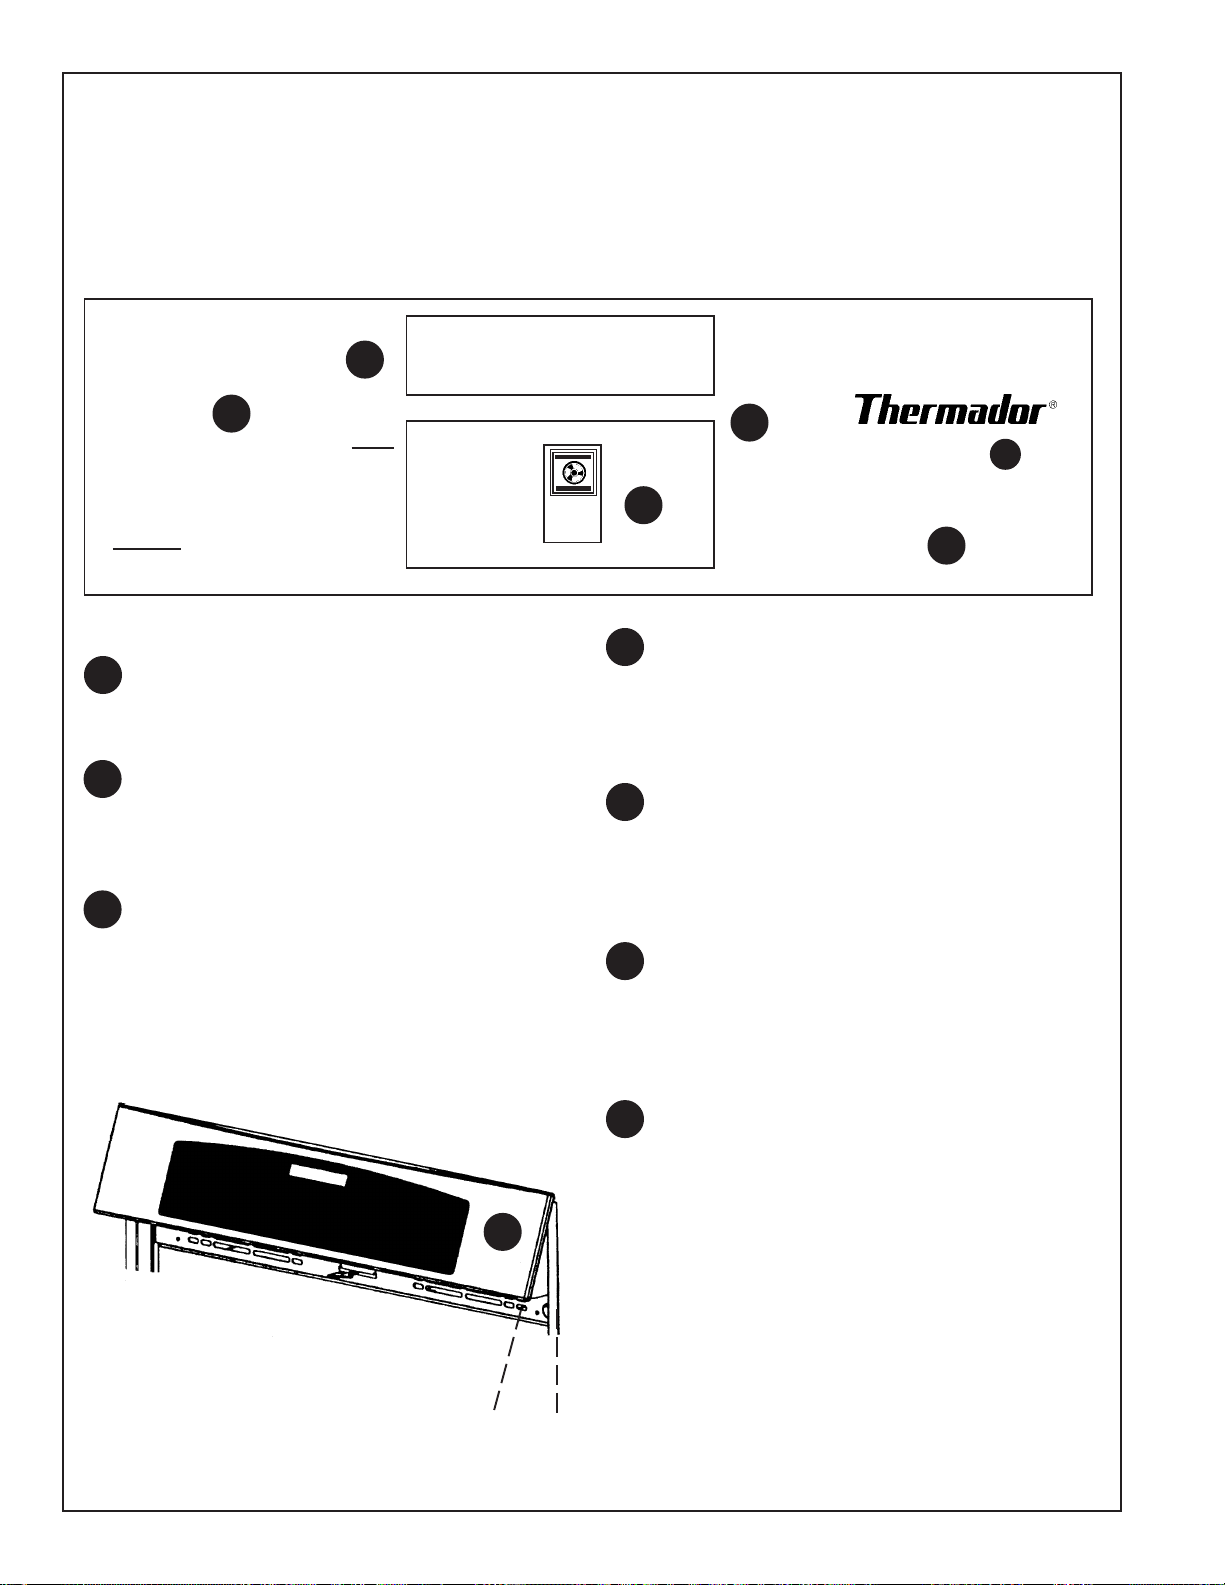
Oven Features
PROBE CONVECTION BAKE UPPER
1
SELF CLEAN BROIL ROAST UPPER
PROOF STOP COOK LOWER
DEHYDRATE TIME TIME OFF
2
Oven Control F eatur es
4
3
6
LOWER
OFF
5
12 3
45 6
78 9
START 0
7
C Oven Care and Use Manual
8
LIGHT PANEL LOCK CLOCK
TIMER 1 TIMER OFF TIMER 2
9
10
11
CONTROL MENU
1. Oven Mode Pads
• Probe – selects doneness temperatures.
• Convection – selects the Convection mode and
may be used in combination with Bak e, Roast or
Broil.
• Bake – selects the Bake mode.
• Roast – selects the Roast mode.
• Broil – selects the Broil mode.
• Proof/Dehydrate – touch once to select proof;
touch twice to select dehydrate.
• Self Clean – selects a Self-Clean mode.
2. Timed Cooking Pads
• Cook Time – selects the hours to cook.
• Stop Time – selects the time of day the oven is
to automatically turn off.
3. Oven Selector Pads
• Upper/Lower – (double oven models only).
touch once to select the upper oven; touch twice
to select the lower oven.
• Upper Off – turns the upper oven off.
• Lower Off – turns the low er oven off.
DISPLA Y WINDOWS
4. Clock
• Displays the time of day.
• Displays timer(s) countdown.
• Displays “Panel Lock” affirmation.
5. Oven
• Displays selected words, numbers and symbols.
NUMBER PADS
6. Number pads – 1 to 0 – selects a time of day,
temperatures, cook and stop time, or timer(s).
7. Start pad – touch this pad last to start cooking
modes or timing functions.
LIGHT, PANEL LOCK, CLOCK, and
TIMER(S) MENU
8. Light – turns oven lights on/off.
9. Panel Lock – locks the cooking modes in the off
position.
10. Clock – selects the time of day on the 12-hour
clock.
11. Timers
• Timer 1 – sets a kitchen timer.
• Timer 2 – sets a second kitchen timer.
• Timer Off – turns timer(s) off.
SPECIAL FEATURES
• Sabbath Mode Setting – complies with some
religious requirements.
• 12 or 24 hour clock choice – clock setting
options.
• Fahrenheit or Centigrade – temperature
setting options.
• Panel Lock / Child Lockout – Panel lock
prevents an y cooking mode from being set when
oven is not being used.
Page 5
Page 8
C Oven Care and Use ManualOven Features
UsingThe Control Panel
The control panel contains a series of electronic touch pads that enable you to set the oven. As
you touch these pads, wor ds and numbers appear in the display windo ws. These word and number
displays ar e called “prompts” and show what has been selected and what m ust be done next.
only one mode or number pad at a time.
11
22
00
00
1
2:
0
2
0
11
22
00
00
Touch
1
PROBE CONVECTION BAKE UPPER
SELF CLEAN BROIL ROAST UPPER
PROOF STOP COOK LOWER
DEHYDRATE TIME TIME OFF
1. CONTROL MENU
1
These pads set the oven modes and select the ov en
to be used - in double oven models.
2. CLOCK / TIMER DISPLAY WINDOW
2
Clock and Timer settings are displa y ed in this window . The Timer settings countdown in minutes and
seconds or in hours and minutes.
3. MODE DISPLAY WINDOW
3
The settings are shown in this window to verify
what has been selected.
selected (in double oven models), cooking or timed
mode, elements on in the oven, ov en temperature,
and the preheat function.
LOWER
OFF
The display shows the o ven
COOK TIME
CONVECTION
ROAST
11
1
11
4
::
00
00
:
0
0
::
00
00
325325
325
325325
o
3
4. NUMBER PADS and START
4
The number pads select temperatures and time
settings in seconds, minutes and hours. It is necessary to select the ST AR T pad to complete any mode
or timed entry.
5. CLOCK and TIMER MENU
5
These pads select the Clock and minute Timers
that operate independently of any oven mode.
These pads control the interior oven lights and
Panel Lock.
PANEL LOCK
6
The Panel Lock is selected to prevent the control
pads from being activated when the oven is not
being used. Touch and hold for 5 seconds to activate; repeat to cancel.
12 3
45 6
78 9
START 0
/
Child Lockout
LIGHT PANEL LOCK CLOCK
TIMER 1 TIMER OFF TIMER 2
6
5
7
➥
C301U model control panel shown in 20º open position.
Page 6
TOUCH 'n' TILT PANEL
7
This panel is on single oven C301U model
only. It can be used in the tilt or flush-to-oven
position. Push in along the center, bottom of the
panel to release latch and raise panel upward. Push
again to release latch and lower the panel.
Single ov en models, C301U and C271U, will
have onl y one o ven displa yed on the contr ol
panel and menu. Instructions and illustrations for double oven models are used
throughout this manual.
Page 9
C Oven Care and Use ManualOven Features
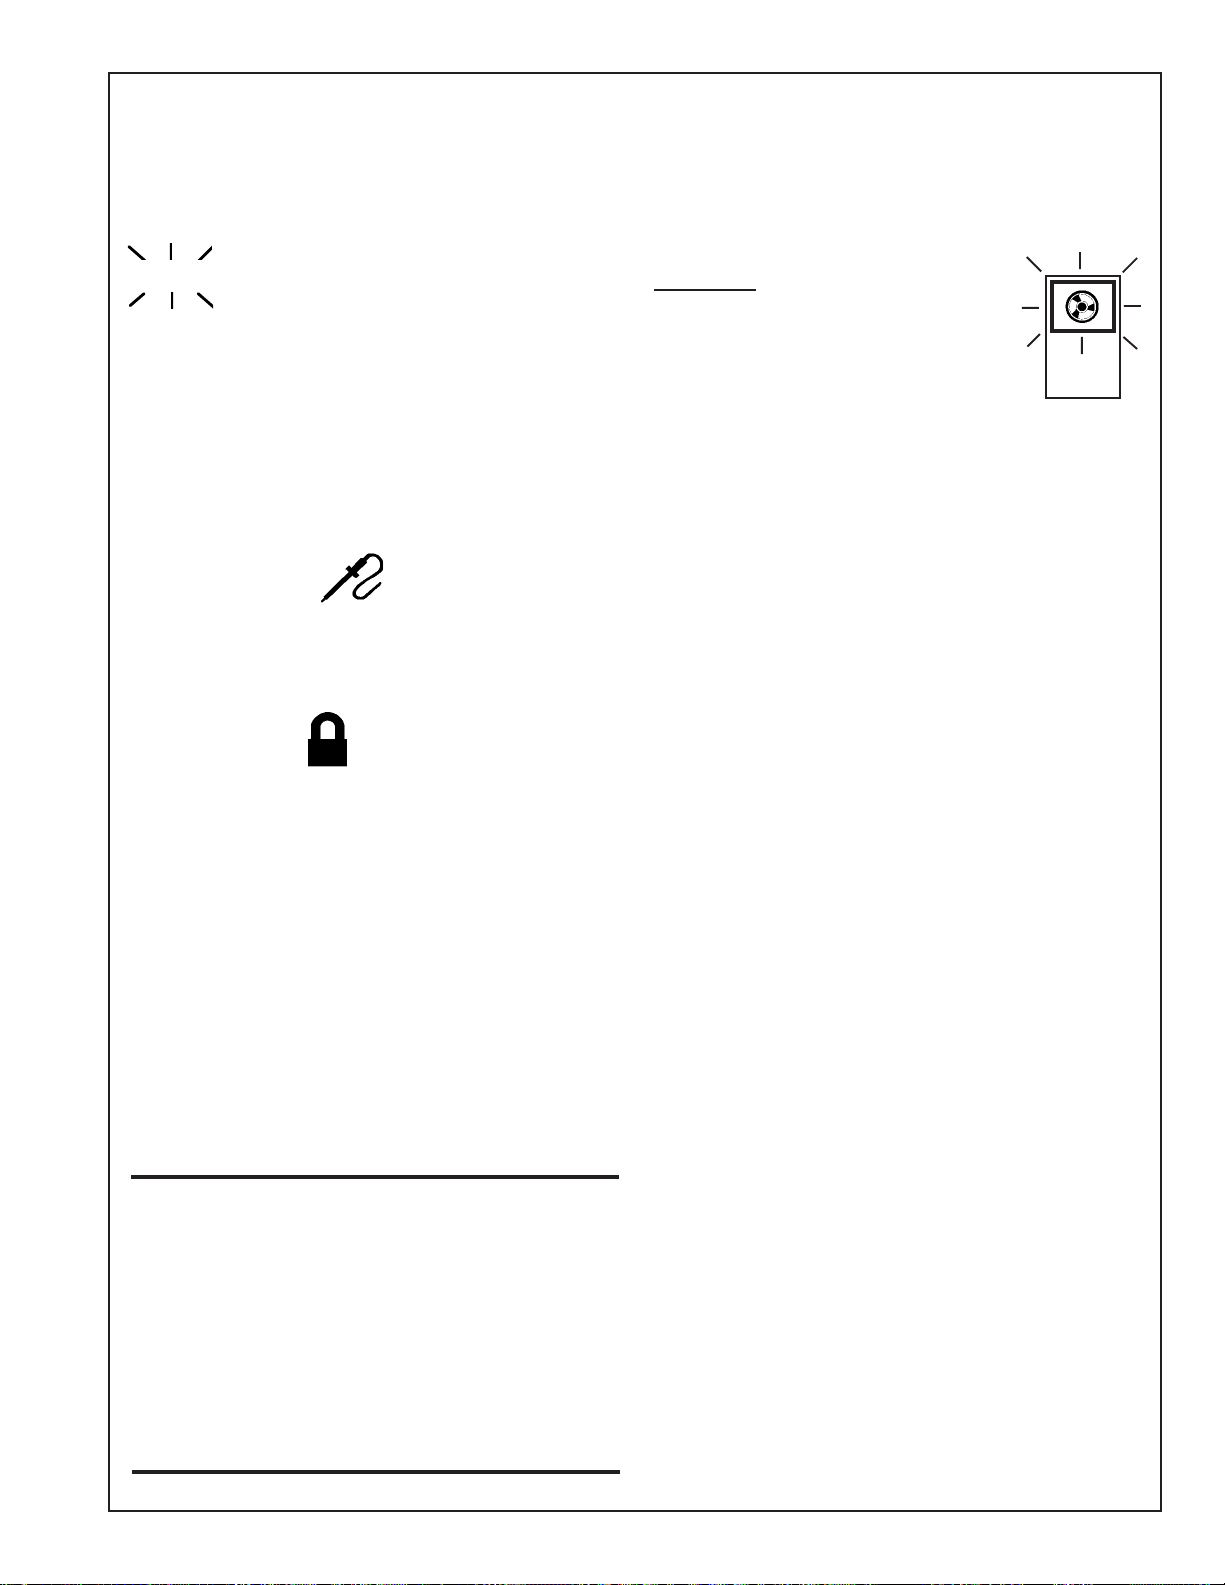
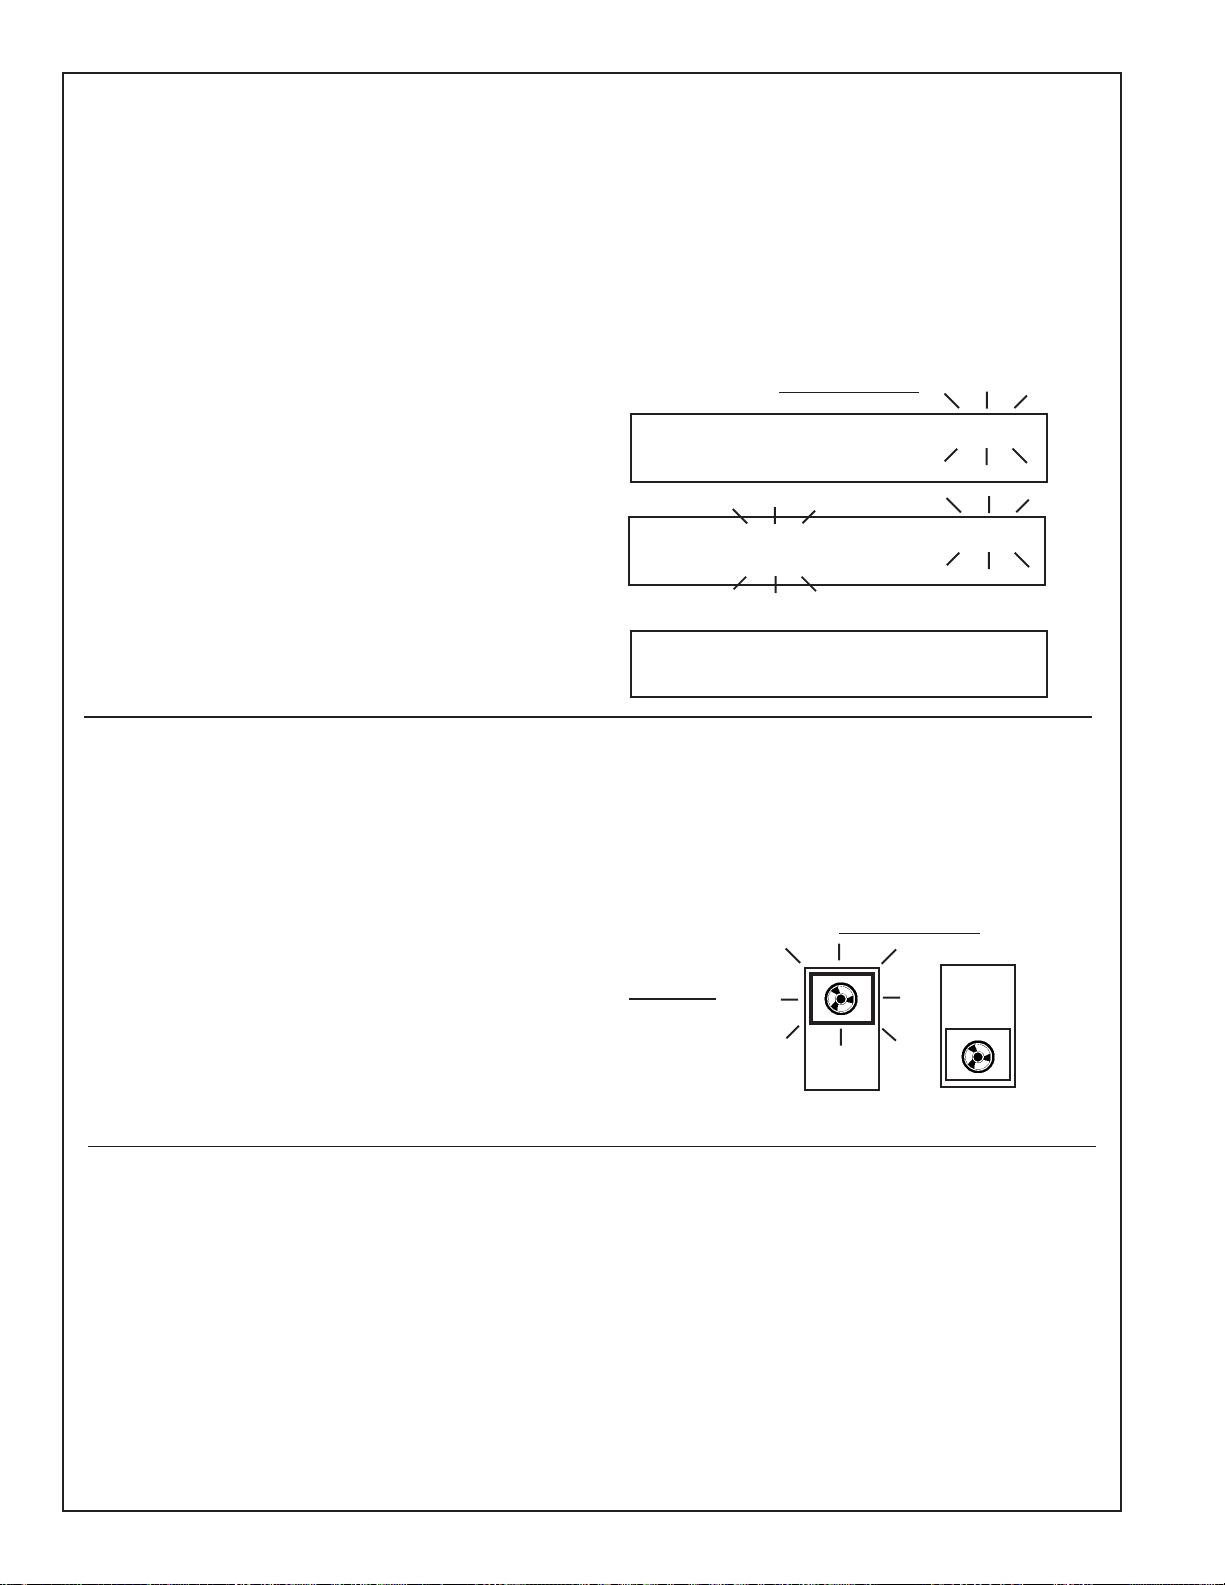
Interpreting the Control Panel: Sights & Sounds
The directions in the Care and Use Manual f or setting the ov en and its various modes are based on the
assumption that the panel displays and sounds will “lead” or help y ou set the controls easily . To aid in this
path the following descriptions provide a basis for interpreting what is seen and heard.
Flashing Symbols or Numbers
Signals an incomplete setting; calls for another step or
START to be touched.
I Beep
Signals the receipt of an entry.
2 Beeps
Signal an error in entry.
4 Chimes
Signal the end of a setting.
Probe Symbol
Displays the internal temperature of the meat rather
than the oven roasting temperature.
ture can be seen briefly by touching the cook mode
after touching START.
Oven tempera-
Lock Symbol
Displays during the Microwave, CookSmart, and Self
Clean modes whenever the door is locked. Door can
be opened when symbol no longer appears.
PAU
Displays when a Microwave or Cooksmart program is
paused or interrupted and door unlocks.
UPPER
LOWER
(Double oven models only) Selects the
active oven to be set by highlighting the
oven in the mode display window.
Default Settings
The cooking modes automatically select a suitable
temperature. These can be changed when a different
one is needed.
START
Touch to complete an entry and before entering an
additional one.
UPPER OFF and LOWER OFF
Touch to cancel a mode that has already been started
or completed.
COOK TIME
Sets the number of hours and minutes the oven will be
“on”. Unlike Timer 1 or 2, the oven turns “off ” automatically when the time elapses. This pad is used with
the automatic timed oven control.
Err
Displays if an invalid temperature or time is entered.
Pow er Failure
After the power returns to the o ven, the clock displays
the time when the power was lost or turned off.
120/208 Volt Connection
• Preheat the oven for all cooking modes.
Preheat time will be slightly longer.
• Preheat the broil element with the door open
for 3 to 4 minutes or until the top element is
red. Do not preheat with the broil pan in the
oven.
• The Self-Clean mode may need a longer clean
time than normal, depending on the amount
of soil.
F Number Codes
These codes are displa yed when there is a problem with
the signal sent to the electronic control boar d. See Solving Operational Problems, Page 36.
Convection Fan
Operates during any convection mode. The fan turns
off if the door is opened.
Component Cooling Fan
Activates during any cooking or self-cleaning mode to
cool inner components and outer door surfaces. This
air is exhausted through the vent located below the
lower oven in double o ven models. It contin ues to run
until components have cooled sufficiently.
Page 7
Page 10
Oven Features
C Oven Care and Use Manual
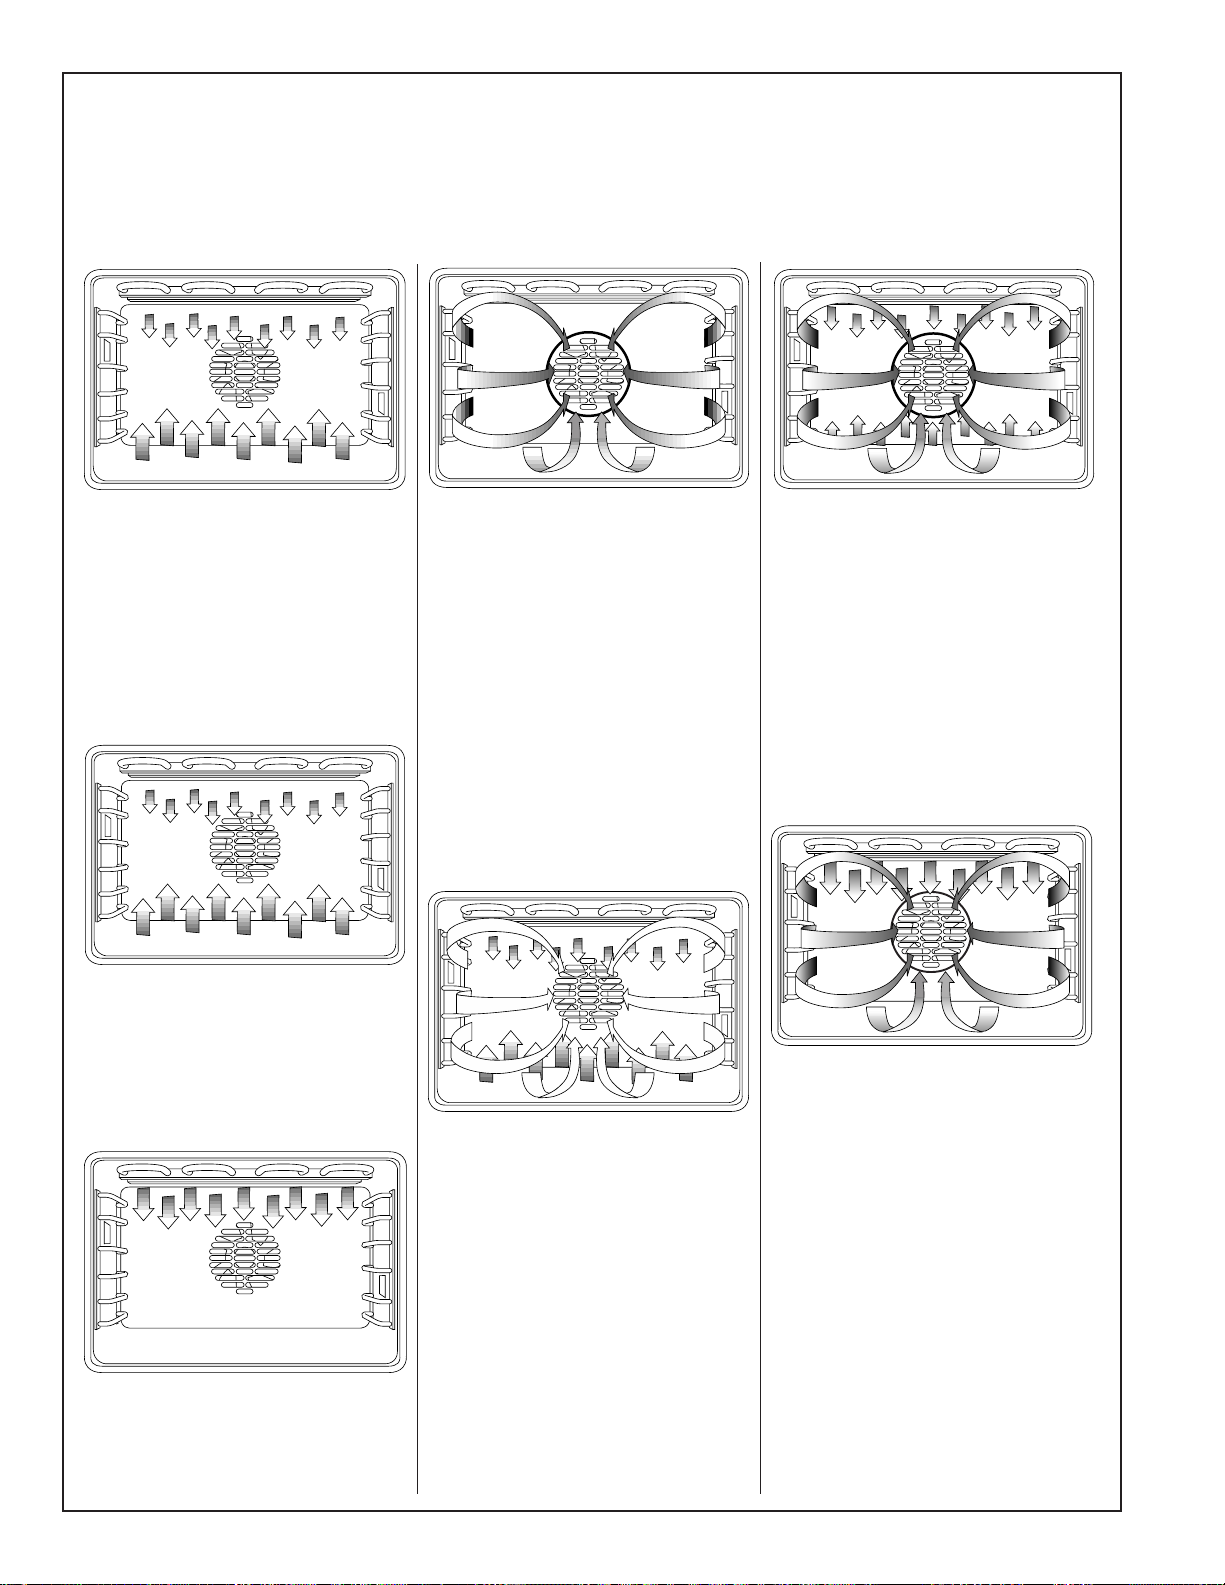
Heating Modes Availab le in Each Oven
The following illustrations give an overview of what happens in the oven with each mode setting. The arr ows represent the location of the heat source during specific modes. The lower element is concealed under the oven floor.
BAKE or PROOF
Baking is cooking with heated air.
Both upper and lower elements are
used to heat the air and cycle to
maintain the temperature. Proofing,
while similar to bake, holds an optimum low temperature for yeast to
rise.
ROAST
Roast has more top heat than bak e.
This additional top heat is for conventional open roasting when drippings are desired or for co vered-dish
roasting.
CONVECTION or
DEHYDRATE
Convection is cooking with heat
from a third element concealed
behind the back wall of the oven. It
is used with a fan to speed up the
circulation of heated air throughout
the oven. Dehydrating is similar to
convection cooking and holds an
optimum low temperature while
circulating the heated air to remo ve
moisture slowly for food
preservation.
CONVECTION BAKE
Convection Bake has heat fr om the
upper and lower element with
circulation assisted by the con vection
fan. This mode is designed for breads
and pastries.
CONVECTION ROAST
Convection roasting combines the
heat from the lower concealed element with additional heat from the
convection element and fan and the
top element. The result is a crispier
exterior that seals in the interior
juices. It is perfect for roasting tender meats in an uncovered, lo w-sided
pan.
CONVECTION BROIL
Convection broiling combines the
intense heat from the upper element
with the circulation assisted by
convection fan. This air circulation
crisps the exterior surface and
retains inner moisture in meats
-1
more than 1
/2" thick.
BROIL
Broiling uses intense heat radiated
from the upper element to give excellent top browning or searing.
Page 8
Page 11

General Tips
C Oven Care and Use ManualOven Features
PREHEA TING THE OVEN*
• Preheat the oven when using the BAKE,
CONVECTION and ROAST modes.
• Preheat is not necessary for BROIL and
CONVECTION BROIL modes.
• Preheat is optional for CONVECTION ROAST.
Preheating is not recommended for
CONVECTION ROAST when using the PROBE.
A hot oven impairs connecting the meat probe
into the receptacle.
• Oven is not preheated for CONVECTION BAKE,
to take advantage of the lower heat yielding a
better crust on baked items.
• Place racks in the oven before preheating.
• During preheat, the selected cooking temperatur e
is displayed and alternates with a display of the
actual oven temperature.
• The oven chimes once when it is preheated and
the selected cooking temperature is displayed.
OPERATIONAL SUGGESTIONS
• Use the cooking charts as a guide.
• Do not set pans on the opened oven door.
• Use the interior oven light to view the food
through the oven door window rather than
opening the door frequently.
• Use TIMER 1 OR TIMER 2 to keep track of cooking
times.
UTENSILS
HIGH ALTITUDE BAKING
• When cooking at high altitude, recipes and cooking
times will vary from the standard. For accurate
information, write the Extension Service, Colorado
State University, Fort Collins, Colorado 80521.
There may be a cost for the bulletins.
/
CONDENSATION
• It is normal for a certain amount of moisture to
evaporate from the food during any cooking
process. The amount depends on the moisture
content of the food. The moistur e may condense
on any surface cooler than the inside of the oven,
such as the control panel.
• Your new Thermador
temperature sensor that accurately maintains the
temperature selected. Your previous oven may
have had a mechanical thermostat that drifted
gradually over time to a higher temperatur e. It is
common to experience an adjustment period
when cooking your favorite recipes in the new
oven.
OVEN RACKS
• Rack positions are numbered fr om the bottom rail
guide (#1) to the top (#6). Check the cooking
charts for the recommended position.
• To insert racks into the oven, hold the rack with
the back rail up and toward the back. Place the
safety hooks under the front of the rail guides.
Push the rack into the oven, lifting the rack stops
over the front of the rail guides. Slide the rack
into position.
TEMPERA TURE SENSOR
®
oven has an electronic
• Reduce oven temperature 25º when baking in glass.
• Use pans that give the desired browning. For tender,
golden brown crusts, use light nonstick/anodized
or shiny metal utensils.
• For brown, crisp crusts, use dark nonstick/anodized
or dark, dull metal utensils or glass bakeware.
Insulated baking pans may increase the length of
cooking time.
• Do not cook with the empty broiler pan in the
oven, as this could change cooking performance.
Store the broil pan outside of the oven.
• Tips for “Solving Baking Problems” are found on
Page 35.
• To remove racks or reposition racks in the oven,
pull the rack towards the front of the o ven. Lift up
the front of rack over the safety stops and pull
from the oven.
• Rack rail supports should not be removed from
the oven.
• CAUTION! Never use aluminum foil to co ver the
oven racks or to line the ov en. It can cause damage
to the oven can liner if heat is trapped under the
foil.
• When placing food on a rack, pull the rack out to
the stop position. The racks are designed to lock
when pulled forward.
Page 9
Page 12
Oven Operations
C Oven Care and Use Manual
Setting the Clock
• Always set the clock immediately after installation
or after a power failure. Once power returns to
the oven, the clock displays the time of day when
power was turned off or lost.
To Set the CLOCK:
1. Select the CLOCK pad. Touch
CLOCK
2. Set the current time of day. Touch
(Example shows 8 o’clock set for 8
the time of day.) 0
0
3. Select START or CLOCK. Touch
START
• If 15 seconds elapse between touching the clock
pad or number pads, the mode is automatically cancelled. Set again.
• The time of day clock can be set when an automatic timed cooking mode is in operation.
You Will See
SET CLOCK
––:––
SET CLOCK
8:00
8:00
Setting the Lights
• Oven lights turn on automatically when the door is opened and off when closed.
• To set manually, always start by highlighting the oven, whether it is “active” or not.
(Touch the UPPER / LOWER pad to display the “active” oven; flashing outline is the active oven.)
• A single LIGHT pad activates the lights in either oven.
• The lights do not operate in the Self-Clean mode.
To manually control the interior oven lights if
either oven is in use:
1. Select the “active” oven by touching once or
twice to highlight oven display.
2. Touch LIGHT once to turn light on or off.
Touch
UPPER
LOWER
Touch
LIGHT
You Will See
OR
Page 10
Page 13

Oven Operations
Setting the Timer
• The oven has two Timers, which ar e independent of each other .
Neither timer controls oven operations.
• Touch once and the Timer is set in minutes and seconds.
• Touch twice and the Timer is set in hours and minutes.
C Oven Care and Use Manual
To Set TIMER 1 or TIMER 2:
1. Select Timer 1 or 2. Touch
TIMER 1
2. Set the amount of time. Touch
(Example shows a 3-minute 3
setting with Timer 1.) 0
0
3 . Start Timer . T ouch
ST ART
4. When set time is complete, Touch
“End” is displayed and 4 chimes sig- TIMER OFF
nal. When turned off, display reverts
to time of day.
Tip: If timer is not turned off, chimes will continue every 30 seconds. After 5 minutes, chimes stop
and the display reverts to the time of day.
MIN SEC TIMER 1
MIN SEC TIMER 1
MIN SEC TIMER 1
You Will See
––:––
3:00
3:00
End
SET
TIMER 1
To Cancel an Active Timer:
1. Select Timer in use. Touch
TIMER 1 or 2
2
. Cancel Timer . T ouch
TIMER OFF
To Set Both TIMER 1 and TIMER 2:
Follow the steps abov e to set each Timer. The Timer with the least amount of countdown time has display
priority . The countdown display for the second timer is shown automatically when the first timer has ended.
The words “TIMER 1” and “TIMER 2” are both displayed along with the number countdown.
The word, “TIMER 1” or “TIMER 2”, with the least remaining countdown time is more brightly lit
than the other word.
During the countdown, touch CLOCK or TIMER. Depending on the pad touched, either the time of da y
or the remaining time is briefly displayed.
To Change a Timer:
1. Touch TIMER 1 or TIMER 2.
2. Enter the new desired time.
3. Touch the START pad.
Page 11
Page 14

Oven Operations
Bak e Mode Operation
• Preheat when using the Bake mode.
• Use BAKE for general cooking on one or two racks.
To set BAKE mode:
1. Select twice for LOWER OVEN.
2. Select BAKE.
The temperature is automatically set at 350ºF.
Touch
UPPER
LOWER
Touch
BAKE
C Oven Care and Use Manual
You Will See
o
350
BAKE
3. Optional step:
To change the temperature from 350ºF, select
another temperature immediately before starting.
4. Select START.
The temperature display alternates between the
set temperature and the actual temperature,
beginning with 100°F. The actual temperature
counts up in 5°F increments.
The oven is preheated when the chime signals once.
PREHEAT disappears from the display .
5. To end this mode, select the oven OFF pad.
BAKE TIPS
• Follow the recipe, package directions, or the cooking
chart on next page for baking temperatures, time
and rack position.
• Baking time will vary with the size, shape and finish
of the baking utensil. Dark metal pans or nonstick
coatings will cook faster with darker results. Insulated
bakeware will lengthen the cooking time for most
foods.
• For best results, bake food on a single rack with at
least 1-1/2" space between utensils and oven walls.
Touch
3
7
5
BAKE
Touch
START
Touch
LOWER
OFF
• Use a maximum of 2 racks when selecting the bake
mode. Stagger pans or baking sheets so that one is
not directly above another.
• Eliminate heat loss from the oven by using the window
to periodically check food for doneness.
• Do not use any aluminum foil or a disposable
aluminum tray to line an y part of the oven. Foil is an
excellent heat insulator and heat will be trapped
beneath it. This will alter the cooking performance
and can damage the finish of the oven.
100o/375
o
375
o
PREHEAT
Page 12
Page 15

Oven Operations
C Oven Care and Use Manual
Baking Chart
Food Item Oven Temp Rack Position Time
Breads
White Bread, Scratch 400°F (205°C) 3 30 to 35 minutes
Breads, Specialty
Biscuits, scratch 450°F (232°F) 3 10 to 12 minutes
Biscuits, canned
Large 375°F (190°C) 3 11 to 15 minutes
Medium 400°F (205°C) 3 8 to 11 minutes
Small 450° F (232°F) 3 8 to 10 minutes
Cornbread, mix or 400° F (205°C) 3 20 to30 minutes
Scratch
Gingerbread 350° F (177°C) 3 35 to 40 minutes
Muffins 425°F (219°C) 3 15 to 20 minutes
Quick Breads 350° F (177°C) 3 50 to 60 minutes
Cakes
Angel Food Mix 350° F (177°C) 1 37 to 47 minutes
Cake Mix,
8" or 9" round(s) 350° F (177°C) 3 or 2 and 5 30 to 35 minutes
9" x 13" rectangle 350° F (177°C) 3 30 to 35 minutes
Scratch 350°F (177°C) 3 30 to 40 minutes
Cakes, Specialty
Bundt Cakes 350° F (177°C) 3 40 to 45 minutes
Cupcakes 350° F (177°C) 3 18 to 21 minutes
Pound Cakes 350° F (177°C) 2 48 to 58 minutes
Carrot Cake, Scratch 350° F (177°C) 3 30 to 40 minutes
Casseroles
9" x 13", Scratch 350° F (177°C) 3 30 to 50 minutes
40 oz., frozen 375° F (190°C) 3 55 to 65 minutes
96 oz., frozen 400° F (205°C) 3 110 to 130 minutes
Cookies
Bar 375° F (190°C) 3 18 to 23 minutes
Drop 375° F (190°C) 3 8 to 10 minutes
Sliced 375° F (190°C) 3 8 to 10 minutes
Desserts
Custard 350° F (177°C) 2 40 to 50 minutes
Fruit, Crisps and 350° F (177°C) 3 40 to 45 minutes
Cobblers 45 to 55 minutes
Pies, frozen 400° F (205°C) 3 60 to 65 minutes
Pudding
Bread Pudding 350° F (177°C) 2 50 to 60 minutes
Rice Pudding 325°F (163°F) 2 40 to 50 minutes
Fruits and Vegetables
Apples, Baked (4) 400° F (205°C) 3 40 to 45 minutes
Potatoes, Baked (4), 400° F (205°C) 3 60 to 70 minutes
6 to 8 oz each
Squash, Winter , 350° F (177°C) 3 50 to 55 minutes
Baked,1-1/2 Ibs
* This chart is a guide. Follow recipe or package.
Page 13
Page 16

C Oven Care and Use ManualOven Operations
Con v ection Mode Operation
• Preheat when using the convection mode.
• For a quick recipe conversion, reduce the oven temperature 25° from the bake setting.
• Cook food in low-sided, uncovered pans.
• Set Timer 1 or 2 as a reminder to check doneness of the food at minimum time.
To Set the CONVECTION Mode:
1. Select twice for LOWER oven.
2. Select CONVECTION.
The temperature is automatically set at 325°F.
3. Optional step:
To change the temperature from 325ºF, select
another temperature immediately before starting.
4. Select START.
The temperature display alternates between the
set temperature and the actual temperature,
beginning with 100°F. The actual temperature
counts up in 5°F increments
Touch
UPPER
LOWER
Touch
CONVECTION
Touch
3
7
5
Touch
START
You Will See
o
325
CONVECTION
o
375
CONVECTION
o
100o/375
PREHEAT
The oven is preheated when the chime signals once.
PREHEAT disappears from the displa y.
5. To end this mode, select the oven OFF pad.
CONVECTION TIPS
• Use low-sided pans, such as a jelly roll pan, cookie
sheets with 1 or 2 sides, and the 2-piece broil pan.
• Shiny aluminum pans are best, unless otherwise
specified.
• Dark finish metal pans and heatproof glass or ceramic
bakeware may require oven temperature to be
reduced or the time shortened.
Touch
LOWER
OFF
• Foods cooking in less than 15 minutes requir es the
same time as in bake mode.
• Foods taking 30 minutes or more to cook will have
a 10 to 15% time savings.
• Check doneness 5 to 10 minutes sooner than the
minimum time for foods taking 30 minutes or more
to cook.
Page 14
Page 17

C Oven Care and Use ManualOven Operations
Convection Cooking Chart
FOOD ITEM OVEN RACK TIME*
TEMPERATURE
Cakes, mix or scratch:
Angel Food 325°F (163º C) 1 40 to 45 minutes
Layers (8" or 9") 325°F (163º C) 2 and 5 32 to 35 minutes
Rectangle (9 x 13) 325ºF (163º C) 3 31 to 34 minutes
Cupcakes 325ºF (163º C) 1, 3, and 5 17 to 20 minutes
Biscuits:
Scratch or 425°F (219º C) 3 10 to 12 minutes
Refrigerator
Cookies:
Drop or Sliced 350°F (177º C) 3 or more racks 8 to 10 minutes
any combination
Cream puffs 375°F (190º C) 3 20 to 30 minutes
Meringues 325°F (163º C) 2 20 minutes
Souffles 350°F (177º C) 3 35 to 40 minutes
* This chart is a guide. Follow recipe or package directions.
Page 15
Page 18

C Oven Care and Use ManualOven Operations
Convection Bake Mode Operation
• Oven is not preheated for CONVECTION BAKE to take advantage of the lower heat yielding a
better crust on baked items.
• Use the conventional baking temperature and cooking time given in the recipe.
• Cook using only one rack at a time.
To Set the CONVECTION BAKE Mode:
You Will See
1. Select OVEN.
• Select twice for LOWER oven..
2. Select CONVECTION BAKE.
The temperature is automatically set at 325°F.
3. Optional step:
To change the temperature from 325ºF , select another
temperature immediately before starting.
4. Select START.
The temperature display alternates between the set
temperature and the actual temperature, beginning with
100°F. The actual temperature counts up in 5°F
increments.
Touch
UPPER
LOWER
Touch
CONVECTION
then
BAKE
Touch
3
7
5
Touch
START
CONVECTION
CONVECTION
o
325
BAKE
o
375
BAKE
o
100o/375
PREHEAT
The oven is preheated when the chime signals once.
PREHEAT disappears from the display .
5. To end this mode, select the oven OFF pad.
Touch
LOWER
OFF
CONVECTION BAKE TIPS
• Most recipes are cooked on rack positions 1 or 2 to take advantage of bottom heat.
• When a recipe has a two-step temperature cooking method (ex: pumpkin pie),
use the lower temperature for the entire cooking time given.
• For extra crisp bottom crusts (ex: scratch pizza), place the metal pan directly on the oven floor.
Page 16
Page 19

C Oven Care and Use ManualOven Operations
Convection Bake Chart
FOOD ITEM RACK OVEN TIME*
TEMPERATURE
Breads-Yeast:
Bread 2 350°F (177º C) 25 to 35 minutes
Dinner Rolls 2 or 3 400°F (205º C) 15 to 20 minutes
Sweet Rolls 2 or 3 375°F (190º C) 20 to 25 minutes
Frozen Dough I or 2 400°F (205º C) 25 to 35 minutes
Pizza:
Prebaked crust** I 450°F (232º C) 12 to 20 minutes
Scratch*** Oven Floor 450°F (232º C) 20 to 25 minutes
Refrigerator 1 425°F (219º C) 18 to 22 minutes
Frozen** 1 400°F (205º C) 18 to 25 minutes
Pies:
2 Crust Fruit, scratch
or frozen
Pumpkin, scratch 2 350°F (177º C) 50 to 60 minutes
or frozen 2 400°F (205º C) 55 to 60 minutes
Meringue toppings 2 350°F (177º C) 15 to 20 minutes
Nut pies 1 350°F (177º C) 40 to 50 minutes
Pastry Crust:
Scratch 2 425°F (219º C) 15 to 20 minutes
Graham Cracker 2 375ºF (190º C) 8 to 10 minutes
Refrigerator 2 450°F (232º C) 10 to 15 minutes
Frozen 2 Follow directions
I 375°F (190º C) 45 to 60 minutes
2 400°F (205º C) 60 minutes
Puff Pastries:
Frozen or scratch I 400°F (205º C) 20 to 25 minutes
Turnovers 1 400°F (205º C) 20 to 25 minutes
Strudel 1 350°F (177º C) 35 to 40 minutes
* This chart is a guide. Follow recipe or package directions.
** No pan used
Page 17
Page 20

C Oven Care and Use ManualOven Operations
Roast Mode Operation
• Use ROAST for conventional open roasting when drippings are desired.
• Roast mode is excellent for less tender meats or poultry when meat is brasied and a covered dish is used.
• Use a high-sided roasting pan or cover dish with a lid or foil.
To set ROAST mode:
1. Select OVEN.
• Select twice for LOWER oven.
2. Select ROAST.
The temperature is automatically set at 350º F.
3. Optional step:
To change the temperature from 350ºF, select
another temperature immediately before
starting.
4. Select START.
The temperature displa y alternate between the
set temperature and the actual temperature,
beginning with 100ºF. The actual temperature
counts up in 5ºF increments.
Touch
UPPER
LOWER
Touch
ROAST
Touch
3
7
5
Touch
START
You Will See
o
350
ROAST
o
375
ROAST
o
100o/375
PREHEAT
The oven is preheated when the chime signals
once. PREHEAT disappears from the display.
5. To end this mode, select the OFF pad.
ROAST TIPS
• This may be used to roast meats, poultry and
vegetables, which would be covered or cooked in a
high-sided open roaster.
• Add liquids, such as water, juice, wine, bouillon or
stock for flavor and moisture.
Touch
LOWER
OFF
• Roasting bags are suitable to use in this mode.
• When roasting whole chick ens or turkey , tuck wings
behind back and loosely tie legs with kitchen string.
Page 18
Page 21

C Oven Care and Use ManualOven Operations
Roasting Chart
MEAT AND POULTRY – OVEN RACK COOK TIME END TEMP
COVERED PAN TEMPERATURE LEVEL
Beef:
Pot roast,
3-4 pounds 350°F (177º C) 1 40 to 60 minutes per pound 170°F (77º C)
Beef Brisket 350°F (177º C) 2 50 to 60 minutes per pound 170°F (77º C)
Beef Chuck 350°F (177º C) 1 45 to 55 minutes per pound 170°F (77º C)
Meat Loaf 350°F (177º C) 3 60 to 90 minutes total time 170°F (77º C)
Poultry:
Chicken, whole or 375°F (190º C) 1 18 to 21 minutes per pound 170°F (77º C)*
halves
Chicken, pieces 375°F (190º C) 1 Total time 60 minutes
Turkey, whole 350°F (177º C) 2 11 to 15 minutes per pound 170°F (77º C)*
Pork:
Shoulder 325°F (163º C) 1 35 to 40 minutes per pound 170°F (77º C)
Smoked Ham, half 325°F (163º C) 1 2 to 3 hours total 160°F (71º C)
* Serving temperature is 175ºF. Cover with foil and let stand for 10-15 minutes.
Thigh
Page 19
Page 22

Convection Roast Mode and Pr obe Operation
• Preheating is optional for CONVECTION ROAST.
Preheating is not recommended for CONVECTION
ROAST when using the PROBE. A hot oven impairs
connecting the probe into the receptacle and into the
roast.
• Roast in a low-sided, uncovered pan.
To Set the CONVECTION ROAST and PROBE Mode:
1. Insert the probe into the thickest part of the
Meat. Push the plug into the oven receptacle.
• Use CONVECTION ROAST when roasting tender
cuts of meat or poultry of any size.
• Results will yield a drier, crisper exterior that seals in
the interior juices with few pan drippings.
• Place tip of probe into the center of thickest section,
avoiding bone and fat.
C Oven Care and Use ManualOven Operations
You Will See
2. Select OVEN.
For double ovens only
• Select once for UPPER oven.
• Select twice for LOWER oven.
3. Select CONVECTION and ROAST.
The temperature is automatically set at 325°F.
4. Optional step:
To change the temperature from 325ºF, select
another temperature immediately before starting.
5. Select PROBE.
The temperature range for the probe is 100 °F to
200ºF (88ºC – 143ºC). The probe automatic
default temperature is programmed at 160ºF
(71ºC).
Touch
UPPER
LOWER
Touch
CONVECTION
then
ROAST
Touch
3
5
0
Touch
PROBE
o
325
CONVECTION
ROAST
o
350
CONVECTION
ROAST
o
160
PROBE
6. To change the probe temperature from 160ºF
(71ºC), select another temperature immediately
before starting.
to be display ed instead of the o ven temperatur e.
7. Select START.
The temperature display alternates between the
set probe temperature and the actual meat/
poultry temperature, increasng in 5ºF increments
starting with 100ºF.
check the oven temperature setting when using the probe. The oven temperature is displayed for 5 seconds
before the probe display continues.
displayed as the heat turns off.
The probe temperature continues
Touch CONVECTION to
The oven chimes 3 times when the meat/poultry item is cooked. End is
Touch
1
4
5
Touch
START
o
145
100o/145
CONVECTION ROAST TIPS
• When roasting whole chickens or turkey, tuck wings behind back and loosely tie legs with kitchen string.
• Use the 2-piece broil pan with the top grid for roasting uncovered.
• Use the PROBE or a meat thermometer to determine the internal doneness or “End ” temperature. (See chart)
• Double-check the internal temperature of meat/poultry by inserting probe into another position.
• While covered, small roast temperatures increase 5ºF and large roast increase 10ºF.
• After removing the item from the oven, cover loosely with foil for 10 to 15 minutes before carving.
Page 20
PROBE
o
Page 23

C Oven Care and Use ManualOven Operations
Convection Roast Chart
MEAT AND POULTRY – OVEN RACK COOK PROBE DONENESS CARVING
UNCOVERED PAN TEMPERATURE TIME TEMP TEMP
Beef:
Standing Rib 325°F (163º C) 2 135°F (57º C) Med Rare 145ºF (63º C)
3 to 6 lbs. 28 to 32 140°F
6 to 9 lbs. 160°F
Boneless rib 325°F (163º C) 2 135°F
I to 4 lbs. 30 to 33 140°F
Sirloin, boneless 325°F (163º C) 2 135°F
Rump, eye 30 to 33 140°F
3 to 6 lbs. 160°F
Tri-Tip 425°F (219º C) 2 135° (57º C) Med Rare 145º (63º C)
Tenderloin 140° (60º C) Med 150° (66º C)
I-1/2 to 3 lbs 160°F
Chicken:
Unstuffed 375°F (190º C) 3 18 to 21 175ºF (79º C) Thigh 175ºF (79º C)
Stuffed 350°F (177º C) 3 18 to 21
Pieces 375°F (190º C) 3
Cornish game
Meatloaf 2
I to 2 lbs. 350°F (177º C)
Lamb:
Leg
4 to 8 lbs. 325°F (163º C) 1 24 to 30 135°F
Rack of Lamb
1 to 3 lbs. 325°F (163º C) 1 30 to 35 135°F
3 to 5 lbs.
hens 350°F (177º C) 2
Minutes Per lb.
(60º C) Med 150°F (66º C)
(71º C) Well 170°F
(57º C) Med Rare 145ºF (63º C)
(60º C) Med 150°F (66º C)
160°F
(71º C) Well 170°F
(57º C) Med Rare 145ºF (63º C)
(60º C) Med 150°F (66º C)
(71º C) Well 170°F
Total Time
30 to 40 min.
35 to 45 min.
Minutes Per lb.
Total Time 165ºF (74º C) Breast 170ºF (77º C)
60 minutes
Total Time Breast
60 to 90 minutes
Total Time
60 to 75 minutes
Minutes Per lb.
(71º C) Well 170°F
minimum Safe Temp. for Stuffing
175ºF (79º C) Thigh 175ºF (79º C)
and
180° (82º C) thigh 180° (82º C)
170°F (77º C) Well 170ºF
(57º C) Med Rare 145ºF (63º C)
(57º C) Med Rare 145ºF (63º C)
(77º C)
(77º C)
(77º C)
(77º C)
165°F (74º C)
(77º C)
Pork:
Loin
4 to 6 lbs. 325ºF (163º C) 2 32 to 35 155°F
Shoulder
3 to 5 lbs. 325ºF (163º C) 2 32 to 35 155°F
Turkey:
Whole,
8 to 15 lbs.
Unstuffed 325ºF (163º C) 2 9 to 12 170ºF (77º
Stuffed 300°F (149º C) 2 10 to 15
Whole
16 to 24 lbs.
Unstuffed 325°F (163º C) I 7 to 11 170ºF
Stuffed 300°F (149º C) 1 10 to 12
Breast, with bone
5 to 7 lbs. 325°F (163º C) 2 16 to 21 165ºF
Veal:
Loin (bone in)
2 to 4 lbs. 325°F (163º C) 2 32 to 34 155°F
Minutes Per lb.
Minutes Per lb.
Minutes Per lb.
Page 21
(68º C) WeII 160ºF (71º C)
(68º C) WeII 160ºF (71º C)
C) Thigh 175ºF (79º C)
Minimum Safe Temp. for Stuffing
(77º C) Thigh 175ºF (79º C)
Minimum Safe Temp. for Stuffing
(74º C) Breast 170ºF (77º C)
(68º C) WeII 160ºF (71º C)
165°F (74º C)
165°F (74º C)
Page 24

C Oven Care and Use ManualOven Operations
Broil and Convection Broil Mode Operation
• Do not Preheat for broil or convection broil.
• Broil with the door closed.
• Always use the two piece broil pan packaged with
your oven.
• Use TIMER to signal when to turn food over.
• Use BROIL when broiling meats, fish or poultry
pieces up to 1-1/2” thick.
• Use CONVECTION BR OIL when broiling meats or
poultry over 1-1/2” thick.
To Set the BROIL and CONVECTION BROIL Modes:
1. Select twice for LOWER oven.
2. Select BROIL or
CONVECTION BROIL.
The temperature is automatically set at
HI (550ºF/288ºC)
3. Optional step:
To change the setting from HI, select a
500ºF for Medium Broil or 450ºF for Low
Broil temperature immediately before
starting.
Touch
UPPER
LOWER
Touch
BROIL
or
Touch
CONVECTION
then BROIL
Touch
5
0
0
You Will See
HI
BROIL
o
500
BROIL
4. Select START.
5 . To end this mode, select the oven OFF
pad.
BROIL AND CONVECTION BROIL TIPS
• Place rack at the rack level needed before turning
on the oven.
• Start broiling with a cool oven and broiler pan.
• Brush fish and lean cuts of meat with vegetable oil
before broiling to prevent sticking.
• Start poultry with skin side down.
• Turn food after one half of the total cooking time.
Thicker cuts of meat or poultry can be turned more
often.
Touch
START
Touch
LOWER
OFF
Utensils:
• Slotted top grid on broiler pan lets fat drip a way from
the upper heating element; this reduces spattering
and smoking.
• When top browning casser oles or toasting bread, use
only metal or glass-ceramic (Pyroceram
Corningware bakeware.
• Never use heatproof glass (Pyr ex
cannot tolerate the high temperatures.
!
CAUTION!
▲
When broiling, open the door carefull y. There may be
an accumulation of steam and smoke. Do not place
the hot broiler pan on the open oven door.
500
®
) or pottery; they
o
®
) such as
Page 22
Page 25

C Oven Care and Use ManualOven Operations
Broil Chart
FOOD ITEM and THICKNESS RACK BROIL BROIL
POSITION SETTING TOTAL TIME
Beef: Ground, patties, 3/4" to 1" 6 HI Med Rare - 8 to 12 min.
Med - 9 to 14 min.
Well - 10 to 15 min.
Steaks, 3/4 to 1-1/4" 6 HI Med Rare - 7 to 11 min.
Med - 8 to 12 min.
Well - 9 to 14 min.
Bread: Garlic Bread, 1/2" slices 6 HI 2-1/2 to 4 minutes
3/4" to 1" slices 6 HI 4 to 6 minutes
Fish: Fillets or steaks, 1/2" to 1" 5 or 6 Med - 500°F (260º C) Flakes - 8 to 12 minutes
(1/2’’ thickness does not
need to be turned after
half of broil time)
Lamb: Chops, 1/2" to 1" 6 HI Med - 12 to 17 minutes
Well - 15 to 20 minutes
Pork: Chops, 1/2" to 1" 6 Med - 500°F (260º C) Well - 18 to 25 minutes
Smoked, ham steak, 1/2" 6 HI Well - 7 to 11 minutes
Ham steak, 1" 6 HI Well - 12 to 15 minutes
Poultry: Chicken, pieces 4 or 5 Low - 450°F(232º C) 30 to 45 minutes
Sausage: Hot Dogs, whole 6 HI 4 to 5 minutes
Veal: Chop, 1" 6 HI Well - 12 to 16 minutes
Convection Broil Chart
FOOD ITEM and THICKNESS RACK BROIL BROIL
POSITION SETTING TOTAL TIME
Beef: Roasts, flat, 1-1/2” or more 4 Med - 500°F (260º C) Med Rare - 16 to 22 min.
Steaks, 1-1/2” or more 4 HI Med - 22 to 28 min.
Well - 26 to 32 min.
Bread: Garlic Bread, 1-1/2” slices 5 HI 4 to 6 minutes
Lamb: Chops, 1-1/4” or more 5 HI Med - 21 to 27 minutes
Well - 27 to 33 minutes
Pork: Chops or tenderloin, 5 Med - 500°F (260º C) Well - 18 to 25 minutes
1-1/4” or more
Poultry: Chicken, quarters 4 or 5 Low - 450°F (232º C) 30 to 45 minutes
Turkey, pieces 4 Low - 450°F (232º C) 30 to 50 minutes
Sausages: Fresh, uncooked 5 HI Well - 6 to 8 minutes
Page 23
Page 26

Proof Mode Operation
• Place food in oven before selecting this mode.
• The proofing temperature is pre-set at 100°F.
• Use any rack level that accommodates the size of the bowl or pan.
• Lightly cover the bowl or pan.
To Set the PROOF Mode:
C Oven Care and Use ManualOven Operations
You Will See
1. Select twice for LOWER oven.
2. Select PROOF/DEHYDRATE once for the
proof mode.
3. Select START.
The oven is preheated when the chime signals once.
PREHEAT disappears from the displa y.
Touch
UPPER
LOWER
Touch
PROOF
DEHYDRATE
Touch
START
PrF
BAKE
PrF
PREHEAT
Touch
4. To end this mode, select the oven OFF pad.
LOWER
OFF
PROOFING TIPS
• Keep the oven door closed and use the oven light to check the rising of the dough.
• Use the reminder convenience of either TIMER 1 or TIMER 2.
Page 24
Page 27

Deh ydrate Mode Operation
• Do not preheat when using the dehydrate mode.
• The dehydrating temperature is pre-set at 140°F.
• Use drying screens (not supplied with oven).
• Multiple racks can be used simultaneously.
• Place food in oven before selecting the mode.
To Set the DEHYDRATE Mode:
1. Select twice for LOWER oven.
C Oven Care and Use ManualOven Operations
You Will See
Touch
UPPER
LOWER
2. Select PROOF/DEHYDRATE twice
for the dehydrate mode.
3. Select START.
The oven is preheated when the chime signals once.
PREHEAT disappears from the displa y.
4. To end this mode, select the oven OFF pad.
Touch
PROOF
DEHYDRATE
Touch
START
Touch
LOWER
OFF
d h Y
CONVECTION
d h Y
PREHEAT
DEHYDRATING TIPS
• Some foods require as much as 14 to 15 hours of time to fully dehydrate.
• Consult a food preservation book for specific times and handling of various foods.
• This mode is suitable for a variety of fruits, vegetables, herbs and meat strips.
• Drying screens can be purchased at specialty kitchen shops.
• By using paper towels, some food moistur e should be absorbed before deh ydrating begins (such as sliced tomatoes
or sliced peaches).
Page 25
Page 28

C Oven Care and Use ManualOven Operations
Timed Oven Modes Operation
• In double oven models, both ovens can be set independently to operate a timed mode.
• Be sure that the time of day clock is displaying the correct time.
• The timed mode turns off the oven at the end of the cook time.
To Set Timed Mode:
Example shown has the time of day set at 3:00.
1. Select OVEN.
• Select twice for LOWER oven.
Touch
UPPER
LOWER
You Will See
. Select BAKE or CONVECTION.
2
Change the preset temperature at this time,
if needed.
3 . Immediately before starting, select the
number of hours and minutes the o ven
will be on. For example, 2, 3, 0 is
2 hours 30 minutes.
4. Select START.
The oven turns on and heats to the temperature selected for the number of hours and
minutes needed. The clock automatically calculates the time of day the mode will stop
and the oven will turn off. The example shows
it
that
2-1/2 hours.
To Delay the Start of the Timed Mode:
Example shown has the time of day set at 3:00
Follo w steps 1, 2 and 3 above.
1.
after the number of hours are selected for
the food to cook, select the Stop Time.
will stop at 5:30 after cooking for
Immediately
Touch
BAKE
Touch
COOK TIME
2
3
0
Touch
START
Touch
STOP
TIME
COOK TIME 2: 30
COOK TIME 2: 30
STOP TIME 5: 30
COOK TIME 2: 30
STOP TIME _:__
o
350
BAKE
o
350
o
100o/350
PREHEAT
o
350
2. Select the time of day the oven will
stop cooking or turn off. This example,
shows that the oven will stop at 7:00 and
cook for 2
3. Select START.
The oven turns on and heats to the temperature selected for the number of hours
and minutes needed.
The clock automatically calculates the time
of day the mode starts and stops.
-1
/2 hours.
Touch
7
0
0
Touch
START
Page 26
COOK TIME 2: 30
Stop Time 7: 00
COOK TIME 2: 30
Start at 4: 30
o
350
o
100o/350
PREHEAT
Page 29

Setting the Sabbath Mode
• This mode is for religious faiths with “no work” requirements on the Sabbath.
• Use only in the BAKE mode; do not use with Timed Bake or the Probe mode.
To Set the Sabbath Mode:
C Oven Care and Use ManualOven Operations
1. Cancel all modes.
2. Select OVEN.
• Select twice for LOWER oven.
3. Select BAKE mode and temperature.
(See Page 39 to change temperature.)
4. Select START.
5. Select on or off status for the lights. To keep
lights off, do not touch.
Touch
UPPER
LOWER
Touch
BAKE
Touch
START
Touch
LIGHTS
You Will See
o
350
BAKE
o
100o/350
PREHEAT
6. To activate the Sabbath mode , touch
and hold TIMER OFF pad for 5 seconds.
• The word “SAb” is displayed.
• Lights will remain on or off as pre viously set,
if the door is open or closed.
• “Preheat” is displa yed until the ov en reaches
temperature.
• All pads, except the oven OFF, will be inactive.
No chime or beep signal is generated.
• Oven will remain “on” indefinitely until
cancelled.
• When the red heating symbol in the display
is illuminated, the bake element is on. Opening
the door at this point will not cause the
heating element to be activated, since it will
already be on. The heating element will remain
on, while the door is open under this
condition.
7. To Cancel or Stop the Sabbath mode:
• Touch oven OFF.
• Turn off the light if it was set to sta y on in Step 5.
Touch
TIMER OFF
SAb
o
100o/350
PREHEAT
Page 27
Page 30

C Oven Care and Use ManualCare and Cleaning
Self-Cleaning The Oven
Your new oven features two pyrolytic self-cleaning
ovens. When set into the CLEAN mode , the oven
reaches a high temperature that burns off the food soil.
• Only one oven can be set to self clean at a time. The
second oven cannot be used while one is self cleaning.
• The microwa ve mode can be used when the Lower
oven is self-cleaning.
• It is common to see smoke and/or an occasional
flame-up during the CLEAN cycle, depending on
the content and amount of soil remaining in the oven.
If a flame persists, turn off the oven and allow it to
cool before opening the door to wipe up the
excessive food soil.
• The oven light will not turn on when the ov en is set
for a clean cycle.
NOTE: Due to the high temperatures used for
self-cleaning, the oven may develop fine hairlike
lines or surface roughness. This is a common condition and does not affect either the cooking or
the cleaning performance of the oven.
BEFORE YOU SELF-CLEAN
1. Hand-clean the oven door edge, window , o ven front
frame and oven cavity edges (shaded areas below).
They do not get hot enough during the cleaning cycle
for soil to burn awa y. Use a soap y sponge or plastic
scrubber or an S.O.S.® pad. DO NOT RUB THE
GASKET.
2 .Wipe up large overspills and grease with
paper towels.
3. Remove all utensils.
4. Remove oven racks. If the oven racks are left
in the oven during a self-cleaning cycle, they
will permanently lose their shiny finish and
change to a dull dark finish. See the Oven
Cleaning Chart for proper care, Page 30-31.
5. Be sure the light is turned off on the control panel
and the bulb and glass cover are in place, see Page
33.
6. Heat and odors are normal during the Self-Cleaning
cycle. Keep the kitchen well ventilated.
AFTER SELF-CLEAN
• At the end of the CLEAN cycle, gray ash remains
inside the oven. The amount of ash depends on how
heavily soiled the oven was before it was cleaned. It
is easily removed, when the oven is cold, using a damp
sponge or cloth. If the racks do not slide easily after
being cleaned, lightly rub rack side rails with
vegetable oil.
IMPORTANT: Be sure to let the inside window glass in the oven door cool completely
before wiping up any ash left fr om the clean
cycle.
Hand-clean front frame
Hand-clean window
and frame.
Hand-clean 1-1/2" from rack
support to front of oven cavity
Hand-clean door
around edge
DO NOT
hand-clean gasket
Page 28
Page 31

Self Clean Mode Operation
To Set the SELF CLEAN Mode to Start Now:
• Self-Clean only one oven at a time.
• The oven light does not operate during this mode.
• Be sure that the time of day clock is displaying the correct time.
• Three hours is the preset length of cleaning.
• The mode stops automatically at the end of the clean hours.
C Oven Care and Use Manual
Example shows clock set at 5:00
1. Select OVEN.
• Select once for UPPER oven.
• Select twice for LOWER oven.
2. Select SELF CLEAN.
The number of clean hours (3:00) is display ed automatically .
3. Optional Step:
To change the setting fr om 3 hours, select either 2 hours for
light soil or 4 hours for heavy soil immediately befor e starting.
4. Select START.
The door locks automatically . When the lock symbol is displa yed,
the door cannot be opened. Confirm that the door locks and
will not open before starting self-clean mode. If door does not
lock, press OFF and do not self-clean; phone 800 / 735-4328
for service (see Page 36 for obtaining service.) If the door is in
the open position when this mode is selected, the displa y will
flash the word “dor”. This is a r eminder that the door must be
closed before the SELF CLEAN mode can be set.
Touch
UPPER
LOWER
Touch
SELF
CLEAN
Touch
4
0
0
Touch
START
COOKTIME 3:00
SELF
CLEAN
COOK TIME 4: 00
You Will See
CLn
CLn
TO DELAY THE START OF THE MODE:
1. Select OVEN.
• Select once for UPPER oven
• Select twice for LOWER oven
2. Select SELF CLEAN.
The number of clean hours (3:00) is display ed automatically.
If the number of clean hours do not need to be changed,
proceed to set the STOP TIME.
3. Select STOP TIME.
When the words STOP TIME flash, touch the time of day.
The oven will stop .
cycle will stop.
4. Select START.
5. To cancel or stop the mode after the “lock” symbol
is displayed, wait until the symbol disappears. Then the
door can be opened.
Oven will display the time when the clean
Touch
UPPER
LOWER
Touch
SELF
CLEAN
Touch
STOP
TIME
Touch
START
Page 32

Oven Cleaning – Upper and Lower Oven
How to use the Ov en
Cleaning Chart
1. Locate the number of the part to be
cleaned in the illustration on this page.
2. Match the letter adjacent to the part
name with the letter on the chart
(next page) for the recommended
cleaning method.
• Use the cleaning method in the
column if the oven is black
left
or white.
• Use the cleaning method in the
right column if the oven is stainless steel.
3. Match the letter with the cleaning
method on the chart on the next
page.
C Oven Care and Use ManualOven Care and Cleaning
6
5
7
8
4
9
3
2
10
11
1
Part
Door Frame
1
Interior Door Window
2
Removable Oven Racks
3
Side T rim
4
Control Panel Trim
5
Control Panel
6
16
17
18
Cleaning Method
Blk / Wht Stainless
Oven Oven
D
F
A
D
D
C
15
Steel
D
F
A
D
D
C, G
14
Part
Seal (Gasket)
10
Interior Oven Door
11
Door Handle
12
13
Door Cooling Vent & Trim
14
Door Front
Door End caps
15
(not shown)
12
13
Cleaning Method
Blk / Wht Stainless
Steel
Oven Oven
B
E
D
D
C & G
D
Oven Cooling Vents
7
Oven Front Frame
8
Oven Cavity
9
D
D
E
E
E
E
Page 30
Broil Pan Grid Top
16
Broil Pan Bottom
17
Probe Accessory
18
(Upper or Single oven only)
A
E
H
Page 33

Oven Care and Cleaning
Oven Finishes / Cleaning Method
The entire oven can be safely cleaned with a soapy sponge, rinsed and dried.
If stubborn soil remains, follow the recommended cleaning methods below.
• Always use the mildest cleaner that will do the job.
• Rub metal finishes in the direction of the grain.
• Use
• Rinse thoroughly with a minimum of water so it does not drip into door slots.
• Dry to avoid water marks.
The cleaners recommended below indicate a type and do not constitute an endorsement.
Use all products according to package directions.
clean, soft cloths, sponges or paper towels.
C Oven Care and Use Manual
PART
A Chrome Wash with hot sudsy water. Rinse thoroughly and dry. Or, gently rub with Soft Scrub®,
Plated
B Fiberglass
Knit
C Glass Spray Windex® or Glass Plus® onto a cloth first, then wipe to clean. Use Fantastik® or
D Painted Clean with hot sudsy water or apply Fantastik® or Formula 409® first to a clean sponge
E Porcelain Immediately wipe up acid spills like fruit juice, milk and tomatoes with a dry towel. Do not
Bon-Ami®, Comet®, Ajax®, Brillo® or S.O.S.® pads as directed. Easy Of
Cleaners (cold oven formula) can be used, but may cause darkening and discoloration. The
broil pan top may be squirted with liquid detergent and covered with wet paper towels
while pan is hot. Allow to stand.
Racks may be cleaned in the oven during the self clean mode. They will lose their shiny
finish and permanently change to a metallic gray.
DO NOT HAND CLEAN GASKET.
Formula 409® to remove grease spatters.
or paper towel and wipe clean. Avoid using powdered cleansers and steel wool pads.
use a moistened sponge/towel on hot por celain. When cool, clean with hot sudsy water or
apply Bon-Ami® or Soft Scrub® to a damp sponge. Rinse and dry . For stubborn stains, gently
use Brillo® or S.O.S.® pads. It is normal for porcelain to craze (fine lines) with age due to
exposure from heat and food soil.
CLEANING METHOD
f® or Dow® Oven
F Reflective Clean with hot sudsy water and sponge or plastic scrubber. Rub stubborn stains with
Glass vinegar, Windex®, ammonia or Bon-Ami®. DO NOT USE HARSH ABRASIVES.
G Stainless Always wipe or rub with grain. Clean with a soapy sponge; rinse and dry. Or, wipe with
Steel Fantastik® or Formula 409® sprayed onto a paper towel. Protect and polish with Stainless
Steel Magic® and a soft cloth. Remove water spots with a cloth dampened with white
vinegar. Use Rever eware Instant Stainless Steel Cleaner® to remove heat discoloration.
H Probe Clean probe by hand with detergent and hot water. Rinse and dry. Do not soak
or clean in dishwasher.
I Rubber Clean with hot sudsy water and sponge. Avoid using steel wool pads.
Page 31
Page 34

Do-It-Yourself Maintenance
C Oven Care and Use Manual
Do-It-Yourself Maintenance
Remo ving the Oven Door
The oven door can be lifted off for your convenience in cleaning hard to reach areas inside the oven.
• Use caution when removing the lower door as it is very heavy.
To Remove the Oven Door
1. Fully open the oven door.
2 . Raise the U-clip over the hook on each of the hinges
to the "locked" position (see illustration below). This
will prevent the hinge from snapping closed when
the door is removed.
3. Grasp the door by the sides toward the back. Raise
the front of the door several inches (there will be
some spring resistance to overcome because of the
hinge being locked). When the front of the door is
high enough, you will be able to lift the hinges to
clear the indents.
4 . Pull the hinges out of the slots in the oven front frame.
DOOR HINGE
To Replace the Oven Door
1. Grasp the sides of the door at the center and insert
the ends of the hinges into the slots in the oven fr ont
frame as far as they will go (see illustration below).
2. With the door open all the way, lower the tw o locking clips.
3 . Raise the oven door and make sure that it fits ev enly
with the front sides.
WARNING:
With the door off, ne ver release the le vers and try
to close the hinges. Without the w eight of the door ,
the powerful springs will snap the hinges closed
with great force.
Raise Clip to “Locked Position”
to Remove Door
Lower Clip After
Door is Replaced
Latch Hinge
Page 32
Page 35

Do-It-Yourself Maintenance
Do-It-Yourself Maintenance
REPLACING THE OVEN LIGHT – LOWER OVEN ONLY
6. Remove the bulb by grasping and sliding the bulb
straight up until the two prongs have cleared the
WARNINGS:
To prevent electrical shock and or personal injury:
• Before replacing the light bulb, be sure the
electric power is turned off at the circuit
breaker.
• Do not operate the oven unless the light cover is
securely in position.
• Halogen bulbs get HOT instantly when turned ON.
• Be sure the oven and light bulb are cool.
ceramic holder.
7. Do not touch the glass of the new replacement
bulb with your fingers. It will cause the bulb to
fail when it first lights. Grasp the replacement
bulb with a clean paper towel or facial tissue
with the prongs facing down. Locate the two
prongs in the ceramic holder, gently poking until
the two prongs locate in the ceramic socket.
C Oven Care and Use Manual
CAUTION: If the light cover is damaged or br oken,
do not use the ov en until a new cover is in place.
The oven lights are located, on the left and right side
walls of the oven. The lights have a removable lens
cover and a halogen light bulb. The ceramic light
socket housing is not removable by the user.
• Replace bulb with a 12-Volt, 10-Watt Halogen
bulb only.
Before replacing bulbs, turn off oven circuit.
To replace Halogen Bulb:
1. Remove oven racks.
2. Slide the tip
of a table
Lens Cover
knife blade
between
oven wall and
the center of
the side of
the protective glass lens
cover.
Light Bulb
Light
Socket
3. Support the
glass lens cover with two fingers along the
bottom edge to prevent the cover from falling
to the bottom of the oven.
8. Press down to seat the bulb.
9. Snap the protective glass lens cover over the
bulb housing.
10. Turn on circuit breaker.
11. The upper oven light must be replaced by a
qualified service technician. See Page 36.
CHANGING TO THE 24-HOUR
CLOCK FORMAT
The oven has been preset to a 12
hour clock format.
To Change the Time of Day Clock
to a 24-Hour Clock, follow these
steps:
1. Turn off both ovens.
2. Touch and hold the UPPER
CLOCK pad at the same time.
3. 12H appears in the Clock window; release
both pads.
4. Touch CLOCK and 24H replaces 12H. This
alternates when CLOCK is touched.
UPPER
OFF
, then touch the
4. Gently twist the knife blade to loosen the glass
lens cover.
5. Remove the glass lens cover.
Page 33
5. To complete the change, touch or
OFF.
UPPER
OFF
Page 36

Do-It-Yourself Maintenance
Do-It-Yourself Maintenance
C Oven Care and Use Manual
FAHRENHEIT TO CENTIGRADE
The oven has been preset to a F ahrenheit temperature.
To Change to Centigrade, follo w these steps:
I. Turn off both ovens.
2. Touch and hold the UPP and then the
CONVECTION pad at the same time.
3. F appears in the temperature digits; release both pads.
4. Touch CONVECTION; C r eplaces F. This alternates
when CONVECTION is touched.
5. To complete the change, touch UPPER .
UPPER
OFF
UPPER
OFF
CALIBRATING OVEN TEMPERATURE
The electronic thermostat has been preset to
0°F and accurately maintains its setting. If the
browning results are too light or too dark for your
preferences, you can raise or lower the setting.
To change the Calibration of the Oven
Temperature:
1. Turn off both ovens.
2. Touch and hold the pad in a double o v en or
the OFF pad in a single oven; touch the BAKE pad.
3. 0 appears in the temperature digits; release all pads.
4. Touch BAKE and 0 changes in increments of 5 degr ees
each time it is touched. The maximum adjustment is
± 35ºF. In Centigrade the range is ± 3ºC to 21ºC.
UPPER
OFF
5. To complete the change, touch .
To calibrate the lower oven models: Repeat the
steps with this exception, touch the instead
of the pad.
UPPER
OFF
UPPER
OFF
LOWER
OFF
Page 34
Page 37

Problem Solving / Consumer Service
C Oven Care and Use Manual
Solving Baking Prob lems
With either BAKE or CONVECTION, poor results can occur for many reasons other than a malfunction of
the oven. Check the chart below for causes of the most common problems. Since the size, sha pe and material
of baking utensils directly affect the baking r esults, the best solution may be to replace old baking utensils that
have dark ened and warped with age and use. Check the Baking Charts for the corr ect rack position and baking
time.
BAKING PROBLEM CAUSE
Food browns unevenly • Oven not preheated.
• Aluminum foil on oven rack or oven bottom.
• Baking utensil too large for recipe.
• Pans touching each other or oven walls.
Food too brown on bottom • Oven not preheated.
• Using glass, dull or darkened metal pans.
• Incorrect rack position.
• Pans touching each other or oven walls.
Food dry or has shrunk • Oven temperature too high.
excessively • Baking time too long.
• Oven door opened frequently.
• Pan size too large.
Food baking or roasting • Oven temperature too low.
too slowly • Oven not preheated.
• Oven door opened frequently.
• Tightly sealed with aluminum foil.
• Pan size too small.
Pie crusts do not brown on • Baking time not long enough.
bottom or have soggy crust • Using shiny steel pans.
• Incorrect rack position.
• Oven temperature is too low.
Cakes pale, flat and may • Oven temperature too low.
not be done inside • Incorrect baking time.
• Cake tested too soon.
• Oven door opened too often.
• Pan size may be too large.
Cakes high in middle with • Baking temperature too high.
crack on top • Baking time too long.
• Pans touching each other or oven walls.
• Incorrect rack position.
• Pan size too small.
Pie crust edges too brown • Oven temperature too high.
• Edges of crust too thin.
Page 35
Page 38

C Oven Care and Use ManualProblem Solving / Consumer Service
Solving Operational Problems
Before calling for service, check the following to avoid unnecessary service charges.
PROBLEM PROBLEM SOLVING
OVEN STEPS
All the numbers touched The numbers were touched too rapidly. Be sure you remove your finger from
do not appear in display the number pad before touching the next digit.
F followed by 2 digits appears Touch OFF or turn power off at the circuit breaker, wait 3 minutes and turn
in the display window it back on. If condition persists, note the code number and call an authorized
servicer.
F-24 or F-25
appears in display window
S A
b
appears in display window Turn off the oven selected by touching OFF (single oven model)
Cooling fan continues to run The fan turns off automatically when the electronic components have
after oven is turned off. cooled sufficiently.
Clock and timer Make sure there is proper electrical power to the oven.
do not work See the CLOCK and TIMER sections on Pages 10 & 11.
Oven will not work Make sure there is proper electrical power to the oven.
Oven light does Replace or reinsert the light bulb if loose or defective. See Page 33.
not work Touching the bulb with your fingers may cause the bulb to burn out quickly.
Oven temperature is The oven thermostat needs adjustment. See CALIBRATING OVEN
too hot or too cold TEMPERATURE in Do-It-Yourself Maintenance, Page 34.
Oven will not self-clean The oven temperature is too high to set the self-clean operation.
This is caused by close contact to the control panel for more than 60 seconds,
such as someone leaning against the controls or objects hanging in front of
controls. See item above for correction.
LOWER
UPPER
or (double oven model).
OFF
Check the circuit breaker or fuse box to your house.
Oven light does not work if CLEAN mode is set.
Allow the oven to cool to room temperature and reset the controls.
Be sure you have touched CLEAN.
OFF
Oven door will not Allow the oven to cool below the locking temperature.
unlock
Oven is not clean Heavily soiled ovens may need to self-clean again or for a longer
after the clean cycle period of time. Heavy spillovers should be cleaned before starting
the clean cycle. See Preparing to Self-Clean, Pages 28 and 29.
Oven does not lock in Do not run Self Clean. Call for service. See information below.
Self Clean Mode
HOW TO OBTAIN SERVICE
For authorized service or parts information, call 800/ 735-4328.
We want you to remain a satisfied customer. If a problem does come up that cannot be resolved to
your satisfaction write to Thermador Customer Support Call Center, 5551 McFadden Avenue, Huntington Beach CA, 92649 or call: 800/ 735-4328.
Please include the Model Number, Serial Number and Date of Original Purchase/Installation.
Page 36
Page 39

Problem Solving / Consumer Service
THERMADOR BUILT-IN OVEN WARRANTY
For Model C302 • C272 • C301 • C271
C Oven Care and Use Manual
WHAT IS COVERED
Full One Year Warranty
For one year from the date of installation or date of
occupancy for a new previously unoccupied dwelling,
any part which fails in normal home use will be repaired
or replaced free of charge. Save your dated receipt or
other evidence of the installation/occupancy date.
Thermador® will pay for all repair labor and replacement parts found to be defective due to materials and
workmanship. Service must be provided by a Factory
Authorized Service Agency during normal working hours.
WHAT IS NOT COVERED
1. Service by an unauthorized agency. Damage or
repairs due to service by an unauthorized agency
or use of unauthorized parts.
2. Service visits to:
• Teach you how to use the appliance.
• Correct the installation. You are responsible
for providing electrical wiring and other
connecting facilities.
W ARRANTY APPLICA TIONS
This warranty applies to appliances used in normal family
households; it does not cover their use in commercial
situations.
This warranty is for products purchased and retained in
the 50 states of the U.S.A., the District of Columbia and
Canada. The warranty applies even if you should move
during the warranty period. Should the appliance be
sold by the original purchaser during the warranty
period, the new owner continues to be protected until
the expiration date of the original purchaser's warranty
period.
THERMADOR® DOES NOT ASSUME ANY
RESPONSIBILITY FOR INCIDENTAL OR
CONSEQUENTIAL DAMAGES. Some states do not
allow the exclusion or limitation of incidental or
consequential damages, so the above limitation or
exclusion may not apply to you. This warranty gives you
specific legal rights and you may also have other rights
which may vary from state to state or province to
province.
SERVICE DATA RECORD
• Reset circuit breakers or replace home fuses.
3. Damage resulting from accident, alteration, misuse,
abuse, improper installation or installation not in
accordance with local electrical codes or plumbing
codes, or improper storage of the appliance.
4. Repairs due to other than normal home use.
The serial tag on the product can be seen inside the
cooling vents on the right-hand side.
on Page 4. Now is a good time to write this information
in the space provided below. Keep your invoice for
warranty validation. To obtain service, see Page 36.
Please see item 10
Model Number:
Serial Number:
Date of Installation or
Occupancy:
Page 37
Page 40

Specifications are for planning purposes only. Refer to installation instructions and consult your countertop
supplier prior to making counter opening. Consult with a heating and ventilating engineer for your specific
ventilation requirements. We reserve the right to change specifications or design without notice. Some
models are certified for use in Canada. Thermador is not responsible for products which are transported from
the U.S. for use in Canada. Check with your local Canadian distributor or dealer.
For the most up to date critical installation dimensions by fax, use your fax handset and call (702) 833-3600.
Use code #8030.
5551 McFadden Avenue, Huntington Beach, CA 92649 • 800/735-4328
ECO 12629 • 16-10-191F • © 2001 BSH Home Appliances Corp. • Litho in USA 12 /01
 Loading...