

Page 1
i i ii ii
k
SE
VENTILATION
AN D CA_E MAN L
A L ¸¸¸¸¸i(¸¸¸¸¸¸¸¸¸¸¸¸¸¸¸¸¸¸¸¸¸7¸¸¸¸¸¸¸¸¸¸¸¸¸¸¸¸¸¸¸
Thermador A,,A.....,.......g_,o,
Page 2

ell
fr
es
page
pages
pagina
3-11
13-21
23-31
Page 3
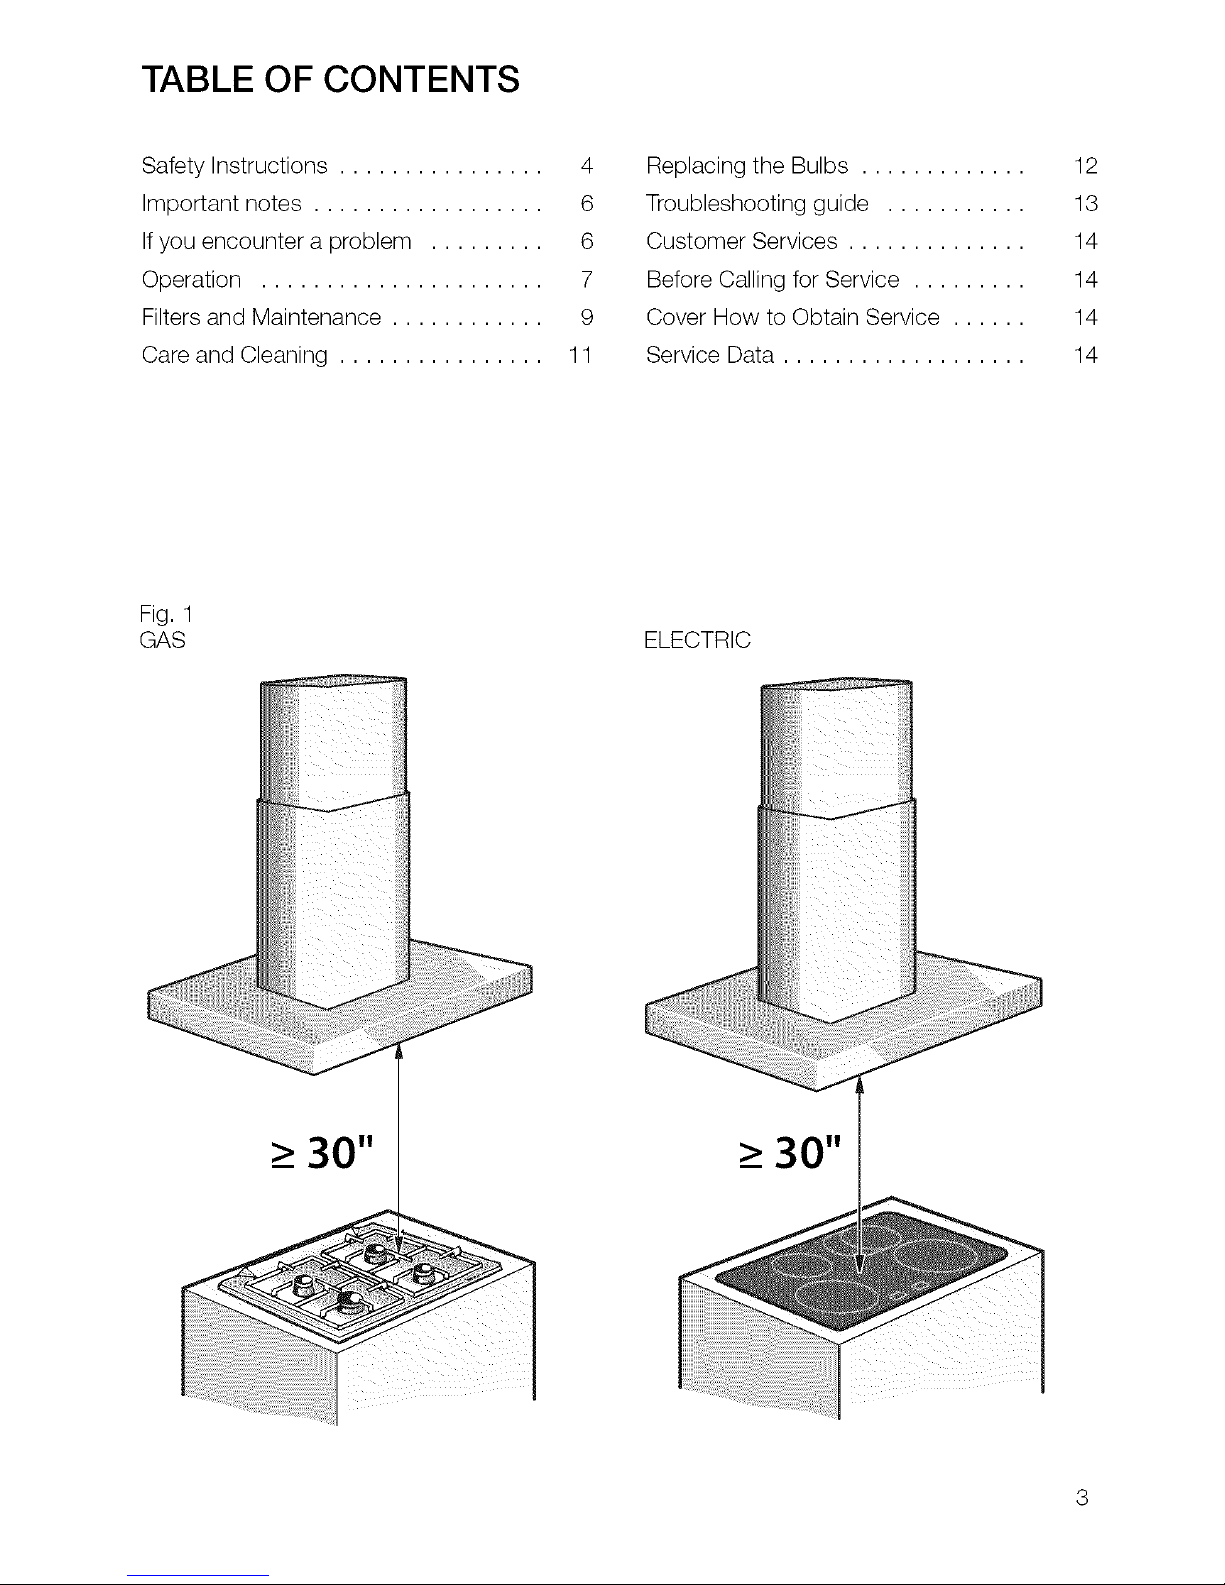
TABLE OF CONTENTS
Safety Instructions ................ 4
Important notes .................. 6
Ifyou encounter a problem ......... 6
Operation ...................... 7
Filters and Maintenance ............ 9
Care and Cleaning ................ 11
Replacing the Bulbs .............
Troubleshooting guide ...........
Customer Services ..............
Before Calling for Service .........
Cover How to Obtain Service ......
Service Data ...................
12
13
14
14
14
14
Fig. 1
GAS ELECTRIC
Page 4
Z_ IM PORTANT SAFETY INSTRUCTIONS
Read All Instructions Before Using the Appliance.
READ AND SAVE THESE INSTRUCTIONS
WARNING - TO REDUCE THE RISK
OF A RANGE TOP GREASE FIRE.
a) Never leave surface units unattended at
high settings. Boilovers cause smoking
and greasy spillovers that may ignite.
Heat oils slowly on low or medium
settings.
b) Always turn hood ON when cooking at
high or when flambeing food (i.e. Crepes
Suzette, Cherries Jubilee, Peppercorn
Beef Flambe).
c) Clean ventilating fans frequently.
Grease should not be allowed to
accumulate on fan or filter.
d) Use proper pan size. Always use
cookware appropriate for the size of the
surface element.
In the event that personal clothing or hair
catches fire, drop and roll immediately to
extinguish flames.
Smother flames from food fires other than
grease fires with baking soda.
Never use water on cooking fires.
CAUTION: Grease left on filters can remett
and move into the vent.
Always have a working smoke detector
near the kitchen.
WARNING - TO REDUCE THE RISK
OF INJURY TO PERSONS IN THE EVENT
OF A RANGE TOP GREASE FIRE, OBSER-
VE THE FOLLOWING:
a) SMOTHER FLAMES with a close-fitting
lid, cookie sheet, or metal tray, then turn
off the burner. BE CAREFUL TO
PREVENT BURNS. If the flames do not
go out immediately, EVACUATE AND
CALL THE FIRE DEPARTMENT.
b) NEVER PICK UP A FLAMING PAN. You
may be burned.
c) DO NOT USE WATER, including wet dish
cloths or towels. A violent steam
explosion will result.
d) Use an extinguisher ONLY if:
1)You know you have a Class ABC
extinguisher, and you already know
how to operate it.
2)The fire is small and contained in the
area where it started.
3) The fire department is being called.
4) You can fight the fire with your back to
an exit.
A
WARNING - Whenever possible, do
not operate blower during a cooktop fire.
However, do not reach through fire to turn
off blower.
When children become old enough to use
the appliance, it is the legal responsibility of
the parents or Iegai guardians to ensure
that they are instructed in safe practices by
qualified persons.
Do not allow children to use this appliance
unless closely supervised by an adult.
Children and pets should not be left alone
or unattended in the area where the
appliance is in use. They should never be
allowed to play in its vicinity, whether or not
the appliance is in use.
Page 5
Z_ IM PORTANT SAFETY INSTRUCTIONS
CAUTION - Items of interest to children
should not be stored in an appliance, in
cabinets above an appliance or on the
backsplash. Children climbing on an
appliance to reach items could be seriously
injured.
Do not allow anyone to climb, stand, lean,
sit, or hang on any part of an appliance,
especially a door, warming drawer, or
storage drawer. This can damage the
appliance, and the unit may tip over,
potentially causing severe injury.
_ WARNING - Be sure the entire
appliance (including the grease filters and
light bulbs, if applicable) has cooled and
grease has sotified before attempting to
clean any part of the appliance.
Have the installer show you the location of
the circuit breaker or fuse. Mark it for easy
reference.
CAUTION - Turn power off at breaker
before removing a damaged bulb. Do not
touch the bulbs immediately after use.
The bulbs will remain hot for several
minutes.
_ WARNING - Make sure the appliance
and lights are cool and power to the
appliance has been turned off before
replacing the light bulb(s). Failure to do so
could result in electrical shock or burns.
The lenses (ifequipped) must be in place
when using the appliance.
The lenses (ifequipped) serve to protect the
light bulb from breaking.
The lenses (ifequipped) are made of glass.
Handle carefully to avoid breaking.
Broken glass can cause an injury.
This appliance must be properly installed
and grounded by a qualified technician.
Connect only to properly grounded outlet.
Refer to Installation Instructions for details.
This appliance is intended for normal family
household use only. It is not approved for
outdoor use. See the Warranty. If you have
any questions, contact the manufacturer.
CAUTION - FOR GENERAL VENTILATION
USE ONLY. DO NOT USE TO EXHAUST
HAZARDOUS OR EXPLOSIVE MATERIALS
AND VAPORS.
Do not store or use corrosive chemicals,
vapors, flammables or nonfood products in
or near this appliance. It is specifically
designed for use when heating or cooking
food. The use of corrosive chemicals in
heating or cleaning wilI damage the
appliance and could result in injury.
Do not operate this appliance if it is not
working properly, or if it has been damaged.
Contact an authorized servicer.
Do not repair or replace any part of the
appliance unless specifically recommended
in this manual. Refer all servicing to a
factory authorized service center.
Page 6
IM PORTANT NOTES
The Instructions for Use apply to several
versions of this appliance. Accordingly,
you may find descriptions of individual
features that do not apply to your
specific appliance.
This hood complies with all relevant
safety regulations.
Repairs should be carried out by
qualified technicians only.
Z_ CAUTION
Improper repairs may put the user at
considerable risk.
Before using your appliance for the first
time, please read these Instructions for
Use carefully. They contain important
information concerning your personal
safety as well as on use and care of the
appliance.
Please retain the operating and
installation instructions for a subsequent
owner.
This appliance is labelled \ ,,D-,==._,/
in accordance with Euro-
pean Directive
2002/96/EG concerning
used electrical and elec-
tronic appliances (waste
electrical and electronic
equipment - WEEE). The guideline
determines the framework for the return
and recycling of used appliances as
applicable throughout the EU.
Remove the packaging from the
appliance and dispose of it properly.
Pay attention to the fact that there are
accessories in the packaging. Keep
packaging elements out of the reach of
children!
Thoroughly clean the appliance before
using it for the first time.
Before operating the appliance for the
first time, check that the mains
connection is in proper working order.
IF YOU ENCOUNTER A
PROBLEM
In the event of malfunctions, first of all
check the household fuses. If the problem
has nothing to do with the power supply,
please contact your specialist dealer or your
local after-sales service.
Ifis not possible to operate the extractor
hood:
Disconnect the extractor hood from the
mains electricity supply by pulling out the
plug or switching it off at the main fuse box.
Wait for approx. 1 minute and then switch it
on again.
Ifyou have any questions or if a fault
occurs, please call Customer Service.
Whenyou call,pleasequotethe following:
I E-Nr. FD
Enter the relevant numbers into the box
above. The E-Nr. (product no.) and FD
(production date) are shown on the
nameplate which can be seen inside the
extractor hood after the filter frame has
been detached.
Z_The manufacturer of the extractor
hoods accepts no liability for complaints
which can be attributed to the design and
layout of the pipework.
I
Page 7
OPERATING MODES
EXHAUST-AIR MODE:
The hood fan extracts the kitchen vapors
and conveys them through the grease
filter into the atmosphere.
The grease filter absorbs the solid
particles in the kitchen vapors.
The kitchen is kept almost free of grease
and odors.
_c._ When the hood is operated in
exhaust-air mode simultaneously with a
different burner which also makes use of
the same chimney (such as gas, oil or
coal-fired heaters, continuous-flow heaters,
hot-water boilers) care must be taken to
ensure that there is an adequate supply
of fresh air which will be needed by the
burner for combustion.
Safe operation is possible provided that the
under pressure in the room where the
burner is installed does not exceed 4 Pa
(0.04 mbar).
This can be achieved if combustion air can
flow through non-lockable openings, e.g. in
doors, windows and via the air-intake/
exhaust-air wall box or by other technical
measures, such as reciprocal interlocking,
etc.
/_, CAUTION
Avoid carbon monoxide poisoning -
Provide adequate air intake so
combustion gases are not drawn back
into the room.
An air-intake/exhaust-air wall box by itself is
no guarantee that the limiting value will not
be exceeded.
Note: When assessing the overall require-
ment, the combined ventilation system for
the entire household must be taken into
consideration. This rule does not apply to
the use of cooking appliances, such as
cooktops and ovens.
CIRCULATING-AIR MODE:
An activated carbon filter must be fitted
for this operating mode (see Filters and
maintenance).
The complete installation set and
replacement filters can be obtained from
specialist outlets.
The extractor-hood fan extracts the
kitchen vapours which are purified in the
grease filter and activated carbon filter
and then conveyed back into the
kitchen.
The activated carbon filter binds the
odorous substances.
If no activated carbon filter is installed, it
is not possible to bind the odorous
substances in the cooking vapours.
Gas Cooktops / Gas Ranges:
/_, CAUTION
Avoid risk of burns or damage to extractor
hood.
Do not use all gas burners simultaneously
at high settings for a prolonged period
(max.15 minutes).
Ifthe hood is located over a gas cooktop,
operate the hood at maximum setting
whenever three or more gas burners are
being used.
Page 8
OPERATION
IMPORTANT: The most effective way to
remove vapors produced during
cooking is to:
Switch the ventilator ON
as soon as you begin cooking.
Switch the ventilator OFF
a few minutes after you have finished
cooking.
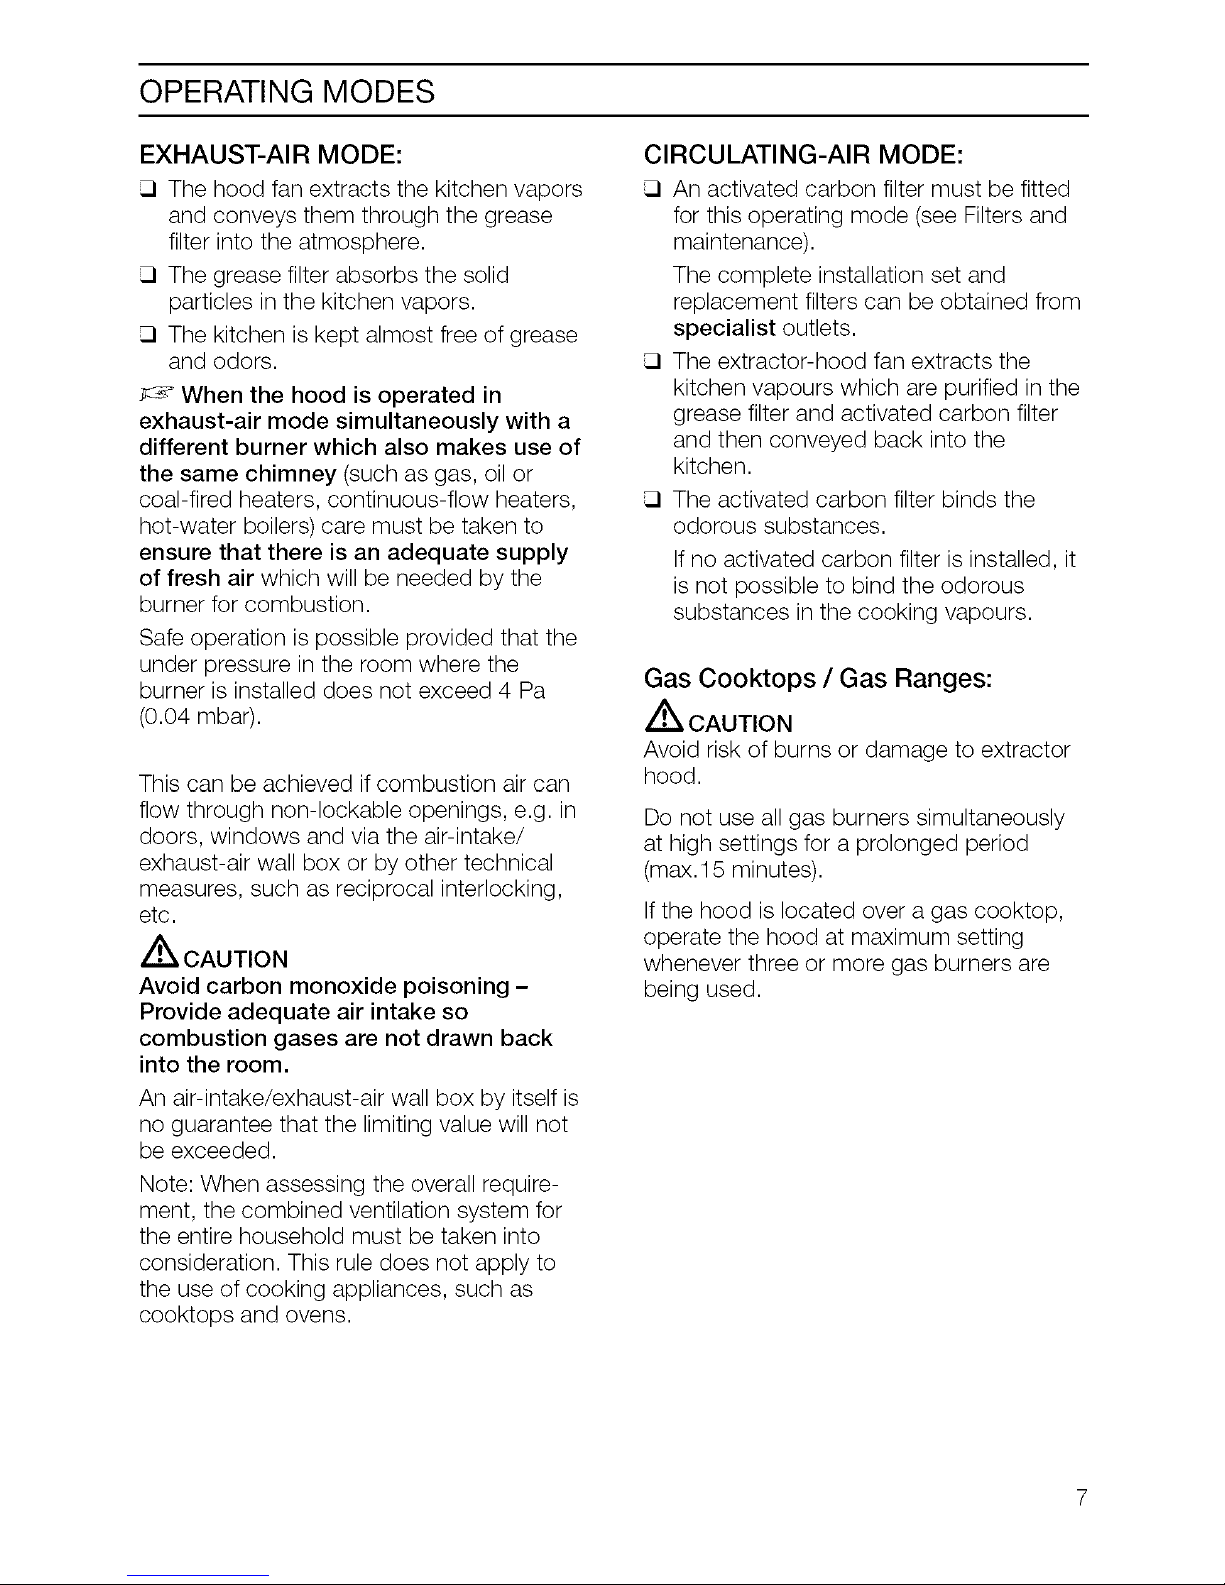
Switching the fan ON
Pressthe LO MED HIbutton.
Switching the fan OFF:
Pressthe OFFbutton.
Delay shut-off:
Press the DELAY button.
The fan runs for 10 minutes on HI.
At the same time, a dot flashes in the
display.
Then the fan switches off automatically.
The illuminated LED indicates that
DELAY SHUT-OFF is working.
Setting the required fan speed:
Press the LO MED HI button.
The fan speed increases by one level.
Lighting:
Press the LIGHT button to switch the
light on and off.
The light can be switched on at any
time, even if the fan is switched off.
Page 9
FILTERS AND MAINTENANCE
GREASE FILTERS:
Metal filters are used to trap the greasy
element of the vapors that develop during
cooking.
The filter mats are made from non-
combustible metal.
Caution:
As the filter becomes more and more
saturated with grease, not only does the
risk of it catching fire increase but the
efficiency of the hood can also be adversely
affected.
Important:
By cleaning the metal grease filters at
appropriate intervals, the possibility of them
catching fire as a result of a build-up of heat
such as occurs when deep-fat frying or
roasting is taking place, is reduced.
Saturation indicator:
When the grease filters reach saturation
point, the FILTER LED lights up. The grease
filters should be cleaned right away. To
switch off the LED, press the FILTERbutton
for 6 seconds.
Cleaning the metal grease filters:
In normal operation (1 to 2 hours daily),
the metal grease filter must be cleaned
1x a month.
The filters can be cleaned in a
dishwasher. It is however possible that
they will become slightly discolored.
The filter must be placed loosely, and
NOT wedged, in the dishwasher.
Important:
Metal filters that are saturated with
grease should not be washed together
with other dishes etc.
When cleaning the filters by hand, soak
them in hot soapy water first of all.
Do not use aggressive, acidic or caustic
cleaners.
Then brush the filters clean, rinse them
thoroughly and leave the water to drain
off.
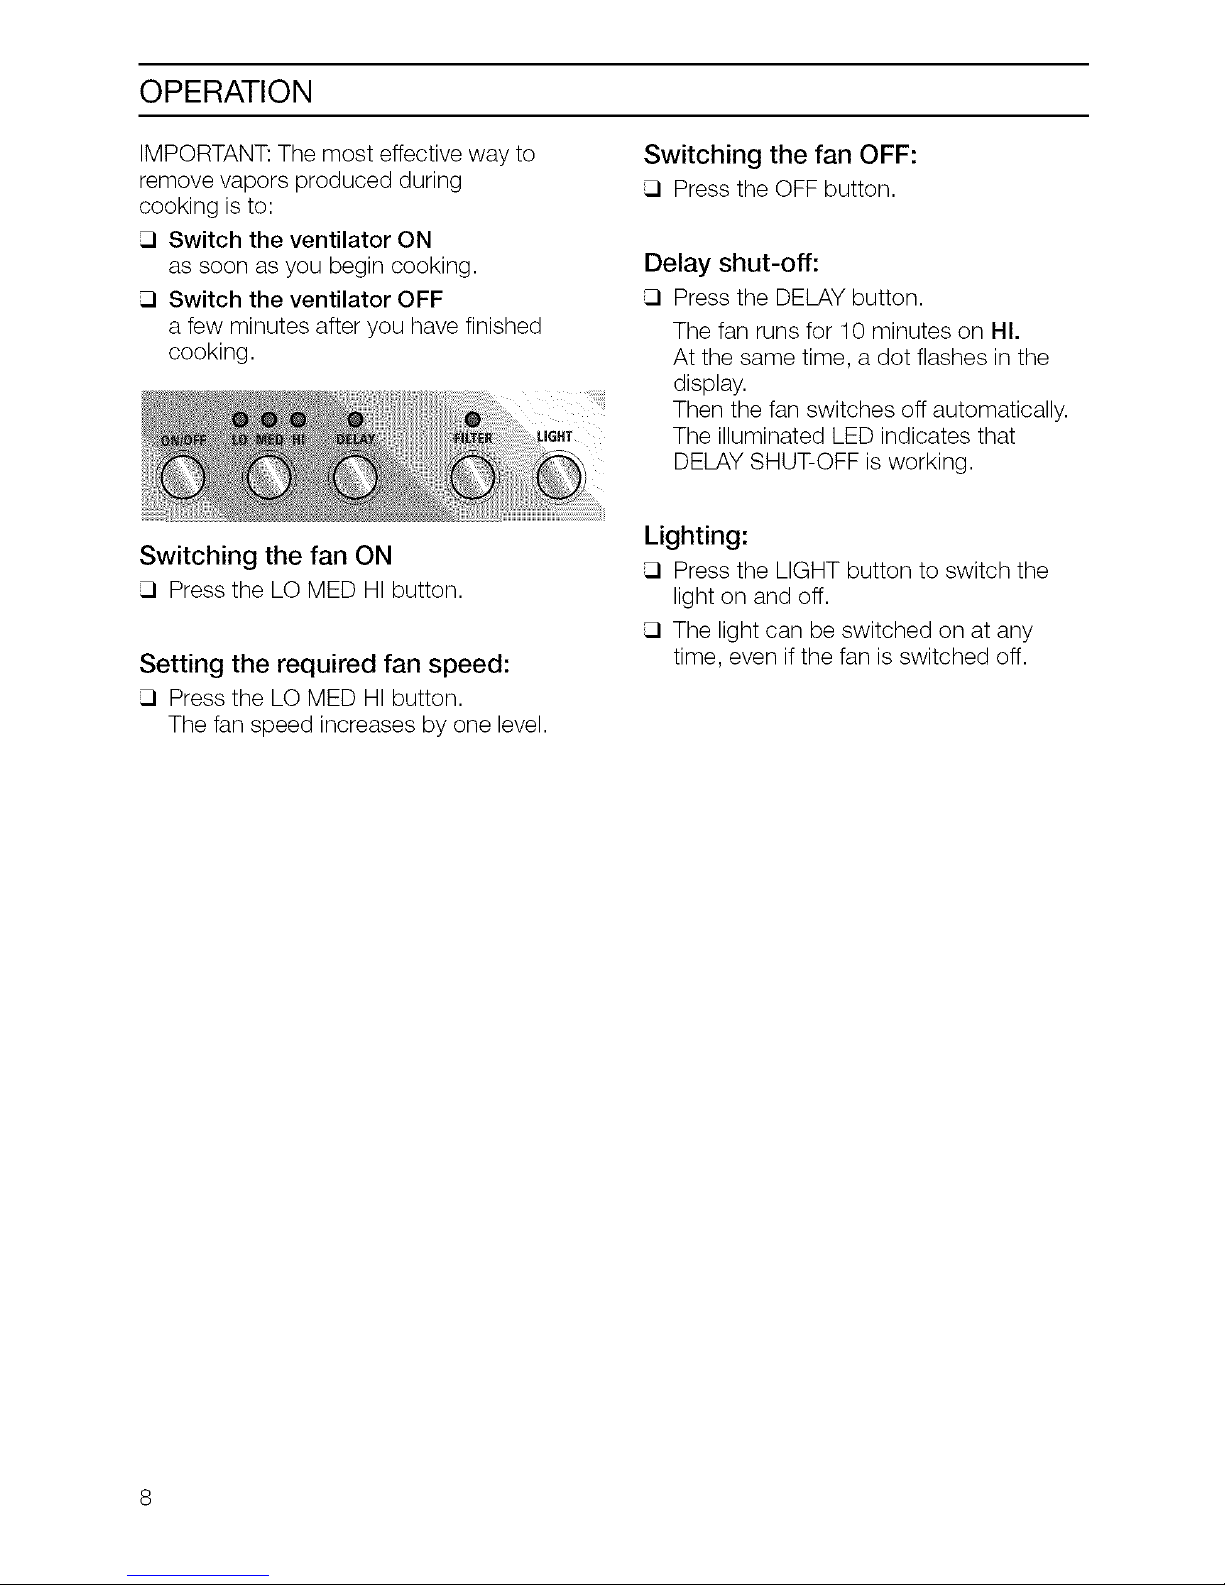
Removing and inserting the metal
grease filters:
/_, Warning: Avoid risk of burns. The
halogen bulbs must be switched off and
cool.
1. Pull the catch on the grease filters and
lower the grease filters.
At the same time take hold of the
underside of the grease filter with your
other hand.
2. Clean the filter.
3. Insert the clean filter back into the hood.
Page 10
FILTERS AND MAINTENANCE
Activated carbon filter:
For neutralizing odours in recirculating
mode.
Caution:
As the filter becomes more and more
saturated with grease, there is an increased
risk of fire and the function of the extractor
hood may be impaired.
Important:
Change the activated carbon filter promptly
to prevent the risk of fire from the
accumulation of heat when deep-fat frying
or roasting.
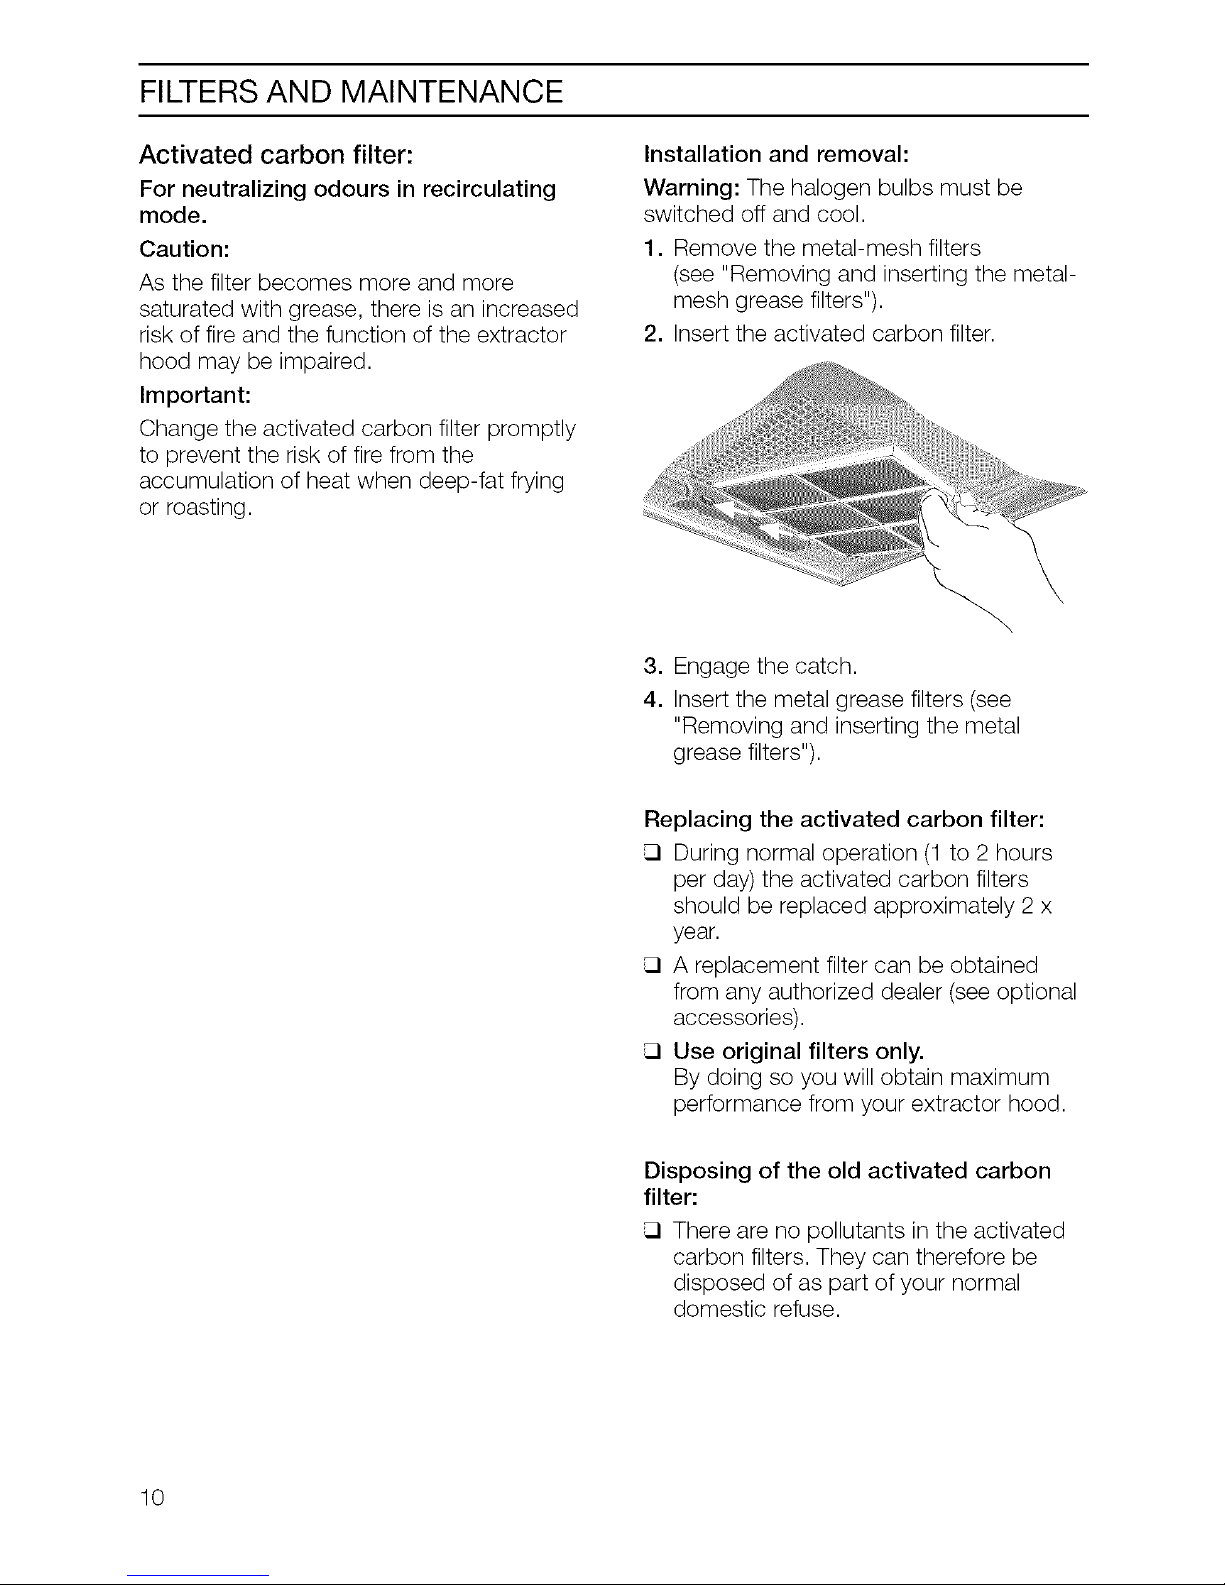
Installation and removal:
Warning: The halogen bulbs must be
switched off and cool.
1. Remove the metal-mesh filters
(see "Removing and inserting the metal-
mesh grease filters").
2. Insert the activated carbon filter.
3. Engage the catch.
4. Insert the metal grease filters (see
"Removing and inserting the metal
grease filters").
Replacing the activated carbon filter:
During normal operation (1to 2 hours
per day) the activated carbon filters
should be replaced approximately 2 x
year.
A replacement filter can be obtained
from any authorized dealer (see optional
accessories).
Use original filters only.
By doing so you will obtain maximum
performance from your extractor hood.
Disposing of the old activated carbon
filter:
There are no pollutants in the activated
carbon filters. They can therefore be
disposed of as part of your normal
domestic refuse.
10
Page 11
CARE AND CLEANING
J_k WARNING To avoid risk of fire and explosion do not use flammable liquids or
solvents.
Always unplug or disconnect the appliance from the power supply before servicing.
IMPORTANT: Do not clean the hood with
abrasive sponges or with cleaning agents
which contain sand, soda, acid or chlorine!
Clean the hood with a hot soap solution
or a mild window cleaner.
Do not scrape off dried-on dirt but wipe
off with a damp cloth.
When cleaning the grease filters, remove
grease deposits from accessible parts of
the housing.
This prevents the risk of fire and ensures
that the hood continues operating at
maximum efficiency.
Note: Do not use alcohol (spirit) on
plastic surfaces, as dull marks may
appear.
Caution: Observe all instructions and
cautions provided with cleaners.
IMPORTANT: Clean the operating buttons
with a mild soapy solution and a soft, damp
cloth only.
Do not use stainless-steel cleaner to clean
the operating buttons.
Stainless steel surfaces:
Use a mild non-abrasive stainless steel
cleaner.
Clean the surface in the same direction
as it has been ground and polished.
We recommend the stainless steel
cleaner Fantastik ®or Formula 409 ®
sprayed onto a paper towel.
Aluminum and plastic surfaces:
Do not use dry cloths.
Use a mild window cleaning agent.
Do not use aggressive, acidic or caustic
cleaners.
Observe the warranty regulations in the
enclosed service booklet.
11
Page 12
REPLACING THE BULBS
Z_ CAUTION. Avoid risk of electric shock.
1. Switch off the hood and pull out the
mains plug or switch off the
electricity supply at the fuse box.
Z_ CAUTION. Avoid risk of burns.
Halogen bulbs become very hot and remain
hot for some time after being switched off.
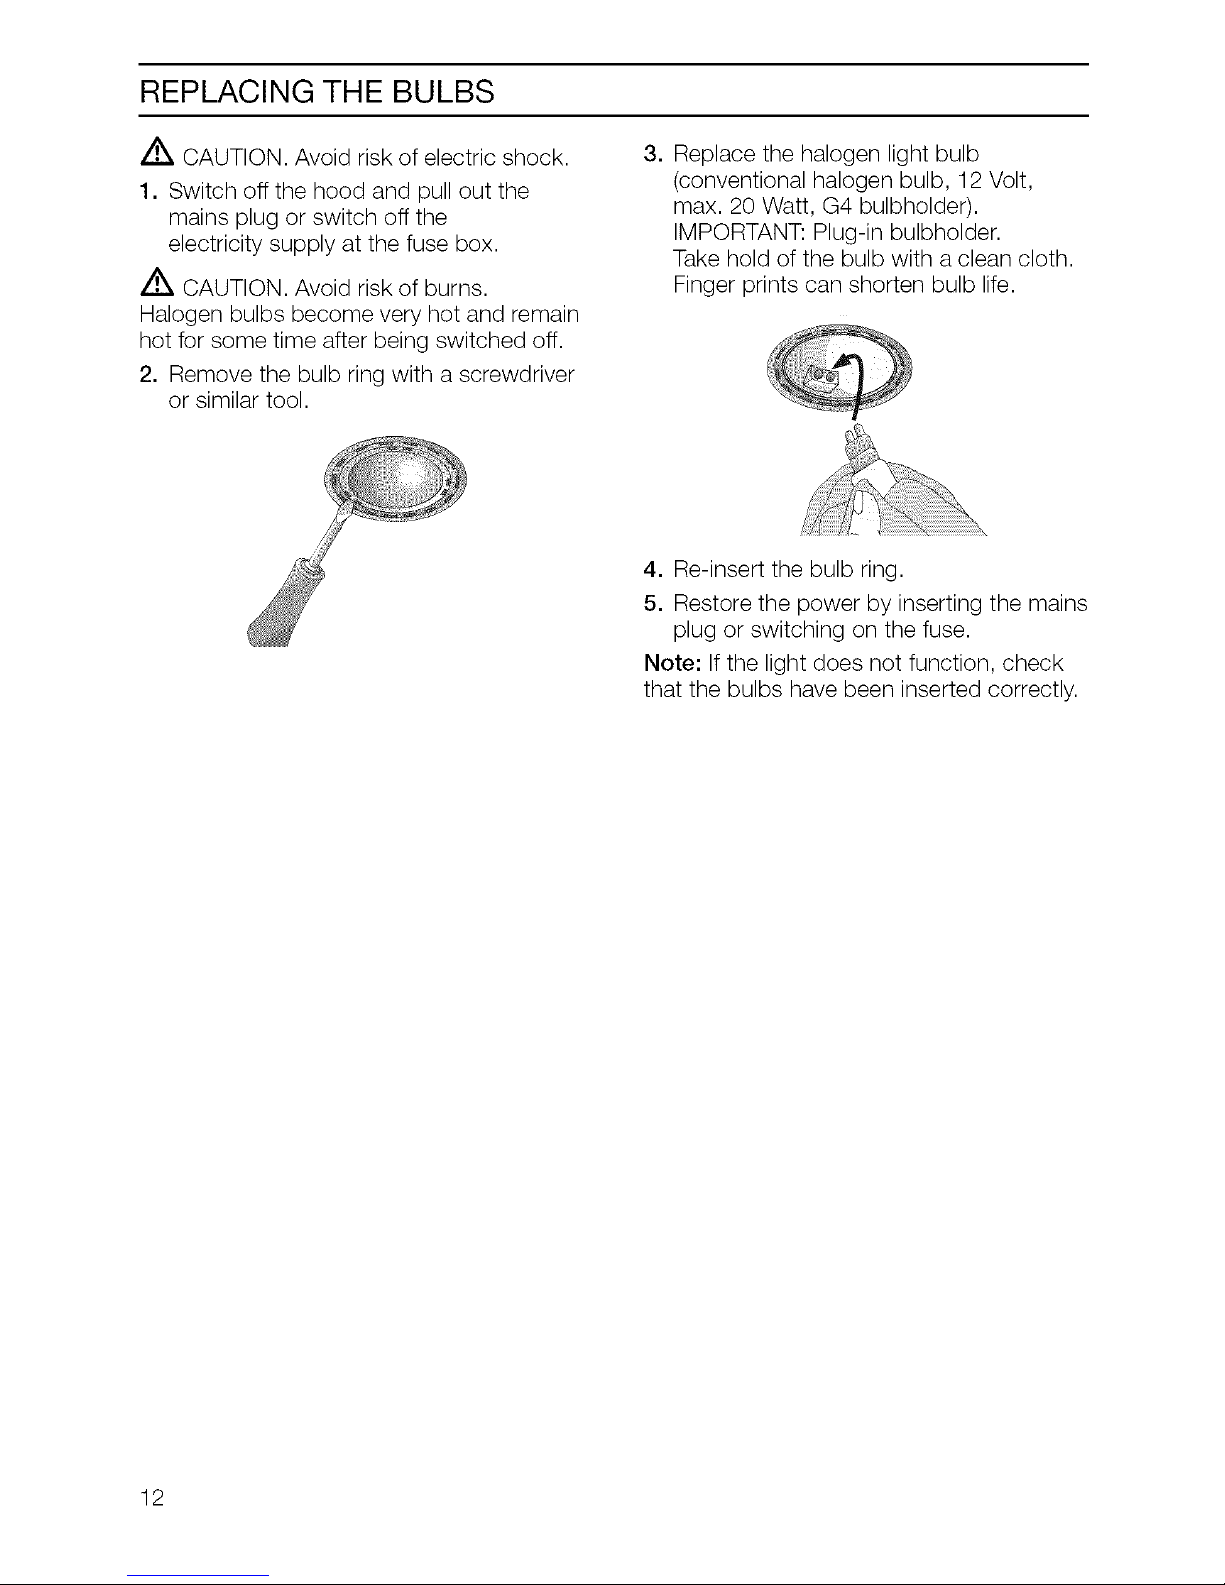
2. Remove the bulb ring with a screwdriver
or similar tool.
3. Replace the halogen light bulb
(conventional halogen bulb, 12 Volt,
max. 20 Watt, G4 bulbholder).
IMPORTANT: Plug-in bulbholder.
Take hold of the bulb with a clean cloth.
Finger prints can shorten bulb life.
4. Re-insert the bulb ring.
5. Restore the power by inserting the mains
plug or switching on the fuse.
Note: If the light does not function, check
that the bulbs have been inserted correctly.
12
Page 13

TROUBLESHOOTING GUIDE
Problem Remedy
Nothing works - display is Contact qualified appliance
not illuminated service technician.
If it is not possible to operate
the hood
Possible Cause
Control button board has
become disconnected.
Power failure Disconnect the hood from
the mains electricity supply
by pulling out the plug or
switching it off at the main
fuse box.
Wait for approx. 1 minute
and then switch it on again.
13
Page 14

CUSTOMER SERVICES
Before Calling for Service
Ifthe blower does not operate:
Ensure that the electrical cord is properly connected and the supply circuit is energized.
Check that the intake is fully raised.
Make sure that the blower speed control knob is not in the OFF position.
How to Obtain Service
For authorized service or parts information, call 1-800-735-4328.
We want you to be a satisfied customer. If a situation arises that has not been resolved to
your satisfaction, please let us know.
Write: Customer Support, BSH Home Appliances, Corp. 5551 McFadden Ave.,
Huntington Beach, CA 92649, or call: 1-800-735-4328.
Please include the model number, serial number, and date of original purchase/installation.
Service Data
For handy reference, the serial tag information has been affixed below.
Keep your invoice for warranty validation. To obtain service, see previous page.
Serial Number/Data Plate Location: Above Electrical
Connection Box, See Page 10,
We reserve the right to change specifications or design without notice. Some models are
certified for use in Canada. BSH is not responsible for products which are transported from
the U.S. for use in Canada. Check with your local Canadian distributor or dealer.
14
Page 15

TABLE DES MATII RES
Consignes de securite ...........
Remarques importantes ..........
Derangements ..................
Fonctionnement ................
Filtres et maintenance ............
Entretien et nettoyage ............
16
18
18
19
21
23
Remplacement des ampoules .....
Guide de depannage ............
Service apres-vente .............
Avant d'appeler le service
apres-vente ...................
Obtention du service apres-vente ...
Donnees concernant le service .....
24
25
26
26
26
26
Fig. 1
GAZ ELECTRIQUE
15
Page 16

Z_ INSTRUCTIONS DE SECURITE IMPORTANTES
Lire toutes les instructions avant d'utiliser cet appareil.
LIRE ET CONSERVER CES INSTRUCTIONS
A
AVERTISSEMENT- POUR REDUIRE
LE RISQUE D'INCENDIE DE GRAISSE SUR
LA TABLE DE CUISSON.
a) Ne laissez jamais des elements de surfa-
ce allumes a forte puissance sans sur-
veiIlance. Les debordements provoquent
de Ia fumee et des residus graisseux qui
peuvent s'enflammer. Faites chauffer
I'huile a.feu doux ou moyen.
b) Allumez toujours la hotte aspirante
Iorsque vous cuisinez a feu vif ou Iorsque
vous faites flamber des aliments (p. ex.
Ies cr_pes Suzette, les cerises Jubilee, Ie
steak au poivre flambe).
c) Nettoyez souvent les ailettes du ventila-
teur. Ne laissez pas la graisse s'accumu-
let sur Ie ventilateur ou le filtre.
d Utilisez des casseroles de taille appro-
priee. Utilisez toujours des casseroles et
ustensiIes correspondant a.Iataille de la
plaque chauffante.
Si vos cheveux ou v_tements prennent feu,
se jeter _tterre et se fouler sur le sol imme-
diatement pour eteindre les flammes.
Etouffer Ies flammes d'un feu I'aliments
autre qu'un feu de graisse avec du bicarbo-
nate de soude.
Ne jamais utiliser d'eau sur Ies feux de cui-
sine.
ATTENTION : La graisse deposee sur les
filtres peut fondre et se depIacer dans
I'event.
Toujours avoir un detecteur de fumee qui
fonctionne a.proximite de Ia cuisine.
/_ AVERTISSEMENT- POUR REDUIRE
LE RISQUE DE LESIONS CORPORELLES
EN CAS D'INCENDIE DE GRAISSE SUR LA
TABLE DE CUISSON, PRENEZ LES PRE-
CAUTIONS SUIVANTES :
a) ETOUFFEZ LES FLAMMES avec un cou-
verde etanche, une plaque a p_.tisserie
ou un plateau metallique, puis eteignez Ie
brOleur. SOYEZ PRUDENT AFIN D'EVl-
TER DES BROLURES. Si les flammes ne
s'eteignent pas immediatement, SOR-
TEZ DE LA PIECE ETAPPELEZ LES
POMPIERS.
b) NE JAMAIS SAISIR UNE CASSEROLE
ENFLAMMEE. Vous risquez de vous brO-
Ier.
c) NE PAS UTILISER D'EAU, y compris des
torchons ou serviettes mouilles. Une vio-
Iente explosion de vapeur se produira.
d) Utiliser un extincteur UNIQUEMENT si :
1) Vous savez que vous possedez un
extincteur de cIasse ABC et vous
savez deja.vous en servir.
2) Le feu est de faibIe importance et
confine dans la zone oQ il a pris.
3) Les pompiers ont deja ete appeles.
4) Vous pouvez combattre le feu en
ayant Ie dos tourne vers une sortie.
A
AVERTISSEMENT- Lorsque pos-
sible, ne pas faire fonctionner Ie ventilateur
Iors d'un incendie de table de cuisson. Tou-
tefois, ne pas passer a travers Ies flammes
pour essayer d'eteindre le ventilateur.
Lorsque les enfants sont en _ge d'utiIiser
I'appareiI, les parents ou tuteurs Iegaux ont
Ia responsabilite IegaIe de verifier qu'iIs ont
regu de personnes quali%es les informa-
tions necessaires pour respecter les regles
de securite.
Ne pas laisser les enfants utiIiser cet appa-
reil sans I'etroite surveillance d'un adulte.
Enfants et animaux ne doivent pas _tre lais-
ses seuIs ou sans surveillance a proximite
de I'appareii en fonctionnement. Ne pas
laisser Ies enfants jouer a.proximite de
I'appareil, que cetui-ci soit en fonctionne-
ment ou non.
16
Page 17

Z_ INSTRUCTIONS DE SECURITE IMPORTANTES
ATTENTION - Les articles d'inter_t pour les
enfants ne doivent pas _tre ranges dans un
appareil electromenager, dans les armoires
au-dessus d'un tel appareil ou sur le dosse-
ret. Un enfant qui grimpe sur I'appareil pour
prendre ces objets peut se bIesser serieu-
sement.
Ne Iaisser personne grimper, se tenir
debout, s'appuyer, s'asseoir ou se sus-
pendre a une pattie quelconque d'un appa-
tell, en particulier une porte, un tiroir chauf-
fant ou un tiroir de rangement. Ceci peut
endommager I'appareii et I'unite peut se
renverser et provoquer des bIessures
potentietlement graves.
AVERTISSEMENT - S'assurer que
I'ensembIe de I'appareil (y compris les filtres
a.graisse et les ampoules, le cas echeant)
ont refroidi et que Ia graisse s'est sotidi%e
avant de tenter de nettoyer une partie quet-
conque de I'appareil.
Demander a.I'installateur de vous indiquer
I'empIacement du coupe-circuit ou du
fusible. Identifier sa position pour pouvoir Ie
retrouver facilement.
CAUTION - Couper le courant au niveau
du disjoncteur avant de changer une
ampoule endommagee. Ne pas toucher les
ampoules immediatement apres Ies avoir
utilisees.
Les ampoules resteront chaudes pendant
pIusieurs minutes.
_ AVERTISSEMENT- Avant de rempIa-
cer une ou plusieurs ampoules, s'assurer
que I'appareil et Ies ampoules ont refroidi et
que Ie courant qui alimente I'appareii est
coupe. Le non respect de cette consigne
peut entratner un choc electrique ou des
brQlures.
Les IentilIes de protection (s'il y en a) doi-
vent _tre mises en place Iorsque I'appareil
est en fonctionnement.
Les lentilles de protection (s'il y en a)ser-
vent a.proteger I'ampoule contre toute cas-
sure.
Les lentiIles de protection (s'iI yen a) sont
en verre. Elles sont a manipuler avec pre-
cautions afin de ne pas les casser.
Les brisures de verre risquent de causer
des lesions.
Cet appareii dolt _tre correctement installe
et mis a terre par un technicien quaIifie. IIne
dolt _tre branche que sur une prise de cou-
rant correctement reliee a la terre. Pour plus
de details, se reporter a.Ianotice d'instaIla-
tion.
Cet appareil est destine uniquement a un
usage domestique familial normal. IIn'est
pas approuve pour I'usage en exterieur. Voir
Iagarantie. Pour toute question, communi-
quer avec Ie fabricant.
ATTENTION - POUR LA VENTILATION
GI_NERALE SEULEMENT. NE PAS UTILI-
SER POUR EVACUER DES MATIERES OU
VAPEURS DANGEREUSES OU EXPLO-
SIVES.
Ne pas entreposer ni utiliser de produits
chimiques corrosifs, vapeurs, matieres
inflammables ou produits non alimentaires
a.I'interieur ou a proximite de cet appareik
Celui-ci a ete speciaIement congu pour _tre
utiIise pendant Ie chauffage et la cuisson
des aliments. L'empIoi de produits chi-
miques corrosifs pour chauffer ou nettoyer
peut endommager I'appareil et occasionner
des blessures.
Ne pas utiliser cet appareil s'il ne fonctionne
pas correctement, ou s'il est endommage.
Communiquer avec un service de repara-
tion autorise.
Ne pas reparer ou remplacer une piece
quelconque de I'appareil a.moins de
recommandations specifiques figurant dans
ce manuel. Toute reparation dolt _tre
con%e a.un centre de reparation agree par
I'usine.
17
Page 18

REMARQUES IMPORTANTES DERANGEMENTS
Le mode d'emploi s'applique a,plusieurs
versions de cet appareil. Ainsi, il se peut
que certaines descriptions de
caracteristiques individuelles ne
correspondent pas exactement a,votre
appareil.
Cette hotte aspirante se conforme a,tous
les reglements de securite pertinents.
Les r_parations doivent _tre effectuees
uniquement par des techniciens
qualifies.
MISE EN GARDE
Des r6parations r6alis6es de mani6re
non conforme peuvent entrainer des
dangers consid6rables pour
I'utilisateur
Avant la premiere utilisation de I'appareil,
veuillez lire attentivement le mode
d'emploi. Celui-ci contient d'importantes
informations concernant votre securite
personnelle ainsi que sur I'utilisation et
I'entretien de I'appareil.
Veuillez conserver la notice d'utilisation
et d'installation pour un futur proprietaire
de I'appareil.
Cet appareil comporte un _,_J
marquage conforme a,la
Directive europeenne
2002/96/CE relative aux
dechets d'equipements
electriques et electro-
niques (DEEE). Cette
Directive fixe un cadre pour la reprise et
la valorisation des equipements en fin de
vie dans I'ensemble de I'Union Euro-
peenne.
Sortez I'appareil de son emballage et
eliminez ce dernier de maniere conforme
aux reglementations !
Attention: I'emballage contient des
accessoires ! Ne laissez pas des enfants
jouer avec I'emballage !
Nettoyez soigneusement I'appareil avant
la premiere utilisation (voir chapitre
<<Nettoyage et entretien >>).
Avant la mise en marche, verifiez si le
branche ment electrique est correct.
En cas d'anomalies de fonctionnement,
commen cez par verifier les fusibles du
Iogement. S'il ne s'agit pas d'un probleme
d'alimentation electrique, prevenez votre
distributeur ou le service apresvente le plus
proche.
Si lestouches de la hotte aspirante restent
inoperantes:
Debranchez pendant une minute environ la
fiche m&le de la hotte aspirante ou retirez le
fusible pour la mettre hors tension.
Ensuite, reenclenchez la hotte.
Si vous avez des questions a,poser ou en
cas de derangement, appelez s.v.p, le
service apres-vente.
(Voir la liste des agences du service apres-
vente).
Lors de votre appel, veuillez mentionner les
numeros suivants:
N E FD I
Inscrivez les numeros correspondants de
votre hotte dans le cadre ci-dessus. Ces
numeros se trouvent a,I'interieur de
I'appareil, sur la plaque signaletique acces-
sible une fois la grille de filtre retiree.
Z_Si des reclamations resultent de la
conception et de la pose de la conduite, le
fabricant de la hotte aspirante decline toute
garantie.
18
Page 19

MODES DE FONCTIONNEMENT
MODE D'I_VACUATION D'AIR :
Le ventilateur de la hotte aspirante
extrait los vapeurs de cuisine et los fait
traverser un filtre a,graisse avant de les
expulser dans I'atmosphere.
Le filtre a,graisse absorbe les particules
solides
qui sent presentes dans les vapeurs de
cuisine.
La cuisine est pratiquement depourvue
de graisses et d'odeurs.
_:-_ Lorsque la hotte aspirante est
utilis_e en mode d'6vacuation d'air
simultan6ment avec un br01eur diff6rent
utilisant 6galement la m_me chemin6e,
(tels des appareils de chauffage au gaz, au
fuel ou au charbon, des chauffe-eau
instantanes ou des chaudieres a,eau
chaude), veillez imp6rativement &ce que
I'apport d'air frais soit suffisant pour
assurer la combustion adequate du brOleur.
Un fonctionnement sans risque est possible
si la sous-pression dans la piece oQ le
brOleur est installe ne depasse pas 4 Pa
(0,04 mbar).
On peut y parvenir en acheminant I'air
requis pour la combustion b,travers des
ouvertures non verrouillables, par exemple
dans les portes et fen_tres, et en
association avec des ventouses 'admission/
d'evacuation d'air fixees au mur ou gr&ce a,
d'autres mesures techniques telles qu'un
verrouillage reciproque, etc.
/_, MISE EN GARDE
levitez I'asphyxie par I'oxyde de carbone
-Veillez & pr6voir une admission d'air
suffisante de fa(2on & ce que les gaz de
combustion ne soient pas refoul6s dans
la piece.
Une ventouse d'admission ou d'evacuation
d'air fixee au mur ne constitue pas a,elle
seule une garantie que la valeur limite ne
sera pas depassee.
Remarque : Iors de I'evaluation de
I'exigence globale, toujours tenir compte de
I'ensemble des moyens d'aeration du
Iogement. Cette regle ne s'applique pas a,
I'utilisation d'appareils de cuisson, comme
les tables de cuisson et les cuisinieres.
CIRCULATING-AIR MODE:
An activated carbon filter must be fitted
for this operating mode (see Filters and
maintenance).
The complete installation set and
I replacement filters can be obtained from
• specialist outlets.
The extractor-hood fan extracts the
kitchen vapours which are purified in the
grease filter and activated carbon filter
and then conveyed back into the
kitchen.
The activated carbon filter binds the
odorous substances.
If no activated carbon filter is installed, it
is not possible to bind the odorous
substances in the cooking vapours.
TABLES DE CUISSON/CUISINII_RES
A GAZ :
/_, MISE EN GARDE
Evitez le risque de brQlures ou de
deterioration de la hotte aspirante.
N'utilisez pas tousles brOleurs a,gaz
simultanement a,des temperatures elevees
pendant une periode prolongee
(max.15 minutes).
Si lahotte aspirante est montee au-dessus
d'une table de cuisson a,gaz, reglez la
hotte sur la puissance maximale si vous
avez allume trois brOleurs ou plus.
19
Page 20

FONCTIONNEMENT
IMPORTANT :la meilleure fa_on d'eliminer
les vapeurs generees au cours de la cuis-
son consiste a :
Mettez le ventilateur sous tension
(ON) des que vous commencez
cuisiner.
Mettez le ventilateur hors tension
(OFF) quelques minutes apres avoir
fini de cuisiner.
Pour mettre le ventilateur sous
tension (ON) :
Appuyez sur la touche LO MED HI
(Regime ventilateur), ou tirez le plateau
de filtre.
Reglage de la vitesse de ventilateur
requise :
Appuyez sur la touche LO MED HI.
Le regime du ventilateur augmente d'un
cram.
Pour mettre le ventilateur hors
tension (OFF) :
Appuyez sur latouche OFF.
Delay shut-off:
Appuyez sur la touche DELAY (Arr_t
temporise).
Le ventilateur tourne pendant
10 minutes sur HI.
En m_me temps, un point clignote sur
I'afficheur.
Puis, le ventilateur s'arr_te automatique-
ment. La DEL lumineuse indique que
DELAY SHUT-OFF est active.
I_clairage :
Appuyez sur la touche LIGHT (Lumiere)
pour allumer et eteindre la lumiere.
On peut allumer et eteindre la lumiere
n'importe quel moment, m_me si le
ventilateur est hors tension.
2O
Page 21

FILTRES ET MAINTENANCE
FILTRES A GRAISSE :
Les filtres en metal sont utilises pour pieger
les particules graisseuses des vapeurs
degagees pendant la cuisson.
Les nattes filtrantes sont en metal
incombustible.
Mise en garde :
Plus le filtre se sature de particules
graisseuses, plus il risque de s'enflammer,
mais egalement de nuire au rendement de
la hotte aspirante.
Important :
En nettoyant les filtres a,graisse en metal a,
intervalles reguliers, vous reduisez le risque
que ceux-ci ne prennent feu en raison de
I'accumulation de chaleur comme par
exemple pendant la friture ou le rOtissage.
Voyant de saturation :
Lorsque les filtres a, graisse atteignent un
point de saturation, la DEL FILTER (Net-
toyage filtre) s'allume. Les filtres a,graisse
doivent _tre nettoyes immediatement. Pour
eteindre la DEL, appuyez sur la touche
FILTERpendant 6 secondes.
Nettoyage des filtres a. graisse en
metal :
En fonctionnement normal (1 a,2 heures
par jour), le
filtre a,graisse en metal doit _tre nettoye
une fois par mois.
Les filtres peuvent _tre nettoyes au
lave-vaisselle. Cela dit, une legere
decoloration peut se produire au lavage.
Le filtre doit _tre place de maniere I&che
dans le lave-vaisselle et ne doit PAS _tre
coince.
Important Ne lavez pas en m_me temps
la vaisselle et les filtres en metal satures
de graisse.
Si vous nettoyez les filtres a,la main,
faites-les d'abord tremper dans de I'eau
savonneuse chaude.
N'utilisez pas de produits de nettoyage
trop puissants, acides ou caustiques.
Ensuite, brossez les filtres, rincez-les
bien et laissez-les s'egoutter.
Retrait et raise en place des filtres a.
graisse en metal :
/_, Avertissement • Ftvitezle risque de
brOlures. Les ampoules a,halogene doivent
_tre eteintes et avoir refroidi.
1. Tirez le cran des filtres a,graisse et
abaissez-les.
Ce faisant, passez I'autre main sous le
filtre.
2. Nettoyez le filtre _tgraisse.
3. Remettez le filtre _tgraisse nettoye en
place.
21
Page 22

FILTRES ET MAINTENANCE
Filtre a. charbon actif :
Ce filtre sert & retenir les substances
odorif6rantes Iorsque la hotte recycle I'air.
Attention:
Plus elles se saturent en particules grasses
et plus elles risquent de s'enflammer.
D'autre part, leur saturation risque de g6ner
le bon fonctionnement de la hotte.
Important :
Un changement a temps des filtres
charbon actif previent le risque d'incendie.
Ce risque est dO a I'accumulation de
chaleur qui se produit pendant une friture
ou la cuisson d'un rOti.
Incorporation et d6position :
Attention : les ampoules halogenes doivent
s'_tre eteintes et avoir refroidi.
1. Retirez d'abord les filtres o,graisse (voir
la section intitulee "Retrait et mise en
place des filtres o,graisse en metal).
2. Mettez en place le filtre o,charbon actif.
_!_7! ¸
:_!!!!!!
3. Faites encranter la platte.
4. Remontez les filtres o,graisse en metal
(voir la section intitulee "Retrait et mise
en place des filtres o,graisse en metal).
Changement du filtre & charbon actif :
Hotte fonctionnant normalement
(1 o,2 heures par jour), il faudra changer
les filtres o,charbon actif environ 2 fois
par an.
Vous pouvez vous procurer un filtre o,
charbon actif de rechange dans le
commerce specialise. Voir la section sur
les accessoires speciaux.
N'utilisez qu'un filtre d'origine.
Vous garantirez ainsi un fonctionnement
optimal de la hotte.
Mise au rebut du filtre & charbon actif
usag6 :
Les filtres o,charbon actif ne contiennent
aucune substance nocive. Vous pouvez
les mettre o,la poubelles de dechets
residuels.
22
Page 23

ENTRETIEN ET NETTOYAGE
J_k AVERTISSEMENT • Pour eviter incendie et explosion, ne pas utiliser de solvents
ou liquides inflammables.
Toujours debrancher I'appareil de I'alimentation avant d'effectuer le service.
IMPORTANT : Ne nettoyez pas la hotte
aspirante avec des eponges a, recurer ou
des detergents _tbase de sable, soude
caustique, acide ou chlore !
Nettoyez la hotte aspirante avec une
solution d'eau savonneuse chaude ou
un produit nettoyant pour vitre non
puissant.
Ne raclez pas la surface pour deloger les
aliments seches, mais essuyez-la plutOt
avec un chiffon humide.
Lors du nettoyage des filtres a,graisse,
nettoyez la graisse qui s'est deposee
aux endroits accessibles du corps de
hotte. Vous evitez ainsi les risques
d'incendie et garantissez un rendement
optimal de la hotte.
Remarque • ne nettoyez pas les
surfaces en plastique avec de I'alcool
(essence), car vous risquez de les ternir.
ATTENTION • Respectez toutes les
consignes et precautions fournies avec
les produits de nettoyage.
IMPORTANT : Nettoyez les touches de
commande avec de I'eau legerement
savonneuse et utilisez un chiffon doux et
humide uniquement. N'utilisez jamais de
produit de nettoyage pour acier inoxydable
pour nettoyer les touches de commande.
Surfaces en acier inoxydable :
Utilisez un produit de nettoyage non
abrasif pour I'acier inoxydable.
Nettoyez la surface dans le sens oQ elle
a ete polie.
Nous recommandons d'utiliser le produit
de nettoyage pour acier inoxydable
Fantastik®ou Formula 409 ®&vaporiser
sur du papier essuie-tout.
Surfaces en aluminium et en
plastique :
N'utilisez pas de chiffons secs.
Utilisez un produit de nettoyage pour
vitres non puissant.
N'utilisez pas de produits de nettoyage
trop puissants, acides ou caustiques.
Respectez les r_glements de la garantie
du livret service ci-joint.
23
Page 24

REMPLACEMENT DES AMPOULES
Z_MISE EN GARDE. Evitez le risque de
choc electrique.
1. Mettez la hotte aspirante hors tension et
debranchez la prise secteur ou coupez
I'alimentation electrique au niveau de la
boTtea,fusibles.
Z_ MISE EN GARDE. Evitez le risque de
brOlures. Les ampoules a,halogene
allumees deviennent tres chaudes et restent
chaudes assez Iongtemps apres avoir ete
eteintes.
2. Enlevez I'anneau d'ampoule a,I'aide d'un
tournevis ou d'un outil identique.
3. Remplacez I'ampoule _thalogene
(ampoule _thalogene classique, 12 Volts,
max. 20 Watts, support d'ampoule G4).
IMPORTANT : Support d'ampoule
enfichable.
Prenez I'ampoule en vous servant d'un
chiffon propre. Les empreintes de doigts
peuvent raccourcir la duree de vie des
ampoules.
4. Remontez I'anneau d'ampoule.
5. Retablissez le courant en branchant de
nouveau la prise secteur ou en reactivant
le fusible.
Remarque • si la lumiere ne fonctionne
pas, verifiez que les ampoules sont
correctement installees.
24
Page 25

GUIDE DE DEPANNAGE
Probleme Cause Possible Solution
Rien ne fonctionne - Le tableau d'affichage des Contactez un technicien
Afficheur non eclaire touches de commande est d'entretien d'appareils
debranche, electromenagers qualifie.
Panne de courant
Impossible de faire
fonctionner la hotte aspirante
Debranchez la hotte
aspirante du reseau
d'alimentation secteur en
tirant sur la prise ou en
coupant I'electricite au
niveau de la boTte a,fusible
Attendez pendant environ
1 minute, puis remettez-la
hotte sous tension.
25
Page 26

SERVICE APRES-VENTE
Avant d'appeler pour un service
Si lasoufflerie ne fonctionne pas :
Wrifiez que le cordon electrique est correctement branche et que le circuit d'alimentation
est alimente.
Assurez-vous que la touche de commande de la soufflerie n'est pas en position d'arr_t
(OFF).
Le fabricant des hottes aspirantes decline toute responsabilite pour toute plainte pouvant
_tre attribuee au design et a, I'agencement des conduites.
Obtention du service
Pour un centre de service autoris6 ou des informations sur les pi_ces, appelez le
+1-800-735-4328.
Nous attachons une extreme importance a,la satisfaction de nos clients. Si un probleme n'est
pas resolu a,votre satisfaction, veuillez nous en informer.
Ecrivez a,: Customer Support, BSH Home Appliances, Corp. 5551 McFadden Ave.,
Huntington Beach, CA 92649, USA ou appelez le : +1-800-735-4328.
Veuillez inclure le numero de modele, le numero de serie et la date d'achat/d'installation
d'origine.
Donnees concernant le service
A des fins de references, I'information de la plaque signaletique est donnee ci-dessous.
Conserver la facture pour valider la garantie. Pour un service, voir la page Drecedente.
Emplacement de la plaque signaletique ; au- deseus de
la bo;te de connexion (}lectrique, Voir page 20.
Nous nous reservons le droit de modifier les donnees techniques sans preavis. Certains
modeles sont certifies pour une utilisation au Canada. BSH n'est pas responsable des
appareils transportes des €:.-U. pour une utilisation au Canada. Wrifier aupres d'un
distributeur ou d'un marchand canadien.
26
Page 27

CONTENIDO
Instruccionesde seguridad ........
Notas importantes ...............
Averfas y perturbaciones ..........
OperaciOn ....................
Filtros y mantenimiento ...........
Cuidado y limpieza ..............
28
3O
3O
31
33
35
Reemplazo de focos .............
Gufa de resoluciOn de problemas ...
Servicio al cliente ...............
Antes de Ilamar al servicio tecnico ..
Cobertura COmo obtener servicio
tecnico .......................
InformaciOn para Servicio .........
36
37
38
38
38
38
Fig. 1
GAS ELECTRICO
__>30" __>30"
27
Page 28

Z_ INSTRUCCIONES IMPORTANTES DE SEGURIDAD
Lea todas las instrucciones antes de usar este aparato.
LEA Y GUARDE ESZAS INSTRUCCIONES
ADVERTENCIA - Si no sigue Ia infor-
macion de este manual exactamente,
puede ocasionarse un incendio o una des-
carga electrica que puede causar daSos
materiales o Iesiones personales.
ADVERTENCIA - No repare ni teem-
place ninguna parte det electrodomestico, a
menos que se recomiende especificamente
en los manuales. La instaIacion, el servicio
tecnico o et mantenimiento incorrectos
pueden causar lesiones o daSos materiales.
Consulte este manuai para su orientacion.
Cualquier otto tipo de reparacion debe set
realizada pot un tecnico calificado.
La unidad es pesada y se requieren ai
menos dos personas o un equipo adecua-
do para trasladarla.
Las superficies ocultas pueden tenet bor-
des fiIosos. Proceda con cuidado al intentar
tomar el electrodomestico pot Iaparte tra-
sera o desde abajo.
INSTRUCCIONESPARACONECTARATIERRA
Este electrodomestico debe estar conecta-
do a tierra. En caso de un cortocircuito
electrico, la conexion a tierra reduce et des-
go de descarga etectrica proporcionando
un cable de escape para Ia corriente etectri-
ca. Este aparato viene equipado con un
cable con un hilo de conexion a tierra y un
enchufe para conexion a tierra. El enchufe
debe colocarse en una toma de corriente
que este correctamente instaIada y conec-
tada a tierra.
ADVERTENCIA - Una conexion incor-
recta a tierra puede crear el riesgo de sufrir
una descarga electrica.
Consulte a un electricista calificado si no
comprende Iatotalidad de Ias instrucciones
de conexion a tierra o si tiene alguna duda
respecto de si el aparato esta correctamen-
te conectado a tierra.
No use un cable de extension. Si el cable
de alimentacion electrica es demasiado
corto, soticite a un electricista calificado que
instale una toma de corriente cerca det
aparato.
28
Antes de enchufar un cable electrico,
asegOrese de que todos los controles esten
en la posicion OFF (Apagado).
Para los etectrodomesticos equipados con
cable y enchufe, no corte ni retire la espiga
de conexion a tierra. Debe enchufarse en
un receptaculo de conexion a tierra compa-
tible para evitar la descarga etectrica. Si
tiene aIguna duda respecto de si et recepta-
culo de pared esta correctamente conecta-
do a tierra, et cliente debe solicitar la verifi-
cacion de un electricista calificado.
Si Ioexige el Codigo Electrico Nacional
[National Electricai Code] (o et Codigo Elec-
trico Canadiense [Canadian Electrical
Code]), este etectrodomestico debe
i_alarse en un circuito derivado separado.
ADVERTENCIA - Para reducir el ties-
go de incendio o descarga eIectrica, no use
et ventilador con ningOn regulador de veto-
cidad de estado sotido.
Instalador: muestre al propietario Ia ubica-
cion det disyuntor o del fusible. Marqueta
para recordarla mas facilmente.
Antes de reaiizar la instalacion, apague ia
alimentacion etectrica en el panel de servi-
cio. Trabe el panel de servicio para impedir
que se encienda accidentaImente Ia aIi-
mentaciOn etectrica.
ADVERTENCIA- PARA REDUCIR EL
RIESGO DE INCENDIO, DESCARGA
ELECTRICA O LESIONES PERSONALES,
RESPETE LO SIGUIENTE:
a]
b]
Use esta unidad solamente para et uso
previsto pot etfabricante. Si tiene pre-
guntas, comuniquese con el fabricante.
Antes de realizar el servicio tecnico o Iim-
piar la unidad, desconecteta de la red
electrica desde el panel de servicio y tra-
be el dispositivo de desconexion det ser-
vicio para impedir que se encienda acci-
dentalmente la alimentacion electrica.
Cuando el dispositivo de desconexion
del servicio no pueda trabarse, cotoque
firmemente algOn tipo de advertencia
que destaque, como por ejemplo una
etiqueta, en et panel de servicio.
Page 29

NOTAS IMPORTANTES
AsegOrese de que el electrodomestico sea
correctamente instalado y conectado a tier-
ra pot un tecnico calificado. La instalacion,
Ias conexiones electricas y la conexion a
tierra deben cumplir con todos los codigos
espondientes.
ADVERTENClA - PARA REDUCIR EL
RIESGO DE INCENDIO, DESCARGA
ELECTRICA O LESIONES PERSONALES,
RESPETE LO SIGUIENTE:
a) El trabajo de instalacion y la instalacion
etectrica deben set realizados pot (una)
persona(s) autorizada(s) de acuerdo con
todos los codigos y normas aplicables,
inciuidos ios cOdigos de construccion
con respecto a incendios.
b) Para una apropiada combustion y eva-
cuacion de gases a traves det caO0n
(chimenea) del equipo donde se quema
el combustible, es necesario que haya
suficiente aire para evitar contratirajes.
Siga las pautas del fabricante del equipo
de calefaccion y las normas de seguri-
dad, tales como las que fueron publica-
das por la Asociacion Nacionai de Pro-
teccion contra Fuegos [Nationai Fire
Protection Association, NFPA] y la Socie-
dad Americana para Ingenieros de Cale-
faccion, Refrigeracion y Aire Acondicio-
nado [American Society for Heating,
Refrigeration and Air Conditioning
Engineers, ASHRAE], y por las autorida-
des locales.
c) AI cortar o taladrar en la pared o et
techo, no daOe cables etectricos ni otras
instalaciones ocultas que pueda haber.
d) Los ventiladores entubados siempre
deben set ventilados hacia el exterior.
Retire toda la cinta y el embalaje antes de
usar el electrodomestico. Destruya el
embalaje despues de desembalar et etec-
trodomestico.
Nunca deje que los ni_os jueguen con et
material de embalaje.
Nunca modifique ni altere la construccion
del etectrodomestico. Por ejemplo, no retire
Ias patas de nivelacion, los paneles, Ias
cubiertas para cables ni los sopor-
tes/tornillos antivuetco.
PRECAUClON - Usar s01opara ventilacion
general. No se debe usar para extraer
materiales ni vapores peligrosos o explosi-
VOS.
Para reducir el riesgo de incendio y para
extraer el aire correctamente, asegOrese de
conducir el aire hacia et exterior. No ventile
el aire de escape a espacios dentro de
paredes, techos, aticos, huecos sanitarios
o garajes.
ADVERTENCIA - Para reducir el ties-
go de incendio, use s0to ductos metalicos.
_ ADVERTENCIA - AI montar la campa-
na, se deben respetar Ias normativas apli-
cables de las compaOias de suministro de
energia y las normativas de construcciOn
regionales.
Este electrodomestico cumple con una o
mas de las siguientes normas:
UL 858, Norma de seguridad para estufas
electricas de uso domestico (Standard for
the Safety of Household Electric Ranges)
UL 923, Norma de seguridad para electro-
domesticos de coccion por microondas
(Standard for the Safety of Microwave Coo-
king Appliances)
UL 507, Norma de seguridad para ventila-
dotes electricos (Standard for the Safety of
Electric Fans)
ANSI Z21.1, Norma nacional estadouniden-
se para electrodomesticos a gas para
cocinar de uso domestico (American Natio-
nai Standard for Household Cooking Gas
Appliances)
CAN/CSA-C22.2 N.° 113-M1984 para ven-
tiladores (Fans and Ventilators)
CAN/CSA-C22.2 N.° 61-M89 para estufas
para cocinar de uso domestico (Household
Cooking Ranges)
Es responsabilidad del propietario y del
instalador determinar si se aplican otros
requisitos y/o normas en instalaciones
especificas.
29
Page 30

NOTAS IMPORTANTES
Las instrucciones de uso se aplican a
varias versiones de este electrodo-
mestico. Por Io tanto, puede encontrar
descripciones de caracterfsticas
individuales que no se apliquen a su
electrodomestico espedfico.
Esta campana extractora cumple con
todas las reglamentaciones de
seguridad pertinentes.
Las reparaciones deben ser
realizadas por t6cnicos calificados
t3nicamente.
Z_ PRECAUCION
Las reparaciones incorrectas pueden
poner en grave riesgo al usuario.
Antes de usar su electrodomestico por
primera vez, lea atentamente estas
instrucciones de uso. Contienen
informaciOn importante sobre su
seguridad personal, as[ como tambien
sobre el uso y cuidado del
electrodomestico.
Conserve las instrucciones de operaciOn
e instalaciOn para un propietario posterior.
Este aparato ester
marcado segOn la
Directiva Europea
2002/96/CE sobre
residuos de aparatos
electricos y electrOnicos
(waste electrical and
electronic equipment -
WEEE). La Directiva marca el a,mbito
para una retirada y aprovechamiento de
los aparatos usados va,lidos en toda la
UE.
Retire el embalaje del aparato y evacue
este correctamente! Por favor tenga en
cuenta: que existe accesorios dentro del
embalaje.
Mantener los elementos de embalaje
fuera del alcance de los ni_os.
Limpie el aparato cuando Io utilice por
primera vez a fondo.
Antes de la puesta en servicio, debera,
comprobar que la conexiOn a la red es la
correcta.
AVERiAS Y
PERTURBAClONES
En caso de que se produzcan anomalfas de
funcionamiento, deber_t comprobar prime
ramente las protecciones electricas de la
casa. Si lacausa no es debido al suministro
de corriente, avise a su comercial o al
servicio de asistencia tecnica de cliente
correspondiente.
En caso de no poder accionar los mandos
ni activar las funciones de la campana
extractora:
Dejar la campana sin corriente durante
aproximadamente 1 minuto extrayendo el
enchufe de la toma de corriente o desco-
nectando el fusible de la red. Conectar a
continuaciOn la campana extractora.
En caso de consultas o averfas de la cam-
pana extractora, no dude en Ilamar al Servi-
cio de Asistencia Tecnica.
(Wase al respecto la lista con las
delegaciones y distribuidores oficiales).
Para cualquier consulta debera,n indicarse
los nOmeros de producto y de fabricaciOn:
N E FD [
Anote las nOmeros correspondientes a su
aparato en los espacios correspondientes.
Los nOmeros figuran en laplaca de
caracterfsticas, a la que se accede tras
desmontar la rejilla del filtro dentro de la
campana extractora.
_Las reclamaciones atribuibles o
relacionadas con la planificaciOn y
ejecuciOn de la instalaciOn de las tubeffas
de la campana extractora, no esta,n
cubiertas por el servicio de garantfa del
fabricante.
3O
Page 31

MODALIDADES DE FUNCIONAMIENTO
MODO DE AIRE DE SALIDA:
El ventilador de la campana extractora
extrae los vapores de cocina y los
conduce por el filtro de grasa a la
atm0sfera.
El filtro de grasa absorbe las partfculas
s01idas de los vapores de cocina.
La cocina se mantiene pra,cticamente sin
grasa ni olores.
;_:-<Cuando se utiliza la campana
extractora en el modo de aire de salida
simultAneamente con una hornilla
diferente que tambi6n utiliza la misma
chimenea (como calentadores a gas,
aceite o carbon, calentadores de flujo
continuo, calentadores de agua), se debe
asegurar que haya un suministro de aire
fresco suficiente, que serb, necesario para
la combustion en la hornilla.
La operaci0n segura es posible siempre
que la subpresion de la habitaci0n donde
esto,instalada la hornilla no supere los 4 Pa
(0,04 mbar).
Esto es posible si el aire de combustion
puede circular a traves de aberturas que no
puedan trabarse, como ser puertas y
ventanas, y a traves de cajas de entra-
da/salida de aire en la pared, o mediante
otras medidas tecnicas, como enclava-
miento recfproco, etc.
Z_ PRECAUCION
Evite la intoxicaci6n por mon6xido de
carbono - Proporcione una entrada de
aire suficiente para que los gases de la
combusti6n no vuelvan a ingresar a la
habitaci6n.
Una caja de entrada!salida de aire en la
pared por sf sola no garantiza que no se
superara, el valor Ifmite.
Nota: AI evaluar el requisito total, se debe
tener en cuenta el sistema de ventilaci0n
combinado para todo el hogar. Esta norma
no se aplica al uso de electrodomesticos de
cocina, como parrillas y hornos.
CIRCULATING-AIR MODE:
An activated carbon filter must be fitted
for this operating mode (see Filters and
maintenance).
The complete installation set and
I replacement filters can be obtained from
• specialist outlets.
The extractor-hood fan extracts the
kitchen vapours which are purified in the
grease filter and activated carbon filter
and then conveyed back into the
kitchen.
The activated carbon filter binds the
odorous substances.
If no activated carbon filter is installed, it
is not possible to bind the odorous
substances in the cooking vapours.
PARRILLAS A GAS/ESTUFAS A
GAS:
PRECAUCION
Evite el riesgo de quemaduras o daSos a la
campana extractora.
No use todas las hornillas a gas simulto,ne-
amente a temperaturas altas durante un
perfodo prolongado (mo,x. 15 minutos).
Si lacampana extractora se encuentra
sobre una placa a gas, haga funcionar la
campana en el valor mo,ximo cuando se
usen tres o mo,s hornillas a gas.
31
Page 32

OPERACION
IMPORTANTE: La manera ma,sefectiva
para eliminar los vapores producidos mien-
tras cocina es:
Encender el ventilador
apenas comienza a cocinar.
Apagar el ventilador
unos minutos despues de haber
terminado de cocinar.
Para encender el ventilador
Presione el bot6n LO MED HI
(VELOCIDAD DEL VENTILADOR) o jale
la bandeja del filtro hacia afuera.
Para programar la velocidad
requerida del ventilador:
Presione el bot6n LO MED HI
(VELOCIDAD DEL VENTILADOR).
La velocidad del ventilador aumenta de a
un nivel por vez.
Para apagar el ventilador:
Presioneel bot6n OFF(APAGADO).
Apagado con demora:
Presione el bot6n DELAY (APAGADO
CON DEMORA).
El ventilador funciona durante
10 minutos en el valor HI).
En el mismo momento, en la pantalla
aparecera,
titilando un punto.
Luego, el ventilador se apaga
automa,ticamente. El LED iluminado
indica que la funcbn DELAY SHUT-OFF
(APAGADO CON DEMORA) esta,
activada.
Iluminaci6n:
Presione el bot6n LIGHT (LUZ) para
encender y apagar la luz.
La luz se puede encender en cualquier
momento, incluso cuando el ventilador
esta,apagado.
32
Page 33

FILTROS Y MANTENIMIENTO
FILTROS DE GRASA:
Los filtros de metal se utilizan para atrapar
los elementos grasosos de los vapores que
se producen mientras cocina.
Las la,minas de filtro esta,n hechas de metal
no combustible.
Precauci6n:
A medida que el filtro se va saturando de
grasa, no solo aumenta el riesgo de que se
incendie, sino que
la eficiencia de la campana extractora se ve
afectada adversamente.
Importante:
Limpiando los filtros de grasa de metal en
intervalos adecuados, disminuye la
posibilidad de que se incendien como
consecuencia de la acumulaciOn de calor,
como cuando se fife con abundante aceite
o se asan alimentos.
Indicador de saturaci6n:
Cuando los filtros de grasa alcanzan el
punto de saturaciOn, se ilumina el LED
FILTER(LIMPIE EL FILTRO).
Los filtros de grasa deben limpiarse de
inmediato. Para apagar el LED, presione el
bot6n FILTER (LIMPIE EL FILTRO) durante
6 segundos.
Para limpiar los filtros de grasa de
metal:
Con el uso normal (1 a 2 horas por dfa),
el filtro de grasa de metal debe limpiarse
1vez por mes.
Los filtros pueden limpiarse en un
lavavajillas. Sin embargo, es posible que
se decoloren ligeramente.
El filtro debe quedar suelto en el
lavavajillas, no debe quedar atascado.
Importante:
Los filtros de metal que esta,n saturados
con grasa no deben lavarse junto con
los dema,s platos, etc.
AI limpiar los filtros a mano, primero
sumerjalos en agua jabonosa caliente.
No utilice limpiadores agresivos, a,cidos
ni ca,usticos.
Luego, cepille los filtros para limpiarlos,
enju_tguelos bien y deje que se escurra
el agua.
Para retirar y colocar los filtros de
grasa de metal:
_ Advertencia: Evite el riesgo de
quemaduras. Los focos halOgenos deben
estar apagados y frfos.
1. Abrir el seguro de retenciOn de los filtros
antigrasa. Abatir los filtros antigrasa
hacia abajo.
Sujetar los filtros antigrasa por bajo con
la otra mano.
2. Limpiar el filtro antigrasa.
3. Colocar el filtro antigrasa limpio en su
sitio.
33
Page 34

FILTROS Y MANTENIMIENTO
Filtro de carv_.o activo:
Para reter os cheiros no funcionamento
corn circula(}_o de ar.
Aten(}_o:
Em caso de satura_,o do filtro com
redduos gordurosos, aumentam as
possibilidades de inflama_,o do mesmo e a
fun_,o do aparelho pode ser prejudicada.
Importante:
Atraves da substituig_,o atempada do filtro
de carv_,o activo, e evitado o perigo de
inc_ndio provocado pela concentra_,o de
calor na confec_,o de fritos ou de assados.
Montar e desmontar:
Aten(}_o: As D,mpadas de halogeneo t_m
que estar desligadas e frias.
1. Desmontar os filtros de gordura
(Ver Desmontagem e montagem dos
filtros meta,licos de gordura).
2. Aplicar o filtro de carv_,o activo.
:_!!!!!!
3. Encaixar as patilhas.
4. Montar os filtros de gordura
(Ver Desmontagem e montagem dos
filtros meta,licos de gordura).
Substitui(}Ao do filtro de carvAo activo:
No caso de funcionamento normal (1 a 2
horas dia,rias), os filtros de carv_,o activo
devem ser substituidos 2 vez no ano.
O filtro de carv_,o activo pode ser
adquirido nos Servi_os Tecnicos (ver
acessOrios especiais).
Devem ser utilizados apenas filtros
originais.
SOassim e garantido o funcionamento
optimizado do exaustor.
Reciclagem do filtro de carvAo activo
usado:
O filtro de carv_,o activo n_,ocontem
subst&ncias prejudiciais. Ele pode ser
reciclado como lixo normal.
34
Page 35

CUIDADO Y LIMPIEZA
_ ADVERTENClA Nu use Ifquidos inflamables o disolventes para evitar un fuego o
una explosion.
Siempre desenchufe o desconecte el aparato de la fuente de alimentaciOn antes de
dar servicio.
IMPORTANTE: iNo limpie la campana
extractora con esponjas abrasivas ni con
agentes de limpieza que contengan arena,
soda co,ustica, o,cido ni cloro!
Limpie la campana extractora con una
soluciOn jabonosa caliente o un
limpiador suave para ventanas.
No raspe la suciedad seca, Ifmpiela con
un paso hOmedo.
Cuando limpie los filtros de grasa, retire
los depOsitos de grasa de las partes
accesibles de la carcasa.
Esto previene el riesgo de incendio y
asegura que la campana extractora
continOe funcionando en su nivel
mo,ximo de eficiencia.
Nota" No use alcohol en las superficies
de plo,stico, ya que pueden aparecer
marcas opacas.
PrecauciOn: Siga todas las instrucciones
y precauciones incluidas con los
limpiadores.
IMPORTANTE: Limpie los botones de
operaciOn solamente con una soluciOn
jabonosa suave y un paso suave hOmedo.
No use limpiadores para acero inoxidable
para limpiar los botones de operaciOn.
Superficies de acero inoxidable:
Use un limpiador para acero inoxidable
no abrasivo suave.
Limpie la superficie en la misma
direcciOn del grano y del pulido.
Recomendamos nuestro limpiador para
acero inoxidable Fantastik®o Formula
409®.
Rocie este producto en una toalla de
papel.
Superficies de aluminio y plb.stico:
No use paros secos.
Use un agente de limpieza suave para
ventanas.
No utilice limpiadores agresivos, o,cidos
ni co,usticos.
Siga las reglamentaciones de la garantia
incluidas en el manual de servicio
tOcnico adjunto.
Page 36

REEMPLAZO DE FOCOS
Z_ PRECAUCION. Evite el riesgo de
descarga electrica.
1. Apague la campana extractora y retire el
enchufe de alimentaciOn de red o
apague el suministro de electricidad en
la caja de fusibles.
Z_ PRECAUCION. Evite el riesgo de
quemaduras.
Los focos halOgenos se calientan mucho y
permanecen calientes durante algOn tiempo
despues de que se apagaron.
2. Retire el aro del foco con un
destornillador o una herramienta similar.
3. Coloque el foco de luz halOgena (foco
halOgeno convencional de 12 voltios,
20 vatios como ma,ximo, portala,mparas
G4)
IMPORTANTE: Enchufe el
portala,mparas.
Tome el foco con un paso limpio.
Las huellas digitales pueden acortar la
vida Otildel foco.
4. Vuelva a colocar el aro del foco.
5. Restablezca la alimentaciOn electrica
colocando el enchufe de alimentaciOn de
red o encendiendo el fusible.
Nota" Si la luz no funciona, verifique que los
focos esten correctamente insertados.
36
Page 37

GUiA DE RESOLUCION DE PROBLEMAS
Problema Causa probable Soluci6n
No funciona nada: El tablero de botones de Comunfquese con un tecnico
la pantalla no esteriluminada control se ha desconectado, de serviciode electrodomes-
ticos calificado.
Si no se puede operar la
Corte del suministro electrico
Desconecte la campana
extractora del suministro de
electricidad de red
desenchufando el enchufe o
desconecta, ndolo en la caja
de fusibles principal. Espere
aproximadamente 1 minuto y
luego vuelva a encenderla.
37
Page 38

SERVICIO AL CLIENTE
Antes de Ilamar al servicio tecnico
Si el soplador no funciona:
Verifique que el cable electrico este correctamente conectado y que el circuito de
alimentacbn electrica este energizado.
Verifique que la perilla de control de velocidad del soplador no este en la posicbn OFF
(Apagado).
El fabricante de las campanas extractoras no asume responsabilidad alguna por las
reclamaciones que puedan atribuirse al dise_o y a la distribucbn de las tuberfas.
C6mo obtener servicio tecnico
Para obtener informaci6n sobre servicio t6cnico autorizado o sobre las piezas, Ilame al
1-800-735-4328.
Queremos que este conforme como cliente. Si usted no ha quedado conforme respecto de la
resolucbn de una situacbn, inf6rmenos.
Escriba a: Customer Support, BSH Home Appliances, Corp. 5551 McFadden Ave.,
Huntington Beach, CA 92649, o Ilame al: 1-800-735-4328.
Incluya el nOmero de modelo, el nOmero de serie y la fecha original de compra/instalacbn.
Informaci6n para Servicio
Se fij6 la informacbn con el n0mero de serie en la etiqueta indicada abajo. Guarde su factura
para validar la grantfa. Vea la po,gina anterior para obtener servicio.
Ubicaci6n de la placa de datos/n0mero de serie: Arriba
de la caja de conexiones electricas, Vea la pagina 30.
Nos reservamos del derecho de modificar las especificaciones o el diseSo sin previo aviso.
Algunos modelos esto,n certificados para ser usados en Canada,. BSH no es responsable de
productos que son transportados desde los Estados Unidos para ser utilizados en Canado,.
Consulte a su distribuidor local en Canado,.
38
Page 39

39
Page 40

Thermador Ao A .....,c.....9coo,_
1 800 735 4328
WWW,THERMADOR,COM
5551 MCFADDEN AVENUE I HUNTINGTON BEACH, CA 92649
(02008 BSH HOME APPLIANCES CORPORATION, ALL RIGHTS RESERVED
#6508 0024 LITHO DATE: 6/08
9000 466 406
Printed in Germany 0709 Es.
 Loading...