

Page 1

Datacryptor® Ethernet
User Manual
1270A450-005 June 2008
Page 2

Datacryptor Ethernet User Manual Preface
Page 2 THALES
Page 3

Datacryptor Ethernet User Manual Preface
Contents
1 Preface............................................................................................................................................5
Trademark Acknowledgements ............................................................. 5
Revision Status....................................................................................... 5
License Agreement and General Information.............................................. 6
Security Advisory ................................................................................... 9
Contact Information............................................................................. 10
2 About This Document ........................................................................................................ 11
This manual is organized into the following sections: ......................... 12
3 Overview ....................................................................................................................................13
Product Images......................................................................................... 13
Product Features....................................................................................... 15
Element Manager ...................................................................................... 16
4 Background Information ..................................................................................................17
Datacryptor Ethernet Unit ......................................................................... 17
Gigabit Ethernet Technology Overview ..................................................... 17
Ethernet Layer 2 Services ..................................................................... 17
Security Terms..................................................................................... 18
Other Terms ........................................................................................ 18
5 Installation................................................................................................................................19
Hardware Installation................................................................................ 19
Rack-Mounting Instructions ................................................................. 19
Cabling Requirements ......................................................................... 20
To Cable the Datacryptor..................................................................... 21
Power on the Datacryptor .................................................................... 22
Software Installation ................................................................................. 23
Requirements ...................................................................................... 23
Installation Procedure .......................................................................... 24
6 Connecting to Datacryptor Ethernet Units............................................................25
Users ........................................................................................................ 25
IP Parameter Configuration via a Serial Connection .................................. 25
Dial Up Networking.............................................................................. 27
Adding a Unit to Element Manager ........................................................... 28
Direct Invocation of Front Panel Viewer .................................................... 32
Command Line Parameters....................................................................... 32
7 Element Manager Reference ..........................................................................................34
Main Window ............................................................................................ 34
Main Window Pull-down Menus................................................................. 35
File....................................................................................................... 35
Edit ...................................................................................................... 35
View..................................................................................................... 35
Tools.................................................................................................... 36
Help ..................................................................................................... 36
Toolbar Icons............................................................................................ 36
Datacryptor Icons ..................................................................................... 36
Front Panel Viewer .................................................................................... 38
User Key Material ................................................................................. 41
The Front Panel LEDs ........................................................................... 41
The Front Panel Viewer buttons ........................................................... 42
1270A450-005 - June 2008 Page 3
Page 4

Preface Datacryptor Ethernet User Manual
Configure Dialog ...................................................................................... 43
Key Manager............................................................................................. 46
To commission a unit with the Commission button ................................. 46
Step 1: Installing a new Certificate Authority (CA)................................ 48
Step 2: Installing the authenticating CA: .............................................. 49
Step 3: Setting the unit name:.............................................................. 50
Step 4: Generating a Certificate: .......................................................... 51
Login Dialog ............................................................................................. 53
Change Password Dialog .......................................................................... 53
Logs Window ............................................................................................ 54
Properties Dialog ...................................................................................... 56
The General Tab .................................................................................. 57
The Diagnostics Tab ............................................................................ 59
The IP Management Tab ...................................................................... 61
Configuring SNMP................................................................................ 62
IP Route Config .................................................................................... 70
The Security Tab .................................................................................. 71
The RIP Tab.......................................................................................... 73
The Ethernet Comm Tab for 1 and 10 Gigabit Datacryptors ................ 75
The Ethernet Comm Tab for 100 Mb Datacryptor................................ 77
The Ethernet Encryption Tab................................................................ 79
The Expert Tab .................................................................................... 80
The Ethernet Tunneling Tab ................................................................ 81
The Environment Tab........................................................................... 85
Appendix A: Device Maintenance.....................................................................................86
Appendix B: Loading Datacryptor Unit Software ....................................................88
Appendix C: Product Specifications ................................................................................ 95
Appendix D: Environmental & Regulatory ..................................................................96
Appendix E: SFP and XFP Interfaces................................................................................98
Appendix F: Preventing Electrostatic Discharge.....................................................99
Appendix G: Troubleshooting ......................................................................................... 100
Appendix H: SNMP MIB Support ..................................................................................... 102
Appendix I: Log and SNMP Trap Numbers............................................................... 105
Standard Traps .................................................................................. 105
Log Trap Errors Hardware.................................................................. 106
Log Trap Errors Software ................................................................... 108
Key Errors .......................................................................................... 110
Audit Errors ....................................................................................... 123
Appendix J: Glossary of Terms.......................................................................................132
Page 4 THALES
Page 5

Datacryptor Ethernet User Manual Preface
1 Preface
Trademark Acknowledgements
Datacryptor is a trademark of Thales e-Security.
Microsoft Windows® XP and Windows® 2003 are registered trademarks of Microsoft
Corporation.
All other logos and product names are trademarks or registered trademarks of their
respective companies.
©2006-2008 Thales e-Security. All rights reserved.
Copyright in this document is the property of Thales e-Security. It is not to be
reproduced, modified, adapted, published, translated in any material form (including
storage in any medium by electronic means whether or not transiently or incidentally) in
whole or in part nor disclosed to any third party without the prior written permission of
Thales e-Security neither shall it be used otherwise than for the purpose for which it is
supplied.
Thales e-Security reserves the right to modify or revise all or part of this document
without notice and shall not be responsible for any loss, cost, or damage, including
consequential damage, caused by reliance on these materials.
Revision Status
Revision Changes Release Date
1270A450-001 First Issue March 2006
1270A450-002 Release 1.1 August 2006
1270A450-003 10 Gig Ethernet unit added and Updates
for product release 4.00
1270A450-004 100 Mb Ethernet unit added March 2008
1270A450-005 Unsupported features in the 10Gig
Ethernet unit: Auto-negotiation; Disabling
CTS mode; Fragmentation
November 2007
June 2008
1270A450-005 - June 2008 Page 5
Page 6

Preface Datacryptor Ethernet User Manual
License Agreement and General Information
THALES e-SECURITY LTD. ("THALES") COMPUTER PROGRAM LICENSE AGREEMENT
YOU SHOULD CAREFULLY READ THE FOLLOWING TERMS AND CONDITIONS OF THIS LICENSE AGREEMENT (the
"AGREEMENT"). FOR PURPOSES OF THIS AGREEMENT, “SOFTWARE” IS DEFINED TO INCLUDE COMPUTER PROGRAMS
INTENDED TO BE RUN ON A WORK STATION, PC, OR SIMILAR MACHINE, AND INCLUDES THE CD-ROM OR OTHER
MEDIA ON WHICH THE SOFTWARE IS CONTAINED. “FIRMWARE” IS DEFINED TO INCLUDE COMPUTER PROGRAMS
WHICH ARE INTENDED TO BE RUN SOLELY ON OR WITHIN A HARDWARE MACHINE (“MACHINE”) PROVIDED BY
THALES, INCLUDING, WITHOUT LIMITATION, FPGA BITSTREAMS. THE SOFTWARE AND FIRMWARE AND THE
ACCOMPANYING USER DOCUMENTATION (THE “DOCUMENTATION”) ARE LICENSED (NOT SOLD) TO YOU BY THALES
DIRECTLY OR THROUGH AUTHORIZED RESELLERS OF THALES. OPENING OR INSTALLING ANY OF THE CONTENTS OF
THIS CD-ROM OR OTHER PROVIDED MEDIA PACKAGE INDICATES YOUR ACCEPTANCE OF THE TERMS AND
CONDITIONS OF THIS LICENSE. IF YOU DO NOT AGREE WITH THE TERMS AND CONDITIONS, PROMPTLY RETURN THE
PACKAGE, THE MACHINE WHICH CONTAINS A COPY OF THE LICENSED FIRMWARE, AND ALL OTHER ENCLOSED ITEMS,
IF ANY, TO THE PLACE WHERE YOU OBTAINED THEM, AND YOU WILL RECEIVE A REFUND.
LICENSE GRANT
A. In consideration of the license fee paid to THALES or to an authorized THALES reseller, THALES hereby grants you,
and you accept a nonexclusive license to use the Software on a single machine (if a “single license” is purchased) or multiple
machines (if an “organizational license” is purchased) owned, leased, or otherwise controlled by you, and to use the
Firmware solely on the Machine sold to you by THALES or its dealers, if any, but only to operate or engage those features
and/or applications for which a charge appears on your order and invoice under the terms stated in this Agreement. If a
software or Firmware enabling key or other similar access device (the “Key”) is provided, you agree to use same solely for
accessing the Software on a single PC or Firmware on a single Machine. Title and ownership of the Software, Firmware,
Documentation and/or Key remain in THALES or its suppliers. If an organizational license is purchased, then you may use
the Software or Firmware on multiple Machines in your organization regardless of quantity, provided all Machines are
located within a single country. A separate single or organizational license will be required in each country.
B. You may not decompile, reverse engineer, modify, or copy the Software, Firmware, or Documentation for any
purpose, except you may copy the Software into machine-readable or printed form for backup purposes in the event the CDROM or other provided media is damaged or destroyed. You may combine the Software with other programs. Any portion
of the Software merged into or used in conjunction with another program will continue to be the property of THALES and is
subject to the terms and conditions of this Agreement.
C. The Software, Firmware, and the Documentation are copyrighted by THALES and/or its suppliers. You agree to
respect and not to remove or conceal from view any copyright or trademark notice appearing on the Software, Firmware, or
Documentation, and to reproduce any such copyright or trademark notice on all copies of the Software, Firmware, and
Documentation or any portion thereof made by you as permitted hereunder and on all portions contained in or merged into
other programs and documentation.
D. You may transfer the Software, Firmware, and this license to another party if the other party agrees to accept the
terms and conditions of this Agreement. If you transfer the Software and/or Firmware, you must at the same time either
transfer all copies whether in printed or machine-readable form, and the Machine, if any, on which the Firmware is licensed
for use, to the same party or destroy any copies not transferred; this includes all modifications and portions of the Software
and/or contained or merged into other programs.
YOU MAY NOT USE, COPY, MODIFY, OR TRANSFER THE SOFTWARE, FIRMWARE, DOCUMENTATION OR KEY, OR ANY COPY,
MODIFICATION OR MERGED PORTION, IN WHOLE OR IN PART, EXCEPT AS EXPRESSLY PROVIDED FOR IN THIS LICENSE.
IF YOU TRANSFER POSSESSION OF ANY COPY, MODIFICATION OR MERGED PORTION OF THE SOFTWARE, FIRMWARE, OR
DOCUMENTATION OR KEY TO ANOTHER PARTY, EXCEPT AS PROVIDED IN THIS SECTION D, YOUR LICENSE IS
AUTOMATICALLY TERMINATED.
TERM
This Agreement is effective upon your acceptance (as set forth above) and shall continue until terminated. You may
terminate this license at any time by destroying the Software, Key, and Documentation along with all copies, modifications
and merged portions in any form, and return the Machine (including Firmware) to THALES or its authorized resellers. It will
also terminate upon conditions set forth elsewhere in this Agreement if you fail to comply with any term or condition of this
Agreement. You agree upon such termination to destroy the Software, Documentation, and Key together with all copies,
modifications and merged portions in any form, and to return the Machine (including Firmware) to THALES or its authorized
resellers.
Page 6 THALES
Page 7

Datacryptor Ethernet User Manual Preface
LIMITED WARRANTY
The following limited warranty applies only to the Software and/or Firmware licensed hereunder. The hardware Machine is
warranted pursuant to a separate Warranty set forth in the Machine documentation. The Machine documentation is
contained on the CD-ROM, if any.
During the first 90 days after receipt of the Software and/or Firmware by you, as evidenced by a copy of your receipt, invoice
or other proof of purchase (the "Warranty Period"), THALES warrants, for your benefit alone, that the Software and Firmware
when properly installed, will perform substantially in conformance with the Documentation provided by THALES at the time
you obtained the Software and/or Firmware from THALES or its authorized resellers, and that the media on which the
Software and/or Firmware is furnished will be free from defects in materials and workmanship under normal use.
EXCEPT AS SPECIFICALLY PROVIDED ABOVE, THE WARRANTIES PROVIDED HEREIN ARE EXCLUSIVE AND IN LIEU OF ALL OTHER
WARRANTIES, EXPRESS, IMPLIED, OR STATUTORY, INCLUDING, BUT NOT LIMITED TO, THE IMPLIED WARRANTIES OF
MERCHANTABILITY OR FITNESS FOR A PARTICULAR PURPOSE
SOME JURISDICTIONS DO NOT ALLOW THE EXCLUSION OF IMPLIED WARRANTIES, SO THE ABOVE EXCLUSION MAY NOT APPLY
TO YOU. WHEREVER SUCH EXCLUSION IS NOT PERMITTED BY LAW, ALL IMPLIED WARRANTIES, INCLUDING THOSE OF
MERCHANTABILITY AND/OR FITNESS FOR A PARTICULAR PURPOSE, SHALL BE LIMITED TO THE WARRANTY PERIOD. THIS
WARRANTY GIVES YOU SPECIFIC LEGAL RIGHTS, AND YOU MAY ALSO HAVE OTHER RIGHTS WHICH MAY VARY FROM
JURISDICTION TO JURISDICTION.
THALES does not warrant that the functions contained in the Software or Firmware will meet your requirements or that their
operation will be uninterrupted or error free.
LIMITATIONS OF REMEDIES
THALES, its authorized resellers’, and/or its suppliers' entire liability and your exclusive remedies under this Agreement are
as follows:
(1) THALES shall use commercially reasonable efforts to correct any defect in the Software or Firmware which is
reported by you during the Warranty Period in writing to THALES, provided such defect can be recreated by THALES
in an unmodified version of the Software or Firmware. However, if THALES is unable to correct such defect within a
reasonable amount of time, you may terminate this Agreement by returning the Software, Machine including
Firmware, Documentation, and Key to the place where you obtained them either for replacement or, if so elected
by THALES, a refund of the amount paid by you for the subject item.
(2) THALES shall replace any media not meeting THALES’ "Limited Warranty" and which is returned to THALES with a
copy of your receipt, invoice or other proof of purchase or, if THALES is unable to deliver replacement media which
is free from defects in materials or workmanship, you may terminate this Agreement by returning the Software,
Firmware, Documentation, and Key to the place where you obtained them for a refund of the amount paid by you
for the subject item.
IN NO EVENT WILL THALES, ITS AUTHORIZED RESELLERS, OR ITS SUPPLIERS BE LIABLE FOR INCIDENTAL, SPECIAL OR
CONSEQUENTIAL DAMAGES OF ANY KIND OR TYPE, INCLUDING, BUT NOT LIMITED TO LOSS OF PROFITS OR REVENUE, LOSS
OF USE OF THE PRODUCT(S) OR ANY ASSOCIATED PRODUCT(S), OR COST OF SUBSTITUTED FACILITIES, PRODUCTS OR
SERVICES WHICH ARISE OUT OF THALES’ PERFORMANCE OR FAILURE TO PERFORM ANY OBLIGATION CONTAINED WITHIN
THIS AGREEMENT OR WITH USE, OR INABILITY TO USE, SOFTWARE AND/OR FIRMWARE, WHETHER THE CLAIM FOR DAMAGES
IS BASED IN CONTRACT, TORT (INCLUDING NEGLIGENCE), STRICT LIABILITY OR OTHERWISE. EXCEPT FOR CLAIMS FOR
PERSONAL INJURY OR FOR DAMAGE TO REAL OR TANGIBLE PROPERTY TO THE EXTENT CAUSED BY THALES’ FAULT OR
NEGLIGENCE, THALES’ MAXIMUM LIABILITY FOR ANY CLAIM FOR DAMAGES RELATING TO THALES’ PERFORMANCE OR NONPERFORMANCE UNDER THIS AGREEMENT SHALL BE LIMITED TO THE LESSER OF (a) YOUR ACTUAL DAMAGES OR (b) THE COST
OF THE PRODUCT GIVING RISE TO THE LIABILITY.
SOME JURISDICTIONS DO NOT ALLOW THE LIMITATION OR EXCLUSION OF LIABILITY FOR INCIDENTAL OR CONSEQUENTIAL
DAMAGES SO THE ABOVE LIMITATION OR EXCLUSION MAY NOT APPLY TO YOU.
PURCHASES BY OR FOR THE FEDERAL GOVERNMENT
The government hereby agrees that this software qualifies as "commercial computer software" as that term is used in the
acquisition regulation applicable to a purchase order or contract. This software may not be acquired by the government in a
contract incorporating clauses prescribed by DFARS Subpart 227.4 (OCT 1988), in which case the government hereby agrees
to return the software unused, in exchange for refund of the full purchase price.
1270A450-005 - June 2008 Page 7
Page 8

Preface Datacryptor Ethernet User Manual
The government agrees that it shall be bound by the terms and conditions of this license agreement, to the maximum
extent possible under federal law. This license agreement, and the governments assent hereto, supersedes any contrary
terms or conditions in other contract documents (such as any statement of work).
EXPORT AUTHORIZATIONS
You shall assume all responsibility for obtaining any required export authorizations necessary to export any Software and/or
Firmware and Documentation purchased hereunder. You shall not re-export Software and/or Documentation directly or
through others, or the product of such data, to the prescribed countries for which such prohibition exists pursuant to the
U.S. or U.K. export regulations unless properly authorized by the appropriate government.
GENERAL
You may not sublicense, assign or transfer this license, Software, Firmware, Documentation or Key, except as expressly
provided in this Agreement. Any attempt otherwise to sublicense, assign or transfer any of the rights, duties or obligations
hereunder is void.
This Agreement will be governed by the laws of England or the event that the Product was delivered in the United States,
Latin America or Canada, the laws of the State of Virginia.
YOU ACKNOWLEDGE THAT YOU HAVE READ THIS LICENSE AGREEMENT, UNDERSTAND IT AND AGREE TO BE BOUND BY ITS
TERMS AND CONDITIONS. YOU FURTHER AGREE THAT IT IS THE COMPLETE AND EXCLUSIVE STATEMENT OF THE
AGREEMENT BETWEEN YOU AND THALES WHICH SUPERSEDES ANY PRIOR PROPOSAL, REPRESENTATION, OR UNDERSTANDING
(ORAL OR WRITTEN) BETWEEN US RELATING TO THE SOFTWARE OR FIRMWARE.
NOTWITHSTANDING THE ABOVE, IF YOU PREVIOUSLY SIGNED A SEPARATE AGREEMENT HAVING A SOFTWARE LICENSE
PROVISION APPLICABLE TO THIS PROGRAM, WHICH HAS NOT EXPIRED OR BEEN TERMINATED, THE TERMS AND CONDITIONS
OF SUCH SEPARATE AGREEMENT AND THE SOFTWARE LICENSE CONTAINED THEREIN SHALL TAKE PRECEDENCE OVER ALL
CONFLICTING TERMS AND CONDITIONS, IF ANY, CONTAINED IN THIS LICENSE AGREEMENT. OTHERWISE, ANY ADDITIONAL
TERMS AND CONDITIONS SET FORTH IN THIS LICENSE AGREEMENT SHALL SUPPLEMENT AND BE READ IN CONJUNCTION WITH
THE SOFTWARE LICENSE CONTAINED IN ANY SUCH SEPARATE AGREEMENT
.
Hardware Warranty
The period of warranty for this product starts on the date of sale to the original purchaser and ends 365 days
thereafter. Thales e-Security will replace any product that fails within 90 days of the date of sale. For failures which
occur more than 90 days after the date of sale, Thales e-Security will repair the product if returned, postage
prepaid, to our designated repair center.
Thales e-Security requires a Return Authorization Number (RAN) prior to the return of any equipment under the
provisions of this warranty. Please contact your authorized reseller or the nearest Thales e-Security product
support center for details.
General Requirements
This equipment should be installed by a qualified Service engineer. Incorrect connection will invalidate warranty
and may cause a hazard.
Should any malfunction be suspected in the unit, return the apparatus to your supplier for service and/or repair to
ensure continued compliance. The Datacryptor Ethernet unit contains no user serviceable parts.
The unit should be installed in an environment compatible with the maximum operating temperature of the unit.
Installation of the unit in a rack should not reduce airflow so as to compromise safe operation of the unit.
Particular attention should be made to make sure that the side ventilation holes on the Datacryptor Ethernet are
not obstructed which could reduce the airflow through the unit. Please refer to the Installation chapter, in the
section titled "
When installed in a rack make sure that the unit is securely installed using all the appropriate mechanical fixings so
that it will not cause a hazardous condition.
Airflow" for further information on providing appropriate air flow.
Page 8 THALES
Page 9

Datacryptor Ethernet User Manual Preface
Security Advisory
This unit is being shipped with a Universal Certificate Authority that is to be used for
demonstration purposes only. USE OF THE DEVICE, AS INITIALLY CONFIGURED, IN AN
OPERATIONAL ENVIRONMENT IS NOT RECOMMENDED. THALES e-SECURITY EXPRESSLY
DISCLAIMS ANY AND ALL LIABILITY FOR DAMAGES, INCLUDING BUT NOT LIMITED TO
CONSEQUENTIAL DAMAGES, RESULTING FROM USE OF THE UNIVERSAL CERTIFICATE OR ANY
OTHER CERTIFICATE SUPPLIED BY THALES e-SECURITY. Prior to use in an operational
environment, please change the certificate authority, following the procedure(s) described in the
Key Manager section.
1270A450-005 - June 2008 Page 9
Page 10

Preface Datacryptor Ethernet User Manual
Contact Information
SALES OFFICES
Americas
Europe, Middle East, Africa
THALES e-Security, INC
2200 North Commerce Parkway
Suite 200
Weston, Florida 33326
U.S.A.
Tel: +1 954 888 6200
Fax: +1 954 888 6211
Toll free within USA:
+1 888 744 4976
e-mail:
THALES e-Security (ASIA) LTD
199 Des Voeux Road, Central
THALES e-Security LTD
Meadow View House
Long Crendon
Aylesbury
Buckinghamshire HP18 9EQ
England
Tel: +44 (0)1844 201800
Fax: +44 (0)1844 208550
e-mail:
Asia Pacific
Units 2205-06, 22/F
Vicwood Plaza
Hong Kong
Tel: +852 2815 8633
Fax: +852 2815 8141
e-mail:
PRODUCT SUPPORT CENTERS
Americas
Tel: +1 954 888 6277
Toll free within USA:
+1 800 521 6261
Fax: +1 954 888 6233
e-mail:
Asia Pacific
Tel: +852 2815 8633
Fax: +852 2815 8141
e-mail:
Page 10 THALES
Europe, Middle East, Africa
Tel: +44 (0) 1844 202566
Fax: +44 (0) 1844 208356
e-mail:
Page 11
Datacryptor Ethernet User Manual About This Document
2 About This Document
Viewing this document in Adobe Acrobat PDF Viewer
It is recommended that this PDF document is viewed at 100% size with text smoothing adjusted
to suit your monitor. The viewing size is easily adjusted by the use of the Zoom toolbar; you
may set 100% size, or simply click the Actual Size icon:
Viewing at 100% will provide the best appearance of the images in this document.
To change the appearance of the text, select: Edit > Preferences > Page Display. Change the
Smooth Text option and click OK. Use this option to compare the appearance of the text with
and without text smoothing, and then select the setting that provides the most comfortable
reading experience.
Introduction to this Manual
There are three models in the Datacryptor Ethernet range: 100 Mb Ethernet, 1 Gig Ethernet, and
10 Gig Ethernet. Predominantly, the information in this manual applies equally to all models
and as such, the device is referred to simply as the ‘Datacryptor Ethernet’. Where there are
differences, the unit being described is referred to either as the 100 Mb Ethernet, 1 Gig
Ethernet, or 10 Gig Ethernet, as appropriate. The differences between the two models are
mainly in the speed of operation and the physical size of the casing.
This manual describes how to install the Thales Datacryptor Ethernet unit and the Element
Manager software. It also describes how to use the Element Manager software to configure and
manage the Thales Datacryptor Ethernet device.
This document is intended for use by network technicians, managers and security
administrators who are familiar with setting up and maintaining network equipment. Some
knowledge of network security issues and encryption technologies is assumed.
This document assumes that its readers have an understanding of the following:
• Basic principles of network security issues
• Basic principles of encryption technologies and terminology
• Basic principles of Ethernet technology
• Basic principles of TCP/IP networking, including IP addressing, switching and routing
• Personal computer (PC) operation, common PC terminology, and use of terminal
emulation software.
The following conventions are used in the body text of this document:
Bold font: Indicates a command to be issued or selected by the user.
• Courier font: Indicates information input or output to/from the Control PC.
• Italic font: Indicates the name of dialog, parameter, object, etc.
1270A450-005 - June 2008 Page 11
Page 12

About This Document Datacryptor Ethernet User Manual
This manual is organized into the following sections:
Overview provides general information on the hardware and software.
Background Information provides a brief introduction to the device and Ethernet Layer 2
technology and terminology.
Installation describes how to install the Datacryptor Ethernet hardware and Element Manager
Software.
Connecting to Datacryptor Ethernet Units describes the main methods that can be used to
connect the PC to the Datacryptor Ethernet unit.
Element Manager Reference provides an overview of the functions provided by the Element
Manager, followed by a detailed description of each in turn.
Appendix A: Device Maintenance describes the periodic maintenance required on your Thales
Datacryptor Ethernet unit.
Appendix B: Loading Datacryptor Unit Software describes how to load software into your
Thales Datacryptor Ethernet unit. Your Datacryptor will be supplied pre-loaded with software, so
you will only require the information in this appendix if a re-load or upgrade is needed.
Appendix C: Product Specifications gives the system specifications.
Appendix D: Environment and Regulatory Information describes the operating conditions
and regulatory certifications.
Appendix E: SFP and XFP Interfaces describes the possible transceiver options.
Appendix F: Preventing Electrostatic Discharge describes how to minimize the risk of ESD.
Appendix G: Troubleshooting describes how to diagnose and repair common problems.
Appendix H: SNMP MIB Support describes the SNMP MIBs supported by the device and the
location of them.
Appendix I: Log and SNMP Trap Numbers provides a list of all the log and trap numbers
together with descriptions of their purpose.
Appendix J: Glossary defines terms used in this document.
Page 12 THALES
Page 13
Datacryptor Ethernet User Manual Overview
3 Overview
The Thales Datacryptor Ethernet is a high speed, high bandwidth, integrated security appliance.
The three models provide different transfer speeds; the 100 Mb Ethernet provides 100 Mbps,
while the 1 Gig and 10 Gig Ethernet units offer encryption at Gigabit Ethernet Layer 2 transfer
rates.
The Datacryptor Ethernet units come in different case styles; the 100 Mb Ethernet and the 1 Gig
Ethernet models are housed in a single unit height 19-inch rack case for transmission speeds
up to 100 Mbps and 1000 Mbps respectively, while the 10 Gig Ethernet model uses a double
height unit for 10,000 Mbps transmission speeds. The 100 Mb Ethernet unit may have its rack
mounting brackets removed so that it can be used as a desktop unit.
The 100 Mb Ethernet units have standard RJ45 sockets on the front panel for Host and Network
connections, while the 1 Gig and 10 Gig Ethernet units have two Small Form Factor sockets on
the front panel; these accept a range of transmit/receive interfaces. The 1 Gig Ethernet unit
uses SFP type sockets, and the 10 Gig Ethernet unit uses the XFP type sockets.
The host port is connected to the private network and receives the data for encryption.
Encrypted data is then passed through the network port for secure transmission over the public
network.
The Datacryptor Ethernet is designed to operate as a Layer 2 (Data Link) encryptor. The
advantage of this is it makes the unit fully transparent to higher protocols.
The units are housed in a tamper evident chassis with interlock switches that will cause the key
material to be erased if the lid is removed.
Product Images
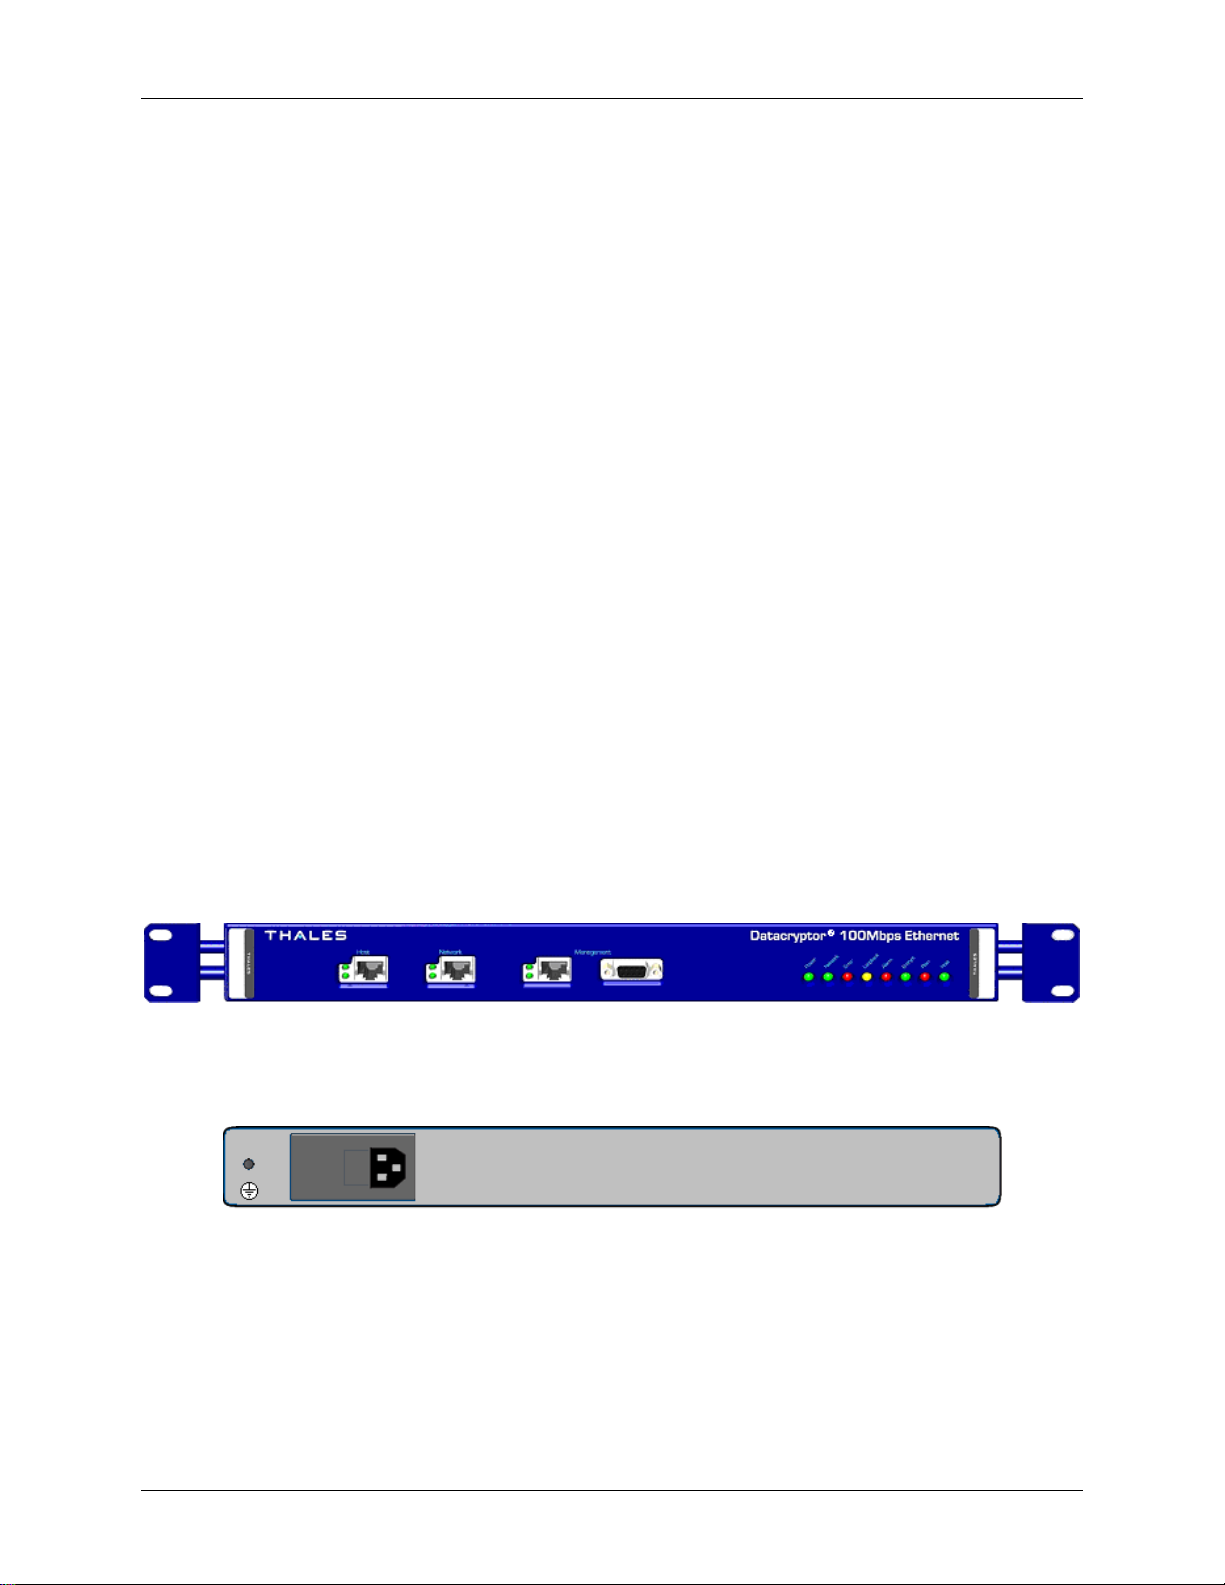
Figure 3-1: Thales Datacryptor 100 Mb Ethernet Front Panel
Figure 3-2: Datacryptor 100 Mb Ethernet Rear Panel
1270A450-005 - June 2008 Page 13
Page 14
Overview Datacryptor Ethernet User Manual
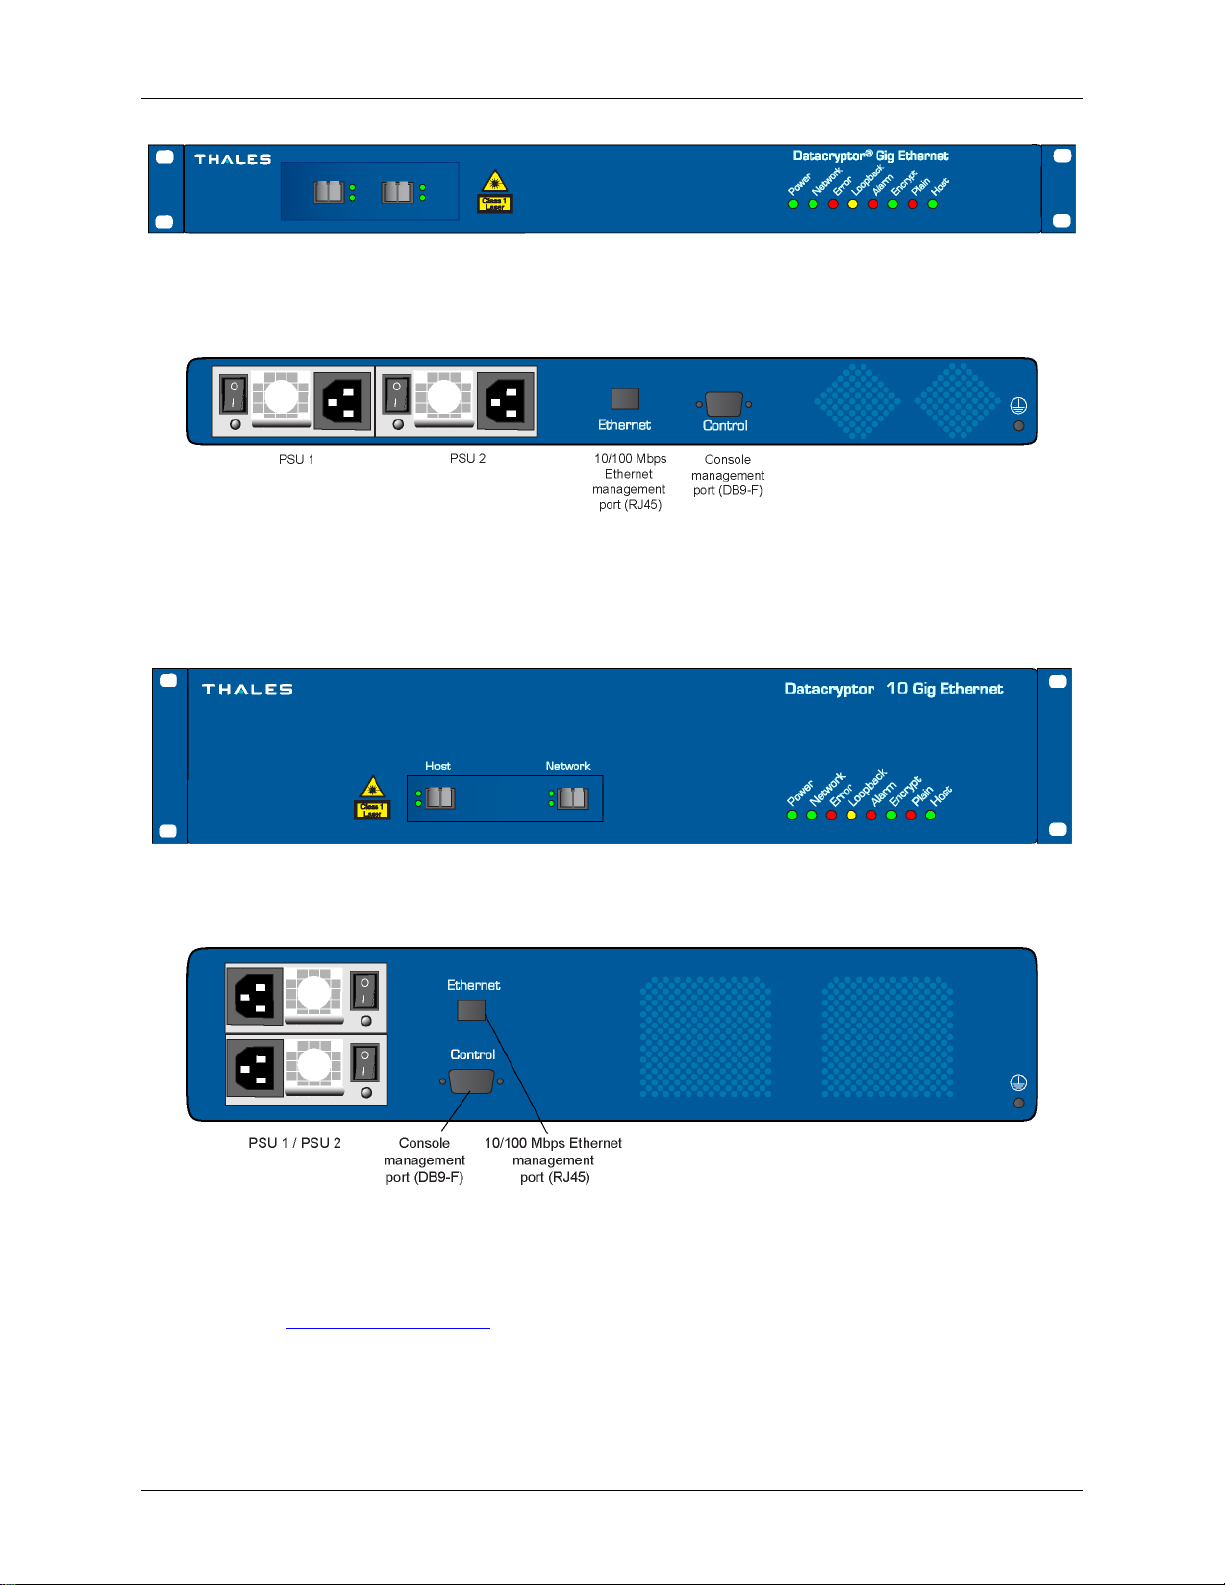
Figure 3-3: Thales Datacryptor 1 Gig Ethernet Front Panel
Figure 3-4: Datacryptor 1 Gig Ethernet Rear Panel
Note: See
information on the LED indicators.
Figure 3-5: Thales Datacryptor 10 Gig Ethernet Front Panel
Figure 3-6: Datacryptor 10 Gig Ethernet Rear Panel
The Front Panel LEDs in the Element Manager Reference section for full
Page 14 THALES
Page 15

Datacryptor Ethernet User Manual Overview
Product Features
Installation
• Mount in any standard 19” rack
or on a tabletop
Interfaces
• The 100 Mb Ethernet has two
RJ45 sockets for connecting to
the Host and Network circuits
• The 1 Gig Ethernet and 10 Gig
Ethernet units have two SFP or
XFP sockets which accept a range
of transceiver modules for the
encrypting and decrypting of
network traffic
• Device management access
through a 10/100 Ethernet port
or an RS-232 craft port
Security features
• Designed to FIPS 140-2 Level 3
Hardware-based encryption
processing
• Very low latency
Maximum Data Transfer Rate
• 200 Mbps full duplex (100 Mb
Ethernet unit), 2 Gbps full duplex
(1 Gig Ethernet unit), or 20 Gbps
full duplex (10 Gig Ethernet unit)
Network Interfaces
• 10/100BaseT: User selectable
between 10 Mbps and 100 Mbps
Key management
• Diffie-Hellman key exchange
(groups 1, 2, and 5)
Encryption
• Advanced Encryption Standard
(AES):
FIPS 197 (256 bit keys)
Management integrity
• HMAC-SHA-1-96 (FIPS PUB 180-1):
RFC 2104, 2404
• HMAC-MD5-96 : RFC 2104, 2403,
1321
Device management
• Element Manager
• Secure download of software
updates
• X.509v1 and X509 v3 digital
certificate support
Power
• 100 Mb Ethernet Unit:
Single fixed AC (universal) or
DC (-48 V) power supply:
15W (51 BTU/hr)
• 1 Gig Ethernet and 10 Gig Ethernet:
Redundant hot swappable AC
(universal) or DC (-48 V) power
supplies:
1 Gig: 120 W (410 BTU/hr)
10 Gig: 140 (480 BTU/hr)
• 1 Gig Ethernet: 1000 Mbps full
duplex
• 10 Gig Ethernet: 10,000 Mbps
full duplex
• Auto negotiation (does not apply
to the 10 Gig Ethernet)
1270A450-005 - June 2008 Page 15
Page 16

Overview Datacryptor Ethernet User Manual
Element Manager
The Element Manager application provides a secure way to configure, manage, and upgrade the
Datacryptor Ethernet. The program runs under various versions of Microsoft Windows operating
systems. Please see the
environment required.
The PC can connect to a Datacryptor Ethernet unit to manage it using the IP protocol over a
standard 10/100 Ethernet connection. The PC can also connect to a Datacryptor Ethernet unit
using PPP protocols via a serial connection. Once the PC is connected to the Datacryptor
Ethernet unit, a communications session can be established; and all the functions provided by
the Element Manager are available.
Software Requirements for a more detailed description of the
Page 16 THALES
Page 17

Datacryptor Ethernet User Manual Background Information
4 Background Information
Datacryptor Ethernet Unit
The Thales Datacryptor Ethernet units are high performance, integrated security appliances that
provide encryption at high line speeds. The 1 Gig and 10 Gig Ethernet units operate at optical
line speeds and have the added advantage that they can, over limited distances, use copper
media. The device’s high-speed processing capabilities eliminate bottlenecks while providing
data encryption and integrity.
It is ideal for bandwidth intensive, latency sensitive applications that demand security and
speed, such as site-to-site VPNs, and the transfer of imaging over the network. It provides
secure transport over private or public networks.
Figure 4-1. An Example of a Site to Site Ethernet Layer 2 connection
A site-to-site VPN application is shown above. The Thales Datacryptor Ethernet is deployed on
either side of the connection, securing the data transmitted across the untrusted public
network. Data is sent from a web server through to the host network. It is then encrypted by the
Datacryptor Ethernet for secure transfer over the public network, where a second Datacryptor
Ethernet decrypts the data at its destination.
Gigabit Ethernet Technology Overview
The Gigabit Ethernet technology used by the 1 Gig and 10 Gig Ethernet units is the latest
specification in the IEEE 802.3 Ethernet standard series. This standard allows the transmission
of data at one or ten Gigabit per second transmission speeds (1 Gbps or 10 Gbps). However the
speed is usually designated as 1,000 Mbps or 10,000 Mbps, as appropriate, to comply with the
standard method of showing Ethernet network speeds.
Ethernet Layer 2 Services
Ethernet Layer 2 security services include:
Encryption - The Advanced Encryption Standard (AES) algorithm is a symmetric block cipher
capable of using cryptographic keys of 128, 192, and 256 bits to encrypt and decrypt data in
blocks of 128 bits. The Datacryptor uses 256 bit keys.
1270A450-005 - June 2008 Page 17
Page 18

Background Information Datacryptor Ethernet User Manual
Authenticate Management Data - The Datacryptor Ethernet uses the HMAC keyed hash variant
of the SHA-1(Secure Hash Algorithm) to authenticate management data using SNMP v3.
Security Terms
Diffie-Hellman – Diffie-Hellman is a method for key exchange that allows two autonomous
systems to exchange a secret key over an untrusted network without prior secrets. DiffieHellman groups define the strength supplied to the Diffie-Hellman calculation for the later
creation of keys by the peers. Three of the five available groups are generated from modulo
function (MODP) calculations and the leveraging of very large prime numbers.
Peer – A peer is a Datacryptor that acts as a tunnel endpoint. A peer encrypts or decrypts data,
adding or stripping away headers, respectively.
Other Terms
Layer2 -The Datacryptor Ethernet is designed to work as a Layer two encryptor.
The addressing scheme is physical i.e. the addresses are MAC (Media Access Control) addresses
hard coded into a device at the time of manufacture. It is generally a 48-bit address which is
usually displayed in hexadecimal format as six two digit parts 01-0B-3B-18-00-CA.
It should be noted that when the unit is operating in the Tunneling mode the peer unit MAC
address must be obtained and entered in the box provided on the relevant property tab.
Frame Checksum (FCS) - FCS is an error detection system based on the numerical value of the
number of set bits in the Frame (packet). This value is transmitted alongside the message, and
the receiving device then applies the same criteria and compares the two values.
Auto-negotiation - Auto-negotiation was devised to address the need for multi-speed devices
on a network to operate at the optimum settings. It achieves this by taking control of the
connection medium and detecting the various mode options available in the device on the other
end, while also advertising its own capabilities. Thus it enables the connection to configure the
highest performance mode of interoperation.
Note: The Datacryptor 1 Gig Ethernet only supports I000 Mbps full duplex, and the
10 Gig Ethernet unit only supports I0,000 Mbps full duplex. The 100 Mb
Ethernet unit can be set to run at speeds of I0 Mbps and I00 Mbps.
The 10 Gig Ethernet unit does not support Auto-negotiation.
Jumbo frames - Jumbo frame is the name given to frames larger than the standard Ethernet
MTU of 1500 bytes. The Datacryptor Ethernet encryptor does not have an MTU limit and will
therefore allow Jumbo frames. Frame size is only limited if fragmentation is enabled.
Multiprotocol Label Switching – MPLS is a solution to the question of many of the earlier
network problems such as speed, scalability and quality of service. This is achieved by the
defining of paths across the network by the addition of label information to a packet to aid
routing etc. It is referred to as multi-protocol because it supports a number of communication
methods such as IP, Frame Relay and ATM. The Datacryptor Ethernet unit is transparent to this
operation as long as the equipment is being deployed in a point-to-point environment.
Page 18 THALES
Page 19

Datacryptor Ethernet User Manual Installation
5 Installation
This section will detail the installation of the hardware and software. Hardware installation is
discussed first.
Hardware Installation
There are four steps in installing the unit:
• Unpack the Shipping Carton
• Mount the Unit
• Connect the Cables
• Power on the Datacryptor
Unpack the Shipping Carton
Remove all product components from the shipping carton and compare the contents to the
packing list. Keep all packaging in case it is necessary to return the appliance. The Datacryptor
is packaged with the following items:
• Datacryptor Ethernet, with the Datacryptor firmware and software factory-installed on
the appliance.
• 115v, 240v or DC Power Supply cables (as appropriate).
• RS-232 cable.
• Element Manager CD-ROM (includes User Manual).
• Release Notes.
• Quick Start Guide.
Note:
Interface transceivers (if ordered) will be shipped separately from the Datacryptor unit
(1 Gig and 10 Gig Ethernet units only).
Rack-Mounting Instructions
The Datacryptor can be mounted in a standard 19-inch rack using the front mounting
brackets, or simply placed on a rack shelf or solid surface.
Preparation
Before installing the Datacryptor in a 19-inch rack, consider the following rack-mounting
guidelines:
Ambient temperature
Install the Datacryptor in an environment compatible with the 105ºF (40ºC) maximum
recommended ambient temperature. Extra clearance above or below the unit on the rack
is not required; however, be aware that equipment placed in the rack beneath the
Datacryptor can add to the heat load. Therefore, avoid installing in an overly congested
rack. Air flowing to or from other equipment in the rack might interfere with the normal
flow of cooling air through the Datacryptor, increasing the potential for overheating.
1270A450-005 - June 2008 Page 19
Page 20

Installation Datacryptor Ethernet User Manual
Airflow
Make sure that there is sufficient flow of air around the Datacryptor so that safe operation
is not compromised. Maintain a clearance of at least 3 inches (7.62 cm) at the sides of the
Datacryptor to ensure adequate air intake and exhaust. If installing in an enclosed rack,
make sure the rack has adequate ventilation or an exhaust fan. An enclosed rack with a
ventilation system that is too powerful can prevent proper cooling by creating negative air
pressure around the Datacryptor.
Mechanical Loading
Keep the center of gravity in the rack as low as possible. This ensures that the weight of
the Datacryptor will not make the rack unstable. Make sure that the rack is secured and
use the proper mounting hardware to secure the Datacryptor to the rack.
Circuit Loading
Consider the connection of the Datacryptor to the supply circuit and the effect that
overloading of circuits might have on over current protection and supply wiring. Consult
the voltage and amperage ratings on the UL label affixed to the unit’s rear panel when
addressing this concern. As the 1 Gig and 10 Gig Ethernet units are fitted with two hot
swappable power supply units, consideration could be given to these types of
Datacryptors using a different supply phase for each of the power supply units.
Disconnection
Power disconnection is achieved by removal of the plugs from the mains outlet sockets.
Ensure that the socket-outlets are close to the unit, and can be easily identified and
accessed.
Grounding
Maintain reliable grounding of a rack-mounted Datacryptor. Pay particular attention to
supply connections other than direct connections to the branch circuit, such as the use of
power strips.
Maintenance
Allow at least 19 inches (48.3 cm) of clearance at the front of the rack for maintenance.
Use a cable-management system to help keep cables organized, out of the way, and free
from kinks or bends that degrade cable performance.
Connect the Cables
Before beginning, make sure the necessary cables are available. See the
Requirements section below for more information.
Cabling
Cabling Requirements
The following table outlines the cabling requirements for each port on the Datacryptor Ethernet.
The connector type listed indicates only what is required to connect to the Datacryptor’s port,
and may or may not be the same connector type required for the other end of the cable.
Page 20 THALES
Page 21

Datacryptor Ethernet User Manual Installation
Port Cabling Supplied By
Network and Host
Port
Management Port
RS-232 Craft Port Shielded copper serial cable, RS-232 DB9 connector
Power receptacles Power supply cables Thales
For the 100 Mb Ethernet unit: Category 5 or above
RJ-45 connector.
For the 1 Gig and 10 Gig Ethernet units:
the SFPs or XFPs ordered with the unit. The options are
Category 5 or above RJ 45 connector. 850nm Multi-mode
fiber. 1310nm or 1550nm Single mode fiber.
Shielded Category 5 straight through cable (STP), RJ-45
connector.
Used when connecting through a LAN.
Category 5 crossover cable with RJ-45 connector.
Required for a direct connection between the management
station and the Datacryptor.
(female to male)
Dependant on
Customer
Customer 10/100 Ethernet
Customer
Thales
To meet the requirements of FCC Part 15 and the Directive 89/336/EEEU EMC C, use only
shielded cables (DB-9 null modem cables and Category 5 STP cables).
To Cable the Datacryptor
The Host and Network interface transceivers that are used with the 1 Gig and 10 Gig Ethernet
units are shipped separately from the Datacryptor unit, and therefore must be inserted before
proceeding with the cabling operation.
The connections are the same when using any of the three types of Ethernet unit. The
illustration below shows a 1 Gig Ethernet unit – please note that the management ports of the
100 Mb Ethernet unit are on its front panel.
• Either connect the RS-232 craft port directly to a PC or workstation using the supplied DB-9
null modem cable, or
• Connect the 10/100 Ethernet management port for management access:
− If connecting to a LAN, use a Category 5 STP straight-through cable with an RJ-45
connector.
− If connecting directly to a PC, use a shielded Category 5 crossover cable and make
sure that the PC and management port IP addresses are on the same subnet.
1270A450-005 - June 2008 Page 21
Page 22

Installation Datacryptor Ethernet User Manual
Figure 5-1: Datacryptor Panel Connectors
(The 100 Mb Ethernet unit’s management ports are located on the front panel)
WARNING: (1 Gig and 10 Gig Ethernet units only) Infra-red radiation is emitted
from aperture ports of single mode or multi-mode transceivers when no cable is
connected. Avoid exposure and do not stare into the open apertures. Apertures
should be covered when not in use.
Power on the Datacryptor
The Datacryptor software is factory-installed on the appliance. The bootable image is stored on
compact flash. Applying power to the Datacryptor initializes the system, which includes:
• Initializing the components
• Performing hardware diagnostics
• Loading the software
• Diagnostic Boot sequence
To power on the Datacryptor
1. The 1 Gig and 10 Gig Ethernet Datacryptor appliances are supplied with two separate hot
swappable power supply units. The 100 Mb Ethernet units have a single fixed power
supply unit. The power supply units for all models of Datacryptor can be either AC or DC
(-48 V).
2. The AC power supplies are auto-sensing 100 to 240 Volts 50 to 60 Hz.
3. Before applying power to the Datacryptor verify that the voltage shown on the UL label
affixed to the unit’s back panel is appropriate for your site.
CAUTION: If the voltage of the Datacryptor is inappropriate for
your site, do not apply power to the appliance. Contact Customer
Support immediately.
Page 22 THALES
Page 23

Datacryptor Ethernet User Manual Installation
4. On the Datacryptor’s rear panel, plug the power cords into the power receptacles. Attach
the opposite ends to a power source.
The power LED illuminates when the unit is powered up. The Diagnostic Boot sequence
allows the LEDs to be checked and the unit type to be verified. The sequence follows this
pattern:
− All LEDs on for one second.
− A pattern which indicates the unit type for one second.
− All LEDs on for one second.
Unit Type
100 Mb Ethernet
1 Gig Ethernet
10 Gig Ethernet
Where, X is LED on, and _ is LED off.
During the boot process the Datacryptor discards all traffic on its data ports.
If the boot process fails the Error LED illuminates and the Datacryptor generates a critical Error
trap. If you experience a problem during the system initialization, see the troubleshooting
information in
Appendix G: Troubleshooting.
Network
_ X _ _ X X _
_ X _ _ X _ _
_ X _ _ X _ X
Error
Loopback
Alarm
Encrypt
Plain
Host
Software Installation
There are two software programs, the firmware resident in the Datacryptor Ethernet unit and
the Element manager software.
The firmware provides the units functionality and is pre-installed. The unit has the ability to
upgrade with new firmware, offering new features, without the requirement of returning the
unit to Thales. Instructions on the Firmware Upgrade ability will be provided with any upgrade.
The Element Manager software is provided on the supplied CD-ROM and must be installed as
directed below.
Requirements
The PC to be used for running the Element Manager must meet these minimum requirements:
• The PC must be an IBM PC or compatible that meets the minimum requirements for
running the following version of Microsoft Windows:
− Microsoft Windows XP, Service Pack 2 or higher (32 and 64 bit versions).
− Note: The software may install and run on older Windows platforms, but due to
Microsoft’s Support Lifecycle policy, we may be unable to support installation and
runtime issues on these older platforms. Please refer to the Microsoft Support
Lifecycle support web page at: http://support.microsoft.com/gp/lifecycle.
1270A450-005 - June 2008 Page 23
Page 24

Installation Datacryptor Ethernet User Manual
• The PC must have a pointing device (mouse), a CD ROM drive, a free serial port, and at
least 228 Mb hard disk space (for the software and data files). If you want to install the
Adobe Acrobat reader (included on the CD to view the manuals) this will require a
further 10 MB of hard disk space.
• The user should ensure that there is at least 5Mb of memory for each copy of the Front
Panel Viewer being run concurrently.
• The PC must be able to reach the Datacryptor on the Ethernet network, or alternatively
be connected to the unit via a serial cable to the unit’s control port.
Installation Procedure
To install the Element Manager on the PC:
• Insert the CD-ROM containing the Element Manager software into your PC.
• This will auto-start the installation page. Select the "Install the Datacryptor Element
Manager Software" link OR run the program ‘setup.exe’ from the root directory on the
CD.
• Follow the instructions displayed by the installation manager.
Page 24 THALES
Page 25

Datacryptor Ethernet User Manual Connecting to Datacryptor Ethernet Units
6 Connecting to Datacryptor Ethernet Units
There are three methods of connecting to the Datacryptor Ethernet units: Element Manager,
serial connection to CLI, and SNMP.
The Element Manager GUI application is used to manage and configure the Datacryptor Ethernet
device(s). It connects to the Datacryptor via the 10/100 Ethernet Management port.
A serial connection can be made to the Datacryptor Ethernet to interface to a text-based
Command Line Interface (CLI). This serial interface can also be used to access the element
manager software.
A third-party SNMP Version 1, Version 2c, or Version 3 compliant network management
application can collect and display performance monitoring data, but may not alter any system
level parameters. The only supported configuration tasks are those associated with SNMPv3
user and view based access control. SNMP traps are issued as Version 3 and authentication and
encryption are supported.
Users
The Datacryptor Ethernet will encrypt everything passed to it from the host network and place it
onto the public network. Because of this there is no need to create secure users for the
Datacryptor Ethernet, as anyone sending information will automatically use the Datacryptor
Ethernet unit.
The people who administrate and configure the Datacryptor Ethernet do need to be secure and
need to be authenticated using secure methods. Certificates are loaded into the Datacryptor
Ethernet units that have keys used to sign messages between the PC used for configuration and
the units themselves. The AES keys used to encrypt and decrypt the data being passed between
Datacryptor units are automatically generated using Diffie Hellman and the supplied Diffie
Hellman parameters.
When first installing the Datacryptor, use the default password. Thales strongly recommends
that the Administrator changes the password before the unit is put in service and changes from
the Universal CA to their own custom CA to ensure maximum security (see the
Password dialog section). Passwords are case-sensitive.
Change
IP Parameter Configuration via a Serial Connection
When shipped, a Datacryptor Ethernet device has the following port settings:
Port IP address Net Mask
Control 2.2.2.2 255.0.0.0
Ethernet management 255.0.0.0 255.255.255.255
Network 1.n.n.n 255.0.0.0
To change the parameters follow the steps below:
1. Connect the Datacryptor’s RS-232 craft port directly to the terminal’s serial port using
the supplied DB-9 serial cable.
1270A450-005 - June 2008 Page 25
Page 26
Connecting to Datacryptor Ethernet Units Datacryptor Ethernet User Manual
2. Open a terminal session through a VT-100 terminal emulation program such as
HyperTerminal. Enter the connection name, the appropriate serial port (usually COM1 or
COM2), and the following serial port parameters:
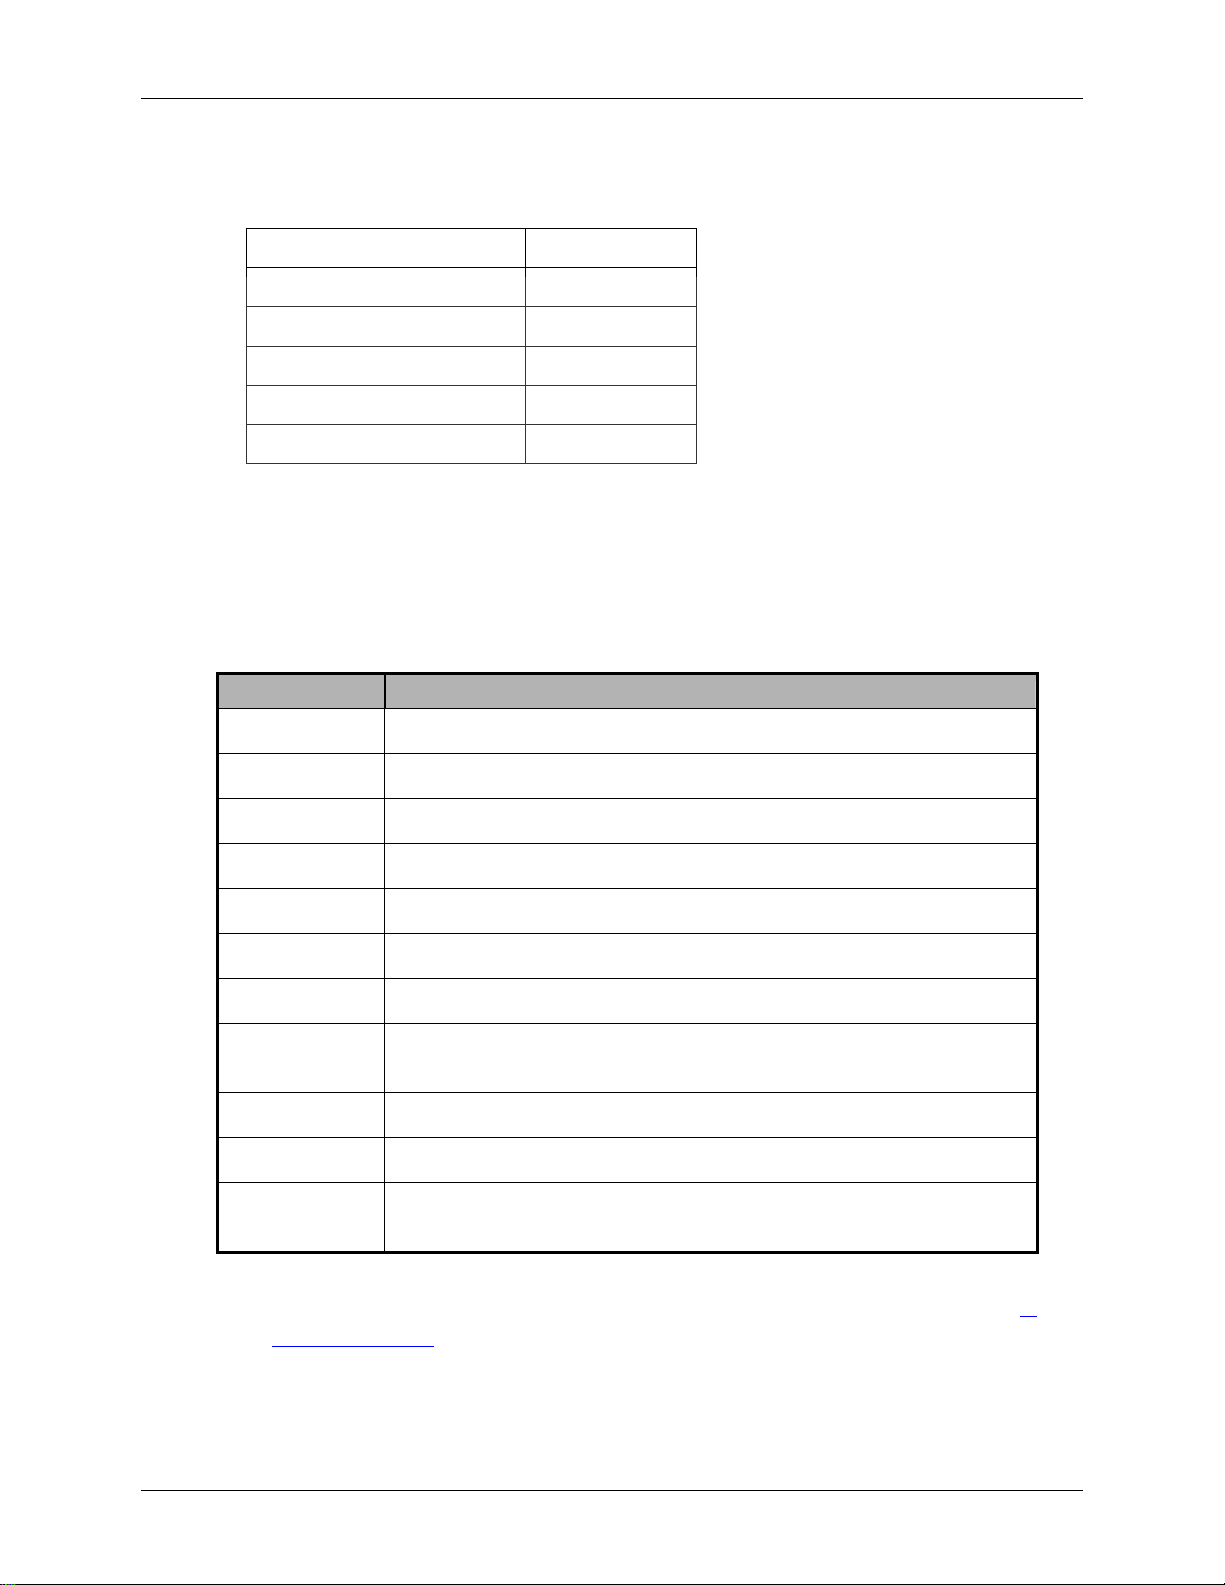
Serial Port Parameter Value
Baud Speed 115,200
Parity None
Data Bits 8
Stop Bits 1
Flow Control None
3. Switch on the Datacryptor unit.
4. As the unit boots the message CONFIG STARTUP Y/N will be shown and all the units
LEDs will be lit.
5. Press Y the unit will respond by displaying a short banner and the prompt IPCONFIG>.
6. At the command prompt, type Help for a list of commands available.
Command Description
HELP Display help for a command
HELPKEYS List of keyboard usage in this command interface
DEFAULT Return all IP address and net mask settings to defaults.
DISPLAY Display current IP address and net mask settings
IPFORWARD Enable or disable IP forwarding
ROUTE Add, delete, or display IP routing data
SET Set an IP address and net mask settings
SETTIME Display or set the unit time (Un-commissioned Datacryptor
Ethernet unit)
SHOWLOG Basic display of log contents
VERSIONS Display version numbers of application and bootstrap
EXIT Exit the process and reboot the unit if a parameter has been
changed, or just exit if no changes have been made.
Note: Before setting the Management port’s parameters, you may want to read the IP
Management tab section for some background knowledge on their values.
Page 26 THALES
Page 27

Datacryptor Ethernet User Manual Connecting to Datacryptor Ethernet Units
7. At the IPCONFIG> prompt, type:
SET <port> <ip address> <subnet mask>
where: <port> identifies the port to be set and is one of the following:
− NETWORK (public network port),
− CONTROL (serial control port),
− ETHERNET (Ethernet management port).
<ipaddr> is IP address of a subnet to be added or deleted.
<netmask value> is netmask of the subnet.
Examples
Set Control 2.2.2.2 255.255.0.0
Sets the Control (serial port) IP Address to 2.2.2.2
Set network 3.4.5.6 255.255.0.0
Sets the network port IP Address to 3.4.5.6
255.255.0.0
Note: - No two IP addresses should be the same
- IP addresses of 127.x.x.x are not allowed.
- Net masks of 0.0.0.0 and 255.255.255.255 are not allowed.
- Public and Private port addresses must be valid Class A, B or C addresses. For
this reason subnet masks must comprise of consecutive
side when represented in binary, for example 255.255.1.0 is invalid.
To make the unit request an Ethernet Management Port IP address from a DHCP/BOOTP server
on the LAN, set its Ethernet Management Port IP address to 255.0.0.0 and net mask to
255.255.255.255 (this is an exception to the rule mentioned in the note above).
To reset the addresses to factory defaults, use the DEFAULT command.
The above section details the steps necessary to connect via the Ethernet management port.
1s from the left hand
Dial Up Networking
It is also possible to connect and run the Element Manager program via the serial Control port
using Dial up Networking.
1. Ensure a serial cable is connected between your PC and the Datacryptor Ethernet unit.
2. Use the Networking wizard for your operating system to generate a Dial up connection;
the following parameters should be used for the settings:
− Set up an advanced connection
− Connect directly to another computer
− Guest
− Connection Name
− Select the Com port to which you have connected the serial cable
− All users
− User Name and Password
3. Select the option for Desktop shortcut.
4. Select Finish.
1270A450-005 - June 2008 Page 27
Page 28
Connecting to Datacryptor Ethernet Units Datacryptor Ethernet User Manual
5. Click on the shortcut to launch the connection.
6. Select the Properties button.
7. On the General tab confirm correct connection.
8. Click Configure button and use the menu to set the maximum connection speed of
115200 bps. Set the flow control to none; the Ethernet and SONET do not support flow
control.
9. On the Network tab, select TCP/IP and click Properties - enter the address 2.2.2.1.
10. Close down the Properties and click Connect.
11. A connection with the Datacryptor Ethernet will be made. Ensure the connection is made
then disconnect.
Adding a Unit to Element Manager
Once the Management or Dial up connection is set up, you can connect to each Datacryptor
Ethernet unit by adding an icon in the Element Manager. The Dial Up connection created earlier
must be running if a serial connection is to be used.
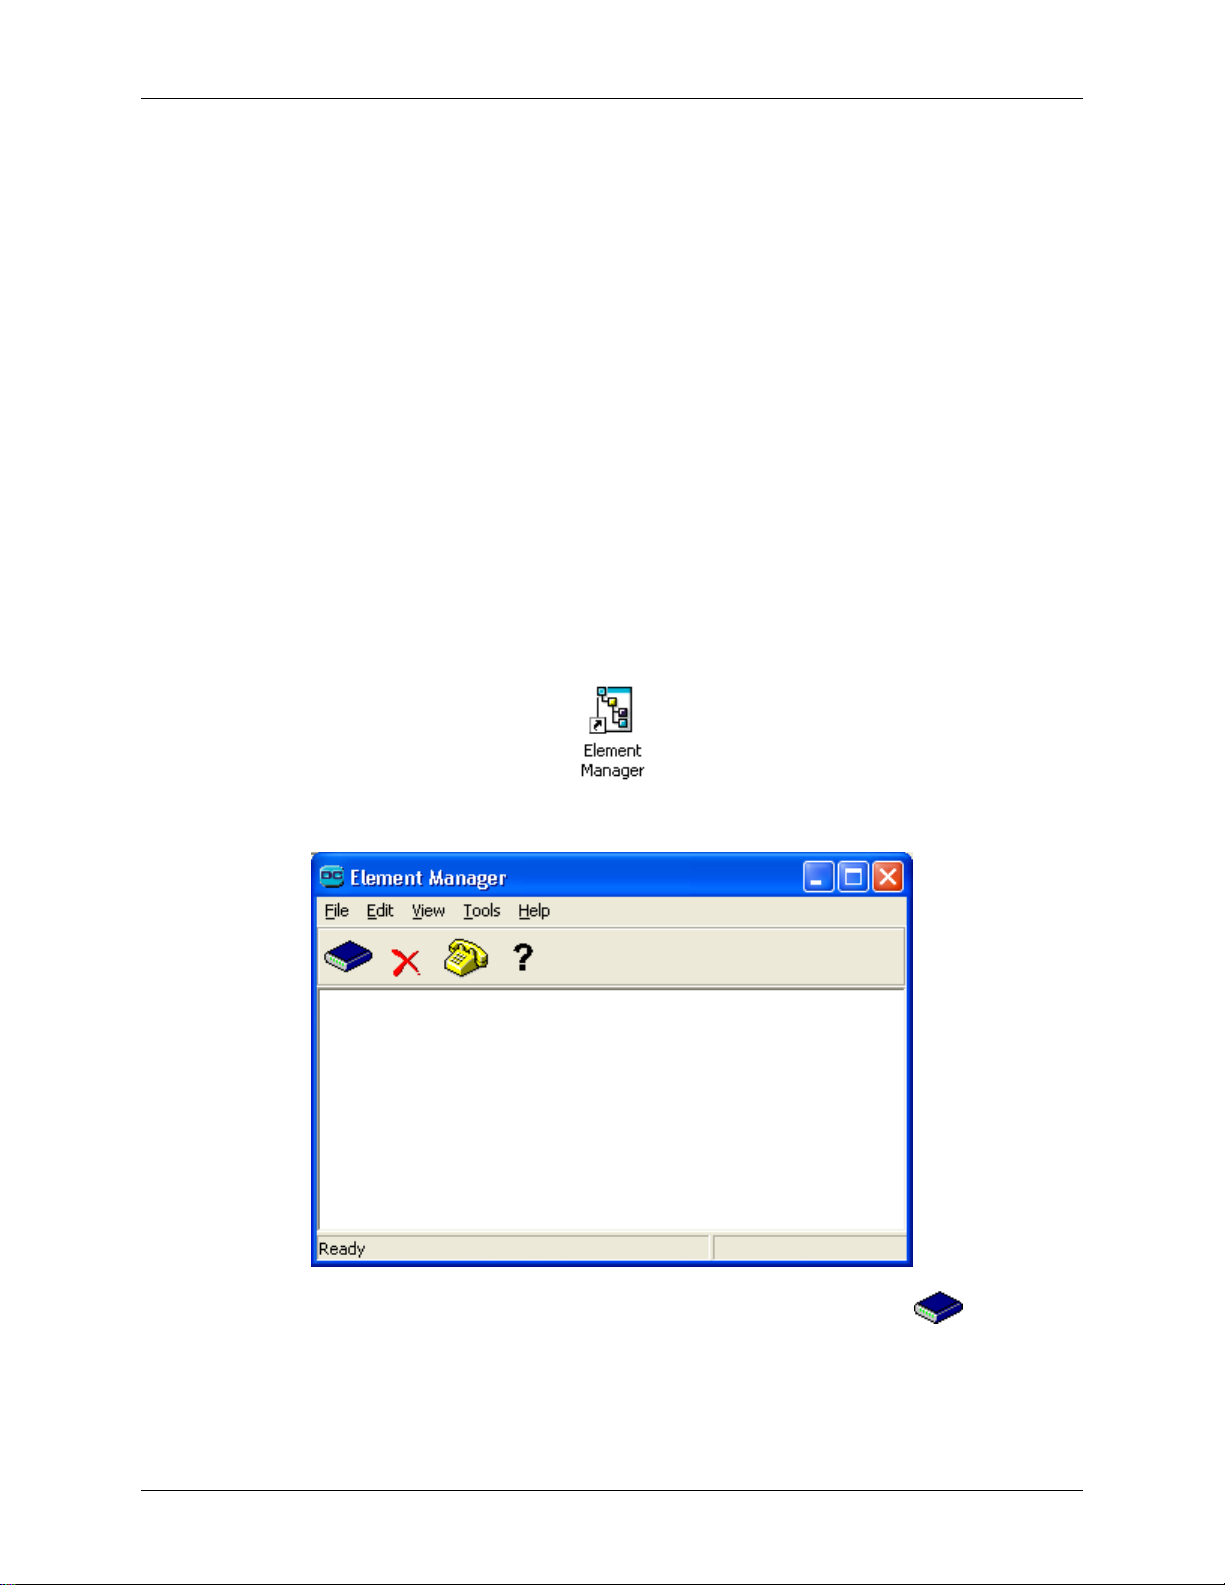
1. Start the Element Manager, e.g. by double-clicking its icon:
2. The Element Manager Main Window will be displayed:
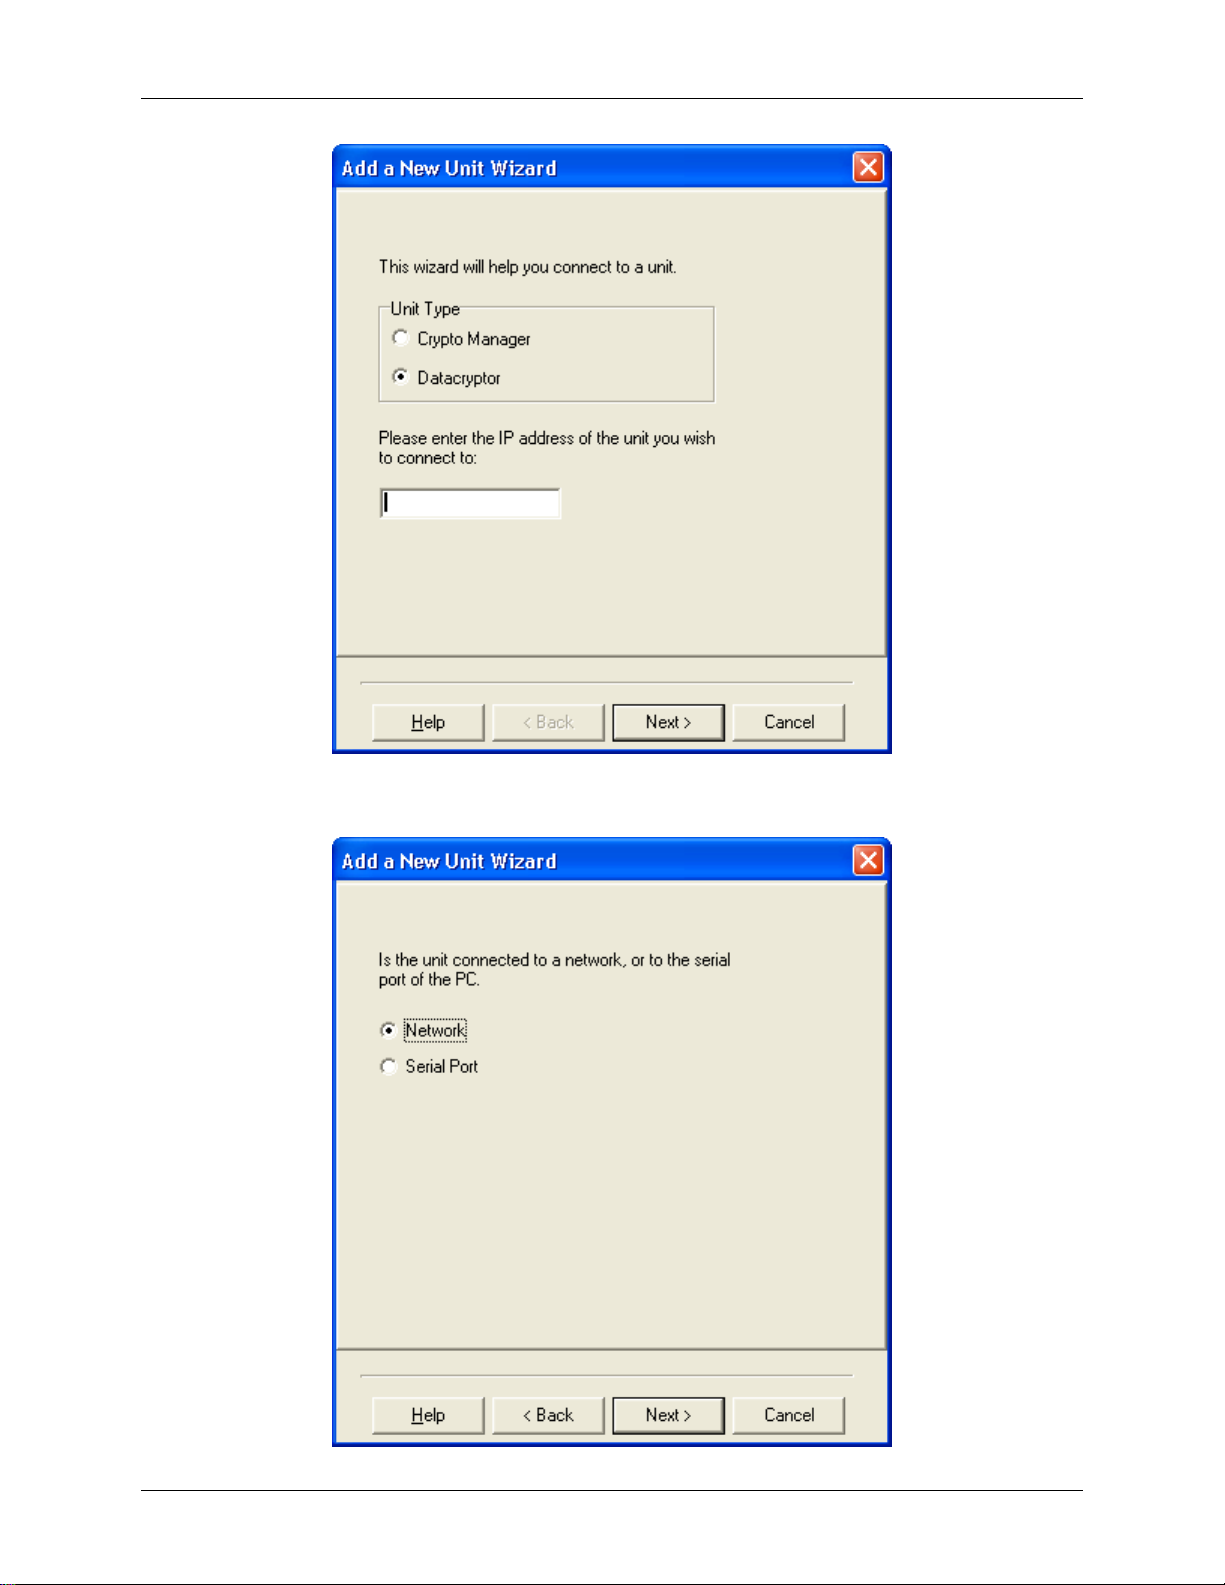
3. Add a new Datacryptor Ethernet unit by clicking on the New Unit icon
the New Unit option from the File menu. This will launch the Add a New Unit Wizard:
or selecting
Page 28 THALES
Page 29
Datacryptor Ethernet User Manual Connecting to Datacryptor Ethernet Units
4. Select the unit type as Datacryptor and enter the IP address of the Datacryptor Ethernet
unit. Press Enter or select Next to continue.
1270A450-005 - June 2008 Page 29
Page 30

Connecting to Datacryptor Ethernet Units Datacryptor Ethernet User Manual
5. Select the connection type for the Datacryptor Ethernet unit; press Enter or click on Next
to continue.
6. The application will attempt to connect to the specified IP address and - if successful -
display the unit's Unit Name by way of confirmation, as above. Type a descriptive name
for the connection in the edit box (this will be shown in the main window below its icon).
7. Click Finish or press Enter to finish adding the new connection and Datacryptor icon,
which will be displayed as a new icon in the main window like this:
Page 30 THALES
Page 31
Datacryptor Ethernet User Manual Connecting to Datacryptor Ethernet Units
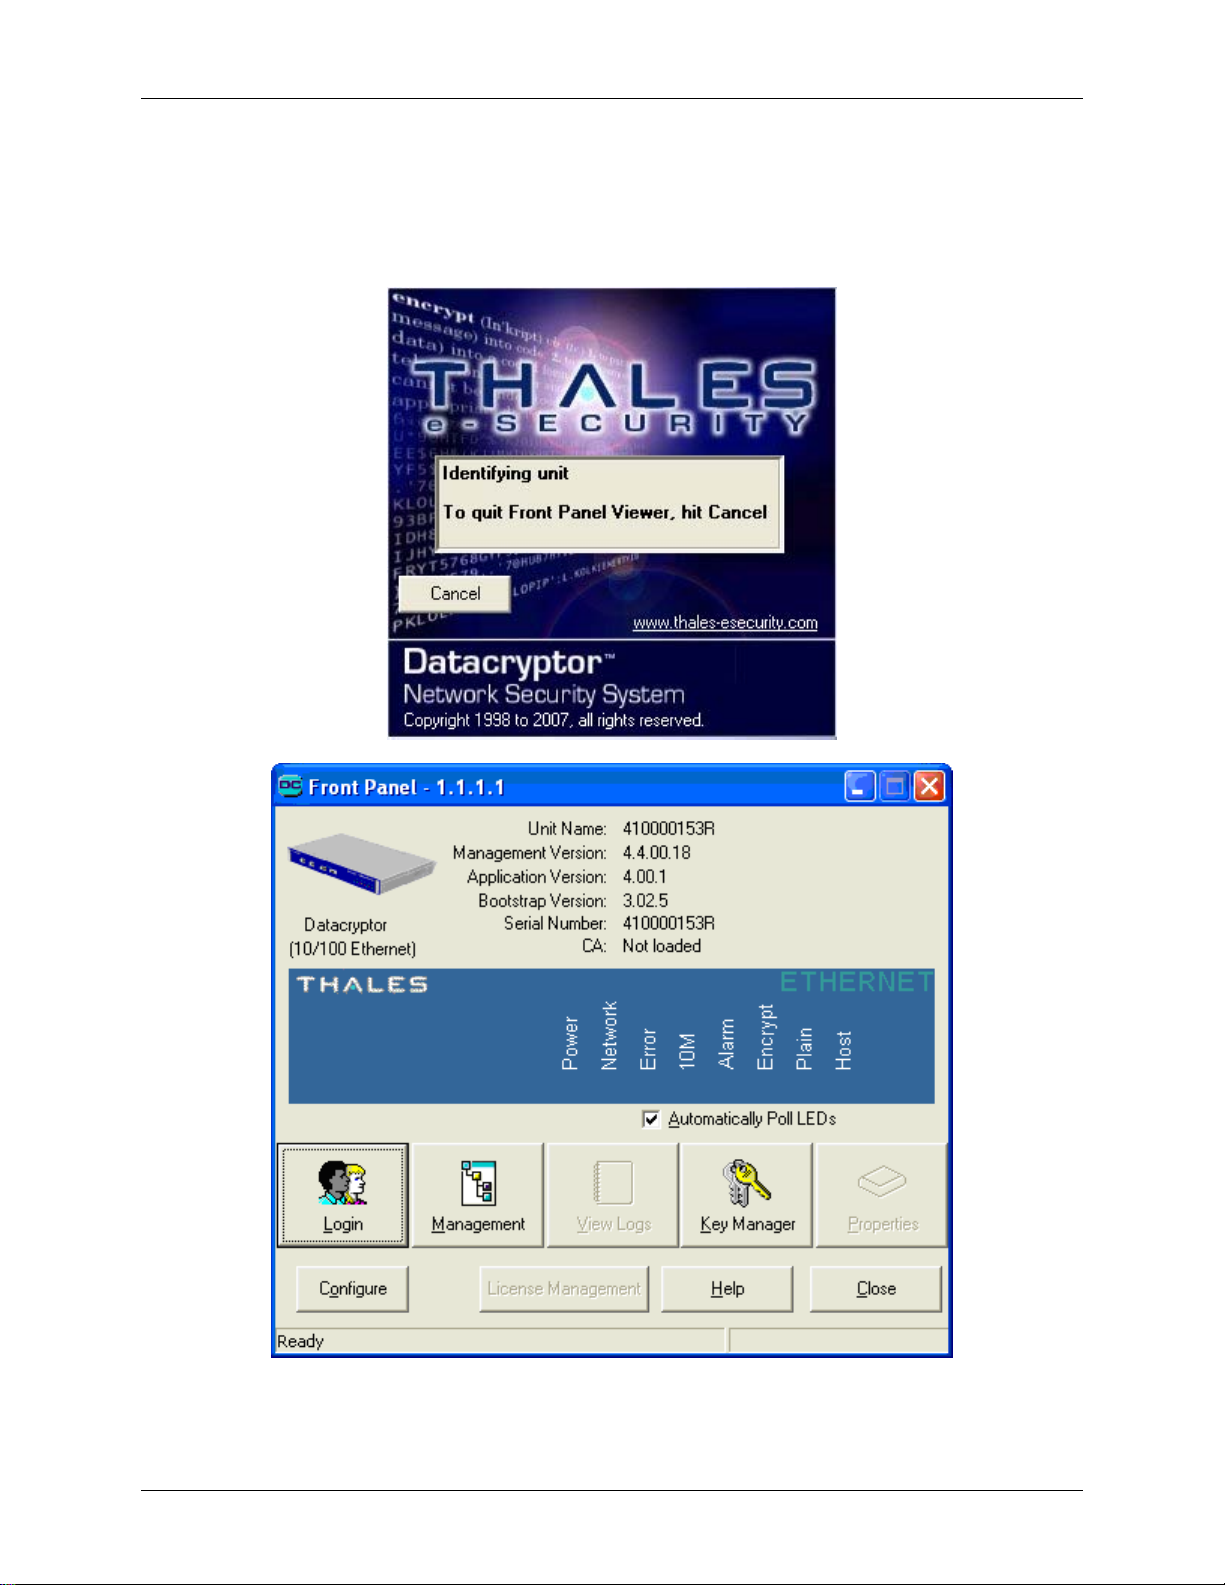
8. Now, double-click on the new Datacryptor icon to connect to it. A splash screen will be
displayed whilst connecting to the unit and within a minute this should display the Front
Panel Viewer for the unit - an example for the 100 Mb Ethernet Datacryptor is given
below. It is possible to abort the connection attempt at the splash screen by pressing its
Cancel button:
9. You can now check the unit details, at the top of the window, to make sure that the unit
is connected correctly, and proceed to configure the unit.
1270A450-005 - June 2008 Page 31
Page 32
Connecting to Datacryptor Ethernet Units Datacryptor Ethernet User Manual
10. You can login to it by using the Login button, and manage it by using the View Logs,
Properties and License Management buttons. The management facilities are described
Element Manager Reference section below. To configure the unit for your network
in
setup, select the Properties button to display the unit's properties, and select the
appropriate tabs.
Note: If you are going to add a number of similar Datacryptor Ethernet units, the
easiest method is to create a virtual unit and then use this virtual unit to
configure them.
Direct Invocation of Front Panel Viewer
It may be advantageous to start the Front Panel Viewer directly from Windows instead of going
through the element manager. This may be achieved by:
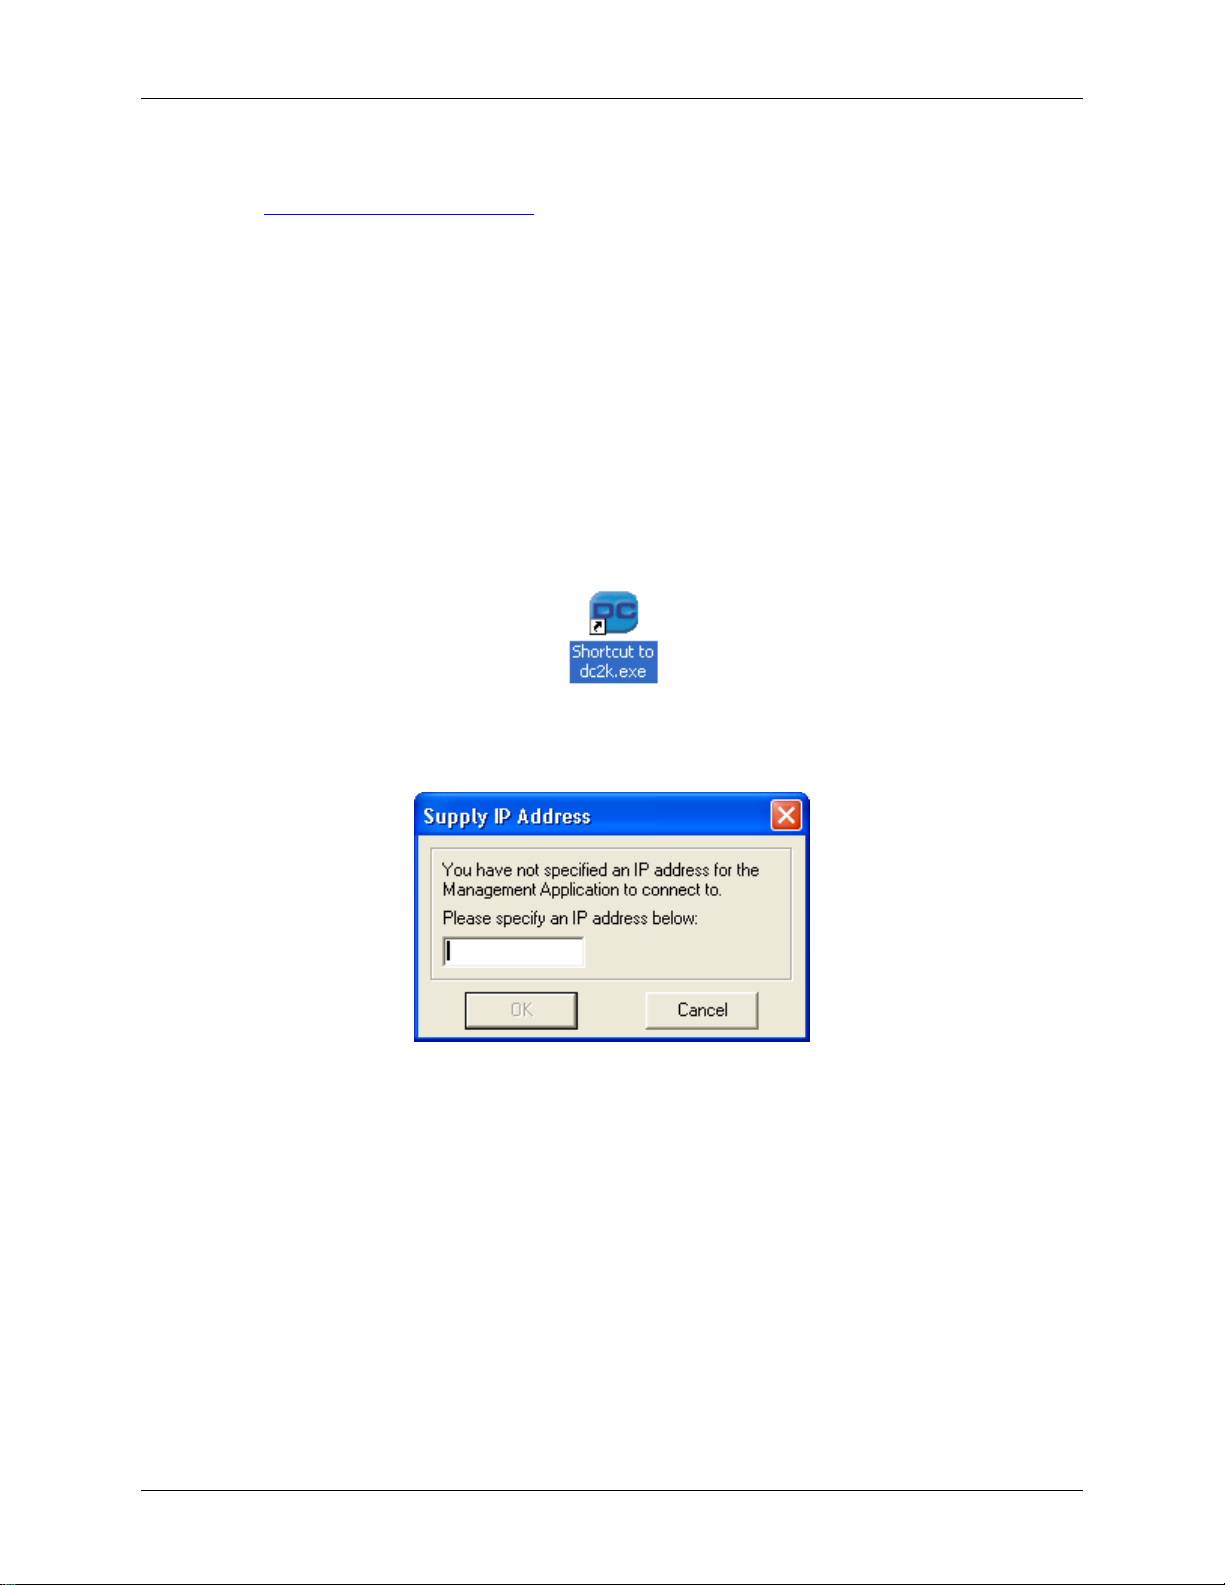
1. Using Windows Explorer, navigate to the location of the DC2k.exe file, create a shortcut
and place on your desktop.
2. Click on the shortcut.
3. The Element Manager Supply IP Address will be displayed.
Enter the IP address of the Datacryptor Ethernet unit and press Enter or OK to continue. After a
few seconds this should display the Front Panel Viewer as shown in Step 8 of the previous
section.
Command Line Parameters
The Element Manager’s Front Panel Viewer can be invoked from the command line with an IP
address as a parameter:
Insert the full path to the exe file, e.g.
C:\Program files\Thales e-Security\Element Manager
and use:
Dc2k.exe 192.168.1.15
The parameter is displayed on the title bar at the top of the application’s window.
Page 32 THALES
Page 33

Datacryptor Ethernet User Manual Connecting to Datacryptor Ethernet Units
This provides a mechanism for another application (e.g. an SNMP network manager) to invoke
the Front Panel Viewer for a specified Datacryptor unit.
If Dc2k.exe is invoked without any parameters, it will prompt the user to enter the IP address of
the unit to connect to.
To display a short summary of the command line parameters supported, use the command:
Dc2k.exe /?
1270A450-005 - June 2008 Page 33
Page 34
Element Manager Reference Datacryptor Ethernet User Manual
7 Element Manager Reference
The Element Manager consists of the following components:
• The Main Window
• The Front Panel Viewer
• The Configure dialog
• Key Manager
• The Login dialog
• The Change Password dialog
• The Logs window
• The Properties dialog
Each will now be described in turn.
Remember that you also have access to online help while using the Element Manager via the F1
(Help) key and the Help menu.
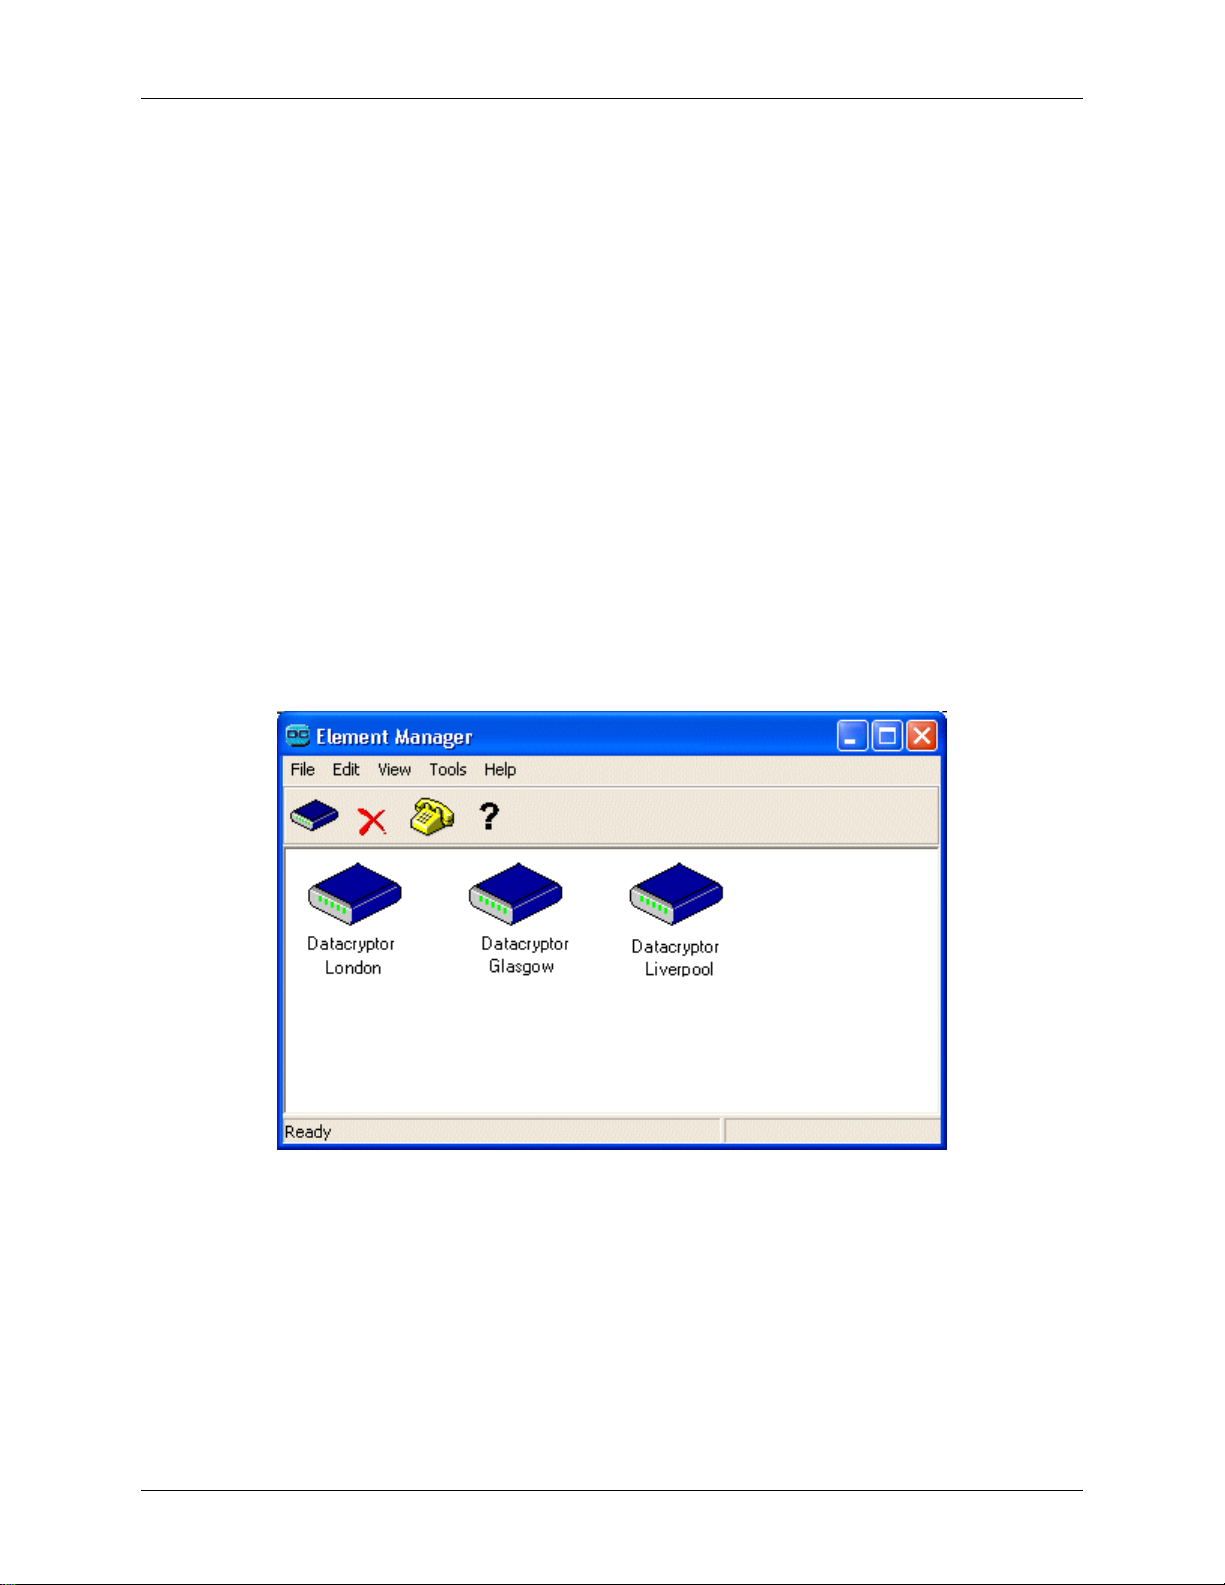
Main Window
The main window is displayed when the Element Manager application is launched, providing
access to menus, toolbar, and a window containing icons representing each of the Datacryptor
units added to the system.
Each of the components of the main window will now be described in more detail.
Page 34 THALES
Page 35

Datacryptor Ethernet User Manual Element Manager Reference
Main Window Pull-down Menus
The pull-down menus are: File, Edit, View, Tools and Help.
File
The following options are available from the File pull-down menu:
Menu Option Description
New Unit Add a new Datacryptor unit to the window.
Delete Unit Delete the selected Datacryptor unit from the window.
Exit Terminate the application, closing all sessions that may be open.
Edit
The following options are available from the Edit pull-down menu:
Menu Option Description
Undo Delete Restore the last Datacryptor unit deleted.
Edit Unit Edit the selected unit's description, IP address or connection
method.
View
The following options are available from the View pull-down menu:
Menu Option Description
Toolbar A toggle controlling the display of the Toolbar and its buttons. Ticked
when enabled.
Status bar A toggle controlling the display of the Status bar, which is used for
context-sensitive message and help. Ticked when enabled.
Large icons
Small icons
List
Details
Refresh Redraw the window, updating all details.
The four different ways that Datacryptor details can be shown, in the
main window. The currently selected method has a bullet next to it.
1270A450-005 - June 2008 Page 35
Page 36

Element Manager Reference Datacryptor Ethernet User Manual
Tools
The following options are available from the Tools pull-down menu:
Menu Option Description
View Audit Log Display an audit log of all changes made using the Element Manager.
Dial-Up Networking Launches the operating system's Dial-Up Networking application, to
manage dial up connection details or make a connection.
Poll Network Units Poll all Datacryptor units connected via the network.
Proxy Ping Ping (test) a specified IP address on a network. Allows the Time To
Live (TTL), packet size and Timeout to be selected. This does not
apply to Datacryptor Ethernet units and is grayed out.
Options Displays the Datacryptor Options dialog, to control operation of the
management application. Options are: Save changes to Disk and
Poll all units on startup.
Help
The following options are available from the Help pull-down menu:
Menu Option Description
Help Topics The main entry point into the application's on-line Help system.
About… The application's version information.
Toolbar Icons
The Toolbar displays a number of graphic buttons that provide direct access to key functions:
- Create New Datacryptor icon (File/New Datacryptor menu option)
- Delete Selected Datacryptor icon (File/Delete Datacryptor menu option)
- Dial-Up Networking (Connect/Dial-Up Networking menu option)
- Help Index (Help/Index menu option)
Visibility of the Toolbar is controlled by the View > Toolbar menu option.
Datacryptor Icons
Each Datacryptor icon in the main window represents a real or virtual Datacryptor unit:
• Grey means a Datacryptor unit that is not connected
• Blue means a Datacryptor unit that is connected
• White means a virtual Datacryptor, used as a template to add similar units
Page 36 THALES
Page 37
Datacryptor Ethernet User Manual Element Manager Reference
To connect to a Datacryptor unit:
1. Double-click its icon.
2. Once the connection has been made, the Front Panel Viewer will be displayed showing
information read from the unit. This dialog provides access to all the Datacryptor unit
management facilities described throughout this guide.
3. To disconnect from the Datacryptor unit, click the Close button in its Front Panel Viewer.
To delete a Datacryptor unit from the system, select its icon and press Del, or select the
File/Delete Unit menu option or click on the Delete button on the Toolbar. This displays a
confirmation dialog first.
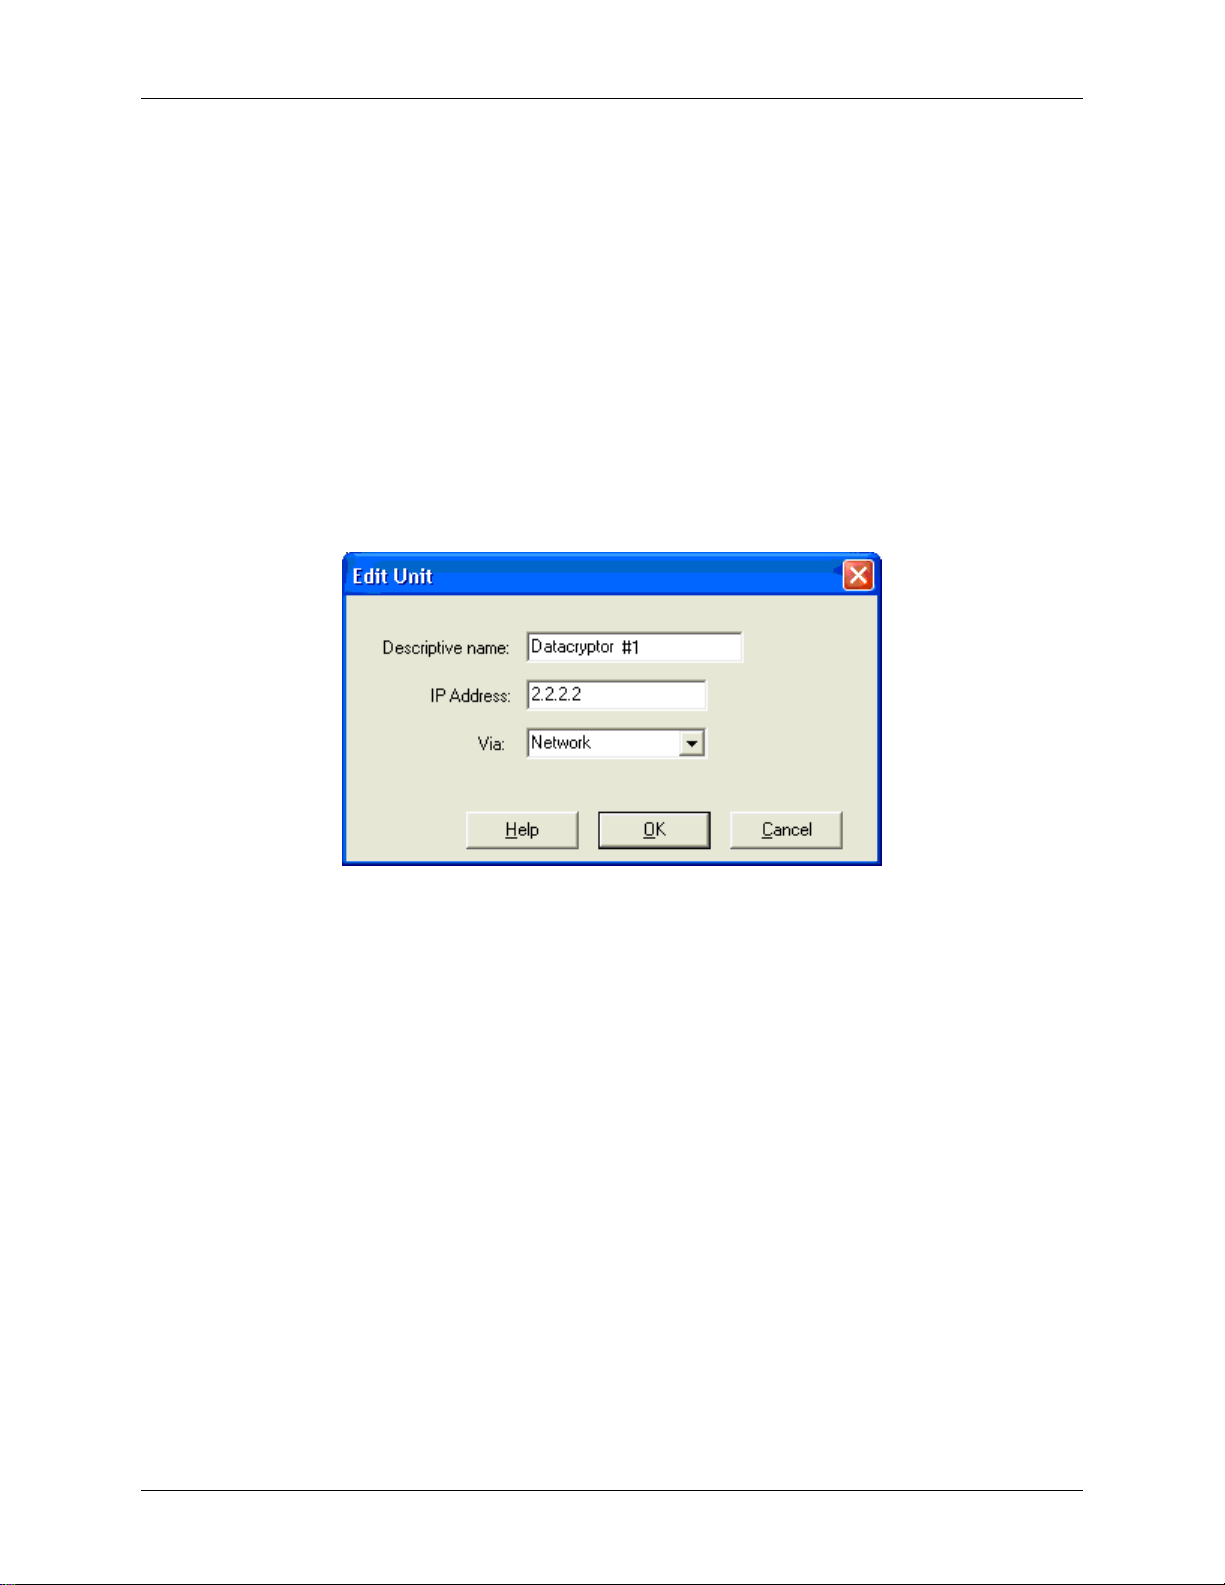
To change an icon's description, IP address, or connection method:
1. Select the icon and select the Edit/Edit Unit menu option or press F2. This displays the
Edit Unit dialog:
2. Edit the name, IP address or connection method and click OK or press Enter.
Note: The type of unit cannot be changed, if you want to change the unit type it will
have to be deleted and re-added.
There is also a pop-up menu for manipulating Datacryptor icons, displayed by “right-clicking”
on the icon. The options are:
• Open - opens a session with that unit (like double-clicking on it)
• Edit - edit the unit's descriptive name or IP address (like the Edit/Edit Unit menu option)
• Delete - deletes the icon from the system (like the File/Delete Unit menu option)
1270A450-005 - June 2008 Page 37
Page 38
Element Manager Reference Datacryptor Ethernet User Manual
Front Panel Viewer
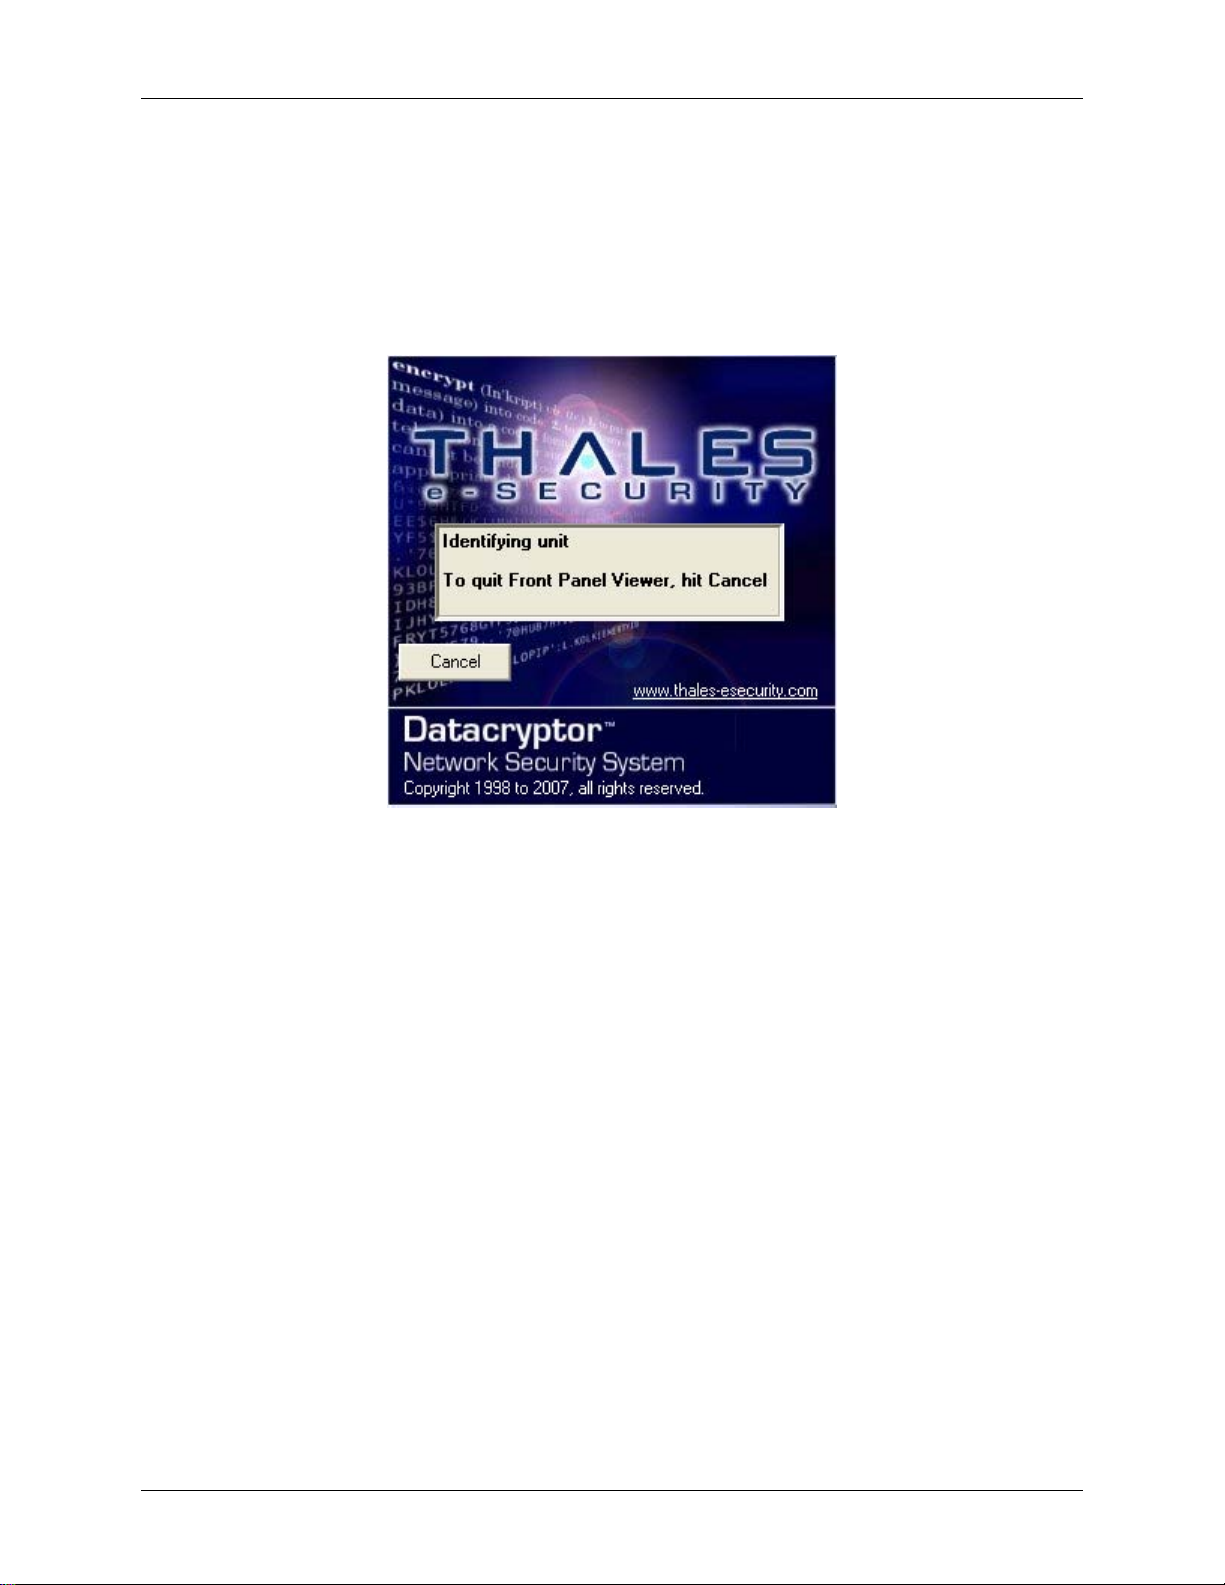
A splash screen is displayed when you attempt to connect to a Datacryptor Ethernet unit. This
process should normally complete within a few seconds but might take up to one minute. You
can abort the connection attempt from the splash screen by pressing its Cancel button. Note
that the text on the splash screen may change from "Identifying unit" to "Fetching unit
information" during the connection process.
The splash screen closes and the Front Panel Viewer is displayed when you successfully connect
to a Datacryptor Ethernet unit, to display its status and provide access to the management
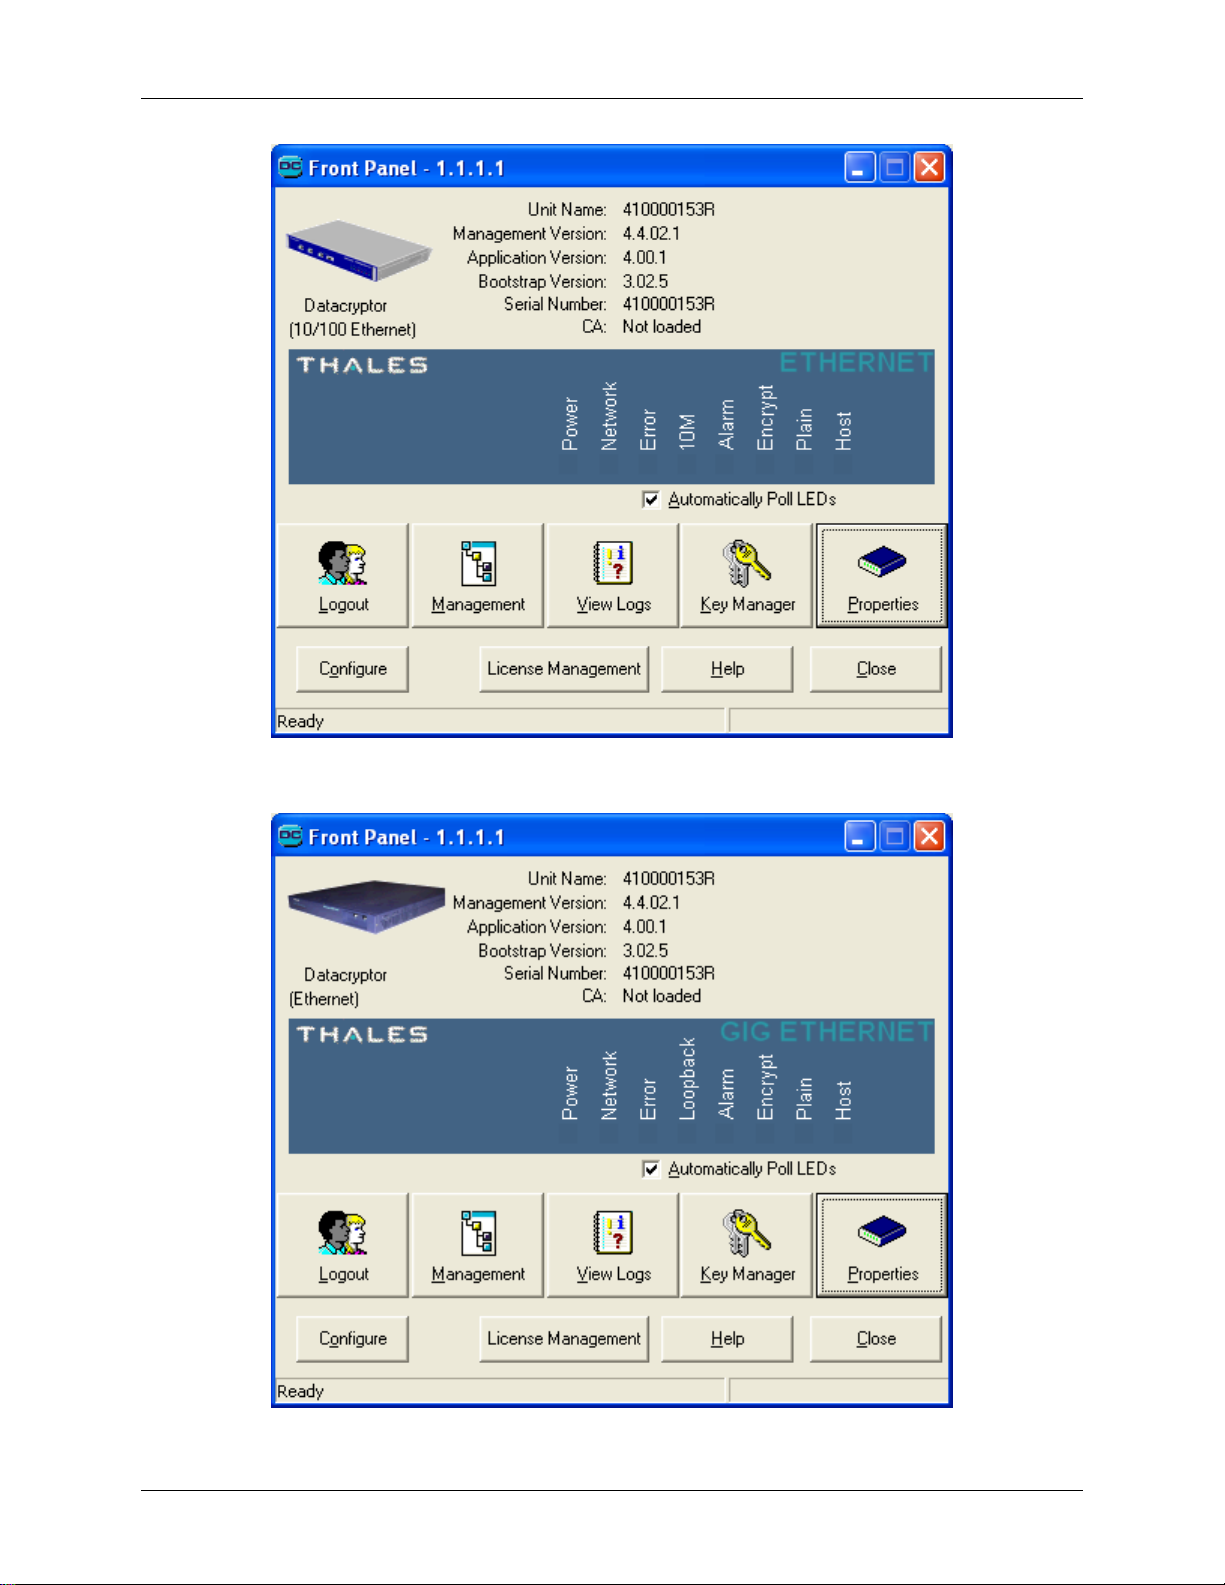
facilities. There are some differences between the Front Panel Viewer for the 100 Mb Ethernet,
the 1 Gigabit and the 10 Gigabit Ethernet Datacryptors. The three variations are shown below:
Page 38 THALES
Page 39
Datacryptor Ethernet User Manual Element Manager Reference
100 Mb Ethernet Front Panel Viewer
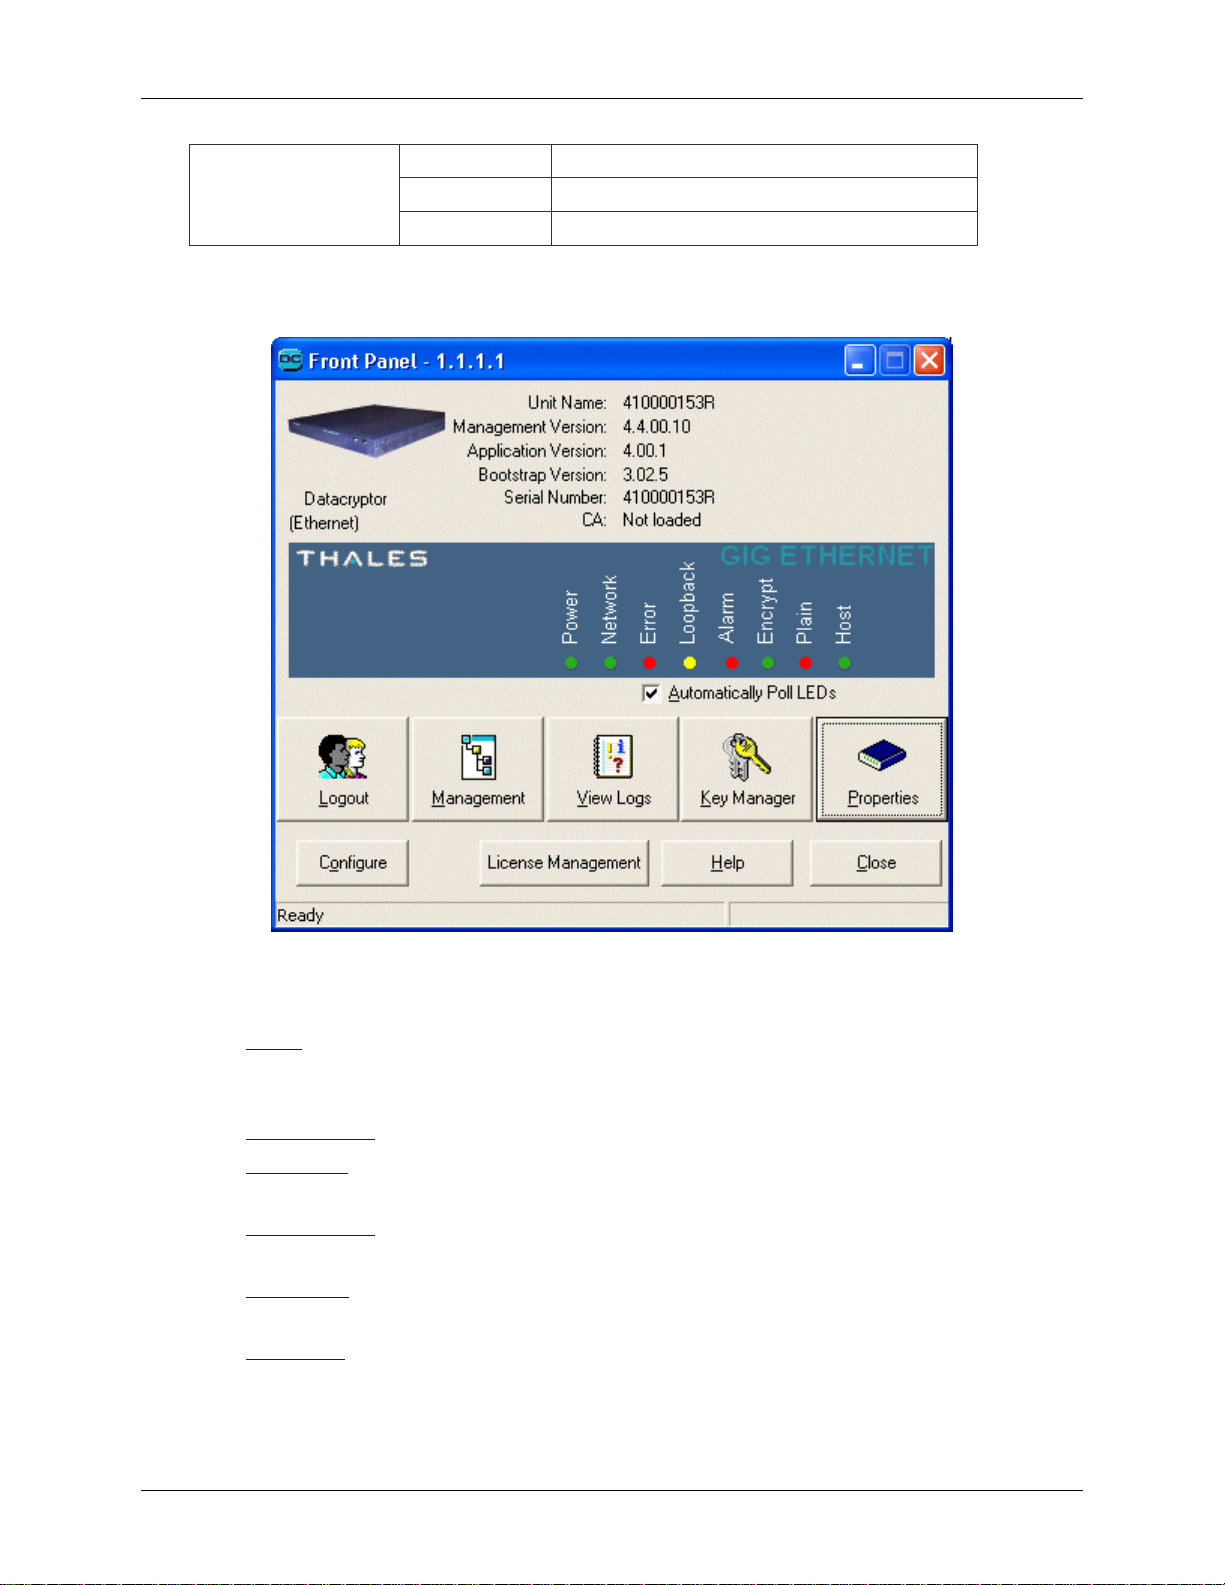
1 Gig Ethernet Front Panel Viewer
1270A450-005 - June 2008 Page 39
Page 40
Element Manager Reference Datacryptor Ethernet User Manual
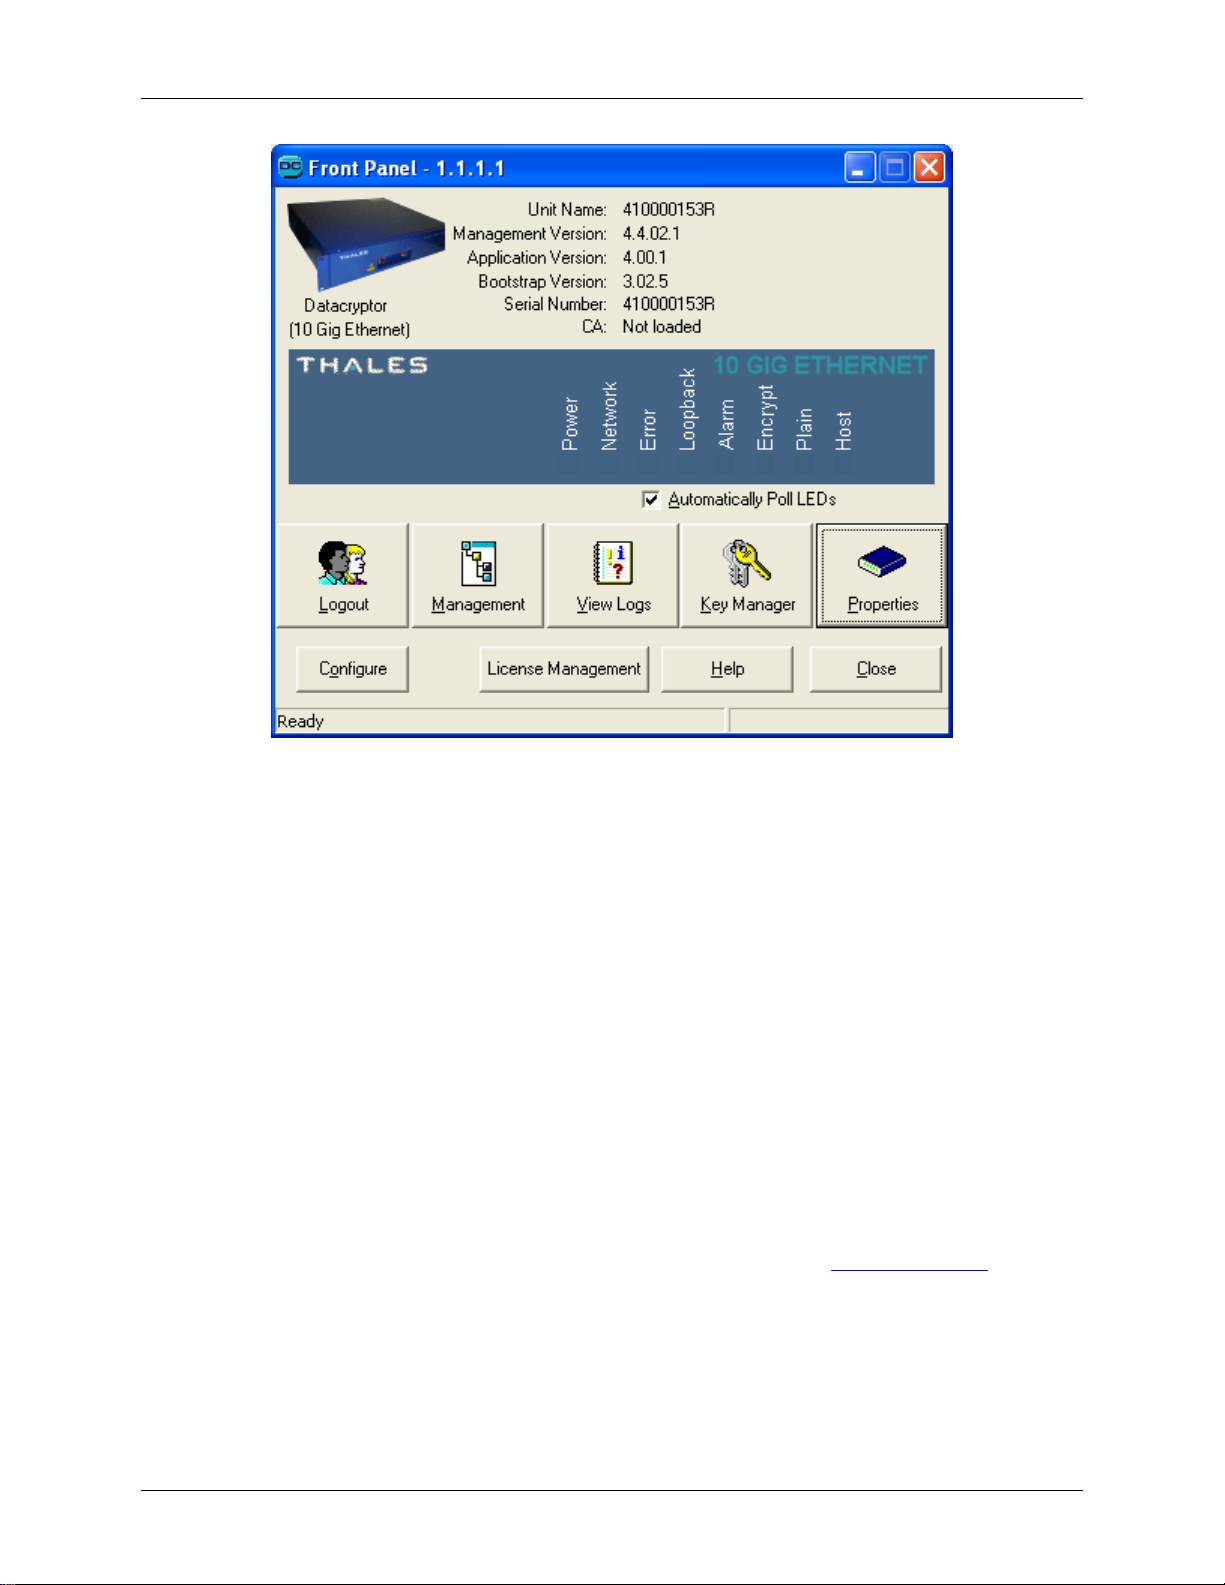
10 Gig Ethernet Front Panel Viewer
The management facilities are provided by the View Logs and Properties buttons. If View Logs
or the Properties buttons are grayed out, they are inaccessible because you haven't logged in
yet - use the Login button to do so. Once you have logged in, the Login button changes to
Logout.
The Front Panel Viewer displays the following information:
• The IP address of the unit (management port) in the title bar
• The model description
• Unit Name: read from the unit
• Management Version: read from the application
• Application Version: read from the unit
• Bootstrap Version: Firmware number
• Serial Number: Unit unique serial number
• In the blue rectangle, a diagram of the unit's front panel shows the state of the LEDs,
which can be examined to check the state of the unit (see the
Front Panel LEDs section).
In addition, if you move the mouse pointer to an LED, after a few seconds a description
of its current state will be displayed next to it in a yellow box.
• Beneath the blue rectangle is the Automatically Poll LEDs checkbox. Tick this to
update the display of the LED status every 10 seconds, or clear it to stop the polling and
reduce the network traffic.
Page 40 THALES
Page 41

Datacryptor Ethernet User Manual Element Manager Reference
• Beneath the front panel diagram are five large buttons that provide direct access to
management facilities (see the
Front Panel Viewer buttons section below).
Note: Pressing F5 while using the Front Panel Viewer will cause a refresh of all
displayed settings from the unit.
User Key Material
Adminv2.usr User key material (containing public and secret keys of user)
protected by a default password of: PASSWORD
Adminv3.usr Alternative user key material (containing public and secret keys of
user) protected by a default password of: 11aaBB!!PASS
The Front Panel LEDs
The Front Panel LEDs indicate the state of the unit.
Indicator Light State Indication
On Unit is powered on Power (green)
Off No power
Network (green)
Error (red)
Ethernet unit only)
Loopback (yellow)
(1 Gig and 10 Gig
Ethernet units only)
Alarm (red)
Encrypt (green)
Host (green) On Normal operation
On Normal operation
Fast Flash Link Down
Slow Flash Not used
Off Loss of Signal, Loss of Synchronization
On Errors have occurred
Fast Flash New errors in log
Off No errors
Off 100 Mbps operation 10M (100 Mb
On 10 Mbps operation
Off Normal operation - no loopback enabled
Slow flash Host loopback enabled
Fast Flash Network loopback enabled
On Host and Network loopback enabled
On Unit is alarmed - Hardware fault
Fast flash Unit is not commissioned
Off No Alarm
On Unit is in Encrypt mode
Slow flash Standby
Off Unit is not in Encrypt mode
Fast Flash Unit is in Plain mode Plain (red)
Off Passthrough mode not selected
1270A450-005 - June 2008 Page 41
Page 42
Element Manager Reference Datacryptor Ethernet User Manual
Fast Flash Link Down
Slow Flash Not used
Off Loss of Signal, Loss of Synchronization
The Front Panel Viewer buttons
The buttons in the Front Panel Viewer are the same for all models of Ethernet Datacryptor; they
provide access to the management facilities, as follows:
• Login: This button is only enabled if you have not logged in yet. Click on it to display
the Login dialog, supply your password and you will gain access to the full set of
management facilities. Once you have logged in, the button changes to Logout.
• Management: Click on this button to display the Element Manager main window.
• View Logs: This button displays the Logs Window, for you to produce, examine and
manage error and other logs from the selected unit.
• Key Manager: Displays the Key Manager dialog to manage the units CAs and
Certificates.
• Properties: This button displays the Properties dialog box for the unit, which allows you
to examine and change the unit's properties (configuration).
• Configure: This button displays a dialog, which allows you to set properties that control
how the Front Panel Viewer manages passwords and session timeout.
• License Management: This button is not used in the Datacryptor Ethernet.
Page 42 THALES
Page 43
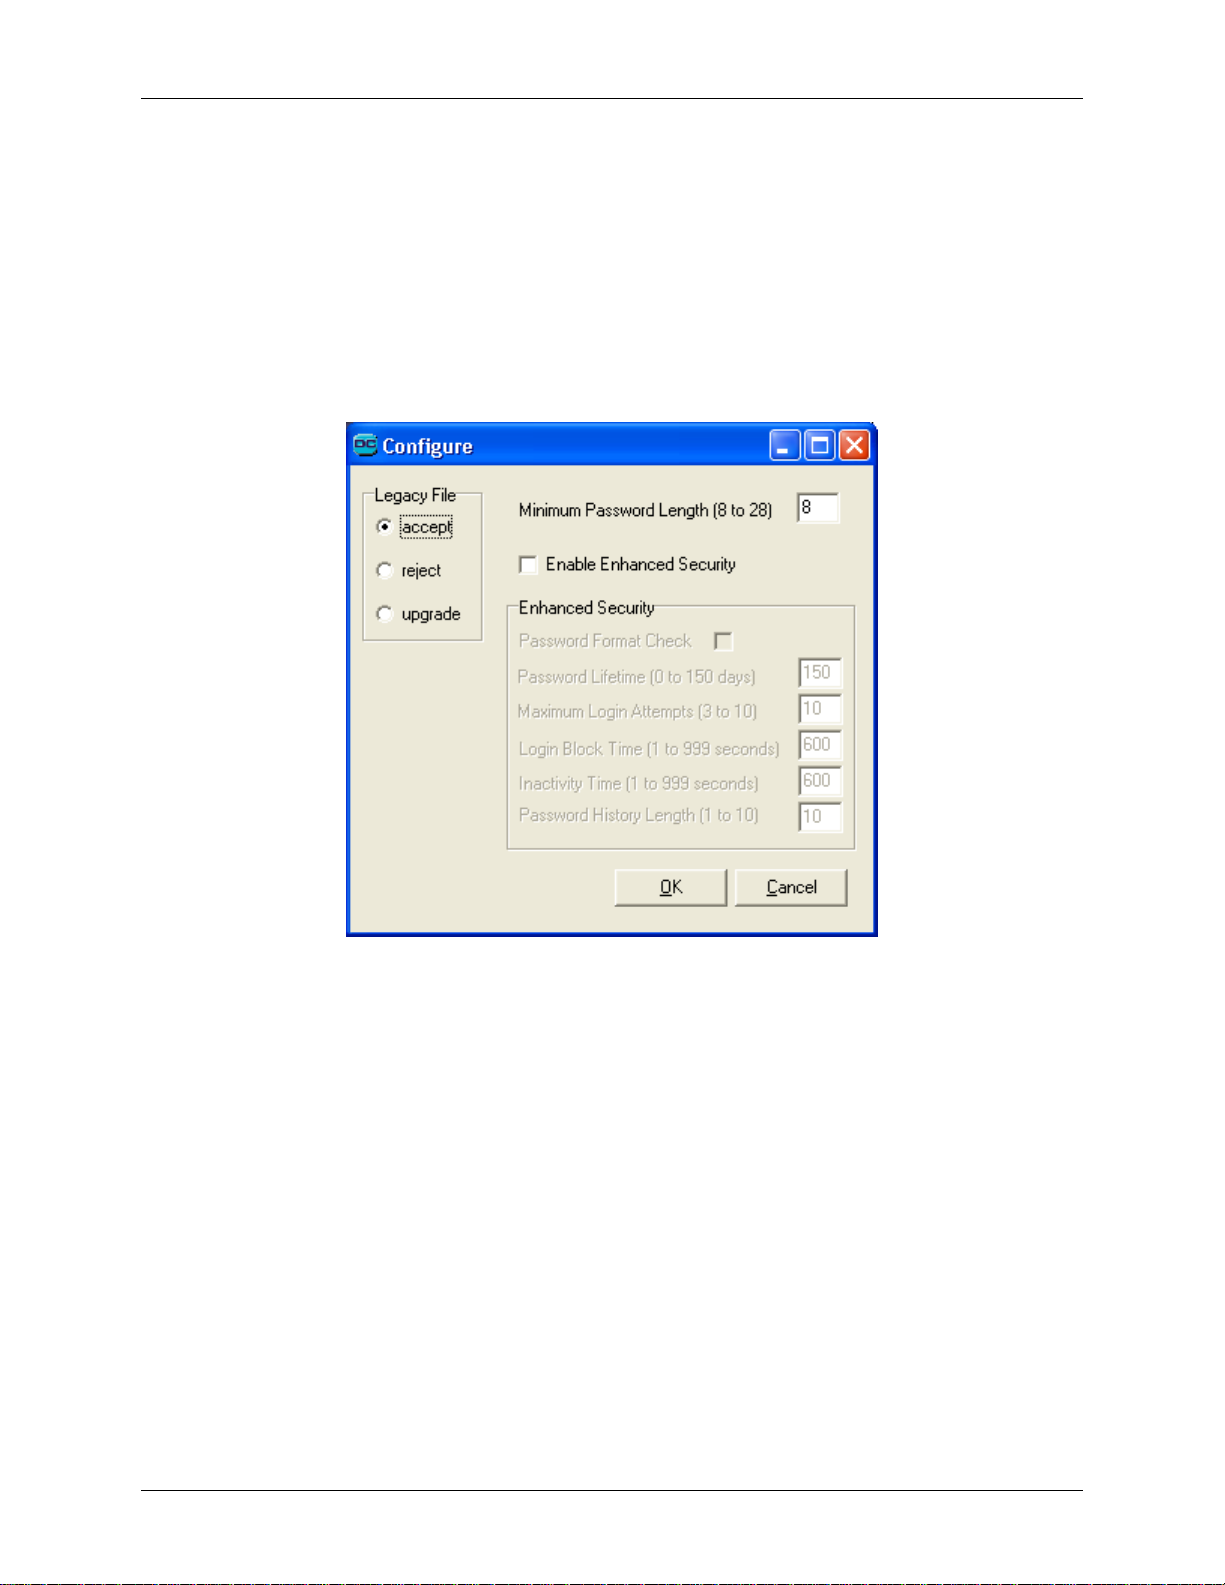
Datacryptor Ethernet User Manual Element Manager Reference
• Help: The Help button launches the help application displaying the help file for the
dialog.
• Close: The Close button closes the Front Panel Viewer.
Configure Dialog
This dialog is displayed when you select the Configure button from the Front Panel Viewer. It
provides configuration of the rules that the Front Panel Viewer will enforce in support of the
security policy.
Legacy File
To support the enforcement of security policy the format of the User Key Material file has been
extended. The adminv3.usr file is in this extended format.
Any existing files and those generated by the Certificate Manager have not been extended. The
adminv2.usr file is in this original format.
The FPV may be configured to reject, accept or upgrade User Key Material files that do not
contain the extended fields.
• accept: Legacy files will be accepted by the Front Panel Viewer even if enhanced
security is turned on. The enhanced checks will not be made when a legacy file is used.
• reject: Legacy files will be rejected by the Front Panel Viewer even if enhanced security
is turned off. The user will be warned that the file will not be accepted.
• upgrade: Legacy files will be automatically upgraded to the extended format when a
user attempts to use one. The user will be required to provide the correct password
before the file will be upgraded.
1270A450-005 - June 2008 Page 43
Page 44

Element Manager Reference Datacryptor Ethernet User Manual
Extended files, including those that have been automatically upgraded, should not be used in
previous versions of the Front Panel Viewer as that could make them unusable in this current
version.
Minimum Password Length
The Front Panel Viewer will require that any new password entered is at least this length. It will
also require existing passwords that are shorter than this to be changed before allowing the
user to login to gain access to the unit management facilities.
Enable Enhanced Security
Select this box to enable the enhanced security policy enforcing features. If this check box is
cleared the Front Panel Viewer will not enforce any of the rules.
Note, however, that the Front Panel Viewer will always keep a record of previous passwords if
the user file is in the extended format.
Password Format Check
The basic requirements for passwords are that they must be between 8 to 28 case-sensitive
alphanumeric characters. Although certain special characters (see below) are valid for use in
passwords, they may cause problems with third party scripting tools. Note also that
ampersands, question marks, periods, and commas are not allowed.
Selecting this box will enable password format checks, in addition to the basic password
requirements. Those checks require the password to include:
• At least two upper case alpha characters (A-Z).
• At least two lower case alpha characters (a-z).
• At least two numeric characters (0-9).
• At least two special characters from this list:
! @ # $ % ^ * ( ) _ + = - [ ] { } \ | ; : < >
Password Lifetime
Enter the required maximum lifetime of a password, in days. The Front Panel Viewer will
require the user, when logging into a unit, to change the password if it has not been changed
within this many days. A value of zero indicates that the password will not expire.
Maximum Login Attempts
The Front Panel Viewer can block a user from logging into a unit if incorrect passwords are
entered. Set this field to the number of wrong attempts that are allowed before the user is
blocked.
Once a user has entered the correct password the count of failed attempts is reset.
Login Block Time
As explained in the previous paragraph, the Front Panel Viewer can block a user from logging
into a unit if incorrect passwords are entered. Set this field to the time, in seconds, that the
user should be blocked for.
Page 44 THALES
Page 45
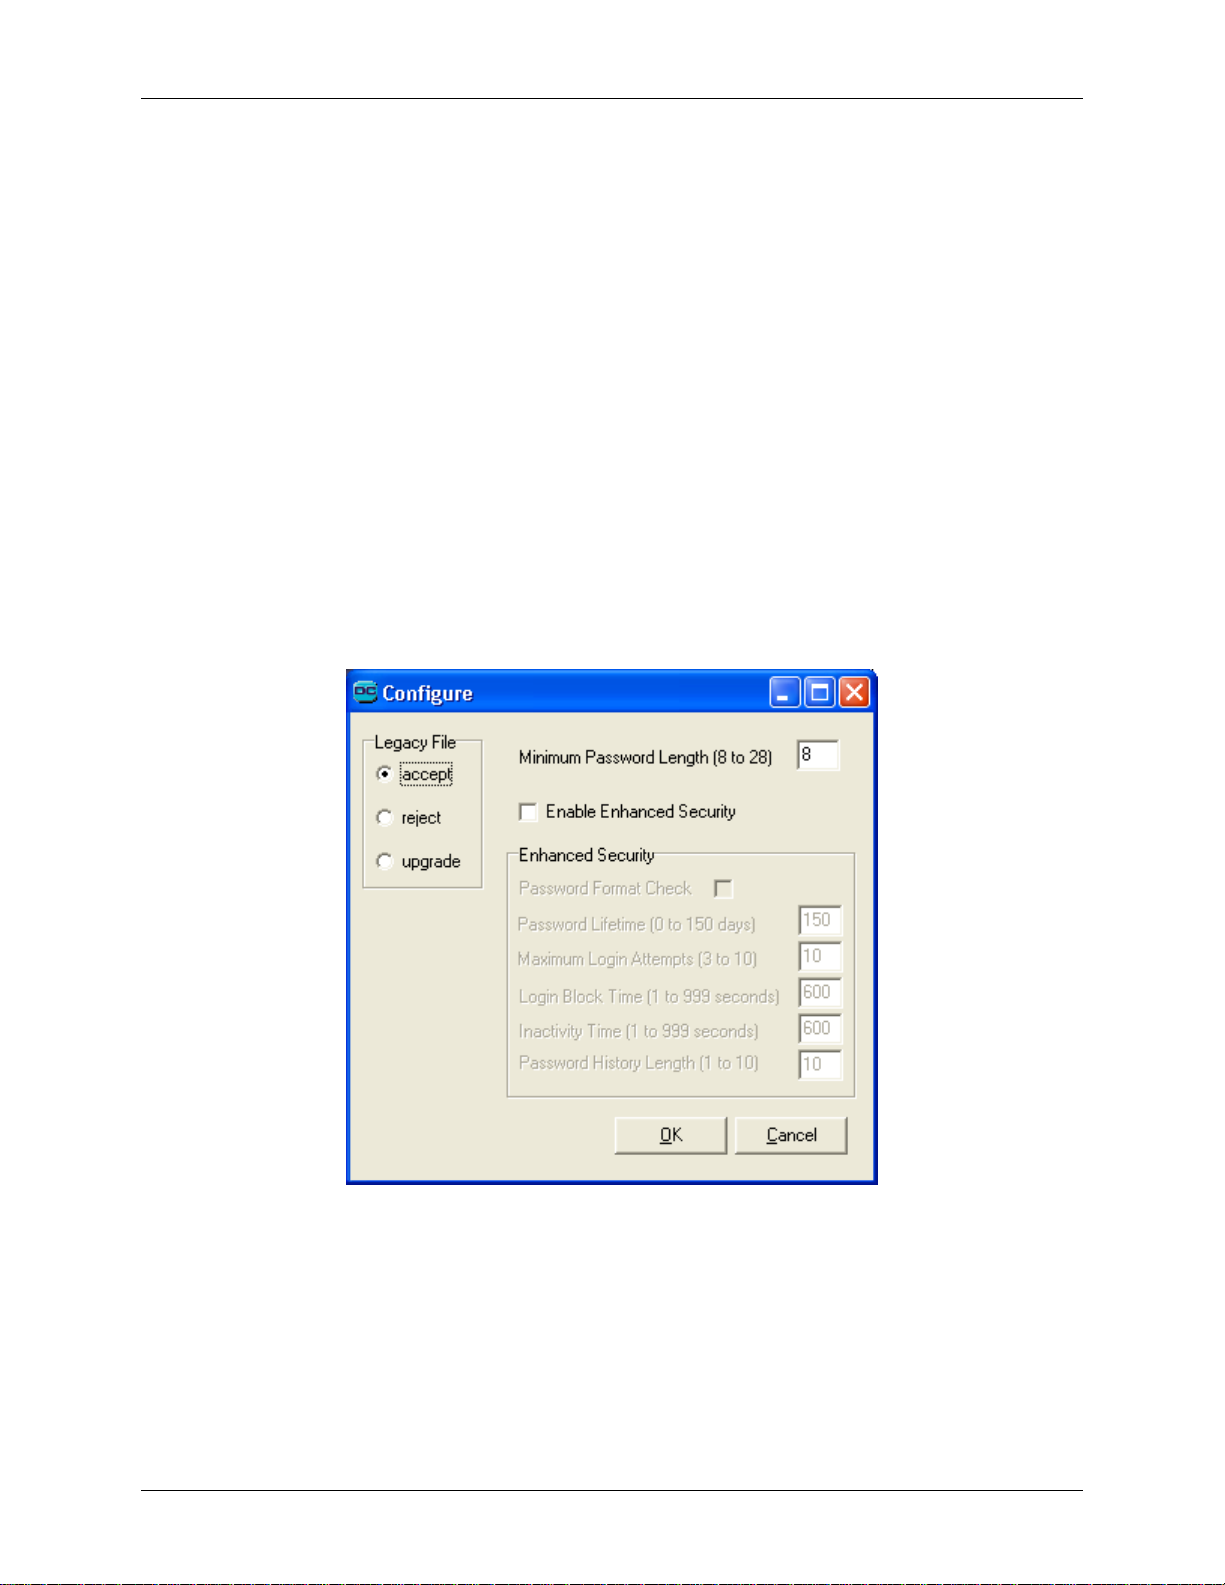
Datacryptor Ethernet User Manual Element Manager Reference
The user will be blocked from further attempts for this time. Once the block time has expired
the user will again be allowed to attempt to log in.
Inactivity Time
The Front Panel Viewer can automatically log off a user if it has seen no mouse or keyboard
activity for a time. Set this field to the maximum inactivity time, in seconds.
Password History Length
The Front Panel Viewer keeps a record of the last nine passwords for each User Key Material File
and will, when changing a password, reject the new password if it has been used before. Set
this field to indicate the number of previous passwords that will be included in the check.
Setting this to one indicates that the new password will only be checked against the existing
password and not against any of the previous passwords. Setting this to ten indicates that the
new password will be checked against the existing password and all nine previous passwords.
Defaults
When the Front Panel Viewer is first installed these fields will default to the values shown here:
These settings permit the Front Panel Viewer to operate identically to the previous version when
using legacy files. If the enhanced security enforcement features are not required then legacy
User Key Material files, including the universal adminv2.usr file, may be used without upgrade.
Securing the Settings
These settings are stored in a file in the SecureData subdirectory. To protect these settings an
administrator should configure the Front Panel Viewer as required and then restrict access to
the SecureData directory and its contents to read-only for users.
1270A450-005 - June 2008 Page 45
Page 46
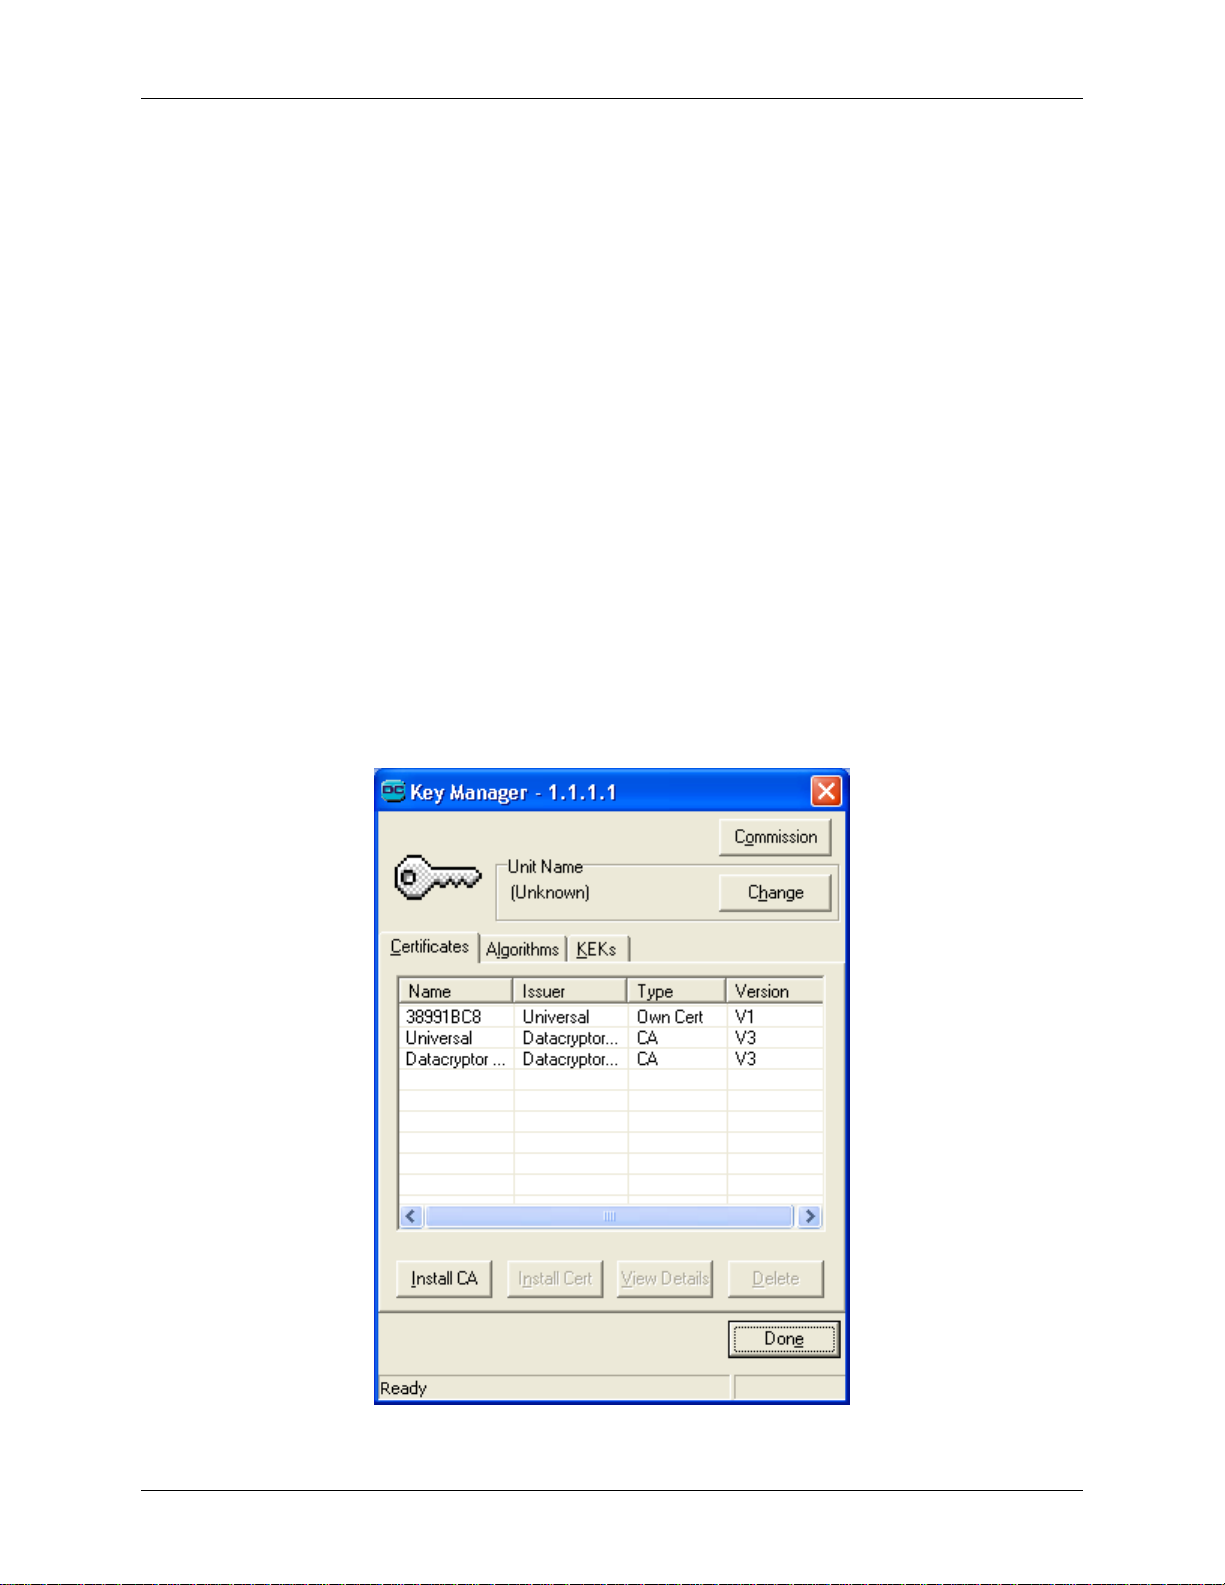
Element Manager Reference Datacryptor Ethernet User Manual
When the directory is set to read-only the Front Panel Viewer will disable the Configure button.
Key Manager
As previously stated when the Datacryptor Ethernet unit is supplied from the Manufacturer,
Thales e-Security provides the CA that is loaded. When first commissioned the unit may require
testing and the Universal CA provided on the Datacryptor Element Manager CD-ROM can be
used. This CA is very insecure, as all owners of Datacryptor units will have a copy, which means
that they all have the Admin2.usr file that can be used to log into any unit that has the Universal
CA loaded.
It is essential for security to change this Universal CA to a Custom CA as soon as possible. If the
unit owner has a copy of ‘Certificate Manager’ a trusted member of staff can create the Custom
CA, if not an external SA can provide one.
The process of installing the required elements is done via Commission button on the Key
Manager dialog. The Key Manager dialog is opened via the Key Manager button on the Front
Panel Viewer.
To commission a unit with the Commission button
1. Click the Key Manager button on the Front Panel Viewer – the Key Manager dialog
opens:
Page 46 THALES
Page 47
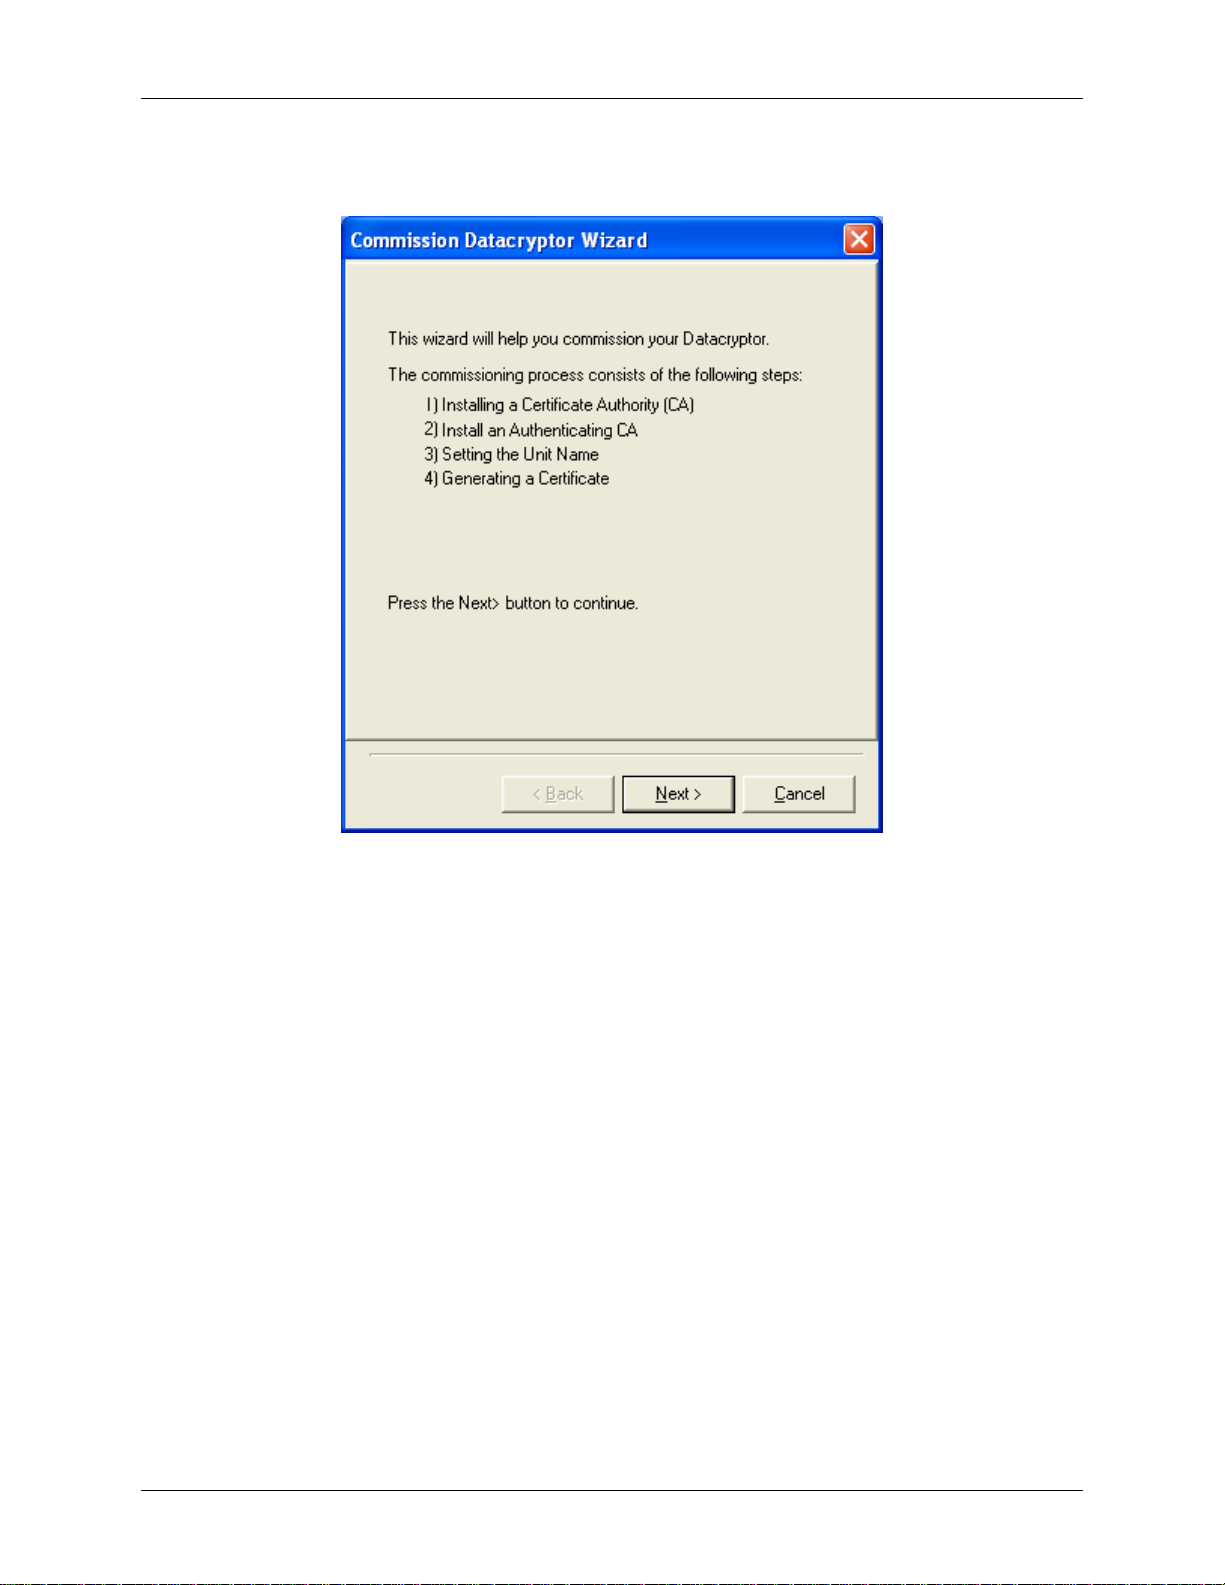
Datacryptor Ethernet User Manual Element Manager Reference
2. Click the Commission button at the top of the dialog. This will start the Commissioning
Wizard, which begins by displaying an overview of the process as shown below:
The first item in the list will be Installing a Certificate Authority (CA) as shown above.
3. Click the Next button to proceed to step 1 below. The first page of the wizard asks if a
new CA is to be installed in the unit.
1270A450-005 - June 2008 Page 47
Page 48
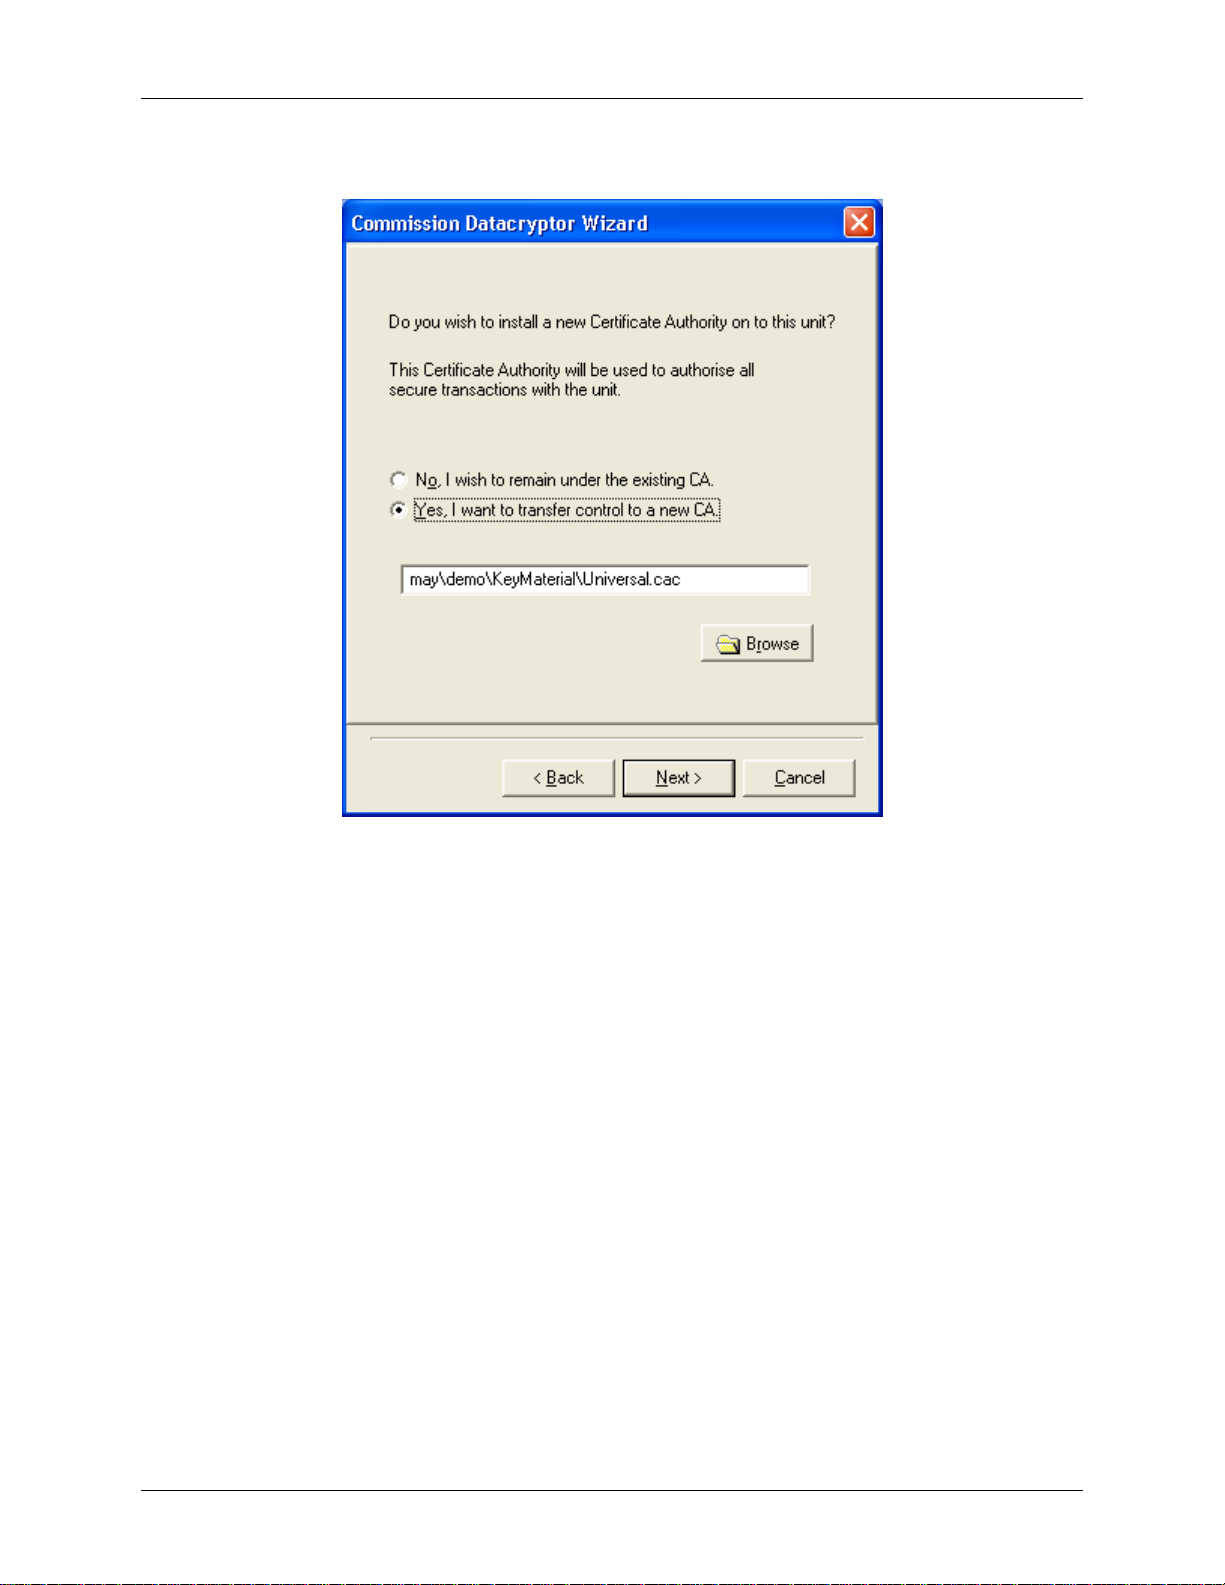
Element Manager Reference Datacryptor Ethernet User Manual
Step 1: Installing a new Certificate Authority (CA)
Units are normally delivered under the control of the manufacturer CA (DC2K Manufacturer),
with the Universal CA available on disk; this dialog allows you to transfer control to a different
custom CA:
1. To stay under the control of the manufacturer CA, select the No option and click the
Next button or press Enter. This will take you to step 3.
2. To transfer from the manufacturer CA to a new CA, select the Yes option. Insert the
diskette containing the new CA's .CAC file and enter the path to the .CAC file (or use the
Browse button to find it). Click the Next button to proceed to step 2.
Page 48 THALES
Page 49
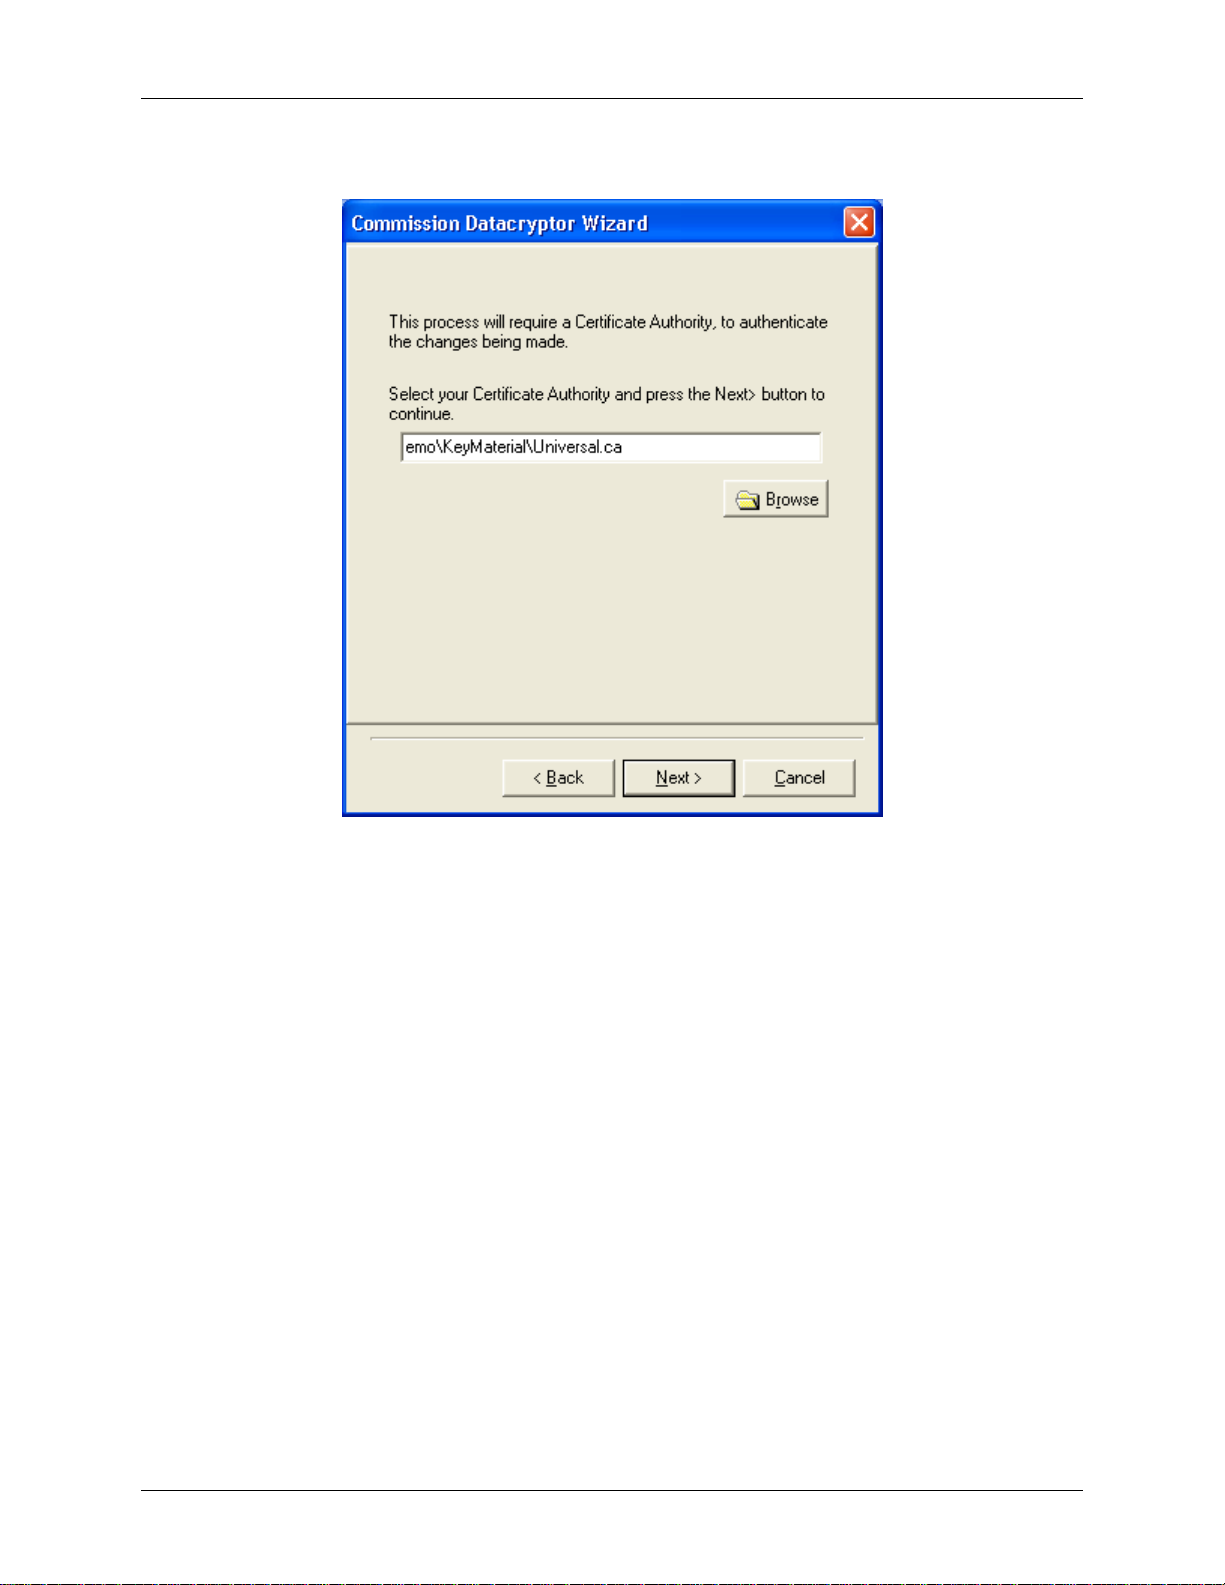
Datacryptor Ethernet User Manual Element Manager Reference
Step 2: Installing the authenticating CA:
Insert the diskette containing the authenticating CA's .CA file and enter the path to the .CA file
(or use the Browse button to find it). Click the Next button to proceed to step 3.
1270A450-005 - June 2008 Page 49
Page 50
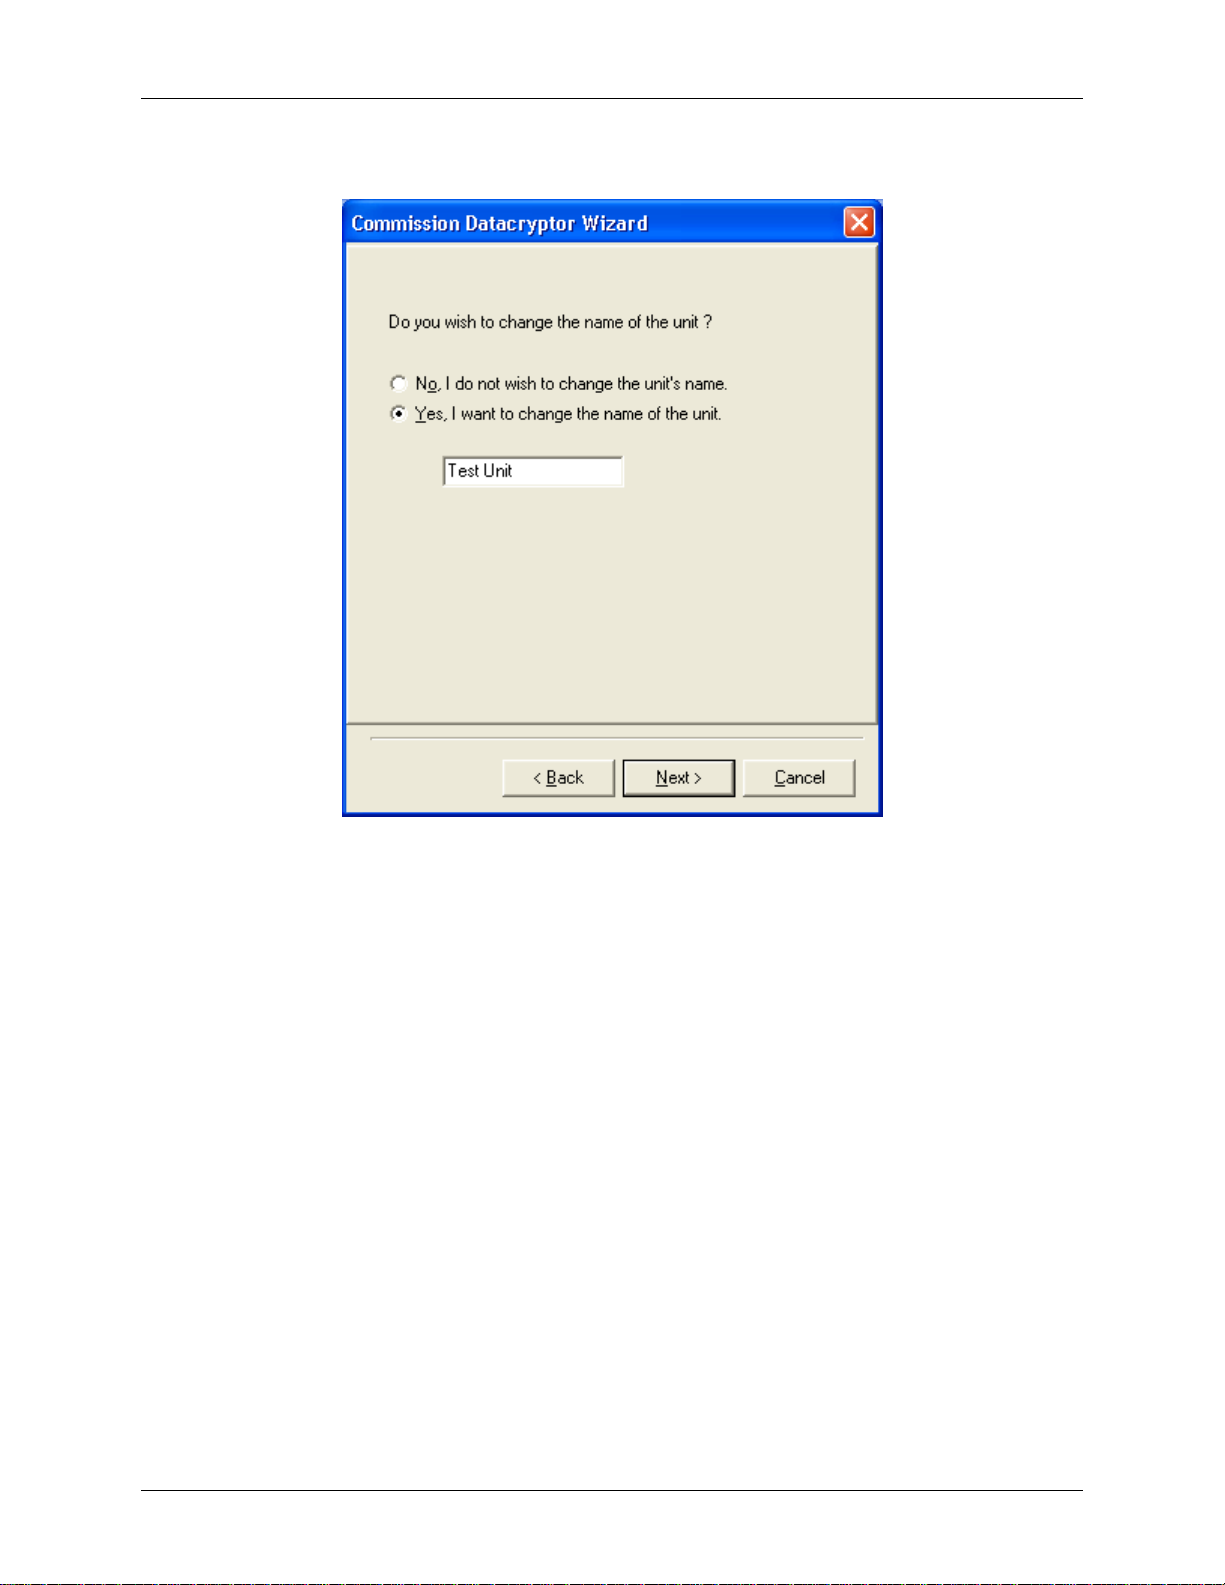
Element Manager Reference Datacryptor Ethernet User Manual
Step 3: Setting the unit name:
Each Datacryptor Ethernet unit within a User Group must have a different name. You can either
leave the unit name as delivered (since units are manufactured with unique names – the same
as the serial number) or change it now, according to your security procedures. The edit box
displays the unit's current unit name.
1. To keep the displayed unit name, click Next.
2. Alternatively, to change the unit's name, click on the Yes radio button and edit the name.
Then click Next to continue.
Page 50 THALES
Page 51
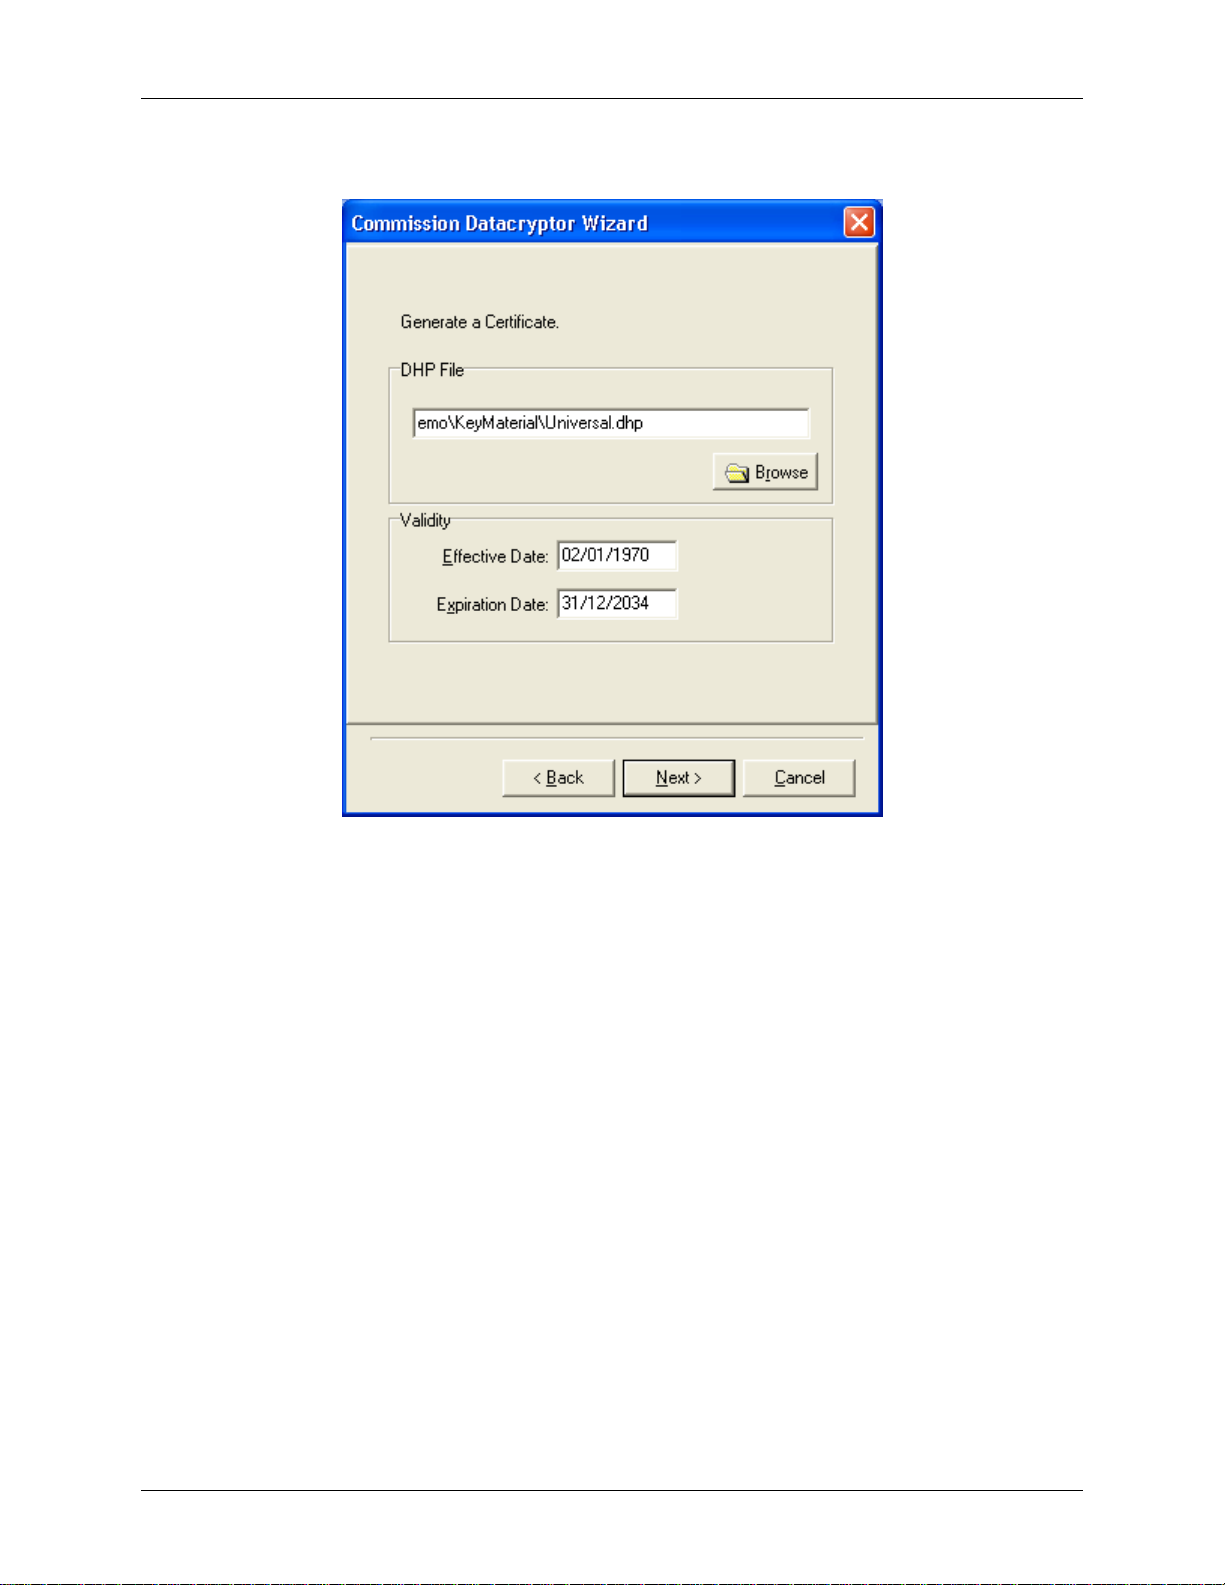
Datacryptor Ethernet User Manual Element Manager Reference
Step 4: Generating a Certificate:
1. Enter the path to the .DHP File (Diffie-Hellman Parameters), or use the Browse button to
select it.
2. Specify the dates between which the Certificate is valid in the Effective Date (start) and
Expiration Date (finish) fields. The Start Time is effectively 00:00 and the End Time is
23:59 (unless the issuing CA is different) on the days selected. The default end date is
the last day of the issuing CA
3. Click Next to continue and a dialog will list the options you have chosen:
1270A450-005 - June 2008 Page 51
Page 52
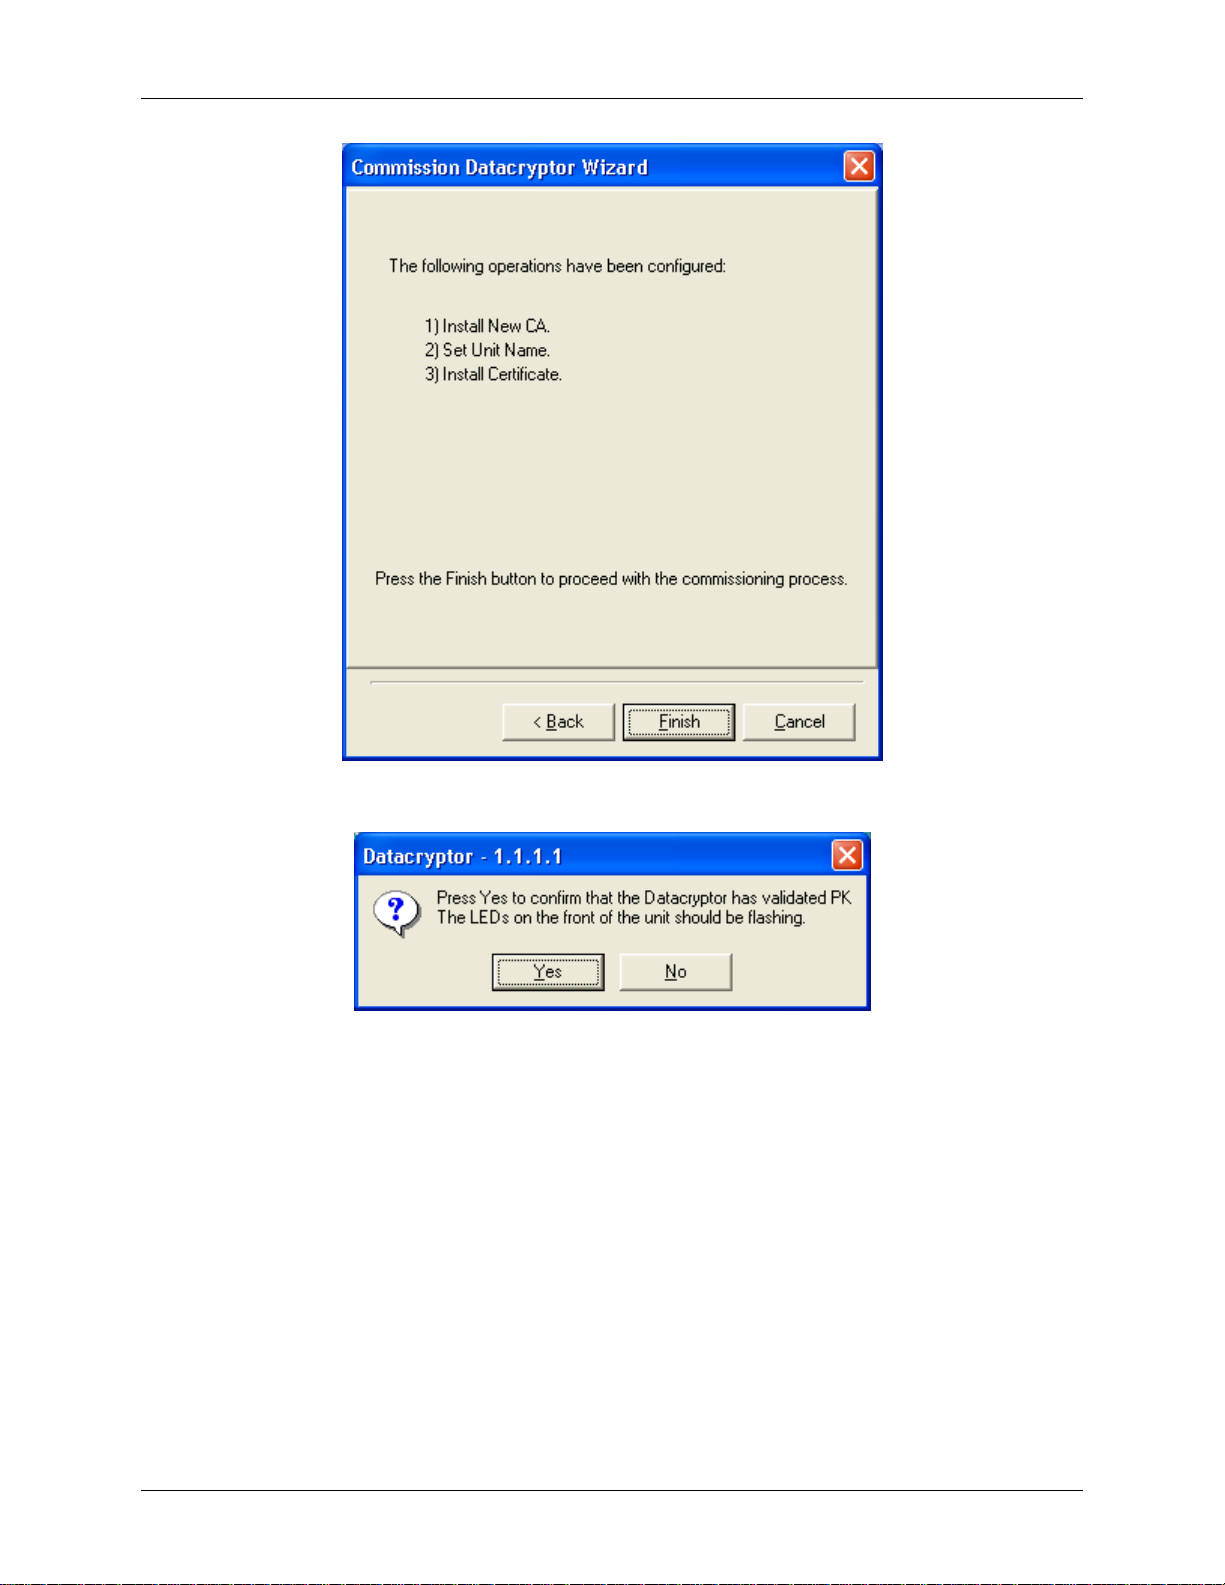
Element Manager Reference Datacryptor Ethernet User Manual
1. Click Finish to begin the commissioning process, which will take a few seconds.
2. When commissioning has completed, confirm that the Datacryptor unit's LEDs are
flashing (which indicates that the unit has been commissioned successfully). Check the
unit's LEDs (or get someone else to do so, if the unit is remote) and click Yes if they are
flashing.
3. The new CA and certificate can be seen in the Certificates tab of the Key Manager.
4. Once a unit has been commissioned, with the correct CA and Certificate it can be used
for the transfer of secure information.
Page 52 THALES
Page 53
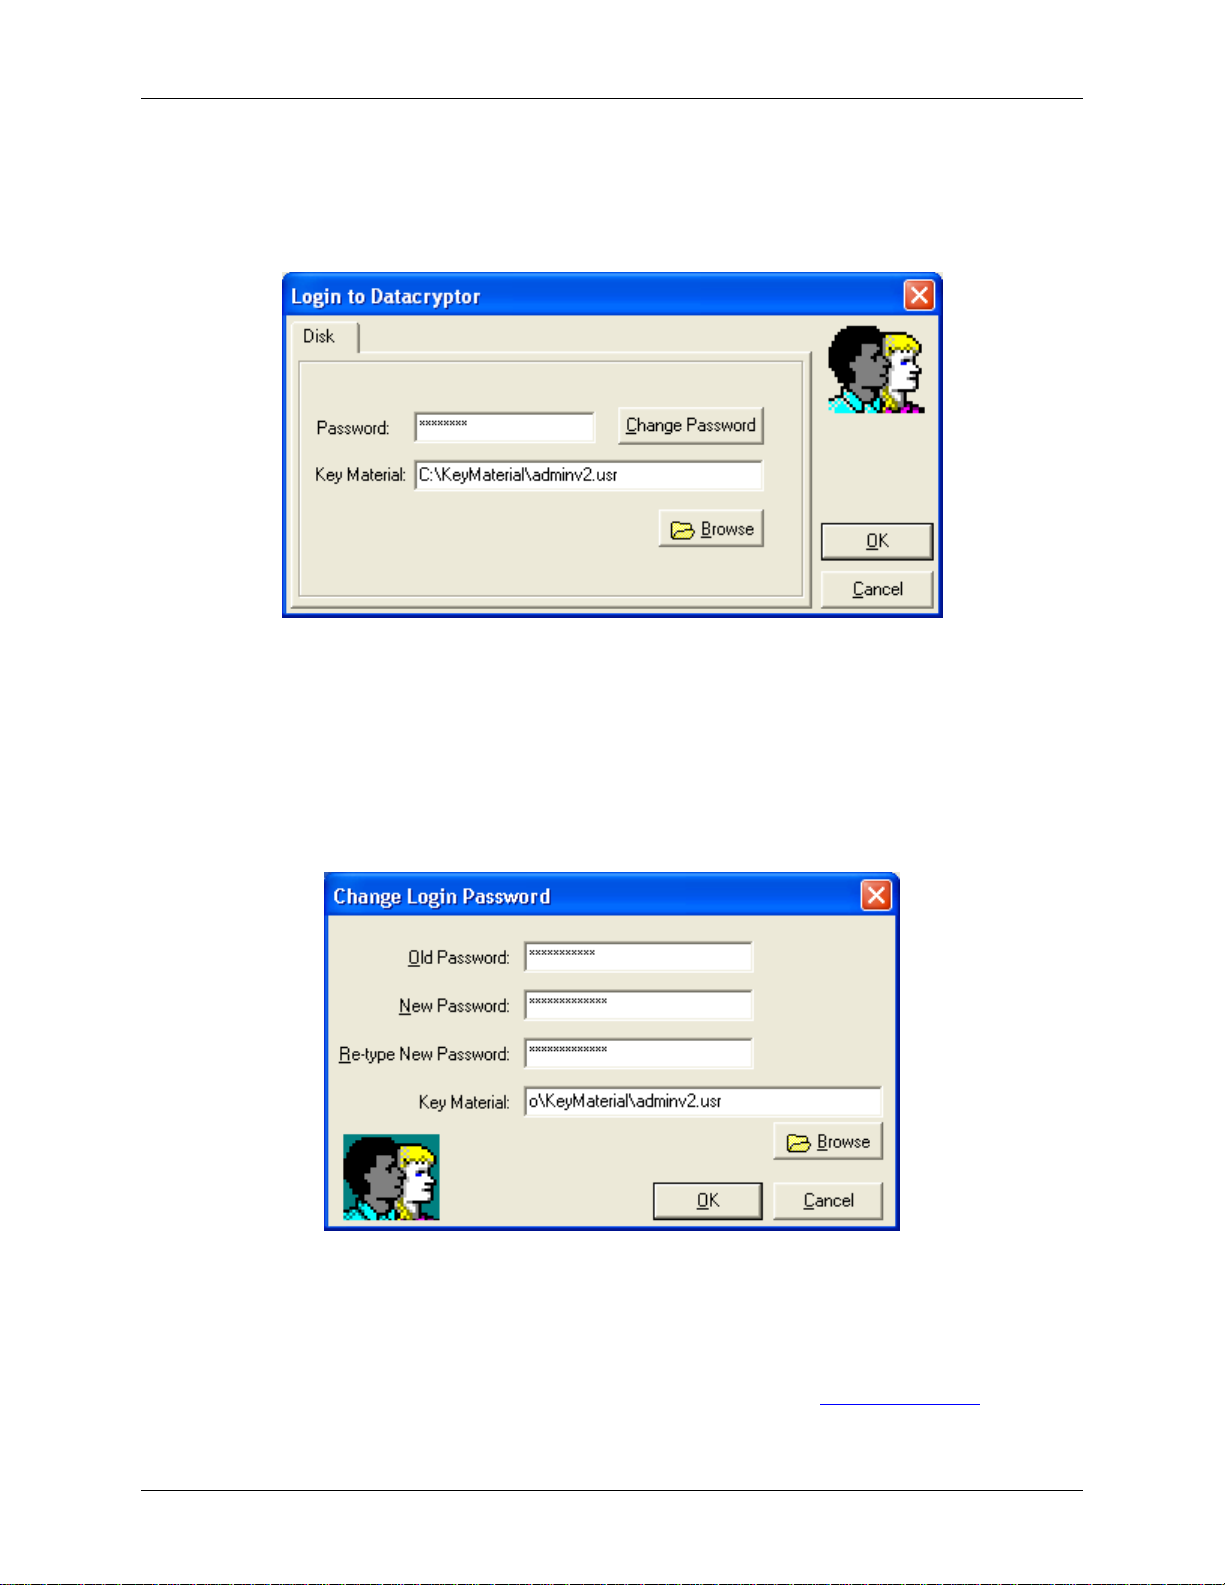
Datacryptor Ethernet User Manual Element Manager Reference
Login Dialog
This dialog is displayed when you select the Login button from the Front Panel Viewer, to login
to gain access to the unit management facilities.
Enter the password into the login dialog and either click the OK button or press Enter.
You can also use the Change Password button to change your password - providing you know
the original password.
Change Password Dialog
This dialog is displayed when you select the Change Password button from the Login dialog.
Type the current password in the Old Password text box, and enter the new password in the
New Password and Re-type New Password text boxes.
The basic password requirement is that it must be 8 to 28 case-sensitive alphanumeric
characters. However, to determine the full requirements that must be met when choosing a
password you should refer to the Password Format Check section in
1270A450-005 - June 2008 Page 53
Configure Dialog.
Page 54
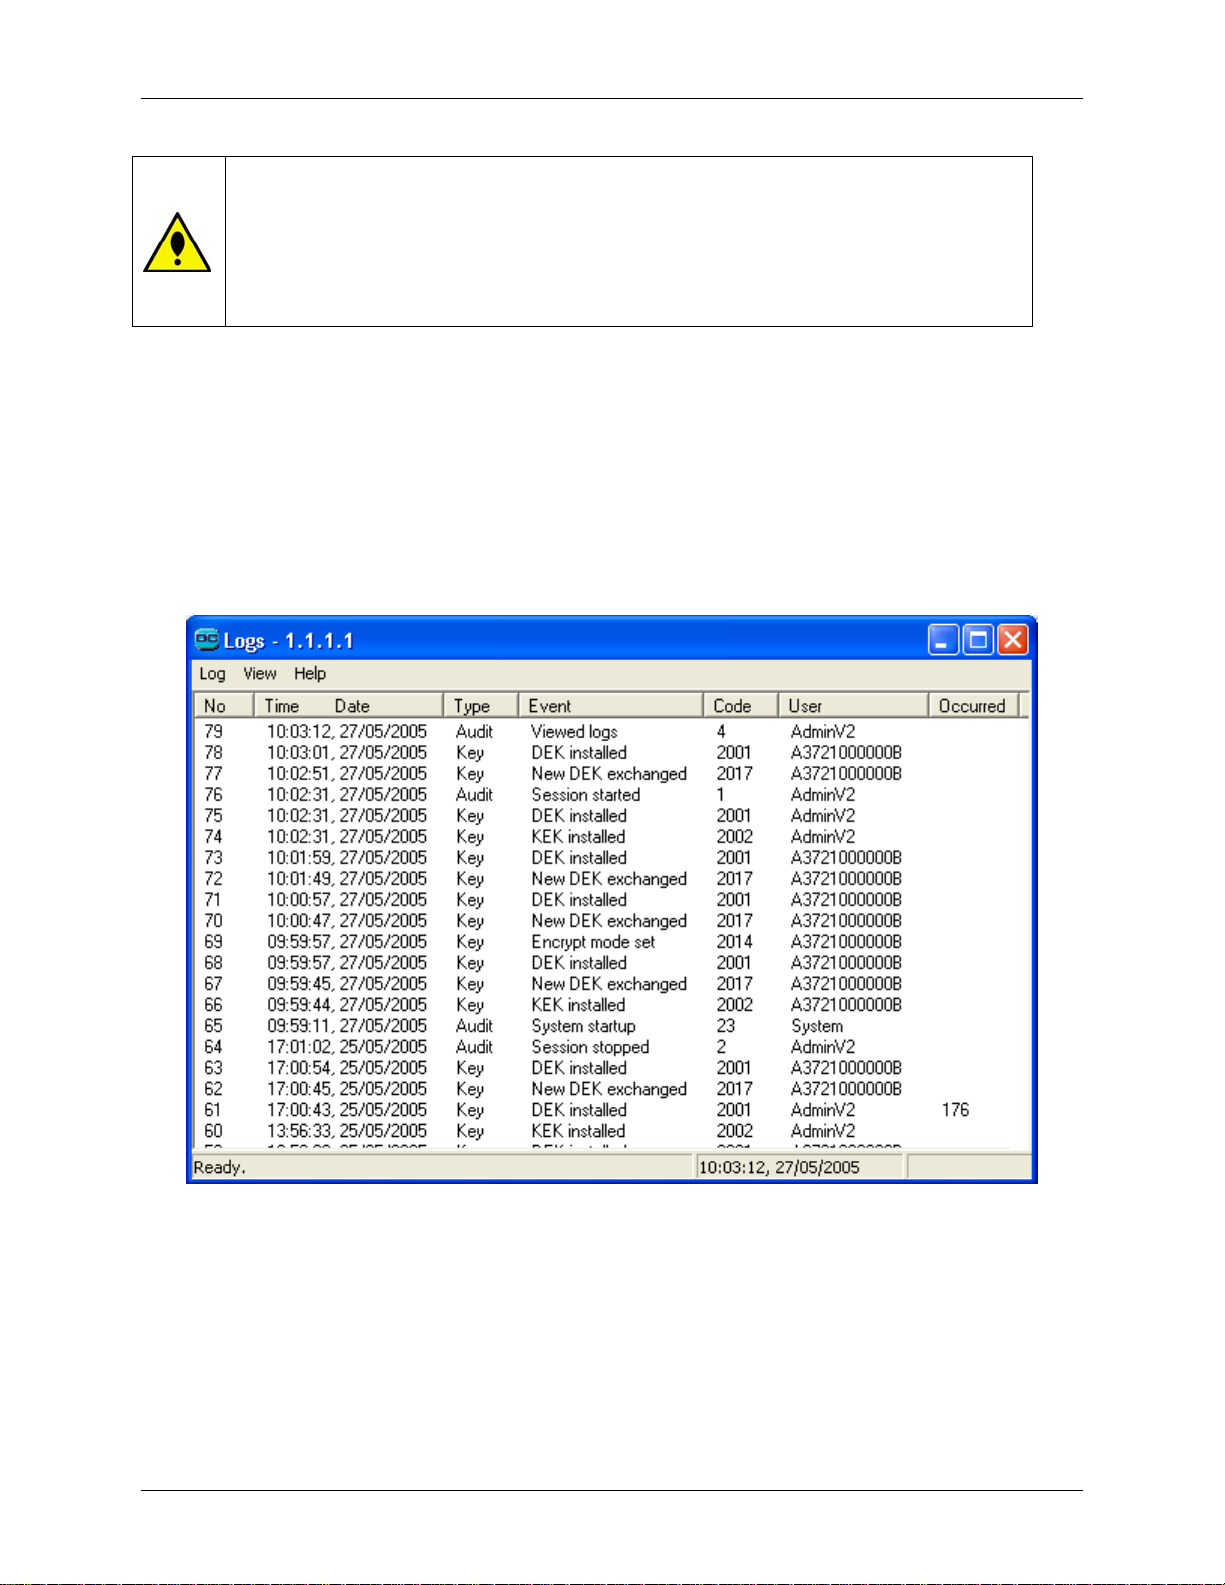
Element Manager Reference Datacryptor Ethernet User Manual
CAUTION: If the password is lost all Administrator functionality is lost,
including the ability to assign a new password. The only means of resetting the
password is to the restore the factory settings on the device (please call
Customer Service for support). This operation overwrites all previously saved
configurations, policies, and keys with factory defaults.
Logs Window
The Datacryptor Ethernet monitors network operations and records information in an audit log
about network events or operations specific to a device. The audit log reconstructs an exact
sequence of network events or device operations. The audit log configuration determines the
types of events that it records.
The Logs Window, which is displayed by clicking on the View Logs button in the Front Panel
View, allows you to view, search, save or clear the log recorded by the selected unit.
There is only one log, but it contains data of four different types:
• Audit: A report of all management operations performed on this unit (using the
Element Manager).
• Error: A report of any faults that have been discovered with unit hardware and
keyspace.
• Key: A report of all key update and erasure attempts.
Page 54 THALES
Page 55

Datacryptor Ethernet User Manual Element Manager Reference
• Trace: A report of internal software conditions detected by the unit, these are not
hardware errors but may help support personnel understand unusual operational
conditions. They appear on the display as ‘Internal Error’ but, when saved to disk as a
text file, the text is expanded. When seen, these should be reported to the Support
department at Thales e-Security for investigation.
Note: New errors will cause the Error LED to flash. Once they have been read, the
Error LED will change to ON and stay on until they have been cleared out of the
log.
A list of all the
log and SNMP trap numbers with descriptions is provided as an appendix to this
guide.
The Logs window provides facilities through three pull-down menus.
The Log menu provides:
• Clear Entries - clear all entries from the currently displayed log(s) - typically after saving
them first.
• Save As - save the currently displayed log(s) in a named file. You can then keep the file as a
backup, print it, or process as appropriate.
• Close - close the Logs Window and return to the Front Panel Viewer.
The View menu provides:
• Audit- If this option is ticked the all the Audit entries in the log are shown.
• Error- If this option is ticked then all the Error entries in the log are shown.
• Trace- If this option is ticked then all the Trace entries in the log are shown.
• Key Update- If this is ticked then all the Key Update entries are shown.
• Newest First, Oldest First - select the order in which entries are displayed by clicking on
it. The selected order is indicated.
• Find - search through the displayed logs for specified text.
• Refresh - update the display by reading the logs from the unit again.
• Stop Reading (F6) – halts the process of reading entries from the audit log.
The function key F5 (Refresh) can also be used for the logs window.
The Help menu provides access to on-line help
1270A450-005 - June 2008 Page 55
Page 56
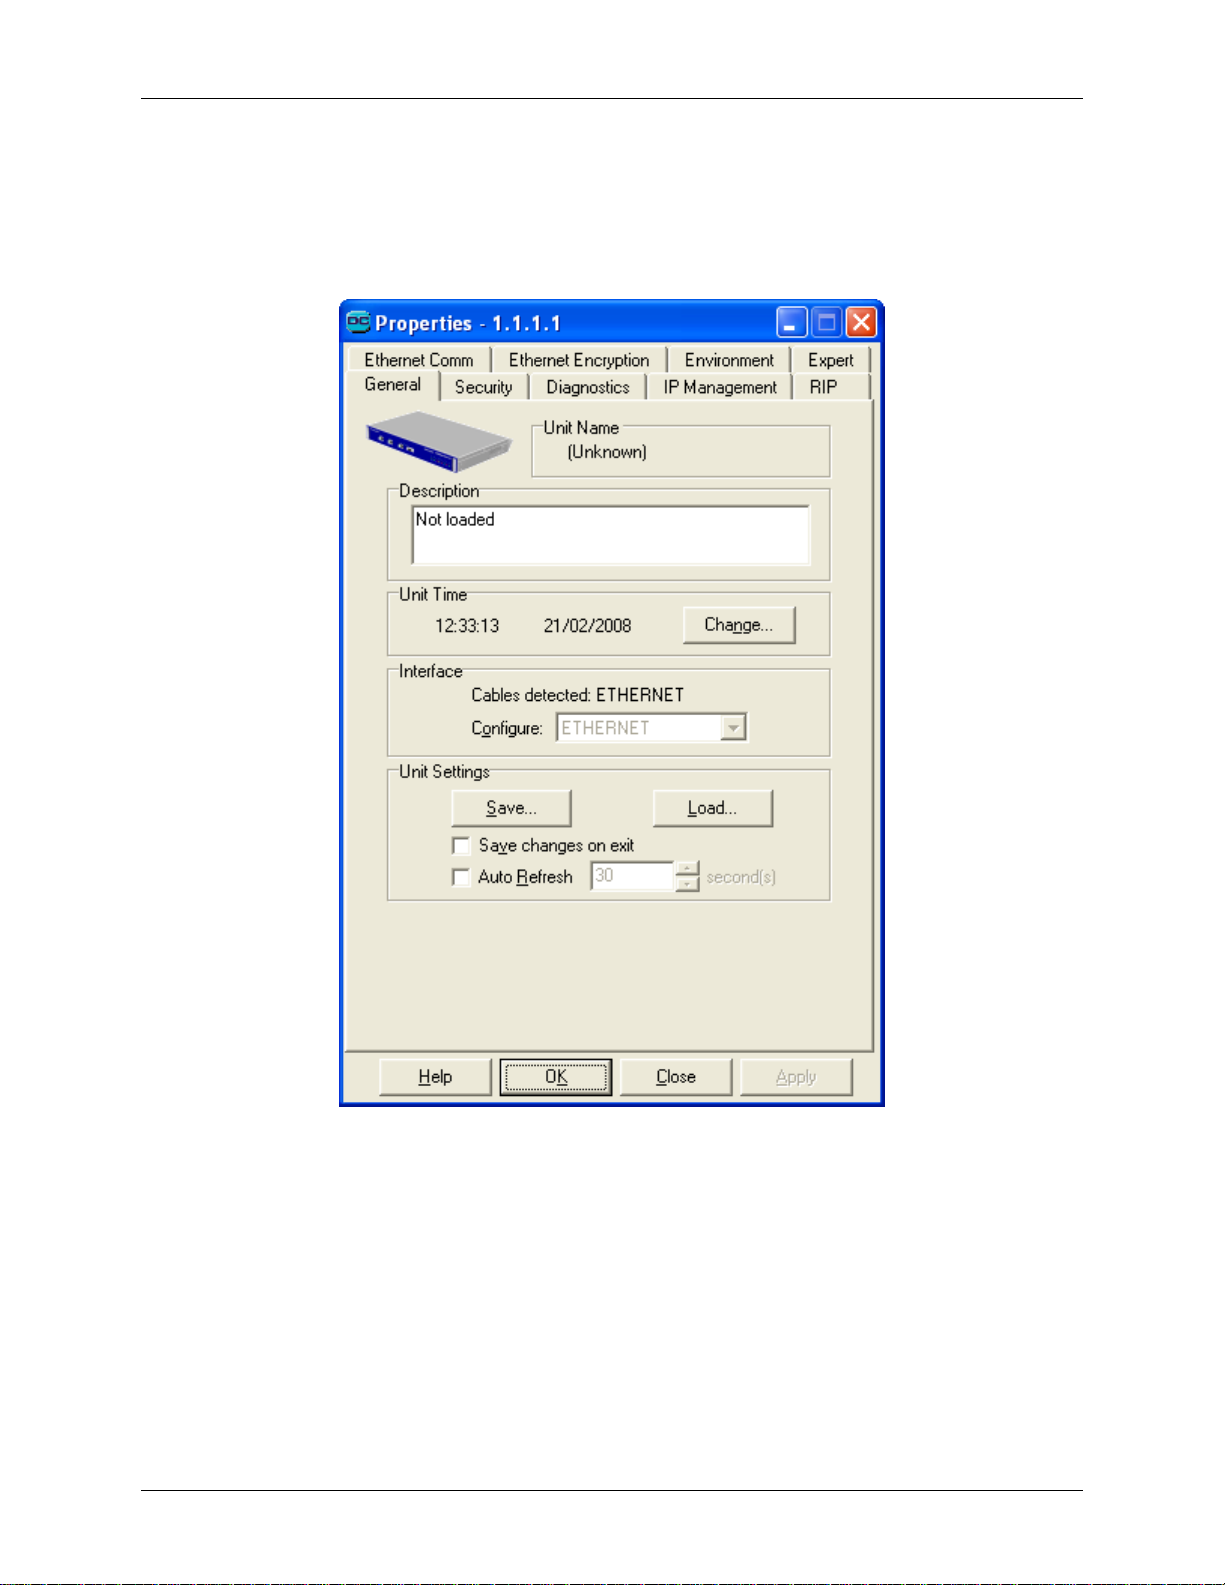
Element Manager Reference Datacryptor Ethernet User Manual
Properties Dialog
The Properties dialog is displayed when you select the Properties button in the Front Panel
Viewer. The image shown on the dialog will reflect the model of Ethernet Datacryptor that you
are using.
You use the dialog to examine and change the properties of the selected unit. These properties
are organized into a number of separate tabs. To display a different tab, click on its name or
use Ctrl+Tab (to display the next tab) or Ctrl+Shift+Tab (to display the previous tab).
If you make changes on a tab, they will be written to the unit when you click the Apply button,
or click the OK button to apply the changes and close the dialog.
You can also store or retrieve the properties by using the controls in the Unit Settings box on
the General tab - this provides an easy way to backup and restore settings, among other
applications.
Note: Press F5 to refresh the displayed properties or tick auto-refresh on the General
tab to refresh automatically.
Page 56 THALES
Page 57
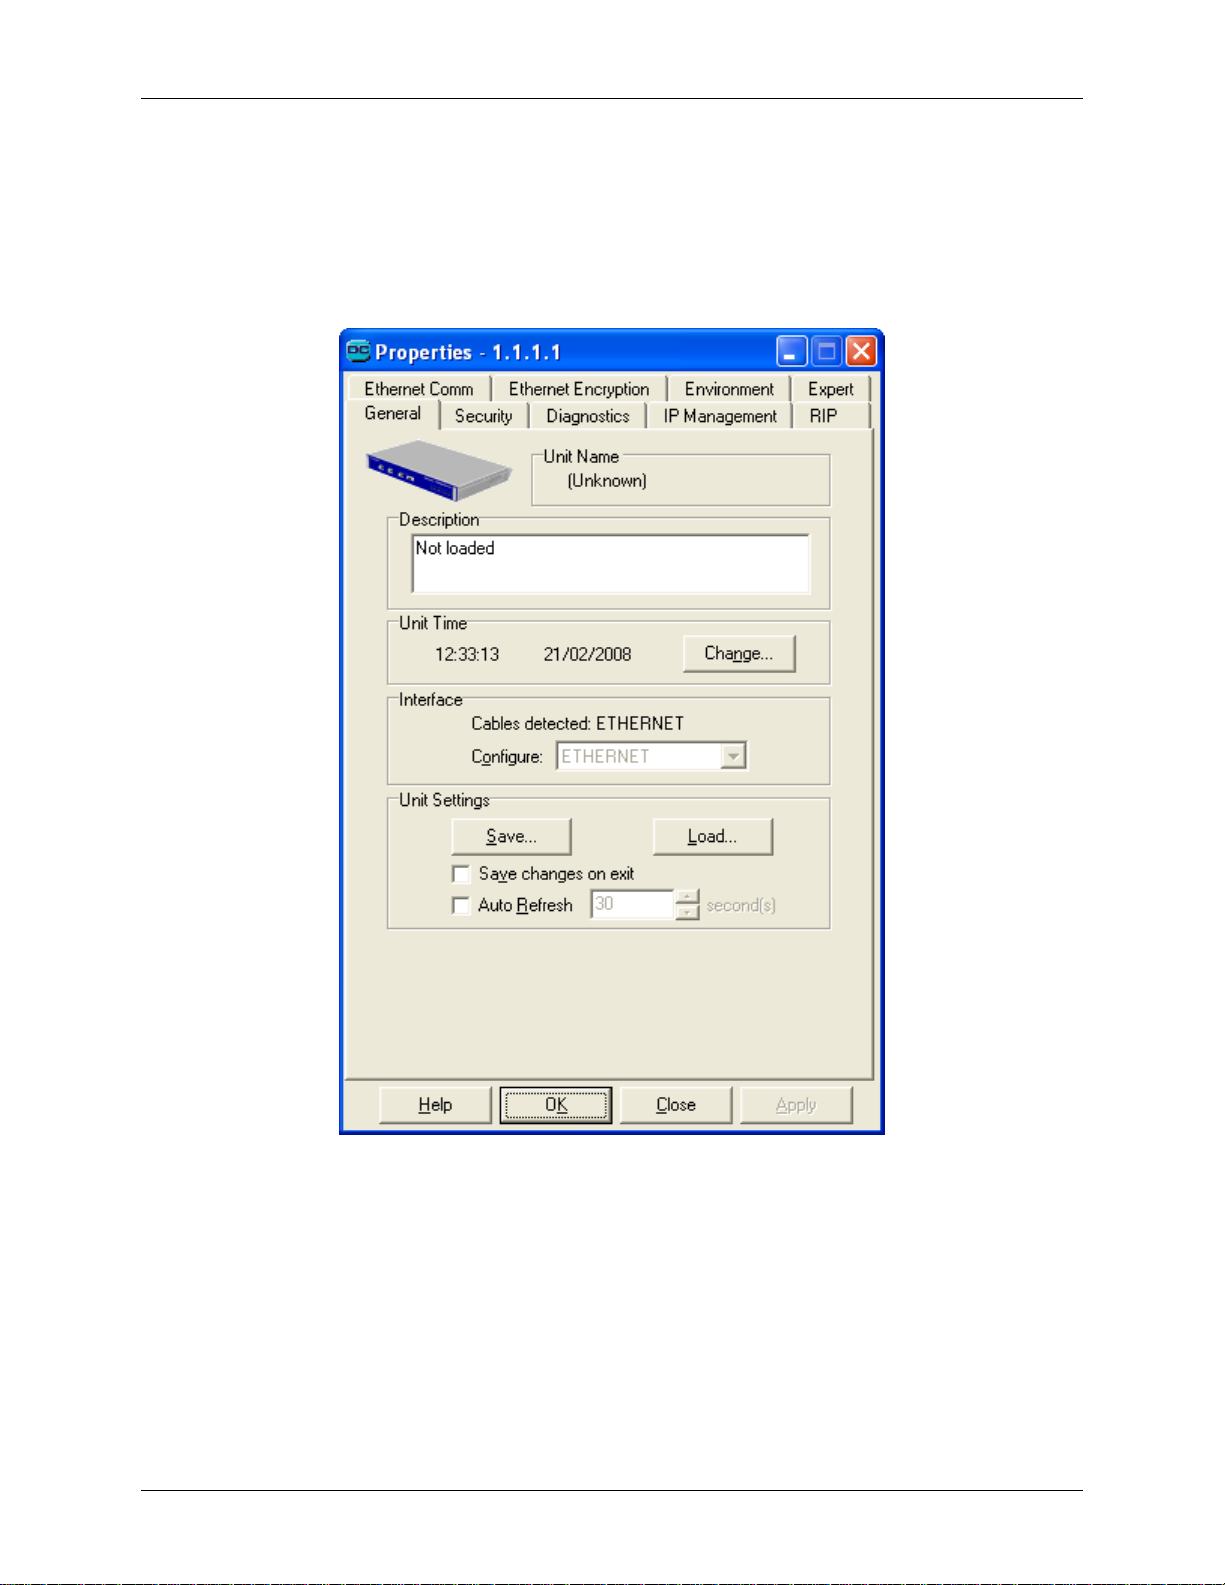
Datacryptor Ethernet User Manual Element Manager Reference
Each of the tabs will now be described in turn.
The General Tab
The properties on the General tab control the general behavior of the unit. The image shown
on the General tab will reflect the model of Ethernet Datacryptor that you are using.
Unit Name: read from the unit.
Description: read from the unit.
Change: click this button to set the unit's clock/calendar. (The clock is used to track the time
that Keys are created and to track certificate expirations.) The unit operates internally on UTC
time and the Element Manager attempts to correct, when setting and when displaying, for the
users time zone.
Note: If you set the unit’s clock backwards to a date and time in the past, reboot it to
avoid filling the log files with error messages about the time setting.
1270A450-005 - June 2008 Page 57
Page 58

Element Manager Reference Datacryptor Ethernet User Manual
Cable detected: the types of cable connected to the unit.
Save: stores the current properties in a named file, which can then be loaded using the Load
button (for example, to restore the settings after a unit has been reset to factory defaults).
Load: loads saved properties from a named file. You can then examine, edit or save them, or
apply them to the current unit by clicking the Apply button.
Save changes on exit: tick this box to save the current properties to a named file when you
exit the program.
Auto Refresh: tick this box to re-load the current setting from the unit every n seconds, where
n is set by the adjacent control. Warning: This may cause large amounts of data to be
transferred from the unit under management and may degrade system performance.
The Save and Load buttons provide a convenient way to set up a number of similar units, as
well as a convenient way to keep backups of unit settings.
Page 58 THALES
Page 59
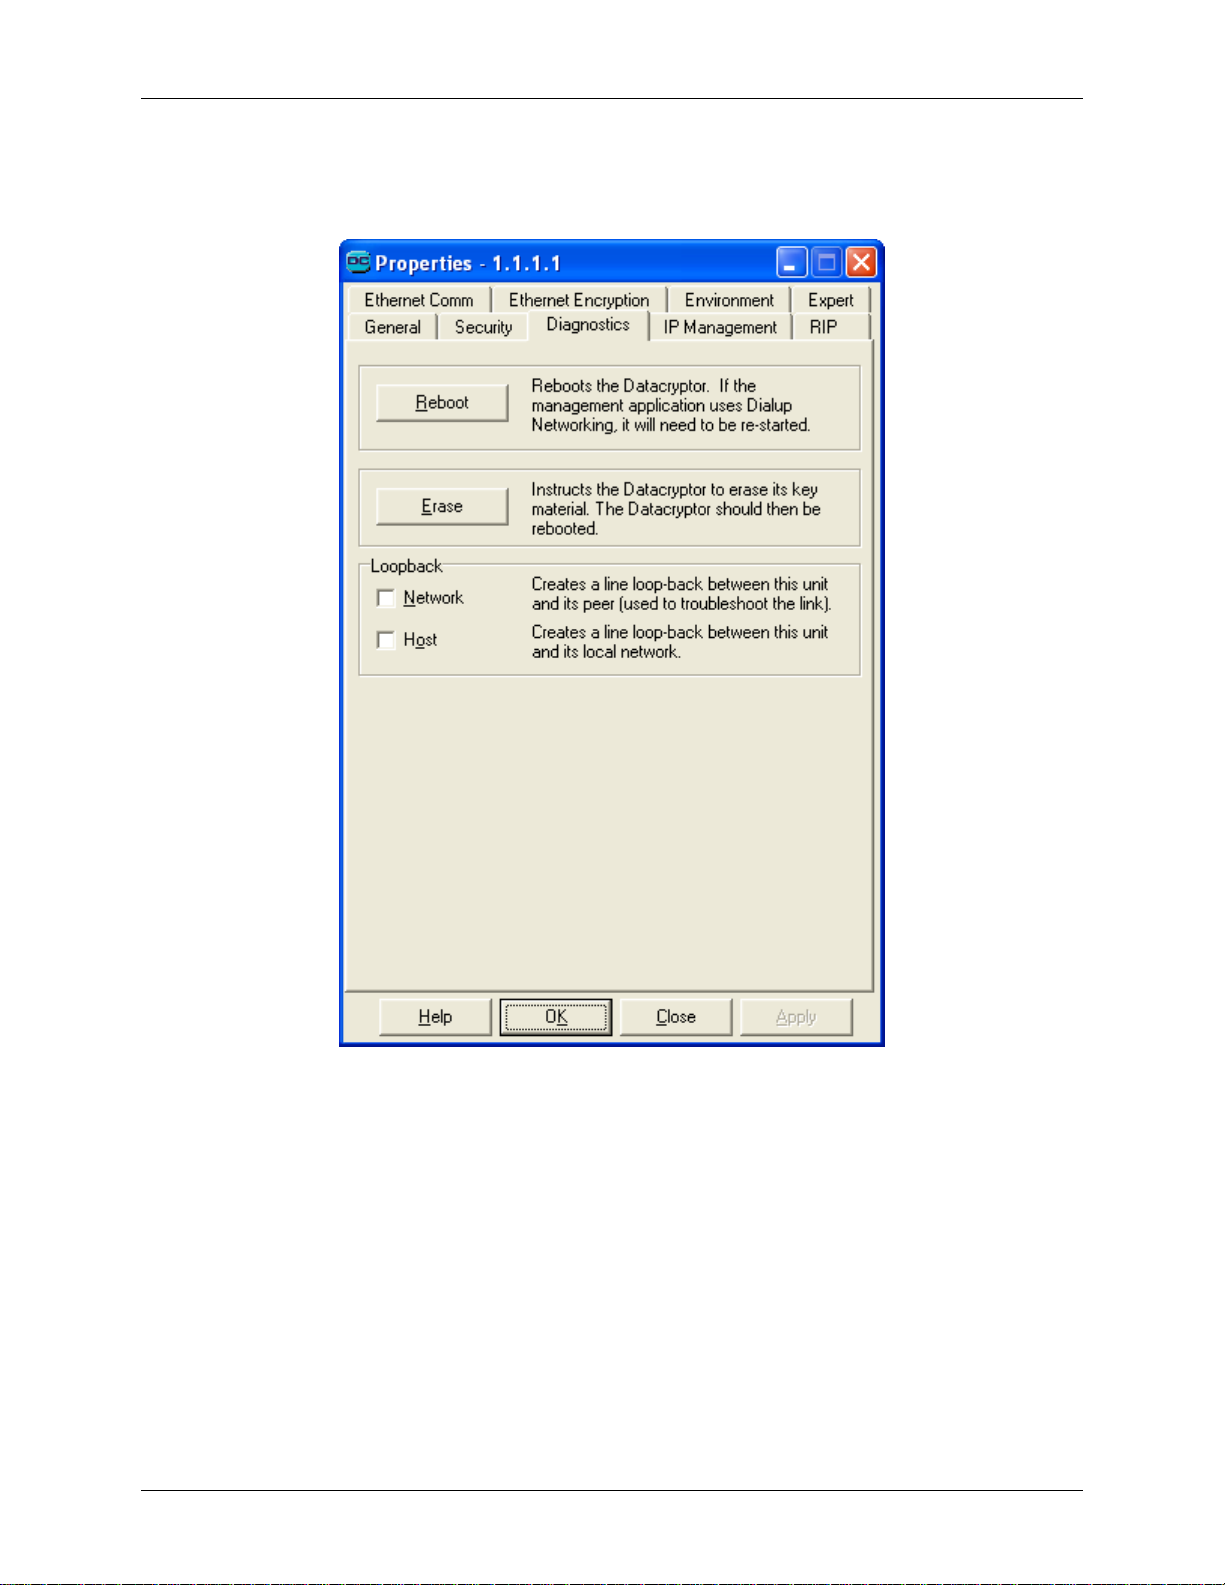
Datacryptor Ethernet User Manual Element Manager Reference
The Diagnostics Tab
The Diagnostics tab will provide a range of diagnostic aids.
Currently, it provides two diagnostic facilities:
Reboot: click this button to reboot the unit as if it had been turned off and on again. (This
operation takes several minutes)
Rebooting halts all operations on the device and starts the boot process in the same manner as
when the power is cycled. Save any configuration changes prior to rebooting the unit. Unsaved
changes will be lost.
1270A450-005 - June 2008 Page 59
Page 60
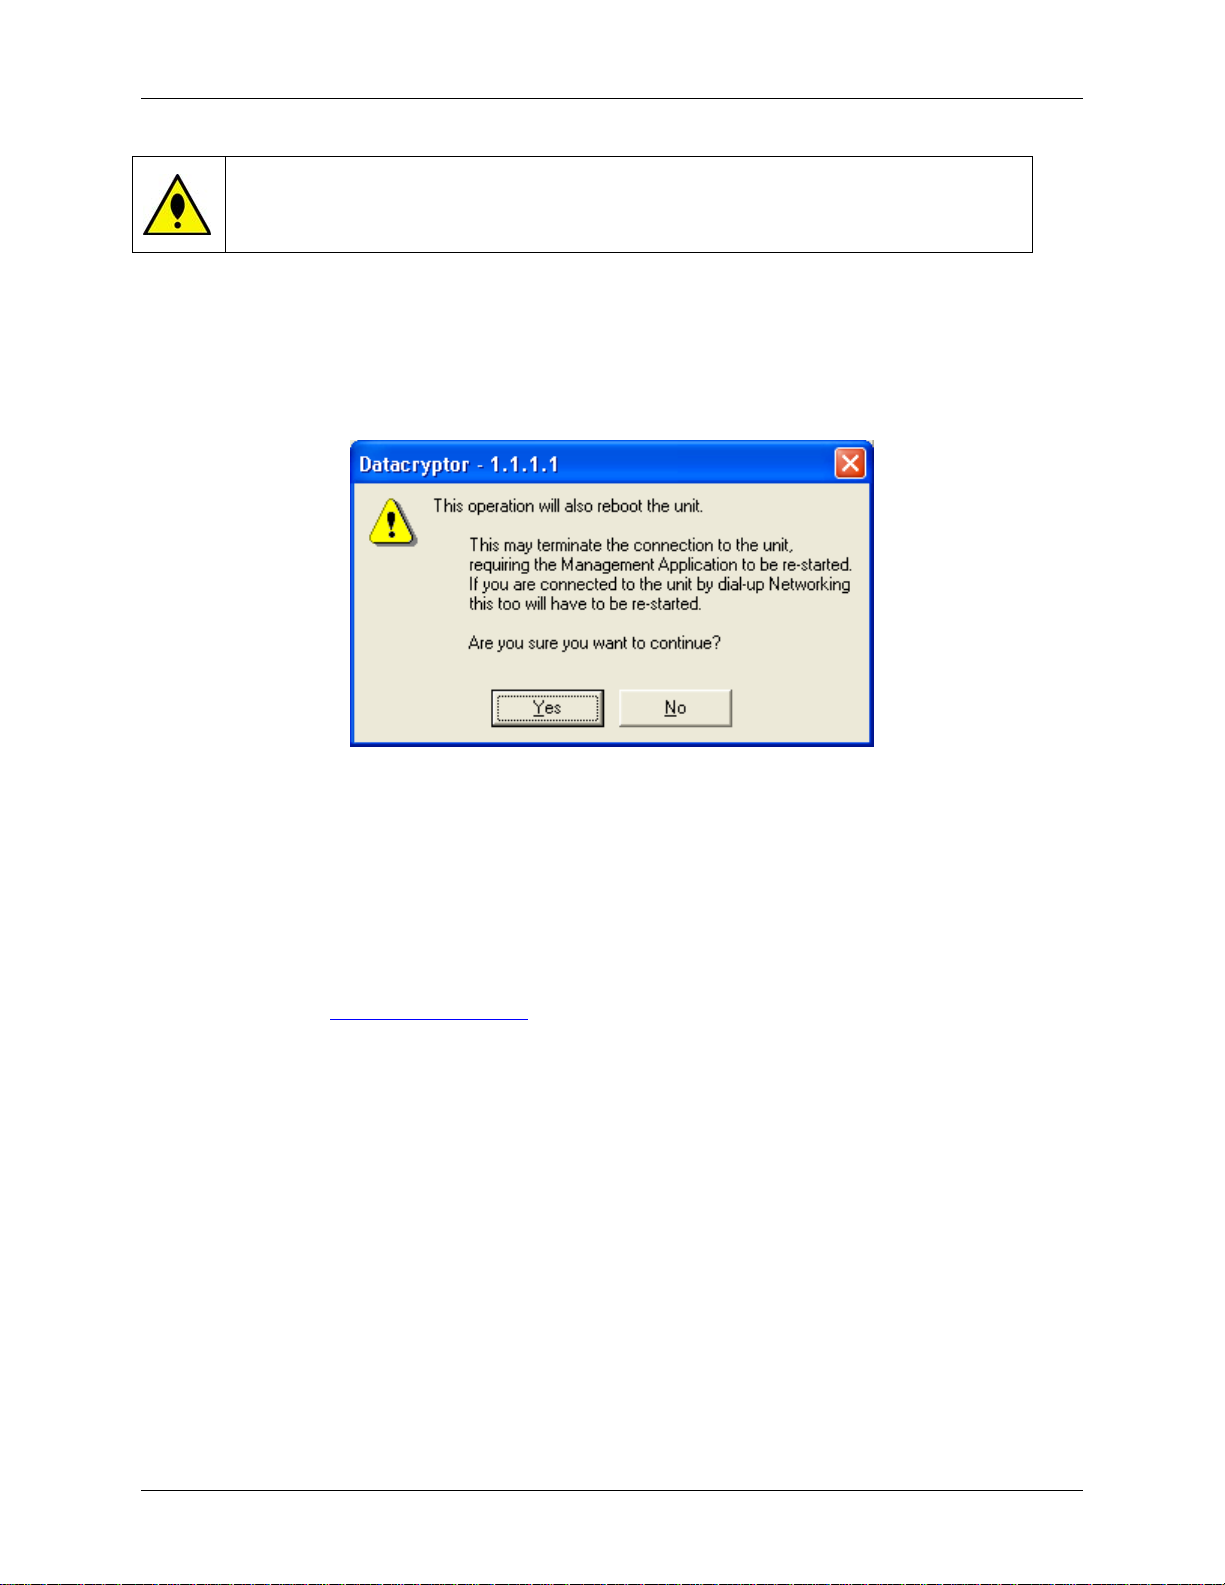
Element Manager Reference Datacryptor Ethernet User Manual
CAUTION: Rebooting the device interrupts the data traffic on the Host and
Network ports.
Erase: click this button to erase the unit’s Key material. Basic unit Configuration will not be lost,
i.e. the unit can still be managed remotely once the unit has re-booted.
The following confirmation dialog will be shown. Click on Yes to continue. The unit will delete
the key material and reboot, this will close any management sessions including dial up
networking connections
Loopback
The loopback facility is a diagnostics test capability that allows either, or both, of the ports to
loop back any signals that are applied.
For example, if the Host port is placed in loopback, then the local signals sent to the
Datacryptor for encryption and onward transmission, are in fact simply returned back to the
Host port. Likewise, if the Network port is placed in loopback mode, any signals received from a
remote unit are looped back out to that remote unit.
An indication of the loopback status of the unit can be obtained from the Loopback LED on the
Front panel. See
These loopback options allow line diagnostic tests to be performed by external test equipment.
The Audit log will record when the host port (Private Loopback) or network port (Public
Loopback) has loopback enabled or disabled.
Note: The Datacryptor 100 Mb Ethernet does not support loopback of either the
Network or Host interface.
Select one or both of the loopback options:
• Network: Select the Network option to create a loopback between the unit and its peer
for troubleshooting purposes.
• Host: The Host option is used to create a loopback between the unit and its local
network.
Loopback functionally is available while the unit is in all encryption modes and all entries and
exits will be entered into the units audit log.
The Front Panel LEDs for the details.
Page 60 THALES
Page 61
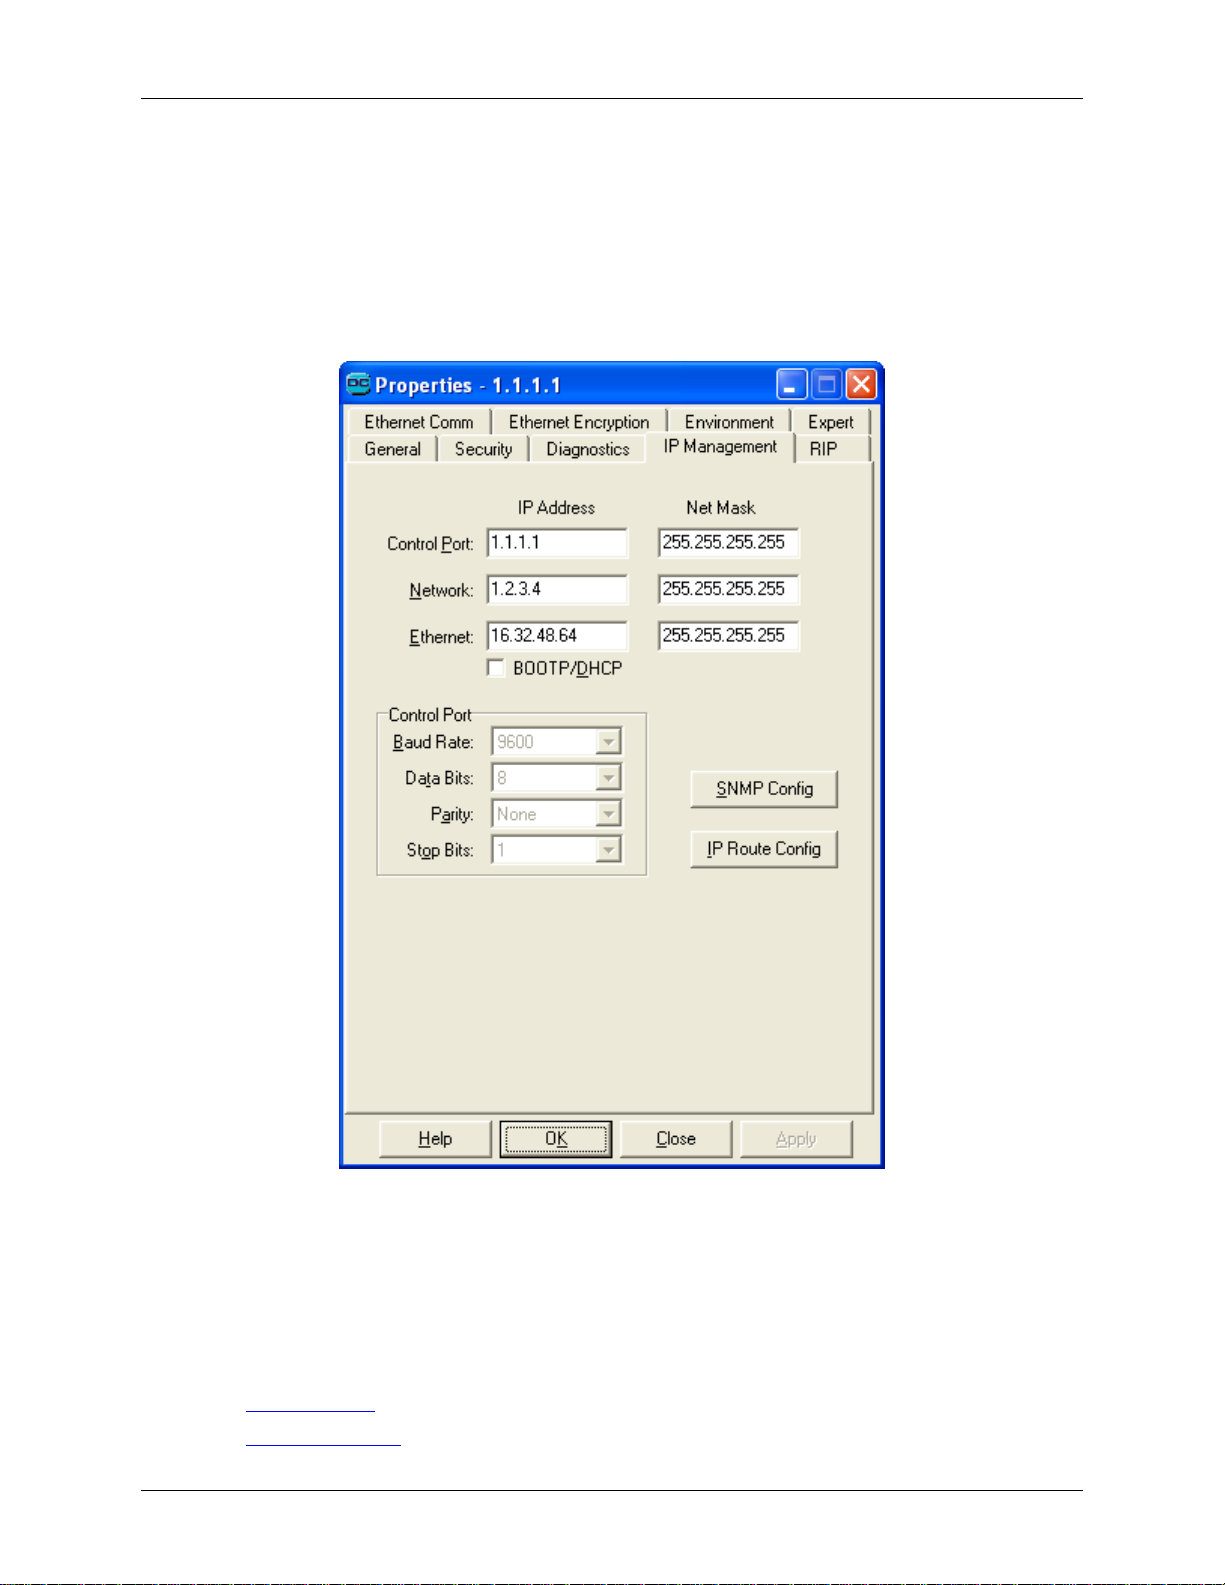
Datacryptor Ethernet User Manual Element Manager Reference
Note: The loopback mode is regarded as a transient feature intended purely as an aid to
troubleshooting. Therefore when the unit is rebooted the loopback options are set
to Disabled.
The IP Management Tab
The properties on the IP Management tab control the IP addressing of the unit.
They are as follows:
• Control Port – the IP address and net mask of the unit’s Control Port, this value is only
used if the PPP does not negotiate another value
• Network - the IP address and net mask of the unit’s Network Port.
• Ethernet - the IP address and net mask of the unit's Ethernet (management) Port.
• Control Port - these fields show the settings for dial up networking.
• SNMP Config – click this button to configure the SNMP trapping for this unit.
• IP Route Config - click this button to configure the IP Routing table for this unit
1270A450-005 - June 2008 Page 61
Page 62
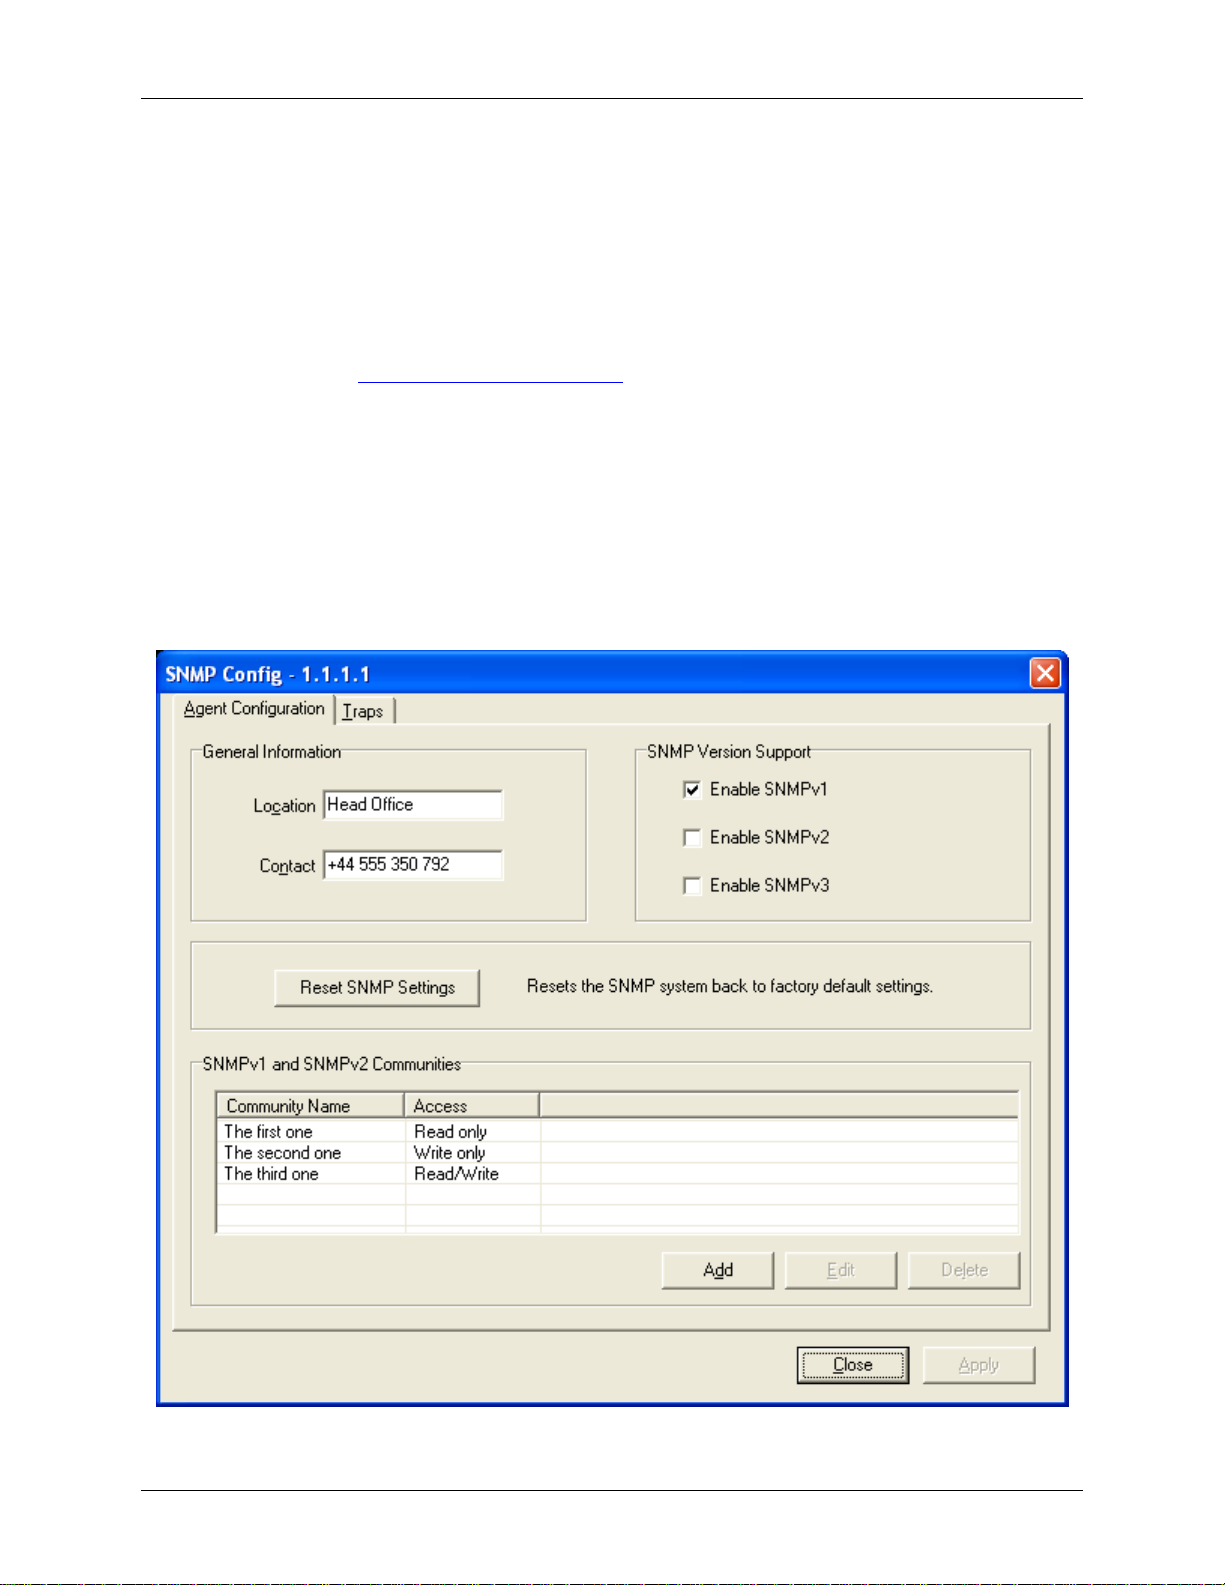
Element Manager Reference Datacryptor Ethernet User Manual
Configuring SNMP
Datacryptor units record all significant management and error events in their logs for later
examination, but can also be configured to report them immediately to a central location, by
using the SNMP protocol - to help centralize and simplify management. Events are reported as
SNMP Traps V1, v2c, or v3 (as selected on the Traps tab – see below), to a central device
(typically a PC) called an SNMP Network Manager. This SNMP Network Manager must be
compliant with the SNMP agent version support selection on the Agent Configuration tab – see
below. A list of the
this guide.
To configure SNMP, click the SNMP Config button on the unit’s IP Management tab to display
the SNMP Config dialog. This dialog has two tabs – the Agent Configuration tab and the Traps
tab.
Agent Configuration Tab
The Agent Configuration tab lists the SNMP communities defined for this unit, and provides
facilities to maintain the list.
log and SNMP trap numbers with descriptions is provided as an appendix to
Page 62 THALES
Page 63
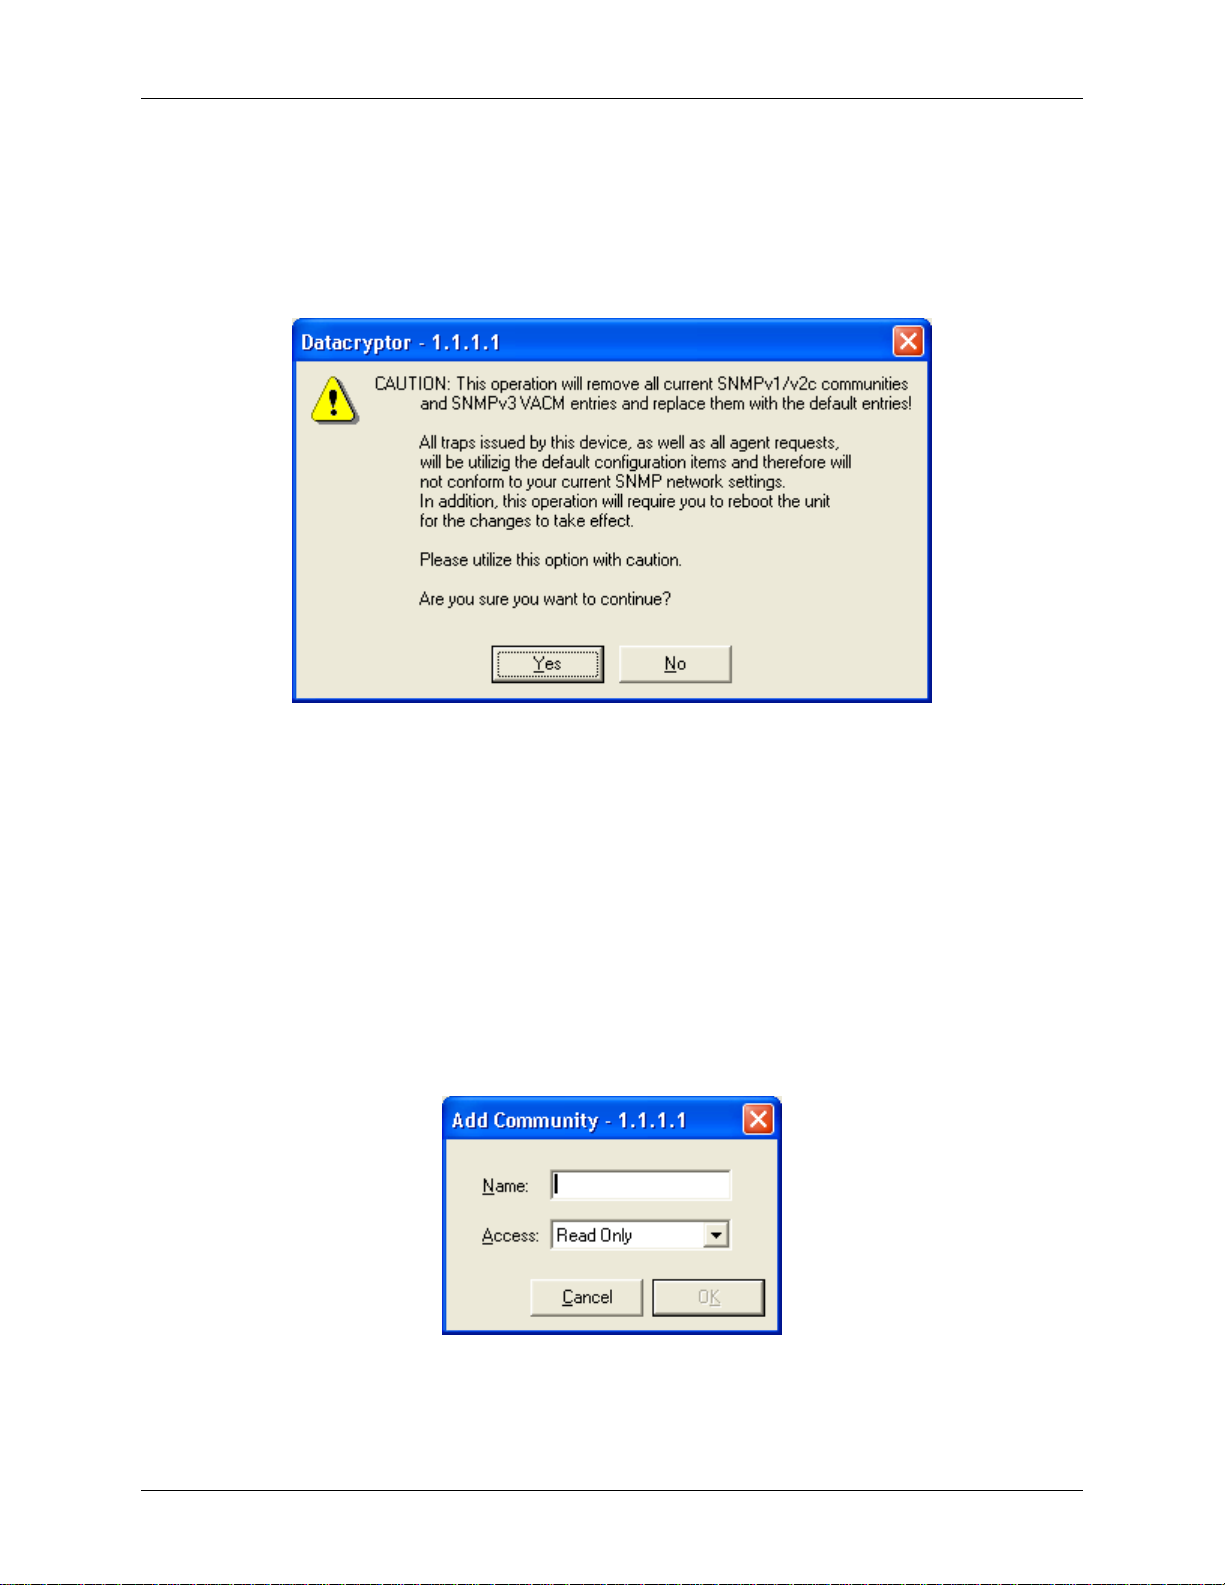
Datacryptor Ethernet User Manual Element Manager Reference
− Enter the Location and Contact information for this unit. Both edit boxes accept
spaces and alphanumeric characters. There is a limit of 255 characters for each field.
− Select which versions of SNMP are to be supported using the Enable SNMP tick boxes.
Note: Clicking on the Reset SNMP Settings button will result in a caution being shown
before the factory defaults are applied – see the following image:
SNMP Communities
SNMP Version 1 and Version 2c support an access control model based upon community
names. An SNMP community defines a name and a set of permissions for that community name
– each SNMP request received by a Datacryptor unit is labeled with the originator’s community
name – so the unit can decide whether to permit or deny the request.
These community strings will be utilized by the device to determine whether or not to allow
SNMPv1 and SNMPv2c requests. To disable SNMPv1 and SNMPv2c requests, deselect the Enable
SNMP tick boxes located above the communities list.
To add a new SNMP community:
1. Select the Communities tab.
2. Click the Add button – the Add Community dialog is shown:
3. Enter the Name for this community.
4. Select the type of Access for the members of this community: Read Only, Write Only or
Read/Write.
1270A450-005 - June 2008 Page 63
Page 64
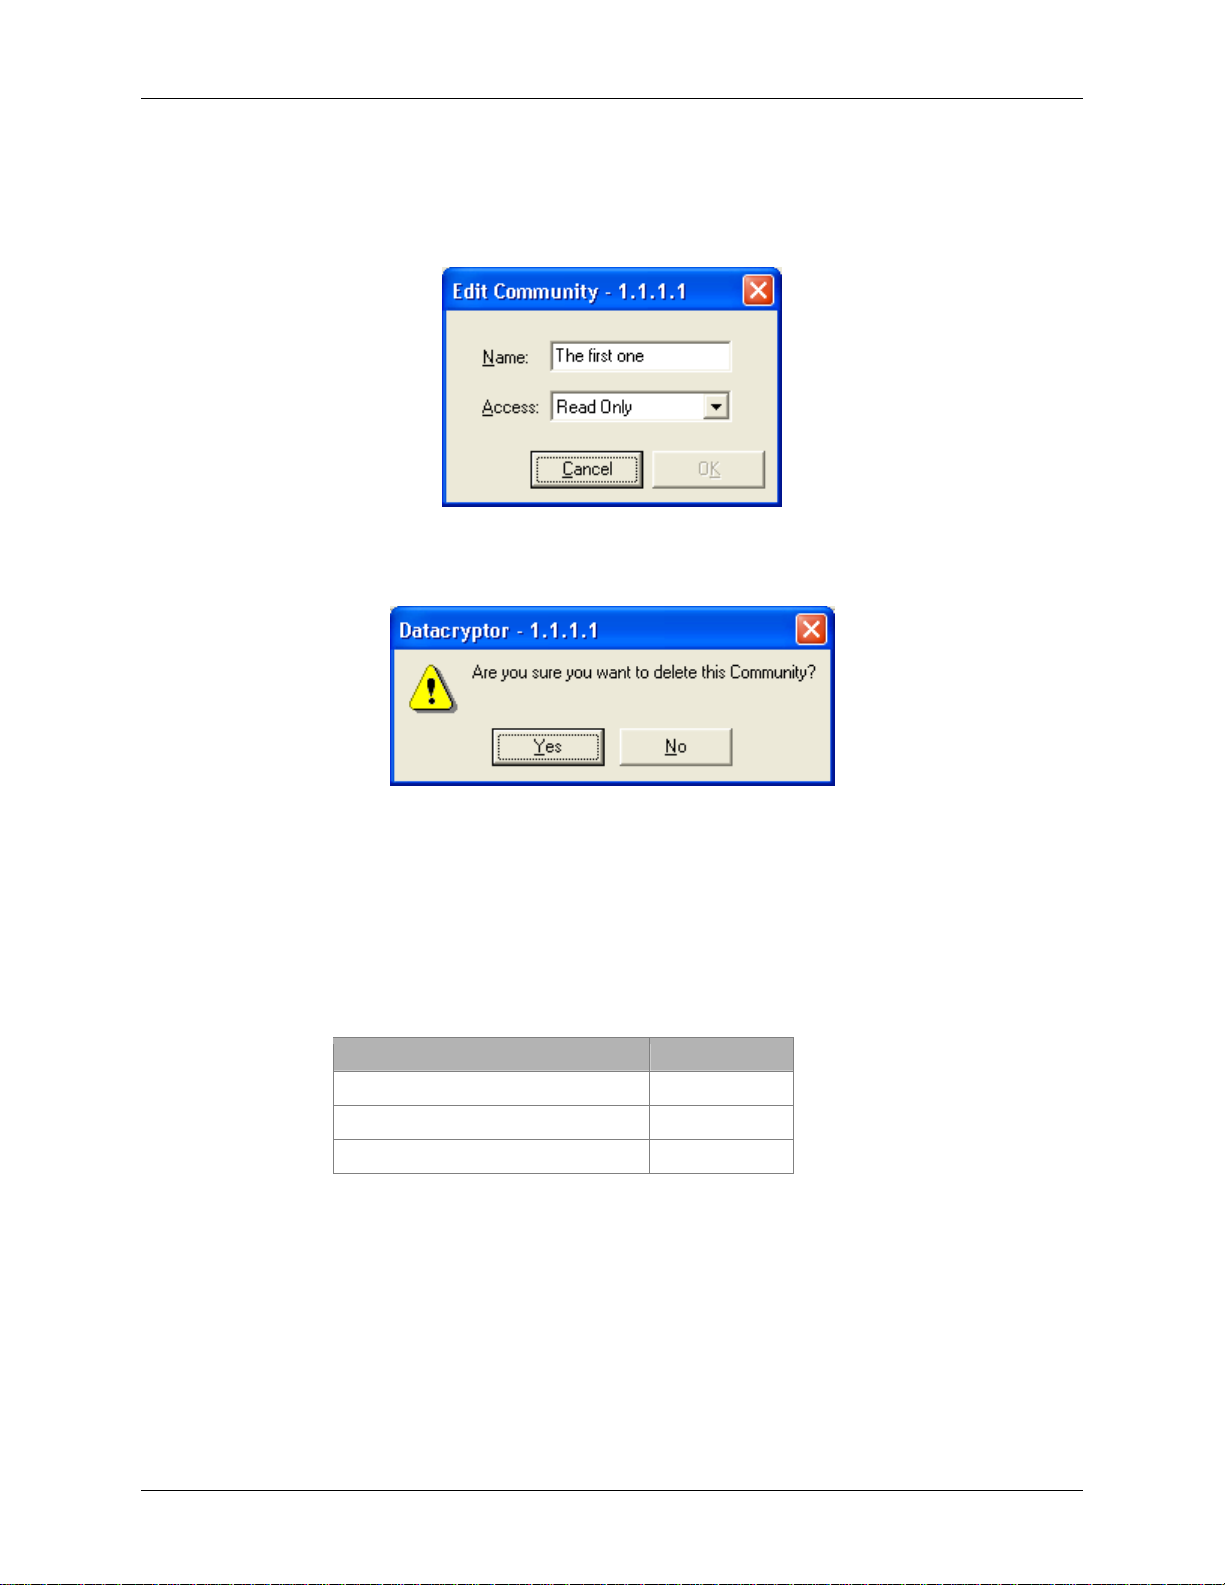
Element Manager Reference Datacryptor Ethernet User Manual
5. Click OK to add the community.
To edit an SNMP community:
Select the entry to edit by clicking on it, and then click the Edit button.
To delete an SNMP community:
Select the entry to delete by clicking on it, and then click the Delete button.
SNMPv3 Users
SNMP Version 3 supports an access control model based upon users and views. Management
of these users and views is controlled using native SNMPv3 commands. Please utilize your
existing SNMPv3 management tools to manage user and view based access control.
Management of the SNMPv3 users is a time consuming task and you should set your command
timeout values to at least 120 seconds per transaction.
Default SNMPv3 user information is displayed in the table below:
Type Value
User Name initial
Authentication Password authentic
Privacy Password private8
Page 64 THALES
Page 65
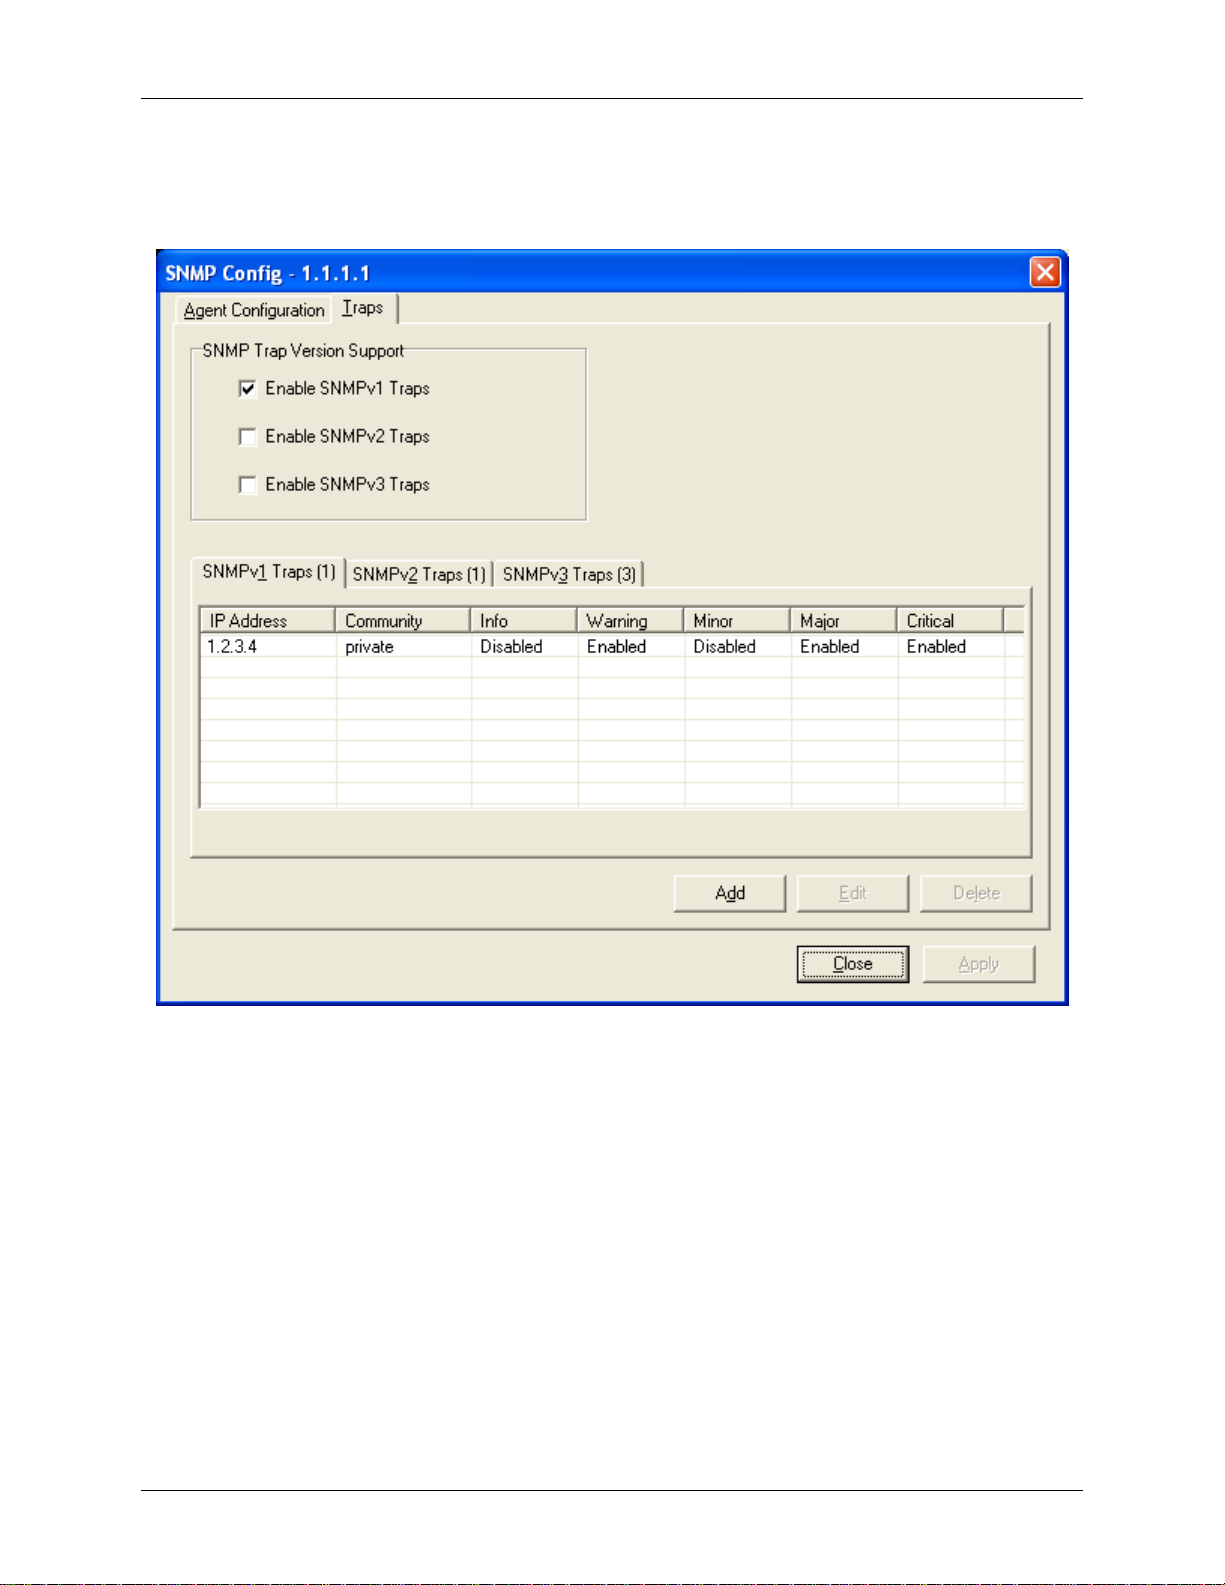
Datacryptor Ethernet User Manual Element Manager Reference
Traps Tab
The Traps tab lists the details of each SNMP trap that has been defined for this unit, and
provides facilities to maintain the list:
To enable or disable SNMP traps for this unit, use the appropriate Enable checkboxes for the
each version of SNMP.
When defining an SNMP Trap that is not on a local network connection, the Datacryptor Ethernet
must have a route defined for the address in order for the Traps to be delivered to the SNMP
Manager.
To add a new SNMP trap manager:
1. Select the Traps tab.
2. Select the appropriate SNMP version tab.
3. Click the Add button.
1270A450-005 - June 2008 Page 65
Page 66
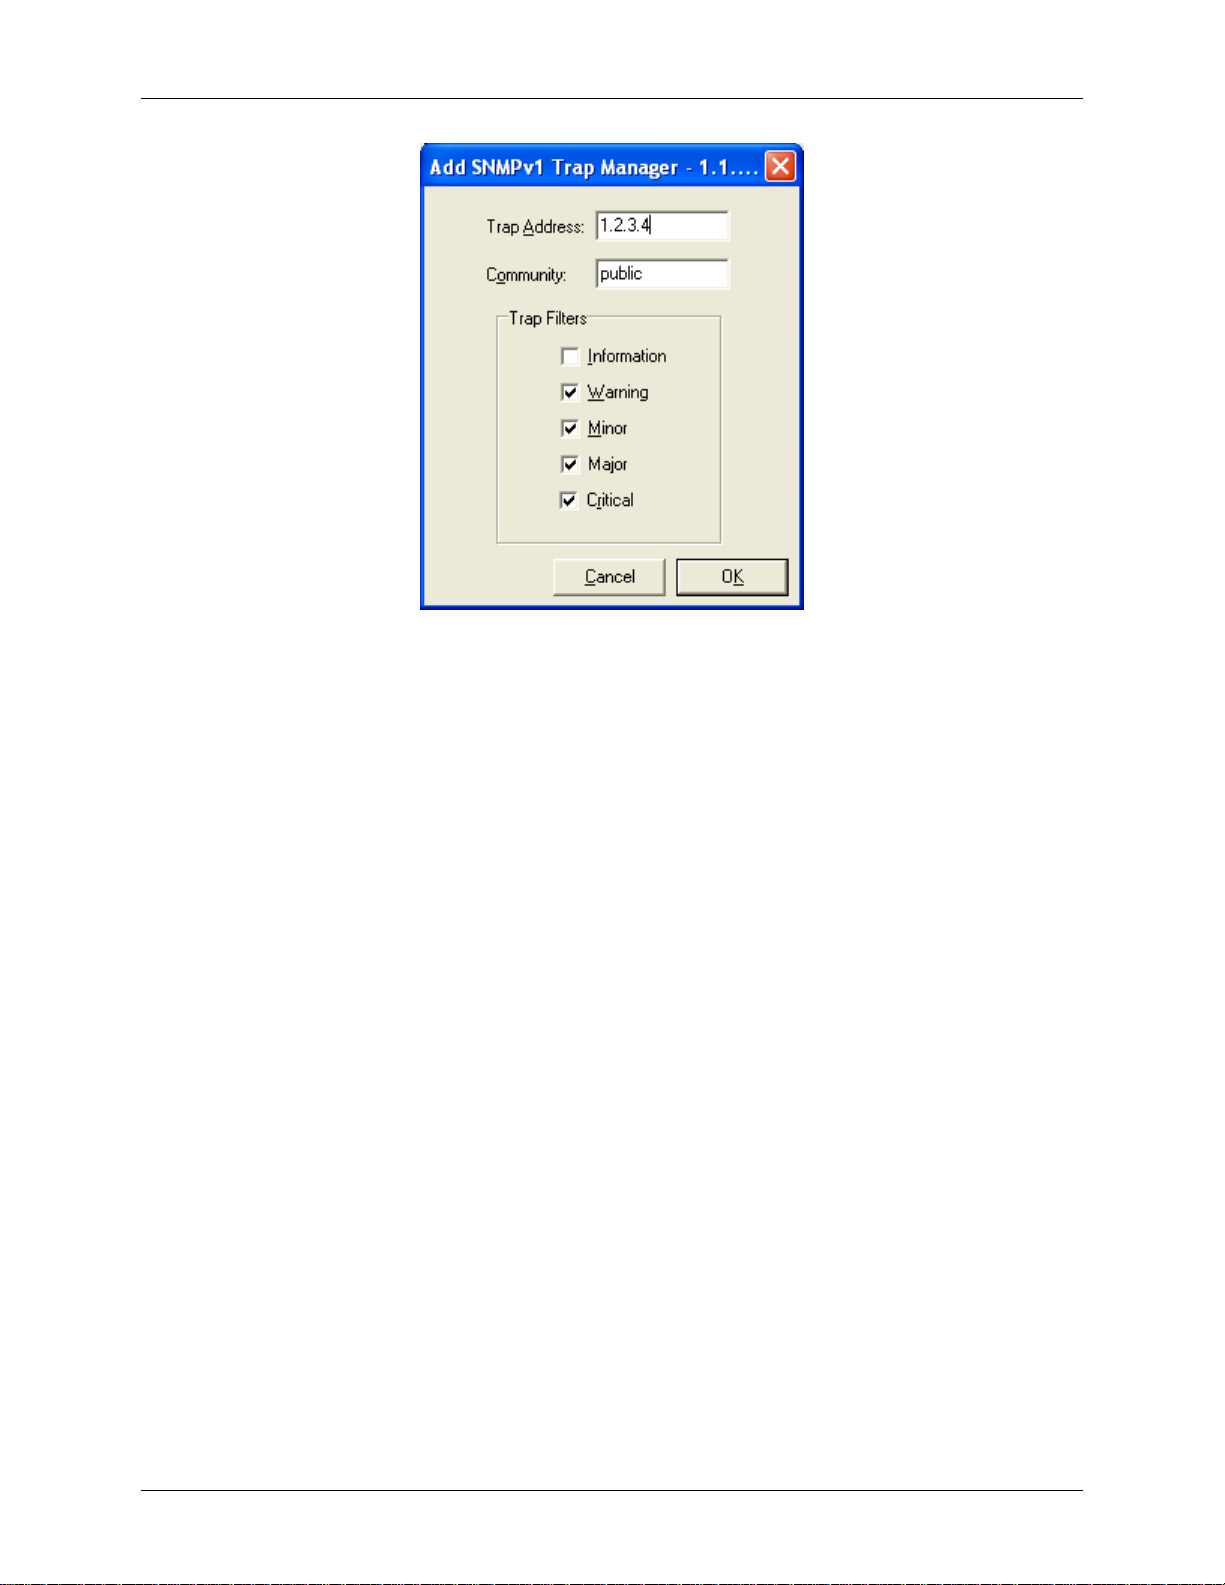
Element Manager Reference Datacryptor Ethernet User Manual
− Trap Address: Type the IP address of the SNMP trap manager.
− Community: This field is unused because the unit only issues SNMP Version 3 traps.
You can set this field to any value without affecting behavior of trap issuance.
− Trap Filter: Tick the categories of event to send to this trap manager.
Note: It may take up to 20 seconds to acknowledge the selected action.
Page 66 THALES
Page 67
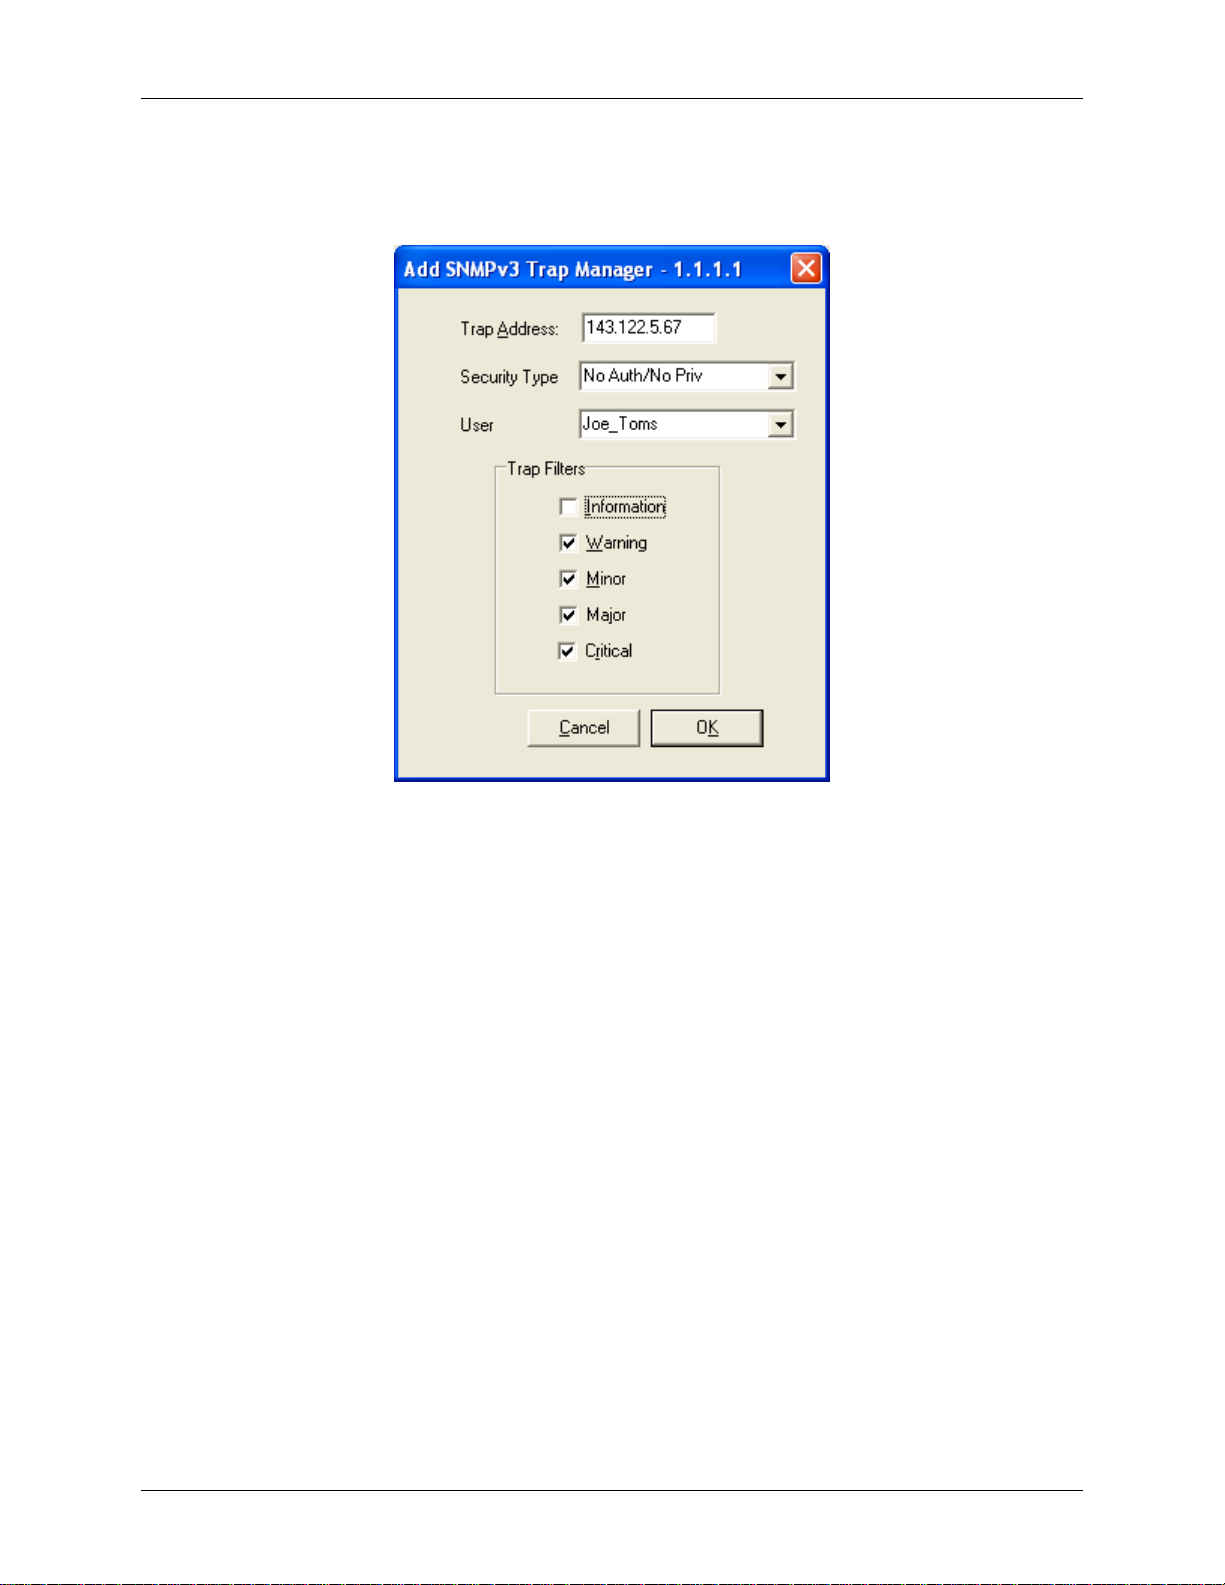
Datacryptor Ethernet User Manual Element Manager Reference
Adding SNMPv3 Trap Managers:
When using SNMPv3 you are able to specify whether the reports will use authentication
alone, or authentication and privacy combined, or no security at all.
Add Trap Manager dialog for SNMPv3
− Security Type: Select the type of security that will be used for the reports from the
drop down list. If the security is set to none (No Auth/No Priv), then the user name will
be highlighted in red on the SNMPv3 tab, as illustrated by the following image:
1270A450-005 - June 2008 Page 67
Page 68
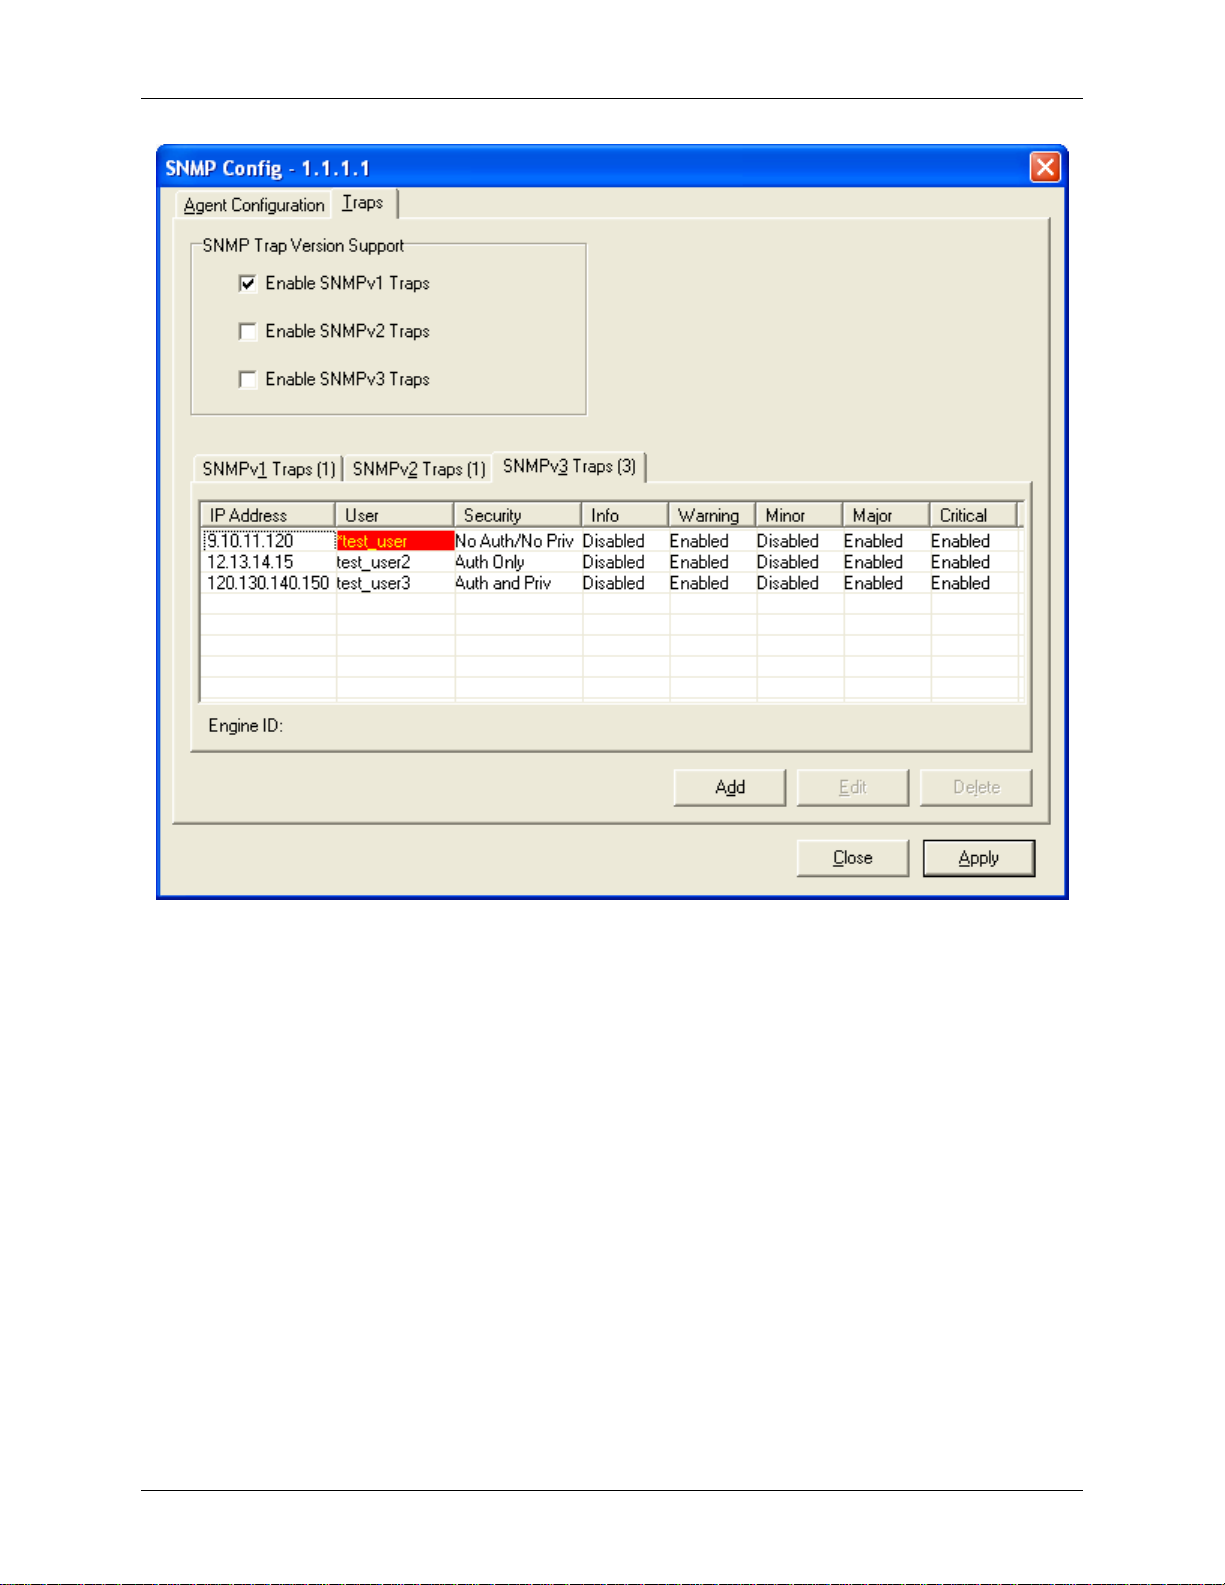
Element Manager Reference Datacryptor Ethernet User Manual
Page 68 THALES
Page 69
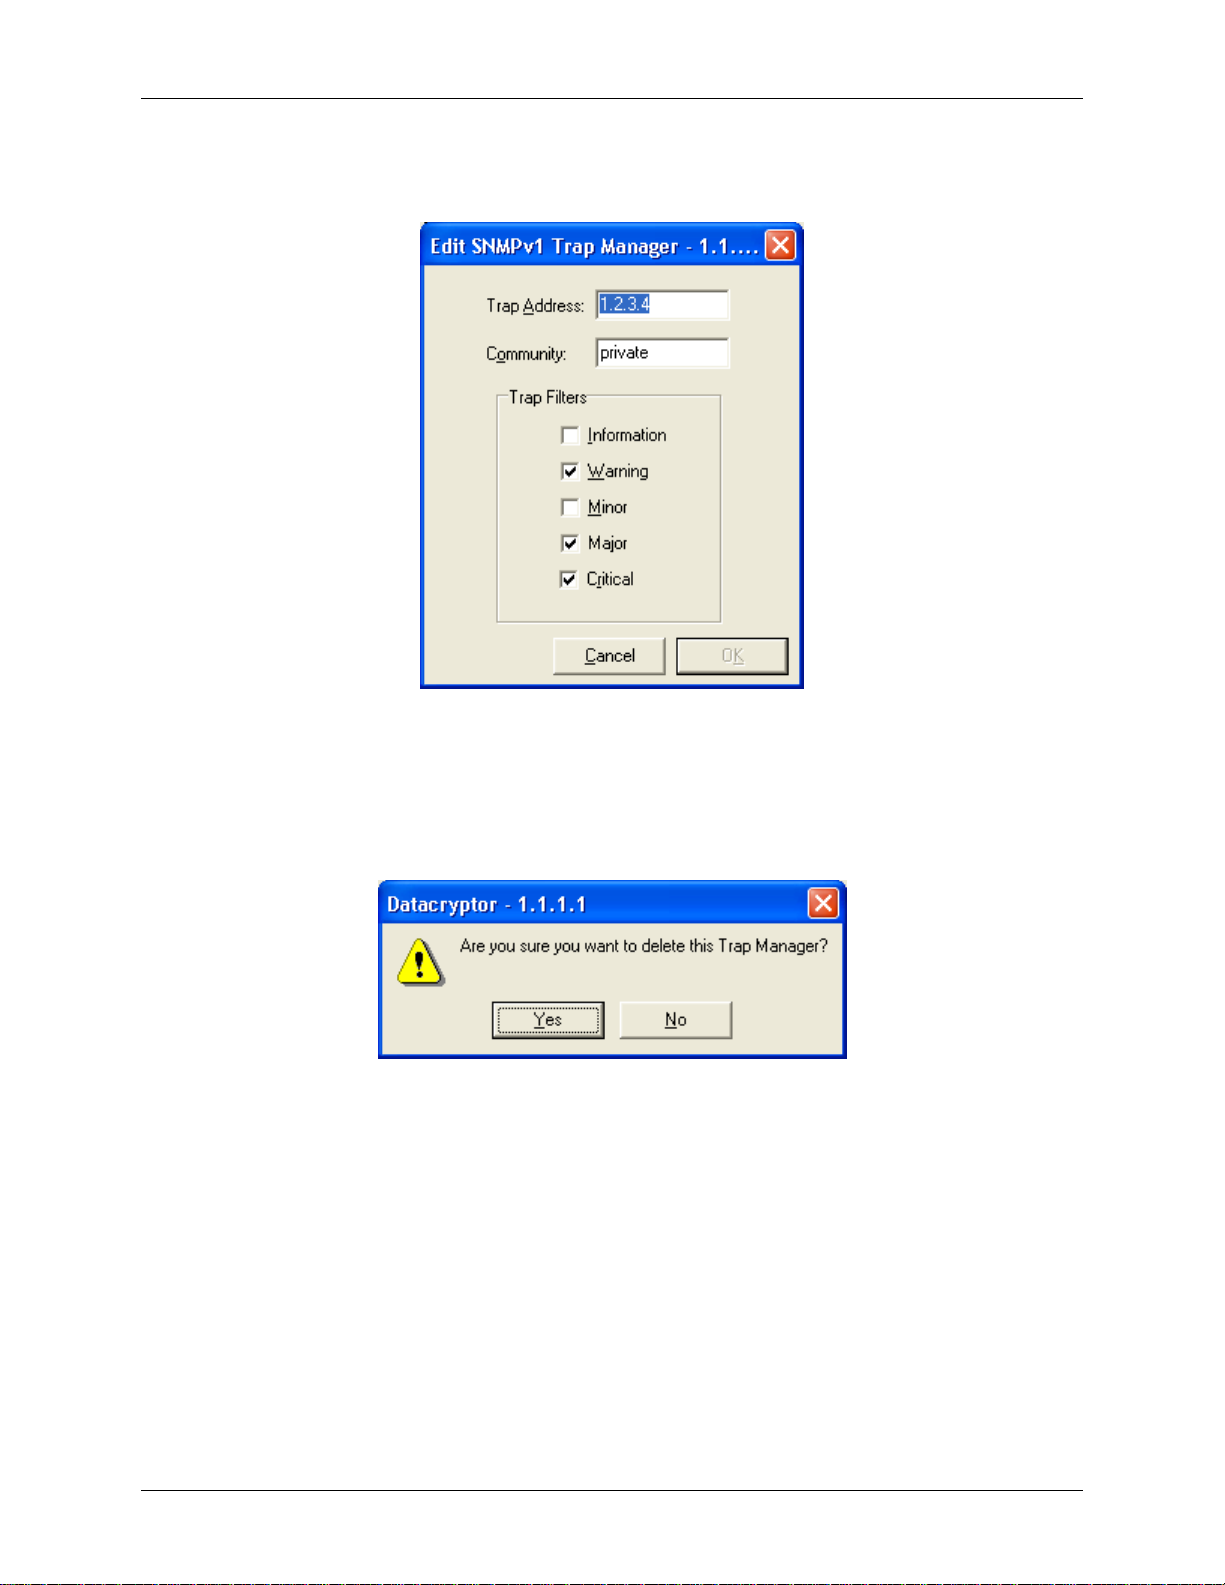
Datacryptor Ethernet User Manual Element Manager Reference
To edit an SNMP trap manager:
1. Select the entry to edit by clicking on it, and then click the Edit button.
2. Edit the entries in the Edit Trap Manager dialog as required, and then click OK.
Note: It may take up to 20 seconds to acknowledge the selected action.
To delete an SNMP trap manager:
1. Select the entry to delete by clicking on it, and then click the Delete button.
2. Click Yes to confirm deletion, or No to cancel deletion.
Note: It may take up to 20 seconds to acknowledge the selected action.
1270A450-005 - June 2008 Page 69
Page 70
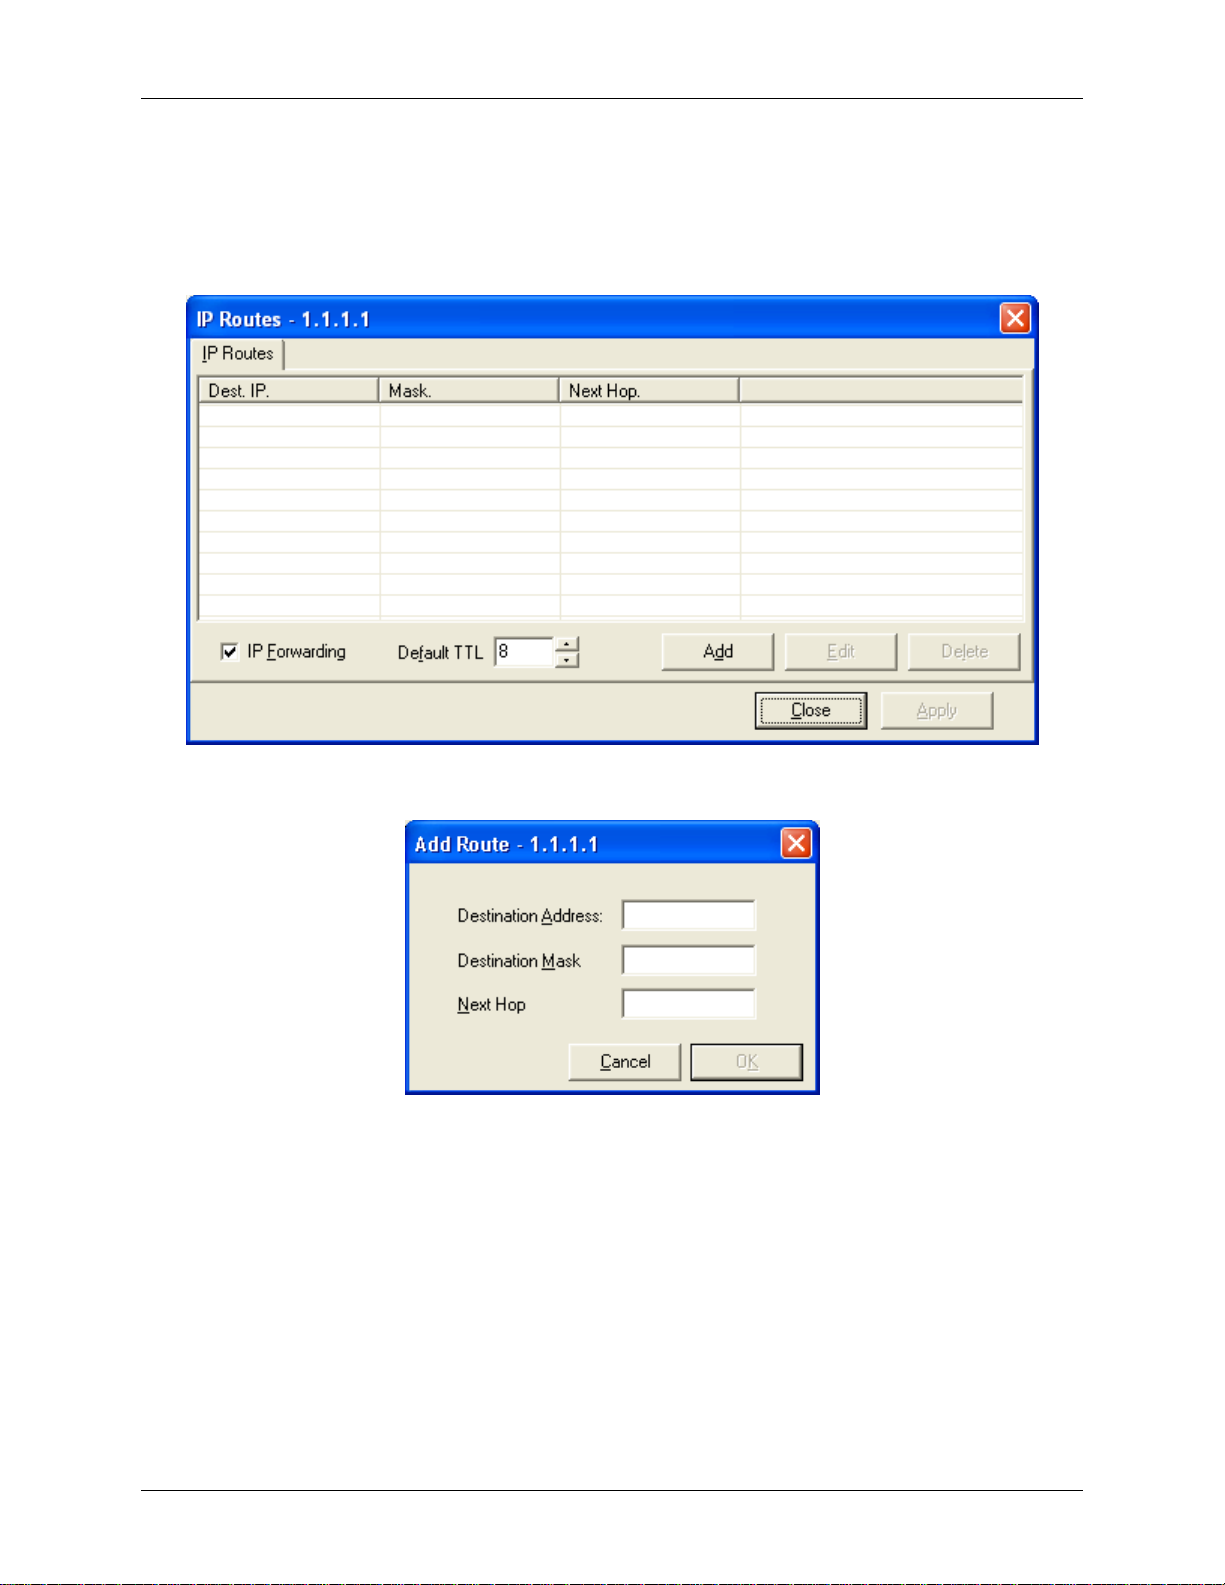
Element Manager Reference Datacryptor Ethernet User Manual
IP Route Config
Selecting this button on the Properties - IP Management tab will display the IP routes dialog
detailing the IP routes that have been defined for this unit and providing facilities to maintain
the IP routes list:
Use the Add, Edit and Delete buttons to manage the required list of IP routes.
Page 70 THALES
Page 71
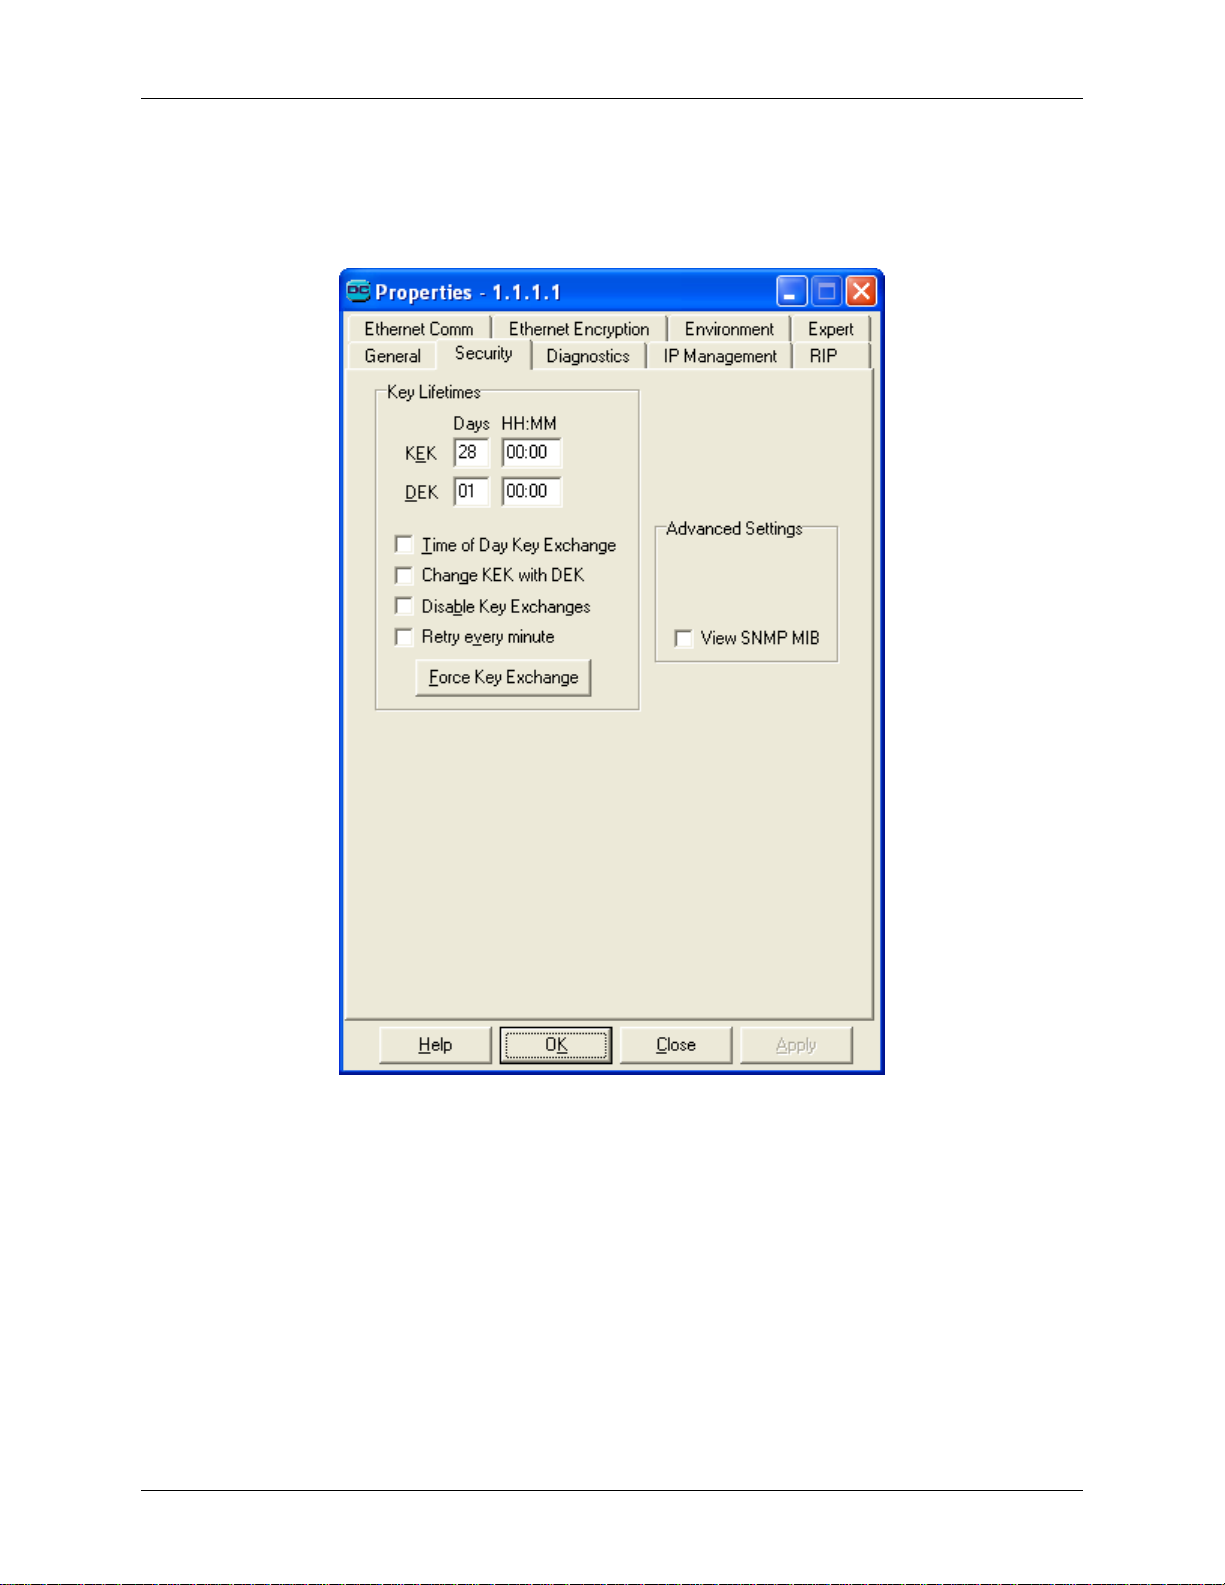
Datacryptor Ethernet User Manual Element Manager Reference
The Security Tab
The properties on the Security tab control crucial aspects of the security of the Datacryptor
unit.
They are as follows:
• KEK: the longest time that the unit will use a KEK for, in days, hours, minutes.
• DEK: the longest time that the unit will use a DEK for, in days, hours, minutes – or the
time at which to perform a daily key exchange (see next control).
• Time of Day Key Exchange: check this box to force a regular key exchange at the
same time every day (as specified by the DEK field).
• Change KEK with DEK: check this box to change the KEK when the DEK changes. When
this is checked the KEKs are not stored and will not be visible in the Key Management
dialog.
1270A450-005 - June 2008 Page 71
Page 72

Element Manager Reference Datacryptor Ethernet User Manual
• Disable Key Exchanges: check this box to disable all key exchanges other than those
required to make a secure connection. (This disables the previous 4 controls until you
uncheck it.)
• Retry every minute - with this box checked the Datacryptor Ethernet will try to poll for
lost peers every minute, this is the default behavior. If the "retry every minute" box is
unchecked the Datacryptor Ethernet will gradually increase the time intervals between
attempted key exchanges. It will try after one minute, then after a further 2 minutes and
then after a further 4 minutes (i.e. the interval is doubled each time). The interval will
continue to double up to a maximum interval of 2 hours, it will then continue to poll
every 2 hours.
• Force Key Exchange: click this button to force an immediate key exchange with the
peer unit.
Advanced Setting
• View SNMP MIB: If checked the user will be able to use an external SNMP MIB browser
to view information regarding network configuration etc.
Page 72 THALES
Page 73
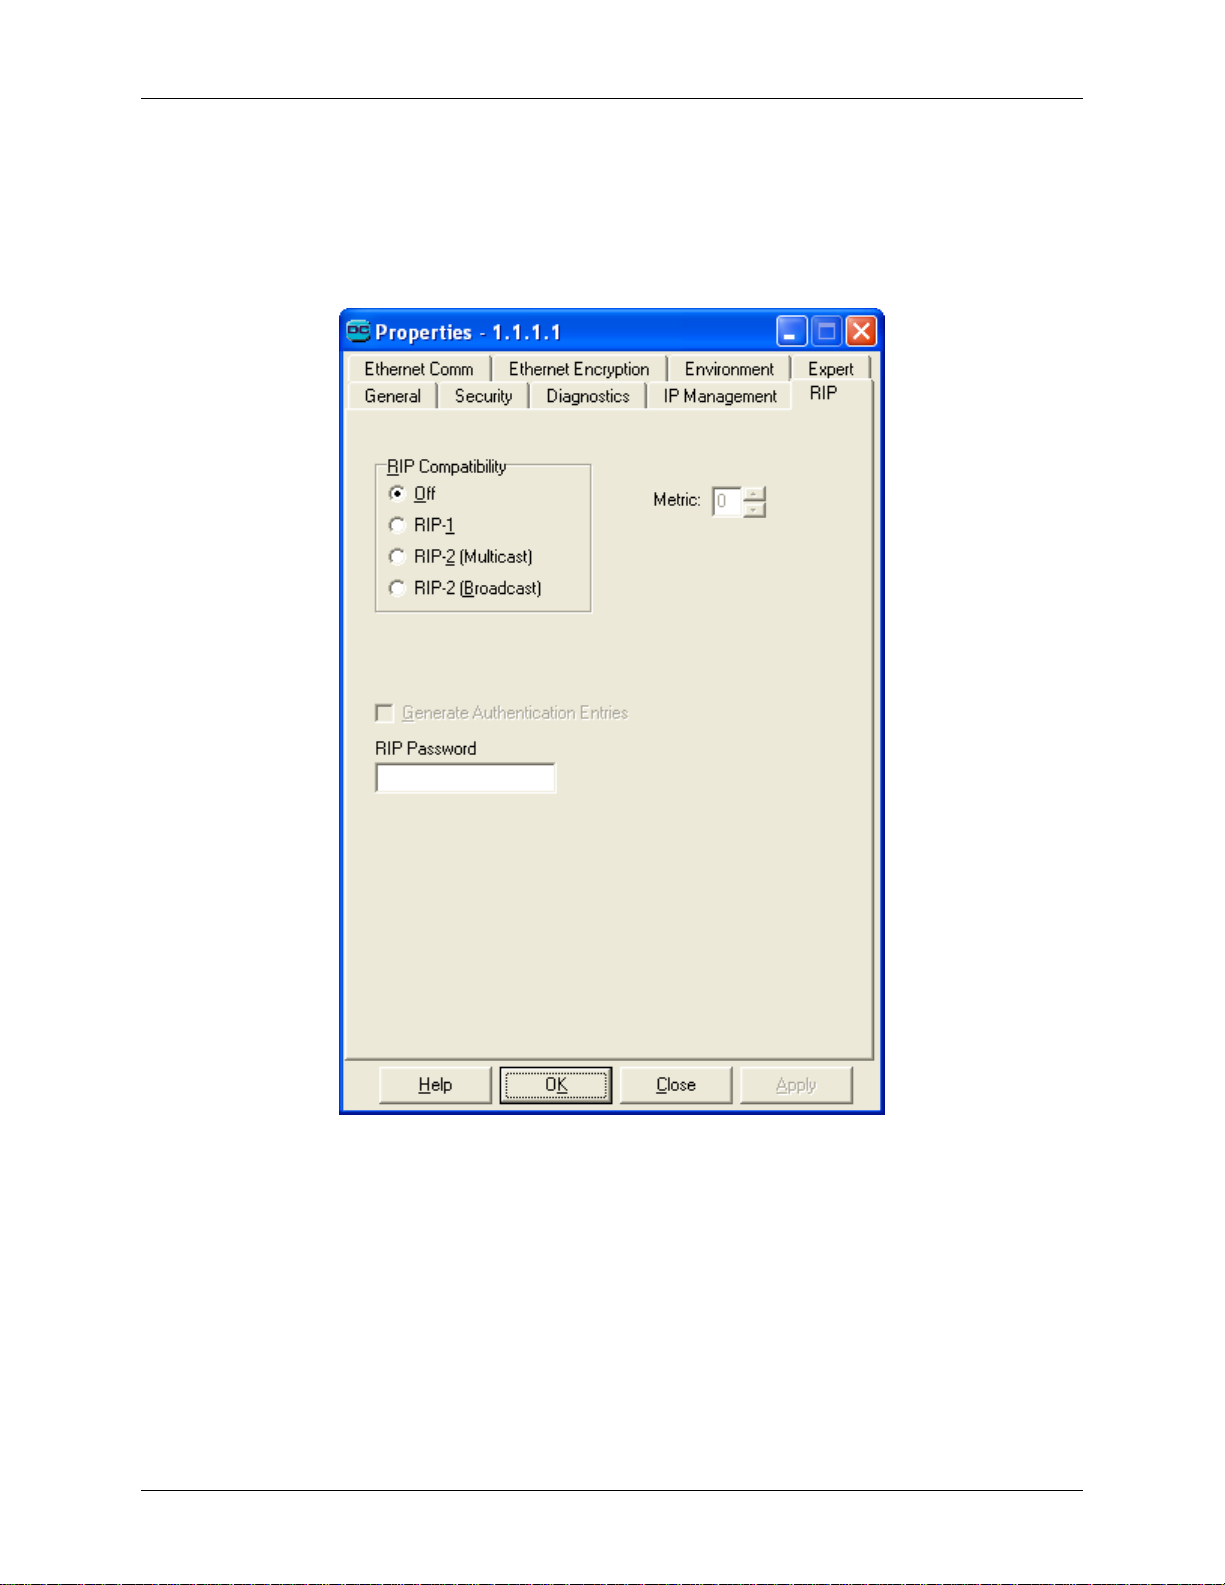
Datacryptor Ethernet User Manual Element Manager Reference
The RIP Tab
The RIP tab sets up the properties of the Routing Information Protocol (RIP) and configures the
way Rip messages are sent to other routers.
The Datacryptor Ethernet supports versions RIP-1 and RIP-2.
RIP Compatibility
This set of radio buttons is used to select which version of RIP that the Datacryptor Ethernet is
using:
• Off - this switches off compatibility with any version of RIP. No RIP messages
transmitted on any port.
• RIP 1 - select this if you wish the Datacryptor to be compatible with the first version of
RIP. This version of RIP only uses broadcasts to pass on information.
• RIP 2 (multicast) - this sets the Datacryptor to be compatible with RIP version 2 when
used in multicast mode. The multicast mode was implemented with the more versatile
RIP 2.
1270A450-005 - June 2008 Page 73
Page 74

Element Manager Reference Datacryptor Ethernet User Manual
• RIP 2 (broadcast) - this sets the Datacryptor to be compatible with RIP version 2 but
uses the broadcast mode. Some networks that are using RIP 1 may want to use RIP 2
but not use multicast transmissions. This will ensure that RIP responses are not
addressed to multicast address 224.0.0.9.
Note: IGMP is not needed since these are inter-route messages that are not
forwarded.
Metric
This sets the metric (or cost) that is associated to each route that is advertised in RIP responses
sent out by the Datacryptor unit.
Generate Authentication Entries
RIP 2 can implement an authentication entry in the first part of its response that contains a
password. If a router matches its own RIP password with that of the RIP response authentication
entry it will accept the routing information in the RIP response. Tick this check box to enable
the inclusion of authentication entries in RIP 2 messages sent from the Datacryptor Ethernet.
Password
This field contains the password to be associated with the authentication entry.
Page 74 THALES
Page 75
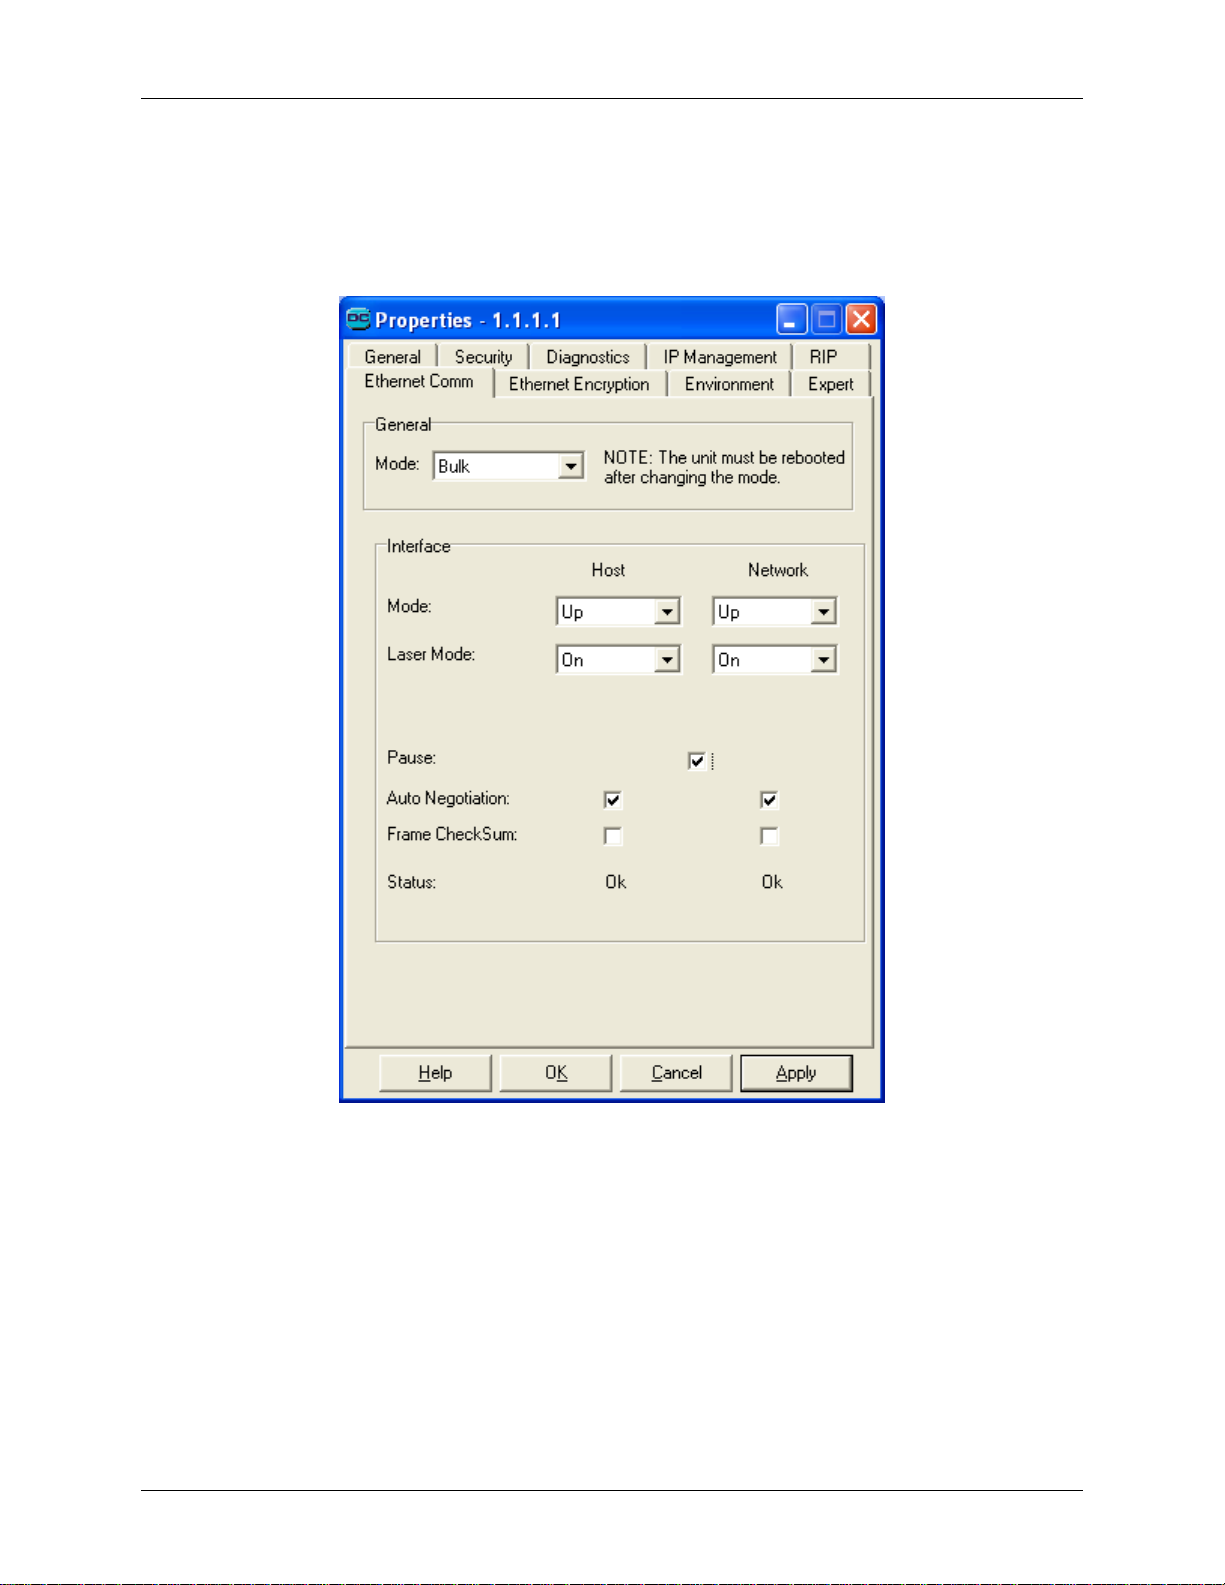
Datacryptor Ethernet User Manual Element Manager Reference
The Ethernet Comm Tab for 1 and 10 Gigabit Datacryptors
The properties on the Ethernet Comm tab control the communications settings of the
Datacryptor unit. The Comm tab illustrated in this section applies to the 1 Gig Ethernet unit.
Differences between the 1 Gig and 10 Gig units will be stated where relevant.
Ethernet Comm Tab for the 1 Gigabit Datacryptor
e properties are as follows:
Th
Mode- Selects one of two options for the transmission mode.
− Bulk - Unit encrypts everything including Ethernet header.
− Tunneling - Unit encrypts every thing below Ethernet header.
When a mode change is made then the following dialog will be shown advising that the unit
must be rebooted.
1270A450-005 - June 2008 Page 75
Page 76
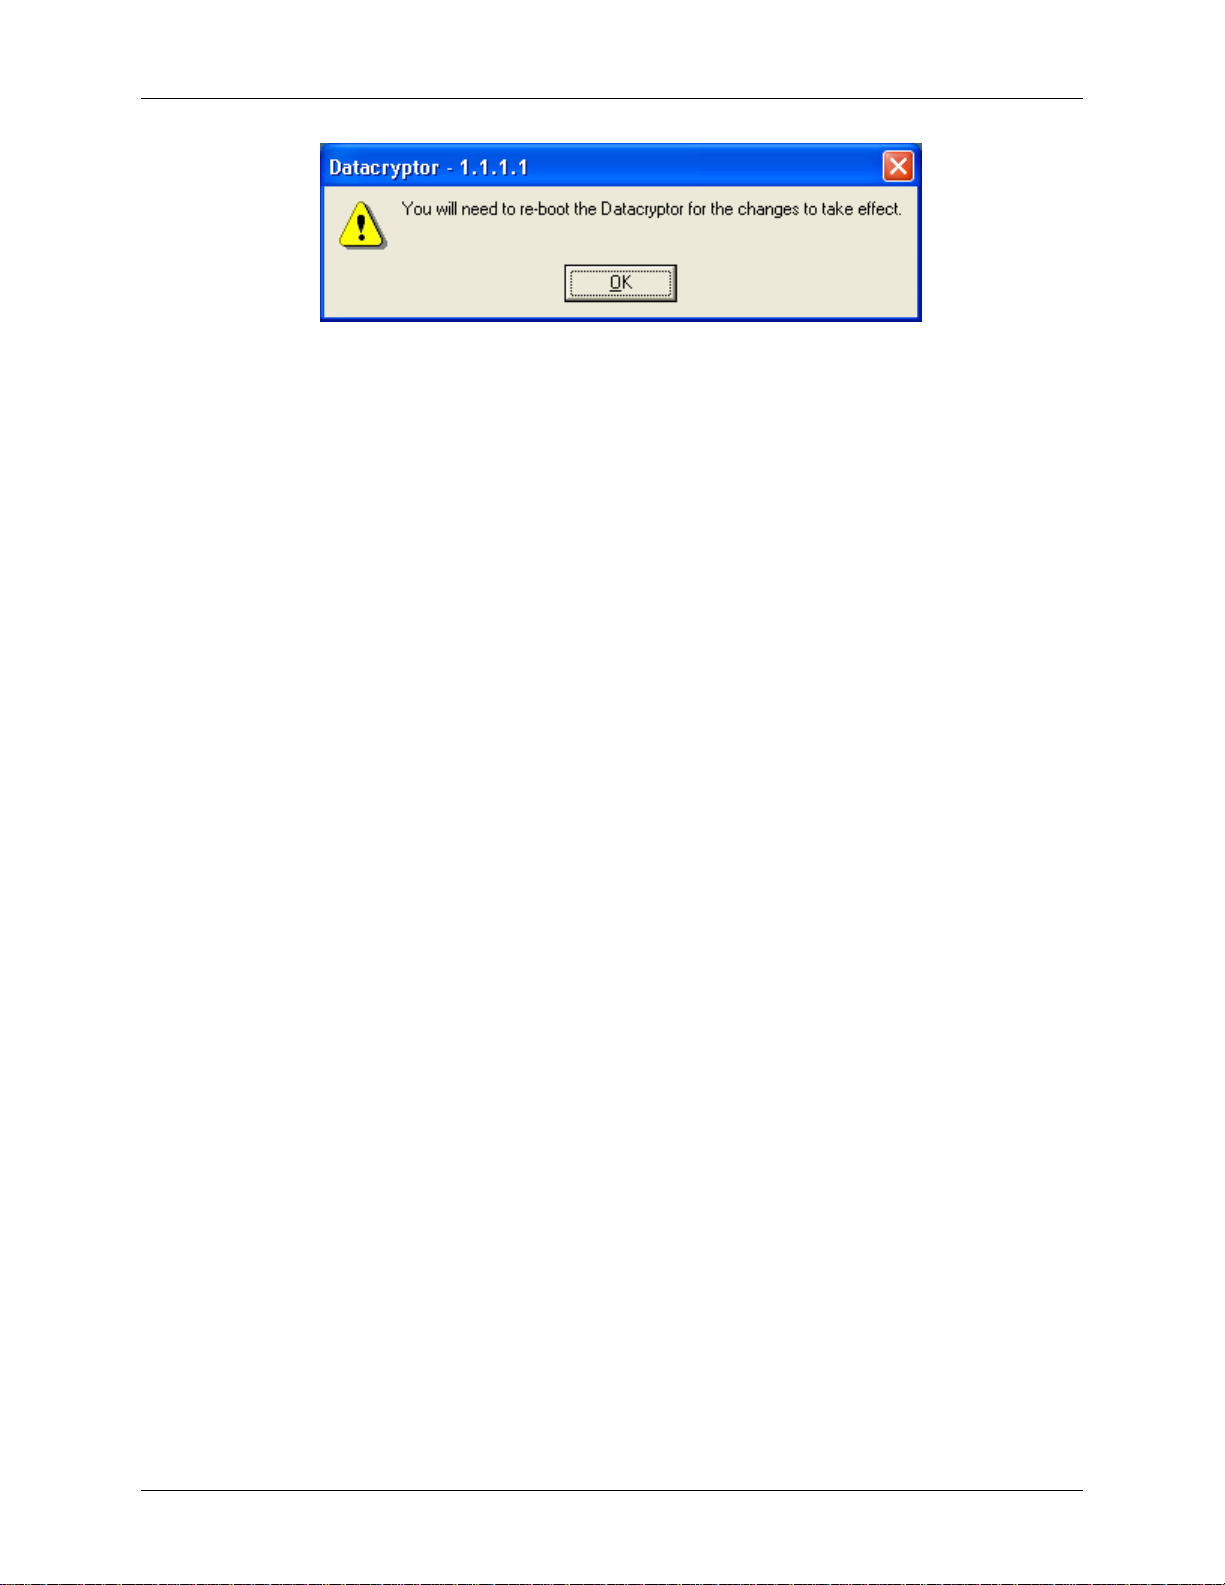
Element Manager Reference Datacryptor Ethernet User Manual
The unit can be rebooted using the option available on the Diagnostic tab
Interface Mode - Allows the Host and network interfaces to be switched Up/Down.
Laser Mode - Allows the Host and network Lasers to be individually switched On/Off.
Pause - The Pause option is a special Ethernet function that provides flow control between
Ethernet devices. If the switch on the public network is told to enable Pause, then a rule has to
be configured on the encryption unit to let the Pause frames pass through unencrypted to the
switch on the local side. A typical rule is:
Plain public 01:80:c2:00:00:01.
This Multicast address corresponds to address reserved in IEEE 802.3 for the Pause
functionality.
Note: The Pause tick box is not displayed for the 10Gig Ethernet unit.
Pause frames can still be used with the 10Gig Ethernet unit but this will not be
auto negotiated and would still require the configuration of a rule to pass
pause frames in the plain.
Auto Negotiation- allows the unit to automatically negotiate connection without intervention
from the user.
Note: The Datacryptor 1 Gig Ethernet only supports I000 Mbps full duplex, and the
10 Gig Ethernet unit only supports I0,000 Mbps full duplex. The 100 Mb unit
supports a selection of one 10 Mbps or 100 Mbps. Anything else will cause the
auto negotiation (if selected) to fail and report Link Down on the General tab
interface status box.
The Auto Negotiation tick box is not displayed for the 10Gig Ethernet unit
since the 10Gig Ethernet unit does not support auto negotiation.
Frame Checksum. If the FCS box is checked then the checksum is stripped off the incoming
frame and added again for outgoing frames. When the FCS box is not checked the FCS is
treated like normal data will be and encrypted and decrypted like data on the public interface.
The FPV imposes the following defaults when switching modes. When switching from Bulk to
Tunneling the Network FCS is checked. When switching from Tunneling to Bulk, the Network
FCS is unchecked. It is advised that the user accepts these default settings.
Status- Shows the current status of the Host and network interfaces.
Page 76 THALES
Page 77
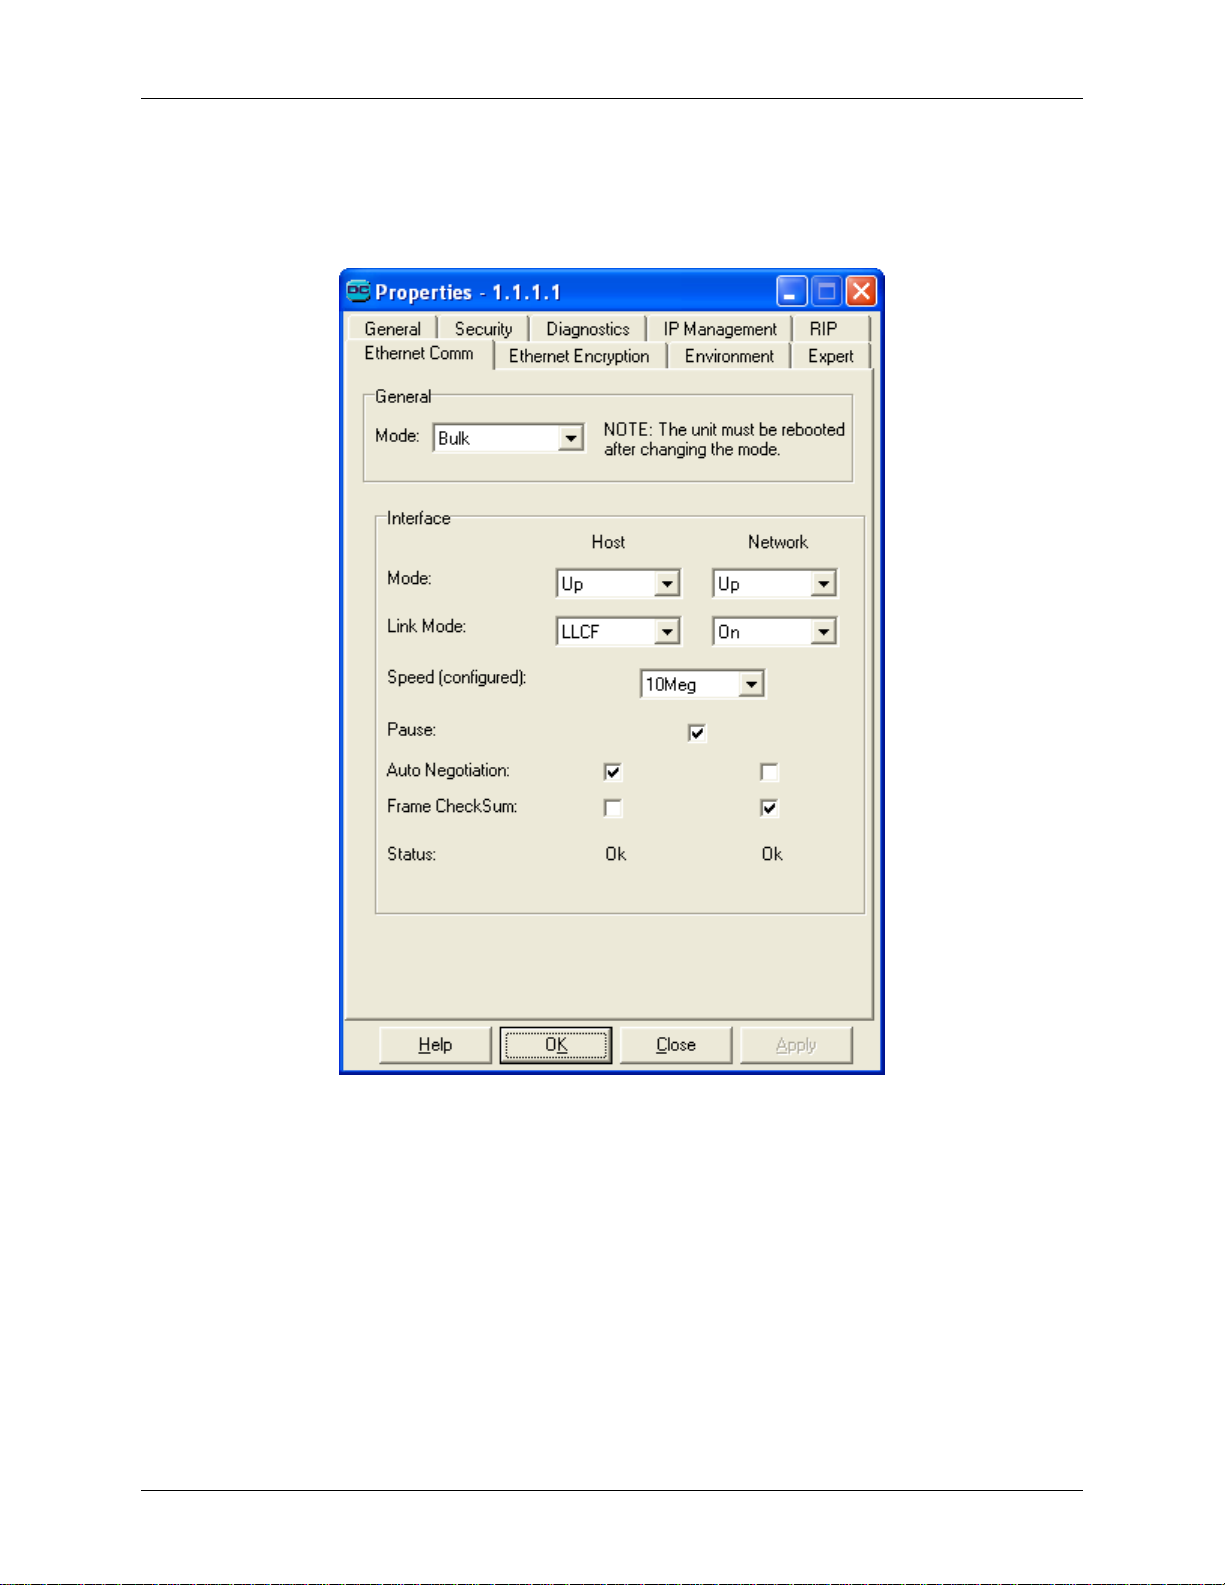
Datacryptor Ethernet User Manual Element Manager Reference
The Ethernet Comm Tab for 100 Mb Datacryptor
The properties on the Ethernet Comm tab control the communications settings of the
Datacryptor unit.
They are as follows:
Mode- Selects one of two options for the transmission mode.
− Bulk - Unit encrypts everything including Ethernet header.
− Tunneling - Unit encrypts every thing below Ethernet header.
When a mode change is made then the following dialog will be shown advising that the unit
must be rebooted.
1270A450-005 - June 2008 Page 77
Page 78
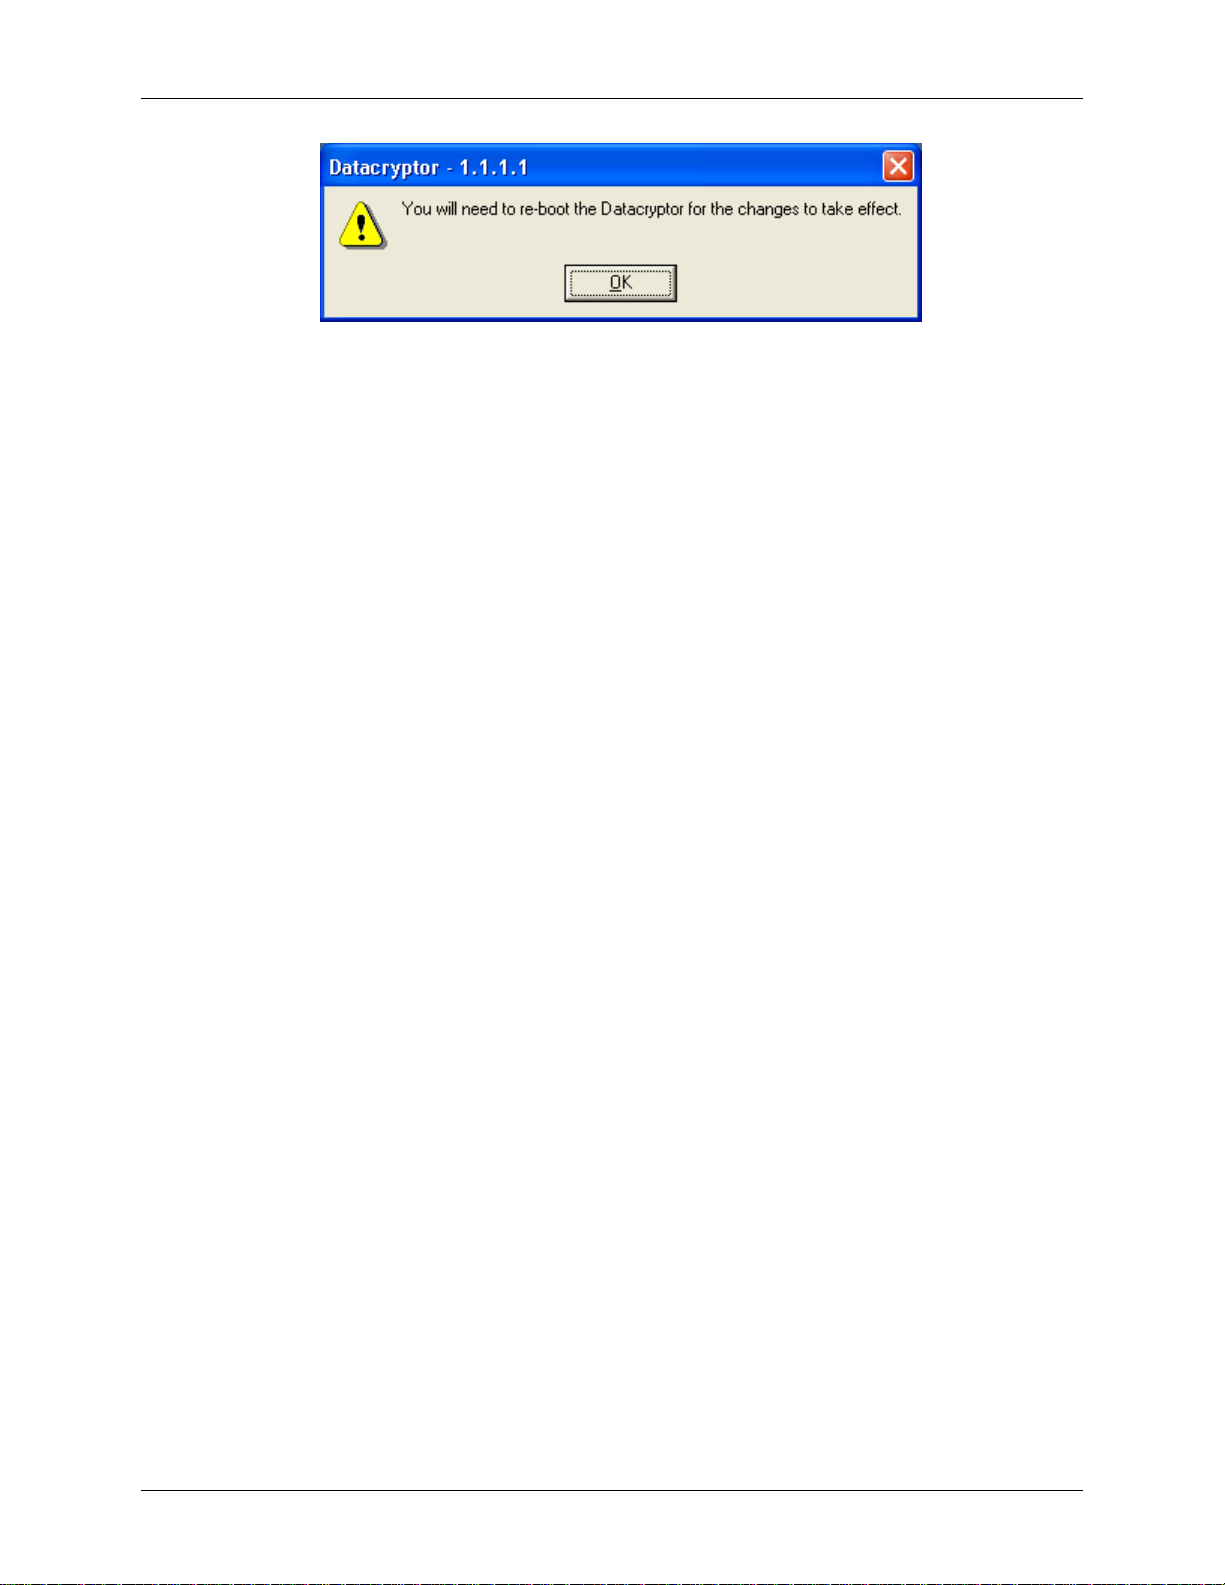
Element Manager Reference Datacryptor Ethernet User Manual
The unit can be rebooted using the option available on the Diagnostic tab
Interface Mode - Allows the Host and network interfaces to be switched Up/Down.
Link Mode - Allows the Host and network connections to be individually switched On/Off. If the
LLCF option is selected, the connection is on with link loss carry forward turned on.
Auto Negotiation - allows the unit to automatically negotiate connection without intervention
from the user.
Note: The Datacryptor 100 Mb Ethernet may be set to 100 Mbps or 10 Mbps full
duplex. The Host and Network interfaces on encryption units at both ends of
the link need to run at the same speed.
Pause - The Pause option is a special Ethernet function that provides flow control between
Ethernet devices. If the switch on the public network is told to enable Pause, then a rule has to
be configured on the encryption unit to let the Pause frames pass through unencrypted to the
switch on the local side. A typical rule is:
Plain public 01:80:c2:00:00:01.
This Multicast address corresponds to address reserved in IEEE 802.3 for the Pause
functionality.
Speed (configured) – Must be set to 10 Meg or 100 Meg as appropriate to the speed of the
link. Enabling auto-negotiation only permits the Datacryptor to tell requesting units what speed
it is set to, it does not support the auto-negotiation of speed.
Frame Checksum. If the FCS box is checked then the checksum is stripped off the incoming
frame and added again for outgoing frames. When the FCS box is not checked the FCS is
treated like normal data will be and encrypted and decrypted like data on the public interface.
The FPV imposes the following defaults when switching modes. When switching from Bulk to
Tunneling the Network FCS is checked. When switching from Tunneling to Bulk, the Network
FCS is unchecked. It is advised that the user accepts these default settings.
Status- Shows the current status of the Host and network interfaces.
Page 78 THALES
Page 79
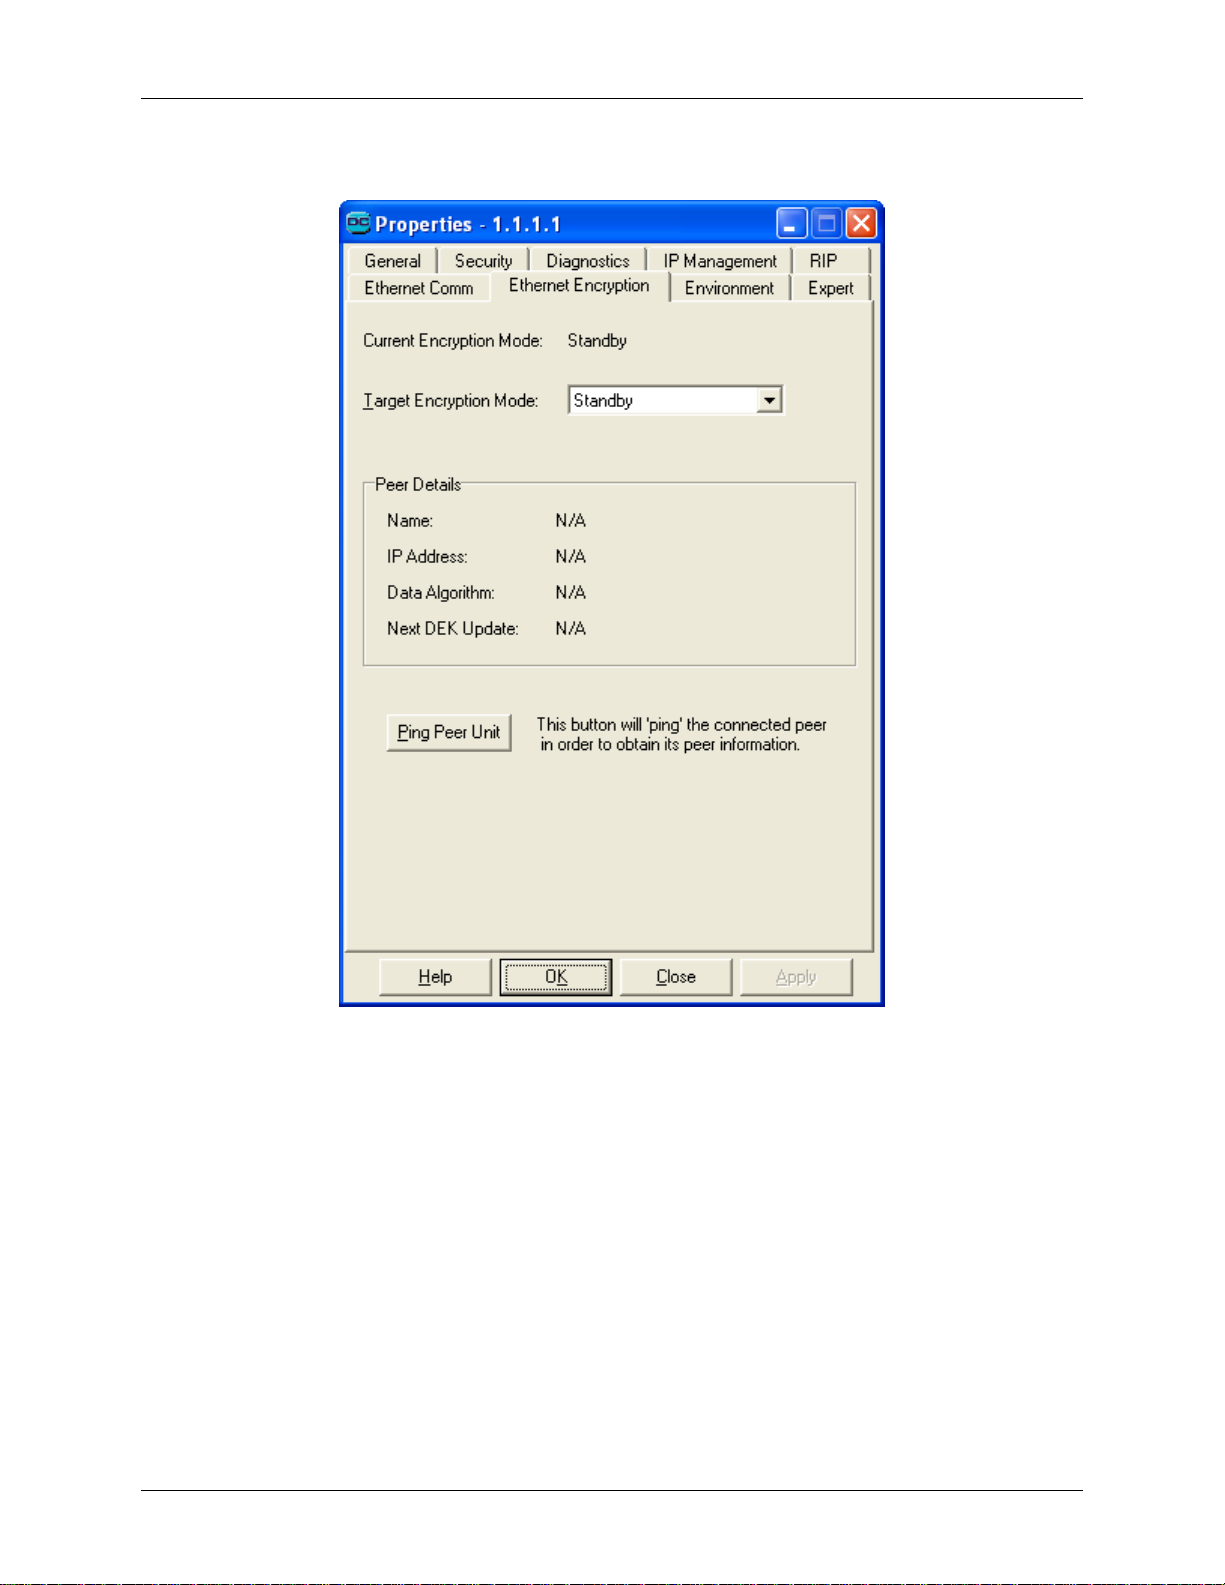
Datacryptor Ethernet User Manual Element Manager Reference
The Ethernet Encryption Tab
The Ethernet Encryption tab shows the Current Encryption mode in use by the unit.
Target Encryption mode: This allows you to select the target or required encryption mode
using the drop down menu. The three options are: Standby, Encrypt, or Plain.
Peer Details: The Peer unit’s details (Name, IP Address, etc) are shown on the tab.
Ping Peer Unit button: This button may be clicked to shows additional Peer information, if
required.
1270A450-005 - June 2008 Page 79
Page 80
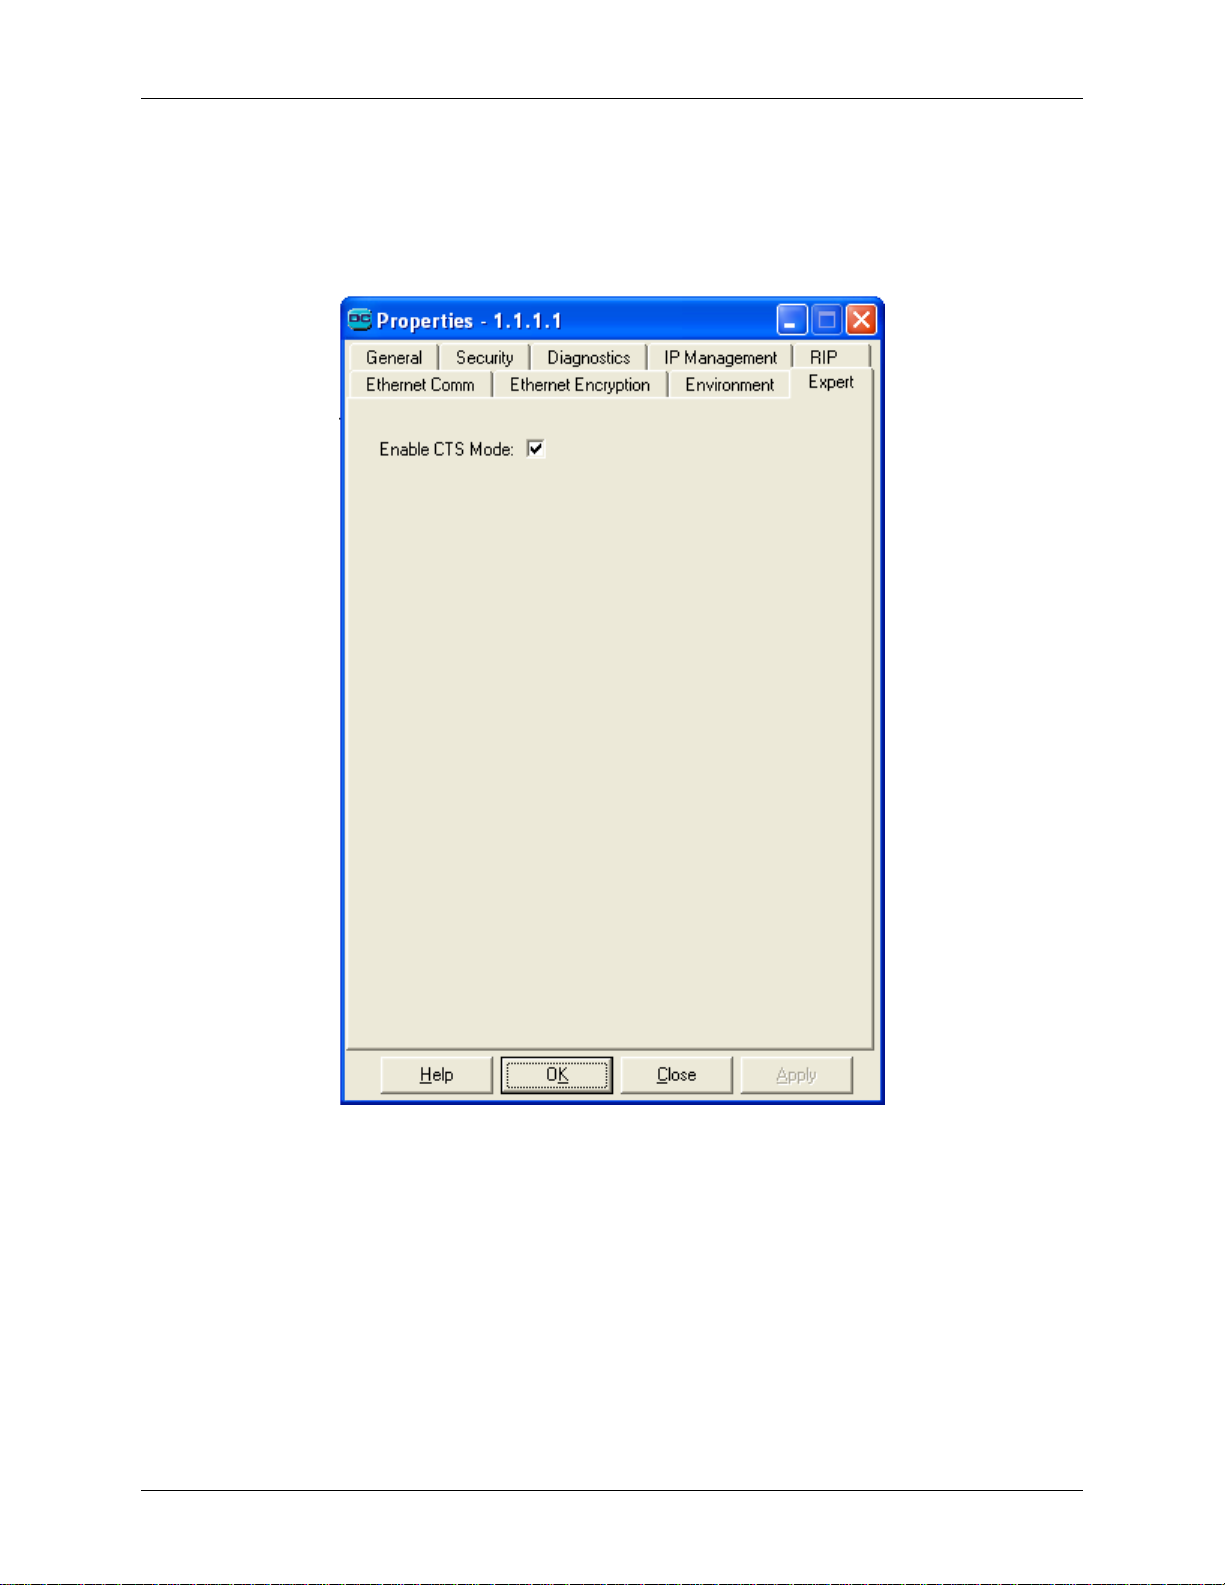
Element Manager Reference Datacryptor Ethernet User Manual
The Expert Tab
The Ethernet Expert tab allows to Enable CTS Mode. The Ethernet Expert tab is not shown
when using the 10Gig Ethernet unit since CTS mode is always enabled for the 10Gig Ethernet
unit.
The CipherText Stealing mode minimizes the latency caused by the encryption of the Ethernet
packets. By default this mode is enabled, and disabling the mode is only recommended when
connecting this unit to a legacy Ethernet Datacryptor which does not support the CTS mode.
The Enable CTS Mode checkbox is greyed-out when the Current Encryption Mode is Encrypt.
The CTS mode may only be changed when in Plain or Standby mode; that includes during the
time that Target Encryption Mode is Encrypt but the Current Encryption Mode is still Plain or
Standby.
Page 80 THALES
Page 81
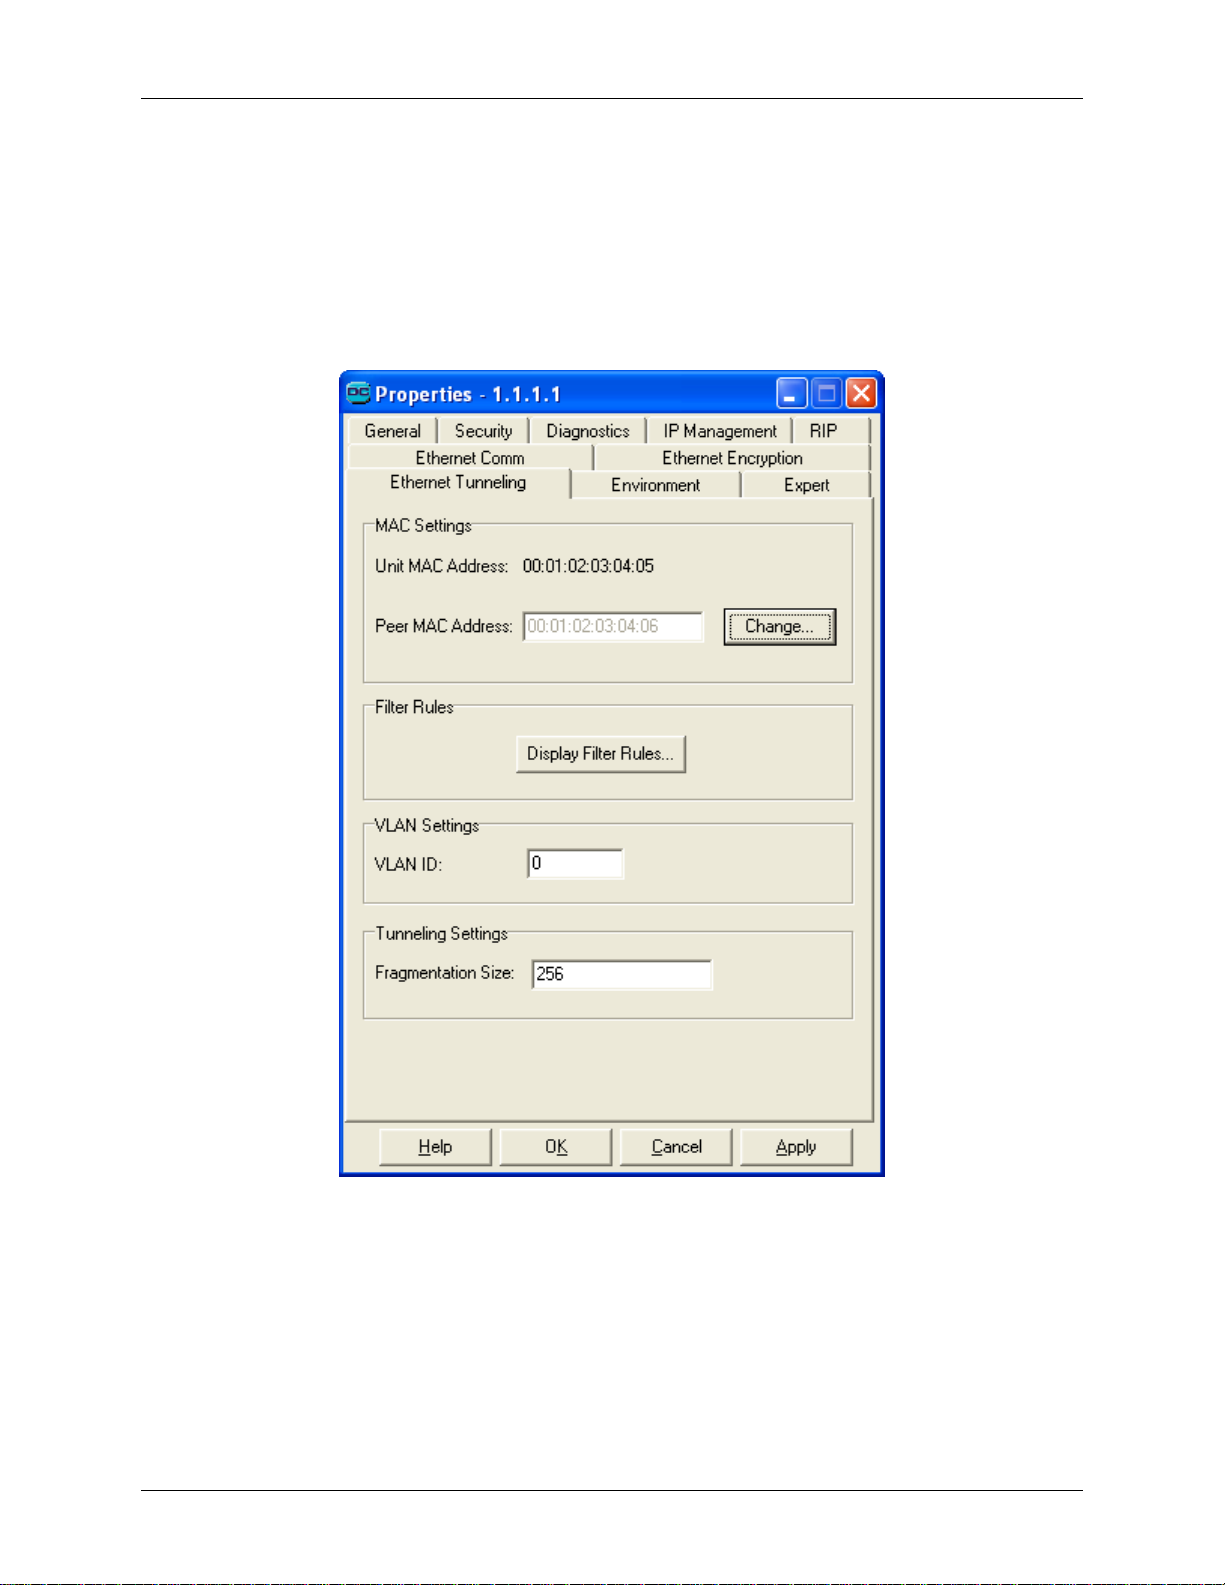
Datacryptor Ethernet User Manual Element Manager Reference
The Ethernet Tunneling Tab
The Ethernet Tunneling tab will only be present when Tunneling mode is selected on the
Ethernet Comm tab.
Note: The Tunneling Settings section, which includes the Fragmentation Size item, is
not displayed for the 10Gig Ethernet unit. The 10Gig Ethernet unit does not
support fragmentation.
MAC Settings - Operating at the Layer 2 level the in band communications between the units
will be controlled by using MAC Addresses. The unit has two addresses assigned for use
between the units at either end of an Ethernet Layer 2 link. The Unit MAC Address is displayed.
The peer MAC address must be obtained and entered in the box provided.
1270A450-005 - June 2008 Page 81
Page 82
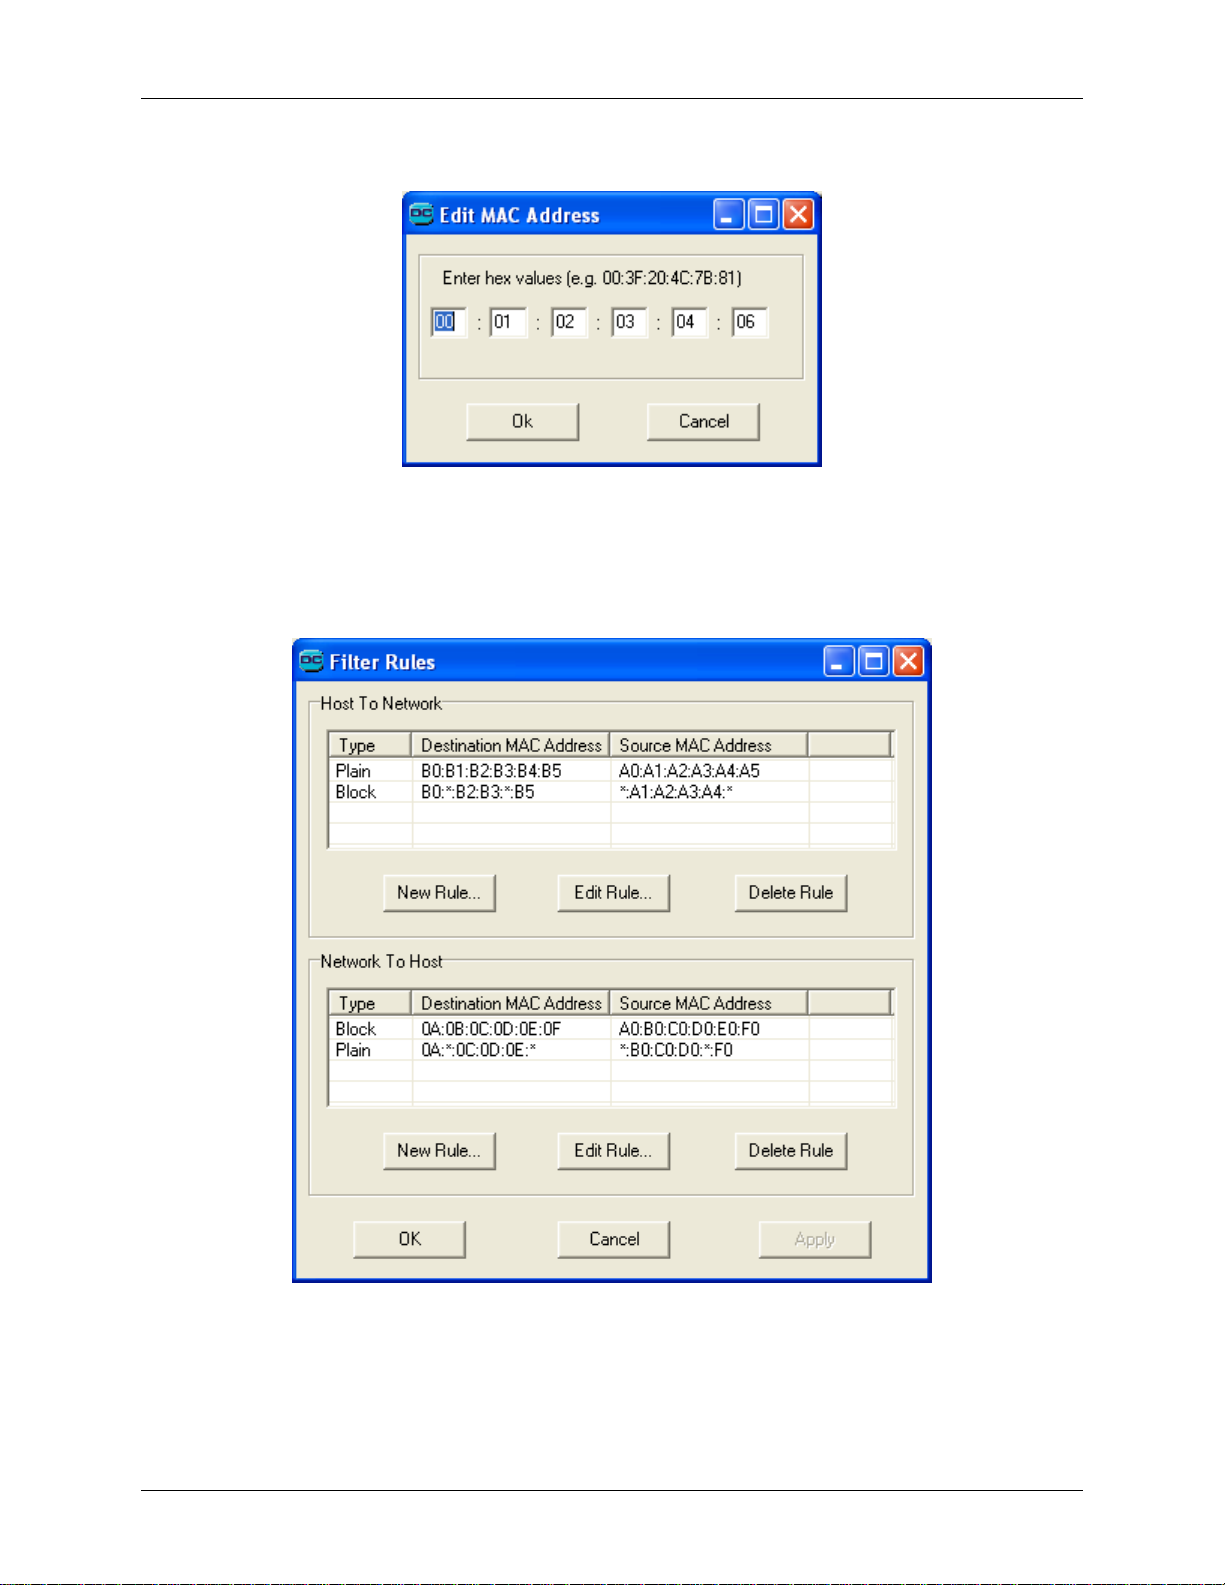
Element Manager Reference Datacryptor Ethernet User Manual
This is entered by selecting the Change button, the following dialog is shown.
Enter the required address in the boxes shown. Movement between the boxes can be achieved
by using the mouse or the tab and shift tab key combinations. The units MAC address must be
inserted in the peer unit address box at the other end of the link.
Filter Rules - Clicking the Display Filter Rules button will display the following dialog:
Page 82 THALES
Page 83
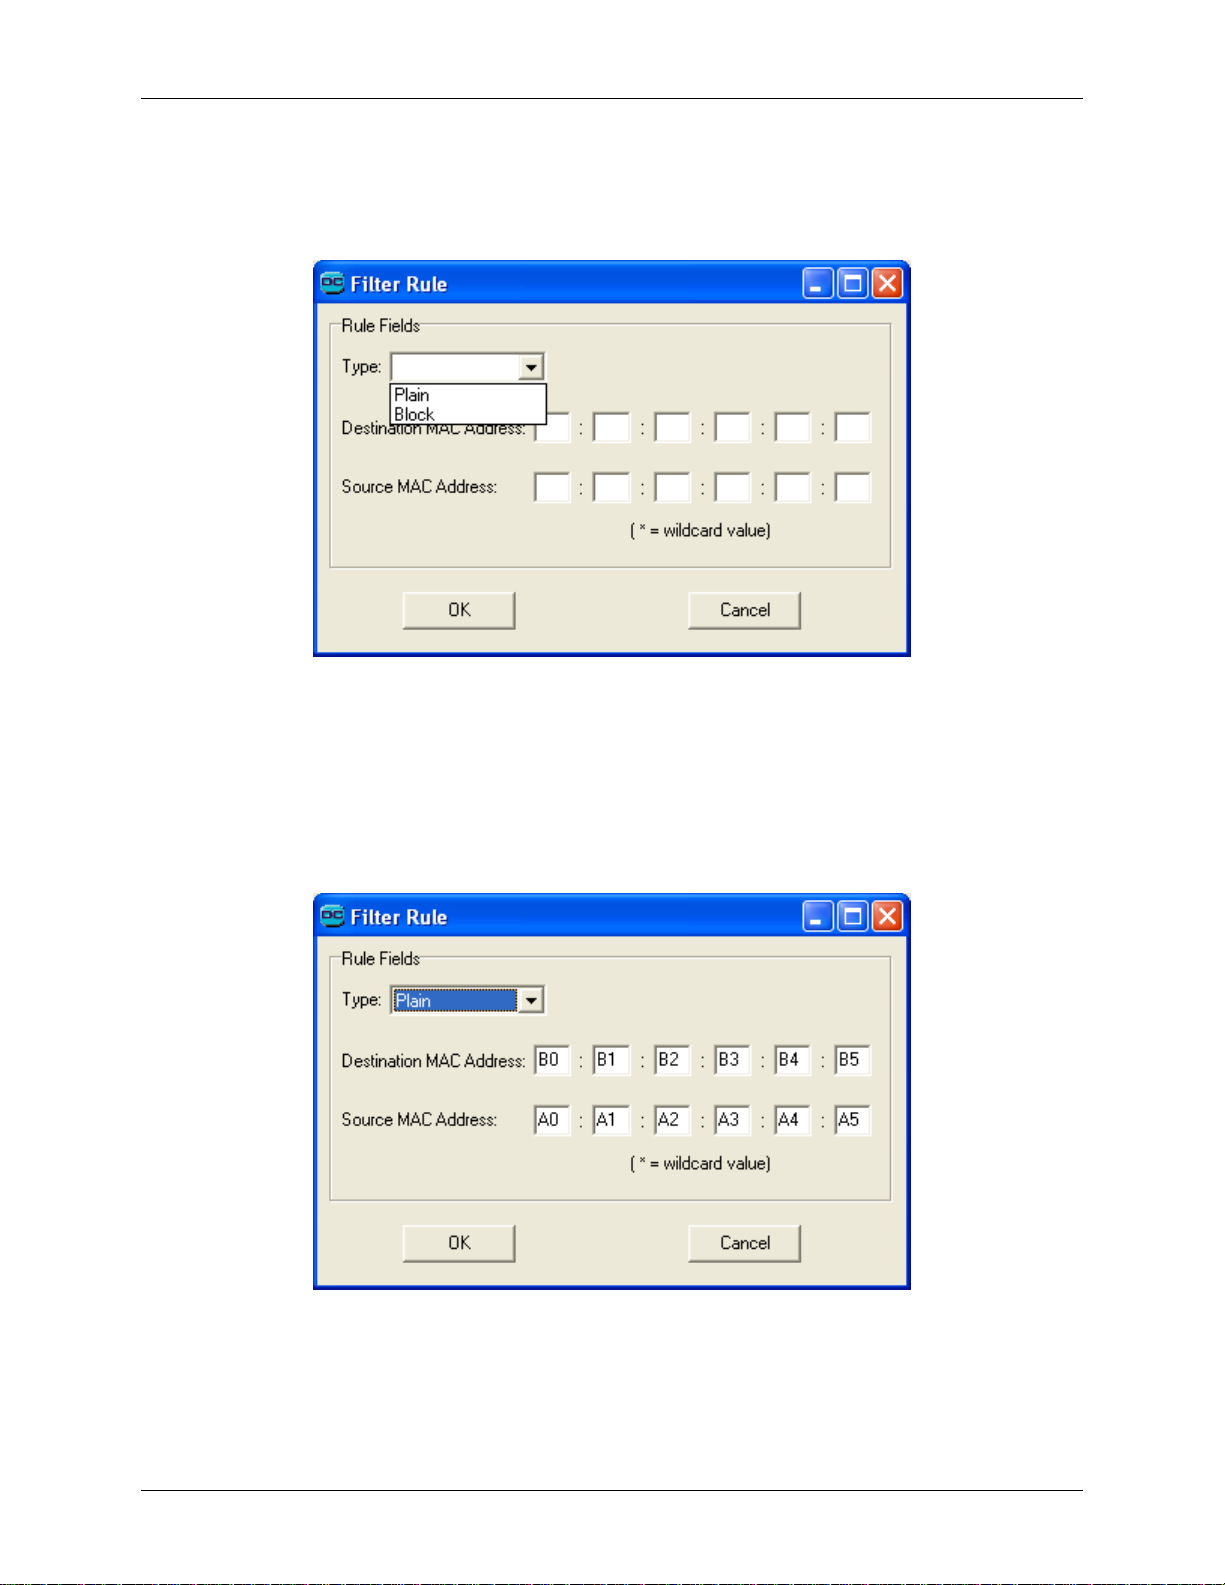
Datacryptor Ethernet User Manual Element Manager Reference
This gives the option of setting a maximum of four rules on both the Host to Network and
Network to Host ports. Selecting the New Rule button will open the Filter Rule dialog.
When setting a rule, the first step is to select a rule type:
Rule Type
• Plain this allows the Datacryptor unit to pass information from the specified addresses in
plain, and is used to allow network specific traffic. To ensure compatibility and operation of
equipment within the public network.
• Block this option identifies individual addresses or a range of addresses which are to be
denied access by the Datacryptor unit.
The second step is then to set the destination and source MAC addresses:
1270A450-005 - June 2008 Page 83
Page 84
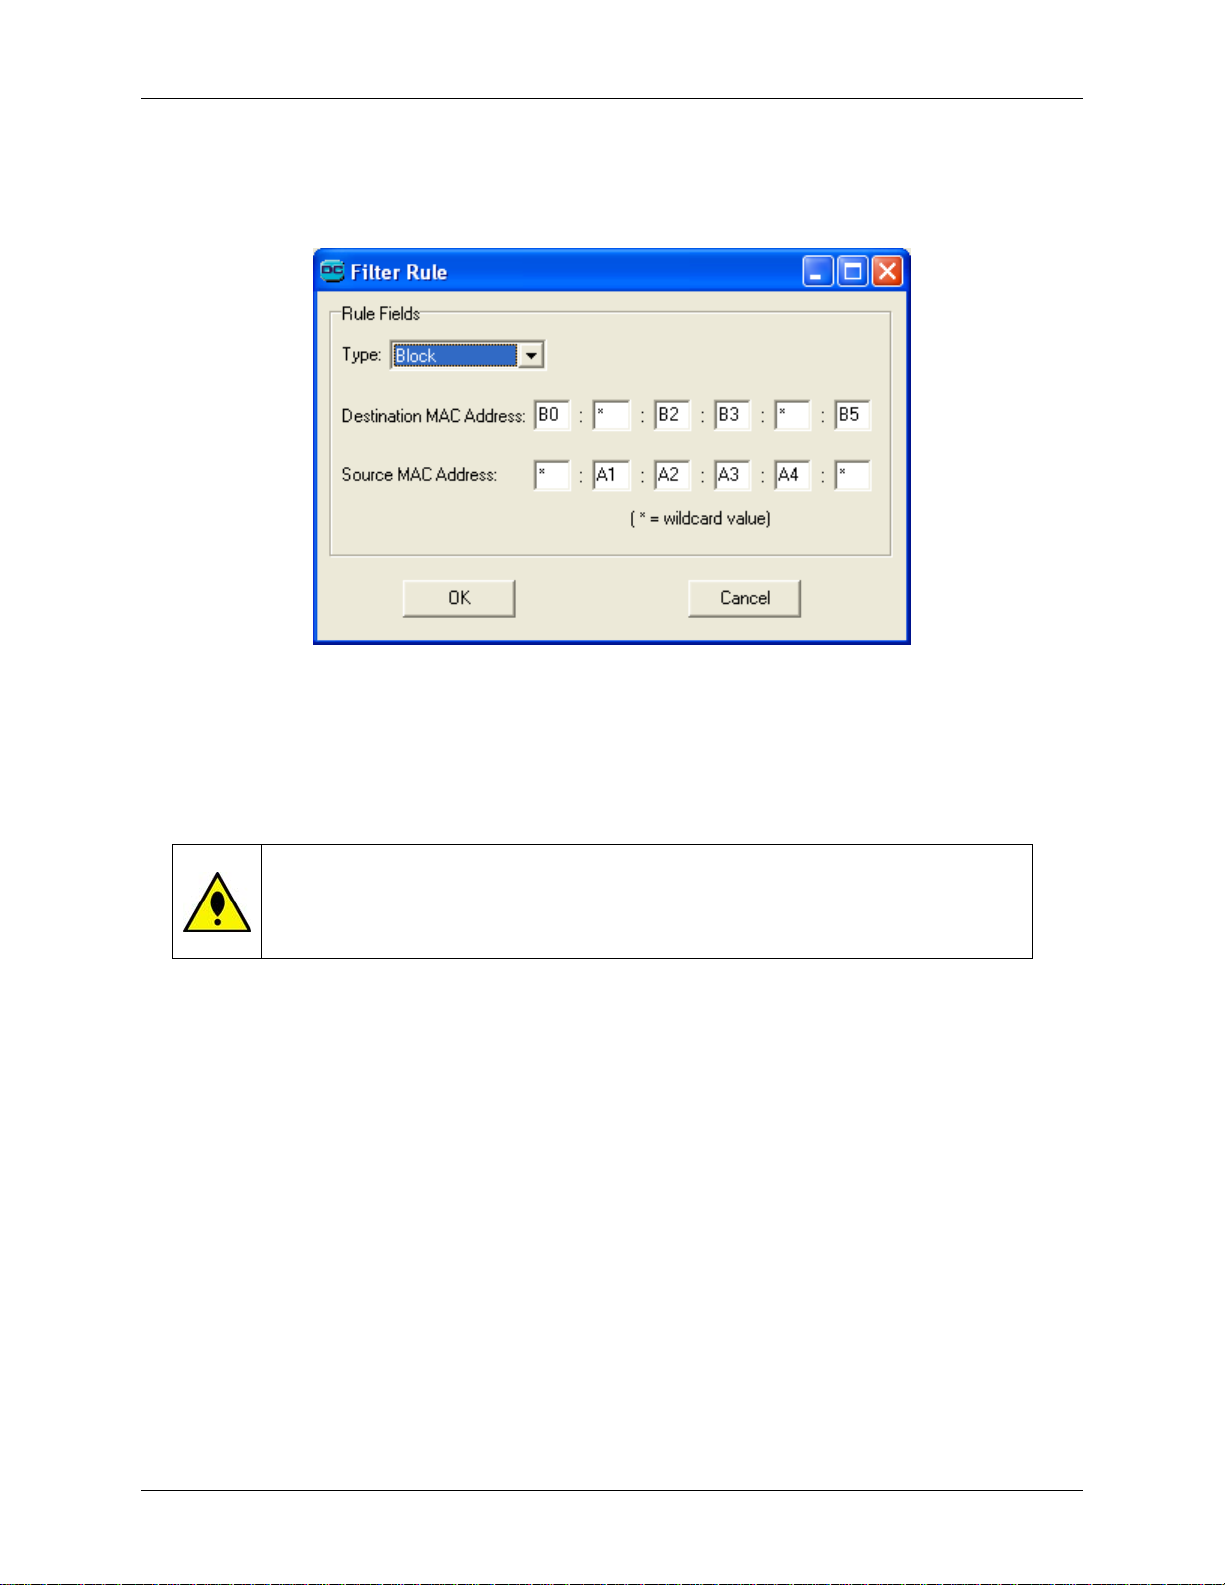
Element Manager Reference Datacryptor Ethernet User Manual
MAC Address
The destination and source addresses are standard MAC addresses with the added option of
using the *wildcard character (see below) to enable a range of addresses to be identified.
When you have set the addresses, select OK to add the new rule to the list. The apply button
will then become active.
The Edit and Delete functions requires the user to select a rule prior to clicking the appropriate
button. However, if the table contains only one rule and the user presses either the edit or
delete button, that rule is automatically selected for the operation.
CAUTION: Care must be exercised when creating filter rules, in order that
the intended traffic and only the intended traffic is allowed.
VLAN Settings - Enter the required VLAN ID (a number between 1 and 4094). If this is set to
zero, then the MAC addresses are used for in band communications.
Tunneling Settings – An optional fragmentation can be enabled with the Fragmentation Size
field in tunnel mode. Encapsulated frames that become larger than the public networks allow,
can be fragmented. The fragmentation works like this:
• Outgoing frames including the tunnel-header smaller or equal to Fragmentation Size will be
sent to the WAN without modification.
• Outgoing frames including the tunnel-header larger than Fragmentation Size will be
fragmented and sent to the WAN in two parts.
• Incoming frames on the local interface which are already larger than Fragmentation Size
will be truncated to Fragmentation Size and therefore discarded on the remote side.
Note: The Tunneling Settings section, which includes the Fragmentation Size item, is
not displayed for the 10Gig Ethernet unit. The 10Gig Ethernet unit does not
support Fragmentation Size setting and will never fragment.
Page 84 THALES
Page 85
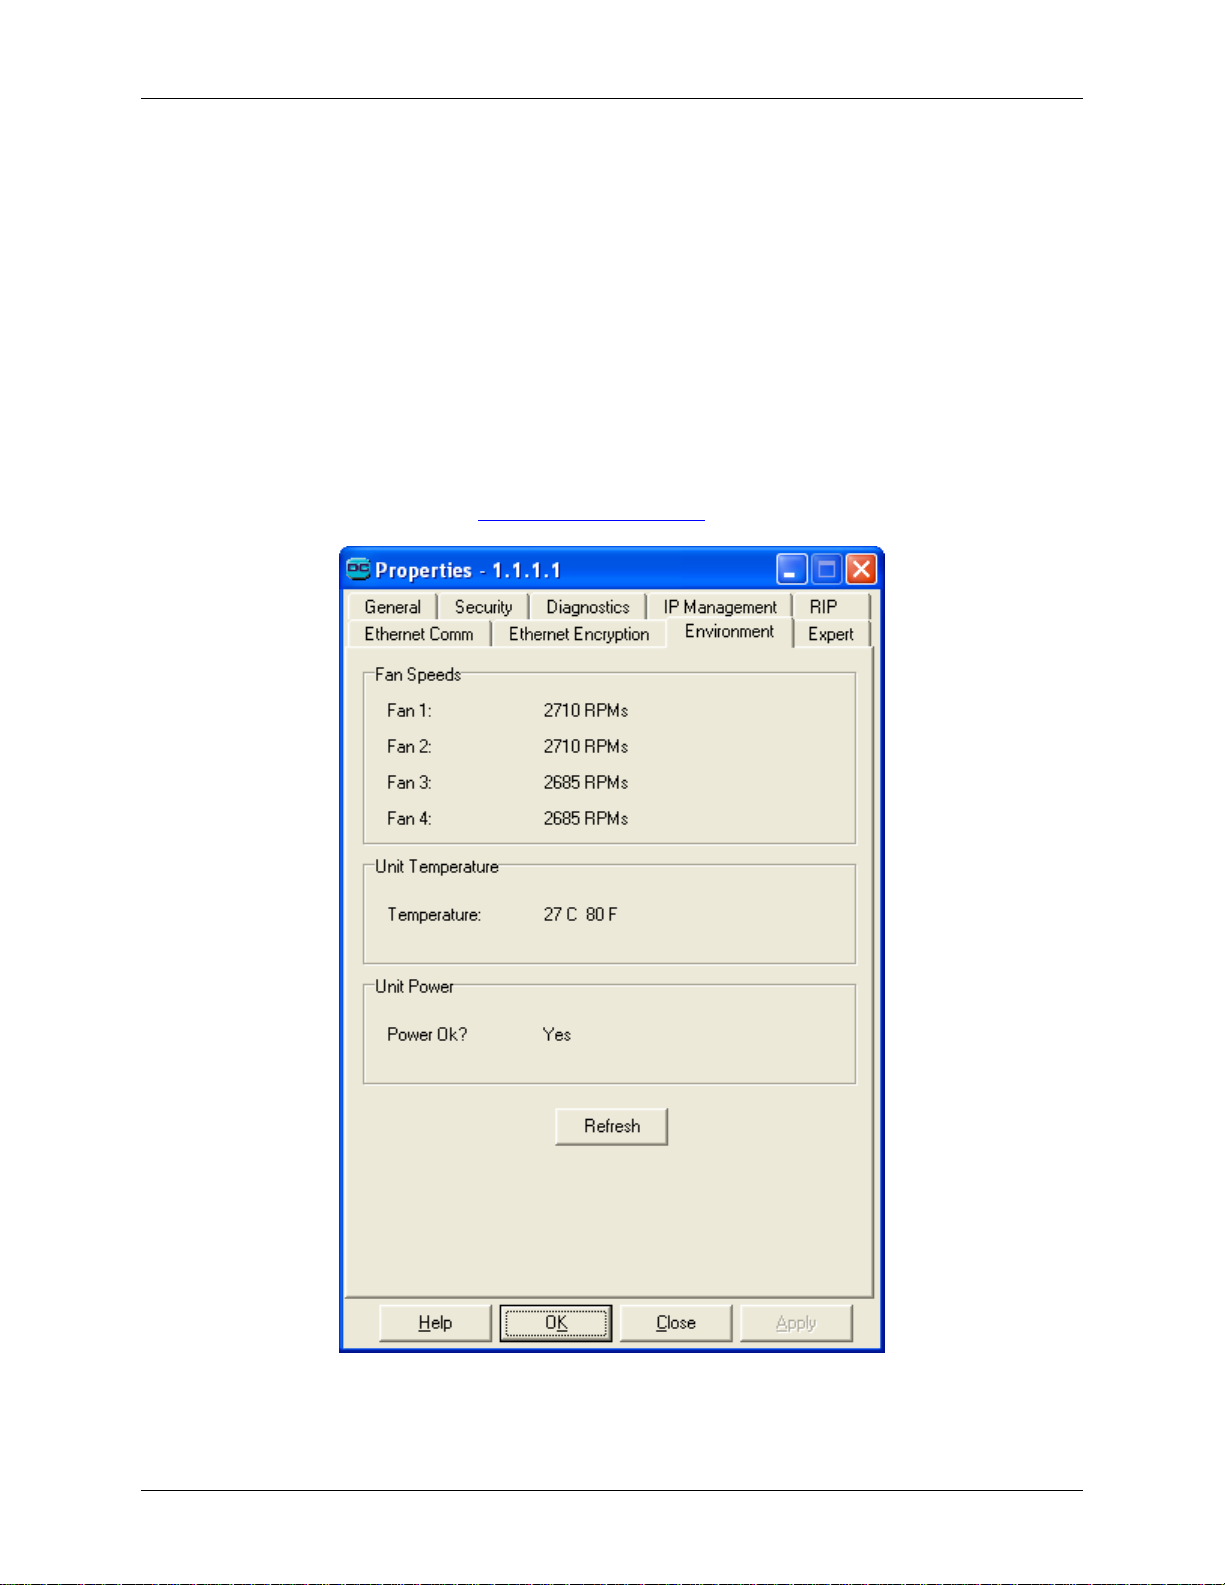
Datacryptor Ethernet User Manual Element Manager Reference
The permissible range for Fragmentation Size is:
• Gigabit Ethernet: 0 = no fragmentation, 256 ≤ Fragmentation Size ≤ 16300
• 10/100 Mb Ethernet: 0 = no fragmentation, 256 ≤ Fragmentation Size ≤ 2000.
The Environment Tab
The Environment tab shows the fan speeds along with the unit temperature and power unit
condition. These readings may be used to check that the Datacryptor environment is
satisfactory for normal operation. It is recommended that you make a note of these readings
during normal operation. These readings may be useful for comparison purposes in the event
of problems such as overheating.
If the unit temperature becomes excessive, the Alarm LED will be on, and an entry will be made
in the Error log – please refer to
Fan/Heat Monitor Alarm for more information.
Note: The Datacryptor 100 Mb Ethernet shows only a single fan.
1270A450-005 - June 2008 Page 85
Page 86
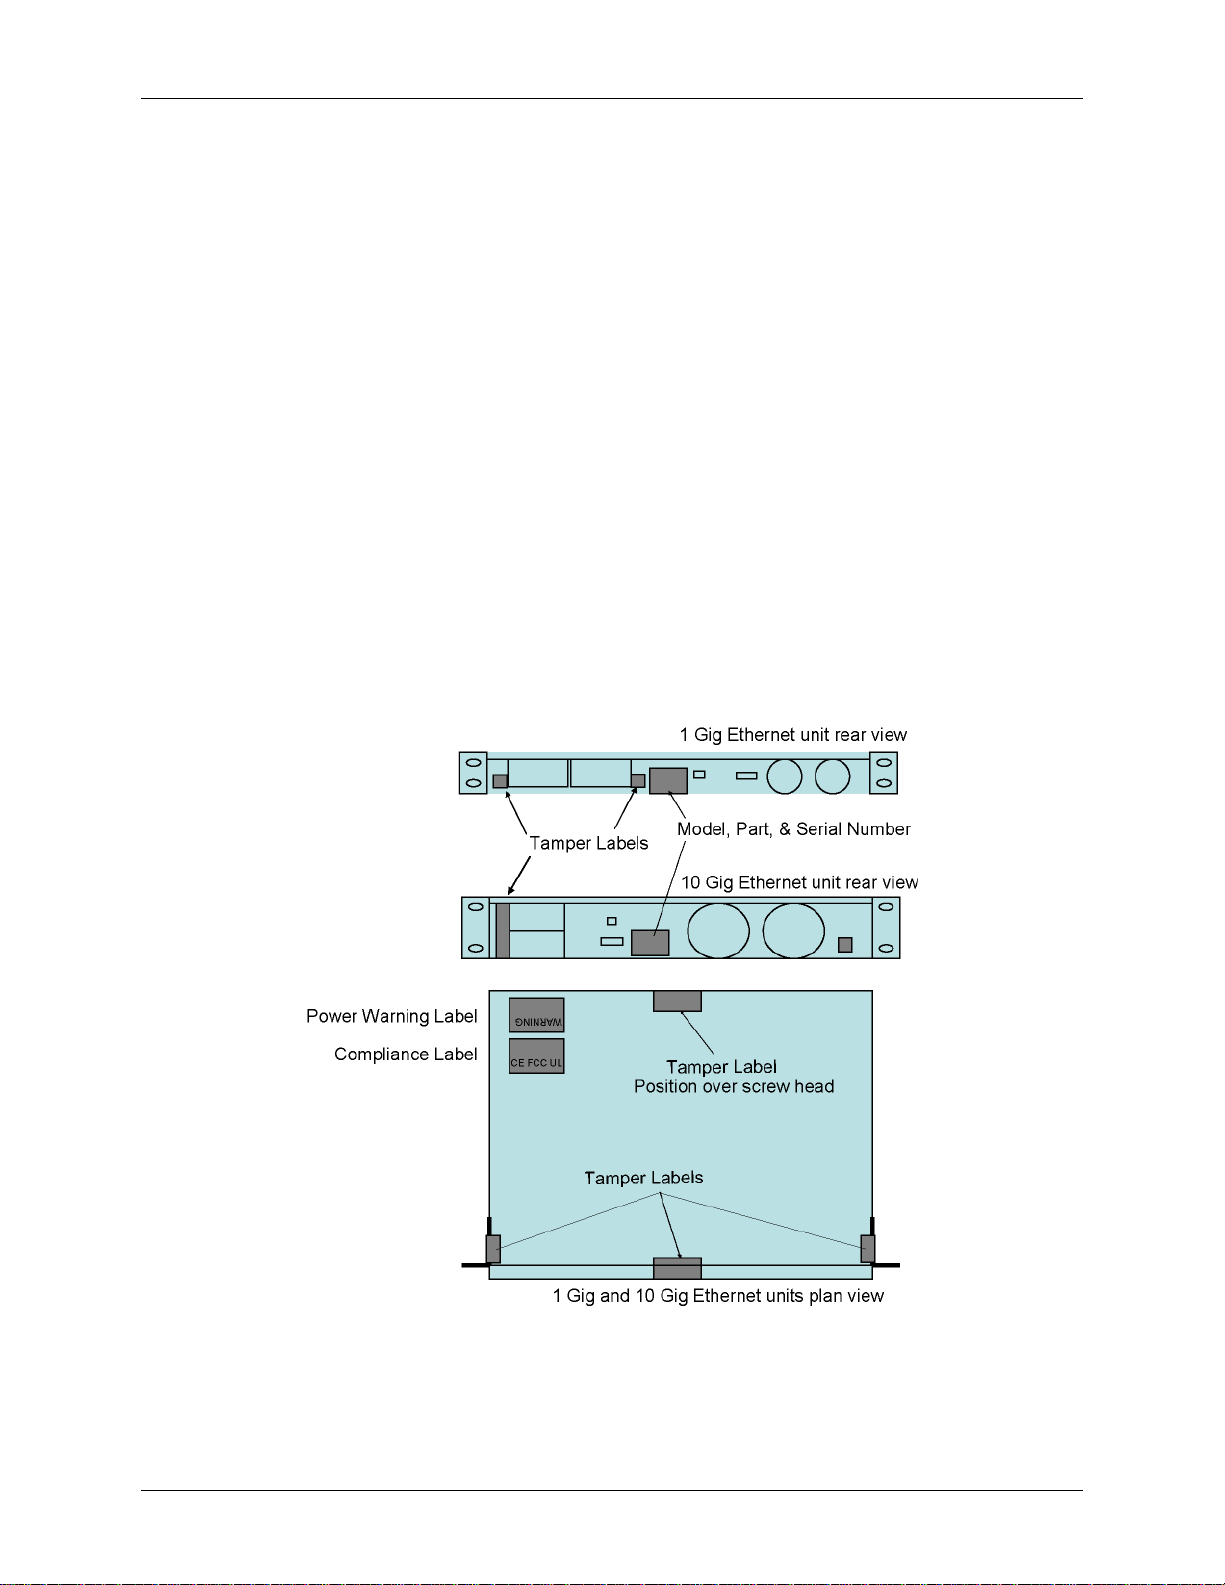
Appendix A: Device Maintenance Datacryptor Ethernet User Manual
Appendices
Appendix A: Device Maintenance
Periodically perform maintenance on your Datacryptor.
• Keep components free of dust and other particulate matter.
• Check fans for reduced airflow caused by dust build-up and clean as necessary.
• Examine cables and fiber for damage and ensure that airflow requirements have been met.
• Consult the Environment tab on the Front Panel Viewer’s Properties dialog for readings of
the fan speeds and unit temperature. Make a note of these readings under normal
operating conditions – these readings can be used for comparison in the event of a
Fan/Heat monitor alarm.
Otherwise, no special maintenance is required.
Physical Inspection
The Datacryptor is housed in a tamper evident chassis. Periodically check the chassis for
evidence of tampering. Items to look for include stripped screws and damaged seals.
Figure A-1 Location of Tamper Proof and Identification Labels on the units
The frequency of a physical inspection depends on the value of the intellectual property being
protected and the security of the environment in which the Datacryptor is located. For example,
Page 86 THALES
Page 87
Datacryptor Ethernet User Manual Appendix A: Device Maintenance
a locked equipment closet provides a more secure environment than an open server room. At a
minimum, we recommended that the unit’s physical integrity be checked monthly.
The units also have interlock switches that will cause the key material to be erased if the lid is
removed.
Power Supplies
Failure of one of the power supply units will cause a high-pitched continuous note to sound,
allowing a replacement to be planned.
Note: There is only one power supply in the Datacryptor 100 Mb Ethernet and so no
audible signal will be generated for power failure in that unit.
Lithium Battery
The Datacryptor contains a lithium battery, which has a typical life expectancy of 10 years,
dependant on usage. The Datacryptor must be returned to Thales for battery replacement.
WARNING: Risk of explosion if battery is replaced by an incorrect type. Dispose
of used batteries according to the instructions.
1270A450-005 - June 2008 Page 87
Page 88
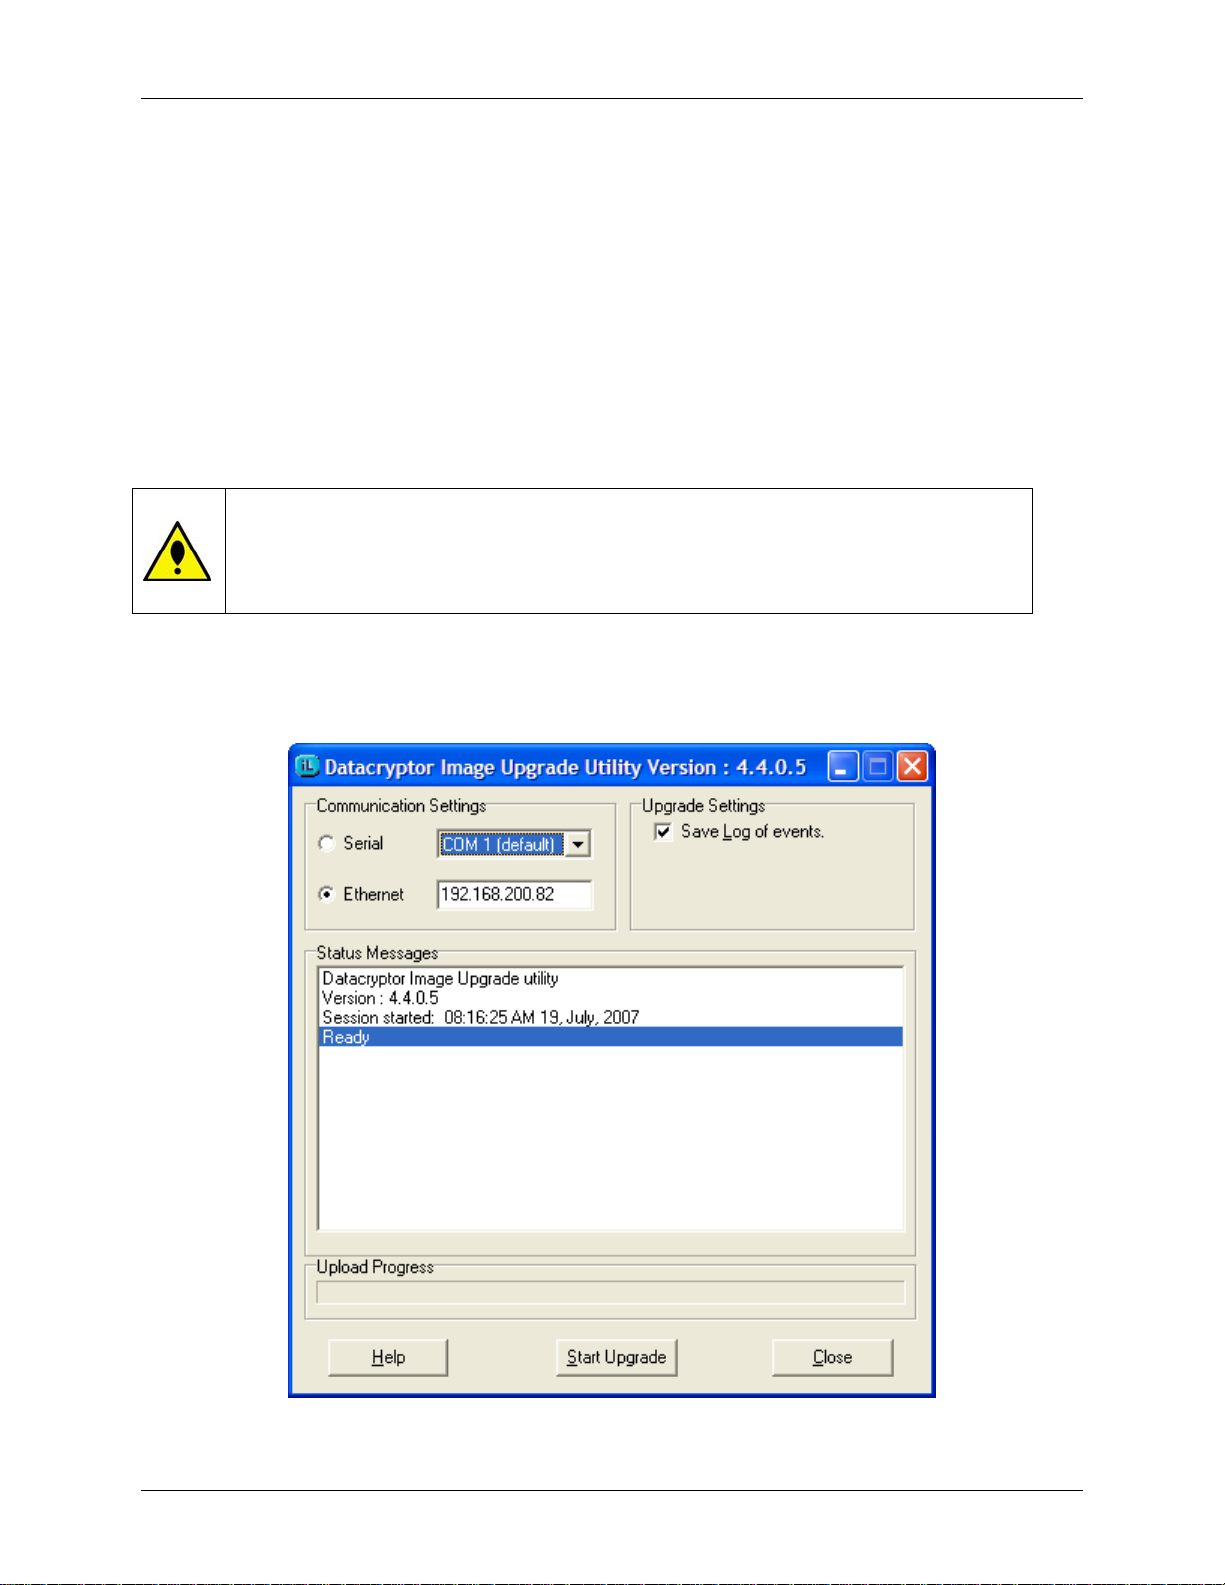
Appendix B: Loading Datacryptor Unit Software Datacryptor Ethernet User Manual
Appendix B: Loading Datacryptor Unit Software
Datacryptors are factory pre-loaded with the required ‘application’ software and protocol data.
However, if a new version of software needs to be loaded into a Datacryptor, the following
procedure describes how to carry out the operation using the Image Loader utility, which will be
provided with the new version of software.
Note: The process of application upgrade can also be used to upgrade the bootstrap of
the unit. If a unit is being upgraded to application software greater then 1.07.04,
then the user is advised to upgrade the bootstrap software to the latest version,
as this is required for the algorithm retention feature.
WARNING: Do not power the Datacryptor unit down during a bootstrap
upgrade; this may cause the unit to enter an unrecoverable state. For this
reason, it is recommended that the Datacryptor is connected to an UPS
(Uninterruptible Power Supply) during this process.
1. Connect the Datacryptor to the COM port of the PC that has access to the Image Loader
utility (imgload.exe), and power it on.
2. Start the imgload.exe application.
Page 88 THALES
Page 89

Datacryptor Ethernet User Manual Appendix B: Loading Datacryptor Unit Software
3. Select the COM port that the Datacryptor is connected to, using the pull down menu.
This is COM1 by default.
4. If the Datacryptor application is already running, you may choose the Ethernet radio
button. Enter the IP address in the field next to the Ethernet radio button. Ethernet is
faster than Serial for loading code.
5. If the status messages that are generated by the Image Loader utility during the session
are not to be saved, clear the check box marked Save Log of Events.
6. Ensure that the Datacryptor is connected to the selected COM port, and that the power is
on. If the Ethernet radio button is selected, use a command window to check that the IP
address that you have entered responds to Ping requests.
7. Click the Start Upgrade button.
Note: The Image Loader utility will operate differently depending on whether you are
using a serial or an Ethernet connection. Please use one of the next two sections,
as appropriate to your type of connection.
Operations during Serial Code Loading
If you are using Ethernet loading, please refer to the next section.
1. The Image Loader will try to initialize communications with the Datacryptor. This will
take a short time if the Datacryptor has no application loaded; the administrator may be
prompted to remove the power and re-power up the Datacryptor. It is best to power
down the unit by removing the mains power cable from the Power Supply Unit.
2. The message ’Current Bootstrap version xx.xx.xxxx‘ will be displayed in the
status window when the Image Loader has successfully started talking to the bootstrap
program in the Datacryptor.
3. After loading and re-initializing the bootstrap, a prompt will be given to select the Image
Loader file (.ilf file) containing the Datacryptor application image (e.g. dc2k.ilf).
Select the file and click OK. Image Loader files may also contain signed ACE images.
1270A450-005 - June 2008 Page 89
Page 90
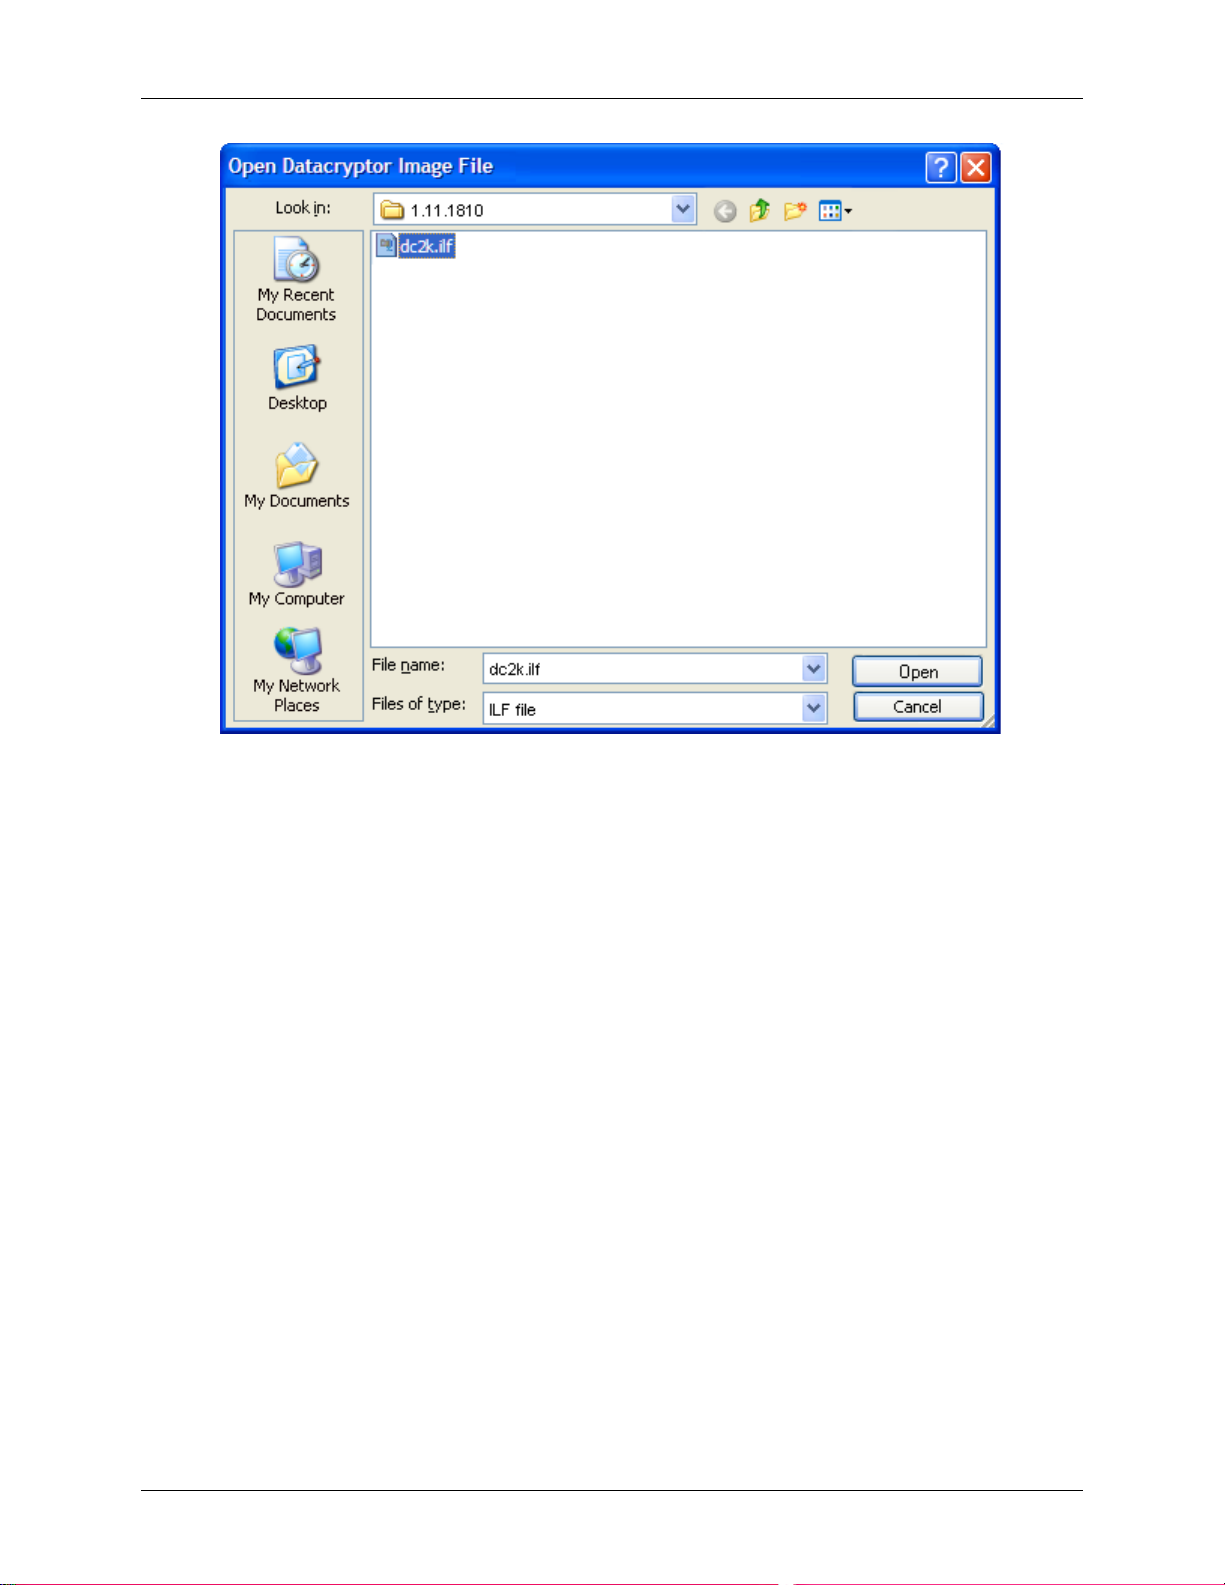
Appendix B: Loading Datacryptor Unit Software Datacryptor Ethernet User Manual
4. The Image Loader may also perform other "housekeeping" tasks such as generation of
correct Ethernet address and IP addresses used by later software, if these are missing. If
housekeeping tasks are performed, you will be notified in the Status Messages.
5. The baud rate at which the upload will take place is displayed, and the upload of the new
application code will begin.
Page 90 THALES
Page 91
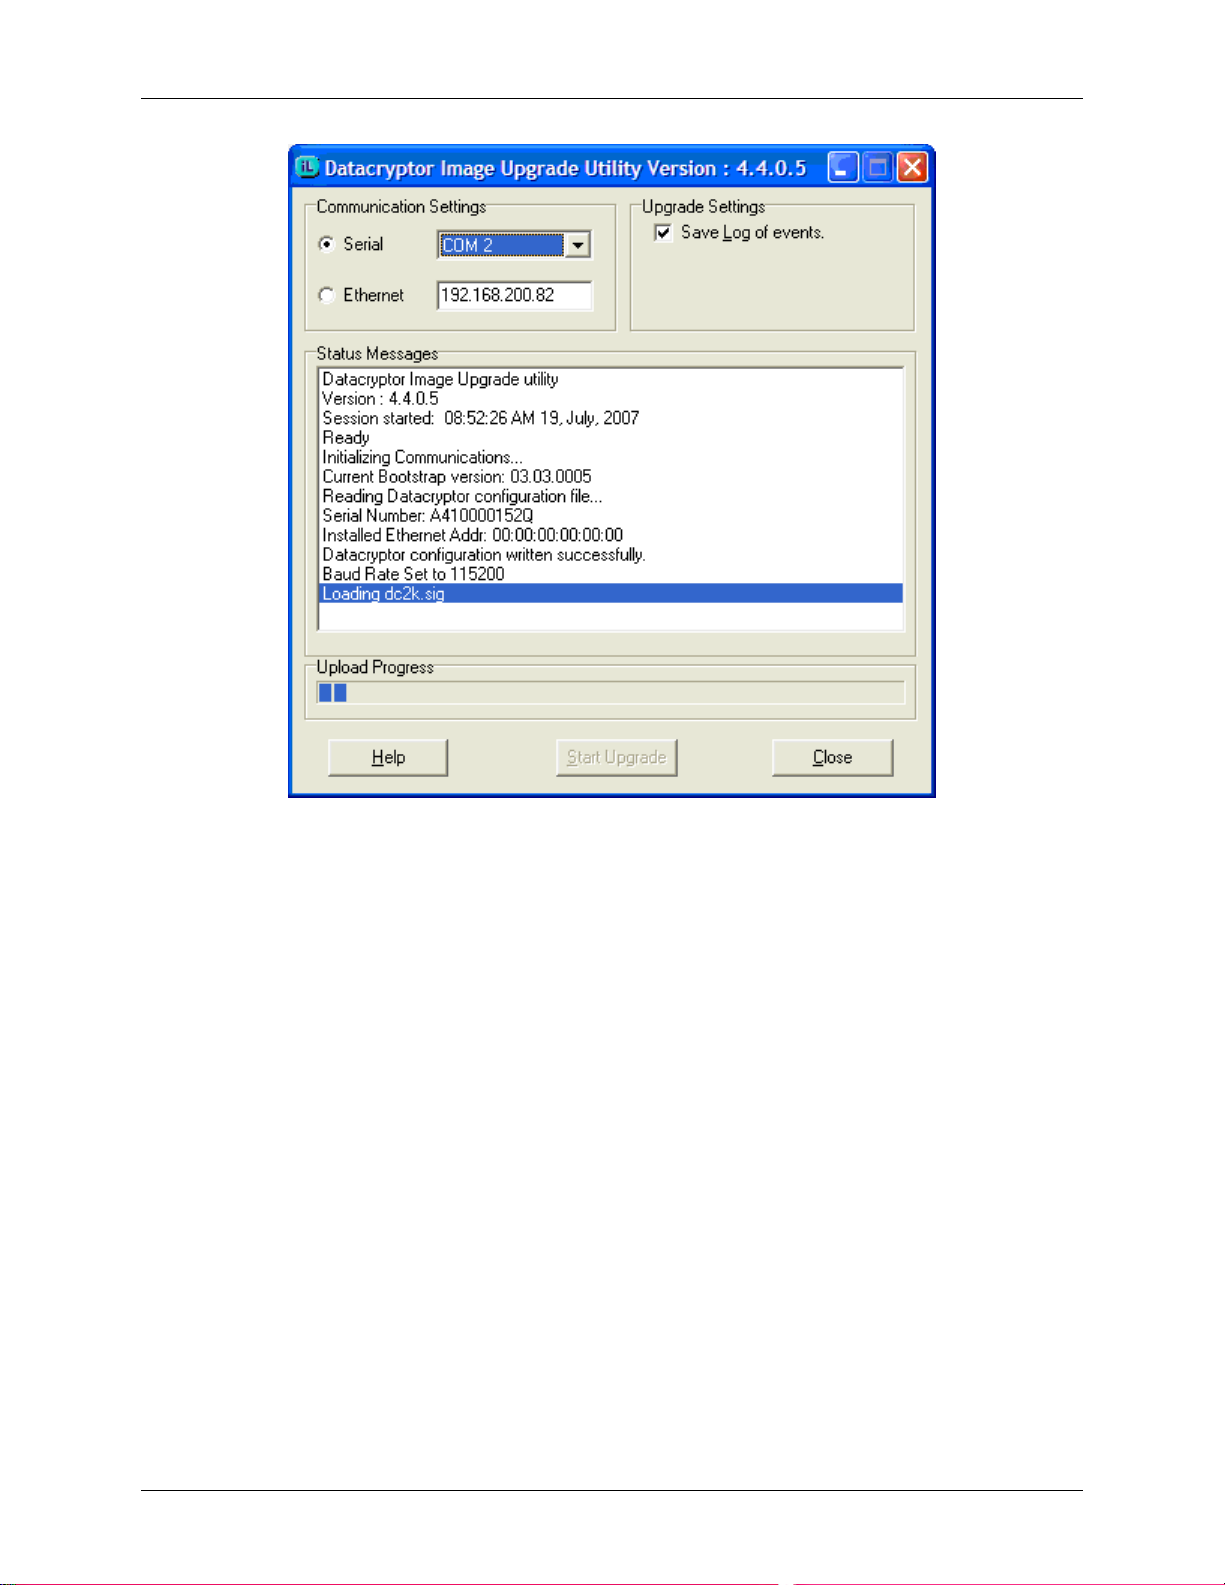
Datacryptor Ethernet User Manual Appendix B: Loading Datacryptor Unit Software
Operations during Ethernet Code Loading
The following operations are only applicable if you are using an Ethernet connection for
loading.
1. The Image Loader will try to initialize communications with the Datacryptor.
1270A450-005 - June 2008 Page 91
Page 92
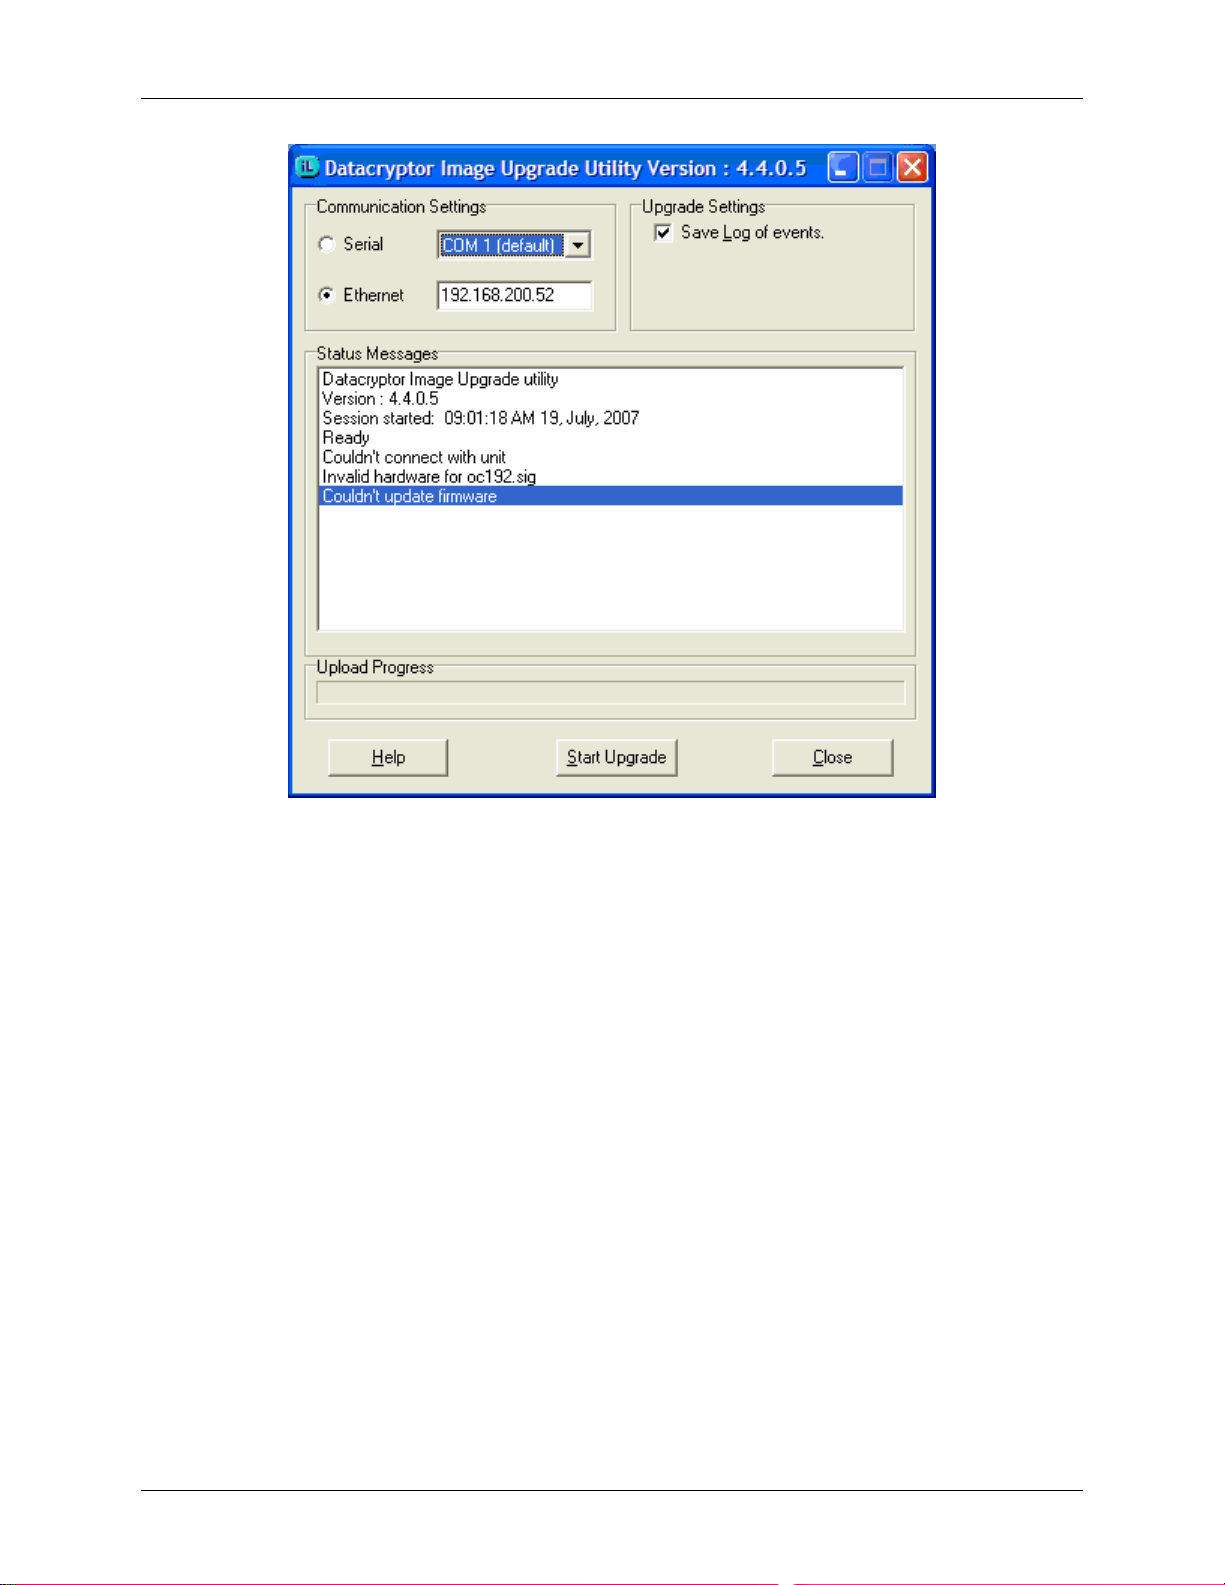
Appendix B: Loading Datacryptor Unit Software Datacryptor Ethernet User Manual
2. Once the hardware has been validated, select the Image Loader file (.ilf file) containing
the Datacryptor application image (e.g. dc2k.ilf). Select the file and click OK.
Page 92 THALES
Page 93
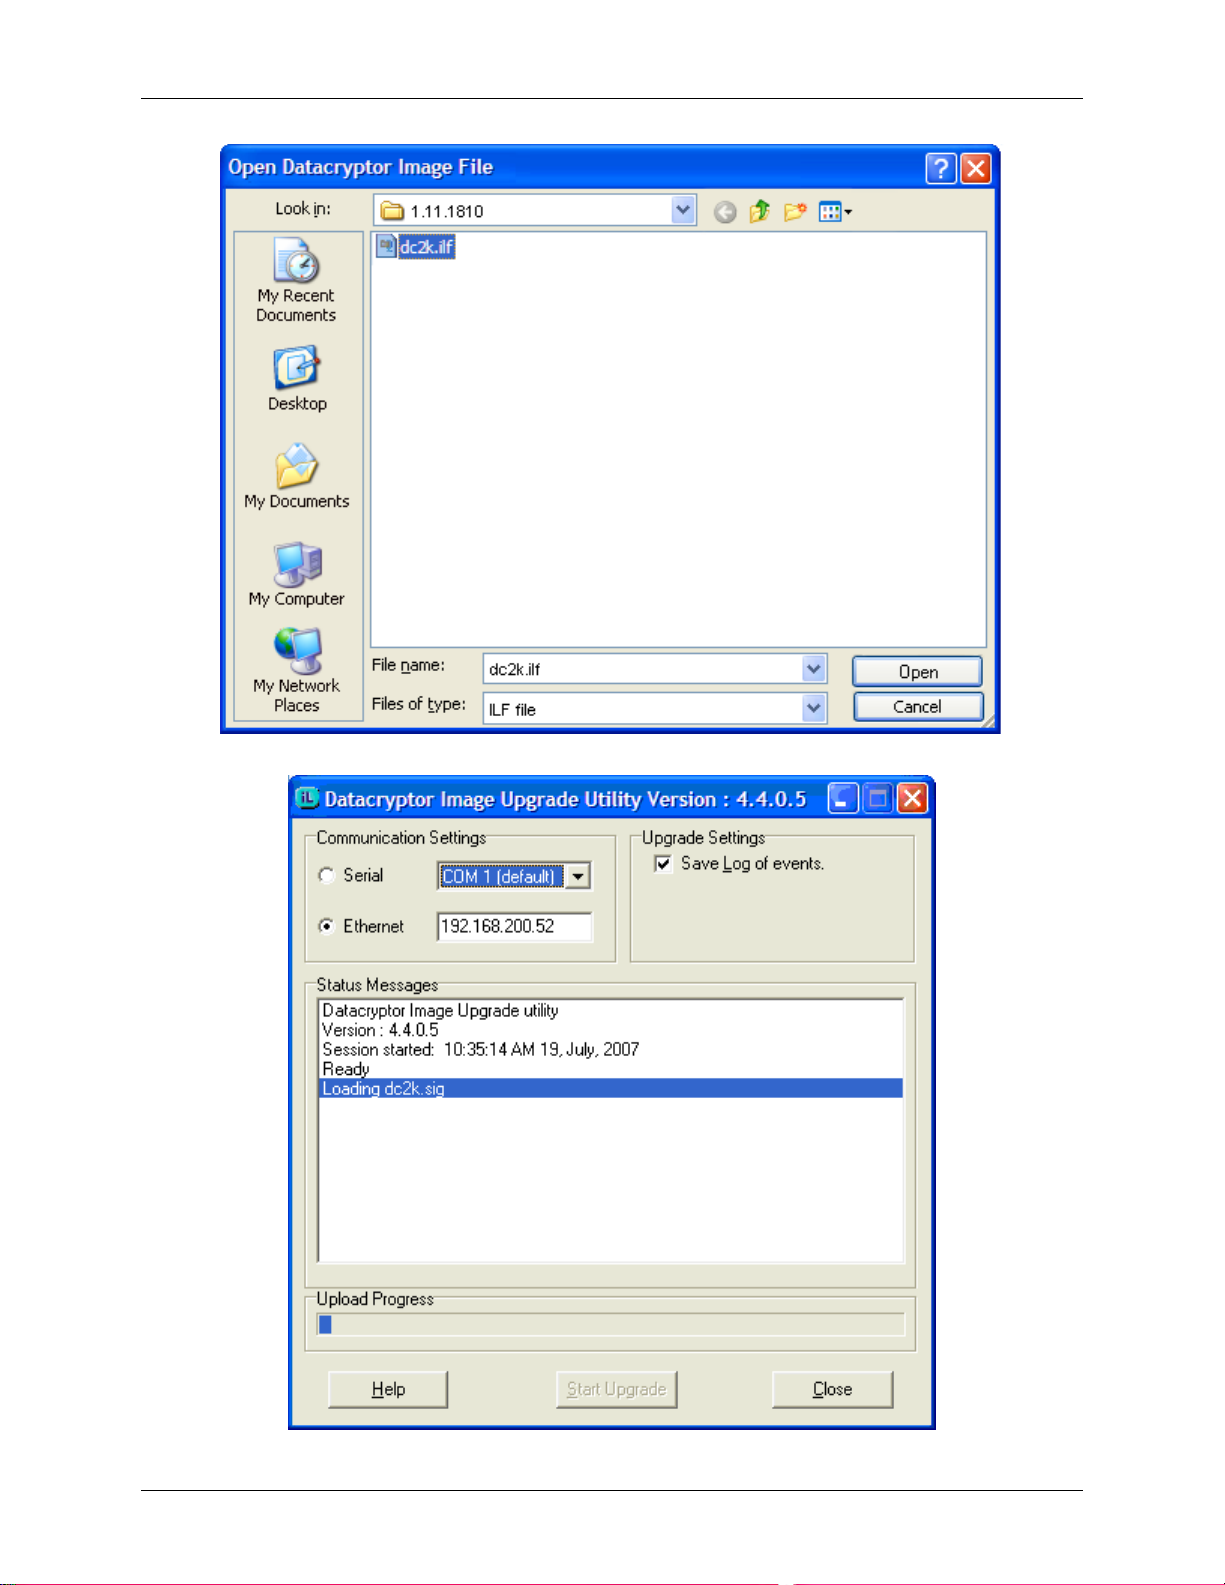
Datacryptor Ethernet User Manual Appendix B: Loading Datacryptor Unit Software
3. Image Loader will begin uploading the code contained in the Image Loader file.
1270A450-005 - June 2008 Page 93
Page 94
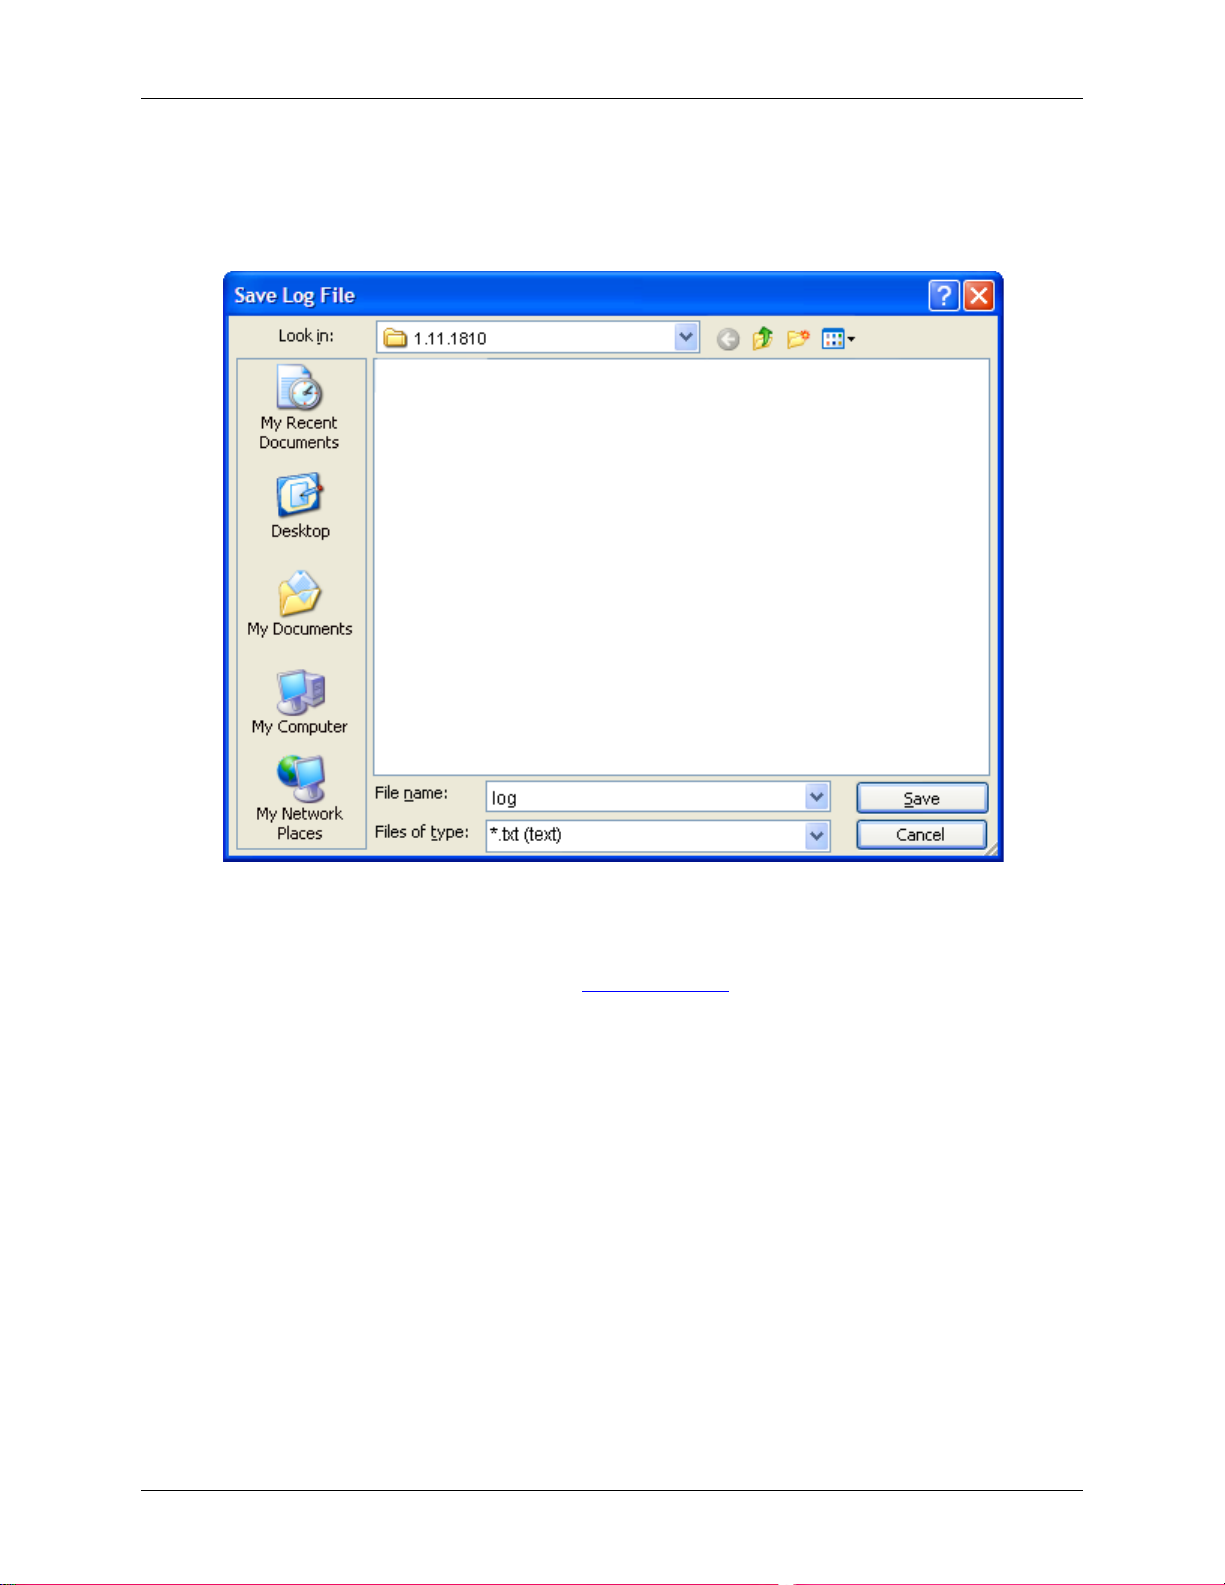
Appendix B: Loading Datacryptor Unit Software Datacryptor Ethernet User Manual
Completing the Upload
1. Progress of the load is shown via the Upload Progress bar and you will be notified when
this is finished. If ‘Save Log Events’ was selected, a dialog will now prompt you for the
file name and location for saving the log file.
2. Upload of the application is complete, click Close to shut down the application, or
connect another Datacryptor for loading.
3. After the application has been loaded and the unit reboots, the algorithm will need to be
loaded into the unit. See the section
Commissioning for more information.
Note: Some algorithms may have to be loaded at the factory or under secure conditions.
Page 94 THALES
Page 95

Datacryptor Ethernet User Manual Appendix C: Product Specifications
Appendix C: Product Specifications
System Specifications
Interfaces - Host and network ports (see Appendix E for transceiver details
used with the 1 Gig and 10 Gig Ethernet Datacryptors)
- 10/100 Mbps auto-sensing LAN port
- RS-232C port
Electrical/Mechanical
Dimensions
Environmental 5 to 40 degrees C (40 to 104 degrees F)
Regulatory See Appendix D
19 inch rack mount design
100-240 VAC, 10A, 50/60 Hz or -48 VDC
100 Mb Ethernet unit:
100M: 44 mm H x 483 mm W (including mounting brackets) x
240 mm D (including connectors)
3.0 Kg
15 Watts power dissipation (typical)
1 Gig Ethernet unit:
44 mm H x 483 mm W (including mounting brackets) x 388 mm
D (including PSU fixed connector)
8.6 Kg
120 Watts power dissipation (typical)
10 Gig Ethernet unit: 88 mm H x 483 mm W (including
mounting brackets) x 420 mm D (including PSU fixed connector)
10.3 Kg
140 Watts power dissipation (typical)
10% to 90% at 25°C (77°F) non-condensing, failing to 50%
maximum at 40°C (100°F)
Certifications Designed to FIPS 140-2 Level 3 compliance.
1270A450-005 - June 2008 Page 95
Page 96

Appendix D: Environmental & Regulatory Datacryptor Ethernet User Manual
Appendix D: Environmental & Regulatory
Environmental Specifications
Description Value
Temperature 5-40 degrees C (40 to 104 degrees F)
Humidity
Altitude -200 - 10,000 feet AMSL operating altitude
Regulatory
Safety/Emissions/Immunity
rd
IEC 60950, 3
CSA-C22.2 No 60950-00 Canadian Safety
Edition (1999) Underwriter Labs Safety
10% to 90% at 25°C (77°F) non-condensing, failing to
50% maximum at 40°C (100°F)
EN 60950 Safety for participating European nations
EN55022: 1998, ANSI C63.4:1992, AS/NZS
3548: 1997 with Amendments 1 and 2,
CNS 13438:1997, and CAN/CSA-CISPR
2296
EN61000-3-2: 1995, EN61000-3-3: 1999 Harmonic Currents
EN61000-4-2: 1995 Electrostatic Discharge
EN61000-4-3: 1995 Radiated Immunity
EN61000-4-4: 1995 Electrical Fast Transient Burst
EN61000-4-5: 1995 Lightning Surge
EN61000-4-6: 1995 Conducted Disturbances
EN61000-4-11: 1995 Voltage Dips, Variations, and Short
FCC Title 47, Part 15, Subpart B, EMC
Directive 89/336/EEC and ICES-003
Interruptions
FCC Information (USA)
This equipment has been tested and found to comply with the limits for a Class B digital device,
pursuant to Part 15 of the FCC Rules. These limits are designed to provide reasonable
protection against harmful interference when the equipment is operated in a commercial
environment. This equipment generates, uses, and can radiate radio frequency energy and, if
not installed and used in accordance with the instruction manual, may cause harmful
interference to radio communications.
Page 96 THALES
Page 97

Datacryptor Ethernet User Manual Appendix D: Environmental & Regulatory
Interference-Causing Equipment Standard Compliance Notice (Canada)
"This Class B digital apparatus meets all requirements of the Canadian-interference causing
Regulations."
Cet appareil numérique de la classe B est respecte toutes les exigences du Règlement sur le
matériel du Canada.
European Notice
Products with the CE Marking comply with both the EMC Directive (89/336/EEC) and the Low
Voltage Directive (73/23/EEC) issued by the Commission of the European Community.
1270A450-005 - June 2008 Page 97
Page 98
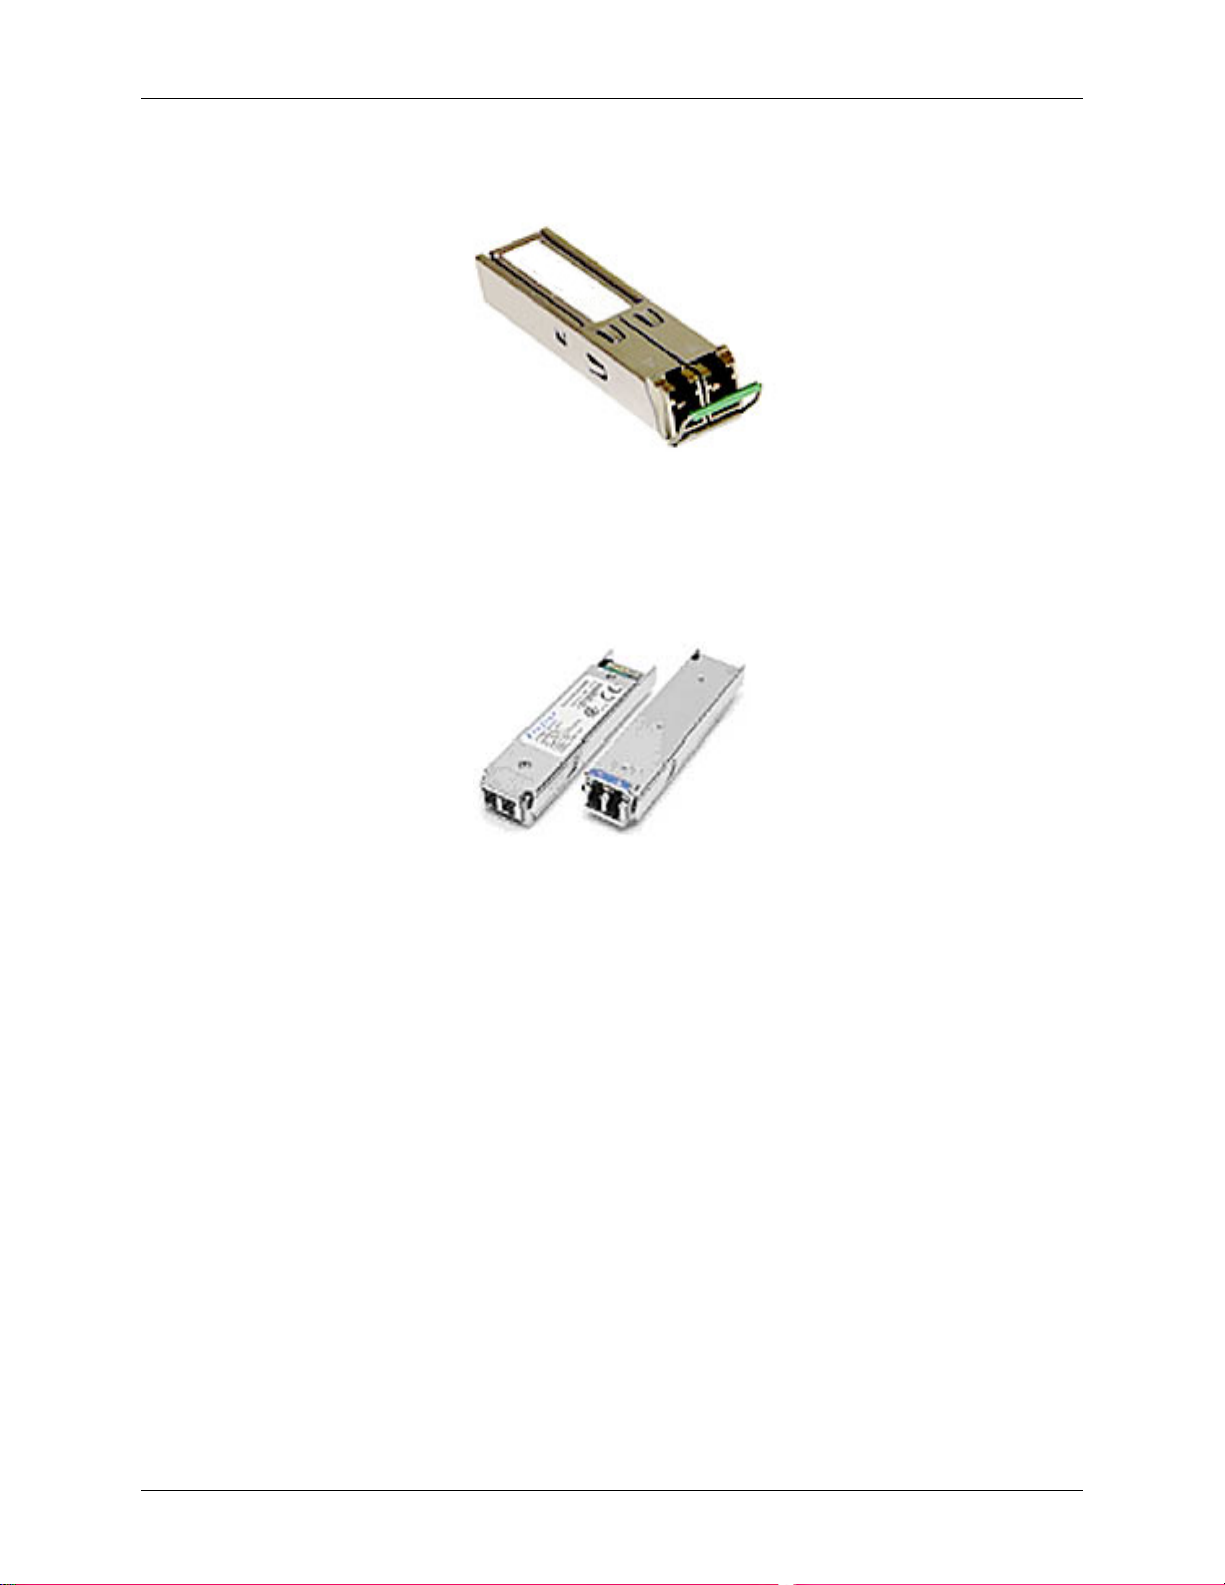
Appendix E: SFP and XFP Interfaces Datacryptor Ethernet User Manual
Appendix E: SFP and XFP Interfaces
The Datacryptor 1 Gig Ethernet unit is supplied with Small Form Factor Pluggable (SFP)
interfaces (see above), using single-mode fiber or multi-mode fiber (MM SPF), as specified at the
time of ordering. The 10 Gig Ethernet unit is supplied with 10 Gigabit Small Form Factor
Pluggable (XFP) single-mode fiber laser devices (see below), as specified at the time of ordering.
The following multi-rate devices are supported:
• Copper RJ45
• 1310nm single-mode, short range
• 1310nm single-mode, intermediate range
• 1310nm single-mode, long range
• 1550nm single-mode, intermediate range
• 1550nm single-mode, long range
• 1550nm single-mode, long range, DWDM
Page 98 THALES
Page 99
Datacryptor Ethernet User Manual Appendix F: Preventing Electrostatic Discharge
Appendix F: Preventing Electrostatic Discharge
Electrostatic discharge (ESD) can damage electronic
components and equipment. ESD occurs when
electronic components are improperly handled and
can result in complete or intermittent failures. Always
follow ESD-prevention procedures when removing
and replacing components.
Use the following guidelines to prevent ESD damage:
• Always use an ESD wrist or ankle strap and ensure that it makes skin contact.
• Connect the equipment end of the strap to an unpainted metal chassis surface.
• If no wrist strap is available ground yourself by touching the metal chassis.
1270A450-005 - June 2008 Page 99
Page 100

Appendix G: Troubleshooting Datacryptor Ethernet User Manual
Appendix G: Troubleshooting
This appendix is provided to aid you in determining basic problems with your Thales
Datacryptor Ethernet unit. If you cannot resolve the problem using this troubleshooting guide,
please contact Thales customer support.
Possible Problems and Solutions
The troubleshooting information in this section is grouped into the following categories:
logging in, configuration and traffic flow. Within each category you will find a list of symptoms
and possible solutions.
Logging In
Symptom Explanation and Possible Solutions
Boot Process Fails Contact Thales support for advice
Administrator password is
forgotten or lost
Not able to connect to the CLI Re-boot the unit
Not able to log in to the Front
Panel Viewer
Contact Thales for service
Log out of the Element Manager application.
Check the Baud rate settings are set to:
115200, 8, N, 1
Verify the password
Configuration
Symptom Explanation and Possible Solutions
Datacryptor does not recognize
its new IP address
The management workstation
can’t communicate with the
Datacryptor
Verify the IP address using the Element Manager (see The
IP Management tab section above). Correct the IP address
if necessary, save the configuration, and then reboot the
Datacryptor.
Verify that the network connection to the management
port is in place (see the
above).
Check the management interface default gateway
configuration. Assign a default gateway if the
management workstation is on a different subnet than
the Datacryptor’s management port.
Connect the Cables section
Datacryptor is not sending
SNMP objects to the
management workstation
Page 100 THALES
Ensure that SNMP traps are enabled.
Verify that the management workstation’s IP address is
configured as the SNMP trap host address.
See the
Configuring SNMP section.
 Loading...