

Page 1

Fryer
Instructions for Use
Page 2

Fryer
TABLE OF CONTENTS
Important Safeguards . . . . . . . . . . . . . . . . . . . . . . . . . . . . . . . . . . . 3
Introduction . . . . . . . . . . . . . . . . . . . . . . . . . . . . . . . . . . . . . . . . . . . 4
Descriptive Diagram/Reset Function. . . . . . . . . . . . . . . . . . . . . . . . 5
Using Your Fryer . . . . . . . . . . . . . . . . . . . . . . . . . . . . . . . . . . . . . . 6
Frying Process . . . . . . . . . . . . . . . . . . . . . . . . . . . . . . . . . . . . . . . . 8
Cooking Tables . . . . . . . . . . . . . . . . . . . . . . . . . . . . . . . . . . . . . . . 10
Cleaning and Maintenance . . . . . . . . . . . . . . . . . . . . . . . . . . . . . . 11
If Your Fryer Does Not Work Properly. . . . . . . . . . . . . . . . . . . . . . 13
Warranty . . . . . . . . . . . . . . . . . . . . . . . . . . . . . . . . . . . . . . . . . . . . 14
2
Page 3

IMPORTANT
SAFEGUARDS
When using electrical appliances, basic safety
precautions should always be followed, including
the following :
1. Read all instructions.
2. Do not touch hot surfaces. Use the handles or
knobs.
3. To protect against electric shock do not
immerse cord, plugs, or this appliance in water
or other liquid.
4. Close supervision is necessary when any
appliance is used by or near children.
5. Unplug from outlet when not in use and before
cleaning. Allow to cool before putting on or
taking off parts, and before cleaning the
appliance.
6. Do not operate any appliance with a
damaged cord or plug or after the appliance
malfunctions, or has been damaged in any
manner. Call our Consumer Service
Department for examination.
7. The use of accessory attachments not
recommended by the appliance manufacturer
may cause injuries.
8. Do not use outdoors.
9. Do not let cord hang over edge of table or
counter, or touch hot surfaces.
10. Do not place on or near a hot gas or electric
burner, or in a heated oven.
11. Extreme caution must be used when moving an
appliance containing hot oil or other hot liquids.
12. Always attach plug to appliance first, then plug
cord in the wall outlet. To disconnect, turn any
control to “off,” then remove plug from wall
outlet.
13. Do not use appliance for other than intended
use.
14. Extreme caution must be used when moving
fryer containing hot oil.
15. Be sure handles are properly assembled to
basket and locked in place. See detailed
assembly instructions.
SAVE THESE
17. Do not overload the basket. For safety reasons
18. Never operate your fryer without any oil or fat.
19. The cooking times are given as guidelines only.
20. The oil must be filtered regularly and changed
21. Do not mix different types of shortening
22. If you use solid vegetable shortening, cut it into
23. If the fryer has a removable pot, never remove
24. If you have any problems, contact the
25. Caution: Overtightening can result in stripping
26. Please check the tightening of the handles and
Polarization instructions
Short Cord instructions
Magnetic connector
FOR HOUSEHOLD
USE ONLY
INSTRUCTIONS
16. The oil level must always be between the MIN
and MAX markings.
never exceed the maximum quantity.
after 8 to 12 uses.
or oils.
pieces and melt it over slow heat in a separate
pot beforehand, then slowly pour it into the
deep fryer pot. Never pour shortening directly
into the deep fryer pot or basket as this will lead
to deterioration of the appliance.
it while the deep fryer is on.
Consumer Service Department or visit internet
address www.t-falusa.com.
of screws or nuts or cracking of handle or feet.
feet screws every 25 uses or 4 times per year.
If this appliance has a polarized plug (one blade
is wider than the other) it is to reduce the risk of
electric shock. This plug is intended to fit into a
polarized outlet only one way. If the plug does
not fit fully into the outlet, reverse the plug. If it
still does not fit, contact a qualified electrician.
Do not attempt to modify the plug in any way.
Do not use with an extension cord. A short
power-supply cord (or detachable power-supply
cord) is to be provided to reduce the risk
resulting from becoming entangled in or tripping
over a longer cord.
The cord is equipped with a detachable
magnetic connector. The magnetic connector
should be attached directly to the fryer. THIS
SHOULD BE DONE PRIOR TO PLUGGING
THE CORD INTO THE WALL OUTLET.
3
Page 4
INTRODUCTION
Emeril’s fryer is something you’ve never seen before. Designed to out-fry
®
all others, the Emerilware™ Fryer by T-fal
heats oil super hot for foods
crispier than you ever dreamed.
Your new Fryer has a system that automatically filters, drains and stores
the oil. Your oil will stay clean and last longer, for healthier frying. Plus,
you’ll able to use the oil, again and again. An indicator light will even tell
you when it’s time for a change.
Your Fryer is easy to handle and take apart. All the parts, except the
heating element, are dishwasher safe. So when you’re done frying, you
can simply throw it in the dishwasher or sink for fast, easy cleanup.
All of your favorite foods – French fries, chicken nuggets, jalapeno
poppers – will pop out of the oil with unbelievable crispness and taste.
Enjoy top-quality frying and irresistibly crispy foods with your new
Emerilware™ Fryer by T-fal
13. 13.
a
®
.
13.
b
13.
c
13.
d
13.
e
4
13.
f
13.
g
Page 5
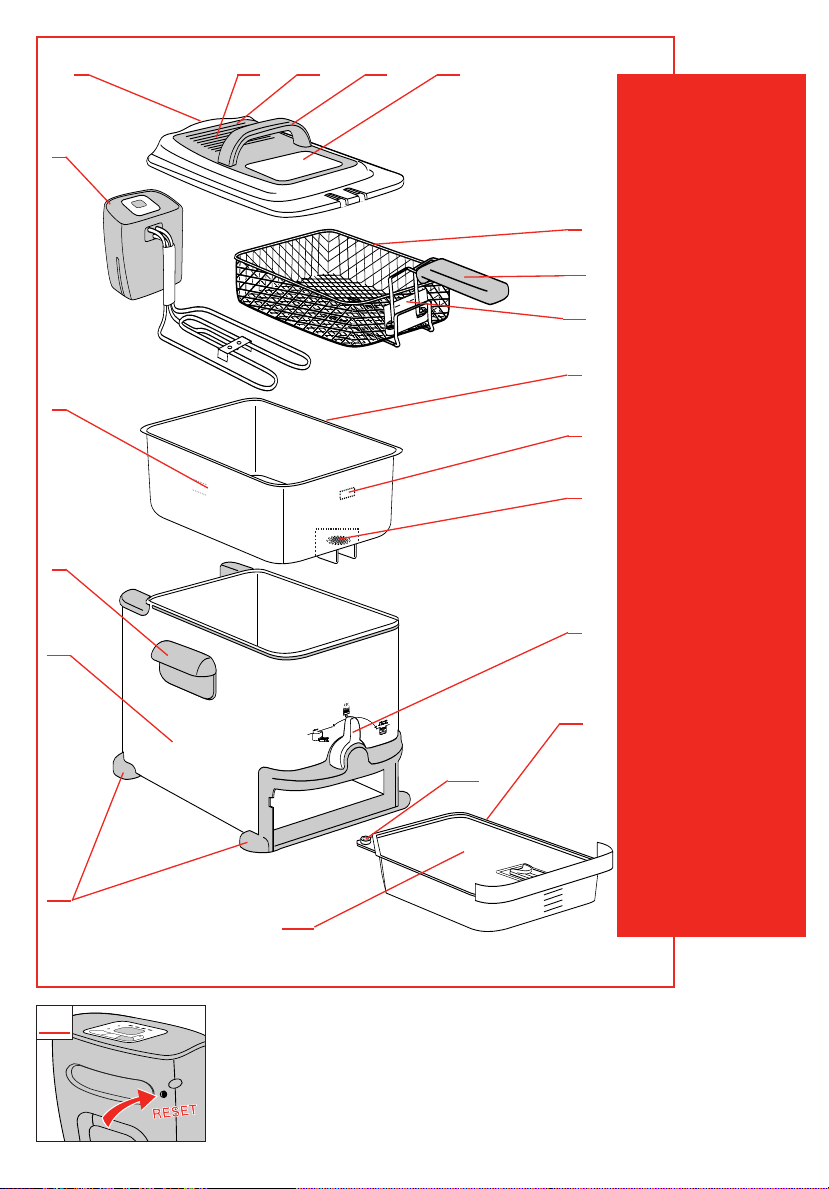
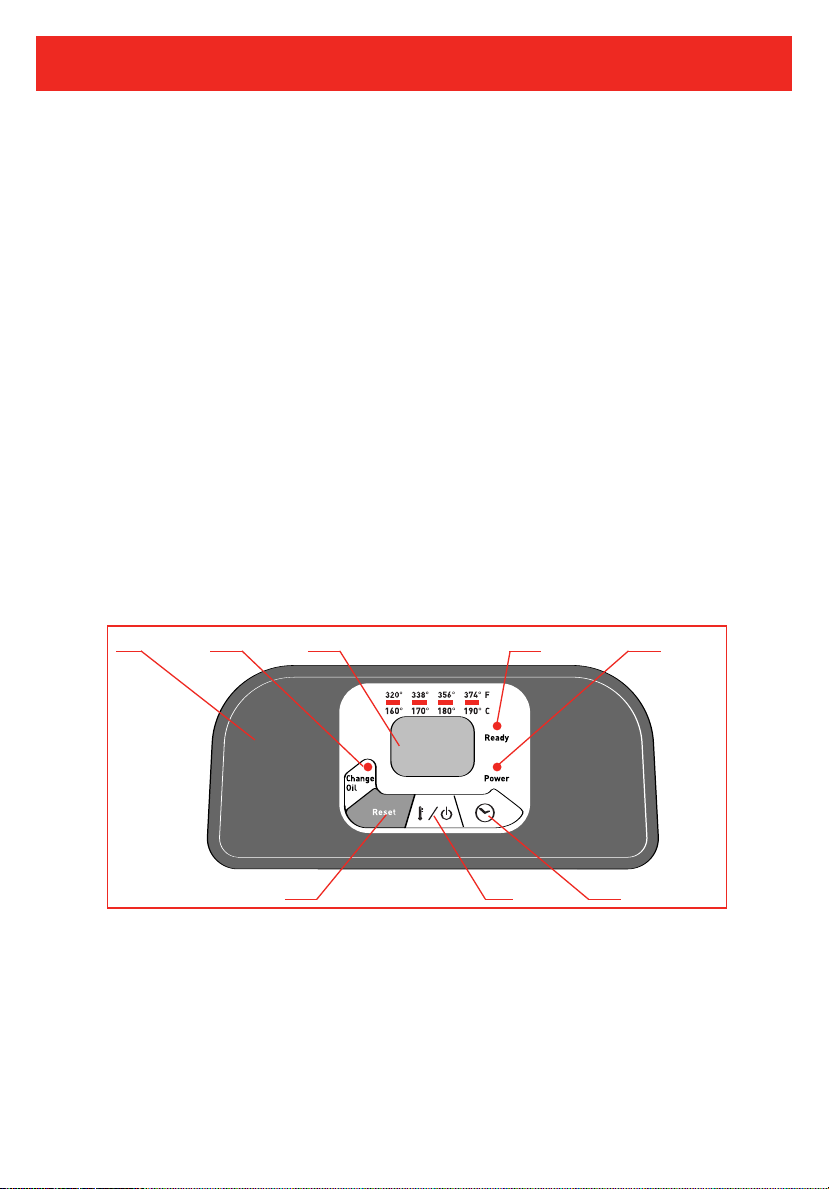
MAX
MIN
M
A
X
2.
5.
8.
10.
12.
1.
1.
a
1.
b
1.
c
1.
d
1.
Lid
a. Permanent filter
b. Filter cover
c. Handle
d. Viewing window
2.
3.
3.
a
3.
b
4.
6.
7.
9.
11.
11.
b
11.
a
Removable
control unit
3.
Frying basket
a. Handle
b. MAX. food level
marking
4.
Removable bowl
5.
Min. and Max. oil
level markers
6.
Basket high position
7.
Fixed oil filter grid
8.
Safety carrying
handles
9.
Oil box control lever
10.
Body
11.
Oil box
a. Lid
b. Oil box cap
12.
Feet
13.
Electronic panel
a. Change oil
indicator light
b. Digital timer
c. Temperature light
d. Power light
e. Change oil Reset
f. Temperature
touchpad / ON-OFF
g. Timer touchpad
14.
Safety cut-out
reset button
14
our appliance is equipped with safety features. If the safety
RESET
cut-out is activated, the appliance will shut off automatically and an error code
will appear on the display. Unplug the appliance, let it cool and follow the
instructions for use. If the error code still appears, push the safety cut-out RESET
button (found on the back of the control unit) with a toothpick or similar nonmetallic object. If the problem with the safety cut-out persists, please contact our
Helpline see details on Page 13.
function:
Y
5
Page 6

USING YOUR FRYER
OK
CLICKCLICK
Using the Oil box container control lever
The Oil box control lever has 3 positions.
Fry Position: to fry.
Automatic Oil Filtration Position: to drain and filter the oil into the oil box.
Oil box Position: to allow for removal of the oil box container.
Before first use
• The fryer can be completely dismantled.
Remove the lid. Remove the frying basket, control unit and bowl. Remove the oil box by positioning
the Oil box control lever on the Oil box position.
• Clean the lid, the bowl, the housing, the frying basket and the Oil box with soap and water or put them in
the dishwasher.
• Clean the control unit and the heating element with a damp cloth.
• Dry thoroughly.
• After cleaning, press on the red button under the fryer to release any water in the bowl.
NOTE: Do not immerse the control unit with the heating element in water.
Check that the red button has gone back to its original position.
• Place the bowl and the heating element in position.
• Place the Oil box control lever on the Oil box position and insert the empty Oil box into the fryer.
Completely unfold the basket handle; a “click” indicates that it is correctly positioned.
•
NOTE:
6
Make sure that the control unit is correctly positioned otherwise the fryer cannot function.
Page 7

USING YOUR FRYER
Getting Started
• Fill the bowl with oil.
The oil level should always be between the MIN and MAX level of the bowl.
Do not exceed the maximum fill line as boiling oil may overflow during frying and can cause
severe burns.
• For best results we recommend vegetable oil.
NOTE: Never use different types of oil at the same time as this may cause the oil to overflow.
MAX 14 cups / 3.3 L
12 cups / 2.8 L
MIN
• If you use solid vegetable shortening:
Cut the shortening into small pieces and melt it in a separate pan. Pour the melted
shortening into the fryer bowl.
NOTE: Never melt the shortening on the heating element or in the frying basket. If you melt
the shortening on the heating element or in the frying basket, the safety cut-out will be
activated. Press the “reset” button, which is located at the back of the fryer.
MAX
MIN
6.55 lbs / 2970 g
5.55 lbs / 2520 g
7
Page 8

FRYING PROCESS
Frying process
• Place the Oil Box control lever on the Fry position.
• After the bowl has been filled with oil, plug in the fryer without the frying basket; the Power indicator light
will come on.
• Press until the (« 00 ») shows on the display. The temperature is automatically set on 320°F.
You can adjust the temperature from 320° to 374°F by pressing the temperature touchpad .
• The fryer will heat the oil to the set temperature.
NOTE: Do not plug in the fryer without oil.
Fresh potato or French fries Frozen potato or French fries
Maximum safety capacity 2.65 lbs / 1.2 kg (in 2 batches) 2 lbs / 900g
Recommended capacity 1.3 lbs / 600 g 1 lb / 450g
• Place food in the basket without overfilling. Notice the Max. food level marking on the basket. Reduce
the quantity for frozen foods.
• After the Ready light switches on, press the timer touchpad to set the time minute by minute. Once
you have removed your finger from the touchpad, the selected time (in minutes) is displayed and the
countdown will start. In case of mistake or to delete the selected time, hold the touchpad down for 2
seconds.
• Place and lower the basket slowly into the oil. Plunging the basket too quickly into the oil may cause it
to overflow.
• Put the lid on the fryer
NOTE: No matter what the recipe, food must be dried thoroughly before frying. This will prevent the oil
overflowing and extend the life of the oil. During cooking, it is normal for the temperature light to go on
and off.
8
.
Page 9

FRYING PROCESS
• Frying is complete when:
- The timer sounds, indicating the cooking time has elapsed.
- The food is of the desired color and texture.
• To stop the signal, press the touchpad .
• Remove the lid.
Allow excess oil to drain by hooking the basket on the elevated support on the inner bowl.
• Serve.
• To turn off, press until display goes off.
- Unplug the appliance and let it cool for about 3 hours.
• For filtering and draining the oil or fat, see the chapter on Maintenance, page 11.
NOTE: Do not touch the fryer when it is in use as it will be extremely hot and can cause severe burns.
Steam coming from the filter is also extremely hot. The timer signals the end of cooking but does not
switch off the appliance.
9
Page 10

COOKING TABLES
The cooking times are a guide only. They could vary depending on quantity,
taste, electricity supply etc...
• For best results and to prevent overflowing, use the traditional method of frying hand made
French fries
- first cycle at 320 °F/160 °C
- second cycle at 374 °F/190 °C
• For safety and for the crispiest results, dry food items thoroughly before frying, especially
frozen foods and freshly made fries.
• Large pieces of chicken or large fries need a longer cooking time.
• Set the temperature thermostat according to the table, or follow the instructions on food
packaging.
• Cooking tip: To prevent food from sticking together, do not use the basket when cooking
battered foods or doughnuts.
FRESH FOODS Quantity Temperature Time
French fries (MAX safety capacity)
French fries (MAX recommended capacity) 1.3 lb / 600 g 190°C / 374°F 9~11 min
Chicken nuggets 8 180°C / 356°F 18~20 min
Apple fritters 8~9 170°C / 338°F 6~7 min
Mushrooms 0.9 lb / 400 g 150°C / 302°F 10~12 min
Fish fillets 0.9 lb / 400 g 160°C / 320°F 5~6 min
2.65 lbs / 1200 g
1st frying
2nd frying
160°C / 320°F
190°C / 374°F
12~15 min
6~8 min
FROZEN FOODS Quantity Temperature Time
French fries (MAX safety capacity) 2 lbs / 900 g 190°C / 374°F 14~16 min
French fries (MAX recommended capacity) 1 lb / 450 g 190°C / 374°F 7~9 min
Fish fillets 0.75 lb / 350 g 190°C / 374°F 7~8 min
Fish nuggets 12 190°C / 374°F 5~6 min
Frozen shrimp 15 190°C / 374°F 4~5 min
• It is recommended that you:
- clean your oil after each use to avoid burnt food particles
- change your oil regularly.
• For quality and fast cooking, limit the quantity of French fries to 1/2 a basket at a time.
10
Page 11

CLEANING AND MAINTENANCE
• For your safety, the appliance automatically drains all kinds of oils (or solid shortenings) when it
is cool enough (approximately 3 hours after the last cooking).
• When you are finished cooking, turn the Oil box control lever to the Automatic oil filtration
position.
• Once filtration is finished, you can store the container in or out of the appliance:
- In the appliance: Turn the Oil box control lever to the Fry position to lock the drawer into
place. The appliance must be carried and transported flat.
- Out of the appliance : Turn the Oil box control lever to the Oil box position and then remove
the container. Transport it with care.
NOTE: Make sure that the oil container is empty before draining the fryer. Carry the container
with both hands. Store it in a cool dry place away from the light.
• To re-use the oil, remove the container with care.
Unscrew the oil box cap and empty the oil in the fryer bowl.
• For the solid shortening, remove the lid from the container. Turn the container over and
press it to loosen the shortening. Cut shortening into pieces and melt in a separate pan.
Once melted, pour shortening into the bowl.
• Insert the empty container in the fryer, with the lid and cap. Place the Oil box control lever
on the Fry position.
NOTE: Never put the Oil box in the microwave oven. Do not pour used oil in the sink.
11
Page 12

CLEANING AND MAINTENANCE
OK
Change oil:
Your fryer is equipped with an oil change indicator.
• After 10 uses, the light will flash to indicate that the oil should be
changed in the near future. At 15 uses, the light will remain on. Oil
should be changed regularly for best frying results and to prevent
overflowing.
• Change the oil/fat and press the Reset button on the panel until the
light goes off.
Dishwasher Safe: very easy to clean.
• The lid, bowl, housing, frying basket and the Oil Box are dishwasher safe.
• The permanent filter in the lid can be cleaned by removing the filter cover.
• The oil filter grid located in the removable bowl is fixed. Do not try to dismantle it.
• After cleaning, press on the red button under the fryer to release any water in the bowl.
NOTE: Before filling the fryer bowl, always check to ensure the red button under the fryer is
in the correct position.
12
Page 13

IF YOUR FRYER DOES NOT WORK PROPERLY
Problems and possible causes Solutions
The fryer is not heating
The appliance is not plugged in. Plug in the appliance.
The cooking temperature is not indicated. Press the button for 3 seconds then select
The Max. marker for filling the bowl Check the oil level (Max.), and remove the excess.
has been exceeded.
The Max. marker for filling the frying basket Check the Max. level of the frying basket, and
has been exceeded. remove the excess.
Food is wet or contains too much water Remove any ice and dry the food thoroughly.
(frozen food) Lower the basket slowly.
Different types of oil/fat have been mixed. Empty and clean the bowl. Refill the bowl with
Bowl does not drain
The oil temperature is still too high. Wait for the temperature to go down
The Oil Box control lever is not on the Turn the Oil Box control lever to the
Automatic Oil Filtration position. Automatic Oil Filtration position.
The filter grid is blocked or clogged. Empty the bowl into a container and clean the
The fat is set or solidified. Warm the fryer for 4 to 5 min.
The max (3.3 l) fill mark for the bowl has been Respect the oil level (3.3 l). Clean the fryer before
exceeded. any use.
There is some oil left in the container or it is Place the Oil Box control lever to the Oil Box
full. position, take out the container and empty it.
Emits unpleasant smells
The fat/oil has deteriorated. Renew the frying oil (after 15 uses max), more
The fat/oil is unsuitable.
Food does not become golden, and remains soft
Pieces are too thick and contain too much water. Try drying the food thoroughly prior to cooking,
Too much food is being cooked at the same time Fry food in small quantities (especially when frozen).
and the cooking oil is not at the right temperature.
The temperature of the frying oil may not be high Set to the recommended temperature or try using
enough: the temperature is set incorrectly. a slightly higher temperature.
French Fries stick together
Unwashed food immersed in hot oil. Wash potatoes well and dry them thoroughly.
The safety cut-out is activated: error codes (from 81 to 85)
The oil level is not suf
Solid fat has been put directly in the fryer.
ficient. Unplug the appliance, let it cool and follow the
If you have any product problems, please contact our Consumer Service Department for expert help and
advice: at US 1-800-395-8325.
Consult our website: www.t-falusa.com
Any repairs must only be carried out by an Approved Service Center with the manufacturer’s own
replacement parts.
the desired temperature.
Oil overflows
one type of oil.
(approximately 3 hours).
filter grid with warm water, liquid dish soap and a
non-metallic brush. Press on the red
button under the fryer to release any water.
Oil leaks
frequently depending on the oil.
Use a good quality blended vegetable oil.
lengthening the cooking time or cutting food into
thinner pieces.
instructions for use. If the error code still appears,
press the Safety cut-out Reset button, which is
located at the a back of the fryer. If the problem
persists, please contact our Customer Relations Team.
13
Page 14

ONE YEAR LIMITED WARRANTY
The manufacturer warrants this product to be defect-free in material and
workmanship for a period of one year from the date of purchase. Defective products
may be returned by the original purchaser or any subsequent owner within the
warranty period, postage pre-paid together with proof of purchase (register receipt)
to a T-fal return facility. If product is returned without proof of purchase it will be
renewed based on the manufacturing production week and year to determine
warranty coverage. Defective products will be replaced at no charge including return
postage if it falls within the warranty timeframe. The warranty does not apply to any
unit that has been tampered with, nor to damages incurred through improper use
and care, faulty packing or mishandling by any common carrier. Manufacturer's sole
obligation and your exclusive remedy under this warranty are limited to such
replacement. This is a limited warranty and is in lieu of all other warranties, express
or implied, including merchantability. This warranty gives you specific legal rights.
You may also have other legal rights varying from state to state.
If you have a claim:
1) Do not return the product to the retailer from which it was purchased.
2) Please contact our consumer service department (1-800-395-8325 M -Th
8:30 - 5 pm & Fr 8:30 - 4 pm EST) for assistance and to ensure the fastest
possible resolution to the problem. Please have the model or type number
of your product on hand.
3) If it is determined that you should return your product for replacement you will be asked to send the product along with the original proof of
purchase and a description of the nature of the defect to the closest T-fal
authorized return facility.
4) Be sure to include your name, address and home telephone number with
your shipment.
5) Returns must be sent with all shipping charges pre-paid. We suggest that
you carefully wrap your package for shipping and send it by insured or by
traceable means.
What happens to my return?
If the inspection shows that the product is defective, under our Limited Warranty, the
return facility will notify T-fal to replace the defective part or product at no cost to
you. Comparable substitutions are based on replacement product availability and at
the sole discretion of the Manufacturer.
If the inspection shows that the product is not defective under our Limited Warranty
we will notify you. Shipping charges may apply to product not covered under
warranty.
Please allow 5 - 10 business days to process your return. You will be notified if a
repair will take longer.
-fal Customer Service :
If problem persists, or for any other problem. Contact
in the U.S. (1-800-395-8325) or www.t-falusa.com
14
T
Page 15

Ref. 5081614 5/06
 Loading...