


Réf : 5253
September 2004
Ref. : 3306880
Document subject to modification • Document sujet à modification • Documento sujeto a modificaciones
Réalisation : Espace Graphique
Instructions for use
Mode d’emploi
Modo de empleo
T-FAL Corporation, P. O. BOX 2001, PINE BROOK NJ 07058
Groupe SEB Canada Inc., 455 Finchdene Square, Scarborough, Ontario, M1X 1B7 G.S.E.B. Mexicana, S.A. de C.V. Goldsmith 38-401, Piso 4, Polanco Chapultepec, Miguel Hidalgo - C.P. 11560 MEXICO D.F. RFC GSB 910719 5A0

|
1 |
|
8* |
|
|
9* |
|
|
10* |
2 |
|
|
||
11 |
3 |
|
|
||
|
4 |
|
|
5 |
|
|
6 |
|
|
7 |
|
|
a |
|
12* |
b |
|
c |
||
|
||
|
d |
|
13* |
e |
|
f |
||
|
||
|
h |
|
14* |
i |
|
|
||
|
j |
|
|
g |
|
*according to model - selon modèle - según modelo |
|

Eng
SAFETY INSTRUCTIONS
•Safety of this appliance complies with the technical regulations and norms in force.
•Make sure that the network voltage corresponds to that indicated on the appliance.
•Considering the diversity of the norms in force, check whether the appliance is used in a country other than that in which it was purchased. Have it verified by an authorized service station.
•Use a stable work platform, protected from water projections.
•Do not carry or move the equipment when in use.
•Do not unplug the equipment by pulling the cord.
INSTRUCTIONS ON THE POWER CORD
•The electrical cord is short in a manner as to reduce the risks of injury that could occur if one gets entangled or if one trips on a longer cord.
•This equipment has a polarized plug (one prong is wider than the other). In order to reduce the risk of electric shock, this plug has been designed in such a manner that it can be connected to the current socket in just one way. If the plug cannot be inserted into the current socket
properly, invert the pins. If the problem persists, call a qualified electrician. Do not try to modify the socket in any way.
•Certain precautions are imposed if you are using an extension cord:
(a)Electric power of your extension cord should at least be equal to that of your toaster oven.
(b)The extension cord should be kept beyond the reach of children and should be kept in such a way that no one trips on it or is injured by it.
(c)The extension should be equipped with a ground cable if the plug of the cable of your equipment is equipped with a ground electrode.
IMPORTANT SAFEGUARDS
A certain number of basic rules, especially those mentioned below, should be respected while using electrical appliances:
•Read all the usage instructions and follow them carefully.
•The appliance is not intended for use by young children or infirm persons without close supervision.
•Young children should be supervised to ensure that they do not play with the appliance.
•Do not keep the appliance within the reach of children.
•Never allow the appliance to be operated without supervision. Remain close to the oven when it is in use.
•Do not use the appliance for a purpose other than that for which it has been designed.
•Do not touch the metallic or hot parts of the oven while it is in use. Use the buttons and the handle. Use oven mitts, if necessary.
•Do not immerse the electrical cord, the current socket or the appliance in water or any other liquid so as to avoid electric shocks.
•Always attach plug to appliance first, then plug cord into the wall outlet.
•To turn off the oven, press stop and unplug it.
•Unplug the appliance when not in use and before cleaning it. Wait for the equipment to cool before cleaning or putting it away.
•Do not use the appliance if:
-it has a defective cord,
-the equipment falls and presents visible damages or functioning defects.
In all these cases, the equipment should be sent to the nearest after-sales service center authorized by T-FAL, in order to avoid all risks.
Consult the guarantee card.
1

Eng
equipment has a polarized plug (one prong is larger than the other): in order to reduce the of electric shock, this plug has been designed to connect to the current socket in just one-
. If the plug cannot be inserted into the current socket properly, invert the pins. If the propersists, call a qualified electrician. Do not try to modify the socket in any way.
of accessories, not recommended by the manufacturer, may be dangerous.
not allow the cord to hang from the table or working surface or touch the hot parts of the
.
not place the appliance on or close to a source of heat (cooking plate, oven, hot gas, elecburner, etc).
not cover the appliance when in use.
may burn, therefore the toaster oven must not be used near or below curtains and other materials. It should be attended when in use.
not operate the appliance under wall-mounted furniture, a shelf, or close to inflammable such as: blinds, curtains, hangings...
parts of the product catch fire, never try to extinguish flames with water.
the appliance and smother the flames with a damp cloth. Never try to open the oven’s in case of fire in the appliance.
not keep inflammable products close to or under the furniture where the appliance is
.
foods or metal ustensils must not be inserted in a toaster oven as they may create a or risk of electric shock.
the appliance: if a functioning defect occurs, after every use, before changing its posiand before washing it.
not use metallic buffers or abrasive, cleaning agents. Metallic particles may come off and the electrical parts of the equipment and lead to a short circuit.
the appliance only indoors.
product is not in use, do not stock accessories other than those recommended by the manufacturer in the appliance. Extreme caution should be exercised when using contai-
constructed of other than metal or glass.
not place any of the following materials in the oven: paper, cardboard or plastic. not use the appliance as a heat or drying source.
appliance should always be in an upright position, never horizontal, tilted or upside down. not insert anything in the ventilation inlets and do not block them.
the crumbs from the crumb tray regularly. Do not cover the crumb collector with alusheets. This would lead the equipment to overheat. Do not cover the crumb tray or any
of the oven with metal foil. This wil cause overheating of the oven.
appliance has been designed only for domestic usage. The manufacturer is not or liable for any kind of professional usage, which is inappropriate or non-
with the recommended usage method.
interventions other than cleaning and maintenance should be entrusted to the nearest, T-FAL service center (see the enclosed list).
user should not repair any part so as to eliminate the risk of domestic accident, fire or
. Only qualified personnel of the authorized T-FAL service center should carry out
.
KEEP THESE INSTRUCTIONS
IN A SAFE PLACE
2

Eng
Appliance features
1 |
Integrated handle in reheat oven door |
4 |
Ventilation holes |
2 |
Top heating element |
5 |
Bottom heating element |
3 |
Control panel |
6 |
Crumb tray drawer |
|
a) Display |
7 |
Integrated handle in main oven door |
|
b)Temperature setting button |
8 |
Bread tong* |
|
c) Cooking time setting button |
9 |
Enameled baking tray for top reheat |
|
d)Clock setting button |
10 |
compartment* |
|
e)“+” or “-” adjustment button |
Non-stick sides* |
|
|
f) BAKE function, baking/roasting |
11 |
Shelf supports |
|
g)WARMER function (reheat |
12 |
Enameled broiling tray* |
|
compartment) |
13 |
Enameled baking tray for main |
|
h)BROIL function |
14 |
compartment* |
|
i) TOAST function |
Reversible rack* |
|
|
j) START/STOP button |
|
|
Advantages
Your Avanté Elite Convection toaster oven offers you the following advantages:
•2 ovens for greater cooking flexibility and for reheating dishes of all kinds.
•The convection oven function enables any type of dish to be quickly cooked or reheated. Because the convection fan circulates air throughout the oven, the cooking results are perfectly even.
•6-slice capacity for easy browning of your toast and bagels.
•A multifunction toaster oven for cooking, heating or grilling/broiling. The top oven is an useful extra feature to help prepare complete meals!
•A reversible grilling rack and 2 shelf positions allow you to vary the grill height and position your dishes or loaves perfectly for the desired cooking results.
•A thermostat that can be precisely adjusted from 150°F to 500°F (25°F increments).
•The crumb collector drawer is easy to remove using its push / pull exterior handle.
•Non-stick baking trays are suitable for all types of dishes. Easy cleaning.
•A non-stick broiling tray* for healthier cooking of your meats and grilled foods.
•A continuously running clock*.
•A user-friendly display for ease and precision in using the electronics.
•Easy care and maintenance with self cleaning oven walls.
*according to model
Eng
Before first use
• Unpack the appliance and remove all self-adhesive stickers.
• Read the instructions for use and follow them carefully.
• Pull out all the accessories* (grill, broiling and baking trays) and wash them in warm, soapy water. Rinse and dry carefully.
• Unroll the power cable completely.
•Wipe over the outside of the appliance with a damp cloth and dry off any excess moisture.
• Plug in the toaster oven. It will beep.
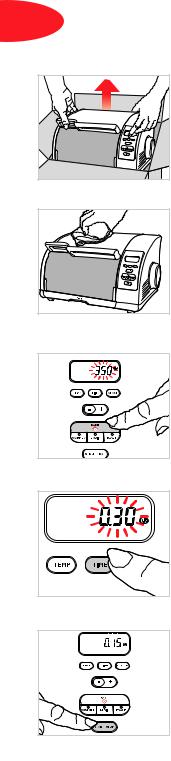
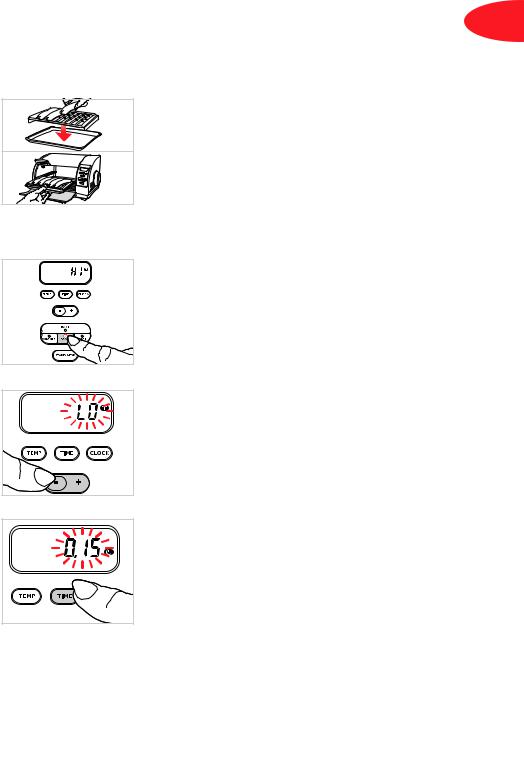
To eliminate the “new” smell, run the appliance empty, with open doors, for 15 minutes:
Select the temperature:
• Press the “BAKE” button.
•The default temperature of 350°F will be shown blinking on the display.
• Press on “+” to select a temperature of 500°F.
Select the cooking time:
• Press the “TIME” button. In so doing, the temperature setting is entered in the system.
• The default setting of “0:30” (30 minutes) will appear blinking on the display.
• Press on the “-” button until the cooking time is set to 15 minutes.
• Press “START”. The appliance will beep and the oven will start.
• The time will be counted down in one-minute intervals.
• At the end of the cooking time, the appliance will beep three times and the oven will turn off.
 You may well observe smoke escaping from the oven. This is normal and will progressively disappear with use.
*according to model
Eng
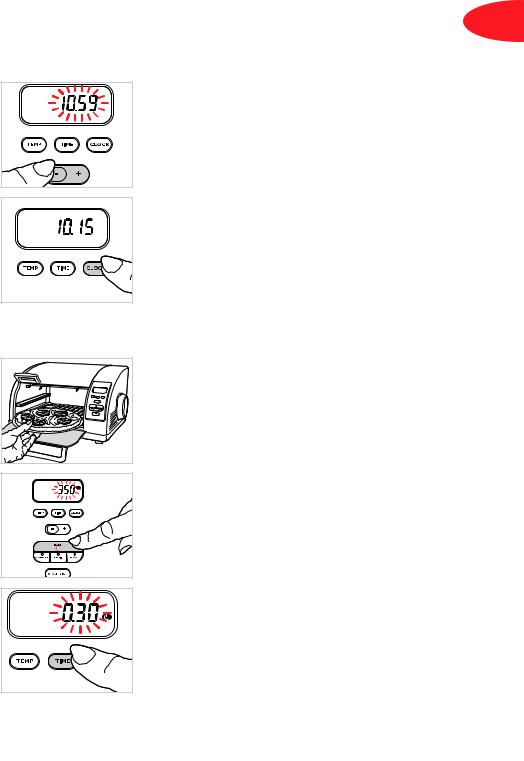
Clock setting
• Immediately after connecting your oven, “12:00” will appear on the display.
• Press the “CLOCK” button. The display will begin to blink.
• Adjust the time in steps of one minute by pressing the “+” or “-” buttons.
•If you press and hold the button for more than 2 seconds, the time will change more quickly.
•Press the “CLOCK” button to enter the time in the system.
 If you do not press the “CLOCK” button, the time will be entered automatically after 30 seconds.
• To see the time during cooking, press the “CLOCK” button. The time will be displayed for 5 seconds; the display will then revert to the countdown.
BAKE/Convection oven function
(the two heating elements operate with temperature control)
To cook all your dishes:
• Place your dishes in the main oven at the desired height.
• Close the door.
Select the temperature:
• Press the “BAKE” button.
• The default temperature of “350°F” will be shown blinking on the display.
• Press the “+” or “-” buttons to select your temperature. The temperature can be changed in 25°F increments.
• The display will continue to blink.
Select the cooking time:
• Press the “TIME” button. In so doing, the temperature setting is entered in the system.
• The default setting of “0:30” (30 minutes) will appear blinking on the display.
• Adjust the cooking time according to your recipe by pressing the “+” or “-” buttons.
• Press “START”. The appliance will beep and cooking will start.
•The time will be counted down in one-minute intervals.
•At the end of the cooking time, the appliance will beep three times and cooking will stop.
•You can stop the cooking at any time by pressing the “STOP” button.
Eng
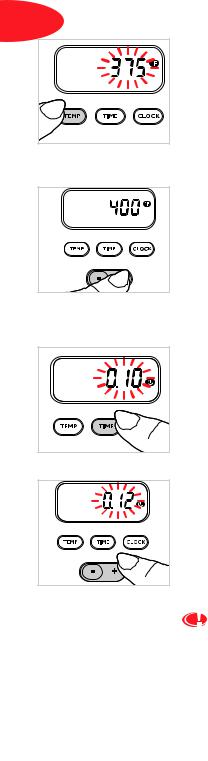
Changing the temperature before confirming the programming:
• After setting the cooking time, press the “TEMP” button.
• The temperature already selected is shown blinking on the display.
•Press the “+” or “-” buttons to select the new temperature.
•The display will continue to blink.
•Press “START”; the appliance will beep and cooking will start.
Changing the temperature during cooking:
• The cooking time is counting down.
• Press the “TEMP” button; the current temperature setting will be displayed.
• Cooking continues.
•Press the “+” or “-” buttons to select the new temperature.
•Press the “TEMP” button again to enter the temperature in the system.
•The display will show the remaining cooking time.
Changing the time during cooking:
• The cooking time is counting down.
• Press the “TIME” button; the time display will start to blink.
• Cooking continues.
• Set the new cooking time as desired by pressing the “+” or “-” buttons.
• Press the “TIME” button again to enter the new time in the system.
• The display will show the new remaining cooking time.
 When the main compartment is in use, the top oven is hot!
When the top compartment is in use, the main oven is
hot!
Eng
BROIL/Grill function
(For this setting only the top heating element is used. There are two grill settings: fast grilling, “HI”, and slow grilling, “LO”)
For healthier cooking of your meat, sausages, etc.
• Place the broiling tray in the baking pan with the four corner dimples facing up, such that the broiling surface is raised away from the baking pan.
• Arrange your food on top of the broiling tray.
• Place trays with food on the shelf grill. The shelf should be adjusted for a minimum 1 inch space between the food and the top element.
• Close the door.
Choosing the grill setting:
• If desired, press the “BROIL” button.
• The display will show “HI”, the fast, default setting of the grill.
•Press the “-” button to reduce the grill temperature and “LO” will appear on the display.
• The display will blink.
Setting the cooking time:
• Press the “TIME” button to confirm the grill setting.
• The default setting of “0:15” (15 minutes) will appear blinking on the display.
• Adjust the cooking time according to your recipe by pressing the “+” or “-” buttons.
•Press “START”. The appliance will beep and cooking will start.
•The time will be counted down in one-minute intervals.
• At the end of the cooking time, the appliance will beep three times and cooking will stop.
•You can stop the cooking at any time by pressing the “STOP” button.
Eng
Changing the grill setting before confirming the programming:
• The cooking time has been set and is shown blinking on the display.
• Press the “TEMP” button. The display will show the current grill setting.
• If it shows “HI”, press “-” to select “LO” and vice versa.
• The display will blink.
• Press “START”. The appliance will beep and cooking will start.
Changing the grill setting during cooking:
• The cooking time is counting down.
• Press the “TEMP” button; the current grill setting will be displayed.
• Cooking continues.
• If it shows “HI”, press “-” to select “LO” and vice versa.
• The display will blink.
• Press the “TEMP” button again to enter the temperature in the system.
• The display will again show the remaining cooking time.
Changing the time during cooking:
• The cooking time is counting down.
• Press the “TIME” button; the time display will start to blink.
•Cooking continues.
•Adjust the cooking time as desired by pressing the “+” or “-” buttons.
•Press the “TIME” button again to enter the new time in the system.
•The display will again show the remaining cooking time.
Eng
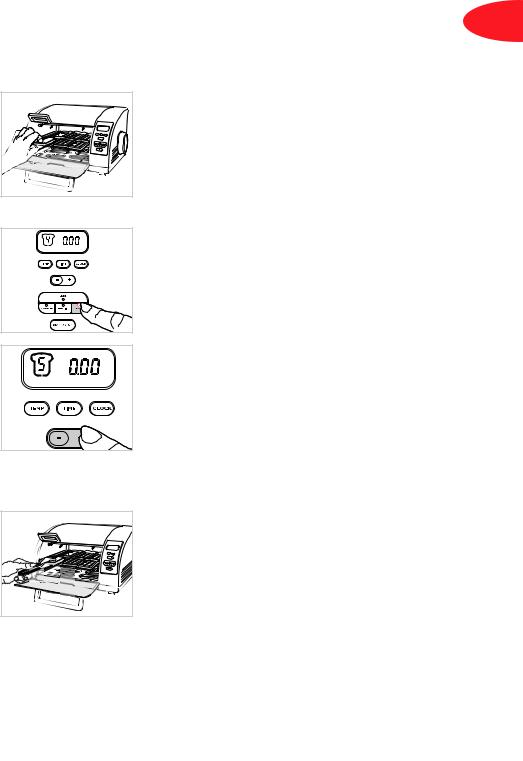
TOAST function
(both heating elements are used)
To toast any kind of bread to your taste
• Place your bread on the shelf grill, with the oven rack in the upper slot, the grill turned upwards.
• Close the door.
Setting the speed of toasting:
• Press the “TOAST” button.
• There are 9 possible settings to deliver a result exactly to your taste.
• The default setting, “4” will appear on the display.
• Press the “+” or “-” buttons to modify to your desired toasting setting.
• Press “START”; the appliance will beep and toasting will start.
• The remaining time will be counted down in one-second intervals.
•At the end of the cooking time, the appliance will beep three times and toasting will stop.
•You can stop the toasting at any time by pressing the “STOP” button.
Eng
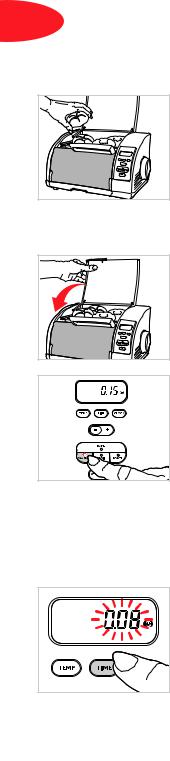
WARMER function/Use of top oven
(This cooking mode can be used separately by pressing the “Warmer” button or while using one of the other 3 cooking modes)
To warm up your buns, croissants or any kind of bread. Can also be used to cook foods like eggs or bacon!
• Place the food on the tray in the top oven.
Using the top oven on its own for cooking or reheating:
• With the Warmer function, you cannot choose the cooking temperature.
•The top heating element of the main oven is used.
•Close the door.
Setting the cooking time:
• Press the “WARMER” button; the default reheat time, “0:15”, will be shown blinking on the display.
• Adjust the cooking time in one second steps by pressing the “+” or “-” buttons.
• Press “START”; the appliance will beep and reheating or cooking will start.
•The time will be counted down in one-minute intervals.
•At the end of the cooking time, the appliance will beep three times and reheating or cooking will stop.
•You can stop the cooking at any time by pressing the “STOP” button.
Changing the time during cooking:
• The cooking time is counting down.
• Press the “TIME” button; the time display will start to blink.
• Reheating or cooking continues.
• Adjust the cooking time as desired by pressing the “+” or “-” buttons.
•Press the “TIME” button again to enter the new time in the system.
•Reheating or cooking continues for the new time required.
Eng
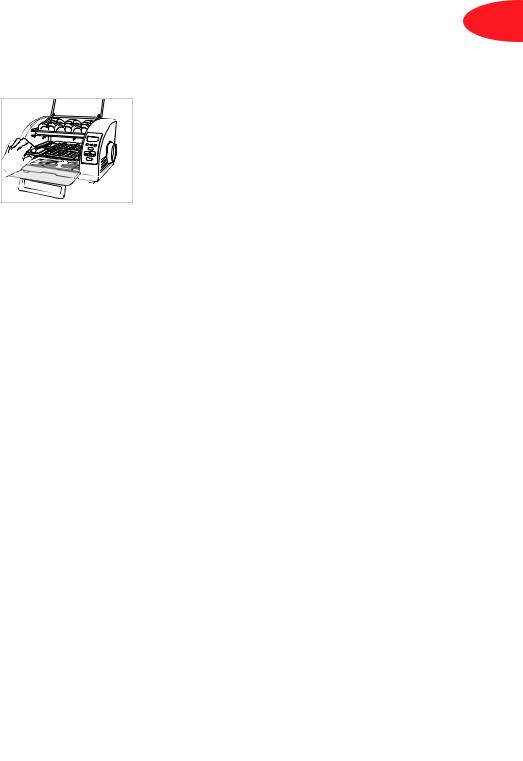
Using the top oven for cooking or reheating at the same time as one of the other three cooking modes:
• In this case, the cooking settings (time and temperature, grill or toasting setting) for the food in the main oven must be chosen first.
• For each of these cooking modes, the top heating element of the main oven is used, so that the top oven is heated.
 In this case, the cooking time is determined according to the food being cooked in the main oven. The oven will
stop at the end of this cooking time.
You will therefore need to keep an eye on the cooking or reheating of the food in the top oven to ensure that they are not over-cooked or reheated for too long.
Although the warming compartment may be used with the other three cooking modes, please avoid using the warming compartment if you are baking delicate items such as soufflés, etc.
When the main compartment is in use, the top oven is hot!
Eng
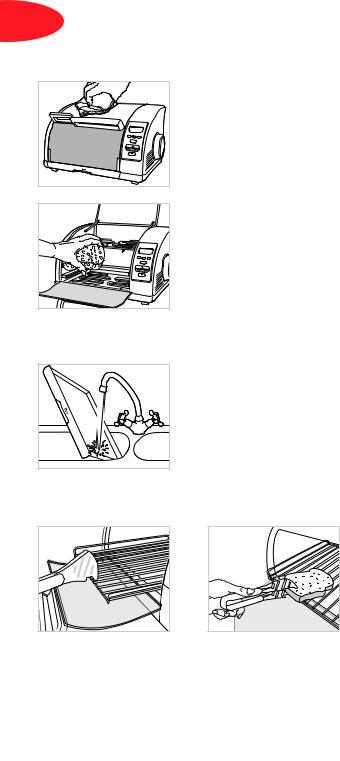
Cleaning and maintenance
 Do not allow grease to accumulate in the appliance.
• Before cleaning or maintenance, disconnect the appliance and allow it to cool.
• A quick wipe with a sponge is sufficient to clean the outside of the appliance.
• Do not use cleaning products intended for metals (stainless steel, copper, etc.).
•Clean the door, enameled or lacquered surfaces and translucent parts with a damp sponge and a mild detergent.
 Do not use aggressive cleaning products (especially soda based oven cleaners), scouring sponges or abrasive pads.
• As your oven has non-stick inside walls, you just have to clean
then with water and detergent.
• All accessories* (shelf grill, broiling and baking trays) should be cleaned with water and detergent.
 Do not wash the crumb tray drawer in the dishwasher.
•Keep the crumb tray in the appliance when it is in use.
•Do not touch the metallic part of the crumb tray while in use or just after having used it.
• The crumb tray drawer should be cleaned in warm soapy water.
Bread tong
*according to model
 Loading...