

Page 1
...............................
...............................
...............................
...............................
...............................
...............................
...............................
...............................
...............................
...............................
...............................
...............................
...............................
...............................
...............................
...............................
...............................
...............................
...............................
...............................
...............................
...............................
...............................
...............................
...............................
...............................
...............................
...............................
...............................
...............................
...............................
...............................
T-FAL CORP. 25 Riverside Drive, Pine Brook, N.J. 07058
T-FAL CANADA INC. 455 Finchdene Square, Scarborough, Ontario M1X1B7
Avanti Bagel 2T 2002.qxd 09/10/2002 15:44 Page 1
Page 2
1
2
3
4 - 5 - 6
7
Avanti Bagel 2T 2002.qxd 09/10/2002 15:44 Page 2
Page 3

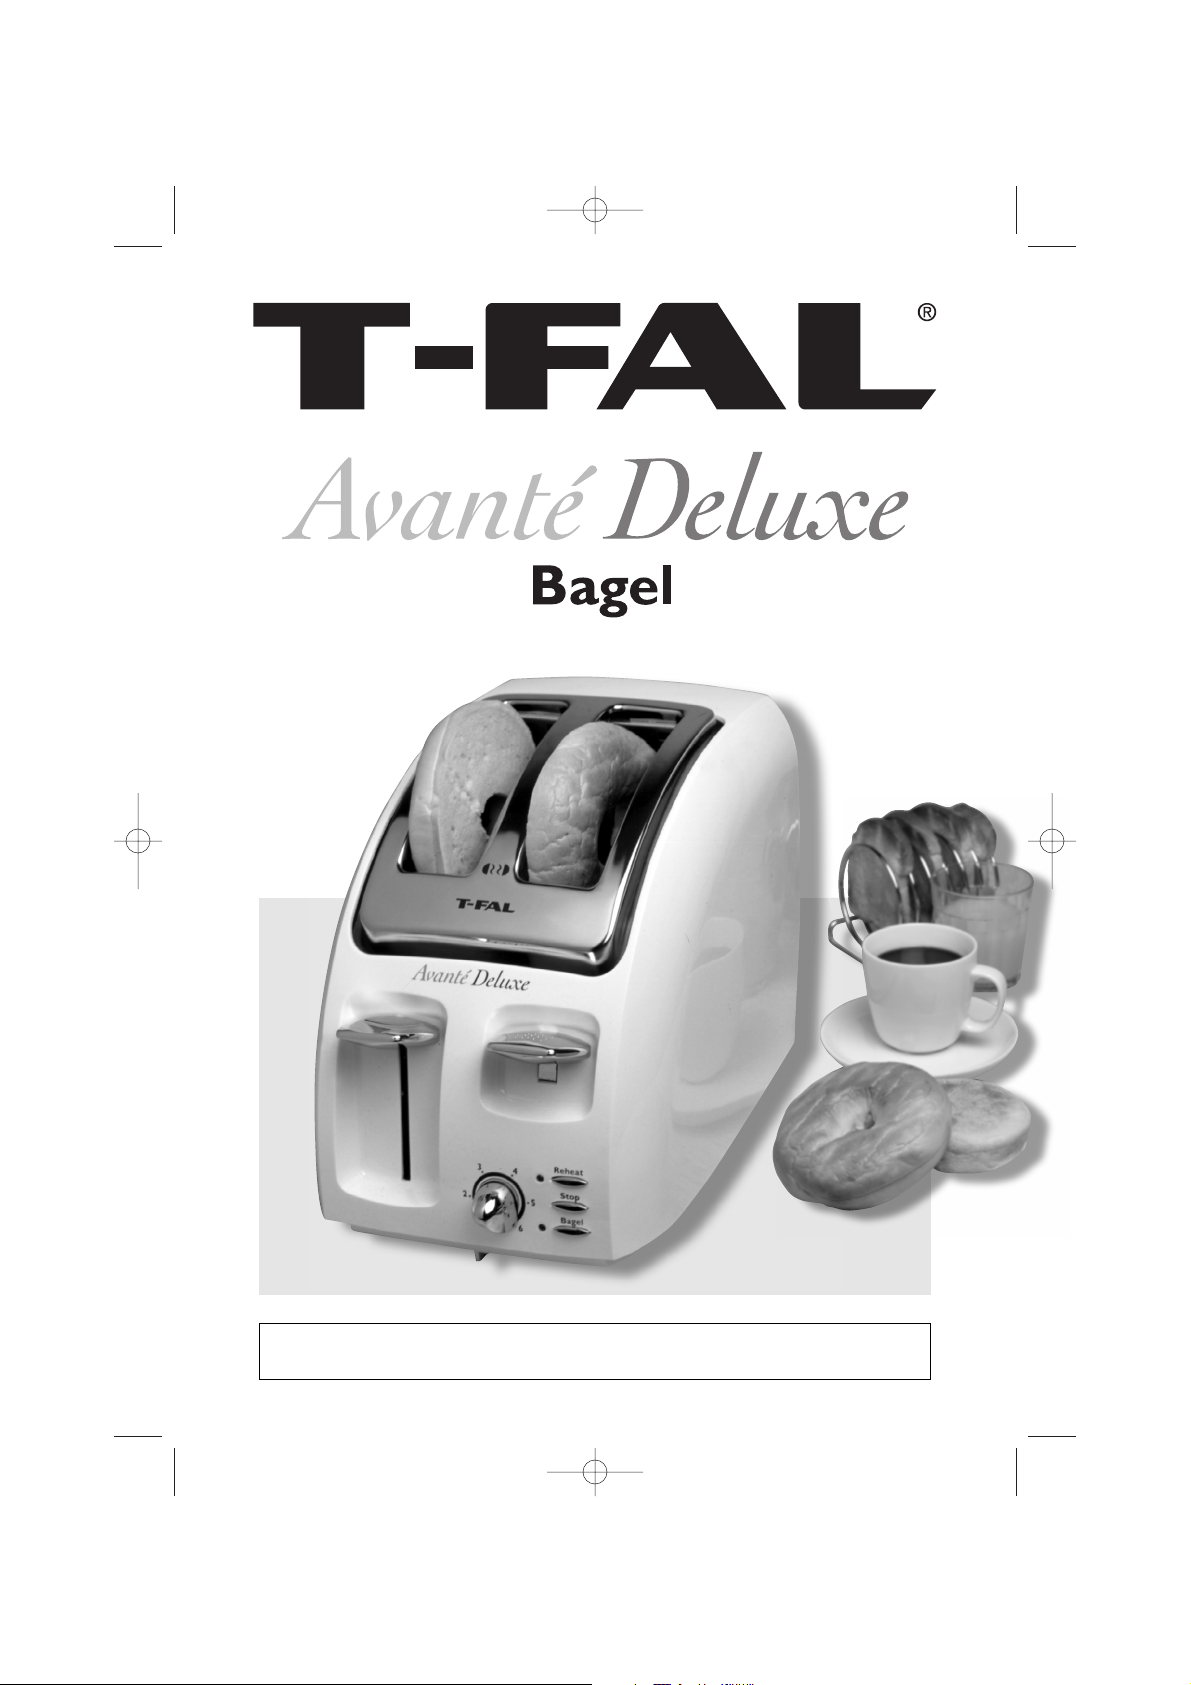
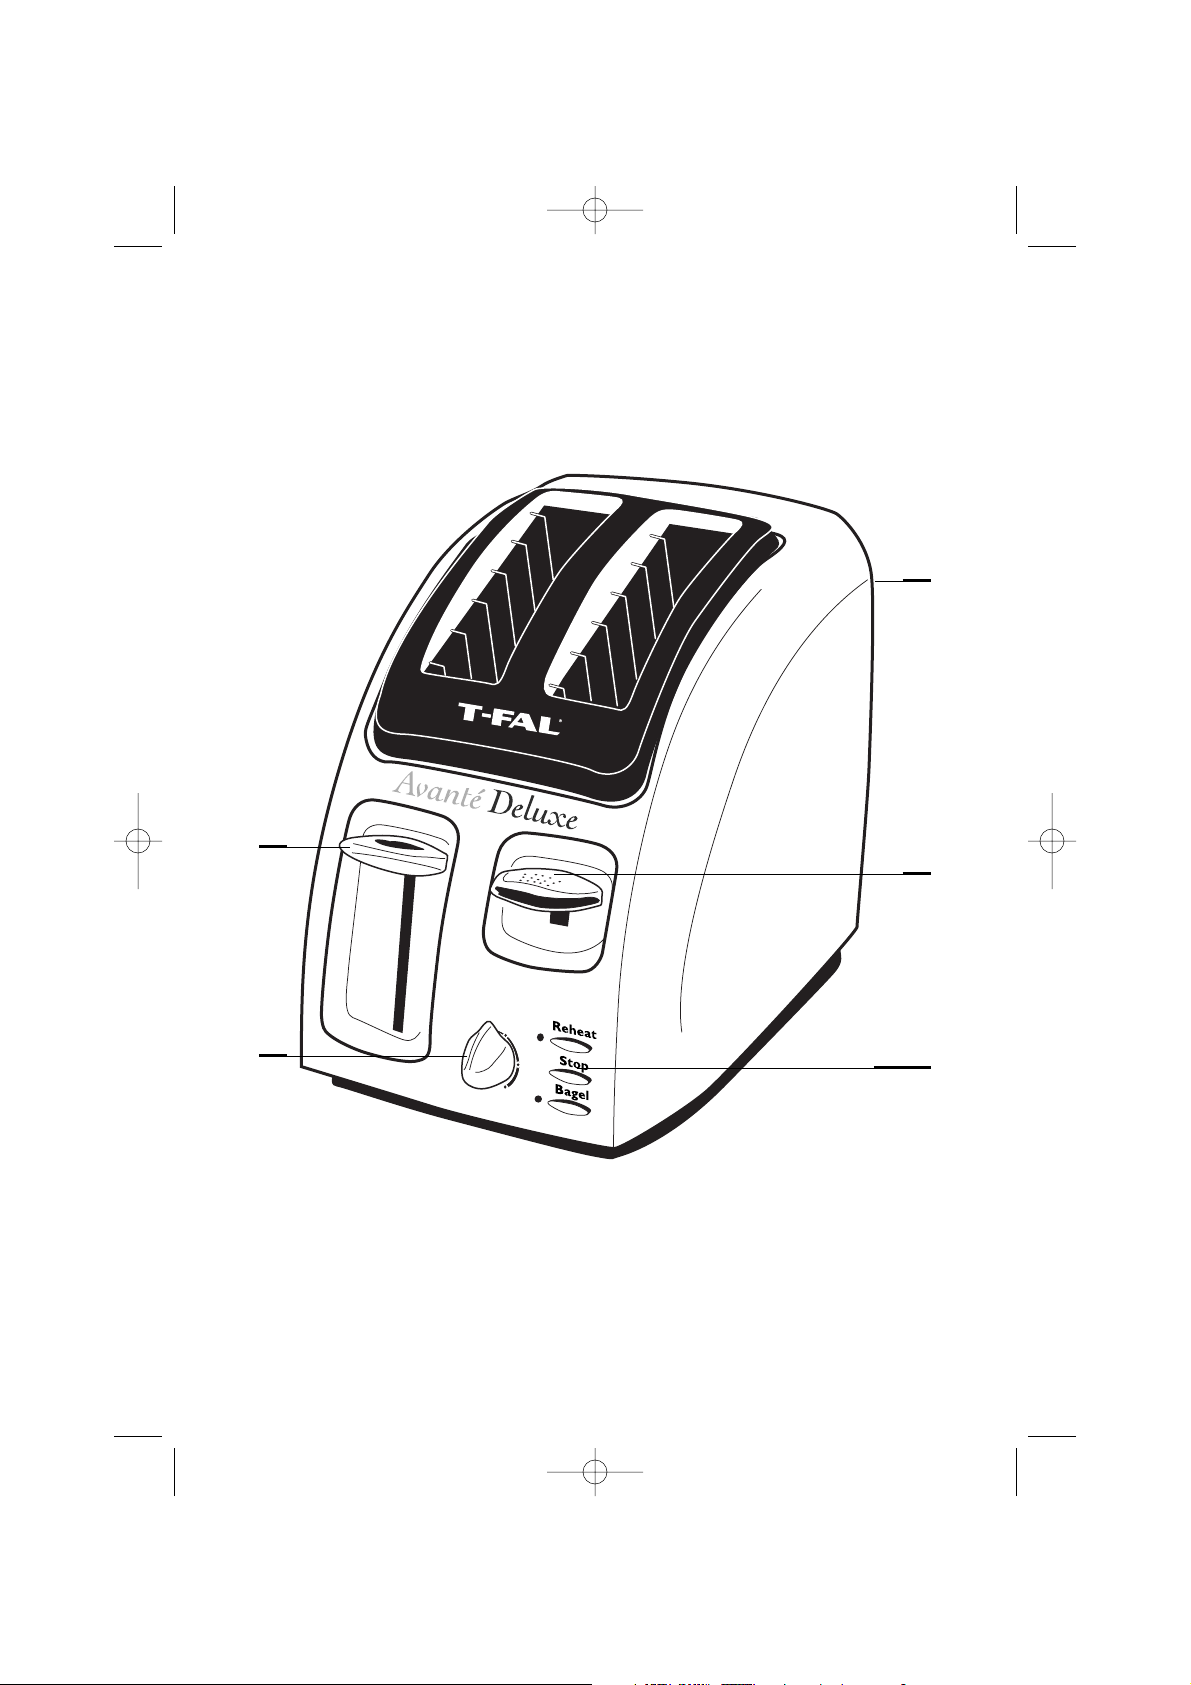
ENGLISH
Features of the toaster
1 Loading command
2 Browning control, 6 positions
3 Hi-lift command
4 «Reheat» button (on selected model only)
5 «Stop» button
6 «Bagel» button (on selected model only)
7 Carrying handle (behind the appliance)
Instruction for use - Fig. 1 and 2
•
Your toaster is ideal for standard sized and
country sized sliced white or wheat, fresh or
frozen bread. It is also suitable for bagels,
English muffins, rolls and other pastries (without
filling) up to a thickness of 1.4 inches (3.5 cm).
•
The loading lever is situated on the left side of
the toaster, at the top.
- Fig. 1
•
The «browning control» with 6 settings is situated
on the front of the appliance.
•
The toaster includes a HI-LIFT feature to facilitate
the removal of the bread. Once toasting is
completed (top right lever), press the Hi-Lift
button to raise the toasts higher. Do not use the
Hi-Lift button during toasting.
- Fig. 2
s
Before using for the first time
•
Unpack the appliance and remove any labels.
•
The packaging box may be recycled, but it may
be useful for returning the appliance to an
authorised Service Dealer if necessary.
•
Read the manual and carefully follow the
instructions.
•
If the appliance is to be used in a country other
than that of purchase, it should be checked by an
approved Service Centre (See After Sales
Service section). Standards may vary according
to the country.
•
Check that the crumb removal tray, situated
under the toaster, is correctly clipped onto the
appliance. Connect to the mains.
•
Unwind the supply cord completely. You can
shorten the length of the cord by loosely
wrapping it once around the pegs at the bottom
of the toaster.
First time use
•
Before using for the first time, set the «browning
control» button to minimum without inserting any
bread.
•
Load the toaster. Using it for the first time without
bread will remove any unpleasant odours from
the new appliance.
Using the toaster
•
Check that the crumb tray is locked underneath
the toaster
(see Fig. 7)
.
•
Unwind the supply cord completely.
Setting the browning control
•
Select the browning control to the appropriate
setting depending on the type and thickness of
the bread :
1-2 very slighty toasted, 3 slighty toasted,
4-5 well toasted, 6 very toasted
•
After trying out the toaster a few times you will
quickly get to know the right setting for each type
of bread.
Remember, this will need to be altered to suit
your own taste and according to :
•
The freshness and texture of the bread - For
bread older than one or two days, use a lower
number setting as it will toast more quickly.
•
For fresh bread, very fresh teacakes, English
muffins and frozen bread, use a higher setting as
they take slightly longer to toast.
For some types of brown bread E.g. Wholemeal
bread, use a slightly higher setting.
•
When the toaster is hot, the bread toasts more
quickly and may need adjusting to a lower setting.
•
When toasting more than one slice of bread, they
must be of the same size, type and thickness
otherwise, they will brown unevenly.
Inserting the slices of bread - Fig. 3
•
Place the slices of bread in the slots. Make sure
the slices do not overlap each other.The loading
command must be in the up position.
s
3
1
2
3
Avanti Bagel 2T 2002.qxd 09/10/2002 15:44 Page 3
Page 4
4
s
«Deluxe» model • Specific functions - Fig. 4
Interrupting toasting process
•
The toaster has a «STOP / EJECT» s function.
So that you can interrupt the toasting process at
any time by pressing the «STOP» button.
The bread will automatically pop up.
(For example, if you realise that the settings are
not properly adjusted or if you think the bread is
sufficiently toasted).
•
If the bread jams in the slots and the elements
do not switch off, remove the plug from the wall
outlet and wait for the appliance to cool down.
Then carefully remove the bread from the toaster
slot, taking care not to touch the heating
elements.
•
When toasting currant buns or teacakes,
remove any loose currants from the bread
before placing them in the toaster. Loose
currants may fall into the appliance and
damage the toaster.
Stop / Cancel
•
To stop the toaster at any time or cancel the
other functions, press the «STOP» s button.
•
The bread pops up, the toaster switches off.
Reheat
•
To reheat toast (fixed, short time) lower the bread
into the toaster and press the «REHEAT» button.
•
The toaster will heat up independently from the
setting of the browning control (1 and 6).
•
At the end of the cycle, the bread will pop up
automatically and the toaster switches off.
Stopping the toasting process
•
Once toasted, the operating control is
automatically unlocked, the slices of bread
come up and the toaster stops working.
Making toast
•
To load the toaster, press down the loading
command until it locks in position, toasting
begins. The metal grills will automatically
adjust to the thickness of the slices.
•
On electronic models, the loading lever can
only be locked in the lower position when the
appliance is plugged in.
•
After extended use, crumbs or dust may block the
locking system. To correct this, simply press down
the loading command several times successively
to lock it and please refer to maintenance and
cleaning tips
.
4
5
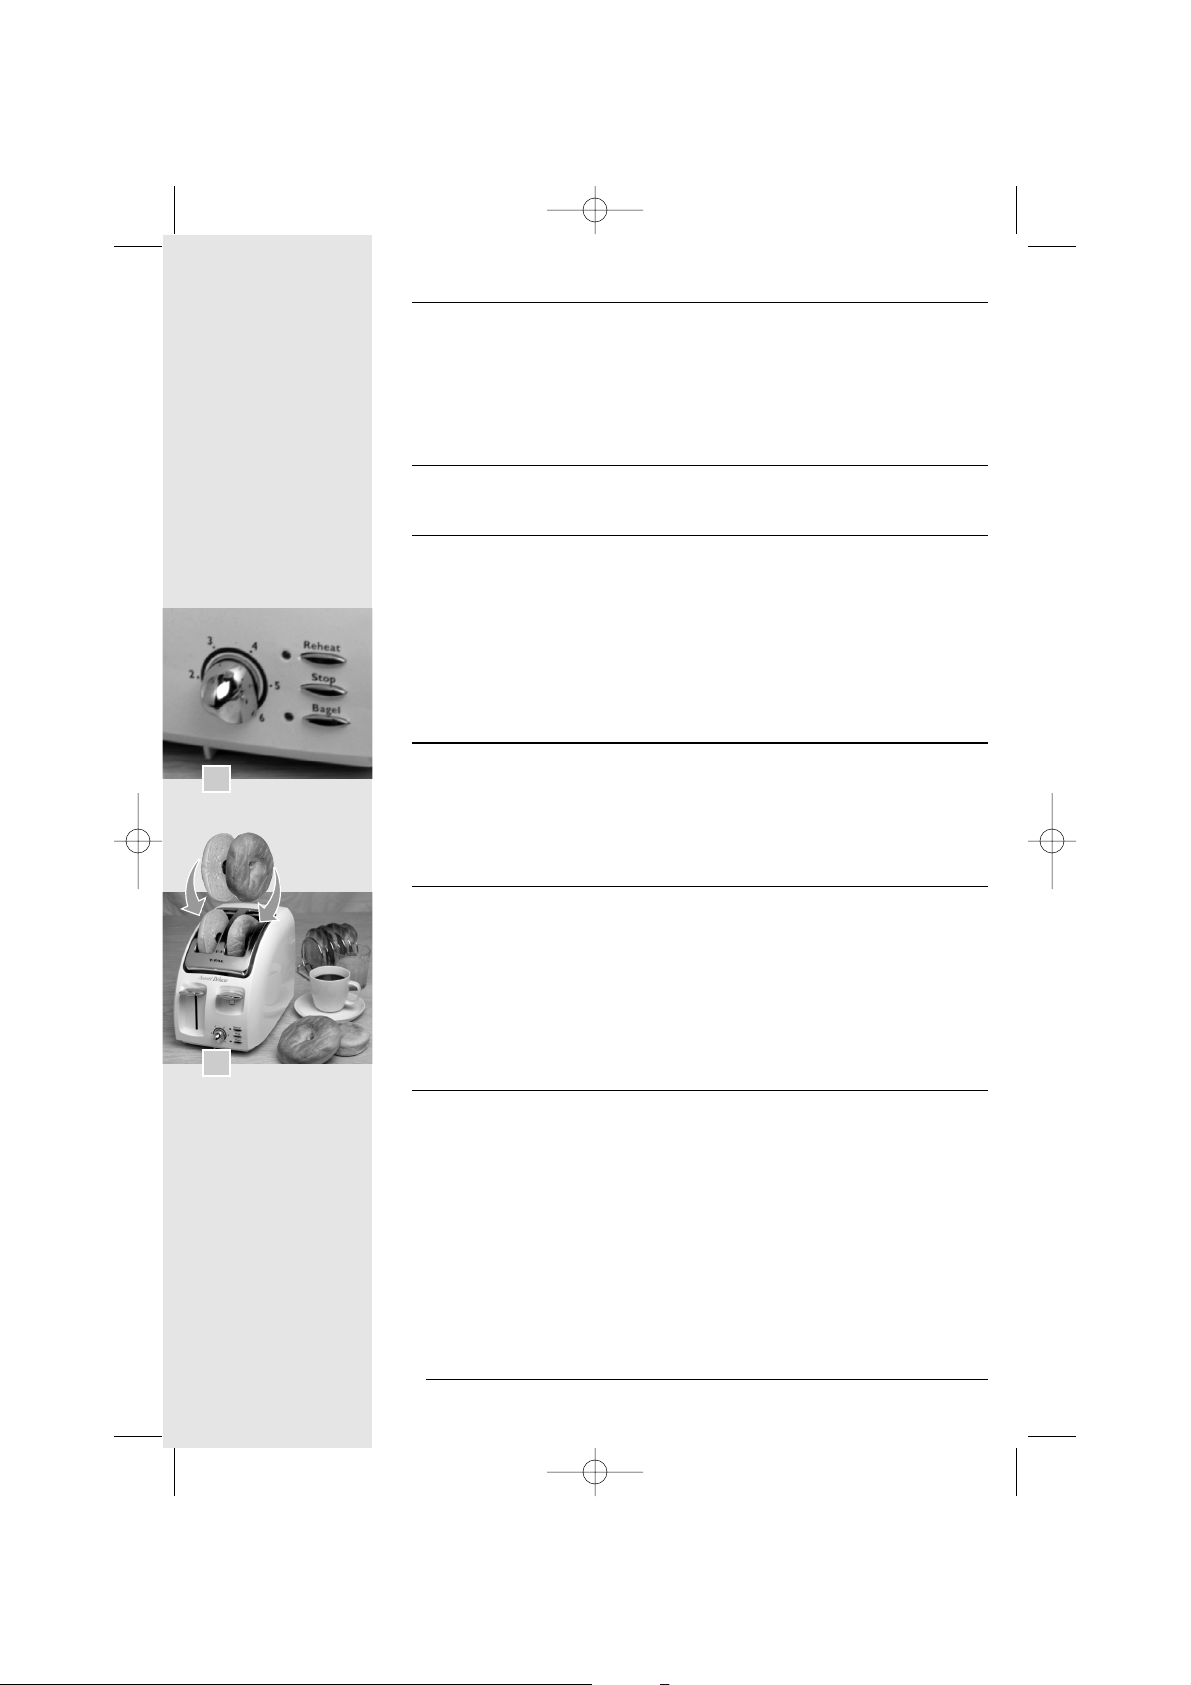
Bagel - Fig. 5
•
Select the browning level desired on the dial from
1 to 6. Place your bagel cut in two parts in your
toaster, the soft part towards the centre
(Fig. 5)
.
Press down the loading command and switch on
the bagel touch. Only the central heating
elements working on.
•
Your bagel will be toasted according the position
choised on the cut face and will be crispy on it
external side.
•
At the end of the cycle, the bagel will pop up
automatically and the toaster switches off.
•
If your bagel is too heavy, pull up the loading
command to bring it out.
•
Do not use the Hi-Lift button during toasting.
s
Avanti Bagel 2T 2002.qxd 09/10/2002 15:44 Page 4
Page 5

Maintenance and cleaning - Fig. 7, 8 and 9
•
To clean the toaster, unclip, open the crumb
removal tray and wipe it clean. Also turn the
appliance upside down and shake out any pieces
of bread that may be stuck between the grills.
(We recommend that your clean the crumb tray
regularly)
.
- Fig. 7
•
Never insert any hard object into the bread slot
as this could damage the heating elements.
•
To clean the exterior and the cord, wipe it down
with a damp cloth. Let it dry before using it again.
•
Do not use scouring powders, abrasive pads,
wire or steel wool, oven cleaners or bleach.
•
Never wrap the cord around the outside of the
appliance during or after use. A cord storage is
located under the appliance.
- Fig. 8
•
To move the toaster, a carrying handle is located
behind the appliance.
- Fig. 9
«Subject to modifications !»
5
s
7
8
9
Instructions for use :
•
Unwind the power cord to its fullest extent and
connect.
•
Insert the bread roll holder (fore-back clips).
•
Set the variable browning control on the desired
setting between position 1 and 3.
•
Lay croissants, buns, bread rolls directly
on the holder.
•
Press down the loading command located to the
left of the appliance.
•
The bread rolls (croissants, etc.) will be ready
when the lever has risen.
•
After use, allow the toaster to cool and
disconnect the appliance.
Warning :
•
Never place bread rolls or croissants directly on
the upper aperture of the appliance.
•
Never use the appliance to warm up or defrost
frozen food trays.
•
Never warm up bread rolls, croissants, etc., and
toast bread at the same time.
Bread roll toaster accessories (depending on the model) - Fig. 5
Description :
•
Bread roll holder accessory (sold separately)
s
6
Avanti Bagel 2T 2002.qxd 09/10/2002 15:45 Page 5
Page 6

•
Read all instructions.
•
To protect against electrical shock do not immerse cord, plugs, or appliance in water or other liquids.
•
Do not let the toaster operate unattended, particularly when toasting for the first time or when changing settings.
• Keep the appliance away from children.
•
Unplug from outlet when not in use and before cleaning. Allow to cool before putting on or taking off parts.
•
Do not operate any appliance with a damaged cord or plug or after the appliance malfunctions, or has been damaged in any manner.
Return appliance to an approved T-FAL After Sales Service Center for examination, repair, or adjustement, to avoid any risk. See Warranty.
•
The use of accessory attachments not recommended by the appliance manufacturer may cause injuries.
•
Do not use outdoors.
•
Do not let cord hang over edge of table or counter, or touch hot surfaces.
•
Do not place on or near a hot gas or electric burner, or in a heated oven
.
•
Toasting lever must be in the «Up» position before attaching or disconnecting the plug from wall outlet.
•
Oversized foods, metal foil packages, or utensils must not be inserted in a toaster as they may involve a risk of fire or electric shock.
•
Bread can burn. Therefore, do not use this appliance near any flammable materials such as curtains, drapes, shelving or wood.
•
Do not attempt to dislodge food when toaster is plugged in.
•
Disconnect the appliance if it shows any working abnormalities, after each use, when moving it and before cleaning.
•
Do not use this appliance for other than intented use. This appliance is for household use only.
•
Do not cover this appliance while in use. Do not use it as a heat source.
•
After each cleaning, adjust the crumb collector carefully.
•
Do not place directly bread, croissants or other pastries on top of the appliance as a bread-warmer accessory is available on some models.
•
This appliance is not intented for use by young children or infirm persons.Young children should be supervised to ensure they do not play
with the appliance.
Important Safeguards
When using electrical appliances, basic safety precautions should always be followed including the following :
Safety instructions
•
For your safety, this appliance complics with applicable technical rules and norms.
•
CE marking in compliance with EEC directive 89/336 relating to electromagnetic compatibility and the EEC low voltage directive 73/23 for
Europeen Countries.
•
Check that the main voltage corresponds to the voltage indicated on the appliance (alternating voltage only).
•
Always connect the appliance to an earthed socket.
•
Considering the diversity of applicable norms, if this appliance is used in a country other than the country it was bought in, have it checked
by an authorised Service Dealer.
•
Use a stable work top, away from any contact with water.
•
When using a heated electrical appliance, high temperatures are produced which may cause burns.
•
Do not touch the metal parts, hot surfaces of the appliance when it is working. Use handles or knobs.Warn other users.
•
Do not move the appliance when working. Do not leave the cable in contact with the warm parts of the appliance. Do not disconnect the
appliance by pulling on the cable.
SHORT CORD INSTRUCTION
A short power-supply cord is provided in accordance with Underwriter's Laboratories Safety Standards for the USA or CSA for CANADA to
reduce the risk resulting from becoming entangled in or tripping over a longer cord. Extension cords may be used if care is exercised in their
use. If an extension cord is used :
(a) The electrical rating of the extension cord should be at least that of the appliance.
(b) The longer cord should be arranged so that it will not drape over the counter top or table top where it can be pulled on by children or
tripped over.
Save these instructions
6
Avanti Bagel 2T 2002.qxd 09/10/2002 15:45 Page 6
Page 7

7
FRANÇAIS
Caractéristiques de l’appareil
1 Bouton de commande du chariot
2 Bouton de réglage thermostat
(6 positions)
3 Manette de surélévation (Hi-Lift)
4 Bouton de réchauffage (suivant modèle)
5 Bouton d’Annulation «Stop / Eject»
6
Bouton de fonction «Bagel» (suivant modèle)
7 Poignée de transport (derrière l’appareil)
Mode d’emploi - Fig. 1 et 2
•
Votre grille pain permet de griller tous les pains :
baguette, pain de mie, pain de campagne, pain
congelé... quelle que soit l'épaisseur des
tranches, jusqu'à 3,5 cm environ.
•
La commande de fonctionnement est située en
haut sur le côté gauche de l’appareil.
(Fig. 1)
•
Le bouton thermostat réglable à 6 positions se
trouve sur le devant de l’appareil.
•
Le grille pain est équipé d’une manette de
surélévation (Hi-Lift) pour saisir plus facilement
le pain. Lorsque le grillage est terminé, l’appui
sur ce bouton remonte le pain à votre
convenance. Ne pas utiliser ce bouton lorsque
le cycle de grillage est en cours.
(Fig. 2)
s
Avant la première utilisation
•
Déballer l’appareil et enlever tous les
autocollants.
•
L’emballage de votre grille-pain est recyclable,
mais il peut également vous être utile pour
retourner l’appareil à une station de service
agréée.
•
Lire le mode d’emploi et suivre attentivement les
instructions d’utilisation.
Début de fonctionnement
•
A la première utilisation, mettre le bouton de
réglage sur la position minimum.
•
Faire fonctionner le grille-pain à vide. Cela évitera
l’odeur désagréable d'appareil neuf.
Fonctionnement
•
Vérifier que le plateau ramasse-miettes est bien
verrouillé sous le grille-pain
.
(voir Fig. 7)
•
Dérouler complètement le cordon d’alimentation
et brancher.
Réglage du thermostat
•
Régler le thermostat sur la position désirée,
suivant la nature et l’épaisseur du pain :
1-2 très légèrement grillé,3 légèrement grillé
4-5 bien grillé, 6 très grillé
•
Après quelques essais vous serez vite familiarisé
avec ces réglages. Il est conseillé de réduire le
réglage du thermostat lorsque vous n’utilisez
pas toute la capacité choisie de l’appareil.
Mise en place des tranches de pain - Fig. 3
•
Le bouton de commande de fonctionnement
étant en position haute, disposer les tranches
de pains.
Mise en marche
•
Abaisser le bouton de commande. La commande
se verrouillera en position basse. Les grilles de
maintien s’ajustent automatiquement selon
l’épaisseur des tranches en centrant le pain entre
les éléments chauffants qui sont alors activés.
•
Sur ce modèle électronique, la commande de
fonctionnement ne s’enclenche en position
basse que lorsque l’appareil est branché.
•
Il est possible que le mécanisme soit gêné par
des débris, des poussières restant trop longtemps
à l’intérieur de l’appareil. Il suffit alors de
manœuvrer plusieurs fois la touche de commande
pour l’enclencher. Veuillez vous référer aux
conseils d’entretien et de nettoyage
.
•
Les tranches ne doivent pas dépasser les grilles,
la partie qui dépasse ne pouvant être grillée.
s
1
2
3
Avanti Bagel 2T 2002.qxd 09/10/2002 15:45 Page 7
Page 8

Arrêt en cours de cycle
•
Vous pouvez interrompre le grillage à tout
moment en appuyant sur le bouton d’annulation
«STOP» s, le pain sera remonté automatiquement (par exemple si vous vous apercevez
que vous avez fait un mauvais réglage ou si vous
jugez que votre pain est suffisamment grillé).
•
Si des tranches de pain restent coincées entre
les grilles, débrancher, et attendre que l’appareil
refroidisse avant de retirer le pain. Ne pas utiliser
d’objet métallique (cuillère, couteau ...).
•
Si vous grillez des petits pains aux raisins,
enlever les raisins qui risquent de se détacher
car ceux-ci peuvent endommager l’appareil.
8
s
Modèle «DELUXE» • Fonctions spécifiques - Fig. 4
Bagel - (Fig. 5)
•
Choisissez votre le degré de brunissage
souhaité en réglant le thermostat entre 1 et 6.
Positionnez votre bagel coupé en deux dans
votre appareil, la mie orientée vers le centre
du toaster
(voir Fig. 5)
.
Abaissez le bouton de commande du chariot
et appuyez sur la touche «Bagel». Seuls les
éléments chauffants centraux fonctionnent.
•
Votre bagel sera grillé selon votre réglage
sur la face tranchée et sera croustillant
sur la face extérieure.
•
A la fin du cycle, le bagel est mis à votre
disposition, le grille pain cesse de fonctionner.
•
Si votre Bagel est lourd, remontez le bouton de
commande pour le faire ressortir.
•
N’appuyez pas sur la manette de surélévation
«Hi-Lift» avant la remontée complète.
Annulation / Stop
•
Pour arrêter le cycle de grillage ou annuler les
autres fonctions, appuyer sur le bouton
annulation «STOP» s.
•
Le pain est mis à disposition, le grille-pain cesse
de fonctionner.
Réchauffage / Reheat
•
Pour réchauffer du pain ou des rôties, abaissez
le bouton de commande du grille-pain et appuyez
sur la touche «Réchauffage / Reheat».
•
L’appareil va fonctionner pendant un temps
court, quelle que soit la position du bouton de
réglage situé entre 1 et 6.
•
A la fin du cycle, le pain est mis à disposition, le
grille-pain cesse de fonctionner.
Arrêt
•
En fin de cuisson, la commande de fonctionnement se déverrouille automatiquement, les
tranches de pain sont remontées et le grille-pain
cesse de fonctionner.
4
s
5
Avanti Bagel 2T 2002.qxd 09/10/2002 15:45 Page 8
Page 9

9
Entretien et nettoyage - Fig. 7, 8 et 9
•
Avant tout entretien, débrancher et laisser
refroidir l’appareil
.
•
Après avoir déverrouillé le plateau ramassemiettes, et l’avoir vidé, retourner l’appareil à
l’envers pour faire tomber les croûtes et les
débris qui peuvent rester entre les éléments
chauffants. Il est recomandé de nettoyer le
plateau ramasse-miettes régulièrement.
- Fig. 7
•
Ne jamais intervenir à l’intérieur de l’appareil
avec un objet métallique sous peine de
détériorations graves.
•
Essuyer l’extérieur de l’appareil et le cordon avec
un linge humide. Sécher.
•
Ne pas utiliser de produits d’entretien trop
agressifs ou abrasifs, de produits à nettoyer les
fours ou de l’eau de Javel.
•
Ne pas enrouler le cordon autour du corps de
l’appareil. Un range-cordon est situé sous
l’appareil.
- Fig. 8
•
Une poignée située à l’arrière de l’appareil vous
permet de le transporter plus facilement.
- Fig. 9
s
8
9
7
«Sous réserve de modifications»
Utilisation :
•
Dérouler complètement le cordon d’alimentation
et brancer.
•
Positionner le support petits pains (appui avantarrière).
•
Sélectionner le bouton de réglage du thermostat
sur la position désirée : de 1 à 3 maxi.
•
Disposer les petits pains, les croissants, etc ...
sur les fils supports.
•
Abaisser le bouton de commande du chariot
situé à gauche de l’appareil.
•
Lorsque ce levier de mise en marche remonte,
les petits pains sont prêts.
•
En fin d’utilisation, laisser refroidir l’appareil et
débrancher-le.
Précautions :
•
Ne jamais placer les petits pains ou les
croissants directement sur l’ouverture
supérieure de l’appareil.
•
Ne pas utiliser l’appareil pour cuire ou
décongeler des repas surgelés.
•
Vous ne devez pas utiliser l’appareil pour griller
simultanément des tranches de pain et
réchauffer des petits pains.
Accessoires réchauffe petits-pains (selon modèle) - Fig. 6
Description :
•
Support petits pains (vendu séparément)
s
6
Avanti Bagel 2T 2002.qxd 09/10/2002 15:45 Page 9
Page 10

•
Lisez entièrement le mode d’emploi et suivez attentivement les instructions d’utilisation.
•
Afin d’éviter les chocs électriques, ne plongez pas dans l’eau le fil électrique, la prise de courant ou tout l’appareil.
•
Ne jamais laisser l’appareil fonctionner sans surveillance et particulièrement à chaque premier grillage ou changement de réglage.
• Ne pas laisser l’appareil à la portée des enfants.
•
Débrancher l’appareil quand il ne sert pas ou pour le nettoyer.
•
Ne pas utiliser l’appareil si :
- Celui-ci a un cordon défectueux,
- l’appareil est tombé et présente des détériorations visibles ou des anomalies de fonctionnement.
Dans ce cas, l’appareil doit-être envoyé au centre de service après-vente agréé T-FAL le plus proche, afin d'éviter tout danger.
•
Ajouter au grille-pain des accessoires qui ne sont pas recommandés par le fabricant peut-être dangereux.
•
N’utilisez l’appareil que dans la maison.
•
Ne laissez pas le cordon pendre dans le vide, il ne doit pas non plus toucher les surfaces brûlantes.
•
Ne posez pas votre grille-pain sur un chauffage, ni trop près de lui, ni sur un four chaud
.
•
Le levier de grillage doit être dans la position haute quand vous branchez ou débranchez votre appareil.
•
Il ne faut pas introduire dans l’appareil de trop grosses tranches de pain, ni des emballages métalliques, ni des ustensiles de métal qui
pourraient s’enflammer ou provoquer des courts-circuits.
•
Le pain peut brûler, aussi l’appareil ne doit pas être utilisé à proximité de matériaux inflammables comme des rideaux, des étagères,
des tentures ou du bois.
•
Si une tranche de pain reste coincée dans l’appareil, débrancher et attendre que le grille-pain refroidisse. Sortir alors la tranche de pain de
la fente en faisant attention de ne pas toucher les parties métalliques. Ne jamais utiliser une fourchette ou autre objet métallique.
•
Cet appareil a été conçu pour un usage domestique uniquement, toute utilisation professionnelle, non appropriée ou non conforme au
mode d’emploi n’engage ni la responsabilité, ni la garantie du fabricant.
•
Ne pas couvrir l’appareil pendant son fonctionnement. Ne pas l’utiliser comme source de chaleur.
•
Nettoyer régulièrement le plateau ramasse-miette pour ôter toutes les miettes.
•
Fixez bien le plateau ramasse-miettes après chaque entretien de l’appareil.
•
Ne pas poser de pain, croissants, ou autres pâtisseries sur le dessus de l’appareil, car un accessoire réchauffe petits-pains est prévu sur
certains modèles.
Précautions importantes
Lorsqu’on utilise des appareils électriques, il y a un certain nombre de règles élémentaires qu’il faut toujours
respecter, en particulier les suivantes :
Prévention des accidents domestiques :
Consignes de sécurité
•
La sécurité de cet appareil est conforme aux règles techniques et aux normes en vigueur.
•
Marquage C.E. conforme à la directive CEE 89/336 relative à la compatibilité électro-magnétique et à la Directive basse tension
CEE 73/23, pour les pays de la Communauté Européenne.
•
Vérifier que la tension du réseau correspond bien à celle indiquée sur l’appareil. Toujours brancher l’appareil sur une prise reliée à la terre,
si son cordon d’alimentation comporte une prise de terre.
•
Utiliser un plan de travail stable à l’abri des projections d’eau.
•
Ne pas porter ou déplacer l’appareil pendant l’utilisation.
•
Ne pas enrouler le cordon autour de l’appareil encore chaud.
•
Pendant l’utilisation, ne pas toucher aux surfaces métalliques qui sont brûlantes. Utiliser des gants ou une pince à pain si nécessaire.
Instructions sur le cordon d’alimentation
Gardez précieusement ces instructions
Le fil électrique est court : il est conforme aux règles de sécurité des normes U.L. pour les Etats-Unis ou CSA pour le Canada de façon à
réduire les risques de s’emmêler dans un fil trop long. Si vous devez utiliser un fil d’extension, certaines précautions s’imposent :
(a) la puissance électrique de votre fil d’extension doit être au moins aussi grande que celle de votre grille-pain.
(b) l’extension doit être placée hors de la portée des enfants.
Avanti Bagel 2T 2002.qxd 09/10/2002 15:45 Page 10
Page 11

Conception : FD Graphic - F 21120 Gémeaux
S.A. SEB 21261 SELONGEY Cedex - R.C. Dijon B 302 412 226
Réf. 3302222 C- Updated 10/2002 - All right reserved
Avanti Bagel 2T 2002.qxd 09/10/2002 15:45 Page 12
 Loading...