

Page 1

TI-Nspire™ Navigator™
Reference Guide
This guidebook applies to TI-Nspire™ Navigator™ software version 1.1.
To obtain the latest version of the documentation, go to
education.ti.com/guides.
Page 2

Important Information
Texas Instruments makes no warranty, either express or implied,
including but not limited to any implied warranties of merchantability
and fitness for a particular purpose, regarding any programs or book
materials and makes such materials available solely on an "as-is" basis. In
no event shall Texas Instruments be liable to anyone for special,
collateral, incidental, or consequential damages in connection with or
arising out of the purchase or use of these materials, and the sole and
exclusive liability of Texas Instruments, regardless of the form of action,
shall not exceed the purchase price of this product. Moreover, Texas
Instruments shall not be liable for any claim of any kind whatsoever
against the use of these materials by any other party.
© 2008, 2009 Texas Instruments Incorporated
ii
Page 3

Contents
Important Information................................................................... ii
Installing the TI-Nspire™ Navigator™ software...................1
Unpacking the boxes...................................................................... 2
Charging the wireless cradles........................................................ 4
Connecting the handhelds to the wireless cradles....................... 6
Installing the software................................................................... 7
Setting up your TI-Nspire™ Navigator™ network
the first time ........................................................................... 12
Checking the status of wireless cradles....................................... 17
Overview ...............................................................................21
Starting the TI-Nspire™ Navigator™ software
on your computer................................................................... 21
The TI-Nspire™ Navigator™ computer home screen................. 22
TI-Nspire™ Navigator™ computer tools..................................... 26
Creating and managing your teacher account........................... 27
Logging in to the TI-Nspire™ Navigator™ system
from the handheld ................................................................. 30
Logging in to the TI-Nspire™ Navigator™ system
(student instruction)............................................................... 33
Managing classes..................................................................35
Creating classes............................................................................. 35
Selecting a class ............................................................................ 37
Beginning and ending a class session ......................................... 38
Changing the class view............................................................... 38
Removing items from the Class Record....................................... 40
Removing classes .......................................................................... 41
Managing student accounts.................................................43
Adding students to classes........................................................... 43
Removing a student from a class................................................. 44
Resetting student passwords....................................................... 46
Checking student login status ..................................................... 48
Arranging the seating chart ........................................................ 48
Sorting student information........................................................ 49
Changing the classes assigned to a student ............................... 50
Changing student names and identifiers.................................... 52
Moving a student to another class.............................................. 54
Copying a student to another class............................................. 54
iii
Page 4

Using Portfolio...................................................................... 57
Viewing Portfolio..........................................................................58
Saving an item to Portfolio..........................................................58
Importing an item to Portfolio ....................................................59
Sorting information in Portfolio..................................................60
Viewing assignment details .........................................................60
Deleting files from Portfolio........................................................60
Opening a Portfolio item ............................................................. 60
Redistributing a Portfolio item .................................................... 61
Renaming a Portfolio item........................................................... 61
Collecting missing files from students......................................... 62
Sending missing files to students.................................................62
Exchanging files with students ........................................... 63
Sending files..................................................................................63
Sending files (student instruction)............................................... 66
Collecting files...............................................................................67
Managing Unprompted actions...................................................69
Deleting files from handhelds .....................................................72
Checking the status of file transfers............................................74
Canceling file transfers.................................................................76
Viewing file properties.................................................................76
Polling students.................................................................... 79
The Quick Poll tool window and tabs .........................................79
Opening the Quick Poll tool ........................................................82
Polling your students....................................................................82
Stopping polls ...............................................................................83
Pausing polls ................................................................................. 83
Resuming paused polls................................................................. 84
Responding to polls (student instruction)...................................84
Sending poll results to students...................................................85
Saving polls ................................................................................... 85
Viewing poll results ......................................................................85
Showing and hiding display names.............................................87
Viewing previous polls .................................................................88
Closing the Quick Poll tool...........................................................88
Capturing handheld screens................................................ 89
Capturing handheld screens ........................................................90
Viewing captured screens ............................................................93
Saving captured screens ...............................................................93
Refreshing captured screens ........................................................94
Using the Gallery View.................................................................96
iv
Page 5

Creating stacks of student screens .............................................. 97
Using the Compare Student Screens feature.............................. 98
Randomizing screens.................................................................... 98
Copying and pasting a screen...................................................... 99
Printing screens ............................................................................ 99
Using Live Presenter ................................................................... 100
Keyboard Shortcuts for Screen Capture.................................... 105
The Class Analysis Tool .......................................................107
Opening Class Analysis............................................................... 107
Using Views to interpret Class Analysis results......................... 109
Grading questions and fine tuning correct responses ............. 117
Displaying Class Analysis results ................................................ 119
Saving and exporting Class Analysis results.............................. 121
Additional information.............................................................. 122
Glossary ....................................................................................... 123
The Transfer Tool .................................................................125
Opening the Transfer Tool......................................................... 125
Adding files to the transfer list ................................................. 126
Removing files from the transfer list ........................................ 127
Changing the destination folder............................................... 128
Viewing transfer status.............................................................. 128
Deleting all handheld folders and files..................................... 129
Stopping file transfers................................................................ 130
Closing the Transfer tool............................................................ 131
Managing the hardware.....................................................133
Wireless cradles .......................................................................... 133
Wireless access point.................................................................. 135
Troubleshooting..................................................................139
Frequently-asked questions....................................................... 139
Error messages............................................................................ 144
Glossary...............................................................................153
Terms ........................................................................................... 153
File types ..................................................................................... 155
Regulatory Information .....................................................157
USA FCC Information Concerning Radio Frequency
Interference .......................................................................... 157
Canadian IC Information............................................................ 158
Warning Statements .................................................................. 163
v
Page 6

Texas Instruments Support and Service............................ 165
vi
Page 7

Installing the TI-Nspire™ Navigator™
software
The TI-Nspire™ Navigator™ classroom learning system provides the
hardware and software tools you need to set up a wireless classroom
network. The TI-Nspire™ Navigator™ system lets you:
• Create and manage classes on the classroom network.
• Transfer files between your computer or TI-Nspire™ handheld and
your students’ handhelds.
• Monitor your students with screen captures and polling.
• Use different tools to create, distribute, and analyze educational
content.
• Delete files from your students’ handhelds, and send files to your
students’ handhelds.
• Upgrade and install TI-Nspire™ Navigator™ OS files on all students’
handhelds at one time.
The system is composed of two parts, hardware and software. The
hardware creates a wireless communications network so that your
computer can communicate with your students’ TI-Nspire™ or
TI-Nspire™ CAS handhelds. The software contains a number of tools to
enhance your classroom, including:
• Quick Poll. Lets you send polls to your students, receive the
students’ responses to the polls, and review the poll results with your
students.
• Screen Capture. Lets you capture your students’ handheld screens.
• Transfer tools. Multiple tools that let you send, collect, and delete
data files on your students’ handhelds.
• Portfolio. Lets you collect student assignments, and review and
distribute student assignments and scores.
• Class Analysis. Lets you analyze student answers for the entire class
or for individual students, share the analysis with the class, and print
analysis reports.
You can obtain educational content on the Web at TI’s Activities
Exchange (education.ti.com/activities).
There are a couple of ways to learn to set up and use the TI-Nspire ™
Navigator™ system:
Installing the TI-Nspire™ Navigator™ software 1
Page 8

•The Getting Started poster—a short version of the setup process with
fewer details.
•The TI-Nspire™ Navigator™ Reference Guide (this guidebook,
provided in both printed and PDF formats)—complete installation
and setup details, troubleshooting, and technical information. After
you install the TI-Nspire™ Navigator™ software on your computer,
you can use the book or PDF file as a reference for the software
tools.
The process of unpacking the equipment, setting up the hardware, and
installing the software will probably require about two hours of your
time.
Unpacking the boxes
The TI-Nspire™ Navigator™ product consists of one classroom kit and a
combination of student kits and individual kits, depending on your
specific order. Each kit is packaged separately. If necessary, you can
purchase additional kits to accommodate as many as 40 students.
1. Determine which kits you have received.
2. Unpack the items from the packing materials.
3. Identify each item, and check the items against the following lists to
make sure your order is complete.
2 Installing the TI-Nspire™ Navigator™ software
Page 9
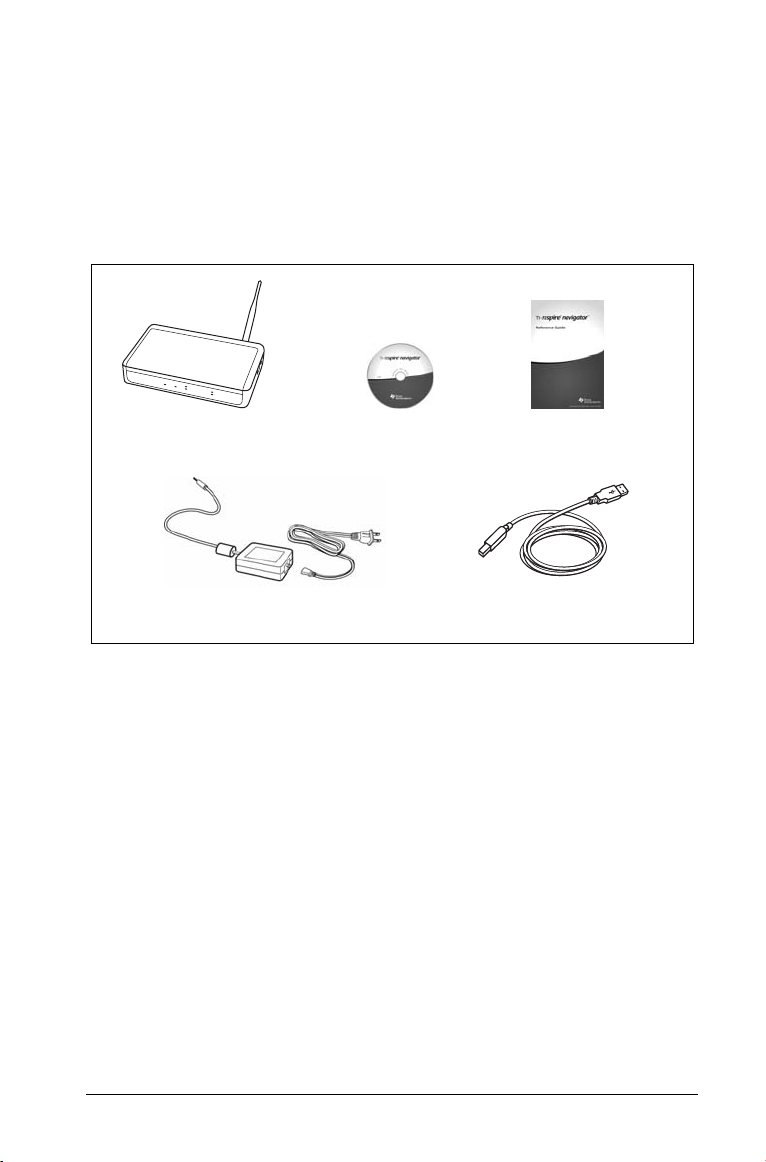
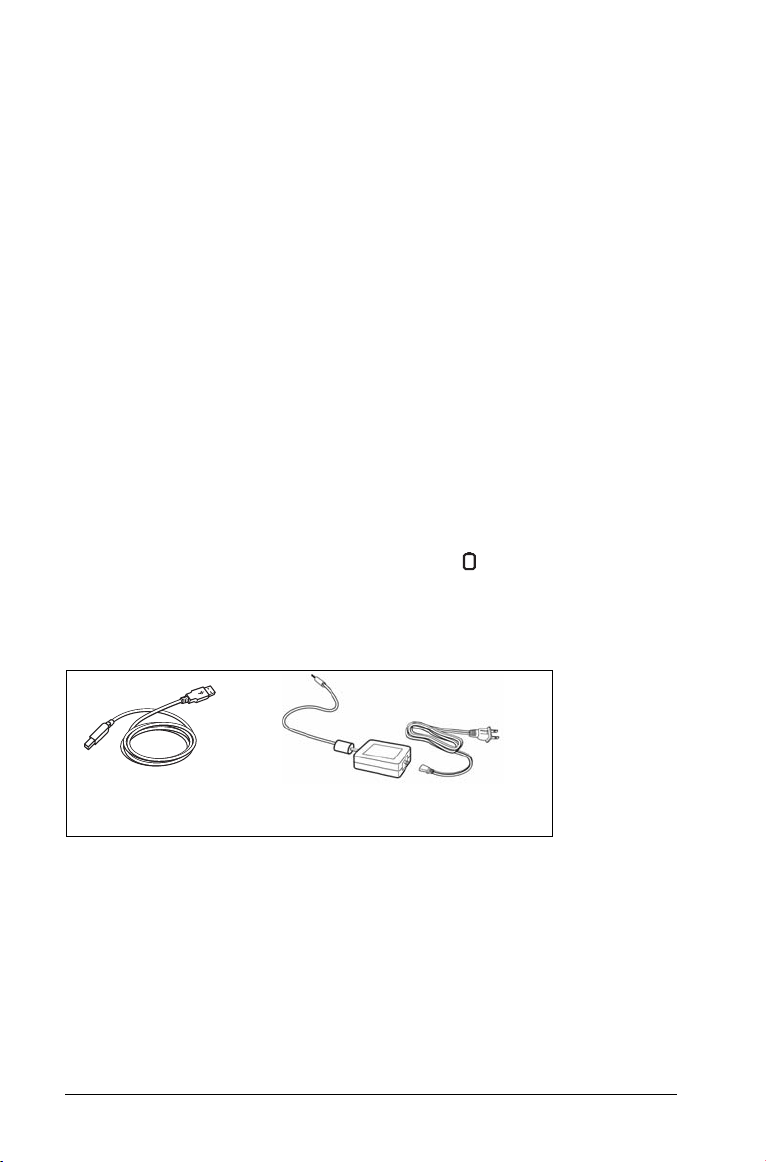
Classroom kit
• 1 TI-Navigator™ access point
• 1 AC9930 power adapter (includes power supply and power cord)
• 1 USB computer cable
• 1 CD containing system and application software
•This TI-Nspire™ Navigator™ Reference Guide
Access point
AC9930 power adapter for the access point
One CD
Reference guide
USB cable
Classroom kit
The Standard-A to Mini-B USB cable and the black and gray
TI-GRAPH LINK™ cables do not work with the TI-Nspire™ Navigator™
system.
Installing the TI-Nspire™ Navigator™ software 3
Page 10
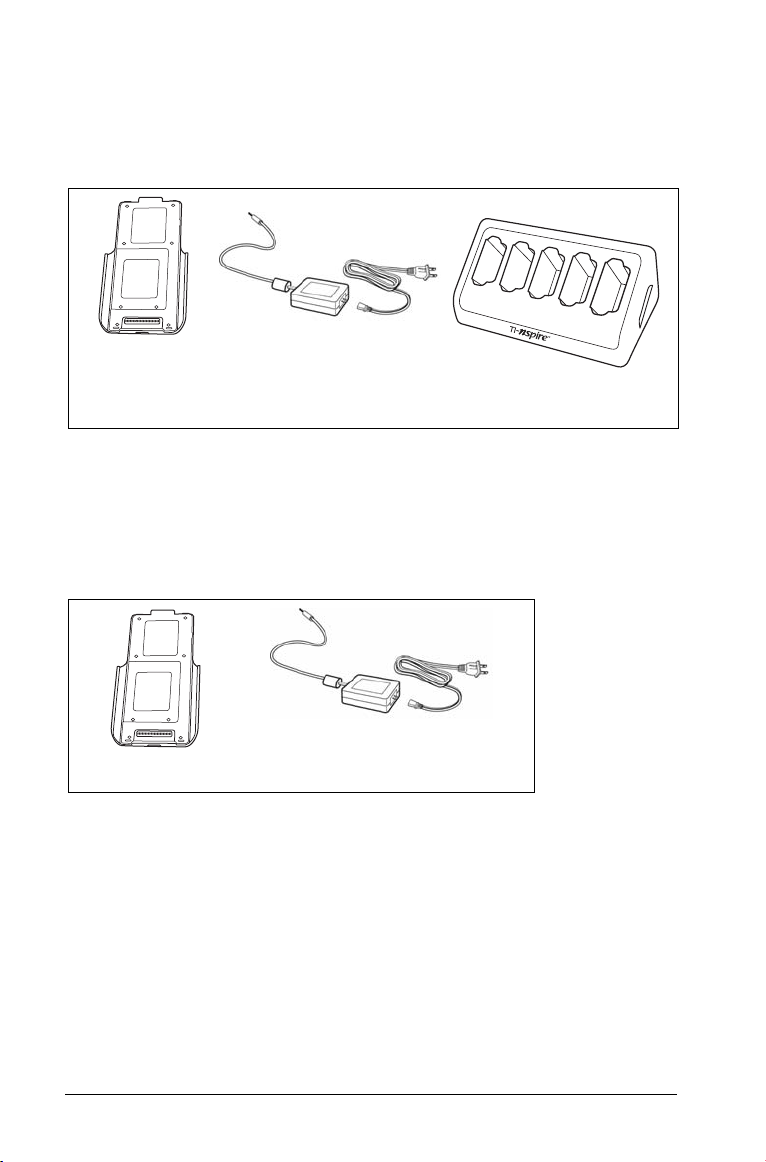
Student kit (up to 5 students)
• 1 TI-Nspire™ Navigator™ cradle charging bay
• 1 AC9940 power adapter (includes power supply and power cord)
• 5 TI-Nspire™ Navigator™ wireless cradles
5 wireless cradles
AC9940 power adapter
(for the charging bay)
Cradle charging bay
Student kit
Individual kit
• 1 TI-Nspire™ Navigator™ wireless cradle
• 1 AC9926 power adapter (includes power supply and power cord)
AC9926 power adapter
Wireless cradle
Individual kit
Charging the wireless cradles
The TI-Nspire™ Navigator™ wireless cradles contain rechargable
batteries. You must charge the batteries overnight before using them in
your class. When the cradles are fully charged, they will function all day
under continuous use. You should recharge them each night.
The TI-Nspire™ Navigator™ cradle charging bay can hold from one to
five wireless cradles. After you place the cradles in the charging bay, they
are charged simultaneously until all are fully charged. If the batteries are
fully discharged, it may take up to 12 hours to fully charge the batteries.
4 Installing the TI-Nspire™ Navigator™ software
Page 11
With five wireless cradles in the charging bay, you should charge them
for 12 hours. Typically this is done overnight or over a weekend.
Note: You cannot damage the batteries by leaving them in the charging
bay beyond the time needed to fully charge them. Also, it is not
necessary to fully discharge the batteries before recharging them.
1. Make sure you have enough (3–4) power outlets for the equipment
you received. If necessary, obtain a plug strip so that you have plenty
of grounded outlets.
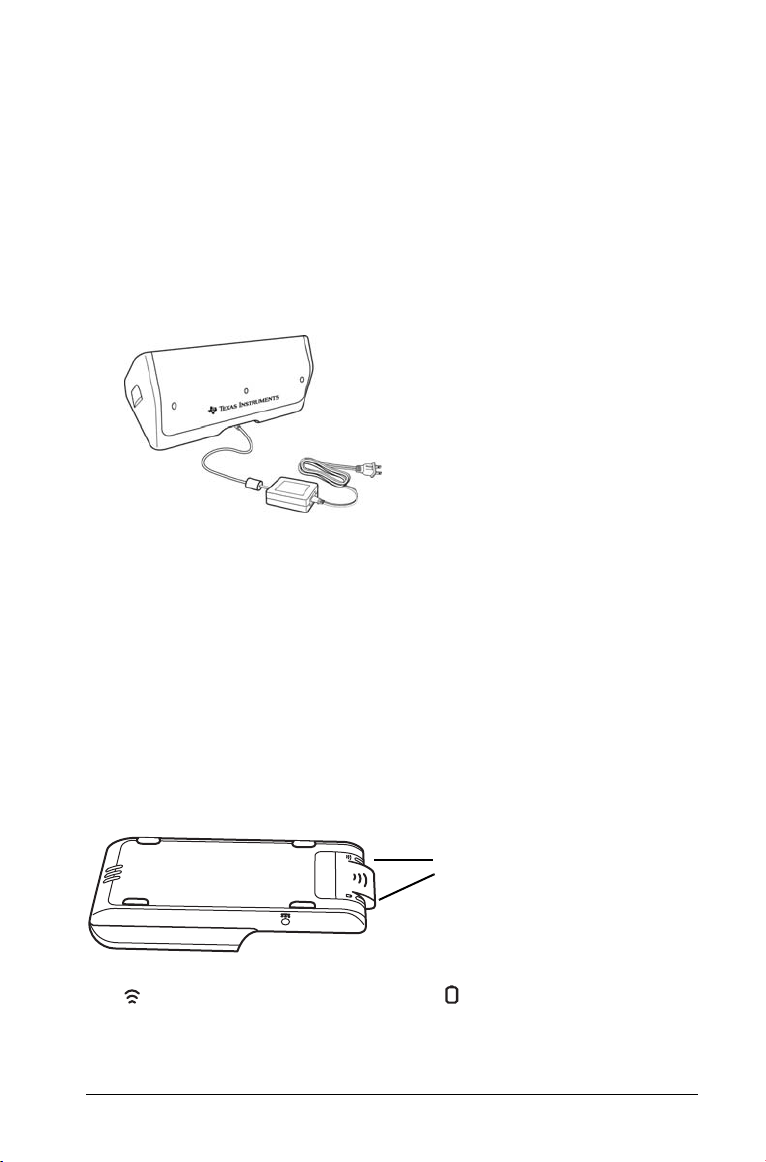
2. Insert the small end of the AC9940 power adapter cord into the
charging bay’s power jack.
3. Plug the other end of the adapter into a power outlet.
4. Insert each TI-Nspire™ Navigator™ wireless cradle into the
TI-Nspire™ Navigator™ cradle charging bay. Make sure the LED is
amber.
Note: If you purchased the individual kit and do not have a cradle
charging bay, you can charge a single wireless cradle using the AC9926
adapter instead.
Checking the LEDs
Two LEDs (small lights) at the top of each TI-Nspire™ Navigator™
wireless cradle blink or change colors to indicate various operations or
status.
LEDs
The LED indicates network activity. The LED indicates batterycharging status. (For more information, see the Technical Information
chapter.)
Installing the TI-Nspire™ Navigator™ software 5
Page 12

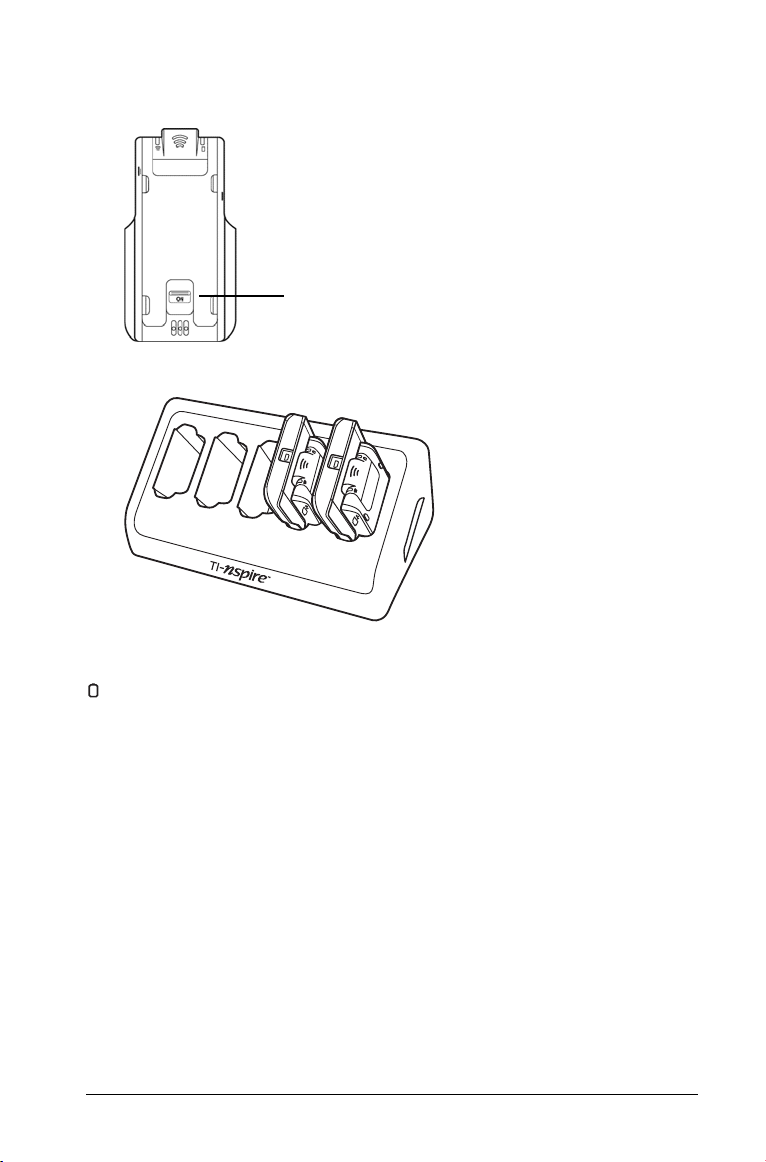
When the wireless cradles are still in the TI-Nspire™ Navigator™ cradle
charging bay:
• A solid amber LED means the wireless cradle is currently
recharging.
• A solid red LED means the wireless cradle is recharging but does
not have good contact with the charging bay. Reposition the cradle
so it has good contact. The LED should then turn amber to indicate it
is recharging.
• A solid green LED means the wireless cradle is fully charged.
Connecting the handhelds to the wireless cradles
After charging the TI-Nspire™ Navigator™ wireless cradles, you are
ready to connect the wireless cradles to the TI-Nspire™ or
TI-Nspire™ CAS handhelds.
1. Slide the lock on the back of the cradle to the OFF position.
Lock in OFF position.
2. To attach the handheld, face the screen upward and slide the
handheld onto the top of the TI-Nspire™ Navigator™ wireless
cradle. Be sure that both sides of the handheld are inserted into both
of the side guides
3. Press firmly to make a good connection. When properly connected,
the TI-Nspire™ handheld appears to be sitting on top of the cradle.
6 Installing the TI-Nspire™ Navigator™ software
.
Page 13
4. Lock the handheld in place by sliding the lock on the back of the
cradle to the ON position.
Lock in ON position.
5. Insert each cradle into the charging bay. Make sure the LED is amber.
At the end of the school day, return the wireless cradle to the charging
bay and charge them overnight. The cradles are charged when all the
(power status) LEDs are solid green or amber.
Installing the software
Before you install and set up the TI-Nspire™ Navigator™ system, make
sure you have the latest operating system installed on your handhelds.
Installing the handheld operating system
Before you can use the handhelds on the network, you must update the
operating system on each handheld. You can use the TI-Nspire™ Teacher
software 2.0 or the TI-Nspire™ Computer Link software to update the
handheld operating system. TI-Nspire™ Computer Link software is
available at
All handhelds on the network must have the latest operating system
installed for the TI-Nspire™ Navigator™ system to work properly.
Installing the TI-Nspire™ Navigator™ software 7
education.ti.com.
Page 14
1. Download the latest TI-Nspire™ operating software from the CD
that comes with your kit or from
education.ti.com/latest. Make
note of where you save it on your computer’s hard drive.
2. Make sure you have connected a TI-Nspire™ handheld to your
computer.
Note: The TI-Nspire™ Computer Link Software works with the
TI-Nspire™ and TI-Nspire™ CAS handhelds only.
3. Open the Teacher software.
The software displays a list of connected handhelds and lets you
select one.
Note: You can communicate with only one handheld at a time.
4. If multiple handhelds are connected, click the handheld to which you
want to connect.
5. Click
Select.
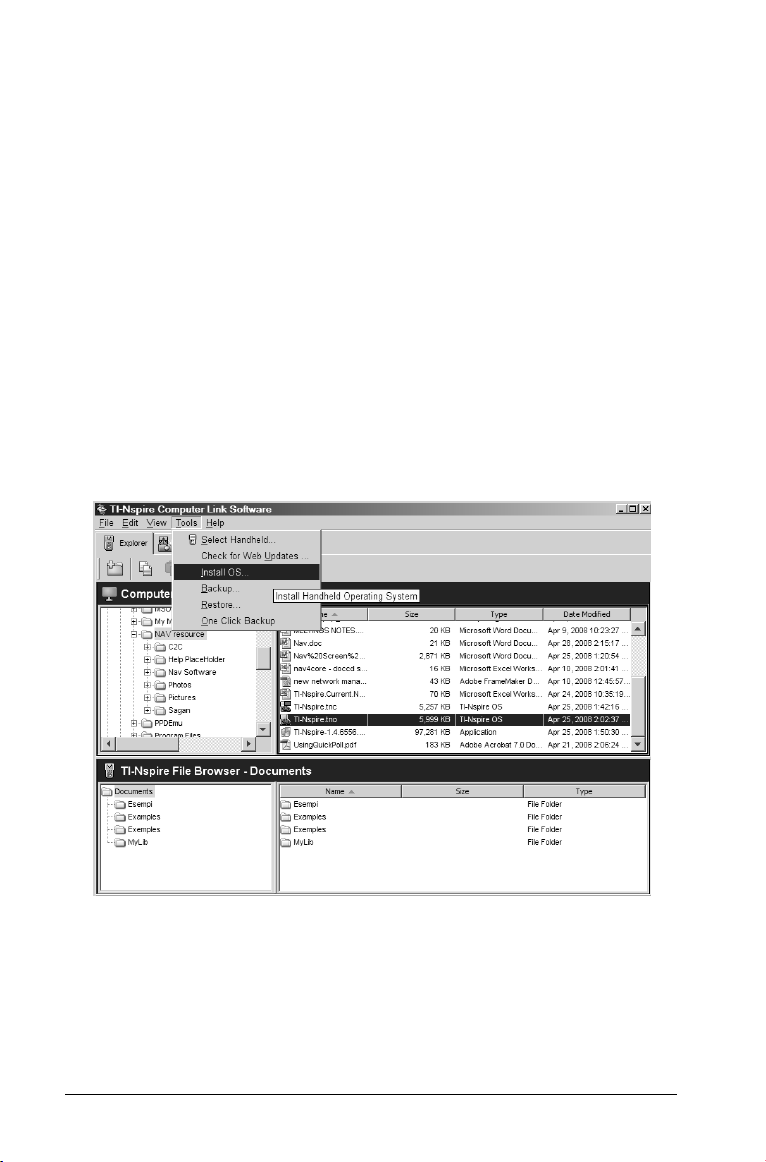
6. TI-Nspire™ Computer Link Software displays the Explorer tab.Click
Too l s > I n st a ll O S .
8 Installing the TI-Nspire™ Navigator™ software
Page 15
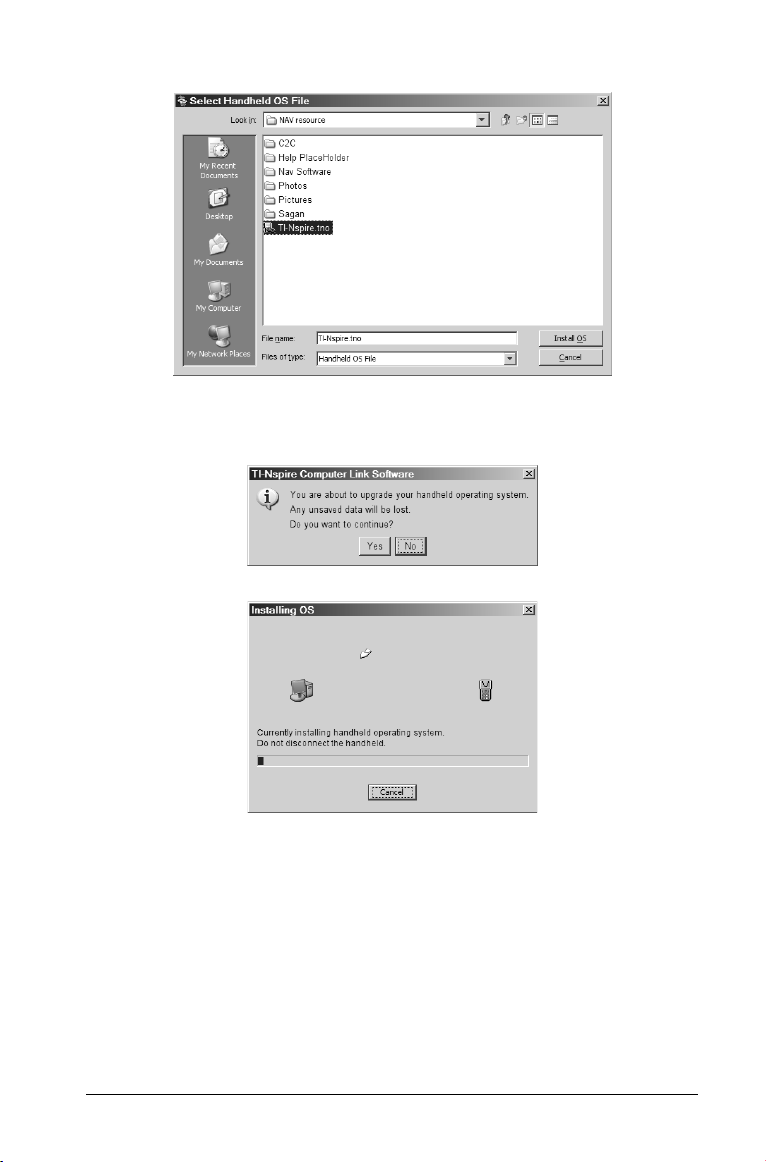
7. Browse to the location you saved the TI-Nspire™ operating system.
8. Highlight the operating system file and click
Install OS.
TI-Nspire™ Computer Link Software displays a message box. Click
Yes.
A progress screen is displayed.
9. When the operating system software has transferred to your
TI-Nspire™ handheld, click
OK. You may now disconnect the
handheld from your computer, and the operating system software
will install itself onto your handheld.
Note: Consider keeping one or two spare handhelds with the latest
operating system and ample memory. It is also a good idea to have spare
cradles on hand. If a problem occurs, you can substitute a spare part.
Installing the TI-Nspire™ Navigator™ software 9
Page 16

Installing the TI-Nspire™ Navigator™ software
To install software on your computer, you must have administrator
privileges when you log in to the Windows
don’t know whether or not you have administrator privileges, check with
your school’s help desk or system administrator.
1. Insert the TI-Nspire™ Navigator™ CD in your computer’s CD-ROM
drive. The window to the CD should open automatically.
Note: If your computer is running Windows® XP Service Pack 2, you
may see the following message. If so, click
Note: If the setup program does not run, click Start > Run, and then
type D:\Autorun.exe, where D is your CD-ROM drive, and click OK.
2. Click TI-Nspire Navigator Software, and then click Install
TI-Nspire™ Navigator™
Software.
The TI-Nspire™ Navigator™ Setup dialog displays.
Separate installations will occur:
– TI-Nspire™ Navigator™ software
– TI-Nspire™ Teacher software and TI-Nspire™ CAS Teacher
software. Refer to the TI-Nspire™ Teacher software user guide,
included with your system, for more information about the
TI-Nspire™ Teacher software.
3. When the installation is complete, the TI-Nspire™ Navigator™ Setup
dialog displays the status of installed components.
• If you have already purchased the software, click
software
, and then click Next. Follow the instructions on the screen
to activate the software.
• If you have not purchased the software, click Continue with trial
version
. The screen displays how many days remain in your trial
period.
• If you have been using the trial version and would like to purchase
the software, click
Purchase software. You can complete the
®
operating system. If you
Yes to continue.
Activate this
10 Installing the TI-Nspire™ Navigator™ software
Page 17

purchase online, and will receive the license and serial number
necessary to begin the activation process.
Activating the software
Activating the software allows to you continue using it past the 30-day
evaluation period.
1. To begin the activation process, click
then click
Next.
Regardless of which activation method you prefer, you will need to
supply the Serial Number and License Number printed on the license
card in your DVD case.
Note: Be careful not to enter a zero for the letter O or a letter O for
a zero.
• Internet — This method uses your Internet connection to
activate your software. You provide the Serial Number and
License Number only. This process will automatically activate
your software.
• Web Portal — This alternative method is for a user who does
not have an active Internet connection on the computer that is
activating the software. Visit this Web page, and insert your
Serial Number and License Number when prompted to retrieve
an activation ID. The ID is displayed on the Web page. If you
provide your e-mail address, the ID is also sent to you by e-mail.
Note: The next time you launch the TI-Nspire™
Navigator™software, you will see an option to activate. Enter
the activation ID at this time to complete the activation process.
• Phone — You provide a TI representative with the Serial
Number and License Number as well as an Installation ID
displayed on your screen. The representative then provides an
Activation ID.
• I already have an Activation ID — After accepting a license
agreement, you fill out a screen with the Serial Number, License
Number, and the Activation ID.
Note: Your activation ID can expire. Be sure to activate as soon
as you get your activation ID via the web portal or your call
center representative.
2. Click an activation method, and then click
instructions.
3. To complete the activation and create a user profile, enter the
requested information, and then click
Activate this software, and
Next and follow the
Next.
Installing the TI-Nspire™ Navigator™ software 11
Page 18
You are now ready to set up your network.
Setting up your TI-Nspire™ Navigator™ network
the first time
A Network Setup wizard helps you activate the access point and wireless
cradles for wireless communication.
If you have not used the TI-Nspire™ Navigator™ software before, a
prompt opens asking if you want to set up your classroom. You can
choose to set up your classroom or continue on to the TI-Nspire™
Navigator™ computer home screen.
If you have used Connect-to-Class™ software and have class data, a
prompt opens asking if you want to import the data. Click
the data. You can skip this step and import the data later by clicking
File > Import Class Data. You may have to restart the software for the
changes to take effect.
Before you begin
1. Make sure you have installed and activated the TI-Nspire™
Navigator™ software on your computer.
2. Make sure each wireless cradle is charged ( LED is solid amber or
solid green).
Connecting the cables to the access point
1. Identify the cables.
Yes to import
USB cable
2. Connect the AC9930 power adapter to the power jack on the access
point.
3. Connect the USB cable to the access point.
12 Installing the TI-Nspire™ Navigator™ software
AC9930 Power adapter
Page 19

USB connection
Power adapter
jack
Access point, side view
Starting the wizard
When you complete the installation of the TI-Nspire™ Navigator™
software, open TI-Nspire™ Network Manager to set up your system. To
open TI-Nspire™ Network Manager from the TI-Nspire™ Navigator™
home screen, do one of the following:
• Click
• Click in the toolbar
• Click the
Tools > TI-Nspire™ Network Manager
Too ls tab, and then click TI-Nspire™ Network
Manager
.
A setup wizard helps you through the next steps.
Note: You can run the setup wizard later by opening TI-Nspire™
Network Manager and clicking Actions > Network Setup Wizard.
1. Confirm that the AC9930 power adapter is connected to the access
point.
2. Plug the AC adapter into a power outlet.
3. Plug the USB cable into the computer.
4. Click
Setup to proceed with the wizard.
TI-Nspire™ Network Manager displays a dialog box to select a
country and channel.
Installing the TI-Nspire™ Navigator™ software 13
Page 20
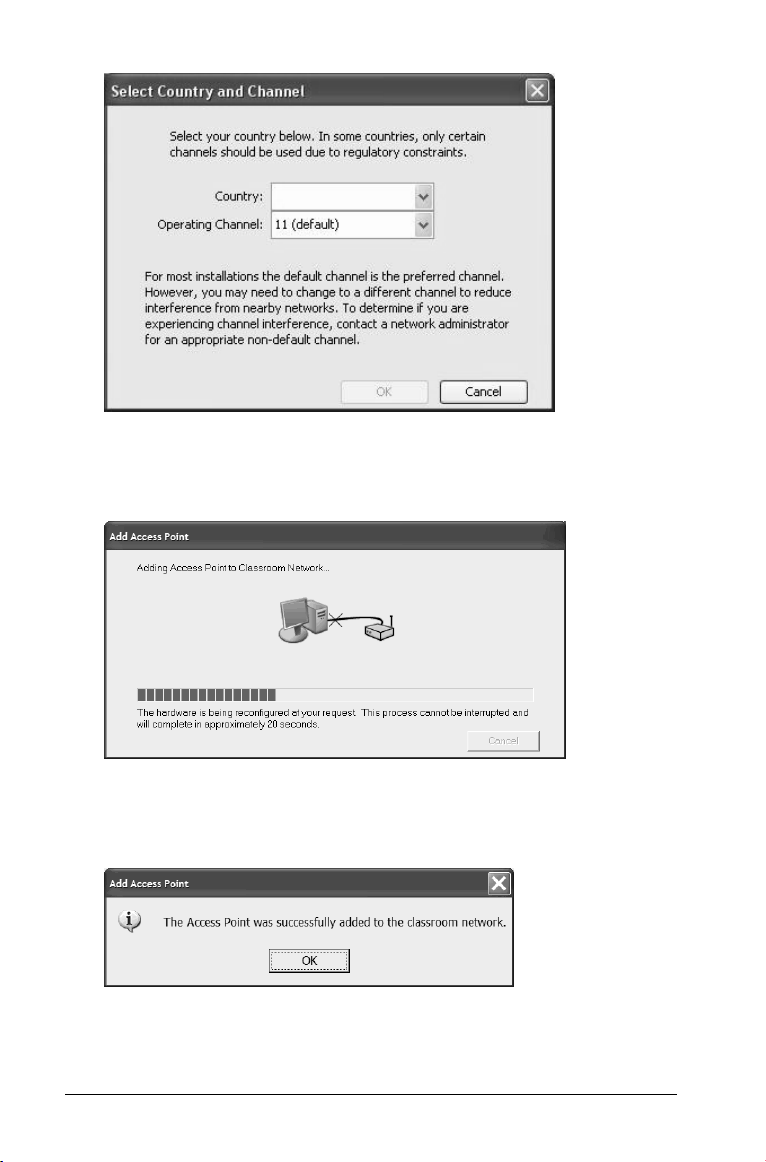
5. Select your country. The operating channel is automatically set to a
default setting.
6. Click OK.
TI-Nspire™ Network Manager sends signals to the access point to
add it to the network.
After the access point is found, the wizard displays a message.
7. Click
14 Installing the TI-Nspire™ Navigator™ software
OK.
Page 21

The next step is to add the TI-Nspire™ Navigator™ wireless cradles
to your classroom network.
Note: The TI-Nspire™ Network Manager wizard automatically
guides you through the process for adding cradles. You can
automatically or manually add cradles at any time by following the
procedures below.
To add cradles automatically
Before you use the auto-discover feature, make sure the TI-Nspire™
Navigator™ wireless cradles are charged.
1. Click
2. Turn on each TI-Nspire™ learning handheld.
3. Slide the lock on the back of the wireless cradle to the OFF position
Auto-Discover Cradle(s).
and attach the handheld to the cradle.
Lock in OFF position
4. Lock the handheld in place by sliding the lock on the back of the
cradle to the ON position.
Lock in ON position
After a brief search for existing wireless cradles, a dialog box opens,
listing all cradles that were found.
Installing the TI-Nspire™ Navigator™ software 15
Page 22
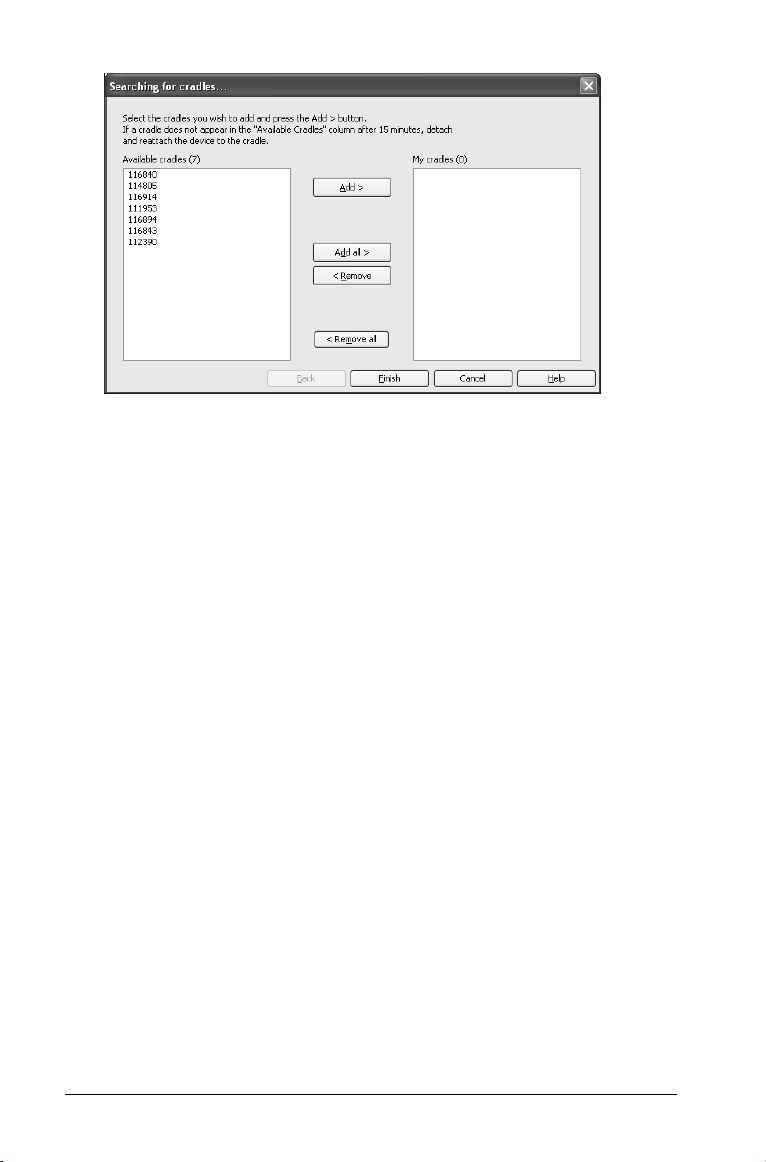
5. Highlight each wireless cradle you want to add, and click Add.
Note: If the cradle does not appear in the Available cradles
column after 6 minutes, try these tips:
• Check the cradle numbers to see which ones are not connecting.
• Detach and reattach the handheld to the cradle.
• Verify that the cradle is locked. (The lock on the back of the
cradle is in the ON position.)
6. When all of the cradles are added, click Finish.
To add cradles manually
When you add a cradle manually, it immediately appears in the
TI-Nspire™ Network Manager window.
1. Click
Manually Add Cradle(s).
The Add Wireless Cradles by ID Number dialog box displays.
16 Installing the TI-Nspire™ Navigator™ software
Page 23
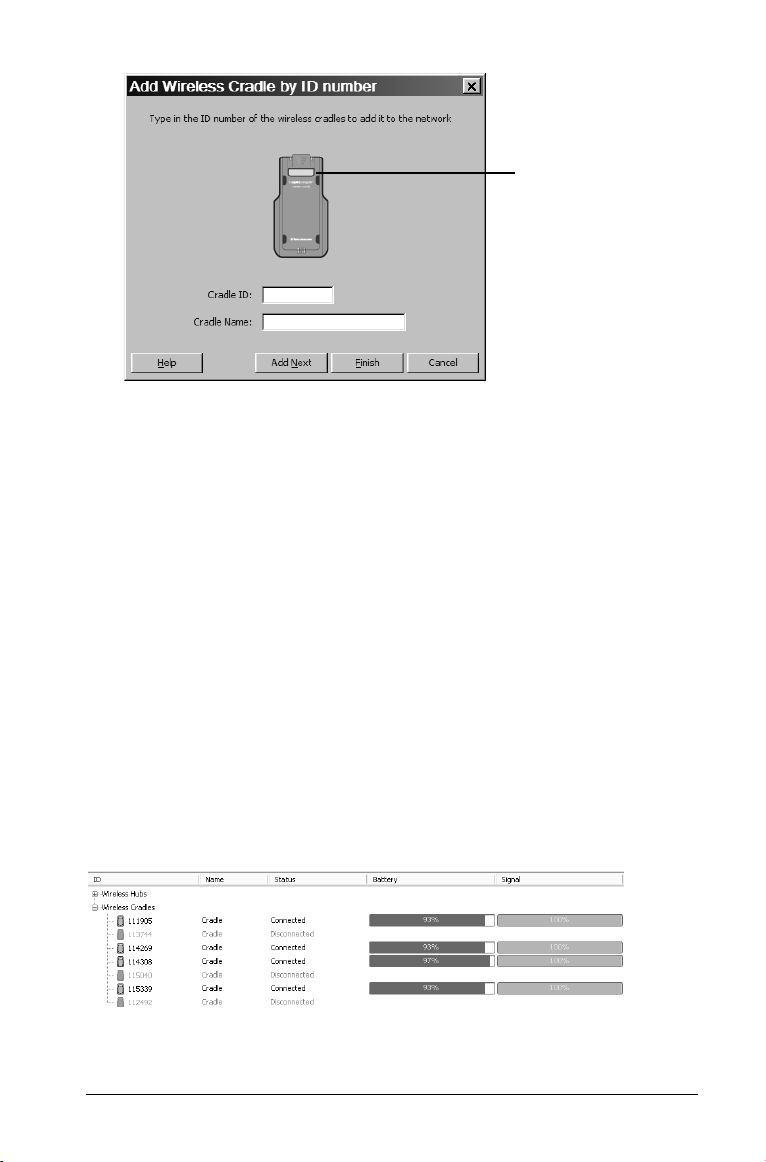
Cradle ID
2. Identify the cradle ID number on the back of the cradle, and enter it
in the Cradle ID box. The cradle ID is six digits.
3. Enter a nickname for the cradle in the Cradle Name box (optional).
Nicknames can consist of letters, spaces, and numbers. A nickname
must contain a minimum of 1 character and can contain a maximum
of 64 characters. If you do not enter a nickname, the name defaults
to "Cradle."
4. Click Add Next to add another cradle if you have more than one
cradle to add.
5. When you are finished adding all of the cradles, click Finish.
Checking the status of wireless cradles
After you have added wireless cradles automatically or manually, all of
the wireless cradles you added appear in the TI-Nspire™ Network
Manager window. If the wireless cradle is charged and attached to a
TI-Nspire™ handheld that is powered on, TI-Nspire™ Network Manager
shows the status as connected. It may take up to 30 seconds to recognize
the cradle and show its status as connected.
Installing the TI-Nspire™ Navigator™ software 17
Page 24
If the wireless cradle is not charged or not connected to a TI-Nspire™
handheld that is powered on, TI-Nspire™ Network Manager displays the
status as disconnected. TI-Nspire™ Network Manager remembers the
cradle IDs you added, and the next time you turn on the TI-Nspire™
handheld that is connected to the wireless cradle, TI-Nspire™ Network
Manager recognizes it.
Note: To refresh the TI-Nspire™ Network Manager window, click
View > Refresh or click .
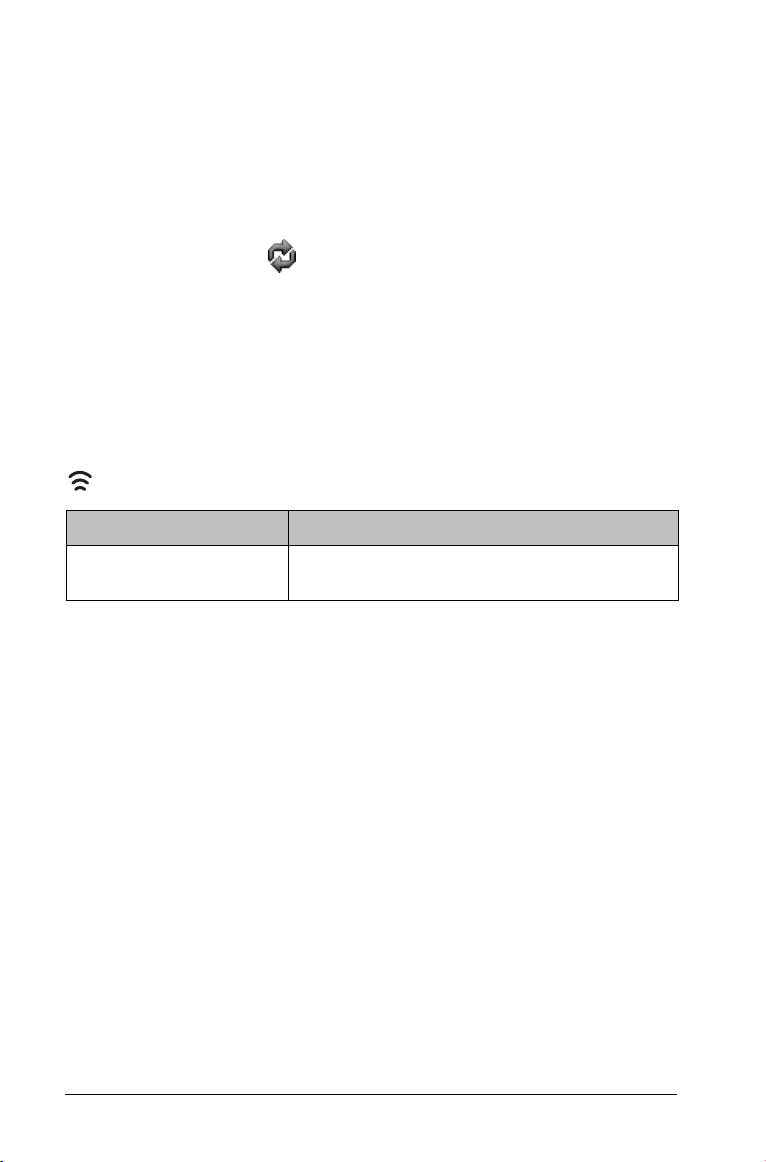
Wireless cradle LEDs
The LEDs on each wireless cradle use various colors and blink patterns to
indicate data activity or power status. This can occur either when the
cradles are seated in the charging bay or when they are outside the
charging bay.
The LEDs indicate status as follows.
Activity LED
Color and pattern Meaning
Blinking green Indicates data transfer to and from the
access point.
18 Installing the TI-Nspire™ Navigator™ software
Page 25
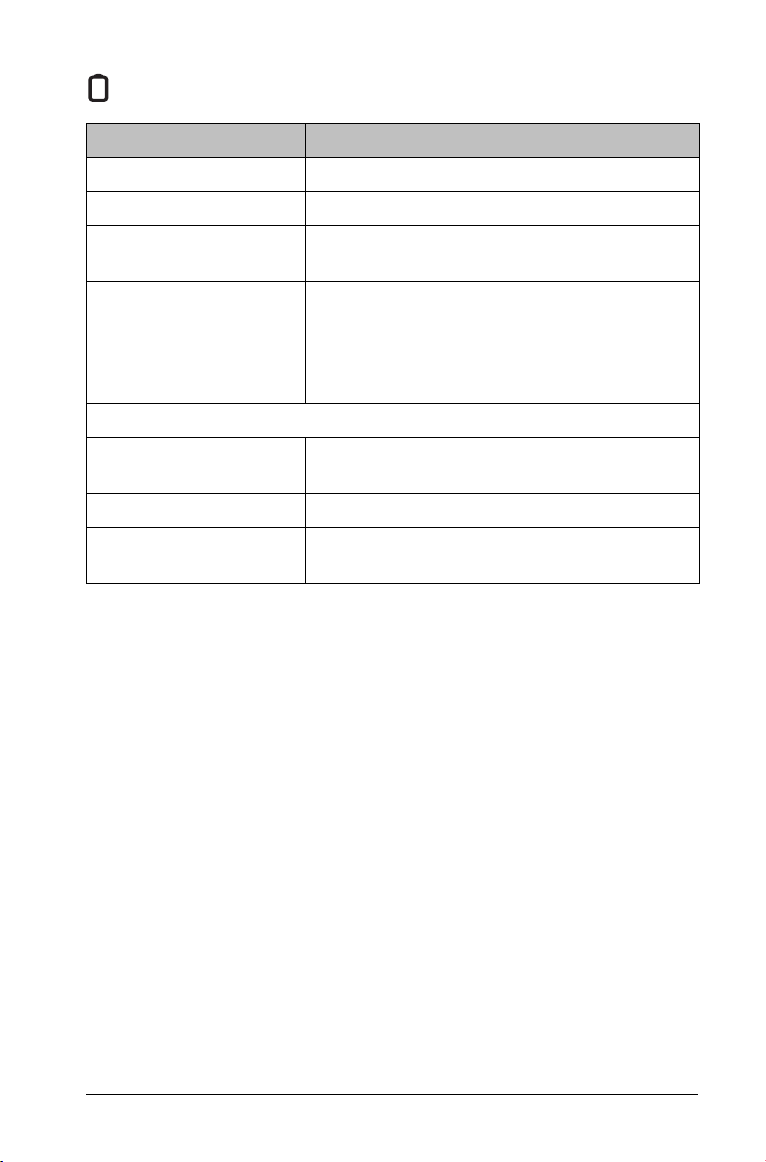
Battery (Power Status) LED
Color and pattern Meaning
In the charging bay
Solid amber The battery is charging.
Solid green Power on; charged and powered by a
charging bay or power adapter.
Solid red The battery is charging, but does not have
good contact with the charging bay.
Reposition the cradle so it has good contact.
The LED should then turn amber to indicate
it is recharging.
Outside the charging bay
Blinking green Power on; battery powered. The battery is
30% to 99% charged.
Blinking amber Low battery (lower than 30% charged).
Blinking red Battery is critically low (lower than 8%
charged).
Installing the TI-Nspire™ Navigator™ software 19
Page 26

20 Installing the TI-Nspire™ Navigator™ software
Page 27
Overview
The TI-Nspire™ Navigator™ computer software contains the tools and
options you need to run your wireless classroom network. The software
automatically opens upon installation, or you can start the software at
any time by following the directions below.
Starting the TI-Nspire™ Navigator™ software on
your computer
You can start the TI-Nspire™ Navigator™ classroom learning system from
your computer’s start menu.
1. Click
Start > Programs > TI Tools > TI-Nspire Navigator > TI-Nspire
Navigator
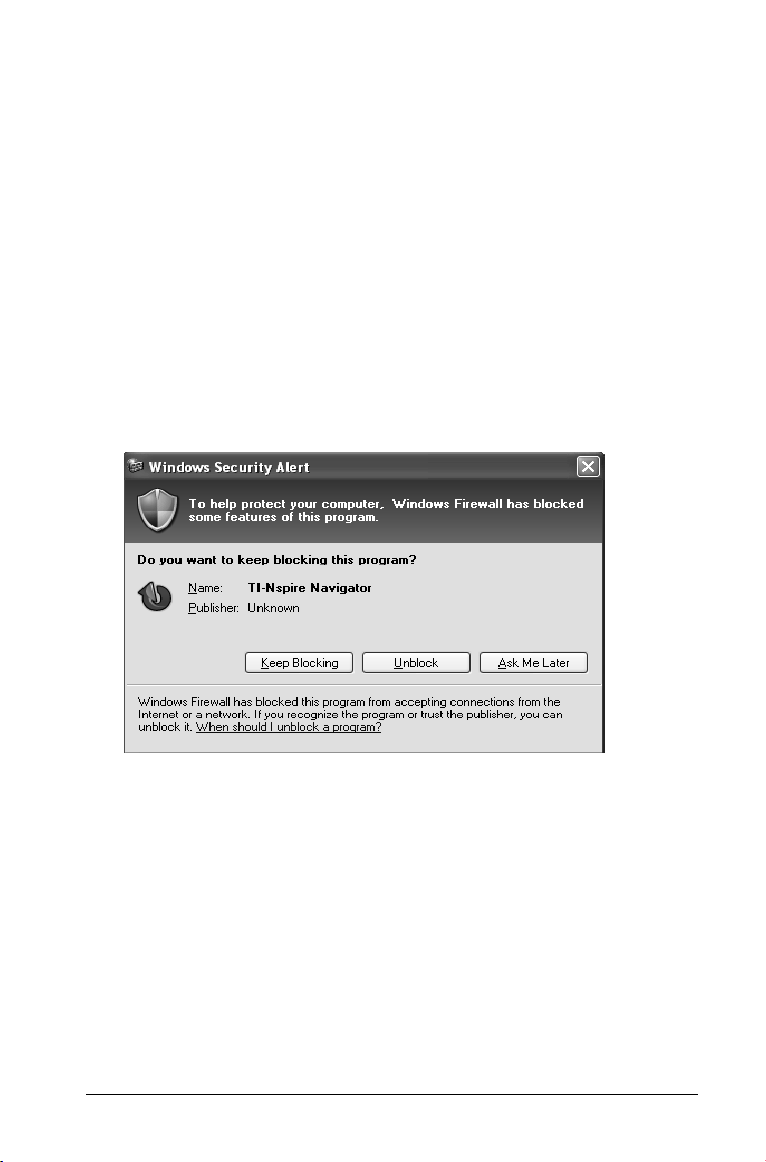
A Security Alert window opens.
.
2. Click
Overview 21
Unblock to allow full access to the TI-Nspire™ Teacher Edition
software, if you installed that option. Refer to the TI-Nspire™ CAS
Computer Software Teacher Edition user guide, included with your
system, for more information about the TI-Nspire™ Teacher Edition
software.
Note: If you click Keep Blocking or Ask Me Later, you will not be
able to use the option "Send to Class" in the TI-Nspire™ Teacher
Edition software, and this window reappears the next time you open
the TI-Nspire™ Navigator™ software. You can choose
that time to gain full access to the TI-Nspire™ Teacher Edition
software.
The TI-Nspire™ Navigator™ computer home screen opens.
Unblock at
Page 28
The TI-Nspire™ Navigator™ computer home
screen
The TI-Nspire™ Navigator™ computer home screen provides the tools
and options you need to run the TI-Nspire™ Navigator™ software. Below
you can see an example of the TI-Nspire™ Navigator™ computer home
screen with its main parts labeled. Following the TI-Nspire™ Navigator™
computer home screen, you can find detailed explanations of each
labeled part.
Note: The example below shows the Classroom tab in Seating Chart view.
ÊË
Í
Î
Ì
Network indicator
Ê Classroom tab
Ë
Tools tab
Ì Portfolio tab
Í Current Class
Î Class Record
Note: Make sure that the network indicator at the bottom of the screen
indicates that the TI-Nspire™ Navigator™ network is available. If it is not
available, this indicates an error.
22 Overview
Page 29
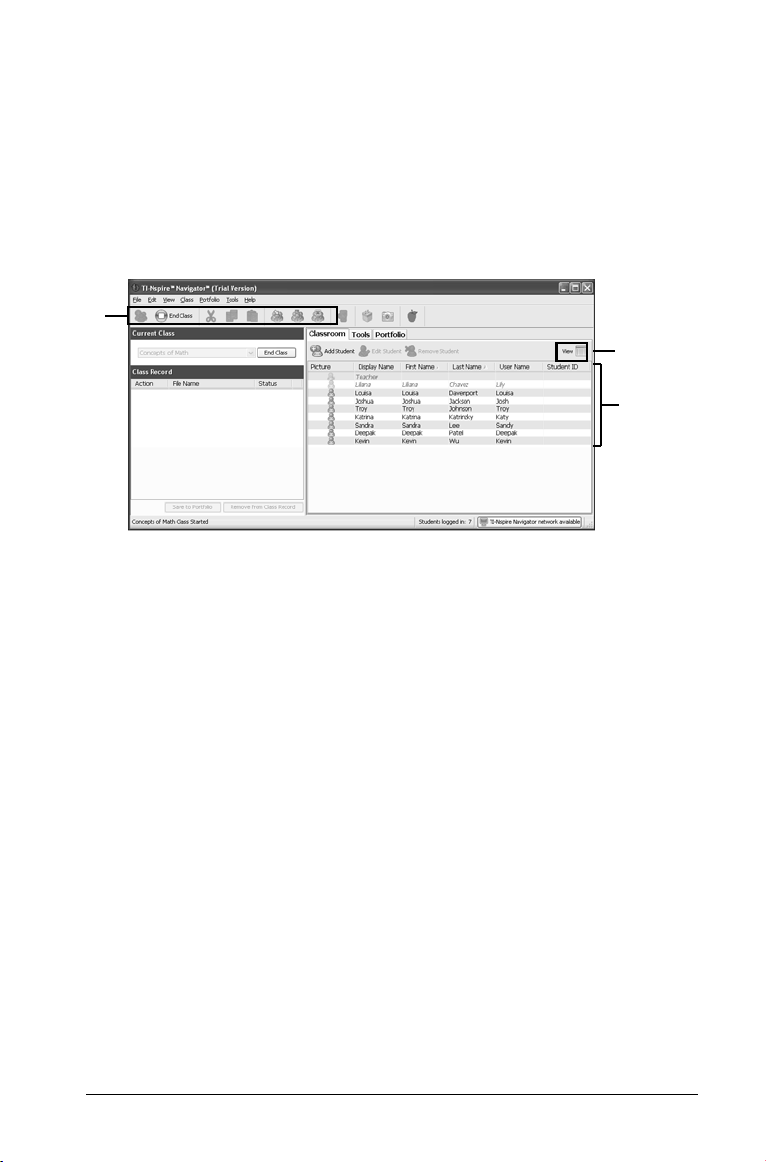
1: Classroom tab
In the Classroom tab, you can view the students in the selected class and
add, remove, or edit students. The Classroom tab has two views, the
Seating Chart and Student List views. In the Seating Chart view, you can
view your students by their display name and an icon. In the Student List
view, you can view your students listed in a table with some of their
account information.
Note: The example below shows the Classroom tab in Student List view.
A
C
B
A: Classroom toolbar. Lets you add a class, and collect, send, and delete
files.
B: Student roster.
1) Seating Chart view - Shows students listed with display names and
student icons. The Seating Chart view lets you arrange your students
in the Classroom tab like they are seated in your classroom.
2) Student List view - Shows students listed in a table with some of their
account information. The Student List view lets you sort students by
display name, first name, last name, user name, and student ID.
selector
. Lets you toggle between the Seating Chart view and the
Student List view.
C: View
2: Tools tab
The Tools tab contains icons that link to a particular tool in the
TI-Nspire™ Navigator™ software.
Overview 23
Page 30
The task icons let you launch task tools in the TI-Nspire™ Navigator™
software, including Quick Poll, Screen Capture, Send to Class, Collect
from Class, Delete from Class, the Transfer Tool, and TI-Nspire™ Network
Manager.
3: Portfolio tab
The Portfolio tab displays student names, assignment names and scores,
and icons of collected files.
4: Current Class
Current Class lets you select classes you have created, as well as begin and
end class sessions for the selected class. Below you can see an example of
the Current Class with its main parts labeled.
A
24 Overview
B
Page 31

A: Class list. A drop-down list where you can select a class from the ones
A
you have created. The Class list is disabled when you have a class session
running.
Begin/End Class button. Button that lets you begin or end a class
B:
session.
5: Class Record
The Class Record contains both the current and historical activity for the
selected class. Below you can see an example of the Class Record with its
main parts labeled, and an explanation of icons.
Class Record icons
E
B
F
C
D
Sent file to class
Collected file from class
Saved to porfolio
Redistributed to class
H
G
Deleted file from students’
handhelds
Click for options
A:
File deletion. The deletion of a file from your students’ handhelds,
indicated by the symbol.
File transfer. The transfer of files between your computer and your
B:
students’ handhelds. Arrows beside files indicate file transfers. The send
symbol indicates transfers from your computer to your class’s
handhelds. The collect symbol indicates transfers from your class’s
handhelds to your computer. File transfers remain current until all
students receive the file, you stop the transfer, or you end the class
session.
C:
Unprompted from Class folder. A folder that contains the files
students have sent to you that were not part of a collect action.
Status. The progress of an action. For example, “23 of 25” indicates
D:
that 23 out of 25 students have received a file.
E:
Current action. An action (for example, send) that is still active.
Overview 25
Page 32

F: Menu icon. Click this icon for quick access to certain menu items. This
icon gives you the same options as a right-click. You can perform the
following actions on a selected item in Class Record: Open in Class
Analysis, Save to Portfolio, Collect Selected File, Redistribute Selected
File, Collect Missing, Remove from Class Record, and Record Item
Properties.
Remove From Class Record button. Button that lets you remove
G:
selected historic or active actions from the Class Record. You can remove
a single action or multiple actions.
H: Save to Portfolio button. Button that enables you to save an item in
the Class Record to the Portfolio. The button is available when in full
color: .
TI-Nspire™ Navigator™ computer tools
The TI-Nspire™ Navigator™ classroom learning system contains tools
that you can use to interact with your students from your computer. This
section describes the tools, and tells you how to launch them.
The TI-Nspire™ Navigator™ computer tools
Quick Poll – Lets you send polls to your students and receive their
poll responses.
Screen Capture – Lets you capture your students’ handheld
screens and display them on your computer.
Send to Class – Lets you send TI-Nspire™ handheld-compatible
files to your students’ handhelds from your handheld or from your
computer. You can send files to the whole class, to students who are
currently logged in, or to individual students.
Collect from Class – Lets you collect TI-Nspire™ handheldcompatible files from your students’ handhelds to your computer.
Delete from Class – Lets you delete files from your students’
handhelds. You can delete files from the whole class or from individual
students.
26 Overview
Page 33

Transfer Tool – Lets you transfer document, application, and
Operating System (OS) files to a succession of handhelds, without
requiring students to log in.
TI-Nspire™ Network Manager – Lets you add or remove
TI-Nspire™ Navigator™ wireless cradles and TI-Nspire™ access points to
your network.
To launch TI-Nspire™ Navigator™ computer tools
1. Click the Too ls tab.
The Tools tab opens.
2. If the tool you want to launch is inactive, begin the class session.
3. Click the icon of the tool you want to launch.
Note: You can also launch many of these tools from the Too ls menu.
Creating and managing your teacher account
You can create your teacher account in the Teacher Preferences section of
the TI-Nspire™ Navigator™ classroom learning system. Your teacher
account lets you log in to the TI-Nspire™ Navigator™ network from your
handheld. After you create your teacher account, you can later change
your password or your user name.
Overview 27
Page 34

To create your teacher account
1. If you have a class session running, end it.
2. Click
Tools > Teacher Preferences or click Teacher Preferences .
The Teacher Preferences dialog box opens.
3. Enter a username.
4. Enter a password.
5. Select or deselect the preference for the teacher icon to appear in
the classroom view.
If you select this preference, the teacher icon will appear in the
classroom view, and you will be included as a recipient in Send to
Class, Collect from Class and Delete from Class operations. The
teacher handheld screen will be included in screen captures of the
class.
6. Select or deselect the options to randomize the order in Screen
Capture, and to individualize the teacher handheld in Screen
Capture.
• Randomize order in Screen Capture: selecting this option
captures and displays student screens in a random order, not the
order on the class listing. This enables students to concentrate
on the assignment, not whose screen they are viewing.
• Individualize Teacher Handheld in Screen Capture: selecting this
option shows the teacher’s screen in the screen capture.
7. Click
OK.
28 Overview
Page 35

To change the password of your teacher account
1. Make sure you are not logged in to the TI-Nspire™ Navigator™
network on your handheld.
2. Click
Tools > Teacher Preferences or click Teacher Preferences .
The Teacher Preferences dialog box opens.
3. Click
Reset.
TI-Nspire™ Navigator™ software clears the current password.
4. Enter a new password.
Overview 29
Page 36

5. Click OK.
To change the user name of your teacher account
1. Make sure you are not logged in to the TI-Nspire™ Navigator™
network on your handheld.
2. Click
3. Enter a new user name.
4. Click
Tools > Teacher Preferences or click Teacher Preferences .
The Teacher Preferences dialog box opens.
OK.
Logging in to the TI-Nspire™ Navigator™ system
from the handheld
The TI-Nspire™ Navigator™ classroom learning system uses both your
computer and your students’ handhelds. Your computer and your
students’ handhelds communicate through the TI-Nspire™ Navigator™
network.
Note: You do not have to log in to communicate with your students’
handhelds; you can use the Transfer Tool to delete files or send files and
operating systems to the students handhelds. However, if you plan to
participate from your handheld during the TI-Nspire™ Navigator™ class
session, then you must log in to the TI-Nspire™ Navigator™ network
from your handheld.
30 Overview
Page 37

TI-Nspire™ handheld login status icons
The icons on the TI-Nspire™ and TI-Nspire™ CAS handheld screens
indicate the communication status between the handheld and the access
point, cradle, or TI-Navigator™ network. The icons indicate status as
follows.
Icon Status Meaning
Blinking The handheld is searching for an access
point.
Solid The handheld has found an access point.
Solid The handheld is not communicating
with the cradle. Unattach the handheld
from the cradle, wait for the icon to
disappear, and then reattach the
handheld to the cradle.
Blinking The handheld is connected to the
network and is ready to login.
Solid The handheld is logged in to the
network and is fully charged.
Before you log in
Create your teacher account in Teacher Preferences.
To log in to the TI-Nspire™ Navigator™ network
1. If you have not already done so, begin the class session on your
computer.
2. Make sure the TI-Nspire™ handheld is ready for login. (The icon
is blinking.)
3. To log in, do one of the following:
– From the home screen of your TI-Nspire™ handheld, select
5:Settings & Status > 5:Login.
– From a screen other than the home screen, press ~ > 8:Login.
4. Type your username and password. (Press
field.)
5. Select
Overview 31
Login.
The Login Successful screen displays.
e to move to the next
Page 38

32 Overview
Page 39

Logging in to the TI-Nspire™ Navigator™ system
(student instruction)
Your computer and your students’ handhelds communicate through the
TI-Nspire™ Navigator™ network. In order for you and your students to
communicate using this network, your students must log in to the
network from their handhelds. Below you can find instructions you can
use to tell your students how to log in to the TI-Nspire™ Navigator™
network.
Before your students log in
• Create your students’ accounts.
• Provide your students with their usernames and, if necessary, their
passwords.
Student Point of View: The steps below are from the student’s
point of view.
To log in to the TI-Nspire™ Navigator™ network
1. Make sure the TI-Nspire™ handheld is ready for login. (The icon
is blinking, indicating the handheld is fully charged and
communicating with the network.)
2. To log in, do one of the following:
– From the home screen of your TI-Nspire™ handheld, select
5:Settings & Status > 5:Login.
– From a screen other than the home screen, press ~ > 8:Login.
3. Type your username and password. (Press
field.)
4. Select
Overview 33
Login.
The Login Successful screen displays.
e to move to the next
Page 40

34 Overview
Page 41

Managing classes
The TI-Nspire™ Navigator™ classroom learning system typically includes
one or more classes. In order to use TI-Nspire™ Navigator™, you need to
create and use classes for each class period that you teach. This section
contains the information you need to create and effectively manage your
classes.
Creating classes
When you start using the TI-Nspire™ Navigator™ classroom learning
system, one of the first things you should do is create your classes. Make
sure you create a class for each of the class periods you plan to teach with
TI-Nspire™ Navigator™.
To create classes
1. If you have a class session running, end it.
2. Click
3. Enter a class name.
4. Click
File > Add Class or click Add Class .
The Add Class dialog box opens.
Note: You can use a mix of TI-Nspire™ handhelds and
TI-Nspire™ CAS handhelds in the same class.
Add Class.
The new class appears in the Add Class dialog box.
Managing classes 35
Page 42

5. (Optional) Import students into the class.
Note: You can import a comma-separated value (CSV) file or a *.txt
file. The CSV or .txt file must have all of these headers in this order:
First Name
Last Name
User Name
Password
Display Name
Student ID
a) Click the class.
b) Click
Import Students.
The Open dialog box opens.
c) Select the file that contains the students you want to
import.
d) Click
36 Managing classes
Open.
Page 43

The Import Status dialog box opens telling you how many
students the TI-Nspire™ Navigator™ software successfully
imported.
e) (Optional) If some students did not import successfully, click
View Details to determine the problem.
The details of the import open in the Import Status dialog
box.
f) Click
6. If you need to create another class, repeat steps 3 - 4.
7. Click
Finish.
OK.
Selecting a class
You can create many classes in the TI-Nspire™ Navigator™ classroom
learning system. To view or start a class, you must select it from a list of
the classes in the Current Class section of the TI-Nspire™ Navigator™
computer home screen.
To select a class
1. If you have a class session running, end it.
2. Click
3. Click the class you want.
Managing classes 37
File > Select Class.
A list of classes opens.
Page 44

TI-Nspire™ Navigator™ software displays the information for the
selected class.
Note: You can view and edit information in the selected class,
however, you cannot perform any network activities until you begin
the class.
Beginning and ending a class session
A class session is the period when the TI-Nspire™ Navigator™ classroom
learning system is active for a specific class. While a class session is
running, you can perform TI-Nspire™ Navigator™ communications
functions with the selected class. You cannot use TI-Nspire™ Navigator™
software to interact with your class until you begin a class session, and
you cannot begin another class in the TI-Nspire™ Navigator™ system
until you end the current one.
To begin a class session
1. If you have a class session running, end it.
2. From the Current Class drop-down list, select the class you want to
begin.
3. Click
File > Begin Class or click Begin Class .
To end a class session
f Click
File > End Class or click End Class .
Changing the class view
In the Classroom tab, you can view the selected class in either the Student
List view or the Seating Chart view. The Student List view shows your
students in a table that contains their display names, first name, last
name, user name, and student ID. The Seating Chart view shows your
students as student icons with display names. You can change the class
view at any time.
To change class view to Student List
1. Click the Classroom tab.
The Classroom tab opens.
Note: The contents of the Classroom tab vary depending on the
selected class and view. The example below shows the Classroom tab
in Seating Chart view.
38 Managing classes
Page 45

2. In the menu, click
View > Classroom > Student List.
-or-
In the Classroom tab, click View > Student List.
The Classroom tab changes the class view to Student List.
To change the class view to Seating Chart
1. Click the Classroom tab.
The Classroom tab opens.
Note: The contents of the Classroom tab vary depending on the
selected class and view. The example below shows the Classroom tab
in Student List view.
Managing classes 39
Page 46

2. In the menu, click View > Classroom > Seating Chart.
-or-
In the Classroom tab, click
The Classroom tab changes the class view to Seating Chart.
View > Seating Chart.
Removing items from the Class Record
The Class Record maintains a list of all of the actions you have performed
in your class. Items remain in this list until you remove the items or you
remove the class. You can remove items from the Class Record at any
time.
40 Managing classes
Page 47

Note: If you remove a collected file list from the Class Record without
first saving it to Porfolio, the TI-Nspire™ Navigator™ software deletes
those students’ files.
To remove items from the Class Record
1. In the Class Record, click the item you want to remove.
The TI-Nspire™ Navigator™ software highlights the selected item in
the Class Record.
2. Click
Edit > Remove From Class Record.
Note: If you are removing an item that is still in progress, the
Remove From Record dialog box opens asking if you are sure you
want to remove the item. Click
Remove.
Removing classes
If you have a class you no longer need, you can remove it from the
TI-Nspire™ Navigator™ classroom learning system. When you remove a
class, the TI-Nspire™ Navigator™ software removes the class from the
software and removes the files on the hard drive that correspond to that
class. If you have students who are not part of any other classes, the
software removes those students from the software as well.
Note: You cannot undo the removal of a class.
To remove classes
1. If you have a class session running, end it.
2. From the Current Class drop-down list, select the class you want to
remove.
The TI-Nspire™ Navigator™ system shows the selected class in the
Current Class field.
Managing classes 41
Page 48

3. Click File > Remove Class.
The TI-Nspire™ Navigator™ system asks if you are sure you want to
remove the class.
4. Click Remove.
42 Managing classes
Page 49

Managing student accounts
The TI-Nspire™ Navigator™ classroom learning system typically contains
many student accounts associated with one or more classes. Each of your
students must have an account to access TI-Nspire™ Navigator™ on their
handhelds. This section contains information on creating and managing
your students’ accounts.
Adding students to classes
Once you create your classes, you will want to add students to them. You
can add students to your classes at any time.
Note: The instructions below explain how to add students once you
create a class. You can also add students when you create a class by
importing them.
To add students to classes
1. Select the class to which you want to add the students.
Note: If you have a class session running, you must end it to select
the class.
2. Click
3. Enter the student’s first name.
4. Enter the student’s last name.
5. Enter a user name.
Managing student accounts 43
Class > Add Student or click Add Student .
The Add Student dialog box opens.
Note: The user name you choose must be unique. It cannot exist in
the current class or any other class.
Page 50

6. If you want your student to create their own password, select
Student Chooses.
-or-
If you want to create a password for your student, select the blank
password entry box and enter a new password.
7. (Optional) Enter a display name.
Note: If you leave the display name blank, the TI-Nspire™
Navigator™ software uses the student’s first name as the display
name.
8. (Optional) Enter a student ID.
9. (Optional) Assign the student to other classes:
a) Click
Assign Classes.
The Assign Classes dialog box opens.
b) Select the check boxes of the student’s classes.
c) Clear the check boxes of the classes to which the student
does not belong.
d) Click
10. If you need to add another student, click
OK.
Add Next Student and
repeat steps 3 - 9.
11. Click
Finish.
Removing a student from a class
As necessary, you can remove students from your classes. When you
remove students, the TI-Nspire™ Navigator™ classroom learning system
only removes them from the selected class. If the students are in other
classes, then they remain in those classes.
44 Managing student accounts
Page 51

Notes:
• You cannot remove students who are logged in to the TI-Nspire™
Navigator™ network.
• You cannot undo the removal of students.
• You can access many of the student account items by right-clicking
the student and choosing an action from the menu.
To remove a student from a class
1. Select the class from which you want to remove the student.
Note: If you have a class session running, you must end it to select
the class.
2. Click the Classroom tab.
The Classroom tab opens.
Note: The contents of the Classroom tab vary depending on the
selected class and view.
3. Click the student you want to remove.
4. Click
Class > Remove Student, or click Remove Student , or
right-click the student and choose
Remove Student from the menu.
The TI-Nspire™ Navigator™ software asks if you are sure you want
to remove the student.
5. Click
Yes.
The TI-Nspire™ Navigator™ software removes the student.
Managing student accounts 45
Page 52

Resetting student passwords
The TI-Nspire™ Navigator™ classroom learning system maintains the
privacy of your students’ passwords. Because of this, you cannot retrieve
passwords for your students if they forget them. However, if necessary
you can reset your students’ passwords. You can reset passwords for all of
the students in a class or for individual students.
Note: You cannot reset the passwords of students who are currently
logged in to the TI-Nspire™ Navigator™ network.
To reset passwords for all students in a class
1. Select the students’ class.
Note: If you have a class session running, you must end it to select
the class.
2. Click the Classroom tab.
The Classroom tab opens.
3. Click a student in the class.
4. Click
5. Click
6. Click
46 Managing student accounts
Edit > Select All.
TI-Nspire™ Navigator™ system selects all of the students in the class.
Class > Reset Student Password(s).
The Confirm Reset Passwords dialog box opens.
OK.
Page 53

7. The next time your students log in, instruct them to enter passwords
of their choosing.
To reset student passwords for individual students
1. Select a class of the student whose password you want to reset.
Note: If you have a class session running, you must end it to select
the class.
2. Click the Classroom tab.
The Classroom tab opens.
Note: The contents of the Classroom tab vary depending on the
selected class and view.
3. Click the student you want to edit.
4. Click Class > Edit Student, or click Edit Student , or right-click
the student and choose Edit Student from the menu.
The Student Properties dialog box opens.
5. Click Reset.
Managing student accounts 47
Page 54

6. If you want the student to create his or her own password, select
Student Chooses.
-or-
If you want to create a specific password for the student, select the
blank password entry box and enter a new password.
7. Click
8. The next time the student logs in:
OK.
The TI-Nspire™ Navigator™ system resets the student’s password.
• If you selected Student Chooses, instruct the student to enter a
password of his or her choosing.
• If you created a password for the student, tell the student the
new password.
Checking student login status
The TI-Nspire™ Navigator™ classroom learning system lets you view the
students’ login status from the Classroom tab. The color of the icon by
your students’ display names indicates their login status as well as the
class status:
Icon Class status Student status Color
Class session not
started.
N/A Grey
Class session started. Student not logged
in.
Class session started. Student logged in. Dark blue
Light blue
Arranging the seating chart
Initially, the Classroom tab arranges the students in the Seating Chart
view in the order that you added them. However, you can rearrange the
students so that they have the same seating arrangement in the
Classroom tab as they do in your actual classroom. You can rearrange the
seating chart at any time.
To arrange students in the seating chart
1. Select the students’ class.
48 Managing student accounts
Page 55

Note: If you have a class session running, you must end it to select
the class.
2. In the menu, click View > Classroom > Seating Chart.
The Classroom tab opens displaying your class in the Seating Chart
view.
3. Within the Classroom tab, drag each student’s icon to the location
that you want.
The TI-Nspire™ Navigator™ software moves the student icons to the
new locations.
Note: Do not place one student’s icon on top of another students’
icon. If you do this, you will only be able to see one of the student’s
icons.
Sorting student information
The Student List view in the Classroom tab shows the information for
students in the selected class. It includes your students’ display names,
first names, last names, user names, and student IDs. In the Student List
view, you can sort your students’ information by each of these categories.
The TI-Nspire™ Navigator™ classroom learning system sorts the
information alphabetically from A-Z or Z-A and numerically from 1-9 or
9-1. You can sort student information at any time.
Managing student accounts 49
Page 56

To sort student information
1. Select the class that contains the student information you want to
sort.
Note: If you have a class session running, you must end it to select
the class.
2. In the menu, click View > Classroom > Student List.
The Classroom tab opens displaying the Student List view.
3. Click the column title of the list you want to sort.
The TI-Nspire™ Navigator™ software sorts the selected list.
4. If you want to sort the selected information in the opposite order,
click the column title again.
Changing the classes assigned to a student
Occasionally your students may move to a different class, or they may
take more than one of your classes. The TI-Nspire™ Navigator™
classroom learning system lets you change your students’ classes when
necessary.
Note: You cannot change the classes of students who are logged in to
the TI-Nspire™ Navigator™ network.
Note: You can access many of the student account items by right-clicking
the student and choosing an action from the menu.
To change a student’s classes
1. Select a class to which the student belongs.
Note: If you have a class session running, you must end it to select
the class.
2. Click the Classroom tab.
50 Managing student accounts
Page 57

The Classroom tab opens.
Note: The contents of the Classroom tab vary depending on the
selected class and view.
3. Click the student you want to edit.
4. Click Class > Edit Student, or click Edit Student , or right-click
the student and choose Edit Student from the menu.
The Student Properties dialog box opens.
5. Click Assign Classes.
The Assign Classes dialog box opens.
Managing student accounts 51
Page 58

6. Select the check boxes of the student’s classes.
7. Clear the check boxes of the classes to which the student does not
belong.
8. Click OK.
9. In the Student Properties dialog box, click
OK.
Changing student names and identifiers
After you add your students, you may find that you need to change one
of their names or identifiers. In the TI-Nspire™ Navigator™ classroom
learning system, there are five different names and identifiers associated
with your students, including:
• First name
•Last name
• User name
• Display name
• Student ID
This section covers how to change any of these types of names and
identifiers.
Note: You cannot change the account information of students who are
logged in to the TI-Nspire™ Navigator™ network.
Note: You can access many of the student account items by right-clicking
the student and choosing an action from the menu.
To change a student’s names or identifiers
1. Select a class to which the student belongs.
Note: If you have a class session running, you must end it to select
the class.
52 Managing student accounts
Page 59

2. Click the Classroom tab.
The Classroom tab opens.
Note: The contents of the Classroom tab vary depending on the
selected class and view.
3. Click the student you want to edit.
4. Click
Class > Edit Student, or click Edit Student , or right-click
the student and choose
Edit Student from the menu.
The Student Properties dialog box opens.
5. Click the field of the name or identifier you want to change.
6. Make the necessary changes.
7. Repeat steps 5 and 6 for any other names or identifiers you want to
change.
8. Click
Managing student accounts 53
OK.
Page 60

Moving a student to another class
If any of your students move to a different class, you can move them
within the TI-Nspire™ Navigator™ classroom learning system as well.
Note: You cannot move students who are logged in to the TI-Nspire™
Navigator™ network.
Note: You can access many of the student account items by right-clicking
the student and choosing an action from the menu.
To move a student
1. Select a class to which the student belongs.
Note: If you have a class session running, you must end it to select
the class.
2. Click the student you want to move.
3. Click
4. From the Current Class drop-down list, select the class where you
5. Click
Edit > Cut or click Cut .
The TI-Nspire™ Navigator™ software removes the student from the
class and places his or her student account information on the
Clipboard.
want to move the student.
Edit > Paste or click Paste .
TI-Nspire™ Navigator™ software moves the student to the selected
class.
Copying a student to another class
When you have students in more than one of your classes, you may find
it convenient to simply copy them from one class to another. Copying
students saves you the time of entering all of their information again.
Note: You cannot copy students who are logged in to the TI-Nspire™
Navigator™ network.
Note: You can access many of the student account items by right-clicking
the student and choosing an action from the menu.
To copy a student
1. Select a class to which the student belongs.
Note: If you have a class session running, you must end it to select
the class.
54 Managing student accounts
Page 61

2. Click the student you want to copy.
3. Click Edit > Copy or click Copy .
The TI-Nspire™ Navigator™ classroom learning system copies the
student onto the Clipboard.
4. From the Current Class drop-down list, select the class to which you
want to copy the student.
5. Click
Edit > Paste or click Paste .
The TI-Nspire™ Navigator™ software copies the student to the
selected class.
Managing student accounts 55
Page 62

56 Managing student accounts
Page 63

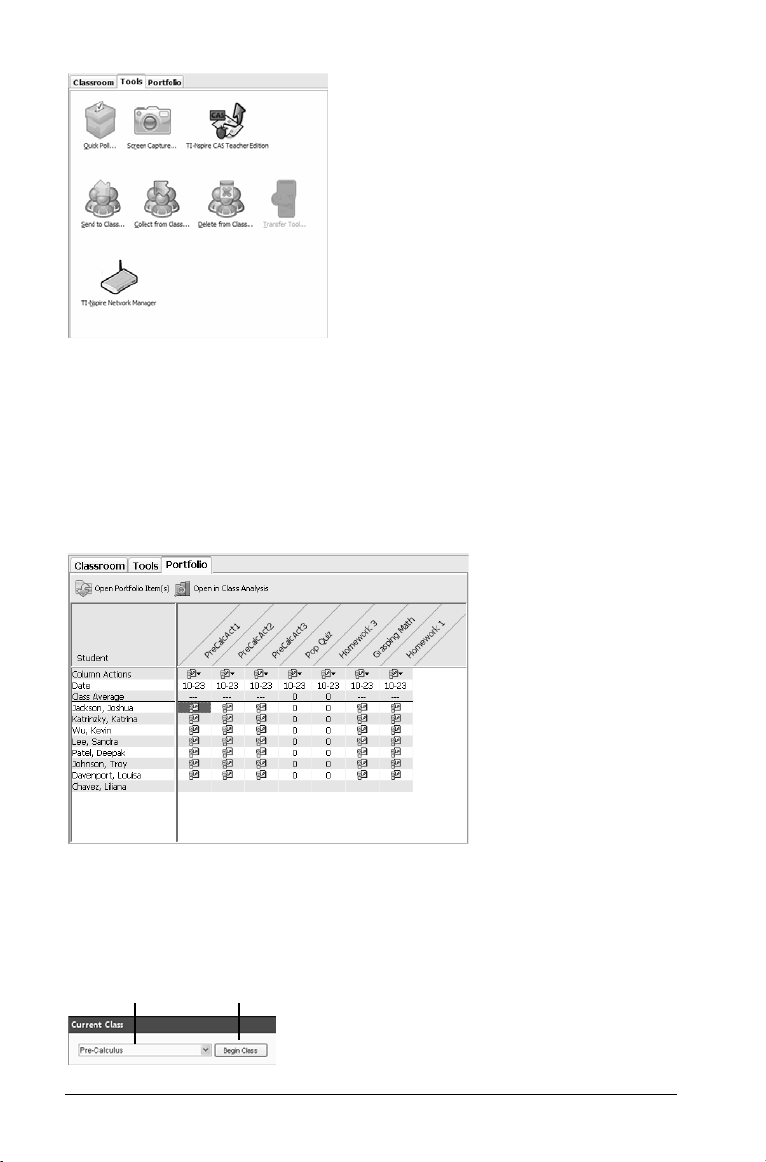
Using Portfolio
Portfolio gives you a way to save, store, review, and manage files your
students send you. Files that you save in Portfolio remain there until you
remove them.
The Portfolio tab displays a list of students in the selected class with the
scores they have received for each assignment included in Portfolio.
A B
C
D
E
F
G
A. Open Portfolio Item(s) button. Lets you open a selected .tns file in
the TI-Nspire™ software.
B. Open in Class Analysis button. Lets you open a selected item in Class
Analysis.
C. Column header. Shows the name of the file or folder that has been
collected or saved to Portfolio. The
Student header lets you sort by
student name. You can resize the column header. The TI-Nspire™
Navigator™ software remembers the size adjustment the next time you
start the software.
D. Column Actions. Lets you perform certain actions on a column.
Clicking a file icon on this row allows you to: Open in Class Analysis,
Select Column, Sort, Send Missing, Collect Missing, Redistribute Portfolio
Column, Remove Portfolio Column, or Rename Portfolio Column. Each of
these actions is explained in further detail in this chapter.
E. Date. Shows the date the file was created or saved.
Using Portfolio 57
Page 64

F. Class Average. Shows the average score of the class for the item in
that column.
G. File icon. Shows the type of file. The file types shown are Quick Poll
and *.tns files.
Viewing Portfolio
1. Select the class that contains the Portfolio you want to view.
Note: If you have a class session running, you must end it to select
the class.
2. In the menu, click View > Portfolio, or click the Portfolio tab.
The Portfolio displays.
Saving an item to Portfolio
You can save (add) collected *.tns files and quick poll results to Portfolio.
1. To save an item to Portfolio from the Class Record, highlight the
collected file you want added to Portfolio.
Note: You can select multiple items listed on a window and add
them to Portfolio in one add action.
To save an item to Portfolio from Quick Poll, stop any active poll.
2. Click
3. The Save to Portfolio dialog box opens. You can create a new
58 Using Portfolio
Edit > Save to Portfolio or choose Save to Portfolio from the
menu icon .
Portfolio column, or add the item to an existing Portfolio column.
Page 65

• Choose Add as new portfolio column to create a new column.
Type a name for the column and click
• Choose
Add to existing portfolio column to add the file to an
Save.
existing column. Click the drop-down arrow to select the desired
column, and then click
Save.
The item is added to Portfolio, and the status bar confirms the
addition.
Items saved in Portfolio are saved in chronological order from the
time of collection.
In the Class Record, the item is marked with a Portfolio icon .
Default names for files saved to Portfolio are as follows. You can edit
the names in the text box.
• Quick Polls are named Poll_mmddyyyy.
• Class records are named with the file name.
Note: If one or more items with the same name already exist in Portfolio,
you will see a warning that you are using a duplicate name for the file.
Importing an item to Portfolio
You can import a .tns file from your computer to a student’s Portfolio
entry.
Before you begin, make sure the column that you are importing the file
to is not open in Class Analysis.
1. Highlight the cell in the student’s row where you want to import the
file.
Note: You can import a file for only one student at a time.
2. Right-click the cell and choose
A Windows Explorer window opens.
3. Navigate to the file you want to import and click it.
Note: You can import only one file at a time.
4. Click
Import.
If a file already exists in that cell, the software displays a dialog box
asking you to confirm replacing the file.
• Click
Replace to save your imported file over the existing file.
• Click Keep Existing to keep the existing file and cancel the
import file function.
Import Item.
Using Portfolio 59
Page 66

Sorting information in Portfolio
1. Click the column header of the list you want to sort.
The TI-Nspire™ Navigator™ software sorts the selected list.
2. If you want to sort the selected information in the opposite order,
click the column header again.
Viewing assignment details
f Double-click the Class Average cell for the Portfolio item you would
like to view. The desired assignment opens in Class Analysis.
Note: A dashed line (---) indicates there is not a Class Analysis file to
open.
Deleting files from Portfolio
There may be times you want to delete files from Portfolio. For example,
a student turned in a Quick Poll file before it was completed, and the low
grade gives a false class average; or an incorrect file was sent to or
collected from a student.
1. Select the items you want to delete. You may select multiple files in a
column.
2. Do one of the following:
• Click Portfolio
• Right-click and select Remove Item(s)
• Press the Delete key on your computer.
3. The system displays a delete confirmation screen. Click Remove to
perform the deletion; click Don’t Remove to cancel the request.
Note: If a file is saved to the Portfolio and later deleted from the Class
Record, that delete action does not affect the file copy in the Portfolio.
The copy remains in Portfolio until it is deleted.
> Column Actions > Remove Item(s).
Opening a Portfolio item
You can open a Portfolio item in the TI-Nspire™ software, or you can
open an item or a selected column of items in Class Analysis.
To open an item in the TI-Nspire™ software
1. Select the .tns file you want to open.
Note: You can open more than one file in a column, but you can not
open multiple files from different columns.
60 Using Portfolio
Page 67

2. Do one of the following:
• Click Portfolio > Column Actions > Open Portfolio item(s).
• Click the Open Portfolio Item(s) button .
• Press the Enter key on your computer.
3. The TI-Nspire™ software opens the item.
If you selected a column, all files are opened, one by one.
To open an item in Class Analysis
You can open a .tns or Quick Poll file in Class Analysis.
Note: You can not open a file if you collected it using the
option.
To open a file or multiple files, do one of the following:
• Select a single file or multiple files in a column and click the
Open in Class Analysis button.
• Click a file icon on the
Class Analysis
• Double-click a cell in the
that column.
to open all items in that column.
Column Actions row and select Open in
Class Average row to open all items in
Custom Files
Redistributing a Portfolio item
This is a useful way to return graded assignments. It is also useful if you
clear the students’ handhelds (for example, before a test) and later want
to return assignments for additional work.
1. Select the item you want to redistribute (highlight the item.)
2. Click
3. The system sends the respective file to each student logged onto the
Portfolio > Column Actions > Redistribute Portfolio item, or
right-click the column and choose
TI-Nspire™ Navigator™ network.
Redistribute Portfolio Item.
Renaming a Portfolio item
You can rename a column header.
1. Select the column you want to rename by double-clicking the
column header.
2. Click
Using Portfolio 61
Portfolio > Column Actions > Rename Portfolio Column or
click the
Rename Portfolio Column button.
Page 68

3. The system displays the Rename Portfolio Item dialog. Type the new
name, then press
4. The column appears in Portfolio with the new name.
Rename to complete the rename operation.
Collecting missing files from students
There may be times when you store a set of student files to the Portfolio
and the collection is incomplete because not all students were present,
had the file ready for collection, or were not logged on.
1. Select an individual file, or click a file icon on the
row to select all files in that column.
Note: You can send only one column of files at a time.
2. Select Collect Missing.
3. Missing files are collected from those students who are logged onto
the network and whose files were not initially collected.
Note: You can also collect missing files from the Class Record.
Column Actions
Sending missing files to students
There may be times when you send a set of student files to the students
and the send is incomplete because not all students were present, or
logged on, or a new student was added to the class.
1. Select an individual file, or click a file icon on the
row to select all files in that column.
Note: You can send only one column of files at a time.
2. Select Send Missing.
3. Missing files are sent to those students who are logged onto the
network and who did not initially receive the files.
Note: You can also send missing files from the Class Record.
Column Actions
62 Using Portfolio
Page 69

Exchanging files with students
The TI-Nspire™ Navigator™ classroom learning system lets you exchange
information with the students in your classes. From the TI-Nspire™
Navigator™ system, you can send files to your students and collect files
from your students, as well as delete files from your students’ handhelds.
Your students can send files to you and receive files from you. This
section covers the different ways to work with files in the TI-Nspire™
Navigator™ system, and includes both instructions for you to use and
instructions for you to give your students.
Sending files
You can send handheld-compatible files (such as .tns files) to your
students’ handhelds from your computer or your handheld. Choosing the
location that you want to send files from depends on the location of your
files and the number of choices you want about where you send the files.
If you choose to send the files from your handheld, then you send files to
your whole class. When you send files from your computer, you can:
• Send files to your whole class, or
• Send files to members of the class currently logged in, or
• Send files to individual students.
To send files from your computer
1. If you have not already done so, begin the class session.
2. Click
Exchanging files with students 63
Tools > Send to class or click Send to class .
The Select file(s) to send dialog box opens.
Page 70

3. Click the Folders button to choose folders, or click the Files button
to choose files.
Note: You can send only files or folders, not a combination of files
and folders.
4. To choose the files or folders you want to send, do one of the
following:
• Navigate to the file or folder you want to send and click it. To
select multiple files or folders, press and hold the Ctrl key while
clicking each file name.
• Type the name of the file or folder in the File name or Folder
box. Folder names may use alphanumeric characters. You
name
can enter slashes ( / and \ ), but double slashes ( // and \\ ) and
some special characters (? | : * " " < > | ) are not allowed.
Note: You can also drag and drop files from a file browser window
onto the TI-Nspire™ Navigator™ window to send files.
5. Click Next.
The Select individual(s) dialog box opens.
64 Exchanging files with students
Page 71

6. Select the student(s) to whom you want to send the file:
• To send the file to the whole class, click
Class . To send the
file only to class members who are currently logged in, check the
Logged in only checkbox.
• To send the file to an individual student, click
Individuals
and then click the student.
Note: If you had any students selected in the Classroom tab, the
TI-Nspire™ Navigator™ software already has them selected.
7. Click Finish.
The file transfer appears in the Class Record.
Exchanging files with students 65
Page 72

Once students receive the file, they can open it on their handhelds.
To send files from your handheld
1. If you have not already done so, begin the class session.
2. On your handheld, log in to the TI-Nspire™ Navigator™ network.
3. From the TI-Nspire™ handheld, open the file you want to send to
the class.
Press
~ > 1:File > 6:Send.
The file sent from the teacher’s handheld appears in the Class
Record.
On the student’s handheld, the message Transfer Complete
displays.
The file transfer appears in the Class Record when you view the
TI-Nspire™ Navigator™ software on your computer.
After your students log in to the TI-Nspire™ Navigator™ network,
they can receive the file from their transfer screen. Once they receive
the file, they can open it on their handhelds.
Sending files (student instruction)
Your students may send files to you outside of a collection. Students can
send files to you unprompted at any time during a class session. Below
you can find instructions you can use to tell your students how to send
files during a collection and how to send files unprompted.
Student Point of View: The steps below are from the student’s
point of view.
66 Exchanging files with students
Page 73

To send files
1. If you have not already done so, log in to the TI-Nspire™ Navigator™
network.
2. Open the file on the handheld.
3. Press ~ > 1:File > 6:Send.
Collecting files
You can collect handheld-compatible files (such as .tns files) from your
students’ handhelds to your computer. You also have the option of
deleting the collected files from your students’ handhelds.
To collect files
1. If you have not already done so, begin the class session.
2. Click
3. If you want a file already listed in the dialog box, navigate to the file
Tools > Collect from Class or click Collect from Class .
The Select file(s) to collect dialog box opens.
you want to collect and click it.
-or-
Right click on the sent file in the Class Record, and select
Selected File(s)
-or-
If you want a custom file not in the dialog box:
.
Collect
Exchanging files with students 67
Page 74

a) Click Enter Filename.
The dialog box opens.
b) Enter the file name, such as homework.tns.
c) Click
Add.
4. Click Next.
The Select individual(s) dialog box opens.
5. Select the student(s) from whom you want to collect the file:
• To collect the file from the whole class, click
68 Exchanging files with students
Class .
Page 75

• To collect the file from an individual student, click Students
and then click the student.
Notes:
• To select a contiguous range of students in the list, press Shift +
click. To select multiple students, press Ctrl + click.
• If you had any students selected in the Classroom tab, the
TI-Nspire™ Navigator™ software already has them selected.
6. If you want to remove the file from the students’ handhelds after
you collect it, select Delete from device after collecting.
7. Click Finish.
The file transfer appears in the Class Record.
Note: You can correct the files or add notes and resend the files to
the students.
Managing Unprompted actions
When a student logged into a Class session sends you a file outside of a
collection, an Unprompted action is created.
These files, which are stored in a database, display in the Class Record
until they are removed. This section shows how to manipulate these files,
including:
•Viewing
• Saving to Portfolio
•Removing
•Exporting
Exchanging files with students 69
Page 76

Reviewing and opening Unprompted actions
Unprompted actions are named "Unprompted" followed by the month
and date. Each Class session contains all .tns files received from students
in one Unprompted folder.
The latest Unprompted action appears at the top of the Class Record for
the most recent files sent by a student during a Class session. During the
next Class session, more recent Unprompted actions appear in the Class
Record above the previous action.
To open the Unprompted action:
1. Double-click the action or right-click and choose
Properties
.
Record Item
The Unprompted dialog opens. By default, no items in the
Unprompted action are selected.
2. From the Unprompted dialog, you can view one or more items, save
the items to Portfolio, remove the items, export the items to another
file location, or do nothing.
Viewing items in an Unprompted action
1. From the Unprompted dialog, click on the checkbox to the left of the
item(s) you want to view.
Note: You can also click on the View icon beside an item to quickly
access the item.
2. Click View.
The items open as read-only files.
Adding items to a new Portfolio record
1. From the Class Record, double-click on the Unprompted action to
open it.
2. Select the items to add to the new Portfolio record.
3. Click
4. Type the name for the new portfolio column and click
Save to Portfolio.
The
Save to Portfolio dialog opens.
Note: If you receive an error while saving, there are probably
multiple documents assigned to a single user. You will be returned to
the Unprompted dialog. Review the files on display, de-select the
duplicate file that you do not want to keep, and continue with the
save.
Save.
70 Exchanging files with students
Page 77

The items are saved to the Portfolio and you return to the
Unprompted dialog.
Note: The files you have saved in Portfolio display in the Class Record
until you remove them using the Remove command.
Adding items to an existing portfolio record
Note: Using this option replaces existing files, so be sure this is what you
want to do.
1. From the Class Record, double-click on the Unprompted action to
open it.
2. Select the items to add to the new Portfolio record.
3. Click
Save to Portfolio.
The Save to Portfolio dialog opens.
Note: If you receive an error while saving, there are probably
multiple documents assigned to a single user. You will be returned to
the Unprompted dialog. Review the files on display, de-select the
duplicate file that you do not want to keep, and continue with the
save.
4. Click on
Add to existing portfolio column.
5. Select the column name you want from the drop-down list.
6. Click
Save.
Removing individual items from an Unprompted action
The Class Record displays items in Unprompted actions until you remove
the Unprompted action. Even if you have exported or saved items, its
Unprompted action continues to display until you remove it. To remove
items from an Unprompted action:
1. From the Class Record, double-click on the Unprompted action to
open it.
2. From the Unprompted dialog, click on the checkbox to the left of the
item(s) you want to remove.
3. Click Remove.
Removing an entire Unprompted action
You can remove an Unprompted action from the Class Record. This
removes all items contained within the Unprompted action, as well as
removing the Unprompted action from the Class record.
1. From the Class Record, click on the Unprompted action to highlight
it.
Exchanging files with students 71
Page 78

2. Click Remove from Class Record.
Exporting Unprompted action items
You can export items from the database to the file system. To export
items from an Unprompted action:
1. From the Class Record, double-click on the Unprompted action to
open it.
2. Select the files you want to export.
3. Click
4. Select the location for the export.
5. Click
Export.
A file browser opens.
Select Folder.
Deleting files from handhelds
When necessary, you can delete files from your students’ handhelds.
To delete files from handhelds
1. If you have not already done so, begin the class session.
2. Click
3. If you want to delete a file already listed in the dialog box, navigate
72 Exchanging files with students
Tools > Delete from class or click Delete from class .
The Select file(s) to delete dialog box opens.
to the file you want to delete and click it.
-or-
Page 79

If you want delete a custom file not in the dialog box:
a) Click Enter Filename.
The dialog box opens.
b) Enter the file name.
c) Click
Add.
4. Click Next.
The Select individual(s) dialog box opens.
5. Select the student(s) whose files you want to delete:
Exchanging files with students 73
Page 80

• To delete the file from the whole class’s handhelds, click Class
.
• To delete the file from an individual student’s handheld, click
Individuals and then click the student.
Note: If you had any students selected in the Classroom tab, the
TI-Nspire™ Navigator™ software already has them selected.
6. Click Finish.
The file deletion appears in the Class Record.
Checking the status of file transfers
When you are sending or collecting files, you may want to check to see
which of your students have received or sent their files.
To check the status of file transfers
1. Click the Classroom tab.
The Classroom tab opens.
74 Exchanging files with students
Page 81

Note: The contents of the Classroom tab vary depending on the
selected class and view.
2. In the Class Record, click the file whose status you want to check.
The TI-Nspire™ Navigator™ software indicates the status of your
students as follows:
• A green background indicates that students have
sent/received the file.
• A yellow background indicates that a student received
the collect or delete action, but they do not have the file on
their handheld.
• A red background indicates that students have not yet
sent/received/deleted the file.
Note: You can also see the file transfer status in the file’s Properties
dialog box.
Exchanging files with students 75
Page 82

Canceling file transfers
If you change your mind about a file transfer, you can cancel the transfer
in the Class Record. Canceling file transfers stops the TI-Nspire™
Navigator™ classroom learning system from transferring more files. Any
files TI-Nspire™ Navigator™ transfers before you cancel remain on the
students’ handhelds.
To cancel file transfers
1. In the Class Record, click the file whose transfer you want to cancel.
2. Click
3. Click
Edit > Remove From Class Record or click Remove From Class
Record
The TI-Nspire™ Navigator™ software asks if you’re sure you want to
remove the action.
The TI-Nspire™ Navigator™ software stops the file transfer and
removes the file from the Class Record list.
.
Remove.
Viewing file properties
Each file that you send or collect has a set of properties that you can
view. These properties include the file’s name, size, date sent, and status.
You can view the file properties at any time.
To view file properties in the TI-Nspire™ Navigator™
system
1. Select the class with the file in the Class Record.
Note: If you have a class session running, you must end it to select
the class.
2. Click the file.
3. Click
Edit > Record Item Properties or right-click the file in Class
Record and select
The Properties dialog box opens displaying the file’s properties.
Record Item Properties.
76 Exchanging files with students
Page 83

Exchanging files with students 77
Page 84

78 Exchanging files with students
Page 85

Polling students
The Quick Poll tool in the TI-Nspire™ Navigator™ system lets you “poll”
your students. A poll is a survey you send to your students that they
immediately receive on their calculators. After your students receive the
poll, they can then send their responses back to your computer. Once you
receive your students’ responses, you can use the Quick Poll tool to
review the responses by yourself or with your class. This section contains
information you need to know to use the Quick Poll tool in your class.
The Quick Poll tool window and tabs
The Quick Poll tool window contains several sets of controls and three
tabs that you can use to run and view polls in the TI-Nspire™ Navigator™
system. Below you can find the:
• Quick Poll tool window
• Poll Prompt tab
• Poll Summary tab
• Poll Details tab
The Quick Poll tool window
Ê
Ë
Ì
Polling students 79
Í
Î
Ï
Page 86

Ê Poll controls. Controls that let you start, pause, and stop polls, as well
as send poll results to your students, update the poll results, and save
them in Portfolio.
Poll set up bar. A set of options that let you create the questions and
Ë
polls you send to your students.
Ì
Poll data tabs. Tabs that let you view poll results in either a list or a
graph.
Data controls. Controls that let you show/hide display names in Poll
Í
Listing and view previous poll results.
Poll responses. Displays number of responses and number of students
Î
logged in.
Ï
Status bar. Displays number of responses and number of students
logged in.
Poll Prompt tab
Ê
Ê Active Poll. Displays question and possible answers for currently active
poll.
80 Polling students
Page 87

Poll Summary tab
Ê
Ê Graph. The graphical representation of the poll responses you receive
from your students.
Poll Details tab
Ê
Ê Display Name column. Column containing the display names for the
students who respond to the poll. By default, the Quick Poll tool hides
the display names.
Response column. Column containing a list of the poll responses
Ë
received from your students.
Polling students 81
Ë
Ì
Page 88

Ì Time Stamp column. Column containing the dates and times that your
students sent their poll responses.
Opening the Quick Poll tool
You can open the Quick Poll tool from the home screen of the TI-Nspire™
Navigator™ system.
To open the Quick Poll tool
1. If you have not already done so, begin the class session.
2. Click
Tools > Quick Poll or click Quick Poll.
The Quick Poll tool window opens.
Polling your students
The Quick Poll tool lets you poll your class from the TI-Nspire™
Navigator™ system. There are a variety of polling question types you can
send, including:
• Open Response
• Agree/Disagree
– Agree/Disagree (5)
– Agree/Disagree (3)
– Agree/Disagree (2)
82 Polling students
Page 89

•Yes/No
• True/False
• Right/Wrong
• Always/Sometimes/Never
• Multiple Choice
• Multiple choice: A-E, A-D, A-C, or A-B
You can poll your students from your computer. When you poll your
students from your computer, you can create the question to send to
your students.
To poll students from your computer
1. Select or clear the Resubmit check box.
2. Select a question type from the drop-down list.
3. Enter your question at the poll prompt.
4. Click
5. Instruct your students to respond to the poll.
Poll > Start Poll or click Start Poll.
Your students receive the poll on their calculators.
Stopping polls
You can stop polls at any time. Once you stop a poll, you cannot restart it.
If you plan to continue the poll, you should pause the poll instead of
stopping it. Your students do not need to do anything on their
calculators to stop the poll.
To stop polls sent from your computer
f Click
Poll > Stop Poll or click Stop Poll.
Pausing polls
If you want to temporarily keep students from responding to a poll, you
can pause the poll. While you have the poll paused, your students cannot
perform any polling actions on their calculators.
To p au s e p o l ls
f Click
Poll > Pause Poll or click Pause Poll.
Polling students 83
Page 90

Resuming paused polls
After you pause a poll, you can resume the poll again at any time.
To resume paused polls
f Click
Poll > Resume Poll or click Resume Poll.
Responding to polls (student instruction)
The poll you send to your students interrupts whatever your students are
doing. When they receive the poll, they can choose to respond to it or
they can exit the poll and resume what they were doing before. You can
use this section to instruct your students on how to respond to the polls
you send them, including both multiple choice and open response polls.
Note: Multiple choice refers to Agree/Disagree, Yes/No, True/False,
Right/Wrong, and Always/Sometimes/Never questions as well as standard
multiple choice questions.
Student Point of View: The following instructions are from the
student’s point of view.
To respond to multiple choice polls
1. If the poll says “Mark your answer,” wait for your teacher to ask you
the poll question.
2. Use your calculator’s up and down arrow keys or the tab key to
navigate to your response.
3. Press the tab key to select Send and then press x or · to send
your answer to the teacher.
Your calculator sends your poll response to your teacher and returns
you to the last screen you used. Your poll response appears on your
teacher’s computer in the Quick Poll tool window.
Note: The contents of the Quick Poll tool window vary depending on
the tab your teacher has selected and the poll responses your teacher
has received from your classmates.
To respond to open choice polls
1. If the poll says “Mark your answer,” wait for your teacher to ask you
the poll question.
2. Press the tab key to move the cursor to the answer box, and type
your response.
84 Polling students
Page 91

3. Press the tab key to select Send and then press the enter key or the
click button
Your calculator sends your poll response to your teacher and returns
you to the last screen you used. Your poll response appears on your
teacher’s computer in the Quick Poll tool window.
Note: The contents of the Quick Poll tool window vary depending on
the tab your teacher has selected and the poll responses your teacher
has received from your classmates.
x to send your answer to the teacher.
Sending poll results to students
After you receive the results of your poll from your students, you may
want to discuss the results with your class. You can send the poll results to
your class to help with your discussion.
Note: You cannot send open response poll results.
To send poll results to students
1. If a poll is in process, stop the poll.
2. Click
Poll > Send Results or click Send Results.
Saving polls
1. If a poll is in progress, stop the poll.
2. Click Poll > Save to Portfolio or click Save to Portfolio.
Note: After the first save, subsequent changes to the poll can be
updated in Portfolio by clicking Poll > Update Portfolio. All of the quick
polls you conduct and update in Portfolio in a class session will update
the score as one assessment.
Viewing poll results
After your students send their poll responses to you, you can view their
results as a histogram or in a table. In the Quick Poll tool window, you
can view poll results graphically in a bar chart or listed in a table.
Polling students 85
Page 92

To view poll results graphically
Click View > Poll Summary or click the Poll Summary tab.
The Poll Summary tab opens displaying the poll results as a histogram.
To view poll results in a table
Click
View > Poll Details or click the Poll Details tab.
The Poll Details tab opens displaying the poll results listed in a
table.
86 Polling students
Page 93

Sorting poll data
The poll data that the Quick Poll tool collects includes the students’
display names, poll responses, and time of submission. You can sort the
poll data by each of these categories.
To sort poll data
1. Click View > Poll Details or click the Poll Details tab.
The Poll Details tab opens.
2. Click the column title of the information you want to sort.
The Quick Poll tool sorts the information in the selected column.
Note: The example below shows the poll details sorted by Time
Stamp.
3. If you want to sort the information in the opposite order, click the
column title again.
Showing and hiding display names
The Poll Details tab gives you the option of showing or hiding the display
names of the students who respond to the poll.
Notes: By default, the Quick Poll tool hides the display names.
To show or hide display names
f Select or clear the
If you selected the Show Student Names check box, the
students’ names appear in the Display Name column.
If you cleared the Show Student Names check box, the word
Polling students 87
Show Student Names check box.
Page 94

“Hidden” replaces the students’ names in the Display Name
column.
Viewing previous polls
The Quick Poll tool stores all of the polls for the current class session in its
history. You can open and view these polls as necessary until you end the
class session.
To view previous polls
1. If a poll is in process, stop the poll.
2. Click
3. Click the poll you want to view.
History.
A drop-down list of previous polls opens.
The selected poll opens in the Quick Poll tool’s window.
Closing the Quick Poll tool
You can close the Quick Poll tool from your computer.
To close the Quick Poll tool on your computer
f Click
Poll > Close.
88 Polling students
Page 95

Capturing handheld screens
The Screen Capture tool in the TI-Nspire™ Navigator™ classroom
learning system enables you to do the following:
• monitor and view your students’ handheld screens. This enables you
to ensure all students are on track with an assignment.
• capture one or several students’ screens for discussion in the
classroom. You can hide student names to focus the discussion on
teaching aims and not on individuals.
• select and display an individual student’s screen and view work as a
live presentation.
This section contains the information you need to know to use the Screen
Capture tool in your classroom.
Views in the Screen Capture tool
There are three ways to view captured screens in the Screen Capture tool:
• Tiled - This view shows all captured screens as thumbnails on the
computer display. This is the traditional view for screen captures
within TI-Nspire™ Navigator™ software.
• Gallery - This view shows tiles of all captured screens down the left
side of the display. When you select one screen, it is enlarged and
Capturing handheld screens 89
Page 96

displayed on the right side of the display so you can view it in
greater detail.
• Live Presenter - This feature enables the student or teacher to project
what they are doing on their handheld.
More details about Gallery and Live Presenter views are provided later in
this chapter.
Capturing handheld screens
In the TI-Nspire™ Navigator™ classroom learning system, you can use the
Screen Capture tool to capture and view your students’ handheld
screens. You can capture the handheld screen of one student, of selected
students, or of all the students in your class.
Notes: In order for you to capture your students’ handheld screens, they
must be logged onto the TI-Nspire™ Navigator™ software.
To capture handheld screens
1. If you have not already done so, begin the class session and ask your
students to log in.
2. Click
90 Capturing handheld screens
Tools > Screen Capture or click Screen Capture from the
Tools tab.
The Select Students dialog box opens.
Page 97

Note: If you selected one or more students in the Classroom tab
before you started the Screen Capture tool, TI-Nspire™ Navigator™
software has these students pre-selected in the Select Students
dialog box.
3. Select the students whose handheld screens you want to capture:
• To capture all of your students’ handheld screens, click
Class
.
• To capture the handheld screens of individual students, click
Individuals and then click the name of each student from
whom you want to capture a screen.
Note: To collect screens from only those students currently logged
in, click the Logged in only check box under the left pane. If you
refresh your screen, any students who log in after the initial
collection will be listed at the end of the screen capture window.
4. Click
OK.
Capturing handheld screens 91
Page 98

The TI-Nspire™ Navigator™ software captures the selected students’
screens and displays them in the Screen Capture tool window.
Note: The example below shows the screens from three selected
students’ handhelds.
5. Decide if you want to display or hide the students’ names. The
default is to hide student names, but you can change this. To do this,
click View > Show Student Names or click the checkbox on the
toolbar.
Note: Each time you initiate a screen capture, the default will reset
to hide student names. You need to change this option each time if
you want to display names.
You can log in and capture your own handheld screen along with the
students. You can also select to make your screen stand out on the
display by going to the Teacher Preferences screen from the main
TI-Nspire™ Navigator™ window, and selecting "Individualize Teacher
Device in Screen Capture."
92 Capturing handheld screens
Page 99

Viewing captured screens
Once you have captured screens, you can rearrange their order and zoom
the view.
To rearrange captured screens
1. Click to select the desired screen.
2. Holding the left mouse button down, drag the screen to the desired
location and release.
To zoom the view of captured screens
f Click to see a larger view of the screens, or to make
the view smaller.
These commands are also available from the View menu or by using
keyboard shortcuts, Ctrl + # (zoom in) and Ctrl + $ (zoom out).
To resize captured screens
Select the View menu and select a magnification level. The default zoom
level is 50% of the screen size.
In Tiled view, you can enlarge or shrink the entire view of all captured
screens by a specified percentage. These are shown in a grid formation,
and if the size of the tiles increases, then the screens wrap on the display
so that all are completely displayed. To see all enlarged captured screens,
scroll down the page.
Saving captured screens
You can save the individual screens you capture from your students onto
your computer.
To save one screen
1. Click the screen you want to save.
2. Click
Capturing handheld screens 93
File > Save Selected Screen(s).
The Save dialog box opens.
Page 100

3. Navigate to the location where you want to save the captured
screen.
4. Enter a file name.
5. Click Save.
The TI-Nspire™ Navigator™ software saves the image as a Portable
Network Graphics file (.png).
To save multiple screens
1. Select the screens you want to save.
To select more than one screen, Press Ctrl and click on each screen
you want to save.
2. Click File > Save Selected Screen(s).
3. Select the location to save the screens.
4. Click Save.
Note: The keyboard shortcut, Ctrl + S, can be used as a shortcut for
saving screen captures.
Refreshing captured screens
After you capture screens from your students, you can refresh them in
the Screen Capture tool’s window. When you refresh screens, the Screen
Capture tool captures the latest screens from your students’ handhelds.
To refresh captured screens
f Click .
94 Capturing handheld screens
 Loading...