

Page 1
-
, .
~
uo--
-
~
M"O_~
.
TEXAS
INSTRUMENIS
Page 2
Copyright 1980 by Texas Instruments Incorporated
All
Rights Reserved - Printed
The
information
and/or
drawings set forth
in
this document and all rights
disclosed herein and patents which might be granted thereon disclosing
In
USA
in
and to inventions
or
employing the
materials, methods, techniques or apparatus described herein are the exclusive property
Texas Instruments Incorporated.
No
copies
of
the information or drawinas shall be made without the prior consent
of
Texas
Instruments Incorporated.
of
Models
Original
Revision
Revision
Letter
A
B
C
763/765
Operating
Issue: 1 December
C:
18
January
Date
4-1-79 449181
4-1-79
12·1-79 447289
12-1-79 445768
1-11-80 460080
Number
436779
Instructions,
1978
1980
ECN
Level
TI
Part No. 2203664-9701
CHANGE NOTICES
Change references
D
D
D
D
0
Update
Remove
Include
Update
to
data
Character
Appendix
latest
from
Description
to
alcohol
engineering
text;
correct
Mapping
B drawings
data;
and
correct
errors
DEV
errors
Option
,
Page 3

Using This Manual
About The Exercises
All operators should read the
Guidelines
manual.
Section I
•
tures
nals and how to load paper, apply power, and
prepare the
• Section
• Section III presents sample operating techniques.
Section IV describes procedures for communicat-
•
ing with other
Section V provides maintenance suggestions.
•
Section
•
you, the operator, learn to use the Models
765 memory data terminals.
The Appendixes contain quick-reference informa-
•
tion, keyboard drawings, code
acter sets, and equipment specifications. The
inside back cover defines a few terms used in this
manual that
to help understand the information in this
of
this manual describes the many fea-
of
the Models 763 and 765 memory termi-
terminal for operation.
II
provides detailed operating instructions.
data
processing equipment.
VI
provides exercises designed to help
may
be unfamiliar to you.
General
tables, printer char-
Operating
7631
The exercises in Section VI
operator, become
tures as
that you study this
you understand the keyboard, indicators, and other features and what they do before you
When you start performing the exercises (which are
designed to be a short operator training course), begin
with Exercise
the sequence presented. The exercises are arranged in
logical learning progression, so for best results please
don't skip around.
quickly as possible. We strongly recommend
familiar with the terminal and its fea-
manual from the beginning to help
1 and proceed through the remainder
are
provided to help you, the
tackle the exercises.
in
Other Manuals
The Models 7631765 Systems Manual (TI Manual No.
2203665-9701)
tailed installation instructions, terminal status adjustments, interface timing descriptions, recommended
operating options, communications features, prompting
operation hints, and
Manual
tems
A pocket-size
No.
to aid Models 763 and 765 operators and
personnel
is intended for advanced operators and sys-
level terminal users.
2203666-9701) is also shipped with each terminal
supplied with your terminal contains de-
typical applications. The Systems
Quick Reference Card (TI Publication
systems-level
to find basic information at a glance.
NOTE
The information
to both U.S. models and international
models unless
otherwise.
in
this manual applies
specifically stated
The
Models 763 and 765 Maintenance Manual (TI
Manual
Texas Instruments supplier. The Maintenance Manual
contains installation and operation instructions, theory
of operation, troubleshooting information, parts lists,
assembly
No. 2200064-9701) may be ordered from
drawings, and electrical schematics.
your
iii
Page 4
TABLE OF CONTENTS
Section Page
Notes
Manu~1
...........................
Using This
About the Exercises
Other Manuals
Introduction
Data Terminal Communications
General Operating Guidelines and
.....................
..
. . . . . . . . . . . . . . .
........................
..........................
.......
..
iii
iii
iii
vi
vi
viii
BECOMING FAMILIAR WITH
THE TERMINAL
Setting Up the Terminal . . . . . . . . . . . .
Switching the Terminal On and Off
Loading Paper
Replacing the Model 765 Outer Cover
Keyboard Controls and Indicators
Function Keys
NUM Mode (Numeric Mode) Switch
and Numeric Keypad
Special Purpose Keys
CMD (Command) Key
Upper Case Lock Key
SKIP Key
PAPER ADVance Key
Line Feed Key . . . .
Carriage Return Key
Programmable Key
Shift Key
Repeating Keys
Double Space Printing . . . . . . . . . . . . .
Indicators . . . . . . . . . . . . . . . . . . . . . . . .
The Commands
ASR Operation
Interactive Operation
Model763
Model765
KSR Operation
The Terminal Memory System
Files
Records
Creating Files
...............................
FileName
File Format a
Line Format
Continuous Format
FileSize
Record
..............
.....
. . . . . . . . . . . . . . . . .
.......................
...............
................
................
................
...........................
................
..
. . . . . .
.................
..................
...........................
......
. . . . . . . . . . . . .
.......................
........................
...................
..........................
..........................
........................
............................
.......................
a
.....................
..........................
Size . . . . . . . . . . . . . . . . . . . .
..
...........
........
. . . . . .
..
.......
....
........
. .
.. . ...
. . . . .
..
..
..
4
4
..
..
..
..
..
II DETAILED TERMINAL
OPERATIONS
Terminal Commands
........................
...................
1
1
2
2
3
4
5
5
5
5
5
5
5
5
5
6
6
6
6
7
7
7
7
7
a
8
a
a
a
a
a
a
9
9
Section
Accessing the Command Mode
Entering a Command . . . . . . . . . . . . . .
Definition of Commands
File Utility Commands
CREATE
DELETE
ERASE
LOCK
FREE
COpy
CATALOG
Communications Parameter Display
and Modification Commands
CHANGE
STATUS
ONLINE
OFFLINE
File Editing Command
EDIT
Terminal Diagnostic Command
TEST
Automatic Command Execution
RUN
Terminal Configuration
ASR Functions
F1
- Playback On
F2 - Record On
F3 - Playback Off
F4 - Record
F5 - Rewind Playback
F6-
Rewind Record
F7 - Playback Forward
Fa - Playback Reverse
F9 - Printer On
FO
- Printer Off
Special Keys
CHAR Key
FIELD Key
Pointer
EDIT Mode
Edit Functions
F1-lndex
F2-Find
F3-Top
F4 - Print
F5 - Delete Line(s) . . . . . . . . . . .
F6-
F7 - Insert
Fa-Stop
........................
........................
.........................
...........................
...........................
..........................
......................
.......................
........................
.........................
........................
...........................
...........................
............................
.......................
Off
.......................
......................
......................
Control
..........................
......................
.......................
.......................
.......................
Delete Character(s)
......................
.......................
...............
...............
................
..................
...............
..................
...................
..............
...............
.............
.............
....................
....................
.....................
.....................
........
..............
.......
.........
.....
......
. .
..
...
Page
9
..
9
9
10
10
11
11
11
11
11
12
12
12
12
13
13
13
13
13
13
14
14
14
16
16
16
16
16
16
16
16
16
16
16
17
17
17
17
1a
19
19
19
20
20
20
20
21
22
iv
Page 5
TABLE
OF
CONTENTS (Continued)
Section
Editing a Record . . . . . . . . . . . . . . . . .
Terminating an Editing Session
III TYPICAL OPERATING
TECHNIQUES
Creating a
General Rules
Storing Data from the Keyboard . . . . . .
Record Function . . . . . . . . . . . . . . . . .
Insert Function
Copy Command
Optional Copy Command
Printing a
Copy from
Print Function of the Edit Mode
Playback Function
Copying
Erasing a
Unlocking a Locked File
Deleting a File
Answer-Back Memory
IV TERMINAL COMMUNICATIONS
Using the Terminal Communications
Model
Files
Using the
Using the ASR Function Keys . . . . . .
Creating the ABM Message
Securing the ABM
Features
Terminal
Changing Terminal Parameters . . . .
765 Operation with
Coupler
Terminal Setup
.......................
File
.......................
.......
.....................
....................
File
........................
File to Printer
ofthe
........................
COPY Command
File
........................
..
. . . . . . . . . . . . . . . . . . .
.................
..................
........................
Status
......
.........................
.....................
. . . . . . . . . . . .
..............
.............
ASR Mode
...............
. . . .
an
Acoustic
.......
.......
..........
..........
......
.. ..
.. . ...
..
..
..
..
..
..
..
..
Page
22
23
24
24
24
25
25
25
25
25
26
26
26
26
27
27
27
28
28
28
29
29
29
30
30
30
30
31
31
Section
Operation . . . . . . . . . . . . . . . . . . . . . . .
Model 763/765 Operation with a Data
Terminal Setup
Model 763 Operation with the Internal
Terminal Setup
Model 763 Operation
Control Characters
V CLEANING
THE TERMINAL
Cleaning the Printhead
Cleaning the Case
Adjusting the Print Contrast
Adjusting the Transmit
VI
OPERATOR EXERCISES
1.
2.
3.
4.
5.
6.
7.
8.
9.
10.
11. Locking, Freeing, Erasing, and
Set
.............................
.....................
Modem (U.S. Models Only)
.....................
in
a dc Current
Loop
............................
..
. . . . . . . . . . . . . . .
AND
ADJUSTING
........
.....................
................
....................
............
Level (U.S.
Models Only)
..
. . . . .
..
. . . . . . . . .
.............
Using the Memory Catalog
Creating a File . . . . . . . . . . . . . . . .
Changing a Record File
Changing the Playback File . . . . .
Recording Data into a File
Playing Back a File
Editing a File
Copying from File to File
Comparing Continuous and
Line File Formats
An Alternate Method of Storing
Data
in
a File
Deleting Files
...............
....................
..............
..................
.................
........
...........
.........
..........
Page
..
32
33
33
34
34
34
..
35
36
36
36
36
..
36
37
38
..
39
40
..
40
41
42
42
45
46
46
47
A Quick Reference Guide
Short Form for Commands and
Parameters
Command Syntax
Change Commands
Special Run Command Functions
Special Functions
Edit Function Keys
EDC Sequences for Prompting
. ASR Function Keys
Error Codes
ESC Functions
Control Characters
B Keyboard Layout and
.........
......................
...
......
.................
...............
.................
..........
................
. . . . . . . . . . . . . .
................
Symbolization
. . . .
. . . . . . . . .
. . . .
......
LIST OF APPENDIXES
..
A-1
..
A-1
A-1
A-2
...
A-2
A-2
..
A-3
A-3
..
A-4
A-5
A-6
A-7
C Code System and Character Set
o
E Printer Character Set
F Character
G Data Entry Validation
v
..
Definitions . . . . . . . . . .
All Keyboards - Function and
Control Keys . . . . . . . . . . . . . . . . .
United States Keyboard
United Kingdom Keyboard
France Keyboard . . . . . . . . . . . . . . .
Germany Keyboard . . . . . . . . . . . . .
Sweden/Finland Keyboard
DenmarklNorway Keyboard
Specifications.
Definitions
. . . . . . . .
Mapping
..........
(inside back cover)
............
..........
.........
..
. . . . . . .
..............
For 763/765
Option
(inside back cover)
........
....
......
..
..
..
..
...
B-1
B-2
B-3
B-4
B-5
B-6
B-7
C-1
0-1
E-1
F-1
G-1
Page 6
INTRODUCTION
The Texas Instruments Silent 700* Model 763 memory
send/receive data terminal and the Model 765 portable
memory data terminal are designed for easy, versatile
storage and communication of data. The memory
in
both models is implemented using a revolutionary new
electromagnetic
by Texas Instruments. The Model
bubble
memory device manufactured
763 is a compact,
table-top data terminal designed for office use. The
Model
765 is a portable unit furnished with
an
attachecase-like cover to make it useful wherever a standard
telephone and an electrical outlet are available. Both
models are capable of sending
and
receiving
information over long or short distances with equal
ease.
A memory data terminal, usually referred to as an auto-
matic send/receive
(ASR) data terminal,
is
equipped to
store data in its memory (magnetic bubble, magnetic
Data Terminal Communications
A data terminal generates codes. The Models 763/765
memory data terminals use the American Standard
Code for Information Interchange (ASCII), commonly
called
"as-key",
codes can
and/or
transmitted to, and understood by, other devices. The Models
record, and print
devices such as data terminals, computers, video terminals, and data loggers.
The code system consists of various combinations of
ones and zeros corresponding to numbers, alphabet
characters, control characters, or symbols. Combina-
orthe
equivalentC.C.I.T.T. codes. The
be
recorded in the 763/765 bubble memory
763/765 terminals also understand,
ASCII or C.C.I.T.T. codes from other
tape, paper tape, diskettes, etc.) from its built-in keyboard or from a communications line (usually a telephone line). The stored data is then available for editing
(corrections, changes, deletions, additions to the recorded text), printing, and for transmission to other devices at much higher speeds than manual keyboard
typing.
For storage of data, the Models
Texas
Ins~ruments
bubble memory, which has no mov-
763/765
use the new
ing parts and retains its stored information even with
power switched
off
(called nonvolatile memory). The
bubble memory offers important advantages over commonly used paper tape, tape cassette, and diskette
memories used in other data terminals: Faster access to
its stored data, smaller size, less weight, and lower
power consumption are only a few advantages
bubble memory in the Models
763/765 data terminals.
of
the
tionsof ones and zeros are transmitted and received at
very high speeds as digital signals. The digital signals
are on and
a zero is
"U"
a light switch on and off) or
off
signals; usually a one is an on Signal, and
an
off Signal. For example, the alphabet letter
is a series of on
off
on
off
on
1 0 1 0 1 0
off
on (imagine flipping
1.
How are the digital signals transmitted from one device
to another?
If the distance is about 15 meters (50 feet)
or
less, cables are used to interconnect the devices and
the devices are referred to as hard wired together
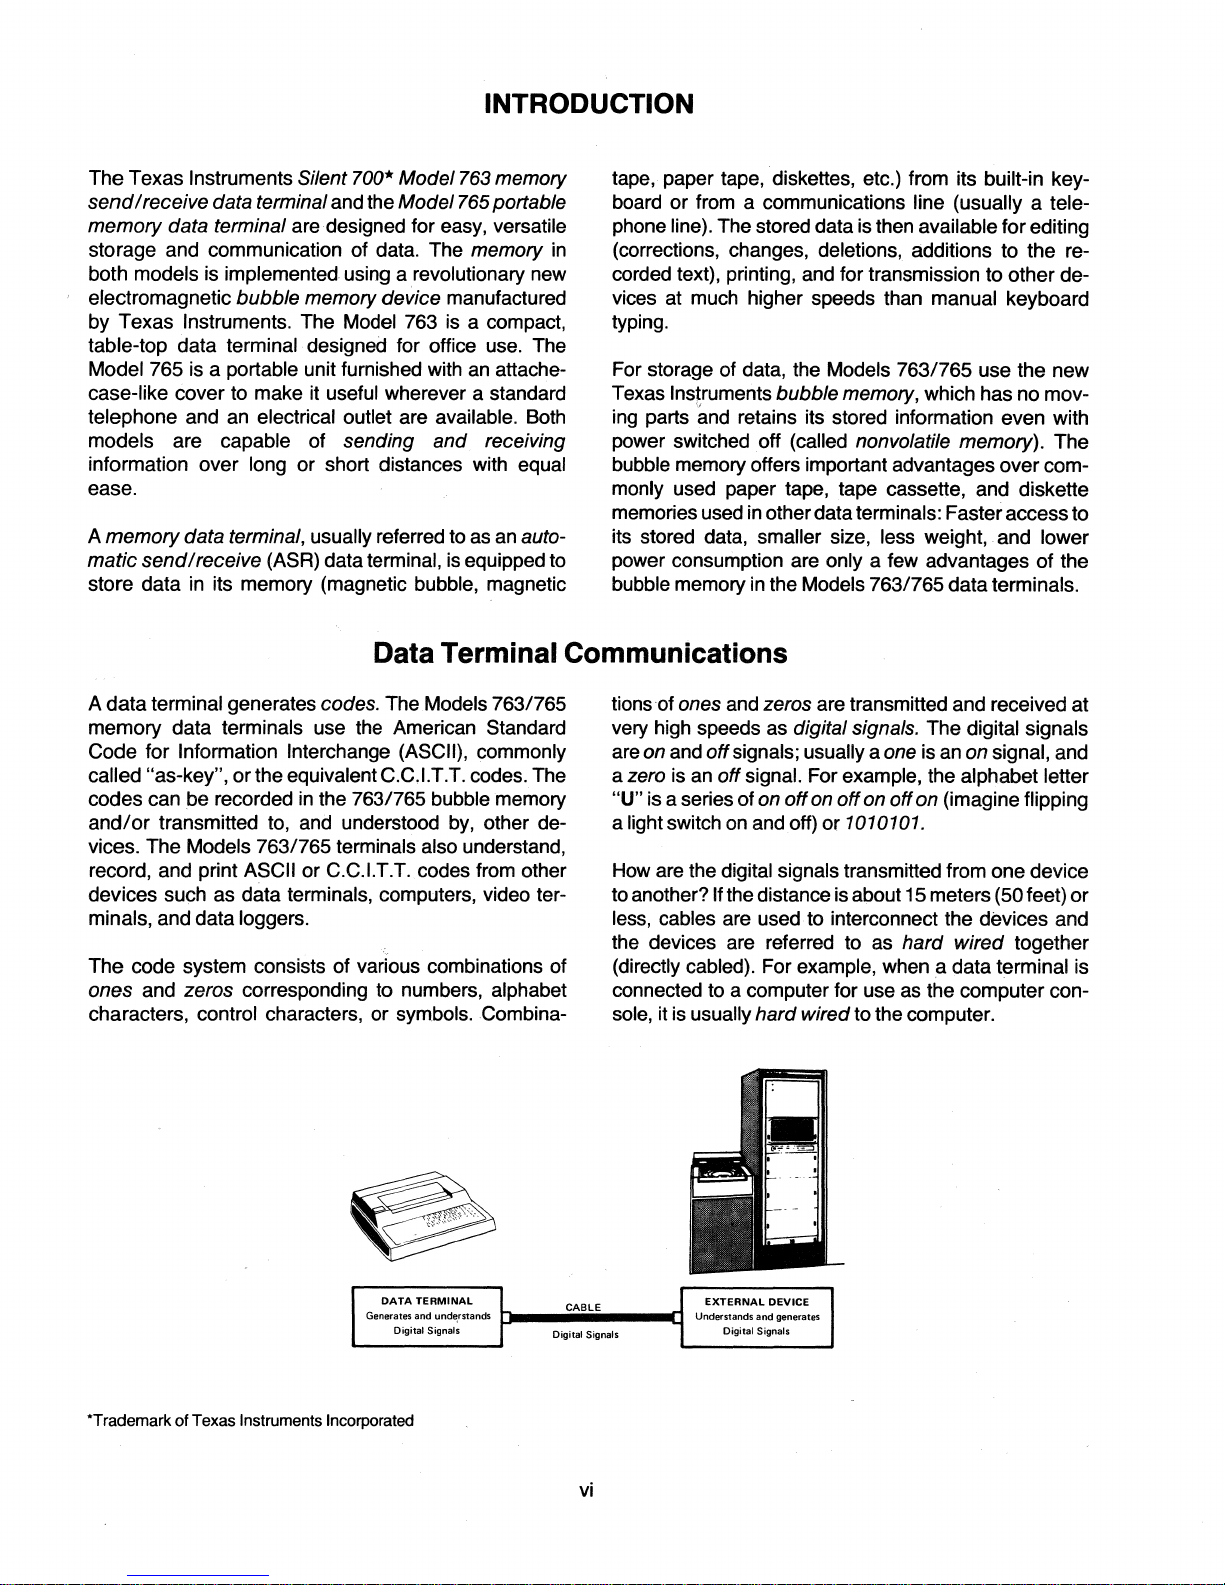
(directly cabled). For example, when
connected to a computer for use
a data terminal is
as
the computer con-
sole, it is usually hard wired to the computer.
DATA TERMINAL
Generates
Digital Signals
<Trademark
of Texas Instruments Incorporated
and
und~rstands
CABLE
Digital Signals
vi
EXTERNAL DEVICE
Understands
and
generates
Digital Signals
Page 7
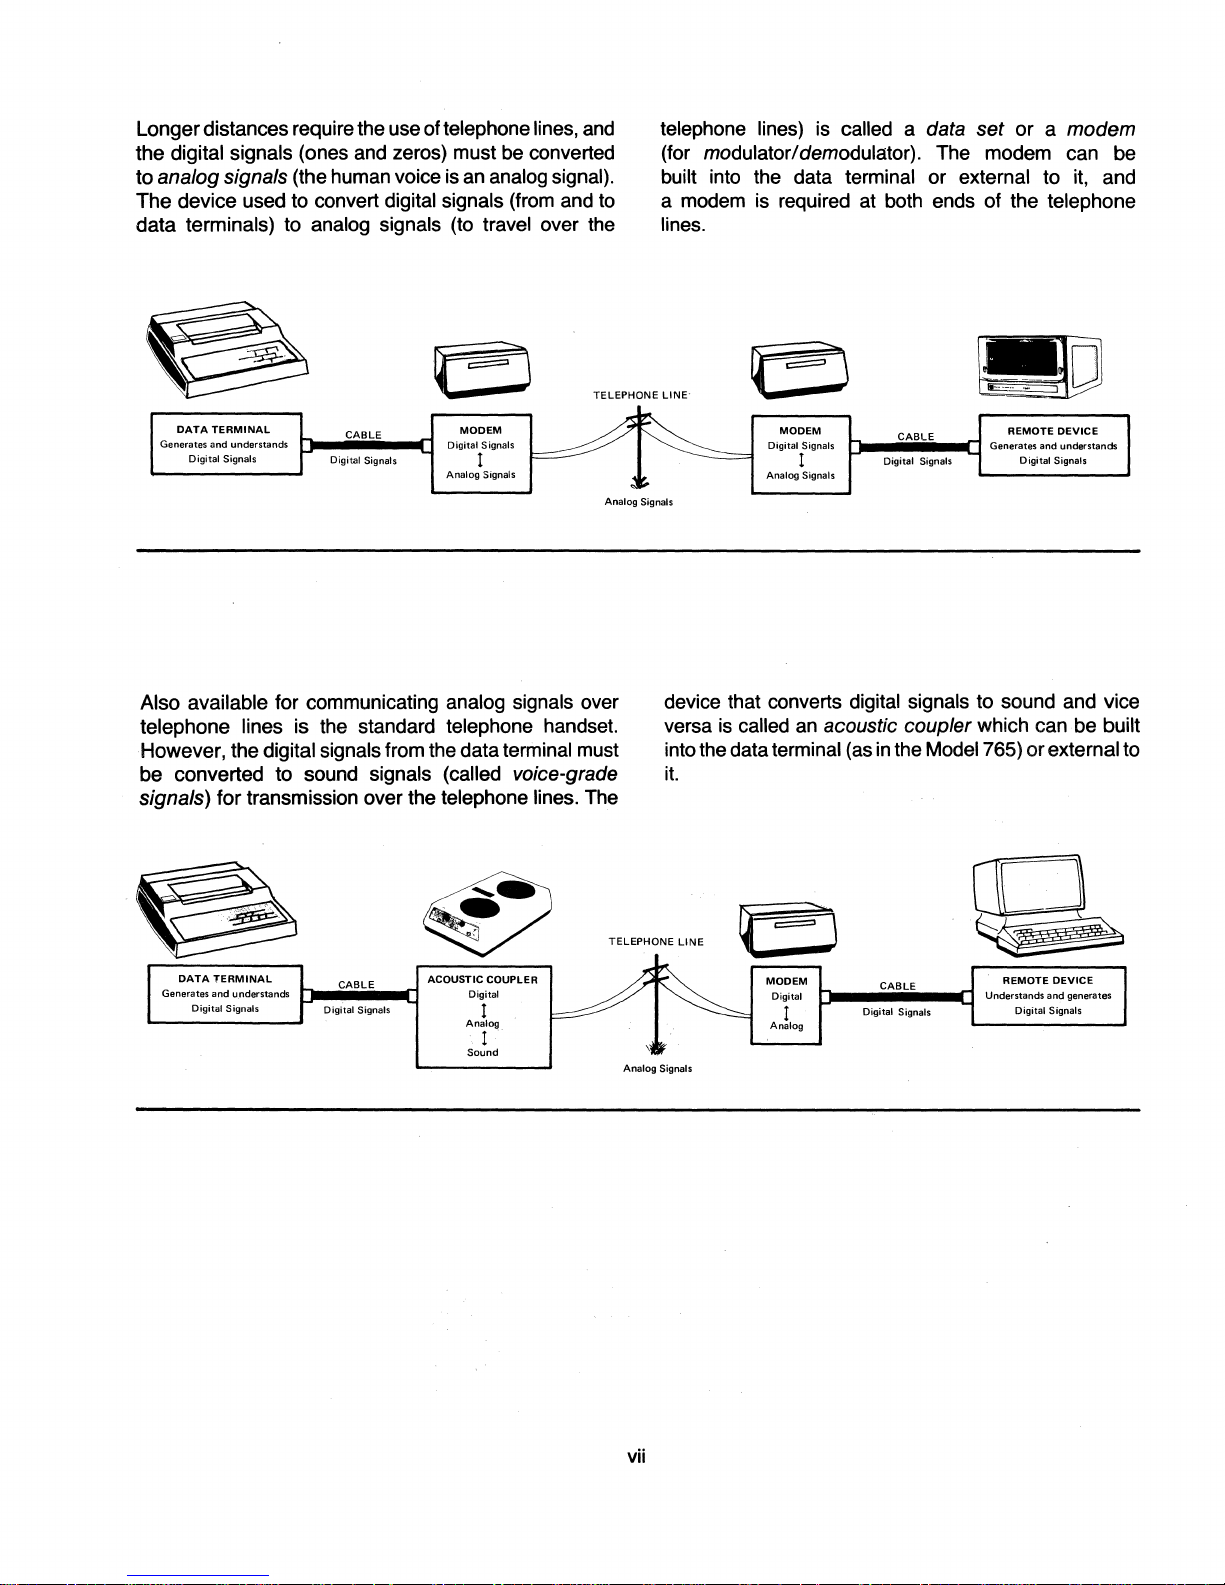
Longer distances require the use
the digital signals (ones and zeros) must
to
analog signals (the human voice
of
telephone lines,
be
is
an
analog signal).
and
converted
The device used to convert digital signals (from and to
data
terminals) to analog signals (to travel over the
telephone lines) is called a data
set
or a modem
(for modulator/demodulator). The modem can be
built into the data terminal or external to
a modem is required
at
both ends of the telephone
it,
and
lines.
TELEPHONE
DATA
Generates
Digital
TERMINAL
and
understands
Signals
CABLE
Digital
Signals
MODEM
Digital
Signals
-
Analog
~~
I I
Signals
Analog
Also available for communicating analog signals over
telephone lines is the standard telephone handset.
However, the
be converted to sound
signals)
digital signals from the data terminal must
signals (called VOice-grade
for transmission over the telephone lines. The
LINE·
~
r,
Signals
device that converts
versa
into the data terminal
it.
TELEPHONE
LINE
is
Digital
Analog
called
MODEM
Signals
Signals
CABLE
Digital Signals
REMOTE
Generates and understands
Digital Signals
digital signals to sound and vice
an
acoustic coupler which can be built
(as
in
the Model 765) or external to
DEVICE
DATA
Generates
Digital
TERMINAL
and
understands
Signals
CABLE
[}II---IIII(]
Digital
Signals
ACOUSTIC
Digital
Analog
Sound
COUPLER
I
I
Analog Signals
vii
MODEM
Digital
I
Analog
CABLE
Digital
Signals
REMOTE
Understands
Digital
DEVICE
and
generates
Signals
Page 8
General Operating Guidelines and Notes
1.
References in this manual to data terminal
terminal apply to both Models 763 and 765unless
specifically stated otherwise. The two models dif-
basically
fer
only
in their intended use and built-in
communications circuits. The Model 765 is designed for portable field use with its integral acoustic coupler mated to a telephone handset. The
Model 763 is intended for table-top, hard-wired,
non portable applications.
2.
Press means momentarily push down the desig-
nated keyboard key and release it.
means push down a key
or
switch until it locks.
Press and hold means push down a key and hold
it down while performing some other stated action
(similar to the
SHIFT key on a standard
typewriter).
3.
Communications line
cable
or
telephone line over which the terminal is
"connected"
to
terminal is set so as to transmit
data over the communications line.
or
simply line refers to the
another device.
On
line means the
and receive coded
Off line (also
called local) means the terminal is electronically
disconnected from the communications line.
4. Press the PAPER ADVance key to advance the
paper (the printhead does not move). This key
does not generate a code, and its action is neither
nor
transmitted
the PAPER
of
the terminal.
stored in memory. Press and hold
ADV
key to feed the printing paper out
or
Depress
5.
Press the SKIP key to move the printhead to the
left margin and advance the paper (equivalentfo a
standard typewriter carriage return).
Or
you
may
press both the LF (line feed) and CR (carriage
return) keys to generate the equivalent to a
standard typewriter carriage return.
6.
Note the operating CAUTIONS throughout this
manual. Most notably,
do
not operate the
data
terminal without printing paper: the platen and
printhead
could be damaged, voiding the
warranty.
7.
The Models
76317E25
terminals are normally in the
ASR mode. To enter the COMMAND mode, simply press the CMD key. The terminal will stop
whatever it may be doing to await your command,
so be careful not to press the CMD key accidentally.
8. The word record is used extensively in this manu-
al to define two entirely different terms. Ref-cord
refers to a contiguous block of
memory.
Re-cord'
RECORD OFF,
(as'
etc.) refers to the act of storing
data in memory. Although no accent marks are
used in the text to distinguish the meaning
word, the context in which it is used should signify
its intended meaning.
data
stored in the
in RECORD ON,
of
the
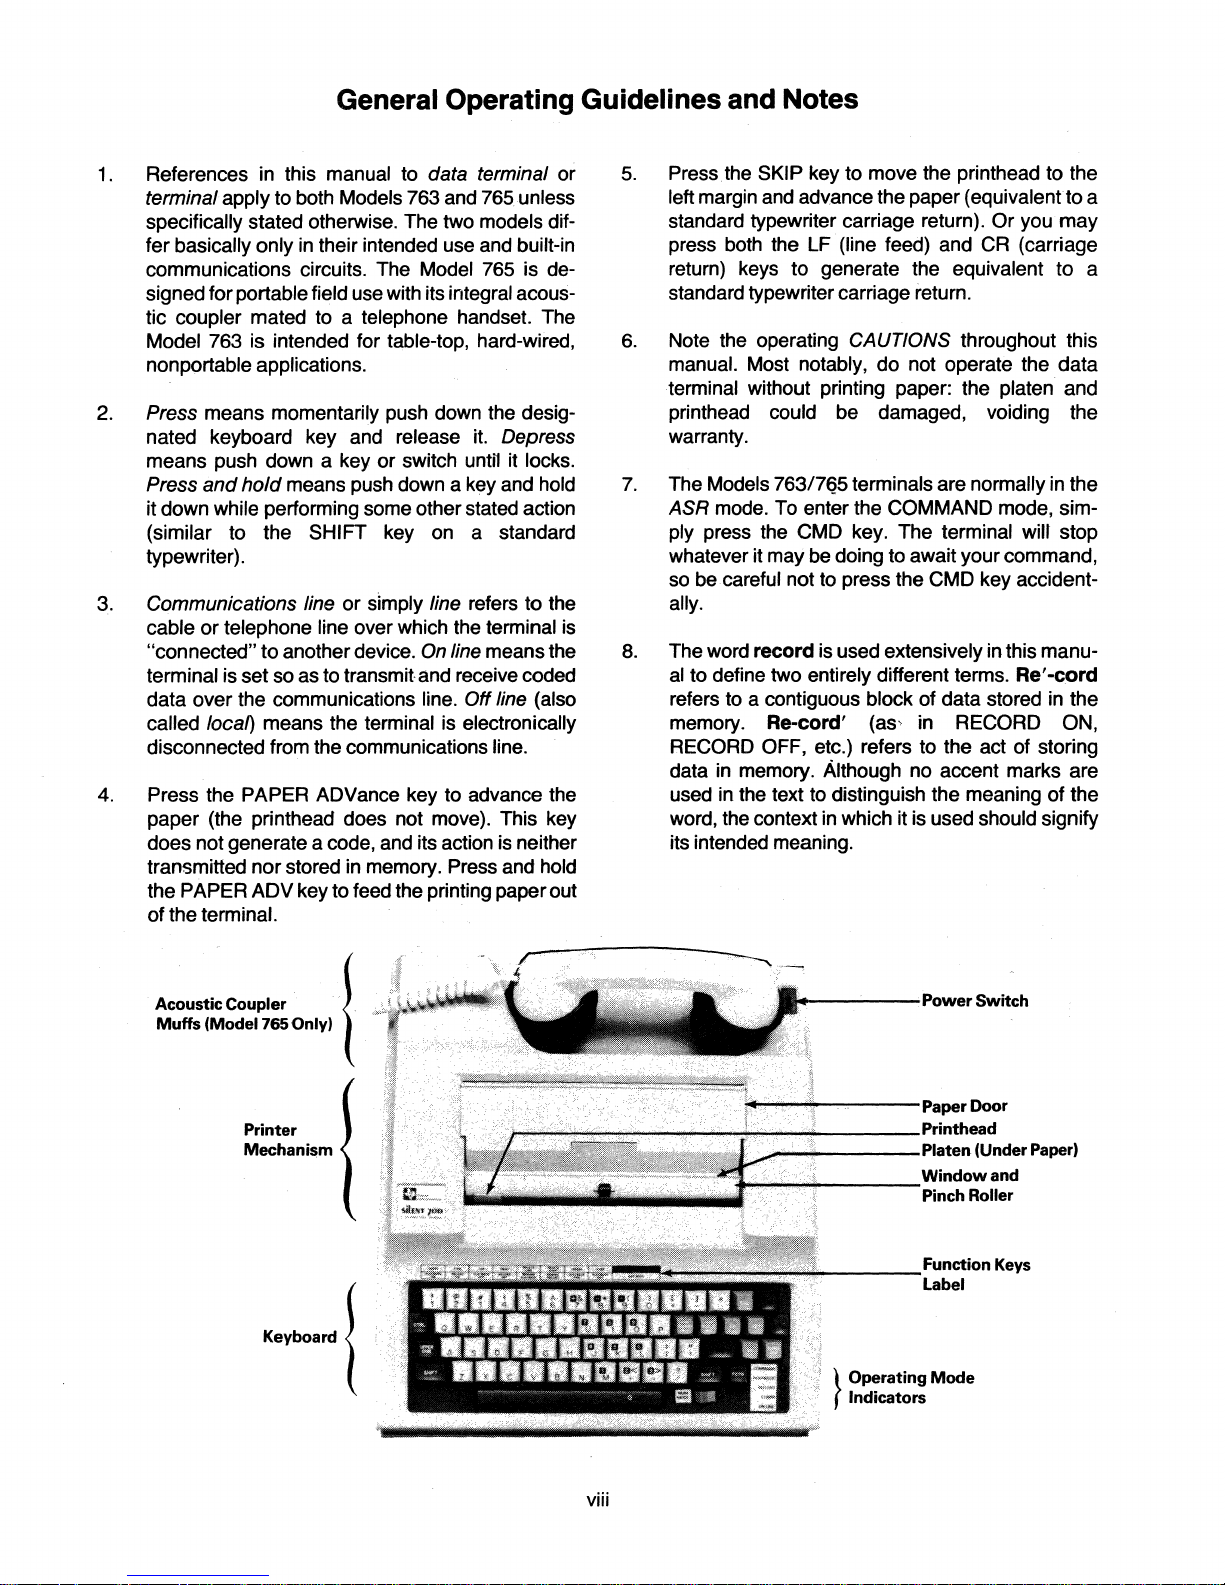
Acoustic Coupler }
Muffs
(Model 765 Only) t
Printer
Mechanism
viii
4o-----,Po1OverSWitch
_---Function
Operating
}
Indicators
Label
Mode
Keys
Page 9

SECTION I
BECOMING
The Models 763/765 memory data terminals are
shipped ready to operate, requiring only connection to a
communications
operations (such as storing data
transmission, entering data
Thus, you can perform most of the instructions listed
this section
Setting
Setting up the Model 765 terminal for operation
simple. The Model 763
completion
installed and operational, you may proceed to the next
topic.
Connections to communications lines
are described in the Systems Manual.
1 . Place the
with the
facing up.
2.
Unlatch the terminal cover by pushing out and
down on the top part
part
of
terminal base; then swing the bottom part of the
line and an electrical outlet. Off-line
in
in
response to prepro-
of
the manual without connecting the termi-
Up
The
Terminal
is
even simpler, requiring only
of
step 5 below. If your terminal
NOTE
Model 765 terminal on a table or stand
Silent 700 label on the terminal cover
of
the latch until the bottom
the latch unhooks from the groove
FAMILIAR WITH THE TERMINAL
memory for later
is
is
already
in
the
in
nal to a communications line. Of course the Model 765
needs only a telephone handset for on-line operation
through its acoustic coupler. The
hard-wired connections to its communications
described in the
terminal.
latch away from the base while still pressing down
on the top part of the latch.
3.
Lift the cover straight up and off.
4.
Remove the ac power cord from inside the terminal cover.
Check the label on the rear of the
terminal to determine the correct
tage required for your terminal. Ensure
that the voltage at the wall outlet
matches the terminal voltage rating
listed on the
5.
Plug the three-socket female connector of the
power cord into the rear of the terminal, and plug
the three-prong male connector into
outlet of the appropriate voltage.
Systems Manual furnished with your
CAUTION
label.
Model 763 requires
line, as
vol-
an
ac wall
Power Cord
Receptacle
+---I~
Serial Number and
~
Voltage Label
( J
Connector
P2
r
111111111
Page 10

Section I
Switching
• Do not press any printable char-
acter keys unless paper
loaded: Damage to the printhead
and platen could result, voiding
the warranty.
• Take care when first operating
the terminal after it has been
stored at temperatures exceeding the normal operating range.
The terminal is designed to operate between
of
allowed to come within this operating range before power
plied. Operation of the terminal
outside
malfunctions.
• After switching power off, wait at
least 15 seconds before switch-
ing power on again: Malfunctions
may result.
the Terminal On and Off
CAUTIONS
is
10°C
and 104
of
this range may cause
OF)
and should
and 40
°C
is
(50
be
ap-
Loading Paper
NOTE
TI-approved
available from Texas
single 100-foot rolls, case lots, and pallet lots under
1.
Switch the terminal power ON.
2.
Lift the paper door.
If only a small amount of paper remains on the
3.
paper supply
from the paper compartment. Tear the paper halfway between the paper roll and the platen, then
remove the
supply core, simply lift out the core.
4. Press and hold the PAPER ADV
remaining paper from the paper chute.
5. Grasp the new paper
the paper is toward you with the end pointed up.
You may fold a
threading.
thermal printing paper is
Instruments
TI Part No. 972603.
roll, grasp the unused roll and lift it
roll. If no paper remains on the paper
key
roll so that the loose end of
"vee"
in
the loose end to aid paper
IMPORTANT NOTE
in
to eject any
1 . Check that the power cord is plugged into the
terminal and the
loaded (see
2.
To switch the terminal ON, set the power switch
wall outlet. Check that paper is
Loading
Paper).
(located on the top right rear of the terminal)
toward the rear of the
terminal. The terminal will
respond by moving the printhead over to the left
margin and typing the message
"READY" followed by two characters that indicate the revision
number
word
of
the terminal internal programming. The
"PROM", followed by a number, also may be
printed to indicate the model of the programmable
read-only memory
(PROM) installed in your
terminal.
3. To switch the terminal OFF, set the power switch
of
toward the front
OFF Symbol
Slide Switc;h
the terminal.
'------OFF
ON Symbol
Toggle Switch
Symbol
Model
765
The warranty
and/or
service contract
on the thermal printhead is subject to
nullification if the thermal printing paper used in the terminal does not meet
TI
~pec;f;cat;on
972603-0001.
6. Place the paper roll on the paper roll supports so
that the loose end is toward the front
of
the termi-
nal. Check that the roll can rotate freely.
7.
Grasp both corners of the loose end of the paper
and
gently pull up about 6 inches.
8. Feed the paper over the aluminum roller and down
through the paper chute until it appears behind the
window. The paper will not
slide behind the print-
head because the printhead is pressed against
the platen.
ON
Symbol-
Model
763
Paper
Loading
(Side
2
Diagram
View)
Page 11
SectIon I
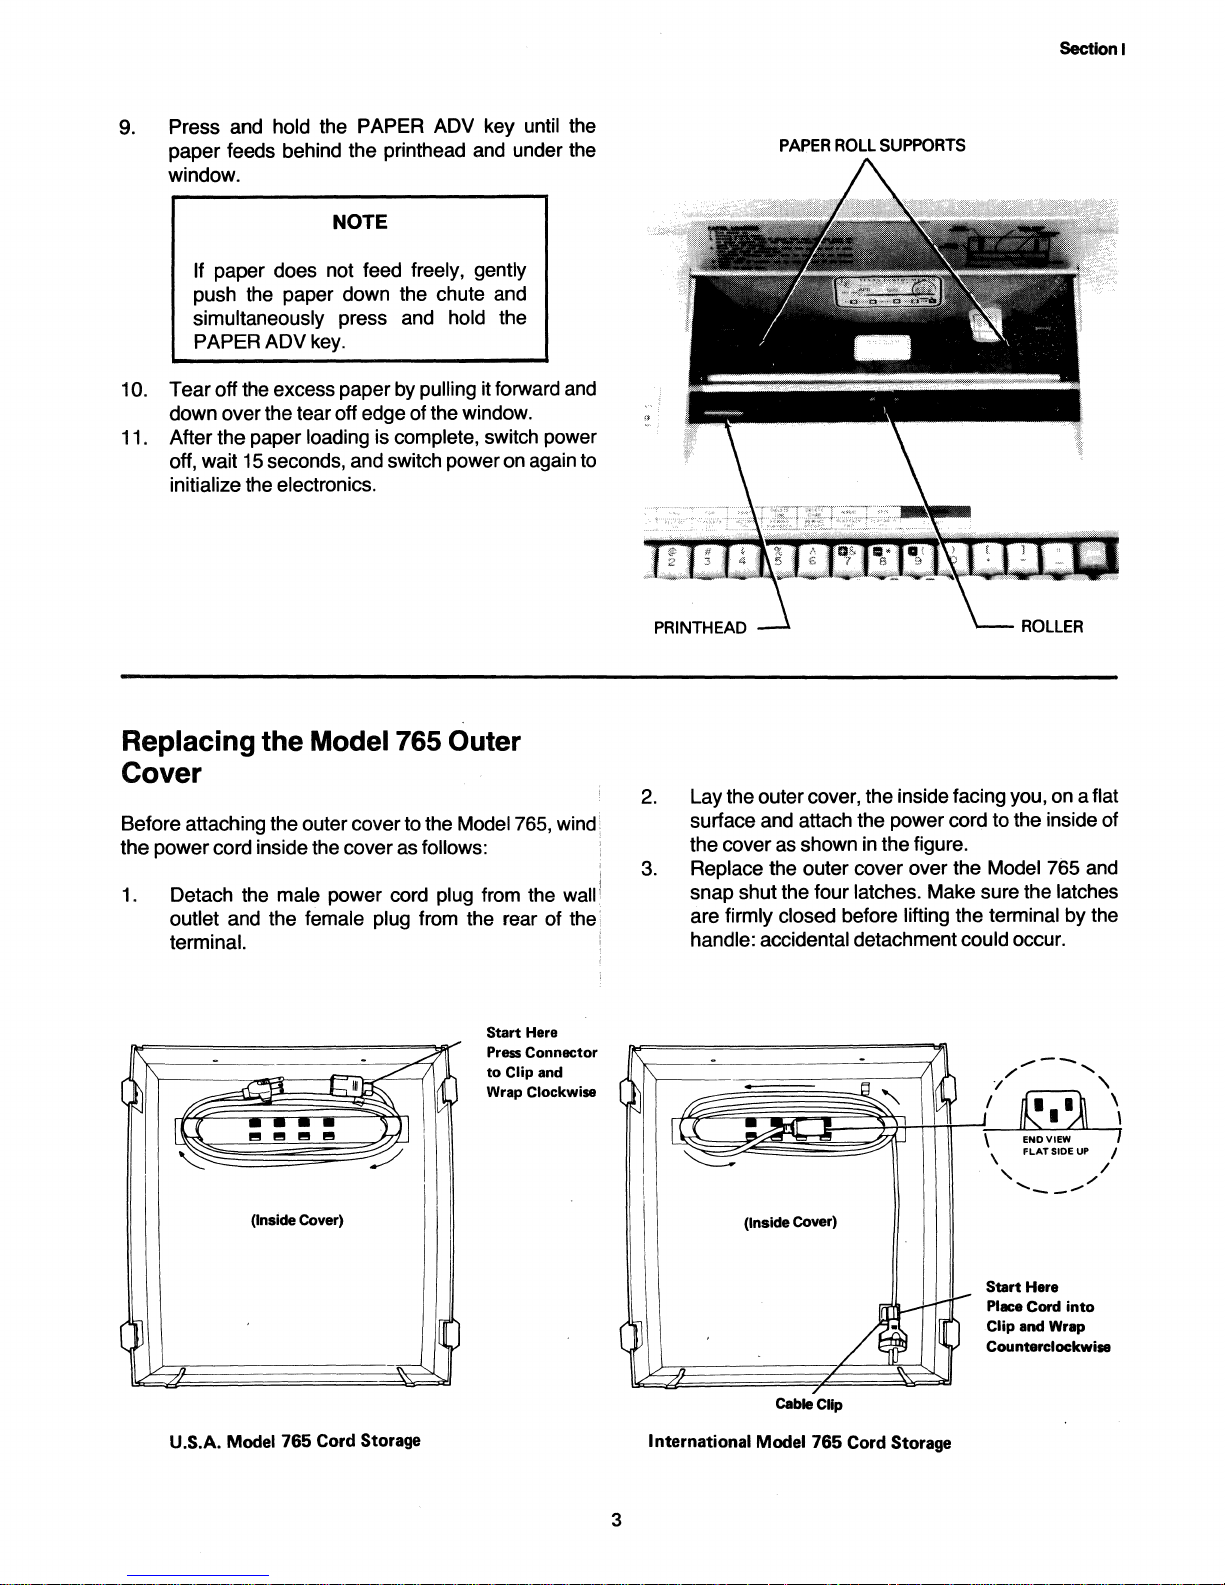
9. Press and hold the PAPER ADV key until the
paper feeds behind the printhead and under the
window.
NOTE
If
paper does not feed freely, gently
push the paper down the chute and
simultaneously press and hold the
PAPER ADV key.
10. Tear off the excess paper by
pulling it forward and
down over the tear off edge of the window.
11. After the paper loading is complete, switch power
off, wait 15 seconds, and switch power on again to
initialize the electronics.
PAPER
ROLL
SUPPORTS
Replacing the Model 765 Outer
Cover
Before attaching the outer cover to the Model 765, wind
the
power cord inside the cover as follows:
1.
Detach the male power cord plug from the wall
outlet and the female plug from the rear of the
terminal.
Start
Hara
Press Connector
to
Clip and
Wrap Clockwise
(Inside Cover)
2.
Lay the outer cover, the inside facing you, on a flat
surface and attach the power cord to the inside of
the cover
as
shown in the figure.
3. Replace the outer cover over the Model
snap shut the four latches. Make sure the latches
are firmly closed before lifting the terminal by the
handle: accidental detachment could occur.
/,,---,
"/
I
[Iij
\
END
\ FLAT SIDE
" /
.......
(Inside Cover)
Start
Hera
Placa
Cord
Clip and Wrap
Counterclockwise
765 and
VIEW
UP
_-,/
into
'\
\
I
I
U.S.A. Model 765 Cord Storage
Cable Clip
International Model 765 Cord Storage
3
Page 12
r
.....
.
i~»···
EOfTMOOE
ASRMOOE
NUM
MODE
[I]o
COMMa
ON
LINEa
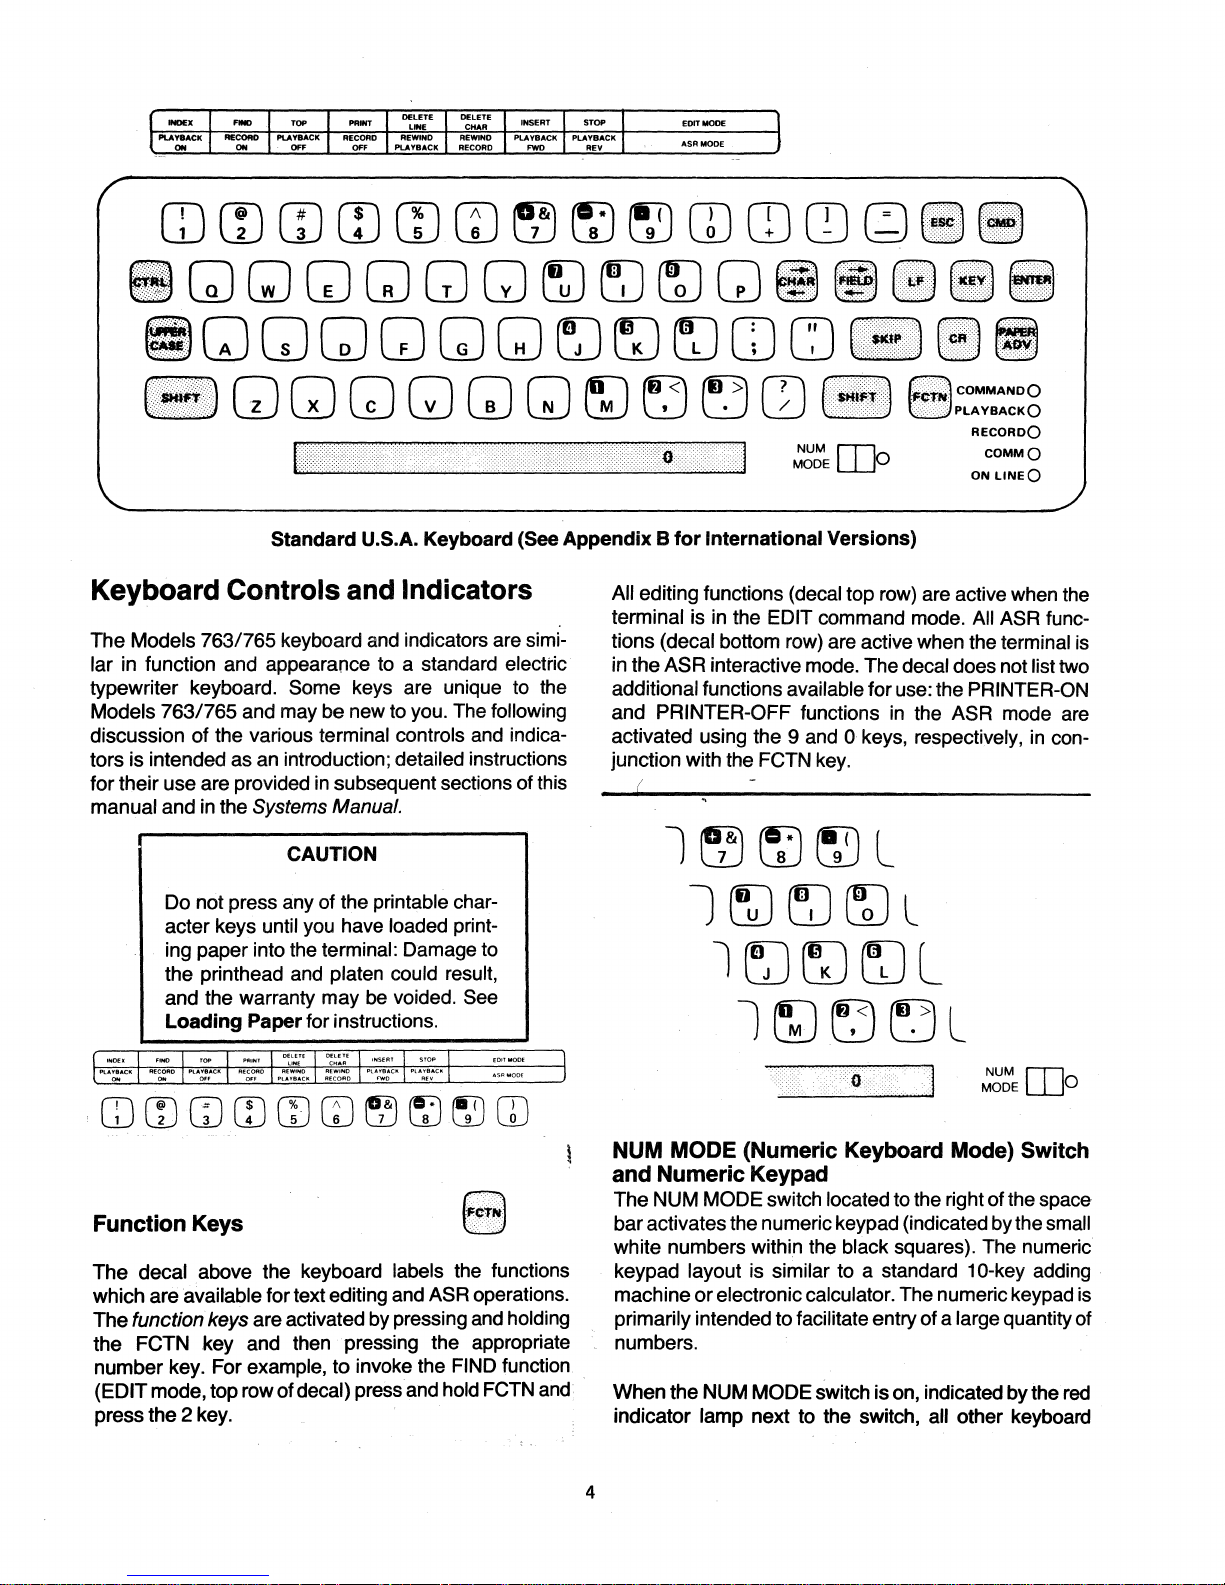
Standard
U.S.A. Keyboard (See
Keyboard Controls and Indicators
The Models
lar in function and appearance to a standard
typewriter keyboard. Some keys are unique to the
Models 763/765 and may be new to you. The following
discussion of the various terminal controls and indicators is intended as an introduction; detailed instructions
for their use are provided
manual and
763/765
in
the Systems Manual.
Do not press any of the printable character keys until you have loaded printing paper into the terminal: Damage to
the printhead and platen could result,
and the warranty may be voided. See
Loading
keyboard and indicators are simi-
in
subsequent sections of this
CAUTION
Paper for instructions.
electric
Appendix B for
All editing functions (decal top row) are active when the
terminal is in the EDIT command mode. All ASR functions (decal bottom row) are active when the terminal is
in
the ASR interactive mode. The decal does not list two
additional functions available for use: the PRINTER-ON
and PRINTER-OFF functions
activated using the 9 and 0 keys, respectively,
junction with the FCTN key.
International
Versions)
in
the ASR mode are
l~~~L
l~~~l
l~~eJL
l~~[:)L
o
MODE a
NUM
in
con-
IT]
Function Keys
The decal above the keyboard labels the functions
which are available for text editing and ASR operations.
The function keys are activated by pressing and holding
the FCTN key and then pressing the appropriate
number key. For
(EDIT mode, top row of decal) press and hold FCTN and
press the 2 key.
example, to invoke the FIND function
NUM
MODE (Numeric Keyboard Mode) Switch
and Numeric Keypad
The NUM MODE switch located to the right of the space
bar activates the numeric keypad (indicated by the small
white numbers within the black squares). The numeric
keypad layout is similar to a standard 10-key adding
machine
primarily intended to facilitate entry of a large quantity of
numbers.
When the NUM MODE switch is on, indicated by the red
indicator lamp next to the switch, all other keyboard
4
or
electronic calculator. The numeric keypad is
Page 13
keys are inoperative unless the SHIFT key is pressed
and
held. With the SHIFT key activated, other charac-
ters can be generated (e.g., comma and bracket). The
keyboard keys active
Appendix
unintentionally activated, since even commands cannot
be entered (unless the
note that the space bar serves as the zero (0) for the
numeric keypad.
B.
Take care that the NUM MODE is not
in
the NUM MODE are shown
SHIFT key
is
also pressed). Also
in
Section I
SKIP Key
The SKIP key performs the same function as a carriage
return on a standard typewriter. Pressing the SKIP key
causes the paper to advance and the printhead to return
to the
left margin. When the terminal is
SKIP key also creates
is added to the data being transmitted or recorded.
Additional uses of the
of this manual under EDIT Mode.
an
end-of-line
SKIP key are detailed
ON
(EOl)
LINE, the
code which
in
Section
II
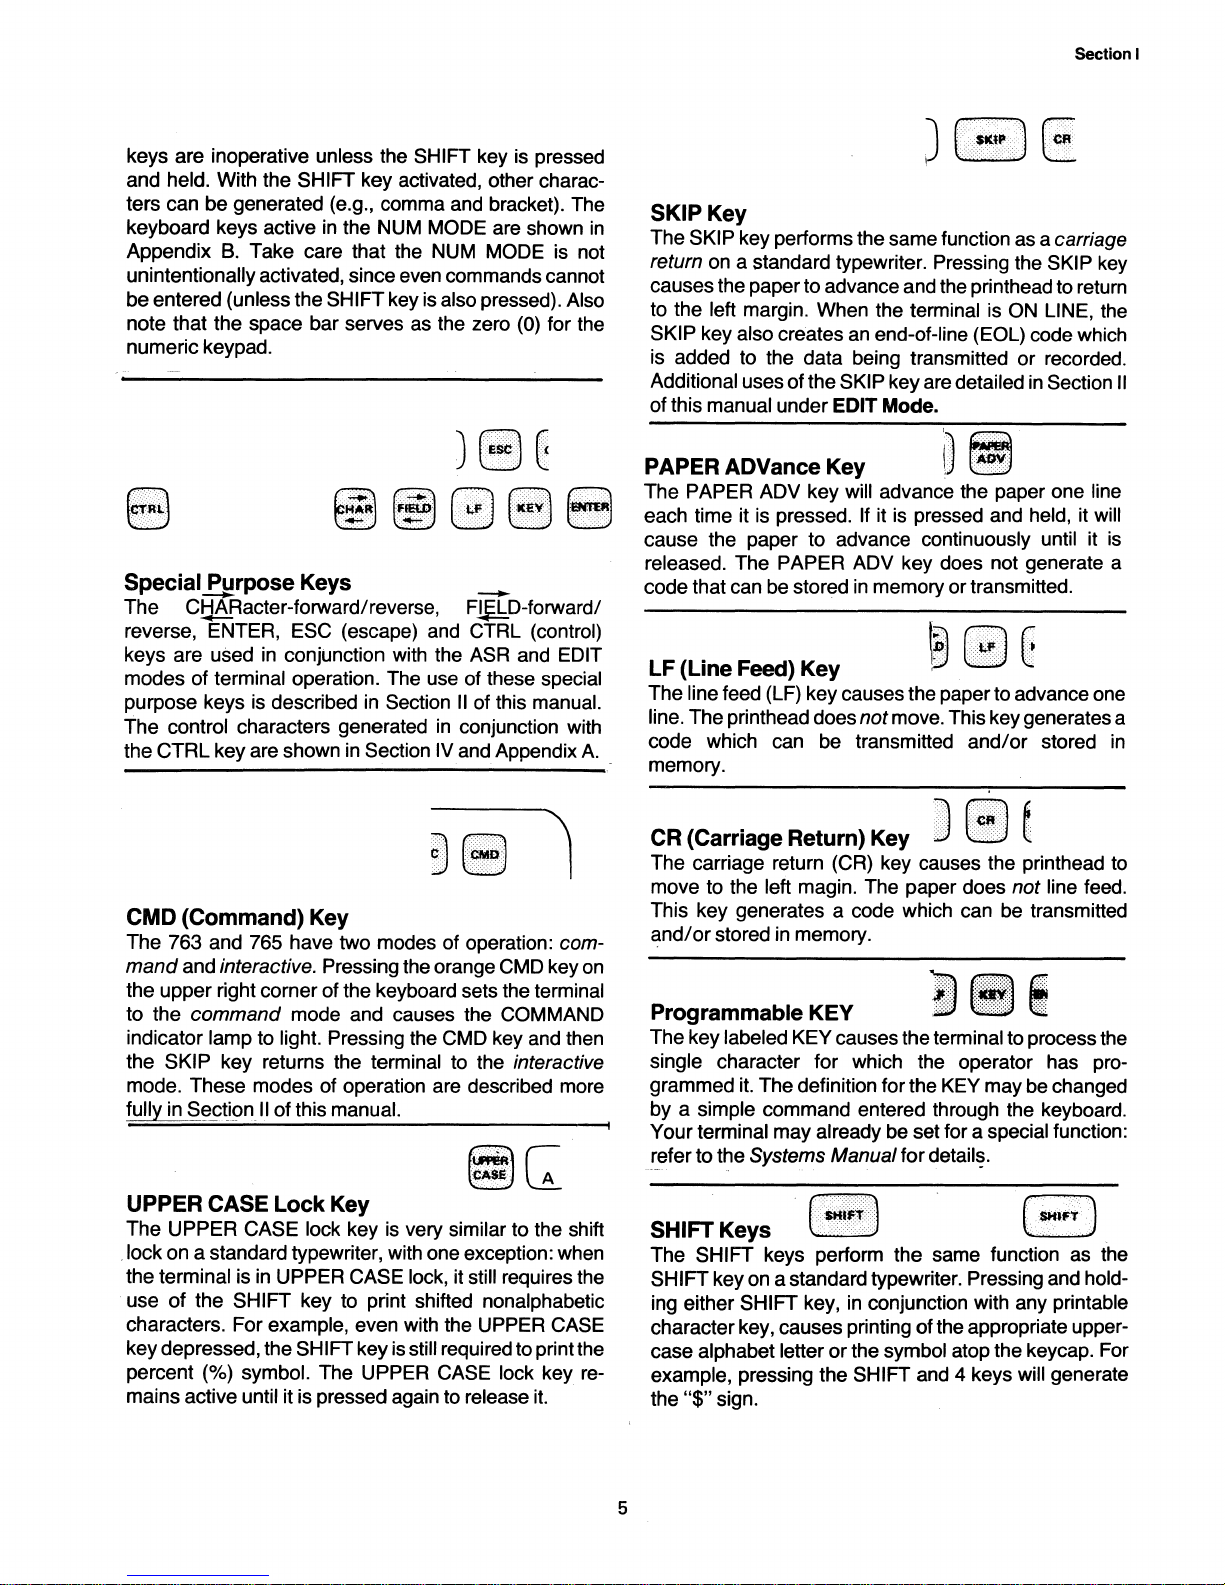
J(!8~
~~
Special
The
reverse, ENTER, ESC (escape) and
keys are used
modes of terminal operation. The use of these special
purpose keys
The control characters generated
the
CMD (Command) Key
The 763 and 765 have two modes of operation: com-
mand
the upper right corner of the keyboard sets the terminal
to the
indicator lamp to light. Pressing the CMD key and then
the
mode. These modes of operation are described more
fully in Section
~rpose
C~ARacter-forward/reverse,
CTRl
key are shown
and interactive. Pressing the orange CMD key
command mode and causes the COMMAND
SKIP key returns the terminal to the interactive
Keys
in
conjunction with the ASR and EDIT
is
described
II
of this manual.
e$o]
l±fJ
LK~VJ
__
FJ~!:p-forward/
CTRl
in
Section
in
Section IV and Appendix
II
of this manual.
in
conjunction with
lENrE~
(control)
A.
on
PAPER ADVance Key
The PAPER ADV key will advance the paper one line
each time it
cause the paper to advance continuously until it
released. The PAPER ADV key does not generate a
code that can be stored
is
pressed. If it
is
pressed and held, it will
in
memory or transmitted.
is
LF (Line Feed) Key
The line feed
line. The printhead does not move. This key generates a
code which can be transmitted and/or stored
memory.
CR (Carriage Return) Key D
The carriage return (CR) key causes the printhead to
move to the
This key generates a code which can be transmitted
and/or
Programmable KEY
The key labeled KEY causes the terminal to process the
single character for which the operator has programmed
by a simple command entered through the keyboard.
Your terminal may already
refer to the
(IF)
key causes the paper to advance one
LEi)
left magin. The paper does not line feed.
stored
in
memory.
_81
it.
The definition for the KEY may
be
set for a special function:
Systems Manual for
detail~.
[
be
changed
in
UPPER CASE Lock Key
The UPPER CASE lock key
. lock on a standard typewriter, with one exception: when
the terminal is
use
of
the SHIFT key to print shifted nonalphabetic
characters. For example, even with the UPPER
key depressed, the SHIFT key
percent (%)
mains active
in
UPPER CASE lock, it still requires the
symbol. The UPPER CASE lock key reuntil it is pressed again to release
is
very similar to the shift
is
still required to print the
CASE
it.
SHIFT Keys
The SHIFT keys perform the same function as the
SHIFT key on a standard typewriter. Pressing and holding either SHIFT key,
character key, causes printing of the appropriate uppercase alphabet
example, pressing the
the
"$"
sign.
5
[SHIfT]
in
conjunction with any printable
letter or the symbol atop the keycap. For
SHIFT and 4 keys will generate
($tilFY
)
Page 14
Section I
Repeating Keys
If orie of the following keys is pressed and held longer
than
1/2
second, their action or character will continu-
ously repeat until the key is released:
Spacebar
•
• Underscore
(_)
key
• Minus/hyphen (-) key
• Period (.) key
• Asterisk (*) key
•
C~ARacterforward
space/backspace key.
Double Space Printing
Off-line double line spacing may be obtained simply by
pressing and holding the FCTN (function) key while
quickly tapping the PAPER ADVance key. All subsequent lines will be printed double space. To return to
single space printing, again press the FCTN and
PAPER ADVance keys.
COMMANDO
PLAYBACKO
RECORDO
NUM IT]
MODE 0
COMMO
ON
LINEO
The Commands
The Models 7631765 memory terminals accept certain
English-text commands which enable the operator to
modify the operational parameters of the terminal,
manipulate
memory, and print out the terminal status display. Other
commands cause the
matically execute commands stored
The commands afford the user the
the
terminal for a wide range of diverse applications.
The ability to modify communications parameters en-
ables
types of networks using the appropriate telecommunications conventions for each.
data and how it is stored
in
the terminal
terminal to test itself and auto-
in
memory.
ability to configure
the terminal to communicate with several different
Indicators
The six indicator lamps located
of the keyboard indicate the
COMMAND - the terminal is in CMD (command)
mode.
PLAYBACK -
playback file is transmitting its contents
to the
line
RECORD - the record file is active and will accept
data from the line or the keyboard for
recording.
COMM - the terminal is ready to transmit and re-
ceive data over the communications
line (acoustic coupler or cable)
ON
LINE - the terminal is set to transmit and re-
ceive data over the communications
line
NUM MODE - located adjacent to the NUM MODE
rocker switch, indicates that the
meric keypad keys are active. All other
alphanumeric keys are inactive.
on
the lower right corner
following when lit:
or
the printer
or
both.
nu-
6
Page 15
Section I
Interactive Operation
Interactive (on-line) operation describes the ability of
the terminal operator to communicate with the terminal
itself and, through the terminal, with remote data processing equipment.
Communications procedures may differ from one data
terminal installation to another, depending
data processing devices with which the Models 763/
765 may be communicating. Therefore, specific stepby-step instructions must be tailored for your communications network. General operating principles applicable to
7631765, however, are described in Section IV,
Terminal
all
communications networks employing the
Communications.
Model 763
The Model 763 must be connected to a communications
line before on-line operations are possible. See the
Systems Manual for cabling information,
Section IV of this manual for more details.
on
the type of
and
refer to
KSR Operation
KSR (keyboard send/receive) is also possible
interactive mode.
board characters via the communications link
printing of any characters received via the communications link.
terminal to transmit its answer-back memory (ABM)
contents before you can commence data transmission
(see
require use of the "BREAK" to signify that you wish to
transmit
triggered by pressing and holding the CTRL key
pressing the 1 key, called "HERE IS". The BREAK
signal is generated by pressing
key and the 2 key. Neither of these keys
such
Some communications links may require your
Section
or
on
your 7631765 keyboard.
KSR is the transmission of any key-
III
of this manual), and some links may
receive messages. The ABM contents are
and
holding the CTRL
is
in
labelled
the
and
and
as
Model 765
Operation of the Model 765 using its built-in acoustic
coupler requires only a standard telephone set and
electrical outlet. Detailed instructions for using the
acoustic coupler are contained
manual.
in
Section
IV
an
of this
ASR Operation
When the terminal is switched on, it is
mode which permits
operations. The terminal will remain
mode until the COMMAND mode is entered by pressing
the CMD key. The FCTN key,
on
number keys
access different
into or playing back data from the memory, along with
many other keyboard and communications operations.
the top row of the keyboard, are used to
ASR (automatic send/receive)
ASR functions such as recording data
in
the interactive
in
the interactive
in
conjunction with the
7
Page 16
Section I
The Terminal Memory System
One
of
the important features of the Models 763/765 is
their ability to record into and play back information from
the terminal memory. The memory enables you to enter
all your information, review
then transmit the information to other data processing
equipment.
Files
To
store information (data)
sary to establish areas
stored. These areas of memory are commonly called
files. The size of the files used
determined when the file is created (see below). This
means the file can be made larger
created, depending on the amount of information to be
stored in the file. Just as the memory system is composed
of
files, the file itself is composed of records.
Records
The term record is used to describe the basic unit of a
file. The records
80
characters long at the time the file is created. The
records in separate files may be different lengths, but
records in the same file must be created the same
length.
of
a file are adjustable in size from 1 to
Creating Files
The files used in memory must be created by the
operator, and each file has four parameters that must be
specified by the operator when creating the file. The four
factors are FILE NAME, FILE FORMAT, FILE SIZE, and
RECORD SIZE. The following paragraphs describe
each parameter
File
Name
Each file
name must be used
This system is very similar to files in an office file
cabinet. When a particular file is desired, one looks for it
under its name. The name of a
contain at least one letter and no more than six letters
numbers total. The file name must begin with a letter.
No
spaces are permitted between characters.
in
detail.
in
memory is assigned its own name.This
it,
correct it as required, and
in
memory, first it is neces-
in
memory where the data can be
in
the memory system is
or
smaller, when
in
all future references to the file.
file
in
memory must
all
or
Line
Format.
contains only one line
operator-designated record length, memory area is
reserved between the end of the line of data and the
designated end of the record. For example, if the record
of
a file is deSignated as 72 characters long (80 characters is the maximum) and the number of characters
entered is only 62, the
between the end
the record (72) would be reserved; that
Although the LINE format is particularly helpful
paring
maximum use of memory: From the above example, 10
characters worth
line.
Continuous
designated record is filled before another record is
started. Therefore, each record may contain one or
more lines of data. If the line from the above example
was
recorded in a CONTINUOUS-formatted file, after
the 62 characters were entered the terminal would use
the first 10 characters of the next line to fill up the
remaining space
more difficult to edit than the LINE format, it makes
maximum use of memory. When the data stored
terminal memory is transmitted to a remote device
through the communications channel
terminal printer, it will appear identical, whether
corded in LINE or CONTINUOUS format.
File
Size
This, simply, is how large the file will be. The size of the
file is measured
and/or
In
the
LI
NE format each record
of
data. For lines shorter than the
10
characters of memory space
of
the line of data (62) and the end of
editing a data file, it does not provide
of
memory were not used
Format.
In
CONTINUOUS format each
in
the record. Although this format is
in
lines (records) of text.
in
memory
is,
not used.
on
the single
or
printed by the
in
pre-
in
re-
Record Size
Record size is a measure of how many characters will
in
be contained
record size is
each record
80
characters.
of
text: The maximum
File
Format
The format of a file determines how the terminal will fill
up
the file with the information entered. The two formats
are
LINE and CONTINUOUS. Each has its own advantages and disadvantages, as the following paragraphs
explain.
8
Page 17
SECTION
II
DETAILED TERMINAL OPERATIONS
This section describes in detail some of the basic terminal operations. Topics discussed include entry and
definition of commands, setting terminal configuration
parameters, using the
editor operations. For additional details
tions, see
Section I of the Systems Manual.
ASR functions, and basic text
on
these opera-
Terminal Commands
The COMMAND mode of the terminal enables you to
perform a variety of functions to control the operation
and configuration of the
English-text form which describes to the terminal the
operation you want performed. The syntax (format) and
entry instructions for each command are described
in
this section.
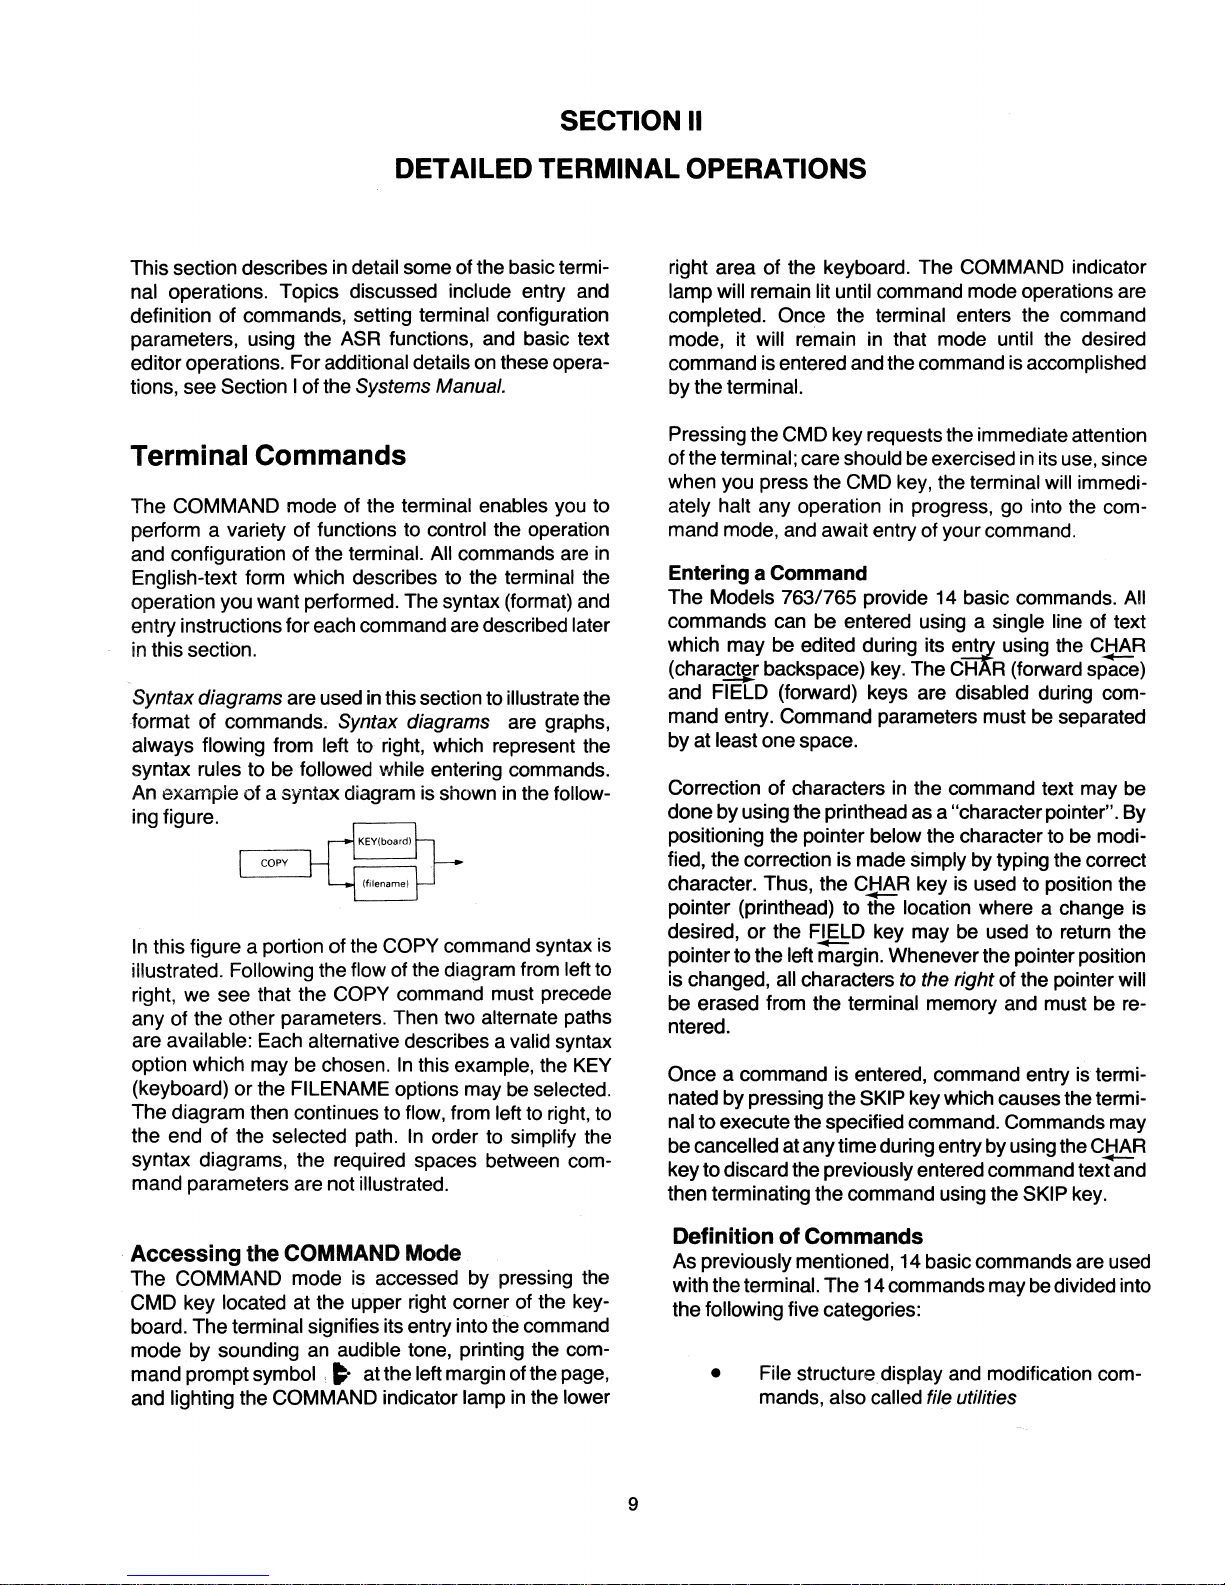
Syntax diagrams are used
format of commands;
always flowing from left to right, which represent the
syntax
An
ing figure.
In
illustrated. Following the flow of the diagram from left to
right, we see that the
any of the other parameters. Then two alternate paths
are available: Each alternative describes a valid syntax
option which may be chosen.
(keyboard) or the
The diagram then continues to flow, from
the end of the selected path.
syntax diagrams, the required spaces between com-
mand parameters are not illustrated.
rules to be followed while entering commands.
exampie of a syntax diagram
this figure a portion
terminal. All commands are
in
this section to illustrate the
Syntax diagrams are graphs,
is
shown
of
the COPY command syntax is
COPY command must precede
In
this example, the KEY
FILENAME options may be selected.
In
order to simplify the
in
the follow-
left to right, to
in
later
right area of the keyboard. The COMMAND indicator
lamp will remain lit until command mode operations are
completed. Once the terminal enters the command
mode, it
command is entered and the command
by the
Pressing the CMD key requests the immediate attention
of the terminal; care should
when you press the
ately halt any operation
mand mode, and await entry of your command.
Entering a Command
The Models 763/765 provide 14 basic commands. All
commands can be entered using a single line of text
which may be edited during its
(charact~r
and FIELD (forward) keys are disabled during command entry. Command parameters must
by at
Correction of characters
done by using the printhead as a "character pointer". By
positioning the pointer
fied, the correction is made simply by typing the correct
character. Thus, the CHAR key
pOinter (printhead) to the location where a change is
desired, or the
pointer to the left margin. Whenever the pointer position
is changed,
be erased from the terminal memory and must be rentered.
Once a command is entered, command entry
nated by pressing the
nal to execute the specified command. Commands may
be
cancelled at any time during entry by using the CHAR
key to discard the previously entered command text and
then terminating the command using the
will remain in that mode until the desired
is
accomplished
terminal.
be
exercised
CMD key, the terminal will immedi-
in
progress, go into the com-
e.!!!')' using the CHAR
backspace) key. The CHAR (forward
least one space.
in
the command text may be
below the character to be modi-
is
in
its use, since
be
used to position the
--
FIELD key may be used to return the
--
all characters to the right of the pointer will
SKIP key which causes the termi-
SKIP key.
sp;ce)
separated
is
termi-
--
Accessing the COMMAND Mode
The COMMAND mode
CMD key located at the upper right corner of the keyboard. The terminal signifies its entry into the command
mode by sounding
mand prompt symbol
and lighting the
COMMAND indicator lamp
is
accessed by pressing the
an
audible tone, printing the com-
~
at the left margin of the page,
in
the lower
Definition of Commands
As previously mentioned, 14 basic commands are used
with the
the
9
terminal. The 14 commands may be divided into
following five categories:
• File structure display and modification commands,
also called file utilities
Page 18
Section
II
• Communications parameter modification
terminal status display commands
and
• File editing command
• Terminal diagnostics (self-test) commands
• Automatic command execution.
Table
2-1
lists the commands
in
each category along
with the abbreviations that may be used to enter some
commands. Commands may be entered in uppercase
or
lowercase text.
File Utility Commands
CREATE
tiguous block of memory for a data
allocated
Syntax:
- The create file command allocates a con-
file. The data file
is identified by the filename you specify.
TABLE
3-1. MODEL 7631765 MEMORY TERMINAL COMMANDS AND ABBREVIATIONS
The filename parameter is a required parameter
•
you must use to assign the name by which a
particular
file will be identified in all future opera-
tions. The filename may consist of up to six char-
acters and must begin with an
alphabet letter (A to
Z). The filename may contain numbers, but may
not contain spaces.
and
TO
which are reserved words.
Filenames may not be KEY
NOTE
When typing the filename, be careful to
type the name
time, in
case
(lowercase and capital letters).
exactly the same each
exactly the same character
For example MYFILE, Myfile, and
myti/e are three different filenames be-
cause each is typed using a different
character case.
CATEGORY
File
Utilities
Communications
Parameter
Modification
and Terminal
Status Display
File Editing
Terminal
Diagnostics
COMMAND
CREATE
DELETE
ERASE (none)
LOCK
FREE
COPY
CATALOG
CHANGE
STATUS ST Displays communication parameters status
ONLINE ON Places terminal in the ON-LINE mode
OFFLINE
EDIT
TEST TS AcUvates terminal self-test feature
ABBREVIATION
CF
(none)
(none)
(none)
CP
CL
CG
OFForOF
ED Permits modification of file contents
Allocates memory space for a data file
Deletes entire file from the memory catalog
Erases the contents of a file
Prevents data in a file from being modified
Releases protection provided by lock command
Copies data from and into a file
Lists file catalog
Modifies communication parameters
Places terminal
COMMAND
in
the OFF-LINE mode
DESCRIPTION
Automatic
Command
Execution
RUN (none) Causes commands stored in a file to
10
be
executed
Page 19
The
•
•
third parameter specifies the format in which
data is to be stored in the file. The option L assigns
line format to the file. The option C assigns a
a
continuous format to the file. See subsection 3.1.6
of
this manual for an explanation of file formats.
The
number-of-records parameter (a positive
number) specifies the maximum number of
cal records in the file. File size cannot be expanded
or
reduced once it is created.
physi-
Section II
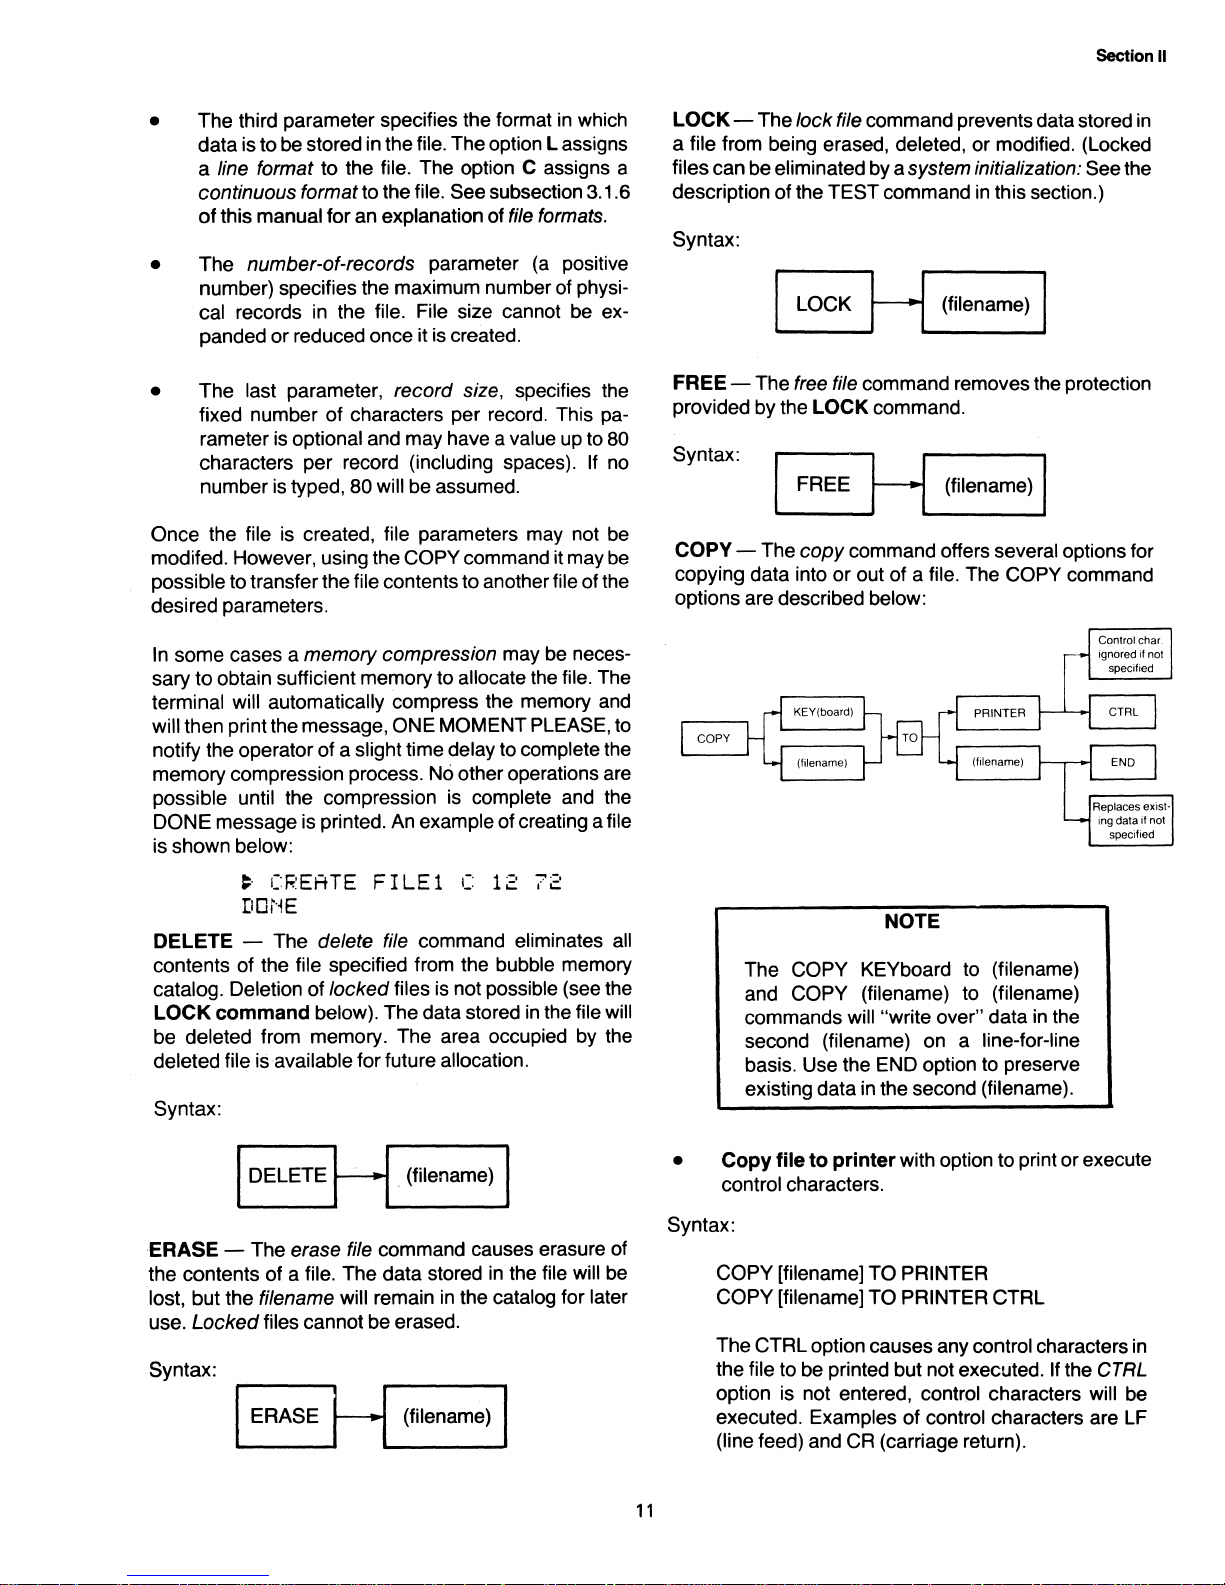
LOCK - The lock file command prevents data stored in
a file from being erased, deleted,
files can be eliminated by a
of
the
I
LOCK
TEST
description
Syntax:
system initialization: See the
command in this section.)
H (filename) I
or
modified. (Locked
The
•
Once
modifed. However, using the
possible to transfer the file contents to another file of the
desired parameters.
In
some
sary
terminal
will then print the message,
notify the operator
memory
possible until the compression is complete and the
DONE
is shown below:
DELETE
contents
catalog. Deletion
LOCK
be deleted from memory. The area occupied by the
deleted file is available for future
Syntax:
last parameter, record size, specifies the
of
fixed number
rameter is optional and may have a value up to 80
characters per record (including spaces). If no
number
the file is created, file parameters may not be
to
is typed, 80 will be assumed.
cases a memory compression may be neces-
obtain sufficient memory to allocate the file. The
will automatically compress the memory and
compression process. No other operations are
message is printed. An example
~
CREATE
Dm~E
- The delete file command eliminates all
of
the file specified from the bubble memory
command
characters per record. This pa-
COpy
ONE
of
a slight time delay to complete the
command it may be
MOMENT PLEASE, to
of
creating a file
FILEI C 12 72
of
locked files is not possible (see the
below).
The
data stored
allocation.
in
the file will
FREE -The
provided by the
Syntax:
COpy
copying
options are described below:
free file command removes the protection
LOCK command.
I
FREE
J-.j (filename) I
- The
copy
command offers several options for
data
into
or
out
of
NOTE
The COPY KEYboard to (filename)
COPY
and
commands will
second (filename) on a
basis. Use the END option to preserve
existing
(filename) to (filename)
"write over" data in the
data
in the second (filename).
a file. The
line-for-line
COpy
command
I DELETE H . (filename) I
ERASE -The
the contents
lost, but the
use.
Locked
Syntax:
erase file command causes erasure of
of
a file.
The
data stored in the file will be
filename will remain in the catalog for later
files cannot be erased.
I
ERASE
H (filename)
11
Copy
file
to
•
control characters.
Syntax:
COpy
COpy
The
CTRL
the file to be printed but not executed.
option is not entered, control characters will be
executed. Examples
(line feed) and CR (carriage return).
printer
[filename]
[filename]
option causes any control characters in
with option to print
TO
PRINTER
TO
PRINTER
of
control characters are LF
CTRL
or
execute
If the CTRL
Page 20
Section II
•
Copy
file
to
file
with an append option.
Syntax:
COPY [filename] TO [filename]
COpy
Copying
is possible, but a format change will occur.
whenever copying data from one file to another,
any text editor filler characters will be removed
from
explanation
editor see
Manual.) The END option causes the source file
(first filename) to be appended to the contents
the destination file (second filename). This option
should not be used for continuous-formatted files
if the source and the destination files are the same
file.
Copying
•
command option permits entry of data directly
from the, keyboard into a
[filename] TO [filename] END
of
data between files of different formats
all except the last record in the file. (For an
of
filler character operation in the text
EDIT MODE description in the Systems
from
the
keyboard
file.
to
a file. This copy
Also,
of
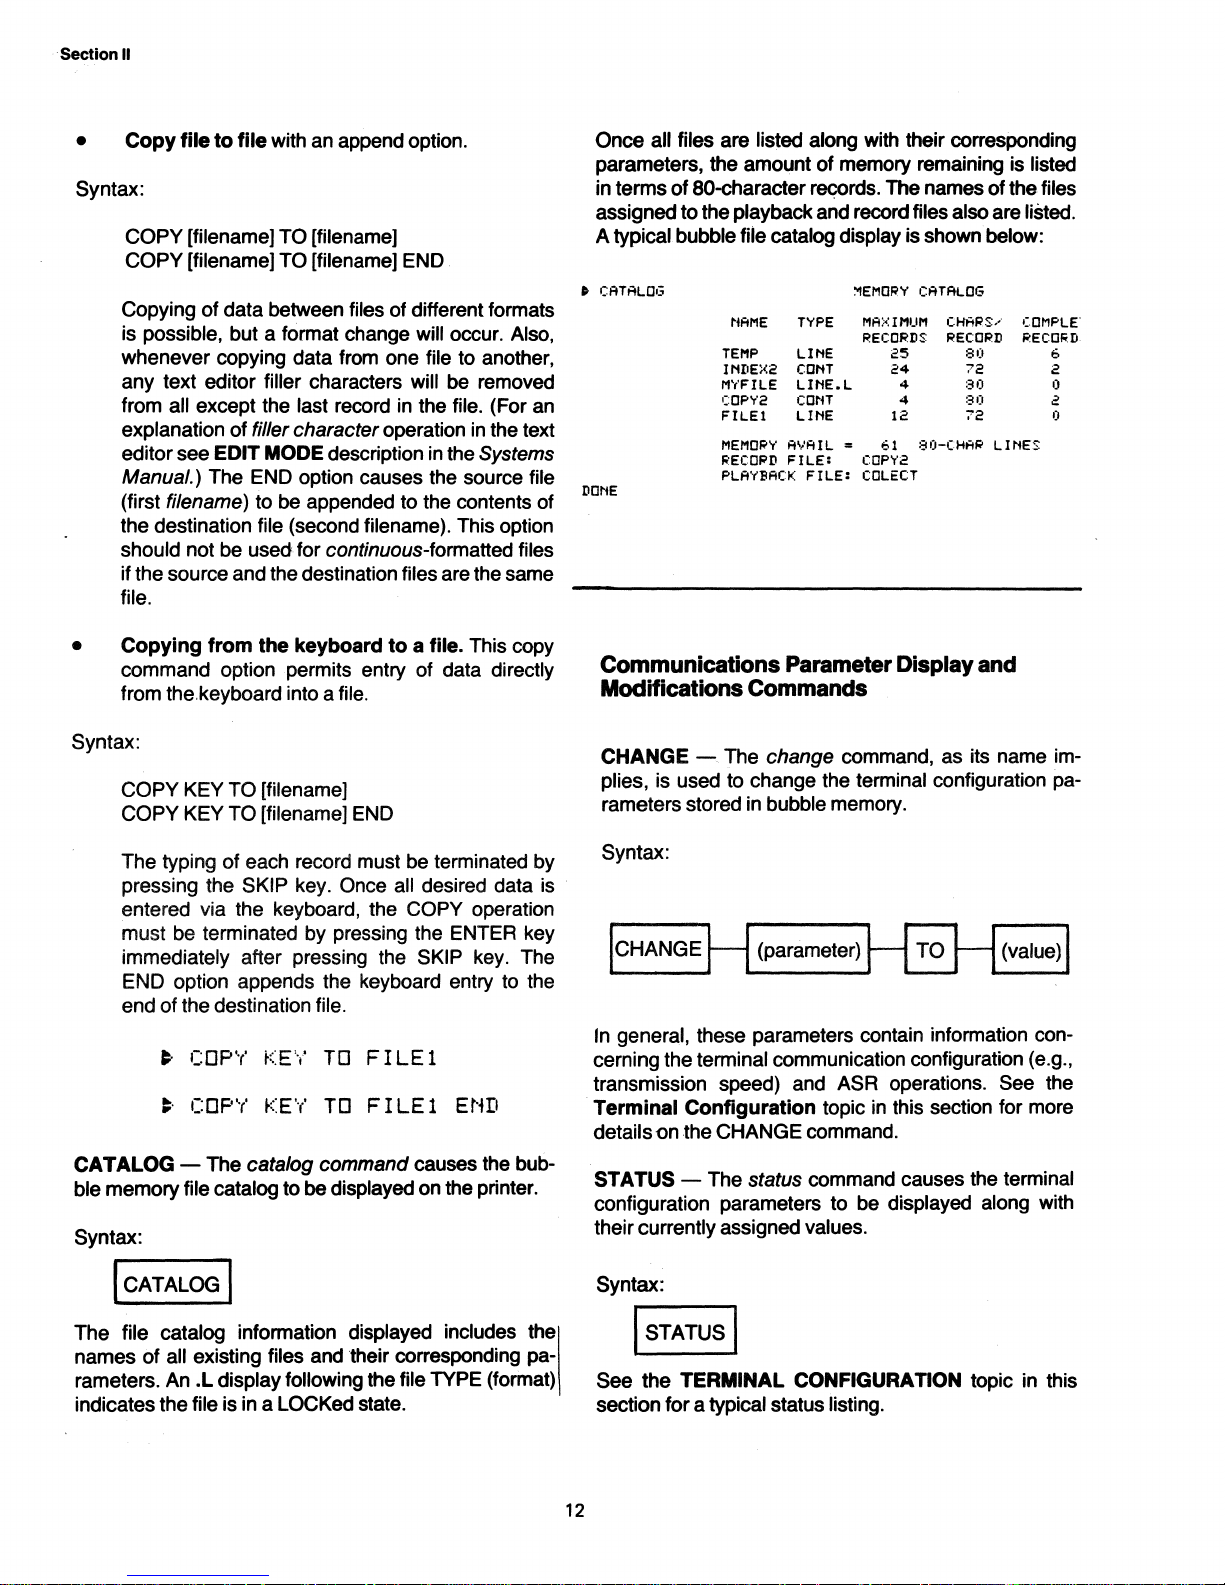
Once all files are listed along with their corresponding
parameters, the amount
in terms
assigned to the playback and record
A typical bubble file catalog display is shown below:
•
CATALOG
DONE
of
80-character
NAME
TEMP
II'IDEX2
MYFILE
':OPY2
FILEt
MEMORY A .....
RECOI1D
PLAYBACK
of
memory remaining is listed
~rds.
TYPE
LINE
corn
LINE.L
CONT
LINE
A I L
FILE:
FILE:
The names
:-rEMORY
MAXIMUM
RECORDS
25
24
12
'"
61
COPY2
COLECT
files also are listed.
CATALOG
CHHI1S
RECORD
4
4
80-CHt=tR
80
72
80
80
72
of
...
LI
the
·
NES
COMPLE'
RECOF<D
Communications Parameter Display and
Modifications Commands
files
6
2
0
a
0
Syntax:
COPY
COpy
The typing
pressing the
entered via the keyboard, the
must be terminated by pressing the ENTER key
immediately after pressing the
END option appends the keyboard entry to the
end of the destination file.
CATALOG
ble memory file catalog to be displayed on the printer.
Syntax:
KEY TO [filename]
KEY TO [filename] END
of
each record must be terminated by
SKIP key. Once all desired data is
COPY operation
SKIP key. The
•
COPY
~
COpy
- The catalog command causes the bub-
KEY
KEY
TO
TO
FILEt
FILEt
END
I CATALOG I
CHANGE
plies, is used to change the terminal configuration parameters stored in
Syntax:
ICHANGE
In general, these parameters contain information concerning the terminal communication configuration (e.g.,
transmission speed) and
Terminal
details
STATUS - The status command causes the terminal
configuration parameters to be displayed
their currently assigned
Syntax:
-.
The change command, as its name im-
bubble memory.
H (parameter)
Configuration
-on
the CHANGE command.
topic in this section for more
values.
~
ASR operations. See the
(value) I
along with
The file catalog information displayed includes the
names
rameters. An
indicates the file is in a
of
all existing files and their corresponding pa-
.L
display following the file TYPE (format)
LOCKed state.
.....
1
S-T-AT-U-s-'I
See
the
TERMINAL CONFIGURATION topic in this
section for a typical status
12
listing.
Page 21
Section
II
ONLINE - The online command places the terminal
in
the ON LINE mode which permits data communications
with external devices. The
ON LINE lamp also will light.
Syntax:
OFFLINE - The
the OFF LINE (local) mode
tions with external devices is
nected. The
offline command places the terminal
in
which data communica-
electronically discon-
ONLINE lamp will go out.
in
Syntax:
EDIT - The edit command causes the terminal to enter
the EDIT MODE,
may be modified using the EDIT function keys
in
which the contents of a specified file
F1
through F8.
Syntax:
EDIT H (filename)
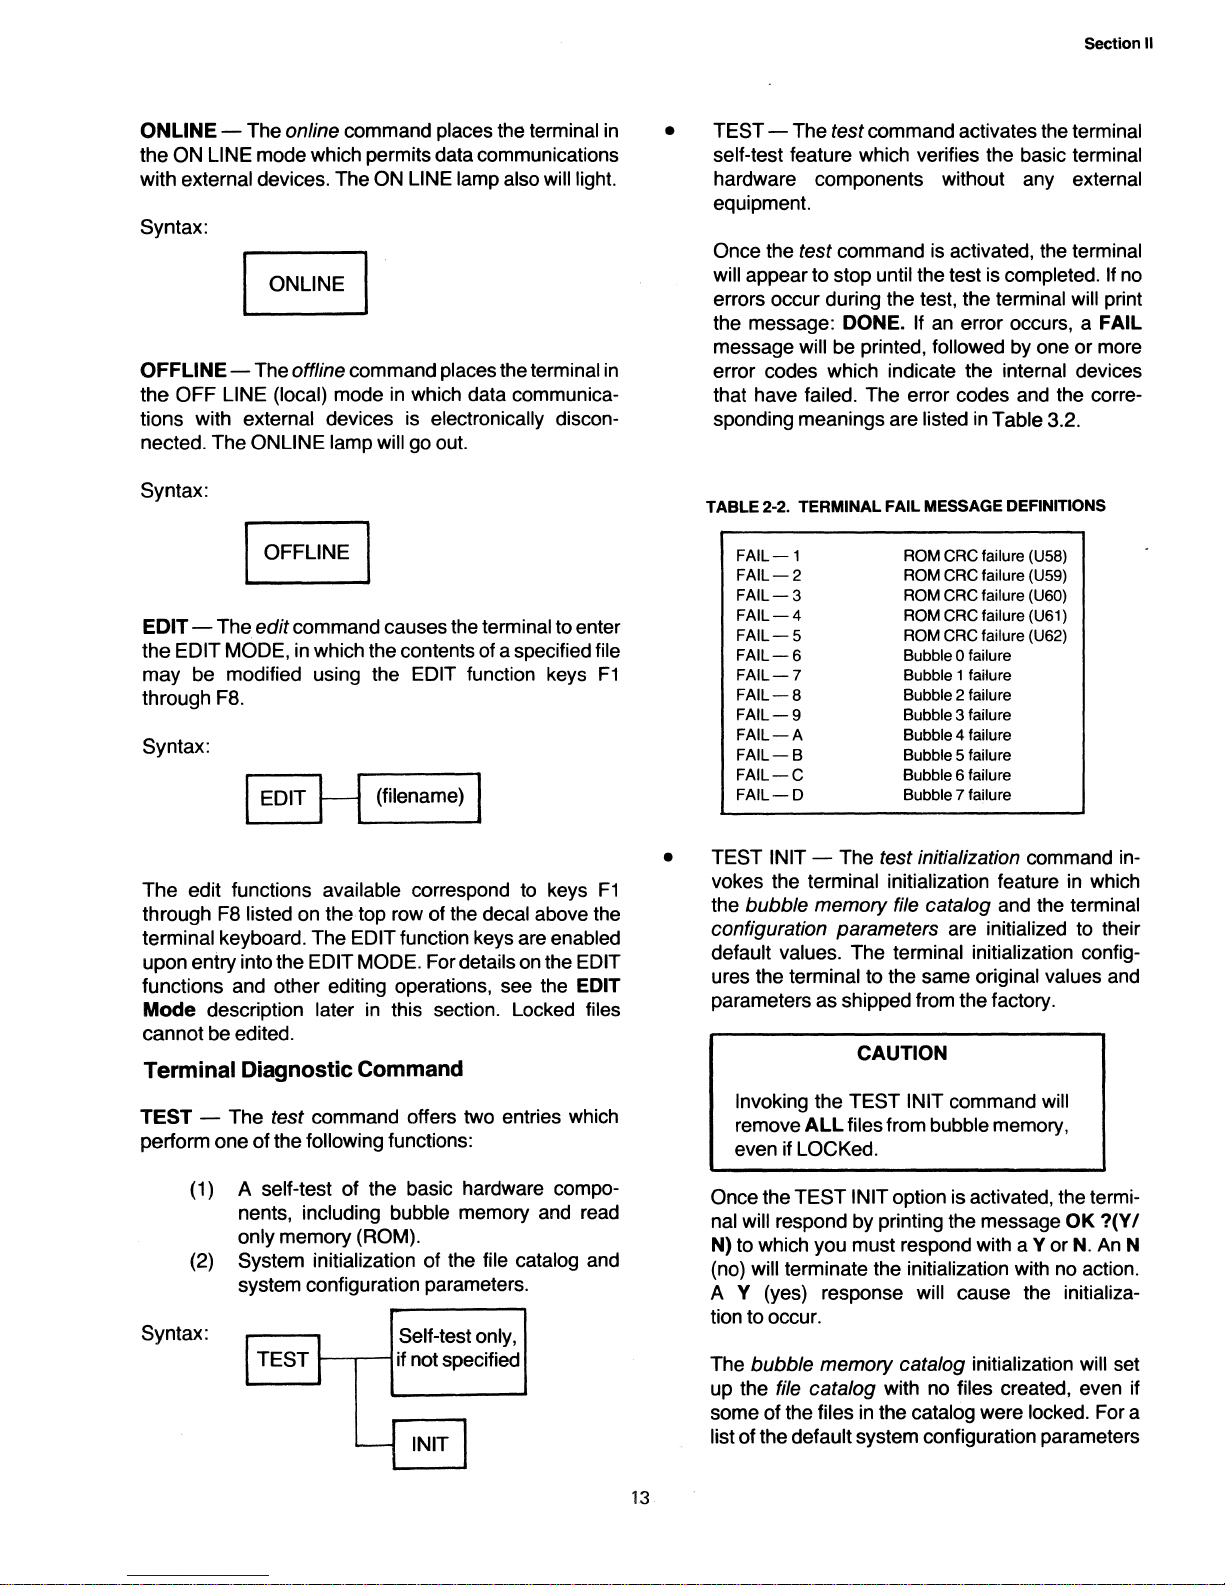
TEST - The test command activates the terminal
•
self-test feature which verifies the basic terminal
hardware components without any external
equipment.
Once the test command
will appear to stop until the test
is
activated, the terminal
is
completed. If
errors occur during the test, the terminal will print
the message:
DONE. If
an
error occurs, a FAIL
message will be printed, followed by one or more
error codes which indicate the internal devices
that have failed. The error codes
sponding meanings are listed
TABLE
2-2. TERMINAL FAIL MESSAGE DEFINITIONS
FAIL-1
FAIL-2
FAIL-3
FAIL-4
FAIL-S
FAIL-6
FAIL-7
FAIL-8
FAIL-9
FAIL-A
FAIL-B
FAIL-C
FAIL-D
ROM CRC failure
ROM CRC failure
ROM CRC failure (U60)
ROM CRC failure (U61)
ROM CRC failure (U62)
Bubble 0 failure
Bubble 1 failure
Bubble 2 failure
Bubble 3 failure
Bubble 4 failure
Bubble S failure
Bubble 6 failure
Bubble 7 failure
and
in
Table 3.2.
(US8)
(US9)
no
the corre-
The edit functions available correspond
through
terminal keyboard. The
upon entry into the
F8
listed
on
the top row of the decal above the
EDIT function keys are enabled
EDIT MODE. For details
to
keys
on
the EDIT
F1
functions and other editing operations, see the EDIT
Mode
description later
in
this section. Locked files
cannot be edited.
Terminal Diagnostic Command
TEST - The test command offers two entries which
perform one of the
(1) A self-test of the basic hardware compo-
nents, including bubble memory and read
only memory (ROM).
(2) System initialization of the file catalog and
system configuration parameters.
Syntax: Self-test only,
following functions:
.----.-----1 if not specified
TEST INIT - The test initialization command in-
•
vokes the terminal initialization feature
bubble memory file catalog and the terminal
the
configuration parameters are initialized to their
default values. The terminal initialization configures the terminal to the same original values
parameters as shipped from the factory.
CAUTION
Invoking
remove
even if
Once
the TEST INIT command will
ALL
files from bubble memory,
LOCKed.
the TEST INIT option is activated, the termi-
nal will respond by printing the message
N) to which you must respond with a Y or
(no) will terminate the initialization with
A V (yes) response
will cause the initializa-
tion to occur.
The
bubble memory catalog initialization will set
up the
some of the files
file catalog with no files created, even if
in
the catalog were locked. For a
list of the default system configuration parameters
in
OK
no
which
and
?(Y I
N.
An
action.
N
13
Page 22
Section II
created during initialization, see Section I
Systems Manual.
original settings configured
The
default parameters are the
at
the factory.
of
the
Automatic Command Execution
Automatic command execution refers to the ability
the terminal to execute commands which have been
previously stored in a file. This capability is achieved by
use
of
the
RUN command.
. Syntax:
I
RUN
The
RUN
command causes commands (such as those
described above in this section) and other
tions to be executed from a memory
the
commands
see
mand,
Section IV
H (filename) I
ASR func-
file. For details on
and functions usable with the RUN com-
of
the Systems Manual.
of
Terminal Configuration
Terminal configuration refers to the state
operating conditions,
rameters,
during
terminal configuration parameters are stored in the
bubble
of
default values (permanently programmed initial val-
ues).
which
terminal provides means
parameters. Using those means a user can define the
terminal configuration that best suits a particular applications. Means also are provided to list the configuration parameters and their corresponding,
assigned values. Parameters are stored in nonvolatile
memory, ensuring that the parameters will remain in the
defined state even if
The
eters
previously mentioned, these configuration parameters
control the operation
operations.
which dictate the behavior
data
communications and ASR operations. The
memory
To
accommodate a variety
may
require different terminal configurations, the
values assigned to specific configuration param-
may
be modified using the change command. As
called terminal configuration pa-
and are intialized at the factory to a set
of
to
modify the configuration
terminal power is switched off.
of
data communications and ASR
of
a number of
of
the terminal
applications, each of
currently
Syntax:
ICHANGE
Table 2-3 lists the parameters which may be modified
via the
entry abbreviations and
amples illustrate changing the values corresponding to
the
playback
Example 1 - Changing the playback file.
(ORDERS is the name
Example
tion:
H (parameter)
change command, along with corresponding
values. The following two ex-
file and the transmit-EDL.
CHANGE
CHANGE
CHANGE
PLAYBACK
2 - Changing the transmit-EDL defini-
XMTEOL
XMTEOL
~
TO
ORDERS
of
an existing file)
TO
DC3
TO
"4"
(value) I
For a detailed description
corresponding
the
Systems Manual.
14
possible values, see Sections I and
of
each parameter and the
II
of
Page 23
TABLE
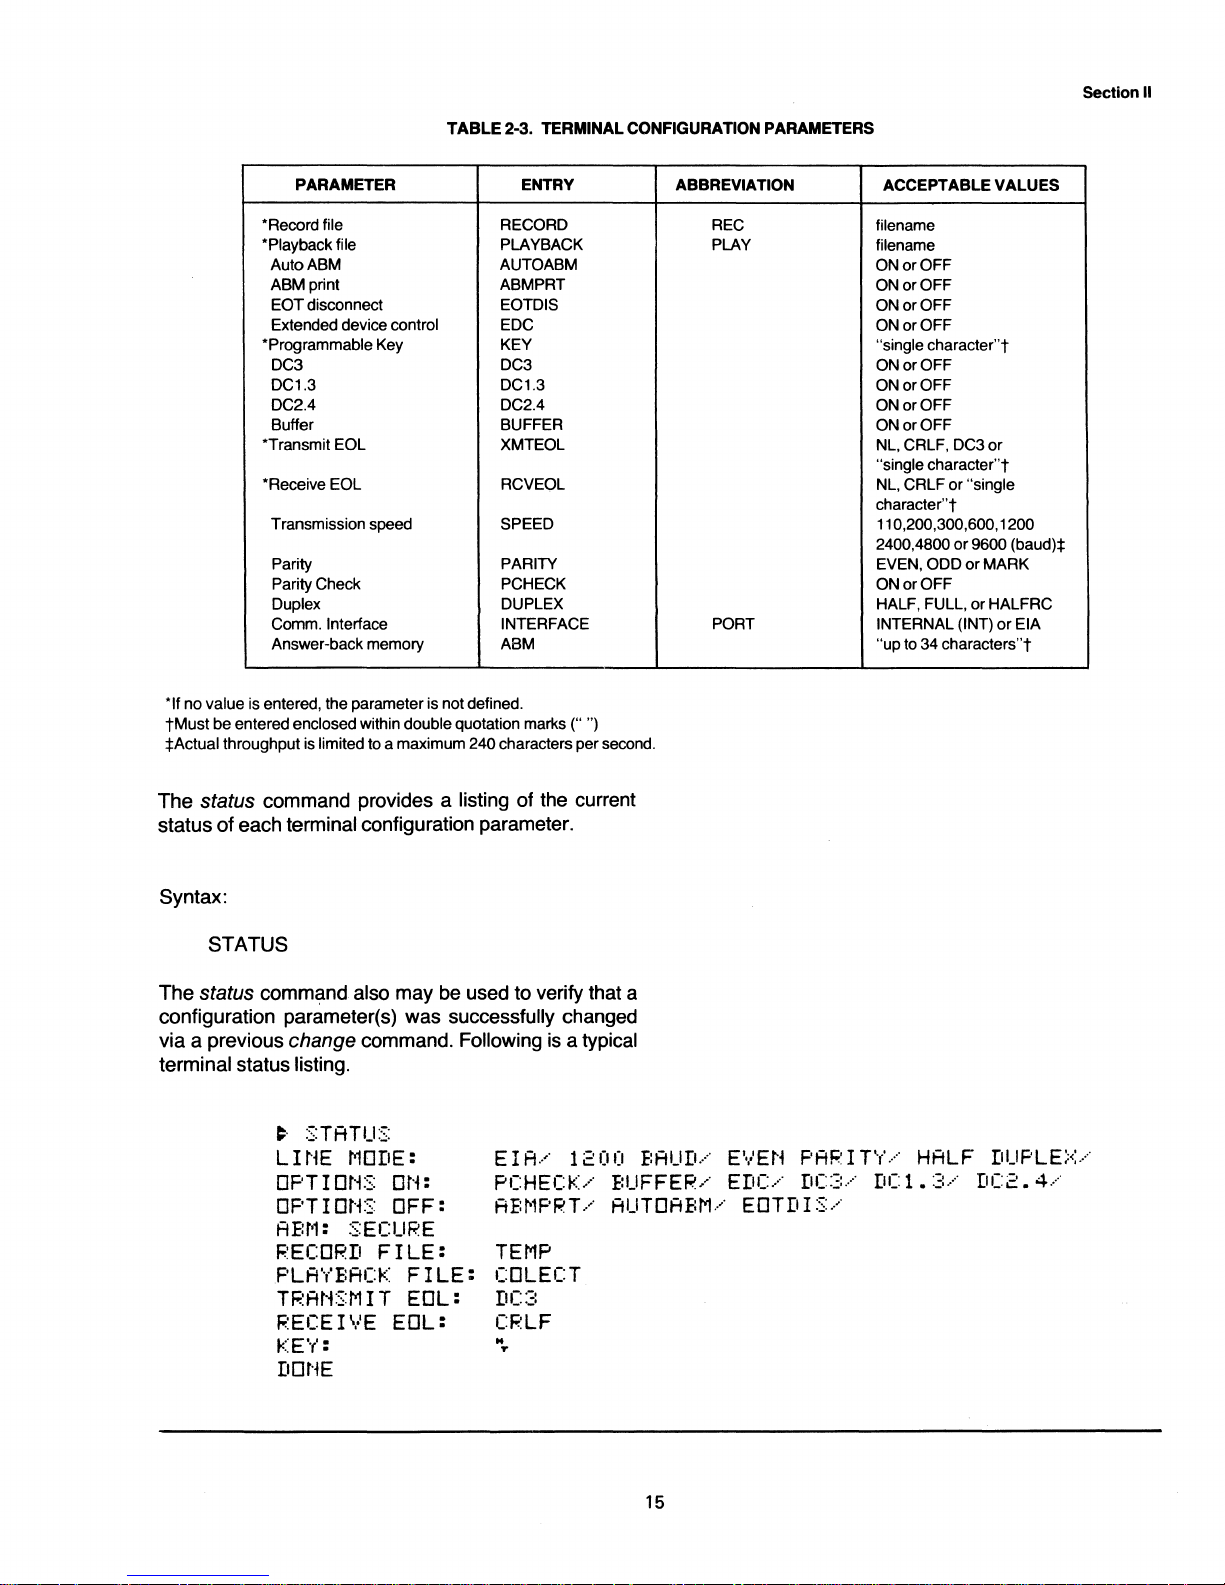
2-3. TERMINAL CONFIGURATION PARAMETERS
Section II
PARAMETER
"Record
"Playback
"Programmable
"Transmit EOL XMTEOL
"Receive EOL RCVEOL
"If
no
value is entered, the parameter is not defined.
tMust
be entered enclosed within double quotation marks (" ")
;Actual
throughput is limited to a maximum 240 characters per second.
file RECORD
file PLAYBACK
AutoABM
ABMprint
EOT
disconnect EOTDIS
Extended device control
Key KEY
DC3 DC3
DC1.3
DC2.4 DC2.4
Buffer BUFFER
Transmission speed SPEED
Parity
Parity Check PCHECK
Duplex
Comm. Interface INTERFACE
Answer-back memory
ENTRY
AUTOABM
ABMPRT
EDC
DC1.3
PARITY
DUPLEX
ABM
ABBREVIATION
REC
PLAY
PORT
ACCEPTABLE VALUES
filename
filename
ON or
OFF
ON or
OFF
ON or OFF
ON or OFF
"single
character"t
ONorOFF
ON or OFF
ON
or OFF
ON
or OFF
NL. CRLF, DC3
"single
character"t
NL, CRLF or "single
character"t
110,200,300,600,1200
2400,4800 or 9600
EVEN, ODD or
ONorOFF
HALF, FULL, or HALFRC
INTERNAL (INT)
"up
to 34
or
(baud);
MARK
or
EIA
characters"t
The status command provides a listing of the current
status
of
each terminal configuration parameter.
Syntax:
STATUS
The status command also may be used to verify that a
configuration parameter(s) was successfully changed
via a previous
change command. Following is a typical
terminal status listing.
~
STATUS:
LH~E
OPT I ONS:
OPT
ABM:
F.:ECORII
MODE:
I Dt'E:
S:ECURE
FILE:
Dt~:
OFF:
PLA'y'E:ACI<
TRANSMIT
F.:ECE I VE
EOL:
I<EY:
I1Dt'~E
FILE:
EOL:
EIA/
PCHECI</
ABMPRT/
TEMP
COLECT
I1C3
CRLF
T
"
1200
BUFFER/
AUTOABM/
BAUD/
EVEN
EDC/
PARITY/
DC3/
EOTDIS/
HALF
I1C1.3/
DUPLEX/
I1C2.4/
15
Page 24
Section II
ASR Mode Functions
When the terminal is in the ASR mode, the function keys
F1
through
FO
control the designated PLAYBACK and
RECORD files. Only one file at a time can be designated
the PLAYBACK
file and only one file can be designated
the
RECORD file. A CHANGE command is used to
designate one of the
files in memory to be the PLAY-
BACK
and/or
RECORD file. For example, to designate
a file by the name
of
DATA-1 the PLAYBACK file, the
procedure is as
follows:
1.
Press the CMD key to place the terminal
in
the COMMAND mode.
2.
Type CHANGE
PLAYBACK
TO DATA-1.
3.
Press the SKIP key to execute the com-
mand.
Once the three steps are completed, all functions
labeled
PLA
YBACK
(F1,
F3,
FS,
F7,
and F8) take action
on the DATA-1 file. The same is true with the
file desig-
nated the
RECORD
file. Files that are designated
PLA
YBACK
and
RECORD
can be either the same files
or
different files.
ASR function keys are activated by pressing and holding the FCTN key on the lower right corner of the keyboard and then pressing the appropriate number key
along the top row of the keyboard. For example, to
activate the
REWIND PLAYBACK function, press and
hold the FCTN key and press the 5 key.
The
following ASR functions control the PLAYBACK
and
RECORD files.
3.2.3.1 ASR MODE
Function
Keys.
F1 -Playback
On. * The PLAYBACK file will output its
contents to the terminal printer and/or the communications
line, depending on the terminal parameters pre-
viously set (use the STATUS command to check). The
PLAYBACK file will continue to output whatever
is
stored in it until either the terminal detects the
end
of
the
text
or
the PLAYBACK OFF (F3) function is activated.
As a tape recorder will begin to
play back from the point
where the tape was
last stopped, the PLAYBACK
ON
function begins outputting the contents of the file at the
record and character
last addressed.
\
F2 -
Record
On. The file designated as the RECORD
file
will accept data from the keyboard and/or the com-
munications
line. If the file has been formatted
in
LINE
format, the terminal will store a
line of data
in
a memory
'When
the tenninal is off line. the ENTER key also may
be
used to
perfonn the
playback-on function.
16
record each time the SKIP key is pressed. If the
RECORD file is in CONTINUOUS format, the data will
be stored in a memory record every time the designated
record length is filled. The
RECORD ON function re-
mains on until the file is filled, the
RECORD OFF func-
tion (see F4) is detected,
or
the COMMAND mode is
entered.
F3 -
Playback
Off. The PLAYBACK file will stop after'
one more character is processed.
F4 -
Record
Off. The RECORD file will stop.
F5 -
Rewind
Playback. The PLAYBACK file will return
to the beginning
of
the file. If the . PLAYBACK and
RECORD files have the same filename, whenever the
designated PLAYBACK file current record is moved
forward or backward, the
RECORD file also is affected.
For example, if DATA-1 is both the PLAYBACK and
RECORD file and the REWIND PLAYBACK function is
used, the
RECORD as well as the PLAYBACK file will
be rewound.
If the files had different file names, the
REWIND PLAYBACK would not affect the RECORD
file.
F6 -
Rewind
Record. The RECORD file will return to
the first record of the
file and if the PLAYBACK and
RECORD files are the same,
F6
will also rewind the
PLAYBACK
file.
F7 -
Playback
Forward. The remainder of the current
memory record will be printed.
If the PLAYBACK file is
already at the end of a record, the next record will be
printed.
If the next record is the end of the text, nothing
will be printed.
F8 -
Playback
Reverse. The PLAYBACK file will
return to the beginning
of
the current record. If it
is
already at the beginning of a record, the PLAYBACK file
will
go
to the beginning of the previous record.
NOTE
The
following two functions do not ap-
pear on the
label above the keyboard.
F9 -
Printer
On. The terminal printer will be switched
on. This function is
automatically active either when the
COMMAND mode is entered or when power to the
terminal is switched on.
FO -Printer
Off. The terminal printer will be switched
off. The primary use of this function is during communications when you
do
not want to have a copy of the data
being transmitted
or
received.
Page 25
Section
II
Special Keys
The
s~e~ial
and
FJ,§bP.
COMMAND and ASR modes with slightly different
sults. The following discussion concerns itself with the
special keys when operating
with
RECORD ON.
CHAR Key - The CHAR key
--
used to move the printhead (and the memory pointer)
- -
one character forward or backward. When the CHAR
key is pressed, the printhead will move to the left (or
backspace) one character.
the printhead
released. The back-character function
an
"intelligent" backspace because the printhead will
move backward over blank spaces, but it
line-feed before it backspaces over the first non-blank
character position
positioning the printhead directly under printed charac-
ter(s) to be corrected, or to simply backspace the print-
head over blank spaces which are to
from the keyboard.
The CHAR key is useful
data when the terminal is in the ASR
modes. To correct
being entered, press the CHAR key until it
desired location for error
mation may then be entered from the keyboard. The
new data
The CHAR key, pressed in conjunction with the SHIFT
key, is useful for moving the printhead (and the character pointer) to the right after making a correction to
entered data.
pressed, the printhead will continue moving to the right
until the keys are released. Note that for
character forward spacing, the SHIFT key need be held
only for the first character-forward.
When CHAR (character-forward)
ters
will be printed as they are "passed over". If a
character-forward is attempted at the end of a record,
the audible tone
in
its current position. Any number of combinations of
forward-character and back-character operations are
permissible
a LINE-formatted file, the CHAR key is usable only with
the present record. when used with
CONTINUOUS format, the CHAR key
the entire range of the file, without regard
physical record boundaries.
keys affecting the ASR mode are
These keys may
in
the off-line
--
will continue moving to the left until it
it
encounters. This has the effect of
in
is
If the key is held pressed,
correcting errors
-
an
error
on
the current line of data
correction. The correct infor-
will replace the old data
--
If the CHAR key (and SHIFT) is held
--
will sound and the printhead will remain
in
any
particula~cord.
be
used
a dual function key
is
referred
will perform a
be
filled with data
and
in
the memory.
is
activated, charac-
When operating
files recorded
is
operable over
__
C~R
in
both the
re-
ASR
mode
-
to
as
in
entered
COMMAND
is
at the
multiple-
on
in
to
logical or
is
F~D
ASR
ASR
sidered as a record forward/back function.
like the CHAR key,
SHIFT key. That
the beginning of the current record being entered. When
the
printhead
or forward, to the
Like
cause
When corrections are to
of a record, the
CHAR keys. Likewise, once a correction
entry
entered, the SHIFTed FIELD key is useful
over"
and
It should
records.
BACK or
just the current response to a prompt from the PLAYBACK file. The
utilizing the
sponse operations
3.2.4
tained by the Model 763/765 firmware may
two files designated PLAYBACK and
The playback pointer will reset to point to the beginning
of the file deSignated PLAYBACK whenever
function-5 (rewind playback)
back pointer
ever
if the pointer is at the beginning of a record. If the
pOinter is at any other location, it will be moved to the
beginning of the current record. The playback pointer
will be incremented by one record when
tion 7 (playback forward) is performed when the pointer
is at the beginning of a record.
location, the pointer will move to the end of the current
record. The pointer also will advance by one record
whenever a complete record is read from the playback
file. This can be caused by
Key - The other special key applicable to the
--
and
COMMAND modes is the FIELD key.
mode this key should more accurately be con-
is
determined
is,
the FIELD key by itself will move to
FIELD key
the
all
is
pressed along with the SHIFT key, the
(and
the record painter) will move to the right,
I~haracter
SHIFTed CHAR key, a SHIFTed FIELD key will
characters "passed over" to be printed.
be
made toward the beginning
FIELD key is often faster than multiple
-
is
to
-
the last character previously entered.
rest to the operator. These pointers are the PLAYBACK
and the
pointers is to
an
continue at
all
data between the current printhead position
be
noted that the FIELD key refers to complete
When
responding to prompts from a PLAY-
RUN
file, the entire record will
Systems Manual describes methods of
FIELD key
POINTER CONTROL. Two "pointers" main-
RECORD pointers. The purpose of these two
"remember" the current file position of the
will
be
ASR
function-8 (playback reverse)
~
end of the data already
in
conjunction with prompt/re-
in
the ASR mode.
decremented by one record when-
an
by
the use of the
of the
is
performed. The play-
ASR function 1 (playback
curr~t
be
RECORD.
If it
is
is
is
an
at any other
In
the
Its direction,
record.
made and
in
"passing
affected, not
be
of inte-
an
ASR
performed
ASR func-
17
Page 26
Section II
on) and the subsequent processing (in the case of a
LINE-format file) of
of a
CONTINUOUS format file, the pOinter will advance
an
end-of-line character.
In
the case
one record for each complete physical record
processed.
The
record pointer* operates
playback pOinter, except that it operates
currently designated the
reset to the beginning of a file when
is.
(rewind record)
in the case of a
performed. It is advanced one record
"'ine format" file whenever
line character is recorded;
ous format" file, when a
in
a manner similar to the
on
the file
RECORD file. The pointer
an
ASR
function 6
an
end-ofanpin the case of a "continucomplete physical record
entered.
The two pointers are
dently of each other.
file is designated to be both the
BACK
files, the two pOinters are maintained always
equal to each other. That is,
function 6 (rewind record)
normally maintained indepen-
In
the special case when the same
RECORD
in
this special case, a
will result
and
PLAY-
in
both the record
and playback pOinters being reset to the beginning of
the file. Similarly,
either painter
an
incrementing or decrementing of
will cause the other pointer
to
change
. identically.
When new
RECORD or PLAYBACK files are assigned
using the CHANGE command, the corresponding
should
be rewound
(FS,
F6) to guarantee the position of
the pointer.
is
is
file
EDIT Mode
The EDIT mode is the terminal mode which enables the
operator to edit the contents of
may
be
edited if it is not LOCKed. Editing of files is done
on
a record basis which means the contents of the file
may be edited one record at a time.
As
previously mentioned, entry into the EDIT mode
accomplished using the EDIT [filename] command
which the name of the file to be edited
entry into the
top section of the
EDIT mode, the functions shown
decal above the keyboard are active.
The labeled functions correspond to the function keys
through 8 keys).
Editing function keys are activated by pressing and
holding the FCTN key
on
keyboard and then pressing one of the number keys, 1
through
function
and
Once the terminal is
8.
For example, to activate the PRINT (F4)
in
the EDIT mode, press and hold the
press the number 4
key.
in
complished by using one of the
tion keys
(F1
through
F4)
modifications are desired. Functions that may be used
to locate records to be edited include
(F2), TOP (F3), and PRINT (F4). These functions cannot be used
on
empty files;
audible tone will result. Detailed use of each of these
functions
is
described later
an
existing file. Any file
is
specified. Upon
on
the lower right corner of the
FeTN
the EDIT mode, editing
"record
locating"
to locate the record
INDEX
an
error message or
in
this section.
in
(Fl),
is
func-
which
FIND
.is
In
.the
(1
key
ac-
an
're-cord'
herein to define a
as
in
storing data: not to be confused with re'-cord, used
line
of
data (also called a physical record).
Once the record requiring editing
is
found, the record
will be printed by the terminal and editing can be performed within that record using the CHAR and
FIELD
keys and the DELETE CHARACTER (F6) and INSERT
(F7) functions. Deletion of records may
plished by use of the DELETE LINE
(FS)
b~
accom-
function. When
all editing of the record is accomplished, pressing any of
the
"record
cause the edited record to be returned
locating"
function keys
(Fl -F4)
to
its correspon-
will
ding place in memory, and the selected "record
locating" function will be performed.
Upon entry into the
not empty, the editor
INDEX function
ETX message will be printed, indicating that that point is
EDIT mode, if the file to be edited is
will automatically activate the
(Fl).
If the file to be edited
is
empty,
an
the end of the text. The terminal then will await the entry
of a function to perform. The only functions permitted
during editing of an
(F7) and the
STOP function (F8).
empty file are the INSERT function
18
Page 27
The
following paragraphs describe operation of each
editing function.
3.2.5.1
EDIT MODE
Function
Keys. The operation
and
terminal responses associated with each function
key are described in this section. For additional
details
concerning the editing functions, see Section I of the
Systems Manual.
F1 -INDEX
Function.
The INDEX function provides
access to records during file editing. Records are accessed
relative to a record pOinter which "points" to the
record in the
file which was accessed. Upon entry into
the
EDIT mode, the record pointer will point immediately
above the first record in the file.
Activating the INDEX function causes the terminal to
perform a carriage return,
followed by a line feed and
printing
of
the INDEX prompt symbol + . A signed
(+
or
- ) number from 0 to 999 may then be typed to specify
the
location of the desired record relative to the record
currently pointed to. If no sign
(+
or
-)
is specified, the
teminal assumes the number is positive. The entered
number
may be corrected using the CHAR key.
-
Once the desired number is entered, the entry is terminated by pressing the
SKIP key. The terminal will then
add (subtract if a negative sign was entered) the number
to (from) the current record
location and go to the
new
record location. When the requested location is
reached, the
terminal will print the record, making it
available for editing.
For
example, if the current location is the tenth record in
a
file, typing a
-6
will cause the INDEX function to
relocate
the
record "pOinter"
to
the fourth record in the
file.
If
the SKIP key is pressed before a number is entered, a
1 is assumed by the terminal. As a result, the terminal
will then point to the next record in the file. Typing a zero
will keep the
pOinter at the current record location. Acti-
vating any of the other
"record locating" function keys
(F1
- F4),
or
the INSERT function key, will terminate
the
INDEX function and will initiate the new function.
In summary:
•
A signed number followed by pressing the SKIP
key will move the editing record pointer that number
of
records and direction
(+
or
-).
For exampie, if you want to review the text six records
before the current record in the
file, type a
-6.
If no
number is entered, a
+1
is assumed.
19
•
Section II
All files in memory start at record 0 and data starts
at record
1.
This means that record 0 is not used to
store data, but
simply. is a record which comes
before the first data record
in
the file. The concept
of record
0 is necessary to insert data before the
first record in the
file.
•
The editing record pointer cannot go to a negative
record
location (Le., before the first record in the
file). For example,
ifthe
record pointer is located at
the fifth record in the file and you enter
-6,
the
record pointer
would not
"go
negative", but would
point
to
0, just before the first record
of
the file.
• If the number entered causes the pointer to move
to a record beyond the
last record in the file, an
ETX (end of text)
symbol will be printed and the
record pointer will point to the
last existing record
in the
file.
F2
- FIND
Function.
The FIND function is used to
locate a memory record which contains a defined character string (a group of characters). Upon activating F2,
the
terminal will print the FIND prompt symbol
( (:. ) in the left margin. A character string of up to 30
characters may then be typed. While typing the char-
~
-
acter string, the CHAR and FIELD keys may be used to
- -
make corrections.
After entry
of
the character string, press the SKIP key.
The
terminal then will forward space once and print the
FIND symbol and begin a search for the character string
in the
file contents. The search will start at the current
record location plus one record. When the desired
record is
located, the terminal will print the record and
the record pointer will point to this record. The record
then is
available for editing.
If the defined character string is not found before the end
of
the text
is
reached, the terminal will print an ETX,
indicating the end
of
the text, and the record pointer will
point to the
last record in the file.
Multiple
searches for the same text (that is, searching
for
the same character string in more than one record)
may
be accomplished by activating F2 and then using
- .
the
FIELD key (SHIFT and FIELD) which will cause the
most
recently defined character string to be reprinted.
Pressing
the
SKIP key at this point will cause the termi-
nal to begin the search for that string. .
Some
general rules for using the FIND function are
• Unless you are sure the character string you want
is
located between the current record plus
one
record and the end of the file,You should return
Page 28
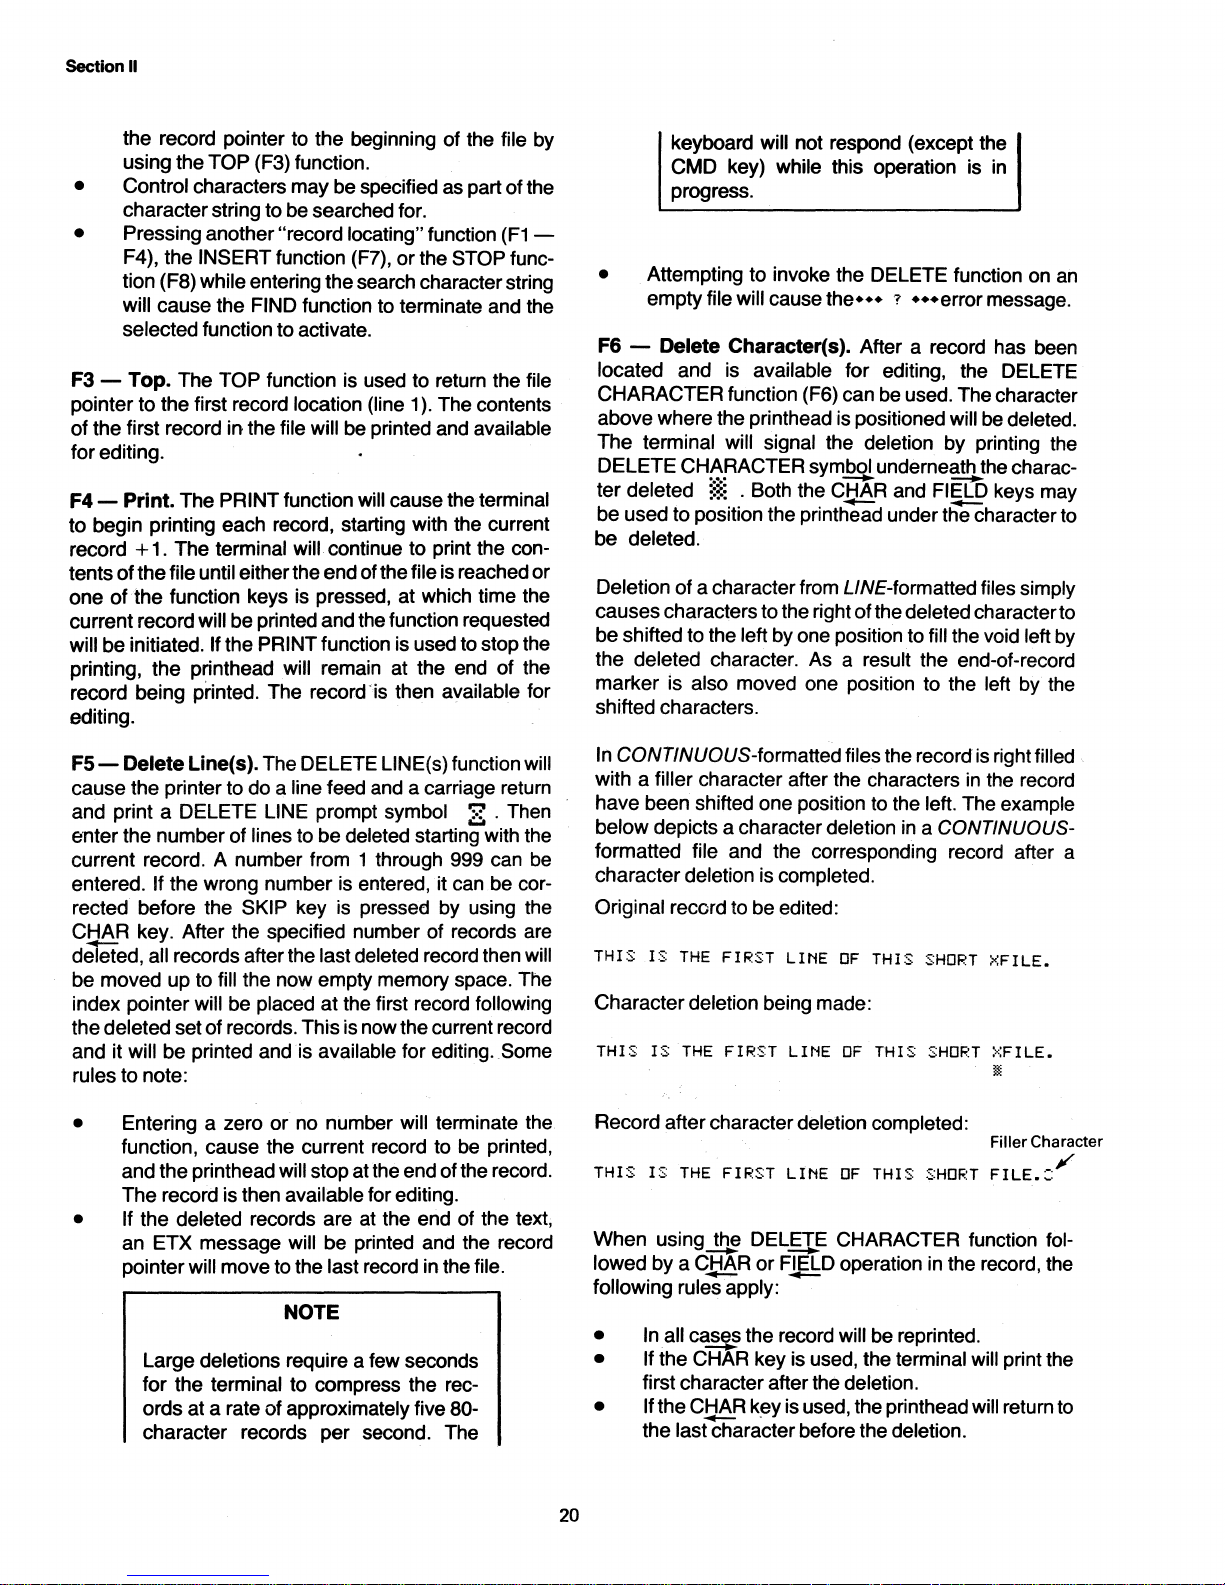
Section
II
the record pointer to the beginning of the file by
using the
Control characters may be specified as part
•
character string to be searched for.
Pressing another
•
F4), the
tion (F8) while entering the search character string
will cause the
selected function to activate.
F3 -
Top.
pOinter
of
for editing.
F4 -
to begin printing each record, starting with the current
record
tents
one
current record will be printed and the function requested
will be initiated.
printing, the printhead will remain at the end
record being pnnted. The
editing.
to the first record location (line 1). The contents
the first record
Print.
+ 1. The terminal will continue to print the con-
of
the file until either the end of the file is reached or
of
the function keys is pressed, at which time the
TOP (F3) function.
of
the
"record locating" function
INSERT function (F7), or the STOP func-
FIND function to terminate and the
The TOP function is used to return the file
in
the file will be printed and available
The PRINT function will cause the terminal
If the PRINT function is used to stop the
record"is then available for
.
(F1
of
-
the
keyboard will not respond (except the
CMD key) while this operation is in
progress.
Attempting to invoke the DELETE function on an
•
empty
F6 located and is available for editing, the DELETE
CHARACTER function
above where the printhead is positioned will be
The terminal will signal the deletion by printing the
DELETE CHARACTER
ter
deleted
be used to position the
be
deleted.
Deletion
causes characters to the right ofthe deleted character to
be shifted to the
the
deleted character. As a result the end-of-record
marker is
shi.fted characters.
file will cause
Delete Character(s). After a record has been
I;
. Both the CHAR and FIELD keys may
of a character from LINE-formatted files simply
left by one position to fill the void left by
also moved one position to the left by the
the·
••
?
•••
error message.
(FS)
can be used. The character
deleted.
symbol underneath the charac-
printti:iad under the character to
F5 - Delete Line(s). The DELETE LlNE(s) function will
cause the printer to do a
and print a DELETE LINE prompt
enter the number of lines to be deleted starting with the
current record. A number from 1 through
entered.
rected before
CHAR key. After the specified number of records are
de1eted,
be moved up to fill the now empty memory space. The
index
the deleted set
and it will be printed and is
rules to note:
•
•
If the wrong number is entered, it can be cor-
the SKIP key is pressed by using the
all records after the last deleted record then will
pOinter will be placed at the first record following
of
records. This is now the current record
Entering a zero or no number will terminate the
function, cause the current record to be printed,
and the printhead
The record is then
If the deleted records are at the end of the text,
an ETX message will be printed and the record
pointer will move to the
Large deletions require a few seconds
for the
ords at a rate of
character records per second. The
terminal to compress the rec-
line feed and a carriage return
symbol
9..
...
Then
999 can be
available for editing. Some
will stop at the end of the record.
available for editing.
last record in the file.
NOTE
approximately five 80-
In
CONTINUOUS-formatted files the record
with a filler character after the characters
have been shifted one position to the
below
depicts a character deletion
formatted file and the corresponding record after a
character
Original
THIS
Character deletion being made:
THIS
Record after character deletion completed:
THIS
When
lowed
following rules apply:
•
•
•
deletion is completed.
record to be edited:
IS
THE
FIRST
IS
THE
FIRST
IS
THE
FIRST
using~
by a CHAR or FIELD operation in the record the
~
In
all
c~
If the CHAR key is used, the terminal will print the
first character after the
If
the
C~R
the
last character before the deletion.
LINE
OF
LINE
LrNE
OF
DELEIE
the record will be reprinted.
k~y
CHARACTER function fol-
.....-
is used, the printhead will return to
in
THIS
OF
THIS
THIS
deletion.
is
right filled
in
the record
left. The example
a CONTINUOUS-
SHORT
SHORT
SHORT
XFILE.
>::FILE.
Ii
Filler Character
FILE.:~
t
..
20
Page 29

If
the
FIELD key is used, the printhead will remain
•
•
F7 -Insert
used
records
has
been located for editing, the printhead should be
moved
desired using the CHAR and
the
INSERT
~
to
location in the record where the insertion begins. Any
existing characters at
be
"saved"
Upon termination of the insert operation, the saved
characters
record inserted.
While entering the text to be inserted, the CHAR and
FIELD keys may be used
- -
within the text being inserted. Modifications to the con-
-
tents
this point.
must
tion cause inserted characters to the right of the print-
head to
insertion within a record:
-
at the end
If
the
the beginning
to
insert
of
to
be
of
the remainder
be
done
be
of
the record.
FIELD key is used, the printhead will return to
of
-
Function.
data
data
the point
functionwill
printed, followed by a line feed indicating the
at this time until the insertion is terminated.
will be appended to the end of the final
Also, terminating an insertion within a record
carefully since some means of termina-
discarded. The following example shows an
the record.
The
INSERT function may be
within a record
in a file. In the first use, after the record
~he
record
cause
or
to the right of the printhead will
to
of
the record are not possible at
and/or
~here
FIELD keys. Activation of
the
make corrections, but only
to insert entire
the insertion is
open insert symbol
-
I Characters Saved
Section
following each other
of
each inserted record. Note that use
end
key (and the
inserted characters in the record to the right of the
printhead to
Once
all desired records are inserted, the INSERTfunc-
tion
may
locating"
DELETE LINE function key (F5). Upon termination of
the
INSERT operation, the CLOSE INSERT symbol
will
be
of
the INSERT operation then will
contents
plus the contents
ated record
following the last record inserted. The added record will
contain
which
examples
THIS
THIS
THIS
Final text:
THIS
THIS
THIS
SKIP key in LINE-formatted files) will cause
be
be terminated by pressing any
function keys
printed.
of
the last record inserted. If the appended text,
length, an additional record will be added
only that part
overflowed the previous record. The following
shows an insertion
~
IS
IS
SECOND
IS
THIPD
IS
FIPST
IS
SECCN~
IS
THIPD
by
pressing the ENTER key at the
of
discarded.
of
the "record
(F1
- F4)
The
characters saved (if any) at the start
of
the last record, exceed the design-
of
the appended character string
Existing Record
FIPST
~---~---------
~INE.
THIS
THIS
l.INE.l
l.INE.
I
oTHIS
LINE.
THIS
LINE.
LINE.TMIS
or
by pressing the
be
appended to the
of
several records.
IS
END"
OF
FILE
TO
CONTINUE.
Inserted Records
IS
ENI)
OF
FILE
TO
CONTINUE.
IS
END
OF
FILE.
FILE.
FILE.
the ENTER
qP)
II
r
THIS
Final text:
THIS
When
records
during insertion. The
the
formatted files; in CONTINUOUS-formatted files, press-
ing
of
line
the
record, and its contents will be returned to memory. The
terminal then will perform a carriage return and line feed
and
record
IS
A
SHORT
"i' r Characters Appended
~!!.!
Inserted Text
IS
inserting text within an existing record, additional
may
ENTER
the
for termination of a record only in LlNE-
SKIP
key while editing a record will cause an end
symbol
ENTER
will open a
key will terminate editing of the current
just
closed. Additional records may be inserted
I
-l
A
VERY
be inserted by use of the ENTER key
(
II
) to be stored in the record. Pressing
new
RECORD.
r
uSHORT
SHORT
SKIP key may be used instead of
record to be inserted following the
_rAt
"
_A.
RECOR~
RECORD.
A
few
guidelines
be
observed:
• Deletion of characters (F6) is not possible during
INSERT function; attempts
the
will cause the audible tone
ters
ing an
• During insertion
sound when the printhead reaches
before the end of the deSignated record
to warn that the maximum record length
approaching.
• When an insertion is done on an existing record,
characters
saved upon activation of the
These characters will be appended to the
record inserted when the INSERT function is terminated.
maximum record
be
inserted automatically to accommodate the
saved characters.
available in the file, the additional characters will
for
using the INSERT function should
to
delete charac-
to
sound, signify-
invalid operation.
of
a record, the audible tone will
10 characters
to
the right of the printhead will be
INSERT function.
If the saved characters then exceed the
length, an additional record will
If no additional record space
length
is
last
is
21
Page 30
SectIon II
be lost, and error code ***69*** will be printed.
A"
appended characters will be printed by the
terminal.
When inserting records, if no more empty records
•
are available in the
be terminated automatically and the INDEX function will
An attempt to insert records into a
•
empty records available will cause printing of
the···
When less than 10 available records remain
•
file, the audible tone will sound each time a new
record is opened for insertion.
INSERT functions are not possible if the terminal
•
is already performing
words,
The
•
insertions within a record before the
tion is terminated.
The ENTER and SKIP keys may be used to insert
•
multiple records, but the SKIP key may be used
only for inserting into a LINE-formatted file. Press-
ing these keys will
inserted and open a new record for data insertion.
Whenever you want to insert records
•
of
following sequence should be followed:
a.
b.
c.
d.
• To insert records at the beginning of a file (i.e.,
above the first record), the
recommended:
a.
be
activated.
l'
•••
'~nested"
CtiAR
a file (i.e., between two existing records), the
and
Locate the record just before the point where
the insertion is desired.
Once the record is located and printed, with
the printhead at the end of the record, invoke
the
INSERT function (F7) and press the
ENTER key. This will close the current re-
cord and will open a new record for insertion.
If the record is completely full of characters,
pressing the ENTER key is not necessary
since the terminal will automatically open a
new record for the insertion.
Continue to type data
press the ENTER key at the end of each
inserted record.
Once
a"
nate the
of the "record locating" function keys
through F4).
Position the record pointer (printhead) be-
fore the first record in the file by performing a
TOP (F3) function followed by
(type
-1
cord pointer now
cord in the file.
by performing an INDEX
after the INDEX prompt).
file, the INSERT operation will
file with no
error message.
an
insert operation; in other
ins~rtions
FI$!!>
desired records are inserted, termiINSERT operation by pressing one
after the INDEX prompt). The re-
are not permitted.
keys can be used to correct
INSERT func-
close the record currently
in
the middle
on
the keyboard and
following sequence is
an
INDEX
pOints
above the first re-
It may also be accomplished
-999
(type
-ggg
in
(F1
-1
b. Begin insertion of records by invoking the
INSERT function (F7). Terminate each inserted record using the ENTER key.
c. Terminate the
ing one of the
through F4).
• After the text is inserted, any function except F7 or
F6 will terminate the
activate the selected function. For example, if
is selected, the INDEX function will be activated
a
upon termination of the
• Pressing the
INSERT operation will cause
the
EDIT mode and could result in partial loss of
inserted data.
F8
- Stop. This function terminates the EDIT mode
and returns the terminal to the
pressing the CMD key anytime while in the EDIT mode
will cause the terminal to terminate the EDIT mode
abnormally, and is not recommended.
CMDkey
INSERT operation by invok-
record locating functions
INSERT function and will
INSERT operation.
or loss of power during
an
abnormal exit of
ASR mode. Note that
(F1
F1
an
22
Page 31

Editing A Record
Once a record is located by using one of the record
locating functions
(F1
through F4), the record will be
printed by the terminal, and the printhead
will remain at
the end
of
the record. The record then may be edited
using the
following guidelines:
• The CHAR and FIELD keys may be used to position
the printheadbelow the character(s) to be
modified. Then you may
"overstrike" existing
characters, or you may add characters to the
existing contents of the record as
long as the
designated maximum record length is not
exceeded.
• The DELETE CHARACTER function
(FS)
may be
used to delete characters within the record.
• The INSERT function may
be
used to insert char-
acters in the record.
• The ENTER key may be used to delete all characters to the right of the printhead,
close the current
record, and access the next record in the
file. (The
SKIP key will perform the same function, but only
on LINE-formatted files.) Using the ENTER key
you can step through an entire file, record by
record, since pressing the ENTER key
also will
cause the next record in the
file to be printed and
made available for editing.
• When editing CONTINUOUS-formatted files, the
SKIP key will generate a special end-of-line
(EOl)
symbol
E3
in the record (This symbol
is
used as
a
line delimiter within the record.)
• Invoking any "record-locating" function
(F1
through F4) while editing a record will terminate
access to that record, store that record in memory,
and activate the selected function.
23
Section
II
Terminating An Editing Session
Terminating an editing session must be accomplished
by invoking the
STOP function (F8) which causes all
pending editing operations to finish and returns the terminal to the ASR mode.
An
editing session should never
be terminated by pressing the CMD key: inserted or
deleted data may be seriously altered. Terminating
an
editing session purges CONTINUOUS-formatted files
of filler characters by shifting data so as to replace the
purged filler-character space in memory. A message,
ONE MOMENT PLEASE, will be printed to signify this
operation.
Page 32
This
section discusses
ous
operating techniques likely
applications using
situations discussed
file, creating
in a
listing a file,
techniques
tasks.
are
the
include creating a file, storing data
the
al1d
copying files. In some cases several
illustrated
Creating A File
SECTION III
TYPICAL OPERATING TECHNIQUES
and
presents examples
to
be
encountered in
Models
answer-back memory sequence,
763/765
for
accomplishing the same
terminals. The
of
vari-
Section VI
for the operator
ations presented in this section are expanded
the exercises.
following text, working the exercises presented in
Section
of
this manual contains exercises
to
gain
"hands
If you have c:lifficulty comprehending
VI
may help.
on"
designed
experience. Situ-
upon
in
the
Before
CATALOG
CATALOG,
ensure
do
an
file.
(2)
file,
create a new
1.
2.
3.
creating a
that
not
duplicate a filename. You may have to DELETE
existing, unused file
To
create'a
type
(line
and
(4) characters
new
command (press the
and press
sufficient
new
or
continuous), (3) maximum records per
file:
Press the CMD key
Type
CREATE
Type
(your
filename)
and press the space bar.
be
an alphabet letter.
file, you may find it wise to use the
CMD
the
SKIP key). You can then
memory
to
file you must specify: (1) filename,
per
and press
is available and that you
free memory space for a new
record. Proceed as follows
to
enter the command mode.
the
space bar.
using up
The first character must
General Rules
When
creating a file, recall
•
Maximum
• Filenames cannot exceed six characters
• Filenames cannot start with a number, but numbers
Filenames
•
• Filenames
•
Maximum
•
Maximum
available termine records remaining.
key, type
to
six characters
number
may
be
cannot
cannot
length
records in a file depends on memory
to
For
Creating A File
included
use
4.
Type
the letter L
record format) and press
or
C (choose line
the
space bar.
5. Type a numeral(s} representing your choice for
the
maximum
number
of
records in the file, and
press the space bar.
6.
Type
a numeral(s} from 1
choice for the maximum characters per record.
7.
Press
the
SKIP
key.
ation
of
the file
t
by
printing DONE.
CREATE
to
80, representing your
The terminal will signal cre-
COPY2
C 4
DONE
the
following guidelines:
of
files in memory is 16
have spaces
be
KEY
or
TO
of
a record is 80 characters
the CATALOG command
to
de-
or
continuous
80
24
Page 33

Section III
Storing
The Models 763/765 data terminals provide three ways
to store data into a file from the keyboard:
• Using the RECORD function
• Using the INSERT function
• Using the
Data From
COpy
KEY TO (filename) command.
the
Keyboard
in
in
EDIT
ASR mode.
mode.
RECORD Function
The RECORD function enables the terminal to store
data into a file either from the keyboard or from the
communications line. The following instructions describe data entry from the keyboard; recording data
received over the communications
Section
file
file) using the RECORD function
1.
2.
III
of the Systems Manual. To store data into a
called filename herein (substitute your name for the
Press the CMD key and type
CHANGE RECORD TO (filename).
Press
the
SKIP
key.
line is explained
in
the
ASR
mode:
in
2.
Press
the
SKIP
key.
3.
Press and hold the FCTN key and press the 7 key
to invoke the F7 (INSERT) function.
4.
Type the data you want stored, pressing the
ENTER key at the end of each line of text.
5.
To terminate storage of data, press and hold
FCTN key and press the 8 key to invoke the
(STOP) function.
and resets the terminal to the
COpy
The third method to store data Into a file from the keyboard is to use the
at the beginning of the file.
1.
2.
Command
Press the CMD key and type
COpy
Press the SKIP
Fa
terminates the EDIT mode
COpy
command. Data wi"
KEY TO (filename)
key.
ASR mode.
be
the
Fa
stored
3.
Press and hold the FCTN key and press
to invoke the F6 (REWIND RECORD) function.
causes the data to be stored at the beginning of
the file.
4.
Press and hold the FCTN key and press
to invoke the F2 (RECORD ON) function.
mits recording of data.
5.
Type the data you want stored, pressing the SKIP
key at the end of each line of text. The CHAR
FIELD keys can be used to make changes to the
text.
6. To terminate data storage,
FCTN key and press 4 to invoke the
OFF) function.
press and hold
the
the
F4
(RECORD
6 key
2 key
F2
F6
per-
and
the
INSERT Function
Another way to store data
the INSERT function of the EDIT mode. When using this
method, keep
INSERT,
this
manual.
1.
To
type
in
mind the guidelines listed under F7 -
in
the EDIT mode presented in
enter
the
EDIT mode press
EDIT (filename)
in
a file from the keyboard
Section"
the
CMD key and
is
of
NOTE
Any
data
in
the
(filename) above
be
"written
will
replace
3.
Type the data you want stored; press
at the end
4. To terminate storage of data, press
key immediately after the last SKIP
Optional
COpy
board to be appended to the end
preserving the data originally recorded
file.
1.
2.
3.
4. To terminate storage of data, press
COpy
command causes data entered from the key-
Press the CMD key and type
COPY KEY TO (filename) END
-Press the SKIP
Type the data you want stored; press
key at the end
key immediately after the final SKIP
over";
the
of
each line
(END) Command. This variation of the
key.
of
i.e.,
old
data line
of
each line
the
new
for
text.
key.
at an existing file, thus
in
of
text.
will
data
line.
the
SKIP key
the
ENTER
the existing
the
SKIP
the
ENTER
key.
25
Page 34
Section
III
Printing a File
The
Models 763/765 data terminals provide three ways
to
print a file:
• COPY from a file to the printer
• PRINT function
• PLAYBACK function of the ASR mode.
The three variations offer different printing options;
hence it is important to choose the one most suited to CHANGE
your
application.
COpy
The
and the file to be printed need not be the PLAYBACK or
RECORD file. The COPY command provides an option
to
characters printed first:
1.
2.
From File
COpy
print control characters to list a file with the control
command will cause any file to be printed,
Press the CMD key and type
COpy
COpy
Press the SKIP
of
the EDIT mode
to
Printer
(filename) TO PRINTER
OR
(filename) TO PRINTER CTRL
key.
PLAYBACK Function
The third way to print a file is using the PLAYBACK
function of the
ters will not be printed. Printing a
follows:
as
1.
Press the CMD key and type
2.
Press the SKIP
3.
Press and hold
to invoke the F5 (REWIND PLAYBACK) function.
4. At this point it is important to check the ONLINE
indicator.
OFFLINE command to set the
prevent
the communications
5.
Press and hold the FCTN key and press
to invoke the
file will be printed without control characters.
of
the ASR Mode
ASR mode.
PLAYBACK
In
this mode control charac-
file
in
TO (filename).
key.
the
FCTN
key and press
If the terminal
accidental transmission
F1
(PLAYBACK ON) function. The
line.
is
ONLINE, use the
this mode is done
the
5 key
terminal offline to
of
the data over
the
1 key
PRINT
The second way to print a file is using the PRINT function
ters are
1.
2. Press the
3. Press and hold
4. After the
Function
of
the EDIT mode.
always printed.
of
the EDIT Mode
In
the EDIT mode control charac-
In
order to list a file in this mode:
Press the CMD key and type
EDIT (filename)
SKIP
key.
the
FCTN
key and press
·to invoke the F4 (PRINT) function. The terminal
will print the contents
file is printed, terminate the EDIT mode
by using the Fa
of
the designated file.
(STOP) function.
the
4 key
26
Page 35
Copying Files
Section III
Two basic methods are available to copy the data contained in one
data from one
file into another. (Copy means to transfer
place
in
memory to another.) One way
is
to utilize the COPY command; the other is to use the
ASR mode. The former method offers the added capability
of
copying the contents of a file to the end of the
same
file, facilitating data duplication. The latter method
allows the data to be printed
Whichever method
is
as
it
is being copied.
used, a file of either LINE or
CONTINUOUS format may be copied to a file of either
format. The advantages and disadvantages of the two
formats are discussed under
this
manual.
Using the
COpy
Command
File Format
in
Section I of
The COPY command, described above under Printing
a File, also may be used to copy the contents of one file
to another (or to the end of itself). To copy one file to
another:
1.
Press the CMD key
COPY (filename1) TO (filename2)
and
type
Using the ASR Function Keys
The contents of one file may also be copied into another
by use of the
ASR function keys. The following steps
describe this technique:
1.
Press the
CHANGE PLAYBACK TO (filename1)
This assigns the
CMD
key
and
playback
type
function to the source
file.
2.
Press the SKIP key.
3. Press the CMD key
CHANGE RECORD TO (filename2)
and
type
This assigns the record function to the desired
destination
file.
4. Press the SKIP key.
5.
"Rewind" both the playback and record files by
pressing
press both the
the record and playback files to their beginning.
and
holding the FCTN key
5 key
and
the 6 key. This "rewinds"
and
then
Filename1 is the name of the source file from
which data is to be transferred.
name of the destination file into which data
recorded.
(In
this case the two files are not the
Filename2
is
is
the
to be
same.)
2.
Press the SKIP key.
If you want to duplicate all data
in
a file by making a
second copy of the data immediately following the first
COPY command, the END option should be included,
typing the command as follows:
COpy
(filename1)
TO
(filename2) END
It should be noted that when both the source and
destination
CONTINUOUS-formatted file.
tions
of
file is the same, the file should not be a
An
attempt to write por-
a CONTINUOUS file
in
this manner may result
reordering of data.
*The
ASR
mode functions 9 (printer on) and 0 (printer off) are
labeled on the decal above the keyboard.
not
in
6.
If you do not want a printed copy of the data, press
and
hold
FCTN
and
press the 0 key (printer off). *
7. Press
and
hold
the FCTN key
key
(record on)
2
on). Both the PLAYBACK and RECORD indicator
and
and
press
both the
then the 1 key (playback
lamps will light.
When the PLAYBACK indicator lamp goes out, the copy
operation is complete.
8.
To terminate the copy operation, press
and
the FCTN key
press the 4 key (record off).
and
hold
27
Page 36

Section III
Erasing a File
You may need to erase the contents of
to delete data you no longer need stored
must then decide which
follows.
Your previously designated filename
and file size and record size parameters will remain unchanged when you
ERASE a file.
1.
Press the CMD key and type
ERASE (filename)
2.
Press the SKIP key.
file to erase and proceed as
NOTE
an
existing file
in
that file. You
Deleting a File
If you want to remove
memory, including the filename and all parameters, you
must use the DELETE command. No trace of the
remain in the CATALOG
memory space
files.
1.
Press the CMD key and type
2.
Press the SKIP
from memory.
If the file you want to delete is locked,
observe the instructions under
Unlocking a Locked File above.
will become available for entry of new
an
entire file from the terminal
or
in terminal memory, and the
DELETE (filename)
key.
The entire file will
NOTE
be
deleted
file will
Unlocking a Locked File
If the file you want to erase is locked [an .L will appear
after the type
CATALOG printout], you must first use the FREE command to
command. To unlock a file:
1.
Press the CMD key and type
2.
Press the SKIP key. The locked file will be "un-
locked"
file (line or cont) in the TYPE column of the
unlock the file belor you attempt the ERASE
FREE (filename)
and available for erasure (or editing).
28
Page 37

Answer-Back Memory
Section
11\
The answer-back memory (ABM) message
up to 34 characters intended to identify,
your terminal as unique from all other terminals within a
telecommunications network. The ABM
gered to transmit to a remote device
ways:
By inputting the HERE IS (CTRL
•
your terminal.
By the remote device transmitting the control
•
character ENQ to your terminal.
When the
•
and the AUTOABM option
CHANGE command), the ABM message is automatically transmitted 1.5 seconds after the external modem connected to your terminal receives a
call.
EIA interface of your terminal
is
set to
is
a string of
in
many cases,
can
be trig-
in
any of three
and
1 keys)
is
ON
(using the
on
active
Creating the ABM Message
The CHANGE command
ABM message. For example, if the desired ABM sequence is:
is
used to create
and
store
an
Securing The ABM
Your communications network may require making the
ABM message secure; i.e., prohibit the local operator
access to the ABM stored within the
simply press the space bar and type the letter
closing quotation mark.
entered as a secure ABM message, enter it as follows:
~.
CHAt'j(:iE
A secured ABM message will not
terminal at any time. The
used to verify that the ABM message
Once the terminal parameters are changed, they will
remain
in
ABt'1
that state even when power is switched off.
If the example above
TO
":~:tH
STATUS command can
terminal. To do this,
S afterthe
is
to
TH.····1
c·::::
4 ':i6 "
be
printed by your
is
indeed changed.
be
:~:
be
SMITH/123456
after pressing the CMD key to enter the COMMAND
mode, type
~.
CHANGE ABt1 TO
and press the SKIP key.
Note that the ABM message must
quotation marks
tion marks as a part of the ABM message (e.g., the
desired ABM
entered as:
~
CHANGE
(" "). If your message requires quota-
is
SET"F"),
ABt'1
..
:~:t'1I
TH.····12::::456
be
enclosed in double
the sequence would be
TO
":~:ET
..
"F"
..
..
'
29
Page 38
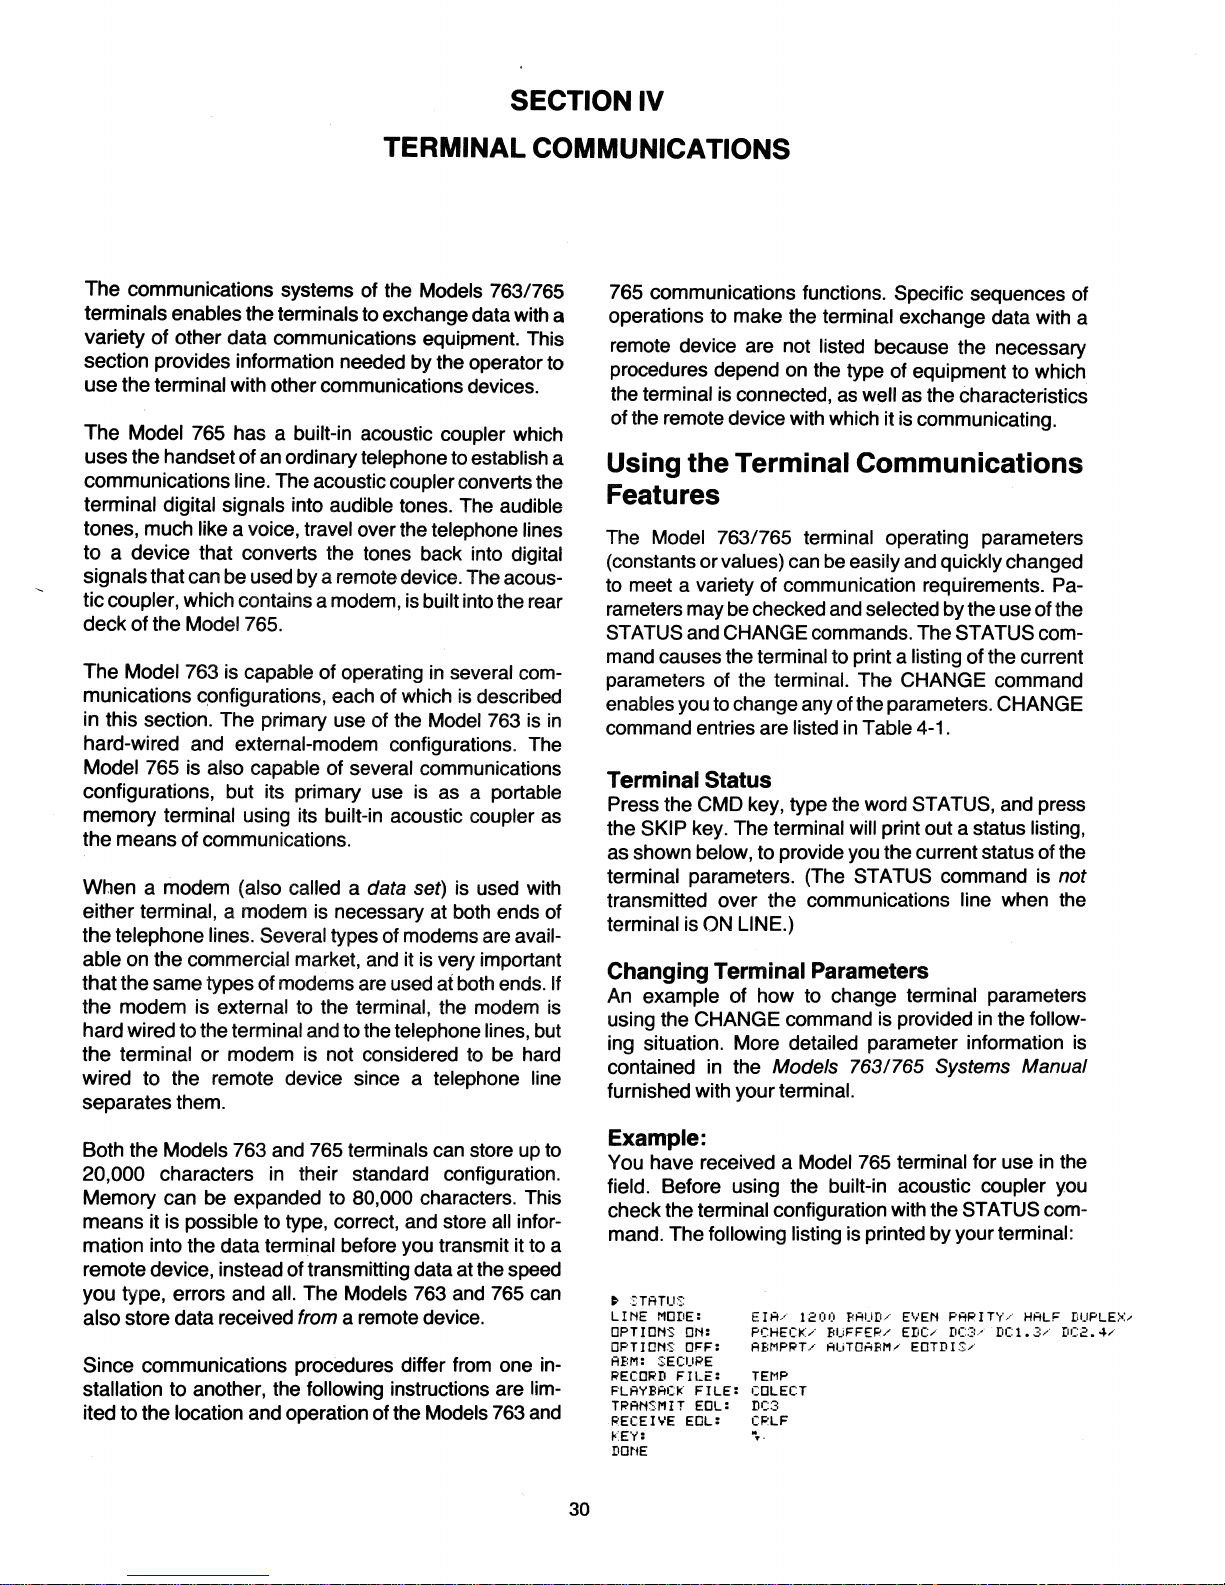
SECTION IV
TERMINAL COMMUNICATIONS
The communications systems of the Models 7631765
terminals enables the terminals to exchange data with a
variety
of
other data communications equipment. This
section provides information needed by the operator to
use
the terminal with other communications devices.
The
Model 765 has a built-in acoustic coupler which
uses the handset
of
an ordinary telephone to establish a
communications line. The acoustic coupler converts the
terminal digital signals into audible tones. The audible
tones, much like a voice, travel over the telephone lines
to a device that converts the tones back into digital
signals that can be used by a remote device. The acoustic coupler, which contains a modem, is built into the rear
of
deck
The
the Model 765.
Model 763 is capable of operating in several communications c.onfigurations, each of which is described
in this section. The primary use of the Model 763 is
in
hard-wired and external-modem configurations. The
Model 765 is also capable of several communications
configurations, but its primary use is as a
portable
memory terminal using its built-in acoustic coupler as
the means
of
communications.
When a modem (also called a data set) is used with
either terminal, a modem is necessary at both ends of
telephone lines. Several types of modems are avail-
the
able on the commercial market, and it is very important
that the same types of modems are used at both ends. If
the modem is external to the terminal, the modem is
hard wired to the
the terminal
terminal and to the telephone lines, but
or
modem is not considered to be hard
wired to the remote device since a telephone line
separates them.
765 communications functions. Specific sequences of
operations to make the
remote device are not
terminal exchange data with a
listed because the· necessary
procedures depend on the type of equipment to which
the terminal is connected, as well as the characteristics
of
the remote device with which it is communicating.
Using the Terminal Communications
Features
The Model 7631765 terminal operating parameters
or
(constants
to meet a variety
rameters may be checked and selected by the use
STATUS and CHANGE commands. The STATUS com-
mand causes the terminal to print a listing
parameters of the terminal. The CHANGE command
enables you to change any of the parameters. CHANGE
command entries are listed in Table 4-1.
Terminal Status
Press the CMD key, type the word STATUS, and press
the SKIP key. The terminal will print out a status listing,
as shown below, to provide you the current status of the
terminal parameters. (The STATUS command is not
transmitted over the communications line when the
terminal is ON LINE.)
Changing
An example
using the CHANGE command is provided
ing situation. More detailed parameter information is
contained in the
furnished with your terminal.
values) can be easily and quickly changed
of
communication requirements. Pa-
of
the
of
the current
Terminal
of
Parameters
how to change terminal parameters
in
the follow-
Models 7631765 Systems Manual
Both the Models 763 and 765 terminals can store up to
20 000 characters
M~mory
can be expanded to 80,000 characters. This
in
their standard configuration.
means it is possible to type, correct, and store all information into the data terminal before you transmit it to a
remote device, instead of transmitting data at the speed
you type, errors and
also store data received
all. The Models 763 and 765 can
from
a remote device.
Since communications procedures differ from one
stallation to another, the following instructions are limited to the location and operation of the Models 763 and
in-
Example:
You have received a Model 765 terminal for use in the
field. Before using the built-in acoustic coupler you
check the terminal configuration with the STATUS com-
mand. The following listing is printed
•
:STATU:S
LINE
Mer'E:
OPTIONS ON:
OPTIONS
ABM:
iO'ECORD
PLAYBACk"
TiO'ANSI'IIT
RECEIIIE
~:EY:
DCtiE
OFF:
SECUiO'E
FILE:
EDL:
EIA/
1201)
PCHECK/
ABMPIH .. AUTOAFlM./ EDTD
TEMP
FILE:
COLECT
DC3
EOL:
CPLF
.
.-
BUFFER ..
30
PAUD
by
your terminal:
.. EVEN PAiO'ITY" HALF
EDC"
DC3/
DC1.3/
IS/
DUPLE~>
DC2.4/
Page 39

Section
IV
Notice that two of the parameters need to be changed
so
that the acoustic coupler can be used for data transmission. The
maximum that can be used with
speed (baud rate) is set for 1200, but the
an
acoustic coupler is
300 baud. The other parameter that must be changed is
INTERFACE, which must be changed from EIA (external) to INTERNAL (refer to Table 4-1).
To
change the speed from 1200 baud to 300 baud, you
must use the CHANGE command.
COMMAND mode and type:
the
~
CHANGE
SPEED
TO
Set the terminal to
300
Press the SKIP key. The terminal will acknowledge that
the parameter change is
complete by printing the word
DONE.
To change the INTERFACE from EIA to INTERNAL,
use the same procedure. Referring to the table you
would find that the parameter name is INTERFACE and
TABLE
4-1. CHANGE COMMAND ENTRIES
Parameter Name I
Entry
the parameter entry is INTERNAL. Set the terminal to
the command mode and type:
~.
CHAnGE I
tHEPFACE
TO
I tHEPt'lAL
and press the SKIP key to complete the change.
Model 765 Operation with an
Acoustic
This section describes operation of the Model 765 ter-
minal with its built-in acoustic coupler. All that is required
for communications is a standard
electrical outlet to provide power to the Model 765.
Terminal Setup
1.
Set the terminal on a table located close to a
standard
the appropriate
rear of your
Coupler
telephone line and
telephone and an acelectrical outlet of
voltage (check the label on the
terminal).
an
ABMPRT
AUTOABM
EOTDIS
RECORD'
PLAYBACK*
EDC
KEY*
DC3
DC1.3
DC2.4
BUFFER
TRANSMIT
RECEIVE
SPEED (baud)
PARITY
PCHECK
DUPLEX
INTERFACE
ABM*
*No
tActual
EOL'
EOL'
entry will yield no definition.
throughput is limited to 240 characters per second.
ON, OFF
ON, OFF
ON, OFF
(filename)
(filename)
ON, OFF
A single character enclosed
marks
("x")
ON, OFF
ON, OFF
ON, OFF
ON, OFF
NL, CRLF, DC3 or a single character enclosed
double quotation marks ("x")
NL,
CRLF or a single character enclosed
double quotation marks ("x")
110,200,300,600, 1200, 2400, 4800t,
EVEN, ODD, MARK
ON, OFF
FULL, HALF, HALFRC
INTERNAL, EIA
Up to
34
quotes. A single imbedded double quote is repre-
sented by two consecutive double quotes
("
rated by a space, the ABM
and will not be printed.
ASCII characters enclosed in double
"x"
"). If
an
S follows the closing quote, sepa-
in
double quotation
9600t
is
considered secure
Remove the outer cover (as described in Section
2.
I).
Remove the power cord from inside the cover.
3.
Plug the female connector into the rear of the
terminal and plug the male connector into the ac
electrical outlet.
4.
the paper door and check that the terminal
Open
is
loaded with a sufficient supply of thermal printing
in
in
paper.
Switch terminal power ON.
5.
Check that the ON LINE indicator in the lower right
6.
corner of the keyboard is
lit. If it is lit, skip to step 8
below.
the ON LINE indicator is not lit, set the terminal to
If
7.
the
COMMAND mode by pressing the CMD key.
Type
8.
ONLINE and press the SKIP key: The ON
LINE indicator should now light.
9.
Check the terminal parameters to ensure that they
meet your system requirements. The parameters
can be checked by using the
described
earlier in this section.
STATUS command
31
Page 40

Section
IV
NOTE
STATUS, CATALOG, and other commands are
terminal in
not
transmitted, even if the
ON LINE.
10. If any parameters are incorrect, correct them using the CHANGE command as described on page
14.
NOTE
When using the built-in acoustic
coupler, the terminal must be
in
INTERNAL configuration and not EIA
(external), and SPEED must be 300
baud or less.
Operation
11
. Pick up the telephone handset and dial the appro-
priate number; an audible high frequency signal
(data tone) can be heard after the
12. As soon as you hear the data tone, firmly insert the
telephone handset into the acoustic coupler muffs
so that the cord is to the
shown in the figure. The Model 765 will transmit a
data tone to the remote equipment.
call
is
answered.
left of the terminal
as
NOTE
It is very important to insert the handset
into the muffs so that the outer
each muff mates with the grooves of
the handset,
or
until the removable
lip of
caps on the handset are
completely
surrounded by the inside circumference of the muffs.
[Also wrap the straps
(if so equipped) around the handset
and secure the straps.]
13. Begin communications according to your system
procedures.
NOTE
Your system may require transmission
of
your terminal answer-back memory
(ABM) message before data can be
communicated. This is done by pressing and
and then pressing the 1 key which
generates HERE
14. Ensure that communications between your terminal and the remote equipment remain
by noting that the
lower right corner
COMM indicator lamp goes out, communications
have been
re-establish the connection.
15. When you have finished, terminate communications according to your system procedure; set the
terminal off
press
the acoustic coupler and replace the handset
cradle.
holding the CTRL (control) key
IS.
in
progress
COMM indicator lamp
of
the keyboard remains lit. If the
lost and you must return to step
in
the
11
line (press CMD, type OFFLINE, and
SKIP); remove the telephone handset from
in
its
to
INSERT
HANDSET
MUFF
OUTER
OR
UNTI L HANDSET
MOUTHPIECE
SERTED
AROUND
CUMFERENCE.
LIP
ARE
32
INTO
ENGAGES
THEIR
MUFFS
GROOVE
EARPIECE
COMPLETELY
ENTIRE
UNTIL
AND
IN
CIR
Page 41

Model 763
or
765 Operation with a
DataSet
Either the Model 763 or 765 terminal can be used with
an external data set (modem). Two different
EIA data
set cable assemblies are available to connectthe 763 or
765 to several types of data sets. The optional 1
03/2021
212 cable assembly (TI Part
No.
2200051) connects
either terminal to the
following types of Bell System data
sets (or equivalent): 103A, 103J,
202C, 202S, and
212A. The 113 data set cable assembly
(TI
Part
No.
2200055) connects either terminal to a Bell System
type-113A data set (or equivalent).
The type of data set used
in
your system will determine
which cable assembly to use. Both the above cables
connect to the terminal at
P1,
the bottom connector
under the hinged flap at the rear of the
terminal.
Terminal Setup
1.
If the terminal is not already connected
to
the data
set, ensure that it is connected with the correct
cable for the data set used
in
your system. Install
the cable as follows:
a.
Grasp the cable connector marked
P1,
and
insert it into the data terminal
BOTTOM connector (under the removable cover) at the
rear of the case.
b.
With a small screwdriver tighten the locking
screws at both sides of the connector.
c.
Install the connector at the opposite end of
the cable into your data set (consult the
instructions furnished with your data set for
details). Tighten the locking screws.
)
111111111
11111
I
P2
P1
(UNDER
FLAP)
2. Open the door and ensure the terminal is loaded
with a sufficient supply of thermal printing paper.
33
Section
IV
3.
Switch the terminal ON.
4. After the terminal prints out a READY message,
press the
CMD key to enter the COMMAND mode.
5. Type
STATUS and press the SKIP key to have the
terminal print its current parameters.
6.
Check the parameters and ensure that the
INTERFACE is EIA (external) and that the baud
rate is correct for your system
application. If any of
the parameters are incorrect, type the correct pa-
rameters using the CHANGE command.
7.
Set the terminal to ONLINE (if it is OFFLINE) by
pressing the
CMD key, type ONLINE and press
the
SKIP key. The ONLINE indicator should light.
8.
Set all controls on the external data set according
to your system requirements.
NOTE
For instructions on operating the data
set, refer to the directions provided with
the data set used
in
your system.
9.
When the connection is complete (the COMM
indicator will light), you may begin communica-
tions according to your system procedures.
NOTE
If the COMM indicator goes out, communications have been lost and you
must set up the data set again.
10. Your system may require transmission
of
your
terminal answer-back memory (ABM) message
before data is communicated. To send the ABM
message press and hold the
CTRL (control) key
and then press the 1 key (HERE
IS).
11. When you are finished, terminate communications according to your system procedures.
Page 42
Section
IV
Model 763 Operation with the
Internal Modem (U.S. Models Only)
This
section describes operation of the Model 763 terminal with the optional internal modem. The CDT 1000A
coupler cable assembly (TI Part No. 2200052) must be
used with the optional internal modem. This cable allows connection
of
the Model 763 to a COT 1000A-type
data coupler which must be used with the Model 763
optional internal modem.
Terminal Setup
1 . If the terminal is not already connected to the data
coupler, ensure that it is connected with the CDT
1000A coupler cable assembly.
2.
Open the paper door and check that the terminal is
loaded with a sufficient supply of thermal printing
paper.
3. Switch the terminal ON.
4. After the terminal prints out the READY message,
presstheCMD
key to enter the COMMAND mode.
5. Type STATUS and press the SKI P key to have the
terminal print out its current parameters.
6.
Check the parameters and ensure that INTER-
FACE is INTERNAL and SPEED does not exceed
300 baud. If other parameters do not meet your
system requirements, use the CHANGE com-
mand to correct them.
7. If the terminal is OFFLINE, switch it to ONLINE
using the COMMAND mode.
NOTE
Your system may require transmission
of
your terminal answer-back memory
(ABM) message before data can be
communicated. To send the ABM
message press and
hold the CTRL
(control) key and then press the 1 key
(HERE IS).
8. When the connection is complete the COMM
indicator lamp will light. Begin operation according
to
your
system procedures.
34
NOTE
If the COMM indicator lamp goes out,
communications have been lost: Repeat step 7 to restore communications.
9.
When you have finished, terminate communications according to your system procedures.
Model 763 Operation in a
dc
Current
Loop
To
operate the Model 763
in a dc
current loop (20
rnA)
interface, the current loop cable assembly (TI Part
No.
2200053) must be used. The terminal setup for
dc
current loop operation is the same as for an internal modem
(see above). Operation is determined by your system
procedures.
NOTE
Current is
not
generated by the Model
763, which is a passive current control
device, not an active current generating device.
Page 43

Control Characters
Section
IV
Many communications procedures used with data terminals require use of control characters. The Models
763/765
dard
terminals are capable of generating all stan-
ASCII and C.C.I.T.T. control characters. The con-
trol characters are made by pressing and holding the
CONTROL
The
following characters are generated/printed by the terminal when the CTRL key is pressed and held.
CTRL
(control) key in the upper left side of the keyboard
and then pressing the key that
corresponds to the
desired function. The control character key assignments of the keyboard are shown below.
CHARACTERS
'The LF key
ACK
BEL
BS
CAN
CR
is
omitted from the Germany, Sweden/Finland,
acknowledge EM end of medium NAK negative acknowledge
bell
backspace EOT end of transmission
cancel ESC
carriage return ETB
DC1 playback
OC2 record
OC3 playback
OC4 record
*OEL
delete
OLE data
"not
strictly a control character
and
Denmark/Norway keyboards;
CONTROL
(From USA Standards Institute Publication
ENQ enquiry NUL null
escape (used for EOC)
end of transmission
ON
ON
OFF FS file separator
OFF
link escape LF line feed
ETX end of text SOH start of heading
FF form feed STX start of text
GS
HT
group separator SYN synchronous idle
horizontal tabulation
and
the
CHARACTERS
block
35
CHAR
and
FIELD
X3.4-1968)
RS
SI
SO
SUB substitute
US
VT
keys
are
each
moved to the right one key.
record separator
shift in
shift out
unit separator
vertical tabulation
Page 44

SECTION V
CLEANING AND ADJUSTING THE TERMINAL
Cleaning
The printhead should be cleaned each time a fresh roll
of thermal paper is loaded into the terminal. Clean more
often if the printed image begins to fade because of
residue
follows:
1 . Remove all thermal paper from the paper chute
(refer to Loading Paper
2. Using 95 percent denatured ethyl alcohol, wet a
50 mm (2-in.) wide strip across a sheet of good
quality bond paper. Quickly insert the sheet down
the paper chute and under the printhead.
PAPER ADVance
the Printhead
accumulating
on
the printhead. Proceed
in
Section
to feed the bond paper.
I).
as
Press
Cleaning the Case
Use a soft, damp cloth or sponge and any nonabrasive
household-type detergent to
of the
electrical components; short-circuits could result.
terminal. Take care not
clean the exterior surfaces
to
spill liquids
on
any
Adjusting the Print Contrast
You will probably never have
contrast since it is preset at the factory for optimum
clarity. But if the contrast has been changed and you
want a darker or
1.
For darker print insert a small slot-type screwdriver into the
on the right side of the terminal; then rotate the
screwdriver
characters from the keyboard, until the printed
image
If the print blurs, you've rotated the
screwdriver too far.
lighter print.
lighter image, adjust it
hole marked CONTRAST located
clockwise (toward
is
dark enough.
NOTE
If
to
adjust the printing
as
follows:
D)
while printing
so,
adjust it
to
a
3.
Print five lines
mm
(2
in.) strip wetted with alcohol. Then advance
the paper to a dry area and print two more
The printhead will not print a visible
image
on
the bond paper across the 50
NOTE
on
the bond paper.
lines.
2.
For lighter print rotate the screwdriver counterclockwise (toward
from the keyboard, until the printed image is most
legible.
L)
while printing characters
Adjusting the Transmit Level
(U.S. Models Only)
The transmit level is factory-calibrated for optimum
performance with most
ever, because of the conditions of some
handsets and since line losses occur
may be necessary to increase or decrease the transmit
level to compensate for unusual conditions. Adjust the
transmit
small screwdriver into the hole marked TRANSMIT
LEVEL
improve
data errors.
level for optimum performance
on the left side of the case; rotate clockwise to
log-on,
In
level
or
some nations, adjusting the transmit
is
illegal. Check local regulations.
U.S. telephone systems, How-
telephone
in
some areas, it
by
inserting a
rotate counterclockwise to reduce
NOTE
36
Page 45
Introduction
SECTION
VI
OPERATOR EXERCISES
This section provides exercises for you
help become more familiar with terminal operation. The
eleven major exercises will have you performing
basic terminal functions. Each exercise
help you become proficient
763/765 terminals
plete the exercises sequentially for best results; i.e.,
start with Exercise
are structured
A brief explanation of the exercise to
•
The steps to be performed are printed
•
letters. When something
terminal keyboard, it
A discussion of what response can
•
from the
sponses are printed
General rules set apart from the exercises provide
•
guidelines for operation of a particular mode or
function.
in
the shortest possible time. Com-
1,
then
in
the following format:
terminal and
in
the use of the Model
2,
3, 4 ...
is
to
is
printed
an
explanation of the
in
normal type.
to
perform
is
designed
etc. The exercises
be
performed
in
italic
be
typed from the
in
boldface type.
be
expected
all
re-
to
to
Sample Exercise A:
Press the CMD key, type the word STATUS, and press
the SKIP key. The terminal will print the current terminal
parameters.
In
the above example you are asked to type a word
indicated by the
boldface type "STATUS".
Sample Exercise B:
Press the CMD key, type CREATE MYFILE L 4
and
press the SKIP
message.
In
sample exercise
Unless otherwise noted, it makes
type uppercase or lowercase letters, except for the file-
names, which must
since several filenames can be created from the same
word: For
three different
acters. The spaces between the words must be included, or the
example, myfile, Mytile, and MYFILE are
key.
The terminal will print a DONE
B,
a group of words
be
typed the same style always,
filenames created from the same char-
terminal will respond with
is
no
difference if
an
requested.
error code.
80,
you
Error Codes
Sometimes while doing the exercises, mis-
takes are made; the
of these errors by printing
error code is a two-digit number between
three asterisks ***77***. When the
prints
an
error code, recheck your work for
any obvious errors.
the error,
Quick Reference Card for the list of error
codes. For some errors the
out a message stating the
look
terminal will inform
an
error code.
If you cannot determine
in
Appendix A or
terminal will type
problem.
37
you
An
terminal
on
your
Page 46

Section
VI
Exercise
The first exercise involves use of the memory catalog.
The catalog lists
.characteristics of the files and how much of the
been used.
have been designated the record and playback files
and how much memory remains for use
1.
2.
EXAMPLE:
1.
Using the Memory Catalog
all current files in memory along with
file has
In
addition, the catalog also lists which files
in
creating files.
Set the terminal
pressing the orange CMD key
corner
a
carriage return (the printhead
margin), print a command prompt symbol,
COMMAND indicator
the keyboard.
Type the command CATALOG and press
SKIP key. The word catalog commands the termi-
nal to print the memory catalog. The SKIP
instructs the terminal to execute the command
typed in.
mand message, press the
terminal
start again at step
of
the keyboard. The terminal will perform
line feed (the paper will advance one line), a
, sound
If
will print
to
the COMMAND mode
in
the upper right
will return to the left
an
audible tone,
in
the lower right corner of
you make a mistake typing the com-
SKIP key anyway, the
an
error code and then you
1.
and
by
light the
the
key
can
The catalog printout is divided into eight areas: Filenames are listed under the NAME column. The format of
the file is listed under the TYPE column. The letter L
after the format indicates that the
files are discussed in Exercise
The maximum number of records the file
listed under the MAXIMUM RECORDS column. The
maximum number of characters each record can contain is
number of records already
the
Another value listed is the amount of MEMORY AVAILABLE for use
sents the number of aD-character records not com-
records that have not been filled. The RECORD FILE
listed under the CHARS/RECORD column. The
COMPLETE RECORDS column.
in
the creation of files: This figure repremitted to files.
and PLAYBACK file headings list which file has been
designated the record and playback files.
Exercise 2 describes how to correct keyboard errors.
Before proceeding to the next exercise, check your
CATALOG listing for a file
COPY2. Both files are used with the exercises
section.
Exercise 2 can
If
It does not include the number of
in
these files exist, both must
be
accomplished because two files
file is locked. Locked
2.
can
contain
filled
in
a file is listed under
file
memory named MYFILE or
in
this
be
deleted before
is
~.
CATALOG
LE
TYPE
LINE
corn
LINE.L
cot"n
LINE
AVAIL
FILE:
FILE:
~~AME
TEMP
INDE::<:2
t'1\,FI
COP'·r'2
FILEt
MEMORY
RECORD
PLAYBACK
DonE
Examine the CATALOG your terminal prints out.
The example above may not
the catalog
EMPTY message
exercise.
in
your terminal. If a CATALOG
is
printed, proceed to the next
be
representative of
MEMORY
MA::<: I MUt1
RECmmS:
CATALOG
'-Ie'
,
c.._
24
4
4
1·-'
Co
CHARS/
RECORD
:=:0
72
:30 0
:30
7'=-
I L...
Cot-1PLETE
F<~ECORIIS:
= 61 80-CHAR LINES
COPY2
CDLECT
cannot have the same name.
the existing files, it is possible to do the
cise by using the same
letters. For example,
three different
file names.
MYFILE,
':1
.=.
'-
2
(I
If
you do not wish to delete
following exer-
file name but
Myfile, and myfi/e are
in
lowercase
38
Page 47

Section
VI
Exercise
Before information (data) can be stored in memory, a file
must be created in which to store it. This exercise
explains
demonstrates some error-correcting techniques.
1.
2.
2.
Creating a File
how
to create a file and, at the same time,
Press the CMD
key.
Purposely type the word CREATES (which is in-
correct)
and press the space bar.
NOTE
If
an error is made while typing the
command word, there is a way to cor-
rect the error before pressing the
key.
To
demonstrate this feature, the
command word
typed is incorrect: the correct com-
mand is
mand with the
in the box
CREATE.
below.
CREATES you just
Correct this com-
C~AR
key, as described
SKIP
3.
Type the word
This is the name of the file you are creating. The
word
MYFILE is not on the same line as CREATES
because of the previous correction, but this has no
effect on the
4.
Type
in
the letter L and press the space bar. The
letter L instructs the terminal that the file will be
the LINE format. If you want the file to be in the
CONTINUOUS format, type a C in place of the
5.
Type the number 4 and press the space bar. This
number instructs the
records
(lines)
MYFILE
file creation message.
of
and press the space bar.
terminal to limit the file to four
data.
in
L.
6. Type in the number 80. This last figure instructs
the
terminal to allow each record to contain up to
80 characters (80 is the maximum possible).
7.
Press the SKIP key. This instructs the terminal to
execute the commands you typed. When the
terminal has created the file, it will type the mes-
DONE.
sage
Correcting a Typing Error
a.
Press the CIJAR key one time. The
terminal will backspace the printhead
one character.
b.
Press the C/iAR key again. This time
terminal will perform a line feed and
the
a backspace. The
line feed the first time the key was
depressed because the
tion detected that the previous character
was a space (a nonprintable character). The
feed until it reaches a printable character. The upper
head
should now be under the letter S
of the word CREATES. To delete the S
simply
This will
space in the memory. Even though the
letter S is not erased from the paper, it
has been
memory. When typing commands, remember that the remainder of the
to the right of the printhead must be
retyped after correcting an error because those characters have been
"erased".
press the space bar one time.
replace the letter S with a
eliminated from the terminal
terminal did not do a
CWR
CI;IAR function will not line
"left
corner of the print-
func-
line
~.
CF<~EfnE:S
t'lYFILE
You have now created a line-formatted file which you
have named
of four records
MYFILE. The file can contain a maximum
(lines) of
80
L 4 :30
characters each.
39
Page 48

Section
VI
Exercise
In this exercise you will change the RECORD file to
MYFILE so that data can be recorded into it. '
1.
2.
3. Type
4.
5.
6.
3.
Changing
Press
the
CMD
Type in
bar.
nal that the function described
to be changed.
bar.
changed.
Type
Type
that the
This completes the CHANGE format required,
which is: CHANGE
Press the SKIP
execute the command.
the
word CHANGE and press
The command
the
word RECORD and press
This specifies that the RECORD file is to be
the word TO and press
the
word MYFILE. This last word specifies
RECORD file is to be changed to MYFILE.
the
Record File
key.
CHANGE
RECORD TO (filename).
key.
This will cause the terminal to
instructs the termi-
in
the next word is
the
space bar.
the
the
space
space
Exercise
In this exercise you will change the PLAYBACK file to
MYFILE so data can be played back.
1.
2.
4.
Changing
Press the CMD
Type CHANGE
the same as Exercise
word
PLA YBACK.
the
key.
PLAYBACK
Playback File
TO MYFILE. This is
3 except for the command
3. Press the SKIP key. This will cause the terminal to
execute the command.
~
CHANGE
DONE
Up to now you have created a file and changed the
terminal
created file named
been changed, use the
1) and check the catalog listing. You will use both
the
exercises.
RECORD and PLAYBACK files to the newly
RECORD and PLAYBACK files in the following
PLAYBACK
MYFILE. To verify that the files have
CATALOG command (Exercise
TO
MYFILE
~
C8ANGE
DOt~E
RECORD
TO
MYFILE
40
Page 49

Section
VI
Exercise
Data can be stored
RECORD file by using the ASR function keys described
in Section
1.
2.
5.
Recording Data
in
a file that has been designated a
III.
The
terminal
pressing and holding the FCTN key and
pressing the number key. For example, the
function F2 (RECORD ON) is activated by
pressing and holding the FCTN key, press-
ing the number 2 key, and then releasing
both keys.
Press
F6
sures that the RECORD file is at the beginning
record. The printer will perform a
carriage return.
Press
the RECORD indicator on the lower right corner of
the keyboard. The terminal will now store into
data will be entered, one record at a time, until you
press the
Then the text can be corrected, if necessary, using
the CHAR and
F2
MYFILE whatever is typed on the keyboard. The
functions
(REWIND RECORD). This function en-
(RECORD
SKIP key to indicate the end of a line.
FIELD keys.
into
a File
are produced by
line feed and a
ON).
The terminal will light
NOTE
When you press the SKIP key after the
last record is typed, the terminal will
respond by printing
•••
77
Observe that the RECORD indicator
lamp is extinguished. The
code informs you that no more space
remains
the SKIP key, the terminal tried to go to
the next line of the file, but since only
four records (lines) were designated
Exercise
and the
nated. The normal method of terminating a RECORD ON function is to use
the F4 (RECORD OFF) function which
would have switched off the RECORD
indicator lamp without printing the error
code.
The four lines of text typed
memory, and will remain
delete, or edit them. Even if the terminal is switched off,
the four lines will remain
in
the file. When you pressed
2,
the error code was printed
RECORD function was termi-
an
error code:
•••
"77"
error
in
step 3 are now stored
in
memory until you erase,
in
memory.
in
in
3. Type the fol/owing text using the SKIP key for line
feed and carriage return:
THIS
IT
THIS
THIS
•••
IS
ONLY
LINE
IS
77
A
VERY
CONSISTS
IS
THE
•••
SHORT
TO
VERY
OF
BE
LAST
STORY.
FOUR
DELETED.
LINES.
LINE.
41
Page 50

Section
VI
Exercise
In
this exercise you will use the designated terminal
PLAYBACK file to verify that the text you typed is stored
in
MYFllE.
1.
2. Press F5 (REWIND PLA
3. Press
4. Press
5.
6. Press
Up
to now you have created a file and recorded data in it.
The next exercise practices editing the data you have
recorded into the
6.
Playing
Switch the terminal
switch the terminal
through the remainder of this exercise, you will be
able to verify that removing the power did not
affect any
the
returns the PLAYBACK file pointer to the beginning
"know where it is.")
of
terminal.
of
the file. (The pointer is the terminal's way to
F1
causes the contents of the PLAYBACK
in the case
printed on the
F1
(PLAYBACK
contents will
has moved to the end
the contents again the file
"rewound" with the F5 function (REWIND
PLAYBACK).
Press
FB
(PLAYBACK
function causes the playback file to "rewind" three
records
print the contents of
second
(lines).
F1
(PLAYBACK
line
Back a
File
OFF.
Wait 15 seconds, then
ON again. As you proceed
the files and settings (parameters) of
(PLA YBACK
of
this exercise
terminal printer.
YBACK).
ON).
ON)
The
F5
function
The
F1
function
file, which
is
MYFILE, to be
again. This time the
not be printed because the file pointer
of
the file. To print
would have to be
REV)
three times. The
ON).
The printer will now
MYFILE, starting with the
of
the text.
file.
Fa
Exercise
This exercise uses all available editing functions to
change the
1.
2. Type EDIT MYFILE and press the SKIP
3. Press
4. Press·
5. Press
6.
7.
Editing a File
data
stored in the file.
Press the CMD
terminal will print the index symbol + below the
command. The
and
the function keys are now defined by the top
row of the
F4
printed. An
of
text is printed to indicate that the end
been reached.
F3
REWIND PLAYBACK function
will cause the record pointer to return to the starting record, and the first
F2
symbol
define a
maximum of
locate.
<:.
The FIND function searches from
current record + 1 to the end of the file.
It
will not search from the starting re-
cord to the current record.
key.
key.
The
terminal is now
label above the keyboard.
(PRINT). The contents of MYFILE will
"ETX"
will be printed after the last line
in
the EDIT mode,
of
text has
be
(TOP). This function is similar to the
in
the ASR mode. It
line will be printed.
(FIND). The terminal will print the FIND
. The FIND function enables you to
"string" (group) of characters up to a
30
characters for the terminal to
NOTE
the.
Type FOUR and press the SKIP key. The terminal
will indicate that it is searching for the defined word
(FOUR) by printing the
defined word. The second
because the word
entire text
should look like this:
FIND symbol
line of the text is printed
"FOUR" was found in it. Your
.~.
after the
42
~
EDIT
+
THIS
IT
THIS
THIS
ETX
+
THIS
~>
FOUR
IT
IS
ONLY
LINE
IS
IS
ONLY
f1YFILE
R
VERY
CONSISTS
IS
THE
A
VERY
~
CONSISTS
SHORT
TO
VERY
SHORT
OF
BE
DELETED.
LAST
OF
STORY.
FOUR
LINE.
STORY.
FOUR
LINES.
LINES.
Page 51

Section
VI
NOTE
If you make
your character string, you
corrections by using the CHAR or
FIELD key before pressing the SKIP
- -
key.
-
7.
Press
and
corner
word
8.
Type the words THREE LINES
SKIP key. You are using the character overstrike
feature to change the words
"THREE LINES." Pressing the SKIP key instructs
the terminal to enter the line as corrected into
memory and to print the next
of
"FOUR".
If the CHAR key
longer than
repeats until released.
operate
space bar, underscore
period (.), and asterisk (*).
-
-
an
error while entering
can
make
hold
the CHAR key until the
the printhead is under the
NOTE
is
pressed and held for
112
second,
in
the same manner are the
it
automatically
Other keys that
(_),
minus
and
"FOUR LINES." to
line of text.
upper
"F"
of
(-),
press the
left
the
Using
A few points about the CHAR and FIELD
keys are worth remembering:
• Pressing the CHAR (backspace) key
will cause the printhead to backspace
until it reaches a printed character, at
which time the terminal will
one time.
continuous backspacing.
The
•
line feed, and the printhead will return
to the beginning of the record.
The CHAR key (SHIFT and CHAR key)
•
will cause the terminal to print the contents of the current record one character at a time. When the printhead
reaches the end of the data in a record,
it will stop and pressing the
CHAR key will cause
and no printhead movement will occur.
The FIELD key (SHIFT and FIELD key)
•
will cause the terminal to print the
mainder of the contents of the current
record.
- -
the
C~R
and
F~D
Keys
-
line feed
Holding it pressed will cause
FIELD (reverse) key will cause a
-
-
SHIFTed
an
-
~
audible tone
re-
9.
Press F5 (delete line). The terminal will print a
DELETE LINE prompt symbol
instructs the terminal to delete the current record
from the
10. Type the
number indicates how many lines are to be deleted, beginning with the current record. Since the
number entered was a
will be deleted. While the specified number of
records are being deleted, the terminal will print
the new current record.
IT
ONLY
THIS
S 1
THIS
file.
number 1 and
CONSISTS
LINE
IS
The number of lines to
be corrected using the CHAR key
fore pressing the SKIP
zero or no number at
the function, and the current record will
be printed and
THE
IS
VERY
press the SKIP key. The
"1", only the current record
TO
EE
NOTE
be
available for editing.
g . This function
OF
FOUR
THREE
DELETED.
LAST
all will terminate
LINE.
be
deleted can
key.
Entering a
-
LINES.
LINES.
be-
11. Use the
the letter ''V''
12. Press
can simply press and hold the FCTN key and a
delete character
time the number 6 key
indicates that the character above it has been
deleted. Five deletions are required for the four
letters of the word "VERY" and the space following
13.
Press the SHIFT
will
printhead
14.
Press the CHAR key once. This will place the
printhead under the period
15. Press the
type in OF THE STORY. The record will now
contain the phrase you have just entered.
Ct'AR
key to position the printhead under
of
the
word
"VERY".
F6
(DELETE CHARacter) five times.
symbol
it.
and
line feed, print the corrected record, and the
will remain at the end of the record.
-
space
bar
~:;:~
will be printed each
is
pressed. This symbol
FIELD keys. The terminal
-
in
the text.
(to strikeover the period)
You
and
43
Page 52

Section
16.
THIS
THIS
..
17.
18.
VI
Press the SKIP key. This will instruct the terminal
that you have completed editing the record. The
terminal will print "ETX"
text. The
the ETX message:
IS
IS
Type
(minus one) instructs the terminal that you require
the record before the current record. The terminal
will print the selected record, and it
able
Press the FIELD
line feed and move the printhead under the first
character
INDEX symbol ~ will be printed below
THE
VERY
~~w.w.~~
THE
LAST
-1
and press the SKIP
for editing.
in
the record.
to
indicate the end of the
LAST
LINE.
key.
LINE.
OF
THE
key.
is
This causes the printer to
STORY.
The
"-1"
now avail-
21. Press the SHIFTed CHAR
print the corrected record and position the printhead under the first
22. Using the SHIFTed CHAR
head under the space before the first letter
word "THREE".
23. Press F7 (INSERT). The terminal will print the
INSERT prompt symbol
24. Press the space
ONLY:
..
-1
IT
ONLY
I T
l=~
IT
CONSISTS
'=ONS I
CONSISTS
l=l=l
[:~ll:~:ll*l
STS
letter of the word consists.
bar
OF
THREE
OF9
ONL··
key.
-
-
and then type the word
OF
The terminal will
key,
move
THREE
LINES.
...
£1
THREE
the
print-
of
LINES.
LINES.
the
19. Press the CHAR (SHIFT and CHAR key) three
times.
that as the printhead moves forward, contents of
the record
each time the SHIFTed CHAR key is pressed.
20. Press F6
lete the word
When using the DELETE CHARacter
f~lon
FIELD keys, remember from the box
above that the following rules apply:
-
• If the SHIFTed CHAR key is
• If
• If the SHIFTed FIELD key is
• If the FIELD key is used, the print-
In
all cases the record will be reprinted.
-
This moves the printhead forward. Notice
will be printed one character at a time,
-
(DELETE
. -
(F6), followed
CHARacter) five times
"ONLY" and the space following.
NOTE
by
the CI;lAR or
to
de-
-
used, the printhead
the first character remaining after
the
deleted material.
the CHAR key is used, the
printhead will return to the last
character remaining before the
deleted material.
used, the printhead will move to
the end of the text.
head
of the record.
-
w111
return to the beginning
will move to
-
25. Press
function and causes the inverted INSERT prompt
symbol to be printed, indicating the end of the
insertion. The first
26. Press
printed.
CONSISTS
THIS
IT
CONSISTS
THIS
ET~<:
F3
(TOP).
Invoking
will terminate the
IS
IS
any function except
F4
(PRINT). The edited text will now be
OF9
A
VERY
OF
THE
LAST
This terminates the insertion
line is then printed.
NOTE
F6
INSERT function.
ONLY
£1
THREE
SHORT
ONLY
LINE
STORY.
THREE
OF
..
DONE
27. Press
F8
(STOP). The terminal will terminate the
EDIT mode and enter the ASR mode.
or F7
LINES.
LINES.
THE
STORY.
44
Page 53

Exercise 8. Copying From File to File
Many times it
file to the printer, to copy (move) data from one file to
another
keyboard. The
data from the keyboard into a
the designated
be printed out on the terminal printer using the COPY
command.
The contents of one file can be copied (moved) into
another
advantage because the
same format
create and edit a file
another
exercise will help you become acquainted with the many
uses
of
To copy data into another
create another
1.
Press the CMD
is
necessary to copy (print out) data from a
file, or to store data into a file directly from the
COPY command enables
file, even if that file
RECORD file. The contents of a file
file using the COPY command: This
files do not have to
you
to copy
is
is
a great
be
in
not
can
the
(continuous or line). This enables you
in
the LINE format and copy it into
file
in
the CONTINUOUS format. The following
the COPY command.
file, it
is
necessary first to
file into which the data can
be
stored.
key.
to
4.
Type COPY MYFILE TO COPY2 and press
SKIP key. This causes the terminal to copy (re-
cord) the contents of
labeled COPY2.
MYFILE into the new file
The data stored
in
mains unchanged.
5.
Press the CMD
6.
Type CATALOG and press the SKIP
key.
catalog will show that the COPY2 file has had data
copied into it. Because of the difference
there will
in
be
one less record
in
the COPY2 file than
MYFILE: The continuous format used for
COPY2 file uses memory space more efficiently.
7.
Press the CMD
8.
Type
COpy
key.
COPY2 TO PRINTER and press
SKIP key. This will verify that the contents of
MYFILE were copied into the COPY2 file. Notice
that the contents were printed even though the
COPY2
cause the
of any
is
not the designated playback file be-
file
COpy
in
command will print the contents
the memory catalog.
Section
MYFILE
key.
in
formats,
VI
the
re-
The
the
2.
Type CREATE COPY2 C 4 80 and press
SKIP key. This command creates a file
continuous format with a capacity of four records,
each record 80 characters
in
length.
3. Press the CMD key.
in
the
the
9.
Press the CMD
10.
Type
COpy
key.
MYFILE TO PRINTER and press
SKIP key. The contents of MYFILE will be printed,
showing that the
the contents of files that are
COpy
command does not alter
<copied.
th&
45
Page 54

,Section
VI
Exercise
9.
Comparing Continuous and Line over."
Format Files
This .brief exercise illustrates the major differences
between data stored
when printed
in
the edit mode.
in
continuous and line formats
Exercise 10. An Alternate Method
of
Storing
Data in a File
Up to this point, to store
necessary to use the
RECORD ON function or
COPY command enables you to store data directly from
the keyboard into a file without a RECORD file. The
following exercise is a way to store and play back from
MYFllE
1.
2.
using the
COpy
Press the CMD key.
Type COPY KEY TO MYFILE and press the SKIP
key. This command instructs the terminal to store
data entered from the keyboard into the
beled
MYFllE.
the COMMAND indicator lit and performing a line
feed and carriage return. Data now typed
keyboard
will be entered into MYFILE. Any data
previously recorded
3.
Type in your name and address.
key as a carriage return and type your company
name
and
address on the second line.
data
in a file it has been
RECORD file and the
an
EDIT mode function. The
command.
The terminal responds
in
MYFILE will
Use
by
be
the
ASR
file la-
leaving
on
the
"written
SKIP
1.
Press the CMD key.
2.
TypeEDITCOPY2 and press the SKIP key.
3.
Press F4(PRINT}. Notice that most of the text fits
on one
three separate
line and part of another line, instead of
lines. To assist you
in
tinuous-formatted files, the end of each line of text
is indicated by the
Hli
. The
EOl
symbol is generated each time the
SKIP key
is
pressed as
in the EDIT mode.
when a continuous file
end-of-line (EOL) symbol
an
aid while the terminal
In
Exercise 8 you observed that
is
printed, it appears iden-
tical to the original line-formatted MYFILE. A good
reminder
identical when they are printed
is
that both types of file formats appear
in
the ASR mode or
transmitted over the communications
only time the format
in
this exercise is seen
when the file is being edited.
4.
Press
F8
(STOP).
~
EDIT
Cop·
....
+
THIS
NE
IS A VERY
OF
2
THE S TO
R Y •
SHORT
III::::
::::
STCRY.~IT
:::
:::
::: :::
::::
::: :::
::::::
:::::::
CONSISTS
::::::::
::::::
:::
En:
+
editing con-
line. The
OF
:::::::
::: :::
::::
::::::::
::::
is
is
ONLY
:':::::
:::::::::
4.
5.
6.
THREE
:::
::::::::::::
Press the SKIP key (to return
the next
line) and press the
to
the beginning of
ENTER
key.
ENTER key terminates recording.
Press the CMD
Type
COpy
entered
over"
the
the
the
in
in
MYFILE, will be printed. Notice that with
COpy
file before recording or playing back because
COPY command rewinds automatically. Also
note that the
to start recording data
than the first record of the
key.
MYFILE TO PRINTER. The data
step
3,
plus any records not "written
command, it
COpy
is
not necessary
command does not allow you
in
a file at any record other
file unless the
to
rewind
option is used with the COPY command (the
option is discussed in Section III of this manual).
LINES.aTHIS
::::::::::
:::;
::::::
:::::::::::::
:::::::
IS
::::::
::::
THE
.:'::::;
LAST
::: :::
:;:::::: ::::;
LI
:::
The
you
END
END
46
Page 55

Section
VI
Exercise
11.
Locking, Freeing, Erasing,
and
Deleting Files
After a file has been used to store data, it may become
necessary to remove the data from the
data can be stored
the
terminal removes the data recorded
altering the file name or parameters. The file
eliminated entirely by using the DELETE command
which removes the filename, parameters,
in
stored
To prevent the
LOCK command will prevent a designated file from
being erased, edited, or
released by using the FREE command.
This exercise
with these functions.
1.
2.
3.
it.
Press the CMD key.
Type ERASE MYFILE and press the SKIP
This instructs the terminal to erase only the data
stored
remain. You can use the
verify that
COMPLETE RECORDS column.
Press the CMD key.
in
it.
By using
accidental erasure or deletion of a file, a
deleted. A locked file may be
will help you become better acquainted
in
MYFILE. The name and parameters
CATALOG command to
MYFILE now contains a 0 (zero)
file so that new
an
ERASE command
in
file without
and
any data
can
in
be
key.
the
4.
Type DELETE MYFILE and press the SKIP
The terminal will delete MYFILE from the memory
catalog.
5.
Press
th.e
CMD
key.
6.
Type LOCK COPY2 and press the SKIP
terminal will lock the file labeled COPY2. To verify
this, use the
the COPY2 file has the letter
indicate locked. Also observe that the previously
deleted MYFILE
7.
Press the CMD
8.
Type DELETE COPY2 and press
The terminal will print
(attempting to write
action
will occur.
An
attempt to EDIT or ERASE the locked file also
will produce the same error response from the
terminal, and no action will occur.
9.
Press the CMD
10.
Type FREE COPY2 and press the SKIP key. The
COPY2 file is now unlocked and can
erased, or edited.
CATALOG command
".L"
is
no
longer listed
key.
an
error code ***84***
in
a locked file);
key.
and
appended
in
the
key.
key.
The
note that
the catalog.
SKIP
key.
no
further
be
deleted,
to
47
Page 56

Page 57

APPENDIX A
QUICK REFERENCE GUIDE
COMMANDI
PARAMETER
CATALOG
CHANGE
COpy
CREATE
DELETE
EDIT
ERASE
FREE
INTERFACE
INTERNAL
LOCK
OFFLINE
ONLINE
PLAYBACK
RECORD
RUN
STATUS
TEST
SHORT
FORM FOR
SHORT
FORM
CL
CG
CP Copy data
CF Create and define a memory file
none
ED Edit a memory file
none
none
PORT Used with CHANGE command
INT
none
OF or OFF Place the terminal off line
ON Place the terminal on line
PLAY
REC Used with CHANGE command
none
ST
TS Execute a ROM resident terminal test
COMMANDS
Print the memory
Change a terminal configuration parameter
Delete a memory
Erase a memory file
Release file protection
Used with CHANGE command
Protect a file against being erased,
Used with CHANGE command
Executes commands from a file
Print all current terminal configuration parameters
AND
PARAMETERS
DESCRIPTION
file catalog
file
or
written into
COMMAND
CATALOG
CHANGE
COPY
CREATE
DELETE
EDIT
ERASE
FREE
OFFLINE
ONLINE
RUN
STATUS
TEST
'Press
the
CMD
key
COMMAND
SHORT
FORM
CL
CG
CP
CF
none
ED
none
none
OForOFF
ON
none
ST
TS
to
enter command mode; press the SKIP key after entering the entire command.
CATALOG
CHANGE
COpy
CREATE
DELETE
EDIT
ERASE
FREE
OFFLINE
ONLINE
RUN
STATUS
TEST
<parameter>
<filename>
<filename>
<filename>
<filename>
<filename>
<parameter>
<filename>
SYNTAX
SYNTAX·
TO
<parameter>
TO
<parameter>
<L
or
C>
<No.
(END or CTRL)
of
rec.>
(record length)
A-'
Page 58

CHANGE
CHANGE (or CG) - To change the following parameters:
*RECORD file:
*PlAYBACK
AUTOABM:
ABMPRT:
EOTDIS:
EDC:
*KEY:
DC3:
DC1.3:
DC2.4:
BUFFER:
*TRANSMIT
*RECEIVE
SPEED:
PARITY:
PARITY CHECK:
DUPLEX:
INTERFACE:
*ABM:
*No
Entry Yields No Definition
file:
EOl:
EOl:
CHANGE
CHANGE PLAYBACK
CHANGE
CHANGEABMPRTTO[ONorOF~
CHANGE EOTDIS TO [ON or OFF]
CHANGE EDC TO [ON or
CHANGE KEY TO ["single ASCII character"]
CHANGE DC3
CHANGE DC1.3 TO [ON or OFF]
CHANGE DC2.4 TO [ON or OFF]
CHANGE BUFFER TO [ON or
CHANGE XMTEOL TO
CHANGE
CHANGE
CHANGE PARITY TO [EVEN, ODD or MARK]
CHANGE
CHANGE DUPLEX TO
CHANGE INTERFACE TO [INTERNAL or ErA]
CHANGE ABM
RECORD TO [filename]
AUTOABM TO [ON or OFF]
RCVEOl
SPEED TO (110, 200, 300, 600,1200,2400,4800,9600]
PCHECK TO [ON or OFF]
COMMANDS
TO [filename]
TO [ON or
[Nl,
TO
[Nl,
[FUll,
TO ["up to 34 characters"] [S if ABM is to be secured]
OF~
OF~
OF~
CRlF,
CRlF,
HALF or
DC3, or "single character"]
or "single character"]
HAlFRC]
SPECIAL RUN
#n
To terminate
(1) DC3 ESC from PLAYBACK file (EDC and DC3 must
(2) Press FCTN and
(3) Receipt of ESC < over communications line.
(4)
NOTE: The
(where n = 0 through
ASR mode and return to execution of the command file:
ESC keys simultaneously.
#ESC
at the end of the ASR function record.
# symbol will appear as a £ symbol on U.K. units.
COMMAND
9)
causes execution of any ASR function.
SPECIAL FUNCTIONS
Double
Disable
Enable
Space - Press FCTN and PAPER ADVance for double-space printing. Press FCTN and PAPER
ADVance again to return to single-space printing.
Printer-
Printer-
Press FCTN and 0 (zero) keys (ASR mode).
Press FCTN and 9 keys (ASR mode).
FUNCTIONS
be
ON).
Repeating
Horizontal
Characters
. - -
will repeat as long as held depressed.
Tab - Record HT and column number to cause horizontal tabbing; for example, HT20 will cause
fast
printheqd slewing to column 20. Horizontal tabbing available only during OFFLINE operation.
- Space bar, - (minus), * (asterisk), _ (underline), . (period), CHAR and FIELD keys
- -
A-2
Page 59

EDIT FUNCTION KEYS
F1
- INDEX Symbol +
Allows movement through file defined by a signed number that represents
direction
FIND Symbol {:.
F2 -
Finds a user defined character string of up to 30 characters. Search for
character string is from current record to end of file.
TOP
F3 -
Returns records pointer to the
PRINT (No Symbol)
F4 -
Prints contents of file starting from the current record until end-of-file is
reached
(+
or
-)
and number of records to be moved.
(No Symbol)
"top"
or
another edit function is detected.
and prints first record of the file.
F5 - DELETE LlNE(S) Symbol
Deletes the number of records, including the current record, specified by the
number following the prompt
F6 - DELETE CHARACTER(S) Symbol
Deletes characters under printhead
is depressed.
INSERT Symbols Open Insert
F7 -
The insertion of new text begins at the point
any other edit function is pressed (except F6 or F7).
Fa -
STOP (No Symbol)
Causes the terminal to exit the EDIT mode and enter the ASR mode.
.:::.
-
symbol.
in
EDC SEQUENCES FOR PROMPTING
The following two-character control sequences must
action:
;~:~
current record each time the
~
Close Insert
F7
is depressed and ends when
be
recorded in the playback file to obtain the listed
tl
F6
function
DC3 DC3 - causes PLAYBACK file to "rewind" and switch OFF
DC3
DC1
- causes PLAYBACK file to "rewind" and resume playback operation
DC3 OLE - causes DC3 to
the PLAYBACK
DC3 ESC - terminates ASR mode and returns execution to COMMAND file
be
file without switching playback off).
processed without stopping playback (needed to record a DC3 character from
A-3
Page 60
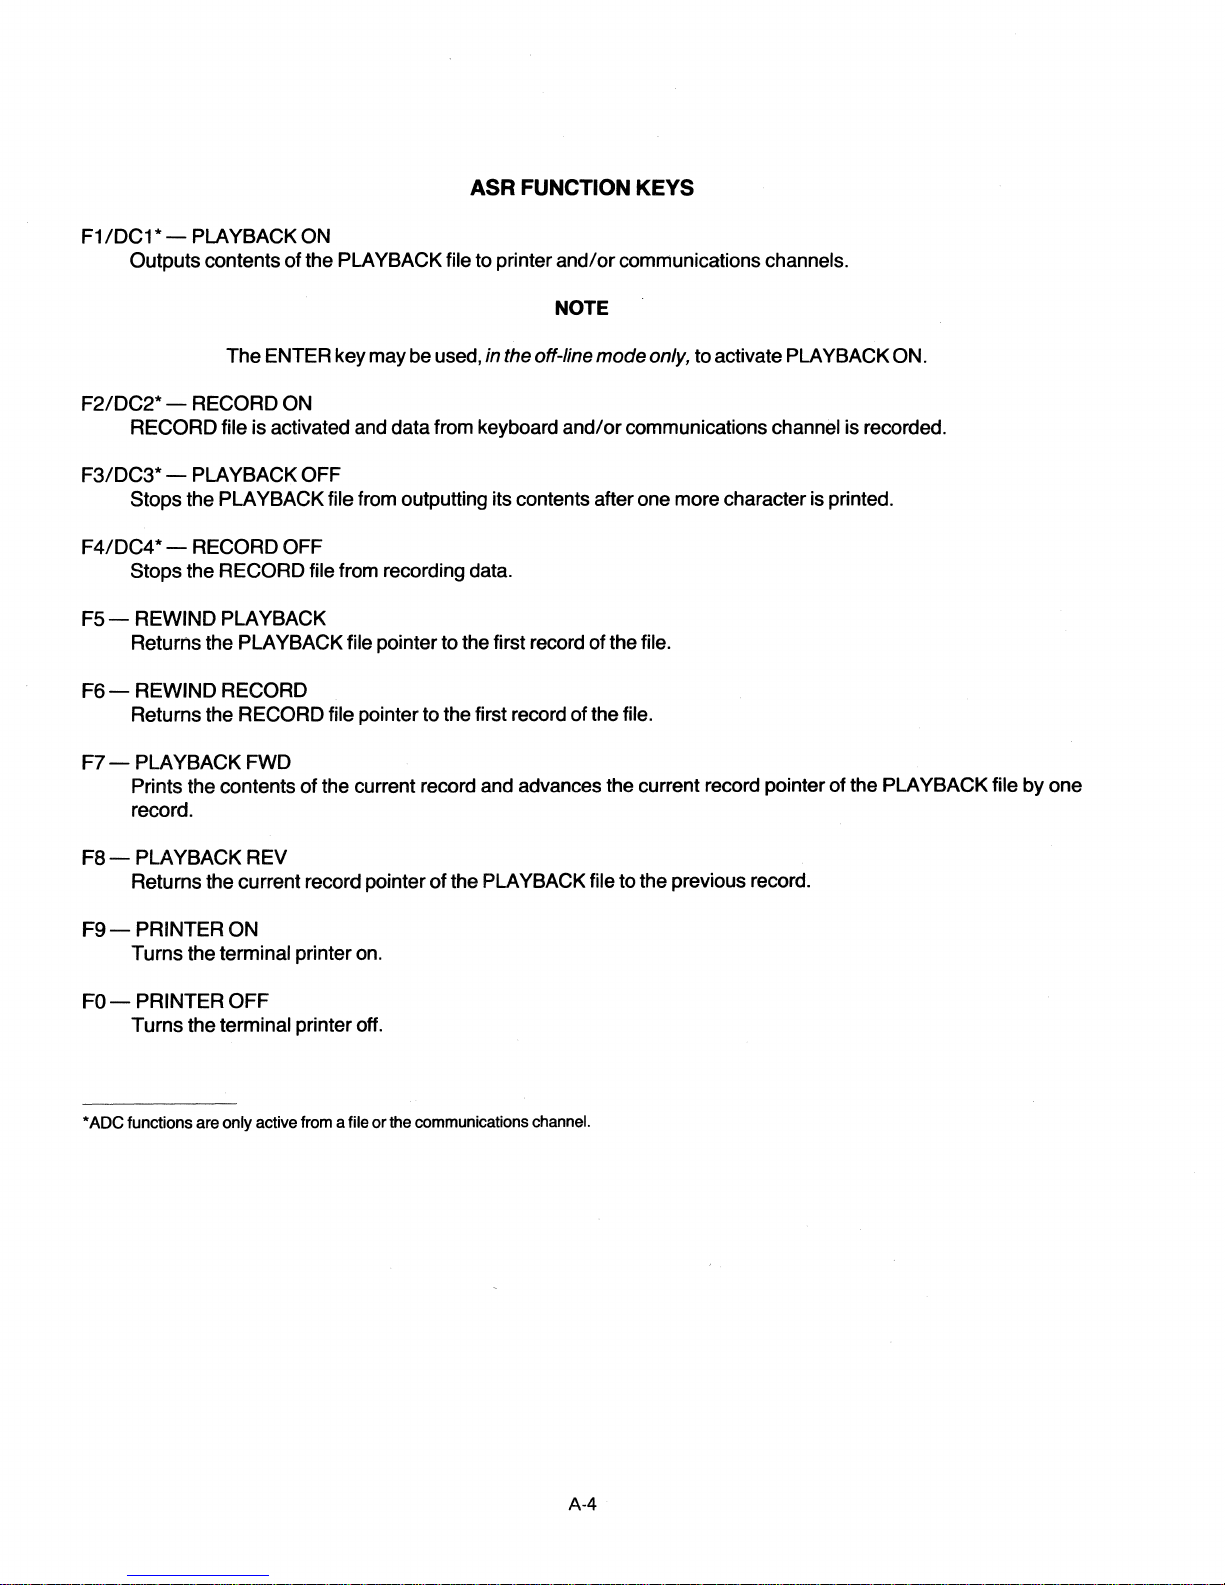
ASR FUNCTION KEYS
F1/DC1*
- PLAYBACK ON
Outputs
contents of the PLAYBACK file to printer
and/or
communications channels.
NOTE
F2/DC2*
RECORD
F3/DC3*
The ENTER key may be used, in the off-line
- RECORD ON
file is activated and data from keyboard and/or communications channel is recorded.
- PLAYBACK OFF
mode
only, to activate PLAYBACK ON.
Stops the PLAYBACK file from outputting its contents after one more character is printed.
F4/DC4*
- RECORD OFF
Stops the RECORD file from recording data.
F5 -
REWIND PLAYBACK
Returns the PLAYBACK file pointer to the first record of the file.
F6
- REWIND RECORD
Returns the RECORD file pointer to the first record of the file.
F7
- PLAYBACK FWD
Prints the contents of the current record and advances the current record pointer of the PLAYBACK file
record.
by
one
Fa
- PLAYBACK REV
Returns the current record
F9
- PRINTER ON
Turns the terminal printer
FO
- PRINTER
OFF
Turns the terminal printer off .
•
ADC
functions are only active from a file
pOinter of the PLAYBACK file to the previous record.
on.
or
the communications channel.
A-4
Page 61
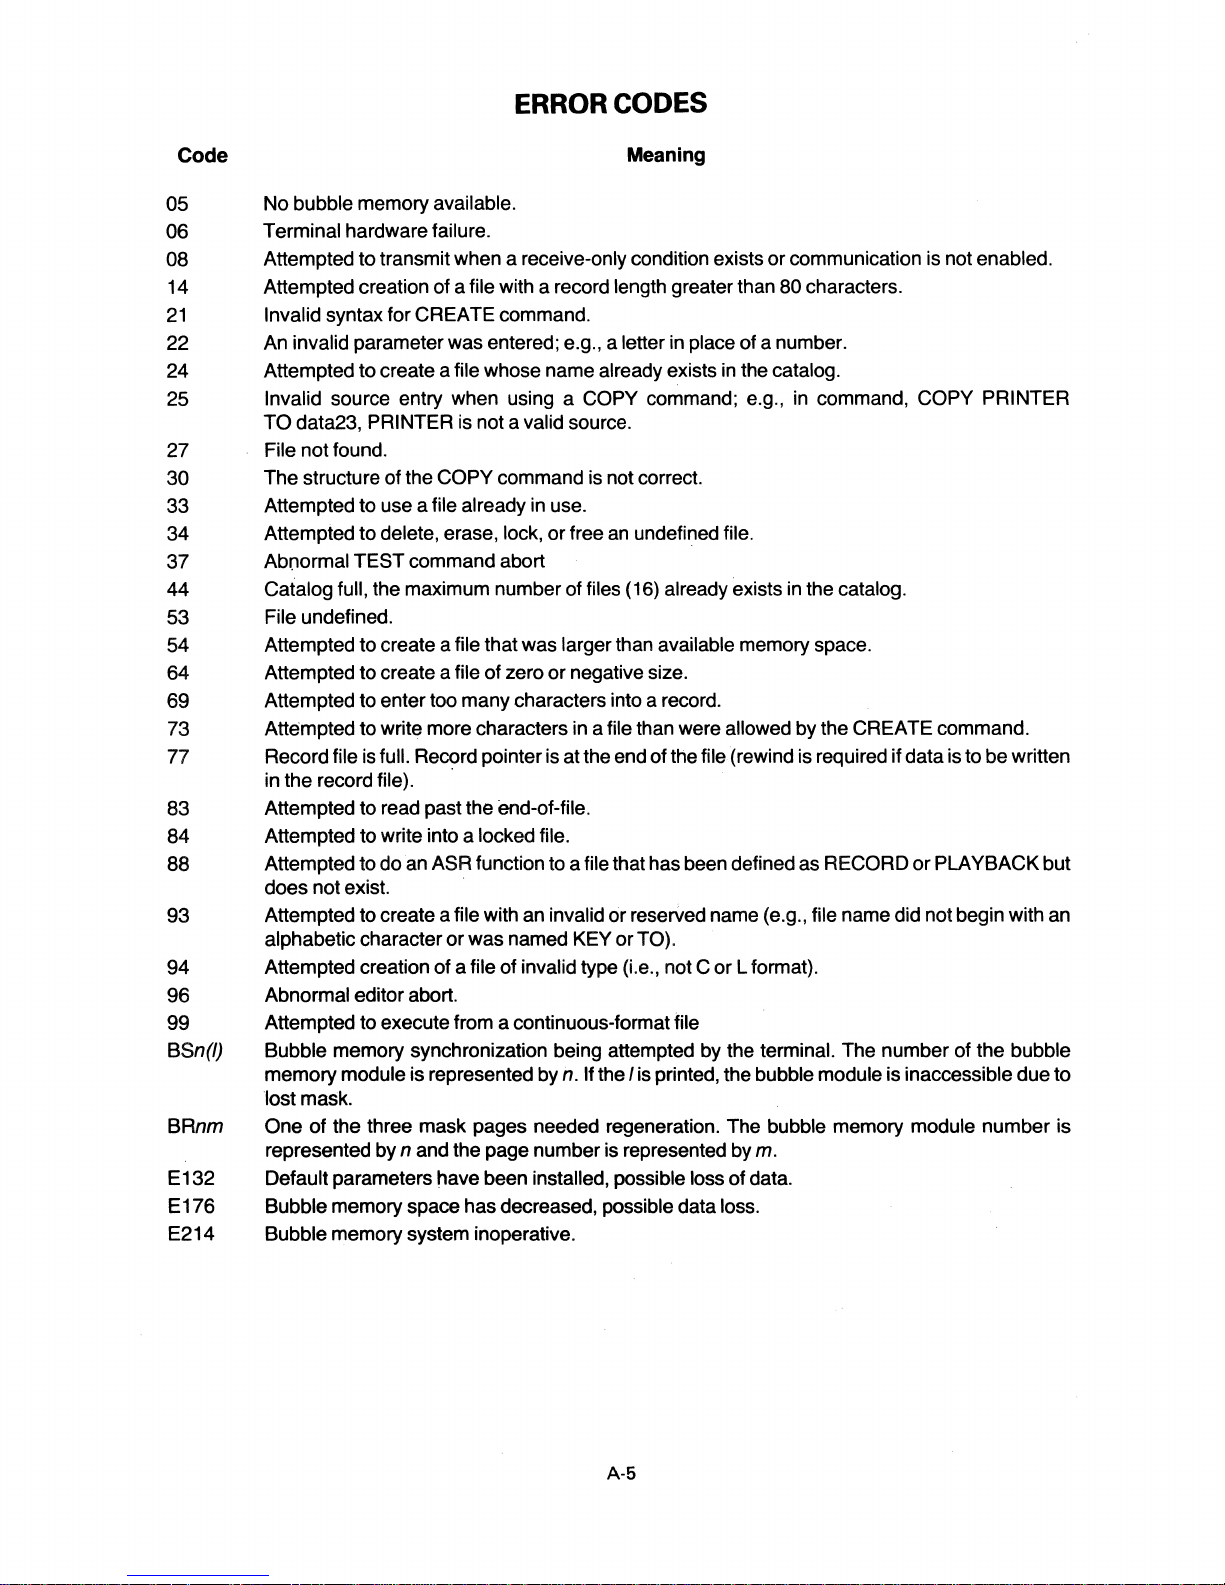
ERROR
CODES
Code
05
06
08
14
21
22
24
25
27
30
33
34
37
44
53
54
64
69
73
77
83
84
88
93
94
96
99
BSn(/)
BRnm
E132
E176
E214
Meaning
No bubble memory available.
Terminal hardware failure.
Attempted to transmit when a receive-only condition exists or communication is not enabled.
80
data.
characters.
in
command,
in
the catalog.
COpy
or
PRINTER
PLAYBACK but
due
to
Attempted creation of a file with a record length greater than
Invalid syntax for CREATE command.
An invalid parameter was entered; e.g., a letter in place of a number.
Attempted to create a file whose name already exists
Invalid source entry when using a COPY command; e.g.,
TO
data23, PRINTER is not a valid source.
File not found.
The structure of the
Attempted to use a file already
Attempted to delete, erase, lock, or free
Abnormal TEST command abort
Catalog full, the maximum number of files (16) already exists
File undefined.
Attempted to create a file that was larger than available memory space.
Attempted to create a file of zero
Attempted to enter too many characters into a record.
Attempted to write more characters in a file than were allowed by the CREATE command.
Record file
in the record file).
Attempted to read past the
Attempted to write into a locked file.
Attempted to do an
does not exist.
Attempted to create a file with an invalid
alphabetic character
Attempted creation of a file
Abnormal editor abort.
Attempted to execute from a continuous-format file
Bubble memory synchronization being attempted by the terminal. The number of the bubble
memory module is represented by
lost mask.
One
represented by
Default parameters have been installed, possible loss
Bubble memory space has decreased, possible data loss.
Bubble memory system inoperative.
is
of
the three mask pages needed regeneration. The bubble memory module number is
COPY command is not correct.
in
use.
an
undefined file.
or
negative size.
full. Record pointer is at the end of the file (rewind is required if data is to be written
end-of-file.
ASR function to a file that has been defined as RECORD
or
reserved name (e.g., file name did not begin with an
or
was named KEY
of
invalid type (Le., not C
or
TO).
n.
If the I is printed, the bubble module is inaccessible
n and the page number is represented by m.
in
the catalog.
or
L format).
of
A-5
Page 62

ESC FUNCTIONS
ESC 0 -
Command
mode. Command follows the digit 0 and is executed by
receive-EOl
sequence.
ESC1 - Transmit Status. Six hexadecimal-ASCII characters representing terminal status are transmitted,
by
the
Char
transmit-EOl
1
followed
the
two characters can be
a
N
F F An error with no error code has occurred.
The
next four characters represent status information in binary form transmitted by the terminal in hex-ASCII
representation. The meaning
Third Character
(MSB) Bit 1 -
(lSB)
Fourth Character
(MSB) Bit
(lSB)
Fifth Character
(MSB) Bit 1 - DC1.3 is on.
(lSB)
Sixth Character (see EXAMPLE)
(MSB) Bit 1 - EOTDIS is on.
(lSB)
Playback is assigned to an existing file.
Bit 2 - Record is assigned to an existing file.
Bit 3 - The
Bit 4 - The playback file is a line format file ( a logic zero indicates a continuous-format file).
1 - The record file is a line file (a logic zero indicates a continuous file).
Bit 2 - The record file is
Bit 3 - The printer has been switched off by a PRINTER-OFF command.
Bit 4 - DC2.4 is on.
Bit 2 - DC3 is on.
Bit 3 - EDC is on.
Bit 4 - Buffer is on.
Bit 2 - AUTOABM is on.
Bit 3 -
ABMPRT is on.
Bit 4 - PCHECK is on.
sequence. The first two characters are the status
Char
2 Meaning
0
N
of
playback and record files are the same file.
Command successfully executed.
Two hexadecimal numbers for an error code,
a logic
ONE
lOCKED.
----i
in each position is
If the terminal transmits the characters
the third through sixth characters converted to binary are
......
of
the binary representation is as follows:
of
last executed command;
if
an error occurred.
EXAMPLE
OOFC21
F C 2 1
I
LeqUalS
~eqUalS
~
binary
bi.nary
equals
binary 1100
equals binary
0001
0010
1111
ESC 2 - Playback file record forward.
ESC 3 - Playback file record reverse.
ESC 4 - Rewind playback file.
ESC 5 - Rewind record file.
ESC 6 ESC 7 -
ADC
ADC
ON
- switches
OFF
- switches off DC1.3, DC2.4, and DC3.
on
DC1.3, DC2.4 and DC3.
ESC 8 - Printer ON.
ESC 9 - Printer
ESC:
-
ESC;
- Free keyboard.
OFF
- the printer will remain off until:
PRINTER ON command
1) A
The
COMMAND mode is entered.
2)
Power is cycled on and off.
3)
lock
out keyboard.
is
encountered.
Thus, the
preted:
six1h
character
(1 ~ binary 0001) would be inter·
bit 1 ~ 0 - EOT disconnect is OFF.
bit 2 ~ 0 - Auto ABM is OFF.
bit 3 ~ O-ABMprintisOFF
bit 4 ~ 1 - Parity check
is
ON.
Hex ASCII
Character
a
1
2
3
4
5
6
7
8
9
A
B
C
D
E
F
Binary
Equivalent
0000
0001
0010
0011
0100
0101
0110
0111
1000
1001
1010
1011
1100
1101
1110
1111
ESC < - Return to RUN command file.
ESC ESC - Causes terminal to process a single ESC character (needed to record single ESC when EDC is
on).
A-6
Page 63
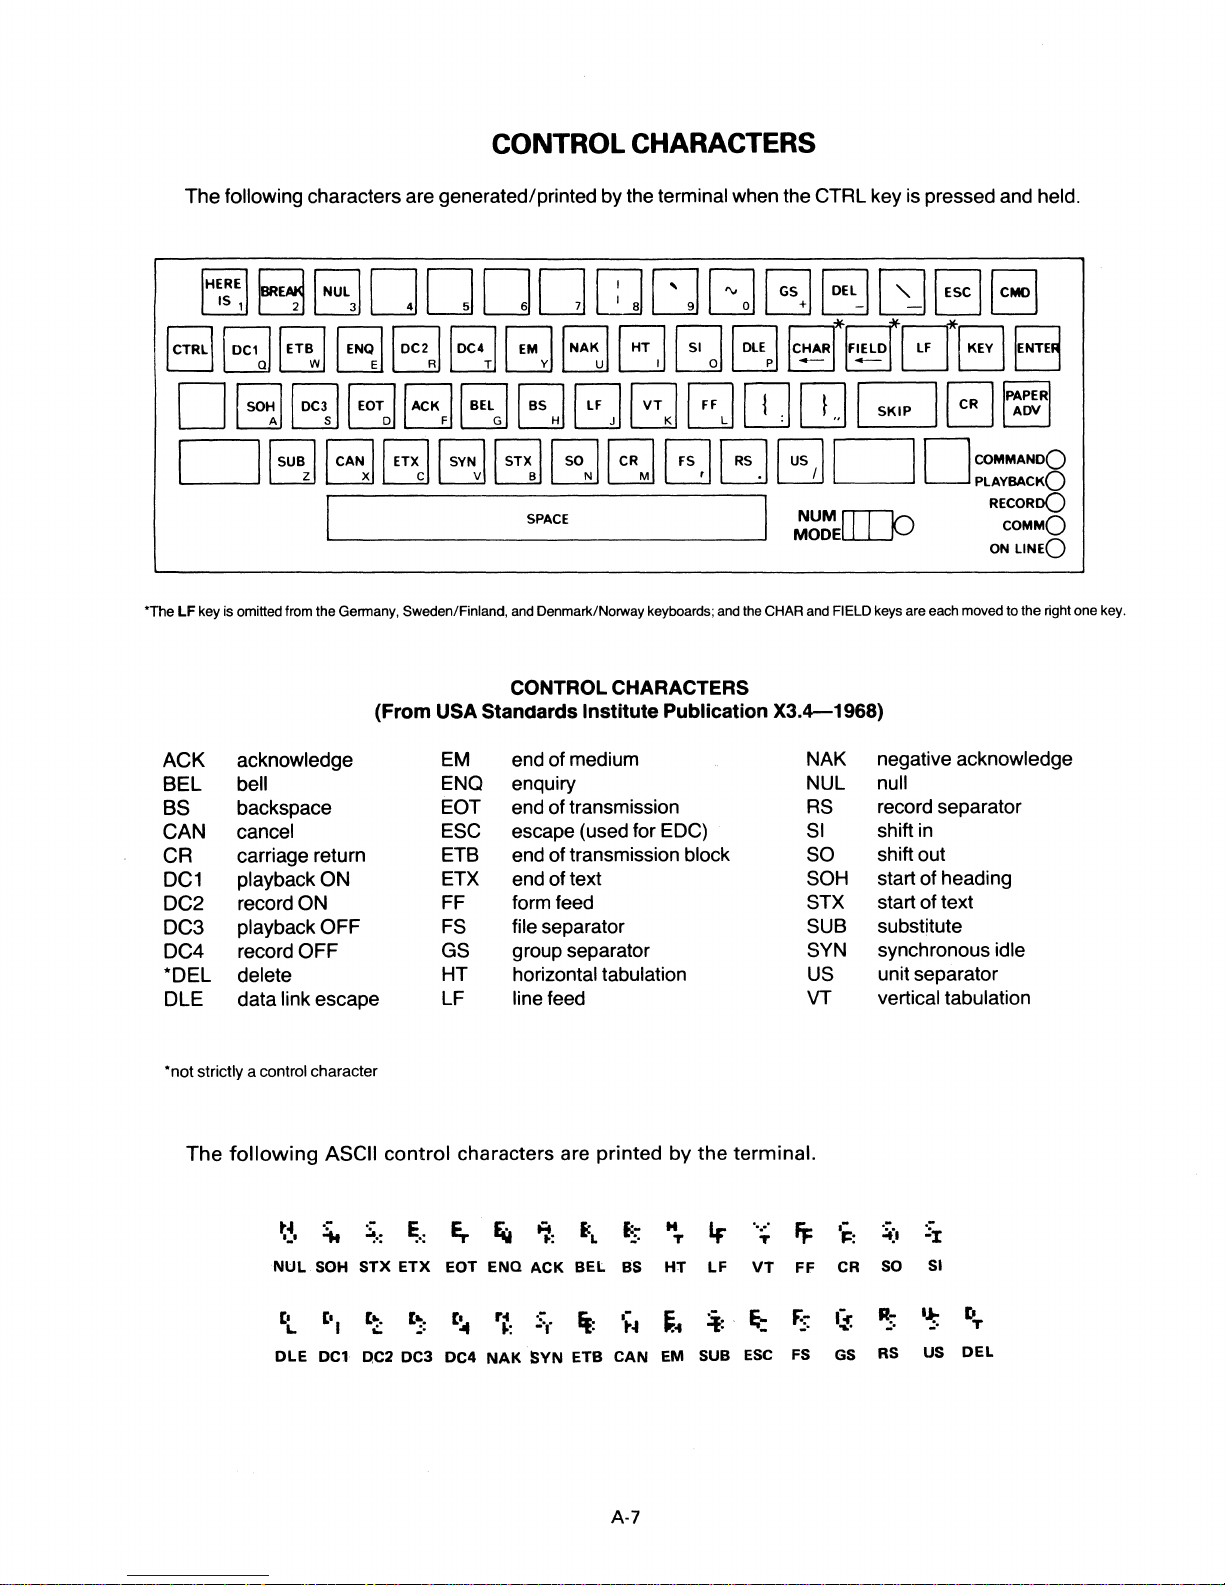
CONTROL
The
following characters are generated/printed by the terminal when the CTRL key is pressed and held.
'The
LF key is omitted from the Germany, Sweden/Finland, and Denmark/Norway keyboards; and the CHAR and FIELD keys are each moved to the right one key.
CHARACTERS
ACK
BEL
BS
CAN
CR
OC1
OC2
OC3
OC4 record OFF
*OEL
OLE
• not strictly a control character
acknowledge
bell
backspace
cancel
carriage return
playback
record ON
playback
delete
data link escape
The
following
ON
OFF
~~,
~
NUL
SOH
ASCII
STX
CONTROL
(From USA Stanaards
EM end of medium
ENQ enquiry NUL null
end of transmission RS
escape (used for EOC)
end of transmission block
group separator
line feed
characters are
A
r.;,
..
:
ENQ ACK
control
~.:
~.:
ETX
EOT
ESC
ETB
ETX end of text
FF form feed
FS file separator
GS
HT horizontal tabulation US
LF
Er-
EaT
CHARACTERS
Institute
printed
E:L
BEL
Publication
by
H
E::-
T
.'
HT
as
the
If
LF
X3.4-1968)
terminal.
.•...
FF
T
VT
FF
NAK negative
record separator
SI
SO
SOH
STX start of text
SUB substitute
SYN synchronous idle
VT
shift
shift out
start of heading
unit separator
vertical tabulation
.-
-=t)
'~:
so
CR
acknowledge
in
.-
':1:
SI
CI CI
L
OLE
DCl
I
OC2DC3
Co;.
~
C~:
C~
DC4
rot
1-:
NAK
.-
.:
...
Ff.
SVN ETB
'~
..
CAN
A-7
~
..
EM
~
SUB
~
ESC
F:::
FS
I~
GS
R-
.:.
RS
Ij.
US
to
.:
.
T
DEL
Page 64
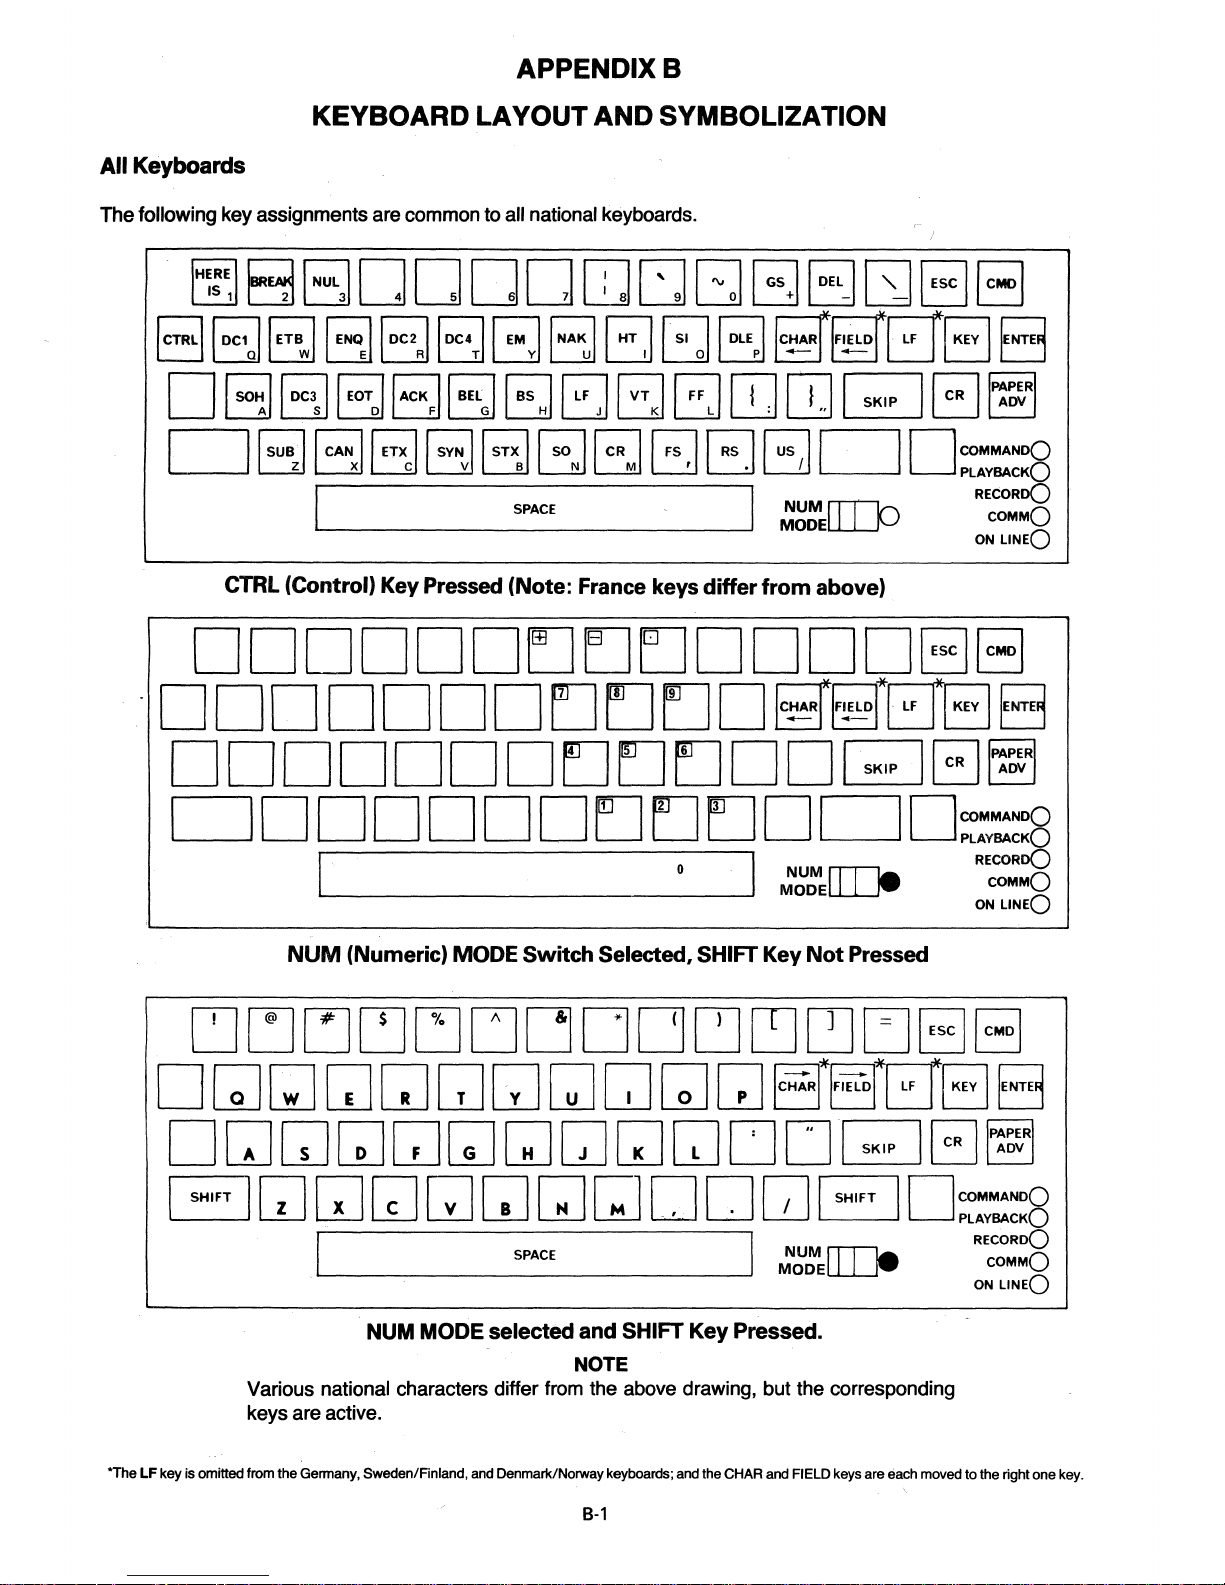
All
Keyboards
APPENDIXB
KEYBOARD LAYOUT AND SYMBOLIZATION
The following
DDDDDDEJ[]EJDDDDEJB
DDDDDDDEJ[JEJD8r~~rEJB8
DDDDDDDEJEJEJDDGJB~
key
assignments
CTRL
(Control) Key Pressed (Note: France keys
are
common
to
all national
keyboards.
differ
from
above)
DDDDDDDEJEJEJDDD~;:~~8
.
I
NUM
(Numeric) MODE
Switch
Selected, SHIFT Key
0 I
NUM
rTT"la
MODELL.1......JW'
Not
Pressed
CJLJrJ~~CJ[JCJDCJ~~uEJEJ
D
GJ
[;]
GJ
[J
GJ
GJ
GJ
CJ
W
GJ
~~~8EJ
D
[J
GJ
GJ
GJ
GJ
GJ
[J
GJ
EJ
Various national characters differ
keys
[J
GJ
GJ
GJ
GJ
GJ
w D D
I
_ .
NUM MODE selected and SHIFT Key Pressed.
are
active.
SPACE
from
NOTE
the
above
w D
drawing, but
[JGJ
[J
B
I NUM
ITTla.
MODE~.
the
corresponding
D~;:~~8
B
RECORoQ
RECORoQ
COMMa
ON
LINEa
B
~
COMMa
ON
LINEa
*The LF key is omitted
from
the Gennany, Sweden/Finland,
and
Denmark/Norway keyboards;
8-1
and
the
CHAR
and
FIELD keys are
each
moved to the right one
key.
Page 65
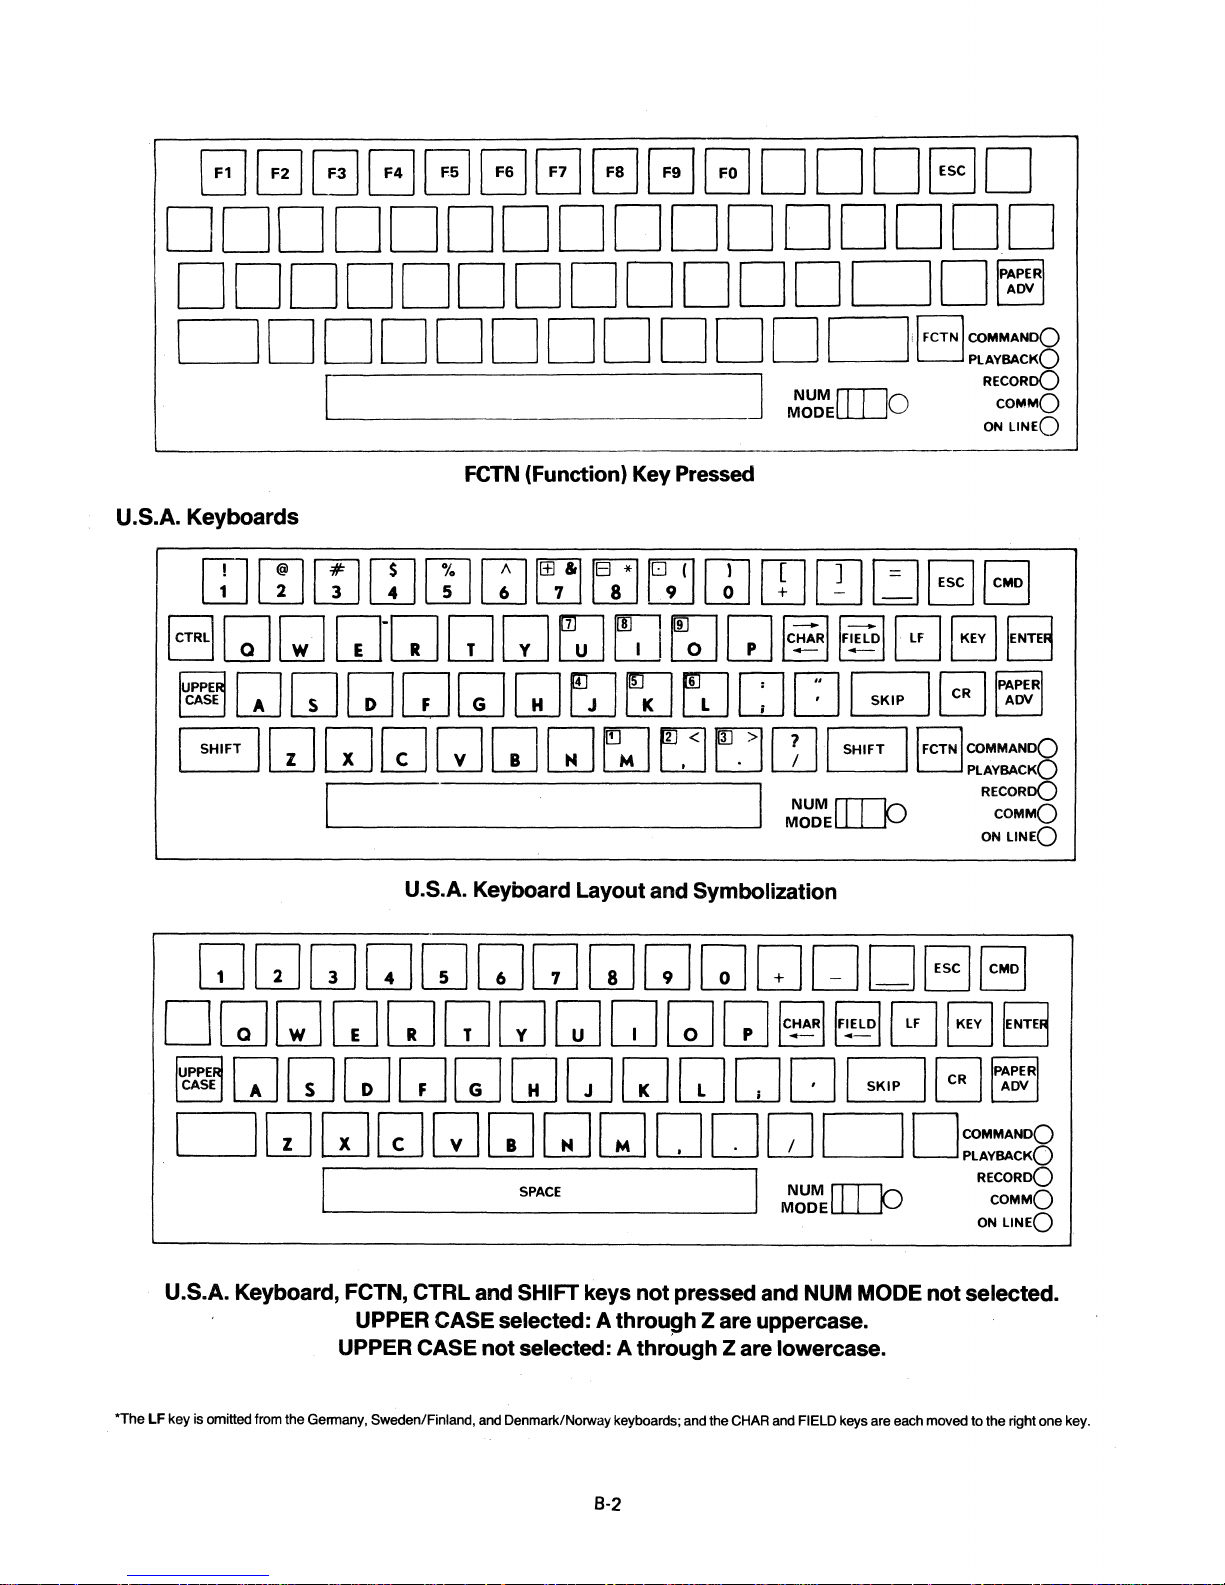
BBGGGGBBGBDDDEJD
DDOODDDDDOODDDOO
DDDDDDDDDDDDCJD~
U.S.A.
DD
Keyboards
ill
m
~
l!J
DO
[
I#l
In
L!J
l!J
DO
FCTN
ron
fAl
LU
W
DD
{Function} Key Pressed
fi±i&1
f8*1
l!J
W
DDDDiEJ~;:~~8
fElf1
rn
l!J
0
J
NUM
MODE
m m
l!J
~
[IJo
I=l
Ld-
RECORoQ
COMMO
ON
EJ
0
ESC
~
LlNEO
8[JGJ[Jl~J[JGJEJ~EJGJ~~8EJ8
~wQwwww~~~DD~B~
EJ
[J
GJ
GJ
GJ
GJ
w
~
I I
U.S.A. Keyboard Layout and Symbolization
EJ
EJ
OJ
EJ
:~~EITIP
IFCTN1~~:;~~~8
RECORDO
COMMO
ON
lINEO
GJGJGJCJQGJ[JGJwGJ[JOOEJEJ
O[JGJ[J[J[JGJGJ[J[JGJ~~8EJ8
~wQwwwwwwwDD~B~
. CJ
U.S.A. Keyboard, FCTN, CTRL and SHIFT keys
"The
LF
key is omitted from the Gennany, Sweden/Finland, and Denmark/Norway keyboards; and the CHAR and FIELD keys are each moved to the right one key.
[J
GJ
GJ
GJ
GJ
I
UPPER CASE selected: A
UPPER CASE
SPACE
not
selected: A
w
[J
8-2
D D
not
pressed and NUM MODE
throu~h
through
Z are uppercase.
Z are lowercase.
[J
I
:~~E
D
ITIP
D~;:~~8
RECORDO
COMMO
ON
LlNEO
not
selected.
Page 66

CJ
~
~~.c:J
LJ
~
CJ
D
CJ
~
~
u
EJ
EJ
Dww[JGJGJGJGJCJwGJ~~EJEJ8
D
[J
GJ
GJ
w
Ww
B[J[JGJGJGJw[JCJD~BD~=:g'
[J
GJ
[J
[J
[J
G;J
EJ
~
United
Kingdom
I I
U.S.A. Keyboard, SHIFT
of
(Independent
Keyboard
United Kingdom Keyboard
UPPER CASE lock) A
SPACE
key
pressed and NUM MODE
through
Layout
Z are uppercase.
and
Symbofization
M~~[[P
not
selected
RECORoQ
COMMO
ON
LlNEO
wGJGJwG][JGJGJGJGJ[JOOEJEJ
Dww[JGJGJGJGJCJwGJ~~EJEJB
~
[J
GJ
GJ
wW
D[J[JGJGJGJw[JDD[JDD~=~~
- . I
I
.
United Kingdom Keyboard, FCTN, CTRL and SHIFT
UPPER CASE selected: A
UPPER CASE
w
SPACE
MODE
NUM
not
selected: A
[J
not
8-3
GJ
[J
selected.
through
through
D D G;J
:~:EITIP
not
pressed and
Z are uppercase.
Z are lowercase.
EJ
~
RECORoQ
COMMO
ON
LlNEO
Page 67
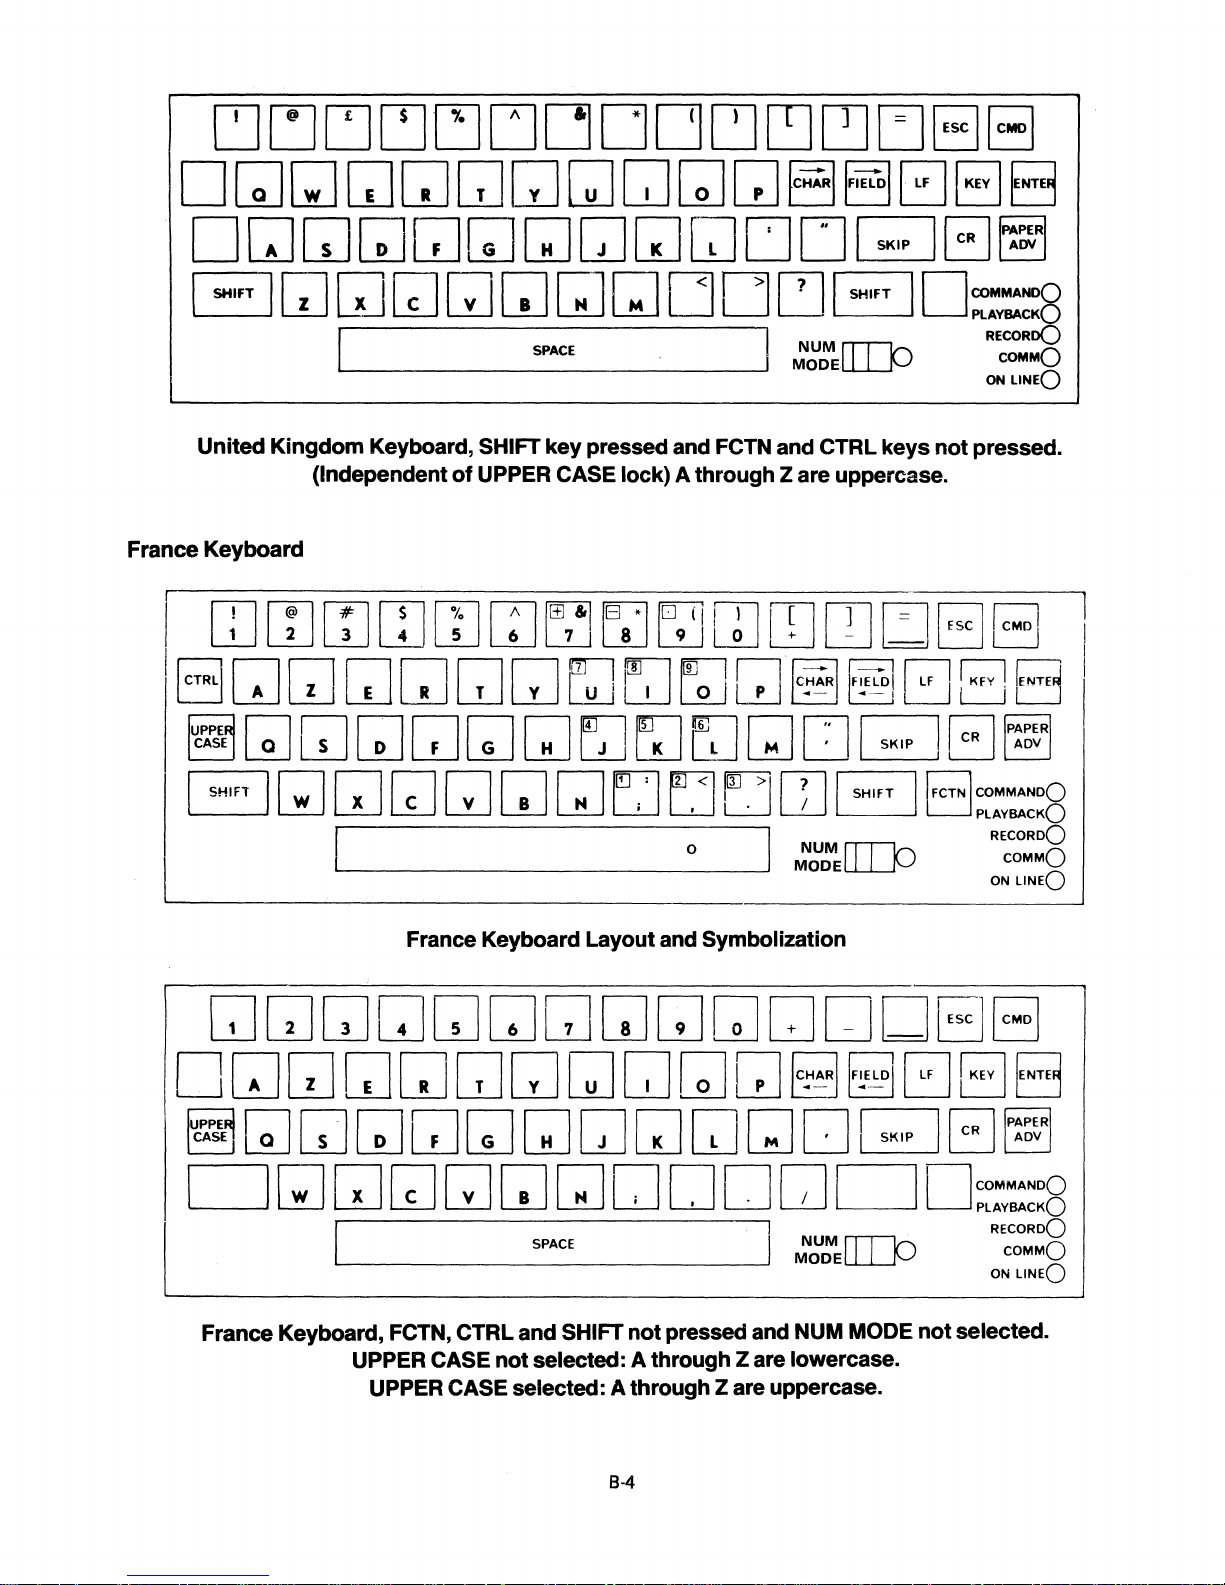
United
Kingdom
(Independent
Keyboard, SHIFT
of
UPPER CASE lock) A
key
pressed and FCTN and CTRL
through
Z are uppercase.
keys
not
pressed.
France
Keyboard
France Keyboard
Layout
and Symbolization
France Keyboard, FCTN, CTRL
UPPER CASE
UPPER CASE selected: A
and
not
selected: A
SHIFT
8-4
not
pressed and NUM MODE
through
through
Z are lowercase.
Z are uppercase.
not
selected.
Page 68

CJ~~LJ~CJ[]DDCJLJc:JoEJEJ
D[JGJ[JGJ[J[JwCJGJGJ~~0EJB
DGJGJGJGJGJGJ[JGJ[JGJDGJEJ~
EJ
Germany
EJ
GJ
GJ
GJ
GJ
GJ
GJ
[J
CJ
D
I
.
France Keyboard, SHIFT key pressed and FCTN and
(Independent
Keyboard
GJ
GJ
of
GJ
GJ
UPPER CASE
I I
'-----------------~
SPACE
GJ
GJ
lock)
EJ
A through Z are uppercase.
E:J
[J
o
CJ
EJ
I
M~~[[IJc)
CTRl
keys not pressed.
OJ
EJ
NUM
rfT"lr-.,
MODEl..LL...l'---'
D~~:Y::~8
RECORDO
COMMO
ON
LlNEO
IFCTNI~~;~::~8
RECORDO
COMMO
ON
lINEO
Germany Keyboard
layout
and Symbolization
wGJGJ[J[J[JGJGJGJ[J[J[JeJEJEJ
i
ID[JGJ[JGJ[JGJwCJGJGJGJ~IT3EJB
'~wGJGJGJGJw[JGJ[J~QDGJ~
D
Germany Keyboard, FCTN,
GJ
GJ
GJ
GJ
GJ
GJ
[J
I I
.
UPPER
UPPER
CTRl
CASE not selected: A through Z,
CASE selected: A through
SPACE
and SHIFT not pressed and NUM MODE not selected.
8-5
D D
A,
°o,
Z,
:(,od,
U are uppercase.
[J
D
!
M~~
[[IJc)
U are lowercase,
D~~:Y::~8
RECORDO
COMMO
ON
LlNEO
Page 69

Germany Keyboard, SHIFT key pressed and FCTN and CTRL keys
(Independent
of
UPPER CASE lock) A
through
Z,
A,
·0,
U are uppercase.
not
pressed.
Sweden/Finland
'mmf#lml%lf!\lfl±Jil~fO(lrnr=lI=l~r::lD
l!JL!JWWLUWL!JWl!Jo~l=J~u~
Keyboard
8GJw[JGJGJ[JEJLJEJGJ[J~~EJB
~wwwwww~~~00uGJ~
Sweden/Finland Keyboard Layout and Symbolization
GJ[J[J[J[J[JGJ[JGJGJ[J[JGJEJEJ
DGJw[JGJGJ[J[J[JGJGJ[J~8EJB
~wwwwwwwwwwwDGJ~
D
GJ
[J
GJ
' I '
I
,
Sweden/Finland Keyboard, FCTN, CTRL and SHIFT
UPPER CASE
UPPER CASE selected: A
[J
[J
NUM
not
selected: A
w
SPACE
MODE
[J
not
selected .
through
through
8-6
D D
. . . . .
Z,
A,
0,
.....
Z,
A,
A, are lowercase;
0,
A are uppercase.
[J
D
:~~E[l]]o
not
pressed and
D~~;:~~8
RECORDO
COMMO
ON
LlNEO
Page 70

CJ~~~c:JCJ[]CJDLJEJDDEJEJ
DGJwGJ[JGJ[J[JCJGJGJ[J~~EJ8
Dwwwwwwwww00DGJ~
B
Sweden/Finland
Denmark/Norway
OJ
GJ
GJ
GJ
I
Keyboard, SHIFT key pressed and FCTN and CTRL keys
(Independent
Keyboard
IT]
IT]
IT]
GJ
[J
w
SPACE
of
UPPER CASE lock) A
rn
w
E;J
[J[]
through
EJ
EiJ
D D B
NUM
I
o
••••
Z,
A,
rn
~
[[]o
~~
0,
A are uppercase.
[J
D~~;:~~8
RECORDO
~~
ON
LlNEO
not
pressed.
[]
EJ EJ
BGJwGJ[JGJ[JEJLJEJGJ[J~~EJ8
~wwwwww~~~~wDGJ~
B
GJ
GJ
I
'--------------------'
GJ
GJ
[J
GJ
EJ
EJ
EJ
o
OJ
I
NUM
MODE
B
[[]o
IFCTN1~~:Y:~~8
RECORDO
COMMO
ON
LlNEO
Denmark/Norway Keyboard Layout and Symbolization
wGJGJGJGJ[JGJ[J[JGJGJCJOEJEJ
DGJwGJ[JGJ[J[JCJGJGJ[J~~EJ8
~wwwwwwwww~QDGJ~
D
GJ
GJ
GJ
GJ
[J
GJ
[J
D D
I
'-------------------'
Denmark/Norway Keyboard, FCTN, CTRL and SHIFT
UPPER CASE
UPPER CASE selected: A
· I
not
.
SPACE
and NUM
selected: A through
MODE
not
through
B-7
selected.
Z,~.,t/J.,
, .
Z,IE,rp,
[J
A are lowercase.
A are uppercase.
D
NUM
[[]o
MODE COMM
not
pressed
D~~:Y:~~8
RECORDO
ON
LlNEO
0
Page 71

CJ
LJLJLJ~
U[J
[jO
LJ
EJ
[~J
[JEJEJ
D[J[JGJGJ[J[J[JCJ[JGJ[J~~EJB
Dwwwwwwwww~QDGJ~
8
GJ
GJ
L
Denmark/Norway
(Independent of UPPER CASE lock); A through Z are uppercase.
GJ
[J
GJ
[J
[J
D D
SPACE
.
Keyboard, SHIFT key pressed and FCTN and CTRL keys not pressed
[J
E~
I
I\.~~~EOI)J
D~~;:~~8
RECORDO
COMMO
ON
LlNEO
B·8
Page 72

APPENDIXC
8
7
4321
001
o 0 1 1
o 1 0 0
o 1 0 1
o 1 1 0
o 1 1 1
1 0 0 0
1 0 0 1
1 0 1 0
1 0 1 1
0 0
1 1
1 1 0 1
1 0
1 1
1 1 1 1
6
0
o
o
5
~
I ill
~~'
11111111
~~
CODE SYSTEM
AND CHARACTER SET
U.S.A. and France Units
(See Notes for Other Nations)
o
o
I
~~illl
~
~H
II
..
~
o
o 1 o o
~";Jtt
II:
k~%s%%:~S,;,~f:t
11:11'
o
~
~
o
___
o
")r.1~ti
:rv
o o
o
SF'
! 1 A Q a
" 2 B R b
13
0 @ P \
. 7 G
( 8 H X h x
) 9 I Y i Y
+-+-_.....:..--+-
, < L
~~
:~RS~.
> N 1\ n 8
10
o
C S c
o
o
-Wg
J Z J Z
__
K---if--~[,-21--_k_+-----,{,--51
\3
M
T4
o
o
r
s
t
u
w
I
m } I
:6
<--_--'I
I11111I1111111111111111
~
Printable Characters
Printer Control Characters
Codes
Generated and Transmitted
by
the terminal
~~4~
ASR Control Codes
Extended Line Control
NOTES
1 £ on U.K. units
2 A on Germany and Sweden/Finland units;AE on DenmarklNorway units
3 Q on Germany and Sweden/Finland
4 U on Germany and Sweden/Finland units;A on Denmark/Norway units
5 a on Germany and Sweden/Finland units;ae on Denmark/Norway units
6 0 on Germany and Sweden/Finland units;
7 ii on Germany and Sweden/Finland units;
8
f3
on Germany units
units;~
on Denmark/Norway units
cf>
on Denmark/Norway units
it
on Denmark/Norway units
C-1
Page 73

APPENDIX 0
SPECIFICATIONS
The following specifications apply to both Models 763
and 765 and to both the discrete and nondiscrete
memory versions of the terminal.
bubble
PRINTER
Method: Nonimpact, electrically
matrix
paper.
thermal printhead, prints on thermographic
heated,S
x 7 dot
Character Set: 95 printable characters in normal mode
with an
acters printed
additional 33 ASCII or C.C.I.T.T. control char-
in
edit mode.
Character Size: 2.6 mm x 2 mm (0.105 in. x 0.080 in.)
Line Length: 203.2 mm (8 in.); 2.54 mm character
spacing
Line Spacing: 4.23 mm
(10 characters per inch); 80 characters per line.
(6
lines per inch).
Printing Rate: Up to 30 characters per second.
Paper: TI thermographic printing paper, Part
972603,216
(10ft.)
mm
color coded.
(8-Y2
in.) x 30.5 m (100 ft.); last 3 m
No.
Platen: Friction-feed.
Carriage Return and Line Feed: Automatic at column
81; no code is transmitted. The 81st character received
is buffered and printed on the next
line.
KEYBOARD
Code: ASCII, C.C.I.T.T.; 128 codes generated.
ENVIRONMENT
Temperature: Operating: 10°C to 40°C (50°F to 104°F);
Storage:
per;
-30°C
-30°C
to 70°C
to 40°C
(-22°F
(-22°F
to 158°F) without pa-
to 104°F) including paper.
Magnetic Field: Maximum permissible magnetic field
at the bubble memory shield
oersteds (Oe).
in
any direction is 40
Humidity: Operating: 10% to 90% (no condensation);
Storage:
10% to 95% (no condensation).
Shock: Operating: 0 G; Storage: 40 G for 18 msec half
sine wave.
Vibration: Operating: 0.5
30 minutes, 20 Hz.
G,
G,
10 to 50 Hz; Storage: 1.5
POWER REQUIREMENTS
Voltage: 90-132 Vrms or 184-264 Vrms.
Frequency: 47-63 Hz.
Power: 150 watts maximum.
PHYSICAL
Size: Width:
in.); Height: 139 mm (5.5 in.); Weight: 7.7
pounds)
DATA
391
mm (15.4 in.); Depth: 406 mm (16.0
including paper.
TRANSMISSION
kg
(17
Method: Asynchronous, serial-by-bit, serial-by-
character.
Code: ASCII, C.C.I.T.T.; seven-level,
acter
including parity, start, and two stop bits at 10
characters per second (110 baud); 10 bits per charac-
ter,
including one stop bit at speeds above 10 charac-
ters per second.
11
bits per char-
Mode: Operator-selectable full duplex, half duplex, or
half duplex with reverse channel.
Parity: Operator-selectable odd, even, or mark parity;
Operator-selectable parity checking.
Received Data Buffering: Character buffering on re-
ceived data, permitting true
operation (no filler characters required after
30 characters per second
CR or LF).
Transmitted Data Buffering: Operator-selectable line
buffering on data to be transmitted, permitting corrections prior to transmission.
Interface: Operator-selectable; Integral originate-only
acoustic coupler or EIA RS-232-C interface with Model
765;
dc
current loop or EIA interface with Model
763; Integral originate-mode modem
with
Model 763 when ordered with optional modem
(U.S.
models only).
or
EIA interface
Baud Rates: Operator-selectable 110, 200, or 300
baud on internat interface, or up to 9600 baud on EIA
interface; throughput limited to 2400 baud.
D-l
Page 74

INTEGRAL ACOUSTIC COUPLER
(Model 765
only)
Signal
Levels: Serial interface signal levels are defined
by EtA Standard RS-232-C as follows:
Compatibility:
equivalent) or C.C.I.T.T.
Mode:
Originate only.
Modulation:
Transmit
Bell System
V.
103/113
21.
Frequency shift keying (FSK).
Carrier
Frequencies: ASCII Mark: 1270 Hz;
data sets (or
Space: 1070 Hz; C.C.I.T.T. Mark: 980 Hz; Space 1180
Hz.
Receive
Carrier
Frequencies: ASCII Mark: 2225 Hz;
Space 2025Hz; C.C.I.T.T. Mark: 1650 Hz; Space 1850
Hz.
Transmit
Level: Adjustable only
on
U.S. models from
-20dBmtoOdBm.
Receiver
300 baud operation;
Sensitivity:
-45
-38
dBm with full duplex and
dBm with half duplex and 300
baud operation.
EIA
INTERFACE (Optional
Optional
terminal to
face cable is a minimum 1.8 m
with a 25-pin
Auxiliary
an
EIA Interface
external device such as a modem. Inter-
male connector (Cannon DB25P or
Both
Models)
Kit:
Interfaces the
(6
feet) long terminated
equivalent).
-25
to
-3Vdc
Data Signal Marking
Timing or
de
(Model
Maximum
Nominal
Maximum
mit)
Maximum
Maximum
Control Function Off
CURRENT LOOP SERIAL DATA INTERFACE
763 Only)
Current: 60 milliamps (transmit or receive).
Current: 20 milliamps.
Voltage Drop: 3 V (receive and 1.5 V (trans-
while marking.
Transmit
Transmit
Voltage: 50 V while spacing.
Rate: 300 baud.
-3
to
+3Vdc
Not Defined
Not
Defined
+3
to
+25Vdc
Space
On
Major Assemblies
The major assemblies and their associated part num-
bers for the
Models 763/765 are shown in Figure 8-1.
D-2
Page 75

APPENDIXE
PRINTER
The
following ASCII characters are printed by the Models 763/765 terminal printer.
CONTROL
CHARACTERS
~
ADOD107')
BI-:-S
b4 b3 b2 b
000
000
o 0 1
o 0 1 1
o 1 0 0
o 1 0 1
o 1 1 0
o 1
1
1
o 0
1 0 0
1
1 0
o 1
1
1 1
0 0
1
0 1
1
1
1
1 0
1
1 1
b
0 0
7
b
6
b
5
1
0
51
'u,
1
I
SOt.
0
I
I
I
I
I
1
I
0
Ii
1
I
0
m I
1
I
I
I
I]
1
I I
0
0
,"
·ll'
rlllo
A("~
."
II!'>
"'
CI-!
0
I
II
I
I
I
(I
I
I
I
I
"
I
v,
I
"
I
I
so
0
0 0
0
0
1 0
2 3
~
::1:::
DlE
~
:WE
":1
~
.....
-~
Ot.'
11
t)c:
I
l>C4
I
,A.
I m i I
~v~.
I I
'"
~
['AN
~
~
,.
I
su.
I
Pi'
:mt:
"
I
GS
~
...
-
-
~
~
I
. .
I
e
~
I
I
I I
i
..
I
:.:.:
~
I
I I
I I
"'
I
~
~
CHARACTER SET
UPPERCASE
----
1
JJ
S
4
1
0
5
~
Ii!
B I
~
It
Ia
I
-
I
~
LOWERCASE
----
0
6
~
:+.::.:
;
A
B
....=:r:l
".
c:
~
EI
............
-...
E
>-+-+-
...
4--<
E
Ii
-+
i
~
I
I
m I m
I
~
i
.
!
12
:t
-+.
f~r
H I
r=
~
[".-
~
+
Ii
H_
~
14
i
I
D
I
li!E
EE
....
I
-
m
1
7
r
I
~.<
Ii
~;:..j
e
11
5
.................
~
e
~.
~
I
I
1
1
air
1
1*
12
"""""2
a
112
1
1
11
14
14
5
14
6
8
NATIONAL
CHARACTERS
.A.
United Kingdom
Character
German
Characters
Sweden/Finland
Characters
Norway/Denmark
Characters
German
3
Characters
3
Sweden/Finland
Characters
3
Norway/Denmark
Characters
German
Characters
Sweden/Finland
Characters
Norway/Denmark
Characters
German
Character
Sweden/Finland
Character
·CONTROLCHARACTER
.......
Iit:Si
5
A
;5
5
1
-=-=i
6
EJ
6
1
T~6
II
~7
17
17
8
11
8
1
E·1
Page 76
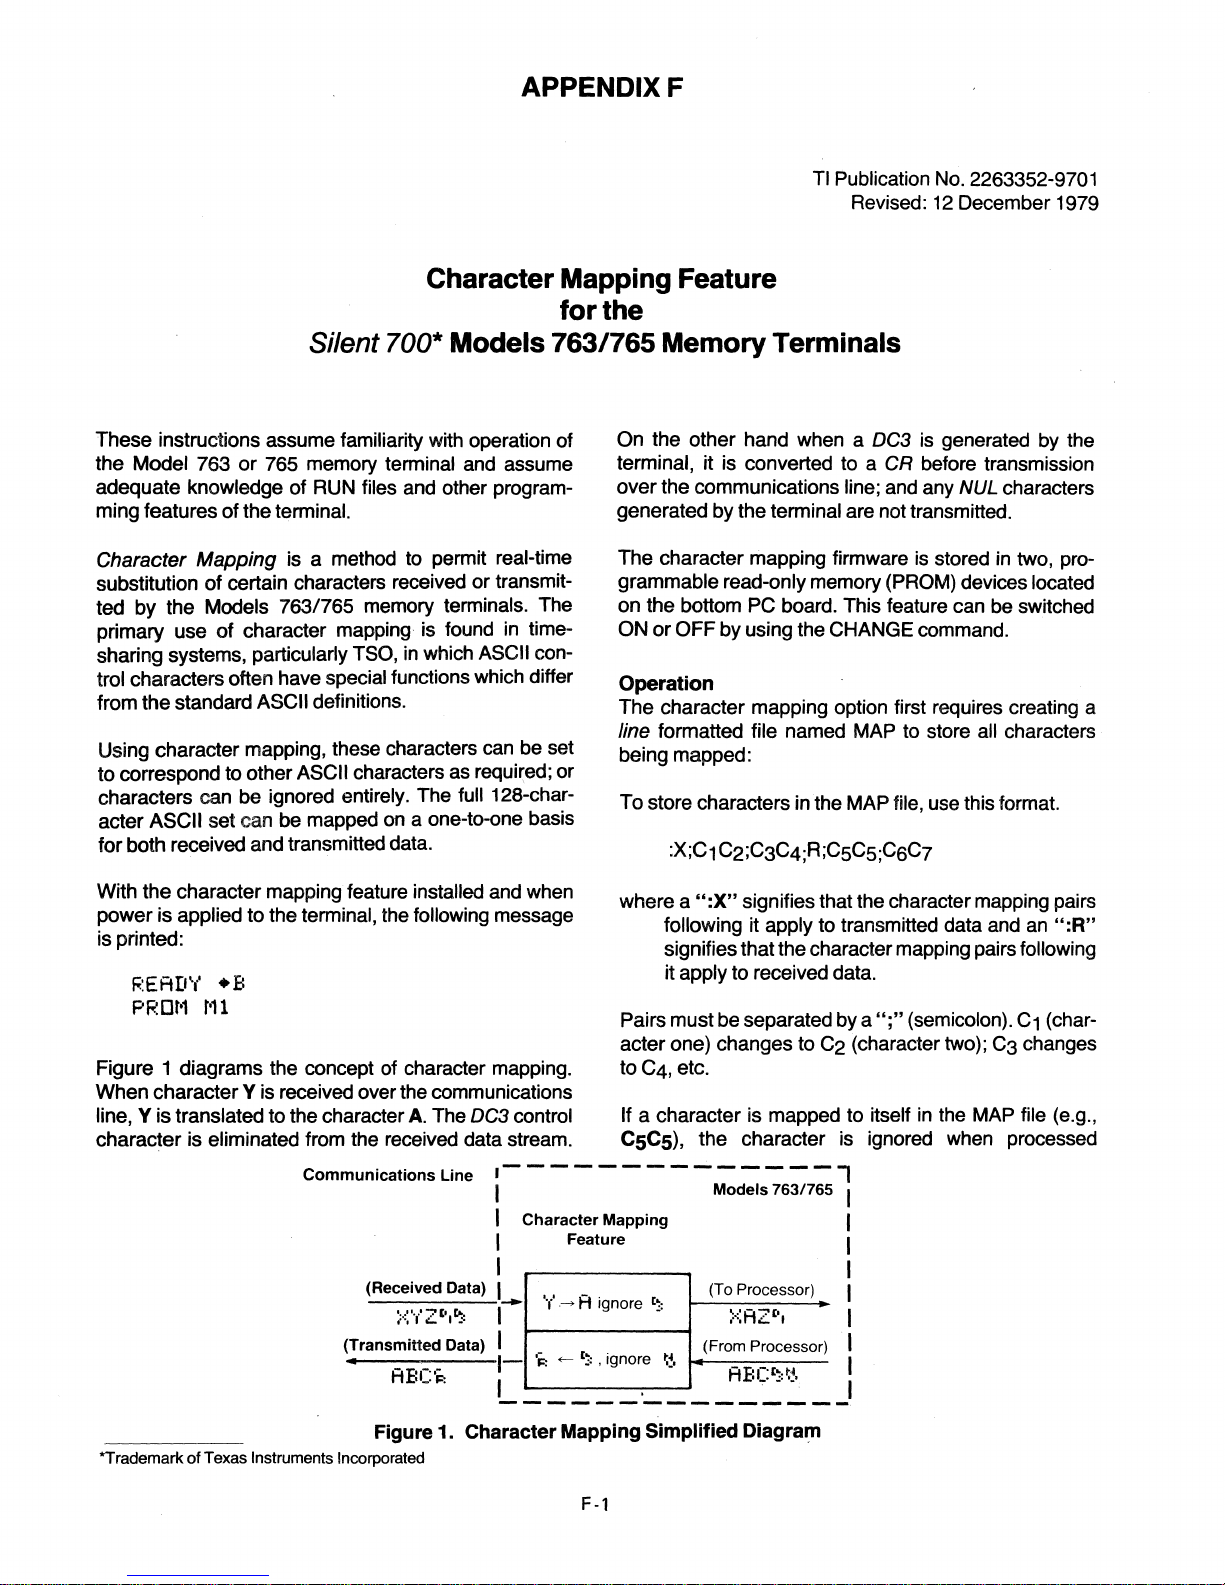
APPENDIXF
TI
Publication
Revised:
Character Mapping Feature
for
the
Silent 700* Models 763/765 Memory Terminals
No.
2263352-9701
12
December 1979
These instructions assume familiarity with operation of
the Model 763 or 765 memory terminal and assume
adequate knowledge of RUN files and other programming features of the terminal.
Character Mapping is a method to permit real-time
substitution of certain characters received or transmit-
ted by the Models 763/765 memory terminals. The
primary use of character mapping is found
sharing systems, particularly
trol characters often have special functions which differ
from the standard
Using character mapping, these characters
to correspond to other
characters can be ignored entirely. The
acter
ASCII set can be mapped
for both received and transmitted data.
With the character mapping feature
power is applied to the terminal, the
is printed:
f':EA[I'I"
PROt'1
Figure 1 diagrams the concept of character mapping.
When character
V is translated to the character
line,
character is eliminated from the received data stream.
ASCII definitions.
• B
t'11
V is received over the communications
TSO,
in
which ASCII con-
ASCII characters as required; or
on
a one-to-one basis
installed and when
following message
A.
The DC3 control If a character is mapped to itself
Communications
Line
in
time-
can
be set
full 128-char-
,-
- - - - - - - - - - - -
I Models
Character Mapping I
I
I Feature I
I I
(Received Data) I I
-----'--
~.::I
....
Z'IIt;: I I
(Transmitted Data) I I
•
ABC'i::
1-
L
_____ , _________
On the other hand when a DC3
terminal, it is converted to a CR before transmission
over the communications line; and any NUL characters
generated by the terminal are not transmitted.
The character mapping firmware
grammable read-only memory
on the bottom PC board. This feature can be switched
ON or OFF by using the CHANGE command.
Operation
The character mapping option first requires creating a
line formatted file named MAP to store
being mapped:
To store characters in the MAP file, use this format.
where a
Pairs must be separated by a
acter one) changes to C2 (character two); C3 changes
to C4, etc.
CSCS),
":X"
signifies that the character mapping pairs
following it apply to transmitted data and
signifies that the character mapping pairs following
it apply to received data.
the character
is
is
generated by the
is
stored
(PROM) devices located
";"
(semicolon).
in
ignored when processed
in
two, pro-
all
characters
an
":R"
C1
(char-
the MAP file (e.g.,
-1
763/765
I
I
I
Figure 1. Character Mapping Simplified Diagram
"Trademark of Texas Instruments Incorporated
F
-1
Page 77

through the file. Hence, if C1C1is mapped for received
data (:R;C1C1), a
received. Similarly, if
data (:X;C1C1),
nal over the communications line.
The MAP option status must be ON to enable the char-
acter mapping feature, and the BUFFER option should
OFF
be
Throughput
Although the entire ASCII set can be mapped for both
transmitted and received data, throughput is reduced
with each mapped character. For example, if only one
character is mapped, the worst-case delay is 40 microseconds; for
milliseconds (the average delay is 1 to 2 milliseconds).
At 300 baud and 1200 baud, normal character mapping
will not impair terminal performance; however, only
characters requiring mapping should be
Errors
Two
operations for which the terminal prints out either
*** AO***
while the MAP option status is ON (see Errors).
types
of
or
*** A 1 ****
C1
is ignored by the terminal when
C1C1 is mapped for transmitted
C1
will
not
be transmitted by the termi-
Considerations
100 characters, the worst-case delay is 3.5
in
the file MAP.
errors occur during character mapping
line
of
data). A simple procedure using the Model 763 or
765 terminal helps determine which characters need to
be mapped for data transmitted by the system to the
terminal.
1.
Create a temporary line formatted data file
and CHANGE that file to RECORD to store
all characters that will be sent by the host
system to the terminal.
2. The status of the terminal should be set with
EDC option OFF and the MAP option
the
OFF.
3. Establish communications
system up to, but not including, the transfer
of data from the terminal to the host system.
4.
REWIND RECORD (FCTN
RECORD ON (FCTN 2).
5.
Transmit data to the host system using the
terminal keyboard as
system.
6. After a few
communications with the host system.
lines of data are sent, terminate
usually done with your
with"
the host
6)
and switch
1.
The error code **
syntax error
the file MAP or checking for errors within the
file occurs when the terminal exits the
COMMAND mode. Using RECORD
(FCTN
then RECORD OFF (FCTN
date the file.
2. The eroor code
operator that the transmit BUFFER option is
ON, which is not permitted if the map option
is ON. The terminal will automatically disable
the buffer if
from the options ON line of the status report.
Applications
Character mapping is particularly useful
tions
or
other systems where ASCII characters control
or
special functions contradict their usage
7631765 terminal. The user must know what characters
the system· requires the terminal to send for various
control and special functions (e.g., termination of each
2)
..
AO***
indicates a format or
in
the file MAP. Validation of
ON
to enter data into the file MAP and
4)
does not vali-
....
* A 1"**) is a
ON, but will not remove the listing
warning
in
TSO applica-
in
the Model
to the
7. Switch
8. Examine the characters recorded by the
terminal using the
PRINTER CTRL command. Which characters require mapping is determined from
the printout as explained below.
Example
Figure 2, Part 1 is a sample terminal printout of a conversational session with a host system. It shows how a
character mapping file may be defined by examining the
differing character definitions between the host and the
Model 7631765. In the example, the 00010, 00020,
00030
acters were transmitted by the terminal operator to the
host system. Figure 2, Part 2 is an editor printout of the
data recorded. Note that a line feed, a DC1, and DC3
also were sent by the host.
Anticipating that data from a playback file will be sent
(which requires a DC1 for playback-on and observing
the host system must receive data one line at
its own prompting for each new line, it becomes ap-
are line prompts sent by the host; all other char-
RECORD OFF (FCTN 4).
COPY (temporary file) TO
a time with
F-2
Page 78

E
I r·iPUT
I)0010AAAAAAARftA
I)0020BBBBBBBBBB
00030
E
Part 1
~.
EDIT
TH1P
...
Iftol[~:
INPUT
I)
(I (I 1
Otolt~:AAAAAAARAA
If
(I 0
02
Ot.,t~:BBBBBBBBE:B
4-00030
t
.,';:
IfE
t.,':::
Er-::
...
Part 2
Figure
parent
ceived
erates in
DC
a
playback
The
to DC3, which
playback
character sequence DC3 NUL. Since the host expects
control character CR as the line termination character,
the
mitted
mapped to a
To
character mapping
that
the DC3 should be eliminated from the re-
data
stream. However, since this system op-
half duplex, it is necessary to eliminate the
1 from the received data stream and map the DC3 to
DC1
so
that the Model 763/765 will not switch on its
file before the host transmits its last character.
TRANSMIT
at
DC3 character should be eliminated from the trans-
data
implement the above example, the user sets up the
EOl
status
of
the terminal must be set
will cause the terminal to switch off its
the end
stream, and the NUL character should be
of
each line and transmit the control
CR for transmission.
file by creating a file named MAP:
~.
CF
t'lAP
L 1
1::::
2.
Example Application
DOnE
Then record into the MAP file, mapping definitions using
either the
follows:
COpy
~
~
CP
EDIT
command
I<E\'
TO
t'lAP
or
the EDIT command as
t'lAP
OR
ET>::
DONE
Figure 3 is a printout
this mapping example: Note from the printout that the
MAP
option is ON, BUFFER is an option OFF, and EDC
is an option
ON.
of
the correct terminal status for
~
::n
LU-lE
OPTIONS
OPTIONS
RECORD
PLAYBACK
T~:Al'iSl'l
PECEI'·
KE
['lRP
r'lODE:
... E EOL:
....
·:
OPT I ON:
Ot--t:
OFF:
FILE:
FILE:
I T
EOL:
INTERNRL/
EDC/ DC3/
PCHECK/
TEMP
TEt'lP
DC3
CF.:LF
ON
DONE
300
BAUD/
DC
1.3.····
ABMPRT/
Figure 3. Example Status Report
F·3
EVEN
AUTDABM/
PARITY/
EOTDIS/ BUFFER/
HALF
DUPLEX/
DC2.4/
Page 79

APPENDIXG
and
763/765
Data Entry
Validation (DEV) Option
(#2263366-9701)
G·1
Page 80

References:
•
PROGRAM
EXECUTION
1.
Model 763/765 Memory Data Terminal Characteristics Guide (#TI-346C-25M-7/78)
2.
Models 763/765 Memory Terminals Operating
Instructions (#2203664-9701)
3.
Models 763/765 Memory Terminals Systems
Manual (#2203665-9701)
4. Models 763/765 Memory Terminals
Programmer's Guide {#2263354-9701)
5.
Models 763/765 Memory Terminals Quick
Reference Card (#220366-9701)
6.
TIBOL
(#2263367-9701)
Programmer's
Reference CARD
TIBOL
Introduction
This describes the Data Entry and Validation Option
(DEV) available in the Models 763/765 Bubble Memory
Terminals. This discussion concerns itself
how
the terminal is affected by the option.
The
DEV
option
a
TIBOL (Texas Instruments Bubble Operating
Language) program. This expanded capability
allows tailored application
arithmetic functions.
enables the terminal
with
data validation and
to
execute
with
EX-The EXECUTE command allows a program
transferred (loaded) from the
memory
initiated.
SYNTAX:
EX
There are three conventional sources from which a
TIBOL programs
From a
command. The
keyboard using the COMMAND mode.
program
struction (EXC).
•
into
the user program area and execution
PROGRAM
......
FILE
~
Ei<
RUN
FILE
KEYBOARD (COMMAND MODE)
TIBOL
SPECIAL
PROGRAM
RUN
file,
can execute another via the Execute in-
PURPOSE
I--
NAME
FILE!.
may
be invoked.
an
EX
may be issued
EX
may also be issued from the
KEYS
file in the bubble
(PERIOD)
r-
PROGl
as
PROGRAM
to
be
NAME
a standard
One TIBOL
The
ability
data input, via application programs,
user
host
tion
to
not
affect
With
grams created
rather than
ject is downloaded into the terminal, where
accessible
application programs can
single
capability. A detailed description
system and
763/765
MER'S GUIDE (#2263354-9701).
to
verify the type, size, and range
to
capture corrected data
computer
the standard features
the
file and thus maximize the terminal's
MEMORY TERMINALS - TIBOL PROGRAM-
system. These features are in add i- .
the
terminal's original functionality.
DEV
option, the terminal executes proon a separate development system
the
terminal keyboard. The program ob-
to
either the operator
the
TIBOL language may be found in the
for
of
be
of
the
allows the
transmission
the 763/765 and do
or a RUN
downloaded into a
of
a development
to
a
it
is
file. All
16
file
During program execution, the
HOME keys recovery
condition. An
an
audible
lamp. These special purpose keys are application
dependent and are described in the 763/765 MEMORY TERMINALS - TIBOL PROGRAMMER'S GUIDE
(#2263354-9701).
G·2
input
tone
and a flashing COMMAND indicator
from
error condition is indicated by
FIELD
a keyboard input error
reverse and
Page 81

•
CMD
(COMMAND)
KEY
The
763/765 has
mand
and interactive.
two
modes
of
operation: com-
• During program execution the CMD key is
•
TERMINAL
The Test
763/765
vides a
self test
including
normally
command
OPERATING INSTRUCTION MANUAL pro-
bubble
disabled.
DIAGNOSTICS
described in Section 2
of
the basic hardware components,
memory
and
ROM
of
the
(read-only
memory).
definitions
may
be printed
Message
FAIL-E
FAIL-F
FAIL-G
FAIL-H
FAIL-I
In addition
for
the 763/765, supplemental messages
as
to
the terminal fail message
defined in the
Meaning
EPROM
EPROM
1 FAILURE (U63)
2 FAILURE (U64)
following:
PROM 1 FAILURE (U65)
PROM
RAM
2 FAILURE (U66)
FAILURE (U53, U57)
G-3
Page 82

Page 83

INDEX
ABM
(Answer-Back Memory)
Accessing the
Acoustic
Adjusting:
Print Contrast
Transmit Level
Alternate Methods of Storing Data
Answer-Back Memory:
Creating the ABM Message
Securing the ABM . . . . . . . . . . . . . . . . . . . . . . . . . . . . . . . . . . .
ASR Function Keys
ASRMode
Automatic Command Execution
Backspace -see CHAR
CATALOG Command
CHANGE
Changing
Changing
Character
Character Set, Code System and . . . . . . . . . . . . . . . . . . . . . . .
Character Set, Printer
Characters, Control
CHAR Key . . . . . . . . . . . . . . . . . . . . . . . . . . . . . . . . . . . . . . . .
Cleaning:
Case
Printhead
Code
COMMAND Mode
Commands:
Accessing the
Automatic, Execution
Communications
Definition of
Entering A
File Editing
File Utility
Table of
Terminal Diagnostic
COMMANDS:
CATALOG
CHANGE
COpy
CREATE
DELETE
EDIT
ERASE
FREE
LOCK
OFFLINE
ONLINE
RUN
STATUS
TEST
TEST
Command
Commands afld Parameters, Short Form
Communications, Data Terminal
Communications Parameter
Modification Commands
Comparing Continuous and Line Format Files . . . . . . . . . . . . .
Continuous Format
Control Characters
Controls, Keyboard . . . . . . . . . . . . . . . . . . . . . . . . . . . . . . . . . . . . .
COMMAND Mode
Coupler, Model 765 Operation With
.........................................
........................................
...............................
..............................................
Command
Terminal
the
Mapping
.................................................
System and Character Set
Parameters. .
Record File
Option
..................................
..............................................
..........
..........................................
& Status
............................................
.............................................
.,
. . . . . . . . . . . . . . . . . . . . . . . . . . . . . . . . . . . . . . .
.............................................
..............................................
......................................
..................................
.........................................
..........................................
..........................................
............................................
...........................................
.............................................
.............................................
.............................................
..............................................
.............................................
.......................................
................................................
INIT
............................................
Syntax
.................
.......................................
..................................
...............................
............................
....................
.............................
...........................
..
. . . . . . . . . . . . . . . . . . . . . . . . . . .
.................................
..........................
...........................
...................................
....................................
........................
................................
..............................
..........................
. . . . . . . . . . . . . . . . . . . .
.............................
. . . . . . . . . . . . . . . .
...................
............................
Display &
.........
. . . . . . . . . . . . . . . . . . . . .
...............
12,14,30,
. . . . . .
..
12,
..
16,27, A-4
..
..
. . . . . .
"
14,31,A-2
11, 26, 27
12,15,30
..
,
31
36
36
25, 46
29
..
29
14
17, 43
12,37
A-2
30
40
F-1
..
C-1
..
E-1
35, A-7
17, 43
36
36
C-1
..
14
, 12
..
13
10
10
13
12,38
10,39
11,47
13,42
11,47
11,47
11,47
13
13
14,A-2
13
13
10,
A-1
A-1
..
12
..
46
35, A-7
..
Index-1
COPY Command . . . . . . . . . . . . . . . . . . . . . . . . . . . . . . .
9
Copying
9
Copying From File to File . . . . . . . . . . . . . . . . . . . . . . . . . . . . . . .
Correcting Typing Errors
Cover, Outer, Replacing
CREATE Command
Creating
Data
7
Data
dc Current Loop, Model 763 Operation in a
Definition of Commands
Definitions
Delete Character(s) Fcmction
DELETE Command
Delete Line(s) Function
Deleting a File
Diagnostic Command,
Double Space Printing
EDC Sequences for Prompting . . . . . . . . . . . . . . . . . . . . . . . . .
EDIT Command
Edit Mode Function Keys
Edit Functions
Editing a File
Editing a Record
EDITMode
6
Editing, Terminating
9
ENTER
Entering a Command
Erasing a File . . . . . . . . . . . . . . . . . . . . . . . . . . . . . . . . . . . . . . . . .
ERASE Command
9
9
Error Codes . . . . . . . . . . . . . . . . . . . . . . . . . . . . . . . . . . . . . .
Errors, Correcting Typing
ESC Functions
Extended Device Control (EDC)
Fail Message Definitions
FIELD Key
File Editing Command
File Format
FileName
Files:
Copying
FileSize
File Utility Commands
vi
Find
Format:
8
FREE Command
Functions:
4
Files
...........................................
..................................
...................................
Files:
Exercise
General Rules for
Creating
Deleting
Editing
Erasing
Locking
Playing Back
Printing
Recording Data
Unlocking
F!Jnction
Continuous
Line
ESC
..............................................
Entry
Validation
Terminal
...............................
.............................................
!<ey '.:
..........................................
...........
...............................................
...............................................
................................................
...........................................
...............................................
...........................................
..............................................
.............
.........................................
.................................................
............................
................................................
.....................................
.....................................
......................................
Option
Communications
...................................
......................................
...................................
...........................................
Terminal
.....................................
.........................................
.......................................
............................................
.........................................
......................................
...................................
......................................
....................................
.........................................
..........................................
Into
...
............................................
..
..................................
....................................
. . . . . . . . .
: . . . . . . . . . . . . . . . . . . . . . . . . . . . . . .
....................................
....................................
; . . . . . . . . . . . . . . . . . . . . . . . . . . . . . . . . . . . . .
......................
...........................
..........................
..................
..............................
..
. . . . . . . . . . . . . . . . . . . . . . .
..............................
. . . . . . . . . . . . . . . . . . . . . . . . . . . . .
..
. . . . . . . . . . . . . . . . . . . . . .
..
. . . . . . . . . . . . . . . . . . . . . .
:
......................
. . . . . . . . . . . . . . . .
..
11, 25, 27
27
..
45
39
10
8, 24, 39
39
24
G-1
34
(Inside Back Cover)
20
11
20
28
..
13
..
A-3
13
19, 43
19, A-3
42
23
18
23
5,21,22,23
..
..
28
11,
47
37, A-5
..
39
A-6
..
A-3
13
17,43
13
..
27
28, 47
42
28,47
47
42
..
26
41
28,47
10
..
19
..
11
A·6
9
8
8
8
8
8
8
3
vi
9
6
Page 84

INDEX
RUN Command
Special
Function Keys:
ASR
EDIT
General Operating Guidelines
General Rules for Creating a File
Index Function
Indicators
Insert Function
Interactive Operation
Internal Modem, Model 763 Operation With
Key, Programmable
Keys, Keyboard
Keys,
Keys,
Keyboard
Keyboard, Storing Data from the
Keyboard Layout
Keypad, Numeric
KSR Operation
Line Format
Loading Paper . . . . . . . . . . . . . . . . . . . . . . . . . . . . . . . . . . . . . . . . .
LOCK Command
Locked File, Unlocking A
Locking Files . . . . . . . . . . . . . . . . . . . . . . . . . . . . . . . . . . . . . .
Manuals,
Memory System
Model
Model
Model
Model 765 Operation with the Acoustic Coupler
Numeric Keypad
NUM
..............................................
..........................................
.............................................
................................................
Special
Special Purpose
Controls and Indicators
Other
763
Operation in a
763
Operation with the Internal Modem . . . . . . . . . . . . .
763
or
Mode
Switch
......................................
..
. . . . . . . . . . . . . . . . . . . . . . . . . . . . . . . . . . . . . . .
............
...........................
..........................................
.......................................
......................................
.......................................
........
...........................................
...........................................
...........................................
(References)
..........................................
765 Operation with a Data Set
..........................................
. . . . . . . . . . . . . . . . . . . . . . . . . . . . . .
....................................
........
.........................................
.....................................
..................................
dc
........................................
...........................
...........................
. . . . . . . . . . . . . . . . . . . . . . . . . . .
...............................
Current Loop
. . . . . . . . . . . . . . .
..................
...................
.................
..............
16,27,
19, A-3
..
..
..
A-2
A-2
..
A-4
..
viii
24
19
21, 25
34
5, 6
17
25
4,
B-1
8, 46
..
11,47
28
11, 46
34
..
34
33
31
Pointer Control
Print Contrast, Adjusting
4
Print Function
Printer Character Set
Printer-Off Function
Printer-On Function
Printhead,
Printing a File
Prompting, EDC Sequences for
6
Quick-Reference Guide
7
Record, Editing a
Record File, Changing the
Record Function . . . . . . .
5
Record Locating Keys
Recording Data into a File
Record-Off Function
5
Record-On Function
4
Records (Definition)
Record
Size
Rewind-Playback Function
4
Rewind-Record Function .
8
References (Other Manuals) .
Replacing the Outer Cover
RUN Command . . . . . . . . . . . . . . . . . . . . . . . . . . . . . . . . . . . . . .
2
Setting Up the
Short Forms for Commands and Parameters . . . . . . . . . . . . .
Specifications, Terminal
Special Functions
iii
Special Purpose Keys
8
STATUS Command
Storing Data, Alternate Methods
Storing Data from the Keyboard
Stop Function
Switch,
ON/OFF
Symbols, Control Character
4
Symbols, Edit Mode
4
Syntax, Command
..........................................
........................................
Cleaning the
..
..............................................
Terminal
........................................
..................................
....................................
......................................
......................................
...................................
. . . . . . .
..
. .
..
. . . . . . .
...........................
...........................
........................................
................................
.. .. ..
....................................
..............
....... , ..............................
.......................................
....................................
.......................................
.....................................
...............................
..........................................
.....................................
...................................
. . . . .
.................................
'.' . .
................................
.. ..
. . . . .
.. .. . .. . ..
.. ..
. . . . . . . . . . .
.................................
.................................
...........................
............................
..........................
..
.. .. .. . ..
. .
..
.. ..
. . . .
. . . . . . . . . . .
Appendix A
. . . . .
..
..
. . . . . . . . .
. . . . . . . . . . .
..
. . . . . . . . . . .
17
36
20,26
E-1
16
16
36
..
26
A-3
23
40
...
16, 25
18
41
..
16
16
16
..
16
..
..
A-2
..
A-1
0-1
A-2
13,15,31
46
25
22, 23
A-7,
E-1
A-3
10,
A-1
8
8
iii
3
1
5
2
OFFLINE Command
ONLINE Command
ON/OFF
Operation in a
Operation with the Acoustic
Operation with a Data Set
Operation with the
Operator Exercises
Optional Copy Command
Outer Cover, Replacing the . . . . . . . .
Paper, Loading
Paper, Part Number
Playback-Forward Function
Playback-On Function
Playback-Off Function
Playback-Reverse Function
Playing Back a File
Switch . . . . . . . . . . . . . . . . . . . . . . . . . . . . . . . . . . . . . . . .
dc
.....................................
......................................
Current Loop, Model 763
Internal Modem
...........................................
Coupler, Model 765
.................................
.........................
................
.................................
.......................................
...............................
................................
....................................
...............................
.......................................
..................
..............
. . . . . . . . . . . . . . . . . . . .
..
. . . . . . .
..
. . .
..
. . . . . .
13
13
..
2
34
31
33
34
..
37
25
..
16
16,26
16
16
42
Index-2
Telephone Handset Connection to the
Model765
Terminal Commands
Terminal Configuration
Table
TerminalDiagnosticCommand
Terminal Memory
Terminal Status
Terminating an Editing Session
3
TEST Command . . . . . . . . . . . . . . . . . . . . . . . . . . . . . . . . . . . . . .
TESTINITCommand
2
Top Function
2
Transmit Level, Adjusting
Unlocking a Locked File . . . . .
Using the
Using
............................................
......................................
of
Parameters
............................................
CHAR
the
Terminal Communications Features
...................................
....
. . . . . . . . . . . . . . . . . . . . . . . . . . . . .
............................
System
......... . ..
and FIELD Keys
......
. . . .
..
..
............................
....................................
.................................
..
. . . . . . . . . . . . . . . . . . . . . . . . .
. .
.......................
.. .. . ..
.. ..
. .
. . . . . . . . . . . . . .
.. ..
. . . . . . . . . . .
...............
32
14
..
15
13
...
..
30
23
..
13
13
20
36
..
28
17,43
30
9
8
Page 85

To
make this manual more useful
improvements
this questionaire
you.
MANUAL ORGANIZATION
Was
the
DYes,
Were the manual sections well organized?
DYes,
GRAPHICS
would
How
Table
you
to
this manual
and
return
of
Contents detailed enough
0
No,
0 No, 0
rate the quality
to
you
feel are needed.
it, postpaid,
0
of
the
o Excellent, 0 Adequate, 0
you,
to
Comment
Comment
photos,
Poor
USER'S CRITIQUE
our
customer, we will appreciate
After
using this manual, please take
the
factory where
and
useful?
diagrams, etc.?
your
your
comments
comments
will be given every consideration.
the
and
recommendations
Hrst
opportunity
to
complete
on
any
Thank
Were there enough illustrations
DYes,
Were
the
tables clear
DYes,
TEXT
How would
0 No, 0
and
0 No, 0
you
rate the quality
o Excellent, 0 Adequate. 0
If
there are particular paragraphs, instructions, etc.,
yourcomments.
GENERAL COMMENTS
____________________________________ ~ ________________________________________
easy
throughout
to
fonow?
of
the
the
Comment
Comment
technical writing?
Poor
----------------------------------------------------------
manual?
you
feel
need
clarification
or
rewriting, please
identify
them
and add
___
Respondent
Company
Address
City/State/Zip
Manual Title
______________________
________________________________________________________________________
-=~--------------------------------------------------------------------
_____________________________________________________
763n65
Operating Instructions .
NO POSTAGE NECESSARY
Fold
on
the
two
lines
on
reverse
Title
_________
Manual No. 2203664-9701
IF
MAILED IN U.S_A.
side,
staple
or tope,
and
------------
muD.
__
_
12-12-79
Page 86

FOLD
IIIIII
NO POSTAGE
NECESSARY
IF
MAILED
INTHE
UNITED STATES
BUSINESS
FIRST CLASS PERMIT NO. 6189
POSTAGE
WILL
BE
REPLY
PAID BY ADDRESSEE
Texas Instruments Incorporated
Attn: Technical Publications
P.
O. Box 1444
Houston, TX
77001
MIS
FOLD
MAIL
HOUSTON, TX
7761
Page 87

DEFINITIONS
ASCII American Standard Code for
ASR
analog
means of nondigital
voltage,
baud
number
bit
of
information
C.C.I.T.T. - the
graph Consultative Committee.
character
bols, such as a letter of the alphabet; a character
made up of a group of seven bits (ASCII and C.C.I.T.T.
code).
code
(characters).
data
data
modulation/demodulation and control functions to
able data transmission/reception over telephone lines
between two data processing devices.
default
to which the terminal
conditions.
digital
means of
express in digital form
ferred, or processed by dual-state condition; e.g., onoff, open-closed, and true-false.
an
eight-level
- automatic send/receive.
- the representation of numerical quantities by
(7
bits + parity) code from the
Information Interchange.
variables; e.g., translation, rotation,
or
resistance. (Contrast with digital).
- a unit of data transmission speed equal to the
of
code elements (bits) per second.
- an abbreviation for binary digit; the smallest unit
- a system of symbols (bits) for representing data
- a general term for any type of information.
set
- the representation of numerical quantities by
in
a binary system of notation.
International Telephone and Tele-
- one symbol of a set of elementary sym-
- (same as
values
discrete integer numbers.
modem)
- a set of base values or original values
a device which performs
"defaults" under certain
It
is possible to
all information stored, trans-
en-
duplex
ting and receiving;
transmission and reception; half duplex means
mission
file
in memory; limited to 16
KSR - keyboard send/receive.
line,
lines, etc. over which data is transmitted to, and received from, the terminal. Also referred to as the "line".
localmodem
demodulator).
is
nonvolatile
retains information when power is off.
off-line
are not connected to the communications line.
on-line
connected to the communications line.
re'-cord
stored as a group; limited to
763/765
re-cord'
device; the 763/765 uses an electromagnetic BUBBLE
memory.
signal-
conveys information from one point to another.
syntax
(commands) must be presented to the terminal or other
data processing equipment.
- describes two operations, such as transmitfull duplex means simultaneous
or
reception, but not both at the same time.
- a collection of related records (see record) stored
in
the Models 7631765.
communications
see off-line.
- same as data set (acronym for modulator/
memory
(local) - describes equipment
- describes equipment or devices which are
(noun) - words, characters, and numerals
(verb) - to store information in a memory
event, phenomenon, or electrical quantity that
- the format, or rules,
- describes cables, telephone
- a recording medium which
or
80 characters
in
which instructions
trans-
devices which
in
the Models
Page 88

Thxaslnstruments Sales Offices
North American
Arizona:
Phoenix
California:
Los Angeles
San Diego
San Francisco
Sunnyvale
Colorado:
Denver
Connecticut:
Hamden
Florida:
F{)rt
Lauderdale
Orlando
Georgia:
Atlanta
Illinois:
Chicago
Iowa:
Des Moines
Indiana:
Fort
Wayne
Indianapolis
Massachusetts:
Boston
Michigan:
Detroit
Minnesota:
Minneapolis
Missouri:
Kansas City
St.
Louis
New
Jersey:
Newark
New
York:
York
New
Rochester
North
Charlotte
Ohio:
Cleveland
Dayton
Oklahoma:
Tulsa
Pennsylvania:
Philadelphia
Pittsburgh
Carolina:
City
Tennessee:
Memphis
Texas:
Dallas
Houston
San Antonio
Utah:
Salt Lake City
Virginia:
Arlington
Washington:
Seattle
Wisconsin:
Milwaukee
Canada
British
Vancouver
Ontario:
Ottawa
Toronto
Quebec:
Montreal
Columbia:
International
Argentina:
Buenos Aires
Australia:
Melbourne
Sydney
Austria:
Vienna
Belgium:
Brussels
Denmark:
Copenhagen
England:
Bedford
Cheshire
Slough
Finland:
Helsinki
France:
Lyon
Nice
Paris
Germany:
Essen
Frankfurt
Freising
Hamburg
Munich
Holland:
Amstelveen
Italy:
Milan
Rome
Japan:
Osaka
Tokyo
Norway:
Oslo
Republic
Singapore:
Singapore
Spain:
Barcelona
Sweden:
Stockholm
'0f .
Texas Instruments reserves the right to change its product and service offerings at any time without notice.
TEXAS)NSTRUMENTS
Printed
in
U.S.A..
~
INCORPORATED
 Loading...