


LMH1982 Evaluation Board
USB Board
USB
Node
PC
COP8
USB Current
Sense
USB
Cable
USB 5V
LDOs
LMH1981
LMH1982
I2C
Ref. In
PC
USB
SD_CLK
HD_CLK
I/O
signals
Ext.
H/V In
3.3V and 2.5V
LPF+VCXO
1 Introduction
The LMH1982 evaluation board was designed by Texas Instruments to evaluate the performance and
operation of the LMH1982 multi-rate video clock and timing generator with the LMH1981 SD/HD video
sync separator. The evaluation board provides input ports to receive analog or digital reference signals,
SMA connector ports to transmit the differential output clocks, and headers to access various input/output
signals. On-board toggle switches allow control over the sync inputs and control inputs, such as device
reset. A USB interface board is also provided to allow programming of the LMH1982 through a PC's USB
port using TI's LMH1982 evaluation software.
Refer to the Evaluation Board Schematic, PCB Layout, and Bill of Materials sections, as well as the
collateral listed in the References section.
1.1 USB Interface Board
Headers X2 and X4 of the USB interface board should be plugged into headers J7 and J11 of the
evaluation board. The USB board's firmware supports the I2C interface, which enables the user to program
the LMH1982 from a PC running the evaluation software. The USB board can also provide 5V from the
PC's USB port to power the LDO regulators on the evaluation board. The block diagram in Figure 1 shows
the connections between the PC, USB board, and evaluation board.
User's Guide
SNOA527A–May 2008–Revised April 2013
AN-1841 LMH1982 Evaluation Board
Figure 1. Simplified Block Diagram of the Evaluation Setup
1.2 Power Supplies
The evaluation board requires a 5V supply and ground connection to power the on-board LP38693 LDO
regulators (U1, U2).
To use 5V from the USB port via header J7, shunt pins 1 and 2 of jumper JP3. Refer to Table 1 for the pin
assignment of JP3. If the USB supply is used, make sure that the USB port of the PC is capable of
nominally sourcing 150 mA (0.75W at 5V). When powering the evaluation board, the USB supply voltage
should measure 5V ± 5% at pin 4 of J7.
All trademarks are the property of their respective owners.
SNOA527A–May 2008–Revised April 2013 AN-1841 LMH1982 Evaluation Board
Submit Documentation Feedback
Copyright © 2008–2013, Texas Instruments Incorporated
1
Introduction
To use an external 5V supply, shunt pins 2 and 3 of JP3 and connect the supply leads to pins 1 and 2 of
header J1.
The LP38693 LDO regulators provide clean 3.3V and 2.5V for the evaluation board. If needed, it is
possible to bypass the LDOs and apply external 3.3V and 2.5V supplies to the appropriate pins of J1. See
Table 2 for the pin assignments of J1. Before applying an external 3.3V supply, remove R2 and short JP1.
Similarly, before applying an external 2.5V supply, remove R4 and short JP2. If external supplies are
used, it is recommended to keep the supply noise to within the same levels offered by the on-board LDO
regulators. Refer to the LP38693 datasheet for more information.
www.ti.com
Table 1. 5V Select Jumper, JP3
Pin #, Location Pin Name
1, Left EXT 5V
2, Center INPUT 5V
3, Right USB 5V
Table 2. External Power Header, J1
Pin #, Location Pin Name
1, Left-most EXT 5V
2 GND
3 EXT 3V3
4 GND
5 EXT 2V5
6, Right-most GND
The LMH1982 requires that 3.3V and 2.5V are regulated to within ±5% and have low noise to ensure
optimal output jitter performance. The 27 MHz VCXO also requires a clean 3.3V supply and proper supply
bypassing for optimal performance.
The DVDD (2.5V) and VDD (3.3V) supply voltages of the LMH1982 can be measured at test points TP1
and TP3, respectively. DVDD and VDD supply currents can also measured by removing the 0Ω resistors
from R22 and R3 and then using a current meter in series.
1.3 Reference Ports
The LMH1982 has two reference ports (REF_A and REF_B) with H sync and V sync inputs, which are
used for phase locking the outputs in Genlock mode. The input signals can be measured at test points
TP27, TP28, TP30, and TP31.
1.3.1 Analog Reference Input
An SD or HD analog video signal can be applied to the BNC connector (J2) to extract H and V sync
signals using the LMH1981 (U4) or LMH1980 (U3) video sync separator. The board is originally populated
with the LMH1981, while the option for LMH1980 is not populated (NP) since the sync separators share
common application circuitry. A shunt can be placed on jumper JP4 to enable the low-pass chroma filter,
formed by R24 and C39, to attenuate the subcarrier signal on a composite video input.
The LMH1981 supports any SMPTE-standard SD and HD analog video input with automatic format
detection and outputs a low-jitter H sync signal using 50% sync slicing. The LMH1980 can also support
any SD/HD standards with automatic format detection, but instead uses a fixed-level sync slicing. Refer to
the LMH1981 and LMH1980 datasheets for more information.
The sync separator's output H and V sync signals can be passed to port REF_A of the LMH1982 through
the NC7WZ125 (U7) logic buffer. See Table 3 for the toggle switch definition for SW2, which controls the
operation of the U7 buffer.
2
AN-1841 LMH1982 Evaluation Board SNOA527A–May 2008–Revised April 2013
Copyright © 2008–2013, Texas Instruments Incorporated
Submit Documentation Feedback

www.ti.com
ON OFF
• U7 buffer output is in Hi-Z mode • U7 buffer output is enabled
• LMH1981 sync signals is gated off from port REF_A • LMH1981 sync signals are passed to port REF_A
• External input signals can be applied to HIN_A and VIN_A
of header J8
1.3.2 Digital Reference Input
In addition to the analog timing signals from the sync separator, external H and V sync input signals can
be applied to ports REF_A or REF_B via header J8. See Table 4 for the pin assignment of J8. Note:
Before applying external signals to HIN_A and VIN_A, set SW2 = ON to avoid signal conflict with the
LMH1981.
The external reference can have digital timing, such as from an SDI receiver or deserializer, and should
be a recognized timing format listed in Table 3 of the LMH1982 Multi-Rate Video Clock Generator with
Genlock Data Sheet (SNLS289). A 48 kHz audio clock can also be applied to the H sync input to
synchronize the output clocks.
Note: The H input frequency accuracy should be within the absolute pull range (APR) of the 27 MHz
VCXO (e.g. ±50 ppm) in order to phase lock the outputs to the input reference; otherwise, phase lock may
not be achieved.
Pin # Pin Name Pin # Pin Name
1 GND 8 HIN_A
2 GND 7 VIN_A
3 GND 6 HIN_B
4 GND 5 VIN_B
Introduction
Table 3. Input Select Switch, SW2
Table 4. Input Header, J8
1.4 Output Clock
The LVDS output SD and HD clocks from the LMH1982 are routed via controlled 100Ω differential
impedance lines to edge-mount SMA connectors as indicated in Table 5. If a differential probe will be used
to measure the clocks directly on the board, then the differential lines should be terminated by populating
R37 and R38 with 100Ω. If the SMA connectors will be used to transmit the clock signal, these resistors
should not be populated; and termination should be done at the receiver instead.
To provide compatibility between various differential signaling levels and receivers, the board allows for
AC coupling capacitors C31/C34 and C35/C37 on the SD_CLK and HD_CLK differential pairs. AC
coupling allows for common-mode level translation/shifting at the receiver.
LVDS SMA Port Clock Port Name
1.5 Output Top of Frame
The output top of frame (TOF) pulse from the LMH1982 can be measured at test point TP23 and at
header J10 located at the bottom edge of the board. The TOF output is a 3.3V LVCMOS signal. The total
load capacitance on the TOF output should be less than 15 pF.
Table 5. LVDS Output Clock Ports, J3 – J6
J3 / J4 SD_CLK / SD_CLK
J5 / J6 HD_CLK / HD_CLK
SNOA527A–May 2008–Revised April 2013 AN-1841 LMH1982 Evaluation Board
Submit Documentation Feedback
Copyright © 2008–2013, Texas Instruments Incorporated
3
Introduction
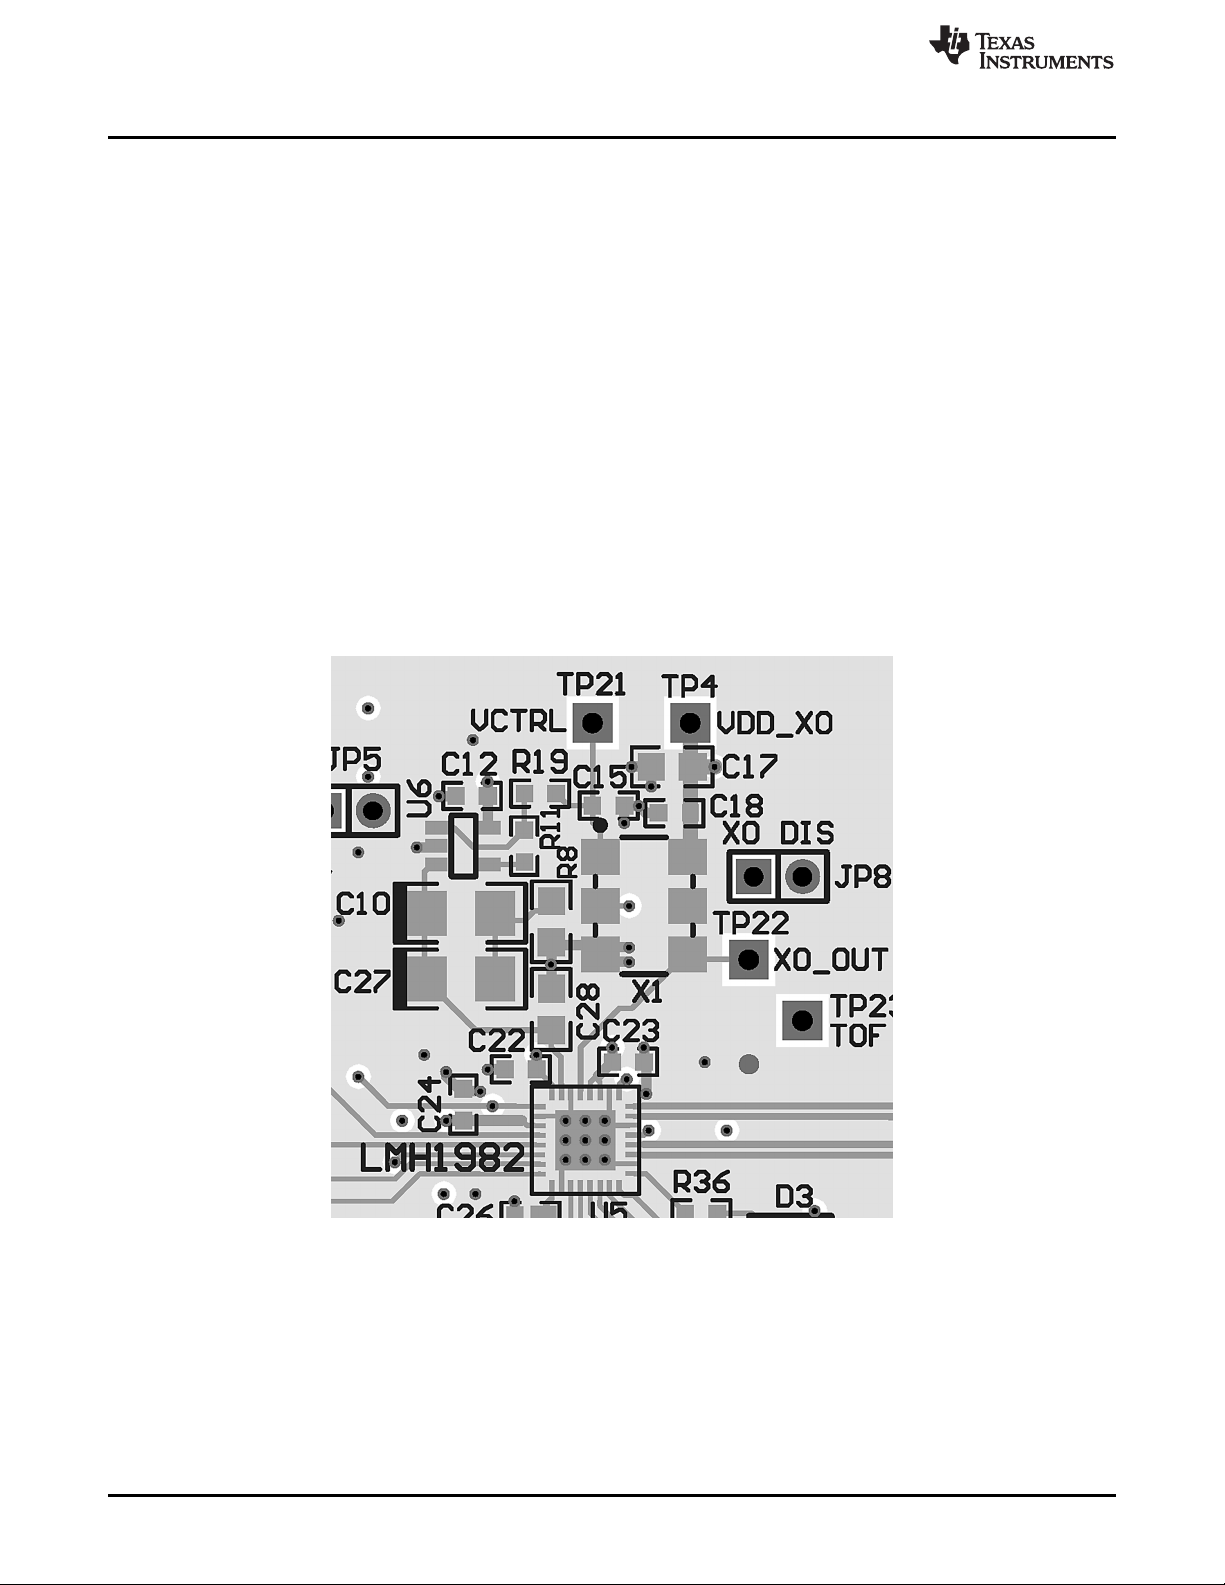
1.6 27 MHZ VCXO and Loop Filter
The LMH1982 requires an external 27 MHz VCXO (X1) and loop filter circuitry for operation of the VCXO
PLL. The board is populated with a CTS 357-series 27.0000 MHz VCXO with ±50 ppm absolute pull range
(APR), which yields 1000 Hz/V nominal tuning sensitivity (K
measured at test point TP21.
The second-order loop filter consists of RS= 20 kΩ (R8), CS= 44 μF (C10 = C27 = 22 μF), and CP= 1 μF
(C28). The parallel combination of C10 and C27 form the series capacitor, CS. Based on the loop
response equations provided in the LMH1982 datasheet, this loop filter yields a nominal -3 dB loop
bandwidth (BW) of about 3 Hz and nominal damping factor of 0.8 assuming K
μA (charge pump current for PLL 1), and FB_DIV = 1716 (feedback divider for NTSC input). This loop
filter was chosen to give good output jitter performance when the LMH1982 is genlocked to a clean black
burst or tri-level sync reference, such as from a Tektronix TG700 video generator.
It is possible to use different loop filter component values (or topologies) to meet output clock jitter and
lock time requirements for other input reference signals and applications. For example, to generate lowjitter output clock from a high-jitter input reference (e.g. recovered H signal from an FPGA SDI receiver), a
narrowband loop filter (e.g. BW < 1 Hz ) is recommended for maximum jitter attenuation. In addition to
changing the loop filter components, I
the LMH1982 datasheet for more complete descriptions about designing the loop filter and optimizing the
VCXO PLL loop response.
The PCB layout of the external VCXO PLL circuitry is shown in Figure 2.
). The VCXO input control voltage can be
VCO
= 1000 Hz/V, I
VCO
can also be programmed to adjust the loop bandwidth. Refer to
CP1
CP1
www.ti.com
= 250
Figure 2. PCB Layout showing Loop Filter and VCXO
1.6.1 VCXO Power Supply Considerations
The VCXO and LMP7701 devices operate from a separate supply plane (VDD_VCXO) derived from the
board’s 3.3V supply. Resistor R5 is used to form a low-pass filter with the associated decoupling and
bypass capacitors to attenuate supply noise to these devices. Refer to the VCXO power supply and
ground routing in the PCB layout section.
4
AN-1841 LMH1982 Evaluation Board SNOA527A–May 2008–Revised April 2013
Copyright © 2008–2013, Texas Instruments Incorporated
Submit Documentation Feedback

www.ti.com
1.7 Free Run Control Voltage Input
The LMH1982 provides the option to set the VCXO's free run control voltage by external biasing of the
VC_FREERUN input (pin 1). The analog bias voltage applied to the VC_FREERUN input will be internally
connected to the LPF output (pin 31) though a low impedance switch when the LMH1982 is operating in
free run. The resultant voltage at the LPF output will drive the VCXO control input to set the free run
output frequency accuracy of the VCXO and LMH1982. The VC_FREERUN input should have low noise
and sufficient filtering to minimize VCXO input voltage modulation, which can result in excessive VCXO
and output clock jitter during free run operation.
The 50K potentiometer P1 can be adjusted to set the input voltage to VC_FREERUN between GND and
VDD. A LMP7701 (U8) op amp is used to buffer the voltage divider from P1. As an alternative to using P1,
an external voltage can be applied to header JP5 to set the VC_FREERUN voltage; however, you must
initially remove P1 and short R27.
1.8 Control Inputs
Switch SW1 allows the LMH1982 control inputs to be set to logic high (VDD) or logic low (GND). See
Table 6 for the toggle switch definitions for SW1.
Introduction
Table 6. Control Input Switch, SW1
SWITCH LABEL LOW HIGH
REF_SEL Select REF_A Select REF_B
I2C_ENA Enable I2C Disable I2C
GENLOCK Genlock Mode Free Run Mode
RESET Reset operation Normal operation
(1)
The REF_SEL and GENLOCK inputs will only be functional after they have been enabled by programming the control registers.
(1)
During normal operation, the RESET input must be set high; otherwise the device will not function
properly. To reset the control registers of the LMH1982, toggle RESET low for at least 10 µs for proper
reset and then set high.
To enable programming via the I2C interface, the I2C_ENABLE input must be set low. If I2C_ENABLE is
set high and any attempt is made to communicate via I2C, the LMH1982 will not acknowledge, and
read/write operations will not occur.
The control inputs can be probed on the inside pins of header J9, while the edge-side pins of J9 are all
connected to GND. See Table 7 for the pin assignments of J9. If SW1 is removed, J9 may also be used to
apply external logic signals to the control inputs.
Table 7. Control Input Test Points, J9
Pin # Pin Name Pin # Pin Name
1 GND 8 REF_SEL
2 GND 7 I2C_ENABLE
3 GND 6 GENLOCK
4 GND 5 RESET
1.9 GENLOCK Status Indication
The evaluation board has two green LEDs (D3, D4) for visual indication of the PLL lock status and
reference status outputs, NO_LOCK and NO_REF. In Genlock mode, the PLL lock status is indicated by
D3 (labeled “GENLOCKED”) and the reference status is indicated by D4 (labeled “REFERENCE”). The
NO_LOCK and NO_REF outputs can be probed respectively at pins 7 and 8 of header J10.
Refer to the LMH1982 Multi-Rate Video Clock Generator with Genlock Data Sheet (SNLS289) for more
information about programming the PLL lock threshold and loss of reference threshold.
SNOA527A–May 2008–Revised April 2013 AN-1841 LMH1982 Evaluation Board
Submit Documentation Feedback
Copyright © 2008–2013, Texas Instruments Incorporated
5

Introduction
Table 8. Genlock Status LEDs
Condition D3 D4
Genlock mode OFF OFF
Reference lost
PLL(s) not locked
Genlock mode OFF ON
Reference valid
PLL(s) locking
Genlock mode ON ON
Reference valid
PLLs locked
1.10 I2C Interface
The I2C interface clock (SCL) and data (SDA) signals come from the USB board via header J11. These
signals can be probed at test points TP11 (SCL) and TP12 (SDA). Both signals traces have 4.7 kΩ pull-up
resistors to VDD and 50Ω series resistors to the I2C pins of the LMH1982. The I2C_ENABLE input must
be set high to allow I2C programming.
1.11 USB Board and PC Software Application
When connected to the PC the Windows operating system (OS) will interpret the USB board as a Human
Interface Device (HID) and use Microsoft’s standard HID driver included in the OS. The LMH1982
evaluation software application can access the USB board through dynamic link libraries, which are used
by the PC application to control the LMH1982 using the I2C interface. For more information, consult the
USB board reference manual and LMH1982 evaluation software user guide.
www.ti.com
(NO_LOCK) (NO_REF)
1.12 List of Test Points
Table 9. Test Points
Designator Signal Name
TP1 DVDD
TP2 VCC
TP3 VDD
TP4 VDD_VCXO
TP7 OEOUT
TP11 SCL
TP12 SDA
Pin 6, J10 TOF_OUT
Pin 7, J10 NO_LOCK
Pin 8, J10 NO_REF
TP21 VCTRL
TP22 XO_OUT
TP23 TOF
TP27 HREF_A
TP28 VREF_A
TP30 HREF_B
TP31 VREF_B
6
AN-1841 LMH1982 Evaluation Board SNOA527A–May 2008–Revised April 2013
Copyright © 2008–2013, Texas Instruments Incorporated
Submit Documentation Feedback

2
2
1
1
4
4
3
3
6
6
5
5
8
8
7
7
10
10
9
9
12
12
11
11
14
14
13
13
16
16
15
15
16 PIN
J7
1
1
2
2
3
3
4
4
5
5
6
6
CONN6
J1
EXT3V3
EXT2V5
EXT5V
USB5V
C55
10 PF
JP3
VCC5V
U2
LP38693MP-2.5
Vin
2
SD
1
Vout
3
ADJ
4
GND
C7
10 PF
5
R4
0
+
C8
47 PF
C16
100 nF
VDD2V5
EXT2V5
JP2
U1
LP38693MP-3.3
Vin
2
SD
1
Vout
3
ADJ
4
GND
C2
10 PF
5
R2
0
+
C3
47 PF
C11
100 nF
VCC3V3
EXT3V3
JP1
+
C42
10 PF
C41
47 PF
C5
100 nF
C13
100 nF
VDD
TP3
VDD
C9
100 nF
R3
0
VCC3V3
www.ti.com
2 Evaluation Board Schematic
Evaluation Board Schematic
Figure 3. Schematic (1 of 4)
LP38693 LDO Regulators with External Power Input Header
SNOA527A–May 2008–Revised April 2013 AN-1841 LMH1982 Evaluation Board
Submit Documentation Feedback
Copyright © 2008–2013, Texas Instruments Incorporated
7

U4
LMH1981
GND
5
GND
11
VFOUT
9
R15
0
JP4
Rext1OEOUT
10
GND2BPOUT
9
Vcc3CSOUT
8
Vin4VSOUT
7
SD/HD5HSOUT
6
REXT OEOUT
VSOUT
HSOUT
LMH1980 (NP)
U3
C33
100 nF
VCC
VIN
Vcc2
6
C1
100 nF
HSOUT
VCC
VIN
4
Vcc1
3
GND
2
Rext
1
7
R51
50
HSOUT
HSYNC
8
R28
50
VSOUT
VSYNC
VSOUT
R1
10.0k (1%)
1%
REXT
C32
10 nF
Vcc3
10
CSOUT
12
BPOUT
13
OEOUT
14
C36
10 PF
C4
100 nF
VCC
TP2
VCC
VCC3V3
R26
50
OEOUT
TP7
OEOUT
VIN
C39
560 pF
C30
OPEN
R24
100
R23
75
J2
ANALOG REF 1
Evaluation Board Schematic
www.ti.com
8
AN-1841 LMH1982 Evaluation Board SNOA527A–May 2008–Revised April 2013
Figure 4. Schematic (2 of 4)
LMH1981 and LMH1980 Sync Separators
Copyright © 2008–2013, Texas Instruments Incorporated
Submit Documentation Feedback

U7
8
A2
5
1
1
8
8
2
2
7
7
3
3
6
6
4
4
5
5
HREF A
VREF B
J8
OE1
VCC
1
R18
33k
VCC
A1
2
HSYNC
Y2
3
GND
4
VCC
R30
NP (10k)
VREF A
VCC
R29
NP (10k)
HREF A
VSYNC
NC7WZ125K8X
R20
NP (0)
R21
NP (0)
Y1
6
OE2
7
C19
100 nF
C38
10 PF
VCC
HREF B
VREF A
2
1
6
SW2
SWITCH
4X2
www.ti.com
Evaluation Board Schematic
Figure 5. Schematic (3 of 4)
Input Header and Switch-Controlled Logic Buffer
SNOA527A–May 2008–Revised April 2013 AN-1841 LMH1982 Evaluation Board
Submit Documentation Feedback
Copyright © 2008–2013, Texas Instruments Incorporated
9

12
1
2
10
3
11
9
457
6
8
SW1
4DPT
VDD
1
1
8
8
2
2
7
7
3
3
6
6
4
4
5
5
J9
4X2
J10
4X2
REF SEL
R34
10k
LMH1982
1
1
8
8
2
2
7
7
3
3
6
6
4
4
5
5
TOF OUT
1
1
2
2
3
3
4
4
5
5
6
6
7
7
8
8
9
9
10
10
11
11
12
12
13
13
14
14
15
15
16
16
TP11
SCL
TP12
SDA
16 PIN
J11
10k
R31
R42
50
I2C_ENABLE
13
10k
R32
R43
50
GENLOCK
14
10k
R33
R44
50
RESET
15
R45
50
NO_REF
16
SCL
12
SDA
11
GND
10
9
GREEN
D1
R46
330
50
R36
17
NO_LOCK
D3
18
GND
19
HD_CLK
20
HD_CLK
21
VDD
22
GND
C25
100 nF
C53
10 µF
VDD
R38
NP (100Ö)
100: DIFF. IMPEDANCE
0Ö (10 nF)
C35
J5
SMA
HD_CLK
0Ö (10 nF)
C37
J6
SMA
HD_CLK
23
SD_CLK
24
SD_CLK
R37
NP (100:)
100: DIFF. IMPEDANCE
0Ö (10 nF)
C31
J3
SMA
SD_CLK
0Ö (10 nF)
C34
J4
SMA
SD_CLK
330
R49
GREEN
50
R40
50
R39
4.7k
R16
4.7k
R17
C20
100 nF
VDD
C44
100 nF
VDD32LPFI
31
GND
30
VCXO
29
28
27
GND
26
TOF_OUT
25
C26
10 nF
C50
100 nF
C51
100 nF
0
R22
TP1V
DD
8
VREF_B
7
HREF_B
6
REF_SEL
5
VREF_A
4
HREF_A
3
2
GND
1
VC_FREERUN
50
R41
REF_SEL
50
R6
HREF_B
50
R7
VREF_B
TP30
HREF_B
TP31
VREF_B
50
R25
VREF_A
TP28
VREF_A
50
R14
HREF_A
TP27
HREF_A
C24
100 nF
R13
NP
0
R12
50
R9
50
R10
TP23
TOF_OUT
TOF_OUT
100 nF
C23
C22
100 nF
U5
U8
LMP7701
+
-
C22
100 nF
3
4
1
2 5
C29
100 nF
P1
50k
NP
R27
JP5
U6
LMP7701
+
-
C12
100 nF
3
4
1
2 5
50: CONTROLLED
IMPEDANCE TRACE
R8
20k
C28
1 µF
C27
22 µF
C10
22 µF
TP22
VDD_VCXO
TP21
VC_IN
C15
NP
R19
0
1
VC
JP8
OUT
4
GND
X1
CTS357
3
VCXO
DISABLE
EN
2
6
VDD_VCXO
VDD_VCXO
0
R11
TP4
VDD_VCXO
C12
100 nF
C17
1 µF
C43
10 µF
+
C6
47 µF
2Ö
R5
C14
100 nF
+
C40
NP
VDD
VDD2V5
DVDD
VDD
DVDD
VDD
VDD
VDDV
DD
VDD_VCXO VCC3V3
VCC
VDDVDD
Evaluation Board Schematic
www.ti.com
10
AN-1841 LMH1982 Evaluation Board SNOA527A–May 2008–Revised April 2013
LMH1982 Clock Generator with Loop Filter, VCXO, and LMP7701 Op Amps
Figure 6. Schematic (4 of 4)
Copyright © 2008–2013, Texas Instruments Incorporated
Submit Documentation Feedback

www.ti.com
3 Evaluation Board Layout
Evaluation Board Layout
Figure 7. PCB Layout (1 of 2)
Top Routing Layer 1 (dark gray) and Ground Plane Layer 2 (light gray)
SNOA527A–May 2008–Revised April 2013 AN-1841 LMH1982 Evaluation Board
Submit Documentation Feedback
Copyright © 2008–2013, Texas Instruments Incorporated
11

Evaluation Board Bill of Materials
www.ti.com
Figure 8. PCB Layout (2 of 2)
Power Plane Layer 3 (light gray) and Bottom Routing Layer 4 (dark gray)
4 Evaluation Board Bill of Materials
Qty Part Designator Part Value / Description Part Footprint
C1, C4, C5, C9, C11, C12, C14, C16, C18,
C19, C20, C21, C22, C23, C24, C25, C29,
20 C33, C44, C50 100 nF, X7R 0603
1 C51 100 nF, X7R 0805
1 C6 100 nF, X7R 1206
1 C13 100 µF, X7R 0603
2 C17, C28 1 µF, X7R 0805
8 C2, C7, C38, C42, C43, C53, C55 10 µF, X5R 0805
2 C3, C8 47 µF, 3528 TANT-B
3 C10, C27, C41 22 µF, X5R 1206
2 C26, C32 10 nF, X7R 0603
1 C39 560 pF, NPO 0603
2 D3, D4 GREEN, SMT LED 0805
1 J1 6 PIN HEADER 6X1
1 J2 EDGE MOUNT BNC SMA
12
AN-1841 LMH1982 Evaluation Board SNOA527A–May 2008–Revised April 2013
Copyright © 2008–2013, Texas Instruments Incorporated
Submit Documentation Feedback

www.ti.com
(1)
Qty Part Designator Part Value / Description Part Footprint
4 J3, J4, J5, J6 EDGE MOUNT SMA SMA
2 J7, J11 0.100" 16 PIN HEADER 8516-4500PL
3 J8, J9, J10 4X2 HEADER 4X2
4 JP1, JP2, JP4, JP8 2 PIN HEADER 2X1
1 JP3 3 PIN HEADER 3X1
1 P1 50K SMT POT ST4ETA503CT-ND
7 R1, R29, R30, R31, R32, R33, R34 10.0K 1% 0603
9 R2, R4, R11, R12, R19, C31, C34, C35, C37 0 0603
3 R3, R15, R22 0 0805
1 R5 2.0 0805
R6, R7, R10, R14, R25, R26, R28, R36, R39,
17 R40, R41, R42, R43, R44, R45, R51 49.9 0603
1 R8 20K 0805
2 R16, R17 4.7K 0603
1 R23 75 0603
1 R18 33K 0603
1 R24 100 0603
2 R37, R38 100 (NP)
2 R46, R49 330 0603
1 SW1 4PDT SWITCH 4PDT
1 SW2 SPDT SWITCH SPDT
4 TP1, TP2, TP3, TP4 RED TEST POINT TEST_POINT
TP7, TP11, TP12, TP21, TP22, TP23, TP27,
10 TP28, TP30, TP31 WHITE TEST POINT TEST_POINT
12 GND BLACK TEST POINT TEST_POINT
1 U1 LP38693 SOT223-5
1 U2 LP38693 SOT223-5
1 U3 LMH1980 (NP)
1 U4 LMH1981 TSSOP14
1 U5 LMH1982 WQFN-32
2 U6, U8 LMP7701 SOT23-5
1 U7 NC7WZ125K8X US-8
1 X1 CTS 357LB3I27M0000 27 MHz VCXO VCXO
7/8” 4-40 THREADED NYLON
4 STANDOFF
4 3/8” 4-40 SCREW
C15, C30, C40, R13, R20, R21, R27 NP
NP = Not Populated
(1)
(1)
(1)
1206
VSSOP10
References
5 References
• LMH1982 Multi-rate Video Clock Generator with Genlock Data Sheet (SNLS289)
• LMH1981 Multi-Format Video Sync Separator with 50% Sync Slicing Data Sheet (SNLS214)
• LMH1980 Auto-Detecting SD/HD/PC Video Sync Separator Data Sheet (SNLS263)
• AN-1187 Leadless Leadframe Package (LLP) (SNOA401)
• USB Interface Module for Applications Reference Manual (SNOU009)
• LLP Design Rules: 0.5 mm Pitch LLP Layout and Assembly Design Guidelines
• Gerber Files: LMH1982 Evaluation PCB Layout (available upon request)
• Gerber Files: SQA32A 32-pin LLP Footprint
SNOA527A–May 2008–Revised April 2013 AN-1841 LMH1982 Evaluation Board
Submit Documentation Feedback
Copyright © 2008–2013, Texas Instruments Incorporated
13

IMPORTANT NOTICE
Texas Instruments Incorporated and its subsidiaries (TI) reserve the right to make corrections, enhancements, improvements and other
changes to its semiconductor products and services per JESD46, latest issue, and to discontinue any product or service per JESD48, latest
issue. Buyers should obtain the latest relevant information before placing orders and should verify that such information is current and
complete. All semiconductor products (also referred to herein as “components”) are sold subject to TI’s terms and conditions of sale
supplied at the time of order acknowledgment.
TI warrants performance of its components to the specifications applicable at the time of sale, in accordance with the warranty in TI’s terms
and conditions of sale of semiconductor products. Testing and other quality control techniques are used to the extent TI deems necessary
to support this warranty. Except where mandated by applicable law, testing of all parameters of each component is not necessarily
performed.
TI assumes no liability for applications assistance or the design of Buyers’ products. Buyers are responsible for their products and
applications using TI components. To minimize the risks associated with Buyers’ products and applications, Buyers should provide
adequate design and operating safeguards.
TI does not warrant or represent that any license, either express or implied, is granted under any patent right, copyright, mask work right, or
other intellectual property right relating to any combination, machine, or process in which TI components or services are used. Information
published by TI regarding third-party products or services does not constitute a license to use such products or services or a warranty or
endorsement thereof. Use of such information may require a license from a third party under the patents or other intellectual property of the
third party, or a license from TI under the patents or other intellectual property of TI.
Reproduction of significant portions of TI information in TI data books or data sheets is permissible only if reproduction is without alteration
and is accompanied by all associated warranties, conditions, limitations, and notices. TI is not responsible or liable for such altered
documentation. Information of third parties may be subject to additional restrictions.
Resale of TI components or services with statements different from or beyond the parameters stated by TI for that component or service
voids all express and any implied warranties for the associated TI component or service and is an unfair and deceptive business practice.
TI is not responsible or liable for any such statements.
Buyer acknowledges and agrees that it is solely responsible for compliance with all legal, regulatory and safety-related requirements
concerning its products, and any use of TI components in its applications, notwithstanding any applications-related information or support
that may be provided by TI. Buyer represents and agrees that it has all the necessary expertise to create and implement safeguards which
anticipate dangerous consequences of failures, monitor failures and their consequences, lessen the likelihood of failures that might cause
harm and take appropriate remedial actions. Buyer will fully indemnify TI and its representatives against any damages arising out of the use
of any TI components in safety-critical applications.
In some cases, TI components may be promoted specifically to facilitate safety-related applications. With such components, TI’s goal is to
help enable customers to design and create their own end-product solutions that meet applicable functional safety standards and
requirements. Nonetheless, such components are subject to these terms.
No TI components are authorized for use in FDA Class III (or similar life-critical medical equipment) unless authorized officers of the parties
have executed a special agreement specifically governing such use.
Only those TI components which TI has specifically designated as military grade or “enhanced plastic” are designed and intended for use in
military/aerospace applications or environments. Buyer acknowledges and agrees that any military or aerospace use of TI components
which have not been so designated is solely at the Buyer's risk, and that Buyer is solely responsible for compliance with all legal and
regulatory requirements in connection with such use.
TI has specifically designated certain components as meeting ISO/TS16949 requirements, mainly for automotive use. In any case of use of
non-designated products, TI will not be responsible for any failure to meet ISO/TS16949.
Products Applications
Audio www.ti.com/audio Automotive and Transportation www.ti.com/automotive
Amplifiers amplifier.ti.com Communications and Telecom www.ti.com/communications
Data Converters dataconverter.ti.com Computers and Peripherals www.ti.com/computers
DLP® Products www.dlp.com Consumer Electronics www.ti.com/consumer-apps
DSP dsp.ti.com Energy and Lighting www.ti.com/energy
Clocks and Timers www.ti.com/clocks Industrial www.ti.com/industrial
Interface interface.ti.com Medical www.ti.com/medical
Logic logic.ti.com Security www.ti.com/security
Power Mgmt power.ti.com Space, Avionics and Defense www.ti.com/space-avionics-defense
Microcontrollers microcontroller.ti.com Video and Imaging www.ti.com/video
RFID www.ti-rfid.com
OMAP Applications Processors www.ti.com/omap TI E2E Community e2e.ti.com
Wireless Connectivity www.ti.com/wirelessconnectivity
Mailing Address: Texas Instruments, Post Office Box 655303, Dallas, Texas 75265
Copyright © 2013, Texas Instruments Incorporated

Mouser Electronics
Authorized Distributor
Click to View Pricing, Inventory, Delivery & Lifecycle Information:
Texas Instruments:
LMH1982SQEEVAL LMH1982SQEEVAL/NOPB
 Loading...