


Connect-to-Class™

Important Information
Texas Instruments makes no warranty, either express or implied,
including but not limited to any implied warranties of merchantability
and fitness for a particular purpose, regarding any programs or book
materials and makes such materials available solely on an "as-is" basis. In
no event shall Texas Instruments be liable to anyone for special,
collateral, incidental, or consequential damages in connection with or
arising out of the purchase or use of these materials, and the sole and
exclusive liability of Texas Instruments, regardless of the form of action,
shall not exceed the purchase price of this product. Moreover, Texas
Instruments shall not be liable for any claim of any kind whatsoever
against the use of these materials by any other party.
License
Please see the complete license installed in C:\Program
Files\TI Education\Connect-to-Class.
© 2008 Texas Instruments Incorporated
Microsoft® and Windows® are trademarks of their owner.
ii

Contents
Important Information................................................................... ii
License............................................................................................. ii
Sample Hardware Setups ......................................................1
Connect-to-Class™ Configuration Requirements......................... 1
Sample Configuration diagrams ................................................... 2
Getting started .......................................................................5
Starting Connect-to-Class™ software .......................................... 6
The Connect-to-Class™ software computer home screen .......... 7
Current Class .................................................................................. 8
Class Record .................................................................................... 8
Classroom tab .............................................................................. 10
Creating and managing your teacher account .......................... 11
Managing classes..................................................................15
Creating classes............................................................................. 15
Selecting a class ............................................................................ 18
Beginning and ending class sessions........................................... 19
Logging in to Connect-to-Class™ (student instruction)............. 20
Changing the class view .............................................................. 23
Arranging the seating chart ........................................................ 24
Removing items from the Class Record....................................... 25
Removing classes ......................................................................... 27
Managing student accounts.................................................29
Adding students to classes........................................................... 29
Checking student login status ..................................................... 31
Sorting student information........................................................ 31
Resetting student passwords....................................................... 32
Changing student classes............................................................. 35
Changing student names and identifiers.................................... 37
Moving a student to another class.............................................. 38
Copying a student to another class............................................. 39
Removing a student from a class................................................. 39
Exchanging files with students ...........................................41
Sending files ................................................................................. 41
Connecting handhelds for file transfers ..................................... 41
Sending files (student instruction) ............................................. 47
Collecting files .............................................................................. 49
Receiving files (student instruction) ........................................... 53
iii

Redistributing files from a collect action....................................55
Deleting files from TI-Nspire™ handhelds .................................56
Checking the status of file transfers............................................58
Canceling file transfers.................................................................58
Finding transferred files...............................................................59
Changing the unprompted file location .....................................59
Viewing file properties.................................................................61
The Transfer Tool................................................................... 63
Opening the Transfer Tool ...........................................................63
Adding files to the transfer list....................................................64
Removing files from the transfer list...........................................66
Changing the destination folder ................................................67
Viewing transfer status ................................................................67
Deleting device folders and files before transferring files ........68
Stopping file transfers..................................................................69
Closing the Transfer tool..............................................................69
Glossary ................................................................................ 71
Terms .............................................................................................71
File types........................................................................................72
Troubleshooting ................................................................... 73
System requirements ....................................................................73
Error messages ..............................................................................73
Connectivity Issues........................................................................75
Texas Instruments Support and Service.............................. 77
iv

Sample Hardware Setups
Two four-port hubs and two USB extension cables are included with your
product. The extension cables allow you to set up the hubs away from
your computer. Using these cables is recommended but not necessary.
However, be sure to use only the two four-port hubs provided.
This section shows some sample hardware setups and how you can use
the cables to configure your system. The section also describes the
minimum configuration requirements for operating Connect-to-Class™
with the TI-Nspire
Connect-to-Class™ Configuration Requirements
• TI-Nspire™ family handhelds (with OS version 1.3 or higher)
• A computer with the minimum system requirements
• Compatible USB cables (Standard A to Mini B) of appropriate length,
used in combination with the two USB extension cables provided
with the product
– USB cable length between the computer and USB hub or
between the TI-Nspire™ handheld and USB hub should not
exceed 16 feet.
– USB cables between the TI-Nspire™ handheld and USB hub
should consist of Standard A and Mini B connectors. You can use
the USB cable that came with the handheld or any Standard A to
Mini B USB cable.
• The two four-port USB hubs supplied with the product, connected to
a personal computer
Warning: Use only the supplied hubs with Connect-to-Class™. In
addition, do not connect any other product or non-TI-Nspire™ device
into these hubs.
Please contact TI by e-mail at ti-cares@ti.com for additional hub details.
TM
handhelds.
Sample Hardware Setups 1
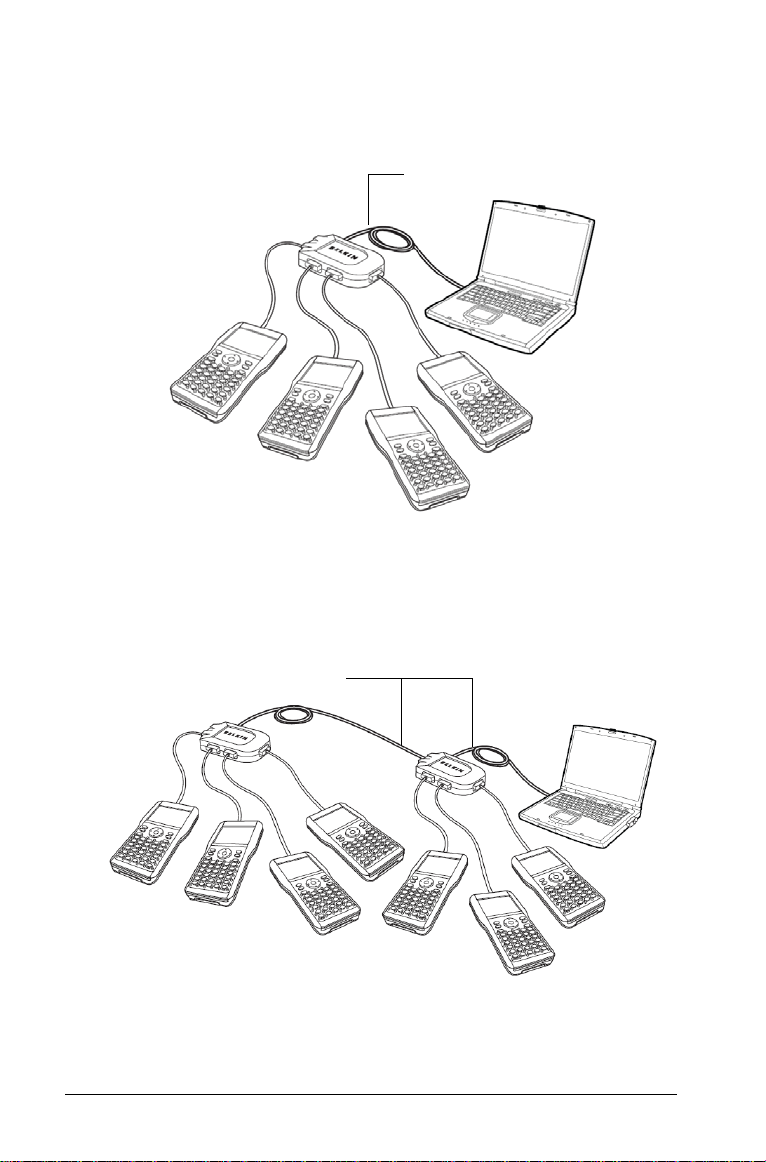
Sample Configuration diagrams
4-port, direct connect
USB Extension Cable
Warning: Use only the supplied hubs with Connect-to-Class™. In
addition, do not connect any other product or non-TI-Nspire™ device
into these hubs.
(2) 4-port, daisy-chained
USB Extension Cables
Warning: Use only the supplied hubs with Connect-to-Class™. In
addition, do not connect any other product or non-TI-Nspire™ device
into these hubs.
2 Sample Hardware Setups
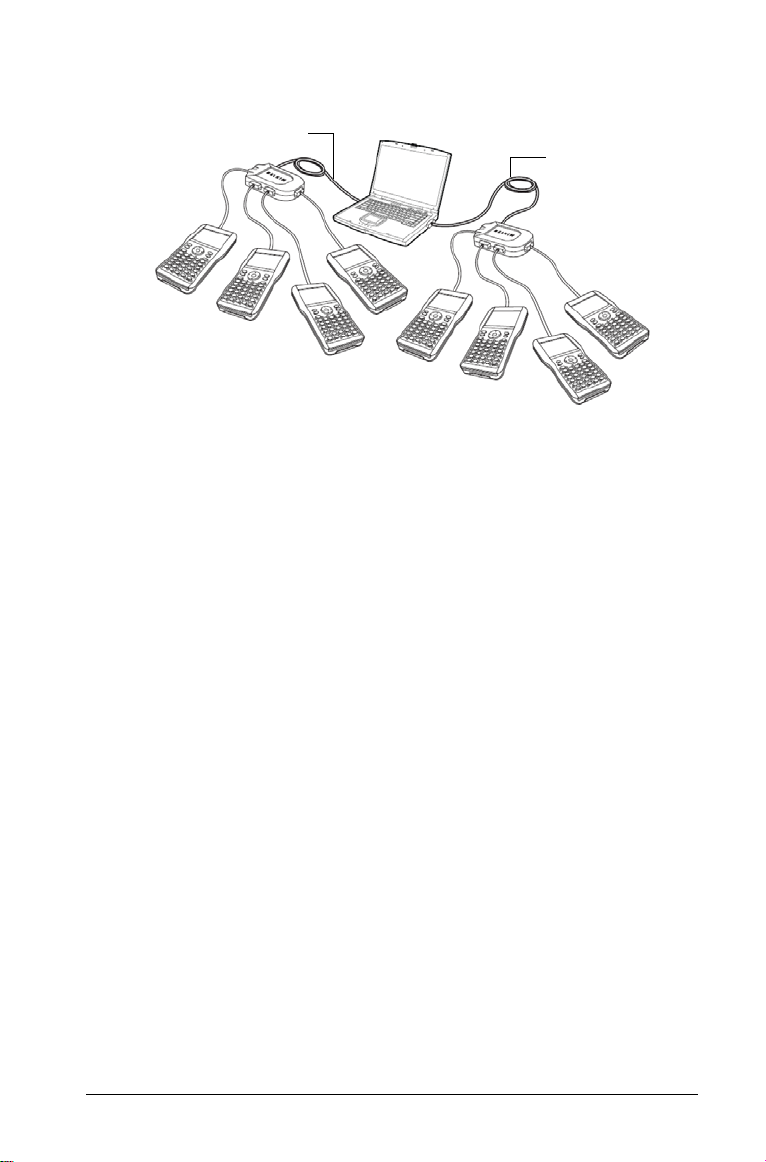
(2) 4-port, direct connect
USB Extension Cable
USB Extension
Cable
Warning: Use only the supplied hubs with Connect-to-Class™. In
addition, do not connect any other product or non-TI-Nspire™ device
into these hubs.
Sample Hardware Setups 3

4 Sample Hardware Setups

Getting started
Use Connect-to-Class™ software to transfer files to and from your
students:
• Transfer documents between your computer or TI-Nspire™ handheld
and your students’ TI-Nspire™ handhelds while a class is in session.
• Transfer files to connected TI-Nspire™ handhelds outside of a
classroom session.
• Manage files (arrange collected files by class, delete files from
student TI-Nspire™ handhelds)
This section provides basic information about Connect-to-Class™
software and using the software with the student’s TI-Nspire™ handheld.
Getting started 5

Starting Connect-to-Class™ software
Start the software from your computer’s Start menu or from a desktop
shortcut.
To start Connect-to-Class™ software
f Click
Start > Programs > TI Tools > Connect-to-Class >
Connect-to-Class
Note: If you have not used Connect-to-Class™ software before, a
prompt asks if you want to set up your classroom. You can set up
your classroom or continue on to the Connect-to-Class™ software
home screen.
.
6 Getting started
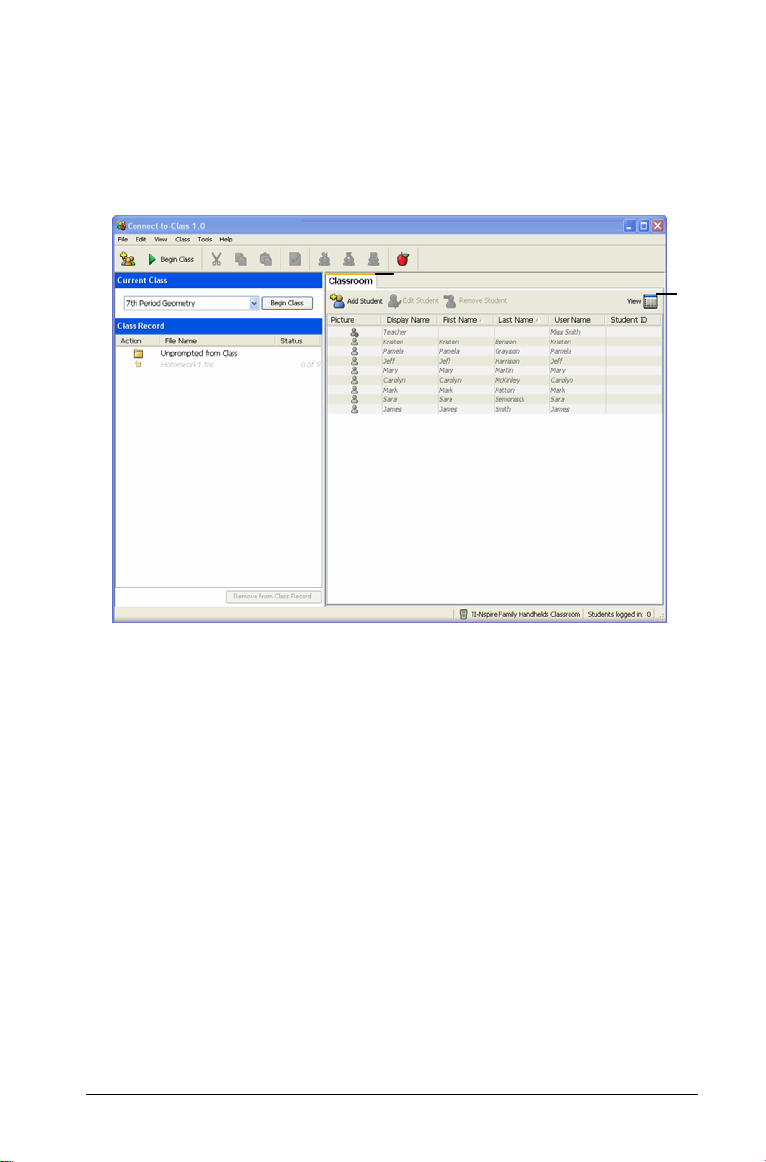
The Connect-to-Class™ software computer home
screen
The home screen provides the tools and options you need to run the
software. Here are the main areas of the home screen, followed by
explanations of each labeled part.
Ê
Ë
Ê Current Class
Ë Class Record
Classroom tab
Ì
Í View Selector
Ì
Í
Getting started 7

Current Class
This area lets you select classes you have created, as well as begin and
end class sessions for the selected class. Below you can see an example of
the Current Class area with its main parts labeled.
Ê
Class list. A drop-down list where you can select a class from the ones
Ê
you have created. The Class list is disabled when you have a class session
running.
Begin/End Class button. Lets you begin or end a class session.
Ë
Ë
Class Record
The Class Record contains both the current and historical activity for the
selected class. The following example shows a Class Record with its main
parts labeled.
À
Á
Â
Ã
Ä
Å
Ð
Unprompted from Class folder. A folder that contains the files
À
students have sent to you that were not part of a collect action.
8 Getting started

Á File transfer. The transfer of files between your computer and your
students’ TI-Nspire™ handhelds. Arrow icons under the Actions column
and beside files indicate file transfers.
• Files that have been sent to your class’s TI-Nspire™ handhelds
• Files you have received from your class’s TI-Nspire™ handhelds
File transfers remain current until all students receive the file, you stop
the transfer, or you end the class session.
Status. The progress of an action. For example, “23 of 25” indicates
Â
that 23 out of 25 students have received a file.
Ã
File deletion. A file that has been deleted from your students’
TI-Nspire™ handhelds is indicated by the symbol under the Actions
column.
Current action. An action (for example, send) that is still active.
Ä
Å
Historic action. An action (for example, send) that is inactive.
Remove From Record button. Lets you remove selected historic or
Æ
active actions from the Class Record. You can remove a single action or
multiple actions.
Getting started 9
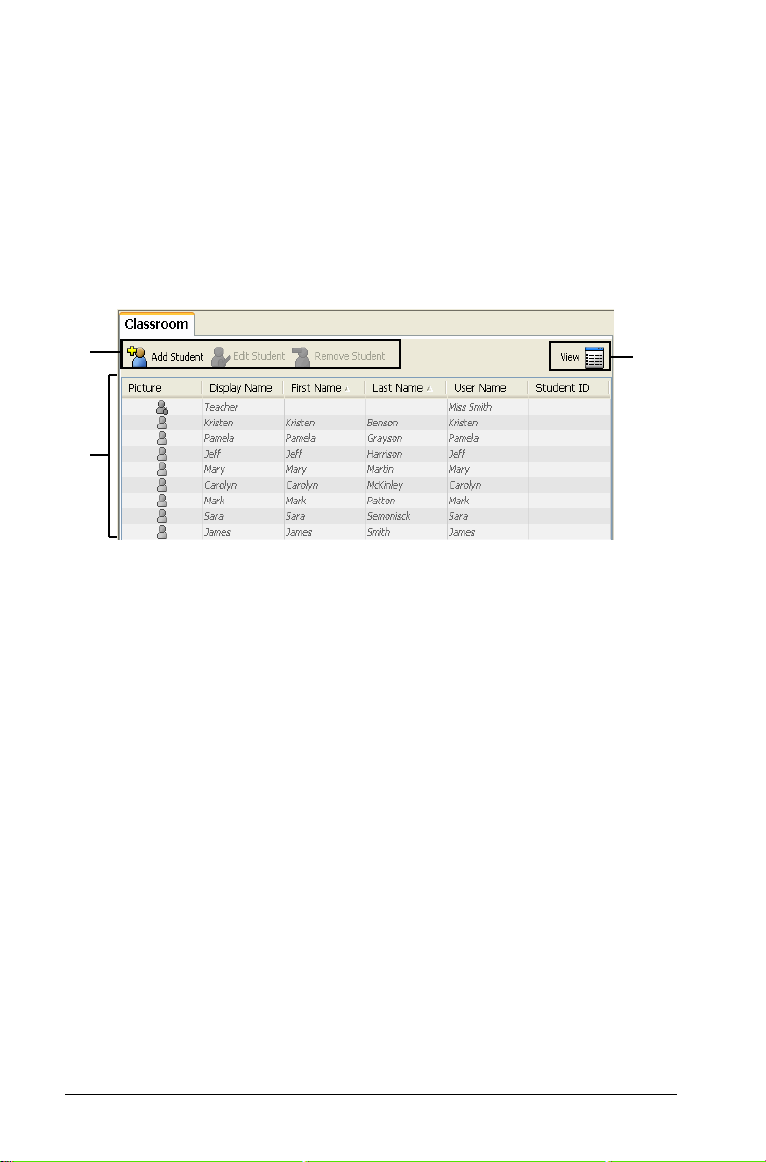
Classroom tab
From the Classroom tab, you can view the students in the selected class
and add, remove, or edit students. The Classroom tab has two views, the
Seating Chart and Student List views. In the Seating Chart view, you can
view your students by their display name and an icon. In the Student List
view, you can view your students listed in a table with some of their
account information. Below you can see an example of the Classroom tab
with its main parts labeled.
Note: The example below shows the Classroom tab in Student List view.
Ê
Ë
Ê
Classroom toolbar. Lets you add, edit, and remove students.
Ë
Student roster. 1) Seating Chart view - Shows students listed with
display names and student icons. In this view, you can arrange your
students in the Classroom tab as they are seated in your classroom.
2) Student List view - Shows students listed in a table with some of their
account information. In this view, you can sort students by display name,
first name, last name, user name, and student ID.
Ì
View selector. Lets you toggle between the Seating Chart and Student
List.
Ì
10 Getting started
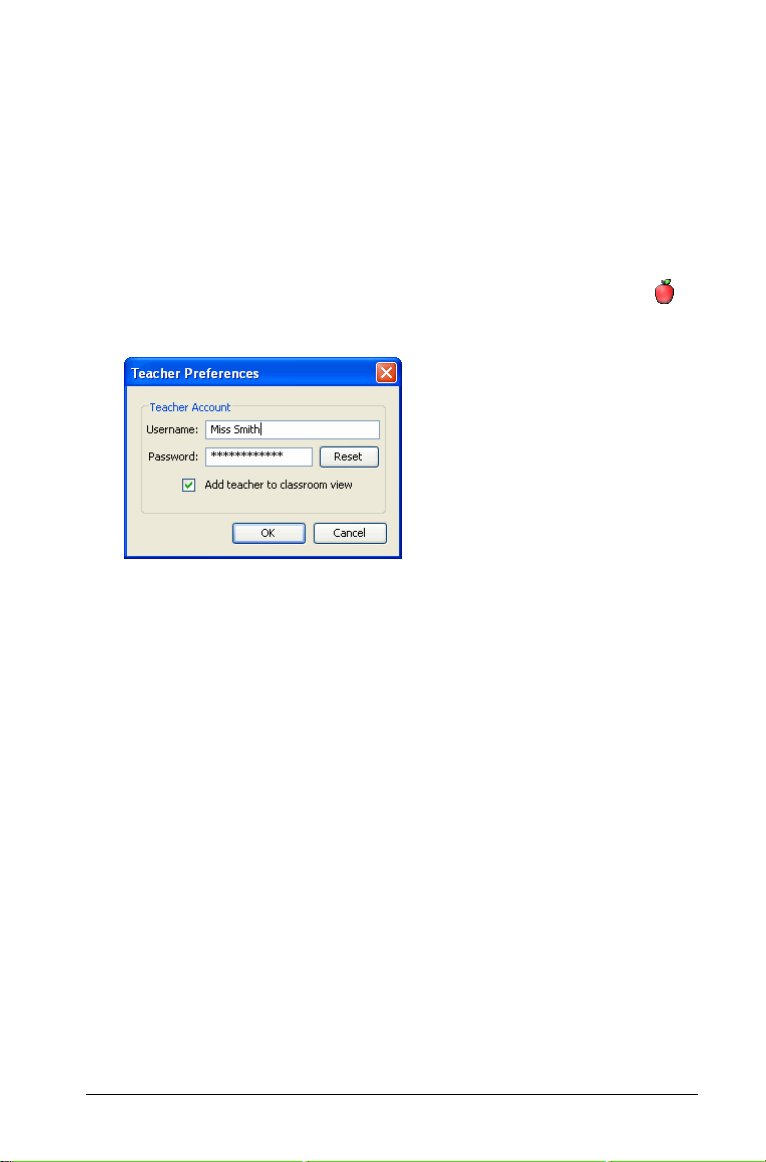
Creating and managing your teacher account
You can create your teacher account in Teacher Preferences. Your teacher
account lets you log in to the Connect-to-Class™ software network from
your TI-Nspire™ handheld. After you create your teacher account, you
can change your password or your user name at any time.
To create your teacher account
1. If you have a class session running, end it.
2. Click
3. Type a user name.
4. Type a password.
5. Select or deselect the preference for the teacher icon to appear in
6. Click
Tools > Teacher Preferences or click Teacher Preferences .
The Teacher Preferences dialog opens.
the classroom view.
If you select this preference, the teacher icon will appear in the
classroom view, and you will be included as a recipient in Send to
Class, Collect from Class, and Delete from Class operations.
OK.
Getting started 11
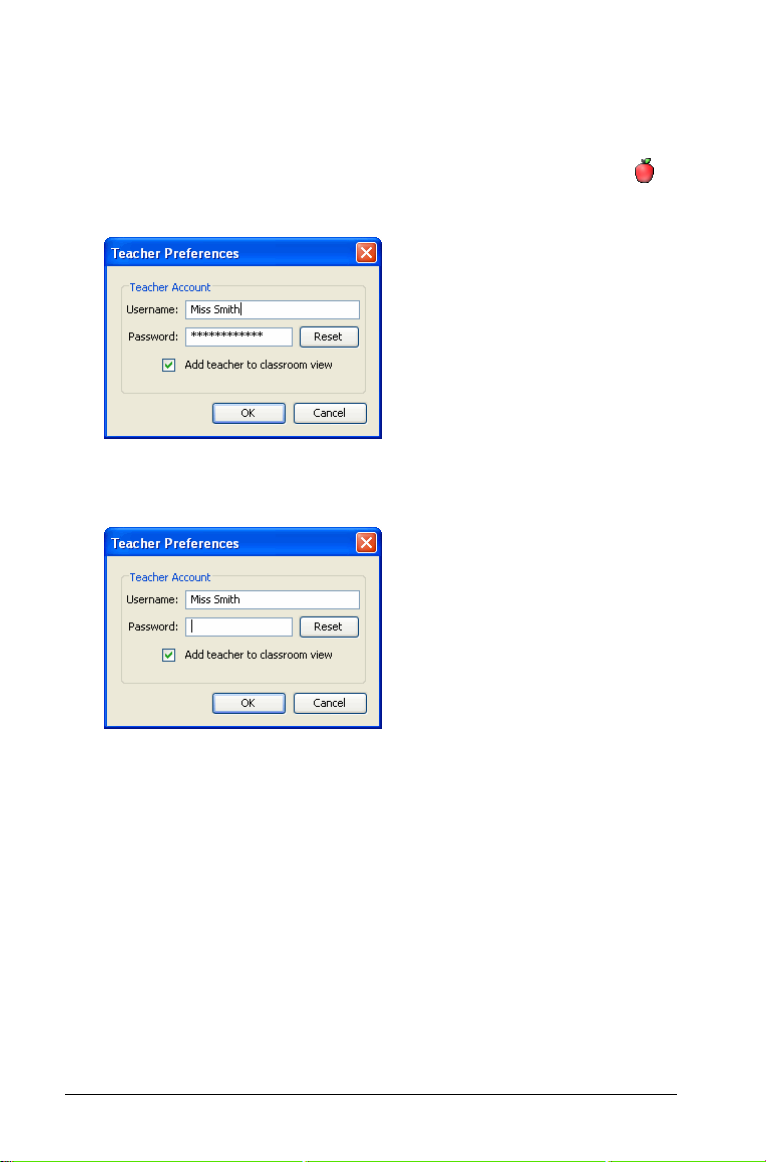
To change the password of your teacher account
1. Make sure you are not logged in to the Connect-to-Class™ software
network on your TI-Nspire™ handheld.
2. Click
Tools > Teacher Preferences or click Teacher Preferences .
The Teacher Preferences dialog opens.
3. Click
Reset.
Connect-to-Class™ software clears the current password.
4. Type a new password.
5. Click
OK.
12 Getting started
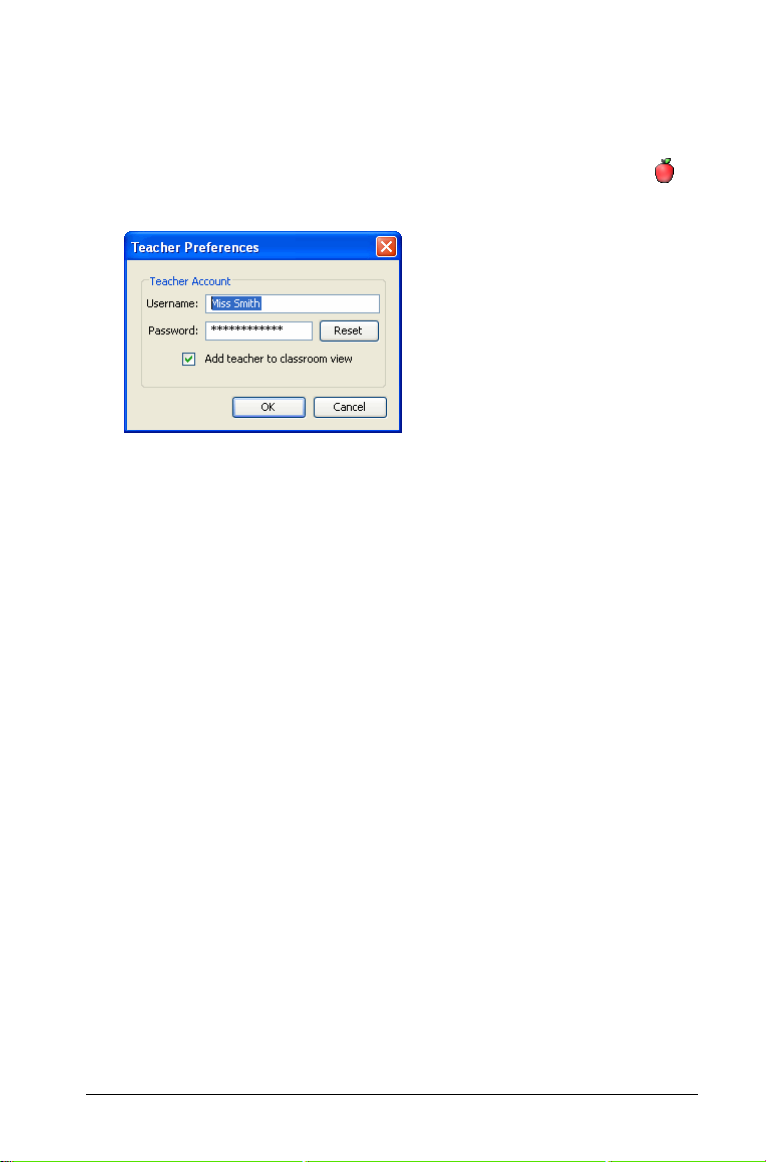
To change the user name of your teacher account
1. Make sure you are not logged in to the Connect-to-Class™ software
on your TI-Nspire™ handheld.
2. Click
Tools > Teacher Preferences or click Teacher Preferences .
The Teacher Preferences dialog opens.
3. Select the current user name, then type a new user name.
4. Click
OK.
13

14
Managing classes
To use Connect-to-Class™ software, you must create a class for each class
period that you teach. This section contains the information you need to
create and effectively manage your classes.
Creating classes
When you start using Connect-to-Class™ software, one of the first things
you should do is create your classes. Make sure you create a class for each
of the class periods you plan to teach with the software.
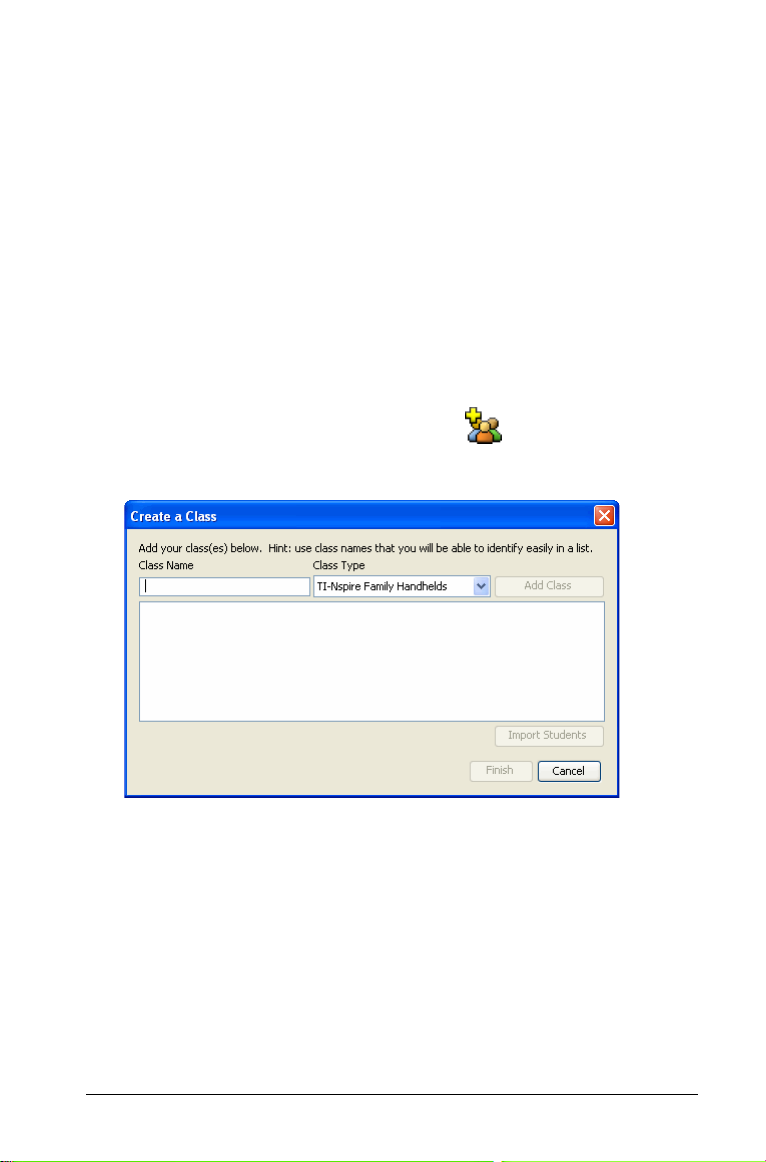
To create classes
1. If you have a class session running, end it.
2. Click
3. Enter a class name.
4. Select a class type.
5. Click
File > Add Class or click Add Class .
The
Create a Class dialog opens.
Add Class.
Note: Once you select a class type and add the class, the class created
will only work with the device type specified.
Managing classes 15
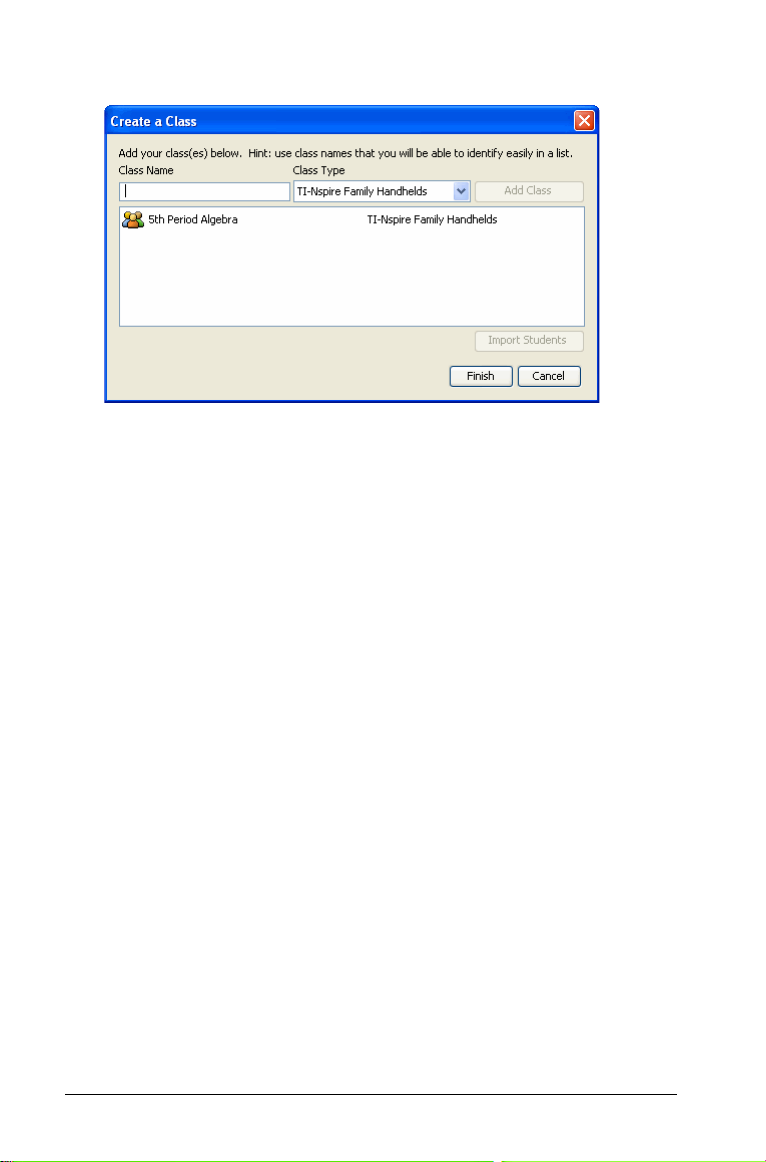
The new class appears in the Create a Class dialog.
Importing students into the class
You can import students into a class when you create it, using a commaseparated value (.csv) file or comma/tab delimited text (.txt) file.
Be sure that the fields in the file you import are structured to correspond
with fields in existing class records. For example:
First Name,Last Name,User Name,Password,Display
Name,Student ID
James,Jones,Jjones,123,Jjones,555-1212
Cindy,Albert,Cabert,456,Cabert,444-1212
Note: These instructions explain how to add students when you create a
class. You can add students individually to a class at any time after
creating it. You can also add students when you create a class by
importing them.
1. Click the class to select it.
2. Click
Import Students.
16 Managing classes
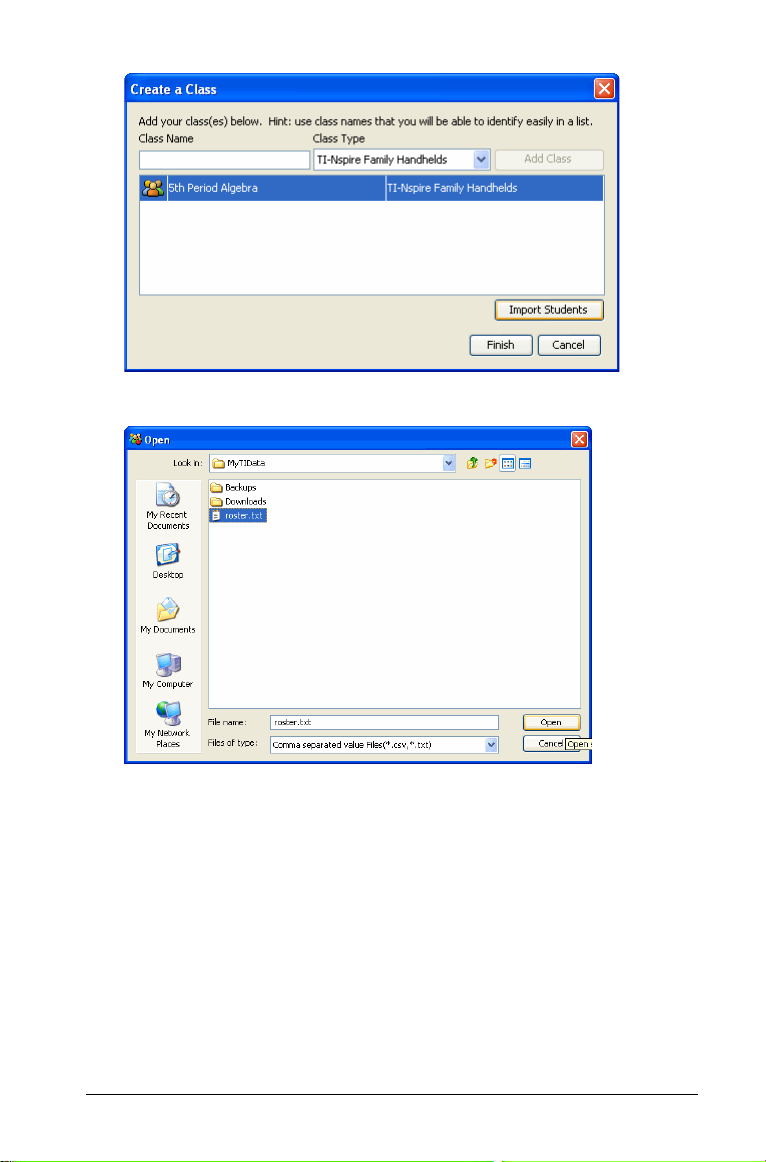
3. The Open dialog displays.
4. Select the file that contains the students you want to import.
Note: The file can be a CSV file or comma/tab delimited text (.txt)
file.
5. Click Open.
The
Import Status dialog opens, telling you how many students
Connect-to-Class™ software successfully imported.
Managing classes 17
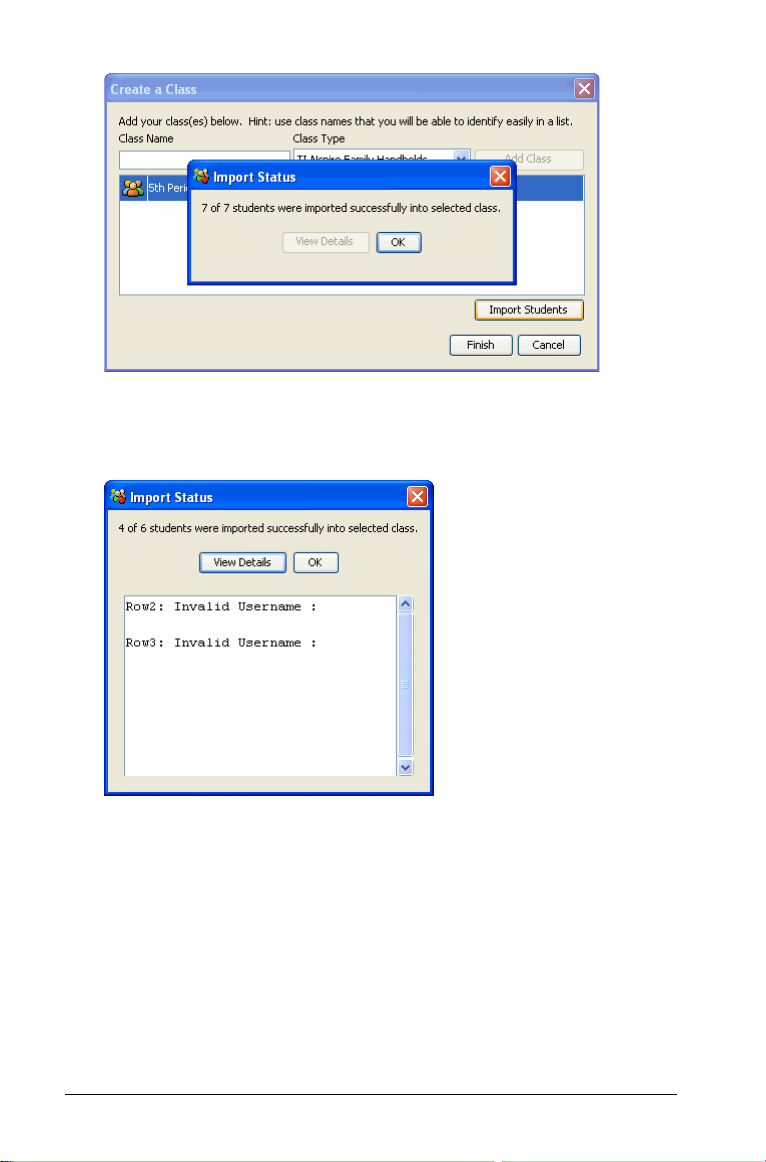
6. If some students did not import successfully, click View Details to
determine the problem.
The details of the import open in the Import Status dialog.
7. Click
8. If you need to create another class, repeat steps 3 - 5.
9. Click
OK.
Finish.
Selecting a class
You can create many classes in the Connect-to-Class™ software system.
To view or start a class, you must select it from a list of the classes in the
Current Class section of the Connect-to-Class™ software home screen.
18 Managing classes
To select a class
1. If you have a class session running, end it.
2. Click File > Select Class.
A list of classes opens.
3. Click the class you want.
Connect-to-Class™ software displays the information for the
selected class.
Note: You can view and edit information in the selected class;
however, you cannot perform any communications functions with
the class until you start the class session.
Beginning and ending class sessions
A class session is the period when the Connect-to-Class™ software
network is active for a specific class. While a class session is running, you
can perform communications functions with the selected class. You
cannot use the software to interact with your class until you begin a class
session, and you cannot begin another class in the software until you end
the current one.
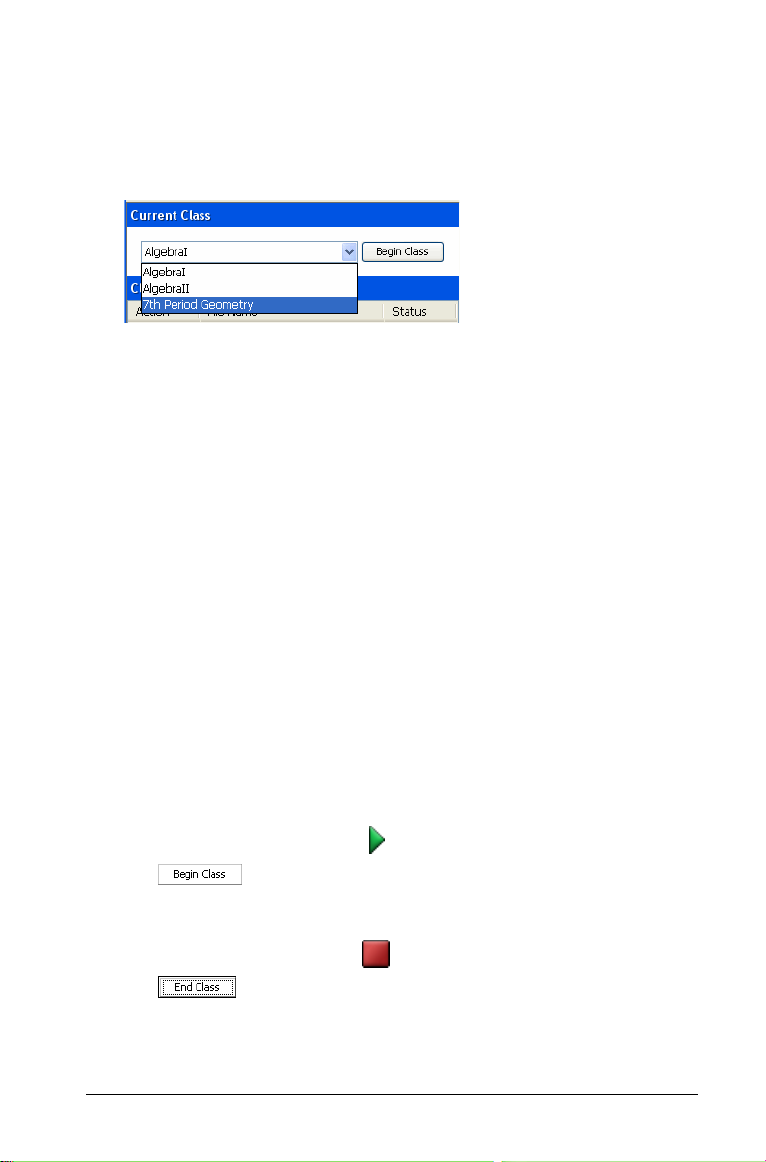
To begin class sessions
1. If you have a class session running, end it.
2. From the Current Class drop-down list, select the class you want to
begin.
3. Click
File > Begin Class, click Begin Class on the tool line, or click
the button next to the class name.
To end class sessions
f Click File > End Class, click End Class on the tool line, or click
the button next to the class name.
Managing classes 19
Logging in to Connect-to-Class™ (student instruction)
Your computer and your students’ TI-Nspire™ handhelds communicate
through the Connect-to-Class™ network. In order for you and your
students to communicate using this software, your students must log in
to the application from their TI-Nspire™ handhelds. Below you can find
instructions you can use to tell your students how to log in to the
Connect-to-Class™ network.
Before your students log in
• Create your students’ accounts.
• Provide your students with their user names and, if necessary, their
passwords.
• Begin the class session on your computer.
Student Point of View: The steps below are from the student’s
point of view.
To log in to Connect-to-Class™
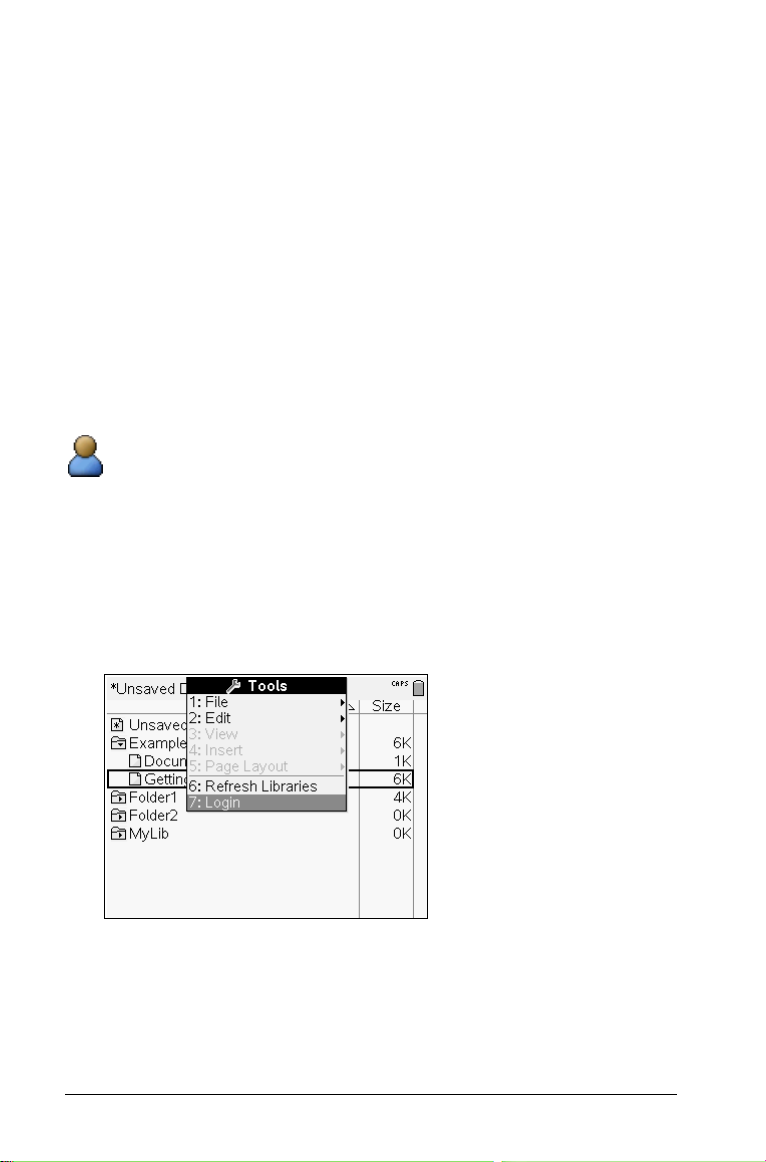
1. From the My Documents screen of your TI-Nspire™ handheld, press
/c to access the Too ls menu. Choose option 7 to select
Login.
2.
20 Managing classes
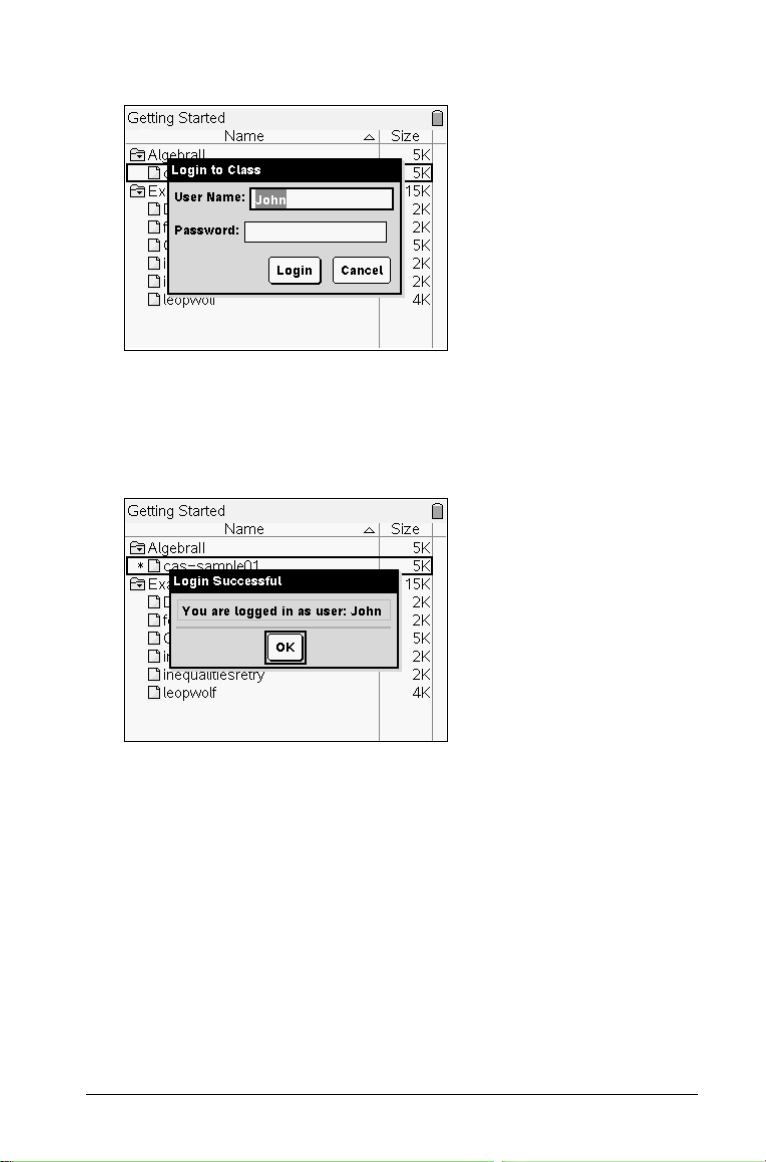
The Login screen displays.
3. Type your user name and password. (Press
Password field.)
4. Select
5. Select
Login.
The Login Successful screen displays.
OK.
e to move to the
Managing classes 21
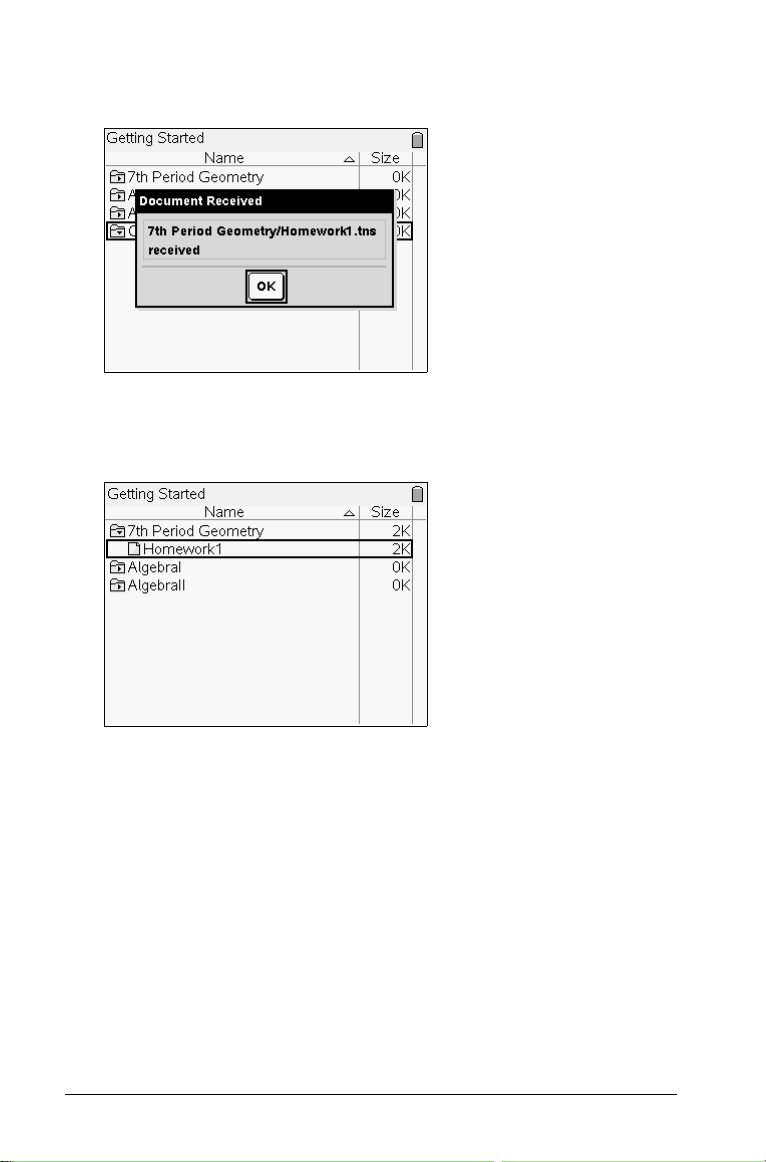
If your teacher has sent any documents to you or to the class, you
will receive the document(s) when you log in.
6. When all documents have transferred, select
OK.
The documents display in the class folder on the My Documents
screen.
22 Managing classes

Changing the class view
From the Classroom tab, you can view the selected class in either the
Student List view or the Seating Chart view. The Student List view shows
your students in a table that contains their display names, first name, last
name, user name, and student ID. The Seating Chart view shows your
students as student icons with display names. You can change the class
view at any time.
To change class view to Student List
1. Click View > Classroom > Student List.
-or-
On the Classroom tab, click
The class view under the Classroom tab changes to Student List.
and select Student List.
Managing classes 23

To change the class view to Seating Chart
1. In the menu, click View > Classroom > Seating Chart.
-or-
In the Classroom tab, click
The Classroom tab changes the class view to Seating Chart.
and select Seating Chart.
Arranging the seating chart
Initially, the Classroom tab arranges the students in the Seating Chart
view in the order that you added them. However, you can rearrange the
students so that they have the same seating arrangement in the
Classroom tab as they do in your actual classroom. You can rearrange the
seating chart at any time.
To arrange students in the seating chart
1. Select the students’ class.
Note: If you have a class session running, you must end it to select a
different class.
2. On the menu bar, select
-or-
On the Classroom tab, click
24 Managing classes
View > Classroom > Seating Chart.
and select Seating Chart.

The Classroom tab opens, displaying your class in the Seating Chart
view.
3. Within the Classroom tab, drag each student’s icon to the location
that you want.
The Connect-to-Class™ software moves the student icons to the new
locations.
Note: Do not place one student’s icon on top of another student’s
icon. If you do this, you will only be able to see one of the students’
icons.
Removing items from the Class Record
The Class Record maintains a list of all of the actions you have performed
in your class. Items remain in this list until you remove the items or you
remove the class. You can remove items from the Class Record at any
time.
Managing classes 25

To remove items from the Class Record
1. In the Class Record, click the item you want to remove.
The software highlights the selected item in the Class Record.
2. Click
Edit > Remove From Class Record or click .
Note: If you are removing an item that is still in progress, the
Remove From Class Record dialog opens asking if you are sure you
want to remove the item. Click Remove.
26 Managing classes

Removing classes
If you have a class you no longer need, you can remove it. When you
remove a class, Connect-to-Class™ does the following:
• Removes the class from the software
• Removes the corresponding file on the hard drive
• Removes students who are not part of any other classes
Note: You cannot undo the removal of a class.
To remove classes
1. If you have a class session running, end it.
2. From the Current Class drop-down list, select the class you want to
remove.
Connect-to-Class™ shows the selected class in the Current Class field.
3. Click File > Remove Class.
Connect-to-Class™ asks if you are sure you want to remove the class.
4. Click
Remove.
27

28

Managing student accounts
The Connect-to-Class™ software can be used to manage many student
accounts associated with one or more classes. Each of your students must
have an account to access the Connect-to-Class™ software on their
TI-Nspire™ handhelds. This section contains information on creating and
managing your students’ accounts.
Adding students to classes
Once you create your classes, you can add students to them. You can add
students to your classes at any time.
Note: The instructions below explain how to add students once you
create a class. You can also add students when you create a class by
importing them.
To add students to classes
1. Select the class to which you will add the students.
Note: If you have a class session running, you must end it to select a
different class.
2. Click
3. Enter the student’s first name.
4. Enter the student’s last name.
Managing student accounts 29
Class > Add Student or click Add Student .
The Add Student dialog opens.

5. Enter a user name.
Note: The user name you choose must be unique. It cannot exist in
the current class or any other class.
6. If you want the student to create his or her own password, select
Student Chooses.
-or-
If you want to create a password for the student, select the blank
password entry box and enter a new password.
7. Enter a display name.
Note: If you leave the display name blank, the Connect-to-Class™
software uses the student’s first name as the display name.
8. Enter a student ID (optional).
9. If you want to assign other classes to the student, click
Classes
. (This step is optional.)
Assign
The Assign Classes dialog opens.
10. Select the check boxes next to the classes you want to assign to the
student.
11. Click
OK.
12. If you need to add another student, click Add Next Student and
repeat steps 3 - 9.
13. Click Finish.
30 Managing student accounts

Checking student login status
The Connect-to-Class™ software lets you view your students’ login status
from the Classroom tab. The presence of color in the icon by a student’s
name indicates the status of the class and the student’s login.:
Icon Class status Student status
Class session not started
(gray icon).
N/A
Class session started (pale
color icon).
Class session started (fullcolor icon).
Student not logged in.
Student logged in.
Sorting student information
The Student List view in the Classroom tab shows the information for
students in the selected class. It includes your students’ display names,
first names, last names, user names, and student IDs. In the Student List
view, you can sort your students’ information by each of these categories.
The Connect-to-Class™ software sorts the information alphabetically
from A-Z or Z-A and numerically from 1-9 or 9-1. You can sort student
information at any time.
To sort student information
1. Select the class that contains the student information you want to
sort.
Note: If you have a class session running, you must end it to select a
different class.
2. On the menu bar, click
-or-
On the
Classroom tab, click and select Student List.
View > Classroom > Student List.
Managing student accounts 31

The Classroom tab opens displaying the Student List view.
3. Click the column title of the list you want to sort.
The Connect-to-Class™ software sorts the selected list.
4. If you want to sort the selected information in the opposite order,
click the column title again.
Resetting student passwords
The Connect-to-Class™ software maintains the privacy of your students’
passwords. Because of this, you cannot retrieve passwords for your
students if they forget them. However, you can reset your students’
passwords, if necessary. You can reset passwords for all of the students in
a class or for individual students.
Note: You cannot reset the passwords of students who are currently
logged in.
32 Managing student accounts

To reset passwords for all students in a class
1. Select the students’ class.
Note: If you have a class session running, you must end it to select a
different class.
2. Click the name of a student in the class.
3. Click Edit > Select All.
The Connect-to-Class™ software selects all of the students in the
class.
4. Click Class > Reset Student Password(s).
The Confirm Reset Student Passwords dialog opens.
5. Click
OK.
6. The next time your students log in, instruct them to enter passwords
of their choosing.
Managing student accounts 33

To reset student passwords for individual students
1. Select a class of the student whose password you want to reset.
Note: If you have a class session running, you must end it to select a
different class.
2. Click the name of the student you want to edit.
3. Click Class > Edit Student or click Edit Student .
The Student Properties dialog opens.
4. Click
Reset.
5. If you want the student to create his or her own password, select
Student Chooses.
-or-
34 Managing student accounts

If you want to create a specific password for the student, select the
blank password entry box and enter a new password.
6. Click OK.
The Connect-to-Class™ software resets the student’s password.
7. The next time the student logs in:
• If you selected Student Chooses, instruct the student to enter a
password of his or her choosing.
• If you created a password for the student, tell the student the
new password.
Changing student classes
Occasionally your students may move to a different class, or they may
take more than one of your classes. The Connect-to-Class™ software lets
you change your students’ classes when necessary.
Note: You cannot change the classes of students who are currently
logged in.
To change a student’s classes
1. Select a class to which the student belongs.
Note: If you have a class session running, you must end it to select a
different class.
2. Click the name of the student you want to edit.
3. Click
Managing student accounts 35
Class > Edit Student or click Edit Student .

The Student Properties dialog opens.
4. Click
Assign Classes.
The Assign Classes dialog opens.
5. Select the check boxes of the student’s classes.
6. Clear the check boxes of the classes to which the student does not
belong.
7. Click
8. In the
OK.
Student Properties dialog, click OK.
36 Managing student accounts

Changing student names and identifiers
After you add your students, you may find that you need to change one
of their names or identifiers. There are five different names and
identifiers associated with your students, including:
• First name
•Last name
• User name
• Display name
• Student ID
This section covers how to change any of these types of names and
identifiers.
Note: You cannot change the account information of students who are
currently logged in.
To change a student’s names or identifiers
1. Select a class to which the student belongs.
Note: If you have a class session running, you must end it to select a
different class.
2. Click the name of the student you want to edit.
3. Click
Managing student accounts 37
Class > Edit Student or click Edit Student .

The Student Properties dialog opens.
4. Click the field of the name or identifier you want to change, and
make the necessary changes.
5. When all fields are correct, click
OK.
Moving a student to another class
If any of your students move to a different class, you can move them
within the Connect-to-Class™ software as well.
Note: You cannot move students who are currently logged in.
To move a student
1. Select a class to which the student belongs.
Note: If you have a class session running, you must end it to select a
different class.
2. Click the name of the student you want to move.
3. Click
4. From the Current Class drop-down list, select the class where you
5. Click
38 Managing student accounts
Edit > Cut or click Cut .
The Connect-to-Class™ software removes the student from the class
and places his or her student account information on the Clipboard.
want to move the student.
Edit > Paste or click Paste .

The Connect-to-Class™ software moves the student to the selected
class.
Copying a student to another class
When you have students in more than one of your classes, you may find
it convenient to simply copy them from one class to another. Copying
students saves you the time of entering all of their information again.
Note: You cannot copy students who are currently logged in.
To copy a student
1. Select a class to which the student belongs.
Note: If you have a class session running, you must end it to select a
different class.
2. Click the name of the student you want to copy.
3. Click Edit > Copy or click Copy .
The Connect-to-Class™ software copies the student onto the
Clipboard.
4. From the Current Class drop-down list, select the class to which you
want to copy the student.
5. Click
Edit > Paste or click Paste .
The Connect-to-Class™ software copies the student to the selected
class.
Removing a student from a class
As necessary, you can remove students from your classes. When you
remove students, the Connect-to-Class™ software only removes them
from the selected class. If the students are in other classes, then they
remain in those classes.
Notes:
• You cannot remove students who are currently logged in.
• You cannot undo the removal of students.
Managing student accounts 39

To remove a student from a class
1. Select the class from which you want to remove the student.
Note: If you have a class session running, you must end it to select a
different class.
2. Click the name of the student you want to remove.
3. Click Class > Remove Student or click Remove Student .
The Connect-to-Class™ software asks if you are sure you want to
remove the student.
4. Click Yes.
The Connect-to-Class™ software removes the student.
40

Exchanging files with students
The Connect-to-Class™ software lets you exchange information with the
students in your classes.
• You can send files to and collect files from your students.
• You can delete files from your students’ TI-Nspire™ handhelds.
• Your students can send files to you and receive files from you.
This section describes working with files and includes instructions for you
and instructions you can give your students.
Sending files
You can send TI-Nspire™ handheld-compatible files (such as TI-Nspire™
documents and OS files) to your students’ TI-Nspire™ handhelds from
your computer or your TI-Nspire™ handheld. You can send files to your
whole class or to individual students.
Connecting handhelds for file transfers
Before you send files to your students, you must connect TI-Nspire™
handhelds to your computer. You can connect multiple handhelds using
one of the supported hub configurations. See the Sample Hardware
Setups chapter to verify that your hub configuration is supported.
To connect multiple TI-Nspire™ handhelds to your computer for file
transfers, follow the steps below.
1. Connect the USB cable for the hub to your computer’s USB port. To
place the hub farther away from your computer, use the provided
USB extension cable.
2. Turn on the TI-Nspire™ handheld(s).
3. Using the standard A to mini B USB cable, connect the hub to the
port on the top of the TI-Nspire™ handheld(s). You can use the USB
cable that came with the handheld or any Standard A to Mini B USB
cable.
When the handhelds are connected to the hub, the student can log in to
the class session.
To send files from your computer
1. If you have not already done so, begin the class session.
Exchanging files with students 41

2. Click Tools > Send to class or click Send to class .
The Select file(s) to send dialog opens.
3. Navigate to the file you want to send, and click it.
Note: You can also drag and drop files from a Windows Explorer
window onto the Connect-to-Class
TM
window to send files.
4. Click Next.
42 Exchanging files with students

The Select Individual(s) dialog opens.
5. Select the student(s) to whom you want to send the file:
• To send the file to the whole class, click Class .
• To send the file to a student, click
Individuals and then
click the student. To choose multiple students, press and hold
the Ctrl key while clicking each student’s name.
Note: If you had any students selected in the Classroom tab, the
Connect-to-Class™ software already has them selected.
6. Click Finish.
The Connect-to-Class™ software transfers the file from your
computer to the selected students’ TI-Nspire™ handhelds. If the
students are not logged in, the Connect-to-Class™ software transfers
the file to the student calculators when the students log in.
The file transfer appears in the Class Record.
Once students receive the file, they can open it on their TI-Nspire™
handhelds.
Exchanging files with students 43

To send files from your TI-Nspire™ handheld
1. If you have not already done so, begin the class session.
2. From the My Documents screen of your TI-Nspire™ handheld, press
/ c 7 to select Login.
The Login screen displays.
3. Type the user name and password of your teacher account. (Press e
to move to the next field.)
4. Select
Login.
The Login Successful screen displays.
44 Exchanging files with students

5. Select OK.
The My Documents screen displays.
6. Open the folder containing the file(s) you want to send to the class.
7. Select the file you want to send.
Note: You can send only one file at a time.
Exchanging files with students 45

8. Press / b to open the Context menu. Press 2to select Send.
The file is sent to all students in the class. The file is placed in the
class folder on the students’ handhelds.
The Class Record updates to show that the file was sent from the
teacher calculator.
46 Exchanging files with students

Sending files (student instruction)
Your students can send files to you both during a collection and outside a
collection (unprompted) at any time during a class session. Below are
instructions you can use to tell your students how to send files during a
collection and how to send files unprompted.
Student Point of View: The steps below are from the student’s
point of view.
1. From the My Documents screen of your TI-Nspire™ handheld, press
/ c to access the To ol s menu. Choose option 7 to select Login.
The Login screen displays.
2. Type your user name and password.
3. Select
Exchanging files with students 47
Login.
The Login Successful screen displays.

4. Select OK.
If your teacher has sent any documents to you or to the class, you
will receive the documents when you log in.
When all documents have transferred, the Transfers complete screen
displays.
5. Select
OK.
Documents display on the My Documents screen.
48 Exchanging files with students

6. Navigate to the class folder that contains the file you want to send.
7. Select the file to send.
8. Press /b2 to select Send.
9. Click Send.
The Connect-to-Class™ software sends the file to your teacher’s
computer and notifies you when the transfer is complete.
Note: The file transfers to the unprompted file location on the
teacher’s computer.
Collecting files
You can collect TI-Nspire™ documents from the class folder on your
students’ TI-Nspire™ handhelds to your computer. You also have the
option of deleting the collected files from the class folder of your
students’ TI-Nspire™ handhelds.
Note: Collect and Delete actions look only in the specified class folder on
the student handheld. If a student renames a file, or moves it to a
different directory, it will not be collected or deleted.
Exchanging files with students 49

To collect files
1. If you have not already done so, begin the class session.
2. Click
Tools > Collect from class, or click Collect from class .
The Select file(s) to collect dialog opens.
Note: Only valid items for the class type are displayed.
3. If you want to collect a file already listed in the dialog, navigate to
the file you want to collect and click it.
-or-
If you want a custom file not in the dialog:
a) Click
CUSTOM.
The options for custom files open.
b) Enter the file name.
c) From the drop-down list, select the file type.
d) Click Add.
4. Click Next.
50 Exchanging files with students

The Select individual(s) dialog opens.
5. Select the student(s) from whom you want to collect the file:
• To collect the file from the whole class, click
• To collect the file from an individual student, click
Class .
Individuals
and then click the student.
Note: If you had any students selected in the Classroom tab, the
Connect-to-Class™ software already has them selected.
6. If you want to remove the file from the students’ TI-Nspire™
handhelds after you collect it, select
collecting
.
Delete from device after
7. Click Next.
Exchanging files with students 51

The Select collect folder dialog opens.
8. Navigate to the collect folder you want, and click it.
9. Click
Finish.
The Connect-to-Class™ software collects the files from the selected
students’ TI-Nspire™ handhelds to your computer.
The file transfer appears in the Class Record.
52 Exchanging files with students

Receiving files (student instruction)
When you send files to your students, they receive them immediately if
they are connected and logged in to the class. The instructions below
describe how files will be received if the student is not logged in when
you send them.
Student Point of View: The steps below are from the student’s
point of view.
To receive files
1. From the My Documents screen of your TI-Nspire™ handheld, press
/c7 to select
Login.
The Login screen displays.
2. Type your user name and password.
Note: If you do not know your user name or password, ask your
teacher.
3. Select
Exchanging files with students 53
Login.

The Login Successful screen displays.
4. Select
OK.
If your teacher has sent any documents to you or to the class, you
will receive the file(s) when you log in.
5. Select
OK.
Documents display in the class folder on the My Documents screen.
54 Exchanging files with students

Redistributing files from a collect action
The Connect-to-Class™ software allows you to re-send files that you have
collected from students.
1. From the Class Record, select a document that you have previously
collected from students.
2. Click
Tools > Redistribute to Class.
The file is sent to the class.
Note: If the file doesn’t exist on your computer, the following error
message displays.
If multiple versions of the file exist, the Connect-to-Class™ software
will select the most recent version, and warn you of a possible
conflict.
If a file with the same name exists on your students’ TI-Nspire™
handhelds, the Connect-to-Class™ software will overwrite the
existing file. The software will not warn you before overwriting the
file.
Exchanging files with students 55

Deleting files from TI-Nspire™ handhelds
When necessary, you can delete files from your students’ TI-Nspire™
handhelds. When you delete the files, the software immediately deletes
the files from your students’ TI-Nspire™ handhelds.
Note: The software looks for the file to be deleted in the specified class
folder on the student handheld, and the name must match exactly. If a
student renames a file, or moves it to a different directory, it will not be
collected or deleted.
To delete files from TI-Nspire™ handhelds
1. If you have not already done so, begin the class session.
2. Click
3. If you want to delete file already listed in the dialog, navigate to the
Tools > Delete from class or click Delete from class .
The Select file(s) to delete dialog opens.
Note: Only valid items for the class type are displayed.
file you want to delete and click it.
-or-
If you want delete a custom file not in the dialog box:
a) Click CUSTOM.
56 Exchanging files with students

The options for custom files open.
b) Enter the file name.
Add.
4. Click
c) Click
Next.
The Select individual(s) dialog opens.
5. Select the student(s) whose files you want to delete:
• To delete the file from the whole class’s TI-Nspire™ handhelds,
Class .
click
• To delete the file from a student’s TI-Nspire™ handheld, click
Individuals and then click the student. To choose multiple
students, press and hold Ctrl and click on each student’s name.
Note: If you had any students selected in the Classroom tab, the
Connect-to-Class™ software already has them selected.
6. Click Finish.
The Connect-to-Class™ software deletes the file from your students’
TI-Nspire™ handhelds.
Exchanging files with students 57

The file deletion appears in the Class Record.
Checking the status of file transfers
When you send, collect, or delete files, you may want to see which of
your students have received or sent their files.
To check the status of file transfers
1. In the Class Record, click the file you want to check.
The Connect-to-Class™ software indicates the status of your students
as follows:
• A green background indicates that the student has
sent/received/deleted the file.
• A yellow background indicates that the student has
received the collect or delete action, but the file was not found
on the TI-Nspire™ handheld.
• A red background indicates that the student has not yet
sent/received/deleted the file.
Note: You can also see the file transfer status in the file’s Properties
dialog.
Canceling file transfers
If you change your mind about a file transfer, you can cancel the transfer
in the Class Record. Canceling file transfers stops the Connect-to-Class™
software from transferring more files. Any files the Connect-to-Class™
software transfers before you cancel remain on the students’ TI-Nspire™
handhelds.
To cancel file transfers
1. In the Class Record, click the file whose transfer you want to cancel.
58 Exchanging files with students

2. Click Edit > Remove From Class Record or click the Remove From
Class Record button
Connect-to-Class™ asks if you’re sure you want to remove the action.
3. Click
Remove.
Connect-to-Class™ software stops the file transfer and removes the
file from the Class Record list.
.
Finding transferred files
You can find the locations of both collected and unprompted files on
your computer, as well as files that you have sent to your class.
To find transferred files
1. In the Class Record, click the file you want to open.
2. Click Edit > Open Location.
A Windows Explorer dialog opens to the location of the file.
Changing the unprompted file location
By default, the Connect-to-Class™ software stores unprompted files in
My Documents\My Connect-to-Class\[Class Name]\Collect. You can change
the default location of the unprompted files when necessary.
To change the unprompted file location
1. If you have a class session running, end it.
Exchanging files with students 59

2. Select the class whose file location you want to change.
3. Click Class > Class Properties.
The Class Properties dialog opens.
4. Click
Change.
The Select Directory dialog opens.
5. Navigate to the location you want as the default.
6. Click Select Directory.
The Select Directory window closes.
7. In the Class Properties dialog, click
OK.
The Connect-to-Class™ software changes the location where it saves
unprompted files to the one you have selected.
60 Exchanging files with students

Viewing file properties
Each file that you send or collect has a set of properties that you can
view. These properties include the file’s name, size (for sent files), date
sent or collected, and status. You can view the file properties at any time.
To view file properties in the Connect-to-Class™ software:
1. Select the class with the file in its Class Record.
Note: If you have a class session running, you must end it to select a
different class.
2. Click the file.
3. Click
Edit > Record Item Properties or click Record Item Properties
.
The Properties dialog opens, displaying the file’s properties. Shown
here is an example of a Collected file.
Exchanging files with students 61

62 Exchanging files with students

The Transfer Tool
Connect-to-Class™ software includes a Transfer Tool that you can use to
transfer files to TI-Nspire™ handhelds when a class session is not active.
The Transfer Tool allows you to transfer document files and operating
system (OS) files to a succession of handhelds, without requiring students
to log in.
The Transfer Tool streamlines the file transfer process. You can select
TI-Nspire™ document and OS files that you have stored on your
computer and install them on your students’ TI-Nspire™ handhelds. Once
the transfer begins, it continues until you stop it. TI-Nspire™ handhelds
can be connected in succession and receive queued files. Connect-toClass™ software keeps track of what handhelds have been connected
and the status of file transfers to those handhelds.
If you are sending the same files to your entire class, sending files to
devices when students are not present, or if you do not plan on collecting
documents using Connect-to-Class™, then you should use the Transfer
Tool. Transfer Tool does not require a student’s login to send files to the
handheld; it simply sends the files to connected devices, allowing you to
send files with or without students present. The Transfer Tool also allows
you to clear folders and files on the handheld, as well as transfer
TI-Nspire™ OS files.
This section covers the information you need to know to use the Transfer
tool.
Opening the Transfer Tool
You can open the Transfer Tool from the Connect-to-Class™ software
home screen.
To open the Transfer Tool
1. If you have a class session running, end it.
2. Select
The Transfer Tool 63
Tools > Transfer Tool.
The Transfer Tool dialog displays.

3. Select the Device type from the drop down menu.
Adding files to the transfer list
You must add TI-Nspire™ document files and operating system files (OS)
to the transfer list in order to transfer them.
Only one OS per device type may be added to the list. The OS must be a
newer version than the one currently on your handheld. You cannot
transfer a version of the OS that is already on the handheld, or an older
version of the OS.
Adding files to the transfer list
1. If you have not already done so, select the Device type from the drop
down menu.
2. Click the Add File button.
3. The Open window displays.
64 The Transfer Tool

4. Navigate to the file you want to add, and click to select it.
Note: To select multiple files, press and hold the Ctrl key while
clicking each file name.
5. Click
Open. The file(s) are added to the list on the Transfer Tool
screen.
6. Repeat Steps 2 -5 until all files for transfer are added to the list.
7. Click Start Transfer to send the files.
The Transfer Tool 65

Removing files from the transfer list
If there are TI-Nspire™ documents or OS files in the transfer list that you
no longer want to have available for transfer, you can remove the files
from the transfer list.
1. Click the name of the file you want to remove from the transfer list.
2. Click
66 The Transfer Tool
Remove File.

Changing the destination folder
To change the destination folder for the file transfer, double click in the
cell and type a new name for the destination folder. Files that you
transfer will be stored in this folder on student handhelds.
If the destination folder name you designate does not exist on student
handhelds, the software creates it.
Note: Folder names may use alphanumeric characters. Special characters
(? / | : * " " < > | ) are not allowed.
Viewing transfer status
To view the status of individual file transfer for a selected handheld, click
on the + before the file name to expand the display.
In the expanded view, the following information displays for each
connected handheld:
• DeviceID (and device icon).
•Name of file
• Progress bar for that file on that handheld.
• Error conditions:
– Low battery
– Wrong device type
–Memory full
– Lost connectivity
Other transfer status information
• When a new device is connected, the status updates.
• The device progress of a file disappears when it reaches 100%.
• Incomplete device transfers remain in the expanded view of the file
status.
• During a transfer session, the transfer tool keeps track of what
device IDs have connected and successfully completed one or more
transfers.
• If a device unplugs and then replugs into the transfer session, the
transfer tool shows the status of completed transfers, and resumes
transfer of other files, if necessary.
• During a transfer, if you select the Setup tab, all the controls are
disabled (read only).
The Transfer Tool 67

If you stop a transfer
• Files under the Setup tab remain listed.
• Status information for the transfer no longer displays under the
Status tab. The message “No transfers are active. Use the Setup tab
to configure and start the transfer” displays.
Deleting device folders and files before transferring files
The Transfer Tool provides the option to delete all files and folders on
each connected handheld before beginning a new file transfer. This
allows you to "baseline" your students’ handhelds to make sure that
your students’ handhelds contain only the files you want them to use. By
default, this option is not selected.
You will find this option useful whenever your student’s handheld should
be blank. Here are some times when you might want to delete folders:
• At the end of a semester, grading period, or conclusion of any
Instruction module
• Before administering exams
To delete folders and files on connected handhelds
1. Click the check box next to the option.
2. Click the Start Transfer button to begin the deletion.
A message displays to confirm that you want to delete the folders
and files.
68 The Transfer Tool

3. Click Yes to confirm.
The status tab tracks the progress of the delete actions as they occur,
displaying which devices have been plugged in, and when the
actions are completed.
Stopping file transfers
You can stop a file transfer at any time.
To stop a file transfer
1. Press the Stop Transfer button.
2. A warning dialog displays, asking if you are sure you want to stop
the transfer.
3. To confirm that you want to halt transmission, click Yes . Transfers
are stopped.
Note: If any student devices received the file or files, those files
remain on the devices.
Closing the Transfer tool
When you finish transferring files to your students’ TI-Nspire™
handhelds, close the Transfer tool. To do this, click Close.
69

70

Glossary
This section provides reference material that you may find helpful while
using the Connect-to-Class™ software. In it, you can find terminology
and file types.
Ter ms
Class – A group of student accounts with an associated class record,
seating layout, and various preferences and settings.
Class Record – A component of the Connect-to-Class™ computer home
screen. The Class Record shows the network actions of a class as well as a
list of historical actions.
Class Session – A period of time when the Connect-to-Class™ network
is available for a particular class.
Classroom Tab – A component of the Connect-to-Class™ computer
home screen. In the Classroom tab, you can view representations of the
students in the current class; add, edit, or remove students from the
current class; view visual indications of the students’ log in status; and
view the status of the current network action.
Classroom View – A means of representing the students in a class.
Connect-to-Class™’s two classroom views are the Seating Chart view and
the Student List view.
Collect – To transfer files from your students’ TI-Nspire™ handhelds to
your computer.
Current Class – Part of the Connect-to-Class™ home screen that lets you
select previously created classes and start/end class sessions for the
selected class.
Display Name – The name of a student that appears in the Connect-toClass™ window.
Seating Chart – The Classroom view that shows a class’s students as
icons labeled with their display names.
Send – To transfer files from your computer to your students’ TI-Nspire™
handhelds and from your students’ TI-Nspire™ handhelds to your
computer.
Glossary 71

Status – The progress of a current action or the final state of an
historical action. For example, the status “15 of 20” means that Connectto-Class™ has transferred 15 out of a possible 20 files.
Student List – The Classroom view that lists a class’s students with their
display names, first names, last names, user names, and student ID.
Teacher Account – An account (user name and password) that lets you
log into the Connect-to-Class™ network as a teacher.
Connect-to-Class™ Handheld – A TI-Nspire™ handheld connected to
the Connect-to-Class™ network.
Connect-to-Class™ Computer – A computer running the Connect-toClass™ software.
Transfer – The exchange of TI-Nspire™ handheld data between
Connect-to-Class™ computers and Connect-to-Class™ TI-Nspire™
handhelds. For example, a send or a collect.
Unprompted from Class – Files students send you that you did not
request with a collect.
User Name – The name used to identify your students when they log in
to the Connect-to-Class™ network from their TI-Nspire™ handhelds.
Each user name must be unique throughout all of your classes.
File types
Below you can find a list of file types that you can send to or collect from
your students’ TI-Nspire™ handhelds using Connect-to-Class™.
Type TI-Nspire™
extension
Documents .tns
Operating System (OS) .tnc, .tno
72 Glossary

Troubleshooting
This section contains information to help you quickly solve problems you
may encounter while using the Connect-to-Class™ software, including
error messages and connectivity issues. If you are unable to find an
answer to your question here or in the help, visit the TI-Cares
KnowledgeBase or call 1-800-TI-CARES.
System requirements
Minimum system requirements
• Windows® Vista Home Premium, Windows® Vista Ultimate,
Windows® Vista Business, or Windows® XP Home or Professional
version) with Service Pack 2 or 3 installed
• 900 MHz Pentium-compatible CPU (1.2 GHz recommended)
• Video adapter set at 1024 x 768 screen resolution
• 256 MB RAM (512 MB recommended)
• Approximately 200 MB of available hard disk space
• CD-ROM drive
• Available USB port on the computer
• Internet Explorer version 5.5 or higher (installed and operational)
Hardware Requirements
• TI-Nspire™ Family Handhelds (with OS version 1.3 or higher)
• USB cables (Standard A to Mini B)
• Two four-port USB hubs (supplied) directly connected to a PC
Warning: Use only the supplied hubs with Connect-to-Class™. In
addition, do not connect any other product or non-TI-Nspire™ device
into these hubs.
Please contact TI by email at ti-cares@ti.com for additional hub
details.
Error messages
Below you can find solutions to error messages that you or your students
might come across while using the Connect-to-Class™ software,
including:
• Computer error messages
Troubleshooting 73

• TI-Nspire™ handheld error messages
Computer error messages
Error message Possible causes or solutions
Invalid First Name In the Add Student dialog, you
did not enter the student’s first
name or you included invalid
characters in the first name.
Invalid Last Name In the Add Student dialog, you
did not enter the student’s last
name or you included invalid
characters in the last name.
Invalid User Name In the Add Student dialog, you
either did not enter a user name
or you did not meet the user
name requirements. User names
must contain 3 to 12 letters
and/or numbers.
Invalid Password In the Add Student dialog, you
either did not enter a password
or you did not meet the
password requirements.
Passwords must contain 3 to 12
letters and/or numbers.
At Least One Class
Must be Selected
You do not have any classes
selected for the student you are
creating or editing.
74 Troubleshooting

TI-Nspire™ handheld error messages
Error message Possible causes or solutions
Communication
failed
Check the cable
Class not started
Login failed The user name or password you
• The TI-Nspire™ handheld is
not connected to the hub
and/or USB cable correctly.
Check the cable connections
to the hub and the
TI-Nspire™ handheld, then
try again.
• (Student point of view only) The
teacher hasn’t started
Connect-to-Class™ on his or
her computer. Wait until the
teacher starts Connect-toClass™ and the class, then
try again.
(Student point of view only) The
teacher hasn’t started the class in
Connect-to-Class™. Wait until
the teacher starts the class and
try again.
entered is not correct. Make sure
you are using the correct user
name and password and try
again. User names and passwords
are case-sensitive.
Connectivity Issues
If you encounter problems sending, collecting, or transferring a file,
make sure your setup is correct:
1. Confirm that you are logged in.
2. Check the USB cable connection on your handheld by disconnecting
and reconnecting the USB cable from the handheld.
3. Check the USB cable connection between your computer and hub by
disconnecting and reconnecting the USB cable at both locations.
75

76

Texas Instruments Support and Service
For general information
Home Page: education.ti.com
KnowledgeBase and
e-mail inquiries:
Phone: (800) TI-CARES / (800) 842-2737
International
information:
education.ti.com/support
For U.S., Canada, Mexico, Puerto Rico, and
Virgin Islands only
education.ti.com/international
For technical support
KnowledgeBase and
support by e-mail:
Phone
(not toll-free):
education.ti.com/support
(972) 917-8324
77

78

Index
A
account, teacher 11
adding
Files to transfer list
students to classes
arranging seating chart
64
29
24
B
beginning class sessions 19
C
calculators
deleting files from
error messages
sending files from
canceling file transfers
changing
Classroom tab view
student classes
unprompted file location
checking
file transfer status
student login status
Class Record
removing items from
using
8
class sessions
beginning
ending
19
19
classes
adding students to
changing for students
changing view
copying students to
creating
15
moving students to
removing
27
removing students from
selecting
18
Classroom tab
changing view
parts of
10
closing
Transfer Tool
56
75
44
58
23
35
58
31
29
23
39
38
23
69
25
35
39
59
collecting files
computer home screen
Class Record
Classroom tab
Current Class
49
7
8
10
8
computers
error messages
sending files from
74
41
Connect-to-Class™
home screen (computer)
logging in to network (students)
20
contact information
copying students
copyright statement
77
39
ii
creating
classes
15
teacher account
Current Class
11
8
customer support and service
D
deleting
calculator files
56
E
ending class sessions 19
error messages
73
F
file transfers
canceling
checking status
file types
Files
adding to transfer list
files
canceling transfers
collecting
finding
receiving (students)
removing from transfer list
sending
sending from calculators
58
58
72
64
58
49
59
53
41
7
77
66
44
79

sending from computers 41
viewing properties
finding transferred files
61
59
H
Hardware
supported configurations
home screen
computer
7
I
instructing students
on receiving files
on sending files
53
47
L
logging in to network
students
20
M
managing
teacher account
moving students
11
38
N
names
changing
network
logging in to (students)
37
O
opening
Transfer Tool
63
P
passwords
changing for teacher
resetting for students
properties of files
12
61
R
receiving files (students) 53
removing
classes
27
32
20
files from transfer list
items from Class Record
students from classes
resetting student passwords
66
25
39
32
S
1
seating chart
arranging
changing class view to
selecting
classes
sending
files
files (students)
files from calculators
files from computers
service and support
sorting
student information
student information, sorting
student list, changing view to
student portfolio
students
adding to classes
arranging in seating chart
changing classes
changing names
checking login status
copying
moving
receiving files
removing from classes
resetting passwords for
sending files
support and service
system requirements
24
24
18
41
47
44
41
77
31
31
29
35
37
31
39
38
53
39
32
47
77
73
31
23
24
T
tabs
Classroom
teacher
add to classroom view
teacher account
changing password
changing user name
terms
71
trademarks
10
11
11
12
13
ii
80

transfer list
adding files to
removing files from
64
66
Transfer Tool
closing
69
opening
transferred files, finding
63
59
transfers
canceling
58
U
unprompted file location, changing
59
user name, changing for teacher
13
using
Class Record
Classroom tab
Current Class
8
10
8
V
view, changing for class 23
viewing
file properties
61
81

82
 Loading...