

Page 1

BOOSTXL-ULN2003 Dual Stepper Motor Driver
BoosterPack Hardware
User's Guide
Literature Number: SLCU002
September 2016
Page 2

Contents
1 Introduction......................................................................................................................... 5
1.1 BOOSTXL-ULN2003 Dual Stepper Motor Driver BoosterPack Overview ........................................ 5
2 Hardware Description ........................................................................................................... 6
2.1 Top and Bottom View.................................................................................................... 6
2.2 Board Overview .......................................................................................................... 6
2.3 Block Diagram ............................................................................................................ 7
2.4 Connector, Switch, and LED Descriptions............................................................................ 8
2.5 Powering the BOOSTXL-ULN2003................................................................................... 11
2.6 Other Hardware Highlights ............................................................................................ 13
3 Interfacing With External Hardware ...................................................................................... 15
3.1 Connecting to a LaunchPad........................................................................................... 15
3.2 Connecting a Motor or Other Peripherals ........................................................................... 15
3.3 Connecting to Other Development Boards.......................................................................... 16
4 Functional Modes............................................................................................................... 17
4.1 Modes of Operation Overview ........................................................................................ 17
4.2 3-pin Serial Mode....................................................................................................... 18
4.3 8-pin Parallel Mode..................................................................................................... 19
5 Additional Information ........................................................................................................ 20
5.1 Design Files ............................................................................................................. 20
5.2 Software.................................................................................................................. 20
5.3 Hardware Change Log................................................................................................. 20
5.4 Schematic................................................................................................................ 21
2
Table of Contents
Copyright © 2016, Texas Instruments Incorporated
SLCU002–September 2016
Submit Documentation Feedback
Page 3

www.ti.com
1 BOOSTXL-ULN2003 Connected to MSP-EXP430F5529LP........................................................... 5
2 Top View of BOOSTXL-ULN2003 ......................................................................................... 6
3 Bottom View of BOOSTXL-ULN2003 ..................................................................................... 6
4 BOOSTXL-ULN2003 Top Side Overview................................................................................. 6
5 BOOSTXL-ULN2003 Block Diagram...................................................................................... 7
6 BOOSTXL-ULN2003 2x20 Header Description.......................................................................... 8
7 Board Image of Switches ................................................................................................... 9
8 Schematic View of Switches ............................................................................................... 9
9 Board Image of LEDs...................................................................................................... 10
10 Schematic View of LEDs.................................................................................................. 10
11 External Supply Connected to Motor Supply Pins..................................................................... 11
12 On-Board Power OR-ing .................................................................................................. 11
13 USB Powering a Single Motor (See NOTE) ............................................................................ 12
14 BoosterPack With ULN2003A ............................................................................................ 13
15 BoosterPack With ULN2803A ............................................................................................ 13
16 Board Image of LED Section ............................................................................................. 14
17 LED Section With R5 Depopulated ...................................................................................... 14
18 Board Image of COM Diode Section .................................................................................... 14
19 COM Diode Section With R14 Depopulated............................................................................ 14
20 BoosterPack Connected to MSP430F5529 LaunchPad .............................................................. 15
21 BoosterPack With Two Stepper Motors ................................................................................. 15
22 BoosterPack with Motor and Male Expansion Header ................................................................ 16
23 BOOSTXL-ULN2003 Mode Overview ................................................................................... 17
24 3-Pin Mode Abbreviated Schematic (Zoom for Higher Resolution).................................................. 18
25 8-Pin Mode Abbreviated Schematic (Zoom for Higher Resolution).................................................. 19
26 BOOSTXL-ULN2003 Schematic (Zoom for Higher Resolution)...................................................... 21
List of Figures
SLCU002–September 2016
Submit Documentation Feedback
Copyright © 2016, Texas Instruments Incorporated
List of Figures
3
Page 4

www.ti.com
List of Tables
1 J1 and J2 Connector Pinout Description ................................................................................. 8
2 Dip Switch Description ...................................................................................................... 9
3 LED Description ............................................................................................................ 10
4 Description of Hardware Changes ....................................................................................... 20
4
List of Tables
Copyright © 2016, Texas Instruments Incorporated
SLCU002–September 2016
Submit Documentation Feedback
Page 5
BOOSTXL-ULN2003 Dual Stepper Motor Driver
BoosterPack Hardware
1 Introduction
1.1 BOOSTXL-ULN2003 Dual Stepper Motor Driver BoosterPack Overview
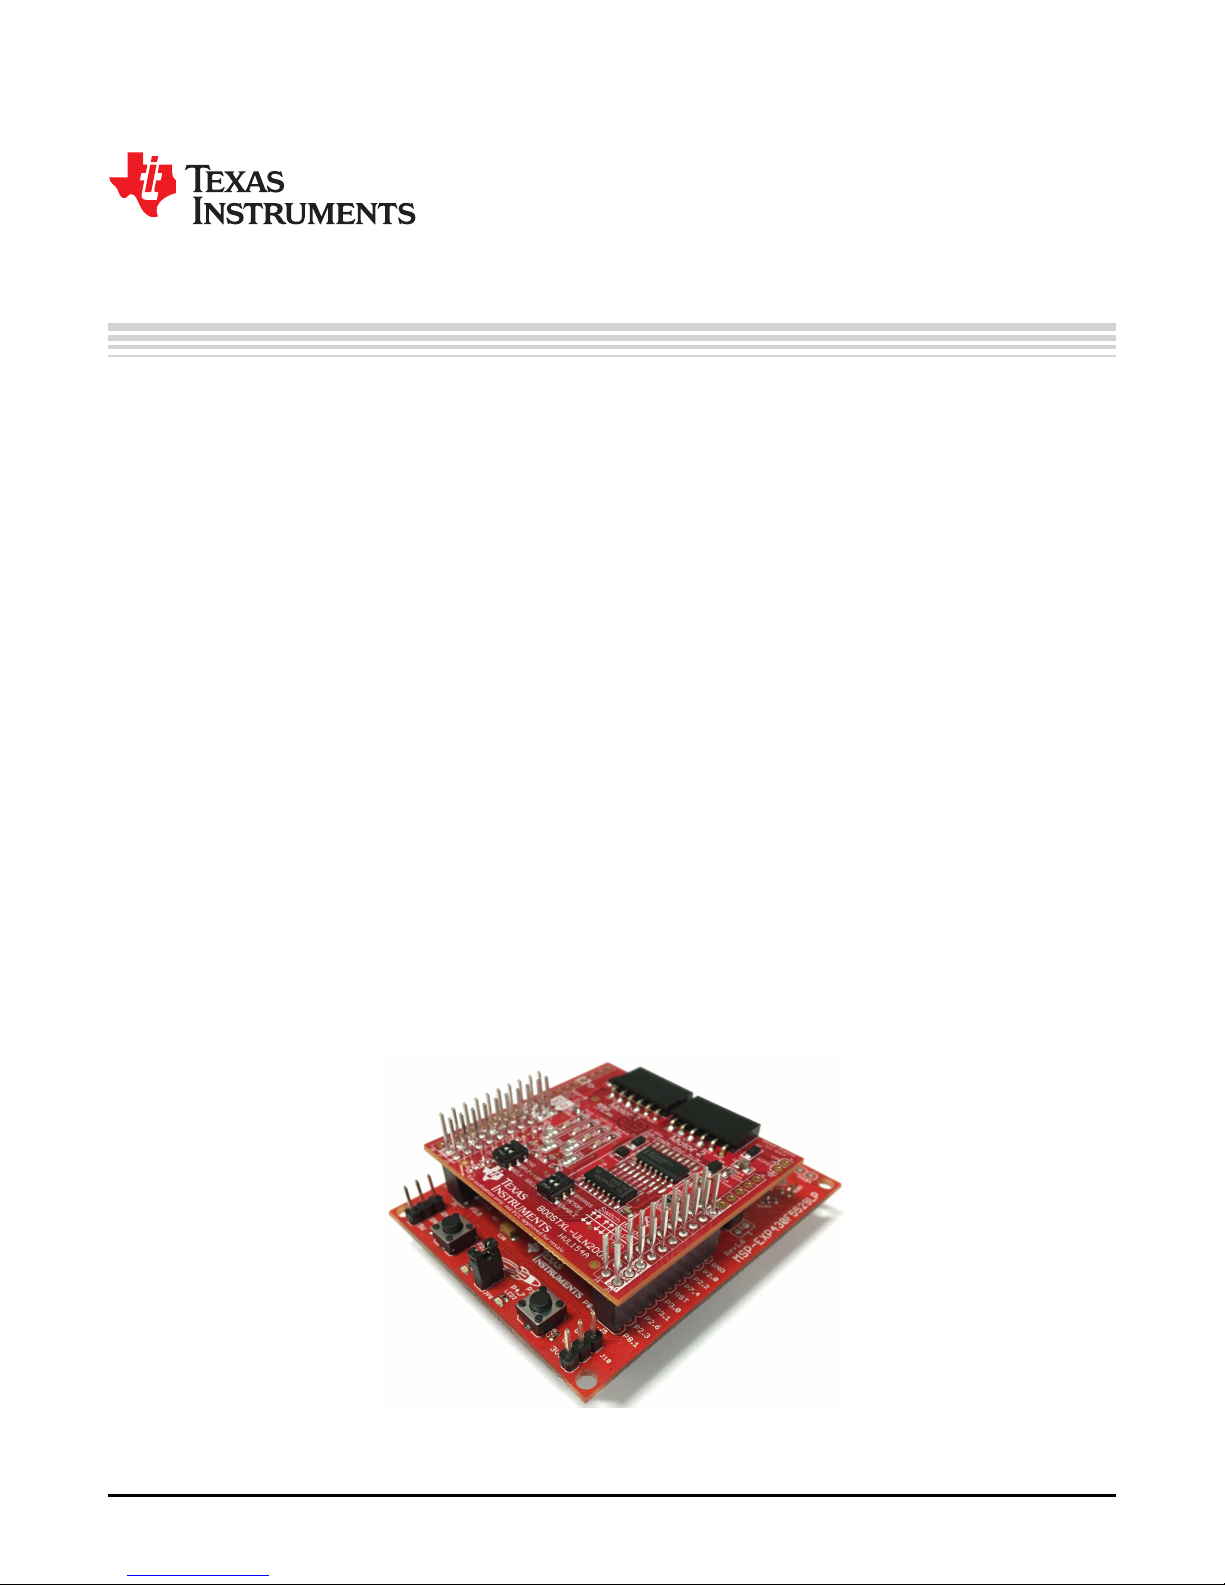
The BOOSTXL-ULN2003 provides an easy-to-use development board to interface with up to two unipolar
stepper motors using any Launchpad in the Launchpad Ecosystem. This user’s guide details a hardware
description of the BoosterPack, how to interface the BoosterPack with external hardware, various modes
of operation, and additional features.
The BOOSTXL-ULN2003 allows for the control of eight high-current (up to 500 mA per channel), high
voltage (up to 30 V), sink outputs. These outputs are controlled either through a serial (3-pin) or parallel
(8-pin) mode. Using the BOOSTXL-ULN2003 in serial 3-pin mode allows for control of two unipolar
stepper motors while only requiring 3 General-Purpose Input/Output (GPIO) pins, ultimately allowing for
flexibility in design and reduction in the number of GPIO pins required.
The BOOSTXL-ULN2003 can not only be used to provide an interface to unipolar stepper motors, but also
can be used in the following applications.
• Relay Driving
• Solenoid Driving
• LED Driving
• High-Voltage Logic Level Shifting
For additional information regarding these applications, see What is a Peripheral Driver? Applications and
Design Considerations.
The Boosterpack is not limited to one specific application at a time, but can be used for all of these
applications simultaneously. For example, one BoosterPack could enable driving one stepper motor,
driving one relay, driving two LEDs, and shifting a 3.3-V logic signal to a 24-V logic signal at the same
time.
User's Guide
SLCU002–September 2016
Figure 1. BOOSTXL-ULN2003 Connected to MSP-EXP430F5529LP
SLCU002–September 2016
Submit Documentation Feedback
BOOSTXL-ULN2003 Dual Stepper Motor Driver BoosterPack Hardware
Copyright © 2016, Texas Instruments Incorporated
5
Page 6
J1, J3 Standard
BoosterPack Header
J
2
,
J
4
Standard
BoosterPack Header
Header for Other Dev Board Compatibility
Dev Board
Hardware Description
2 Hardware Description
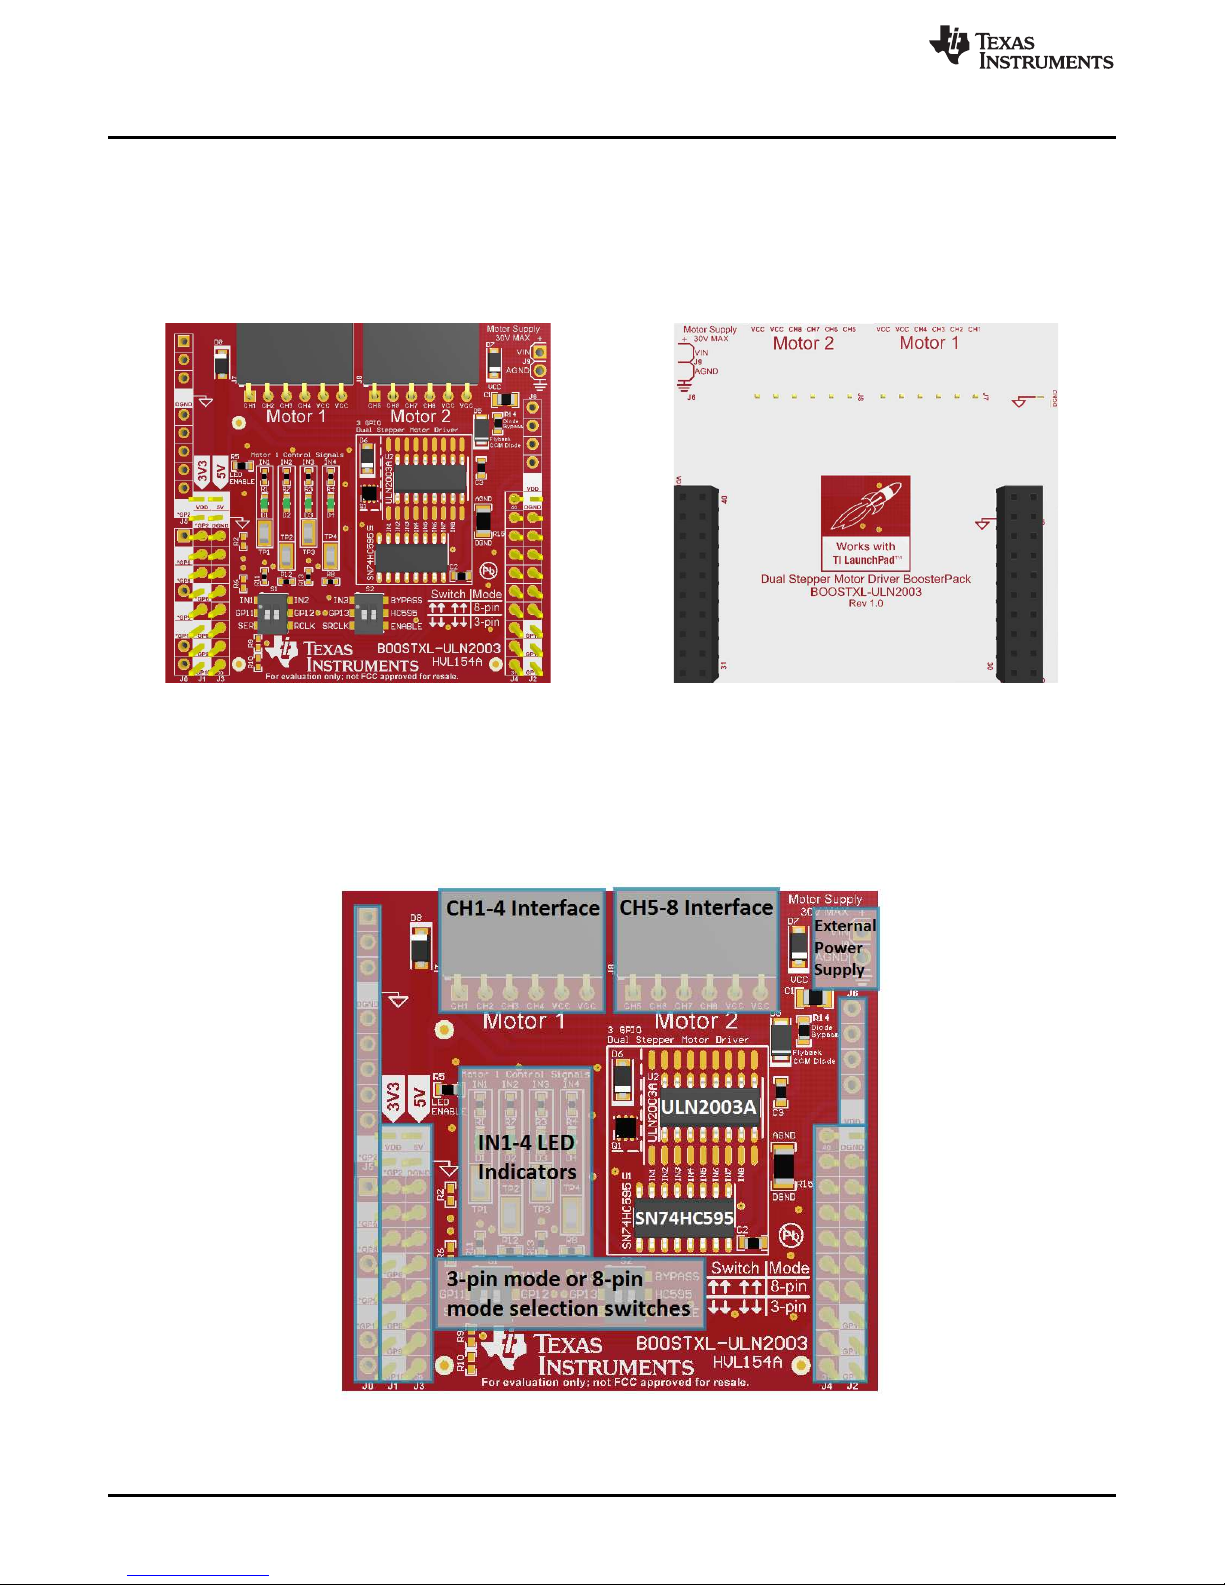
2.1 Top and Bottom View
Figure 2 is a top view of the BOOSTXL-ULN2003, and Figure 3 is a bottom view of the
BOOSTXL-ULN2003.
www.ti.com
Figure 2. Top View of BOOSTXL-ULN2003 Figure 3. Bottom View of BOOSTXL-ULN2003
2.2 Board Overview
Figure 4 shows an overview of the BOOSTXL-ULN2003 BoosterPack. The main features such as devices,
switches, connectors, and LEDs are highlighted.
See Section 2.4 for additional details regarding each section.
Figure 4. BOOSTXL-ULN2003 Top Side Overview
6
BOOSTXL-ULN2003 Dual Stepper Motor Driver BoosterPack Hardware
Copyright © 2016, Texas Instruments Incorporated
SLCU002–September 2016
Submit Documentation Feedback
Page 7
VCC
3V3
MSP430
Launchpad
40-pin
BoosterPack
Interface
ULN2003A
+
CSD17571Q2
SN74HC595
CH1-4 + Vcc
[Motor 1]
[4 Relays]
[4 LEDs]
CH5-8 + Vcc
[Motor 2]
[4 Relays]
[4 LEDs]
3-Pin
Mode
Dip Switches (x4)
8-Pin
Mode
Dual Stepper Motor Driver BoosterPack
BOOSTXL-ULN2003
Inputs
Outputs
Motor Supply
-
+
AGND
VIN
+
5V+3V3
-
DGND
VIN
5V
Power
OR-ing
VCC
VCC
VCC
Copyright © 2016, Texas Instruments Incorporated
www.ti.com
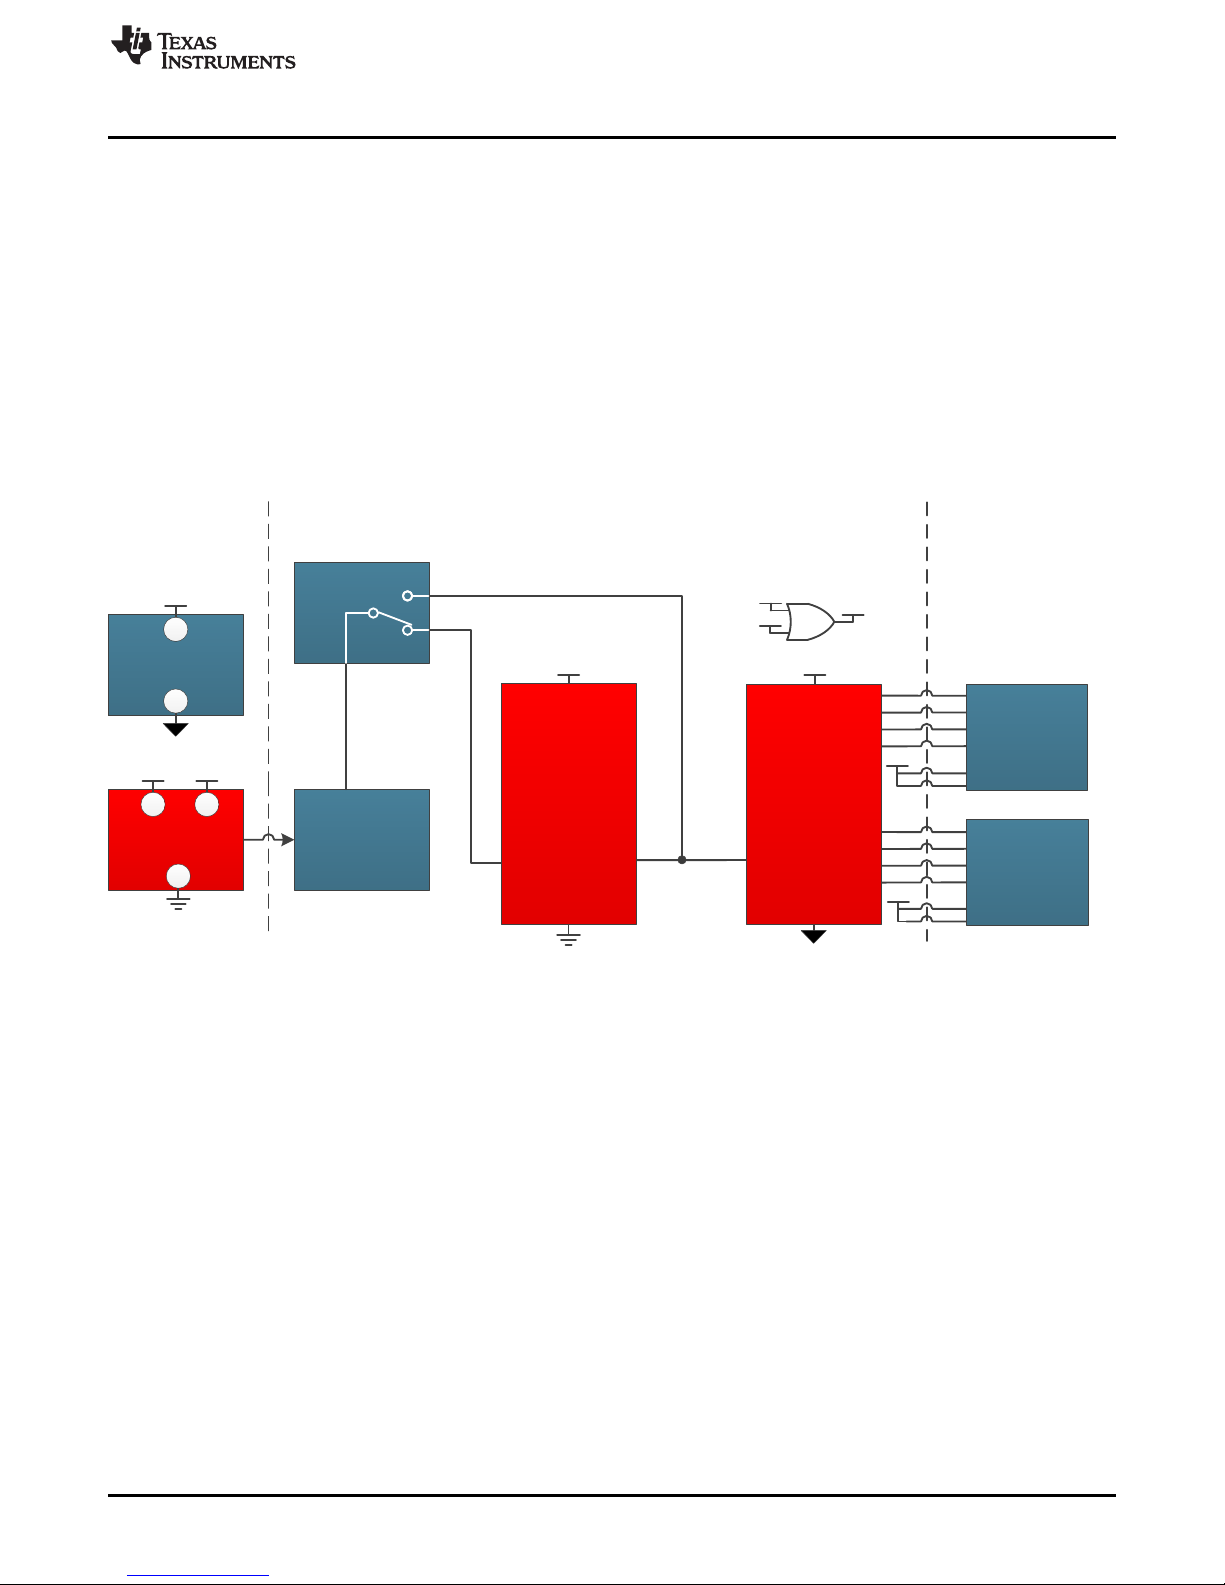
2.3 Block Diagram
Figure 5 details a block diagram of the BOOSTXL-ULN2003 BoosterPack. The 40-pin BoosterPack
header allows the BoosterPack to be interfaced with any LaunchPad in the MSP430 LaunchPad
ecosystem. See ti.com/launchpad for a list of all available MSP430 LaunchPads. A row of four switches
allow the user to choose between a parallel, direct-drive (8-pin) mode and a serial (3-pin) mode of control
of the ULN2003A.
The ULN2003A is a 7-channel Darlington pair array that is used to drive motors, solenoids, LEDs, or
relays. See the ULN2003A product folder for additional overview regarding this device. The CSD17571Q2
is a TI N-Channel NexFET Power MOSFET that is paired with the ULN2003A in order to enable an eighth
output channel. See the CSD17571Q2 product folder for additional overview regarding this device. The
SN74HC595 shift register enables the 3-pin control mode, ultimately reducing the number of GPIOs
required for driving eight output channels. See the SN74HC595 product folder for additional overview
regarding this device. See Section 4 for additional information on how to select between 3-pin mode and
8-pin mode.
Hardware Description
Figure 5. BOOSTXL-ULN2003 Block Diagram
SLCU002–September 2016
Submit Documentation Feedback
BOOSTXL-ULN2003 Dual Stepper Motor Driver BoosterPack Hardware
Copyright © 2016, Texas Instruments Incorporated
7
Page 8
Hardware Description
2.4 Connector, Switch, and LED Descriptions
2.4.1 Connectors
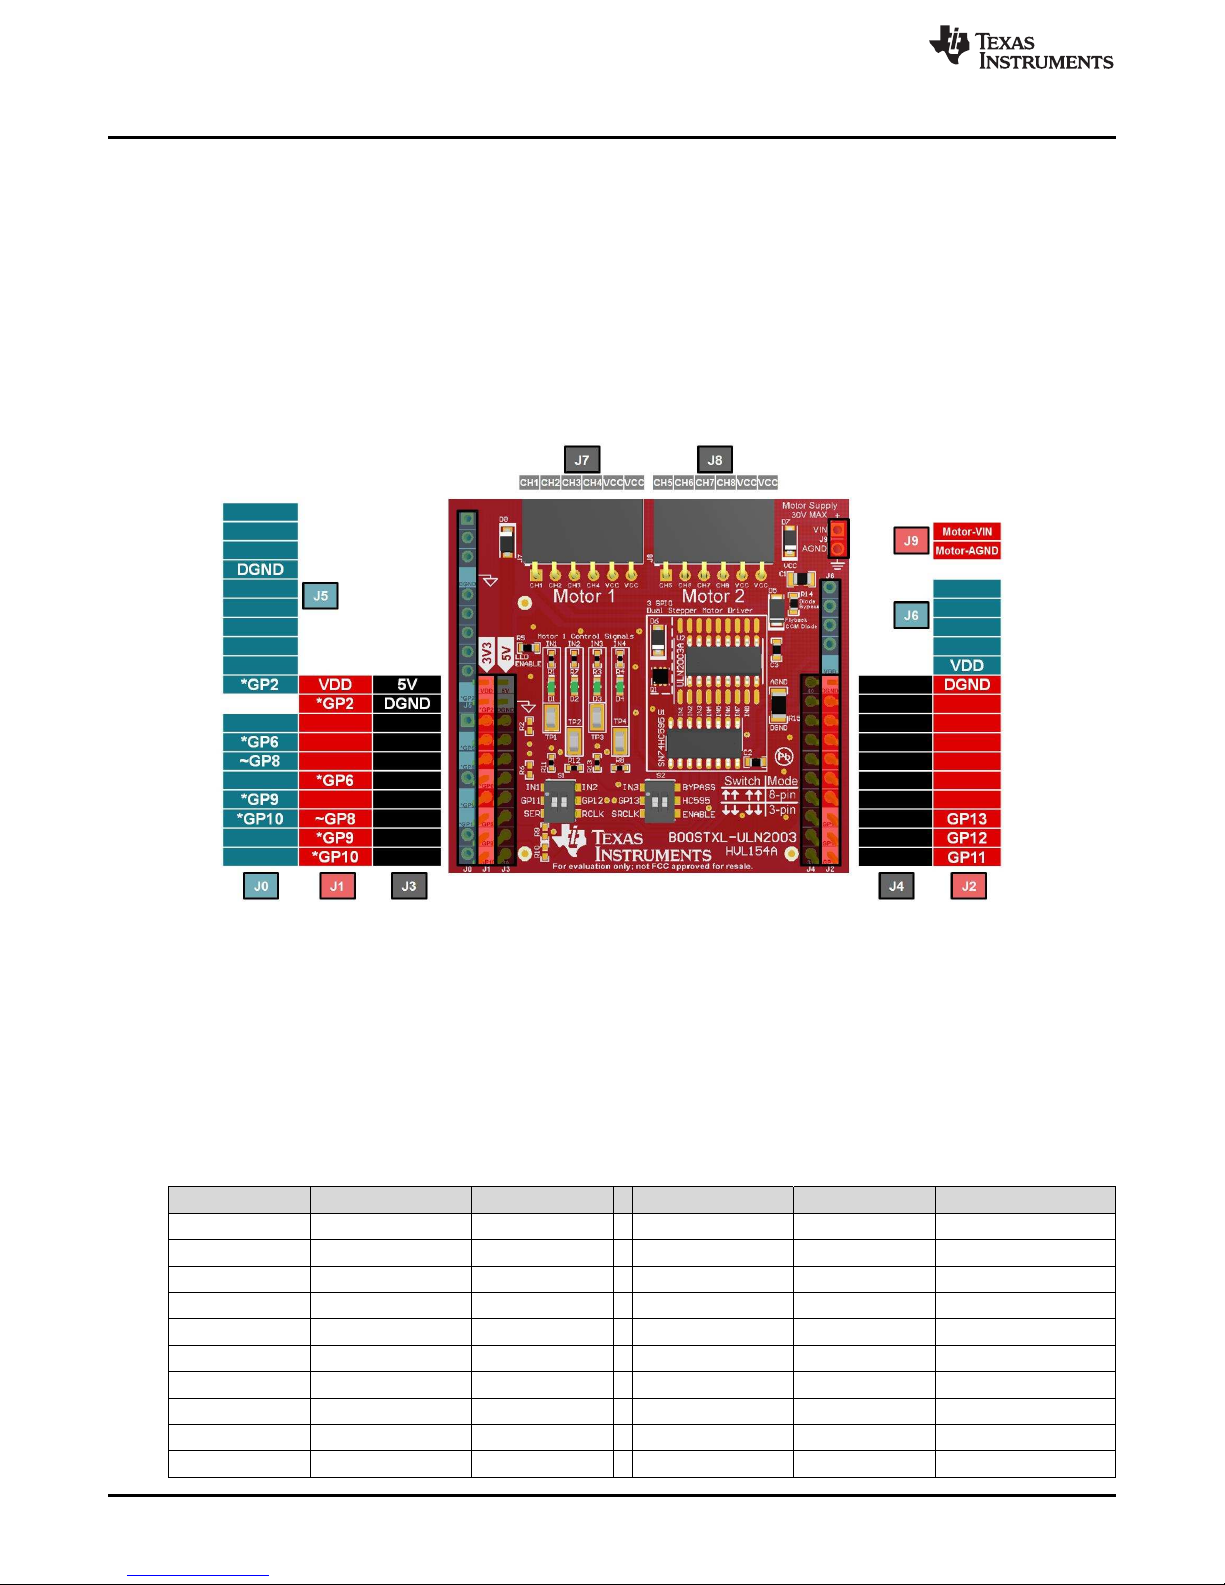
The signal assignment on the BoosterPack pin connectors is shown in Figure 6. The J1-J4 descriptions on
the BoosterPack follow the J1-J4 convention for the Launchpad ecosystem. See ti.com/launchpad for
further description of the 40-pin BoosterPack standard.
Only the outer two pin columns, J1 and J2 (highlighted in red below) are required for BoosterPack
operation, the inner 2 columns, J3 and J4, are provided to pass signals from any 40-pin Launchpad to
other BoosterPack boards that may require these pins. The additional headers, J0, J5, and J6 are for
interfacing with other development boards. See Section 3.3 for details regarding connecting to other
development boards.
www.ti.com
(1) Pins with no name/description are not connected. Pins with the same name/description are shorted together.
(2) *~ These pins are not required for BoosterPack operation.
(3) * These pins are not connected out of the box. To enable control of this board through these pins, see
Section 4.3.1.
(4) ~ This pin is connected to IN4 out of the box. This allows for channels IN1-IN4 to be driven directly using 8-
pin parallel mode. A resistor is connected to protect the line from bus contention if 3-pin mode is being used
and this pin is being used for another purpose.
Figure 6. BOOSTXL-ULN2003 2x20 Header Description
Table 1. J1 and J2 Connector Pinout Description
Direction Pin Name Pin Number Pin Number Pin Name Direction
POWER VDD J1.1 J2.20 DGND POWER
INPUT GP2* J1.2 J2.19
INPUT GP6* J1.6 J2.15
INPUT GP8~ J1.8 J2.13 GP13 INPUT
INPUT GP9* J1.9 J2.12 GP12 INPUT
INPUT GP10* J1.10 J2.11 GP11 INPUT
8
BOOSTXL-ULN2003 Dual Stepper Motor Driver BoosterPack Hardware
J1.3 J2.18
J1.4 J2.17
J1.5 J2.16
J1.7 J2.14
SLCU002–September 2016
Submit Documentation Feedback
Copyright © 2016, Texas Instruments Incorporated
Page 9

GP11 GP12 GP13
SRCLK
IN3
RCLK
IN2
SER
IN1
OE
DGND
3V3
3
1
2
6
4
5
S2
3
1
2
6
4
5
S1
560
R11
560
R12
560
R13
www.ti.com
2.4.2 Switches
The four on-board dip switches are used to select between 3-pin mode and 8-pin mode operation of the
BoosterPack. Descriptions for each of the switches are provided in Table 2.
Hardware Description
Figure 7. Board Image of Switches
Figure 8. Schematic View of Switches
Table 2. Dip Switch Description
Reference Description
This SPDT switch directs the signal from BoosterPack header input GP11. If the switch
is down, it connects GP11 to the SER input of the SN74HC595. If the switch is up, it
S1 - GP11
S1 - GP12
S2 - GP13
S2 - HC595
connects GP11 directly to IN1 – ultimately connected to the gate of the CSD17571Q2
FET.
Switch Down = 3-pin Serial Mode
Switch Up = 8-pin Parallel Mode
This SPDT switch directs the signal from BoosterPack header input GP12. If the switch
is down, it connects GP12 to the RCLK input of the SN74HC595. If the switch is up, it
connects GP12 directly to IN2 – ultimately connected to 1B of the ULN2003A device.
Switch Down = 3-pin Serial Mode
Switch Up = 8-pin Parallel Mode
This SPDT switch directs the signal from BoosterPack header input GP13. If the switch
is down, it connects GP13 to the SRCLK input of the SN74HC595. If the switch is up, it
connects GP13 directly to IN3 – ultimately connected to the 2B of the ULN2003A
device.
Switch Down = 3-pin Serial Mode
Switch Up = 8-pin Parallel Mode
This SPDT switch connects the OE pin either to 3V3 or DGND. This determines
whether or not the SN74HC595 outputs are enabled or are in high-impedance (Hi-Z)
mode. If the switch is down, it enables the SN74HC595 outputs. If the switch is up, it
disables the SN74HC595 outputs. Disabling these outputs is required for 8-pin Parallel
Mode to avoid bus contention at the inputs of the ULN2003A and the CSD17571Q2
FET.
Switch Down = 3-pin Serial Mode
Switch Up = 8-pin Parallel Mode
SLCU002–September 2016
Submit Documentation Feedback
Copyright © 2016, Texas Instruments Incorporated
BOOSTXL-ULN2003 Dual Stepper Motor Driver BoosterPack Hardware
9
Page 10

Green
12
D1
Green
12
D2
Green
12
D3
Green
12
D4
DGND
IN1 IN2 IN3 IN4
0
R5
1.0k
R1
1.0k
R7
1.0k
R3
1.0k
R4
Hardware Description
2.4.3 LEDs
The four on-board LEDs provide visual feedback for the IN1 through IN4 signals. When operating in 3-pin
mode these LEDs are driven by the SN74HC595, and when operating in 8-pin mode these LEDs are
being driven directly by the MSP430 GPIO pins.
If the user wants to disable the onboard LEDs, resistor R5 can be removed. Additional details are found in
Section 2.6.2.
www.ti.com
Figure 9. Board Image of LEDs Figure 10. Schematic View of LEDs
Reference Description
D1
D2
D3
D4
Table 3. LED Description
D1 is connected to the signal IN1. D1 is on when IN1 is high, and is off when IN1 is low.
When IN1 is high, M1_CH1 is activated – ultimately being pulled to AGND as the CSD17571Q2
inverts the logic signal.
D2 is connected to the signal IN2. D2 is on when IN2 is high, and is off when IN2 is low.
When IN2 is high, M1_CH2 is activated – ultimately being pulled to AGND as the ULN2003A inverts
the logic signal.
D3 is connected to the signal IN3. D3 is on when IN3 is high, and is off when IN3 is low.
When IN3 is high, M1_CH3 is activated – ultimately being pulled to AGND as the ULN2003A inverts
the logic signal.
D4 is connected to the signal IN4. D4 is on when IN4 is high, and is off when IN4 is low.
When IN4 is high, M1_CH4 is activated – ultimately being pulled to AGND as the ULN2003A inverts
the logic signal.
10
BOOSTXL-ULN2003 Dual Stepper Motor Driver BoosterPack Hardware
Copyright © 2016, Texas Instruments Incorporated
SLCU002–September 2016
Submit Documentation Feedback
Page 11

VCC
AGND DGND
0
R15
1µF
C1
D7
VIN
1
2
J9
5V
D8
www.ti.com
2.5 Powering the BOOSTXL-ULN2003
2.5.1 Powering the On-Board Devices
The BoosterPack is designed to accept power from a connected Launchpad. The 3.3 V line from the
Launchpad is required to power the SN74HC595 device. The 3.3 V line from the LaunchPad cannot
source enough current to power motors, relays, or LEDs, so an additional source of power is required as
described in Section 2.5.2.
2.5.2 Powering the Motor or Other Peripherals
The method of powering the external peripherals is dependent upon the LaunchPad being used in addition
to the output current requirements.
For higher current or voltage applications, the external motor supply pins should be connected to an
external supply as shown in Figure 11. The maximum voltage supplied through these pins should not
exceed 30 V, or permanent damage to components may occur. While there is some protection against
reverse polarity included on the board, note the correct orientation of the motor supply pins to avoid
permanent damage to the board.
Hardware Description
Figure 11. External Supply Connected to Motor Supply Pins
As shown in Figure 12, the VCC connected to the motor peripheral to provide power is created by using
power OR-ing diodes.
• If there is no 5-V line available from the LaunchPad, the motor supply is required to power the external
peripherals.
• If there is a 5-V line connected, and no motor supply is connected, the VCC pins provide a voltage
close to 5 V.
• If there is a 5-V line connected, and the motor supply voltage is connected and greater than 5 V, the
motor supply is used to power any external peripherals.
SLCU002–September 2016
Submit Documentation Feedback
Figure 12. On-Board Power OR-ing
BOOSTXL-ULN2003 Dual Stepper Motor Driver BoosterPack Hardware
Copyright © 2016, Texas Instruments Incorporated
11
Page 12

Hardware Description
Some LaunchPad boards have a 5-V supply pin, which is powered directly from the USB port. This supply
can be used to power peripherals, as shown in Figure 13, but there are some exceptions to when this can
be used (See the following NOTE). The 5-V stepper motor used in Figure 13 below has the following DigiKey Part Number: 1528-1366-ND. A 12-V version of this stepper motor has the following Digi-Key Part
Number: 1528-1367-ND.
www.ti.com
Figure 13. USB Powering a Single Motor (See NOTE)
NOTE: When using the 5-V pin (USB Power) to provide power to an external peripheral, TI does not
recommend to exceed 250 mA, and further caution should be taken when powering
additional BoosterPacks. TI does not recommend to power more than one stepper motor
from this board when using the 5-V LaunchPad power pin.
12
BOOSTXL-ULN2003 Dual Stepper Motor Driver BoosterPack Hardware
Copyright © 2016, Texas Instruments Incorporated
SLCU002–September 2016
Submit Documentation Feedback
Page 13

ULN2803A
ULN2003A
www.ti.com
2.6 Other Hardware Highlights
2.6.1 Additional Device Compatibility
While the board initially comes populated with a ULN2003A device, this board is compatible with many
other pin-to-pin devices that perform a similar function. As shown in Figure 14, the Boosterpack has the
landing pattern for both the 16-pin D (SOIC) as well as the 18-pin DW (WIDE SOIC) package. Figure 15
shows the Boosterpack populated with the ULN2803A device.
If the ULN2003A device is depopulated, the following list of devices can be populated in order to be
evaluated.
• ULQ2003A - –40°C to +105°C Temperature Range
• ULQ2003-Q1 - Automotive Qualified Variant
• ULN2003LV - FET based variant
• ULN2003V12 - Wider-Voltage FET based variant
• ULN2803 - 8 channel variant
• TPL7407L - FET based variant with 40V outputs and drive circuitry to decrease power dissipation
Hardware Description
Figure 14. BoosterPack With ULN2003A Figure 15. BoosterPack With ULN2803A
SLCU002–September 2016
Submit Documentation Feedback
BOOSTXL-ULN2003 Dual Stepper Motor Driver BoosterPack Hardware
Copyright © 2016, Texas Instruments Incorporated
13
Page 14
Hardware Description
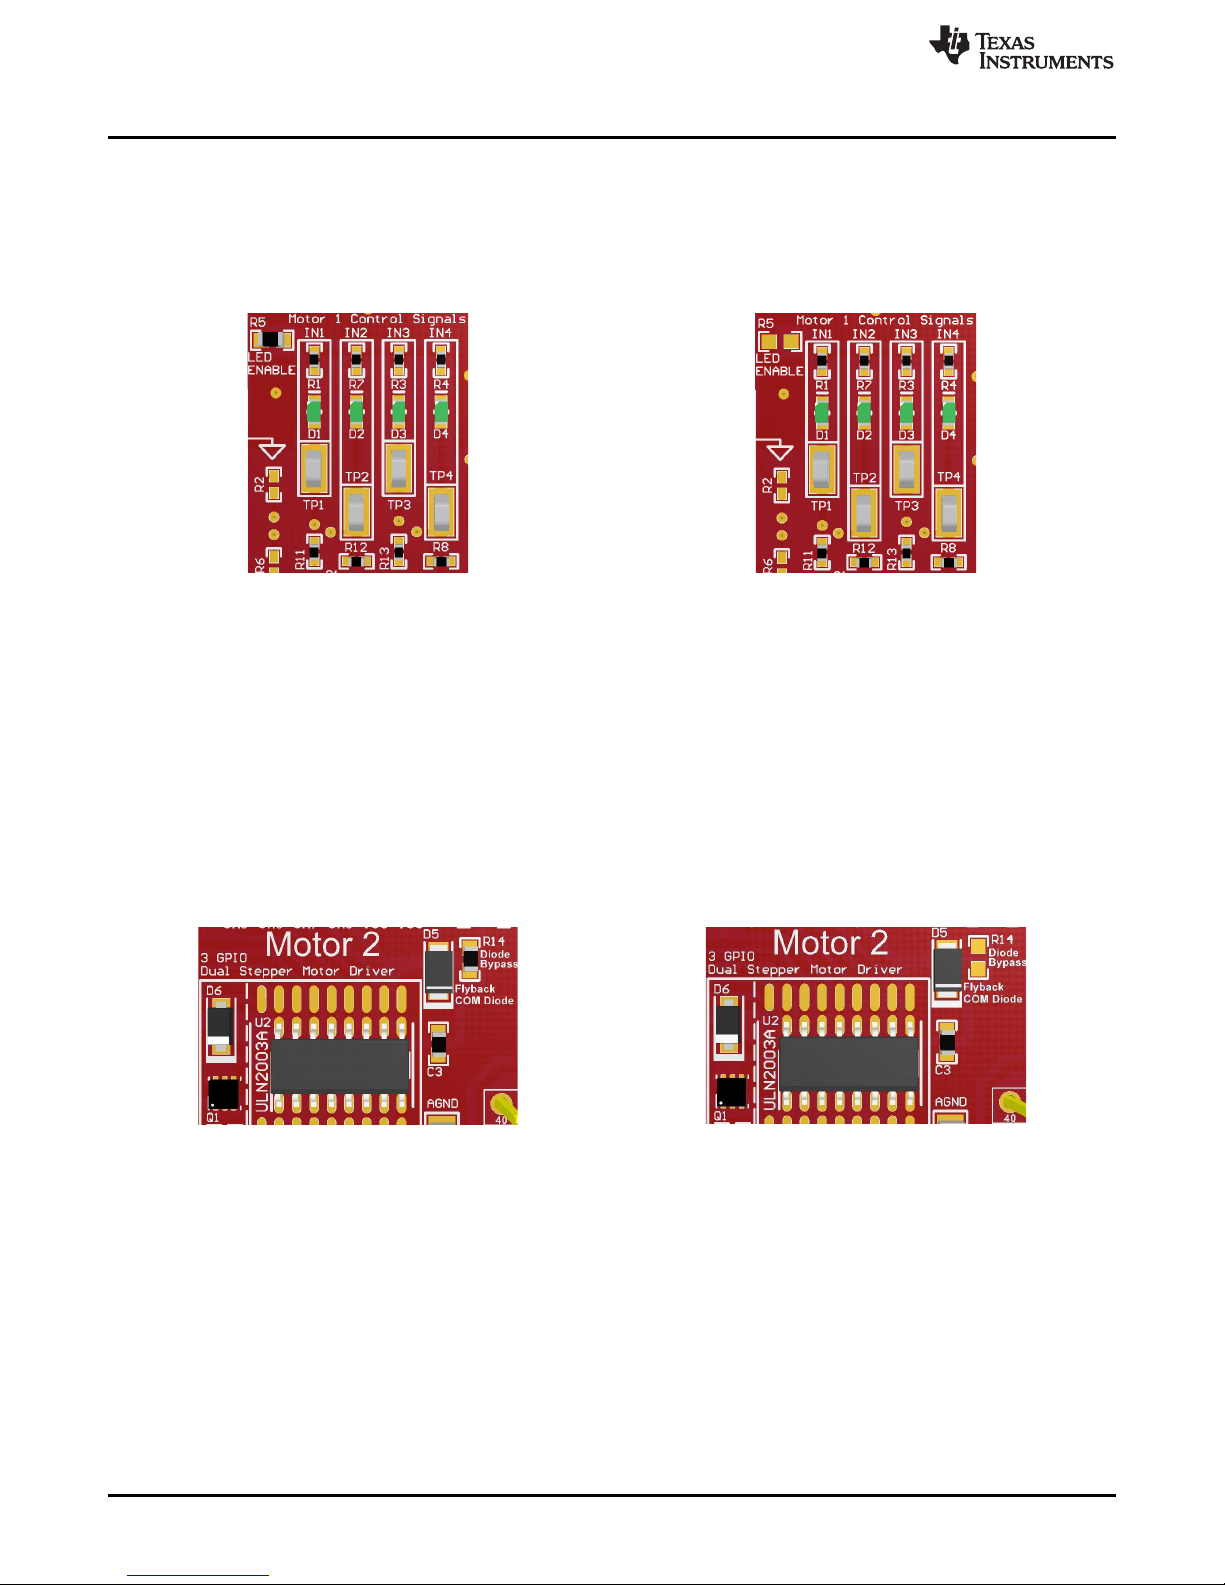
2.6.2 Disabling the On-Board LEDs
Figure 16 shows the section of the board with the LEDs. The R5 resistor is labeled LED ENABLE because
when a 0-Ω resistor is populated here, it allows a path for current flow through the LEDs. The on-board
LEDs can be disabled easily by depopulating this R5 resistor. Figure 17 shows the resistor depopulated,
so there is no longer a path for current to flow through the LEDs, thereby disabling them.
Figure 16. Board Image of LED Section Figure 17. LED Section With R5 Depopulated
2.6.3 Enabling Quick Inductor Discharge
The ULN2003A has internal flyback diodes to suppress voltage spikes due to inductive kickback. Stepper
Motors and relays have inductive kickback that is suppressed by these internal diodes. The rate of
discharge of the inductor is also directly proportional to the voltage across the inductor when discharging.
Figure 18 shows the section of the board near the COM pin of the ULN2003A device. Diode D5, also
labeled Flyback COM diode, is a 12-V Zener diode that is in series with the internal flyback diodes of the
ULN2003A. Normally there is a 0-Ω resistor (R14) in parallel with this Zener diode, also labeled Diode
Bypass, effectively bypassing the Zener diode. To enable the quick inductor discharge, the Diode Bypass
resistor (R14) should be depopulated. Figure 19 shows the board with this resistor depopulated, ultimately
enabling quick inductor discharge.
www.ti.com
Figure 18. Board Image of COM Diode Section Figure 19. COM Diode Section With R14 Depopulated
14
BOOSTXL-ULN2003 Dual Stepper Motor Driver BoosterPack Hardware
Copyright © 2016, Texas Instruments Incorporated
SLCU002–September 2016
Submit Documentation Feedback
Page 15

www.ti.com
3 Interfacing With External Hardware
3.1 Connecting to a LaunchPad
The BoosterPack is ready to connect to any LaunchPad out of the box. Figure 20 shows the correct
orientation of the BoosterPack on the LaunchPad.
The connectors should be aligned carefully as misalignment could cause
permanent damage to the BoosterPack.
Interfacing With External Hardware
CAUTION
Figure 20. BoosterPack Connected to MSP430F5529 LaunchPad
3.2 Connecting a Motor or Other Peripherals
The Boosterpack provides two standard 100 mil spacing female receptacles to interface two unipolar
stepper motors or other peripherals such as relays, solenoids, or LEDs.
Each receptacle provides a six-pin interface. Four pins are dedicated to the outputs of the ULN2003A and
CSD17571Q2 to drive the peripheral, and two pins are connected to the motor supply that is connected to
the board. These two VCC pins allow for connection to both 5-pin and 6-pin type Unipolar stepper motors.
Figure 21 shows two 5-pin unipolar motors connected to the BoosterPack.
Figure 21. BoosterPack With Two Stepper Motors
SLCU002–September 2016
Submit Documentation Feedback
BOOSTXL-ULN2003 Dual Stepper Motor Driver BoosterPack Hardware
Copyright © 2016, Texas Instruments Incorporated
15
Page 16

Interfacing With External Hardware
As shown in Figure 22, a male to male header can also be added to the receptacle to help interface with
standard 5-pin or 6-pin unipolar stepper motors with female receptacles.
Figure 22. BoosterPack with Motor and Male Expansion Header
www.ti.com
3.3 Connecting to Other Development Boards
The BoosterPack is compatible with Arduino development boards, but some additional hardware is
required beyond what is supplied in the box. The following list shows the additional required materials.
These must be populated on the BoosterPack to enable a hardware interface with the development board.
• J0 Male Pin Header
• J5 Male Pin Header
• J6 Male Pin Header
Once the additional headers are populated, the BoosterPack can be connected to the development board.
NOTE: The BoosterPack must be placed on the development board upside down for the pins to
align properly.
16
BOOSTXL-ULN2003 Dual Stepper Motor Driver BoosterPack Hardware
Copyright © 2016, Texas Instruments Incorporated
SLCU002–September 2016
Submit Documentation Feedback
Page 17

www.ti.com
4 Functional Modes
4.1 Modes of Operation Overview
Figure 23 provides a brief overview of how the Boosterpack pins are connected to either the SN74HC595
or the ULN2003A based on the selected mode of operation. Additional details for 3-pin mode and 8-pin
mode can be found in Section 4.2 and Section 4.3 respectively.
Functional Modes
(1) *There are NO resistors populated for pins GP6, GP2, GP9, and GP10, therefore there will be no direct
connection to IN5, IN6, IN7, and IN8 respectively. 0 Ohm or solder bridge connections can be made to
connect these pins in order to enable the full functionality of 8 pin mode. See Section 4.3.1 for additional
details
(2) ~There IS a resistor populated for pin IN4, therefore it can be used in 8-pin mode without bus contention;
however, in 3-pin mode it will draw current if GP8 is set low. The resistor allows IN4 and GP8 to be different
voltage levels when GP8 is being used for another purpose while the Boosterpack is in 3-pin mode. See
Section 4.2.1 for additional details.
Figure 23. BOOSTXL-ULN2003 Mode Overview
SLCU002–September 2016
Submit Documentation Feedback
BOOSTXL-ULN2003 Dual Stepper Motor Driver BoosterPack Hardware
Copyright © 2016, Texas Instruments Incorporated
17
Page 18

GP12
DGND
GP13
GP11
QB
1
QC
2
QD
3
QE
4
QF
5
QG
6
QH
7
GND
8
QH'
9
SRCLR
10
SRCLK
11
RCLK
12
OE
13
SER
14
QA
15
VCC
16
U1
SN74HC595DR
VCC
AGND
Green
12
D1
Green
12
D2
Green
12
D3
Green
12
D4
VCC
AGND
AGND
VCC
3
5,6,84,7
1,2,
Q1
CSD17571Q2
DGND
0.1 µF
C3
IN1
0
R14
DGND
TP1
TP2
TP3
TP4
0.1 µF
C2
IN1
IN2
IN3
IN4
IN5
IN6
IN7
IN8
IN1 IN2 IN3 IN4
3V3
DGND
1B
1
2B
2
3B
3
4B
4
5B
5
6B
6
7B
7
GND
8
COM
9
7C
10
6C
11
5C
12
4C
13
3C
14
2C
15
1C
16
U2
ULN2003ADR
1
2
3
4
5
6
J7
1
2
3
4
5
6
J8
M1_CH1
M1_CH2
M1_CH3
M1_CH4
M2_CH5
M2_CH6
M2_CH7
M2_CH8
COM
AGND
VCC
0
R5
DGND
0
R15
COM
1µF
C1
D7
DB2W40200L
D6
DB2W40200L
VIN
1
2
J9
12V
D5
5V
D8
DB2W40200L
1.0k
R1
1.0k
R7
1.0k
R3
1.0k
R4
Copyright © 2016, Texas Instruments Incorporated
Launchpad Inputs
Motor/Peripheral Outputs
Functional Modes
4.2 3-pin Serial Mode
4.2.1 Enabling 3-pin Mode
The BoosterPack has all of the required components to run 3-pin Mode out of the box. To enable this
mode of operation, the four dip switches should be in the lower position. Each switch works as defined in
Table 2.
4.2.2 3-pin Mode of Operation
Figure 24 shows the effective schematic for the 3-pin mode of operation. Inputs GP11, GP12, and GP13
from the microcontroller are used to drive the inputs of the SN74HC595 device. This 8-bit shift register
converts the serial input data to parallel output data to control the ULN2003A channels. For example
software to drive the SN74HC595, see Section 5.2.
www.ti.com
18
BOOSTXL-ULN2003 Dual Stepper Motor Driver BoosterPack Hardware
Figure 24. 3-Pin Mode Abbreviated Schematic (Zoom for Higher Resolution)
Copyright © 2016, Texas Instruments Incorporated
SLCU002–September 2016
Submit Documentation Feedback
Page 19

GP13
GP12
GP11
VCC
AGND
Green
12
D1
Green
12
D2
Green
12
D3
Green
12
D4
VCC
AGND
AGND
VCC
3
5,6,84,7
1,2,
Q1
CSD17571Q2
DGND
0.1 µF
C3
IN1
0
R14
TP1
TP2
TP3
TP4
IN1
IN2
IN3
IN4
IN5
IN6
IN7
IN8
IN1 IN2 IN3 IN4
1B
1
2B
2
3B
3
4B
4
5B
5
6B
6
7B
7
GND
8
COM
9
7C
10
6C
11
5C
12
4C
13
3C
14
2C
15
1C
16
U2
ULN2003ADR
1
2
3
4
5
6
J7
1
2
3
4
5
6
J8
M1_CH1
M1_CH2
M1_CH3
M1_CH4
M2_CH5
M2_CH6
M2_CH7
M2_CH8
COM
AGND
VCC
0
R5
DGND
0
R15
COM
1µF
C1
D7
DB2W40200L
D6
DB2W40200L
VIN
1
2
J9
12V
D5
5V
D8
DB2W40200L
1.0k
R1
1.0k
R7
1.0k
R3
1.0k
R4
Copyright © 2016, Texas Instruments Incorporated
GP10
GP9
GP8
GP6
GP2
560
R8
0
R6
0
R2
0
R9
0
R10
560
R13
560
R12
560
R11
Launchpad Inputs
Motor/Peripheral Outputs
X
X
X
X
DNP
DNP
DNP
DNP
www.ti.com
4.3 8-pin Parallel Mode
4.3.1 Enabling 8-pin Mode
The BoosterPack has the required components to run ONLY 4 pins of the 8-pin Mode out of the box.
Ultimately, this allows control of a single stepper motor in a parallel control mode, so additional
components are required to enable control of all 8 outputs in parallel mode. To use 8-pin mode, the four
dip switches should be in the upper position. Each switch works as defined in Table 2.
To enable all 8 pins for this mode of operation, a 0-Ω resistor or solder bridge should be populated on the
pads for resistors R6, R2, R9, and R10 to enable IN5, IN6, IN7, and IN8 respectively.
NOTE: The 560-Ω resistors exist on IN1, IN2, IN3, and IN4 to help protect against bus contention if
the IN1, IN2, IN3, and IN4 pins are being driven by both the SN74HC595 and the
microcontroller. This should only happen if the dip switches are in the wrong position. If the
intent is to use the device in the 8-pin mode, and the switches are set properly, then there
should be no potential for bus contention, and therefore 560-Ω resistors are not required for
R6, R2, R9, and R10.
4.3.2 8-pin Mode of Operation
Figure 25 shows the effective schematic for the 8-pin mode of operation. Inputs GP11, GP12, GP13, GP8,
GP6, GP2, GP9, and GP10 from the microcontroller are used to drive the inputs of the ULN2003A device
directly. For example software to drive unipolar stepper motors using the ULN2003A, see Section 5.2.
Functional Modes
SLCU002–September 2016
Submit Documentation Feedback
Figure 25. 8-Pin Mode Abbreviated Schematic (Zoom for Higher Resolution)
BOOSTXL-ULN2003 Dual Stepper Motor Driver BoosterPack Hardware
Copyright © 2016, Texas Instruments Incorporated
19
Page 20

Additional Information
5 Additional Information
5.1 Design Files
All design files including schematics, layout, Bill of Materials (BOM), Gerber files, and documentation are
made available in the Texas Instruments Resource Explorer:
dev.ti.com/tirex
The schematic for the design is also attached as Figure 26 to the end of the document for quick reference.
5.2 Software
For software examples including the out-of-box experience, 3-pin mode driving, and 8-pin mode driving,
see dev.ti.com/BOOSTXL-ULN2003.
For additional information regarding stepper motor driving patterns, including half-step, full-step, and wave
drive, see Stepper Motor Driving with Peripheral Drivers (Driver ICs)
5.3 Hardware Change Log
PCB Revision Description of Changes
Rev 1.0
www.ti.com
Table 4. Description of Hardware Changes
• Initial Release
20
BOOSTXL-ULN2003 Dual Stepper Motor Driver BoosterPack Hardware
Copyright © 2016, Texas Instruments Incorporated
SLCU002–September 2016
Submit Documentation Feedback
Page 21

QB
1
QC
2
QD
3
QE
4
QF
5
QG
6
QH
7
GND
8
QH'
9
SRCLR
10
SRCLK
11
RCLK
12
OE
13
SER
14
QA
15
VCC
16
U1
SN74HC595DR
COM
10
1B
1
2B
2
3B
3
4B
4
5B
5
6B
6
7B
7
8B
8
GND
9
8C
11
7C
12
6C
13
5C
14
4C
15
3C
16
2C
17
1C
18
U3
ULN2803ADW
GPIO !
31
GPIO !
32
GPIO !
33
GPIO !
34
Timer_Cap/GPIO !
35
Timer_Cap/GPIO !
36
PWM/GPIO !
37
PWM/GPIO !
38
PWM/GPIO !
39
PWM/GPIO !
40
GPIO !
11
SPI_CS/GPIO !
12
SPI_CS/GPIO !
13
SPI_MISO
14
SPI_MOSI
15
RST
16
GPIO
17
GPIO !
18
PWM/GPIO !
19
GND
20
J2/J4
SSQ-110-03-T-D
+3.3V
1
Analog_In
2
LP_UART_RX
3
LP_UART_TX
4
GPIO !
5
Analog In
6
SPI_CLK
7
GPIO !
8
I2C_SCL
9
I2C_SDA
10
+5V
21
GND
22
Analog_In
23
Analog_In
24
Analog_In
25
Analog_In
26
Analog_In/I2S_WS
27
Analog_In/I2S_SCLK
28
Analog_Out/I2S_SDout
29
Analog_Out/I2S_SDin
30
J1/J3
SSQ-110-03-T-D
VCC
AGND
Green
12
D1
Green
12
D2
Green
12
D3
Green
12
D4
GP8
GP13
GP12
GP11
GP10
GP11 GP12 GP13
DGND
VCC
AGND
AGND
VCC
3
5,6,84,7
1,2,
Q1
CSD17571Q2
DGND
3V3
0.1µF
C3
IN1
0
R14
DGND
TP1
TP2
TP3
TP4
GP2
GP10
GP9
GP6
GP9
GP8
GP6
GP2
SRCLK
IN3
RCLK
IN2
SER
IN1
SER
SRCLK
RCLK
5
4
1
2
3
6
7
8
J0
5
4
1
2
3
J6
0.1µF
C2
IN4 IN1
IN2
IN3
IN4
IN5
IN6
IN7
IN8
IN1 IN2 IN3 IN4
IN6
IN5
IN7
IN8
3V3
DGND
OE
OE
DGND
3V3
1B
1
2B
2
3B
3
4B
4
5B
5
6B
6
7B
7
GND
8
COM
9
7C
10
6C
11
5C
12
4C
13
3C
14
2C
15
1C
16
U2
ULN2003ADR
5
4
1
2
3
6
7
8
9
10
J5
IN1
IN2
IN3
IN4
IN5
IN6
IN7
IN8
AGND
COM
M2_CH8
M2_CH7
M2_CH6
M2_CH5
M1_CH4
M1_CH3
M1_CH2
M1_CH1
1
2
3
4
5
6
J7
1
2
3
4
5
6
J8
M1_CH1
M1_CH2
M1_CH3
M1_CH4
M2_CH5
M2_CH6
M2_CH7
M2_CH8
COM
AGND
VCC
3
1
2
6
4
5
S2
3
1
2
6
4
5
S1
0
R5
DGND
DGND
DGND
3V3
0
R15
GP10
GP9
GP8
GP6
GP2
COM
1µF
C1
3V3
D7
DB2W40200L
D6
DB2W40200L
VIN
1
2
J9
12V
D5
5V
5V
D8
DB2W40200L
1.0kR11.0kR71.0kR31.0k
R4
560
R11
560
R12
560
R13
560
R8
560
R6
560
R2
560
R9
560
R10
Copyright © 2016, Texas Instruments Incorporated
X
DNP
X
DNP
X
DNP
X
DNP
X
DNP
X
DNP
X
DNP
X
DNP
www.ti.com
Additional Information
21
SLCU002– September 2016
Submit Documentation Feedback
Copyright © 2016, Texas Instruments Incorporated
BOOSTXL-ULN2003 Dual Stepper Motor Driver BoosterPack Hardware
5.4 Schematic
Figure 26. BOOSTXL-ULN2003 Schematic (Zoom for Higher Resolution)
NOTE: DNP is an abbreviation for do not populate. Components highlighted as DNP in the schematic are not populated out of the box.
Page 22

22
SLCU002– September 2016
Submit Documentation Feedback
BOOSTXL-ULN2003 Dual Stepper Motor Driver BoosterPack Hardware
Page 23

www.ti.com
Additional Information
IMPORTANT NOTICE FOR TI DESIGN INFORMATION AND RESOURCES
Texas Instruments Incorporated (‘TI”) technical, application or other design advice, services or information, including, but not limited to,
reference designs and materials relating to evaluation modules, (collectively, “TI Resources”) are intended to assist designers who are
developing applications that incorporate TI products; by downloading, accessing or using any particular TI Resource in any way, you
(individually or, if you are acting on behalf of a company, your company) agree to use it solely for this purpose and subject to the terms of
this Notice.
TI’s provision of TI Resources does not expand or otherwise alter TI’s applicable published warranties or warranty disclaimers for TI
products, and no additional obligations or liabilities arise from TI providing such TI Resources. TI reserves the right to make corrections,
enhancements, improvements and other changes to its TI Resources.
You understand and agree that you remain responsible for using your independent analysis, evaluation and judgment in designing your
applications and that you have full and exclusive responsibility to assure the safety of your applications and compliance of your applications
(and of all TI products used in or for your applications) with all applicable regulations, laws and other applicable requirements. You
represent that, with respect to your applications, you have all the necessary expertise to create and implement safeguards that (1)
anticipate dangerous consequences of failures, (2) monitor failures and their consequences, and (3) lessen the likelihood of failures that
might cause harm and take appropriate actions. You agree that prior to using or distributing any applications that include TI products, you
will thoroughly test such applications and the functionality of such TI products as used in such applications. TI has not conducted any
testing other than that specifically described in the published documentation for a particular TI Resource.
You are authorized to use, copy and modify any individual TI Resource only in connection with the development of applications that include
the TI product(s) identified in such TI Resource. NO OTHER LICENSE, EXPRESS OR IMPLIED, BY ESTOPPEL OR OTHERWISE TO
ANY OTHER TI INTELLECTUAL PROPERTY RIGHT, AND NO LICENSE TO ANY TECHNOLOGY OR INTELLECTUAL PROPERTY
RIGHT OF TI OR ANY THIRD PARTY IS GRANTED HEREIN, including but not limited to any patent right, copyright, mask work right, or
other intellectual property right relating to any combination, machine, or process in which TI products or services are used. Information
regarding or referencing third-party products or services does not constitute a license to use such products or services, or a warranty or
endorsement thereof. Use of TI Resources may require a license from a third party under the patents or other intellectual property of the
third party, or a license from TI under the patents or other intellectual property of TI.
TI RESOURCES ARE PROVIDED “AS IS” AND WITH ALL FAULTS. TI DISCLAIMS ALL OTHER WARRANTIES OR
REPRESENTATIONS, EXPRESS OR IMPLIED, REGARDING TI RESOURCES OR USE THEREOF, INCLUDING BUT NOT LIMITED TO
ACCURACY OR COMPLETENESS, TITLE, ANY EPIDEMIC FAILURE WARRANTY AND ANY IMPLIED WARRANTIES OF
MERCHANTABILITY, FITNESS FOR A PARTICULAR PURPOSE, AND NON-INFRINGEMENT OF ANY THIRD PARTY INTELLECTUAL
PROPERTY RIGHTS.
TI SHALL NOT BE LIABLE FOR AND SHALL NOT DEFEND OR INDEMNIFY YOU AGAINST ANY CLAIM, INCLUDING BUT NOT
LIMITED TO ANY INFRINGEMENT CLAIM THAT RELATES TO OR IS BASED ON ANY COMBINATION OF PRODUCTS EVEN IF
DESCRIBED IN TI RESOURCES OR OTHERWISE. IN NO EVENT SHALL TI BE LIABLE FOR ANY ACTUAL, DIRECT, SPECIAL,
COLLATERAL, INDIRECT, PUNITIVE, INCIDENTAL, CONSEQUENTIAL OR EXEMPLARY DAMAGES IN CONNECTION WITH OR
ARISING OUT OF TI RESOURCES OR USE THEREOF, AND REGARDLESS OF WHETHER TI HAS BEEN ADVISED OF THE
POSSIBILITY OF SUCH DAMAGES.
You agree to fully indemnify TI and its representatives against any damages, costs, losses, and/or liabilities arising out of your noncompliance with the terms and provisions of this Notice.
This Notice applies to TI Resources. Additional terms apply to the use and purchase of certain types of materials, TI products and services.
These include; without limitation, TI’s standard terms for semiconductor products http://www.ti.com/sc/docs/stdterms.htm), evaluation
modules, and samples (http://www.ti.com/sc/docs/sampterms.htm).
Mailing Address: Texas Instruments, Post Office Box 655303, Dallas, Texas 75265
SLCU002–September 2016
Submit Documentation Feedback
Copyright © 2017, Texas Instruments Incorporated
BOOSTXL-ULN2003 Dual Stepper Motor Driver BoosterPack Hardware
Copyright © 2016, Texas Instruments Incorporated
23
Page 24

IMPORTANT NOTICE FOR TI DESIGN INFORMATION AND RESOURCES
Texas Instruments Incorporated (‘TI”) technical, application or other design advice, services or information, including, but not limited to,
reference designs and materials relating to evaluation modules, (collectively, “TI Resources”) are intended to assist designers who are
developing applications that incorporate TI products; by downloading, accessing or using any particular TI Resource in any way, you
(individually or, if you are acting on behalf of a company, your company) agree to use it solely for this purpose and subject to the terms of
this Notice.
TI’s provision of TI Resources does not expand or otherwise alter TI’s applicable published warranties or warranty disclaimers for TI
products, and no additional obligations or liabilities arise from TI providing such TI Resources. TI reserves the right to make corrections,
enhancements, improvements and other changes to its TI Resources.
You understand and agree that you remain responsible for using your independent analysis, evaluation and judgment in designing your
applications and that you have full and exclusive responsibility to assure the safety of your applications and compliance of your applications
(and of all TI products used in or for your applications) with all applicable regulations, laws and other applicable requirements. You
represent that, with respect to your applications, you have all the necessary expertise to create and implement safeguards that (1)
anticipate dangerous consequences of failures, (2) monitor failures and their consequences, and (3) lessen the likelihood of failures that
might cause harm and take appropriate actions. You agree that prior to using or distributing any applications that include TI products, you
will thoroughly test such applications and the functionality of such TI products as used in such applications. TI has not conducted any
testing other than that specifically described in the published documentation for a particular TI Resource.
You are authorized to use, copy and modify any individual TI Resource only in connection with the development of applications that include
the TI product(s) identified in such TI Resource. NO OTHER LICENSE, EXPRESS OR IMPLIED, BY ESTOPPEL OR OTHERWISE TO
ANY OTHER TI INTELLECTUAL PROPERTY RIGHT, AND NO LICENSE TO ANY TECHNOLOGY OR INTELLECTUAL PROPERTY
RIGHT OF TI OR ANY THIRD PARTY IS GRANTED HEREIN, including but not limited to any patent right, copyright, mask work right, or
other intellectual property right relating to any combination, machine, or process in which TI products or services are used. Information
regarding or referencing third-party products or services does not constitute a license to use such products or services, or a warranty or
endorsement thereof. Use of TI Resources may require a license from a third party under the patents or other intellectual property of the
third party, or a license from TI under the patents or other intellectual property of TI.
TI RESOURCES ARE PROVIDED “AS IS” AND WITH ALL FAULTS. TI DISCLAIMS ALL OTHER WARRANTIES OR
REPRESENTATIONS, EXPRESS OR IMPLIED, REGARDING TI RESOURCES OR USE THEREOF, INCLUDING BUT NOT LIMITED TO
ACCURACY OR COMPLETENESS, TITLE, ANY EPIDEMIC FAILURE WARRANTY AND ANY IMPLIED WARRANTIES OF
MERCHANTABILITY, FITNESS FOR A PARTICULAR PURPOSE, AND NON-INFRINGEMENT OF ANY THIRD PARTY INTELLECTUAL
PROPERTY RIGHTS.
TI SHALL NOT BE LIABLE FOR AND SHALL NOT DEFEND OR INDEMNIFY YOU AGAINST ANY CLAIM, INCLUDING BUT NOT
LIMITED TO ANY INFRINGEMENT CLAIM THAT RELATES TO OR IS BASED ON ANY COMBINATION OF PRODUCTS EVEN IF
DESCRIBED IN TI RESOURCES OR OTHERWISE. IN NO EVENT SHALL TI BE LIABLE FOR ANY ACTUAL, DIRECT, SPECIAL,
COLLATERAL, INDIRECT, PUNITIVE, INCIDENTAL, CONSEQUENTIAL OR EXEMPLARY DAMAGES IN CONNECTION WITH OR
ARISING OUT OF TI RESOURCES OR USE THEREOF, AND REGARDLESS OF WHETHER TI HAS BEEN ADVISED OF THE
POSSIBILITY OF SUCH DAMAGES.
You agree to fully indemnify TI and its representatives against any damages, costs, losses, and/or liabilities arising out of your noncompliance with the terms and provisions of this Notice.
This Notice applies to TI Resources. Additional terms apply to the use and purchase of certain types of materials, TI products and services.
These include; without limitation, TI’s standard terms for semiconductor products http://www.ti.com/sc/docs/stdterms.htm), evaluation
modules, and samples (http://www.ti.com/sc/docs/sampterms.htm).
Mailing Address: Texas Instruments, Post Office Box 655303, Dallas, Texas 75265
Copyright © 2017, Texas Instruments Incorporated
 Loading...