

Page 1

BA II PLUS™
Calculator
©1997, 2002 Texas Instruments Incorporated
Page 2

Important
Texas Instruments makes no warranty, either expressed or implied,
including but not limited to any implied warranties of merchantability
and fitness for a particular purpose, regarding any programs or book
materials and makes such materials available solely on an “as-is” basis.
In no event shall Texas Instruments be liable to anyone for special,
collateral, incidental, or consequential damages in connection with or
arising out of the purchase or use of these materials, and the sole and
exclusive liability of Texas Instruments, regardless of the form of
action, shall not exceed the purchase price of this calculator. Moreover,
Texas Instruments shall not be liable for any claim of any kind
whatsoever against the use of these materials by any other party.
US FCC Information Concerning Radio Frequency Interference
This equipment has been tested and found to comply with the limits for
a Class B digital device, pursuant to Part 15 of the FCC rules. These
limits are designed to provide reasonable protection against harmful
interference in a residential installation. This equipment generates, uses,
and can radiate radio frequency energy and, if not installed and used in
accordance with the instructions, may cause harmful interference with
radio communications. However, there is no guarantee that interference
will not occur in a particular installation.
If this equipment does cause harmful interference to radio or television
reception, which can be determined by turning the equipment off and
on, you can try to correct the interference by one or more of the
following measures:
•
Reorient or relocate the receiving antenna.
•
Increase the separation between the equipment and receiver.
•
Connect the equipment into an outlet on a circuit different from that
to which the receiver is connected.
•
Consult the dealer or an experienced radio/television technician for
help.
Caution:
approved by Texas Instruments may void your authority to operate the
equipment.
ii
Any changes or modifications to this equipment not expressly
Page 3

1: Overview of Calculator Operations 1
Turning the Calculator On and Off
Resetting the Calculator
Keys and 2nd Functions
The Display
..................................................
Display Indicators
.......................................
.......................................
............................................
Setting Calculator Formats
Clearing the Calculator
Correcting Entry Errors
Math Operations
........................................
.......................................
..............................................
More on Selected Math Operations
Memory Operations
...........................................
Calculations Using Constants
Last Answer Feature
..........................................
..............................
....................................
.............................
..................................
Using Worksheets: Tools for Financial Solutions
Types of Worksheets
Worksheet Variables
Clearing Worksheets and Setting Defaults
..........................................
..........................................
......................
................
2
3
4
4
5
6
11
12
13
15
17
19
20
21
22
22
26
iii
Page 4

2: Time-Value-of-Money and Amortization Worksheets 27
TVM and Amortization Worksheet Labels
Time-Line Diagrams
.....................................
Procedure: Using the TVM Worksheet
Procedure: Generating an Amortization Schedule
Procedure: Automatically Generating a Schedule
Basic Loan Calculations—Interest
Basic Loan Calculations—Payments
Future Value of Savings
Present Value of Savings
..................................
.................................
Present Value in Present-Value Annuities
Perpetual Annuities
Variable Cash Flows
Lease-or-Buy Decision
.....................................
.....................................
...................................
Present Value of Lease with Residual Value
Monthly Payments
......................................
....................
......................
.............
.............
.........................
........................
....................
..................
Yield to Maturity on Bond Purchased on Interest Date
Saving for the Future by Making Monthly Deposits
Amount to Borrow and Down Payment
.....................
Regular Deposits for a Specified Future Amount
Time Value of Money/Amortization Schedule
Interest and Loan Balance after Specified Payment
Canadian Mortgages
.....................................
............
..............
.................
............
.........
28
32
33
34
35
36
37
38
39
40
42
44
46
48
49
50
51
52
53
54
56
57
3: Cash Flow Worksheet 59
Cash Flow Worksheet Labels
Interpreting the Results of IRR Calculations
Uneven and Grouped Cash Flows
Entering Cash Flows
Deleting Cash Flows
Inserting Cash Flows
....................................
....................................
....................................
Computing NPV and IRR
Uneven Cash Flows
.....................................
Value of a Lease with Uneven Payments
iv
.............................
..................
..........................
.................................
.....................
60
61
62
63
64
65
66
67
70
Page 5

4: Bond Worksheet 73
Terminology
Entering Bond Data and Computing Results
Bond Price and Accrued Interest Example
...........................................
..................
...................
76
77
79
5: Depreciation Worksheet 81
Depreciation Worksheet Labels
Entering Data and Computing Results
Declining Balance with Straight-Line Crossover Example
Straight-Line Depreciation Example
............................
......................
..........
........................
82
84
85
86
6: Statistics Worksheet 87
Statistics Worksheet Labels
Regression Models
......................................
Entering Statistical Data
Editing Statistical Data
Computing Statistical Results
One-Variable Statistics Example
Two-Variable Statistics Example
...............................
.................................
..................................
.............................
...........................
...........................
88
90
91
92
93
95
96
7: Other Worksheets 99
Percent Change/Compound Interest Worksheet
Interest Conversion Worksheet
Date Worksheet
........................................
Profit Margin Worksheet
Breakeven Worksheet
Memory Worksheet
...................................
.....................................
............................
.................................
...............
100
104
106
108
110
112
v
Page 6

Appendix: Reference Information 115
Formulas
Error Conditions
Accuracy Information
IRR Calculations
AOSé (Algebraic Operating System) Calculations
Battery Information
In Case of Difficulty
Texas Instruments (TI) Support and Service Information
Texas Instruments (TI) Warranty Information
.............................................
.......................................
...................................
.......................................
.............
.....................................
.....................................
.......
................
116
125
128
129
131
132
133
134
135
Index 137
vi
Page 7

1
Overview of Calculator Operations
This chapter contains information on:
•
Basic calculator operation
•
Clearing and correcting
•
Math operations
•
Memory
•
Last Answer
•
Worksheets
1: Overview of Calculator Operations 1
Page 8

Turning the Calculator On and Off
Turning the Calculator On
$
Press
to turn the calculator on.
•
If you turned the calculator off by pressing
calculator returns to operation in the standard-calculator
mode. A value of zero is displayed and the values in all of
the worksheets are the same as you left them, as are the
formats for numbers, angle units, dates, separators, and
calculation method.
•
If the APD™ feature turned the calculator off, the
calculator, including the display and any error condition,
returns exactly as you left it.
$
, the
Turning the Calculator Off
When you press
•
The displayed value is cleared.
•
Any unfinished standard-calculator operation is canceled.
•
Any worksheet calculation in progress is canceled.
•
Any error condition is cleared.
•
The Constant Memory™ feature retains all worksheet values
and settings, including the contents of the 10 memories and
all format settings.
$
to turn the calculator off:
Automatic Power Down™ (APD™) Feature
To prolong the life of the battery, the Automatic Power Down
(APD) feature turns the calculator off automatically if you do
not press any key for approximately 10 minutes.
2 BA II PLUS™ Calculator
Page 9

Resetting the Calculator
Resetting the calculator restores all default settings and clears
all data. Because you can clear only selected portions of data,
you should reserve the reset function for appropriate situations.
You might choose to reset when you first purchase the
calculator or when you start a new project.
Effects of Resetting
•
Clears the display and any unfinished calculation.
•
Clears all 10 memories.
•
Clears all worksheet data and restores the default settings.
(For information on specific worksheets, refer to the
specific worksheet chapters.)
•
Returns the calculator to the standard-calculator mode.
Alternatives to Resetting
Before resetting the calculator, consider the other methods for
clearing described in this chapter. For example, if you need to
clear only one worksheet, you can do so without resetting.
Procedure: Resetting the Calculator
If necessary, first press P to clear any error condition.
쐃
Press &
RST ?
쐇
To reset the calculator, press
}
and the
.
indicator are displayed.
ENTER
!
.
RST
and
0.00
are
displayed.
.
To cancel the reset operation instead, press
Note:
displayed.
& U
0.00
is
The calculator is in standard-calculator mode.
1: Overview of Calculator Operations 3
Page 10
Keys and 2nd Functions
The primary function of each key is printed on the key. For
example, press
Some keys provide a secondary function. which is printed in
yellow above the key. When you press &, the character,
abbreviation, or word printed above a key becomes active for
the next keystroke. For example, press & U to leave a
worksheet and return to standard-calculator mode.
$
The Display
The display shows entries and results with up to 10 digits. The
indicators along the top of the display provide information
about the status of the calculator and tell you what keys are
available at different times.
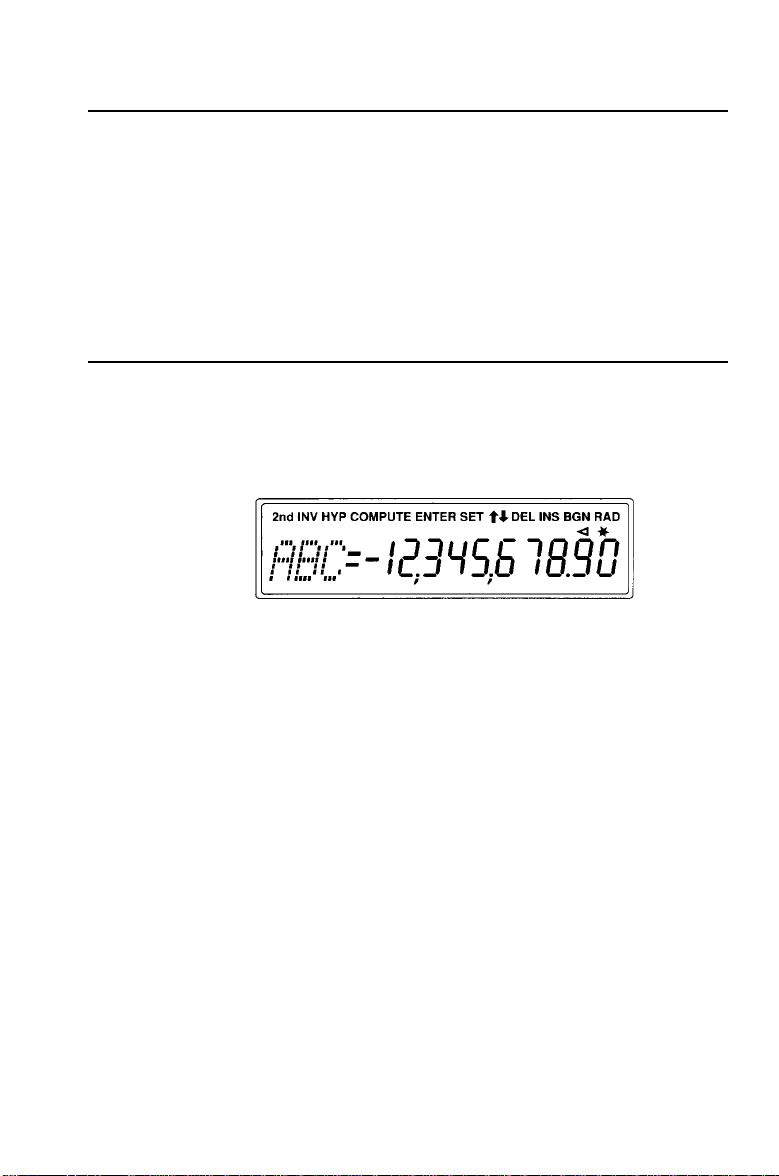
ABC
represents the spaces where the three-letter abbreviations
for the variable labels are displayed.
to turn the calculator on or off.
4 BA II PLUS™ Calculator
Page 11

Display Indicators
Indicator Meaning
2nd
INV
HYP
COMPUTE
ENTER
SET
# $
DEL
INS
BGN
RAD
=
.
The calculator will access the second function of the next key
pressed.
The calculator will access the inverse function of the next key or
key sequence pressed.
The calculator will access the hyperbolic function of the next
key or key sequence pressed.
You can compute a value for the displayed variable by pressing
%
.
You can enter a value for the displayed variable by keying in a
value and pressing
The displayed variable is a setting that you can change by
pressing & V.
You can press " to view previous variables in the current
worksheet or # to view subsequent variables.
You can press & W to delete a cash flow or a statistical data
point.
You can press & X to insert a cash flow or a statistical data
point.
You have selected beginning-of-period payments for TVM
calculations. If the
in the TVM worksheet, end-of-period payments are selected.
The calculator is in the radian mode. All angle values are
displayed and must be entered as radians. If the
not displayed, all angle values are displayed and must be entered
as degrees.
The displayed value has been entered in a worksheet. After a
computation, the indicators are cleared.
The displayed value has been computed in a worksheet. If you
make a change to the worksheet that invalidates a previously
computed value, the indicator is removed from that value.
The displayed value is “assigned” to the variable represented by
the label in the display. If the = indicator is not displayed, the
displayed value is not assigned to the displayed variable.
The displayed value is negative.
!
.
indicator is not displayed when you are
BGN
RAD
indicator is
1: Overview of Calculator Operations 5
Page 12

Setting Calculator Formats
You can set formats for five aspects of the calculator.
Format Options Default
Number of decimal places
Angle units degrees (
Dates
Number separatorsUS format 1,000.00 or
Calculation method
The sections that follow give details about each format and
instructions for changing the format.
Number of Decimal Places
The calculator internally stores numeric values to an accuracy of
13 digits. You can specify the number of decimal places to be
displayed. The default is two decimal places, rounding if necessary.
The decimal format setting affects only the display; it does not
round the internal value, except for amortization and depreciation
results. To round the internal value, use the round function.
Examples in this guidebook assume a setting of two decimal
Note:
places. Other settings may show different results.
0 – 9
(floating-decimal format = 9)
US
format mm-dd-yyyy or
(European) format dd-mm-yyyy
(European) format 1.000,00
Chn
(chain) or
Operating System) calculations
DEG
) or radians (
AOS
Eur
Eur
™
(Algebraic
2
places
RAD)DEG
(degrees)
US
US
Chn
format
format
(chain)
6 BA II PLUS™ Calculator
Page 13

Procedure: Changing the Number of Decimal Places
쐃
Press &
|
is displayed with the current
.
DEC=
decimal-place setting.
쐇
Enter the number of decimal places to be displayed (0
through 9) and press
!
. To specify a floating-decimal
format, enter 9.
쐋
Choose one of the following to continue:
<
To continue setting formats, press #.
<
To return to the standard-calculator mode, press &
<
To access a worksheet, press the appropriate worksheet
key or key sequence.
Angle Unit Format
You can enter and display angle values in either degrees or
radians. You can specify which method you require.
The default setting for angle units is degrees. There is no
display indicator for this setting. However, if you specify
radians, the
indicator is displayed in the upper right-hand
RAD
corner of the display.
Procedure: Changing the Angle Unit Format
쐃
If necessary, press &
| #
.
U
.
The most recently selected angle-units format is displayed,
either
쐇
Press & V repeatedly to set either
쐋
Choose one of the following to continue:
<
To continue setting formats, press # or ".
<
To return to the standard-calculator mode, press &
<
To access a worksheet, press the appropriate worksheet
DEG
or
RAD
.
DEG
or
RAD
.
U
key or key sequence.
1: Overview of Calculator Operations 7
.
Page 14

Date Format
Both the Bond and Date worksheets use dates. You can select
either the US or the European display format. The default
setting for dates is the US format.
US format (US): Month Day Year
12 - 31 - 1990
European format (
EUR
): Day Month Year
31 - 12 - 1990
Procedure: Changing the Date Format
쐃
If necessary, press &
| # #
.
The most recently selected date format is displayed, either
or
US
쐇
Press & V repeatedly to select either
쐋
Choose one of the following to continue:
<
To continue setting formats, press # or ".
<
To return to the standard-calculator mode, press &
<
To access a worksheet, press the appropriate worksheet
EUR
.
or
US
EUR
key or key sequence.
.
U
.
8 BA II PLUS™ Calculator
Page 15

Separator Format
You can select either the US or the European format for the
display of separators in numbers. The default setting for
separators is the US format.
US and UK format (US):
European format (
EUR
):
1,000.00
1.000,00
Procedure: Changing the Separator Format
쐃
If necessary, press &
| # # #
.
The most recently selected separator format is displayed,
either
쐇
Press & V repeatedly to select either
쐋
Choose one of the following to continue:
<
<
<
US
or
EUR
.
or
US
EUR
To continue setting formats, press # or ".
To return to the standard-calculator mode, press &
To access a worksheet, press the appropriate worksheet
key or key sequence.
.
U
.
1: Overview of Calculator Operations 9
Page 16

Calculation Method
You can select either the chain calculation method or the
AOS
(algebraic operating system) calculation method. The default
setting for calculation method is chain (
When the calculation method is set to
).
Chn
(chain), the
Chn
calculator solves problems in the order that you enter them.
This calculation method is used in most financial calculators.
For example, in
when you enter 3 H 2 < 4 N, the answer is
Chn
20 (3 + 2 = 5, 5 * 4 = 20).
When the calculation method is set to
(the algebraic
AOS
operating system), the calculator solves problems according to
the standard rules of algebraic hierarchy. In AOS, multiplication
and division operations are completed before addition and
subtraction operations.
This calculation method is used in most scientific calculators.
For example, in
when you enter 3 H 2 < 4 N, the answer
AOS
is 11 (2 Q 4 = 8; 3 + 9 = 11). The multiplication operation is
completed before the addition operation.
Procedure: Changing the Calculation Method
쐃
If necessary, press &
| # # # #
.
The most recently selected calculation method is displayed,
either
(Chain) or
Chn
(Algebraic Operating System).
AOS
쐇
Press & V repeatedly to select either
쐋
Choose one of the following to continue:
<
To continue setting formats, press # or ".
<
To return to the standard-calculator mode, press &
<
To access a worksheet, press the appropriate worksheet
Chn
or
AOS
.
U
key or key sequence.
10 BA II PLUS™ Calculator
.
Page 17

Clearing the Calculator
To clear . . . Keystrokes
. . . one character at a time from the display (including
decimal points).
. . . an incorrect entry, an error condition, or an error
message from the display.
. . . out of a worksheet and return to standard-calculator
mode.
. . . all pending operations in the standard-calculator mode
and display zero.
. . . in a worksheet, a value you have keyed into the display
but not yet entered as a variable value. The previous value
returns.
. . . any calculation you have started but have not yet
completed.
. . . the TVM worksheet and return the values in the
worksheet to a known starting point.
. . . any worksheet (not TVM) and return the values in the
worksheet to a known starting point. Also returns you to
the first variable in the worksheet.
. . . all 10 memories.
. . . one of the 10 memories without affecting the others.
*
P
& U
& U
P P
P P
& U
& ^
& z
& {
& z
Q D
key for the
number of the
memory (0–9)
*
and the
* When you are in a worksheet, press P repeatedly to return to standard-calculator
mode.
1: Overview of Calculator Operations 11
Page 18

Correcting Entry Errors
If you enter an incorrect number but have not yet pressed an
operation key (such as H or 4), you can correct the number
without clearing the calculation.
•
Remove the last digit or decimal point from a number you
have keyed in by pressing the backspace key * and then
enter the correct digit.
•
Erase the entire number by pressing P once, then key in
the correct number and continue with your calculation.
Pressing
Note:
pressed an operation key clears any calculation in progress.
Example: Correcting an Entry Error
Compute 3 Q 1234.56, but accidentally enter .86 instead of .56.
Use * to correct the mistake, and then continue with your
calculation.
Procedure Keystrokes Display
Clear the calculator.
Begin the expression.
Enter the second number incorrectly.
Erase the 86.
Complete the number correctly.
Compute the result.
to correct a numeric entry immediately after you have
P
& U
<
3
1234.86 1,234.86
* *
56 1,234.56
N
0.00
3.00
1,234.
3,703.68
12 BA II PLUS™ Calculator
Page 19

Math Operations
When the calculation method is set to chain (
), mathematical
Chn
expressions, such as 3 + 2 Q 4, are evaluated in the order that you enter
them. The N key completes an operation and displays the result.
Operation Example Keystrokes Display
N
Addition 6 + 4
Subtraction 6 N 4
Multiplication 6 Q 4
Division 6 P 4
Universal power 3
1.25
Parentheses 7 Q (3 + 5)
Percent 4% of $453
Percent ratio 14 is what percent of
25?
Percent add-on $498 + 7% sales tax
Percent discount $69.99 N 10% discount
Square 6.3
2
Combinations n = 52, r = 5
Permutations n = 8, r = 3
6
H 4
N
6
B 4
N
6
< 4
N
6
6 4
1.25
< 4 2
6 25 2
2
H 7
N
N
N
3
;
7
< 9 3 H 5 :
453
14
498
N
69.99
B 10
N
4
6.3
52
& s 5
8
& m 3
N
N
2
N
10.00
2.00
24.00
1.50
3.95
56.00
18.12
56.00
34.86
532.86
7.00
62.99
39.69
2,598,960.00
336.00
1: Overview of Calculator Operations 13
Page 20

Math Operations (cont.)
Some operations are performed immediately and do not require that
you press N.
Operation Example Keystrokes Display
3
Square root
15.5
Reciprocal 1/3.2
Factorial 5!
Natural logarithm ln 203.45
Natural antilogarithm e
.69315
Round Round 2 P 3 to the set
decimal format
Random number* Generate random
number
Store “seed” value
Sine** sin(11.54°)
Cosine** cos(120°)
Tangent** tan(76°)
1
Arcsine** sin
Arccosine** cos
Arctangent** tan
-
-
-
(.2)
1
(-.5)
1
(4)
Hyperbolic sine sinh(.5)
Hyperbolic cosine cosh(.5)
Hyperbolic tangent tanh(.5)
1
Hyperbolic arcsine sinh
Hyperbolic arccosine cosh
Hyperbolic arctangent tanh
-
-
-
(5)
1
1
(5)
(.5)
15.5
5
3.2
g
5
&
>
203.45
&
i
.69315
2
6 3 N &
& a
D & a
&
&
d
f
d
e
f
e
d
e
f
11.54
120
76
&
.2
8
.5
S 8
4
8
.5
& c
.5
& c
.5
& c
5
& c 8
5
& c 8
.5
& c 8
o
d
e
f
3.94
0.31
120.00
5.32
2.00
0.67
0.86
0.86
0.20
N
0.50
4.01
11.54
120.00
75.96
0.52
1.13
0.46
2.31
2.29
0.55
* The random number generated when you press & a may not be the one shown
here.
** Angles are interpreted according to the current setting for angle units (degrees or
radians). These examples show angles in degrees.
14 BA II PLUS™ Calculator
Page 21

More on Selected Math Operations
Universal Power
;
lets you raise a positive number to any power (2
example). However, you can raise a negative number only to an
integer power or the reciprocal of an odd number. In either
case, the power can be either positive or negative.
Parentheses
Parentheses let you control the order in which a numeric
expression is evaluated. The portion of an expression enclosed
in parentheses is evaluated separately. Up to 15 levels of
parentheses are available, with up to 8 pending operations.
If an expression would end in a series of closed parentheses
you can omit pressing :. Press N to close all of the
parentheses automatically, evaluate the expression, and display
the end result. To see intermediate results, press : repeatedly.
Factorial
To compute the factorial of a displayed number, press & g.
The number must be a positive integer 69.
.5
or 2
(1/3)
, for
Random Numbers
To generate a random real number between zero and one
(0<x<1) from a uniform distribution, press &
a
.
To repeat a sequence of random numbers, you must first store a
“seed” value in the random number generator. To store a seed
value, key in an integer greater than zero and press D
a
. This lets you recreate experiments by generating the
&
same series of random numbers.
Combinations
& s
computes the number of combinations of n items taken
r at a time.
n
nCr
=
1: Overview of Calculator Operations 15
!
nr r
!!
−×
()
Page 22
Permutations
& m
computes the number of permutations of n items taken
r at a time.
n
n
Pr
!
=
nr
−
()
!
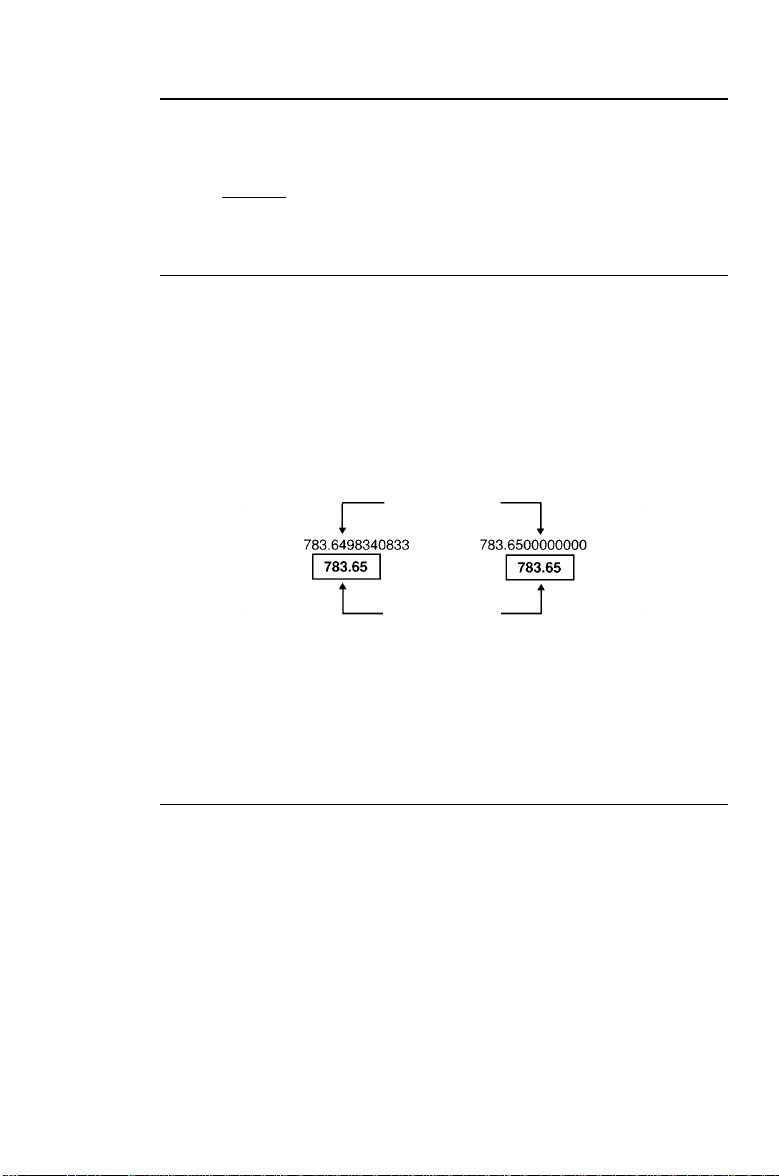
Rounding
The round function is useful when you need to perform a
calculation using the displayed form of a number rather than
the unrounded value that the calculator stores internally. The
decimal format setting does not round the calculator’s
internally stored value, only the displayed value.
& o
lets you change the internal value to match its
displayed form.
Internal value
Displayed value
Before rounding
After rounding
For example, in the Bond worksheet, you might want to round
a computed selling price to the nearest penny (two decimal
places) before continuing with your calculation.
Scientific Notation
If you compute a value that is larger or smaller than the
calculator can display in standard decimal format, the value is
displayed in scientific notation. A value in scientific notation is
displayed as a base value (sometimes called a mantissa),
followed by a blank space, followed by an exponent.
You cannot directly enter a number in scientific notation, but
when the AOS calculation method is selected, you can use the
;
key to enter a number in scientific notation.
For example, for 3 Q 10
16 BA II PLUS™ Calculator
3
, key in 3 <
10
;
.
3
Page 23

Memory Operations
Your calculator always has 10 memories available.
•
The memories can hold any numeric value within the range
of the calculator.
•
The memories are numbered
access each memory using a single keystroke.
Clearing Memory
There are two ways to clear memory.
•
Storing a zero in an individual memory clears the memory
(shown in “Memory Examples” below).
through M9. This lets you
M0
•
To clear all of the memories simultaneously, press &
& z
to clear the Memory worksheet.
{
Storing to Memory
To store a displayed value to a memory (0 through 9), press
and a digit key 0 through 9.
•
Any previous value in that memory is replaced by the new
value.
•
When you turn the calculator off, the Constant Memory
feature retains all stored values.
Recalling from Memory
To recall a number stored in a memory to the display, press
and a digit key 0 through 9. The number is displayed, but also
remains in memory.
Memory Examples
Function Keystrokes
0
4
Store a zero in memory 4 (clear memory 4).
Store 14.95 in memory 3.
Recall a value from memory 7.
D
14.95
J
D
7
3
D
J
1: Overview of Calculator Operations 17
Page 24

Memory Arithmetic
Memory arithmetic allows you to perform a calculation on a
stored value and then store the result with a single operation.
•
Memory arithmetic does not change the displayed value,
only the value in the affected memory.
•
Memory arithmetic does not complete any calculation in
progress.
The table below shows the memory arithmetic functions
available with the calculator. In each case, the result is stored in
the specified memory.
These examples assume that a value is already in the display.
Function Keystrokes
Add the value in the display to the value in
D H
D B
D <
D 6
D ;
9
3
0
5
4
memory 9.
Subtract the value in the display from the
value in memory 3.
Multiply the value in memory 0 by the value in
the display.
Divide the value in memory 5 by the value in the
display.
Raise the value in memory 4 to the power of the
displayed value.
18 BA II PLUS™ Calculator
Page 25

Calculations Using Constants
& `
stores a number and an operation for use in repetitive
calculations.
After you store the constant, you can use it in subsequent
calculations by entering a new value and pressing N. The
constant is cleared when you press any key other than a
numeric entry key or N.
Example: Multiply 3, 7, and 45 by 8.
Procedure Keystrokes Display
Clear calculator.
Begin first calculation.
Store Q 8 in the constant register.
Compute 7 Q 8.
Compute 45 Q 8.
Keystrokes for Constant Calculations
The following table shows how to set the constant for addition,
subtraction, multiplication, division, universal power, and
percent. The constant value is denoted by c.
Keystrokes Function
H & ` c
n
B & ` c
n
< & ` c
n
6 & ` c
n
; & ` c
n
H & ` c 2 NAdds c% of each subsequent entry to that entry.
n
B & ` c 2 NSubtracts c% of each subsequent entry from that
n
N
N
N
N
N
Adds c to each subsequent entry.
Subtracts c from each subsequent entry.
Multiplies each subsequent entry by c.
Divides each subsequent entry by c.
Raises each subsequent entry to the power of c.
entry.
& U
3 3
< & `
N
7
N
45
8
N
0.00
24.00
56.00
360.00
Repeat constant calculations with n N.
1: Overview of Calculator Operations 19
Page 26

Last Answer Feature
To display the last answer, press & x. If your current
equation calls for the last answer repeatedly, you can retrieve
the value of
You can use the last answer feature to copy a value:
•
From one place to another within the same worksheet.
•
From one worksheet to another.
•
From a worksheet to the standard-calculator mode.
•
From the standard-calculator mode to a worksheet.
is updated when:
ANS
more than once.
ANS
•
You enter a value by pressing
•
You compute a value by pressing %.
•
You press N to complete a calculation.
•
The calculator automatically computes a value.
!
.
Example: Last Answer
Procedure Keystrokes Display
Clear the calculator.
Enter a calculation and complete it
with the equal key.
Begin a new calculation.
Recall the last answer.
Complete the calculation.
& U
N
3
H 1
;
2
& x
N
0.00
4.00
2.00
4.00
16.00
20 BA II PLUS™ Calculator
Page 27

Using Worksheets: Tools for Financial Solutions
What Is a Worksheet?
Each worksheet is designed as a framework for a set of
variables. The formulas that define the relationships between
the variables, though not visible, are built into each worksheet.
•
Each worksheet is designed to solve specific types of
problems such as time-value-of money, cash-flow, bond, or
depreciation problems.
•
You access the Time-Value-of-Money (TVM) worksheet
variables with the five TVM keys on the third row of the
keyboard (,, -, ., /, 0).
•
All other worksheets are prompted. For example, the
\
key sequence lets you access the variables in the
prompted worksheet to amortization calculations.
•
You select settings for some variables, assign known values
to other variables, and compute values for the unknown
variables.
•
Variable labels are displayed one at a time, along with any
value previously assigned to the variable.
•
By changing the values of the variables, you can quickly
perform “what if” calculations.
•
Generally, each worksheet is independent of the others;
operations you perform in one worksheet do not affect
variables in other worksheets.
•
All current worksheet data is retained when you stop using a
worksheet, even if you turn off the calculator.
&
1: Overview of Calculator Operations 21
Page 28

Types of Worksheets
The calculator has two modes.
•
In the standard-calculator mode, you can perform standard
math operations and compute TVM values (
).
FV
•
In the prompted worksheet modes, you are guided through
specialized tasks such as amortization calculations and
cash-flow analyses.
Worksheet Variables
TVM Variables
You access the five time-value-of-money variables with the five
TVM keys on the third row of the keyboard. You can access
other parts of the TVM worksheet and other TVM functions by
pressing the & key.
Z[\ ]^
,-. /0
You can enter values using the five basic TVM keys at any time,
even when you are in another worksheet. However, to compute
TVM values or clear the TVM worksheet, you must be in the
standard-calculator mode. To return to the standard-calculator
mode, press &
U
N, I/V, PV, PMT
.
,
22 BA II PLUS™ Calculator
Page 29

Prompted-worksheet Variables
To access the column of variables within a prompted worksheet
(or portion of a prompted worksheet), press the appropriate
worksheet key or key sequence.
For example, to access the amortization variables
PRN,
and
(first payment in a range, last payment in a range,
INT
remaining balance, principal, and interest), press &
P1, P2, BAL
\
.
This is the prompted worksheet for amortization calculations.
Press # and " to move to the next or previous variable in a
prompted worksheet. Different variable labels and values are
displayed. Indicators in the display prompt you to select
settings, enter values, or compute results.
To return to standard-calculator mode, press &
U
.
There are five types of worksheet variables:
•
Enter-only
•
Compute-only
•
Automatic-compute
•
Enter-or-compute
•
Settings
Enter-Only Variables
You cannot compute a value for enter-only variables. Values
may be limited to a specified range. An enter-only variable can
be:
•
Entered directly from the keyboard.
,
•
The result of a math calculation.
•
Recalled from memory.
•
Obtained from another worksheet using the last answer
feature.
When you access an enter-only variable, the variable label and
the
indicator are displayed. The
ENTER
ENTER
indicator also
reminds you that once you have keyed a value into the display,
you must press
!
to assign that value to the variable. An =
sign is displayed between the label and the value when the
value has been assigned to the variable.
1: Overview of Calculator Operations 23
Page 30

Compute-Only Variables
For compute-only variables, you compute values by displaying
the appropriate label and pressing %; you cannot enter a
value for this type of variable.
When you access a compute-only variable, the variable label
and the
COMPUTE
indicator are displayed. This indicator
reminds you to press % to compute a value for the displayed
variable. An = sign is displayed between the label and the value
when the value has been assigned to the variable.
Automatic-Compute Variables
For automatic-compute variables, you do not have to press %;
a value is automatically computed and displayed when you
access the variable by pressing # or ". After a value is
automatically computed, an = sign is displayed between the
label and the value.
Enter-or-Compute Variables in the TVM Worksheet
The five variables in the TVM worksheet (N,
) are enter-or-compute variables. It is not necessary to be in
FV
I/Y, PV, PMT
, and
the standard-calculator mode when you enter values for these
variables. However, you must be in the standard-calculator
mode to compute values for these variables.
•
To enter a TVM value, key a value into the display and press
the appropriate variable key.
•
To compute a TVM value, press % and the appropriate
variable key.
24 BA II PLUS™ Calculator
Page 31

Enter-or-Compute Variables in Prompted Worksheets
Some prompted worksheets contain variables that you can
either enter or compute. When you access an enter-or-compute
variable, the variable label is displayed along with both the
and
ENTER
•
The
COMPUTE
indicator reminds you that if you key in a value
ENTER
for the variable, you must press
indicators.
!
to assign the value to
the variable.
•
The
COMPUTE
indicator reminds you that if you want to
compute a value for the variable, you must press %.
After you press
!
or %, an = sign is displayed between
the label and the value.
Selecting Worksheet Settings
Most prompted worksheets have variables with two or more
options (settings). When you access a setting, the variable label
and the
indicator are displayed. The label that is displayed
SET
indicates the current setting.
Press & V repeatedly to cycle through the options to the
one you want.
Indicators
When you enter a value for a variable, the calculator displays .
When you compute a value for a variable, the calculator
displays . If you make a change to a worksheet that invalidates
previously entered or computed values, the and indicators
are removed.
1: Overview of Calculator Operations 25
Page 32

Clearing Worksheets and Setting Defaults
Label
& }
!
N
I/Y
PV
PMT
FV
P/Y
C/Y
END /
BGN
P1
P2
BAL
PRN
INT
Note: & }
US number separators, CHN calculations).
00
00
00
00
00
12 12
12 12
END END
11
11
00
00
00
!
& ^& [
*
also sets the calculator formats (2 decimal places, DEG, US dates,
& z
& ]
& z
& \
& z
26 BA II PLUS™ Calculator
Page 33

2
Time-Value-of-Money and
Amortization Worksheets
The Time-Value-of-Money and Amortization worksheets are
useful in applications where the cash flows are equal, evenly
spaced, and either all inflows or all outflows. They help you
solve problems involving annuities, loans, mortgages, leases,
and savings. You can also generate an amortization schedule.
Press # and " to move through each set of variables.
Z[\]^
,-./0
2: TVM and Amortization Worksheets 27
Page 34

TVM and Amortization Worksheet Labels
Keys Label Meaning
,
-
.
/
0
& [
#
& ]
& V
& \
#
#
#
#
N
I/Y
PV
PMT
FV
P/Y
C/Y
END
BGN
P1
P2
BAL
PRN
INT
Notes about the TVM and Amortization Worksheets
Number of periods Enter/compute
Interest rate per year Enter/compute
Present value Enter/compute
Payment Enter/compute
Future value Enter/compute
Number of payments per year Enter-only
Number of compounding
periods per year
End-of-period payments Setting
Beginning-of-period payments Setting
Starting payment Enter-only
Ending payment Enter-only
Balance Auto-compute
Principal paid Auto-compute
Interest paid Auto-compute
Type of
Variable
Enter-only
& } !
♦
C/Y=12; END
& ^
♦
affect
P/Y, C/Y
& [ & z
♦
& ] & z
♦
& \ & z
♦
.
INT=0
When solving a problem using only four of the five TVM
♦
sets
(not
BGN
sets
N, I/Y, PV, PMT
, or the
N=0, I/Y=0, PV=0, PMT=0, FV=0; P/Y=12
);
P1=1, P2=1; BAL=0, PRN=0, INT=0
, and FV to zero; does not
BGN/END
sets
sets
sets
setting.
and
P/Y=12
(not
END
P1=1, P2=1, BAL=0, PRN=0
BGN
C/Y=12
).
.
,
.
, and
variables, make sure the unused variable is zero.
28 BA II PLUS™ Calculator
Page 35

Notes about TVM and Amortization Worksheets (cont.)
♦
Enter values for
PV, PMT
, and FV as negative if they are
outflows (cash paid out) or as positive if they are inflows
(cash received). To enter a negative value, press S after
entering the number.
♦
Enter
automatically converts
values for
♦
When you enter a value for
automatically entered for
♦
The
as the nominal interest rate. The TVM worksheet
I/Y
to a “per period” rate based on the
I/Y
P/Y
END/BGN
and
setting lets you specify whether the transaction
C/Y
.
, the same value is
P/Y
. (You can change
C/Y
C/Y
.)
is an ordinary annuity or an annuity due.
<
In ordinary annuities, the payments occur at the end of
each payment period. Most loans are in this category. For
ordinary annuities, select
<
In annuities due, payments occur at the beginning of each
END
.
payment period. Most leases are in this category. For
annuities due, select
♦
Pressing % when
or P2 is displayed updates P1 and P2 to
P1
BGN
.
represent the next range of payments.
♦
A computed value for
after a specified number of
BAL
payments may be slightly different than a computed value for
after the same number of payments.
FV
<
When solving for
the
value rounded to the number of decimal places
PMT
BAL, PRN
, and
, the calculator uses
INT
specified by the decimal format.
<
When solving for
value for
2: TVM and Amortization Worksheets 29
PMT
, the calculator uses the unrounded
FV
.
Page 36

Entering, Recalling, and Computing TVM Values
You enter a TVM value by keying in a value and pressing the
appropriate TVM key (,, -, ., /, or 0). The value is
stored in the TVM variable (
N, I/Y, PV, PMT
, or FV).
You recall a TVM value to the display by pressing J and the
TVM key.
When you enter or recall a value for any of the five TVM
variables (
N, I/Y, PV, PMT
, or FV), you can be in either standard
calculator mode or a worksheet mode. The display responds
differently according to the mode you are in.
•
In standard calculator mode (accessed by pressing
U
), the variable label, the = sign, and the value you
&
entered or recalled are displayed.
•
In worksheet mode, only the value you entered or recalled is
displayed. Any label previously in the display remains.
To compute a TVM value, press % and the appropriate TVM
key. When you compute a TVM value, you must be in standard
calculator mode. Press &
U
to return to standard
calculator mode.
Entering a Value for N Using [xP/Y]
You can use &
Z
to enter a value for N. Pressing &
Z
automatically multiplies a displayed number by the value stored
in the
variable (number of payments per year).
P/Y
By entering the number of years (for example, 30) and pressing
& Z
, you can compute the number of payments required to
pay off an annuity. Press , to enter that value as the number of
payments in a TVM calculation.
30 BA II PLUS™ Calculator
Page 37

Compound Interest
Many lending institutions add the interest you earn to the
principal. The interest you earn from the previous compounding
period becomes part of the principal for the next compounding
period. Compound interest enables you to earn a greater
amount of interest on your initial investment.
In order to earn compound interest, the interest must remain
with the principal. For example, if you invest $100 at an annual
interest rate of 10% compounded annually, you earn $10 interest
after one year. At the end of the second year, the interest is
calculated on $110 ($100 principal plus $10 accumulated
interest), so you earn $11 in the second year. As additional
interest accumulates, your interest earnings increase each year.
2: TVM and Amortization Worksheets 31
Page 38

Time-Line Diagrams
A time-line diagram can help you visualize cash flows by
showing the amounts paid or received (cash outflows or cash
inflows) at various points in time.
•
Cash flows received are shown with arrows pointing up, as
with the loan amount at the left.
•
Cash flows invested have arrows pointing down, as with the
35 regular payments and the balloon payment at the right.
Loan amount
23,000 Enter inflows as positive.
Time
- 400- 400
Pmt 2 Pmt 3 Pmt 34 Pmt 35
400- 400
-
15,000
-
Balloon
Pmt
Entering Inflows and Outflows
The calculator follows the established convention of treating
inflows of cash (cash received) as positive and outflows of cash
(cash paid out) as negative.
•
You must enter inflows as positive values and outflows as
negative values.
•
The calculator displays computed inflows as positive values
and computed outflows as negative values.
32 BA II PLUS™ Calculator
Page 39

Procedure: Using the TVM Worksheet
The worksheet stores the values and settings you enter until
you clear the worksheet or change the values or settings.
Therefore, you may not need to do all the steps in the
procedure every time you work a TVM problem.
쐃
Press &
(
N=0, I/Y=0, PV=0, PMT=0, FV=0; P/Y=12, C/Y=12; END; P1=1
P2=1; BAL=0, PRN=0, INT=0
쐇
If
P/Y
key in the number of payments per year, and press
쐋
Press #.
} !
to reset all variables to their defaults
).
(payments per year) should not be 12, press & [,
!
(compounding periods per year) and its
C/Y=
current value are displayed. When you enter a value for
the same value is automatically entered for
C/Y
. If the
compounding periods per year is different than the
END
!
is the
.
payments per year, key in the value and press
쐏
If you want beginning-of-period payments (
default setting), press & ] & V.
If beginning-of-period payments are selected, the
BGN
indicator is displayed; no indicator is displayed for end-ofperiod payments.
쐄
Press &
쐂
Enter values for the four known variables. Key in each value
U
to return to standard calculator mode.
and press the appropriate key (,, -, ., /, or 0). The
value of the unknown variable is 0.
쐆
Press % and the key for the unknown variable to compute
its value.
,
.
P/Y
,
2: TVM and Amortization Worksheets 33
Page 40

Procedure: Generating an Amortization Schedule
The worksheet for amortization calculations uses the values
you entered and computed in the TVM worksheet to compute
amortization data. The procedures on these pages give you two
ways to generate an amortization schedule.
쐃
Press &
(
N=0, I/Y=0, PV=0, PMT=0, FV=0; P/Y=12, C/Y=12; END; P1=1
P2=1; BAL=0, PRN=0, INT=0
쐇
Press &
P1=
쐋
Specify the range of payments.
<
To enter a value for
key in a value and press
<
To enter a value for
press #, enter a value, and press
쐏
Press # repeatedly to display the automatically computed
} !
to reset all variables to their defaults
).
\
.
and its current value are displayed.
(the first payment in the range),
P1
!
.
(the last payment in the range),
P2
!
.
values:
<
<
<
쐄
Press &
— the remaining balance after payment
BAL
— the principal
PRN
— the interest paid over the specified range
INT
\
or, if
is displayed, press # to display
INT
P2
again.
쐂
Repeat steps 2 and 3 for each range of payments to generate
an amortization schedule.
,
P1
34 BA II PLUS™ Calculator
Page 41

Procedure: Automatically Generating a Schedule
After you enter the initial values for P1 and P2, as described
above, you can automatically compute an amortization
schedule.
쐃
Press &
P1=
쐇
Press %. This automatically updates both
\
or, if
INT
and its current value.
is displayed, press # to display
and P2 to
P1
represent the next range of payments.
The calculator computes the next range of payments using
the same number of periods as in the previous range of
payments. For example, if the previous range was 1 through
12 (12 payments), pressing % updates the range to 13
through 24 (12 payments).
쐋
Press # to display
<
If you pressed % when
for
is automatically displayed. (You can still enter a
P2
new value for
<
If you did not press % when
press % when
and P2 for the next range of payments.
P1
쐏
Press # as needed to display the automatically computed
values for
쐄
Repeat steps 1 through 4 until the schedule is complete.
BAL, PRN
.
P2
was displayed, a new value
P1
, if necessary.)
P2
was displayed, you can
P1
is displayed to enter values for both
P2
, and
for the next range of payments.
INT
2: TVM and Amortization Worksheets 35
Page 42

Basic Loan Calculations—Interest
Example: Interest Rate
You have a 30-year mortgage for $75,000 and make payments
each month of $576.69. What is the interest rate of your
mortgage?
Procedure Keystrokes Display
Set all variables to defaults.
Enter number of payments
using payment multiplier.
Enter loan amount.
Enter payment amount.
Compute interest rate.
The interest rate is 8.5% per year.
& } !
30
& Z
75000
576.69
% -
.
S
,
/
RST 0.00
N= 360.00
PV= 75,000.00
PMT= -576.69
I/Y= 8.50
36 BA II PLUS™ Calculator
Page 43

Basic Loan Calculations—Payments
Example: Monthly Payment
You are considering a 30-year mortgage at 8.5% for $75,000.
How much would the monthly payment be?
Procedure Keystrokes Display
Set all variables to defaults.
Enter number of payments
using payment multiplier.
Enter interest rate.
Enter loan amount.
Compute payment.
The monthly payment would be $576.69.
Example: Quarterly Payment
(continued from previous example)
Your mortgage company also offers an option for a quarterly
mortgage with quarterly compounding.
How much would your quarterly payment be? (You do not need
to enter the loan amount or the interest rate. The compounding
periods is automatically reset to equal the payments periods.)
& } !
30
& Z
-
8.5
.
75000
% /
,
RST 0.00
N= 360.00
I/Y= 8.50
PV= 75,000.00
PMT= -576.69
Procedure Keystrokes Display
Set payments per year to 4.
Return to calculator mode.
Enter number of payments
using payment multiplier.
Compute payment.
& [
& U
30
% /
!
4
& Z
,
P/Y= 4.00
0.00
N= 120.00
PMT= -1,732.71
The quarterly payment would be $1,732.71.
2: TVM and Amortization Worksheets 37
Page 44

Future Value of Savings
Example: Future Value of Savings
You have opened a savings account with $5,000. The bank pays
5%, compounded at the end of each year. What is the future
value of the account after 20 years?
Procedure Keystrokes Display
Set all variables to defaults.
Set payments per year to 1.
Return to calculator mode.
Enter number of payments.
Enter interest rate.
Enter beginning balance.
Compute future value.
The future value is $13,266.49.
& } !
& [
& U
20
-
5
5000
% 0
,
S
1
!
.
RST 0.00
P/Y= 1.00
0.00
N= 20.00
I/Y= 5.00
PV= -5,000.00
FV= 13,266.49
38 BA II PLUS™ Calculator
Page 45

Present Value of Savings
Example: Future Value of Savings
You are opening a savings account that you want to be worth
$10,000 in 20 years. The bank pays 5%, compounded at the end
of each year. How much do you need to deposit now?
Procedure Keystrokes Display
Set all variables to defaults.
Set payments per year to 1.
Return to calculator mode.
Enter number of payments.
Enter interest rate.
Enter final balance.
Compute future value.
The present value is $3,768.89. This is the amount you need to
deposit.
& } !
& [
& U
20
-
5
10000
% .
!
1
,
0
RST 0.00
P/Y= 1.00
0.00
N= 20.00
I/Y= 5.00
FV= 10,000.00
PV= -3,768.89
2: TVM and Amortization Worksheets 39
Page 46

Present Value in Present-Value Annuities
Example: Present Value of Cost Savings
The Furros Company purchased a machine that provides
annual savings of $20,000 per year for the next 10 years. Using
an annual discount rate of 10%, compute the present value of
the savings using an ordinary annuity and an annuity due.
•
For a present value ordinary annuity:
PV = ?
$20,000 $20,000 $20,000
. . .
0 1 9 N = 10
I/Y = 10
•
For a present value annuity due for a leasing agreement:
PV = ?
$20,000 $20,000 $20,000
. . .
0 1 9 N = 10
I/Y = 10
40 BA II PLUS™ Calculator
Page 47

Example: Present Value of Cost Savings (cont.)
Procedure Keystrokes Display
Set all variables to defaults.
Set payments per year to 1.
Return to calculator mode.
Enter number of payments.
& } !
& [
1
!
& U
,
10
RST 0.00
P/Y= 1.00
0.00
N= 10.00
Enter interest rate per
payment period.
Enter payment.
-
10
20000
S
/
I/Y= 10.00
PMT= -20,000.00
Compute PV for an ordinary
annuity.
Set beginning-of-period
payments.
Return to calculator mode.
Compute PV for annuity due.
% .
& ]
& V
& U
% .
PV= 122,891.34
BGN
0.00
PV= 135,180.48
The present value is $122,891.34 with an ordinary annuity and
$135,180.48 with an annuity due.
…
…
2: TVM and Amortization Worksheets 41
Page 48

Perpetual Annuities
A perpetual annuity consists of equal payments that continue
indefinitely. An example of a perpetual annuity is a preferred
stock that yields a constant dollar dividend.
These time-line diagrams represent a perpetual annuity as an
ordinary annuity and as an annuity due.
•
For a perpetual ordinary annuity:
PV
PMT PMT
01 2
•
For a perpetual annuity due:
PV
PMT PMT PMT
01 2
Because the term (1 + I/Y / 100)
equations approaches zero as N becomes larger, you can use
the following equations to solve for the present value of a
perpetual annuity.
. . . to infinity
. . . to infinity
-
N
in the present value annuity
•
For a perpetual ordinary annuity:
(
I/Y
PMT
/ 100)
(
I/Y
PMT
/ 100)
PV =
•
For a perpetual annuity due:
PV = PMT +
42 BA II PLUS™ Calculator
Page 49

Example: Present Value of Perpetual Annuities
The Land of OZ has issued perpetual bonds for replacing bricks
in their highway system. The bonds pay $110 per $1000 bond.
You plan to purchase the bonds if you can earn 15% annually.
What price should you pay for the bonds?
Procedure Keystrokes Display
Clear.
Calculate PV for a perpetual
ordinary annuity.
Calculate PV for a perpetual
annuity due.
& U P P
110
6 15 2
H
110
N
N
0.00
733.33
843.33
You should pay $733.33 for a perpetual ordinary annuity and
$843.33 for a perpetual annuity due.
2: TVM and Amortization Worksheets 43
Page 50

Variable Cash Flows
In annuities, all payments are equal. In variable cash flows,
however, the payments are unequal. You can solve for the
present value of variable cash flows by treating the cash flows
as a series of compound interest payments.
The present value of variable cash flows is the value of cash
flows occurring at the end of each payment period discounted
back to the beginning of the first cash flow period (time zero).
PV = ?
CF
01 N
Example: Present Value of Annual Savings
The ABC Company is purchasing a machine that will save the
following end-of-year amounts.
Year 1234
Amount $5000 $7000 $8000 $10000
Assuming a discount rate of 10%, does the present value of the
cash flows exceed the original cost of $23,000?
1
. . .
CF
j-1
1N
N
Cf
j
PV = ?
$5,000 $7,000 $8,000 $10,000
0 1 2 3 N=4
44 BA II PLUS™ Calculator
Page 51

Example: Present Value of Annual Savings
Procedure Keystrokes Display
Set all variables to defaults.
Set payments per year to 1.
Return to calculator mode.
Enter interest rate per cash
flow period.
Enter 1st cash flow.
Enter period number of 1st
cash flow.
Compute present value of 1st
cash flow.
Store in M1.
Enter 2nd cash flow.
Enter period number.
Compute present value of 2nd
cash flow.
Sum to memory.
Enter 3rd cash flow.
Enter period number.
Compute present value of 3rd
cash flow.
Sum to memory.
Enter 4th cash flow.
Enter period number.
Compute present value of 4th
cash flow.
Sum to memory.
Recall total present value.
Subtract original cost.
& } !
& [
1
!
RST 0.00
P/Y= 1.00
& U
-
10
0
S
5000
,
1
% .
D
1
0
S
7000
,
2
% .
D H
1
0
S
8000
,
3
% .
D H
1
0
S
10000
,
4
% .
D H
1
J
1 23,171.23
B
23000
N
I/Y= 10.00
FV= -5,000.00
N= 1.00
PV= 4,545.45
FV= -7,000.00
N= 2.00
PV= 5,785.12
FV= -8,000.00
N= 3.00
PV= 6,010.52
FV= -10,000.00
N= 4.00
PV= 6,830.13
0.00
171.23
…
…
…
…
The present value of the cash flows is $23,171.23, which
exceeds the machine’s cost by $171.23. This is a profitable
investment for the company.
2: TVM and Amortization Worksheets 45
Page 52

Lease-or-Buy Decision
Your business is considering getting a new computer server. If
you lease, you would pay $36,000 per year for five years at the
first of each year. You could buy it for $125,000. The server is
expected to save the company $46,000 per year. It will have no
resale value at the end of the five years. The company can
borrow at 15% annual interest. You require a 20% annual return
on projects and investments of this kind. Ignoring tax effects,
should you acquire it, and if so, should you lease or purchase it?
Example: Present Value of Cost Savings
Procedure Keystrokes Display
Set all variables to defaults.
Set payments per year to 1.
Return to calculator mode.
Enter number of periods.
Enter required annual return
rate.
Enter annual savings.
Compute present value of
savings.
& } !
& [
& U
,
5
20
46000
% .
-
1
S
!
/
RST 0.00
P/Y= 1.00
0.00
N= 5.00
I/Y= 20.00
PMT= -46,000.00
PV= 137,568.16
…
The present value of the annual savings exceeds the purchase
price (i.e., the investment will exceed your annual required
return rate). Acquiring the server is a good financial move.
Should you lease or buy it?
46 BA II PLUS™ Calculator
Page 53

Example: Present Value of Lease Payments
Procedure Keystrokes Display
Set all variables to defaults.
Set payments per year to 1.
Set beginning-of-period
payments.
Return to calculator mode.
Enter number of periods.
& } !
& [
1
!
& ]
& V
& U
,
5
RST 0.00
P/Y= 1.00
BGN
0.00
N= 5.00
Enter periodic interest rate at
which your firm can borrow.
Enter annual lease payment.
-
15
36000
S
/
I/Y= 15.00
PMT= -36,000.00
Compute present value of
lease payments.
% .
PV= 138,779.22
The present value of the lease payments is greater than the
purchase price of $125,000, so it would be best to buy the server
outright.
2: TVM and Amortization Worksheets 47
Page 54

Present Value of Lease with Residual Value
The Peach Bright Company wants to purchase a machine that it
is currently leasing from your company. You offer to sell it for
the present value of the lease discounted at an annual interest
rate of 22% compounded monthly. The machine has a residual
value of $6500, and 46 monthly payments of $1200 remain on
the lease. If the payments are due at the beginning of each
month, how much should you charge for the machine?
The total value of the machine is the present value of the
residual value plus the present value of the lease payments.
Procedure Keystrokes Display
Set all variables to defaults.
Set payments per year to 1.
Set beginning-of-period
payments.
Return to calculator mode.
Enter number of payments.
Calculate and enter periodic
interest rate.
Enter residual value of asset.
Compute present value of
residual.
Enter amount of lease
payment.
Compute present value of
lease payments.
& } !
& [
& ]
& V
& U
46
22
6 12 N
6500
% .
1200
% .
,
S
S
1
!
-
0
/
RST 0.00
P/Y= 1.00
BGN
N= 46.00
I/Y= 1.83
FV= -6,500.00
PV= 2,818.22
PMT= -1,200.00
PV= 40,573.18
0.00
Peach Bright should pay your company $40,573.18 for the
machine.
48 BA II PLUS™ Calculator
Page 55

Monthly Payments
You are planning to purchase a new small desk and chair set
that is sale priced at $525. You can finance your purchase at
20% APR, compounded monthly, for two years. How much is
the monthly payment?
PV = $525 FV = $0
PMT = ? PMT = ? PMT = ?
0 1 23 N = 24
Example: Monthly Payments
Procedure Keystrokes Display
Set all variables to defaults.
Enter number of payments
using payment multiplier.
Enter interest rate.
Enter loan amount.
Compute payment.
. . .
I/Y = 20 ÷ 12
& } !
2
& Z
-
20
525
S
% /
.
,
RST 0.00
N= 24.00
I/Y= 20.00
PV= -525.00
PMT= 26.72
Your monthly payment is $26.72.
2: TVM and Amortization Worksheets 49
Page 56

Yield to Maturity on Bond Purchased on Interest Date
A 9% $1,000 semiannual commercial bond has 13 remaining
coupon payments. You can purchase the bond for $852.50
(ignoring commissions). At this price, what is your yield to
maturity and the annual effective rate?
Example: Yield to Maturity
Procedure Keystrokes Display
Set all variables to defaults.
Set payments per year to 2.
Return to calculator mode.
Enter number of remaining
coupon payments.
Enter bond price.
Calculate the coupon payment.9 2 6 2 <
Enter bond redemption value.
Compute annual yield.
Store in memory.
& } !
& [
& U
13
852.5
N /
1000
% -
D
,
S
0
1
2
!
.
Example: Effective Annual Interest
1000
RST 0.00
P/Y= 2.00
N= 13.00
PV= -852.50
PMT= 45.00
FV= 1,000.00
I/Y= 12.37
0.00
(continued from previous example)
Use the Interest Conversion worksheet (Chapter 7) to calculate
the effective annual interest rate.
Procedure Keystrokes Display
Select and clear Interest
Conversion worksheet.
Recall rate from memory.
Enter compounding periods.
Compute annual effective rate."
& v
& z
J
!
1
#
#
!
2
%
NOM= 0.00
NOM= 12.37
C/Y= 2.00
EFF= 12.75
The annual yield to maturity is 12.37% with semiannual
compounding. The equivalent annual effective rate is 12.75%.
50 BA II PLUS™ Calculator
Page 57

Saving for the Future by Making Monthly Deposits
Accounts with payments made at the beginning of the period
are referred to as “annuity due” accounts. Interest on annuity
due accounts starts accumulating earlier and produces slightly
higher yields.
An individual has decided to invest $200 at the beginning of
each month in a retirement plan. What will the account balance
be at the end of 20 years if the fund earns an annual interest of
7.5 % compounded monthly, assuming beginning-of-period
payments?
Future value(FV) = ?
Interest = 7.5%
Number of payments (N) = 240
. . .
Payment amount (PMT) = $200
Example: Regular Deposits (Annuity Due)
Procedure Keystrokes Display
Set all variables to defaults.
Set beginning-of-period
payments.
Return to calculator mode.
Enter number of payments
using payment multiplier.
Enter interest rate.
Enter amount of payment.
Compute future value.
& } !
& ]
& V
& U
20
& Z
-
7.5
200
S
% 0
,
/
RST 0.00
BGN
N= 240.00
I/Y= 7.50
PMT= -200.00
FV= 111,438.31
0.00
Depositing $200 at the beginning of each month for 20 years
results in a future amount of $111,438.31.
2: TVM and Amortization Worksheets 51
Page 58

Amount to Borrow and Down Payment
You want to buy a car that sells for $5,100. The finance
company charges 13.51% APR, compounded monthly, on a
48-month loan. If you can afford a monthly payment of $125,
how much can you borrow? How much do you need for the
down payment?
Example: Loan Amount and Down Payment
Calculate the loan amount. Then subtract it from the cost of the
car to find the down payment.
PV = ? FV = $0
$125 $125 $125
. . .
0 1 47 N=48
I/Y = 13.51 ÷ 12
Procedure Keystrokes Display
Set all variables to defaults.
Enter number of payments
using payment multiplier.
Enter monthly interest rate.
Enter payment.
Compute loan amount.
Calculate down payment.
& } !
-
/
S
,
N
4
& Z
13.51
125
S
% .
H
5100
RST 0.00
N= 48.00
I/Y= 13.51
PMT= -125.00
PV= 4,615.73
-484.27
To buy the car, you can borrow $4,615.73 and make a down
payment of $484.27.
52 BA II PLUS™ Calculator
Page 59

Regular Deposits for a Specified Future Amount
You plan to open a savings account and deposit the same
amount of money at the beginning of each month. In 10 years,
you want to have $25,000 in the account. How much should you
deposit if the annual interest rate is 7% with quarterly
compounding?
(compounding periods per year) is automatically set to
C/Y
equal
Example: Monthly Deposits Compounded Quarterly
Procedure Keystrokes Display
Set all variables to defaults.
Set compounding periods to 4.
Set beginning-of-period
payments.
Return to calculator mode.
Enter number of deposits
using payment multiplier.
Enter interest rate.
Enter future value.
Compute deposit amount.
(payments per year), so you need to set
P/Y
& } !
& [
#
!
4
& ]
& V
& U
,
0
10
& Z
-
7
25000
% /
.
C/Y
RST 0.00
P/Y=
C/Y=
BGN
N= 120.00
I/Y= 7.00
FV= 25,000.00
PMT= -143.92
12.00
4.00
0.00
You need to make monthly deposits of $143.92.
2: TVM and Amortization Worksheets 53
Page 60

Time Value of Money/Amortization Schedule
This two-part example shows you how to use the TVM and
Amortization worksheets to compute the monthly payment on a
30-year loan and then generate an amortization schedule for the
first three years of the loan.
Example: Mortgage Payment
Using the TVM worksheet, determine the monthly payment on a
30-year mortgage with a loan amount of $120,000 and an annual
percentage rate of 9.125%.
Procedure Keystrokes Display
Set all variables to defaults.
Enter number of payments
using payment multiplier.
Enter interest rate.
Enter loan amount.
Compute payment.
& } !
-
.
,
30
& Z
9.125
120000
% /
Notice that the interest rate displays as 9.13, even though you
entered 9.125. The calculator uses 9.125 for
calculation. To see the stored value of
digits, press &
|
! & U J
3
I/Y
RST 0.00
N= 360.00
I/Y= 9.13
PV= 120,000.00
PMT= -976.36
to make the
I/Y
displayed with three
.
I/Y
The computed monthly payment is $976.36. Because
PMT
is
money paid out, it is displayed as a negative number.
54 BA II PLUS™ Calculator
Page 61

Example: Loan Amortization
(continued from previous example)
Use the Amortization worksheet to generate an amortization
schedule for the first three years of the loan. Assume that the
first payment is in April; therefore, the first year has 9 payment
periods. There are 12 payment periods per year thereafter.
Procedure Keystrokes Display
Select the Amortization
worksheet.
Set ending period to 9.
Display first year amortization
data.
Change beginning period to 10.
Change ending period to 21.
Display second year
amortization data.
Move to P1 and press % to
enter next range of payments.
Display P2.
Display third year
amortization data.
& \
#
!
9
#
#
#
#
!
10
#
!
21
#
#
#
#
%
#
#
#
#
P1= 1.00
P2= 9.00
BAL=
PRN=
INT=
P1= 10.00
P2= 21.00
BAL=
PRN=
INT=
P1= 22.00
P2= 33.00
BAL=
PRN=
INT=
119,407.46
-592.54
-8,194.70
118,551.85
-855.61
-10,860.71
117,614.86
-936.99
-10,779.33
Note that the principal and interest are displayed as negative
because they are outflows.
2: TVM and Amortization Worksheets 55
Page 62

Interest and Loan Balance after Specified Payment
To evaluate the financial advisability of financing all or some of
the sale price of a property, a seller must know the amount of
interest that will be received and the remaining balance at the
end of the term (balloon payment).
A seller is asked to finance $82,000 at 10% annual interest,
amortized over a 30-year term but with a balloon payment due
after five years.
The seller wants to know:
•
The amount of the monthly payment.
•
The amount of interest he will receive.
•
The amount of the balloon payment.
Example: Compute Monthly Payment
Procedure Keystrokes Display
Set all variables to defaults.
Enter number of payments
using payment multiplier.
Enter interest rate.
Enter loan amount.
Compute payment.
& } !
30
& Z
-
10
.
82000
% /
RST 0.00
,
N= 360.00
I/Y= 10.00
PV= 82,000.00
PMT= -719.61
Example: Compute Amortization Schedule
(continued from previous example)
Procedure Keystrokes Display
Select Amortization worksheet.
Enter end period after five
years.
View computed balance due
after five years.
View computed interest paid
after five years.
& \
#
5
& Z
#
#
#
P1= 1.00
!
P2= 60.00
BAL= 79,190.83
INT= -40,367.43
If the seller financed the sale, he would receive:
•
$719.61 each month for five years.
•
$40,367.43 in interest over the five-year term.
•
$79,190.83 as the balloon payment.
56 BA II PLUS™ Calculator
Page 63

Canadian Mortgages
Canadian mortgages typically require the borrower to make
monthly payments, although interest is compounded
semiannually. Additionally, mortgages are usually refinanced at
the end of a fixed period of time, such as five years.
A home buyer borrows $60,000 for 20 years at an annual
interest rate of 13 % compounded semiannually. How much are
the monthly payments and the amount necessary to pay off the
mortgage after five years?
Example: Payment
Procedure Keystrokes Display
Set all variables to defaults.
Leave payments per year at 12.
Set compounding periods per
year to 2.
Return to calculator mode.
Enter number of payments
using payment multiplier.
Enter interest rate per year.
Enter present value.
Compute payment.
& } !
& [
#
!
2
& U
.
,
20
& Z
-
13
60000
% /
RST 0.00
P/Y= 12.00
C/Y= 2.00
0.00
N= 240.00
I/Y= 13.00
PV= 60,000.00
PMT= -688.52
Example: Amortization Schedule
(continued from previous example)
Procedure Keystrokes Display
Select Amortization worksheet.
Enter number of payments as
P2
using payment multiplier.
View balance after five years.
& \
#
5
& Z
#
!
P1= 1.00
P2= 60.00
BAL= 55,389.85
The monthly payment is $688.52, and $55,389.85 is required to
pay off the mortgage after five years.
2: TVM and Amortization Worksheets 57
Page 64

58 BA II PLUS™ Calculator
Page 65

Cash Flow Worksheet
Three keys are used for performing cash-flow calculations.
3
'
(
)
Press # and " to move through each set of variables.
lets you enter cash flow data.
lets you compute net present value.
lets you compute internal rate of return.
3: Cash Flow Worksheet 59
Page 66

Cash Flow Worksheet Labels
Key Label Meaning Variable Type
'
#
#
(
#
)
CFo
nn
* Amount of
C
nn
* Frequency of
F
Z
NPV
IRR
Initial cash flow Enter-only
Discount rate Enter-only
Net present value Compute-only
Internal rate of return Compute-only
th
n
cash flow Enter-only
th
n
cash flow Enter-only
*nn represents the number of the cash flow (
corresponding frequency (
F01–F24
).
C01–C24
) or the number of the
Notes about the Cash Flow Worksheet
♦
' & z
♦
& } !
To enter cash-flow values and frequencies, press '. You can
♦
enter the initial cash flow (
sets all variable values to zero.
sets all variable values to zero.
) plus up to 24 cash flows,
CFo
each of which can be a unique value. Enter inflows (cash
received) as positive and outflows (cash paid out) as
negative. Use S to enter a negative value.
♦
The
INS
and
indicators in the display let you know that
DEL
you can use & X and & W to insert or delete cash
flows.
60 BA II PLUS™ Calculator
Page 67

Interpreting the Results of IRR Calculations
When you compute a value for
(internal rate of return), the
IRR
calculator displays either a solution or an error message.
When a solution is displayed, there are two possibilities.
•
The displayed solution is the only solution.
•
There may be additional solutions. This occurs when there
are two or more sign changes in the cash flow sequence.
When an error message is displayed, there are two possibilities.
•
No solution for
IRR
exists (
). This occurs when there
Error 5
are no sign changes in the cash flow sequence.
•
The calculator is unable to determine a value for
a maximum number of iterations (
Error 7
).
For a detailed description of sign changes as they relate to
IRR
within
IRR
refer to “IRR Calculations” in the Appendix.
,
3: Cash Flow Worksheet 61
Page 68

Uneven and Grouped Cash Flows
Uneven Cash Flows
The Cash Flow worksheet lets you analyze the value of money
over equal time periods. It allows you to enter uneven values,
each of which can be either an inflow (cash received) or an
outflow (cash paid out).
Similar to an annuity’s present value (PV) in the TVM
worksheet, a typical cash-flow problem usually has an initial
cash flow (labeled
Grouped Cash Flows
In some cash-flow problems, every cash flow may be a unique
value. In other cash-flow problems, there may be consecutive
cash flows of equal value.
). This is always a known, entered value.
CFo
You must enter unequal cash flows separately, but you can save
time and space by using the
nn
variable to enter groups of
F
consecutive cash flows of equal value.
62 BA II PLUS™ Calculator
Page 69

Entering Cash Flows
You can enter the initial cash flow and up to 24 additional cash
flows, each of which can be a unique value. Enter inflows as
positive and outflows as negative. If you have consecutive cash
flows of equal value, you can enter the cash-flow value and then
a frequency of up to 9,999 for the number of times the value
occurs.
Procedure: Entering Cash Flows
쐃
Press ' to select the cash flow entry portion of the Cash
Flow worksheet.
and its current value are displayed.
CFo=
쐇
If necessary, press &
쐋
Key in a value for
쐏
Press # to display
z
(initial cash flow) and press
CFo
.
C01
to clear the worksheet.
!
Key in a value for the first cash flow or group of cash flows
and press
!
. Enter an inflow (cash received) as a
positive number; enter an outflow (cash paid out) as a
negative number.
쐄
Press # to display
F01
.
If there are multiple, consecutive, equal occurrences of the
cash flow you entered, key in the number of occurrences
(frequency) and press
쐂
Press # to display the next available cash flow.
Key in the value of the cash flow(s) and press
쐆
Press #.
!
. The default value is
1
!
.
If there are multiple, consecutive, equal occurrences of the
cash flow you entered, key in a value for the frequency and
!
press
쐊
Repeat steps 6 and 7 until all cash flows and frequencies are
.
entered.
.
.
When you have entered all the cash-flow data, you can press
#
or " to review the entries.
3: Cash Flow Worksheet 63
Page 70

Deleting Cash Flows
When you delete a cash flow, the calculator decreases the
numbers of subsequent cash flows .
Before deleting After deleting
8,000 cash flow 8,000 cash flow
Procedure: Deleting a Cash Flow
The
indicator lets you know when you can delete a cash
DEL
flow.
쐃
Press # or " until the cash flow you want to delete is
displayed.
쐇
Press & W.
The cash flow you specified (and its frequency) is deleted. The
calculator decreases the numbers of subsequent cash flows so
that there is no gap.
64 BA II PLUS™ Calculator
Page 71

Inserting Cash Flows
When you insert a cash flow, the calculator increases the
numbers of the current and subsequent cash flows.
When inserting cash flows, remember that the most cash flows
you can enter is 24.
Procedure: Inserting a Cash Flow
The
indicator lets you know when you can insert a cash
INS
flow.
쐃
Press # or " until the display shows the current cash flow
where you want to insert the new cash flow.
For example, if you want to insert a new second cash flow,
display
쐇
Press & X.
쐋
Key in the value of the new cash flow and press
C02
.
!
The new cash flow is entered “before” the current cash flow.
The calculator increases the numbers of the current and
subsequent cash flows. For example,
쐏
If necessary, press #, enter a value for the frequency, and
!
press
.
becomes
C02
C03
.
.
3: Cash Flow Worksheet 65
Page 72

Computing NPV and IRR
(internal rate of return) is the interest rate at which the net
IRR
present value of the cash flows is equal to zero.
present value) is the sum of the present values for the cash
inflows (cash received) and outflows (cash paid out).
NPV
(net
A positive value for
indicates a profitable investment.
NPV
Procedure: Computing Net Present Value
쐃
Press (.
Z
and its current value are displayed.
=
쐇
Key in a value for
쐋
Press # to display the
쐏
Press % to compute the net present value of the series of
Z
(discount rate) and press
variable label.
NPV
!
cash flows.
The calculator computes and displays the value.
Procedure: Computing Internal Rate of Return
쐃
Press ).
and its current value are displayed.
IRR=
쐇
Press % to compute the internal rate of return. The
calculator computes and displays the value.
.
66 BA II PLUS™ Calculator
Page 73

Uneven Cash Flows
A company plans to pay $7,000 for a new machine. The
company would like a 20% annual return on its investment.
Over the next six years, the company expects to receive the
annual cash flows shown below.
Year Cash Flow Number Cash Flow Estimate
1 1 3,000
2–5 2 5,000 each year
6 3 4,000
The following time line shows that these cash flows are a
combination of equal and unequal values. Because the initial
cash flow (
On the next few pages, you will enter cash flow data, edit the
data when a change is necessary, and compute the net present
value and internal rate of return.
) is an outflow, it is a negative value.
CFo
Example: Entering Cash Flow Data
Procedure Keystrokes Display
Set all variables to defaults.
Select Cash Flow worksheet.
Enter initial cash flow.
Enter cash flow for first year.#
Enter cash flows for years
two through five.
Enter cash flow for sixth
year.
& } !
'
3000
5000
4
4000
S
!
!
!
!
!
7000
#
#
#
#
#
3: Cash Flow Worksheet 67
RST 0.00
CFo= 0.00
CFo=-7,000.00
C01=
F01=
C02=
F02=
C03=
F03=
3,000.00
1.00
5,000.00
4.00
4,000.00
1.00
Page 74

Example: Editing Cash Flow Data
(continued from previous example)
After entering the data, you learn that the cash flow projections
you were given were incorrect. The $4,000 cash-flow value
should occur in the second year instead of the sixth. Otherwise,
the entries are correct.
Year Incorrect Cash Flow Correct Cash Flow
1 3,000 3,000
2 5,000 4,000
3 5,000 5,000
4 5,000 5,000
5 5,000 5,000
6 4,000 5,000
Edit the existing data in the Cash Flow worksheet by deleting
the $4,000 value for year 6 and inserting it for year 2.
Procedure Keystrokes Display
Move to third cash flow.
Delete third cash flow.
Move to second cash flow.
Insert new second cash flow.
Move to next cash flow to verify
data.
"
& W
" "
& X
#
#
#
4000
C03= 4,000.00
C03= 0.00
C02= 5,000.00
!
C02=
F02=
C03=
F03=
4,000.00
1.00
5,000.00
4.00
68 BA II PLUS™ Calculator
Page 75

Example: Computing Net Present Value
(continued from previous example)
Compute the net present value (
period (
Procedure Keystrokes Display
Access
Enter interest rate per period.
Compute net present value.
[
) of 20%.
NPV
.
) using an interest rate per
NPV
(
!
20
# %
[
= 0.00
[
= 20.00
NPV= 7,266.44
Example: Computing Internal Rate of Return
(continued from previous example)
Compute the internal rate of return (
Procedure Keystrokes Display
IRR
Access
Compute internal rate of return.
.
)
%
IRR
).
IRR= 0.00
IRR= 52.71
The internal rate of return is 52.71%.
3: Cash Flow Worksheet 69
Page 76

Value of a Lease with Uneven Payments
A lease with an uneven payment schedule usually
accommodates seasonal or other anticipated fluctuations in the
lessee’s cash position.
Suppose a 36-month lease has the following payment schedule,
with beginning-of-period payments.
Number of Months Payment Amount
4$0
8 $5000
3$0
9 $6000
2$0
10 $7000
If the required earnings rate is 10% annually with monthly
compounding:
•
What is the present value of these lease payments?
•
What even payment amount at the beginning of each month
would result in the same present value?
Because the cash flows are uneven, use the Cash Flow
worksheet to determine the net present value (
lease.
NPV
) of the
70 BA II PLUS™ Calculator
Page 77

Example: Compute Net Present Value of Cash Flows
The cash flows for the first four months are stated as a group of
four $0 cash flows. Because the lease specifies beginning-ofperiod payments, you must treat the first cash flow in this
group as the initial investment (
three cash flows on the cash flow screens (
The BGN/END setting in the TVM worksheet does not affect the
Note:
Cash Flow worksheet.
Net present value (NPV) = ?
Interest (I) = 10%
C01 C02 C03 C04 C05 C06
$0 $5000 $0 $6000 $0 $7000
F01 = 3 F02 = 8 F03 = 3 F04 = 9 F05 = 2 F06 = 10
Initial investment (CFo) = $0
Procedure Keystrokes Display
Set all variables to defaults.
Select Cash Flow worksheet.
Enter first group of cash
flows.
Enter second group of cash
flows.
Enter third group of cash
flows.
Enter fourth group of cash
flows.
Enter fifth group of cash
flows.
Enter sixth group of cash
flows.
Select NPV.
Enter monthly earnings rate.10 6 12
Compute NPV.
Store in memory 0.
& } !
'
#
#
#
#
#
#
#
#
#
#
#
#
(
# %
D
) and enter the remaining
CFo
and
C01
RST 0.00
CFo= 0.00
C01=
!
3
S
S
S
!
!
!
!
5000
8
3
6000
9
2
7000
10
!
!
!
!
!
0 NPV -138,088.44
F01=
C02=
F02=
C03=
F03=
C04=
F04=
C05=
F05=
C06=
F06=
[
= 0.00
[
=0.83
NPV= -138,088.44
F01
).
-
5000.00
-
6000.00
-
7000.00
0.00
3.00
8.00
0.00
3.00
9.00
0.00
2.00
10.00
3: Cash Flow Worksheet 71
Page 78

Example: Compute Equivalent Monthly Payments
(continued from previous example)
Use the net present value (
as the present value (
PV
) from the Cash Flow worksheet
NPV
) in the TVM worksheet to compute the
equivalent even monthly payment that is equivalent to the
uneven cash flows.
Present value (PV) = NPV from Cash Flow worksheet
Interest (I/Y) = 10%
Number of payments (N) = 36
. . .
Payment amount (PMT) = ?
Procedure Keystrokes Display
Set beginning-of-period
payments.
Return to calculator mode.
NPV
Enter
as PV and make it
positive.
Enter interest per year.
Enter number of payments.
Compute payment.
& ]
& V
& U
J
0
S
-
10
,
36
% /
.
BGN
0.00
PV= 138,088.44
I/Y= 10.00
N= 36.00
PMT= -4,418.90
At the required earnings rate of 10%, the present value of the
lease payments is $138,088.44. An even monthly payment of
$4,418.90 would result in the same present value.
72 BA II PLUS™ Calculator
Page 79

4
Bond Worksheet
To access the Bond worksheet, press &
Press # and " to move through each set of variables.
l
.
4: Bond Worksheet 73
Page 80

Bond Worksheet Labels
Label Meaning Variable Type
SDT
CPN
RDT
RV
ACT*
360*
2/Y*
1/Y*
YLD
PRI
AI
* Press & V repeatedly to view the options for day-count method or
Settlement date Enter-only
Annual coupon rate in percent Enter-only
Redemption date Enter-only
Redemption value (percentage of par value) Enter-only
Actual/actual day-count method Setting
30/360 day-count method Setting
Two coupons per year Setting
One coupon per year Setting
Yield to redemption Enter/compute
Dollar price Enter/compute
Accrued interest Auto-compute
coupons per year.
Notes about the Bond Worksheet
♦
& l & z
(
SDT, RDT
, day-count method, and coupon frequency are not
sets
RV=100, CPN=0, YLD=0
, and
PRI=0
.
affected.)
2/Y
sets
RV=100, CPN=0, YLD=0
.
♦
& } !
and
to 12-31-1990; day-count method to
RDT
frequency to
If you have not entered the necessary values, an error occurs
♦
, and
ACT
PRI=0; SDT
; coupon
when you press # or " to move through the worksheet.
You can enter dates in US format (MM.DDYY) or European
♦
format (DD.MMYY). Dates are displayed with hyphens, either
MM-DD-YYYY (US format) or DD-MM-YYYY (European
format).
You can enter dates from January 1, 1950, through December
♦
31, 2049.
When you enter a value for
♦
, remember that it is the
CPN
annual coupon rate as a percent—not the dollar amount of
the coupon payment.
74 BA II PLUS™ Calculator
Page 81

Notes about the Bond Worksheet (cont.)
♦
Enter a date for
(redemption date) in the date format
RDT
you selected (U.S. or European). The calculator assumes that
the redemption date (
<
For “to maturity” calculations, enter the maturity date for
.
RDT
<
For “to call” calculations, enter the call date for
♦
Redemption value (
) coincides with a coupon date.
RDT
) is a percentage of the bond’s par
RV
RDT
value.
<
For “to maturity” analysis, enter 100 for
<
For “to call” analysis, enter the call price for
♦
When either
ACT
or
is displayed, you can set the day-
360
RV
.
.
RV
count method by pressing & V repeatedly to select either
(actual/actual) or
ACT
♦
When either
1/Y or 2/Y
repeatedly to set coupon frequency as
payments per year) or
♦
To compute a value for
♦
To compute a value for
♦
A value for
is computed automatically in terms of dollars
AI
(30/360).
360
is displayed, you can press &
(two coupon
2/Y
(one coupon payment per year).
1/Y
, enter a value for
YLD
, enter a value for
PRI
PRI
YLD
.
.
V
per $100 of par value.
.
4: Bond Worksheet 75
Page 82

Terminology
The following terminology applies to the Bond worksheet.
Call Date
before the bond’s maturity date is a callable bond. The call date
for such a bond is printed in the bond contract.
Coupon Payment
of the bond as interest.
Coupon Rate
Dollar Price
dollars per $100 of par value.
Par Value (or face value)
Premium Bond
the par value sells at a premium.
Discount Bond
sells at a discount.
Redemption Date
retires the bond. This date may be the date of maturity or, for a
callable bond, a call date.
Redemption Value
bond when it is retired. If the bond is redeemed at the maturity
date, the redemption value is the par value printed on the bond.
If the bond is redeemed at a call date, the redemption value is
the bond’s par value plus any call premium. The calculator
treats the redemption value in terms of dollars per $100 of par
value.
— A bond that can be retired by the issuing agency
— The periodic payment made to the owner
— The annual interest rate printed on the bond.
— Price of the security expressed in terms of
— The value printed on the bond.
— A bond that sells for an amount greater than
— A bond selling for less than the par value
— The date on which the issuing agency
— The amount paid to the owner of the
Settlement Date
for funds.
Yield to Maturity
from payments of principal and interest, with interest
compounded semiannually at the stated yield rate. The yield to
maturity takes into account the amount of premium or
discount, if any, and the time value of the investment.
76 BA II PLUS™ Calculator
— The date on which a bond is exchanged
— The rate of return to the investor earned
Page 83

Entering Bond Data and Computing Results
Before computing values for price or yield and accrued interest,
enter the four known values (settlement date, coupon rate,
redemption date, and redemption value). If necessary, change
the day-count method and coupon frequency settings. The
worksheet stores values and settings until you clear the
worksheet or change the values and settings.
Procedure: Entering Bond Data
First enter the known values:
쐃
Press &
SDT
쐇
Press &
쐋
Key in a value for
쐏
Press # repeatedly and enter values for
RDT
you did for
l
.
is displayed, along with the previous date.
z
to clear the worksheet.
(settlement date) and press
SDT
CPN
(coupon rate),
(redemption date), and RV (redemption value) just as
.
SDT
Procedure: Selecting Bond Settings
After entering the known values, select the settings:
쐃
Press # until
ACT
or
is displayed to select the day-count
360
method.
<
To select the actual/actual day-count method, press
& V
<
To select the 30/360 day-count method, press &
repeatedly until
쐇
Press # until
repeatedly until
is displayed.
360
or
2/Y
is displayed to select coupon
1/Y
is displayed.
ACT
frequency.
<
To select two coupons per year, press & V repeatedly
until
<
To select one coupon per year, press & V repeatedly
until
is displayed.
2/Y
is displayed.
1/Y
!
V
.
4: Bond Worksheet 77
Page 84

Procedure: Computing Bond Price (PRI)
쐃
Press # until
쐇
Key in a value for
쐋
Press # to display
A value for
is displayed.
YLD
and press
YLD
, and then press %.
PRI
is computed and displayed.
PRI
!
.
Procedure: Computing Bond Yield (YLD)
쐃
Press # until
쐇
Key in a value for
쐋
Press # to display
A value for
is displayed.
PRI
and press
PRI
, and then press %.
YLD
is computed and displayed.
YLD
!
.
Computing Accrued Interest (AI)
A value for AI (accrued interest) is computed and displayed
automatically when you access the variable.
is computed in
AI
terms of dollars per $100 of par value.
Press # repeatedly until
and its value are displayed.
AI
78 BA II PLUS™ Calculator
Page 85

Bond Price and Accrued Interest Example
You want to purchase a semiannual corporate bond that
matures on 12/31/97 to settle on 6/12/96. The bond is based on
the 30/360 day-count method with a coupon rate of 7%. It will be
redeemed at 100% of its par value. For an 8% yield to maturity,
compute the bond’s price and the accrued interest.
Example: Entering Bond Data
Procedure Keystrokes Display
Set all variables to defaults.
Select Bond worksheet.
Enter settlement date.
Enter coupon rate.
Enter redemption date.
Leave redemption value as is.
& } !
& l
!
6.1296
#
!
7
#
12.3197
#
Example: Computing Bond Price and Accrued Interest
(continued from previous example)
Select 30/360 day-count
method.
Leave two coupon payments
per year.
Enter yield.
Compute price
View accrued interest.
# & V
# & V
#
!
8
# %
#
RST 0.00
SDT = 12-31-1990
SDT = 6-12-1996
CPN = 7.00
!
RDT = 12-31-1997
RV = 100.00
360
2/Y
YLD = 8.00
PRI = 98.56
AI = 3.15
For an 8% yield to maturity, the price of the bond is $98.56 per
100 and the accrued interest is $3.15 per 100.
4: Bond Worksheet 79
Page 86

80 BA II PLUS™ Calculator
Page 87

Depreciation Worksheet
To access the Depreciation worksheet, press & p. Then
choose a depreciation method, enter the known values, and
compute the unknown values.
To choose a depreciation method, press & V repeatedly
until the desired method is displayed.
Press # and " to move through each set of variables.
5
5: Depreciation Worksheet 81
Page 88

Depreciation Worksheet Labels
Label Meaning Variable Type
* Straight line method Setting
SL
* Sum-of-the-years’-digits method Setting
SYD
* Declining-balance method Setting/Enter
DB
DBX*DB
* French straight-line method Setting/Enter
SLF
* French declining balance method Setting/Enter
DBF
LIF
M01
DT1
CST
SAL
YR
DEP
RBV
RDV
* Press & V repeatedly to view all of the options for depreciation method.
Notes about the Depreciation Worksheet
method with crossover to
Life of the asset in years Enter-only
Starting month Enter-only
Starting date (
Cost of the asset Enter-only
Salvage value of the asset Enter-only
Year to compute Enter-only
Depreciation for the year Auto-compute
Remaining book value at the end of the year Auto-compute
Remaining depreciable value Auto-compute
) Enter-only
SLF
SL
Setting/Enter
♦
& p & z
sets
LIF=1, M01=1, YR=1; CST=0, SAL=0
.
The depreciation method is not affected.
♦
& } !
sets the depreciation method to
declining-balance percent (for
M01=1, YR=1; CST=0, SAL=0
(straight-line, French method) and
♦
SLF
DB
and
DBX
only) to
.
(declining-
DBF
;
SL
200; LIF=1
balance, French method) are European depreciation
methods. They are only available if you have selected the
European format for entering dates or entering separators in
numbers.
♦
DEP, RBV
(initial date) is available only for
DT1
, and
are computed a year at a time. Results are
RDV
SLF
.
rounded to the number of decimal places specified by the
display format.
82 BA II PLUS™ Calculator
,
Page 89

Notes about the Depreciation Worksheet (cont.)
♦
Values for
DEP, RBV
, and
are computed and displayed
RDV
automatically when you press # to display each variable.
♦
If you choose
DB
or
as the depreciation method, enter a
DBX
value for declining-balance percent when you display the
or
label. The value you enter must be a positive number.
DBX
(The default value is 200.)
♦
The value you enter for
<
If
or
SL
<
If
SYD, DB, DBX
♦
The value you enter for
is selected, a positive real number.
SLF
, or
must be:
LIF
is selected, a positive integer.
DBF
has two parts. The integer
M01
portion represents the month that the asset is placed into
service. The decimal portion represents the fraction of the
initial month in which the asset begins to depreciate. For
example, entering 1.5 specifies that the asset begins to
depreciate in the middle of the first month. Entering 4.25
specifies that the asset begins to depreciate a quarter of the
way through the fourth month.
♦
When computing depreciation, the value you enter for
must be a positive integer.
♦
From
, you can press # to return to YR. To represent the
RDV
next depreciation year, press % to increment the value for
by one.
YR
DB
YR
♦
Repeatedly returning to
value for
, and computing values for
YR
, pressing % to increment the
YR
DEP, RBV
, and
RDV
computes a depreciation schedule. The schedule is complete
when
5: Depreciation Worksheet 83
equals zero.
RDV
Page 90

Entering Data and Computing Results
Because the worksheet stores previous values and settings until
you change them or clear the worksheet, you may not need to
do all the steps every time you work a depreciation problem.
Procedure: Selecting a Depreciation Method
쐃
Press & p to select the Depreciation worksheet.
The label for the current depreciation method is displayed.
쐇
Press &
쐋
Press & V repeatedly until the depreciation method you
want is displayed (
쐏
If you select
z
or
DB
to clear the worksheet.
SL, SLF, SYD, DB, DBX
, key in a value for the declining-
DBX
, or
DBF
).
balance percent. The default value is 200.
Procedure: Entering Depreciation Data
쐃
Press # to display
쐇
Key in a value for
쐋
Repeat for
To use
SLF
M01, DT1
or
DBF
, do not forget to set either the European date
format or the European format for separators (&
.
LIF
and press
LIF
(if
SLF
!
),
CST, SAL
.
, and YR.
|
).
Computing Results
After entering the data, press # repeatedly to automatically
compute and display values for
DEP, RBV
, and
RDV
.
The symbol in the display lets you know that each value has
been computed.
Procedure: Generating a Depreciation Schedule
To generate a depreciation schedule and compute values for
other years:
쐃
Press # to display the
variable, and then press % to
YR
increment the value by one.
쐇
Press # repeatedly to automatically compute and display
new values for
84 BA II PLUS™ Calculator
DEP, RBV
, and
RDV
.
Page 91

Declining Balance with Straight-Line Crossover Example
In mid-May, a company begins to depreciate a machine with a
seven-year life and no salvage value. The machine cost is
$100,000. Use the declining-balance with straight-line crossover
method to compute the depreciation expense, remaining book
value, and remaining depreciable value for the first two years.
The declining-balance percent is 200.
Example: Declining-Balance Data
Procedure Keystrokes Display
Set all variables to defaults.
Select Depreciation
worksheet.
Select declining-balance
crossover method.
Enter life in years.
Enter starting month.
Enter cost.
Leave salvage value at 0.
Leave year at 1.
Display depreciation amount,
remaining book value, and
remaining depreciable value.
View second year.
Display second year
depreciation data.
& } !
& p
& V
& V
& V
#
!
7
#
!
5.5
#
#
#
#
#
#
#
%
#
#
#
100000
!
RST 0.00
SL
DBX = 200.00
LIF = 7.00
M01 = 5.50
CST = 100,000.00
SAL = 0.00
YR = 1.00
DEP =
RBV =
RDV =
YR =
YR =
DEP =
RBV =
RDV =
17,857.14
82,142.86
82,142.86
1.00
2.00
23,469.39
58,673.47
58,673.47
For the first year, the depreciation amount is $17,857.14, the
remaining book value is $82,142.86, and the remaining
depreciable value is $82,142.86.
For the second year, the depreciation amount is $23,469.39, the
remaining book value is $58,673.47, and the remaining
depreciable value is $58,673.47.
5: Depreciation Worksheet 85
Page 92

Straight-Line Depreciation Example
In mid-March, a company begins depreciation of a commercial
building with a 31½ year life and no salvage value. The building
cost $1,000,000. Use the straight-line depreciation method to
compute the depreciation expense, remaining book value, and
remaining depreciable value for the first two years.
Example: Entering Straight-Line Depreciation Data
Procedure Keystrokes Display
Set all variables to defaults.
Select Depreciation
worksheet.
Enter life in years.
Enter starting month.
Enter cost.
Leave salvage value as is.
Leave year as is.
Display depreciation amount,
remaining book value, and
remaining depreciable value.
View second year.
Display second year
depreciation data.
& } !
& p
#
#
#
!
#
#
#
#
#
#
%
#
#
#
!
31.5
!
3.5
1000000
RST 0.00
SL
LIF = 31.50
M01 = 3.50
CST = 1,000,000.00
SAL = 0.00
YR = 1.00
DEP =
RBV =
RDV =
YR =
YR =
DEP =
RBV =
RDV =
25,132.28
974,867.72
974,867.72
1.00
2.00
31,746.03
943,121.69
943,121.69
For the first year, the depreciation amount is $25,132.28, the
remaining book value is $974,867.72, and the remaining
depreciable value is $974,867.72.
For the second year, the depreciation amount is $31,746.03, the
remaining book value is $943,121.69, and the remaining
depreciable value is $943,121.69.
86 BA II PLUS™ Calculator
Page 93

Statistics Worksheet
Two keys are used for performing statistics calculations.
6
& j
& k
Press # and " to move through each set of variables.
lets you enter statistical data.
lets you choose a statistics calculation method and
compute results.
6: Statistics Worksheet 87
Page 94

Statistics Worksheet Labels
Keys Label Meaning Variable Type
& j
#
& k
& V
#
(as needed)
nn
X
nn
Y
LIN
Ln
EXP
PWR
1-V
n
x
Sx
s
x
y
**
**
Sy
s
**
y
**
a
**
b
**
r
**
X'
**
Y'
G
X
2
G
X
G
**
Y
2
G
Y
G
XY
*
Current X value
*
Current Y value
Standard linear regression
Logarithmic regression
Exponential regression
Power regression
One-variable statistics
Number of observations
Mean (average) of X values
Sample standard deviation of X
Population standard deviation of X
Mean (average) of Y values
Sample standard deviation of Y
Population standard deviation of Y
Linear regression y-intercept
Linear regression slope
Correlation coefficient
Predicted X value
Predicted Y value
Sum of X values
Sum of X squared values
Sum of Y values
Sum of Y squared values
**
Sum of XY products
**
Enter-only
Enter-only
Setting
Setting
Setting
Setting
Setting
Auto-compute
Auto-compute
Auto-compute
Auto-compute
Auto-compute
Auto-compute
Auto-compute
Auto-compute
Auto-compute
Auto-compute
Enter/compute
Enter/compute
Auto-compute
Auto-compute
Auto-compute
Auto-compute
Auto-compute
*nn indicates the number of the current X or Y value.
** Not displayed for one-variable statistics.
88 BA II PLUS™ Calculator
Page 95

Notes about the Statistics Worksheet
& j & z
sets all
and Y values and all values in
X
the Stat portion of the worksheet to zero, but does not affect
the statistics calculation method.
& k & z
and all values to zero.
LIN
& } !
, and all other values to zero.
X, Y
You can enter up to 50 (
sets the statistics calculation method to
sets the statistics calculation method to
x,y
) data points.
LIN
If you have not entered any data points, an error will occur
when you press # or " to move through the portion of the
worksheet that displays results.
When you are entering data for one-variable statistics,
nn
represents the value and
specifies the number of
Y
occurrences (frequency). When you enter a value for
value for
To analyze one-variable statistics, select
x
, Sx,
nn
defaults to 1.
Y
. Only values for n,
s
G
,
, and
X
X
2
G
are computed and displayed for one-
X
1-V
nn
X
nn
, the
X
variable statistics.
When analyzing two-variable statistics, you have four
regression methods to choose from:
and
•
— Standard linear regression analysis
LIN
•
— Logarithmic regression analysis
Ln
•
•
Except for
— Exponential regression analysis
EXP
— Power regression analysis
PWR
and Y', the values for the statistics variables are
X'
automatically computed and displayed when you access them.
You can use the
You can enter a value for
to compute X'.
Y'
6: Statistics Worksheet 89
and Y' variables for regression predictions.
X'
to compute Y', or enter a value for
X'
Page 96

Regression Models
For two-variable data, the Statistics worksheet has four
regression models for curve fitting and forecasting.
value is interpreted as the independent variable and the
The
X
value as the dependent variable.
Model Formula Restrictions
LIN
Linear (
Logarithmic (Ln) Y = a + b ln(X) All X values > zero
Exponential (
Power (
The statistical results are computed using transformed values:
•
The linear model uses X and Y.
•
The logarithmic model uses ln(X) and Y.
•
The exponential model uses X and ln(Y).
•
The power model uses ln(X) and ln(Y).
) Y = a + b X
EXP
PWR
) Y = a X
) Y = a b
Y
x
b
All Y values > zero
All X and Y values > zero
The calculator determines the values for
and b that create the
a
line or curve that best fits the data.
Correlation Coefficient
The calculator also determines r (the correlation coefficient)
which measures the goodness of fit of the equation with the
data.
In general, the closer
is to 1 or -1, the better the fit; the closer
r
is to zero, the worse the fit.
90 BA II PLUS™ Calculator
r
Page 97

Entering Statistical Data
& j
lets you enter and display up to 50 data points. The
Statistics worksheet stores the values you enter until you clear
the worksheet or change the values. Therefore, you may not
need to do all the steps each time you perform a Statistics
calculation.
Procedure: Entering Data Points
쐃
Press & j to select the data-entry portion of the
Statistics worksheet.
is displayed, along with any previous value.
X01
쐇
Press &
쐋
Key in a value for
<
If you are entering one-variable data,
z
to clear the worksheet.
and press
X01
!
.
is the first data
X01
point.
<
If you are entering two-variable data,
is the first
X01
X
value.
쐏
Press # to display the
and press
<
If you are entering one-variable data, you can enter the
!
.
number of times the
variable. Key in a value for
Y01
value occurs (frequency). The
X
Y01
default value is 1.
<
If you are entering two-variable data, enter the first
Y
value.
쐄
Press # to display the next
variable.
X
쐂
Repeat steps 3 through 5 until all of the data points are
entered.
Displaying Data Points
As with other worksheets, you can move up and down through
the data-entry portion of the Statistics worksheet by pressing
#
or ".
6: Statistics Worksheet 91
Page 98

Editing Statistical Data
Pressing & j also lets you insert or delete data points. You
may not need to do all the steps each time you perform a
Statistics calculation.
Procedure: Deleting a Data Point
When the
indicator is displayed, you can delete a data
DEL
point.
쐃
Press # or " until the data point you want to delete is
displayed.
쐇
Press & W.
The data point you specified (both
and Y) is deleted. The
X
calculator decreases the numbers of subsequent data points so
that there is no gap.
Procedure: Inserting a Data Point
When the
쐃
Press # or " until the display shows the current
indicator is displayed, you can insert a data point.
INS
variable
X
of the data point where you want to insert the new data.
For example, if you want to insert a new second data point,
display
쐇
Press & X.
쐋
Key in the new
The new
.
X02
value and press
X
value is entered “above” the current data point.
X
!
.
The calculator increases the numbers of the current and
subsequent data points. For example,
X02
becomes
X03
.
쐏
If necessary, press #, and then key in a value for the
variable and press
92 BA II PLUS™ Calculator
!
.
Y
Page 99

Computing Statistical Results
Procedure: Selecting a Statistics Calculation Method
쐃
Press & k to select the statistical calculation portion of
the Statistics worksheet.
The most recently selected statistics calculation method is
displayed (
쐇
Press & V repeatedly until the statistics calculation
method you want is displayed.
LIN, Ln, EXP, PWR
, or
1-V
).
If you are analyzing one-variable data, select
쐋
Press # to begin computing results.
1-V
.
Computing Results
To compute results based on the current data set, press
#
repeatedly after you have selected the statistics calculation
method.
The results of the statistical calculations (except for
and Y')
X'
are computed and displayed automatically when you access
them.
s
For one-variable statistics, only values for
2
G
are computed and displayed.
X
n,
x
, Sx,
G
,
, and
x
X
Procedure: Computing Y'
쐃
If necessary, press & k.
쐇
Press " or # until
쐋
Key in a value for
쐏
Press # to display the
쐄
Press % to compute a predicted
is displayed.
X'
and press
X'
variable.
Y'
!
Y'
.
value.
6: Statistics Worksheet 93
Page 100

Procedure: Computing X'
쐃
If necessary, press & k.
쐇
Press " or # until
is displayed.
Y'
쐋
Key in a value for
쐏
Press " to display the
쐄
Press % to compute an
and press
Y'
variable.
X'
value.
X'
!
.
94 BA II PLUS™ Calculator
 Loading...