

Page 1
PLACE PHOTO HERE
USERS MANUAL Micro System
Model: MCD-3251 07/05
Micro System
Thank you for choosing to purchase one of our TEVION products, we appreciate your business and believe that
we have provided you with a product that is both reliable and value for money. We encourage you and your
friends to choose from our range of TEVION products again in future.
PACKAGE CONTENTS
1 Micro System (incl. two speakers)
1 Remote Control
1 AM Antenna
1 FM Antenna
1 Instruction manual
Confirm all parts before disposing of carton.
For any customer query or in the unlikely event of a product failure, please phone or
email the helpline contact details below for assistance.
DO NOT RETURN THE PRODUCT TO THE RETAILER.
Toll Free Help line: 1300 366 144
Email: [email protected]
1
Page 2
SAFETY INSTRUCTIONS
Carefully read this manual before using this Micro System. Make sure that you know how the unit
functions and how to operate it. Maintain this product in accordance with the instructions to ensure
that it functions properly. Keep this manual with the unit. If this Micro System is to be used by a
third party, this instruction manual must be supplied with it. The safety instructions, by themselves,
do not eliminate danger completely, and proper accident prevention measures must always be used.
BEFORE INITIAL USE
Remove all packaging. Carefully wipe the outer case with a soft damp cloth and dry it afterwards
with a dry towel. This will remove any dust from the unit that may have built up during transit. Do
not immerse any part of the Micro System in water or any other liquid. Check for any damage that
may have occurred during transit. Do not use if the unit is damaged in any way or if the supply cord
is damaged. Immediately return to supplier for replacement or repair.
PARTS DETAIL
MAIN UNIT
2
1. POWER Key
• Press to turn the power ON/Stand-by.
2. CD Key
• For compact disc.
3. TUNER Key
• To select the Tuner source.
4. MEMORY/CLOCK ADJUSTMENT Key (MEM/CLK ADJ)
• In the Radio mode: the preset memory is called in ascending order.
• In the CD mode: for setting program.
• In the clock mode: for setting of the clock or timer adjustment.
5. PHONES JACK
• Connection for headphones.
6. SEARCH/CLK
7. SLEEP/TIMER
8. MUTE Key
• To terminate the sound output.
9. STOP/BAND Key
• In the CD mode: to stop the compact disc or clear program.
• In the Radio mode: to select the receiving band.
10. VOLUME Key
• To adjust the volume level.
11. PRESET EQUALIZER Key (EQ)
• For selecting Digital Sound Control: CLASSIC, ROCK, POP and FLAT.
12. OPEN/CLOSE Key
13. PLAY/PAUSE Key
• In the CD mode: to start or interrupt play.
14. MEMORY-UP/REPEAT Key (REPEAT/M-UP)
• In the Radio mode: for recalling the preset memory in order.
• In the CD mode: for selecting the all repeat or track repeat mode.
15. DISPLAY Key
• To indicate the functioning of the unit.
16. AUX Key
17. REMOTE SENSOR
• To receive signals from the remote control.
18. AC POWER CORD
19. ANTENNA
20. SPEAKER SOCKET
21. STEREO/MONO SELECTOR
22. AUX INPUT SOCKET
23. LINE OUT SOCKET
3
Page 3
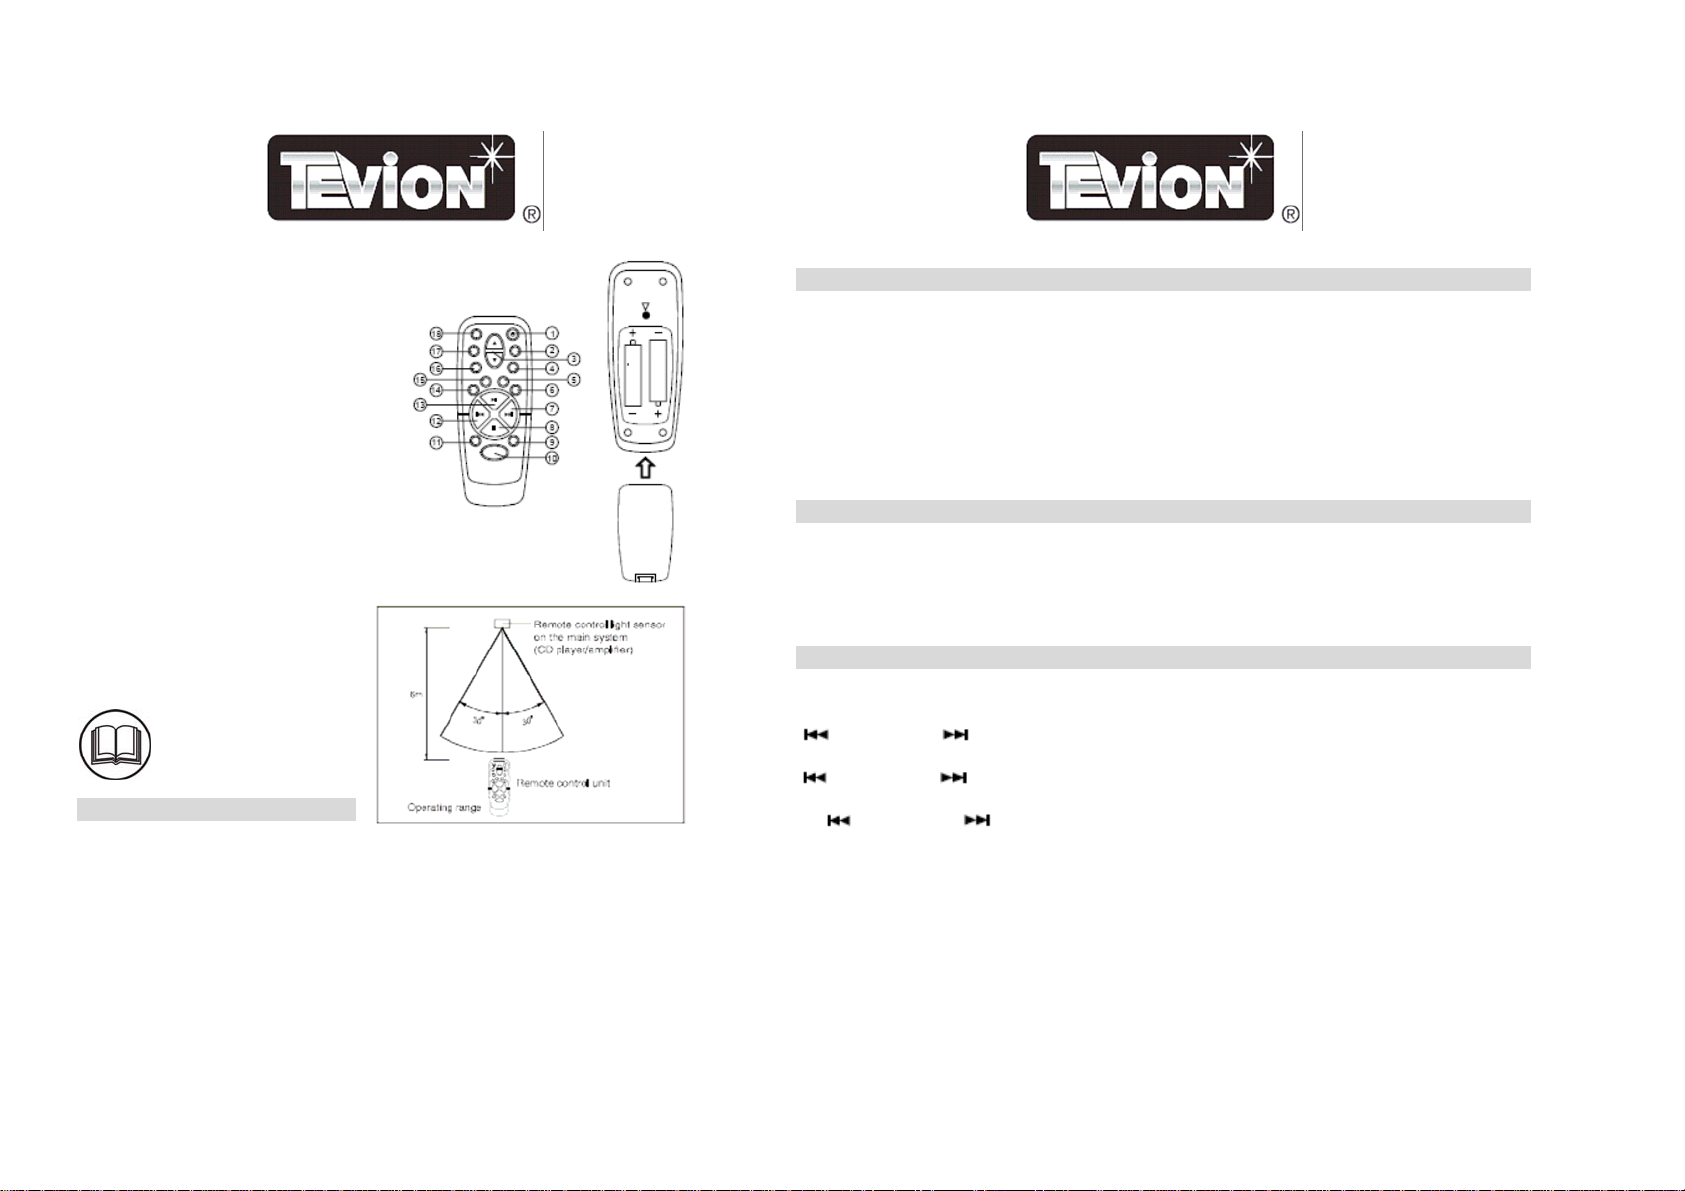
REMOTE CONTROL
1. POWER Key
2. PRESET EQUALIZER Key (EQ)
3. VOLUME Key
4. SNOOZE Key
5. INTRO Key
6. REPEAT Key
7. F.F Key
8. STOP / BAND Key
9. MEMORY-UP Key
10. FUNCTION Key
11. DISPLAY Key
12. REW Key
13. PLAY/PAUSE Key
14. PROG/MEM Key
15. RAND Key
16. TIMER Key
17. SLEEP Key
18. MUTE Key
INSTALLATION
Unpack all parts and remove protective material.
•
• Insert the batteries (2xUM-4/SIZE "AAA") into
battery compartment.
• Do not connect the unit to th
connections have been made.
• Do not cover any vents and m
for ventilation.
e mains before checking the main voltage and before all other
ake sure that there is a space of several centimetres around the unit
the remote control transmitter as shown in the
4
CONNECTIONS
A) Terminals for two loudspeakers (minimum speaker impedance 4 ohm.)
Attach loudspeaker cables to the unit.
Left speaker: connect the wire to terminal 'L'.
Right speaker: connect the wire to terminal 'R'.
B) Terminal for FM antenna. The antenna wire supplied with the unit can be connected to terminal. Adjust
the position of FM antenna for optimum reception. For good FM stereo reception, use an FM outdoor
antenna or connect the supplied antenna wire to your house distribution system.
C) Voltage selector (not on all version). If your version has this selector, check that the setting corresponds
with your local mains voltage. If the selector must be reset, disconnect the AC power cord.
D) AUX input. For connection of other sound sources. (e.g. TV or VCR audio output).
OPERATION
POWER STANDBY ON/OFF
When you first plug the unit into the mains, the unit will go into standby mode. The display will show the time.
– You can press POWER to switch on the unit.
– The standby function of the unit remains on until the unit is switched on.
– Pull the main plug out of the wall socket if you want to switch off the main voltage completely.
OPERATION – CLOCK SETTING
1. Press DISPLAY for changing to Clock display.
2. Press and hold MEMORY/CLK ADJ, the first second digit of "24H" will flash, press
SEARCH/CLK to set the correct hour mode.
3. Press MEMORY/CLK ADJ to select the hour setting, the first second digit of "00" will flashes, press the
SEARCH/CLK to set the correct hours.
4. Press MEMORY/CLK ADJ again to select the minutes setting, the third fourth digit of "00" will flashes, press
the
SEARCH/CLK to set the correct minutes.
5. Press MEMORY/CLK ADJ again to store in the memory.
5
Page 4
OPERATION – TUNER
TUNING
1. Press POWER to switch on the unit.
2. Press TUNER button.
3. Select the tuning band range by pressing the STOP/BAND button.
4. Press
– The tuner will automatically search for the first transmitter of sufficient strength.
– Repeat this procedure if you wish to select another station.
5. To tune to weak stations, briefly depress SEARCH/CLK continuously until you read
the correct frequency or the reception is at its optimum.
PROGRAMMING OF PRESET STATIONS
1. Select the tuning band range by pressing the STOP/BAND button.
2. Tune to the desired station as described under Tuning.
3. Press MEMORY/CLK ADJ. "MEMORY" will start to flash.
4. Press REPEAT/M-UP to assign a number (1-10) to the preset station.
5. Press MEMORY/CLK ADJ again. The frequency, preset number and stereo setting are now
entered in the memory.
6. Repeat this procedure to store other frequencies and preset in the memory.
TUNING TO PRESET STATIONS
Select a number between 1 and 10 by pressing:
– REPEAT/M-UP button.
SEARCH/CLK for few seconds, then release the button.
OPERATION – COMPACT DISC
INSERTING THE DISC
1. Press CD key.
2. Press OPEN/CLOSE key to open the CD door.
3. Insert a CD in the tray.
4. Press OPEN/CLOSE key to close the CD door.
The CD-player starts and scans the contents list of the CD. After a few seconds, the total playing
time and number of tracks appear on the display.
6
SELECTING A DIFFERENT TRACK DURING PLAY
1. Press
2. Shortly appear this; the chosen track will start playing.
STARTING AGAIN WITH THE TRACK THAT IS CURRENTLY PLAYING by pressing
SEARCHING FOR A PASSAGE DURING PLAY by holding
search for the required passage. If you release the button, play will continue. The volume will automatically be
reduced to a low level during search operation and will return to its normal level when the search button is
released.
PROGRAMMING TRACKS
Up to 20 tracks can be store in the memory.
1. Load a CD as described under Inserting the disc.
2. Press MEMORY/CLK ADJ to start programming.
3. Press
4. When you have found the correct track number, press MEMORY/CLK ADJ to store it in the memory. The
display will show the programmed tracks.
5. To stop programming, press STOP/BAND once.
6. The programming will automatically stop if no button is pressed in a period of
10 seconds.
REVIEWING THE PROGRAM
1. Press MEMORY/CLK ADJ to review of the tracks currently programmed will begin. The tracks will be
displayed on the LCD.
2. Press MEMORY/CLK ADJ again for going to the next.
PLAYING A PROGRAM
1. Press PLAY/PAUSE .
2. Play starts with the first track of the program.
3. When all tracks have been played, the CD player stops.
CLEAR PROGRAM TRACKS
Opening and closing the CD tray will erase all programmed tracks.
SEARCH/CLK until the required track number appears in the display.
SEARCH/CLK once. The track will be started again from the beginning.
SEARCH/CLK to locate a particular track. The track number is displayed on the LCD.
7
SEARCH/CLK pressed down to
Page 5
OPERATION – COMPACT DISC (Continued)
RANDOM PLAY (FOR REMOTE HANDSET ONLY)
You can play all the tracks in a random order.
1. Press CD Key.
2. Press RANDOM Key.
3. "RANDOM" lights up on the display.
4. Press PLAY/PAUSE .
5. The tracks will be played in a random order.
6. Press STOP or RANDOM to cancel the random mode.
REPEAT PLAY
If at any time you wish to listen to a disc or program over and over again, the REPEAT function
will allow you to do so.
1. Press REPEAT/M-UP.
2. "REPEAT" will be displayed on the LCD. The contents of the disc will be replayed after the last
track.
3. Press REPEAT/M-UP again, "REPEAT" will flash. The contents of the particular track will be
replayed all over again.
4. Press STOP or REPEAT/M-UP to cancel the repeat function.
OPERATION – MAIN FUNCTION
In Radio Mode:
Press DISPLAY to change display information as follows:
Freq display > Clock display > Timer > (Freq display)
In CD Mode:
Press DISPLAY to change display information as follows:
CD normal display > Clock display > Timer > (CD normal display)
Select the CD remain time display at CD normal display:
- Normal Play:
- Random Play:
- Memory Play:
Each > Clock display > Timer > (Each)
Each > Remain > Clock display > Timer > (Each)
Each > Clock display > Timer > (Each)
8
In Other Mode:
Press DISPLAY to change display information as follows:
Clock display > Timer > (Clock display)
OPERATION – TIMER
Before setting the timer, make sure the clock is correctly set.
TIMER ON SETTING
Press CD, TUNER to select the desired sound source.
For TUNER
1. If you select TUNER, press REPEAT/M-UP to select a preset station.
2. The display will show the selected preset station and frequency.
3. Press TIMER to confirm your selection.
4. 'TIMER' segment will appear on the display.
5. Press DISPLAY to change the display to clock mode.
6. Press TIMER, start time and TIMER segment will flash on the display about 5 seconds.
7. Press and hold MEMORY/CLK ADJ, the digit of hour segment will flash
on the display about 10 seconds.
8. Press
9. Press MEMORY/CLK ADJ again, digit of minutes segment will flash on the display about 10 seconds.
10. Press
11. Press MEMORY/CLK ADJ again to store the start time.
For CD
1. Insert a disc into the CD tray.
2. Press TIMER.
3. Repeat steps 5-11 under For tuner for Timer ON setting.
4. CD will be played.
TIMER OFF SETTING
1. Press the TIMER.
2. The "Timer" will disappear.
SEARCH/CLK to set the hour.
SEARCH/CLK to set the minutes.
9
Page 6
OPERATION – SLEEP
1. Press SLEEP, 'SLEEP' will appear on the display.
2. Keep pressing SLEEP to adjust the sleep time in the order of 90>80>70....10 minutes.
3. To cancel the SLEEP mode, press SLEEP again.
OPERATION – PRESET EQUALISER
Press PRESET EQ to select the digital sound performance in the order of CLASSIC, ROCK, POP
and FLAT.
OPERATION – MUTE
Press MUTE to terminate the sound output. Press again to cancel this mode.
AM ANTENNA INSTALLATION
Connect the AM aerial leads to the two AM input sockets. To fit base plate for AM aerial, simply
fold base plate 180 degrees until it reaches the base plate fixing slots, press the base plate clip
outwards to allow the base plate to lock into place. Do not force.
GENERAL INFORMATION
Set not reacting when any function button is pressed.
Hang up problem due to electro-static discharge and/or software, press POWER button
to switch off and then on the unit or in the worst case, pull the mains plug out
of the wall socket and then reconnect the unit.
10
ELECTRICAL SAFETY
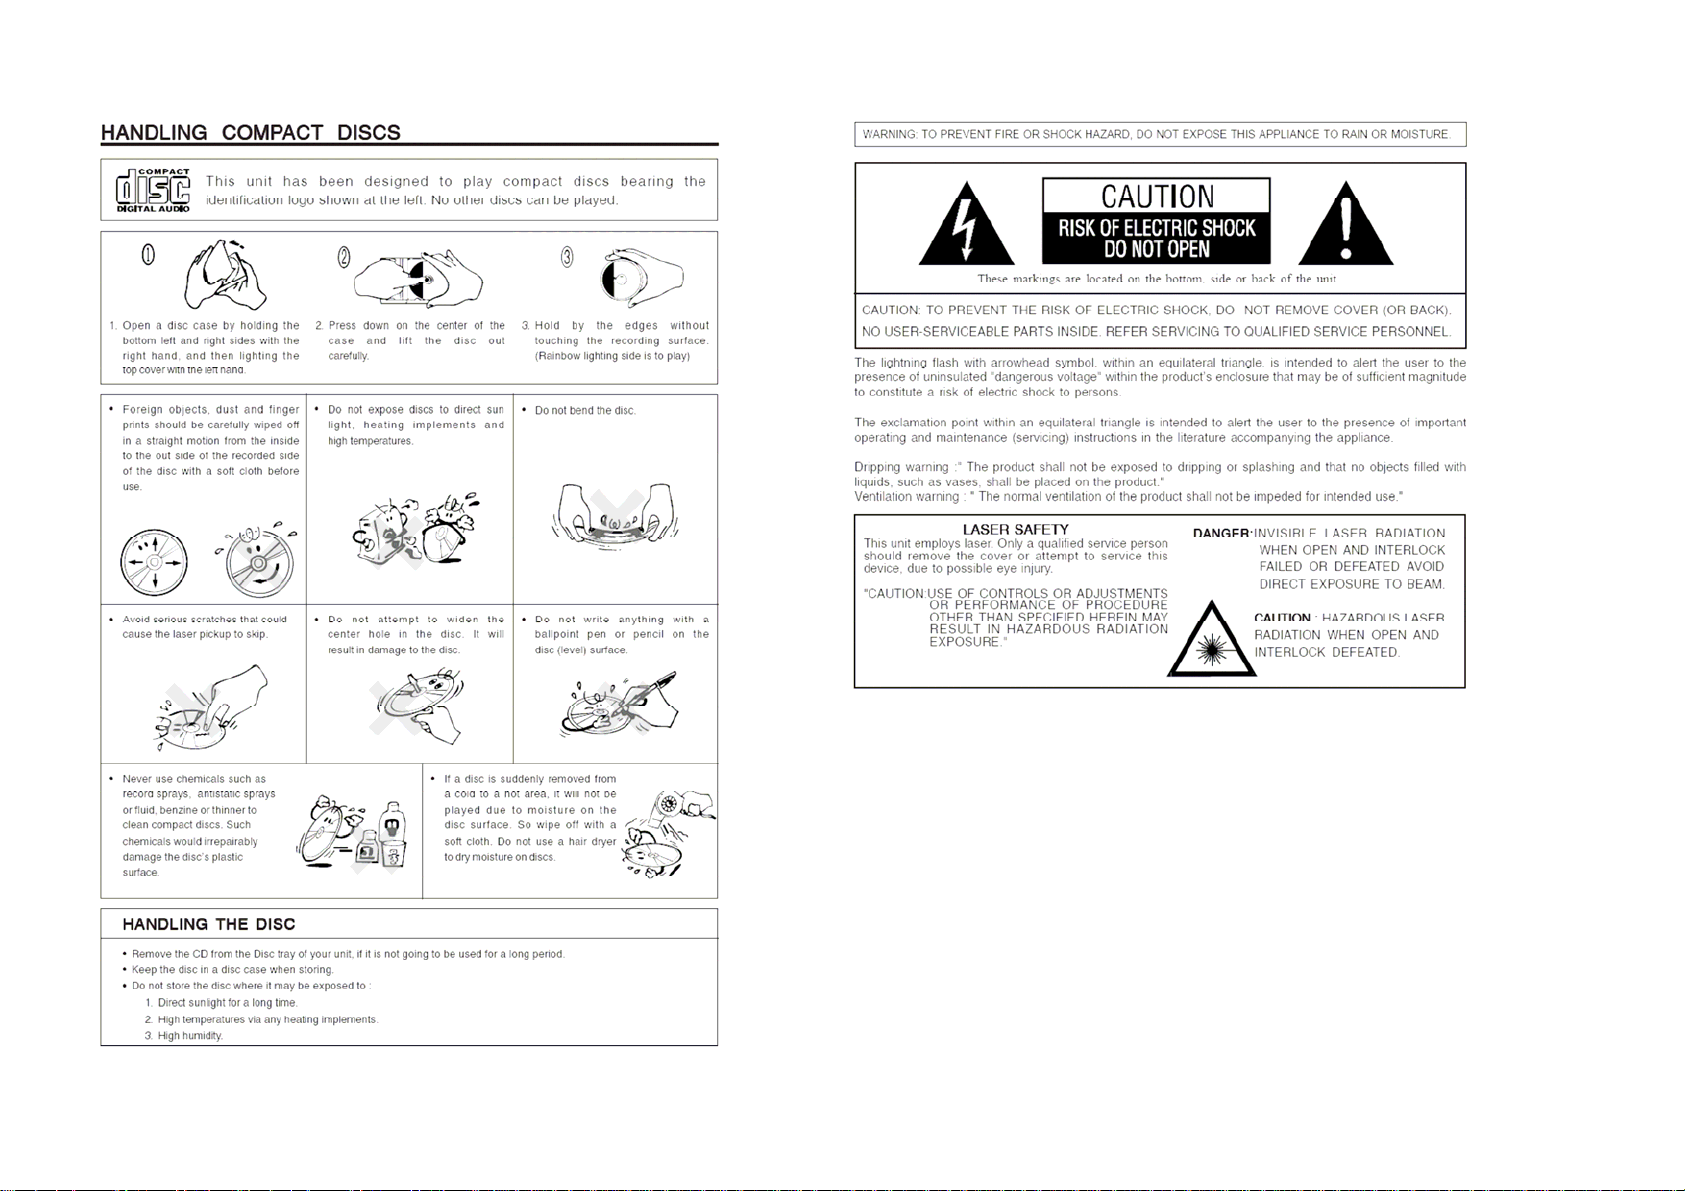
When using electrical products always observe safety regulations where applicable to reduce the risk of fire,
electric shock and personal injury.
Always check that the power supply corresponds to the voltage on the rating plate. When using any electrical
apparatus always observe safety regulations and use basic safety precautions to reduce the risk of fire, electric
shock and personal injury, including the following
.
Read, Keep and Follow these instructions, heeding all Warnings.
Keep out of reach of young children. This apparatus is not suitable for use by young children or infirm persons
without supervision. Young children must be supervised to ensure that they do not play with the apparatus.
WARNING. Do not insert any objects into any openings of an electrical apparatus.
WARNING. Do not touch any moving parts of any electrical apparatus.
WARNING. Do not use this apparatus near water. To avoid the risk of fire or electric shock, do not expose this
apparatus to rain or moisture. The apparatus shall not be exposed to dripping or splashes.
WARNING. No objects filled with liquid, such as vases, shall be placed on any electrical apparatus. Do not
immerse in any liquid whilst in use or in cleaning. Clean only with a damp cloth, dry with a dry towel. Do not
use harsh abrasives as these may damage plastic parts.
DO NOT block any ventilation openings. Keep away from curtains, newspapers and restricted areas. Install in
accordance with any specific manufacturer’s instructions. Always allow a sufficient gap around the apparatus to
avoid overheating.
DO NOT install near any heat sources such as radiators, gas heaters, stoves or other apparatus (including
amplifiers) that produce heat. Do not leave in direct sunlight.
WARNING. Do not place any naked flame source, such as lighted candles on any electrical apparatus.
WARNING! Connect to a suitable 230-240 ~ 50 Hz power supply only. If a class 1 product it must be connected
to a suitably earthed mains socket.
11
Page 7
ELECTRICAL SAFETY (Continued)
Always unplug from the power source when any electrical apparatus is not in use.
Do not abuse or damage a power cord. If any power cord is damaged, it must be replaced by the
manufacturer, its service agent or a similarly qualified person in order to avoid a hazard. A
replaceable cord must be replaced with an authorised replacement from an authorised service agent
only.
Only use attachments/accessories specified by the manufacturer.
Unplug this apparatus during lightening storms or when unused for long periods of time.
Attention is drawn to the environmental aspects of disposing of any battery.
Refer all servicing to qualified personnel. Servicing is required when the apparatus has been
damaged in any way, such as when the power supply cord or plug is damaged, liquid has been
spilled or objects have fallen into the apparatus, the apparatus has been exposed to rain or moisture,
does not operate normally, or has been dropped. Do not attempt to service any double insulated
apparatus. Double insulated apparatus requires specialist servicing and knowledge to retain the
safety of the apparatus.
WARNING. Do not use any electrical apparatus outdoors. If any electrical apparatus is to be used
outdoors, use a suitable Isolating transformer or Electrical Safety Switch (RCD).
For household use only, this apparatus is not intended for commercial use.
If this apparatus is to be used by a third party, please supply these instructions with it.
No liability will be accepted for any personal injury or damage caused by failure to follow these
instructions.
12
CARE AND CLEANING
Before cleaning.
When not in use or before cleaning, always disconnect the equipment from the mains supply.
Cleaning guide.
Regularly clean the outside of the equipment with a soft damp cloth and dry it with a dry towel. Do not immerse
in water. Do not use harsh solvents to clean the plastic components.
Storage
When not in use store the Antenna and these instructions in a dry place.
TECHNICAL SPECIFICATIONS
Power Supply: AC power 230-240 ~ 50 Hz
Output Power (Per Channel): 12.5 watts RMS into 4 ohm
Power Consumption: 70W
Radio Section
Frequency Range: AM 522 - 1620 KHz
FM 87.5 - 108 MHz
Compact Disc Section
Frequency Response (-6dB): 20-15,000 Hz
Signal-to-noise Ratio: 50 dB
Harmonic Distortion: 0.4%
Channel Separation: 40 dB
CONTINUOUS IMPROVEMENTS ARE BEING MADE TO OUR EQUIPMENT BOTH IN QUALITY AND
PERFORMANCE, THUS WE RESERVE THE RIGHT TO ALTER SPECIFICATIONS WITHOUT NOTICE.
13
Page 8
Page 9

Warranty Card
This product is guaranteed against faulty materials and workmanship for a per i od of twelve months
from the date of purchase. This warranty becomes void if the product has been tampered with,
damaged by accident, damaged in any other way by im proper use or has been purchased second
hand. All production orders have quality inspections.
For any customer query or in the unlikely event of a product failure, please
phone or email the helpline contact details below for assistance.
DO NOT RETURN THE PRODUCT TO THE RETAILER.
WARRANTY FOR APPLIANCES USED COMMERCIALLY LIMITED TO 90 DAYS
Product: ______________________________________________________
Model No.: _____________________________________ Purchase Date:_________
Product Purchased From: ________________________________________________
_________________________________________________________________________
Your Name: _____________________________________________________________
Address: ________________________________________________________________
______________________________________________ Phone Number: __________
IMPORTANT!
Please retain this warranty card along with your purchase receipt. Please do not
post to the retailer
Toll Free Help line: 1300 366 144
Email: [email protected]
Page 10

 Loading...