

Page 1

Operation Manual
for
Model MP-2986
Display and Keypad
for use with
TC-36-25 RS232 Temperature Controller
May 29, 2008
Drawing #4712 Rev. A
®
TE
1590 Keane Drive Phone: (231) 929-3966
Traverse City, MI 49696-8257 Fax: (231) 929-4163
http://www.tetech.com e-mail: [email protected]
All Materials Copyright © 2008, TE Technology, Inc.
TECHNOLOGY, INC.
Page 2

Table of Contents
General Description ........................................................................................................................ 3
Setup Instructions ........................................................................................................................... 4
Operating Instructions ..................................................................................................................... 6
MP-2986 Layout ............................................................................................................................. 7
MP-2986 Dimensions ..................................................................................................................... 8
Notice: Improper tuning of this temperature controller (or any temperature controller) can lead
to excessive thermal cycling and/or overheating of the thermoelectric device, either of which are
known to reduce the lifetime of any thermoelectric device. Care should be taken to prevent the
temperature of the thermoelectric device from going beyond the range specified by the device
manufacturer. Care should also be taken so that any thermal cycling of the thermoelectric device
is a result of changes in the controller’s set-point temperature and not instability at a given set
point due to improper selection of the tuning variables.
In no event shall TE Technology, Inc. be liable for any damages whatsoever (including without
limitation, damage for loss of business profits, business interruption, loss of business
information, or any other pecuniary loss) arising out of the use or inability to use this TE
Technology, Inc. product, even if TE Technology, Inc. has been advised of the possibility of
such damages.
2
Page 3
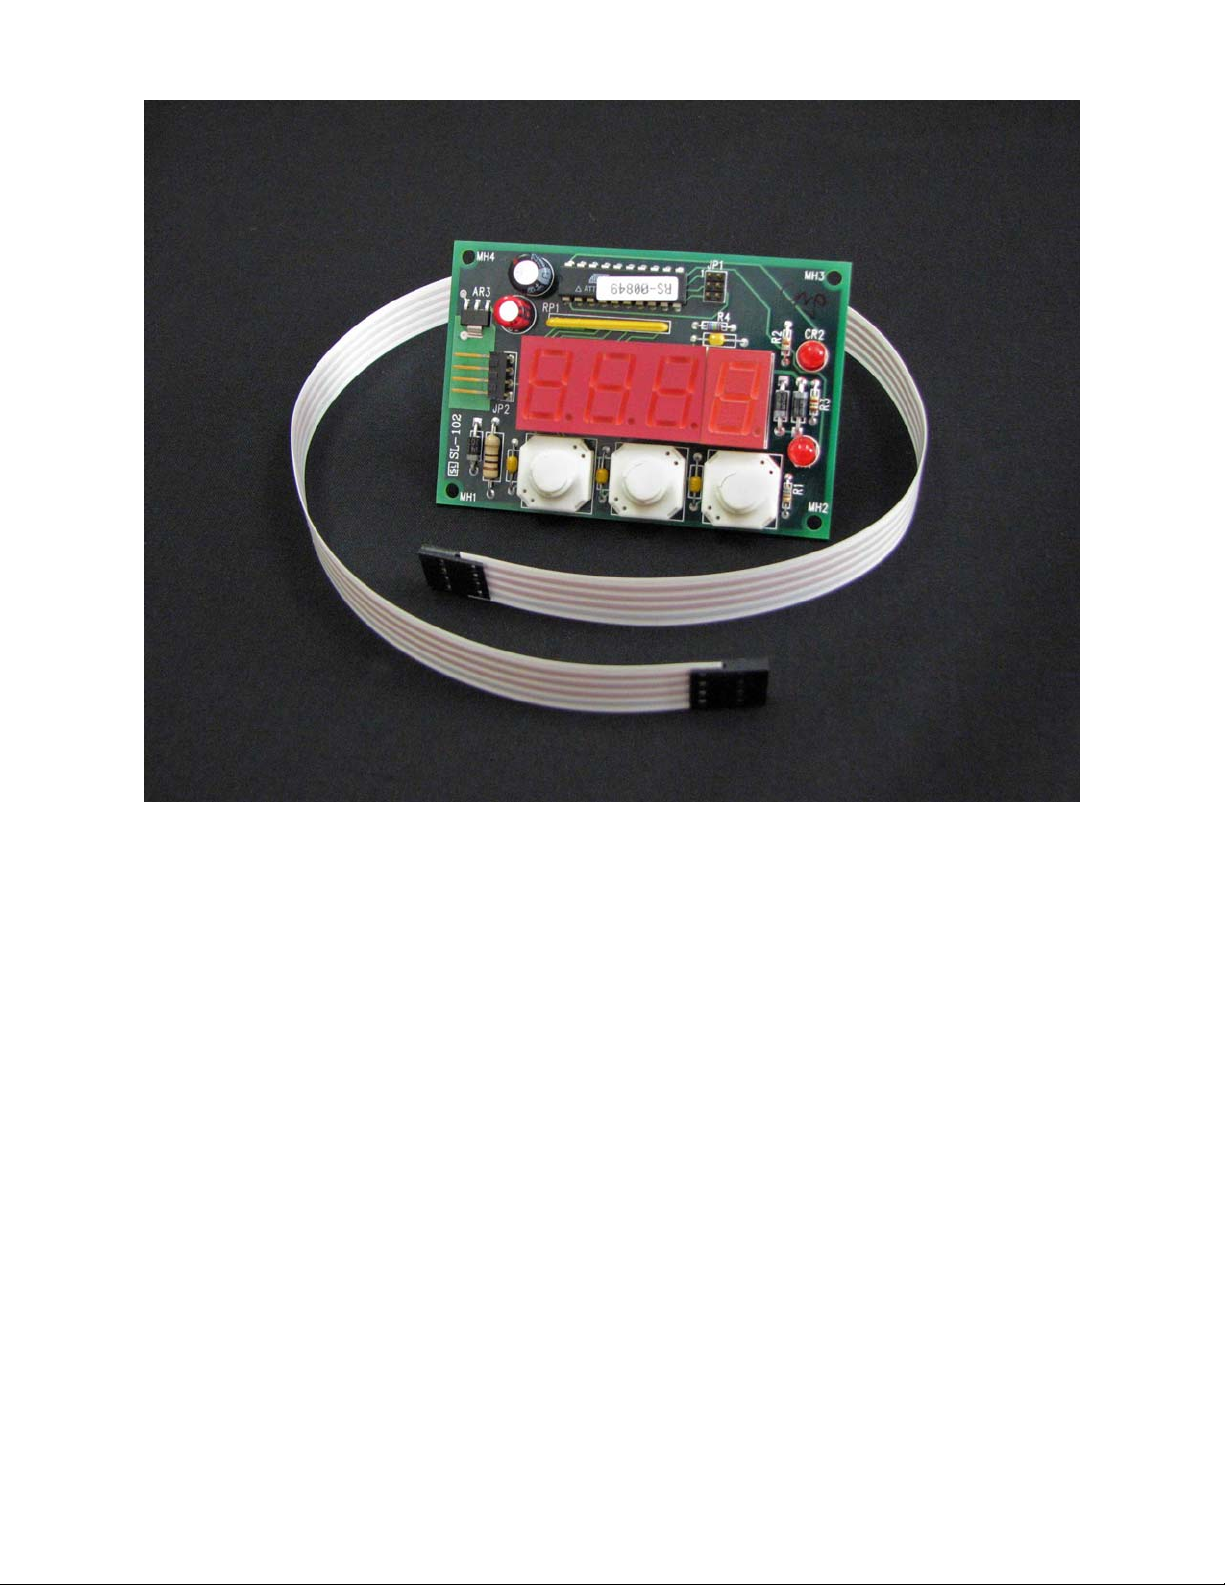
General Description
The MP-2986 Display and Keypad accessory can be used with the TC-36-25 RS232 temperature
controller. Normally, the controller interfaces with a computer so that all of the relevant control
settings can be configured and adjusted. Once that is done, the software can be used to show the
actual sense temperature. However, if you want to operate the controller separate from the
computer, the software is, of course, no longer available to show the actual temperature. In this
case, the MP-2986 can then be used to provide a convenient way to display not only the actual
temperature, but it can be used to change the set point as well.
The display provides a maximum of 0.01° resolution. Since it is a 4-digit display, the actual
resolution will depend on the temperature being shown.
The MP-2986 is an “open-frame” component. That is, it does not come pre-installed into a box
that would provide any physical or environmental protection to the circuitry. This keeps the costs
to a minimum, particularly if you are prototyping this for an original equipment application.
However, for daily laboratory use, you might want to install it into a box. Panel mounting details
are provided below.
3
Page 4
Setup Instructions
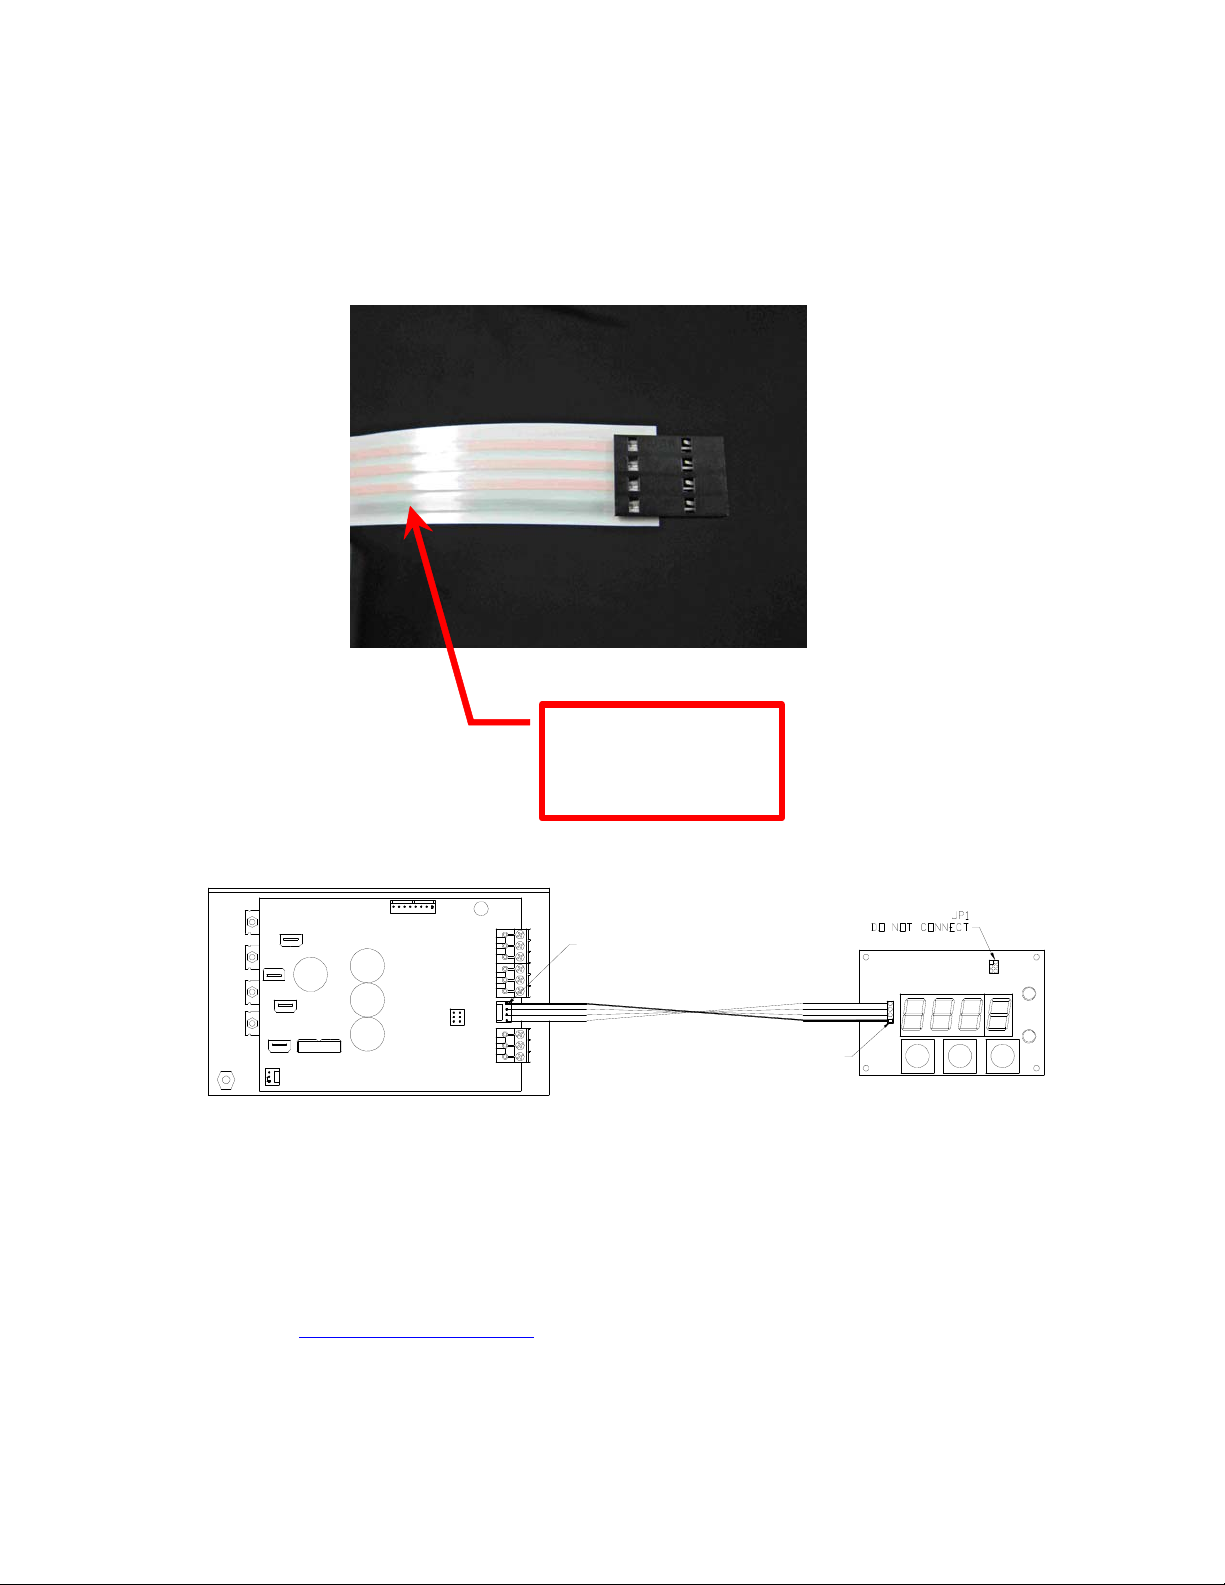
1. Make sure the controller is not powered. Connect the flat-flex cable to JP2 on the MP-2986
and JP3 on the TC-36-25 RS232. Make sure the gray-shaded conductor connects to Pin 1
on JP2 and Pin 1 on JP3.
WP1
WP4
WP2
WP3
JP6
Note: the connection diagram above shows only the connection between the MP-2986 and
the TC-36-25 RS232. Other connections to the controller are not shown for the sake of
clarity.
The cable length provided is 457 mm (18 in.). You can use a longer flat-flex cable though if
necessary. However, the maximum allowable length is 910 mm. Longer cables can be purchased
from Digi Key (http://www.digikey.com). The basic part number is A9BBG-F-ND. The
first two boxes correspond to the number of connectors; the next two boxes correspond to the
length of the cable, in inches. For example, suppose you want a length of 610 mm. This is
equivalent to 24 inches, so the part number would be A9BBG-0424F-ND. Digi Key only lists
standard parts of up to 8 inches (203.2 mm) length, so you will need to contact them to verify
availability.
gray-shaded conductor
must con n e ct to Pin 1
of J P2 on disp la y and
JP3 on controller
JP3
PIN 1
JP2
PIN 1
4
Page 5
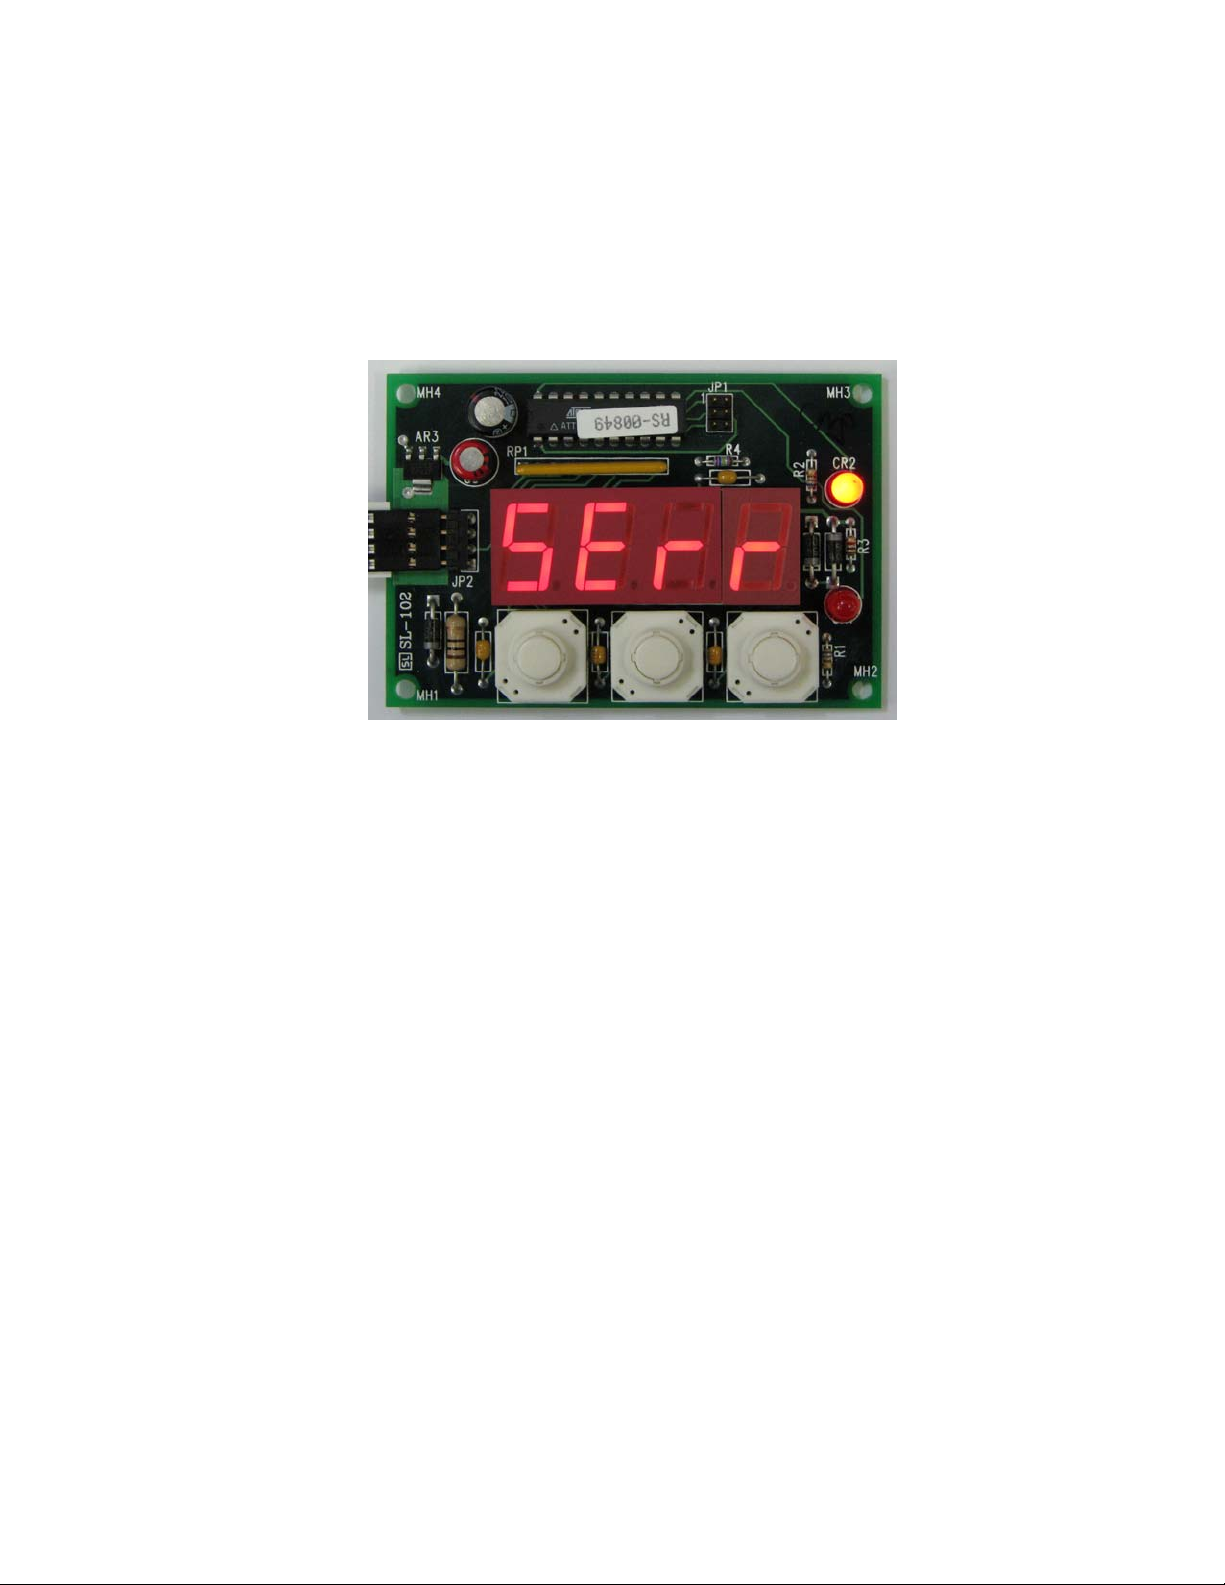
2. Connect the un-powered controller to the un-powered computer (see the controller manual
for further details) first, and then power up the controller and computer. The display should
automatically come on. Since the controller has not been previously programmed to read
from the MP-2986, the display will show “SErr”, as shown below:
3. Start the TC-36-25 RS232 software, and enter the following settings:
a) Check the DISPLAY FUNCTION ENABLE box.
b) Select the “JP3 DISPLAY SET VALUE” option under the SET TEMP TYPE
menu key.
c) If you want to set maximum and minimum allowable temperature set points,
enter the corresponding values in the SET TEMP HIGH RANGE and SET
TEMP LOW RANGE boxes. Then click the SEND SET RANGE TO
DISPLAY button, located in the far, lower right-hand corner of the software
GUI.
d) Click the SEND BOX VALUES button (or send the command codes if you are
using your own software). The display should now show the temperature
properly, and you can now use the MP-2986 to set the set point temperature
and to show the actual temperature being sensed.
e) If you intend to operate the controller separate from the computer, save the
controller settings to EEPROM, shut the computer down, and then disconnect
the controller from the computer and power supply before connecting the MP-
2986. (See the controller manual for complete details.)
5
Page 6
Operating Instructions
1. The right-hand button is the MENU button, which toggles between the ACTUAL TEMP
and the SET TEMP mode. When the bottom LED is lit, the MP-2986 is in the SET TEMP
mode. When the top LED is lit, it is in the ACTUAL TEMP mode.
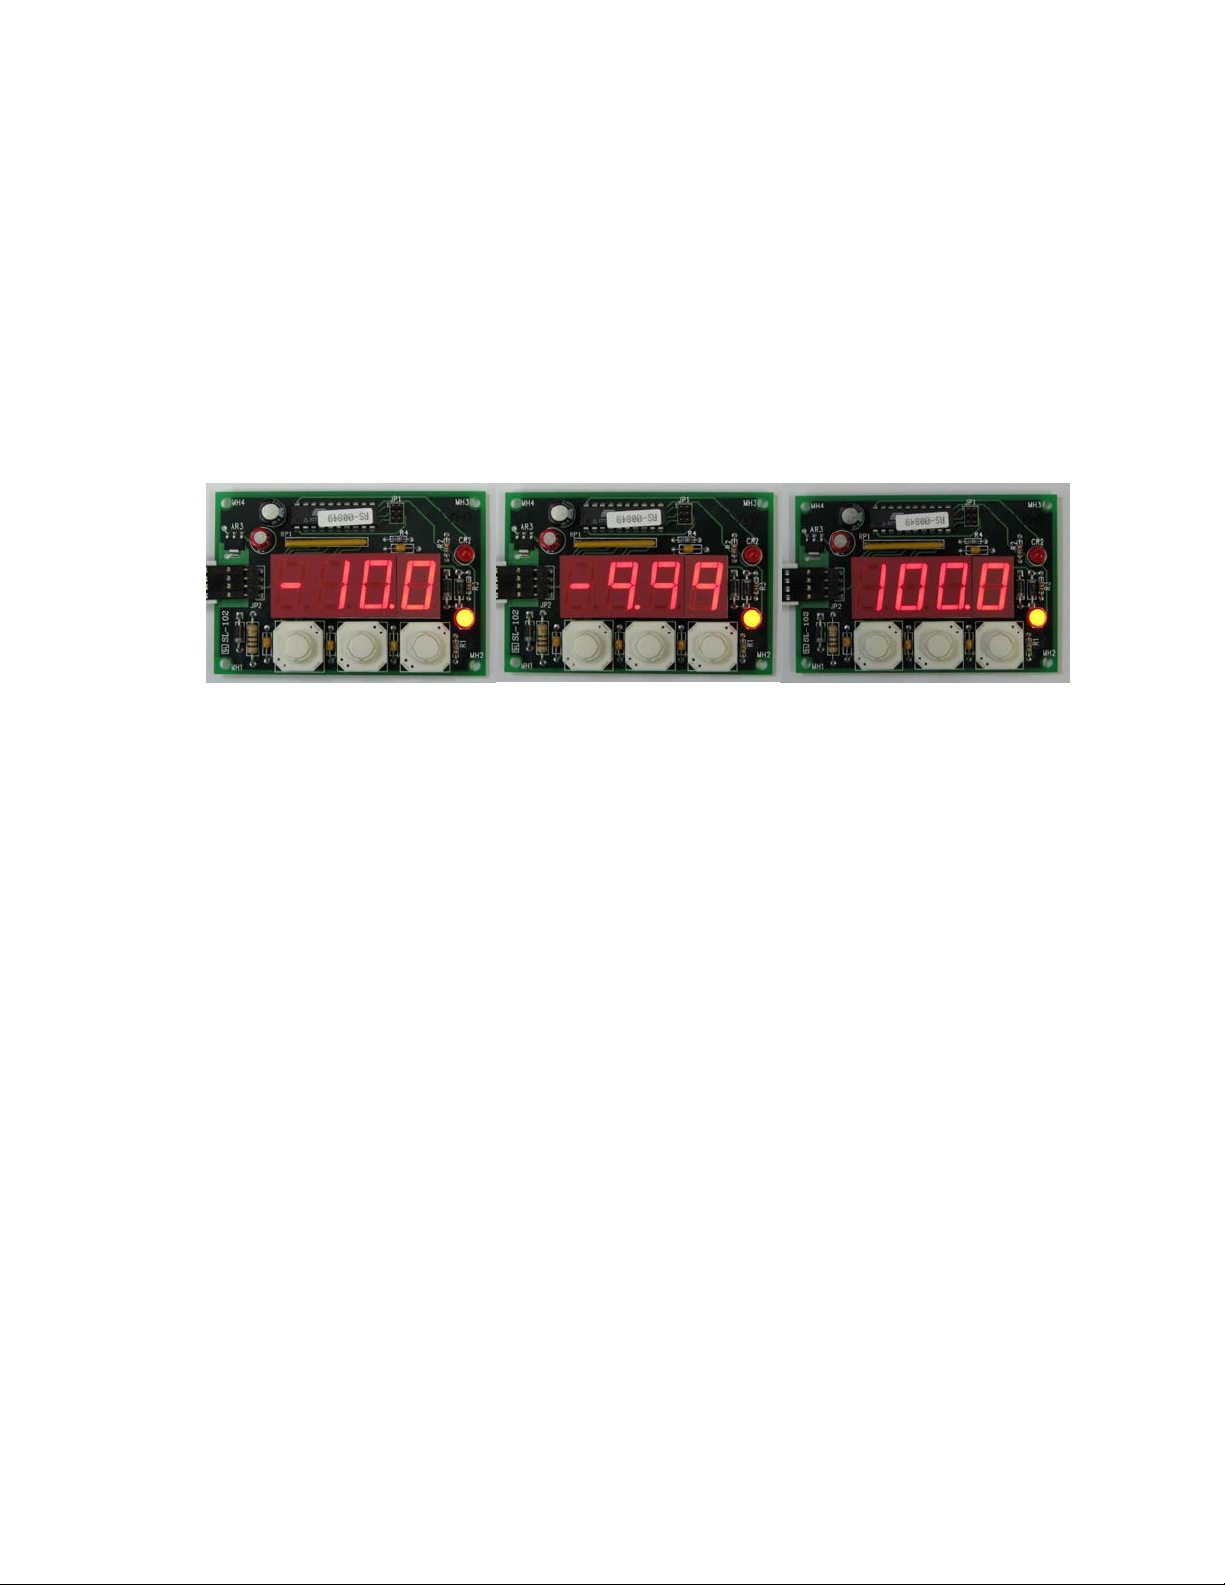
The display has 4 digits, so the temperature resolution will depend on the temperature
being displayed. The pictures below show three examples of displays in which the
resolution is either 0.01 or 0.1 degrees. The resolution will be 0.1 degrees for temperatures
less than or equal to -10.0 degrees and for temperatures greater than or equal to +100.0
degrees. For temperatures ranging from -9.99 to +99.99, the resolution will be 0.01
degrees.
2. SET TEMP mode
The controller set-point temperature can be adjusted using the left-hand button to increase
the set-point temperature or the middle button to decrease the set point temperature. Push
the button once for an incremental change in set point. Push and hold the button for rapidly
changing the set point. The temperature set point will be shown in whatever units (°C or
°F) the controller was initially programmed.
3. ACTUAL TEMP mode
The actual temperature being sensed by the primary thermistor is shown in the display.
The temperature shown will be in whatever units (°C or °F) the controller was initially
programmed.
6
Page 7
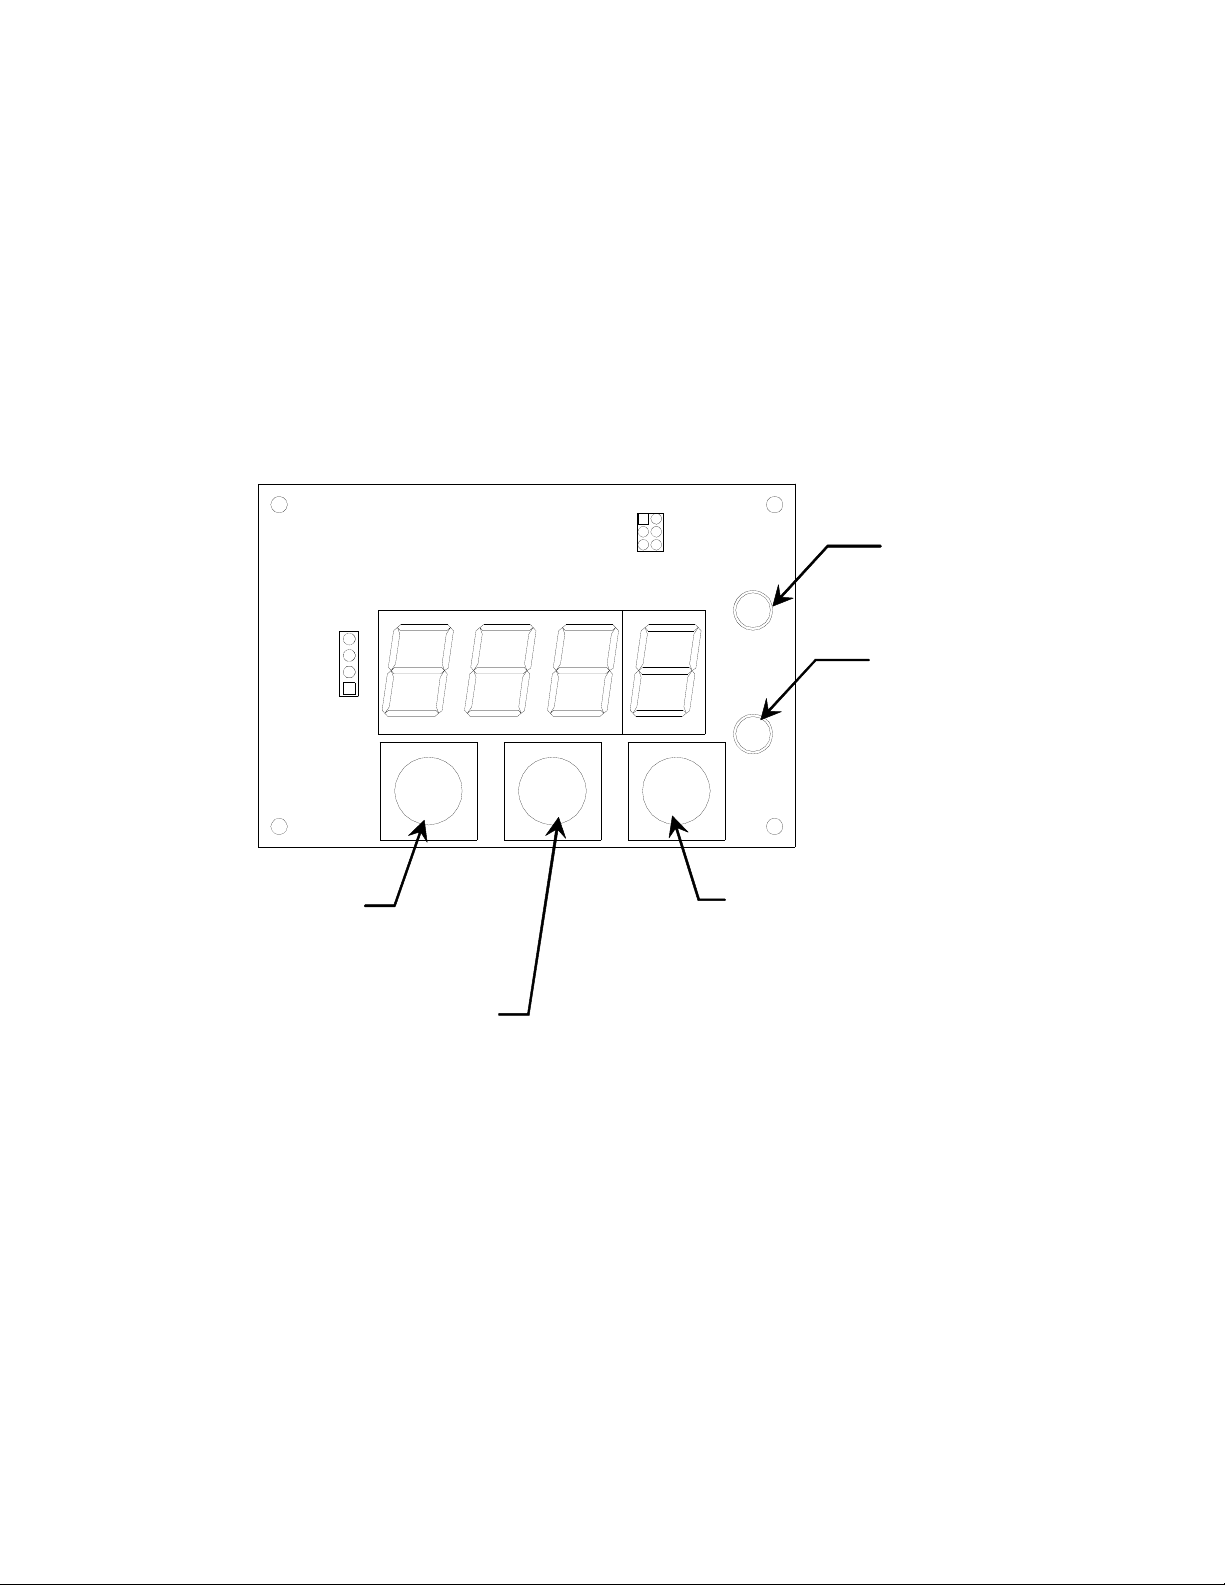
MP-2986 Layout
ACTUAL TEMP
LED
SET TEMP
LED
INCREASE
SET TEMP
BUTTON
MENU BUTTON
DECREASE
SET TEMP
BUTTON
7
Page 8
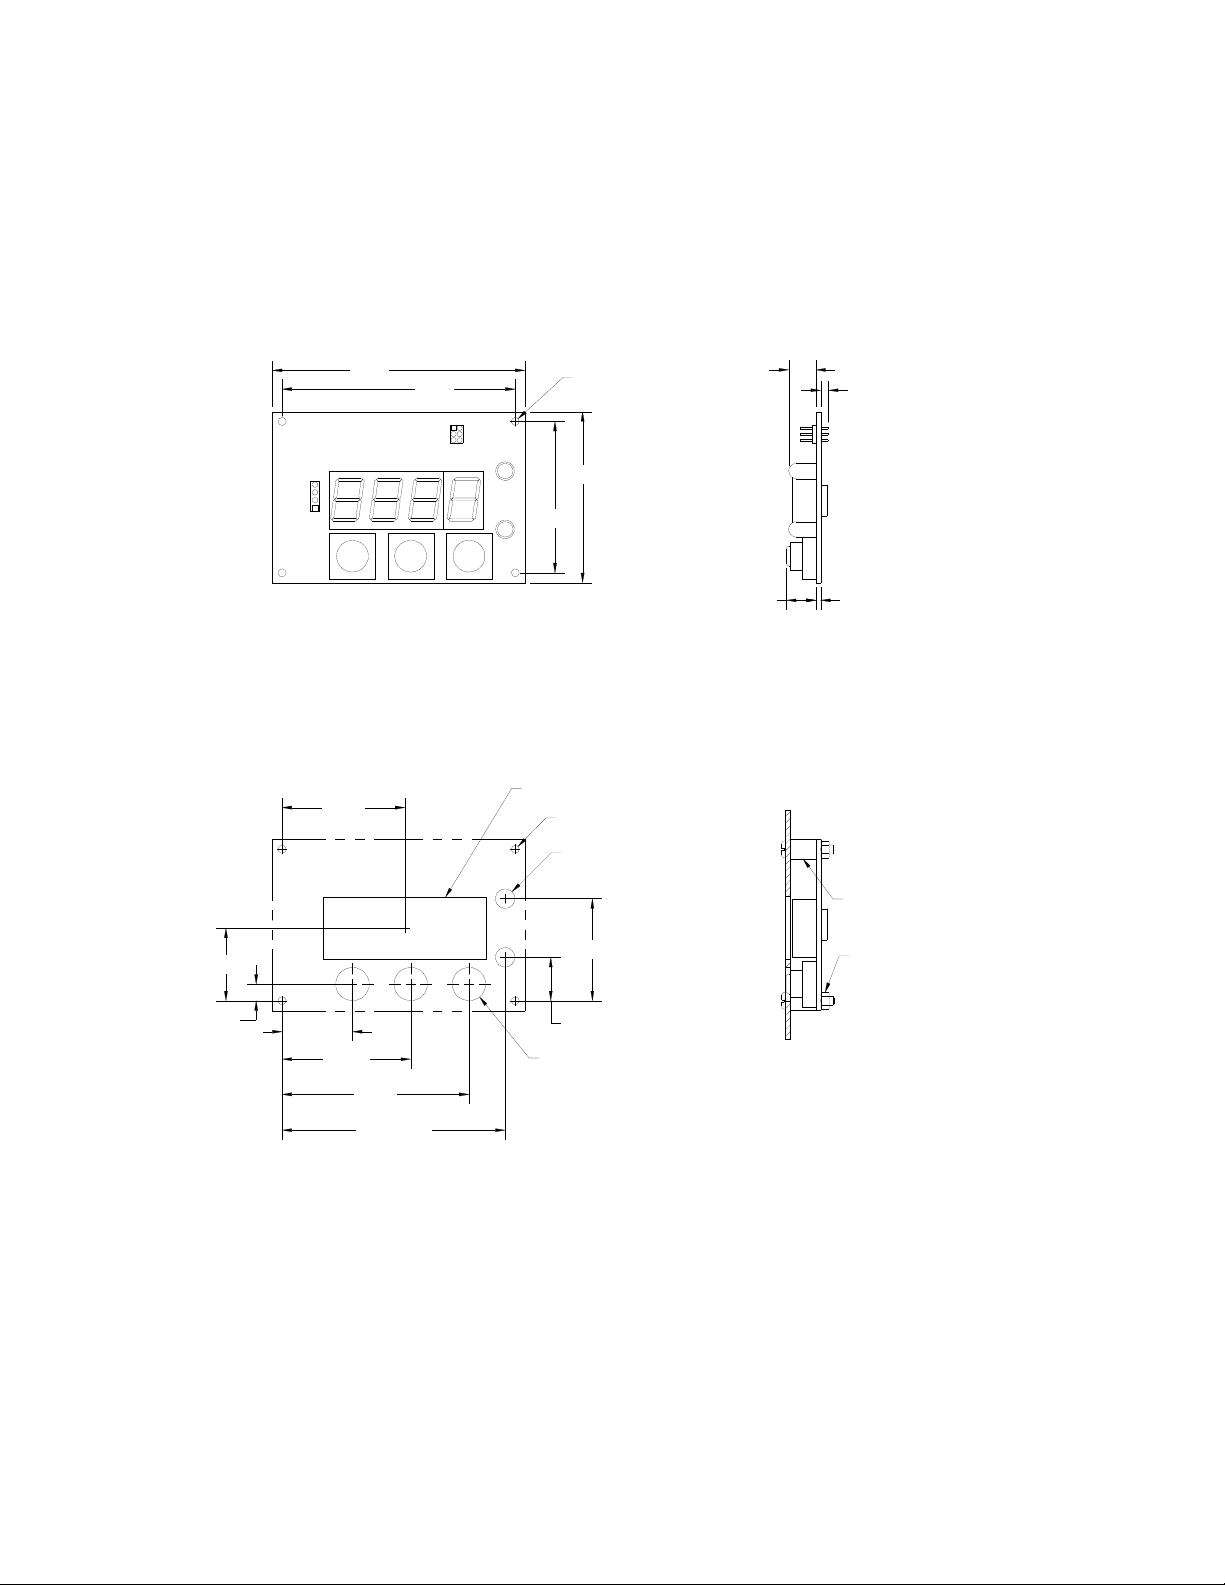
MP-2986 Dimensions
23.75
3X 5.46
22.99
82.6
76.2
Ø3.05
55.9
49.5
NOTE: ALL DIMENSIONS IN MILLIMETERS
40.13
42.04
20.32 X 53.34
4X Ø3.05
2X Ø6.35
33.40
14.22
3X Ø10.92
8.89
9.65
2.54
1.60
8.26 X Ø6.35 SPACER
(CUSTOMER SUPPLIED)
4-40 NUT AND SCREW
OR M3 X 0.5 NUT AND SCREW
(CUSTOMER SUPPLIED)
61.09
2X 72.90
PANEL CUTOUT DETAIL
8
 Loading...