

V
testo 872 - Thermal Imager
Instruction manual
Short
instructions
Thermography
pocket guide
Instruction
manual
ideos


Contents
Contents
1 Safety and waste disposal ................................................................... 5
1.1 Zu diesem Dokument ............................................................................. 5
1.2 Safety ..................................................................................................... 5
1.3 Waste disposal ....................................................................................... 7
2 Technical data ..................................................................................... 7
2.1 Bluetooth module ................................................................................... 7
2.2 General technical data ........................................................................... 7
3 Description of the instrument ............................................................. 11
3.1 Use ....................................................................................................... 11
3.1 Instrument / operating elements overview ........................................... 11
3.1 Displays overview................................................................................. 12
3.2 Power supply ....................................................................................... 13
4 Operation ........................................................................................... 14
4.1 Initial operation ..................................................................................... 14
4.2 Switching instrument on and off .......................................................... 14
4.3 Getting to know the menu .................................................................... 15
4.4 Quick select button .............................................................................. 16
5 WLAN connection - using the App ..................................................... 18
5.1 Activating/disabling the connection ..................................................... 18
5.2 Using the App ...................................................................................... 19
5.2.1 Establishing a connection ...................................................... 19
5.2.2 Select display ........................................................................ 19
6 Bluetooth® connection ....................................................................... 20
7 Performing the measurement ............................................................. 22
7.1 Saving an image ................................................................................... 22
7.2 Setting measuring functions ................................................................ 23
7.3 Image gallery ........................................................................................ 24
7.4 Image type ........................................................................................... 27
7.5 Setting the scale .................................................................................. 27
7.6 Setting emissivity and reflected temperature ....................................... 29
7.6.1 Selecting the emissivity ......................................................... 31
7.6.2 Customizing the emissivity .................................................... 31
7.6.3 Setting the RTC ..................................................................... 31
7.6.4 Setting ε-Assist...................................................................... 31

Contents
7.7 Selecting the colour palette ................................................................. 32
7.8 Activating/disabling the zoom ............................................................. 32
7.9 Activating/disabling the laser ............................................................... 32
7.10 Activating humidity, solar or electrical mode ....................................... 33
7.11 Activating the differential temperature ................................................. 33
7.12 Activating/disabling the Min/Max on Area function ............................. 35
7.13 Configuration ....................................................................................... 35
7.13.1 Settings ................................................................................. 35
7.13.2 SuperResolution ................................................................... 37
7.13.3 Save JPEG function .............................................................. 37
7.13.4 Connectivity .......................................................................... 38
7.13.5 Ambient conditions ............................................................... 38
7.13.6 Info ........................................................................................ 39
7.13.7 Fullscreen mode ................................................................... 39
7.13.8 Reset options ........................................................................ 39
8 Maintenance ...................................................................................... 41
8.1 Charging the rechargeable battery ...................................................... 41
8.2 Changing the rechargeable battery ..................................................... 41
8.3 Cleaning the instrument ....................................................................... 43
9 Tips and assistance ........................................................................... 44
9.1 Questions and answers ....................................................................... 44
9.2 Accessories and spare parts ............................................................... 45
10 Authorizations and certification .......................................................... 46

1 Safety and waste disposal
1 Safety and waste disposal
1.1 Zu diesem Dokument
• The instruction manual is an integral part of the instrument.
• Keep this document throughout the entire operating life of the instrument.
• Always use the complete original instruction manual.
• Please read this instruction manual through carefully and familiarise yourself
with the product before putting it to use.
• Pass this instruction manual on to any additional or subsequent users of the
product.
• Pay particular attention to the safety instructions and warning advice in
order to prevent injury and damage to the product.
1.2 Safety
General safety instructions
• Only operate this instrument in the proper manner, for its intended purpose
and within the parameters specified in the technical data.
• Do not apply any force to open the instrument.
• Do not operate the instrument if there are signs of damage on the housing,
mains unit or connected cables.
• Always comply with the locally valid safety regulations when carrying out
measurements. Dangers may also arise from objects to be measured or the
measuring environment.
• Do not store the product together with solvents.
• Do not use any desiccants.
• Only perform maintenance and repair work on this instrument that is
described in this documentation. Follow the prescribed steps exactly.
• Use only original spare parts from Testo.
• During operation, this instrument must not be pointed at the sun or other
intensive sources of radiation (e.g. objects with temperatures exceeding
650 °C). This can cause serious damage to the detector. The manufacturer
does not provide any warranty for any such damage to the microbolometer
detector.
5

1 Safety and waste disposal
Batteries
• Improper use of batteries may cause the batteries to be destroyed, or lead
to injury due to current surges, fire or escaping chemicals.
• Only use the batteries supplied in accordance with the instructions in the
instruction manual.
• Do not short-circuit the batteries.
• Do not take the batteries apart and do not modify them.
• Do not expose the batteries to heavy impacts, water, fire or temperatures in
excess of 60 °C.
• Do not store the batteries in the proximity of metal objects.
• In the event of contact with battery acid: rinse affected areas thoroughly
with water, and if necessary consult a doctor.
• Do not use any leaky or damaged batteries.
• Only charge the rechargeable battery in the instrument or in the
recommended charging station.
• Immediately stop the charging process if this is not completed in the given
time.
• Take the rechargeable battery out of the instrument or the charging station
immediately if it is not functioning properly or if it shows signs of
overheating. Rechargeable battery may be hot!
• When not in use for a long period of time, take the rechargeable battery out
of the instrument to prevent exhaustive discharge.
Warnings
Always pay attention to any information denoted by the following warnings.
Implement the precautionary measures specified!
Display Explanation
WARNING
CAUTION
ATTENTION
Indicates possible serious injury.
Indicates possible minor injury.
Indicates possible damage to equipment.
6

2 Technical data
1.3 Waste disposal
• Dispose of faulty rechargeable batteries and spent batteries in accordance
with the valid legal specifications.
• At the end of its useful life, dispose of the instrument via separate collection
for electrical and electronic devices. Please observe local regulations
regarding waste disposal, or alternatively return the product to Testo for
disposal.
2 Technical data
2.1 Bluetooth module
The use of the wireless module is subject to the regulations and
stipulations of the respective country of use, and the module may only
be used in each case in countries for which a country certification has
been granted.
The user and every owner undertake to adhere to these regulations and
prerequisites for use, and acknowledge that the re-sale, export, import,
etc. in particular in, to or from countries without wireless permits, is
their responsibility.
2.2 General technical data
Infrared image output
Feature Values
Infrared resolution 320 x 240
Thermal sensitivity (NETD) 60 mK
Field of view (FOV) / min.
focusing distance
Geometric resolution (IFOV) 2.3 mrad
SuperResolution (optional
function)
IR image refresh rate 9 Hz
Focus Fixed focus
Spectral range 7.5 - 14 μm
42° x 30° / <0.5 m
640 x 480 pixels / 1.3 mrad
7

2 Technical data
A
Visual image output
Feature Values
Image size / min. focusing
distance
Image presentation
Feature Values
Display 8.9 cm (3.5") TFT, QVGA (320 x 240 pixels)
Digital zoom 2x, 3x, 4x
Display options
Interface
Colour palettes 11 options:
Measurement
Min. 3.1 MP / 0.5 m
• Infrared image
• Real image
• WLAN
• Bluetooth
• USB 2.0 micro B
• Blue/red
• Grey
• Inverted grey
• High temp
• Cold-hot
• Humidity
• Iron
• Rainbow
• Rainbow HC
• Sepia
• Testo
Feature Values
Measuring range -30 to 650 °C
Accuracy
ɛ-Assist
Emissivity/reflected
± 2 °C / ± 2%
utomatic emission value and RTC detection
0.01 to 1/manual
temperature adjustment
8

2 Technical data
Measurement functions
• Single point measurement
• Coldspot
• Hotspot
• Differential temperature
• Area measurement
• ScaleAssist
• IFOV warner
• Surface moisture distribution
• Humidity measurement with testo 605i
humidity probe
• Solar mode (manual)
• Electrical mode (manual)
• Electrical measurement with testo 770
wireless clamp meter
Imager equipment
Feature Values
Digital camera Yes
Fullscreen mode Yes
File format .jpg
Video streaming
• USB
• WiFi via the App
Laser not available in USA,
Japan, China
635 nm, class 2
Image storage
Feature Values
File format
• .jpg
• .bmt
• Option of exporting in
.bmt
.jpg
.png
.csv
.xls
9

2 Technical data
Memory capacity Internal mass storage 2.8 GB,
Power supply
Feature Values
Battery type Li-Ion rechargeable battery 2500 mAh / 3.7 V
Operating time 4.0 h @ 20 °C
Charging option In instrument/in charging station (optional)
Charging time approx. 5 h via mains unit
Ambient conditions
Feature Values
Operating temperature -15 to 50 °C
Storage temperature -30 to 60 °C
Humidity 20 - 80 %RH, not condensing
Physical features
Feature Values
Weight 510 g (including battery)
Dimensions 219 x 96 x 95 mm
Housing PC/ABS
Protection class (IEC 60529) IP 54
Vibration (IEC 60068-2-6) 2 G
Standards, tests, warranty
> 2000 images (without SuperResolution)
approx. 8 h via a PC's USB interface
Feature Values
EMC 2014/30/EU
RED 2014/53/EU
Warranty 2 years, warranty conditions: see
www.testo.com/warranty
You can find the EU declaration of conformity on the Testo homepage
www.testo.com under the product-specific downloads.
10
3 Description of the instrument
3 Description of the instrument
3.1 Use
The testo 872 is a handy, robust thermal imager. You can use it to undertake
the non-contact measurement and display of surface temperature distribution.
Areas of application
• Building inspection: Energy efficiency rating of buildings (heating,
ventilation, air-conditioning trade, building engineers, engineering firms,
experts)
• Production monitoring / quality assurance: monitoring of production
processes
• Preventive maintenance / servicing: Electrical and mechanical inspection of
systems and machines
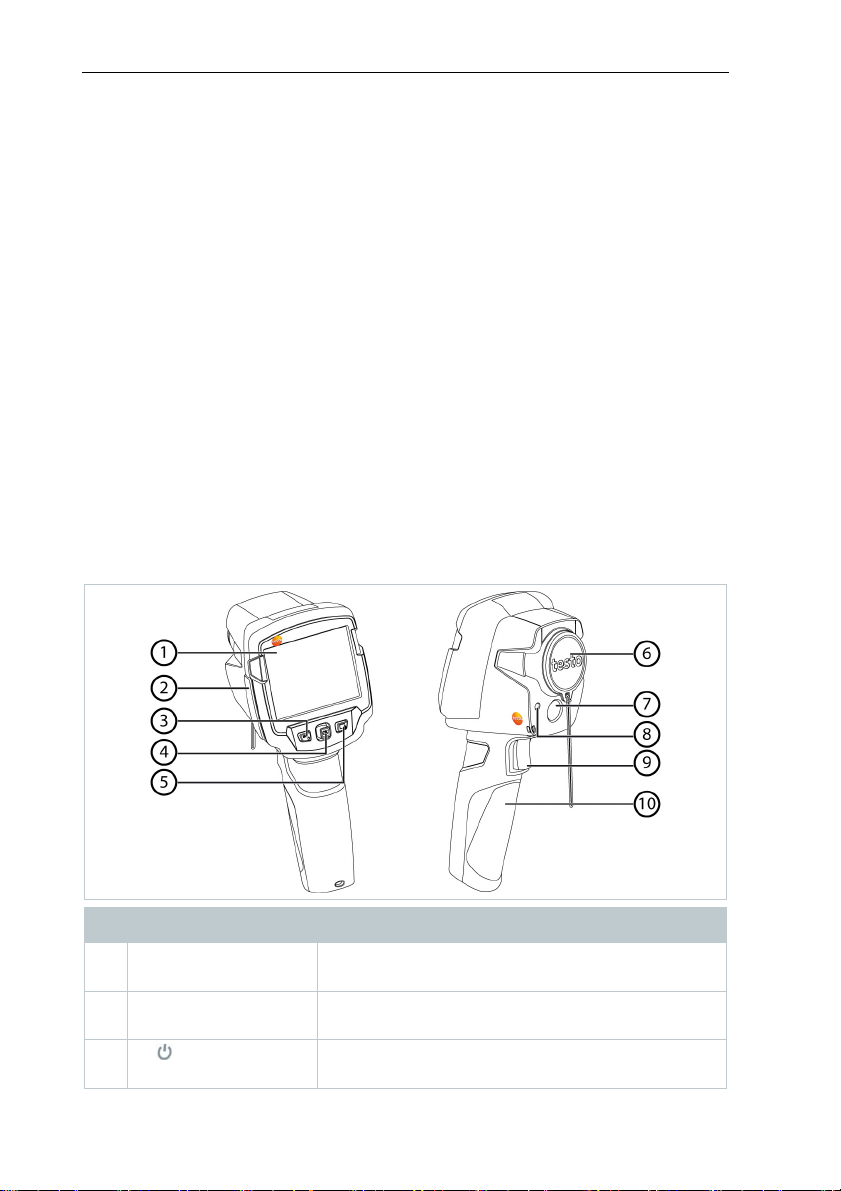
3.1 Instrument / operating elements
overview
Element Function
1 Display Displays infrared and real images, menus and
functions
2 Interface terminal Contains micro USB interface for power supply
and connection to the computer
3 - key
- Esc key
- Switch camera on and off
- Cancel action
11
3 Description of the instrument
Element Function
4 - OK key
- Joystick
- Open menu, select function, confirm setting
- Navigate within the menu, highlight function,
select colour palette
5 Quick select button Opens the function assigned to the quick select
button; the icon for the selected function is
displayed bottom right
6 Infrared camera lens;
Takes infrared images; protects the lens
protective cap
7 Digital camera Takes real images
8 Laser Marking of the measuring point
9 Trigger Saves the displayed image
10 Battery compartment Contains the rechargeable battery
CAUTION
Laser radiation! Class 2 laser
- Do not look into the laser beam
Laser can be activated with the Remote function, also via smartphone
or tablet.
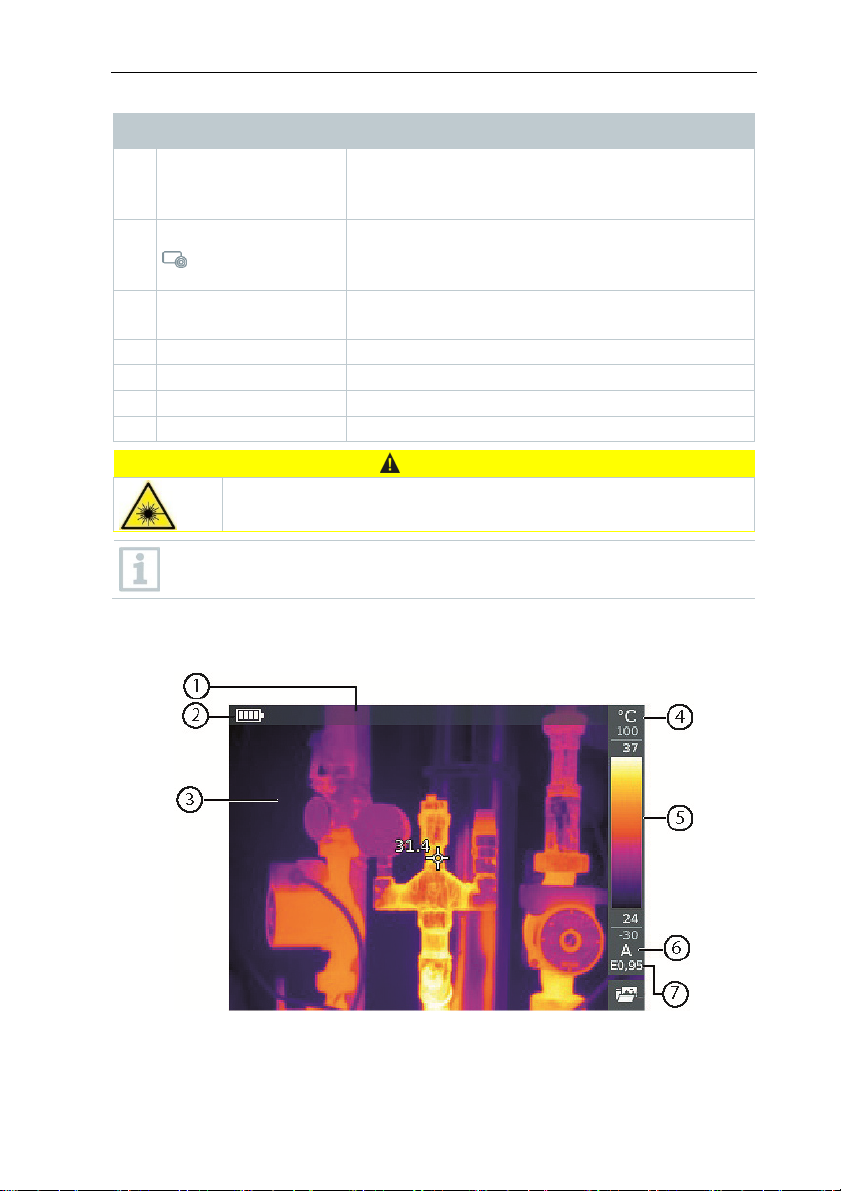
3.1 Displays overview
12
3 Description of the instrument
Element Function
1 Status bar In the status bar, values are displayed depending
on the setting.
2
Battery capacity / charge status:
: Battery operation, capacity 75-100%
: Battery operation, capacity 50-75%
: Battery operation, capacity 25-50%
: Battery operation, capacity 10-25%
: Battery operation, capacity 0-10%
: Mains operation, battery is charging
3 Image display IR image or real image display
4 °C or °F Unit set for reading and scale displays
5 Scale - Temperature unit
- Grey characters: measuring range
- White characters: temperature margin of the
image displayed, showing the
minimum/maximum reading (with automatic
scale adjustment) or the selected
minimum/maximum display value (with
manual scale adjustment)
6 A, M or S A - automatic scale adjustment
M - manual scale adjustment
S - ScaleAssist is enabled
7 E ... Emissivity set
3.2 Power supply
The power is supplied to the instrument via a replaceable rechargeable battery
or the mains unit provided (battery must be inserted).
With an attached mains unit, power is supplied automatically via the mains unit
and the rechargeable battery is charged (only at ambient temperatures from 0
to 40°C).
If the instrument is switched off when connected to a PC via the USB interface,
the rechargeable battery is charged via the USB interface.
It is also possible to charge the battery using a charging station (accessory).
The instrument is equipped with a buffer battery to maintain the system data
during an interruption in the power supply (e.g. when the battery is changed).
13
4 Operation
4 Operation
4.1 Initial operation
Please read the testo 872 1st steps commissioning instructions supplied
(0970 8652).
4.2 Switching instrument on and off
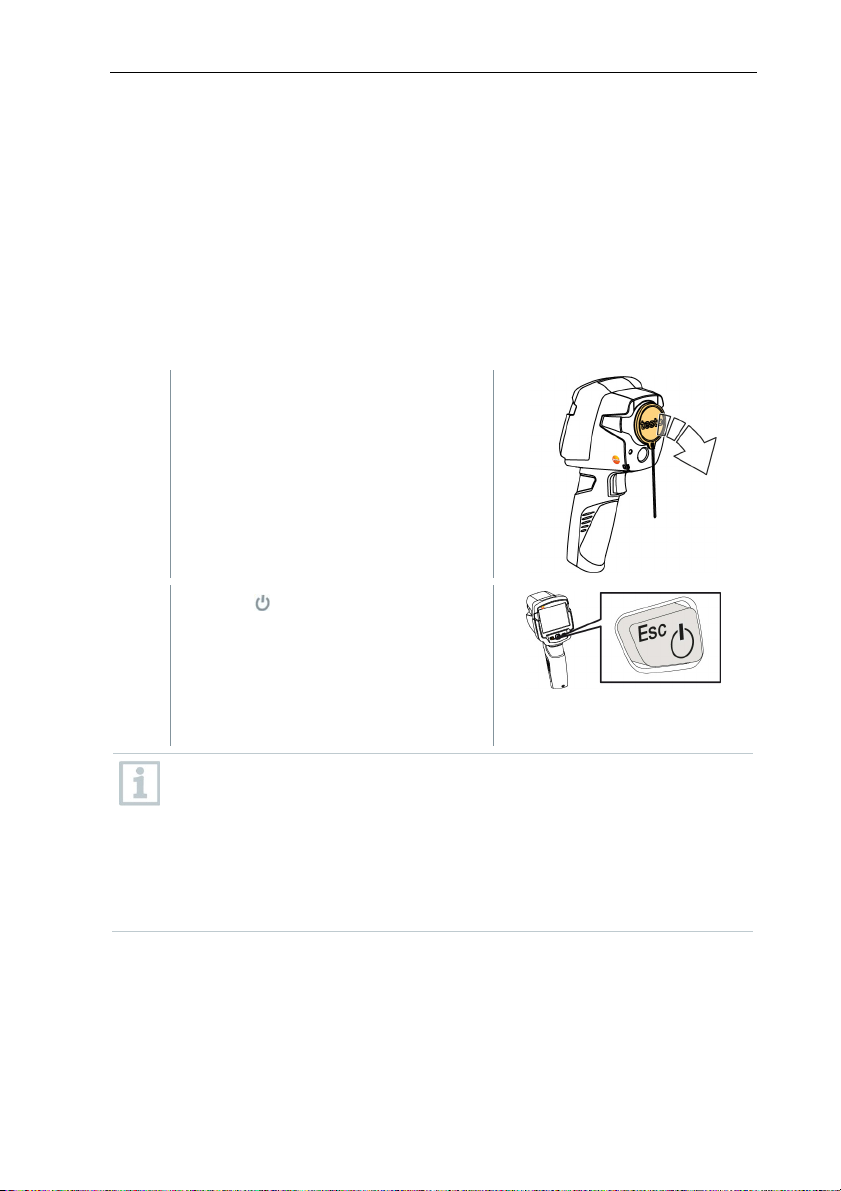
Switching on the camera
1 - Remove protective cap from the
lens.
2
- Press .
14
The camera starts.
The start screen appears on the
display.
The camera carries out automatic zeroing approx. every 60 seconds in
order to guarantee measuring accuracy. A "click" is heard when this
happens. The image freezes briefly when this occurs. Zeroing is carried
out more frequently during the camera warm-up period (takes
approx. 90 seconds).
During the warm-up period no measuring accuracy is guaranteed. The
image can already be used for indication purposes and saved.

Switching off the camera
1
- Press and hold down until the
progress bar is complete.
The display goes off.
The camera is switched off.
4.3 Getting to know the menu
1 - Press OK to open the menu.
4 Operation
2 - Move the joystick down/up to
highlight a function (orange border).
3 - Press OK to select the function.
3.1 - Move the joystick to the right to open the submenu (marked with >).
- Return to the main menu:
o Move the joystick to the left or
o Move the joystick to the menu bar and press OK.
15
4 Operation
4.4 Quick select button
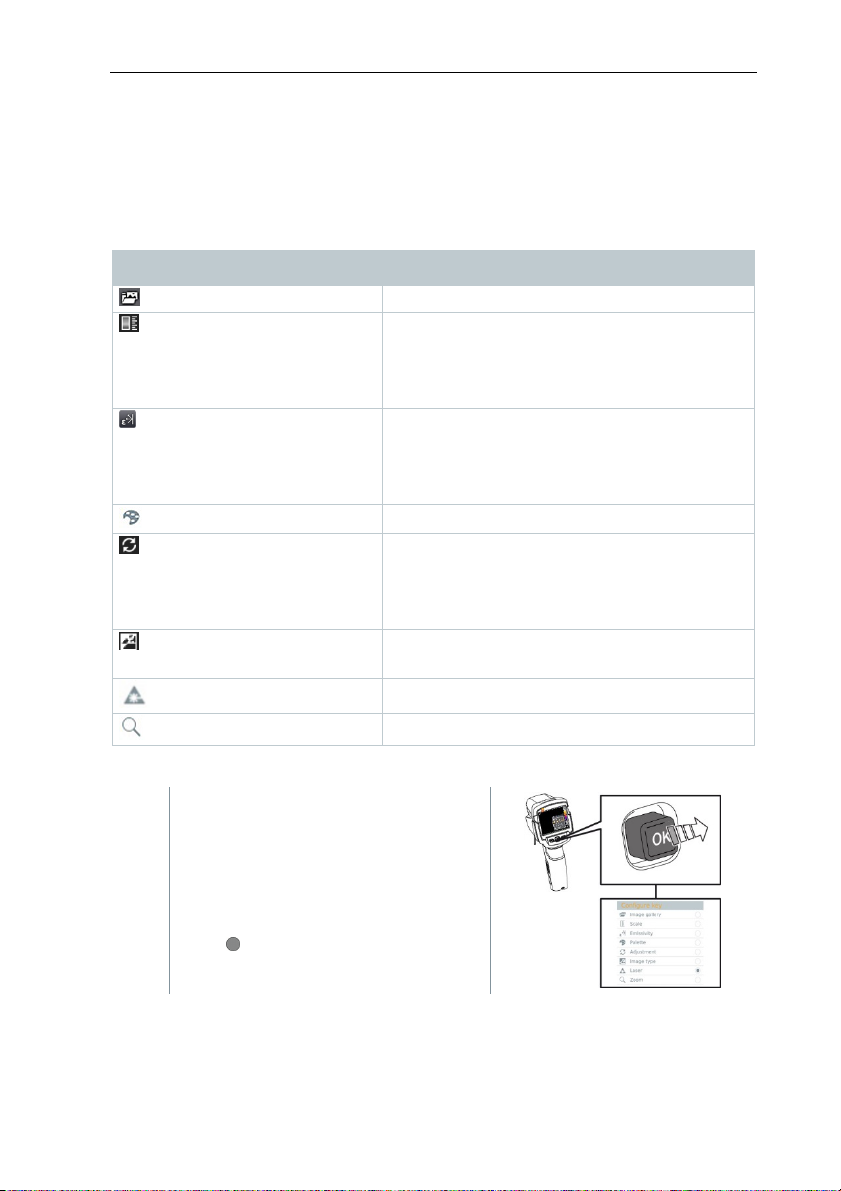
The quick select button is another navigation option that you can use to call up
certain functions simply at the touch of a button.
Quick select menu items
Menu item Function
Image gallery
Scale
This function is only available if
the Image type is set to
infrared)
Emissivity
This function is only available if
the Image type is set to
infrared)
Palette
Adjustment
This function is only available if
the Image type is set to
infrared)
Image type
Laser
Zoom
Changing assignment
Opens an overview of saved images.
Set scale limits.
Set emissivity (E) and reflected temperature
(RTC).
Toggles the palette selection.
Carries out manual zeroing.
Alternately switches the image display
between infrared and real image.
Activates the laser pointer.
Enlarges the image section (2x, 3x, 4x)
1 - Move the joystick to the right.
The Configure key selection menu
appears.
The activated function is marked with
a dot ( ).
16
 Loading...