

Page 1

testo 831 (0560 8316)
Bedienungsanleitung de
Instruction manual en
Mode d’emploi fr
Manual de instrucciones es
Manuale di istruzioni it
Manual de instruções pt
Handleiding nl
Page 2

2
1. Allgemeine Hinweise
Lesen Sie dieses Dokument aufmerksam durch und machen Sie
sich mit der Bedienung des Produkts vertraut, bevor Sie es einsetzen. Bewahren Sie dieses Dokument griff bereit auf, um bei
Bedarf nachschlagen zu können.
2. Produktbeschreibung
Infrarot-Sensor, Laser
Display
Infrarot-
Messung
Ein-/Aus-
schalten
Batterie fach
Messtaste:
Infrarot-Messung
Lederschutzhülle,
inkl. Gürtelhalter
Art.-Nr. 0516 8302
Zubehör
Bezeichnung Artikel-Nr.
Emissionsklebeband
= 0,95 0554 0051
3. Sicherheitshinweise
Elektrische Gefahren vermeiden:
Infrarotmessung: Bei Messung von spannungs führenden
Teilen erforderliche Sicherheitsabstände einhalten.
Produktsicherheit / Gewährleistungsansprüche wahren:
Nur sach- und bestimmungsgemäß und unter Einhaltung der
vor gegebenen Parameter einsetzen. Keine Gewalt anwenden.
Nicht elektromagnetischer Strahlung (z. B. Mikrowellen, Induk-
tions heizungen), statischer Aufladung, Hitze oder starken
Temperaturschwankungen aussetzen.
Nicht zusammen mit Lösungsmitteln (z. B. Aceton) lagern.
Produkt nur öffnen, wenn dies zu Wartungs- oder Instand-
haltungsarbeiten ausdrücklich in der Dokumentation beschrie-
ben ist.
Page 3

Laserstrahlung!
Nicht in den Laserstrahl blicken.
Fachgerecht entsorgen:
Defekte Akkus / leere Batterien an den dafür vorgesehenen
Sammelstellen abgeben.
Produkt nach Ende der Nutzungszeit direkt an Testo senden.
Wir sorgen für eine umwelt schonende Entsorgung.
4. Bestimmungsgemäße Verwendung
Das testo 831 ist ein kompaktes Infrarot-Thermometer zur
berührungslosen Messung von Oberflächentemperaturen.
Nicht für diagnostische Messungen im medizinischen
Bereich geeignet!
5. Technische Daten
Eigenschaft testo 831
Messgröße °C/°F
Messbereich IR -30...+210 °C
Auflösung IR 0,1 °C
Genauigkeit IR ±1,5 °C oder 1,5% v.Mw. (-20,0...+210,0 °C)
(bei 23°C)+/- 1 Digit ±2,0 °C oder 2,0% v.Mw. (-30,0...-20,1 °C)
Emissionsfaktor 0,1...1,0 einstellbar
Messrate IR 0,5 s
Optik (90%-Wert) 30:1 (typisch bei einem Abstand von
Einsatztemperatur -20...+50 °C
Transport- / Lagertemperatur -40...+70°C
Spannungsversorgung 9V-Block
Batterie-Standzeit 15 h
Gehäuse ABS
Maße in mm (LxHxB) 190 x 75 x 38
CE-Richtlinie 2014/30/EU
Laser
Lasertyp 2-fach Laser
Leistung < 1 mW
Wellenlänge 645 bis 660 nm
Klasse 2
Norm DIN EN 60825-1:2001-11
1
der größere Wert gilt
2
+ Öffnungsdurchmesser des Sensors (16mm)
1,0 m zum Messobjekt)
1
;
1
2
3
deenfresitptsvnl????
6. Inbetriebnahme
Batterie einlegen: siehe 9.1 Batterie wechseln.
Page 4

4
7. Bedienung
7.1 Ein- / Ausschalten
Gerät einschalten: Messtaste drücken.
- Alle Display-Segmente leuchten kurz auf. Das Gerät wechselt
in die Infrarot-Messansicht (
Die Displaybeleuchtung wird bei jeder Tastenbetätigung für 10s
eingeschaltet.
Gerät ausschalten: gedrückt halten, bis das Display erlischt.
Das Gerät schaltet nach 1min ohne Tastenbetätigung selb ständig
aus.
7.2 Messen
Hinweise zur Infrarot-Messung (Kapitel 11) beachten.
Das Zurücksetzen der Min- / Max.-Werte erfolgt mit Drücken
der Messtaste.
- Gerät ist eingeschaltet.
IR-Messung
1 Messung starten: Messtaste gedrückt halten.
2 Messobjekt mit Hilfe der Laserpunkt e anpeilen: Laser mar-
kieren oberes und unteres Ende des Messflecks (bei Abstand
zum Messobjekt von 1,0 m; siehe Kapitel 11.2 Messfleck,
Entfernung).
- Der aktuelle Messwert wird angezeigt (2 Messungen pro s)
3 Messung beenden: Taste loslassen.
- HOLD leuchtet. Der letzte Messwert und Min.- / Max.-Wert
werden bis zur nächsten Messung gehalten.
Zwischen Min.-, Max.- und festgehaltenem Wert wechseln:
drücken.
Messung erneut starten: Messtaste drücken.
Emissionsgrad einstellen
- Gerät befindet sich in der Infrarot-Messansicht.
Wird im Emissionsgradmodus für 3s keine Taste gedrückt,
wechselt das Gerät zur Infrarot-Messansicht.
1
3s gedrückt halten.
2 Emissionsgrad einstellen: oder drücken.
- Das Gerät wechselt zur Infrarot-Messansicht.
leuchtet).
Page 5

5
8. Einstellungen
- Gerät ist ausgeschaltet
Wird im Einstellmodus für 3s keine Taste gedrückt, wechselt
das Gerät zur nächsten Ansicht.
1
3s gedrückt halten.
- Das Gerät wechselt in den Einstellmodus.
2 Unteren Alarmwert ( ALARM) einstellen: oder drücken.
Für schnellen Vorlauf Taste gedrückt halten.
3 Oberen Alarmwert (
Für schnellen Vorlauf Taste gedrückt halten.
4 Alarmfunktion ein- (on) / ausschalten (oFF) einstellen:
drücken.
Messgröße einstellen (°C oder °F) :
5
- Das Gerät wechselt zur Infrarot-Messansicht.
Bei Über- / Unterschreitung der eingestellten Alarmwerte
erfolgt ein optischer und akustischer Alarm.
ALARM) einstellen: oder drücken.
oder
oder drücken.
9. Wartung und Pflege
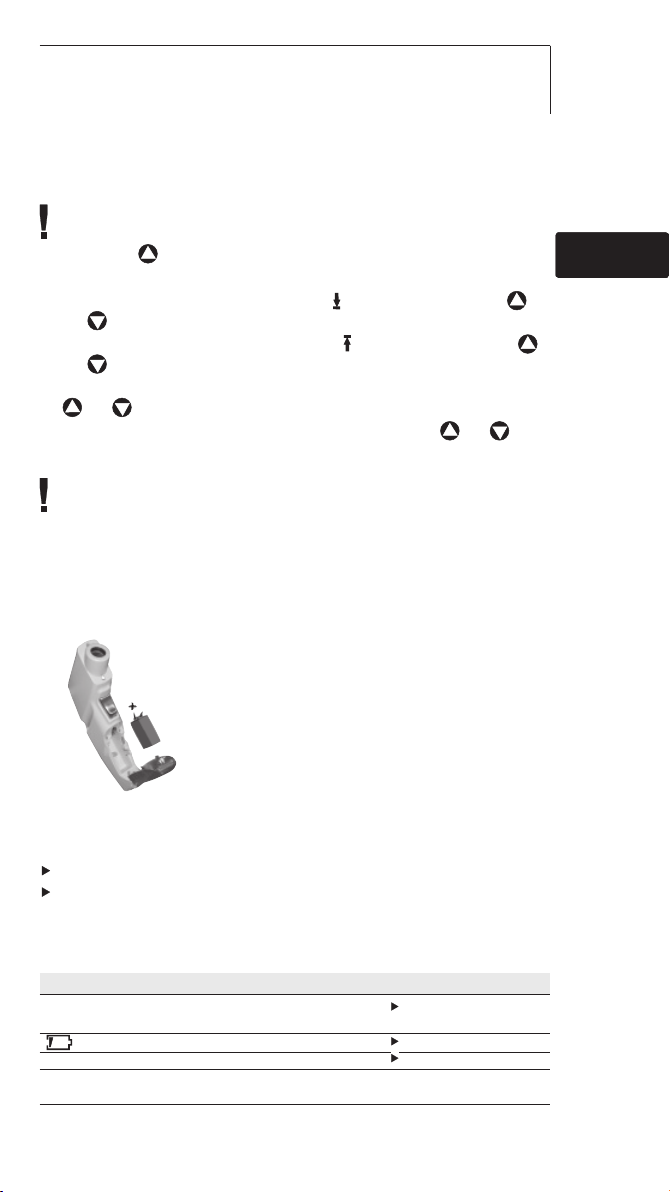
9.1 Batterie wechseln
Gerät muss ausgeschaltet sein!
1 Batteriefach öffnen: Deckel aufklappen.
2 Verbrauchte Batterie herausnehmen und neue
einlegen. Polung beachten! Minuspol muss
nach einlegen der Batterie sichtbar sein.
3 Batteriefach schließen: Deckel zuklappen.
deenfresitptsvnl????
9.2 Gerät reinigen
Keine scharfen Reinigungs- oder Lösungsmittel verwenden!
Das Gehäuse mit einem feuchten Tuch (Seifenlauge) abreiben.
Die Linse vorsichtig mit einem mit Wasser oder medizinischem
Alkohol benetzten Watte stäbchen reinigen.
10. Fragen und Antworten
Frage Mögliche Ursachen Mögliche Lösung
Displaybeleuchtung funktioniert - Batterie fast leer.
nicht mehr
leuchtet. - Batterie leer. Batterie wechseln.
Gerät läßt sich nicht - Batterie leer.
einschalten
IR-Messansicht: - Messwerte außerhalb des -
- - - leuchtet. Messbereichs.
Falls wir Ihre Frage nicht beantworten konnten, wenden Sie sich
bitte an Ihren Händler oder den Testo-Kundendienst.
Batterie wechseln.
Batterie wechseln.
Page 6

6
11. Hinweise zur Infrarot (IR) - Messung
11.1 Messmethode
IR-Messung ist eine optische Messung
Linse sauber halten.
Nicht mit beschlagener Linse messen.
Messbereich (Bereich zwischen Gerät und Messobjekt) von
Störgrößen freihalten: Keine Staub- und Schmutzpartikel, keine
Feuchtigkeit (Regen, Dampf) oder Gase.
IR-Messung ist eine Oberflächenmessung
Wenn sich Schmutz, Staub, Rauhreif usw. auf der Oberfläche
befinden, wird nur die oberste Schicht gemessen, sprich der
Schmutz.
Bei eingeschweißten Lebensmitteln nicht an Lufteinschlüssen
messen.
Bei kritischen Werten immer mit KontaktThermometer nachmessen. Besonders im
Lebensmittelbereich: Kerntemperatur mit
Einstech- / Eintauchthermometer messen.
Angleichzeit
Bei Veränderung der Umgebungstemperatur (Wechsel des
Messortes, z. B. Innen-/ Außenmessung) benötigt das Messgerät
für die Infrarot-Messung eine Angleichzeit von 15min.
11.2 Messfleck, Entfernung
Abhängig von der Entfernung des Messgeräts zum Messobjekt
wird ein bestimmter Messfleck erfasst.
Messoptik (Verhältnis Entfernung : Messfleck)
testo 831
Ø 16 mm
500 mm
Ø 18 mm
700 mm
1000 mm
Ø 68 mm
Ø 36 mm
Ø 24 mm
1500 mm
2000 mm
Ø 100 mm
Laser
Laser
Page 7

7
1. General Information
Please read this document through carefully and familiarise
yourself with the operation of the product before putting it to use.
Keep this documentation to hand so that you can refer to it when
necessary.
2. Product Description
Infrared sensor, laser
Measurement button:
Display
Infrared
measurement
On/Off switch
Battery
compartment
infrared measurement
Leather pouch,
including belt holder
Item no. 0516 8302
Accessories
Name Item no.
Emissivity adhesive tape
= 0.95
0554 0051
3. Safety Information
deenfresitptsvnl????
Avoid electrical hazards:
Infrared measurement: Please adhere to the required safe
distance when measuring on live parts.
Preserving product safety/warranty claims:
Operate the instrument properly and according to its intended
purpose and within the parameters specified. Do not use
force.
Do not expose to electromagnetic radiation (e.g. microwaves,
induction heating systems), static charge, heat or extreme
fluctuations in temperature.
Do not store together with solvents (e.g. acetone).
Open the instrument only when this is expressly described in
the documentation for maintenance purposes.
Laser radiation!
Do not look into laser beam. Laser class 2.
Page 8

8
Ensure correct disposal:
Dispose of defective rechargeable batteries and spent
batteries at the collection points provided.
Send the instrument directly to us at the end of its life cycle.
We will ensure that it is disposed of in an environmentally
friendly manner.
4. Intended Use
testo 831 is a compact infrared thermometer for the non-contact
measurement of surface temperatures.
Not suitable for diagnostic measurements in the medical
sector!
5. Technical Data
Feature testo 831
Parameter °C / °F
Infrared measurement range -30 to +210°C / -22 to +410°F
Infrared resolution 0.1°C / 0.1°F
Infrared accuracy ±1.5°C / 1.8°F or 1.5% of reading (-20 to +210°C / -4 to +412°F)
(at 23°C/73°F) ±2.0°C / 3.6°F or 2.0% of reading (-30 to -20.1°C / -22 to -4°F)1;
+/- 1 digit
Emissivity 0.1 to 1.0 adjustable
Infrared measurement rate 0.5s
Optics (90% value) 30:1 (regarding the distance of
Operating temperature -20 to +50°C / -4 to +122°F
Transport / Storage temperature -40 to +70°C / -40 to +158°F
Power supply 9V block battery
Battery life 15 h
Housing ABS
Dimensions (LxHxB) 190 x 75 x 38 mm / 7.5 x 3.0 x 1.5 in
CE guideline 2014/30/EC
Laser
Laser type 2 x laser
Power < 1 mW
Wavelength 645 to 660 nm
Class 2
Standard DIN NE 60825-1:2001-11
1
the larger value applies
2
+ Opening diameter of the sensor (16mm / 0.6 in)
1,0 m to measuring object typically)
2
1
;
6. Initial Operation
Insert battery: See 9.1 Changing the battery.
Page 9

9
7. Operation
7.1 Switching on/off
Switch on instrument: Press measurement button.
- All display segments light up briefly. The instrument changes to
the infrared mode (
10 seconds every time a button is activated.
Switch off instrument: Keep pressed until display darkens.
The instrument switches off after 1min if no buttons are activated.
7.2 Measuring
Observe information on infrared measurement (chapter 11).
The min./max. values are reset by pressing the measurement
button.
- The instrument is switched on.
Infrared measurement
1 Start measurement: Hold down measurement button.
2 Locate object to be measured using laser point: Laser
marks the upper and lower end of the measurement spot
(at distance to measurment object from 1,0m; see chapter
11.2 measurement spot, distance).
- The current reading is shown (2 measurements per second)
3 End measurement: Release button.
- HOLD lights up. The last measured value and min./max. value
are saved until the next measurement.
Switch between min., max. and recorded value: Press .
Restart measurement: Press measurement button.
Setting the emissivity
- Instrument is in the infrared measurement mode.
If no button is pressed for 3 s in the emissivity mode, the
instrument switches to the infrared measurement mode.
1 Press
2 Set emissivity: Press or .
- The instrument switches to the infrared measurement mode.
for 3 s.
lights up). The display light remains for
deenfresitptsvnl????
Page 10

10
8. Settings
- Instrument is switched off.
If no button is activated in the setting mode for 3 s, the
instrument changes to the next mode.
1 Press
- The device switches to settings mode.
2 Set lower alarm value ( ALARM): Press or . Hold the
button down to go forward quickly.
3 Set upper alarm value (
button down to go forward quickly.
4 Set alarm function on / oFF: Press
5 Select parameter (°C / °F) : Press or .
- The device returns to IR measurement view.
If the set alarm values are exceeded/not reached, a visual and
acoustic alarm is output.
for 3 s.
ALARM): Press or . Hold the
or .
9. Service and Maintenance
9.1 Changing the battery
Instrument must be switched off!
1 Open battery compartment:
Open up cover.
2 Remove used battery and insert new
one. Observe +/-. The minus should be
visible once the battery is inserted.
3 Close battery compartment: Close
cover.
9.2 Clean instrument
Do not use abrasive cleaning agents or solutions.
Clean the housing with a damp cloth (soap water).
Carefully clean the lens with water or cotton buds dipped in
water or medical alcohol.
10. Questions and Answers
Query Possible causes Possible solution
Display is no longer illuminated - Low battery.
lights up. - Battery empty. Change battery.
Instrument cannot be - Battery empty.
switched on
Infrared measurement mode: - Readings outside -
- - - lights up. measurement range.
If we have not answered your question, please contact your local
distributor or Testo´s Customer Service.
Change battery.
Change battery.
Page 11

11
11. Information on infrared
measurement
11.1 Measurement method
Infrared measurement is an optical measurement
Keep lens clean.
Do not measure with clouded lens.
Keep measurement field (area between instrument and object
being measured) free of interferences: no dust and dirt
particles, no moisture (rain, steam) or gases.
Infrared measurement is a surface measurement
If there is dirt, dust, frost etc. on the surface, only the top layer will
be measured, i.e. the dirt.
In the case of shrinkwrapped foodstuffs, do not measure in air
pockets.
If values are critical, always subsequently measure using a
contact thermometer. Particularly in the food sector, the core
temperature should be measured with a penetration/immersion
thermometer.
Adaptation time
If the ambient temperature changes (change of location, e.g.
inside/outside measurement) the instrument needs an adaptation
time of 15 minutes for infrared measurement.
11.2 Measurement spot, Distance
A specific spot is determined depending on the distance from the
measuring instrument to the object being measured.
Measurement optics (Ratio Distance : Measurement spot)
deenfresitptsvnl????
testo 831
Ø 16 mm
500 mm
Ø 18 mm
700 mm
1000 mm
Ø 100 mm
Ø 68 mm
Ø 36 mm
Ø 24 mm
Laser
Laser
1500 mm
2000 mm
Page 12

12
1. Informations générales
Lire attentivement ce document avant toute utilisation de
l’appareil. Garder ces consignes d’utilisation et de sécurité à
portée de main, afin de pouvoir vous y référer si cela s’avère
nécessaire.
2. Description de l’appareil
Capteur infrarouge, laser
Touche de mesures:
Afficheur
Mesure
infrarouge
Touche
On/Off
Compartiment
à piles
mesure infrarouge
Etui de protection en
cuir avec clip ceinture
Réf. 0516 8302
Accessoires
Désignation Réf.
Ruban adhésif d’émissivité
= 0.95
0554 0051
3. Consignes de sécurité
Eviter les chocs électriques :
Mesures en mode infrarouge : Respecter une distance de
sécurité suffisante, lors de mesure sur des éléments sous
tension.
Garantie :
Utiliser l’appareil conformément à l’usage préconisé dans ce
mode d’emploi et dans la limite des caractéristiques
techniques exposées çi-dessous. Ne pas utiliser la force.
Ne pas exposer l’appareil à des rayonnements
électromagnétiques, (ex : Four micro-ondes, plaques
inductions), à des charges statiques ou à des variations de
températures importantes.
Ne pas stocker avec des solvants (ex : acetone).
N’ouvrir l’appareil qu’à des fins de maintenance décrits dans
ce mode d’emploi.
Page 13

13
Rayon laser !
Ne jamais se trouver dans le champs du rayon laser. .
Environnement :
Utiliser des accus et déposer les piles usagées aux points de
collecte prévus à cet effet.
Tous les appareils en fin de cycle de vie doivent nous être
retournés. Nous assurons un recyclage qui respectera
l’environnement.
4. Applications
Le thermomètre compact infrarouge, testo 831 est l’appareil
idéal pour les mesures de température de surface ou pour des
mesures de température sans contact.
Ne convient pas à une utilisation en milieu médical
5. Caractéristiques techniques
Caractéristiques testo 831
Paramètres °C/°F
Etendue de mesure infrarouge -30... +210°C
Résolution infrarouge 0.1°C
Précision infrarouge ±1,5 °C ou 1,5% v.m. (-20,0...+210 °C)
(á 23°C) +/- 1 digit ±2,0 °C ou 2,0% v.m. (-30...-20,1 °C)
Emissivité 0.1 ... 1.0 réglable
Cadence de mesure infrarouge 0.5s
Optique (90% valeur) 30:1 (concernant une distance de
Température d’utilisation -20 ... +50 °C
Température de transport/stockage -40... +70°C
Alimentation pile 9V
Autonomie pile 15 h
Boîtier ABS
Dimensions en mm (Lxlxh) 190 x 75 x 38
Norme CE 2014/30/UE
Laser
Type de laser 2 x laser
Alimentation < 1 mW
Longueur d´onde 645...660 nm
Classe 2
Standard DIN NE 60825-1:2001-11
1
Valeur la plus haute appliquée
2
+ ouverture diamètre de la sonde (16mm)
1,0m de l‘objet mesuré usage normal)
1
;
1
2
deesitptsvnl???? enfr
6. Première utilisation
Insérer la pile : Voir 9.1 Remplacer la pile.
Page 14

14
7. Utilisation
7.1 Allumer/Eteindre l’appareil
Allumer l’appareil : Appuyer sur la touche de mesure.
- Bref affichage de tous les segments. L’appareil se met en
mode infrarouge (
est actif 10 secondes suivant l’activation de n’importe quelle
touche.
Eteindre l’appareil : Appuyer sur cette touche jusqu’à ce
que l’écran s’éteigne.
L’appareil s’éteint automatiquement au bout de 1 min si aucune
touche n’est activée.
7.2 Mesures
Respecter les remarques relatives aux mesures IR
(chapitre 11).
Les valeurs min./max. peuvent être réinitialisées en appuyant
sur la touche de mesure.
- L’appareil est allumé.
Mesures infrarouge
1 Commencer la mesure : Maintenir la touche de mesure
enfoncée.
2 Viser l’objet à mesurer à l’aide du point laser: le laser définit le
point le plus haut et le plus bas de la zone de mesure à une
distance de l‘objet mesuré de 1,0m; cf. chapitre 11.2 cible,
distance de mesure.
- Les valeurs de mesure s’affichent (2 mesures par secondes)
3 Fin de mesure : Relâcher la touche.
- HOLD s’affiche. La dernière valeur de mesure et les valeurs
min./max. sont conservées jusqu‘à la mesure suivante.
Basculer entre les valeurs min./max. et la valeur conservée :
appuyer sur
Procéder à une nouvelle mesure : appuyer sur la touche de
mesure.
Réglage de l’émissivité
L’appareil est en mode infrarouge.
Si dans le mode émissivité aucune touche n’est activée
pendant 3 s, l’appareil passe automatiquent en infrarouge.
1 Maintenir
2 Régler l’émissivité : Appuyer sur ou .
- L’appareil passe en mode infrarouge.
enfoncé 3 sec.
s’allume). Le rétro-éclairage de l’afficheur
.
Page 15
15
8. Réglages
L’appareil est éteint.
Si aucune touche n’est activée pendant 3 s, l’appareil change
de mode.
1 Maintenir
- L‘appareil revient en mode de réglage.
2 Régler la limite d‘alarme inférieure ( ALARM) : appuyer sur
ou
3 Régler la limite d‘alarme supérieure ( ALARM) : appuyer sur
ou
4 Activer (on) / Désactiver (oFF) la fonction d‘alarme : appuyer sur
ou .
5 Sélectionner une grandeur (°C / °F) : appuyer sur ou .
- L‘appareil passe en mode d‘affichage IR des mesures.
Une alarme acoustique et optique apparaît en cas de
dépassement par le haut ou le bas des valeurs d‘alarme
réglées.
enfoncé 3 sec.
. Maintenir la touche enfoncée pour une avance rapide.
. Maintenir la touche enfoncée pour une avance rapide.
9. Nettoyage et maintenance
9.1 Remplacer la pile
L’appareil doit être éteint.
1 Ouvrir le compartiment à pile: retirer le
couvercle
2 Retirer la pile usagée et en mettre une
neuve. Attention à la polarité +/-.
Le - doit être visible quand la pile est en
place.
3 Fermer le compartiment à pile.
deesitptsvnl???? enfr
9.2 Nettoyage de l’appareil
Ne pas utiliser de solutions trop abrasives.
Nettoyer le boîtier à l’aide d’un chiffon humide.
Nettoyer la lentille délicatement avec de l’eau ou du coton
imbibé d’eau ou d’alcool médical.
10. Questions/Réponses
Message Causes possibles Régler le problème
L‘éclairage de l‘écran - Pile faible
ne fonctionne plus.
s’affiche. - Pile vide Changer la pile
L’appareil ne s’allume pas - Pile vide
En mode infrarouge : - L’étendue de mesure -
- - - s’affiche. est dépassée
Changer la pile
Changer la pile
Page 16

16
11. La mesure infrarouge
11.1 Méthode de mesure
La mesure infrarouge est une mesure optique
Nettoyer la lentille.
Ne pas effectuer de mesure avec une lentille sale.
Garder le champs de mesure libre de toutes interférences :
pas de poussière, de particules de moisissure, de saleté
(humidité, vapeur) ou de gaz.
La mesure infrarouge est une mesure de surface
S’ il y a de la poussière ou de la rouille sur la surface de l’objet à
mesurer, ce sont ces particules qui seront mesurées.
Pour les produits alimentaires sous emballage, ne pas
effectuer de mesures dans les poches d’air.
Si la valeur vous semble douteuse, utiliser en parralèlle un
thermomètre à contact. Pour toutes les mesures sur aliments
congelés, utiliser un thermomètre à contact équipé d’une
sonde d’immersion / pénétration.
11.2 Zone de mesure, Distance
Une zone de mesure est déterminée selon la distance à laquelle
on se trouve par rapport à l’objet mesuré.
Mesure optique (Ratio Distance : zone de mesure)
testo 831
Ø 16 mm
Ø 18 mm
500 mm
700 mm
Ø 36 mm
Ø 24 mm
1000 mm
1500 mm
Ø 68 mm
2000 mm
Ø 100 mm
Laser
Laser
Page 17

17
1. Información general
Por favor dedique un tiempo a leer detalladamente este manual
de instrucciones y asegúrese de que está familiarizado con
el funcionamiento antes de utilizarlo. Tenga el manual de
instrucciones a mano por si necesita consultarlo.
2. Descripción del producto
Sensor infrarrojos, láser
Tecla medición:
Visualizador
Medición por
infrarrojos
Encendido/
Apagado
Compartimiento
para pila
Medición por infrarrojos
Funda de piel, incl.
sujeción para cinturón
Modelo 0516 8302
Accesorios
Descripción Modelo
Cinta adhesiva para
emisividad
e = 0.95
0554 0051
3. Información de seguridad
Evitar riesgos por electricidad:
Medición por infrarrojos: Por favor respete la distancia de
seguridad cuando mida en partes activas.
deenfresitptsvnl????
Conservar la seguridad del producto/mantiene
la garantía:
Utilice el instrumento adecuadamente, de acuerdo a su
propósito y dentro de sus especificaciones. No utilice la fuerza.
No exponer a radiación electromagnética (Por ej. microondas,
sistemas de calor por inducción), cargas estáticas, calor o
extremas fluctuaciones de temperatura.
No almacenar junto con disolventes (Por ej. acetona).
El instrumento sólo debe abrirse para su mantenimiento y
reparación si así se describe en el manual de instrucciones.
¡Radiación láser!
No mirar hacia el emisor.
Page 18

18
Eliminación ecológica:
Diposite en el contenedor adecuado las pilas recargables
defectuosas y también las pilas vacías.
Puede devolvernos el equipo cuando ya no quiera utilizarlo
más. Nosotros nos responsabilizamos de que su eliminación
no cause daños al medio ambiente.
Atención: su producto está marcado con este símbolo.
Significa que los productos eléctricos y electrónicos
usados no deberían mezclarse con los residuos
domésticos generales. Existe un sistema de recogida
independiente para estos productos.
4. Uso predefinido
El testo 831 es un termómetro compacto por infrarrojos para
mediciones de superficie sin contacto.
¡No es adecuado para mediciones de diagnosis en el sector
médico!
Este instrumento no es apto para los usos indicados en la orden
ITC/3701/2006, del 22 de Noviembre.
5. Datos técnicos
Características testo 831
Parámetro °C/°F
Rango de medición por infrarrojos -30 a +210°C
Resolución de infrarrojos 0.1 °C
Exactitud infrarrojos ±1,5 °C o 1,5% de la lectura (-20.0...+210 °C)
(a 23°C) +/- 1 dígito ±2,0 °C o 2,0% de la lectura (-30....-20.1 °C)
Emisividad 0.1 a 1.0 ajustable
Intervalo de medición por infrarrojos 0.5s
Ópticas (90% valor 30:1 (A una distancia de
Temperatura funcionamiento -20 a +50 °C
Temperatura transporte /Almacenamiento -40 a +70°C
Alimentación 9V pila bloque
Vida de la pila 15 h
Caja ABS
Tamaño en mm (lxaxh) 190 x 75 x 38
Directriz CE 2014/30/UE
Láser
Tipo de láser 2 x laser
Potencia < 1 mW
Longitud de onda 645 a 660 nm
Clase 2
Estándar DIN NE 60825-1:2001-11
1
Se aplica el valor mayor
2
+ Apertura del diámetro del sensor (16mm)
1,0 m al objeto medido)
2
1
;
1
Page 19

19
6. Funcionamiento inicial
Insertar la pila: Ver 9.1 Cambiar la pila.
7. Funcionamiento
7.1 Encender/Apagar el instrumento
Encender el instrumento: Presionar tecla de medición.
- Se iluminan brevemente todos los segmentos del visualizador.
El instrumento cambia a modo infrarrojo (
El visualizador permanece illuminado durante 10 segundos cada
vez que se activa una tecla.
Apagar el instrumento: Mantener presionado hasta que el
visualizador se apague.
El instrumento se apaga después de 1 min si no se activa
ninguna tecla.
7.2 Medición
Tener en cuenta las indicaciones para la medición de infrarrojo
(capítulo 11).
El reset de los valores mín/máx. se realiza presionando la tecla
de medición.
- Instrumento encendido.
Medición por infrarrrojos
1 Iniciar la medición: Mantener pulsada la tecla de medición.
2 Localizar el objeto a medir con el punto láser: el láser marca el
punto superior e inferior del área de medición (a una distancia
de 1,0m al objeto medido; ver capítulo 11.2 marca de
medición, distancia).
- Se muestra la lectura actual (2 mediciones por segundo)
3 Final de medición: liberación de la tecla.
- Se ilumina HOLD. El último valor medido y el valor mín./máx.
se mantienen hasta la próxima medición.
Cambiar entre el valor mín., máx. y retenido: Presionar .
Reiniciar la medición: Presionar tecla de medición.
Ajustar la emisividad
El instrumento está en modo de medición por infrarrojos.
Si no se presiona ninguna tecla durante 3 s en el modo de
emisividad, el instrumento cambia a modo de medición por
infrarrojos.
11 Mantener pulsada la tecla
2 Ajustar emisividad: Pulsar o .
- El instrumento cambia a modo de medición por infrarrojos.
durante 3s.
se ilumina).
deenfresitptsvnl????
Page 20

20
8. Ajustes
Instrumento apagado.
Si no se activa ninguna tecla en modo de ajuste durante 3 s, el
instrumento cambia al siguiente modo.
1 Mantener pulsada la tecla
- El instrumento pasa a modo de ajuste..
2 Ajustar el límite de alarma inferior ( ALARM): Pulsar o .
Para un avance rápido, mantener pulsada la tecla.
3 Ajustar el límite de alarma superior (
Para un avance rápido, mantener pulsada la tecla.
4 Ajustar la función de alarma conectar (on) / desconectar (oFF):
Pulsar
5 Seleccionar el parámetro (°C / °F) : Pulsar o .
- El instrumento pasa a la vista medida de infrarrojos.
Si se superan o no se alcanzan los valores de alarma
ajustados, se produce una alarma óptica y acústica.
o .
durante 3s.
ALARM): Pulsar o .
9. Servicio y Mantenimiento
9.1 Cambiar la pila
¡El instrumento debe estar apagado!
1 Abrir el compartimiento de la pila: Abrir la tapa.
2 Reemplazar la pila usada e insertar una de
nueva. Prestar atención +/-. El símbolo menos
debe ser visible una vez la pila esté insertada.
3 Cerrar el compartimiento de la pila: Cerrar la
tapa.
9.2 Limpiar el instrumento
No utilice limpiadores agresivos o disolventes.
Limpiar la caja con un paño húmedo (agua con jabón).
Limpiar la lente cuidadosamente con agua o algodón
humedecido con agua o alcohol médico.
10. Preguntas y respuestas
Fallo Causas posibles Solución
La iluminación del display - La pila está casi agotada.
ya no funciona.
Se ilumina
El instrumento - Pila vacía. Cambiar la pila.
no se enciende
Modo de medición por - Lectura fuera del rango -
infrarrojos: se ilumina - - - de medición
Si tiene algún fallo sin respuesta contacte con el servicio técnico
de testo más cercano.
- Pila vacía. Cambiar la pila.
Cambiar la pila.
Page 21

21
11. Información de la medicion por
infrarrojos
11.1 Método de medición
La medición por infrarrojos es una medición óptica
Mantener limpias las lentes.
No medir con las lentes empañadas.
Mantener el campo de medición (el área entre el instrumento y
el objeto a medir) libre de interferencias: sin partículas de
suciedad o polvo, sin vaho (agua o vapor) o gases.
La medición por infrarrojos es una medición superficial
Si hay suciedad, polvo, hielo, etc. en la superfície, sólo se medirá
la capa superior. Por ej. la suciedad.
En el caso de alimentos envasados al vacío, no medir en las
burbujas de aire.
Si el valor a obtener es muy importante, utilizar siempre al
mismo tiempo un termómetro de contacto para realizar la
medición. En la industria alimentaria, la temperatura interna
debería medirse con un termómetro de penetración/inmersión.
Tiempo de adaptación
El instrumento necesita un tiempo de adaptación de 15 min
para la medición por infrarrojos si la temperatura ambiente
cambia ( Cambio de lugar, por ej. mediciones dentro/fuera).
11.2 Área de medición, Distancia
La área específica se determina dependiendo de la distancia
desde el instrumento de medición al objeto a medir.
Medición óptica (Ratio de distancia : área de medición)
deenfresitptsvnl????
testo 831
Ø 16 mm
500 mm
Ø 18 mm
700 mm
1000 mm
Ø 24 mm
1500 mm
Ø 100 mm
Ø 68 mm
Ø 36 mm
Laser
Laser
2000 mm
Page 22

22
1. Informazioni generali
Leggere attentamente il presente manuale, prima di utilizzare lo
strumento. Tenere sempre il manuale a portata di mano, in modo
da poterlo consultare in caso di bisogno.
2. Descrizione del prodotto
Sensore di infrarossi, Laser
Tasto per la misura a
Display
Misura a
infrarossi
Accensione,
spegnimento
Vano batteria
infrarossi
Custodia in pelle con
aggancio a cintura
Codice 0516 8302
Accessori
Nome codice
astro adesivo per emissività
N
= 0.95 0554 0051
3. Informazioni sulla sicurezza
Evitare il pericolo di scosse elettriche:
Misura a infrarossi: mantenere le adeguate distanze di
sicurezza quando si misurano parti in tensione.
Sicurezza del prodotto/rispetto delle condizioni
di garanzia:
Utilizzare lo strumento rispettando i parametri specificati. Non
applicare stress meccanici allo strumento.
Non stoccare lo strumento insieme a solventi (es. acetone).
Aprire lo strumento solo quando è espressamente richiesto dal
manuale nella sezione manutenzione.
Non esporre a radiazioni elettromagnetiche (es. microonde,
impianti di riscaldamento a induzione), cariche statiche, calore
diretto o ampie variazioni di temperatura.
Radiazioni laser!
Non guardare direttamente il raggio laser.
Page 23

23
Smaltimento:
Smaltire le batterie ricaricabili difettose o batterie esaurite negli
appositi contenitori.
Potete rispedire lo strumento direttamente a noi al termine
della sua vita operativa. Provvederemo a eliminarlo nel rispetto
dell’ambiente.
4. Scopo di utilizzo
testo 831 è un termometro a infrarossi per misure di superficie
senza contatto.
Non utilizzabile per misure diagnostiche in campo medico!
5. Dati tecnici
Caratteristiche testo 831
Unità di misura °C/°F
Campo di misura a infrarossi da -30 a +210°C
Risoluzione con misura a infrarossi 0,1 °C
Precisione con misura a infrarossi ±1,5 °C o 1,5% v.m..(da -20,0 a +210 °C)
(a 23°C) +/- 1 digit ±2,0 °C o 2,0% v.m. (da -30,0 a -20,1 °C)
Emissività da 0,1 a 1,0 regolabile
Frequenza di misura a infrarossi 0,5s
Ottica (90% del valore) 30:1 (Circa ad una distanza di
Temperatura di lavoro da -20 a +50 °C
Temperatura di trasporto e stoccaggio da -40 a +70°C
Alimentazione Batteria tipo 9V
Durata della batteria 15 h
Custodia ABS
Dimensioni in mm 190 x 75 x 38
Normativa CE 2014/30/UE
Laser
Tipo laser 2 x laser
Alimentazione < 1 mW
Lunghezza d´onda 645 a 660 nm
Classe 2
Standard DIN NE 60825-1:2001-11
1
si applica il valore maggiore
2
+ Diametro di apertura del sensore (16mm)
1,0 m dall’ oggetto misurato)
1
;
1
2
deenfresitptsvnl????
6. Operazioni iniziali
Inserire batterie: v. paragrafo 9.1 “Sostituzione delle batterie”.
Page 24

24
7. Funzionamento
7.1 Accensione/Spegnimento
Accensione dello strumento: Premere il tasto di misura.
- Si accendono brevemente tutti i segmenti del display. Lo
strumento si posiziona nella modalità di misura a infrarossi
(viene visualizzato
Il display rimane illuminato per 10 secondi, ogni qualvolta vienei
attivato un tasto.
Spegnimento dello strumento: tenere premuto finché il
display non si scurisce.
Se nessun tasto viene attivato, lo strumento si spegne dopo
1 minuti.
7.2 Misura
Osservare le avvertenze per la misura IR (capitolo 11).
L‘azzeramento dei valori min./max. avviene premendo il tasto
di misura.
- Lo strumento è acceso.
Misura a infrarossi
1 Iniziare una misura: Tenere premuto il tasto di misura.
2 Puntare l’oggetto da misurare col puntatore laser: Il laser
segnala il punto più in alto e quello più in basso dell‘area di
misura (alla distanza dall’oggetto di misura compresa tra 1,0m;
vedi capitolo 11.2 area di misura, distanza)..
- La misura in corso viene visualizzata (2 misure al secondo)
3 Terminare la misura: rilasciare il tasto.
- HOLD si accende. L‘ultimo valore rilevato e il valore min./max.
vengono mantenuti sino alla misura successiva.
Per passare dal valore min./max. al valore mantenuto e
viceversa: Premere
Per riavviare la misurazione: Premere il tasto di misura.
Impostare l’emissività
Lo strumento è sulla modalità di misura a infrarossi.
Se nessun tasto è premuto per 3 secondi nella modalità di
impostazione emissività, lo strumento passa alla misura nella
modalità a infrarossi.
1 Tenere premuto per 3s il tasto
2 Impostare il valore di emissività: premir o .
- Lo strumento passa alla modalità di misura a infrarossi.
).
.
.
Page 25

25
8. Impostazioni
- A strumento spento.
Se nessun tasto viene premuto per 3 secondi nella modalità di
impostazione, lo strumento passa alla modalità successiva.
1 Tenere premuto per 3s il tasto
- Lo strumento passa in modalità regolazione.
2 Per impostare la soglia di allarme inferiore ( ALARM): Premere
o . Per un avanzamento veloce, mantenere premuto il
tasto.
3 Per impostare la soglia di allarme superiore (
o . Per un avanzamento veloce, mantenere premuto il
tasto.
4 Per attivare (on) / disattivare (oFF) la funzione di allarme:
Premere
5 Selezionare l’unità di misura (°C / °F) : Premere o .
- Lo strumento passa alla vista misure IR.
Quando la soglia di allarme inferiore o superiore viene
oltrepassata, viene emesso un allarme ottico e acustico.
o .
.
ALARM): Premere
9. Manutenzione
9.1 Sostituzione delle batterie
Lo strumento deve essere spento!
1 Aprire il vano batteria: Aprire il coperchio.
2 Rimuovere le batterie usate e inserire le nuove.
Fare attenzione alla polarità +/-. Il meno deve
essere visibile.
3 Chiudere il vano batteria: Chiudere il
coperchio.
deenfresitptsvnl????
9.2 Pulizia dello strumento
Non utilizzare soluzioni abrasive.
Pulire la custodia con un panno umido (acqua e sapone).
Pulire con attenzione la lente con del cotone imbevuto di
acqua o alcool denaturato.
10. Domande e risposte
Messaggio Possibili cause Possibili soluzioni
L‘illuminazione del display - La batteria è quasi scarica.
non funziona più.
Si accende
Lo strumento non si accende - Batteria esaurita.
In modalità di misura a infrar: - Letture fuori dal campo di mis. -
Si accende - - -.
Per altre informazioni contattate il vostro distributore di zona o il
servizio assistenza Testo.
. - Batteria esaurita. Cambiare batteria.
Cambiare batteria.
Cambiare batteria.
Page 26

26
11. Informazioni sulla misura a
infrarossi
11.1 Metodo di misura
La misura a infrarossi è una misura di tipo ottico
Tenere la lente pulita.
Non misurare se la lente è offuscata.
Tenere il campo di misura (l’area tra il sensore e l’oggetto
misurato) libera da interferenze: niente polvere o particelle di
sporco, niente umidità (pioggia, vapore) o gas.
La misura a infrarossi è una misura di superficie
Se sulla superficie è presente uno strato di polvere, sporco o
brina, il valore misurato sarà quello dello strato superiore.
Nel caso di confezioni alimentari termoretrattili, non misurare
sulle bolle d’aria.
Se i valori sono critici, misurare sempre anche con un
termometro a contatto. In particolare nel settore alimentare, la
temperatura interna del cibo andrebbe sempre misurata con
un termometro a immersione/ penetrazione.
Tempo di adattamento
Se la temperatura ambiente varia (cambio di postazione, ad es.
misure all’aperto o in ambienti chiusi) lo strumento ha
bisogno di 15 minuti di adattamento per la misura a infrarossi.
11.2 Area e distanza di misura
L’area della superficie misurata varia in funzione della distanza
dello strumento dall’oggetto misurato.
Ottica di misura (Rapporto Distanza : Area di misura)
testo 831
Ø 16 mm
Ø 18 mm
500 mm
700 mm
Ø 68 mm
Ø 36 mm
Ø 24 mm
1000 mm
1500 mm
2000 mm
Ø 100 mm
Laser
Laser
Page 27

27
1. Informação Geral
Por favor, leia este manual cuidadosamente e verifique se está
familiarizado com o produto antes de usá-lo. Mantenha este
manual sempre à mão caso seja necessário
usá-lo.
2. Descrição do Produto
Sensor laser de infraver
Tecla de medição;
Visor
Medidor de
infravermelho
Ligar/ desligar
Comparitmento da
pilha
Medidor de
infravermelhos
Capa em pele, inclui
clip para cinto
Item no. 0516 8302
Acessórios
Nome Item no.
Fita adesiva de
emissividade.
= 0.95 0554 0051
3. Informações de segurança
Evitar riscos eletricos:
Medição de infravermelhos: Por favor mantenha distância ao
medir em peças com movimento.
deenfresitptsvnl????
Conservar a segurança do produto /manter a garantia::
Trabalhe apropriadamente com o instrumento e de acordo
com a sua finalidade pretendida e dentro dos parâmetros
específicos. Não aplicar a força
Não expor a radiações electromagnéticas (por exemplo
microondas, sistemas de indução de calor), carga estática,
calor ou variações extremas de temperatura.
Não armazenar junto de produtos abrasivos (por ex. acetona).
O instrumento só poderá ser aberto para sua manutenção e
reparação se assim estiver descrito no manual de instruções.
Radiação laser
Não olhar directamente para o feixe de luz.
Page 28

28
Eliminação:
Deposite as pilhas recarregáveis ou as pilhas gastas num
contentor adequado.
Pode devolver o intrumento directamente a nós quando já não
o usar. Nós responsabilizamo-nos pela sua correcta
eliminação.
4. Modo de usar
testo 831 é um termómetro de infravermelhos compacto para
medição de temperaturas de superfície.
Não apropriado para medidas de diagnóstico no sector
médico!
5. Ficha Técnica
Característica testo 831
Parâmetro °C/°F
Gama de medição infravermelhos -30...+210°C
Resolução infravermelhos 0.1 °C
Precisão de infravermelho ±1,5 °C ou 1,5% do v.m. (-20,0...+210 °C)
(a 23 °C) +/- 1 dígito ±2,0 °C ou 2,0% do v.m. (-30...-20,1 °C)
Emissividade ajustável de 0.1 a 1.0
Tempo de resposta infravermellhos 0.5s
Ópticas (90% valor) 30:1 (Normalmente numa distância de
Temperatura de funcionamento -20...+50 °C
Temperatura transp./armazenamento -40...+70°C
Tipo de pilha 9V pilha de bloco
Duração da pilha 15 h
Caixa ABS
Dimensões em mm (LxHxB) 190 x 75 x 38
Normas de conformidade CE 2014/30/UE
Laser
Tipo de Laser 2 x laser
Potência < 1 mW
Comprimento de onda 645 to 660 nm
Classe 2
Standard DIN NE 60825-1:2001-11
1
aplica-se o maior valor
2
+Diâmetro de abertura do sensor (16mm)
1,0m do objecto medido)
2
1
;
1
6. Operação inicial
Inserir pilha: Ver 9.1 Mudanças de pilhas.
Page 29

29
7. Operação
7.1 Ligar/Desligar
Ligar o instrumento: Premir o botão de medição.
- Todos os segmentos do visor acendem brevemente. O
instrumento muda para o modo infravermelho (
acende).
- A luz de exposição liga-se durante 10 segundos sempre que
uma tecla seja activada.
Desligar o instrumento: Mantenha pressionado até que se
apague a luz.
O instrumento desliga-se 1 min depois se nenhuma tecla for
activada.
7.2 Medição
Ter atenção aos avisos sobre a medição de infravermelhos
(capítulo 11).
A reposição dos valores Mín. / Máx. é efectuada premindo o
botão de medição.
- O instrumento está ligado.
Medição de infravermelhos
1 Iniciar medição: Manter o botão de medição premido.
2 Localize o objecto a medir usando o ponto de laser: o laser
marca a extremidade superior e inferior do local da medida (a
uma distância de 1,0 m do objecto; ver capítulo 11.2 marca
de medição, distância).
- A leitura actual é mostrada (2 medições por segundo)
3 Fim da medição: solte a tecla.
- A tecla HOLD pisca. O último valor de medição e o valor Mín./
Máx. são mantidos até à próxima medição.
Alternar entre o valor Mín., Máx. e o valor retido: premir .
Reiniciar medição: Premir o botão de medição.
Ajuste da emissividade
O instrumento está no modo de medição de infravermelhos.
Se não for pressionada nenhuma tecla durante 3 segundos no
modo emissividade, o instrumento muda para o modo de
infravermelhos.
1 Manter premido durante 3s.
2 Ajuste da emissividade: premir ou .
- O instrumento muda para o modo de medição de
infravermelhos.
a luz
deenfresitptsvnl????
Page 30

30
8. Ajustar
- O instrumento está desligado.
Se nenhuma tecla for activada no modo de ajustar durante 3
segundos, o instrumento muda para o modo seguinte.
1 Manter premido durante 3s.
- O aparelho muda para o modo de ajuste.
2 Definir o valor de alarme inferior ( ALARM): premir ou .
Manter o botão premido para avançar rapidamente.
3 Definir o valor de alarme superior (
Manter o botão premido para avançar rapidamente.
4 Ligar (on) / Desligar (oFF) função de alarme : premir
5 Selecionar parâmetros (°C / °F) : premir ou .
- O aparelho comuta para a vista de medição de infraver melhos.
Se os limites máximos e mínimos dos valores de alarme
ajustados forem excedidos, o sistema transmite um sinal
acústico e visual.
ALARM): premir ou .
ou .
9. Serviços e manutenção
9.1 Mudar a pilha
O instrumento tem de estar desligado!
1 Abra o compartimento da pilha:
Abertura por cima da tampa.
2 Retire a pilha gasta e troque por uma nova.
Tenha em atenção a polarização +/-. The
minus should be visible once the battery is
inserted.
3 Feche o compartimento da pilha: Fechar.
9.2 Limpeza do instrumento.
Não use produtos ou soluções abrasivas.
Limpar a caixa com um pano húmido (com água e sabão).
Limpe cuidadosamente as lente com algodão embebido em
água ou alcool etílico.
10. Perguntas e respostas
Pergunta Causa Possível Solução possível
Iluminação do visor - Pilha fraca.
não funciona
Pisca. - Pilha gasta. Mudar pilha.
Instrumento não liga - Pilha gasta.
Modo medição Infravermelho: - fora da gama -
- - - Pisca. gama de medição.
Se não respondermos à sua pergunta, por favor contacte o seu
fornecedor local ou o serviço de clientes da Testo.
Mudar pilha.
Mudar pilha.
Page 31

31
11. Informação na medição de
infravermelho
11.1 Método de medição
A medição por infravermelho é uma medição óptica
Mantenha a lente limpa.
Não meça com as lentes embaciadas.
Mantenha o campo de medida (área entre o instrumento e o
objecto a ser medido) livre de interferências como poeiras,
sujidade, particulas,sem humidade (chuva, vapor) ou gases.
A medição por infravermelhos é uma medição de superfície
Se estiver suja, com poeiras, congelada etc. na superfície,
somente a superfície será medida, isto é, a sujidade.
No caso de comida embalada, não fazer medição nos sacos
de ar.
Se os valores são críticos, faça sempre as medições
posteriores usando um termometro de contacto. Particularmente no sector da alimentação, a temperatura do interior
deve ser medida com um termómetro de penetração/ imersão.
Tempo de adaptação
Se houver mudanças de temperaturas ambientais (Mudança
de localização, isto é, medições dentro/fora) o instrumento
precisa de um tempo de adaptação de 15 min. para medições
de infravermelhos.
11.2 Área de mediçao, Distancia
A área específica determina-se dependendo da distancia do
instrumento de mediçao ao objecto a medir.
Mediçao optica (Racio de distancia: Área de mediçao)
deenfresitptsvnl????
testo 831
Ø 16 mm
500 mm
Ø 18 mm
700 mm
1000 mm
Ø 100 mm
Ø 68 mm
Ø 36 mm
Ø 24 mm
Laser
Laser
1500 mm
2000 mm
Page 32

32
1. Algemene opmerkingen
Gelieve deze handleiding grondig door te lezen en zich met dit
meetinstrument voldoende vertrouwd te maken, alvorens het
in de praktijk te gebruiken. Bewaar deze handleiding binnen
handbereik zodat u ze op elk gewenst ogenblik kunt raadplegen.
2. Productbeschrijving
infrarood-sensor, laser
meettoets:
display
infrarood-
meting
aan- / uit-
schakelen
infraroodmeting
Capa em pele, inclui
clip para cinto
artikelnr. 0516 8302
batterij vak
Toebehoren
omschrijving artikelnr.
emissiviteitskleefband
= 0,95
0554 0051
3. Veiligheidsvoorschriften
Elektrische gevaren vermijden:
Infraroodmeting: bij het meten van onderdelen onder spanning
dient u om veiligheidsredenen voldoende afstand te nemen.
Productzekerheid / aanspraak op garantie:
Het meetinstrument enkel gebruiken in overeenstemming met
de aangegeven technische gegevens. Nooit geweld gebruiken.
Het meetinstrument niet blootstellen aan elektromagnetische
straling (bv. microgolven, induc tieverwarming), statische lading,
hitte of sterker temperatuurschommelingen.
Het meetinstrument niet bewaren in de nabijheid van
oplosmiddelen (bv. aceton).
Het meetinstrument enkel openen indien dit uitdrukkelijk in de
handleiding beschreven is, voor onderhoudsdoeleinden.
Laserstraling!
Niet in de laserstraal kijken. Laserklasse 2.
Page 33

33
Afval:
Defecte accu’s en lege batterijen dienen als KGA behandeld te
worden.
Indien het meetinstrument buiten werking wordt gesteld en niet
meer wordt gebruikt, gelieve deze naar ons terug te sturen. Wij
zorgen voor een milieuvriendelijke afvalverwijdering.
4. Correct gebruik
De testo 831 is een compacte infraroodthermometer voor
contactloze metingen van oppervlaktetemperaturen.
De testo 831 is niet geschikt voor diagnosemetingen bij
medische toepassingen!
5. Technische gegevens
Eigenschappan testo 831
Grootheden °C/°F
Meetbereik IR -30...+210 °C
Aflezing IR 0,1 °C
Nauwkeurigheid IR ±1,5 °C of 1,5% v.d. mw. (-20,0...+210,0 °C)
(bij 23°C)+/- 1 digit ±2,0 °C of 2,0% v.d. mw. (-30,0...-20,1 °C)
Emissiviteitscoëfficiënt 0,1...1,0 instelbaar
Meetinterval IR 0,5 sec
Optiek (90%-waarde) 30:1 (typisch bij een afstand van
Lasertype 2-voudige laser
Werkingstemperatuur -20...+50 °C
Transport- / opslagtemperatuur -40...+70°C
Stroomvoorziening 9V-blokbatterij
Autonomie batterij 15 h
Behuizing ABS
Afmetingen in mm (LxHxB) 190 x 75 x 38
CE-richtlijn 2004/30/EU
Laser
Lasertyp 2-voudige laser
Prestatie < 1 mW
Golflengte 645 tot 660 nm
Klasse 2
Norm DIN EN 60825-1:2001-11
1
de hoogste waarde geldt
2
+ openingsdiameter van de sensor (16mm)
0,7 m van het meetobject)
1
;
1
2
deenfresitptnlnl????
6. Ingebruikname
Batterij plaatsen: zie 9.1 Batterij vervangen.
Page 34

34
7. Bediening
7.1 Aan- / uitschakelen
Meetinstrument aanschakelen: meettoets indrukken.
- Alle displaysegmenten lichten even op. Het meetinstrument
schakelt over naar het infraroodmenu (
De displayverlichting wordt bij elke druk op een toets gedurende
10 seconden geactiveerd .
Meetinstrument uitschakelen: ingedrukt houden tot het
meetinstrument uitgeschakeld is.
Het meetinstrument schakelt na 1 min inactiviteit automatisch uit.
7.2 Meten
Opmerkingen bij infraroodmetingen.
De min / max-waarden worden gereset door op de knop te
drukken.
- Het meetinstrument is aangeschakeld .
IR-meting
1 Meting starten: meettoets ingedrukt houden.
2 Het meetobject met behulp van de laserpunt(en) aanduiden:
de lasers markeren de boven-/onderkant van de meetvlek (bij
een afstand van 0,7/ m van het meetobject; zie hoofdstuk 11.2
Meetvlek, afstand).
- De huidige meetwaarde verschijnt (2 metingen per sec.)
3 Meting beëindigen: de meettoets loslaten.
- HOLD verschijnt. De laatste meetwaarde en min.-/max.-waarde
blijft onveranderd in het display tot de volgende meting.
Tussen min.-, max.- en vastgehouden waarde wisselen:
indrukken.
Meting starten: meettoets indrukken.
verschijnt).
De emissiecoëfficiënt instellen
Het meetinstrument bevindt zich in het infraroodmenu .
Indien in het emissiecoëfficiënt-menu gedurende 3 sec geen toets
is ingedrukt, schakelt het instrument over naar het infraroodmenu.
1
3 sec ingedrukt houden..
2 De emissiecoëfficiënt instellen: of indrukken.
- Het meetinstrument schakelt over naar het infraroodmenu.
Page 35

35
8. Instellingen
- Het meetinstrument is uitgeschakeld
Indien in het instellingen-menu gedurende 3 sec geen toets wordt
ingedrukt, schakelt het instrument over naar de volgende
weergave.
1
3 sec ingedrukt houden.
- Het meetinstrument schakelt over naar het instellingenmenu.
2 Ondergrens alarmwaarde ( ALARM) instellen: of
indrukken. Om snel vooruit te gaan, toets ingedrukt houden.
Bovengrens alarmwaarde (
3
indrukken. Om snel vooruit te gaan, toets ingedrukt houden.
Alarmfunctie in- (on) / uitschakelen (oFF):
4
5 Meetgrootheid instellen (°C of °F) : of indrukken.
- Het meetinstrument schakelt over naar het infraroodmenu.
Bij over- / onderschrijding van de ingestelde alarmgrenswaarde
wordt het optisch en akoestisch alarm geactiveerd .
ALARM) instellen: of
of indrukken.
9. Onderhoud
9.1 Batterij vervangen
Het meetinstrument moet uitgeschakeld zijn!
1 Batterijvak openen: het deksel uitklappen.
2 Verbruikte batterij verwijderen en nieuwe
plaatsen. let op de polariteit! De min-pool moet
na het plaatsen van de batterij zichtbaar zijn.
3 Batterijvak sluiten: het deksel dichtklappen.
deenfresitptnlnl????
9.2 Het meetinstrument reinigen
Geen scherpe reinigings- of oplosmiddelen gebruiken !
De behuizing met een vochtige doek (zeep) schoonwrijven.
De lens voorzichtig met een - in water of zuivere alcohol
gedrenkt - wattenstaafje reinigen.
10. Vragen en antwoorden
Vraag Mogelijke oorzaken Mogelijke oplossingen
Displayverlichting doet het - Batterij bijna leeg.
niet meer
verschijnt - batterij is leeg batterij vervangen.
het instrument kan niet - batterij is leeg
aangeschakeld worden
IR-meetmenu: - de meetwaarden zijn -
- - - verschijnt. buiten het meetbereik.
Indien wij uw vragen niet konden beantwoorden, gelieve zich te
wenden tot uw handelaar of tot de testo klantenservice.
Batterij wisselen.
batterij vervangen.
Page 36

36
11. Opmerkingen bij infraroodmeting
11.1 Meetmethode
IR-meting is een optische meting
De lens zuiver houden.
Niet meten met een beslagen lens.
De afstand tussen het meetinstrument en het meetobject
vrijwaren van storende elementen: geen stofpartikels, geen
vochtigheid (regen, damp) of gassen.
IR-meting is een oppervlaktemeting
Wanneer zich vuil, stof enz. op het oppervlak bevindt, wordt enkel
de bovenst laag gemeten, met name het vuil .
Bij levensmiddelen verpakt in folie, niet meten aan luchtzakken.
Bij kritische waarden steeds met een contactthermometer
nameten. Belangrijk in de levensmiddelensector: de
kerntemperatuur meten met een steekthermometer.
Aanpassingstijd
Bij een verandering van de omgevingstemperatuur (verandering
van meetlocatie, bv. meting binnen / buiten) is een aanpassingstijd
van het meetinstrument vereist van 15 minuten voor een
infraroodmeting.
11.2 Meetvlek, afstand
De grootte van de meetvlek is afhankelijk van de afstand van het
meetinstrument tot het meetobject .
Meetoptiek (verhouding afstand : meetvlek)
testo 831
Ø 16 mm
Ø 18 mm
500 mm
750 mm
Ø 24 mm
1000 mm
Ø 100 mm
Ø 68 mm
Ø 36 mm
Laser
Laser
1500 mm
2000 mm
Page 37

37
deenfresitptnlnl????
Page 38

38
Page 39

39
deenfresitptnlnl????
Page 40

0977 8312 de en fr es it pt nl 03
www.testo.com
 Loading...