

Page 1
testo 316-EX · gas leak detector
Instruction manual
www. .com
information@itm.com1.800.561.8187
Page 2

1 Safety and the environment
3
1 Safety and the environment
1.1. About this document
Use
> Please read this documentation through carefully and
familiarize yourself with the product before putting it to use. Pay
particular attention to the safety instructions and warning advice
in order to prevent injuries and damage to the products.
> Keep this document to hand so that you can refer to it when
necessary.
> Hand this documentation on to any subsequent users of the
product.
1.2. Ensure safety
> Do not operate the instrument if there are signs of damage at
the housing, mains unit or feed lines.
> Only operate the product properly, for its intended purpose and
within the parameters specified in the technical data. Do not
use any force.
> Do not store the product together with solvents. Do not use any
desiccants.
> Only use the device in closed, dry rooms and protect it from rain
and moisture.
> Carry out only the maintenance and repair work on this
instrument that is described in the documentation. Follow the
prescribed steps exactly. Use only original spare parts from
Testo.
1.3. Protecting the environment
> Dispose of faulty rechargeable batteries/spent batteries in
accordance with the valid legal specifications.
> At the end of its useful life, send the product to the separate
collection for electric and electronic devices (observe local
regulations) or return the product to Testo for disposal.
www. .com
information@itm.com1.800.561.8187
Page 3

2 Specifications
4
2 Specifications
2.1. Use
The testo 316-EX is a gas leak detector for the short-term detection
of gases in areas at risk of explosion according to Directive
94/9/EC (ATEX).
Areas of application are the gas detection in rooms and the location
of leaks at gas systems. The instrument is designed for use by
trained personnel.
For operation in areas at risk of explosion, also observe the
Safety instructions document.
Explosion limits of flammable substances
A flammable substance in the air has a lower explosion limit (LEL)
and an upper explosion limit (UEL). The air/gas mixture is
flammable anywhere between these two limits, potentially leading
to an explosion (critical range). Below the LEL, the mixture is too
lean for an explosion, and above the UEL it is too rich (non-critical
range).
The explosion limits depend on the substance:
• Methane CH4: LEL 4.4 vol% / UEL 16.5 vol%
• Propane C3H8: LEL 1.7 vol% / UEL 10.9 vol%
• Hydrogen H2: LEL 4.0 vol% / UEL 77.0 vol%
Restrictions of the application range
Do not use the instrument as a monitoring instrument for personal
safety! The testo 316-EX is no protective equipment!
Do not use the instrument as a gas analyzer! The sensor detects
almost all flammable gases to the same extent.
www. .com
information@itm.com1.800.561.8187
Page 4

2 Specifications
5
2.2. Technical data
Characteristic Values
Type Semi-conductor
Response threshold 1 ppm
Reaction time (t90) 14 s
Measuring range Methane CH4: 0 ppm up to 2.5 vol%
Propane C3H8: 0 ppm up to 1.0 vol%
Hydrogen H2: 0 ppm up to 2.0 vol%
Accuracy (at 20 to
50 % RH, 0 to
40 °C/32 to 104 °F)
at 100 ppm: -50 ppm to +150 ppm
at 0.1 vol%: -250 ppm to +0.2 vol%
Accuracy (at
20…50 % RH,
-10 to 0 °C/
14 to 32 °F)
at 100 ppm: -60 ppm to +150 ppm
at 1,0 Vol%: -0,4 Vol% to +0,3 Vol%
Accuracy at 50%
LEL (at 20 to 50 %
RH, 0 to 40 °C/
32 to 104 °F)
CH4 (2.2 Vol%): -0.2 to +0.2 Vol%
C3H8 (1.0 Vol%): -0.2 to +0.3 Vol%
H2 (2.0 Vol%): -0.2 to +0.2 Vol%
Resolution at 0 to 999 ppm: 1 ppm
at 0.1 to 2.5 vol%: 0.1 vol%
Power supply 2 x 1.5 V mignon/AA
Type approved for use in areas at
risk of explosion: Camelion
Alkaline PLUS AA
Battery life approx. 6 h (typical)
Storage/transport
conditions
-10 to 50 °C / 14 to 122 °F
0 to 70 % RH
Operating
conditions
-10 to 40 °C / 14 to 104 °F
20 to 80 % RH not condensing
Weight approx. 200 g/0.44 lb. (incl. battery)
Dimensions (L x W
x H)
Housing: approx. 135 x 45 x 25 mm /
5.31 x 1.77 x 0.99"
Long, flexible sensor shaft including
sensor head: approx. 200 mm/7.87"
Protection class IP54
www. .com
information@itm.com1.800.561.8187
Page 5

2 Specifications
6
Characteristic Values
Warranty
2 years, warranty conditions: see
www.testo.com/warranty
EC Directives 94/9/EC (ATEX)
2014/30/EC
ATEX instrument
labelling
1258 II 2 G Ex ib IIC T1
www. .com
information@itm.com1.800.561.8187
Page 6

3 Product description
7
3 Product description
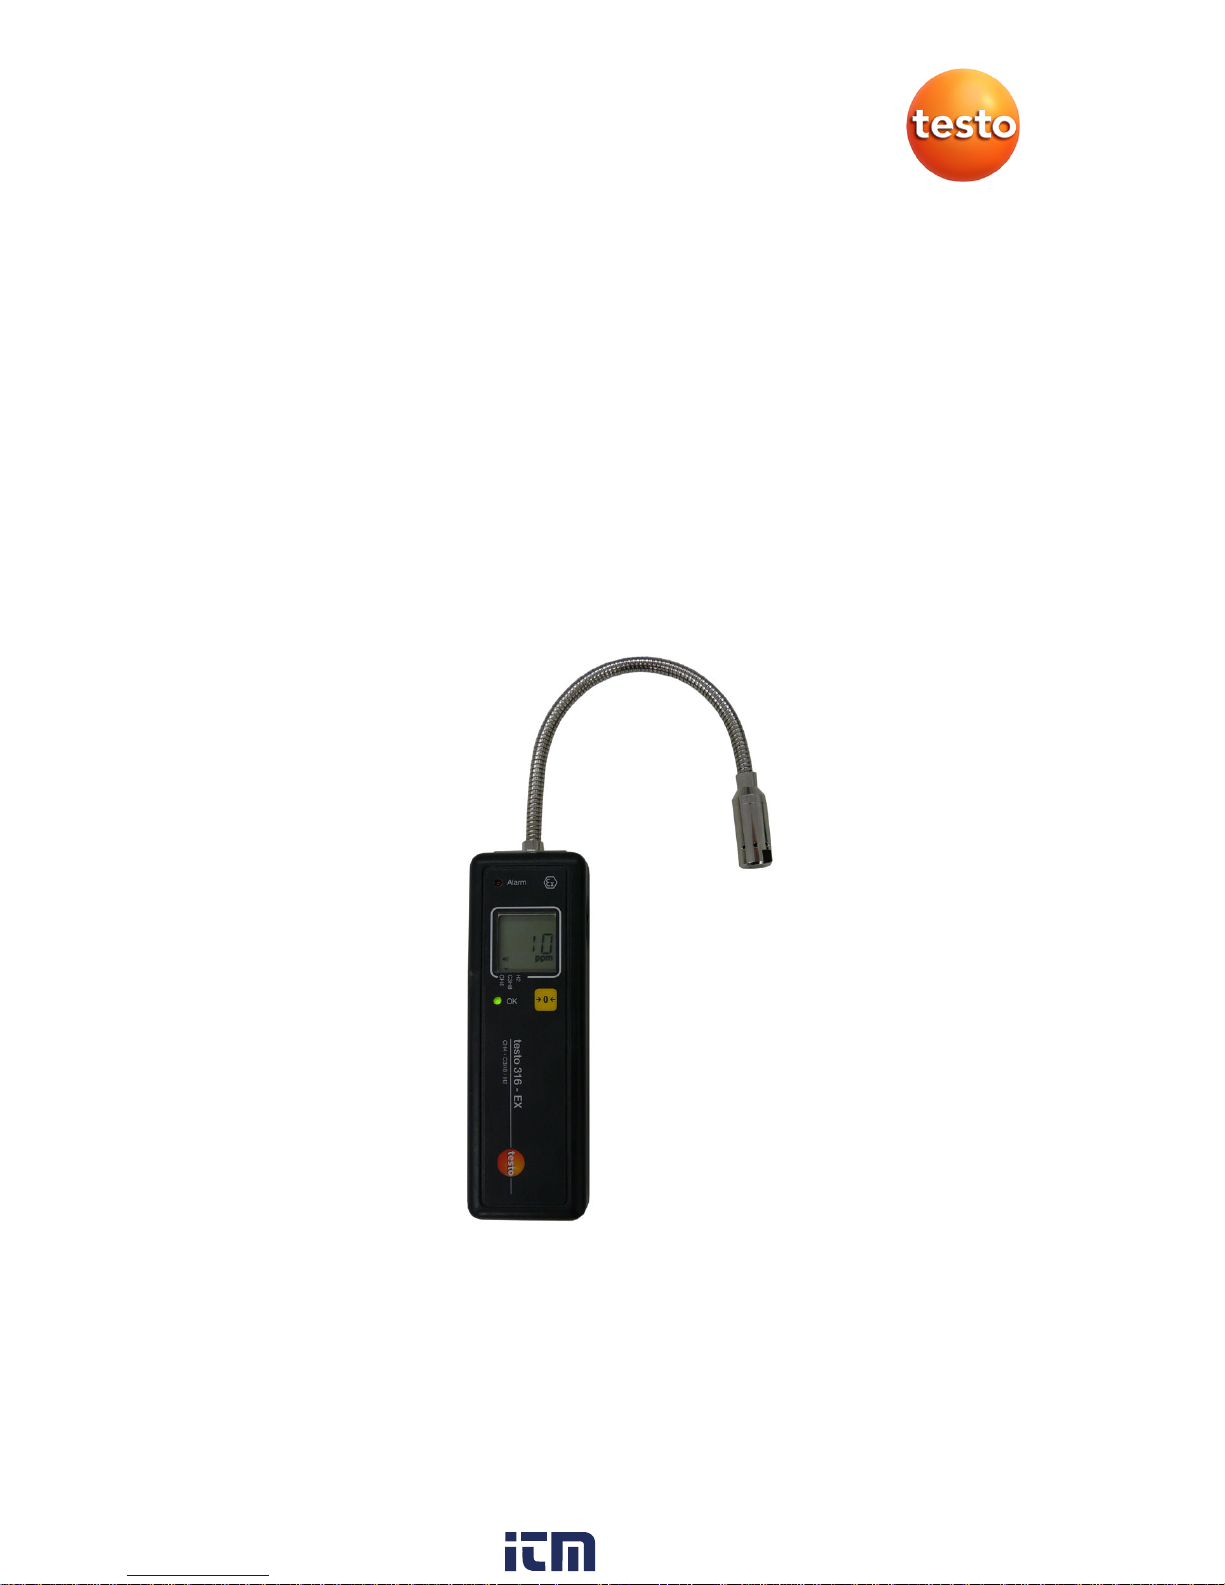
3.1. Overview
1 Sensor head with gas sensor and exchangeable protection cap
2 Flexible sensor shaft
3 Alarm LED
4 Display
5 Readiness LED
6 Battery compartment (on rear)
7 Control key
8 On/off switch
www. .com
information@itm.com1.800.561.8187
Page 7

4 First steps
8
4 First steps
4.1. Commissioning
Inserting batteries
✓ The instrument is switched off.
1. Open battery compartment (on rear of instrument) using
enclosed Allen key.
Battery type approved for use in areas at risk of explosion:
Camelion Alkaline PLUS AA
2. Insert batteries/rechargeable batteries (observe the polarity!).
3. Close battery compartment, tighten Allen head bolt by hand.
4.2. Getting to know the product
Switching on
Only switch on the instrument in fresh air as an automatic zeroing
is performed at the end of the warm-up time. The ambient
temperature during zeroing should correspond to the temperature
at the measuring location. If required, zero again manually at the
measuring location.
When not in use for a long period of time, the sensor
becomes contaminated due to oxidation, causing the zero
point to become unstable. If the instrument has not been in
operation for a long period of time (> 2 weeks), it must be
switched on approx. 30‑45 minutes before use and
thereafter zeroed manually.
If the instrument has been stored at temperatures <0
°C/<32 °F, it must be switched on 10 minutes before use
and thereafter zeroed manually.
> Push up on/off switch on the right side of the instrument.
- The sensor is warmed up (duration: approx. 60 s).
During the warm-up time, the following information is shown in
succession:
• All segments light up. Display segment test
• WAIT: wait
• V3.03 (example): firmware version (important information in
the event of service)
www. .com
information@itm.com1.800.561.8187
Page 8

4 First steps
9
• T126 (example): sensor table version (important information
in the event of service)
• PPM: measuring unit, alarm LED (red) and status LED
(green) alternately light up
• Display light is switched on
• 152 (example): check value (important information in the
event of service)
• CH4 (methane), C3H8 (propane) or H2 (hydrogen): set gas
type
• EN (English), DE (German), FR (French), ES (Spanish), IT
(Italian) or CS (Czech): set instrument language
• batt and bar graph: remaining battery capacity
• NP and two short signal tones: automatic zeroing is
performed
- The instrument is ready for use if the status LED (green) lights
up and a reading is shown in the display.
- With ToN3 (readiness tone) function activated, a short signal
tone is also emitted every 20 s as an indication of the readiness
for operation.
Switching off
> Push down on/off switch on the right side of the instrument.
Set language
The instrument language is set to EN (English) in the condition on
delivery. Proceed as follows to change the instrument language:
✓ The instrument is in the measurement view.
1. Press and hold [--> 0 <--] for approx. 8 s until a pulsed signal
tone sequence sounds.
2. Repeatedly press [--> 0 <--] briefly until LANGUA is shown.
3. Press and hold [--> 0 <--] until the display changes.
4. Repeatedly press [--> 0 <--] briefly until the desired language is
shown: EN (English), DE (German), FR (French), ES (Spanish),
IT (Italian) or CS (Czech).
5. Press and hold [--> 0 <--] until the display changes.
- EXIT is displayed.
6. Press and hold [--> 0 <--] until the display changes.
- The instrument is once again in measurement view.
www. .com
information@itm.com1.800.561.8187
Page 9

5 Using the product
10
5 Using the product
5.1. Performing settings
Open configuration menu
✓ The instrument is in measurement view.
> Press and hold [--> 0 <--] for approx. 8 s until a pulsed signal
tone sequence sounds.
- The instrument is in configuration view.
Selecting, opening and setting functions
> To select the next function: Briefly press [--> 0 <--].
> To open the selected function: Press and hold [--> 0 <--] until
the display changes.
> To set the opened function: Briefly press [--> 0 <--].
> To end the function: Press and hold [--> 0 <--] until the display
changes.
Adjustable functions
Ensure correct settings: All settings are applied
immediately; there is no cancel function.
Function Setting options/comments
LIGHT (display
light)
OFF (display light cannot be activated) or ON
(display light can be activated)
SOUND1 (alarm
tone)
ON (acoustic alarm on) or OFF (acoustic
alarm off).
The frequency sequence of the alarm tone
becomes faster with a higher concentration.
ALARM (alarm
threshold)
Any value within the measuring range.
If a value above the measuring range
final value is set: The alarm tone
sounds after reaching the measuring
range final value (CH4: 2.5 vol%,
C3H8: 1.0 vol%, H2: 2.0 vol%).
The respective flashing number can be set;
the number that can be set changes if a
button is not pressed for 5 s.
www. .com
information@itm.com1.800.561.8187
Page 10

5 Using the product
11
Function Setting options/comments
PROBE (detection
characteristic curve)
CH4 (methane), C3H8 (propane) or
H2 (hydrogen)
SOUND3
(readiness tone)
OFF (readiness tone off) or ON (readiness
tone on).
A short signal tone every 20 s.
CONTRAST
(display contrast)
Value between 0005 and 0025
LANGUA
(instrument
language)
EN (English), DE (German), FR (French), ES
(Spanish), IT (Italian) or CS (Czech)
Exit (close
configuration menu)
-
5.2. Performing gas detection
CAUTION
Destruction of the sensor by external influences!
> Do not expose the sensor to high concentrations of H
2
S
(hydrogen sulphide), SO
x
(sulphur dioxides), Cl2 (chlorine) or
HCl (hydrogen chloride).
> Avoid contact between alkaline materials or water and the
sensor.
> Avoid the effect of moisture and frost on the sensor.
Have the instrument calibrated by the manufacturer
annually.
Checking natural gas pipelines or hydrogen pipelines:
Methane (the main constituent of natural gas) and
hydrogen are lighter than air. The detection should take
place above the line/the suspected leak.
Checking propane gas pipelines: Propane is heavier than
air. The detection should take place below the line/the
suspected leak, starting from the ground up.
> Guide the sensor head as near as possible and at a low speed
(approx. < 2 cm per second) over the components that are to be
checked for leaks.
- If the set alarm value is exceeded, the Alarm LED lights up red.
If the acoustic alarm is switched on a warning tone also sounds,
www. .com
information@itm.com1.800.561.8187
Page 11

5 Using the product
12
the frequency sequence of which becomes faster as the
concentration increases.
Manually perform zeroing
It is only possible to manually set the zero point if the gas
concentration currently detected is below 1000 ppm.
Gas concentrations present at the point of the zeroing are
suppressed by means of the zeroing. The reading shown
therefore no longer conforms to the gas concentration
actually present.
✓ The instrument is in the measurement view.
> Briefly press [--> 0 <--].
- The zero point is reset.
Switching display light on/off
✓ The instrument is in the measurement view.
✓ The LIGHT function is activated.
> Press and hold [--> 0 <--] until a signal tone sounds.
- The display light is switched on or off.
- The display light automatically goes out if no buttons are
pressed for 2 minutes.
www. .com
information@itm.com1.800.561.8187
Page 12

6 Maintaining the product
13
6 Maintaining the product
Changing the batteries
Do not change the battery in areas at risk of explosion.
✓ The instrument is switched off.
1. Open battery compartment (on rear of instrument) using
enclosed Allen key.
Battery type approved for use in areas at risk of
explosion: Camelion Alkaline PLUS AA
2. Remove empty batteries and insert new batteries (observe the
polarity!).
3. Close battery compartment, tighten Allen head bolt by hand.
Cleaning the instrument
> If the housing of the instrument is dirty, clean it with a damp
cloth.
Do not use any aggressive cleaning agents or solvents! Weak
household cleaning agents and soap suds may be used.
Clean protection cap
Contamination at or in the protection cap can be removed using
compressed air.
CAUTION
Destruction of the sensor
> With the sensor protection cap open, take care that the sensor
is not damaged.
> Do not direct the compressed air jet at the sensor, do not touch
the sensor.
1. Carefully unscrew protection cap from sensor shaft.
2. Blow out protection cap and then screw on again.
www. .com
information@itm.com1.800.561.8187
Page 13

7 Tips and assistance
14
7 Tips and assistance
7.1. Questions and answers
Question Possible causes Possible solution
Error is
displayed.
Instrument error
> Contact Testo
Customer Service or
your dealer.
F30 is shown
and the red
LED lights up
Sensor faulty
> Contact Testo
Customer Service or
your dealer.
Zero point
instable
Contamination of the
sensor due to
oxidation during long
periods of non-use
> Leave instrument
switched on until the
zero point stabilizes
(can take up to
45 minutes).
The instrument
does not
change to
measuring
mode (remains
in the warm-up
phase)
Battery voltage too
low
> Change batteries.
If we could not answer your question, please contact your dealer or
Testo Customer Service. You can find the contact data in the
Internet under: www.testo.com/service-contact
www. .com
information@itm.com1.800.561.8187
Page 14

7 Tips and assistance
15
7.2. Accessories and spare parts
Description Article no.
Camelion Alkaline PLUS AA battery, 1
pc.
Note: 2 batteries are required for the
testo 316-EX
0515 0316
Sensor protection cap 0180 0316
www. .com
information@itm.com1.800.561.8187
 Loading...