

Page 1
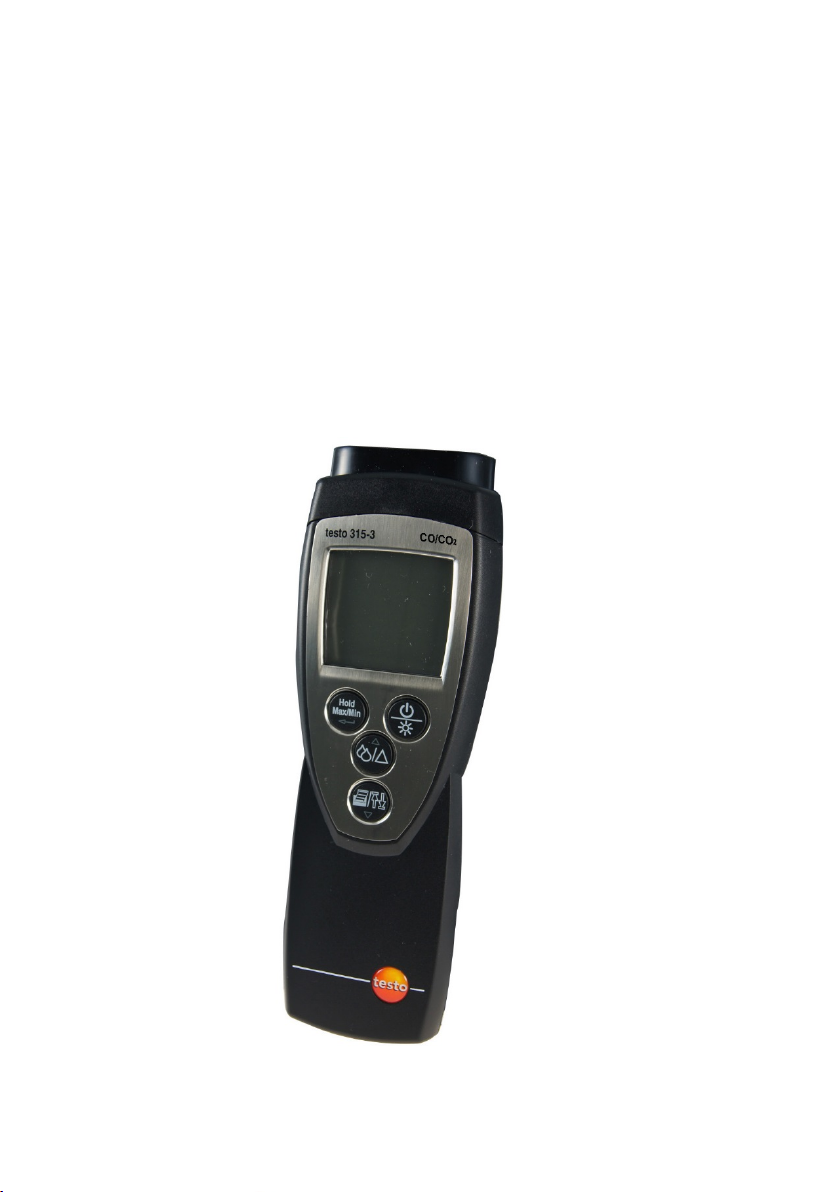
testo 315
-3 · CO/CO2 measuring instrument
Instruction manual
Page 2

2
Page 3

1 Contents
1 Contents
1 Contents ................................................................................................... 3
2 Safety and the environment .................................................................... 4
2.1. About this document ........................................................................ 4
2.2. Ensure safety................................................................................... 4
2.3. Protecting the environment .............................................................. 5
3 Specifications .......................................................................................... 6
3.1. Use .................................................................................................. 6
3.2. Technical data ................................................................................. 6
3.2.1. Measurement ranges and resolution .................................................................. 6
3.2.2. Accuracy and response time .............................................................................. 6
3.2.3. Other instrument data ......................................................................................... 7
3.2.4. Bluetooth® module (option) ................................................................................. 7
4 Product description ................................................................................. 9
4.1. Overview ......................................................................................... 9
4.1.1. Control elements and connections ..................................................................... 9
4.1.2. Display...............................................................................................................12
4.2. Basic properties ............................................................................. 13
5 First steps .............................................................................................. 13
6 Using the product .................................................................................. 14
6.1. Performing settings ........................................................................ 14
6.2. Measuring ...................................................................................... 15
6.3. Printing the measurement results .................................................. 16
6.4. Bluetooth® and IrDA data transfer ................................................. 17
7 Maintaining the product ........................................................................ 17
8 Tips and assistance............................................................................... 18
8.1. Questions and answers ................................................................. 18
8.2. Calibration interval ......................................................................... 20
8.3. Accessories and spare parts ......................................................... 20
3
Page 4
2 Safety and the environment
2 Safety and the environment
2.1. About this document
Use
> Please read this documentation through carefully and
familiarize yourself with the product before putting it to use. Pay
particular attention to the safety instructions and warning advice
in order to prevent injuries and damage to the products.
> Keep this document to hand so that you can refer to it when
necessary.
> Hand this documentation on to any subsequent users of the
product.
Symbols and writing standards
Represen-
Explanation
tation
Note: Basic or further information.
1. ...
2. ...
> ... Action: a step or an optional step.
- ... Result of an action.
Action: more steps, the sequence must be followed.
Menu Elements of the instrument, the instrument displays
or the program interface.
[OK] Control keys of the instrument or buttons of the
2.2. Ensure safety
✓ ...
program interface.
Handling prerequisite
> Only operate the product properly, for its intended purpose and
within the parameters specified in the technical data. Do not
use any force.
> Dangers may also arise from the systems being measured or
the measuring environment: Note the safety regulations valid in
your area when performing the measurements.
4
Page 5

2 Safety and the environment
> Do not perform contact measurements on non-insulated, live
parts.
> Do not store the product together with solvents. Do not use any
desiccants. These substances may impair the operation and
reliability of the instrument.
> Carry out only the maintenance and repair work on this
instrument that is described in the documentation. Follow the
prescribed steps exactly. Use only original spare parts
from Testo.
> Temperatures given on probes/sensors relate only to the
measuring range of the sensors. Do not expose handles and
feed lines to any temperatures in excess of 70 °C unless they
are expressly permitted for higher temperatures.
For products with Bluetooth® (optional)
Changes or modifications that have been made without the explicit
consent of the responsible approval authority, may cause the
retraction of the type approval. Data transfer may be disturbed by
equipment that uses the same ISM band, e.g. WLAN, microwave
ovens, ZigBee.
The use of radio communication links is not permitted in aeroplanes
and hospitals, among others. For this reason the following points
must be ensured before entering:
The data transfer function must not be active.
2.3. Protecting the environment
> Dispose of faulty rechargeable batteries/spent batteries in
accordance with the valid legal specifications.
> At the end of its useful life, send the product to the separate
collection for electric and electronic devices (observe local
5
regulations) or return the product to Testo for disposal.
Page 6
3 Specifications
option may only be operated in countries in
Humidity 11
5 to 95 %RH
0.1 %RH
3 Specifications
3.1. Use
The testo 315-3 is a convenient and robust measuring instrument
for recording ambient CO/CO
values. It is used to avoid risks.
2
Fields of application are, for example
- Heating systems with operation dependent on ambient air
- Ventilation systems
- Storage in the food and drinks industry
The Bluetooth®
which it is type approved.
3.2. Technical data
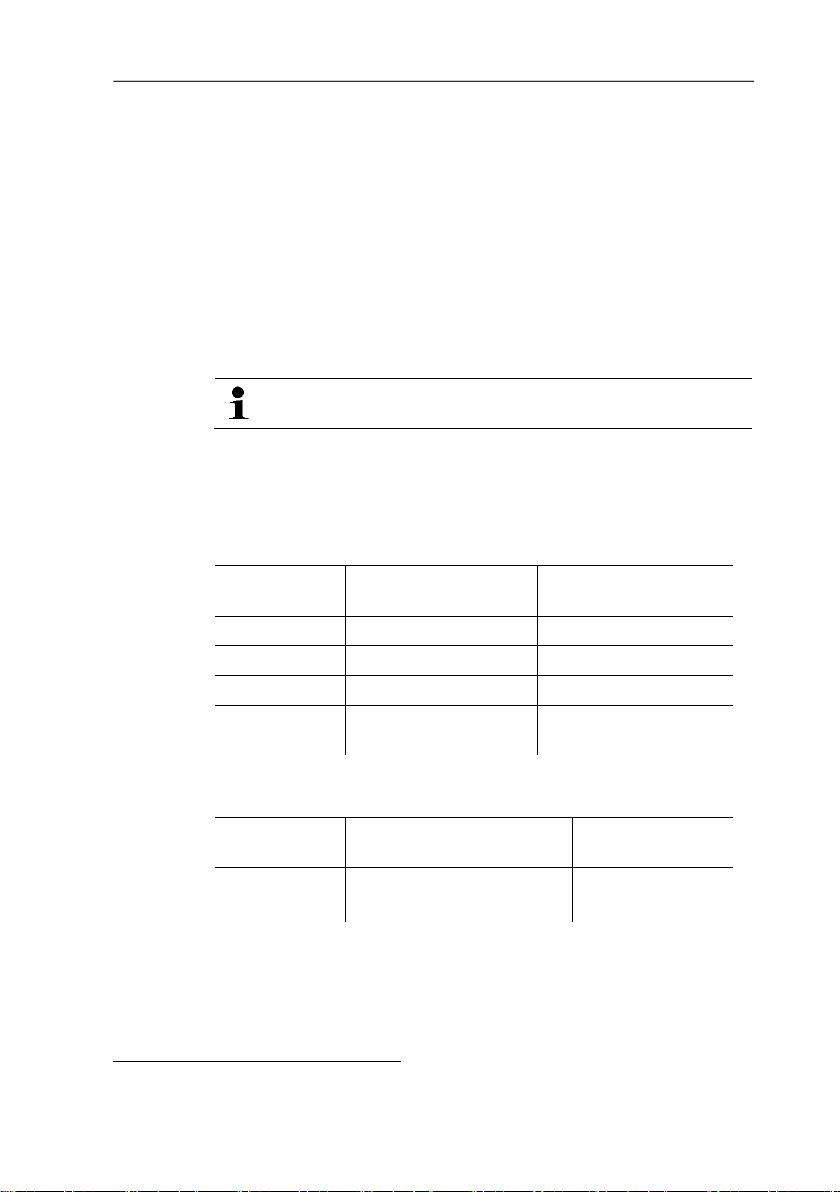
3.2.1. Measurement ranges and resolution
Measurement
parameter
CO 0 to 100 ppm 0.5 ppm
CO
2
Measuring range Resolution
0 to 10,000 ppm 10 ppm
Temperature1 -10 to +40 °C/
0.1 °C/°F
14 to 104 °F
3.2.2. Accuracy and response time
Measurement
parameter
CO ± 3 ppm to 20 ppm
1
Only when the humidity/temperature sensor is connected (optional)
6
Accuracy Response time
< 120 s (t90)
± 5 ppm from 20 ppm
Page 7

3 Specifications
parameter
Storage/transportation
Measurement
Accuracy Response time
CO2 ±300 ppm
(0 to 4,000 ppm)
±8 % of meas. val.
(4,000 to 6,000 ppm)
±500 ppm.
(6,000 to 10,000 ppm)
Humidity1 ±2.5 %RH (5 to 95 %RH)
Temperature1 ±0.5 °C (+ 1 digit)
3.2.3. Other instrument data
Feature Values
-20 to 60 °C/-4 to 140°F
conditions
Operating conditions 0 to 40 °C/32 to 104 °F/0 to 95 %RH
Weight incl. holster Approx. 382 g
Housing material ABS
Dimensions (L x W x
H)
Protection class IP 40 acc. to EN 60529
Operating time
Display Segment display
Supported printer 0554 0549/0554 0547
License acc. to EN 50543
Warranty Instrument: 24 months
EC Directive 2014/30/EC
0 to 95 %RH
190 x 65 x 40 mm
Min 10 h measuring time (at
20 °C/68 °F), mains operation possible
Battery: 12 months
CO sensor: 12 months
CO
Warranty conditions: see website
www.testo.com/warranty
sensor: 12 months
2
< 120 s (t90)
3.2.4. Bluetooth® module (option)
7
• Bluetooth® type: BlueNiceCom IV
• Bluetooth
®
product note: BNC4_HW2x_SW2xx
Page 8

3 Specifications
®
• Bluetooth
• Bluetooth
identification: B013784
®
company: 10274
• Coverage: < 10 m
Certification
Belgium (BE), Bulgaria (BG), Denmark (DK), Germany (DE),
Estonia (EE), Finland (FI), France (FR), Greece (GR), Ireland (IE),
Italy (IT), Latvia (LV), Lithuania (LT), Luxembourg (LU), Malta (MT),
Netherlands (NL), Austria (AT), Poland (PL), Portugal (PT),
Romania (RO), Sweden (SE), Slovakia (SK), Slovenia (SI), Spain
(ES), Czech Republic (CZ), Hungary (HU), United Kingdom (GB),
Republic of Cyprus (CY).
Iceland (IS), Liechtenstein (LI), Norway (NO) and Switzerland (CH).
Turkey (TR), El Salvador (SV), Columbia (CO)
8
Page 9

4 Product description
4.1. Overview
4.1.1. Control elements and connections
4 Product description
1 Connection for temperature/humidity module (optional)
2 IR interface, record printer
3 CO sensor module
4 CO
sensor module (back)
2
5 Display
6 Keyboard
7 Reset button (back)
8 USB mains unit socket
9
Page 10

4 Product description
Button
Duration
Status
Function
Displays maximum
minimum value,
after 3 minutes
Temperature/humidity module option
9 Temperature/humidity sensor
10 Connection for temperature/humidity module to the testo 315-3
Key functions
Reading display • Holds measuring
values
•
values
Short
• Displays minimum
values
• Displays current
values
Long
Configuration
mode
Reading display
(current value)
Reading display
(maximum
value/minimum
Confirms entry, next
setting
Opens configuration
mode
Resets maximum
value,
hold value
value/hold value)
Configuration
mode
Exits configuration
mode (changes are
stored)
Instrument is off Switches instrument
on
Instrument is on Switches on display
illumination/switches
Short
off display illumination
The display
illumination
switches off
10
Long
if no keys are
pressed.
Instrument is on Switches instrument
off
Page 11
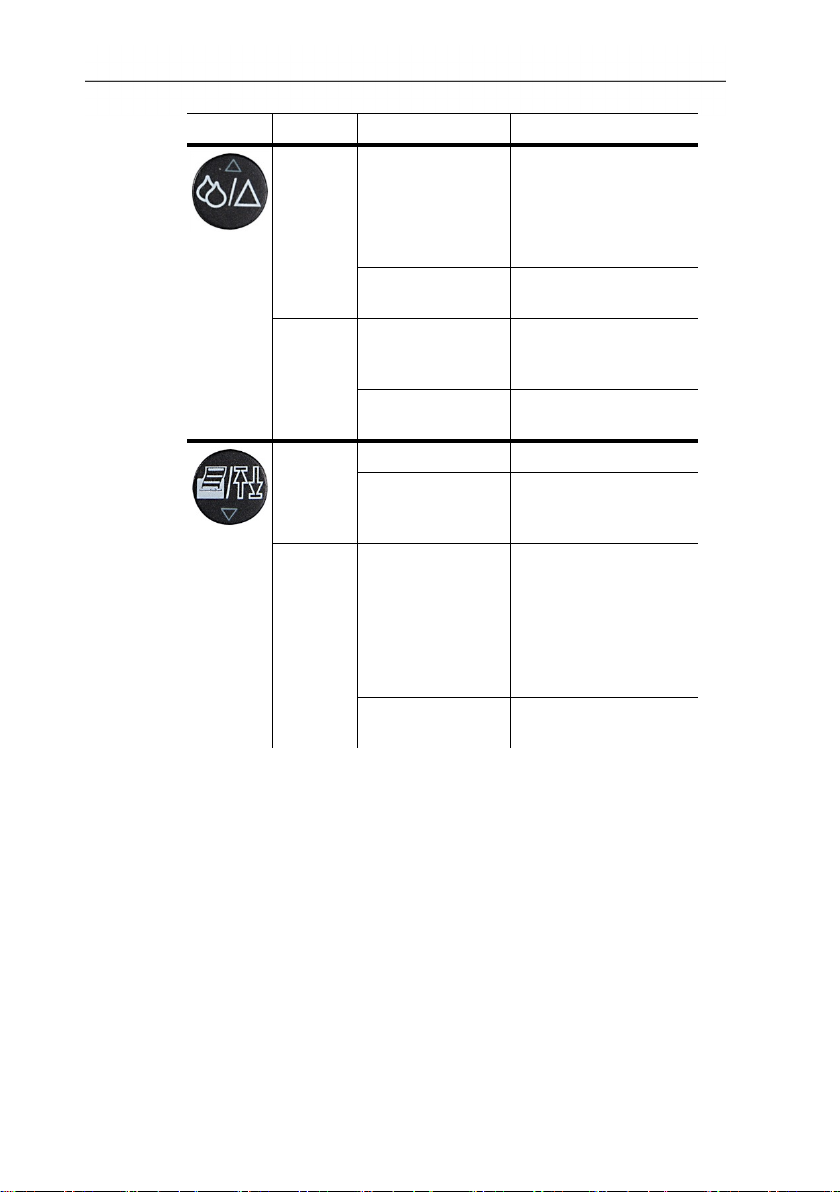
Button Duration Status Function
transfer mode via IrDa
Short
Reading display,
only if humidity
module is
connected
• Displays humidity
and temperature
• Displays dew
point/temperature
• Displays CO/CO
Configuration
mode
Changes
option/increases value
Reading display Sets zero
point/deletes zero
Long
Configuration
mode
point
Increases value
quickly
Reading display Prints data
Short
Configuration
mode
Changes
option/decreases
value
Reading display
Switches on data
or Bluetooth®
(optional) / switches
Long
off data transfer mode
via IrDa or Bluetooth
(optional)
Configuration
mode
Decreases value
quickly
4 Product description
2
®
11
Page 12
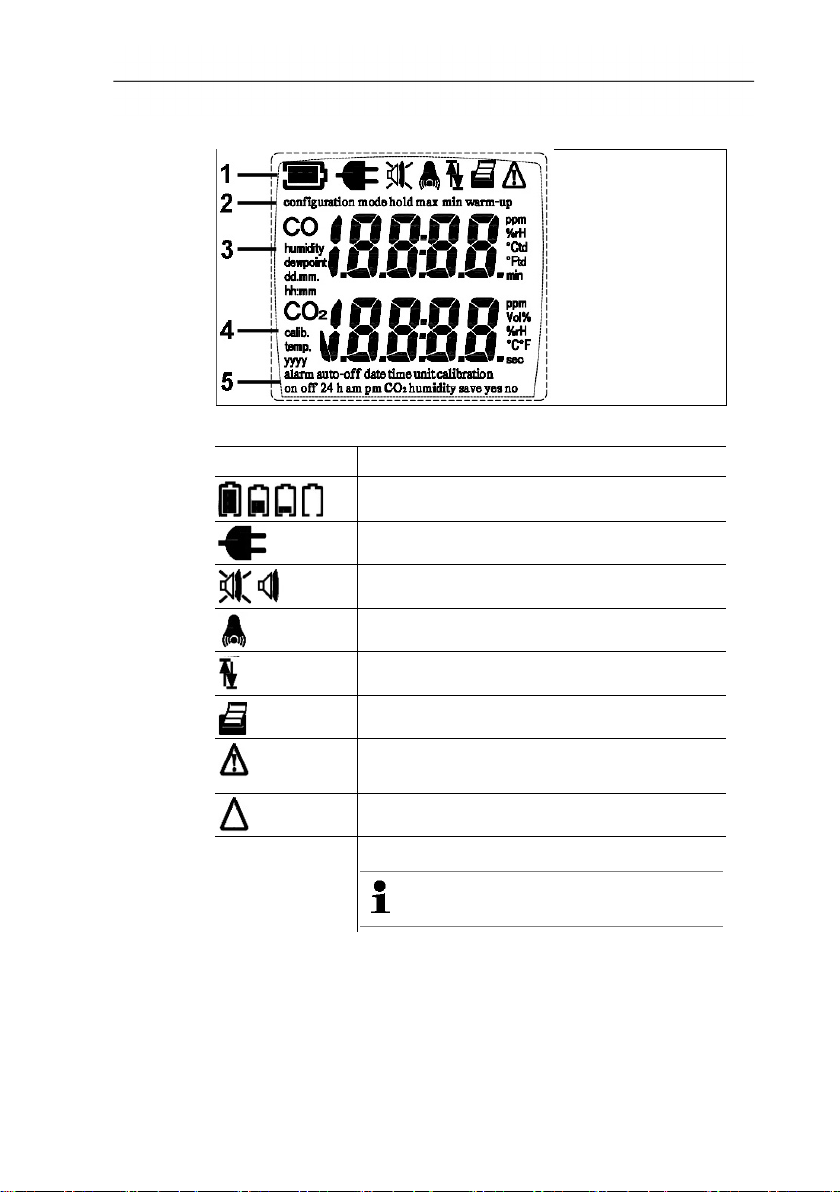
4 Product description
Icon
Function
4.1.2. Display
1 Status information
Battery capacity: 100% / 66% / 33%, <10%
Micro USB mains unit is connected.
Alarm off, alarm on
Flashes: the alarm threshold is exceeded
Data transfer
Data transfer enabled
Lights up: information
Flashes: error message
Differential measurement
calibration Flashes: adjust CO2 sensor in fresh air.
CO
sensor should be adjusted in
2
fresh air after 120 operating hours.
2 Measuring functions
3 Display of CO measuring value, humidity, dew point, date (day
and month), hours and minutes, measurement parameter
4 Display of CO2 measuring value, adjustment value,
temperature, year, measurement parameter.
5 Settings
12
Page 13

4.2. Basic properties
Power supply
Power is supplied to the testo 315-3 via:
• Rech. batt., type: Li-Po rechargeable battery pack, 3.7 V/1,500
mAh (can be replaced via Testo Service)
• USB mains unit inc. cable (0554 1105), 5,0 V/1.000 mAh
With an attached mains unit, power is supplied automatically via
the mains unit and the instrument's rechargeable battery is
charged. To avoid destroying the rechargeable battery, only charge
5 First steps
it at an ambient temperature of 0 to 45 °C/32 to 113 °F.
5 First steps
Switching on
Connect the humidity/temperature module (0636 9725)
before switching the instrument on (option).
1. Switch the instrument on: press [ ] briefly.
- All segments of the display light up for around 1 s.
- The warm-up phase then occurs for 30 s. (information in
display: warm-up).
During first commissioning, the configuration menu is
opened automatically, see Settings.
- The current measurement values are displayed. The instrument
is operational.
The measurement value of the CO sensor is displayed
in the upper line.
The measurement value of the CO
in the lower line.
sensor is displayed
2
Switching off
2. Switch off the instrument: press and hold down [ ].
13
Page 14

6 Using the product
6 Using the product
6.1. Performing settings
Opening the configuration menu
✓ The instrument is in measurement view.
> Open configuration menu: press and hold down [ ] until
configuration mode appears.
Selecting, opening and setting functions
> To select the next function: press [ ] / [ ] briefly.
> To enable the selected function: press [ ] briefly.
> To adjust the open function: press [ ] / [ ] briefly.
> To cancel the function: press [ ] briefly until the display
changes.
14
Adjustable functions
Ensure correct settings: all settings are transferred
immediately. There is no Cancel function.
Settings and display of temperature and humidity are only
possible if the humidity module was connected before
switching on.
Function Setting options/comments
alarm off or on
on selected:
• Enables/disables acoustic signal
• Sets CO limiting value
• Sets CO
limiting value
2
auto-off off or on
on selected:
Sets value
date Sets year, month, day
time
off or on selected
Selects 24h or am or pm format, sets hours
and minutes
Page 15

6 Using the product
Before completing the adjustment, the
Function Setting options/comments
unit CO2: Vol% or ppm
temp./dewpoint: °F, °C/°Ftd, °Ctd
calibration CO2 yes (adjust) or no (do not adjust)
yes selected:
CO2 value is adjusted to the nominal value
and stored (only possible with a current CO
value < 650 ppm)
The calibration/adjustment must be
carried out in fresh air that has a
normal CO
concentration of
2
approx. 400 ppm.
To avoid incorrect calibra-
tion/adjustment values, calibration
should, for example, not be carried
out on busy roads or in closed rooms.
Ensure that, before and during the
calibration/adjustment, no exhaled air
reaches the instrument.
instrument should be left in the fresh
air for 3-4 minutes.
2
calibration
humidity
> Cancel configuration menu: press and hold down [ ] until
configuration mode display switches to the measurement
6.2. Measuring
view.
✓ testo 315-3 is on.
- Display of the current CO and CO2 measuring values.
15
yes or no
yes selected:
Humidity values are aligned to the alignment
points 11.3 % RH and 75.3 % RH and saved.
To adjust to the alignment points, use
the testo Control and alignment set
for humidity sensors (0554 0660).
Page 16

6 Using the product
> Display humidity and temperature value: press [ ] briefly.
> Display dew point: press [ ] briefly.
Delta measurement
✓ testo 315-3 for CO and CO
> Call up Delta measurement menu: press [ ] until the display
- Delta measurement is carried out ([ ] lights up). The current
> To cancel the function: press and hold down [ ] until the
Hold/Max/Min
✓ testo 315-3 is in measurement view.
The measuring values for Hold/Max/Min can be called up for:
• CO and CO2
• Temperature and humidity (if temperature and humidity module
• Dew point (if temperature and humidity module is connected)
> Call up Hold function: press [ ] briefly.
- The current measuring values are held.
> Call up Max function: press [ ] briefly.
- The maximum measuring values are displayed.
> Call up Min function: press [ ] briefly.
- The minimum measuring values are displayed.
> Set Hold/Max/Min values to the current value: press and hold
- Measuring values flash several times and are updated.
Switching to humidity, temperature and dew point value is
only possible if a humidity/temperature module is
connected.
is in the measurement view.
2
changes.
measuring values are zeroed as a reference.
display switches to the measurement view.
is connected)
down [ ].
6.3. Printing the measurement results
✓ testo 315-3 is on.
> Call up Print function: press [ ] briefly.
- The data is transferred to the printer via the IrDA interface.
16
Page 17

7 Maintaining the product
- [ ] lights up.
6.4. Bluetooth® and IrDA data transfer
Data is transferred via Bluetooth
this interface. Otherwise, data is transferred via the IrDA
interface.
®
if both instruments have
Data can currently be transferred to the following testo measuring
instruments:
• testo 330 (0632 3306 / 0632 3307) from firmware version V1.11
• testo 330 (0632 3304 / 0632 3305) from firmware version V1.63
✓ testo 315-3 is on and a measurement has been carried out.
> Switch on data transfer: press and hold down [ ].
- [ ] lights up. Data is transferred.
Please refer to the operating instructions for the relevant
7 Maintaining the product
testo measuring instrument.
Charging the rechargeable battery
1. Connect the mains unit connector to the instrument's micro
USB socket.
2. Connect the mains plug to the mains socket.
The charging process will start automatically. Charging is indicated
by a change in the battery icon segments. lights up when the
battery is fully charged.
Cleaning the instrument
Do not use any aggressive cleaning agents or solvents! Mild
household cleaning agents and soap suds may be used.
17
Page 18

8 Tips and assistance
Question
Possible causes/solutions
8 Tips and assistance
8.1. Questions and answers
v
flashes and E145
lights up
The instrument temperature is outside
the permissible range:
> Let the instrument warm up or cool
down.
flashes and E161
lights up
or
A serious error has occurred:
> Contact your dealer or the Testo
Customer Service.
flashes and E419
lights up
or
flashes and E999
lights up
flashes and E290
lights up
The current CO
high for an adjustment:
measuring value is too
2
Acknowledge the error message with
[Hold/Max/Min] and carry out the
adjustment again in fresh air (CO
measuring value < 650 ppm).
flashes and E420
lights up
Fan is blocked
> Please check if any item sticks in
the ventilation slot on the back of
the instrument. After 90 seconds,
the fan is started again.
> If there is nothing directly visible,
please contact your dealer or the
Testo Customer Service.
CO
sensor must be adjusted
, calibration and
CO2 flash
2
> Adjust CO
sensor in fresh air.
2
flashes Battery capacity too low
> Connect the mains unit.
2
18
Page 19

8 Tips and assistance
[Hold/Max/Min]
Question Possible causes/solutions
and flash, E401
lights up
Rechargeable battery is empty,
instrument will soon switch off
automatically.
> Connect the mains unit (the warning
can be deleted with
).
and flash
Recharging the battery is impossible:
> Contact your dealer or the Testo
Customer Service.
Can the battery be
replaced?
The battery cannot be replaced.
> Contact your dealer or the Testo
Customer Service.
Can the battery be
The battery cannot be charged.
charged via the USB
port of a laptop or
PC?
Can Bluetooth
retrofitted?
Can humidity,
temperature and dew
point measurements
be carried out?
The display is
illuminated also after
the testo 315 - 3 is
switched off
The CO2 measuring
value is displayed as
®
be
Bluetooth® functionality cannot be
retrofitted.
Humidity, temperature and dew point
measurements are possible with the
temperature/humidity module
(accessory).
The display illumination goes out as
soon as the instrument has shut down.
While the display is illuminated, the
instrument cannot be switched on.
The current measuring value is over
10,000 ppm.
0000
The CO2 reading is
implausible.
The gas opening on the back of the
instrument might be covered. This
means that a correct CO2
measurement is not possible.
If we could not answer your question or the solutions given during
troubleshooting did not help: please contact your dealer or Testo
Customer Service. Contact data see back of this document or
website www.testo.com/service-contact
.
19
Page 20

8 Tips and assistance
8.2. Calibration interval
Testo recommends that calibration of the measuring instrument is
carried out once a year by Testo Customer Service or a service
centre authorised by Testo.
8.3. Accessories and spare parts
Description Article no.
testo 315-3 without Bluetooth® (incl. micro USB
mains unit, cable USB A - USB micro B)
testo 315-3 with Bluetooth® (incl. micro USB
mains unit, cable USB A - USB micro B)
Temperature/humidity module 0636 9725
Topsafe 0516 0223
USB mains unit inc. cable 0554 1105
Basic printer 0554 0549
Spare printer paper (6 rolls) 0554 0568
Control and calibration set for humidity sensors
(11.3 %RH and 75.3 %RH)
0632 3153
0632 3154
0554 0660
20
Page 21

Page 22

Page 23

Page 24

0970 3153 en 04
 Loading...