

Page 1

Bedienungsanleitung de
Instruction manual en
Mode d’emploi fr
Manual de instrucciones es
Manuale di istruzioni it
Handleiding nl
Руководство пользователя ru
testo 108-2
Wasserdichtes Temperatur-Messgerät
Watertight temperature measuring instrument
Thermomètre étanche
Aparato de medición de temperatura estanco al agua
Termometro impermeabile
Waterdicht temperatuur-meetinstrument
Герметичный прибор для измерения температуры
Page 2

Allgemeine Hinweise2
Bedienungsanleitung (de)............................................................3
Instruction manual (en) .............................................................11
Mode d’emploi (fr) ....................................................................19
Manual de instrucciones (es) ....................................................27
Manuale di istruzioni (it) ............................................................35
Handleiding (nl).........................................................................43
Руководство пользователя.............................................................43
Page 3

1. Allgemeine Hinweise
Lesen Sie dieses Dokument aufmerksam durch und machen Sie
sich mit der Bedienung des Produkts vertraut, bevor Sie es ein setzen. Bewahren Sie dieses Dokument griff bereit auf, um bei
Bedarf nachschlagen zu können.
2. Produktbeschreibung
3. Sicherheitshinweise
Elektrische Gefahren vermeiden:
Nicht an oder in der Nähe von spannungs führenden Teilen
messen!
Produktsicherheit / Gewährleistungsansprüche wahren:
Nur sach- und bestimmungsgemäß und unter Einhaltung der
vor gegebenen Parameter einsetzen. Keine Gewalt anwenden.
Nicht zusammen mit Lösungsmitteln (z. B. Aceton) lagern.
Produkt nur öffnen, wenn dies zu Wartungs- oder Instand -
haltungsarbeiten ausdrücklich in der Dokumentation beschrie ben ist.
Fachgerecht entsorgen:
Defekte Akkus / leere Batterien an den dafür vorgesehenen
Sammelstellen abgeben.
Produkt nach Ende der Nutzungszeit direkt an Testo senden.
Wir sorgen für eine umwelt schonende Entsorgung.
Allgemeine Hinweise 3
deenfresitptsvnl????
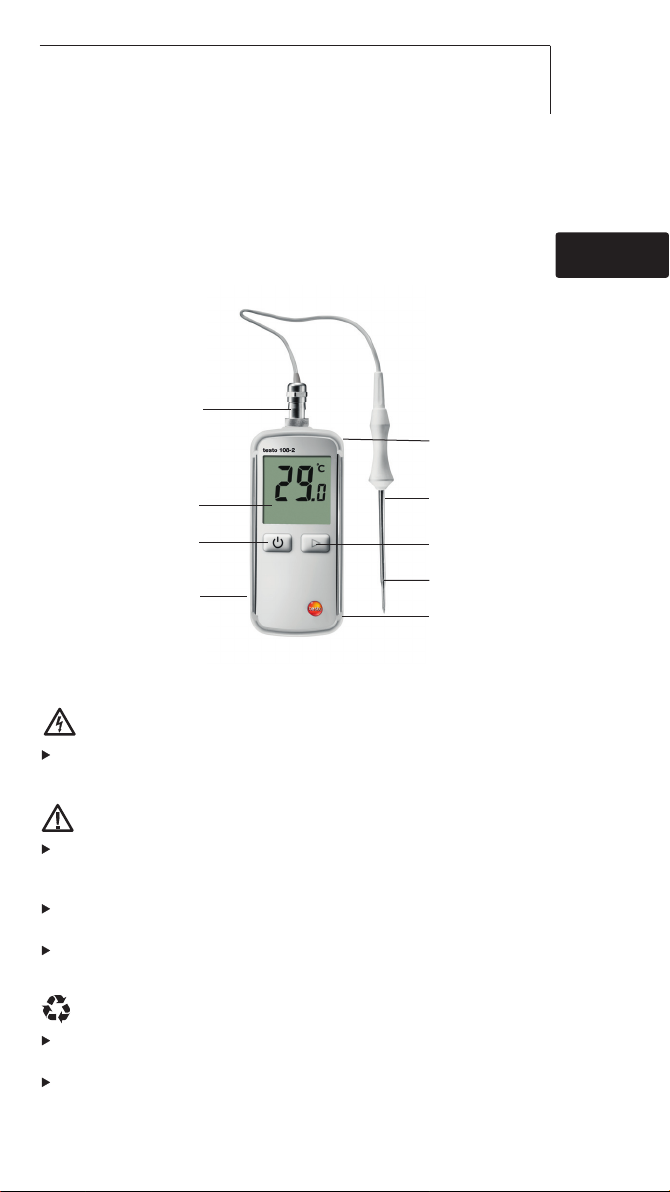
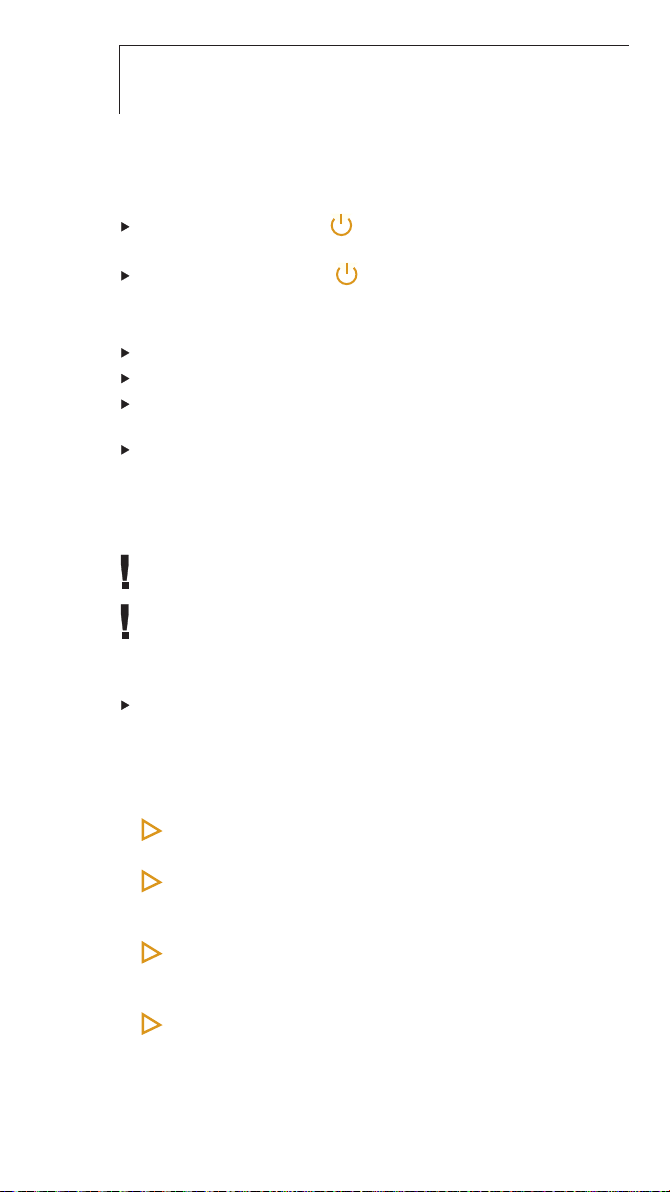
Gerät ein-/ausschalten
Batterie fach
(Rückseite)
Display
Mindesteinstech-/
Eintauchtiefe
Schutzhülle (Softcase)
Fühleranschlussbuchse
Menüführung im
Konfigurationsmodus
Vertiefung Schutzhülle
(Softcase)
Tauch-/
Einstechsonde
Page 4

4. Bestimmungsgemäße Verwendung4
4. Bestimmungsgemäße Verwendung
Das testo 108-2 ist ein wasserdichtes Lebensmittel-Thermometer.
Das Produkt wurde für folgende Aufgaben / Bereiche konzipiert:
· Lebensmittelbereich: Produktion, Speisenausgabe, Stich proben messung
· Messung von flüssigen, pastösen und halbfesten Medien
Folgende Komponenten des Produkts sind ent sprechend der
Verordnung (EG) 1935/2004 für den dauerhaften Kontakt mit
Lebensmitteln ausgelegt:
Die Tauch-/Einstechsonde von der Messspitze bis 1 cm vor dem
Fühlerhandgriff bzw. dem Kunststoffgehäuse. Falls angegeben sind
dabei die Hinweise über Einstech tiefen in der Bedienungsanleitung
unter Punkt 7.2 oder die Markier ung(en) am Tauch-/Einstechfühler zu
beachten.
In folgenden Bereichen darf das Produkt nicht eingesetzt werden:
· In explosionsgefährdeten Bereichen
· Für diagnostische Messungen im medizinischen Bereich
5. Technische Daten
Eigenschaft Werte
Sensortyp Thermoelement Typ T (im Lieferumfang)
Messbereich -50...+300°C/-58...+572°F (gilt nur für metallische
Sondenspitze)
Messgröße Temperatur in °C/°F
Auflösung 0,1°C/°F
Genauigkeit Gerät ±0,5 °C (-30...+70°C)
(Umgebungstemperatur ±0,5 °C ±0,5 % des Messwerts (-50...-30°C/+70...+300°C)
+23°C ±3°C)
Genauigkeit Fühler ±0,5 °C (-40...-20°C)
±0,2 °C (-20...+70°C)
±0,5 °C (+70...+125°C)
±0,4% des Messwerts (+125...+300°C)
Angleichzeit t99 10s (in bewegter Flüssigkeit)
Messrate 2 Messungen pro Sekunde
Arbeitstemperatur -20...+60°C/-4...+140°F
Transport- / Lagertemperatur -30...+70°C/-22...+158°F
Spannungsversorgung 3 x Batterie Typ AAA
Batteriestandzeit 2500 h (typisch bei 23°C )
Gehäuse TPE/PC + 20%GF, ABS/PET, ABS + PC + 10%GF/TPE
Schutzart IP67 (der im Set mitgelieferte Fühler ist angebracht)
Abmessungen Gerät 144 x 60 x 24,5 mm
Gewicht 162g (Gerät inkl. Batterien, ohne Softcase), 54g (Fühler)
Anzeige LCD, einzeilig, mit Statuszeile
Normen EN 13485
Zertifikate: siehe www.testo-international.com,
Service&Support | Download Center (Registrierung erforderlich)
EG-Richtlinie 2004/108/EG
Funktionen Auto-Hold, Hold, Min, Max
Garantie 2 Jahre, Garantiebedingungen: siehe Internetseite
www.testo.com/warranty
Page 5

Normenhinweis
Dieses Produkt erfüllt die Richtlinien gemäß der Norm
EN 13485. Eignung: S, T (Lagerung, Transport)
Umgebung: E (Transportable Thermometer)
Genauigkeitsklasse: 1
Messbereich: -50...+300 °C
Nach EN 13485 ist eine regelmäßige Überprüfung und
Kalib rierung des Messgeräts gemäß EN 13486
durchzuführen (Empfehlung: jährlich).
Kontaktieren Sie uns für nähere Informationen.
6. Inbetriebnahme
6.1 Schutzhülle (Softcase)
Die mitgelieferte Schutzhülle (Softcase) schützt das testo 108-2
vor Stößen und Verschmutzung.
Zusätzlich kann der Fühler in der Vertiefung der mitgelieferten
Schutzhülle (Softcase) an der Seite des Gerätes sicher verstaut
werden.
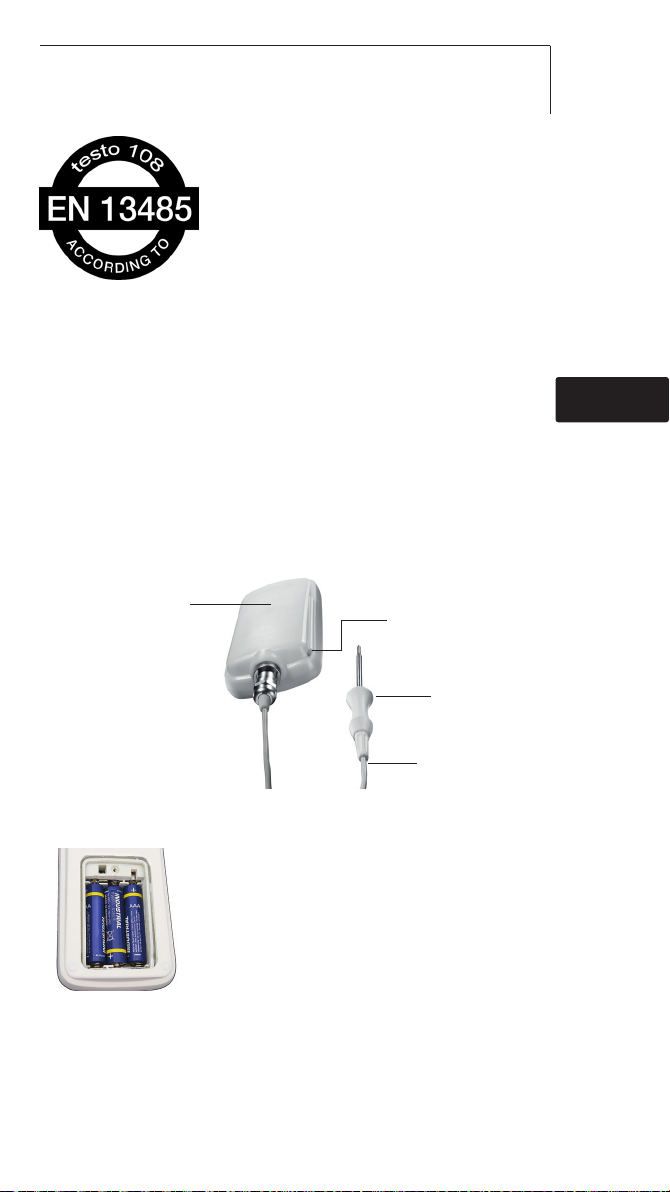
6.2 Batterien einlegen
1
Schraube am Batteriefach lösen.
2 Batteriefach öffnen.
3 Batterien (3 x Typ AAA) einsetzen.
Polung beachten!
4 Batteriefach schließen.
5 Schraube anziehen.
6. Inbetriebnahme 5
deenfresitptsvnl????
Fühler
Fühlerkabel
Vertiefung Schutzhülle
(Softcase)
Schutzhülle (Softcase)
Page 6

7. Bedienung6
7. Bedienung
7.1 Ein- / Ausschalten
Gerät einschalten: kurz drücken.
- Displaytest erscheint. Gerät ist messbereit.
Gerät ausschalten: >3 sec gedrückt halten.
Werkseinstellungen
Das Gerät ist im Auslieferungszustand folgendermaßen
eingestellt:
Einheit: °C
Auto-off-Zeit: 10 min (Gerät schaltet sich 10 min nach
Einschalten des Geräts automatisch aus).
Auto-Hold: off
Einstellungen ändern siehe Gerät einstellen.
7.2 Messen
Erforderliche Eintauch-/ Einstechtiefe für korrekte Mess ergebnisse beachten: mindestens 22mm.
Das Gehäuse darf maximal der Betriebstemperatur von -20 bis
+60°C
ausgesetzt werden. Der Messbereich von -50 bis
+300°C gilt nur für die metallische Sondenspitze.
✓ Gerät ist eingeschaltet.
Tauch-/Einstechsonde in Messobjekt eintauchen / -stechen.
- Aktueller Messwert wir
d angezeigt. Warten, bis sich der
Messwert nicht mehr verändert.
7.3 Während der Messung
1 drücken: Hold wird angezeigt.
- Der aktuell angezeigte Messwert wird eingefroren.
2 drücken: Min wird angezeigt.
- Der minimale Messwert, der während dieser Messung
gemessen wurde, wird angezeigt.
3 drücken: Max wird angezeigt.
- Der maximale Messwert, der während dieser Messung
gemessen wurde, wird angezeigt.
4 drücken um zurück zum Messmodus zu wechseln.
Page 7

7
deenfresitptsvnl????
7. Bedienung
Min-/Max-Messwerte löschen
drücken und gedrückt halten.
- Im Display erscheint CLr, die Min-/Max-Messwerte werden
gelöscht.
Beim Ausschalten des Gerätes werden die Min-/MaxMesswerte automatisch gelöscht.
7.4 Fühler anbringen
1 Fühler an der Rändelmutter halten, an
die Fühlerbuchse ansetzen und mit
Druck und einer Rechtsdrehung in die
Buchse drehen.
2 Durch Drehen der Rändelmutter den
Fühler in der Buchse fixieren.
3 Der Fühler ist dann richtig angebracht,
wenn eine Einrastung erfolgt ist und der
Fühleranschluss ohne Zwischenraum /
Rille direkt auf dem Softcase und dem
Gehäuse aufliegt.
Page 8

8. Gerät einstellen
Im Einstellungsmenü können Einheit, Auto-off-Zeit und Auto-Hold
verändert werden.
Das Einstellungsmenü muss immer komplett durchlaufen
werden, auch wenn nur ein Parameter geändert werden soll.
✓ Gerät ist ausgeschaltet.
1 Gerät einschalten: kurz drücken.
- Displaytest erscheint.
2 während Displaytest ca. 3 sec gedrückt halten.
- Konfigurationsmodus ist geöffnet, je nach Voreinstellung wird
°C oder °F angezeigt.
3 Einheit °C oder °F wählen: drücken, mit bestätigen.
- Je nach Voreinstellung wird 10, 30, 60 oder off angezeigt.
4 Auto-off-Zeit 10, 30, 60 oder off wählen: drücken, mit
bestätigen.
- Je nach Voreinstellung wird Auto-Hold on oder off angezeigt.
5 AutoHold on oder off wählen: drücken, bestätigen.
- Die Konfiguration ist abgeschlossen. Das Gerät wechselt mit
den neuen Einstellungen in den Messmodus.
8. Gerät einstellen8
Page 9

9. Wartung und Pflege 9
9. Wartung und Pflege
9.1 Batterien wechseln
1 Schraube am Batteriefach lösen.
2 Batteriefach öffnen.
3 Batterien (3 x Typ AAA) einsetzen.
Polung beachten!
4 Batteriefach schließen.
5 Schraube anziehen.
9.2 Gerät reinigen
Für die Reinigung nur schwache handelsübliche Neutral-/
Haushaltsreiniger (z.B. Spülmittel) verwenden. Keine scharfen
Reinigungs- oder Lösungsmittel verwenden!
Schutzhülle (Softcase) kann im Geschirrspüler gereinigt werden.
Gehäuse und Sonde sind für die alkoholische Sprühdesinfektion
geeignet. Hierzu die Angaben des Desinfektionsmittelherstellers
beachten.
✓ Der im Set mitgelieferte Fühler ist angebracht.
Gehäuse und Sonde unter fließendem Wasser reinigen und mit
einem Tuch trocken reiben.
10. Fragen und Antworten
Frage Mögliche Ursachen Mögliche Lösung
leuchtet. Batterien leer. Batterien wechseln.
- - - leuchtet. Messbereich über- oder Messungen nur im angeunterschritten. gebenen Messbereich
vornehmen.
Gerät lässt sich nicht Batterien leer. Batterien wechseln.
einschalten.
Gerät schaltet sich Gerät schaltet sich je nach Gerät einschalten. selbständig aus. eingestellter Auto-off-Zeit Wenn gewünscht: Auto-
automatisch aus. off-Zeit verändern, siehe
Gerät einstellen.
Falls wir Ihre Frage nicht beantworten konnten: Wenden Sie sich
bitte an Ihren Händler oder den Testo-Kundendienst.
Kontaktdaten siehe Internetseite www.testo.com/service-contact.
deenfresitptsvnl????
Page 10

10
Page 11

11
1. General information
Please read this document through carefully and familiarise
yourself with the operation of the product before using it. Keep
this documentation to hand so that you can refer to it when
necessary.
2. Product description
3. Safety information
Avoid electrical hazards:
Do not conduct measurements on or near live parts!
Adhere to the product safety/guarantee requirements:
Operate the instrument properly and according to its intended
purpose and within the parameters specified. Do not use
force.
Do not store with solvents (e.g. acetone).
Only open the instrument if this is expressly described in the
documentation for maintenance purposes.
Ensure correct disposal:
Dispose of defective rechargeable batteries and spent battery
at the collection points provided.
Send the instrument directly to us at the end of its life cycle.
We will ensure that it is disposed of in an environmentally
friendly manner.
de
enfresitptsvnl????
General information
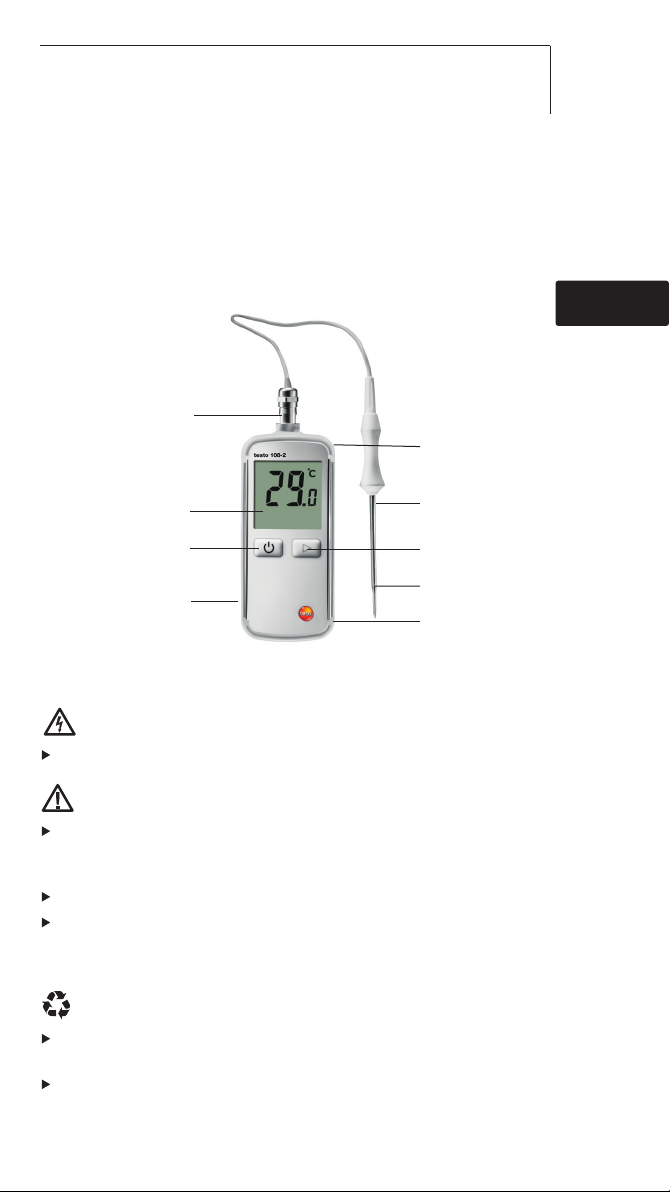
Switch On/ Switch Off
the instrument
Battery compartment
(on back of instrument)
Display
Protective cover
(Softcase)
Probe connector socket
Menu assistance in
configuration mode
Protective cover
recess (Softcase)
Immersion/
penetration probe
Minimum immersion/
penetration depth
Page 12

12
4. Intended Use
The testo 108-2 is a watertight food thermometer.
The product is designed for the following tasks/areas:
· Food sector: production, food service, spot check
measurement
· Measuring liquids, pastes and semi-solid materials
The following product components are designed for continuous
contact with foodstuffs in accordance with Regulation (EC)
1935/2004:
The immersion/penetration probe from the tip up to 1 cm before the
probe’s handgrip or the plastic housing. If provided, the information
about penetration depths under point 7.2 in the instruction manual or
the mark(s) on the immersion/penetration probes should be noted.
The product may not be used in the following areas:
· Potentially explosive areas
· For diagnostic measurements in the medical sector
5. Technical data
Feature Values
Sensor type Thermocouple Type T (included)
Measurement range -50...+300 °C/-58...+572 °F (only applies to metallic probe
points)
Measurement Parameter Temperature in °C/°F
Resolution 0.1°C/°F
Instrument accuracy ±0.5 °C (-30...+70 °C)
(Ambient temperature ±0.5 °C ±0.5% of the measurement value
+23°C ±3°C) (-50...-30 °C/+70...+300 °C)
Probe accuracy ±0.5 °C (-40...-20 °C)
±0.2 °C (-20...+70 °C)
±0.5 °C (+70...+125 °C)
±0.4% of the measurement value (+125...+300 °C)
Adjustment time t99 10 s (measured in moving liquid)
Measurement rate 2 measurements per second
Operating temperature -20...+60 °C/-4...+140 °F
Transport/storage temperature -30...+70 °C/-22...+158 °F
Power supply 3 x AAA batteries
Battery life 2500 h (typically at 23 °C )
Housing TPE/PC + 20%GF, ABS/PET, ABS + PC + 10%GF/TPE
Protection class IP67 (the probe included in the set is connected))
Instrument dimensions 144 x 60 x 24,5 mm
Weight 162 g (instrument incl. batteries, without soft case), 54 g probe)
Display LCD, one-line, with status line
Standards EN 13485
Certificates: see www.testo-international.com,
Service&Support | Download Center (registration required)
EC Directive 2004/108/EC
Functions Auto-Hold, Hold, Min, Max
Warranty 2 years, terms of warranty: see website
www.testo.com/warranty
4. Intended Use
Page 13

13
Information on standards
This product complies with the guidelines as per EN
13485 standard, performance: S, T (storage,
transportation), environment: E (transportable
thermometer)
Accuracy class: 1
Measuring range: -50...+300 °C
According to EN 13485, the measuring instrument
should be checked and calibrated regularly under the
terms of EN 13486 (recommended frequency: yearly).
Contact us for more information.
6. Initial operation
6.1 Protective casing (Softcase)
The protective casing (Softcase) supplied with the testo 108-2
protects it from impact and contamination.
In addition, the probe can be safely stowed in the recess of the
supplied protective casing (Softcase) on the side of the appliance.
6.2 Inserting batteries
1
Loosen the screw to the battery
compartment.
2 Open the battery compartment.
3 Insert batteries (3 x AAA).
Observe the polarity!
4 Close the battery compartment.
5 Tighten the screw.
de
enfresitptsvnl????
6. Initial operation
Probe
Probe cable
Protective cover recess
(Softcase)
Protective cover
(Softcase)
Page 14

14
7. Operation
7.1 On / Off.
Switch the instrument on: Press quickly.
- Display test appears. The instrument is ready for
measurement.
Switch off the instrument: Hold down for at least 3 seconds
Factory settings
The instrument is set up for the delivery as follows:
Unit: °C
Probe type: T
Auto off-Time: 10 min (instrument automatically switches off
10 mins after switching on).
Auto-Hold: off
To edit the settings see how to adjust the instrument.
7.2 Measuring
Observe the required immersion/penetration for correct
measuring result: at least 22 mm.
The housing must be exposed to a maximum operating
temperature of -20 to +60 °C. The measurement range from
-50 to +300 °C is only applicable to metallic probe points.
✓ Instrument is switched on.
Immerse/place the probe into the object being measured.
- The current measurement value is shown. Wait until the
measurement value does not change any more.
7.3 During measurement
1 Press : Hold is displayed.
- The measuring value currently displayed is frozen.
2 Press : Min is displayed.
- The minimum measuring value from this measurement is
displayed.
3 Press : Max is displayed.
- The maximum measuring value from this measurement is
displayed.
4 Press in order to switch back to the measuring mode.
7. Operation
Page 15

15
Deleting min/max measuring values
Press and hold .
- CLr appears on the display, the min/max measuring values are
deleted.
When the instrument is switched off, the min/max measuring
values are deleted automatically.
7.4 Attach probe
1 Hold probe by the knurled nut, position
it on the probe socket and twist into the
socket in a clockwise direction, applying
pressure.
2 Secure the probe in the socket by
twisting the knurled nut.
3 The probe is fitted correctly once it
snaps into place and the probe
connection is resting directly on the soft
case and the housing with no gaps /
grooves.
de
enfresitptsvnl????
7. Operation
Page 16

16
8. Setting up the instrument
In the set-up menu the unit, Auto-off -Time and Auto-Hold can be
changed.
The set-up menu must always be completely run through, also
if the only one parameter has been changed.
✓ Instrument is switched off.
1 Switching the instrument on: Press quickly.
- Display test appears.
2 hold pressed down for about 3 sec during Displaytest.
- Configuration mode is opened,
after presetting °C or °Fis
displayed.
3 Choose °C or °F unit: press and confirm with .
-
After presetting 10, 30, 60 or
off
are displayed.
4 Auto-off Time 10, 30, 60
or
off choose: press and confirm
with .
- After presetting, Auto-Hold on or off is displayed.
5 Select AutoHold on or off: press , confirm .
- The configuration is finished.
With the new settings, the
instrument changes in measurement mode.
9. Service and Maintenance
9.1 Changing the batteries
1 Loosen the screw on the battery
compartment.
2 Open the battery compartment.
3 Insert batteries (3 x AAA).
Observe the polarity!
4 Close the battery compartment.
5 Tighten the screw.
8. Setting up the instrument
Page 17

9. Service and Maintenance 17
9.2 Cleaning the instrument
Only use weak, commercially available neutral/household cleaning
agents (e.g. washing-up liquid) to clean the instrument. Do not
use aggressive cleaning agents or solvent!
Protective cover (Softcase) can be cleaned with washing up
liquid.
The housing and probe can be disinfected using an alcoholbased spray. In doing so, always follow the manufacturer’s
instructions.
✓ The probe included in the set is connected.
Clean the housing and probe under running water and rub dry
with a towel.
10. Questions and Answers
Question Possible causes Possible solution
lights on. Batteries dead. Change batteries.
- - - lights on. Measurement range exceeded Measurements can only
or fallen below. be carried out in the
range specified.
Instrument cannot be Batteries dead. Change batteries.
switched on.
Instrument switches itself off. The instrument switches itself Switch the instrument on. -
off automatically as per the If required: To change the
configured Auto-off-Time. Auto-Off-Time see how to
set up the instrument.
If we were not able to answer your question, please contact your
local dealer or Testo´s Customer Service. For contact details,
please visit www.testo.com/service-contact.
de
enfresitptsvnl????
Page 18

18
Page 19
19
1. Informations générales
Lire attentivement ce document et se familiariser avec le produit
avant tout utilisation de l’appareil. Conserver ce document à
portée de main afin de pouvoir s’y référer si nécessaire.
2. Description du produit
3. Consignes de sécurité
Eviter les chocs électriques :
Ne pas effectuer de mesure sur ou à proximité d’éléments
sous tension !
Sécurité du produit / Garantie :
Utiliser uniquement l’appareil aux fins auxquelles il a été conçu
et en respectant les paramètres indiqués. Ne jamais faire
usage de la force.
Ne pas stocker l’appareil à proximité de produits solvants
(par ex. : acétone).
N’ouvrir l’appareil que pour les travaux de maintenance et de
réparation expressément décrits dans ce document.
Recyclage et environnement :
Déposer les accumulateurs défectueux / piles usagées dans
les différents points de recyclage prévus à cet effet.
A la fin de son cycle de vie, retourner directement l’appareil à
Testo afin d’assurer son recyclage dans le respect de
l’environnement.
deenfresitptsvnl????
Informations générales
Allumer / Eteindre
l’appareil
Compartiment à piles
(face arrière)
Ecran
Profondeur d’immersion /
de pénétration minimale
Gaine de protection
(Softcase)
Douille de connexion
du capteur
Menu en mode de
configuration
Logement de la gaine
de protection (Softcase)
Sonde d’immersion /
depénétration
Page 20

20
4. Utilisation conforme
Le testo 108-2 est un thermomètre alimentaire étanche.
Ce produit est destiné aux applications / secteurs suivants :
· Agroalimentaire : production, distribution de plats cuisinés,
mesure d’échantillons.
· Mesure de liquides, pâtes et matériaux semi-solides.
Les composants suivants du produit sont adaptés aux contacts
répétés avec des produits alimentaires et répondent à la norme (CE)
1935/2004 :
Sonde d’immersion/pénétration de la pointe de mesure jusqu’à 1 cm
avant la poignée de la sonde ou au boîtier en plastique. Si celles-ci
sont indiquées, les informations relatives à la profondeur de
pénétration données au point 7.2 du mode d’emploi ou la/les
marque(s) sur la sonde d’immersion/pénétration doivent être
respectées.
Ne pas utiliser l’appareil dans les environnements suivants :
· dans les zones à risques d’explosion
· pour les diagnostics médicaux
5. Caractéristiques techniques
Propriétés Valeurs
Types de capteurs pouvant Thermocouple de type T (fourni)
Plages de mesure -50...+300 °C / -58...+572 °F (uniquement pour les pointes
de sonde métalliques)
Grandeurs de mesure Température, en °C / °F
Résolution 0,1 °C/°F
Précision de l’appareil ± 0,5 °C (-30...+70 °C)
(température ambiante : ± 0,5 °C ± 0,5 % de la valeur de mesure
+23°C ±3°C) (-50...-30 °C / +70...+300 °C)
Précision du capteur ± 0,5 °C (-40...-20 °C)
± 0,2 °C (-20...+70 °C)
± 0,5 °C (+70...+125 °C)
± 0,4 % de la valeur de mesure (+125...+300 °C)
Temps de réponse t99 10 s (dans des liquides non stagnants)
Taux de mesure 2 mesures par seconde
Température d’utilisation -20...+60 °C / -4...+140 °F
Température de transport/ -30...+70 °C / -22...+158 °F
stockage
Alimentation en tension 3 piles de type AAA
Durée de vie des piles 2500 h (usage normal à 23 °C)
Boîtier TPE/PC + 20%GF, ABS/PET, ABS + PC + 10%GF/TPE
Classe de protection IP67 (capteur fourni dans le kit connecté)
Dimensions de l’appareil 144 x 60 x 24,5 mm
Poids 162 g (appareils avec piles, sans Softcase), 54 g (capteur)
Ecran LCD, une ligne, avec ligne de statut
Normes EN 13485
Certificats : cf. www.testo-international.com,
Service&Support | Download Center (enregistrement requis)
Directive CE 2004/108/CE
Fonctions Auto-Hold, Hold, Min., Max.
Garantie 2 ans, pour les conditions de garantie : cf. page Internet
www.testo.com/warranty
4. Utilisation conforme
Page 21

21
Informations - Normes
Ce produit satisfait aux exigences de la norme EN
13485. Convenance : S, T (stockage, transport),
environnement : E (thermomètre portable)
Classe de précision : 1
Plage de mesure : -50...+300 °C
Conformément à la norme EN 13485, l’appareil de
mesure doit être vérifié et étalonné régulièrement selon
les termes de la norme EN 13486 (recommandation :
chaque année).
Nous contacter pour plus de renseignements.
6. Première utilisation
6.1 Gaine de protection (Softcase)
La gaine de protection fournie (Softcase) protège le testo 108-2
contre les chocs et la saleté.
Le capteur peut également être rangé en toute sécurité dans le
logement de la gaine de protection (Sotfcase) fournie, sur le côté
de l’appareil.
6.2 Mise en place des piles
1
Retirer la vis du compartiment à piles.
2 Ouvrir le compartiment à piles.
3 Insérer les piles (3x type AAA).
Attention à la polarité !
4 Fermer le compartiment à piles.
5 Serrer la vis.
deenfresitptsvnl????
6. Première utilisation
Capteur
Câble du capteur
Logement de la gaine
de protection (Softcase)
Gaine de protection
(Softcase)
Page 22

22
7. Utilisation
7.1 Démarrage / Mise à l’arrêt
Allumer l’appareil : appuyer sur brièvement.
- « Test de l’écran » s’affiche. L’appareil est prêt pour la mesure.
Eteindre l’appareil : maintenir enfoncé pendant
> 3 secondes.
Valeurs par défaut
A la livraison, l’appareil est réglé comme suit :
Unité : °C
Type de capteur : T
Délai Auto-Off : 10 min. (L’appareil s’éteint automatiquement
10 min. après son démarrage).
Auto-Hold: off
Pour modifier les réglages, cf. « Réglages ».
7.2 Mesures
Pour obtenir des résultats de mesure corrects, respecter la
profondeur d’immersion/de pénétration : au moins 22 mm.
Le boîtier ne peut être soumis qu’à des températures de
service de
-20 à +60 °C max. La plage de mesure de -50 à
+300 °C s’applique pour les pointes de sonde métalliques.
✓ L’appareil est allumé.
Immerger/Visser la sonde dans l’objet à mesurer.
- La valeur de mesure s’affiche. Attendre jusqu’à ce que la
valeur de mesure ne varie plus.
7.3 Pendant la mesure
1 Appuyer sur : Hold s'affiche.
- La valeur de mesure actuellement affichée est gelée.
2 Appuyer sur : Min. s'affiche
- La valeur de mesure la plus basse obtenue pendant cette
mesure s'affiche.
3 Appuyer sur : Max. s'affiche.
- La valeur de mesure la plus élevée obtenue pendant cette
mesure s'affiche.
4 Appuyer sur pour revenir au mode de mesure.
7. Utilisation
Page 23

23
Effacer les valeurs min./max.
Appuyer sur et maintenir enfoncé .
- CLr apparaît à l'écran ; les valeurs de mesure min./max. sont
effacées.
Les valeurs de mesure min./max. sont automatiquement effacées
à l'arrêt de l'appareil.
7.4 Remplacement du capteur
1 Maintenir le capteur par l'écrou moleté,
l'approcher de la prise pour capteur et
le tourner vers la droite en le pressant
dans la prise
2 Fixer le capteur dans la prise en
tournant l'écrou moleté.
3 Le capteur est correctement installé
lorsqu'il s'enclenche et que le raccord
de capteur repose directement sur le
Softcase et le boîtier, sans interstice /
rainure.
deenfresitptsvnl????
7. Utilisation
Page 24

8. Réglages24
8. Réglage de l’appareil
Le menu « Réglages » permet de modifier l’unité, le délai Auto-Off
et Auto-Hold.
Le menu « Réglages » doit toujours être parcouru dans son
intégralité, même si un seul paramètre doit être modifié.
✓ L’appareil est éteint.
1 Allumer l’appareil : appuyer sur brièvement.
- « Test de l’écran » s’affiche.
2 doit être maintenu enfoncé pendant env. 3 secondes
pendant le test de l’écran.
- Le mode de configuration est ouvert,
en fonction du réglage
par défaut,
°C
ou °Fs’affiche.
3 Sélectionner le type de capteur Type K
ou
Type T : appuyer
sur et confirmer avec.
-
En fonction du réglage par défaut,
10, 30, 60
ou
off
s’affiche.
4 Sélectionner le délai Auto-Off 10, 30, 60
ou
off : appuyer
sur et confirmer avec.
- En fonction du réglage par défaut, Auto-Hold on ou off
s'affiche.
5 Sélectionner AutoHold on ou off : appuyer sur,
confirmer.
- La configuration est terminée.
L’appareil applique les nouveaux
réglages pour le mode de mesure.
Page 25

25
9. Service et maintenance
9.1 Remplacement des piles
1 Retirer la vis du compartiment à piles.
2 Ouvrir le compartiment à piles.
3 Insérer les piles (3x type AAA).
Attention à la polarité !
4 Fermer le compartiment à piles.
5 Serrer la vis.
9.2 Nettoyage de l’appareil
Pour le nettoyage, utiliser uniquement des solutions lavantes
neutres / ménagères (par ex. du produit vaisselle) douces. Ne pas
utiliser de produits de nettoyage ou solvants corrosifs !
La gaine de protection (Softcase) peut être nettoyée au lavevaisselle.
Le boîtier et la sonde peuvent être nettoyés au moyen de
désinfectant en spray à base d’alcool. Respecter les instructions
du fabricant du désinfectant.
✓ Le capteur fourni dans le kit est connecté.
Nettoyer le boîtier et la sonde à l’eau courante et les essuyer
au moyen d’un chiffon.
10. Questions et réponses
Si nous ne pouvons pas répondre à vos questions : S’adresser à
un revendeur ou au service après-vente Testo.
Vous trouverez nos coordonnées sur Internet, à l’adresse
www.testo.com/service-contact.
deenfresitptsvnl????
9. Service et maintenance
Question Causes possibles Solution possible
s’allume. Les piles sont vides. Remplacer les piles.
- - - s’allume. Valeurs en dehors de
l’étendue de mesure.
Procéder uniquement à
des mesures dans la plage
de mesure donnée.
L’appareil ne s’allume pas. Les piles sont vides. Remplacer les piles.
L’appareil s’éteint
automatiquement.
L’appareil s’éteint
automatiquement après le
délai Auto-Off réglé.
Allumer l’appareil. Si souhaité : modifier le
délai Auto-Off, cf.
« Réglages ».
Page 26

26
Page 27
27
1. Información general
Lea detalladamente este documento y familiarícese con el
funcionamiento del producto antes de utilizarlo. Tenga este
documento siempre a mano por si necesita consultarlo.
2. Descripción del producto
3. Información de seguridad
Evitar riesgos por electricidad:
¡No hacer mediciones en piezas bajo tensión ni cerca de estas!
Seguridad del producto/mantener la garantía:
Utilizar el instrumento adecuadamente, únicamente para su
utilidad original y siguiendo las especificaciones. No fuerce el
aparato ni ninguna de sus piezas.
No almacenar junto con disolventes (p. ej. acetona).
El instrumento únicamente debe abrirse en aquellos casos
explícitamente indicados en el manual de instrucciones para
su mantenimiento y reparación.
Correcto procedimiento con los desechos:
Deposite pilas recargables defectuosas y pilas descargadas en
un contenedor adecuado.
Puede devolver el equipo a Testo cuando no desee utilizarlo
más. En tal caso nosotros garantizamos una eliminación
respetuosa con el medio ambiente.
deenfr
esitptsvnl????
Información general
Encender/apagar
el instrumento
Compartimiento de
las pilas
(parte trasera)
Pantalla
Terminal para la
conexión del sensor
Mínima profundidad de
penetración/inmersión
Funda protectora
(softcase)
Avance por los menús en
modo de configuración
Hueco en la funda
protectora (softcase)
Sonda de inmersión/
penetración
Page 28

28
4. Utilización conforme a las
especificaciones
El testo 108-2 es un termómetro de alimentación estanco al
agua. El producto ha sido concebido para las siguientes
tareas/áreas:
· Área de comestibles: Producción, salida de alimentos,
mediciones de muestreo
· Medición de líquidos, pastas y semisólidos
Los siguientes componentes del producto están diseñados para el
contacto continuo con alimentos de acuerdo a la norma (CE)
1935/2004:
La sonda de inmersión/penetración desde la punta de medición hasta
1 cm antes de la empuñadura o de la caja del instrumento. Tenga en
cuenta, en su caso, las indicaciones sobre profundidades de
penetración en el punto 7.2 del manual de instrucciones o las marcas
en la sonda de inmersión/penetración.
El producto no debe emplearse en las siguientes áreas:
· En áreas potencialmente explosivas
· Para mediciones de diagnóstico en el área médica
5. Datos técnicos
Características Valores
Tipo de sensor Termoelemento tipo T (incluido)
Rango de medición -50...+300 °C/-58...+572 °F (válido para la punta metálica
delasonda)
Parámetro de medición Temperatura en °C/°F
Resolución 0.1°C/°F
Precisión del aparato ±0.5 °C (-30...+70 °C)
(temperatura ambiente +23°C ±3°C) ±0.5 °C ±0.5 % del valor medido (-50...-30 °C/+70...+300 °C)
Precisión sensor ±0.5 °C (-40...-20 °C)
±0.2 °C (-20...+70 °C)
±0.5 °C (+70...+125 °C)
±0.4 % del valor medido (+125...+300 °C)
Tiempo de adaptación t99 10 s (en líquido en movimiento)
Intervalo de medición 2 mediciones por segundo
Temperatura de trabajo -20...+60 °C/-4...+140 °F
Temperatura de transporte/ -30...+70 °C/-22...+158 °F
almacenamiento
Alimentación de corriente 3 pilas tipo AAA
Duración de las pilas 2500 h (a 23 °C )
Carcasa TPE/PC + 20%GF, ABS/PET, ABS + PC + 10%GF/TPE
Tipo de protección IP67 (el sensor incluido en el set está colocado)
Tamaño aparato 144 x 60 x 24,5 mm
Peso 162 g (Aparato con pilas y funda), 54g (sensor)
Pantalla LCD, una línea, con línea de estado
Normas EN 13485
Certificados: véase www.testo-international.com,
Service&Support | Download Center (necesitará registrarse)
Directriz CE 2004/108/EG
Funciones Auto-Hold, Hold, Min, Max
Garantía Garantía 2 años, véanse condiciones de la garantía en la
página web www.testo.com/warranty
4. Utilización conforme a las especificaciones
Page 29

29
Información estándar
Este producto cumple con las directrices del estándar
EN 13485. Idoneidad: S (almacenamiento), T
(transporte), entorno: E (termómetro transportable)
Clase de exactitud: 1
Rango de medición: -50...+300 °C
De acuerdo con la EN 13485, los instrumentos de
medición deberían revisarse y calibrarse regularmente
según los términos de EN 13486 (Recomendación:
anualmente)
Contacte con nosotros para más información.
6. Puesta en servicio
6.1 Funda protectora
La funda protectora (softcase) proporcionada protege al
testo 108-2 frente a golpes y suciedad.
Además se puede guardar el sensor en el hueco de la funda
protectora (softcase) proporcionada en el lateral del aparato.
6.2 Colocar las pilas
1
Soltar el tornillo en el compartimiento
de las pilas.
2 Abrir el compartimiento de las pilas.
3 Colocar pilas (3 pilas tipo AAA).
Prestar atención a la polaridad.
4 Cerrar el compartimiento de las pilas.
5 Apretar el tornillo.
deenfr
esitptsvnl????
6. Puesta en servicio
Sensor
Cable del sensor
Hueco en la funda
protectora (softcase)
Funda protectora
(softcase)
Page 30
30
7. Manejo
7.1 Encender/Apagar
Encender el instrumento: pulsar brevemente.
- Aparece el test de pantalla. El instrumento está preparado
para funcionar.
Apagar el instrumento: Mantener presionada durante más
de 3 segundos.
Configuración inicial de fábrica
Los ajustes de fábrica son como sigue:
Unidad: °C
Tipo de sensor: T
Tiempo de apagado automático (Auto OFF): 10 min
(elinstrumento se apaga 10 min después del encendido).
Auto-Hold: off
Para modificar las preferencias véase Ajustar el instrumento.
7.2 Mediciones
Para un correcto resultado de la medición observar la
profundidad de las sondas de inmersión/penetración: al
menos 22 mm.
No exponga la carcasa a temperaturas inferiores a
-20 ni
superiores a +60 °C
. El rango de medición de -50 a +300 °C
sólo es aplicable a la punta metálica de la sonda .
✓ El instrumento está encendido.
Sumergir/introducir la sonda de inmersión/penetración en el
objeto a medir.
- Aparece la lectura actual. Esperar a que el valor permanezca
estable.
7.3 Durante la medición
1 Pulsar : Aparece Hold.
- Se congela el valor de medición mostrado en el momento.
2 Pulsar : Aparece Min.
- Se muestra el mínimo valor de medición registrado durante la
medición actual.
3 Pulsar : Aparece Max.
- Se muestra el máximo valor de medición registrado durante la
medición actual.
4 Pulsar para regresar al modo de medición.
7. Manejo
Page 31

31
Borrar valores de medición Min/Max
Pulse y manténgalo pulsado.
- En la pantalla aparece CLr, se borran los valores de medición
Min/Max.
Al apagar el instrumento se borran automáticamente los valores
de medición Min/Max.
7.4 Cambiar el sensor
1 1 Sujetar el sensor por la tuerca
moleteada, colocar en el
correspondiente terminal de conexión
del sensor e introducir mediante un giro
hacia la derecha.
2 2 Girar la tuerca moleteada para que el
sensor quede sujeto en su terminal de
conexión.
3 3 Si el sensor está bien colocado
encaja y el terminal de conexión queda
justo encima de la funda sin que quede
sitio libre en medio/una ranura.
8. Ajustar instrumento
En el menú de ajustes se pueden modificar la unidad utilizada, el
tiempo de apagado automático (Auto OFF) y Auto-Hold.
Para el ajuste de un parámetro en el menú de ajustes es
necesario recorrer todo el menú.
✓ El instrumento está apagado.
1 Encender el instrumento: pulsar brevemente.
- Aparece el test de pantalla.
2 mantener pulsado unos 3 segundos durante el test de
pantalla.
- El modo de configuración está abierto,
según los ajustes
aparecerán °Co °F.
deenfr
esitptsvnl????
7. Manejo
Page 32

32
3 Seleccionar la unidad °C o °F: pulsar, confirmar
mediante .
-
Según los ajustes aparecerá
10, 30, 60
o bien
off
.
4 Seleccionar tiempo para Auto OFF 10, 30, 60
o bien
off:
pulsar, confirmar mediante .
- Según los ajustes aparecerá Auto-Hold bien off.
5 Seleccionar AutoHold on o bien off: pulsar , confirmar..
- La configuración se ha completado.
El instrumento pasa al
modo de medición con las nuevas preferencias.
9. Servicio y mantenimiento
9.1 Cambiar las pilas
1 Soltar el tornillo en el compartimiento
delas pilas.
2 Abrir el compartimiento de las pilas.
3 Colocar pilas (3 pilas tipo AAA).
Prestar atención a la polaridad.
4 Cerrar el compartimiento de las pilas.
5 Apretar el tornillo.
9.2 Limpiar el instrumento
Para la limpieza, utilizar únicamente limpiadores neutrales/
domésticos comunes suaves (p. ej. lavavajillas). No utilice
limpiadores agresivos ni disolventes.
La funda protectora (softcase) se puede limpiar en el lavavajillas.
La caja y la sonda son adecuadas para la desinfección por
rociado con alcohol. Tener en cuenta las indicaciones del
fabricante del desinfectante.
✓ El sensor incluido en el set está colocado.
Limpiar la caja y la sonda con agua corriente y secarlas con un
paño.
8. Ajustar instrumento
Page 33

33
10. Preguntas y respuestas
Si no hemos respondido a su pregunta: Diríjase a su distribuidor
oficial o al servicio de atención al cliente de Testo.
Encontrará los datos de contacto en la página de internet
www.testo.com/service-contact.
deenfr
esitptsvnl????
9. Servicio y mantenimiento
Problema Posibles causas Posible solución
está iluminado. Pilas vacías. Cambiar pilas.
- - - está iluminado. Fuera del rango de medición. Las mediciones solo se
pueden llevar a cabo en el
rango especificado.
El instrumento no se enciende Pilas vacías. Cambiar pilas.
El instrumento se apaga solo. El instrumento se apaga
automáticamente alcanzado el
tiempo Auto OFF ajustado.
Encender el aparato. Si se desea: Modificar el
tiempo Auto OFF, véase
Ajustar el instrumento.
Page 34

34
Page 35

35
1. Avvertenze generali
Leggere attentamente questo documento e familiarizzare con il
funzionamento dello strumento prima di utilizzarlo. Tenere sempre
il manuale a portata di mano, in modo da poterlo consultare in
caso di bisogno.
2. Descrizione del prodotto
3. Avvertenze di sicurezza
Pericolo di folgorazioni elettriche:
Non misurare vicino o su oggetti sotto tensione!
Sicurezza del prodotto/Rispetto delle condizioni
digaranzia:
Utilizzare lo strumento solo in modo regolamentare e conforme
alle disposizioni, rispettando i parametri specificati. Non
sottoporre lo strumento a stress meccanici.
Non stoccare lo strumento insieme a solventi (es. acetone).
Aprire lo strumento solo quando è espressamente indicato nel
manuale per i lavori di manutenzione.
Smaltimento a regola d’arte:
Smaltire le batterie/batterie ricaricabili scariche/difettose negli
appositi contenitori.
Rispedire lo strumento direttamente a Testo al termine del suo
ciclo di vita. Provvederemo a smaltirlo nel pieno rispetto
dell’ambiente.
deenfr
esitptsvnl????
Avvertenze generali
Accensione/Spegnimento
Vano batterie
(retro)
Display
Profondità minima
d’immersione/
penetrazione
Custodia protettiva
(softcase)
Attacco sonda
Navigazione nel menu
in modalità
Configurazione
Sede della sonda nella
custodia protettiva
(softcase)
Sonda di immersione/
penetrazione.
Page 36

36
4. Uso regolamentare
Lo strumento testo 108-2 è un termometro impermeabile per
alimenti.
Il prodotto è stato concepito per i seguenti lavori/settori:
· Settore alimentare: produzione, fornitura di alimenti, controlli
qualità a campione
· Misura di sostanze liquide, pastose e semisolide
I seguenti componenti del prodotto sono adatti a un contatto continuo
con alimenti, in conformità con la norma (CE) 1935/2004:
la sonda di immersione/penetrazione dal puntale di misura fino a 1cm
prima dell’impugnatura o del corpo in plastica. Se presenti, osservare
le informazioni sulla profondità di immersione presenti nel manuale di
istruzioni al punto 7.2 o le apposite tacche sulla sonda di
immersione/penetrazione.
Lo strumento non può essere adoperato nei seguenti settori:
· In aree potenzialmente esplosive
· Per misure diagnostiche in ambito medico
5. Dati tecnici
Proprietà Valori
Tipo sensore Possibile il collegamento di termocoppie di tipo T
Fascia di misura -50...+300 °C/-58...+572 °F (valori validi solo per il puntale
metallico della sonda)
Valore rilevato Temperatura in °C/°F
Risoluzione 0.1 °C/°F
Precisione strumento ±0.5 °C (-30...+70 °C)
(temperatura ambiente ±0.5 °C ±0.5% del valore di misur
+23°C ±3°C) a (-50...-30 °C/+70...+300 °C)
Precisione sonda ±0.5 °C (-40...-20 °C)
±0.2 °C (-20...+70 °C)
±0.5 °C (+70...+125 °C)
±0.4% del valore di misur (+125...+300 °C)
Tempo di adattamento t99 10 s (in liquido in movimento)
Frequenza di misura 2 misure al secondo
Temperatura di lavoro -20...+60 °C/-4...+140 °F
Temperatura di trasporto/ -30...+70 °C/-22...+158 °F
stoccaggio
Alimentazione 3 batterie AAA
Autonomia batterie 2500 h (a 23 °C)
Corpo TPE/PC + 20%GF, ABS/PET, ABS + PC + 10%GF/TPE
Classe protezione IP67 (la sonda fornita nel kit in dotazione è collegata)
Dimensioni strumento 144 x 60 x 24,5 mm
Peso 162 g (strumento incl. batterie, senza softcase), 54g (sonda)
Display LCD monoriga con riga di stato
Norme EN 13485
Certificati: vedere www.testo-international.com,
Service&Support | Download Center (necessaria la
registrazione)
Direttiva CE 2004/108/CE
Funzioni Auto-Hold, Hold, Min, Max
Garanzia 2 anni, per le condizioni di garanzia vedere l’indirizzo
www.testo.com/warranty
4. Uso regolamentare
Page 37

37
Avvertenze sulle norme
Questo prodotto soddisfa le direttive ai sensi della
norma EN 13485. Idoneità: S, T (stoccaggio, trasporto)
Ambiente: E (termometro portatile)
Classe di precisione: 1
Fascia di misura: -50...+300 °C
Secondo la norma EN 13485, lo strumento di misura
dovrebbe essere controllato e calibrato periodicamente
secondo la norma EN 13486 (intervallo raccomandato:
1 volta all’anno).
Contattateci per maggiori informazioni.
6. Messa in funzione
6.1 Custodia protettiva (softcase)
La custodia protettiva in dotazione (softcase) protegge lo
strumento testo 108-2 da urti e sporco.
La sonda può inoltre essere sistemata al sicuro nella sede laterale
della custodia protettiva (softcase) fornita in dotazione.
6.2 Inserimento delle batterie
1
Svitare la vite del vano batterie.
2 Aprire il vano batterie.
3 Inserire le batterie (3 tipo AAA).
Rispettare la corretta polarità!
4 Chiudere il vano batterie.
5 Serrare a fondo la vite.
deenfr
esitptsvnl????
6. Messa in funzione
Sonda
Cavo della sonda
Sede della sonda nella
custodia protettiva
(softcase)
Custodia protettiva
(softcase)
Page 38

38
7. Uso
7.1 Accensione/Spegnimento
Per accendere lo strumento: premere brevemente.
- Sul display viene visualizzato il test di autodiagnosi. Lo
strumento è operativo.
Per spegnere lo strumento: tenere premuto > 3 secondi.
Impostazioni di fabbrica
Lo strumento lascia la fabbrica con le seguenti impostazioni:
Unità: °C
Sensore: T
Tempo di autospegnimento: 10 min (lo strumento si spegne
automaticamente 10 min dopo l’accensione).
Auto-Hold: off
Per modificare le impostazioni, vedere Impostazioni strumento.
7.2 Misura
Per garantire misure corrette, rispettare la corretta profondità di
immersione/penetrazione: almeno 22 mm.
Il corpo dello strumento può essere esposto a una
temperatura d’esercizio compresa tra max.
-20 e +60 °C. La
fascia di misura da -50 a +300 °C vale solo per il puntale
metallico della sonda.
✓ Lo strumento è acceso.
Immergere o introdurre la sonda nell’oggetto da misurare.
- Viene visualizzato il valore momentaneamente rilevato.
Attendere sino a quando il valore visualizzato rimane stabile.
7.3 Durante la misura
1 Premere : Viene visualizzata la scritta Hold.
- Il valore momentaneamente visualizzato viene “congelato”.
2 Premere : Viene visualizzata la scritta Min.
- Viene visualizzato il valore minimo che è stato rilevato durante
questa misura.
3 Premere : Viene visualizzata la scritta Max.
- Viene visualizzato il valore massimo che è stato rilevato durante
questa misura.
4 Premere per tornare al modo di analisi.
7. Uso
Page 39

39
Cancellazione dei valori di misura Min/Max
Premere e mantenere premuto .
- Sul display compare la scritta CLr, i valori di misura Min/Max
vengono cancellati.
Quando si spegne lo strumento, i valori Min/Max vengono
cancellati automaticamente.
7.4 Sostituzione della sonda
1 Tenere la sonda afferrandola per il dado
zigrinato, sistemarla nell'ingresso e
ruotare l'ingresso con una pressione e
una rotazione verso destra
2 Ruotare il dado zigrinato per fissare la
sonda nell'ingresso.
3 La sonda è correttamente fissata
quando scatta percettibilmente in sede
e il collegamento poggia senza gioco né
fessure direttamente al softcase e al
corpo
deenfr
esitptsvnl????
7. Uso
Page 40

40
8. Impostazioni strumento
Nel menu Impostazioni è possibile modificare l’unità, il tempo di
autospegnimento e Auto-Hold.
Nel menu Impostazioni è sempre necessario riconfermare tutti
e tre i valori, anche se deve essere modificato un solo
parametro.
✓ Lo strumento è spento.
1 Accendere lo strumento: premere brevemente.
- Sul display viene visualizzato il test di autodiagnosi.
2 Mentre viene visualizzato il test di autodiagnosi, premere
per circa 3 sec.
- Lo strumento passa in modalità di configurazione,
a seconda
dell’impostazione precedente viene visualizzato °Co °F
.
3 Per selezionare l’unità °C o °F: premere e confermare con .
-
A seconda dell’impostazione precedente viene visualizzato
10,
30, 60
o
off
.
4 Per selezionare il tempo di autospegnimento 10, 30, 60o off:
premere e confermare con .
- A seconda dell'impostazione precedente, vengono visualizzate
le scritte Auto-Hold on oppure off.
5 Per selezionare AutoHold on oppure off: premere [ ] e
confermare.
- La configurazione è conclusa.
Lo strumento torna in modalità
Misura con le nuove impostazioni.
8. Impostazioni strumento
Page 41

41
9. Manutenzione e cura
9.1 Sostituzione delle batterie
1 Svitare la vite del vano batterie.
2 Aprire il vano batterie.
3 Inserire le batterie (3 tipo AAA).
Rispettare la corretta polarità!
4 Chiudere il vano batterie.
5 Serrare a fondo la vite.
9.2 Pulizia dello strumento
Per la pulizia utilizzare esclusivamente detergenti domestici/neutri
delicati (p.es. detersivo per piatti). Non usare detergenti o solventi
aggressivi!
La custodia protettiva (softcase) può essere lavata in lavastoviglie.
Corpo e sonda possono essere puliti con disinfettanti spray a
base di alcool. Rispettare le istruzioni del produttore del
disinfettante.
✓ La sonda fornita nel kit in dotazione è collegata.
Pulire corpo e sonda sotto acqua corrente e asciugare con un
panno.
10. Domande più frequenti
Domanda Possibili cause Possilbile soluzione
Sul display compare . Le batterie sono scariche. Sostituire le batterie.
Sul display compare - - - . La soglia massima/minima Misurare esclusivamente
della fascia di misura è stata entro la fascia di misura
superata specificata.
Impossible accendere lo Le batterie sono scariche. Sostituire le batterie.
Lo strumento si spegne da Lo strumento si spegne Accendere lo strumento. -
solo. automaticamente dopo il Se necessario: modificare
tempo di autospegnimento il tempo di
impostato. autospegnimento, vedere
Impostazioni strumento.
Per ulteriori informazioni: contattare il rivenditore o il servizio
assistenza Testo. Per le informazioni di contatto vedere il sito
internet www.testo.com/service-contact.
deenfr
esitptsvnl????
9. Manutenzione e cura4243
Page 42

Page 43

1. Algemene aanwijzingen
Door deze handleiding goed te lezen raakt u vertrouwd met het
product, voordat u het voor de eerste keer gebruikt. Bewaar deze
handleiding binnen handbereik zodat u deze bij behoefte kunt
raadplegen.
2. Productbeschrijving
3. Veiligheidsinstructies
Elektrische gevaren vermijden:
Niet aan of in de buurt van spanningvoerende onderdelen
meten!
Productveiligheid/aansprakelijkheid:
Het meetinstrument alleen vakkundig, reglementair en met
inachtneming van de gestelde parameters gebruiken. Geen
geweld gebruiken.
Niet samen met oplosmiddelen (bijv. aceton) bewaren.
Het meetinstrument alleen openen, wanneer dit voor het
onderhoud of de verzorging uitdrukkelijk in de documentatie
beschreven is.
Vakkundig verwijderen
Defecte accu´s/lege batterijen bij de daarvoor bestemde
inzamelpunten afgeven.
Stuur het instrument aan het einde van zijn gebruikstijd
rechtstreeks naar Testo. Wij zorgen voor een milieuvriendelijke
verwijdering.
deenfr
esitnlsvnl????
Algemene aanwijzingen
Instrument
in-/uitschakelen
Batterijvakje
(achterkant)
Display
Minimale dompel-/
insteekdiepte
Voeleraansluiting
Schacht
beschermdoosje
(softcase)
Dompel-/insteeksonde
Menusturing
configuratiemodus
Beschermdoosje
(softcase)
Page 44

44
4. Doelmatig gebruik
De testo 108-2 is een waterdichte levensmiddel-thermometer.
Dit instrument is ontwikkeld voor de volgende taken /
toepassingen:
· Levensmiddelenbereik: productie, voedseluitgifte,
steekproefmetingen
· Meten van vloeibare, halfvaste en vaste stoffen
De volgende componenten van het product zijn conform de
verordening (EG) 1935/2004 voor een betrouwbaar contact met
levensmiddelen ontwikkeld:
De dompel-/insteeksonde van de meetpunt bevindt zich tot 1 cm van
de voelerhandgreep resp. de kunststofbehuizing. Indien aangegeven
moeten hierbij de aanwijzingen over insteekdiepten in de handleiding
onder punt 7.2 of de markering(en) op de dompel-/insteekvoeler
worden nageleefd.
Het instrument mag niet worden gebruikt:
· in explosiegevaarlijke gebieden
· voor diagnostische metingen in medische toepassingen
5. Technische gegevens
Eigenschap Waarde
Sensortype aansluitbaar Thermo-element type T (in levering inbegrepen)
Meetbereik -50...+300°C/-58...+572°F
(geldt enkel voor metalen punt van de sonde)
Meeteenheid Temperatuur in °C/°F
Resolutie 0.1°C/°F
Nauwkeurigheid instrument ±0.5 °C (-30...+70 °C)
(omgevingstemperatuur ±0.5 °C ±0.5 % van de meetwaarde
+23°C ±3°C) (-50...-30 °C/+70...+300 °C)
Nauwkeurigheid voeler ±0.5 °C (-40...-20 °C)
±0.2 °C (-20...+70 °C)
±0.5 °C (+70...+125 °C)
±0.4 % van de meetwaarde (+125...+300 °C)
Afstemtijd t99 10 s (in bewogen vloeistof)
Meetfrequentie 2 metingen per seconde
Arbeidstemperatuur -20...+60 °C/-4...+140 °F
Transport-/opslagtemperatuur -30...+70 °C/-22...+158 °F
Voeding 3 x batterij type AAA
Levensduur batterij 2500 h (typisch bij 23 °C )
Behuizing TPE/PC + 20%GF, ABS/PET, ABS + PC + 10%GF/TPE
Beschermingsklasse IP67 (de in de set meegeleverde voeler is aangebracht)
Afmetingen instrument 144 x 60 x 24,5 mm
Gewicht 162 g (instrument incl. batterijen, zonder softcase), 54 g (voeler)
Display LCD, één regel, met statusregel
Normen EN 13485
Certificaten: zie www.testo-international.com,
Service&Support | Download Center (registreren vereist)
EG-richtlijn 2004/108/EG
Functies Auto-Hold, Hold, Min, Max
Garantie 2 jaar, garantievoorwaarden: zie internetpagina
www.testo.com/warranty
4. Doelmatig gebruik
Page 45
45
Normverwijzing
Dit product voldoet aan de richtlijnen volgens de norm
EN 13485. Geschiktheid: S, T (opslag, transport),
omgeving: E (transporteerbare thermometer)
Nauwkeurigheidsklasse: 1
Meetbereik: -50...+300 °C
Conform EN 13485 dient er een regelmatige controle
en kalibratie van het meetinstrument volgens EN 13486
te worden uitgevoerd (aanbeveling: jaarlijks
Neem contact met ons op voor meer informatie.
6. Ingebruikname
6.1 Beschermdoosje (softcase)
Het meegeleverde beschermdoosje (softcase) beschermt de
testo 108-2 tegen stoten en vuil worden.
Daarnaast kan de voeler in de schacht van het meegeleverde
doosje (softcase) opzij van het instrument veilig worden
opgeborgen.
6.2 Batterijen
plaatsen
1
Schroef op batterijvakje losdraaien.
2 Batterijvakje openen.
3 Batterijen (3x type AAA) plaatsen.
Let op de juiste polariteit!
4 Batterijvakje sluiten.
5 Schroef vastdraaien.
deenfr
esitnlsvnl????
6. Ingebruikname
Voeler
Voelerkabel
Schacht beschermdoosje
(softcase)
Beschermdoosje
(softcase)
Page 46
46
7. Bediening
7.1 In-/uitschakelen
Instrument inschakelen: even drukken.
- Displaytest verschijnt. Instrument is klaar om te meten.
Instrument uitschakelen: > 3 sec ingedrukt houden.
Fabrieksinstellingen
Het instrument is bij levering als volgt ingesteld:
Eenheid: °C
Voelertype: T
Auto-Off-tijd: 10 min (instrument schakelt 10 min na
inschakelen van het instrument automatisch uit).
Auto-Hold: off
Instellingen wijzigen zie instrument instellen.
7.2 Meten
Neem de noodzakelijke indompel-/insteekdiepte voor correcte
meetresultaten in acht: minstens 22 mm.
De behuizing mag maximaal aan bedrijfstemperaturen van
-20
tot +60 °C
worden blootgesteld. Het meetbereik van -50 tot
+300 °C geldt alleen voor de metalen punt van de sonde.
✓ Instrument is ingeschakeld.
Dompel-/insteeksonde in meetobject dompelen/steken.
- Actuele meetwaarde wordt weergegeven. Wachten totdat de
meetwaarde niet meer verandert.
7.3 Tijdens de meting
1 indrukken:Hold wordt getoond.
- De momenteel weergegeven meetwaarde wordt bevroren.
2 indrukken: Min wordt getoond.
- De minimale meetwaarde die tijdens deze meting werd
gemeten, wordt getoond.
3 indrukken: Max wordt getoond.
- De maximale meetwaarde die tijdens deze meting werd
gemeten, wordt getoond.
4 indrukken om terug te gaan naar de meetmodus.
7. Bediening
Page 47

47
Min-/Max-meetwaarden verwijderen
indrukken en ingedrukt houden..
- Op het display verschijnt CLr, de Min-/Max-meetwaarden
worden verwijderd.
Bij het uitschakelen van het instrument worden de Min-/Max-
meetwaarden automatisch verwijderd.
7.4 Voeler wisselen
1 Voeler aan de kartelmoer vasthouden,
tegen de voelerbus aan drukken en met
druk en een rechtsdraaiing in de bus
draaien.
2 Door de kartelmoer te draaien de voeler
fixeren in de bus.
3 De voeler is dan juist aangebracht, als
hij is vastgeklikt en de voeleraansluiting
zonder tussenruimte/spleet direct op de
softcase en de behuizing rust.
deenfr
esitnlsvnl????
8. Instrument instellen
Page 48

48
8. Instrument instellen
In het instellingenmenu kunnen eenheid, Auto-Off-tijd en AutoHold worden aangepast.
Het instellingenmenu moet altijd volledig doorlopen worden,
ook als u maar één parameter wilt veranderen.
✓ Instrument is uitgeschakeld.
1 Instrument inschakelen: even drukken.
- Displaytest verschijnt.
2 Tijdens displaytest ca. 3 sec ingedrukt houden.
- Configuratiemodus is geopend,
al naargelang de instelling
°C
of °Fweergegeven.
3 Eenheid °C of °F kiezen: drukken, met bevestigen.
- Al naargelang de instelling wordt
10, 30, 60
of
off
weergegeven.
4 Auto-Off-tijd 10, 30, 60
of
off kiezen: drukken, met
bevestigen.
-
Al naargelang de instelling wordt Auto-Hold on of off
weergegeven.
5 AutoHold on of off kiezen: indrukken, bevestigen.
- De configuratie is afgesloten.
Het instrument schakelt met de
nieuwe instellingen in de meetmodus.
9. Onderhoud en verzorging
Page 49

49
9. Onderhoud en verzorging
9.1 Batterijen vervangen
1 Schroef op batterijvakje losdraaien.
2 Batterijvakje openen.
3 Batterijen (3x type AAA) plaatsen.
Let op de juiste polariteit!
4 Batterijvakje sluiten.
5 Schroef vastdraaien.
9.2 Instrument reinigen
Gebruik voor de reiniging uitsluitend milde, gangbare
huishoudelijke reinigingsmiddelen (bijv. afwasmiddel). Gebruik
geen agressieve reinigings- of oplosmiddelen!
Beschermdoosje (softcase) kan in de vaatwasser worden
gereinigd.
Behuizing en sonde zijn geschikt voor sproeidesinfectie met
alcohol. Neem hierbij de gegevens van de
desinfectiemiddelfabrikant in acht.
✓ De in de set meegeleverde voeler is ingestoken.
Behuizing en sonde onder stromend water reinigen en met een
doek afdrogen.
10. Vragen en antwoorden
Indien wij uw vraag niet konden beantwoorden: Gelieve u te
wenden tot uw dealer of de Testo-klantendienst.
Contactgegevens zie internetsite www.testo.com/service-contact.
Hello Simona,
I hope you are the right Simona, I choosed the fifty fifty chance.
deenfr
esitnlsvnl????
Vraag Mogelijke oorzaken Mogelijke oplossing
brandt. Batterijen leeg. Batterijen vervangen.
- - - brandt. Meetbereik over- of
onderschreden.
Metingen alleen binnen het
aangegeven meetbereik
uitvoeren.
Instrument kan niet worden
ingeschakeld.
Batterijen leeg. Batterijen vervangen.
Instrument schakelt vanzelf
uit.
Instrument schakelt al
naargelang de ingestelde
Auto-Off-tijd automatisch uit.
Instrument inschakelen. Indien gewenst: Auto-Offtijd veranderen, zie
instrument instellen.
Page 50

50
Walter Heinemann is already in holiday and is back hat January 1st .
Hello Simona,
I hope you are the right Simona, I choosed the fifty fifty chance.
Walter Heinemann is already in holiday and is back hat January 1st .
Page 51

51
deenfresitptrunl????
Общие сведения
1. Общие сведения
Перед использованием внимательно прочтите настоящий документ и
ознакомьтесь с правилами работы с прибором. Храните настоящий
документ в легкодоступном месте для своевременного получения
необходимой информации.
2. Описание прибора
3. Инструкция по безопасности
Во избежание поражения электрическим током:
Не проводите измерений вблизи или на деталях под напряжением!
Придерживайтесь условий сохранности прибора/гарантийных
требований прибора:
Работайте с прибором аккуратно и в соответствии с его назначением, а
также, в рамках указанных в технических данных прибора параметров.
Не применяйте силу при работе с прибором.
Не храните в непосредственной близости от растворителей (например,
ацетона).
Не вскрывайте прибор, если в документации на этот счёт нет особого
указания для целей технического обслуживания.
Соблюдайте правила утилизации:
Утилизируйте неисправные и отработавшие батареи в специальных
приёмных пунктах.
По окончании срока службы прибора отправьте прибор нам. Мы
обеспечим утилизацию прибора с использованием экологичных
методов.
Включение/выключение
прибора
Отсек для батареек (на
задней панели прибора)
Дисплей
Защитный чехол (Softcase)
Разъём подключения зонда
Вспомогательная кнопка в
режиме конфигурации
Ниша защитного чехла
(Softcase)
Погружной/проникающий
зонд
Минимальная глубина
погружения/проникновения
Page 52

52
4. Область применения
Прибор testo 108 это герметичный термометр для пищевых продуктов.
Прибор разработан для решения следующих задач/применения в
следующих областях:
Продовольственный сектор: производство, поставка продуктов питания,
точечные контрольные измерения
Измеряемые жидкости, пасты и полутвёрдые материалы
Согласно Норме (ЕЭС) 1935/2004 следующие компоненты прибора разработаны
с учётом постоянного контакта с продуктами питания: Расстояние от наконечника
погружного/проникающего зонда до рукоятки или пластикового корпуса должно
составлять не менее 1 см. Если это предусмотрено, то в Пункте 7.2 настоящего
Руководства пользователя должны быть указаны сведения или отметки о глубине
погружения погружного/проникающего зонда.
Прибор непригоден для использования в следующих областях:
Потенциальновзрывоопасные области
Диагностические измерения в медицине
4. Область применения
Характеристика Значения
Тип сенсора Термопара Тип T (включена в комплект)
Диапазон измерения
50...+300°C/58...+572°F (только для металлических
наконечников зондов)
Единица измерения Температура в °C/°F
Разрешение 0,1°C/°F
Погрешность прибора (при
окружающей температуре
+23°C ±3°C)
±0,5°C (30...+70°C)
±0,5°C ±0,5% от измеренного значения
(50...30°C/+70...+300°C)
Точность зонда
±0,5°C (40...20°C)
±0.2°C (20...+70°C)
±0,5°C (+70...+125°C)
±0,4% от измеренного значения (+125...+300°C)
Время температурного
выравнивания t99
10 сек. (значение измерения в движущейся жидкости)
Частота измерений 2 измерения в секунду
Рабочая температура 20...+60°C/4...+140°F
Температура
транспортировки/хранения
30...+70°C/22...+158°F
Питание 3 батареи типа AAA
Ресурс батарей 2500 ч (работа при 23°C)
Корпус ТЭП/ПК+20%GF, АБС/ПЭТ, АБС+ПК+
Класс защиты IP67 (при условии, чтовходящий в комплект зонд подключён)
Габаритные размеры прибора 144 x 60 x 24,5 мм
Масса 162 г (прибор + батареи, без чехла softcase), 33 г (зонд)
Дисплей Ж/к, однострочный + строка состояния
Стандарты
EN 13485
Сертификаты: см. www.testo.ru, Сервис и поддержка |
Download Center (требуется регистрация)
Директива ЕЭС 2004/108/EC
Гарантия 2 года, условия гарантии: см. www.testo.ru/warranty
5. Технические данные
Page 53

53
Сведения о стандартах
Данный прибор соответствует положениям стандарта
EN13485, рабочие характеристики: "S" и "T" (хранение и
транспортировка), рабочие условия: "E" (переносной
термометр)
Класс точности: 1
Диапазон измерений: 50...+300°C
Согласно стандарту EN13485 измерительный прибор
подлежит регулярной поверке и калибровке в соответствии
с условиями стандарта EN13486 (рекомендованная
периодичность: ежегодно). Для получения более
подробной информации обращайтесь к нам.
6. Начало работы
6.1 Защитный чехол (Softcase)
Защитный чехол (Softcase), поставляемый с testo 1082, служит для защиты
от механических воздействий и загрязнений.
Так же зонд можно поместить для защиты в нишу прилагаемого защитного
чехла (Softcase), которая находится на боковой стороне прибора.
6.2 Установка батарей
1 Ослабьте винт на батарейном отсеке.
2 Откройте батарейный отсек.
3 Установите батареи (3 x AAA).
Соблюдайте полярность установки!
4 Закройте батарейный отсек.
5 Затяните винт.
defresitptrunl????
6. Начало работы
Зонд
Кабель зонда
Ниша защитного чехла
(Softcase)
Защитный чехол
(Softcase)
Page 54

54
7. Работа прибора
7.1 Включение/Выключение.
Включите прибор: Кратковременно нажмите .
Будет выполнена проверка дисплея. Прибор готов к измерениям.
Выключите прибор: Нажмите и удерживайте 3 сек. кнопку
Заводские настройки
В состоянии поставки прибор имеет следующие настройки:
Единица измерения: °C
Время автоматического отключения: 10 мин. (прибор отключается
автоматически через 10 мин. после включения).
Auto Hold: off
Инструкции по правке настроек приведены в разделе Настройка прибора.
7.2 Измерения
Для получения правильных результатов измерений соблюдайте глубину
погружения/проникновения: минимум 22 мм.
Максимальная рабочая температура окружающей среды не должна
выходить за диапазон 20 +60 °C. Значение диапазона измерений от
50 до +300°C указано только для металлических наконечников зондов.
✓ Включите прибор.
Погрузите/вставьте зонд в измеряемый объект.
Будет показано текущее значение измерения. Дождитесь стабилизации
значения измерения.
7.3 Во время измерения
1 Нажмите : Hold отображается на дисплее
Текущее измеренное значение будет зафиксированно
2 Нажмите : Min. отображается на дисплее.
Отображается минимальное значение в текущем измерении
3 Нажмите : Max отображается на дисплее.
Отображается максимальное значение в текущем измерении
4 Нажмите для возврата в режим измерений.
Удаление мин./макс. измеренных значений
Нажмите и удерживайте .
На дисплее появится надпись Clr. Мин./макс измеренные значения
7. Работа прибора
Page 55

55
При отключении прибора мин./макс измеренные значения удаляются.
7.4 Замена зонда
1 Возьмите зонд за резьбовое соединение и подсоединете его к разъему
для зонда, закручивая гайку по часовой стрелке и применяя небольшое
усилие.
2 Закрепите зонд, закручивая гайку по часовой
стрелке и применяя небольшое усилие.
3 Зонд установлен правильно, если между
разъемом зонда и корпусом (Top Safe) нет
зазора.
defresitptrunl????
8. Настройка прибора
Page 56

56 9. Сервисное и техническое обслуживание
8. Настройка прибора
В меню настроек прибора можно изменить настройки времени
автоматического отключения и режима фиксации
измеренных значений AutoHold.
Потребуется проверка всех значений настроек
параметров меню, даже если меняется только
одно значение.
Выключите прибор.
1 Включение прибора: Кратковременно нажмите .
Будет выполнена проверка дисплея.
2 в ходе проверки дисплея, нажмите и удерживайте прибл. в течении 3
сек.
После отображения выбранной единицы измерения °C или °F будет
выполнен вход в режим конфигураций.
3 Выберите единицу измерений °C или °F: нажмите и подтвердите
выбор нажатием .
По завершении настройки будет показано 10, 30, 60 или off.
4 Выбор времени автоматического выключения 10, 30, 60 или off:
нажмите и подтвердите выбор нажатием .
Конфигурация завершена. После вступления в силу новых настроек
прибор перейдёт в режим измерений.
5 Выбор автоматической фиксации измеренного значения AutoHold on
или off: нажмите , подтвердите .
Вопрос
Возможные
причины
Возможное решение
Загорается
Отработавшие батареи. Замените батареи.
Загорается Измеряемое значение выше
верхнего или ниже нижнего
предельного значения
диапазона измерений.
Измерения можно
проводить только в
установленном диапазоне.
Прибор не включается. Отработавшие батареи. Замените батареи.
Прибор произвольно
выключается.
Прибор выключается
автоматически в
установленное время
автоматического выключения
прибора.
Включите прибор. При
необходимости: для
настройки автоматического
отключения прибора,
обратитесь к разделу
“Настройка прибора”.
10. Вопросы и ответы
Page 57

57
9. Сервисное и техническое обслуживание
9.1 Замена батарей
1 Ослабьте винт на батарейном отсеке.
2 Откройте батарейный отсек.
3 Установите батареи (3 x AAA).
Соблюдайте полярность установки!
4 Закройте батарейный отсек.
5 Затяните винт.
9.2 Чистка прибора
Для чистки прибора используйте только имеющиеся в свободной продаже
нейтральные/бытовые чистящие средства (например, ополаскиватели). Не
используйте высокоэффективные чистящие средства или растворители! Для
чистки защитного чехла (Softcase) можно использовать моечную жидкость.
Для дезинфекции корпуса и прибора можно использовать спреи на основе
спирта. При этом необходимо следовать указаниям производителя.
Ополосните корпус и прибор под проточной водой и протрите сухим
полотенцем.
Если вы не получили ответы на возникающие вопросы обратитесь в
ближайшее представительство или в Сервисную службу Testo. Контактная
информация приведена на сайте www.testo.ru/контакты.
defresitptrunl????
Page 58

Page 59

Page 60

testo AG
Postfach 11 40, 79849 Lenzkirch
Testo-Straße 1, 79853 Lenzkirch
Telefon: (0 76 53) 6 81 - 0
Fax: (0 76 53) 6 81 - 1 00
E-Mail: info@testo.de
Internet: http://www.testo.com
www.testo.com
0973 1082 de en fr es it nl ru 01
 Loading...