


EJ09
Sewing Machine
User Manual
Tesco Sewing Machine IB Final.indd 1 |
|
|
12/01/2009 16:05:39 |
|
|
||
|
|
|
|
IMPORTANT SAFETY GUIDE
Please follow all the precautions listed below for safety and to reduce the risk of fire, injury or electrical shock.
Read all the instructions before operating the appliance and keep them for future reference. If you pass the product on to a third party, include these instructions.
Always unplug the sewing machine from the mains supply when removing covers, lubricating, or when making any user or servicing adjustments mentioned in the instruction manual.
Do not unplug the unit by pulling on the cord. To unplug, grasp the plug, not the cord. Ensure there is adequate room to operate the unit.
Never operate this appliance if it has a damaged cord or plug, if it is not working properly, if it has been dropped or damaged, or dropped into water. Return the appliance to a competent service centre for examination, repair, electrical or mechanical adjustment.
This appliance is not intended for use by persons (including children) with reduced physical, sensory or mental capabilities, or lack of experience and knowledge, unless they have been given supervision or instruction concerning use of this appliance by a person responsible for their safety.
Children should be supervised to ensure that they do not play with the appliance Do not use outdoors or in damp or wet conditions.
Before operating, ensure that the surface on which the unit is placed is stable.
Never operate the appliance with any air openings blocked. Keep all ventilation openings of the sewing machine and foot controller free from accumulations of lint, dust, and loose cloth.
Do not insert any object into ventilation slots.
Keep fingers away from all moving parts. Special care is required around the sewing machine needle.
Always use the proper needle plate. The wrong plate can cause the needle to break. Do not use broken, deformed or blunt needles.
Do not pull or push fabric while stitching. It may deflect the needle causing it to break.
Switch the sewing machine off when making any adjustments in the needle area, such as threading the needle, changing needles, threading bobbins, changing the presser foot and the like.
Do not operate where aerosol spray products are being used or where oxygen is being administered.
This appliance is only for household use. Industrial or professional use will invalidate the warranty.
Do NOT use this appliance for any purpose not covered by the instructions.
THE APPLIANCE MUST NOT BE LEFT UNATTENDED WHILE IT IS CONNECTED TO THE SUPPLY MAINS.
ELECTRICAL INFORMATION
Before using this appliance ensure that the voltage of your electricity supply is the same as that indicated on the appliance.
The means of disconnecting this appliance from the mains supply is the mains plug. This should be unobstructed and readily operable at all times.
May we suggest that before you start to use your sewing machine, you discover its many features and advantages by going through this instruction book, step by step, while seated at your sewing machine.
Page 2
Tesco Sewing Machine IB Final.indd 2 |
|
|
12/01/2009 16:05:39 |
|
|
||
|
|
|
|

CONTENTS
Safety Guide |
Page 2 |
Details of the machineFront View |
Page 4 |
Details of the machineRear View |
Page 5 |
Accessories |
Page 6 |
Fitting the snap-in sewing table |
Page 7 |
Connecting power |
Page 8 |
Attaching the needle |
Page 9 |
The presser foot |
Page 10 |
Winding the bobbin |
Page 11 |
Inserting the bobbin |
Page 12 |
Checking the bobbin tension |
Page 12 |
Threading the upper thread |
Page 13 |
Bringing up the lower thread |
Page 14 |
Basic sewing |
Page 15 |
Reverse sewing |
Page 16 |
Removing the work |
Page 16 |
More about Straight Stitching |
Page 17 |
Zig-Zag stitching |
Page 18 |
Adjusting the upper thread tension |
Page 19 |
Tesco Sewing Machine IB Final.indd 3
More about the pressure foot |
Page 20 |
Matching the needle, fabric and thread |
Page 21 |
Sewing on buttons |
Page 22 |
Sewing buttonholes |
Page 23 |
Attaching zippers and piping |
Page 24 |
3-step zig-zag sewing |
Page 25 |
Stitch selection |
Page 26 |
Smocking stitch |
Page 27 |
Decorative and practical stitches |
Page 28 |
Patching |
Page 29 |
Appliqué |
Page 30 |
Monogramming and embroidering -1 |
Page 31 |
Monogramming and embroidering -2 |
Page 32 |
Maintenance -1 (Replacing the Light Bulb) |
Page 33 |
Maintenance -2 (Cleaning and Lubrication) |
Page 34 |
Troubleshooting |
Page 35 |
After Use |
Page 36 |
Care |
Page 36 |
Warranty |
Page 36 |
Page 3
12/01/2009 16:05:39
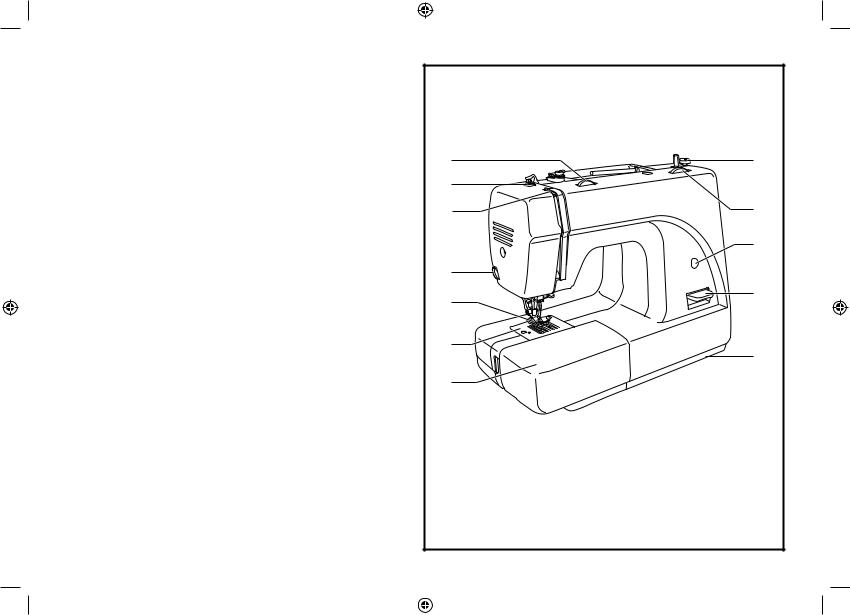
DETAILS OF THE MACHINE – FRONT VIEW
1.Thread tension dial
2.Presser foot pressure
3.Thread take-up lever
4.Thread cutting
5.Presser foot
6.Needle plate
7.Sewing table/ Accessories box
8.Bobbin stopper
9.Stitch length dial
10.Stitch display
11.Reverse sewing lever
12.Base
1 |
8 |
|
2 |
|
|
3 |
9 |
|
|
10 |
|
4 |
11 |
|
5 |
||
|
||
6 |
12 |
|
|
||
7 |
|
Page 4
Tesco Sewing Machine IB Final.indd 4 |
|
|
12/01/2009 16:05:39 |
|
|
||
|
|
|
|
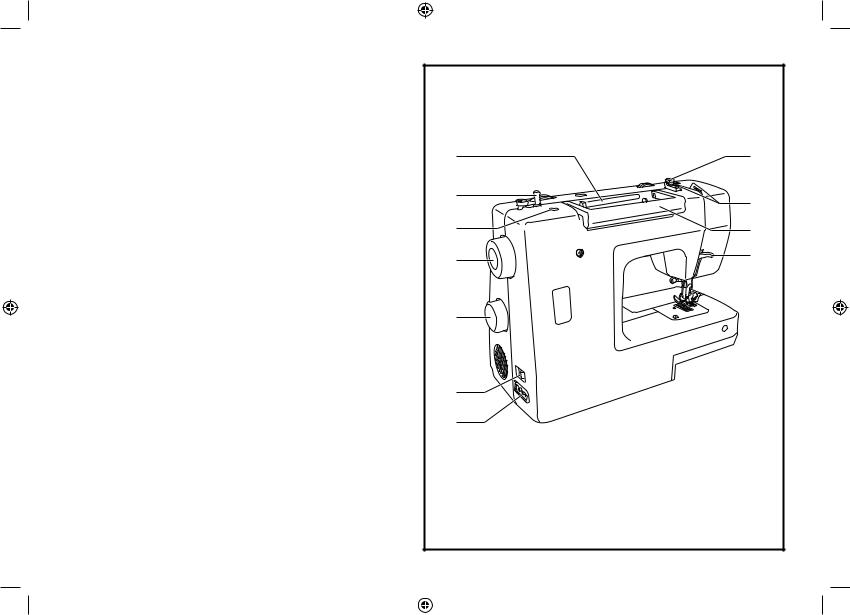
DETAILS OF THE MACHINE – REAR VIEW
13.Spool pin
14.Bobbin winder
15.Hole for second spool pin
16.Hand wheel
17.Patten selector dial
18.Power switch
19.Main plug socket
20.Bobbin thread guide
21.Upper thread guide
22.Handle
23.Presser foot lever
13 |
20 |
14 |
21 |
|
|
15 |
22 |
16 |
23 |
|
|
17 |
|
18 |
|
19 |
|
Page 5
Tesco Sewing Machine IB Final.indd 5 |
|
|
12/01/2009 16:05:39 |
|
|
||
|
|
|
|
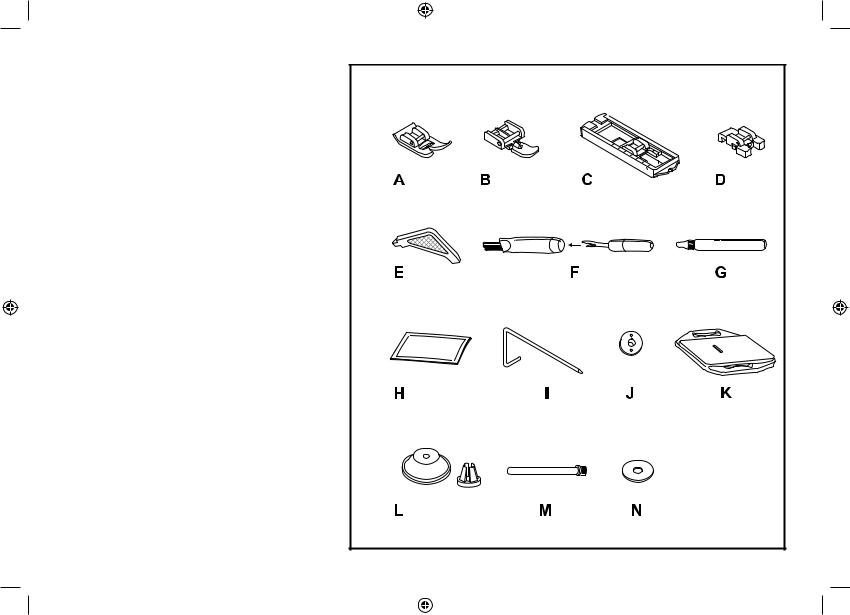
SUPPLIED ACCESSORIES
A.Standard foot
B.Zipper foot
C. Buttonhole foot
D.Button sewing foot
E. L-screwdriver
F.Seam ripper/ brush
G.Lubricating Oil bottle
H. Pack of 3 needles
I. Seam guide
J. 3 Bobbins
K.Darning plate
L.Spool holder
M.Second spool pin
N.Spool pin felt
Page 6
Tesco Sewing Machine IB Final.indd 6 |
|
|
12/01/2009 16:05:39 |
|
|
||
|
|
|
|
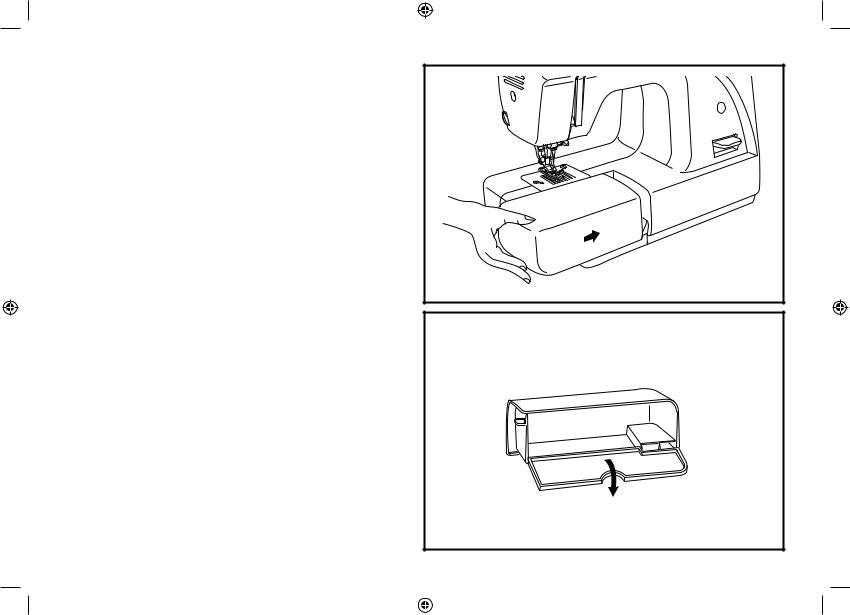
FITTING THE SNAP-IN SEWING TABLE
Hold the the snap-in sewing table horizontal, and push it in the direction of the arrow.
The inside of the snap-in sewing table can be utilized as an accessory box.
Page 7
Tesco Sewing Machine IB Final.indd 7 |
|
|
12/01/2009 16:05:39 |
|
|
||
|
|
|
|
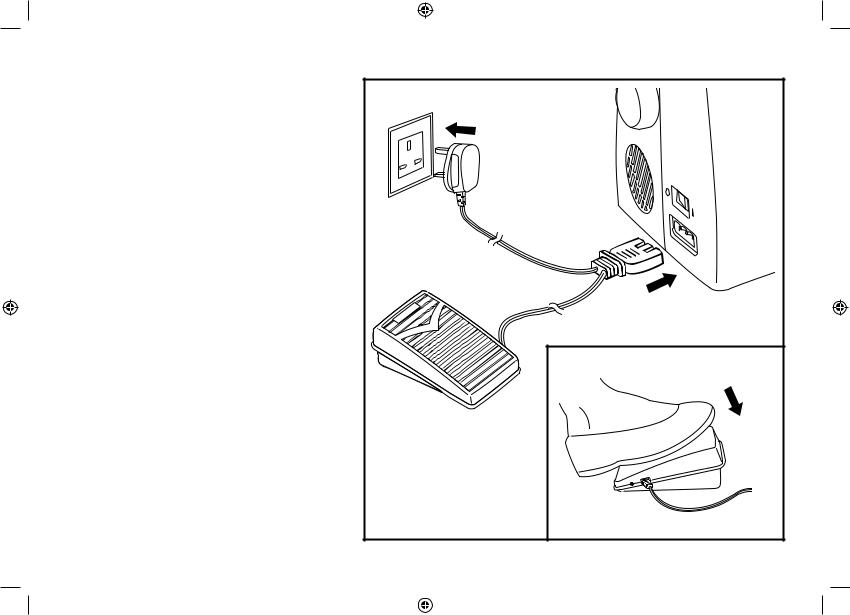
CONNECTING POWER
A:Switch the machine’s Power Switch OFF – “0” position
B:Plug in the Machine Power connector firmly.
C:Place the Foot Controller in a convenient unobstructed place.
D:Plug in the Mains Plug to the mains supply and switch on.
E:Adjust the position of the foot controller (see Fig. 2 below) Now remove your foot from the control.
F:Switch the machine’s Power Switch ON – “I” position
Your sewing machine is now ready for use.
1 |
|
|
D |
|
A |
C |
|
F |
|
|
|
C |
|
B |
|
|
|
|
2 |
E |
|
|
Page 8
Tesco Sewing Machine IB Final.indd 8 |
|
|
12/01/2009 16:05:39 |
|
|
||
|
|
|
|
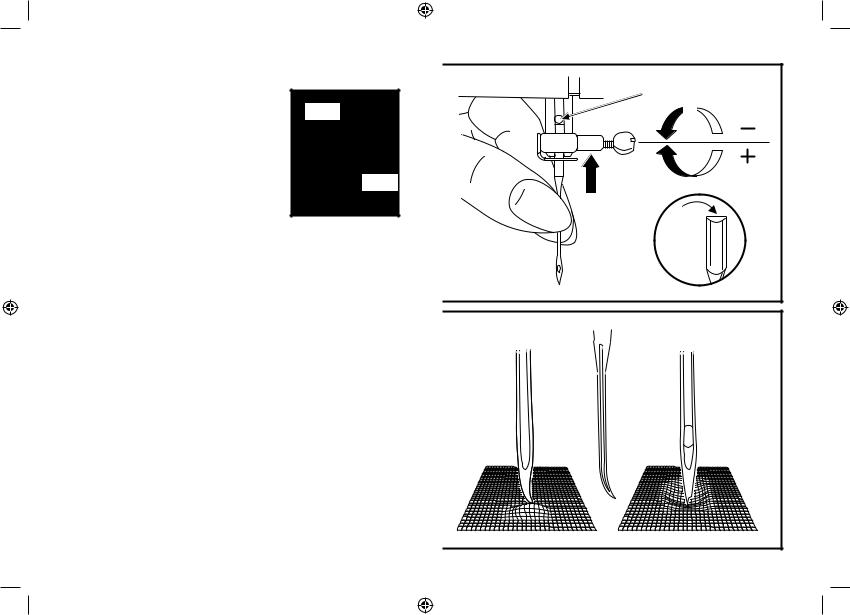
ATTACHING THE NEEDLE
|
LOWER |
The Presser Foot Assembly is raised and lowered |
23 |
with the Preser Foot Lever (No.23 on P. 5). This also |
|
raises and lowers the needle. |
RAISE |
|
Insert the needle following the illustrated instructions (Fig. 1) Loosen the needle clamp screw (A).
Insert the needle with the flat side towards the back (B) and the eye facing the front (C).
Push the needle as far as it will go (D). Retighten the screw.
Change the needle regularly, especially if it is showing signs of wear and causing problems.
Needles must be in perfect condition. ( Fig. 2) Problems can occur with:
A.Bent needles
B.Blunt needles
C.Damaged points
Attention: ALWAYS swith the power off when attaching needles.
CAUTION: Always exercise care when attaching needles. Store needles safely away from children and pets and dispose of them with great care with the points protected.
|
|
D |
|
A |
B |
|
|
|
1 |
C |
|
|
|
|
B |
A |
C |
2
Page 9
Tesco Sewing Machine IB Final.indd 9 |
12/01/2009 16:05:39 |
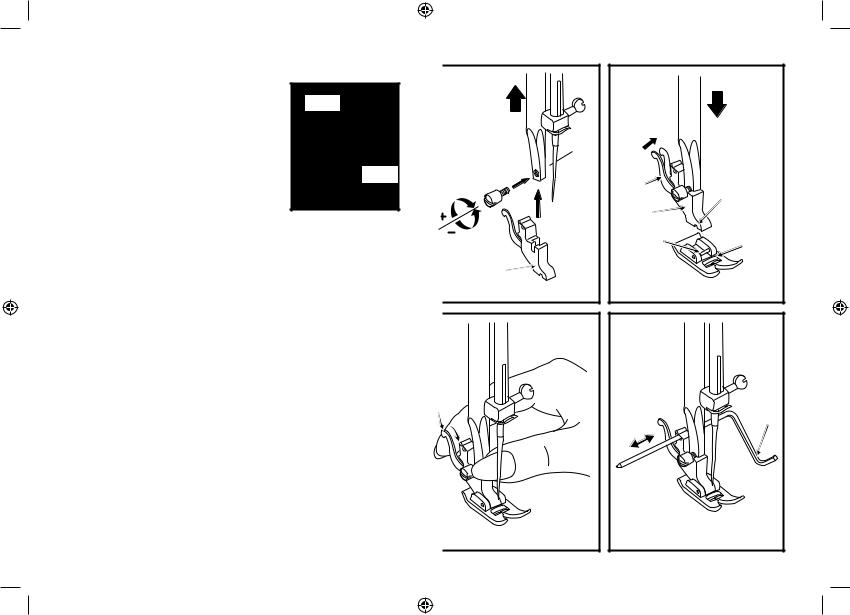
THE PRESSER FOOT
|
LOWER |
The Presser Foot Assembly is raised and lowered |
23 |
with the Preser Foot Lever (No.23 on P.XX) |
 RAISE
RAISE
First, switch the power off:
To attach the Presser Foot HolderRefer to figure 1:
A:Raise the presser foot clamp.
B:Attach the presser foot holder as illustrated.
You can use the provided screw driver to loosen and tighten the screw.
To attach the Pressure FootRefer to figure 2:
Place the All Purpose Foot (F) on the needle plate
Gradually lower the presser foot holder (B) until the cut-out (C) is directly above the pin (D) on the plate.
Raise the lever (E). Lower the presser foot holder fully onto the presser foot and the presser foot will lock automatically in place. Release the lever.
To remove the Pressure FootRefer to figure 3:
Raise the presser foot. Raise the lever (e) and the foot disengages.
To Attach the Seam GuideRefer to figure 4:
The seam guide is a useful accessory to help you gauge the position of seams etc. but its use is not essential.
Attach the seam guide (g) in the slot as illustrated. Adjust according to need for hems, pleats, etc.
Tesco Sewing Machine IB Final.indd 10
|
A |
|
|
A |
|
|
|
|
|
|
|
|
|
E |
|
C |
|
|
|
B |
|
|
|
|
|
|
|
|
|
|
|
|
D |
F |
|
|
|
|
|
|
|
1 |
B |
|
|
|
|
2 |
|
|
STANDARD FOOT |
|
|
E |
|
|
|
G |
|
|
|
|
|
|
|
3 |
4 |
|
|
|
|
Page 10 |
|
|
|
|
|
|
|
|
|
12/01/2009 |
16:05:39 |

WINDING THE BOBBIN
Your sewing machine works by stiching two threads. The main thread is contained on the spool which is at the top of the machine. A second thread is contained in a compartment under the machine. This thread is wound onto a “bobbin” from the main spool.
Place the main spool as shown in the top illustration.
For large spools of thread place the spool holder with the large side next to the spool (Fig 1). For small spools of thread place the spool holder with the small side next to the spool (Fig 2).
To wind the bobbin:
Wind thread clockwise around bobbin winder tension disc (Fig. 3). Thread the bobbin as illustrated and place on spindle (Fig. 4).
Push the bobbin to the right (Fig. 5). This is the “bobbin winding” position. Hold the thread end (Fig. 6).
Switch the power on:
Step on the foot control pedal (Fig. 7). Gradually apply pressure to increase speed. Allow the bobbin to wind sufficient thread. Remove your foot from the pedal. Now cut the threads (8).
Press the bobbin to left (9) and remove. Moving the bobbin to the left places the machine in the “sewing” position.
Note:
When the bobbin winder spindle is in “bobbin winding” position, the machine will not sew.
To start sewing, push the bobbin winder spindle to the left (sewing position).
1 |
2 |
3 |
4 |
5 |
6 |
|
7 |
|
8 |
|
9 |
Page 11
Tesco Sewing Machine IB Final.indd 11 |
|
|
12/01/2009 16:05:39 |
|
|
||
|
|
|
|
 Loading...