

Terumo Pinnacle Precision Access System Series, Pinnacle TIF Tip Series Instructions For Use Manual

Pinnacle®
PM-01979
Pinnacle® Precision
AccessSystem®
Pinnacle® TIF Tip™
Introducer Sheath / Gaine d’introduction
Vaina Introductora / Bainha Introdutora
Read These Instructions Before Use / Lire le mode d’emploi
avantutilisation/ Leer estas instrucciones antes del uso /
Leiaestasinstruçõesantes de utilizar
Instructions for Use . . . . . . . . . . . . . . . . . . . . . . . . . 3
Mode d’emploi . . . . . . . . . . . . . . . . . . . . . . . . . . . . . . 7
Instrucciones de uso . . . . . . . . . . . . . . . . . . . . . . . 11
Instruções para Utilização. . . . . . . . . . . . . . . . . . . 15
RFIN0083 © Terumo Medical Corporation 2017-09-20

TERUMO and Pinnacle are registered trademarks of TERUMO CORPORATION.
PM-01979
PRECISION ACCESS SYSTEM is a registered trademark of TERUMO MEDICAL
CORPORATION.
TERUMO et Pinnacle sont des marques déposées de TERUMO CORPORATION.
PRECISION ACCESS SYSTEM est une marque déposée de TERUMO MEDICAL
CORPORATION.
TERUMO y Pinnacle son marcas registradas de TERUMO CORPORATION.
PRECISION ACCESS SYSTEM es una marca registrada de TERUMO MEDICAL
COPORATION.
TERUMO e Pinnacle são marcas registadas da TERUMO CORPORATION. PRECISION
ACCESS SYSTEM é uma marca registada da TERUMO MEDICAL CORPORATION.
MADE IN USA
TERUMO MEDICAL CORPORATION
EC REP
INTERLEUVENLAAN 40, 3001 LEUVEN,
950 ELKTON BLVD.,
ELKTON MD, 21921 USA
TERUMO EUROPE N.V.
BELGIUM
TERUMO CORPORATION
TOKYO, SHIBUYA-KU,
HATAGAYA, 2-44-1, JAPAN
輸入販売元:テルモ株式会社
東京都渋谷区幡ヶ谷2丁目44番1号
2
Instructions for Use
PM-01979
DESCRIPTION AND INDICATIONS FOR USE
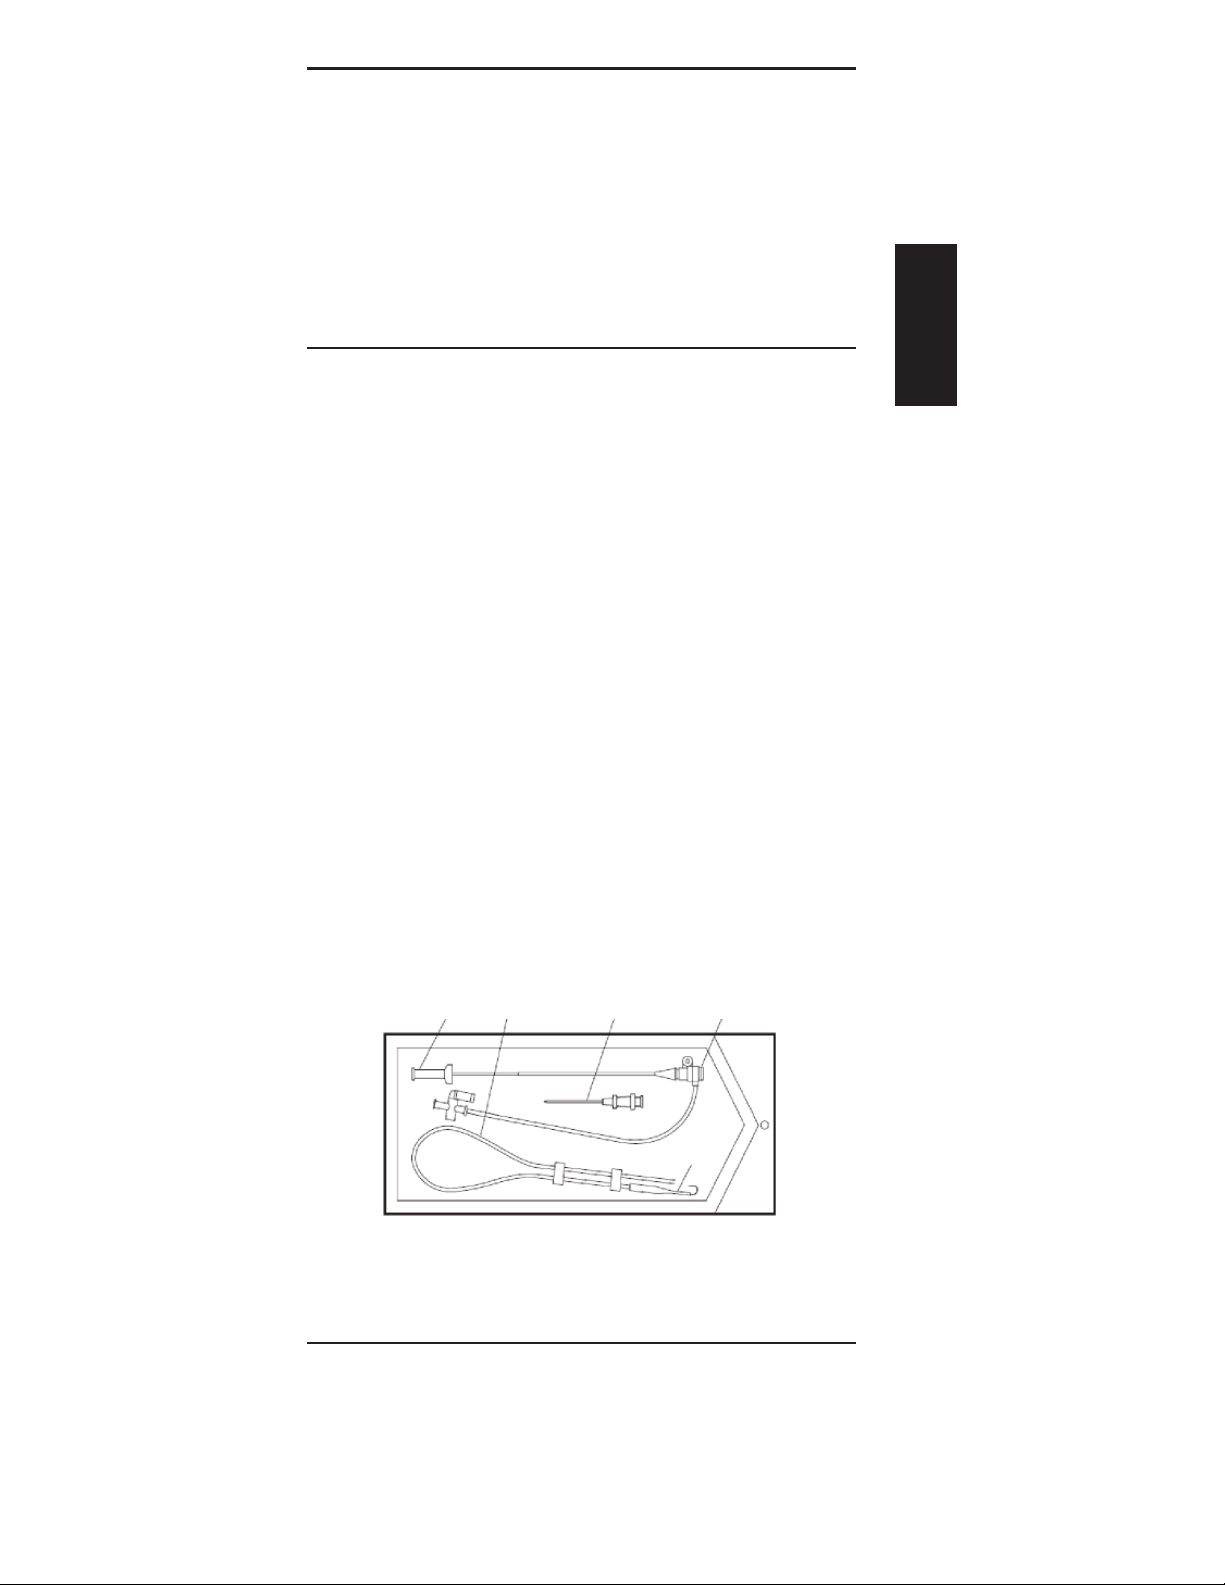
The PINNACLE INTRODUCER consists of an introducer (a sheath
and a dilator), a mini guidewire, a guide inserter, and may
contain an introducer needle.
The Pinnacle Introducer is used to facilitate placing a catheter
through the skin into a vein or artery. The mini guidewire is an
accessory device which is used for placement of the sheath into
the vein or artery. The introducer needle is an accessory device
which is used in facilitating entry through the skin into a vein or
artery to provide a conduit for the mini guidewire.
COMPONENT DESCRIPTION
Refer to product labeling for appropriate system components. All
components that enter blood vessels are radiopaque.
Sheath
Incorporates a 1-way valve and a 3-way stopcock connected by
a side tube. The sheath can be used with a catheter of the same
Fr. size or up to two Fr. sizes smaller without blood leakage at
the 1-way valve. This highly exible sheath is designed to resist
kinking.
Dilator
The precise t of the dilator in the sheath allows for simultaneous
motion of both dilator and sheath.
ENGLISH
Spring Coil Mini Guidewire or Nitinol Mandrel Guidewire
A 45 cm stainless steel guidewire or 43 cm Nitinol guidewire with
0.21 inch, 0.35 inch or 0.38 inch outside diameter is included
depending on the catalog number of the system.
Guide Inserter
Before inserting the mini guide wire, the guide inserter can be
set at the entry of the needle hub for easy insertion.
Needle
The introducer needle is an accessory device which is used in
facilitating the entry through the skin into a vein or artery to
provide a conduit for the mini guidewire. The needle has a
tapered distal end to provide 21Ga access to vessel. Needle may
be included depending on catalog number of the system.
Dilator Mini Guidewire Needle Sheath
Guide Inserter
The contents of this package may di er from that
shown in the instructions for use. Please consult
available catalog information for proper contents.
PRECAUTIONS
• When using metal needle cannula, do not withdraw
the guidewire back into the cannula, as shearing of the
guidewire may result.
• This kit must be used by a trained physician.
• This kit is for single use only. Do not resterilize or reuse.
3
• Contents are sterile, non-toxic, and non-pyrogenic in unopened,
PM-01979
undamaged package.
• Do not use if the package or product is stained or damaged. Use
the introducer kit immediately after opening the package and
dispose of the kit after use.
• Before use, make sure the sheath size (Fr.) is appropriate for the
access vessel and the catheter to be used.
• The entire procedure from skin incision to sheath removal must be
carried out aseptically.
• Do not use a power injector through the side tube and 3-way
stopcock.
Caution
• Federal (U.S.A.) law restricts this device to sale by or on the
order of a physician.
INSTRUCTIONS FOR USE
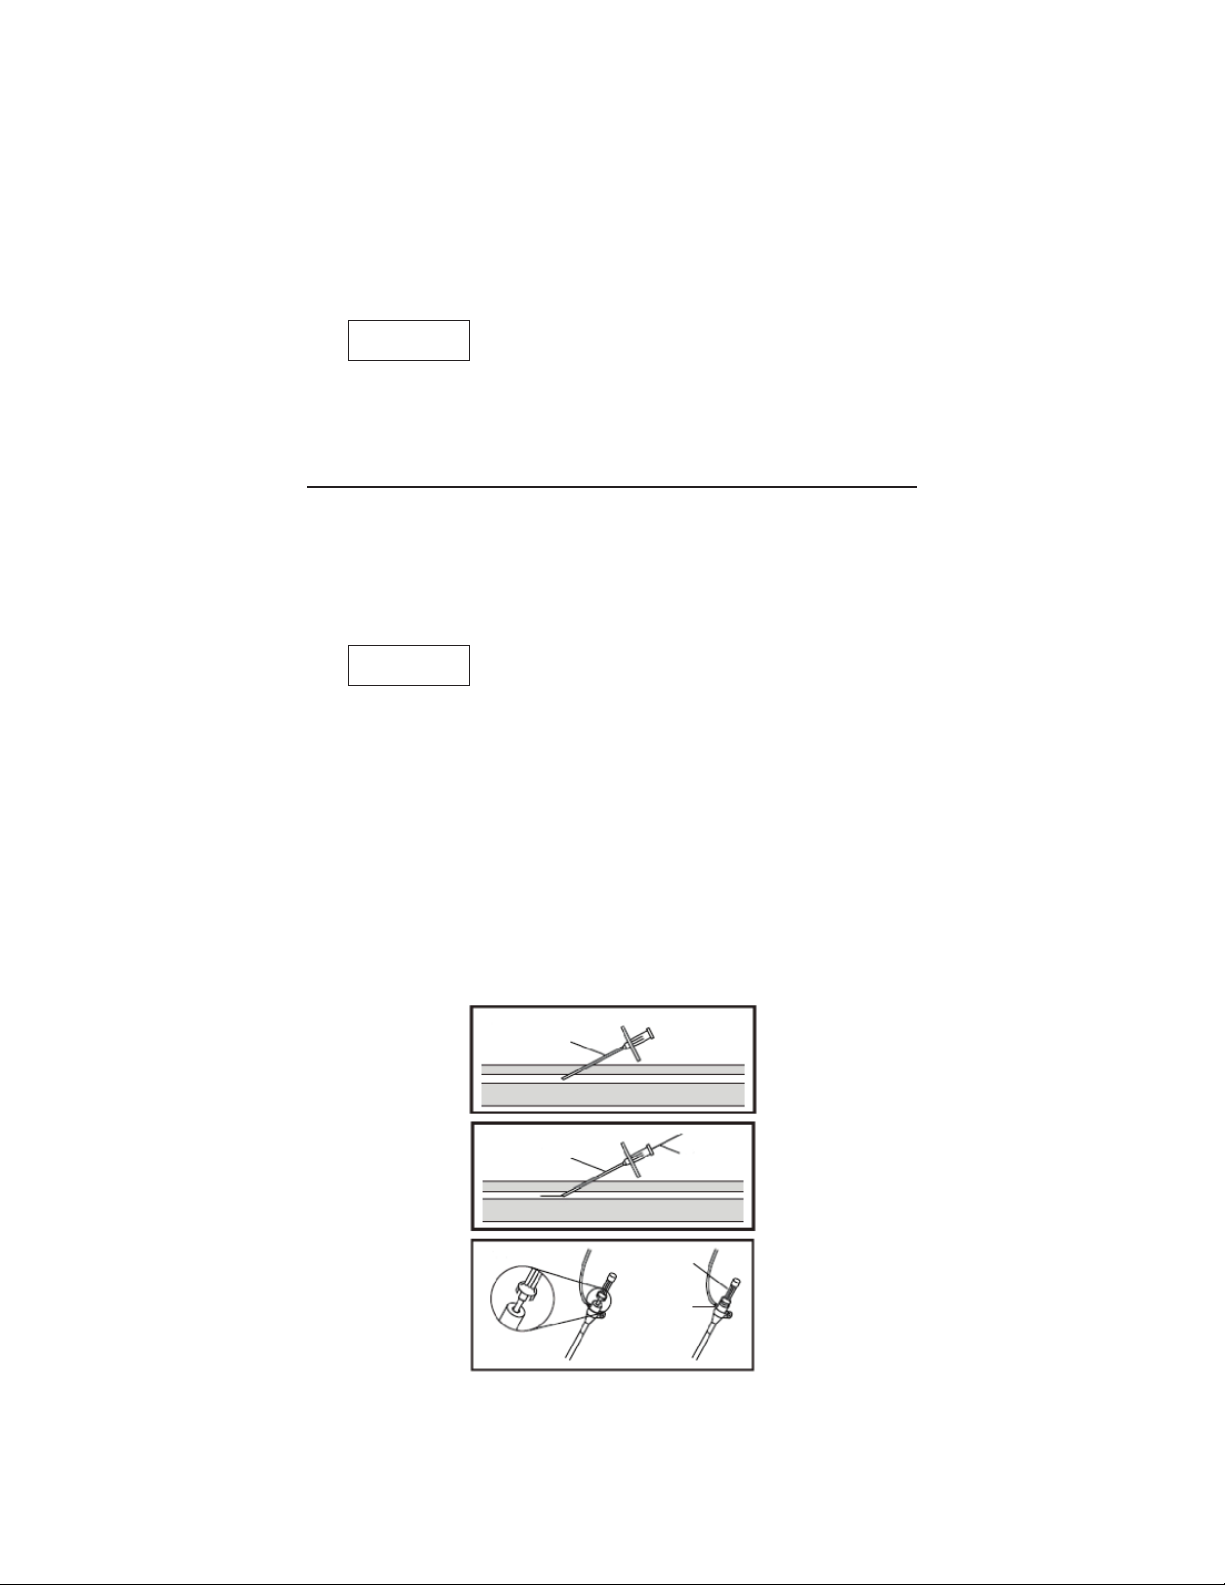
1. If necessary, make a small skin incision at the puncture site with a
surgical knife.
2. Insert a cannula into the vessel (Fig. 1).
3. Insert the selected exible end of the mini guidewire through the
cannula into the vessel (Fig. 2).
Caution
• Advance the mini guidewire slowly. If resistance is met, do not
advance or withdraw the mini guidewire until the cause of
resistance is determined.
4. Remove the cannula over the mini guidewire.
5. Connect a ushing line to the 3-way stopcock of the introducer
sheath. Fill the sheath assembly completely with heparinized
saline, removing all air.
6. Prime the dilator using a syringe with heparinized saline.
7. Insert the vessel dilator fully into the sheath. The female hub of the
sheath connects with the male hub of the dilator, and locks in place
by means of grip (Fig. 3).
Fig. 1
Fig. 2
Cannula
Cannula
Mini
Guidewire
Fig. 3
Dilator Hub
Sheath Hub
4

Cautions
PM-01979
• Insert the dilator into the center of the sheath valve.
Forced insertion of the dilator which misses the center
of the sheath valve may cause damage, and result in
blood leakage.
• Lock the dilator hub into the sheath hub securely. If the
dilator hub is not locked into the sheath hub, only the
sheath will advance into the vessel and the tip of the
sheath may damage the vessel. Advancing the sheath
alone may cause damage to the vessel.
8. Insert the dilator and sheath together over the mini
guidewire, and into the blood vessel (Fig. 4).
9. “Unlock” the dilator hub from the sheath hub by bending
the dilator hub downward (Fig. 5).
10. Slowly remove the dilator and mini guidewire together,
leaving the sheath in the vessel (Fig. 6). If injection or
sampling is necessary at this point, remove the mini
guidewire only, and use the dilator hub as an injection port
before removing it.
Caution
• Slowly remove the dilator from the sheath. Rapid
withdrawal of the dilator may result in the incomplete
closing of the 1-way valve, resulting in blood ow
through the valve. If this occurs, replace the dilator into
the sheath and remove again slowly.
ENGLISH
11. Insert a catheter through the sheath and into the blood
vessel, and advance to the desired location (Fig. 7).
Fig. 4
Sheath
Fig. 5
Fig. 6
Fig. 7
Lever
Dilator Hub
Suture Hub
Mini Guidewire
3-Way Stopcock
Mini
Guidewire
Dilator
Mini Guidewire
Dilator
Catheter
5
Cautions
PM-01979
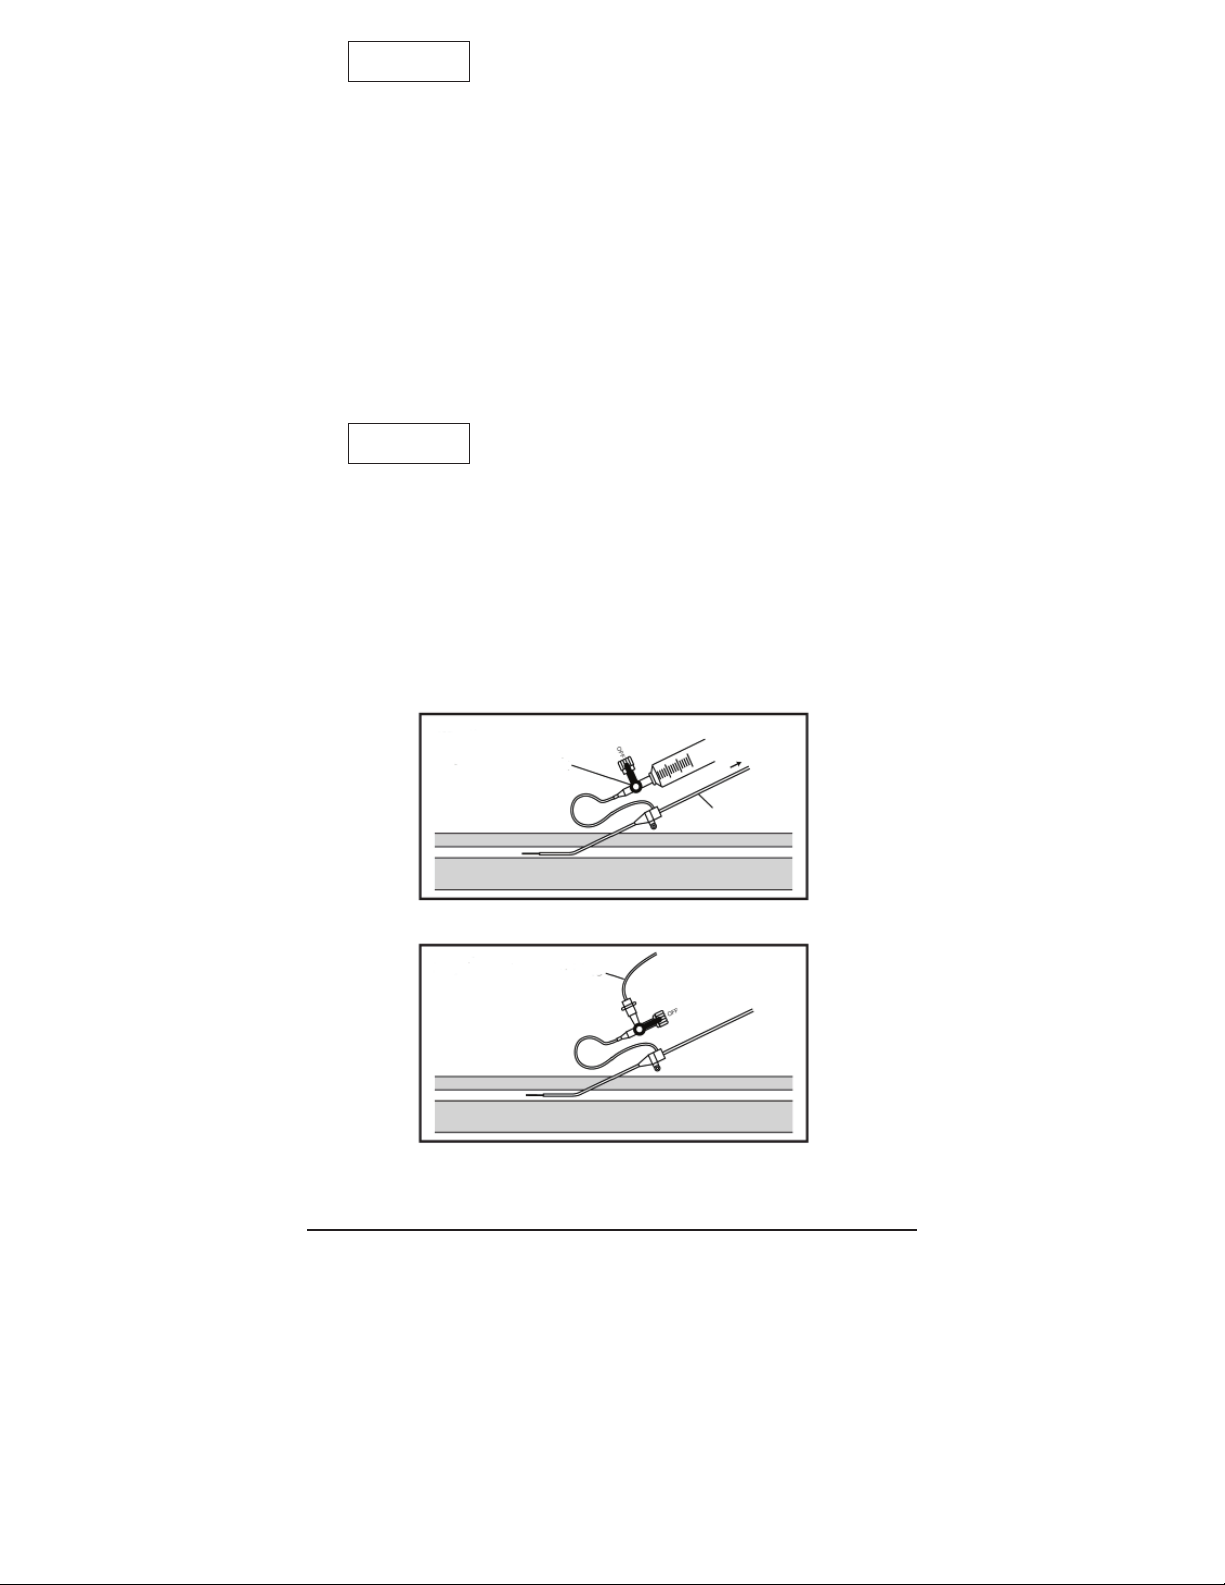
• Before removing or inserting the catheter through the sheath,
aspirate blood from the 3-way stopcock to remove any brin
deposition which may have accumulated in or on the tip of
the sheath (Fig. 8).
• When puncturing, suturing, or incising the tissue near the
sheath, be careful not to damage the sheath. Do not put a
clamp on the sheath nor bind it with a thread.
The ushing line may also be used as a continuous infusion site by
connecting an infusion line to the 3-way stopcock (Fig. 9).
12. When inserting, manipulating or withdrawing a catheter from the
sheath, always hold it in place. To temporarily suture the sheath (for
continued access) use the suture eye.
Cautions
• Do not place suture on the sheath tubing since this may
restrict access/ ow through the sheath.
• Do not use a power injector through the side tube and 3-way
stopcock.
13. When exchanging catheters, remove the used catheter and repeat
Step 11.
14. After the intended procedure is completed, remove the catheter
and then the sheath.
Fig. 8
3-Way Stopcock
Catheter
Fig. 9
Infusion Line
CAUTION FOR STORAGE
Do not store at extreme temperatures and humidity. Avoid direct
sunlight.
6
 Loading...