

Page 1
Manual (English)
Page 2

CE Declaration
We:
TerraTec Electronic GmbH, Herrenpfad 38, D-41334 Nettetal, Germany
hereby declare that the product:
ReceiverSystem TerraTec Cinergy 250 USB,
to which this declaration refers is in compliance with the following standards or standardizing
documents:
EN55024
EN55022 cl. B
EN55013
EN55020
EN60950
EN60065.
The Cinergy 250 USB is solely intended to be connected to devices
that comply with the EN60950 safety standard.
The following are the stipulated operating and environmental conditions for said compliance:
residential, business and commercial environments and small-company environments.
This declaration is based on:
Test report(s) of the EMC testing laboratory
The information in this document is subject to change without notice and shall not be deemed as a warranty by the
seller. No warranties, express or implied, are made with regard to the quality, suitability or accuracy of this document. The manufacturer reserves the right to change the contents of this document and/or the associated products
at any time without the provision of prior notice to specific persons or organizations. The manufacturer shall not be
held liable for damages of any kind arising from the use, or the inability to use this product or its documentation,
even if the possibility of such damage is known. The information in this document is subject to copyright. All rights
are reserved. No part of this manual may be reproduced or transmitted in any form or for any purpose without the
express written permission of the copyright holders. Product and brand names contained in this document are used
for identification purposes only. All registered trademarks, product designations or brand names used in this
document are the registered property of their respective owners.
©TerraTec
®
Electronic GmbH, 1994-2004. All rights are reserved (09.07.04).
2 Cinergy 250 USB (English)
Page 3

Contents
Welcome! ............................................................................................................................. 4
Analog TV via USB 2.0 ......................................................................................................... 4
Fully video-enabled ..............................................................................................................5
All inclusive..........................................................................................................................5
Key features.......................................................................................................................... 6
System requirements............................................................................................................ 6
Scope of delivery. ................................................................................................................. 6
Using the Cinergy 250 USB for the first time ...........................................................................7
Installing the drivers.............................................................................................................7
Hardware at a glance........................................................................................................... 8
Important settings for sound card owners. .......................................................................... 9
The TV software. ..................................................................................................................10
Installation......................................................................................................................... 10
Launching the TV software for the first time. ....................................................................... 11
The main page....................................................................................................................16
The TV window. ..................................................................................................................18
Context menu. ....................................................................................................................19
The configuration menu..................................................................................................... 22
Configuration: Playback settings. ...................................................................................... 22
Configuration: Capture settings ......................................................................................... 24
Configuration: Still image capture. .................................................................................... 26
Configuration: Stations ......................................................................................................27
Configuration: Options .......................................................................................................27
Configuration: About ..........................................................................................................27
Cinergy 250 USB (English) 3
Page 4
Welcome!
We're pleased that you have chosen a TerraTec ReceiverSystem and would like to congratulate you on this decision. With the TerraTec Cinergy 250 USB you've purchased a sophisticated product representing the state of the art of PC/TV technology. We're convinced that our
product will prove extremely useful to you and provide you with a great deal of entertainment.
The manual provided tells you in complete detail all about the ReceiverSystem TerraTec Cinergy 250 USB and how to use it correctly. But first, here's a quick overview:
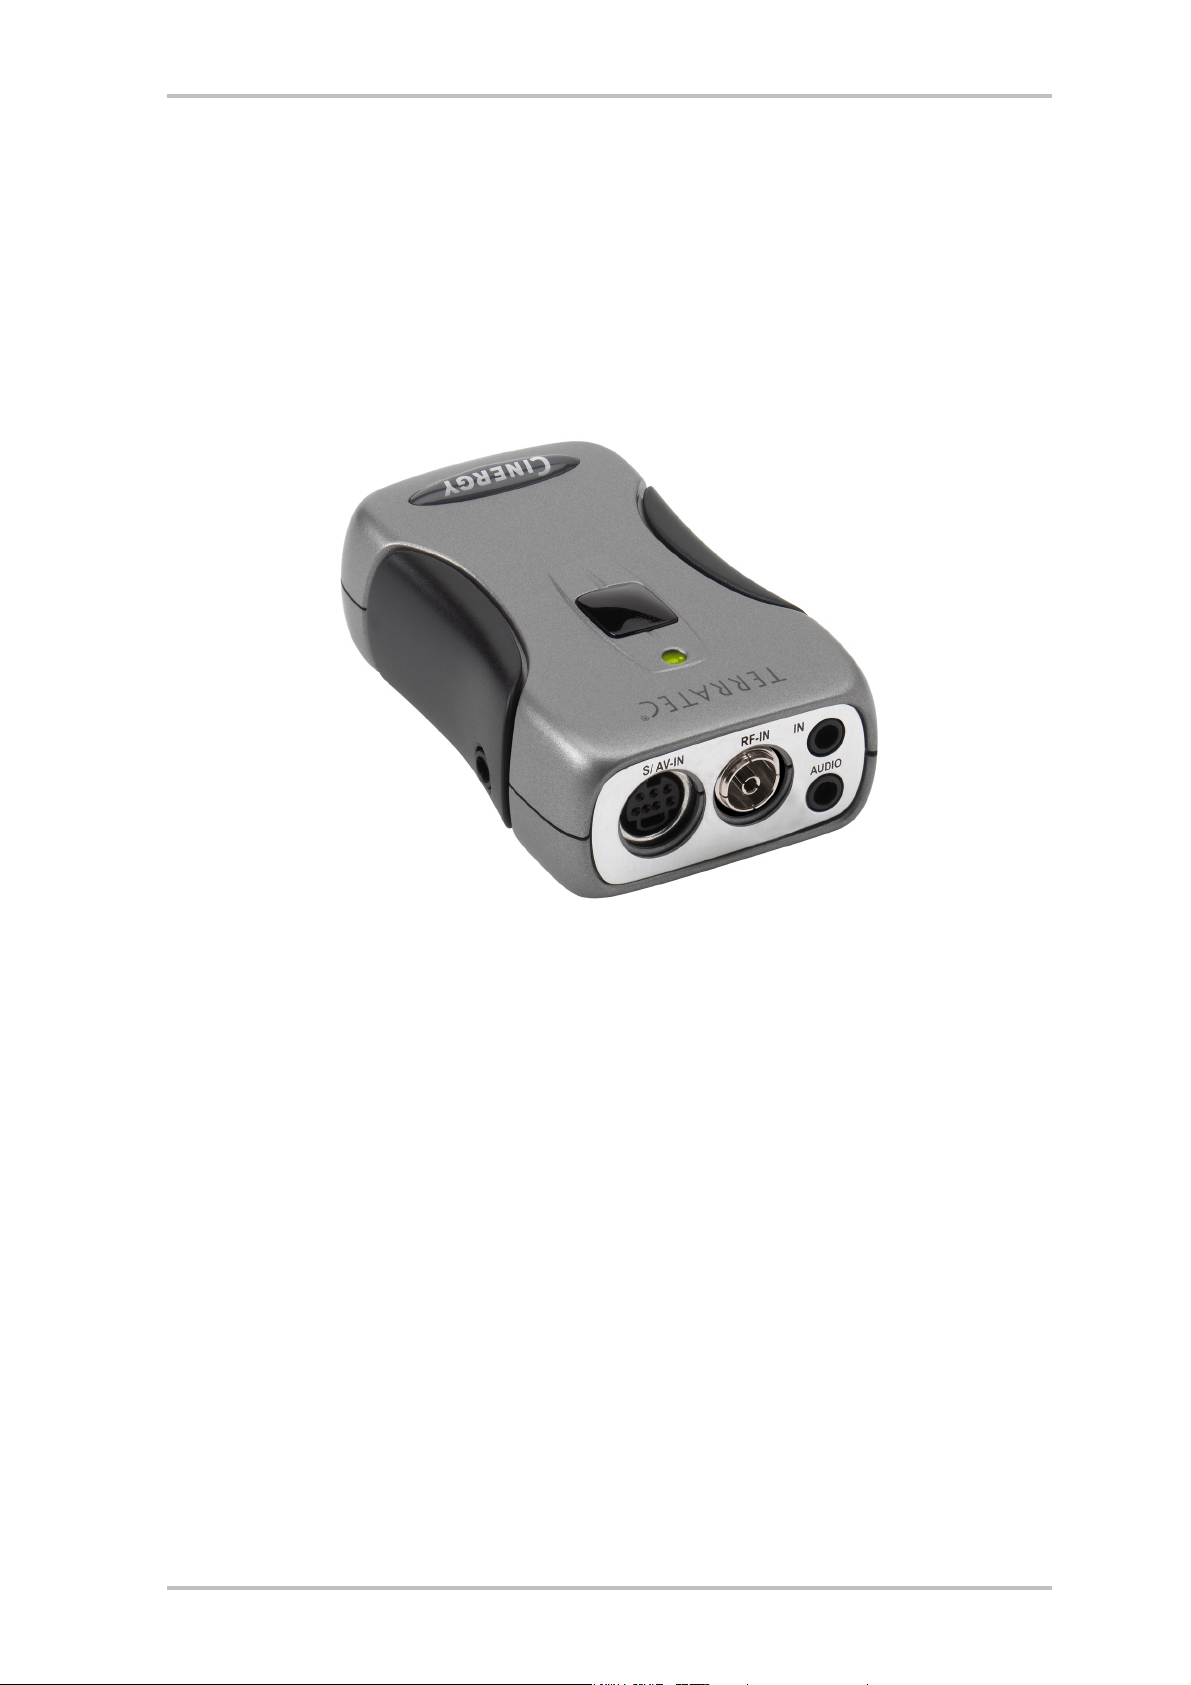
TerraTec Cinergy 250 USB ReceiverSystem (appearance may vary)
Analog TV via USB 2.0
The Cinergy 250 USB lets you watch antenna and broadband cable TV broadcasts on your
desktop or notebook PC and digitize your videos. For all its features, this mobile TV solution is
no larger than a pack of cigarettes and weighs a mere 65 grams. It connects directly to your
USB 2.0 port, which also serves as its power supply—a separate AC adapter or batteries are
not required.
4 Cinergy 250 USB (English)
Page 5

Fully video-enabled
The Cinergy 250 USB uses TV signals from your antenna or broadband cable. It can also easily
process video signals from your VHS recorder, DVD player or camcorder via its composite or
SVHS connector.
Good hardware isn't everything—that's why the Cinergy 250 USB comes with an extensive
software package for convenience in watching videos or recording programs. For example,
timeshifting will revolutionize your viewing habits: interrupt programs whenever you like and
continue watching them later from where you left off.
Timer-controlled recording is also no problem. Determine the format yourself: the Cinergy 250
USB supports virtually all common video codecs such as DivX, letting you minimize space
requirements when archiving films on your hard drive or on CDs. The included video recording
software also lets you create video CDs or DVDs with just a few clicks of the mouse.
All inclusive
The Cinergy remote not only lets you channel-hop with ease and enjoy TV programs from the
comfort of your sofa, it also controls a wide range of other multimedia applications. With the
included headset, you can also watch TV anywhere on your laptop.
Thanks for your attention—enjoy!
...your TerraTec Team
Cinergy 250 USB (English) 5
Page 6

Key features.
· Power supply via USB
· USB 2.0 port, 480 Mbps
· Analog video inputs, S-video and composite
· Remote control
· Digital video recorder (support for MPEG1/2 and nearly all current video codecs such as
DivX)
· Timer-controlled recording and timeshifting
System requirements.
· Windows 2000/XP
· USB 2.0 interface
· CPU, 800 MHz or higher
· 128 MB RAM
· CD-ROM drive (to install drivers/software)
· CD burner (to create VCD/mini-DVDs) or DVD burner (to create DVDs)
Scope of delivery.
· TerraTec Cinergy 250 USB
· Remote control
· Headphones
· Audio cable, mini jack to mini jack (3.5 mm)
· Audio cable, mini jack (3.5 mm) to RCA
· S-video cable (mini 7-pin to RCA)
· USB 2.0 cable (0.6 m)
· USB 2.0 cable (1.5 m)
· TerraTec Cinergy 250 USB CD-ROM
· This manual
· Service request form
· Registration documents
6 Cinergy 250 USB (English)
Page 7

Using the Cinergy 250 USB for the first time
Installing the drivers
Please do not connect your Cinergy 250 USB to the PC just yet!
1. Please close all active applications.
2. Insert the driver CD-ROM into your CD-ROM drive.
3. Choose your language and
4. click the "Driver installation" button.
5. Follow the instructions as they appear on your screen.
Please note that a warning will be displayed when installing in Windows 2000/XP.
Continue the installation anyway. The driver can be installed despite the lack of signature. The missing
signature has no effect on the quality or functionality of the driver.
6. Restart your PC.
7. Connect the Cinergy 250 USB to one of your computer's USB 2 ports.
8. Follow the instructions as they appear on your screen.
When the installation is complete, the Cinergy 250 USB will be available in all relevant applications.
The Cinergy 250 USB will be listed in your PC's Device Manager under "Imaging devices".
Cinergy 250 USB (English) 7
Page 8
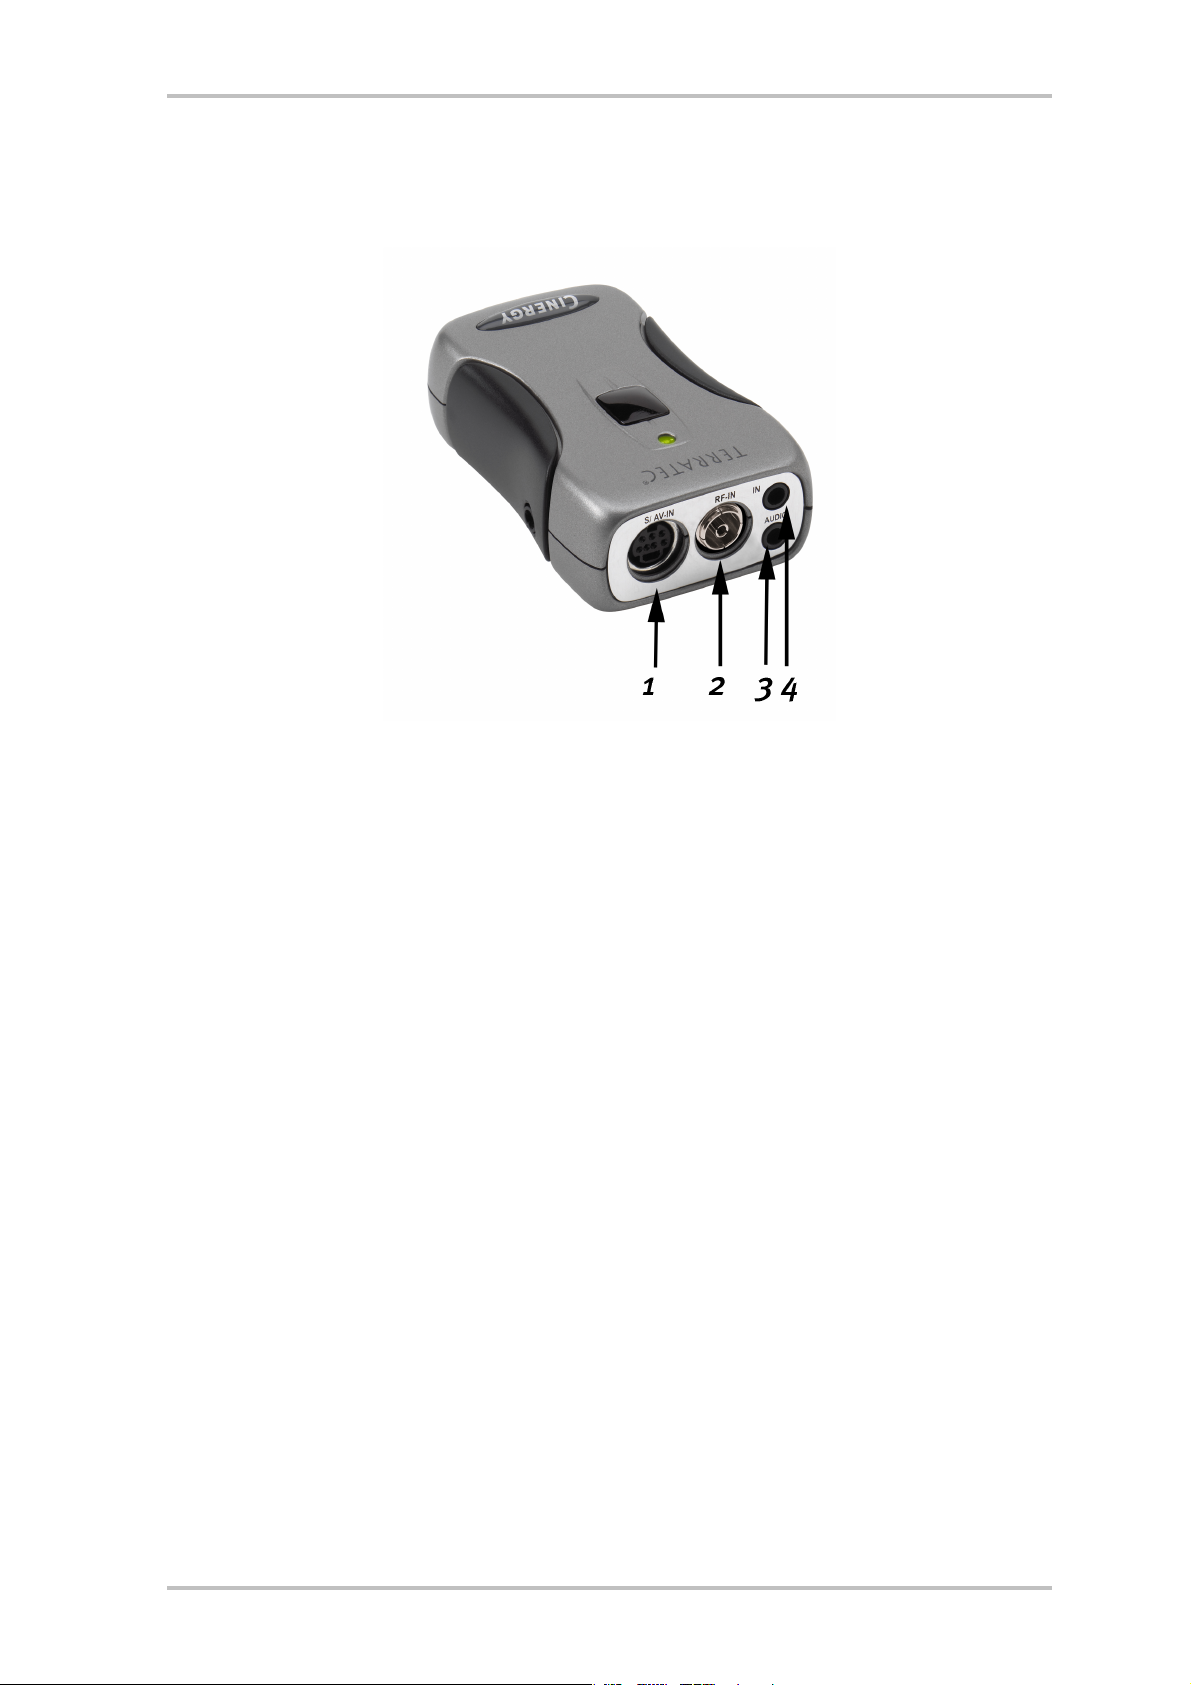
Hardware at a glance.
The following is an overview of the Cinergy and its terminals.
1 Analog video input (S-video and composite via adapter)
2 TV Antenna In
3 Audio Out
4 Audio In
Analog video input
This input is used to connect external devices like video recorders and satellite receivers. Use
the included adapter to connect external devices via composite.
TV Antenna In
Use this terminal to connect your home antenna or to establish a connection to a cable network.
Audio Out
Link this terminal to your sound card, headphones or active loudspeakers. Please note that
USB 2 audio is not yet supported. The connection must therefore also be made when feeding
the Cinergy via the TV antenna input.
Audio In
If you are connecting external devices using the Composite or S-video input terminal, you also
have to establish an audio connection. Use this jack to do so.
8 Cinergy 250 USB (English)
Page 9

Important settings for sound card owners.
If you have connected the Audio output of the TV card to the Line-In input of your sound card
using the provided cinch-cinch cable, you will have to make certain settings in the mixer for
the sound card so that you can hear and record the TV/Video tone.
To do so, proceed as follows:
1. Double-click the volume control icon illustrated as a speaker on the taskbar.
2. Be sure that the "Mute" option under the "Line-In" slider is not checked and that the
"Line-In" slider is not at the bottom of its range.
This makes sure you will be able to hear the tone of the TV signal through your system and
control the volume. Other settings are required for recording (see instructions below):
3. Select the "Options\Properties" menu item.
4. Set the "Adjust volume for“ option to "Recording". Confirm your choice by clicking the
"OK" button.
5. Now enable the check box below the Line-In slider and move the slider itself to its middle
position. By checking the check box, you define the Line-In input of your sound card as a
recording input source. This is essential if you want to record a video sequence with
sound.
This completes the configuration of the sound card settings and you can now close the mixer!
Cinergy 250 USB (English) 9
Page 10

The TV software.
The heart of your Cinergy TV card is its TV software. You use it to program stations, optimize
the picture, adjust the sound to your needs and much more. You can also use the TV software
as a simple-to-use video recorder as well as for capturing individual frames.
Installation.
To install the Cinergy TV software, select the appropriate item on the autostart menu of the
included CD-ROM. If the autostart program does not appear automatically when you insert
your Cinergy Installation CD, start it manually by running the "AUTORUN.EXE" file located on
the root directory of the Cinergy Installation CD.
As an alternative to the version on the included CD-ROM, you can also download the current
version of the Cinergy TV software from http://www.terratec.com/. Double-click the
downloaded file to start the installation.
The language selected for the installation will also be used in the Cinergy TV application. It
can be changed at any time, however. The Cinergy TV icon will be present on your desktop if
you accepted the defaults during the installation.
10 Cinergy 250 USB (English)
Page 11

Launching the TV software for the first time.
The station manager will open automatically the first time you start the Cinergy TV application.
· Click the Scan button.
The automatic channel scan will enter its results in the left-hand
"Found channels" window.
The channel scan in action.
Once the standard channel scan has completed, you will be asked whether any stations are
missing.
Cinergy 250 USB (English) 11
Page 12

A friendly prompt.
If you find that you are missing stations that you would
otherwise receive cleanly, repeat the search with the option
"All frequencies". Click on "Default" and this option will be
displayed.
12 Cinergy 250 USB (English)
Page 13

· Transferring stations to Favorites.
Finished? Good. Use the arrows between the left- and right-hand windows to move individual (>) or all stations (>>) to the Favorites list in the right-hand window. You will only be
able to select stations that are in your Favorites list when using the program.
The detected stations that you want to save now have to be copied into the list on the right. To do so, use
the center arrow buttons.
Cinergy 250 USB (English) 13
Page 14

· Editing station names—fine-tuning.
You may find that the correct names could not be determined for the stations, or that they
are not perfectly in tune. Select the station in the Favorites list and click on the tool icon
below the list.
Edit stations
A dialog box will open in which you can change the name of the station and adjust the frequency manually.
14 Cinergy 250 USB (English)
Page 15

Click the tool icon under the Favorites list to open the "Edit station" menu.
You can also change the station name and fine tuning at any time on the station management
tab. There's no need to complete the whole job in one sitting.
· Sorting stations
You can resort your Favorites with the arrow buttons on the right-hand edge of the list.
· Removing stations
To remove stations from the Favorites, click the X icon below the list.
· Switch from the "Stations" tab to the "TV" tab. If you have connected the audio output of
the Cinergy hardware to the line input of your sound card, you can adjust the preliminary
settings here. If you have more than one sound card, or if you are not using the line input
as your audio input, then adjust the settings in the "Audio" section under "Mixer“ and
"Source".
· Click "OK" to close the configuration menu.
· Happy zapping!
Cinergy 250 USB (English) 15
Page 16

The main page.
The basic functions of the TV software are grouped in the main menu. To display brief descriptions of the individual functions, hover over the buttons with the mouse cursor.
The main menu contains
· a context-sensitive display for additional information
· input signal/station selection
· display functions
· recording functions
· audio functions
· special functions (configuration, IPG, Besonic Mood Radio)
A number of the listed functions permit/require additional settings that can be found in the
configuration menu. Please see the specified pages for detailed descriptions.
Station list/Input signal
The antenna signal is the default input signal. The
desired station can be chosen from the station
list.
Selects an external video source at the S-video
16 Cinergy 250 USB (English)
input of the TV hardware as the input signal.
Selects an external video source at the composite
video input of the TV hardware as the input signal.
Page 17

Display functions
Enables and disables the TV picture.
Starts the multiple-channel preview mode. Thumbnails
of the current programs of all stations in the Favorites
list provide a quick overview.
If this function is active, the picture can be scaled
horizontally and vertically without regard for the selected aspect ratio (4:3).
Recording functions
Starts the playback of the last recording. This function
usually launches the Windows Media Player, which is
associated with .AVI files by default.
Starts video recording and saves the video in the "My
Pictures" / "My Videos" folder of the current user by
default.
Stops recording or playback.
Takes a still picture of the current TV picture and stores
it in the "My Pictures" folder of the current user by
default.
Cinergy 250 USB (English) 17
Page 18

Audio functions
Volume control.
Enables/disables mute.
Special functions
Opens the configuration menu.
Opens the IPG (I
nternet Program Guide).
Launches "BeSonic Mood Radio“.
The TV window.
Depending on the selected input signal, the TV window will display a TV or video picture. The
first presupposes the availability of an antenna signal, the second an external video source
on either the S-video or composite inputs.
IMAGE: The television picture opens by clicking the TV button.
Size. The size of the picture can be scaled freely with the mouse in either a specified (4:3) or
free aspect ratio ("Free aspect ratio" button active). Place the mouse cursor on the edge of the
window in such a way that it turns into a horizontal, vertical or diagonal double-headed arrow
and enlarge or reduce the picture by dragging the edge.
Position. Press and hold the left mouse button anywhere within the picture and move the
window to the desired position.
Full screen/window view. A double-click switches the picture to full-screen display; doubleclicking once more restores the picture to its window.
18 Cinergy 250 USB (English)
Page 19

Context menu.
· Context menu/keyboard control. The context menu plays such a central role in the use of
the software that the following chapter is devoted entirely to it. Just read on.
Right-click inside the picture window or in the main menu to open the context menu. Grayedout functions are not available. Our reason for mentioning that the context menu is also
available in the display of the main menu will become apparent when you try out the "Desktop TV" function. More about that later.
The context menu.
Like the main menu of the TV software, the context menu is organized in sections to group
similar functions. The following sections cover only those functions that have not yet been
explained as parts of the main menu.
Cinergy 250 USB (English) 19
Page 20

Station list/Input signal
Channel +/–. Changes one channel up or down.
AV. Selects the S-video or composite input, depending on where a signal is recognized.
Station list/Input signal
Desktop TV. Fixes the TV picture at its current position on the desktop. The TV picture will
behave in the same way as desktop wallpaper, i.e. the icons and windows will always be
visible in the foreground.
AdvancedàAlways on top. This setting ensures that the TV picture always remains in the
foreground and cannot be partly or completely covered by other windows.
AdvancedàOptimize size. Displays the TV picture with exactly the selected number of pixels.
(see "TV" à "Video" à "Format" tab)
Recording functions
AdvancedàOpen still image directory. Opens the folder that you have selected for your still
images.
AdvancedàOpen video directory. Opens the folder that you have selected for your videos.
AdvancedàTerratec Scheduler. Opens the application for programming scheduled re-
cordings. For more information on the Scheduler, see autostarter à documentation à
Scheduler.
20 Cinergy 250 USB (English)
Page 21

Misc.
DirectShow configuration. Refer to this for further information when troubleshooting.
Language selection
Language/Language. Sets the language of the software's user interface.
Cinergy 250 USB (English) 21
Page 22

The configuration menu
Click on the tool icon in the main menu of the TV software to open the configuration menu.
The various tabs contain a wide selection of additional configuration options. Each tab has an
"OK" button with which the configuration can be completed at any time.
Configuration: Playback settings.
Configure the video and audio playback properties under "TV“.
The TV page of the advanced configuration menu.
VideoàFormat. The display format is shown under "Format". You can also change the color
space settings of the picture here. The format specified here corresponds to the number of
pixels used horizontally and vertically. Although the picture can be scaled freely or displayed
in full-screen mode, this is the maximum number of pixels that will be displayed at any time.
In addition, the color space can also be specified here. You can choose between YUY2 and
I420.
AudioàMixer. If your system is equipped with more than one sound card with Windows
mixers, select the sound card you have connected to the audio output of the TV card.
AudioàSource. Use this to define which audio-in terminal is to supply the audio signal for
playback. In normal situations, you will want to select "Line In” or "Input Off.
22 Cinergy 250 USB (English)
Page 23

AudioàBalance. Use this slider to adjust the left and right side audio output signals sent to
your speakers.
Display. Like on your television set, these options let you adjust the brightness, contrast,
color and sharpness of the TV picture to your liking. Click "Default" to restore all of the sliders
to their central positions.
Note: The later described settings apply globally for the entire TV software and are not stored
individually for each channel.
Multi-channel preview. The multi-channel preview feature lets you take a glance at what is
showing on all of the TV channels that you have stored. To accomplish this, the multi-channel
preview function scrolls automatically through all of the channels and shows a recorded
frame of each channel. If you see a program that interests you, simply switch to its channel
with a mouse click. Double-clicking "opens" the station in the view that you are used to.
Set the number of "snapshots" displayed in the TV window using the Count option; the Auto
option selects the size of the pictures automatically. Furthermore, you can enter the switch
time in seconds. When the TV window is open, you can start the multi-channel preview by
clicking its corresponding button
in the main menu.
Cinergy 250 USB (English) 23
Page 24

Configuration: Capture settings
Configure the video recording properties under "Capture“.
Video capture uses a number of Windows components, especially compression algorithms
known as codecs. In addition to the default selection, additional codecs are available from
third-party vendors. For sources, see "HotLinks!!!" in the autostart menu of the CD-ROM. For
further information on installing and configuring the codecs, please refer to the vendor's
documentation.
Note: Some of the items in the "HotLinks!!!" topics are links to third-party providers (on the
Internet), for which we expressly take no responsibility.
Capture properties in the configuration menu.
VideoàFormat. Set the display format and color space of the capture under "Format". The
format specified here corresponds to the number of pixels used horizontally and vertically. In
addition to the format, the color space can also specified. You can choose between YUY2 and
I420. Not every combination of format and color space can be selected. The configuration
selected here will directly affect the file sizes of the video capture. Considerable file sizes
result in a short time even at low resolutions in compressed color space. Additional compression algorithms should therefore be used.
24 Cinergy 250 USB (English)
Page 25

VideoàCompression. Select the compression algorithm mentioned above here. The quality of
a codec is determined by the relationship between picture quality and data compression, as
well as the processor load during data compression. The compression that can be achieved
and the associated processor loads are not constant, but vary according to the resolution and
color depth.
DivX ;-) is to video compression what MP3 is to audio. Based on MPEG-4, DivX ;-) delivers
surprisingly high quality video despite high data compression—i.e. small file sizes—much to
the pleasure of many video enthusiasts. The DivX ;-) codec (free of charge when this document was printed) can be downloaded from the Internet and is easy to install, after which it
will appear in the list of available video codecs. At this point we should point out that not
every codec listed in the TV software is actually suitable for capture.
Many codecs offer personal configuration options, which you can change by clicking the >>
button. As the options vary from one vendor to the next, please understand that we cannot go
into detail on them here. Feel free to experiment—there's no way that you can "break" anything.
AudioàDevice. If your system is equipped with more than one sound card with Windows
mixers, select the sound card you have connected to the audio output of the TV card.
AudioàSource. Use this to define which audio-in terminal is to supply the audio signal for
playback. In normal situations, you will want to select "Line In” or "Input Off.
AudioàCompression. Our explanations above about the data volume resulting from video
capture naturally also apply to your choice of audio compression. The installed audio codecs
are also available here.
Save videos in. Use this to specify the directory on your hard disk where you want the video
files saved. The default setting saves the video file in the "My Pictures" ("My Videos") folder of
the current user.
Tip: The file name is generated by the software automatically so that you can start recording
without delay. If a file name is already in use, the TV software adds a number to its end sequentially to create a new file name.
Stop capturing by. You can stop recording without having to confirm a dialog box by pressing
the ESC key. To do so, check the corresponding option. If you want to stop recording after a
specific amount of time, manually enter the time in seconds or minutes.
Cinergy 250 USB (English) 25
Page 26

Configuration: Still image capture.
The TV software of your Cinergy card lets you capture single snapshots at the touch of a button, which it saves using a preselected format. To view captures pictures, you can use, for
example, the Paint program included with Windows or (for images saved as .JPG) just about
any Internet browser.
The snapshot page of the advanced configuration menu.
VideoàFormat Select the file format here. Choose between uncompressed bitmap (BMP) or
the JPEG format, which is optimized for image compression. The amount of compression to be
used for a JPEG image can be adjusted using the JPEG Compression slider. Here, "min" indi-
cates less compression, thus a larger file with an image quality that is close to the original.
The "max" side produces the opposite effect.
Save still image in. Here, specify whether you want the captured frame (snapshot) copied to
the Windows clipboard or written to a file for later use. If you choose the file option, you can
specify the location for the saved files under File. The default setting saves snapshots in the
"My Pictures" folder of the current user.
26 Cinergy 250 USB (English)
Page 27

Configuration: Stations
The station management was already described at length at the start of this manual. We don't
want to bore you, after all.
Configuration: Options
"Options“ mainly contains country- and language-specific settings. The "Miscellaneous"
section lets you configure the appearance of the application. It also provides quick access to
the Remote Control Editor and the Scheduler.
Options…
Configuration: About
Here you can find information that can prove useful for your own troubleshooting measures or
for support inquiries.
Cinergy 250 USB (English) 27
 Loading...