

Page 1
English Manual
Stand 25.3.2002
Page 2

CE - Statement
We:
TerraTec Electronic GmbH · Herrenpfad 38 · D-41334 Nettetal
hereby declare that the product:
VideoSystem Cameo 200 DV
to which this declaration refers complies with the following standards or standardizing documents:
1. EN 50081-1
2. EN 50082-1
The following are the stipulated operating and environmental conditions for the said compliance:
Residential, business and commercial environments and small-company environments.
This declaration is based on:
test report (s) of the EMC testing laboratory
TerraTec® ProMedia, SoundSystem Gold, SoundSystem Maestro, SoundSystem Base1, SoundSystem
DMX, SoundSystemDMX XFire 1024, AudioSystem EWS®64, AudioSystem EWS88, AudioSystem
EWX 24/96, XLerate, XLerate Pro, Base2PCI, TerraTec 128iPCI, TerraTec 512i digital, TerraTV+, TerraTV
Radio+, TerraTValue, VideoSystem Cameo 200 DV, WaveSystem, TerraCAM USB, TerraCAM USB Pro,
TerraCAM iLook, m3po, Phono PreAmp, MIDI Smart and MIDI Master Pro are trademarks registered by
TerraTec® Electronic GmbH Nettetal.
In most cases, the designations used in this manual for software and hardware are also registered
trademarks and are thus subject to the relevant regulations.
©TerraTec® Electronic GmbH, 1994-2001. All Rights Reserved (25.3.2002).
All texts and regulations have been created with the utmost care. However TerraTec and its authors are
not responsible in any way for possible incorrect specifications and their consequences. Technical
specifications are subject to changes.
All texts of this documentation are copyright-protected. All rights reserved. No part of this
documentation may be reproduced in any form as photocopy, microfilm or in any other way be
transferred into a language or form, that may be used by a computer. All rights by reproduction in
lecture, Radio or TV are reserved
2 VideoSystem Cameo 200 DV (English)
Page 3

Contents
Preface ................................................................................................................................... 4
Installation ..............................................................................................................................5
The card's layout ..................................................................................................................5
Installing the Cameo 200 DV – PCI card ................................................................................7
Connection of a DV – Camcorder ......................................................................................... 9
Connection of additional FireWire™-components................................................................ 9
Installation of drivers.............................................................................................................10
Installation using Windows 98 SE....................................................................................... 11
Installation using Windows ME........................................................................................... 14
Installation using Windows 2000 ....................................................................................... 16
Installation using Windows XP............................................................................................ 17
Software installation..............................................................................................................19
Installation of DirectX 8.1 .......................................................................................................19
Installation of Power Director Pro 2.0 DE ................................................................................19
Appendix .............................................................................................................................. 20
FAQ – Frequently Asked Questions and their answers........................................................ 20
The perfect computer......................................................................................................... 22
You're not alone ... .............................................................................................................23
TerraTec service..................................................................................................................25
Glossary .............................................................................................................................27
VideoSystem Cameo 200 DV (English) 3
Page 4

Preface
Thank you for purchasing a product made by TerraTec. You have made a good choice, as the
Cameo 200 DV is an impressive piece of "State of the art" technology. This product is one of
the most efficient computer devices for video applications. We are convinced, that the Cameo
200 DV will serve you well and you will have a lot of fun, whenever you are using it.
4 VideoSystem Cameo 200 DV (English)
Page 5

Installation
The card's layout
The external IEEE-1394-connectors
These connectors allow you to connect the Cameo 200 DV to the rest of the world, e.g. to your
camcorder.
The internal IEEE-1394-connector
This connection is used to connect internal IEEE-1394 devices with the Cameo 200 DV, such as
the 5.25" front module Cameo Connect which is available as an accessory.
VideoSystem Cameo 200 DV (English) 5
Page 6
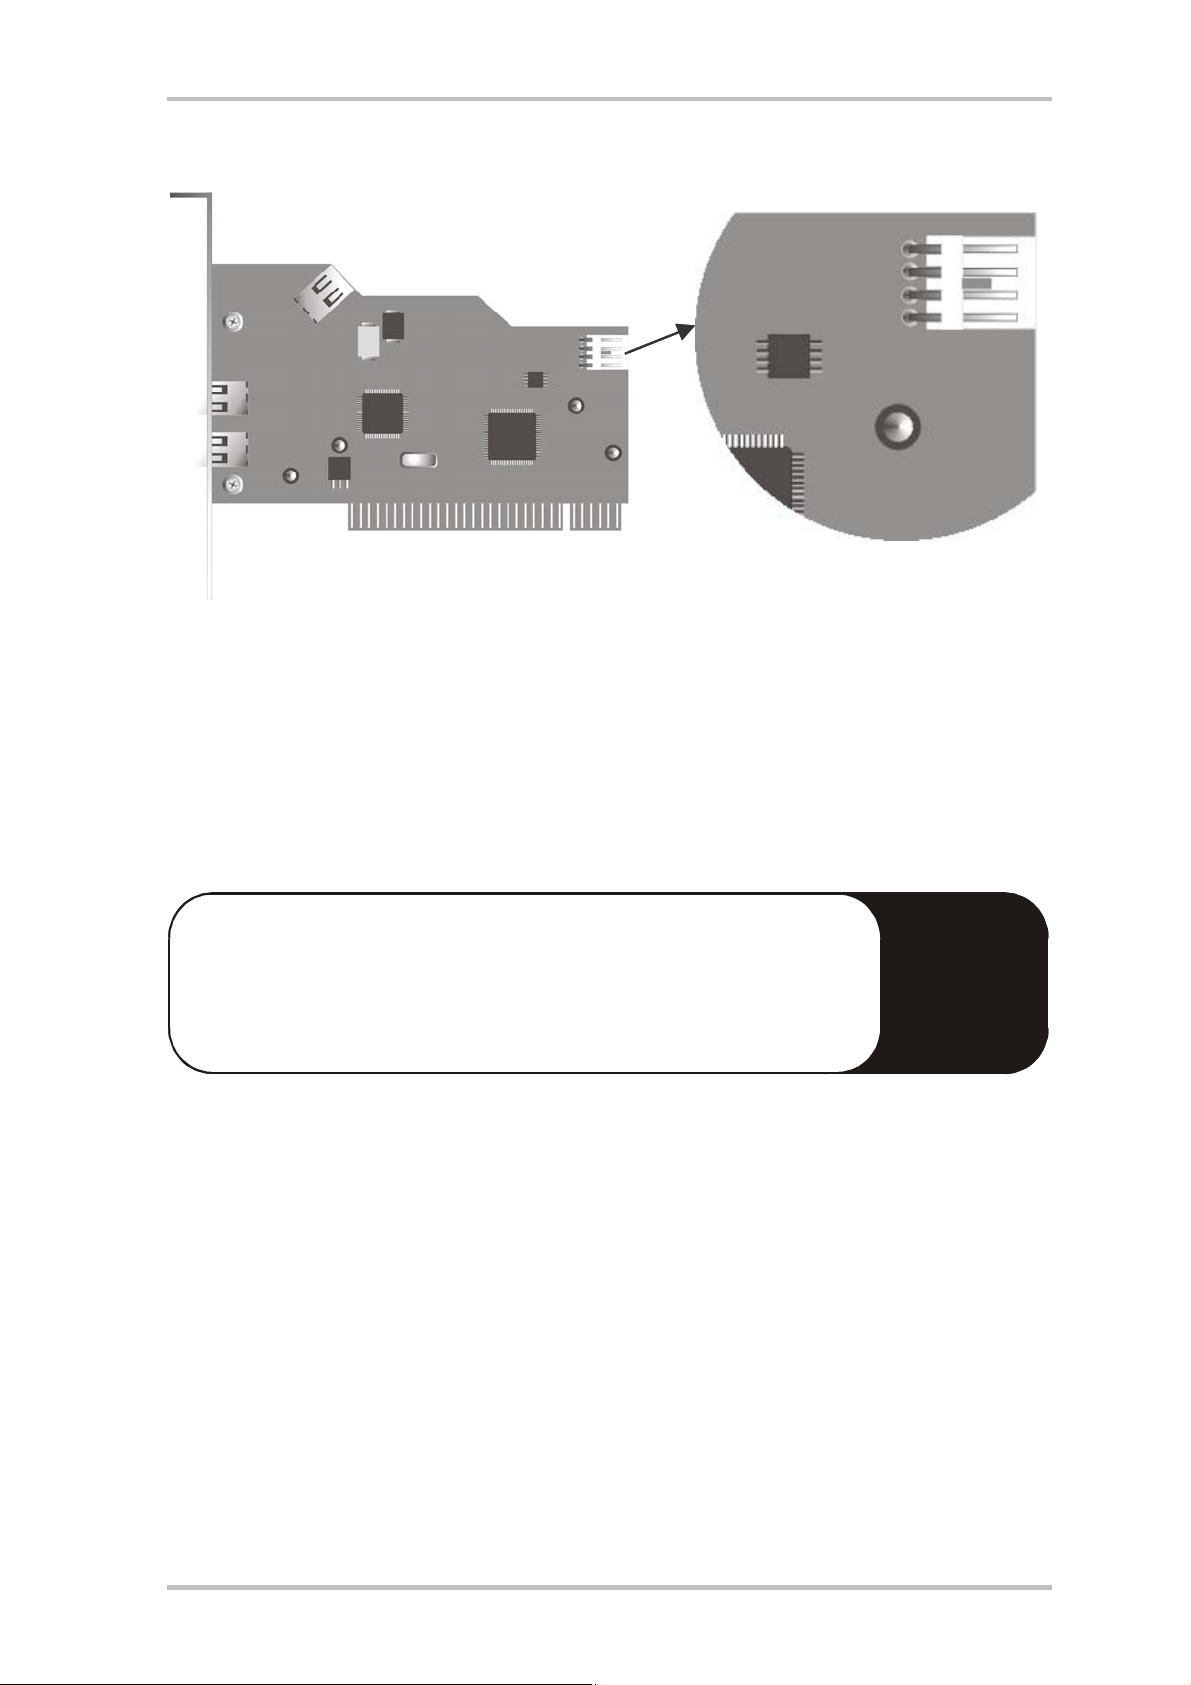
The internal power supply The internal power supply
If you wish to connect further IEEE-1394 components, which need to receive their power supply
via the Cameo 200 DV, you should connect your computer's power supply directly to the
Cameo 200 DV. This way, the power is provided by the power supply, so that the main board,
which otherwise conducts the current, will not be overloaded.
Please be careful, when connecting the power adapter to your Cameo
200 DV, as an incorrect connection may damage the product and
other components of your system. For more information, please refer
to page 8.
!
!
6 VideoSystem Cameo 200 DV (English)
6 VideoSystem Cameo 200 DV (English)
Page 7

Installing the Cameo 200 DV – PCI card
Before installing the Cameo 200 DV into your computer, please pay attention to special
features of your computer's configuration. Read the instruction manuals of your computer and
other additional cards for information about settings.
If you follow the instructions, the installation should be easy.
If you are experiencing any problems, please carefully read the corresponding sections in the
manual once again.
First, check if the package is complete.
Minimum contents of package:
1 Cameo DV, PCI-IEEE1394 Controller
1 Installation CD
1 IEEE1394 connection cable 6 Pin to 4Pin for connection to your camcorder
1 Registration card with serial number
1 Instruction manual
Send in your registration card as soon as possible or get registered the via internet on
http://www.terratec.net/register.htm
.. This is important for support and hotline.
VideoSystem Cameo 200 DV (English) 7
Page 8

Safety note:
Disconnect the power cord from your computer´s power supply and
the electrical socket before opening the enclosure!
And now... step by step:
•
Shut down your computer and all connected peripheral components, like printer and
monitor. Ensure the power is switched off at the mains supply socket. Leave the power
cord connected first, so that your computer is earthed.
•
Touch the metal plate on the rear side of your computer to ground yourself and discharge
any static electricity. Remove the power cord.
•
Remove the cover of your computer.
•
Look for a free PCI expansion slot, remove the screw that holds the slot's bracket and
remove the bracket. To guarantee the best operation of your Cameo 200 DV, choose a slot
that is not next to a card already installed.
!
•
Unpack the Cameo 200 DV – PCI card carefully. Only touch the card's edges, while the
other hand should rest on the metal surface of your computer, ensuring that the
electrostatic discharge flows into the computer without damaging the card. Never touch
the components on the card´s surface.
•
Adjust the bracket of the Cameo 200 DV to the slot, so that the card's PCI connector
exactly fits to the socket of the slot.
•
Apply the card to the slot. You may have to use a little force to make sure that it is
connected correctly.
•
Now attach the Cameo 200 DV with the screw of the PCI slot's bracket.
8 VideoSystem Cameo 200 DV (English)
Page 9

Connection of a DV – Camcorder
Your camcorder has a female connector, indicated with „DV IN“, „DV IN / OUT“ or „iLink™“ .
Apply the smaller connector of the FireWire™ cable to the camcorder's connector and the
larger connector to the Cameo PCI card or to the "I/O port" on the front side of the Cameo
Connect front module.
Connection of additional FireWire™-components
In addition to DV camcorders, there are other FireWire™-devices that may be operated with a
Cameo 200 DV. These are, for example, FireWire™-hard disk drives, - CD-ROM- or DVD drives, printers etc. You may connect and operate up to 63 of these devices simultaneously.
When connecting other FireWire™-components, please refer to the corresponding instruction
manuals!
VideoSystem Cameo 200 DV (English) 9
Page 10
Installation of drivers
If you are using Windows ME, Windows 2000 or Windows XP, you may skip this section and
continue reading on page 14 (Windows ME), page 16 (Windows 2000) or page 17 (Windows
XP).
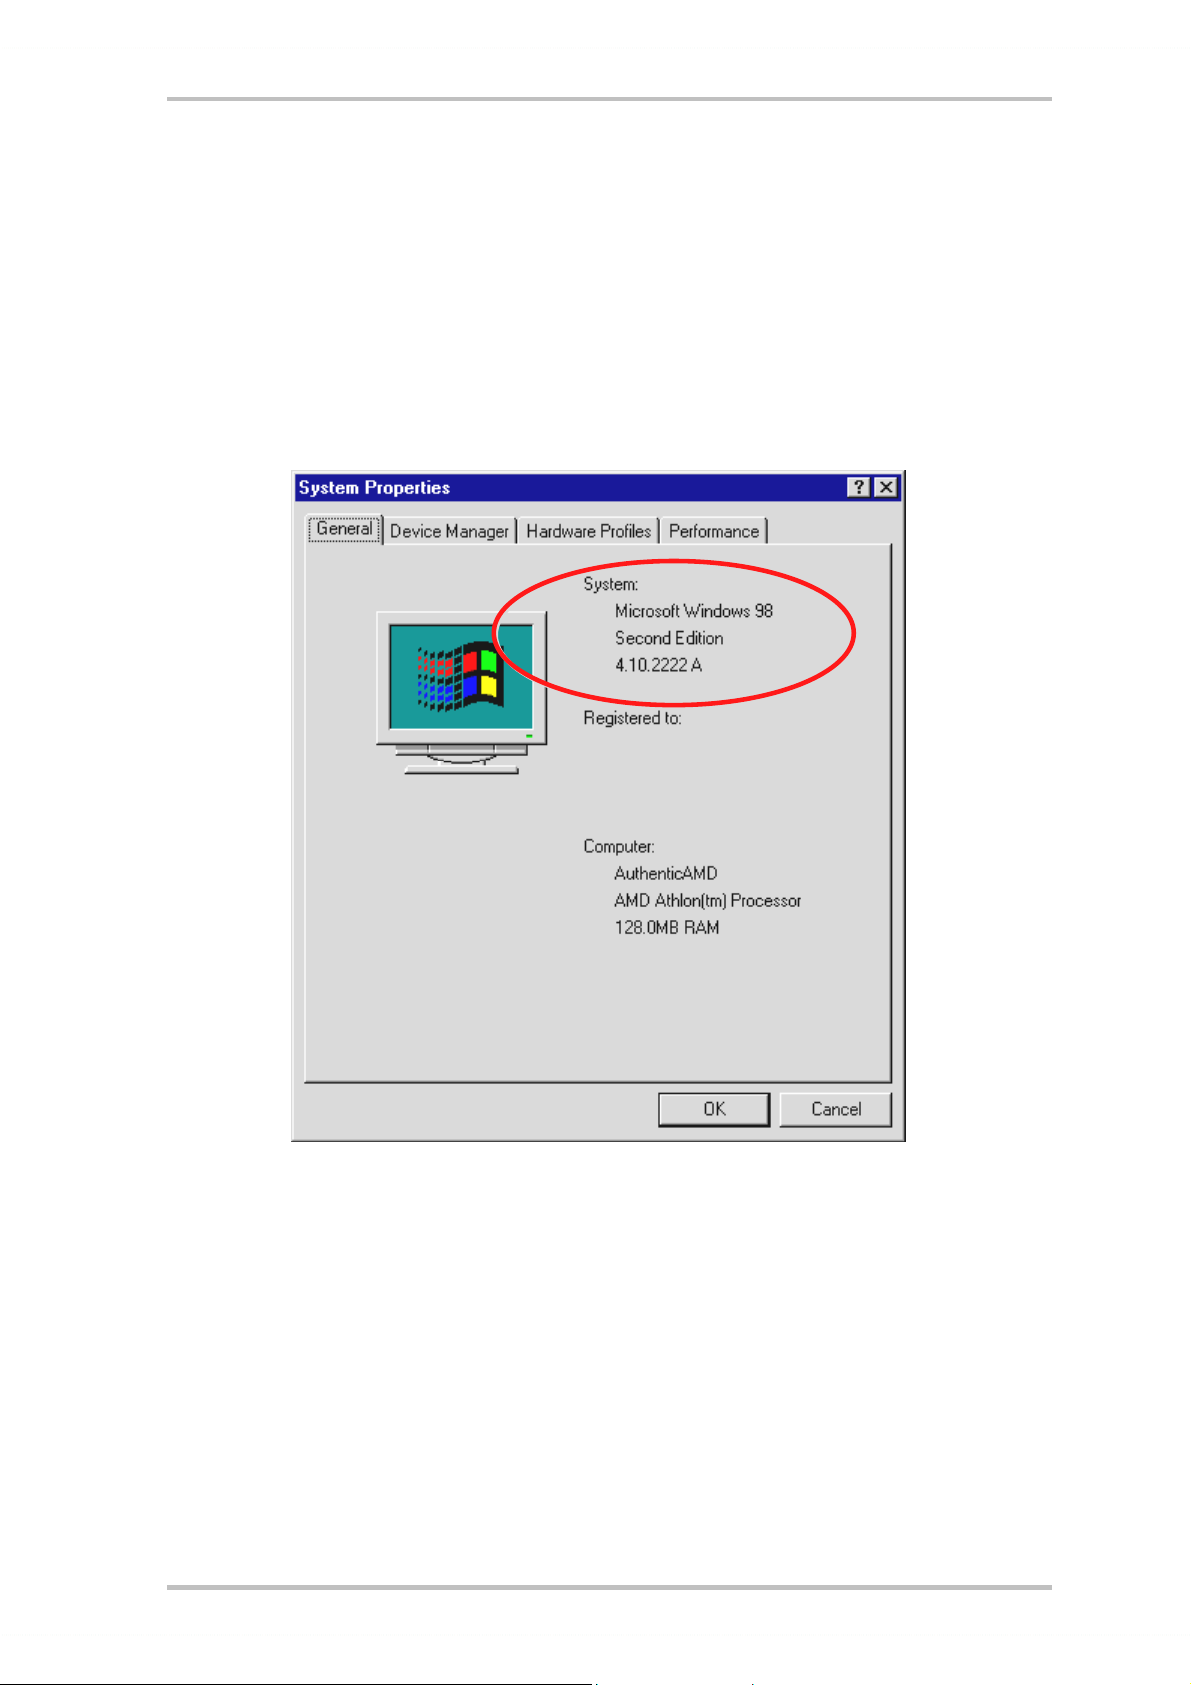
Before starting the installation under Windows 98 SE, you should check, whether you are
really using the second edition of Windows 98 on your computer. Open the "device manager",
proceeding as follows:
Click „Start“ -> „Settings“ -> „Systems Manager“ -> „System“.
Please note that Windows 98 SE has many improvements in comparison to the first version of
Windows 98 and is absolutely necessary for editing DVD videos.
If your system runs with the first version of Windows 98, we strongly recommend you to
upgrade to Second Edition. Upgrades from Windows 98 to Windows 98 SE are available at
your local retailer and will protect you from major problems, in your objective of performing
video editing.
10 VideoSystem Cameo 200 DV (English)
Page 11

Installation using Windows 98 SE
Disconnect your camcorder from the Cameo 200 DV during the driver installation process.
When you have installed the Cameo 200 DV and have started your computer, Windows 98 SE
will automatically detect the card as a new hardware device and will display the following
screen.
Click "Next". The following message will appear:
Don't choose any of the options and remove all check marks, which may have already been set. Insert
the Windows 98 SE installation CD and again click "Next".
If you see the message above, you must tell Windows, where to look for the CD.
If you click "OK", the next window will appear:
VideoSystem Cameo 200 DV (English) 11
Page 12

In the section "Copy files from:", enter the path of the Win98SE folder on the installation CD. (E: in the
example above refers to the drive letter where your Windows 98 SE CD is inserted). You may also click
"Browse" to search for the file.
If Windows has found the necessary files, select "best drivers (recommended)" and click "Next".
To complete the installation you should click "Finish" in the final window.
Windows will now install the drivers for you. This should be all for the moment. However, if
you should receive a message, telling you to do something, pressing "Enter" normally is the
best thing to do.
After having completed the installation successfully, we recommend
you to install DirectX 8.1.
For more information, read page Fehler! Textmarke nicht definiert..
!
12 VideoSystem Cameo 200 DV (English)
Page 13

When the drivers are installed.
After having completed the installation successfully, you should check the status of your
Windows 98 SE system. Open the device manager to see the installed and detected hardware
components of your computer. To open the device manager, select "System" from the control
panel and click on "Device Manager"
Once the camera is installed and initialised, the Plug-and-Play function will indicate it in the
device manager.
VideoSystem Cameo 200 DV (English) 13
Page 14

Installation using Windows ME
Disconnect the camcorder from the Cameo 200 DV during the driver installation process.
Once you have installed the Cameo 200 DV PCI card and re-started your computer, Windows
ME will automatically detect the card as a new hardware component and display the following
window:
Next, this dialog window will appear.
Click "Next" and the following window will be displayed:
To complete the installation, click "Finish“.
Windows will now install the drivers for you. This should be all for the moment. However, if you
should receive a message, telling you to do something, pressing "Enter" normally is the best
thing to do.
After having successfully completed the driver installation, we
recommend you install DirectX 8.1.
For more information, read page Fehler! Textmarke nicht definiert..
14 VideoSystem Cameo 200 DV (English)
!
Page 15

When the drivers have been installed.
After the driver installation has been completed successfully, you should check the status of
your Windows ME system. Open the "Device Manager" to see all installed and detected
hardware components of your computer. To open the device manager, click "System" at your
control panel and select "Device Manager".
Once you have connected and started your camera, the Plug-and-Play function will indicate it
in the device manager.
VideoSystem Cameo 200 DV (English) 15
Page 16

Installation using Windows 2000
Disconnect your camcorder from the Cameo 200 DV during the driver installation process.
Windows 2000 offers the easiest installation, because all components which are necessary for
DV editing, are already available. Drivers will be installed automatically without any requests.
After having completed the driver installation successfully, we
recommend you install DirectX 8.1.
For more information, read pageFehler! Textmarke nicht definiert..
Check the installation once more in the device manager of Windows 2000.
Click "Start ->Settings ->System Manager -> System" and select the registry "Hardware"
followed by "Device Manager´".
!
When you have connected the camcorder it will appear in the above list under "Imaging
devices"
16 VideoSystem Cameo 200 DV (English)
Page 17

Installation using Windows XP
Disconnect your camcorder from the Cameo 200 DV during the driver installation process.
Windows XP offers the easiest installation, because all components which are necessary for
DV editing, are already available. Drivers will be installed automatically without any requests.
Check the installation once more in the device manager of Windows XP.
Click "Start ->Settings ->System Manager -> System" and select the registry "Hardware"
followed by "Device Manager´".
VideoSystem Cameo 200 DV (English) 17
Page 18

When you have connected the camcorder it will appear in the above list under "Imaging
devices"
18 VideoSystem Cameo 200 DV (English)
Page 19

Software installation
Inserting the "Cameo 200 DV –CD" will automatically start the setup utility. If not, start the
program AUTORUN.EXE manually in the main folder of the CD.
The setup utility will do a lot of the work for you. However, it cannot all be done automatically.
For a complete installation, some points still must be considered.
Installation of DirectX 8.1
Frequently we realize that things don't always go as planned.
With the introduction of DirectX 8.1, Microsoft offers many improvements and bug fixes that
are essential for digital video editing. Please install this update first!
If you are using Windows XP, you do not need to install DirectX 8.1.
Installation of Power Director Pro 2.0 DE
Following the installation of DirectX 8.1, please install Power Director Pro 6.0 DE. During the
installation, you will be asked to enter registration information and a CD key, which can be
found on the cover of the Cameo 200 DV installation CD. For additional information, please
consult the online manual of Cyberlink's Power Director Pro 2.0, which can also be found on
the Cameo 200 DV installation CD.
VideoSystem Cameo 200 DV (English) 19
Page 20

Appendix
FAQ – Frequently Asked Questions and their answers
Recording video data from the Media Studio Pro 6.0 VE with your DV-camcorder using
Windows 98SE does not work as described in the Chapter "DV reproduction on your
camcorder.
1. You probably you haven't activated your camcorder´s DV-In feature or you haven't
installed DirectX 8.1. DirectX 8.1 is included in the installation CD.
2. Check the DirectX website frequently for updates.
http://www.microsoft.com/directx
I heard that the file size of videos is a problem. Is that true?
There are indeed limitations to the file size. One reason is the AVI format itself. The AVI
format is supported by older VfW-based Software only to a file size of up to 2GB . Current
programs, based on DirectShow, support AVI files up to 4GB. As this also only supports a
maximum DV video length of 18 minutes, the format has been enhanced. The current
OpenDML-format has no limitations apart from the file size of the corresponding
operation system.
- FAT (Windows 98 SE, ME, 2000)
Maximum file size is 2GB (approximately 9 minutes of DV video)
- FAT 32 (Windows 98 SE, ME, 2000)
Maximum file size is 4 GB (approximately 18 minutes of DV video)
NTFS (Windows 2000)
The maximum file size depends on the partition size.
If you wish to edit longer videos, we recommend Windows 2000 as an operating system.
Media Studio Pro 6.0 VE of course supports open DML files.
20 VideoSystem Cameo 200 DV (English)
Page 21

Recorded videos are jumpy and jerky.
Most probably your hard disk drive is too slow and cannot write the transmitted data fast
enough. We recommend you de-fragment your hard disk frequently. If you are using an
Ultra DMA hard disk, be sure that the Ultra DMA mode is activated in the device manager.
Check if there is an IRQ conflict between the Cameo 200 DV and any other component in
your PC.
We also recommend you use a separate hard disk drive only for your video material. All
temporary folders for Media Studio Pro 6.0 VE should also be installed on this hard disk.
Read the next section too.
Video data is not being recorded and the computer crashes during the recording.
Make sure that there is no IRQ (Interrupt) conflict between the Cameo 200 DV and any
other component in your PC. Open the device manager (by clicking on "Start->Settings>System Manager->System. In the device manager, double click on "Computer" to display
the IRQ list of your computer.). If there is an IRQ conflict you should try first to operate the
device in another PCI slot. This will solve the problem in most cases. Be sure not to
operate the Cameo 200 DV in the first PCI slot (next to the AGP slot of your graphic card),
as this slot in most cases uses the same IRQ as the AGP slot.
What is the required speed of a hard disk drive to avoid dropouts during recordings or
reproductions?
For a seamless transfer of DV video data, you need a hard disk drive with a minimum
speed of 3,5 MB/s. We strongly recommend you to use a SCSI- or IDE hard disk drive,
which supports the Ultra DMA mode. If you are using an Ultra DMA hard disk drive, be
sure to activate this mode in the device manager and to use the updated Ultra DMA
drivers for your system.
Can frequent transfers between the computer and the camera reduce the quality of video
material?
No! The video material is already available in digital format and doesn't need to be
changed anymore. The transmission process between camera and computer can be best
compared to a digital copy procedure.
While trying to export a rendered clip, I get the message, that the cassette is write-protected
or that a recording is impossible.
Some cameras have problems, indicating their status correctly when they are using a
FireWire™ interface. Remove the cassette from the camera and tape the holes on the rear
side with two small tape strips.
VideoSystem Cameo 200 DV (English) 21
Page 22

The perfect computer
Sorry, but the perfect computer hasn't been built yet. Every computer has its advantages and
drawbacks and should be conceived for a primary purpose. We have put together a little list to
make the choice a little easier for you.
The CPU
For working with DV video data, the processor's speed is secondary, but will be relevant, if you
want to create video effects and complex transitions. A faster processor will decrease the
effect calculation time and the time you have to wait. For video editing, we recommend Intel
Pentium IV, AMD Athlon XP or, of course, faster!
The main memory
If you are editing videos, the video material must be manipulated. When large amounts of
data can be held in the memory and don't need to be read from the hard disk drive all the
time, the advantages are obvious. Though 64MB Ram is enough, we recommend you use a
main memory of 128MB. If you are using Windows 98 SE an extended main memory is useless.
For Windows ME, Windows 2000 and Windows XP we recommend 256MB.
The hard disk drive
The most important component for video editing! An up to date hard disk should usually be
able to read and write data fast enough. If you are using an IDE hard disk, make sure that it is
in DMA mode. We also recommend you to use an additional hard disk, which is only used for
video data.
22 VideoSystem Cameo 200 DV (English)
Page 23

You're not alone ...
We have put together this list of Internet links, which are hopefully of interest.
Links of camcorder Producers:
Canon
Germany - http://www.canon.de
England - http://www.canon.co.uk
France - http://www.canon.fr
Italy - http://www.canon.it
Spain - http://www.canon.es
Netherlands - http://www.canon.nl
JVC
http://www.jvc-europe.com/JvcCons/
Panasonic
Germany - http://www.panasonic.de
England - http://www.panasonic.co.uk
France - - http://www.panasonic.fr
Italy - http://www.panasonic.it
Spain - http://www.panasonic.es
Netherlands - http://www.panasonic.nl
SONY
Germany - http://www.sony.de
England - http://www.sony.co.uk
France - http://www.sony.fr
Italy - http://www.sony.it
Spain - http://www.sony.es
Netherlands - http://www.sony.nl
VideoSystem Cameo 200 DV (English) 23
Page 24

The following companies are e offering activators for DV camcorders (to enable the DV-in feature):
http://www.como.com
Germany
http://www.dv-in.de
http://www.dvcut.de
http://www.hifivideofachversand.de
http://www.stonehead.de
Netherlands
http://www.twintek.nl/dvwidget.html
http://enable.dvin.org/
UK
http://enable.dvin.org
Further links for digital video editing:
http://www.dvfilmmaker.com
http://www.mainconcept.com
well as further useful software)
http://www.videox.net
http://www.slashcam.de
(Site in German)
(Site in German)
(Site in English dealing with DV video topics)
(Producer of video cutting and composition programs as
24 VideoSystem Cameo 200 DV (English)
Page 25

TerraTec service.
Even the best systems may experience problems or breakdowns. In this case, the TerraTec
team will be pleased to help you.
Hotline, Mailbox, Internet.
In case of bigger problems, that cannot be solved alone, with the help of your retailer or this
manual, contact us directly.
The Internet is the first way to look for help: Visit http://www.terratec.net/
you find current answers to frequently asked questions (FAQ's) as well as up to date drivers,
all available in our mailbox system. Phone numbers are: +49-(0)2157-8179-24 (Analog)
and +49-(0)2157-8179-42 (ISDN).
If this still doesn't help you, please refer to our telephone hotline. You may also contact us
online, visiting this page: http://www.terratec.net/support.htm
keep the following information available:
•
Your registration number,
•
This instruction manual,
•
A printout of your configuration files,
•
The manual of your motherboard,
•
A printed screenshot of your BIOS configuration.
It would also be good for you to sit next to your computer while calling our technicians, in oder
to try out some of the hints immediatly. We strongly recommend you to note the name of the
technician, when contacting our support team. You need this name, if your card is defective
and must be returned.
. In both cases,
, where
Broken?!
Contact us, before your card is returned to us, note the name of the support technician and
pay attention to the following points:
•
Fill out the service card that comes with your product, completely and explicitly. The more
detailed you describe the problem, the quicker it can be handled. Contributions without a
description of the problem cannot be forwarded and will be returned at your expense.
•
We strongly recommend you also send in a copy of the receipt or bill (not the original). If
there is no copy included, we assume that the guarantee time has run out and will repair
the card at your expense.
•
Please use a safe and appropriately protective package. Goods damaged in transit cannot
be repaired by us under warranty. Experience has shown, that the original package serves
best for this purpose. Remember that your card is a fragile and sensitive electronic part.
•
Put an appropriate postage on the package, just as we do, when returning your card..
VideoSystem Cameo 200 DV (English) 25
Page 26

General service regulations
1. General
With the purchase and the receipt of the product you accept our general service
regulations
2. Proof of guarantee
To verify your proof of guarantee, we recommend you send in the receipt, bill or delivery
note. Without any proof of guarantee we will repair the product at your expense.
3. Description of problem
Contributions without a description or with an incomplete description ("defect" or "to be
repaired") will be returned and a fee will be charged as, this additional complication could
have been avoided.
4. Invalid returns
In case of Invalid returns ( no fault found, probably operational error), we will return the
product and charge a fee.
5. Package
Please use the original package, when returning the product to us. Improper packing will
endanger the warranty claim. Damages resulting from poor packaging during transport will
invalidate the warranty claim.
6. Foreign manufactured products
Products that have not been manufactured or distributed by TerraTec Electronic GmbH, will
be returned and a fee will be charged.
7. Repairs liable to your expense
Repairs out of the warranty period are liable to your expense.
8. Transportation costs
The sender is responsible for the costs for transportation and insurance of products sent
to TerraTec Electronic GmbH. In case of warranty, TerraTec is responsible for the costs of
returning the product to the customer. Packages with no postage will be returned due to
organizational reasons.
9. Final regulation
General service regulations of TerraTec GmbH are subject to changes without notice.
In all other respects the general trading conditions of TerraTec GmbH are considered as
accepted.
26 VideoSystem Cameo 200 DV (English)
Page 27

Glossary
Activation – Due to the European customs regulations, the import of digital video recorders
is more expensive than the import of digital video playback devices. For this reason,
manufacturers of camcorders have started to modify their products for the European market by
disabling the DV input. Some smart developers didn't take long to find ways to remove this
limitation. This procedure is called "Activation". This activation is required to transfer video
material from external sources to a DV camcorder. Activators are available for almost all types
of camcorders, and can be bought legally at your retailer.
AVI – A Windows video format.
Bitrate – Indicates the amount of a data transferred per second. The higher the bit rate, the
better the quality. There are two types of bit rates: Constant (e.g. for -> VCD) and variable (e.g. >SVCD and -> DVD. In contrast to the constant bit rate, the variable bit rate is aligned to picture
material.
Blue Screen – A Variation of -> Chroma Keying
Capture – Another word for recording.
Chroma Keying – Chroma keying uses a mono colored surface, to record , for example, an
actor in front of it. When the recorded video is edited, the mono colored surface may be
replaced by another background.
Chrominance – Chrominance indicates the color signal in ->YUV, which consists of two color
components. U is the balance between red and cyan, while V is the balance between yellow
and blue.
Clip – A small piece of video material.
Color saturation – Indicates the amount of color in a picture.
Composite Video – Composite Video is a transmission process used in the consumer section.
It is processed over a cinch connector and is often used with TV sets. In this procedure, all
signals (chrominance and luminance) are transmitted with only one cable. The Composite
Video's quality is worse than, for example, in -> S-Video, where chrominance and luminance
are transmitted separately.
CPU – Central Processing Unit. The part of your computer that actually calculates (I. E.
Pentium or Athlon)
D8 – Digital 8 is the successor of Hi8 or the VHS-C format for camcorders. Though it is still
recorded on Hi8 or D8 cassettes, it uses a digital DV format.
VideoSystem Cameo 200 DV (English) 27
Page 28

Data flow rate – see Data transfer rate
Data transfer rate – the data transfer rate indicates, how fast your hard disk drive can read or
write continuously. The data transfer rate is measured in megabytes per second, e.g. 7 MB/s.
Device control – Indicates the possibility to control your DV camcorder from the computer.
DirectDraw – DirectDraw is a graphical standard initiated by Microsoft. Among other features
it enables data to be written directly to the graphic card's memory space, to allow e.g. a
seamless video display.
Dropped Frames – these are missing pictures in the video data flow, mainly caused by slow
hard disk drives.
DV – DV is the abbreviation of Digital Video. The DV standard has a compression procedure
of 5:1, which corresponds to a data rate of 3,125 MB/s and therefore can be handled by almost
every hard disk drive. The DV quality standard is very high and is often used in professional
productions. There are two types of DV cassettes, which differ in size and maximum play
length, while their video data is compatible to one another. Mini DV is mostly used in the
consumer section and offers tapes with a length of up to one hour. The DV format for
professional use offers play lengths of up to three hours.
DVD – DVD is the abbreviation of Digital Versatile Disk. The diameter is the same as of a
standard CD-ROM. At the moment, memory capacities from 4,7GB (DVD-5) to 17GB (DVD-18)
and data rates from 600 to 1300KByte/s are specified.
In addition there are various formats, like DVD-Video, DVD-Audio, DVD-ROM, DVD-R, DVD-RW
and DVD-RAM.
DV-In – The DV connector of a camcorder usually is able to transfer video data in both
directions – in and out of the camcorder. However, many of the E European camcorders do
not provide the DV input option. See also -> Activation
FireWire™ – Apple’s name for -> IEEE-1394
Framerate – Indicates the number of pictures in specific time. Often measured in
FramesPerSecond.
Half pictures – To avoid flickering when reproducing video signals on a TV screen, 50 half
pictures per second are transmitted in stead of 25 whole pictures (in PAL standard. Half
pictures are e either the uneven lines (transmitted first) or the even lines, displayed on the
screen.
Hi8 – Analog video recording system, transmitting color and illumination separately, allowing
a better quality as in example VHS-C.
28 VideoSystem Cameo 200 DV (English)
Page 29

Hosiden connector – A small connector with 4 poles to transmit ,in example, -> S video
signals.
IEEE-1394 – Originally a Universal Bus system for digital data transfer, developed by Apple.
Devices may be connected by cables with a length of up to 4, 5 m. This system offers data
transfer rates of up to 400 Mbits/s. As there's is no specified data format for this system yet, a
homogenous standard for video data is still missing. Sony has filled the gap with the
"normative strength of the actual", by integrating FireWire™ connectors into their own digital
recorders. FireWire™ and the Sony protocol have finally achieved seamless video editing.
Ilink – Sony’s name for -> IEEE-1394
Interlacing – see half pictures.
Linear Editing – see Linear video cut
Linear video cut – The linear video cut originates in analogue video. Original video data is
mostly available in the same order as edited video clips. A simple way of linear cutting is, for
example, the transmission from an analogue video camera to a video recorder and the
simultaneous erasure of some clips. If you wish to insert, for example, a new video clip at the
middle, all following clips must be cut again.
Luma Keying – In opposition to Chroma Keying, in Luma Keying the video transparence is
determined by the illumination.
Luminance – Luminance indicates illumination in -> YUV. (Y)
Main memory – See RAM
MiniDV – the consumer version of the DV-format. See also –> DV.
MiniDVD – Indicates a procedure, where -> DVD data with a corresponding registry structure
and a navigation menu is copied to conventional CD. Due to the small memory space, a
MiniDVD can only store 18 minutes of video data. Unfortunately, only a few DVD players can
play MiniDVD, so that for the creation of a MiniDVD, a reproduction on a computer is
recommended.
MJPEG – Motion JPEG is a compression procedure, where every picture in the video data
stream is compressed individually.
MPEG – The Motion Picture Experts Group is a consortium of leading manufacturers and
developers of video technology, setting new standards like MPEG-1 or MPEG-2.
Non-linear Editing – see Non Linear Video Cut
VideoSystem Cameo 200 DV (English) 29
Page 30

Non-linear video cut – In contrast to the -> linear video cut, this procedure allows you to edit
video clips without influencing the following clips. The non-linear video cut enables you, for
example, to shorten a clip at the beginning of a video project without having to edit the
following video clips again.
NTSC – NTSC is a video standard which is used, for example in Japan or the USA. NTSC offers a
higher frame rate than PAL (30 pictures or 60 -> half pictures per second, but uses a lower
resolution (525 lines, of which 480 are visible). The color display in the NTSC standard is
indicated in ->YIQ.
Overscreening – Indicates the soft effective transition from one video clip to another.
PAL – PAL is the most common video standard in Europe. The frame rate of PAL is 25 pictures
per second (or 50 ->half pictures. The color display in PAL is indicated in ->YUV.
Preview – the preview offers you a practical overview of your work. The final quality is usually
better than the quality of a preview.
RAM – Random Access Memory is your computers main memory. Video editing with the use of
effects requires a lot of main memory, so: The more RA M you have, the better it is.
Rendering – Indicates the re-calculation of video and audio clips, after having changed them,
for example, by using filters or effects.
RGB Color space – In the RGB color space, every visible pixel consists of the three
components R(ed), G(reen) and B(lue).
Saturation – see Color saturation
Screen – see Overscreening
Storyboard – In contrast to -> Timeline, the Storyboard offers a topical overview of your video
project's order. Individual scenes can be identified easily, with the lack of a relation to the real
length of a project.
SVCD – Abbreviation for Super Video CD. SVCD resembles a ->VCD with the advantage, that
the data is available in a MPEG2 format with a -> variable bit rate. In addition, the resolution of
480 x 576 pixels exceeds the resolution of a VCD. A SVCD can usually store 45 to 50 minutes of
video. The bit rate (audio and video) of a SVCD must not exceed 2,6 Mbps. Most pure DVD
players can replay the SVCD.
S-Video – In contrast to -> Composite Video, chrominance and luminance of the video signal
are being transferred separately and therefore offer a higher quality.
Timeline – Timeline is a time axis on which you edit and position your video clips
30 VideoSystem Cameo 200 DV (English)
Page 31

Transition – See Overscreening
Trim – Indicates the cutting of a video at the beginning or end
VCD – Abbreviation for Video CD. A Video CD offers a PAL resolution of 352 x 288 pixels and
uses the MPEG1 format for saving video and audio data. The VCD uses a constant bit rate of
1,15 Mbps for video and 224 kbps for audio data. Almost every DVD player can replay a VCD.
Video filter – Video filters allow you to edit your video material in many ways. You may, for
example, use video filters to change colors and use complex filters to decrease the quality of
your best videos and let them look like an old silent movie.
Video for Windows – A video concept for Windows, aged, but still frequently used.
YIQ – YIQ is a color space related to -> YUV. It is equally determined by an illumination
component -> Luminance (Y), but by different color components, called I (Cyan Orange
Balance) and Q(Magenta Green Balance). YIQ is, for example, used with -> NTSC.
YUV – A color space, that is determined by an illumination component (-> Luminance-Y) and
two color components (-> Chrominance- U,V).
VideoSystem Cameo 200 DV (English) 31
 Loading...