

Page 1
FRANCE : Siège Commercial
Terraillon
B.P.73
78403 Chatou Cedex
Service Après Vente :
Terraillon chez MGF logistique
ZI d’Epluches - Rue des Préaux
95310 St Ouen-l’Aumône
Service Consommateurs Terraillon
0 826 88 1789
UK : Terraillon / Hanson
81a Marlowes
Hemel Hempstead
Hertfordshire, HP1 1LF
Tel: 01442-270444 - Fax: 01442-270666
E-mail: Sales@Hansonuk.com
www.terraillon.com
Date de création de la notice : juillet 2005.
IM Duo.qxd 29/07/05 14:11 Page 1
Page 2

ELECTRONIC
KITCHEN SCALE
..........................p 4
ELEKTRONINEN
KEITTIÖVAAKA
............................p 22
ELEKTRONISCHE
HAUSHALTSWAAGE
......................p 6
ELEKTRONICZNA
WAGA KUCHENNA
......................p 24
BALANZA DE COCINA
ELECTRÓNICA
............................p 8
ЭЛЕКТРОННЫЕ
КУЛИНАРНЫЕ ВЕСЫ
..................p 26
BILANCIA DA CUCINA
ELETTRONICA
............................p 10
∏§∂∫Δƒ√¡π∫∏ ∑À°∞ƒπ∞
∫√À∑π¡∞™
................................p 28
BALANÇA CULINÁRIA
ELECTRÓNICA
..........................p 12
ELEKTRONİK
MUTFAK TARTISI
..........................p 30
ELEKTRONISCHE
KEUKENWEEGSCHAAL
..............p 14
ELEKTRONICKÉ
KUCHYŇSKÉ VÁHY
......................p 32
ELEKTRONISK
KØKKENVÆGT
..........................p 16
ELEKTRONICKÉ
KUCHYNSKÉ VÁHY
......................p 34
ELEKTRONISK
HUSHÅLLSVÅG
..........................p 18
IM Duo.qxd 29/07/05 14:11 Page 1
IM DUO
BALANCE CULINAIRE
R
F
E
D
E
P
ÉLECTRONIQUE
N
E
T
I
S
T
..........................p 2
ELEKTRONISK
O
N
P
R
E
T
KJØKKENVEKT
I
F
L
U
L
R
..........................p 20
L
N
A
D
V
S
S
C
K
S
Page 3
2
LA BALANCE
CARACTÉRISTIQUES
• Portée maximale : 5 Kg
• Graduation : 1 g
• Pesée avec tare automatique (permet de peser
successivement différents ingrédients sans les
retirer du plateau)
• Mesure des liquides en millimètres
• Minuteur (compte à rebours)
MISE EN MARCHE DE LA BALANCE
1) Piles : Ouvrez le boîtier situé au dessous de
l’appareil et installez les 2 piles au lithium
CR2032 (fournies avec l’appareil) en retirant la
languette rouge ; la partie la plus large de la pile
doit être sur le dessus. Le « + » doit être visible
une fois les piles insérées.
2) Posez votre balance sur une surface plane et dure.
3) Appuyez sur la touche « Tare » pour allumer la
balance. L’affichage indique : puis .
UTILISATION
*Après la mise en marche, placez l’ingrédient
directement sur le plateau ou versez-le dans le
récipient. Le poids s’affiche. Au fur et à mesure que
vous ajoutez du poids, le poids affiché augmente.
Pour faire la tare :
Installez le récipient, saladier ou autre sur le plateau
avant de mettre l’appareil en marche.
Pour peser individuellement et successivement
différents ingrédients :
- Pesez le premier aliment comme expliqué
précédemment *.
- Appuyez sur la touche « Tare » pour remettre la balance
à zéro. L’affichage indique : puis .
- Ajoutez alors le deuxième aliment. L’affichage
indique uniquement le poids du deuxième aliment.
Et ainsi de suite… Procédez de la même façon pour
tous les aliments successifs. Si des aliments sont
enlevés après avoir réalisé une tare, la valeur
négative qui s’affiche correspond au poids des
aliments retirés. Par exemple :
Pour mesurer les liquides en millilitres :
Pendant la pesée, appuyez sur la touche « H2O »
pour passer en fonction « mesure des liquides ».
Appuyez de nouveau sur la touche « H2O » pour
repasser en fonction pesée.
ARRÊT DE LA BALANCE
Quand l’écran affiche , appuyez sur la touche
« Tare ». Si l’écran affiche autre chose, appuyez sur la
touche « Tare », attendez que s’affiche et
appuyez de nouveau sur la touche « Tare ».
Dans tous les cas, la balance s’éteindra
automatiquement au bout de 2 minutes si aucune
touche n’est activée.
AFFICHAGES SPÉCIAUX
Surcharge
Lorsque la balance est en surcharge, l’écran
affiche : . Retirez le poids immédiatement
pour ne pas endommager votre balance.
Indicateur d’usure de pile
(valable pour la balance et le minuteur)
Remplacer la pile quand la balance affiche .
EEEE
0 g0
g
0
g
0
g
F
R
BALANCE CULINAIRE ÉLÉCTRONIQUE
Cher client,
Vous venez d’acquérir cette balance culinaire électronique Terraillon : nous vous en remercions et nous
espérons que vous en serez satisfait. Nous vous recommandons de lire attentivement cette notice d’utilisation pour tirer le meilleur profit de votre balance.
IM Duo.qxd 29/07/05 14:11 Page 2
Page 4
3
FONCTION HORLOGE – MINUTEUR
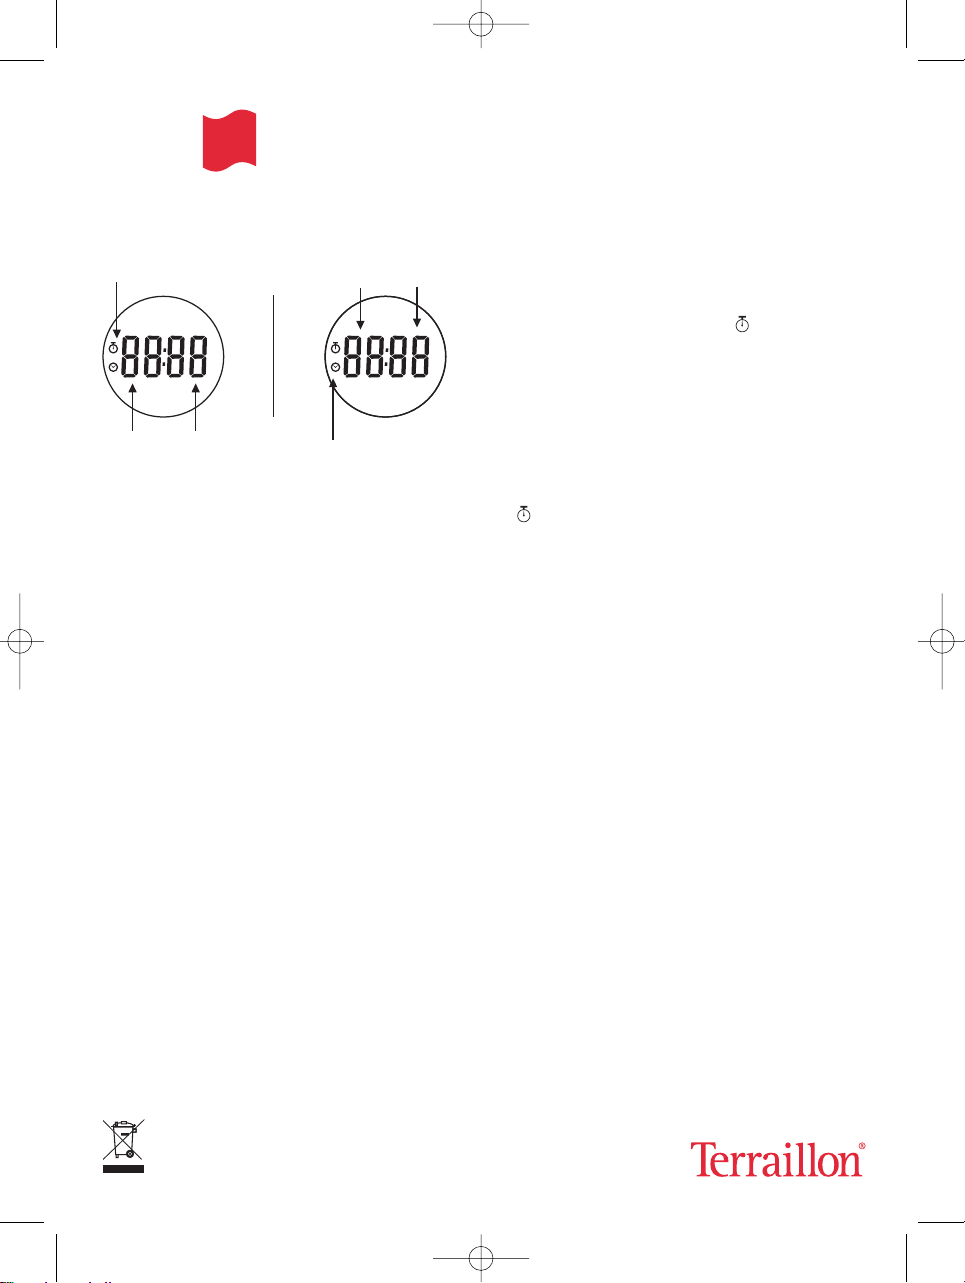
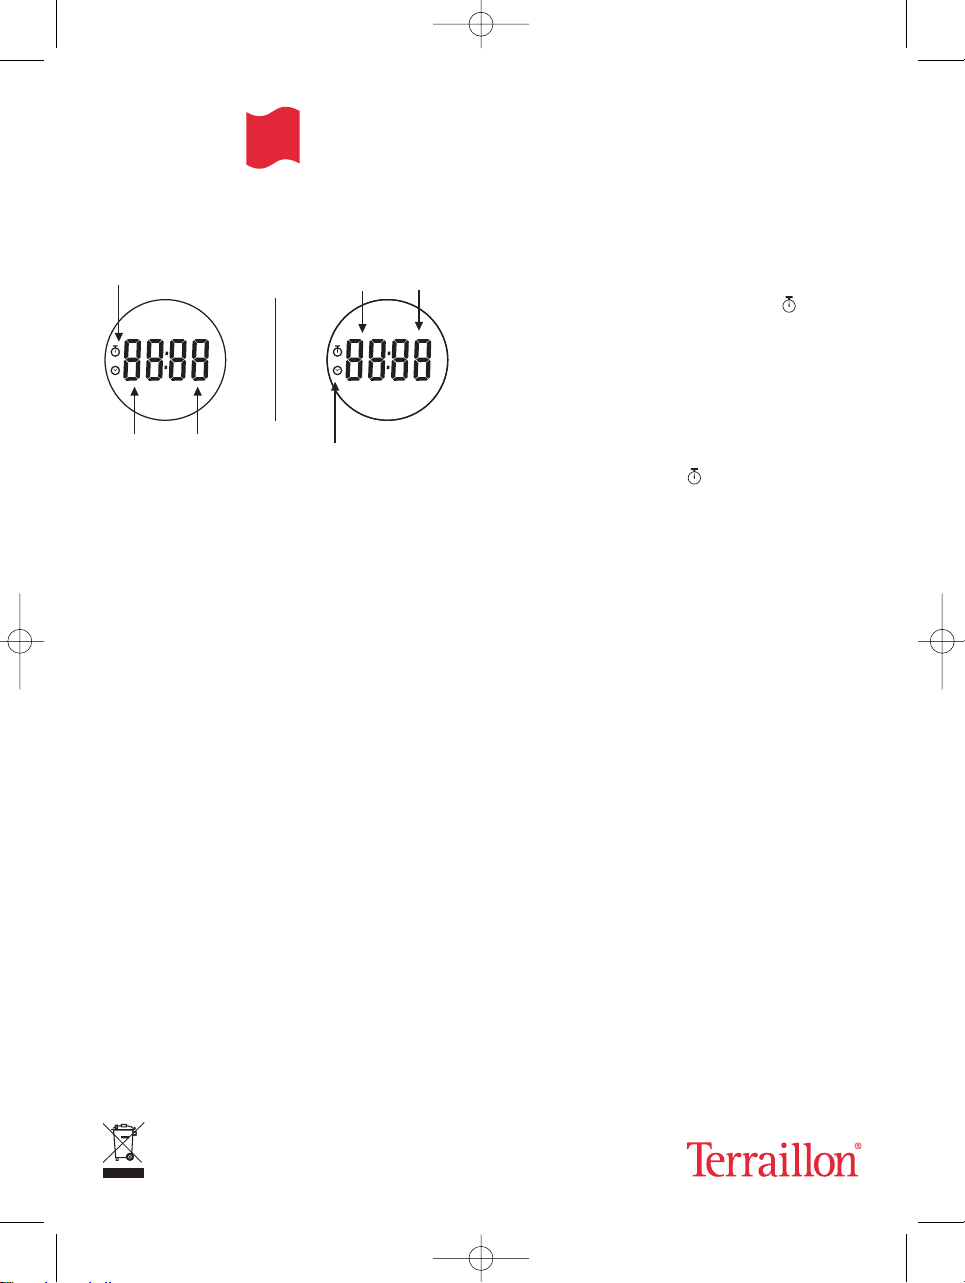
En mode Minuteur En mode Horloge
En mode Horloge
Format 24h
1) Ouvrez le boîtier situé au-dessous de l’appareil
et installez la pile A76 (fournie avec l’appareil) en
retirant la languette rouge ; la partie la plus large
de la pile doit être sur le dessus. Le « + » doit être
visible une fois la pile en place.
2) Une fois la pile installée, la balance passe en
mode horloge au format 24h.
3) Pour régler l’heure, appuyez sur la touche
« clock set » à l’arrière de l’appareil.
À l’écran, « 00:00 » clignote. Appuyez sur « ▲ »
ou « ▼ » pour augmenter ou diminuer l’heure.
Les chiffres défileront plus vite si vous maintenez
la pression sur la touche.
4) Pour valider l’heure, patientez quelques secondes.
Remarques :
L’heure doit être réglée à chaque changement de
pile comme indiqué précédemment.
En mode Veille, lorsqu’il n’y a pas de compte à
rebours, l’heure s’affiche.
En mode Minuteur
Programmation maximale :
99 minutes 59 secondes.
1) En mode Horloge, appuyez sur « ▲ » ou « ▼ »
pour passer en mode Minuteur.
Le symbole du minuteur et la durée
précédemment programmée s’affichent.
2) Appuyez sur les touches « ▲ » ou « ▼ » pour
programmer la durée du compte à rebours. Pour
faire défiler les chiffres plus vite, maintenez la
pression sur la touche.
3) Pour valider la durée sélectionnée, patientez 3
secondes. Le clignotement du symbole minuteur
confirme le lancement du compte à rebours.
4) À la fin du compte à rebours, l’alarme sonne
pendant 30 secondes, « 00:00 » clignote à l’écran.
Vous pouvez l’éteindre en appuyant sur
n’importe quelle touche.
Pour arrêter le compte à rebours, appuyez sur « ▲ »
ou « ▼ ». À ce moment-là, si vous souhaitez régler la
durée du minuteur à nouveau, rappuyez sur « ▲ » ou
« ▼ ». Pour repasser en mode Horloge, appuyez sur
« ▲ » ou « ▼ » et n’appuyez plus sur aucune touche
pendant 10 secondes.
La balance et le minuteur sont indépendants
l'un de l'autre : vous pouvez utiliser ces deux
appareils séparément ou simultanément.
F
R
BALANCE CULINAIRE ÉLÉCTRONIQUE
Icône Minuteur
Icône Horloge
minutes secondes
heures minutes
PRÉCAUTIONS D’EMPLOI
de la balance et du minuteur
• Nettoyez votre balance avec une éponge et de l’eau
savonneuse, en évitant solvants et abrasifs.
Ne l’immergez pas dans l’eau.
• Ne mettez pas votre balance dans le four à micro-ondes.
• Retirez les piles en cas de non-utilisation prolongée.
Ne jetez pas les piles usagées.
Déposez-les dans un container prévu à cet effet
pour qu’elles soient collectées et recyclées.
IM Duo.qxd 29/07/05 14:11 Page 3
AM
PM
AM
PM
Page 5
4
THE SCALE
FEATURES
• Maximum capacity: 5 Kg
• Graduation: 1 g
• Weighing with automatic tare (allows you to weigh
different ingredients successively without removing them from the platform)
• Measures liquids in milliliters
• Timer (countdown)
TURNING THE SCALE ON
1) Batteries :
Open the housing located on the bottom of the
scale and connect the 2 lithium CR2032 batteries (included with the scale) by removing the red
tongue: the widest part of the battery should be
on the top. The “+” must remain visible once the
batteries are installed.
2) Place your scale on a hard, flat surface.
3) Press the button « Tare » to turn the scale on.
The display reads: then .
Remark:
If your scale has a conversion switch on the base, you
can change the measuring units from Metric to
Imperial or vice versa, by simply activating this conversion switch located on the under-side of the scales.
OPERATION FLOW
*After turning the scale on, place the ingredient
directly on the platform or pour it into the container.
The weight is displayed. As you add weight, the
weight displayed increases.
To use the tare function:
Install the container, salad bowl, etc. on the platform before turning the scale on.
To weigh different ingredients individually and
successively:
- Weigh the first food item as explained previously*.
- Press the button « Tare » to reset the scale. The
display reads: then .
- Then add the second food item. The display indicates the weight of the second item only.
And so on… Proceed in the same manner for all the
successive food items. If items are removed after
having established the tare, the negative value that
appears on the display corresponds to the weight
of the items removed. For example:
To measure liquids in milliliters
In weigh mode, press the “H
2
O” button to move to
the “liquid measurement” function. Press the “H2O”
button again to return to the weigh function.
TURNING THE SCALE OFF
When the screen displays , press the « Tare »
button. If the screen displays something else, press
the « Tare », wait for the display and press
the again « Tare ».
In all cases, the scale will turn off automatically after
2 minutes if no button is activated.
SPECIAL DISPLAYS
Overload
When the scale is overloaded, the screen displays :
. Remove the weight immediately or you will
damage your scale.
Low battery indicator (valid for the scale and
the timer)
Replace the battery when the scale display
reads .
EEEE
0 g0
g
0 g0
g
ELECTRONIC KITCHEN SCALE
Dear Customer,
Thank you for purchasing a Terraillon electronic kitchen scale. We hope you will find it satisfactory. Please
read these instructions carefully to take full advantage of your scale.
IM Duo.qxd 29/07/05 14:11 Page 4
N
E
Page 6
5
THE CLOCK - TIMER
In Timer mode In Clock mode
In clock mode
24h Format
1) Open the battery housing located on the back of
the timer and connect the A76 battery (supplied
with the scale) by removing the red tongue: the
widest part of the battery should be on the top.
The “+” must remain visible once the batteries
are installed.
2) As soon as the battery is inserted, the scale goes
into clock mode and the format is 24 h.
3) To set the time, press on the button « clock set »
on the back of the appliance.
On the screen the « 00:00 » flash. Press on « ▲ »
or « ▼ » to increase or decrease the time.
By pressing and holding the button down, the
figures go faster.
4) To validate the time chosen, wait for a few
seconds.
Remarks:
Every time you change batteries, the clock format is
to be reset as above. In sleep mode, when there is
no countdown, the time is displayed.
In Timer mode
Maximum programming:
99 minutes 59 seconds.
1) In clock mode, press on « ▲ » or « ▼ » to go into
timer mode. The symbol of the timer and the
duration previously scheduled are displayed.
2) Press on buttons « ▲ » or « ▼ » to schedule the
duration of the countdown.
For the figures to go faster, press and hold the
button down.
3) To validate the time chosen, wait for 3 seconds.
Then the timer symbol flashes signaling the
count down.
4) At the end of the countdown, the alarm rings for
30 seconds. The « 00:00 » flashes on the screen.
It is then possible to turn the alarm off by pressing on any button.
To stop the countdown, press on « ▲ » or « ▼ ».
At that time, if you wish to readjust the time of the
timer, press again on « ▲ » or « ▼ » .
To go back in clock mode, press on « ▲ » or « ▼ »
and do not push on any button for 10 seconds.
The scale and the timer are separate. You may
use both appliances separately or simultaneously.
USE PRECAUTIONS for the scale and timer
• Clean your scale with a sponge and soapy water,
avoiding solvents and abrasive cleansers. Do not
immerse it in water.
• Do not place your scale in the microwave oven.
• Remove the battery when the scale is not used for
extended periods.
ELECTRONIC KITCHEN SCALE
Timer icon
Clock icon
minutes seconds
hour minutes
Do not throw used batteries away.
Dispose of them in a container designed for this purpose so that they can be collected and recycled.
IM Duo.qxd 29/07/05 14:11 Page 5
N
E
AM
PM
AM
PM
Page 7
6
DIE WAAGE
TECHNISCHE DATEN
• Wiegebereich: 5 Kg
• Skaleneinteilung: 1 g
• Automatisches Zuwiegen (für das aufeinanderfolgende Wiegen von verschiedenen Zutaten, ohne
sie von der Wiegefläche zu nehmen).
• Messung von Flüssigkeiten in Millilitern
• Zeitschaltuhr (Countdown)
EINSCHALTEN
1) Batterien : Öffnen Sie das Batteriefach auf der
Geräteunterseite. Setzen Sie die 2 LithiumBatterien vom Typ CR2032 ein (mit der Waage
mitgeliefert). Dazu entfernen die die rote Lasche.
Der breiteste Teil der Batterie muss oben liegen.
Das Pluszeichen (“+”) muss sichtbar sein, wenn
die Batterien eingesetzt sind.
2) Stellen Sie die Waage auf eine harte und gerade
Oberfläche.
3) Betätigen Sie die Taste « Tare », um die Waage ein-
zuschalten. Auf der Anzeige erscheint zunächst:
und dann .
BETRIEB
* Legen Sie nach dem Einschalten die zu wiegende
Zutat direkt auf die Wiegefläche, oder gießen Sie
sie in den Behälter. Das Gewicht wird angezeigt. Mit
zunehmendem Gewicht steigt auch die
Gewichtsanzeige an.
Tara:
Stellen Sie den Behälter, die Salatschüssel o.ä. auf
die Wiegefläche, bevor Sie das Gerät einschalten.
Einzelnes und aufeinanderfolgendes Wiegen
von mehreren Zutaten:
- Wiegen Sie die erste Zutat, wie voranstehend
erklärt*.
- Betätigen Sie die Taste « Tare », um die Anzeige
auf Null zurück zu stellen. Auf der Anzeige
erscheint zunächst: und dann .
- Fügen Sie die zweite Zutat hinzu. Die Anzeige
zeigt jetzt nur das Gewicht der zweiten Zutat an.
Fahren Sie in gleicher Weise mit allen weiteren
Zutaten fort. Wenn nach einer Nullrückstellung
Zutaten von der Wiegefläche entfernt werden, entspricht der angezeigte negative Wert dem Gewicht
der entnommenen Zutaten. Beispiel:
Messen von Flüssigkeiten in Millilitern:
Drücken Sie während des Wiegens die Taste “H
2
O”,
um auf die Funktion “Flüssigkeitsmessung” umzuschalten.
Betätigen Sie erneut die Taste “H2O”, um wieder in
den Wiegemodus zu gehen.
ABSCHALTEN
Wenn auf der Anzeige erscheint, betätigen
Sie die Taste « Tare ».
Wenn auf der Anzeige etwas anderes erscheint,
warten Sie, bis angezeigt wird und betätigen dann noch einmal die Taste« Tare ».
Wenn keine Taste betätigt wird, schaltet sich die
Waage automatisch nach 2 Minuten ab.
SONDERANZEIGEN
Überlastung
Wenn die Waage überlastet ist, erscheint auf der
Anzeige: . Entlasten Sie sofort die Waage,
weil sonst die Gefahr von Schäden besteht.
Batterieanzeige (gilt für Waage und Zeitschaltuhr)
Legen Sie eine neue Batterie ein, wenn die Anzeige
erscheint.
EEEE
0
g0 g
0
g
0
g
ELEKTRONISCHE HAUSHALTSWAAGE
Sehr geehrte Kundin, sehr geehrter Kunde,
Sie haben eine elektronische Küchenwaage von Terraillon erworben. Wir danken Ihnen für das Vertrauen,
das Sie uns entgegenbringen. Damit Sie die Möglichkeiten des Geräts optimal nutzen und mit Ihrem
Produkt voll und ganz zufrieden sind, empfehlen wir, diese Bedienungsanleitung aufmerksam durchzulesen.
IM Duo.qxd 29/07/05 14:11 Page 6
E
D
Page 8

7
DIE ZEITSCHALTUHR - UHR
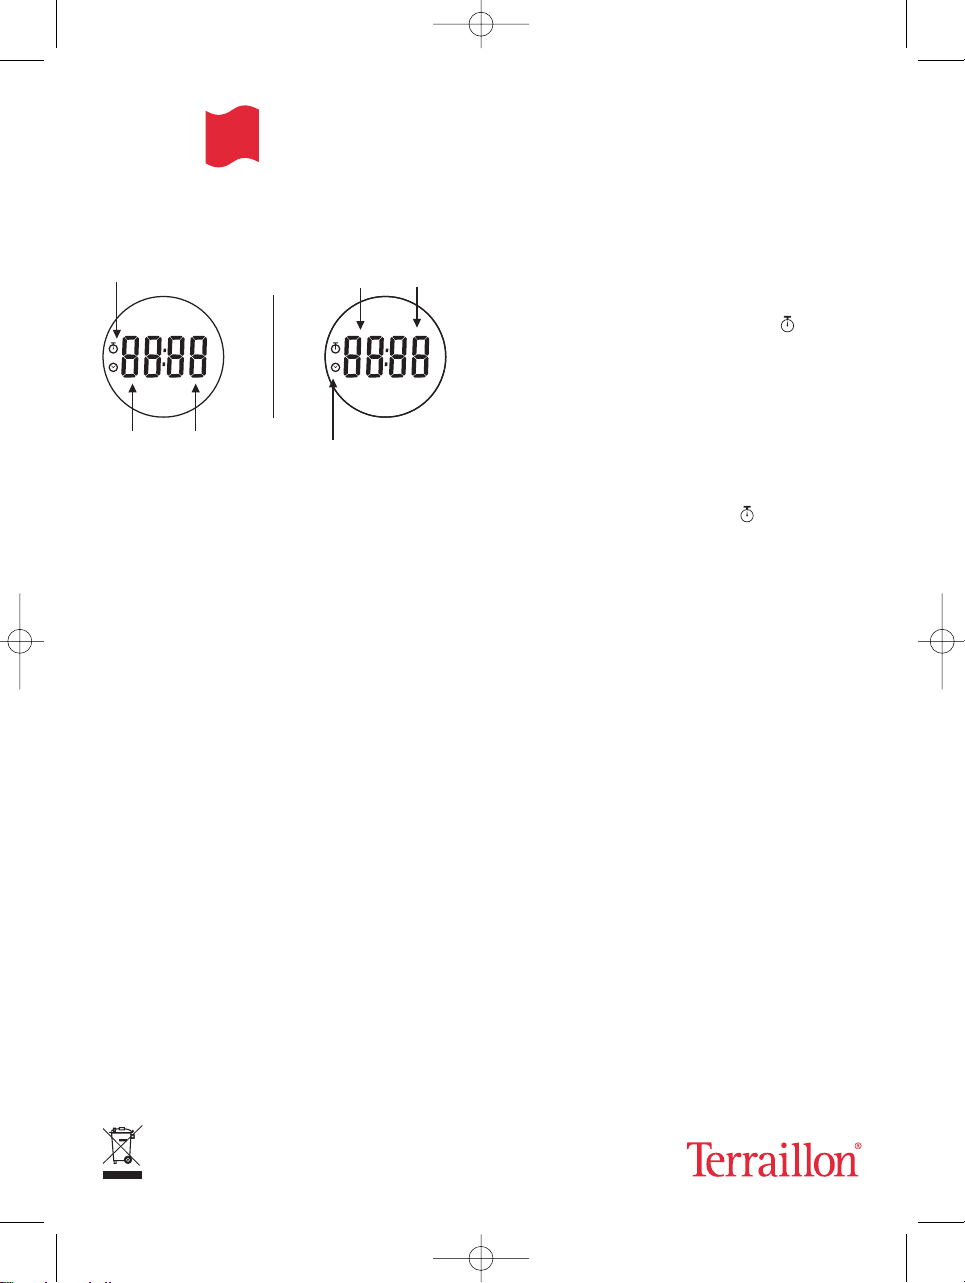
Im Zeitschaltuhrmodus Im Uhrmodus
Im Uhrmodus
24-Stunden-Format
1) Öffnen Sie das Batteriefach auf der
Geräteunterseite. Setzen Sie die Batterie vom
Typ A76 ein (mit der Waage mitgeliefert). Dazu
entfernen die die rote Lasche. Der breiteste Teil
der Batterie muss oben liegen. Das Pluszeichen
(“+”) muss sichtbar sein, wenn die Batterien eingesetzt sind.
2) Sobald die Batterie eingesetzt ist, wechselt die
Waage in den Uhrenmodus im 24-Stunden-Format.
3) Um die Uhrzeit einzustellen, betätigen Sie die
Taste « clock set » auf der Rückseite des Geräts.
Auf der Anzeige blinkt « 00:00 ». Drücken Sie auf
« ▲ » oder « ▼ », um die Uhrzeit vor- oder
zurückzustellen.
Wenn Sie die Taste gedrückt halten, werden die
Ziffern schneller durchlaufen.
4) Um die Uhrzeit zu bestätigen, warten Sie einige
Sekunden.
Hinweise:
Bei jedem neuen Batteriewechsel muss das
Uhrenformat wie oben beschrieben neu eingestellt
werden.
Im "Sleep"-Modus, ohne Countdown, wird die
Uhrzeit angezeigt.
Im Zeitschaltuhrmodus
Programmierung bis zu:
99 Minuten 59 Sekunden
1) Drücken Sie im Uhrenmodus auf « ▲ » oder « ▼ »,
um in den Zeitschaltuhrmodus zu wechseln.
Das Symbol der Zeitschaltuhr und die zuletzt
programmierte Dauer werden angezeigt.
2) Betätigen Sie die Tasten « ▲ » oder « ▼ », um die
Laufzeit der Zeitschaltuhr einzustellen.
Um die Ziffern schneller zu durchlaufen, halten
Sie die Taste gedrückt.
3) Um die Uhrzeit zu bestätigen, warten Sie 3
Sekunden.
Dann beginnt der Countdown und wird durch das
blinkende Zeitschaltuhrsymbol angezeigt.
4) Am Ende des Countdown ertönt der Alarm 30
Sekunden lang. Auf der Anzeige blinkt « 00:00 ».
Der Alarm kann mit jeder beliebigen Taste abgeschaltet werden.
Um den Countdown zu stoppen, drücken Sie auf
« ▲ » oder auf « ▼ ».
Wenn Sie dann die Zeit der Zeitschaltuhr neu einstellen möchten, drücken Sie noch einmal auf « ▲ »
oder auf « ▼ » .
Um in den Uhrenmodus zurückzukehren, drücken Sie
auf « ▲ » oder auf « ▼ ». Innerhalb von 10 Sekunden
darf dann keine andere Taste betätigt werden.
Die Waage und die Zeitschaltuhr sind voneinander getrennt. Sie können beides getrennt oder
zusammen verwenden.
GEBRAUCHSHINWEISE für Waage und
Zeitschaltuhr
• Reinigen Sie die Waage mit einem Schwamm und
Seifenwasser. Vermeiden Sie Lösemittel und
Scheuermittel. Nicht in Wasser eintauchen.
• Die Waage niemals in den Ofen oder in die
Mikrowelle stellen.
• Bei längerem Nichtgebrauch die Batterie herausnehmen.
ELEKTRONISCHE HAUSHALTSWAAGE
Zeitschaltuhrsymbol
Uhrsymbol
Minuten Sekunden
Stunden Minuten
Altbatterien niemals in den Müll werfen, sondern in
einen dafür vorgesehenen Behälter, damit die Batterien
gesammelt und recycelt werden können.
IM Duo.qxd 29/07/05 14:11 Page 7
E
D
AM
PM
AM
PM
Page 9
8
BILANCIA
CARATTERISTICHE
• Portata massima: 5 Kg
• Graduazione: 1 g
• Pesatura con tara automatica (consente di pesare
vari ingredienti successivamente senza toglierli
dal piatto)
• Misura di liquidi in millilitri
• Timer (conto alla rovescia)
AZIONAMENTO DELLA BILANCIA
1) Batterie : aprire l’alloggiamento situato nella parte
inferiore della bilancia e inserire le 2 batterie al litio
CR2032 (fornite insieme alla bilancia) rimuovendo
la linguetta rossa: la parte più larga della batteria
deve restare in alto. Il segno “+” deve rimanere visibile dopo l’installazione delle batterie.
2) Collocare la bilancia su una superficie rigida e piana.
3) Premere il tasto « Tare » per azionare la bilancia.
Il display indica: poi .
FUNZIONAMENTO
*Dopo aver azionato la bilancia, collocare l’ingrediente direttamente sul piatto oppure in un altro
contenitore. Viene visualizzato il peso.
Aggiungendo peso, il peso visualizzato aumenta.
Per usare la funzione tara:
Posizionare il recipiente, l’insalatiera o altro sul piatto prima di azionare l’apparecchio.
Per pesare individualmente e
successivamente diversi ingredienti:
- Pesare il primo alimento come spiegato prece-
dentemente *.
- Premere il tasto « Tare » per azzerare l’apparecchio. Il display indica: poi .
- Aggiungere quindi il secondo alimento. Il display
indica soltanto il peso del secondo alimento.
E così via… Procedere nello stesso modo per tutti
gli alimenti successivi. Se vengono tolti gli alimenti
dopo aver realizzato una tara, il valore negativo che
appare sul display corrisponde al peso degli alimenti tolti. Ad esempio: .
Per misurare i liquidi in millilitri
Durante la pesatura, premere il tasto “H
2
O” per
passare alla funzione “misura dei liquidi”.
Premere di nuovo il tasto “H2O” per ritornare alla
funzione di pesatura.
ARRESTO DELLA BILANCIA
Quando il display visualizza , premere il
tasto « Tare ». Se il display visualizza un’altra cosa,
premere « Tare », attendere la visualizzazione
poi premere di nuovo « Tare ».
In tutti i casi, la bilancia si spegnerà automaticamente nel giro di 2 minuti se non viene attivato
alcun tasto.
VISUALIZZAZIONI SPECIALI
Sovraccarico
Quando la bilancia è in sovraccarico, il display
visualizza: . Rimuovere il peso immediatamente altrimenti si danneggerà la bilancia.
Indicatore di consumo della batteria (valido per
bilancia e timer)
Sostituire la batteria quando il display indica:
EEEE
0 g0
g
0
g
0
g
I
T
BILANCIA DA CUCINA ELETTRONICA
Gentile Cliente,
La ringraziamo per aver scelto questa bilancia da cucina elettronica Terraillon. Le auguriamo di farne eccellente uso. Affinché possa ottenere piena soddisfazione da questo prodotto, Le raccomandiamo di leggere
attentamente le istruzioni sotto riportate.
IM Duo.qxd 29/07/05 14:11 Page 8
Page 10
9
OROLOGIO - TIMER
Modalità timer Modalità orologio
Modalità orologio
Formato 24 ore
1) Aprire l’alloggiamento della batteria situato sul
retro del timer e inserire la batteria A76 (fornita
con la bilancia) rimuovendo la linguetta rossa: la
parte più larga della batteria deve restare in alto.
Il segno “+” deve rimanere visibile dopo l’installazione delle batterie.
2) Appena viene inserita la batteria, la bilancia si
pone in modalità orologio con formato di 24 ore.
3) Per impostare l’ora, premere il tasto « clock set »
sul retro dell’apparecchio.
I numeri « 00:00 » lampeggiano sul display.
Premere « ▲ » o « ▼ » per far avanzare o retrocedere l’ora.
Tenendo premuti i tasti, i numeri scorrono più
velocemente.
4) Per convalidare l’ora impostata, attendere alcuni
secondi.
Osservazioni:
Ogni volta che si sostituiscono le batterie, il formato
orologio viene azzerato e occorre procedere come
sopra. In modalità di veglia, quando non viene effettuato il conto alla rovescia, viene visualizzata l’ora.
Modalità timer
Programmazione massima:
99 minuti 59 secondi.
1) In modalità orologio, premere « ▲ » oppure « ▼ »
per passare in modalità timer.
Viene visualizzato il simbolo timer insieme
alla durata programmata.
2) Premere i pulsanti « ▲ » oppure « ▼ » per pro-
grammare la durata del conto alla rovescia.
Per far scorrere più velocemente i numeri, tenere
premuto il tasto.
3) Per convalidare l’intervallo programmato, atten-
dere 3 secondi.
Quando il simbolo del timer lampeggia, il
conto alla rovescia inizia.
4) Alla fine del conto alla rovescia, l’allarme suona
per 30 secondi. Le cifre « 00:00 » lampeggiano
sul display.
È allora possibile disattivare l’allarme premendo
un tasto qualsiasi.
Per arrestare il conto alla rovescia, premere « ▲ »
oppure « ▼ ».
A questo punto, se si desidera riprogrammare l’intervallo del timer, premere di nuovo « ▲ » oppure
« ▼ ».
Per tornare in modalità orologio, premere « ▲ »
oppure « ▼ » e non premere alcun pulsante per 10
secondi.
La bilancia e il timer sono separati. Le due funzionalità possono essere usate simultaneamente o separatamente.
PRECAUZIONI D’USO per bilancia e timer
• Pulire la bilancia con spugna e acqua saponata, evi-
tando solventi e abrasivi. Non immergerla in acqua.
• Non mettere la bilancia nel forno a microonde.
• Togliere la batteria in caso di inutilizzo dell’apparec-
chio per un periodo prolungato.
Icona timer
Icona orologio
minuti secondi
ore minuti
Non gettare le batterie scariche.
Depositarle in un apposito contenitore
affinché siano raccolte e riciclate.
I
T
BILANCIA DA CUCINA ELETTRONICA
IM Duo.qxd 29/07/05 14:11 Page 9
AM
PM
AM
PM
Page 11
10
LA BALANZA
CARACTERÍSTICAS
• Capacidad máxima: 5 kg
• Graduación: 1 g
• Función de peso con tara automática (permite
pesar distintos ingredientes sucesivamente sin
retirar los anteriores del platillo)
• Medición de los líquidos en mililitros
• Temporizador (cuenta atrás)
ENCENDIDO
1) Pilas: Abra el compartimiento para pilas ubicado
en la parte inferior de la balanza y conecte las dos
pilas de litio CR2032 (entregadas con el aparato)
retirando la lengüeta roja: la parte más ancha de
las pilas debe ir hacia arriba. El “+” debe permanecer visible una vez instaladas las pilas.
2) Coloque la balanza sobre una superficie dura y
plana.
3) Pulse el botón “Tare” para encender la balanza. Se
visualizará en pantalla: y luego .
FUNCIONAMIENTO
* Una vez encendida la balanza, coloque el ingrediente directamente sobre el platillo o dentro del
recipiente. Se visualizará el peso correspondiente.
A medida que añade más cantidad, el peso visualizado va aumentando.
Para activar la función de tara:
Instale el recipiente (ensaladera u otro) en el platillo
antes de encender el aparato.
Para pesar individualmente distintos ingredientes de forma sucesiva:
- Pese el primer alimento, siguiendo las instruc-
ciones detalladas anteriormente.*
- Pulse el botón “Tare” para poner la balanza en cero.
Se visualizará en pantalla: y luego .
- A continuación, añada el segundo alimento. Se
visualizará en pantalla el peso del segundo alimento solo.
Y así sucesivamente. Proceda de la misma forma
con todos los alimentos que vaya incorporando. Si
retira alimentos tras haber determinado una tara, el
valor negativo que se visualizará en pantalla
corresponderá al peso de los alimentos retirados.
Por ejemplo:
.
Para medir los líquidos en mililitros
En la función de peso, pulse el botón “H
2
O” para
pasar a la función de medición de líquidos.
Pulse nuevamente el botón “H2O” para volver a la
función de peso.
APAGADO
Cuando se visualice en pantalla , pulse el
botón “Tare”. Si se visualiza otro valor en pantalla,
pulse el botón “Tare”, espere a que aparezca
y pulse nuevamente el botón “Tare”.
En todos los casos, la balanza se apagará automáticamente al cabo de dos minutos si no se activa
ningún botón.
MENSAJES ESPECIALES
Sobrecarga
Cuando la balanza está sobrecargada, se visualiza
en pantalla: . Retire el peso de inmediato; de
lo contrario, se estropeará el aparato.
Indicador de pila gastada (válido para la balanza
y el temporizador)
Sustituya la pila cuando visualice en pantalla:
0 g0
g
0
g
0
g
BALANZA DE COCINA ELECTRÓNICA
Estimado Cliente:
Acaba usted de adquirir una balanza de cocina electrónica Terraillon y le agradecemos por ello. Esperamos
saque el máximo provecho de este producto. Para obtener plena satisfacción, le recomendamos lea atentamente las siguientes instrucciones de uso.
IM Duo.qxd 29/07/05 14:11 Page 10
S
E
EEEE
Page 12

11
RELOJ-TEMPORIZADOR
Modo Temporizador Modo Reloj
Modo Reloj
Formato 24 hs
1) Abra el compartimiento para pilas ubicado en la
parte posterior del temporizador y conecte la pila
A76 (entregada con el aparato) retirando la
lengüeta roja: la parte más ancha de la pila debe
ir hacia arriba. El “+” debe permanecer visible
una vez instalada la pila.
2) Al instalar la pila, la balanza se pone en modo
reloj con formato 24 hs.
3) Para ajustar la hora, pulse el botón “Clock Set” ubi-
cado en la parte posterior del aparato. Comenzarán
a titilar en pantalla cuatro ceros “00:00”. Pulse los
botones “▲” o “▼” para avanzar o atrasar la hora
y los minutos. Para que los números desfilen más
rápido, mantenga pulsado el botón.
4) Para confirmar la hora seleccionada, espere
unos segundos.
Observaciones:
Cada vez que se cambien las pilas, se habrá de reajustar el formato de la hora siguiendo las indicaciones descritas. En modo inactivo, cuando el temporizador no está funcionando, se visualiza la hora.
Modo Temporizador
Plazo máximo programable:
99 minutos 59 segundos.
1) En modo reloj, pulse “▲” o “▼” para pasar al
modo temporizador. Se visualizarán el símbolo
del temporizador y el plazo previamente
programado.
2) Pulse los botones “▲” o “▼” para programar la
duración de la cuenta atrás. Para que los números desfilen más rápido, mantenga pulsado el
botón.
3) Para confirmar la duración seleccionada, espere
tres segundos.
Comenzará a titilar el símbolo del temporizador
indicando la cuenta atrás.
4) Al final de la cuenta atrás, sonará la alarma
durante 30 segundos y titilarán los cuatro ceros
“00:00” en pantalla. Es posible apagar la alarma
pulsando cualquier botón.
Para detener la cuenta atrás, pulse “▲” o “▼”.
Si quiere luego reprogramar la duración de la cuenta atrás, pulse nuevamente “▲” o “▼”.
Para volver al modo reloj, pulse “▲” o “▼” y absténgase de pulsar ningún botón durante diez segundos.
La balanza y el temporizador son dos dispositivos independientes, por lo cual se pueden utilizar conjunta o separadamente.
PRECAUCIONES para la balanza y el temporizador
• Limpie la balanza con una esponja embebida en
agua con jabón, evitando utilizar disolventes y abrasivos. No la sumerja en agua.
• No coloque la balanza en el horno microondas.
• Retire la pila en caso de no utilizar la balanza duran-
te un período prolongado.
Pantalla del temporizador
pantalla del reloj
minutos segundos
horas minutos
No tire las pilas usadas. Deposítelas
en un contenedor previsto a tales efectos
para su ulterior reciclaje.
BALANZA DE COCINA ELECTRÓNICA
IM Duo.qxd 29/07/05 14:11 Page 11
S
E
AM
PM
AM
PM
Page 13

12
DESCRIÇÃO DA BALANÇA
CARACTERÍSTICAS
• Capacidade máxima: 5 Kg
• Graduação: 1 g
• Pesagem com tara automática (permite pesar
diferentes ingredientes sucessivamente sem os
remover do prato)
• Mede líquidos em mililítros
• Temporizador (contagem regressiva)
LIGAR A BALANÇA
1) Pilha : Abra a caixa situada por baixo da balança
e conecte as 2 pilhas de lítio CR2032 (fornecidas
com a balança) removendo a fita vermelha: as pilhas devem ser colocadas respeitando as polaridades de tal modo que o sinal “+” fique visível.
2) Coloque a sua balança numa superfície dura e
plana.
3) Prima o botão « Tare » para ligar a balança. O
visor indica: e depois .
FUNCIONAMENTO
*Depois de ter ligado a balança, coloque o ingrediente directamente no prato ou deite-o num recipiente. O peso é visualizado. À medida que adicionar ingredientes, o peso indicado aumenta.
Para utilizar a função tara:
Coloque o recipiente, saladeira, etc. no prato antes
de ligar a balança.
Para pesar diferentes ingredientes
Individualmente e sucessivamente:
- Pese o primeiro alimento como indicado anterior-
mente *.
- Prima o botão « Tare » para reiniciar a balança.
O visor indica: e depois .
- A seguir junte o segundo alimento.
O visor indica apenas o peso do segundo alimento, e
assim sucessivamente… Proceda do mesmo modo
para os sucessivos alimentos. Se retirar ingredientes
após ter determinado a tara, o valor negativo que
aparece no visor corresponde ao peso dos alimentos
retirados. Por exemplo:
Para medir líquidos em mililitros
No modo pesagem, prima o botão “H
2
O” para pas-
sar à função “medição de líquido”. Volte a premer
o botão “H2O” para voltar à função pesagem.
DESLIGAR A BALANÇA
Quando o visor indica , prima a botão
« Tare ». Se o visor indicar uma coisa diferente,
prima o botão « Tare », aguarde até aparecer o
símbolo e volte a premer « Tare ».
Em qualquer dos casos, a balança desliga-se automaticamente após 2 minutos se nenhum botão foi
activado.
INDICAÇÕES ESPECIAIS NO VISOR
Sobrecarga
Quando a balança está em sobrecarga, o visor
indica : . Retire imediatamente o peso, pois
pode danificar a balança.
Indicador de pilha gasta (válido para a balança e
o temporizador)
Substitua a pilha quando o visor da balança indicar:
.
EEEE
0 g0
g
0
g
0
g
P
T
BALANÇA CULINÁRIA ELECTRÓNICA
Caro Cliente,
Obrigado por ter comprado uma balança culinária electrónica Terraillon. Desejamos uma excelente utilização. Para obter plena satisfação da sua balança, por favor leia atentamente estas instruções.
IM Duo.qxd 29/07/05 14:11 Page 12
Page 14

13
RELÓGIO- TEMPORIZADOR
Em modo Temporizador Em modo Relógio
Em modo relógio
Formato 24h
1) Abra o compartimento das pilhas situado por
trás do temporizador e conecte a pilha A76 (fornecida com a balança) removendo a fita vermelha: A pilha deve ser colocada respeitando as
polaridades de tal modo que o sinal “+” fique
visível.
2) Depois de inserir a pilha, a balança coloca-se em
modo relógio no formato 24h.
3) Para regular o tempo, prima o botão « clock set »
por trás do aparelho.
No visor, a indicação « 00:00 » pisca. Prima
« ▲ » ou « ▼ » para avançar ou atrasar a hora.
Se premer e manter o botão premido, as indicações desfilam mais rapidamente.
4) Para validar a hora escolhida, aguarde alguns
segundos.
Nota:
Cada vez que substituir as pilhas, terá de redefinir o
formato do relógio como indicado anteriormente.
Em modo de espera, quando não há contagem
regressiva, o visor indica a hora.
Em modo Temporizador
Programação máxima:
99 minutos 59 segundos.
1) No modo relógio, prima « ▲ » ou « ▼ » para
passar para o modo temporizador. O símbolo do
temporizador e a duração previamente programada aparecem no visor.
2) Prima os botões « ▲ » ou « ▼ » para programar
a duração da contagem regressiva. Para que as
indicações desfilem mais rapidamente, mantenha o botão premido.
3) Para validar o tempo escolhido, aguarde 3
segundos. O símbolo do temporizador pisca,
visualizando a contagem regressiva.
4) No final da contagem regressiva, o alarme soa
durante 30 segundos. O símbolo « 00:00 » pisca
no visor. O alarme pode ser desligado premindo
qualquer botão.
Para parar a contagem regressiva, prima «▲» ou «▼».
Nesse momento, se desejar reajustar o tempo do
temporizador, volte a premer « ▲ » ou « ▼ ».
Para voltar ao modo relógio, prima «▲» ou «▼» e
não prima qualquer outro botão durante 10 segundos.
A balança e o temporizador estão separados.
Pode utilizar os dois aparelhos separada ou
simultaneamente.
PRECAUÇÕES DE USO para a balança e o temporizador
• Limpe a sua balança com uma esponja embebida
em água com sabão, evitando utilizar solventes ou
produtos abrasivos. Não imergir em água.
• Não coloque a sua balança no microondas.
• Remova a pilha em caso de não utilização prolongada.
Ícone do Temporizador
ícone da Relógio
minutos segundos
hora Minutos
Não deite as pilhas gastas no lixo comum. Coloque-as
num contentor previsto para o efeito para que sejam
recolhidas e recicladas.
P
T
BALANÇA CULINÁRIA ELECTRÓNICA
IM Duo.qxd 29/07/05 14:11 Page 13
AM
PM
AM
PM
Page 15

14
DE WEEGSCHAAL
KENMERKEN
• Maximum capaciteit: 5 Kg
• Schaalverdeling: 1 g
• Weegt met automatische tarra (zodat u
achtereenvolgens verschillende ingrediënten kunt
wegen zonder dat u ze van de schaal hoeft te nemen)
• Meet vloeistoffen in milliliters
• Keukenwekker (timer)
DE WEEGSCHAAL AANZETTEN
1) Batterijen: Open het batterijvak aan de onderkant
van de weegschaal en sluit de 2 (meegeleverde)
CR2032 lithium batterijen aan door het rode lipje
te verwijderen: het breedste deel van de batterij
moet naar boven liggen. De “+” moet zichtbaar
blijven als de batterijen geïnstalleerd zijn.
2) Plaats de weegschaal op een stevige en vlakke
ondergrond.
3) Druk op « Tare » om de weegschaal aan te zetten.
Het display toont: en dan .
WERKWIJZE
*Zet de weegschaal aan en plaats het ingrediënt
direct op de schaal of in de kom. Het gewicht wordt
op het display getoond. Als u product toevoegt,
neemt de getoonde waarde toe.
De Tarra functie:
Plaats de kom, de slabak e.d. op de schaal voordat
u de weegschaal aanzet.
Verschillende ingrediënten apart en achterelkaar
wegen:
- Weeg het eerste product zoals hierboven
beschreven *.
- Druk op « Tare » om de weegschaal te resetten.
Het display toont: en dan .
- Voeg het tweede product toe. Het display toont
het gewicht van het tweede product (zonder het
eerste).
En zo voort… Weeg op deze wijze alle
achtereenvolgende producten. Als u producten
verwijdert nadat u de tarra hebt ingesteld, toont het
display een negatieve waarde die overeenkomt met
het gewicht dat u hebt verwijderd. Bijvoorbeeld:
.
Vloeistoffen in milliliters meten
Druk in weegmodus op “H
2
O” om de functie
“vloeistoffen meten” te selecteren. Druk nogmaals
op “H2O” om terug te gaan naar de weegfunctie.
DE WEEGSCHAAL UITZETTEN
Druk, als het display aangeeft, op « Tare ».
Als het display een andere melding toont: druk op
« Tare », wacht tot het display aangeeft en
druk nogmaals op « Tare ».
De weegschaal gaat automatisch na 2 minuten uit
als u op geen enkele knop gedrukt hebt.
SPECIALE MELDINGEN
Overbelasting
Als de weegschaal te zwaar gelast is, toont het
display: . Verwijder het product onmiddellijk,
om beschadiging van de weegschaal te
voorkomen.
“Batterij leeg” indicator (voor de weegschaal en
de keukenwekker)
Vervang de batterij als de melding op het
display verschijnt.
EEEE
0 g0
g
0
g
0
g
ELEKTRONISCHE KEUKENWEEGSCHAAL
Geachte klant,
U hebt een Terraillon elektronische keukenweegschaal gekocht en wij feliciteren u met uw keuze. Wij hopen
dat u hem naar volle tevredenheid zult gebruiken. Lees deze aanwijzingen aandachtig om de functies en
mogelijkheden van uw weegschaal optimaal te kunnen benutten.
IM Duo.qxd 29/07/05 14:11 Page 14
L
N
Page 16

15
KLOK - KEUKENWEKKER
In modus Keukenwekker In modus Klok
In modus Klok
24h instelling
1) Open het batterijvak aan de achterkant van de
timer en sluit de (meegeleverde) A76 batterij aan
door het rode lipje te verwijderen: het breedste
deel van de batterij moet naar boven liggen. De
“+” moet zichtbaar blijven als de batterijen
geïnstalleerd zijn.
2) Zodra de batterij is aangesloten, gaat de
weegschaal in klokmodus met 24 uurs instelling.
3) Ga als volgt te werk om de tijd in te stellen: druk
op « clock set » aan de achterkant van het
apparaat.
De « 00:00 » knippert op het display. Druk op
« ▲ » of « ▼ » om de tijdinstelling te verhogen of
te verlagen.
Door de knop ingedrukt te houden, veranderen
de cijfers sneller.
4) Wacht enkele seconden om de ingestelde tijd te
bevestigen.
Opmerking:
Elke keer als u de batterijen vervangt, moet de klok
opnieuw worden ingesteld volgens bovenstaande
procedure. In sluimermodus wordt, als de
keukenwekker niet actief is, de tijd aangegeven.
In modus Keukenwekker
Maximum programmering:
99 minuten 59 seconden.
1) Druk in klokmodus op « ▲ » of « ▼ » om de
keukenwekkermodus in te schakelen. Het
symbool van de keukenwekker en de duur van
de ingestelde tijd worden op het display getoond.
2) Druk op « ▲ » of « ▼ » om de tijdsduur in te stellen.
De cijfers veranderen sneller als u de knop
ingedrukt houdt.
3) Wacht 3 seconden om de ingestelde tijdsduur te
bevestigen. Het symbool van de keukenwekker
knippert om aan te geven dat de
keukenwekkerfunctie gestart is.
4) Als de ingestelde tijd verlopen is, gaat het
alarmsignaal 30 seconden af. Op het display
gaat « 00:00 » knipperen.
U kunt dan het alarmsignaal afzetten door op
een willekeurige knop te drukken.
Om de keukenwekker uit te zetten, drukt u op « ▲ »
of « ▼ ». Als u op dat moment de tijdsduur van de
keukenwekker wilt wijzigen, drukt u nogmaals op
« ▲ » of « ▼ » . Om terug te gaan naar de
klokmodus: druk op « ▲ » of « ▼ » en wacht 10
seconden voordat u opnieuw op een knop drukt.
De weegschaal en de keukenwekker werken
onafhankelijk van elkaar. U kunt beide functies
afzonderlijk of gelijktijdig gebruiken.
VOORZORGSMAATREGELEN voor de weegschaal
en de keukenwekker
• Reinig de weegschaal met een spons en zeepsop,
vermijd het gebruik van oplosmiddelen en schurende
schoonmaakmiddelen. Dompel het apparaat niet in
het water.
• De weegschaal is niet geschikt voor de magnetron.
• Verwijder de batterijen als u het apparaat gedurende
langere tijd niet denkt te gebruiken.
pictogram Keukenwekker
pictogram Klok icon
minuten seconden
uren minuten
Gooi lege batterijen niet bij het huishoudelijk afval.
Breng ze terug naar een erkend inzamelpunt
zoals ze gerecycled kunnen worden.
ELEKTRONISCHE KEUKENWEEGSCHAAL
IM Duo.qxd 29/07/05 14:11 Page 15
L
N
AM
PM
AM
PM
Page 17

16
KØKKENVÆGT
EGENSKABER
• Max. vejning: 5 Kg
• Gradinddeling: 1 g
• Vejning med automatisk tara (giver mulighed for
at veje forskellige ingredienser efter hinanden
uden at fjerne dem fra vejefladen)
• Måling af væsker i milliliter
• Minutur (nedtælling)
IGANGSÆTNING
1) Batterier : Luk batterirummet op, som sidder
under vægten, og tilslut de 2 litium CR2032
batterier (medfølger) ved at fjerne den røde
tunge: den bredeste del af batteriet skal være
øverst. “+” skal stadig være synlig, når
batterierne er sat i.
2) Stil vægten på en hård og plan flade.
3) Tryk på tasten « Tare » for at tænde for vægten.
Displayet viser: og dernæst .
VEJNING
*Efter igangsætning, læg fødevaren direkte på
vejefladen eller kom den i en skål. Vægten vises.
Efterhånden som der lægges mere vægt på,
forøges den viste vægt.
For at bruge tarafunktionen:
Stil en beholder, en skål, eller en anden genstand
på vejefladen, før du tænder for køkkenvægten.
For at veje flere ingredienser enkeltvis efter
hinanden:
- Vej den første fødevare som forklaret ovenfor*.
- Tryk på tasten « Tare » for at nulstille.
Displayet viser: og dernæst .
- Læg den anden fødevare på. Displayet viser nu
kun vægten af den anden fødevare.
Og så videre… Brug samme fremgangsmåde til alle
de fødevarer, der skal vejes.
Hvis fødevarerne fjernes efter at have beregnet
taraen, svarer den negative værdi i displayet til de
fjernede fødevarers vægt. F.eks.:
For at måle væsker i milliliter
Under vejningen, tryk på tasten “H
2
O” for at skifte
over til funktionen “måling af væsker”. Tryk på
tasten “H2O” igen for at vende tilbage til
vejefunktionen.
SLUKNING
Når displayet viser , tryk på tasten « Tare ».
Hvis displayet viser noget andet, tryk på tasten
« Tare », vent til vises i displayet og tryk igen
på tasten « Tare ».
I alle tilfælde vil køkkenvægten slukke automatisk
efter 2 minutter, hvis der ikke trykkes på nogen tast.
SÆRLIGE VISNINGER
Overbelastning
Når køkkenvægten er overbelastet, viser displayet:
. Fjern straks det, der ligger på vægten for
ikke at beskadige den.
Indikator for svagt batteri (gælder for vægt og
minutur)
Skift batteriet ud, når displayet viser.
EEEE
0 g0
g
0
g
0
g
D
A
ELEKTRONISK KØKKENVÆGT
Kære kunde,
Tillykke med din nye elektroniske køkkenvægt fra Terraillon. Vi håber, du bliver glad for vægten og anbefaler, at du nøje læser denne brugsanvisning for at få størst mulig nytte af produktet.
IM Duo.qxd 29/07/05 14:11 Page 16
Page 18

17
UR - MINUTUR
I funktion med minutur I funktion med ur
I funktion med ur
Over 24 timer
1) Luk batterirummet op, som sidder bag på
minuturet, og tilslut A76 batteriet (medfølger) ved
at fjerne den røde tunge: den bredeste del af
batteriet skal være øverst. “+” skal stadig være
synlig, når batteriet er sat i.
2) Så snart batteriet er sat i, slår køkkenvægten
over til funktion med ur og formatet er 24 timer.
3) Tryk på tasten « clock set » bag på apparatet for
at indstille klokkeslættet.
« 00:00 » blinker i displayet. Tryk på « ▲ » eller
« ▼ » for at lægge til eller trække fra
klokkeslættet.
Når man holder tasten trykket ind, ruller tallene
hurtigere.
4) Vent i nogle få sekunder for at godkende det
valgte klokkeslæt.
Bemærk:
Hver gang batterierne skiftes ud, skal uret indstilles
igen som forklaret ovenfor. Klokkeslættet vises i
dvaletilstand, når der ikke er nogen nedtælling.
I funktion med minutur
Maksimal programmering:
99 minutter 59 sekunder.
1) I funktion med ur, tryk på « ▲ » eller « ▼ » for at
skifte over til funktion med minutur. Symbolet for
minutur og den varighed der sidst blev
programmeret vises.
2) Tryk på tasterne « ▲ » eller « ▼ » for at
programmere nedtællingens varighed. Hold
tasten trykket ind for at få tallene til at rulle
hurtigere.
3) Vent i 3 sekunder for at godkende den valgte
varighed. Når symbolet for minutur blinker,
betyder det, at nedtællingen er startet.
4) Når nedtællingen er slut, ringer alarmen i 30
sekunder. « 00:00 » blinker i displayet. Man kan
slukke alarmen ved at trykke på en vilkårlig tast.
Tryk på « ▲ » eller « ▼ » for at standse nedtællingen.
Man kan nu justere nedtællingens varighed ved at
trykke igen på « ▲ » eller « ▼ » .
Tryk på « ▲ » eller « ▼ » for at vende tilbage til
funktion med ur og tryk ikke på nogen tast i 10
sekunder.
Køkkenvægten og minuturet er adskilte. Man
kan bruge funktionerne særskilt eller samtidig.
FORSIGTIGHEDSREGLER UNDER BRUG af køkkenvægten og minuturet
• Rengør køkkenvægten med en klud og sæbevand,
undgå opløsningsmidler og skuremidler. Dyp den
ikke ned i vand.
• Stil ikke køkkenvægten ind i en mikrobølgeovn.
• Tag batteriet ud, når køkkenvægten ikke bruges i en
længere periode.
Minuturets ikon
Urets ikon
minutter sekunder
timer minutter
Kast ikke brugte batterier bort sammen med almindeligt køkkenaffald. Kom dem i en container, der er forudset til specielt affald,
så de kan blive indsamlet og genbrugt.
D
A
ELEKTRONISK KØKKENVÆGT
IM Duo.qxd 29/07/05 14:11 Page 17
AM
PM
AM
PM
Page 19

18
VÅGEN
TEKNISKA KÄNNETECKEN
• Maximal kapacitet: 5 Kg
• Gradering: 1 g
• Vägning med automatisk tarafunktion (som
innebär att du kan väga olika ingredienser
successivt utan att ta bort dem från plattan)
• Mätning av vätska i milliliter
• Timer (nedräkning)
GÖR SÅ HÄR FÖR ATT STARTA VÅGEN
1) Batterier : Öppna facket som sitter under vågen
och anslut de 2 litiumbatterierna CR2032 (som
levereras med apparaten) genom att avlägsna
den röda fliken: den bredaste delen av batteriet
ska sitta uppåt. Tecknet ”+” måste förbli synligt
när batterierna har satts på plats.
2) Placera vågen på en hård, plan yta.
3) Tryck på knappen ”Tare” för att sätta på vågen.
Displayen visar: sedan .
ANVÄNDNING
*När du har startat vågen ska du lägga ingrediensen
direkt på plattan eller hälla dem i behållaren. Vikten
visas. När du lägger till vikt, ökar den vikt som visas
på displayen.
Så här använder du tarafunktionen:
Placera behållaren, en salladsskål e.d. på plattan
innan du startar vågen.
Gör så här för att väga olika ingredienser
individuellt och successivt:
- Väg den första matvaran enligt instruktionerna ovan*.
- Tryck på knappen ”Tare” för att nollställa vågen.
Displayen visar: sedan .
- Lägg sedan till den andra matvaran. Displayen
anger bara vikten för den andra matvaran.
Och så vidare … Gå tillväga på samma sätt för alla
följande matvaror. Om matvaror tas bort efter det
att tareringen har fastställts, motsvarar det negativa
värde som visas på displayen vikten på de matvaror
som tagits bort. Till exempel:
Gör så här för att mäta vätska i milliliter
I läget vägning ska du trycka på knappen ”H2O” för
att växla till funktionen ”mätning av vätska”. Tryck
på knappen ”H2O” en gång till för att återgå till
funktionen vägning.
GÖR SÅ HÄR FÖR ATT STÄNGA AV VÅGEN
När displayen visar ska du trycka på
knappen ”Tare” Om displayen visar något annat ska
du trycka på ”Tare”, vänta på visningen och
trycka på ”Tare” igen.
Under alla omständigheter kommer vågen att
stängas av automatiskt efter 2 minuter om ingen
knapp aktiveras.
SPECIELLA VISNINGAR
Överbelastning
När vågen är överbelastad visar displayen: .
Tag omedelbart bort vikten annars skadas vågen.
Indikator som visar att batteriet är urladdat
(gäller för vågen och timern)
Ersätt batteriet när vågens display visar.
EEEE
0 g0
g
0
g
0
g
ELEKTRONISK HUSHÅLLSVÅG
Kära kund,
Tack för att du köpt en elektronisk hushållsvåg från Terraillon. Vi hoppas att du kommer att uppskatta den.
Läs dessa instruktioner noggrant för att du ska kunna utnyttja vågens alla fördelar.
IM Duo.qxd 29/07/05 14:11 Page 18
V
S
Page 20

19
KLOCKAN - TIMERN
I läget Timer I läget Klocka
I läget klocka
Formatet 24h
1) Öppna batterifacket på timerns baksida och
anslut batteriet A76 (som levereras med vågen)
genom att avlägsna den röda fliken: den
bredaste delen av batteriet ska sitta uppåt.
Tecknet ”+” måste förbli synligt när batterierna
har satts på plats.
2) När batteriet har satts på plats hamnar vågen i
läget klocka och formatet är 24h.
3) För att ställa klockan ska du trycka på knappen
”clock set” på apparatens baksida.
På displayen blinkar visningen ”00:00”. Tryck på
”▲” eller ”▼” för att öka eller sänka
tidsangivelsen.
Genom att trycka på knappen och hålla den
intryckt bläddras siffrorna snabbare.
4) Du bekräftar den valda tiden genom att vänta
några sekunder.
Anmärkningar:
Varje gång du byter batterier måste tiden ställas in
enligt beskrivningen ovan. I viloläge (sleep), när det
ingen nedräkning pågår, visas tiden.
I läget Timer
Maximal programmering:
99 minuter 59 sekunder.
1) I läget klocka ska du trycka på ”▲” eller ”▼” för
att växla till läget timer. Symbolen för timer
och den tidsperiod som tidigare ställts in visas.
2) Tryck på knapparna ”▲” eller ”▼” för att ställa in
tidsperiod för nedräkning. Om du vill att siffrorna
ska bläddras snabbare ska du trycka på
knappen och hålla den intryckt.
3) Du bekräftar den valda tiden genom att vänta 3
sekunder. Sedan blinkar symbolen för timer
vilket anger nedräkning.
4) Efter nedräkningen ringer timern under 30
sekunder. Visningen ”00:00” blinkar på
displayen. Sedan kan du stänga av ringningen
genom att trycka på vilken knapp som helst.
För att stoppa nedräkningen ska du trycka på ”▲”
eller ” ▼”.
Om du i detta skede vill ställa tiden för timern ska du
trycka på ”▲” eller ”▼” igen.
För att gå tillbaka till läget klocka ska du trycka på
”▲” eller ”▼” och inte trycka på någon knapp under
10 sekunder.
Vågen och timern är separata. Du kan använda
båda apparaterna separat eller samtidigt.
VAR FÖRSIKTIG med vågen och timern
• Rengör vågen med en svamp och tvålvatten och
undvik lösningsmedel och slipande rengöringsmedel.
Överskölj inte apparaten med vatten.
• Ställ inte in vågen i mikrovågsugnen.
• Avlägsna batteriet när vågen inte används under en
längre period.
Ikon för Timer
Ikon för klocka
minuter sekunder
timme Minuter
Släng inte de använda batterierna i soporna.
Lägg dem i en behållare avsedd för detta ändamål så att de kan
samlas in och återvinnas.
ELEKTRONISK HUSHÅLLSVÅG
IM Duo.qxd 29/07/05 14:11 Page 19
V
S
AM
PM
AM
PM
Page 21

20
VEKTEN
KARAKTERISTIKKER
• Maks. vekt: 5 Kg
• Vektinndeling: 1 g
• Veiing med automatisk tareringsfunksjon (gjør det
mulig å veie ulike ingredienser etter hverandre
uten å fjerne dem fra vektskålen)
• Veiing av væsker i milliliter
• Timer (nedtellingsfunksjon)
SLÅ VEKTEN PÅ
1) Batterier : Åpne batterirommet på undersiden av
vekten og kople til de 2 CR2032 lithiumbatteriene (levert med vekten) ved å fjerne den
røde klaffen: batteriets bredeste del skal være
øverst. “+”-tegnet skal være synlig når batteriene
er lagt på plass.
2) Plasser vekten på en hard, plan overflate.
3) Trykk på tasten « Tare » for å slå på vekten.
Displayet viser: og deretter .
BETJENING
*Etter å ha slått vekten på, plasser ingrediensen
direkte på vektskålen eller hell den i en beholder.
Vekten vises. Etterhvert som det legges på mer
vekt, vil den siste vekten øke.
For å bruke tareringsfunksjonen:
Plasser en beholder, en salatbolle o.l. på vektskålen
før vekten slås på.
For å veie ulike ingredienser hver for seg og
etter hverandre:
- Vei den første ingrediensen som forklart tidligere *.
- Trykk på tasten « Tare » for å nullstille vekten.
Dsiplayet viser: og deretter .
- Tilføy så den neste ingrediensen. Displayet viser
nå bare vekten til den siste ingrediensen.
Fortsett deretter på denne måten for alle
ingrediensene etter hverandre. Dersom noen
ingredienser er blitt fjernet fra vekten etter at taraen
er blitt trukket fra, vil den negative vekten som vises
på displayet tilsvare den vekten som er blitt fjernet.
For eksempel:
For å veie væsker i millilitre:
I veiemodus, trykk på tasten “H
2
O” for å veksle til
funksjonen “veiing av væsker”. Trykk en gang til på
tasten “H2O” for å gå tilbake til vanlig veiefunksjon.
SLÅ VEKTEN AV
Når displayet viser , trykk på tasten « Tare ».
Dersom displayet viser noe annet, trykk på tasten
« Tare », vent til vises, og trykk en gang til på
tasten « Tare ».
Vekten vil uansett slå seg av automatisk etter 2
minutter hvis ingen av tastene aktiveres.
SPESIELLE VISNINGER
Overvekt
Når ingrediensene som veies overstiger vektens
kapasitet, vises displayet: . Fjern ingrediensene
umiddelbart, ellers vil det skade vekten.
Batteriindikator (gjelder for vekten og timeren)
Skift ut batteriet når displayet viser .
EEEE
0 g0
g
0
g
0
g
ELEKTRONISK KJØKKENVEKT
Kjære kunde,
Takk for at du kjøpte denne Terraillon elektroniske kjøkkenvekt. Vi håper du vil bli fornøyd med den.
Vennligst les nøye igjennom denne bruksanvisningen, slik at du får fullt utbytte av vekten.
IM Duo.qxd 29/07/05 14:11 Page 20
O
N
Page 22

21
KLOKKE - TIMER
I Timer-modus I Klokke-modus
I klokke-modus
24t format
1) Åpne batterirommet på baksiden av timeren og
koble til A76 batteriet (levert med vekten) ved å
fjerne den røde klaffen: batteriets bredeste del
skal ligge øverst. “+”-tegnet skal være synlig når
batteriene er lagt på plass.
2) Når batteriet er installert, stilles vekten i klokke-
modus og formatet er 24 t.
3) For å stille klokkeslettet, trykk tasten « clock
set » på baksiden av apparatet. På displayet
blinker « 00:00 ». Trykk på tastene « ▲ » eller
« ▼ » for å stille klokkeslettet fremover eller
bakover. Ved å trykke tasten og holde den inne,
går det raskere.
4) For å bekrefte klokkeslettet du har valgt, vent
noen sekunder.
Merk:
Hver gang du skifter batteriene, må klokkeformatet
stilles igjen som forklart ovenfor. I sovemodus er det
ingen nedtelling. Klokkeslettet vises.
I timer-modus
Maks. programmeringstid:
99 minutter 59 sekunder.
1) I klokke-modus, trykk på tastene « ▲ » eller « ▼ »
for å komme inn i timer-modus. Timer-symbolet
og den sist programmerte tiden vises.
2) Trykk på tastene « ▲ » eller « ▼ » for å
programmere nedtellingstiden. For at det skal gå
raskere, kan du trykke tasten og holde den inne.
3) For å bekrefte tiden du har valgt, vent i 3
sekunder. Da blinker timer-symbolet , noe
som angir at nedtellingen har startet.
4) Når nedtellingen er over, høres det et lydsignal i
30 sekunder. På displayet blinker « 00:00 ». Da er
det mulig å slå av lydsignalet ved å trykke på en
hvilken som helst tast.
For å stoppe nedtellingen, trykk på tastene « ▲ »
eller « ▼ ».
Hvis du nå ønsker å stille inn nedtellingstiden til
timeren på nytt, trykk en gang til på tastene « ▲ »
eller « ▼ » .
For å komme tilbake til klokke-modus, trykk på
tastene « ▲ » eller « ▼ » og deretter ikke på noen
tast i 10 sekunder.
Vekten og timeren er to forskjellige ting. Du kan
bruke begge funksjoner hver for seg eller samtidig.
FORHOLDSREGLER VED BRUK av vekten og timeren
• Rengjør vekten med svamp og såpevann. Ikke bruk
oppløsningsmidler eller slipende regjøringsmidler.
Vekten skal ikke legges ned i vann.
• Ikke sett vekten i mikrobølgeovn.
• Ta ut batteriet dersom vekten ikke skal brukes på en
stund.
Timer symbol
Klokke-symbol
Minutter Sekunder
Time Minutter
Ikke kast brukte batterier, men legg dem
i en beholder som er forutsatt for dette
slik at de kan samles inn og resirkuleres.
ELEKTRONISK KJØKKENVEKT
IM Duo.qxd 29/07/05 14:11 Page 21
O
N
AM
PM
AM
PM
Page 23

22
VAAKA
OMINAISUUDET
• Maksimikapasiteetti: 5 Kg
• Punnitustarkkuus: 1 g
• Punnitus automaattisen taarauksen kanssa (se
tekee mahdolliseksi punnita eri valmistusaineita
peräkkäin poistamatta niitä punnitustasolta)
• Mittaa nesteet millilitroina
• Ajastin (laskenta alaspäin)
VAA’AN KYTKEMINEN PÄÄLLE
1) Paristot : Avaa paristolokero, joka sijaitsee
vaa’an pohjassa ja liitä kaksi CR2032
litiumparistoa (toimitetaan vaa’an mukana)
poistamalla punainen kieleke: pariston leveän
pään tulee olla ylhäällä. “+” –merkin tulee olla
näkyvissä, kun paristot on asennettu paikoilleen.
2) Laita vaakasi kovalle ja tasaiselle pinnalle.
3) Paina valitsinta « Tare » vaa’an käynnistämiseksi.
Näytössä on: sitten .
KÄYTTÖ
*Kun olet käynnistänyt vaa’an, sinun tulee laittaa
ruoka-aineet suoraan punnitusalustalle tai kaataa
ne astiaan. Paino ilmestyy näytölle. Lisätessäsi
painoa vaa’an näyttämä paino kasvaa.
Taarauksen käyttö:
Laita astia, salaattikulho jne. punnitusalustalle
ennen vaa’an käynnistystä.
Eri ruoka-aineiden punnitseminen yksittäin ja
peräkkäin:
- Punnitse ensimmäinen ruoka-aine edellä kuvatulla
tavalla*.
- Paina valitsinta « Tare » vaa’an säätämiseksi
uudelleen. Näytössä on: sitten .
- Lisää sitten toinen ruoka-aine. Vaaka ilmoittaa
vain toisen ruoka-aineen painon.
Ja niin edelleen… Toimi samalla tavalla kaikkien
lisäämiesi ruoka-aineiden kohdalla. Jos ruokaaineita otetaan pois taarauksen jälkeen, näyttöön
ilmestyvä negatiivinen arvo vastaa poistettujen
ruoka-aineiden painoa. Esimerkiksi:
Nesteiden mittaaminen millilitroina
Paina punnitustoiminnossa valitsinta “H
2
O”, jotta
pääsisit “nesteenmittaustoimintoon”.
Paina valitsinta “H2O” uudelleen painotoimintoon
palaamiseksi.
VAA’AN SAMMUTTAMINEN
Kun näytössä näkyy , paina valitsinta
« Tare ». Jos näytöllä on jotain muuta, paina
« Tare », odota kunnes tulee näyttöön ja
paina sitten uudelleen « Tare ».
Kaikissa tapauksissa vaaka sammuu
automaattisesti 2 minuutin kuluttua, jos mitään
valitsinta ei paineta.
ERIKOISNÄYTÖT
Ylikuorma
Kun vaaka on ylikuormitettu näytössä on: .
Ota paino heti pois tai vahingoitat vaakaasi.
Pienen paristojännityksen ilmaisin (koskee
vaakaa ja ajastinta)
Vaihda paristo, kun vaa’an näytölle ilmestyy:
EEEE
0 g0
g
0
g
0
g
F
I
ELEKTRONINEN KEITTIÖVAAKA
Arvoisa asiakas,
Kiitämme sinua siitä, että olet valinnut elektronisen Terraillon- keittiövaa’an. Toivomme, että olet siihen tyytyväinen. Lue nämä ohjeet huolellisesti, jotta pystyt saamaan vaa’astasi kaiken hyödyn.
IM Duo.qxd 29/07/05 14:11 Page 22
Page 24

23
KELLO - AJASTIN
Ajastinkäyttö Kellokäyttö
Kellokäytössä
24h näyttö
1) Avaa paristolokero, joka sijaitsee ajastimen
takana, ja yhdistä A76 -paristo (toimitetaan
vaa’an mukana) poistamalla punainen kieleke:
pariston leveän pään tulee olla ylöspäin. “+”
–merkin tule pysyä näkyvillä, kun paristo on
asennettu paikoilleen.
2) Heti kun paristo on paikoillaan, vaaka siirtyy
kellotoimintoon ja näyttötapa on 24 h.
3) Ajan säätämiseksi paina valitsinta « clock set »,
joka on laitteen takana.
Näytöllä vilkkuu « 00:00 ». Paina « ▲ » tai « ▼ »
ajan lisäämiseksi tai vähentämiseksi.
Paina valitsinta ja pidä se alhaalla, numerot
liikkuvat nopeammin.
4) Valitun kellonajan vahvistamiseksi tulee odottaa
muutama sekunti.
Huomiota:
Aina kun vaihdat paristoja, kello on säädettävä
uudelleen yllä kuvatulla tavalla. Laitteen ollessa
säästötoiminnossa eikä alaspäin laskentaa tapahdu
näkyy kellonaika.
Ajastinkäytössä
Maksimiohjelmointi:
99 minuuttia 59 sekuntia.
1) Kellotoiminnossa paina « ▲ » tai « ▼ », jotta
pääset ajastin toimintoon. Ajastimen symboli
ja aiemmin säädetty kesto tulevat näytölle.
2) Paina valitsimia « ▲ » tai « ▼ », jotta säädät
alaspäin laskennan keston. Jos haluat
numeroiden vaihtuvan nopeammin, paina
valitsinta ja pidä se alhaalla.
3) Valitun kellonajan vahvistamiseksi odota 3
sekuntia.
Sitten ajastinsymboli vilkkuu ilmaisten
laskentaa alaspäin.
4) Alaspäin laskennan lopussa äänimerkki soi 30
sekuntia. Näytöllä välkkyy « 00:00 ». Nyt
hälytyksen voi katkaista painamalla mitä tahansa
valitsinta.
Alaspäin laskemisen pysäyttämiseksi paina « ▲ » tai
« ▼ ».
Jos haluat tällöin säätää ajastimen ajan, paina
uudelleen « ▲ » tai « ▼ ».
Kellotoimintoon palaamiseksi paina « ▲ » tai « ▼ »
äläkä paina mitään valitsinta 10 sekuntiin.
Vaaka ja ajastin ovat erillisiä. Voit käyttää
kumpaakin laitetta yhdessä tai erikseen.
KÄYTTÖVAROITUKSIA ajastimelle ja vaa’alle
• Puhdista vaaka sienellä ja saippuavedellä, vältä
liuottimia ja hankaavia puhdistusaineita. Älä upota
vaakaa veteen.
• Älä laita vaakaa mikroaaltouuniin.
• Poista paristo, kun vaaka ei ole käytössä pidempään
aikaan.
Ajastinsymboli
Kellosymboli
Minuutit Sekunnit
Tunnit Minuutit
Älä heitä käytettyä paristoja pois.
Toimita ne tähän tarkoitukseen varattuihin
astioihin, jotta ne voidaan kerätä ja kierrättää.
F
I
ELEKTRONINEN KEITTIÖVAAKA
IM Duo.qxd 29/07/05 14:11 Page 23
AM
PM
AM
PM
Page 25

24
WAG A
PARAMETRY
• Maksymalna nośność : 5 kg
• Podziałka: 1 g
• Ważenie z automatycznym tarowaniem (umożliwia
doważanie; ważenie kolejno dorzucanych składników
bez zdejmowania ich z płyty )
• Odmierzanie płynów w mililitrach
• Minutnik (odliczanie)
URUCHOMIENIE WAGI
1)Baterie : Otwórz schowek na baterie znajdujący się na
spodzie wagi, podłączcie 2 litowe baterie CR2032 (na
wyposażeniu wagi) wyjmując czerwoną wypustkę:
szersza strona baterii ma być skierowana ku górze.
Znak “+” ma zostać widoczny po zainstalowaniu baterii.
2) Umieść wagę na twardej i płaskiej powierzchni.
3) Naciśnij przycisk « Tare » w celu włączenia wagi.
Wyświetlacz wskazuje: następnie .
WAŻENIE
*Po uruchomieniu wagi,umieść produkt bezpośrednio na
płycie wagi lub wsyp go do pojemnika . Wyświetla się
ciężar produktu. W miarę dorzucania produktu,
wyświetlany ciężar wzrasta.
W celu tarowania :
Zainstaluj na płycie pojemnik, miskę czy inne naczynie,
przed uruchomieniem wagi.
W celu indywidualnego ważenia
i doważania różnych składników :
- Zważ pierwszy składnik według podanych uprzednio
instrukcji *.
- Naciśnij przycisk « Tare » aby wyzerować.Wyświetlacz
wskazuje: następnie .
- Dodaj drugi składnik. Wyświetlacz pokazuje ciężar
jedynie drugiego składnika.
I tak kontynuować... Postępuj w ten sam sposób ze
wszystkimi kolejnymi składnikami. Jeżeli składniki zostały
zdjęte po wykonaniu tarowania, ujemna wartość, którą
odczytujemy na wyświetlaczu odpowiada ciężarowi
zdjętego składnika. Na przykład:
W celu odmierzania płynów w mililitrach :
Podczas ważenia, naciśnij na przycisk “H
2
O” w celu
przejścia na funkcję “odmierzanie płynów”. Ponownie
naciśnij na przycisk “H2O” żeby wrócić do funkcji
ważenia.
ZATRZYMANIE WAGI
Kiedy na ekranie wyświetla się , naciśnij na
przycisk « Tare » Jeżeli ekran wyświetla coś innego,
naciśnij na przycisk « Tare », zaczekaj na wyświetlenie
i naciśnij drugi raz przycisk « Tare ».
W każdym przypadku, waga wyłączy się automatycznie
po upływie 2 minut, jeżeli żadna funkcja nie jest
uaktywniona.
SPECJALNE WIADOMOŚCI
Przeciążenie
Kiedy waga jest przeciążona, ekran wyświetla : .
zdejmij ten ciężar natychmiast, w przeciwnym
razie uszkodzisz wagę.
Wskaźnik zużycia baterii
Wymieńcie baterię, kiedy waga wyświetla.
EEEE
0 g0
g
0 g0
g
P
L
ELEKTRONICZNA WAGA KUCHENNA
Szanowny Kliencie,
Właśnie nabyłeś elektroniczną wagę kuchenną Terraillon, za co dziękujemy. Życząc pełnej satysfakcji w używaniu naszej wagi,
zalecamy uważne zapoznanie się z instrukcją obsługi.
IM Duo.qxd 29/07/05 14:11 Page 24
Page 26

25
ZEGAR - MINUTNIK
Tryb minutnika Tryb zegarowy
W TRYBIE ZEGAROWYM
Format 24h
1) Otwórz schowek na baterie znajdujący się z tyłu
minutnika, włóż baterie A76(na wyposażeniu wagi)
wyjmując czerwoną wypustkę: szersza strona baterii
ma być skierowana ku górze. Znak “+” ma zostać
widoczny po zainstalowaniu baterii.
2) Po wprowadzeniu baterii, waga przestawia się na tryb
zegarowy format 24 h.
3) Aby nastawić czas naciśnij przycisk « clock set » z tyłu
urządzenia. Na ekranie migocze « 00:00 » .Naciśnij na
« ▲» lub « ▼» w celu zmniejszenia lub zwiększenia
czasu. Naciskając i przytrzymując palec na dolnym
przycisku uzyskujemy szybsze przesuwanie się czasu.
4) W celu potwierdzenia wybranego czasu, należy
odczekać kilka sekund.
Uwagi:
Przy każdej zmianie baterii, należy ponownie wybrać format
zegarowy, jak opisano powyżej.
W trybie czuwania, bez odliczania, wyświetla się czas.
W TRYBIE MINUTNIKA
Maksymalny zakres programowania:
99 minut 59 sekund.
1) W trybie zegarowym, naciśnij na « ▲» lub « ▼ » w
celu przejścia na minutnik. Znak minutnika i
wcześniej zaprogramowany czas wyświetlają się na
ekranie.
2) Naciśnij przyciski « ▲» lub « ▼ » w celu
zaprogramowania czasu odliczania.W celu szybszego
wyswietlania się godzin, Nacisnąć i przytrzymać palec
na dolnym przycisku.
3) W celu potwierdzenia wybranego czasu należy
odczekać 3 sekundy. Następnie znak minutnika
migocze sygnalizując w ten sposób odliczanie.
4) Pod koniec odliczania, przez 30 sekund dzwoni alarm.
Znak « 00:00 » migocze na ekranie.Wtedy można go
wyłączyć naciskając na dowolny przycisk.
Aby zatrzymaćodliczanie, Naciśnij na przycisk «▲» lub
«▼».
Od tej chwili, jeżeli chcesz dopasowaćczas minutnika
naciśnijcie na «▲» lub «▼» .
Aby wrócićdo trybu zegarowego, naciśnij na «▲» lub «▼»
nie naciskając na inne przyciski przez 10 sekund.
Waga i minutnik są zupełnie oddzielne. Możesz
używać obydwu funkcji oddzielnie lub w tym
samym czasie.
ZALECENIA UŻYCIA wagi i minutnika
• Myj wagę wodą z mydłem przy użyciu gąbki, unikając
rozpuszczalników i materiałów ściernych. Nie należy
zanurzać wagi w wodzie.
• Nie należy wkładać wagi do kuchenki mikrofalowej.
• Kiedy nie używasz wagi przez dłuższy czas, wyjmij baterie.
Icona minutnika
Ikona zegarowa
minuty sekundy
godziny minuty
Nie wyrzucaj zużytych baterii. Baterie należy zanieść
do pojemników przeznaczonych do tego celu,
aby umożliwić ich zebranie i utylizację.
P
L
ELEKTRONICZNA WAGA KUCHENNA
IM Duo.qxd 29/07/05 14:11 Page 25
AM
PM
AM
PM
Page 27

26
ВЕСЫ
ХАРАКТЕРИСТИКИ
• Предел взвешивания: 5 кг
• Цена деления: 1 г
• Режим автоматического учета веса тары
(позволяет взвешивать по отдельности различные
ингредиенты, добавляя их к уже взвешенным,
которые находятся на платформе весов)
• Измерение объема жидких продуктов в
миллилитрах
• Таймер (с обратным отсчетом времени)
ВКЛЮЧЕНИЕ ВЕСОВ
1) Элементы питания
Весы поставляются с двумя литиевыми
элементами питания CR2032, которые находятся в
предназначенном для них отсеке, расположенном
на нижней стороне весов. При первом включении
весов следует обеспечить контакт между этими
элементами питания, удалив из отсека красную
изоляционную прокладку. Каждый элемент
питания должен быть вставлен в отсек таким
образом, чтобы его широкая сторона была
обращена наружу. Знак “+” на вставленном
элементе питания должен быть виден.
2) Весы должны стоять на ровной и твердой
плоской поверхности.
3) Для включения весов нужно нажать на кнопку
« Tare ». На экране индицируется , затем
.
ЭКСПЛУАТАЦИЯ ВЕСОВ
*После того, как весы включены, взвешиваемый
продукт помещается прямо на платформу весов, либо
в какую-либо посуду или другую емкость, которая
ставится на платформу весов. При этом на экране
индицируется вес. При добавлении количества
продукта значение веса на экране возрастает.
Режим учета веса тары:
На платформу весов, перед их включением, нужно
поместить какую-либо посуду (чашу, блюдо и т.д.)
или другую емкость.
Последовательное взвешивание различных
ингредиентов:
- Взвешивается первый ингредиент способом,
описанным выше*.
- Затем нажатием кнопки « Tare » весы приводятся в
исходное состояние. На экране появляется ,
затем .
- После этого нужно поместить второй ингредиент
на платформу, не снимая первого. На экране при
этом индицируется только вес второго
ингредиента.
Далее, аналогичным образом, последовательно
взвешиваются все остальные ингредиенты. Если
взвешенные продукты снимаются с платформы весов
в режиме учета веса тары, то на экране индицируется
отрицательное число, соответствующее их весу.
Например:
Измерение объема жидких продуктов
миллилитрах
Для перехода из режима взвешивания в режим
измерения объемов жидкостей нужно нажать на
кнопку “H
2
O”.
Для обратного перехода из режима измерения
объемов жидкостей в режим взвешивания нужно еще
раз нажать на кнопку “H
2
O”.
ВЫКЛЮЧЕНИЕ ВЕСОВ
Если на экране индицируется , нажать на
кнопку « Tare ».
Если на экране индицируется другая информация,
нажать на кнопку « Tare » и подождать, пока на
экране появится , затем снова нажать на
кнопку « Tare ».
В любом случае, весы автоматически
выключаются сами, если в течение 2 минут не
происходит нажатия ни на одну кнопку.
ОСОБЫЕ СООБЩЕНИЯ
Перегрузка
В случае перегрузки весов на экран выводится
сообщение: . Следует незамедлительно
снять взвешиваемый продукт с платформы весов,
в противном случае перегрузка может вызвать
неисправность весов.
Индикатор понижения напряжения элемента
питания (для весов и для таймера)
Если на экране индицируется сообщение , то
необходимо заменить элемент питания.
EEEE
0
g
0
g
0
g
0
g
R
U
ЭЛЕКТРОННЫЕ КУЛИНАРНЫЕ ВЕСЫ
Уважаемый клиент!
Вы приобрели электронные кулинарные весы Terraillon. Мы благодарим Вас за эту покупку и надеемся,
что Вы останетесь ею довольны. Советуем Вам внимательно прочитать настоящее руководство по
эксплуатации, чтобы наилучшим образом использовать все возможности приобретенных Вами весов.
IM Duo.qxd 29/07/05 14:11 Page 26
Page 28

27
ЧАСЫ- ТАЙМЕР
В режиме « Таймер» В режиме « Часы»
Режим « Часы»
24-часовой формат
1) Таймер поставляется вместе с элементом
питания A76, который находится в отсеке для
элементов питания, расположенном на задней
панели таймера. При первом включении таймера
следует обеспечить контакт элемента питания,
для этого нужно открыть отсек и удалить
красную изоляционную прокладку. Элемент
питания должен быть вставлен в отсек таким
образом, чтобы его широкая сторона была
обращена наружу. Знак “+” на вставленном
элементе питания должен быть виден.
2) После того, как элемент питания вставлен в отсек
без изоляционной прокладки, устанавливается
режим « Часы», с 24-часовым форматом.
3) Чтобы установить время на экране, нужно
нажать на кнопку « clock set » на задней панели
прибора. На экране начинает мигать значение
« 00:00 » . Нажимая на кнопки «
▲ » и « ▼ »,
можно увеличивать или уменьшать это значение
и, таким образом, установить нужное время.
Если нажать кнопку и удерживать ее нажатой, то
цифры на экране меняются быстрее.
4) Когда на экране появится нужное значение,
нужно подождать несколько секунд, чтобы
подтвердить выбор этого значения.
Примечания:
Каждый раз, когда происходит замена элементов
питания, происходит сброс значения на экране и
устанавливается режим « Часы», как описано
выше. В режиме ожидания, если не включен
обратный отсчет времени,на экране индицируется
время.
Режим « Таймер»
Максимальное время программирования:
99 минут 59 секунд.
1) Чтобы перейти из режима « Часы» в режим
« Таймер», нужно нажать на кнопку «
▲ » или
«
▼ ». На экране индицируется пиктограмма
таймера и продолжительность ранее
запрограммированного срока.
2) Продолжительность срока обратного отсчета
можно изменить, нажимая на кнопки «
▲ » и
«
▼ ». Если нажать кнопку и удерживать ее
нажатой, то цифры на экране меняются
быстрее.
3) Когда на экране появится нужное значение,
нужно подождать 3 секунды, чтобы подтвердить
его выбор. После этого пиктограмма таймера
мигает - это означает, что включен режим
обратного отсчета времени.
4) По окончании обратного отсчета времени
будильник звонит в течение 30 секунд. На
экране при этом мигает « 00:00 ». Будильник в
этот момент можно выключить, нажав на любую
кнопку.
Чтобы выйти из режима обратного отсчета
времени, нужно нажать на кнопку «
▲ » или « ▼ ».
В этот момент, чтобы узнать, который час, нужно
снова нажать на кнопку « ▲ » или « ▼» .
Чтобы перейти в режим « Часы», нужно нажать на
кнопку «
▲ » или « ▼ » и затем не нажимать ни на
какую кнопку в течение 10 секунд.
Весы и таймер – это два отдельных устройства.
Их можно использовать как вместе, так и
отдельно друг от друга.
МЕРЫ ПРЕДОСТОРОЖНОСТИ
при использовании весов и таймера
• Весы следует мыть губкой и мыльной водой,
избегая растворителей и абразивов. Не
погружать весы в воду.
• Не следует помещать весы в микроволновую печь.
• Если весы не используются в течение
продолжительного времени, следует вынуть из
них элемент питания.
Пиктограмма таймера
Пиктограмма часов
минуты секунды
часы минуты
Не выбрасывайте использованные элементы питания.
Их следует помещать в контейнер, специально предназначенный
для их сбора с целью дальнейшей переработки.
R
U
ЭЛЕКТРОННЫЕ КУЛИНАРНЫЕ ВЕСЫ
IM Duo.qxd 29/07/05 14:11 Page 27
AM
PM
AM
PM
Page 29

28
∏∏ ∑∑ÀÀ°°∞∞ƒƒππ∞∞
ÃÃ∞∞ƒƒ∞∞∫∫ΔΔ∏∏ƒƒππ™™ΔΔππ∫∫∞∞
• ª¤БИЫЩЛ ‰˘У·ЩfiЩЛЩ· : 5 Kg
• ¢È·‚¿ıÌÈÛË: 1 g
• ∑‡ÁÈÛÌ· Ì ·˘ÙfiÌ·ÙÔ ·πfi‚·ÚÔ (tare) (ÂπÈÙÚ¤πÂÈ ÙÔ
˙‡БИЫМ· ‰И·КФЪВЩИОТУ ˘ПИОТУ ‰И·‰Ф¯ИО¿ ¯ˆЪ›˜ У·
·Ê·ÈÚÂ›Ù·È ·πfi ÙË ‚¿ÛË Ù˘ ˙˘Á·ÚÈ¿˜)
• ª¤ЩЪЛМ· ˘БЪТУ ЫВ ¯ИПИФЫЩfiПИЩЪ·
• ГЪФУФ‰И·ОfiπÙ˘ (·УЩ›ЫЩЪФКЛ М¤ЩЪЛЫЛ)
∂∂¡¡∂∂ƒƒ°°√√¶¶√√ππ∏∏™™∏∏ ΔΔ∏∏™™ ∑∑ÀÀ°°∞∞ƒƒππ∞∞™™
1) ªªπ
··ÙÙ··ÚÚ››Â˜˜
∞УФ›НЩВ ЩЛ ı¤ЫЛ О¿Щˆ ·πfi ЩЛ ˙˘Б·ЪИ¿
О·И Ы˘У‰¤ЫЩВ ЩИ˜ 2 Мπ·Щ·Ъ›В˜ ПИı›Ф˘ CR2032
(πВЪИП·М‚¿УФУЩ·И ЫЩЛ ˙˘Б·ЪИ¿) ·К·ИЪТУЩ·˜ ЩФ
ОfiООИУФ БПˆЫЫ›‰ИФ: ЩФ К·Ъ‰‡ЩВЪФ М¤ЪФ˜ ЩЛ˜
Мπ·Щ·Ъ›·˜ ı· πЪ¤πВИ У· ‚Ъ›ЫОВЩ·И ЫЩФ Вπ¿Уˆ
М¤ЪФ˜. ΔФ “+” ı· πЪ¤πВИ У· π·Ъ·М¤УВИ ФЪ·Щfi
МfiПИ˜ ВУВЪБФπФИЛıФ‡У ФИ Мπ·Щ·Ъ›В˜.
2) ΔÔπФıВЩВ›ЫЩВ ЩЛ ˙˘Б·ЪИ¿ ЫВ ЫОПЛЪ‹, Вπ›π‰Ë
ÂπÈÊ¿ÓÂÈ·.
3) ¶È¤ÛÙ ÙÔ πÏ‹ÎÙÚÔ « Tare » БИ· У· ВУВЪБФπÔÈ‹ÛÂÙÂ
ÙË ˙˘Á·ÚÈ¿. ∏ ÔıfiÓË ‰Â›¯ÓÂÈ: ¤πÂÈÙ· .
∑∑ÀÀ°°ππ™™ ªª∞∞
*ªВЩ¿ ЩЛУ ВУВЪБФπФ›ЛЫЛ ЩЛ˜ ˙˘Б·ЪИ¿˜, ЩФπФıВЩВ›ЫЩВ
ЩФ ˘ПИОfi ·πВ˘ıВ›·˜ π¿Уˆ ЫЩЛ ‚¿ЫЛ ЩЛ˜ ‹ М¤Ы· ЫЩФ
ВИ‰ИОfi ‰Ф¯В›Ф ЩЛ˜. ΔФ ‚¿ЪФ˜ ВМК·У›˙ВЩ·И ЫЩЛУ ФıfiУЛ.
∫·ıТ˜ πЪФЫı¤ЩВЩВ ‚¿ЪФ˜
, Ë ¤Ó‰ÂÈÍË ‚¿ÚÔ˘˜
·˘Í¿ÓÂÙ·È.
°°ÈÈ·· ÓÓ·· ¯¯ÚÚËËÛÛÈÈÌÌÔÔπÔÔÈÈ‹‹ÛÛÂÂÙÙ ÙÙËË ÏÏÂÂÈÈÙÙÔÔ˘˘ÚÚÁÁ››·· ··πfifi‚‚··ÚÚÔÔ˘˘
:
ΔФπФıВЩВ›ЫЩВ ЩФ ВИ‰ИОfi ‰Ф¯В›Ф, ¤У· МπФП, ОПπ. π¿Уˆ
ЫЩЛ ‚¿ЫЛ ЩЛ˜ ˙˘Б·ЪИ¿˜ πЪИУ ЩЛ ı¤ЫВЩВ ЫВ ПВИЩФ˘ЪБ›·.
°°ÈÈ·· ÓÓ·· ˙˙˘˘ÁÁ››ÛÛÂÂÙÙ ‰‰ÈÈ··ÊÊÔÔÚÚÂÂÙÙÈÈÎο¿ ˘˘ÏÏÈÈÎο¿ Íͯ¯ˆˆÚÚÈÈÛÛÙ
Ù¿¿ Îη·ÈÈ
‰‰ÈÈ··‰‰ÔÔ¯¯ÈÈÎο¿
:
- ∑˘Á›ÛÙ ÙÔ πÚÒÙÔ ·πfi Ù· ˘ÏÈο fiπˆ˜ ВНЛБВ›ЩВ
π·Ú·π¿Óˆ *.
- ¶È¤ÛÙ ÙÔ πÏ‹ÎÙÚÔ « Tare » ÁÈ· Ó· ÌˉÂÓ›ÛÂÙ ÙË
˙˘Á·ÚÈ¿. ∏ ÔıfiÓË ‰Â›¯ÓÂÈ: ¤πÂÈÙ· .
- ™ÙË Û˘Ó¤¯ÂÈ· πÚÔÛı¤ÛÙ ÙÔ ‰Â‡ÙÂÚÔ ˘ÏÈÎfi. ∏
ÔıfiÓË ‰Â›¯ÓÂÈ ÙÔ ‚¿ÚÔ˜ ÙÔ˘ ‰Â‡ÙÂÚÔ˘ ˘ÏÈÎÔ‡ ÌfiÓÔ.
∫·И Ф‡Щˆ О·ıВН‹˜… ∞ОФПФ˘ıВ›ЫЩВ ЩЛУ ›‰И· ‰И·‰ИО·Ы›·
БИ· fiП· Щ· ‰И·‰Ф¯ИО¿ ˘ПИО¿. ∞У Щ· ˘ПИО¿ ·К·ИЪВıФ‡У
МВЩ¿ ЩФ ˙‡БИЫМ¿ ЩФ˘ ·πfi‚·ЪФ˘, МИ· ·ЪУЛЩИО‹ ·Н›·
ВМК·У›˙ВЩ·И ЫЩЛУ ФıfiУЛ Л ФπФ›· ·УЩИЫЩФИ¯В› ЫЩФ
‚¿ЪФ˜ ÙˆÓ ˘ПИОТУ πÔ˘ ·Ê·ÈÚ¤ıËηÓ. °È·
π·Ú¿‰ÂÈÁÌ·:
°°ÈÈ·· ÓÓ·· ÌÌÂÂÙÙÚÚ‹‹ÛÛÂ
ÂÙÙ ˘˘ÁÁÚÚ¿¿ ÛÛ ¯¯ÈÈÏÏÈÈÔÔÛÛÙÙfifiÏÏÈÈÙÙÚÚ··
™ЩЛ ПВИЩФ˘ЪБ›· ˙˘Б›ЫМ·ЩФ˜, πȤÛÙ ÙÔ πÏ‹ÎÙÚÔ “H
ÇÇOO
”
БИ· У· πВЪ¿ЫВЩВ ЫЩЛ ПВИЩФ˘ЪБ›· «˙‡БИЫМ· ˘БЪТУ».
¶È¤ÛÙ ÙÔ πÏ‹ÎÙÚÔ “H
ÇÇOO
” Í·Ó¿ ÁÈ· Ó· Âπ·Ó¤ÏıÂÙ ÛÙË
ПВИЩФ˘ЪБ›· ˙˘Б›ЫМ·ЩФ˜.
∞∞¶¶∂∂¡¡∂∂ƒƒ°°√√¶¶√√ππ∏∏™™∏∏ ΔΔ∏∏ ™™ ∑∑ÀÀ°°∞∞ƒƒππ∞∞™™
ŸÙ·Ó Ë ÔıfiÓË ‰Â›¯ÓÂÈ , πȤÛÙ ÙÔ πÏ‹ÎÙÚÔ
« Tare ». ∞Ó Ë ÔıfiÓË ‰Â›¯ÓÂÈ Î¿ÙÈ ¿ÏÏÔ, πȤÛÙ ÙÔ
πÏ‹ÎÙÚÔ « Tare », πВЪИМ¤УВЩВ М¤¯ЪИ У· ВМК·УИЫЩВ› Л
¤Ó‰ÂÈÍË ÛÙËÓ ÔıfiÓË Î·È π
ȤÛÙ ͷӿ ÙÔ
πП‹ОЩЪФ « Tare ».
™В О¿ıВ πВЪ›πЩˆЫЛ, Л ˙˘Б·ЪИ¿ ı· Ы‚‹ЫВИ ·˘ЩfiМ·Щ·
МВЩ¿ ·πfi 2 ПВπЩ¿ ·У О·У¤У· πП‹ОЩЪФ ‰ВУ
ВУВЪБФπФИЛıВ›.
∂∂ππ¢¢ππ∫∫∂∂™™ ∂∂¡¡¢¢∂∂ππ••∂∂ππ™™
ÀÀπÂÂÚÚÊÊfifiÚÚÙÙˆˆÛÛËË
ŸЩ·У Л ˙˘Б·ЪИ¿ В›У·И ˘πВЪКФЪЩˆМ¤УЛ, Л ФıfiУЛ
‰В›¯УВИ : . ∞Ê·ÈÚ¤ÛÙ ÙÔ ‚¿ÚÔ˜ ·Ì¤Ûˆ˜ ÁÈ· Ó·
ÌËÓ πÚÔηϤÛÂÙ ‚Ï¿‚Ë ÛÙË ˙˘Á·ÚÈ¿.
ŒŒÓÓ‰‰ÂÂÈÈÍÍËË ÂÂÍÍ··ÓÓÙÙÏÏËËÌ̤¤ÓÓˢ˜ ÌÌππ··ÙÙ··ÚÚ››··˜˜(È
ÈÛÛ¯¯‡‡ÂÂÈÈ ÁÁÈÈ·· ÙÙËË
˙˙˘˘ÁÁ··ÚÚÈÈ¿¿ Îη·ÈÈ ÙÙÔÔ ¯¯ÚÚÔÔÓÓÔÔ‰‰ÈÈ··ÎÎfifiπÙÙËË
)
∞ÓÙÈηٷÛÙ‹ÛÙ ÙË Ìπ·Ù·Ú›· fiÙ·Ó Ë ÔıfiÓË Ù˘
˙˘Á·ÚÈ¿˜ ‰Â›¯ÓÂÈ.
EEEE
0
g0 g
0 g0
g
E
L
∏∏§§∂∂∫∫ΔΔƒƒ√√¡¡ππ∫∫∏∏ ∑∑ÀÀ°°∞∞ƒƒππ∞∞ ∫∫√√ÀÀ∑∑ππ¡¡∞∞™™
∞Á·πËÙ¤πÂÏ¿ÙË
,
™·˜ В˘¯·ЪИЫЩФ‡МВ БИ· ЩЛУ ·БФЪ¿ ЩЛ˜ ЛПВОЩЪФУИО‹˜ ˙˘Б·ЪИ¿˜ ЩЛ˜
Terraillon.
∂˘ÂÏπÈÛÙԇ̠fiÙÈ ı· ·ÓÙ·πÔÎÚÈı›
ÛÙȘ
π
ЪФЫ‰ФО›В˜ Ы·˜. ¶·Ъ·О·ПФ‡МВ ‰И·‚¿ЫЩВπЪФЫВОЩИО¿ ЩИ˜ Ф‰ЛБ›В˜ ·˘Щ¤˜, БИ· У· ·НИФπФИ‹ЫВЩВ ·πfiП˘Щ· ЩЛ
˙˘Á·ÚÈ¿ Û·˜
.
IM Duo.qxd 29/07/05 14:11 Page 28
Page 30

29
ƒƒ√√§§√√´´ -- ÃÃ√√¡¡√√¢¢ππ∞∞∫∫√√¶¶ΔΔ∏∏™™
§§ÂÂÈÈÙÙÔÔ˘˘ÚÚÁÁ››·· ÃÃÚÚÔÔÓÓÔÔ‰‰ÈÈ··ÎÎfifiπÙÙËË §§ÂÂÈÈÙÙÔÔ˘˘ÚÚÁÁ››·· ƒƒÔÔÏÏÔÔÁÁÈÈÔÔ‡‡
§§ÂÂÈÈÙÙÔÔ˘˘ÚÚÁÁ››·· ÚÚÔÔÏÏÔÔÁÁÈÈÔÔ‡‡
¶¶··ÚÚÔÔ˘˘ÛÛ››··ÛÛË
Ë 2244hh
1) ∞ÓÔ›ÍÙ ÙË ı¤ÛË ÁÈ· ÙȘ Ìπ·Ù·Ú›Â˜ Ë ÔπÔ›·
‚Ú›ÛÎÂÙ·È ÛÙÔ π›Ûˆ ̤ÚÔ˜ ÙÔ˘ ¯ÚÔÓԉȷÎfiπÙË Î·È
Û˘Ó‰¤ÛÙ ÙËÓ Ìπ·Ù·Ú›· A76 (πВЪИП·М‚¿УВЩ·И ЫЩЛ
Ы˘ЫОВ˘·Ы›·) ·К·ИЪТУЩ·˜ ЩФ ОfiООИУФ БПˆЫ›‰ИФ: ЩФ
К·Ъ‰‡ЩВЪФ М¤ЪФ˜ ЩЛ˜ Мπ·Ù·Ú›·˜ ı· πÚ¤πÂÈ Ó·
‚Ú›ÛÎÂÙ·È ÛÙÔ Âπ¿Óˆ ̤ÚÔ˜. ΔÔ “+”ı· πÚ¤πÂÈ Ó·
π·Ъ·М¤УВИ ФЪ·Щfi МfiПИ˜ ВУВЪБФπÔÈËı› Ë Ìπ·Ù·Ú›·.
2) ªfiПИ˜ ВУВЪБФπÔÈËı› Ë Ìπ·Ù·Ú›·, ÙÔ ÚÔÏfiÈ
ÂÌÊ·Ó›˙ÂÙ·È ÛÙËÓ ÔıfiÓË Ù˘ ˙˘Á·ÚÈ¿˜ Î·È Ë
π·ÚÔ˘Û›·ÛË Â›Ó·È Û 24 h.
3) °È· Ó· Ú˘ıÌ›ÛÂÙ ÙËÓ ÒÚ·, πȤÛÙ ÙÔ πÏ‹ÎÙÚÔ
« clock set » ÛÙÔ π›Ûˆ ̤ÚÔ˜ Ù˘ Û˘Û΢‹˜. ™ÙËÓ
ÔıfiÓË ·Ó·‚ÔÛ‚‹ÓÂÈ Ë ¤Ó‰ÂÈÍË « 00:00 ». ¶È¤ÛÙÂ
ÙÔ πÏ‹ÎÙÚÔ «
▲ » ‹ « ▼ » ÁÈ· Ó· ÂπÈϤÍÂÙ ÙË
ÛˆÛÙ‹ ÒÚ·. ¶È¤˙ÔÓÙ·˜ Î·È ÎÚ·ÙÒÓÙ·˜ ÙÔ
πП‹ОЩЪФ, ФИ ·ЪИıМФ› ·ПП¿˙Ф˘У БЪЛБФЪfiЩВЪ·.
4) °È· Ó· ÂπИ‚В‚·ИТЫВЩВ ЩЛУ ВπИПВБМ¤УЛ ТЪ·,
πВЪИМ¤УВЩВ МВЪИО¿ ‰В˘ЩВЪfiПВπÙ·.
¶·Ú·ÙËÚ‹ÛÂȘ:
∫¿ı ÊÔÚ¿
π
Ô˘ ·ÏÏ¿˙ÂÙ Ìπ·Ù·Ú›Â˜, ı· πÚ¤πÂÈ Ó·
Ú˘ıÌ›˙ÂÙÂ ÙËÓ ÒÚ· fi
π
ˆ˜ ˘πÔ‰ÂÈÎÓ‡ÂÙ·È π·Ú·π¿Óˆ.
ŸÙ·Ó Ë Û˘Û΢‹ Â›Ó·È Û‚ËÛÙ‹ Î·È fiÙ·Ó ‰ÂÓ ˘
π
¿Ú¯ÂÈ
·УЩ›ЫЩЪФКЛ М¤ЩЪЛЫЛ, ЫЩЛУ ФıfiУЛ ВМК·У›˙ВЩ·И Л ТЪ·.
§§ÂÂÈÈÙÙÔÔ˘˘ÚÚÁÁ››·· ¯¯ÚÚÔÔÓÓÔÔ‰‰ÈÈ··ÎÎfifiπÙÙËË
ªª¤¤ÁÁÈÈÛÛÙÙËË ‰‰˘˘ÓÓ··ÙÙfifiÙÙËËÙÙ·· πÚÚÔÔÁÁÚÚ··ÌÌÌÌ··ÙÙÈÈÛÛÌÌÔÔ‡‡::
9999 ÏÏÂÂπÙÙ¿¿ 5599 ‰‰Â¢˘ÙÙÂÂÚÚfifiÏÏÂÂπÙÙ··..
1) ∫·Щ¿ ЩЛ ПВИЩФ˘ЪБ›· ЪФПФБИФ‡, πȤÛÙ ÙÔ πÏ‹ÎÙÚÔ
«
▲ » ‹ « ▼ » ÁÈ· Ó· ÂπИП¤НВЩВ ЩЛ ПВИЩФ˘ЪБ›·
¯ÚÔÓԉȷÎfiπÙË. ΔÔ Û‡Ì‚ÔÏÔ ÙÔ˘ ¯ÚÔÓԉȷÎfiπÙË
Î·È Ë πЪФЛБФ‡МВУЛ πЪФБЪ·ММ·ЩИЫМ¤УЛ
‰È¿ÚÎÂÈ· ÂÌÊ·Ó›˙ÔÓÙ·È ÛÙËÓ ÔıfiÓË.
2) ¶È¤ÛÙ ٷ πÏ‹ÎÙÚ· «
▲ » ‹ « ▼ » ÁÈ· Ó·
πЪФБЪ·ММ·Щ›ЫВЩВ ЩЛ ‰И¿ЪОВИ· ЩЛ˜ ·УЩ›ЫЩЪФКЛ˜
М¤ЩЪЛЫЛ˜. °И· У· ·ПП¿НФ˘У ФИ ·ЪИıМФ›
БЪЛБФЪfiЩВЪ·, πȤÛÙÂ Î·È ÎÚ·Ù‹ÛÙ ÙÔ πÏ‹ÎÙÚÔ.
3) °È· Ó· ÂπИ‚В‚·ИТЫВЩВ ЩЛУ ВπИПВБМ¤УЛ ТЪ·, πÂÚÈ̤ÓÂÙÂ
3 ‰Â˘ÙÂÚfiÏÂπÙ·. ΔfiÙ ÙÔ Û‡Ì‚ÔÏÔ ÙÔ˘ ¯ÚÔÓԉȷÎfiπÙË
·Ó·‚ÔÛ‚‹ÓÂÈ ÁÈ· Ó· ÛËÌ·ÙÔ‰ÔÙ‹ÛÂÈ ÙËÓ ¤Ó·ÚÍË
ЩЛ˜ ·УЩ›ЫЩЪФКЛ˜ М¤ЩЪЛЫЛ˜.
4) ™ЩФ Щ¤ПФ˜ ЩЛ˜ ·УЩ›ЫЩЪФКЛ˜ М¤ЩЪЛЫЛ˜, Л
ÂȉÔπÔ›ËÛË ÛËÌ·›ÓÂÈ ÁÈ· 30 ‰Â˘ÙÂÚfiÏÂπÙ·. ∏
¤Ó‰ÂÈÍË « 00:00 » ·Ó·‚ÔÛ‚‹ÓÂÈ ÛÙËÓ ÔıfiÓË.
ªπÔÚ›Ù ÙfiÙ ӷ ·πВУВЪБФπÔÈ‹ÛÂÙ ÙËÓ
ÂȉÔπÔ›ËÛË πȤ˙ÔÓÙ·˜ ÔπÔÈÔ‰‹πÔÙ πÏ‹ÎÙÚÔ.
°И· У· ЫЩ·М·Щ‹ЫВЩВ ЩЛУ ·УЩ›ЫЩЪФКЛ М¤ЩЪЛЫЛ, πИ¤ЫЩВ
ЩФ
π
Ï‹ÎÙÚÔ «▲» ‹ «▼». ™ÙÔ ÛËÌÂ›Ô ·˘Ùfi, ·Ó
Â
π
Иı˘МВ›ЩВ У· ‰ИФЪıТЫВЩВ ЩЛУ ТЪ· ЩФ˘ ¯ЪФУФ‰И·ОfiπЩЛ,
π
ȤÛÙ ͷӿ ÙÔ πÏ‹ÎÙÚÔ «▲» ‹ «▼». °È· Ó·
Â
π
ИЫЩЪ¤„ВЩВ ЫЩЛ ПВИЩФ˘ЪБ›· ЪФПФБИФ‡, πИ¤ЫЩВ ЩФ
π
П‹ОЩЪФ «▲» ‹ «▼» О·И МЛУ ВУВЪБФπФИ‹ЫВЩВ
ηӤӷ
π
Ï‹ÎÙÚÔ ÁÈ· 10 ‰Â˘ÙÂÚfiÏÂπÙ·.
∏∏ ˙˙˘˘ÁÁ··ÚÚÈÈ¿¿ Îη·ÈÈ ÔÔ ¯¯ÚÚÔÔÓÓÔÔ‰‰ÈÈ··ÎÎfifiπÙÙˢ˜ ››ÓÓ··ÈÈ Íͯ¯ˆˆÚÚÈÈÛÛÙÙÔÔ››..
ªªπÔÔÚÚ››ÙÙ ÓÓ·· ¯¯ÚÚËËÛÛÈÈÌÌÔÔπÔÔÈÈ››ÙÙ ÙÙÔÔ˘˘˜˜ ‰‰‡‡ÔÔ ÌÌË˯¯··ÓÓÈÈÛÛÌÌÔÔ‡‡˜˜
Í
ͯ¯ˆˆÚÚÈÈÛÛÙÙ¿¿ ‹‹ ÙÙ··˘˘ÙÙfifi¯¯ÚÚÔÔÓÓ··..
√√¢¢∏∏°°ππ∂∂™™ ∞∞™™ºº∞∞§§∂∂ππ∞∞™™ ÁÁÈÈ·· ÙÙËË ˙˙˘˘ÁÁ··ÚÚÈÈ¿¿ Îη·ÈÈ ÙÙÔÔ
¯¯ÚÚÔÔÓÓÔÔ‰‰ÈÈ··ÎÎfifiπÙÙËË
- ∫·ı·Ú›ÛÙ ÙË ˙˘Á·ÚÈ¿ Ì ÛÊÔ˘ÁÁ¿ÚÈ Î·È ÓÂÚfi ÌÂ
Û·πÔ‡ÓÈ, ·πÔʇÁÔÓÙ·˜ πЪФ˚fiУЩ· О·ı·ЪИЫМФ‡ πÔ˘
πÂÚȤ¯Ô˘Ó ‰È·Ï˘ÙÈο ‹ ÏÂÈ·ÓÙÈο Û˘ÛÙ·ÙÈο. ªËÓ ÙË
‚˘ı›˙ÂÙ ÛÙÔ ÓÂÚfi.
- ªËÓ ÙÔπФıВЩВ›ЩВ ЩЛ ˙˘Б·ЪИ¿ ЫЩФ КФ‡ЪУФ МИОЪФО˘М¿ЩˆУ.
- ∞Ê·ÈÚ¤ÛÙ ÙȘ Ìπ·Ù·Ú›Â˜ fiÙ·Ó Ë ˙˘Á·ÚÈ¿ ‰ÂÓ πÚfiÎÂÈÙ·È
У· ¯ЪЛЫИМФπФИЛıВ› БИ· МВБ¿ПФ ¯ЪФУИОfi ‰И¿ЫЩЛМ·.
ГЪФУФ‰И·ОfiπÙ˘
ƒÔÏfiÈ
ÏÂπÙ¿ ‰Â˘ÙÂÚfiÏÂπÙ·
ÒÚ· ÏÂÙ¿
ªªËËÓÓ ÂÂÙÙ¿¿ÙÙ ÙÙÈȘ˜ ¯¯ÚÚËËÛÛÈÈÌÌÔÔÔÔÈÈËËÌ̤¤ÓÓ˜˜ ÌÌ··ÙÙ··ÚÚ››Â˜˜..
ΔΔÔÔÔÔııÂÂÙÙ‹‹ÛÛÙÙ ÙÙÈȘ˜ ÛÛÙÙÔÔ˘˘˜˜ ÂÂÈȉ‰ÈÈÎÎÔÔ‡‡˜˜ Îο¿‰‰ÔÔ˘˘˜˜
ÁÁÈÈ·· ÙÙËË ÛÛ˘˘ÏÏÏÏÔÔÁÁ‹‹ Îη·ÈÈ ·
·ÓÓ··Î·‡ÎÎÏψˆÛÛ‹‹ ÙÙÔÔ˘˘˜˜..
E
L
∏∏§§∂∂∫∫ΔΔƒƒ√√¡¡ππ∫∫∏∏ ∑∑ÀÀ°°∞∞ƒƒππ∞∞ ∫∫√√ÀÀ∑∑ππ¡¡∞∞™™
IM Duo.qxd 29/07/05 14:11 Page 29
AM
PM
AM
PM
Page 31

30
TARTI
ÖZELLİKLER
• Maksimum kapsama: 5 kg
• Derecelendirme: 1 g
• Otomatik tare ile tartım (değişik malzemeleri tartıdan
çıkarmaksızın sırasıyla tartmaya imkan verir)
• Sıvıların mililitre olarak ölçümü
• Zamanlayıcı (geri sayma)
TARTININ ÇALIŞTIRILMASI
1) Piller Tartının alt kısmında bulunan bölmeyi açın ve
kırmızı dili çıkartarak 2 lityum CR2032 pil takın
(tartı ile birlikte verilmiştir): pilin geniş kısmı üstte
olmalıdır. “+” piller takıldığında görülebilir olmalıdır.
2) Tartınızı sert, düz bir yüzeye koyun.
3) Tartınızı açmak için « Tare » tuşuna basın. Ekranda
şu gözükmektedir: daha sonra .
İŞ AKIŞI
*Cihazı açtıktan sonra, maddeyi doğrundan platforma
koyun veya konteynıra dökün.Ağırlık görüntülenecektir.
Siz ağırlık ekledikçe ağırlık artacaktır.
Dara işlevinin kullanılası:
Tartıyı açmadan önce platformun üzerine konteynırı,
salata kabını vs. koyun.
Teker teker ve ardışık olarak farklı muhteviyatın
tartılması:
- Önceden açıklandığı gibi öncelikle yiyecek maddesini
tartın *.
- Tartıyı sıfırlamak için « Tare » tuşuna basın. Ekranda
şu gözükecektir daha sonra .
- Daha sonra ikinci yiyecek öğesini ekleyin. Ekran sadece
ikinci maddenin ağırlığını göstermektedir.
Ve bunun gibi devam edin… Daha sonraki ardışık tüm
maddeler için aynı şekilde devam edin.
Eğer maddeler dara tespit edildikten sonra kaldırılırsa,
ekranda gözüken negatif değer kaldırılan maddenin
ağırlığına karşılık gelmektedir. Örneğin:
Sıvıları milimetre olarak ölçmek için:
Tartma modunda, “sıvı ölçüm” işlevini kaldırmak için
“H2O” tuşuna basın. Tartı işlevine geri dönmek için
“H2O” tuşuna tekrar basın.
TARTININ KAPATILMASI
Ekran i gösterdiğinde “Tare” tuşuna basın. Eğer
ekran başka bir şey gösterirse, “Tare” ya basın
ekranını bekleyin ve daha sonra “Tare” ya yeniden basın.
Tüm durumlarda, eğer herhangi bir tuşa basılmazsa 2
dakika sonra tartı otomatik olarak kapanacaktır.
ÖZEL GÖRÜNTÜLER
Aşırı yük
Tartı aşırı yüklendiğinde, ekran şunu gösterecektir: .
Derhal ağırlığı kaldırın, yoksa tartınız zarar görecektir.
Düşük pil göstergesi (tartı ve zamanlayıcı için geçerli)
Tartı ekranında gözüküyorsa pilleri değiştirin.
EEEE
0
g
0
g
0 g0
g
T
R
ELEKTRONİK MUTFAK TARTISI
Değerli müşterimiz,
bu Terraillon elektronik mutfak tartısını satın aldınız ve bunun için size teşekkür ederiz. Üründen memnun kalacağınızı
umuyoruz. Tartınızdan tam randımanı alabilmeniz için bu kullanım talimatını dikkatle okumanızı tavsiye ederiz
IM Duo.qxd 29/07/05 14:11 Page 30
Page 32

31
SAAT - ZAMANLAYICI
Zamanlayıcı modunda Saat modunda
Saat modunda
24 saat formatı
1) Zamanlayıcının arkasında bulunan pil bölmesini açın
ve kırmızı dili çıkartarak A76 pili takın (tartı ile
birlikte tedarik edilmektedir) : pilin geniş kısmı
yukarıda olmalıdır. Piller takıldığında “+” görülebilir
olmalıdır.
2) Pil takılır takılmaz, tartı saat moduna geçecek ve
format 24 saat formatı olacaktır.
3) Zamanı ayarlamak için, cihazın arkasında bulunan
“clock set” tuşuna basın. Ekranda “ 00: 00” yanıp
sönecektir. Zamanı artırmak veya azaltmak için « ▲ »
veya « ▼ » tuşlarına basın. Tuşa basarak ve tuşu
aşağıda tutarak rakamın hızlı ilerlemesi sağlanabilir.
4) Seçilen zamanı değiştirmek için birkaç saniye bekleyin.
Açıklamalar :
Pilleri her değiştirdiğinizde, saat formatı yukarıdaki gibi
sıfırlanacaktır. Uyku modunda, geri sayma olmadığında,
zaman görüntülenecektir.
Zamanlayıcı modunda
Maksimum programlama :
99 dakika 59 saniye.
1) Saat modunda, zamanlayıcı moduna geçmek için
« ▲ » veya « ▼ » tuşuna basın.Zamanlayıcı sembolü
ve önceden programlanan süre gösterilir.
2) Geri sayma süresini programlamak için « ▲ » veya
« ▼ » tuşlarına basınız. Rakamların daha hızlı gitmesi
için tuşa basın ve basılı tutun.
3) Seçilen zamanı doğrulamak için 3 saniye bekleyin.
Daha sonra sembolü yanıp sönecek ve geri
saymayı gösterecektir.
4) Geri saymanın sonunda, alarm 30 saniye boyu
çalacaktır. Ekranda “ 00: 00” yanıp sönecektir.
Herhangi bir tuşa basarak alarmı kapatmak
mümkündür.
Geri saymayı durdurmak için «▲» veya «▼» tuşuna
basın.
O anda, eğer zamanlayıcının zamanını yeniden ayarlamak
istiyorsanız,tekrar «▲» veya «▼» tuşuna basın.
Saat moduna geri dönmek için «▲» veya «▼» tuşuna
basın ve 10 saniye için herhangi bir tuşa basmayın.
Tartı ve zamanlayıcı ayrıdır.Her iki cihazı ayrı ayrı
veya eşzamanlı olarak kullanabilirsiniz.
Tartı ve zamanlayıcı için KULLANIM
TALİMATLARI
• Sünger ve sabunlu su kullanarak tartınızı temizleyin,
çözücü ve aşındırıcılar kullanmayın.Suya daldırmayın
• Tartınızı mikro dalga fırına koymayın.
• Tartı uzun süreler kullanıldığında pilleri çıkartın.
AM
PM
AM
PM
Zamanlayıcı ikonu
Saat ikonu
dakika saniye
saat dakika
Kullanılmış pilleri atmayın. .
Bu amaç için tasarlanmış olan bir konteynıra atın,
böylelikle toplanabilir ve geri dönüştürebilirler.
T
R
ELEKTRONİK MUTFAK TARTISI
IM Duo.qxd 29/07/05 14:11 Page 31
Page 33

32
VÁHY
VLASTNOSTI
• Kapacita: 5 kg
• Citlivost: 1 g
• Dovažování s automatickým vážením obalu (umožňuje
postupné odvažování přidávaných přísad bez jejich
sundání z misky)
• Měření kapalin v mililitrech
• Funkce časovače (odpočet času)
ZAPNUTÍ VAH
1) Baterie : Otevřete kryt na dně vah a po odstranění
červené pásky zapojte 2 lithiové baterie CR2023
(dodané společně s váhami). Nejširší část baterie
musí být nahoře. Pokud jsou baterie správně vložené,
kladný pól “+” musí zůstat viditelný.
2) Postavte váhy na tvrdý a rovný podklad.
3) Váhy zapněte stisknutím tlačítka « Tare ». Na displeji
se objeví: a poté .
POSTUP VÁŽENÍ
*Po zapnutí vah položte váženou potravinu přímo na
misku vah nebo ji nalijte do nádoby. Hmotnost se zobrazí
na displeji. Pokud zvýšíte množství vážené potraviny,
zobrazená hmotnost se zvýší.
Použití funkce dovažování:
Před zapnutím vah umístěte na misku vah nádobu,
salátovou mísu apod.
Při samostatném a postupném
vážení přísad podle receptu:
- Odvažte první přísadu podle výše uvedeného postupu*.
- Stisknutím tlačítka « Tare » vynulujte váhy.Na displeji se
objeví: a poté .
- Přidejte druhou přísadu. Na displeji se objeví pouze
hmotnost druhé přísady atd.
Stejně postupujte při vážení všech ostatních přísad.
Pokud jste váženou přísadu odstranili po zvážení obalu,
záporná hodnota, která se zobrazí na displeji, odpovídá
hmotnosti odstraněné přísady.Například:
Měření tekutin v mililitrech
V režimu vážení přepněte váhy na funkci “měření tekutin”
stisknutím tlačítka « H
2
O ». Opětovným stisknutím
tlačítka « H2O » vrátíte váhy do režimu vážení.
VYPNUTÍ VAH
Pokud je na displeji zobrazeno , stiskněte tlačítko
« Tare ». Pokud je na displeji zobrazeno něco jiného,
stiskněte tlačítko « Tare » a počkejte,dokud se na displeji
nezobrazí a znovu stiskněte tlačítko « Tare ».
Po 2 minutách nečinnosti (pokud nestisknete žádné
tlačítko) se váhy automaticky vypnou.
SPECIFICKÁ ZOBRAZENÍ NA DISPLEJI
Přetížení vah
Pokud jsou váhy přetížené, na displeji se zobrazí: .
Okamžitě váženou potravinu odstraňte, mohlo by dojít k
poškození vah.
Indikace vybité baterie (platí pro váhy i časový
odpočet)
Vyměňte baterii, pokud se na displeji vah zobrazí
symbol:
EEEE
0 g0 g0 g0
g
C
S
ELEKTRONICKÉ KUCHYŇSKÉ VÁHY
Vážení zákazníci,
děkujeme Vám, ž e jste si zakoupili elektronické kuc hyňské váhy Terraillon.Věříme , že s nimi budete spokojení. Pečlivě si, prosím,
přečtěte tento návod, abyste mohli využít všechny výhody těchto vah.
IM Duo.qxd 29/07/05 14:11 Page 32
Page 34

33
HODINY – ČASOVÝ ODPOČET
V režimu časovače (časový odpočet) V režimu hodin
V režimu hodin
zobrazení 24 h
1) Odstraňte kryt baterie na zadní straně časovače a po
odstranění červené pásky zapojte baterii A76
(dodanou spolu s váhami): širší část baterie musí být
otočená směrem nahoru.Při správném vložení baterie
musí kladný pól “+” zůstat viditelný.
2) Po vložení baterie se váhy ihned nastaví do režimu
hodin s formátem zobrazení 24 h.
3) Přesný čas se nastavuje pomocí tlačítka « clock set »
na zadní straně přístroje. Na displeji bliká « 00:00 ».
Čas nastavíte postupným stlačováním tlačítek « ▲ »
nebo « ▼ ».Nastavení času se urychlí, pokud přidržíte
tlačítko stisknuté.
4) Před potvrzením nastaveného času počkejte několik
sekund.
Poznámky:
Zobra z ení hodin je nutné znovu nastavit po každé výměně
baterií. Pokud časovač neodpočítává čas v režimu sleep, na
displeji se zobrazí hodiny se správným časem.
V režimu časovače
Nejdelší neprogramovatelný čas:
99 minut 59 sekund.
1) Z režimu hodin se přechází do režimu časovače
stisknutím tlačítka « ▲ » nebo « ▼ ». Zobrazí se
symbol časovače a odpočítávaná doba z
předcházejícího časového odpočtu.
2) Dobu, kterou chcete odpočítat, nastavte pomocí
tlačítka « ▲ » nebo « ▼ ». Nastavení časovače se
zrychlí, pokud přidržíte tlačítko stisknuté.
3) Před potvrzením nastaveného času počkejte 3
sekundy. Blikající symbol časovače signalizuje
časový odpočet.
4) Po odpočtení nastavené doby se rozezní
upozorňovací signál, který potrvá 30 sekund. Na
displeji bliká « ▲ » nebo « ▼ ». Stisknutím
libovolného tlačítka je možné zvonění vypnout.
Časový odpočet zastavíte stisknutím
« ▲ » nebo « ▼ »
.
Pokud chcete časovač znovu nastavit, znovu stiskněte
« ▲ »
nebo « ▼ »
.
Pro návrat do režimu hodin stiskněte
« ▲ » nebo « ▼ »
a
10 sekund nemačkejte žádné tlačítko.
Váhy a hodiny jsou dva na sobě nezávislé
přístroje. Můžete je používat buď samostatně
nebo současně.
PREVENTIVNÍ UPOZORNĚNÍ
• Váhy čistěte houbičkou a mýdlovou vodou, nepoužívejte
rozpouštědla ani abrazívní čistící prostředky. Váhy
neponořujte do vody.
• Váhy neohřívejte ani nepoužívejte v mikrovlnné troubě.
• Pokud váhy nebudete delší dobu používat,vyndejte baterii.
AM
PM
AM
PM
Symbol časového odpočtu
Symbol hodin
minuty sekundy
hodiny minuty
Použité baterie neodhazujte do domovního odpadu.
Vyhoďte je do speciálních sběrných
kontejnerů vyhrazených k tomuto účelu.
C
S
ELEKTRONICKÉ KUCHYŇSKÉ VÁHY
IM Duo.qxd 29/07/05 14:11 Page 33
Page 35

34
VÁHY
VLASTNOSTI
• Váživosť: 5 kg
• Citlivosť: 1 g
• Dovažovanie s automatickým vážením obalu (Vám
umožní postupné odvažovanie návažkov bez ich
odstránenia z misky)
• Meranie kvapalín v mililitroch
• Minútky (odpočítanie času)
ZAPNUTIE VÁH
1) Batérie : Otvorte kryt na dne váh a odstránením
červenej pásky pripojte 2 lítiové batérie CR2023 (dodané
s váhami). Najširšia časť batérie by mala byť hore. Keď sú
batérie nainštalované, pól “+” musí ostať viditeľný.
2) Postavte váhy na tvrdý a rovný povrch.
3) Váhy zapnite stlačením tlačidla « Tare ». Na displeji sa
zobrazí: a potom .
PRACOVNY POSTUP
*Po zapnutí váh,dajte návažok priamo na misku váh alebo
ho nalejte do nádoby. Hmotnosť sa zobrazí na displeji.
Keď návažok pridáte, zobrazená hmotnosť sa zvýši.
Použite dovažovacej funkcie:
Pred zapnutím váh nainštalujte na misku váh nádobu,
šalátovú misu atď.
Pri samostatnom a postupnom
dovažovaní zložiek:
- Odvážte prvý návažok podľa predošlého opisu*.
- Stlačením tlačidla « Tare » vynulujte váhy. Na displeji sa
zobrazí: a potom .
- Pridajte druhý návažok. Na displeji sa zobrazí iba
hmotnosť druhého návažku atď.
Rovnako postupne pokračujte so všetkými
odvažovanými prísadami. Ak ste návažok odstránili po
určení hmotnosti obalu, záporná hodnota, ktorá sa
zobrazí na displeji zodpovedá hmotnosti odstráneného
návažku. Napríklad:
Meranie kvapalín v mililitroch
V režime váženia stlačením tlačidla « H2O » prepnite
váhy na funkciu “merania kvapalín”.Opätovným stlačením
tlačidla « H2O » vrátite váhy do režimu váženia.
VYPNUTIE VÁH
Keď displej zobrazuje
,
stlačte tlačidlo « Tare ».Ak je
na displeji niečo iné, stlačte tlačidlo « Tare », počkajte,až sa
na displeji zobrazí a znovu stlačte tlačidlo « Tare ».
Po 2 minútach sa váhy samočinne vypnú, ak nestlačíte
žiadne tlačidlo.
OSOBITNÉ ZOBRAZENIA
Preťaženie váh
Keď sú váhy preťažené, na displeji sa zobrazí: .
Okamžite návažok odstráňte, inak sa váhy môžu poškodiť.
Ukazovateľ vybitej batérie (platí pre váhy i
minútky)
Vymeňte batériu, keď je na displeji váh:
EEEE
0 g0 g0 g0
g
S
K
ELEKTRONICKÉ KUCHYNSKÉ VÁHY
Vážený zákazník,
ďakujeme Vám, že ste si kúpili elektronické kuchynské váhy Terraillon. Veríme, že budete s nimi spokojný. Starostlivo si, prosím,
prečítajte tento návod, aby ste mohli využiť všetky výhody svojich váh.
IM Duo.qxd 29/07/05 14:11 Page 34
Page 36

35
HODINY – MINÚTKY
V režime minútok V režime hodín
V režime hodín
zobrazenie 24 h
1) Otvorte kryt batérie na zadnej strane minútok a
odstránením červenej pásky zapojte batériu A76
(dodanú spolu s váhami): Širšia časť batérie by mala
byť hore. Keď sú batérie nainštalované, pól “+” musí
ostať viditeľný.
2) Po vložení batérie sa váhy ihneď nastavia do režimu
hodín s formátom zobrazenia 24 h.
3) Presný čas sa nastavuje pomocou tlačidla « clock set »
na zadnej strane prístroja. Na displeji bliká « 00:00 ».
Čas nastavte stláčaním « ▲ » alebo « ▼ ».
Nastavovanie sa zrýchli,keď pridržíte tlačidlo stlačené.
4) Na potvrdenie zvoleného času vyčkajte niekoľko sekúnd.
Poznámky:
Formát zobrazenia hodín treba opísaným spôsobom znovu
nastaviť po každej výmene batérií.
Keď minútky neodpočítavajú čas v režime sleep, zobrazuje sa
na displeji denný čas.
V režime minútok
Najdlhšie naprogramovanie:
99 minút 59 sekúnd.
1) Z režimu hodín prejdete do režimu minútok stlačením
« ▲ » alebo « ▼ ». Zobrazí sa symbol minútok a
trvanie odpočítania času, nastavené predošle.
2) Trvanie odpočítania času prestavte stláčaním tlačidla
« ▲ » alebo « ▼ ». Nastavovanie sa zrýchli, keď
pridržíte tlačidlo stlačené.
3) Na potvrdenie zvoleného času vyčkajte 3 sekundy.
Blikajúci symbol minútok potom signalizuje
odpočítavanie času.
4) Po skončení odpočítania času zvoní poplach 30
sekúnd. Na displeji bliká « ▲ » alebo « ▼ ». Stlačením
ktoréhokoľvek tlačidla možno zvonenie vypnúť.
Odpočítanie času zastavíte stlačením
« ▲ » alebo « ▼ »
.
Ak chcete minútky znovu nastaviť, znovu stlačte
« ▲ » alebo
« ▼ »
.
Na návrat do režimu hodín stlačte
« ▲ » alebo « ▼ »
a 10
sekúnd nestlačte žiadne tlačidlo.
Váhy a hodiny sú samostatné prístroje. Môžete
ich používať buď samostatne, alebo súčasne.
PREVENTÍVNE UPOZORNENIE
• Váhy čistite hubou a mydlovou vodou, nepoužívajte
rozpúšťadlá ani abrazívne čistiace prostriedky. Neponorte
váhy do vody.
• Váhy nevkladajte do mikrovlnovej rúry.
• Keď nebudete váhy dlhší čas používať, vyberte batériu.
AM
PM
AM
PM
Symbol minútok
Symbol hodín
minúty sekundy
hodiny minúty
Použité batérie neodhadzujte do odpadu.
Na ich zneškodnenie použite osobitný
kontajner určený na tento účel.
S
K
ELEKTRONICKÉ KUCHYNSKÉ VÁHY
IM Duo.qxd 29/07/05 14:11 Page 35
 Loading...