

Page 1

TERRA PCs
HANDBUCH
USER MANUAL
MANUEL DE
L’UTILISATEUR
INSTRUKCJA
UŻYTKOWNIKA PCs
IT. MADE IN GERMANY.
FRENDE PL
Page 2

2
Vorwort
Wir gratulieren Ihnen recht herzlich zum Kauf Ihres TERRA Computersystems und
hoffen, dass es die von Ihnen gesetzten Erwartungen erfüllt. Dieses Handbuch soll
Ihnen einen Überblick über den Aufbau und die Funktionen Ihres PCs geben. Wir
arbeiten ständig an der Weiterentwicklung aller Typen und Modelle. Bitte haben Sie
Verständnis dafür, dass deshalb jederzeit Änderungen des Lieferumfangs in Form,
Ausstattung und Technik möglich sind. Aus Angaben, Abbildungen und Beschreibung
dieser Gebrauchsanweisung können daher keine Ansprüche hergeleitet werden.
Hinweise bezüglich der Gestaltung und eventuell vorhandener Fehler teilen Sie bitte
Ihrem Fachhändler mit. Gerne werden wir sinnvolle Anregungen und Verbesserungen
aufgreifen und umsetzen. Alle Rechte vorbehalten. Kein Teil dieses Handbuches darf
in irgendeiner Form (Druck, Fotokopie, Mikrofilm oder andere Verfahren) ohne vorherige schriftliche Genehmigung der Firma WORTMANN AG reproduziert oder unter
Verwendung elektronischer Systeme verarbeitet, vervielfältigt oder verbreitet wer-
den. Die genannten Firmen- und Markennamen sowie Produktbezeichnungen unterliegen in der Regel marken-, patent oder warenzeichenrechtlichem Schutz.
Dieses Handbuch wurde erstellt und herausgegeben von der WORTMANN AG, Bredenhop 20, 32609 Hüllhorst,
Tel: 05744 / 944-0, Fax: 05744 / 944-444.
Page 3

3
DE
Inhaltsverzeichnis
Sicherheitshinweise 4-5
Gerät transportieren 6
Gerät reinigen 6
Gewährleistungen 7
Rücknahme von Altgeräten 7
CE-Kennzeichnung 8
Inbetriebnahme 9
Gerät aufstellen 10
Anschlüsse und Bedienelemente 11-13
Anschlüsse Gehäuserückseite 14-15
Anschlussmöglichkeiten Display 16-18
Externe Geräte anschließen 19-20
Maus- und Tastatur-Set anschließen 21
Externe Geräte an die USB-Anschlüsse anschließen 22
Gerät an die Netzspannung anschließen 23
Bildschirm und Gerät einschalten 24
Weitere Hinweise 25-32
Original TERRA Hersteller Service 33-34
Page 4

4
Sicherheitshinweise
Beachten Sie beim Aufstellen und beim
Betrieb des Gerätes die Hinweise für die
Umgebungsbedingungen.
Sie dürfen das Gerät nur betreiben, wenn
die eingestellte Netzspannung des Gerätes
mit der örtlichen Netzspannung überein-
stimmt. Überprüfen Sie die eingestellte
Netzspannung des Gerätes!
Eine Steckdose muss sich in der
Nähe des PCs benden und leicht
zugänglich sein.
Achtung, an den Bauteilen im Inneren
des Gerätes können hohe Temperaturen
auftreten.
Der Ein- und Ausschalter
trennt das Gerät nicht
von der Netzspannung.
Zur vollständigen Trennung von der Netzspannung müssen Sie den Netzstecker
aus der geerdeten Schutzkontakt-Steckdose ziehen.
Unsere PC-Systeme sind für den üblichen
Gebrauch konzipiert. Sollten Sie Systeme
für den Einsatz 24/7 benötigen, unterbreiten wir Ihnen gerne ein individuelles
Angebot.
PCs mit Audioausgang:
Warnung! Zu große Lautstärke bei der
Verwendung von Kopfhörern erzeugt
übermäßigen Schalldruck und kann zum
Verlust des Hörvermögens führen.
!
Wir empfehlen das Gerät
nur durch autorisiertes
Fachpersonal öffnen zu
lassen.
Page 5

5
DE
Stellen Sie die Lautstärke vor der Wiedergabe auf den niedrigsten Wert ein. Starten
Sie die Widergabe und erhöhen Sie die
Lautstärke langsam auf einen Pegel der
Ihnen angenehm ist. Durch verändern der
Grundeinstellungen des Equalizers, des
Treibers, der Software oder des Betriebssystems kann es zur Erhöhung der Lautstärke und dadurch zu bleibenden Hör-
schäden kommen.
PCs mit TV-Tunerkarte
Wenn Sie Ihren DVBT-Tuner über eine
Hausantenne anschließen, muss diese
nach den örtlichen Installationsvorschrif-
ten geerdet sein.
Die Sicherheitsaspekte bei Multimedia-
Anwendungen sind zu beachten!
VORSICHT: Explosionsgefahr bei un-
sachgemäßem Austausch der Batterie.
Entsorgung gebrauchter Batterien nach
Anleitung.
Page 6

6
Gerät transportieren
Transportieren Sie alle Geräte einzeln
und nur in der Originalverpackung oder
in einer anderen geeigneten Verpackung,
die Schutz gegen Stoß und Schlag ge-
währt.
Gerät reinigen
Schalten Sie das Gerät und alle angeschlossenen Geräte aus und ziehen
Sie den Netzstecker aus der geerdeten
Schutzkontakt-Steckdose.
Der Gehäuseinnenraum des Gerätes
darf nur von autorisiertem Fachpersonal
gereinigt werden.
Verwenden Sie für die Reinigung kein
Scheuerpulver und keine Kunststoff
lösenden Reinigungsmittel.
Achten Sie darauf, dass keine Flüssigkeit
in das Innere des Gerätes gelangt.
Die Gehäuseoberfläche können Sie mit
einem trockenen Tuch reinigen. Bei
starker Verschmutzung können Sie
zusätzlich einen milden Glasreiniger
benutzen.
Tastatur und Maus können Sie außen mit
Desinfektionstüchern reinigen.
!
Page 7

7
DE
Gewährleistungen
Für unsere Systeme gelten die Gewährleistungen gemäß BGB sowie darüber
hinaus Garantieleistungen nach Ver-
einbarung. Das von Ihnen erworbene
System wurde in unserem nach ISO 9001
zertifizierten Unternehmen umwelt- und
qualitätsgerecht produziert.
Rücknahme von
Altgeräten
Die Rücknahme und Recyclingfähigkeit
unserer Systeme ist in unserem Umweltmanagementsystem geregelt und
garantiert.
Unsere Geräte sind weitestgehend aus
Materialien hergestellt, die einem fach-
gerechten Recycling zugeführt werden
können. Nach seinem Gebrauch wird das
Gerät zurückgenommen, um es einer
Wiederverwendung bzw. wertstofflichen
Verwertung zuzuführen, soweit es in
einem Zustand zurückgegeben wird, der
dem bestimmungsmäßigen Gebrauch
entspricht. Nicht verwertbare Geräteteile werden sachgemäß entsorgt. Zur
Rückgabe eines Gerätes nutzen Sie bitte
die in Ihrem Land vorhandenen Recy-
cling- und Entsorgungsmöglichkeiten.
Weitere Informationen über länderspezifische Recycling- und Entsorgungsmög-
lichkeiten finden Sie im Internet unter:
www.wortmann.de.
Wenn Sie darüber hinaus
noch Fragen zur Entsorgung haben, wenden Sie
sich bitte an Ihren Fachhändler.
Page 8
8
CE-Kennzeichnung
Dieses Gerät erfüllt in der ausgelieferten Ausführung die Anforderungen der
EG-Richtlinien 2014/30/EU „Elektromag-
netische Verträglichkeit“, 2009/125/EG
„Ökodesign Richtlinie“, 2011/65/EU „RoHs
Richtlinie“ und 2014/35/EU „Niederspannungsrichtlinie“.
CE-Kennzeichnung für Geräte mit Funkkomponente
Dieses Gerät erfüllt in der ausgelieferten
Ausführung die Anforderungen der EG-
Richtlinie 1999/5/EG des Europäischen
Parlamentes und des Rates vom 9. März
1999 über Funkanlagen und Telekommunikationseinrichtungen und die gegen-
seitige Anerkennung der Konformität.
Dieses Gerät darf in folgenden Ländern
verwendet werden:
Aktuelle Informationen über eventuelle
Einschränkungen im Betrieb finden Sie
bei der Behörde des jeweiligen Landes.
Wenn Ihr Land nicht in der Aufzählung
erwähnt ist, fragen Sie bitte bei der entsprechenden Aufsichtsbehörde, ob die
Nutzung dieses Produkts erlaubt ist.
Bulgarien
Belgien
Dänemark
Deutschland
Estland
Frankreich
Griechenland
Großbritannien
Irland
Island
Italien
Lettland
Liechtenstein
Litauen
Luxemburg
Malta
Niederlande
Österreich
Polen
Portugal
Rumänien
Schweiz
Slowakei
Slowenien
Spanien
Tschechische
Republik
Ungarn
Zypern
Page 9

9
DE
Inbetriebnahme
Lieferinhalt auspacken und überprüfen
Die Originalverpackung der Geräte sollten
Sie für einen eventuellen Transport auf-
bewahren.
• Packen Sie alle Teile aus.
• Prüfen Sie den Verpackungsinhalt auf
eventuelle Transportschäden.
• Prüfen Sie, ob die Lieferung mit den
Angaben auf dem Lieferschein
übereinstimmt.
• Wenn Sie Transportschäden oder
Unstimmigkeiten zwischen Verpack ungsinhalt und Lieferschein feststel-
len, informieren Sie unverzüglich Ihren
TERRA Fachhändler.
Schritte der Erstinbetriebnahme
Es sind nur wenige Schritte nötig, um Ihr
neues Gerät das erste Mal in Betrieb zu
nehmen: Bitte beachten Sie die Sicher-
heitshinweise auf Seite 4.
• Stellplatz für das Gerät wählen und
Gerät aufstellen.
• Nennspannung überprüfen und dann
das Gerät an das Stromnetz anschließen.
• Gerät einschalten.
Externe Geräte
Wenn Sie zusätzlich zu Ihrem Gerät andere externe Geräte erhalten haben (z.B.
einen Drucker), schließen Sie diese erst
nach der Erstinstallation an. Wie Sie die-
se externen Geräte anschließen, ist in den
folgenden Abschnitten beschrieben.
i
!
Page 10

10
Gerät aufstellen
Berücksichtigen Sie beim Aufstellen des
Gerätes die Empfehlungen und Sicher-
heitshinweise.
Stellen Sie das Gerät nur in der dafür vorgesehenen Betriebslage (z.B. senkrecht
auf den Standfüßen) auf. Wir empfehlen
Ihnen, das Gerät auf eine rutschfeste Unterlage zu stellen. Bei der Vielfalt der bei
Möbeln verwendeten Beschichtungen und
Lacke ist es nicht auszuschließen, dass die
Kunststofffüße Schäden auf der Stelläche
verursachen. Stellen Sie nicht mehrere
Geräte übereinander.
Das Gerät darf nur auf den Standfüßen
stehend in Betrieb genommen werden.
Abhängig vom Standort Ihres Gerätes kann
es zu störenden Vibrationen und
Geräuschen kommen. Um dies zu ver-
meiden, sollte bei Gehäuseeinheiten ohne
Lüftungsächen ein Mindestabstand von
drei Millimetern zu anderen Geräten oder
Gegenständen eingehalten werden.
Achten Sie darauf, dass das Gerät ausreichend belüftet wird. Die Lüftungsächen
des Bildschirms und des Gerätes dürfen
nicht verdeckt werden, um Überhitzung zu
vermeiden.Setzen Sie das Gerät keinen
extremen Umgebungsbedingungen aus
und schützen Sie das Gerät vor Staub,
Feuchtigkeit und Hitze.
!
Achtung: Das Gerät darf
nur in aufrechter Lage
betrieben werden.
Ausnahmen: Mini-ITX-PC
und Slim-Desktop-PC,
wenn im Internet / auf der
Herstellerseite beschrieben.
Page 11
11
DE
Anschlüsse und Bedienelemente
In diesem Kapitel werden die einzelnen Hardware-Komponenten Ihres Geräts vorgestellt. Sie erhalten eine Übersicht
über die Anzeigen und die Anschlüsse des Geräts. Machen Sie sich mit diesen Elementen vertraut, bevor Sie mit dem
Gerät arbeiten.
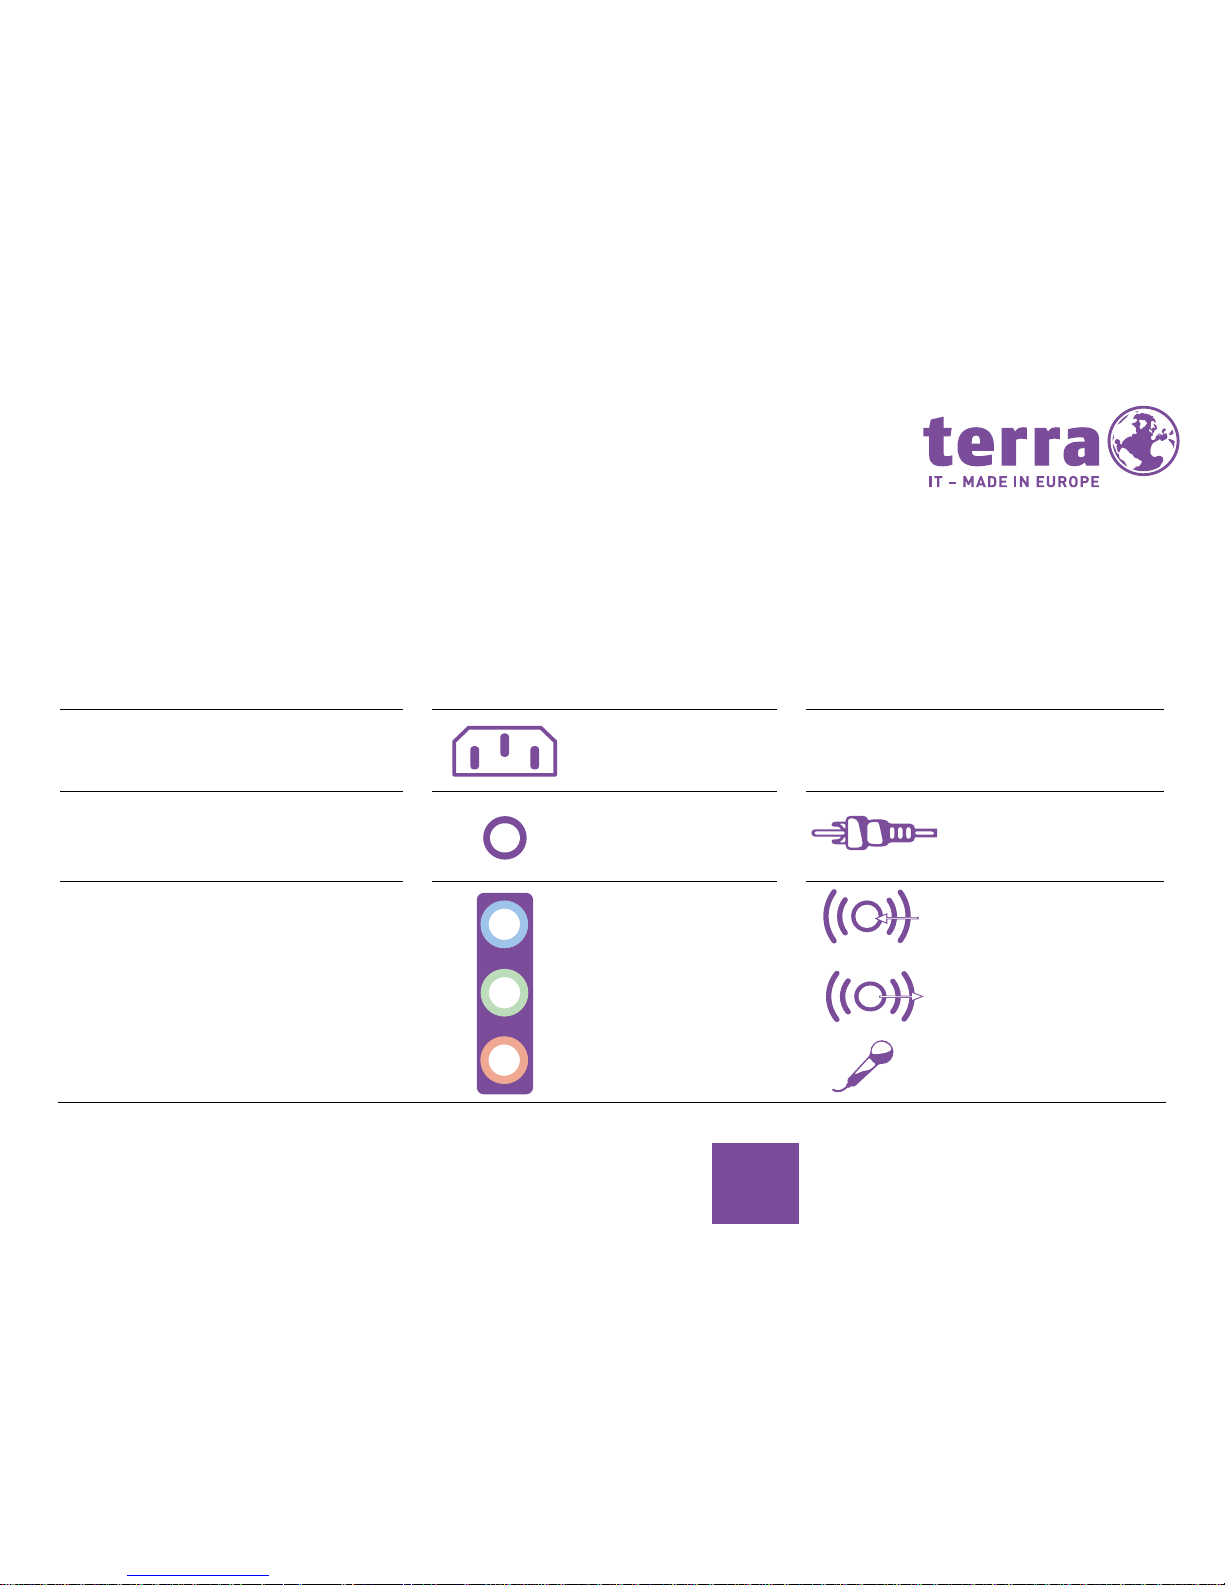
FUNKTION ABBILDUNG BEZEICHNUNG SYMBOL
Spannungsversorgung des PCs
Netzanschluss
Digitaler Soundanschluss,
siehe auch Handbuch zum
Mainboard
Cinch-Anschluss
(Coax)
SPDIF-Out
Sound (externe Tonquellen z.B. Aktivlautsprecher, Mikrofon).
Sound on board
Bei zusätzlich eingebauter Soundkarte ist die Soundfunktion auf
dem Mainboard nicht aktiviert bzw.
„Sound onboard“ ist nicht vorhanden.
Beispiel einer
3,5 mm-Klinken-
buchse
Line In
Line Out
Mic
Page 12

12
FUNKTION ABBILDUNG BEZEICHNUNG SYMBOL
Anschluss für USB-Geräte (z.B.
Maus, IR-Sender/Empfänger-Modul,
Scanner, Drucker, etc.). Maximale
Kabellänge 3m. Wichtiger Hinweis
zu USB 3.0: Der Betrieb von Tastatur
und Maus kann an USB 3.0 Ports zu
Problemen führen.
USB 3.1 – rot
USB 3.0 – blau
USB 3.0 inkl. Ladefunktion - gelb
USB 2.0 – schwarz
USB-Buchse Typ-A
Anschluss für USB-Geräte
USB 3.1 Typ C Buchse
Netzwerk oder DSL-Modem
RJ-45-Buchse oder
Videoeingangs- und Ausgangsanschluss (optional) (siehe Dokumentation zur VGA-/TV-Karte)
SVIDEO IN
SVIDEO OUT
4- oder mehr-
polige Buchse
Page 13
13
DE
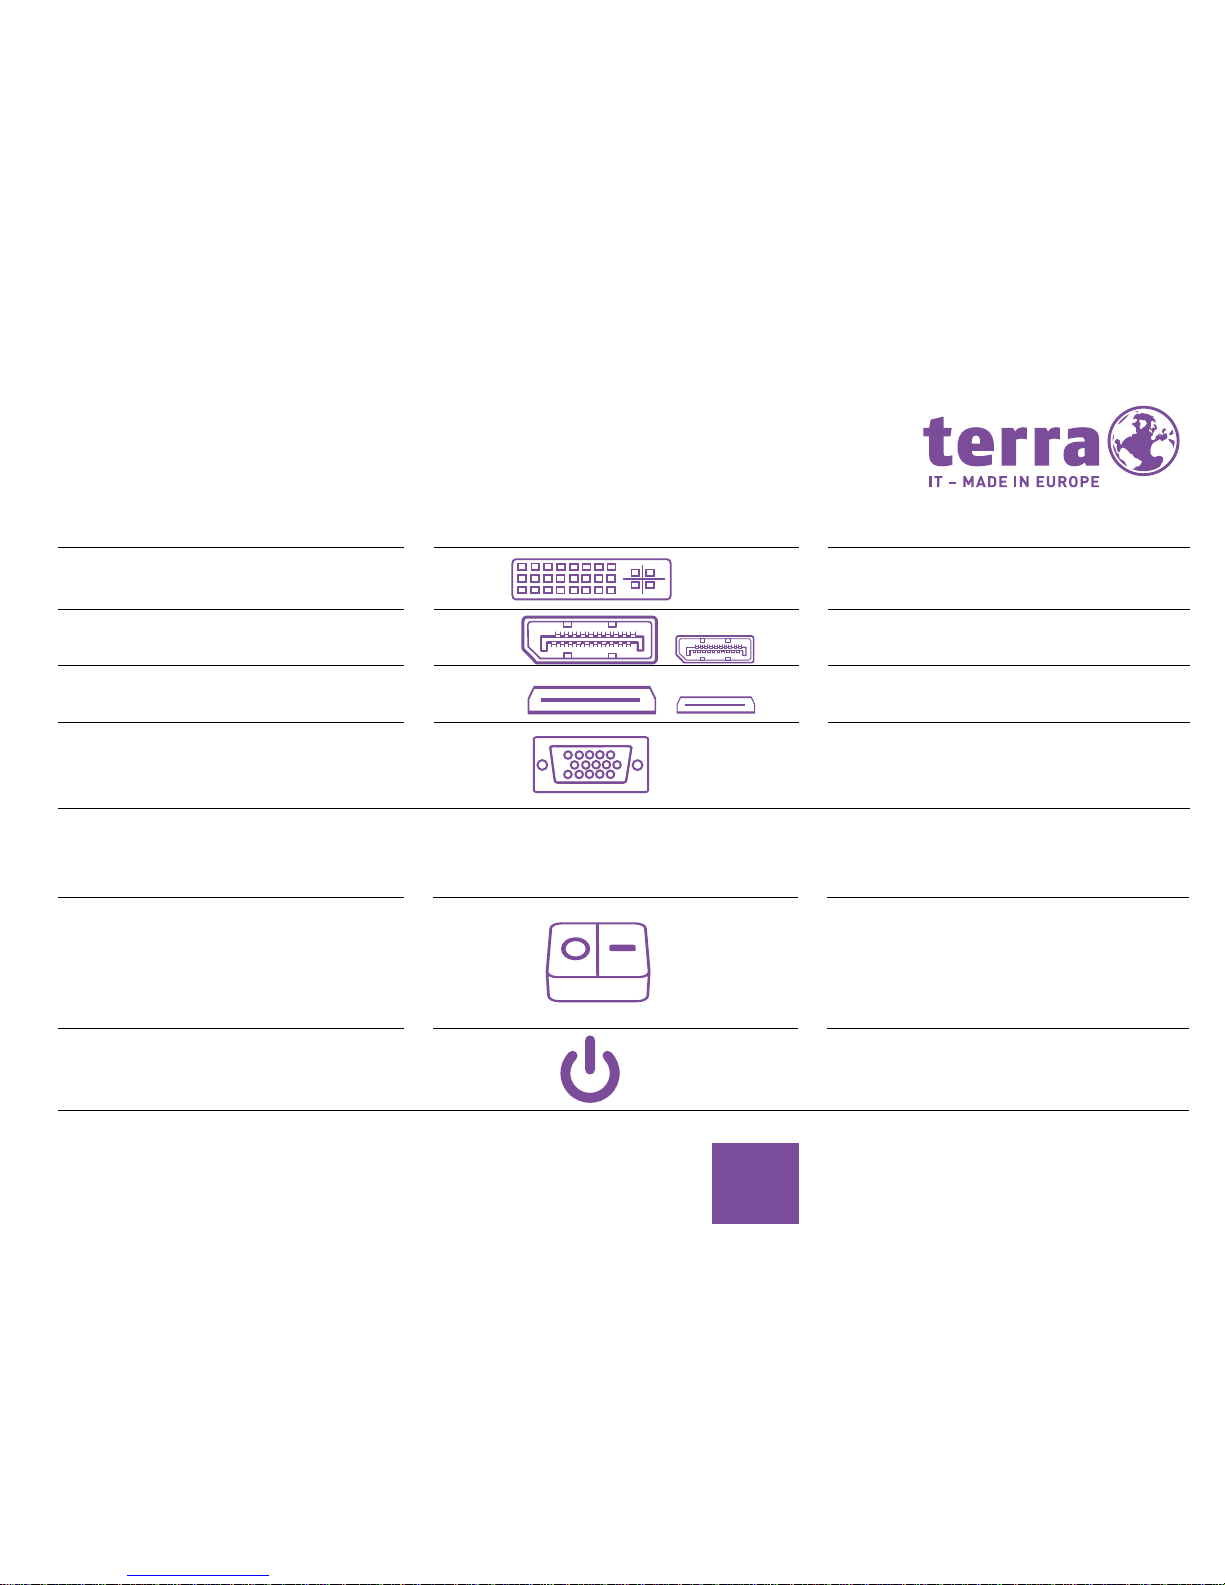
FUNKTION ABBILDUNG BEZEICHNUNG
Anschluss für digitales
Videosignal (Monitor)
DVI*
Audio-Video-Schnittstelle (Monitor) Display-Port/mini Display-Port*
Digitale Audio-Video-Schnittstelle
(Monitor)
HDMI/mini HDMI*
Analoge Videoschnittstelle
(Monitor)
VGA*
BEZEICHNUNG SYMBOL FUNKTION
Ein-/Ausschalter Das Gerät kann im ausgeschalteten
Zustand nicht mehr aus dem Netzwerk gestartet werden (Wake on
LAN).
Es wird kein Strom verbraucht.
Stand-by Schalter Schalter zum Hochfahren des Sys-
tems. Stand-by Schalter leuchtet
blau: Das System ist eingeschaltet.
* Dieser Anschluss kann sowohl onboard als auch auf einer zusätzlich gesteckten Grakkarte vorhanden sein. Ist eine zusätzliche Grakkarte vorhanden,
sind die onboard-VGA-Anschlüsse in der Regel deaktiviert.
Page 14
14
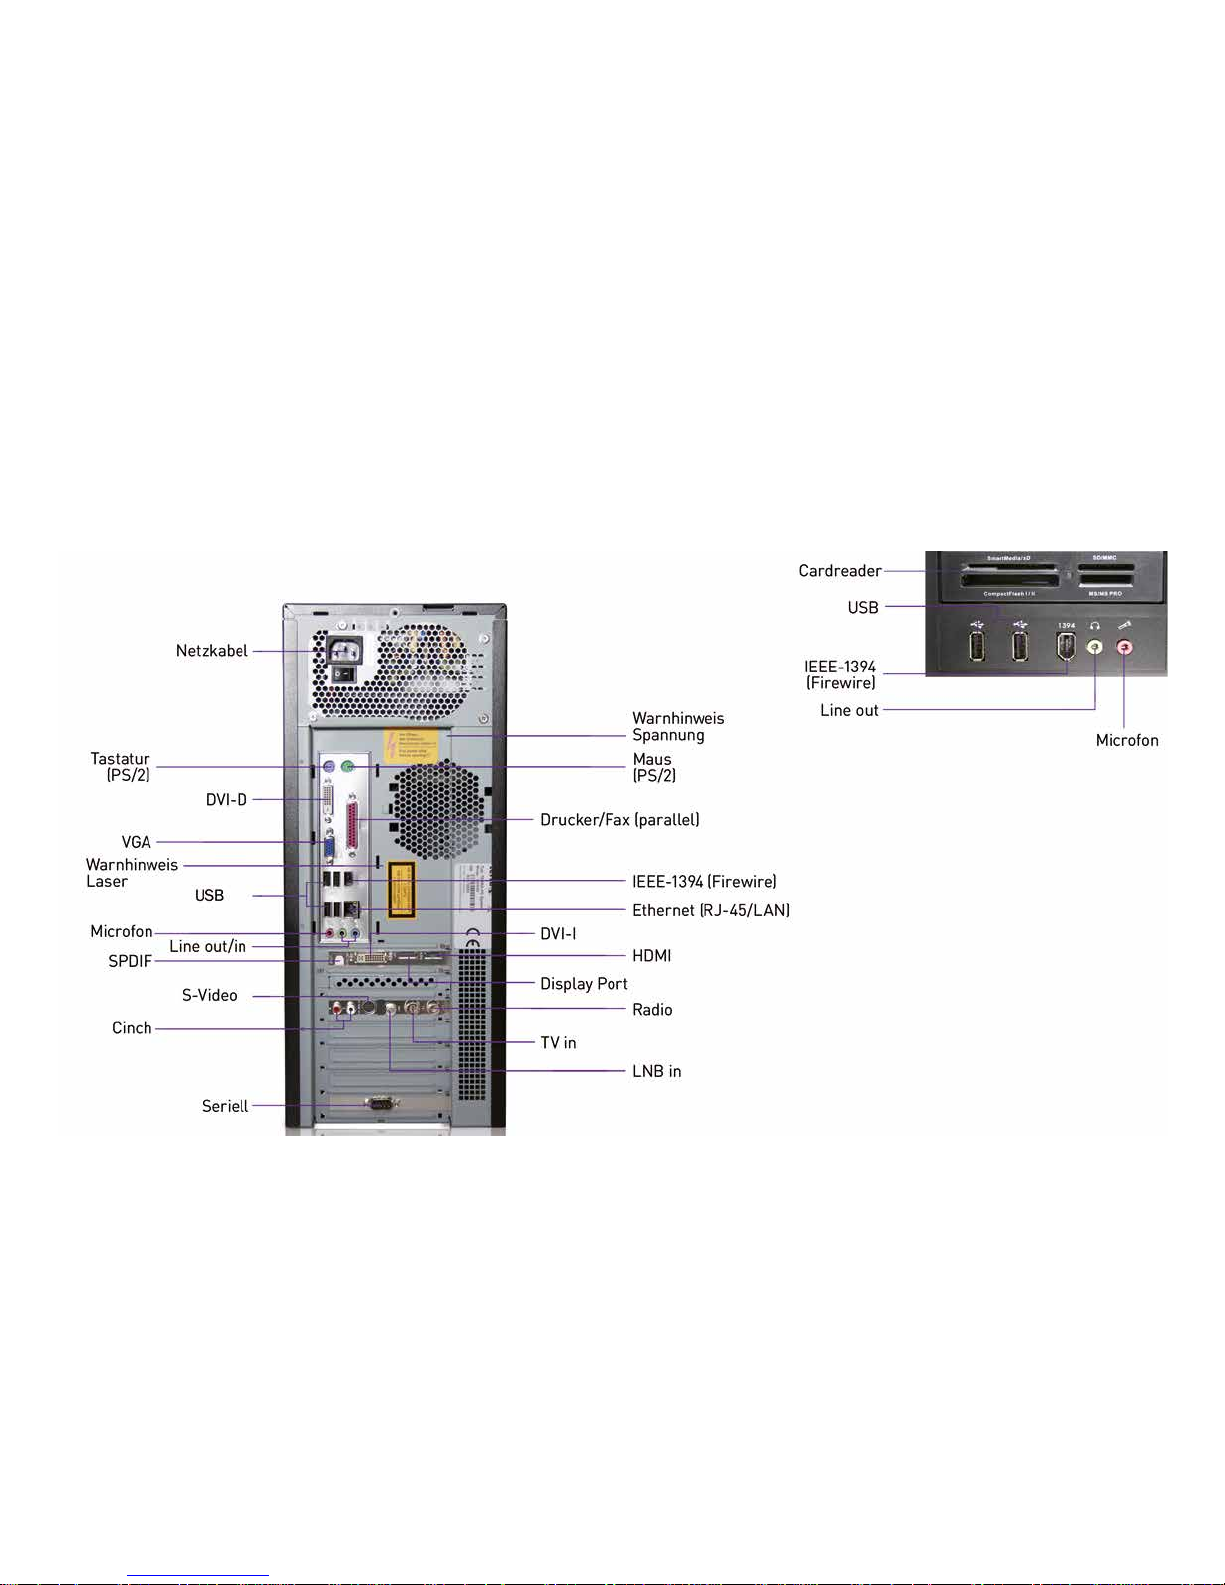
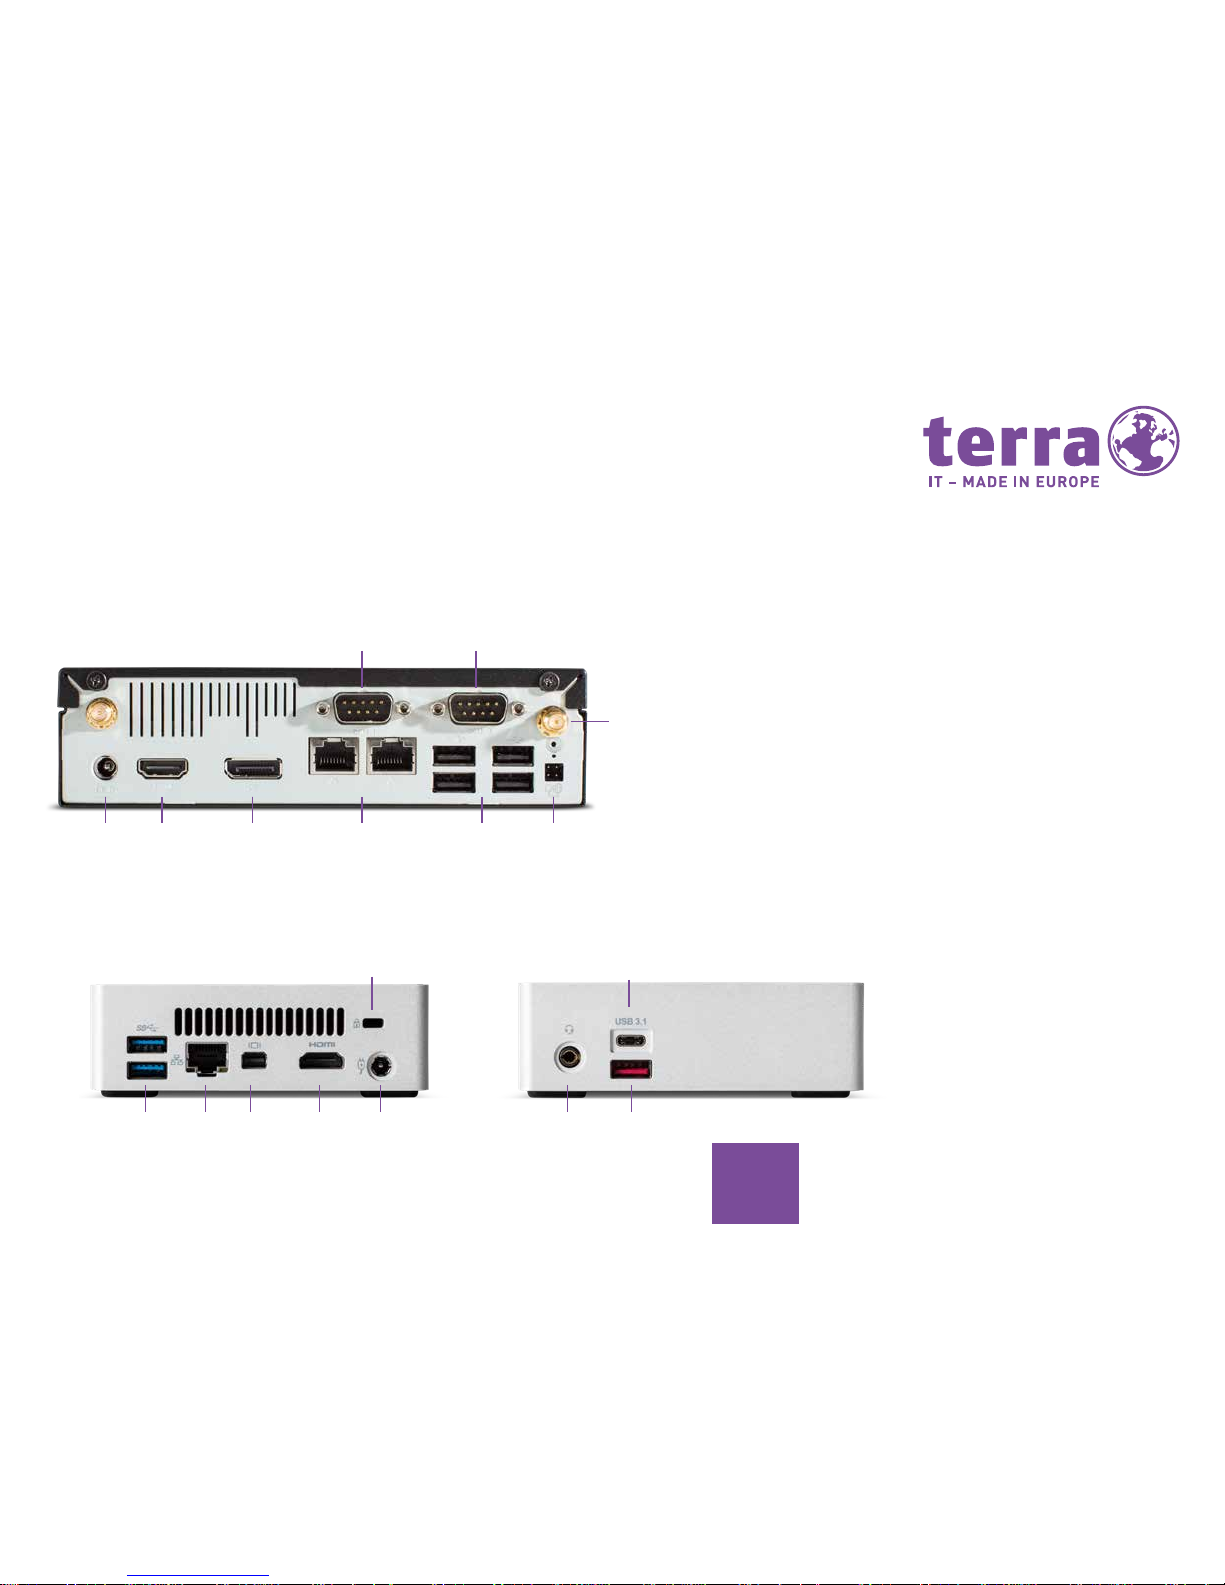
Anschlüsse Gehäuserückseite
Montagebeispiel:
Page 15
15
DE
TERRA MINI PC
TERRA MICRO PC
Anschlüsse Gehäuserückseite
USB 3.0 LAN mini
display
Port
HDMI power
kensington-
lock
headphone
USB 3.1
typ A
USB 3.1
typ C
DC IN display
port
HDMI RJ45/1 Gbit USB 2.0
connector for
ext. power button
WLAN
RS 232RS 232/422/485
Page 16
16
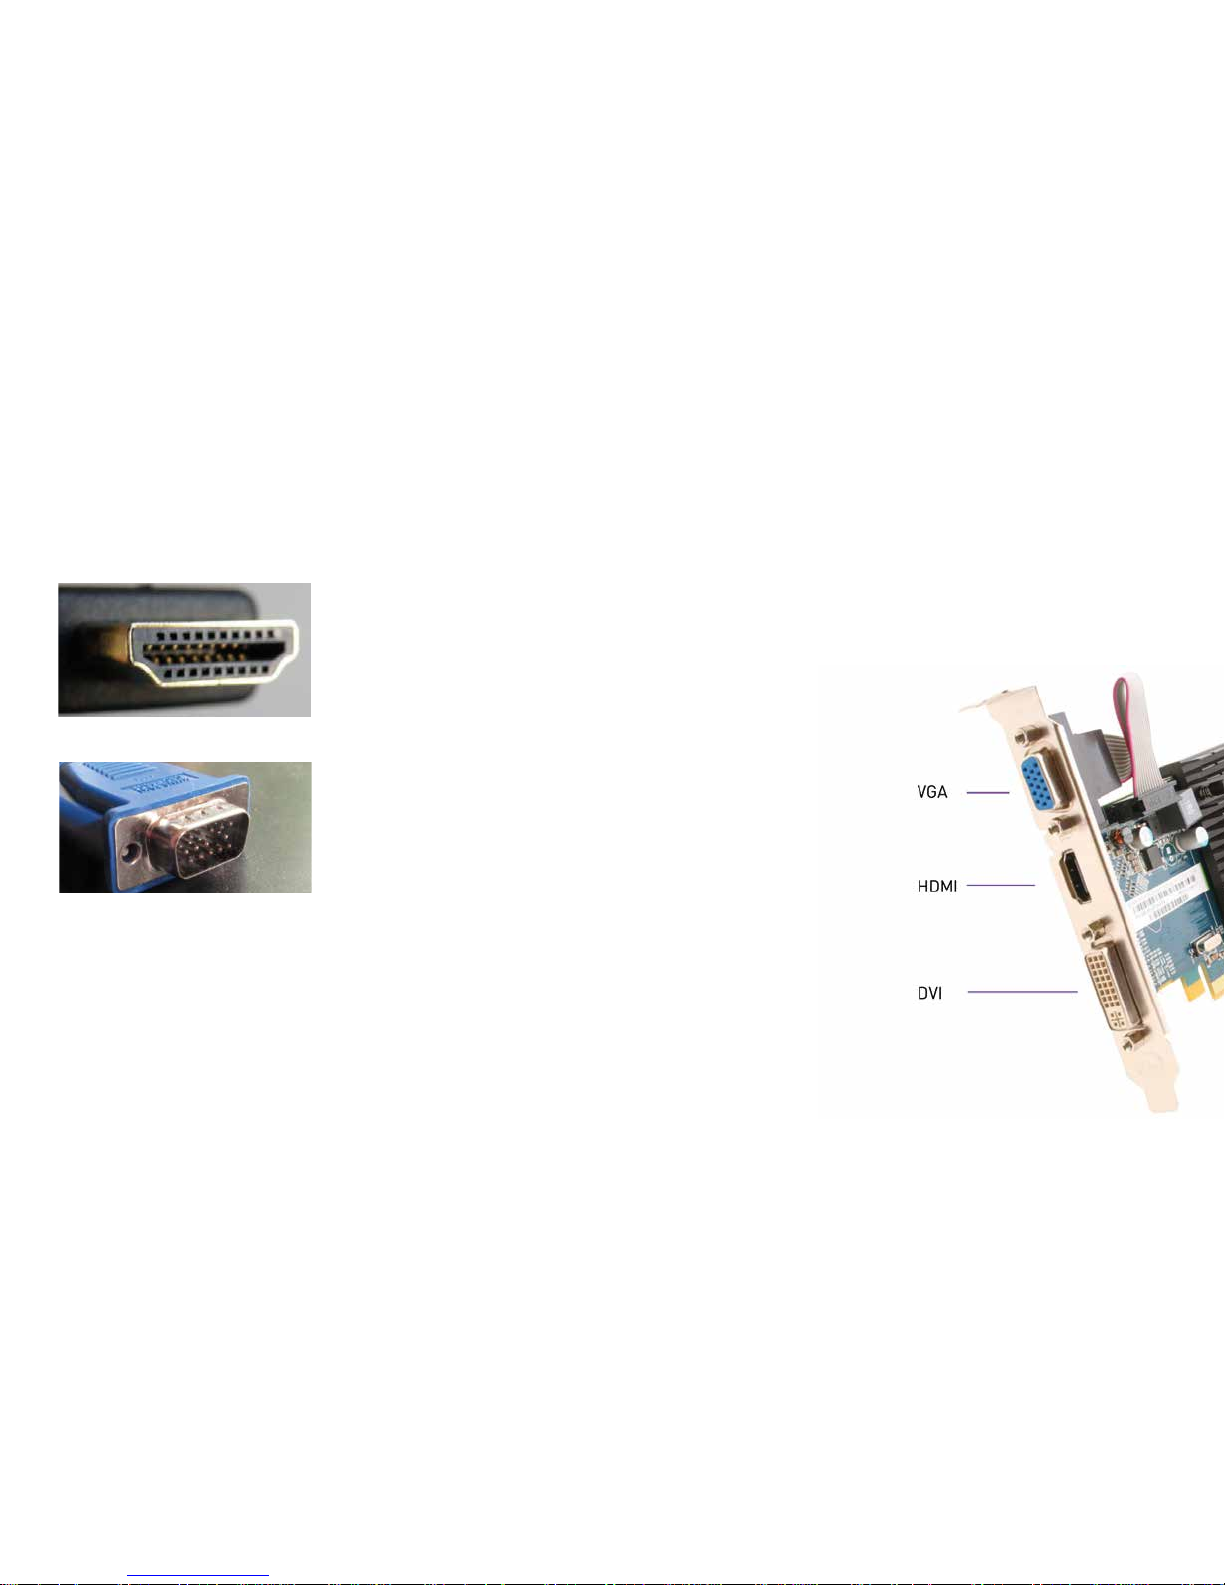
Anschlussmöglichkeiten Display
Der HDMI-Anschluss (High Definition Multimedia Interface)
• Digitaler Multimedia-Anschluss
• Standard auch im TV-Umfeld
• Neben Video wird auch der Ton übertragen
• Typische Auösung: Full HD= 1920x1080p/60Hz
• Ermöglicht direkten und einfachen Anschluss
des PCs an moderne TFTs+LCD-TVs
Der VGA-Anschluss/D-Sub
• Analoger Anschluss
• Für hohe Auösung nicht empfehlenswert
Page 17
17
DE
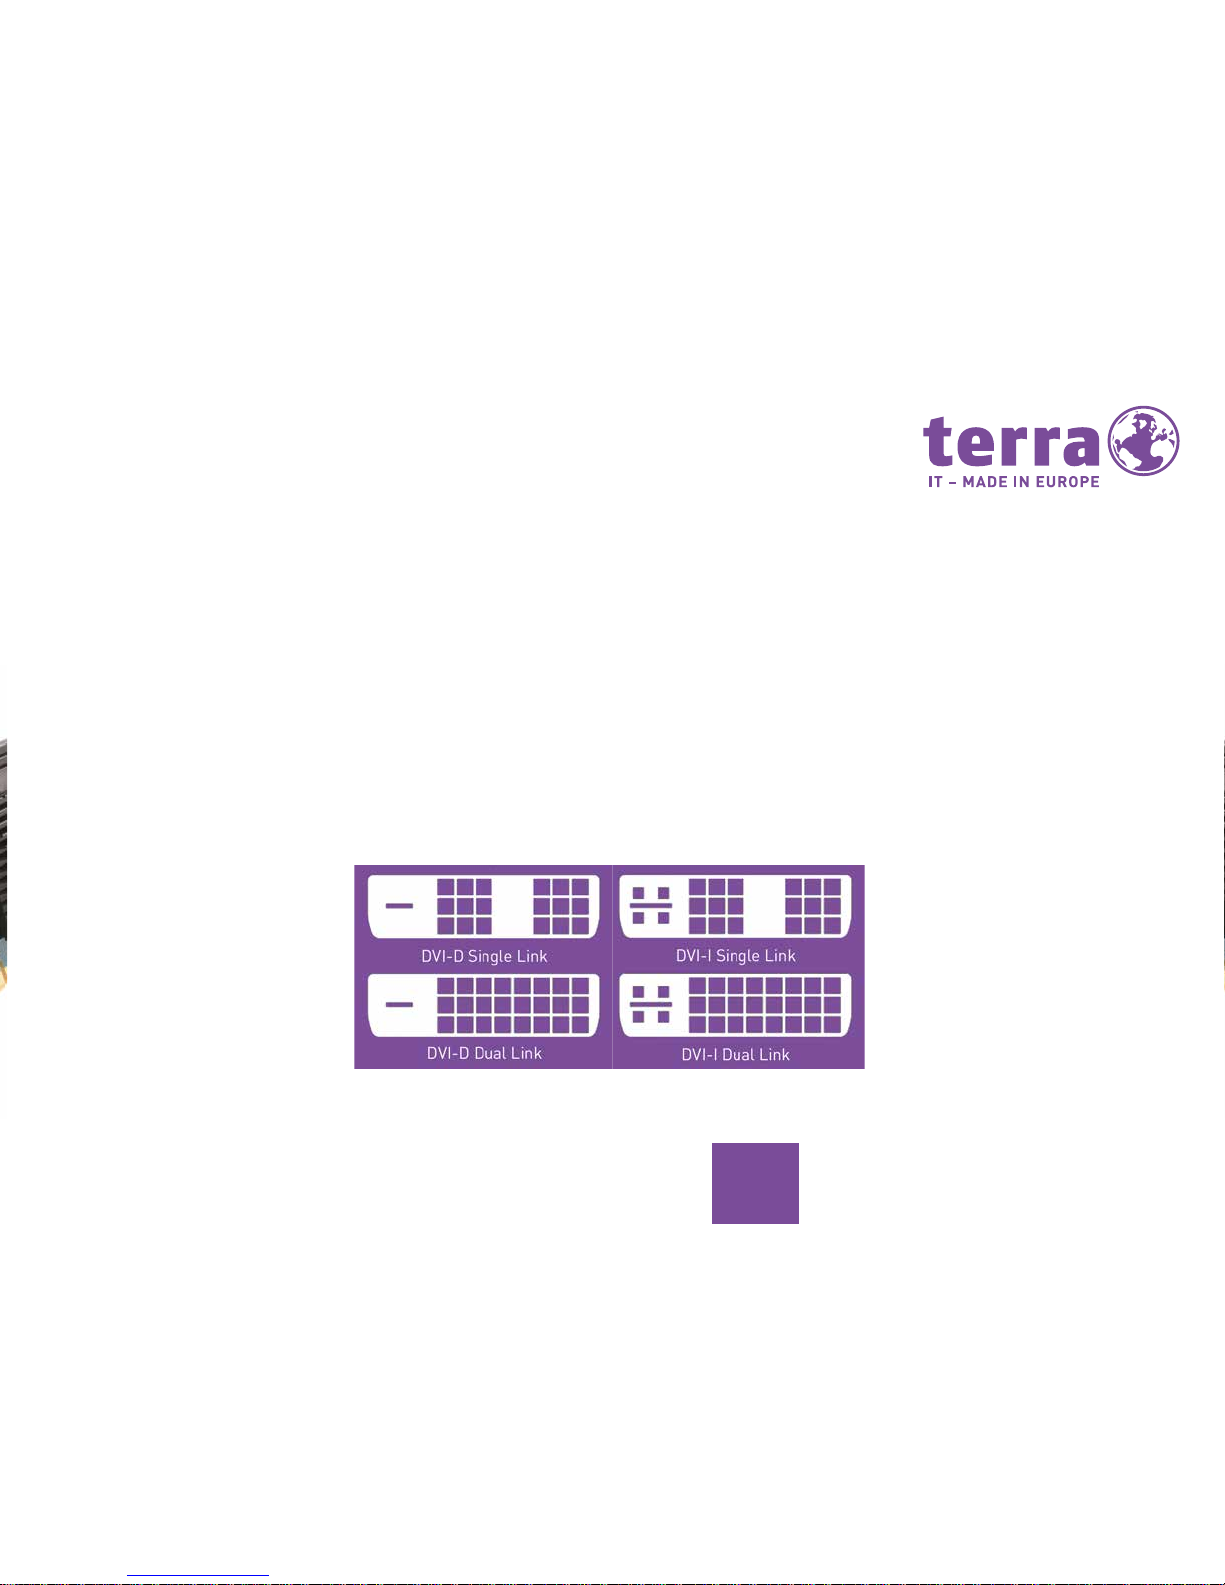
Der DVI-Anschluss
• Digitaler Anschluss
• Unterscheidung in Single-Link und Dual-Link
- SL: max. 1600x1200@60Hz
- DL: max. 2560x1600@60Hz (es werden zwei Signale übertragen)
• Unterscheidung in DVI-I, DVI-D
- DVI-D: nur digitale Signale werden übertragen
- DVI-I: digitale und analoge Signale werden übertragen (Adapter verfügbar)
• DVI-D (und DVI-I) ist Signal-kompatibel zu HDMI (Adapter verfügbar)
Page 18
18
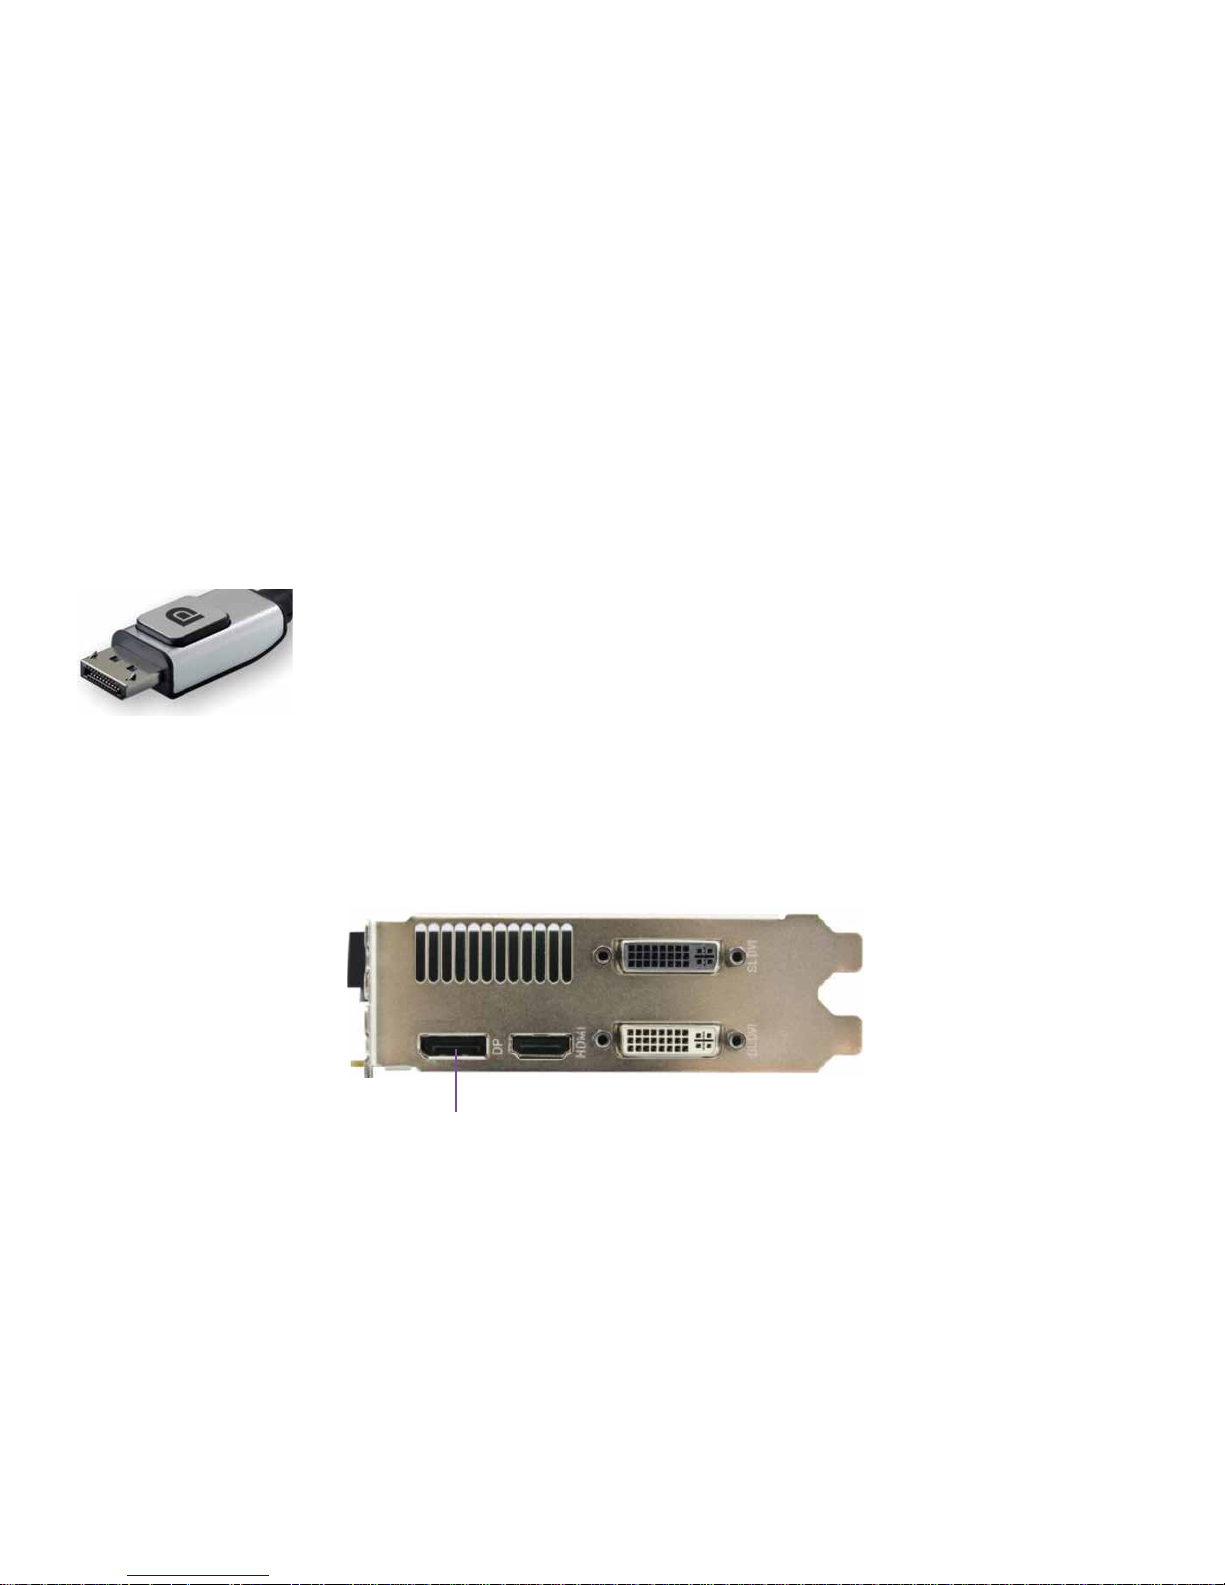
Der Display Port
• Digitaler Anschluss
• Auösung (versionsabhängig):
- DP 1.1: bis zu 2560x1600@60Hz
- DP 1.2: bis zu 4096x2560@60Hz
- DP 1.3: bis zu 5120x2880@60Hz
- DP 1.4: bis zu 7680x4320@60Hz
• Überträgt HD Audiosignale
• Seit DP 1.2: mehrere Monitore mit nur einem Grakanschluss anschließbar,
Unterstützung für stereoskopisches 3D, sowie mehr Farbräume
Display Port
Page 19
19
DE
Externe Geräte anschließen
Lesen Sie die Dokumentation zum externen Gerät, bevor Sie es anschließen.
Außer bei USB-Geräten müssen die Netz-
stecker gezogen sein, wenn Sie externe
Geräte anschließen!
Bei Gewitter dürfen Sie die Leitungen we-
der stecken noch lösen.
Fassen Sie beim Lösen einer Leitung immer am Stecker an. Ziehen Sie nicht an der
Leitung!
Halten Sie beim Anschließen oder Lösen
der Leitungen die nachfolgend beschriebene Reihenfolge ein.
Leitungen anschließen
• Alle betroffenen Geräte ausschalten.
• Die Netzstecker aller betroffenen
Geräte aus den Schutzkontakt-
Steckdosen ziehen.
• Alle Leitungen am Gerät und an den
externen Geräten stecken. Beach ten Sie dabei die bereits beschrie benen Sicherheitshinweise.
• Alle Datenübertragungsleitungen in
die vorgesehenen Steckvorrichtungen
der Daten-/Fernmeldenetze stecken.
• Alle Netzstecker in die geerdeten
Schutzkontakt-Steckdosen stecken.
USB-Geräte sind hot-plug-fähig. Daher
können die Leitungen von USB-Geräten
bei eingeschaltetem Gerät angeschlossen und gelöst werden.
!
i
Page 20

20
Leitungen lösen
• Alle betroffenen Geräte ausschalten.
• Die Netzstecker aller betroffenen
Geräte aus den Schutzkontakt Steckdosen ziehen.
• Alle Leitungen am Gerät und an den
externen Geräten lösen. Beachten Sie
dabei die bereits beschriebenen
Sicherheitshinweise.
• Alle Leitungen am Gerät und an den
externen Geräten lösen.
Bildschirm anschließen
• Bereiten Sie den Bildschirm vor,
wie in der Betriebsanleitung zum
Bildschirm beschrieben (z.B Lei-
tungen stecken).
• Stecken Sie die Datenleitung in den
Bildschirmanschluss des Gerätes.
Je nach Ausbaustufe Ihres Gerätes und
Ihres Bildschirms, können Sie die Da-
tenleitung auch an die DVI- oder HDMISchnittstelle anschließen.
i
Page 21
21
DE
Maus- und Tastatur-Set anschließen
Modellabhängig gehört zum Lieferumfang Ihres Gerätes ein kabelloses Mausund Tastatur-Set bzw. ein Maus- und
Tastatur-Set mit Kabel (USB-Anschluss /
PS/2-Anschluss).
Kabelloses Maus- und Tastatur-Set
anschließen
Schließen Sie Maus und Tastatur an,
wie in der Betriebsanleitung von diesen
beiden Geräten beschrieben. Der rich-
tige Funkverbindungscode ist bereits
ab Werk eingestellt und das Maus- und
Tastatur-Set sofort betriebsbereit.
Sollte es dennoch zu Verbindungsstörungen kommen, sehen Sie in der Betriebsanleitung der beiden Geräte im
Bereich „Funkverbindung neu aufbauen“
nach oder kontaktieren Sie Ihren Fachhändler.
Maus- und Tastatur-Set anschließen
Verbinden Sie Maus und Tastatur mit je
einem der USB-Anschlüsse an Ihrem
Gerät.
Maus und Tastatur sind sofort betriebsbereit. Anschlüsse von PS/2 Geräten
dürfen nur bei ausgeschaltetem Gerät
eingesteckt oder gelöst werden. Beim
Anschließen beachten Sie bitte die
Gleichfarbigkeit von Stecker und An-
schluss an der Rückseite des Gerätes.
i
i
Page 22

22
Externe Geräte an die USB-Anschlüsse
anschließen
An die USB-Anschlüsse können Sie eine
Vielzahl externer Geräte anschließen
(z.B. Drucker, Scanner, Tastatur, etc).
USB-Geräte sind hot-plug-fähig. Daher
können die Leitungen von USB-Geräten
bei eingeschaltetem Gerät angeschlossen und gelöst werden.
Weitere Informationen finden Sie in den
Dokumentationen der USB-Geräte.
• Schließen Sie die Datenleitung an das
externe Gerät an.
• Schließen Sie die Datenleitung an
einen USB-Anschluss Ihres Gerätes an.
Gerätetreiber
Für die externen USB-Geräte, die Sie an
einen der USB-Anschlüsse anschließen,
benötigen Sie üblicherweise keine eigenen Treiber, da die notwendige Software
bereits im Betriebssystem enthalten ist.
Wenn das externe USB-Gerät jedoch eine
eigene Software benötigt, installieren
Sie diese von dem Datenträger, der mit
dem USB-Gerät geliefert wurde.
Vom vorderen USB-Anschluss Ihres
Gerätes zum externen USB-Gerät darf
nur eine maximal drei Meter lange Leitung verwendet werden, um USB 2.0 zu
gewährleisten.
i
i
Page 23
23
DE
!
Gerät an die Netzspannung anschließen
• Schließen Sie die Netzleitung am Gerät an.
• Stecken Sie den Netzstecker in eine
geerdete Schutzkontakt-Steckdose.
Erstes Einschalten: die Software wird
installiert
Wenn das Gerät in ein Netzwerk eingebunden wird, sind bei der Software-Instal-
lation Angaben zu Benutzer, Server und
Netzwerkprotokoll nötig.
Bei Fragen zu diesen Angaben wenden Sie
sich an Ihren Netzwerkadministrator.
• Wenn Sie das Gerät zum ersten Mal
einschalten, wird die mitgelieferte
Software installiert und konguriert.
• Planen Sie etwas Zeit dafür ein, denn
dieser Vorgang darf nicht unterbrochen
werden.
• Nach dem Beginn der Installation darf
das Gerät nicht ausgeschaltet werden
bis sie abgeschlossen ist!
• Während der Installation darf das Gerät
nur bei Aufforderung neu gestartet
werden!
• Die Installation wird sonst nicht korrekt
durchgeführt und der Festplatteninhalt
muss vollständig wiederhergestellt
werden.
• Eventuell benötigen Sie während der
Installation die Lizenznummer von
Windows.
Diese Nummer nden Sie als Aufkleber
auf Ihrem Gerät.
Page 24

24
Bildschirm und Gerät einschalten/ ausschalten
Gerät einschalten
• Bei Geräten mit Ein-Aus-Schalter:
Stellen Sie den Ein-Aus-Schalter an der
Rückseite des Geräts auf
Position „I“ (1).
• Drücken Sie den Stand-by Schalter an
der Vorderseite des Geräts (2).
• Die Betriebsanzeige leuchtet, das Gerät
startet.
Gerät ausschalten
• Beenden Sie ordnungsgemäß Ihr
Betriebssystem.
• Das Betriebssystem fährt ihr Gerät
automatisch herunter und schaltet es
aus.
• Sollte sich das System wider Erwarten
nicht automatisch ausschalten, halten
Sie den Stand-by Schalter mindestens 4
Sekunden lang gedrückt. Sollten Sie das
Gerät wiederholt so ausschalten müssen,
lassen Sie es von Ihrem Fachhändler überprüfen!
Der Stand-by Schalter trennt das Gerät
nicht von der Netzspannung. Zur vollstän-
digen Trennung von der Netzspannung
müssen Sie den Netzstecker ziehen.
• Schalten Sie gegebenenfalls den Bild schirm aus (s. Bedienungsanleitung
des Bildschirms).
* Ein-Aus-Schalter
geräteabhängig
1.
2.
Page 25
25
DE
Weitere Hinweise
Betreiberhinweis:
Dieses Gerät wurde funktechnisch sorgfältig
entstört und geprüft. Jedoch sollten Sie bei
externen Datenkabeln folgendes beachten:
Sollte ein Austausch der vom Hersteller
spezizierten Datenkabel nötig werden, muss
der Betreiber eine einwand-freie Funkentstö-
rung sicherstellen, dass Austauschkabel und
Abschirmqualität dem Originalkabel ent-
sprechen. Verwenden Sie nur abgeschirmte
Leitungen und nur externe Geräte, die vom
Sicherheitsniveau und dem EMV Verhalten
mit dem vorliegenden Produkt identisch sind.
Bei Nichtbeachtung ist die Entsprechung der
o.g. Normen nicht mehr gewährleistet!
Laser (Sicherheitshinweis): Vorsicht – Laser-
strahlung, wenn Abdeckungen geöffnet! In dem Produkt können
Lasereinrichtungen der Laserklassen 1 bis
3B verwendet sein. Bei ungeöffnetem Gehäu-
se erfüllt die Einrichtung die Anforderungen
der Laser Klasse 1. Durch Öffnen des Gerätes
können Lasereinrichtungen bis zu Laserklasse 3B erreichbar werden. Diese Laserstrahlung ist in den CD-Laufwerken enthalten. Bei
Ausbau und / oder Öffnung dieser Laufwerke
ist zu beachten: Nicht in den Strahl blicken,
auch nicht mit optischen Instrumenten, nicht
dem Strahl aussetzen, Bestrahlung von
Augen oder Haut durch direkte oder Streu-
strahlung vermeiden. Die eingebauten CD-
Laufwerke enthalten keine zur Wartung oder
Reparatur vorgesehenen Teile.
!
Page 26

26
CD- Laufwerke sind
zur ausschließlichen Reparatur beim Hersteller
vorgesehen.
Einsatzbereich:
Das vorliegende Produkt ist nicht für die
Verwendung in medizinischen, lebensrettenden oder lebenserhaltenden Anwen-
dungen vorgesehen.
Umweltgerechter Computer:
Der von Ihnen erworbene Arbeitsplatz-
Computer ist umweltgerecht konstruiert
und zeichnet sich durch seine Langlebig-
keit, Aufrüst- und Erweiterbarkeit, Recy-
clingfähigkeit und Wiederverwertbarkeit
aus.
Rücknahme der Geräte:
Wir nehmen alle unsere Produkte nach
deren Gebrauch zurück, wenn der Zustand
dem üblichen bestimmungsgemäßen
Gebrauch entspricht. Zurückgenommene
Geräte werden entweder einer Weiterverwendung zugeführt oder umweltgerecht
zerlegt und verwertet. Die Rücknahme
erfolgt über Ihren Fachhändler.
Page 27

27
DE
Langlebigkeit der Geräte:
Der Arbeitsplatz-Computer ist modular
aufgebaut. Die verwendeten Komponenten
sind leicht auszutauschen oder zu entfernen. Wir empfehlen eine Aufrüstung/Erweiterung nur durch autorisiertes Fachpersonal.Die Geräte sind so konzipiert,
dass folgende Erweiterungen durchgeführt werden können:
• Austausch des Prozessors
• Erweiterung der Kapazität des Arbeits-
speichers durch austauschbare oder
ergänzbare Module
• Einbau, Austausch, Erweiterung oder
Anschluss weiterer Massenspeicher
• Aufrüstung der Grakfähigkeit
• Freie Steckplätze für individuelle
Erweiterungen
Der verwendete Werkstoff ist recyclingfähig. Materialanforderungen an die
Kunststoffe der Gehäuse und Gehäuseteile:
• Für die verwendeten Kunststoffe der
Gehäusematerialien sind keine dioxin-
oder furanbildenden Stoffe verwendet
worden.
• Die umweltgerechten Eigenschaften
des verwendeten Kunststoffs haben wir
in einem unabhängigen Labor in
Deutschland prüfen lassen.
Materialanforderungen an Leiterplatten:
Wir haben uns bei allen Lieferanten ver-
sichert, dass die zugelieferten Leiterplatten
kein PCB (polybromierte Biphenyle) oder
PBDE (polybromierte Diphenylether) oder
Chlorparafne enthalten.
Die Garantiezeit für das
Gerät entnehmen Sie bitte
den beigefügten Garantieunterlagen
Page 28

28
Recyclinggerechte Konstruktion der
Geräte:
Dieses Gerät erfüllt die Prinzipien der VDI
Richtlinie 22 43 gemäß der „Konstruieren
recyclinggerechter technischer Produkte”.
Diese Richtlinie beinhaltet im Einzelnen:
• Vermeidung nichtlösbarer Verbindungen
(z. B. durch Kleben, Schweißen)
zwischen unterschiedlichen Werk-
stoffen, Vorhandensein leicht lösbarer
mechanischer Verbindungen.
• Vermeidung von Beschichtungen und
Verbundmaterialien.
• Einfache Demontierbarkeit der Geräte
und Baugruppen, auch für Zwecke einer
einfachen Reparatur.
• Verringerung der Werkstoffvielfalt.
• Verringerung der Kunststoffsortenviel falt für Gehäuseteile.
• Alle wesentlichen Kunststoffgehäuse-
teile bestehen bei dem vorliegenden
Gerät aus einem Werkstoff.
Ersatzteile werden für 5 Jahre ab
Produktionseinstellung verfügbar gehalten.
Kennzeichnung von Kunststoffen:
In dem vorliegenden Gerät sind alle wesentlichen Kunststoffteile entsprechend
ISO 11469 gekennzeichnet. Somit ist bei ei-
ner Wiederverwertung nach Gebrauch des
Gerätes die problemlose Trennung und das
Recycling der verwendeten Kunststoffteile
sichergestellt.
Page 29
29
DE
Batterien:
In dem vorliegenden Gerät werden keine
schwermetallhaltigen Batterien verwendet.
Die verwendeten Lithiumbatterien haben
eine extrem hohe Lebensdauer (> 10 Jahre).
Bezüglich Wartung, Austausch und Entsorgung dieser Batterie sind die Anweisungen
des Herstellers (Mainboard-Handbuch) zu
beachten.
Energieverbrauch:
Unsere Arbeitsplatz-Computer sind energiesparend konzipiert. Die Geräte sind für
mindestens 4 Wochen vom Netz trennbar,
ohne dass ein Verlust der Funktionsfähig-
keit eintritt. Unsere Business-PCs verbrauchen in der leistungsstärksten Konguration 116,9 kWh pro Jahr (ETEC). Durch die
Reduzierung der Bildschirmhelligkeit kann
der Energieverbrauch weiter reduziert
werden.
Schall-Leistungspegel
Business-PCs, die mit dem Blauen Engel
zertiziert sind, erfüllen spezielle Anforderungen an Schall-Emissionen:
Betriebszustand Max. Soll Max. Ist
Leerlauf 38,0 db 25,0 db
akt. Festplatten-
laufwerk
42,0 db 26,0 db
akt. opt. Lauf-
werk
50,0 db 46,4 db
Page 30

30
Die Leistungsaufnahmen in den
verschiedenen Betriebszuständen sind
für die Standard- Arbeitsplatz-Computer wie folgt:
Im Aus-Zustand werden weniger als 0,5 W
verbraucht. Im Ruhezustand werden weniger als 0,5 W verbraucht.
Werksseitig ist das Gerät so eingestellt,
dass das Gerät nach 60 Minuten automa-
tisch in den Ruhezustand wechselt.
Die Parameter können unter Energie-
optionen im Betriebssystem verändert
werden
Energiespareinstellungen Windows
Abschalten des Displays 10 min
Abschalten der Festplatte 10 min
Standby
20 min
Ruhezustand 60 min
Page 31

31
DE
Rücknahme der Altgeräte
Die WORTMANN AG gibt eine Rücknahmegarantie für Altgeräte: Aufgrund der
von uns verwendeten Materialien ist eine
fachgerechte Wiederaufbereitung bzw.
Entsorgung gegeben, d.h. Ihr PC ist voll
recyclebar.
Die Gewährleistung für das vorliegende
Produkt beträgt 24 Monate.
Der Umkarton und alle Kartoninnenteile
können zur Entsorgung dem Altpapier
beigelegt werden. Die PE-Schaumteile
(Transportschutz des Rechners) können der
gelben Tonne zugeführt werden.
Technische Daten:
Das von Ihnen erworbene Gerät ist für den
Betrieb an Netzwechselstrom 50/60 Hz
vorgesehen. Die allpolige Trennung bzw.
Verbindung des Netzes erfolgt durch ziehen
bzw. einstecken des Netzkabels. Benutzen
Sie zum Anschluss nur eine ordnungsgemäß angeschlossene Schutzkontaktsteck-
dose. Die Nenneingangsspannung beträgt:
AC 230 V.
Die maximal mögliche Stromaufnahme
entnehmen Sie bitte dem auf der Rückseite
des Gerätes angebrachten Typenschild.
Detaillierte Informationen zur Systemausstattung (Mainboard, Grak, Sound etc.)
entnehmen Sie bitte dem Kartonaufkleber.
Page 32

32
Umgebungsbedingungen für den Betrieb des Gerätes
Umgebungstemperatur +10°C bis +32°C (bei Betrieb)
-20°C bis +50°C (außer Betrieb, Lagerung)
Relative Luftfeuchtigkeit 10% bis 75% (bei Betrieb, keine Kondensation)
5% bis 95% (außer Betrieb, keine Kondensation)
Page 33

33
DE
Original TERRA Hersteller Service:
TERRA Originalservice steht für Zuverlässigkeit, Kulanz und eine optimale Lo-
gistik. Mit weniger sollten Sie sich nicht
zufrieden geben. Nur mit Original TERRA
Service können Sie auf alle Ressourcen
der WORTMANN AG zugreifen.
Mit jedem TERRA Computersystem
können Sie selbst auswählen, welche
Serviceleistung Sie wünschen. Aufgrund
der Langlebigkeit und der hohen Qualität
der TERRA Computersysteme können
Sie preiswert bis zu fünf Jahre TERRA
Service buchen. Welche Leistung Sie gebucht haben können Sie auf den Unterlagen Ihres TERRA Systemhauses sehen.
Sie sollten bereits bei Ankauf das für
Ihre Nutzung am besten geeignete
Servicepaket wählen, das ist am güns-
tigsten. Wenn Sie später feststellen,
dass Sie Ihr Gerät länger nutzen möchten als ursprünglich vorgesehen ist das
kein Problem. Sie können während der
gesamten Laufzeit preiswert eine Verlängerung des Service bei Ihrem TERRA
Partner buchen. Dafür reichen die Seriennummer und das gewünschte Serviceprodukt mit Laufzeit.
Anbei eine Übersicht über die wichtigs-
ten TERRA Serviceleistungen:
Wenn Sie nicht sicher sind, welches
Servicelevel und welche Garantiezeit
ihr Gerät hat, können Sie dies bei Ihrem
Partner erfragen oder jederzeit online
unter www.terra.de einsehen.
TERRA Garantie
Bis zu 5 Jahre Anspruch auf kostenlose
Reparatur der Hardware im Servicezen-
Page 34

34
trum der WORTMANN AG und kostenlose
Neuzustellung nach erfolgter Reparatur.
TERRA Vor-Ort-Service
Bis zu 5 Jahre Reparatur im Falle einer
Störung direkt am Standort des Geräts
mit einer Reaktionszeit von 24 Stunden.
Versand der benötigten Ersatzteile per
Express und Anfahrtskosten und Arbeitszeit des zuständigen TERRA Ser-
vicepartners. In den meisten Fällen ist
eine Datensicherung oder Neuinstallation nicht notwendig.
TERRA Medieneinbehalt
Sehr preiswerte Zusatzleistung zum
TERRA Vor-Ort-Service für Ihren Datenschutz. Im Falle eines Festplattendefekts
installiert Ihre TERRA Servicepartner
eine neue Festplatte in ihrem System.
Die defekte Festplatte wird nicht wie allgemein üblich zum Festplattenhersteller
retourniert sondern verbleibt bei Ihnen.
Sie können den defekten Datenträger
nach eigenem Ermessen vernichten. So
stellen Sie absolut sicher, dass niemand
versuchen kann, Restdaten auf der Fest-
platte einzusehen.
Grundsätzlich empfehlen wir für die
Dauer der Nutzung TERRA Vor-Ort-Ser-
vice mit Medieneinbehalt, wenn Sie mit
vertraulichen Daten arbeiten.
Der Missbrauch von Daten durch Frachtführer oder Mitarbeiter der anderen
Änderungen vorbehalten, die neuesten
Daten können Sie jederzeit online unter
www.terra.de einsehen.
Page 35

35
EN
Preface
To the purchase of TERRA computer systems we congratulate sincerely and we
hope, that the product comply with your composed expectations. The manual guide
overviews the installation and functions of the computer. The text- and graphic
parts are adapted with special care. However we assumed no liability for potentially
available mistakes and whose consequences. Please share your hints referring to
the design and existing mistakes with your specialized dealer. We are gladly to pick
up and realize sensible suggestions and improvements. All rights reserved. Parts
of this manual mustn’t reproduced in any form (print, photography, microfilm or
any other methods), processed by using electronic systems, copied or widespread
without a written license of WORTMANN AG. The mentioned company or branding
names as well as the labels are covered by patents, trademark and brand rights.
This manual was produced and published by Wortmann AG, Bredenhop 20, 32609 Hüllhorst,
Tel: 05 744 / 944-0, Fax: 05 744 / 944-44 4.
Page 36

36
Contents
Safety instructions 37-38
Transporting the appliance 39
Cleaning the appliance 39
Warranties 40
Taking back of used appliances 40
CE symbol 41
Start-up 42
Setting up the appliance 43
Connections and control elements 44-46
Back panel connectors 47-48
Display connection options 49-51
Connecting external devices 52-53
Connecting the mouse and keyboard set 54
Connecting external devices to USB ports 55
Connecting the appliance to the mains power supply 56
Activating the screen and appliance 57
Further instructions 58-65
Page 37

37
EN
Safety instructions
Please heed the instructions concerning
ambient/environmental conditions when
operating the appliance.
The appliance should only be operated
if the mains voltage configuration of the
appliance corresponds to the local mains
voltage. Check the mains voltage confi-
guration of the appliance!
A socket should be located close to the
PC which is easy to access.
Caution, high temperatures may be experienced on the components inside the
appliance.
The On/Off switch does
not disconnect the appliance from the mains
power supply. The mains
plug should be pulled out of the grounded socket to completely disconnect the
appliance from the mains power supply.
Our PC systems are made for normal
use. If you need systems to use for 24/7,
we can make you an individual offer.
PCs with audio output:
Warning! Setting the volume too loud
when using headphones creates excessive sound pressure which can result in
loss of hearing. Set the volume to the
lowest level prior to playback.
!
We recommend that the
device be only opened by
authorised skilled
personnel.
Page 38

38
Start playback and increase the volume
slowly until you reach a level which you
find pleasant.
Modifying the basic settings of the equalizer, driver, software or the operating
system can increase the volume and lead
to permanent damage to hearing.
PCs with TV tuner card
When connecting your DVBT tuner to a
house antenna, ensure that the antenna is grounded in compliance with local
installation regulations.
Observe safety aspects during multimedia applications!
CAUTION: Risk of explosion if batteries
are replaced incorrectly. Dispose of used
batteries according to instructions.
Page 39

39
EN
Transporting the appliance
All appliances should be transported individually and only in the original packaging or in other suitable packaging which
protects it against impacting and shocks.
Cleaning the
appliance
Deactivate the appliance and all connected devices and pull the mains plug
out of the grounded socket.
The interior of the appliance housing
should only be cleaned by authorised
skilled personnel.
Do not use any scouring powder or cleaning agents which dissolve plastics for
cleaning the appliance.
Ensure that no liquid can penetrate
through to the interior of the appliance.
You can clean the outer surface of the
housing with a dry cloth. A mild glass
cleaner can also be used for more excessive dirt.
The exterior of the keyboard and mouse
can be cleaned with disinfection cloths.
!
Page 40

40
Warranties
Warranties pursuant to the BGB (Civil Code) and guarantees according to
agreement apply to our systems. The
system you have purchased was manufactured in our company to comply with
environmental and quality specifications.
Our company is certified in accordance
with ISO 9001.
Taking back of used
appliances
The taking back and suitability for recycling of our systems is laid down and
guaranteed in our environmental ma-
nagement system.
Our appliances are manufactured in as
far as possible from materials suitable
for professional recycling. The appliance
will be taken back after use for reuse
or recycling, provided it is returned in
a condition commensurate with correct
use. Appliance parts which cannot be
recycled will be disposed of in a correct
manner. Please use the recycling and
disposal options available in your country
when returning an appliance.
Further information on specific national
recycling and disposal options is availa-
ble in the internet at: www.wortmann.de.
Please contact your specialist dealer should you
have any additional questions concerning disposal.
Page 41

41
EN
CE symbol
This appliance meets the requirements
of the EC Directive 2014/30/EU “Electromagnetic compatibility”, 2014/35/EU
“Low voltage directive”, 2009/125/EU
“Energy-related Products“ and
2011/65/EU ”RoHS“
CE symbol for devices with radio components
This appliance meets the requirements
of the EC Directive 1999/5/EC of the European Parliament and Council dated 9th
March 1999 on radio systems and telecommunications equipment and mutual
recognition of conformity.
This appliance may be used in the following countries:
Current information on possible restrictions relating to operation can be
obtained from the respective authorities
in each country. If your country is not
included in this list, please make inquiries of the relevant supervisory authority
to find out if this product can be used in
your country.
Belgium
Bulgaria
Denmark
Germany
Estonia
France
Greece
Great Britain
Ireland
Iceland
Italy
Latvia
Liechtenstein
Lithuania
Luxembourg
Malta
Netherlands
Austria
Poland
Portugal
Romania
Switzerland
Slovakia
Slovenia
Spain
Czech
Republic
Hungary
Cyprus
Page 42

42
Start-up
Unpacking and checking the contents of
the shipment
You should retain the original appliance
packaging for any future transportation.
• Unpack all components.
Check the contents of the packaging for
any transportation damage.
• Check whether the shipment corre
sponds to the details on the delivery
docket.
• Inform your specialised TERRA dealer
immediately should you detect any
transportation damage or discrepancies
between the packaging contents and
delivery docket.
Initial start-up
It takes only a few steps to start up your
appliance for the rst time:
• Select a location for the appliance and
set up the appliance.
• Check the rated voltage and then connect
the appliance to the mains power supply.
• Switch on the appliance.
External devices
If you have also received other devices in
addition to your appliance (e.g. a printer),
these should only be connected following
initial installation. The manner in which
these external devices are connected is
described in the following sections.
i
!
Page 43

43
EN
Setting up the appliance
Consider the recommendations and safety
instructions when setting up the appliance.
Only place the appliance in its intended
operating position (e.g. Perpendicular to
the feet). We recommend you, to place the
unit on a non-slip support. With the variety
of coatings and lacquers used in furniture,
it is possible that the plastic feet cause
damage on the oor. Do not place multiple
devices on top of each other.
Warning: This unit may only be operated
in an upright position.
Exceptions: Mini-ITX-PC and Slim-Desktop-PC, when in the Internet /
manufacturer‘s site described.
The device may only be used on the feet
standing.
Disturbing vibration and noises may be
detected, depending on the location of
your appliance. In order to avoid this, a
minimum clearance of three millimetres
should be maintained to other devices or
objects in the case of housing units without
ventilation surfaces.
Ensure that the appliance is adequately
ventilated. To avoid overheating, the ventilation surfaces on the screen and appliance should not be covered.
Do not expose the appliance to any extreme ambient conditions and protect it
from dust, damp and heat.
!
Page 44

44
Connections and control elements
Individual hardware components of your appliance are described in this chapter. It provides you with an overview of the
indicators and connections on the appliance. Please familiarise yourself with these elements prior to working with the
appliance.
FUNCTION IMAGE DESIGNATION SYMBOL
PC power supply
Mains connection
Digital sound port,
see also manual for
mainboard
Cinch port (coax) SPDIF-Out
Sound (external sound sources, e.g
active loudspeaker, microphone)
- Sound on board
In the case of an additional integrated soundcard, the sound function
on the mainboard is not activated or
the sound on board is not available.
3.5 mm jack
Line In
Line Out
Mic
Page 45

45
EN
FUNKTION ABBILDUNG BEZEICHNUNG SYMBOL
Port for USB devices (e.g. mouse
IR transmitter/receiver module,
scanner) Important note for USB 2.0:
in order to ensure a reliable data
transmission rate, we recommend
that you use a USB connection cable
with a max. length of 3 m
USB 3.1 – red
USB 3.0 – blue
USB 3.0 inkl. Ladefunktion - yellow
USB 2.0 – black
USB typ-a
Anschluss für USB-Geräte
USB 3.1 typ c
Network or DSL modem
RJ-45 or
Video input and output port (optional) (see documentation for VGA/TV
card)
4 or multipole
port
SVIDEO IN
SVIDEO OUT
Page 46

46
FUNCTION IMAGE SYMBOL
Port for digital video signal (monitor)
DVI*
Audio/video interface (monitor)
Display-Port/mini Display-Port*
Digital audio/video interface (monitor)
HDMI/mini HDMI*
Analog video interface (monitor)
VGA*
FUNCTION IMAGE SYMBOL
Switch for activation/deactivation. The appliance can no longer
be started from the network in the
deactivated mode (Wake on LAN).
No current is consumed.
On/Off switch
Switch for booting the system. On/
Off switch illuminated blue: the
system is activated.
standby switch
* This connection can be available on-board or on an additional plugin graphic card. The on-board VGA connections are generally deactivated if an additional
graphic card is available.
Page 47

47
EN
Back panel connectors
mounting example:
Page 48

48
TERRA MINI PC
TERRA MICRO PC
Back panel connectors
USB 3.0 LAN mini
display
Port
HDMI power
kensington-
lock
headphone
USB 3.1
typ A
USB 3.1
typ C
DC IN display
port
HDMI RJ45/1 Gbit USB 2.0
connector for
ext. power button
WLAN
RS 232RS 232/422/485
Page 49

49
EN
Display connection options
The HDMI port (High Definition Multimedia Interface)
• Digital multimedia port
• Also standard in TV environment
• Sound is also transmitted in addition to video
• Typical resolution: full HD= 1920x1080p/60Hz
• Enables direct, uncomplicated connection
of the PC to modern TFTs+LCD-TVs
The VGA port/D-Sub
• A nalo g por t
• Not recommended for high resolution
Page 50

50
The DVI port
• Digital port
• Differentiation between single link and dual link
- SL: max. 1600x1200@60Hz
- DL: max. 2560x1600@60Hz (two signals are transmitted)
• Differentiation between DVI-I, DVI-D
- DVI-D: only digital signals are transmitted
- DVI-I: digital and analog signals are transmitted (adapter available)
• DVI-D (and DVI-I) is signal compatible to HDMI (adapter available)
Page 51

51
EN
The display port
• Digital port
• Resolution (depends on version):
- DP 1.1: up to 2560x1600@60Hz
- DP 1.2: up to 4096x2560@60Hz
- DP 1.3: up to 5120x2880@60Hz
- DP 1.4: up to 7680x4320@60Hz
• Transmits HD audio signals
• Since DP 1.2: several monitors can be connected with only one graphic port,
support for stereoscopic 3D and more colour spaces
display port
Page 52

52
Connecting external devices
Read the documentation for the external
device prior to connecting it.
The mains plug should be pulled out
when connecting external devices, except in the case of USB devices!
Cables should not be plugged in or pul-
led out during electrical storms.
Always grasp the plug when disconnecting a cable. Never pull on the cable!
Adhere to the following sequence when
connecting or pulling out the cables.
Connecting cables
• Deactivate all affected devices.
• Pull the mains plugs of all affected
devices out of the grounded sockets.
• Plug in all cables on the appliance
and the external devices. Please heed
the safety instructions already
described during this.
• Plug all data transmission cables into
the data/telecommunications network
plug fixtures provided for purpose.
• Plug all mains plugs into the
grounded sockets.
USB devices are hot plug compatible.
This means that cables from USB devices can be connected and disconnected
when the appliance is switched on.
!
i
Page 53

53
EN
Disconnecting cables
• Deactivate all affected devices.
• Pull the mains plugs of all affected
devices out of the grounded sockets.
• Pull out all cables on the appliance
and the external devices. Please heed
the safety instructions already
described during this.
• Pull out all cables on the appliance
and the external devices.
Screen connection
• Prepare the screen as described in
the screen manual (e.g. plug in the
cables).
• Plug the data cable into the screen
port on the appliance.
The data cable can also be connected to
the DVI or HDMI interface, depending on
the expansion level of your appliance and
your screen.
i
Page 54

54
Connecting the mouse and keyboard set
The scope of delivery of your appliance
includes a wireless mouse and keyboard
set or a mouse and keyboard set with
cable (USB port / PS/2 port).
Connecting the wireless mouse and
keyboard
Connect the mouse and keyboard as described in the operating manual for these
two devices. The correct radio link code
is already configured ex works and the
mouse and keyboard are turnkey devices
ready for immediate use. However, in
the event of connection faults occurring,
please check in the operating manual for
both devices under “Establish new radio
link” or contact your specialised dealer.
Connecting the mouse and keyboard
Connect the mouse and keyboard each to
one of the USB ports on your appliance.
The mouse and keyboard are turnkey
devices ready for immediate use. Con-
nectors of PS/2 devices should only be
plugged in or disconnected when the
appliance is deactivated. Please ensure
during connection that the connector and
port on the rear of the appliance have the
same colour.
i
i
Page 55

55
EN
Connecting external devices to USB ports
A variety of external devices can be
connected to the USB ports (e.g. printer,
scanner, keyboard, etc.).
USB devices are hot plug compatible.
This means that cables from USB devices can be connected and disconnected
when the appliance is switched on.
Please refer to the documentation for
USB devices for further information.
• Connect the data cable to the external
device.
• Connect the data cable to a USB port
on your appliance.
Drivers
You generally do not require any drivers
especially for the external USB devices
which you connect to one of the USB
ports, as the required software is alrea-
dy contained in the operating system.
However, in the event of the external USB
device requiring its own software, this
should only be installed following consultation with the company Richard Wolf
GmbH. The cable used between the most
forward USB port on your appliance
and the external USB device should not
exceed three meters in length to ensure
USB 2.0.
i
i
Page 56

56
!
Connecting the appliance to the main power
supply
• Connect the mains cable to the
appliance.
• Plug the mains plug into the grounded
socket.
Initial activation:
If the device is integrated into a network,
the software installation needs information about the user, server and network
protocol. If you have questions about these
details, please contact your network administrator.
• When you turn on the device for the
rst time, the supplied software will be
installed and congured.
• Please schedule some time for this
action, because this process must not
be interrupted
• After starting the installation the device
may not be turned off until it is
completed.
• During the installation, the device may
only be restarted by request.
• Otherwise the installation will not be
correct accomplished and the hard
drive contents must be completely
restored.
• It is possible that you need the license
number for windows during the
installation. The number can be found
on the lable on your device.
Page 57

57
EN
Activating the screen and appliance
Switching on the device
• Devices with On/Off switch:
Set the On/Off switch at the rear of the
device to the “I” position (1).
• Push the standby switch on the front of
the device (2).
• The power indicator illuminates, the
device is activated.
Switching off the device
• Shut down your operating system in the
correct manner.
• The operating system shuts down your
device and switches it off.
• In the event of the system
unexpectedly failing to deactivate
automatically, press and hold the
standby switch for at least 4 seconds.
Should you need to shut down the
device repeatedly in this manner, please
have it checked by a specialised dealer!
The standby switch does not disconnect
the device from the mains power supply.
The mains plug should be pulled out of the
socket to disconnect completely from the
mains power supply.
• Switch off the monitor if necessary (see
monitor operating manual).
* On/Off switch depends on
appliance
1.
2.
Page 58

58
Further instructions
Operator instruction:
The appliance has undergone careful
suppression of radio interference and
has been tested. However, in the event
of external data cables being used, and
should it be necessary to replace the data
cables specied by the manufacturer, the
operator should ensure that perfect radio
interference suppression is maintained
and that the replacement cables and
shielding quality correspond to the original
cables. Used only shielded cables and only
external devices with a level of safety and
EMC characteristics identical to this pro-
duct. Conformity with the abovementioned
standards is no longer guaranteed if these
directions are not observed!
Laser (service instruction): Caution – laser
radiation if covers are
opened! Laser class l to 3B laser equip-
ment can be used in the product. The
equipment meets the requirements of
laser class 1 if the housing is unopened.
Laser equipment up to laser class 3B can
be achieved by opening the appliance.
This laser radiation is contained in the CD
drives. Please ensure the following when
removing and/or opening these drives:
do not stare into the beam, including with
optical instruments, avoid exposure to the
beam, avoid radiation of the eyes or skin
through direct or scattered radiation. The
integrated CD drives do not contain any
parts which require maintenance or repair.
!
Page 59

59
EN
CD drives should only be
repaired by the manufacturer.
Area of use:
This product is not designed for use in lifesaving or life supporting applications.
Environmentally friendly workstation
computer . The workstation computer you
have purchased is designed to be environmentally friendly and distinguished
by its long service life, its suitability for
upgrading and expansion, recycling and its
reusability.
Durability of the appliances:
The PC system is a modular solution. The
components used are easy to replace or
remove. Upgrading of components is not
included in the design.
Taking back of the appliances:
We will take back all our products after
use, provided their condition is com-
mensurate with normal and correct use.
Appliance which are taken back are either
reused or dismantled and recycled/utilised
in an environmentally friendly manner.
Your specialised dealer will take back
appliances.
Page 60

60
Environmentally friendly workstation
computer
The workstation computer you have
purchased is designed to be environmentally friendly and distinguished by its long
service life, its suitability for upgrading
and expansion, recycling and its reusabi-
lity.
Durability of the appliances:
The PC system is a modular solution. The
components used are easy to replace or
remove. Upgrading of components is not
included in the design.
Taking back of the appliances:
We will take back all our products after
use, provided their condition is com-
mensurate with normal and correct use.
Appliance which are taken back are either
reused or dismantled and recycled/utilised
in an environmentally friendly manner.
Your specialised dealer will take back
appliances.
Suitability of appliance design for recycling:
This appliance fulls the principles of VDI
Directive 22 43 pursuant to the “Design of
technical products suitable for recycling”.
This directive contains the following in
detail:
• Avoidance of permanent connections
(e.g. through gluing, welding) between
different materials, availability of easily
detachable mechanical connections.
• Avoidance of coatings and composite
materials.
Please refer to the enclosed guarantee documents
for the guarantee period
for this appliance
Page 61

61
EN
• Easy dismantling of appliances and
modules, including for the purpose of
simple repairs.
• Reduction of material diversity.
Reduction of variety of plastic types for
housing parts.
• All signicant plastic housing parts are
made of one material in this appliance.
The material used is suitable for recycling Material requirements to be met by
plastics in the housing and housing parts:
• No substances which form dioxins or
furan have been used in the plastics
utilised for housing materials.
• We have had the environmental
properties of the plastic used tested in
an independent laboratory in Germany.
Spare parts will be available for 5 years
after end of production.
Material requirements to be met by printed circuit boards:
• We have inspected our suppliers and
assured ourselves that the printed
circuit boards supplied do not contain
any PCBs (polychlorinated biphenyls),
PBDEs (polybrominated diphenyl
ethers) or chlorinated parafns.
Page 62

62
Labelling of plastics:
All signicant plastic parts in this appliance
are labelled in compliance with ISO 11469.
This facilitates problem-free separation for
reuse following use of the appliance and
ensures that the plastic parts utilised are
recycled.
Batteries:
No batteries containing heavy metals are
used in this appliance. The lithium batteries
have an extremely long service life (> 10
years). Please observe the manufacturer’s
instructions (mainboard manual) with regard to the maintenance, replacement and
disposal of these batteries. Our business
PCs consume in the most powerful conguration 116,9 kWh per year (ETEC).
By reducing the screen brightness, the
power consumption can be reduced
Sound-powerlevel
Business PCs that are certied with the
Blue Angel, fulll special sound-powerlevel
requirements:
operating status
limit
measurement
standby 38,0 db 25,0 db
act. hard disc
drive
42,0 db 26,0 db
act. opt. hard
disc
50,0 db 46,4 db
Page 63

63
EN
Energy consumption:
Our workstation computers are designed to
be particularly energy efcient. The current
input specication on the nameplate relates
to the maximum possible current input if the
computer is fully upgraded and the integrated power supply unit is providing 100
% of the permissible power. The appliances
can be disconnected from the mains power
supply for up to 4 weeks without suffering a
loss of functionality.
The parameters can be changed in the operating system.
Energy-saving settings Windows
turn off the displays 10 min
turn off the hard drive 10 min
standby
20 min
hibernation 60 min
Page 64

64
Our appliance meets the requirement to use
less than 30 Watt in standby mode. Current
saving mode settings can be individually adapted in the BIOS setup. Please consult your
mainboard description in this respect. Dis-
connection from the mains supply by pulling
out the mains plug prevents any energy
consumption whatsoever by the workstation
computer. The typical energy consumption
of this workstation computer lies between
60 W and 150 W, depending on the level of
technical equipment and operating mode
(e.g. access to drives).
WORTMANN AG pledges to take back all old
devices. The materials used by us mean that
professional reuse and disposal of your appliance is possible (i.e. your PC is completely recyclable). The warranty for this product
is valid for 24 months.
The carton and all interior carton parts can
be disposed of for recycling with used paper.
PE foam parts (transport protection for the
computer) can be recycled.
Technical data:
The appliance you have purchased is
designed for operation with alternating
mains current of 50/60 Hz. The all-pole
disconnection and connection of the mains
supply is realised by pulling out or inserting
the mains cable plug. Use only a correctly
connected and easily accessible grounded socket for connection. The rated input
voltage is: AC 200-240 V. Measurement 42
x 18 x 42.5, 12,3kg. Please refer to the lable
on the back of your device for the maximum
power consumption.
Page 65

65
EN
Ambient conditions:
Ambient temperature +10°C to +32°C (during operation)
-20°C to +50°C (decommissioned, storage)
Relative humidity 10% to 75% (during operation, no condensation)
5% to 95% (decommissioned, no condensation)
Please refer to the sticker on the carton for detailed information on system equipment (main-
board, graphics, sound, etc.).
Caution:
This product can only be operated in an upright position! Exceptions: Mini-Itx and
Slim Desktop PC, if described in the Internet /on the manufacturing side.
Page 66

66
Avant propos
Nous vous félicitons d’avoir fait l’acquisition d’un système informatique TERRA et
espérons qu’il saura répondre à vos attentes. Vous trouverez dans ce manuel une
vue d’ensemble de la structure et des fonctions de votre PC. Malgré le soin que
nous apportons à la vérification de ce manuel, nous ne pouvons exclure la présence d‘erreurs ou d‘omissions. Nous ne pouvons en aucun cas être tenus pour
responsables des dysfonctionnements ou pertes de données pouvant en résulter.
N’hésitez pas à faire part de vos commentaires à votre distributeur ou à lui signaler
d’éventuelles erreurs. Nous sommes disposés à appliquer toute suggestion ou
amélioration jugée utile. Tous droits réservés. Il est interdit de reproduire, de trai-
ter ou de distribuer ce manuel ou une partie de ce manuel de quelque manière que
ce soit (impression, photocopie, microfilm ou tout autre processus) ou de le traiter
à l’aide d’un système électronique, sauf autorisation écrite préalable de la société
WORTMANN AG. Les noms de sociétés, marques et produits sont en principe déposés et doivent être traités comme tels.
Ce manuel a été réalisé et diffusé par WORTMANN AG, Bredenhop 20, 32609 Hüllhorst,
Tel: 05744 / 944-0, Fax: 05744 / 944-444. Pour la France: Terra Computer Tel: 0.388.208.550 Fax: 0.388.208.551
Page 67

67
FR
Table des matières
Conseils de sécurité 68-69
Transport du système 70
Nettoyage du système 70
Garanties 71
Reprise d’anciens systèmes 71
Marque CE 72
Mise en service 73
Mise en place du système 74
Branchements et éléments de commande 75-77
Connecteurs du panneau arrière 78-79
Modes de raccordement possibles de l‘afficheur 80-82
Connexion de périphériques extérieurs 83-84
Connexion du kit clavier-souris 85
Connexion de périphériques aux ports USB 86
Connecter le périphérique au réseau électrique 87
Allumer l’écran et l’unité centrale 88
Autres conseils 89-96
Page 68

68
Conseils de sécurité
Lors de la mise en place et de
l’utilisation du système, veuillez respecter les conseils relatifs aux condi-
tions environnementales.
Avant de connecter l’appareil à une
source d’alimentation, assurez-vous que
sa tension nominale correspond à celle
de la source d’alimentation. Vérifiez la
tension nominale!
Veiller à disposer d‘une prise de courant
bien accessible à proximité du PC.
Attention, les composants internes du
système peuvent atteindre des tempéra-
tures élevées.
La mise sous ou hors
tension du système ne
le déconnecte pas de la
source d’alimentation.
Pour déconnecter totalement l’appareil,
débranchez impérative ment le câble
d’alimentation de la prise de courant.
Nos PC sont conçus pour un usage normal. Si vous envisagez une utilisation
24/7 de votre système, nous vous ferons
parvenir une offre adaptée.
PC avec sortie audio :
Avertissement ! Un niveau sonore trop
important lors du port d‘un casque
d‘écoute provoque une pression sonore
!
Nous recommandons de
coner toute ouverture de
l‘appareil à un personnel
qualié et autorisé.
Page 69

69
FR
excessive et peut donner lieu à la perte
de la faculté auditive. C‘est pourquoi vous
devrez ajuster le volume sonore
le plus bas avant la restitution. Ensuite,
démarrez la restitution et augmentez
lentement le volume sonore jusqu‘à ce
que le son vous convienne. Une modifica-
tion des réglages de base de l‘égaliseur,
du pilote, du logiciel ou du système
d‘exploitation peut augmenter le volume
sonore et entraîner des troubles auditifs
irréversibles.
PC avec carte tuner TV
Si vous raccordez votre tuner DVBT via
une antenne extérieure, celle-ci doit être
mise à la terre conformément aux consignes d‘installation locales.
Respectez les rapports de sécurité lors
des applications multimédia!
ATTENTION : Risque d‘explosion si les
piles sont remplacées de manière incor-
recte. Jetez les piles usagées conformément aux instructions .
Page 70

70
Transport du système
Transportez tous les appareils individuellement et dans leur emballage
d’origine ou un autre emballage adapté, assurant une protection contre les
chocs.
Nettoyage du système
Éteignez l‘ordinateur et tous les périphériques raccordés, puis débranchez le
cordon d‘alimentation secteur de la prise
de courant.
L’intérieur du boîtier ne doit être nettoyé
que par des professionnels autorisés.
N‘employez pas de poudres à récurer, ni
de produits nettoyants qui attaquent le
plastique.
Faites bien attention à ce qu’aucun liquide ne pénètre à l’intérieur du système.
L’extérieur du boîtier peut être nettoyé
avec un chiffon sec. En cas de salissure
importante, utilisez un produit nettoyant
doux pour les vitres.
Pour le clavier et la souris, munissezvous d’une lingette de désinfection.
.
!
Page 71

71
FR
Garanties
Les garanties appliquées à nos systèmes
sont régies par les dispositions du
code civil allemand et peuvent être
étendues sur demande. L‘appareil que
vous venez d‘acquérir a été produit en
respect des critères de protection de
l’environnement et de garantie de qualité
au sein de notre entreprise certifiée
selon la norme ISO 9001.
Reprise d’anciens
systèmes
La reprise et le recyclage de nos
systèmes sont garantis et organisés au
sein de notre système de gestion envi-
ronnementale.
Nos systèmes sont fabriqués dans la
mesure du possible avec des matériaux
facilement recyclables. Après utilisa-
tion, cet appareil sera repris en vue
d’un recyclage ou d’une revalorisation
des matériaux, dans la mesure où son
état de restitution est conforme aux
prescriptions en vigueur. Les pièces non
recyclables seront mises au rebut selon
les prescriptions en vigueur. Pour mettre
votre système au rebut, veuillez utiliser
les possibilités de recyclage et de traite-
ment applicables dans votre pays.
Pour plus de renseignements sur les
possibilités de recyclage et de traitement
spécifiques propres à chaque pays, con-
sultez le site Internet www.wortmann.de.
Si vous avez d‘autres
questions au sujet du
traitement, adressez-vous
à votre distributeur
Page 72

72
Marque CE
Cet appareil satisfait aux exigences des
directives 2014/30/EU «Compatibilité
électromagnétique» et 2014/35/EU
« basse tension» et 2009/125/EU
« Energy-produits connexes»
et 2011/65/EU « RoHS»
Marquage « CE » des équipements hertziens et équipements terminaux de
télécommunications
Cet appareil satisfait aux exigences de
la Directive 1999/5/CE du Parlement
européen et du Conseil du 9 mars 1999
concernant les équipements hertziens et
les équipements terminaux de télécommunications et la reconnaissance mutu-
elle de conformité.
Cet appareil peut être utilisé dans les
pays suivants
Vous trouverez des informations actualisées sur les éventuelles restrictions
à l’usage auprès des autorités compé-
tentes des pays concernés. Si votre pays
n’est pas énuméré dans la liste, veuillez
vous adresser à l’autorité compétente de
votre pays pour savoir si l’utilisation du
produit est autorisée.
Allemagne
Chypre
Portugal
Liechtenstein
Lituanie
Danemark
Espagne
Roumanie
Pays-Bas
Pologne
France
Slovaquie
Slovénie
Italie
Grèce
Belgique
Bulgarie
République
tchèque
Malte
Islande
Estonie
Grande-
Bretagne
Autriche
Lettonie
Hongrie
Irlande
Suisse
Luxembourg
Page 73

73
FR
Mise en service
Veuillez respecter les conseils de sécurité
de la page 4.
Déballage et vérification de la livraison
Nous vous conseillons de conserver
l’emballage d’origine de votre système
pour tout transport ultérieur.
• Déballez l’ensemble du matériel
• Vériez que le contenu des emballages
n’a subi aucun dommage lors du
transport
• Vériez la conformité du matériel avec
le bon de livraison
• Si vous constatez des dommages liés
au transport ou si le matériel n’est pas
conforme au bon de livraison, infor-
mezen immédiatement votre
distributeur TERRA.
Première mise en service
Quelques étapes seulement sont nécessaires avant la première mise en service
de votre système.
• Choisissez son lieu d’installation et
mettez-le en place
• Vériez la tension nominale puis bran-
chez l’appareil sur une prise de courant
• Mettez l’appareil sous tension
Périphériques externes
Si vous avez réceptionné des périphériques externes en complément de votre
système (par exemple une imprimante), ne
les connectez qu’après la première mise
en service du système. Les prochaines
sections vous indiqueront comment procéder.
i
!
Page 74

74
Mise en place du système
Lors de la mise en place de votre système,
tenez compte des consignes et conseils de
sécurité. Installez le système exclusivement dans la position prévue (verticalement, sur les pieds). Nous vous recom-
mandons de le placer sur un support non
glissant. Du fait de la diversité des revête-
ments et des peintures appliqués sur les
meubles, il n‘est pas exclu que les pieds en
plastique du système fassent des marques
à l‘endroit où ils seront posés. Ne superposez pas plusieurs appareils.
Le système ne doit être mis en service
que reposant sur ses pieds et installé à
la verticale.
Exceptions : PC Mini-ITX et Slim-Desk-
top, en suivant les recommandations du
constructeur sur son site Internet
En fonction de la position de l’appareil, des
vibrations ou des bruits peuvent intervenir.
Pour éviter ces désagréments, il est conseillé d’espacer les systèmes sans orice
de ventilation d’au moins trois millimètres
des autres appareils ou objets.
Veillez à la bonne ventilation des éléments.
Les orices de ventilation de l’écran et de
l’unité centrale ne doivent pas être obstrués, pour éviter toute surchauffe.
Ne placez pas l’appareil dans des conditions environnementales extrêmes et
protégez-le contre la poussière, l’humidité
et la chaleur.
!
Page 75

75
FR
Branchements et éléments de commande
Ce chapitre présente les composants hardware individuels de votre système et propose une vue d’ensemble des éléments
de commande et connecteurs du système. Familiarisez-vous avec ces éléments avant de commencer à travailler.
FONCTION ILLUSTRATION DÉSIGNATION SYMBOLE
Alimentation du PC
Connecteur
d’alimentation
Connecteur de son numérique
Voir également manuel de la carte
mère
Prise Cinch
(coax)
SPDIF-Out
Son (source externe, par exemple
haut-parleurs actifs, micro)
- Sound on board
En cas d’installation d’une carte son
additionnelle, la fonction son de la
carte mère est désactivée, „Sound
onboard“ n’existe pas.
Prise jack 3,5
mm
Line In
Line Out
Mic
Page 76

76
FONCTION ICÔNE DESCRIPTION SYMBOLE
Connectique pour appareils USB
(par ex. souris, module émetteur/
récepteur IR, scanner, imprimante,
etc.). Câbles max. 3m. Important
concernant l‘USB 3.0 : l‘utilisation
d‘un clavier et d‘une souris peut
entraîner des problèmes aux ports
USB 3.0.
USB 3.1 – rouge
USB 3.0 – bleu
USB 3.0
incl. fonction chargeur - jaune
USB 2.0 – noir
Port USB type A
Connectique pour appareils USB
Port USB 3.1 type C
Réseau ou modem DSL
Port RJ-45 ou
Connectiques entrée et sortie vidéo
(en option) (voir documentation sur
la carte VGA/TV)
SVIDEO IN
SVIDEO OUT
Connecteur 4
broches ou plus
Page 77

77
FR
FONCTION ILLUSTRATION SYMBOLE
Connecteur pour signal vidéo numérique (moniteur)
DVI*
Interface audio-vidéo (moniteur) Display-Port/mini Display-Port*
Interface audio-vidéo numérique
(moniteur)
HDMI/mini HDMI*
Interface vidéo analogique (moniteur)
VGA*
FONCTION IMAGE SYMBOL
Bouton Marche/Arrêt. Un appareil
hors tension ne peut plus être démarré par le réseau (Wake on LAN).
Il n’est plus alimenté électriquement.
Marche/Arrêt
Bouton de mise en route du
système. Si le bouton est éclairé en
bleu, le système est allumé.
Standby
* Ce connecteur peut se trouver onboard ou sur une carte graphique additionnelle. Si vous disposez d’une carte graphique additionnelle, les connecteurs
VGA onboard sont généralement désactivés
Page 78

78
Connecteurs du panneau arrière
exemple de montage:
Page 79

79
FR
TERRA MINI PC
TERRA MICRO PC
Connecteurs du panneau arrière
USB 3.0 LAN mini
display
Port
HDMI power
kensington-
lock
headphone
USB 3.1
typ A
USB 3.1
typ C
DC IN display
port
HDMI RJ45/1 Gbit USB 2.0
connector for
ext. power button
WLAN
RS 232RS 232/422/485
Page 80

80
Modes de raccordement possibles
de l‘afcheur
Interface HDMI (High Definition Multimedia Interface)
• Raccordement multimédia numérique
• Standard, également dans l‘environnement TV
• Diffusion de son, outre la diffusion vidéo
• Résolution typique : Full HD= 1920x1080p/60Hz
• Pour un raccordement simple du PC
directement à des téléviseurs TFT+LCD modernes
Raccordement VGA / D-Sub
• Raccordement analogique
• Recommandé pour une haute résolution
Page 81

81
FR
Raccordement DVI
• Raccordement numérique
• Single-Link et Dual-Link différenciés
- SL : max. 1600x1200@60Hz
- DL : max. 2560x1600@60Hz (transmission de deux signaux)
• DVI-I, DVI-D différenciés
- DVI-D : transmission de signaux numériques seulement
- DVI- I: transmission de signaux numériques et analogiques (adaptateur disponible)
• Compatibilité des signaux DVI-D (et DVI-I) avec l‘interface HDMI (adaptateur disponible)
Page 82

82
Raccordement de l‘afficheur
• Raccordement numérique
• Résolution (en fonction de la ligne) :
- DP 1.0 jusqu‘à 1.1: 2560x1600@60Hz
- DP 1.2: jusqu‘à 4096x2560@60Hz
- DP 1.3: jusq´à 5120x2880@60Hz
- DP 1.4: jusq´à 7680x4320@60Hz
• Transmission de signaux audio HD
• Depuis DP 1.2 : raccordement de plusieurs moniteurs via un seul raccord graphique,
support du 3D stéréoscopique, ainsi que plusieurs espaces colorimétriques
display port
Page 83

83
FR
Connexion de périphériques extérieurs
Lisez la documentation qui accompagne le périphérique externe avant de le
connecter.
Hormis pour les périphériques USB, il
convient de débrancher (retirer la prise
de courant) le système avant de con-
necter un périphérique externe.
En cas d’orage, ne branchez ou ne débranchez pas de périphérique.
Pour débrancher un périphérique, ne
tirez pas sur le câble, retirez le con-
necteur de la prise de courant.
Lors du branchement ou débranchement, respectez la chronologie suivante :
Connexion
• Mettez tous les appareils hors tension
• Débranchez tous les câbles
d’alimentation
• Branchez tous les câbles de
connexion à l’unité centrale et aux
périphériques. Respectez les
consignes de sécurité
• Rebranchez tous les câbles de
transmission et de données dans la
position prescrite
• Rebranchez tous les câbles
d’alimentation
Les périphériques USB sont connectables « à chaud », ce qui permet de les
connecter ou déconnecter sans mettre le
système hors tension.
!
i
Page 84

84
Déconnexion
• Arrêtez tous les périphériques concernés
• Retirez toutes les prises des câbles
d’alimentation
• Débranchez tous les connecteurs du
système et des périphériques.
Respectez les consignes de sécurité.
Connexion de l’écran
• Préparez l’écran en respectant le guide
de mise en service qui l’accompagne
(connectez-y les câbles)
• Connectez le câble de données de
l’écran au connecteur d’écran de
l’unité centrale
En fonction de l’écran et de l’unité centrale, vous pourrez également relier le
câble de données à l’interface DVI ou
HDMI.
i
Page 85

85
FR
Connexion du kit clavier-souris
En fonction de votre modèle, votre
système sera livré avec un kit clavier-
souris sans fil ou avec fil (connecteur
USB/PS/2)
Connexion du kit clavier-souris sans fil
Connectez le clavier et la souris en
suivant les instructions du manuel de
ces périphériques. La fréquence de la
connexion radio est réglée d’usine ce qui
permet au clavier et à la souris d’être
immédiatement fonctionnels.
En cas d’interférences dans la connexion, reportez-vous au mode d’emploi des
deux périphériques pour découvrir comment modifier ce paramètre ou contactez
votre distributeur.
Connexion du kit clavier-souris avec fil
Connectez le clavier et la souris à l’unité
centrale par l’intermédiaire d’un port
USB. Les deux sont immédiatement opérationnels. Si vous avez opté pour une
connexion PS/2, la connexion ou déconnexion ne doivent se faire qu’après avoir
mis le système hors tension. Lors de la
connexion, respectez les codes de couleur entre le connecteur du périphérique
et le port situé à l’arrière du système.
i
i
Page 86

86
Connexion de périphériques aux ports USB
Les ports USB acceptent une grande variété de périphériques externes (par ex.
imprimantes, scanners, claviers, etc.)
Les périphériques USB sont connectables « à chaud », les branchements ou
débranchements peuvent donc intervenir
sans éteindre le système.
Vous trouverez toutes les informations
requises dans les manuels des périphériques USB
concernés.
• Connectez le câble de données au
périphérique
• Connectez l’autre extrémité du câble
de données à l’un des ports USB de
votre système
Pilotes de périphériques
Les périphériques USB externes, à connecter à un port USB de l’unité centrale,
n’ont en principe besoin d’aucun pilote,
les logiciels requis étant déjà intégrés
au système d’exploitation. Si un péri-
phérique USB nécessite malgré tout un
pilote, installez-le à partir du support de
données accompagnant le périphérique.
Pour permettre l’utilisation d’USB 2.0,
le câble de raccordement USB entre le
périphérique externe et le port USB de
la façade avant ne doit pas dépasser une
longueur de 3 m.
i
i
Page 87

87
FR
!
Connecter le périphérique au réseau
électrique
• Connectez le câble d’alimentation au
périphérique
• Branchez le câble dans une prise de
courant mise à la terre
Premier démarrage :
installation du logiciel
Si le système est intégré dans un réseau, vous devrez fournir au moment de
l’installation logicielle des informations
relatives à l’utilisateur, au serveur et au
protocole réseau.
Adressez-vous à votre administrateur
réseau, si vous ne disposez pas de ces
informations.
• Lorsque le système est mis en
marche la première fois, les logiciels
qui l’accompagnent sont automotique
ment installés et configurés
• Prévoyez un certain délai avant
l’achèvement de l’opération, il ne
faut en aucun cas inter rompre la
procédure
• Pendant l’installation, le système ne
doit être redémarré que sur sa deman
de expresse
• A défaut, l’installation ne sera pas
correcte et il faudra restaurer totale-
ment le contenu du disque dur
• Vous aurez peut-être besoin au cours
de l’installation du numéro de licence
de Windows. Il figure sur une étiquet
te collée sur l’unité centrale.
Page 88

88
Allumer l’écran et l’unité centrale
Mise en circuit de l‘appareil
• Pour appareils avec interrupteur
Marche / Arrêt : positionnez
l‘interrupteur Marche / Arrêt au dos
de l‘appareil sur « I » (1).
• Appuyez sur l‘interrupteur de veille
(Stand-by) en face avant de l‘appareil
(2).
• L‘indicateur de service est éclairé,
l‘appareil démarre.
Mise hors circuit de l‘appareil
• Terminez votre système d‘exploitation
comme il se doit.
• Le système d‘exploitation arrête votre
appareil et le met hors circuit
automatiquement.
• Si, contre toute attente, le système ne
s‘arrête pas automatiquement,
appuyez sur l‘interrupteur de veille
(Stand-by) et maintenez-le enfoncé pendant au moins 4 secondes. Si l‘appareil
ne se met pas à nouveau hors circuit,
soumettez-le à un contrôle technique par
votre revendeur spécialisé !
L‘interrupteur de veille (Stand-by) ne
coupe pas l‘appareil de la tension électrique. Pour une mise hors circuit définitive, vous devrez le débrancher.
• Si nécessaire, éteignez l‘écran (cf.
instructions de service de l‘écran).
* Marche/Arrêt principal en fonc-
tion des modèles
1.
2.
Page 89

89
FR
Autres conseils
Conseil d’utilisation
Cet appareil a été minutieusement conçu
et testé afin d’éviter toute perturbation
radioélectrique. Toutefois, observez les
consignes suivantes en ce qui concerne
les câbles de données externes : si vous
souhaitez remplacer l’un des câbles de
données spécifiés par le fabricant, assurezvous que les câbles de remplacement
disposent des mêmes caractéristiques
de blindage que le câble d’origine afin
d’éviter toute perturbation radioélec-
trique. Utilisez toujours des lignes élec-
triques blindées ainsi que des périphériques externes répondant au niveau de
sécurité et de compatibilité électromag-
nétique (CEM) de notre produit.
A défaut, le respect des normes susmentionnées n’est plus garanti.
Laser (conseil
d’utilisation)
Attention - Rayon-
nement laser lorsque le couvercle est
ouvert ! Le produit peut contenir des
équipements laser de classes 1 à 3B. Si
le boîtier n’est pas ouvert, l’équipement
répond aux exigences de classe 1. Lors
de l’ouverture de l’appareil, les équipements laser sont au plus de classe 3B.
Ce rayonnement laser intervient dans les
lecteurs de CD. Lors du démontage et/ou
de l’ouverture de ce lecteur, veillez à ne
pas regarder le rayonnement, directement ou avec des instruments optiques,
!
Page 90

90
Les lecteurs de CD doivent être exclusivement
réparés par les techniciens
du constructeur
ne pas vous exposer au rayonnement, et
évitez l’exposition des yeux et de la peau
à un rayonnement direct ou diffusé.
Les lecteurs optiques intégrés ne contiennent pas de pièces exigeant un entretien ou une réparation.
Utilisation
Ce produit n’est pas destiné à un usage
médical et ne convient pas à une opérati-
on de sauvetage ou de réanimation.
Ordinateur respectueux de
l’environnement
Votre ordinateur est construit dans le respect de l’environnement et se distingue
par sa durabilité et ses possibilités de
mise à jour et d’extension, de recyclage
et de réutilisation.
Page 91

91
FR
Durabilité du système
Cet ordinateur est de construction modulaire. Les composants utilisés sont
faciles à échanger ou à retirer. Nous
vous conseillons de ne faire procéder à
une mise à jour ou une extension que par
un personnel autorisé.
Ces systèmes sont conçus de manière à
permettre les extensions suivantes :
• Mise à niveau du processeur
• Extension de la capacité de la mé
moire de travail grâce un échange des
modules de mémoire
• Ajout, changement, amélioration ou
connexion de périphériques de
mémoire auxiliaire supplémentaires
• Mise à niveau des fonctions
graphiques
• Logements libres pour mise à niveau
individuelle
Reprise du système
Nous reprenons tous nos produits après
utilisation sous réserve d’une utilisati-
on normale de l’appareil. Les appareils
repris sont réutilisés ou mis au rebut de
manière écologique. Vous pouvez retourner votre appareil à votre revendeur.
Construction orientée vers le recyclage
Cet appareil est conforme à la norme CGI
22 43, conformément à la « Construction de produits techniques recyclables
». Cette norme détaille les consignes
suivantes :
• Éviter les connexions non-solubles
(par ex. la colle ou la soudure) entre
Page 92

92
différents matériaux.
• Les connexions mécaniques doivent
êtres facilement détachables.
• Éviter les pièces blindées ou les
matériaux composites.
• L’appareil doit être facilement démon-
table, également pour une simple
réparation.
• Réduction de l’utilisation de matéri
aux multiples.
• Réduction de l’utilisation de plasti ques multiples pour les pièces du carter.
• Presque toutes les pièces en
plastique du carter sont constituées
du même matériau recyclable.
Les pièces de rechange sont tenus disponibles 5 ans après la fin de production
de votre produit.
Nos appareils sont fabriqués avec des
matériaux recyclables. Exigences matérielles pour le carter en plastique et
les pièces du carter
• Tous les plastiques utilisés dans le
carter sont fabriqués grâce à une
méthode de production sans dioxine
ni furanne.
• Un laboratoire de test allemand indé-
pendant a testé et approuvé les
caractéristiques des plastiques
utilisés.
Exigences matérielles des cartes de
circuit imprimé
• Tous nos fournisseurs nous ont
garanti que leurs cartes de circuit
ne contiennent pas de PCB (polybro mite biphényle), de PBDE (polybro-
mite diphénylether) ou de paraffine
chlorique.
Page 93

93
FR
Marquage des matériaux plastiques
Toutes les pièces plastiques de cet appareil sont marquées conformément à la
norme ISO 11469. Cela permet de sépa-
rer aisément les différents matériaux
lors de leur recyclage.
Batteries
Cet appareil ne contient pas de batteries constituées de métaux lourds. Les
batteries en lithium utilisées jouissent
d’une très longe durée de vie (> 10 ans).
Veuillez consulter les instructions du
constructeur (manuel de la carte mère)
en ce qui concerne l’entretien, le remplacement ou la mise au rebut de la
batterie. Nos PC Business consomment
dans la configuration la plus puissante
116,9 kWh par année (ETEC). En rédu-
isant la luminosité de l‘écran, la consommation d‘énergie peut être réduite
davantage.
Le Niveau de puissance sonore
Les PC Business qui sont certifiés avec
l‘Ange Bleu, répondent à des exigences
spécifiques en matière d‘émissions
sonores.
En fonctionnement niveau max
niveau de
référence
Fonctionnement
sans charge
38,0 db 25,0 db
disque dur actif 42,0 db 26,0 db
lecteur optique actif 50,0 db 46,4 db
Page 94

94
Consommation d’énergie
Nos stations de travail sont particulièrement économiques en termes de con-
sommation d’énergie. Les données de la
plaque d’identification s’appliquent à la
consommation de courant autorisée maximale, lorsque la station est totalement
équipée et que le bloc d’alimentation
fournit 100% de l’énergie. Les appareils
peuvent être débranchés d’une source de
courant externe pendant 4 semaines au
moins sans perdre de leur fonctionnalité.
Les paramètres peuvent être modiés dans
le système d‘exploitation.Nos systèmes
répondent à l’exigence d’une consommation inférieure à 30 Watts en mode «
Pause ».
Le paramétrage du mode d’économie
d’énergie s’effectue dans le Setup du
BIOS. Reportez-vous à la description
de la carte mère pour en savoir plus.
En isolant l’appareil du secteur (cordon
d‘alimentation débranché), la consommation énergétique de la station de
travail sera ramenée à zéro. En fonction
de l’équipement de la station et de son
mode de fonctionnement (par ex. de
D‘économie d‘énergie les paramètres
de Windows
éteindre les écrans 10 min
éteindre le disque dur 10 min
veille
20 min
hibernation 60 min
Page 95

95
FR
l’accès aux lecteurs), cette consommation se situe dans une fourchette de 60 à
150W.
WORTMANN AG garantit la reprise des
anciens appareils : les matériaux employés permettent une réutilisation ou
une mise au rebut dans le respect de
l’environnement, ce qui signifie que votre
PC est totalement recyclable.
La garantie pour ce produit est de 24
mois.
L’emballage extérieur et toutes les
séparations en carton peuvent être mis
au rebut en tant que vieux papiers. Les
mousses en PE (protections lors du
transport des ordinateurs) sont à mettre au rebut dans le bac de collecte des
plastiques.
Données techniques
Votre station de travail doit être ali-
mentée en courant alternatif à hauteur
de 50/60 Hz. Pour relier l’appareil à
une source d’alimentation, branchez
le câble d’alimentation. Pour le décon-
necter de l’alimentation, retirez le câble
d’alimentation.
Utilisez une prise de courant mise à la
terre facilement accessible.
La tension d’entrée est de : 200 - 240 V~.
Measurement 42 x 18 x 42.5, 12,3kg.
Please refer to the lable on the back of
your device for the maximum power con-
sumption.
Page 96

96
une source d’alimentation, branchez le câble d’alimentation. Pour le déconnecter de
l’alimentation, retirez le câble d’alimentation. Utilisez une prise de courant mise à la
terre facilement accessible. La tension d’entrée est de : 200 - 240 V~.
Environnement de fonctionnement :
Température +10°C à +32°C (en utilisation)
-20°C à +50°C (éteint, stockage)
Humidité relative de l’air
10% à 75% (en utilisation, sans condensation)
5% bis 95% (éteint, sans condensation)
Veuillez consulter l’étiquette qui figure sur le carton pour une présentation plus détaillée des caractéristiques techniques du système (carte mère, carte graphique, carte
son, etc.).
ATTENTION :
Votre station de travail ne doit être utilisée qu’en position verticale!
Exception : PC Mini-ITX et Slim-Desktop, en suivant les recommandations du
constructeur sur son site Internet
Page 97

97
PL
Słowo wstępne
Gratulujemy Państwu zakupu systemu komputerowego TERRA i mamy nadzieję,
że spełni on pokładane w nim oczekiwania. Niniejsza instrukcja obsługi ma zadanie przedstawić Państwu budowę i funkcjonowanie komputera osobistego PC.
Ciągle pracujemy nad rozwojem wszystkich typów i modeli. Dlatego też prosimy
o wyrozumiałość dla ewentualnych zmian w zakresie dostaw, form, wyposażeni
i budowy. Wyklucza się jakiekolwiek roszczenia w związku z danymi podawanymi
w niniejszej instrukcji obsługi, ilustracjami oraz znajdującymi się w niej opisami.
Wnioski i sugestie dotyczące formy i ewentualnie występujących błędów, prosimy
przekazywać sprzedawcy. Chętnie skorzystamy z sensownych sugestii i propozycji
ulepszeń. Wszystkie prawa zastrzeżone. Żadna z części niniejszej instrukcji nie może
być reprodukowana lub obrabiana przy pomocy systemów elektronicznych, powielana lub wykorzystywana w jakiejkolwiek formie (druk, fotokopia, mikrofilm lub inne)
bez wcześniejszej pisemnej zgody firmy WORTMANN AG. Stosowane nazwy firmowe
i towarowe, jak również nazwy produktów podlegają z reguły ochronie związanej ze
znakami towarowymi, prawem patentowym lub towarowym.
Niniejsza instrukcja została utworzona i wydana przez WORTMANN AG, Bredenhop 20, 32609 Hüllhorst,
tel. 05744/944-0, fax: 05744/944-444.
Page 98

98
Spis treści
Wskazówki dotyczące bezpieczeństwa 99-100
Transport urządzenia 101
Czyszczenie urządzenia 101
Gwarancje 102
Zwrot urządzeń używanych / elektronicznego złomu 102
Oznaczenie CE 103
Uruchomienie 104
Instalacja urządzenia 105
Złącza i elementy obsługi 106-108
Złącza z tyłu obudowy 109-110
Możliwości podłączenia wyświetlacza / monitora 111-113
Podłączanie urządzeń zewnętrznych 114-115
Podłączanie myszki i klawiatury 116
Podłączanie zewnętrznych urządzeń do portów USB 117
Podłączanie urządzenia do sieci / zasilania 118
Włączanie monitora i urządzenia 119
Pozostałe wskazówki 120-127
Page 99

99
PL
Wskazówki bezpieczeństwa
Prosimy przestrzegać wskazówek
związanych z ustawieniem i warunkami,
w jakich pracować będzie urządzenie.
Urządzenie może być użytkowane tylko
wtedy, kiedy ustawione napięcie sieciowe
urządzenia zgodne jest z napięciem w
lokalnej sieci. Prosimy sprawdzić ustawienie napięcia sieciowego urządzenia!
Wtyczka musi znajdować się w pobliżu
PC i być łatwo dostępna.
Uwaga, na elementach we wnętrzu
urządzenia mogą występować wysokie
temperatury.
Wyłącznik / włącznik nie odłącza
urządzenia od napięcia w sieci. W celu
całkowitego odłączenia urządzenia od
zasilania należy wyciągnąć wtyczkę z
uziemionego gniazdka prądowego.
Nasze systemy PC przeznaczone są do
zwykłego użytku.
Jeśli potrzebujecie Państwo systemów
pracujących 24/7, chętnie przedstawimy
Państwu indywidualną ofertę.
PC z wyjściem audio:
Uwaga! Zbyt wysoki poziom głośności podczas użytkowania słuchawek powodować
będzie nadmierne ciśnienie akustyczne
i może prowadzić do uszkodzeń aparatu
słuchowego. Przed każdym odtwarzaniem
prosimy o ustawienie regulacji na najniższą
wartość. Dopiero wtedy zalecamy
!
Zaleca się otwieranie
urządzenia tylko przez
autoryzowany i przeszkolony personel.
Page 100

100
wlaczenie odtwarzania i powolne
zwiększanie głośności do pożądanej
wartości. Poprzez zmianę ustawień podstawowych equalizera, sterowników,
oprogramowania lub systemu operacyjnego
możliwe są zmiany w poziomie głośności,
a co się z tym wiąże niebezpieczeństwem
trwałego uszkodzenia słuchu.
PC z kartą tunera TV
Jeśli podłączacie Państwo tuner DVBT do
domowej anteny, należy stosować się do
miejscowych przepisów instalacyjnych.
Podczas korzystania z multimediów zawsze
należy pamiętać o bezpieczeństwie!
 Loading...