

Page 1

Page 2

Page 3
Deutsch
Sicherheitsvorkehrungen und Wartung
Installation / Grundeinstellungen
Das Bild auf dem Bildschirm einstellen
Funktionen
Bild
Farben
Geometrie
Setup
Den LED-Monitor installieren
Unterstützte Auflösung und Bildwiederholfrequenz
Störungssuche
Spezifikationen
3
4
4
5
5
6
6
7
9
10
11
12
English
Français
Safety Precautions and Maintenance
Basic setup
Screen image setups
Functions
Picture
Color
Tracking
Setup
Installing the LED Monitor
Supporting Timing Modes
Troubleshooting
Specifications
Précautions de sécurité et entretien
Configuration de base
Configuration d'image à l'écran
Fonctions
Image
Couleur
Reglages
Installation
Installation du moniteur LED
Fréquence de rafraîchissement et résolution supportées
Dépannage
Specifications
13
14
14
15
15
16
16
17
19
20
21
22
23
24
24
25
25
26
26
27
29
30
31
32
1
Page 4

Español
Precauciones de seguridad y mantenimiento
Configuración básica
Configuración de imagen de pantalla
Funciones
Cuadro
Color
Ajustes
Setup
Instalación del monitor LED
Soporte de modos de reloj
Solución de problemas
Especificaciones
33
34
34
35
35
36
36
37
39
40
41
42
Italiano
Sicurezza e Manutenzione
Configurazione di base
Configurazione delle immagini dello schermo
Funzioni
Immagine
Colore
Ricerca
Controllo
Installazione del Monitor LED
Modalità di Temporizzazione Supportate
Risoluzione dei Problemi
Specifiche
Меры безопасности и техническое обслуживание
Базовая установка
Настройка изображения
KAPT H AИК
ЦВЕТ
Ч /ФАЗАACTOTA
УСТ КАAHOB
Установка LED монитора
Поддерживаемое разрешение и частота обновления
Устранение неисправностей
Технические характеристики
43
44
44
45
45
46
46
47
49
50
51
52
53
54
54
55
55
56
56
57
59
60
61
62
2
Page 5

Sicherheitsvorkehrungen und Wartung
Deutsch
Lesen Sie diese Bedienungsanleitungbitte aufmerksam durch und bewahren sie für
1. Trennen Sie den Monitor vor dem Reinigen mit einem leicht benetzten Tuch vom Stromnetz ab.
2. Wischen Sie den Bildschirm mit einem trockenen Tuch sauber. Schalten Sie das Gerät dabei
jeweils zuvor aus und trennen es vom Stromnetz ab.
3. Verwenden Sie keinen Alkohol oder Flüssigkeiten auf Ammoniakbasis.
4. Dieser Monitor ist mit Lüftungslöchern auf der Rückseite des Gehäuses versehen. Lassen Sie
diese jederzeit frei.
5. Stellen Sie den Monitor nicht in unmittelbarer Nähe eines Elektroheizgeräts oder einer Heizung
oder in einem Einbaukasten ohne ausreichende Luftzirkulation auf.
6. Schieben Sie keine Gegenstände in die Lüftungslöcher und sprühen Sie keine Sprays auf das Gerät.
7. Stellen Sie den Monitor nur an festen und sicheren Orten auf, um ein Herunterfallen des Geräts zu
vermeiden und um möglichen Verletzungen vorzubeugen.
8. Trennen Sie den Monitor vom Stromnetz ab, falls Sie ihn über längere Zeit nicht in Betrieb nehmen
werden.
9. Stellen oder legen Sie keine schwere Gegenstände auf den Monitor oder auf das Stromkabel.
10. Versuchen Sie nicht, die Rückseite des Gerätegehäuses zu öffnen. Im Innern des Geräts sind
Hochspannungen vorhanden.
eine zukünftige Bezugnahme gut auf.
Inhalt
* Monitor
* VGA-Kabel
* Audiokabel
* Stromkabel
* Netzadapter
* Garantiekarte
* Bedienungsanleitung
Merkmale:
*
.16 7 Millionen Farben für eine hohe Bildqualität
*
OSD-Bedienmenüs für eine einfache und intelligente Bildschirmeinstellung
*
Automatikfunktionen: Falls keine Einstellungen vorgenommen wurden, werden die optimalen
Einstellungen automatisch gewählt
3
Page 6
Deutsch
Installation / Grundeinstellungen
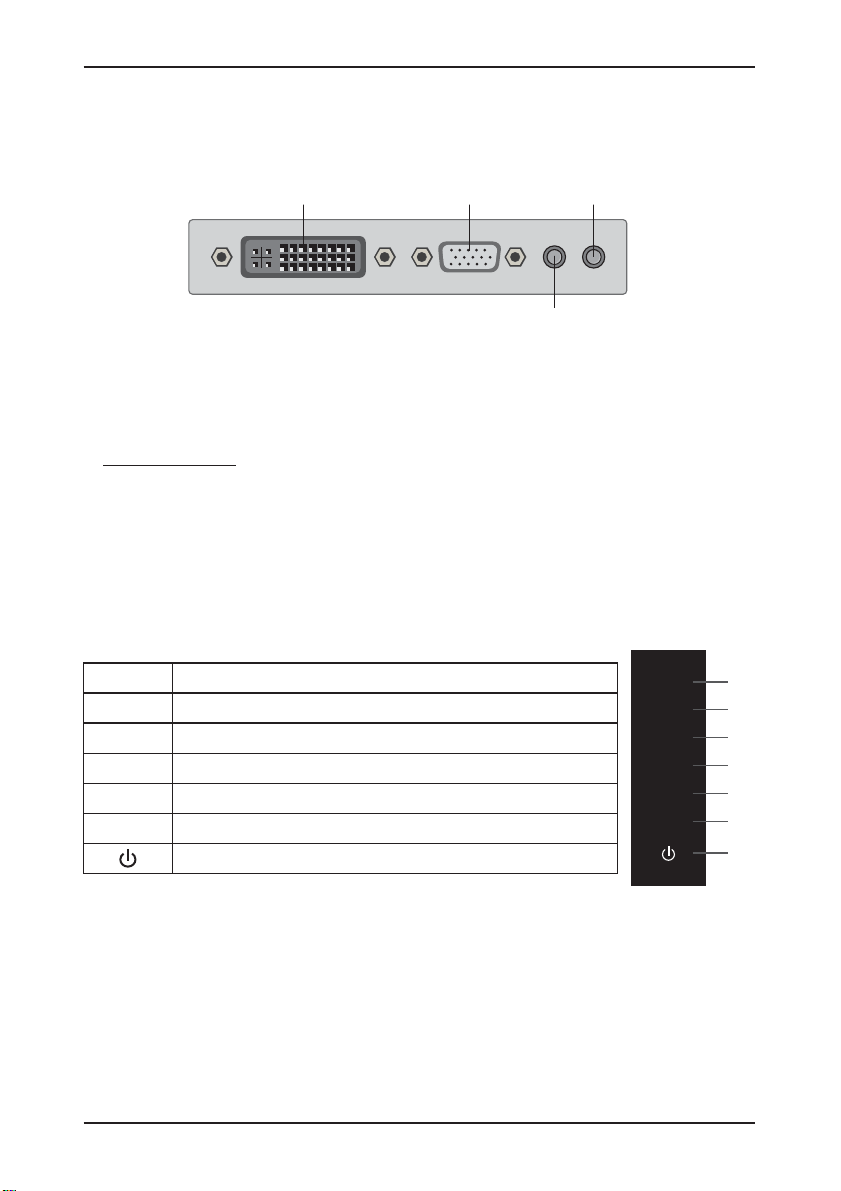
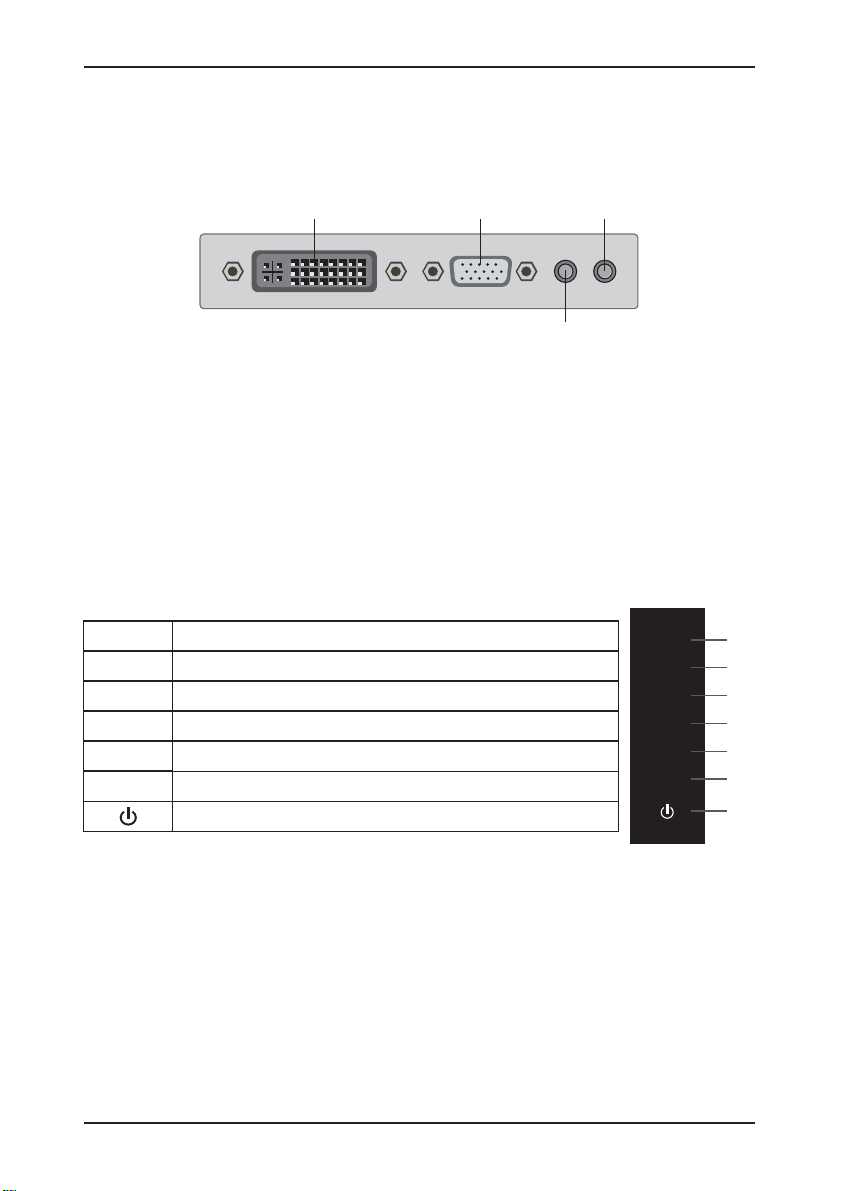
a) Schließen Sie das DVI- oder VGA-Kabel (Signalkabel) an die PC-Grafikkarte (Signalausgang) an.
Es wird empfohlen, die digitale Schnittstelle zu verwenden (DVI).
DVI-Anschluss
b Der Monitor kann in einem weiten Netzspannungsbereich von 100 bis 240 Volt und bei einer
)
VGA-Anschluss
Netzfrequenz von 50 bis 60 Hz eingesetzt werden.
Schließen Sie das Stromkabel an den Monitor und an die Netzsteckdose an.
c)
Schalten Sie die Stromzufuhr ein.
d)
Drücken Sie auf den Ein- / Ausschalter, um den Monitor einzuschalten.
e)
Wichtiger Hinweis:
Um die beste Bildqualität darzustellen, sollte am PC stets die Ausgabe-Auflösung eingestellt werden,
die mit der physikalischen Auflösung des Displays übereinstimmt (siehe technische Daten).
Welche Auflösung tatsächlich ausgegeben wird, kann im Monitor-Bedienmenü im Bereich „SETUP“
kontrolliert werden.
Das Bild auf dem Bildschirm einstellen
Auf der rechten Seite des Monitors befinden sich sieben Tasten für die Einstellung der
Monitoreinstellungen mit Hilfe der Anzeige auf dem Bildschirm(On Screen Display, OSD).
Gleichstrom-Anschluss
Audioanschluss
AUTO
VOL+
VOL-
UP
DOWN
MENU
Automatische Anpassung der Bildqualität (nur über VGA notwendig bzw. verfügbar)
Im Menü: zurück zu Hauptmenü bzw. Menü schließen
Lautstärke oder Einstellungswert erhöhen
Lautstärke oder Einstellungswert verringern
Einstelloption auswählen
Ohne Menüeinblendung: Umschaltung der Signalquelle zwischen VGA und DVI
Einstelloption auswählen
Ohne Menüeinblendung: Bildformatumschaltung zwischen 4:3 und 16:9
Aufrufen des OSD-Menüs, eines Untermenüs oder einer Einstelloption
Ein-/Ausschalter
4
AUTO
VOL+
VOL-
UP
DOWN
MENU
1
2
3
4
5
6
7
Page 7

Funktionen:
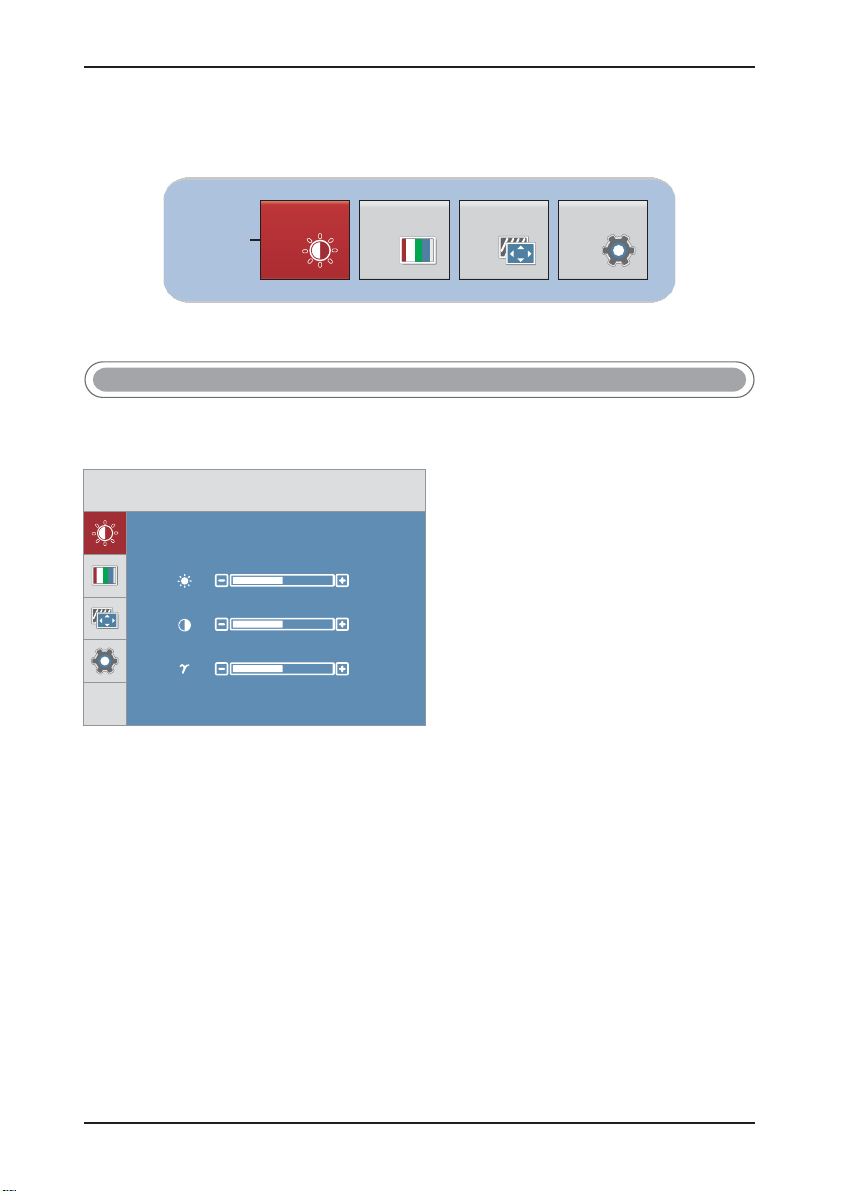
Drücken Sie auf die -Taste (Menü), wonach das Hauptmenü des OSDs erscheint.MENU
Deutsch
GEOMETRIE SETUP
Hauptmenü
BILD
FARBEN
BILD
Drücken Sie auf die -Taste (Menü), wonach das Hauptmenü wie folgt erscheint:
Drücken Sie auf die / -Taste (Auf/Ab), um die Option im Hauptmenü auszuwählen.
Drücken Sie danach auf die -Taste (Menü), um das Menü aufzurufen.
BILD
HELLIGKEIT
Drücken Sie auf die / -Taste (Auf/Ab), um die Option auszuwählen.
Drücken Sie danach auf die -Taste (Menü), um die Auswahl zu bestätigen und drücken auf die
/ -Taste (Lautstärke Auf/Ab), um die Einstellung vorzunehmen.
VOL+ VOL-
MENU
UP DOWN BILD
MENU
HELLIGKEIT
KONTRAST
GAMMA
UP DOWN HELLIGKEIT
MENU
50
50
0
KONTRAST
Drücken Sie auf die / -Taste (Auf/Ab), um die Option auszuwählen.
Drücken Sie danach auf die -Taste (Menü), um die Auswahl zu bestätigen und drücken auf die
/ -Taste (Lautstärke Auf/Ab), um die Einstellung vorzunehmen.
VOL+ VOL-
UP DOWN KONTRAST
MENU
GAMMA
Drücken Sie auf die / -Taste (Auf/Ab), um die Option auszuwählen. Drücken Sie
danach auf die -Taste (Menü), um die Auswahl zu bestätigen und drücken auf die /
-Taste (Lautstärke Auf/Ab), um die Einstellung vorzunehmen.
UP DOWN GAMMA
MENU VOL+ VOL-
5
Page 8
Deutsch
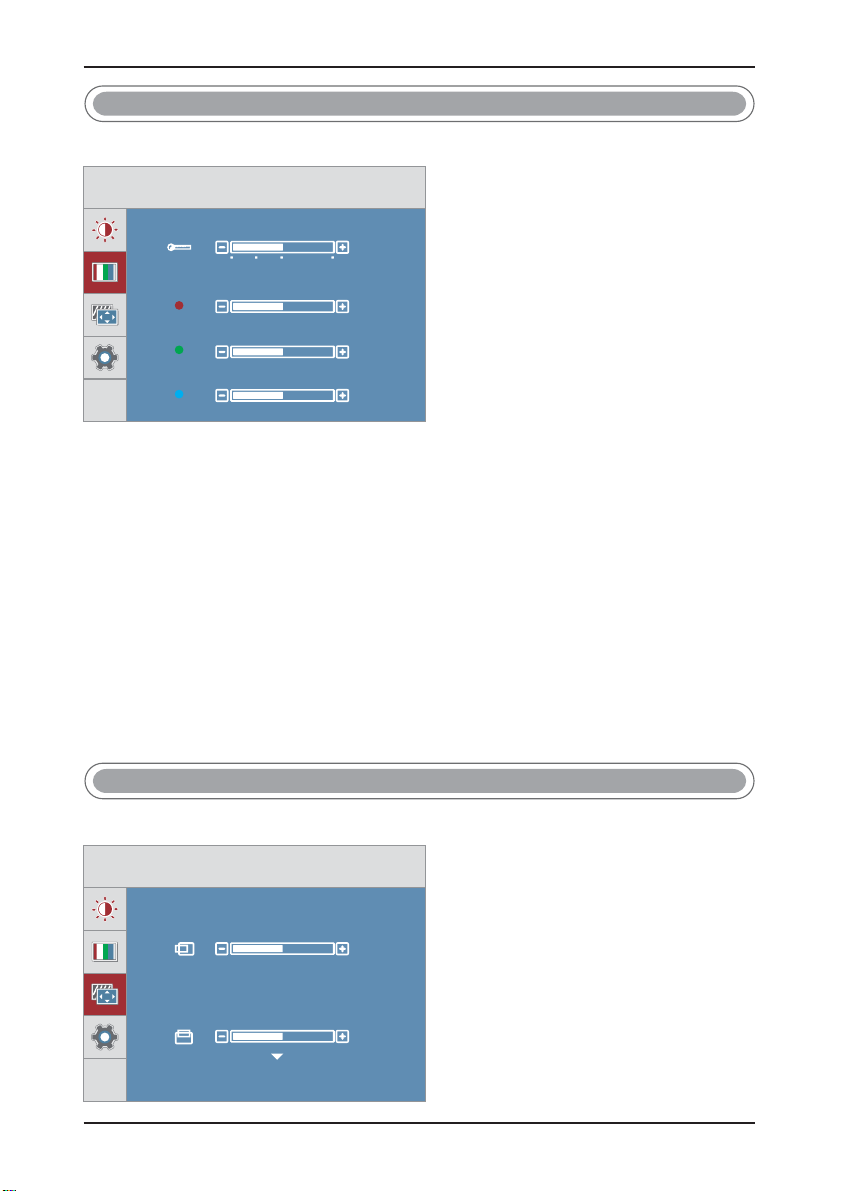
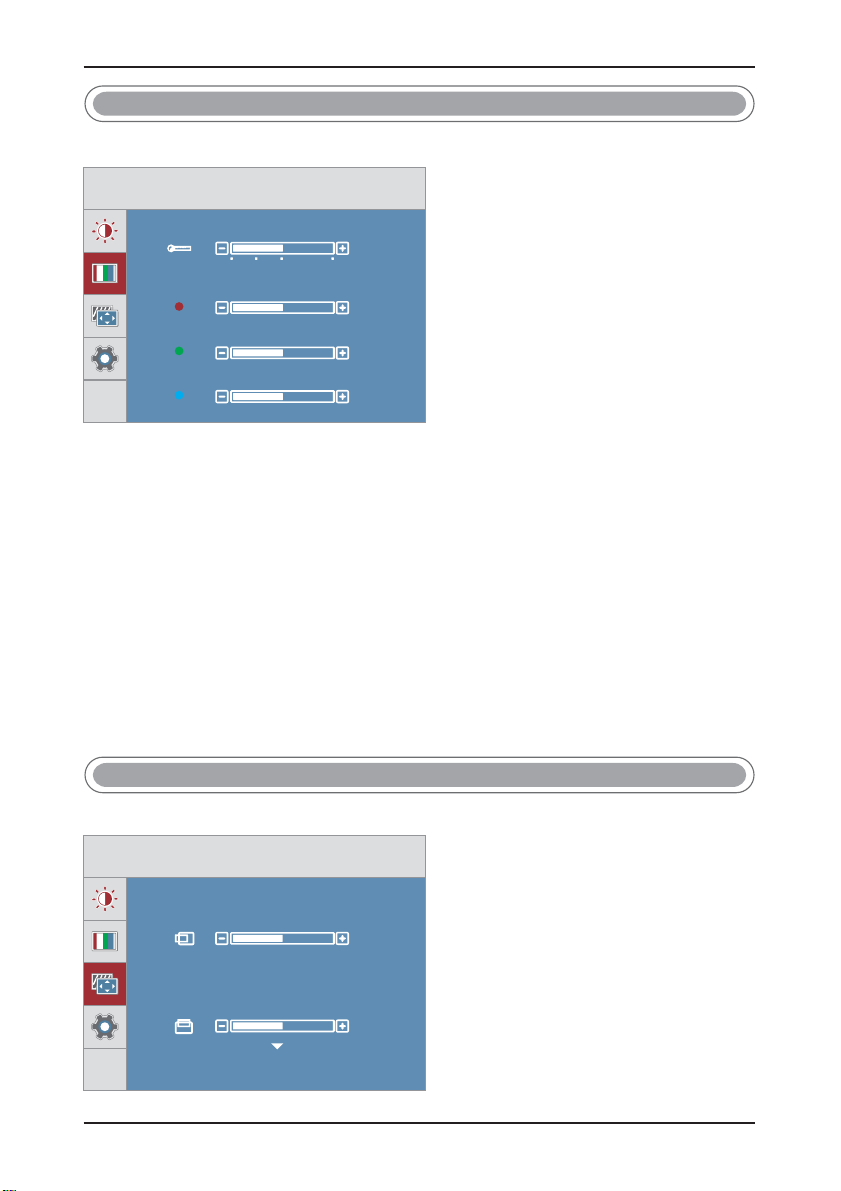
FARBEN
Drücken Sie auf die / -Taste (Auf/Ab), um im Hauptmenü die Option auszuwählen.
Danach auf die -Taste (Menü) drücken, um das Menü aufzurufen.
FARBEN
VOREINSTELLUNG
Drücken Sie auf die / -Taste (Auf/Ab), um die Option auszuwählen.
Drücken Sie danach auf die -Taste (Menü), um die Auswahl zu bestätigen und drücken auf die
/ -Taste (Lautstärke Auf/Ab), um die Einstellung vorzunehmen.
VOL+ VOL-
ROT
Drücken Sie auf die / -Taste (Auf/Ab), um die Farbe auszuwählen, und danach auf die
-Taste (Menü), um die Auswahl zu bestätigen. Drücken Sie danach auf die / -Taste
MENU VOL+ VOL-
(Lautstärke Auf/Ab), um den Wert der Hauptfarbe Rot einzustellen.
GRÜN
Drücken Sie auf die / -Taste (Auf/Ab), um die Farbe auszuwählen, und danach auf
die -Taste (Menü), um die Auswahl zu bestätigen. Drücken Sie danach auf die /
MENU VOL+ VOL-
-Taste (Lautstärke Auf/Ab), um den Wert der Hauptfarbe Grün einzustellen.
BLAU
Drücken Sie auf die / -Taste (Auf/Ab), um die Farbe auszuwählen, und danach auf
die -Taste (Menü), um die Auswahl zu bestätigen. Drücken Sie danach auf die /
MENU VOL+ VOL-
-Taste (Lautstärke Auf/Ab), um den Wert der Hauptfarbe Blau einzustellen.
UP DOWN FARBEN
MENU
VOREINSTELLUNG
5400K
6500K 9300K
S
RGB
ROT
GRÜN
BLAU
UP DOWN VOREINSTELLUNG
MENU
50
50
50
UP DOWN ROT
UP DOWN GRÜN
UP DOWN BLAU
GEOMETRIE
Drücken Sie auf die / -Taste (Auf/Ab), um die Option im Hauptmenü auszuwählen,
und danach auf die -Taste (Menü), um das Menü aufzurufen.
GEOMETRIE
UP DOWN GEOMETRIE
MENU
HORIZONTAL
VERTIKAL
50
50
6
Page 9

Deutsch
H. Position
Drücken Sie auf die / -Taste (Auf/Ab), um die Option auszuwählen, und danach
auf die -Taste (Menü), um Ihre Auswahl zu bestätigen. Drücken Sie danach auf die -Taste
MENU VOL+
(Lautstärke Auf), um das Bild nach rechts zu verschieben, und auf die -Taste (Lautstärke Ab),
um das Bild nach links zu verschieben.
V. Position
Drücken Sie auf die / -Taste (Auf/Ab), um die Option auszuwählen, und danach
MENU VOL+
auf die -Taste (Menü), um Ihre Auswahl zu bestätigen. Drücken Sie danach auf die -Taste
(Lautstärke Auf), um das Bild nach oben zu verschieben, und auf die -Taste (Lautstärke Ab),
um das Bild nach unten zu verschieben.
GEOMETRIE
UP DOWN H. Position
VOL-
UP DOWN V.Position
VOL-
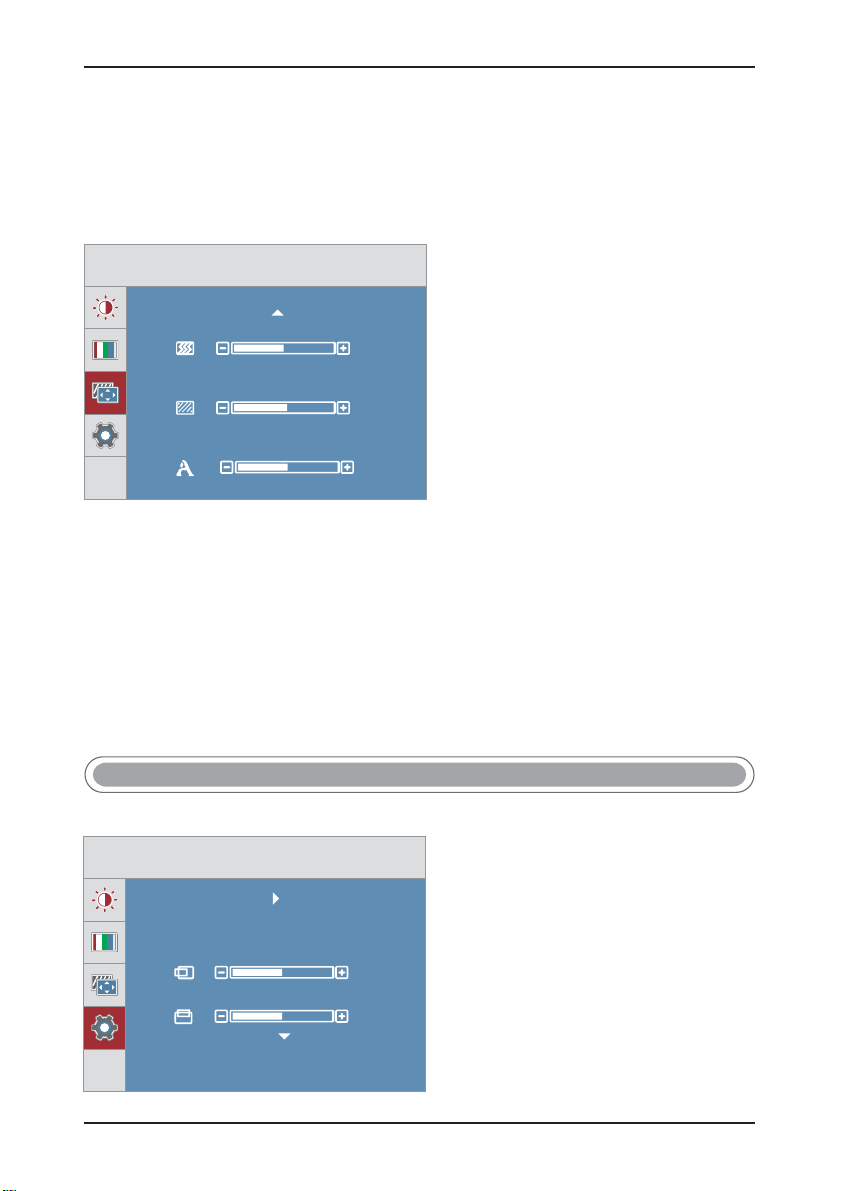
TAKT
TAKTRATE
SCHAERFE
50
54
5
TAKT
Drücken Sie auf die / -Taste (Auf/Ab), um die Option auszuwählen, und danach
auf die -Taste (Menü), um Ihre Auswahl zu bestätigen. Drücken Sie auf die / -Taste
MENU VOL+ VOL-
(Lautstärke Auf/Ab), um die Einstellung vorzunehmen.
UP DOWN TAKT
TAKTRATE
Drücken Sie auf die / -Taste (Auf/Ab), um die Option auszuwählen, und danach
auf die -Taste (Menü), um Ihre Auswahl zu bestätigen. Drücken Sie auf die / -Taste
MENU VOL+ VOL-
(Lautstärke Auf/Ab), um die Einstellung vorzunehmen.
UP DOWN
TAKTRATE
SCHAERFE
Drücken Sie auf die / -Taste (Auf/Ab), um die Option auszuwählen, und danach
MENU VOL+ VOL-
auf die -Taste (Menü), um Ihre Auswahl zu bestätigen. Drücken Sie auf die / -Taste
(Lautstärke Auf/Ab), um die Einstellung vorzunehmen.
UP DOWN SCHAERFE
SETUP
Drücken Sie auf die / -Taste (Auf/Ab), um die Option auszuwählen, und danach auf
die -Taste (Menü), um das Menü aufzurufen.
MENU
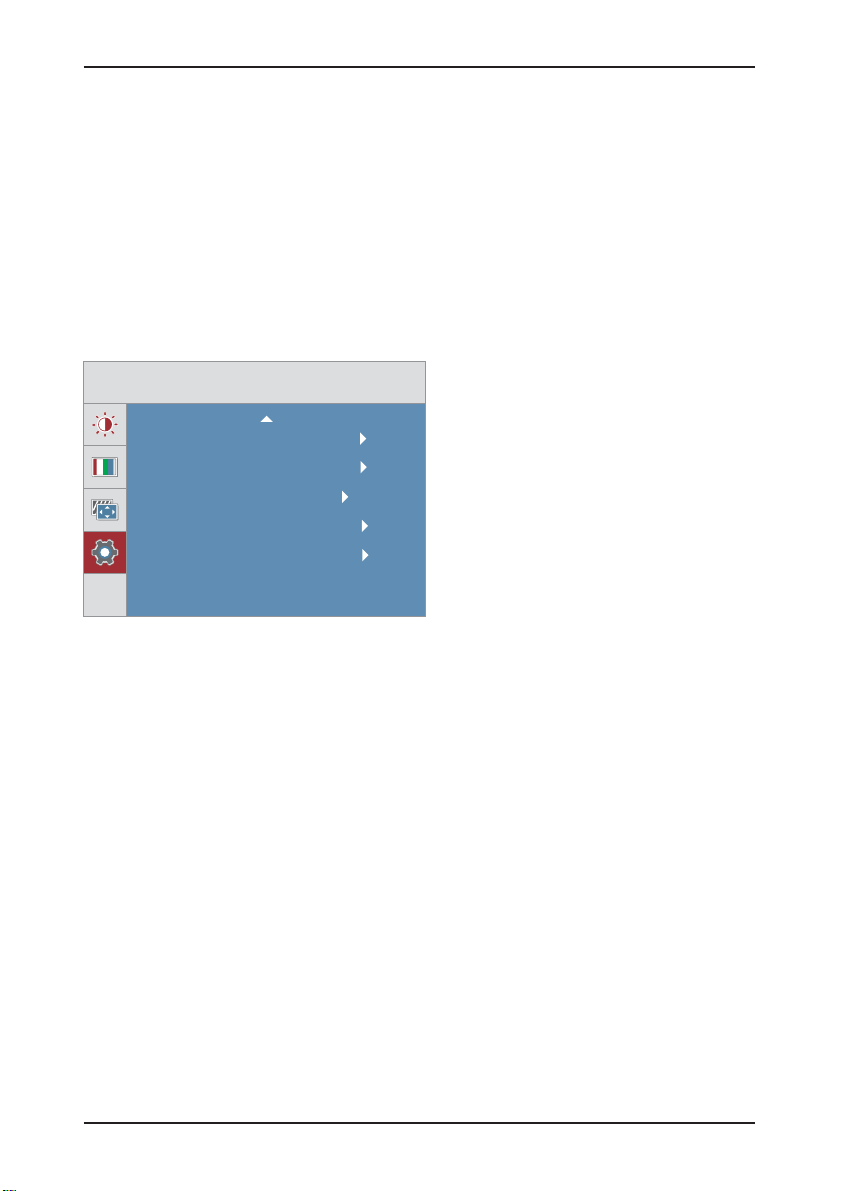
SETUP
UP DOWN SETUP
SPRACHE
OSD POSITION
HORIZONTAL
VERTIKAL
DEUTSCH
50
50
ANALOG
1920x1080 60Hz
7
Page 10

Deutsch
SPRACHE
Drücken Sie auf die / -Taste (Auf/Ab), um die Option auszuwählen, und danach
die -Taste (Menü), um Ihre Auswahl zu bestätigen. Drücken Sie auf die / -Taste
MENU VOL+ VOL-auf
(Lautstärke Auf/Ab), um die Einstellung vorzunehmen.
HORIZONTAL
Drücken Sie auf die / -Taste (Auf/Ab), um die Option auszuwählen, und
danach auf die -Taste (Menü), um Ihre Auswahl zu bestätigen. Drücken Sie danach auf die
-Taste (Lautstärke Auf), um das OSD nach rechts zu verschieben, oder auf die -Taste
VOL+ VOL-
(Lautstärke Ab), um das OSD nach links zu verschieben.
VERTIKAL
Drücken Sie auf die / -Taste (Auf/Ab), um die Option auszuwählen, und danach
MENU VOL+
auf die -Taste (Menü), um Ihre Auswahl zu bestätigen. Drücken Sie danach auf die -Taste
(Lautstärke Auf), um das OSD nach oben zu verschieben, oder auf die -Taste (Lautstärke Ab),
um das OSD nach unten zu verschieben.
SETUP
UP DOWN SPRACHE
UP DOWN HORIZONTAL
MENU
UP DOWN VERTIKAL
VOL-
WEISS BALANCE
DCR
BILDFORMAT
SIGNALEINGANG
WERKSEINSTELLUNG
ANALOG
1920x1080 60Hz
NEIN
AUS
BREITBILD
VGA
NEIN
WEISS BALANCE
Bestätigen Sie Ihre Auswahl und drücken auf die / --Taste (Lautstärke Auf/Ab), um die
Funktion auszuführen.
VOL+ VOL
DCR
Drücken Sie auf die / -Taste (Auf/Ab), um die Option auszuwählen, und danach auf die
-Taste (Menü), um Ihre Auswahl zu bestätigen. Drücken Sie auf die / -Taste
MENU VOL+ VOL-
(Lautstärke Auf/Ab), um zwischen EIN oder AUS auszuwählen.
UP DOWN DCR
BILDFDRMAT
Drücken Sie auf die -Taste (Auf/Ab), um die Option auszuwählen.Drücken
Sie auf die / -Taste (Lautstärke Auf/Ab), um zwischen 4:3 oder BREITBILD auszuwählen.
VOL+ VOL-
UP DOWN/
BILDFORMAT
SIGNALEINGANG
Drücken Sie auf die / -Taste (Auf/Ab), um die Option auszuwählen.
Drücken Sie auf die / -Taste (Lautstärke Auf/Ab), um zwischen VGA und DVI umzuschalten.
UP DOWN SIGNALEINGANG
VOL+ VOL-
ZURÜCKSETZEN AUF WERKSEINSTELLUNG
Drücken Sie auf die / -Taste (Auf/Ab), um die Option auszuwählen.
Drücken Sie auf die / -Taste (Lautstärke Auf/Ab), um die Funktion auszuführen und alle Werte
zurückzusetzen.
UP DOWN WERKSEINSTELLUNG
VOL+ VOL-
8
Page 11
Sonstige Funktionen
OSD GESPERRT
Deutsch
Halten Sie die -Taste ca. 5 Sekunden lang gedrückt, um das Menü zu sperren
(OSD GESPERRT).
Halten Sie die -Taste ca. 5 Sekunden lang gedrückt, um das Menü wieder zu entsperren
(OSD ENTRIEGELT).
MENU
OSD ENTRIEGEIT
MENU
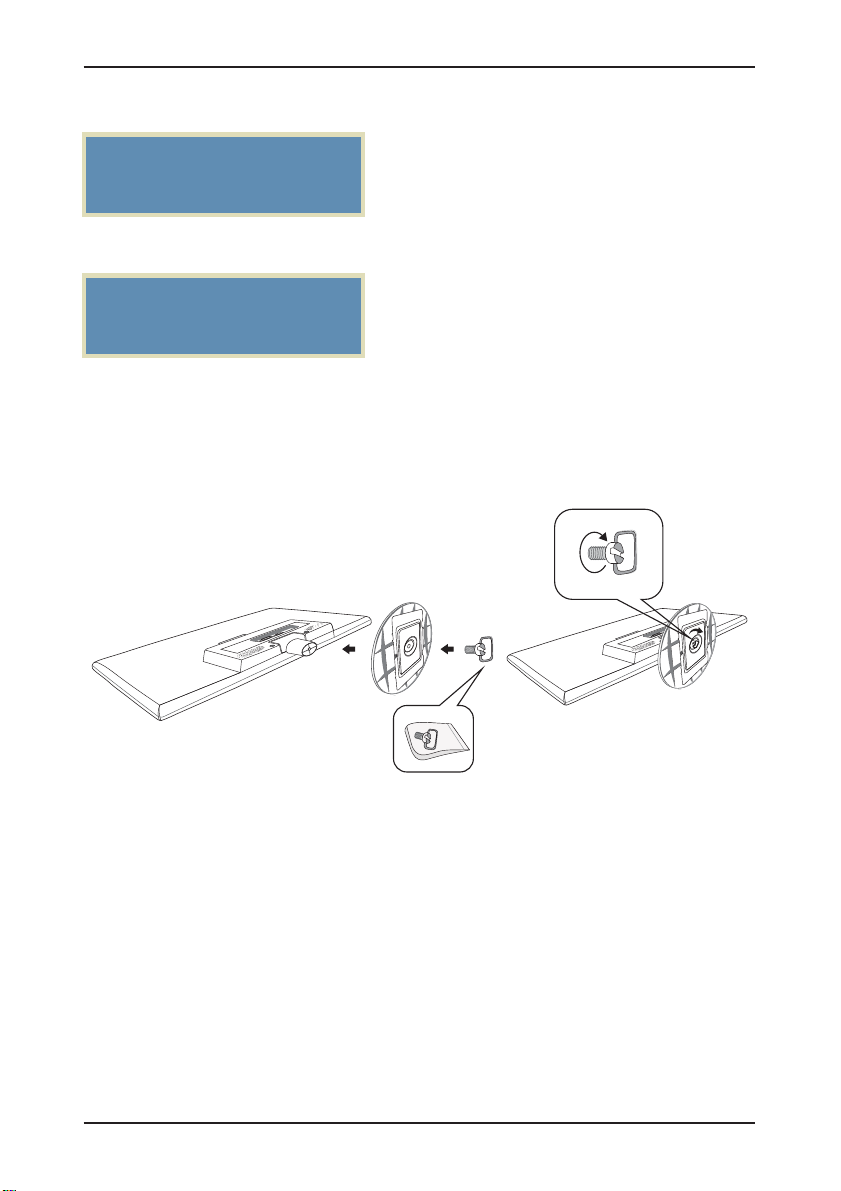
Den LED-Monitor installieren
Die Schraube finden Sie im kleinen beigelegten Beutel.
1. Den Monitor mit der Vorderseite nach unten auf ein weiches Tuch oder auf ein Kissen auf einem
Tisch hinlegen.
2. Den Standfuß an den Monitor befestigen.
9
Page 12
Deutsch
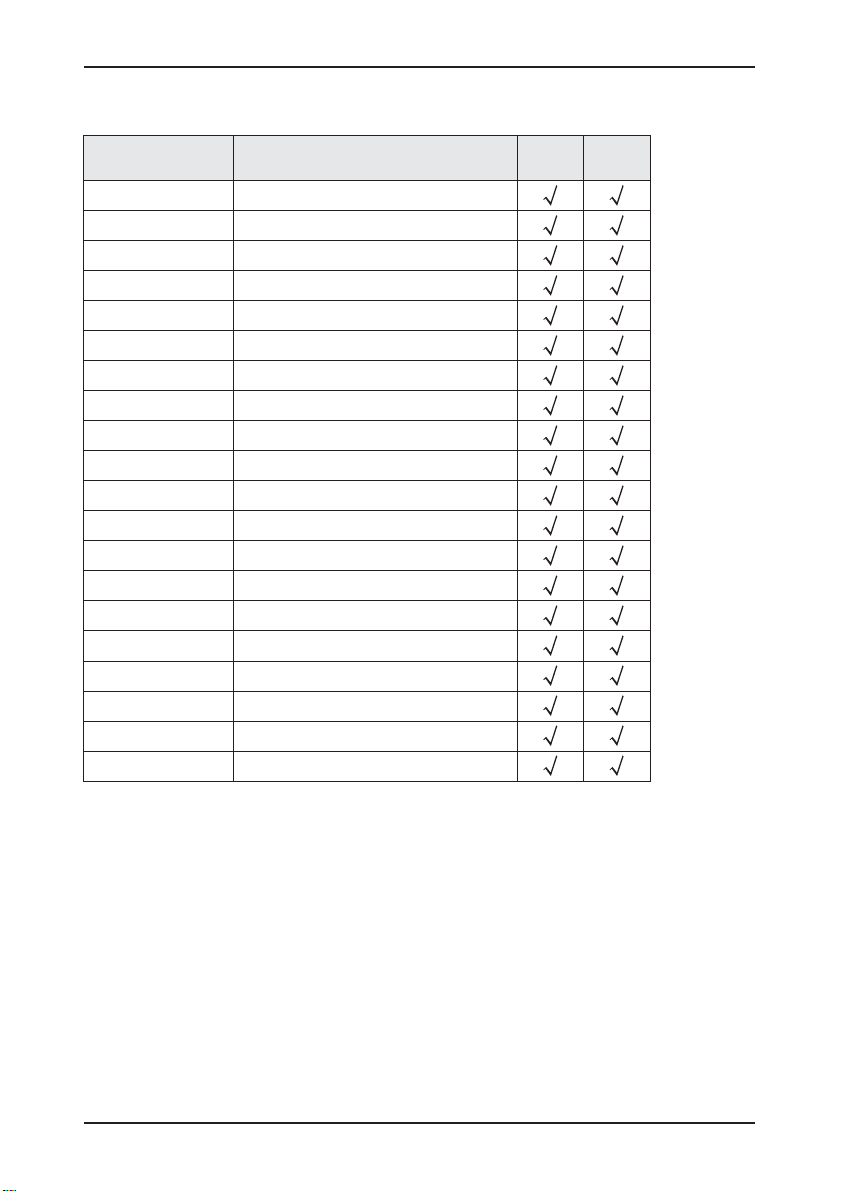
Unterstützte Auflösung und Bildwiederholfrequenz
Norm
VGA
VGA
MAC
VESA
VESA
VESA
VESA
VESA
VESA
VESA
VESA
VESA
VESA
VESA
VESA
VESA
VESA
VESA
VESA
VESA
Auflösung
720x400 70Hz@
640x480 60Hz@
640x480 67Hz@
640x480 72Hz@
640x480 75Hz@
800x600 56Hz@
800x600 60Hz@
800x600 72Hz@
800x600 75Hz@
1024x768 60Hz@
1024x768 70Hz@
1024x768 75Hz@
1280x960 60Hz@
1152x864 60Hz@
1280x1024 60Hz@
1280x1024 75Hz@
1440x900 60Hz@
1600x1200 60Hz@
1680x1050 60Hz@
1920x1080 60Hz@
VGA DVI
Warnung: Stellen Sie die Grafikkarte in Ihrem Computer nicht so ein, dass die maximalen
Bildwiederholfrequenzen überschritten werden, um permanente Schäden Ihres Monitors zu vermeiden.
10
Page 13

Deutsch
Störungssuche
1. Kein Bild auf dem Bilschirm
a) Überprüfen Sie, ob das Gerät mit dem Netzschalter (Power) eingeschaltet wurde.
b) Überprüfen Sie, ob die Helligkeit und der Kontrast des Monitors normal eingestellt sind.
c) Überprüfen Sie, ob die Betriebsanzeige blinkt. Wenn ja, weist dies darauf hin, dass der Monitor
kein Eingabesignal empfängt.
d) Falls die Signalanzeige an einem Notebook- oder Laptop-PC ist, stellen Sie sicher, dass das
Signal auf den Bildschirmmodus geschaltet ist.
2. Nicht fokussiertes Bild
a) Überprüfen, ob das Signalkabel richtig angeschlossen wurde (in aufrechter Position).
3. Blinkender Bildschirm
a) Die Stromspannung ist zum Anschließen des Monitors zu niedrig oder zu schwach.
b) Um ein Magnetfeld um den Monitor zu vermeiden, dürfen keine anderen Geräte in unmittelbarer
Nähe des Monitors aufgestellt werden, wie z.B. Lautsprecher, Fluoreszenzlampen,
WS-Transformatoren, Tischlüfter usw.
c) Drücken Sie auf die AUTO-Taste,wonach mit der Funktion für die automatische Bildeinstellung die
Einstellungen des Bildschirms automatisch optimal eingestellt werden.
4. Falsche oder ungewöhnliche Farbe
a) Falls die rote, grüne oder blaue oder eine andere Farbe nicht angezeigt wird, prüfen Sie nach, ob
das Signalkabel richtig angeschlossen ist. Falls der Anschlußstecker lose ist, kann dies zu einem
schlechten Anschluss führen.
b) Versuchen Sie, zum Vergleichen einen anderen PC anzuschließen.
5. Auf dem ganzen Bildschirm erscheint - und + H-rollendes Abtasten
a) Stellen Sie sicher dass die Frequenz des Eingabesignals zwischen 60-75 Hz ist.
6. Den Monitor reinigen
a) Stellen Sie sicher, dass der Monitor ausgeschaltet ist.
b) Sprühen Sie keine Flüssigkeiten direkt auf den Bildschirm oder auf den Plastikschirm.
7. Beim Reinigen des Bildschirms
a) Wischen Sie den Bildschirm mit einem sauberen und weichen Tuch ohne Pelz sauber.
b) Hartnäckige Schmutzflecken auf dem Bildschirm werden mit einer ammoniakfreien Flüssigkeit und
einem alkoholfreien Glasreiniger entfernt.
8. Beim Reinigen des Plastikschirms
a) Verwenden Sie ein weiches und trockenes Tuch.
b) Hartnäckige Schmutzflecken auf der Oberfläche werden mit einer ammoniakfreien Flüssigkeit und
einem alkoholfreien Glasreiniger oder einem nichtscheuernden Reinigungsmittel entfernt.
11
Page 14
Deutsch
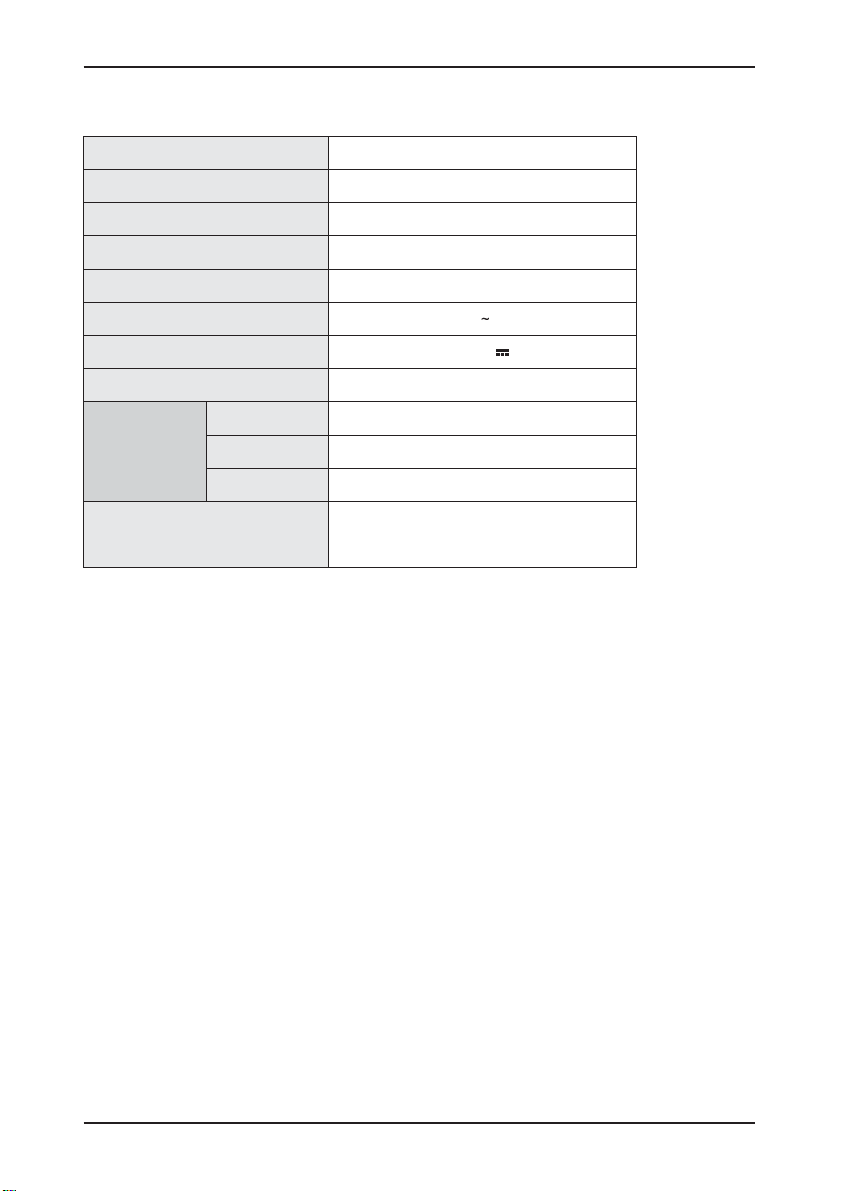
SPEZIFIKATIONEN:
Abmessung
Monitortyp
Helligkeit
Farbe
Auflösung
Stromanforderung
Netzadapter
Stromaufnahme
VGA
Eingangsanschluss
DVI D-
Audioeingang
Umgebungsbedingungen
21 5."
LED
250cd/m
2
16.7M
1920x1080 60Hz
100-240V
@
50/60Hz
DC12V 3A
<
30W
VGA analog
DVI digital
3 5mm Stereo-Klinkenbuchse.
Zul. Betriebstemperatur:
Zul. Feuchtigkeit: Unter
Zul. Aufbewahrungstemperatur:
0°-40°С
80%
-20° - 60°С
12
Page 15

English
Safety Precautions and Maintenance
Read this manual carefully and retain for future reference
1 Unplug the monitor before cleaning it with a slightly damp cloth..
2 Wiping the screen with a dry cloth is recommendable and only during the power has been switched off.,.
3 Do not use alcohol or ammonia based liquids.-.
4 This monitor is designed with ventilation holes on the cabinet back please do not cover them or block it.,.
5 Also avoid placing the monitor near the electric heater or heater includingin an enclosed room with no
.
ventilations,.
6 Please do not insert any matter or spray any liquid on it..
7 Please do not position the monitor on unsafe space if it falls it may be damaged and may hurt the user,, ..
8 Unplug the monitor if it is not going to be in use for an extended period of time..
9 Please do not put heavy items on the monitor or electric cord,..
10 Please do not open the monitor back panel because the monitor contained high voltage current..
Contents
* A monitor
* A signal cord
* A power cable
* A adapter
* A warranty card
* A user manual instruction
* An audio cable
Features:
*.16 7M high quality image colors
* Smart image screen setting OSD with simple layout and easy selection-
* Smart control interfaces for easy settings
*;Auto function when no settings are set it will auto adjust to optimum settings,-
13
Page 16
English
Basic setup
a Insert the DVI or VGA cable signal cord to the PC graphic card signal input) cable ( ) ( ).
We recommend using the digital interface (DVI).
DVI connector
b The monitor has a wide power voltage range it can be used on AC100 240V 50 60Hz supply);/.- ~ power
c Connect the power cable to the Monitor power socket and to the power source in the room) .
d Turn on the power source supply).
e To switch on the monitor press the power control key), .
VGA connector
DC connector
Audio connector
Screen image setups
The right side of the monitor
.
Display
AUTO
VOL+
VOL-
UP
DOWN
MENU
Exit main menu or when no menus auto adjust image,.-
Increase the sound level/ Adjust the options move up or higher-
Decrease the sound level/-Adjust the options move down or lower
Adjust the options move up or higher When no menus VGA DVI source selection-/ /
Adjust the options move down or lower When no menus 4 3 r 16 9 selection-/:o:
Shows main choice menus
Power ON OFF/
have Seven keys to adjust the monitor settings with the aid of the OnScreen
AUTO
VOL+
VOL-
UP
DOWN
MENU
1
2
3
4
5
6
7
Adjustment settings
1 Press key into main Setup menu on the screen. MENU .
2 Press key to switch selections on the Setup screen. UP DOWN/.
3 Press key again to access setup selection. MENU .
a Press to jump between menu options. .UP DOWN/
.Press key to access the functionMENU
b Press to adjust the setting. .VOL+ VOL-/
c Press to return to main menu. AUTO .
14
Page 17
English
Functions:
Press the Buttion Then the main menu of the appearsMENU OSD,.
TRACKING SETUP
Main Menu
PICTURE
COLOR
PICTURE
Press button the main menu will appear as followsMENU ,:
Press button to select in the main menu then press button to enterUP DOWN PICTURE MENU/,.
PICTURE
BRIGHTNESS
CONTRAST
GAMMA
BRIGHTNESS
Press buttonto select then press button confirmation choice and press
UP DOWN BRIGHTNESS MENU
/,
VOL+ VOL-
button to adjust
/.
50
50
0
CONTRAST
Press button to select then press button confirmation choice and press
UP DOWN CONTRAST MENU
/,
VOL+ VOL-
button to adjust
/.
GAMMA
Press button to select thenpress button confirmation choice and press
UP DOWN GAMMA MENU
/,
VOL+ VOL-
button to adjust
/.
15
Page 18
English
COLOR
Press ,.UP DOWN/ button to select in the main menu then press button to enterCOLOR MENU
COLOR
PRESET
5400K
6500K 9300K
S
RGB
RED
GREEN
BLUE
PRESET
Press button to select then press button confirmation choice And press
UP DOWN PRESET MENU
/, .
VOL+ VOL-
button to adjust
/.
RED
Press button to select then press button confirmation choice and press
UP DOWN RED MENU
/,
VOL+ VOL-
button to adjust the value of the three primary colors of red
/.
GREEN
Press button to select then press button confirmation choice and press
UP DOWN GREEN MENU
/,
VOL+ VOL-
button to adjust the value of the three primary colors of green
/.
50
50
50
BLUE
Press button to select then press button confirmation choice and press
VOL+ VOL-
/
button to adjust the value of the three primary colors of blue
/.
,UP DOWN BLUE MENU
TRACKING
Press UP DOWN ,/ button to select in the main menu then press buttonTRACKING MENU to enter.
TRACKING
HORIZONTAL
VERTICAL
50
50
16
Page 19
English
H Position.
Press button to select then press button confirmation choice and
button image toward the right migrationVOL+ VOL-
V Position.
Press and Press
UP DOWN V Position/.,
button image toward the up migration
VOL+ VOL- .
TRACKING
button to select then press button confirmation choice
H Position MENU.,UP DOWN/
Press button image toward the left migration
..
.
Press button image toward the down migration
MENU
Press
CLOCK
PHASE
SHARPNESS
50
54
5
CLOCK
Press button to select then press button confirmation choice and press
UP DOWN CLOCK MENU
/,
VOL+ VOL-
button to adjust
/.
PHASE
Press button to select then press button confirmation choice and press
UP DOWN PHASE MENU
/,
VOL+ VOL-
button to adjust
/.
SHARPNESS
Press button to select then press button confirmation choice and press
UP DOWN SHARPNESS MENU
/,
VOL+ VOL-
button to choose1 to 5 between
/.
SETUP
Press in the main menu to enterUP DOWN SETUP/,.button to select then press buttonMENU
SETUP
LANGUAGE ENGLISH
OSD POSITION
HORIZONTAL
VERTICAL
50
50
ANALOG
1920x1080 60Hz
17
Page 20
English
LANGUAGE
Press button to select then press button confirmation choice and press
UP DOWN LANGUAGE MENU
/,
VOL+ VOL-
HORIZONTAL
Press button to select then press button confirmation choice and
Press button OSD toward the right migration Press button OSD toward the left migration
VERTICAL
Press button to select thenpress button confirmation choice and Press
VOL+ VOL-
SETUP
button to adjust
/.
UP DOWN HORIZONTAL MENU
/,
VOL+ VOL-
UP DOWN VERTICAL MENU
/,
button OSD toward the up migration Press button OSD toward the down migration
..
..
WHITE BALANCE
DCR
4 3 WIDE:
OR
INPUT SELECT
FACTORY RESET
ANALOG
1920x1080 60Hz
NO
ON
WIDE
VGA
NO
WHITE BALANCE
Confirmation choice and press button to choose YES or NOVOL+ VOL-/.
DCR
Press buttonto select then press button confirmation choice and press
UP DOWN DCR MENU VOL+ VOL-/, /
button to choose ON or OFF
.
4:3 WIDEOR
Press button to select then press button confirmation choice and press
UP DOWN 4:3 OR WIDE MENU
/,
VOL+ VOL-
button to choose 4 3 or wide
/:.
INPUT SELECT
Press button to select then press button confirmation choice and press
UP DOWN INPUT SELECT MENU
/,
VOL+ VOL-
button to choose VGA or DVI
/ .
FACTORY RESET
Press button to select then press button confirmation choice and
UP DOWN FACTORY RESET MENU
press button to choose YES or NO When select YES the system will restore to the factory
mode
/,
VOL+ VOL-
/.,
.
18
Page 21

Other function
OSD LOCKED
Press key to long term OSD LOCKEDMENU -, .【】
OSD UNLOCKED
Then press MENU【】key to long term OSD UNLOCKED-, .
Installing the LED Monitor
English
Youcan find the screw in the
small bag from the attached bag
1 place the monitor face down on a soft cloth or cushion on a table
..
2 Install the stand base to the monitor
..
19
Page 22

English
Supporting Timing Modes
Standard
VGA
VGA
MAC
VESA
VESA
VESA
VESA
VESA
VESA
VESA
VESA
VESA
VESA
VESA
VESA
VESA
VESA
VESA
VESA
VESA
Resolutions
720x400 70Hz@
640x480 60Hz@
640x480 67Hz@
640x480 72Hz@
640x480 75Hz@
800x600 56Hz@
800x600 60Hz@
800x600 72Hz@
800x600 75Hz@
1024x768 60Hz@
1024x768 70Hz@
1024x768 75Hz@
1280x960 60Hz@
1152x864 60Hz@
1280x1024 60Hz@
1280x1024 75Hz@
1440x900 60Hz@
1600x1200 60Hz@
1680x1050 60Hz@
1920x1080 60Hz@
VGA DVI
Warning: .
may result in permanent damage to your monitor
Do not set the graphic card in your computer to exceed these maximum refresh rates Doing so
.
20
Page 23

English
Troubleshooting
1 NO Image on Screen.
a Check if the power button has been switched on) .
b Verify the brightness and contrast of the monitor is within the normal setting) .
c Check if the power indicator is flashing If so this indicates that the monitor is not receiving the input) .
signal.
d If the signal indicator is notebook or laptop make sure that the signal has been switched to screen) ,
mode.
2 Non focus Image.--
a Check if the image signal cable is inserted properly uprightposition)().
3 Flash Screen.
a The power is insufficient to connect the monitor or too weak) .
b To avoid magnetic field around the monitor do not place these devices close to it Such as speakers) ,,.
,fluorescence lightings AC transformer table fan and etc,,.
c By pressing the AUTO key the Auto Adjust Image function will automatically apply optimizes settings) ,
to the display.
4 Wrong or Unusual Colour.
a if red green blue or any of the colour disappears check to see if the signal cord is connected properly) ,, , .
If the plug is loosely connected it might cause bad connection.
b Try connecting to another PC for comparison) .
5 The Whole Screen Appear and H rolling Scan.-+--+-
a Make sure that the input signal frequency is within 60 75Hz) -.
6 How to Clean the Monitor.
a Make sure that the monitor power has been switched off) .
b Do not spray any liquid on the screen or the plastic panel directly) .
7 When Cleaning the Screen.
a Use clean soft no fur materials to clean the screen) ,.
b If it is still dirty do add a little of non ammonia liquid and non alcoholglass cleanser to clean the screen) ,- - .
8 When Cleaning the Plastic Panel.
a Use soft dry cloth)
b To add a little of non ammonia liquid and non alcohol of non abrasion cleanser to clean surface if it) ---
.is still unclean
21
Page 24

English
SPECIFICATIONS:
Dimension
Monitor type
Brightness
Color
Resolutions
Power requirement
Power Mains adapter
Power consumption
VGA
Input
connector
DVI D-
Audio Input
Environment
21 5."
LED
250cd/m
2
16.7M
1920x1080 60Hz
100-240V
@
50/60Hz
DC12V 3A
<
30W
VGA analog
DVI Digital
3.5mm stereo jack
Operation Temp: 0°-40°С
Humidity Less than
Storage Temp::
80%
-20° - 60°С
22
Page 25

Français
Précautions de sécurité et entretien
Lire attentivement ce manuel et le conserver pour une consultation ultérieure
1. Débrancher le moniteur avant de le nettoyer avec un chiffon légèrement humide.
2. Il est recommandé de nettoyer l'écran avec un chiffon sec, et seulement pendant que l'alimentation
est coupée.
3. Ne pas utiliser de l'alcool ou des liquides à base d'ammoniac.
4. Ce moniteur est conçu avec des fentes d'aération sur l'arrière du boîtier, veuillez ne pas les couvrir
ou les bloquer.
5. Eviter également de placer le moniteur près d'un radiateur électrique ou réchaud, y compris dans
une pièce encloisonnée sans aération.
6. Veuillez n'insérer aucune substance ni pulvériser du liquide dessus.
7. Veuillez ne pas positionner le moniteur sur une surface dangereuse, s'il tombe, il risque de s'abîmer
et de blesser l'utilisateur.
8. Débrancher le moniteur si l'on prévoit de ne pas l'utiliser pendant une période de temps prolongée.
9. Veuillez ne pas placer des articles lourds sur le moniteur ou sur le cordon électrique.
10. Veuillez ne pas ouvrir le panneau arrière du moniteur car le moniteur contient un courant à tension
élevée.
Contenu
* Uncordondesignal
* Uncâbled'alimentation
* Unadaptateur
* Unecartedegarantie
* Unmoded'emploi
* Uncâbleaudio
Caractéristiques :
* Couleursd'imagedehaute qualité 16.7M
* Réglaged'écranetd'image convivial -OSD avec unedispositionsimpleetune facilité de sélection
* Interfacesdecommandeconviviales pour un réglage facile
* FonctionAuto ; en absencederéglages,ils'auto-ajuste à des réglages optimisés
23
Page 26

Français
Configuration de base
a) Insérez le câble DVI ou VGA (cordon de signal) dans la carte graphique du PC (entrée de signal).
Nous conseillons d'utiliser l'interface numérique (DVI).
Connecteur DVI
b
) Le moniteur dispose d'une large gamme de tensions électriques ; il peut être utilisé sur une
alimentation électrique CA100-240V 50/60Hz.
~
Connecteur VGA
c) Connectez le câble d'alimentation à la prise électrique du moniteur et à la source d'alimentation
de la pièce.
d) Allumer l'alimentation électrique.
e) Pour allumer le moniteur, appuyez sur l'interrupteur d'alimentation.
Configuration d'image à l'écran
Le côté droit du moniteur comporte sept touches destinées à régler les paramètres du moniteur au
moyen de l'affichage sur écran.
Connecteur CC
Connecteur Audio
AUTO
VOL+
VOL-
UP
DOWN
MENU
Quitter le menu principal, ou en absence de menu auto-régler l'image.
Augmenter le niveau sonore/Régler les options se déplacer vers le haut
ou augmenter le réglage
Diminuer le niveau sonore/Régler les options se déplacer vers le bas ou
diminuer le réglage
Régler les options-se déplacer vers le haut ou augmenter le réglage/En
absence de menu, sélection de la source VGA/DVI
Régler les options- se déplacer vers le bas ou diminuer le réglage/ En
absence de menu, sélectionner 4:3 ou 16:9
Affiche les menus de sélections principales
Mise en Marche/Arrêt
Paramètres de réglage
1. Appuyez sur la touche pour accéder au menu de configuration principal à l'écran.MENU
2. Appuyez sur la touche pour changer de sélection sur l'écran de configuration.UP DOWN/
3. Réappuyez sur la touche pour accéder à la sélection de configuration.MENU
a. Appuyez sur pour sauter entre les options de menu. Appuyez sur la touche MENU/UP DOWN
Pour accéder à la fonction.
b. Appuyez sur / pour effectuer le réglage.VOL+ VOL-
c. Appuyez sur pour revenir au menu principal.AUTO
24
AUTO
VOL+
VOL-
UP
DOWN
MENU
1
2
3
4
5
6
7
Page 27

Fonctions :
Appuyez sur la touche . Le menu principal OSD s'affiche ensuite.MENU
Français
REGLAGES INSTAL
LATION-
Menu principal
IMAGE
COULEUR
IMAGE
Appuyez sur la touche , le menu principal s'affichera comme suit :
Appuyez sur la touche pour sélectionner dans le menu principal, puis appuyez
sur la touche pour accéder.
IMAGE
MENU
LUMINOSITÉ
CONTRASTE
GAMMA
LUMINOSITÉ
Appuyez sur la touche pour sélectionner , puis appuyez sur la toucheLUMINOSITÉ MENU
pour confirmer le choix et appuyez sur la touche / pour régler.
MENU
UP DOWN/
/UP DOWN
IMAGE
50
50
0
VOL+ VOL-
CONTRASTE
Appuyez sur la touche pour sélectionner , puis appuyez sur la toucheCONTRASTE MENU
pour confirmer le choix et appuyez sur la touche / pour régler.
/UP DOWN
VOL+ VOL-
GAMMA
Appuyez sur la touche pour sélectionner , puis appuyez sur la touche pourGAMMA MENU
confirmer le choix et appuyez sur la touche / pour régler.
/UP DOWN
VOL+ VOL-
25
Page 28

Français
COULEUR
Appuyez sur la touche pour sélectionner dans le menu principal, puis appuyez
sur la touche pour accéder.
COULEUR
MENU
PR
ROUGE
VERT
BLEU
ÉDÉF
S
UP DOWN/
RGB
5400K
6500K 9300K
50
50
50
COULEUR
PRÉDÉF
Appuyez sur la touche pour sélectionner , puis appuyez sur la touche
Pour confirmer le choix. Et appuyez sur la touche / pour régler .
/UP DOWN PRÉDÉF MENU
VOL+ VOL-
ROUGE
Appuyez sur la touche pour sélectionner , puis appuyez sur la touche pourROUGE MENU
confirmer le choix et appuyez sur la touche / pour régler la valeur des trois couleurs
primaires du rouge.
/UP DOWN
VOL+ VOL-
VERT
Appuyez sur la touche pour sélectionner , puis appuyez sur la touche pourVERT MENU
confirmer le choix et appuyez sur la touche / pour régler la valeur des trois couleurs
primaires du vert.
/UP DOWN
VOL+ VOL-
BLEU
Appuyez sur la touche pour sélectionner , puis appuyez sur pour confirmerBLEU MENU
le choix et appuyez sur la touche / pour régler la valeur des trois couleurs primaires du bleu.
/UP DOWN
VOL+ VOL-
REGLAGES
Appuyez sur la touche pour sélectionner dans le menu principal, puis
appuyez sur la touche pour accéder.
REGLAGES
HORIZONTAL
VERTICAL
UP DOWN REGLAGES/
MENU
50
50
26
Page 29

Français
Position H.
Appuyez sur la touche pour sélectionner , puis appuyez sur la touche
pour confirmer le choix et appuyez sur la touche pour déplacer l'image vers la droite. Appuyez
sur la touche pour déplacer l'image vers la gauche.
VOL-
UP DOWN/
Position V.
Appuyez sur la touche pour sélectionner , puis appuyez sur la touche
pour confirmer le choix et appuyez sur la touche pour déplacer l'image vers le haut. Réappuyez
sur la touche pour déplacer l'image vers le bas.
REGLAGES
VOL-
UP DOWN POSITION V. MENU
/
POSITION H. MENU
VOL+
VOL+
HORLOGE
PHASE
NETTET
É
50
54
5
HORLOGE
Appuyez sur la touche pour sélectionner , puis appuyez sur la toucheHORLOGE MENU
pour confirmer le choix et appuyez sur la touche / - pour régler.
/UP DOWN
VOL+ VOL
PHASE
Appuyez sur la touche pour sélectionner , puis appuyez sur la touche pourPHASE MENU
confirmer le choix et appuyez sur la touche / pour régler.
/UP DOWN
VOL+ VOL-
NETTETÉ
Appuyezsurla touche poursélectionner ,puisappuyez sur la toucheNETTETE MENU
confirmerlechoix et appuyez sur la touche / pour choisir entre 1et5.
/UP DOWN
VOL+ VOL-
pour
INSTALLATION
Appuyez sur la touche pour sélectionner dans le menu principal,
puis appuyez sur la touche pour accéder.
INSTALLATION
LANGUE
POSITION OSD
HORIZONTAL
VERTICAL
UP DOWN INSTALLATION/
MENU
FRANÇAIS
50
50
ANALOGIQUE
1920x1080 60Hz
27
Page 30

Français
LANGUE
Appuyez sur la touche pour sélectionner , puis appuyez sur la toucheLANGUE MENU
pour confirmer le choix et appuyez sur la touche / pour régler.
/UP DOWN
VOL+ VOL-
HORIZONTAL
Appuyez sur la touche pour sélectionner , puis appuyez sur la toucheHORIZONTAL
MENU VOL+
pour confirmer le choix et appuyez sur la touche pour déplacer l'OSD vers la droite.
Appuyez sur la touche pour déplacer l'OSD vers la gauche.
/UP DOWN
VOL-
VERTICAL
Appuyez sur la touche pour sélectionner , puis appuyez sur la toucheVERTICAL MENU
pour confirmer le choix et appuyez sur la touche pour déplacer l'OSD vers le haut. Appuyez
sur la touche pour déplacer l'OSD vers le bas.
INSTALLATION
VOL-
BALANCE DES BLANCS
DCR
43:
LARGE
INPUT SELECT
RÉINITIAL ISATION
/UP DOWN
ANALOGIQUE
1920x1080 60Hz
VOL+
NON
OFF
LARGE
VGA
NON
BALANCE DES BLANCS
Confirmez votre choix et appuyez sur la touche / pour choisir OUI ou NON.VOL+ VOL-
DCR (Rapport de contraste dynamique)
Appuyez sur la touche pour sélectionner , puis appuyez sur la touche pour
confirmer le choix et appuyez sur la touche / pour choisir Activé ou Désactivé.
UP DOWN DCR MENU
/
VOL+ VOL-
4:3 LARGE
pour confirmer le choix et appuyez sur la touche / pour choisir 4:3 LARGE.
/UP DOWNAppuyez sur la touche pour sélectionner , puis appuyez sur la touche
4:3 LARGE MENU
VOL+ VOL-
INPUT SELECT
Appuyez sur la touche pour sélectionner , puis appuyez sur laUP DOWN INPUT SELECT
MENU VOL+ VOL-
pour confirmer le choix et appuyez sur la touche / pour choisir VGA ou DVI.
/ Touche
RÉINITIAL ISATION
Appuyez sur la touche pour sélectionner , puis appuyez surUP DOWN RÉINITIAL ISATION
MENU VOL+ VOL-
pour confirmer le choix et appuyez sur la touche / pour choisir OUI ouNON. Lorsque
la valeur OUI est sélectionnée, le système rétablira le mode usine.
/ laTouche
28
Page 31

Autre fonction
OSD VERROUILLAGE
Appuyez longuement sur la touche pendant 5 secondes, OSD VERROUILLE.【】MENU
OSD DEVERROUILLAGE
Puis appuyez longuement sur la touche pendant 5 secondes, OSD DEVERROUILLE.【】MENU
Installation du moniteur LED
Français
Vous pouvez retrouver la vis dans un petit sachet du sac joint.
1. Placez le moniteur face orientée vers le bas sur un chiffon doux ou un coussin et sur une table.
2. Fixez le socle au moniteur.
29
Page 32

Français
Fréquence de rafraîchissement et résolution supportées
Standard
VGA
VGA
MAC
VESA
VESA
VESA
VESA
VESA
VESA
VESA
VESA
VESA
VESA
VESA
VESA
VESA
VESA
VESA
VESA
VESA
Résolutions
720x400 70Hz@
640x480 60Hz@
640x480 67Hz@
640x480 72Hz@
640x480 75Hz@
800x600 56Hz@
800x600 60Hz@
800x600 72Hz@
800x600 75Hz@
1024x768 60Hz@
1024x768 70Hz@
1024x768 75Hz@
1280x960 60Hz@
1152x864 60Hz@
1280x1024 60Hz@
1280x1024 75Hz@
1440x900 60Hz@
1600x1200 60Hz@
1680x1050 60Hz@
1920x1080 60Hz@
VGA DVI
Avertissement : Ne pas régler la carte graphique de votre ordinateur en dépassant ces taux de
rafraîchissement maximaux. Ce faisant, vous pouvez endommager irrémédiablement le moniteur.
30
Page 33

Français
Dépannage
1.AUCUNE image à l'écran
a) Vérifiez si le bouton Marche/Arrêt est allumé.
b) Vérifiez que la luminosité et le contraste du moniteur est dans les limites du réglage normal.
c) Vérifiez si le voyant d'alimentation clignote. Si c'est le cas, ceci indique que le moniteur ne reçoit
pas de signal d'entrée.
d) Si l'indicateur de signal est un bloc-notes ou un ordinateur portable, vérifiez que le signal est
passé au mode écran.
2.Image floue
a) Vérifiez si le câble de signal d'image est inséré comme il faut (position verticale).
3.L'écran clignote
a) Le courant est insuffisant pour connecter le moniteur ou bien trop faible.
b) Pour éviter la présence de champ magnétique autour du moniteur, ne placez pas trop près des
appareils tels que les haut-parleurs, les éclairages fluorescents, les transformateurs CA, les
ventilateurs de table, etc.
c) En appuyant sur la touche AUTO, la fonction Ajustement automatique d'image appliquera
automatiquement des réglages optimisés à l'affichage.
4.Couleur erronée ou inhabituelle
a) Si le rouge, le vert, le bleu ou l'une des couleurs disparaît, vérifiez que le cordon de signal est
branché correctement. Si la prise est branchée de manière relâchée, ceci pourrait causer une
mauvaise connexion.
b) Essayez de connecter à un autre PC pour comparer.
5.L'image défile horizontalement à l'écran
a) Vérifiez que la fréquence de signal d'entrée est dans les limites de 60-75Hz.
6.Comment nettoyer le moniteur
a) Vérifiez que le moniteur est éteint.
b) Ne vaporisez pas du liquide directement sur l'écran ou sur le panneau en plastique.
7.Lors du nettoyage de l'écran
a) Utilisez un tissu propre, doux et non pelucheux pour nettoyer l'écran.
b) En cas de saletés tenaces, ajoutez un peu de liquide non-ammoniacal et de nettoyant à vitres
sans alcool pour nettoyer l'écran.
8.Lors du nettoyage du panneau en plastique
a) Utilisez un chiffon sec et doux.
b) Ajoutez un peu de liquide non-ammoniacal et de nettoyant non-abrasif sans teneur en alcool pour
nettoyer la surface si c'est toujours sale.
31
Page 34

Français
SPECIFICATIONS:
Dimension
Type de moniteur
Luminosité
Couleur
Résolution
Puissance requise
Adaptateur secteur
Consommation d'énergie
VGA
Connecteur
d'entrée
DVI D-
Entrée audio
Environnement
21 5."
LED
250cd/m
2
16.7M
1920x1080 60Hz
100-240V
@
50/60Hz
DC12V 3A
<
30W
VGA analogique
DVInumérique
3.5mm jack stéréo
Temp. de fonctionnement : 0°- 40°С
Humidité : Moins de 80%
Temp.destockage:
-20° - 60°С
32
Page 35

Español
Precauciones de seguridad y mantenimiento
Lea atentamente este manual y consérvelo como referencia en el futuro
1. Desconecte el monitor antes de limpiarlo con una gamuza ligeramente humedecida.
2. Se recomienda limpiar la pantalla con una gamuza seca, solamente si se ha apagado la alimentación.
3. No use líquidos con base de alcohol o amoníaco.
4. Este monitor está diseñado con ranuras de ventilación en la parte posterior del chasis, no las cubra
ni obture.
5. Evite colocar el monitor cerca de calefactores eléctricos o calefacciones, incluyendo una sala
cerrada sin ventilación.
6. No introduzca ningún material ni rocíe ningún líquido sobre el monitor.
7. No coloque el monitor sobre lugares poco seguros; si cae puede dañarse y provocar heridas al
usuario.
8. Desconecte el monitor si no va a usarse durante un periodo prolongado de tiempo.
9. No coloque objetos pesados sobre el monitor ni el cable eléctrico.
10. No abra el panel trasero del monitor, el interior del monitor contiene corriente de alta tensión.
Contenido
* Unmonitor
* Uncabledeseñal
* Uncabledealimentación
* Unadaptador
* Unatarjetadegarantía
* Unmanualdeinstrucciones del usuario
* Uncableaudio
Características:
* Imagendealtacalidad en 16,7 M decolores
* Configuracióndepantallainteligente OSDconestructura sencilla y fácil selección
* Interfazdecontrolinteligente para una sencilla configuración
* Funciónautomática;cuandono se establece ninguna configuración,seajustaautomáticamentea
laconfiguraciónóptima
33
Page 36

Español
Configuración básica
a) Introduzca el cable DVI o VGA (cable de señal) en la tarjeta gráfica del PC (entrada de señal.
Recomendamos usar la interfaz digital (DVI).
Conector DVI
Conector VGA
b) El monitor tiene un rango amplio de tensiones de alimentación, puede usarse con una alimentación
de A 100-240V ~ 50/60 Hz.
C
c) Conecte el cable de alimentación a la toma de energía del monitor y a la fuente de alimentación
la sala.
d) Active la fuente de alimentación.
e) Para encender el monitor, pulse la tecla de control de encendido.
Configuración de imagen de pantalla
El lado derecho del monitor dispone de siete teclas para ajustar su configuración mediante la
información en pantalla.
Conector CC
Conector de audio
de
AUTO
VOL+
VOL-
UP
DOWN
MENU
Salir al menú principal o, sin menús, ajustar automáticamente la imagen.
Aumentar el volumen de sonido/Ajustar las opciones mover arriba o nivel
superior
Reducir el volumen de sonido/Ajustar las opciones mover abajo o nivel
inferior
Ajustar las opciones-mover arriba o nivel superior/Cuando no haya menús
selecciona fuente VGA/DVI
Ajustar las opciones-mover abajo o nivel inferior/Cuando no haya menús
selección de 4:3 o 16:9
Muestra los menús de selección principales
Encendido/apagado
Configuración de ajustes
1. Pulse la tecla para acceder al menú principal de configuración en pantalla.MENU
2. Pulse la tecla / para cambiar la selección en la pantalla de configuración.UP DOWN
3. Pulse de nuevo la tecla para acceder a la selección de configuración.MENU
a. Pulse para cambiar entre las opciones del menú.UP DOWN/
b. Pulse / para ajustar la configuración.VOL+ VOL-
c. Pulse para volver al menú principal.AUTO
acceder a la función.Pulse la tecla paraMENU
34
AUTO
VOL+
VOL-
UP
DOWN
MENU
1
2
3
4
5
6
7
Page 37

Funciones:
Pulse el botón . Se mostrará el menú principal.MENU OSD
Español
AJUSTES SETUP
Menú principal
CUADRO
COLOR
CUADRO
Pulse el botón y aparecerá el menú principal.
Pulse / para seleccionar en el menú principal, y pulse para acceder.
CUADRO
BRILLO
Pulse el botón para seleccionar , y pulse el botón para confirmar laBRILLO MENUUP DOWN
selección. Pulse / para ajustarla.
MENU
UP DOWN CUADRO MENU
BRILLO
CONTRASTE
GAMMA
50
50
0
/
VOL+ VOL-
CONTRASTE
UP DOWN MENU
Pulse el botón para seleccionar , y pulse el botón para confirmar laCONTRASTE
selección. Pulse / para ajustarla.
/
VOL+ VOL-
GAMMA
UP DOWN MENU
Pulse el botón para seleccionar , y pulse el botón para confirmar laGAMMA
selección. Pulse / para ajustarla.
/
VOL+ VOL-
35
Page 38

Español
COLOR
Pulse / para seleccionar en el menú principal, y pulse para acceder.UP DOWN COLOR MENU
COLOR
PREDEF
5400K
6500K 9300K
S
RGB
ROJO
VERDE
AZUL
PREDEF
Pulse / para seleccionar y pulse para confirmar la selección.UP DOWN PREDEF MENU
Pulse / para ajustar los valores.VOL+ VOL-
ROJO
Pulse el botón para seleccionar , y pulse el botón para confirmar la selección.ROJOUP DOWN MENU
VOL+ VOL-
Pulse / para ajustar el valor del color primario rojo.
/
VERDE
Pulse el botón para seleccionar , y pulse el botón para confirmar la selección.VERDEUP DOWN MENU
VOL+ VOL-
Pulse / para ajustar el valor del color primario verde.
/
50
50
50
AZUL
Pulse el botón para seleccionar , y pulse el botón para confirmar la selección.AZULUP DOWN MENU
VOL+ VOL-
Pulse / para ajustar el valor del color primario azul.
/
AJUSTES
Pulse / para seleccionar en el menú principal, y pulse para acceder.UP DOWN AJUSTES MENU
AJUSTES
HORIZONTAL
VERTICAL
50
50
36
Page 39

Español
Posición H
Pulse el botón / para seleccionar Posición y pulse para confirmar la selección.UP DOWN H MENU
Pulse para mover la imagen hacia la derecha. Pulse para mover la imagen hacia la izquierda.VOL + VOL-
Posición V
Pulse el botón para seleccionar Posición y pulse para confirmar la selección.VUP DOWN MENU
VOL + VOL-
Pulse para mover la imagen hacia arriba. Pulse para mover la imagen hacia abajo.
AJUSTES
/
RELOJ
FASE
NITIDEZ
50
54
5
RELOJ
Pulse el botón / para seleccionar , y pulse el botón para confirmar la selección.UP DOWN RELOJ MENU
Pulse / para ajustarlo.VOL+ VOL-
FASE
Pulse el botón para seleccionar , y pulse el botón para confirmar la selección.FASEUP DOWN MENU
VOL+ VOL-
Pulse / para ajustarla.
/
NITIDEZ
UP DOWN NITIDEZ MENU
Pulse el botón para seleccionar , y pulse el botón para confirmar la
VOL+ VOL-
Pulse / para elegir entre 1 y 5.
/ selección.
SETUP
Pulse / para seleccionar en el menú principal, y pulse para acceder.UP DOWN SETUP MENU
SETUP
IDIOMA
POSICI NÓ
HORIZONTAL
VERTICAL
OSD
ESPAÑOL
50
50
ANAL G
ÓICO
1920x1080 60Hz
37
Page 40

Español
IDIOMA
Pulse el botón / para seleccionar , y pulse el botón para confirmar la selección.UP DOWN IDIOMA MENU
Pulse / para ajustarla.VOL+ VOL-
HORIZONTAL
Pulse el botón para seleccionar y pulse para confirmar la selección.HORIZONTALUP DOWN MENU
VOL+ VOL-
Pulse para mover el OSD hacia la derecha. Pulse para mover el OSD hacia la izquierda.
VERTICAL
Pulse el botón para seleccionar y pulse para confirmar la selección.VERTICALUP DOWN MENU
VOL+ VOL-
Pulse para mover el OSD hacia arriba. Pulse para mover el OSD hacia abajo.
SETUP
/
/
BALANCE DE BLANCOS
DCR
43:
EN AMPLIO
INPUT SELECT
RESTABLECER
ANAL G
ÓICO
1920x1080 60Hz
NO
OFF
AMPLIO
VGA
NO
BALANCE DE BLANCOS
Confirme la selección y pulse / para elegir SÍ o NO.VOL+ VOL-
DCR
Pulse el botón / para seleccionar , y pulse el botón para confirmar la selección.UP DOWN DCR MENU
Pulse / para elegir ACTIVADO o DESACTIVADO.VOL+ VOL-
4:3ENAMPLIO
Pulse el botón para seleccionar , y pulse el botón para confirmarMENUUP DOWN 4:3 EN AMPLIO
la selección. Pulse / para elegir 4: 3 EN AMPLIO.
/
VOL+ VOL-
INPUT SELECT
Pulse el botón para seleccionar , y pulse el botónUP DOWN INPUT SELECT MENU
la selección. Pulse / para elegir VGA o DVI.
/ para confirmar
VOL+ VOL-
RESTABLECER
UP DOWN RESTABLECER MENU
Pulse el botón para elegir y pulse el botón para
selección. Pulse el botón / para elegir SÍ o NO. Cuando elija SÍ, el sistema Volverá al
modo por defecto de fábrica.
/ confirmar La
VOL+ VOL-
38
Page 41

Otras funciones
OSD BLOQUEADO
Presione y mantenga la tecla , BLOQUEO DE OSD.【】MENU
OSD DESBLOQUEADO
A continuación, presione y mantenga la tecla , OSD DESBLOQUEADO.【】MENU
Instalación del monitor LED
Español
Puede encontrar el tornillo en la bolsa pequeña incluida.
1 Coloque el monitor boca abajo sobre una tela blanda o cojín, sobre una mesa.
.
2. Instale la base del monitor.
39
Page 42

Español
Soporte de modos de reloj
Estándar
VGA
VGA
MAC
VESA
VESA
VESA
VESA
VESA
VESA
VESA
VESA
VESA
VESA
VESA
VESA
VESA
VESA
VESA
VESA
VESA
Resoluciones
720x400 70Hz@
640x480 60Hz@
640x480 67Hz@
640x480 72Hz@
640x480 75Hz@
800x600 56Hz@
800x600 60Hz@
800x600 72Hz@
800x600 75Hz@
1024x768 60Hz@
1024x768 70Hz@
1024x768 75Hz@
1280x960 60Hz@
1152x864 60Hz@
1280x1024 60Hz@
1280x1024 75Hz@
1440x900 60Hz@
1600x1200 60Hz@
1680x1050 60Hz@
1920x1080 60Hz@
VGA DVI
Atención: No configure la tarjeta gráfica del ordenador de forma que supere estas tasas de refresco
máximas. Hacerlo puede dañar permanentemente el monitor.
40
Page 43

Español
Solución de problemas
1. Sin imagen en pantalla
a) Compruebe que el botón de encendido esté activado.
b) Compruebe que el brillo y contraste del monitor sean normales.
c) Compruebe que el indicador de alimentación esté parpadeando. Si es el caso, indica que el monitor
no recibe la señal de entrada.
d) Si el indicador de señal es de un portátil, asegúrese de que la señal se haya cambiado a modo
pantalla.
2. Imagen desenfocada
a) Compruebe que el cable de señal de imagen esté correctamente introducido (posición derecha).
3. Parpadeo de pantalla
a) La potencia es insuficiente para conectar el monitor o es demasiado débil.
b) Para evitar que haya campos magnéticos alrededor del monitor, no coloque los siguientes
dispositivos cerca de éste: Altavoces, luces fluorescentes, transformadores CA, ventiladores de
sobremesa, etc.
c) Pulsando la tecla AUTO, la función de ajuste automático de imagen aplicará automáticamente la
configuración óptima a la pantalla.
4. Color incorrecto o poco habitual
a) si desaparece el rojo, verde, azul o cualquier color, compruebe que el cable de señal esté
correctamente conectado. Si la toma está suelta puede provocar una mala conexión.
b) Pruebe a conectar con otro PC para comparar.
5. La pantalla aparece con saltos horizontales
a) Asegúrese de que la frecuencia de la señal de entrada esté entre 60-75 Hz.
6. Limpieza del monitor
a) Asegúrese de que el monitor se haya apagado.
b) No rocíe ningún líquido en la pantalla ni el panel de plástico directamente.
7. Limpieza de la pantalla
a) Use un material limpio, suave y sin pelos para limpiar la pantalla.
b) Si sigue sucia, añada un poco de limpia cristales sin amoníaco ni alcohol para limpiar la pantalla.
8. Limpieza del panel de plástico
a) Use una gamuza suave seca
b) Añada un poco de limpiador sin amoníaco, alcohol ni abrasivo para limpiar la superficie si sigue
sucia.
41
Page 44

Español
ESPECIFICACIONES:
Dimensiones
Tipo de monitor
Brillo
Color
Resoluciones
Requisitos de alimentación
Adaptador de alimentación
Consumo
VGA
Conector de
entrada
DVI D-
Entrada audio
Entorno
21 5."
LED
250cd/m
2
16.7M
1920x1080 60Hz
100-240V
@
50/60Hz
DC12V 3A
<
30W
VGA analógico
DVI Digital
Jack estéreo de 3.5 mm
Temperatura de funcionamiento:
Humedad: Inferior al 80%
Temperatura de almacenamiento:
0°- 40°С
-20° - 60°С
42
Page 45

Italiano
Sicurezza e Manutenzione
Leggere attentamente il presente manuale e conservarlo per consultazioni future
1. Scollegare il monitor prima di pulirlo con un panno leggermente umido.
2. È consigliabile pulire lo schermo con un panno asciutto, e solamente quando è spento.
3. Non utilizzare alcol o liquidi a base di ammoniaca.
4. Il presente monitor è progettato con fori di ventilazione presenti sulla parte posteriore del vano
elettrico, non coprirli o bloccarli.
5. Evitare inoltre di posizionare il monitor in prossimità di stufe elettriche o al riscaldamento, incluse
stanze chiuse senza ventilazione.
6. Non inserire alcuna materia e non spruzzare alcun liquido all'interno.
7. Non posizionare il monitor in luoghi non sicuri, in caso di caduta, potrebbe danneggiarsi e ferire
l'utente.
8. Scollegare il monitor in caso di non utilizzo per un lungo periodo di tempo.
9. Non posizionare elementi pesanti sul monitor o sul cavo elettrico.
10. Non aprire il pannello posteriore del monitor in quanto contiene corrente elettrica ad alto voltaggio.
Contenuti della confezione
* Unmonitor
* Uncavodisegnale
* Uncavodialimentazione
* Unadattatore
* Unaschedadigaranzia
* Unmanualed'istruzionipe l'utente
* Uncavoaudio
Caratteristiche:
* Immaginiadaltaqualità a 16.7M colori
* ImpostazioniOSDdelloschermo a immagine smart conlayouteselezionesemplice
* Interfaccedicontrollosmart per impostazioni semplici
* FunzioneAutomatica; in caso nonsianostateselezionateimpostazioni particolari,
ilmonitorregolerà automaticamente le impostazioni ottimali
43
Page 46

Italiano
Configurazione di base
a) Inserire il cavo DVI o VGA (cavo di segnale) nella scheda del cavo grafico del PC (ingresso di
Si consiglia di utilizzare l'interfaccia grafica (DVI).segnale).
Connettore DVI
Connettore VGA
Connettore DC
Connettore Audio
b) Il monitor dispone di un ampio intervallo di voltaggio di alimentazione; può essere utilizzato con
CA100-240V 50/60Hz.
~
c) Connettere il cavo di alimentazione alla presa di alimentazione del monitor e collegare l'altra
estremità alla presa a muro della stanza.
d) Accendere la fonte di alimentazione.
e) Per accendere il monitor, premere il tasto di controllo dell'alimentazione.
Configurazione delle immagini dello schermo
Il lato destro del monitor dispone di sette tasti per regolare le impostazioni del monitor con l'aiuto
della Visualizzazione a Schermo.
AUTO
VOL+
VOL-
UP
DOWN
MENU
Esce dal menu principale, e quando non ci sono più menu aperti, regola
l'immagine automaticamente.
Aumenta il livello audio/Regola le opzioni - si sposta in su o ad un livello
superiore
Diminuisce il livello audio/Regola le opzioni - si sposta in giù o ad un livello
inferiore
Regola le opzioni-sposta in su o ad un livello superiore/in caso non ci
siano menu aperti, seleziona la fonte VGA/DVI
Regola le opzioni-sposta in giù o ad un livello inferiore/In caso non vi siano
menu aperti seleziona il formato 4:3 o 16:9
Mostra il menu di scelta principale
Accende o Spegne
AUTO
VOL+
VOL-
UP
DOWN
MENU
1
2
3
4
5
6
7
Impostazioni di Regolazione
1. Premere il tasto per accedere alla schermata del menu Impostazioni.MENU
2. Premere i tasti / per passare da una selezione all'altra sulla schermata Impostazioni.UP DOWN
3. Premere nuovamente il tasto per accedere alla selezione impostazioni.MENU
a. Premere i tasti / per saltare da un'opzione all'altra. Premere il tasto perUP DOWN MENU
accedere alle funzioni.
b. Premere / per regolare le impostazioni.VOL+ VOL-
c. Premere per ritornare al menu principale.AUTO
44
Page 47

Funzioni:
Premere il tasto . apparirà quindi il menu principale .MENU OSD
Italiano
RICERCA CONTROLLO
Menu Principale
IMMAGINE
COLORE
IMMAGINE
Premere il tasto , apparirà quindi il menu principale secondo quanto segue:
Premere i tasti / per selezionare dal menu principale, poi premere nuovamente
il tasto per accedere.
MENU
IMMAGINE
LUMINOSIT
Premere i tasti / per selezionare , poi premere nuovamente il tasto per
confermare la scelta e premere i tasti / per procedere con la regolazione.
MENU
UP DOWN IMMAGINE
LUMINOSITÀ
CONTRASTO
GAMMA
50
50
0
À
UP DOWN LUMINOSITÀ MENU
VOL+ VOL-
CONTRASTO
Premere i tasti / per selezionare , poi premere nuovamente il tasto per
confermare la scelta e premere i tasti per procedere con la regolazione.
UP DOWN CONTRASTO MENU
VOL+ VOL-
/
GAMMA
Premere i tasti / per selezionare , poi premere nuovamente il tasto per
confermare la scelta e premere i tasti per procedere con la regolazione.
UP DOWN GAMMA MENU
VOL+ VOL-
/
45
Page 48

Italiano
COLORE
Premere i tasti / per selezionare dal menu principale, poi premere nuovamente il
tasto per accedere.
MENU
COLORE
UP DOWN COLORE
PREIMP
5400K
6500K 9300K
S
RGB
ROSSO
VERDE
BLU
50
50
50
PREIMP
il tasto per
Premere i tasti / per selezionare , poi premere nuovamenteUP DOWN PREIMP
confermare la scelta. Premere i tasti / per procedere con la regolazione.
VOL+ VOL-
MENU
ROSSO
Premere i tasti per selezionare , poi premere nuovamente il tasto perROSSO MENUUP DOWN
confermare la scelta e premere i tasti / per procedere con la regolazione del valore dei tre
colori primari di rosso.
/
VOL+ VOL-
VERDE
Premere i tasti per selezionare , poi premere nuovamente il tasto perVERDE MENUUP DOWN
confermare la scelta e premere i tasti / per procedere con la regolazione del valore dei tre
colori primari di verde.
/
VOL+ VOL-
BLU
Premere i tasti per selezionare , poi premere nuovamente il tasto per confermareBLU MENUUP DOWN
la scelta e premere i tasti / per procedere con la regolazione del valore dei tre colori primari
di blu.
/
VOL+ VOL-
RICERCA
Premere i tasti / per selezionare dal menu principale, poi premere nuovamente
il tasto per accedere.
RICERCA
UP DOWN RICERCA
MENU
ORIZZONTALE
VERTICALE
50
50
46
Page 49

Italiano
Posizione Orizzontale
Premere i tasti / per selezionare , poi premere nuovamente ilUP DOWN POSIZIONE ORIZZONTALE
tasto per confermare la scelta e premere i tasti per muovere l'immagine verso laMENU VOL+
migrazione a destra. Premere il tasto per muovere l'immagine verso la migrazione a sinistra.VOL-
Posizione Verticale
Premere i tasti per selezionare , poi premere nuovamente il tastoPOSIZIONE VERTICALEUP DOWN/
MENU VOL+per confermare la scelta e premere i tasti per muovere l'immagine verso la migrazione
in alto. Premere il tasto per muovere l'immagine verso la migrazione in basso.VOL-
RICERCA
OROLOGIO
FASE
NITIDEZZA
50
54
5
OROLOGIO
Premere i tasti / per selezionare , poi premere nuovamente il tasto per
confermare la scelta e premere i tasti / per procedere con la regolazione.
UP DOWN OROLOGIO MENU
VOL+ VOL-
FASE
Premere i tasti per selezionare , poi premere nuovamente il tasto per
confermare la scelta e premere i tasti per procedere con la regolazione.
UP DOWN
/
FASE MENU
VOL+ VOL-
/
NITIDEZZA
Premere i tasti per selezionare , poi premere nuovamente il tasto per
confermare la scelta e premere i tasti per scegliere tra1e5.
UP DOWN
/
NITIDEZZA MENU
VOL+ VOL-
/
CONTROLLO
Premere i tasti / per selezionare dal menu principale, poi premere
nuovamente il tasto per accedere.
CONTROLLO
UP DOWN CONTROLLO
MENU
LINGUA ITALIANO
POSIZIONE OSD
ORIZZONTALE
VERTICALE
50
50
ANALOGICA
1920x1080 60Hz
47
Page 50

Italiano
LINGUA
Premere i tasti / per selezionare , poi premere nuovamente il tasto perUP DOWN LINGUA MENU
confermare la scelta e premere i tasti / - per procedere con la regolazione.VOL+ VOL
ORIZZONTALE
Premere i tasti per selezionare , poi premere nuovamente il tastoORIZZONTALE MENUUP DOWN
per confermare la scelta e premere i tasti per muovere l'OSD verso la migrazione a destra.
Premere il tasto per muovere l'OSD verso la migrazione a sinistra.
VERTICALE
Premere i tasti per selezionare , poi premere nuovamente il tastoVERTICALE MENUUP DOWN
per confermare la scelta e premere i tasti per muovere l'OSD verso la migrazione in alto.
Premere il tasto - per muovere l'OSD verso la migrazione in basso.
CONTROLLO
/
VOL-
/
VOL
BIL DEL BIANCO
.
DCR
4 3 WIDE:
IN
INPUT SELECT
FABBRICA RESET
ANALOGICA
1920x1080 60Hz
VOL+
VOL+
NO
OFF
WIDE
VGA
NO
BIL DEL BIANCO.
Scelta di conferma e premere i tasti / per scegliere SI o NO.VOL+ VOL-
DCR
Premere i tasti / per selezionare , poi premere nuovamente il tasto perUP DOWN DCR MENU
confermare la scelta e premere i tasti / per scegliere ON o OFF.VOL+ VOL-
4:3INWIDE
Premere i tasti / per selezionare , poi premere nuovamente il tasto perUP DOWN MENU4:3IN WIDE
VOL+ VOL-confermare la scelta e premere i tasti / per scegliere 4:3oWIDE.
INPUT SELECT
Premere i tasti / per selezionare , poi premere nuovamente il tastoUP DOWN
INPUT SELECT MENU
VOL+ VOL-per confermare la scelta e premere i tasti / per scegliere VGA o DVI.
FABBRICARESET
Premere i tasti / per selezionare , poiUP DOWN
MENU VOL+ VOL-
per confermare la scelta e premere i tasti / per scegliere SI o NO. Se si seleziona
FABBRICARESET
SI, il sistema ritornerà alle impostazioni di fabbrica.
premere nuovamente il tasto
48
Page 51

Altre funzioni
OSD BLOCCATO
Premere a lungo il tasto , OSD BLOCCATO.【】MENU
OSD SBLOCCATO
Poi premere nuovamente a lungo il tasto , OSD SBLOCCATO.【】MENU
Installazione del Monitor LED
Italiano
Le viti si trovano nel sacchetto all'interno della confezione
1. Posizionare la parte davanti del monitor su di un panno morbido o su di un cuscino sul tavolo.
2. Installare il piedistallo sul monitor.
49
Page 52

Italiano
Modalità di Temporizzazione Supportate
Standard
VGA
VGA
MAC
VESA
VESA
VESA
VESA
VESA
VESA
VESA
VESA
VESA
VESA
VESA
VESA
VESA
VESA
VESA
VESA
VESA
Risoluzione
720x400 70Hz@
640x480 60Hz@
640x480 67Hz@
640x480 72Hz@
640x480 75Hz@
800x600 56Hz@
800x600 60Hz@
800x600 72Hz@
800x600 75Hz@
1024x768 60Hz@
1024x768 70Hz@
1024x768 75Hz@
1280x960 60Hz@
1152x864 60Hz@
1280x1024 60Hz@
1280x1024 75Hz@
1440x900 60Hz@
1600x1200 60Hz@
1680x1050 60Hz@
1920x1080 60Hz@
VGA DVI
Attenzione: Non impostare la scheda grafica del computer con frequenze di aggiornamento superiori
a quelle qui elencate. Ciò potrebbe causare danni permanenti al monitor.
50
Page 53

Italiano
Risoluzione dei Problemi
1. Nessuna Immagine sullo Schermo
a) Controllare che l'interruttore di alimentazione sia acceso.
b) Verificare che la luminosità ed il contrasto del monitor siano entro le normali impostazioni.
c) Controllare che l'indicatore di alimentazione lampeggi. ciò indica che il monitor non sta ricevendo
il segnale in ingresso
d) Qualora l'indicatore di segnale sia un notebook o un PC portatile, assicurarsi che il segnale sia
stato commutato alla modalità schermo.
2. Immagine sfocata
a) Controllare che il cavo di segnale dell'immagine sia inserito correttamente (posizione verticale).
3.Schermo lampeggiante
a) L'alimentazione è insufficiente o troppo debole per connettere il monitor.
b) Per evitare campi magnetici vicino al monitor, non posizionare dispositive come quelli elencati qui
di seguito nelle immediate vicinanze. Come altoparlanti, luci fluorescenti, trasformatori CA, ventilatori
da tavolo, ecc.
c) Premendo il tasto AUTO, verrà applicata automaticamente la funzione di Regolazione Automatica
dell'Immagine per ottimizzare le impostazioni della visualizzazione.
4. Colori Errati o non Usuali
a) in caso il rosso, il verde, il blu o qualsiasi altro colore scompaia, controllare che il cavo di segnale
sia collegato correttamente. In caso la spina non sia collegata saldamente, potrebbe causare una
cattiva connessione.
b) Provare a connettere ad un altro PC per una comparazione.
5. Appare l'intera schermata-e+Scansione oscillante H
a) Assicurarsi che il segnale di frequenza in ingresso sia entro i 60-75Hz.
6. Modalità di Pulizia del Monitor
a) Assicurarsi che il monitor sia spento.
b) Non spruzzare alcun liquido direttamente sullo schermo o sul pannello di plastica.
7. Durante la Pulizia dello Schermo
a) Per pulire lo schermo, utilizzare un panno pulito e morbido senza peluria.
b) In caso lo schermo risultasse ancora sporco, aggiungere una piccolo quantità di liquido senza
ammoniaca o di detergente per vetri senza alcol.
8. Durante la Pulizia del Pannello di Plastica
a) Utilizzare un panno morbido ed asciutto
b) In caso lo schermo risultasse ancora sporco, aggiungere una piccolo quantità di liquido senza
ammoniaca o di detergente non abrasivo.
51
Page 54

Italiano
SPECIFICHE:
Dimensione
Tipologia di Monitor
Luminosità
Colore
Risoluzione
Requisiti di Alimentazione
Alimentatore di Rete
Consumo Energetico
VGA
Connettore
d'Ingresso
DVI D-
Ingresso Audio
Ambiente
21 5."
LED
250cd/m
2
16.7M
1920x1080 60Hz
100-240V
@
50/60Hz
DC12V 3A
<
30W
VGA analogica
DVI Digital
3.5mm stereo jack
Temp. di Funzionamento:
Umidità: Meno dell'80%
Temp. di Stoccaggio:
-20° - 60°С
0°- 40°С
52
Page 55

Меры безопасности и техническое обслуживание
Внимательно прочитайте данное руководство и сохраните его.
1. Очистку монитора производите влажной тканью, предварительноотключив шнур питания от
сети.
2. Протирать экран следует только сухой тканью и только при выключенном питании.
3. Не используйте спиртосодержащие и содержащие аммиак жидкости.
4. На задней панели монитора расположены вентиляционные отверстия. Не закрывайте и не
блокируйте данные отверстия.
5. Не устанавливайте монитор вблизи электрических нагревателей и других источников тепла,
а также в закрытых непроветриваемых помещениях.
6. Избегайте попадания на монитор какой-либо жидкости и других посторонних предметов.
7. Устанавливайте монитор только на устойчивой поверхности. В случае падения, монитор
может быть поврежден и может нанести повреждение пользователю.
8. Если монитор не используется длительное время, отключите шнур питания от сети.
9. Не помещайте тяжелые предметы на монитор или на электрический шнур.
10. Не открывайте заднюю панель монитора, так как монитор может находиться под высоким
напряжением.
Комплектация
* Монитор
* Сигнальныйкабель
* Шнурпитания
* Адаптер
* Гарантийныйталон
* Руководствопользователя
* Аудио-кабель
Характеристики:
* Высокое качествовоспроизведенияцветов–16.7млн цветов
* Режимотображения выполняемыхфункцийна экране с удобнымменю
* Удобныйинтерфейс
* Авто-режим;если дополнительныенастройкине установлены, оптимальныепараметры
будутподобраны автоматически.
53
Page 56

Базовая установка
a) Подсоедините DVI-кабель или VGA-кабель к графической карте компьютера
(сигнальный разъем). Мы рекомендуем использовать цифровой видеоинтерфейс (DVI).
Разъем DVI
Разъем VGA
Разъем DC
Звуковой разъем
b) Широкий диапазон напряжения. Монитор может работать при напряжении AC100-240V
50 60Hz
/.
c Подсоединитешнурпитаниякразъемупитаниямонитораикисточникупитания.
)
d) Включите источник питания.
e) Для включения монитора нажмите кнопку питания.
Настройка изображения
На правой стороне монитора расположены семь клавиш для управления настройками
монитора с помощью экранного меню.
AUTO
VOL+
VOL-
UP
DOWN
MENU
Выход из главного меню. Если меню не открыто, то автоматическая
настройка изображения.
Увеличениегромкости/ Выбор опции в меню - вверх
Уменьшение громкости/ Выбор опции в меню - вниз
Выбор опции в меню - вверх/ Если меню не открыто, то выбор
Выбор опции в меню - вниз/ Если меню не открыто, то выбор формата
изображения 4:3 или 16:9
Основное меню
Включение/ Выключение питания
VGA/DVIисточника
AUTO
VOL+
VOL-
UP
DOWN
MENU
Настройка параметров
1. Нажмите клавишу (МЕНЮ) в основном установочном меню на экране.MENU
2. Нажмите клавишу / (ВВЕРХ/ВНИЗ) для выбора опции в экранном установочном меню.UP DOWN
3. Повторно нажмите клавишу (МЕНЮ) для активизации выбора опции.MENU
a. Нажмите клавишу / (ВВЕРХ/ВНИЗ) для переключения между опциями меню.
Нажмите клавишу (МЕНЮ) для активизации выбора.
b. Нажмите / для настройки параметров.VOL+ VOL-
c. Нажмите для возврата в основное меню.AUTO
UP DOWN
MENU
~
1
2
3
4
5
6
7
54
Page 57

Функции:
Нажмите клавишу . Появится основное меню OSD (отображение выполняемых функций
MENU
на экране).
Ч
ACTOTA УСТ КАAHOB
ФАЗА
Основное меню
KAPT H AИК
ЦВЕТ
KAPT H AИК
Нажмите клавишу , на экране отобразится основное меню:Нажмите клавишу /
для выбора меню в основном меню, затем нажмите клавишу для входа.
KAPT H AИК
MENU UP DOWN
MENUKAPT H AИК
ЯРКОСТЬ
КОНТРАСТ
ГАММА
50
50
0
ЯРКОСТЬ
Нажмите клавишу / для выбора меню , затем нажмите для
подтверждения выбора, нажмите / для настройки параметров.
UP DOWN Яркость MENU
VOL+ VOL-
КОНТРАСТ
Нажмите для выбора меню , затем нажмите клавишу для
UP DOWN/
подтверждения выбора, нажмите / для настройки параметров.
КОНТРАСТ MENU
VOL+ VOL-
ГАММА
Нажмите клавишу для выбора меню , затем нажмитеГАММАUP DOWN MENU
Подтверждения выбора, нажмите / для настройки параметров.
/ Клавишу для
VOL+ VOL-
55
Page 58

ЦВЕТ
Нажмите клавишу / для выбора меню в основном меню, затем нажмите клавишу
для входа.
MENU
UP DOWN ЦВЕТ
ЦВЕТ
ЛДУСТPE
5400K
6500K 9300K
S
RGB
КРАСНЫЙ
ЗЕЛЕНЫЙ
50
50
ГОЛУб ЙO
50
ЛДУСТPE
Нажмитеклавишу / для выбора меню ,затемнажмитеклавишуUP DOWN Л ДУСТ MENUPE
дляподтверждения выбора. Нажмите клавишу / длянастройки параметров.VOL+ VOL-
КРАСНЫЙ
Нажмитеклавишу / длявыбора меню , затемнажмитеклавишу
дляподтверждения выбора. Нажмите клавишу / длянастройки интенсивности красногоVOL+ VOL-
цвета.
UP DOWN РАСНЫЙ MENU
ЗЕЛЕНЫЙ
Нажмитеклавишу / длявыбора меню ,затемнажмите клавишуUP DOWN ЗЕЛЕНЫЙ MENU
дляподтверждения выбора. Нажмите клавишу / длянастройки интенсивности
VOL+ VOL-
зеленогоцвета.
ГОЛУб ЙO
Нажмитеклавишу / для выбора меню , затем нажмитеклавишуUP DOWN ГОЛУб Й MENUO
дляподтверждения выбора.Нажмите клавишу / для настройки интенсивностисинегоцвета.VOL+ VOL-
ЧФАЗАACTOTA/
Нажмите клавишу / для выбора меню в главном меню, затем нажмите
клавишу для входа.
MENU
Ч /ФАЗАACTOTA
UP DOWN
ГОРИЗОНТА ЛИ НЫЙb
ВЕРТИКАЛ НЫЙb
ЧФАЗАACTOTA/
50
50
56
Page 59

ГОРИЗОНТАЛИ НЫЙb
Нажмите клавишу / для выбора меню , затем нажмите клавишуUP DOWN ГОРИЗОНТАЛИ НЫЙ
MENU VOL+
для подтверждения выбора. Нажмите клавишу для передвижения изображения
вправо, нажмите для передвижения влево.
VOL-
b
ВЕРТИКАЛ НЫЙb
Нажмите клавишу / для выбора меню , затем нажмите клавишу
для подтверждения выбора. Нажмите клавишу для передвижения изображения
MENU
вверх, нажмите для передвижения вниз.
Ч /ФАЗАACTOTA
UP DOWN
VOL-
ВЕРТИКАЛ НЫЙ
b
VOL+
ЧACTOTA
ФАЗА
ЧЕТКОСТЬ
50
54
5
ЧACTOTA
Нажмите клавишу / для выбора меню затем нажмите клавишу дляUP DOWN Ч , MENUACTOTA
подтверждения выбора, нажмите / для настройки параметров.VOL+ VOL-
ФАЗА
Нажмите клавишу / для выбора меню , затем нажмите клавишу дляUP DOWN ФАЗА MENU
подтверждения выбора, нажмите / для настройки параметров.VOL+ VOL-
ЧТЕ КОСТЬ
Нажмите клавишу / для выбора меню , затем нажмите клавишу дляUP DOWN ЧЕТКОСТЬ MENU
подтверждения выбора, нажмите / для настройки параметров от 1 до 5.VOL+ VOL-
УСТ КАAHOB
Нажмите клавишу / для выбора меню в главном меню, нажмите
для входа.
УСТ КАAHOB
UP DOWN MENUУСТ КАAHOB
ЯЗЫК PУССКИЙ
ПОЗИЦИЯ ЕНЮM
ГОРИЗОНТА ЛИ НЫЙb
ВЕРТИКАЛ НЫЙb
50
50
АНАЛИ Г ВЫЙOO
1920x1080 60Hz
57
Page 60

ЯЗЫК
Нажмите клавишу / для выбора меню , затем нажмите клавишуUP DOWN ЯЗЫК MENU
Подтверждения выбора, нажмите / для настройки параметров.
VOL+ VOL-
для
ГОРИЗОНТАЛИ НЫЙb
Нажмите клавишу для выбора меню , затемUP DOWN ГОРИЗОНТАЛИ НЫЙ
MENU VOL+
для подтверждения выбора. Нажмите для передвижения экранного меню вправо.
Нажмите для передвижения экранного меню влево.
VOL-
/ нажмите клавишу
b
ВЕРТИКАЛ НЫЙb
Нажмите клавишу для выбора меню , затем нажмитеUP DOWN ВЕРТИКАЛ НЫЙ MENU
Для подтверждения выбора. Нажмите для передвижения экранного меню вверх. Нажмите
VOL-
для передвижения экранного меню вниз.
УСТ КАAHOB
/клавишу
b
VOL+
БАЛАНС БЕЛОГО
DCR
4:3 ШИРОКИЙ К3PAH
INPUT SELECT
ЗАВОДСКИЕ УСТ ОВКИAH
АНАЛИ Г ВЫЙOO
1920x1080 60Hz
HET
ВЫКИ
ШИ ОКИЙP
VGA
HET
БАЛАНС БЕЛОГО
Подтвердите выбор, нажмите / и выберите ДА или НЕТ.VOL+ VOL-
DCR(ДИНАМИЧЕСКИЙ КОНТРАСТ)
Нажмите клавишу / для выбора (ДИНАМИЧЕСКИЙ КОНТРАСТ),UP DOWN DCR Затем нажмите
клавишу для подтверждения выбора, нажмите / для включения/выключения
MENU VOL+ VOL-
Данной функции.
4:3 ШИРОКИЙ 3 PAHК
Нажмите клавишу / для выбора формата изобржения затем
Нажмите клавишу для подтверждения выбора. Нажмите / для выбора формата
4: 3 или ШИРОКИЙ.
UP DOWN 4:3 ШИРОКИЙ К
3PAH
MENU VOL+ VOL-
INPUT SELECT
Нажмите клавишу / для выбора меню , затем нажмите клавишу
Для подтверждения выбора. Нажмите / для выбора входа VGA или DVI.
UP DOWN MENU
INPUT SELECT
VOL+ VOL-
ЗАВОДСКИЕ УСТ ОВКИAH
Нажмите клавишу / для выбора меню , затем нажмите
клавишу для подтверждения выбора. Нажмите / , выберите ДА или НЕТ для
MENU VOL+ VOL-
Принятия/отклонения заводских настроек. В случае принятия, система восстановит Заводские
Настройки.
UP DOWN ЗАВОДСКИЕ УСТ ОВКИ
AH
58
Page 61

Другие функции
MЕНЮ ЗАбЛОКИРОВАНО
Для блокировки экранного меню (OSD) нажмите и удерживайте в течение 5 секунд клавишу
【】MENU .
MЕНЮ РАЗАбЛОКИРОВАНО
Чтобы разблокировать экранное меню (OSD), нажмите и удерживайте в течение 5 секунд клавишу
【】MENU .
Установка LED монитора
Шурупы входят в комплектацию и находятся
1. Положите монитор на мягкую ткань или подушку на столе экраном вниз.
2. Подсоедините подставку к монитору.
в прилагаемом пакете.
59
Page 62

Поддерживаемое разрешение и частота обновления
Стандарт
VGA
VGA
MAC
VESA
VESA
VESA
VESA
VESA
VESA
VESA
VESA
VESA
VESA
VESA
VESA
VESA
VESA
VESA
VESA
VESA
Разрешение
720x400 70Hz@
640x480 60Hz@
640x480 67Hz@
640x480 72Hz@
640x480 75Hz@
800x600 56Hz@
800x600 60Hz@
800x600 72Hz@
800x600 75Hz@
1024x768 60Hz@
1024x768 70Hz@
1024x768 75Hz@
1280x960 60Hz@
1152x864 60Hz@
1280x1024 60Hz@
1280x1024 75Hz@
1440x900 60Hz@
1600x1200 60Hz@
1680x1050 60Hz@
1920x1080 60Hz@
VGA DVI
Внимание: При подключении графической карты вашего компьютера, следите, чтобы не была
превышена максимальная частота обновления. Это может привести к повреждению
монитора.вашего
60
Page 63

Устранение неисправностей
1. На экране НЕТ изображения
a) Проверьте,включена ли клавиша питания.
b) Удостоверьтесь, что установлены необходимые параметры яркости и контрастности.
c) Проверьте,не мигает ли индикатор питания. Если мигает, то монитор не получает входящий
сигнал.
d) Если источник сигнала – портативный компьютер, убедитесь, что сигнал переключен в
экранный режим.
2. Изображение не фокусируется
a) Проверьте,правильно ли подсоединен видеокабель.
3. Изображение мерцает
a) Напряжение для соединения монитора недостаточное.
b) Избегайте наличия магнитных полей рядом с монитором. Не располагайте вблизи приборы,
излучающие магнитные поля. Например, акустические колонки, флуоресцентные лампы,
трансформатор переменного тока, настольный вентилятор и др.
c) При нажатии клавиши AUTO будет включен авто-режим, оптимальные параметры изображения
будут подобраны автоматически.
4. Неверное отображение цвета
a) Если красный, зеленый, синий или любой другой цвет не отображается, проверьте правильность
подсоединения сигнального кабеля. Неплотное подсоединение кабеля может быть причиной
плохого сигнала.
b) Попробуйте подсоединить монитор к другому ПК.
5. Изображение на экране дрожит
a) Убедитесь, что частота входящего сигнала - 60-75Hz.
6. Как чистить монитор
a) Убедитесь, что питание монитора отключено.
b) Не наносите никакую жидкость на экран или пластиковую панель монитора.
7. При чистке экрана
a) Используйте чистую, мягкую, не оставляющую ворсинок ткань для чистки экрана.
b) Если экран всё же недостаточно чист, добавьте немного средства для чистки стекол, не
содержащего спирт и аммиак.
8. При чистке пластиковой панели
a) Используйте мягкую сухую ткань
b) Если поверхность всё же недостаточно чиста, добавьте немного неабразивного моющего
средства, не содержащего спирт и аммиак.
61
Page 64

Технические характеристики:
Габариты
Тип монитора
Яркость
Цвет
Разрешение
Требования к напряжению
Power Mains adapter
Потребляемая мощность
VGA
Разъем
входа
DVI D-
Аудио разъем
Условия
21 5."
LED
250cd/m
2
16.7M
1920x1080 60Hz
100-240V
@
50/60Hz
DC12V 3A
<
30W
VGA аналог овый
DVI Digital
35. мм стерео разъем
Температура использования: 0°- 40
Влажность: не выше 80%
Температура хранения: -20° - 60°С°С
62
Page 65

Page 66

 Loading...