

Page 1
®
Printing Instructions
Print this document on both sides of a letter-size sheet of paper, and fold in half.
The finished size is 5.5" x 8.5" after folding.
· In the Print dialog, set Page Scaling to None (Acrobat 6 or later), or
uncheck ‘Shrink oversize pages’ and ‘Expand small pages’. (Acrobat 5).
Duplex (two-sided) printers:
· Print both pages 3 and 4 to a letter-size sheet, landscape (sideways)
orientation, duplex, flipped on the short edge.
Singl e-sided printers:
· Print page 3 to a letter-size sheet, landscape (sideways) orientation.
· Re-insert the printed page into the printer feed tray, upside down, and
rotate if needed, then print page 4.
· Fold the printed sheet in half.
IP Phone 4104 Quick Reference
Page 2

Page 3

Call Directory
The Call Directory allows you to easily access up to 36 speed dial
numbers.
DIRECTORY
Press the DIRECTORY key to view the Call Directory.
Press the DIRECTORY key again to exit.
Directory entries are displayed on nine screen pages, with four entries
per page.
To see a different directory page, select a page by pressing a dial
pad key (1-9), or press the Left Arrow or Right Arrow key.
Press the softkey that is under the number that you want to dial.
Select EDIT from the User Setup menu to add a new directory
entry or edit an existing one.
Enter a # character at the end of the number for immediate dialing.
Setting the Ringer Volume
VOLUME
VOLUME
When the telephone is idle (not on a call), press the left side of
the VOLUME key to reduce the ringer volume, or press the
right side to increase the ringer volume.
The telephone will ring once with the new ringer volume setting,
and the new setting will be shown briefly in the display.
If RINGER OFF is shown in the display, press the right side of
the VOLUME key while you are not on a call to enable the
ringer.
®
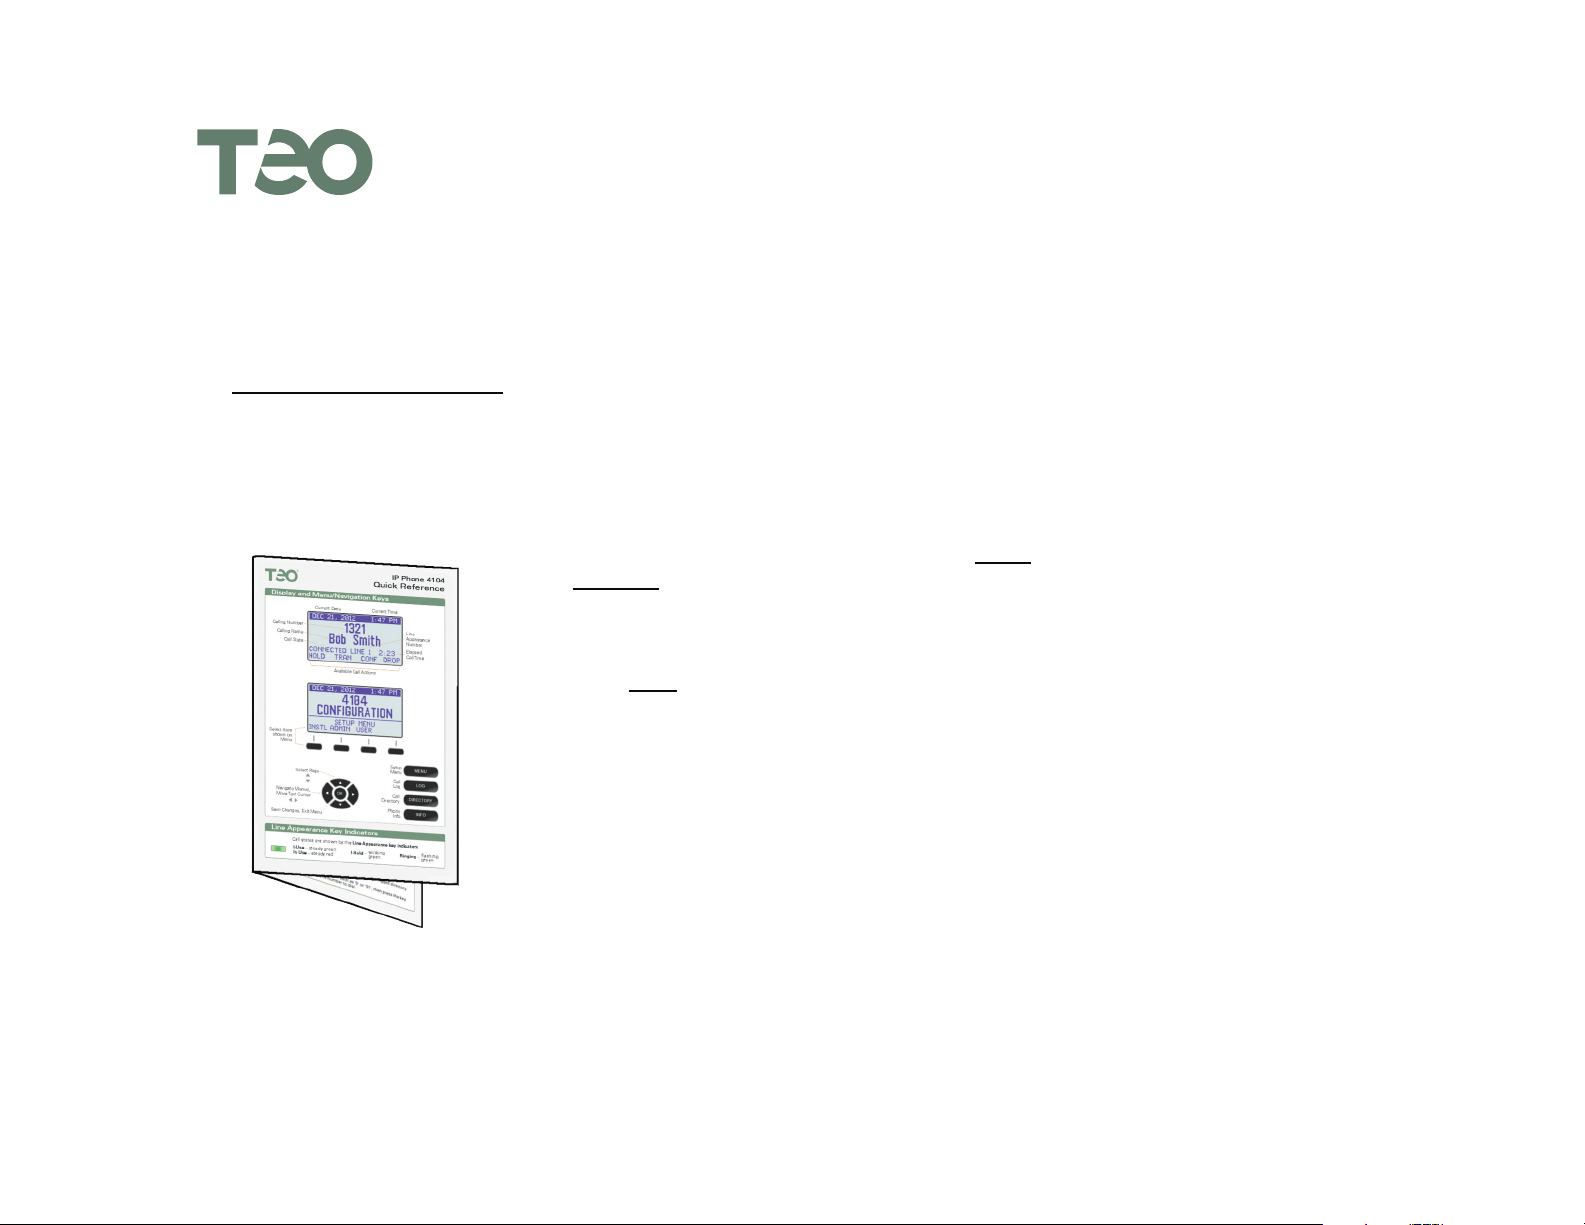
Quick Reference
Display and Menu/Navigation Keys
Current Date Current Time
Calling Number
Calling Name
Call State
Bob Smith
1321
CONNECTED LINE 1 2:23
HOLD TRAN CONF DROP
Available Call Actions
4104
CONFIGURATION
SETUP MENU
Select Item
shown on
Menu
INSTL ADMIN USER
IP Phone 4104
Line
Appearance
Number
Elapsed
Call Time
Setting Up Speed Dial Keys
MENU
OK
Press the MENU key to enter Setup Mode.
Select USER from the main menu, and then select KEYS.
Press an unlit Speed Dial key.
Enter the speed dial string with the dial pad.
Enter a # character at the end for immediate dialing .
When you have finished editing the Speed Dial key, press the
OK key to return to the k ey selection menu or press the MENU
key to exit Setup Mode.
14-280222 Rev. B
Select Page
Navigate Menus,
Move Text Cursor
Save Changes, Exit Menu
OK
Line Appearance Key Indicators
Call states are shown by the Line Appearance key indicators.
I-Use – steady green
In Use – steady red
I-Hold –
winking
green
Setup
Menu
Call
Log
Call
Directory
Phone
Info
MENU
LOG
DIRECTORY
INFO
Ringing –
flashing
green
Page 4

User Setup Options
Transferring a Call
You can customize your telephone with these user options:
CLOCK – Time and Date
KEYS – Speed Dial
DIR – Call Directory
RING – Ringing Options
The system may be configured to set the automatically.
MENU
MENU
Press the MENU key to enter Setup Mode.
Select USER from the main menu, then select the option you
want to change.
Press the MENU key when finished.
Placing a Call
Manual Dialing
Dial the number with the dial pad, and then select SEND, lift the
handset, press the SPEAKER key, or press the HEADSET key.
OK
You can also go off-hook before dialing. Select SEND or press the
OK key after all digits are entered.
Speed Dialing or Direct Station Select
Press a speed dial or DSS/BLF key to automatically access an idle
line and dial a number.
You can also dial from the Call Log or Call Directory.
VOICE – Handset/Headset Volume
DISPLY – Display Contrast
PIN – Call Log PIN
clock
Select TRAN to place the current call on hold and access a new
idle line appearance.
Press a speed dial or DSS/BLF key to dial the party to whom you
wish to transfer the call.
Or dial the party with the dial pad and then select SEND.
You may wait until the called party answers to announce the call,
or transfer it immediately before the called party answers.
Select TRAN again to complete the transfer.
Conferencing Calls
Select CONF to place the current call on hold and access a new
idle line appearance.
Dial the party you wish to add to the conference.
Or press the key of a held call that you wish to add to the conference.
After the added party answers, select CONF to conference all
parties together.
To remove the last party added, select DROP.
To remove yourself from the conference, disconnect the call (hang
up). Other parties may remain connected, depending on the
system configuration.
Answering a Call
SPEAKER
HEADSET
To answer the call shown in the display, lift the handset, press
the SPEAKER key, or press the HEADSET key.
To answer a different ringing call, press its Line Appearance key.
Holding a Call
Select HOLD to place a call on hold.
Or press another Line Appearance or DSS key to automatically place
the current call on hold and access another line appearance.
To reconnect to a held call, press its Line Appearance key, or
select UNHOLD.
Call Log
LOG
OK
Press the LOG key to view the call log.
Press the LOG key again to exit.
Or select UNANS, if it is shown in the display, to show unanswered
calls.
Select UNANS (unanswered calls), ANSWD (answered calls), or
OUT (outgoing) calls.
Press the Down Arrow key to view previous (older) calls.
Press the Up Arrow Key to view the last-displayed (newer) call.
Select DELETE to remove the call from the log.
Select DETAIL to view IP packet statistics; select DATE to return
to the time/date/duration display.
To dial the logged call entry, select CALL to access an idle line
and show the logged directory number in the display.
Add any required prefixes, such as '9' or '91', then press the key
under the displayed number to dial.
 Loading...