

Page 1
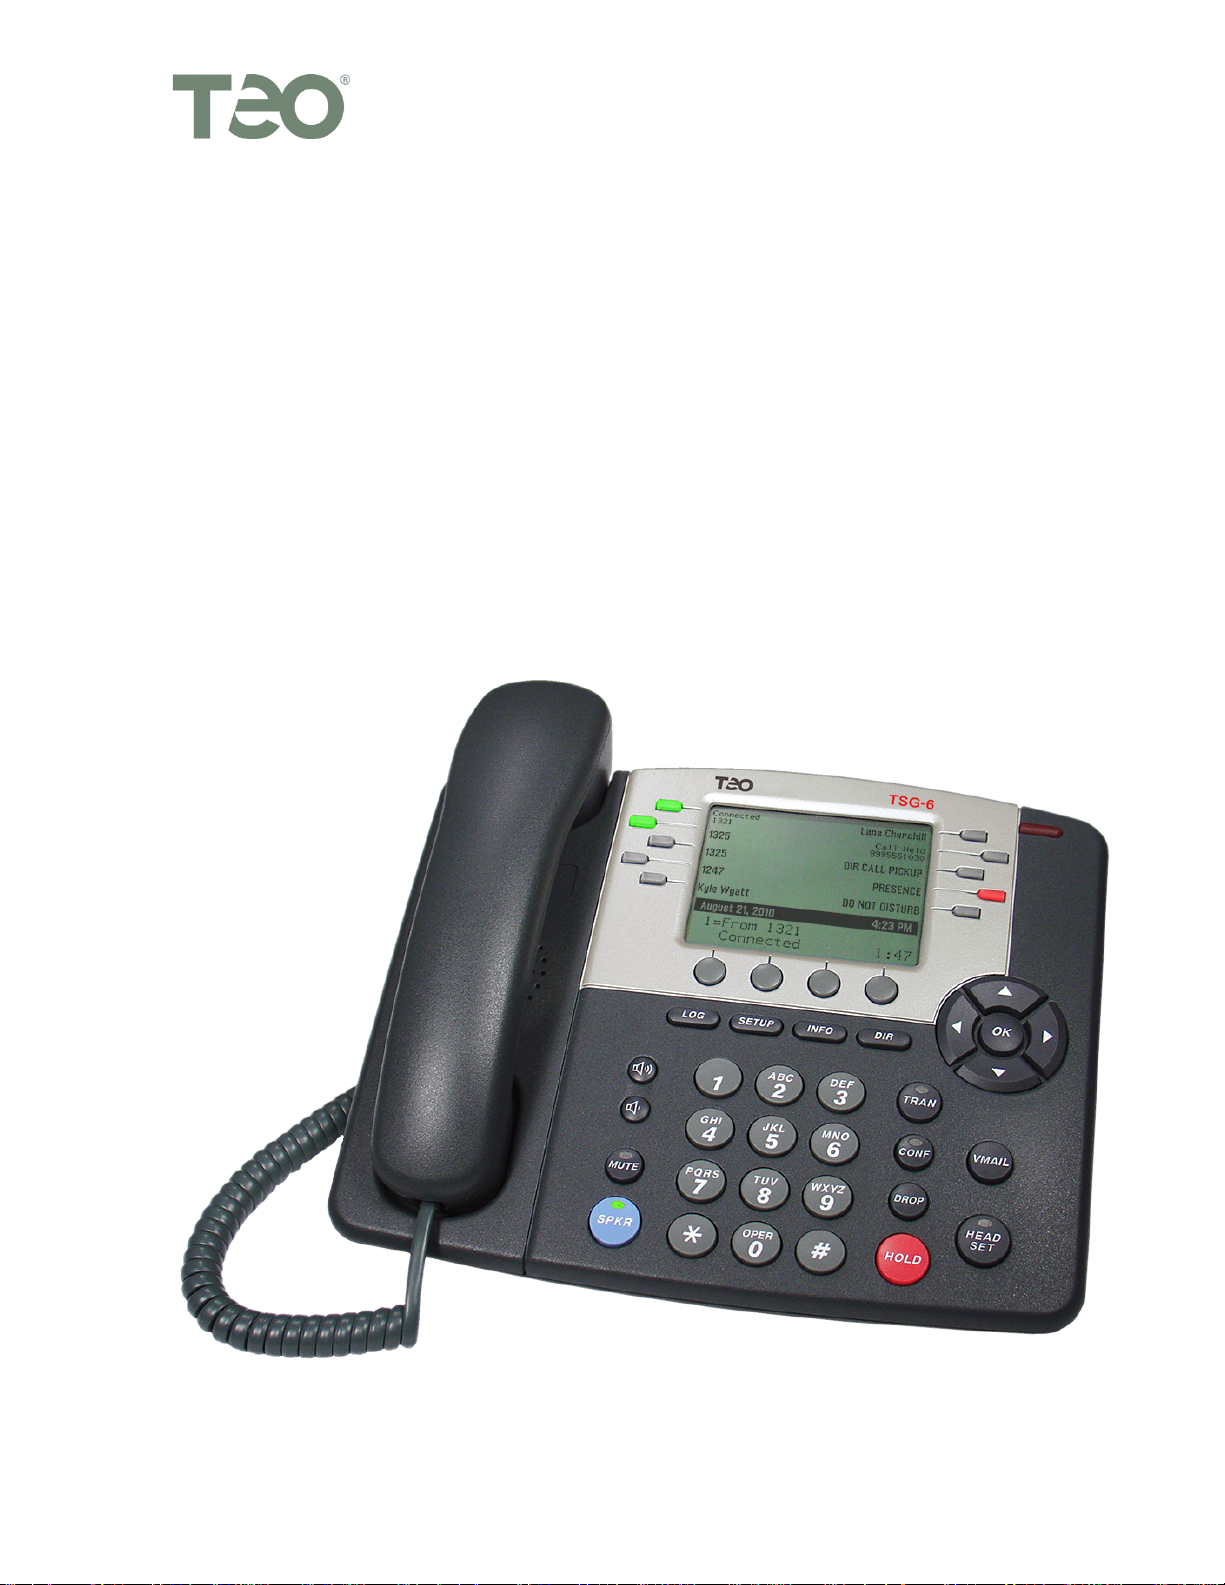
IIPP PPhhoonnee 77881100
Teo Technologies, Inc.
11609 49
Mukilteo, WA 98275-4255
(800) 524-0024 (425) 349-1000
th
Place West
Fax (425) 349-1010
www.teotech.com
TTSSGG SSeerriiees
s
IInnssttaallllaattiioonn IInnssttrruuccttiioonnss
Software Version 05.04.1, Document #13-280138 Rev. H
February 2014
Page 2

Teo IP Phone 7810 TSG Series Installation Instructions
© 2014 Teo Technologies Inc. All rights reserved.
Page 2 13-280138 Rev. H
Page 3

C
o
n
t
e
n
t
s
C
o
n
t
e
C
o
n
Introduction ................................................................................................................................. 5
General Features .................................................................................................................. 5
Controls and Indicators ........................................................................................................ 7
Installation ................................................................................................................................. 11
Desktop Installation ............................................................................................................ 11
Wall Mounting .................................................................................................................... 13
Label the Set ....................................................................................................................... 15
Line and Power Connections ............................................................................................. 16
Configure the Set ................................................................................................................ 18
Installation Options ................................................................................................................... 23
Installation Options Menu .................................................................................................. 23
IP Addresses ....................................................................................................................... 24
SIP Configuration................................................................................................................ 30
Quality of Service ............................................................................................................... 35
Configuring Keys ................................................................................................................ 36
Configuring Call Monitoring .............................................................................................. 49
Call Timeout Options .......................................................................................................... 50
Installation PIN .................................................................................................................... 51
Reset to Factory Default Settings ...................................................................................... 52
Updates ............................................................................................................................... 53
PC Port (7810PoE-TSGA and 7810PoE-TSGB only) ......................................................... 55
Security Options ................................................................................................................. 55
Viewing the Error Log ........................................................................................................ 56
n
t
e
n
t
s
t
s
Administration Options ............................................................................................................ 57
Administration Options Menu ........................................................................................... 57
Local Inspect ....................................................................................................................... 57
Version ................................................................................................................................ 59
Test ...................................................................................................................................... 60
Diagnostic Displays ............................................................................................................ 62
Restarting the Phone .......................................................................................................... 63
oubleshooting ........................................................................................................................ 65
Tr
Power-up & Connection Troubleshooting......................................................................... 65
Call Control Troubleshooting ............................................................................................. 67
Diagnostic Troubleshooting ............................................................................................... 68
Appendix A Setup Menu Tree ............................................................................................. 71
Appendix B Service and Warranty ...................................................................................... 79
Appendix C Specifications ................................................................................................... 81
Appendix D Regulatory Statements .................................................................................... 83
13-280138 Rev. H Page 3
Page 4

Teo IP Phone 7810 TSG Series Installation Instructions
Page 4 13-280138 Rev. H
Page 5
A B
No
I
n
t
r
o
d
u
c
t
i
o
n
I
n
t
r
o
d
u
c
t
I
n
t
r
o
d
u
For operation instructions and user setup options, please refer
to the IP Phone 7810 TSG Series User Guide, doc. #14-280211.
GGeenneerraall FFeeaattuurreess
Teo Model 7810 TSG Series IP Phones are easy to use multiline terminals that provide
sophisticated services over managed IP networks running the Session Initiation Protocol
(SIP).
To meet TSG requirements, special positive-disconnect circuitry and ultra low-emissions
technology ensures that no microphonic audio signals are produced on any wires leaving
the phone when it's on-hook.
Teo TSG-6 IP phones meet the stringent requirements specified in the CNSS (Committee
on National Security Systems) Instruction No. 5000 and 5001, and have been tested for
compliance and approved by the National Telecommunications Security Working Group
(NTSWG). Class A versions are not dependent on any other equipment for on-hook
security, and may be used in standalone applications within a secure area. The Class B
version must be connected to an Ethernet switch collocated within the SCIF.
c
i
t
o
n
o
n
i
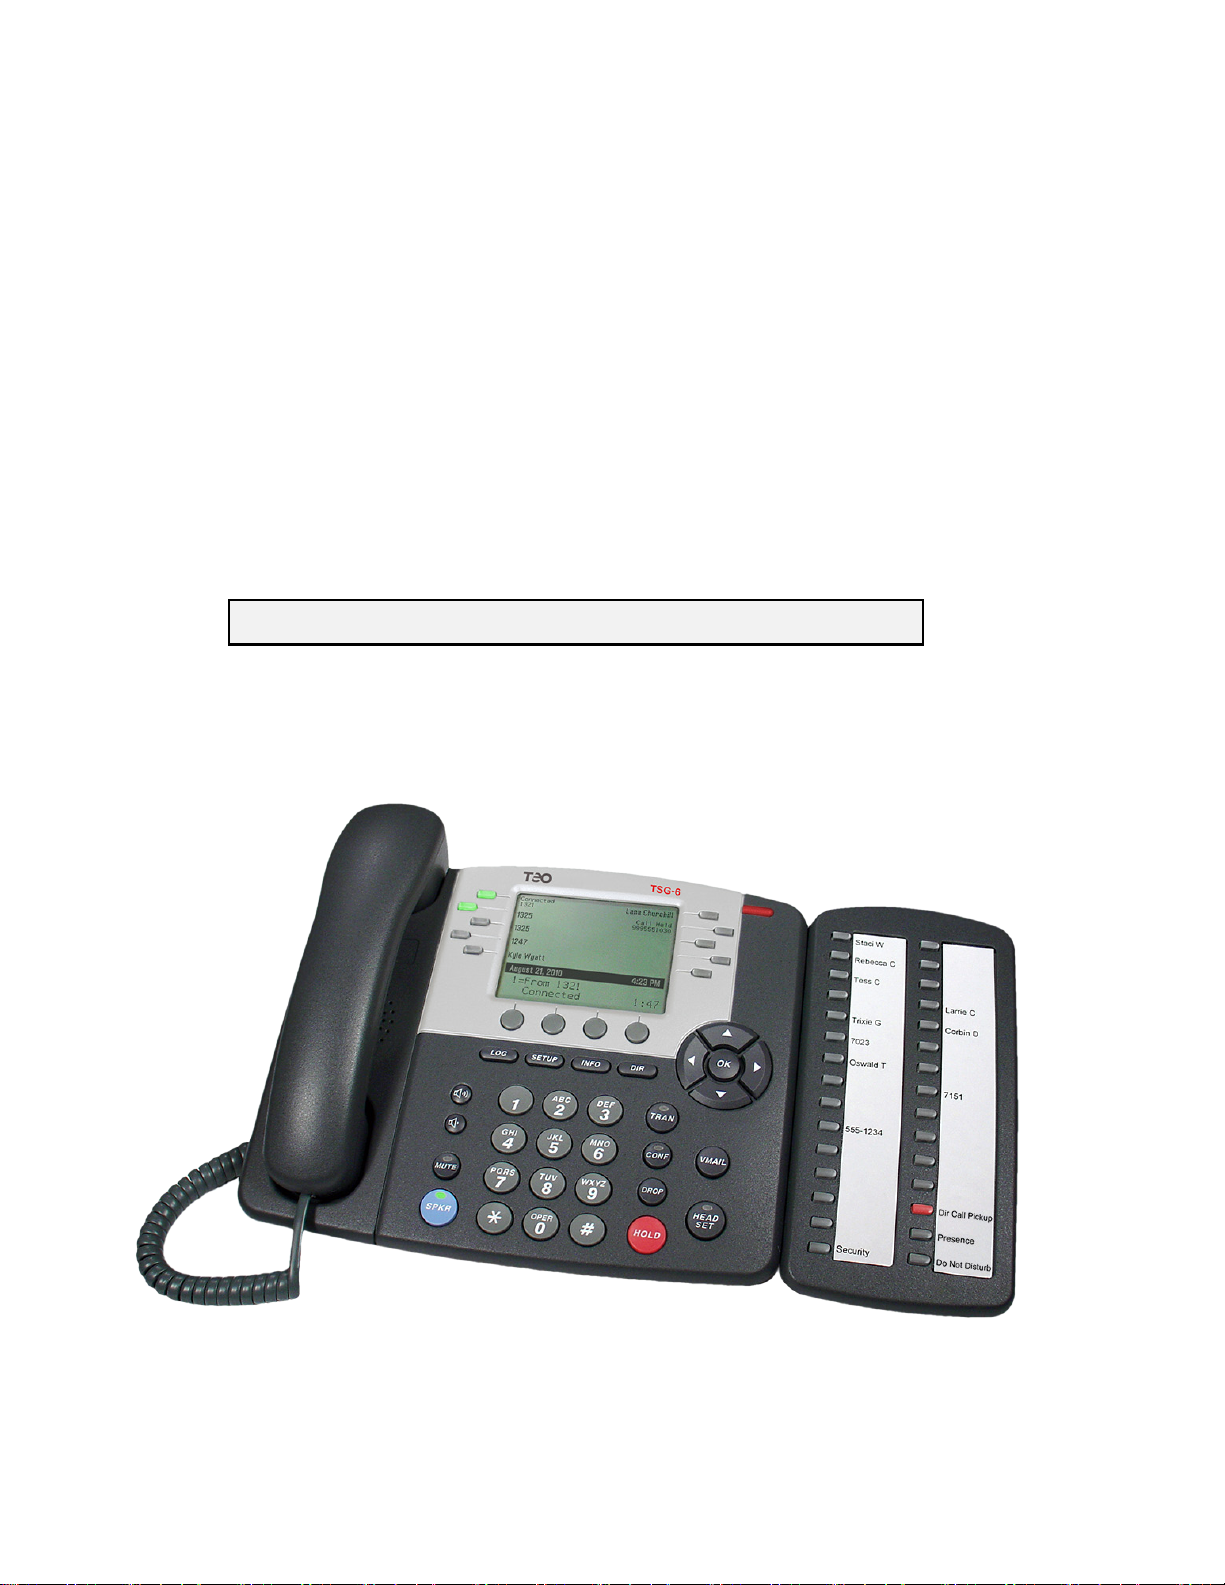
The phones have 10 multifunction keys; the optional 8030X Expansion Module adds 30
multifunction keys.
Three TSG models are available. Model-specific options are listed in the table below.
Model 7810-TSG 7810PoE-TSGA 7810PoE-TSGB
TSG-6 Class A
802.3af PoE No
PoE Security Reset
Switch
Local Power Standard
Switched Ethernet
PC Port
CNSS Number CNSS-A-01-2009 CNSS-A-04-2010
No
No
Endpoint Only
Yes
Optional
Yes
Midspan or
Endpoint
Optional
Yes
CNSS-B-05-2010
13-280138 Rev. H Page 5
Page 6
Teo IP Phone 7810 TSG Series Installation Instructions
Features of all 7810 TSG Series models include:
• TSG-6 Certified for use in SCIF areas
• 100-entry Call Log for Unanswered,
Answered, and Outgoing Calls
• Call Timer
• Last Number Redial
• Speed Dial
• Pre-Dialing
• Direct Station Select
• 100-entry Call Directory
• Flexible Ringing Options
• Presence Status
Various features may not be available with some SIP services.
• Message Waiting Indication
• Voice Mail Control Keys
• Ringing Control for Shared Lines
• Desktop or Wall Mounting
• Large Graphic LCD Display
• On-screen Electronic Key Labels
• Call Monitoring
• Handset or Headset Operation
• Headset Activation Key
• Dedicated Headset Jack
7810 TSG Series Phone with 8030X Button Expansion Module
Page 6 13-280138 Rev. H
Page 7
Introduction
CCoonnttrroollss aanndd IInnddiiccaattoorrss
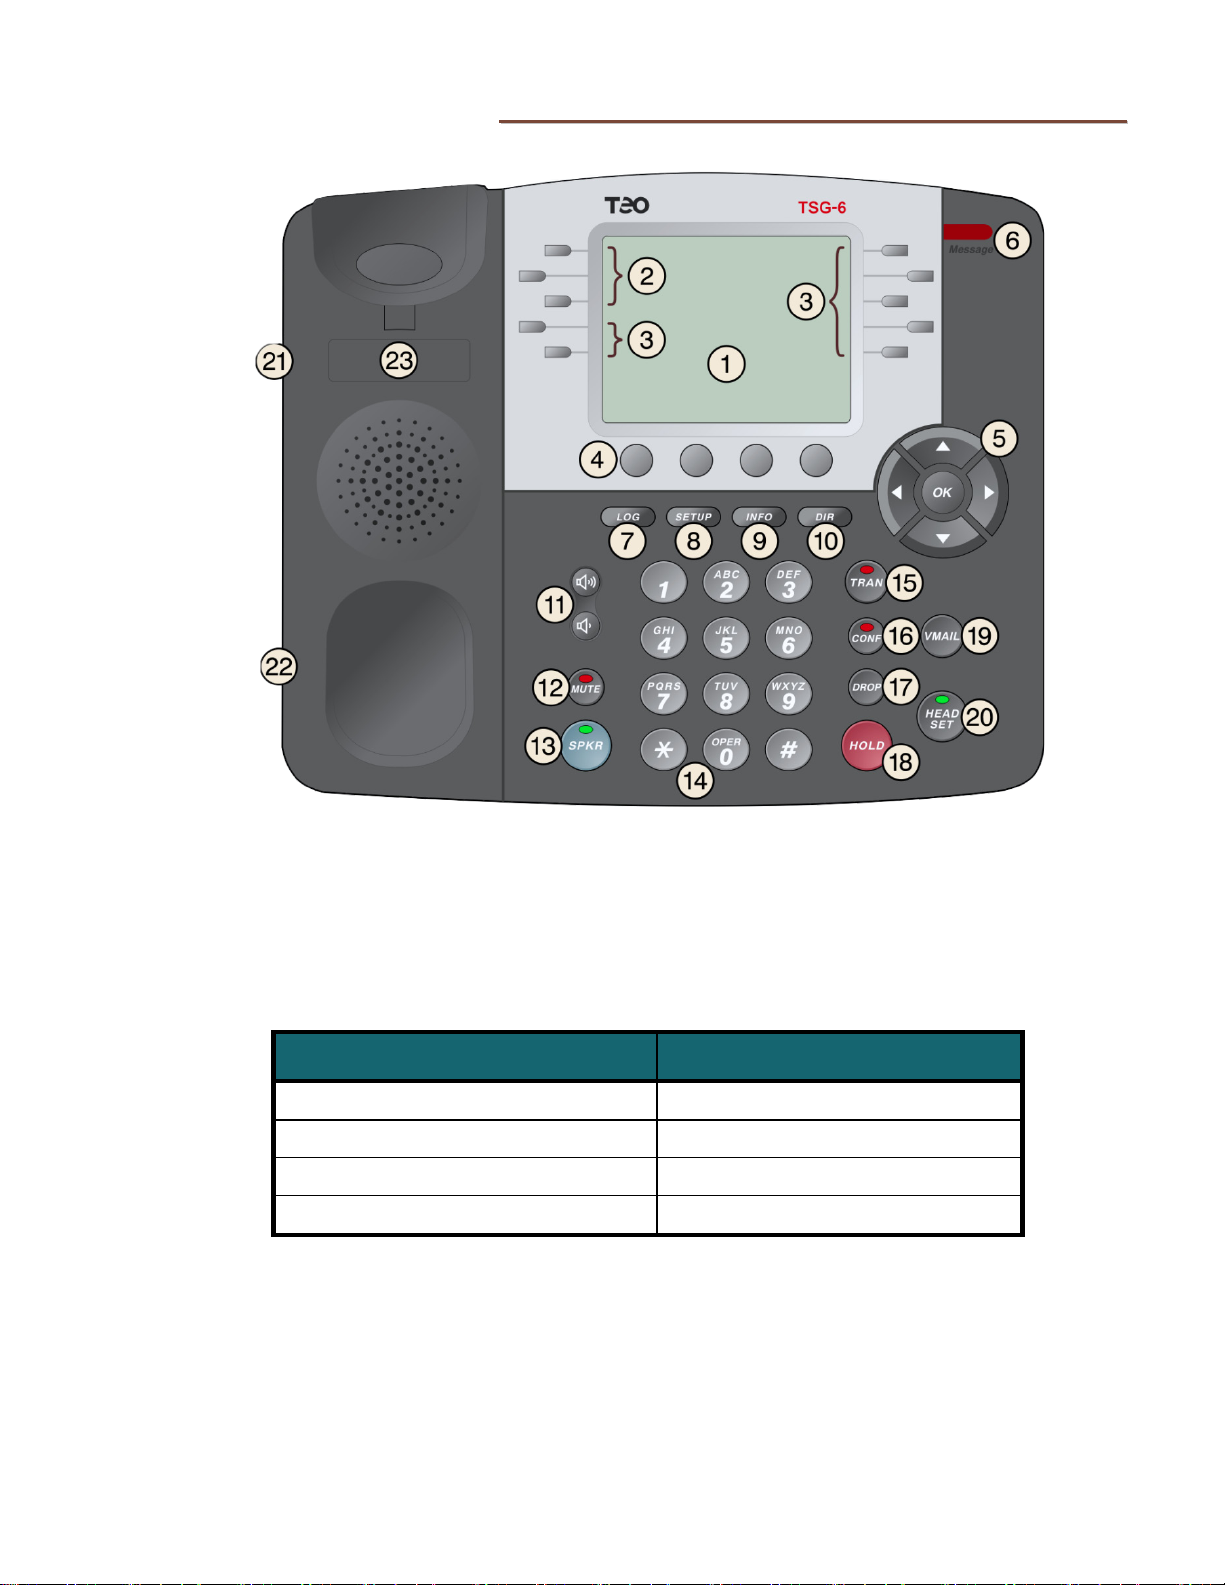
1) Display – shows the multifunction key labels, call states, caller ID, dialed digits, network
call control messages, and elapsed time during calls. When not on a call, the date, time
of day, and softkey options are displayed.
The viewing angle is primarily set by selecting the high or low base mounting position
(page 11). Display contrast can be adjusted by a menu selection.
2) Line Keys – used for Primary Line Appearances.
Line Appearance Key Indicator Line State
OFF Idle (On-Hook)
Steady Green In Use (Off-Hook)
Winking Green On Hold
Flashing Green Ringing
3) Multifunction Keys – used for Additional Line Appearance, Direct Station Selection/
Busy Lamp Field (DSS/BLF), Feature, or Speed Dial keys. The optional 8030X Button
Expansion Module provides 30 additional multifunction keys.
Red and green indicators on the keys show line appearance, DSS/BLF and feature
status.
13-280138 Rev. H Page 7
Page 8
Teo IP Phone 7810 TSG Series Installation Instructions
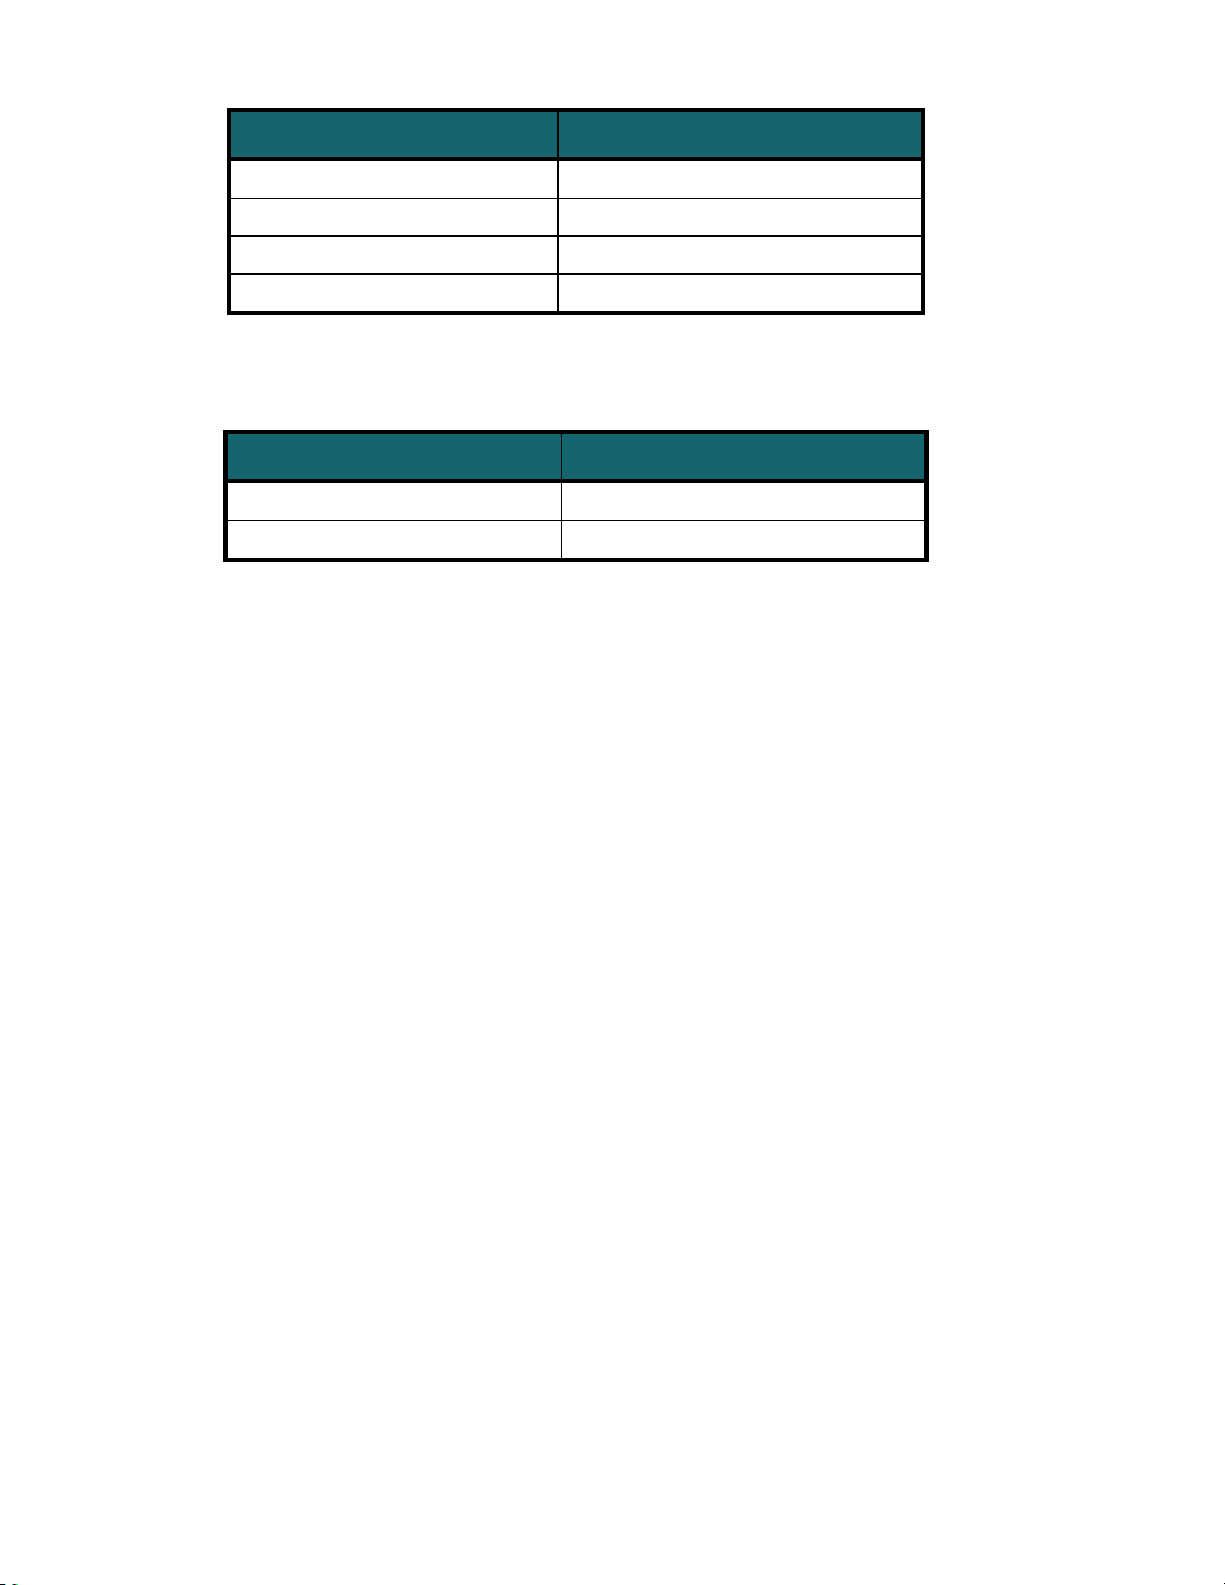
DSS/BLF Key Indicator Monitored Station State
OFF Available (On-Hook)
Steady Red / Green Other Presence State* (On-Hook)
Steady Red On The Phone (Off Hook)
Flashing Green Ringing
* Note: If your phone is connected to a Teo UC System, steady red/green is used to indicate
Busy, Away, Not Available, Do Not Disturb, On Holiday, On Vacation, After Hours, or Call
Forward presence states.
Feature Key Indicator Feature State
OFF Deactivated
Steady Red Activated
4) Softkeys – select the function displayed above the key on the bottom line of the display.
5) Navigation (Arrow) Keys – navigate within menus. In editing modes, thekey moves
the cursor one position to the right and the
left. The
key exits the current menu, saves any changes made, and returns to the previous menu
options.
6) Message Waiting Indicator – a bright red indicator is lit when messages are waiting,
controlled by the network.
7) LOG Key – displays Call Log options.
8) SETUP Key – enters and exits Setup Mode.
9) INFO Key – displays version and configuration information about the phone and
connected options.
10) DIR (Directory) Key – displays the Call Directory.
11) Volume Keys – adjust the receiver/speaker volume when on a call; adjust the ringer
volume when on-hook.
12) MUTE Key – mutes the handset or headset microphone. A red indicator on the key is lit
when mute or Call Monitoring is active.
13) SPKR (Speaker) Key – activates Call Monitoring (if enabled). A green indicator on the
key is lit when Call Monitoring is active.
and keys are used to shift between pages on multi-page screens. The OK
key moves the cursor one position to the
14) Dial Pad – dials telephone numbers, and sends DTMF tones to external equipment such
as voice mail systems. The dial pad is also used for text and number entry during setup.
15) TRAN (Transfer) Key – places the current call on hold, and selects an idle line
appearance for transferring the call. A second press completes a transfer.
16) CONF (Conference) Key – adds other parties to a conference call.
17) DROP Key – removes the last party added to a conference call, or disconnects you from
a call and returns new dial tone when not in conference mode.
18) HOLD Key – places a call on hold.
Page 8 13-280138 Rev. H
Page 9

Introduction
19) VMAIL (Voice Mail) Key – accesses network voice mail services.
20) HEADSET Key – activates the headset. A green indicator is lit when the headset is in use.
21) Headset Jack – a jack on the underside of the telephone connects to an optional
standard headset.
22) Handset Jack – a jack on the underside of the telephone connects to the included
handset.
23) Telephone Identification Label Area – indented area for a directory number label. Use
½” x 1¾” adhesive labels (Avery 8167 / 5267 or equivalent).
13-280138 Rev. H Page 9
Page 10

Teo IP Phone 7810 TSG Series Installation Instructions
Page 10 13-280138 Rev. H
Page 11
I
n
s
t
a
l
l
a
t
i
o
n
I
n
s
t
a
l
l
a
t
I
n
s
t
a
l
i
l
a
t
o
n
o
n
i
DDeesskkttoopp IInnssttaallllaattiioonn
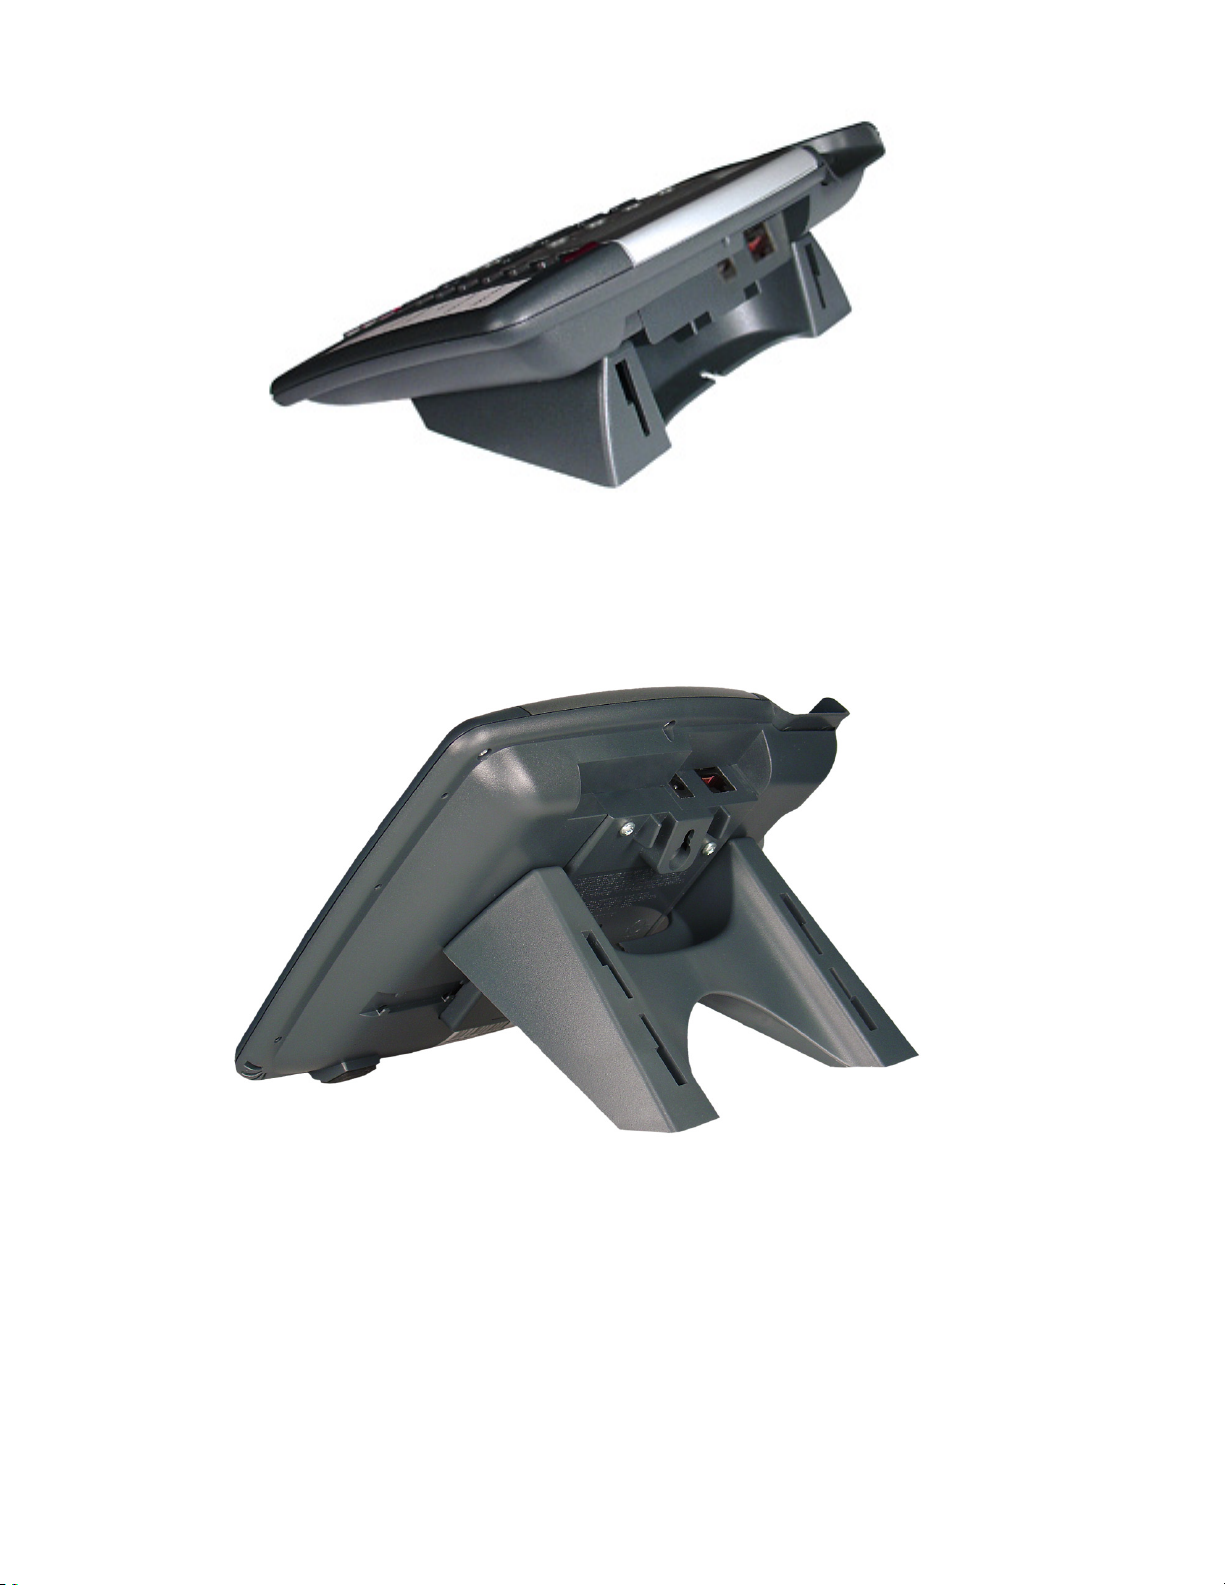
The stand can be installed in two positions for desktop use. Select the position that
provides the best screen readability and easy control operation for the phone’s location.
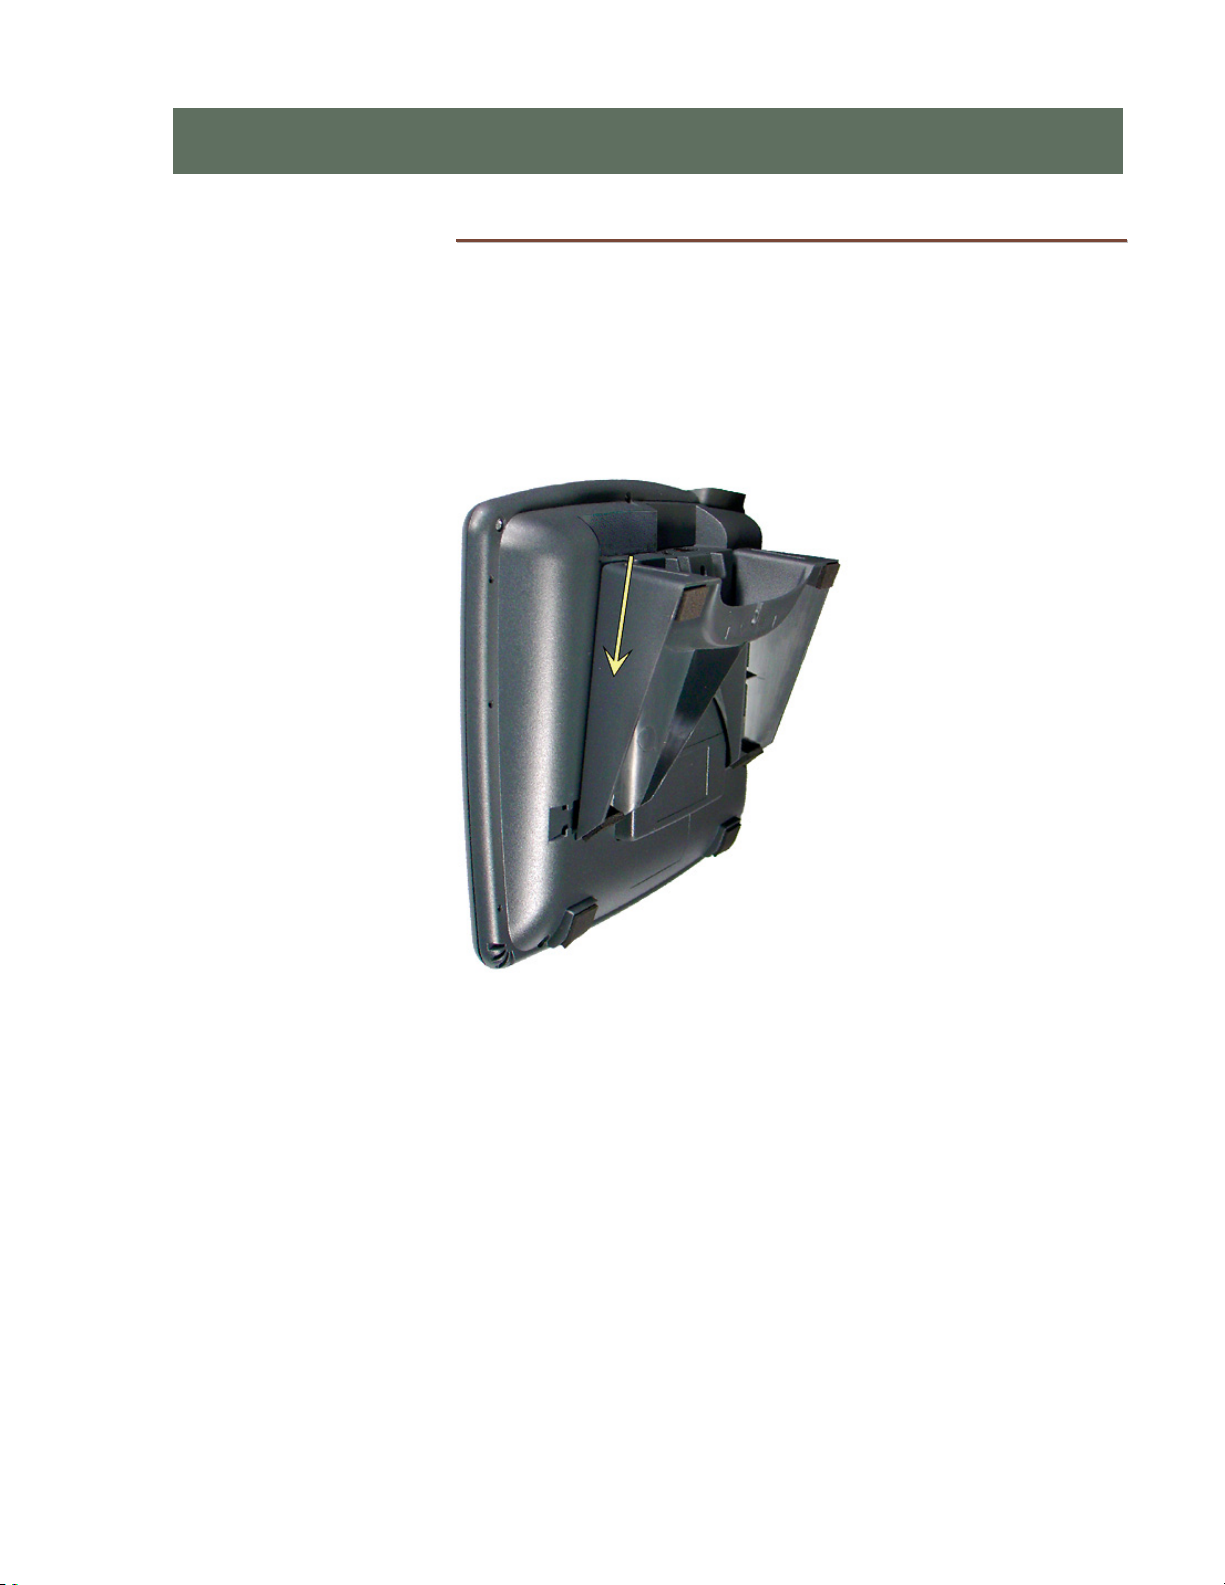
• If you need to remove the stand, press it down to disengage the snap tabs, and then lift
off the stand.
The low desktop stand position is shown; the removal procedure is the same for high
desktop and wall mount positions.
Stand Removal
• Rotate the stand as needed; refer to the pictures below.
• To install the stand, insert the tabs on the telephone into the large openings in the
stand’s upper slots, and then press the stand toward the top of the telephone until it
locks into place.
If you are installing an 8030X Button Expansion Module on the phone, use the doublewidth stand included with the 8030X.
13-280138 Rev. H Page 11
Page 12
Teo IP Phone 7810 TSG Series Installation Instructions
Low Desktop Position
High Desktop Position
Page 12 13-280138 Rev. H
Page 13
Installation
HHaannddsseett RReettaaiinneerr CClliipp,, LLooww DDeesskkttoopp AApppplliiccaattiioonnss
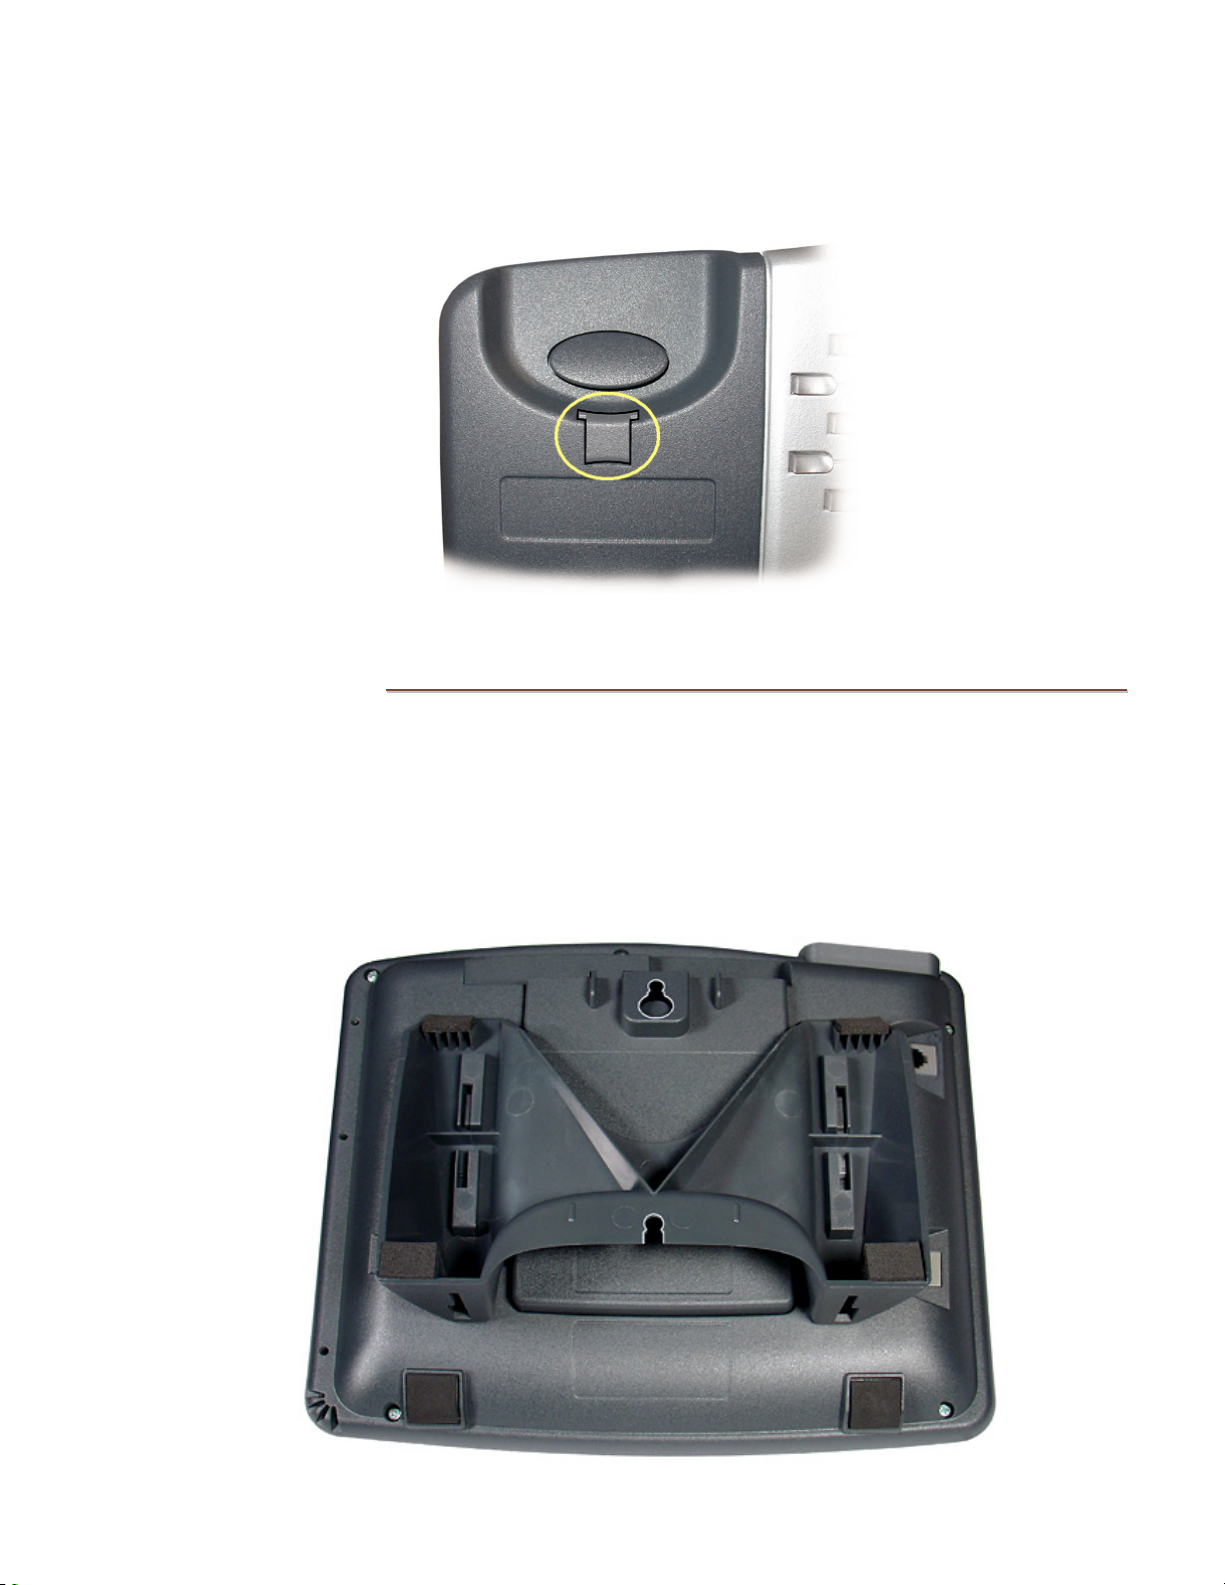
For low desktop position use, the handset retainer clip should be installed in the default
position, without the tab protruding into the hookswitch area. Rotate the clip for high
desktop applications.
WWaallll MMoouunnttiinngg
Refer to page 15.
The phone stand and handset retainer clip must be rotated for wall mounting.
• Remove the stand from the phone base.
• Rotate the stand as shown below.
• To install the stand, insert the tabs on the telephone into the large openings in the
stand’s upper slots, and then press the stand toward the top of the telephone until it
locks into place.
Refer to page 11.
13-280138 Rev. H Page 13
Page 14
Teo IP Phone 7810 TSG Series Installation Instructions
AAttttaacchhiinngg ttoo aa wwaallll mmoouunntt jjaacckk
• Plug an 8”, 10/100BaseT network cable into the NETWORK jack on the telephone. Refer
to page 16.
• Hold the telephone next to the wall mount jack. Plug the network cable into the jack.
• Hang the telephone on the wall plate mounting studs. The top mounting stud fits into
the keyhole slot in the phone expansion cover or optional Terminal Adapter, and the
bottom stud slides into the ‘U’-shaped slot in the wedge base. Press down firmly to lock
into place.
MMoouunnttiinngg DDiirreeccttllyy oonn aa WWaallll
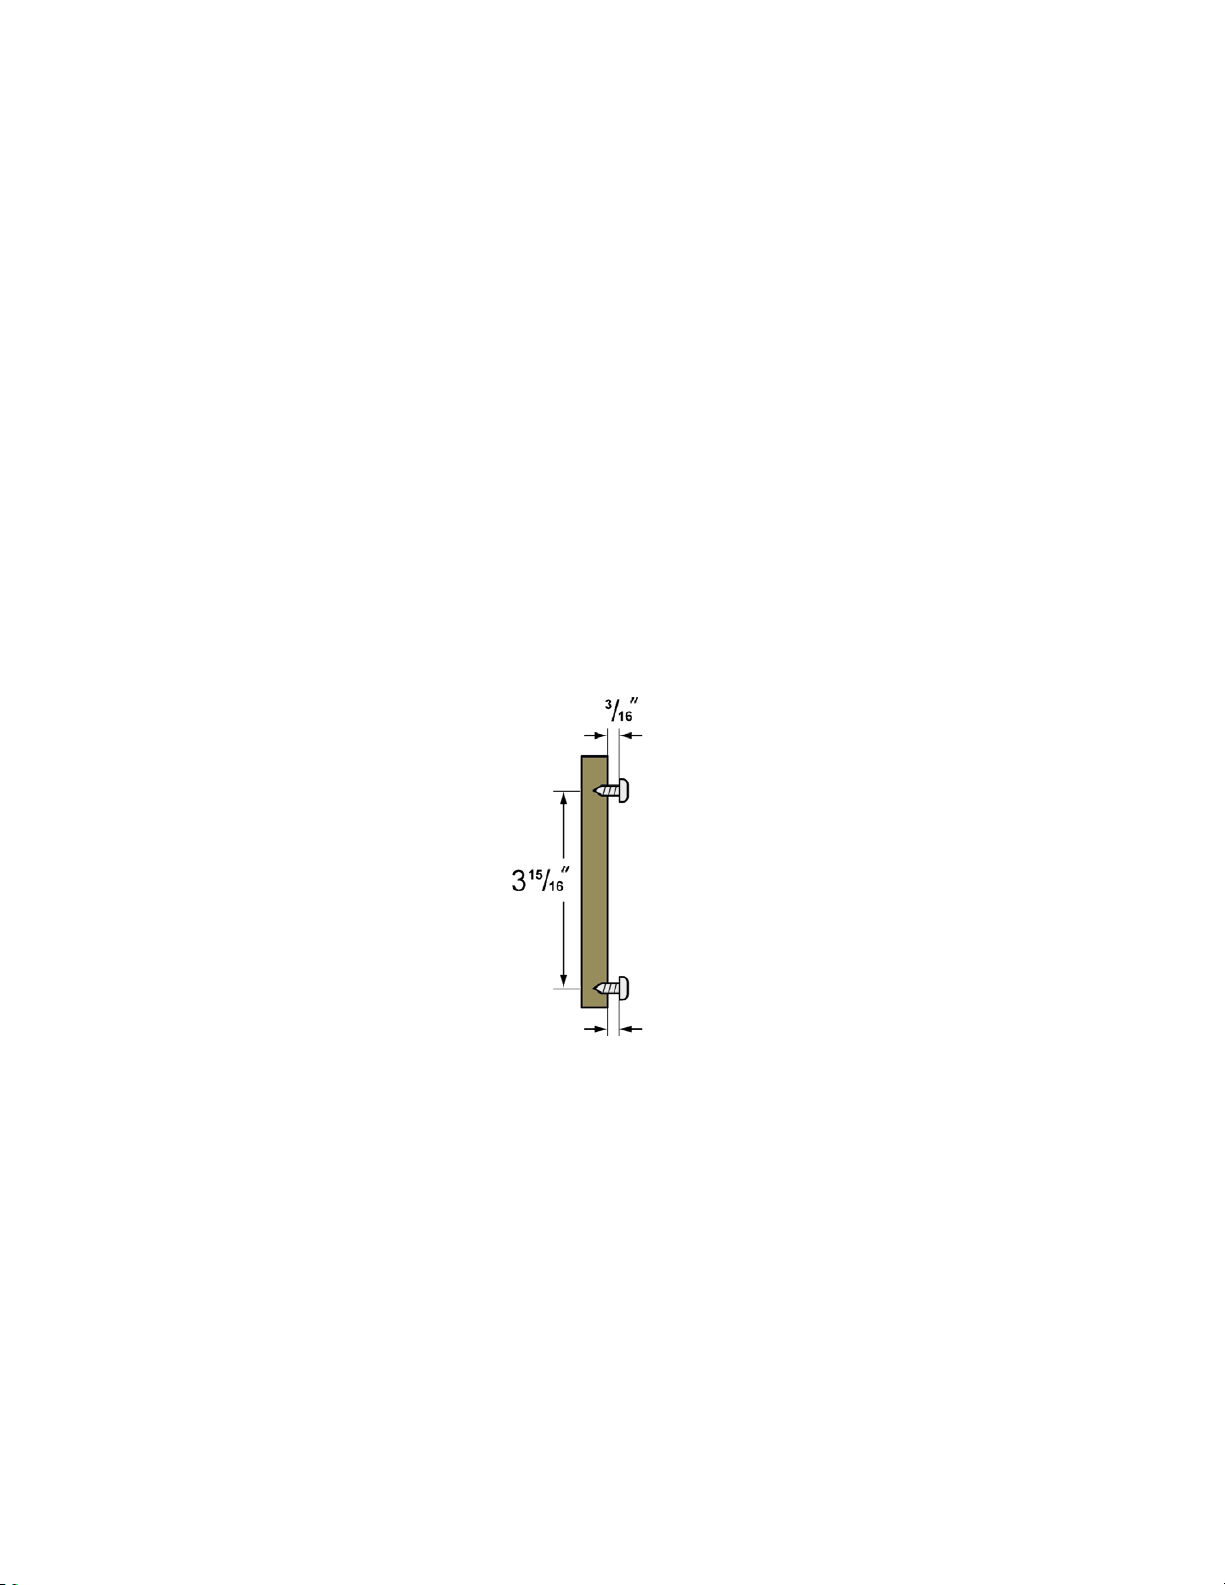
To save space, you can directly hang the phone on a wall or wall plate. You need two
screws that will fit the keyhole slots.
Note: Wall mounting screws are not supplied with the phone.
• On the wall or a wall plate, drill two holes with a distance of 315/16 inches apart. If
drilling into drywall only, make sure to install an anchor system for the screws.
• Thread a screw into each hole with each head extending about
or wall plate.
3
/16 inch from the wall
• Connect the AC power adapter, LAN and PC cords (pages 16-17) and route them
between the base and the phone.
• Align the phone’s keyhole slots with the screws and slide the phone downward to
secure it.
Page 14 13-280138 Rev. H
Page 15
Installation
HHaannddsseett RReettaaiinneerr CClliipp,, WWaallll MMoouunntt oorr HHiigghh DDeesskkttoopp PPoossiittiioonn AApppplliiccaattiioonnss
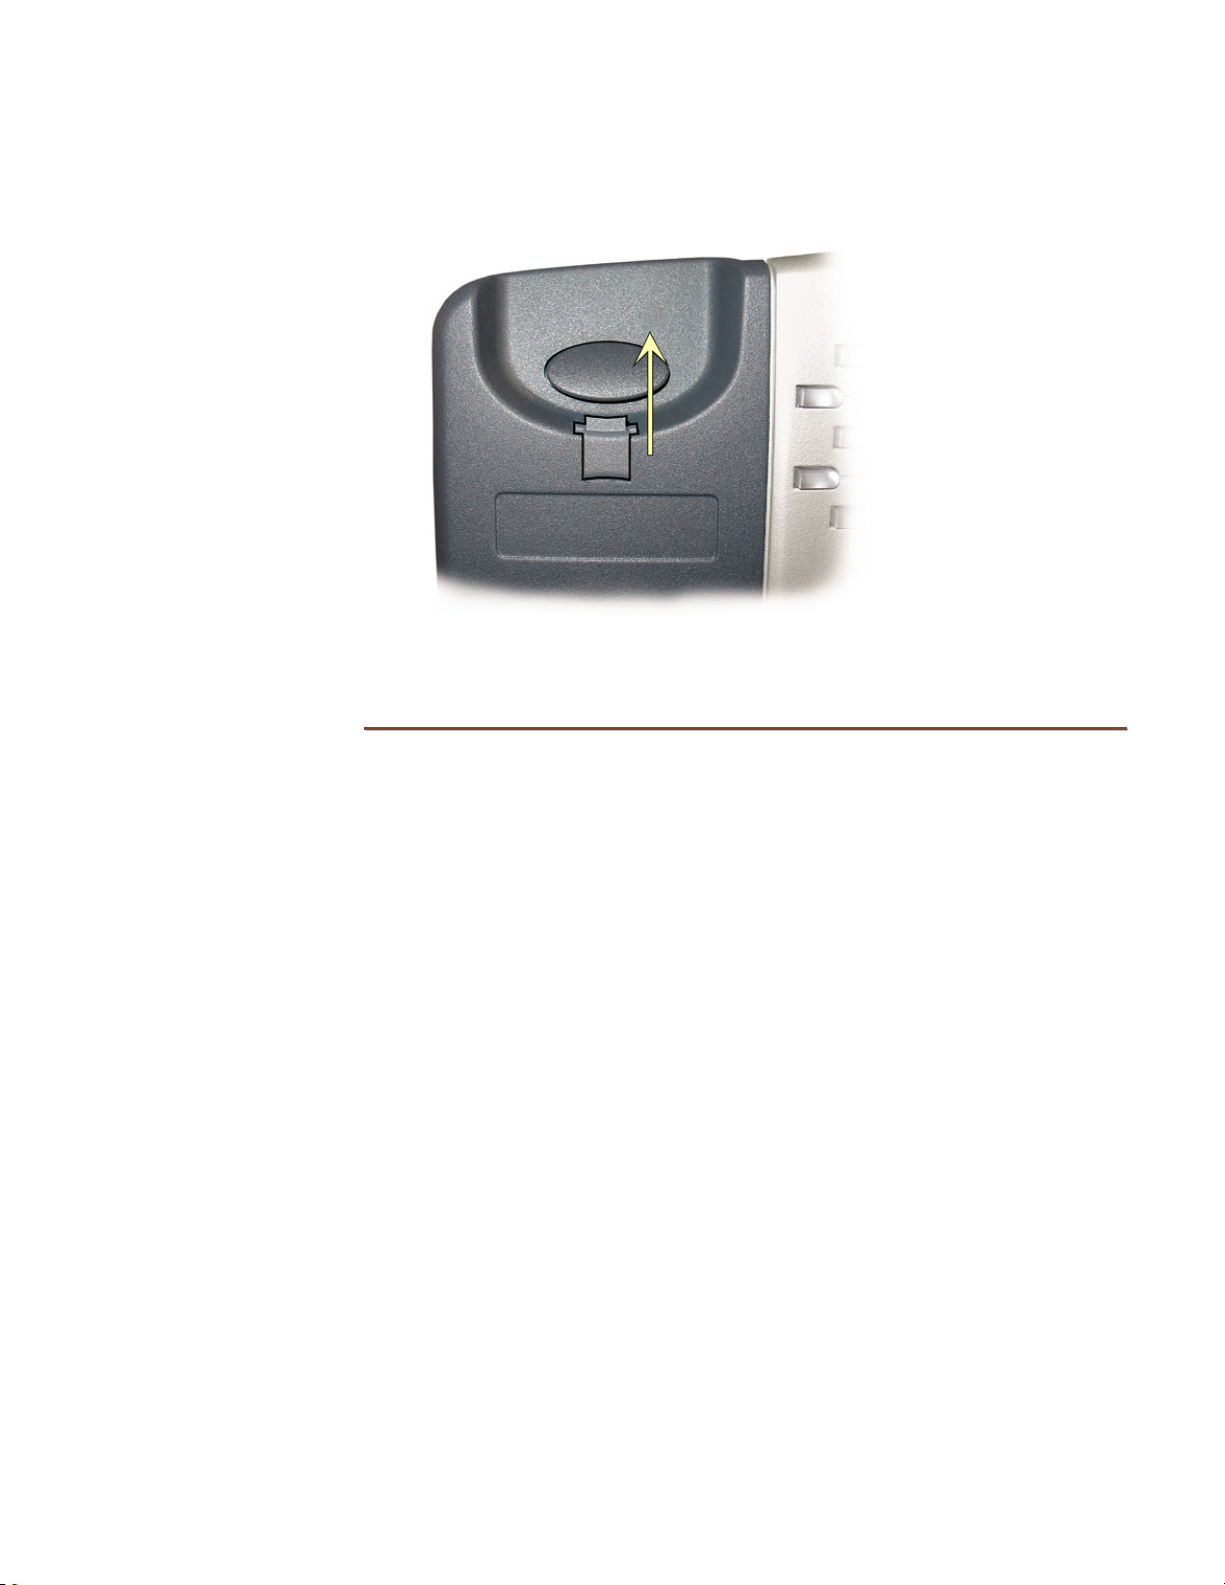
Pull out the handset retainer clip as shown. Rotate the clip 180°, and then re-insert the clip.
The tab should protrude into the hookswitch area for wall mount or high desktop position
use.
LLaabbeell tthhee SSeett
Multifunction keys on the 7810 are labeled on the display screen. Refer to page 36.
8030X label templates for Microsoft Word can be downloaded from www.teotech.com.
A space is provided beneath the handset for a directory number label. Use ½” x 1¾”
adhesive labels (Avery 8167 / 5267 or equivalent).
UUssiinngg LLooccaall IInnssppeecctt ttoo VVeerriiffyy KKeeyyss
Local Inspect allows you to identify the line appearance or feature assignment of each
configured key.
Refer to page 57.
13-280138 Rev. H Page 15
Page 16
Teo IP Phone 7810 TSG Series Installation Instructions
LLiinnee aanndd PPoowweerr CCoonnnneeccttiioonnss
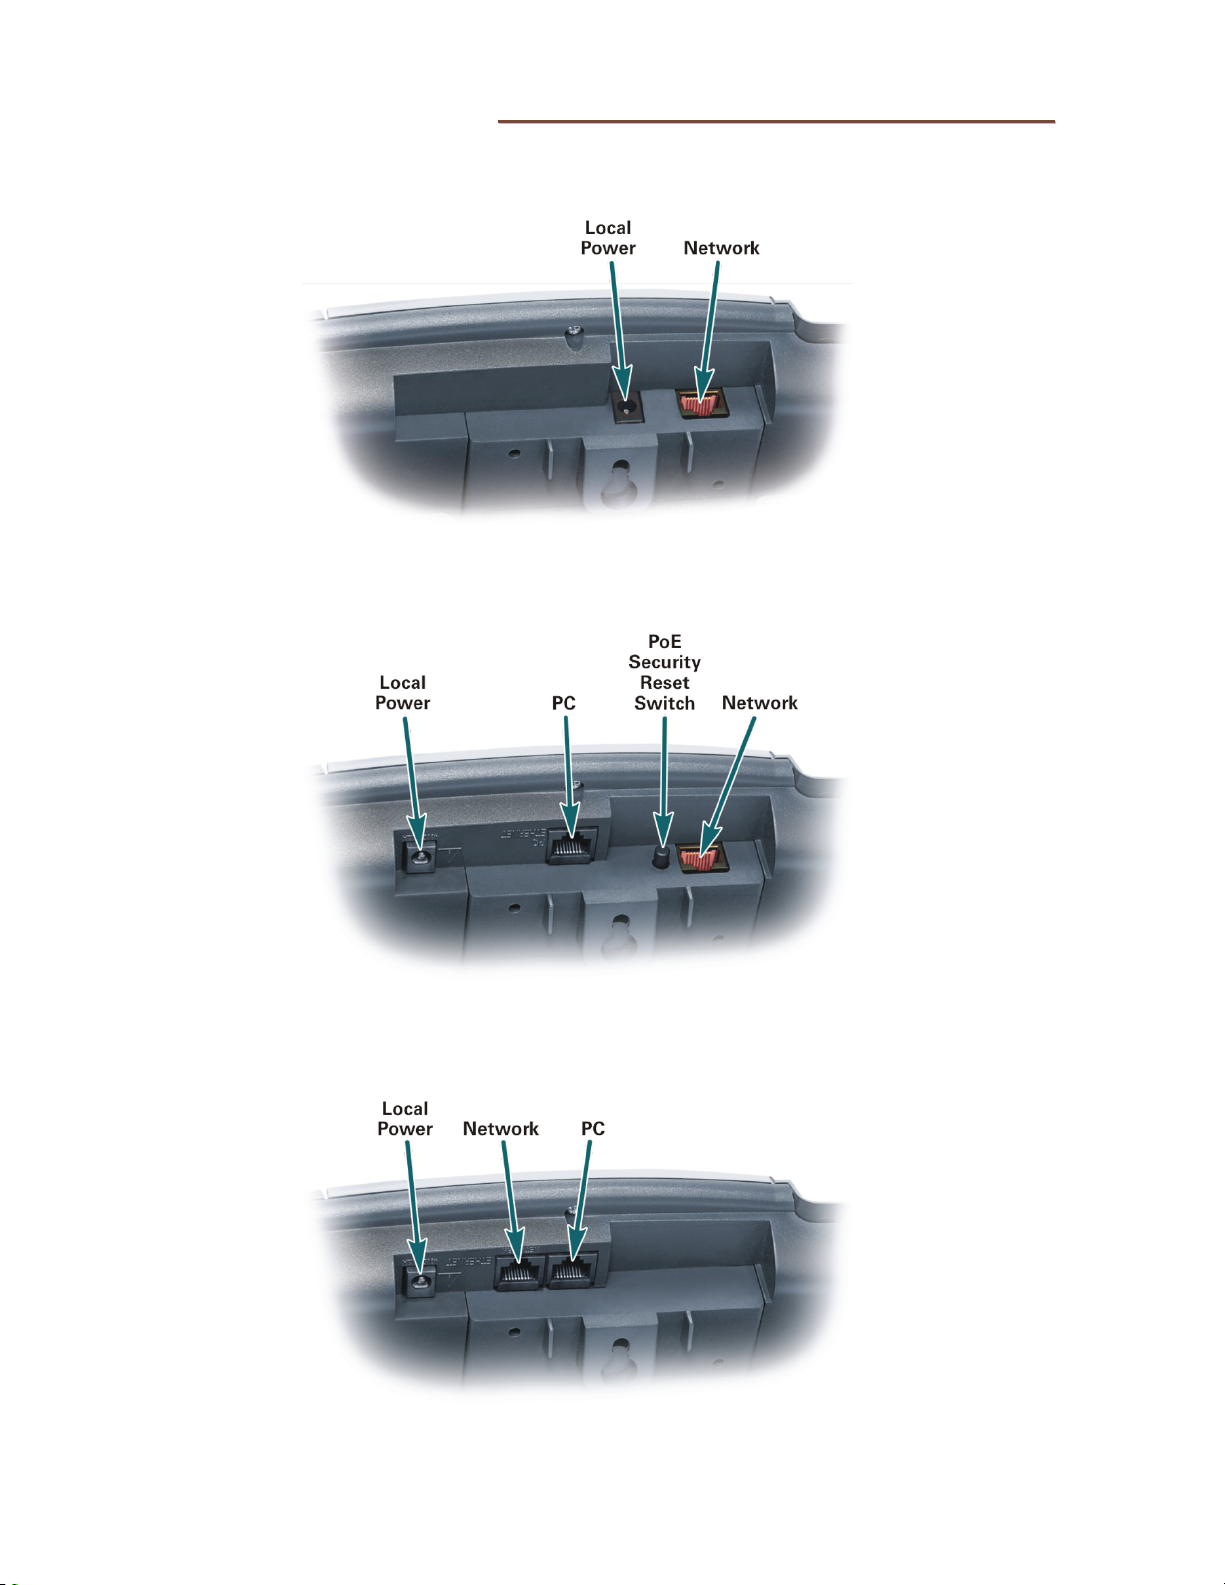
Refer to the pictures below when connecting Ethernet and power cables.
7810-TSG
7810PoE-TSGA
7810PoE-TSGB
Page 16 13-280138 Rev. H
Page 17

Installation
NNeettwwoorrkk CCoonnnneeccttiioonn
Connect the NETWORK jack on the phone to the LAN switch using a Category 5 or better
cable.
PPCC CCoonnnneeccttiioonn
If you want to use a PC on the same network connection, connect the PC network interface
card to the phone's PC
PPoowweerr CCoonnnneeccttiioonn
LLooccaall PPoowweerr
A local power option (-PWR1) is available for all TSG models.
WARNING: Select a Listed ITE "Limited Power Source, LPS or Class 2" power
supply rated 48 VDC, 0.2 A to 0.4 A, such as the Teo 901034.
Connect power after all other connections are complete. Plug the power supply
barrel connector into the round jack on the back of the phone. Connect the power
supply to a standard 120 VAC, 60 Hz grounded power outlet.
((77881100PPooEE--TTSSGGAA aanndd 77881100PPooEE--TTSSGGBB oonnllyy)
jack using a Category 5 or better cable.
)
PPoowweerr oovveerr EEtthheerrnneett
The 7810PoE-TSGB is compatible with IEEE 802.3af power over Ethernet cabling, utilizing
either power over spare cable pairs (midspan power source) or phantom power over
signaling pairs from the Ethernet switch (endpoint power source).
The 7810PoE-TSGA model is compatible with IEEE 802.3af endpoint power only.
Both models provide 802.3af PD Class 2 indication to the power sourcing equipment and
require a maximum of 5 watts of power.
PPooEE SSeeccuurriittyy RReesseett SSwwiittcchh
The 7810PoE-TSGA model provides complete metallic disconnect of the Ethernet line when
the phone is not powered.
To start the phone after connection to the PoE switch, press the Security Reset Switch until
the Message Waiting indicator lights (less than one second).
The phone will remain active until the Ethernet line is disconnected or disrupted.
The Security Reset Switch is not used with local power applications.
((77881100PPooEE--TTSSGGAA aanndd 77881100PPooEE--TTSSGGBB oonnllyy)
((77881100PPooEE--TTSSGGAA oonnllyy)
)
)
HHaannddsseett//HHeeaaddsseett
Plug the supplied handset into the HANDSET jack on the lower left side of the telephone.
Plug a compatible headset into the HEADSET jack on the upper left side of the telephone.
13-280138 Rev. H Page 17
Page 18
Teo IP Phone 7810 TSG Series Installation Instructions
123
abc
ABC
CCoonnffiigguurree tthhee SSeett
Appropriate IP addresses, configuration attributes, and passwords may be provided by
various network servers, providing automatic configuration of the phone.
You will be prompted for any required setup information that cannot be set automatically.
EEnntteerriinngg AAllpphhaannuummeerriicc CChhaarraacctteerrss
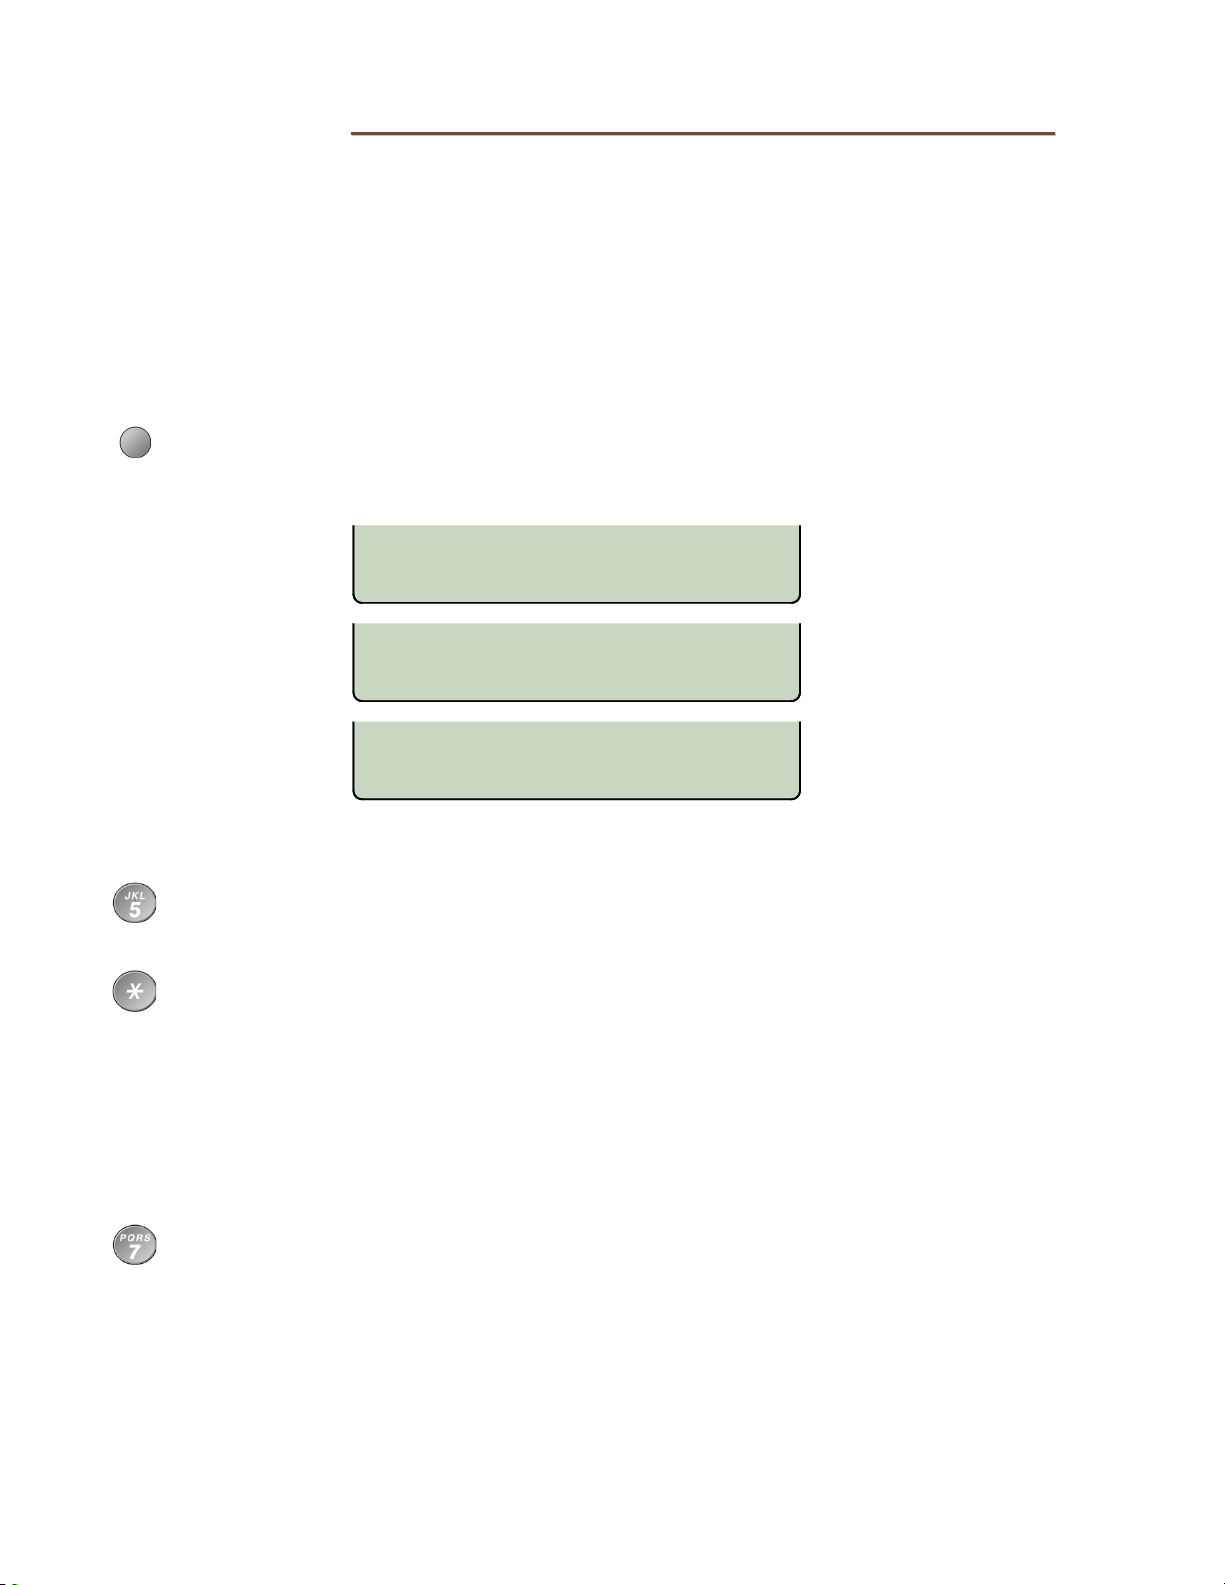
Character strings are entered with the dial pad. Three entry modes are available for most
fields – numeric, upper case, and lower case.
The entry mode default is numeric, as indicated by ‘123’ in the display above the 3
softkey. To enter uppercase (ABC) or lowercase (abc) characters, press the softkey
until the desired label entry mode is shown.
LINE ID= ¤
DELETE CLEAR
LINE ID= ¤
DELETE CLEAR
LINE ID= ¤
NNuummeerriicc CChhaarraacctteerrss
Press a dial pad key to enter a digit.
DELETE CLEAR
rd
The cursor will immediately advance to the next character position.
To enter a ∗ or a period, press the * key repeatedly until the desired character
appears.
After a short delay, the cursor will advance to the next character position. You can
also immediately press a dial pad key or the Right Arrow key to enter the next
character without waiting for the delay.
UUppppeerr oorr LLoowweerr CCaassee CChhaarraacctteerrss
Letters are entered with dial pad keys 2-9. Press a key repeatedly until the desired
character appears.
After a short delay, the cursor will advance to the next character position. You can
also immediately press a dial pad key or the Right Arrow key to enter the next
character without waiting for the delay.
Page 18 13-280138 Rev. H
Page 19
Installation
PPuunnccttuuaattiioonn aanndd SSppeecciiaall CChhaarraacctteerrss
To enter punctuation or special characters, press the * key when in upper or lower
case mode to show available characters in the top line of the display. Press the
key repeatedly until the cursor is on the desired character.
After a short delay, the character will be added to the dial string and the cursor will
advance to the next character position. You can also immediately press a dial pad
key to enter the next character without waiting for the delay.
.:+@_-/\,;*'"()<>~=?!$%&
DELETE CLEAR ABC
To enter a # or a space, press the # key repeatedly until the desired character
appears.
EEddiittiinngg CChhaarraacctteerr SSttrriinnggss
Press the Left Arrow or Right Arrow key to move the cursor.
Press a dial pad key to enter a character to the left of the cursor, or select DELETE
to delete the character under the cursor.
*
Select CLEAR to remove all characters.
13-280138 Rev. H Page 19
Page 20
Teo IP Phone 7810 TSG Series Installation Instructions
IInniittiiaalliizzaattiioonn
With the application of power, the phone’s operating software is loaded into internal
memory. During this interval, the Message Waiting Indicator will be illuminated. Upon
completion, the display will show the current software version.
Initializing...
APP VERSION 05.04.16
The display will show progress messages while establishing the communication layers.
Many configuration settings can be set automatically by a DHCP server and telephone
update server. DHCP should be used if available; it is enabled by default.
If DHCP and update servers are available and configured properly, the phone will prompt
for a Line ID and SIP Password the first time that the phone is connected to the network.
You may also be prompted for an authentication ID if required by the system.
LINE ID=
DELETE CLEAR 123
• Enter the appropriate Line ID (phone) number, and then press the
would typically be the phone number used for station-to-station calls.
OK key. This
AUTH ID=
DELETE CLEAR 123
• If prompted, enter the appropriate authentication ID number, and then press the
key. Leave this entry blank if no authentication ID is required.
OK
SIP PSWD=
DELETE CLEAR 123
• Enter the appropriate password, and then press the
no password is required.
• If the update server protocol and IP address are not supplied by DHCP, configure
these items as shown on the following page.
During the registration process, the line key indicators will flash red. When lines are
registered with the proxy server, the indicators will turn solid green momentarily, and then
go out. The following status message will be displayed when registration is complete.
OK key. Leave this entry blank if
ALL LINES REGISTERED
The idle display will then appear, indicating that the phone is ready for use.
Page 20 13-280138 Rev. H
Page 21
Installation
TPS
IInniittiiaalliizzaattiioonn wwiitthhoouutt DDHHCCPP SSeerrvveerr
The DHCP (Dynamic Host Configuration Protocol) server automatically assigns the
telephone address, server addresses, and subnet mask. If DHCP is not available, or is not
provisioned with all of these parameters, they must be entered manually.
The following display will be shown while the phone attempts to connect to a DHCP server.
CHECKING DHCP
DISABLE
• If no DHCP server is available, select DISABLE to use static addressing.
IP4 ADDR=000.000.000.000
EDIT
• Select EDIT.
IP4 ADDR=000.000.000.000
DELETE CLEAR PING4
• Select CLEAR to remove the displayed IP address. Enter the phone’s IP address with
the dial pad; use the
• Enter the required subnet mask and gateway IP address when prompted; press the
OK key after each entry.
key to enter a ".". Press the OK key when finished.
*
Next, the phone will prompt for an update server protocol and IP address.
SELECT UPDATE SERVER: ¤
TEO TFTP HTTP HT
SELECT UPDATE SERVER: ¤
NONE
• Select a protocol, and then enter the update server IP address. Press the
when finished. If no update server is available, select NONE.
The phone then will prompt for the Line ID, authentication ID, and SIP password as shown
on the previous page.
OK key
13-280138 Rev. H Page 21
Page 22

Teo IP Phone 7810 TSG Series Installation Instructions
Page 22 13-280138 Rev. H
Page 23
I
n
s
t
a
l
l
a
t
i
o
n
O
p
t
i
o
n
s
I
n
s
t
a
l
l
a
t
i
o
n
O
p
t
i
I
n
s
t
a
l
l
a
t
i
o
n
O
The following options are available from the Installation Options menu:
• IP Addresses • Reset to Default Settings
• SIP Options • Configuration Updates *
• Quality of Service * • PC Port (7810PoE models)
• Keys • Security Options
• Call Timeouts • Error Log
• Installation PIN
* Noted options are explained briefly in this manual.
For details, refer to the IP Telephone Network Administration Guide
IInnssttaallllaattiioonn OOppttiioonnss MMeennuu
You can enter the Installation Options menu when the phone is idle.
p
o
t
i
o
n
s
n
s
.
Press the
Select INSTL.
The Installation Options menu may be protected by a PIN. Enter your PIN with the
dial pad, and then press the
To change or remove the PIN, refer to page 51.
When
Arrow key to see additional menu selections.
SETUP key.
◄ or ►
appears in the upper line of the display, you can press the Left or Right
SETUP MENU
INSTL ADMIN USER
OK key.
ENTER PIN:********
£BKSP CLEAR
INSTALLATION OPTIONS ¤
IP SIP QoS KEYS
INSTALLATION OPTIONS £¤
CALL PIN RESET UPDATE
INSTALLATION OPTIONS £
PCPORT SECRTY LOG
13-280138 Rev. H Page 23
Page 24

Teo IP Phone 7810 TSG Series Installation Instructions
Some configuration changes only take effect after a phone restart. You may be prompted
to allow a restart before you can proceed with changes.
RESTART NEEDED: PROCEED?
YES NO
Select YES to proceed with editing, or NO to abort and return to the previous
menu.
After exiting Setup Mode, you may be prompted to restart the phone. Some changes
require a restart.
RESTART WITH NEW VALUES?
YES NO
Select YES to restart the phone immediately, or NO return to the Setup menu.
IIPP AAddddrreesssseess
IP address entries are required for the phone, subnet mask, gateway/router, SIP proxy, and
optional update and SNTP servers. By default, the phone uses DHCP (Dynamic Host
Configuration Protocol) to automatically set the IP addresses and the subnet mask.
The phone can also obtain server addresses, as well as software updates and QoS settings
from an update server. Please refer to the
AAuuttoommaattiicc IIPP CCoonnffiigguurraattiioonn ((DDHHCCPP))
IP addresses for the telephone, servers, and subnet mask are normally provided by a DHCP
server when the phone starts.
The DHCP server can supply the following addresses:
• Phone IP Address
• Phone Subnet Mask
• Phone Domain Name
• Default Gateway IP Address
• DNS Server IP Address(es)
• SNTP Server IP Address(es)
• Update Server IP Address
• SIP Proxy IP Address(es)
IP Telephone Network Administration Guide
.
MMaannuuaall IIPP CCoonnffiigguurraattiioonn
All IP addresses listed above may be entered as static (fixed) addresses from the phone’s
Installation Options Menu. When setting up servers and telephones, server names can be
entered in place of IP addresses.
Page 24 13-280138 Rev. H
Page 25
Installation Options
Note: You must restart the phone after any IP address changes have been made for the changes
to take effect. (
From the Installation Options menu, select IP.
SETUP → INSTL → IP)
(
SETUP → ADMIN
→
► → RESTART)
IP ADDRESSES ¤
PHONE SUBNET GATEWY DNS
IP ADDRESSES £
UPDATE SNTP SYSLOG MAC
Select the IP address to view or edit.
PHONE – IP address of this telephone
SUBNET – Subnet mask for telephone IP addresses
GATEWY – Gateway to WAN or Internet
DNS – Domain name server
UPDATE – Update server
SNTP – Time server
SYSLOG – Error and QoS logging server
MAC – Ethernet MAC address (view only)
Note: To edit the SIP proxy server and SIP registration server IP address,
see pages 32–33.
IInntteerrnneett PPrroottooccooll
The phone supports both IPv4 and IPv6 protocols. The IP address configuration method
can be selected independently for the phone, domain name server, update server, SNTP
server, and Syslog server.
PPhhoonnee IIPP AAddddrreessss
The phone can have a IPv4 address, as well as several IPv6 addresses.
PHONE ADDRESS OPTIONS
IPv4 IPv6
Select the IP address type that you want to configure.
IIPPvv44
IP4 ADDR=216.122.043.243
EDIT PING4
The phone's IPv4 address is normally supplied by DHCP.
13-280138 Rev. H Page 25
Page 26
Teo IP Phone 7810 TSG Series Installation Instructions
STATIC
UPDATE
CFG
CFG
To use static addressing for the phone, subnet, and gateway, first select STATIC
from the ADDRESS CONFIG OPTIONS - IPv4 menu.
SETUP → INSTL → IP → UPDATE → CFG → STATIC) (page 53)
(
IP ADDRESSES ¤
SNTP SYSLOG MAC
UPDATE=192.168.1.1
EDIT PING4
UPDATE ADDR CONFG=STATIC
DHCP4
Enter the phone's new IP address with the dial pad.
SETUP → INSTL → IP → PHONE → IPv4 → EDIT)
(
IPv4 ADDR=192.168.1.35
DELETE CLEAR PING4
IIPPvv66
IPv6 ADDRESS(ES)
LINK GLBL1 ADD
Select LINK to view the local link address.
If a global address has been automatically configured, GLBL1 will be shown in the
menu. Select this option to edit or remove the global address.
Select ADD to add a new global address. The phone can have up to five global
addresses.
Enter the global address with the dial pad.
OOtthheerr IIPP AAddddrreesssseess
After selecting an IP submenu (DNS, UPDATE, SNTP, or SYSLOG), select CFG to
change the IP address configuration method to DHCP4 or STATIC.
ADDR=2115:21:3:A:204:8D:
VIEW EDIT REM PING6
DNS=192.168.1.2
EDIT PING4
DNS ADDR CONFIG=DHCP4
DHCP4 STATIC
Page 26 13-280138 Rev. H
Page 27
Installation Options
OPTION
OFFSET
If you have set the protocol to STATIC, select EDIT to change the address, and then
enter the address with the dial pad. The address can be an IP address or fully
qualified domain name (FQDN). Select 123 to change between numeric, uppercase
alpha and lowercase alpha character entry mode.
DNS=192.168.1.2
DELETE CLEAR 123
UUppddaattee SSeerrvveerr
In addition to the IP address or FQDN, you can also specify a non-standard port and path
name for update files. Enter a colon between the IP address or FQDN and the port number.
To enter a colon, select 123 to change to alpha character entry mode (ABC or abc), then
press * twice. If the update files are not located in the root directory of the update sever,
include a path name to the appropriate subdirectory under the root directory.
UPDATE=myserver:9443/teo
DELETE CLEAR abc
SSNNTTPP SSeerrvveerr
In addition to the IP address or FQDN, you can also specify the time offset (in hours) from
UTC for your local time zone, and automatically adjust for daylight savings time.
TTiimmee OOffffsseett
SNTP=206.080.111.006
EDIT
PING4 CFG
13-280138 Rev. H Page 27
Select OPTION.
SNTP OPTIONS
DSTADJ
Select OFFSET.
CHG AUTO CONFIG? DHCP4
DHCP4 STATIC
If the above display appears, select an addressing option, then press the OK key.
TIME OFFSET=-8 HOURS
(-) (+)
Select (–) or (+) to change the time offset.
Press the
OK key twice when finished.
Page 28
Teo IP Phone 7810 TSG Series Installation Instructions
OPTION
DSTADJ
OPTION
DDaayylliigghhtt SSaavviinnggss TTiimmee
Select OPTION.
Select DSTADJ.
Select ON to automatically adjust the clock for daylight savings time, or OFF to
disable daylight savings time adjustment.
The default setting in the phone starts daylight savings time at 2:00 a.m. on the
second Sunday of March, and ends it at 2:00 a.m. on the first Sunday of November.
These settings can be customized in the phone's XML configuration file – refer to
IP Telephone Network Administration Guide
the
SNTP=206.080.111.006
EDIT
PING4 CFG
SNTP OPTIONS
OFFSET
AUTO DAYLIGHT SAVING=ON
ON OFF
.
Press the OK key three times when finished.
SSyysslloogg SSeerrvveerr
A Syslog server can record error logs and QoS statistics sent from activated telephones on
the network.
SYSLOG=206.080.123.012
EDIT
Select OPTION, and then choose one of these options:
NONE – disable Syslog messages from this telephone
BASIC – record telephone error logs
QoS – record telephone error logs and QoS statistics
PING4 CFG
SYSLOG OPTION=BASIC
NONE BASIC QoS
Press the
Page 28 13-280138 Rev. H
OK key when finished.
Page 29
Installation Options
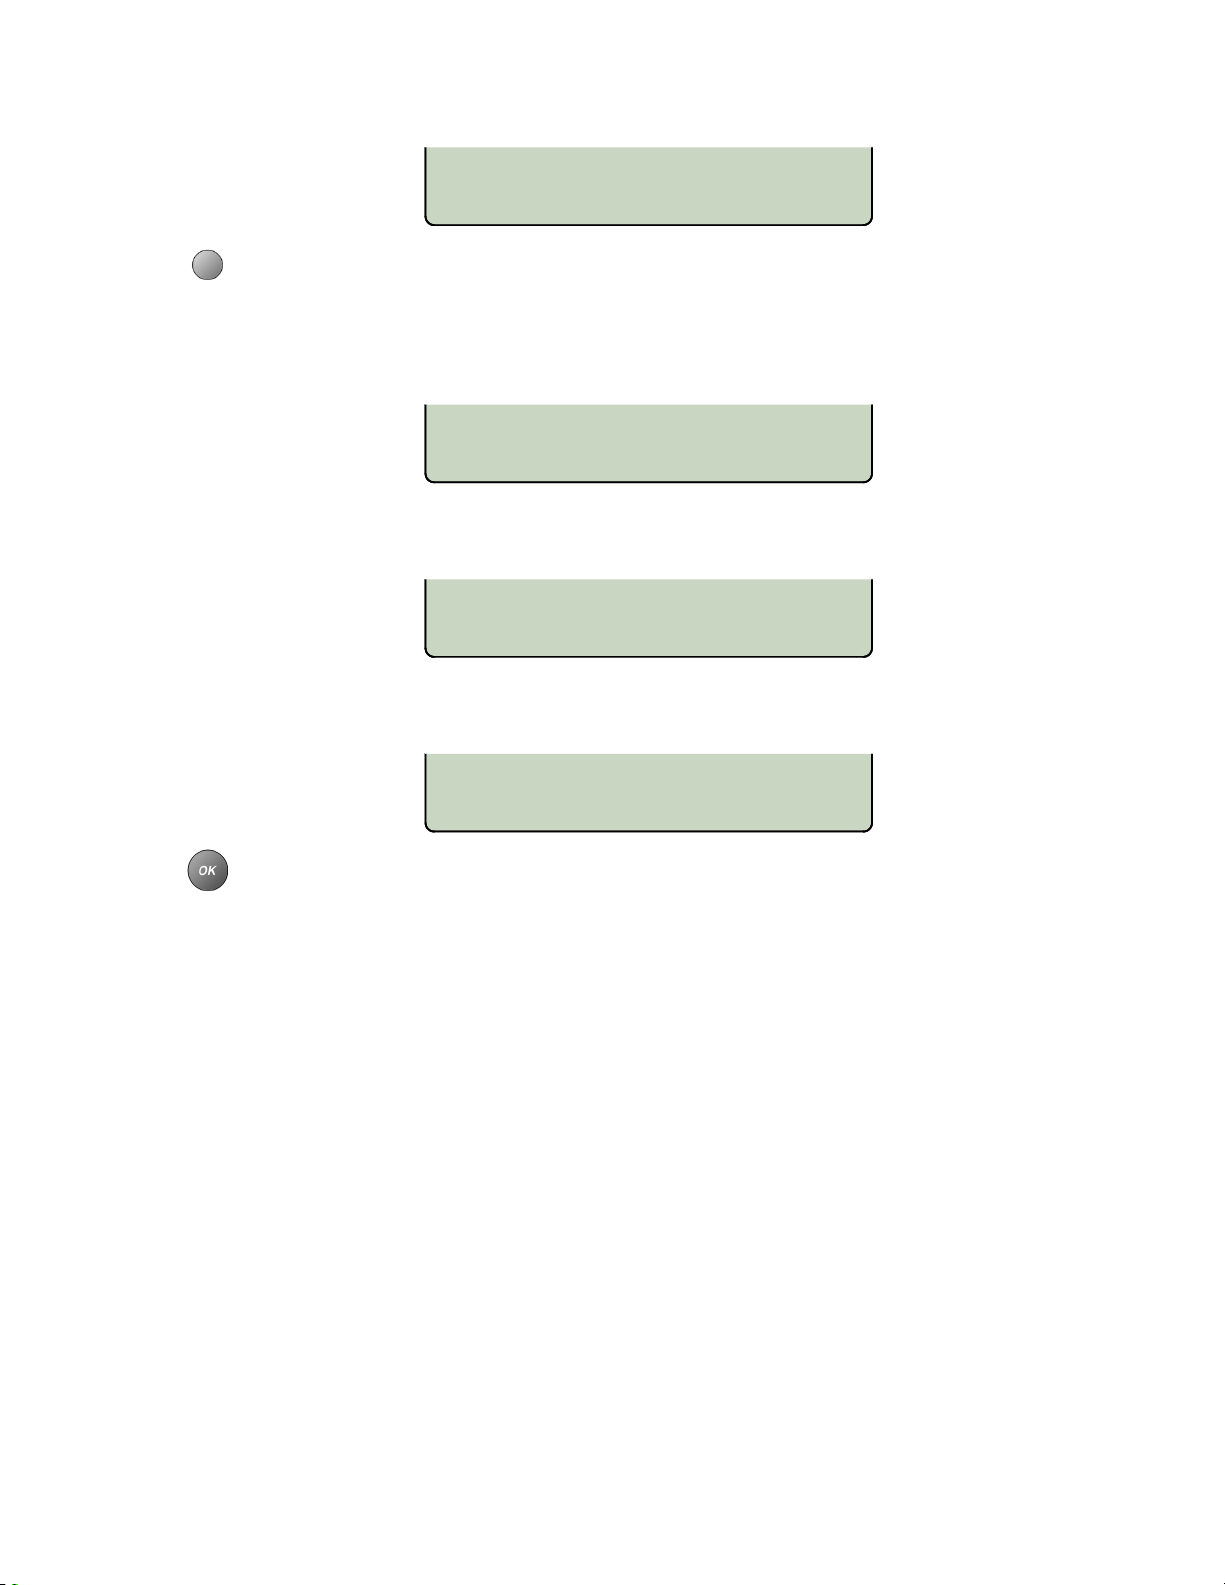
PPiinngg TTeesstt
To test the phone, gateway/router, or server address, select PING4 or PING6 from
the device’s IP address menu. If you have entered a new phone IP address, the
phone must be restarted before ping will work properly.
SETUP → ADMIN
(
While the phone is pinging the address, the following display will appear.
If a response is received, indicating a valid address, "PING4 SUCCESSFUL" or
"PING6 SUCCESSFUL" will be displayed.
If no response is received, the entered address is invalid. "PING4 FAILED" OR
"PING6 FAILED" will be displayed.
IP4 ADDR=216.122.043.243
EDIT PING4
→
► → RESTART)
PINGING IP4 ADDRESS...
PRESS ANY KEY TO CANCEL
PING4 SUCCESSFUL
PRESS ANY KEY TO EXIT
PING4 FAILED
PRESS ANY KEY TO EXIT
Press any key to return to the previous menu.
13-280138 Rev. H Page 29
Page 30
Teo IP Phone 7810 TSG Series Installation Instructions
SSIIPP CCoonnffiigguurraattiioonn
The SIP options configure the phone to allow registration with and signaling of SIP Server
applications. Please refer to the
server documentation.
From the Installation Options menu, select SIP.
SETUP
(
→ INSTL → SIP)
IP Telephone Network Administration Guide
and the SIP
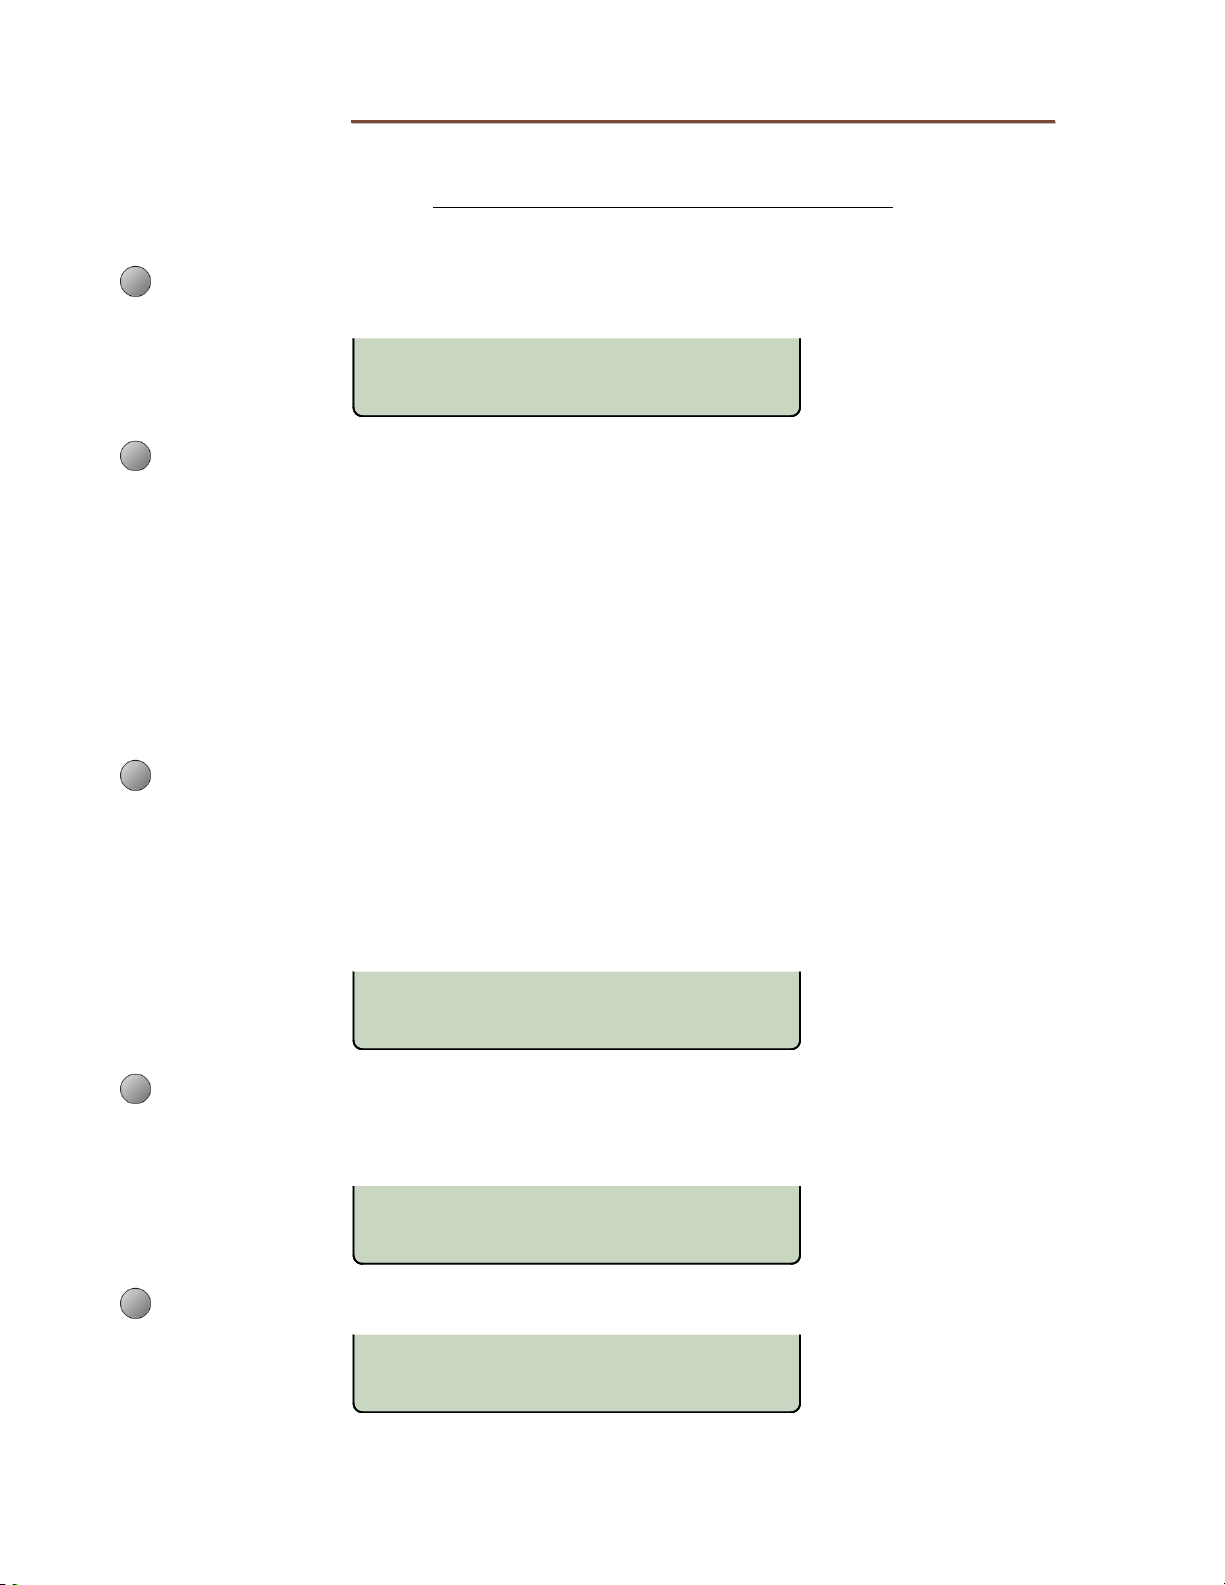
SIP CONFIGURATION
PHONE PROXY REGSTR MWI
Select one of the SIP options.
PHONE – domain name, port, and RTP start port for this telephone
PROXY – SIP Proxy server IP address and port
REGSTR – registration enable, SIP Registrar server IP address and
port
MWI – message summary event subscription for Message
Waiting Indication
After selecting an option to view or edit, you can begin editing immediately if the
phone is not currently registered with the SIP server.
If the phone is currently registered, select CHANGE to edit the setting, or press the
OK key to return to the previous menu (PHONE, PROXY, or REGSTR).
You will be warned that a restart of the phone is required for the changes to take
effect. Select YES to continue editing, or NO to return to the previous menu.
PPHHOONNEE ((SSIIPP PPhhoonnee CCoonnffiigguurraattiioonn))
SIP PHONE CONFIGURATION
DOMAIN PORT RTP
Select one of the displayed options. The current setting will be shown.
DOMAIN
(Domain Name or IP Address)
DOMAIN=DOMAIN.COMPANY.CO
CHANGE
Select CHANGE.
DOMAIN=DOMAIN.COMPANY.CO
DELETE CLEAR ABC
Page 30 13-280138 Rev. H
Page 31
Installation Options
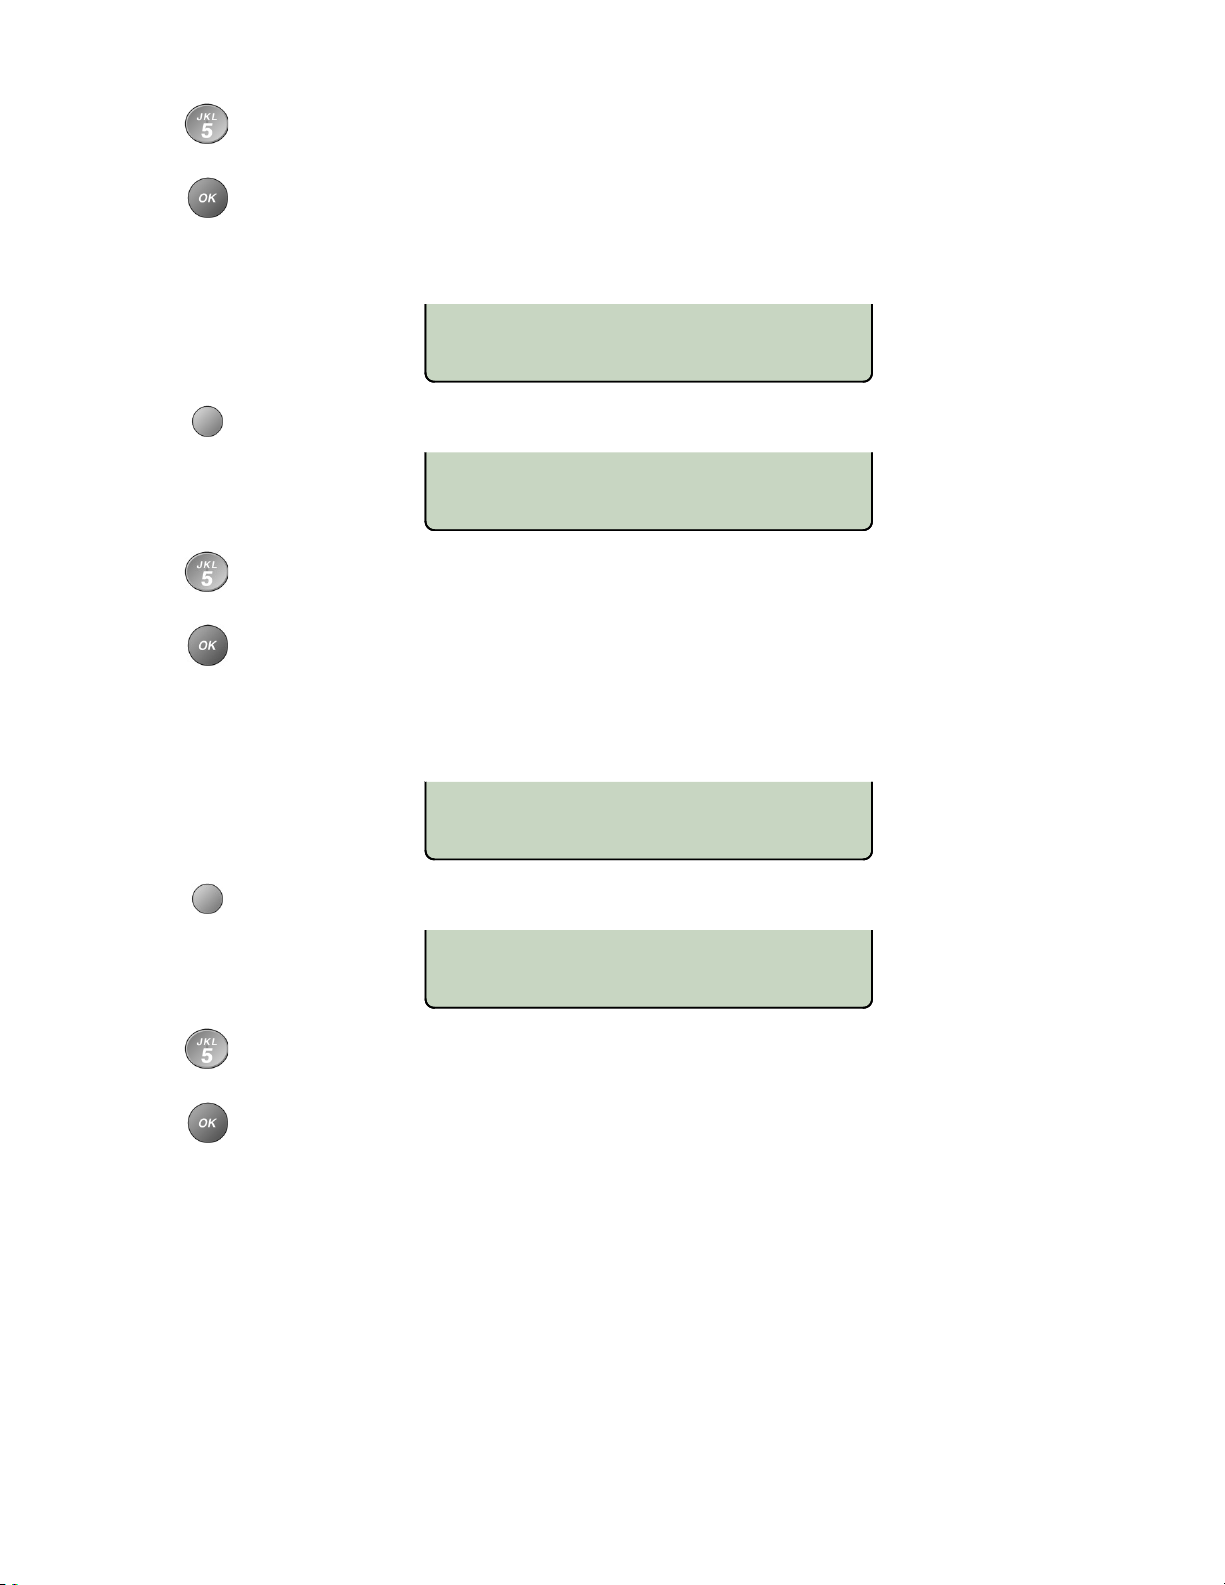
Enter or edit the domain name or IP address with the dial pad (maximum 128
characters).
Character entry is explained on page 18.
When finished, press the
PORT
Select CHANGE.
Enter or edit the proxy port number with the dial pad (maximum 5 numeric
characters).
When finished, press the
SIP signaling will use the new port number on the next call or registration attempt.
RTP
(RTP Start Port)
OK key to return to the SIP Phone Configuration menu.
SIP PORT=5060
CHANGE
SIP PORT=5060
DELETE CLEAR 123
Character entry is explained on page 18.
OK key to return to the SIP Phone Configuration menu.
RTP PORT=16384
CHANGE
Select CHANGE.
RTP PORT=16384
DELETE CLEAR 123
Enter or edit the RTP start port number with the dial pad (maximum 5 numeric
characters).
When finished,
menu. SIP signaling will use the new port number on the next call or registration
attempt.
Character entry is explained on page 18.
press the OK key twice to return to the SIP Phone Configuration
13-280138 Rev. H Page 31
Page 32
Teo IP Phone 7810 TSG Series Installation Instructions
PPRROOXXYY ((SSIIPP PPrrooxxyy))
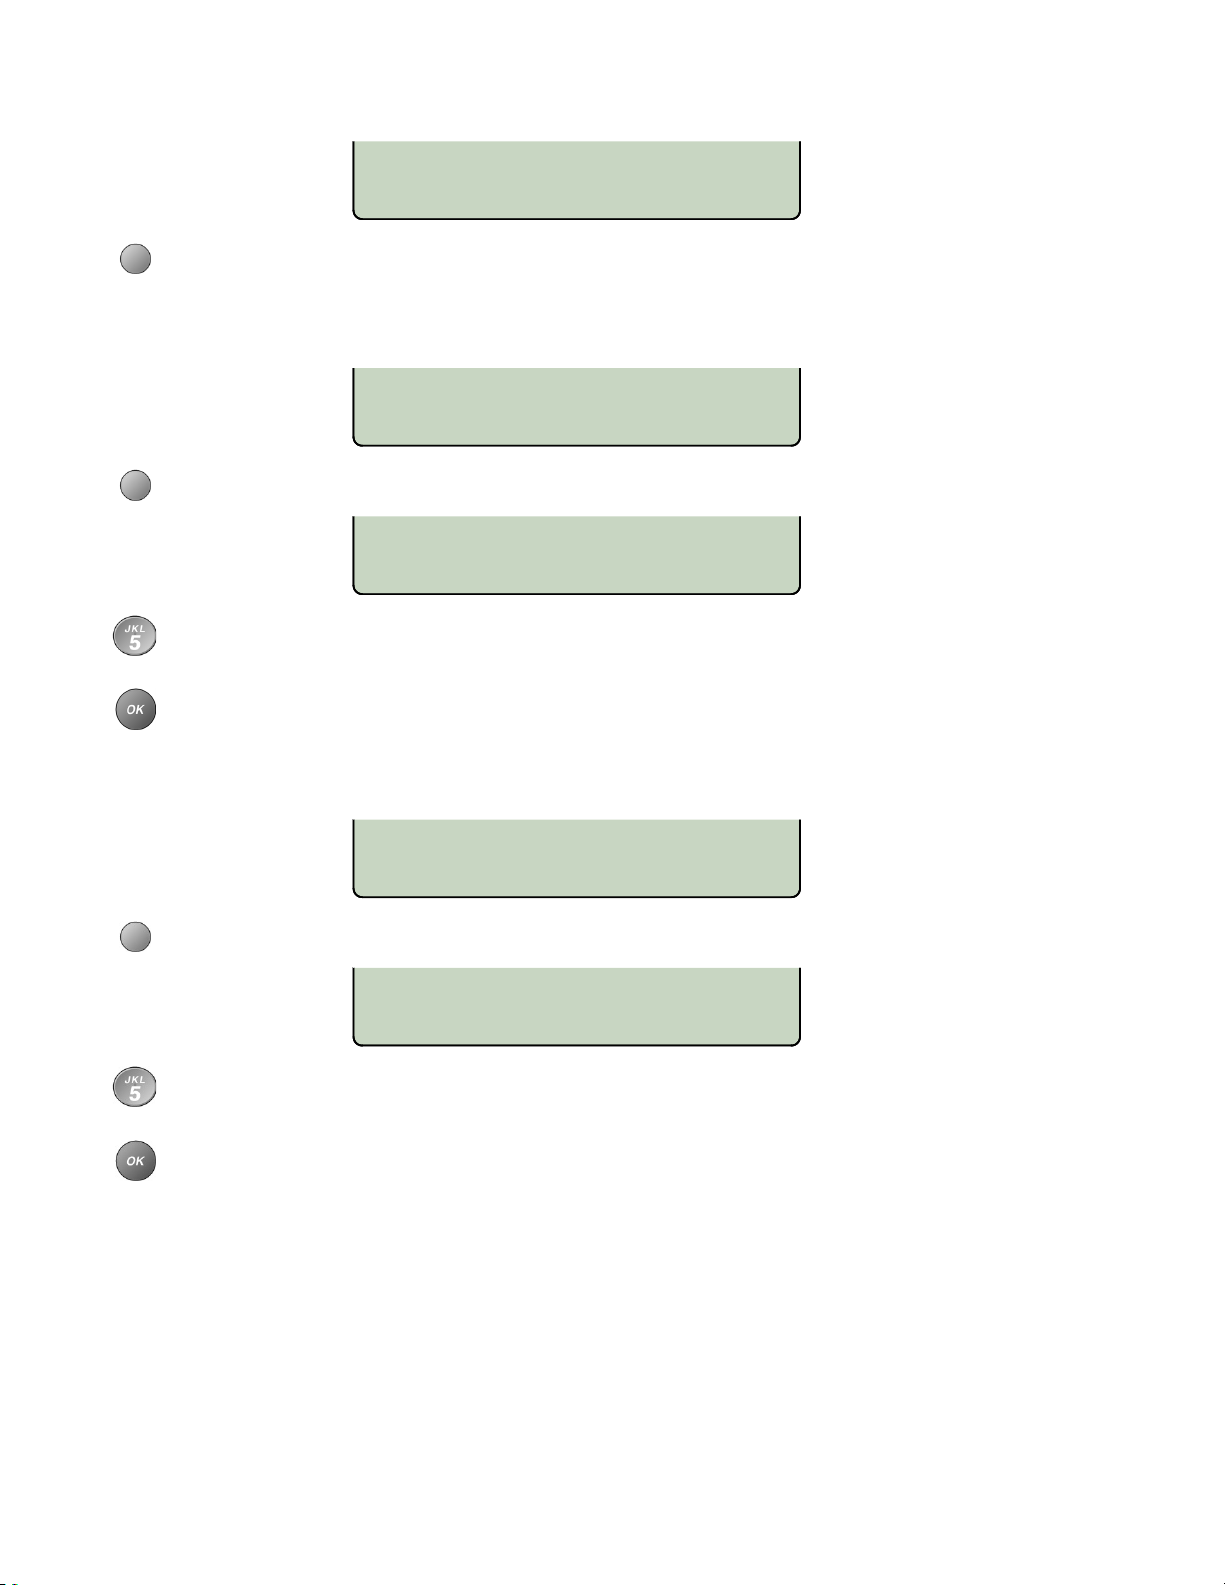
SIP PROXY CONFIGURATION
ID PORT
Select one of the displayed options. The current setting will be shown.
ID
(Fully-Qualified Domain Name or IP Address)
PROXY=192.168.72.111
CHANGE
Select CHANGE.
PROXY=192.168.72.111
DELETE CLEAR 123
Enter or edit the fully-qualified domain name or IP address with the dial pad
(maximum 128 characters).
Character entry is explained on page 18.
PORT
When finished, press the
OK key to return to the SIP Proxy Configuration menu.
PROXY PORT=5060
CHANGE
Select CHANGE.
PROXY PORT=5060
DELETE CLEAR 123
Enter or edit the proxy port number with the dial pad (maximum 5 numeric
characters).
When finished,
signaling will use the new proxy port number on the next call or registration
attempt.
Character entry is explained on page 18.
press the OK key to return to the SIP Proxy Configuration menu. SIP
Page 32 13-280138 Rev. H
Page 33
Installation Options
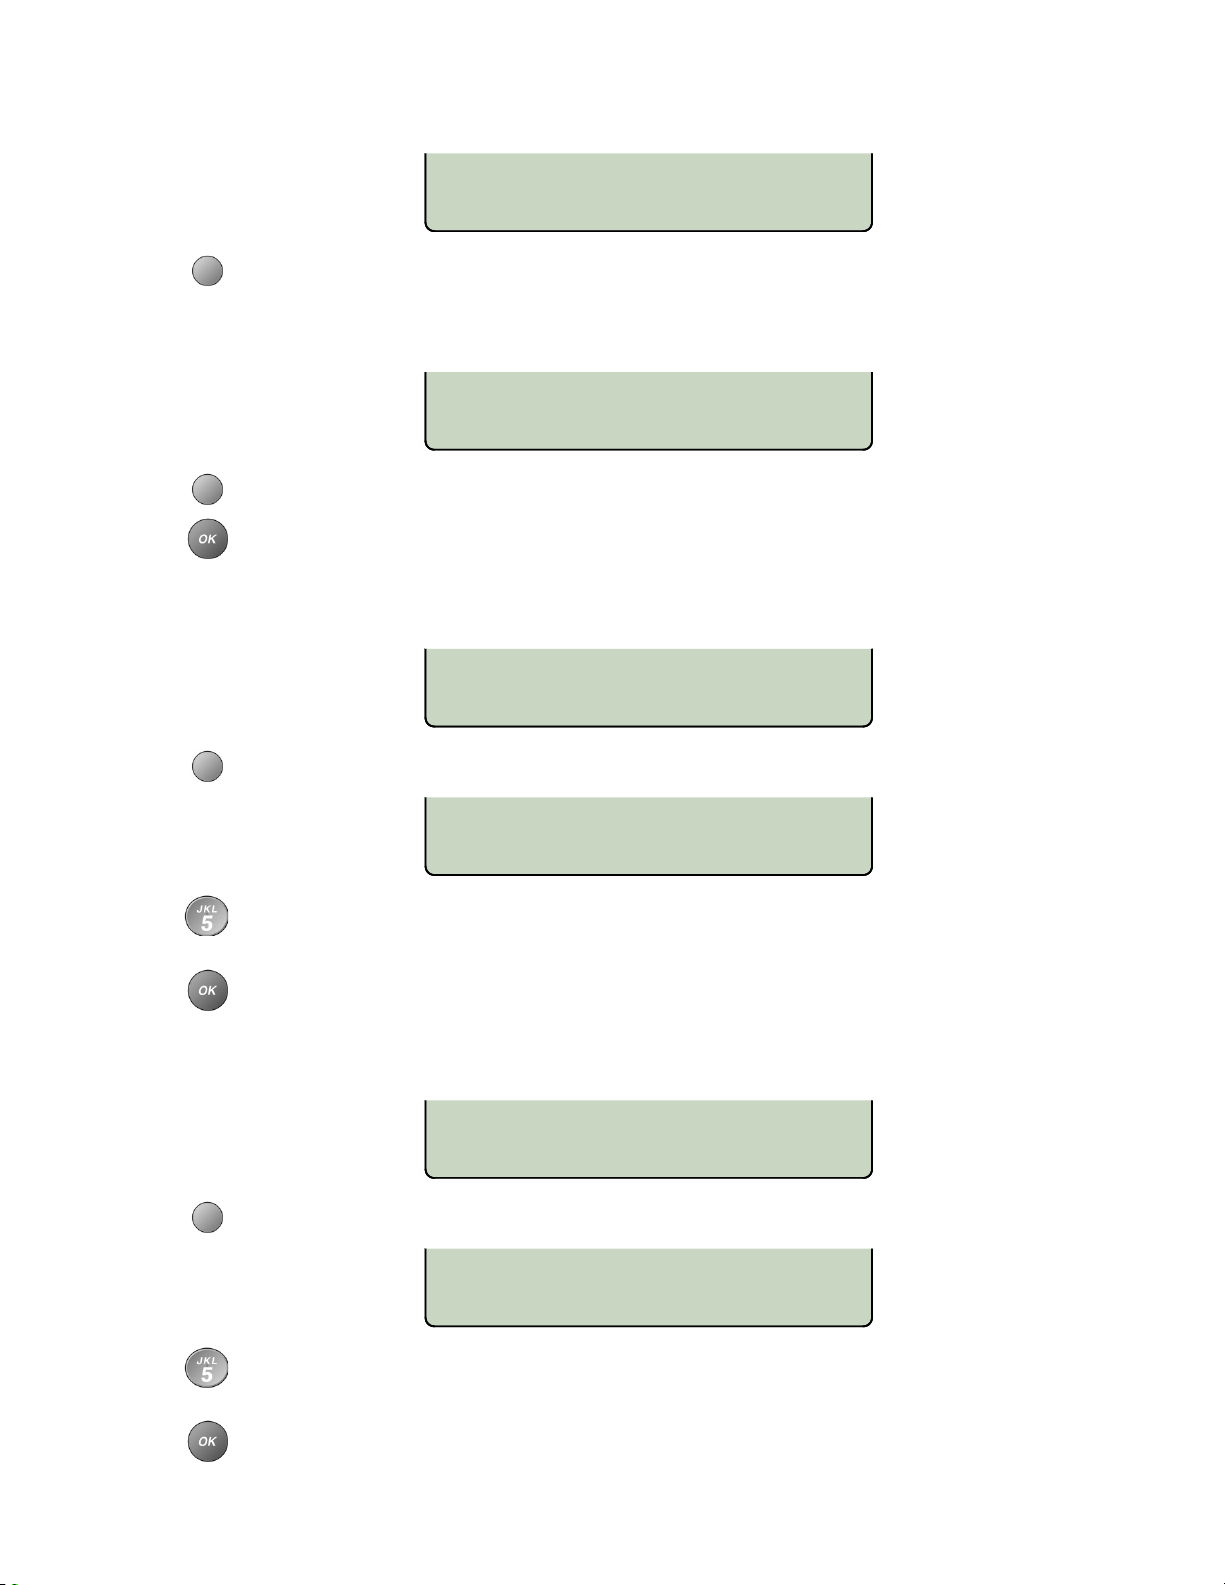
RREEGGSSTTRR ((SSIIPP RReeggiissttrraattiioonn))
SIP REGISTRATION
ENABLE ID PORT
Select one of the displayed options. The current setting will be shown.
ENABLE
(Enable or Disable SIP Registration)
SIP REG=ENABLED
ENABLE DISABLE
Select ENABLE or DISABLE.
When finished,
ID
(Fully-Qualified Domain Name or IP Address)
press the OK key to return to the SIP Registration menu.
REG=192.168.72.111
CHANGE
PORT
Select CHANGE.
REG=192.168.72.111
DELETE CLEAR 123
Enter or edit the fully-qualified domain name or IP address with the dial pad
(maximum 128 characters).
When finished, press the
Character entry is explained on page 18.
OK key to return to the SIP Registration menu.
REGISTRAR PORT=5060
CHANGE
Select CHANGE.
REGISTRAR PORT=5060
DELETE CLEAR 123
Enter or edit the proxy port number with the dial pad (maximum 5 numeric
characters).
When finished, press the
SIP signaling will use the new port number on the next call or registration attempt.
13-280138 Rev. H Page 33
Character entry is explained on page 18.
OK key to return to the SIP Phone Configuration menu.
Page 34

Teo IP Phone 7810 TSG Series Installation Instructions
MMWWII ((MMeessssaaggee SSuummmmaarryy EEvveenntt SSuubbssccrriippttiioonn ffoorr MMWWII))
This setting determines whether the phone subscribes to message summary events for
Message Waiting Indication. This parameter should be set to
systems.
OFF for Cisco voicemail
MSG-SUMMARY SUB=ON
OFF
Select OFF or ON. The current setting will be shown.
Page 34 13-280138 Rev. H
Page 35
Installation Options
QQuuaalliittyy ooff SSeerrvviiccee
Quality of Service (QoS) settings can improve voice performance over a network by
prioritizing voice packets.
These settings must be coordinated with other network devices, and should not be
changed unless required to correct audio problems. Consult with your network
administrator before changing these settings.
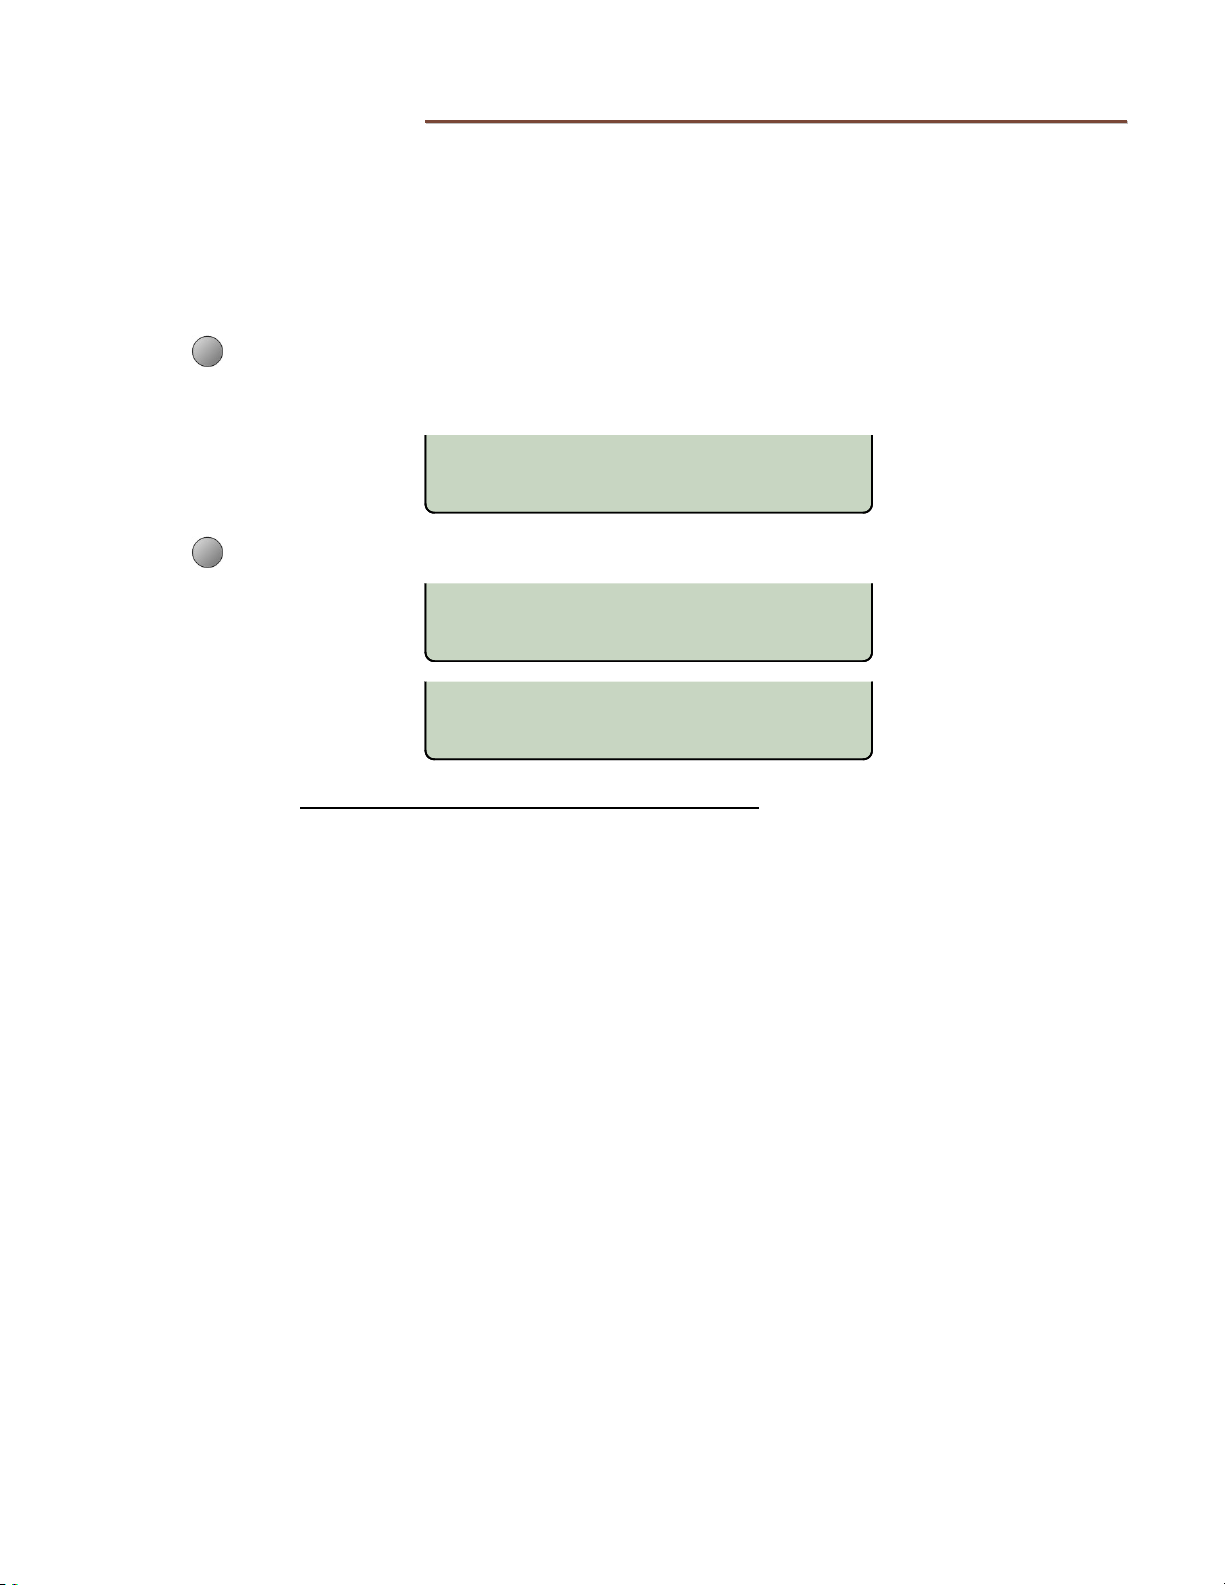
To view or change Quality of Service settings, select QoS from the Installation
Options menu.
SETUP → INSTL → QoS)
(
Select L2 for Layer 2, or L3 for Layer 3.
Refer to the
QUALITY of SERVICE
L2 L3
LAYER 2 802.1Q=ON
OFF PHONE PC
LAYER 3 DIFFSERV
VOICE SIGNAL
IP Telephone Network Administration Guide
for help with setting QoS options.
13-280138 Rev. H Page 35
Page 36
Teo IP Phone 7810 TSG Series Installation Instructions
LABEL
Green
Red
Off
CCoonnffiigguurriinngg KKeeyyss
You can assign line appearances, feature activators, and DSS/BLF/Speed Dial numbers to
keys, and set up the
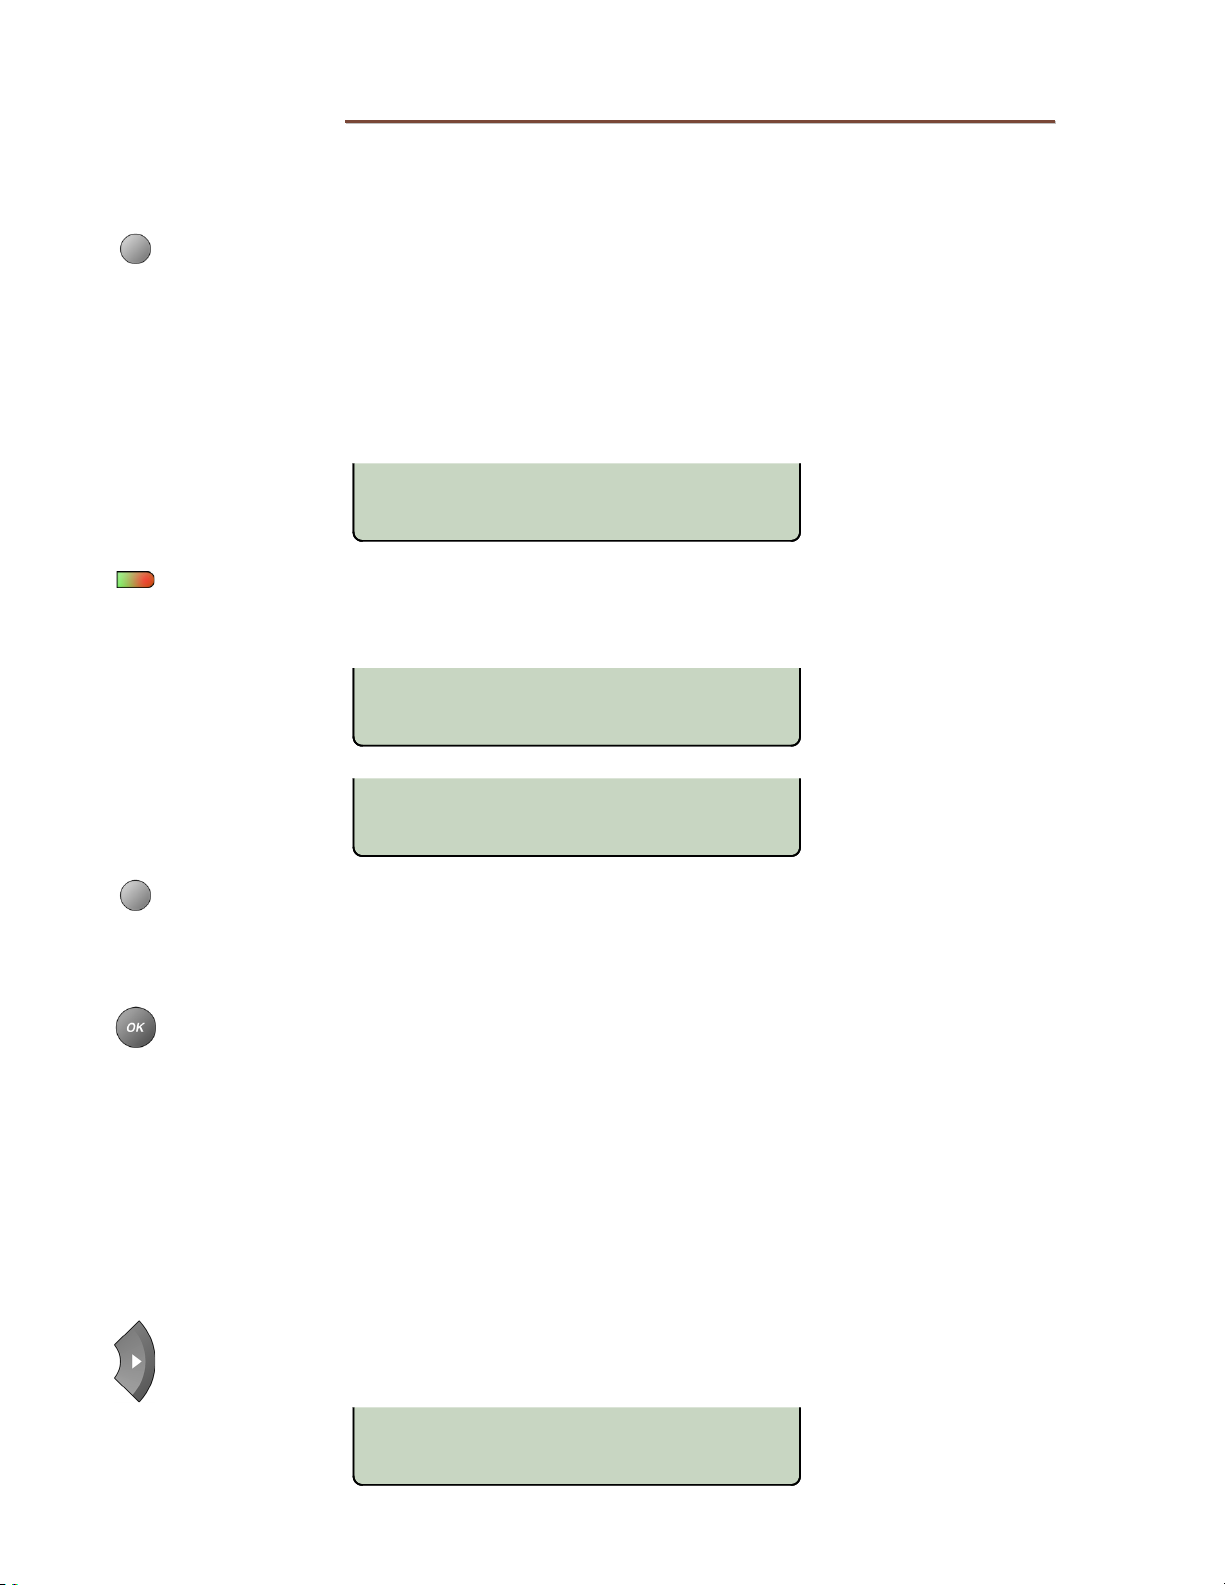
From the Installation Options menu, select KEYS.
SETUP
(
The status indicator for each key will indicate the current setting:
→ INSTL → KEYS)
VOICE MAIL and SPKR keys by using this option.
– Line Appearance or DSS/BLF
– Feature Activator
– Unused or Speed Dial
SELECT A KEY
On the phone or 8030X Button Expansion Module, press the line or multifunction
key to be programmed.
The selected key’s indicator will alternately flash red and green.
12=UNUSED ¤
LINE FA DSS SPDIAL
12=UNUSED £
ACD UNUSED
Select LINE (Line Appearance), FA (Feature Activator), DSS (Direct Station
Select/Busy Lamp Field), SPDIAL (Speed Dial), ACD (Automatic Call Distribution), or
UNUSED from the menu.
Programming procedures for each key type are described below.
When finished editing keys, press the
menu or press the
KKeeyy LLaabbeellss
The line and multifunction keys on the phone are labeled on the display. You can
customize the labels for Line Appearance, Speed Dial, and DSS/BLF keys by entering user
names or other identifiers.
SETUP key to exit Setup Mode.
OK key to return to the Installation Options
Paper labels are used on the 8030X Button Expansion Module. 8030X label templates for
Microsoft Word can be downloaded from
After selecting a multifunction key, the key type, and the EDIT menu selection,
press the Left or Right Arrow key repeatedly until LABEL is shown in the menu.
www.teotech.com
.
LINE KEY OPTIONS ¤
ADD REMOVE
Page 36 13-280138 Rev. H
Page 37
Installation Options
LINE
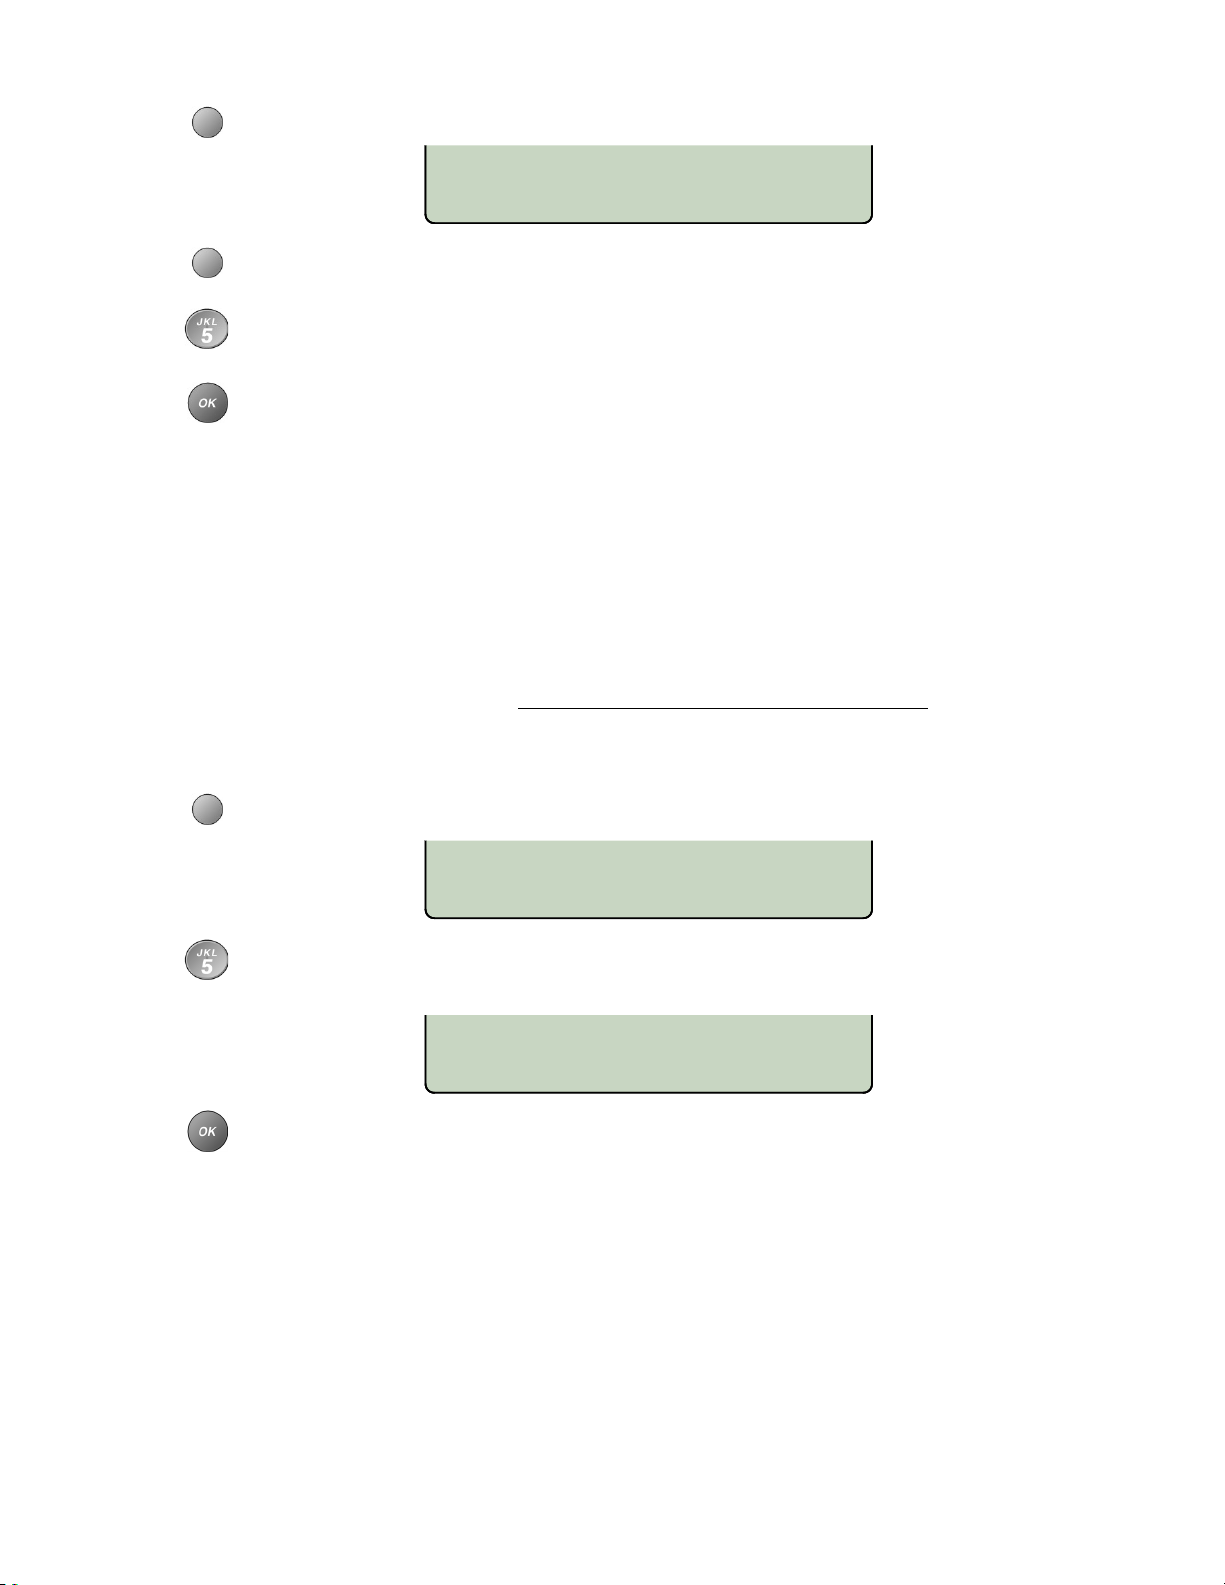
Select LABEL.
LBL=LINE KEY
DELETE CLEAR ABC
Select CLEAR to remove the existing label, or press the Left or Right Arrow key to
move the cursor position for editing.
Using the dial pad, enter a label (18 characters max.) to identify the key.
Character entry is explained on page 18.
Press the
LLiinnee AAppppeeaarraannccee KKeeyyss
Line keys are used to place and answer calls. A SIP line can appear on up to five multiple
consecutive keys.
Notes: Line keys 1-3 are dedicated for use as the primary line ID of the phone, and cannot be
used for any other purpose.
For information about the CODEC, PTIME (packetization time), and JTR (jitter buffer)
settings, please refer to the IP Telephone Network Administration Guide
NNeeww LLiinnee KKeeyy
If the key is not currently programmed as a line key, select LINE from the menu.
OK key to return to the key options menu.
.
04=UNUSED ¤
Enter the line ID with the dial pad.
Character entry is explained on page 18.
FA DSS SPDIAL
LINE ID=1234
DELETE CLEAR 123
Press the
The Line Key Options menu will appear. Proceed with editing the key options as
explained below.
13-280138 Rev. H Page 37
OK key.
Page 38
Teo IP Phone 7810 TSG Series Installation Instructions
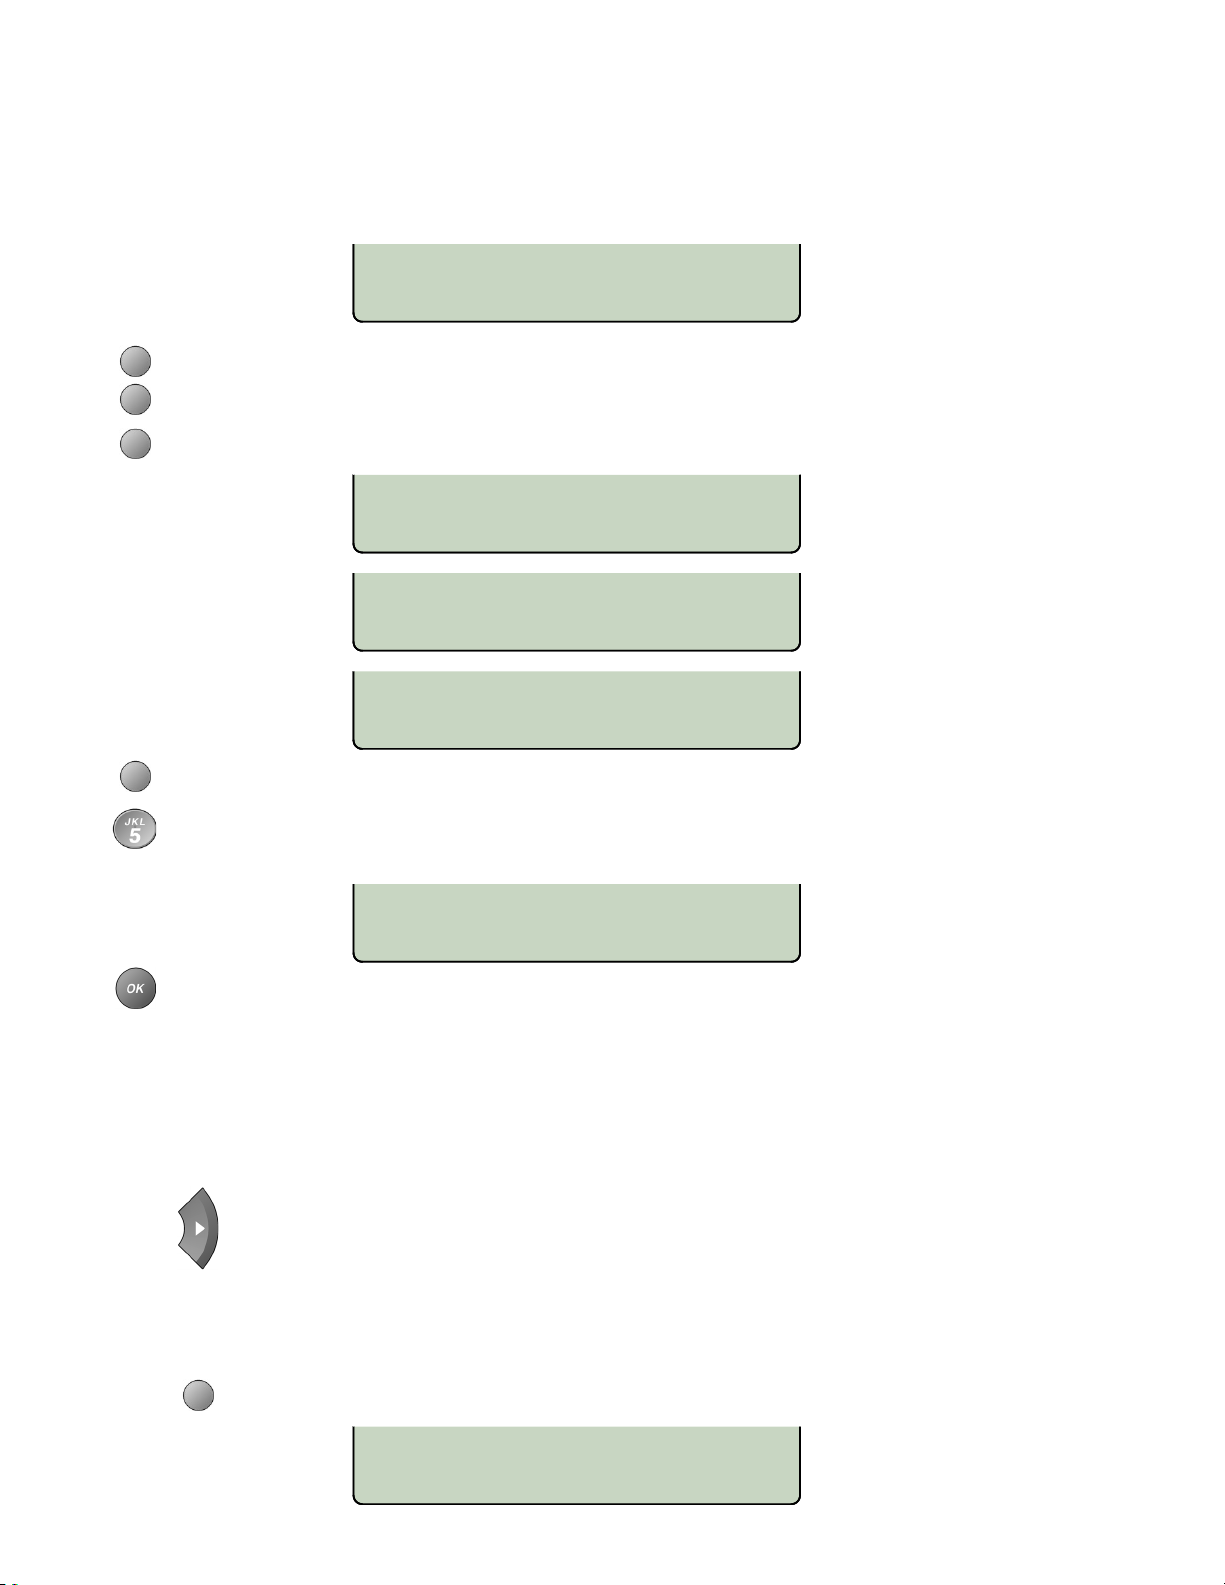
EEddiitt EExxiissttiinngg LLiinnee KKeeyy
If the selected key is currently programmed as a line key, the display will show the key
number and line ID. A range of consecutive key numbers will be shown if the line ID is
assigned to multiple keys (a multiple line appearance group).
01-03: 4321
EDIT ADD REMOVE
Select ADD to add the next key to the group. A group can contain up to five keys.
Select REMOVE to remove the last key from the group.
Select EDIT to change the settings for the key.
LINE KEY OPTIONS ¤
ID NAME AUTHID PSWD
LINE KEY OPTIONS £¤
SHARE CODEC PTIME JTR
LINE KEY OPTIONS £
ADD REMOVE LABEL
Select NAME.
Enter the caller ID display name with the dial pad, up to 24 characters maximum.
Caller ID name display may not be supported by some SIP servers.
NAME=Nick Robinson
DELETE CLEAR abc
Press the
Line sharing as described below is for use with Avaya and other systems that support
shared lines. Leave the Shared Line setting disabled when connected to a Teo UC
system. The share setting is not used for multiple registrations of the same Line ID as
the primary line.
OK key.
Press the Left or Right Arrow key repeatedly until SHARE is shown in the
menu.
The AUTHID (authentication ID) and PSWD (SIP authentication password)
may be required for this line, and the codec, ptime, and jitter buffer options
may need to be changed; consult your system administrator.
Select SHARE to control sharing of this line with other telephones.
SHARED LINE=DISABLED
ENABLE DISABLE
Page 38 13-280138 Rev. H
Page 39
Installation Options
LABEL
∗
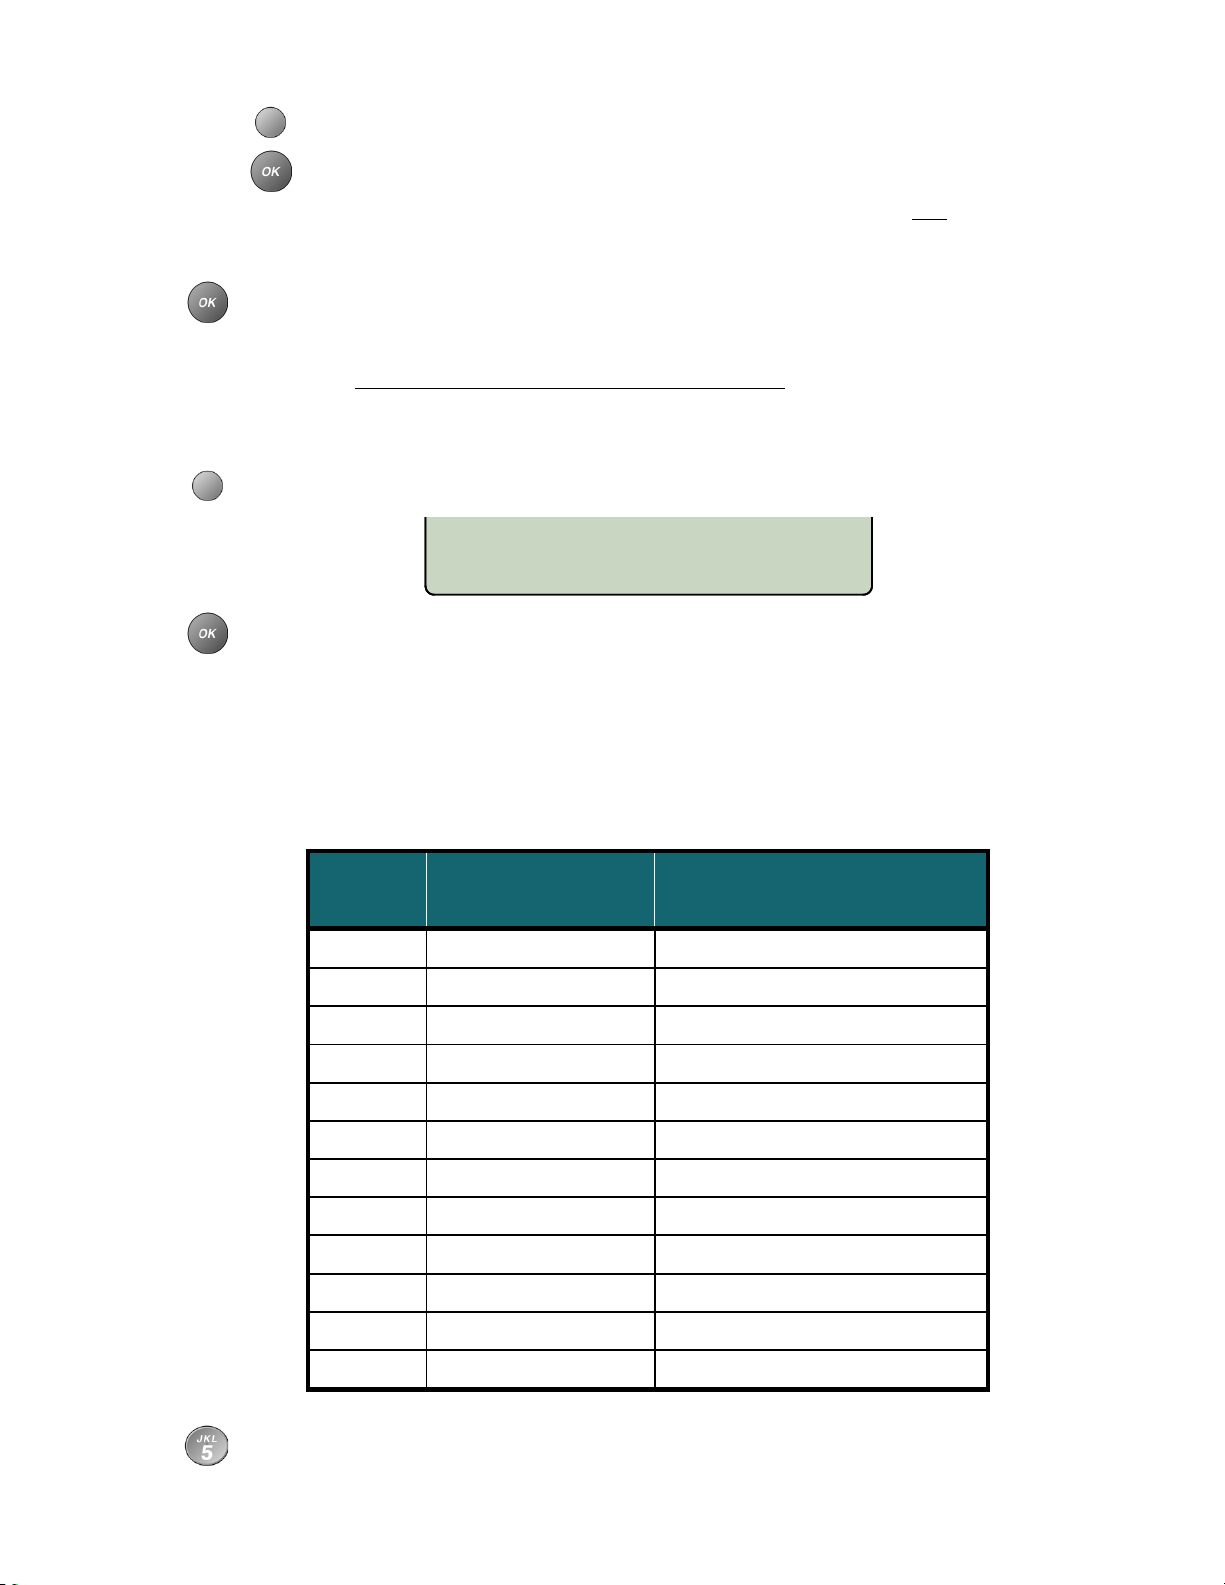
Select ENABLE to enable sharing, or DISABLE to disable sharing.
OK key.
When finished with this key, press the OK key to return to key selection.
Note: For information about the CODEC and JTR (jitter buffer) settings, please refer to
KKeeyy LLaabbeellss
To customize the on-screen key label, select LABEL.
Press the
At other telephones that will share this line, set up a key (
with the same Line ID, and enable sharing for that key.
IP Telephone Network Administration Guide
the
LINE KEY OPTIONS ¤
ADD REMOVE
Press the
FFeeaattuurree AAccttiivvaattoorr KKeeyyss
OK key to return to key selection.
line key 1-3)
not
.
Refer to page 36.
Feature Activators are assigned to keys from a list of presets. Default presets are shown in
the table below; they may be customized by your network administrator.
Dial Pad
Key
1 Call Forward Key 9
2 Do Not Disturb Key 10
3 Directed Call Pickup –
4 Presence –
5 unused –
6 unused –
7 unused –
8 unused –
9 unused –
0 unused –
Predefined Label
unused –
Default Multifunction Key
Assignment
# unused –
Use the dial pad to select one of the available presets.
13-280138 Rev. H Page 39
Page 40
Teo IP Phone 7810 TSG Series Installation Instructions
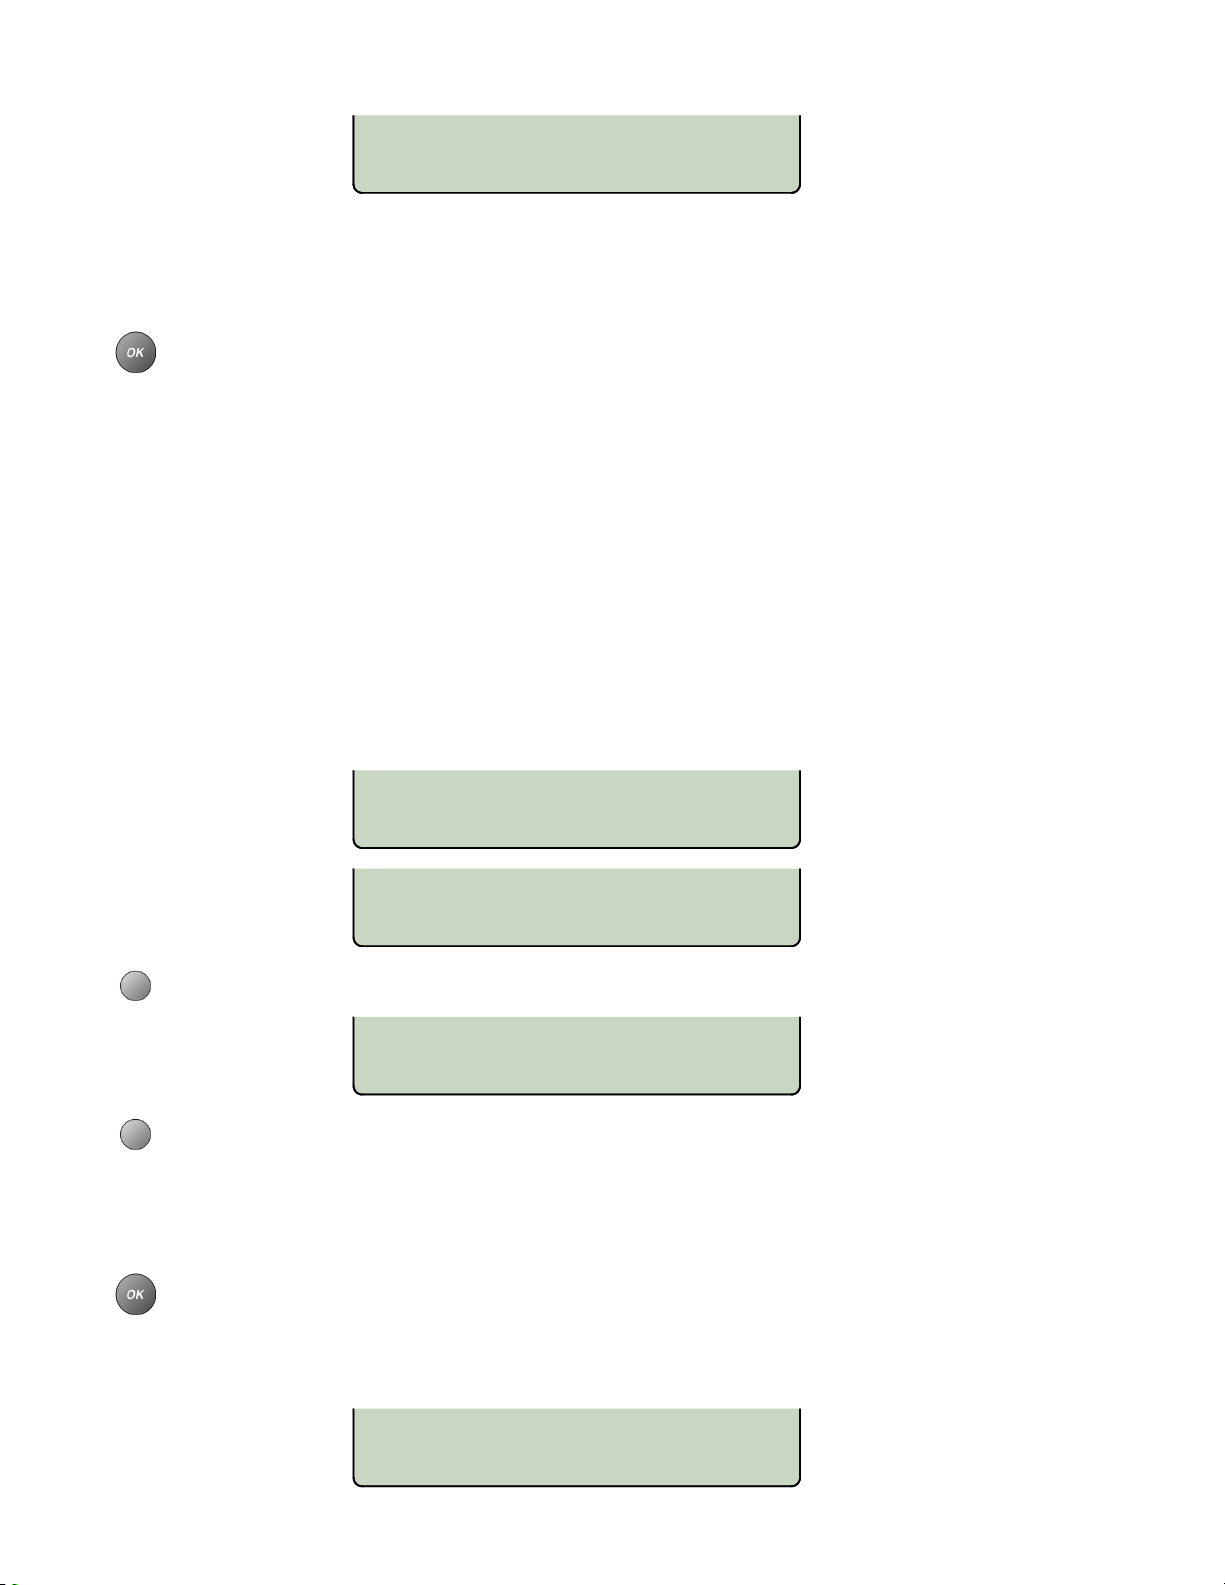
PRES
DIALOG
DLGSLA
3=DIR CALL PICKUP
USE DIALPAD KEYS
Note: Call Forward and Presence keys are mutually exclusive; only one of these keys
can be configured on a phone.
and includes a Call Forward option.
The Presence key is used with the Teo UC System
Press the
DDSSSS//BBLLFF KKeeyyss
DSS/BLF keys are Line Appearance keys that have been programmed with speed dial
numbers to provide Direct Station Selection. The line assigned to a DSS/BLF key appears
on one or more additional telephones. When the line indicator shows idle or busy, a
DSS/BLF key behaves like a Speed Dial key, it calls a station. When the line assigned to the
DSS/BLF key is blinking green at your phone, pressing the DSS/BLF key will answer the
call.
Enter the Line ID, Caller ID Name, Authentication ID, and Authentication Password
as described for standard line keys. For Caller ID Name, Authentication ID and
Authentication Password, check with your system administrator.
OK key to return to key selection.
DSS/BLF KEY OPTIONS ¤
ID NAME AUTHID PSWD
DSS/BLF KEY OPTIONS £
TYPE DSS# LABEL
Select TYPE.
EVENT TYPE=PRESENCE
PRES DIALOG DLGSLA
Select the event type that is supported by the SIP server:
– (Event: presence), for use with the Teo UC System
– (Event: dialog)
– (Event: dialog;sla)
Press the
The Line ID followed by a # character is automatically entered as the speed dial
number.
OK key.
DSS SPDIAL=54321#
DELETE PAUSE 123
Page 40 13-280138 Rev. H
Page 41
Installation Options
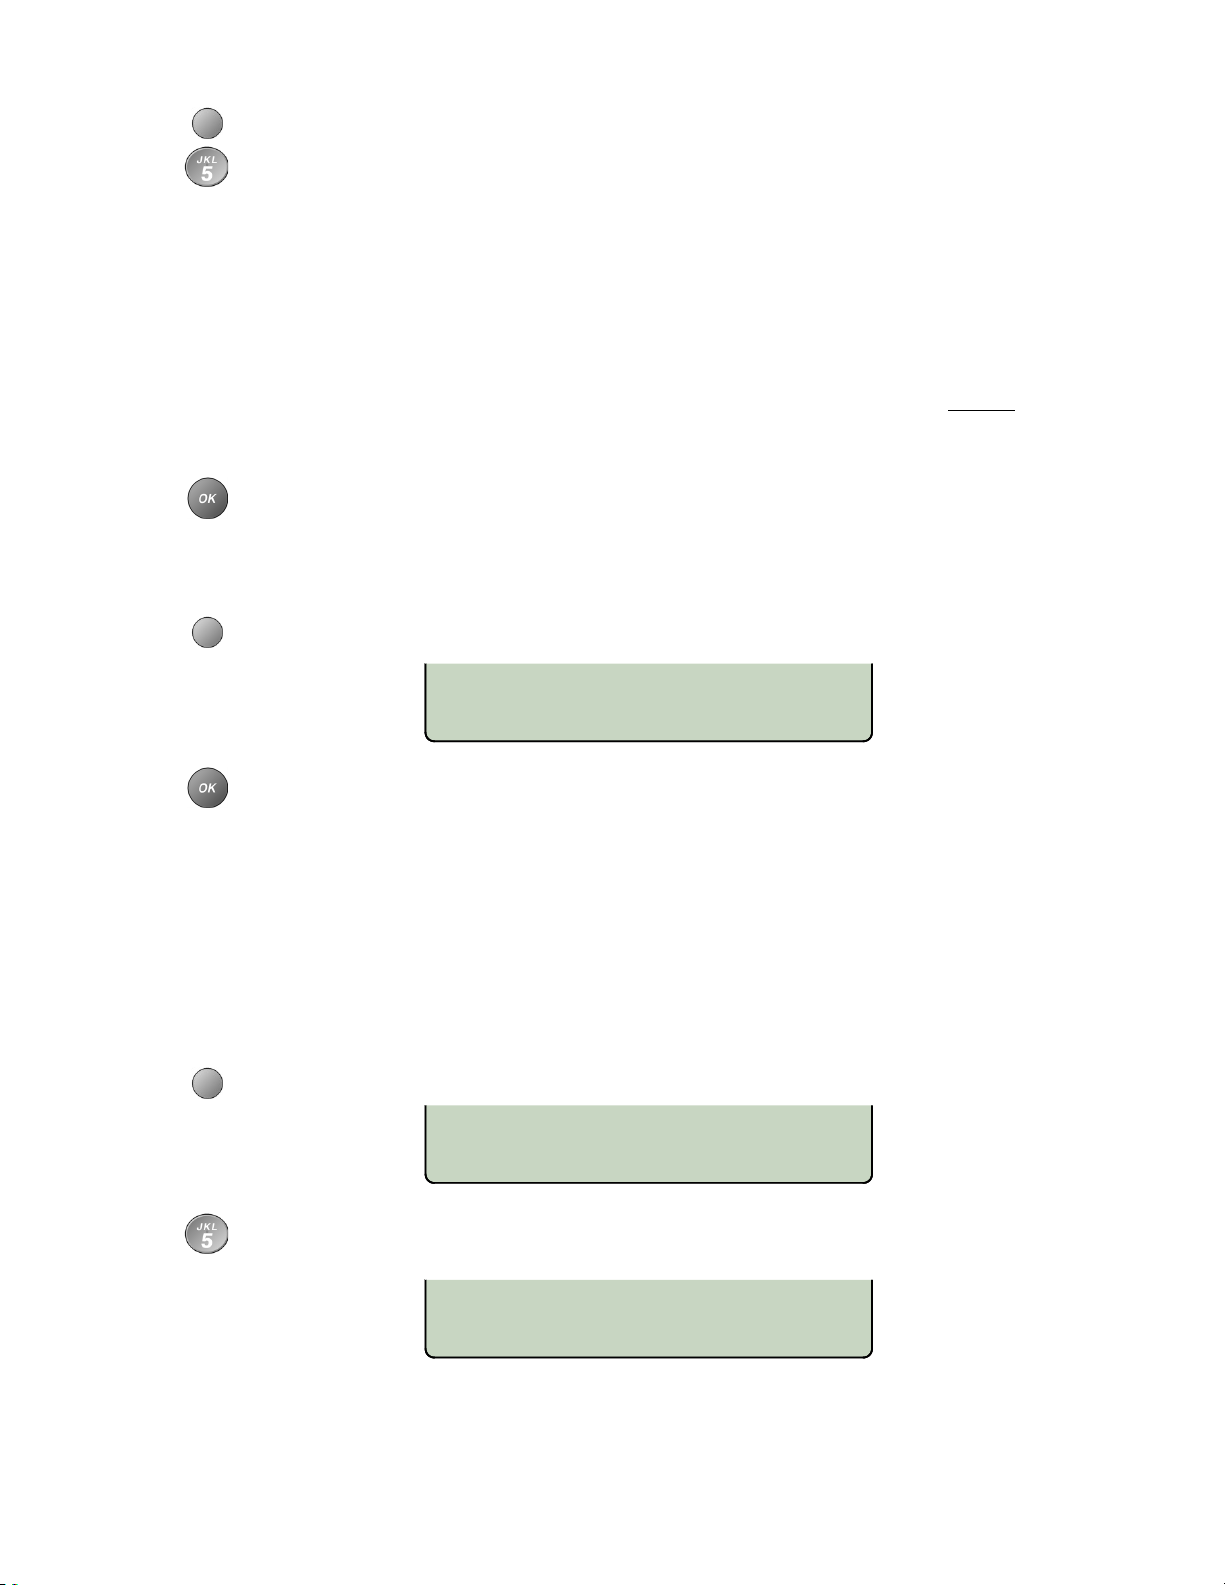
NUMBER
LABEL
If you need to edit the dial string, select DSS#, and then enter the number to dial
with the dial pad.
Character entry is explained on page 18.
IImmmmeeddiiaattee oorr EEddiittaabbllee DDiiaalliinngg
For one-touch dialing, enter a # character at the end of the dial string. The string will be
dialed immediately when the DSS/BLF key is pressed.
A DSS/BLF key can be used in conjunction with manual dialing. If you want to enter more
digits after pressing the DSS/BLF key, or edit the dial string before dialing,
the # character.
When all digits have been entered, press the OK key.
KKeeyy LLaabbeellss
To customize the on-screen key label, select LABEL. Refer to page 36.
do not
include
DSS/BLF KEY OPTIONS ¤
Press the
TYPE DSS#
OK key to return to key selection.
SSppeeeedd DDiiaall KKeeyyss
Unused keys not assigned for line appearances or feature activators may be used as Speed
Dial keys. Dialing strings can include network feature activator codes, to simplify the use of
features such as Directed Call Pickup and Call Forwarding. Speed Dial keys may also be
programmed from the User Options menu.
Select NUMBER.
SPDIAL
LABEL
Enter speed dial digits with the dial pad.
Character entry is explained on page 18.
NUMBER=5553491000
DELETE CLEAR 123 PAUSE
13-280138 Rev. H Page 41
Page 42
Teo IP Phone 7810 TSG Series Installation Instructions
LABEL
““SSmmaarrtt”” PPaauusseess
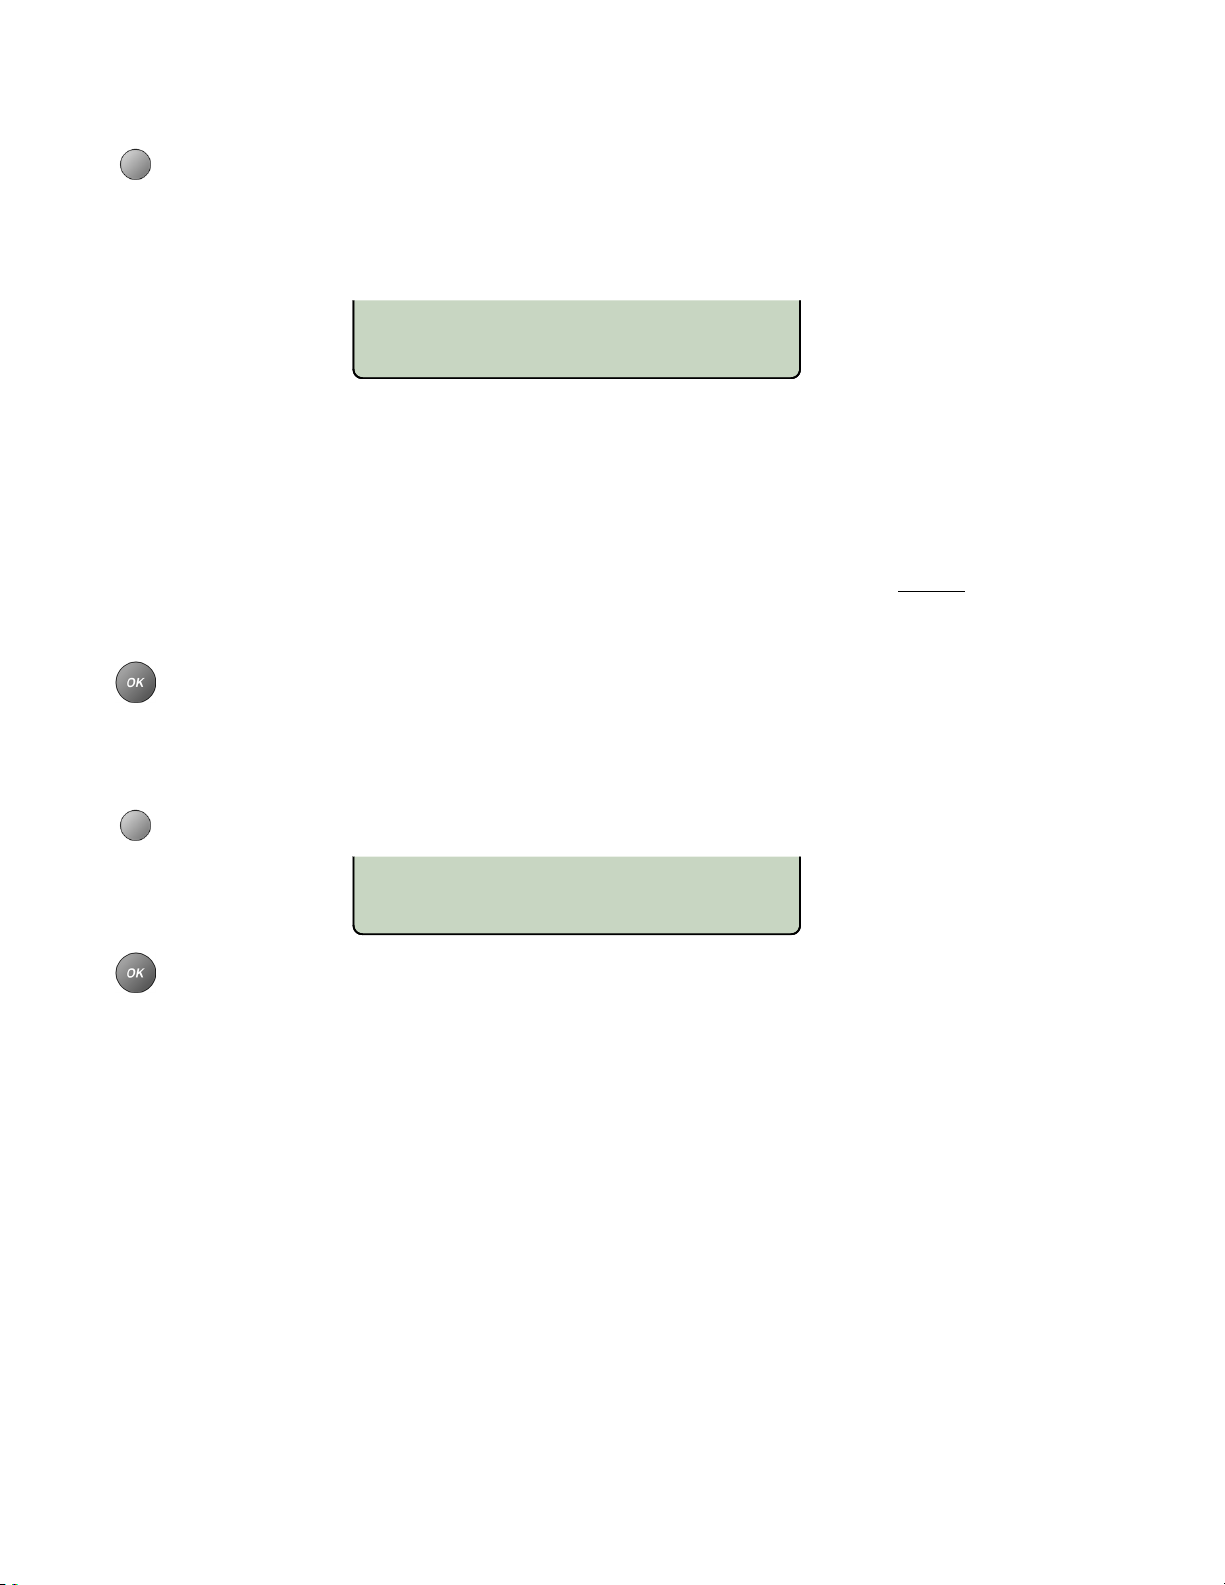
Pauses are entered with the PAUSE softkey, and are shown in the display as a Å
character. The first pause in a dial string will delay dialing until the call is answered;
additional pauses delay dialing for one second per pause. Enter multiple pauses to
increase the delay time. You can use a smart pause to automatically enter a PIN
code after the called number answers.
NUMBER=5553491000¥1234#
DELETE CLEAR 123 PAUSE
IImmmmeeddiiaattee oorr EEddiittaabbllee DDiiaalliinngg
For one-touch dialing, enter a # character at the end of the dial string. The string will be
dialed immediately when the Speed Dial key is pressed.
A Speed Dial key can be used in conjunction with manual dialing. If you want to enter more
digits after pressing the Speed Dial key, or edit the dial string before dialing,
the # character.
When all digits have been entered, press the OK key.
do not
include
KKeeyy LLaabbeellss
To customize the on-screen key label, select LABEL. Refer to page 36.
Press the
SPDIAL=7891
NUMBER
OK key to return to key selection.
Page 42 13-280138 Rev. H
Page 43
Installation Options
UNUSED
AACCDD KKeeyyss
ACD keys are used to log in to or log out of a Sylantro ACD (Automatic Call Distribution)
group.
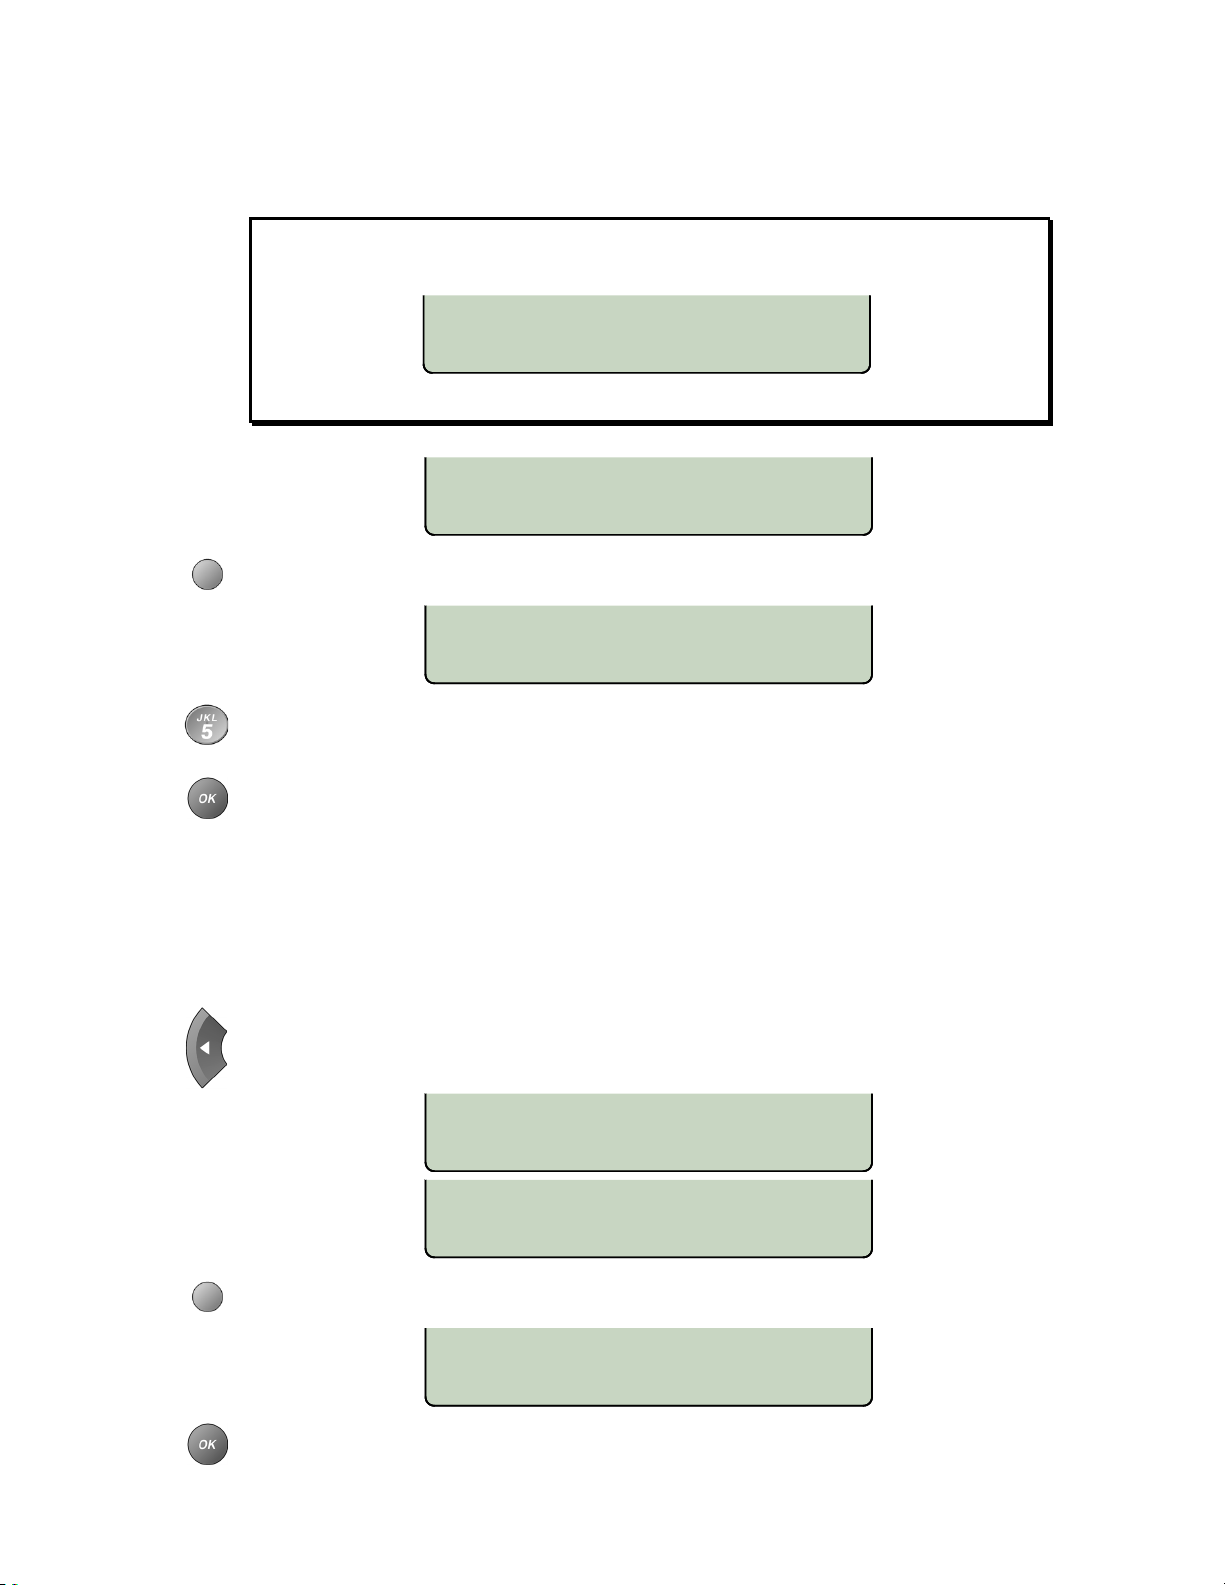
ACD requires two keys for Login and Activate functions. If the selected key
is not followed by an unused key, you will receive the following warning.
Select another key to continue.
FEATURE REQUIRES TWO
ADJACENT UNUSED KEYS
ACD KEY OPTIONS
ID LBL1 LBL2
Select ID.
GROUP ID=
DELETE CLEAR 123
Enter the ACD group number.
Character entry is explained on page 18.
Press the
The default key labels are “ACD LOGIN” and “ACD ACTIVATE”. Select LBL1 or
LBL2 to change the labels.
UUnnuusseedd KKeeyyss
After selecting a key, press the Left or Right Arrow key until UNUSED is shown in
the menu.
Select UNUSED.
OK key.
06=SPDIAL ¤
LINE FA DSS SPDIAL
06=SPDIAL ¤
ACD
13-280138 Rev. H Page 43
Press the
06=UNUSED ¤
ACD UNUSED
OK key to return to key selection. The key is converted to an Unused key.
Page 44
Teo IP Phone 7810 TSG Series Installation Instructions
VVooiiccee MMaaiill KKeeyyss
VVooiiccee MMaaiill AAcccceessss KKeeyy
Note: The VMAIL key must be programmed to dial the voice mail access number in order for
this feature to work properly. “Smart” pauses and PIN codes can be included in the
number.
From the Installation Options menu, select KEYS.
SETUP
(
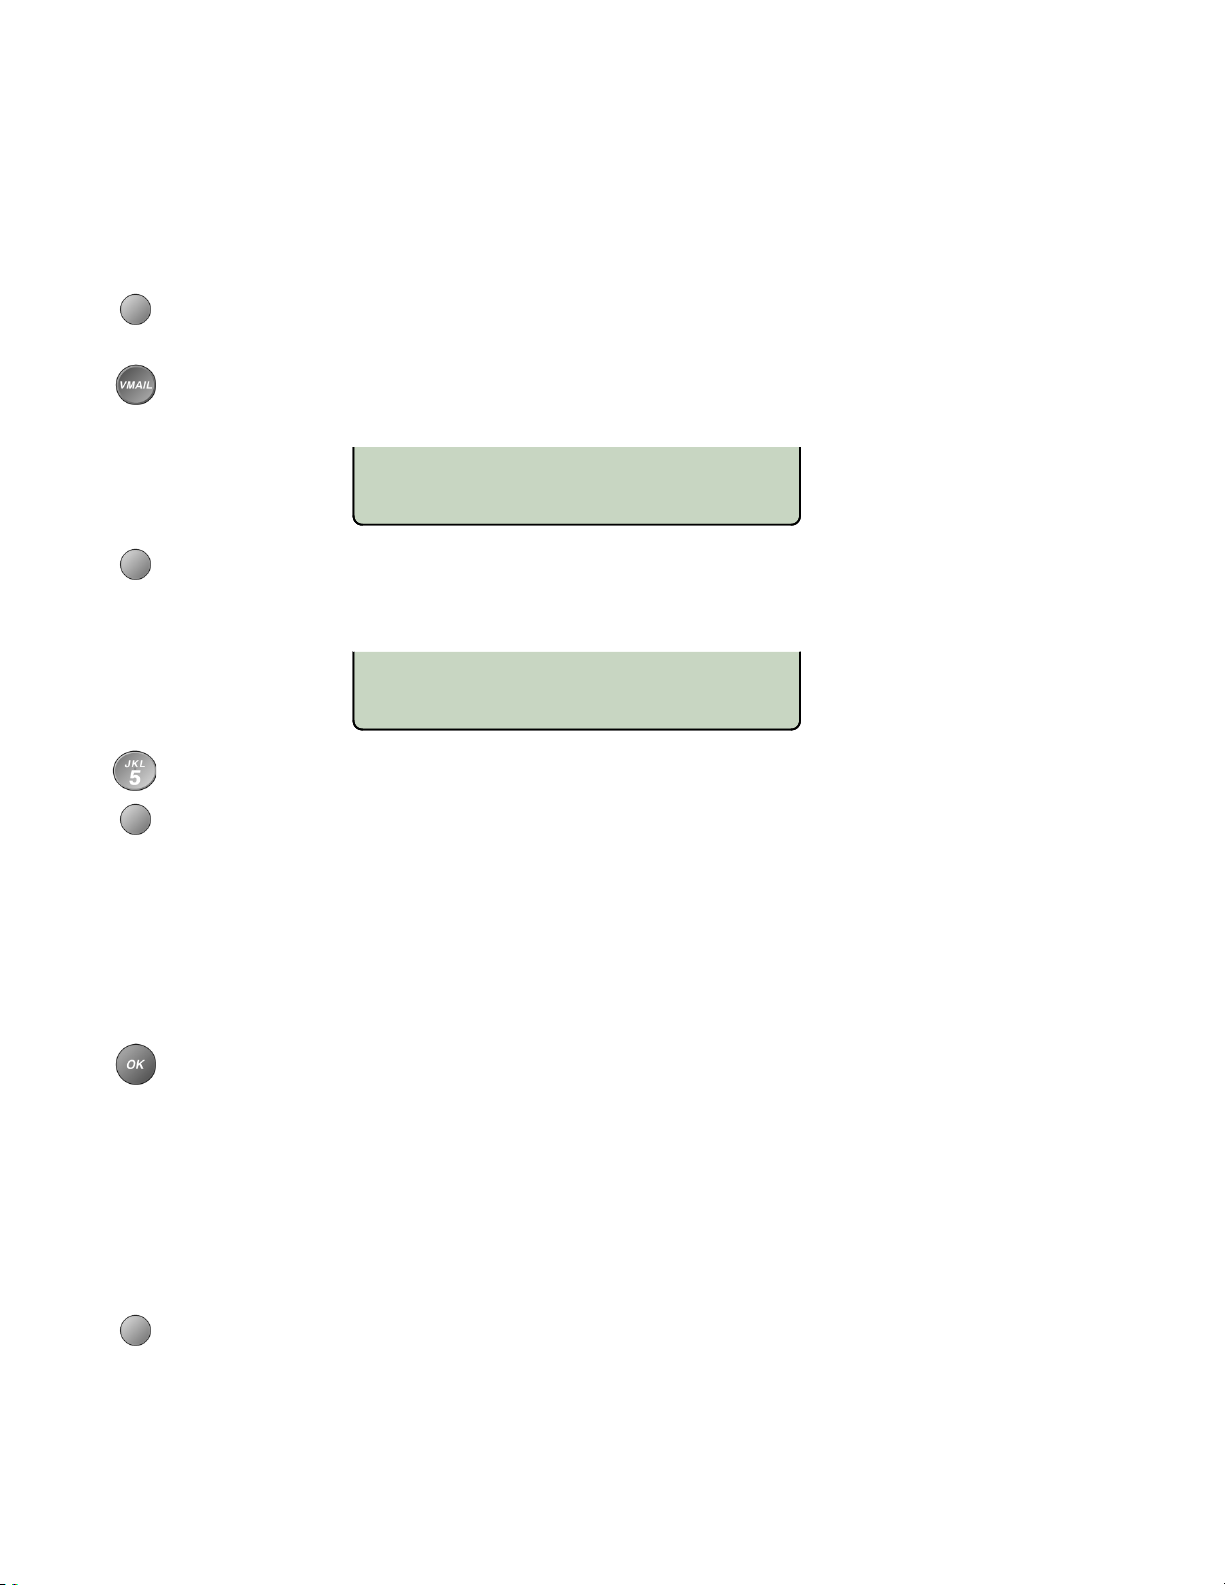
Press the VMAIL key.
The Message Waiting indicator will flash.
→ INSTL → KEYS)
VOICE MAIL ACCESS
NUMBER EDIT SWAP TYPE
Select NUMBER to view or change the
number that is dialed to access your voice mail system.
The currently programmed dial string, if any, will be shown in the display.
VMAIL key speed dial number. This is the
NUMBER=95551432
DELETE CLEAR 123 PAUSE
Enter the voice mail system number with the dial pad.
“Smart” pauses are entered with the PAUSE softkey, and are shown in the display
as a Å character. The first pause in a dial string will wait until the call is answered;
additional pauses delay dialing for one second per pause. Enter multiple pauses to
increase the delay time. You can use a smart pause to automatically enter a voice
mail PIN code after the voice mail system answers.
If you need to make corrections while entering numbers, press the Left or Right
Arrow key to move the cursor position, and then select DELETE to delete the
character under the cursor. CLEAR removes all digits, allowing you to start over.
When all digits have been entered, press the
VVooiiccee MMaaiill MMeennuu KKeeyyss
Multifunction keys can be programmed to speed dial common voice mail access functions
when connected to the voice mail system.
Presets are provided for several voice mail systems. You can load one of the presets and, if
needed, change individual keys; or start with a blank menu and customize all keys.
Select TYPE to load a preset or clear all keys.
OK key.
Page 44 13-280138 Rev. H
Page 45
Installation Options
Key
#
Function / Label
Code
Key
#
Function / Label
Code
∗
The display will show the current preset type, or “CUSTOM” if any keys have been
edited.
VOICE MAIL TYPE=CUSTOM ¤
TEO CISCO AVAYA ASTRSK
VOICE MAIL TYPE=CUSTOM ¤
NEC3C APMAX CALLEG BROAD
Select one of the menu presets, or select NONE to clear all Voice Mail Menu keys,
and then select YES to confirm your selection when the message “SET (name)
DEFAULT MENU?” appears.
The presets are compatible with the following voice mail systems:
TEO – Teo UC System
CISCO – Cisco Unity Express
AVAYA – Avaya Aura/Audix
ASTRSK – Asterisk
NEC3C – NEC Univerge 3C
APMAX – Innovative Systems APMAX
CALLEG – Callware Callegra
BROAD – BroadSoft BroadWorks
MITEL – Mitel Communications Director
GENA2 – Genband A2
Press the
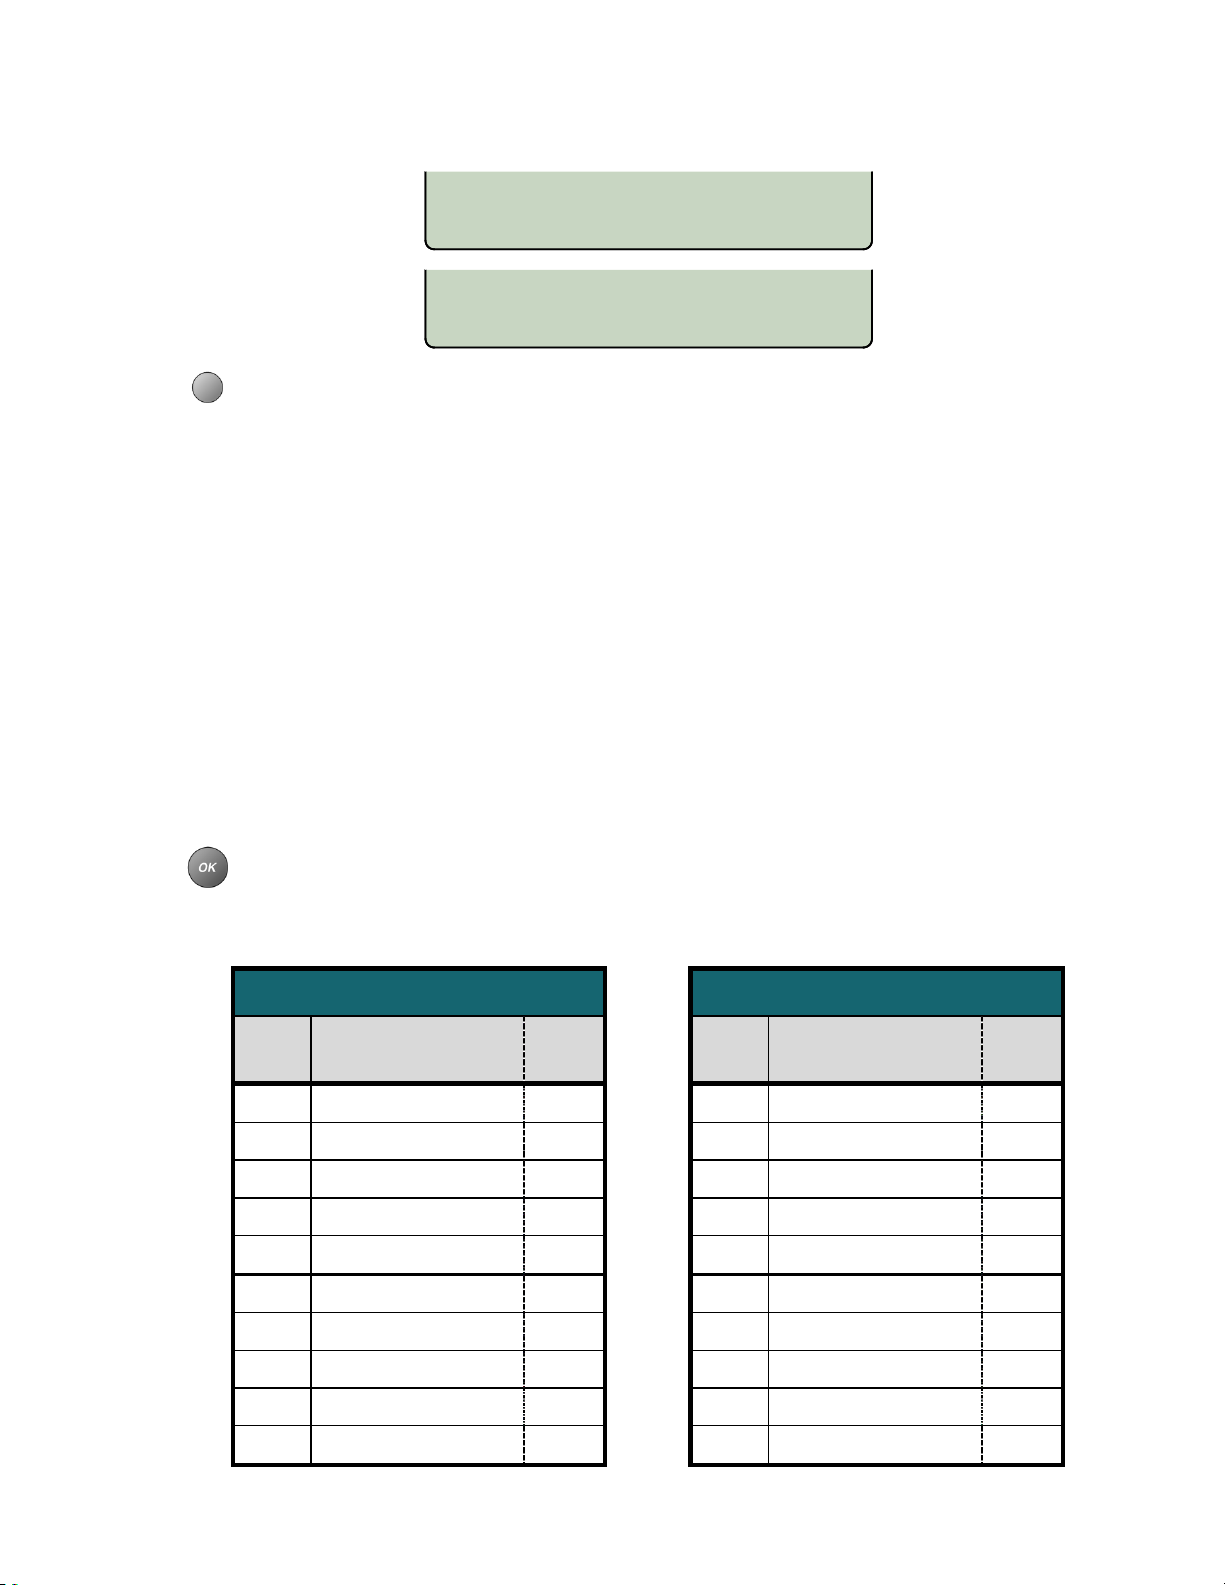
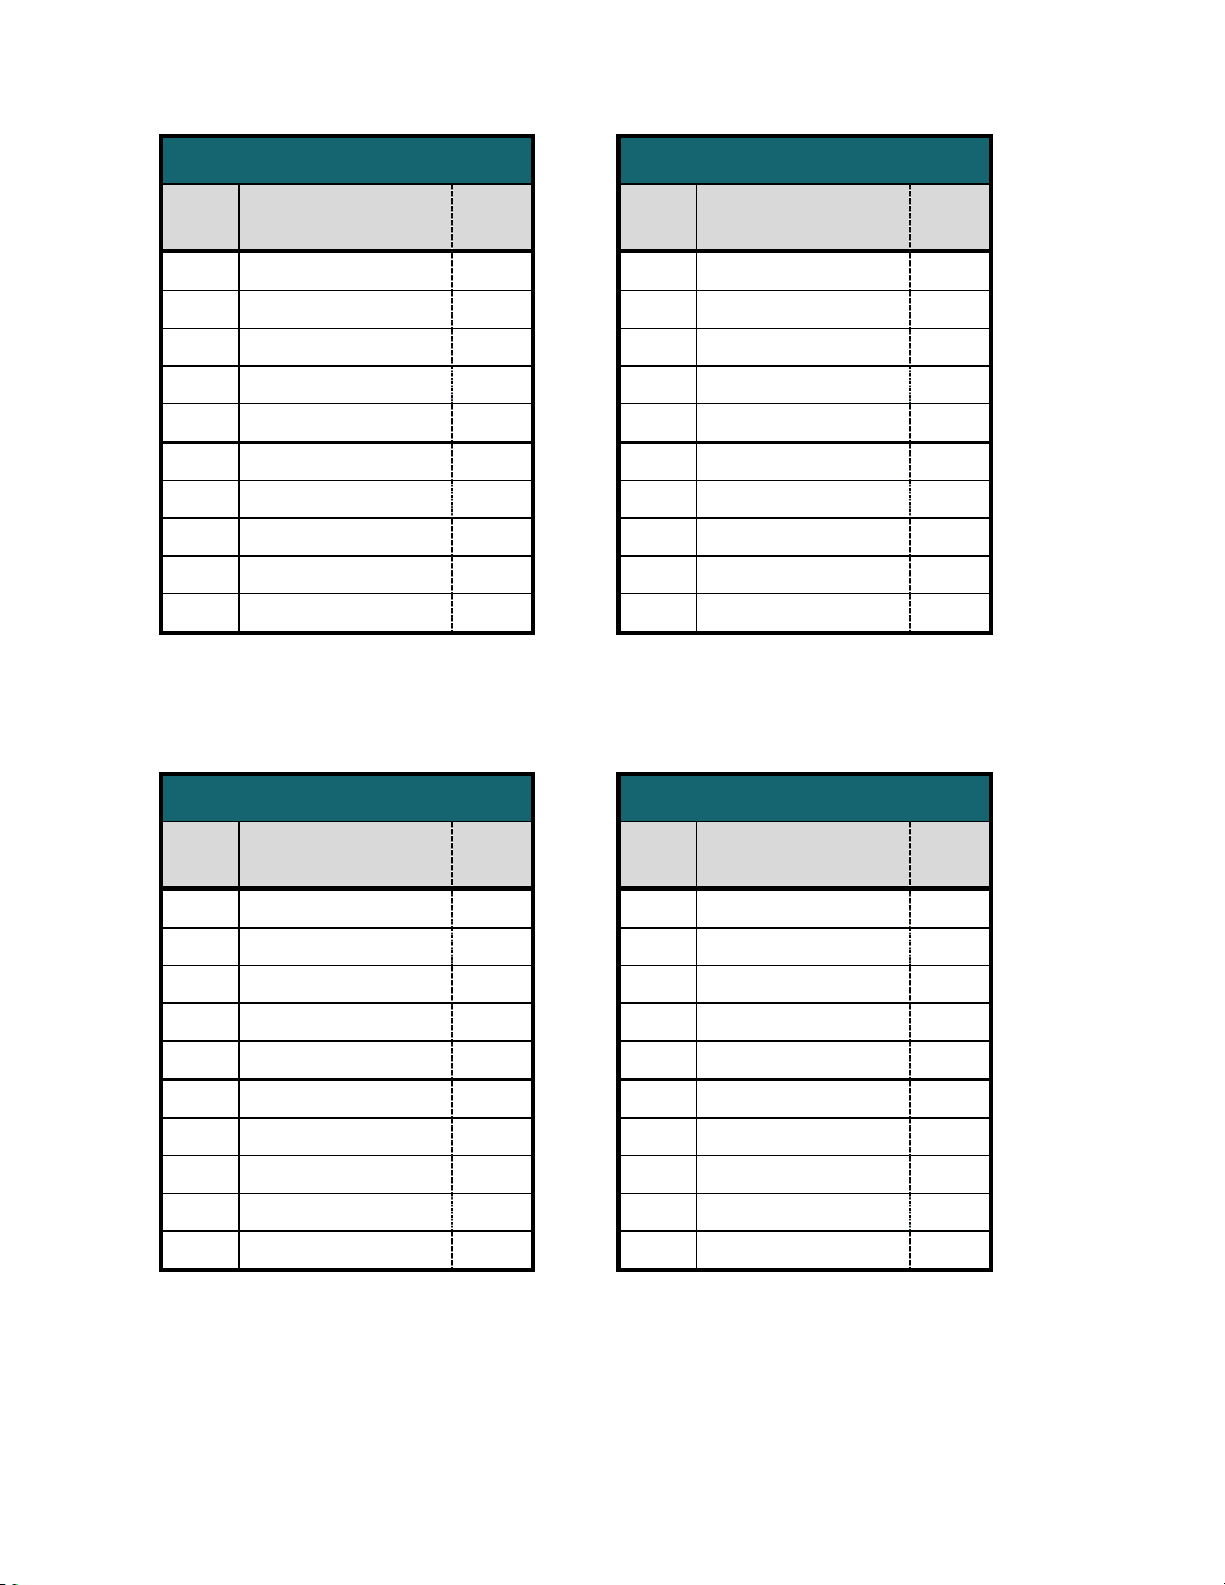
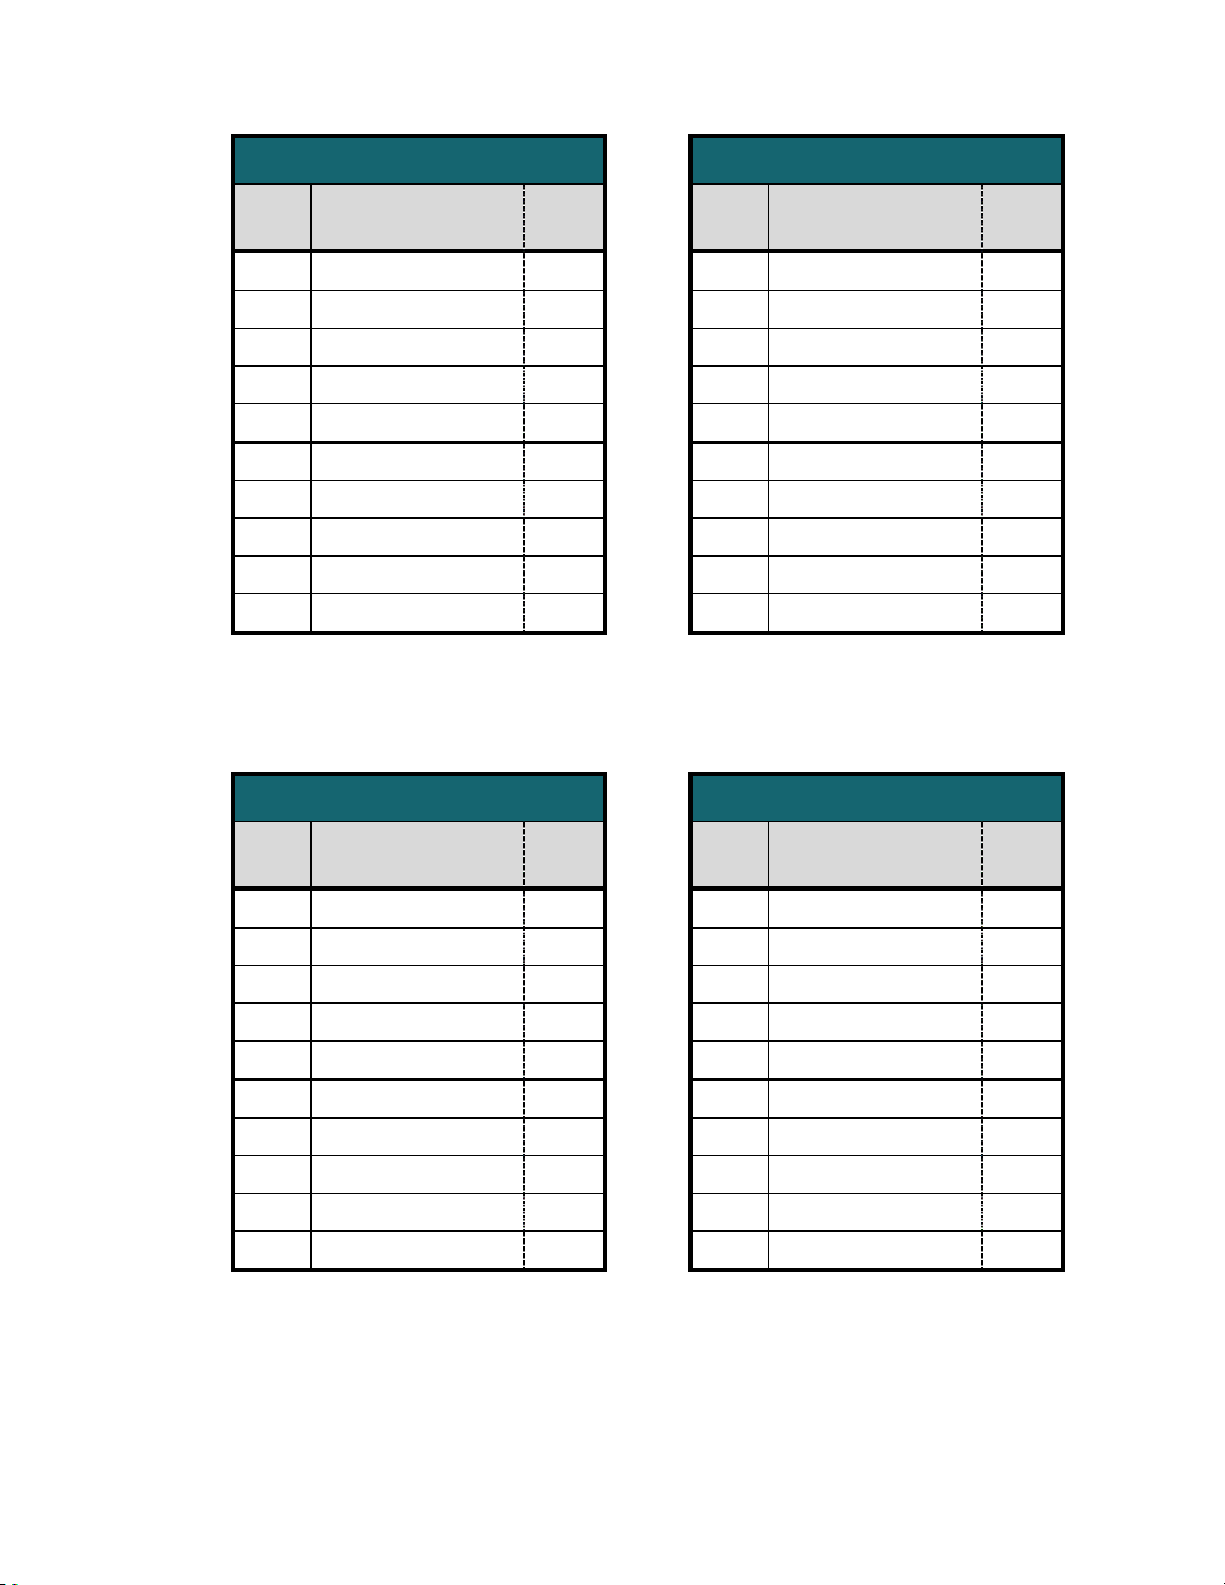
Presets are listed in the following tables.
1 PLAY / REPLAY 1 1 PLAY / REPLAY 1
2 REWIND 7 2 REWIND 7
3 PAUSE / RESUME 8 3 PAUSE / RESUME 8
4 FAST FORWARD 9 4 FAST FORWARD 9
5 SKIP TO NEXT # 5 SKIP #
6 PLAY SAVED / SAVE 2 6 SAVE MESSAGE 2
7 FORWARD MESSAGE 5 7 SAVE AS NEW 6
8 RETURN CALL 4 8 FORWARD MESSAGE 5
9 ERASE MESSAGE 3 9
10 MAILBOX OPTIONS
OK key to select a preset and exit this menu.
TEO
0 10 ERASE MESSAGE 3
CISCO
REPLY
4
13-280138 Rev. H Page 45
Page 46
Teo IP Phone 7810 TSG Series Installation Instructions
Key
#
Function / Label
Code
Key
#
Function / Label
Code
∗
∗∗
∗
∗
Key
#
Function / Label
Code
Key
#
Function / Label
Code
∗
AVAYA
1 PLAY / REPLAY 20 1 PLAY FIRST 1
2 REWIND 5 2 REWIND
3 PAUSE / RESUME 3 3 PAUSE / RESUME 0
4 FAST FORWARD 6 4 FAST FORWARD #
5 SKIP TO NEXT # 5 REPLAY MESSAGE 5
6 ENVELOPE INFO 23 6 NEXT MESSAGE 6
7 SAVE AS SAME
8 RESPOND 1 8 SAVE MESSAGE 9
9 ERASE MESSAGE
10 ACTIVITY MENU
4 7 PREVIOUS MESSAGE 4
3 9
7 10 DELETE / UNDELETE 7
ASTRSK
FORWARD MESSAGE
8
NEC3C
1 REPLAY 5 1 PLAY / REPLAY 1
2 REWIND 7 2 REWIND 7
3 PAUSE / RESUME 8 3 PAUSE / RESUME 8
4 FAST FORWARD 9 4 FAST FORWARD 9
5 SKIP TO NEXT # 5 SKIP TO NEXT 2
6 SKIP DATE / TIME 1 6 FORWARD MESSAGE 6
7 FORWARD MESSAGE 4 7 SAVE AS NEW 4
8 RETURN CALL 6 8 REPLY 5
9 REPLY 3 9
10 ERASE MESSAGE 2# 10 MAIN MENU
APMAX
ERASE MESSAGE
3
Page 46 13-280138 Rev. H
Page 47
Installation Options
Key
#
Function / Label
Code
Key
#
Function / Label
Code
1
∗
2
3
4
5
6
7
7
8
9
9
10
Key
#
Function / Label
Code
Key
#
Function / Label
Code
∗
∗
CALLEG
1 PLAY / REPLAY
2
3
4
5
6
8
10
REWIND
PAUSE / RESUME
FAST FORWARD
NEXT MESSAGE
ENVELOPE INFO
SAVE MESSAGE
RESPOND
ERASE MESSAGE
PREVIOUS MENU
BROAD
7
1
#
6
8
5
2
3
9
PLAY / PAUSE
REWIND
FAST FORWARD
NEXT MESSAGE
PREVIOUS MESSAGE
ENVELOPE INFO
SAVE MESSAGE
RETURN CALL
FORWARD MESSAGE
ERASE MESSAGE
2
1
3
6
4
5
#
8
92
7
MITEL
GENA2
1 PLAY / REPLAY 7 1 PLAY / REPLAY 1
2 REWIND
2 NEXT / PAUSE #
3 PAUSE / RESUME 1 3 PREVIOUS / REWIND 7
4 FAST FORWARD # 4 ENVELOPE/FAST FWD 6
5 SKIP TO NEXT 8 5 RETURN CALL 55
6 ENVELOPE INFO 6 6 SAVE MESSAGE 2
7 SAVE MESSAGE 5 7 FORWARD MESSAGE 4
8 ANSWER 2 8 REPLY 51
9 FORWARD MESSAGE 4 9
ERASE MESSAGE
10 ERASE MESSAGE 3 10 MAIN MENU
3
13-280138 Rev. H Page 47
Page 48
Teo IP Phone 7810 TSG Series Installation Instructions
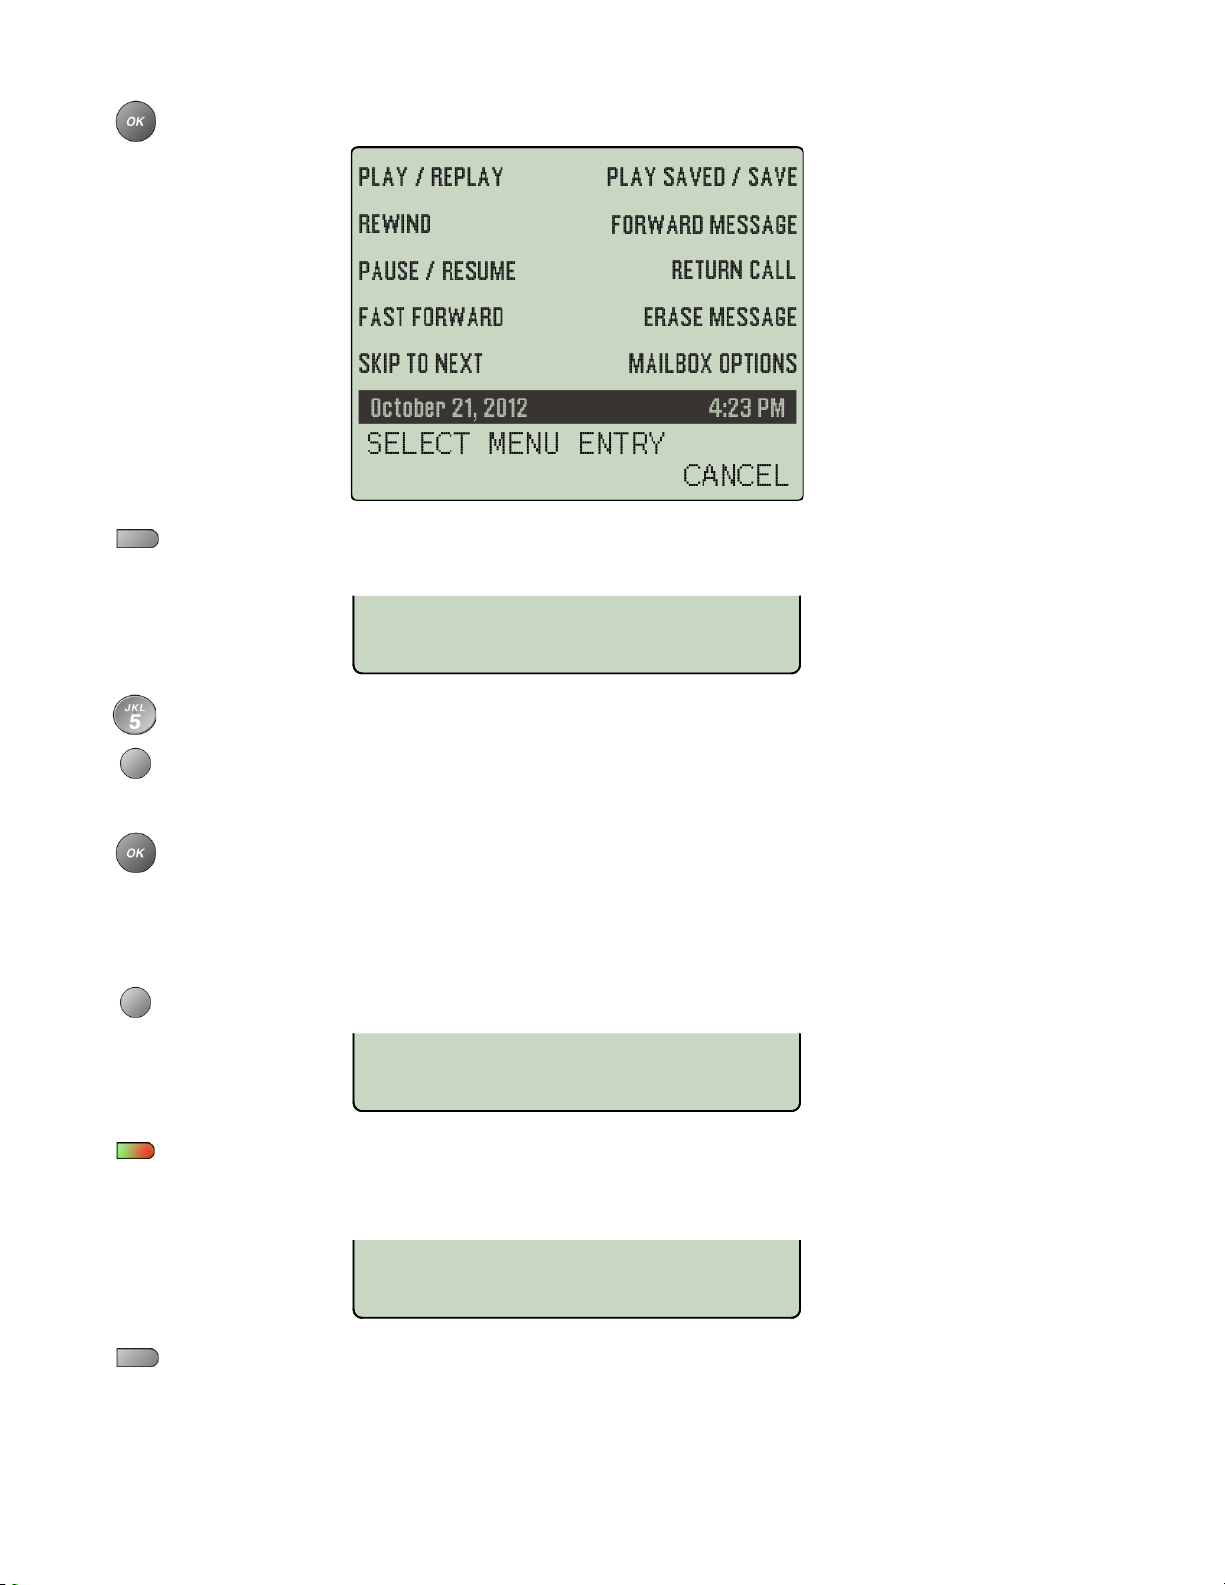
To customize Voice Mail Menu keys, select EDIT.
Press a multifunction key to change its label or speed dial number. Consult your
voice mail user’s guide for voice mail functions and their access codes.
NAME:PLAY MESSAGE
DELETE CLEAR ABC CODE
Enter or change a key label with the dial pad keys.
Select CODE to change the speed dial number assigned to the key. Function access
codes for voice mail systems are typically one to three digits, although you can
enter up to 128 digits per key. Multiple functions can be combined on a single key.
Press the
SSwwaappppiinngg VVooiiccee MMaaiill MMeennuu KKeeyy PPoossiittiioonnss
If you want to swap the positions of two Voice Mail Menu keys, select SWAP.
OK key after entering the new code.
SELECT ENTRY TO SWAP
CANCEL
Press the first key that you want to swap. The selected key’s indicator will
alternately flash red and green.
CANCEL aborts the swap operation.
SET NEW LOCATION
CANCEL
Refer to page 36.
Press the key for the new position, or select CANCEL to exit without swapping.
Page 48 13-280138 Rev. H
Page 49
Installation Options
CCoonnffiigguurriinngg CCaallll MMoonniittoorriinngg
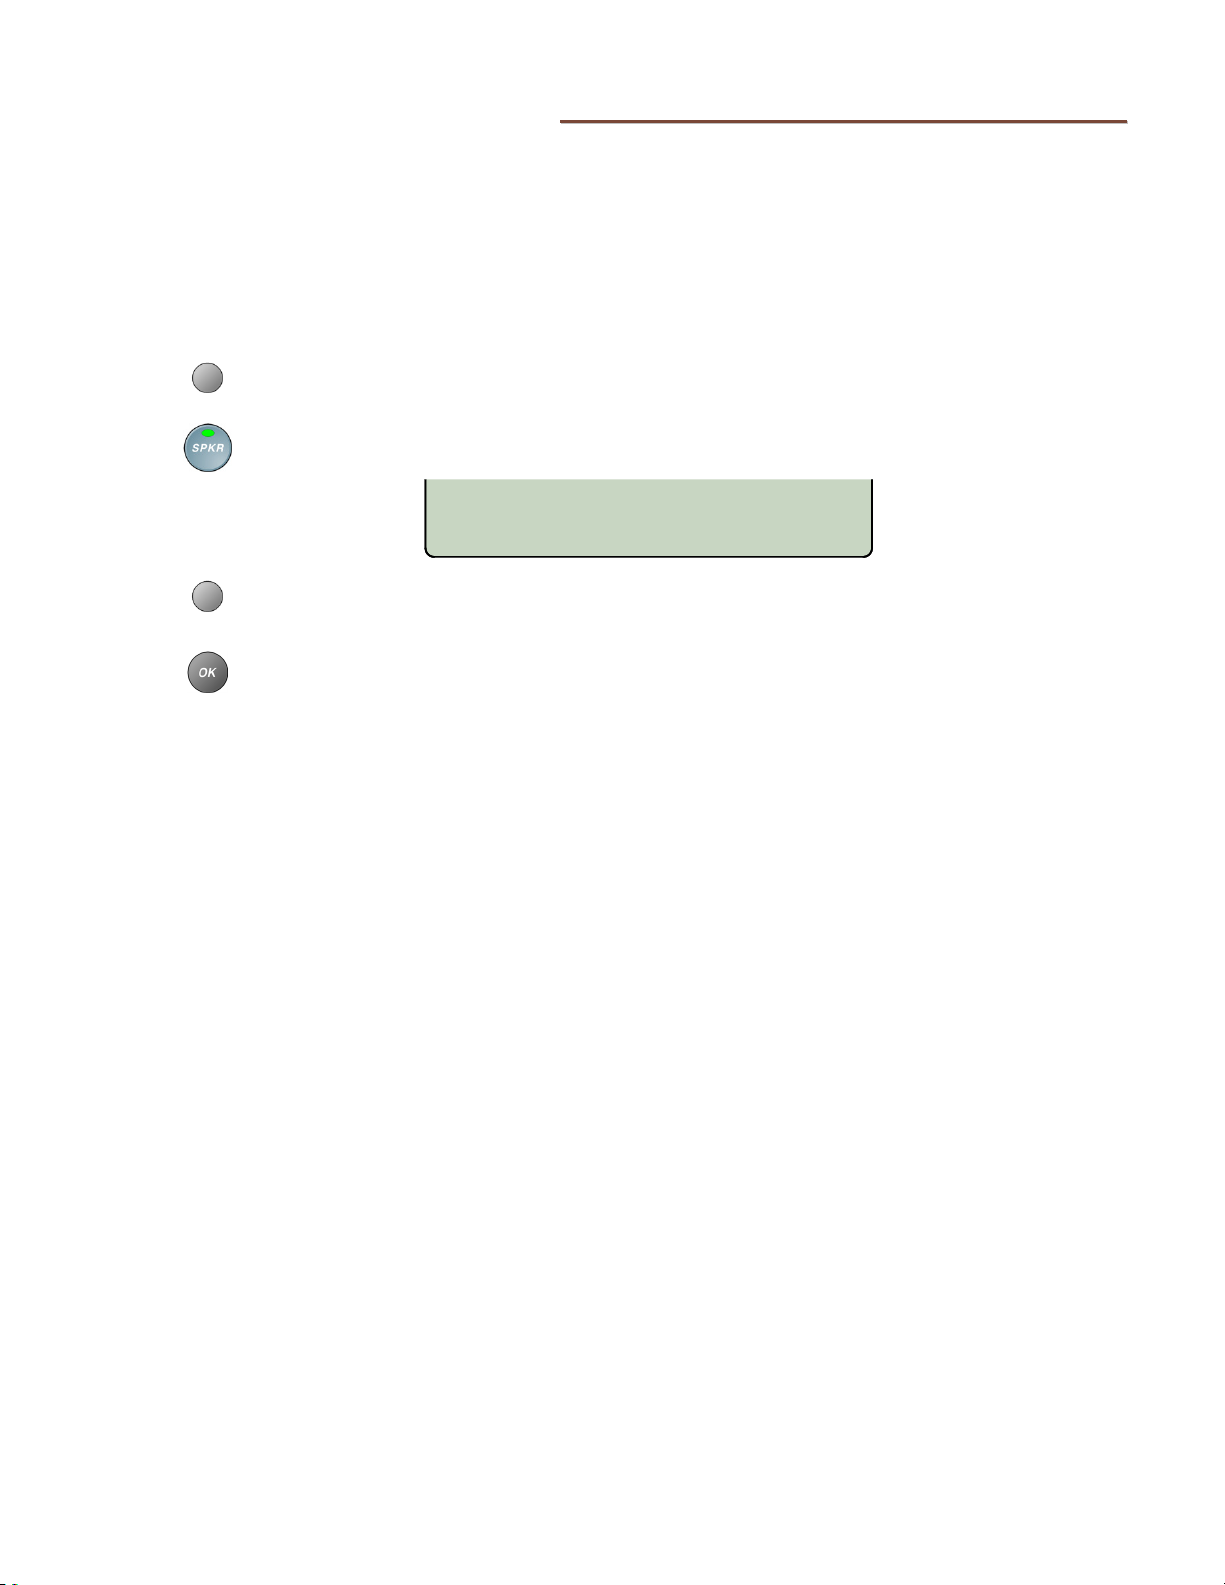
Call Monitoring allows on-hook dialing and a listen-only call monitor function that is
SPKR
activated by the
way speakerphone operation is not possible.
key. The 7810 TSG models have no speakerphone microphone; two-
When Call Monitoring is active, the indicators on the
progress tones, dialed digits, and the remote party can be heard through the built-in
speaker, but you can only talk to the remote party with the handset or headset.
From the Installation Options menu, select KEYS.
SETUP → INSTL → KEYS)
(
Press the
SPKR key.
SPKR
and
MUTE
keys are lit. Call
SPEAKER=MONITOR ONLY
MON DISABLE
Select MON to enable Call Monitoring, or DISABLE to disable the speakerphone
and Call Monitoring.
Press the
OK key twice to return to the Installation Options menu.
13-280138 Rev. H Page 49
Page 50
Teo IP Phone 7810 TSG Series Installation Instructions
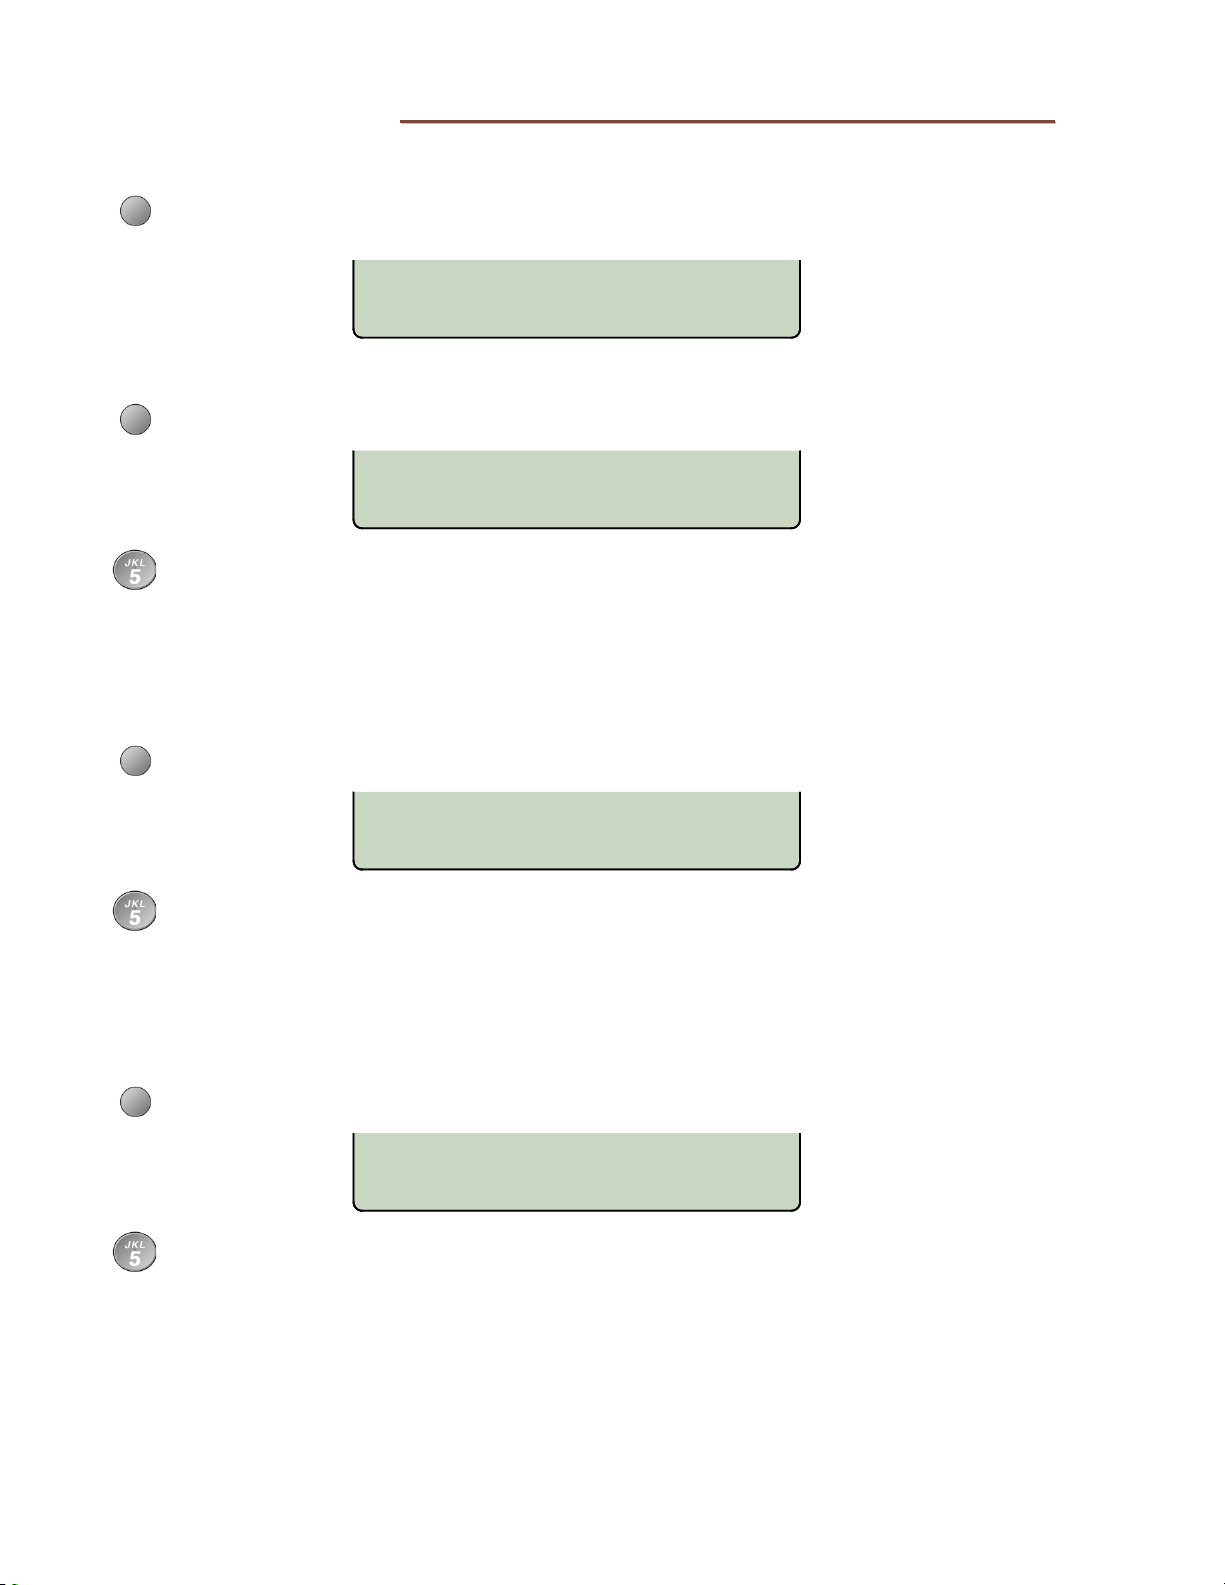
CCaallll TTiimmeeoouutt OOppttiioonnss
These options set dialing, ringing, and reorder timeouts.
From the Installation Options menu, select CALL.
SETUP → INSTL
(
→
► → CALL)
CALL TIMEOUT OPTIONS
DIAL RING REORDER
DDiiaalliinngg TTiimmeeoouutt
Select DIAL.
DIALING TIMEOUT SEC=10
DELETE CLEAR 123
Enter the number of seconds (1-30) to wait after entering digits, before a call is
automatically dialed without selecting SEND or pressing the
select CLEAR for no dialing timeout (automatic dialing after timeout is disabled).
OK key. Enter 0 or
RRiinnggiinngg TTiimmeeoouutt
Select RING.
Enter the number of seconds (1-300) that an incoming call will ring, before ringing
is turned off and the call is abandoned. Enter 0 or select CLEAR for no ringing
timeout (call continues to ring).
RReeoorrddeerr TTiimmeeoouutt
Select REORDER.
Enter the number of seconds (1-300) that the phone will remain in a disconnected
or error state before the call is cleared. Enter 0 or select CLEAR for no reorder
timeout (call remains in a disconnected or error state).
RINGING TIMEOUT SEC=180
DELETE CLEAR 123
REORDER TIMEOUT SEC=180
DELETE CLEAR 123
Page 50 13-280138 Rev. H
Page 51
Installation Options
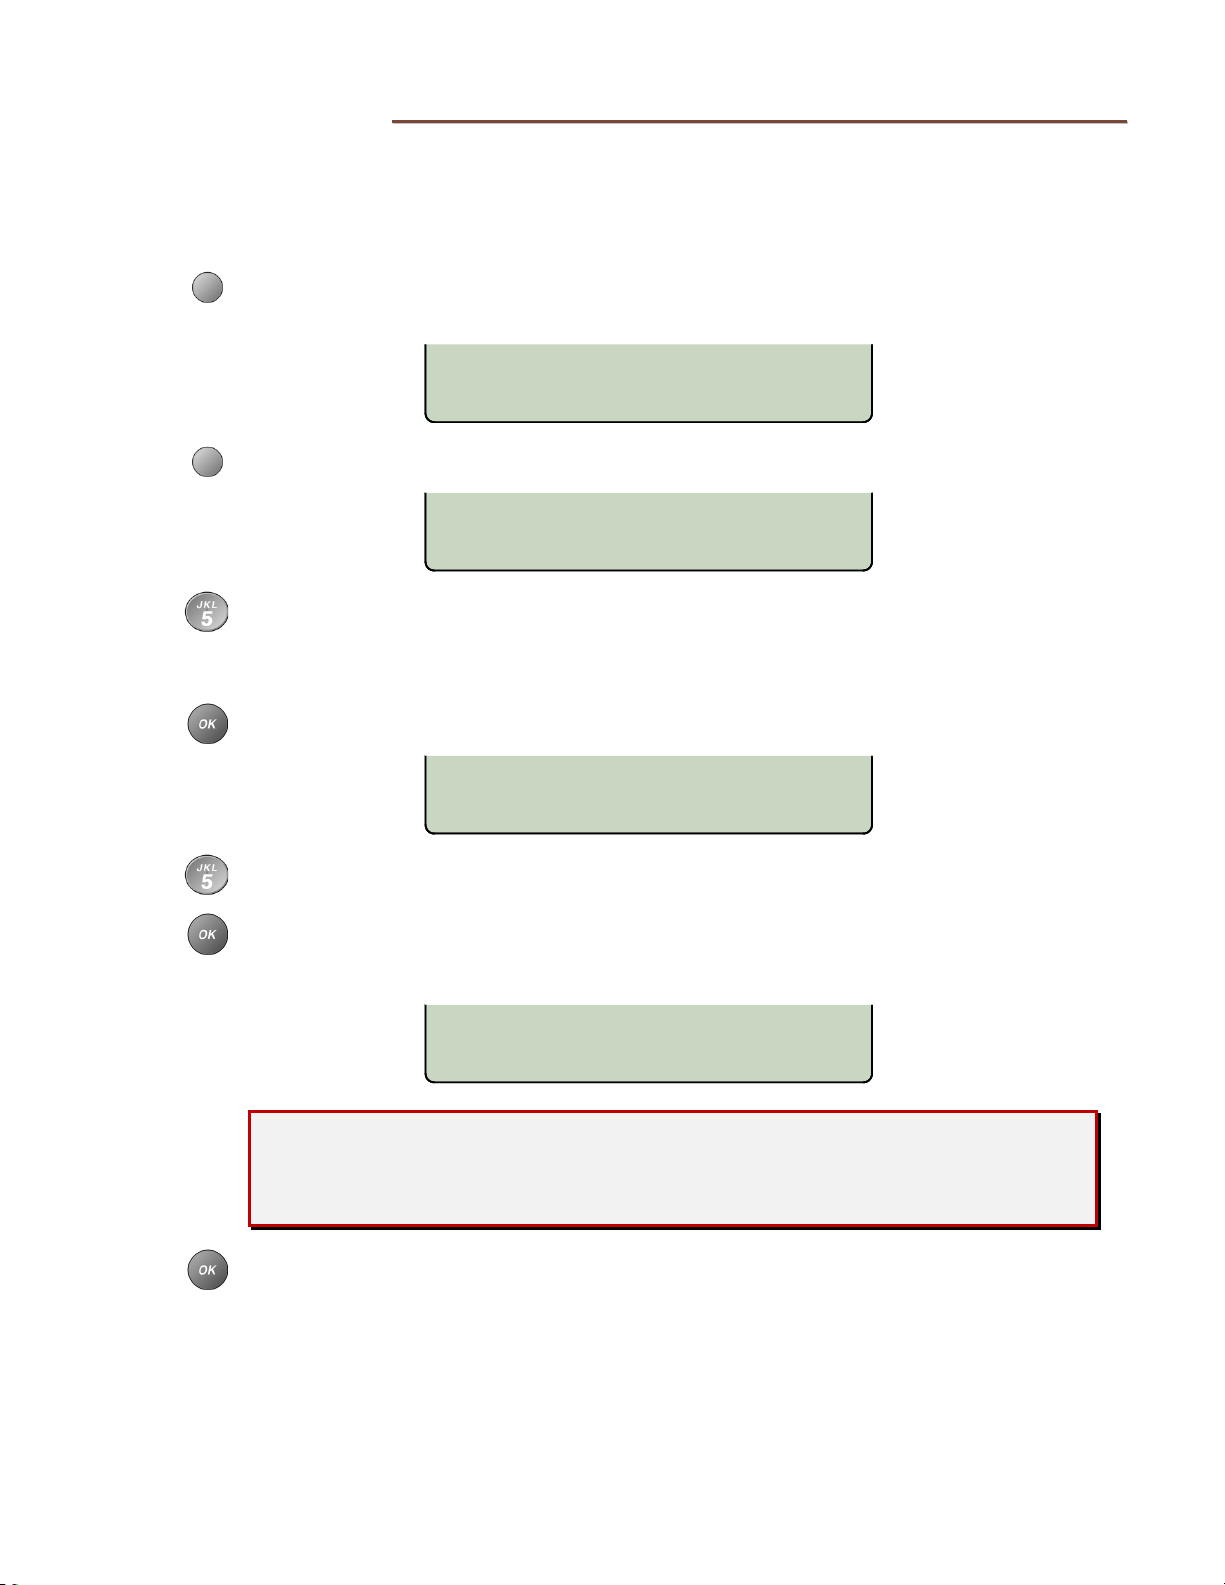
IInnssttaallllaattiioonn PPIINN
You can set a PIN to prohibit unauthorized entry into the Installation Options menu.
If a PIN is currently set, the display will prompt you to enter your PIN prior to making
changes.
From the Installation Options menu, select PIN.
SETUP → INSTL
(
→
► → PIN)
INSTALLATION PIN
SET
Select SET.
ENTER PIN:*********
£BKSP CLEAR
Enter a new 4 to 20 digit PIN with the dial pad.
If you need to make corrections, select ◄BKSP (backspace) to delete the previous digit, or
select CLEAR to remove all digits.
Press the OK key.
VERIFY:************
£BKSP CLEAR
Repeat the PIN when prompted to verify the new entry.
Press the
“PIN SET” will be displayed to confirm the new PIN.
OK key.
PIN SET
Record your PIN for future reference.
If you lose your PIN, you will no longer be able to access the Installation
Options menu – contact Teo Technical Support for assistance.
Press the OK key to return to the Installation Options menu or press the SETUP key
to exit Setup Mode.
RReemmoovviinngg tthhee PPIINN
To remove the Installation Options PIN, the phone must be reset. Refer to Reset to Factory
Default Settings below.
13-280138 Rev. H Page 51
Page 52
Teo IP Phone 7810 TSG Series Installation Instructions
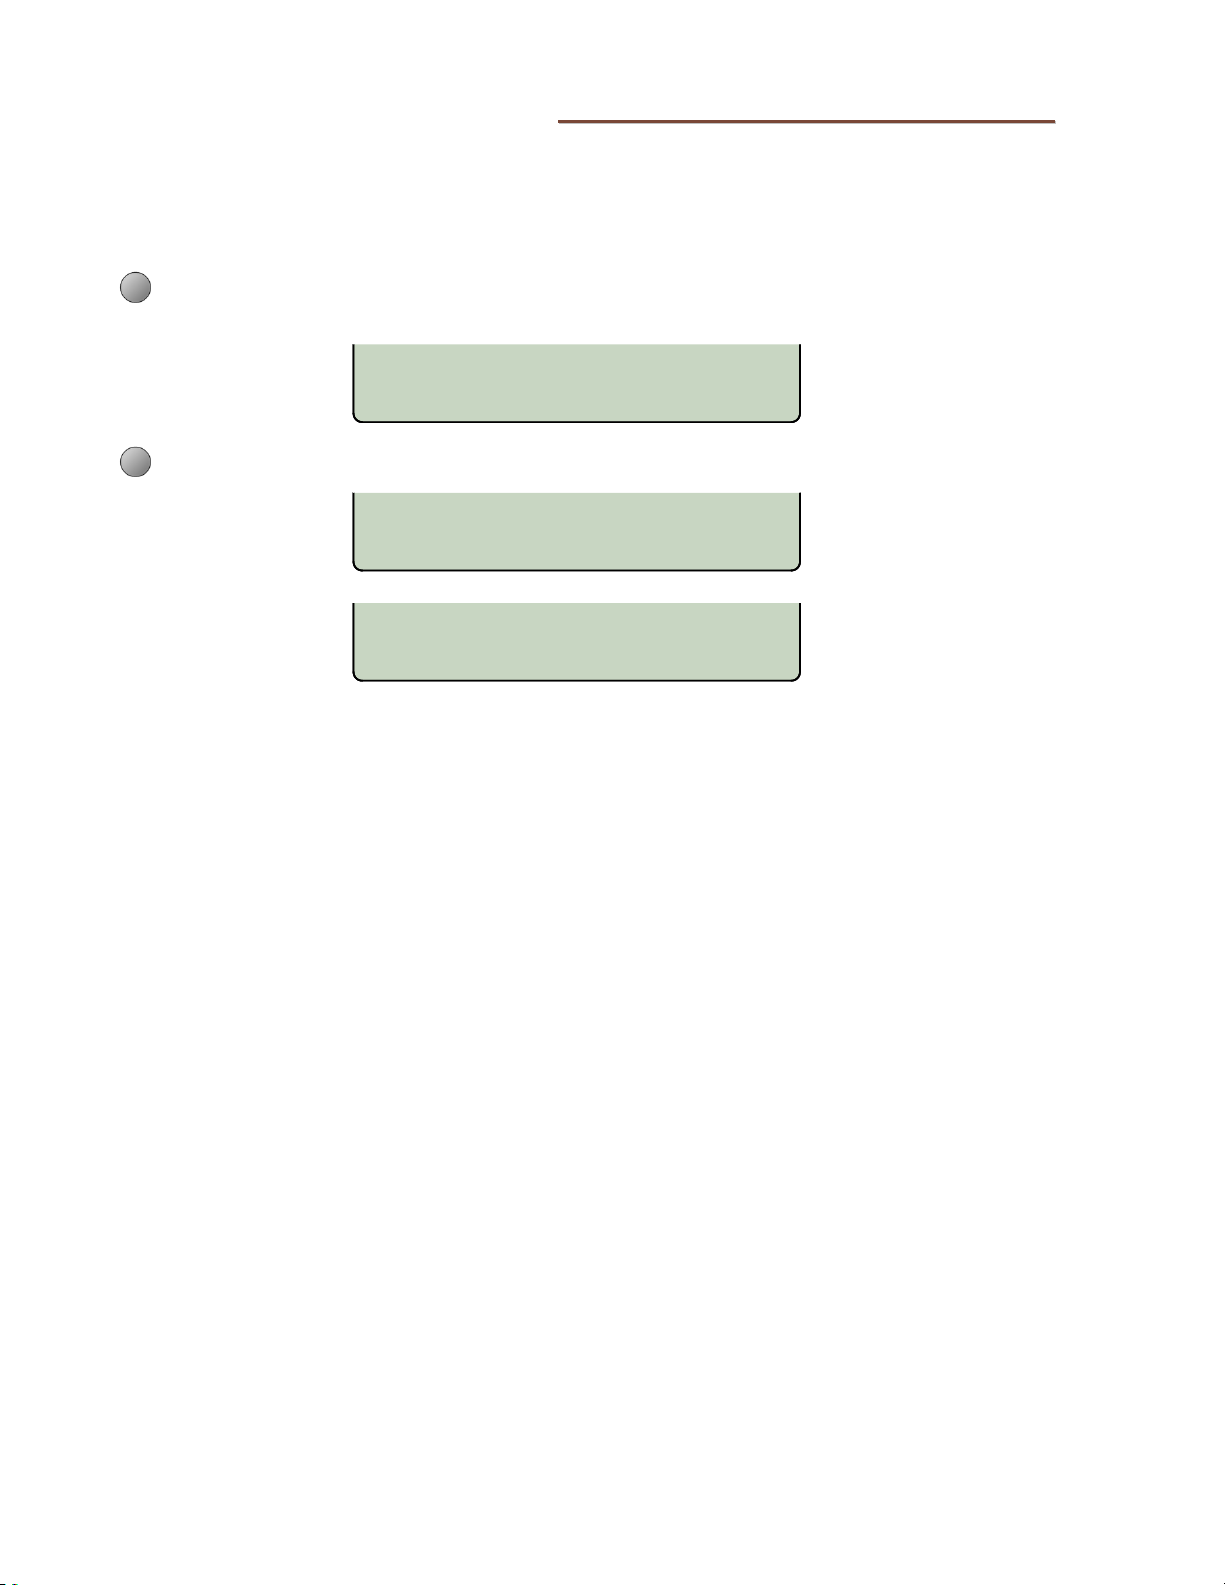
RReesseett ttoo FFaaccttoorryy DDeeffaauulltt SSeettttiinnggss
Reset returns all settings to the factory defaults, and clears all line IDs, server addresses,
speed dial numbers, call logs, and PINs. The error log is not cleared.
This option is useful when moving the telephone to a new user or location.
From the Installation Options menu, select RESET.
SETUP → INSTL
(
→
► → RESET)
RESET ALL SETUP OPTIONS?
YES NO
Select YES to confirm the reset operation.
ALL SETTINGS CLEARED
PHONE WILL BE RESTARTED
INITIALIZING...
Page 52 13-280138 Rev. H
Page 53
Installation Options
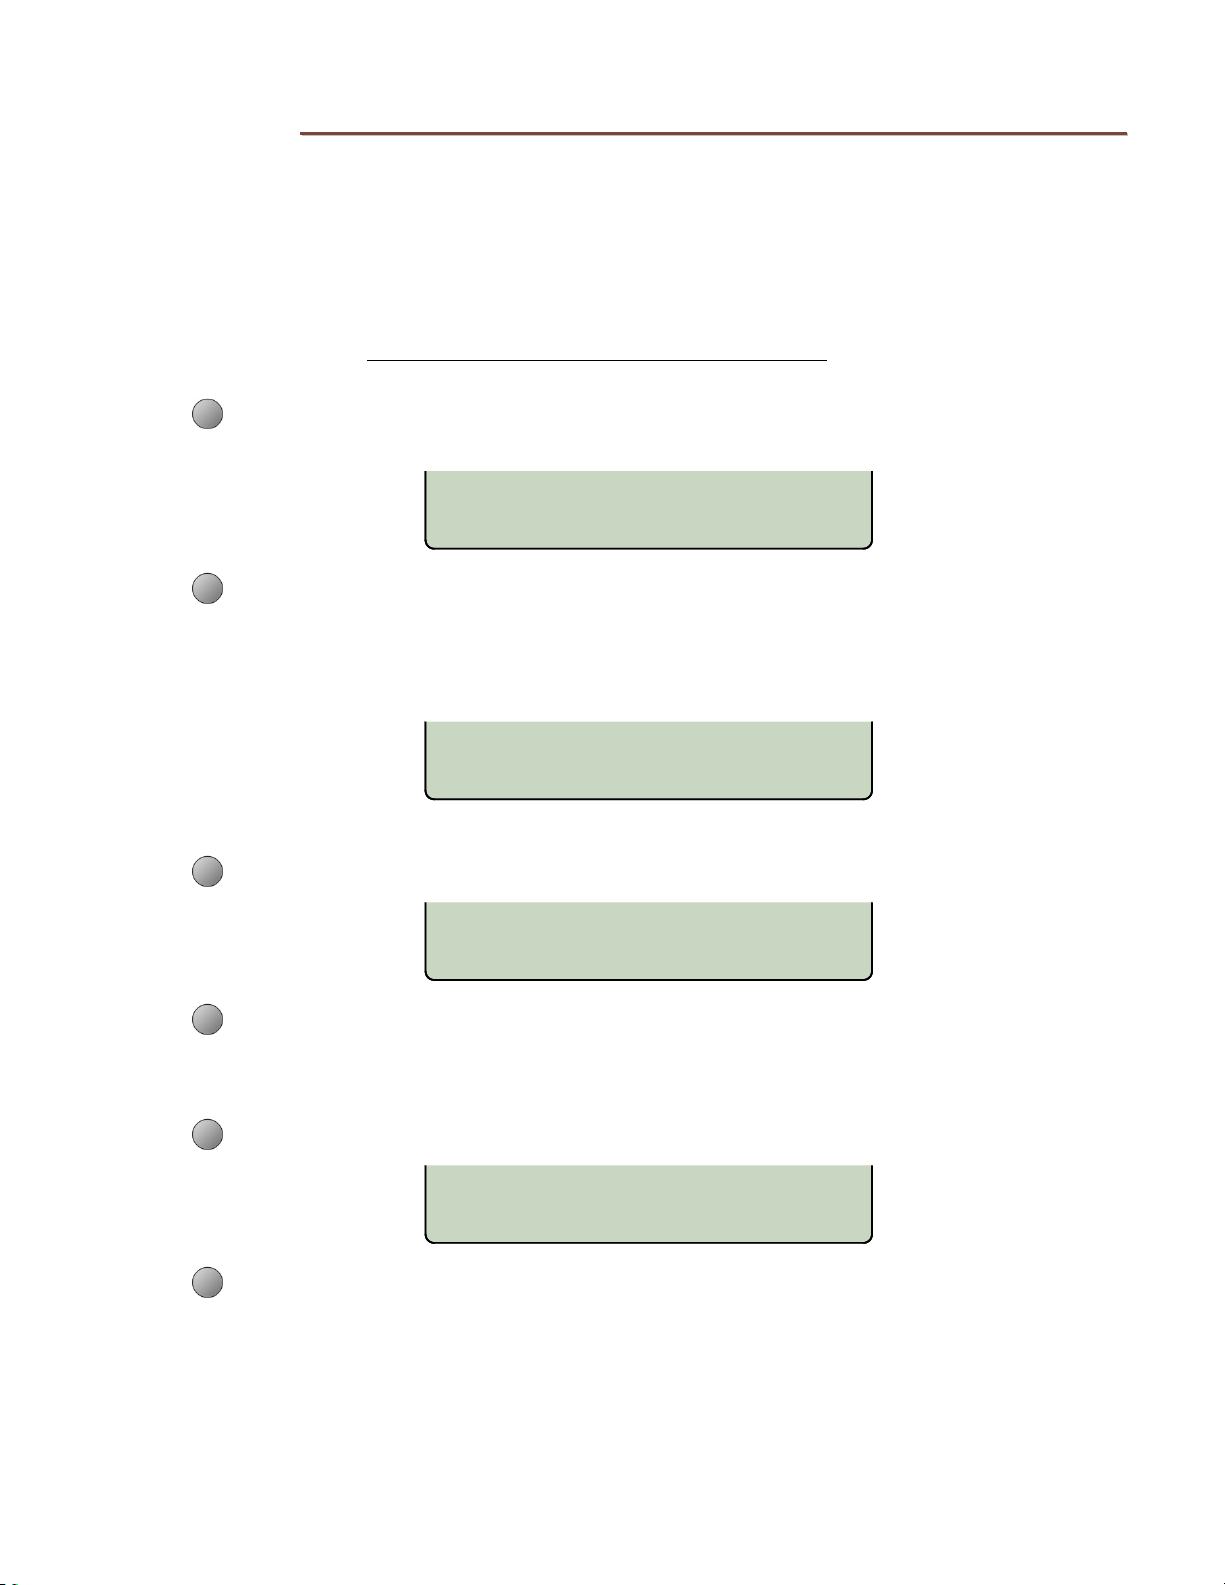
UUppddaatteess
The telephone can be remotely configured, and its operating software updated, by several
methods. Configuration and program updates can be stored on a Teo UC Server, or on a
TFTP, HTTP, or HTTPS server. The update is initiated by selecting the START menu option.
The Installation Options menu can be protected by a PIN to prevent unauthorized updates – see page
51.
Please refer to the IP Telephone Network Administration Guide
From the Installation Options menu, select UPDATE.
SETUP → INSTL
(
→
► → UPDATE)
for more information.
IP CONFIGURATION UPDATE¤
ADDR CONFG PRGRM
Select one of the update options.
AADDDDRR ((PPhhoonnee IIPP AAddddrreessss CCoonnffiigguurraattiioonn))
ADDRESS CONFIG OPTIONS
IPv4 IPv6
IIPPvv44 AAddddrreesssseess
Select IPv4 to select the method used to set the phone IPv4 address.
Select DHCPv4 to enable DHCP, STATIC to disable DHCP and use manually-entered
IPv4 addresses, or OFF to disable IPv4 addressing (IPv6 protocol only)
IIPPvv66 AAddddrreesssseess
Select IPv6 to select the method used to set the phone IPv6 address.
Select OFF to disable IPv6 addressing (IPv4 protocol only), AUTO6 to enable
stateless global IPv6 address auto configuration, or STATIC to use manuallyentered Global IPv6 addresses
The phone must be restarted to use the new IP address settings.
ADDRESS IPv4=DHCPv4
DHCPv4 STATIC OFF
(page 25).
ADDRESS IPv6=OFF
AUTO6 STATIC OFF
(page 25).
13-280138 Rev. H Page 53
Page 54
Teo IP Phone 7810 TSG Series Installation Instructions
TPS
TPS
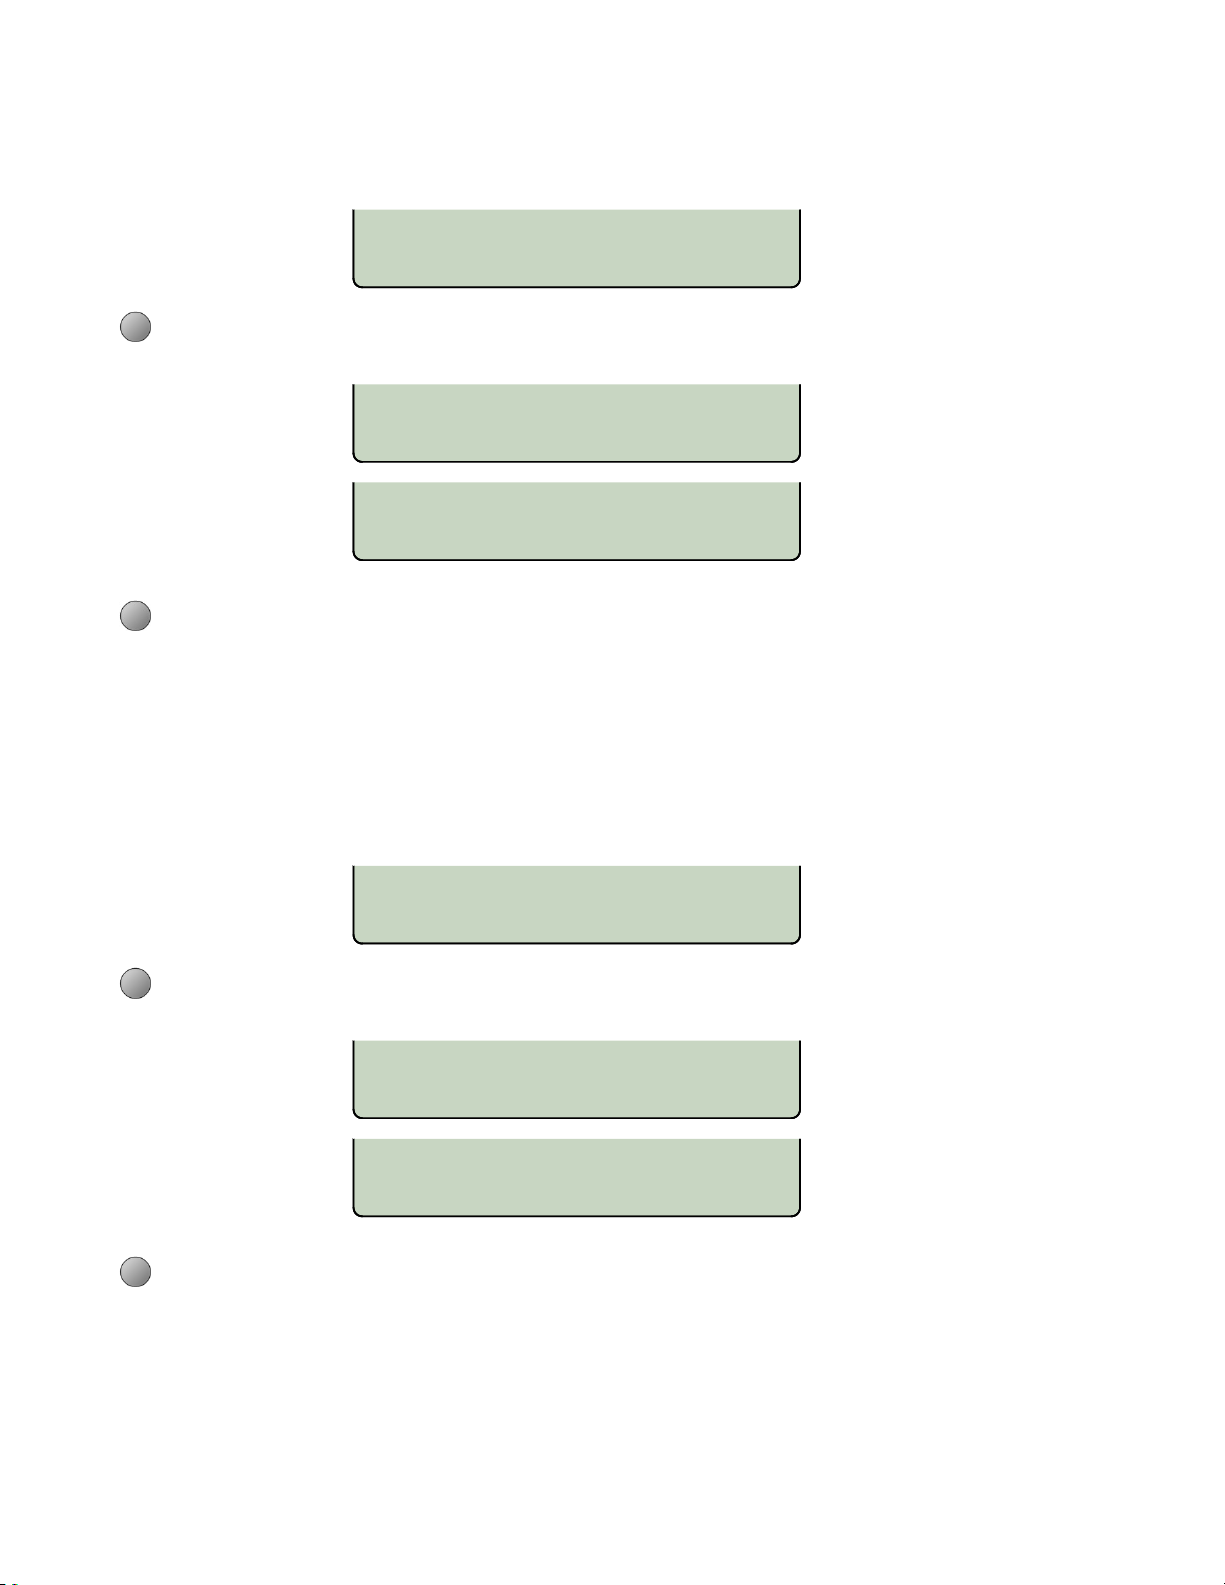
CCOONNFFIIGG ((CCoonnffiigguurraattiioonn UUppddaatteess))
This option updates the phone configuration.
CONFG=TEO AUTO=OFF
START PROTO
Select PROTO to select the update server type: TEO (for use with Teo UC System),
TFTP, HTTP, HTTPS, or NONE.
UPDATE PROTOCOL=TEO ¤
TEO TFTP HTTP HT
UPDATE PROTOCOL=TEO ¤
NONE
To update the phone immediately, select START. The phone may restart after a
successful configuration update.
PPRRGGRRMM ((PPrrooggrraamm UUppddaatteess))
This option updates the phone operating software. Phone operating firmware is digitally
signed by Teo to ensure code validity. Modified operating firmware cannot be loaded into
the phone.
PROGRAM=TEO AUTO=OFF
START PROTO
Select PROTO to select the update server type: TEO (for use with Teo UC System),
TFTP, HTTP, HTTPS, or NONE.
UPDATE PROTOCOL=TEO ¤
TEO TFTP HTTP HT
UPDATE PROTOCOL=TEO ¤
NONE
To update the phone immediately, select START. The phone will restart after a
successful program update.
Page 54 13-280138 Rev. H
Page 55
Installation Options
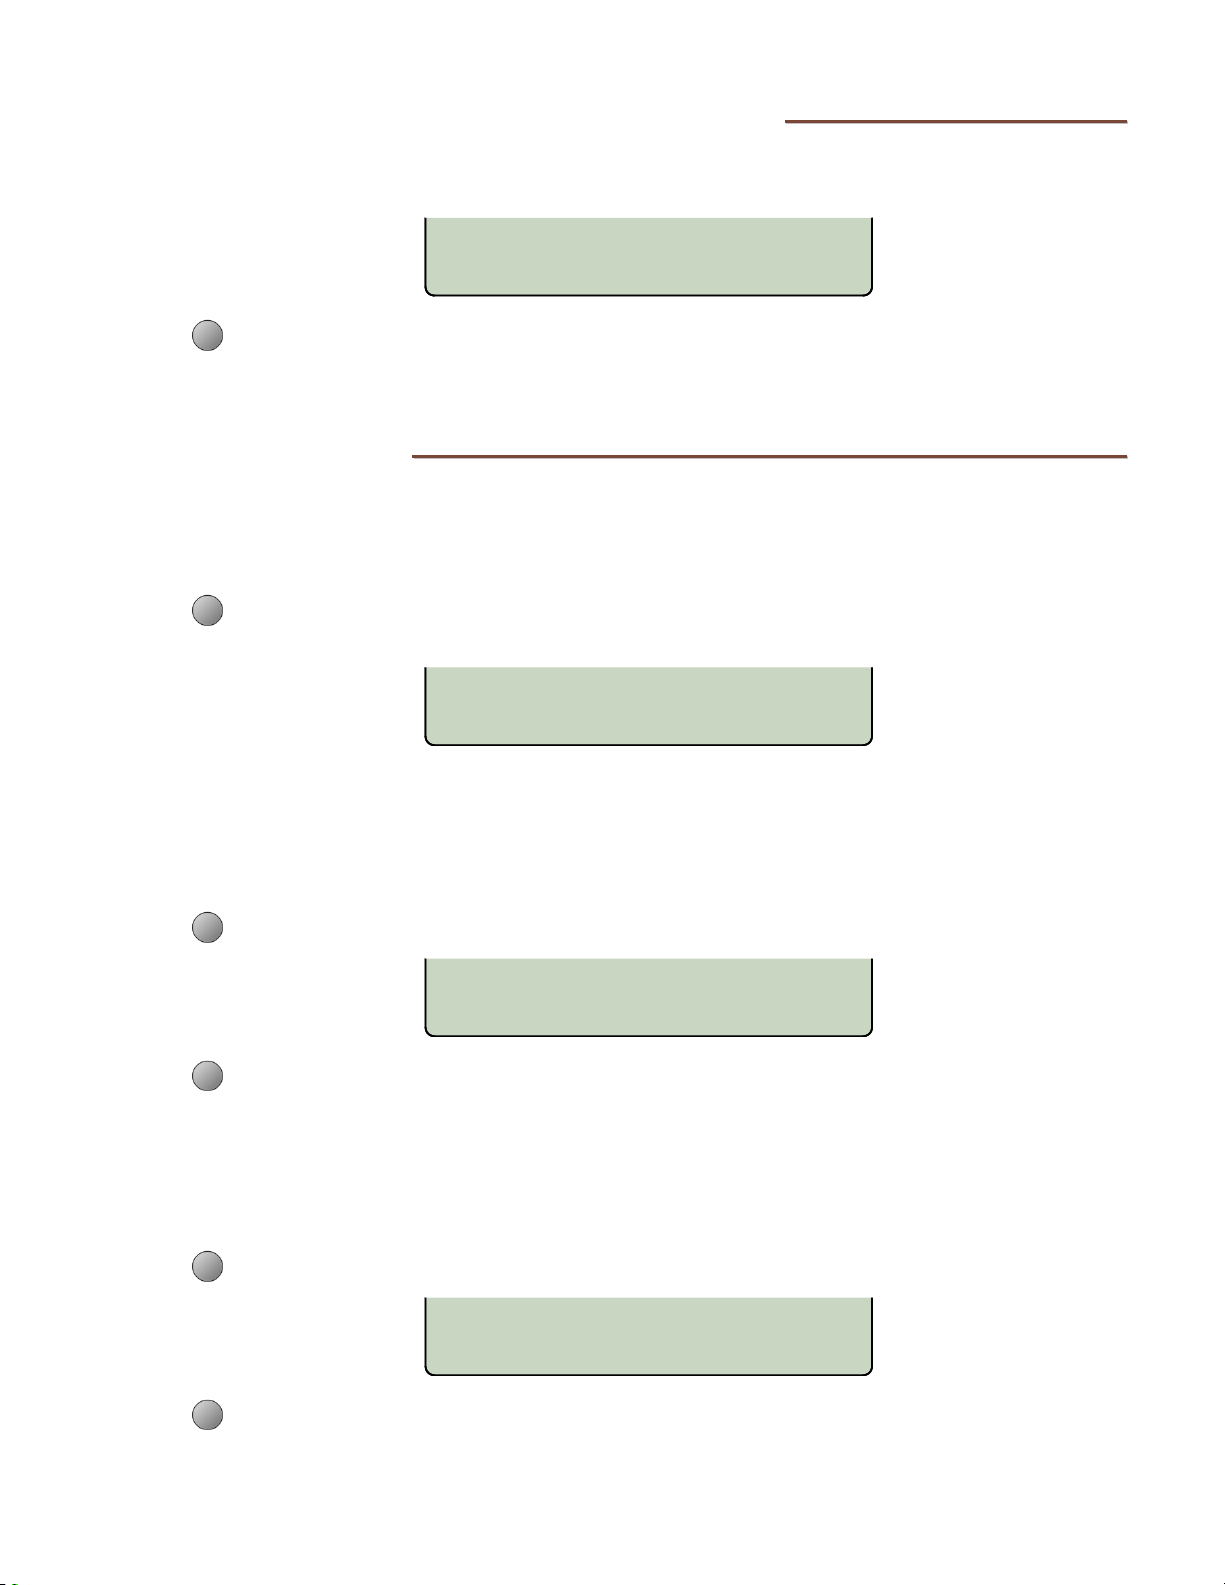
PPCC PPoorrtt
The built-in Ethernet switch and PC port allows a computer to share the phone’s Ethernet
connection.
((77881100PPooEE--TTSSGGAA aanndd 77881100PPooEE--TTSSGGBB oonnllyy)
)
PC PORT=ENABLED
ENABLE DISABLE
Select ENABLE or DISABLE as needed.
SSeeccuurriittyy OOppttiioonnss
The security options allow you to control ARP monitoring, SRTP, SIP transport, and MLPP
dialing. Leave these settings at the default values, unless changes are required for your
network.
From the Installation Options menu, select SECRTY.
SETUP
(
→ INSTL
→
► → SECRTY)
SECURITY OPTIONS
ARP SRTP TRANS MLPP
AARRPP MMoonniittoorriinngg
If your network does not monitor for Address Resolution Protocol (ARP) attacks, enable this
option to turn on ARP monitoring in the phone.
Select ARP.
ARP MONITORING=DISABLED
ENABLE DISABLE
Select ENABLE or DISABLE as needed.
SSRRTTPP
Secure Real-time Transport Protocol (SRTP) is used to encrypt transmitted voice packets.
Select SRTP.
SECURE RTP=DISABLED
ENABLE DISABLE
Select ENABLE or DISABLE as needed.
13-280138 Rev. H Page 55
Page 56
Teo IP Phone 7810 TSG Series Installation Instructions
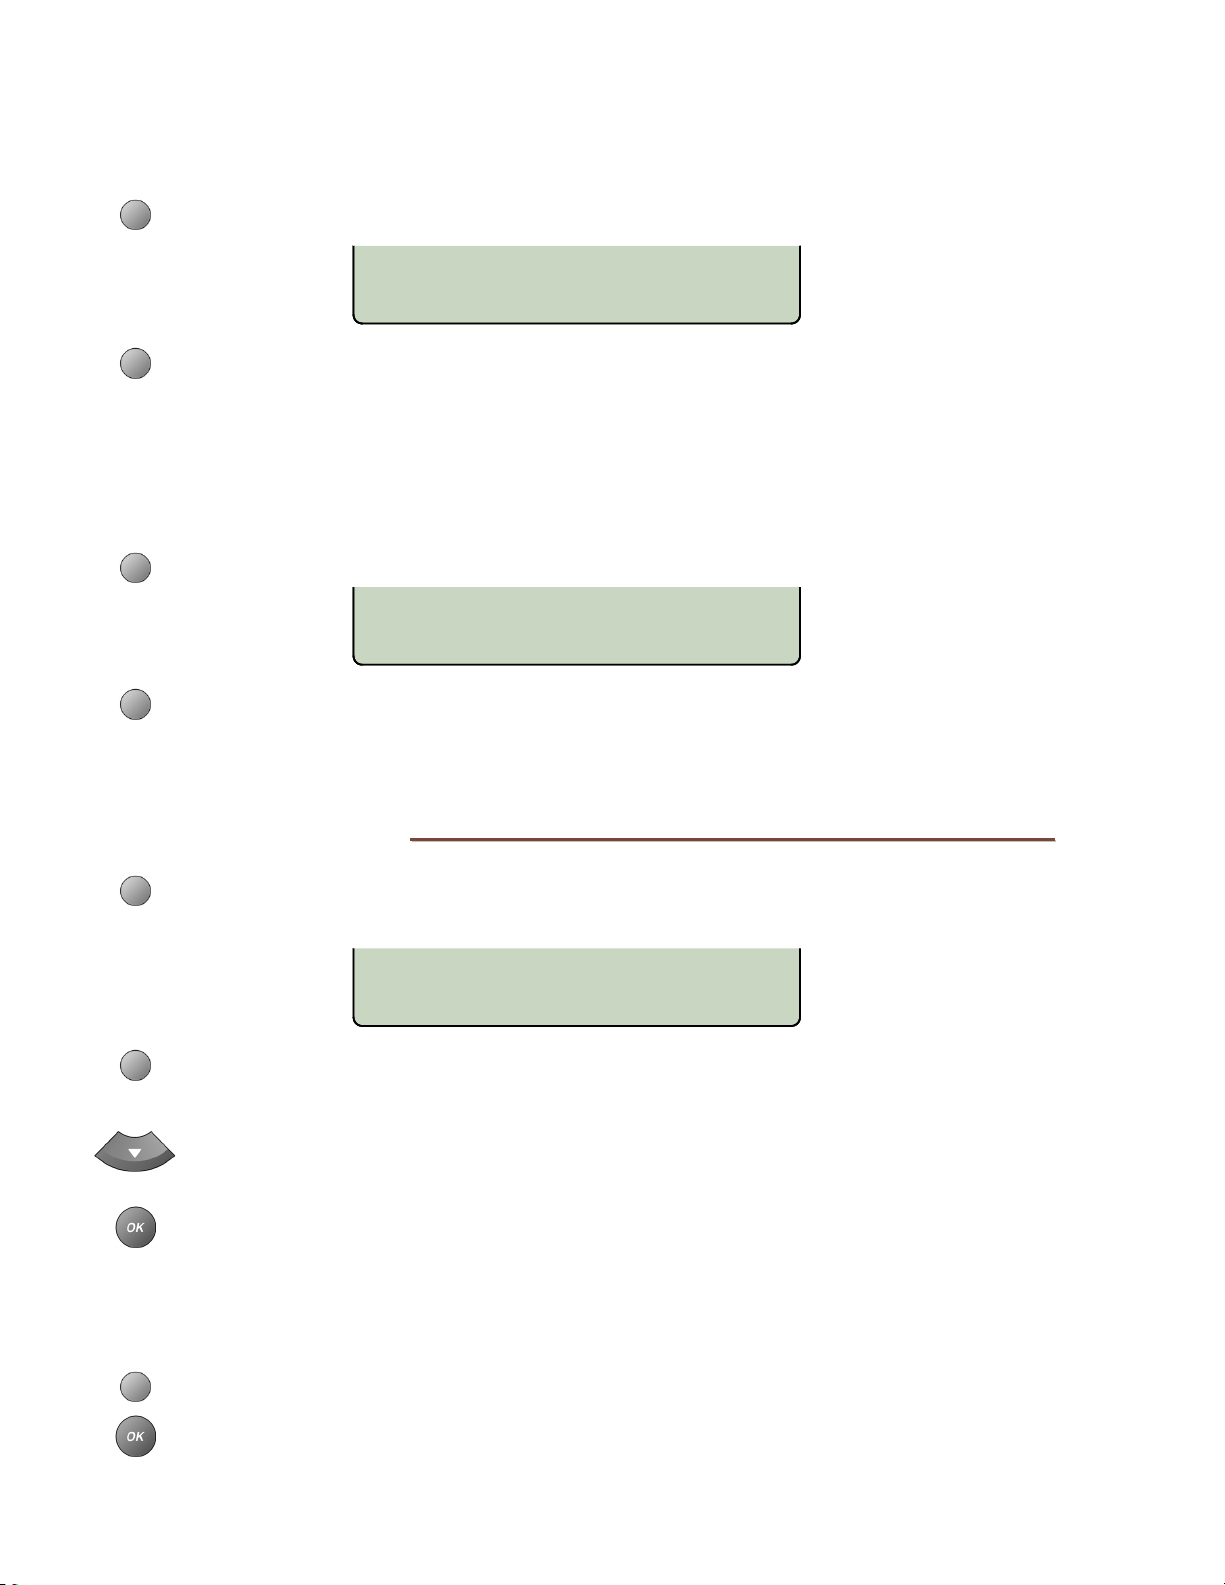
SSIIPP TTrraannssppoorrtt
Defines the type of SIP transport used for SIP signaling.
Select TRANS.
SIP TRANSPORT=UDP
UDP TCP TLS TLS+
Select UDP, TCP, TLS (uses SIP in the URI), or TLS+ (uses SIPS in the URI).
MMLLPPPP DDiiaall PPllaann
Enables MLPP dialing and identifies the MLPP network domain. Note: This option may not
appear if a custom dial plan has been configured through XML configuration download.
Select MLPP.
MLPP DIALPLAN=DISABLED
DSN UC DISABLE
Select DSN or UC network domain to enable MLPP, or DISABLE to disable MLPP
dialing and preemption.
VViieewwiinngg tthhee EErrrroorr LLoogg
From the Installation Options menu, select LOG.
SETUP
(
→ INSTL
→
► → LOG)
VIEW LOG ENTRIES
ERROR CLEAR
Select ERROR to view the error log.
The most recent log entry will be shown.
Press the Down Arrow key to view previous entries, or press the Up Arrow key to
return to newer entries.
Press the OK key to return to the View Log Entries menu or press the
exit Setup Mode.
SETUP
key to
CClleeaarriinngg tthhee EErrrroorr LLoogg
Select CLEAR to remove all entries from the error log.
Press the OK key to return to the Installation Options menu or press the SETUP key
to exit Setup Mode.
Page 56 13-280138 Rev. H
Page 57
A
d
m
i
n
i
s
t
r
a
t
i
o
n
O
p
t
i
o
n
s
A
d
m
i
n
i
s
t
r
a
t
i
o
n
O
p
t
i
A
d
m
i
n
i
s
t
r
a
t
i
o
n
O
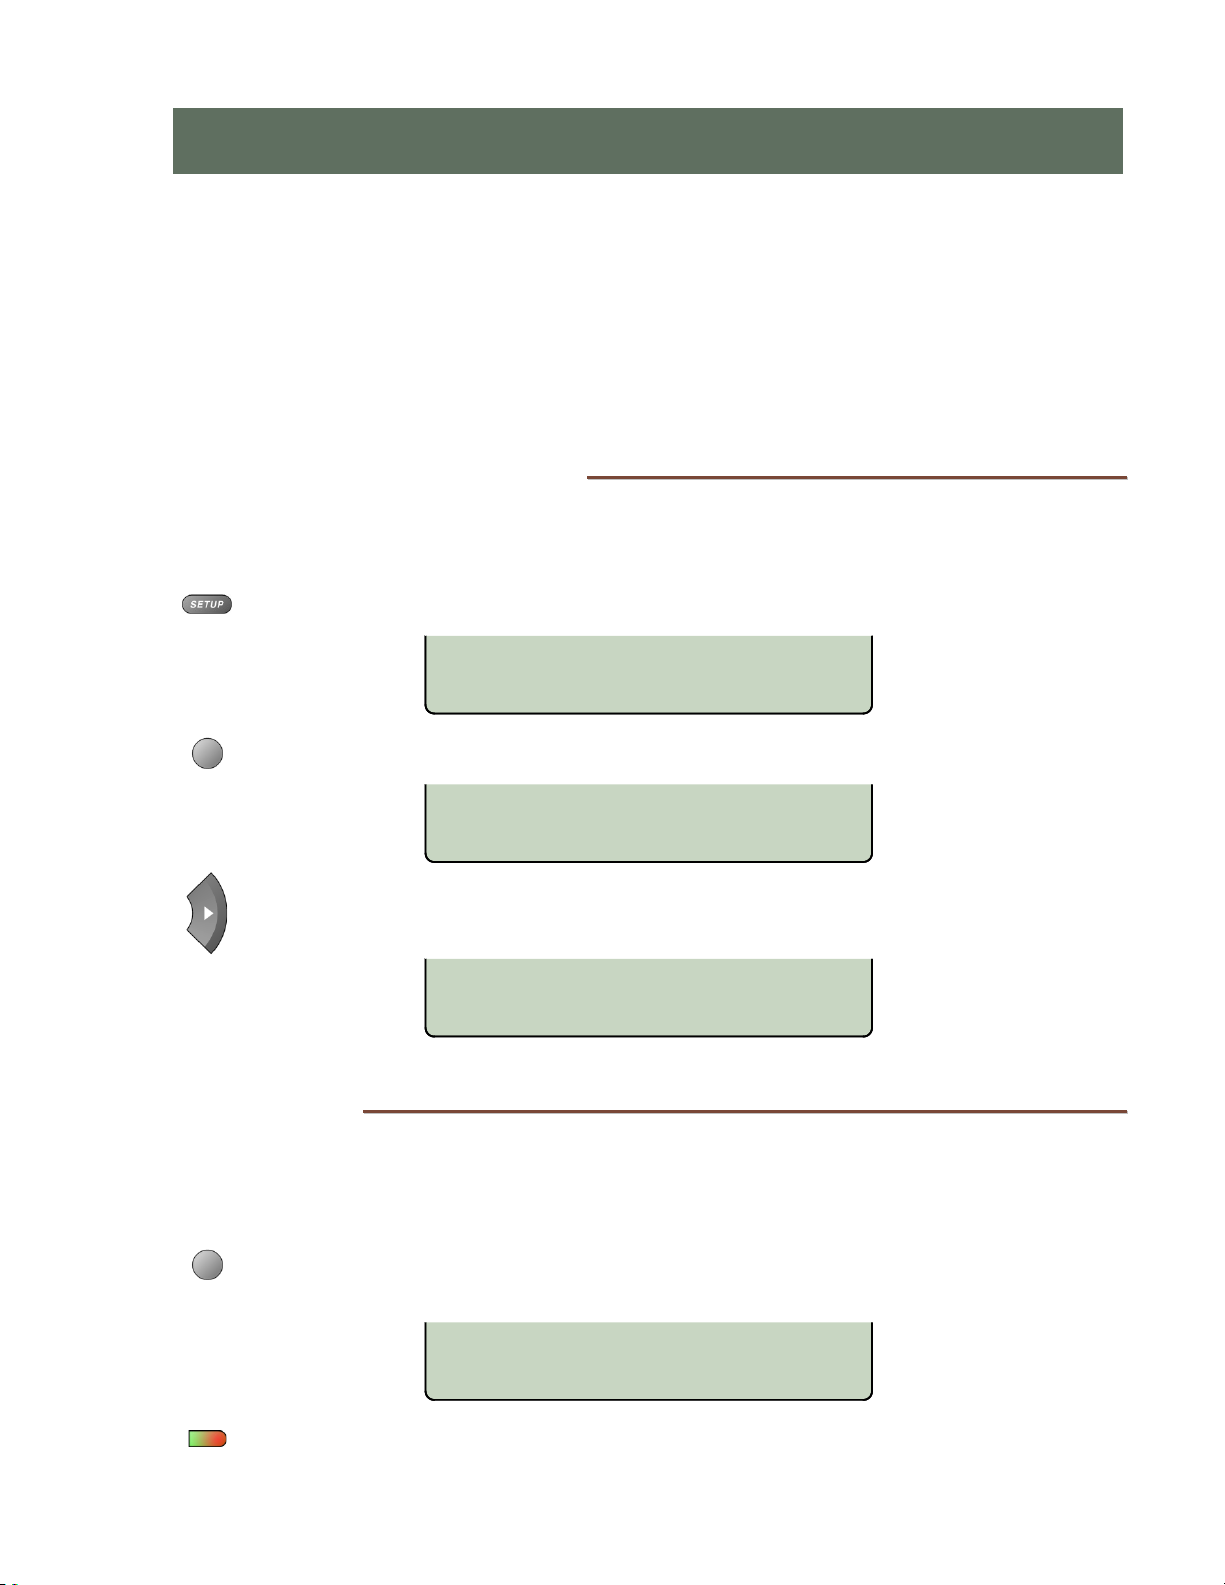
The following test and diagnostic options are available from the Administration Options
menu:
• Local Inspect • Test Functions
• Hardware Version • Diagnostics
• Software Version • Phone Restart
• Serial Number
AAddmmiinniissttrraattiioonn OOppttiioonnss MMeennuu
You can enter from the Administration Options menu when the phone is idle or during an
active call.
p
o
t
i
o
n
n
s
s
Press the
Select ADMIN.
When
Arrow key to see additional menu selections.
LLooccaall IInnssppeecctt
Local Inspect allows you to identify the Line ID or feature assignment of each configured
key. You can use Local Inspect after key initialization to verify line appearance and feature
assignments.
SETUP key.
SETUP MENU
INSTL ADMIN USER
ADMINISTRATION OPTIONS ¤
INSPCT VERS TEST DIAG
►
appears in the upper line of the display, you can press the Left or Right
ADMINISTRATION OPTIONS £
RESTART
From the Administration Options menu, select INSPCT.
SETUP → ADMIN
(
On the phone or 8030X Button Expansion Module, press the key that you want to
inspect.
13-280138 Rev. H Page 57
→ INSPCT)
SELECT A KEY
Page 58
Teo IP Phone 7810 TSG Series Installation Instructions
The key’s indicator will alternately flash red and green.
The first two displayed digits are the key number. Additional displayed information
will vary depending upon the key type, as shown below.
LLiinnee AAppppeeaarraannccee KKeeyy
The display will show the SIP Line ID (username) and SIP Display Name (CID) for
the selected key.
FFeeaattuurree AAccttiivvaattoorr
The display will show the network feature activator number and service description
for the selected key.
DDSSSS//BBLLFF KKeeyy
The display will show the first 17 digits of the monitored SIP Line ID (username)
and the programmed autodial string.
01=LINE 4018
Bessie THOMPSON
07=FEATURE ACTIVATOR
CALL PARK
05=DSS/BLF_PRES
4251
SSppeeeedd DDiiaall KKeeyy
The display will show the programmed autodial string for the selected key.
When you are finished inspecting keys, press the
Administration Options menu or press the
08=SPEED DIAL
9995552341#
OK key to return to the
SETUP key to exit Setup Mode.
Page 58 13-280138 Rev. H
Page 59
Administration Options
VVeerrssiioonn
Use this option to view the telephone’s hardware versions, application software version,
serial number, and the version of attached optional equipment. This information can also
be viewed by pressing the
INFO key.
From the Administration Options menu, select VERS.
SETUP → ADMIN
(
→ VERS)
VERSION
H/W S/W SERIAL 8030X
HHaarrddwwaarree VVeerrssiioonn
Select H/W.
MODEL: 7810
TOP:293701B PCB:293602D
AApppplliiccaattiioonn SSooffttwwaarree VVeerrssiioonn
Select S/W.
APP VERSION:05.04.16
SSeerriiaall NNuummbbeerr
Select SERIAL.
SERIAL#:00368065003
OOppttiioonnaall EEqquuiippmmeenntt VVeerrssiioonn
Select 8030X (if displayed).
MODEL:8030X BUTTON EXPAN
VERSION: 02.01.03
Press the
key to exit Setup Mode.
13-280138 Rev. H Page 59
OK key to return to the Administration Options menu or press the SETUP
Page 60
Teo IP Phone 7810 TSG Series Installation Instructions
TTeesstt
Select this option to test the LCD display, LED indicators, and keys.
From the Administration Options menu, select TEST.
SETUP → ADMIN
(
→ TEST)
TERMINAL TEST
DISPLY KEYS 8030X
DDiissppllaayy aanndd LLEEDD IInnddiiccaattoorrss
Select DISPLY.
DISPLAY/LED TEST
LCD RED GREEN OFF
LLCCDD DDiissppllaayy
LLEEDD IInnddiiccaattoorrss
Select LCD.
All pixels (picture elements, or dots) on the display should turn dark.
Press any key to return the display to normal operation.
Select RED to turn on all red indicators, and turn all others off.
Select GREEN to turn on all green indicators, and turn all others off.
Select OFF to turn off all indicators, or wait 5 seconds for automatic off.
Press the OK key to return to the Terminal Test menu or press the SETUP key to exit
Setup Mode.
KKeeyyss
Select KEYS.
PRESS EACH KEY TO TEST
OR GO OFF-HOOK TO EXIT
Press each key on the telephone (not on the Button Expansion Module), including
the dial pad keys, one at a time.
A letter should appear in the display for each pressed key.
“vwx” is shown in the lower right corner of the display after the first keypress, to
fill out the 48-character display. The 7810 has 45 keys.
ABCDEFGHIJKLMNOPQRSTUVWX
abcdefghijklmnopqrstuvwx
Page 60 13-280138 Rev. H
Page 61
Administration Options
If all keys are operational, the following display will be shown. Press any key to
return to the Terminal Test menu.
KEY TEST PASSED
PRESS ANY KEY TO EXIT
If any key fails, or to exit before testing all keys, go off-hook with the handset or
unplug the phone.
88003300XX BBuuttttoonn EExxppaannssiioonn MMoodduullee
This option tests the keys and LED indicators on an 8030X Button Expansion Module. It is
only available if an 8030X is connected to the phone.
Select 8030X.
PRESS EACH KEY ON 8030X
PRESS OK TO EXIT
Press each key on the 8030X, one at a time.
The key's LED indicator should flash alternately red and green, and a number
should appear in the display for each pressed key.
12345678901234567890
1234567890
After all keys have been tested, press any key to exit the test.
You can also exit the test at any time by pressing the OK key to return to the
Terminal Test menu, or by lifting the handset to exit Setup Mode.
13-280138 Rev. H Page 61
Page 62
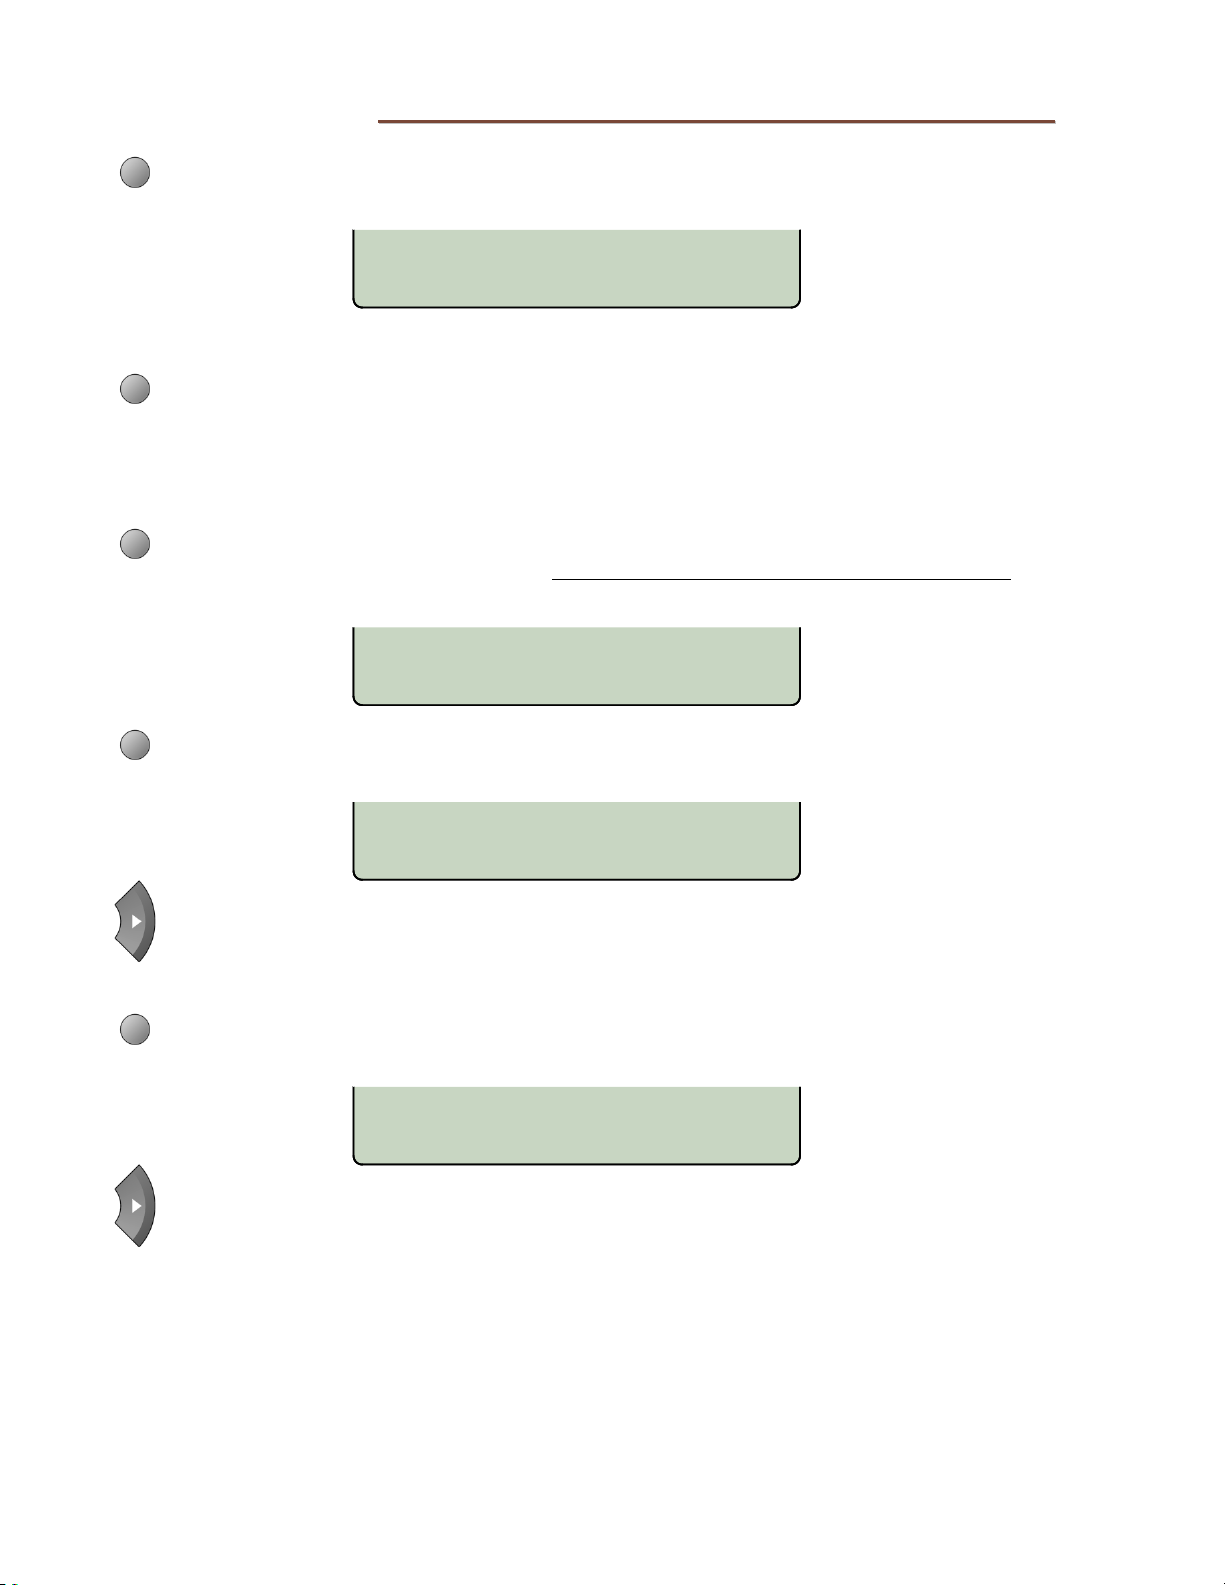
Teo IP Phone 7810 TSG Series Installation Instructions
DDiiaaggnnoossttiicc DDiissppllaayyss
From the Administration Options menu, select DIAG.
SETUP → ADMIN
(
→ DIAG)
LLiinnkk
Select LINK to determine which SIP lines are registered after phone initialization.
Registered lines will light green; unregistered lines will light red.
PPaacckkeett SSttaattiissttiiccss
Select PACKET to view packet reception statistics for an active call, or the last 50
recorded call statistics. Refer to the
a detailed description of packet statistics.
Select ACTIVE to view packet reception statistics for the current call. This option
can be viewed only during an active call.
DIAGNOSTIC OPTIONS
LINK PACKET PING
IP Telephone Network Administration Guide
for
PACKET STATISTICS
ACTIVE HISTORY
G.711/20ms JTR=10/100ms¤
ACTIVE CALL
Press the Right Arrow key to view additional statistics.
From the Packet Statistics menu, select HISTORY to view the last 50 recorded
packet reception statistics.
JITTER DELAY=10ms ¤
HISTORY
Press the Right Arrow key to view additional statistics.
Page 62 13-280138 Rev. H
Page 63
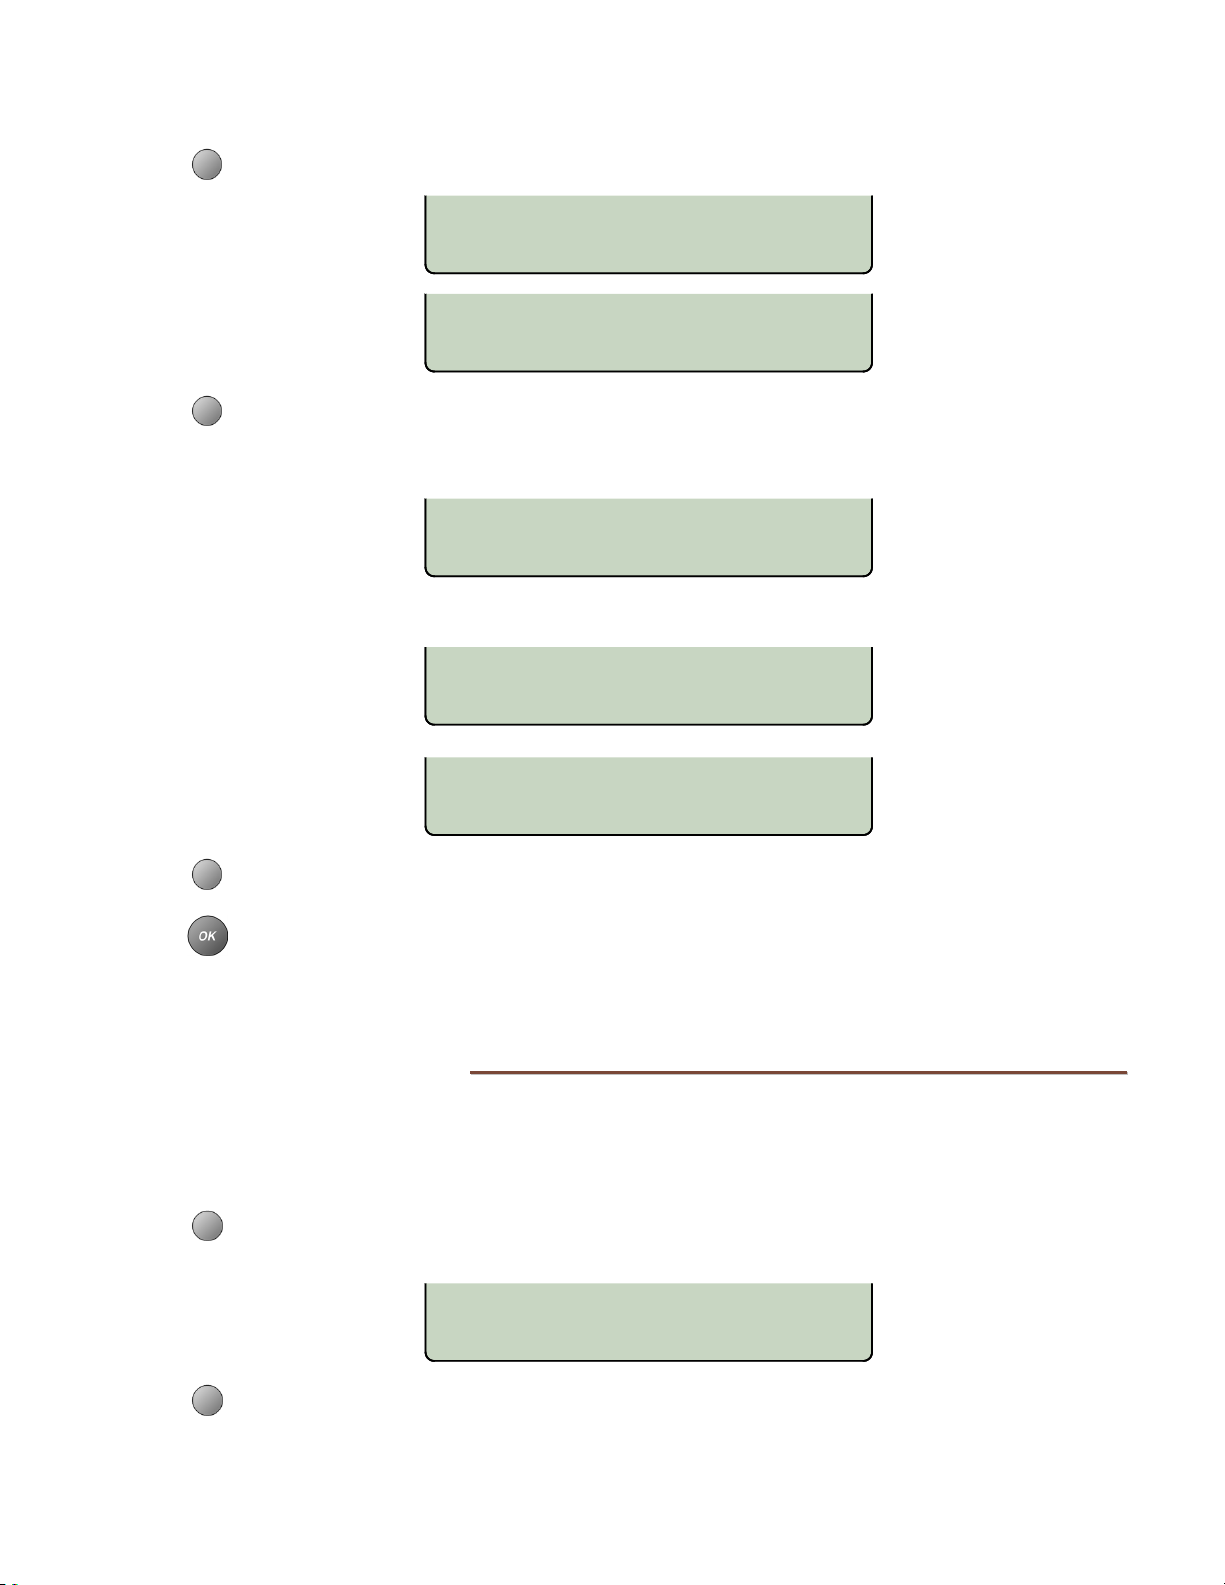
Administration Options
PPiinngg
Select PING to verify the path to an IP address.
SELECT DEVICE TO PING ¤
PHONE GATEWY TFTP PROXY
SELECT DEVICE TO PING £
SNTP DHCP REGSTR OTHER
Select a device to ping.
Or, select OTHER, enter an IP address or server name, and then select PING.
Character entry is explained on page 18.
OTHER=
DELETE CLEAR PING
The display will show the result of the ping test.
PING4 SUCCESSFUL
PRESS ANY KEY TO EXIT
PING4 FAILED
PRESS ANY KEY TO EXIT
Press any key to return to the Ping menu.
When finished, press the
SETUP key to exit Setup Mode.
the
RReessttaarrttiinngg tthhee PPhhoonnee
OK key to return to the Diagnostic Options menu or press
Select Restart to reset the phone. If you are on an active call you will be disconnected. The
call log will be cleared. No configuration parameters will be altered, and the error log will
not be cleared.
From the Administration Options menu, select RESTART.
SETUP → ADMIN
(
→
► → RESTART)
RESTART?
YES NO
Select YES to restart the phone.
13-280138 Rev. H Page 63
Page 64

Teo IP Phone 7810 TSG Series Installation Instructions
Page 64 13-280138 Rev. H
Page 65

T
r
o
u
b
l
e
s
h
o
o
t
i
n
g
T
r
o
u
b
l
e
s
h
o
o
t
T
r
o
u
b
l
e
s
h
o
7810 telephones have built-in diagnostic and testing capabilities to quickly isolate problems
affecting their operation.
PPoowweerr--uupp && CCoonnnneeccttiioonn TTrroouubblleesshhoooottiinngg
Whenever power is applied or a connection is made to the LAN or WAN, the phone
initiates a startup routine, with progress shown in the display. When the phone and
network are fully initialized, the idle display, indicating date and time, will be shown. In
cases where full initialization is not attained, the following displays or conditions will be
shown continuously until corrected.
Problem Observed Remedial Action
No display information is
shown
o
i
t
n
g
n
g
Check power connections and source.
Verify connection to 802.3af-compatible PoE power
source.
Press the PoE Security Reset Switch (7810PoE-TSGA) –
see page 17.
i
NO ETHERNET CONNECTION
LINE ID=
DELETE CLEAR 123
DHCPv4 ERROR, RETRYING
PRESS SETUP TO CONFIGURE
IP4 ADDR=000.000.000.000
EDIT
GATEWAY=
EDIT
SUBNET=000.000.000.000
EDIT
Check connections to the LAN or WAN.
The Line ID is a null value. Enter the appropriate Line
ID number.
Verify that the DHCP server is operating and
accessible.
If the LAN or WAN does not include a DHCP server,
disable IP configuration via DHCP and enter the
appropriate IP values (phone, default gateway, subnet
mask, update) using the INSTL→IP Menu.
The phone IP address is a null value. Enter the
appropriate phone IP address or name, or change the
IP Configuration Update IPv4 address from STATIC to
IPv4 to allow the DHCP server to assign an address to
the telephone.
The default gateway IP address is a null value. Enter
the appropriate gateway IP address or server name.
The subnet mask is a null value. Enter the appropriate
subnet mask.
UPDATE=
EDIT
AUTH ID=
DELETE CLEAR 123
13-280138 Rev. H Page 65
The update server IP address is a null value. Enter the
appropriate update server IP address or server name.
The AUTH ID is a null value. Enter the appropriate
AUTH ID.
Page 66

Teo IP Phone 7810 TSG Series Installation Instructions
Problem Observed Remedial Action
AUTH PSWD=
DELETE CLEAR 123
PROXY=
DELETE CLEAR 123
REGISTERING LINES
REGISTERING LINES
CONTINUE
RESTART WITH NEW VALUES?
YES NO
PHY:100MBPS IP:DHCP FAIL
PING4 FAILED
PRESS ANY KEY TO EXIT
The AUTH PSWD (password) is a null value. Enter the
appropriate AUTH password.
The Proxy server address is a null value. Enter the
appropriate Proxy server IP address or server name.
The primary line has not registered with the SIP
server. Verify all entries (LINE ID, AUTH ID, AUTH
Password, all IP addresses and subnet mask) and reenter as required.
The primary line has registered with the SIP server;
however, additional lines have not. Verify the LINE ID,
AUTH ID and AUTH passwords for all additional lines
and re-enter as required.
Certain critical values have changed and a restart is
required. Select YES.
Upon lease expiry, the phone was unable to negotiate
a new lease with the DHCP server. Verify that the
DHCP server is operating and accessible.
If all attempts to ping IP addresses fail, check Layer 2
802.1Q (VLAN) programming at the phone, using the
QoS menu.
If “LAYER 2 802.1Q=ON”, verify that the network
supports this packet prioritization standard. If it does
not, set LAYER 2 802.1Q to “OFF”. Ping valid
addresses using the ADMIN→DIAG→PING Menu.
Page 66 13-280138 Rev. H
Page 67
Troubleshooting
CCaallll CCoonnttrrooll TTrroouubblleesshhoooottiinngg
After the phone is fully initialized (idle display showing), the following call control
anomalies may be encountered.
Problem Observed Remedial Action
All lines indicate the arrival of
inbound calls via the key
indicators; however, the phone
does not ring for some of
them.
All lines indicate the arrival of
inbound calls via the key
indicators; however, the phone
never rings.
Verify that the affected lines are not set for NEVER or
an extended WAIT interval, using the
USER→RING→CONTROL Menu. If this behavior is not
desired, change the value of the attribute to
“ALWAYS” where applicable.
Verify that “RINGER OFF” is not showing in the
display. If it is, use the Volume Up key to set the ringer
level to a value higher than OFF.
13-280138 Rev. H Page 67
Page 68

Teo IP Phone 7810 TSG Series Installation Instructions
OK
DDiiaaggnnoossttiicc TTrroouubblleesshhoooottiinngg
After the phone is fully initialized (idle display showing), the following diagnostic
information may be reviewed, using the ADMIN→DIAG Menu.
Diagnostic Mode Information Provided
LINK option selected: The LINK option provides information about the
network and SIP server status as follows:
1) Status about the network will be displayed:
PHY:100MBPS IP:AUTO
(DHCP used for IP addressing at phone)
or
PHY:100MBPS IP:NO AUTO
(DHCP is enabled, and has not completed
successfully)
or
PACKET option selected:
and then ACTIVE option
selected:
PHY:100MBPS IP:STATIC
(DHCP is disabled, fixed IP addresses are in use at
phone)
2) Registration status for each line will be indicated via
line status LED for 2 seconds.
Solid Green – Line registration successful with
server.
Alternating red/green – Line registration in process
and un-determinate.
Solid Red – Line registration failed.
Flashing red – The primary line is active, and
secondary line(s) are not registered.
The PACKET option allows the selection of statistics
for the current active call (ACTIVE) or a standing
aggregate of previous calls (HISTORY).
Status indicating the negotiated codec, the received
packetization rate and the real-time jitter buffer setting
is displayed for the current call as below:
G.711/30ms JTR=XX/YYYms¤
ACTIVE CALL
Selecting the Right Arrow key in succession will
indicate additional status information as below:
Total number of concealed packets (lost or delayed)
Total number of lost packets (expected, not-received)
Total number of not-delayed packets (<10mS delay)
Total number of packets delayed more than 10mS
Page 68 13-280138 Rev. H
Page 69

Troubleshooting
Diagnostic Mode Information Provided
or HISTORY option selected:
Total number of packets delayed more than 20mS
Total number of packets delayed more than 30mS
Total number of packets delayed more than 40mS
Total number of packets delayed more than 50mS
Total number of packets delayed more than 60mS
Total number of packets delayed more than 70mS
Total number of packets delayed more than 80mS
Total number of jitter buffer underflow events
Total number of jitter buffer overflow events
Total number of expected packets (received and not
received)
Status for the current “start of call” average jitter
buffer setting for either fixed or calculated, adaptive
delay for the primary line.
JITTER DELAY=XXms ¤
HISTORY
Selecting the Right Arrow key in succession will
indicate additional status information as below:
Total number of concealed packets (lost or delayed)
Total number of lost packets (expected, not-received)
Total number of not-delayed packets (<10mS delay)
Total number of packets delayed more than 10mS
Total number of packets delayed more than 20mS
Total number of packets delayed more than 30mS
Total number of packets delayed more than 40mS
Total number of packets delayed more than 50mS
Total number of packets delayed more than 60mS
Total number of packets delayed more than 70mS
Total number of packets delayed more than 80mS
Total number of jitter buffer underflow events
Total number of jitter buffer overflow events
Total number of expected packets (received and not
received)
13-280138 Rev. H Page 69
Page 70

Teo IP Phone 7810 TSG Series Installation Instructions
Diagnostic Mode Information Provided
PING option selected: The PING option provides the means for measuring
single packet network delays.
The following IP addresses may be “pinged”:
PHONE
GATEWAY
UPDATE SERVER
SIP PROXY SERVER
SNTP SERVER
DHCP SERVER
SIP REGISTRAR SERVER
OTHER*
*A valid address must also be entered.
There are three outcomes as the result of a ping:
IP ADDRESS NOT SET
In this case enter the appropriate IP address, using the
INSTL/IP Menu.
or
PING4 FAILED
PRESS ANY KEY TO EXIT
In this case, check Layer 2 802.1Q and other
network settings.
or
PING4 SUCCESSFUL
PRESS ANY KEY TO EXIT
Page 70 13-280138 Rev. H
Page 71

A
p
p
e
n
d
i
A
p
p
A
S
S
S
e
p
p
e
e
t
u
e
p
t
u
e
t
u
INSTL (Installation Options – PIN Protected)
x
n
d
i
x
n
d
i
M
p
M
p
M
IP (Internet Protocol Addresses) ................................................................................... page 24
PHONE
SUBNET
GATEWY (Gateway IPv4 Address)
DNS
UPDATE (
SNTP
AA
x
A
e
n
u
T
r
e
e
e
n
u
e
IPv4 (Internet Protocol version 4 Address)
IPv6
EDIT
EDIT
PING4
(Domain Name Server Address)
EDIT
PING4
CFG (DNS IP Address Configuration)
EDIT
PING4
CFG (Update Server IP Address Configuration)
EDIT
OPTION
PING4
CFG
T
n
u
T
(Phone IP Address)
EDIT
PING4
(Internet Protocol version 6 Addresses)
LINK
GLBL1 (Global Address)
VIEW
EDIT
REM
PING6
ADD (Add Global Address)
(Phone IPv4 Subnet Mask)
DHCP4
STATIC
Update Server Address)
DHCP4
STATIC
(Simple Network Time Protocol Server Address)
DHCP4
STATIC
OFFSET (Time Offset from UTC)
DSTADJ (Daylight Savings Time Adjustment)
(SNTP Server IP Address Configuration)
DHCP4
STATIC
r
e
e
r
e
e
(Link-Local Address)
(Remove Global Address)
13-280138 Rev. H Page 71
Page 72

Teo IP Phone 7810 TSG Series Installation Instructions
SYSLOG (Logging Server Address)
EDIT
OPTION
NONE (Disable Syslog Messages)
BASIC
QoS
CFG
(Syslog Server IP Address Configuration)
DHCP4
STATIC
(Ethernet MAC Address)
MAC
SIP (Session Initiation Protocol Settings) ...................................................................... page 30
PHONE (
SIP Phone Configuration)
DOMAIN (
PORT (Phone SIP Port Number)
RTP
(Phone RTP Start Port Number)
PROXY (
SIP Proxy)
ID
(SIP Proxy Server Name or IP Address)
PORT
REGSTR (SIP Registration)
ENABLE
ENABLE (Enable SIP Registration)
DISABLE (Disable SIP Registration)
ID
(SIP Registrar Name or IP Address)
PORT
MWI
(Message Summary Event Subscription for MWI)
OFF
ON
(Record Error Logs)
(Record Error Logs and QoS statistics)
Phone Domain Name)
(SIP Proxy Server Port Number)
(SIP Registrar Port Number)
QoS
(Quality of Service Options) ................................................................................. page 34
(Layer 2 801.2Q)
L2
OFF/ON
PHONE
VOICE
SIGNAL
ID
(Voice Packet Priority)
(Signaling Packet Priority)
(Phone VLAN ID)
PC
CLEAR
NONE
L3 (Layer 3 DiffServ)
VOICE (Voice Differentiated Services Code Point)
SIGNAL (Signaling Differentiated Services Code Point)
Page 72 13-280138 Rev. H
Page 73

Setup Menu Tree
KEYS
(Line Appearance Key) ................................................................................ page 36
LINE
ID
(SIP Line ID)
NAME
AUTHID
PSWD (SIP Password)
SHARE
CODEC (Codec 1, 2, or 3)
PTIME (Packetization Time)
JTR
When FIXED is selected:
When ADAPT is selected:
ADD
REMOVE
LABEL
FA
(Feature Activator) ......................................................................................... page 39
(Direct Station Select/Busy Lamp Field) ........................................................ page 40
DSS
ID
NAME (
AUTHID (SIP Authentication ID)
PSWD (SIP Authentication Password)
TYPE
DSS#
LABEL
SPDIAL (Speed Dial) ........................................................................................... page 41
NUMBER
LABEL
(Caller ID Name)
(SIP Authentication ID)
(Bridged Line Appearance)
ENABLE
DISABLE
CODEC
(Codec Type)
G.711
G.729A
G.722
TIME+
TIME-
(Jitter Buffer Type and Settings)
DLY+
DLYADAPT
DELAY
(Adaptive Jitter Buffer Delay)
MIN+
MINMAX+
MAX-
FIXED (Fixed Jitter Buffer Delay)
(Add Line Appearance to Group)
(Remove Highest-Numbered Line Appearance in Group)
(Key Label)
(SIP Line ID)
Display Name)
(SIP Event Type)
PRES (Event: presence)
DIALOG
DLGSLA
(DSS Speed Dial Number)
(Event: dialog)
(Event: dialog;sla)
(Key Label)
(Speed Dial Number)
(Key Label)
13-280138 Rev. H Page 73
Page 74

Teo IP Phone 7810 TSG Series Installation Instructions
ACD (Automatic Call Distribution) ....................................................................... page 43
(ACD Group ID)
ID
LBL1
(Login Key Label)
(Activate Key Label)
LBL2
UNUSED .......................................................................................................... page 43
Voice Mail Keys
NUMBER
EDIT
SWAP (Swap Voice Mail Menu Key Positions)
TYPE
Call Monitor
MON
DISABLE
(Press VMAIL key for this menu): ............................................... page 44
(VMAIL key Dial String)
PAUSE
(Voice Mail Menu Keys)
(Dialing Pause)
CODE (Dial String)
(Menu Key Preset Type)
TEO (Teo UC System)
CISCO (Cisco Unity Express)
AVAYA
ASTRSK
(Avaya Aura/Audix)
(Asterisk)
NEC3C (NEC Univerge 3C)
APMAX (Innovative Systems APMAX)
CALLEG (Callware Callegra)
BROAD (BroadSoft BroadWorks)
MITEL (Mitel Communications Director)
GENA2 (Genband A2)
NONE
(Press SPKR key for this menu): ....................................................... page 49
(Call Monitor; Microphone Disabled)
(Call Monitor Disabled)
CALL (Call Timeout Options) ....................................................................................... page 50
(Dialed Digits Timeout)
DIAL
RING
(Ringing Timeout)
REORDER
(Reorder Timeout)
PIN (Installation Options PIN) ...................................................................................... page 51
(Add or Change PIN)
SET
RESET
(Reset to Default Settings) .............................................................................. page 51
Page 74 13-280138 Rev. H
Page 75

Setup Menu Tree
UPDATE (Configuration and Program Updates)
ADDR
CONFG ................................................................................................................ page 53
PRGRM ............................................................................................................... page 54
(Phone IP Address Configuration) .............................................................. page 53
IPv4
DHCPv4
STATIC
OFF (IPv6 only)
IPv6
AUTO6
STATIC
(IPv4 only)
OFF
START (Start Configuration Update)
PROTO (Update Server Protocol)
TEO
TFTP
HTTP
HTTPS
NONE
START (Start Program Update)
PROTO (Update Server Protocol)
TEO
TFTP
HTTP
HTTPS
NONE
PC PORT (Ethernet Port for PC. 7810PoE-TSGA and 7810PoE-TSGB only) .................... page 55
ENABLE
DISABLE
SECRTY
(Security Options) ........................................................................................ page 55
(ARP Monitoring)
ARP
ENABLE
DISABLE
SRTP
(Secure Real-time Transport)
ENABLE
DISABLE
TRANS
(SIP Transport Protocol)
UDP
TCP
TLS
TLS+
MLPP
(MLPP Dial Plan)
DSN
UC
DISABLE
Error Log) ........................................................................................................... page 56
LOG (
ERROR
CLEAR
(View Error Log)
(Clear Error Log)
13-280138 Rev. H Page 75
Page 76

Teo IP Phone 7810 TSG Series Installation Instructions
ADMIN (Administration Options)
INSPCT (Local Inspect) ............................................................................................... page 57
VERS (Version) ........................................................................................................... page 59
(Hardware Versions)
H/W
(Software Version)
S/W
SERIAL
TEST .......................................................................................................................... page 60
DISPLY (Display and Indicators)
KEYS
DIAG (Diagnostic Display) ........................................................................................... page 62
LINK
PACKET
PING
(Serial Number)
LCD
(Test LCD Display)
(Test Red Indicators)
RED
GREEN
OFF (
(Connection Status)
(Test Green Indicators)
Turn All Indicators Off)
(Test Phone Keys)
(Packet Reception Statistics)
ACTIVE (Current Active Call)
HISTORY
(Ping Message to Server or IP Address)
(Previous 50 Statistics)
PHONE (This Telephone)
GATEWY
UPDT
(Gateway)
(Update Server)
PROXY (Proxy Server)
SNTP (
DHCP (
REGSTR
SNTP Time Server)
DHCP Server)
(SIP Registration Server)
OTHER
DELETE (Delete Character)
CLEAR
PING
(Clear IP Address)
(Initiate/Repeat Ping)
RESTART (Restart Phone and Clear Call Log) .............................................................. page 63
Page 76 13-280138 Rev. H
Page 77

Setup Menu Tree
USER (User Options)
Options in this menu are described in the IP Phone 7810 User Guide
CLOCK (Set Time and Date)
KEYS (Speed Dial Keys)
NUMBER (Dial String)
DELETE
CLEAR (Clear Dial String)
123/ABC/abc (Character Entry Mode)
PAUSE
LABEL (Screen Label)
DELETE
CLEAR (Clear Label)
123/ABC/abc (Character Entry Mode)
DIR
(Call Directory)
VIEW (View Entries)
(Edit Entries)
EDIT
NUMBER (Dial String)
NAME
SORT
(Sort Entry Positions)
PAGE (Sort This Page)
ALL
CANCEL
SWAP (Swap Entry Positions)
(Delete Character)
(Dialing Pause)
(Delete Character)
DELETE
CLEAR
123/ABC/abc
PAUSE
DELETE
CLEAR (Clear Label)
123/ABC/abc
FIRST (Sort by First Name)
LAST (Sort by Last Name)
(Sort All Pages)
FIRST
LAST (Sort by Last Name)
(Delete Character)
(Clear Dial String)
(Character Entry Mode)
(Dialing Pause)
(Screen Label)
(Delete Character)
(Character Entry Mode)
(Sort by First Name)
.
13-280138 Rev. H Page 77
Page 78

Teo IP Phone 7810 TSG Series Installation Instructions
RING (Personal Ringing)
TONE
OFFHK (Off-Hook Ringing)
CONTRL (Ringing Control)
LCFWD (Local Call Forward No Answer Delay)
VOICE (Handset/Headset Options)
MODE (Voice Mode)
VOLUME
(Ringing Tone)
ALL
(All Keys use the same Ringing Tone)
NORMAL
SINGLE (Single Burst)
ALWAYS (Ring Immediately)
NEVER
(Never Ring)
WAIT2 (Wait 2 Ring Cycles / 12 seconds)
WAIT3
WAIT4
WAIT5
WAIT6
WAIT7
DELETE
(Wait 3 Ring Cycles / 18 seconds)
(Wait 4 Ring Cycles / 24 seconds)
(Wait 5 Ring Cycles / 30 seconds)
(Wait 6 Ring Cycles / 36 seconds)
(Wait 7 Ring Cycles / 42 seconds)
(Delete Character)
CLEAR (Clear Label)
HAND (Handset)
HEAD (Headset)
HAND (Handset)
RCV+
(Receive Volume Up)
(Receive Volume Down)
RCV-
XMT+
XMT-
HEAD
RCV+
RCV-
XMT+
XMT-
RESET
(Transmit Volume Up)
(Transmit Volume Down)
(Headset)
(Receive Volume Up)
(Receive Volume Down)
(Transmit Volume Up)
(Transmit Volume Down)
(Reset to Default Volume Levels)
DISPLY
PIN
(Display Contrast)
(Increase Contrast)
(+)
(–)
(Decrease Contrast)
(Call Log PIN)
SET
(Set New PIN)
CLEAR
(Remove PIN)
Page 78 13-280138 Rev. H
Page 79

A
p
p
e
n
d
i
i
n
n
c
c
c
d
d
e
e
e
x
i
x
i
A
p
p
p
e
e
e
r
r
p
r
v
v
v
e
e
i
i
A
S
S
S
SSeerrvviiccee
The Teo 7810 has no user-serviceable parts inside; repair must be done by Teo.
Prior to equipment removal, call Teo Customer Technical Support for assistance in
determining the source of the problem. This critical action can often prevent needless
removal of equipment and subsequent customer inconvenience.
x
a
a
a
BB
B
n
n
n
d
d
d
W
W
W
a
a
a
r
r
a
n
t
y
r
r
a
n
r
r
a
n
t
y
t
y
Teo
Technical Support Department
11609 49
Mukilteo, WA 98275-4255 USA
Teo is committed to meeting the product needs of our customers. Please write or call us
with any suggestions for improvement.
th
Place West
Phone: (425) 349-1000
(800) 524-0024
Fax: (425) 349-1010
E-mail: [email protected]
: www.teotech.com
Web
13-280138 Rev. H Page 79
Page 80

Teo IP Phone 7810 TSG Series Installation Instructions
TTeeoo PPrroodduucctt WWaarrrraannttyy
For a period of one year from date of dealer purchase, but not to exceed 16 months from
date of manufacture, Teo Technologies, Inc. (Teo) warrants its products to be free from
defects in material and workmanship under conditions of normal use and service. Teo
shall, at its option, repair or replace any defective product which, in its opinion, has not
been misused, damaged, or improperly installed.
Repair or replacement under this warranty will be performed at Teo's factory.
Authorization must be obtained from Teo prior to returning a product for repair. Freight
must be prepaid for all units returned to Teo. Units repaired under warranty will be
shipped UPS Ground (or equivalent), freight prepaid by Teo.
Products that are older than the warranty period, but less than 7 years old, or still
manufactured by Teo may be repaired at the factory for a flat rate charge. Repaired out-ofwarranty units are warranted for 90 days from the date of repair.
The repair or replacement of a product under this warranty represents the entire obligation
of Teo; Teo shall not be liable for any special or consequential damages resulting from or
caused by any defect, failure, incapacity or malfunction of any of its products.
The foregoing express warranty is in lieu of all other warranties, express or implied,
including but not limited to any implied warranty of merchantability, fitness, or
adequacy for any purpose or use, quality, productiveness or capacity; Teo, to the
extent permitted by law, hereby disclaims all such other warranties.
The foregoing express warranty is in lieu of all other warranties, express or implied,
including but not limited to any implied warranty of merchantability, fitness, or
adequacy for any purpose or use, quality, productiveness or capacity; Tone
Commander, to the extent permitted by law, hereby disclaims all such other
warranties.
Page 80 13-280138 Rev. H
Page 81

A
p
p
e
n
d
i
A
p
p
p
p
p
p
p
e
e
e
e
e
c
c
c
A
S
S
S
n
n
i
i
i
x
d
i
x
d
i
f
i
c
f
i
c
f
i
c
x
a
a
a
CC
C
t
t
t
i
o
n
s
n
n
s
s
i
o
i
o
CCoonntteennttss ooff SShhiippppiinngg CCoonnttaaiinneerr
Telephone + Stand
Handset
7' Category 5 Ethernet cable
Modular handset coil-cord
Documentation CD
Local Power Supply (model 7810-TSG only)
SSttaannddaarrddss CCoommpplliiaannccee
FCC Part 15
Hearing Aid Compatible
UL, cUL Listed
NNeettwwoorrkk CCoommppaattiibbiilliittyy
10BaseT and 100BaseT Ethernet
PPoowweerr RReeqquuiirreemmeennttss
Power over Ethernet: 802.3af Class 2, midspan or endpoint (7810PoE-TSGB)
802.3af Class 2, endpoint only (7810PoE-TSGA)
Local Power: 48 VDC nominal @ 4 W max. per terminal (excluding wiring losses)
PPhhyyssiiccaall DDiimmeennssiioonnss
9.6” W x 8.0” D x 3.5” H, excluding handset
WWeeiigghhtt
2.3 lbs., including stand and handset
EEnnvviirroonnmmeennttaall
Operating Temperature: 32° to 104° F (0° to 40° C)
Storage Temperature: 32° to 122° F (0° to 50° C)
Humidity: 5% to 95% non-condensing
13-280138 Rev. H Page 81
Page 82

Teo IP Phone 7810 TSG Series Installation Instructions
Page 82 13-280138 Rev. H
Page 83

A
p
p
e
n
d
i
A
p
p
p
e
e
e
p
g
g
g
e
e
u
u
u
A
R
R
R
n
n
l
l
x
d
i
x
d
i
x
a
t
o
a
t
o
l
a
t
o
DD
D
r
y
r
r
y
y
S
t
a
t
e
m
e
n
t
s
S
t
a
t
e
m
e
S
t
a
t
e
m
e
n
n
t
s
t
s
IImmppoorrttaanntt SSaaffeettyy IInnssttrruuccttiioonnss
1. Read the installation instructions before connecting the system to its power source.
2. Installation of equipment must not route interconnecting cables or external power supply sources
outdoors. This is defined as "Network Environment 0" by IEC TR 62101.
3. Never install network jacks in wet locations unless the jacks are specifically designed for wet locations.
4. Never touch uninsulated wires or terminals.
5. Do not connect this product to telephone network voltage (TNV) circuits. Some LAN and WAN ports both
use RJ-45 connectors. Use caution when connecting cables.
When using your telephone equipment, basic safety precautions should always be followed to reduce the risk
of fire, electric shock and injury to persons, including the following:
6. Read and understand all instructions.
7. Follow all warnings and instructions marked on the product.
8. Unplug all cables before cleaning. Do not use liquid or aerosol cleaners. Use a damp cloth for cleaning.
9. Do not use this product near water, for example, near a bathtub, wash bowl, kitchen sink, or laundry tub,
in a wet basement, or near a swimming pool.
10. Do not place this product on an unstable cart, stand, or table. The product may fall, causing serious
damage to the product.
11. This product should be operated only from the type of power source indicated on the marking label.
12. Do not allow anything to rest on the power cord. Do not locate this product where the cord will be
abused by persons walking on it.
13. Do not overload wall outlets and extension cords as this can result in the risk of fire or electric shock.
14. This product contains "No User-Serviceable Parts."
15. `Unplug this product from the wall outlet and refer servicing to qualified service personnel under the
following conditions:
A. When the power supply cord or plug is damaged or frayed.
B. If liquid has been spilled into the product.
C. If the product has been exposed to rain or water.
D. If the product does not operate normally by following the operating instructions. Adjust only those
controls that are covered by the operating instructions, because improper adjustment of other
controls may result in damage and will often require extensive work by a qualified technician to
restore the product to normal operation.
E. If the product has been dropped or the case has been damaged.
F. If the product exhibits a distinct change in performance.
SSAAVVEE TTHHEESSEE IINNSSTTRRUUCCTTIIOONNSS
13-280138 Rev. H Page 83
Page 84

Teo IP Phone 7810 TSG Series Installation Instructions
FFCCCC RReeqquuiirreemmeennttss
The Teo 7810 is hearing-aid compatible (HAC) per Section 68.316, FCC Rules and
Regulations.
This equipment has been tested and found to comply with the limits for a Class A digital device,
pursuant to Part 15 of the FCC Rules. These limits are designed to provide reasonable protection
against harmful interference when the equipment is operated in a commercial environment. This
equipment generates, uses, and can radiate radio frequency energy and, if not installed and used in
accordance with the instruction manual, may cause harmful interference to radio communications.
Operation of this equipment in a residential area is likely to cause harmful interference in which case
the user will be required to correct the interference at their own expense.
Page 84 13-280138 Rev. H
 Loading...