

Page 1
110V
P/N:110401102691
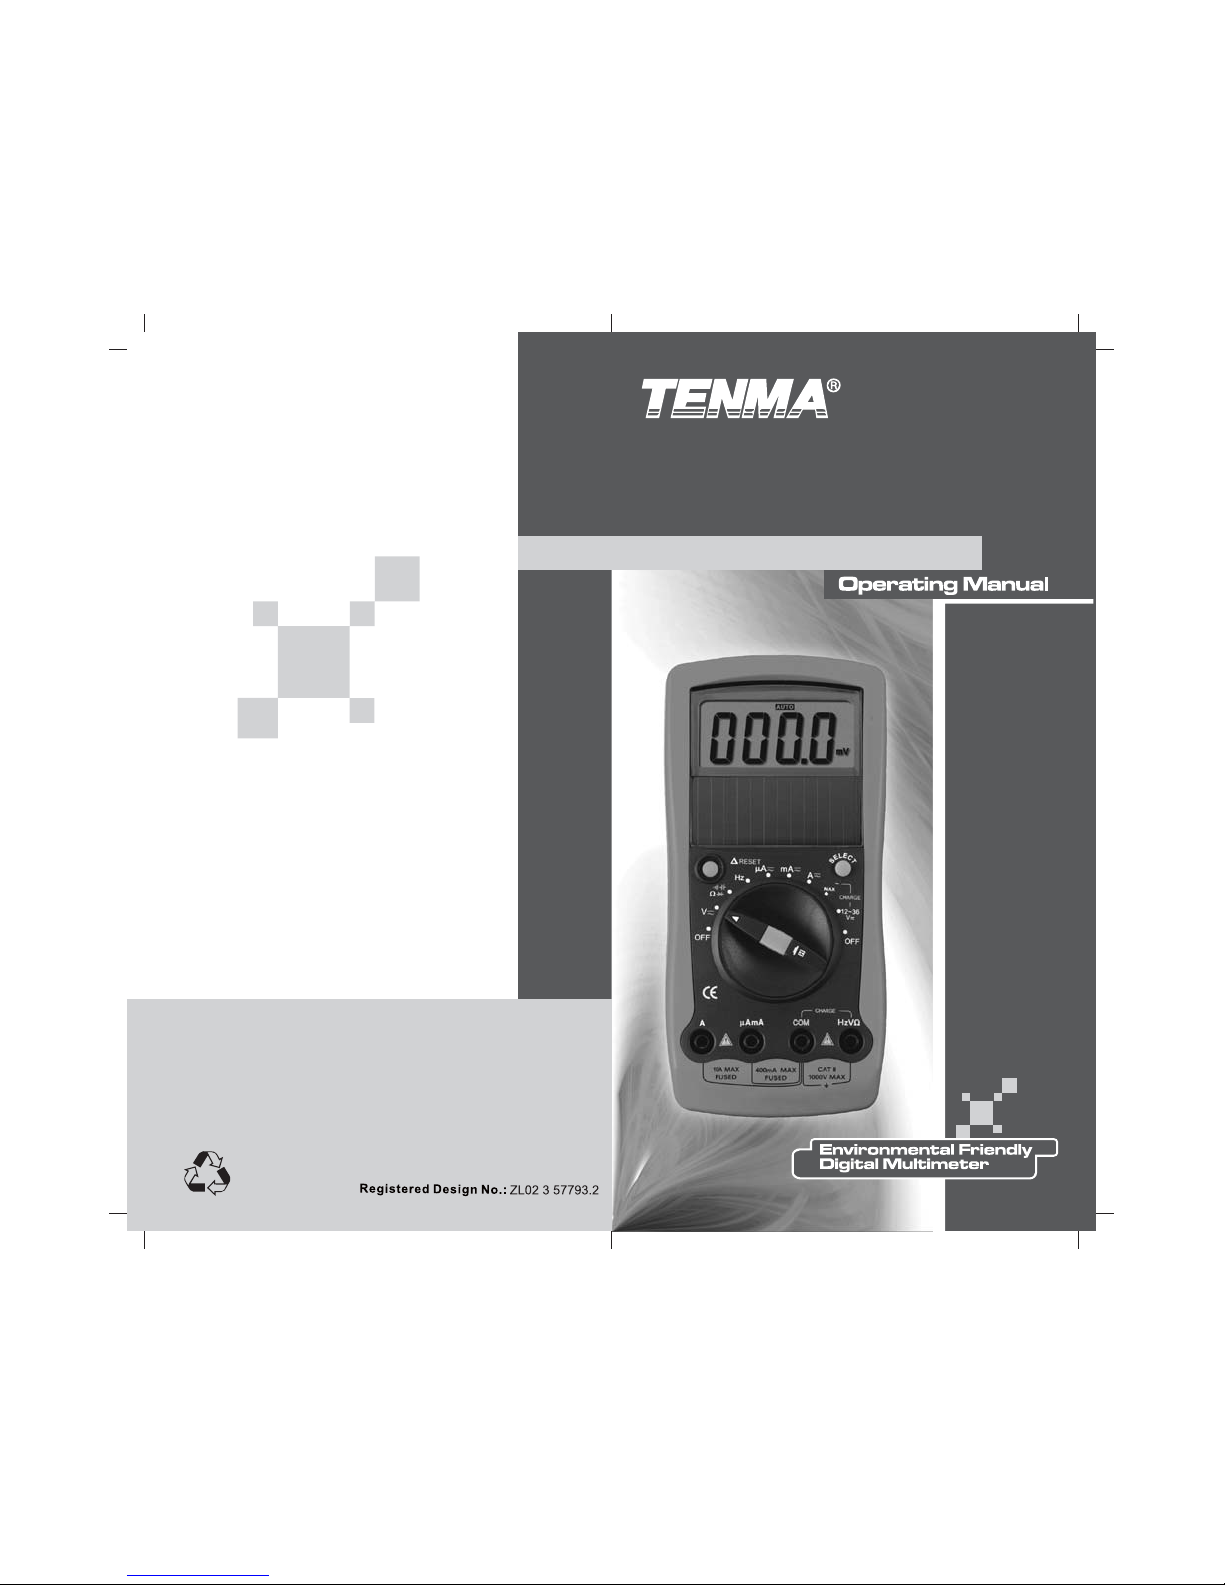
72-9375
Page 2

1
Table of Contents
Title Page
Overview…………………………………………………2
Package Contents………………………………………2
Safety Information………………………………………2
Rules for Safe Operation………………………………3
International Electrical Symbols……………………….4
The Meter Structure…………………………………….5
Rotary Switch……………………………………………5
Functional Buttons………………………………..........6
Display Symbols…………………………………..........6
Measurement Operation……………………………....8
A. AC & DC Voltage Measurement……………….8
B. Measuring Resistance, Diodes, Continuity &
Capacitance……………………………………..10
C. Frequency Measurement………………………14
D. AC & DC Current Measurement………………15
E. Power Charging…………………………………16
Operation of Hold Mode……………………………….17
The Use of Relative Value Mode……………………..18
The RESET Button…………………………………….19
The SELECT Button…………………………………...19
Sleep Mode……………………………………………..19
General Specifications………………………………....19
Accuracy Specifications……………………………….20
A. AC Voltage………………………………………20
B. DC Voltage………………………………………21
C. Resistance………………………………………21
D. Diode & Continuity…………………………….. 21
E. Capacitance Test……………………………….22
F. Frequency Test………………………………….22
G. AC Current………………………………………22
H. DC Current………………………………………23
Maintenance…………………………………………….23
A. General Service………………………………….
23
B. Replacing the Fuses…………………………….24
72-9375: OPERATING MANUAL
Page 3
2
Overview
This Operating Manual covers information on safety
and cautions. Please read the relevant information
carefully and observe all the Warnings and Notes
strictly.
Warning
To avoid electric shock or personal injury, read the
“Safety Information” and “Rules for Safe
Operation” carefully before using the Meter.
The Tenma 72-9375 (hereafter referred to as “the
Meter”) is a 4000 counts, 3 3/4 digits solar powered
auto ranging electrical tester with stabilized functions,
safe design, and reliable performance.
In addition to the conventional measuring function,
such as DC/AC voltage, DC/AC current, resistance,
diode, data hold and continuity, it is equipped with
capacitance test, frequency test, relative mode and
this meter is equipped with the flexibility of charging
through 110V AC or 12-36 AC/DC or built-in solar
energy cell. With this design, the Meter does not
require a conventional battery, which reduces waste
and cost associated with disposable batteries.
PACKAGE CONTENTS
Open the package case and take out the Meter.
Check the following items carefully to see any missing
or damaged part:
tem Description
ty
1 English Operating Manual 1 piece
Test Lead 1 pair
Holster 1 piece
In the event you find any missing items or damage to
the included items, please contact your dealer
immediately.
Safety Information
This Meter complies with standards IEC61010: in
pollution degree 2, overvoltage category (CAT. II
72-9375: OPERATING MANUAL
Page 4
3
1000V, CAT. III 600V) and double insulation.
Use the Meter only as specified in this operating
manual, otherwise the protection provided by the
Meter may be impaired.
In this manual, a Warning identifies conditions and
actions that pose hazards to the user, or may damage
the Meter or the equipment under test.
A Note identifies the information that user should pay
attention on.
Rules For Safe Operation(1)
Warning
To avoid possible electric shock or personal injury,
and to avoid damage to the Meter or to the
equipment under test, adhere to the following
rules:
z Before using the Meter inspect the case. Do
not use the Meter if it is damaged or the case
(or part of the case) is removed. Look for
cracks or missing plastic. Inspect the
insulation around the connectors.
z Inspect the test leads for damaged insulation
or exposed metal. Check the test leads for
continuity. Replace damaged test leads with
identical model number or electrical
specifications before using the Meter.
z When using the test leads, keep your fingers
behind the finger guards.
z Do not apply more than the rated voltage, as
marked on the Meter, between the terminals
or between any terminal and grounding.
z When the Meter working at an effective
voltage over 60V in DC or 30V in AC, special
care should be taken from there is danger of
electric shock.
z Use the proper terminals, function, and range
for your measurements.
z The rotary switch should be placed in the
right position and no any changeover of
72-9375: OPERATING MANUAL
Page 5
4
range shall be made during measurement is
conducted to prevent damage of the Meter.
z Disconnect circuit power and discharge all
high-voltage capacitors before testing current,
resistance, diodes, continuity or capacitance.
z Start charging as soon as the power indicator
appears. With a low battery, the Meter
might produce false readings that can lead to
electric shock and personal injury.
z When servicing the Meter, use only the same
model number or identical electrical
specifications replacement parts.
z The internal circuit of the Meter shall not be
altered at will to avoid damage of the Meter
and any accident.
z Soft cloth and mild detergent should be used
to clean the surface of the Meter when
servicing. No abrasives or solvents should be
used on or in the meter.
z Turn the Meter off when it is not in use
z Do not use or store the Meter in an
environment of high temperature, humidity,
explosive, inflammable and strong magnetic
field; the performance of the Meter may
deteriorate.
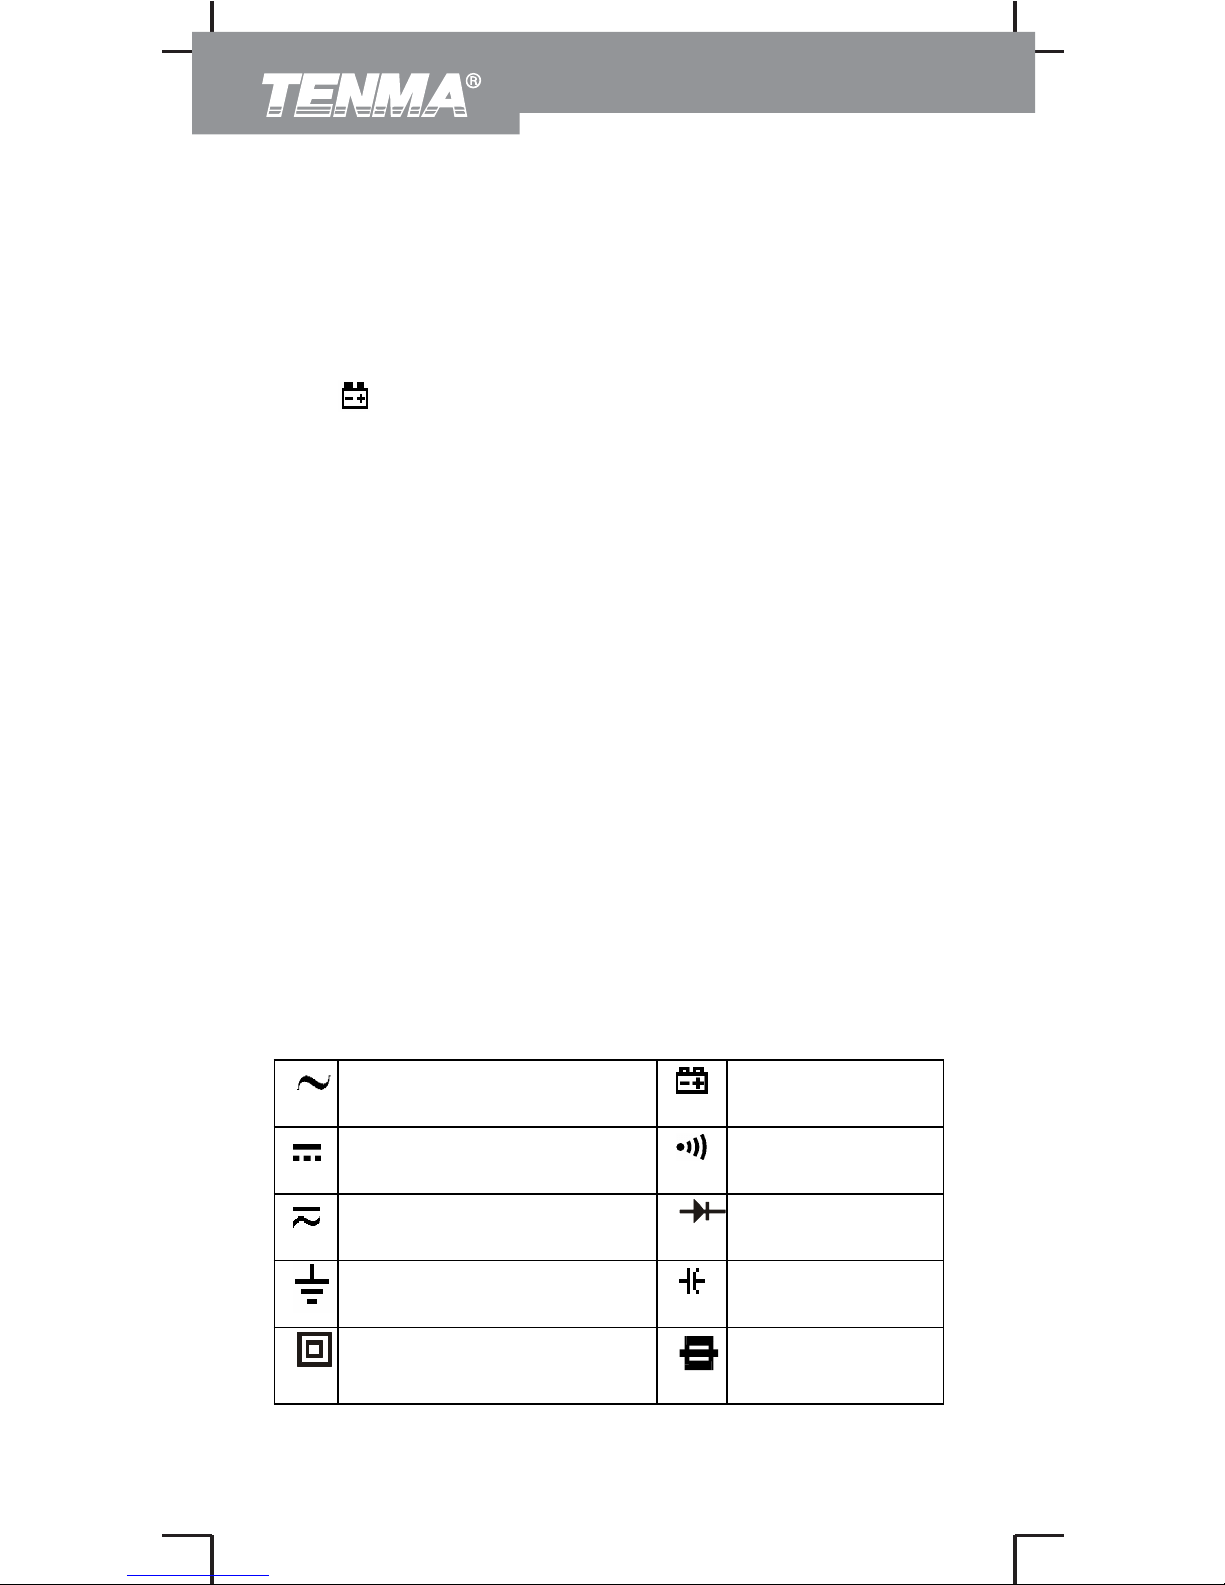
International Electrical Symbols
AC(Alternating
Current)
Low Battery
DC (Direct Current) Continuity
Test
AC or DC
Diode
Grounding
Capacitance
Test
Double Insulated Fuse
72-9375: OPERATING MANUAL
Page 6
5
Warning. Refer to
the Operating Manual
Conforms to
Standards of
European
Union
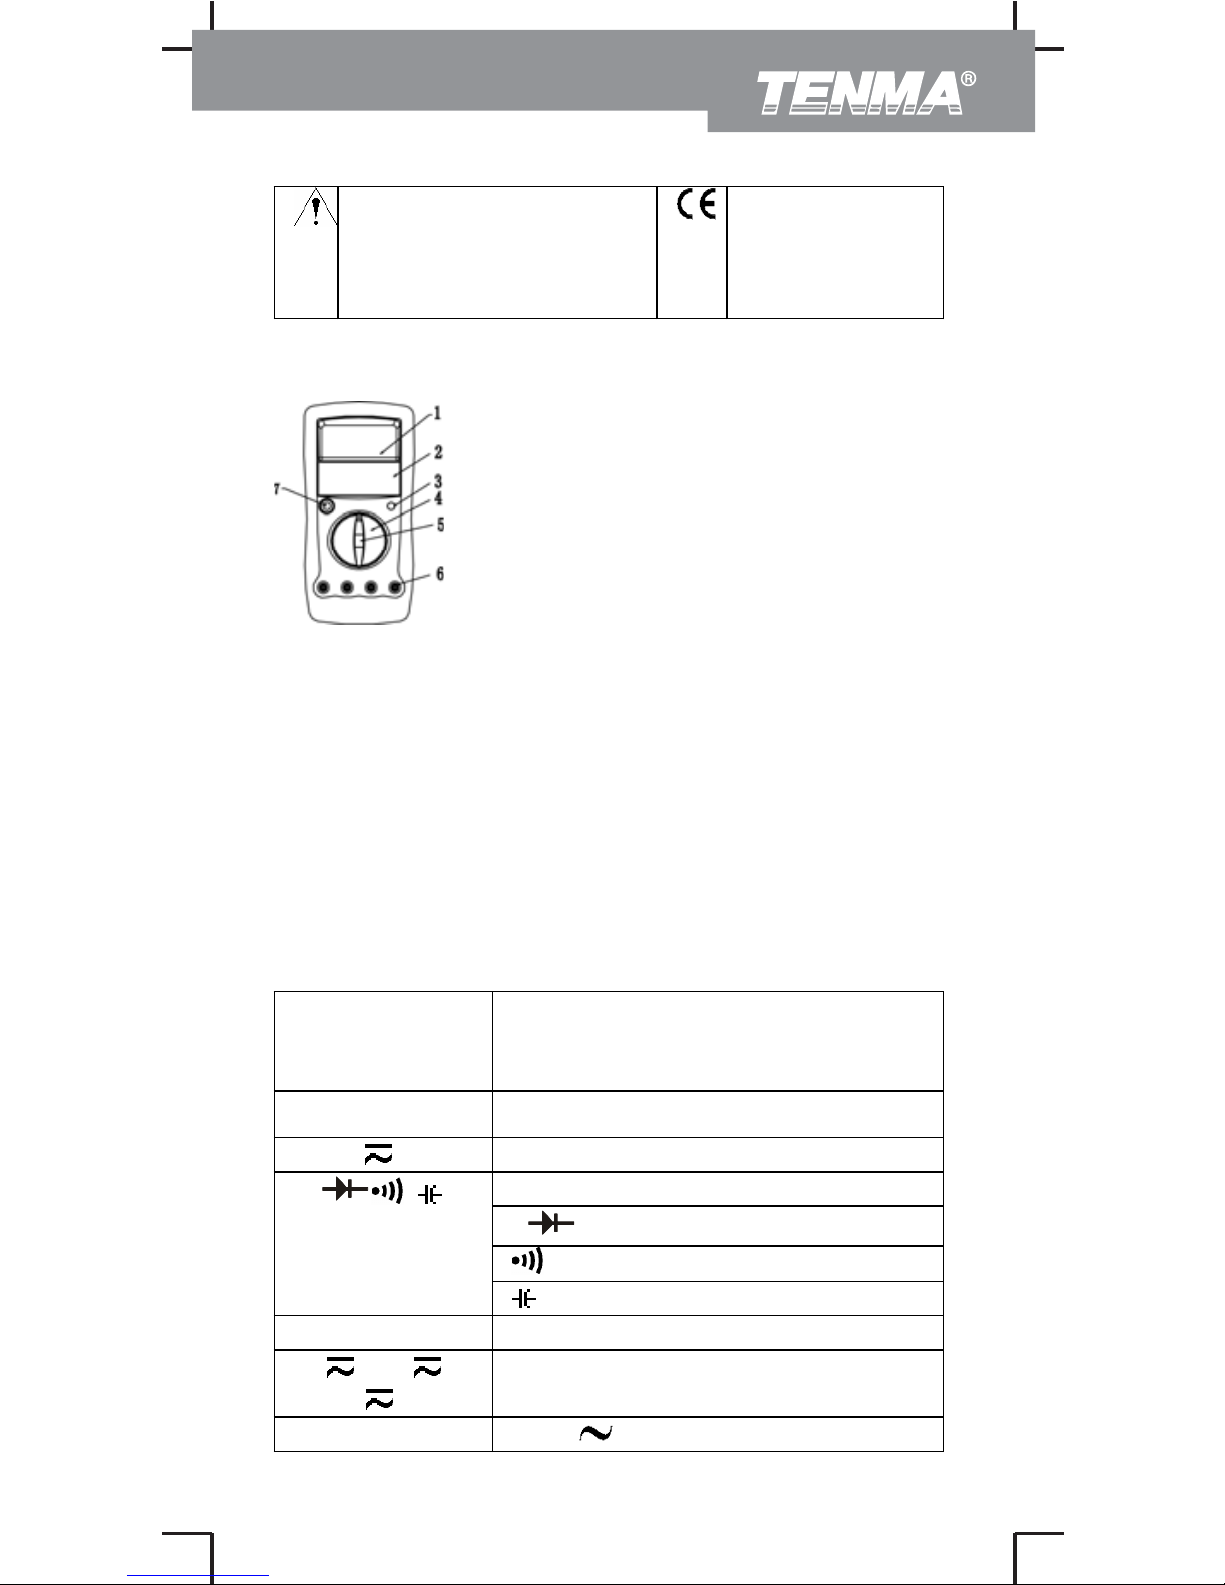
The Meter Structure (see figure 1)
ķ LCD Display
ĸ Solar Panel
Ĺ SELECT Button
ĺ Rotary Switch
Ļ HOLD Button
ļ Input Terminals
Ľ Relative Mode & RESET Button
Rotary Switch
Below table indicated for information about the rotary
switch positions.
Rotary
Switch
Position
Function
OFF Power is turned off
V AC/DC voltage measurement
ȍ: Resistance measurement
: Diode Test.
: Continuity test
ȍ
: Capacitance test
Hz Frequency Test.
μA , mA ,
A
AC or DC Current Measurement
CHARGE 110V MAX:
72-9375: OPERATING MANUAL
Page 7
6
Charge at 110VAC.
12-36
: Charge at 12-36 .
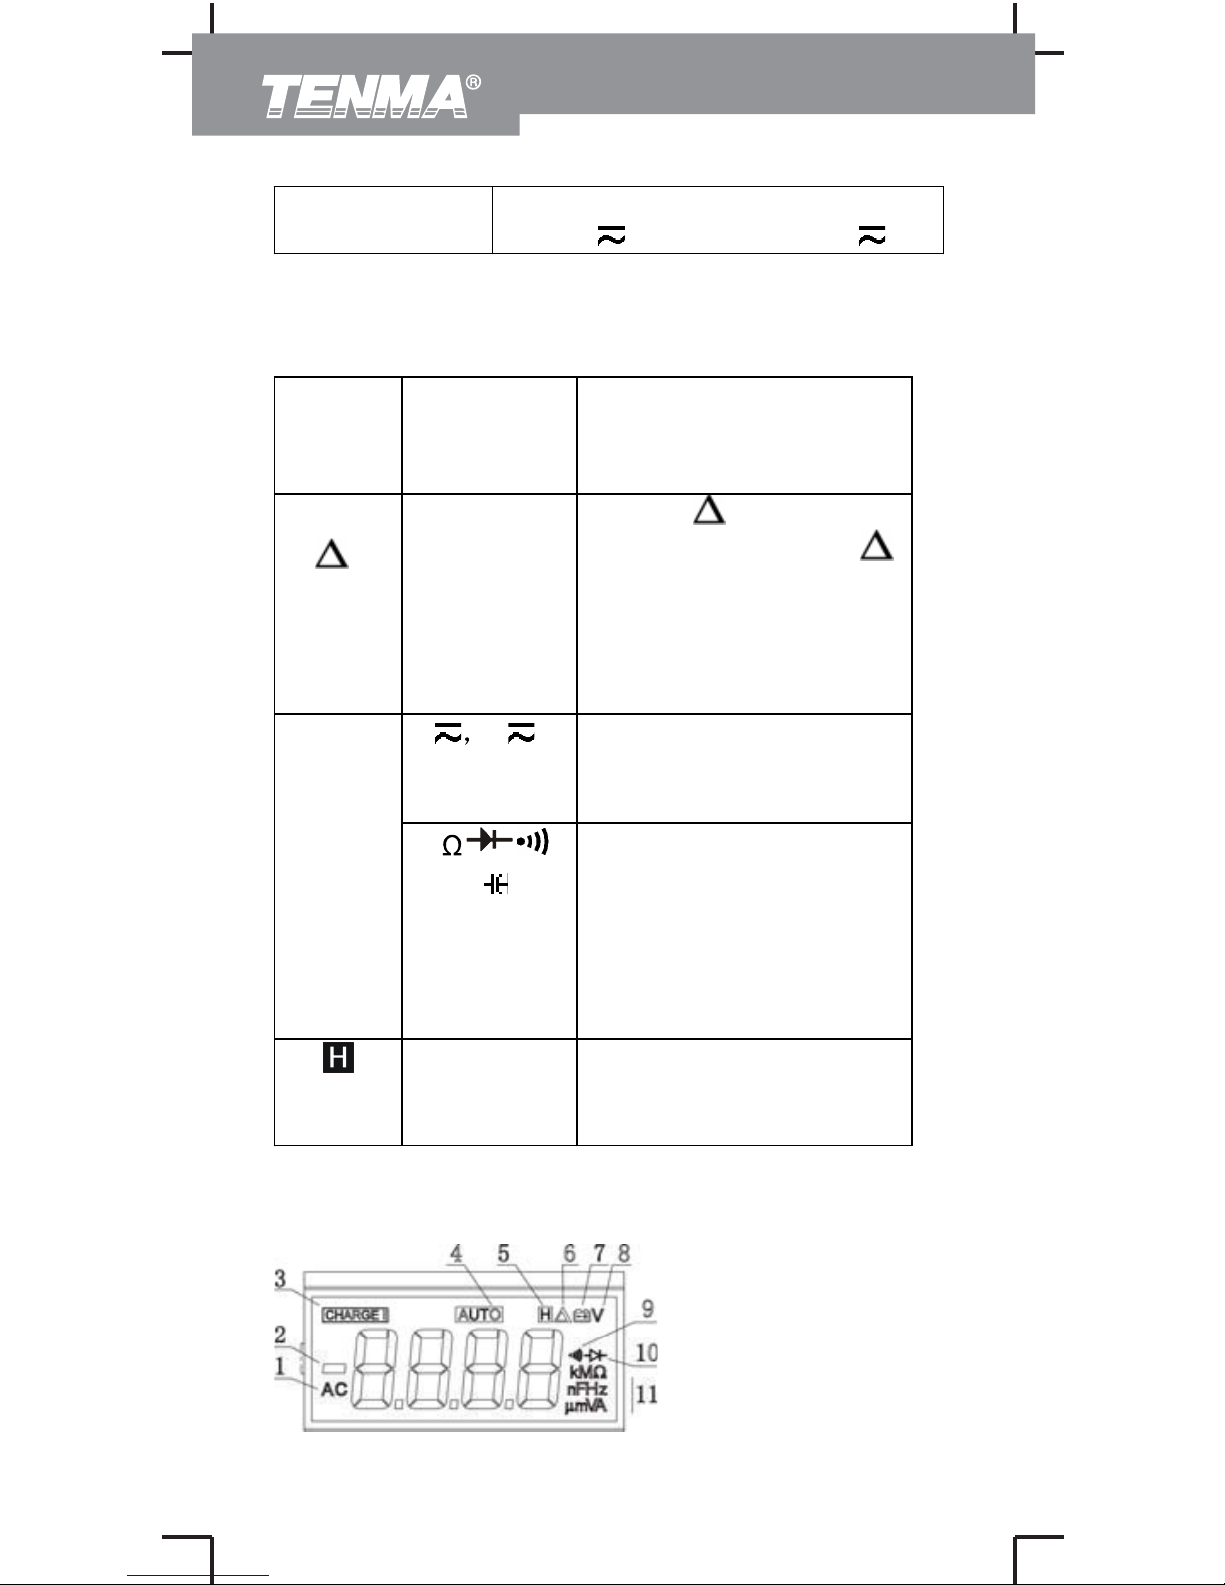
Functional Buttons
Below table indicated for information about the
functional button operations.
Butto
n
Measurin
g
Function
Operation Performed
RESE
T
Any rotary
switch
position
except Hz
and
CHARGE
Press
RESET to
enter and exit the
mode in any measuring
mode except in
frequency and charge
mode (Meter will beep)
V A
Switches between AC
and DC voltage/current
(DC is default)
SELE
CT
Switches between
resistance, diode,
continuity and
capacitance
measurements
(Resistance is default)
Any rotary
switch
position
Press to enter and exit
the Hold mode in any
mode
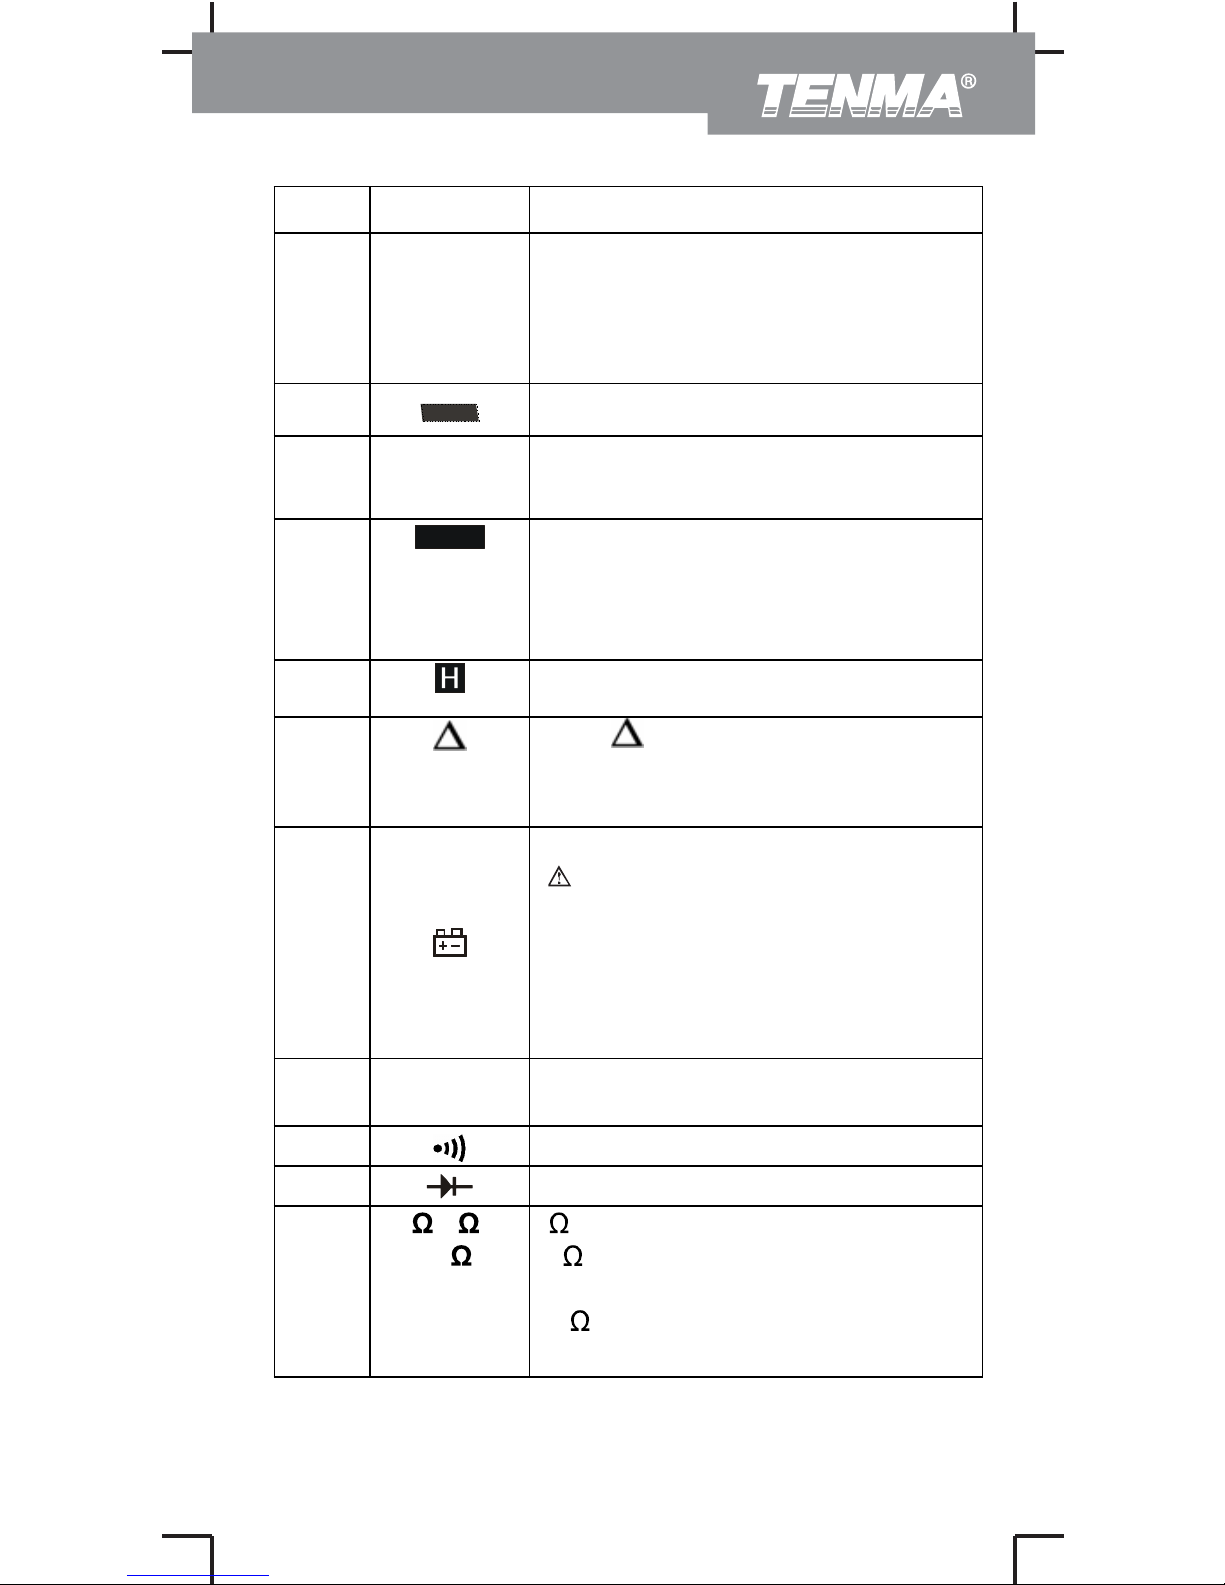
Display Symbols (see figure 2)
72-9375: OPERATING MANUAL
Page 8
11
7
No. Symbol Meaning
AC Indicator for AC voltage or
current.
The displayed value is the mean
value.
Indicates negative reading.
CHARG
E
Charge indicator
AUTO
The Meter is in the auto range
mode in which the Meter
automatically selects the range
with the best resolution.
Data hold is active
The mode displays the
present value minus the stored
value
The power is low.
Warning: To avoid false
readings, which could lead to
possible electric shock or
personal injury, replace the
battery as soon as the battery
indicator appears.
V
Unit voltage (when charging is
on)
Continuity buzzer
Test of diode
1
2
3
4
5
6
7
8
9
10
,k ,
M
:
:
k
M :
Ohm (unit of resistance)
Kilohm (1 x 10
3
or 1000
ohms)
Megohm (1 x 10
6
or
1,000,000 ohms)
72-9375: OPERATING MANUAL
Page 9
Measurement Operation
8
µF, nF F:
µF:
nF:
Farad (unit of capacitance)
Microfarad. 1 x 10
-6
or
0.000001 farads.
Nanofarad. 1 x 10
-9
or
0.000000001 farads.
Hz, kHz,
MHz
Hz:
kHz:
MHz:
Hertz (The unit of frequency
in cycles/second.
Kilohertz. 1 x 10
3
or 1,000
hertz.
Megahertz. 1 x 10
6
or1,000,000 hertz.
V, mV V:
mV:
Volts (unit of voltage)
Millivolt (1 x 10
-3
or 0.001
volts)
A, mA,
µA
A:
mA:
µA:
Amperes (amps). The unit
of current.
Milliamp. 1 x 10
-3
or 0.001
amperes.
Microamp. 1 x 10
-6
or
0.000001 amperes.
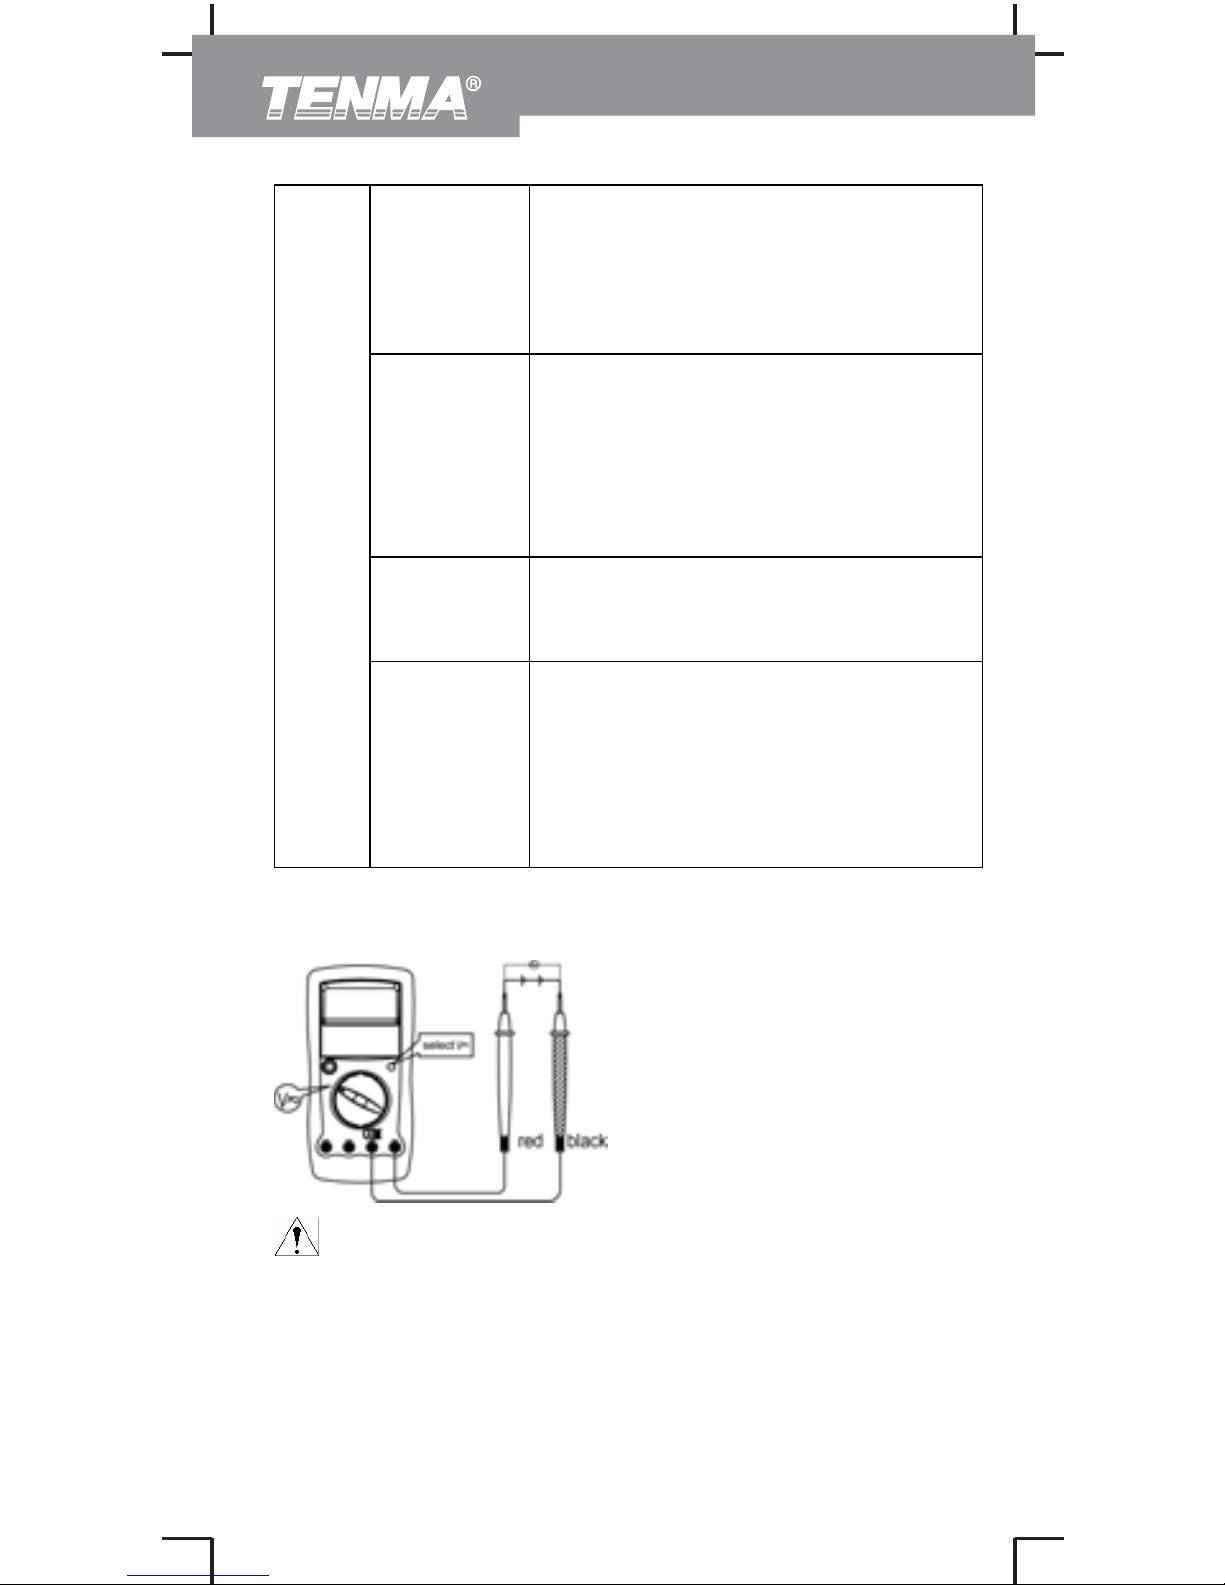
A. AC & DC Voltage Measurement (see figure 3)
Warning
To avoid personal injury or damages to the Meter
from electric shock, please do not attempt to
measure voltages higher than 1000VDC / 750VAC
RMS although readings may be obtained.
72-9375: OPERATING MANUAL
Page 10
9
AC voltage measurement
The AC voltage ranges are: 4.000V, 40.00V, 400.0V
and 750.0V. To measure AC Voltage, connect the
Meter as follows:
1. Insert the red test lead into the HzVȍ terminal
and the black test lead into the COM terminal.
2. Set the rotary switch to V
and press SELECT
button to select AC measurement mode.
3. Connect the test leads with the object being
measured.
The measured value shows on the displayˈwhich
is effective value of sine wave (mean value
response).
Note
z At 400mV range, the Meter has an input
impedance of 4000Mȍ. All other ranges the
Meter has an input impedance of 10Mȍ. This
loading effect can cause measurement errors in
high impedance circuits. If the circuit
impedance is less than or equal to 10kȍ, the
error is negligible (0.1% or less).
z When AC voltage measurement has been
completed, disconnect the connection between
the test leads and the circuit under test.
DC voltage measurement
The DC Voltage ranges are: 400.0mV, 4.000V, 40.00V,
400.0V and 1000V. To measure DC voltage, connect
the Meter as follows:
1. Insert the red test lead into the HzVȍ terminal and
the black test lead into the COM terminal.
2. Set the rotary switch to V
; DC measurement is
default or press SELECT button to select DC
measurement mode.
3. Connect the test leads across with the object being
measured.
The measured value shows on the display.
72-9375: OPERATING MANUAL
Page 11
10
Note
At 400mV range, the Meter has an input
impedance of 4000M . Except at 400mV range,
all other ranges the Meter has an input
impedance of 10M
. This loading effect can
cause measurement errors in high impedance
circuits. If the circuit impedance is less than or
equal to 10k
, the error is negligible (0.1% or
less).
When DC voltage measurement has been
completed, disconnect the connection between
the testing leads and the circuit under test.
B. Measuring Resistance, Diodes, Continuity &
Capacitance
Warning
To avoid personal injury, never attempt to input
over 60V in DC or 30V rms in AC.
To avoid damages to the Meter or to the devices
under test, disconnect circuit power and discharge
all the high-voltage capacitors before measuring
resistance, diodes, continuity & capacitance
For testing capacitance, use the DC Voltage
function to confirm that the capacitor is discharged.
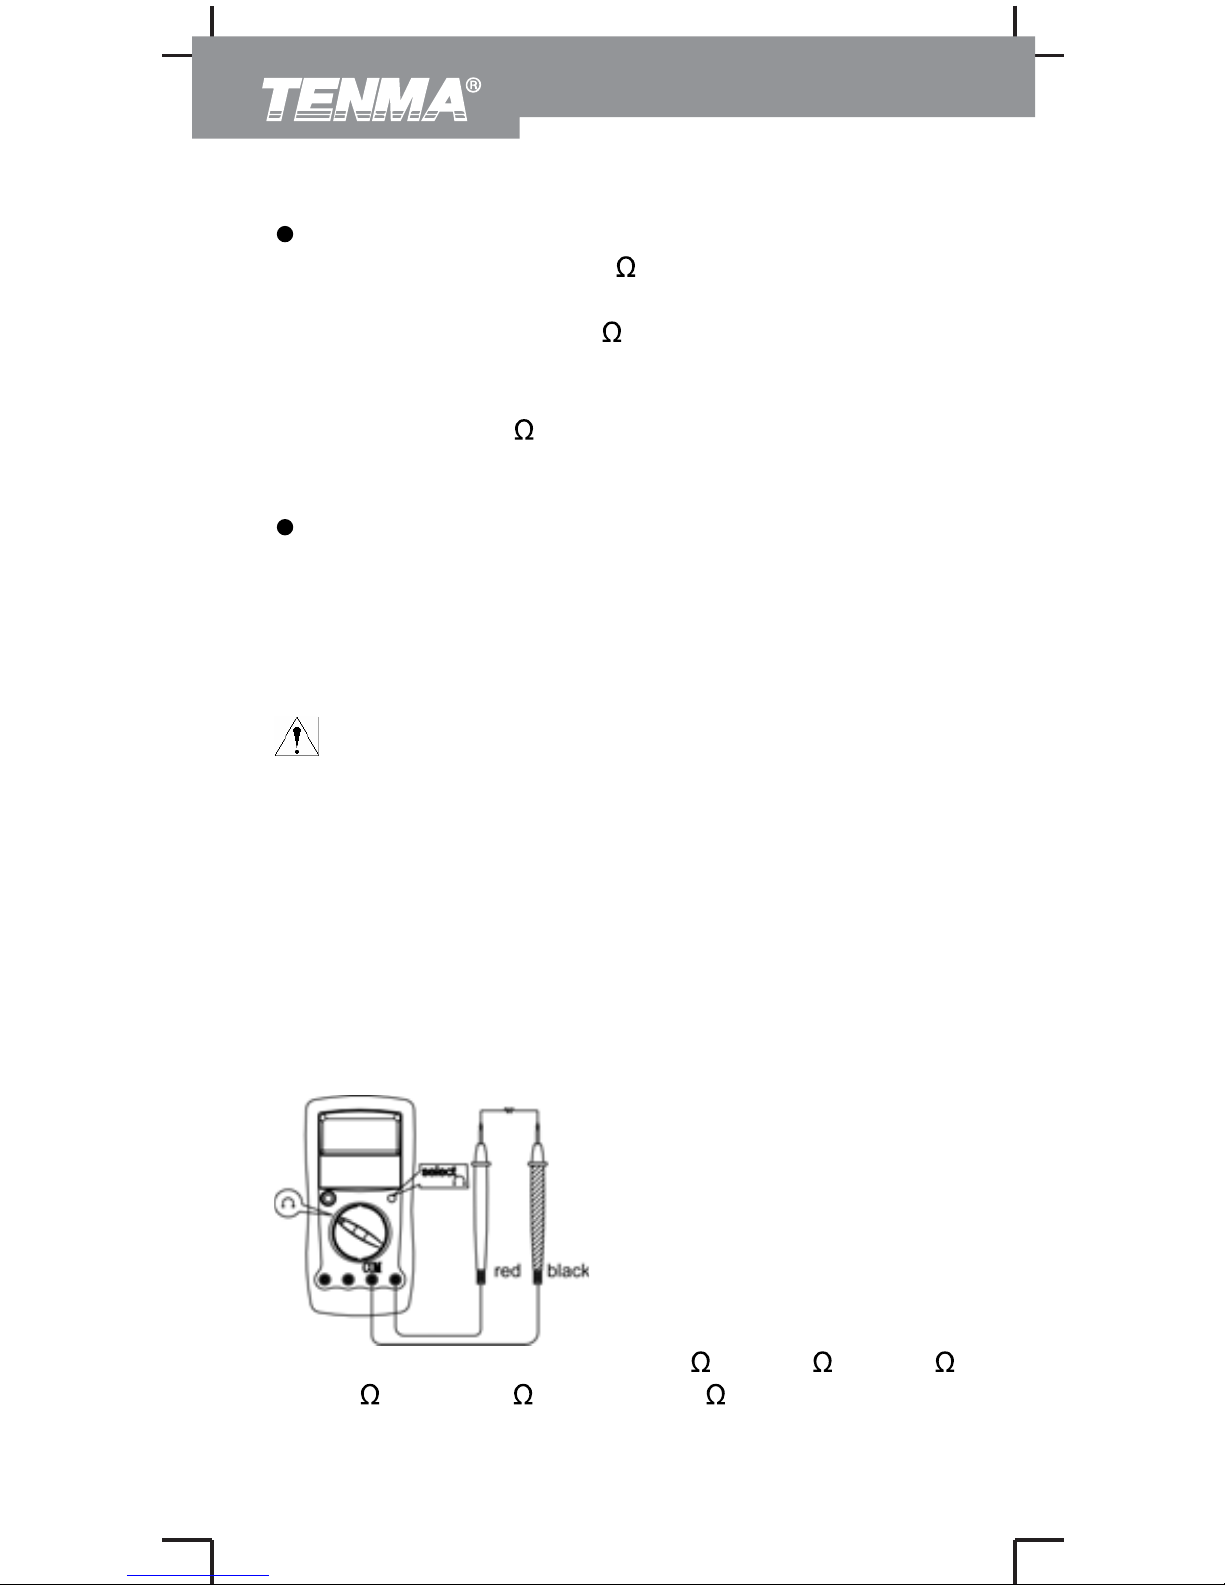
Resistance Measurement (see figure 4)
The resistance ranges are: 400.0 , 4.000k , 40.00k ,
400.0k
, 4.000M and 40.00M . To measure
resistance, connect the Meter as follows:
72-9375: OPERATING MANUAL
Page 12
11
1. Insert the red test lead into the HzVȍterminal and
the black test lead into the COM terminal.
2. Set the rotary switch toȍ
, resistance
measurement (ȍ) is default (or press SELECT
button to selectȍmeasurement mode)
3. Connect the test leads with the object being
measured.
The measured value shows on the display.
Note
z The test leads can add 0.1ȍto 0.2ȍ of error to
resistance measurement. To obtain precision
readings in low-resistance measurement, that is
the range of 400.0ȍ, short-circuit the input
terminals beforehand, using the relative value
function button
RESET to automatically
subtract the value measured when the testing
leads are short-circuited from the reading.
z For high-resistance measurement (>1Mȍ), it is
normal taking several seconds to obtain a stable
reading.
z If ȍ reading with shorted test leads is not 0.5ȍ,
check for loose test leads, incorrect function
selection, or enabled Data Hold function.
z The LCD displays OL indicating open-circuit for
the tested resistor or the resistor value is higher
than the maximum range of the Meter.
z When resistance measurement has been
completed, disconnect the connection between
the test leads and the circuit under test.
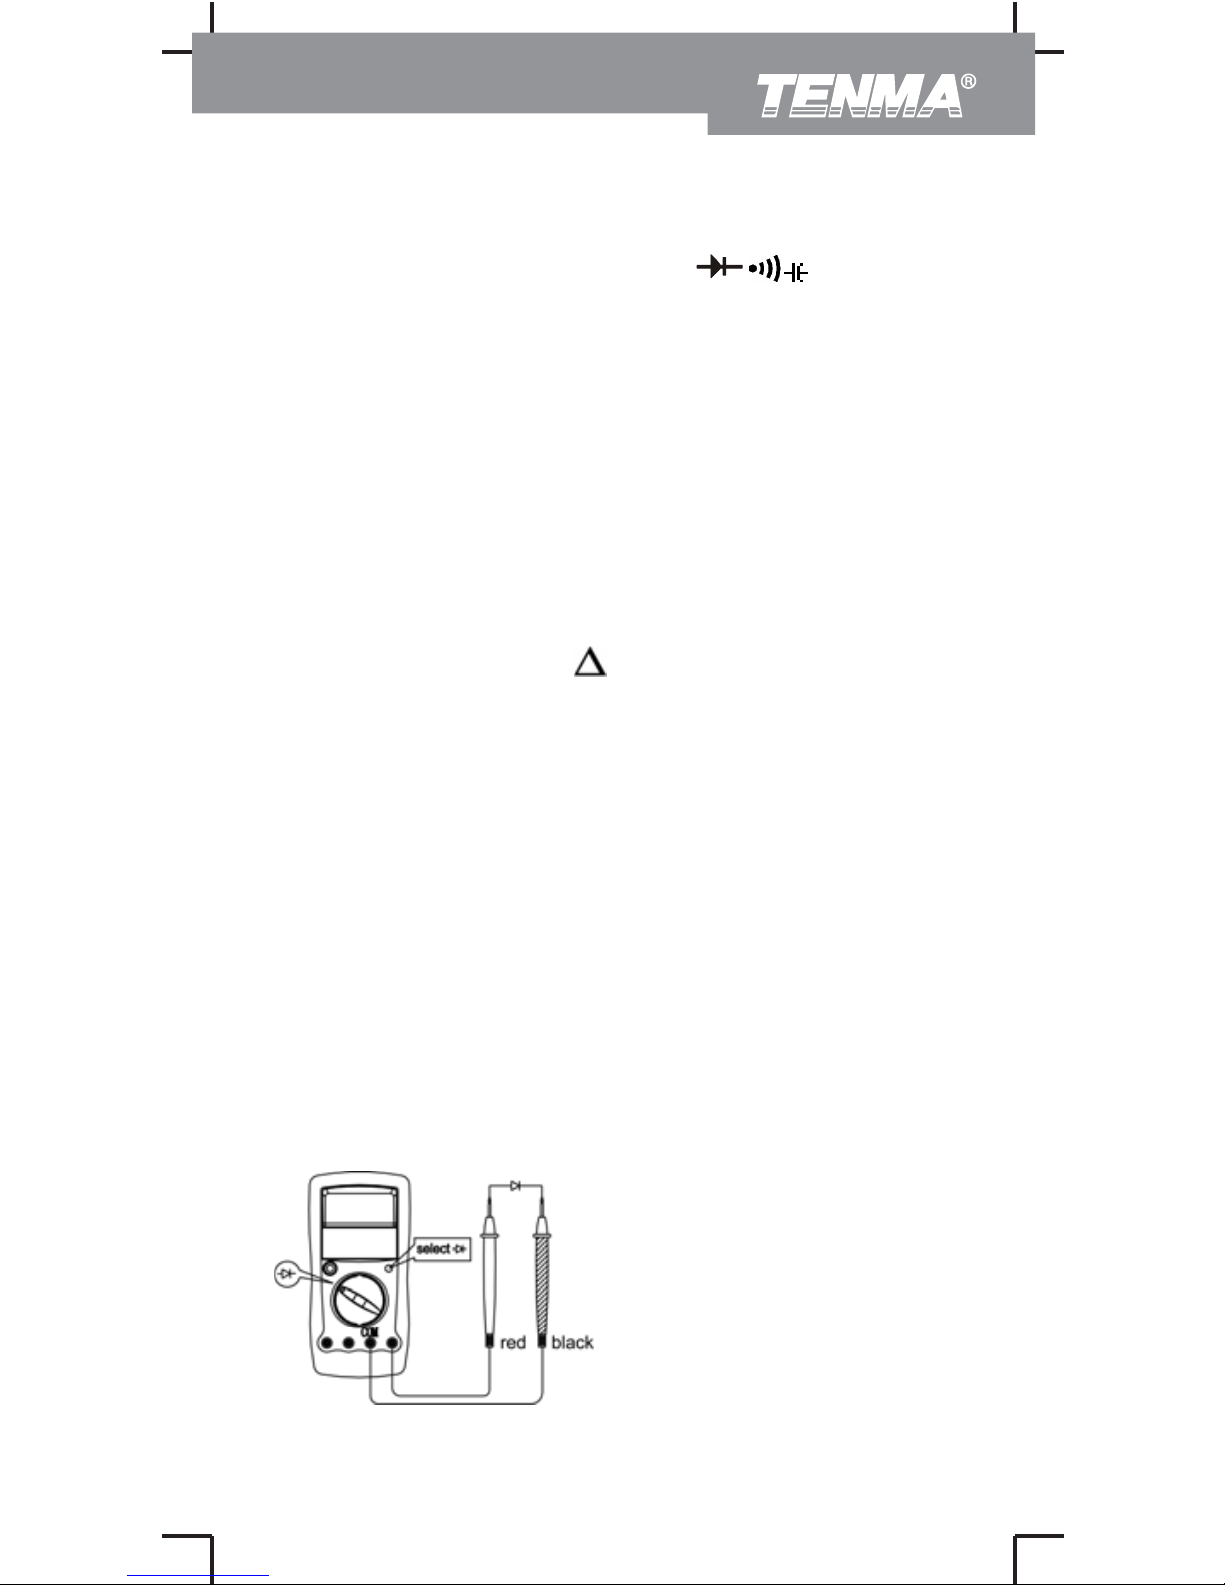
Testing Diodes (see figure 5)
Use the diode test to check diodes, transistors, and
72-9375: OPERATING MANUAL
Page 13
12
other semiconductor devices. The diode test sends a
current through the semiconductor junction, and then
measures the voltage drop across the junction. A
good silicon junction drops between 0.5V and 0.8V.
To test a diode out of a circuit, connect the Meter as
follows:
1. Insert the red test lead into the HzVȍterminal and
the black test lead into the COM terminal.
2. Set the rotary switch toȍ
and press
SELECT button to select
measurement
mode.
3. For forward voltage drop readings on any
semiconductor component, place the red test
lead on the component’s anode and place the
black test lead on the component’s cathode.
The measured value shows on the display.
Note
z In a circuit, a good diode should still produce a
forward voltage drop reading of 0.5V to 0.8V;
however, the reverse voltage drop reading can
vary depending on the resistance of other
pathways between the probe tips.
z Connect the test leads to the proper terminals as
listed above. The LCD will display OL indicating
open-circuit for wrong connection. The unit of
diode is Volt (V), displaying the
positive-connection voltage-drop value.
z When diode testing has been completed,
disconnect the connection between the testing
leads and the circuit under test.
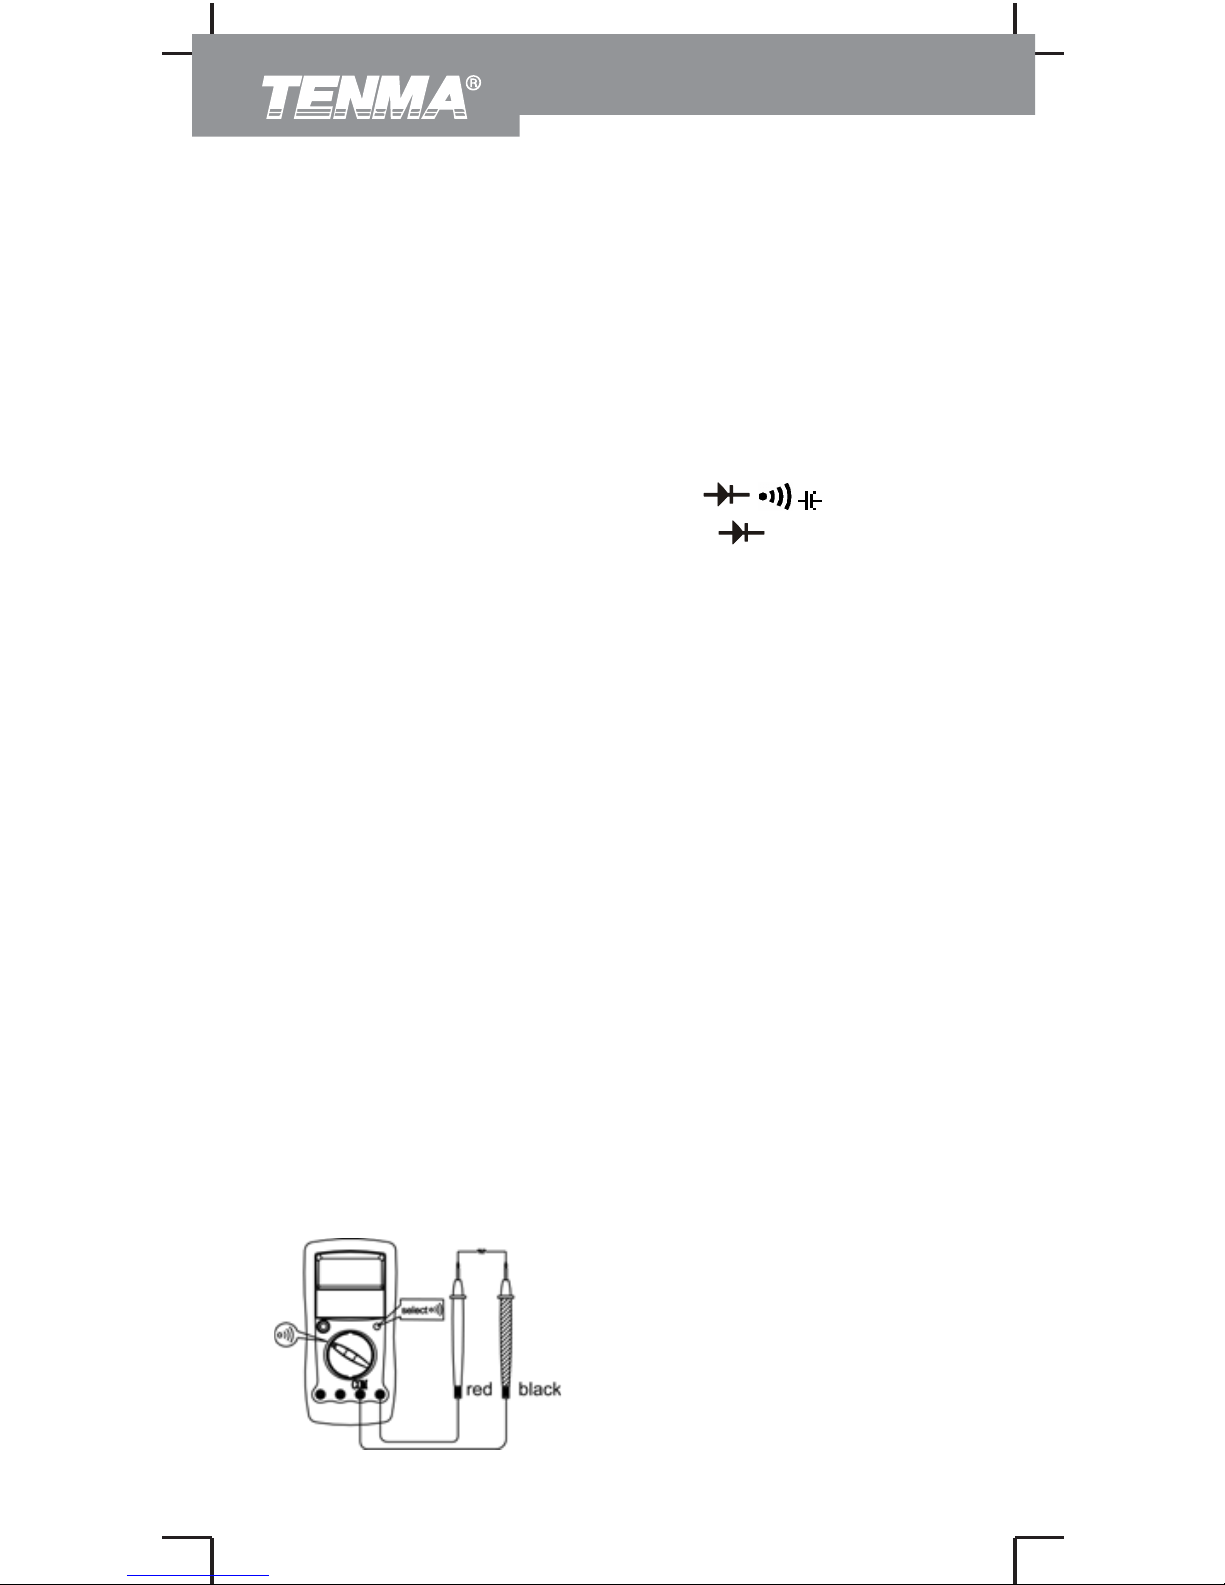
Continuity Testing (see figure 6)
72-9375: OPERATING MANUAL
Page 14
13
To test for continuity, connect the Meter as below:
1. Insert the red test lead into the HzV
terminal and
the black test lead into the COM terminal.
2. Set the rotary switch to
and press
SELECT button to select
measurement
mode.
3. The buzzer does not sound if the circuit is
disconnected and resistance value is > 100
.
The buzzer sounds continuously if the circuit is in
good condition, with resistance value 10 .
4. The nearest circuit resistance value shows on
the display, the unit is
.
Note
The LCD displays OL indicating the resistance of
the circuit being tested is higher than 400 .
The buzzer sounds if the
RESET, SELECT or
is pressed.
When continuity testing has been completed,
disconnect the connection between the test
leads and the circuit under test.
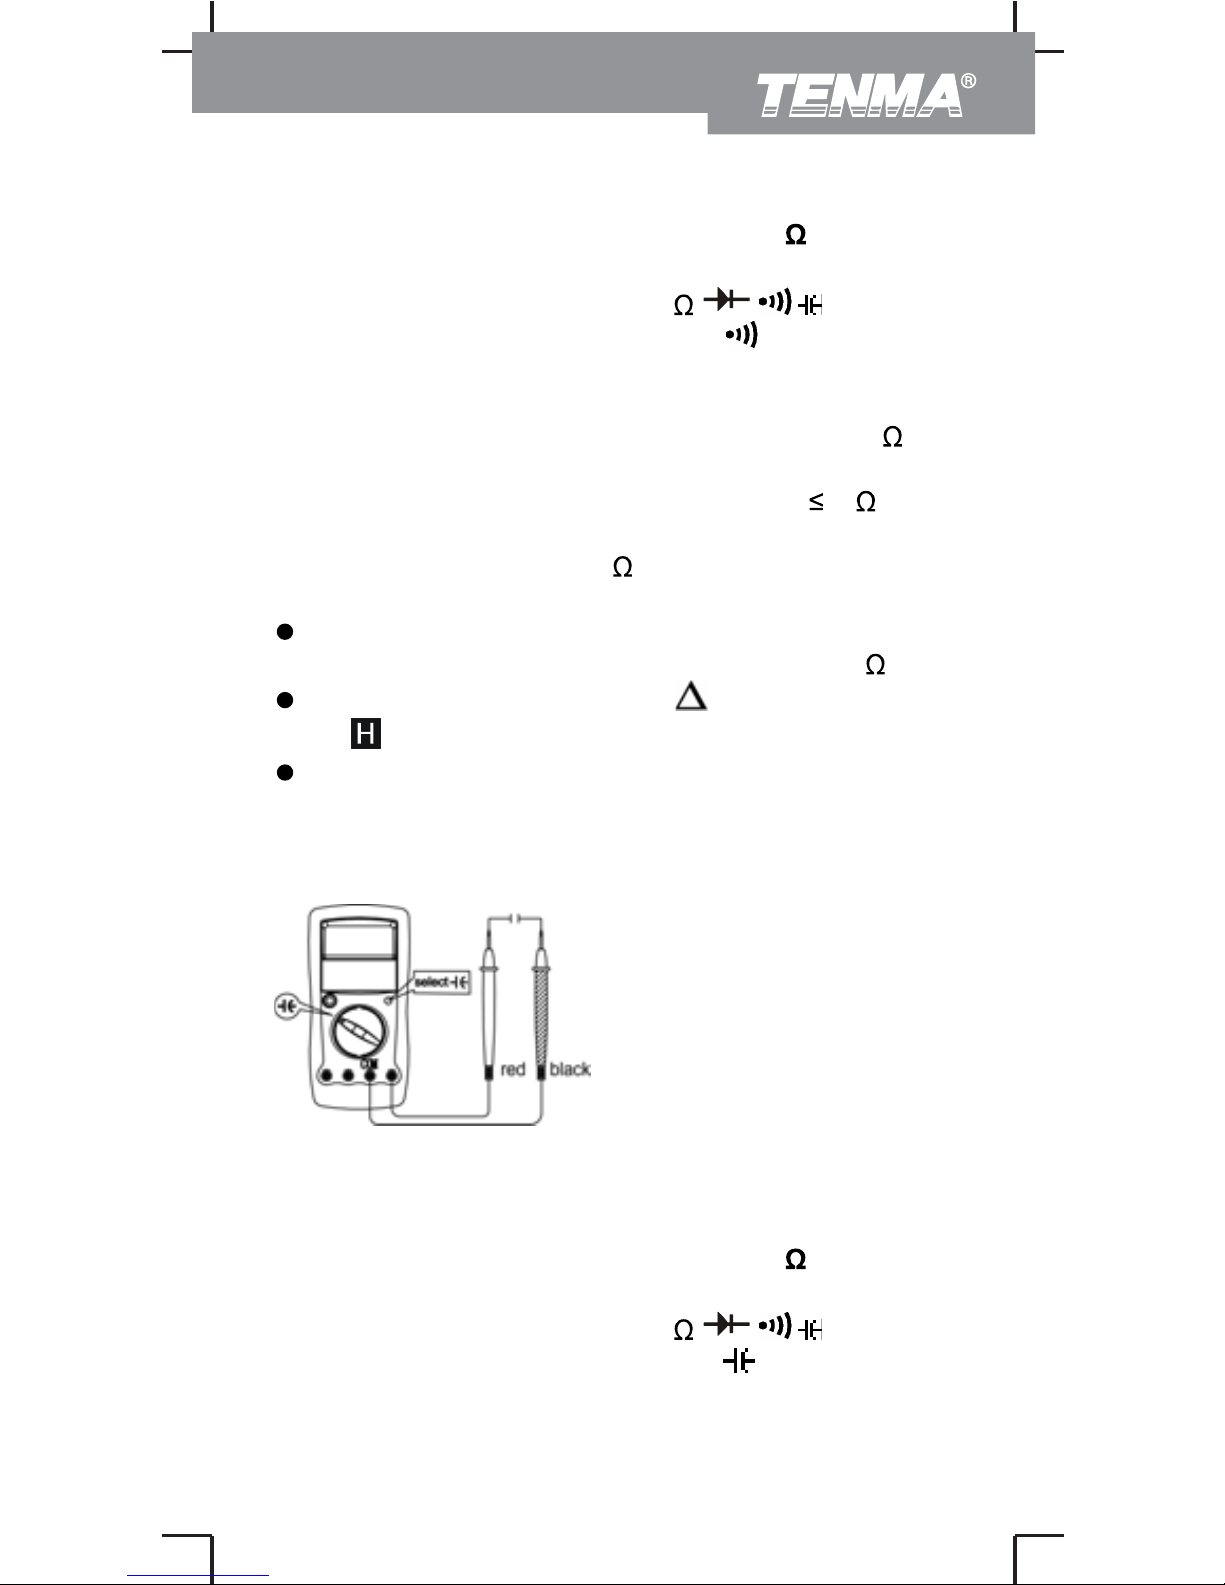
Capacitance Measurement (see figure 7)
The Meter’s capacitance ranges are: 40.00nF, 400.0nF,
4.000μF, 40.00μF, and 100.0μF. To measure
capacitance, connect the Meter as follows:
1. Insert the red test lead into the HzV
terminal and
the black test lead into the COM terminal.
2. Set the rotary switch to
and press
SELECT button to select
measurement
mode. The built-in equalized capacitance of the
Meter will affect the reading accuracy. For better
72-9375: OPERATING MANUAL
Page 15
14
accuracy of capacitance measurement, press
button before measuring (the LCD will display 0).
3. Connect the test leads with the object being
measured.
The measured value shows on the display.
Note
The LCD displays OL indicating the capacitor is
short-circuited or the capacitor value being
tested is overload.
For testing the capacitor polarity, connect the red
test lead to anode & black test lead to cathode
instead of using test leads as mentioned above.
Readings take longer when testing a capacitor
value which is higher than 10μF range.
When capacitance measurement has been
completed, disconnect the connection between
the testing leads and the circuit under test.
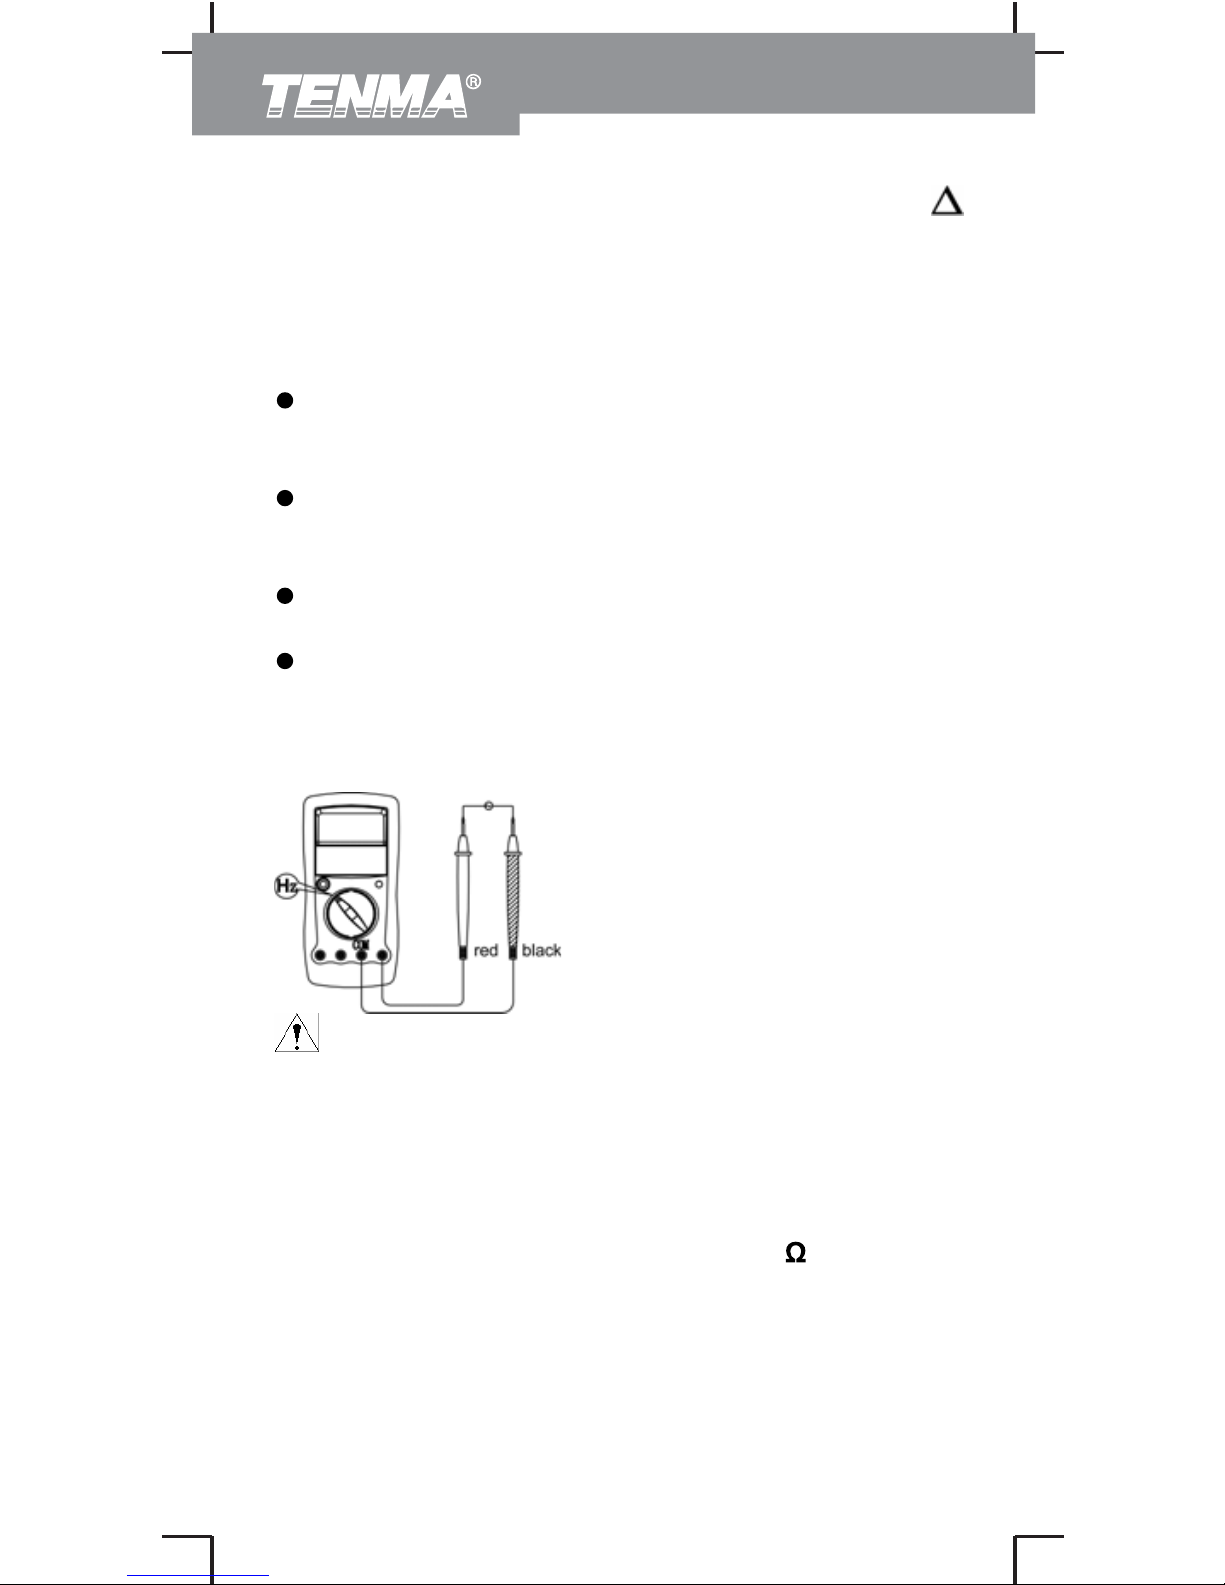
C. Frequency Measurement (see figure 8)
Warning
To avoid personal injury, please do not attempt to
input frequency voltage being tested higher than
30V.
The measurement ranges are from 10Hz to 10MHz.
To measure frequency, connect the Meter as follows:
1. Insert the red test lead into the HzV
terminal and
the black test lead into the COM terminal.
2. Set the rotary switch to Hz.
3. Connect the test leads across with the object
being measured.
The measured value shows on the display.
72-9375: OPERATING MANUAL
Page 16
15
Note
When Hz measurement has been completed,
disconnect the connection between the testing
leads and the circuit under test.
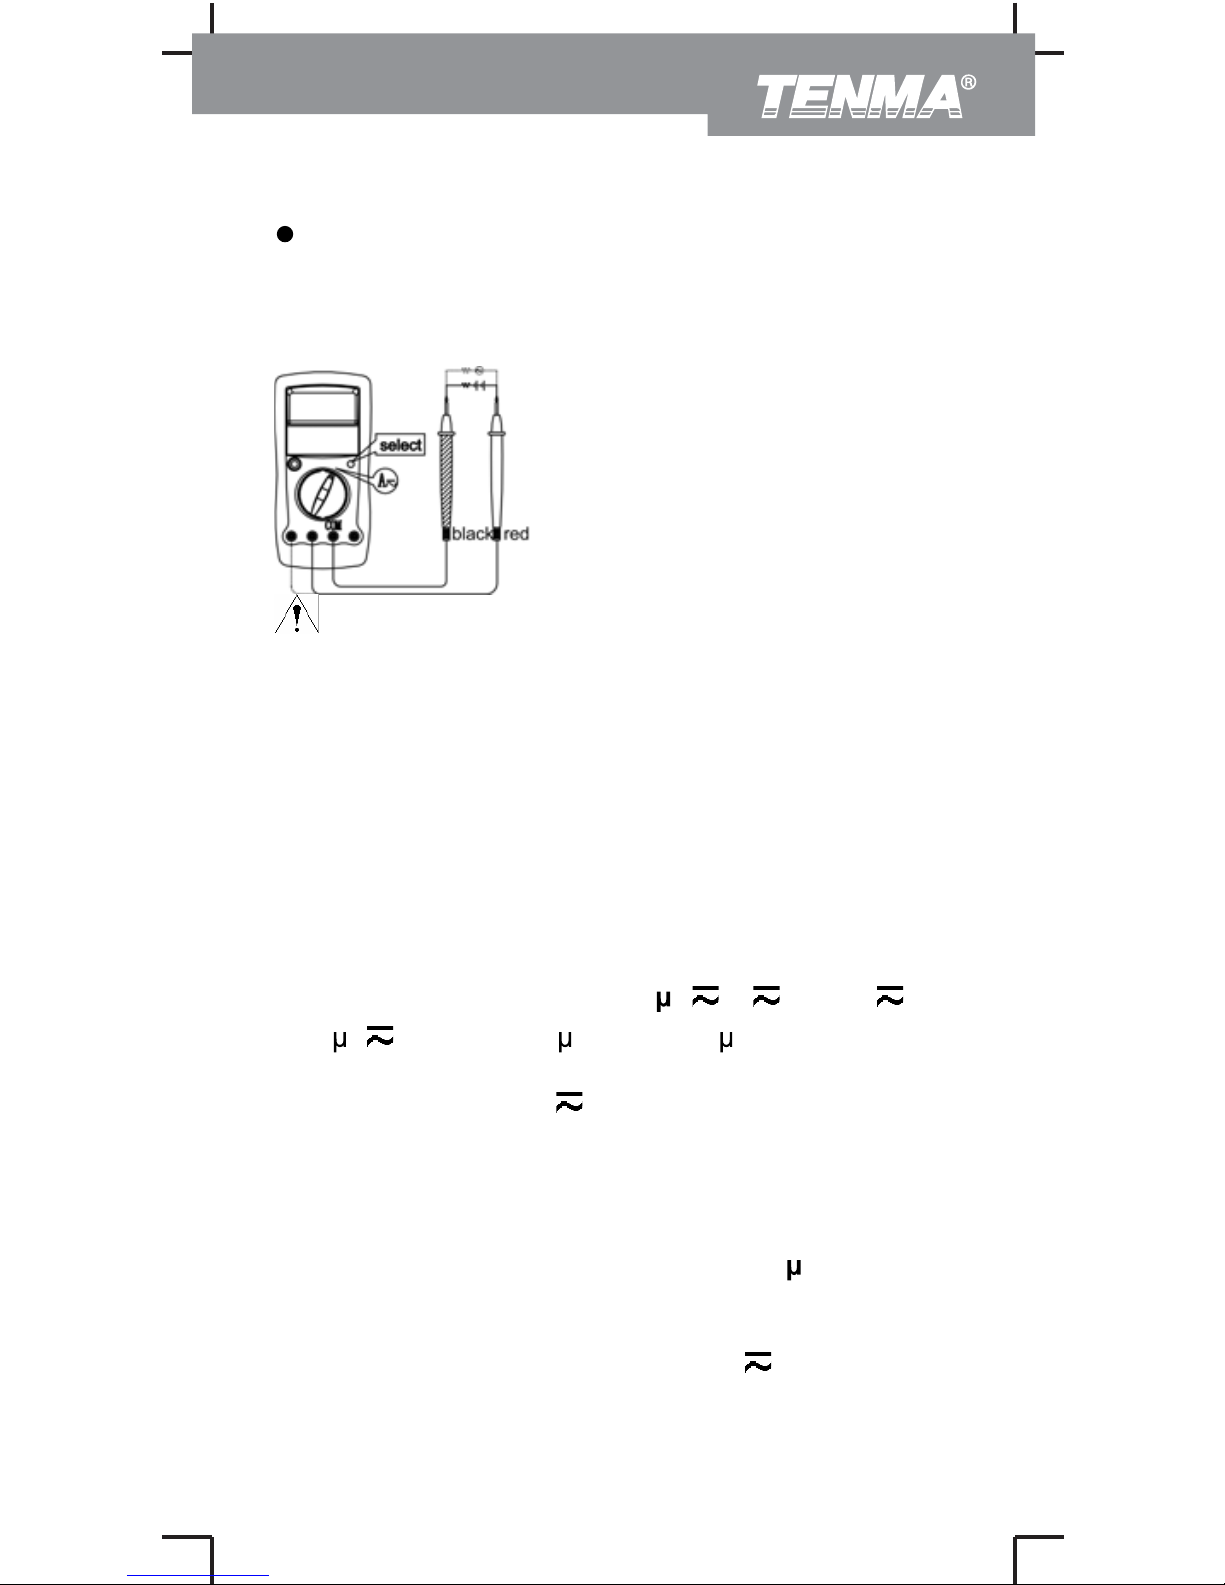
D. AC & DC Current Measurement (see figure 9)
Warning
Never attempt an in-circuit current measurement
where the open-circuit voltage between the circuit
and ground is greater than 110V.
If the fuse burns out during measurement, the
Meter may be damaged or the operator himself
may be hurt. Use proper terminals, function, and
range for the measurement. When the testing
leads are connected to the current terminals, do
not parallel them across any circuit.
The current measurement has 3 measurement
positions on the rotary switch:
A
, A and mA .
The
A
has a 400.0 A and 4000 A range, with auto
ranging; the mA has a 40.00mA and 400.0mA range,
with auto ranging; A
position has a 4.000A and
10.00A range, with auto ranging.
To measure current, do the following:
1. Turn off power to the circuit. Discharge all
high-voltage capacitors.
2. Insert the red test lead into the
AmA or 10A
terminal and the black test lead into the COM
terminal.
Use the 10A terminal and A
range if the
current value to be tested is an unknown.
72-9375: OPERATING MANUAL
Page 17
16
3. Set the rotary switch toȝA , mA or A .
4. The Meter defaults to DC current measurement
mode. To toggle between DC and AC current
measurement function, press SELECT button.
AC current is displayed as an mean value
(calibrated against sine wave effective value).
5. Break the current path to be tested. Connect the
red test lead to the more positive side of the
break and the black test lead to the more
negative side of the break.
6. Turn on power to the circuit.
The measured value shows on the display.
Note
z For safety sake, the measuring time for high
current should be less than 10 seconds for each
measurement and the interval time between 2
measurements should be greater than 15
minutes.
z When current measurement has been completed,
disconnect the connection between the testing
leads and the circuit under test, and remove the
testing leads away from the input terminals of the
Meter.
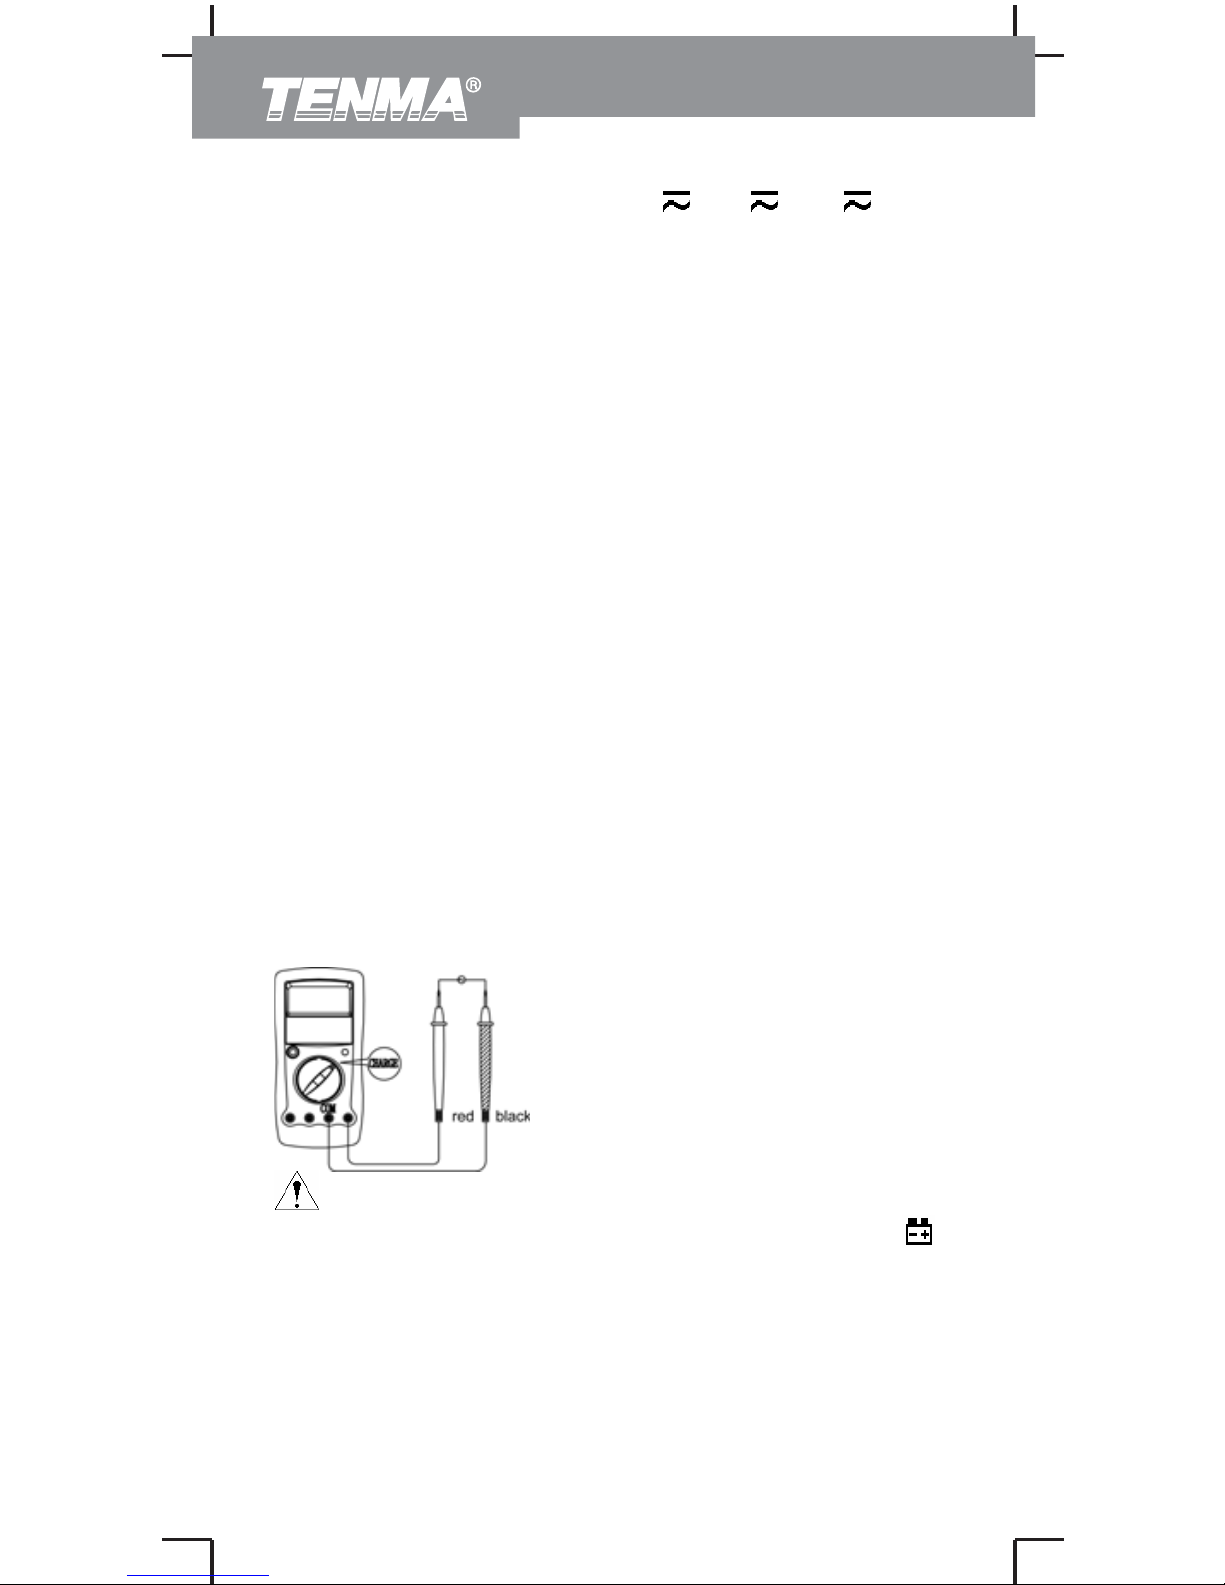
E. Power Charging (see figure 10)
Warning
Start charging as soon as the power indicator
appears. With a low battery, the Meter might
produce false readings that can lead to electric
shock and personal injury.
To avoid damage to the Meter, please do not
attempt to change the rotary switch during
charging.
72-9375: OPERATING MANUAL
Page 18
17
To set up charging as follows:
Charge at 110V AC
1. Insert the red test lead into the HzV terminal and
the black test lead into the COM terminal.
2. Set the rotary switch to 110V
MAX.
3. Insert the test leads’ probe tip into the 110V AC
power supply respectively.
4. CHARGE shows on the display.
5. The charging time is around 15 mins.
6. Take the DC Voltage range as an example, the
continuous working time is
90 mins
Charge at 12-36V
1. Insert the red test lead into the HzV terminal and
the black test lead into the COM terminal.
2. Set the rotary switch to 12-36V
.
3. Place the test leads’ probe tip onto the 12-36V
power supply respectively.
4. CHARGE shows on the display.
5. The charging time is at least 30 mins.
6. The continuous working time is
90 mins
Charge by Solar Power
Automatic charging can be completed through the
built-in solar cell and a steady light source (preferably
sunlight).
Remarks:
The display indicates “0.7V” as the rated charge
voltage (us as a comparative value)
The LCD will turn off when the power is low.
When the LCD turned on or charging after 5
minutes during charging, press RESET to
display the correct current charging voltage.
When power charging has been completed,
disconnect the connection between the testing
leads and the supply power.
Operation of Hold Mode
Warning
To avoid possibility of electric shock, do not use
Hold mode to determine if circuits are without
72-9375: OPERATING MANUAL
Page 19
18
power. The Hold mode will not capture unstable
or noisy readings.
The Hold mode is applicable to all measurement
functions.
Press
to enter Hold mode (meter will beep)
Press again to exit Hold mode (meter will
beep)
In Hold mode,
is displayed.
The Use of Relative Value Mode
The
mode applies to all measurement functions
except frequency and charge function
it subtracts a
stored value from the present value and displays the
relative value (
) as the result
The definition is as follows:
Relative value (
) = present value – stored value
For instance, if the stored value is 20.0V and the
present measurement value is 22.0V, the reading
would be 2.0V. If a new measurement value is
equal to the stored value then display 0.0V.
To enter or exit
mode:
Use rotary switch to select the measurement
function before selecting
RESET.If
measurement functions change manually after
RESET is selected, the Meter exits the
mode.
Press
RESET to enter mode, and the
present measurement range is locked and
display the last measurement value as “0” as the
stored value.
Press RESET again to reset the stored value
and exit
Mode.
Turn the rotary back and forth one time to return
to auto ranging mode. This only applies to
those functions having auto ranging.
Pressing in any modes makes the Meter stop updating.
Pressing again to resume updating.
72-9375: OPERATING MANUAL
Page 20
19
The RESET button
The RESET mode applies only to the charge function.
The LCD will be closed when the power is low. When
the LCD is first opened or charging after 5 minutes
during power charging, press RESET to display the
correct current charging voltage.
The SELECT button
It uses for selecting the required measurement
function when there is more than one function at one
position of the rotary switch.
Sleep Mode
To preserve battery life, the Meter automatically
turns off if you do not turn the rotary switch or
press any button for about 30 minutes.
The Meter can be activated by turning the rotary
switch or pressing any button
To disable the Sleep Mode, press SELECT while
turning on the Meter.
General Specifications
Maximum Voltage between any Input
Terminals and ground: Refer to different range
input protection voltage.
Fuse protection: 500mA, 250V, fast
of
AmAterminal type, 5x20mm
Fuse protection: 10A, 250V, fast
of 10A terminal type,
5x20mm
Measurement Speed: Updates 3 times /second.
Maximum Display: 3999
Temperature:
Operating: 0
~40 (32 ~104 ).
Storage: -10 ~50 (14 ~122 ).
Relative Humidity :
75% @ 0 to below 30
50% @ 31 to 40
Altitude: Operating : 2000m
Storage: 10000m
Power: Charge at 110VAC/ 50Hz/0.35W or 12-36
or solar cell
72-9375: OPERATING MANUAL
Page 21
20
Electro-Magnetic Field Interference:
When field value is under 1V/m:
total accuracy = assigned accuracy + 5% of the
range.
When field value is over 1V/m: there is no assigned
accuracy
Battery Deficiency: Display
Negative reading:Display
Overloading: Display: OL.
Equipped with full icons display
Manual / Auto ranging
Polarity: Automatically display
Dimensions (HxWxL): 179 x 88 x 39mm
Weight: 380g (including holster and battery)
Safety/Compliances:
IEC61010: CAT. II 1000V, CAT. III 600V overvoltage
and double insulation standard.
Certification:
Accuracy Specifications
Accuracy
± a% reading + b digits guarantee for 1
year
Operating temperature
23 ±5
Relative humidity <75%
Temperature coefficient: 0.1 x (specified accuracy) /
1
A. AC Voltage
Range
Resolu
tion
Accuracy
Overload
Protection
4V 1mV
40V 10mV
400V 100mV
±(1%+5)
750V 1V ±(1.2%+5)
1000V DC
or 750V AC
continuous.
Remarks:
Input impedance: approx. 10M .
Frequency response: 40Hz ~ 400Hz.
Displays effective value of sine wave (mean
value response).
72-9375: OPERATING MANUAL
Page 22
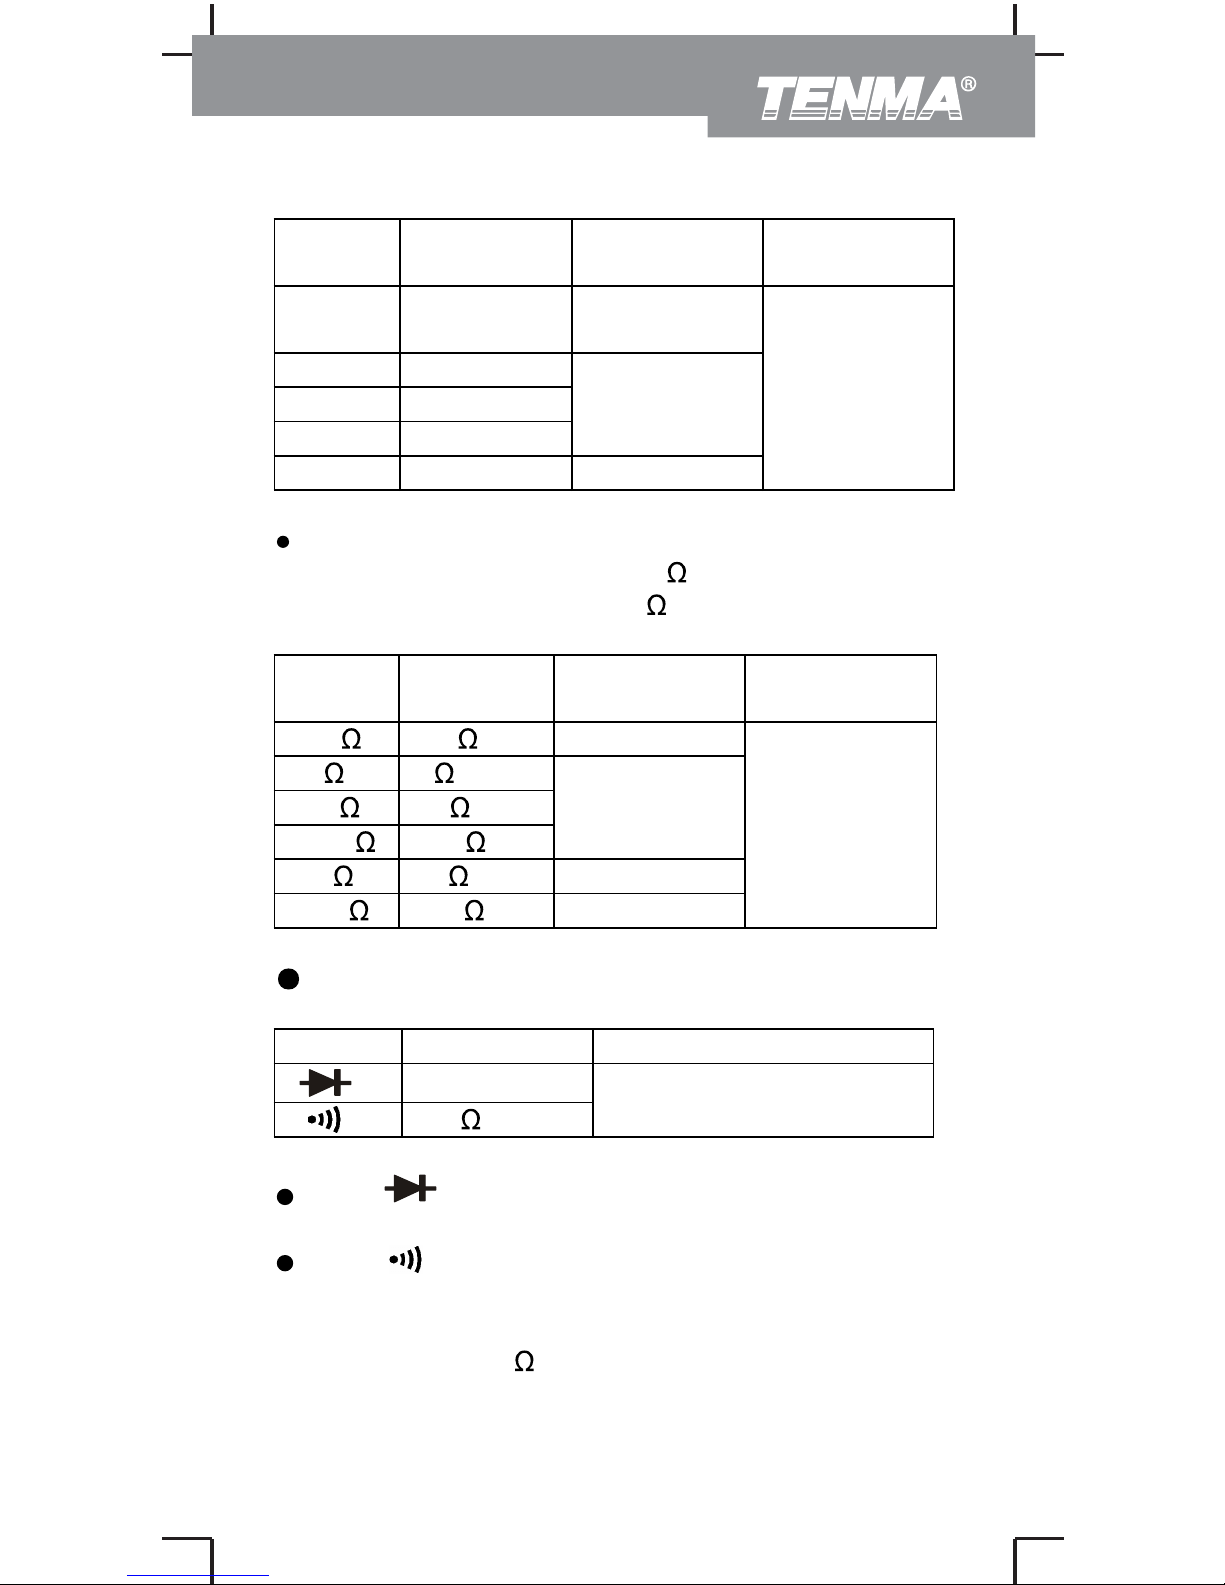
21
B. DC Voltage
Range
Resol
ution
Accuracy
Overload
Protection
400m
V
0.1mV ±(0.8%+3)
4V 1 mV
40V 10 mV
400V 100mV
±(0.8%+1)
1000V 1V ±(1%+3)
1000V DC
or 750V AC
continuous
Remark:
Input impedance:
At 400mV range: above 4000M
All other ranges: approx. 10M
C. Resistance
Rang
e
Resol
ution
Accuracy
Overload
Protection
400 0.1 ±(1.2%+2)
4k 1
40k 10
400k 100
±(1%+2)
4M 1k ±(1.2%+2)
40M 10k ±(1.5%+2)
600Vp
Remarks:
Open circuit voltage: approx. 0.45V
D. Diode & Continuity
Range Resolution Overload Protection
1mV
0.1
600Vp
Remarks:
At
Range:
Open circuit voltage approximate 1.48V.
At
Range:
Open circuit voltage approximate 0.45V.
The buzzer does not sound when the resistance
value is >100
(The circuit is disconnected or
open).
The buzzer sounds continuously when the
72-9375: OPERATING MANUAL
Page 23
22
resistance value is 10 (The closed circuit is in
working condition).
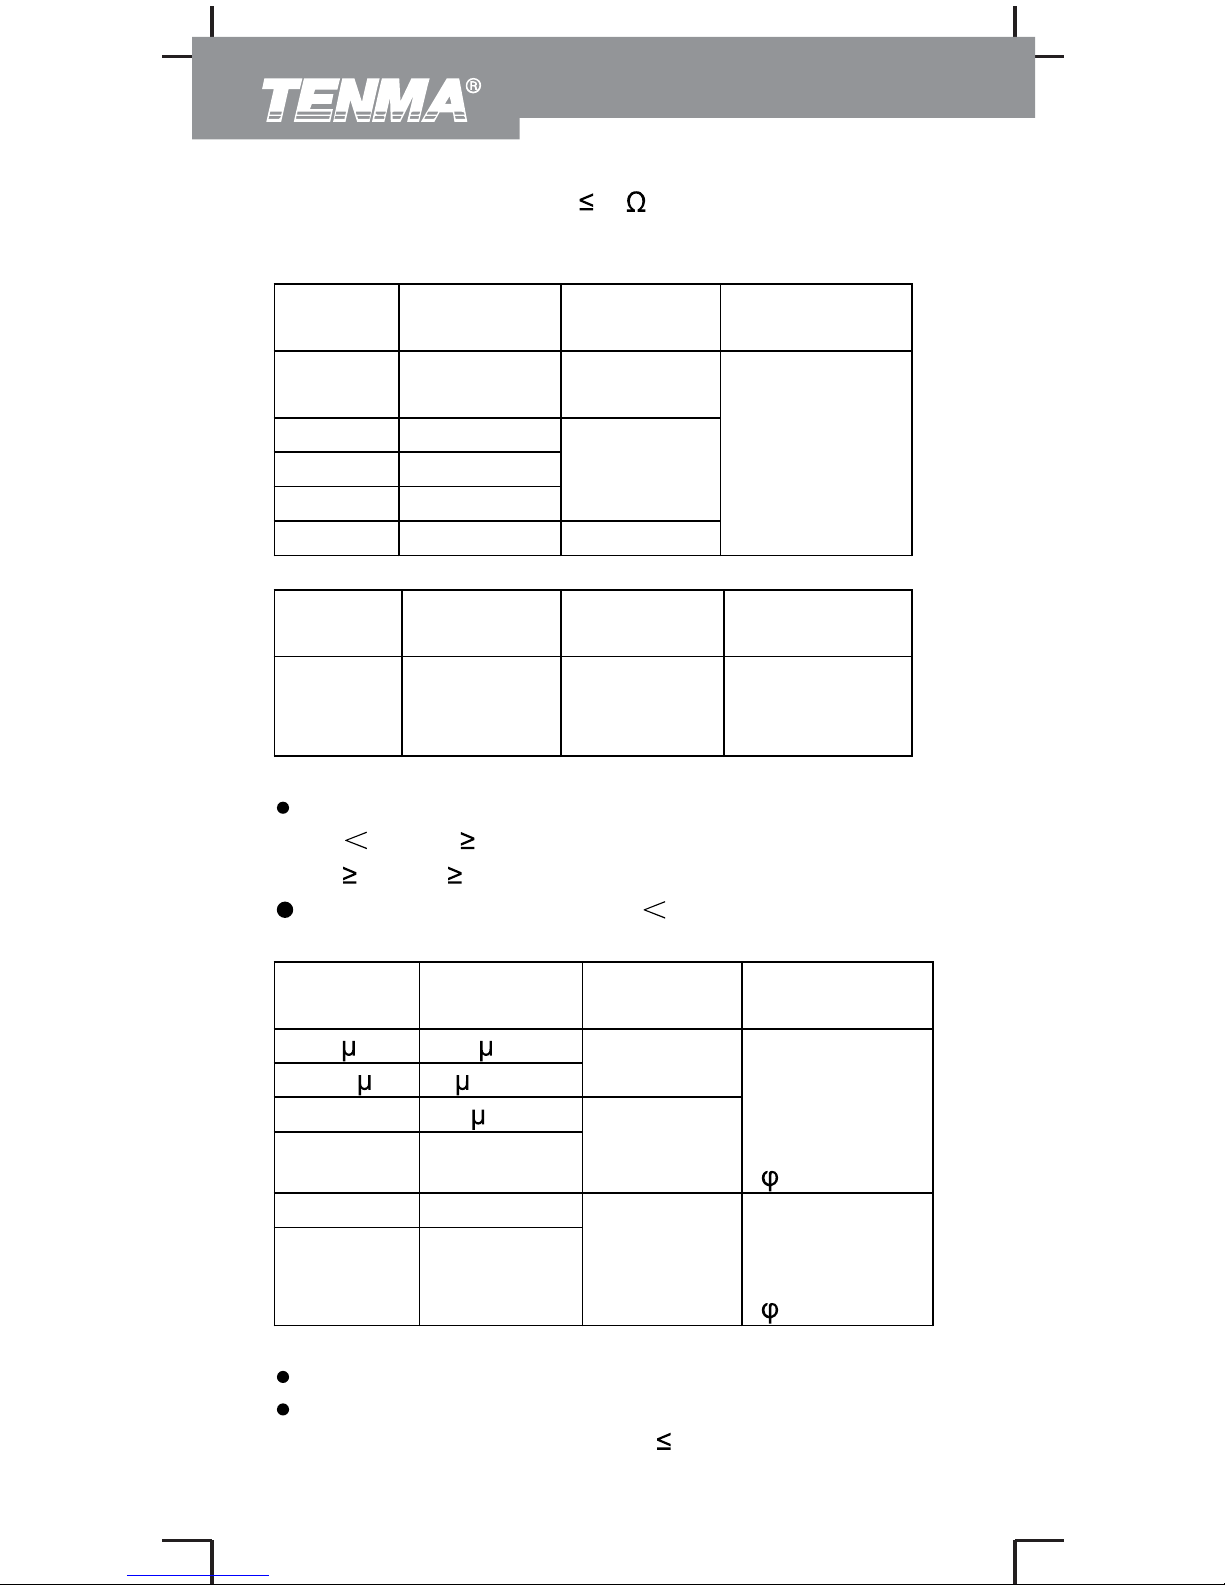
E. Capacitance Test
Rang
e
Resoluti
on
Accurac
y
Overload
Protection
40nF 10pF
±(3%+10)
400nF 100pF
4μF 1nF
40μF 10nF
±(3%+5)
100μF 100nF ±(4%+5)
600Vp
F. Frequency Test
Range
Resoluti
on
Accurac
y
Accurac
y
Overload
Protection
10Hz~
10MH
z
0.01Hz~
10kHz
±(0.1%+3
)
600Vp
Remarks:
Minimum input amplitude :
when
1MHz: 300mV
when
1MHz: 600mV
Maximum input amplitude: 30V rms
G. AC Current
Range
Overload
Protection
400 A 0.1 A
4000 A1A
±(1.5%+
5)
40mA 10 A
400mA 0.1mA
±(2%+5)
Fuse
500mA,
250V, fast
type,
5×20mm
4A 1mA
10A 10mA
±(2.5%+
5)
Fuse 10A,
250V, fast
type,
5×20mm
Remarks:
Frequency response: 40Hz – 400Hz.
At 10A Range:
For continuous measurement
10 seconds (with
72-9375: OPERATING MANUAL
Resoluti
on
Page 24
23
15 minutes rest intervals between tests)
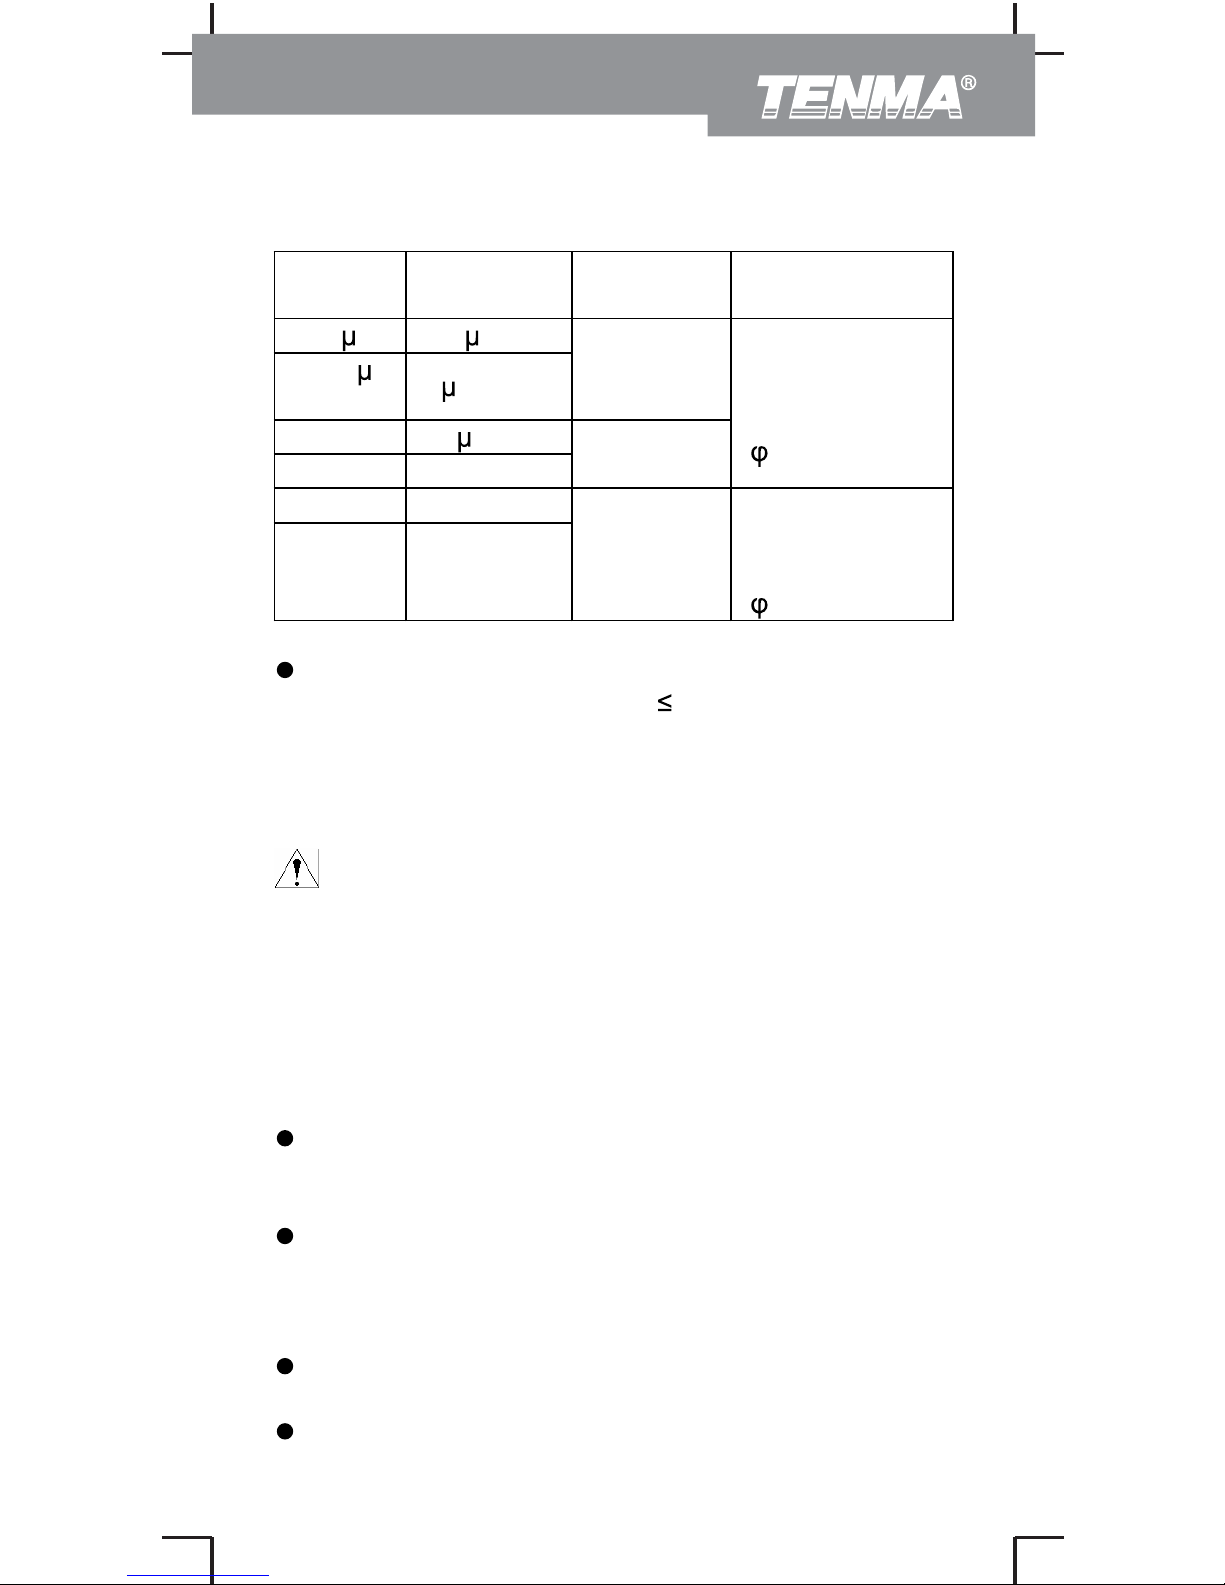
H. DC Current
Range
Overload
Protection
400 A 0.1 A
4000
A
1
A
±(1%+2)
40mA 10 A
400mA 0.1mA
±(1.2%+
3)
Fuse 500mA,
250V, fast
type,
5×20mm
4A 1mA
10A 10mA
±(1.5%+
5)
Fuse 10A,
250V, fast
type,
5×20mm
Remarks:
At 10A range:
For continuous measurement 10 seconds (with 15
minutes rest intervals between tests)
MAINTENANCE
This section provides basic maintenance information
including battery and fuse replacement instruction.
Warning
Do not attempt to repair or service your Meter
unless you are qualified to do so and have the
relevant calibration, performance test, and service
information.
To avoid electrical shock or damage to the Meter,
do not get water inside the case.
A. General Service
Periodically wipe the case with a damp cloth and
mild detergent. Do not use abrasives or
solvents.
Make sure the power is off, and clean the
terminals with a small brush or swab with a very
small amount of contact cleaner or alcohol.
Moisture or debris can create false readings.
Turn the Meter off when it is not in use and take
out the battery when not using for a long time.
Do not store the Meter in an area of high humidity,
72-9375: OPERATING MANUAL
Resoluti
on
Accurac
y
Page 25
24
high temperature, explosives, and strong
magnetic field.
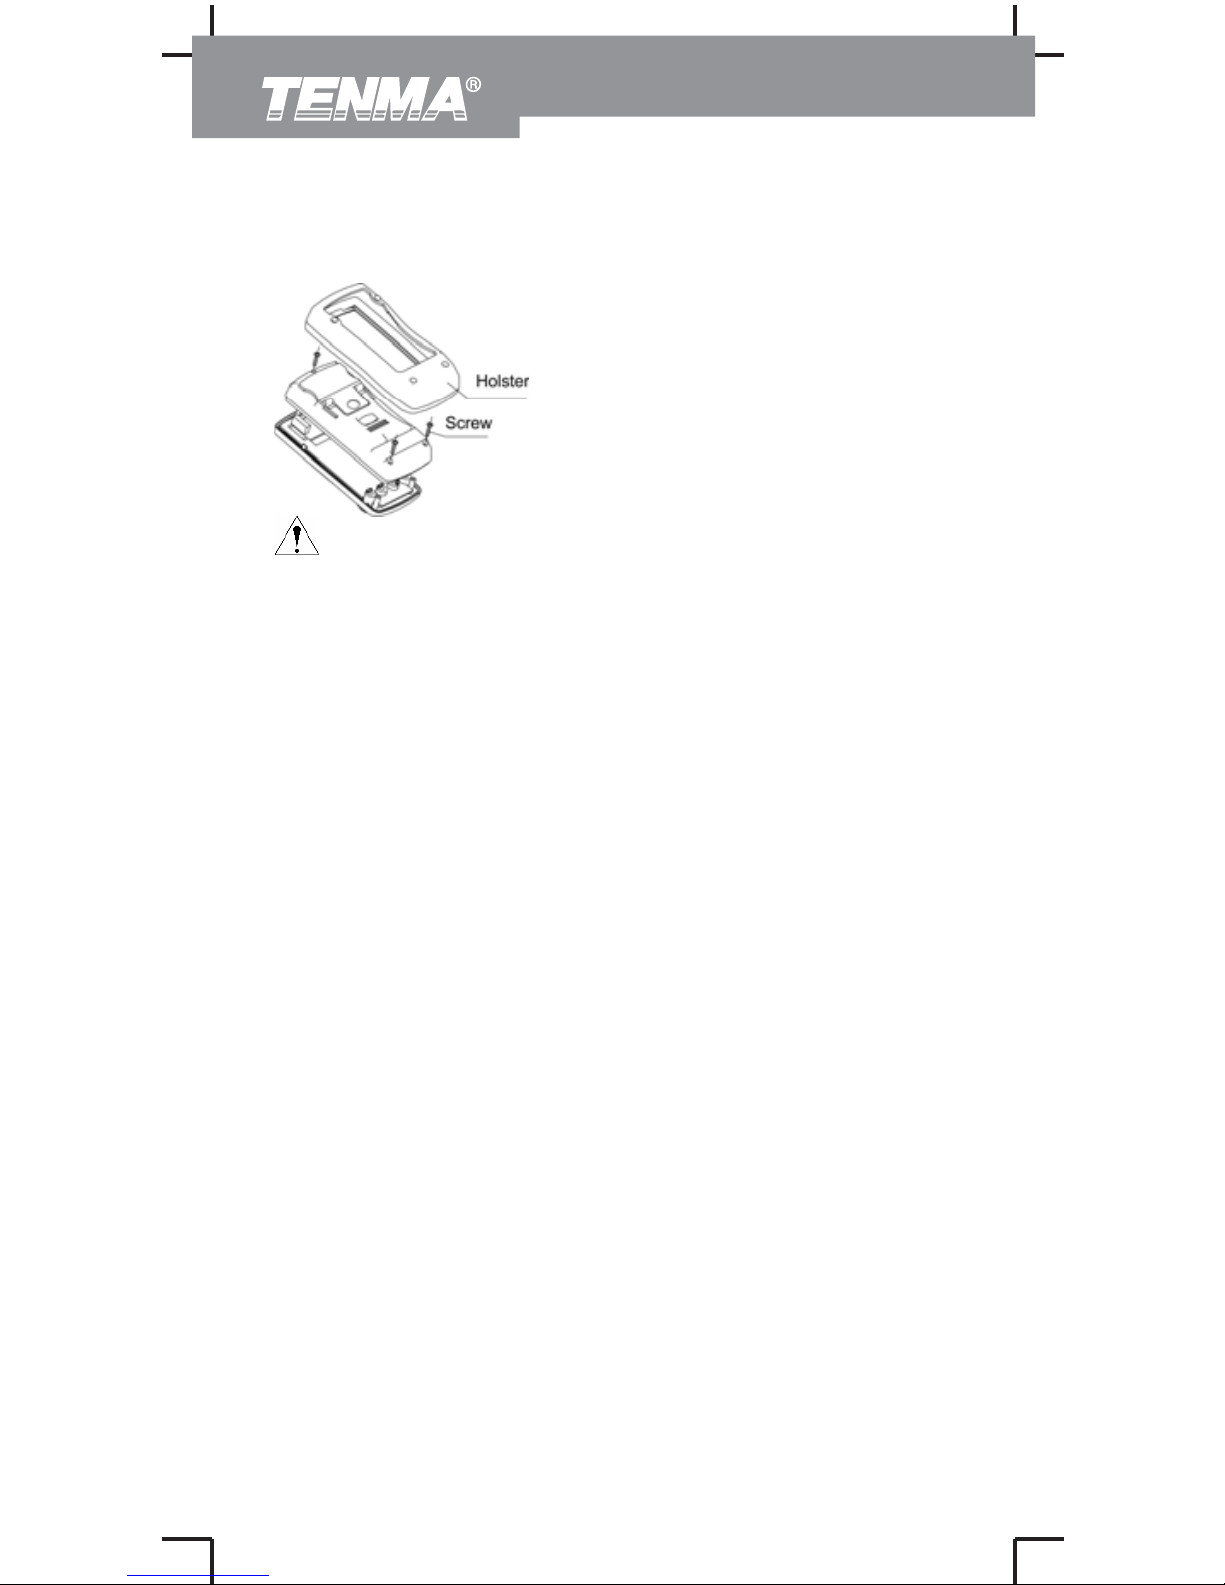
B. Replacing the Fuses (see figure 11)
Warning
To avoid electrical shock or arc blast, which would
cause personal injury or damage to the Meter, use
specified fuses ONLY in accordance with the
following procedure.
To replace the Meter’s fuse:
1. Turn the Meter off.
2. Remove the outer holster from the Meter.
3. Remove all connections from the Meter’s
terminals.
4. Remove the 3 screws from the case bottom, and
separate the case top from the case bottom.
5. Remove the fuse by gently prying one end loose,
and remove the fuse from its bracket.
6. Install ONLY replacement fuses with the identical
type and specification as follows and make sure
the fuse is fixed firmly in the bracket.
Fuse 1: 10A, 250V, fast type, ij5x20 mm.
Fuse 2: 500mA, 250V, fast type, ij5x20 mm.
7. Rejoin the case bottom and case top, and
reinstall the 3 screws.
Replacement of the fuses is seldom required. Blowing
of a fuse almost always results from improper
operation.
This operating manual is subject to change without
notice.
72-9375: OPERATING MANUAL
 Loading...