

Page 1

DIGITAL FAMILY OF SYSTEMS
Operating Instructions
76-110-0165/G Issue 1
Page 2

76-110-0165/G, Issue 1
DIGITAL FAMILY OF SYSTEMS
Operating Instructions
Telrad Telecommunications Inc.
Woodbury, New York
Page 3

Printed in Israel
76-110-0165/G, Issue 1
Telrad Telecommunications Inc.
Woodbury, New York
Page 4

NOTICE
The information in this manual refers to the Telrad DIGITAL family of telephone systems, including the DIGITAL KEY BX system
(Release SB7), DIGITAL 400 system (Release DB7), and DIGITAL 1000 system (Release LB7), as of August, 1999. Telrad, Ltd.,
reserves the right to make changes in the equipment described in this manual without notification. However, changes in the equipment do not necessarily render this manual invalid.
Additional copies of this manual may be obtained from Telrad, Ltd. Reproduction of this manual or parts thereof, without written
permission from Telrad, Ltd., is strictly prohibited.
© 1999 Telrad Telecommunications Inc.
Woodbury, New York
The following are registered trademarks of the respective listed firms:
Trademark Firm Trademark Firm
IMAGEN Telrad Telecommunications, Inc. MS-DOS Microsoft Corp.
MS WINDOWS Microsoft Corp. UL Underwiters Laboratories, Inc.
FCC Regulations
Warning
This equipment generates, uses and can radiate radio frequency energy and if not installed and used in accordance with the instruction manual, may cause interference to radio communications. Operation of this equipment in a residential area is likely to
cause harmful interference, in which case the user should contact the Telrad Field Service Department, at the tel ephone number
listed below, to correct the interference problem. It has been tested and found to comply with the limits for a Class A computing
device pursuant to Subpart J of Part 15 of the FCC Rules which are designed to provide reasonable protection against such interference when operated in a commercial environment.
Registration
The Telrad DIGITAL Family systems are registered with the FCC based upon compliance with part 68 of its rules. Connection of
these systems to the nationwide telecommunications network is made through a standard network interface jack which you can
order from your telephone company. Jacks for this type of customer-provided equipment will not be provided on party lines or coin
lines.
Hearing Aid Compatibility
DIGITAL family telephones are Hearing Aid compatible, as defined in Section 68.316 of Part 68 FCC Rules.
Telephone Company Registration
It is usually not necessary to call the telephone company with information on the equipment before connecting the DIGITAL family
system cabinet to the telephone network. But, if the telephone company should require this information, provide the following:
FCC Registration Number - Key system ARAISR-18430-KF-E
(on label affixed to cabinet) - Multi-function (Hybrid Key/PBX) system ARAISR-18427-MF-E
Ringer Equivalence Number 3.9B
USOC Jack: DB15, RJ2EX, RJ2FX, RJSGX, RJ2HX, RJ21X, RJ48C
Service Order Code (SOC) - for off premise extensions and all analog trunk cards except the DID card 9.OF
Facility Interface Code (FIC): - Central Office Ground-start trunk 02GS2
If the system is determined to be causing harm to the telephone network, the telephone company may discontinue your service
temporarily. If possible, the telephone company will notify you as soon as possible. You will be given the opportunity to correct
the situation and you will be informed of your right t o file a complaint t o the FCC. Your telephone company may make changes in
its facilities, equipment, operations, or procedures that could affect the proper functioning of your system. If it does this, you will
be notified in advance to give you the opportunity to maintain uninterrupted telephone service.
In the event of an equipment malfunction, all repairs will be performed by Telrad Telecommunications, Inc., or by one of its authorized dealers.
Address of repair facility in USA
Telrad Service Center, 135 Crossways Park Drive, Woodbury, NY 11797. Phone: 1-800-645-1350.
- for DID cards AS.2
- for digital trunks 6.0P
- Central Office Loop-start trunk 02LS2
- Direct Inward Dialing 02RV2-T
- Off-premises extension OL13C
- Primary Rate Interface (PRI24) 04DU9-1SN
- Basic Rate Interface (BRT and BHT) 04DU9-1SN
- T1 (DIGITAL TRUNK) 04DU9-BN, 04DU9-DN. 04-DU9-1KN, 04DU9-1SN, 04-DU9-1ZN
- E&M (TIE TRUNK INTERFACE -- 2-wire)
- E&M (TIE TRUNK INTERFACE -- 4-wire)
- DPNSS/QSIG Interface (N24 and N12) 04DU9-1SN
Rights of the Telephone Company
Page 5

INTRODUCTION
1.1 GENERAL
This manual applies to the DIGITAL KEY BX, DIGITAL 400 and
DIGITAL 1000 systems, Release 7 and constitutes a supplement
to the DIGITAL FAMILY OF SYSTEMS, Operating Instructions,
Release 6 (Cat. No. 76-110-0165/F)
1.2 PRODUCT DEFINITION
The DIGITAL KEY BX, DIGITAL 400 and DIGITAL 1000 systems
comprise the DIGITAL family of systems which are advanced busi ness communication systems, offering cut ting-edge technology for
telephone communication servic es and a wide variety of voice and
data options.
Section 1
1.3 SCOPE OF MANUAL
The outstanding difference between Release 7 of the DIGITAL
FAMILY OF SYSTEMS and its Release 6 predecessor is the i ntroduction of the Avanti family of telephone sets and the new “Phone
Book” feature. This manual constitutes a supplement to the Release 6 Operating Instructions and includes the operating instructions for the new Avanti sets as well as any new feat ures included
in the current release.
The DIGITAL FAMILY OF SYSTEMS Operating Instructions, Release 6, should be used as the principal reference for any other
DIGITAL FAMILY OF SYSTEMS telephone equipment.
1-1
Page 6

76-110-0165/G, Issue 1
1.4 MANUAL STRUCTURE
The manual is divided into the following sections:
1. INTRODUCTION
This section provides a general explanation of the con tents of this
manual.
2. Avanti FAMILY TELEPHONE SETS
This section contains a description of the new Avanti telephone
sets introduced in the DIGITAL family of systems and explains how
their improved features affect their operation.
3. Avanti TELEPHONE OPERATING INSTRUCTIONS
This section contains operati ng procedures for the new Avanti proprietary sets.
4. Avanti ATTENDANT CONSOLE - OPERATING
INSTRUCTIONS
This section contains operating procedures for the Avanti
Attendant Console.
5. PHONE BOOK FEATURE OPERATING INSTRUCTIONS
This section contains operating and programming procedures for
the new Phone Book feature.
6. REMOTE FEATURES
This section contains instructions for operating features included
in the DIGITAL system which can be accessed from outside the
system, including Executive Credit Code (ECC), Direct Inward
System Access (DISA) and network features.
Appendix A - SYSTEM AND DND MESSAGES
The Appendix contains the following tables:
• System messages
• DND messages.
1.5 INTENDED AUDIENCE
This manual is intended for the DIGITAL KEY BX or DIGI TAL 400
system administrator and for advanced extension subsc ri bers of
these systems.
1.6 APPLICABLE DOCUMENTATION
This manual is one of a series on the system and r elated peripheral equipment, as follows:
Operating Instructions
tains a detailed explanation of how the DIGITAL system features
are operated from the various types of proprietary telephone sets
or SLT extensions.
, Release 6 (Cat. No. 76-110-0165/F) con-
1-2
Page 7

Section 1: INTRODUCTION
Feature description addendum
ments the Version SB6 manual and contains a detailed explanation of the DIGITAL system features and services that are new in
Version SB7.
Administration, Installation and Upgrade Addendum
76-110-0175/G) supplements the Version SB6 manual and contains a detailed explanat ion of new ins tr uctions fo r inst allat ion, upgrade and administration tasks on the DIGITAL system.
(Cat. No. 76-110-0690/G) supple-
(Cat. No.
IMAGEN Integrated Multiple Application Generator System
manual
GEN, including an explanation of IMAGEN capabilities and features, as well as installation, maintenance and programming
instructions.
User Guides
features available from your particular extension. These booklets
are supplied by your distributor, including:
(Cat. No. 76-110-0285/I) contains an explanation of IMA-
are individual booklets which descr ibe how to activate
Avanti Set 3025 User Guide (Cat.No. 79-610-0010/A).
Avanti Set Attendant User Guide (Cat.No. 79-660-0010/A).
Avanti Set 3020/3015D User Guide (Cat.No. 79-620-0010/A).
Avanti Set 3000/3015 User Guide (Cat.No. 79-650-0010/A).
Quick Reference Guides
cise procedures for features used most often:
Avanti Set 3025 (Cat.No. 79-610-0001/A).
Avanti Set 3020 (Cat.No. 79-620-0001/A).
Avanti Set 3015D (Cat.No. 79-630-0001/A).
Avanti Set 3000/3015 (Cat.No. 79-650-0001/A).
1.7 CONVENTIONS
This section includes in formati on concerni ng co nventions appli cable throughout this manual.
1.7.1 Terminology conventions
“DIGITAL system” and “DIGITAL family of systems” refer to Tel-
rad’s DIGITAL KEY BX, DIGITAL 400 and DIGITAL 1000 sys-
tems.
are convenient cards that provide con-
1-3
Page 8

76-110-0165/G, Issue 1
1.7.2 Typographic conventions
Throughout this manual, the following typographic conventions
have been used:
• Text appearing on the telephone display is shown like this:
ADD ON, ENTER DN, MAIN 2.11, EX2 DAP;
• Keys to be pressed on the telephone set are shown like this:
[#], [PROGRAM], [4]+[2].
• Softkeys ar e shown like this:
{PROGRAM}, {TIME}.
When softkeys appear in various abbreviated forms on the different display sets, they wil l be referred to in th e following generi c format:
Press the
CALL FORWARD
softkey (i.e. no braces).
1-4
Page 9

THE AVANTI FAMILY TELEPHONE SETS
2.1 GENERAL
Section 2
The DIGITAL family of systems features five new Avanti family digital telephone sets and an Avanti Attendant console. This section describes the various proprietary sets and the different pri n ciples of operation for each set.
Table 2-1 contains a detailed comparison of the capabilities of the sets.
Table 2-1 Comparison of the A vanti family telephone sets
Comparison of
station capabilities
Display panel
Cursor movement
and ENTER keys
Fixed buttons 9 9 9 9 9 22
Dual-color
programmable
buttons
Softkeys 16 6 3 - - 16
Speakerphone Y Y Y Y N N
Offhook voice
announce with HFAB
Half/Full Duplex
option
On hook dialing Y Y Y Y Y Y
Data card options Y Y Y Y N Y
DSS Add-on unit
(option)
Graphic icons Y N N N N N
Avanti 3025
set
128x240
pixels
YNNNN Y
29 24 19 19 4 15
YY Y NN N
Full duplex
only
YYYYN Y
Avanti 3020
set
4 lines x 24
characters
Y Y N N Full duplex only
Avanti 301 5D
set
2 lines x 20
characters
Avanti 3015
set
- - 128x240 pixels
Avanti 3000
set
Avanti Attendant
console
2-1
Page 10
76-110-0165/G, Issue 1
2.2 THE AVANTI FAMILY TELEPHONE SETS
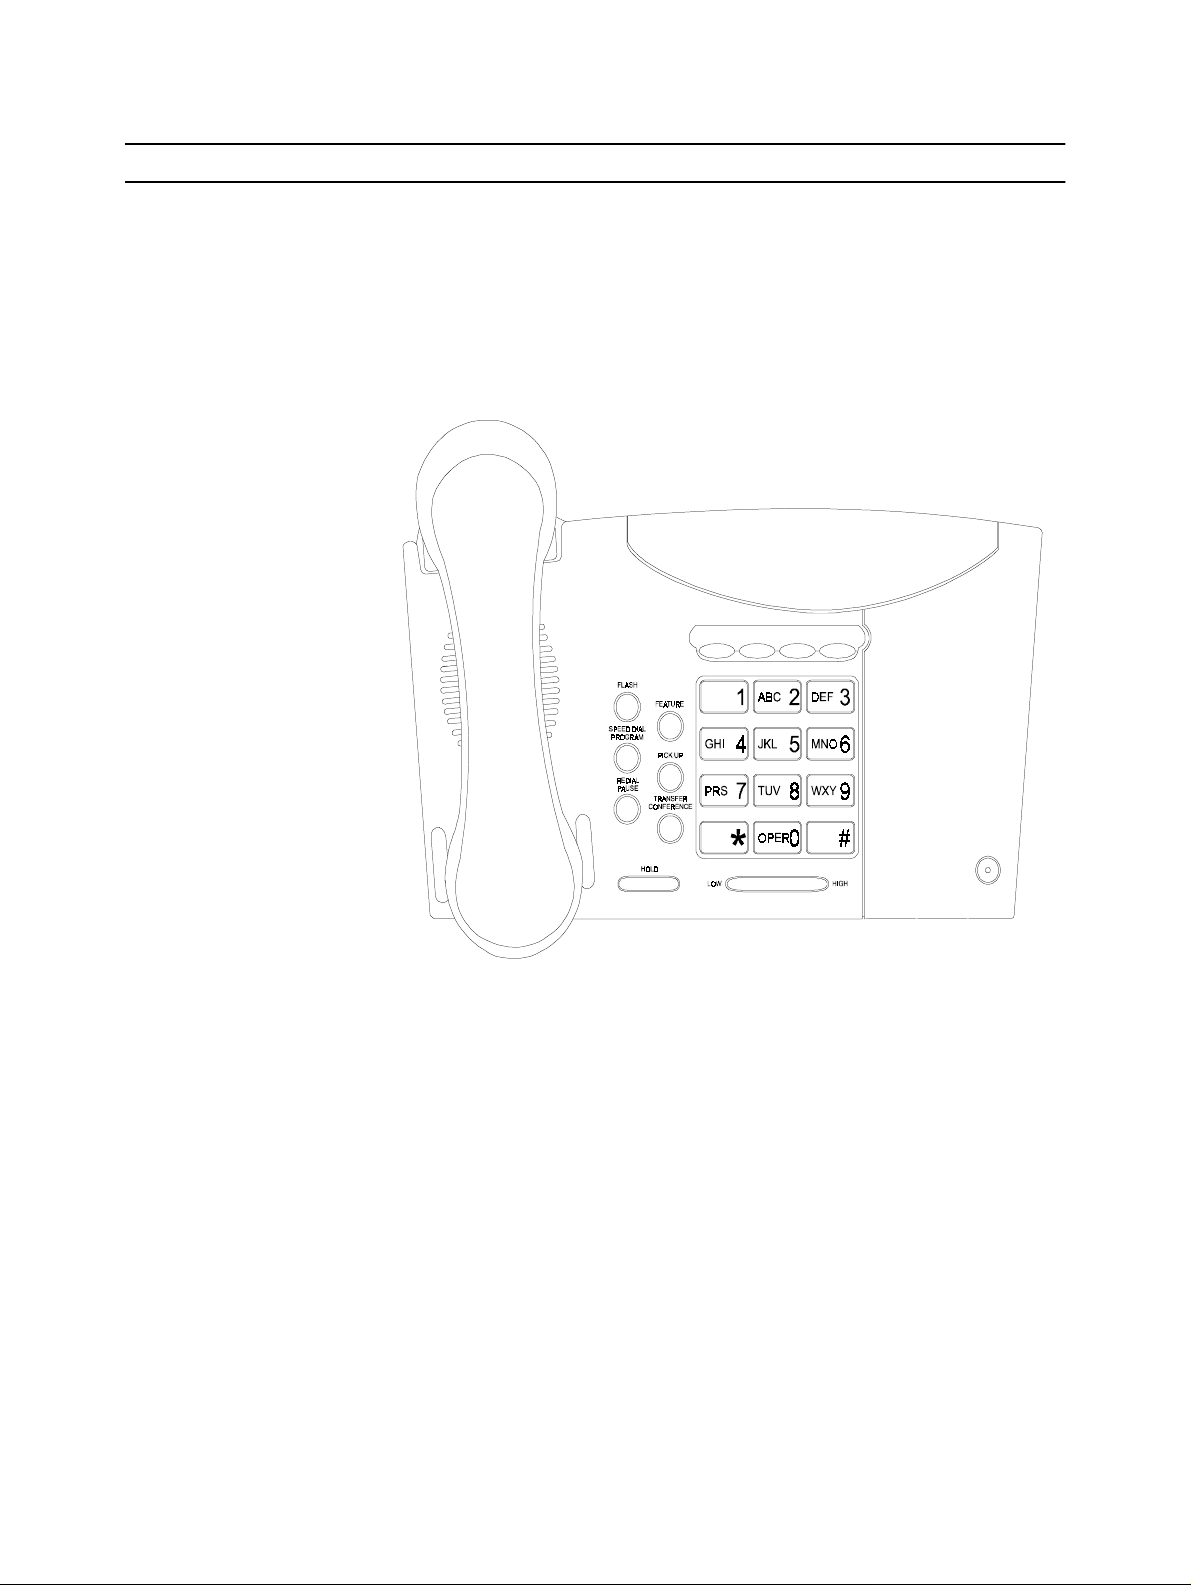
2.2.1 Avanti 3000 set
The Avanti 3000 set (see Figure 2-1) i s a Single Audio Path (SAP) tel ephone set, having the standard dialpad, eight adjacent fixed feat ure buttons and four programmable keys (default programmed). Most of the
features available in the DIGITAL family of systems can be operated
from the Avanti 3000 set, using these buttons.
2-2
Figure 2-1 Avanti 3000 set
Page 11
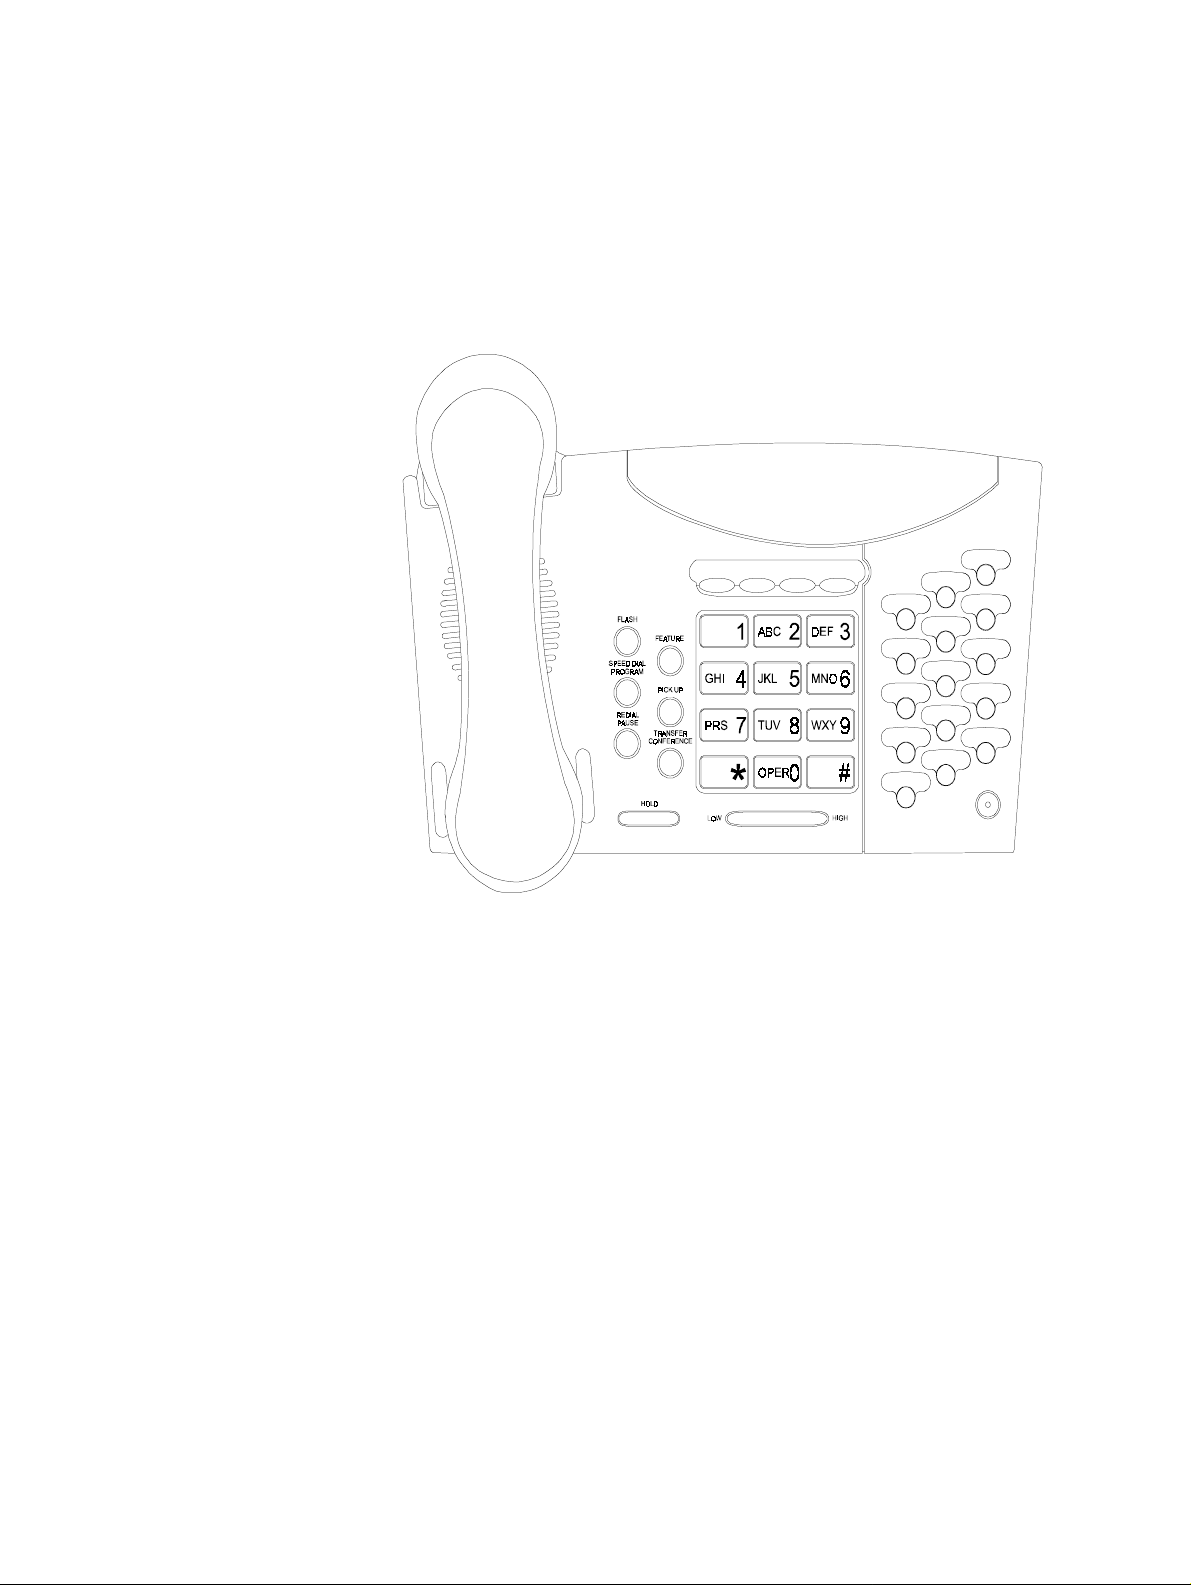
2.2.2 Avanti 3015 set
Section 2: THE AVANTI FAMILY TELEPHONE SETS
The Avanti 3015 set (see Figure 2-2) is similar to the Avanti 3000, but
provides speakerphone capability and an ad ditional progr ammable button array for programming up to 15 more buttons for accessing out side
lines, features and extensions. The Avanti 3015 can support a Telrad
DATA
Lync
or APP
Lync
data card or a DSS (Direct Station Select) Add-
on unit.
Figure 2-2 Avanti 3015 set
2-3
Page 12

76-110-0165/G, Issue 1
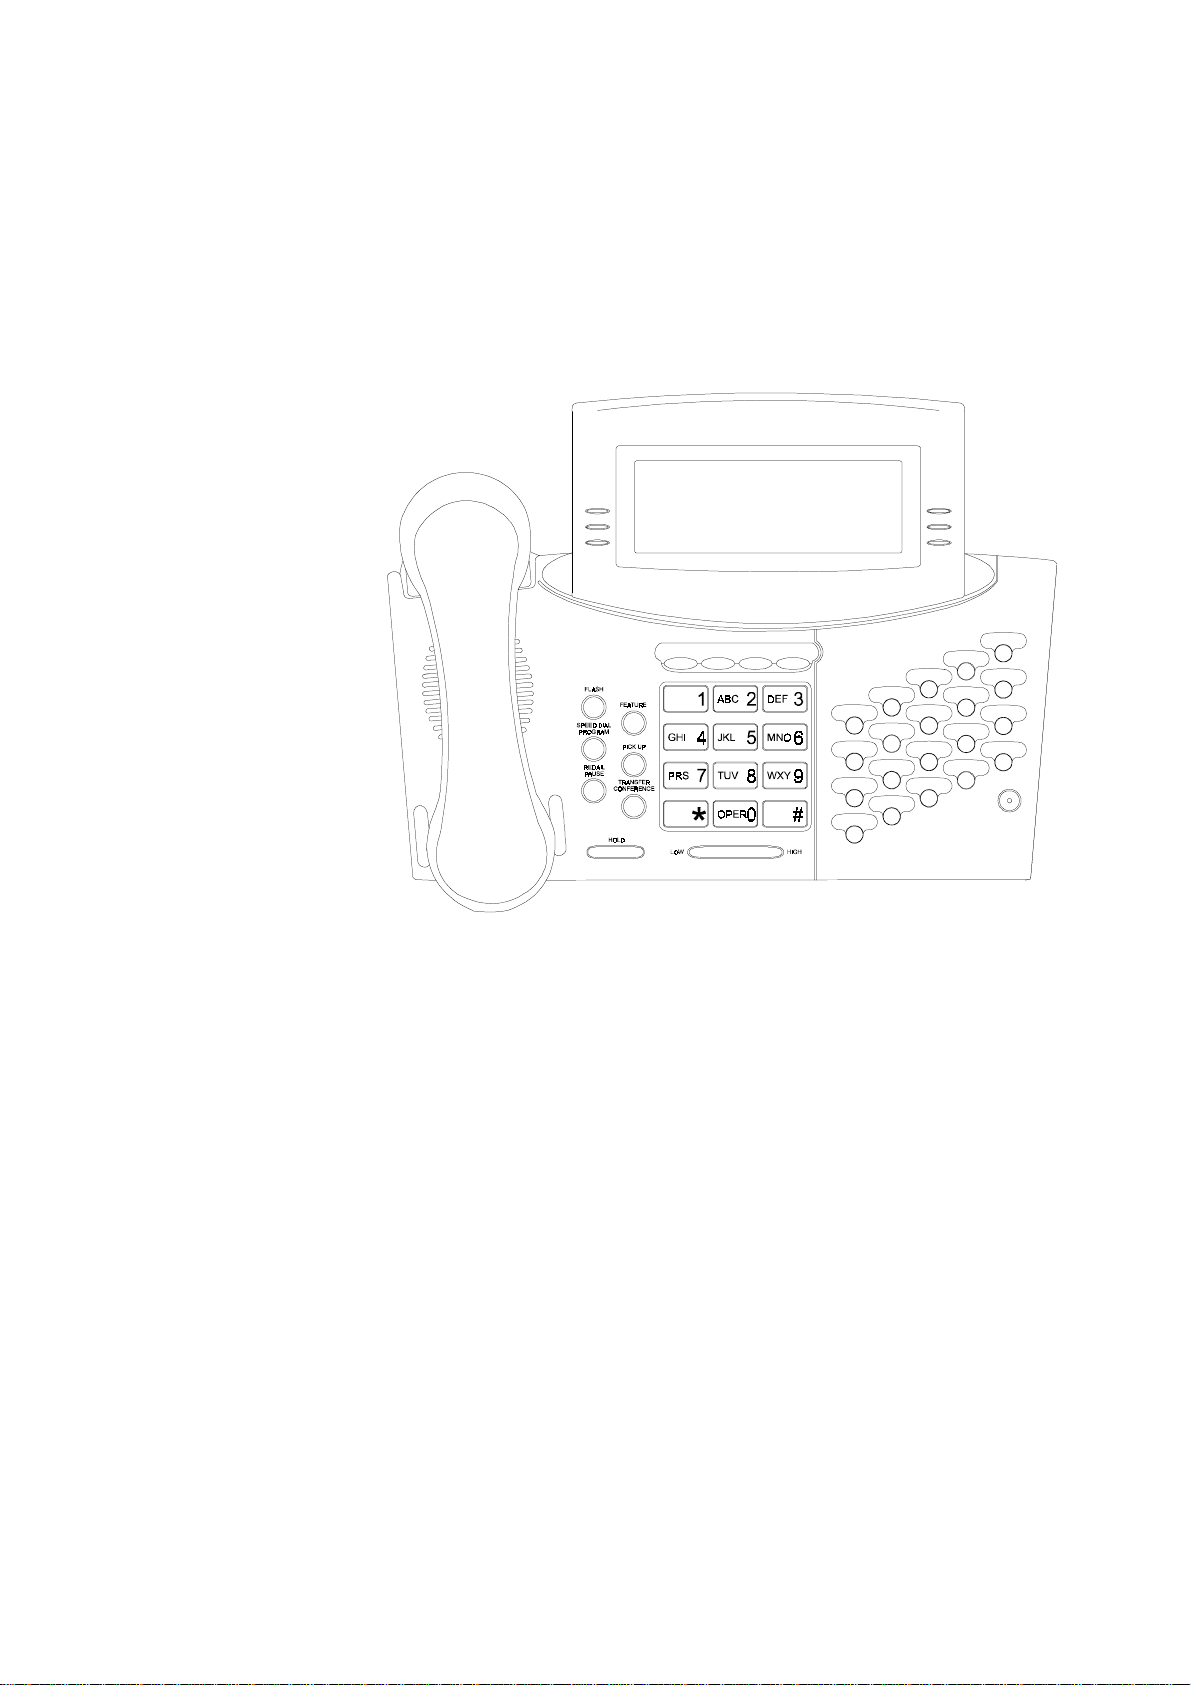
2.2.3 Avanti 3015D set
The Avanti 3015D (see Figure 2-3) set has dual audio path (DAP) and
speakerphone capability, a half- and full-duplex version and can be
programmed with OffHook Voice Announce (OHVA) with Handsfree
Answerback (HFAB). The set features a two-line by 20 character
display with three adjacent softkeys under t he displ ay and can sup port
a Telrad DATA
Lync
or APP
Lync
data card or a DSS Add-on unit.
2-4
Figure 2-3 Avanti 3015D set
Page 13
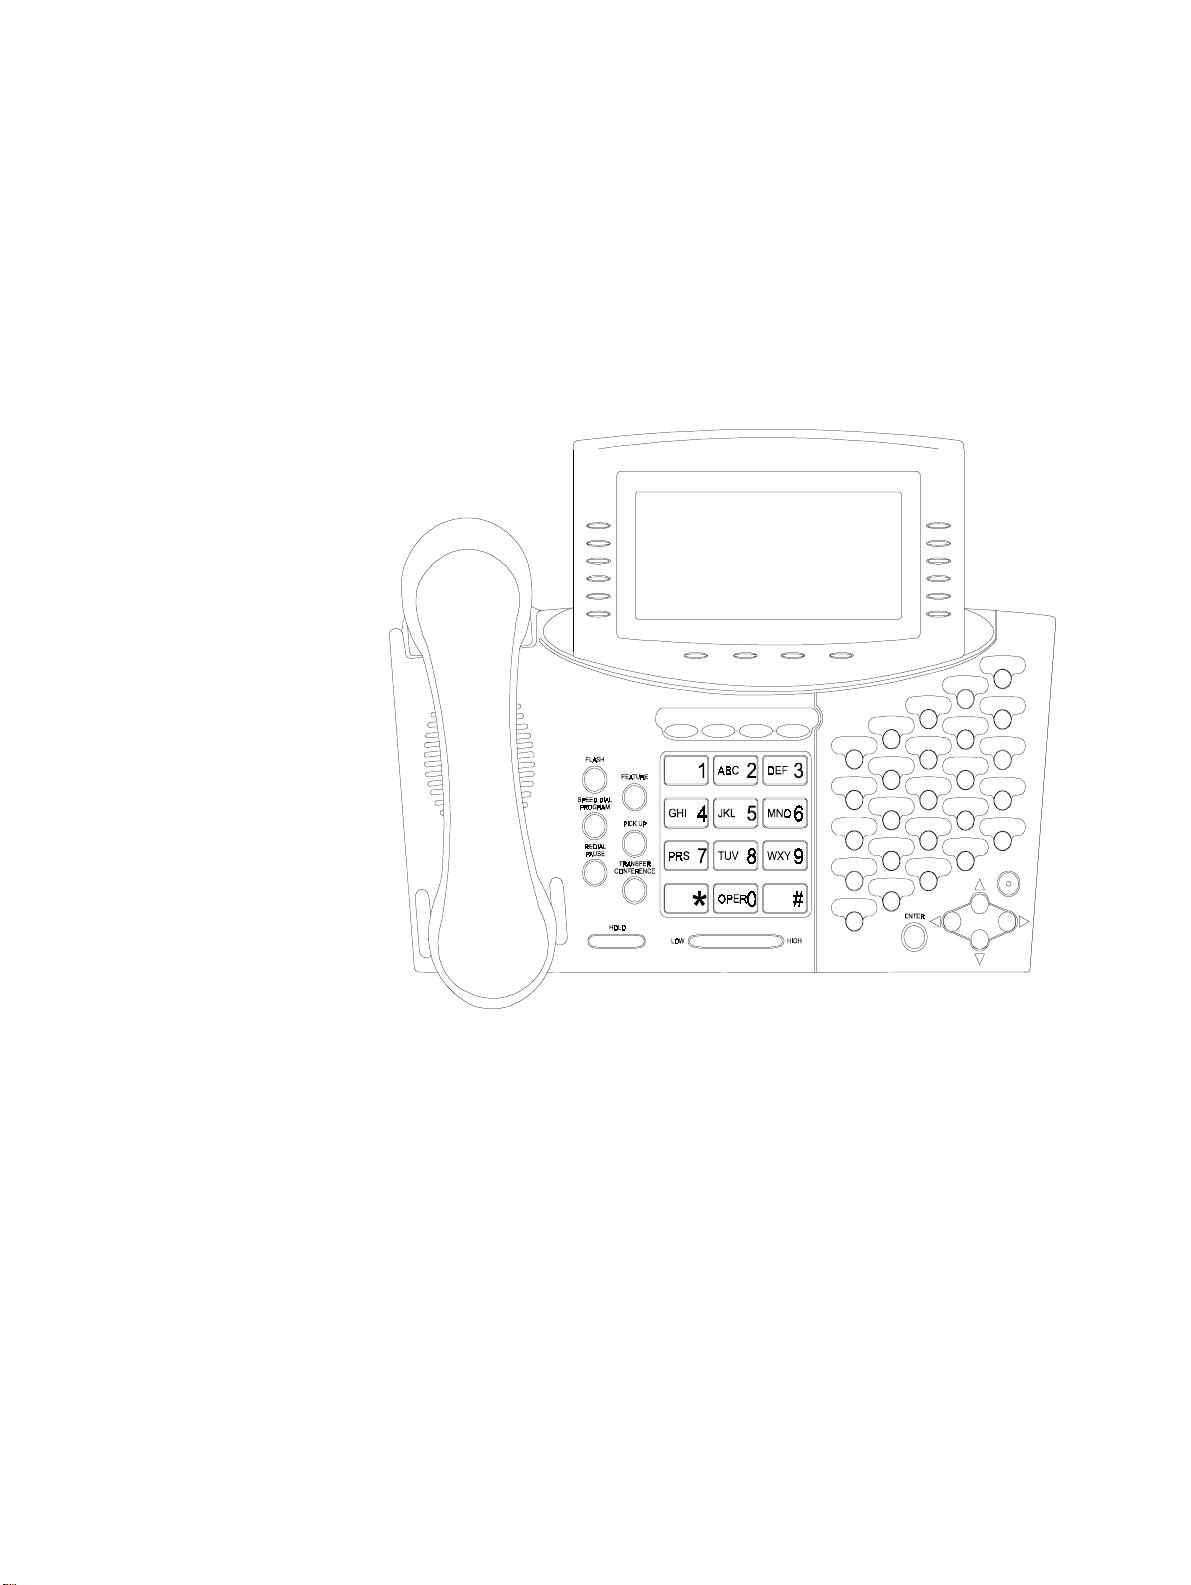
2.2.4 Avanti 3020 set
Section 2: THE AVANTI FAMILY TELEPHONE SETS
The Avanti 3020 set (see Figure 2-4) has dual audio path (DAP) and
speakerphone capability, a half- a nd full-duplex vers ion and can be programmed with Offhook Voice Announce (OHVA) with Handsfree An-
Lync
swerback (HFAB). The Avanti 3020 can suppor t a Telrad DATA
Lync
APP
data card, has a f our-line by 2 4-charact er displ ay and can be
or
provided with a DSS Add-on unit.
Figure 2-4 Avanti 3020 set
2-5
Page 14
76-110-0165/G, Issue 1
2.2.5 Avanti 3025 set
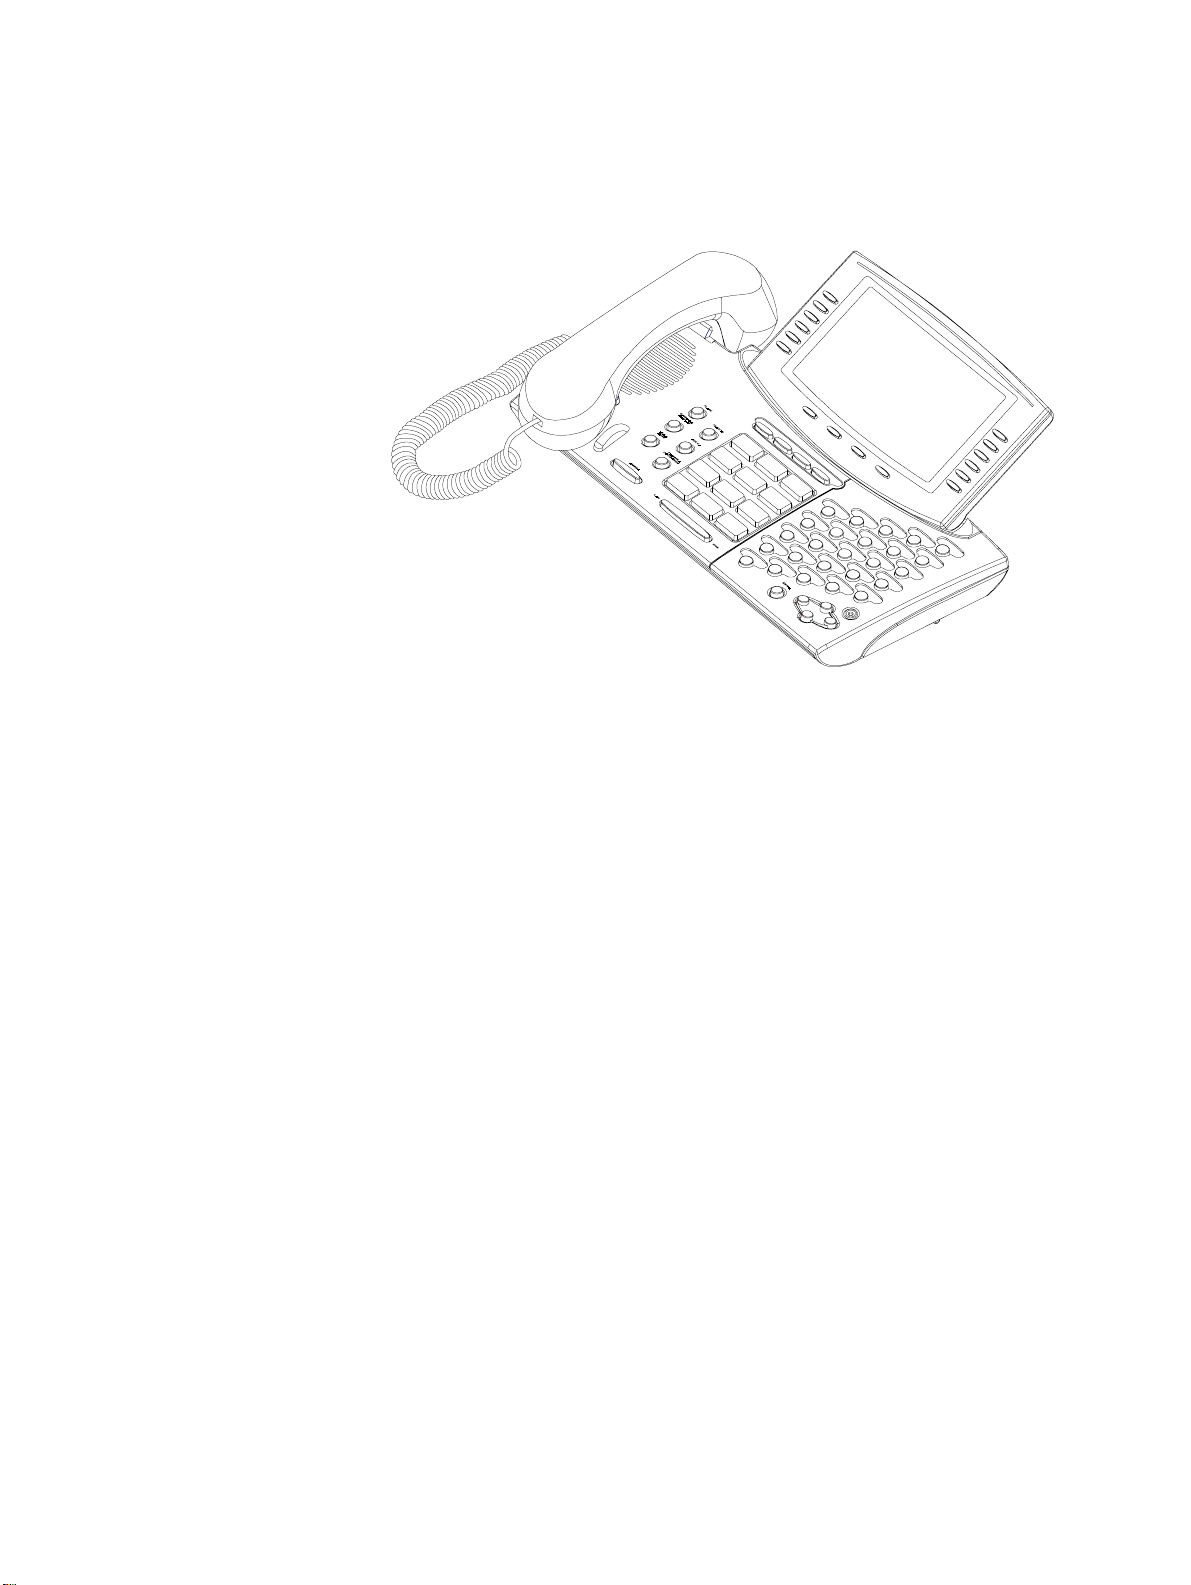
The Avanti 3025 set (see Figure 2-5) has
of
tal graphic display
softkeys and four icon softkeys at t he bottom of the displ ay. The se t
ble
128x240 pixels with six menu softkeys, six workta-
an
angle-adjustable liquid crys-
also features full duplex communication with dual audi o path (DAP) and
speakerphone capability and can be programmed to allow Offhook
Voice Announce with HandsFree AnswerBack (HFAB). It has 29 programmable buttons, directional buttons and an enter button, and can
support a Telrad DATA
Lync
or APP
Lync
data card for connection to a
PC. In addition, DSS Add-on units can be connected to this set.
2-6
Figure 2-5 Avanti 3025 set
Page 15
2.2.6 Avanti Attendant console
The Avanti Attendant consol e (ATC) ( Figure 2-6) is physi cally similar to
the Avanti 3025 set but functions differentl y, as detailed in Section 4.
Section 2: THE AVANTI FAMILY TELEPHONE SETS
Figure 2-6 Avanti Attendant
2-7
Page 16

76-110-0165/G, Issue 1
2.2.7 DSS Add-on unit
Most of the Avanti sets (excluding the Avanti 3000 set) can be configured with up to four DSS Add-on units (see Figure 2-7). Each unit pro-
vides 30 programmable buttons which are system programmed as
Speed dial, Direct Station Select (DSS) or Automatic Redial (ARD) buttons. These 30 buttons have dual-color LED i ndicators that enable them
to display extension stat us. The four LED buttons in the leftmost column
are used for selecting and identifying which of the four logical maps is
currently displayed. In this way, one unit can represent a combined total
of up to 120 buttons.
If four units are connected to one telephone set, all four maps can be
displayed simultaneously, enabling one touch access.
Up to eight physical Add-on units can be supported in the DIGITAL KEY
BX system, 16 in the DIGITAL 400 system or 48 in the DIGITAL 1000
system.
If eight logical maps are programmed (in the DIGITAL 400 syst em), the
MAP buttons can be programmed to represent either MAPs 1-4 or
MAPs 5-8.
2-8
Figure 2-7 DSS Add-on unit
Page 17

2.3 AVANTI SET BUTTONS
There can be up to three types of buttons on your Avanti set; fixed feature buttons, programmable buttons and softkeys.
The buttons have dual color (red/green) LED indicators. The me aning
of the colors and flash rates of the LEDs is explained in Table 2-3, be-
low.
2.3.1 Fixed feature buttons
The standard dialpad and adjacent fixed feature buttons are common
to all of the AVANTI telephone sets. The dialpad is the same familiar
dialpad found on most push-button telephones. The other common
fixed feature buttons are described below.
Section 2: THE AVANTI FAMILY TELEPHONE SETS
NOTE
If your telephone is in a Multiple Station Appearance (MSA) group, some of its buttons behave
differently than described here. To understand
the differences, read the section on Multiple Station Appearance, before proceeding (see Section
3.25, in the Release 6 Operating Instructions).
The nine fixed feature buttons adjacent to the dialpad are:
• [FEATURE] - Pressed prior to dial ing feature codes, for activating
features (see Section 2.6);
• [PICK UP] - Used to pick up calls ringing or on hold at other extensions;
• [TRANSFER/CONFERENCE] - Used to trans fer calls to ano ther extension, or to establish a conference;
• [SPEED DIAL/ PROGRAM] - Used to stor e and dial speed dial num-
bers, or, after pressing [FEATURE], to initiate a programming session (e.g. alarm, DND message, etc.);
• [REDIAL PAUSE] - Used to redial the last number dialed out, or to
insert pauses in a dialing sequence;
• [FLASH] - Depending o n system programming, this bu tton is used to
disconnect or to send Flash Signal to the connected remote exchange;
• [LO HI] (actually two buttons) - Used to change the volume level
of the speaker, handset, headset , tones, page calls, and background
music. You press these buttons while the current feature is active.
When your telephone is idle, the [LO HI] button is used to adjust
the display contrast on display sets;
• [HOLD] - Used to put an act ive conv ersa tion on ho ld i n order to p ursue another activity (e.g. placing calls, programming, etc.).
2.3.2 Programmable buttons
Some of the buttons on your set are programmed in the system configuration for a particular purpose. A programmable button may be as-
2-9
Page 18

76-110-0165/G, Issue 1
signed a particular feature (e.g. outside line, message) or may be
defined as a user-programmable button (e. g. speed dial or memory bu tton). System programmed MEMORY and SPEED DIAL butto ns may be
assigned values by each user. For example, a user can store an extension number into a system programmed MEMORY button.
The four buttons directly above the dialpad of all digital set models are
programmable in the system configuration, like any of the other programmable button types described in thi s section. By defaul t, however,
they are used for the following features:
• [MSG] Message butt on - for activating the message feature;
• [DND] Do Not Dist urb butt on - for the Do Not Disturb (DND) feature,
DND message programming and Call forward;
• [MUTE] button - for activating and de activating th e telephone set mi-
crophone;
• [SPKR] Speaker button - for answering and disconnecting calls or
getting dial tone without lifting your handset.
Typical system-programmed buttons:
• [MEM]
Memory buttons
A user can program a defined MEMORY
button with a valid extensi on Directory Number ( DN) or feature code,
to enable calling an extension or activating a feature j ust by pressing
the button, without dialing the indi vidual digits. The LED indic ator on
the MEMORY button indicates the current activity of the extension or
feature to which it is assigned, by flashing gr een or red at a specifi ed
rate.
• [SPD] Speed dial buttons - A user can store numbers of up to 16 digits in a system-defined Speed Dial button. SPD buttons are usually
used for storing outside numbers. Other strings, including outside
line/outside line group numbers, extension numbers, feature codes ,
etc. may also be programmed on a SPD button, but (unlike MEMORY buttons) the validity of t he string will not be checked and no sta tus
LED indication will be given.
• [TK] Outside line butt ons - An outside line is assigned to th is button.
When you press it, you will be connected to the designated outside
line (if available), or answer an inco ming call on that line if it is ringing. The button's LED indicator shows the availability of the outside
line by flashing green if in use at your set or red if busy elsewhere.
• [TG] Outside line group button - A group of outside lines are assigned to this button. When you press an outside line group button,
an available line from the group is automatically selected.
• [FL] Floating button - A floating button is used to represent an outside line from within an outside line group, making the outside line
group button available for other outside line activi ty. Similarly, a floating button can represent a half-pri vate or private outside line . The FL
2-10
Page 19

Section 2: THE AVANTI FAMILY TELEPHONE SETS
button provides a temporary "appearance" (a LED button for representing the state of an outside line) for the partic ular outside line. The
allocation of a FL button can occur automatically or be assigned
manually.
Once an FL button has been associated with a pa rticular member of
an outside line group, the outside line group button remains free for
dialing out, receiving another incoming call or for answering an outside line transferred to your se t, fo r whi ch you have no ap pearan ce.
As any appearance for an outside line, the f loating button shows th e
current state of the outside line via the LED indicator, and enables
easy pickup by pressing the button. A floating button may also be
used to represent a private outside line which has no appearance at
your set.
• [LCR] Least Cost Routi ng button used to have your call routed v ia the least expensive line avail able to
the system at the time of your call.
• [P→T] Tone dial button - T he Tone dial button (Pulse to Tone) allows
the user to switch to DTMF dialing on a pulse outside line.
• List of button options - For a full list of buttons which may be programmed on your system, see the Administration manual.
The Least Cost Routing button is
2.3.3 Softkeys
The Avanti models 3025, 3020, 3015D telephones have varying numbers of softkeys, as detailed above.
Softkeys are buttons whose function changes depending on the situation of the call in progress. The softkey's current func tion is displayed in
the display, next to the softkey. To operate the displayed function you
just press the softkey.
On the Avanti 3025, the top five of the six buttons on the upper righthand side are "worktable softkeys" which represent outside lines currently on hold, in use, or recalling the extension. The corresponding buttons on the left are "menu softkeys" used for activati ng features. The
last button in each column and the f our buttons at the bottom of t he display are for icon activated features, See Section 2.3.5.
NOTES
Watch the icons and worktable softkey menu
carefully during call processin g. The function represented by a particular key can change readily.
The Attendant Console also feat ures 10 softkeys
which are used somewhat differently than described above.
For details, see Section 4, below.
2.3.4 Avanti 3025/3020 set default buttons
The Avanti 3025 and 3020 sets have 25 or 20 programmable buttons
(respectively) to the right of the dialpad. These are also programmab le
but some are default programmed, as follows:
2-11
Page 20

76-110-0165/G, Issue 1
• [CA AL] - for activat ing Call Forward No Answer for all calls , internal
calls or external calls;
• [CY AL] - for activating Call Forward Busy for all calls, internal calls
or external calls;
• [TIME] - for setting the alarm time at your te lephone set (and f or set-
ting the system time, if you are designated as the time sett ing extension);
• [CB/QUE] - for enteri ng a Callback Queue when the outside li ne (or
outside line group) dial ed is busy or for requesting ex tension callback
from a busy extension;
• [SAVE/RPT] - used to save the number currently dialed, redial the
number saved in memory and save a programmed entry;
• [MR1] - [MR24] - Memory buttons 1 through 24 (see also Section
2.3.2.
2.3.5 Avanti 3025 Icon softkeys
Graphic icons are the new feature of the Avanti 3025 (and Attendant)
set. When you move the cursor to an icon (using the four-direction cursor movement key) an explanation of that icon’s func tion briefly appears
on the display.
Icons indicating the status of your station appear on the second line of
the screen and are for display only.
Icons indicating the status of a specific call appear on the ri ght hand
side of the display, next to the name or number of the trunk or extension.
They are activated by pressing the appropriate softk ey on the right hand
side of the display.
Icons for use in activating or programming features appear on the bottom line of the display and are activated by pressing the bottom left
hand softkey, the bottom r ight hand soft key, or the four softkeys across
the bottom of the display - or by using the four direction cursor movement key to place the cursor on the appropriate icon and pressing ENTER.
The following list explains the meanings of the icons and when and
where they appear on the display.
Icon Meaning When you see it
Ring Your set is ringing for an external
call. The icon appears on the
right side of the display, next to
the name or number of the
outside line.
In use The line is in use. Appears on the
right side of the display, next to
the name or number of the
outside line.
2-12
Page 21

Section 2: THE AVANTI FAMILY TELEPHONE SETS
Icon Meaning When you see it
Hold The call is on hold. Appears on
the right side of the display, next
to the name or number of the line
on hold.
Transfer You have transferred a call to
another extension. Appears on
the right side of the display, next
to the name or number of the line
on which the transferred call was
made.
Background
music
DND Your set is in Do Not Disturb
Alarm The alarm is set to ring on your
Recall/Trunk
queue
You are listening to background
music. Appears on the 2nd line.
mode. Appears on the 2nd line.
set. Appears on the 2nd line.
Your set is ringing for a call that
you left on hold or for a previously
busy outside line that you
requested. Appears on the right
side of the display, next to the
name or number of the line or
extension.
Program Appears on the bottom line.
Press to program phone book,
speed dial, DND message, ECC
code, or time alarm.
Exit Appears on the bottom line.
When engaged in a conference
call, press to exit the conference.
When in programming mode,
press to exit.
Message Appears on the bottom line.
Press to send a message, reply
to a message, or cancel
messages.
Drop/Cancel Appears on the bottom line.
Press to drop a party from a
conference call or to cancel call
forward.
Save or Send. Appears on the bottom line.
Press to save programming or to
indicate you have finished dialing
a number on an ISDN line.
Call forward
(cancel)
Appears on the bottom line, after
pressing
cancel call forwarding.
{CANCEL}
. Press to
2-13
Page 22

76-110-0165/G, Issue 1
Icon Meaning When you see it
If you have IMAGEN, you may also see the various icons on your display like the ones shown bel ow. See t he IMAGEN user guide for an explanation of how to use these and other icons that appear while using
IMAGEN.
Icon Meaning
Next page When programming any feature
that uses more than one page of
your display (Message, DND
message, Phone Book), press to
scroll to the next page.
Time Appears on the bottom line, after
Pause
Previous menu
Visual list
pressing
Press to program the time alarm.
Appears on th e bottom line.
Pressing this button while dialing on an external line inserts a
pause in a dialing s equence.
.
2.4 DISPLAYS
The AVANTI family telephone displays show the current time and date
when in idle state. The Avanti 3025 set also show the set's Directory
Number (DN). When the set is active, the display provides current status information (such as elapsed call time, calling extensions and outside lines, features being used, status in a programming sequence,
etc.). The display can also show the total call cost (if programmed), at
the end of the conversation.
The display indicates the type of call cur rently active in the set , such as
onhook voice announce calls (Page and Handsfree Answerback),
transferred calls, etc.
There are three types of displays. The Avanti 3015D has a two line by
20 character LCD displa y at the top of the set. The Ava nti 30 20 set has
a four line by 24 character LCD displa y. The Avanti 3025 set a nd Attendant console have a 128 x 240 pixel graphic disp lay. The t op li ne is for
time, date and station DN; the next five li nes are used for t ext softk eys;
the bottom line is used for graphic icon softkeys.
Repeat current menu
Record a message
2-14
Page 23

2.5 THE FEATURE BUTTON
Although most features may be activated by pressing a dedicated button (e.g. [MSG], [SPEED DIAL/ PROGRAM], etc.), almost all system
features may be activated from any telephone set by pressing [FEA-
TURE] and dialing the appr opriate feat ure code. This enables set s with
fewer programmable buttons, to activate many features.
2.6 CODE ACTIVATION OF FEATURES
There are two ways to activate features with dialing:
• By dialing a feature code;
• By pressing the [FEATURE] button and dialing a feature code.
Single line telephones, which do not have a [FEATURE] button, simulate pressing the [FEATURE] button by dialing a code (default: 7).
2.6.1 Default values
Certain features have a single digit default code. These include:
Feature 7
Dial Attendant 0
Tone 1
All/Group *
Cancel #
Section 2: THE AVANTI FAMILY TELEPHONE SETS
Other features are accessed by pressing [FEATURE] or dialing the
FEATURE access code, whose default value is 7, followed by the desired feature code.
The default codes for the station features were planned according to a
scheme whereby a two digit code represents each feature.
For example: TIME ALARM=[T] [A] = [8][2].
Table 2-2 lists the default codes for the various DIGITAL system fea-
tures.
NOTE
The codes listed below are default values and
can be changed via system administration. See
the Administration manual for more information.
2-15
Page 24

76-110-0165/G, Issue 1
Table 2-2 Feature codes
Feature name Access method Abbreviation
ACCOUNT CODE
ACD LOGIN
ACD LOGOUT
ALL/GROUP
ATTENDANT
BACKGROUND MUSIC 1
BACKGROUND MUSIC 2-4 (2-8 in S400)
BARGE IN
CALL ACC. MONITOR
CALLBACK/QUEUE
CALL FORWARD-(ALWAYS)
CALL FORWARD-BUSY
CALL FORWARD-NO ANSWER
CANCEL
CLIR
(1)(2)
CONFERENCE LOOP No. 1-10
DIRECTORY 1 THROUGH 10
DROP FROM CONFERENCE
END OF DIALING/SEND
EXECUTIVE CREDIT CODE
FEATURE
FLASH SIGNAL
FLIP FLOP
GROUP PICKUP
INTRUSION
LAST HOLD
LEAST COST ROUTING
LOCK (1)
MEET ME CONFERENCE 1-5
MEET ME PAGE
MESSAGE
NIGHT SERVICE
PAGE - INTERNAL 1 through 8
PAGE - EXTERNAL 1 through 8
PHONE BOOK PRIVATE LIST
PHONE BOOK: LIST 1-10
PICKUP
PROGRAM
REDIAL
SAVE/REPEAT
SPEED DIAL
TIME ALARM
TONE
TONE DIAL (DTMF)
TRAVEL COS
(1)
TRUNK PATCH
TRUNK SPEED DIAL
VOICE MESSAGE
(1) Access method not assigned by default.
(2) Only available on ISDN PRI calls
(1)
(1)
(1)
(1)
(1)
(1)
(1)
(1)
(1)
(1)
(1)
(1)
(1)
[FEATURE][2][8] AT
--
-[*] [0] [FEATURE][2][6] BM
-[FEATURE][2][4] BI
-[FEATURE][2][2] CB
[FEATURE][3][5] FL
[FEATURE][3][2] FB
[FEATURE][3][6] FN
[#] -
--
--
--
-[FEATURE][#] [FEATURE][3][9] EX
[7] [FEATURE][3][7] FS
[FEATURE][3][3] FF
-[6] [FEATURE][5][4] LH
--
--
-[FEATURE][6][6] MM
[FEATURE][6][3] ME
-[FEATURE][4][1] to [4][8] I1
-X1
through
through
I8
X8
[FEATURE][7][1] [FE ATUR E][7][2 ][0 ] to [7 ][2 ][9]
[FEATURE][7][ 8] PU
[FEATURE][7][ 6] PM
[FEATURE][7][ 5] RL
[FEATURE][7][ 7] SR
[FEATURE][7][3] SD
[FEATURE][8][2] TA
[1] -
--
-[FEATURE][8][7] TP
--
--
2-16
Page 25

Section 2: THE AVANTI FAMILY TELEPHONE SETS
2.7 VISUAL AND AUDIBLE INDICATORS
Your Avanti set provides you with pertinen t audi o and visual feedback.
The set issues various types of rings and tones to inform you of the
progress of a call. The LED button i ndicators provide you with st atus indications for their respecti ve buttons by change of color (red, green) and
distinctive flashing rates.
As a rule, a lit LED indicates t hat the associ ated featur e is activ e (off indicating inactive).
Regarding outside lines, a lit red LED indicates non-availability (for example, a busy line), whereas a lit green LED indicates that the feature
or line associated is either available or in use from your telephone set.
Sets provide useful informat ion on the st atus of a cal l, out side l ine, p rogramming sequence, etc. via messages on the display.
The LED flashing rates and colors are listed in Table 2-3, below.
Table 2-3 Visual indicator flashing rates and colors
Button type Color Flashing rate (seconds) Meaning
Outside line or
Outside line group
Green 1.0 ON 1.0 OFF Incoming ring
Green Steady In use
Feature
DSS
Green 0.5 ON 0.5 OFF Call on hold (by you) can be retrieved
Green 0.25 ON 0.25 OFF Recall or transfer
Red Steady ON Outside line busy or outside line group busy
OFF OFF Idle
Green 0.5 ON 0.5 OFF
(e.g. CALL RECORD)
Green ON (e.g. BGM) Active
OFF OFF Inactive
Red 1.0 ON 1.0 OFF Ringing
Red Steady ON In use by someone else (not available to you)
0.5 ON 0.5 OFF On hold by someone else (retrievable using
Red 0.5 ON 0.5 OFF DND active
OFF OFF Idle
Feature flash
Pickup-hold)
2-17
Page 26

76-110-0165/G, Issue 1
The DIGITAL system also sends dist inctive call progress tones to help
the user identify the current status of the extension dialed or the result
of an action performed.
Table 2-4, below, lists the DIGITAL system distinctive tones and rings.
Table 2-4 Tone and ring indications
Name Rate (seconds)
Tones
Rings
Account code tone One beep (0.25 ON) every 40 seconds prior to initiating code
Barge-in tone
(override tone)
Busy tone 0.5 ON 0.5 OFF
Camp-on/Offhook tone 0.25 ON 0.25 OFF 0.25 ON
Dial tone Steady
External ring tone 1.0 ON, 3.0 OFF,
Call forward tone
Handsfree tone (begin) 0.5 ON
Handsfree tone (end) 0.5 ON
Internal ring tone 0.5 ON, 0.25 OFF
Message tone (0.5 ON 0.5 OFF) twice, then dial tone
One beep 0.25 ON
Paging (begin) 0.5 ON 0.25 OFF 0.5 ON then begin page
Paging (end) 0.5 ON 0.25 OFF 0.5 ON then paging is disconnected
Retry tone 3-4 beeps (0.25 ON, 0.25 OFF), then dial tone
Alarm ring Steady ON (15 sec)
entry. One beep every 25 seconds if code entry process was
initiated, but not completed.
One beep (0.25 ON) at a programmabl e interval (1 - 59 s econds).
Default=10 seconds
Three bursts of 0.25 ON 0.25 OFF then dial tone
0.5 ON, 2.0 OFF
2-18
External ring 1.0 ON3.0 OFF
Internal ring 0.4 ON, 0.2 OFF,
0.4 ON, 2.0 OFF
Recall (offhook) 0.5 ON 4.0 OFF
Recall (onhook) 0.5 ON 2.0 OFF
Trunk queue 0.5 ON 0.5 OFF
Page 27

2.8 HOT DIAL PA D
Hot dialpad means that you need not l ift your hand set or p ress [SPKR]
in order to dial a number or activate certain features.
For example, from the idle (onhook) stat e, you can dial extension 21 just
by pressing [2][1] on the dialpad, or pick up a call without first having to
lift the handset or press the [SPKR] button.
The "hot dialpad" feature can be deactivated for a part icular telephone
set via system administration, if desired.
When hot dialpad is deactivated, it becomes necessary to lift the handset or press [SPKR] before dialing.
2.9 HANDSFREE OPERATION
Even if your telephone set is not programmed with a "hot dialpad",
handsfree operation is automatically activat ed when you press certain
buttons. This means that you need not l ift your handset before p ressing
any of the following buttons:
[SPKR] to obtain internal dial tone;
Section 2: THE AVANTI FAMILY TELEPHONE SETS
[MEM] for one-touch dialing a Handsfree Answerbac k (HFAB) call to
another extension or activating a programmed feature code ;
[SPEED DIAL] for dialing an outside number;
[TONE] to place a ringing intercom call to an extension;
[TK] to select a private outside line;
[TG] to select an outside line from a group;
[LCR] to place a call via Least Cost Routing.
2.10 PREFERRED LINE
An extension may be programmed with a "preferr ed line". Suc h a set i s
connected to a programmed outside line (or outside line grou p) immediately upon lifting the handset or pressin g [SPKR]. This feature is in-
tended for extensions which make frequent outside calls. A station
programmed with preferred line requires an [ICM] ("intercom") button
which must be pressed to receive internal dial tone, which is required
when performing any activity other than placing an outside call.
2-19
Page 28
Section 3
AVANTI FAMILY SETS
OPERATING INSTRUCTIONS
3.1 GENERAL
This section provides detailed instru ctions for the operation
of the Telrad AVANTI family telephone sets.
3.2 ALTERNATIVE ACTIONS AND ASSUMPTIONS
This section provides the basic alternative actions and assumptions applicable for operating instructions.
3.2.1 Alternative actions
The following table provides alternative methods of using
your telephone set.
Table 3-1 Alternative actions
Instead of: You can:
Pressing [
Using hot dialpad Press [
Pressing
function code
Dialing the directory number (DN) of an
extension
Pressing an outside line or outside line
group button
Accessing an outside line and then dialing a speed dial number
SPKR
] Lift the handset.
[FEATURE]
and dialing a
SPKR
] or lift the handset before
starting any action
Press a programmed memory button
Press a programmed memory button
Dial an outside line or outside line group
code
Include the outside line access code in the
speed dial number
3.2.2 Basic assumptions
The instructions contained in this section assume the follo wing:
• Your set is default-programmed with a hot dialpad;
• Your set is not programmed with a preferred line;
• If your extension is programmed with a Prefer red Line
(see Section 3.8, below), you will have to press the ICM
(intercom) button before performing any operat ion that requires internal dial tone;
• You use handsfree operation wheneve r possi ble. If you
don't have a hot dialpad or choose not to use handsfree
operation, then either lift your handset or pre ss the
[SPKR] button before you begin a procedure;
3-1
Page 29

76-110-0165/G, Issue 1
• The feature codes indicat ed in the text (see Table 2-2 above) are de-
• The telephones connected to your system may be programmed to
• Button designations are generally in capital letters, or icons as they
3.3 BASIC OPERATION
This section describes the basic telephone set operat ions.
faults. They may be programmed dif ferently i n your syste m. If t his is
the case, ask your System Administr ator for an updated list of access
codes;
operate in Key mode or PBX mode;
Key mode refers to the standard operating mode whereas PBX
mode refers to the Multiple Station Appearance (MSA) mode of op-
eration. The consequences of being de fined in a Multi ple Station Appearance group is described in more detail in Section 3.27 , below,
which you may wish to consult before reading the operation procedure for a particular feature;
appear on the digital telephone sets (e.g. [FLASH]).
3.3.1 Internal dial tone
3.3.2 External dial tone
To get internal dial tone
• Lift handset or pre ss [SPKR].
NOTE
1. If your telephone is programmed with a preferred line, you must press [ICM] to get internal
dial tone.
2. If you are working with a headset, press the
[HS] button to get internal dial tone.
To get an outside line
• Press an outside line button ([TK]) or outside line group button
([TG]) or Least Cost Routing button ([LCR]) or dial the appropriate
access code for one of the above.
NOTE
If you have a preferred line or an outside line access code is programmed in the speed dial stri ng
you are currently using, you do not have to access an outside line as stated above.
3.3.3 Speakerphone
3-2
A high quality speakerphone is prov ided on th e 3025, 3020 and 30 15D
sets.
The speakerphone allows you to conduct a conversation without lifting
the handset.
Page 30

Section 3: AVANTI FAMILY SETS OPERATING INSTRUCTIONS
To convert a handset conversation to a handsfree call
1. Press [SPKR].
2. Replace the handset.
You may now speak handsfree to the other extension.
3.3.4 Keeping your calls private (Mute)
There are several ways to prevent the other party from hearing you
while you are on a call.
During speakerphone calls:
The [MUTE] button operates in toggle fashion: pressed once, the station microphone is disconnected. Pressed a second time, it is connected again.
In a HandsFree AnswerBack (HFAB) conversation, the called party
speaks with you via your set's microphone and speaker (handset remains in its cra dl e).
When an HFAB call arrives at your set, the callin g party can hear what
is going on in the vicinity of the set, via the station microphone. If your
set has the Dual Audio Path (DAP) option, the calling party can speak
and listen even when you are on another call via your handset.
3.3.5 Handset mute
To disable your microphone
•Press [MUTE].
-The [MUTE] indicator goes on.
- Now, when an HFAB call arrives at your set, you will be able to
hear the calling party, but the caller cannot hear you.
To speak to the calling party again
•Press [MUTE] again to make your microphone active.
When you finish your conversation, your set will return to the mute status automatically and the [MUTE] button indicator will go on.
Avanti 3025, 3020 and 3015D sets can use the mute feature to consult
privately during speakerphone handsfree calls.
When mute is activated before you initiate a speakerphone cal l, the
mute state will be temporarily deactivated. When you terminate your
call, the mute function will automatically resume operation.
The mute function is automatically activated when a page announcement is received at your s et. Mut e cannot be canc ele d duri ng the page.
To facilitate privacy on handset calls, your System Administrator can
program a separate handset mute button ([HS MUTE]). Pressing the
[HS MUTE] button during a handset call disconnects the handset microphone. Pressing the button a second time reactivates the microphone.
Once you finish the current call, the handset microphone will automatically be active again, even if the most recent operation deactivated it.
3-3
Page 31

76-110-0165/G, Issue 1
3.3.6 Allowing others to hear your call (Speaker Monitor)
This feature is used to enab le other people in the room to hear your conversation, while you are usin g th e hands et. When t he feat ure is activa ted, the people listening in will hear the ot her party via the set speaker.
The set microphone will remain inactive.
To activate speaker monitor during a regular handset call
All Avanti sets
3.3.7 Distinctive ringing
•Press [FEATURE] and then [SPKR].
- [SPKR] button indicator turns on.
- Other party is heard via the speaker.
To deactivate speaker monitor
•Press [SPKR].
To renew speaker monitor operation
•Press [FEATURE] and then [SPKR] again.
To change back to a regular speakerphone call
• Place handset on cradle.
To adjust the speaker volume
• Press the [LO HI] button, as necessary.
If the handset is lifted again during a speakerphone call, regular
handset operation is initiated.
You can program telephone sets (digi tal sets only) located close to each
other with distinctive rings, to enable you to ident if y which tel ephone is
ringing. Nine different rings are available.
3-4
All Avanti sets
To change the ring for your telephone set
1. Press [
] and [#] simultaneously.
*
NOTE
If you have the Voice Dialing option installed,
{Selective Ringing}
press
.
2. Press one of the dialpad buttons ([1] to [9]).
When you hear the ring you want:
3. For Avanti 3025 and 3020 sets, press
{SAVE}
.
For any other sets, press [#].
4. Lift and replace the handset.
Your telephone set reinitializes and all telephone rings (internal,
external, recall, etc.) sound with the distinctive ring selected.
Page 32

Section 3: AVANTI FAMILY SETS OPERATING INSTRUCTIONS
3.4 INTERNAL CALLS
Your extension can ring another extension directly.
3.4.1 Making an internal ringing call
NOTES
If your extension is programmed with a Preferred
line (see Section 3.8 , below), you must press
[ICM] before you can dial another extension.
For calling an extension in a networked DIGI TAL
system, see Section 6.4 .
You can activate the Note pad feature during an
internal call. See Section 3.5.11
All Avanti sets
1. Dial [1].
Display sets show
2. Dial the required extension number.
If the extension is available, ringback tone is heard.
Avanti 3025 sets show the name of the extension dialed, if defined,
and its DN, followed by
Avanti 3020 and 3015D sets show both the extension name and DN
(if both are defined).
When the called party answers, talk. The telephone set display shows
CONV
show the extension DN.
If the called extension is not free to receive a call, you hear busy tone.
This may also occur if the called extension is in the Do Not Disturb
(DND) state.
followed by the extension name. Avanti sets with display also
The procedures given for making an internal call
(above) and for making a handsfree answerbac k
(HFAB) call (see Section 3.4.2), assume the default system setup. Check with your System administrator whether the same procedures apply
for your system.
TONE
.
RING
..
NOTE
3.4.2 Making a handsfree answerback (HFAB) call
You can call an available digital telephone set through it s speaker, with
the called party answering through the set's microphone. This is a voice
announce Handsfree Answerback (HFAB) call.
1. Dial the desired extension's number.
A tone burst is heard.
Display sets show HF followed by the name or the DN of the extension dialed.
2. Talk to the other party.
3-5
Page 33

76-110-0165/G, Issue 1
The duration of an HFAB call may be limited by the system. If the predetermined time of the handsfree con versation elapses, you hear a second tone burst, the call is disconnected, and then you hear dial tone.
If the called party lifts the handset during the handsfree answerback
conversation, the call i s convert ed into a r egular int ernal c all (
places
longer limited.
If HFAB call is directed to a s ingle line t elephone ( SLT), a Telr ad Tracker, or a set to which an HFAB calls are restricted, the call is automat ically converted to a regular ringing call. In this case, the appropriate
display is shown (
sion dialed) and the call has no time limit.
3.4.3 Barging into an ongoing call
The Barge-in feature allows you to join an internal or external conversation being carried on by another extension user, prov ided the call is not
a conference, and both your set and the target extensions are programmed to permit this.
HF
CONV
on the telephone display), and the duration of the call is no
NOTE
The Note pad feature cannot be used until the
called party lifts the hands et and changes the call
to a regular internal call. See Section 3.5.11.
CONV
followed by the name or the DN of the exten-
re-
3025/3020/
3015D sets
All other sets
The system Class Of Service programming may prevent you from performing Barge-in from your extension. Also, a parti cular exten sion may
be programmed to prevent you from barging in even if you are programmed with Barge-in capability.
If the extension to be barged into i s on an outsi de call, th e conversati on
must already be in progress (that is, dialing must have been completed) .
Once you barge in, you will be in conversation with both parties.
To barge in
(after trying to call an extension and hearing the busy tone)
1. Press
1. Press [FEATURE] or dial FEATURE access code.
Display sets show
fault: [2] [4]).
- You and the parties on whom you barged in may hear a barge-in
On a barge-in call with internal parties only, display sets show
CONF
If one of the parties is on an outside line, the display will show the
BARGE IN
tone, to indicate that a conversation between thr ee parties has been
established (It is possible for the initial tone not to be heard, if the
system is so programmed).
along with the names or DNs of the participating extensions.
softkey
FEATURE.
Dial the BARGE IN access code (de-
3-6
Page 34

3.4.4 Executive intercom
3.4.5 Extension callback
Section 3: AVANTI FAMILY SETS OPERATING INSTRUCTIONS
elapsed time followed by CO and the DN or name of the outside
line.
2. Talk to the parties.
Depending on the way the system is programmed, the warning tone
may be repeated periodically for the duration of your participation in
the conversation.
If your extension is programmed with the executive intercom feature,
you will be able to call an extension defined as your secretary' s, even if
it is in the Do Not Disturb state (see Section 3.16 below).
Executive intercom calls can be HFAB or internal ringing calls.
If the extension you are calling is busy or is in the DND mode, you can
have the DIGITAL system call you back when the extension becomes
available or deactivates DND.
NOTE
This feature can be activated toward an extension of another networked DIGITAL system (see
Section 6.4).
After you dial an extension and hear a busy tone:
3025/3020/
3015D sets
• Press
The
{CALL BACK}
{CNCL CBACK}
.
button appears, the [CB/QUE] LED indicator
lights and dial tone is heard.
You can now proceed with another activity.
3015 set
•Press [CB/QUE].
The [CB/QUE] indicator lights and dial tone is heard.
You can now proceed with another activity.
3000 set
•Press [FEATURE] and dial [2][2].
Dial tone is heard.
You can now proceed with another activity.
All sets When the extension becomes available (or you deactivate DND):
- You hear short rapid ringing.
- Display sets show
CALL BACK
followed by the name or the DN of
the requested extension.
NOTE
If the callback is activated from another networked system's extension, display sets show
the name of the TIE line used.
•Press [SPKR].
- The system dials the previously busy extension.
3-7
Page 35

76-110-0165/G, Issue 1
3025/3020/
3015D sets
- When the extension answers, a call is established and the cal l-
back request is automatically canceled.
To cancel a callback request
You can cancel a callback request before or during callback ringing:
•Press
The LED indicator goes off and the callback request is canceled.
{CNCL CBACK}
.
3015 set
3000 set
3.4.6 Internal speed dialing
•Press [CB/QUE].
The indicator goes off and the callback request is canceled.
•Press [#].
Display sets show
•Press [FEATURE] and dial [2][2].
The callback request is canceled.
To dial another extension at the push of a button
• Press the button programmed with the desired extension.
The system automatically dials the number.
For programming speed dial and memory numbers, see Section 3.18
and Section 3.19, below.
3.4.7 System Dial By Name (SDBN)
If your telephone system inc lude s IMAGEN with Syste m Dial By Name
(SDBN), you can make System Dial By Name calls, as described below.
The numbers which can be dialed using System Dial By Name are arranged in directories defined in SDBN programming.
CANCEL
.
3-8
3025 set
3020/3015D
sets
To dial using SDBN
1. Press
2. Press the softkey of the directory where the name is listed (for
3. If you already see the name of the person you wish to dial, press the
1. Dial the access code or press a dedicated button (if defined) for the
2. Spell the first letters (up to six letters) of the party's name on your
{DIRECTORY}
example,
You will see a list of names or a list of alphabetical name ranges
(e.g. ANNE-BETTY, BRIAN-CAROL, CECIL-DINA, etc.).
appropriate softkey. Otherwise, press the softkey of the appropriate
range which contains the name of the desired person and then
press the allocated softkey when it appears thereafter.
The number is dialed automatically.
directory containing the desired party (see your System Administrator for details).
Display shows:
dialpad (for example, ALAN : 2526).
- Asterisks appear as each digit is entered.
{MARKETING}
.
).
DIAL NAM E
:
Page 36

Section 3: AVANTI FAMILY SETS OPERATING INSTRUCTIONS
3. Press
desired name if it already appears.
- The party is dialed automatically.
If the name is misspelled, not defi ned, or if th ere is more t han one us er
with the same numerical equivalent (for example, "JENNY", "KENNY"
and "LENNY"), error tone is heard.
3.5 OUTSIDE CALLS
3.5.1 Making an outside call
Outside calls may be place d by any extension with a button for a private
outside line or an outside line group.
{VIEW}
to show matching names or press the button with the
NOTE
The letters to be dialed from the dialpad are:
For A, B and C dial 2
For D, E and F dial 3
For G, H and I dial 4
For J, K and L dial 5
For M, N and O dial 6
For P, Q, R and S dial 7
For T, U and V dial 8
For W, X, Y and Z dial 9
NOTE
Depending on the programming of your system,
the cost of your call may be displayed.
Any set with an
outside access
button
Sets with no
outside line ac-
cess buttons
To make an outside call
1. Press an outside line button, outside line group button, LCR button
or dial the LCR access code.
The associated button's indicator lights and external dial tone is
heard.
2. Dial the desired number.
Display stations show the digits dialed. If the party is available, ringback tone is heard.
3. When the called party answers, begin your conversation.
Display sets show the outside line numbe r and then t he call elapse d
time.
1. Dial an outside line, outside line group or LCR access code.
2. Listen for external dial tone.
3. Dial the desired number.
If the party is available, ringback tone is heard.
4. When the called party answers, begin your conversation.
If, after seizing an outside line, you do not start dialing within a
defined timeout, you will hear a retry tone and the system will
3-9
Page 37

76-110-0165/G, Issue 1
release the line.
To enter pauses in a dialing sequence
When your DIGITAL system is connected behind another Private
Branch Exchange (PBX), the PBX may take a few seconds before it provides an outside line. Thus, when speed dialin g, it may be necessary to
enter a pause after the digits of the outside line access code.
By pressing [PAUSE], the system allows sufficient time to access the
line. A number of pauses may be entered. The length of the pause time
is programmable. See the DIGITAL Administration manual (76-1100175/F) and the DIGITAL System Description (76-110-0180/F) for further information on pause time.
3.5.2 Calling Line Identification on Outside Calls
When you are placing an outside call using an ISDN lin e, t he re ceivin g
end may see your line identificatio n number. This i s ca lled Cal ling Line
Identification Presentation (CLIP). If you want t o restrict the appearance
of this number, use the Caller Line Ident ifi cation Restr iction (CLI R) f eature as follows:
1. Dial the CLIR access code.
2. Access the line and dial the desired number.
3.5.3 Hot line
To cancel the restriction:
All sets
1. Press [#].
2. Dial the CLIR access code.
Whether the calling line identif ication number i s presented (CLIP) or restricted (CLIR) depends on the Class of Servic e (COS) assigned to your
extension (see the Administrat ion manual). The COS programming can
be overridden on a call-by-call basis by using the CLIR and CANCEL
CLIR features before dialing a call . If COS does not restrict calling line
identification, you ca n use the CLIR f eature to rest rict an indivi dual call.
If the COS imposes CLIR, you can use the CANCEL CLIR feature to allow CLIP for an individual call. Once you hang up the syst em returns to
the method that is programmed for your COS.
CLIR may not be available on all networks.
If you have a Hot line, thi s e nables y ou to a ccess an outside l ine whi ch
will ring immediately to a particular external subscriber.
All sets 1. Seize the designated hot line.
- Ringback tone is heard.
NOTE
3-10
2. Wait for the external subscriber to answer.
Page 38

3.5.4 Account code (ACC)
The system allows you to enter an account code on o utgoing or incoming external calls. The code entered is printed out on the Station Message Detail Recording (SMDR) printer.
The entry can be vol untary (the user di als the code befor e or after sei zing the outside line), or it may be forced (the user cannot seize an outside line without first entering the code). The extensi on may also be
programmed so that the user hears a periodic tone during outside conversations as a reminder to enter an account code. The code may be
entered at any point after the initial elapsed call ti meout and before the
call is disconnected.
Several account codes may be entered during a single call.
To enter an account code
To enter a forced account code, the following procedure mus t be performed prior to seizi ng the outside line. If the entry is voluntary, you may
use this procedure before dialing out or during the conve rsation.
Section 3: AVANTI FAMILY SETS OPERATING INSTRUCTIONS
NOTE
An extension programmed with forced account
code will not be able to perfo rm Automati c redial.
3025 set
1. Press
- Display shows
2. Dial an account code string (up to 11 digits).
- The digits scroll from right to left.
3. Press
{ACCOUNT}.
ACC
NOTE
{ACCOUNT}
The
call elapsed time displa y. If you wish to enter an
account code before this h appens, execute Step
All other sets
1 for
{SAVE}
to complete the process.
To abort, press
{SAVE}.
ing
Follow the procedure above to enter another ac-
count code.
softkey appears along wi th the
, below.
NOTE
{ACCOUNT}
again before press-
3-11
Page 39

76-110-0165/G, Issue 1
All other sets
3.5.5 Tone dialing
3025 set
1. Press the [ACC] button (if you have one defined) or press
[FEATURE] and dial [2][8].
ACC
Display sets show
.
2. Dial an account code string (up to 11 digits).
On display sets, the digits scroll from right to left.
3. Press [#] to complete the process.
The code may be changed as many times as desi red during the conversation, by the procedure above. Also, if you have not yet pressed [#] or
[SAVE] button to enter a new code, you may start the pr ocedure again
to change your entry or to deactivate the code currently i n effect.
The Tone dial feature allows you to switch to DTMF dialing on a pulse
outside line call. This is us eful for accessing various carrier ser vices and
external equipment (e.g. answering machine).
To switch to tone dialing while connected to an outside line
•Press
{TONE DIAL}.
- Display sets show T at the current digit position on the display.
- The dialing method is changed to DTMF.
All other sets
NOTE
{TONE DIAL}
The
softkey only appears when
dialing on non-ISDN lines
•Press the
[P→T]
button (if defined) or
[FEATURE]
TONE DIAL access code.
- [P→T] button (if defined) lights.
T
- Display sets show
at the current digit position on the display.
- The dialing method is changed to DTMF.
NOTES
Be sure to implement tone dialing in the appropriate location in the str ing of th e digits t o be dialed.
If the outside line is disconnected or placed on
hold, or enters a conference , the [P→T] button in-
T
dicator turns off and the
disappears.
The tone dial feature can be included in a Speed
Dial, Redial, ARD or Save/Repeat sequence activated on a pulse outside line.
Activating the tone dial feature wh ile internal dial
tone is heard, will result in retry tone.
.
followed by the
3.5.6 If no outside lines are available
When you request an outside line for placing a call and the line, or all
lines of the requested group are busy, you can queue for an available
line.
3-12
Page 40

Avanti sets
with display
Section 3: AVANTI FAMILY SETS OPERATING INSTRUCTIONS
When the outside line becomes available, the system rings your extension. When you answer, you are automatically connected to an outsi de
line.
To enter an outside line queue
After an attempt to obtain an outside line resulted in a busy tone:
•Press
- Dial tone is heard, the
{TKQUE}.
{CNCL TKQUE}
QUE] LED indicator lights
softkey appears and the [CB/
All other sets
3025/3020/
3015D sets
All other sets
1. Press [CB/QUE] (if defined) or press [FEATURE] and dial [2][2].
- Dial tone is heard and the [CB/QUE] indicator (if defined) lights.
2. Hang up or continue using your set normally;
When the line becomes available and your extension is free:
• You will hear short rapid ring bursts. If your set has an appearance
button for the outside line, its indicator will flash.
• Display sets show
name or number (e.g.
• The 3025 and 3020 sets al so provide a worktable s oftkey to the ri ght
of the display, for the ringing outside line (e. g.
softkey
{CNCL TKQUE}
TK QUE
followed by the requested outside line
TK QUE
CO 801).
{TQUE 800}
for canceling the request.
), and a
To access the ringing line
• Press the outside line softkey.
1. Go offhook (press [SPKR] or lift the handset) or press the appearance button for the outside line.
- You will hear external dial tone.
2. Dial the desired number.
To cancel the queue request
3025/3020/
•Press
CANCEL TRUNK QUEUE
3015D sets
All other sets
3.5.7 Making a Least Cost Routing (LCR) call
•Press [CB/QUE] button (if defined).
- The trunk queue request is canceled and dial tone is heard to con-
firm.
Any applicable button indicators and di spla ys are d eacti vated ( i.e. [CB/
QUE] indicator stops flashing,
The LCR feature routes your call via the least expensive outside lines
available, taking into accou nt the ti me of d ay, and the day of t he week.
Your telephone bill can be sign ificantly reduc ed using this fe ature. LCR
is defined and activated via system programming.
softkey
TK QUE
.
display disappears, etc.).
3-13
Page 41

76-110-0165/G, Issue 1
To use LCR
All sets 1. Press [LCR],
or
Dial the LCR access code (usually “9”, but consult your System
Administrator for the correct LCR acc e ss met hod in your system).
- Dial tone is heard and display sets show
2. Dial the external number.
If you press [FLASH] during an LCR dialing attempt, you can dial im-
mediately through LCR, with out having to pres s the [LCR] button again.
3.5.8 Disconnecting a conversation
To disconnect a handset conversation
All sets • Replace the handset.
- The conversation is disconnected.
LCR.
NOTE
When you use LCR, the call will automatically
move to a floating button (if defined).
To disconnect a handsfree conversation
All sets •Press [SPKR].
- The conversation is disconnected.
- On display sets, the elapsed time display for outside calls freezes
and the call cost (if defined) is shown for a set timeout.
Other actions that will disconnect a conversation are:
• Pressing an outside line button to obtain an outside line.
• Pressing a memory button t o place a Direct Station Select ( DSS) call
disconnects an internal call.
• Pressing [FLASH]. (NOTE: Depending upon system programming,
you may have to press [ FEATURE][FLASH] instead),
• Pressing a DN button (see Section 3.27, below).
3.5.9 To disconnect an outside call but keep the line
If you are speaking on a n outside line, you can disconnect the call whil e
still retaining the outside line, by pressing the [FLASH] button.
(NOTE: Depending upon system programming, you may have to press
[FEATURE][FLASH] instead). You can then press [REDIAL] (to dial
the same number again) or make another outside call wit hout having to
select an outside line again.
When the system is connected directly to outside lines:
•Press [FLASH] (NOTE: Depending upon system programming, you
may have to press [FEATURE][FLASH] instead).
- The conversation is disconnected and you hear external dial tone.
3-14
Page 42

3.5.10 Telephone lock
All sets 1. Dial the LOCK access code or press [LOCK] (if defined).
3.5.11 Note pad
Section 3: AVANTI FAMILY SETS OPERATING INSTRUCTIONS
You can prevent people from making outside cal ls from your telephone.
To lock your telephone
- Display sets show
2. Dial your Executive Credit Code (see your System Administrator).
3. Hang up.
- The telephone lock dialing restrictions are in effect.
- The [LOCK] button, if defined, lights.
ENTER CODE
:
To unlock your telephone
• Repeat the above procedure.
- Your telephone is unlocked.
You can enter a string of up to 16 digits in the station memory for later
reference (e.g. a telephone number) during a conversat ion. The number
is saved in your personal speed dial memory (see also Section 3.11.5 ).
Avanti 3025/
3020/3015D
sets
All other sets
To save a number while in conversation
NOTE
If you are calling via handsfree answerback, the
{PROGRAM}
appear. Follow procedure for
low, instead.
1. Press
2. Dial an available speed dial code or press an available speed dial
3. Enter up to 16 digits
4. Press
1. Press [FEATURE]
2. Press [SPEED DIAL] twice
3. Dial an available speed dial code or press an available speed dial
4. Enter up to 16 digits
5. Press [SPEED DIAL].
PROGRAM softkey
button.
{SAVE}.
button.
If 8 seconds pass after the last digit was entered,
or you end the conversation, the digits dialed up
to then, will be saved.
softkey or the icon does not
All other sets
or the icon and then
NOTE
, be-
{SPEED DIAL}
To dial the number saved via Note pad
• Use the regular speed dialing procedure with the SPEED DIAL code
or SPEED DIAL button that you used to save the number (see Sec-
tion 3.11.5 ).
3-15
Page 43

76-110-0165/G, Issue 1
3.6 CONFERENCE
3.6.1 Setting up a conference call
Up to eight parties, any of which may be outside parties, may converse
together on a conference call.
The conference feature provides various options:
• To initiate a conference call.
• To add more parties to the existing conference.
• To remove outside line parties to the exist ing conference.
• To leave the conference call temporar ily.
• To return to the conference after leaving temporarily.
• To leave the conference call permanently (other parties remain in
conversation).
To establish a conference call
Avanti 3025/
3020/3015D
sets
1. Place the first call.
2. Press
- Dial tone is heard, and SPLT softkey appears for th e line or extension
of the first call.
CONFERENCE
softkey.
All other sets
All sets •Press [CONFERENCE].
3. Call the next conferee.
When the next conferee answers:
•Press
1. Place the first call.
2. Press [CONFERENCE].
3. When you hear dial tone, call the next conferee
When the next conferee answers:
•Press [CONFERENCE].
- There are now three pa rties to the c all. If they ar e internal user s with
{JOIN}
display sets, each set shows the extension numbers of the other
conferees. If one of the conferees is on an outside l ine, syst em participants with display sets will see the elapsed time for the current
call.
.
To add more parties to the conference proceed as follows
When you hear dial tone:
• Call the next conferee.
When the next conferee answers:
•Press [CONFERENCE].
All parties are in conference.
3-16
Page 44

Section 3: AVANTI FAMILY SETS OPERATING INSTRUCTIONS
To 40 an outside line party to the conference
Avanti 3025 set • Press the
the conference.
•Press
- The party is disconnected.
{DROP}
To leave the conference call temporarily
All sets •Press.
You will hear dial tone.
You are now free to use your set as you wish and still have the opti on
to return to the conference.
SPLT
softkey of the outsi de li ne you want to r emove f rom
.
NOTE
If, after exiting from a conference, you comple te
another call, do not hang up. If you do, you will
be permanently disconnected from the conference call. To disconnect, press [FLASH].
To return to the conference
Avanti 3025/
•Press
3020/3015D
sets
All other sets
•Press [CONFERENCE].
To leave the conference call permanently
Avanti 3025/
•Press
3020/3015D
sets
All other sets
3.6.2 Intercom loop Conference
• Hang up.
The Intercom loop conference is a special variatio n on th e standar d
conference. The feature allows a designated mediato r to speak with up
to 30 participants who are connected in a “l isten onl y” mode or in a twoway mode, as defined by system programming.
{CONF RET}.
{CONF EXIT}
To properly facilitat e this feature, the medi ator requires a 3025 set, plus a DSS unit with appearances of all possible participants.
or hang up.
NOTE
In the “listen only” mode, the mediator may al low up to 5 ap pointed p articipants to speak on the conference as well. Participants may request
to speak during the conference and the mediator is given a flashing indication when this occurs, on the participant’ s DSS button. Conference
members can be preprogrammed or added as the conference progresses.
3-17
Page 45

76-110-0165/G, Issue 1
All participants in the intercom loop conference are local extensions
(networked extensions and outside lines cannot be included).
To program a list of participants
1. Press (program) icon and [CFLn] (a predefined conference l oop
button,
where n = 1 to 10. See System Administrator).
Display shows:
Conf. Loop <No.> Setup
Member <number 1-30>
2. Enter the DNs of the desired participants or press the associated
DSS buttons, one at a time. Only legal DNs will be regist ered. Press
[FLASH] to delete the DN currently displayed. A 3-beep error tone
indicates an illegal value. You may scroll through the list as it grows,
using the [LO HI] button.
3. Press
{EXIT}
or go onhook to end the programming process.
To initiate the intercom loop conference
1. Dial the CONF. LOOP feature code or press a defined CONF. LOOP
button.
The list of participants is dialed. Each participant is added upon
answering.
2. To add participants, enter the desired DN or press the desired DN
button.
The following two procedures apply to “listen only” mode:
To request permission to speak
(participants with a flash button only)
•Press [FLASH]
DSS button for requesting station changes from “on” to flashing
state.
To grant permission to speak (mediator only)
• Press the flashing DSS button.
Participant can now talk. Pressi ng the b utt on ag ain wil l r eini tiat e the
one-way state (toggle action).
To disconnect the conference
• Hang up
3.6.3 Meet me conference (option)
The Meet me conference is a new variation on the conference call
whereby up to eight potential participants dial a common DN and are
connected by the system, in order of ar rival. The fir st caller who di als in
receives a special tone or music-on-hold. Subsequent callers receive
ringback tone prior to being connected. All current participants already
connected hear a special tone when a newcomer connects or when a
participant drops out.
3-18
Page 46

Section 3: AVANTI FAMILY SETS OPERATING INSTRUCTIONS
To join a Meet me conference
• Dial the Meet me conference DN (see System Administrator).
You hear a special tone or music on hold (if you are the first caller),
or ringback tone after whi ch you are joined in conference with other
callers.
To exit a Meet me conference
• Hang up.
Remaining participants hear a special tone indic a ting you discon-
nected.
3.6.4 To patch together two outside lines
You may connect two outside par t ies via your DIGITAL syst em lin es to
enable private conversation between them. At least one of the outside
parties must be capable of dialing DTMF digits.
To connect two outside parties together
1. Place a conference call with two outside parties (as explained above)
2. Notify the parties that when a tone is heard, one of them must dial a
DTMF digit to continue the conversation. (Otherwise, the patch initiator will be recalled automatically and the outside lines will be disconnected after a fixed timeout, if the recall to the initiator is not
answered.)
To complete the patch:
1. Press [CONFERENCE].
2. Press [FEATURE] or dial the feature access code and
dial [T][P] ([8] [7]).
The parties are joined in a patch.
To rejoin the patch
1. Press [PICK UP].
2. Press one of the participating (light indication) outside line buttons
(3025/3020 sets press either of the
not have outside line buttons must dial the number of one of the participating outside lines).
A conference with the patched parties is reestabli shed.
PAT CH
3.7 TO OVERRIDE EXTENSION RESTRICTIONS (Travel COS)
The Travel Class Of Service (Travel COS) feature enables you to
change the Class of Service (COS) temporarily at a system extension
in order to use otherwise inaccessible servi ces from the extension. The
COS can be one of five programmed Global COSs available throughout
the system or the COS of a particular extension. The global COS can
only be accessed with an appropriate password (consult System Administrator for global COS). The password for a parti cular extension's
COS is the extension's Execut iv e Credit Cod e (E CC) (see Section 6.2,
below).
softkeys. Sets that do
3-19
Page 47

76-110-0165/G, Issue 1
To activate a Travel COS
All sets 1. Press [TC] (if defined) or dial the Travel COS access code.
2. Dial the desired DN or press [
3. Dial the appropriate ECC code or Global COS password.
3.8 PREFERRED LINE
A preferred line is an outside line to which yo u are connected when you
lift your handset or press [SPKR] (instead of recei ving internal dial
tone).
Display sets show
Display sets show
ENTER NO:
] for a Global COS number.
*
ENTER CODE:
-The [T C ] indicator (if defined) lights.
- The Travel COS is currently active for a predefined time.
- You may now access an outside line and place any call allowed
under the currently active COS.
NOTE
In order to dial internally or acti vate features, you
must press [ICM] to access inte rnal dial tone.
The preferred line is defined in system configuration.
3.9 PAGE
To use your preferred line
1. Lift your handset or press [SPKR].
2. Dial any external number as you would from a regular external telephone.
You can use your set to make a general announcement or to page
someone via any of up to eight internal and eight external page zones
on the DIGITAL KEY BX or DIGITAL 400 systems or 16 internal page
zones and 24 external page zones for the DIGITAL 1000 system.
An internal page zone comprises a programmed grouping of DIGITAL
or Avanti telephone sets which are accessed by dial ing a prog rammed
access code. An external page consists of external speakers or public
address system accessed by dialing a programmed access code. Internal page zone codes may be programmed so that an i nternal page also
activates external speakers simultaneously.
NOTES
Only one internal and one external page call may
be active in the system at a time.
To activate page toward a networked DIGITAL
system, a prefix must be dialed first (see Section
3-20
Page 48

Section 3: AVANTI FAMILY SETS OPERATING INSTRUCTIONS
6.4.6).
To make an announcement
1. Dial the required page zone code or press a dedi cated PAGE ZONE
button (if defined).
- Display sets show PAGE, and the page access code.
- You will hear a double tone burst.
2. Make your announcement.
You might not have access to all zones. If you tr y to dial a zone to which
you do not have access, you will hear a retry tone.
Paging time may be limited. If the ti me limit is exceeded, you wi ll hear a
double tone burst, the call will be disconnected, and you will then hear
internal dial tone.
You can also page someone in order to transfer an outside call (see
Section 3.14.3 , below).
3.10 MESSAGES
If you call an extension and receive no answer or the extension is busy,
you may leave a message at the extension.
Up to six messages may be stored in an ex tension's mess age memory
at a time: five from other extensions, including one from the Integra ted
Multiple Application Generator (IMAGEN) voice mail feature (if installed), and an additional message from the Attendant Console.
The message may be a Basic Message such as CALL 239 (see Section
3.10.2), or you may select one of 30 text messages programmed in the
system, which will appear on the called station's disp lay, along with the
sender's directory number or name.
Some of the text messages may be edited by dialing the appropriate
digits from the dialpad (
All messages sent to non-display sets and SLTs are Basic Messages.
The recipient of the message knows when messages have arrived, as
follows:
• At first, display st ations will show the text of the message and the
sender's name or number. After a few seconds, the display shows
the number of messages waiting (e.g.
MESSAGES
• The [MSG] button will indicate messages waiting, via the button indicator;
• When messages are waiting, a broken dial tone is heard whenever
the extension goes offhook (Message Reminder Tone). Do not confuse this tone with the Call forward tone.
If, when you try to leave a message at an extension, an error tone is
heard, this means that the maximum allowed number o f messages has
);
CALL ME AT
BE BACK AT ** :
,
*****
CALL HOME 231
).
**
, and then
3
3-21
Page 49

76-110-0165/G, Issue 1
been left at that extension and you will be unable to leave your message.
NOTE
Only a Basic Message can be sent to another
networked DIGITAL system's extension.
3.10.1 Reading and
Avanti 3025/
3020 sets
Avanti 3015D
answering
When messages have been received at your station:
The number of waiting messages (e.g.
display, the [MSG] indicator lights and, on the 3025 set, the message
icon
or
The text of the last message sent and the sender's name or extension
number appears in the display, the [MSG] indicator flashes and, on the
3025 set, the <
while and then the number of waiting messages reappears on the display.
The number of waiting messages (e.g.
set
display, and the [MSG] (if defined) indicator lights
or
The text of the first message and the sender's name or extension number appears in the display and the [MSG] (if defined) indicator flashes.
This state remains for a short while, and after a few seconds, number of
messages waiting appears.
To view messages sent to your station (display sets only)
messages
appears
ANSWER
5 MESSAGES
softkey appears. This sta te remains for a short
5 MESSAGES
) appears in the
) appears in the
3-22
Avanti 3025 set
Avanti 3020/
3015D
Avanti 3025 set
Avanti 3020/
3015D sets
•Press [MSG] or the message icon
Your list of messages is displayed.
1. Press [MSG].
- The first message in the message memory list is displayed.
2. Press the appropriate side of the [LO HI] button to s croll ba ckwar d
or forward respectively through your list of messages.
The next (or previous) message in the list is displayed.
.
To reply to your messages
• Press the
The extension whose message is currently displayed is called.
If the [MSG] indicator is flashing:
•Press [MSG].
The extension whose message is currently displayed is called.
If the [MSG] indicator is on steady:
1. Press [MSG].
- The next message to be answered is displayed.
ANSWER
softkey for the desired message.
Page 50

Section 3: AVANTI FAMILY SETS OPERATING INSTRUCTIONS
2. Press [MSG] (again).
The extension whose message is currently displayed is called.
Non display
sets
Avanti 3025 set
• Press the flashing [MSG] button.
The extension which left a message is call ed. If more t han one mes-
sage has been left, the first one sent is answered first.
NOTE
If the called extension answers, the message is
deleted from.your extension’s messag e list. If the
called extension does not answer, the message
is retained. If the called extension is busy, busy
tone is heard and the message is retained.
When you answer a message received from the Integrated Multiple Application Generator (IMAGEN), you will recei ve recorded instructions on
how to proceed with the message answering process. On the Avanti
3025, 3020 and 3015D sets, softkeys will appear in the display to simplify operation. On the Avanti 3025 set in addition to the softkeys , features can be operated using icons. See the Integrated Multiple
Application Generator (IMAGEN) User Guide.
To delete a message
You can delete a message without calling back the exte nsion which left it.
1. Press [MSG].
2. Press the
delete.
- The message disappears from the display.
DELETE>
IMAGEN voice mail messages must be erased
from within an IMAGEN mailbox session. Otherwise, the message which you thought you deleted by pressing a
after a fixed timeout.
softkey to the right of the message you wish to
NOTE
DELETE
> softkey reappears
Avanti 3020/
3015D sets
Non display
sets
1. Press [MSG].
2. Scroll to the message you wish to delete, using the [LO HI] button.
3. Press [#].
The message disappears and the next message (if any remain) is
displayed.
When the last message in the list is deleted:
- Dial tone is heard.
Your extension cannot delete specific messages in a straightforward
fashion. However, if you call back the sender (by pressing the flashing
[MSG] button), and leave a message (see Section 3.10.2 ) , the sender's
message is removed from your list of messages and a message is left
back at the sender's extension.
3-23
Page 51

76-110-0165/G, Issue 1
3.10.2 Sending messages
If, however, you wish to d elete all yo ur messages at o nce, do the f ollowing:
1. Press [#].
2. Press [MSG].
3. Hang up.
If you dial an extension and receive busy tone, or there is no answer,
you may send the called extension a message.
If the extension to which you sent a message has a display, you can
send a text message to appear in the display.
If the extension does not have a display, you can still leave a basic c allback message to which the called extension can reply, even without
knowing which extension left the message.
The types of messages available are as follows:
• Basic message;
• Stored message;
• Confirmed message;
• Integrated Multiple Appli cation Generator (IMAGEN) voice message.
Avanti 3025 set
All other sets
BASIC MESSAGE
A basic message is the simplest message that can be left at an extension.
At non-display extensions (SLTs) a brok en tone is heard prior to the regular internal dial tone, to indicate a message is waiting. Also, the message button (if equipped in the extension) lights.
NOTE
A basic message can also be sent to a remote
extension of a networked system.
When you dial an extension and receive busy tone or no answer:
• Press the message icon
- The basic message is sent.
•Press [MSG] and hang up.
- The basic message is sent.
and hang up.
STORED MESSAGES
If the station to which you are sending a message has a display, you
may select a text message t o be sent to the display of the station. Thi rty
preprogrammed stored messages, of up to 16 character s are avail able.
3-24
Stored messages in which asterisks appear can be edited using the
dialpad, e.g.
of five asterisks can be included in each message.
Table A-1, in Appendix A, lists the messages stor ed in your system.
CALL
can be edited to be C
*****
ALL 12345
. A maximum
Page 52

Section 3: AVANTI FAMILY SETS OPERATING INSTRUCTIONS
To send a stored message
When you dial an extension and receive busy tone or no answer:
Avanti 3025 set
Avanti 3020/
3015D sets
Non display
sets
1. Press the message icon
SELECT A MSG:
-
es and the scrolling icon
2. Press the scrolling icon
you find the one you need.
3. Press the softkey for the desired message.
4. Use the dialpad to edit the message, (editable digits are indicated
by asterisks), if applicable.
5. Press
1. Press [MSG].
-
2. If you know the number of the message you want to leave, enter the
appropriate two digit (01 to 30) message code via the dialpad.
- If you are not sure of the message number, press the [LO HI]
3. Use the dialpad to edit the message, if necessary.
4. Hang up.
- The message is sent.
1. Press [MSG].
2. If you know the number of the message you want to leave, enter the
appropriate two-digit (01 to 30) message code using the dialpad
(see Table A-1 in Appendix A, below). Otherwise, hang up and a
basic message will be sent.
3. Use the dialpad to edit the message, if necessary.
4. Hang up.
- The message is sent.
{SEND MSG}
SELECT A MSG:
button.
is displayed followed by a list of st ored messag-
to send the message.
is displayed.
.
.
to scroll through the list of messages until
To abort prior to sending the message
At any point before sending the message:
•Press [FLASH].
CONFIRMED MESSAGES
A "confirmed message" is a message which the recipient can read and
respond to while busy on another call.
NOTE
This feature is applicable to display sets only.
If you call a displ ay set which i s busy, you may send it a confirmed message, which appears immediately on the called extension's display,
along with your direct ory name. The calle d party can then a cknowledge
your message, or reject it, wit hout i nterrup ti ng the cur rent cal l. You are
informed (via your display) as to whether the message was accepted or
3-25
Page 53

76-110-0165/G, Issue 1
Avanti 3025 set
rejected. There may be up to 30 prepared messages which you may
use (see Table A-1 in Appendix A, below, for a li st of stored messages),
some of which may be edited.
A confirmed message may be sent only if:
• Both the sending and receiving sets have displays;
• The called set is on an established internal or external call (it is not
dialing);
• Another confirmed message is not currently active at this set.
To send a confirmed message
If you dialed an extension and received busy tone, then:
1. Press the message icon
SELECT A MSG:
-
the scrolling icon
is displayed along with the list of messages and
.
.
Avanti 3020/
3015D sets
2. Press the scrolling icon
you find the one you need.
3. Press the softkey for the desired message.
4. Use the dialpad to edit the message, (editable digits are indicated
by asterisks), if applicable.
5. Press
- The destination set receives a muffled two beep tone, the [MSG]
If you dialed an extension and received a busy tone, then:
1. Press [MSG].
-
2. If you know the number of the message you want to leave, enter its
two digit (from 01 to 30) message code with the dialpad.
If you are not sure of the message number, use [LO HI] button to
scroll through the list of messages until you find the one you need.
3. Use the dialpad to edit the message, if necessary.
4. Press [MSG].
- The destination set receives a muffled two beep tone, the [MSG]
If the called party confirms the message ( see below),
appears on your display. If you go onhoo k before the c alled party has a
chance to respond, the message will be sent as a regular stored message.
{SEND MSG}
indicator flashes and the display shows the text of the message
selected followed by your extension name or number:
lowed by the text of the message selected.
SELECT A MSG:
indicator flashes and the display shows the text of the message
selected followed by your extension name or number:
lowed by the text of the message selected.
to scroll through the list of messages until
to send the message.
is displayed.
MSG ACCEPTED
WAIT..
WAIT..
fol-
fol-
3-26
If the called party disconnects without responding to your confirmed
message, your display will indicate that the message was rejected
MSG REJECTED
(
extension as a regular stored message.
If you press [FLASH], the process is aborted.
). If you then go onhook, the message is sent to the
Page 54

Section 3: AVANTI FAMILY SETS OPERATING INSTRUCTIONS
Responding to a confirmed message
When a confirmed message arrives at your set, you will hear two b eeps
and see the text of the sender's confirmed message. To respond, f ollow
these steps:
To confirm (accept) the message
• Press the flashing [MSG] button (3025 set: press
- This sends a confirmation to the se nder that the message was re-
ceived (
MSG ACCEPTED
).
{ACCEPT MSG}
To reject the message
•Press [FLASH] or go onhook. This will disconnect the current call ,
(3025 set: press
MSG REJECTED
-
call will be disconnected if you flash or go onhook) and the message is left at the extension called as a regular stored messag e.
{REJECT MSG}
appears on the sender's display (your current
) to reject the message.
INTEGRATED MULTIPLE APPLICATION GENERATOR (IMAGEN)
MESSAGE
If installed, the
option may be used to leave a recorded message for a part icular extension. This can be done by calling the
Generator (IMAGEN)
ed instructions.
Integrated Multiple Application Generator (IMAGEN)
Integrated Multiple Appl ication
access number directly and foll owing the record-
).
If you call an extension which has forwarded its calls to the IMAGEN
system for busy or no answer, you will be automatically given instructions for leaving a voice message via the IMAGEN system.
If your system has a defined VOICE MESSAGE access code, you can
leave a message from any other set by dialing the code or pressing a
programmable button containing the code, after attempti ng to call the
extension.
If you leave a voice message, the system will automatically leave a
message on the display of the recipient set (e.g.
more information on IMAGEN, see your System Administrator.
3.11 ABBREVIATED DIALING
3.11.1 Last number redial
You can redial the last outside number you dialed in one short procedure:
NOTE
The Avanti 3025 set may have a
softkey for recording a message for another extension, when you call the extension and it is
busy or there is no answer.
{VOICE MSG}
3 MSGS IVM
). For
3-27
Page 55

76-110-0165/G, Issue 1
1. Select an outside line or LCR.
2. Press [REDIAL].
- Display sets show the redial ed number while the system automat-
3.11.2 Automatic Redial (ARD)
Automatic Redial causes the system to automatically dial a busy outside number until it becomes available.
When a number is dialed and found to be bus y, p ress ing a sys tem-p rogrammed [ARD] button stores the dialed number in memory. The number will then be dialed out at regular inter vals until t he dialed number is
available (i.e. until ringback tone is received).
Both the number of dialing attempts a nd the time interval between them
are programmed via system configuration . See the Administration manual for more information.
If, after the preprogrammed number of dialing attempts, the dialed number is still busy, Automatic Redial is suspende d. Wh en the called pa rty
rings, you must lift the handset or press [SPKR] in order to talk to the
party.
Automatic Redial can be deactivated and reactivated at any time.
The status of the Automatic Redial is indicated by the status of the
[ARD] button indicator.
ically redials it.
NOTE
The [ARD] button can also handle an LCR call.
ARD waits for the LCR route until available for dialing, if necessary.
To operate Automatic Redial
When you dial the desired outside party and receive a busy tone:
1. Press an [ARD] button.
-The [ARD] indicator goes on.
2. Hang up.
- When the ARD feature is active (dialing, waiting for busy or ring
detection), the indic ator flashes.
The system continues to dial automati cally until the party is reached, the
time period is exceeded or the request is deactivated.
To deactivate ARD temporarily, without deleting the number fr om
memory
• Press the [ARD] button again.
- The indicator goes off.
The ARD request can be reactivated later if it isn't used for a differ ent
number in the meantime.
3-28
To reprogram the [ARD] button with a new number
When you receive busy tone on an outside number:
•Press [ARD].
Page 56

Section 3: AVANTI FAMILY SETS OPERATING INSTRUCTIONS
3.11.3 Outside number scanning
The scanning feature allows the repeated calling of outside telephone
numbers that are currently busy. If a busy signal is encountered, then
the next listed number is dialed after a programmed ringing interval.
A station user can enter as many numbers int o the scanner memory as
there are dedicated automatic redial [ARD] buttons on the st ation. The
scanner will then proceed to dial each number, serially, until a number
is reached. After the first call is completed, the scanner continues dialing the rest of the listed numbers in memory, until all t he calls have been
successfully completed.
To activate the scanning dialer
• Follow the procedure above for a number of [ARD] buttons, one after
the other.
- For each attempt, a number will be dialed (in sequential order) , at
a defined interval for a defined period, until a party is reached.
3.11.4 Dialing a frequently used outside number (Save/Repeat)
You can store one frequently us ed exter nal number in a spec ial memory, which you may change as you wish. You can automatically dial the
stored number by just pressing a button on the Avant i 3025 set or by a
programmed button or feature access code dialing on other sets.
Avanti 3025 set
All other sets
Avanti 3025 set
All other sets
To store a number
1. Select an outside line.
2. Dial the number you wish to save.
To save the number of the party you just dialed
At any point before you disconnect:
•Press
•Press [SAVE/REPEAT] or press [FEATURE] and dial [S][R]
([7][7]).
- The number is saved.
{SAVE}
.
To dial the stored number again
1. Select an outside line.
2. Press
•Press [SAVE/REPEAT] or press [FEATURE] and dial [S][R]
([7][7]).
- Display sets show the number being dialed.
- Each time you store a new number, the old one is deleted from
{REPEAT}
memory.
.
3.11.5 Speed dialing a number from a speed dial directory
Your DIGITAL system has two types of speed dial director ies. One is a
system directory, that holds a large number of frequently used tele-
3-29
Page 57

76-110-0165/G, Issue 1
phone numbers for the various users of the system. The second directory is your own personal one in which you enter telephone numbers
frequently used by you. A number saved via the Note pad feat ure is also
saved in your personal speed dial directory (see Section 3.5.11 ).
NOTE
Numbers saved in the new Phone Book feature
(see Section 5) occupy the personal speed dial
directory memories.
The System Administrator determines whic h system directory numbers
you will have access to, as wel l as the size of your personal telephone
directory.
To speed dial an external number from either directory
NOTE
If Trunk Speed Dial is programmed in your system (consult your System Administrator), then
you may wish to select a specif ic o utsi de line (or
press [LCR]) first.
1. Press [SPEED DIAL].
- Display telephones show
SPD.
2. Dial the speed dial code of the desired number or number saved via
Note pad (see Section 3.5.11 ).
- The system automatically dials the number. The telephone dis-
play shows the number during dialing.
You can use the speed dial feature before or aft er manual dialing, and
you can also use more than one speed dial number in a dialing sequence.
To enter a number in your personal speed dial directory, see Section
3.18 , below.
To dial an external number using a speed dial button
NOTE
If Trunk Speed Dial is programmed in your system (consult your System Administrator), then
you may wish to select a specif ic o utsi de line (or
press [LCR]) first:
• Press the desired SPEED DIAL button.
- The system automatically dials the number. The telephone display shows t he number during dialing.
3.11.6 Internal speed dialing
To dial another extension at the push of a button
• Press the button programmed with the desired extension.
3-30
- The system automatically dials the number.
Page 58

Section 3: AVANTI FAMILY SETS OPERATING INSTRUCTIONS
For programming speed dial and memory numbers, see Section 3.18
and Section 3.19, below.
3.12 RECEIVING CALLS
3.12.1 Answering an internal ringing call
When another user places a regular internal call to you, your set rings.
The telephone display shows the name or number of the calling extension.
To answer the call
Avanti 3025/
3020/3015 sets
Do one of the following:
•Press [SPKR].
-The [SPKR] indicator lights,
or
• Lift the handset.
3000 set
3.12.2 Answering a handsfree answerback (HFAB) call
1. Lift the handset.
2. Talk to the caller.
If someone places an onhook voice announce (HFAB) call to your set:
You will hear a tone burst and the [SPKR] indicator will light.
The display of the Avanti 3025 sets show t he calling extension's name,
if defined, and its DN and
The Avanti 3020 and 3015D set displays show
defined, and its DN.
1. Verify that the [MUTE] indicator is off.
2. Talk to the caller.
- The duration of the handsfree call may be limited.
HANDSFREE
To convert the handsfree call to a regular call
(whose duration is not limited)
• Lift the handset and continue talking normally.
- On display sets,
[SPKR] indicator goes off.
Avanti 3025/3020/3015 sets may return the conversation to handsfree
(with unlimited duration) by pressing [SPKR] again and placing the
handset onhook.
HANDSFREE
.
the extension's name, if
changes to
CONV
and the
3.12.3 Answering an outside call
An incoming call arrives at your set, accompanied by ringing or a fl ashing button. The telephone display shows the ringing outside line or the
calling party's number or the DID NAME/MESSAGE (if defined). See
the Administration manual.
3-31
Page 59

76-110-0165/G, Issue 1
All sets Do one of the following:
NOTE
The DIGITAL system, if programmed with the
CLIP feature (see Administration manual), can
support Caller Name and Cal ler Identificati on display.
1. Press the flashing appearance button for the ringing call,
or
Press [SPKR] (sets with speakerphone only),
or
Lift your handset.
Display sets show the elapsed time and the outside line number.
- You are connected to the outside line.
2. Begin your conversation.
You can answer a call on a line that does not ring at your set, but has
an appearance (flashing indicator), by pressing the flashing button.
When an outside line rings at your set, a number of other reactions may
be noted at your set. The appearance indicator will flash for the appropriate line, outside line group or assigned floating button. The Avanti
3025/3020 sets will provide a worktable soft key appearance for the ringing call (Example:
RING 8001
).
All display sets show
CO
, the name of the outside line or outside line
group or its DN. The call may ring, and i ndicators may l ight, at o ther extensions too.
These extensions may also answer the call.
Executive Suite application for incoming calls
If your extension is programmed for th e Executive Suite application, you
will be able to handle incoming calls efficiently for a number of organizations. For each incoming call, an appropriate name or message appears on your display indicating for which organization the arriving call
is intended. With this information, you can answer the call as a representative of the appropriate organization.
3.12.4 Answering a call camped on at your extension
If an extension user wants to transfer a call to you, but your extension
is busy, she can camp on the call at your extensio n (see Secti on 3.14.6
, below). The Avanti 3025/3020 sets provide a worktable softkey appearance for the camp-on call. If so programmed, any set can provide
a flashing appearance on an appropriate outside line, outside line group
or floating button. The visual indi cation may als o be ac companied by a
camp-on tone.
To answer the camp-on call
Avanti 3025/
3020 sets
• Press the worktable softkey associated with the camp-on call
{ 8850}/{CAMP 8850}
(
- Your current ca ll is disconnect ed and the camp-o n call is connec ted.
).
3-32
Page 60

Section 3: AVANTI FAMILY SETS OPERATING INSTRUCTIONS
Any other set
with an appear-
ance button
Any set with no
appearance
button
• Press the flashing appearance button.
- Your current call i s disconnected and the camp-on call is connec ted.
1. Hang up.
- The extension will ring.
2. Lift the handset.
- You are in conversation with the camp-on caller.
To answer the camp-on call without disconnecting
the current call
• Place the current call on hold before answering the camp-on call.
3.12.5 Answering a second incoming call
While you are talking on your set, a second incoming call may ring, arriving on an outside line programmed to ring or recal l at your extension.
If your telephone set is defined as KEY mode and you are talking via
your handset, you will hear a muffled ring through the station speaker.
If you are talking via your speak erphone, no ringing is heard. PBX mode
sets with an available DN will receive a call waiting tone via the speaker,
or via the handset if the extension has no speaker.
The Avanti 3025/3020 sets will show the number of the outside line.
Other sets may have a flashing appearance for the ringing call.
Avanti 3025/
3020 sets
Any other set
with an appear-
ance button
Any set with no
appearance
button
Avanti 3025/
3020 sets
Any other set
with an appear-
ance button
Any set with no
appearance
button
To answer the second call (disconnecting the current call)
• Press the worktable softkey indicating the ringing line
{ 8850}/{RING 8850}
(
• Press the appropriate flashi ng appearance button.
1. Hang up.
- The extension will ring.
2. Lift the handset.
- Your current call is disconnected and you are connected to the
second call.
).
To answer the second call without disconnecting the current call
1. Press [HOLD].
2. Press the worktable softkey indicating the ringing line
{ 8850}/{RING 8850}
(
1. Press [HOLD].
2. Press the flashing appearance button.
1. Press [HOLD].
2. Press [FEATURE] and [3][3].
- You are now connected to the second call.
).
3-33
Page 61

76-110-0165/G, Issue 1
Avanti 3025/
3020 sets
To return to the original call
1. Press [HOLD].
2. Press the worktable softkey for the call left on hold (
{HOLD 8880}
).
{ 8880}/
Any other set
with an appear-
1. Press [HOLD].
2. Press the flashing appearance button for the call left on hold.
ance button
Any set with no
appearance
button
3.12.6 Making an outside line button available
1. Press [HOLD].
2. Press [FEATURE] and [3][3].
- You are now connected to the original call again.
In order to make an outside line group button available, a "floating
button is assigned temporar ily to a specif ic outside li ne (or to one l ine of
an outside line group) which does not hav e a dedi cated but ton o n your
station.
The floating button enables reception of outside calls at those extensions which do not have an appearance for the particular line withi n a
group. Also you may transfer a call from an outside l ine group to a floating button (when on hold), in order to take an outside line from the outside line group on which the call was received and dial out on it. When
more than one incoming call without an indicator rin gs at the extension
at the same time, the system allocates only one flo ating button for those
calls. If one call is taken (by pressi ng the floating butto n or by any other
method) the next defined floating button flashes to remind you of the
next call.
3-34
Allocation of a button is essent ial for call handl ing, such as placing calls
on hold, retrieval from hold, etc.
NOTE
Floating buttons are not relevant for PBX mode
extensions (see Section 3.27, bel ow).
During the conversation:
1. Press [HOLD].
- You will hear dial tone and the outside line group indi cator will
flash at the hold rate.
2. Press an available floating button to transfer the call from the outside line group button to the floating button.
- The call appearance is assigned to the floating button.
- All the call's status indications will appear on the floating button.
3. T a lk to the party.
To retrieve the original call from hold on the floating button
• Press the floating button with the appearance for the call.
- You are connected to the original call.
Page 62

3.13 HOLD
3.13.1 Automatic hold
Section 3: AVANTI FAMILY SETS OPERATING INSTRUCTIONS
While you are in conversation with a caller on an outside line, you can
place the call on hold. You are then free to use your extension for receiving or making other calls, and may perform any dialing operation,
before returning to the outside line that is on hold.
NOTE
PBX mode telephone sets can place internal
calls on hold also. However, an internal call on
hold cannot be transferred. Transfer of internal
calls can only be done using the [TRANSFER]
button.
You can place a call on hold in three different ways:
• Automatic Hold;
• Exclusive Hold;
• Inclusive Hold.
You can transfer a call to another extension without the need to press
the [TRANSFER] button firs t. By simply pressing the MEMORY button
programmed with the number of the request ed extension (Direct Station
Select) or pressing the DN button of the desired extension (see Section
3.27, below), the call is automatical ly placed on hold until the call trans-
fer is completed and the call is picked up.
3.13.2 Exclusive hold
3.13.3 Inclusive hol d
During a conversation on an outside line, yo u can place the call on hold
in such a way that only your extension can rejoin the call (the line appears busy for all other extensions).
•Press [HOLD] once (You may be required to press the
ton twice. Consult your System Administrator).
- You hear dial tone and the line indicat or on any set (if a line button
is allocated) flashes. At all other sets, the respective indicato r
lights red steadily, indicating t he line is busy.
An outside call placed on Inclusi ve hold may be picked up by any extension defined within the group, by selecting and pressin g the r espectiv e
outside line button or using the pickup function.
When a call is transferred with the page function, the out side line is automatically placed on Inclusive hold.
•Press [HOLD] twice (You may be required to press the [HOLD] but-
ton once. Consult your System Administrator).
- You hear dial tone and the indi cator for the li ne on hold flashes at
all sets with an available appearance button.
If you do not rejoin the call on hold within the hold time (defined in the
system setup), the call will automatical ly ring back at your set. If you do
[HOLD] but-
3-35
Page 63

76-110-0165/G, Issue 1
3.13.4 Last hold
not answer within the recall time ( defined i n t he system s etup) , the s ystem will transfer the call to the Attendant position (during day service),
or drop the call (during night service), depending on system setup.
To return to a call on hold from any set where the line is flashing:
• Press the button of the flashing outside line.
To return to the last call which you placed on hold
(if you placed a number of calls on hold)
Avanti 3025/
•Press [PICK UP] and
3020 sets
All other sets
1. Press [PICK UP].
2. Press [FEATURE] (or dial [7])and [L][H] ([5][4]).
- You will be connected to the last call placed on hold.
3.14 TRANSFERRING CALLS
You can transfer an outside call to another extension using any of the
following methods:
• Unannounced;
• Announced;
• Page and Meet me page;
• Confirmed;
• Camp on.
{LAST HOLD}
NOTE
Unannounced, announced and confirmed transfers can be activated to a networked extension.
See Section 6 of the Release 6 Operating Instructions for details.
.
3.14.1 Transferring calls unannounced
If you are talking on an outside call, you may transfer it to another extension without announcing it as follows:
All sets 1. Press [TRANSFER].
- Dial tone is heard.
2. Dial the required extension number.
3. Hang up.
- The call is transferred automatically.
3.14.2 Announcing a call prior to transfer
You may wish to notify the intended party before transferri ng the call.
This is called a screened transfer.
3-36
Page 64

Section 3: AVANTI FAMILY SETS OPERATING INSTRUCTIONS
Follow the procedure above, but bef ore you hang up, wai t for the extension to answer.
When the extension user answers, announce the call.
If the intended party wishes to accept the call:
• Hang up.
- The call is transferred automatically.
NOTE
Calls can be transferred to a hunt group. To do
so, follow the procedures described above, and
dial the hunt group access code instead of the
specific extension number. (see Section 3.24,
below).
Calls can be forwarded to an Automated Call Distribution (ACD) plan. Fo r detail s, see Syst em Administrator.
If the required extension party is busy, you can perform call camp-on
(see Section 3.14.6, below) to the extension by hanging up. When the
extension becomes available, the camped-on call will ring.
Avanti 3025/
3020 sets
Any other set
with an appear-
ance button
Any other set
with no appear-
ance button)
If you don't want to camp the call on to the busy extension:
•Press [FLASH].
- The call remains on hold at your extension and you hear dial tone.
You will be able to try the transfer again (as long as the outsi de
party remains connected).
To return to the outside caller
If the party does not accept the call or there i s no answer, return to the
call, as follow s :
• Press the worktable softkey for the call left on hold
{ 8880}/{HOLD 8880}
(
• Press the flashing appearance button for the outside line on hold.
- You are reconnected to the outside party.
•Press [PICK UP] and then [HOLD].
- You are reconnected to the outside party.
Depending on system setup, if you t ransferred the call unscreened and
the called extension does not answer, it may ring back at the Att endant
console after a set time (during day programmed service), or at your extension (during night se rvice) . In ei ther ca se, if t he call is not ans wered
within the programmed recall time, it will be dropped.
).
3.14.3 Transferring a call using page
If you are not sure where the requested person is located, you can
transfer the call by paging. Up to eight internal page zones and eig ht ex-
3-37
Page 65

76-110-0165/G, Issue 1
ternal pages may be defined within the system.
1. Press [TRANSFER] and dial the appropriate internal or external
page zone access code.
- The call is placed automati cally on inclusive hold.
- The telephone display
- An outside line indicat or will flash at all extensions that have a but-
2. Listen for a double tone burst.
3. Announce the call, mentioning on which line the call is waiting.
4. Hang up.
- The call may now be picked up at any extension (see Section
3.14.4 Meet me page transfer
The Meet me page feature gives the paged party a chance to consult
you before taking (or refusing) the call.
the zone number.
ton for that line.
3.15, below ).
shows the outside line number,
PAGE
and
3.14.5 Confirmed transfer
• The paged party performs a meet me page pickup (see Section
3.15.4, below) after you announce the call, but before you hang up.
- The paged party can now speak with you.
If the party wishes to take the call:
• Hang up.
- The call is transferred.
If the party does not want the call:
• Press the flashing out side line indic ator or press [PICK UP] fol lowed
by [HOLD].
- You will be reconnected to the outside party.
If the call is not picked up after a preset time, it wi ll ring back at your extension. If you do not answer, the call will be routed to the attendant console (in Day service), or dropped (in Night service), depending on how
the system is programmed.
Private outside lines (no t associated with any Attendant posi tion) are totally independent and will not recall an Attendant position, but will continue ringing at the intended extension.
To confirm that a transfer is successfully completed
1. Press [CONFERENCE].
- The caller is placed on hold.
2. Dial the required extension.
When the party answers:
1. Announce the call.
2. Press [CONFERENCE].
- You will now hear both parties.
3-38
Page 66

3.14.6 Camp on
3.15 CALL PICK UP
Section 3: AVANTI FAMILY SETS OPERATING INSTRUCTIONS
- The transfer is confirmed.
3. Hang up.
If the required extension is busy when you attempt to transfer the call,
you can camp on the call at the extension.
To camp an incoming call on a busy extension
(After having attempted to transfer the call as descr ibed above and
hearing busy tone)
• Hang up.
- The extension called will hear a camp-on tone.
- The call will ring the required extension as soon as it becomes
available.
To answer a call camped on at your extension, see Section 3.12.4,
above.
If a call is ringing or on hold at another ex tension, or if s omeone has announced that there is a call waiting for you, you can pick u p that call
your set, unless your extension is r est ricte d fr om access t o the outside
line which you are attempting to pick up .
To pick up a call ringing at another extension
(e.g. internal ringing, reca ll ringing, etc. Trunk queue excluded
All sets •Press [P ICK UP].
- Display telephones show
To complete the pickup:
• Dial the number of the ringing extension.
- You are now connected to the call initiator.
- Display telephones show the number of the call initi ator.
To pick up outside calls
All sets •Press [P ICK UP].
- Display telephones show
To complete the pickup:
• Dial the directory number of the extension where the ca ll is ringing or
hold,
on
or
Dial the number of the outside line.
- You are now connected to the line. Display telephones show the
outside line number or name and the elapsed call time.
from
)
PICK UP.
PICK UP.
3-39
Page 67

76-110-0165/G, Issue 1
3.15.1 Group pickup
All sets •Press [PICK UP].
If
your extension is defined as belonging to a pickup group, you may re-
calls ringing or recalling at another extension of your pickup group,
trieve
even if you don't know what extension, outside line or outside line group
the call is on.
If you hear an extension ringing from within your pickup group:
- Display telephones show
PICK UP.
To complete the pickup:
• Dial the ALL access code ( [
{ALL}
).
]). (Avanti 3025/3020/3015D sets press
*
- You are now connected to the caller.
- Display telephones show the name and number of the calling ex-
tension or outside line.
NOTE
If you have programmed a SPEED DIAL or
MEMORY buttons with SYSTEM PICKUP (see
NOTE at end of Section 3.18, below), you can
pick up a call ringing in your group by simply
pressing this button.
3.15.2 Hold pickup
To pick up a call on hold at your extension
Avanti 3025/
• Press the softkey representing the call on hold
3020 sets
All other sets
If the set has a flashing appearance button for the call on hold:
• Press the flashing button for the call on hold.
If there is no appearance for the call on hold:
1. Press [PICK UP].
2. Press [HOLD].
3.15.3 Patch pickup
Picking up an outside line patch
To rejoin a conversation that you set up between two outside parties,
see Section 3.6.4, above.
3.15.4 Meet me page pickup
{ 8850}/{HOLD 8850}
(
).
- You will be connected to the call which was on hold.
- You will be connected to the call which was on hold.
3-40
Picking up a page call using Meet me page
During a page call, you can establish a connection with the page initiator:
1. Lift the handset or press [DND] twice,
Page 68

2. Press [FEATURE] (or dial FEATURE access code) and [6][6].
- The telephone display shows MEET ME PAGE
3. Dial the page zone access code.
- The page call is canceled at all extensions in the page zone.
- You are connected to the page initiator.
- The telephone display shows the page initiator's name or n umber.
If the page initiator has a call on hold, she may transfer it to you by hanging up (see Section 3.14.3, above).
3.16 DO NOT DISTURB (DND)
If you do not wish to be disturbed, you can block the ringing of all calls
arriving at your extension:
•Press [DND] (from onhook state only).
-The [DND] indicator goes on (The icon appears on the second
row of the Avanti 3025 display).
- The telephone display shows the last DND message programmed
(see Section 3.16.1, below).
The [DND] button has a toggle action. It activates the DND feature by
pressing once, and deactivates it by pressing a second ti me.
Section 3: AVANTI FAMILY SETS OPERATING INSTRUCTIONS
3.16.1 DND messages
When DND is activated:
• All announcements to your set are blocked;
• Callers to your extension receive busy tone.;
• The calling extension’s display will show BUSY followed by your directory name or number. If a DND message is programmed, the telephone display shows your DND message;
If a DND forward extension has been defined for your set i n the system
setup, calls to your DN will ring at the programmed forward extensi on,
and your DND message (if programmed is not displayed (see Section
3.16.1, below).
Pressing [DND] during a page call or an HFAB call will cance l the voice
intrusion. If a call left on hold ri ngs back at your set, p ressing [DND] will
cancel the ringing and place the call on hold a second time.
You can program your set to send a text message to the display of another set that calls you while you have DND activated. Ther e are 30 preprogrammed DND messages which you can select, some of which can
be edited, (e.g.
may be inserted. See DND messages, Appendix A, Table A-2, below).
When you activate the DND feature, the current DND message is also
shown on the display of your set.
CALL ME AT
, the asterisks indi cating wher e dig its
*****
Avanti 3025 set
To select a DND message (or replace the existing one)
1. Press the icon
3-41
Page 69

76-110-0165/G, Issue 1
Avanti 3020/
3015D sets
Avanti 3015/
3000 sets
1. Press
2. Press
3. Use
4. Press the softkey adjacent to the desired message. Use the dialpad
5. Press
1. Press [FEATURE] and then [PROGRAM].
2. Press [DND]
3. If you know the number of the message you want to leave, enter the
4. If the message you select requires editing, use the dialpad to enter
5. Hang up.
PROGRAM
- PROGRAMMING appears on the display.
softkey.
{DND MSG}.
- SELECT A MSG: appears on the display.
{NXT SCREEN}
the list of DND messages available.
to edit the message if necessary.
{SAVE}
- Dial tone is heard and the selected message is saved.
appropriate two-digit (01 to 30) message code via the dialpad (see
DND messages, Appendix A, Table A-2).
the digits (room number, time etc.)
- The message selected is saved.
to save the message.
Pressing [FLASH] at any time during the DND
message selection procedure wil l abort the operation.
(3025 use scrolling icon ) to scroll th rough
NOTE
All sets 1. Press [DND].
All sets 1. Press [DND].
Avanti 3025 set
To activate the DND message
-The
[DND] indicator lights, the selected DND message appears
on display sets, and th e message will be received by a ny displ ay
set which calls you.
To resume normal service
-The [DND] indicator goes off and the DND message disappears
(on display sets).
To delete a specific DND message
You can delete the current DND message without selecting a new one.
In this case, the display on the calling telephone set will show
lowed by your directory name or number.
1. Press
- Display shows CANCEL.
2. Press the
- Display shows CANCEL PROG.
3. Press
{CANCEL}
icon
{DND MSG}
.
.
BUSY
fol-
3-42
Page 70

Section 3: AVANTI FAMILY SETS OPERATING INSTRUCTIONS
All other sets
1. Press [#].
- Display sets show
2. Press [PROGRAM].
- Display sets show
3. Press [DND].
3.17 CALL FORWARDING
There are three ways of forwarding calls to another destination:
CALL FORWARD - forwards calls without them ringing at your extension;
CALL FORWARD BUSY - forwards calls arriving at your telephone
when your telephone is busy;
CALL FORWARD NO ANSWER - forwards calls which ring at your telephone and are not answered within the preset time.
For each of the three types of call forward, you can have different call
forward destinations for inte rnal and external calls, or you can have all
calls forwarded to the same destination.
CANCEL
CANCEL PROG
NOTES
1. Depending on system programming, calls can
be forwarded to an ext ension, attendant, hunt
group, MDN, ACD plan or to an outside number.
2. If your telephone set is defined as PBX mode,
call forward is defined per DN button. The procedure is slightly diff erent, as indicated below.
3. In the instructions below, the destination extension, attendant, hunt group and MDN numbers are all referred to as the forwarding DN.
4. Call forward and DND cannot be activated simultaneously.
An outside number for forwarding calls must be programmed via a
speed dial code or speed dial button.
WARNING
If the number programmed for this speed dial
code or speed dial button i s changed, calls will be
forwarded to the new number.
3-43
Page 71

76-110-0165/G, Issue 1
Avanti 3025
and 3020 sets
To program call forwarding
(PBX sets: First press the DN button for which you want your calls for-
warded. Then:)
1. Press
2. Press the appropriate softkey to select the type of call forward that
you want to program -
3. Press the appropriate softkey to select the type of calls that you
want to forward -
- The programmed destination appears (if alr eady programmed).
4. Dial the desired forwarding DN or speed dial code, or press an
appropriate forwarding speed dial or memory button.
5. Press
If you programmed Call Forward All:
• Key mode sets: The [DND] button flashes red and a reminder bro-
ken dial tone is heard when you go offhook.
• PBX mode sets: The DN button p rogrammed with call f orward flash-
es red and a reminder broken dial tone is heard when you access this
DN.
CALL FORWARD
If you are authorized, you can execute call forwarding for all your DNs at once. If so, press the
CALL FORWARD
which only appears on authorized sets).
{ALL}, {INT}
{EXIT}
(Avanti 3025: press icon) to return to idle.
softkey
NOTE
softkey and then
{FWD DNS}
{CALL FWD}, {BUSY}
{EXT}
or
.
{NOANS}
or
.
All other sets
Each call forward type is activated by dialing a feature access code or
by pressing programmable buttons to desi gnate the type of call for ward
and the type of calls to be forwarded (ALL/INT/EXT).
The default CALL FORWARD access codes are:
CALL FORWARD - [FEATURE][3] [5]
or
Press [SPKR] and then [DND]
CALL FORWARD BUSY - [FEAT U RE] [3] [2]
CALL FORWARD NO ANSWER - [FEATURE] [3] [6]
When forwarding calls, t he forward code is followed by a cod e designating the type of calls to be forwarded (ALL/INT/EXT). This code is not entered if it has been already programmed on a speed dial button. The
codes designating the type of call to be forwarded:
ALL calls
(both internal and external) [2].
EXT (external) [3].
INT (internal) [4].
NOTE
Your telephone set may have a predefined button for a particular call forwarding method (Example: CALL FORWARD BUSY INTERNAL).
3-44
Page 72

Section 3: AVANTI FAMILY SETS OPERATING INSTRUCTIONS
Buttons marked [CA AL] and [CY AL] are default-programmed for ALL call s (both internal and
external).
To forward all calls (both internal and external)
to an internal destination:
1. If you are programming a specific DN button on a PBX mode set,
first press the desired DN button. Otherwise, skip to the next step.
2. Dial one of the CALL FORWARD acce ss codes followed by [2],
or
Press a button programmed for forwarding ALL calls (Example:
CALL FORWARD NO ANSWER ALL)
3. Dial the desired forwarding DN or speed dial code, or press an
appropriate forwarding speed dial or memory button.
- Key mode sets: The [DND] button flashes red and a reminder
broken dial tone is heard when you go offhook.
- PBX mode sets: The DN button programmed with call forward
flashes red and a reminder broken dial to ne is heard when you access this DN.
To forward external calls
1. If you are programming a specific DN button on a PBX mode set,
first press the desired DN button. Otherwise, skip to the next step.
2. Dial one of the CALL FORWARD acce ss codes followed by [3],
or
Press a button programmed for forwarding EXTERNAL calls (Example: CALL FORWARD BUSY EXTERNAL).
3. Dial the desired forwarding DN or speed dial code, or press an
appropriate forwarding speed dial or memory button.
To forward internal calls
1. If you are programming a specific DN button on a PBX mode set,
first press the desired DN button. Otherwise, skip to the next step.
2. Dial one of the CALL FORWARD acce ss codes followed by [4],
or
Press a button programmed for forwarding INTERNAL calls (Example: CALL FORWARD INTERNAL).
3. Dial the desired forwarding DN or speed dial code, or press an
appropriate forwarding speed dial or memory button.
WARNING
If you later change the number programmed for a
forwarding speed dial co de or button, calls will be
forwarded to the new number.
Avanti 3025 set
To cancel call forward programming
PBX mode sets:
1. Follow the procedure above (steps 1 to 2) for programming call for-
3-45
Page 73

76-110-0165/G, Issue 1
Any other set To cancel call forwarding of all calls:
warding, and then:
2. Press
3. Press
{DELETE}
{EXIT}
- The appropriate DN button stops flashing and set returns to the
idle state.
Key mode sets:
1. Press the flashing [DND] button.
-The [DND] button stops flashing and dial tone returns to the nor-
mal state.
1. If you programmed call forwarding for a specific DN button on a PBX
mode set, first press that DN button. Otherwise, skip to the next
step.
2. Press [#].
3. Dial the CALL FORWARD access codes followed by [2],
or
Press a button programmed for forwarding ALL calls (Example:
CALL FORWARD NO ANSWER ALL).
4. Hang up
NOTE
When Call forward ALL is activated on a key
mode set, the [DND] button flashes. You can
cancel the feature by simply pressi ng the flashing
[DND] button.
To cancel call forwarding of external calls
1. If you programmed call forwarding for a specific DN button on a PBX
mode set, first press that DN button. Otherwise, skip to the next
step.
2. Press [#].
3. Dial the CALL FORWARD access codes followed by [3],
or
Press a button programmed for forwarding EXTERNAL calls (Example: CALL FORWARD BUSY EXTERNAL).
4. Hang up
To cancel call forwarding of internal calls
1. If you programmed call forwarding for a specific DN button on a PBX
mode set, first press that DN button. Otherwise, skip to the next
step.
2. Press [#].
3. Dial the CALL FORWARD access codes followed by [4],
or
Press a button programmed for forwarding INTERNAL calls (Exam-
3-46
Page 74

Avanti 3025/
3020/3015D
sets
Section 3: AVANTI FAMILY SETS OPERATING INSTRUCTIONS
ple: CALL FORWARD INTERNAL).
4. Hang up
Canceling Call forward to me
If another extension has programmed Call forward to your extension
and you want to cancel this status, proceed as follows:
1. Press
2. Press
3. Press
4. . Hang up
{CANCEL}.
{FLW TO ME} ({FL 2ME}
{ALL}
Call forward to your extension
or enter the DN of the extension which programmed
on 3015D.
Any other set
1. Dial the CANCEL access code ([#])
2. Press [FEATURE] or dial the FEATURE access code ([7])
3. Dial the CALL FORWARD access code ([3][5])
4. Dial [8].
5. Dial the DN of the extension which programmed Call forward to your
extension
or
Dial the ALL access code [*] to delete Call forward to me from all
extensions.
6. Hang up
3.18 PROGRAM MING PERSONAL SPEED DIAL NUMBERS
The following procedures describe how to enter a number in your personal speed dial memory library, or to program SPEED DIAL buttons.
The size of your personal speed dial memory (the amount of codes you
can program) is dictated by system setup. Ask your System Administrator how many speed dial numbers and SPEED DIAL buttons have been
allocated to your extension. The personal speed di al memory also affects the Phone Book feature (see Section 5).
3.18.1 Special characters in a speed dial string
There are a few special characters which can be entered in a Speed dial
string, as follows:
TRANSFER - This can only be entered as t he first digit of the string and
is useful for frequent one-touch call transfers. From Avanti 3025/3020/
3015D sets, use the
[TRANSFER] button. An
effect, occupies the equivalent of two digits.
FEATURE FLASH - This is useful when your system is behind a CENTREX or other PABX and you wish to access their special services.
From Avanti 3025/3020/3015D sets, use the
other sets, press [FLASH-SIGNAL] (if defined) or [FEATURE]
[FLASH]. (NOTE: Depending upon system programming, you may
have to press [FLASH] instead). "
{XFER}
softkey. On other sets, use the
X
appears as the first digit of the string and, in
{FLASH SIG}
/"
(slash) appears to represent this
softkey. On
3-47
Page 75

76-110-0165/G, Issue 1
digit in the string and, in effect, occupies the equivalent of two digits.
TONE DIAL - This is used when you are dialing on a line defined as
pulse dialing, but you wish to switch over to tone dialing (e.g. for voice
mail services). From Avanti 3025/3020/3015D sets, use the
AL}
button. On other sets, press [P→T] (Pulse_Tone), otherwise, con-
T
sult your System Administrator.
occupies the equivalent of two digits.
PAUSE - This is used when you want to intr oduce a short timeout in the
middle of dialing for whatever reason (e.g. allowing for reaction time),
but not as the first digit. From Avanti 3025/3020/3015D sets, use the
{PAUSE}
appears to represent this digit in the first four digits of the string. Any
pause entered after the fourth digit appears as an asterisk and all entries thereafter appear as asteri sks during a pr ogramming sess ion an d
do not appear at all in the display procedure (see below) or during
speed dialing. This is useful for entering private numbers.
The speed dial string may include digits (0-9), the cha racters : *, #, and
any of the special characters mentioned above: /, (sl ash)
(blank) or * (pause/hidden).
softkey. On other sets, press [PAUSE]. A blank space (" ")
appears on the display and, in effect,
{TONE DI-
X, T
, and -
All display sets
Avanti 3025/
3020/3015D
sets
The string may include "chai ning". For example, a single string may dial
an outside line code, wait for dial tone and proc eed to dial a subscr iber.
To display a speed dial number(display sets only)
1. Press
- The display shows
2. Dial the speed dial code (3 digits, starting with “0”) or press the corresponding button whose number you want to see.
- The display will show
PROGRAM
for the requested speed dial memory (e.g.
18005551212
On 16-character display sets,
disappear if the string contains more than eight
digits.
softkey (Avanti 3025: Press the icon).
PROGRAMMING
SP
).
, the code and the number programmed
NOTE
.
SP
and the code
SP 003
To enter or change a number
1. Press
- Display shows
2. Press
- Display shows
3. Dial the speed dial code (3 digits, starting with “0”) for one of the
available memories or press the desired SPEED DIAL button.
- Display shows
- If no string was programmed previously, just
PROGRAM
softkey (Avanti 3025: Press the icon)
PROGRAMMING
SPEED DIAL
grammed) the previous speed dial number (e.g.
18005551212
softkey.
SPD
SP
, the speed dial code and (if previously pro-
).
SP
displayed.
SP 003
and the code is
3-48
Page 76

Section 3: AVANTI FAMILY SETS OPERATING INSTRUCTIONS
4. Dial the new number to be stored (up to 16 digits, including t he special characters described above, which are accessed by pressing
{FLASH SIG}, {XFER}, {TONE DIAL}
- Display shows the digits as you enter them.
5. Press
6. Hang up.
{SAVE}
or [PAUSE].
All other sets
1. Press [FEATURE] and then [PROGRAM].
2. Dial the speed dial code (3 digits) for one of the available memories
or press the desired SPEED DIAL button.
3. Dial the new number to be stored (up to 16 digits, including some of
the special characters described above) by pres sing:
[TRANSFER], [PAUSE], [P→T] (if defined), [FLASH-SIGNAL] (if
defined) or [FEATURE][FLASH] (NOTE: Depending upon system
programming, you may have to press [FLASH] instead).
4. Hang up.
NOTES
1. If your extension is defined as the system
speed dial programming extension, then the
same procedure is used, except that you will be
able to program an additional range of speed dial
numbers to be used by defined extensi ons. Consult your System Administrator for details.
2. You can program a SPEED DIAL or a MEMORY button with the SYSTEM PICKUP access
code for one-touch pickup of any call ringing in
your defined pickup group.
3.19 PROGRAM MING MEMORY BUTTONS
You can configure any of the programmable MEMORY buttons, which
are defined by system programming, for one-touch diali ng of internal
extensions or most of the fe ature access codes (see Table 2-2 , above).
The MEMORY button indicator shows the status of the programmed extension (see Table 2-3 , above) or whether the feature represented is
active.
To program a memory button
Avanti 3025/
3020/3015D
sets
All other sets:
1. Press
1. Press [FEATURE] and then [PROGRAM]
- Display sets show
PROGRAM
softkey (Avanti 3025: Press the icon).
PROGRAMMING
.
3-49
Page 77

76-110-0165/G, Issue 1
2. Press the MEMORY button you want to program.
- Display sets show
MEMORY button (each MEMORY button on your set has an assigned number) and the currently programmed extension or f eature (if one exist s ).
3. Dial the new number (extension or feature access code).
- On display sets, the digits (or name of the extension or feature)
appear as they are dialed.
- Hang up.
MEMORY KEY
, the number representing the
To display a number programmed for a MEMORY button
(Display sets only)
All Avanti dis-
1. Press
PROGRAM
softkey (Avanti 3025: Press the icon).
play sets
- Display shows:
2. Press the MEMORY button.
- Display shows the number or name of the extension or feature
programmed for the button.
PROGRAMMING
3.20 SETTING THE ALARM ON YOUR SET
Your set can be used as an alarm clock.
To do so, you preset the time when you want the DIGITAL system to
ring your extension. At the appropr iate time a 15 second continuous ring
Avanti 3025 set
is heard and
ALARM
To set the alarm time
1. Press the icon.
- Display shows
2. Press the icon.
- The display shows
time has been already programmed, but did not ring yet).
3. Enter the alarm time, in the form HHMM. Use two digits (00 through
23) for the hour and two digits (00 through 59) for the minutes (e.g.
3:15 pm would be entered as 1515).
4. Press the
appears on display sets.
PROGRAMMING
icon (or hang up).
.
TIME
(and the current alarm time, if an alarm
3-50
Avanti 3020/
3015D sets
1. Press the
- Display set shows
2. Press [TM].
- The display shows
time has been already programmed, but did not ring yet).
3. Enter the alarm time, in the form HHMM. Use two digits (00 through
23) for the hour and two digits (00 through 59) for the minutes (e.g.
PROGRAM
softkey.
PROGRAMMING
TIME
(and the current alarm time, if an alarm
Page 78

Section 3: AVANTI FAMILY SETS OPERATING INSTRUCTIONS
3:15 pm would be entered as 1515).
4. Press [SR].
Non display
sets
Avanti 3025 set
All other sets
1. Press [FEATURE] (or dial the FEATURE access code) and [8][2].
2. Enter the alarm time, in the form HHMM. Use two digits (00 through
23) for the hour and two digits (00 through 59) for the minutes (e.g.
3:15 pm would be entered as 1515).
3. Press [PROGRAM].
If you want to exit in the middle of the time setting procedure, press
[FLASH].
When the alarm rings, you can stop it either by lifting t he handset, pressing [SPKR] or by pressing [TM] (on sets which have the [TM] button).
You can mute the alarm by pressing [DND]. After the alarm rings, the
programmed alarm time is erased.
To cancel the set alarm time
1. Press
- Display shows
2. Press
1. Press [#].
- Display sets show
2. Press [FEATURE] (or dial the FEATURE access code) and [T][A]
([8][2]).
{CANCEL}.
CANCEL
{TIME ALARM}
.
CANCEL
3-51
Page 79

76-110-0165/G, Issue 1
3.21 ADJUSTING THE VOLUME
The volume of your telephone set speaker and handset can be adjusted, as needed.
Use the [LO HI] button to adjust the spe aker volume during a reg ular
speakerphone call or while you hear dial tone via the speaker. This
same volume setting applies for handsfree answerback (HFAB) calls.
If you are talking via your handset, you can set l evel wi th [LO HI] but-
ton.
While a call is ringing at your ext ension, use the [LO HI] button to ad-
just the ringing volume.
The volume level of the b ackgr ound mus ic may be adjust ed with [LO
HI] button while the extension is connected to background music.
For digital sets, the volume adjustment for each particular feature is
stored in the station memory until changed.
3.21.1 Adjusting the disp lay contrast
Eight contrast levels are available on display set s for viewing ease in
varied lighting conditions and from different viewing angles.
3.22 DOOR UN IT
When your set is idle, use the [LO HI] but ton to adjust the contr ast on
your display. Press HI to darken the text of the display or LO to lighten
it (make sure that Background music is not active).
If the Door Unit option is equipped in your syst em, you may be able to
control the entry of visitors. When someone presses the doorbel l, ring
routed extensions will ring. If you have a display set, the display will
show
DOOR RING
for up to ten seconds. If an extern al page button exists for the ringing door unit, its indicator will flash. You may speak to the
visitor and open the electric door latch.
When someone rings the door unit doorbell:
• Press the blinking [EXT PAGE] (if defined) button or dial the door
unit's external page code.
(If the door unit is pr ogrammed to ring at your st ation, press [SPKR].
- Door unit ringing stops.
-Your [EXT PAGE] button indicator (if defined) goes on
- You are in conversation with the person at the door.
- Display sets show the external page display.
3-52
To open the electric door latch
•Press [
].
*
- The door latch opens.
Page 80

Section 3: AVANTI FAMILY SETS OPERATING INSTRUCTIONS
To end the conversation with the person at the door
•Press [FLASH] or hang up.
- The extension is disconnected from door unit.
- [EXT PAGE] button indicator goes off.
3.23 BACKGROUND MUSIC (BGM)
If equipped, the background music (BGM) feature option allows users
to listen to a source of music, such as a radi o or tape r ecorder, th rough
the station speaker, when your telephone set is not being used. While
you are listening to the music, your extension remains available to receive all calls and other facil ities offered by the system. Background music is temporarily disconnected while the telephone is being used, and
then automatically reconnected when your telephone becomes id le
again.
To listen to background music
If you have a [BGM] button:
• Press [BGM].
- The button indica tor goes on (
and the music source is heard.
If you have no [BGM] button:
•Press [FEATURE] or dial FEATURE access code and [B][M]
([2][6]).
- The music source can be heard.
icon appears on Avanti 3025 set)
3.24 HUNT GROUPS
To cancel background music at your extension
• Repeat the activation procedure.
- You will no longer hear background music. If you have a [BGM]
button, the indicator (and icon on the Avanti 3025) will go off.
Up to 32 extensions may be joined in a hunt group, so that when a call
arrives for the group, it will ring at an extension that is not busy. Ea ch
hunt group is represented by an individual access code (your System
Administrator can supply you with information on the hunt group access
codes in your system).
To place a hunt group internal call
• Dial the appropriate hunt group acc e ss code.
- Ring tone is heard and one of the h unt group member ext ensions
rings.
- If all the extension s of the hunt group are busy, busy tone is heard.
3-53
Page 81

76-110-0165/G, Issue 1
If all members of a hunt group are busy and an external call is transferred unscreened to the group, the call will be campe d on and the first
extension to become available will ring.
An announcer unit, hunt group or Attendant console may be defined as
the call forward busy destination for th e hunt group. When activated, incoming calls will be forwarded to the preprogrammed destinati on.
To answer a call ringing at a hunt group extension
•Press [SPKR] or lift the handset.
To transfer an outside call to a hunt group
1. Press [TRANSFER].
2. Dial the desired hunt group access code.
- Ring tone (or busy tone, as appropri a te) is heard.
3. Hang up.
To make a screened transfer of an outside call to a hunt group
1. Press [TRANSFER].
2. Dial the desired hunt group access code.
3. Wait for the ringing extension to reply.
4. Announce the call.
5. Hang up.
To make use of the callback facility when calling a hunt group, if all
group members are busy, press [QU], and the call will b e queued at one
of the hunt group members.
For more information on transferring calls, see Section 3.14, above.
3-54
Page 82

Section 3: AVANTI FAMILY SETS OPERATING INSTRUCTIONS
3.25 MULTIPLE APPEARANCE DIRECTORY NUMBER (MDN)
Up to 16 ringing extensions plus an unlimited number of flashi ng extensions can be defined as members of an MDN group. Th is means that a
call arriving for the group will cause ringin g at up to 16 of the group's extensions simultaneously, and the MDN indicator will flash at all other extensions defined as members of the group. Any extension within the
group which has a flashing MDN butto n can pick up the call by p ressing
the flashing button. Ringing extensions defined with automatic answer
can simply go offhook. An outside line group may be defined as ringrouted to an MDN group. Also, call forwarding may be programmed toward an MDN group.
To make an internal call to an MDN group
• Dial the desired MDN group access code.
- The extensions of the MDN group ring or flash (as programmed).
- Avanti 3025 sets show MDN name and number.
- Avanti 3020 and 3015D sets show the MDN name.
3.26 FEATURE FLASH
If your system is connected behind CENTREX or another private exchange (PBX), the feature flash option enables you to activate special
services and features which can be obtaine d on lines defined as behin d
the exchange.
3.26.1 Activating an external PABX feature
To signal the exchange and request a service
(after seizing an outside line)
Avanti 3025 set
All other sets
•Press
ming, you may have to press just [FLASH] instead),
•Press [FEATURE] and then [FLASH] (NOTE: Depending upon system programming, you may have to press just [FLASH] instead),
or
Press [FEATURE] and dial the FEATURE FLASH access code.
- Dial tone is heard.
- Display sets show
{FLASH SIG}
. (NOTE: Depending upon system program-
/
(slash) at the current position.
3-55
Page 83

76-110-0165/G, Issue 1
3.27 MULTIPLE STATION APPEARANCE (MSA)
The Multiple Station Appearance (MSA) feature can be programmed to
enable a Telrad telephone set t o ha ndle the c alls of another ex tension.
This is done by means of a button known as a DN (Directory Number)
button, which can be pressed in order to answer calls for the other extension.
3.27.1 Primary DN
Each extension in the MSA mode (or PBX mode) is assigned a DN button with the actual directory number of the extension. This serves as the
extension's Primary DN and is usually the first button in the button arra y,
for the sake of conveni ence. The Pr imary DN butt on is used for placing
and receiving most of the calls associated with the extens ion's DN (except for calls on private outside lines, when defined).
3.27.2 MSA group
An extension may belong to several MSA groups simultaneously - as
many as the number of DN buttons designated for it.
3.27.3 Placing calls
3.27.4 Answering calls
Each MSA group may be one of two types, depending on the type of DN
button represented:
• One type is when the but ton represents the physical (Primary) DN of
another extension.
• The second type is when the button represents a
Virtual DN
which
behaves as if it represents a physical extension, but no extension
has this DN as an actual Primary DN.
A precondition for placing a cal l from an MSA programmed extension is
that an available DN button exists, whether it be the primary DN or another DN.
Whenever a user places a call, a DN button indicator g oes on. Also, the
indicator for the same DN button existi ng anywhere else in the system
also goes on. For indicator rate s, see Table 2-3 , above.
Both internal and outside (Outside line, Outside line group, TIE, DID)
calls are directed via a DN button. A DN but ton (whether pri mary or not)
is programmed to ring and flash or to flash only. When a call is direct ed
to a specific DN, the corresponding DN button at all extensions pro grammed with that DN button will flash, or ring and flash, as required.
Ringing display extensions wi ll a lso show the cal ler' s n umber or name,
if applicable.
To answer the call, ringing extensions can simply press [SPKR] or lift
the handset. Flashing extensions take the call by pressi ng the flashing
DN button first.
3-56
Page 84

3.27.5 Hold
3.27.6 Recall
3.27.7 DN hunting
3.27.8 Hunting station
Section 3: AVANTI FAMILY SETS OPERATING INSTRUCTIONS
A call appearing on a DN button can be placed on hold (inclusive or exclusive). The held call can then be picked up by any other extension with
the same DN button by pressing it, for inclus ive hold, or by pressing the
[PICK UP] button and then the DN button, for exclusive hold.
A recall resulting from the transfer of an external call to a specific DN,
will recall on a free DN but ton at the extension which transferred the call
only.
A call directed to a busy DN receives busy tone, unless a hunting station
is defined (see below). If additional DN buttons are defined, the call is
routed to the first available DN button.
A Hunting station can be assi gned to a n MSA group. The hunti ng station will usually be the primary DN extension.
The programming of the hunting station determines call routing for forwarding and for the DN hunt sequence when the system must find another available DN button, because the called DN was busy.
3.27.9 Individual Call forwarding
Call forwarding on a PBX station is programmed individually for each
DN represented. The forwarding number may be another extensio n, attendant, hunt group, MSA group number or a speed dial memory containing an outside number. A chain of up to five call forward steps are
allowed within the system (That is, Sta tion A forwards to B who forwards
to C who forwards to D who forwards to E).
3.27.10 Call forwarding station
The Call forwarding station is the extension al lowed to progr am call forwarding for an MDN. This may be limited to any, all, or no extensions
from within the MDN group.
3.27.11 Call move
You can move a call to any avail able DN but ton by s imply pressi ng the
other DN button. This is useful when you need to keep a particular DN
button available for other calls.
3-57
Page 85

4.1 GENERAL
Section 4
ATTENDANT CONSOLE
OPERATING INSTRUCTIONS
This section explains the ope ration of t he DIGITAL system Avant i model Attendant console (ATC).
The ATC is a highly sophisticated, extremely flexible uni t, designed to
aid you in routing the various calls which go through the DIGITAL exchange. The ATC units can be programmed in many different configurations. The configurati on of you r p art icular c onsole wi ll d epend o n the
size of your system and your special requirements.
NOTE
Not all of the functions described her ein wi ll ne cessarily be available on your console.
Figure 4-1 Attendant console faceplate
4-1
Page 86

76-110-0165/G, Issue 1
4.2 ATTENDANT CONSOLES AND ATTENDANT POSITIONS
A DIGITAL system supports up to four ATC units. The ATCs can operate
in parallel - in a "logical" Attendant Position (ATP) in which all the ATCs in
the ATP serve the same extensions, outside lines and queues and have
the same button map. While the ATP has a general "dial Attendant" ac-
number (e.g. "0") which rings at all ATCs belonging to that ATP, each
cess
attendant also has its own private extension number (e.g. 20).
Up to four logical ATP units can be defined in the system.
The
concept of Logical Attendant Positions is depicted in Figure 4-2 and
Figure 4-3
Figure 4-2 One logical Attendant Position (four ATCs)
4-2
Page 87

Section 4: ATTENDANT CONSOLE OPERATING INSTRUCTIONS
Figure 4-3 Three logical Attendant Positions (four ATCs)
4.3 CALLS TO THE ATTENDANT
A user who wants to contact an Attendant in the ATP, without caring
which Attendant answers, can simply dial the "dial Attendant" access
number ("0" by default or programmable). However, if the user wishes
to speak to a particular At tendant, she must dial the speci fic Attendant's
extension Directory Number. Such a call is considered a direct call to
that particular ATC.
No matter what activity the ATP is perfo rming, it is never consi der ed in
the busy state. Therefore, a user dialing an Attendant wi ll alway s get a
ring tone.
4.4 ATTENDANT OFFHOOK STATE
The Attendant is always functionally offhook. This means that depr essing the hookswitch or hanging up the handset has no ef fect on operation
and does not disconnect the call in progress.
4-3
Page 88

76-110-0165/G, Issue 1
4.4.1 Dial tone
In general, the Attendant does not hear inter nal dial t one as on e would
expect from a regular telephone set nor does she need to hear it to
make internal calls. When an outside line is selected, the external dial
tone is heard.
4.4.2 Handset and headset
The console may be operated with either a headset or a regular handset.
4.5 USING THE ATTENDANT CONSOLE
4.5.1 Feature activation
At the Attendant console, most features can be activated using
softkeys. Certain features, though, are oper ated by pressing the
[FEATURE] button and dialing a feature access code of up to four
digits.
4.5.2 Mute ring
These instructions assume that your system operates with the default
values for feature access codes.
Features are assigned default two-digit access codes . For example, 24
is the default code for Barge In, which i s accessed by pressing [2][4] on
the dialpad.
If the codes have been alter ed for your system, c onsult your System Administrator for the revised list of codes.
The arrival of a new call is announced by a ring. Also, if an idle Attendant has calls waiting in queues, a cal l waiting tone is sounded at preset
intervals. Both the new call ring and call waiting tones may be disabl ed
using the [MUTE RING] button. The button operates in toggle fashion.
To disable ringing
•Press [MUTE RING
].
- The button's LED indicator lights.
To enable ringing once again
•Press [MUTE RING] again.
- The LED indicator goes off.
4.5.3 Distinctive ringing
4-4
You may be located close to a number of other tel ephone sets. To avoid
confusion when a number of telephones are ringing simultaneously , you
can program your console with a distinctiv e ring. Nine different rings are
available.
Page 89

Section 4: ATTENDANT CONSOLE OPERATING INSTRUCTIONS
To change the ring tone for your console
[
]
1. Press
*
and
[#]
simultaneously.
NOTE
If you have the Voice Dialing option installed,
press
{
Selective Ringing
}
.
- The ring selection screen is displayed.
- The four buttons above the dialpad flas h in pairs, in an alternating
fashion.
2. Press one of the dialpad options (1-9).
- You will hear the sample ring.
3. You can try any of the options.
When you decide which ring you prefer:
1. Press
{
.
}
SAVE
- The display responds SAVED
2. Lift and replace the handset.
- Your console reinitializ es a nd all rin g s (i nternal, external, recall,
etc.) sound with the distinctive ring selected.
4.5.4 To set the volume
The volume of the handset or headset and tones may be changed by
pressing the left si de of the [LO HI] button to reduce the volume, and
the right side of the [LO HI] button to increase the volume.
4.5.5 To set the display contrast
While the console is idle (not in conversation, ringi ng, dialing etc.), press
the appropriate side of the [LO HI] button to change the display contrast.
4.5.6 Dialing digits during a call
The DIGITAL system automatically places an exi sting call on hold when
any digits are dialed. Dial continuation should be used when you want
to dial DTMF digits during an outside call without placing the call on
hold, or to dial internally (for example, when using IMAGEN). When the
dial continuation state is inact ive, any digits pressed are interpret ed internally by the system.
For the most part, dial continuation is activated and deactivated automatically by the system. However, you may need to activate or deactivate dial continuation when transferring calls, setting up conference
calls, and when dialing to Voice Store & Forward systems, answering
machines, etc.
To activate dial continuation
•Press [DIAL CONT].
-The [DIAL CONT] LED indicator lights.
4-5
Page 90

76-110-0165/G, Issue 1
To deactivate dial continuation
•Press [DIAL CONT] again.
4.5.7 To disconnect a call
The [DROP] button is used to disconnect the cons ole from the current
call or process, and to return the console to the previou s stat e.
The [RELEASE] button terminates a call in progress, or completes the
transfer of an outside line. The console is not connect ed to a new call,
but is placed in an inactive state, allowing the Attendant to decide on
any subsequent action.
4.5.8 Call queues
All calls arriving at the ATP join the Main Call queue and wait to be answered in a First-In First-Out (FIFO) order.
In addition, incoming calls to the Attendant may also be routed to spe cial queues (such as the Incoming Call Identifier queues, see Section
4.6.4, below), giving y ou the option to answer cal ls out of the FIFO order
(although each queue has its own FIFO order).
-The [DIAL CONT] LED indicator goes off.
The presence of one or more calls in any one of the queues causes a
green LED indicator to flash on the rel evant queue butt on. To answer a
call from a particular queue, press the queue button. Once the queue
becomes empty of calls, the LED goes off.
In addition, the following q ueues are also ac tive, or are associ ated with
programmable buttons:
Answer ho ld
The Attendant may place incoming call s, received on outside lines, in a
common Attendant position hold queue. Calls held in this queue will be
retrieved in the order that they were placed on hold, using the [AN-
SWER HOLD] button.
Recall
An unanswered call transferred from another a ttendant or extension, or
a call placed in the Hold queue, which is not answered within a preprogrammed waiting time, will re enter the Main Cal l queue and wil l also be
placed in the Recall queue. Calls held i n the common Recall queue may
be answered with the [RCL] button from any Attendant console of the
Attendant position.
Private recall
Recalls intended for a speci fic Attendant console, will be directed to that
Attendant console's Private Recall queue. Calls can be retrieved from
the Attendant's Private Recall queue by pressing the [PRIVATE RCL]
button.
4-6
Page 91

Section 4: ATTENDANT CONSOLE OPERATING INSTRUCTIONS
Private interposition
The Interposition queue holds any ca lls addressed to a pa rticular Att endant console by means of its own directory number, and not by the Attendant access number. The queue is used for transferring calls
between Attendant positions.
Dial Attendant queue
The Dial Attendant Queue holds calls addressed to an Attendant position by dialing the Attendant access number (u sually "0"). The calls may
be accessed, using the [DIAL ATTENDANT] programmable button, on
any of the Attendant consoles making up the Attendant position.
4.6 ANSWERING CALLS
4.6.1 About incoming call indications
The call waiting indication, at the r ight end of the first line of the ATC di splay, flashes with the current number of cal ls waiting ( e.g.
green LED flashes next to the appropriate queue buttons.
CW02
) and a
The term "incoming call" refe rs to ringing calls arriving at the Attendant Console. It includes both
calls arriving from the outside, via outside lines,
and calls from extensions.
4.6.2 Executive suite Attendant
If your console is programmed for the Executi ve Suite application, you
will be able to handle incoming calls efficiently for a number of organizations. For each incoming call, an appropriate name or message appears on your display indicating for which organization the arriving call
is intended. With this information, you can answer the call as a representative of the appropriate organization.
4.6.3 Answering calls from the Main Call queue
Pressing [ANSWER] releases you from your current activity and answers the next ringing call waiting in the Main Call queue on a First-In
First-Out (FIFO) basis. If the Main Call queue is empty, the next call
from the Hold queue is answered.
When a call arrives:
• The console rings if it was idle and i f MUTE RING (see Section 4.5.2,
above) was not activated.
• A green LED flashes on any relevant queue buttons.
-The CW display (calls waiting) in the upper right-hand corner
flashes with the latest count of calls waiti ng.
- The calling extension or outs ide line is identi fied (name, number)
INCOM
and
appears in the display to indicate incomin g ringing.
NOTE
4-7
Page 92

76-110-0165/G, Issue 1
Telrad’s DIGITAL family of systems supports
Caller Name and Caller Identification displ a y for
calls arriving via the public exchange.
To answer the call
•Press [ANSWER] or any flashing queue button.
- The call picked up will be the first call waiting in the queue.
- The number following CW will be decremented by one.
- The outside line ide ntification (CO number) remai ns in the display
and the
- You are connected to the caller.
4.6.4 Answering calls with ICI buttons
Incoming Call Identification (ICI) queues consist of calls from specific
outside lines, outside line groups, busy forwar d hunt groups and ext ensions. The ICI queues will be system-defined according to the impor tance of the callers in the queues. ICI buttons are used to represent
these queues and allow you to give preference to VIP or manager's
calls over other calls.
SERIAL
{
}
and
NOTE
{
FLASH-SIG
}
softkeys appear.
The [DIAL ATTENDANT] and [INTERPOSITION] buttons are specific
types of queue buttons used for answering calls directed to the Attendant;
The [DIAL ATTENDANT] button is used to answer calls from extensions that dialed the dial Attendant access number (for example, "0").
The [INTERPOSITION] button is used for an swering calls to a particul ar
Attendant which were dialed via the specific Attendant's Directory Number (for example, "200").
Green LED indicators flash on the ICI buttons, when calls are in queue.
Pressing an ICI button answers the first call waiting in the associated ICI
queue.
When you press the ICI button associated with the call you wish to an-
swer:
- The number following CW will be decremented by one.
- For an outside call , the outside line number remains in the display,
SERIAL
and the
{
- For an internal call, STN (directory name and number)
pears (e.g.
}
softkey appears.
STN LORI 243 CONV
CONV
ap-
).
- The conversation is established.
4.6.5 Answering recalls
4-8
Various types of calls e nter the Recall queue. These include calls whi ch
have been in the main Hold queue f or lon ger than the s pecified syst em
timeout, and were transferred to Recall . The flashing green LED on the
[RCL] button indicates the presence of at least one call in this queue.
Page 93

Section 4: ATTENDANT CONSOLE OPERATING INSTRUCTIONS
To connect to a call in the Recall queue
•Press [RCL
- The connection is established.
4.6.6 Answering Private Recalls
Certain calls, such as serial calls which have returned from an extension, enter the Private Recall queue. A flashing LED on the [PRIVATE
RCL] button indicates the presence of at least one call in this queue.
To connect to a call in the Private Recall queue
•Press [PRIVATE RCL].
- The connection is established.
4.7 PLACING CALLS ON HOLD
Outside calls may be placed on hold either automatically or manually.
4.7.1 Automatic hold
Automatic hold is activated when you are on an outside call and then
dial any digit, or press [TONE], [SPEED DIAL], a MEMORY button, or
[
PAGE].
].
4.7.2 Manual hold
4.7.3 Private hold
Manual hold is activated when you press [HOLD].
When a call is on hold, the green LED on the [ANSWER HOLD] button
flashes. Any Attendant in the ATP can answer the call on hold.
To pick up a call in the main Hold queue
•Press [ANSWER HOLD
- Connection is established with the next party in the queue.
If the call is not picked up, it will be sent to the ATP Recall queue.
If you want an outside call to remain on hold at your console only, plac e
the call on private hold:
• Press an available private hold softkey (on the right of the display
panel).
- The softkey will be all ocated as Private hold for the curr ent call (in
the adjacent display field).
After a while, recall ringing will arrive.
].
To retrieve a call from private hold (on hold or recalling)
• Press the displayed private hold softkey.
- Connection is established with the corresponding party.
4-9
Page 94

76-110-0165/G, Issue 1
4.8 TRANSFERRING CALLS
4.8.1 To transfer internal calls
1. Dial the desired extension number.
- If you wish to transfer the call screened (announc ed), wait fo r the
extension to answer.
2. Press [RELEASE
4.8.2 To transfer external calls
There are several methods for transferring a call to another extension:
• Screened;
• Unscreened
• Confirmed;
• Serial;
• Camp-on;
• Page transfer.
NOTE
The private hold function is not a queue: only one
call may be held under each particular private
hold softkey.
NOTE
The [TRANSFER/CONFERENCE] button is not
used for call transfer.
].
NOTE
If you are transferring an outside call which you
initiated, press the [DIAL CONT] button, if its
LED is off, before dialing the extension.
4-10
Unannounced, announced and confirmed transfers can be activated to a networked extension.
See Section 6 of the Release 6 Operating Instructions for details.
To transfer an outside call screened
1. Dial the requested extension or press the extension's MEMORY button.
- The outside call is automatically placed on hold.
- An appropriate softkey appears for the outside line (e.g.
8880
).
SPLT
2. Inform the answering party that a call is waiting.
If the called party is ready to accept the call:
1. Press [RELEASE
].
- The call is transferred.
or,
- If the called party is not ready to accept the call:
Page 95

Section 4: ATTENDANT CONSOLE OPERATING INSTRUCTIONS
2. Press the appropriate softkey to reconnect to the calling party.
If you now want to transfer the call to someone else (after the called party hangs up and you hear dial tone):
1. Press [DROP].
2. Dial another party.
To transfer an outside call unscreened
1. Dial the extension requested.
- The outside call is automatically placed on hold.
2. Press [RELEASE] to connect the outside line with the extension.
- If the called extension is busy, the call will be camped on at the
extension.
If the call is not answered:
• Dial tone is heard and the softkey for t he line on hold remains displayed.
To make a confirmed transfer
• Dial the required extension.
- The external party is placed on hold.
When the extension answers:
}
{
JOIN
•Press
.
- You hear a short beep indicati ng a conference has been ini tiated.
- Both parties are connected with you in a three-way confer ence.
- The other two parties are identified on the display.
When you are satisfied that the two parties are connected:
• Press the [RELEASE] button to leave the conference.
4.8.3 Serial transfer
A serial transfer enables you to transfer an outside cal ler to several extensions, one after the other, if the call er initia lly notif ies you that s he is
interested in speaking to several people.
When the first called e xtension hangs up, the call au tomatica lly retu rns
to the Attendant. The Attendant can then transfe r the caller to othe r extensions.
To transfer a call with serial transfer
1. Press
{SERIAL}.
2. Dial the first extension number requested.
3. Press [RELEASE].
When this conversation is finished, the Attenda nt is recall ed via the Private Recall queue; outside line number
SERIAL
appears in the display.
To return to the outside call and transfer it again
1. Press [PRIVATE RCL] to return to the outside call.
4-11
Page 96

76-110-0165/G, Issue 1
2. Press
3. Dial the next requested extension.
4. Repeat the above procedure as necessary.
4.8.4 To camp-on an outside call
The Attendant may camp an incoming call on a busy extension, completing the transfer by pres sing t he f ixed [RELEASE] button. The busy
extension receives a tone to indicate that a call is waitin g. The camp on
tone is heard via the extension's speaker, on dual audio path st ations.
On single audio path (SAP) stations, or dual audio pat h (DAP) st ations
programmed as SAP, the camp on tone is heard via the extension handset. When the extension to which the call is transferred hangs up, the
camped on call rings.
• Dial the required extension.
When you hear busy tone:
•Press [RELEASE] to camp on the call at the extension.
4.8.5 Page transfer
If an outside call arrives for someone who is not at her extension, you
may make a page call and announce the call to any of the internal or
external paging zones. The paged party can then retri e ve the call or
connect to the Attendant (using Meet Me page) and have the cal l transferred.
{
SERIAL
}
again.
To announce the call
1. Press [FEATURE] and dial the page zone code or press a PAGE
2. Press [RELEASE].
4.9 INTERNAL CALLS
To make an internal ringing call
•Press [TONE] and dial the number of the extension or press the c or-
4.9.1 Handsfree calls
In a handsfree call, the telephone does not ring. Inst ead, a single tone
burst is heard through the receiving telephone set' s speaker, after which
NOTE
To implement page transfer to another networked DIGITAL system extension, see
Section 6.4.
button or a speed dial butt on programmed with the page zone code.
- Announce who the call is for and on which line it is.
- The call can now be retrieved from any extension.
responding MEMORY button.
- The ring tone is heard and the extension name and number ap-
pear in the display, followed by
RING
TOM 233 RING
(e.g.
).
4-12
Page 97

4.9.2 Callback
Section 4: ATTENDANT CONSOLE OPERATING INSTRUCTIONS
a conversation is establishe d and the cal led party may t alk back via the
set's microphone, without lifting the handset.
To make a handsfree call
NOTE
You may have to dial the INTRUSION code first
(default=
[6]
). Consult your System Administra-
tor.
• Dial the extension number,
or
Press the MEMORY button programmed with the extension's number.
- You hear a beep and
number appears on your display (e.g.
HF
followed by the extension's name and
HF RITA 346
).
- The call arrives at the extension as a handsfree call.
If the extension you dialed is busy, you can have the system call you
back, when the dialed extension becomes available.
NOTE
This feature can be activated toward an extension of another networked DIGITAL system. See
also Section 6.4.
After you hear busy tone:
•Press
{
CALL BACK
}
.
- When the extension becomes avail able, the system automatically
rings the Attendant position, so long as the Private Reca ll queue
is empty.
- The callback is indicated on the display (e.g.
544
).
CALL BACK PETE
To answer the callback ring
•Press [PRIVATE RCL
].
When you answer, the system rings the previously busy extension.
When the party answers, you are connected in a regular internal conversation with the extension.
If you wish to cancel the callback before the extension becomes available:
•Press
{
CNCL CBACK
}
.
4.9.3 Barge-in
If you try to contact an extension and get busy tone, you may be able to
barge into the extension's current call , subject to system programming.
If necessary, you can then disconnect the parties.
After hearing the busy signal:
•Press
{
BARGE IN
}
.
4-13
Page 98

76-110-0165/G, Issue 1
4.10 PAGE
- You will be connected to the extension's current call.
- A periodic barge-in tone wi ll be heard by all parties for the du ration
of the barge-in call.
To disconnect the parties
•Press [DROP].
To leave the conversation without disconnecting the parties
•Press [RELEASE].
You can use the console for making page an nouncements through one
of the internal or external page zones.
NOTE
To activate page toward a networked DIGITAL
system, a prefix must be dialed first (see Section
6.4.6).
1. Press [FEATURE] and dial the page zone code (or press the desired
[
PAGE] or [EX. PAGE] button).
- The display shows
- A double tone burst is heard.
2. Make your announcement, after you hear the tone burst
When you finish your announcement:
•Press [RELEASE].
4.11 OUTSIDE CALLS
An outside call can be made via an outside line group, private outside
line, or via Least Cost Routing (LCR).
One or more of the programmable buttons of the console may be designated as OUTSIDE LINE GROUP buttons.
Depending on system programming, either the cost of the call or the
message units will be displayed.
4.11.1 Making an outside call
zone dialed.
PAGE
followed by the number of the page
4-14
To make an outside call
1. Press an OUTSIDE LINE GROUP button, dial the LCR access code
(usually “9”), or dial a private outside line or outside l ine group access
code.
- External dial tone is heard.
Page 99

Section 4: ATTENDANT CONSOLE OPERATING INSTRUCTIONS
2. Dial the number.
- Dial tone stops as the first digit is dialed.
- The dialed digits start to appear at t he right hand co rner of the dis-
play.
- Once the called party responds (or a predefined system timeout
expires), the outside line number appears on the first line of the
display, and the elapsed time counter (to s how the duration of the
call) and call cost appear on the second line of the display.
4.11.2 If no outside lines are availab le
If the LED on the OUTSIDE LINE GROUP button light s, no outside lines
in the associated outside line group are available. If you try to seize a
busy outside line, the display shows the number of the ex tension u sing
the outside line, the extension's state and the line number (see Busy
Verification, Section 4.22, below). The
well
.
You may reserve an outside line so t hat when the outside line, or an outside line in an outside line group becomes available, the system will inform you.
{TKQUE}
softkey appears as
To reserve an outside line when none is available
1. Press
TKQUE
}
.
{
- When an outside line becomes available, if your Private Recall
queue is empty, ringing is heard. The outside line number, followed by
TKQUE
appears in the display, and a green LED lights
on the [PRIVATE RCL] button.
2. Press [PRIVATE RCL].
- You will hear external dial ton e.
3. Proceed to dial the external number.
To cancel a trunk queue request
•Press
{
CNCL TKQUE
}.
4.11.3 To disconnect a call without losing the line
When connected to an outside line, be it during the course of a call or
during dialing, you may disconnect the call, or cancel the dialing, without losing the outside line.
To disconnect a call in progress while retaining the line
•Press [FLASH].
- There will be a momentary disconnection. Then dial tone will be
heard, indicating that the outside line is available.
4.11.4 Controlling Caller Identification with ISDN outside lines
• When you are placing a c all using an ISDN outside li ne, the receiving
end may see your line identification number. This is called Calling
Line Identification Presentation ( CLIP). Whether the call ing line identification number is presented (CLIP) or re stricted (CLIR) depends on
4-15
Page 100

76-110-0165/G, Issue 1
the Class of Service (COS) assigned to your extension (see the Administration manual). If you want to restrict the appearance of this
number use the Calling Line Identifica tion Restriction ( CLIR) feature
as follows:
1. Dial the CLIR access code.
2. Access the outside line and dial the desired number.
To cancel the restriction
{
1. Press
CANCEL
}.
2. Dial the CLIR access code.
3. Access the outside line and dial the desired number.
NOTE
Whether the calling line identification number is
presented (CLIP) or restricted (CLIR) depends
on the Class of Service (COS) assigned to your
extension (see the Administration manual). The
COS programming can be overridden on a callby-call basis by using the CLIR and CANCEL
CLIR features before dialing a call. If the COS
does not restrict calling line identification, you
can use the CLIR feature to restri ct an indivi dual
call. If the COS imposes CLIR, you can use the
CANCEL CLIR feature to allow CLIP for an individual call. Once you hang up, the system returns
to the method that is programmed for your COS.
4.11.5 Activating exte rnal PABX features
The feature flash option enables you to activate special services and
features which can be obtained on lines defined as behind the exchange. This is applicable when the system is connected to another
PABX or Centrex exchange.
To signal the exchange and request a service
(after seizing an outside line)
{
•Press
FLASH-SIG
- Dial tone is heard.
- Display shows / (slash) at the current position.
Feature flash may be included in a Speed dial,
Redial, Save repeat or ARD string.
4.11.6 Tone dialing
The Tone dial feature allows you to switch to DTMF dialing, on a pulse
outside line call. This is useful for accessing certain carr ier services and
external equipment (e.g. answering machine).
To switch to DTMF dialing while connected to an outside line
{
•Press
TONE DIAL
}
.
NOTE
}
or [P→T] button (if defined).
4-16
 Loading...