

Zephyr Xport
Field Audio Transceiver
USER’S GUIDE
Manual Version 1.0 for software version 1.0 and later
17 February, 2003
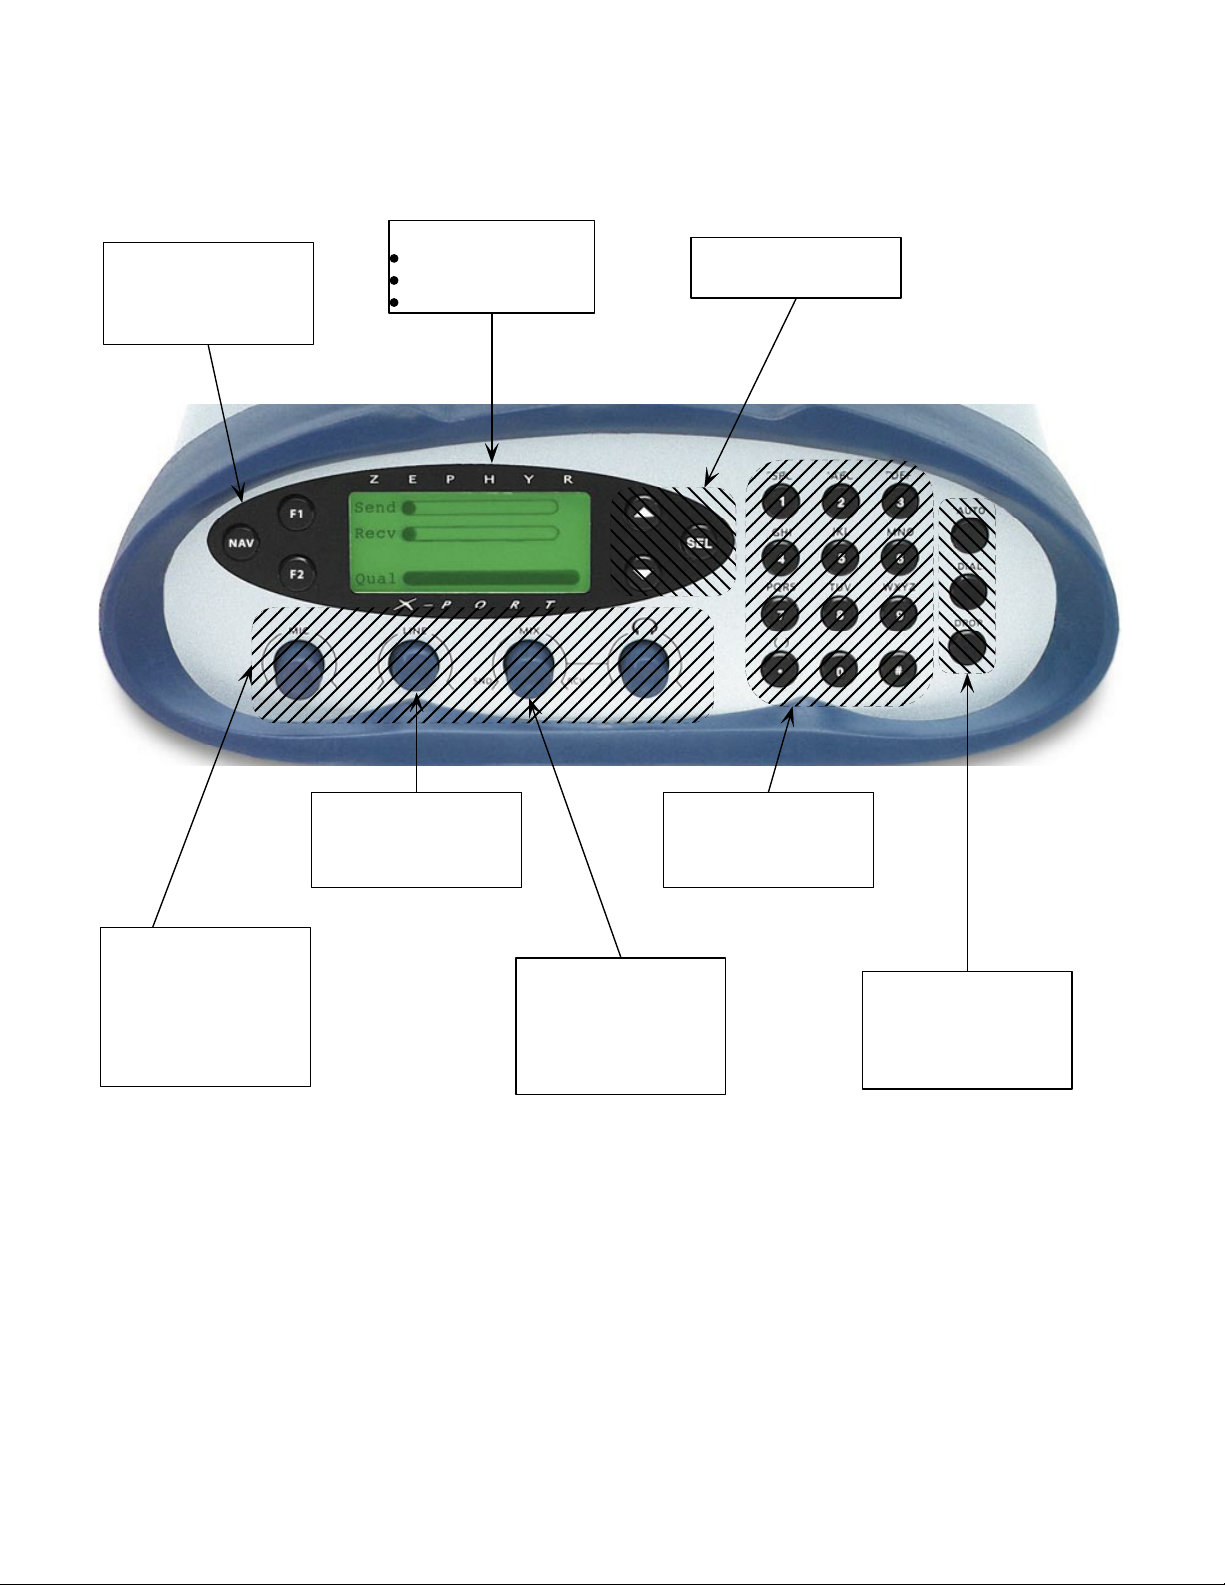
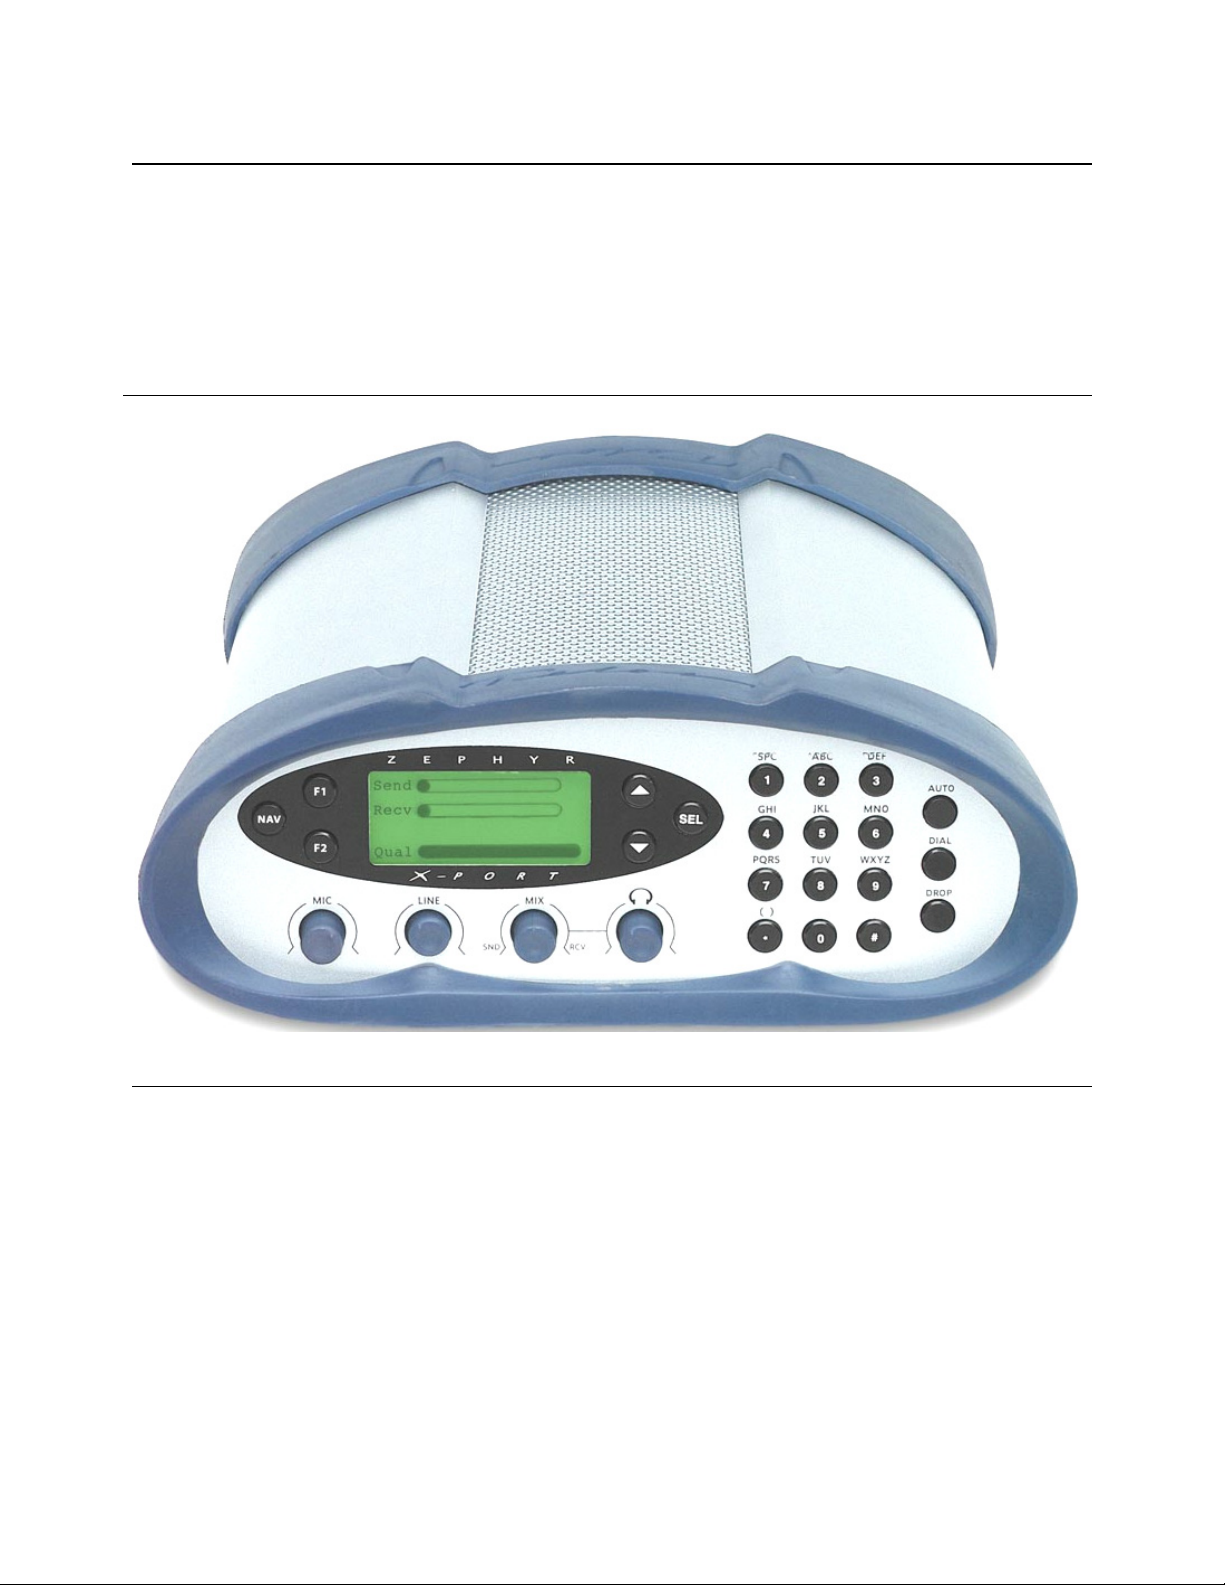
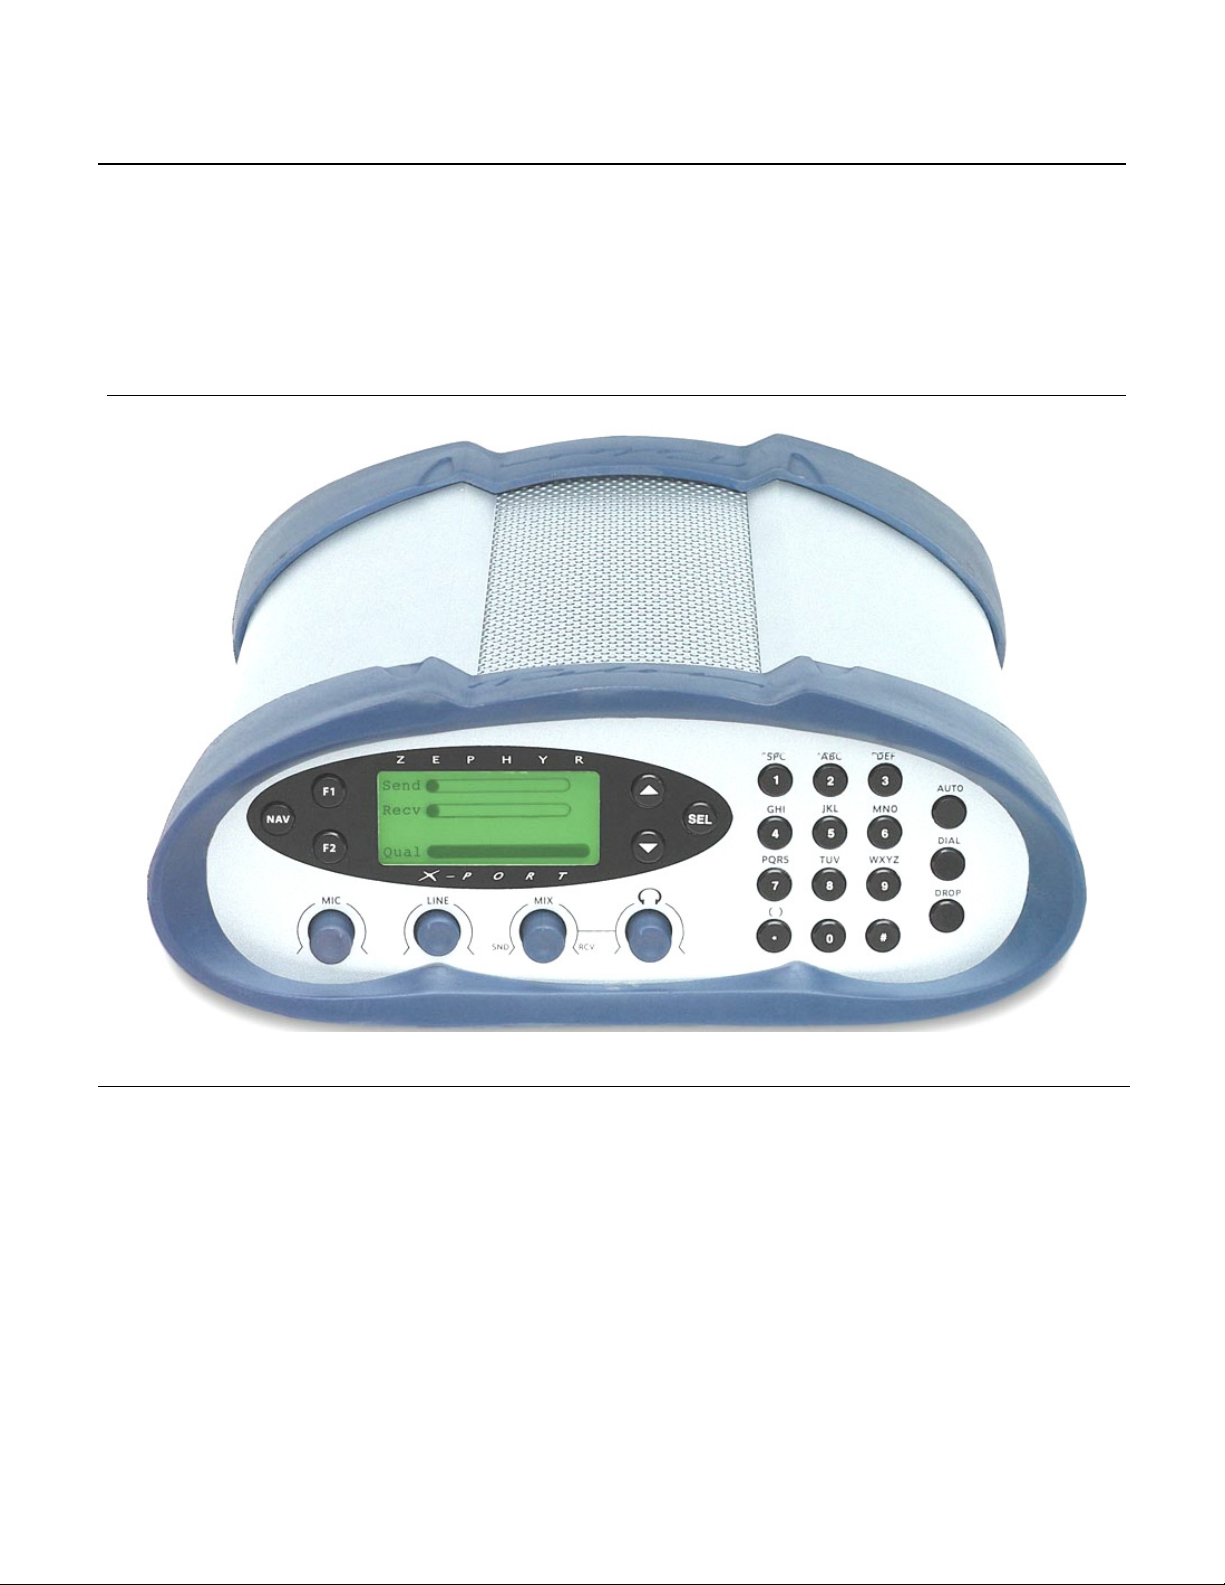
The Xport's Front Panel
NAV Key
Allows for easy menu access.
NAV also acts as an "escape"
key when in a menu s election.
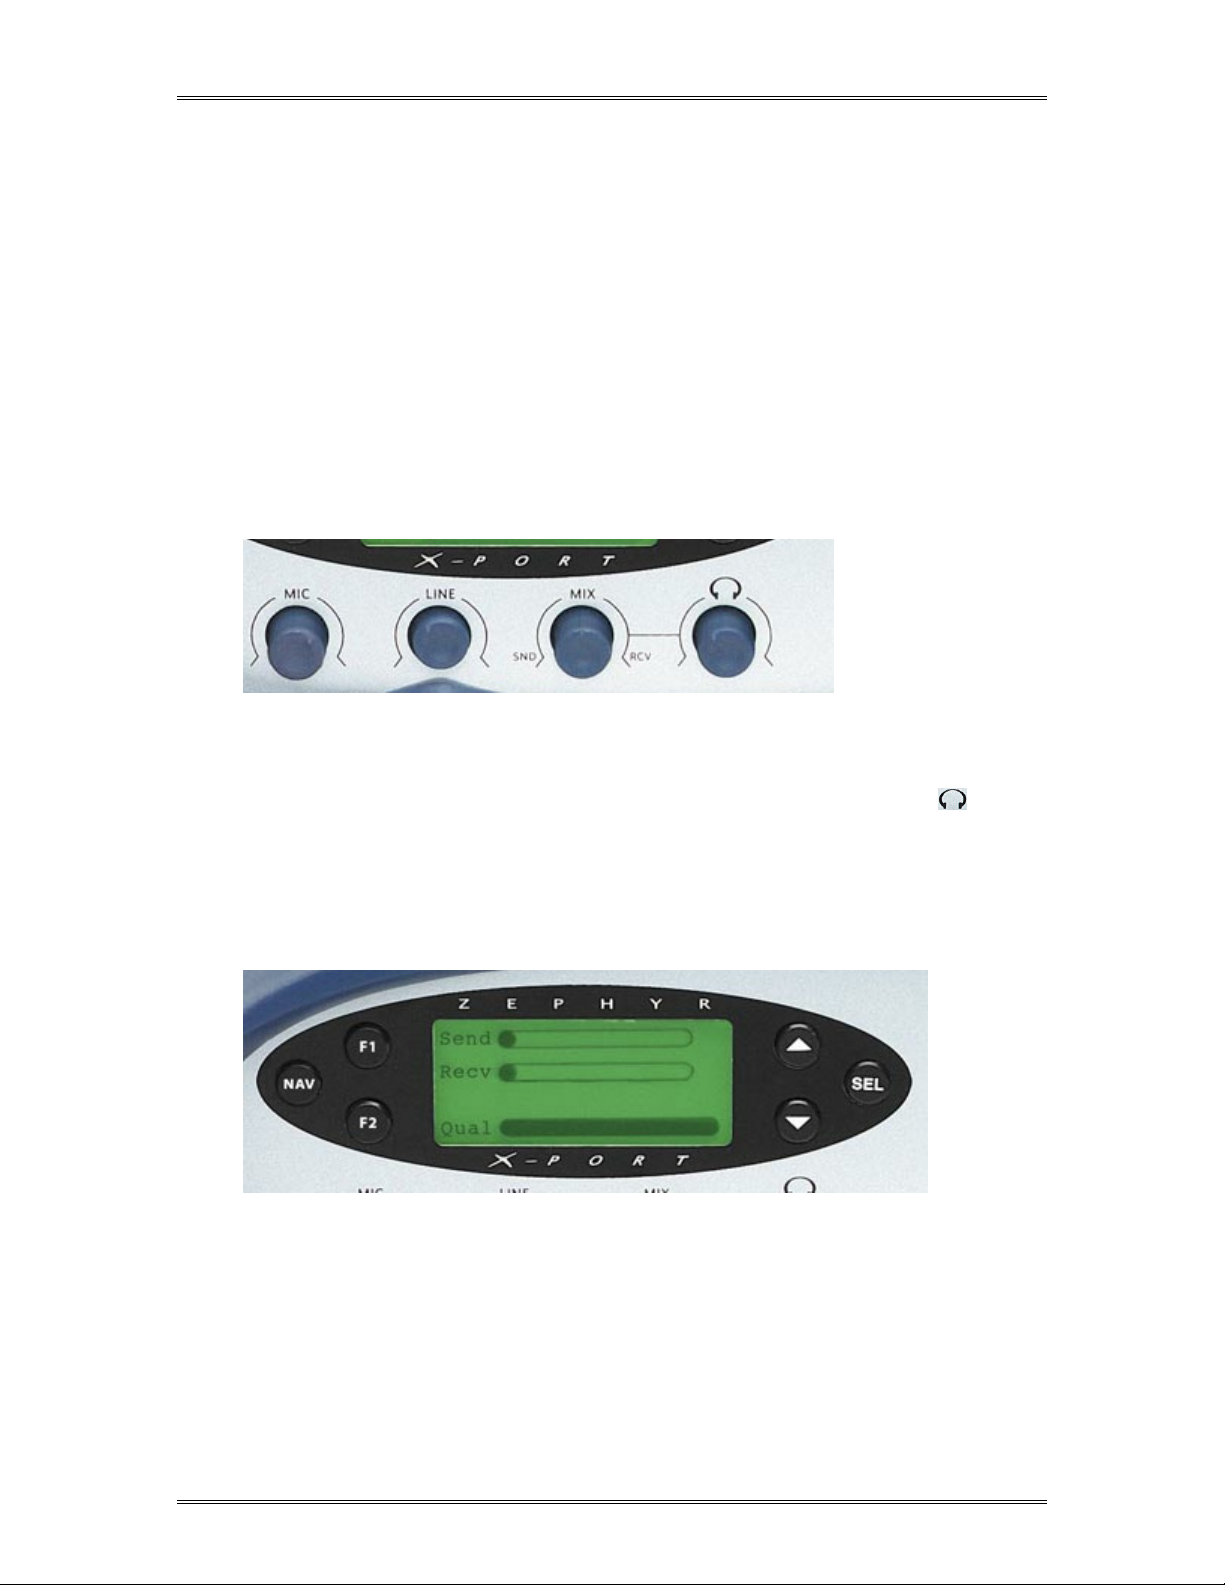
LCD Display
Audio Level metering
Modem connection s tatus
Menu acc ess
Stowable Knobs
Allow you to set it and forget
it, preventing accidental
changes.
Menu Navigation and
Selection Keys
Numeric Keypad
Used to enter numerical &
text information. Used for
dialing.
Mixer Section
Straightfor ward, easy to use
mixer has Mic & Line inputs.
Loc al mix ability permit s a mix
of the IFB audio with the send
audio for headphone and PA
feeds.
For convenient adjustment of
the ratio of the Send and
Rec eiv e audio in the
headphone & Monitor Mix
(See the inside rear cover for information on the rear panel)
MIX Control
Outputs.
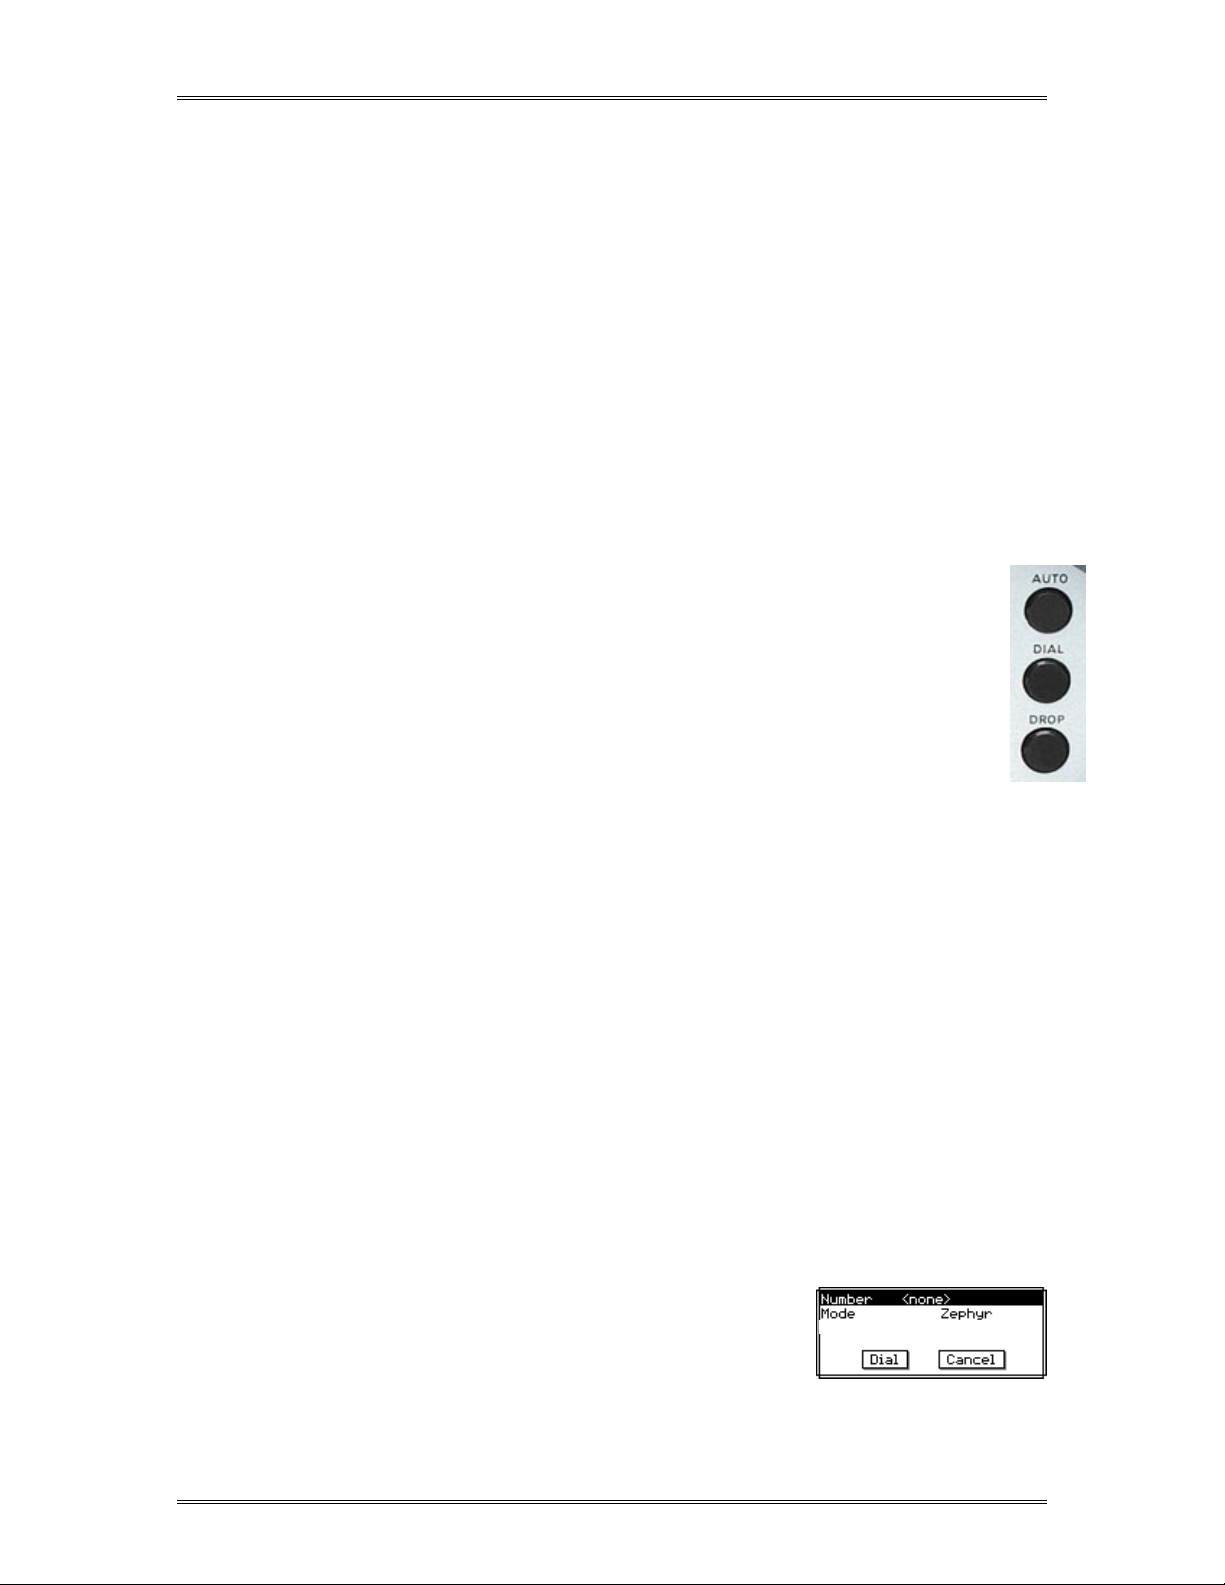
Auto Key
Allo w a c c ess to s t or ed D I AL &
LOCATION Setups
Dial & Drop Keys
Used for manual dialing.
Zephyr Xport
Field Audio Transceiver
USER’S GUIDE
Manual Version 1.0 for software version 1.0 and later
17 February, 2003
ZEPHYR
XPORT
USER’S GUIDE
Customer Service
We support you...
By phone/Fax in the USA.
Customer service is available from 9:30 AM to 6:00 PM USA Eastern Time, Monday through Friday at
+1 216.241.7225.
Fax: +1 216.241.4103.
By phone/Fax in Europe.
Service is available from Telos Europe in Germany at +49 81 61 42 467.
Fax: +49 81 61 42 402.
By E- Mail.
The address is: support@telos- systems.com.
Via World Wide Web.
The Telos Web site has a variety of information which may be useful for product selection and
support. The URL is: http://www.telos- systems.com/support/default.htm.
Feedback
We welcome feedback on any aspect of the Telos Zephyr Xport or this manual. In the past, many
good ideas from users have made their way into software revisions or new products. Please contact us
with your comments.
Telos Systems
2101 Superior Avenue
Cleveland, OH 44114
USA
+1 (216) 241-7225
Fax: +1 (216) 241-4103
Telos Europe
Johannisstra βe 6
85354 Freising
Germany
+49 81 61 42 467
Fax: +49 81 61 42 402
II CHAPTER 1 - INTRODUCING THE XPORT

IMPORTANT NOTE:
The Zephyr
lines. This jack should not be connected to other types of lines, such a proprietary telephone jack
present in many office telephone systems. See Section 3 for more information. In order to comply
with Telecom regulations, the COUNTRY setting must be set appropriately before use.
XPORT
Updates
The operation of the Telos Zephyr
may become available - to determine if this is the case check our web site. Contact us to determine
if a newer release is more suitable to your needs.
Our Telos electronic newsletter has announcements of major software updates for existing
products, as well as keeping you up to date on the latest Telos and Omnia product releases. To
subscribe go to:
http://www.telos- systems.com/support/default.htm
Trademarks
Telos Systems, the Telos logo, Zephyr, ZephyrExpress, Zephyr Xstream, Zephyr Xport and the
phrase "The Best Way to Hear From There" are trademarks of TLS Corporation. All other
trademarks are the property of their respective holders.
Copyright
Copyright © 2002 by TLS Corporation. Published by Telos Systems, who reserves the right to make
improvements or changes in the products described in this manual, which may affect the product
specifications, or to revise the manual without notice. All rights reserved.
Notice
All versions, claims of compatibility, trademarks, etc. of hardware and software products not made
by Telos mentioned in this manual or accompanying material are informational only. Telos
Systems makes no endorsement of any particular product for any purpose, nor claims any
responsibility for operation or accuracy.
Warranty
This product is covered by a one year limited warranty, the full text of which is included in the
section 7 of this manual.
ZEPHYR
's POTS LINE interface is intended for use with analog loop start telephone
XPORT
XPORT
USER’S GUIDE
is determined largely by software. Periodic updates
Service
You must contact Telos before returning any equipment for factory service. Telos Systems will
issue a Return Authorization number, which must be written on the exterior of your shipping
container. Please do not include cables or accessories unless specifically requested by the
Technical Support Engineer at Telos. Be sure to adequately insure your shipment for its
replacement value. Packages without proper authorization may be refused. US customers please
contact Telos technical support at +1 (216) 241- 7225. All other customers should contact your
local representative to arrange for service.
We strongly recommend being at the unit when you call, so our Support Engineers can verify
information about your unit and the conditions under which the problem occurs. If the unit must
return to Telos, we will need your serial number, located on the rear panel.
CHAPTER 1 - INTRODUCING THE XPORT iii
Test Lines
To aid you in testing and demonstrating your Zephyr
test numbers available:
• USA: +216 781.9310 or 216 781.9311 (Layer III Dual transmit @ 32 KHz sample rate for
Zephyr/Zephyr Xstream + aacPlus @ 48 kHz SR for Xport).
• Germany: (49) 81 61 42 061 Dial this number twice (Layer III Dual transmit @ 32 KHz sample
rate for Zephyr/Zephyr Xstream + aacPlus @ 48 KHz SR for Xport).
• Germany: (49) 81 61 42 062 (Layer II Mono @ 48 KHz) for Zephyr/Zephyr Xstream.
Notices and Cautions
CAUTION:
THE INSTALLATION AND SERVICING INSTRUCTIONS IN THIS MANUAL ARE FOR USE BY
QUALIFIED PERSONNEL ONLY. TO AVOID ELECTRIC SHOCK, DO NOT PERFORM ANY
SERVICING OTHER THAN THAT CONTAINED IN THE OPERATING INSTRUCTIONS UNLESS
YOU ARE QUALIFIED TO DO SO. REFER ALL SERVICING TO QUALIFIED PERSONNEL.
e
WARNING:
TO REDUCE THE RISK OF ELECTRICAL SHOCK, DO NOT EXPOSE THIS PRODUCT
TO RAIN OR MOISTURE. KEEP LIQUIDS AWAY FROM THE VENTILATION
OPENINGS IN THE TOP AND REAR OF THE UNIT. DO NOT SHOWER WITH THE
UNIT.
e
ZEPHYR
XPORT
USER’S GUIDE
XPORT
, Telos Systems has the following
WARNING!
This equipment is designed to be operated from a power source that includes a third
“grounding” connection in addition to the power leads.
Do not defeat this safety feature. In addition to creating a potentially hazardous
situation, defeating this safety ground will prevent the internal line noise filter from
functioning.
e
IMPORTANT SAFETY INFORMATION!
If fuse replacement is required, please note: For continued protection
against fire, replace fuse only with same type and value.
w
e
IV CHAPTER 1 - INTRODUCING THE XPORT
WARNING:
ZEPHYR XPORT USES CONVECTION COOLING. DO NOT BLOCK THE
VENTILATION OPENINGS IN THE TOP AND REAR OF THE UNIT.
e
ZEPHYR
FAILURE TO ALLOW PROPER VENTIUALATION COULD DAMAGE THE
UNIT OR CREATE A FIRE HAZARD.
DO NOT PLACE THE UNIT ON A CARPET, BEDDING, OR OTHER
MATERIALS THAT COULD INTERFERE WITH THE REAR PANEL
VENTILATION OPENINGS.
DO NOT STACK MORE THAN 3 UNITS HIGH.
This symbol, wherever it appears, alerts you to the presence
of uninsulated, dangerous voltage inside the enclosure –
voltage which may be sufficient to constitute a risk of shock.
This symbol, wherever it appears, alerts you to important
operating and maintenance instructions. Read the manual.
XPORT
USER’S GUIDE
TO PREVENT RISKS OF
ELECTRIC SHOCK,
DISCONNECT POWER
CORD BEFORE SERVICING
USA CLASS A COMPUTING DEVICE INFORMATION TO USER. WARNING:
equipment generates, uses, and can radiate radio-frequency energy. If it is not installed and
used as directed by this manual, it may cause interference to radio communication. This
equipment complies with the limits for a Class A computing device, as specified by FCC Rules,
Part 15, Subpart J, which are designed to provide reasonable protection against such
interference when this type of equipment is operated in a commercial environment. Operation of
this equipment in a residential area is likely to cause interference. If it does, the user will be
required to eliminate the interference at the user’s expense.
to TV or radio reception can occur if other devices are connected to this device without the use
of shielded interconnect cables. FCC rules require the use of only shielded cables.
CANADA WARNING: “This digital apparatus does not exceed the Class A limits for
radio noise emissions set out in the Radio Interference Regulations of the Canadian Department
of Communications.” “Le present appareil numerique n’emet pas de bruits radioelectriques
depassant les limites applicables aux appareils numeriques (de les Class A) prescrites dans le
Reglement sur le brouillage radioelectrique edicte par le ministere des Communications du
Canada.”
NOTE: Objectionable interference
This
Telecommunications line cord to connect between your Xport and the telephone circuit.”
SAFETY CAUTION: “To reduce the risk of fire, use only N0. 26 AWG gauge
CHAPTER 1 - INTRODUCING THE XPORT v

ZEPHYR
XPORT
USER’S GUIDE
A note from the CEO
It's been nearly 10 years since Telos brought you the original Zephyr – the first product
in the world to use MP3, and the first to bring all the necessary pieces for ISDN remotes
together in one easy- to-use and reliable package. In 2001, we offered you the latest
MPEG technology and numerous improvements with the introduction of the Zephyr
Xstream family of codecs. Together, these have become among the most successful and
enabling tools in broadcasting’s digital era.
Unless you enjoy reading user manuals for the thrill, you presumably have the new
Zephyr
XPORT
at hand, and you will be using it with an ordinary telephone line to
connect to a Zephyr Xstream ISDN codec. Prepare to hear the highest fidelity low- bitrate
coding method on Earth, aacPlus, in action. For the first time, you will experience FMlike audio over analog telephone lines – with surprisingly detailed highs and fuzz- free
clarity, on both speech and music. You will also experience remarkable stability. Because
the studio side is connected digitally, modem performance is considerably more reliable
than with POTS- only schemes.
Maybe you are thinking, "What took you so long?" Those with long memories may recall
that we had a POTS codec prototype using MP3 at the NAB radio show many years ago,
before any others were marketed. However interesting the demo, we decided MP3 and
the other codecs around at that time were just not up to our snuff on quality over
modems.
All the while since, we’ve been keeping our eyes and ears open. We knew POTS Telco, we
knew codecs, and we knew ISDN, so we knew what we were looking for. Now, finally, all
the pieces have come together to let us give you all the right stuff.
My guiding principle at Telos is to make the stuff I would have wanted for myself when I
was in the CE game. So, here’s another one I sure could have used! It’s really cool when
something like this one comes together so well.
So, go ahead and use this baby to shock and amaze. We are looking forward to hearing of
your experiences using the Xport…
Steve Church
February 2003
VI CHAPTER 1 - INTRODUCING THE XPORT

ZEPHYR
XPORT
USER’S GUIDE
Table of Contents
Table of Contents...................................................................................................................................................... vii
1 INTRODUCING THE ZEPHYR
Looking for Information? .......................................................................................................................................... 1
2 GETTING ORIENTED.............................................................................................3
2.1 Quick Start........................................................................................................................................................ 3
Connecting the Audio Inputs/Outputs....................................................................................................................... 4
Connecting to the Telephone Line ............................................................................................................................ 4
Powering Up............................................................................................................................................................... 5
Setting the Country .................................................................................................................................................... 5
Mixer Adjustments..................................................................................................................................................... 6
2.2 Placing Your First Call, to Telos.................................................................................................................... 6
2.3 What have we here?......................................................................................................................................... 8
Accessories ................................................................................................................................................................ 8
2.3.1 The front panel................................................................................................................................................. 8
2.3.2 Frequently Used Menus; AUTO, DIAL, & DROP ..................................................................................... 12
2.3.3 The rear panel................................................................................................................................................. 13
XPORT
................................................................1
3 THE DETAILS.......................................................................................................15
3.1 Telephone Connections ................................................................................................................................. 15
3.1.1 POTS .............................................................................................................................................................. 15
3.1.2 ISDN INTERFACE (Optional) .................................................................................................................... 16
3.2 Audio Connections & Mixer......................................................................................................................... 17
3.2.1 Audio Inputs................................................................................................................................................... 18
3.2.2 Audio Outputs................................................................................................................................................ 18
3.2.3 The AUX INTERFACE connector. ............................................................................................................... 19
3.2.4 The Interface Connector ................................................................................................................................ 19
3.3 Setups ............................................................................................................................................................... 19
Dial Setups .............................................................................................................................................................. 20
Location Setups........................................................................................................................................................ 21
3.4 The Xport's ISDN interface.......................................................................................................................... 24
3.5 Connecting two Xports to the same ISDN circuit ..................................................................................... 25
Sharing ISDN in the USA & Canada...................................................................................................................... 25
Sharing ISDN worldwide ........................................................................................................................................ 26
3.6 Cell Phone Interfacing (the Aux Audio Interface) .................................................................................... 26
Connecting the Cell Phone to the Xport ................................................................................................................. 27
3.7 Feeding the Xport from a computer over Ethernet.................................................................................. 27
Telos Soundcard Emulator...................................................................................................................................... 27
CHAPTER 1 - INTRODUCING THE XPORT vii

ZEPHYR
3.8 Remote Control .............................................................................................................................................. 29
XPORT
USER’S GUIDE
4 FREQUENTLY ASKED QUESTIONS.................................................................30
5 WHAT TO DO IF… ...............................................................................................34
6 TECHNICAL & INSTALLATION INFORMATION...............................................38
6.1 Environmental Considerations .................................................................................................................... 38
Ventilation and ambient temperature ...................................................................................................................... 38
AC (mains) requirements......................................................................................................................................... 38
6.2 Installing the ISDN option ............................................................................................................................ 39
6.3 Enabling Phantom Power............................................................................................................................. 41
7 SPECIFICATIONS & WARRANTY......................................................................42
ZEPHYR XPORT LIMITED WARRANTY........................................................................................................ 44
8 REFERENCES......................................................................................................45
Ordering ISDN......................................................................................................................................................... 45
Applications Notes................................................................................................................................................... 45
Technology Articles................................................................................................................................................. 45
White Papers ............................................................................................................................................................ 46
w NOTE: To communicate with the Xport using the high
quality aacPlus POTS codec mode, the Zephyr Xstream at the
far end must be using version 2.5.0p or later software. For
information on updating the Zephyr Xstream see the Telos
web site: www.telos- systems.com
w NOTE: When using ISDN, be sure to connect the ISDN line
to the
XPORT
before powering up the unit.
VIII CHAPTER 1 - INTRODUCING THE XPORT

ZEPHYR
XPORT
USER’S GUIDE
1 Introducing the Zephyr
ISDN makes for great sounding remotes, but you can’t always get ISDN where and when you
want it. The
with the Zephyr Xstream ISDN codec in your studio.
The Xport features the highest fidelity low- bitrate coding method on Earth: MPEG AAC + the
ground- breaking Spectral Band Replication enhancement: aacPlus). For the first time, you will
experience FM- like audio over analog telephone lines with detailed highs and fuzz- free clarity –
for both speech and music.
XPORT
side is connected digitally with ISDN, modem performance is considerably more reliable than
with POTS- only schemes.
XPORT
is the field side of a system that has Zephyr Xstream at the studio. Because the studio
lets you use ordinary analog telephone lines or ISDN in the field to connect
XPORT
: Ordinary Phone Line – Extraordinary Audio
To extract maximum reliability from real-world analog Telco lines,
based modem that lets us optimize for maximum performance with audio signals. Normal
modems are designed for non- real- time data, where a bad packet may be re-transmitted
without much consequence and “retraining” is not a major problem. With audio, this would
result in serious drop- outs. A modem for live audio requires a different set of trade- offs that are
not possible with off- the-shelf consumer modem chips.
Your studio Zephyr Xstream becomes a universal codec, connecting with both Xport and ISDN
codecs. This saves you money, rack space, operator training, telephone lines, and console/router
audio inputs and mix- minus outputs.
The
XPORT
audio with the remote mix- minus feed. We’ve also included a multi- band automatic gain
control and limiter designed by the Omnia processing gurus. This was crafted to work in
harmony with the audio codec, and is another reason audio is the smoothest, cleanest possible.
XPORT
The
codec system ever offered to broadcasters. Because it lets you get double- duty out of your ISDN
codec and line, it is also cost-effective.
And, with the optional ISDN interface,
’s integrated mixer handles two inputs and includes a return mixer to combine local
/Xstream combo is the best sounding, easiest to use and most reliable analog Telco
XPORT
takes advantage of ISDN as well.
XPORT
has a custom DSP-
Looking for Information?
We've taken great care to make the
users in mind. In fact, we expect that most users will be up and running long before they refer to
this guide. Section 4 has Frequently Asked Questions and Section 5 has troubleshooting tips.
XPORT
as easy to use as possible, keeping non- technical
CHAPTER 1 - INTRODUCING THE XPORT 1

ZEPHYR
XPORT
USER’S GUIDE
Here's where to turn for additional information:
Tell me more about the box.
Section 2 (Getting Oriented) will guide you step- by- step through setup and testing of the
XPORT
.
I've never used a codec or plugged in a telephone. What do I do with this box?
Section 2.1 (Quick Start) is for you. We provide step- by- step directions on how to plug in the unit and get
up and running promptly.
So where do I plug in my… audio gear? … telephone line? What does this jack do?
Section 3 (The Details) gives the details on the connectors, the mixer section and audio connectors,
telephone line connections, etc.
How do I create Auto Dial Setups?
How do I create Location Setups?
How do I connect the Xport to a cell phone?
We cover these features in Section 3.3.
I can transmit audio from my computer to the Xport over Ethernet? How?
This ability is covered in Section 3.7 (Feeding the Xport from a computer over Ethernet).
Something seems amiss. What now?
Section 5 (What to do if…) guides you through some simple tests to determine where your problem lies. If
you still can't make things work we are here to help. See page iii for contact information or email us at
support@zephyr.com .
How do I upgrade this thing?
Section 6 (Technical & Installation Information) covers technical information about your
Phantom Power, updating software, and installing the ISDN option.
XPORT;
enabling
What are the specs? Warranty?
Section 8 (Specifications and Warranty) covers this.
Where can I find additional information not included in this guide?
Section 7 (References) gives links to lots of additional information on the Telos website.
2 CHAPTER 1 - INTRODUCING THE XPORT

ZEPHYR
XPORT
USER’S GUIDE
2 Getting Oriented
This Quick Start section will walk you step- by- step through setting the unit up and
placing calls. This section includes an introduction to the
information required to get you up and running in a hurry. First, we'll cover the front
and rear panels.
In Section 3 (The Details), we'll cover the audio section and mixer, as well as additional
details such as creating auto dials, using ISDN, use with a cell phone, and how to
transmit audio from your computer using Ethernet.
XPORT
and includes the basic
2.1 Quick Start
This section will get you up and running quickly. We will use a microphone and
headphones. We will place a call to the Telos test line so you can verify correct operation
of the unit.
h HOT TIP! The Xport is intended to be used in conjunction with a Telos Zephyr
Xstream back at the studio. An Xport cannot call another Xport, nor can it communicate
with POTS codecs that use proprietary coding methods.
The Xport can also be used to call any Telephone or hybrid, however in that case the
results will be standard telephone quality audio.
You have just opened the carton containing the latest Telos codec product. We know
how you feel. You don’t want to sit around and read a manual. You want to plug- in your
new Zephyr
over POTS connections is better than ever. We know because we feel the same way when
we get a new, piece of gear.
As much as we understand your excitement, we ask you to please peruse the following to
get the most out of your Zephyr
This manual is designed to instruct you on the basic capabilities of your Zephyr
We also provide you with links to interesting and useful information about advanced
level features, audio coding, and digital telephony on our website. We hope you will take
the time to read the manual.
If you need to put the unit in service today, or have experience with other, similar
equipment, this section will allow you to get started quickly with your Zephyr
XPORT
and hear what it can do. You want to connect to hear how audio
XPORT
.
“Quick Results” Are for You If You...
• Know how to dial a telephone call.
• Understand and have before you all of the items listed in the section that
follows called “What you need before you start.”
XPORT
XPORT
.
.
• Understand that these “Quick Results” only get you started and will not
answer all of your questions, or demonstrate all of the features, of the
Zephyr
XPORT
.
CHAPTER 2 - GETTING STARTED 3

ZEPHYR
• Promise to read the full manual later.
Now, let’s get started.
XPORT
USER’S GUIDE
What you need before you start…
To complete the following you will need:
• Your Zephyr
• A standard "RJ- 11 style" telephone cable (supplied with the
• A pair of headphones that use a standard 1/4 stereo connector
• A dynamic Microphone, together with a cable ending with a 3- pin XLR "male"
connector. Xport can be used with condenser microphones, but phantom power
must be enabled. This is beyond the scope of this section.
• A Plain Old Telephone line (analog loop start line).
XPORT
XPORT
)
Success, Step-by-Step:
Connecting the Audio Inputs/Outputs
You want to hear something, don’t you? Connections are needed for sending audio to
the remote location and receiving audio. You will need to provide a microphone and
headphones, along with an appropriate cable.
Headphones
Connect your headphones to the headphone jack
on the rear panel.
Microphone
Connect your dynamic microphone to the MIC. INPUT jack on the rear panel using
an appropriate cable (normally an XLR male to XRL female).
Connecting to the Telephone Line
Connect the modular cable to the jack on the
other end to the telephone jack. In some countries, you may need an adaptor. These are
readily available at most airports and many electronic stores.
XPORT
labeled POTS LINE. Attach the
w IMPORTANT NOTE! Xport is for use with "Plain Old (analog loop-start) Telephone
Service (it can also be used with ISDN, but we'll cover that later).
Be sure the line you connect to your Xport really is an analog line. In many offices, and
some hotels, you will find perfectly ordinary-looking phones that are connected to inhouse phone systems using special, proprietary lines. DO NOT connect your Xport to such
lines. See Section 3 for more information.
4 CHAPTER 2 - GETTING STARTED

ZEPHYR
Ideally, you should check an unknown line by connecting an ordinary analog telephone
and attempting a call.
h
HOT TIP! The Xport uses the center pins of the 6- position miniature modular jack -
In parts of Europe we have seen the same type of jack using different pins. In this case,
you will need an adaptor.
XPORT
USER’S GUIDE
Powering Up
Time to turn on the XPORT!
• Connect the provided IEC power cable to the
• Connect the other end of the IEC cable to your AC (mains) power outlet.
The Zephyr Xport’s power input is universal, accepting anything from 100
to 240 Volt AC 50/60Hz.
• Flip the power switch, located just above the power cable connector, to the
“on” position (push in the side labeled “1”).
• Your Zephyr
panel LCD display screen will be displayed:
Snd
Rcv
Idle
Modem Performance
Snd
Rcv
Basic Configuration
Setting the Country
XPORT
will start up. After about 40 to 60 seconds, the front
════════
════════
════════
════════
XPORT
.
The
XPORT
operation, you must tell it the country in which you are located. Follow these steps:
• Press the <NAV> button two times.
• Highlight the option COUNTRY by pressing the <6> key. The word "country"
should appear with white text on a black background.
• Press the <SEL> button. Use the <
countries. If your country is not listed, use "USA" or "CTR 21". Once your country is
displayed press <SEL> to accept your selection or press <NAV> once to "escape"
without making a change.
• Press <NAV> once to get back to the main menu.
can be used on analog lines from all over the world. To achieve optimal
5> & <6> keys to scroll through the list of
CHAPTER 2 - GETTING STARTED 5

ZEPHYR
XPORT
USER’S GUIDE
Mixer Adjustments
h HOT TIP! The Xport has "stowable" control knobs for the mixer functions. If the knob
is not protruding, push it in and release to make it accessible.
Microphone
Speak into your Microphone and adjust the MIC knob on the front panel to adjust the
level displayed on the Snd meter (at the top of the screen). If you cannot get adequate
level on the meter, even with the MIC knob turned all the way up, you will need to
change the Mic Gain setting in the first LCD menu.
Headphones
First, adjust the MIX knob to the 12 O'clock position (straight up). Next, turn the
headphone
microphone. Turn up the headphone
headphones.
knob all the way down. Put on your headphones and speak into the
adjustment until you can hear yourself in the
You are ready to place your first call.
2.2 Placing Your First Call, to Telos
Located less than a mile from the Rock ‘n’ Roll Hall of Fame, there is always something
interesting playing on the Telos test line. Let’s call Cleveland. If you prefer, you can call
our test line in Europe. That number is listed under “Test Lines” on page iii at the front
of this manual.
Follow these step-by-step instructions:
1. Remove your headphones.
2. Press the <DIAL> button once. Use the keypad to enter the Telos test line number.
Be certain to precede it with any number you may need to dial to access an outside
line (such as "9") and/or to place a long distance (such as "1") or international call.
The number is +1 216 781- 9310. Press the <DIAL> button again.
h HOT TIP! If your phone line has the feature "call waiting," you should temporarily
disable this by entering "*70" (or other special code) before the number to be dialed.
3. You should see a series of messages that say Modem Off Hook, Dialing Finished,
Modem Detected, Connecting., Connecting, Connecting…, Connected, and finally,
Connect Lock 0:00:01 .
6 CHAPTER 2 - GETTING STARTED

ZEPHYR
XPORT
USER’S GUIDE
If successful, the words "Connect Lock"
will appear along with a call duration
timer.
You should now see audio on the Receive
audio meter (labeled "Rcv") moving as the
audio is received from the test line.
Put on your headphones and listen. You may adjust the relative volume of your local
microphone audio and the audio from Telos by adjusting the MIX control on the
Xport's front panel.
4. Whether or not you have successfully connected, press the <DROP> button twice.
You want to be sure to disconnect, as this may be an expensive call.
5. If you have successfully connected, go on to the next section. If you have not, try
again. If you do not succeed, here are a few things to try:
• Wait an hour and try again. The Telos test line may be busy.
• If you need to dial a prefix (such as 9) try entering a pause after this digit and
before the rest of the number it by pressing <#> twice (a "," will be displayed)
when dialing.
Snd
════════
Rcv
════════
Connect Lock 0:00:05
Modem Performance
Snd
════════
Rcv
════════
• USA users should try calling using a different long- distance carrier. To do so,
insert the carrier’s seven- digit access code. The number to dial starts with any
prefix needed for you to get an outside line, followed by the long distance
access code, followed by the Telos test line number. See section 5 for additional
codes. Let us say you don’t need a prefix to dial out (and most people don’t)
and you want to use MCI. Dial:
1010222 1 216- 781- 9310
If this works, you should contact your local telephone company to determine
who your default long distance carrier is.
• Review the information in Section 5 (What if to do if…).
• Call Telos Customer Support for assistance. The Xport may provide error
messages under some circumstances. Have these messages ready when you
call, as they will help speed the process of solving your problem (see page iii).
What’s Next?
Now you are ready to call the world. Remember your promise to read the entire manual!
Reading the rest of this section will fill you in on the basics. Section 3 covers additional
features. Section 8 (References) gives references for information on seldom- used
features and other technical information.
Further assistance in using your Zephyr
XPORT
can be found in the HELP text that is
displayed whenever you select a menu item using the <SEL> key. You may wish to go
through the menus and select various items to learn more about what they do.
CHAPTER 2 - GETTING STARTED 7
ZEPHYR
2.3 What have we here?
XPORT
USER’S GUIDE
Time for a guided tour of your
XPORT
.
Accessories
A stand is available for the Xport to tip the unit up for easier viewing. Contact your Telos
representative to order Telos Part # 1451- 00199- 001.
A soft carry vase is also available. Request Telos Part # 2091- 00032
2.3.1 The front panel
THE MIXER SECTION
XPORT
The
inputs: MIC and LINE. The mixed audio from these sources is fed to the Omnia
AGC/Limiter and to the codec for transmission to the far end.
This audio mix, together with the received audio is output on the headphone
Monitor Mix Out jacks. The ratio of these two audio sources is determined by setting of
the MIX control.
's mixer section (pictured above) is easy to under stand. There are two
and the
See the inside rear cover of this manual for a block diagram of how the mixer functions.
THE DISPLAY AND USER INTERFACE
The Zephyr
Repeated presses of this button, pages through the screens of options. The following
information is meant as a quick introduction only. Section 3 (The Details) covers the
menu selections in detail.
XPORT
has two menus screens accessed by pressing the <NAV> button.
8 CHAPTER 2 - GETTING STARTED

ZEPHYR
(
g)
The Default Display
This is the display you will see most of
the time. It has bargraph meters for
Send and Receive audio levels, a status
line, and modem quality bargraphs for
each direction.
The Snd and Rcv modem quality
bargraph meters indicate the quality of
XPORT
USER’S GUIDE
Snd
══════▪══
Rcv
══════▪══
Connect Locked 0:00:30
Modem Performance
Snd
══════▪══
Rcv
══════▪══
Send Audio Level
(Outbound)
Received Audio Level
Incomin
Connection
Status
Modem Quality
(Outbound)
Modem Quality
(Inbound)
the connection moment- to- moment. A certain amount of fluctuation is normal.
However, if the readings stay below the line on the meter, you should hang up and
redial as soon as convenient.
The system monitors the quality of the connection in each direction, and will
prompt you if the connection has become unstable. You will have the option of
"retraining" the modem or shifting to "phone" mode should this happen.
This default display will appear after the system has been left idle for 120 seconds.
POTS Connection Status (see section 3.1.2 for ISDN Connection status)
The connection status indicates the status of the line as follows:
On Hook - POTS mode idle
Off hook - Line is in use
Modem Detected - Modem carrier has been detected and modem training begun
Connecting. - Modem "handshake start"
Connecting.. - Modem "Ranging" stage is complete
Connecting… - Modem "Training" stage complete
Connect - Modem connection is operational
Connect Lock - Modem connection is operational and aacPlus decoder has valid data
Renegotiation Request - Far end has authorized modem re- negotiation. Audio will be re-
established in 3- 5 seconds. Or, far end has dropped the call. Or, modem operation is no longer
possible, and system will revert to Phone mode.
Retrain Request - Modem connection will be re- negotiated.
Modem Lost Sync - Modem connection has been lost; unit reverting to phone mode
Warning Dialogues
In a few cases, the Xport will warn the operator about status of the modem
connection.
Marginal Performance – This indicates that the modem has detected marginal conditions that could
cause dropouts or instability. Often the problem is transient, and you can choose “IGNORE”. If you
see the dialogue more than once in a 10 minute period you may wish to choose “RETRAIN” or to
redial during a break in programming (Retrain will cause a short 5-6 second gap in audio). If you
cannot take a break, you can choose “PHONE” mode which will seamlessly switch to the telephone
quality mode until you can redial.
Bit Rate Too Low…Falling back to Phone Mode - The modem is unable to negotiate an acceptable
connection and therefore the connection has been established in “Phone” mode. You may wish to
try redialing.
Unacceptable Modem Performance…Falling back to Phone Mode – The modem connection has
failed and therefore the connection has been converted to “Phone” mode. You should redial when
convenient.
CHAPTER 2 - GETTING STARTED 9

ZEPHYR
Lost Modem Sync…Falling back to Phone Mode – The modem connection has failed and therefore
the connection has been converted to “Phone” mode. You should redial when convenient.
The Menus
Repeated presses of the <NAV> button pages through the menu’s screens one at a
time.
Once a desired page of menu selections is shown on the display, you must highlight
and select the item to be changed (or field to be edited). The current selection will
be highlighted; i.e. it will be displayed with white text on a black background. Other
menu items (which are not highlighted) will be shown with black text on a white
background. You can change which item is highlighted using the <
buttons.
XPORT
USER’S GUIDE
5> & <6>
h HOT TIP! The bottom line of the LCD display will give you a description of the
highlighted menu item. This context sensitive help will give you an indication of what an
item does. For more information about that item, push the <SEL> button.
Once the desired menu selection is highlighted, you must select it by pressing the
<SEL> button. The selected item will move to the top of the screen and detailed
information about that menu selection will be shown below it.
In the case of most menu items, you can now view the options for this item using
the <
5> or <6> buttons. Note that the option currently in effect has square
brackets “[ ]” around it.
w IMPORTANT TIP! If you change your mind, get lost, or otherwise panic, don’t worry.
Pressing <NAV> will de- select the item currently selected, without saving the changes in
progress.
In the case of numeric or alphanumeric text fields, you can begin entering text as
soon item has been selected with the <SEL> button. To erase previously entered
text, use the <
5> button.
w IMPORTANT TIP! Like many devices using telephone keypads, the Zephyr Xport uses
multiple presses of the various buttons of the keypad to enter all of the letters of the
alphabet, as well as the digits 0 through 9. We will cover this in detail below.
Let’s go through a couple of quick examples to see the Zephyr
action.
XPORT
's menus in
Example 1: Selecting a setting from a list (country):
1. From the default screen. press the <NAV> button two times. You ??? should see a
screen that looks like the following:
2. Now press the <6> button once so the menu item Country is highlighted (i.e. is
shown with white text on a black background). ??? as shown below:
10 CHAPTER 2 - GETTING STARTED

ZEPHYR
3. Press the <SEL> button once. Note that the menu item moves to the top of the
screen and information about Country is displayed.
4. Press the <6> button repeatedly to view the possible settings for this menu item (e.
g. Argentina to Yemen, or something in between).
XPORT
USER’S GUIDE
w IMPORTANT TIP! You can press the <NAV> button at any time to “escape” without
saving the changes you have made.
5. Press the <SEL> button to confirm your selection. Or, press <NAV> to ignore the
change.
Example 2: Entering a numeric entry (i.e. entering a prefix):
1. From the default menu, press the <NAV> button twice. You should see ???
2. Verify that the menu item Prefix is highlighted (i.e. is shown with white text on a
black background). If not, use the <5> button to highlight this menu selection.
3. Press the <SEL> button once. Note that the menu item moves to the top of the
screen and information about Prefix is displayed. ???
4. Press the <5> button repeatedly to erase any existing information.
5. Type in the new Prefix number using the Zephyr Xport’s keypad.
6. To place a 1 second pause in a dialing string, press <*> or <#> twice to enter a ","
character.
w IMPORTANT TIP! You can press the <NAV> button at any time to “escape” without
saving the changes you have made.
IF THIS UNIT HAS ALREADY BEEN CONFIGURED, YOU SHOULD PRESS <NAV> NOW!
7. Press <SEL> to confirm your entry. Or, press <NAV> to ignore the information and
abort the entry process.
More on the Numeric Keypad – Entering Alphabetic Characters
Some menu items allow entry of characters from the keypad. A given keypad button
corresponds to the number printed on it. It can also be used for text entry of the
letters beside it. Additional characters are available on the <*> key (i.e. * ( ) [ ] < >
<Space>) and the <#> key (i.e. # . , ; : ! ? <space>) and underscore is available on the
<1> key.
To enter text characters, press the key with the appropriate letter printed near it.
Keep tapping it to cycle through the possible choices. For example, tapping the
key in a text field will first enter
then the lower- case letters, then the number
A. Repeated taps will change that to a B, then C,
2. Enter a space by pressing * eight
2-
times. Punctuation characters appear on the * and # keys.
CHAPTER 2 - GETTING STARTED 11
ZEPHYR
For example:
Press the number 2 once...... See the character
... press it again...... See the character B
... press it again...... See the character
... press it again...... See the character
... press it again...... See the character
... press it again...... See the character
... press it again...... See the numeral 2
... press it yet again...... the cycle starts again from A
XPORT
USER’S GUIDE
A
C
a
b
c
To move to the next character in a field, tap any other key or press the <
To back up, press the <
5> key.
6> button.
2.3.2 Frequently Used Menus; AUTO, DIAL, & DROP
AUTO
The AUTO menu is used to enter or activate Dial Setups and Location Setups.
The <AUTO> key allows access to Zephyr Xport’s 100 stored Dial Setups (#00 to
#99). These can be accessed by pressing <AUTO>, entering two digits, and then
pressing <AUTO> again.
It can also be used to access the 30 Location Setups (#100 to 129) can be accessed
to configure the ISDN settings for frequently visited locations. Press and hold the
<
6> key to scroll to the Location Setups. Or, press <AUTO> enter 3 digits and
press <AUTO> again.
See section 3.3 for more on Setups.
DIAL
The <DIAL> key is used to manually dial a number. Press, <DIAL>, enter the phone
number and press <DIAL>. To redial the last number dialed simply press <DIAL> twice.
h HOT TIPS ON DIALING!
1) If your phone line has the feature "call waiting," you should temporarily disable this by
entering "*70" (or other special code) before the number to be dialed.
2) In some cases, you may need to cause the Xport to pause during dialing (for example
when a special access code is used). Press the <#> or <*> key twice to insert a one second
pause (the "," character will be displayed). Multiple pauses may be entered.
The DIAL menu
The DIAL menu appears after the Dial button has been
pressed and looks like the following:
The Mode determines the type of call to be placed as follows:
Xport
Places a call using the POTS interface to a Zephyr Xstream at the far end. The Xport
mode uses aacPlus and the Xport's built- in DSP modem.
12 CHAPTER 2 - GETTING STARTED

ZEPHYR
Phone
Places a call to a standard telephone. DSP hybrid technology prevents send audio
coloration due to leakage, however the audio quality will still be only 300 to 3.3 kHz
telephone quality. If the ISDN interface and line are present at the time of bootup,
the call will go over ISDN. Otherwise, the call will be placed over the POTS interface.
XPORT
USER’S GUIDE
h HOT TIP!
You can use this mode to call the on-air telephone system of any radio station, or to a
telephone.
Zephyr
NOTE: This option will only be present if the optional ISDN interface is present and
your unit is connected to ISDN.
Places a data call using the ISDN interface to a Zephyr Xstream at the far end. This
mode is only available if the ISDN interface is present. This mode offers very high
quality with very low delay, and is recommended whenever ISDN is available at the
remote site where the Xport will be used.
The Zephyr mode uses AAC- LD - the far end Xstream should be set to:
Xmt = AAC- LD Mono 64, RCV = AAC- LD 64, Sample = 48 kHz.
DROP
The <DROP> key is also straightforward. Pressing <DROP> twice will drop any call
active.
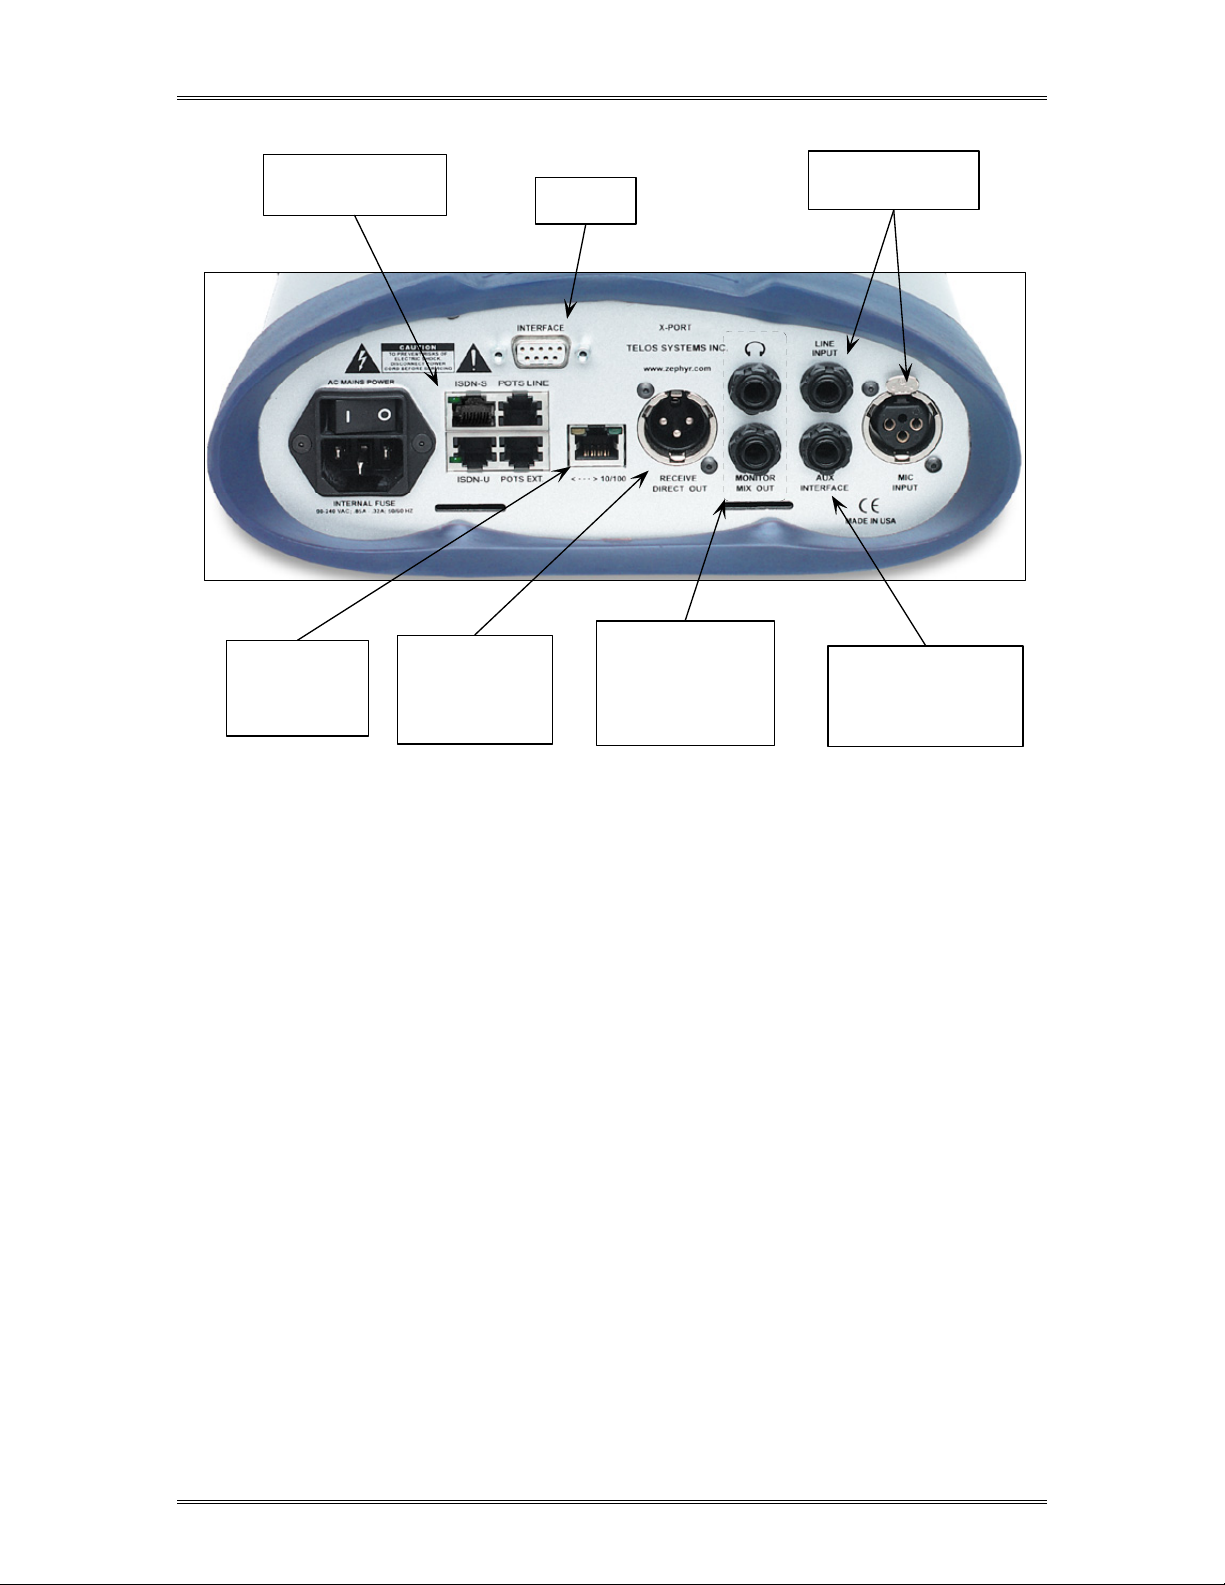
2.3.3 The rear panel
The rear panel connections are shown below. For additional information, see Section 3
(The Details).
CHAPTER 2 - GETTING STARTED 13
ZEPHYR
XPORT
USER’S GUIDE
ISDN S UPP O RT
Optiona l ISDN S, or ISDN
S + U interf aces
ETHERNET
For direct audio from
a PC, control via a
web browser, & easy
updates.
RECEIVE DIRECT
OUTPUT
Unmix ed output
contains far-end
audio only.
CONTACT
CLOSURES
Hav e a mix of lo cal (send)
audio & remote (receive)
audio from remote site
HEAD PHONE
& MONITOR
OUTPUTS
TWO-INPUT MIXER
Has microphone and line
lev el inputs
AUX INTERFACE
Allows c onne cting to Ce llular
Telephone Hands ets. A lso
can be used as a "Record
Out" and "Monitor Mix input ".
14 CHAPTER 2 - GETTING STARTED

ZEPHYR
3 The Details
By now your Xport should be up and running. In this section, we assume you have
gotten to know your Xport by going through the Quick Start procedure and brief tour
covered in Section 2 (Getting Started).
In this section, we'll explain more about how the mixer works, cover more about using
the Auto Dial function, as well as how to use a cell phone for transmission when a
telephone line is not available. Finally, we'll show you how you can transmit audio from
your computer to the Xport using Ethernet.
3.1 Telephone Connections
3.1.1 POTS
POTS LINE JACK
This is for connection to "Plain old telephone service" (analog loop- start) lines. The line
inserted into this jack is the most critical part of an Xport installation. It can mean the
difference between the remarkable quality of aacPlus and falling back to a voice grade
Phone call. Here are some pointers to reliably achieve success:
XPORT
USER’S GUIDE
DO DON'T
Use a line directly from the Telco. Connect the Xport to an "analog port" off a PBX (or a
"modem port" of an office telephone). This may work as a
last resort, but you will almost certainly see reduced quality
in this case.
Check the jack first with a telephone. If you hear
silence, or nothing but a buzz or hum, it is not an
analog line (or it is not working) and you should not
connect the Xport to it. If you can dial out using this
phone, you can connect the Xport. If the line has lots of
noise or static you should try to locate a better.
Use Category 3 (or higher) twisted pair cables when a
long connection cable is required. Keep modular "flat"
cables to less than 10 feet (3 meters) in length.
Make sure to unplug or disconnect other devices (such
as fax machines, telephones, ringers, etc) sharing the
line you will be using.
Check the quality of the wiring from the phone room to
the jack. Wire the jack using twisted pair (Category 3 or
higher) cable. Alternatively, plug directly into the
Network Interface.
Connect the Xport to a jack that is feeding an office phone
with more than 2 lines, or fancy advanced features, without
testing the jack with an analog phone first. These jacks are
generally proprietary protocols, and will only work with
phones from the manufacturer of that telephone system.
They might even cause damage to your Xport.
Use more than 10 feet (3 meters) of modular "flat" cable to
connect Xport to the telephone jack. Don't route telephone
cable near sources of interference such as motors or
transmitter coax feeds.
Leave other devices connected to the line. At the very least,
you will experience an interruption if some other telephone
tries to use the line. However, even when not in use, these
can degrade performance.
Use a jack wired with older cloth, or the old
red/green/black/yellow untwisted cable. Your
performance will probably be sub- par in these cases.
CHAPTER 3 - THE DETAILS 15

ZEPHYR
XPORT
USER’S GUIDE
h HOT TIP!
The Xport uses the center pins of the 6- position miniature modular (RJ- 11 style) jack. In
parts of Europe, we have seen the same type of jack using different pins.
In order to get the best performance from your Xport on POTS lines, be sure to set the
COUNTRY menu selection for the correct setting. If your country is not listed, try the
settings for USA and for CTR21. See section 2.3.1
POTS EXT. JACK
This jack allows you to connect a telephone to your Xport. This telephone is for use when
you are not using the Xport. To avoid accidentally causing interference while the Xport is
in use, this jack is inactive whenever the Xport is "off hook". We suggest you pack a good
quality phone as part of your remote kit. It is useful for troubleshooting, among other
things.
When you are using ISDN, this jack does nothing.
3.1.2 ISDN INTERFACE (Optional)
The ISDN interface may not be present in your Xport. You can check if it is available by
pressing <NAV> twice from the default menu and checking to see if ISDN Setup is
available as a menu choice. See Section 6 (Technical Information) for how to install the
ISDN option. See Section 3.5 (Xport's ISDN interface) for information on the ISDN
configuration menu and ISDN status screen.
h HOT TIP! If you intend to use ISDN, connect the ISDN line before powering on the
Xport. The ISDN interface will only be active if the unit is connected to ISDN at the time of
startup.
U INTERFACE (only active if option 1701-00056 is present)
This interface will only be active if you have the specified version of the ISDN interface. It
allows interfacing directly to 2- wire 2B1Q ISDN circuits, as used in the USA & Canada,
directly. This is a 6- position/4- pin miniature modular jack (RJ- 11 style) and uses the
center pins to connect to the ISDN circuit. This connection requires a standard
telephone cable with 6- position/2- pin or 6- position/4-pin miniature modular plugs
(RJ- 11 style) on both ends.
U Interface Sync LED (active only if option 1701-00056 is present)
A green LED, located beside the U interface jack, shows the status of the built- in
NT1. Normal status is indicated by the LED being lit. If off there is no ISDN present
at the U connector. Rapid flashing (about eight times per second) indicates an ISDN
line is connected and is being initialized. If the NT1 can contact the central office
(or an active repeater), the LED will blink slowly (about once per second) as the S
connection between the NT1 and the rest of the ISDN interface occurs. The LED
will come on solidly when all handshaking is completed and the basic line
connection is good. If this LED does not light continuously, once you have
connected your 2- wire "U" ISDN circuit, you may wish to skip ahead to Section 5
16 CHAPTER 3 - THE DETAILS

ZEPHYR
XPORT
(What to do if…), or consult your Zephyr Xstream User's Manual for extensive tips
for troubleshooting the problem.
If you are not using the 2- wire "U" interface, you can disregard this LED.
S INTERFACE (only active if option 1701-00135 or option 1701-00056 is present)
This interface will only be active if you have one of the optional ISDN interfaces installed
in your Xport. It is the usual interface for most parts of the world. It can also be used in
the USA and Canada if an external NT1 is provided, or to allow two Xports to share the
same ISDN circuit, see Section 3.6 (Connecting two Xports…).
This jack allows interfacing to the 4- wire "S" Interface provided by external Network
Channel Termination Equipment (NCTE, NT1, NTBA). This is an 8- position/8-pin
miniature modular jack (RJ- 45 style) and uses pins 3- 6 to connect to the 4- wire ISDN S
circuit.
A twisted pair cable with 8- postion/8- pin miniature modular plugs should be used. This
cable should comply with either the TIA/EIA- 568- A T568A or TIA/EIA- 568- A T568B
standards for pinning.
3.2 Audio Connections & Mixer
USER’S GUIDE
See the inside rear cover for an illustration of the rear panel. Section 2.3 explains the
mixer. Here is a block diagram of the Xport's Mixer:
Mic .
Input
(XLR)
Line
Input
(¼" TRS)
Headphone
(¼")
Monitor
Mix Out
(¼" TRS)
Aux
Inte rf a c e
(¼" TRS)
Rec eive
Dir ec t Ou t
(XLR)
TO:
Omnia
Process or
& Encoder
Section
Mix
Control
FROM:
Decoder
Section
CHAPTER 3 - THE DETAILS 17

3.2.1 Audio Inputs
The Xport mixer has two analog audio inputs as follows:
MIC INPUT
This XLR female input will accept microphones with nominal output levels from - 53 to 43 dBu. A Phantom Power source of 12 volts at 10 milliamps will power most Condenser
microphones. Enabling phantom power is covered in section 6.3.
The microphone input gain is set by a menu option called Mic Gain.
NOTE: Microphones that require a voltage greater than 12 volts will require an external
power supply.
LINE INPUT
This ¼" balanced (TRS) connector accepts line level inputs with nominal levels of +4 to 9 dBu. Maximum input level (clip point) is 20 dBu.
When using unbalanced sources we recommend using pin 2 and 3 to connect the signal
and ground, respectively. By leaving pin 1 unconnected, you will prevent ground loops.
ZEPHYR
XPORT
USER’S GUIDE
The AUX INTERFACE connector can also be used to provide an additional input to the
local monitor mix. See below.
AUDIO PROCESSING
The output of the mixer is fed to the DSP section through an analog- to- digital converter.
It then passes through an Omnia ® audio processor section and from there feeds the
codec section. A menu option called Process allows the processor to be set for Voice,
Music, or Off.
3.2.2 Audio Outputs
The following audio outputs are provided (The AUX INTERFACE connector also has an
output, see below):
HEADPHONE
This ¼" output provides a mix of the send audio (from the Mic and Line inputs) and the
audio received from the far end site. The ratio of these is controlled using the Mix control
on the front panel. The headphone volume is controlled using the front panel control.
While the audio is mono, this connector is designed to drive both sides of standard
stereo headphones.
MONITOR MIX OUT
This ¼" balanced output contains the same audio as on the headphone jack (see above)
at a nominal level of +4 dBu (20 dBu clip point).
When used to feed an unbalanced destination, we recommend that you use Tip and Ring
for the signal and ground respectively, and leave the sleeve unconnected. By leaving the
sleeve unconnected, you will prevent ground loops.
18 CHAPTER 3 - THE DETAILS

ZEPHYR
DIRECT RECEIVE OUT
This XLR balanced output contains the audio received from the far end.
This output is active whenever a receive signal is present. Nominal output level is +4 dBu
(20 dBu clip point). Pin 1 is ground; Pin 2 "hot"; Pin 3 "return".
When used to feed an unbalanced destination, we recommend that you use pins 2 and 3
for the signal and return respectively, and leave pin 1 unconnected. By leaving the sleeve
unconnected, you will prevent ground loops.
XPORT
3.2.3 The AUX INTERFACE connector.
This ¼" (TRS) connector is provided primarily for interfacing the Xport's mixer to the
"headset" jack on a cellular telephone (handset). Both an input and output are available
on this connector. See section 3.6 for information on using the Xport with a cellular
telephone (handset). However, this connector can also adds some useful flexibility for
other purposes as well.
AUX INTERFACE INPUT (ring & sleeve)
This unbalanced input uses the ring (signal) and sleeve (common) conductors of this
connector and permits a signal to be injected into the Xport's monitor mix. This is an
unbalanced input at +4 dBu nominal level (20 dBu clip point). This signal is injected
directly into the monitor/headphone mix, and is not affected by the front panel Mix
control.
USER’S GUIDE
A few possible uses for this input are to provide headphone cueing to talent, to feed
another mixer's output to the Xport's headphone mix, etc.
AUX INTERFACE OUTPUT (tip & sleeve)
This unbalanced output uses the tip (signal) and sleeve (common) conductors of this
connector, and allows tapping the mix feeding the Xport's codec. This can be used for
example, to provide a local recording of the program being sent. This signal is at - 27 dBu
nominal level.
3.3 The INTERFACE Connector
By default, this connector is used for transmission of contact closures. It can also be used
for diagnostic purposes, in which case it acts as a DCE serial port (in this case the
internal ribbon cable must be moved to an alternate position inside the unit).
For information on using the Xports contact closures see:
http://www.telos- systems.com/xport
3.4 Setups
The Xport supports two types of Setups. Dial Setups allow easy access to frequently
dialed numbers. Location Setups allow easy configuration of the unit when arriving at
frequently visited locations. This is particularly handy when the (optional) ISDN
interface is used.
The AUTO menu is used to enter or activate Dial Setups and Location Setups.
CHAPTER 3 - THE DETAILS 19

Dial Setups
Dial Setups are very similar to the "Dial Setups" used in the Zephyr Xstream. Each of the
100 dial setups consists of several pieces of information.
A Setup number – this 2- digit number (00 to 99) can be used to instantly access a
An alphanumeric Name
Number – The telephone number to be dialed.
A Mode as follows (See section 2.3.2 for more on the available Modes):
The bit rate (56 or 64 kbps) to be used for the call (this setting is only used for ISDN
Activating a Dial Setup – Step by Step
Before beginning, verify the Zephyr Xport is connected to the phone line and ready
for use. If necessary, activate the appropriate Location Setup for the location (if you
have just arrived there) now (see below).
ZEPHYR
XPORT
USER’S GUIDE
given setup.
• Codec – places one of the following types of calls: If ISDN is not present, a Xport
call will be placed (aacPlus). If ISDN is present, a Zephyr call will be placed
using AAC.
• Phone for calls to a standard telephone.
codec calls).
1. Press the <AUTO> key. The most recently used Dial Setup will be highlighted (white
text on a black background. To activate this Setup Press <AUTO> again.
2. To choose a different Dial Setup you have two options:
• Use the <5> and <6> to scroll through the list of 100 Dial Setups.
• Or: Use the Keypad to enter the two- digit number (00 to 99) for the desired
setup. That setup will be displayed and will be highlighted.
3. Once the desired setup is highlighted, press the <AUTO> button to activate the dial
sequence. The illustration below shows several sample Dial Setups.???
Creating Dial Setups – Step by step
1. Press the <AUTO> key. Choose the Dial Setup to
be entered. Note: You can edit an existing setup
by selecting it.
To choose a Dial Setup you have two options:
• Use the <5> and <6> to scroll through the list of 100 Dial Setups.
• Or: Use the Keypad to enter the 2- digit number (00- 99) for the desired setup.
That setup will be displayed and will be highlighted.
2. Once the desired setup is highlighted, press the <SEL> button to allow entry of (or
editing of) the information for this setup. If an empty setup was selected, "Empty
20 CHAPTER 3 - THE DETAILS

ZEPHYR
Entry" will be displayed.
3. Press <SEL> to continue or press <5> and then
<SEL> to escape without changing.
4. Enter a name (see Section 2.3.1 for an example
on how to select and enter information).
5. Enter the telephone number to be dialed.
6. Move the cursor to the word Save (using the <5> and <6> keys) and then press
<SEL> to complete the entry process.
Editing Dial Setups
1. Press the <AUTO> key. Choose the Dial Setup to be edited.
To choose a Dial Setup you have two options:
• Use the <5> and <6> to scroll through the list of 100 Dial Setups.
XPORT
USER’S GUIDE
• Or: Use the Keypad to enter the 2- digit
number (00 to 99) for the desired setup. That
setup will be displayed and will be
highlighted.
2. Once the desired setup is highlighted, press the
<SEL> button. The name of the setup will be
displayed.
3. Press <5> and then <SEL> to edit the setup.
4. Edit the name, the number, and call type (see
Section 2.3.1 for an example on how to select and
enter information).
5. Move the black cursor to the word Save (using the
<5> and <6> keys) and then press <SEL> to complete the editing process.
LOCATION SETUPS
Location setups are a useful feature that allows you to pre-configure information about
the phone line at a particular location. For instance, the SPID or MSN. Each dial setup
consists of several pieces of information:
An alphanumeric Name
ISDN settings (if ISDN option is present) – Telco, SPID & MSN/DN
Prefix
CHAPTER 3 - THE DETAILS 21

ZEPHYR
XPORT
USER’S GUIDE
Activating a Location Setup – Step by Step
Note that this process is the same as accessing a Dial Setup, only a three-digit
number is used.
1. Press the <AUTO> key.
2. To choose a Location Setup you have two options:
• Use the <5> and <6> to scroll through the
list of 30 Location Setups. These are setups #
100 to 130 - press and hold <6> to scroll past
the Dial Setups.
• Or, use the Keypad to enter the three- digit number for the desired setup. That
setup will be displayed and will be highlighted.
3. Once the desired setup is highlighted, press the
<AUTO> button to activate the configuration
sequence. Once configuration is complete, the
Xport may will show the following screen:
4. Press <5> then <SEL> to reboot.
Creating Location Setups – Set by Step
1. If the location Setup will be for ISDN, configure and test the Zephyr Xport for the
ISDN line to be used at this location (optional). You must make certain that these
items are entered correctly in the setup:
• Telco, SPID, MSN/DN. Ideally, you should be connected to the line for the
target location, so you can verify the ISDN settings are correct. In that case, the
line status should indicate Ready and you should be able to place calls (with
ETS 300 ISDN it is acceptable if Deactivated & Deactivated is displayed as long
as you can place calls). If you are not connected to the line that's ok too, but you
should be certain that the items mentioned above are set correctly.
2. Press the <AUTO> key. Choose the Location Setup to be entered. Note: You can edit
an existing setup by selecting it.
To choose a Location Setup you have two options:
• Press and hold the <6> to scroll to the list of 30
Location Setups (these are setups # 100 to 130).
• Or, use the Keypad to enter the three- digit
22 CHAPTER 3 - THE DETAILS
number for the desired setup. That setup will be displayed and will be
highlighted.
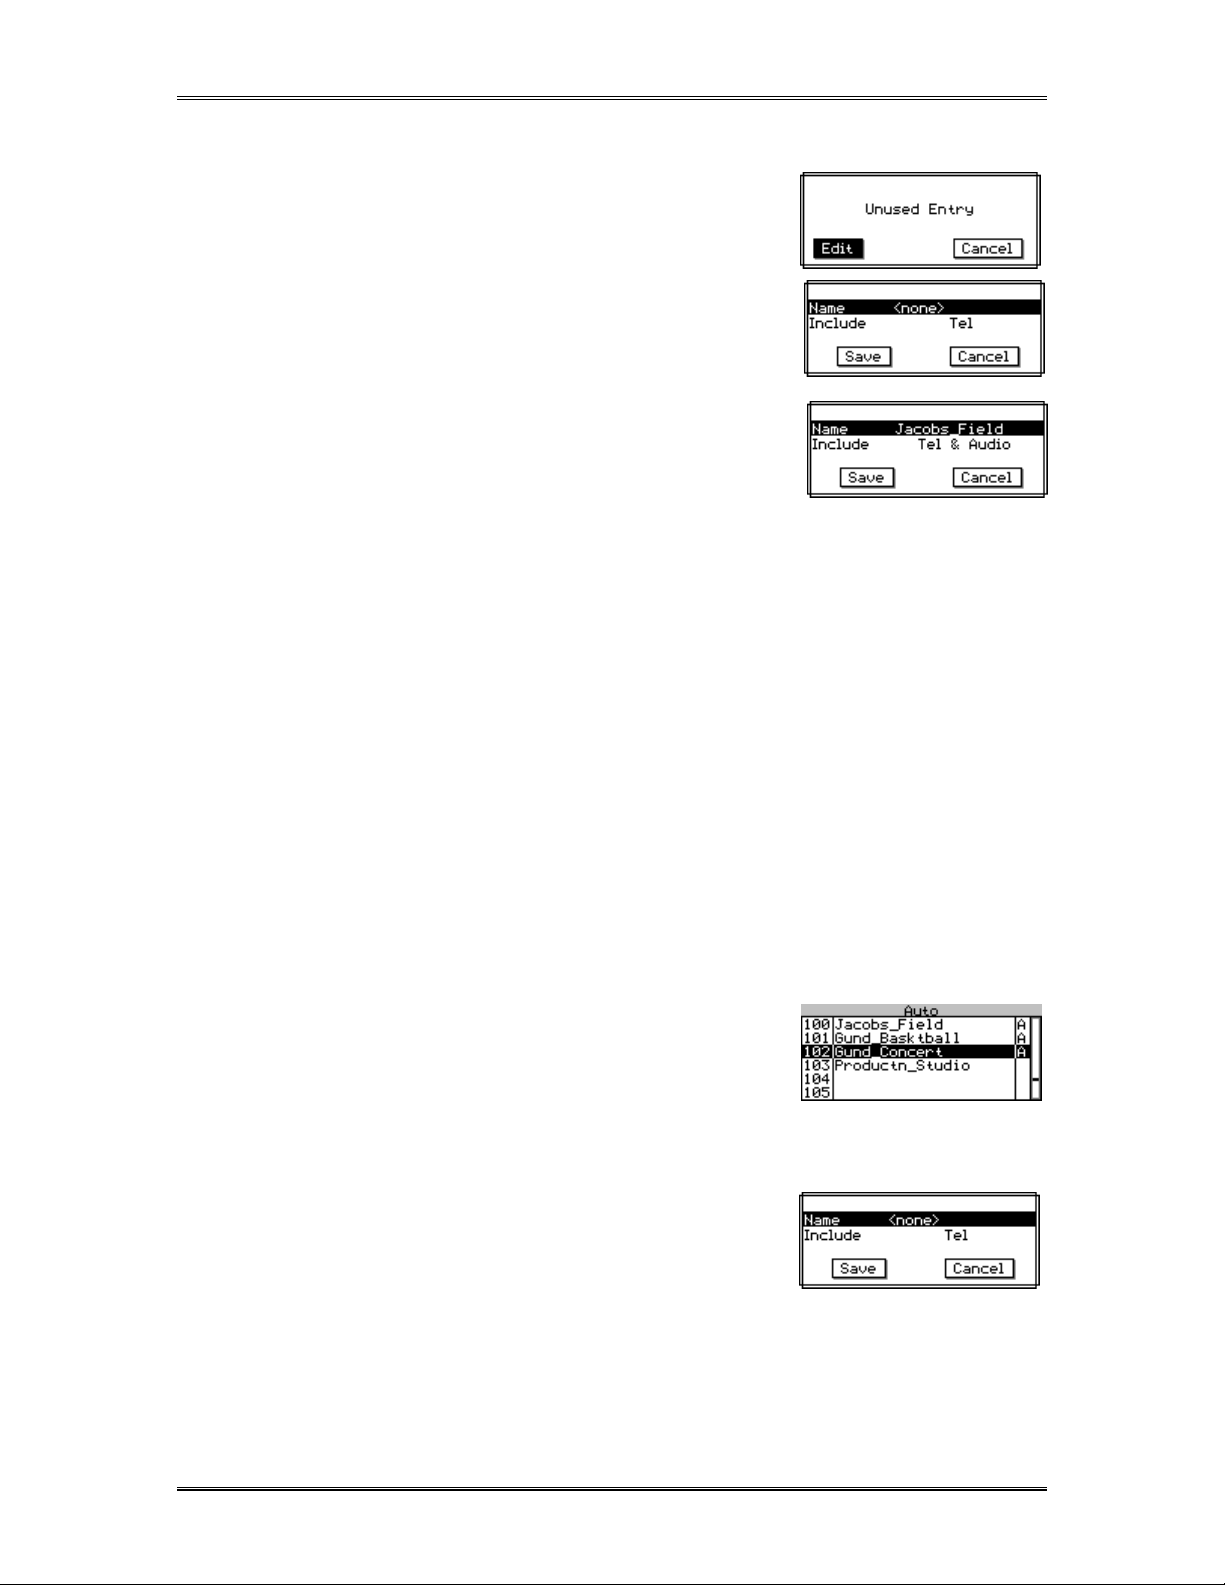
ZEPHYR
3. Once the desired setup is highlighted, press the <SEL> button to allow entry of (or
editing of) the information for this setup. If an
empty setup was selected, "Unused Entry" will be
displayed.
4. Press <SEL> to continue to the screen shown: or
press <5> and then <SEL> to escape without
changing.
5. Enter a name (see Section 2.3.1 for an example on
how to select and enter information) and press
<SEL> to store it.
6. Move the cursor to each of the following fields and
enter the appropriate information (if the information shown is incorrect you can
delete it by pressing <5> repeatedly after selecting that field). Telco, SPID &
MSN/DN. ????
7. Move the cursor to the word Save and then press <SEL> to complete the entry
process.
XPORT
USER’S GUIDE
Editing Location Setups
1. If the setup to be edited is for a location with ISDN, program the Zephyr Xport with
the information ISDN line to be used at this location (see Section 3.4, below).
2. Press the <AUTO> key. Choose the Location Setup to be edited.
To choose a Location Setup you have two options:
• Press and hold the <6> to scroll to the list of 30
Location Setups (these are setups # 100 to 130).
• Or, use the Keypad to enter the three- digit
number for the desired setup. That setup will be displayed and will be
highlighted.
3. Once the desired setup is highlighted, press the
<SEL> button. The name of the setup will be
displayed. Press <5> and then <SEL> to edit the
setup.
4. Edit the name (see the beginning of this chapter section for an example on how to
select and enter information) or other fields as desired. To delete an existing entry,
select it and then use the <5> key repeatedly to delete the existing information.
CHAPTER 3 - THE DETAILS 23

ZEPHYR
5. Move the cursor to the word Save (using <5> or <6>) and then press <SEL> to
complete the editing process.
XPORT
USER’S GUIDE
3.5 The Xport's ISDN interface
Units with either of the ISDN interface options will display "Found ISDN card" shortly
after startup. This is also displayed on the About screen. ??? picture
h HOT TIP! When using an ISDN- equipped Xport on an analog (POTS) line you can
force the unit into POTS mode by pressing <5> and <6> simultaneously when the
"Found ISDN card" message is displayed. This will shorten startup time.
THE ISDN CONFIGURATION MENU
This menu will not be present if the ISDN option is not installed, or if the ISDN was not
connected at the time of start up.
To configure the information about your ISDN circuit press <NAV> twice. Then, press
6> key twice to highlight ISDN Setup. Now press <SEL> once.
the <
• SPID
Users in the USA & Canada with Natl I- 1 and DMS Cust ISDN service should enter
either of their SPIDs here. Your Telco should have provided you your SPID numbers
for your ISDN circuit. The format is often XXXYYYZZZZ0101 (where XXX is the area
code, YYYZZZZ is the 7 digit telephone number).
If you are using ETS 300 (Euro ISDN, used throughout the world), INS 64 (used in
Japan), or AT&T Cust PTP (sometimes used in the USA) ISDN service, you should
leave this field blank.
• MSN/DN
The use of these fields depends on the type of ISDN to be used.
Natl I- 1 and DMS Cust. Protocol (used in the USA and Canada): enter the 7- digit
telephone number associated with the SPID entered above here.
INS 64, or AT&T Cust PTP ISDN Protocol: leave this field blank.
ETS 300 (Euro ISDN): you may enter a "Multiple Subscriber Number" or "MSN"
here. This is optional, and may be used if you are sharing the ISDN with another
device.
• Telco
This configures the Xport to operate with the particular type of ISDN line that may
be connected. This is the ISDN "Protocol" or "Switch Type" and must be configured
properly for the ISDN to function properly. ETS300 is used in most of the world
including Europe, INS 64 is used in Japan, and AT&T Cust. PTP, DMS Cust. and
Natl.I- 1 are used in the USA (Natl.I- 1 is used most commonly).
Once you are done setting this item, the Xport will prompt you to reboot.
24 CHAPTER 3 - THE DETAILS

ZEPHYR
XPORT
USER’S GUIDE
ISDN STATUS SCREEN
When using ISDN, one of the following status words will be showed on the default
screen.
Ready: Line is initialized and is idle. If a SPID is required, and has been omitted, this could be
displayed.
Connected: Line is in use
SPID Pending: If an external NT1 is used this may be displayed if it has not completely initialized.
May also be seen if the line is misconfigured. If SPIDs are not required, and have been entered, this
may be shown.
SPID Error: Indicates the SPID is incorrect. SPIDS are only needed with certain ISDN protocols
used in the USA & Canada.
SPIDS are not used for ETS300 (Euro ISDN), INS 64 (Japanese ISDN) or AT&T Cust. PTP (AT&T
Custom).
Inact: Indicates the external NT1 (if any) has not initialized to the line and nor is there an active
NT1 on the S interface. NOTE that Euro ISDN (ETS 300) lines are permitted to go into this state,
and will act normally when the time comes to dial (or a call is received).
For information on connecting the unit to ISDN, see Section 3.1.2 (ISDN Interface).
3.6 Connecting two Xports to the same ISDN circuit
Sharing ISDN in the USA & Canada
Sharing a single ISDN BRI circuit between two Xports is quite simple. The following
steps will have you up and running in no time.
8-position 8-pin modular cable
6-position 4-pin modular cable
1. Connect the first Xport to ISDN in the usual manner (see Section 3.1.2)
2. Configure the first Xport's ISDN settings. You must use Natl I- 1 or DMS Cust ISDN
service to share the ISDN circuit (AT&T Cust. PTP does not support this ability) for
this to work. Enter SPID 1 and DN/MSN 1 (see Section 3.4).
CHAPTER 3 - THE DETAILS 25
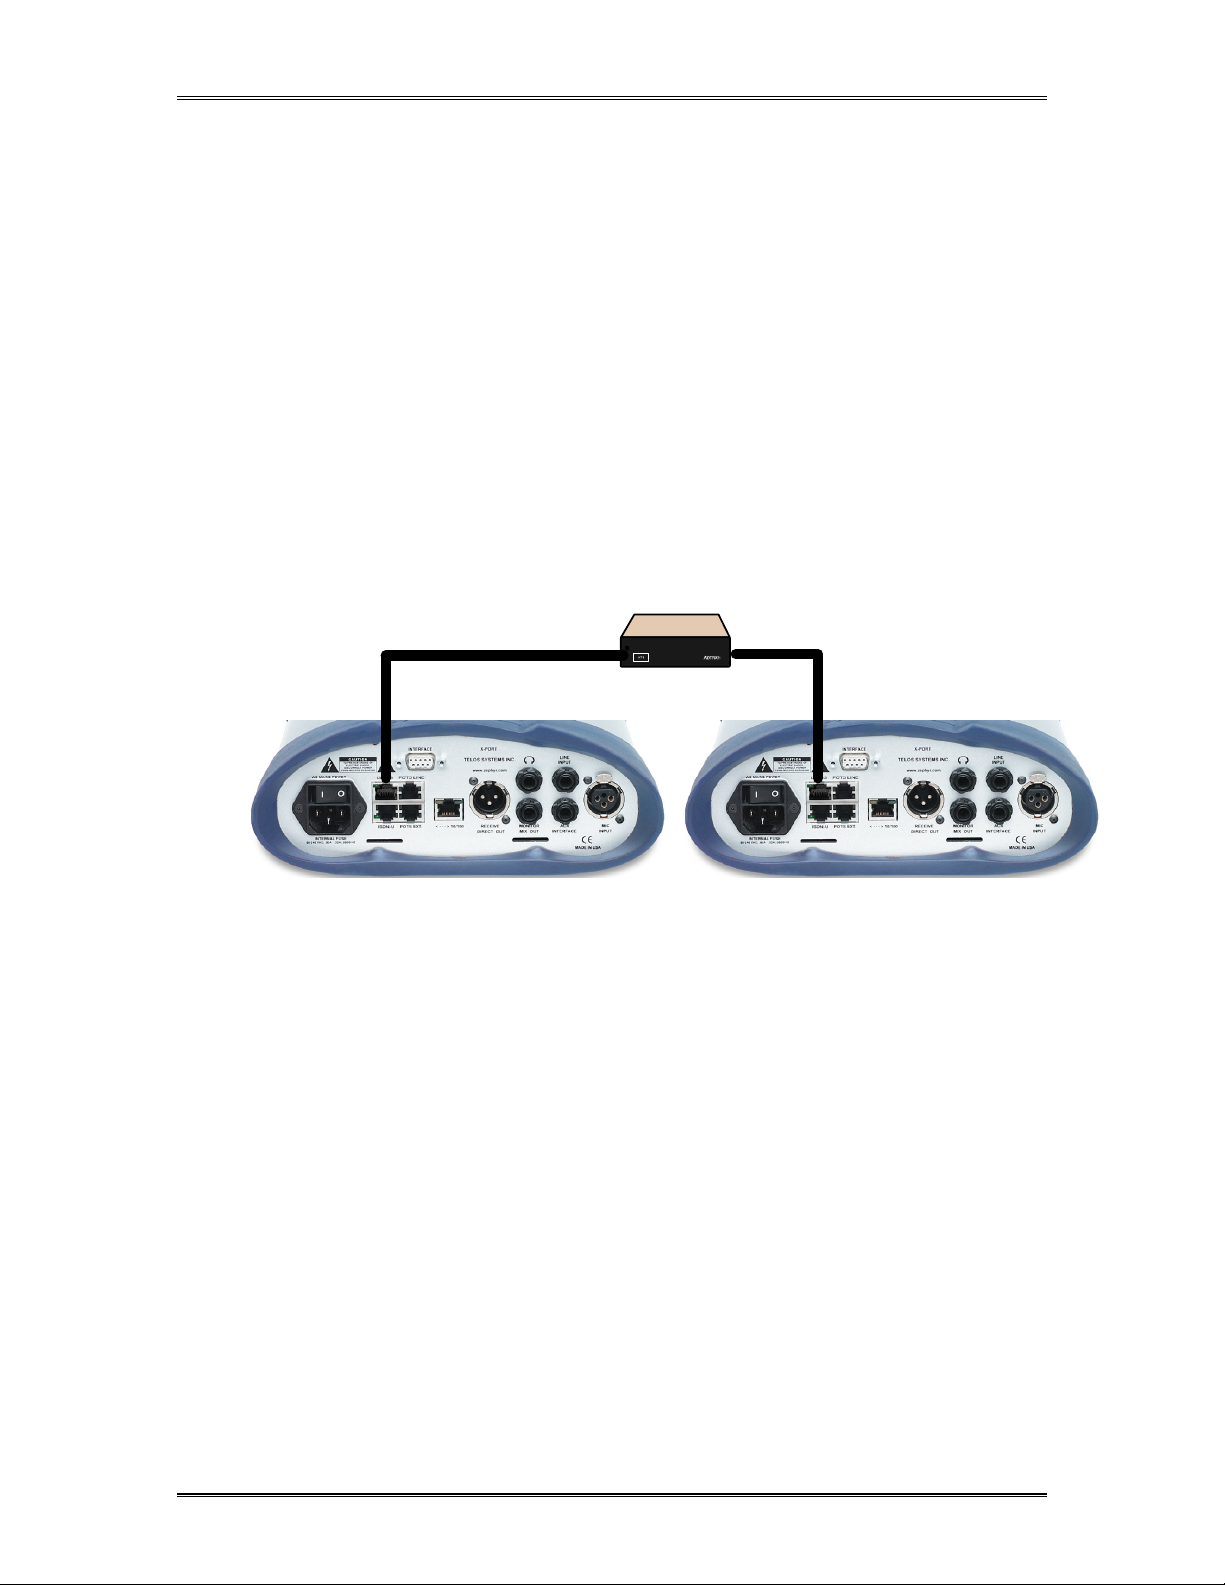
3. Using a "straight through" 8 pin cable wired according to TIA/EIA T- 568- A T-568A
or T- 568B connect the ISDN S jack of the first Xport to the ISDN S jack of the second
Xstream.
4. Configure the second Xport's ISDN settings. Enter your second SPID and your
second Directory number as MSN/DN.
5. Reboot both units. They should now function normally, each with access to one
ISDN B channel.
Sharing ISDN worldwide
Multiple ISDN terminals sharing the ISDN "S bus" are quite common in many countries
outside the USA. The Xports ISDN card includes 110 ohm terminating resistors. You can
get detailed requirements from your Telecom vendor if you need more information than
provided here. This technique can also be used in the USA and Canada, when an
external NT 1 is used.
ZEPHYR
XPORT
USER’S GUIDE
8-position 8-pin modular cables
NT1
(NTBA or NCTE)
1. Connect the first Xport to ISDN NT1 (NCTE, DSU, or NTBA) in the usual manner
(see section 3.1.2).
2. Configure the first Xport's ISDN settings normally for your situation. The TELCO
setting would generally be set to ETS 300 (or, for Japan, INS 64). You may optionally
enter a MSN into the MSN/DN field (see section 3.5).
3. Connect the second Xport to ISDN NT1 (NCTE, DSU, or NTBA). If the NT1 does not
have a second interface port use a "straight through" modular splitter to break out
the modular jack at the NT1 into two jacks.
4. Configure the second Xport's ISDN settings. The TELCO setting would normally be
set to ETS 300 (or, for Japan, INS 64). You may optionally enter a MSN into the
MSN/DN field.
5. Reboot both units. They should now function normally.
3.7 Cell Phone Interfacing (the Aux Audio Interface)
For maximum flexibility, your Zephyr Xport can be used as a mixer to establish
connections through a cellular telephone (handset). The audio quality will be dependant
on the type of cellular system used, and will be comparable to any other cellular call
using the system in question.
26 CHAPTER 3 - THE DETAILS
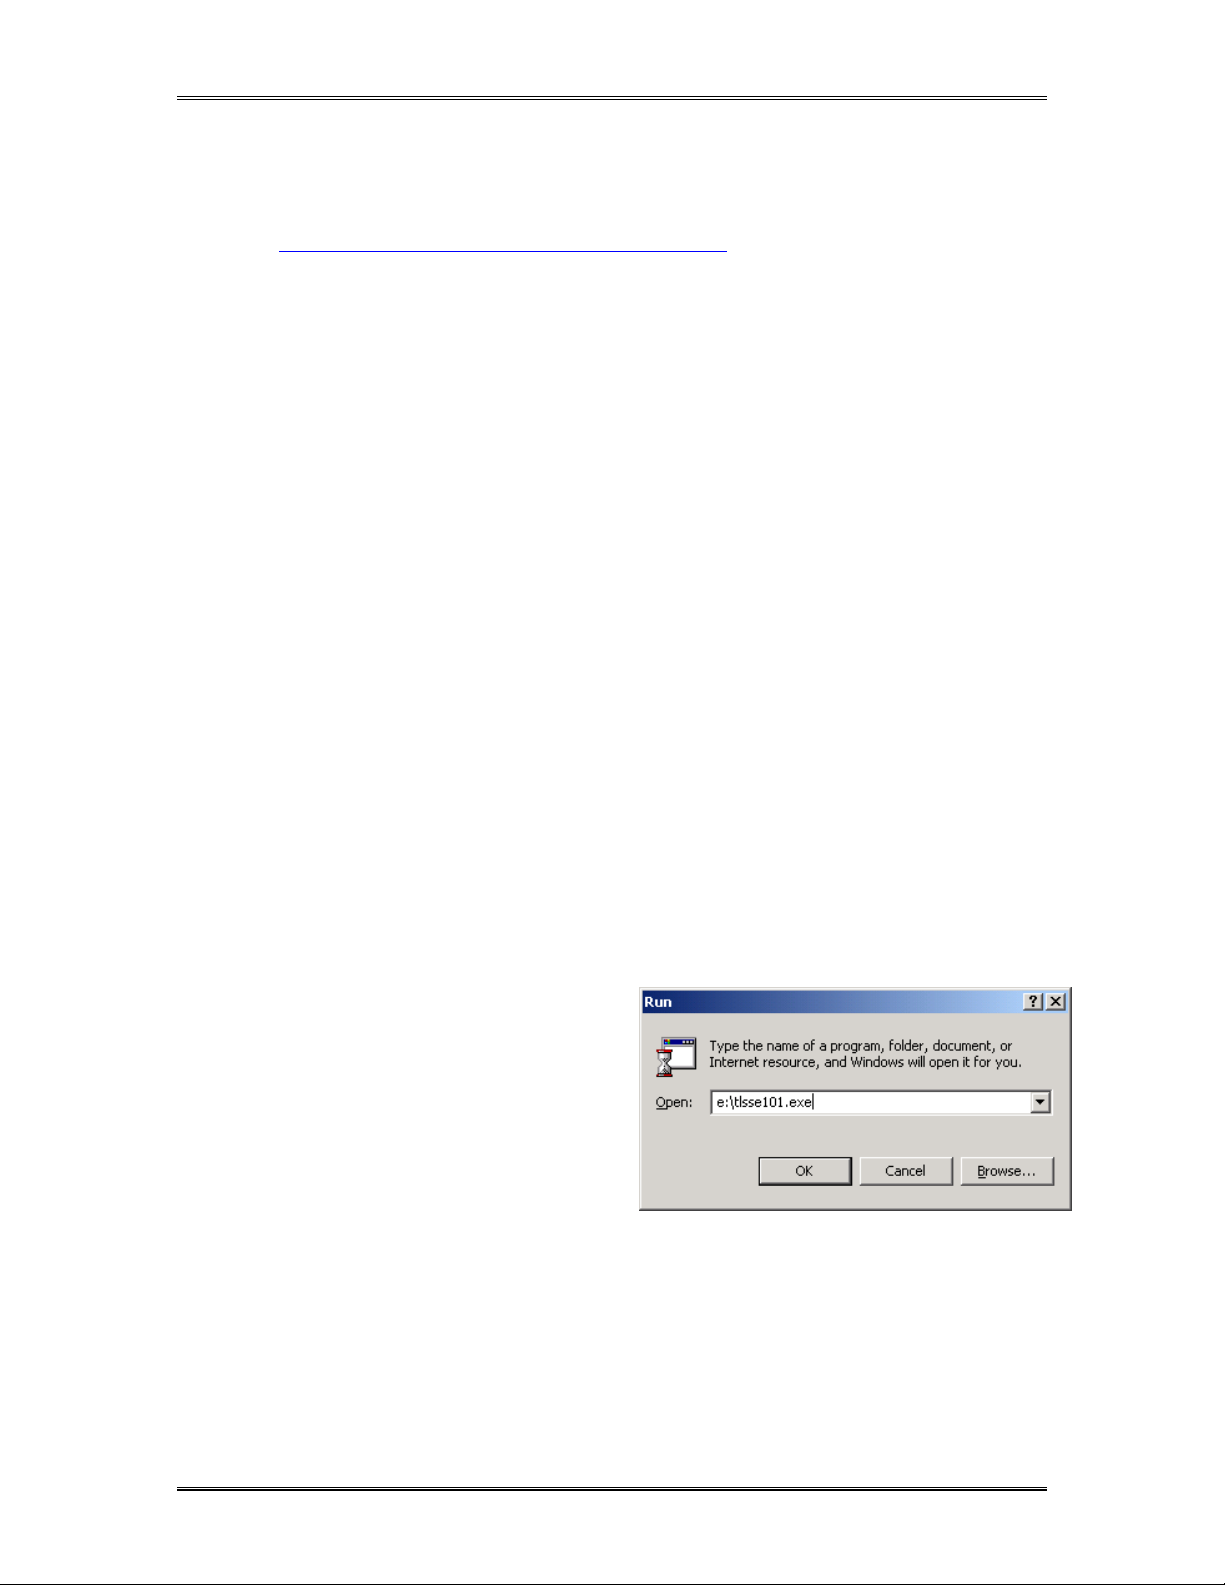
ZEPHYR
XPORT
USER’S GUIDE
Connecting the Cell Phone to the Xport
For more information on using this feature, see the Application Note on our web site.
See http://www.telos- systems.com/support/csb.htm
The majority of cellular telephones include a connector intended for use with a headset.
Typically the headset connector is a three conductor 3/32" (2.4 mm) "sub- mini phone
plug" connector. Typically, the headset's microphone connects to the "tip" connection
and the earpiece connects to the "ring" connection. We'll refer to this arrangement as
the "standard 3- conductor sub-mini connector". Telos can provide a 3/32" to 1/4" cable
for use in this application - Telos part number 2091- 00034- 000.
Adaptors to this standard 3- conductor sub- mini format are available for most handsets
that do not use this format. These are readily available from numerous vendors. Several
such vendors are listed in the Application note mentioned above.
3.8 Feeding the Xport from a computer over Ethernet
We often see reporters in the field editing material on their laptop computer and then
feeding the finished report over a codec back to the studios. The Xport allows audio
"played" on a Windows ® computer to be directly digitally linked to the Xports codec
section over Ethernet for these applications.
NOTE: The audio from the computer is mixed with the audio in the Xport's mixer and
fed to the Codec for transmission. The computer audio is not available locally on the
Xport's mixer, although it will be shown on the Xport's SEND meter.
Telos Soundcard Emulator
Telos Soundcard Emulator is Microsoft Windows 98/NT/2000/XP compatible soundcard
driver. It enables you to connect you PC to Zephyr Xport using Ethernet to make all
digital audio path from you PC playback application to the codec.
Installation
1. Run tlsse101.exe software
installation package located on
the CD- ROM included with
your Xport. Go to “Run” in
“Start” menu on your desktop.
2. The installer will walk you
quickly through the installation
process.
3. After installation is successfully completed, Telos Audio Emulator configuration
window will appear (see below). Configure it as follows:
• Enter your Zephyr Xport’s IP address (as entered in Ethernet Setup menu on the
Xport).
CHAPTER 3 - THE DETAILS 27
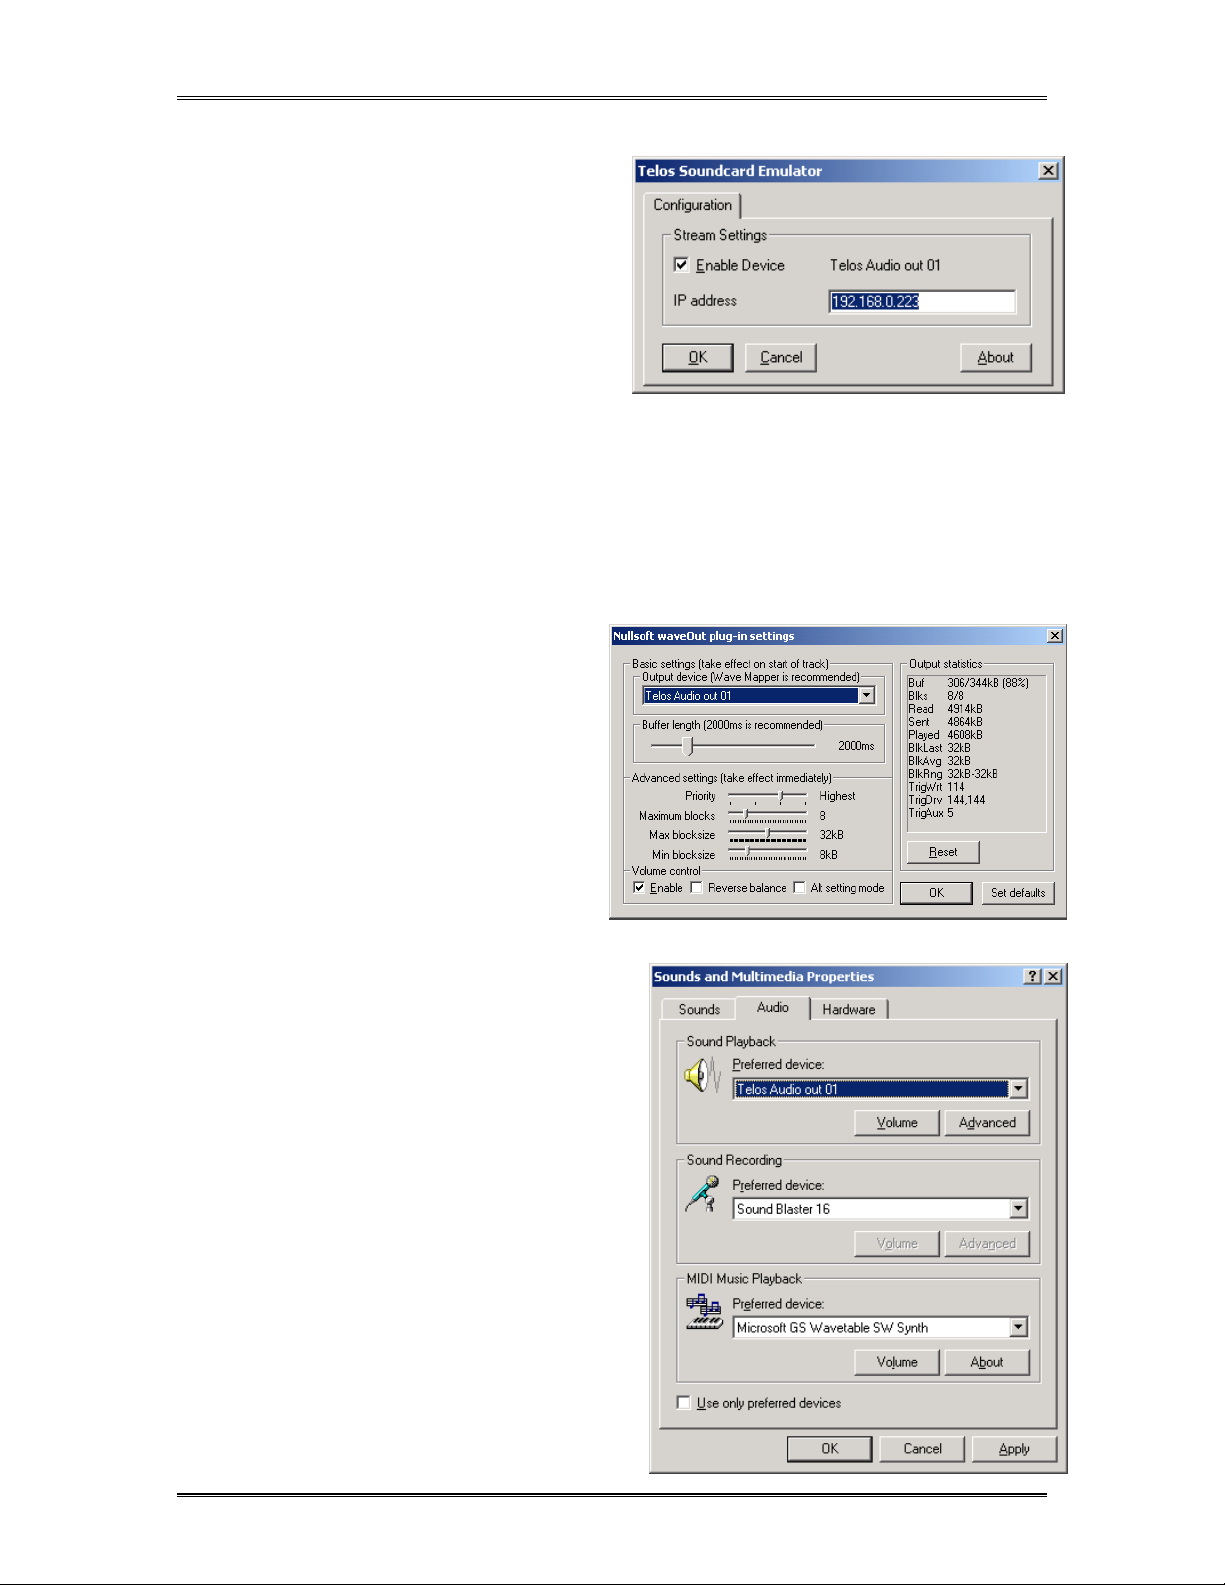
ZEPHYR
• Click “OK” button to save
new settings
4. Installation is complete.
To uninstall, run
“Add/Remove Programs”
applet from the Windows
Control Panel. Choose Telos
Soundcard Emulator and click
“Uninstall”
XPORT
USER’S GUIDE
Changing configuration
Open “Control Panel”. Choose “Telos Soundcard Emulator” applet. The same window as you used
for configuring the driver at installation time will pop up. Now you can change driver’s settings.
They will take effect as soon as you click “OK” button.
Selecting a Playback Device
Windows ® considers the Telos Sound
Card Emulator to be a sound card.
Therefore it can be selected as a sound
card in Windows ® applications. Every
playback application has a way of
selecting an audio device such as a sound
card. However, the exact method varies
from application to application.
Frequently, they will use the default
windows device selected in the “Sounds
And Media” applet in Control Panel (see
below).
Once you get to device selection choose “Telos Audio out 01” for Xport audio. Picture on the right
is an example of Winamp’s waveOut plug- in
configuration.
Configuring Windows “Sounds and Media”
The Windows ® Sounds and Multimedia
settings will determine the sound card used for
Microsoft applications as well as some other
programs that do not allow selection of a sound
card directly .If you would like Windows sound
system to use Telos Audio Device for all
sounds, do the following:
1. Open “Control Panel”.
2. Double click on to “Sounds and
Media” applet.
3. Click on the “Audio” tab and
select “Telos Audio Out 01” as
“Preferred device” for sound
28 CHAPTER 3 - THE DETAILS

ZEPHYR
playback.
4. Click "OK"
XPORT
USER’S GUIDE
Changing the playback volume
The Telos Soundcard Emulator
supports Windows ® mixer device
interface. To change the playback
volume, use the fader or volume control
available in your playback application,
or you can use the Windows Volume
Control tool.
To start the Windows Volume Control,
click on speaker icon on the taskbar.
Make sure correct mixer device is
selected. Go to “Options” to popup
“Properties” window.
3.9 Remote Control
The Xport can be controlled using a web browser. The Xport would need to be
connected to the same network (LAN or WAN) as the computer and both units will need
IP addresses. If the Xport is to be accessed from outside the local network a gateway IP
address will need to be entered as well. These items are configured in the Ethernet
Setup… sub menu of the Xport.
One everything is configured, simply type "http://123.345.567.789" (use the Xport's IP
address here) into your browser to connect to the Xport. You will be prompted for a
password. The default password is "Telos" (this is case sensitive).
We've tested Xport with the following browsers: ???
CHAPTER 3 - THE DETAILS 29

ZEPHYR
XPORT
USER’S GUIDE
4 Frequently Asked Questions
We cover general questions about the Xport and the technology involved here. If you
have questions related to operational issues, or need to troubleshoot a problem, see
Section 5 (What to do if…).
Is Xport a “POTS codec”?
Yes and no. Xport is for the field, and uses POTS (Plain Old Telephone Service) analog lines or
ISDN lines (using the optional ISDN interface). But, you will be connecting with a Zephyr Xstream
at the studio using an ISDN line – the same one you probably already have.
Are there advantages to using ISDN, in addition to being able to use the same Telco line and Zephyr
codec equipment at the studio?
Yes, certainly. Modems work best on lines that are noise and distortion- free. They are also
sensitive to the echo and noise inevitably caused by the hybrids and converters needed to adapt
analog lines to the digital switching and transmission used within the Telco network. When you
have a digital ISDN connection at the studio side, you get rid of much of the problem, by removing
two hybrids and eliminating any possible noise problems from half of the link.
Older POTS codecs confined to using analog at both ends require a total of 4 hybrids in the path, each of
which can cause modem problems from reflections and from the analog/digital conversion noise that is
added each time. Noise can be induced into two analog lines.
Zephyr opens a pure digital connection on the studio side, so half the trouble is eliminated.
The combination of ISDN + the special DSP- based modem technology means that Xport can cut
through line problems that other codecs cannot. Internet Service Providers have used this
approach for years.
30 CHAPTER 4 - FREQUENTLY ASKED QUESTIONS

ZEPHYR
XPORT
USER’S GUIDE
Is there anything I need to know about using ISDN for this application?
Nothing special. The telephone network automatically translates the signals on the analog line to
the digital form (called "G.711") carried over ISDN.
The ISDN line must be configured to allow this type of call (called Circuit Switched Voice or
"CSD"). However, the vast majority of ISDN lines have this feature (our ISDN order forms have
always requested this feature).
Can I share an ISDN line between two Xports?
Yes. As with many ISDN terminals, you can connect multiple Xports together using the S interface.
See section 3.6 for more information.
How does the studio Zephyr know what kind of call is being received?
First, we look at the ISDN “set- up message,” that tells us if the incoming call is from a digital
device or from an analog phone line. Then we wait for the modem tone. Then we initiate Xportspecific handshaking to be sure.
Will it work for both local and long-distance calls? Anything special I need to do?
Within the USA and most other countries, all switching and transmission of telephone calls are
done digitally, so performance should be nearly as good for long distance as for local. In both
cases, only the “last mile” analog part should have any effect on modem performance.
What about international calls?
You should experience better quality and fewer drop- outs with the Xport approach compared to
POTS- only codecs. Most international calls are switched and transmitted over digital links, so the
only analog part will be the last mile at the remote site.
On some connections, however, there may be some compression used to conserve bandwidth.
The most common is ADPCM, which reduces the usual Telco 64 kbps rate to 32 kbps. There may
also be “echo- suppressors” at some point within the connection. If either of these occurs, you
may want to try a different long- distance carrier to get a good connection. Note that these
problems are possible with POTS- only connections also. Actually, ISDN makes them less probable
because the Telco network is likely to assign better facilities to digital calls.
What happens when the line is very bad?
In this case, modem bitrate will be too low to be useful, and the Xport will switch to a non- modem
“audio coupler” mode. Because we use digital hybrid technology borrowed from our telephone
interface products, send/receive isolation is quite good. You will not get high- fidelity audio, but
you will get the best possible. See Section 5 (What to do if…) for troubleshooting tips.
What is the reasoning behind your choice of the aacPlus audio coding method?
It is, without much doubt, the best low- bitrate codec there is. MPEG AAC has
been independently tested using a double- blind procedure and found to be
superior to any other scheme at rates down to 16 kbps. aacPlus uses a
powerful spectral band replication method to take this already excellent
performance to jaw- dropping amazing. Because it is an enhancement
designed specifically for very low bitrates, it is perfect for POTS codecs. (As a side note, SBR
added to MP3 is called MP3 Pro, and is catching on quickly for Internet applications.)
aacPlus in being considered for inclusion within MPEG, and will probably be adopted within the
next few months. XM Satellite Radio has announced that they are using it.
Other POTS codecs use proprietary coding methods that have not been independently tested, and
are likely to be much worse than aacPlus. Some use CELP, which is a voice- only codec – basically a
scaled- up version of the codec in mobile phones. These don’t work very well for music or for voice
CHAPTER 4 - FREQUENTLY ASKED QUESTIONS 31

ZEPHYR
XPORT
USER’S GUIDE
combined with background sounds such as from sports spectators, traffic, applause, etc. CELP
does have the advantage of lower delay, but it comes at too much cost to audio quality, in our
view.
Will other vendors be able to make products to interoperate with Xport and Xport-enabled Zephyr
Xstreams?
If they want to, yes. As is Telos tradition, we prefer standards that do not lock you in. Remember
the early ISDN codec days? In the face of repeated attempts to get users to take up proprietary
schemes, we held fast to standards. And, we sought the very best at the time – MPEG Layer 3. We
were, in fact, the first in the world to license and offer what has come to be known as MP3, a
decision well vindicated over time. When needed, we have worked co- operatively with
competitors to help them achieve interoperability. Xport continues this tradition and approach.
The aacPlus codec is licensable by all who choose it. We hope it catches on widely, because it really
is very good.
Why did you wait so long to make an analog line codec? Seems like a natural extension of your
Zephyr, and you guys do know coding, right?
Maybe it was because we know coding that we have been on the sidelines until now. We just hadn’t
heard a codec that sounded broadcast quality to our ears before this one. Those with long
memories may recall that we demo- ed a POTS codec prototype using MP3 at an NAB radio show
many years ago – before any others were marketed. We have been thinking and planning this step
for some time.
Also, we didn’t want to use an off- the- shelf modem owing to the problems with those, and we
wanted to use ISDN on the studio side, so that had to wait for the companion Xstream. The pieces
finally came together to let us give you all the right stuff.
Can I upgrade my older Zephyr Xstream codec to operate with the Xport? Will it be free?
Of course! Telos has had a long history of enabling new applications with software enhancements
to products. Because the Xstream has an Ethernet port, it may be upgraded over the Internet,
without changing any parts or sending it to Telos. You may do so for free. Or, you may choose to
upgrade by replacing a memory SIMM or by sending the unit to us. In these cases, there will be a
modest charge.
What version software must I have in my Xstream to work with the Xport?
You will need version 2.5 or later
Tell me more about the Ethernet?
This can be used for remote software and for control via a web browser, just like the Xstream.
However, we also have another exciting use for this port. These days, field work often includes a
Laptop PC. We believe that Ethernet will come to be regarded as an essential way to interface most
broadcast gear to computers and networks, so all of our new equipment has it. The Xport will
support a streaming audio connection so that you can play files from a PC into the Xport for
transmission.
So what is the Aux Interface connector for?
The Aux Interface connector has audio send/receive signals on a TRS connector, and is intended
for analog hook- up to today’s mobile phones via the often- included headset jack. You can achieve
some benefit over normal phone quality by using a professional microphone and the Omnia
processing – a little better than standard phone audio, anyway.
32 CHAPTER 4 - FREQUENTLY ASKED QUESTIONS

ZEPHYR
XPORT
USER’S GUIDE
Anything better possible with mobile phones?
Not yet. Current generation phones have a maximum data rate of 14.4 kbps, not enough for
anything approaching high fidelity.
We expect to interface digitally to next- generation phones with fast rate capability. This will be via
the Ethernet or Interface connectors, depending on what the phone makers bring us. Japan’s IMode system, based on 3G Qualcomm technology, has a 64 kbps ISDN- like channel option today.
If that catches on around the world, you will be ready to use your Xport for remotes with quality
equal to landline ISDN codecs. Since the fixed end of I- Mode is via ISDN, your studio side Xstream
will be ready. (This mode will not be possible with POTS codecs that don’t use ISDN at the studio
side because there would be no way to get the 64 kbps down an analog line.)
Why do you include a multi-band digital AGC and limiter? Maybe that is a little over-the-top?
Because they are under the same roof, the Telos and Omnia designers often share ideas and work
together. Omnia has been making a streaming audio dynamics processor for some time, which
was designed in partnership with the Telos codec guys to sound good with coded audio. So it really
was natural to get some of this Omnia work back into Telos products – hence the integration into
Xport. The bitrate is very low, and we want every practical tool to smooth and clarify the audio.
That is why we went “whole hog” with a multi- band DSP approach – it really makes a difference to
the quality. We figure most of the time you are using a POTS codec, you want some control over
dynamics anyway. (Think sports announcers.) Of course, you can switch it off if you prefer a more
purist approach.
Where can I get answers to my technical questions?
See section 5 (What to do if) for troubleshooting questions. If that does not help contact Telos -
We're here to help.
CHAPTER 4 - FREQUENTLY ASKED QUESTIONS 33

ZEPHYR
XPORT
USER’S GUIDE
5 What to do if…
Sadly, the world is not perfect. We all know this, but that knowledge does not help us when
unexpected problems happen right before the "big broadcast". This section should help when
things won't work.
When dialing using POTS the status goes to “off hook” and then immediately back to “on hook”. What
should I do?
Check the following:
Is this really an analog phone line? If it was connected to a phone with more than two lines, or had
a fancy LCD display it was probably a proprietary office phone. Or the line may be dead. Plug in an
analog phone into the jack to see if you get dial tone.
You may have a bad phone cord. Try another cord.
Try the Xport on another line.
What does it mean when a dialogue box comes up that says “Degrading Performance! Do you want to
drop back to Phone mode?”
The means that modem performance has deteriorated. Normally you should choose “Ignore”. If the dialogue
appears often (more than once every hour or two) you should choose “retrain” when convenient (NOTE
retrain will cause a drop in audio for about 6 seconds). If you have tried retraining and you see this dialogue
appear again, you should re-dial as soon as convenient. In the meanwhile, particularly if you are getting
audible dropouts, you can select phone “Phone” (this will give greatly reduced quality, but this will allow you
to stay connected without dropouts until you can redial).
What does it mean when I dial and a dialogue box comes up and says “Bit rate too low…Falling Back to
Phone Mode”???
This means the modem is unable to negotiate an acceptable connection and therefore the connection has
been established in “Phone” mode. You may wish to try redialing.
What does it mean when I am connected and a dialogue box comes up and says “Lost Modem
Sync…Falling back to Phone Mode” or “ Unacceptable Modem Performance…Falling back to Phone
Mode”?
The modem connection has failed and therefore the connection has been converted to “Phone” mode. You
should redial when convenient.
While the Xport’s custom DSP modem is designed to be as stable as possible, there are certain line
conditions that can interrupt any modem. Minor interruptions will display the “Marginal Quality” dialogue (see
above). In cases where the modem connection is in eminent danger of termination the system will prevent
an interruption by automatically switching to phone mode and one of the above messages will be displayed.
You should redial when convenient.
How can I tell if my Xport has the ISDN option?
ISDN units will display “found ISDN card looking for line…” shortly after power up. You can also go to the
“About” screen to check this.
Why does my ISDN Xport take so long to boot up?
We know that menu options for things like “SPIDS” or “DNs” can be intimidating to non-technical users.
Therefore, we display the ISDN setup menu only if the ISDN interface is present and active (i.e. with an
34 CHAPTER 5 - WHAT TO DO IF…

ZEPHYR
XPORT
USER’S GUIDE
active line present). When using POTS you can speed boot time by pressing <5> and <6> simultaneously
when the "Found ISDN card" message is displayed.
I can’t find the ISDN setup menu.
The ISDN circuit should be connected to the Xport before you power the unit up, or it will boot into POTS
mode. Or you can force the unit into ISDN mode by ???
Why does the unit abruptly switch to phone mode without warning, even though my line is very
good and my connections show good quality readings?
Be sure to disable call waiting on lines that support this feature. You can verify if this is the case by calling
into the unit while it is dialed up. You should get a “busy signal” in this case. If you hear “ringing” the line
supports call waiting. In most areas of the USA you can disable call waiting on outbound calls by adding *70
to the beginning of the number to be dialed. Or, you can enter these digits in the Prefix field in the Xport’s
menu.
Why won’t the Xport establish a POTS (modem) connection? Why do my connections show a very
low quality reading? I get the message??? or ???
Check the following:
Are you using “Xport” as the “Mode” when you dial? The Xport call type indicates you wish to make
a modem connection.
Does the problem happen only with long distance calls? Try using a different carrier.
Is the Xstream running version 2.5.0 or later? It must have version 2.5.0 to communicate using
aacPlus.
Is the COUNTRY setting set to match the country where the Xport is located?
Is the line you are using of adequate quality? If the Xport works fine from other lines served from
the same Telco central office you may have a problem with a bad line. Here are some things to
check before calling the Telco:
Is the line “shared” between the Xport and any other device?
Try disconnecting all other equipment connected to the line in question. For best performance,
you don’t want extra equipment or phone jacks on the line to be used with Xport.
If you must use a line that is used for other equipment, it is best to wire up an A/B switch as
close as possible to where the line enters the building, and feed a dedicated wire and jack and
for the Xport from the switch.
What kind of wiring is used between the network interface (or Telco protector block) and the
jack? If it is the older cloth wire, or the red/green/black/yellow untwisted cable, you should
replace the wire with twisted pair wire (category 3 or greater).
If there is a network interface, try plugging Xport directly into it (thereby bypassing the inside
wiring and other devices).
You may have a problem with your phone line. Try using a different line to see if that makes a
difference.
If the problem occurs with all lines from a given Telco central office, but not on lines from
different central office suspect a network problem.
CHAPTER 5 - WHAT TO DO IF… 35

ZEPHYR
I can dial local calls just fine, as can the far end. Why can’t I place a long distance call?
There may be a problem with your long distance carrier. Try dialing a test call with a different carrier. In the
USA & Canada, you can force a call to a specific carrier by using a 101xxxx access code. If this solves the
problem, be sure to follow up by contacting your carrier, or setting up and account with another carrier. The
following access codes are just a few of the available carriers (Note: for ISDN “Zephyr mode” calls use one
of the first 3 listed).
1010222 (MCI) 1010321 (Telecom USA)
1010288 (AT&T) 1010345 (Lucky Dog)
1010333 (Sprint) 1010220 (Telecom USA)
XPORT
USER’S GUIDE
h HOT TIP! While these access codes are handy for troubleshooting, in many cases the
rates using them can be very high. We strongly recommend directly contacting a long
distance company and establishing an account.
I am unable to establish calls using POTS from the Xport to the Zephyr Xstream at the station.
Check the following:
Is the Xstream at the station properly configured and working?
Can it dial from B channel one to B channel 2 as described in the Xstream manual? If not,
what happens? See the Xstream manual for more assistance on troubleshooting ISDN.
Can it accept calls from a Telephone? If not, what happens? In rare cases, an ISDN line might
not have the ability to accept “Circuit Switched Voice calls” enabled. In that case you will need
to have your Telco enable “circuit switched voice” for at least one B channel.
Can the Xport place a call to a Telephone?
If you call a telephone using the “Call Type” of XPORT, the far end should hear a modem tone
after it answers.
If you call a Telephone using the “Call Type” of PHONE, the far end should hear your audio,
and you should be able to hear them speaking on the Xport.
You may need to enter a “9”, “8”, or other number before you dial. If so, you may need to
enter a pause between this digit and the rest of the number (or you may sometimes get the
wrong number). Listen carefully to the Received headphones while dialing to hear what is
happening. In this case use the <#> or <*> key to enter the <,> character (pause) when
dialing.
Can the Xstream and Xport in question call the Telos Test line?
I can’t place a call using ISDN in Zephyr mode.
Can you place a call using ISDN using the “Phone” mode?
If so, then your ISDN line may not be configured to allow Circuit Switched Data(CSD) calls. If
you cannot place calls using either call mode, then see the next question.
36 CHAPTER 5 - WHAT TO DO IF…

ZEPHYR
XPORT
USER’S GUIDE
When placing ISDN “Zephyr mode” calls between Xstream and my Xport, I get no audio or lock.
Zephyr mode calls from Xport require that the Xstream’s codec settings be configured as follows:
Xmt = AAC-LD mono 64; Rcv = AAC-LD 64; Bit rate 56 or 64; Sample = 48 kHz
I can’t place or receive calls using ISDN.
If you are using the (2-wire) U interface, what is the status of the U Sync LED located next to the ISDN
U interface jack.
If this LED is flashing slowly disconnect any equipment attached to the ISDN S interface jack
and restart the Xport.
If this LED is flashing quickly (flickering) try another cable between the ISDN jack and the
Xport. If this does not help, suspect the ISDN line.
If the LED is illuminated continuously, this indicates the “layer 1” connection has been
established between the Xport and the ISDN switch (or an active U repeater). In this case
check the line status on the main status screen (see Section 3.5 for more on the ISDN line
status). Go to the ISDN menu and check your SPID (if required) and make sure that the
correct Directory Number is entered. Check the Telco setting and then restart the unit.
If you are using the (4-wire) S interface, check the status indicators on the external NT1.
If the NT1 shows normal status check the line status on the main status screen (see Section
3.5) for more on the ISDN line status). Go to the ISDN menu and check your SPID (if
required) and make sure that the correct Directory Number is entered (if required). Check the
Telco setting and then restart the unit.
If the ISDN status shows INACT try placing a call to the unit. Does the status change when a
call is attempted?
CHAPTER 5 - WHAT TO DO IF… 37

ZEPHYR
XPORT
USER’S GUIDE
6 Technical & Installation Information
6.1 Environmental Considerations
Ventilation and ambient temperature
The Xport should not be placed on bedding, carpet or other materials where the rear-panel
ventilation openings could be blocked. Do not block the ventilation openings on the top of the
unit. You may stack Xstreams as long as the ventilation openings are not blocked. We do not
recommend stacking more than three Xstreams.
The Xport is designed to be used at ambient air temperatures between 0 to 40 degrees Celsius (32
to 104 degrees Fahrenheit) and a relative humidity of 0 to 98% non-condensing.
AC (mains) requirements
The Xport will work with AC power sources providing between 100 to 240 volts at between 50 to 60
Hz. The power supply is self- configuring so adjustment is not required.
AC surge protection is desirable. See
protection.
It is essential that the third “grounding” pin not be defeated on the power cord and that the power
cord be connected to a properly grounded receptacle. If a grounded receptacle is not available, a
qualified electrical contractor familiar with the regulations in you’re area should be contracted to
provide one.
IMPORTANT!
As with any piece of modern electronic gear, it is advisable that precautions be
taken to prevent damage caused by power surges. Standard line surge protectors
can be used to offer some degree of protection. It is the user’s responsibility to
ensure protection adequate for their conditions is provided (see above).
w
IMPORTANT SAFETY INFORMATION!
If fuse replacement is required, please note: For continued protection
against fire, replace fuse only with same type and value.
www.telos- systems.com for additional information on AC
w
Telephone Lightning Protection
The single biggest source of failures of Telecom equipment is due to damage related to lightning.
38 CHAPTER 6 - T ECHNICAL & INSTALLATION IFNORMATION
e

ZEPHYR
Some failures are catastrophic failures, while some are due to the cumulative damage that can
occur over the course of several years. For this reason, we recommend that in addition to AC
(mains) power protection (see above), that a quality telephone line surge protector be employed
at the back panel of the Zephyr Xport. The ground terminal of this device should be connected
directly to the Zephyr Xport chassis, and the protector connected to the Xstream’s ISDN and/or
POTS Interface jack with as short a cable as possible (under 8 inches). This approach is particularly
well suited to situations where you expect nearby strikes, such as when you are located near a
tower. See
www.telos- systems.com for additional information on telephone line protection.
6.2 Installing the ISDN option
IMPORTANT! WARNING! DANGER!
Always disconnect AC (mains) power and Telephone Circuit(s) before
removing the Zephyr Xport’s cover.
Potentially lethal voltages are inside! Failure to observe the above
warning may result in electric shock, injury or even death!
Refer all servicing to qualified personnel.
e
XPORT
USER’S GUIDE
w
The Xport can be ordered with, or without, one of the ISDN options. The ISDN interface
connectors will not be active if the associated option is not present. You check for the presence of
this interface by looking in the About menu option. The two ISDN options are:
• Telos Part # 1701- 00056: for use in the USA & Canada. Allows operation with the ISDN "S"
(4- wire) interface or the ISDN "U" (2- wire) interface in the USA and Canada.
• Telos Part # 1701- 00135: For sale worldwide: Supports the ISDN "S" interface.
To Install the ISDN option card, follow the steps below:
1. Disconnect the AC (mains) power cord and all
telephone connections from the rear panel of
the Xport.
2. Remove the rear bumper of the Xport by gently
pulling at the top with your fingers (see photo)
3. Remove the 6 Phillips- head screws around the
perimeter of the rear panel.
4. Grasp the rear panel and pull it partially out
(see picture below).
5. Look at the bottom of the unit, and locate the green wire going to the power entry
module. Disconnect this green wire by unplugging it from the power module. Pull
the board out from the chassis.
CHAPTER 6 - TECHNICAL & INSTALLATION INFORMATION 39

ZEPHYR
6. Note the standoff near JP 11 and headers
JP6, JP7, and JP12 et al. Remove the screw
(and washer) from the standoff.
7. Plug in and fasten the ISDN card in as
follows (see below):
• Orient the Xport circuit board so that
the rear panel is to your left.
• Orient the ISDN option board so that
the sockets labeled JP1, JP2 and JP4 are
away from you and facing down.
• With the ISDN card angled up so that you can see, make a preliminary
alignment of sockets JP1, JP2 and JP4 of the isdn board to headers JP12, JP7 and
JP6 on the motherboard, respectively (see below).
You may need
to push the
leads to the
power supply
down and out
of the way.
Now tilt the
board down
level and push
down the
board down
onto headers
JP12, JP7, and
JP6.
XPORT
USER’S GUIDE
• Push down
above socket JP3 of the ISDN card firmly, seating it with header JP 11 on the
motherboard. You should feel the ISDN card snap into place.
• Replace the screw and washer removed in step 6, above, to lock the ISND card
in place. Tighten with moderate pressure.
8. Re- attach the green wire removed in step 5 to the power entry module.
9. Carefully align the front edges of the circuit board with the lower pair of grooves on
the inside of the case, and carefully slide the circuit board into the chassis. If you
encounter resistance, remove the board, check the alignment, and repeat.
10. Replace the 6 screws removed in step 3
11. Replace the bumper removed in step 2.
12. To configure and test your ISDN Xport please refer to Section 3.4
40 CHAPTER 6 - T ECHNICAL & INSTALLATION IFNORMATION

ZEPHYR
6.3 Enabling Phantom Power
IMPORTANT! WARNING! DANGER!
Always disconnect AC (mains) power and Telephone Circuits before
removing the Zephyr Xport’s cover.
Potentially lethal voltages are inside! Failure to observe the above
warning may result in electric shock, injury or even death!
Refer all servicing to qualified personnel.
e
The Xport has a built in 12 volt (10 mA) phantom power supply for use with condenser
microphones. If your microphone requires a higher voltage, you will need to use an external power
supply. Follow the steps below to enable the phantom power supply:
1. Disconnect the AC (mains) power cord and all telephone connections from the rear
panel of the Xport.
2. Remove the rear bumper of the Xport by gently pulling at the top with your fingers
(see photo above)
XPORT
USER’S GUIDE
w
3. Remove the 6 Phillips- head screws around the perimeter of the rear panel.
4. Grasp the rear panel and pull it out (see photo above)
5. Look at the bottom of the unit, and locate the green wire going to the power entry
module. Disconnect this green wire by unplugging it from the power module. Pull
the board out from the chassis.
6. Locate jumper JP- 10. Remove the jumper block and relocate it to the two pins
closer to the rear of the unit (to enable Phantom power).
7. Re- attach the green wire removed in step 5
8. Carefully align the front edges of the circuit board with the lower pair of grooves on
the inside of the case, and carefully slide the circuit board into the chassis. If you
encounter resistance, remove the board, check the alignment, and repeat.
9. Replace the 6 screws removed in step 3.
10. Replace the bumper removed in step 2.
CHAPTER 6 - TECHNICAL & INSTALLATION INFORMATION 41

ZEPHYR
XPORT
USER’S GUIDE
7 Specifications & Warranty
All specifications subject to change without notice
GENERAL
• Full Duplex field terminal supports analog
(POTS) telephone lines and ISDN circuits
(optional).
• Full duplex high fidelity
operation using aacPlus
coding.
• Fallback to digital
adaptive hybrid mode if line is unable to
support reliable data connections.
• MPEG AAC-LD coding over optional ISDN
interface.
• Auxiliary connector allows use over cellular
handset.
FREQUENCY RESPONSE
• Mixer:
• Line input to Mix output: ± 0.5 dB 20 Hz to
20 kHz
• Mic input to Mix output: + 0.1/-0.75 dB 20 Hz
to 20 kHz
• Codec (Line in to Direct Rcv Out):
• End to end connection at 24 kbps: +0/- 3
dB @ 20 Hz - 15 kHz
• End to end connection (ISDN) at 56 or 64
Kbps: +0/- 3 dB @ 20 Hz – 15 kHz
THD + NOISE
MICROPHONE INPUT (balanced XLR-3
female)
• Clip point
• Gain High: -37 dBu
• Gain Low: -27 dBu
• Available Gain:
• Gain High: 50 dB
• Gain Low: 60 dB
• Impedance: ≥ 3.8 K Ω
• CMRR @ 1 kHz: 75 dB
• Phantom power: 12 volt @ 10 mA
LINE INPUT (balanced; ¼” TRS)
• Level: +4 dBu (+20 clip)
• Impedance: ≥ 19 K Ω
• CMMR @ 1 kHz ≥ 62 dB
AUXILARY JACK (unbalanced input and output
on ¼” jack: Tip output, Ring input)
• Input:
• Level: Unity gain to Mix Out, 20 dBu clip
point
• Impedance: ≥ 9 K Ω
• Output:
• Mixer - From line input to Mix output (adjusted
fully to send) loop mode: 0.0043% @ 1 kHz,
22Hz – 22 kHz
• Codec - End to end connection at 24 kbps (Line
in to Direct Rcv Out): 0.04% @ 1 kHz 22Hz –
22 kHz
DELAY (round trip)
• aacPlus (POTS) <700 msec
• AAC-LD (ISDN) <90 msec
42 CHAPTER 6 - T ECHNICAL & INSTALLATION IFNORMATION
• Level: -26 dBu (nom.)
• Impedance: ≤ 12 Ω
RECEIVE DIRECT OUT (Balanced XLR-3 male
jack)
• Level: +4 dBu (20 dBu clip)
• Digital nominal operating level: -18dBfs
• Impedance: ≤ 50 Ω
• Noise floor ( no decoder lock): -75.5 dBu

ZEPHYR
XPORT
USER’S GUIDE
• Dynamic Range
• No Decoder Lock: 94 dB
• Encoder/Decoder loopback: 91 dB
• THD (Line input, 100 Hz to 10 kHz @ +4 dBu):
0.05%
HEADPHONE OUTPUT
• Level (level control @ maximum and nominal
input level at line input): ~ 103 dBa SPL
MONITOR MIX OUT (Floating Balanced ¼”
TRS) Mix POT set to “Send”:
• Level: +4 dBu (20 dBu clip)
• Impedance: ≤ 50 Ω
• Noise floor (Mic & Line inputs off): -85 dBu
• THD (Line input, 100 Hz to 10 kHz @ +4 dBu):
0.01%
PROCESSOR/LIMITER
Digital 2 band AGC and look-ahead limiter.
Ensures that the encoder is fed an optimal input
signal at all times. Settings for VOICE or MUSIC.
The VOICE setting is tuned to reduce the effects of
harsh sibilants on the perceptual coding algorithms.
• International version: Supports 4-wire ISDN S
interface on a 8-position/8-pin miniature
modular connector (RJ-45 style)
• USA & Canada version: 4-wire ISDN S interface
on a 8-position/8-pin miniature modular
connector (RJ-45 style) and the 2-wire ISDN U
interface on a 6-position/4-pin connector (RJ11 style)
REMOTE CONTROL
Remote control supported using popular web
browsers over 10/100 Base-T Ethernet.
ANCILLARY DATA
Two contact closures in each direction.
• Inputs: Integral 10K ohm pull-up to 5 volts.
External pull-ups can be used to support
higher voltages.
• Open collector, sinks up to 250 mA
RESOLUTION
24-bit
•
POWER SUPPLY
• Internal, auto configuring.
POTS interface
• Protected by self resetting fuses
• User selectable country selection allows
operation internationally.
• 6-Position/4-Pin miniature modular connector
(RJ-11 style) with connections on the center
pins (pins 3 & 4)
ISDN Interface (optional)
• Supports National ISDN-1, DMS Custom, 5ESS
Custom PTP, ETS 300 (Euro ISDN), INS 64
(Japan) protocols. Physical interface as
described below:
• 100 to 240 volts ac 47-63 Hz
• 390 watts max
• CE Approved
DIMENSIONS
9.25 x 12.75 x 3.5 inches (23 x 32 x 9 cm)
SHIPPING WEIGHT
7.5 Lbs ( 3.4kg)
CE Approved
CHAPTER 7 - SPECIFICATIONS & WARRANTY 43

ZEPHYR
XPORT
ZEPHYR XPORT LIMITED WARRANTY
This Warranty covers “the Products,” which are defined as the various audio equipment, parts,
software and accessories manufactured, sold and/or distributed by TLS Corp., d/b/a Telos Systems
(hereinafter “Telos Systems”).
With the exception of software-only items, the Products are warranted to be free from defects in
material and workmanship for a period of one year from the date of receipt by the end-user.
Software-only items are warranted to be free from defects in material and workmanship for a
period of 90 days from the date of receipt by the end-user.
This warranty is void if the Product is subject to Acts of God, including (without limitation)
lightning; improper installation or misuse, including (without limitation) the failure to use
telephone and power line surge protection devices; accident; neglect or damage.
EXCEPT FOR THE ABOVE-STATED WARRANTY, TELOS
SYSTEMS MAKES NO WARRANTIES, EXPRESS OR IMPLIED
(INCLUDING IMPLIED WARRANTIES OF MERCHANTABILITY AND
FITNESS FOR A PARTICULAR PURPOSE).
In no event will Telos Systems, its employees, agents or authorized dealers be liable for incidental
or consequential damages, or for loss, damage, or expense directly or indirectly arising from the
use of any Product or the inability to use any Product either separately or in combination with
other equipment or materials, or from any other cause.
In order to invoke this Warranty, notice of a warranty claim must be received by Telos Systems
within the above-stated warranty period and warranty coverage must be authorized by Telos
Systems. If Telos Systems authorizes the performance of warranty service, the defective Product
must be delivered, shipping prepaid, to: Telos Systems, 2101 Superior Avenue, Cleveland, Ohio
44114.
Telos Systems at its option will either repair or replace the Product and such action shall be the
full extent of Telos Systems’ obligation under this Warranty. After the Product is repaired or
replaced, Telos Systems will return it to the party that sent the Product and Telos Systems will pay
for the cost of shipping.
Telos Systems’ authorized dealers are not authorized to assume for Telos Systems any additional
obligations or liabilities in connection with the dealers’ sale of the Products.
Telos products are to be used with registered protective interface devices which satisfy regulatory
requirements in their country of use.
USER’S GUIDE
44 CHAPTER 7 - SPECIFICATIONS & WARRANTY

8 References
We've kept the intimidating technical stuff out of this User's Guide. However, we know that some
users want to stay abreast on the latest technology, or are just plain curious. Also, we've written a
number of Bulletins for advanced users covering advanced and infrequently used features. The
links below should provide the information you seek.
Our Telos electronic newsletter has announcements of major software updates for existing
products, as well as keeping you up to date on the latest Telos and Omnia product releases. To
subscribe go to:
ZEPHYR
XPORT
USER’S GUIDE
http://www.telos- systems.com/support/default.htm
Ordering ISDN
It is important to order ISDN correctly so it will be compatible with your Xport or Xstream. This is
particularly true in the USA and Canada. The Xport's requirements are identical to those of the
Zephyr Xstream. See the Zephyr Xstream user's manual (Appendix) or the following URL's for
order forms:
http://www.telos- systems.com/techtalk/Z- ISDN_Info_Order_Form_2002.pdf
Applications Notes - See the following URL for the following application notes on the
Xport.
http://www.telos- systems.com/support/csb.htm
Updating the Xport’s software
• Covers how to update your Xports software.
Using the Xport with a Cell Phone (Using the Auxiliary Audio Interface)
• The Auxiliary Audio Interface on Xport allows connection to the headset jack on many handsets. This
Bulletin includes sources for adaptors to use with various cellular handsets, and more.
Using the Zephyr Xport’s Contact Closures
• The Xport allows transmission of up to two contact closures in each direction. This Bulletin covers the
use of these contact closures.
Technology Articles
Audio Coding FAQ
• http://www.telos- systems.com/techtalk/coding/default.htm
CHAPTER 8 - REFERENCES 45

Information on AAC, AAC-LD and CT-aacPlus
• http://www.telos- systems.com/techtalk/aac/default.htm
• http://www.telos- systems.com/techtalk/aacpaper_2/default.htm
A Plain English Explanation of ISDN
• http://www.telos- systems.com/techtalk/isdn/default.htm
ISDN Cause Codes (for troubleshooting)
• http://www.telos- systems.com/techtalk/cause.htm
ISDN and Telephone Glossary
• http://www.telos- systems.com/techtalk/isdngl.htm
White Papers
• Troubleshooting the Public Switched Telephone Network –
ZEPHYR
http://www.telos- systems.com/techtalk/PSTN/default.htm
XPORT
USER’S GUIDE
Manual History:
Rev 1.0 02/2003 RKT
As broadcast engineers, we are familiar with the pain involved with getting
Telephone Companies to solve problems with their lines. At the very least, this can
require persistence.
However, even worse is the situation where the lines in question are fine, and the
problem is actually within the telephone network. This paper instructs you on how
to determine if this is the case, and then goes on to advise you how to convince the
telephone company that this is the case.
46 CHAPTER 8 - REFERENCES
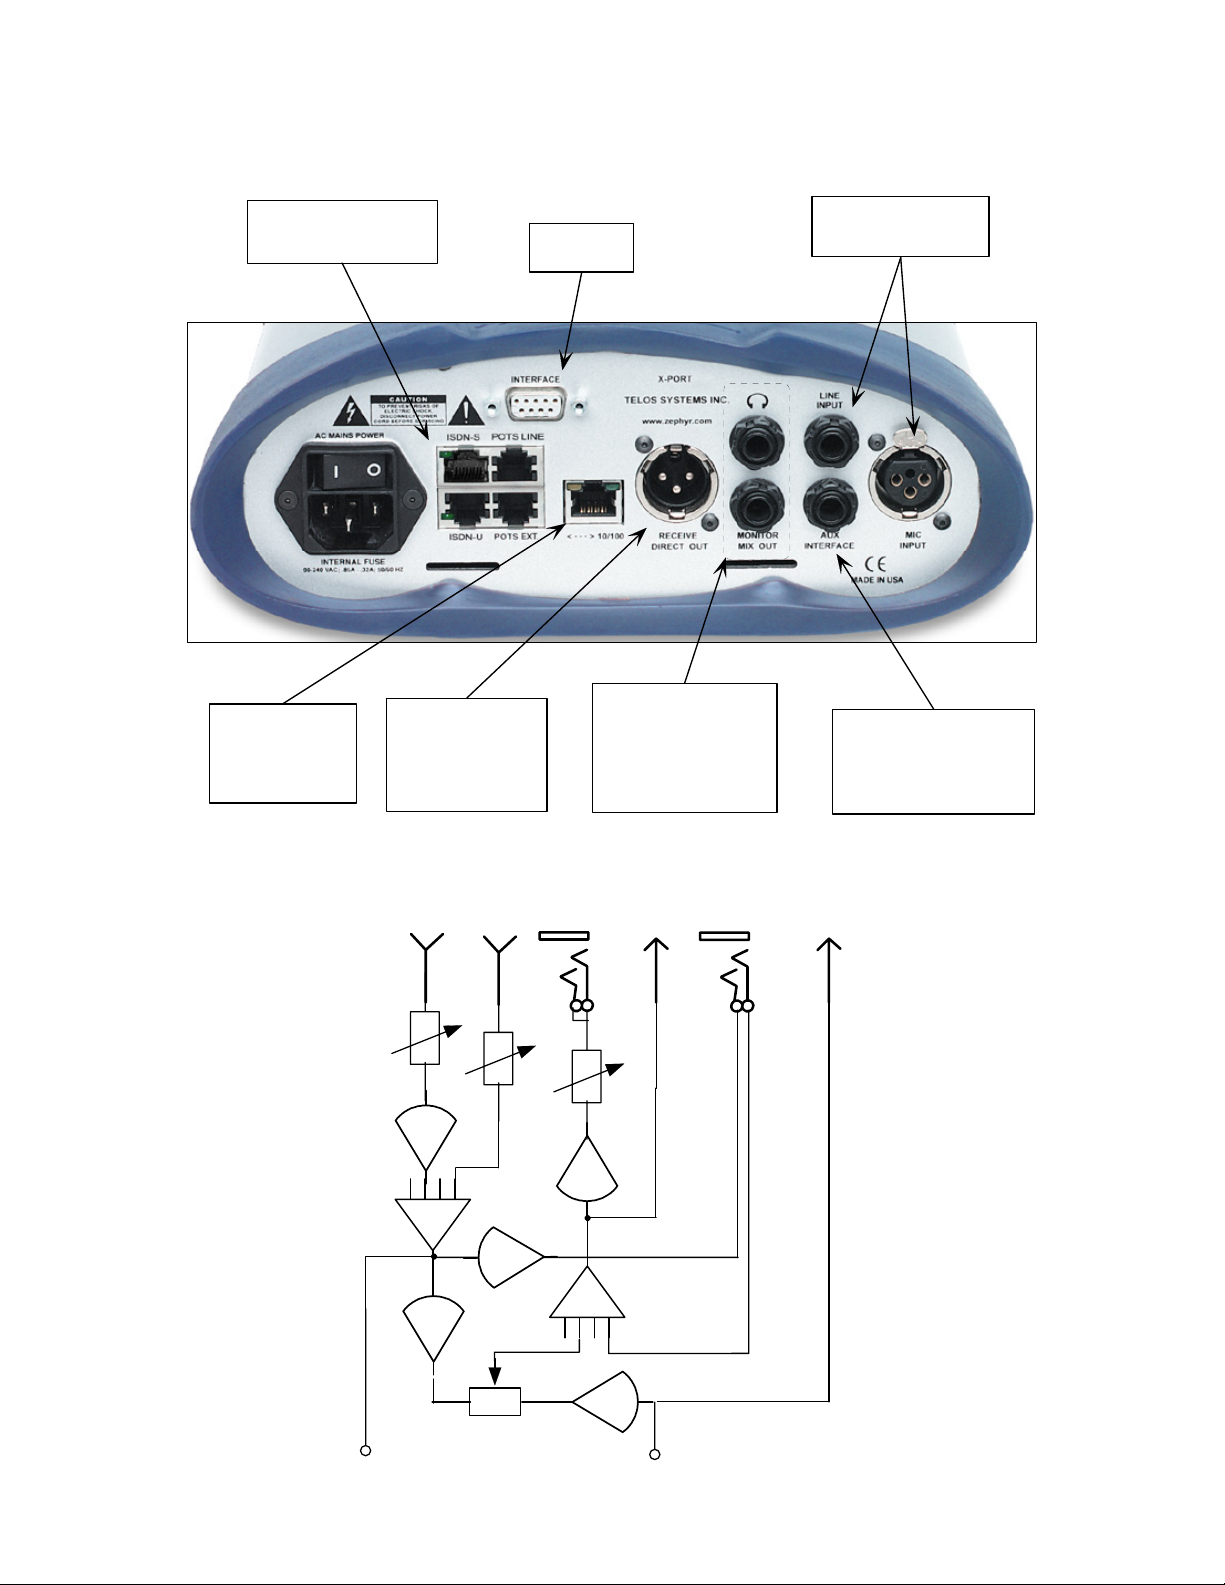
The Xport's Rear Panel
Optional ISDN S, or ISDN
ETHERNET
For direct audio from
a PC, control via a
web browser, & easy
updates.
ISDN S UPP O R T
S + U interfaces
RECEIVE DIRECT
OUTPUT
Unmixed output
contains far-end
audio only.
CONTACT
CLOSURES
Hav e a mix of local (se nd)
audio & remote (receive)
audio from remote site
HEADPHONE
& MONITOR
OUTPUTS
TW O-INPUT MIXER
Has microphone and line
lev el inputs
AUX INTERFAC E
Allo ws conne cting to Cellular
Telephone Handsets. Also
can be used as a "Record
Out" an d "Monitor Mix input".
Mic .
Input
(XLR)
TO:
Omnia
Pr ocess or
& Enc oder
Section
Line
Input
(¼" TRS)
Mix
Control
Headphone
(¼")
Monitor
Mix Out
(¼" TRS)
Decoder
Aux
Int er f ac e
(¼" TRS)
FROM:
Section
(See the inside front cover for information on the front panel)
Rec e iv e
Dir ec t Ou t
(XLR)
 Loading...