

Telos ZephyrExpress User Manual

Portable ISDN
Digital Audio Transceiver / Mixer
The Best Way to Hear from There
™
User’s Manual
Manual Version: 1.0 / April, 1999
(v1.2.1 software)

What you’ve got here:
ZephyrExpress is a portable, one-box solution for high-quality broadcast audio
remotes via ISDN. It combines a flexible stereo digital mixer, two stereo
monitor mixers, coder and decoder for international-standard audio data
compression, and an ISDN interface.
· You can plug microphones and a headphone in one end, an ISDN line in
the other, and you’re ready for instant two-way 20kHz stereo transmission
virtually anywhere in the world.
ZephyrExpress communicates with Telos’ Zephyr or another ZephyrExpress, or
with any other brand of codec using MPEG Layer 2, MPEG Layer 3, or G.722
algorithms. ISDN and audio setups can be pre-programmed for one-button
connection. ZephyrExpress can even call standard telephones via ISDN,
eliminating the need for a separate circuit and phone at the remote location.
(ISDN, by the way, is a telephone company technique for stuffing two bidirectional 64kpbs channels on the same copper pair that was originally
designed for a single voice circuit. In many cases it can use existing wiring.
ISDN requires special terminators and synchronized terminal adapters, built in
to ZephyrExpress.)
· Actually, what you’ve got here is the Users’ Manual. It’ll tell you everything
you need to operate ZephyrExpress, how to order ISDN circuits and connect
to them, how audio coding work and how to choose its options, how to
maintain ZephyrExpress, and lots of tips and shortcuts for using the system
efficiently.
· There’s also a 40-page Mini-Manual with abbreviated operating instructions
and common questions about using ZephyrExpress. It’s designed to be kept
with the unit and taken to the remote broadcast.
· And there’s a 4-page laminated Field Guide, also intended to be kept with
ZephyrExpress.
ii Introduction

Customer Service
We support you...
· By phone/Fax in the USA.
Customer service is available from 9:30 AM to 6:00 PM USA Eastern Time,
Monday through Friday at +1 216.241.7225. We’re often here at times outside of
these, as well – please feel free to try at any time!
Fax: +1 216.241.4103.
· By phone/Fax in Europe.
Service is available from Telos Europe in Germany at +49 81 61 42 467.
Fax: +49 81 61 42 402.
· By E-Mail.
The address is: support@zephyr.com.
· Via World Wide Web.
The Telos Web site has a variety of information which may be useful for
product selection and locating other compatible users. The URL is:
http://www.zephyr.com.
Feedback
We welcome feedback on any aspect of ZephyrExpress or this manual. In the
past, many good ideas from users have made their way into software revisions
or new products. Please contact us with your comments.
Telos Systems
2101 Superior Avenue
Cleveland, OH 44114
USA
+1 216.241.7225
Fax: +1 216.241.4103
Telos Europe
JohannisstraBe 6
85354 Freising
Germany
+49 81 61 42 467
Fax: +49 81 61 42 402
Introduction iii

Blank Screen?
If ZephyrExpress’ LEDs light when you first apply power but the LCD screen
appears dark, or the LCD screen lights but no characters appear, the last user
may have left its brightness or contrast at an extreme setting. To reset:
• Press the DROP button and hold that button in while turning the Edit
p
d
knob clockwise to reset the backlighting. It may take a few turns.
• Press the DIAL button and hold that button in while turning the Edit
knob either direction to change the LCD Contrast.
Test Lines
Telos Systems maintains ISDN test lines with continuously-playing music. Feel
free to dial into them from your ZephyrExpress to test your setup or line.
· USA: +216 781.9310, +216 781.9311 (Layer 3 Dual transmit @ 32 kHz sample
rate. Dial just one number to test Layer 3 Mono, or dial both numbers to test
Layer 3 Dual. You can also test Layer 3 Stereo by dialing both numbers; a
slight distortion of the stereo image may result because you’re receiving our
Dual test signal rather than true stereo. Your ZephyrExpress will work
correctly with a stereo transmission.)
h
· Germany: (49) 81 61 42 061 (Layer 3 Dual transmit @ 32 kHz sample rate; dial
once to test Layer 3 Mono, or dial twice to test Layer 3 Dual. The warning
about Layer 3 Stereo, above, applies.)
· Germany: (49) 81 61 42 062 (Layer 2 Mono @ 48 kHz; ZephyrExpress must be
set to Layer 2 receive. Only one line is required.)
HOT TIP:
ZephyrExpress will dial a test line for you:
1) Verify that the word Ready appears twice on the LCD screen. If it doesn’t, you
have an ISDN problem and can’t place a call. ISDN setup instructions appear in
this booklet.
2) Press the DIAL button
3) Turn the EDIT knob to select Auto... and tap the EDIT knob in toward the
panel to confirm that choice
4) Turn the EDIT knob to select a test line and tap the knob again
5) The word Go! will be highlig hted on the screen. Tap the knob one more time,
and ZephyrExpress will place the call.
iv Introduction

e
Updates
How ZephyrExpress works is almost entirely determined by software. This
booklet is based on software version 1.2.1.
Power Supply
ZephyrExpress is powered by a separate modular power supply, which is selfadjusting to any voltage between 100 - 250 VAC, 50 - 60 Hz. It connects to a 4-pin
XLR connector on the rear panel. The supply must be turned off at its switch, or
disconnected from the AC line, before plugging or unplugging this XLR
connector.
WARNING:
Do not use the XLR connector as an on/off switch!
Connecting or disconnecting the power supply while it is powered can erase
current ISDN setup and other user settings.
Trademarks
Telos Systems, the Telos logo, Zephyr, ZephyrExpress, and “The Best Way to
Hear from There” are trademarks of TLS Corporation. All other trademarks are
property of their respective holders.
Copyright
Copyright © 1999 by TLS Corporation. Published by Telos Systems, who
reserves the right to make improvements or changes in the products described
in this manual, which may affect the product specifications, or to revise the
manual without notice. All rights reserved.
Notice
All versions, claims of compatibility, trademarks, etc. of hardware and software
products not made by Telos mentioned in this manual or accompanying
material are informational only. Telos Systems makes no endorsement of any
particular product for any purpose, nor claims any responsibility for operation
or accuracy.
Warranty
This product is covered by a one year limited warranty, the full text of which is
in the Appendix section.
Introduction v

Repairs
You must contact Telos before returning any equipment for repair. Telos
Systems will issue a Return Authorization number which must be written on
the exterior of your package. Be sure to adequately insure your shipment.
Packages without proper authorization may be refused. US customers should
contact Telos customer support at +1 216.241.7225. All other customers should
contact their local Telos Dealer who will verify the problem and will contact
Telos and arrange for repair.
CAUTION: The installation and servicing instructions in this manual are for
use by qualified personnel only. To avoid electric shock, do not perform any
servicing other than that contained in the operating instructions unless you
are qualified to do so. Refer all servicing to qualified personnel.
WARNING: To reduce the risk of electrical shock, do not expose this product
to rain or moisture. Avoid underwater remote broadcasts without adequate
protection.
This symbol, wherever it appears, alerts you to the presence of
uninsulated, dangerous voltage inside the enclosure — voltage which
e
may be sufficient to constitute a risk of shock.
This symbol, wherever it appears, alerts you to important operating
and maintenance instructions. Read the manual.
w
CAUTION
e
USA CLASS A COMPUTING DEVICE INFORMATION TO USER. WARNING: This
equipment generates, uses, and can radiate radio-frequency energy. If it is not installed
and used as directed by this manual, it may cause interference to radio
communication. This equipment complies with the limits for a Class A computing
device, as specified by FCC Rules, Part 15, Subpart J, which are designed to provide
reasonable protection against such interference when this type of equipment is
operated in a commercial environment. Operation of this equipment in a residential
area is likely to cause interference. If it does, the user will be required to eliminate the
interference at the user’s expense. NOTE: Objectionable interference to TV or radio
reception can occur if other devices are connected to this device without the use of
shielded interconnect cables. FCC rules require the use of only shielded cables.
w
TO PREVENT RISKS OF ELECTRIC SHOCK, DISCONNECT
POWER CORD BEFORE SERVICING.
CANADA WARNING: “This digital apparatus does not exceed the Class
A limits for radio noise emissions set out in the Radio Interference
Regulations of the Canadian Department of Communications.” “Le
present appareil numerique n’emet pas de bruits radioelectriques
depassant les limites applicables aux appareils numeriques (de les Class
A) prescrites dans le Reglement sur le brouillage radioelectrique edicte par
le ministere des Communications du Canada.”
w
vi Introduction

Table of Contents
More comprehensive tables of contents, with page numbers, are at the start of each section.
A complete index follows section 11.
Section 1: Quick Results
Part I: Instant Gratification, or “How
to hear stereo music on a phone line”
Gather information about your ISDN line
Set up the hardware
Configure ZephyrExpress for your ISDN line.
Call yourself (testing your unit and the line)
Tune into one of our test lines
Part II: Fast Answers to FrequentlyAsked Questions
Section 2: What You’ve Got
Here...
THE BEST WAY TO HEAR FROM THERE™
Introducing ZephyrExpress
Features and Benefits
Introducing ISDN
ISDN Configurations
Introducing Audio Coding
About coding delays
About Layer 2 and Layer 3 Coding
Compatibility and proprietary coding
About Telos Systems
Making ZephyrExpress work for you
Section 4: Audio Operations
A console at your fingertips...
The Send Mixer
The Monitor Mixers
Receive Meters
LOCK lights
Analog (G.711) phone calls
Dealing with Delay
Section 5: Audio Coding
OVERVIEW
Introduction to Audio Coding
Basic Principles of Perceptual Coding
ISO/MPEG LAYER 3
Layer 3 Features
ISO/MPEG LAYER 2
G.722
CASCADING
CHOOSING THE CODING METHOD FOR
YOUR APPLICATION
Compatibility
Section 6: Menu Reference
The Menu System
Menu Overview
Section 3: ZephyrExpress
Hardware
About our hardware...
Front Panel
The Mixer Section
Display section
Control section
Rear Panel
Data connection section
Audio i/o section
Power connection
Using Setups
Applying a Setup
Creating or Changing a Setup
Master Setups
Applying a Master Setup
Creating or Changing a Master Setup
Autodial Setups
Menu Details
Codec menu
Audio menu
ISDN menu
System menu
Safe mode menu
Introduction vii

Section 7: ISDN Reference
ISDN BASICS
Background
The Basic Rate Interface (BRI)
HOW TO ORDER ISDN
ZephyrExpress ISDN Compatibility
Ordering: Central Office Switches and Protocols
Section 8: System Functions
Software Updates
ZephyrExpress data ports
The Serial Port
The Parallel Port
Section 9: Troubleshooting
First Steps
GENERAL
Thinking About Problem Solving
Diagnostic Aids
Some Error Conditions
Section 10: Schematics and
Data Sheets
Section 11: Appendix
ABOUT AUDIO LEVELS
CODEC COMPATIBILITY INFORMATION
Comprehensive ZephyrExpress Compatibility
List
FINDING PUBLIC ISDN SITES
List of Known Working SPIDs by Telephone
Company
ISDN BRI, ZEPHYR, AND YOU
Ordering ISDN
The Faxable ISDN Order Form (for use
in US only)
ISDN Problems
viii Introduction

A Note From the President...
Waaay back in 1984, Telos’ first product was being designed on a Radio Shack
TRS-80 and the attached modem was considered to be respectably state-of-theart, operating at the impressive speed of 300 bits per second. This was nearly
three times the speed of the 110 bps, twenty-five pound, phone company-issue
boxes I had been using over at the local college campus to talk to the hulking
IBM in the bomb-shelter basement.
The PC revolution had begun a few years back, so there were quite a few of
them around, but they were, except for by grace of these modems and
mainframes, islands. No one as yet had figured a way to link them up in any
practical way.
How the world has changed! Politicians talking up the “Information Super
Highway” have made the phrase a parody, and 10 Million bits per second LANS
are starting to be thought of as kind of slow.
We radio broadcasters have until recently been only just a bit ahead of computer
users a decade ago. Our stations mostly exist as islands, with what audio we get
from elsewhere coming from the mainframe-like satellites and networks.
But now come the liberating technologies that do for us what networking is
doing for computing: digital telephony and high-power audio data coding.
These make possible the instant dial-up transportation of audio from and to
anywhere in the modern world. Digital telephone interconnection is being
delivered to us via ISDN, and ISO/MPEG Layer III is the perfect coding method
to exploit it for high-fidelity audio.
ZephyrExpress is the next logical extension of our original high-quality audio
network transceiver, the Zephyr.
With Zephyr, we tried to bring together gracefully these technological pieces to
permit you to easily do that which was previously difficult or impossible. It is
my hope that it becomes, in your hands, an empowering tool for the creation of
a more interesting audio future. It’s a result of what were once my personal
passions, and what have now become what MBA types call our “core corporate
competencies,” Digital Signal Processing and telephones for broadcast. It feels
as if everything we’ve done until now have lead to this. Plug it in, dial it, listen,
and see if you, too, don’t share the excitement we felt in the lab when we got the
first prototype going, listening to a Zappa CD being played from our partner lab
in Europe. It was absolutely mind-boggling – we were hearing CD-quality audio
from the other side of the planet ... on a phone line.
God, I love this technology!
Steve Church
Introduction ix
Notes About this Manual
ZephyrExpress and the studio Zephyr unit share a lot of features in common,
particularly in how they code audio and are connected to ISDN lines. In general,
things you already know or learn here about one unit will apply to the other.
We use the following symbols to draw your attention to particularly important
points.
DANGER!
e
w
h
i
c
This symbol calls attention to the presence of dangerous voltages inside
ZephyrExpress.
IMPORTANT!
This information is essential to getting ZephyrExpress to work, or to prevent
damage to it. Read these notes to avoid major headaches.
HOT TIP!
This information will probably come in handy at some point. It’s a good
idea to read these tips.
ISDN TIP!
Important information about ISDN and ZephyrExpress’ built-in Terminal
Adapter. Recommended for all users.
COMPATIBILITY TIP!
Tips about operating modes, how to get the best results with other Telos
units, and particularly how to connect ZephyrExpress to other brands of
codec. You should read these.
t
?
x Introduction
DEEP TECH NOTE!
Details about the intricacies of ZephyrExpress and ISDN and coding
technologies. Useful information for troubleshooting, and fascinating
reading for the technically-minded.
CURIOSITY NOTE!
Amaze your friends with your grasp of ISDN and Coding trivia! Or just ignore
these notes. It’s up to you.
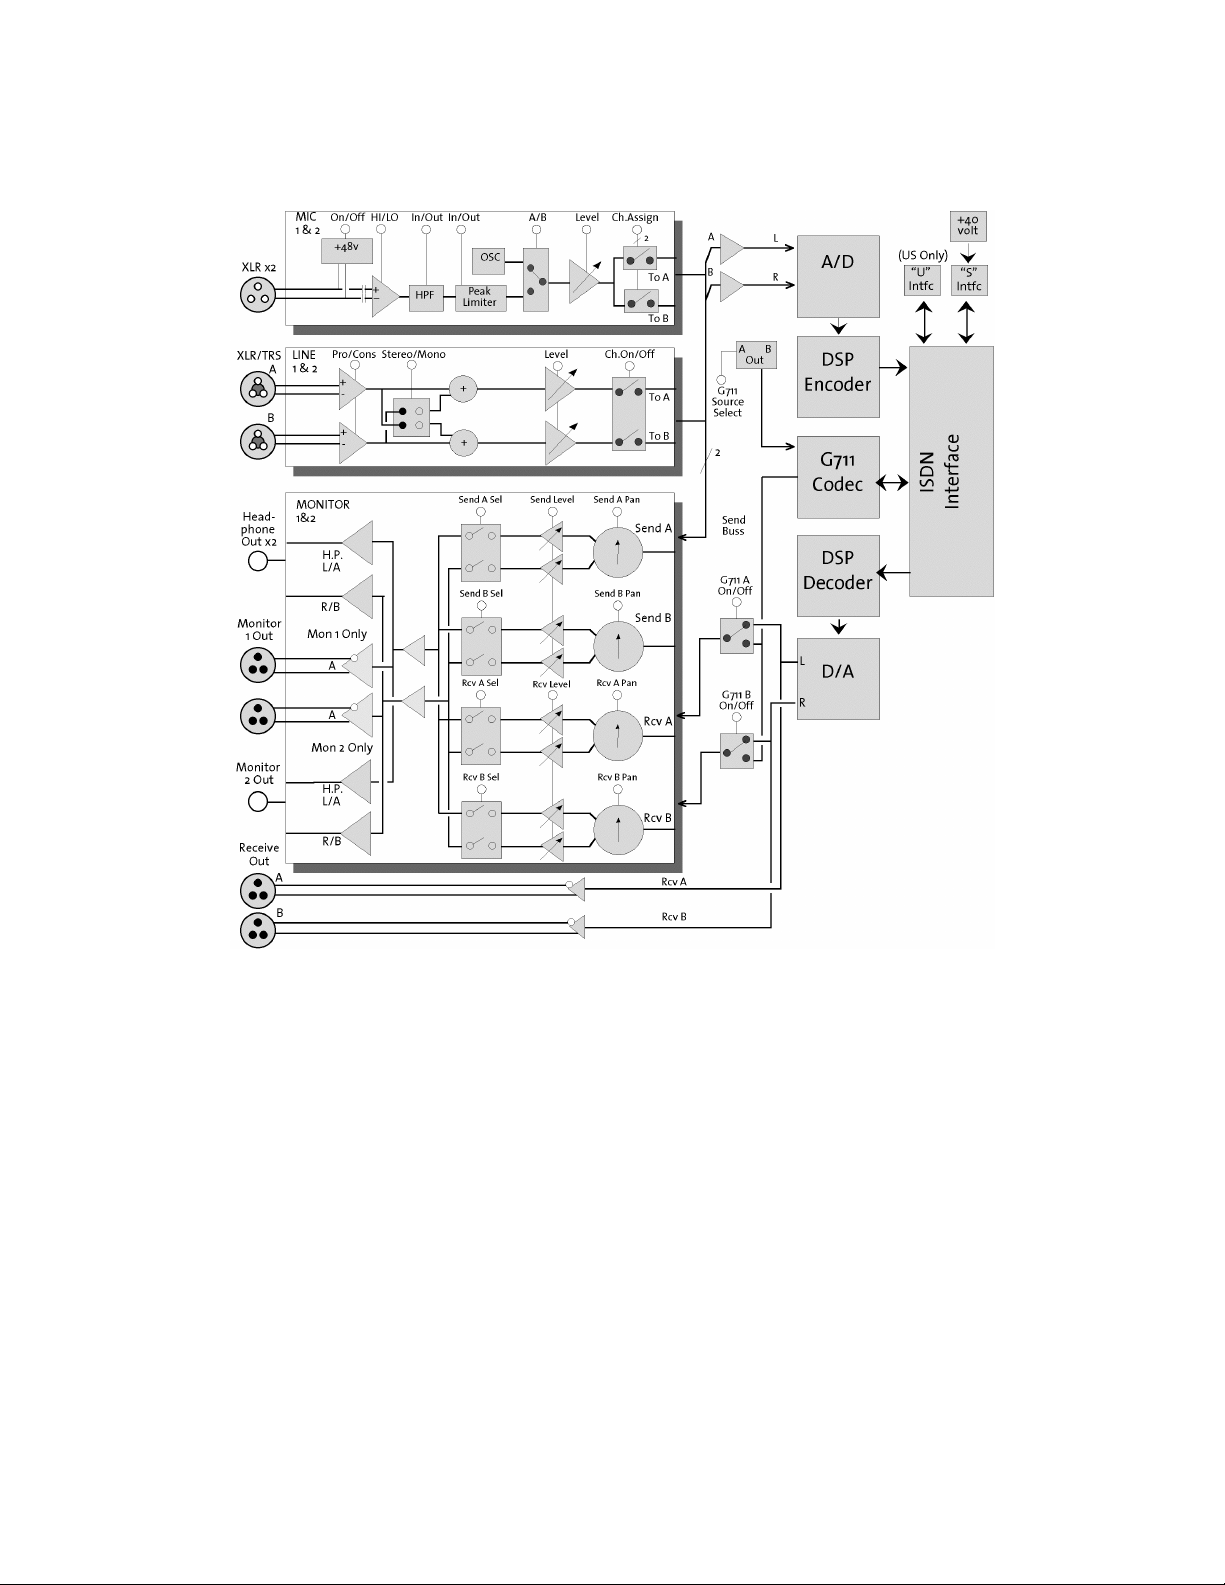
Block Diagram
Introduction xi
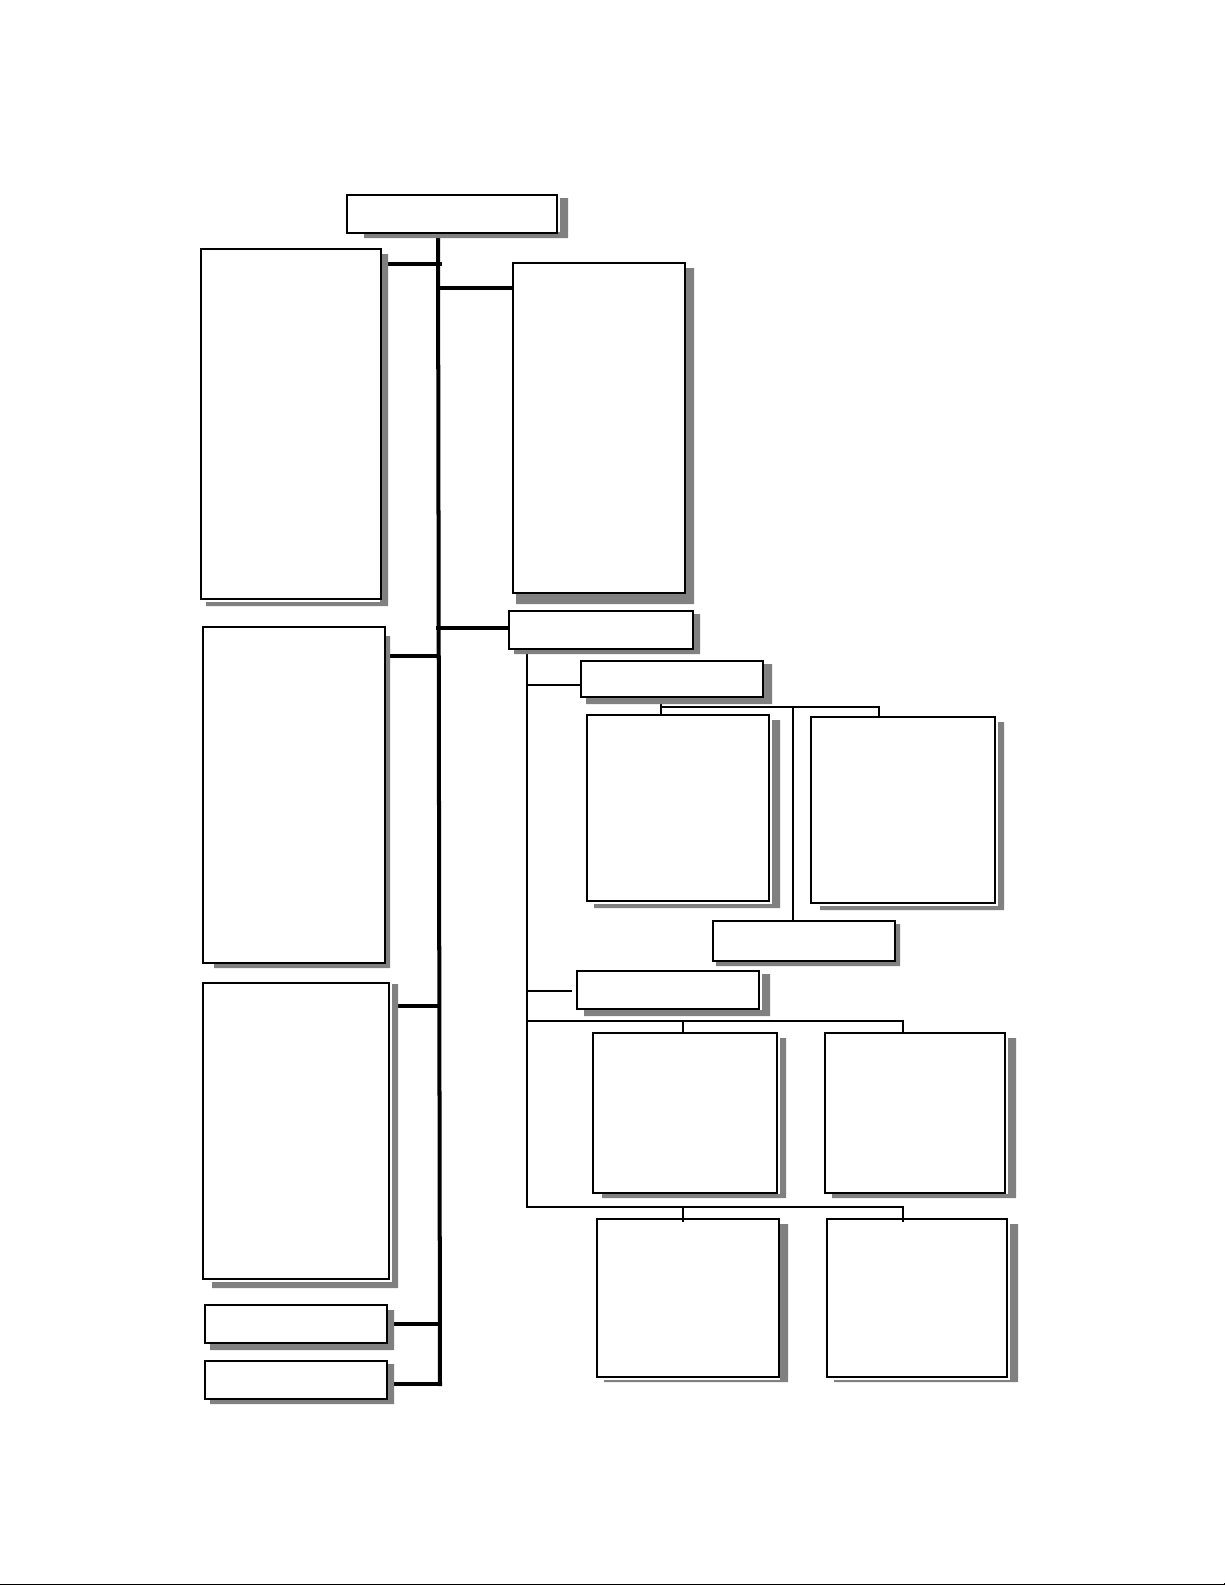
Menu Structure
y
p
p
y
y
g
g
g
g
g
g
g
g
g
g
g
g
y
Utility Menu
Codec
Transmit
Receive
Bitrate
Sam
le Rate
Compatibilit
Ancill Data
Status Out
Loop Mode
Contacts Out
Codec Setu
System
LCD Contrast
LCD Backlight
Click Volume
POTS Volume
Menu Timeout
Baud Rate
Set Time
s
ISDN
Switch type
SPID #1
SPID #2
DN #1
DN #2
MSN #1
MSN #2
Outside Line
Panic Dial
Audio
Microphones
Sensitivity
Phantom Power
Low Cut Filter
Mic 1
Test Tone
Mic 1
Sensitivit
Phantom Power
Low Cut Filter
Test Tone
Software
About...
Safe Mode
Codec
Audio
ISDN
stem
S
Channel Assign
Manual Dial
Autodial
Master
Autodial
xii Introduction
Line Sensitivit
Mon 1 Xmt Pan
A Settin
B Settin
AB setting A
AB settin
Mon 2 Xmt Pan
A Settin
B Settin
AB setting A
AB settin
Limiter Bypass
B
B
Mon 1 Rcv Pan
A Settin
B Settin
AB setting A
AB settin
Mon 2 Rcv Pan
A Settin
B Settin
AB setting A
AB settin
B
B

SECTION 1:
QUICK RESULTS
Part I: Instant Gratification, or “How to hear stereo music over a phone line” 1-2
Gather information about your ISDN line 1-3
Set up the hardware 1-5
Configure ZephyrExpress for your ISDN line. 1-7
Call yourself (testing your unit and the line) 1-9
Configure the Codec 1-9
Set up an audio input and output 1-11
Place the call to yourself 1-11
Tune into one of our test lines 1-13
Part II: Fast Answers to Frequently-Asked Questions 1-15
Blank Screen? 1-15
The Basics 1-15
1: What do I do if I’m totally lost? 1-15
2: How do I use the menus? 1-16
3: How do I use a menu that appears locked? 1-17
4: How do I lock a specific menu? 1-17
5: How do I enter numbers or names? 1-17
6: How do I create my own Setups and Master Setups? 1-18
7: How do I connect ZephyrExpress to an ISDN circuit? 1-19
8: How do I manually enter a network setup? 1-20
9: How do I test that I’ve set things up properly? 1-20
10: What do I do if I can’t connect? 1-21
11: How do I set ZephyrExpress for my microphones? 1-22
12: How do I use line-level sources? 1-22
13: How do I create a monitor mix? 1-23
14: How do I test my audio and compression setups? 1-23
15: How do I place a call? 1-24
16: What do I do if they can’t hear me? 1-25
17: How do I send a test tone? 1-26
18: How do I hang up? 1-26
19: Where do I find answers to other questions? 1-27
QUICK RESULTS 1-1

If you’re in a hurry...
This part of the manual will get you started quickly. It presents answers to the questions
that come up often when using ZephyrExpress. It’s not a thorough technical guide —
that’s what the rest of this book is about — but a way to get you through most operating
situations.
If you need to put the unit in service immediately, or have experience with Zephyr or
other similar ISDN codecs, this section may be all you need. It’s in two parts:
· Step-by-step instructions for configuring ZephyrExpress and dialing our test site.
You’ll be able to hear music in high-quality stereo as well as verify that
ZephyrExpress and the ISDN line are working properly.
· Answers to common questions about using ZephyrExpress in the field. This material
can also be found in our Mini-Manual.
FAST TRACK!
c
If you already know how to use a Zephyr, we recommend you read through the
next five or six pages. ZephyrExpress’ controls and menus work differently, and
the specific steps on these pages may be the fastest way to get acquainted with
them... even if you’re not interested in “Instant Gratification”.
Don’t ignore the rest of this book. Aside from the technical references, we’ve included
interesting and useful information on audio coding and digital telephony. They’ll help
you get the best results from your ZephyrExpress, teach you about a technology that’s
becoming more important with the advent of digital broadcasting and Internet webcasts,
and provide you with tons of tidbits you can use to impress others.
Part I:
Instant Gratification, or
“How to hear stereo music over a phone line”
This section is for you if you:
· Know how to dial a telephone call.
· Are not intimidated looking at the front panel of ZephyrExpress.
· Have Basic ISDN1, a switched digital service provided by the telephone company.
ISDN allows two simultaneous connections on a single circuit — like having two
simultaneous analog calls on a single copper pair. The circuit may show up as a
standard telephone jack, an 8-pin RJ-45 jack, or even a pair of screw terminals or
copper wires. US users should contact their telephone company to verify that the line
1
Also known as a BRI or a 2B+D line. ZephyrExpress is not designed to be used with PRI,
Switched 56, or fractional T-1 lines.
1-2 QUICK RESULTS

was installed exactly as specified in the ISDN order instructions found at Telos’ web
site and at the end of this manual.
· Have circuit information supplied by the phone company. This must include the
type of switch on the circuit and the telephone number(s)1. In the US, it will probably
also include two SPID numbers. In Europe, it may include MSN numbers.
· Have a ZephyrExpress, a microphone, and a pair of stereo headphones or other
audio monitor.
· Understand that these instructions are just to get you started and will not answer all of
your questions or demonstrate all of the features of ZephyrExpress.
· Promise to read the full manual later.
Now, let’s get started.
Gather information about your ISDN line
Analog telephones are simple: all a phone needs to do is tap into a line, and it’ll probably
start working immediately.
ISDN is more complicated. Before any ISDN device can receive or transmit signals, it has
to be matched to central office settings for that particular circuit. These settings include
line identification numbers and a communication protocol.
Your ISDN circuit consists of two digital lines, and both can operate at the same time on a
single copper pair. Each line has an identification number, which may (or may not) be its
telephone number. Sometimes, both lines will use the same identification number.
The phone company’s equipment expects ZephyrExpress — or any other ISDN terminal
equipment — to know the right identification numbers for the circuit it’s connected to,
and to transmit them on demand. If the proper identification numbers aren’t entered
into the equipment, you won’t be able to place or receive calls.
In North America, these numbers take the form of Service Profile Identification (SPID)
numbers: If you’re given SPIDs, they must be programmed into ZephyrExpress.
The two lines also have standard telephone numbers, which users of other ISDN
equipment will dial to call your ZephyrExpress. Unlike regular telephone lines, both lines
may have the same telephone number assigned to them.
European telephone systems don’t use SPID. They may use optional Multiple Subscriber
Numbers (MSNs) to limit which lines will be answered. If you put two MSNs into
ZephyrExpress, the unit will answer calls only on those lines.
Confused? Here are some rules of thumb:
1
There can be one or two standard phone numbers for a US circuit, and may be more
than two for a European one.
QUICK RESULTS 1-3

1. If you’re given two SPIDs by the phone company, enter just those numbers into
ZephyrExpress. This is the most common case in North America.
2. If you’re given just one SPID, don’t enter it: instead, use the PTP setting for Switch
.
Type
3. If you’re in Europe you don’t have to enter anything. However, if you’re given MSNs
and want to limit which numbers ZephyrExpress will answer, enter them for those
numbers.
There are also several different types of ISDN switching devices that can be used at the
central office, each with a different set of protocols. You must know what type you have.
ISDN TIP!
i
Here’s a summary of circuit information. You may want to copy this form for each location.
Location___________________________________________ Date ______________________
1 ISDN type, check one:
2 ISDN telephone numbers with area code:
If you have AT&T Point-to-Point protocol or European ISDN, the phone company
might provide just one number for the MSN or Directory Number.
These numbers, and possibly also the protocol, will be different for each ISDN circuit
you connect to. Since ZephyrExpress is portable, it’s likely to be used in multiple
locations. You can enter the complete information for each location into ZephyrExpress,
and recall its complete setting at the touch of a button.
Item 1 and 2 are required. Use just one set of numbers for item 3. Item 4 is optional.
❐ National ISDN-1 (The most frequent choice in the US. Will always have SPIDs. Also
use this choice if your ISDN protocol is DMS Custom.)
❐ AT&T Point-to-Point or PTP. (Will not have SPIDs.)
❐ European ISDN (Euro-ISDN or ETS300. Will not have SPIDs.)
❐ Other (Contact Telos Customer Support.)
Line 1 _______________________________ Line 2 ___________________________________
3 SPID numbers, if supplied (US users only with National ISDN-1):
Line 1 _______________________________ Line 2 ___________________________________
or MSN numbers, if supplied (Euro ETS300 only):
Line 1 _______________________________ Line 2 ___________________________________
4 Prefix required by internal phone system for outside lines:
1-4 QUICK RESULTS

Set up the hardware
You’ll need:
· A ZephyrExpress
· The ZephyrExpress Modular Power Supply with an appropriate power cord for your
local AC supply. The supply is self-adjusting for any voltage between 100 - 250 VAC,
50 - 60 Hz. It connects to a 4-pin XLR connector on the rear panel. The modular
supply must be turned off at its switch, or disconnected from the AC line,
before plugging or unplugging its XLR connector.
You may connect the power supply to ZephyrExpress now, and then apply AC power
and turn it on. The screen and all the LEDs will light up. After a few seconds, you
should see the word Status on the top of the screen. If the screen goes dark or totally
blank, see page 1-15 of this chapter.
WARNING!
w
Do not use the XLR connector as an on/off switch!
Connecting or disconnecting the power supply while it is powered can erase
current ISDN setup and other user settings.
· An NT1 (also called a Network Termination Unit) with connection cables. All of the
connection cables have telephone-type modular connectors and come packaged
with your Zephyr. There are three ways your NT1 can be present:
1. ZephyrExpress units sold in North America have a built-in NT1. If you see two
modular-type telephone jacks on the back of your ZephyrExpress, the lower jack
is the NT1. It’s marked U and LINE DIRECT. It uses a standard analog telephone line
cord (type RJ-11 or RJ-14).
If you have this kind of NT1 and a North American ISDN installation, you may
connect them now. If the telco provided a large 8-pin (RJ-45) jack, you should
still use the standard line cord: plug it into the middle of the jack, and it’ll find
the right conductors.
2. Most European and Asian telephone companies provide the NT1 as part of their
installation. It uses a large eight-conductor telephone plug (RJ-45), the same as
computer 10Base-T ethernet.
If you have this kind of NT1 and a European ZephyrExpress with only one
telephone jack on the back panel, you may connect them now.
QUICK RESULTS 1-5
WARNING!
w
ZephyrExpress units sold in North America provide power for an external NT1. If
you’re using one of these, disconnect any other power supply connected to the NT1. If both ZephyrExpress and the NT1 are providing power, both
will be damaged.
You can tell if a ZephyrExpress will supply power by looking at the ISDN
connections: if there are two telephone jacks, it’s a North American unit and
you must follow the above precaution. If there’s only one telephone jack, it’s a
European unit and can be connected safely to powered NT1s.
European units are also marked with this Euro Telecom logo on the rear panel.
If you’re using a North American ZephyrExpress with two telephone jacks, and a
European or Asian NT1, disconnect the NT1’s power supply! Once you have
done this, you may connect an eight-conductor cable to the NT1. If you can’t
disconnect the NT1’s power supply, contact Telos Customer Service before
proceeding.
3. If you’re using a European ZephyrExpress in North America, you’ll need an
external NT1. It’s about the size of a small book, has some telephone-type
connectors, and usually has some little indicator lights. You’ll need two cables:
The first is a large, telephone-type modular cable with eight wires that fits into
the single jack on the Zephyr and a jack on the NT1 that is labeled “Terminal.”
The second is a telephone-type modular cable that fits into the jack on the NT1
that is labeled “Line” and the jack provided by the telephone company.
· You’ll also need a microphone, a mic cable with an XLR male plug, and a stereo
1-6 QUICK RESULTS
If you’re using this kind of NT1, you may connect the two telephone cables now.
The external NT1 has its own power supply. Do not use the external NT1’s
power supply if your ZephyrExpress has two telephone jacks on the back. If
your ZephyrExpress has only one telephone jack, you may connect the NT1’s
power supply now.
headphone with a standard 1/4” tip/ring/sleeve plug.
Configure ZephyrExpress for your ISDN line.
HOT TIP!
h
i
There are two boxes on the bottom of ZephyrExpress’ screen.
If you see the word Ready in both of them, your unit is probably already
configured for the ISDN line. Skip this step, and go right to “Calling Yourself” on
page 1-9.
If you see the word inact in both of them, your unit is not connected to a
working ISDN circuit. Recheck your connections.
ISDN TIP!
You can check ISDN continuity with an ordinary analog telephone or a pair of
600Ω headphones. Disconnect ZephyrExpress, and briefly place the phone (or
phones) across the line. You should hear either a rhythmic clicking — about
once per second — or a loud, continuous white noise. If you hear a dial tone, it’s
not an ISDN circuit. If you don’t hear anything, the line is dead.
ZephyrExpress is configured by pressing the UTIL button, using the EDIT knob to select
menu items, and tapping the EDIT knob in towards the panel to confirm choices. The
process is intuitive, and you should be able to configure your unit with a minimum of
instructions. But if you get lost, see the instructions on page 1-16.
u
To configure ZephyrExpress for a particular line, first make sure you have the
information about that line from page 1-4.
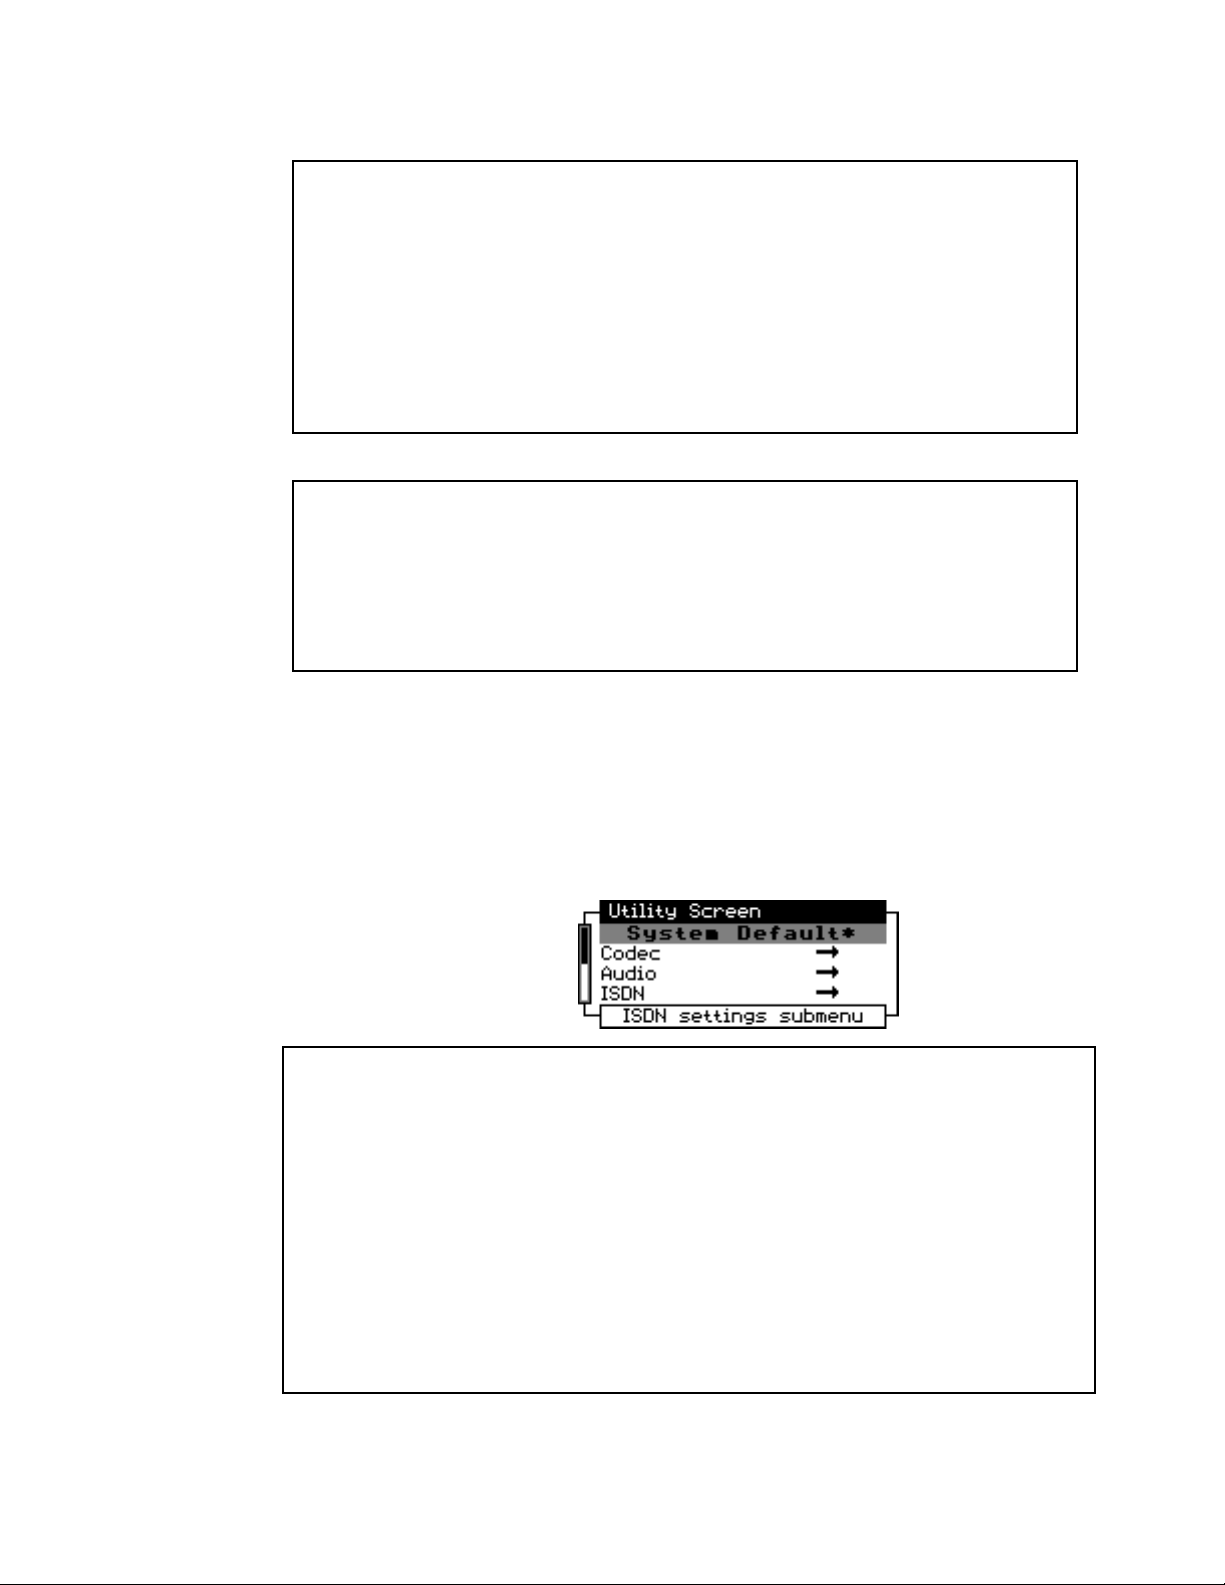
Press the UTIL button.
The LCD display will change
to look like this:
Lost already?
If you don’t see something that says Utility Screen at the top, don’t panic. Just turn the
EDIT knob counterclockwise until it appears.
If the second line of the screen says something other than System Defaults, don’t worry.
If you don’t see anything at all on the screen, but you know ZephyrExpress is getting
power (because some LEDs are on):
If the screen is dark, press the DROP button and hold it in while turning the EDIT
knob clockwise to reset the backlighting. This may take a few turns.
If the screen is lit, press the DIAL button and hold it in while turning the EDIT knob
either direction to chance the LCD contrast.
QUICK RESULTS 1-7
U
T
Turn the EDIT knob three clicks clockwise, to highlight ISDN.
Then tap the knob in toward the panel.
The display will change to look like this:
Turn the edit knob clockwise to highlight either SPID#1, DN#1, or MSN#1, depending on
which type of number you entered in the form on page 1-4. The menu scrolls down as
you keep turning the knob.
Tap the edit knob in toward the panel again to start entering that number.
The display will change to look something like this, depending on what kind of number
you’ll be entering.
D
Use the numeric keys to enter the number.
Enter exactly the digits the phone company supplied you with. Leading and trailing zeros
are important. If you make a mistake, you can turn the EDIT knob counterclockwise to
back up.
Once the number is completely entered, tap the EDIT knob toward the panel to confirm.
Turn the knob one click clockwise to highlight SPID#2, DN#2, or MSN#2. Tap the knob,
then enter that number the same way. When you’re done entering the number, tap EDIT
to confirm.
If this line requires a prefix to reach an outside line (item 4 on the form on page 1-4), turn
the knob clockwise to highlight Outside line prefix. Then enter the prefix the same
way you’ve entered the line identification numbers, and tap the knob to confirm.
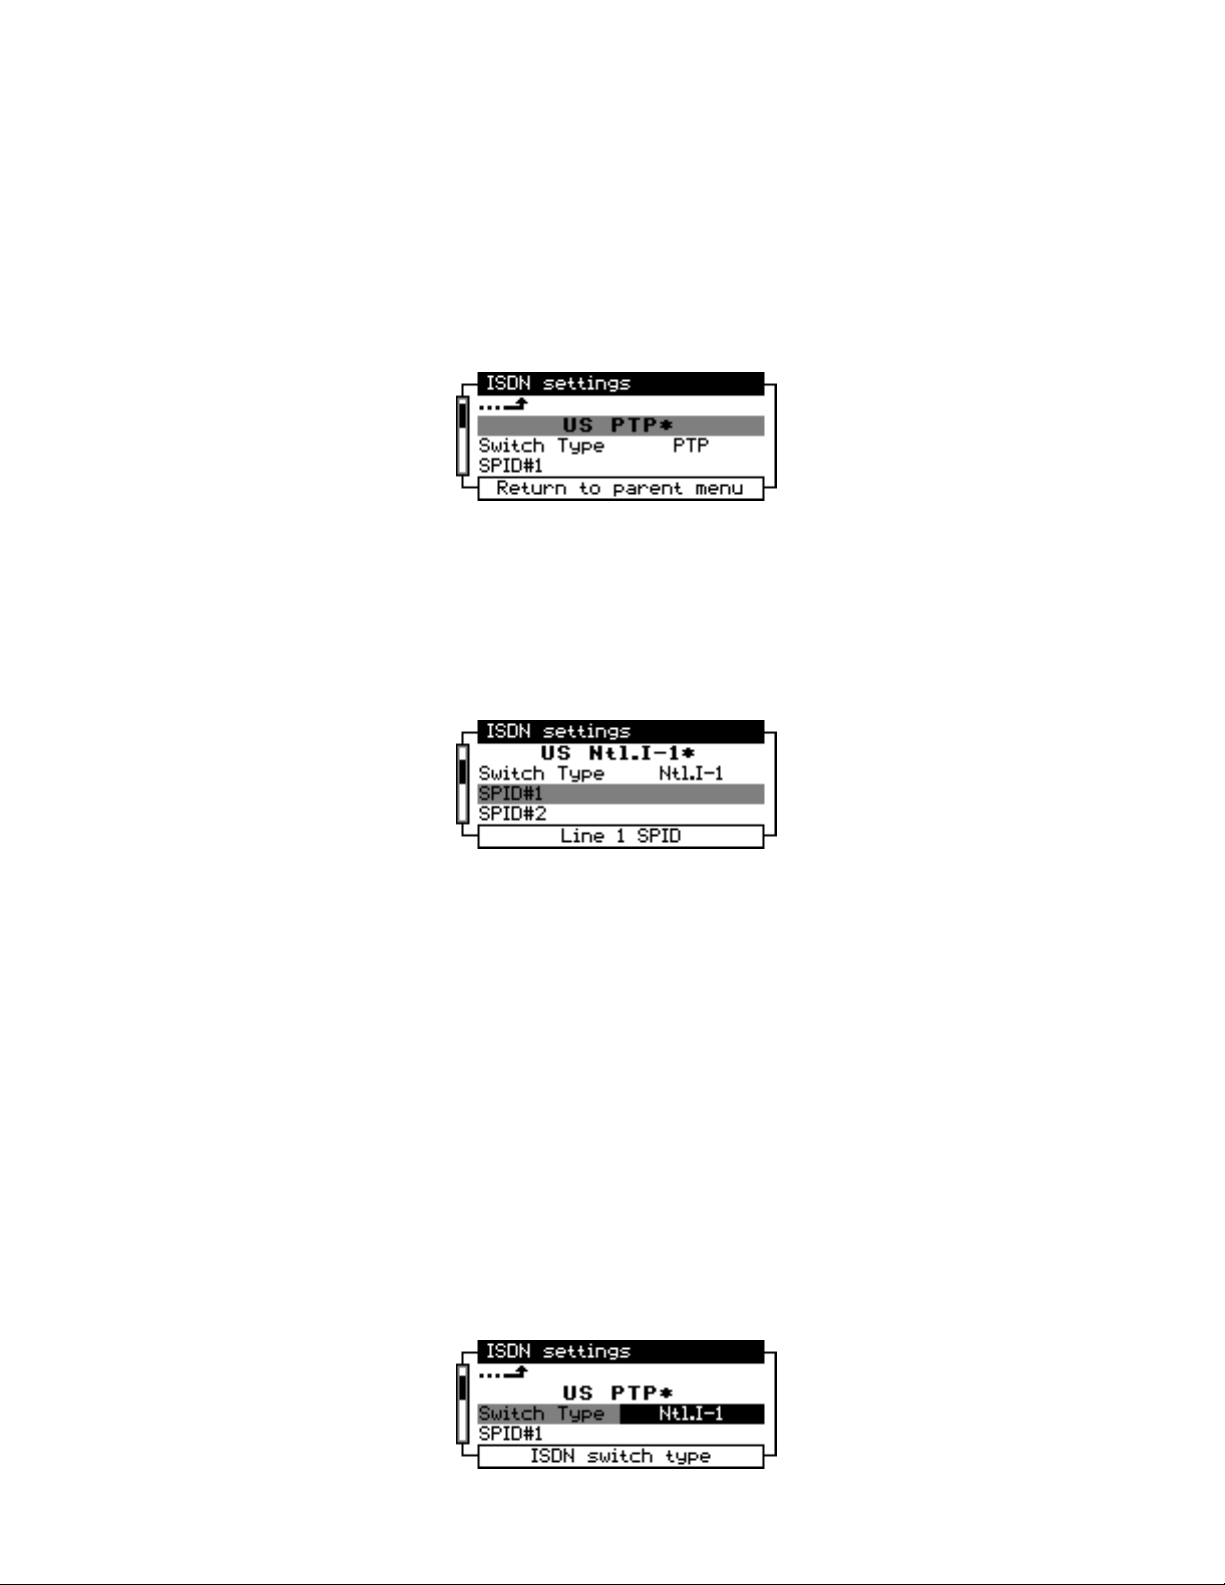
Turn the EDIT knob counterclockwise to go back up to Switch Type, and tap it toward the
panel. The screen will look like this. If you’ve entered a SPID#1, you should see it also.
1-8 QUICK RESULTS
Turn the knob to select the switch type for this line, and tap to confirm.
HOT TIP!
h
The currently-selected switch type will have brackets around it (like [PTP]). If the
current switch is correct for your line, select a different type and tap the knob to
confirm. Then wait a few seconds, and select the proper one and confirm.
This will force ZephyrExpress to resynchronize to the line using your circuit
numbers.
Hold the edit knob in toward the panel for about five seconds. This will take you back up
through the menu system, back to the Status screen. Then release the knob.
In a few seconds, you should see the word Ready in each of the boxes on the bottom of
the screen.
· If you don’t see Ready twice on the Status screen, go back and check to make sure
you’ve entered all the numbers and the switch type correctly.
· If that doesn’t work, turn to the Troubleshooting section of this manual.
Call yourself (testing your unit and the line)
Before you call our test lines, make sure ZephyrExpress is working properly with the
phone system. The easiest way to do this is to place a call on one of your ISDN lines,
through the telco’s central office, and back to yourself!
Verify that the word Ready appears twice on ZephyrExpress’ screen. If it doesn’t, go back
through the previous few pages to configure the system for your ISDN line.
Configure the Codec
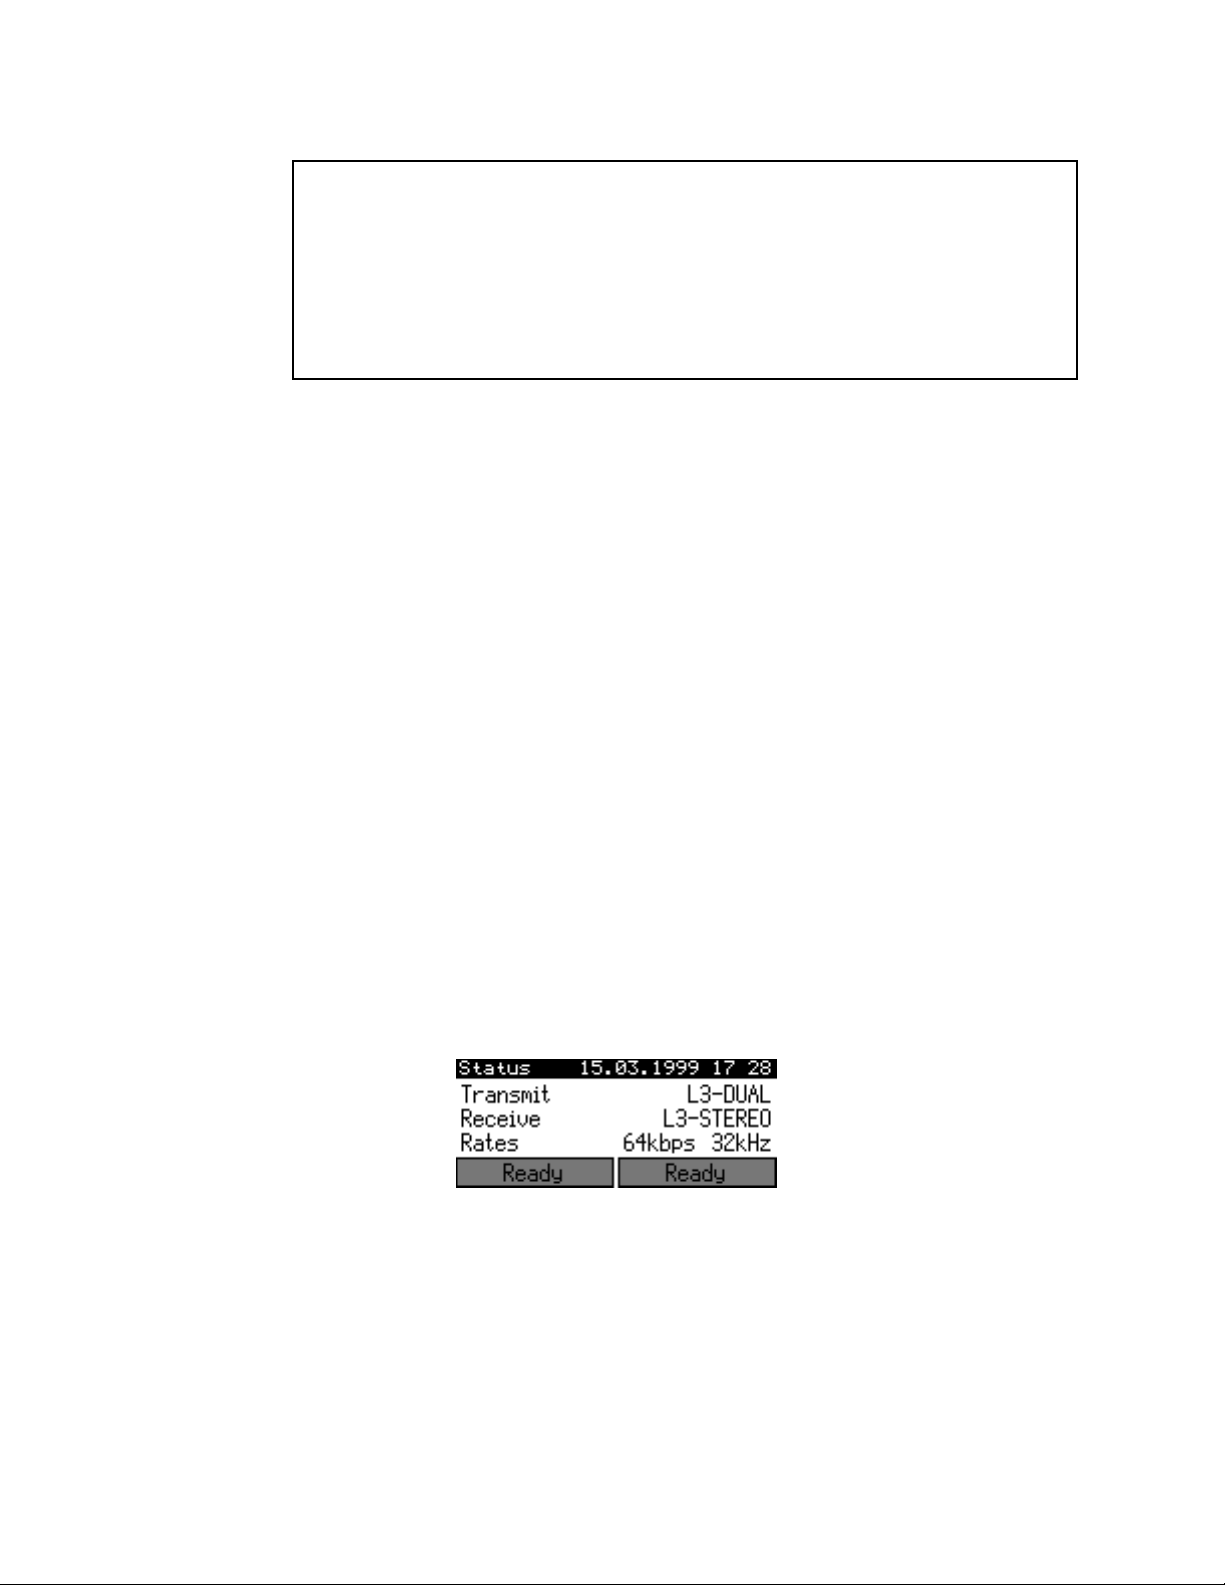
Check the Status screen. If it shows Transmit L3-DUAL and Receive L3-STEREO like the
picture below, you can skip the configuration steps and go to Place the Call on page 1-9.
If the Transmit or Receive modes are different from the picture above, follow the
following steps:
QUICK RESULTS 1-9
u
U
Press the UTIL button.
A screen like this will appear. If you don’t see it, turn the EDIT knob counterclockwise.
Turn the EDIT knob clockwise, to select Codec.
Tap the knob towards the panel to confirm that choice. The display will change to look
like this:
Turn the knob one click clockwise, to select the first text line (L3 stereo* in the picture
above, but the text may be different on your ZephyrExpress). Tap the knob in towards the
panel to confirm.
h
Turn the knob to select L3 Stereo*. Tap to confirm.
HOT TIP!
In the step above, make sure you are selecting L3 Stereo* in the centered line at
the top of the screen.
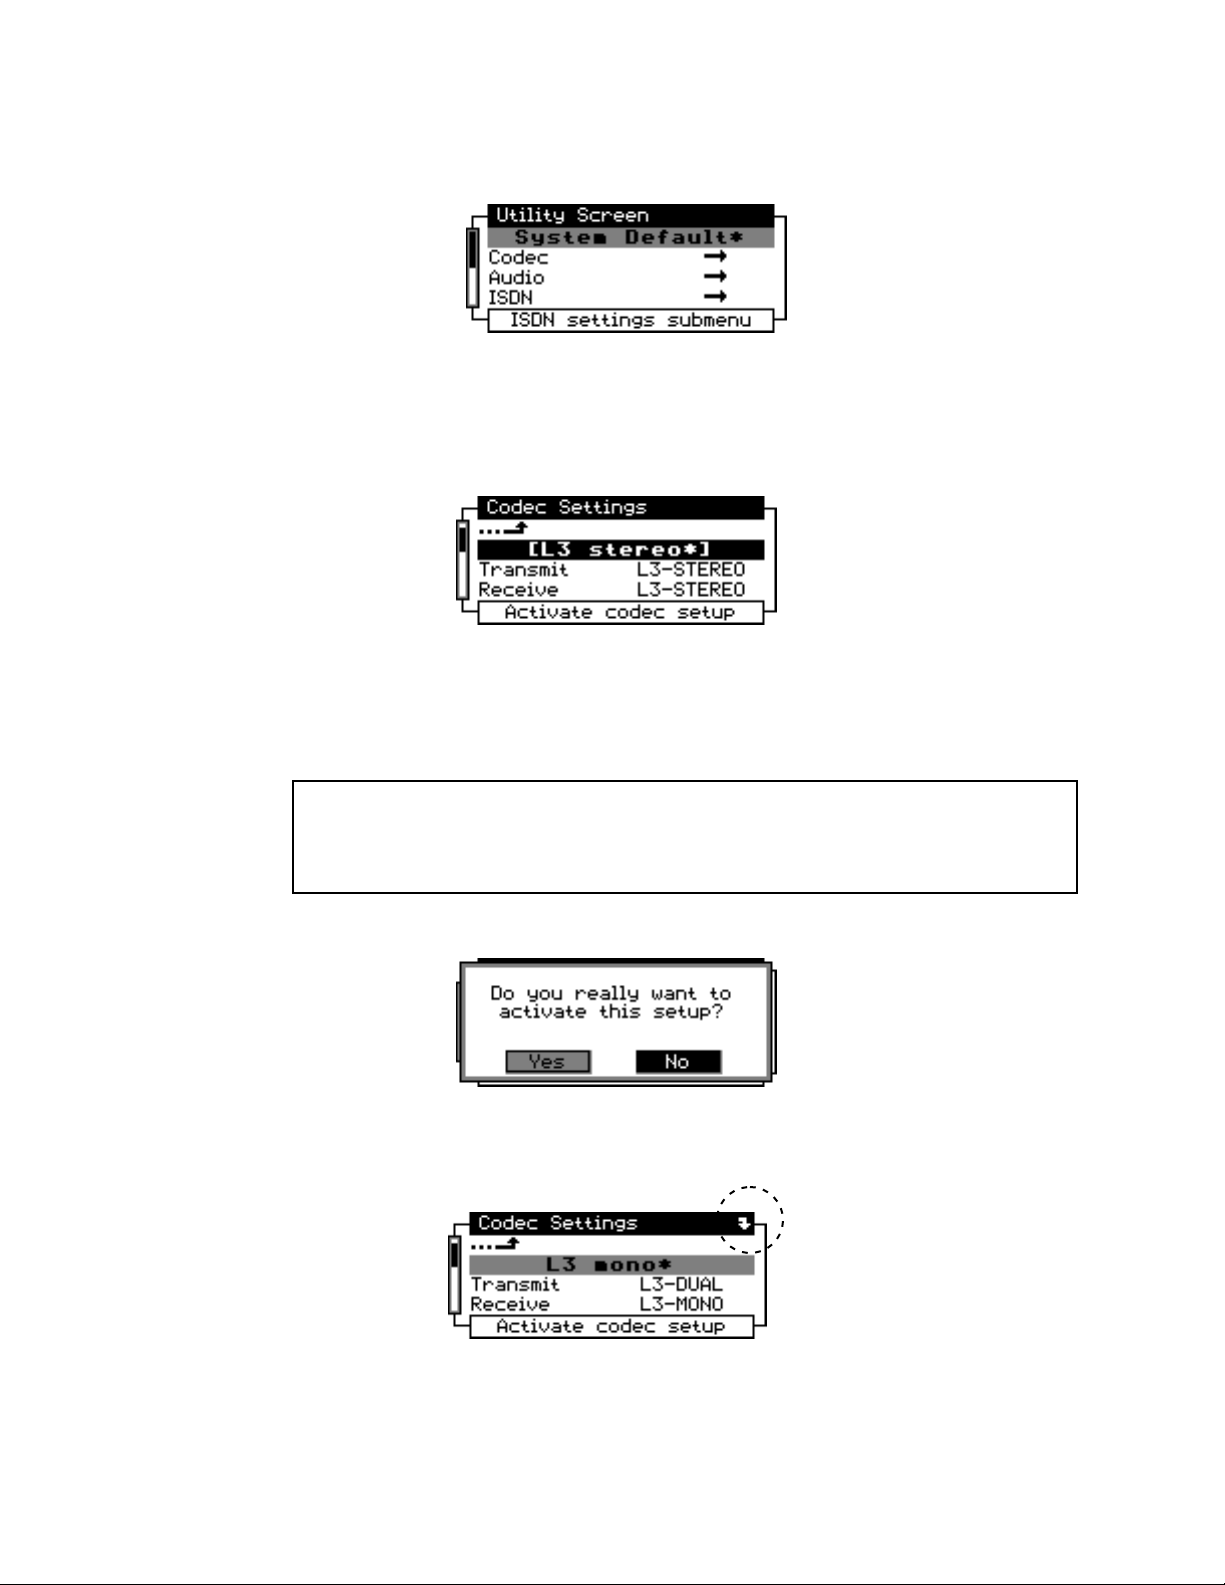
ZephyrExpress will show you a confirmation screen, like this:
Turn the knob to select Yes and tap to confirm. It may take about ten seconds for
ZephyrExpress to change codec modes. During that time, you’ll see a bent arrow,
pointing down, in the upper right corner of the screen:
When the arrow disappears, hold the edit knob in towards the panel for a few seconds to
return to the status screen. It should show Transmit L3-DUAL and Receive L3-STEREO,
like the illustration at the top of this section. If it says L3-STEREO twice, that’s okay.
1-10 QUICK RESULTS
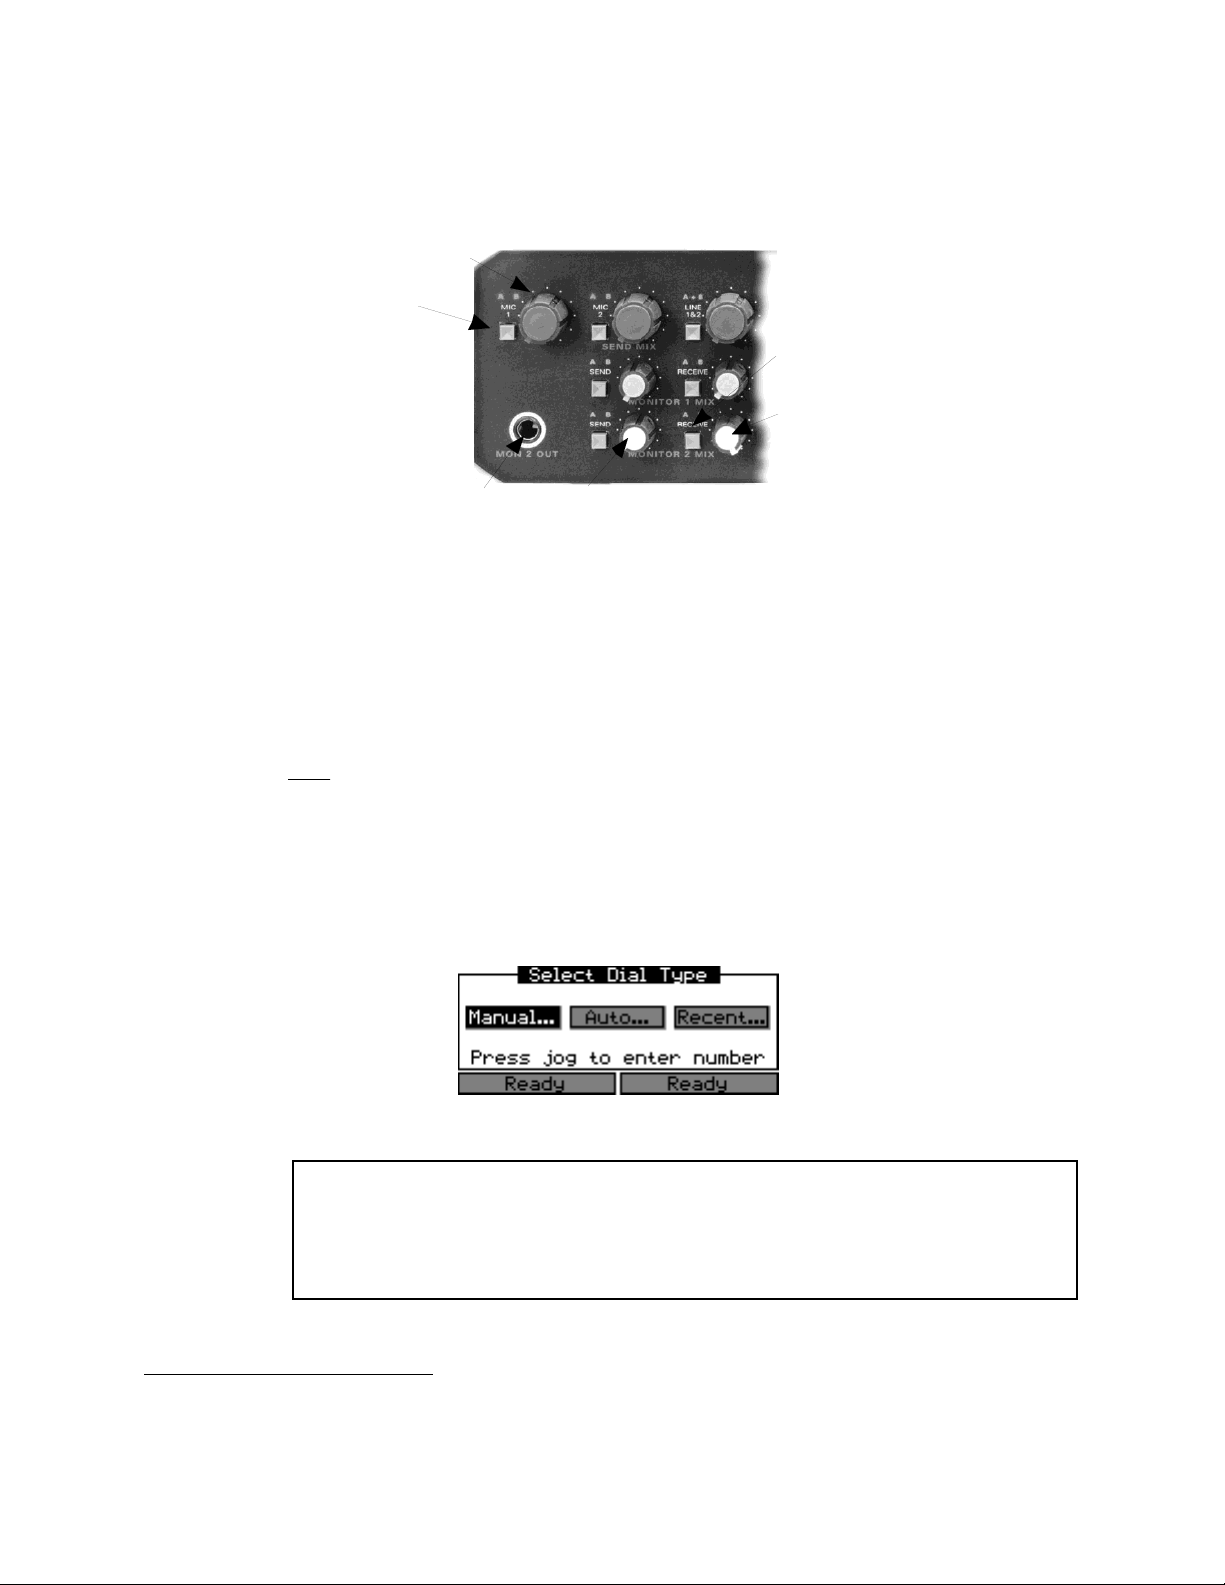
Set up an audio input and output
p
Plug the microphone into the MIC 1 INPUT jack on the back panel. Plug a stereo
headphone into the MON 2 OUT headphone jack on the front panel.
Mic 1 Volume
Mic 1 Routing Switch
Monitor 2 Receive
routing switch
Monitor 2 Receive
volume
Monitor 2 Head
Tap the MIC 1 routing switch until the letters AB above it light up green.
Talk into the mic, and raise its volume control until you see a good level on the top two
meters in the middle of the front panel. If you can’t adjust the mic for a good level, or the
letters AB are turning red on peaks, you’ll have to change ZephyrExpress’ input
sensitivity1: see page 1-22.
Tap the MONITOR 2 RECEIVE routing switch until both letters A and B above it light up. You
shouldn’t hear anything in the headphones for now: if you do, make sure the MONITOR 2
SEND volume control is turned all the way down.
Place the call to yourself
Verify that you can see the word Ready twice in the Status screen. If you can’t, check the
d
configuration steps on page 1-7.
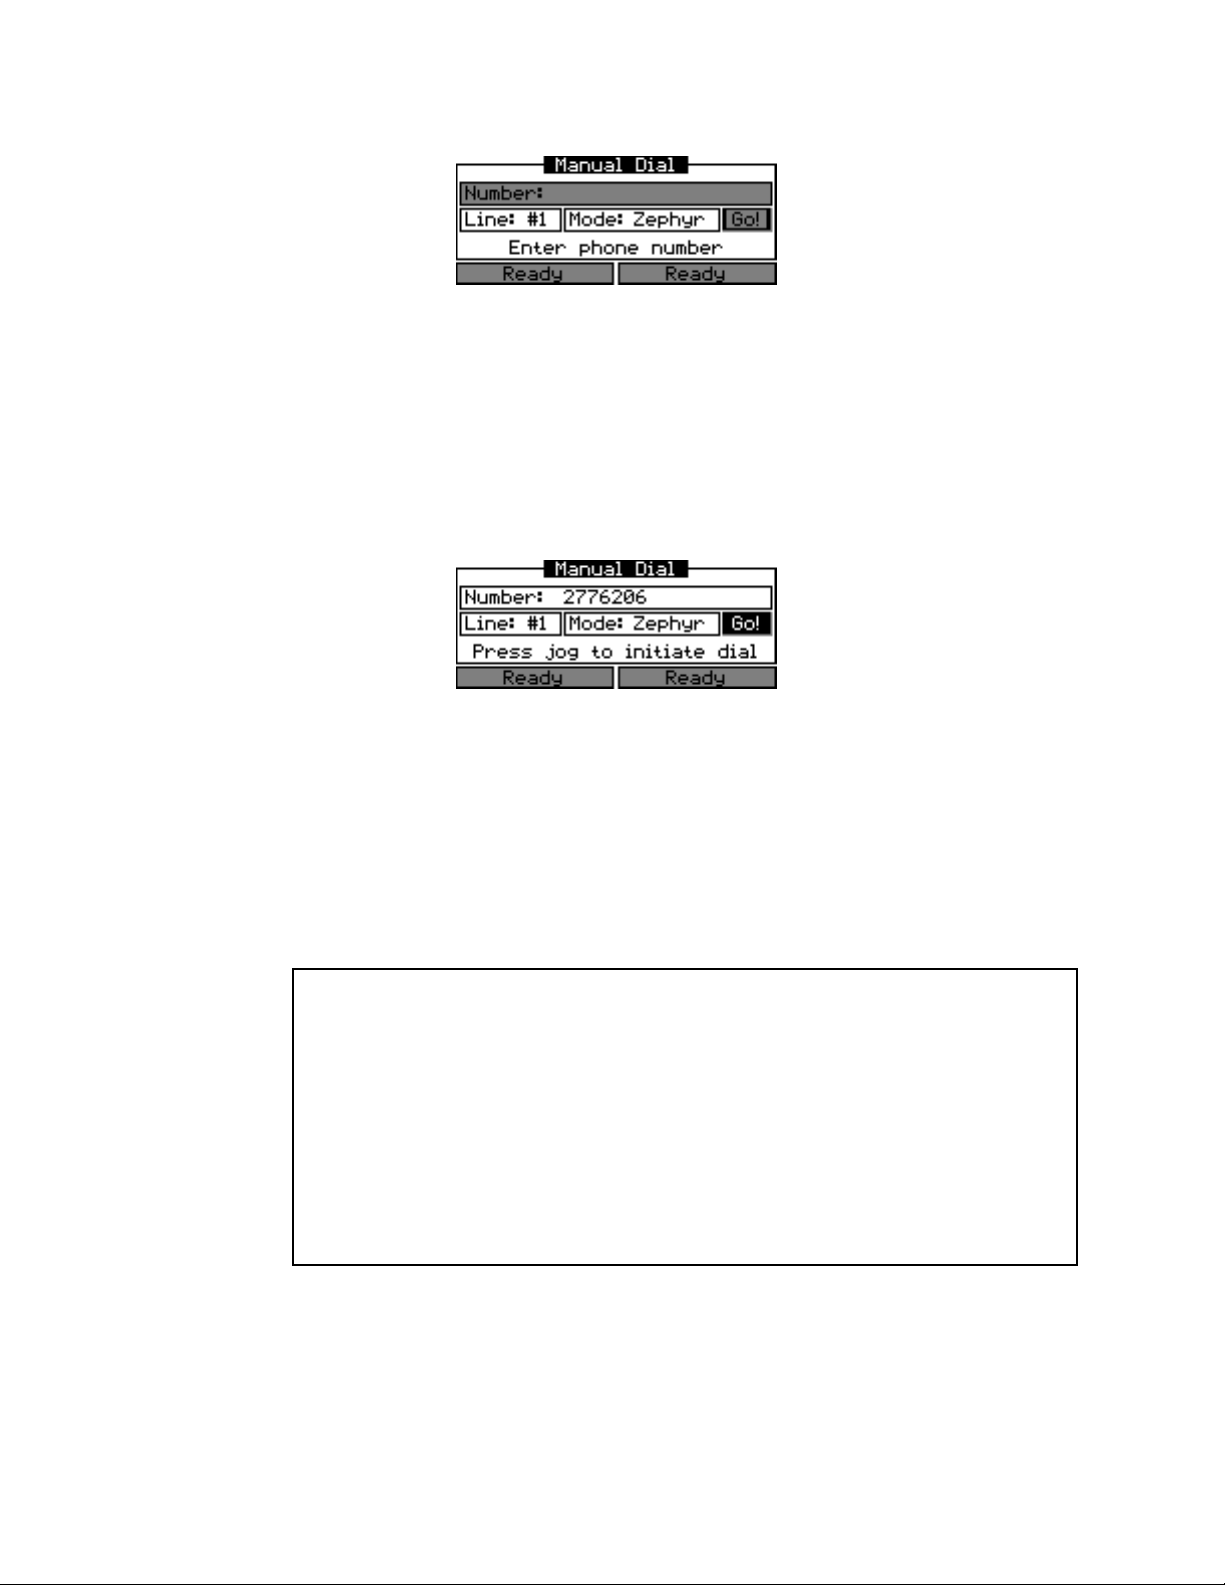
Then press the DIAL button. A screen like this will appear:
hone Jack Monitor 2 Send volume
If the word Manual... is not already highlighted, turn the EDIT knob to select it.
h
Some screens prompt you to Press jog to enter data or confirm a choice. It
means the same thing as tap the EDIT knob in toward the front panel... but we
didn’t have enough room to say all that.
1
Or if you’re eager to place your first call, leave the sensitivity alone for now — our audio
circuits and codecs have a wide dynamic range — but be aware that any noise or
distortion you hear during this test is because of that mismatch.
HOT TIP!
QUICK RESULTS 1-11
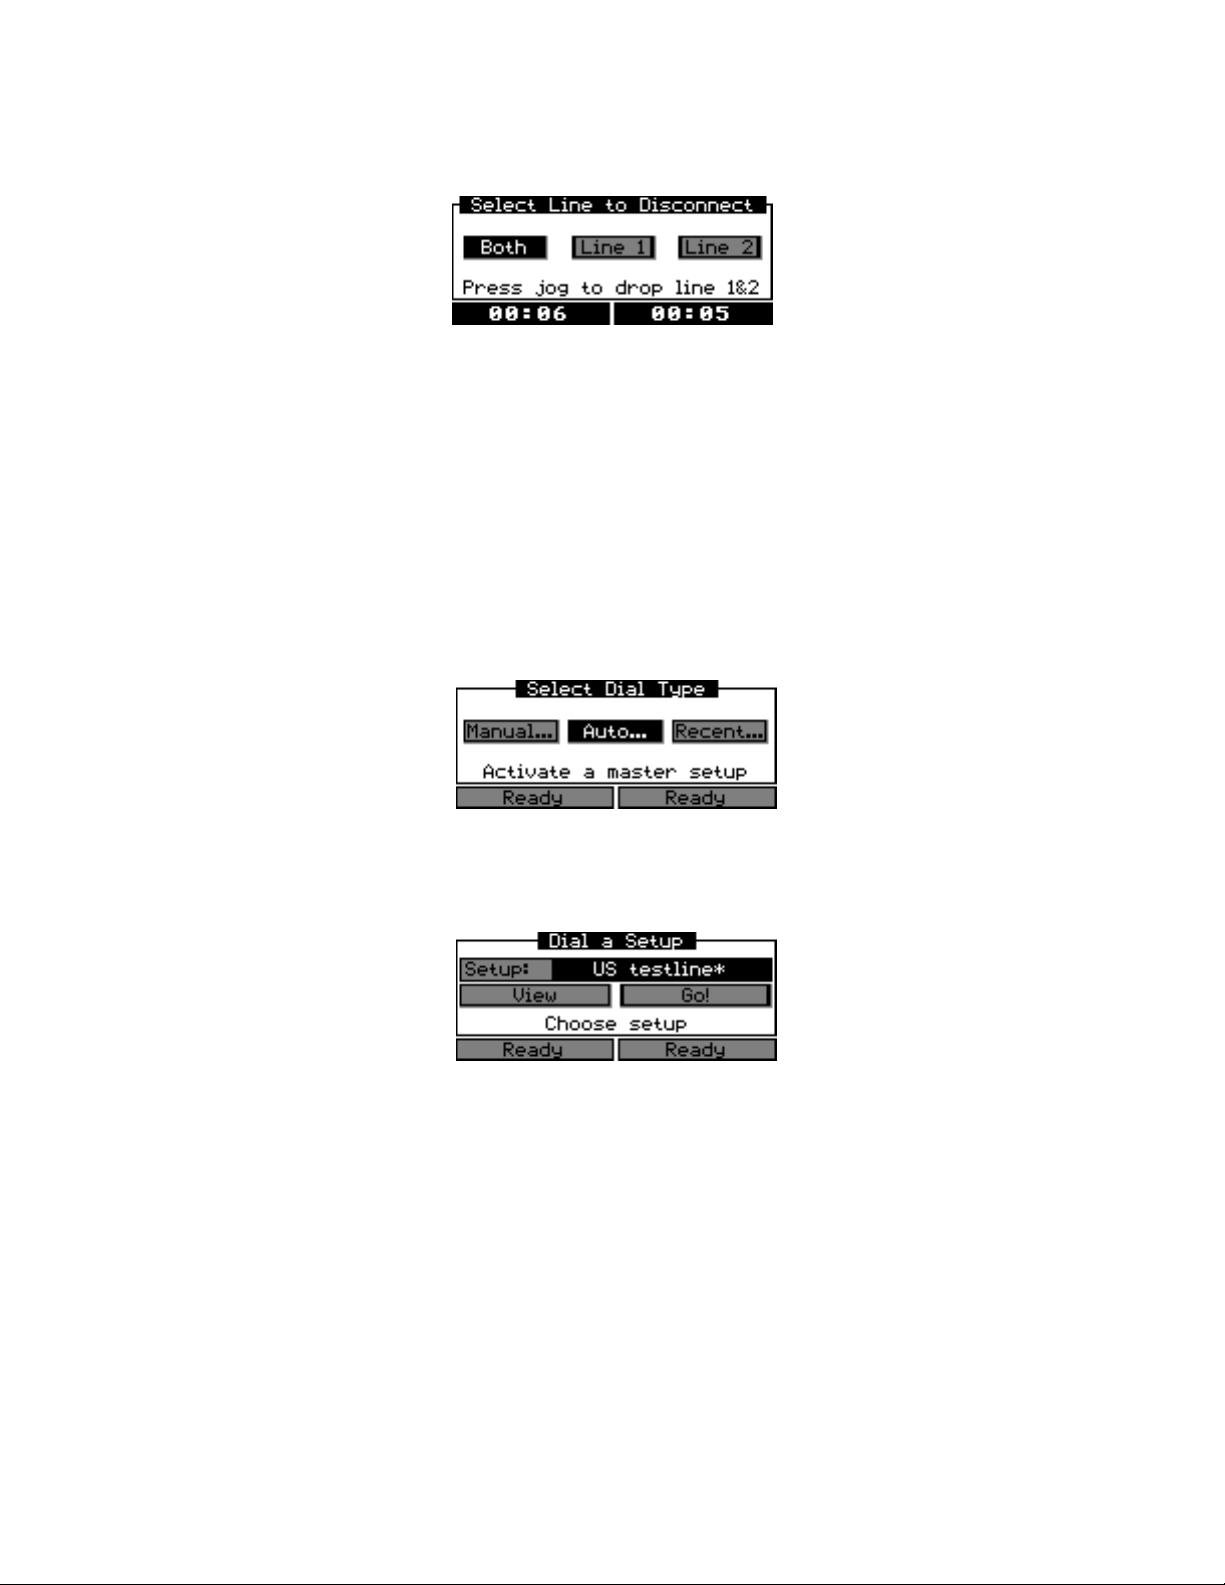
Now tap the EDIT knob toward the panel. The display will change to look like this:
Using the numeric keypad, enter the local number — usually without an area code — for
line 2 of this ISDN circuit. You want to enter line 2, because you’ll be calling it from line
1.
If you’ve placed a manually-dialed call since turning ZephyrExpress on, that number will
already be entered. You can erase it, or delete any number you enter by mistake, by
turning the EDIT knob counter-clockwise.
When the number is completely entered, tap the EDIT knob toward the panel. This
confirms the number. The Go! box will now turn dark:
?
Tap the Edit knob to place the call.
In a few seconds, ZephyrExpress will beep twice to indicate the connection has been
made. The two red LOCK lights towards the lower left of the display screen will light: if
they don’t, verify that the status screen shows Transmit L3-DUAL and Receive L3-STEREO
(see page 1-9).
Talk into the microphone. You should see the signal, slightly delayed, on both lower
volume meters. Turn up the MONITOR 2 RECEIVE volume until you hear the mic in the
headphone.
CURIOSITY NOTE
While the signal you’re hearing sounds almost as good as if the mic were
connected directly to the headphones, you’re actually listening to it after it’s
gone to the phone company’s central office and been sent back to you. Both
digital signals — sending and receiving — are multiplexed on the same copper
ISDN pair.
But the delay you’re hearing is not because of the round trip. It’s a result of the
computer processing necessary to squeeze a high-fidelity signal into a very small
amount of digital data.
ZephyrExpress includes features to minimize the effect of this delay during live
broadcasts. These include low-delay modes for less critical signals and flexible
monitoring to let talent hear their voices locally while receiving music and cues from the
distant studio. You’ll learn how to use these features later in this manual.
1-12 QUICK RESULTS
p
When you’re finished talking to yourself via ISDN, press the DROP button.
The screen will change to look like this:
Tap the EDIT knob to hang up. Now you’re ready to really rock!
Tune into one of our test lines
Our US test line originates less than a mile from the Rock ‘n’ Roll Hall of Fame, in
Cleveland, Ohio. There’s always something interesting playing through it.
We also maintain a European test line in Freising, Germany.
Here’s how to connect to them:
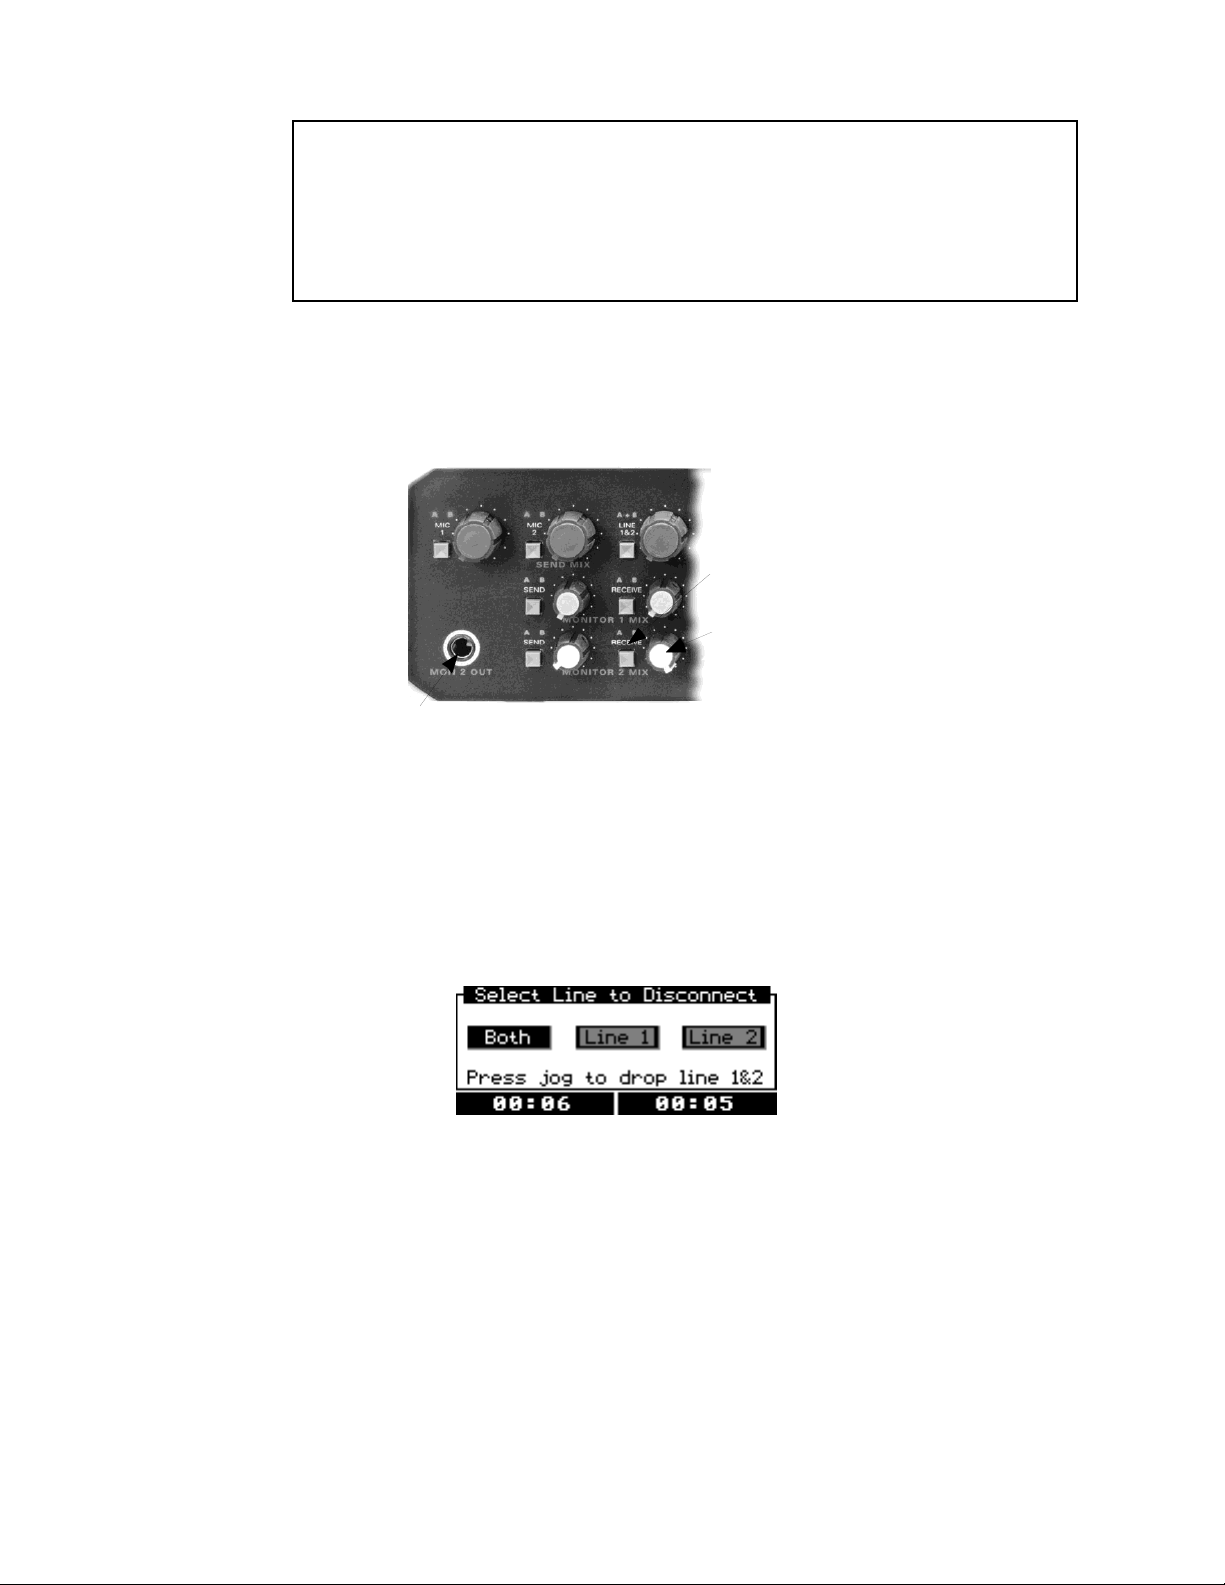
Press the DIAL button.
d
A screen like this will appear:
U
If the word Auto is not highlighted, turn the EDIT knob until it is.
With Auto highlighted, tap the knob towards the panel to confirm. The screen will
change like this:
Turn the knob to select US testline* or Euro testline*. The asterisk means the number
is pre-programmed at the factory. Tap the knob to confirm.
After you tap, the highlighting will switch to the Go! box. Tap again to dial.
If ZephyrExpress’ codec is not already set to the correct mode to receive the testline, the
unit will automatically change to match. This may take a few seconds.
Then ZephyrExpress will dial the test line. In a few seconds, you should see the red LOCK
LEDs light, and music on the RECEIVE meters. If you see the words Busy or Conn once or
twice on the status screen, try again later.
QUICK RESULTS 1-13
p
ISDN TIP
i
If you can place a local call to yourself, but can’t call our test line long distance,
the problem is probably with your long-distance carrier. In the US, you can
switch carriers by applying a “1010” code. Instructions are in the ISDN section of
this manual.
Press the small gray MONITOR 2 RECEIVE routing button until the letters A and B directly
above it light up. This button is located along the bottom of the front panel, above the
printed words MONITOR 2 MIX.
onitor 2 Receive button
onitor 2 volume
Monitor 2 Head
Turn up the MONITOR 2 volume knob, and you should hear music through headphones
plugged into the front panel headphone jack.
hone Jack
p
Enjoy.
When you’re finished listening, press the DROP button.
You’ll see a screen like this:
The word Both will already be highlighted. Tap the EDIT knob to drop the lines, and
ZephyrExpress will hang up.
1-14 QUICK RESULTS

Part II:
Fast Answers to Frequently-Asked Questions
This section covers common operating issues. Chances are it’ll tell you all you need to
know about setting up ZephyrExpress and using it in the field. Scan through the topics
now, so you’ll know what you can find here.
Of course, the rest of this manual will tell you a lot more about ZephyrExpress, teach you
how to use the system more efficiently, and turn you into an all-around ISDN and audio
coding guru. Please don’t ignore it.
HOT TIP!
h
p
d
T
This section also appears in the handy Mini-Manual that came with
ZephyrExpress. We recommend you keep that booklet with the unit, and bring it
along on remote broadcasts.
Blank Screen?
If ZephyrExpress’ LEDs light when you first apply power but the LCD screen appears
dark, or the LCD screen lights but no characters appear, the last user may have left its
brightness or contrast at an extreme setting. To reset:
• Press the DROP button and hold that button in while turning the
Edit knob clockwise to reset the backlighting. It may take a few turns.
• Press the DIAL button and hold that button in while turning the Edit
knob either direction to change the LCD Contrast.
The Basics
TURN or TAP
The EDIT knob can be turned to scroll through menus or enter choices. It can
also be tapped in toward the front panel, just like a push button, to confirm
a choice.
When the Status screen is showing, turning or tapping the EDIT knob brings
up the help screen.
1: What do I do if I’m totally lost?
Press the HELP button on the right side of the front panel, near the Edit knob.
Different Help screens will appear, depending on what you were doing when you
l
pressed it.
To exit Help, tap the EDIT knob in towards the panel and you’ll return to the screen that
was displayed when you pressed help.
To exit any other screen and return to the main Status screen, press and hold the EDIT
knob in for at least three seconds.
QUICK RESULTS 1-15
2: How do I use the menus?
p
ZephyrExpress uses a series of nested menus to set how it works. To open the menu
system, press the UTIL button to the right of the Edit knob. The Utility Screen, with a
u
T
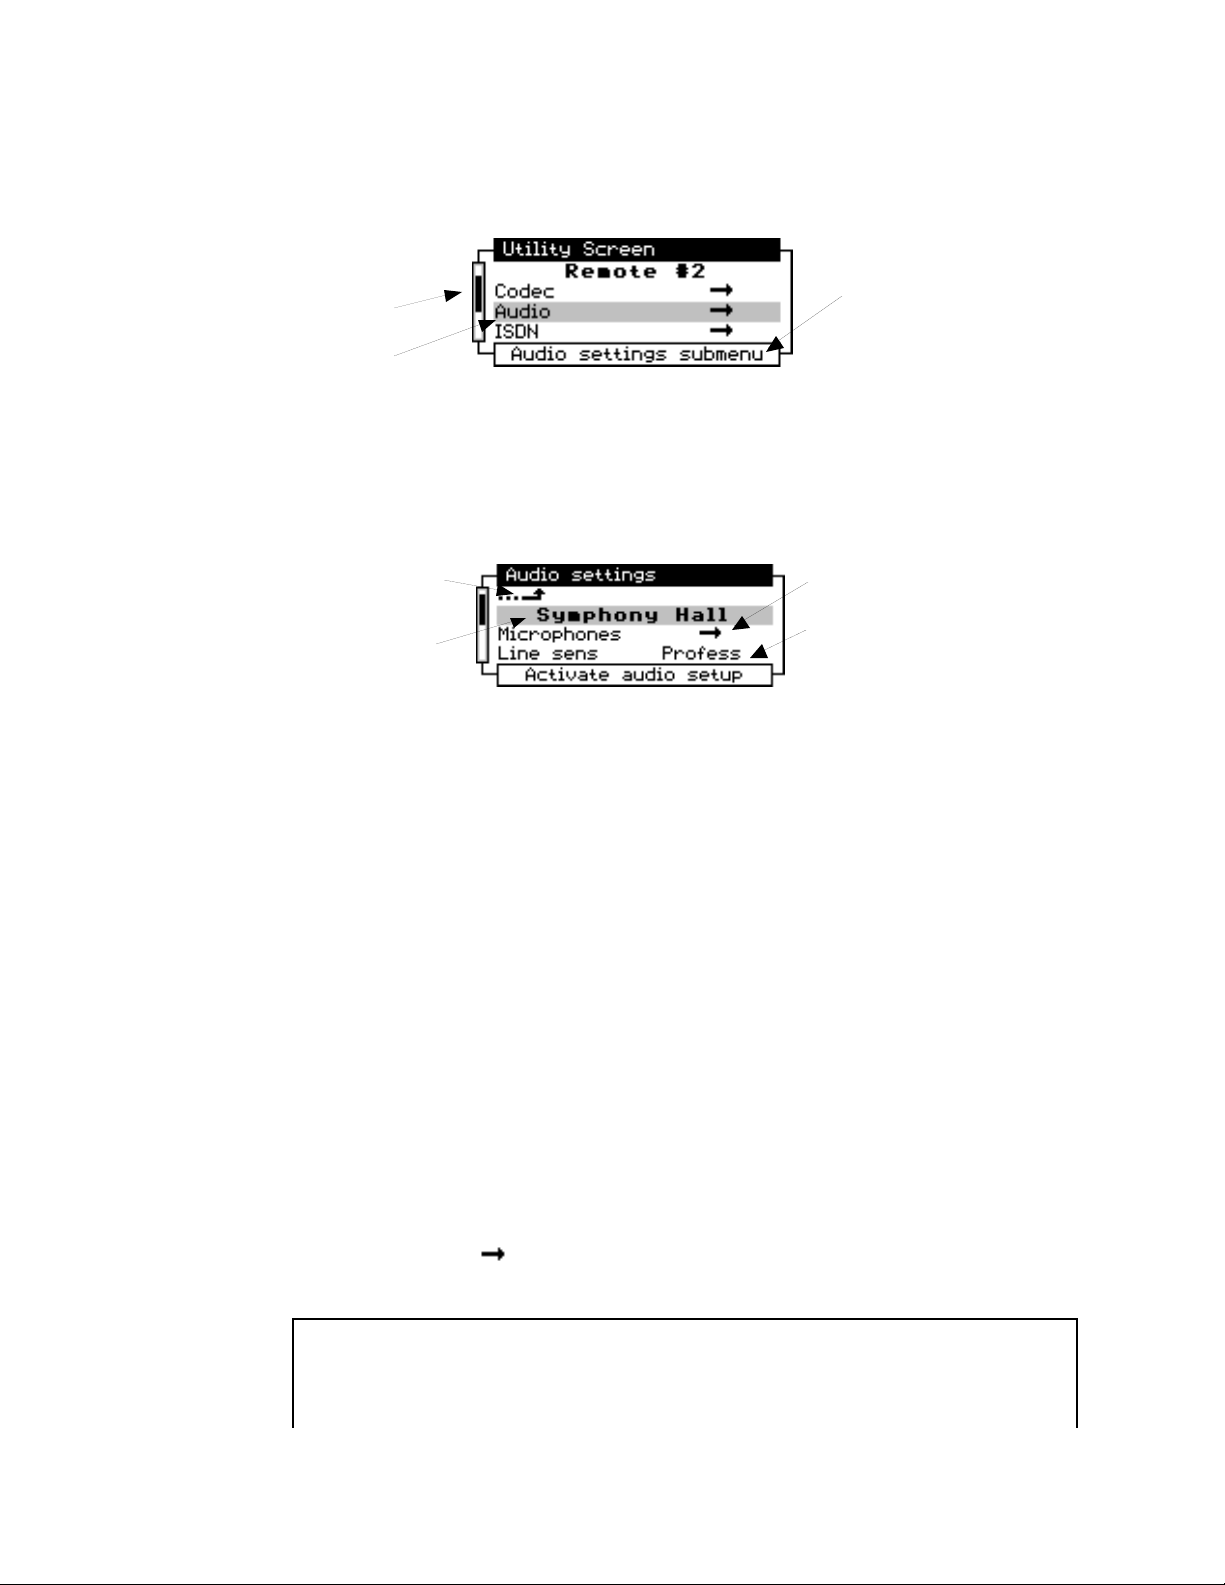
list of submenus, will appear:
Scrollbar
Highlighted
Item
To access any menu item, turn the EDIT knob until that item is highlighted. The scrollbar
moves up and down to show how far through the list you’ve gone.
Once you’ve highlighted an item, tap the EDIT knob toward the panel and the item’s
submenu will appear. Some screens refer to this knob as JOG to save space. It’s the
same thing.
Description of
Highlighted
Item
Takes you up to next
higher menu
Pre-programmed
setu
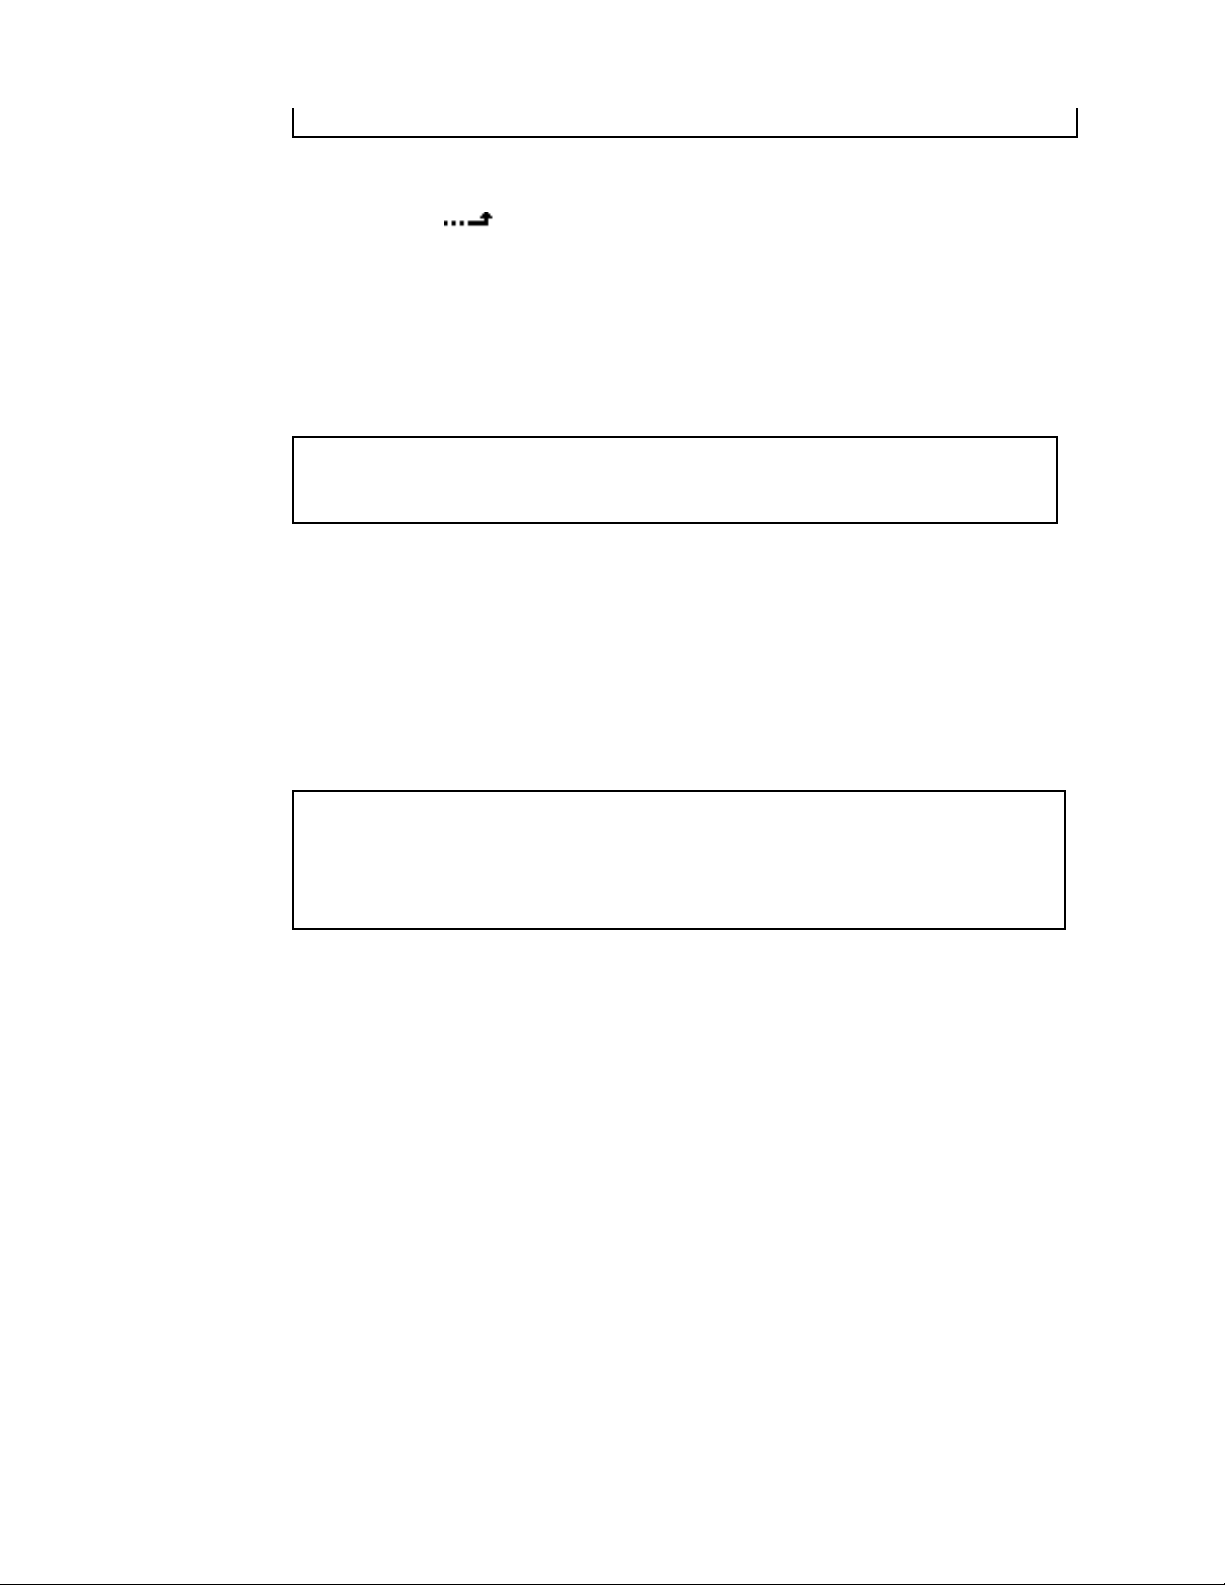
The first text entry in any menu is the current Setup for that menu (in this picture, it’s a
user-programmed setup called Symphony Hall). Setups instantly set every parameter in
every submenu below them. Some setups are pre-programmed at the factory, and
appear with an asterisk in their name. You can also create your own setups, following
instructions on page 1-18.
If an item displays its current value (such as Line sens Profess in the picture) you can
change its value with the EDIT knob:
1. Highlight the item and tap the knob once.
2. Turn the knob to cycle through its possible values. The currently-active setting has
brackets around it.
3. When you see the value you want, tap the knob to set it.
If you can’t change a value, make sure the SAFE light isn’t lit. See page 1-17 for more
information about Safe Mode.
Indicates there’s
a submenu
This item is directly
settable anddoesn’t
have submenus.
When you change a Setup, every menu item below it is changed to match the stored
value for that setup.
If a menu item has a icon, there’s a submenu. Highlight it and tap the Edit knob to
open the submenu.
HOT TIP!
h
1-16 QUICK RESULTS
To jump to the top of any menu, hold the Edit knob in and turn it one click to
the left. To jump to the bottom, hold the knob in and turn in one click to the
right.
To exit any menu, hold the EDIT knob in for at least three seconds...
· or, select the icon in a submenu and tap the EDIT knob.
· or, hold the EDIT knob in and turn it to the left: each click will take you one step back
through the menu structure, until you return to the Status screen.
· or ignore the menu. After a while (which can be set in the System menu) it will time
out and revert to the next-highest level.
HOT TIP:
h
There’s a complete map to the menus in the front of this manual.
3: How do I use a menu that appears locked?
Critical parameters can be locked to protect against accidental changes. When Safe Mode
is on, SAFE appears in red on the front panel and the message This menu is disabled in
SAFE mode
on the rear panel to turn this mode on or off. A small screwdriver blade will help you
reach the switch. Don’t use a pencil to change the setting — the graphite tip might break
off, and cause a short within ZephyrExpress.
NOTE:
w
Don’t turn off Safe Mode unless you know what you’re doing. Codec settings
have to match the distant studio and ISDN ones have to agree with the phone
company. With the wrong ones, transmission will be impossible.
4: How do I lock a specific menu?
Obviously, turning the SAFE MODE switch to its On position will lock something. But before
you use it, enter the Utility: Safe Mode submenu. You’ll see a list of ZephyrExpress
activities that can be locked. Each can be set to Allow or Block.
appears when you try to open a blocked submenu. Use the SAFE MODE switch
5: How do I enter numbers or names?
To enter a number for any menu item or when dialing, use the keypad.
To enter individual letters in a text field, press the number key with that letter printed on
it. Tap the key repeatedly to cycle through the choices. When you see the one you want,
move to the next character by tapping another number key or turning the Edit knob
clockwise.
If you make a mistake, turn the Edit knob counter-clockwise to back up. Once you’ve
finished entering, tap the knob to confirm.
QUICK RESULTS 1-17
6: How do I create my own Setups and Master Setups?
HOT TIP!
h
You can capture a “snapshot” of all your current settings by using the Auto-
Create function, described in step 4 below.
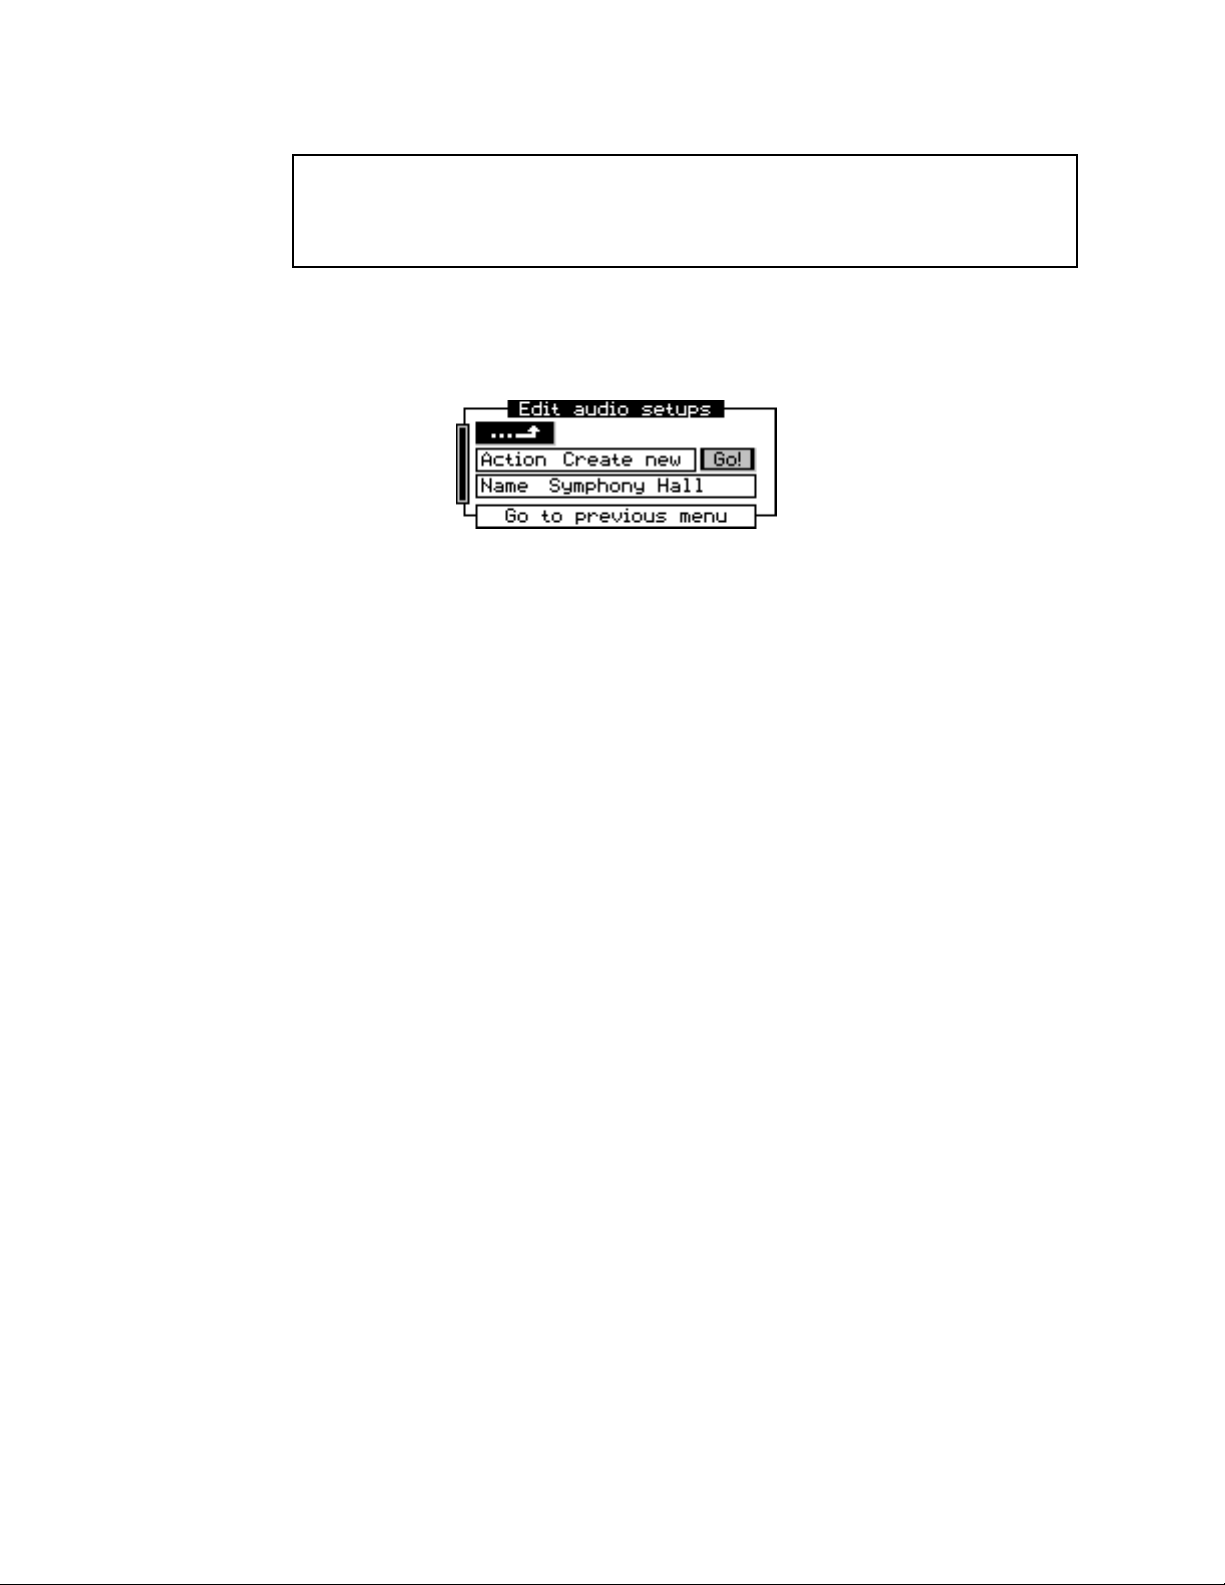
1. Make sure all the parameters within a menu page are set the way you want them for
this Setup. Then enter the Setups submenu at the bottom of that page. It will be
similar to this:
2. Enter the Action box and select Create new. This will take you to the Name box.
3. Using the keypad, enter a name for this setup. This will take you to the Go! box.
4. Tap the Edit knob and the parameters will be stored.
The main Utility menu has two setup choices at the bottom:
· Master Setups activate all the individual menu setups at once:
If you select Action: Create New, you’ll be able to enter a name for this setup. Then
you’ll see a list where you can choose individual Setups that will be activated for each
of ZephyrExpress’ menus. After you’ve selected these setups, scroll back to the Go!
field to create the new master setup.
· Autodial Setups let you enter phone numbers and call type (Zephyr or standard phone)
1-18 QUICK RESULTS
If you select Action: Auto-Create, after you enter the name the Go! field will be
automatically selected. If you then tap EDIT again, ZephyrExpress will scan every
current menu setting and create a full set of new Setups that include them. For
example, Auto-creating a new “Arena” master setup will also create a “Arena-ISDN”
setup, a “Arena-audio” setup, and so on. You can use these individually, or just leave
them alone to be invoked by the maser setup.
for each line, and select an optional Master Setup to apply whenever the call is
placed.
Autodial Setups can override Safe Mode. Even if a user is blocked from manually
changing a parameter or setup in an individual menu, Autodialing will automatically
change all the menus to match its master setup.
 Loading...