

Page 1

Telit RS Car Phone Installation
Guide
Mounting instructions
Page 2

Table of Content:
1 Carphone kit ............................................................................................................ 3
2 Installation Diagram ................................................................................................. 5
3 Carphone layout ...................................................................................................... 6
4 Preplanned Accessory Positioning ............................................................................ 7
4.1 Plan Phone and Cradle Positions 7
4.2 Plan the Microphone’s Position 8
4.3 Plan the Speaker’s Position 8
5 Installing the Cradle and Phone ................................................................................ 9
5.1 Where to Position (Reminder) 9
5.2 Installing the Cradle and Phone 10
5.3 Installing the Microphone 11
5.4 Installing the Speaker 13
5.5 Installing the Electrical Connections 14
5.6 Installing the Voltage Cable 15
5.7 Installing RF Antenna 16
5.8 Installing GPS Antenna 18
5.9 Installing the SIM card 20
6 Trouble Shooting ................................................................................................... 21
7 Appendix ............................................................................................................... 22
Mounting instructions
Page 3
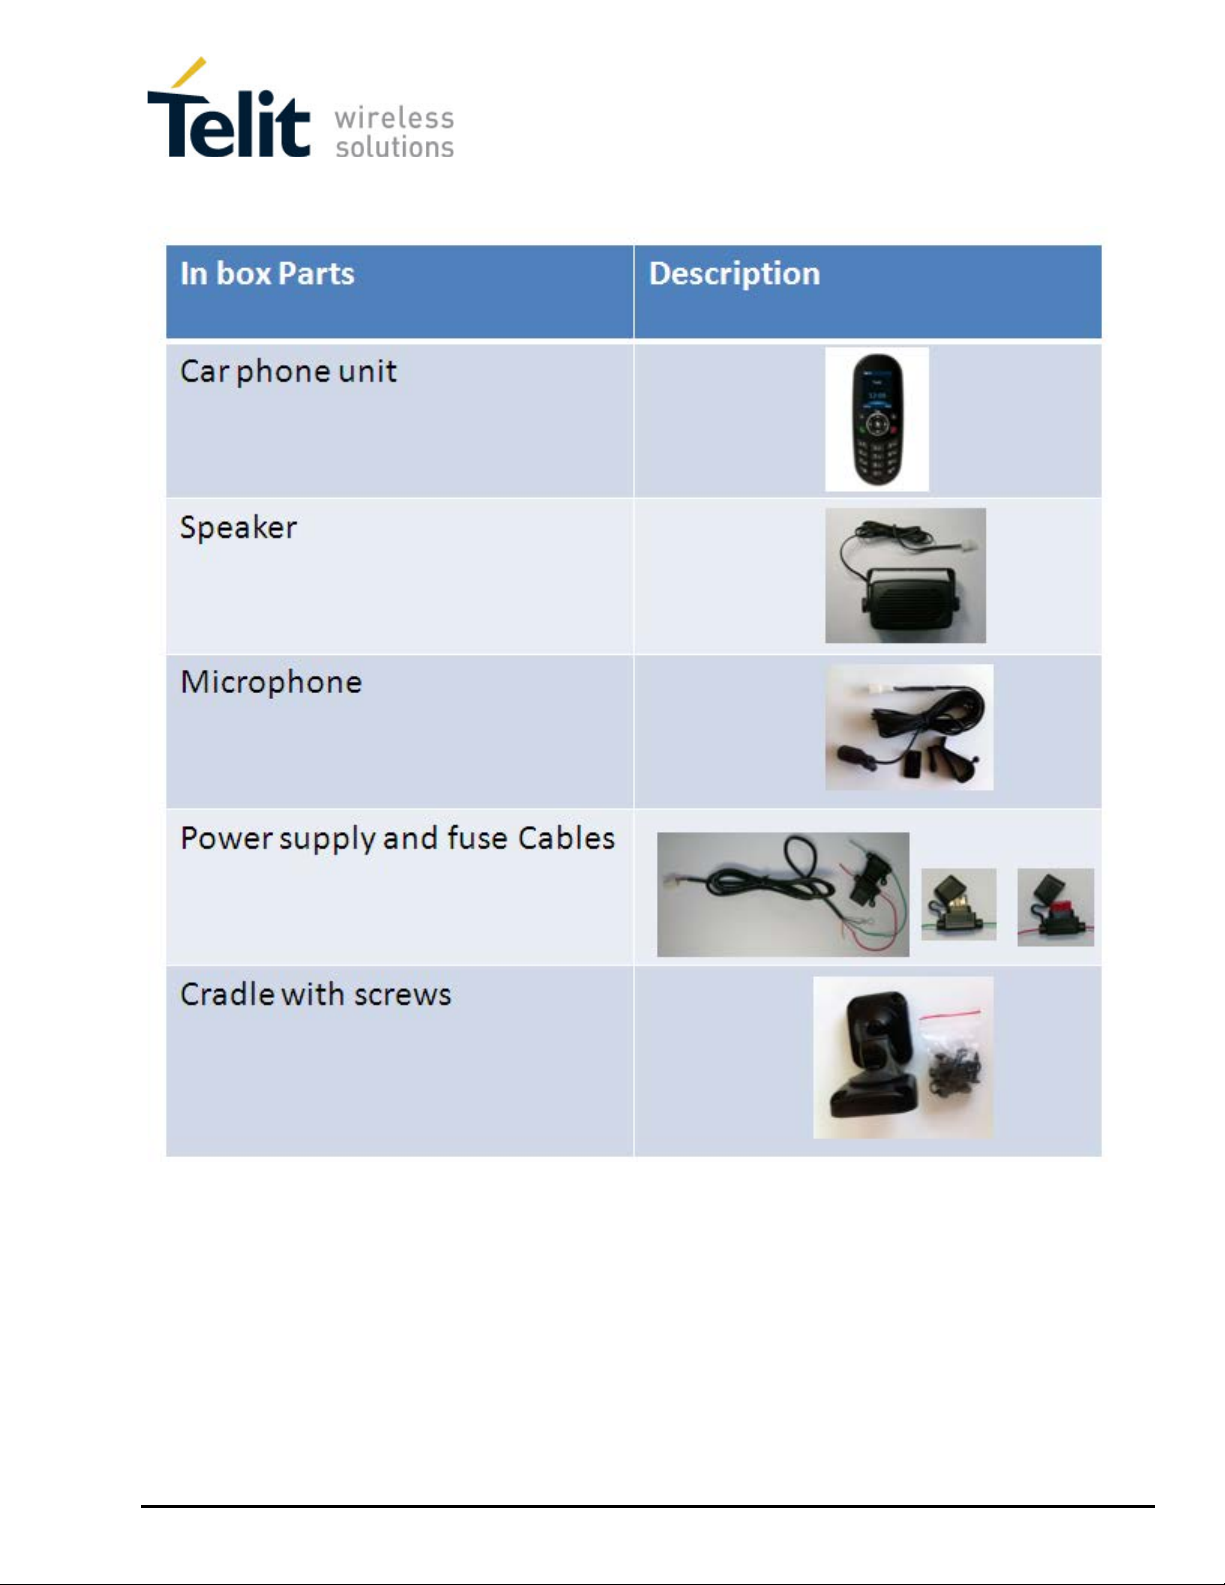
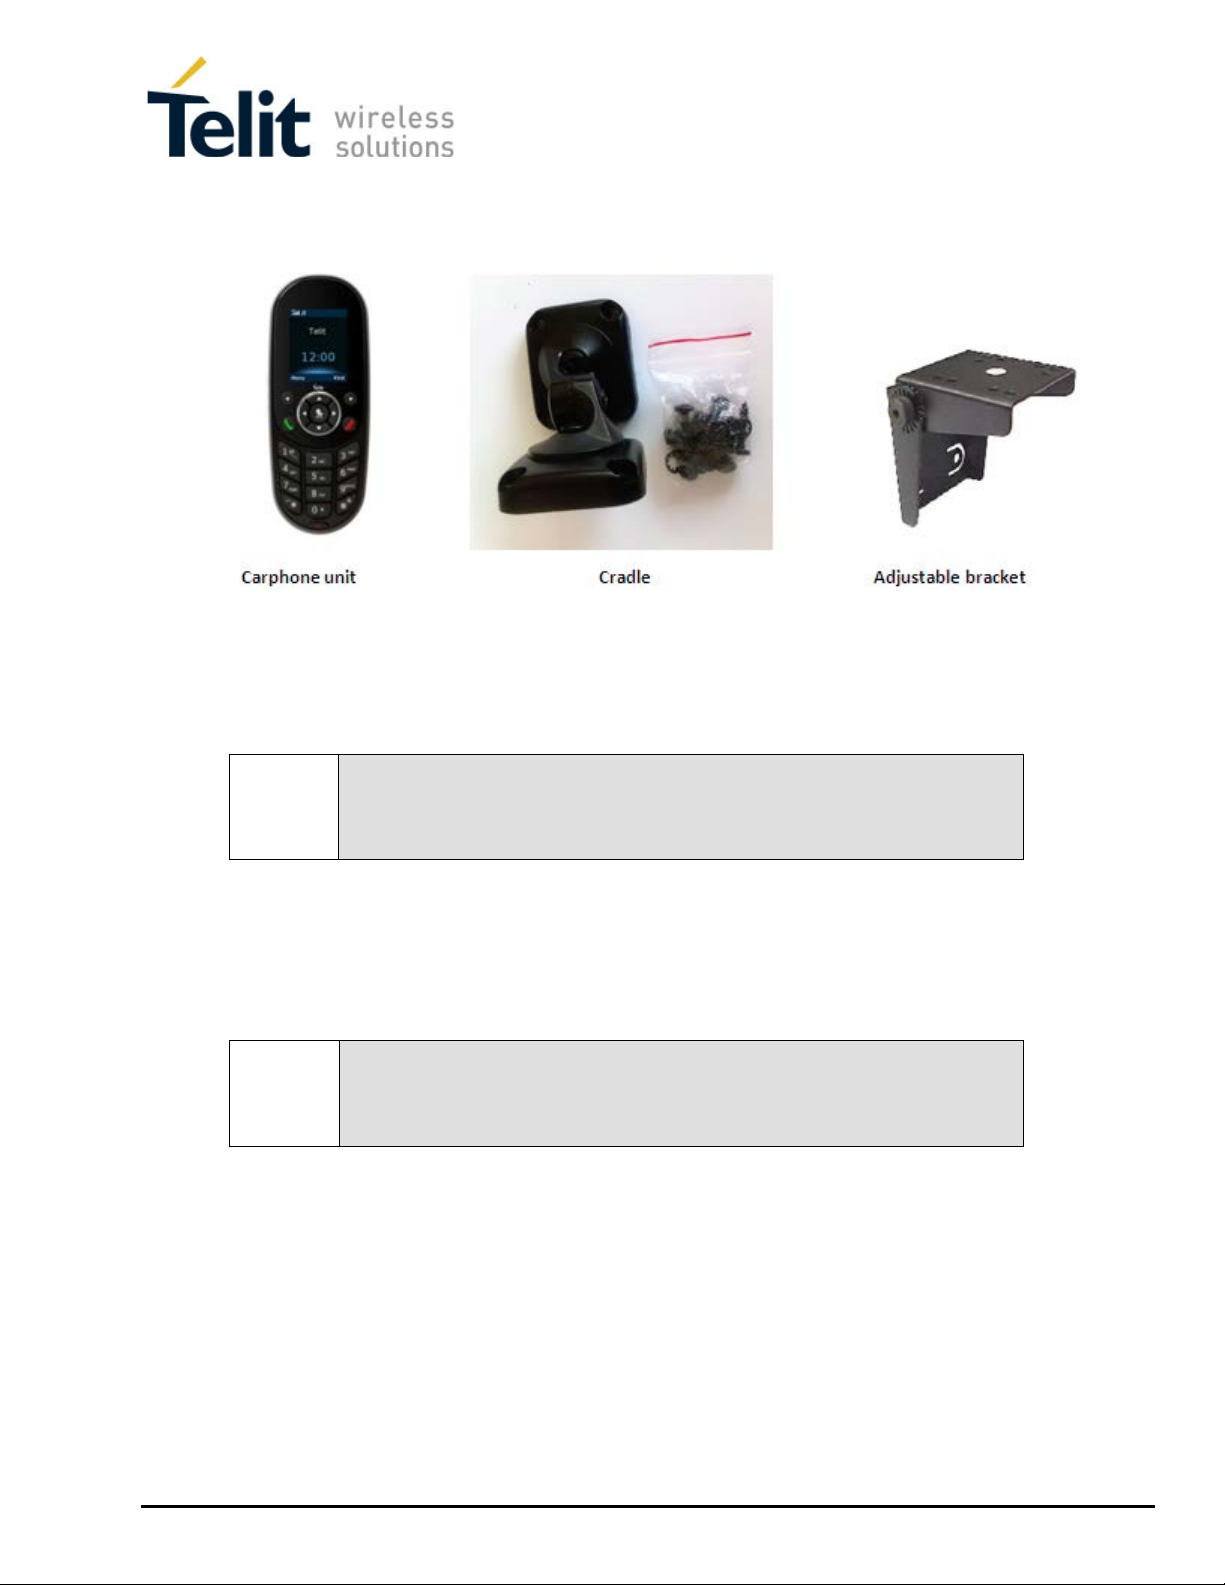
1 Carphone kit
Mounting instructions
Page 4

Mounting instructions
Page 5
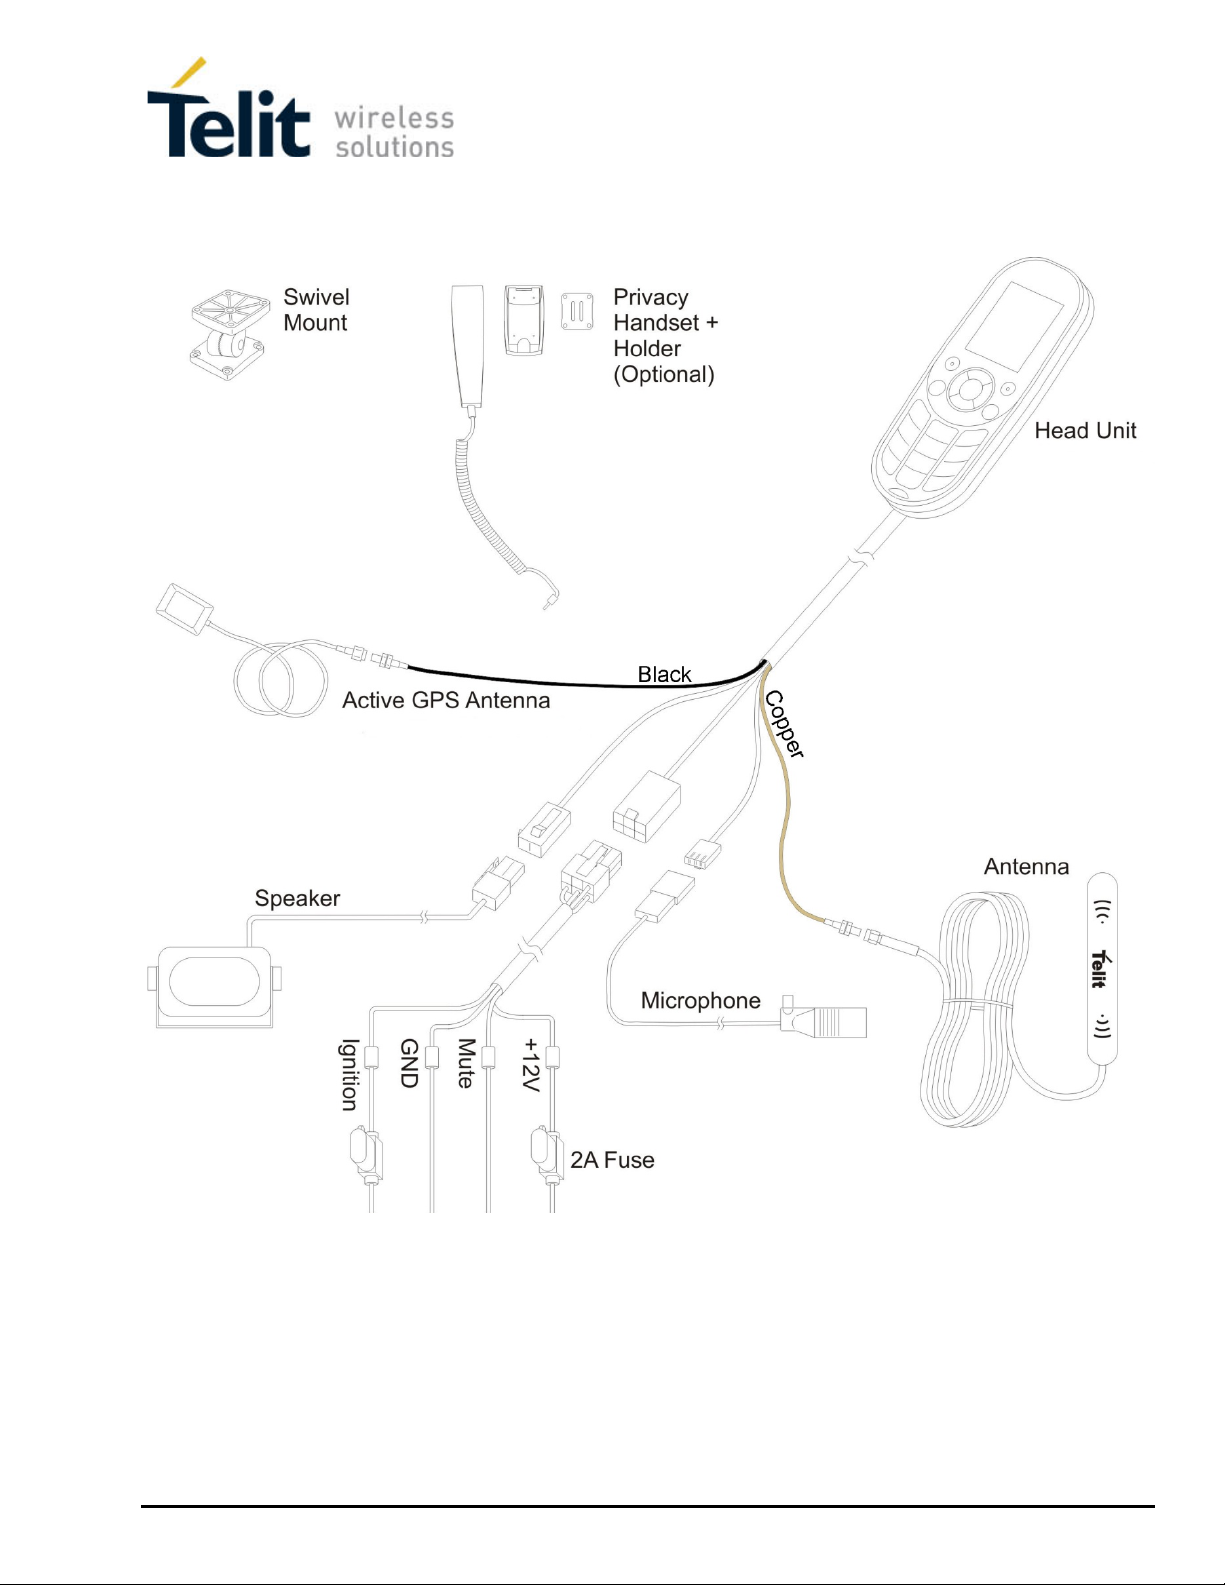
2 Installation Diagram
Mounting instructions
Page 6
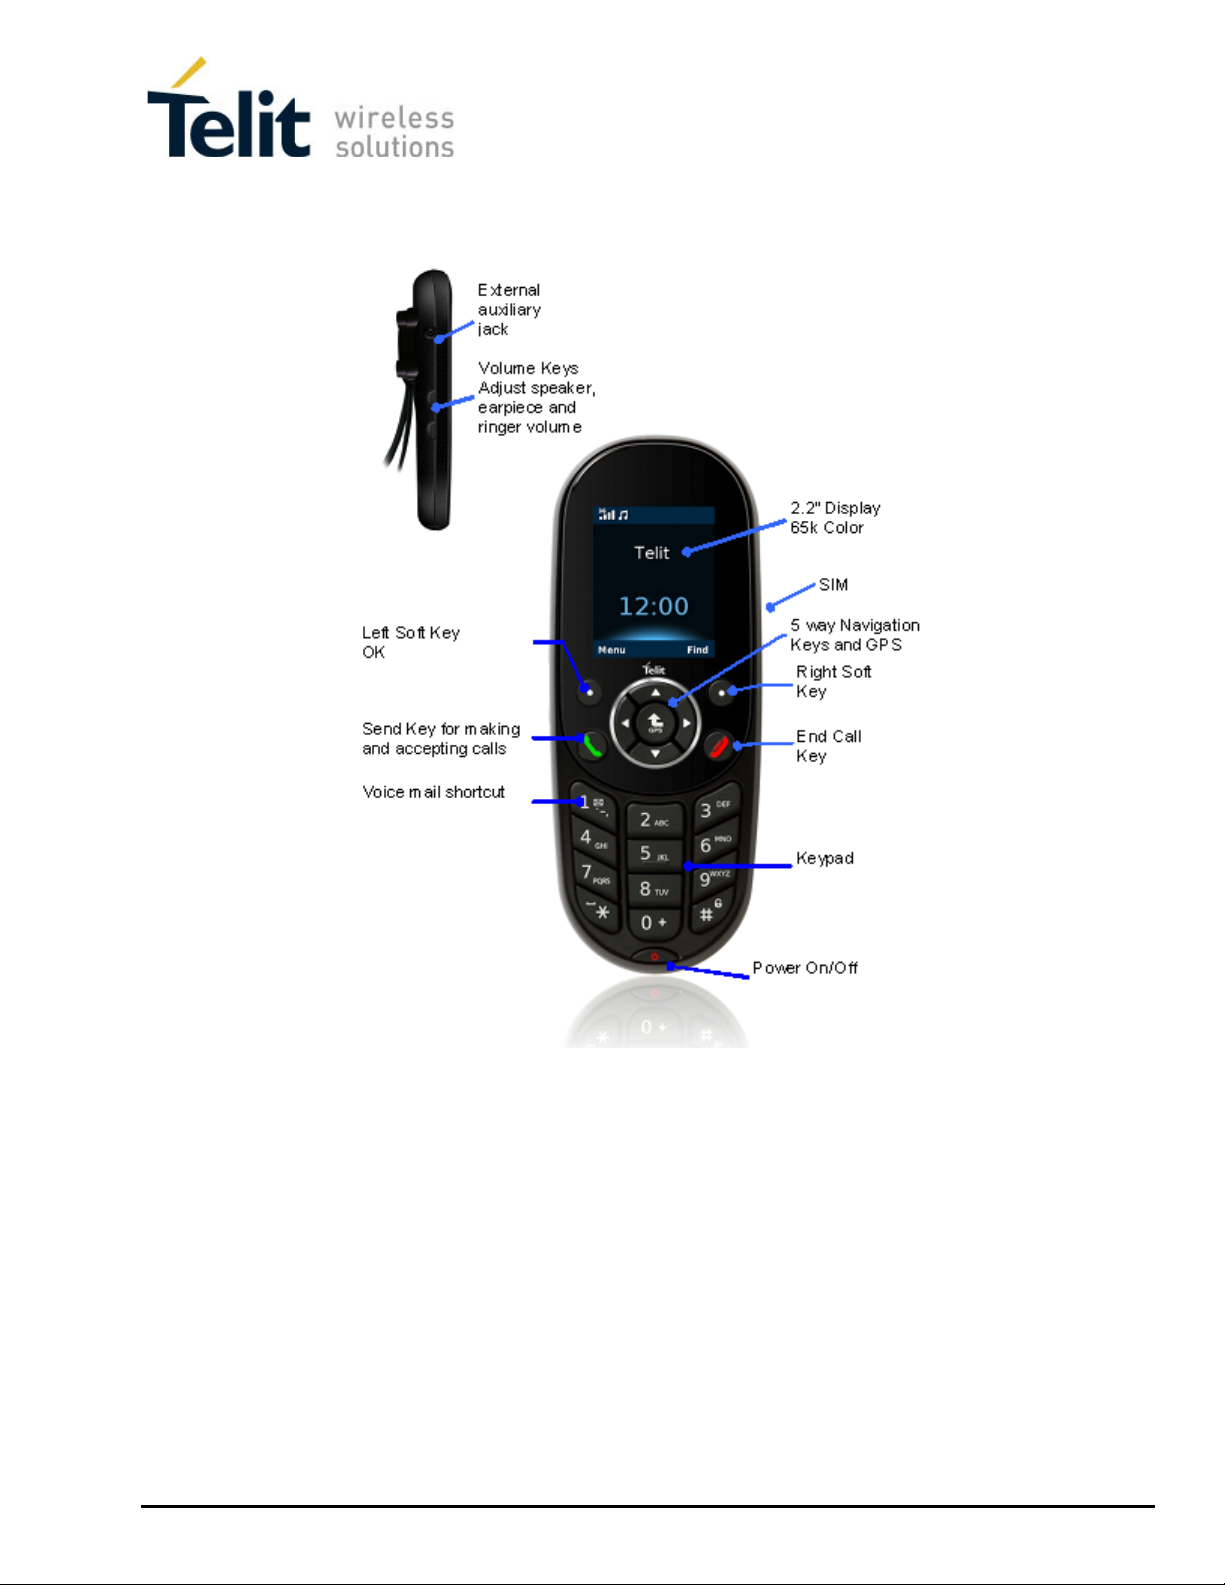
3 Carphone layout
Mounting instructions
Page 7

4 Preplanned Accessory Positioning
Positioning of all accessories must be planned in advance before installation begins.
• Ensure that no wire braids go through locations where Phone accessories are to
be installed.
• Ensure that any parts of the handsfree Phone will not interfere with the vehicle or
its accessories’ opera ti on.
4.1 Plan Phone and Cradle Positions
The best way to determine the Phone’s position to the customer’s full
satisfaction is to locate it when the customer is beside you and obtain
Note!
• Please ensure the Phone’s location does not interfere with the vehicle or its
his/her approval.
accessories operation: it should not interfere with opening the glove compartment
or ashtray, should not prevent access to the lighter, moving the gear stick,
operating the hand break etc.
Do not install the Phone in front of the vehicle’s air bag. This restriction
must be adhered to, as in the case of an emergency the air bag blows up
Warning!
• Ensure the surface on which this Phone is installed is sufficiently strong to carry
the weight and pressure which would be exerted on it.
• When selecting the Phone’s location, please ensure the control cable connected
to it does not interfere with the vehicle or its accessories’ operation.
• Ensure it is safe and convenient to operate the Phone and read the display from
the driver’s seat.
• Ensure the Phone would be protected from direct sunlight and humidity (air
conditioner openings).
• Ensure the Phone would be protected from mechanical damage by the car’s
and can fail to work properly.
accessories.
Mounting instructions
Page 8
Note!
Note!
4.2 Plan the Microphone’s Position
• Install the handsfree Phone’s microphone 30-40 cm away from where the driver
speaks when he/she is in their normal driving position.
• It is recommended to install the microphone inbetween car roof and windscreen
glass and away from external sources of noise.
• Install the microphone in a different direction than the speaker so as to avoid
echo.
4.3 Plan the Speaker’s Position
The speaker and microphone (installed inbetween car roof and windscreen
glass above the driver) must face different directions.
Do not hide the speaker inside the dash board.
If you cover it, sound quality will be lowered.
• Locate the speaker at the right side of the main console, at the front of the
console, in a location where it would not bother the driver or passengers but
would sound best.
Mounting instructions
Page 9
5 Installing the Cradle and Phone
5.1 Where to Position (Reminder)
The best way to determine the Phone’s position to the customer’s full
satisfaction is to locate it when the customer is beside you and obtain
Note!
• Please ensure the Phone’s location does not interfere with the vehicle or its
accessories operation: it should not interfere with opening the glove compartment
or ashtray, should not prevent access to the lighter, moving the gear stick,
operating the hand break etc.
Warning!
• Ensure the surface on which this Phone is installed is sufficiently strong to carry
the weight and pressure which would be exerted on it.
• When selecting the Phone’s location, please ensure the control cable connected
to it does not interfere with the vehicle or its accessories’ operation.
• Ensure it is safe and convenient to operate the Phone and read the display from
his/her agreement.
Do not install the Phone in front of the vehicle’s air bag. This restriction
must be adhered to, as in the case of an emergency the air bag blows up
and can fail to work properly.
the driver’s seat.
Mounting instructions
Page 10

Note!
Note!
• Ensure the Phone would be protected from direct sunlight and humidity (air
conditioner openings).
• Ensure the Phone would be protected from mechanical damage by the car’s
accessories.
5.2 Installing the Cradle and Phone
1. Disassemble the cradle into its two parts.
2. Install one of the cradle parts in the determined location in the car with 4 tin
screws.
If you are not able to locate the cradle properly, please use a adjustable
bracket from the station inventory.
3. Install the second cradle part on the handsfree Phone, using the 4 philips screws
provided with this kit.
Only use the original screws provided with this kit.
4. Connect the two cradle parts.
5. Direct the control cable coming out of the Phone behind the car panel.
Mounting instructions
Page 11
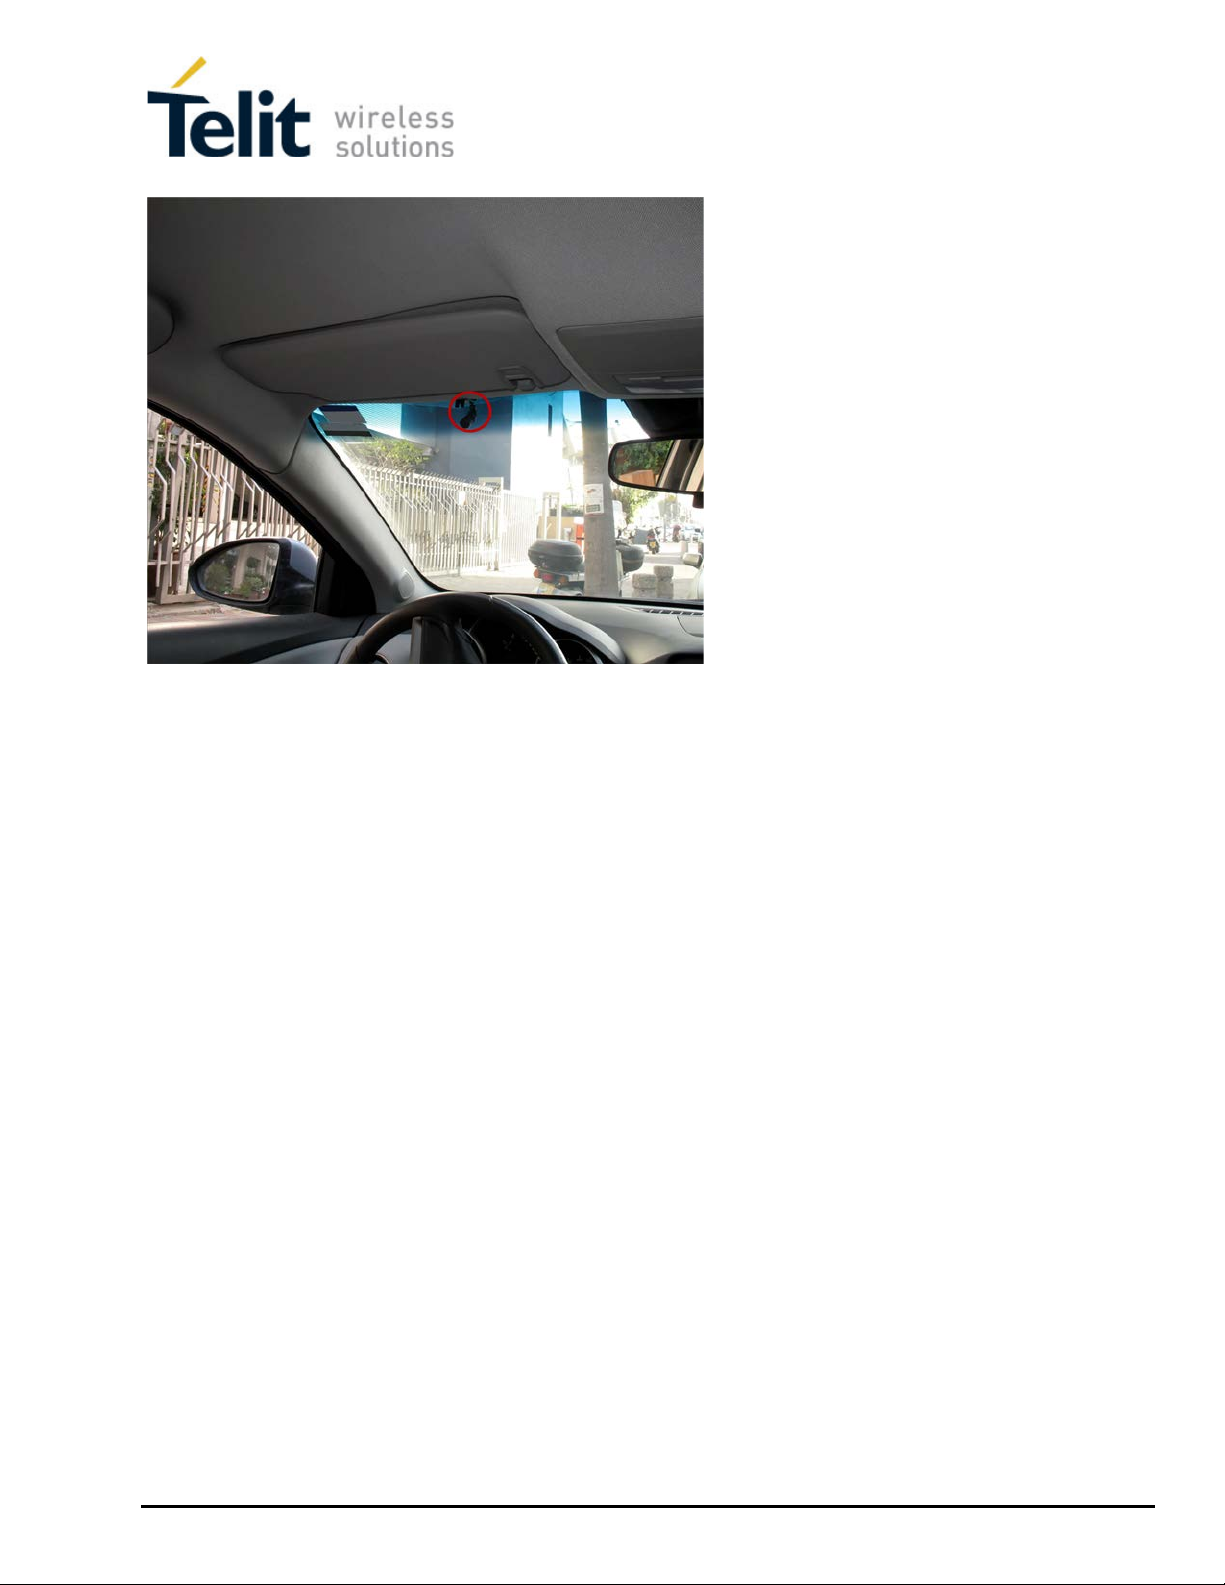
5.3 Installing the Microphone
The microphone is provided with a clip which makes it possible to install it inbetween the car
roof and windscreen glass.
5.3.1 Where to Locate the Microphone (Reminder)
• Install the handsfree P hone’s microphone 30-40 cm away from where the driver
speaks when he/she is in their normal driving position.
• It is recommended to install the microphone inbetween car roof and windscreen
glass and away from external sources of noise.
• Install the microphone in a di ffer ent di r ec ti on th an the s peaker so as to avoid echo,
and ensure there is a distanc e of at l east 1.5 meter s bet ween them.
Mounting instructions
Page 12
5.3.2 Installing the Microphone
1. Using the clip, install the microphone inbetween the car roof and windscreen
glass.
2. Direct the microphone cable along the roof, behind it, so as not to b e see n.
3. Continue directing the microphone cable along the left beam on the driver side.
4. Direct the cable under the dash board to the connection point of the cable with
the control cable connected to the Phone.
Ensure the microphone cable and antenna cable are kept away from each
other.
Note!
5. Connect the microphone cable plug to the correct port on the control cable.
Ensure the microphone cable is not in contact and does not interfere with
the car pedals and steering wheel stick.
Mounting instructions
Page 13
Note!
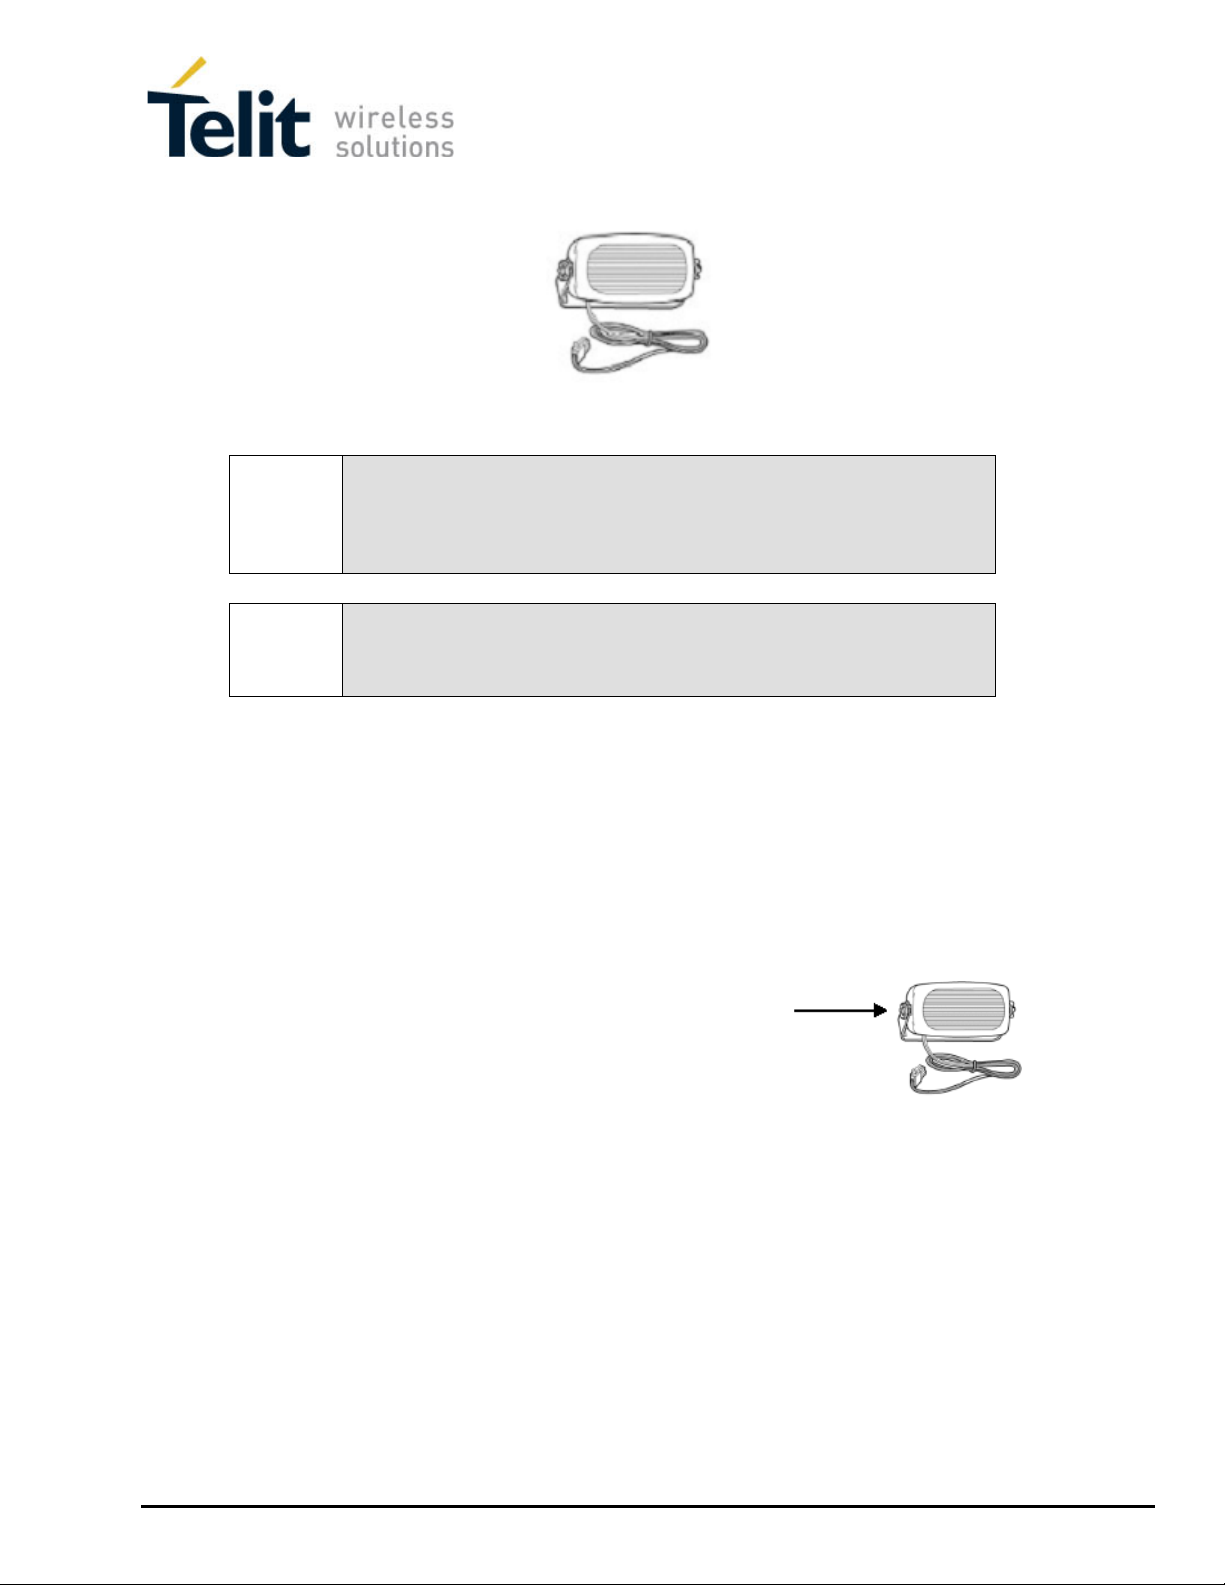
5.4 Installing the Speaker
5.4.1 Where to Locate the Speaker (Reminder)
The speaker and microphone (installed inbetween the car roof and
windscreen glass above the driver) must face different directions.
Note!
If the speaker and microphone face each other, this will cause echo.
Do not hide the speaker inside the dash board.
If you cover it, sound quality will be lowered.
• Locate the speaker at the right side of the main console, at the front of the
console, in a location where it would not bother the driver or passengers but
would sound best.
5.4.2 Installing the Speaker
1. Install the speaker at the right side of the main console, at the front of the
console.
2. Disassemble the screws connecting the speaker
to the hanger.
3. Install the hanger using the 2 tin screws.
4. Direct the speaker cable behind the mat located at the bottom of the car.
5. Ensure the cable does not interfere with the vehicle or its accessories’ operation.
6. Ensure the speaker cable is not exposed to damage by the passengers.
Mounting instructions
Page 14
5.5 Installing the Electrical Connections
The electrical cable is provided separately from the control cable. Before installation begins,
connect the four leads (which include the 2A fuses) using a red or blue crimp sleeve as
appropriate.
Please note sharp edges or moving parts which may damage the wires.
Warning!
The electrical cables should be directed as follows:
Note!
The value for the fuses provided with the kits must not be changed.
The kit is appropriate only for a 12V vehicle.
In case of converting any other kit model into this kit, please change the
power cable.
• So as not to disturb the driver or passengers.
• So as not to pass near the car’s sharp or moving parts.
The external voltage connection is located under the dash board or close
to the fuse box (depending on the car model).
In new vehicles a cellular phone connection can be found near the fuse
box. See the car’s user’s manual under Info.
Only use the kit’s original fuses (250V / 2A).
Mounting instructions
Page 15
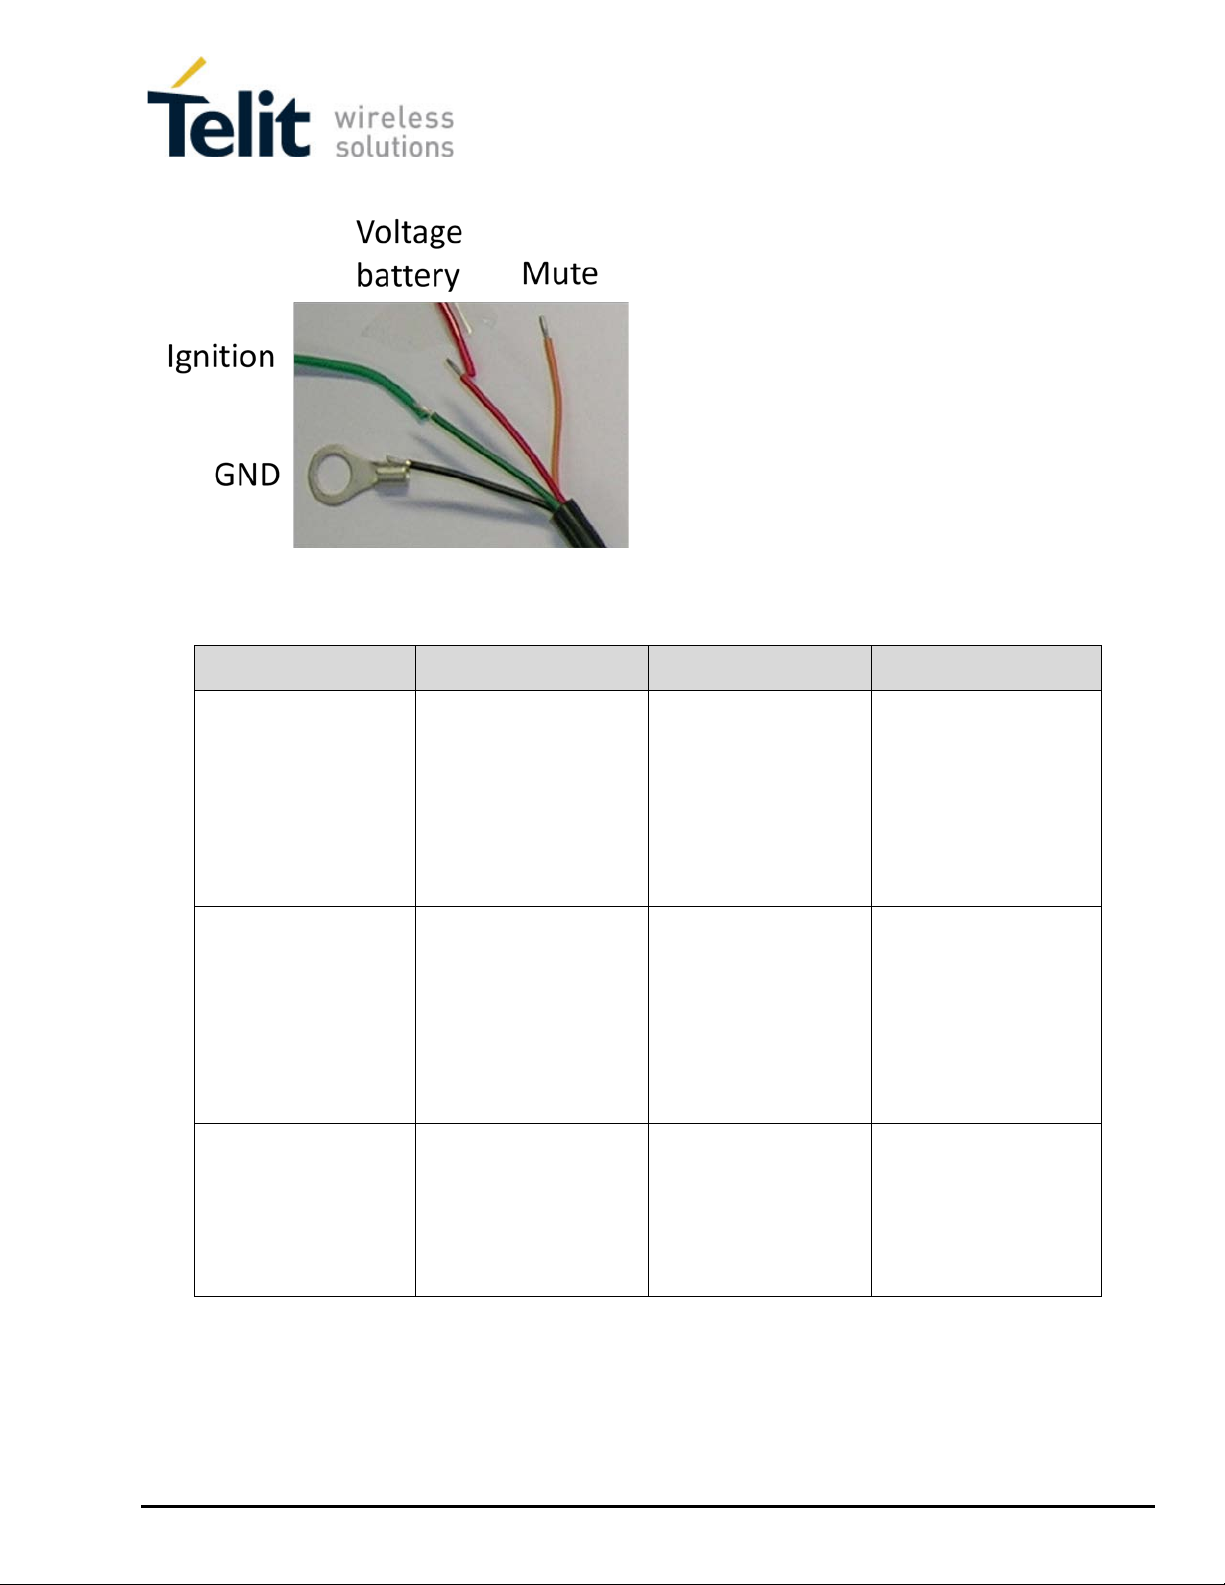
Wire Color
Function
Must be connected to
Ensure
(+)
ignition is switched off.
5.6 Installing the Voltage Cable
The following chart covers the manner by which the voltage cable should be connected to the
car’s electrical system.
Red
Includes fuse case
Black
Green
Includes fuse case
To provide the
handsfree Phone with
fixed voltage
To provide a fixed
minus (-)
To turn on the cellular
phone after switching
the ignition on and
turn it off after car
12V fixed voltage
An additional fuse
case is provided which
must be connected to
a fixed voltage source
Car body (minus) Ensure the connection
12V-24V Ignition
voltage
Ensure a 250V / 2A
fuse is used
point is on the car
body only.
Use a cable shoe, tin
screw and springy disc.
Determine the correct
point with a voltmeter
Ensure a 250V / 2A
fuse is used.
Mounting instructions
Page 16

Some car vendors (such as Renault) feature a radiation filter on the windshield.
Therefore it is necessary to install the antenna on a side or back window.
should be directed behind or beside the airbag.
Note!
5.7 Installing RF Antenna
5.7.1 Where to Locate the Antenna
• The preferred location for the antenna is on the right side of the windshield.
• If other communication system is installed in the car, please locate the antenna as far
as possible from the other phone antenna. Recommended distance is 30cm.
Note!
Note!
5.7.2 Installing the Antenna
1. Thoroughly clean the location intended for installation using
a cloth and detergent. Allow the spot to dry before you
continue.
2. Carefully remove the protective film from the 3M adhesive
3. Locate the antenna on the cleaned location.
4. Carefully press the antenna toward the window. Ensure all
corners of the antenna are attached to the window.Chose
the mounting position on the vehicle windshield according
to bellow drawing.
In vehicles with air bags on the beam where the antenna cable passes, the antenna cable
Please keep min. 20 mm distance from metal surface.
Mounting instructions
Page 17

5.7.3 Possible positions
5.7.4 Installing the Coaxial Cable
1. Direct the antenna’s coaxial cable along the car beam. Ensure the antenna cable does
not get damaged.
2. W hen completing the cables installation and reaching close to the device coaxial cables
SMA female connector attach both connectors together.
3. Roll the remaining cable.
4. Examine the antenna and cables properly installed.
Mounting instructions
Page 18

In vehicles with air bags on the beam where the antenna cable passes, the antenna cable
should be directed behind or beside the airbag.
5.8 Installing GPS Antenna
5.8.1 Where to Locate the Antenna
• The preferred location for the antenna is on the bottom right side of the dashboard
Note!
5.8.2 Installing the Antenna
1. Thoroughly clean the location intended for installation using a cloth and detergent. Allow
the spot to dry before you continue.
2. Carefully remove the protective film from the 3M adhesive
3. Locate the antenna on the cleaned location.
4. Carefully press the antenna toward the dashborad. Ensure all corners of the antenna
are attached to the dashboard.
5.8.3 Possible positions
Mounting instructions
Page 19

5.8.4 Installing the Coaxial Cable
5. Direct the antenna’s coaxial cable along the car beam. Ensure the antenna cable does
not get damaged.
6. W hen completing the cables installation and reaching close to the device coaxial cables
SMA female connector attach both connectors together.
7. Roll the remaining cable.
8. Examine the antenna and cables properly installed.
Mounting instructions
Page 20

5.9 Installing the SIM card
Note!
See SIM card installation position:
Insert the SIM card when the phone is off.
Mounting instructions
Page 21

Symptom
What to Check
What to Do
No reception
Check whether connector is correctly
meter
Replace connector
Check if internal and external antenna base
is correctly attached
Attach antenna base
Check proper working order of antenna
cable
Replace antenna cable
Other party cannot
Check speaker’s proper working order
Replace speaker
A Phone problem may exist
Replace Phone
Check speaker location
Change location
User is not heard
Check microphone and contacts
Tighten microphone connector to the
Phone
Check routing of microphone cable
Change routing of microphone cable
Check microphone’s proper working order
Replace microphone
A Phone problem may exist
Replace Phone
Noise is heard
Ask whether noise always occurs in specific
Explain that reception trouble
between coverage areas
Ask whether noise occurs when window is
Explain that the Phone is an amplifying
speak with a closed window
Check whether microphone and antenna are
installed on the same side
If they are, install microphone as per
the instructions
Check whether eye contact exists between
speaker and microphone
If it does, change location accordingly
Check for improper voltage connection –
per instructions
Change voltage source in accordance
Phone switches on
and off by itself
Check minus (-) connection
Black wire: connect minus to car body
Check voltage contacts
Tighten loose contacts
Phone switches on
Check fuse. Check connection to voltage
Replace fuse. Tighten connection to
fuse is used
Phone does not
switching off car
Check connection to power source (green
Tighten connection to power source
Phone does not
switching off car
Check connection to power source. Check
Replace fuse. Tighten connection to
6 Trouble Shooting
0B
connected to the cable – use an efficiency
1B
be properly heard
2B
3B
by the other party
4B
5B
6B
7B
geographical areas
sometimes occurs in transition
and off by itself
switch off after
switch off after
open
check whether voltages are connected as
source (green cable)
cable)
fuse (red cable)
system that receives all environmental
noise, and therefore it is preferable to
with instructions
voltage source. Ensure a 250V / 2A
power source
Mounting instructions
Page 22

7 Appendix
Finding IMEI code
1. Type code *#06#
2. Find locking code *5625#
Mounting instructions
Page 23

Telit RS
User Guide
989889789789 Rev.2 – YYYY-MM-DD
Page 24

User Guide
989889789789 Rev.2 – YYYY-MM-DD
Reproduction forbidden without written authorization from Telit Communications S.p.A. - All Rights
Reserved. Page 2 of 27
Mod. 0810 2011-07 Rev.2
Page 25

User Guide
989889789789 Rev.2 – YYYY-MM-DD
SPECIFICATIONS SUBJECT TO CHANGE WITHOUT NOTICE
Notice
While reasonable efforts have been made to assure the accuracy of this document, Telit
assumes no liability resulting from any inaccuracies or omissions in this document, or from
use of the information obtained herein. The information in this document has been carefully
checked and is believed to be entirely reliable. However, no responsibility is assumed for
inaccuracies or omissions. Telit reserves the right to make changes to any products described
herein and reserves the right to revise this document and to make changes from time to time
in content hereof with no obligation to notify any person of revisions or changes. Telit does
not assume any liability arising out of the application or use of any product, software, or
circuit described herein; neither does it convey license under its patent rights or the rights of
others.
It is possible that this publication may contain references to, or information about Telit
products (machines and programs), programming, or services that are not announced in your
country. Such references or information must not be construed to mean that Telit intends to
announce such Telit products, programming, or services in your country.
Copyrights
This instruction manual and the Telit products described in this instruction manual may be,
include or describe copyrighted Telit material, such as computer programs stored in
semiconductor memories or other media. Laws in the Italy and other countries preserve for
Telit and its licensors certain exclusive rights for copyrighted material, including the
exclusive right to copy, reproduce in any form, distribute and make derivative works of the
copyrighted material. Accordingly, any copyrighted material of Telit and its licensors
contained herein or in the Telit products described in this instruction manual may not be
copied, reproduced, distributed, merged or modified in any manner without the express
written permission of Telit. Furthermore, the purchase of Telit products shall not be deemed
to grant either directly or by implication, estoppel, or otherwise, any license under the
copyrights, patents or patent applications of Telit, as arises by operation of law in the sale of a
product.
Computer Software Copyrights
The Telit and 3rd Party supplied Software (SW) products described in this instruction manual
may include copyrighted Telit and other 3rd Party supplied computer programs stored in
semiconductor memories or other media. Laws in the Italy and other countries preserve for
Telit and other 3rd Party supplied SW certain exclusive rights for copyrighted computer
programs, including the exclusive right to copy or reproduce in any form the copyrighted
computer program. Accordingly, any copyrighted Telit or other 3rd Party supplied SW
computer programs contained in the Telit products described in this instruction manual may
not be copied (reverse engineered) or reproduced in any manner without the express written
permission of Telit or the 3rd Party SW supplier. Furthermore, the purchase of Telit products
shall not be deemed to grant either directly or by implication, estoppel, or otherwise, any
license under the copyrights, patents or patent applications of Telit or other 3rd Party supplied
SW, except for the normal non-exclusive, royalty free license to use that arises by operation
of law in the sale of a product.
Reproduction forbidden without written authorization from Telit Communications S.p.A. - All Rights
Reserved. Page 3 of 27
Mod. 0810 2011-07 Rev.2
Page 26

User Guide
989889789789 Rev.2 – YYYY-MM-DD
Usage and Disclosure Restrictions
License Agreements
The software described in this document is the property of Telit and its licensors. It is
furnished by express license agreement only and may be used only in accordance with the
terms of such an agreement.
Copyrighted Materials
Software and documentation are copyrighted materials. Making unauthorized copies is
prohibited by law. No part of the software or documentation may be reproduced, transmitted,
transcribed, stored in a retrieval system, or translated into any language or computer language,
in any form or by any means, without prior written permission of Telit
High Risk Materials
Components, units, or third-party products used in the product described herein are NOT
fault-tolerant and are NOT designed, manufactured, or intended for use as on-line control
equipment in the following hazardous environments requiring fail-safe controls: the operation
of Nuclear Facilities, Aircraft Navigation or Aircraft Communication Systems, Air Traffic
Control, Life Support, or Weapons Systems (High Risk Activities"). Telit and its supplier(s)
specifically disclaim any expressed or implied warranty of fitness for such High Risk
Activities.
Trademarks
TELIT and the Stylized T Logo are registered in Trademark Office. All other product or
service names are the property of their respective owners.
Copyright © Telit Communications S.p.A. 2011.
Reproduction forbidden without written authorization from Telit Communications S.p.A. - All Rights
Reserved. Page 4 of 27
Mod. 0810 2011-07 Rev.2
Page 27

User Guide
989889789789 Rev.2 – YYYY-MM-DD
Contents
1. General Info ................................................. 6
1.1. Safety Information ........................................ 6
1.2. Exposure to Radio Frequency Signal ........................ 7
1.3. Antenna Installation Guidelines ........................... 7
1.4. Antenna Configuration ..................................... 8
1.5. FCC Notice to Users ....................................... 8
1.6. Industry Canada Notice to Users .......................... 10
1.7. European Union Directives Conformance Statement .......... 11
1.8. Environmental and Recycling .............................. 13
2. Your Telit RS Car Phone ..................................... 14
2.1. Dedicated Keys Functionality ............................. 14
2.2. Display .................................................. 15
3. Getting Started ............................................. 16
3.1. Install your SIM card .................................... 16
3.2. Power Control ............................................ 17
3.3. Volume Control ........................................... 17
3.4. Menu Access and Navigation ............................... 17
3.5. Make or Answer a Call .................................... 18
3.6. Advanced Call Features ................................... 18
3.7. Call Log ................................................. 22
3.8. Settings ................................................. 24
4. Specific Absorption Rate Data ............................... 26
5. Warranty .................................................... 27
Reproduction forbidden without written authorization from Telit Communications S.p.A. - All Rights
Reserved. Page 5 of 27
Mod. 0810 2011-07 Rev.2
Page 28

Pacemakers
The Health Industry Manufacturers Association recommends that a minimum separation of
6 inches (15 centimeters) be maintained between a wireless phone's antenna and a
pacemaker to avoid potential interference with the pacemaker. These recommendations are
consistent with the independent research by and recommendations of Wireless Technology
Research.
Persons with pacemakers:
Should ALWAYS keep the phone more than 6 inches (15 centimeters) from their
pacemaker when the phone is turned ON.
Should turn the phone OFF immediately if you have any reason to suspect that
interference is taking place.
Other Medical Devices
If you use any other personal medical device, consult the manufacturer of your device to
determine if it is adequately shielded from external RF energy. Your physician may be able
to assist you in obtaining this information. Turn your phone OFF in health care facilities
when any regulations posted in these areas instruct you to do so. Hospitals or health care
facilities may be using equipment that could be sensitive to external RF energy.
Blasting Areas
To avoid interfering with blasting operations, turn your Telit RS car phone OFF when in a
"blasting area" or in areas posted: "Turn off two-way radio." Obey all signs and
instructions.
Potentially Explosive Atmospheres
Turn your phone OFF, and obey all signs and instructions. Sparks from your battery in
such areas could cause an explosion or fire resulting in bodily injury or even death.
Areas with a potentially explosive atmosphere are often but not always clearly marked.
They include: fueling areas such as gasoline stations; below deck on boats; fuel or
chemical transfer or storage facilities; areas where fuel odors are present (for example, if a
gas/propane leak occurs in a car or home); areas where the air contains chemicals or
particles, such as grain, dust, or metal powders; and any other area where you normally
would be advised to turn off your vehicle engine.
Electronic Devices
Most modern electronic equipment is shielded from RF signals. However, certain
equipment may not be shielded against the RF signals from your wireless phone.
Posted Facilities
Turn your phone OFF in any facility where posted notices so require.
Service and Repairs
If you have questions or need assistance, you may refer to the Warranty supplied with the
purchase of this product.
For Vehicles Equipped with an Air Bag
An air bag inflates with great force. Do NOT place objects, including either installed or
portable wireless equipment, in the area over the air bag or in the air bag deployment area. If
1. General Info
1.1. Safety Information
IMPORTANT: Read the following precautions carefully to avoid dangerous situations and to
ensure ideal performance of your Telit RS car phone.
User Guide
989889789789 Rev.2 – YYYY-MM-DD
Reproduction forbidden without written authorization from Telit Communications S.p.A. - All Rights
Reserved. Page 6 of 27
Mod. 0810 2011-07 Rev.2
Page 29

in-vehicle wireless equipment is improperly installed and the air bag inflates, serious injury
could result.
Vehicles
RF signals may affect improperly installed or inadequately shielded electronic systems in
motor vehicles. Check with the manufacturer or its representative regarding your vehicle.
You should also consult the manufacturer of any equipment that has been added to your
vehicle.
Use While Driving
Check the laws and regulations on the use of phones in the area where you drive. Always
obey them. When using your phone while driving, please:
Give full attention to driving and to the road.
Use hands-free operation.
Pull off the road and park before making or answering a call if driving conditions so
require.
Note
The design of your Telit RS car phone complies with these standards when used as described
in this guide.
User Guide
989889789789 Rev.2 – YYYY-MM-DD
1.2. Exposure to Radio Frequency Signal
Our wireless mobile telephone is a low power radio transmitter and receiver. When it is ON, it
receives and also sends out radio frequency (RF) signals.
Your Telit RS car phone complies with the following RF energy exposure standards and
guidelines:
United States Federal Communications Commission, Code of Federal Regulations; 47CFR
part 2 sub-part J
American National Standards Institute (ANSI) / Institute of Electrical and Electronic
Engineers (IEEE) C95. 1-1992
Institute of Electrical and Electronic Engineers (IEEE) C95.1-1999 Edition
International Commission on Non-Ionizing Radiation Protection (ICNIRP) 1998
Ministry of Health (Canada) Safety Code 6. Limits of Human Exposure to Radiofrequency
Electromagnetic Fields in the Frequency Range from 3 kHz to 300 GHz, 1999.
1.3. Antenna Installation Guidelines
To meet the FCC's RF Exposure Guidelines and satisfy the categorical exclusion
requirements for mobile transmitters, the antenna must be installed so there is at least 30 cm
of separation between the antenna and both the occupants of the vehicle and bystanders
outside of the vehicle. Use only the supplied or an approved replacement antenna.
Unauthorized antennas, modifications, or attachments could damage the phone and may
violate local agency regulations
Reproduction forbidden without written authorization from Telit Communications S.p.A. - All Rights
Reserved. Page 7 of 27
Mod. 0810 2011-07 Rev.2
Page 30

1.4. Antenna Configuration
Do not operate your mobile telephone when a person is within 12 inches (30 centimeters) of
the vehicle antenna. A person or object within 12 inches (30 centimeters) of the antenna could
impair call quality and may cause the phone to operate at a higher power level than necessary
and expose that person to RF energy in excess of that established by the FCC RF Exposure
Guidelines.
1.5. FCC Notice to Users
User Guide
989889789789 Rev.2 – YYYY-MM-DD
The following statement applies to all products that have received FCC approval. Applicable
products bear the FCC logo, and/or and FCC ID in the format FCC-ID:xxxxxx on the product
label. Telit has not approved any changes or modifications to this device by the user. Any
changes or modifications could void the user’s authority to operate the equipment. See 47
CFR Sec. 15.21.
This device complies with part 15 of the FCC Rules. Operation is subject to the following two
conditions: (1) This device may not cause harmful interference, and (2) this device must
accept any interference received, including interference that may cause undesired operation.
See 47 CFR Sec. 15.19(3).
This equipment has been tested and found to comply with the limits for a Class B digital
device, pursuant to part 15 of the FCC Rules. These limits are designed to provide reasonable
protection against harmful interference in a residential installation. This equipment generates
uses and can radiate radio frequency energy and, if not installed and used in accordance with
the instructions, may cause harmful interference to radio communications. However, there is
no guarantee that interference will not occur in a particular installation. If this equipment does
cause harmful interference to radio or television reception, which can be determined by
turning the equipment off and on, the user is encouraged to try to correct the interference by
one or more of the following measures:
Reorient or relocate the receiving antenna.
Increase the separation between the equipment and the receiver.
Connect the equipment to an outlet on a circuit different from that to which the receiver is
connected.
Consult the dealer or an experienced radio/TV technician for help.
1.5.1. Modification statement
Telit Communications S.p.A. has not approved any changes or modifications to this device by
the user. Any changes or modifications could void the user’s authority to operate the
equipment.
Reproduction forbidden without written authorization from Telit Communications S.p.A. - All Rights
Reserved. Page 8 of 27
Mod. 0810 2011-07 Rev.2
Page 31

1.5.2. Interference statement
This device complies with Part 15 of the FCC Rules and Industry Canada licence-exempt
RSS standard(s). Operation is subject to the following two conditions: (1) this device may not
cause interference, and (2) this device must accept any interference, including interference
that may cause undesired operation of the device.
1.5.3. Wireless notice:
This product emits radio frequency energy, but the radiated output power of this device is far
below the FCC and IC frequency exposure limits. This equipment complies with FCC and IC
RF radiation exposure limits forth for an uncontrolled environment. Nevertheless, the device
should be used in such a manner that the potential for human contact with the antenna during
normal operation is minimized.
RS 850/1900
This product integrates the HE863-NAR 2G/3G module (FCC ID: RI7HE863NA, IC: 5131AHE863NA). The HE863-NAR module is granted with a modular approval for mobile
applications. Integration has been done meeting the following conditions:
1. At least 20cm separation distance between the antenna and any person body is
maintained at all times.
2. To comply with FCC/IC regulations limiting both maximum RF output power and
human exposure to RF radiation, the maximum antenna gain including cable loss in a
mobile only exposure condition does not exceed 4.2 dBi.
3. The HE863-NAR antenna is not co-located with any other antennas.
User Guide
989889789789 Rev.2 – YYYY-MM-DD
Reproduction forbidden without written authorization from Telit Communications S.p.A. - All Rights
Reserved. Page 9 of 27
Mod. 0810 2011-07 Rev.2
Page 32

User Guide
989889789789 Rev.2 – YYYY-MM-DD
RS 900/2100
This product integrates the HE863-EUR 2G/3G module (FCC ID: RI7HE863EU). The
HE863-EUR module is granted with a modular approval for mobile applications. Integration
has been done meeting the following conditions:
4. At least 20cm separation distance between the antenna and any person body is
maintained at all times.
5. To comply with FCC regulations limiting both maximum RF output power and
human exposure to RF radiation, the maximum antenna gain including cable loss in a
mobile only exposure condition does not exceed 4.2 dBi.
6. The HE863-NAR antenna is not co-located with any other antennas.
1.6. Industry Canada Notice to Users
Operation is subject to the following two conditions: (1) This device may not cause
interference and (2) This device must accept any interference, including interference that may
cause undesired operation of the device. See RSS-GEN 7.1.5.
Reproduction forbidden without written authorization from Telit Communications S.p.A. - All Rights
Reserved. Page 10 of 27
Mod. 0810 2011-07 Rev.2
Page 33

Bulgarian
С настоящето TELIT COMMUNICATIONS S.P.A. декларира, че car kit cellular/gps/bluetooth
отговаря на съществените изисквания и другите приложими изисквания на Директива 1999/5/ЕС.
Czech
TELIT COMMUNICATIONS S.P.A. tímto prohlašuje, že tento car kit cellular/gps/bluetooth je ve
shodě se základními požadavky a dalšími příslušnými ustanoveními směrnice 1999/5/ES.
Danish
Undertegnede TELIT COMMUNICATIONS S.P.A. erklærer herved, at følgende udstyr car kit
cellular/gps/bluetooth overholder de væsentlige krav og øvrige relevante krav i direktiv 1999/5/EF.
Dutch
Hierbij verklaart TELIT COMMUNICATIONS S.P.A. dat het toestel car kit cellular/gps/bluetooth in
overeenstemming is met de essentiële eisen en de andere relevante bepalingen van richtlijn 1999/5/EG.
English
Hereby, TELIT COMMUNICATIONS S.P.A., declares that this car kit cellular/gps/bluetooth is in
compliance with the essential requirements and other relevant provisions of Directive 1999/5/EC.
Estonian
Käesolevaga kinnitab TELIT COMMUNICATIONS S.P.A. seadme car kit cellular/gps/bluetooth
vastavust direktiivi 1999/5/EÜ põhinõuetele ja nimetatud direktiivist tulenevatele teistele asjakohastele
sätetele.
German
Hiermit erklärt TELIT COMMUNICATIONS S.P.A., dass sich das Gerät car kit cellular/gps/bluetooth
in Übereinstimmung mit den grundlegenden Anforderungen und den übrigen einschlägigen
Bestimmungen der Richtlinie 1999/5/EG befindet.
Greek
ΜΕ ΤΗΝ ΠΑΡΟΥΣΑ TELIT COMMUNICATIONS S.P.A. ΔΗΛΩΝΕΙ ΟΤΙ car kit
cellular/gps/bluetooth ΣΥΜΜΟΡΦΩΝΕΤΑΙ ΠΡΟΣ ΤΙΣ ΟΥΣΙΩΔΕΙΣ ΑΠΑΙΤΗΣΕΙΣ ΚΑΙ ΤΙΣ ΛΟΙΠΕΣ
ΣΧΕΤΙΚΕΣ ΔΙΑΤΑΞΕΙΣ ΤΗΣ ΟΔΗΓΙΑΣ 1999/5/ΕΚ.
Hungarian
Alulírott, TELIT COMMUNICATIONS S.P.A. nyilatkozom, hogy a car kit cellular/gps/bluetooth
megfelel a vonatkozó alapvetõ követelményeknek és az 1999/5/EC irányelv egyéb elõírásainak.
Finnish
TELIT COMMUNICATIONS S.P.A. vakuuttaa täten että car kit cellular/gps/bluetooth tyyppinen laite
on direktiivin 1999/5/EY oleellisten vaatimusten ja sitä koskevien direktiivin muiden ehtojen mukainen.
French
Par la présente TELIT COMMUNICATIONS S.P.A. déclare que l'appareil car kit cellular/gps/bluetooth
est conforme aux exigences essentielles et aux autres dispositions pertinentes de la directive 1999/5/CE.
Icelandic
Hér með lýsir TELIT COMMUNICATIONS S.P.A. yfir því að car kit cellular/gps/bluetooth er í
samræmi við grunnkröfur og aðrar kröfur, sem gerðar eru í tilskipun 1999/5/EC
Italian
Con la presente TELIT COMMUNICATIONS S.P.A. dichiara che questo car kit cellular/gps/bluetooth
è conforme ai requisiti essenziali ed alle altre disposizioni pertinenti stabilite dalla direttiva 1999/5/CE.
Latvian
Ar šo TELIT COMMUNICATIONS S.P.A. deklarē, ka car kit cellular/gps/bluetooth atbilst Direktīvas
1999/5/EK būtiskajām prasībām un citiem ar to saistītajiem noteikumiem.
Lithuanian
Šiuo TELIT COMMUNICATIONS S.P.A. deklaruoja, kad šis car kit cellular/gps/bluetooth atitinka
esminius reikalavimus ir kitas 1999/5/EB Direktyvos nuostatas.
Maltese
Hawnhekk, TELIT COMMUNICATIONS S.P.A., jiddikjara li dan car kit cellular/gps/bluetooth
jikkonforma mal-ħtiġijiet essenzjali u ma provvedimenti oħrajn relevanti li hemm fid-Dirrettiva
1999/5/EC.
Norwegian
TELIT COMMUNICATIONS S.P.A. erklærer herved at utstyret car kit cellular/gps/bluetooth er i
samsvar med de grunnleggende krav og øvrige relevante krav i direktiv 1999/5/EF.
User Guide
989889789789 Rev.2 – YYYY-MM-DD
1.7. European Union Directives Conformance
Statement
1999/5/EC Directive
The RS 900/2100 and RS 850/2100 car kit cellular/gps/bluetooth have been evaluated against
the essential requirements of the 1999/5/EC Directive.
Reproduction forbidden without written authorization from Telit Communications S.p.A. - All Rights
Reserved. Page 11 of 27
Mod. 0810 2011-07 Rev.2
Page 34

Polish
Niniejszym TELIT COMMUNICATIONS S.P.A. oświadcza, że car kit cellular/gps/bluetooth jest
zgodny z zasadniczymi wymogami oraz pozostałymi stosownymi postanowieniami Dyrektywy
1999/5/EC
Portuguese
TELIT COMMUNICATIONS S.P.A. declara que este car kit cellular/gps/bluetooth está conforme com
os requisitos essenciais e outras disposições da Directiva 1999/5/CE.
Slovak
TELIT COMMUNICATIONS S.P.A. týmto vyhlasuje, že car kit cellular/gps/bluetooth spĺňa základné
požiadavky a všetky príslušné ustanovenia Smernice 1999/5/ES.
Slovenian
TELIT COMMUNICATIONS S.P.A. izjavlja, da je ta car kit cellular/gps/bluetooth v skladu z
bistvenimi zahtevami in ostalimi relevantnimi določili direktive 1999/5/ES.
Spanish
Por medio de la presente TELIT COMMUNICATIONS S.P.A. declara que el car kit
cellular/gps/bluetooth cumple con los requisitos esenciales y cualesquiera otras disposiciones aplicables
o exigibles de la Directiva 1999/5/CE.
Swedish
Härmed intygar TELIT COMMUNICATIONS S.P.A. att denna car kit cellular/gps/bluetooth står I
överensstämmelse med de väsentliga egenskapskrav och övriga relevanta bestämmelser som framgår av
direktiv 1999/5/EG.
RF spectrum use
(R&TTE art. 3.2)
EN 300 328 V1.7.1
EN 300 440-2 V1.4.1
EN 301 511 V9.0.2
EN 301 908-1 V4.2.1
EN 301 908-1 V4.2.1
EMC (R&TTE art.
3.1b)
EN 301 489-1 V1.8.1
EN 301 489-3 V1.4.1
EN 301 489-7 V1.3.1
EN 301 489-17 V2.1.1
EN 301 489-24 V1.5.1
Health & Safety
(R&TTE art. 3.1a)
EN 60950-1:2006 + A11:2009 +
A1:2010 + A12:2011
EN 62311:2008
User Guide
989889789789 Rev.2 – YYYY-MM-DD
In order to satisfy the essential requirements of 1999/5/EC Directive, ZE61-2.4 module is
compliant with the following standards:
Reproduction forbidden without written authorization from Telit Communications S.p.A. - All Rights
Reserved. Page 12 of 27
Mod. 0810 2011-07 Rev.2
Page 35

This symbol on a Telit product means the product should not be
disposed of with household waste. This requirement applies to the
European Union and other locations where separate collection systems
are available. Do not dispose of these products as unsorted municipal
waste. By returning the products to collection you help prevent
uncontrolled waste disposal and promote the reuse of material
resources.
For more information about returning your obsolete product, please contact your local
waste authorities or local distributor.
1909
User Guide
989889789789 Rev.2 – YYYY-MM-DD
The conformity assessment procedure referred to in Article 10 and detailed in Annex IV of
Directive 1999/5/EC has been followed with the involvement of the following Notified Body
Notified Body:
AT4 wireless, S.A.
Parque Tecnologico de Andalucía
C/ Severo Ochoa 2
29590 Campanillas – Málaga
SPAIN
Notified Body No: 1909
The Technical Construction File (TCF) relevant to the product described above is held at:
Telit Communications S.p.A
Via Stazione di Prosecco, 5/b
34010 Sgonico (TRIESTE)
Italy
This equipment can be operated in the EU without restrictions.
Thus, the following marking is included in the product:
The full declaration of conformity can be found on the following address:
http://www.telit.com/XXXXX
The use of an antenna different to the one supplied and evaluated may affect the compliance;
if the antenna is changed the product with the new antenna must be assessed to demonstrate
compliance with the essential requirements of the 1999/5/EC Directive. It should be noted
that the assessment does not necessarily lead to testing.
1.8. Environmental and Recycling
Reproduction forbidden without written authorization from Telit Communications S.p.A. - All Rights
Reserved. Page 13 of 27
Mod. 0810 2011-07 Rev.2
Page 36

Key
Description
Dial key
Make or answer a call.
In Idle mode, display the Calls Log.
End key
In the Call, end a call.
In Menu mode, cancel input and return to Idle mode.
4-way navigation key
In Menu mode, scroll through menu options.
-L
Left Soft Key
In Idle mode, enter the main menu.
In the call receiving, mute the ringtone.
-R
Right Soft Key
In Idle mode, enter the phonebook menu.
In the call receiving, enter the call options menu.
In the Main Menu, goes back to the previous menu.
In the Entering mode, delete a character or a number.
Pound Key
Long pressing on the pound key will lock the phone keypad.
In order to unlock press on
-L
and enter a code. Default is “0000”
Hush Key
In Entering Mode, add a space.
Volume key
In ldle mode, adjust the ringtone tone volume.
In the call, adjust the speaker volume.
Power key
Turn the phone on and off (press and hold).
In Menu mode, behave as OK.
989889789789 Rev.2 – YYYY-MM-DD
2. Your Telit RS Car Phone
2.1. Dedicated Keys Functionality
User Guide
Reproduction forbidden without written authorization from Telit Communications S.p.A. - All Rights
Reserved. Page 14 of 27
Mod. 0810 2011-07 Rev.2
Page 37

Icon
Description
Signal strength
Voice call in progress
Out of your service area
Normal profile activated
Silent profile activated
Keypad lock activated
Voice mail received
Internet connected
3G network
User Guide
989889789789 Rev.2 – YYYY-MM-DD
2.2. Display
The following icons may appear on the top line of the screen to indicate your phone’s status. Depending on
your country or service provider, the icons shown on the display may vary.
Reproduction forbidden without written authorization from Telit Communications S.p.A. - All Rights
Reserved. Page 15 of 27
Mod. 0810 2011-07 Rev.2
Page 38

3. Getting Started
3.1. Install your SIM card
With your phone powered off, insert the SIM card into the SIM card socket at the right side of
the phone.
User Guide
989889789789 Rev.2 – YYYY-MM-DD
Reproduction forbidden without written authorization from Telit Communications S.p.A. - All Rights
Reserved. Page 16 of 27
Mod. 0810 2011-07 Rev.2
Page 39

Note
When you access a menu requiring the PIN2, you must enter the PIN2 supplied with the SIM
or USIM card. For details, contact your service provider.
3.2. Power Control
When installed properly, the phone powers on and off automatically using the car's ignition
switch. For manual operation press and hold the power key ( ) until the display panel
lights on/off. Enter your PIN and press (if necessary).
3.3. Volume Control
When call is inactive, press the volume keys located on the side of the phone to set the Ring
Tone Volume.
3.3.1. Call Volume
During a call, press either of the volume keys on the side of the phone to adjust the call
volume.
3.3.2. Muting Microphone
User Guide
989889789789 Rev.2 – YYYY-MM-DD
During a call, press
key again.
-R
to mute the microphone. To Unmute the microphone, press this
3.3.3. Key Volume
Press the
adjust the volume with the up or down keys.
-L
Settings Sounds Volume Key Tone, and
3.4. Menu Access and Navigation
Use the 4-way navigation key to navigate the menu system and change feature settings.
You can navigate graphic menus in any direction – right, left, down and up. The primary
movements within list menus are down and up. To change settings in list menus, navigate the
datebook or edit text, you can also move left and right.
To access your phone’s menus:
1. In Idle mode, press
2. Use the key to scroll to a menu or option.
3. Press
4. Press
-L
or key to confirm the highlighted option.
-R
to move up one level; Press to return to Idle mode.
-L
to access Menu mode.
Reproduction forbidden without written authorization from Telit Communications S.p.A. - All Rights
Reserved. Page 17 of 27
Mod. 0810 2011-07 Rev.2
Page 40

3.5. Make or Answer a Call
3.5.1. Make a call
1. In Idle mode, enter an area code and a phone number.
2. Press to dial the number.
3. To end the call, press .
3.5.2. Answer a call
1. To accept incoming call press .
2. To end the call, press .
3.5.3. Call a recently dialed number
User Guide
989889789789 Rev.2 – YYYY-MM-DD
1. In Idle mode, press .
2. Scroll up or down to a number or name.
3. Press Options key to view call details or to dial the number.
3.6. Advanced Call Features
3.6.1. Make a conference call
1. During a call, call the second participant. The first call is put on Hold.
2. Press <Options> and select Conference.
3. Repeat step 1 and 2 to add more participants.
4. To end the call, press .
3.6.2. Speed Dial
Your Telit RS car phone support up to 99 speed dial entries. Each entry can contain one
phone number where first entry is reserved for Voice Mail number.
To dial speed dial number
1. Enter speed dial number, then press .
2. For 2-9 entries, press and hold the number.
3. For 10-99 entries, dial the entry and press .
4. To end the call, press .
To add a speed dial entry
1. Press
2. Choose your speed dial entry from 2-99
3. Use key to choose the number for assignment
4. Press
Reproduction forbidden without written authorization from Telit Communications S.p.A. - All Rights
Reserved. Page 18 of 27
-L
-L
, or key to confirm your choice.
Mod. 0810 2011-07 Rev.2
Page 41

Note
Deleting speed dial will not effect phonebook contact. while deleting a contact from the phonebook
list will erase an assigned speed dial.
Note
Updating or editing the fixed dial list FDN status changing or update requires SIM PIN2, you must
enter PIN2 supplied with the SIM or USIM card. For details, contact your service provider.
User Guide
989889789789 Rev.2 – YYYY-MM-DD
To delete a speed dial entry
1. Press
-L
2. Choose your speed dial entry from 2-99
3. To delete press
-L
3.6.3. Fixed Dialing
You can restrict your outgoing calls to selected phone numbers, if this function is supported
by your SIM card. To save and edit the numbers, you need the SIM PIN2 code. When you
turn on fixed dialing, you can orginate calls only to the numbers stored in the fixed dial list.
Turn fixed dialing on or off
1. Press
2. Enter your PIN2
3. Scroll with between Enable/Disable.
4. Press
Once FDN is enabled you will be able to use and view only FDN list of numbers.
Use the fixed dial list
-L
-L
to confirm.
1. Press
-L
2. Enter your FDN contacts
3. Enter your PIN2
4. Press
-L
to confirm.
3.6.4. Hold or Mute a Call
While in call press to put all active calls on hold.
While in call press
-R
to mute all active calls.
3.6.5. Call Waiting
During a call, an alert will be heard indicating for second call.
Press to answer the new call.
To switch between calls, press .
To connect the 2 calls, use conference option.
Reproduction forbidden without written authorization from Telit Communications S.p.A. - All Rights
Reserved. Page 19 of 27
Mod. 0810 2011-07 Rev.2
Page 42

Note
Emergency numbers vary by country. Your phone’s pre-programmed emergency number(s) may
not work in all locations, and sometimes an emergency call cannot be placed due to network,
environmental, or interference issues.
3.6.6. Emergency Calls
Your service provider programs one or more emergency phone numbers, such as 911 or 112,
so that you can call under any circumstances, even when your phone is locked or the SIM
card is not inserted.
1. Press the keypad keys to dial the emergency number.
2. Press to call the emergency number.
3.6.7. International Calls
If your phone service includes international call dialing, press and hold “0” to insert your
local international access code (indicated by +). Then, press the keypad keys to dial the
country code and phone number.
User Guide
989889789789 Rev.2 – YYYY-MM-DD
Phonebook
Telit RS phonebook support up to 1,000 contacts (up to 3 numbers per each contact). When
you select a name from your phone book, the first number would be the contact mobile phone
number. The phonebook contact list could be stored in your phone memory, or to your SIM or
both. You can also copy entries from a SIM card to your car phone and from the car phone to
the SIM card.
3.6.8. Storing a New Number
1. Enter the phone number and press
or add it to existing contact.
2. Scroll to select the type: Mobile, Home, Work.
3. Enter your contact name. You can switch the language or change to numeric under
Additional number can be added (Home, Work)
4. Upon completion, press under
5. Depends on your memory selection the contact will be stored either in phone or SIM card or
both.
-L
. You can choose to save it as new entry
-L
.
-L
.
Reproduction forbidden without written authorization from Telit Communications S.p.A. - All Rights
Reserved. Page 20 of 27
Mod. 0810 2011-07 Rev.2
Page 43

989889789789 Rev.2 – YYYY-MM-DD
3.6.9. Searching for names and numbers
1. You can access the list of names and phone numbers quickly from the Idle mode by
pressing
-R
.
2. Press the first letter of the desired name.
3. You can now view all the names stored in your contacts list which start with the selected
letter. They are listed in alphabetical order.
4. Scroll with to the desired name in the list.
5. To make a call to this person, press .
6. To end the call, press .
7. To return to Idle mode, press .
3.6.10. Phonebook Sync
User Guide
Updates your phonebook with your Google's contacts list. You can update up to 1,000 entries.
While updating, the phone won't be available for use.
3.6.11. Memory Status
You can view your memory status by pressing
3.6.12. Phonebook storage
You can store either to your SIM, phone memory or both, by pressing
-L
-L
-L
Reproduction forbidden without written authorization from Telit Communications S.p.A. - All Rights
Reserved. Page 21 of 27
Mod. 0810 2011-07 Rev.2
Page 44

3.6.13. Copy from SIM to phone
You can copy your contacts from SIM to phone by pressing
-L
3.7. Call Log
Telit RS displays the phone numbers of missed, received, and dialed calls and the time and
date of your calls.
The phone displays missed and received calls only if the network supports these functions and
if the phone is switched on and within the network’s service area.
In these lists you can view up to 30 of the last calls made to your phone or received or up to
30 numbers you have last dialed. They are provided for your reference. The recently dialed
item is shown at the top of the list.
Dialed Calls are using icon
Received Calls are using icon
Missed Calls are using icon
User Guide
989889789789 Rev.2 – YYYY-MM-DD
3.7.1. Missed calls
To view a list of up to 30 of the latest missed calls, with the display in idle mode:
1. Press
-L
2. Scroll with through the list.
3. To make a call to entry, press .
4. To save the entry to car phone memory, press
page 16.
5. To return to Idle mode, press .
3.7.2. Received calls
To view a list of up to 30 registered numbers of your latest received calls, while the display is
in Idle mode:
1. Press
2. Scroll with through the list.
3. To make a call to entry number, press .
4. To save the entry number to car phone memory, press
-L
-L
and follow the instruction on
-L
and follow the instruction on page 16.
5. To return to Idle mode, press .
Reproduction forbidden without written authorization from Telit Communications S.p.A. - All Rights
Reserved. Page 22 of 27
Mod. 0810 2011-07 Rev.2
Page 45

3.7.3. Dialed numbers
You can use a shortcut to view the list of up to 30 from the last dialed numbers while the
display in Idle mode:
User Guide
989889789789 Rev.2 – YYYY-MM-DD
1. Press
-L
2. Scroll with through the list.
3. To make a call to entry number, press .
4. To save the entry number to car phone memory, press
-L
and follow the instruction on page 16.
5. To return to Idle mode, press .
3.7.4. Call Duration Timers
The call duration timer showing the elapsed time. This time includes busy signals and ringing.
The period of time may not be equal to the amount of time which being use by your service
provider for billing. For billing information, contact your service provider.
3.7.4.1. Dialed Calls
1. Press
2. For Timers’ reset, press
3.7.4.2. Last Dialed Call
-L
-L
.
1. Press
2. For reset, press
-L
-L
3.7.4.3. All Calls
1. Press
2. For reset, press
-L
-L
.
.
Reproduction forbidden without written authorization from Telit Communications S.p.A. - All Rights
Reserved. Page 23 of 27
Mod. 0810 2011-07 Rev.2
Page 46

Sounds
Sound for Ringtone
Select a sound from your sounds list to use as a ringtone:
Press
-L
and select the desired sound.
Scroll with through the list.
Press
-L
to select the chosen sound.
Volume
Press
-L
Choose volume for Ringer / Voice / Key Tone.
Press
-L
to confirm.
Sound for Keypad
Press
-L
and select Off or Beep.
Press left soft key
-L
to confirm.
Alerts
Press
-L
and select Off/On to Connect Call or to
Disconnect Call.
Display
Banner Text
To change the displayed text banner in Idle mode, to your preferences.
Press
-L
Press and scroll with between ON/OFF.
To choose the color of the banner press
Scroll with through the list.
To edit the banner text, press .
Edit your banner text.
Press left soft key
-L
to confirm.
Display Contrast
To adjust the contrast of your car phone’s display:
Press
-L
Scroll with through the list.
Press
-L
to confirm.
Keypad light intensity
To adjust the keypad light timeout:
Press
-L
Scroll with through the list.
Press
-L
to confirm.
3.8. Settings
User Guide
989889789789 Rev.2 – YYYY-MM-DD
Reproduction forbidden without written authorization from Telit Communications S.p.A. - All Rights
Reserved. Page 24 of 27
Mod. 0810 2011-07 Rev.2
Page 47

Security
Codes & Passwords
Your phone’s 4-digit unlock code is originally set to 0000. If your service provider
did not change these codes, you should change them:
Press
-L
Enter the old code.
Press
-L
to confirm. Enter a new code.
Press
-L
to confirm. Repeat the code for confirmation.
Press
-L
to confirm.
Phone Lock
To lock your phone in different states:
Press
-L
Scroll with between “Lock now”, “Lock on Power On”, “Off”
Press
-L
to confirm.
During Incoming call when your car phone is locked, there is no need to enter the
unlock code to answer the call.
Delete all
To delete all the data in your phonebook or call log:
Press
-L
Scroll with between “Phone Book”, “Call History”
Press
-L
to choose
Press
-L
to confirm
PIN Code
To enable or disable PIN code:
Press
-L
.
Scroll with between Enable or Disable
Press
-L
to confirm.
Note
You can also change your SIM PIN or PIN2 codes. If you forget your security code, SIM PIN
code, or PIN2 code, contact your service provider.
General
Phonebook Sync
In order to set synchronize with Google contacts list:
Press
-L
Enter APN, Google User and Google Password. Press
-L
to confirm.
Set Time
In order to set time:
Press
-L
Enter digits. Press
-L
to confirm.
Set Date
In order to set time:
Press
-L
Enter digits. Press
-L
to confirm.
User Guide
989889789789 Rev.2 – YYYY-MM-DD
Reproduction forbidden without written authorization from Telit Communications S.p.A. - All Rights
Reserved. Page 25 of 27
Mod. 0810 2011-07 Rev.2
Page 48

989889789789 Rev.2 – YYYY-MM-DD
4. Specific Absorption Rate Data
The antenna should be installed at least 30 cm away from all vehicle occupants.
The World Health Organization has stated that present scientific information does not indicate
the need for any special precautions for the use of mobile devices. They note that if you want
to reduce your exposure then you can do so by limiting the length of calls or using a “handsfree” device to keep the mobile phone away from the head and body.
Additional Information can be found on the websites of the World Health Organization
(http://www.who.int/emf).
User Guide
Reproduction forbidden without written authorization from Telit Communications S.p.A. - All Rights
Reserved. Page 26 of 27
Mod. 0810 2011-07 Rev.2
Page 49

5. Warranty
Without prejudice of legal warranty, The Telit RS is warranted during 1 year from the date of
purchase for defects in materials and workmanship, provided that no deterioration to the
product has been made, and upon presentation of proof of purchase (date of purchase, location
of sale and product serial number/IMEI number) to the retailer.
Warranty does not cover: upgrading of the software, data recovery, deterioration of the
external aspect due to normal use of the product, any damage caused by accident, misuse,
misapplication, or non-approved products. The authorised distributor for Telit products is not
responsible for storage, loss or damage to data during transit or repair. Any product
wrongfully declared to be defective will be returned to sender and inspection, process and
carriage costs will be invoiced to them. Due to the technical nature of this product, we advise
you to seek professional installation.
The authorised distributor for Telit shall not be held responsible for any dysfunction caused
by an installation which does not follow the instructions provided or an incorrect installation.
If you are experiencing any issues with returning your Telit product please contact an
Authorised local distributor.
User Guide
989889789789 Rev.2 – YYYY-MM-DD
Reproduction forbidden without written authorization from Telit Communications S.p.A. - All Rights
Reserved. Page 27 of 27
Mod. 0810 2011-07 Rev.2
 Loading...