

Page 1
USER INSTRUCTIONS
MODEL MCE325
PROGRAMMABLE USER STATION
9350-6464-00 Rev J, 7/2001
Page 2

PROPRIETARY NOTICE
The RTS product information and design disclosed herein were originated by and are the property of Telex Communications, Inc. telex reserves all patent, proprietary design, manufacturing, reproduction, use and sales rights
thereto, and to any article disclosed therein, except to the extent rights are expressly granted to others.
COPYRIGHT NOTICE
Copyright © 1995-2001 by Telex Communications, Inc. All rights reserved. Reproduction in whole or in part without prior written permission from Telex is prohibited.
UNPACKING AND INSPECTION
Immediately upon receipt of the equipment, inspect the shipping container and the contents carefully for any discrepancies or damage. Should there be any, notify the freight company and the dealer at once.
WARRANTY INFORMATION
RTS products are warranted by Telex Communications, Inc. to be free from defects in materials and workmanship
for a period of three years from the date of sale.
The sole obligation of Telex during the warranty period is to provide, without charge, parts and labor necessary to
remedy covered defects appearing in products returned prepaid to Telex. This warranty does not cover any defect,
malfunction or failure caused beyond the control of Telex, including unreasonable or negligent operation, abuse,
accident, failure to follow instructions in the Service Manual or the User Manual, defective or improper associated
equipment, attempts at modification and repair not authorized by Telex, and shipping damage. Products with their
serial numbers removed or effaced are not covered by this warranty.
To obtain warranty service, follow the procedures entitled “Procedure For Returns” and “Shipping to Manufacturer
for Repair or Adjustment”.
This warranty is the sole and exclusive express warranty given with respect to RTS products. It is the responsibility
of the user to determine before purchase that this product is suitable for the user's intended purpose.
ANY AND ALL IMPLIED WARRANTIES, INCLUDING THE IMPLIED WARRANTY OF MERCHANTABILITY ARE LIMITED TO THE DURATION OF THIS EXPRESS LIMITED WARRANTY.
NEITHER TELEX NOR THE DEALER WHO SELLS RTS PRODUCTS IS LIABLE FOR INCIDENTAL OR
CONSEQUENTIAL DAMAGES OF ANY KIND.
CUSTOMER SUPPORT
Technical questions should be directed to:
Customer Service Department
RTS/Telex
12000 Portland Avenue South
Burnsville, MN 55337 U.S.A.
Telephone: (952) 848-4051
Fax: (800) 323-0498
Page 3

RETURN SHIPPING INSTRUCTIONS
PROCEDURE FOR RETURNS
If a repair is necessary, contact the dealer where this unit was purchased.
If repair through the dealer is not possible, obtain a RETURN AUTHORIZATION from:
Customer Service Department
Telex Communications, Inc.
Telephone: (877) 863-4169
Fax: (800) 323-0498
DO NOT RETURN ANY EQUIPMENT DIRECTLY TO THE FACTORY WITHOUT FIRST OBTAINING A
RETURN AUTHORIZATION.
Be prepared to provide the company name, address, phone number, a person to contact regarding the repair, the type
and quantity of equipment, a description of the problem and the serial number(s).
SHIPPING TO MANUFACTURER FOR REPAIR OR ADJUSTMENT
All shipments of RTS products should be made via United Parcel Service or the best available shipper, prepaid. The
equipment should be shipped in the original packing carton; if that is not available, use any suitable container that is
rigid and of adequate size. If a substitute container is used, the equipment should be wrapped in paper and surrounded
with at least four inches of excelsior or similar shock-absorbing material. All shipments must be sent to the following
address and must include the Return Authorization.
Factory Service Department
Telex Communications, Incorporated
West 1st Street
Blue Earth, MN 56013 U.S.A.
Upon completion of any repair the equipment will be returned via United Parcel Service or specified shipper collect.
Page 4

End-User License Agreement for Telex® Software
IMPORTANT - Please read this document carefully before using this product.
THIS DOCUMENT STATES THE TERMS AND CONDITIONS UPON WHICH TELEX COMMUNICATIONS,
INC. (the “COMPANY”) OFFERS TO LICENSE THE INSTALLED SOFTWARE OR PROGRAM (the “SOFTWARE”) FOR USE WITH THE PRODUCT IN WHICH IT WAS INSTALLED. YOU ARE AGREEING TO
BECOME BOUND BY THE TERMS OF THIS AGREEMENT. IF YOU DO NOT AGREE TO THE TERMS OF
THIS AGREEMENT, DO NOT USE THIS PRODUCT. PROMPTLY RETURN THE PRODUCT TO THE
PLACE WHERE YOU OBTAINED IT FOR A FULL REFUND.
The installed software as supplied by the Company is licensed, not sold, to you for use only under the terms of this
license, and the Company reserves all rights not expressly granted to you. You own the product or other media on or
in which the Software is originally or subsequently recorded or fixed, but the Company retains ownership of all
copies of the Software itself.
1. License: This license allows you to use the Software for internal purposes only on a single product in which it
was installed.
2. Restrictions: (a) You may not market, distribute or transfer copies of the Software to others or electronically
transfer or duplicate the Software. YOU MAY NOT REVERSE ENGINEER, DECOMPILE, DISASSEMBLE,
MODIFY, ADAPT, TRANSLATE, RENT, LEASE OR LOAN THE SOFTWARE OR CREATE DERIVATIVE
WORKS BASED ON THE SOFTWARE OR ANY ACCOMPANYING WRITTEN MATERIALS. (b) The Software and the accompanying written materials are copyrighted. Unauthorized copying of the Software, including
portions thereof or the written materials, is expressly forbidden. (c) You understand that the Company may update
or revise the Software and in so doing incurs no obligation to furnish such updates to you.
3. Limited Warranty: The Company does not warrant that the operation of the Software will meet your requirements or operate free from error. The Company DISCLAIMS ALL OTHER WARRANTIES AND CONDITIONS
EITHER EXPRESS OR IMPLIED, INCLUDING THE WARRANTIES OF MERCHANTABILITY, FITNESS
FOR A PARTICULAR PURPOSE AND NON-INFRINGEMENT OF THIRD PARTY RIGHTS.
4. Limited Liability: The liability of the Company for any claims arising out of this License based upon the Software, regardless of the form of action, shall not exceed the greater of the license fee for the Software or $50.
Page 5

TABLE OF CONTENTS
Description & Specifications 1-1
Description . . . . . . . . . . . . . . . . . . . . . . . . . . . . . . . . . . . . . . . . . . . . . . . . . . . . . . . . . 1-1
General . . . . . . . . . . . . . . . . . . . . . . . . . . . . . . . . . . . . . . . . . . . . . . . . . . . . . . . . . 1-1
Features . . . . . . . . . . . . . . . . . . . . . . . . . . . . . . . . . . . . . . . . . . . . . . . . . . . . . . . . . 1-1
Front Panel Features . . . . . . . . . . . . . . . . . . . . . . . . . . . . . . . . . . . . . . . . . . . . . . . . . . 1-2
Channel Selector and Operation Buttons . . . . . . . . . . . . . . . . . . . . . . . . . . . . . . . . . . . . . . 1-2
Volume Controls . . . . . . . . . . . . . . . . . . . . . . . . . . . . . . . . . . . . . . . . . . . . . . . . . . . 1-2
Sidetone Nulling Trimmers . . . . . . . . . . . . . . . . . . . . . . . . . . . . . . . . . . . . . . . . . . . . . . 1-2
Connections, Inputs and Outputs . . . . . . . . . . . . . . . . . . . . . . . . . . . . . . . . . . . . . . . . . . . . 1-2
Front Panel . . . . . . . . . . . . . . . . . . . . . . . . . . . . . . . . . . . . . . . . . . . . . . . . . . . . . . 1-2
Panel Microphone Jack . . . . . . . . . . . . . . . . . . . . . . . . . . . . . . . . . . . . . . . . . . . . . . . . . . . . . . 1-2
Rear Panel Features. . . . . . . . . . . . . . . . . . . . . . . . . . . . . . . . . . . . . . . . . . . . . . . . . . . 1-3
Intercom Lines. . . . . . . . . . . . . . . . . . . . . . . . . . . . . . . . . . . . . . . . . . . . . . . . . . . . . . . . . . . 1-3
External Program Input . . . . . . . . . . . . . . . . . . . . . . . . . . . . . . . . . . . . . . . . . . . . . . . . . . . . . . 1-3
Speaker Output . . . . . . . . . . . . . . . . . . . . . . . . . . . . . . . . . . . . . . . . . . . . . . . . . . . . . . . . . . 1-4
Auxiliary Connector . . . . . . . . . . . . . . . . . . . . . . . . . . . . . . . . . . . . . . . . . . . . . . . . . . . . . . . . 1-4
Programming . . . . . . . . . . . . . . . . . . . . . . . . . . . . . . . . . . . . . . . . . . . . . . . . . . . . . . 1-4
Power . . . . . . . . . . . . . . . . . . . . . . . . . . . . . . . . . . . . . . . . . . . . . . . . . . . . . . . . . . 1-4
Mounting Configuration . . . . . . . . . . . . . . . . . . . . . . . . . . . . . . . . . . . . . . . . . . . . . . . . . 1-4
MCE325 Specifications . . . . . . . . . . . . . . . . . . . . . . . . . . . . . . . . . . . . . . . . . . . . . . . . . . . 1-5
General . . . . . . . . . . . . . . . . . . . . . . . . . . . . . . . . . . . . . . . . . . . . . . . . . . . . . . . . . 1-5
Microphone Preamplifier. . . . . . . . . . . . . . . . . . . . . . . . . . . . . . . . . . . . . . . . . . . . . . . . . 1-5
Headphone Amplifier . . . . . . . . . . . . . . . . . . . . . . . . . . . . . . . . . . . . . . . . . . . . . . . . . . 1-5
Speaker Amplifier . . . . . . . . . . . . . . . . . . . . . . . . . . . . . . . . . . . . . . . . . . . . . . . . . . . . 1-5
Power and Mechanical . . . . . . . . . . . . . . . . . . . . . . . . . . . . . . . . . . . . . . . . . . . . . . . . . 1-5
Connectors . . . . . . . . . . . . . . . . . . . . . . . . . . . . . . . . . . . . . . . . . . . . . . . . . . . . . . . 1-6
MCS325 Specifications . . . . . . . . . . . . . . . . . . . . . . . . . . . . . . . . . . . . . . . . . . . . . . . . . . . 1-6
Installation 2-1
Internal Programming and Adjustments . . . . . . . . . . . . . . . . . . . . . . . . . . . . . . . . . . . . . . . . . . 2-1
General . . . . . . . . . . . . . . . . . . . . . . . . . . . . . . . . . . . . . . . . . . . . . . . . . . . . . . . . . 2-1
Intercom Line-Channel Configurations (DS1-DS3, J6, J7, J19 & J20) . . . . . . . . . . . . . . . . . . . . . . . . . 2-2
Front Panel Setup Mode Lock-out (DS4) . . . . . . . . . . . . . . . . . . . . . . . . . . . . . . . . . . . . . . . . 2-5
ISO (DS5) . . . . . . . . . . . . . . . . . . . . . . . . . . . . . . . . . . . . . . . . . . . . . . . . . . . . . . . . 2-5
Remote Talk-off (DS7) . . . . . . . . . . . . . . . . . . . . . . . . . . . . . . . . . . . . . . . . . . . . . . . . . . 2-5
VOX (DS8) . . . . . . . . . . . . . . . . . . . . . . . . . . . . . . . . . . . . . . . . . . . . . . . . . . . . . . . . 2-5
Program Assignment – IFB Option (J4, J5, J16-J18) . . . . . . . . . . . . . . . . . . . . . . . . . . . . . . . . . . 2-6
Balanced/Unbalanced Dynamic Microphone Selection (J24) . . . . . . . . . . . . . . . . . . . . . . . . . . . . . . 2-6
Headphone Sidetone Trimmer Adjustment (R37) . . . . . . . . . . . . . . . . . . . . . . . . . . . . . . . . . . . . 2-6
Speaker Dim Adjustment (R157) . . . . . . . . . . . . . . . . . . . . . . . . . . . . . . . . . . . . . . . . . . . . 2-6
Mechanical Installation . . . . . . . . . . . . . . . . . . . . . . . . . . . . . . . . . . . . . . . . . . . . . . . . . . . 2-6
Electrical Installation . . . . . . . . . . . . . . . . . . . . . . . . . . . . . . . . . . . . . . . . . . . . . . . . . . . . 2-8
AC Power and Fuse . . . . . . . . . . . . . . . . . . . . . . . . . . . . . . . . . . . . . . . . . . . . . . . . . . . 2-8
Intercom Lines J8, J9, and J10 . . . . . . . . . . . . . . . . . . . . . . . . . . . . . . . . . . . . . . . . . . . . . 2-8
General. . . . . . . . . . . . . . . . . . . . . . . . . . . . . . . . . . . . . . . . . . . . . . . . . . . . . . . . 2-8
Connector Pin-outs. . . . . . . . . . . . . . . . . . . . . . . . . . . . . . . . . . . . . . . . . . . . . . . . . . 2-8
Four-wire Output Termination . . . . . . . . . . . . . . . . . . . . . . . . . . . . . . . . . . . . . . . . . . . . 2-8
Program Inputs, J14 and J15 . . . . . . . . . . . . . . . . . . . . . . . . . . . . . . . . . . . . . . . . . . . . . . 2-9
External Speaker, J27 . . . . . . . . . . . . . . . . . . . . . . . . . . . . . . . . . . . . . . . . . . . . . . . . . . 2-9
Auxiliary Connector, J22. . . . . . . . . . . . . . . . . . . . . . . . . . . . . . . . . . . . . . . . . . . . . . . . . 2-9
Four-Wire Channel A and B Input . . . . . . . . . . . . . . . . . . . . . . . . . . . . . . . . . . . . . . . . . . 2-9
Key outputs – Expanded IFB Option . . . . . . . . . . . . . . . . . . . . . . . . . . . . . . . . . . . . . . . . . 2-10
Remote Microphone Switch . . . . . . . . . . . . . . . . . . . . . . . . . . . . . . . . . . . . . . . . . . . . . 2-10
ISO Connection . . . . . . . . . . . . . . . . . . . . . . . . . . . . . . . . . . . . . . . . . . . . . . . . . . . 2-10
External Headset . . . . . . . . . . . . . . . . . . . . . . . . . . . . . . . . . . . . . . . . . . . . . . . . . . . 2-10
External Electret Microphone. . . . . . . . . . . . . . . . . . . . . . . . . . . . . . . . . . . . . . . . . . . . . 2-11
i
Page 6

Unswitched Microphone Output . . . . . . . . . . . . . . . . . . . . . . . . . . . . . . . . . . . . . . . . . . . 2-11
External DC Power Source . . . . . . . . . . . . . . . . . . . . . . . . . . . . . . . . . . . . . . . . . . . . . 2-11
Remote Speaker Mute Control. . . . . . . . . . . . . . . . . . . . . . . . . . . . . . . . . . . . . . . . . . . . 2-11
Front Panel Headset Connections . . . . . . . . . . . . . . . . . . . . . . . . . . . . . . . . . . . . . . . . . . . 2-11
Headset Requirements . . . . . . . . . . . . . . . . . . . . . . . . . . . . . . . . . . . . . . . . . . . . . . . 2-11
Headset Connections . . . . . . . . . . . . . . . . . . . . . . . . . . . . . . . . . . . . . . . . . . . . . . . . 2-11
Operation 3-1
General. . . . . . . . . . . . . . . . . . . . . . . . . . . . . . . . . . . . . . . . . . . . . . . . . . . . . . . . . . . .3-1
Operating Instructions . . . . . . . . . . . . . . . . . . . . . . . . . . . . . . . . . . . . . . . . . . . . . . . . . . . .3-1
Momentary/Latching Button action . . . . . . . . . . . . . . . . . . . . . . . . . . . . . . . . . . . . . . . . . . . .3-1
LED Indicators . . . . . . . . . . . . . . . . . . . . . . . . . . . . . . . . . . . . . . . . . . . . . . . . . . . . . .3-1
Channel Selection. . . . . . . . . . . . . . . . . . . . . . . . . . . . . . . . . . . . . . . . . . . . . . . . . . . . .3-1
Panel Mic/Headset Mic Selection . . . . . . . . . . . . . . . . . . . . . . . . . . . . . . . . . . . . . . . . . . . . .3-2
Microphone On/Off . . . . . . . . . . . . . . . . . . . . . . . . . . . . . . . . . . . . . . . . . . . . . . . . . . . .3-2
Speaker On/Off . . . . . . . . . . . . . . . . . . . . . . . . . . . . . . . . . . . . . . . . . . . . . . . . . . . . . .3-2
Volume Adjustment . . . . . . . . . . . . . . . . . . . . . . . . . . . . . . . . . . . . . . . . . . . . . . . . . . . . 3-2
Front Panel Sidetone Nulling Trimmer Adjustment . . . . . . . . . . . . . . . . . . . . . . . . . . . . . . . . . . . .3-2
Sending and Receiving Call Signals . . . . . . . . . . . . . . . . . . . . . . . . . . . . . . . . . . . . . . . . . . . 3-3
Using the Talk-Off Feature . . . . . . . . . . . . . . . . . . . . . . . . . . . . . . . . . . . . . . . . . . . . . . . . 3-3
Front Panel Programming . . . . . . . . . . . . . . . . . . . . . . . . . . . . . . . . . . . . . . . . . . . . . . . . . .3-3
Activating Setup Mode . . . . . . . . . . . . . . . . . . . . . . . . . . . . . . . . . . . . . . . . . . . . . . . . . .3-3
Menu Selection/Ending Setup. . . . . . . . . . . . . . . . . . . . . . . . . . . . . . . . . . . . . . . . . . . . . . .3-3
Submenus. . . . . . . . . . . . . . . . . . . . . . . . . . . . . . . . . . . . . . . . . . . . . . . . . . . . . . . . . 3-3
Channel ID . . . . . . . . . . . . . . . . . . . . . . . . . . . . . . . . . . . . . . . . . . . . . . . . . . . . . . .3-4
Four-channel Listen . . . . . . . . . . . . . . . . . . . . . . . . . . . . . . . . . . . . . . . . . . . . . . . . . . 3-4
Mono . . . . . . . . . . . . . . . . . . . . . . . . . . . . . . . . . . . . . . . . . . . . . . . . . . . . . . . . . .3-4
Call Disable . . . . . . . . . . . . . . . . . . . . . . . . . . . . . . . . . . . . . . . . . . . . . . . . . . . . . .3-4
Button Lock . . . . . . . . . . . . . . . . . . . . . . . . . . . . . . . . . . . . . . . . . . . . . . . . . . . . . .3-4
Latch Disable . . . . . . . . . . . . . . . . . . . . . . . . . . . . . . . . . . . . . . . . . . . . . . . . . . . . .3-4
Instant Mic . . . . . . . . . . . . . . . . . . . . . . . . . . . . . . . . . . . . . . . . . . . . . . . . . . . . . . .3-5
Reset. . . . . . . . . . . . . . . . . . . . . . . . . . . . . . . . . . . . . . . . . . . . . . . . . . . . . . . . . . 3-5
Maintenance 4-1
Preventive Maintenance . . . . . . . . . . . . . . . . . . . . . . . . . . . . . . . . . . . . . . . . . . . . . . . . . . .4-1
Factory Support Information . . . . . . . . . . . . . . . . . . . . . . . . . . . . . . . . . . . . . . . . . . . . . . . . .4-1
Corrective Maintenance . . . . . . . . . . . . . . . . . . . . . . . . . . . . . . . . . . . . . . . . . . . . . . . . . . .4-1
Access . . . . . . . . . . . . . . . . . . . . . . . . . . . . . . . . . . . . . . . . . . . . . . . . . . . . . . . . . .4-1
Front Panel Removal . . . . . . . . . . . . . . . . . . . . . . . . . . . . . . . . . . . . . . . . . . . . . . . . . . .4-1
Cleaning. . . . . . . . . . . . . . . . . . . . . . . . . . . . . . . . . . . . . . . . . . . . . . . . . . . . . . . . . . 4-2
Test and Adjustment Procedures. . . . . . . . . . . . . . . . . . . . . . . . . . . . . . . . . . . . . . . . . . . . . . .4-2
Notes . . . . . . . . . . . . . . . . . . . . . . . . . . . . . . . . . . . . . . . . . . . . . . . . . . . . . . . . . . .4-2
Test Equipment . . . . . . . . . . . . . . . . . . . . . . . . . . . . . . . . . . . . . . . . . . . . . . . . . . . . . .4-2
Power Supply Test. . . . . . . . . . . . . . . . . . . . . . . . . . . . . . . . . . . . . . . . . . . . . . . . . . . . . 4-2
Initial Configuration . . . . . . . . . . . . . . . . . . . . . . . . . . . . . . . . . . . . . . . . . . . . . . . . . . . .4-3
Keying Output Test . . . . . . . . . . . . . . . . . . . . . . . . . . . . . . . . . . . . . . . . . . . . . . . . . . . .4-3
USMB (Un-Switched Microphone Balanced) Frequency Response and Level Check . . . . . . . . . . . . . . . . . .4-4
Frequency Response and Level Check, Mic to Line . . . . . . . . . . . . . . . . . . . . . . . . . . . . . . . . . . .4-4
Four-Channel, Two-Wire Mode . . . . . . . . . . . . . . . . . . . . . . . . . . . . . . . . . . . . . . . . . . . . 4-4
Two-Channel, Four-Wire Mode . . . . . . . . . . . . . . . . . . . . . . . . . . . . . . . . . . . . . . . . . . . .4-5
Sidetone Null Test and Adjustment . . . . . . . . . . . . . . . . . . . . . . . . . . . . . . . . . . . . . . . . . . . .4-5
True Sidetone Adjust . . . . . . . . . . . . . . . . . . . . . . . . . . . . . . . . . . . . . . . . . . . . . . . . . . . 4-6
Level and Frequency Response Check, Intercom Channel to Headphone . . . . . . . . . . . . . . . . . . . . . . . . 4-6
Level and Frequency Response Check, Intercom Channel to Speaker. . . . . . . . . . . . . . . . . . . . . . . . . .4-7
Level and Frequency Response, Program to Headphones and Speaker . . . . . . . . . . . . . . . . . . . . . . . . .4-7
Program A to Left Headphone . . . . . . . . . . . . . . . . . . . . . . . . . . . . . . . . . . . . . . . . . . . . .4-7
Program B to Right Headphone . . . . . . . . . . . . . . . . . . . . . . . . . . . . . . . . . . . . . . . . . . . .4-8
Program to Speaker . . . . . . . . . . . . . . . . . . . . . . . . . . . . . . . . . . . . . . . . . . . . . . . . . .4-8
IFB Test . . . . . . . . . . . . . . . . . . . . . . . . . . . . . . . . . . . . . . . . . . . . . . . . . . . . . . . . . .4-8
IFB B . . . . . . . . . . . . . . . . . . . . . . . . . . . . . . . . . . . . . . . . . . . . . . . . . . . . . . . . . . 4-8
ii
Page 7

IFB A . . . . . . . . . . . . . . . . . . . . . . . . . . . . . . . . . . . . . . . . . . . . . . . . . . . . . . . . . 4-9
Level and Frequency Response Check, Four-Wire Input to Headphone . . . . . . . . . . . . . . . . . . . . . . . . 4-9
Four-Wire A Input to Left Headphone . . . . . . . . . . . . . . . . . . . . . . . . . . . . . . . . . . . . . . . . 4-9
Four-Wire B input to Right Headphone. . . . . . . . . . . . . . . . . . . . . . . . . . . . . . . . . . . . . . . . 4-9
Panel Mic to Channel Test. . . . . . . . . . . . . . . . . . . . . . . . . . . . . . . . . . . . . . . . . . . . . . . . 4-10
Carbon Mic to Channel Test . . . . . . . . . . . . . . . . . . . . . . . . . . . . . . . . . . . . . . . . . . . . . . . 4-10
VOX Test. . . . . . . . . . . . . . . . . . . . . . . . . . . . . . . . . . . . . . . . . . . . . . . . . . . . . . . . . 4-10
Mic Kill Receive Test. . . . . . . . . . . . . . . . . . . . . . . . . . . . . . . . . . . . . . . . . . . . . . . . . . . 4-10
Mic Kill Transmit Test . . . . . . . . . . . . . . . . . . . . . . . . . . . . . . . . . . . . . . . . . . . . . . . . . . 4-11
Call Transmit Test . . . . . . . . . . . . . . . . . . . . . . . . . . . . . . . . . . . . . . . . . . . . . . . . . . . . 4-11
Call Receive Test . . . . . . . . . . . . . . . . . . . . . . . . . . . . . . . . . . . . . . . . . . . . . . . . . . . . 4-11
ISO Test . . . . . . . . . . . . . . . . . . . . . . . . . . . . . . . . . . . . . . . . . . . . . . . . . . . . . . . . . 4-12
Remote Mic Switch Test . . . . . . . . . . . . . . . . . . . . . . . . . . . . . . . . . . . . . . . . . . . . . . . . . 4-12
Program Lockout Test . . . . . . . . . . . . . . . . . . . . . . . . . . . . . . . . . . . . . . . . . . . . . . . . . . 4-12
Noise Checks . . . . . . . . . . . . . . . . . . . . . . . . . . . . . . . . . . . . . . . . . . . . . . . . . . . . . . 4-12
Parts Lists 5-1
Packaging Assembly (9000-6464-00) . . . . . . . . . . . . . . . . . . . . . . . . . . . . . . . . . . . . . . . . . . . 5-1
Final Assembly, MCE325 (9010-6464-00) . . . . . . . . . . . . . . . . . . . . . . . . . . . . . . . . . . . . . . . . . 5-1
Front Panel Assembly (9020-6261-00) . . . . . . . . . . . . . . . . . . . . . . . . . . . . . . . . . . . . . . . . . . . 5-2
Back Panel Assembly (9020-6262-00) . . . . . . . . . . . . . . . . . . . . . . . . . . . . . . . . . . . . . . . . . . . 5-3
Heatsink Assembly (9020-6324-00) . . . . . . . . . . . . . . . . . . . . . . . . . . . . . . . . . . . . . . . . . . . . 5-3
Main PC Board Assembly (9030-6245-01) . . . . . . . . . . . . . . . . . . . . . . . . . . . . . . . . . . . . . . . . . 5-3
PC Board Assembly, Front Panel (9030-6246-00) . . . . . . . . . . . . . . . . . . . . . . . . . . . . . . . . . . . . . 5-13
Diagrams 6-1
iii
Page 8

iv
Page 9

Description
General
The MCE325 is a four-channel, programmable intercom station. It may be used as a headset
station or, with the addition of the MCS325 Modular Speaker, as a speaker station. It may be
mounted in a console or equipment rack via optional mounting kits.
C
HAPTER
1
D
ESCRIPTION
& S
S ECTION
PECIFICATIONS
The MCE325 can be used with either two-wire or four-wire intercom lines, or a combination of
both. In this manual and in the labeling on the MCE325, references to channels 1, 2, 3, and 4
indicate two-wire lines; references to four-wire A and four-wire B indicate four-wire lines.
The MCE325 can be interfaced to a variety of external devices including external program
sources, two-way radios, paging systems, and satellite circuits. Some typical applications are
shown in Figure 1.2 through Figure 1.10.
Features
Features of the MCE325 include:
• Call Signaling: Call signaling is accomplished using an inaudible (20 kHz) signal to activate a
call indicator LED.
• Remote “talk-off”: Active, unattended remote station microphones may be deactivated by
momentarily injecting an inaudible (24 kHz) signal into the corresponding intercom line. The
MCE325 can send and receive “talk-off” signals.
• VOX circuit: The MCE325 may be programmed for voice activation of the microphone.
• Simple IFB: Program audio assigned to a channel is interrupted during talk.
• External device keying: External devices, such as two-way radios, speaker mute relays, or
paging systems may be activated through key outputs at the auxiliary connector on the rear
panel. The key outputs may also be used to expand the simple IFB function, allowing any one
of a number of MCE325 stations to interrupt the program source and talk on the line.
• Microphone limiter: The microphone preamplifier circuit contains a limiter, which helps to
equalize voice levels.
• Fully programmable: Retains programming even when power is shut off.
1-1
Page 10

NOTE
Front Panel Features
Channel Selector and Operation Buttons
These buttons have two modes of operation: standard operating mode and program, or setup,
mode. The printing on the face of each button indicates its function in standard operating mode;
printing under each button indicates its setup mode function. (See Section 3 for operation and
programming instructions.) An LED located above each button provides status information.
The MCE325 is factory pre-programmed for two-channel operation, with each channel having
one talk and one listen button. However, the MCE325 may also be programmed so that each
channel selector button controls both talk and listen for a single channel, permitting operation of
up to four intercom channels. Additionally, users may wish to customize the identification of
channels. With this in mind, a button kit has been supplied with the MCE325 to allow you to
customize the button labeling to suit your particular application. Figure 1.11 shows the available
button caps as well as some typical button configurations.
The standard buttons are opaque. As a result, the front panel LED’s may not be visible when
viewing the MCE325 from a low angle (such as when it is mounted high in an equipment rack).
As a remedy for this problem, clear buttons are available that allow the LED light to pass through.
(Order RTS™ part no. 9000-2698-800)
Volume Controls
CH1 (VOL 1): This control adjusts the volume of channels 1 and/or 3 to the left headphone when
stereo headphones are used. It adjusts the mono mix level of these channels when monaural
headphones or an external speaker is used.
CH2 (VOL 2): This control adjusts the volume of channels 2 and/or 4 to the right headphone
when stereo headphones are used. It adjusts the mono mix level of these channels when monaural
headphones or an external speaker is used.
PGM VOL: This control adjusts the mono mix of program A and program B (input at the rear
panel and assigned via internal programming) to the headphones and external speaker.
Sidetone Nulling Trimmers
These trimmers are adjusted to prevent acoustic feedback when using a panel microphone along
with an external speaker.
Connections, Inputs and Outputs
Front Panel
DYNamic MIC HEADSET: This connector accepts a stereo-earphone, dynamic-microphone
headset (with or without a mic on/off switch).
CARBon MIC HEADSET: This connector accepts a standard 3-conductor, ¼-inch phone plug.
The necessary phantom power is provided to power a carbon microphone or its electronic
equivalent.
Panel Microphone Jack
The MCE325 may be optionally fitted with a gooseneck panel microphone by removing the
blanking plug located in the upper-right corner of the front panel. The panel microphone jack
accepts specially made gooseneck microphones (MCP-90 series), which are available from RTS.
1-2 MCE325 User Instructions
Page 11
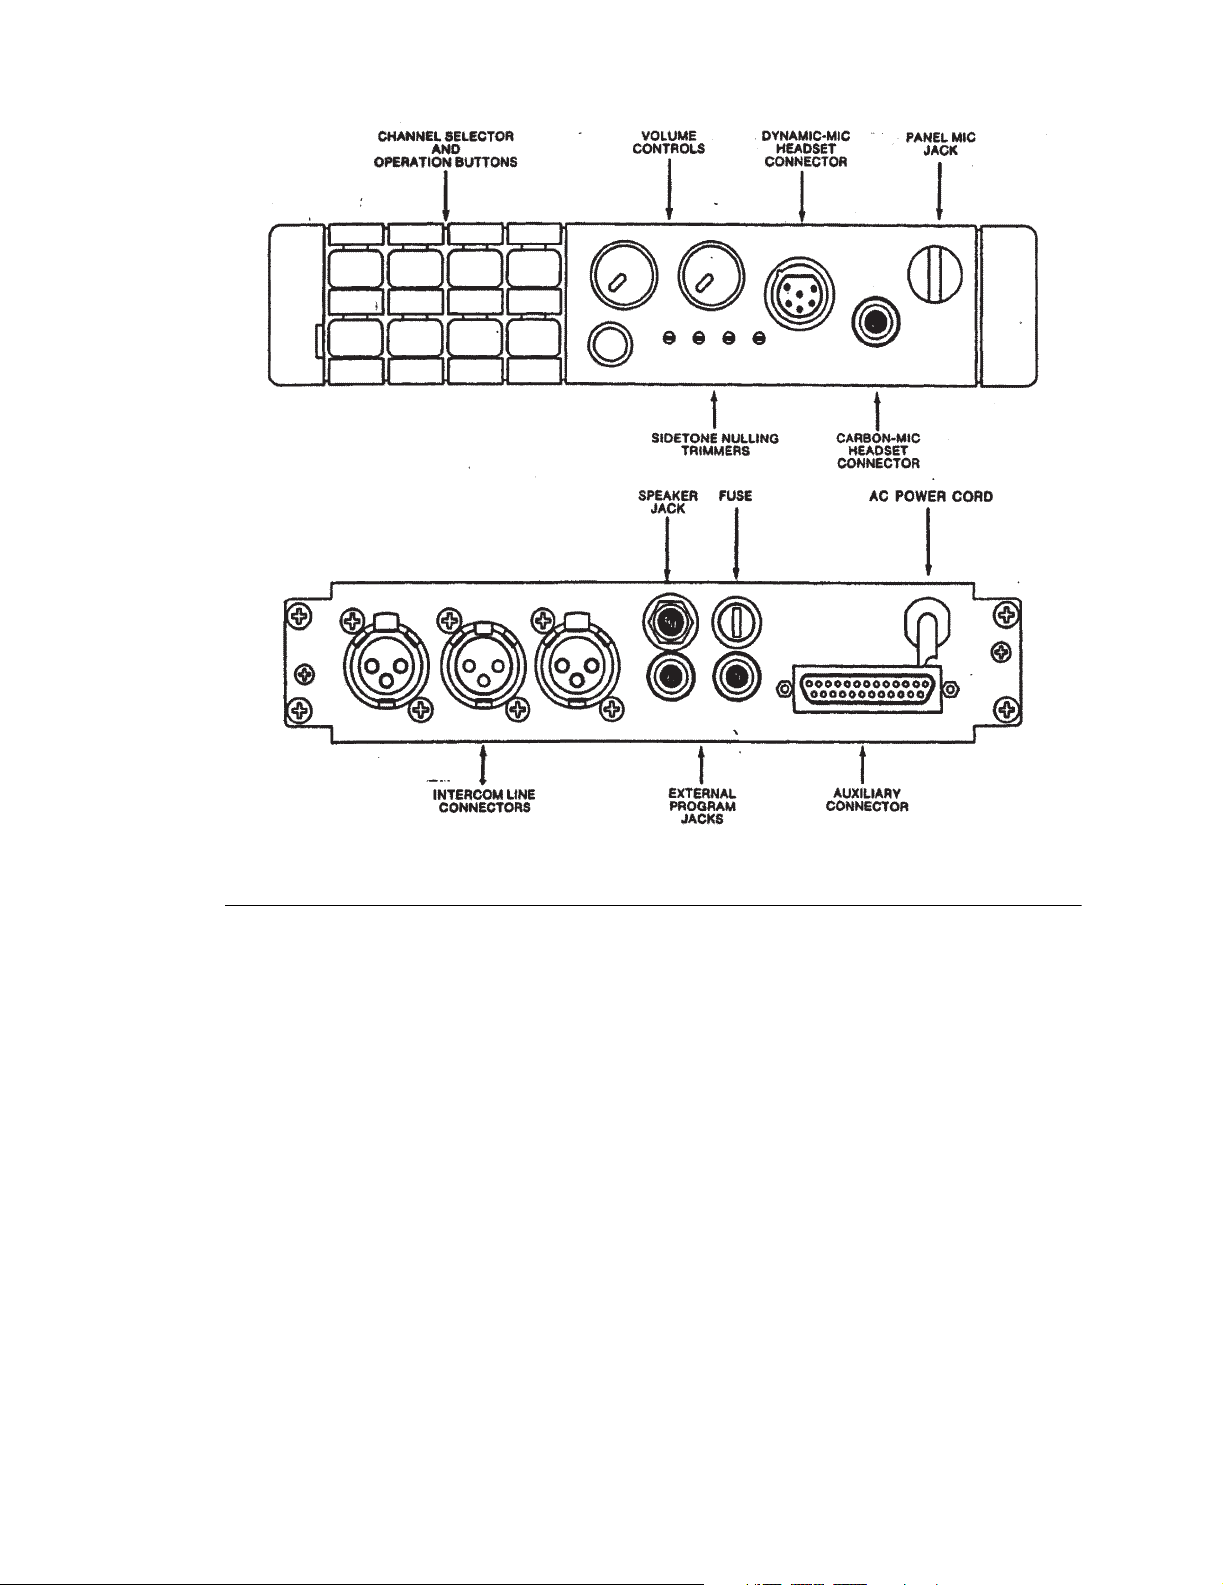
Figure 1.1
MCE325 front and rear panel features.
Rear Panel Features
Intercom Lines
Connectors J8 and J9 are parallel-wired for loop-through connection to additional stations. These
connectors are used either for two-wire channels 1 and 2 input/output, or four-wire channel A
output. (The four-wire channel A input is connected at the auxiliary connector.)
Connector J10 is used for two-wire channel 3 and 4 input/output, or four-wire channel B output,
but no loop-through connector is provided for these channels. (The four-wire channel B input is
connected at the auxiliary connector.)
The MCE325 presents a bridging impedance of 10,000 ohms to the intercom line, and is designed
for use with intercom lines having a 200-ohm line terminating impedance. A 200 ohm termination
plug is supplied (connected to J10) to prevent channels three and four from oscillating when the
MCE325 is in two-channel mode.
External Program Input
Two ¼-inch phone jacks are provided for external program input. The station accepts line-level,
balanced input. The two program inputs are mixed internally, and may be assigned (through
internal programming) to right headphone, left headphone, external speaker, or any combination
of these. In addition, program A may be assigned (through internal programming) to two-wire
channel 3 or four-wire channel A; program B may be assigned to two-wire channel 4, but cannot
1-3
Page 12

be assigned to a four-wire channel. The program assigned to channels is interrupted during talk
output.
Speaker Output
A ¼-inch phone jack is provided for connection of an external speaker (8-ohms minimum
impedance). The speaker output is compatible with the MCS325 speaker.
Auxiliary Connector
Standard Options on the 25-pin, female, D-Sub connector are:
1 Unswitched microphone output
2 ISO connection to a VCP6A/VCP12A/VCP12B
3 Microphone on/off switch
4 Remote headset
5 Remote panel microphone
6 Separate inputs for +10 to +15 volts DC, and +17 to +24 volts DC
7 Common/ground circuit
8 Four-wire channel A and B inputs
9 Remote speaker mute
10Key outputs
Programming
Three methods of programming are used:
1 Front panel programming via the channel selector and operation buttons.
2 Internal programming via circuit board DIP switches.
3 Internal programming via circuit board jumpers.
The most commonly programmed options are assigned to the front panel for convenience.
Detailed information on internal programming is provided in Section 2, Installation. Detailed
information on front panel programming is provided in Section 3, Operation.
Power
The MCE325 is designed for local powering, and is supplied ready for use with either 115 or 230
VAC (but not both). The unit may also be powered from an external DC source connected at the
Auxiliary (J22) connector on the rear panel. For information on changing the AC supply voltage
configuration, or using DC power, see Section 2.
Mounting Configuration
Mounting configurations are illustrated in Figure 2.3 and include rack mount speaker station,
console mount headset station, rack mount headset station, desk top headset station, and portable
speaker station. Some mounting configurations may require a remotely located microphone or
headset. These may be connected to the Auxiliary connector (J22) on the back of the unit.
1-4 MCE325 User Instructions
Page 13

MCE325 Specifications
General
Bridging Impedance (to line) 10,000 ohms typical
Noise Contribution to 200-ohm Line -90 dBu
Call Signal Frequency 20 kHz, crystal controlled
Talk-off Frequency 24 kHz, crystal controlled
Microphone Preamplifier
Maximum Voltage Gain 54 dB
Frequency Response 100 Hz to 8,000 Hz, ±3 dB
Input Impedance 1,000 ohms
Limiter Range 30 dB
Headphone Amplifier
Maximum Voltage Gain 30 dB
Frequency Response 100 Hz to 8,000 Hz, ±3 dB
Headphone Impedance 50 to 600 ohms
Output Power 150 mW into 50 ohms
Output Voltage Level 8 Vp-p
Speaker Amplifier
Maximum Voltage Gain 30 dB
Frequency Response 100 Hz to 8,000 Hz, ±3 dB
Speaker Impedance 8 to 16 ohms
Output Power per Amplifier 5W into 8 ohms
Output Voltage Level 16 Vp-p
Power and Mechanical
Power Requirements 115 to 230 VAC, 20 VA max,
12 to 25 VDC, 100 to 125 mA quiescent, 900 mA max
Dimensions 1.72” H x 8.2” W x 8” D (44 mm x 208 mm x 203 mm)
Weight 4.25 lbs (1.93kg)
Material/Finish Thermo-plastic front panel, aluminum case, light gray
finish
1-5
Page 14
Connectors
Intercom Line Connector XLR type, 3-pin (male-female loop through on two-wire
Dynamic Mic XLR type, 6-pin female
Carbon Mic ¼-inch phone jack, 3-circuit
Auxiliary Connector 25-pin, female, D-Sub
Program Inputs ¼-inch phone jack, 3-circuit
Speaker Output ¼-inch phone jack, 3-circuit
Panel Mic ¼-inch phone jack, metal busing, 3-circuit
MCS325 Specifications
The MCS325 is designed for use with MCE325, but may also be used as a general-purpose
monitor for program material.
Impedance 8 ohms (DCR5.5 to 7 ohms)
Power Rating 5W RMS continuous
Sensitivity 90 dB ±2 dB/2.83 volts/one meter on axis averaged over
channel 1 and 2, or four-wire channel A; Female only on
two-wire channel 3 and 4, or four-wire channel B
one octave bands centered at 250 Hz, 500 Hz, 1 kHz,
2 kHz, 4 kHz, and 8 kHz when enclosed in a sealed box
of 1.3 liters volume.
Frequency Response 200 Hz to 10 kHz ±4 dB on 1/10 octave measurement in
1.3 liter sealed box.
Free Air Resonance 200 Hz to 250 Hz
Distortion Less than 10% @ 5W at resonance.
Stray Magnetic Field Less than 1 gauss at 1 cm from chassis.
Mechanical Noise Unit to be free of buzzes and rattles at 5 W sine wave
input from 100 Hz to 10 kHz.
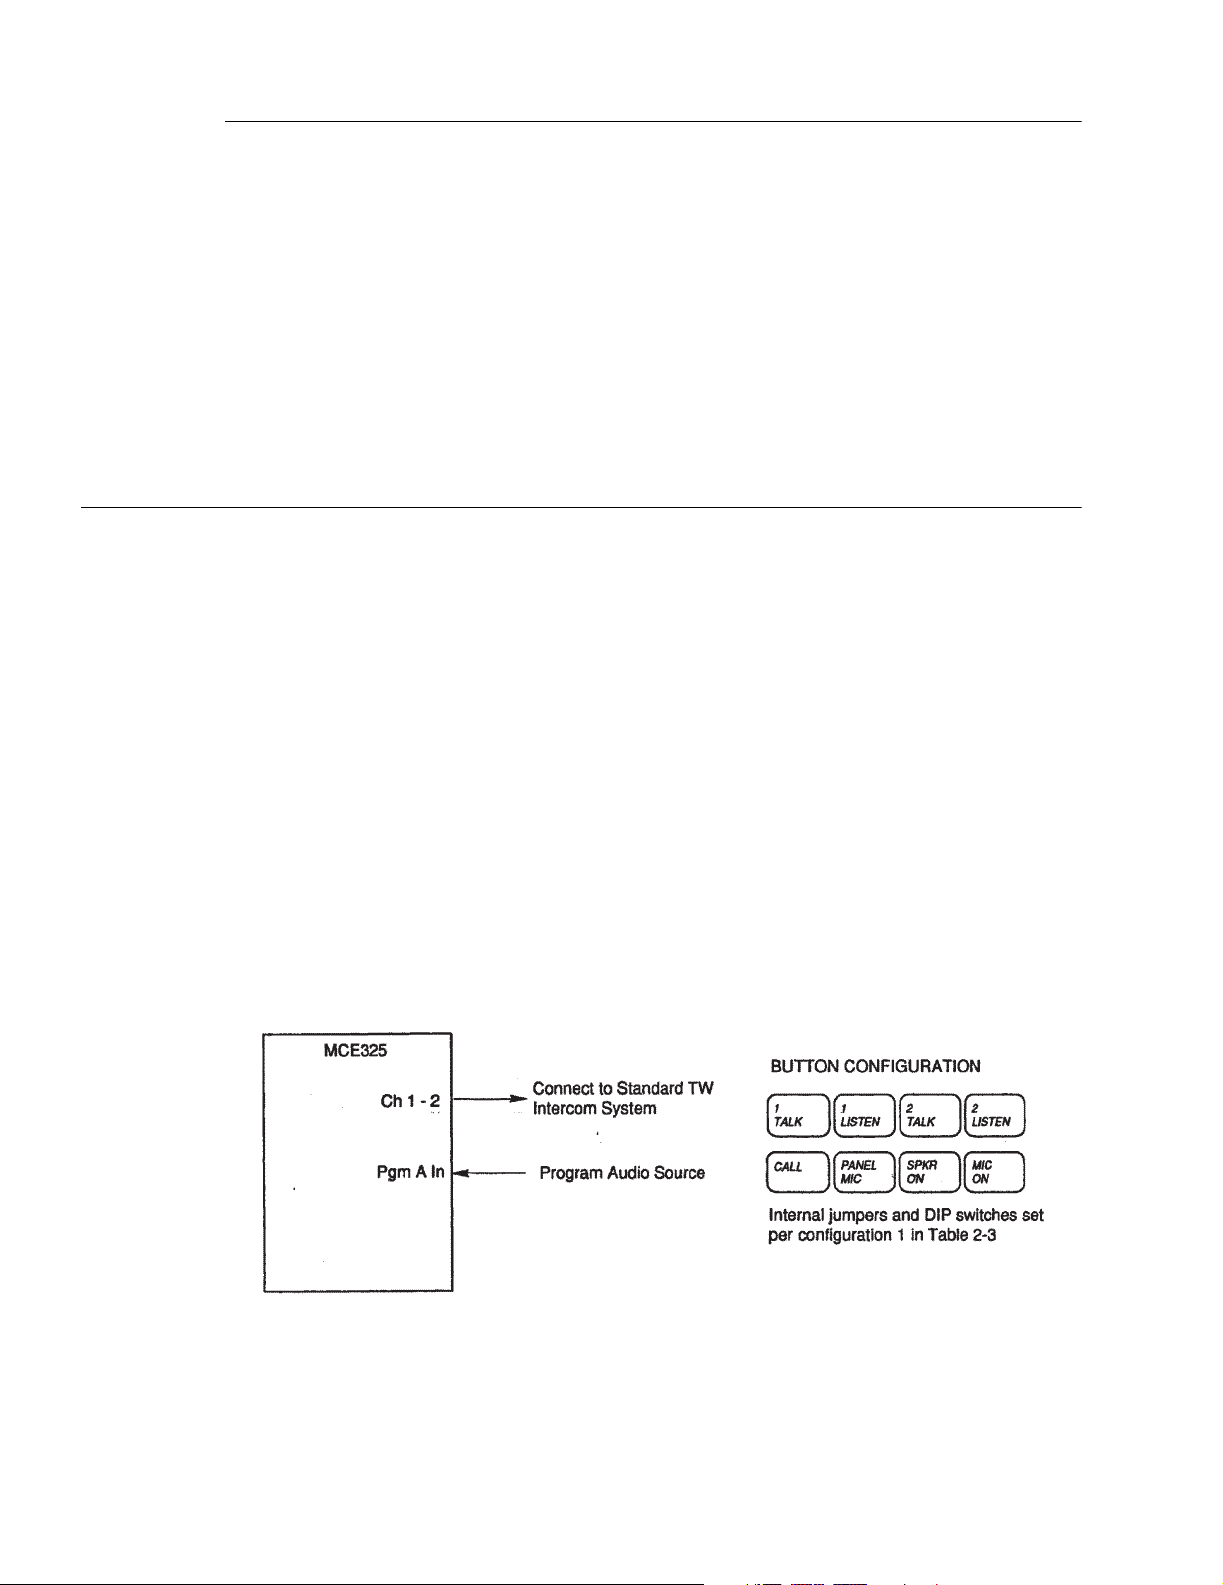
Figure 1.2
Standard two-channel, two-wire configuration.
1-6 MCE325 User Instructions
Page 15
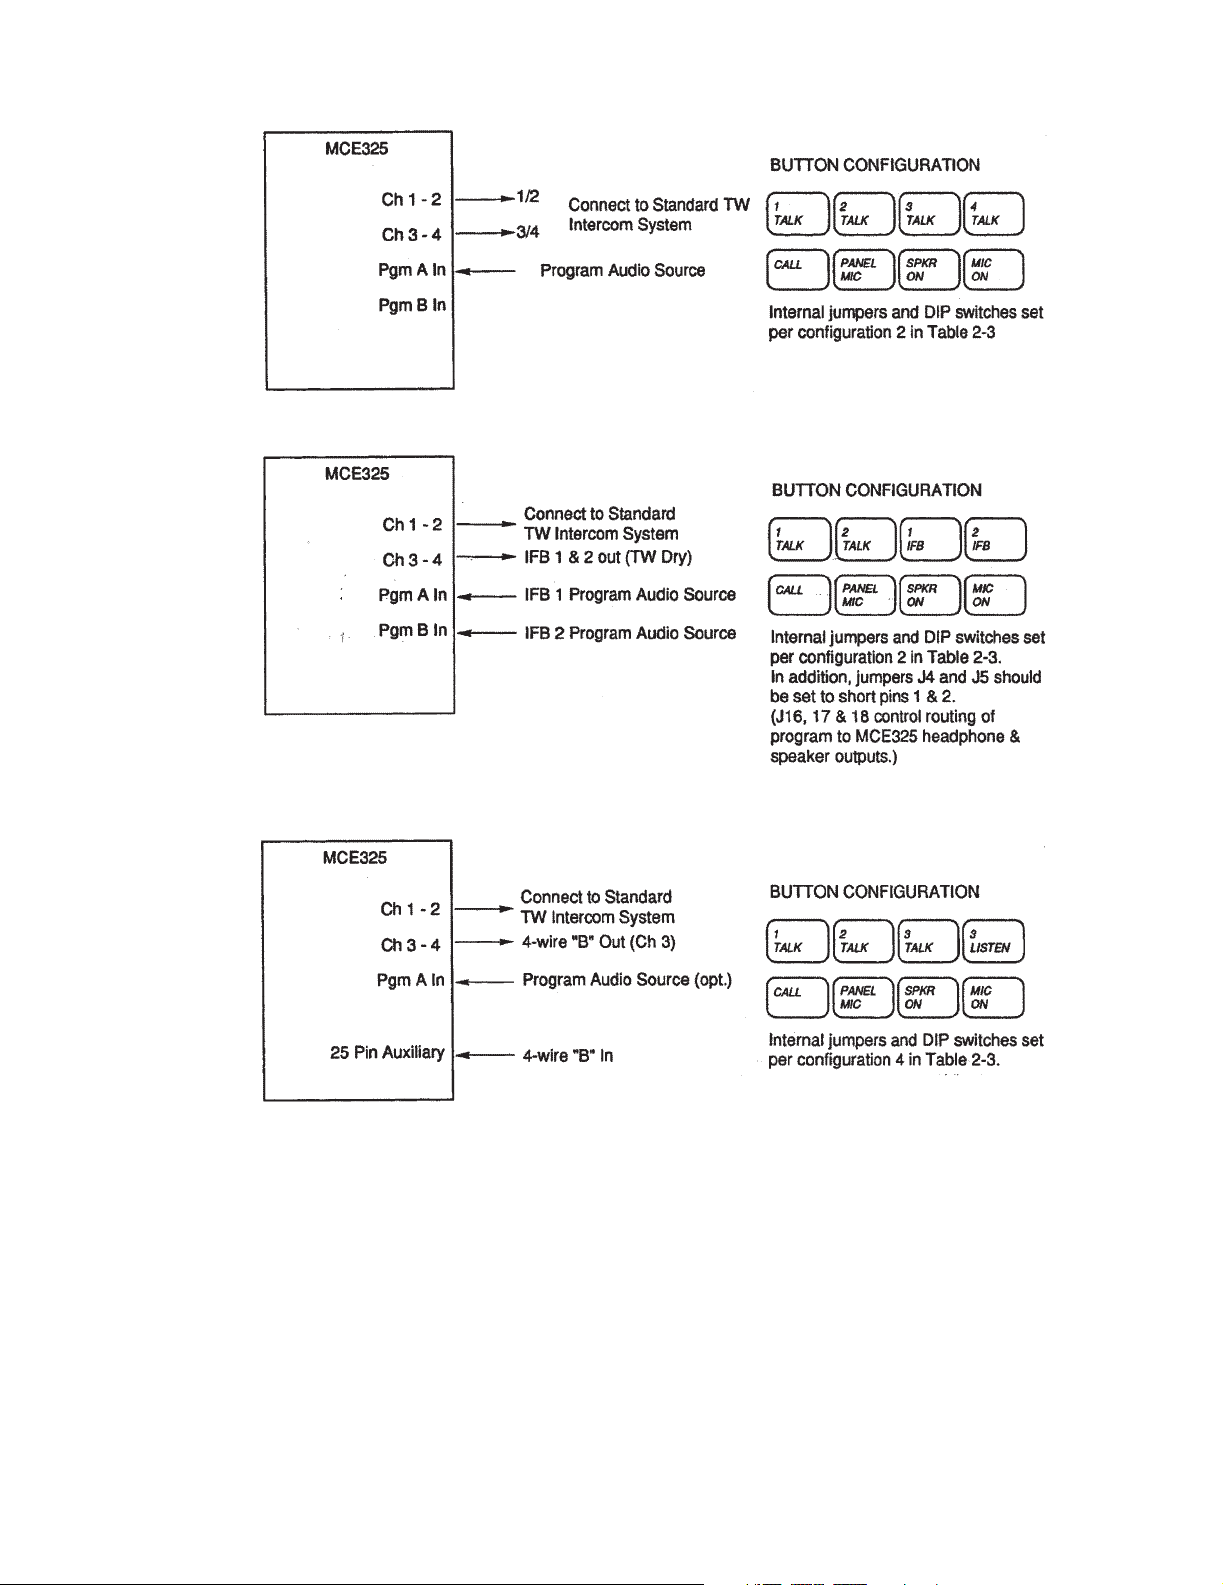
Figure 1.3
Standard four-channel, two-wire configuration.
Figure 1.4
Figure 1.5
A four-channel, two-wire configuration with two channels used for IFB’s.
Configuration for one or two two-wire channels and one four-wire channel.
1-7
Page 16
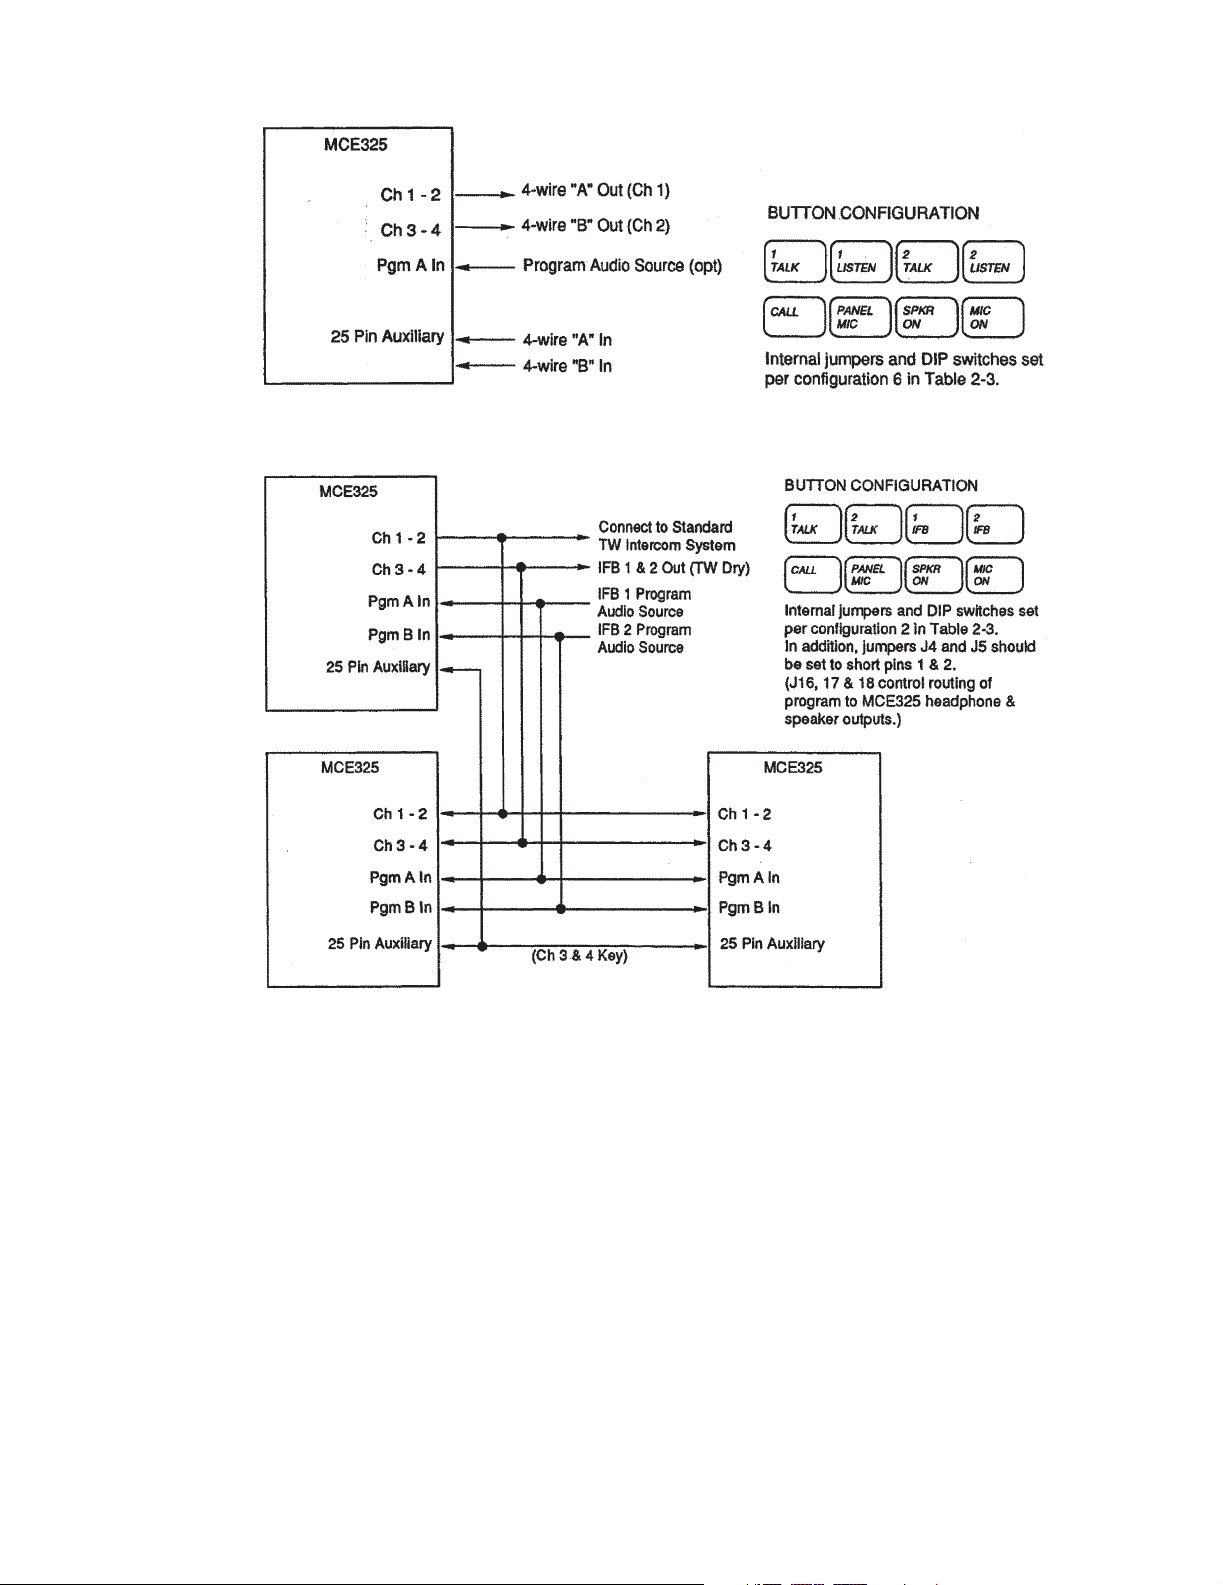
Figure 1.6
Standard two-channel, four wire configuration.
Figure 1.7
Multiple interconnected stations in four-channel, two-wire configuration with two channels
used for IFB’s.
1-8 MCE325 User Instructions
Page 17
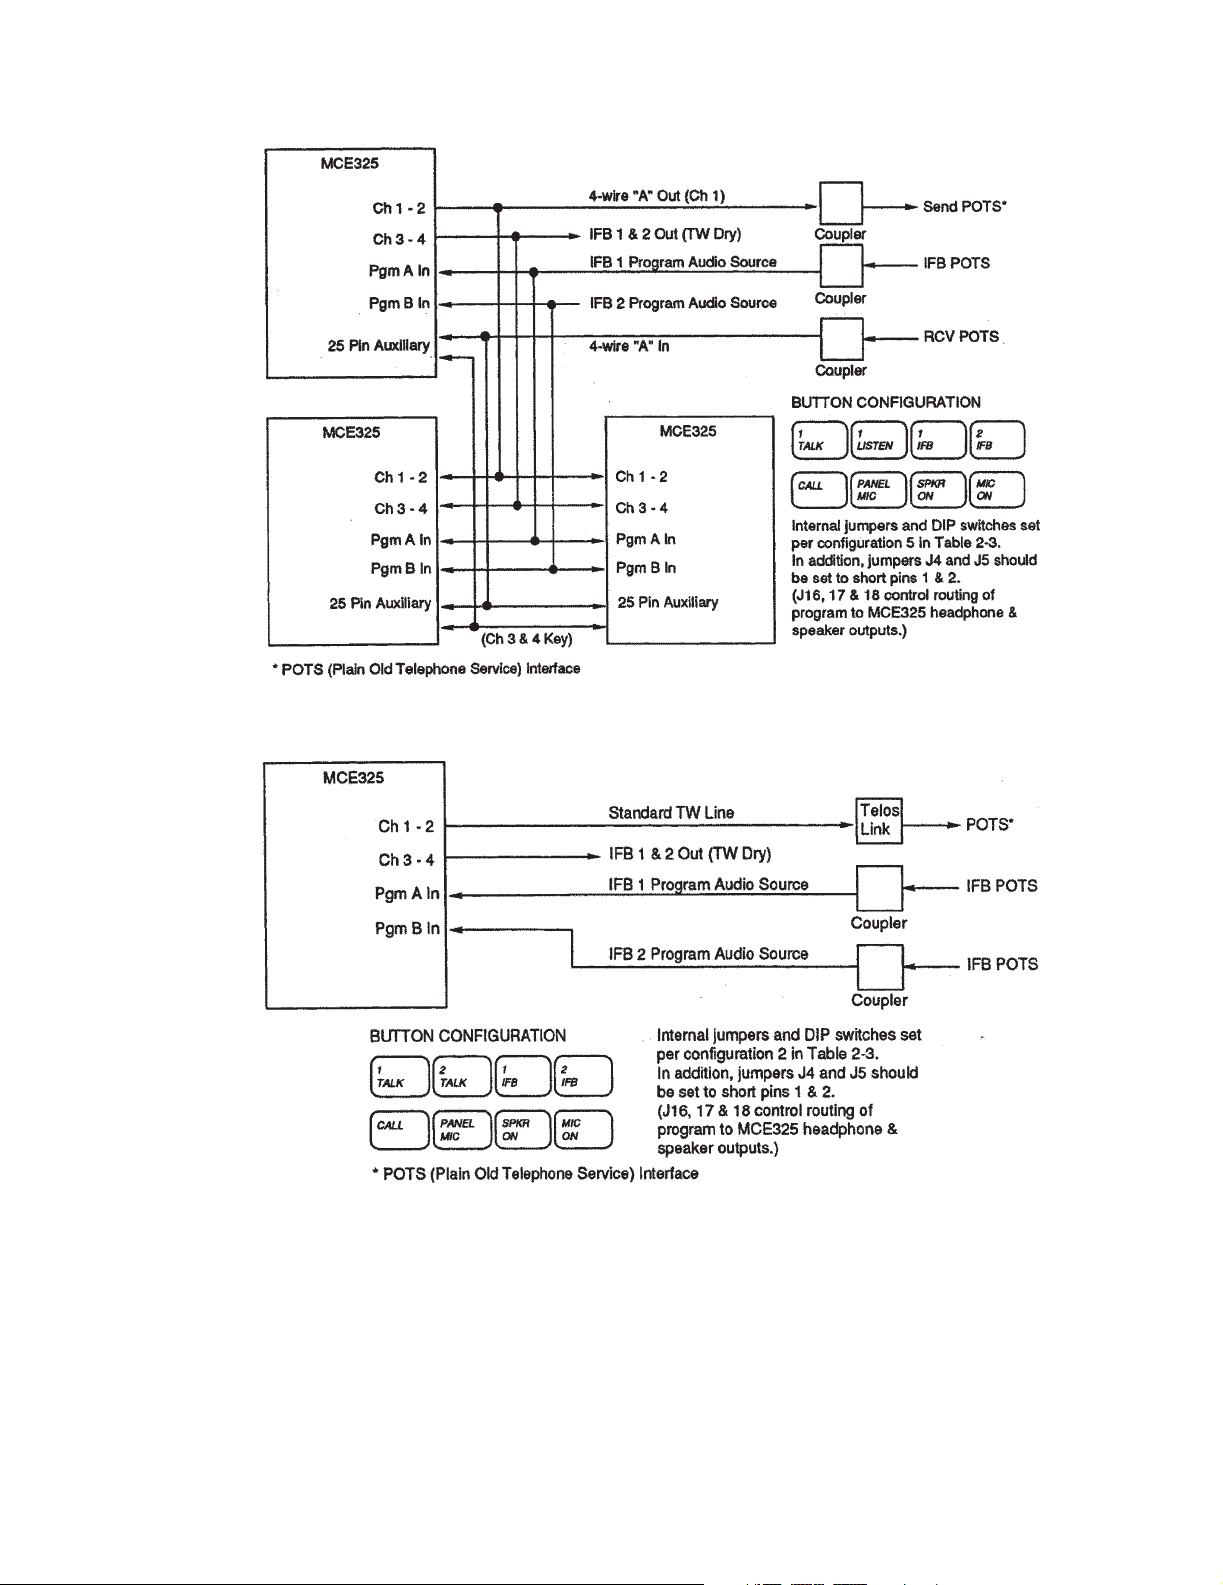
Figure 1.8
Multiple interconnected stations using one four-wire intercom channel and two two-wire
channels for IFB’s.
Figure 1.9
A four-channel, two-wire configuration with two channels used for IFB’s (shown with TELCO
interface).
1-9
Page 18
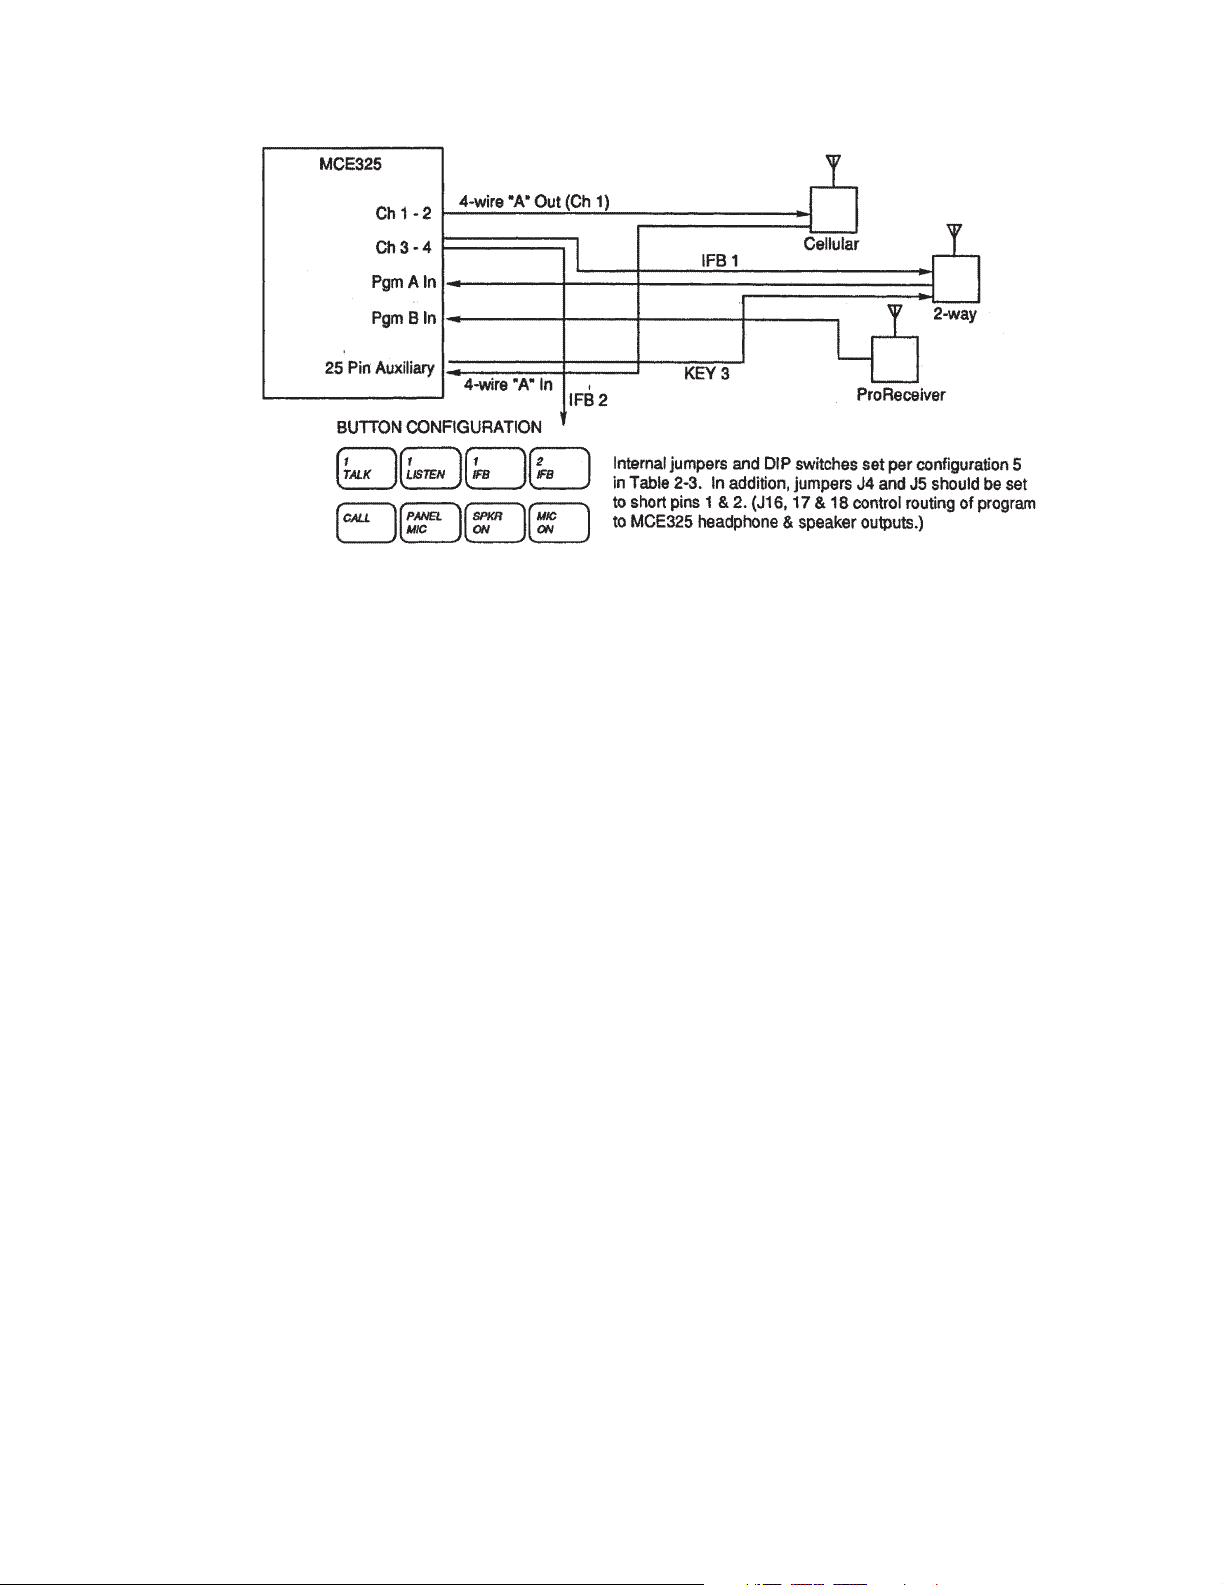
Figure 1.10
Configuration for an ENG truck using one four-wire intercom channel and two two-wire
IFB’s.
1-10 MCE325 User Instructions
Page 19
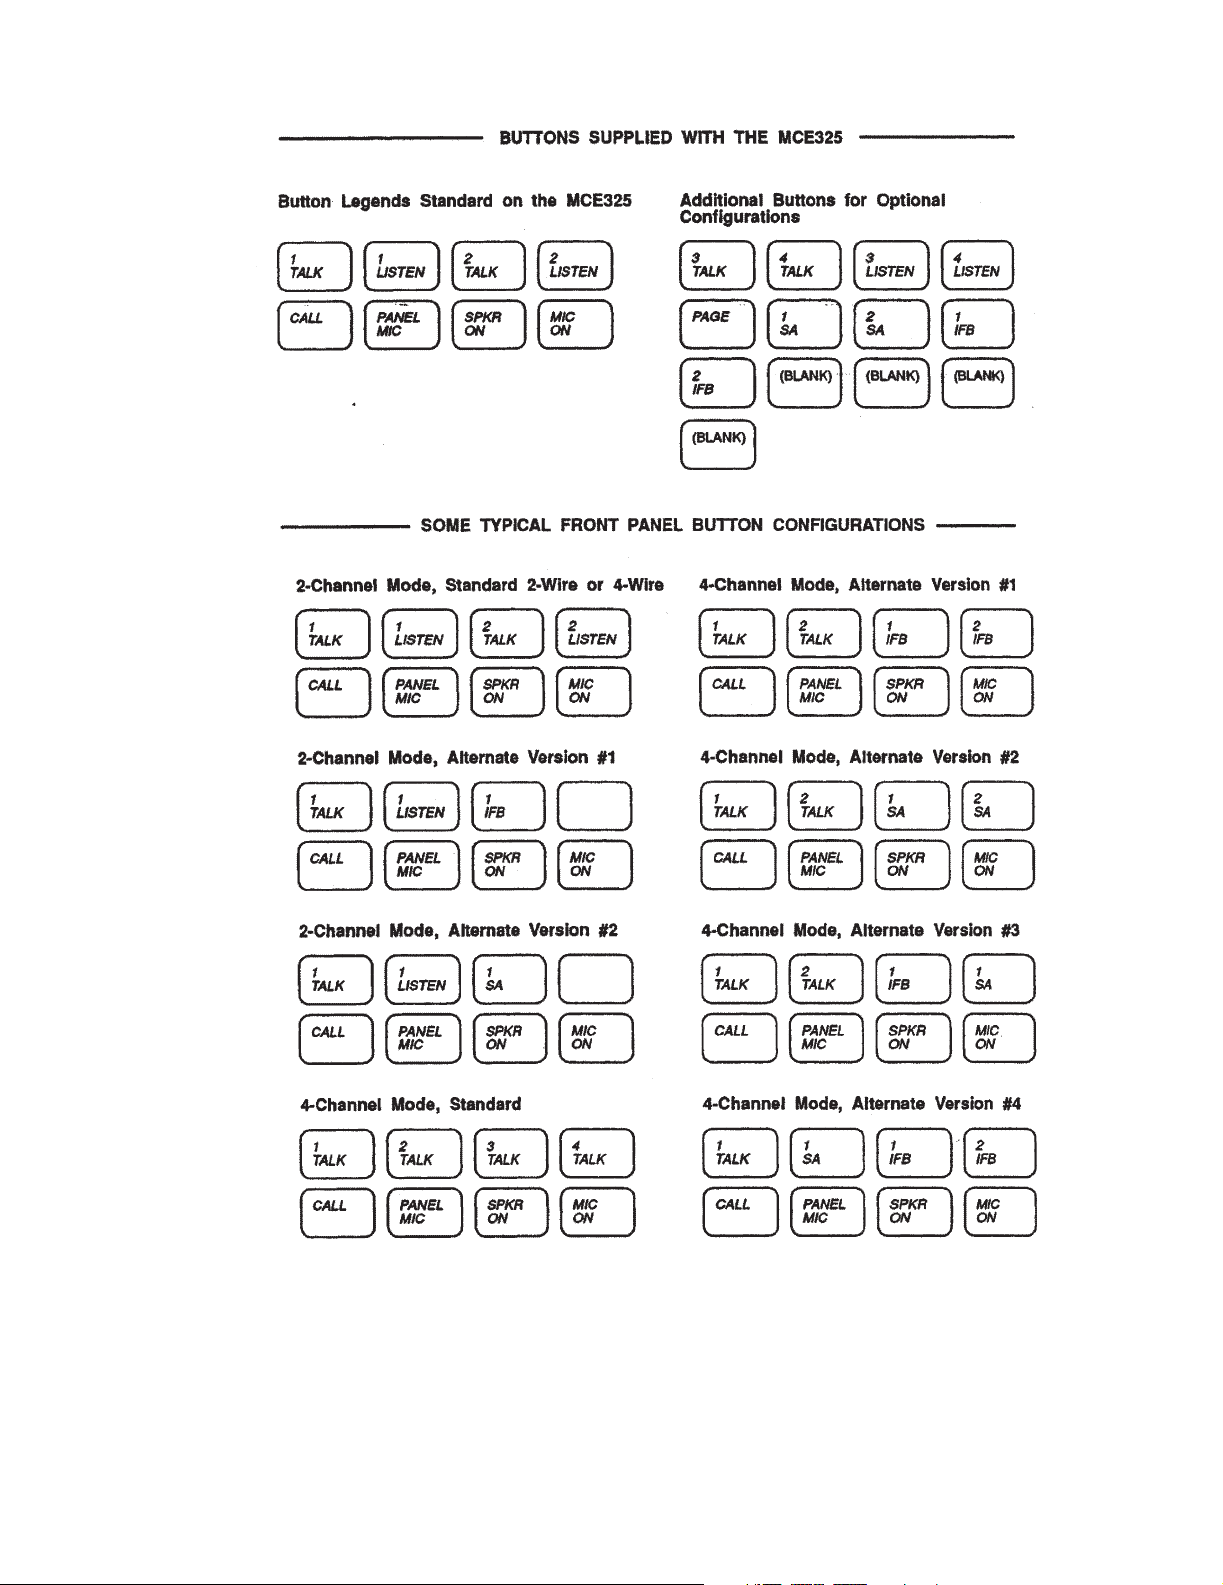
Figure 1.11
MCE325 button configurations.
1-11
Page 20

1-12 MCE325 User Instructions
Page 21

Internal Programming and Adjustments
WARNING
Hazardous voltages exist inside this equipment. Disconnect the AC line cord before
opening the equipment or attempting any internal programming or adjusting.
General
S ECTION
C
HAPTER
2
I
NSTALLATION
Prior to installing the MCE325, it may be necessary to change some of the internal programming
to suit your particular application. Table 2.1 and Table 2.2 list the functions for the DIP switches
and jumpers which are used for internal programming. Also shown are the default settings that
were pre-programmed at the factory.
If your application requires settings that are different from the defaults, you will have to remove
the top cover of the unit (see Figure 2.1) and make the required changes. If you do change the
internal programming, it may be useful to note the changes for future reference.
The locations of the DIP switches and jumpers are illustrated in Figure 2.2. DIP switch
programming is accomplished by setting switches to the “off” or “on” positions. Jumper
programming is accomplished using shorting jumpers. By inserting the jumpers to short the
appropriate pins, a function is either assigned or not assigned. Pin 1 of each jumper is indicated by
a square symbol in Figure 2.2 for reference when making changes. Also shown in Figure 2.2 are
trimmers for adjusting the sidetone and speaker dimming levels. Usage of the DIP switches,
jumpers, and level trimmers is described in the following paragraphs.
2-1
Page 22

Figure 2.1
Top cover removal.
NOTE
Intercom Line-Channel Configurations (DS1-DS3, J6, J7, J19 & J20)
The four channels of the MCE325 may be assigned to intercom lines in a variety of ways.
Channel assignment is determined by the settings of DIP switches DS1 through DS3 and jumpers
J6, J7, J19, and J20. There are six possible intercom line configurations. These are listed in Table
2.3 together with the proper DIP switch and jumper settings for each.
Table 2.1
Switch Number Switch Function Default Setting
DS1 four-wire CH A output not installed (off), four-wire CH A output installed
DS2 four-wire CH B output not installed (off), four-wire CH B output installed
DS3 two-channel mode (off)*, four-channel mode (on) Off
DS4 Front panel setup lock-out disabled (off), Front panel setup lock-out
DS5 Listen and talk muted during ISO (off), Talk only muted during ISO (on) Off
DS6 Not used Off
DS7 Talk-off transmit disabled (off), Talk-off transmit enabled (on) On
DS8 VOX disabled (off), VOX enabled (on) Off
The terms “two-channel mode” and “four-channel mode” apply only to two-wire lines. In twochannel mode, each two-wire line uses two channel selector buttons: one for talk and one for
listen. In four-channel mode, each two-wire line uses one channel selector button for both talk and
listen.
DIP switch functions and default settings.
Off
(on)
Off
(on)
Off
enabled (on)
The two-channel mode should be selected under only two circumstances:
1 When only one or two two-wire lines are connected to channels one and two only.
2-2 CSI-200 User Instructions
Page 23

2 When a two-wire line is connected to channel one and a four-wire line is connected to channel
B.
For all other intercom line configurations that use two-wire lines, DS3 must be set to the “on”
position for four-channel operation.
Table 2.2
Jumper Number Jumper Function Default Setting
J4 Assigns PROGRAM A input to two-wire CH 3 or four-wire CH B.
J5 Assigns PROGRAM B input to two-wire CH 4.
J6 Selects two-wire CH1 and CH 2, or four-wire CH A output. (See J19
J7 Selects two-wire CH 3 and CH 4, or four-wire CH B output. (See J20
J16 Assigns mono mix of the PROGRAM A and B inputs to the left
J17 Assigns mono mix of the PROGRAM A and B inputs to the right
J18 Assigns mono mix of the PROGRAM A and B inputs to the speaker.
J19 Selects four-wire CH A input. Off (not used): pins 2 & 3 shorted.*
J20 Selects four-wire CH B input. Off (not used): pins 2 & 3 shorted.*
J24 Selects unbalanced or balanced dynamic mic input.
Jumper functions and default settings.
Not assigned
Not assigned: pins 2 & 3 shorted.
Assigned: pins 1 & 2 shorted (IFB to CH 3).
Not assigned
Not assigned: pins 2 & 3 shorted.
Assigned: pins 1 & 2 shorted (IFB to CH 4).
Two-wire operation
for CH A input.)
CH1 and CH 2 selected: pins 2 & 3 shorted.
Four-wire CH A output selected: pins 1 & 2 shorted.
Two-wire operation
for Ch B input.)
CH 3 and CH 4 selected: pins 2 & 3 shorted.
Four-wire CH B output selected: pins 1 & 2 shorted.
Assigned
headphone.
Not assigned: pins 2 & 3 shorted.
Assigned: pins 1 & 2 shorted.
Assigned
headphone.
Not assigned: pins 2 & 3 shorted.
Assigned: pins 1 & 2 shorted.
Assigned
Not assigned: pins 2 & 3 shorted.
Assigned: pins 1 & 2 shorted.
Off
On when LISTEN 1 button is on: pins 1 & 2 shorted.
Always on: pins 3 & 4 shorted.
Off
On when LISTEN 2 button is on: pins 1 & 2 shorted.
Always on: pins 3 & 4 shorted.
Unbalanced mic input
Unbalanced: pins 2 & 3 shorted.
Balanced: pins 1 & 2 shorted.
NOTE
*J19 and J20 jumpers should be in “off” positions when two-wire lines are used.
2-3
Page 24
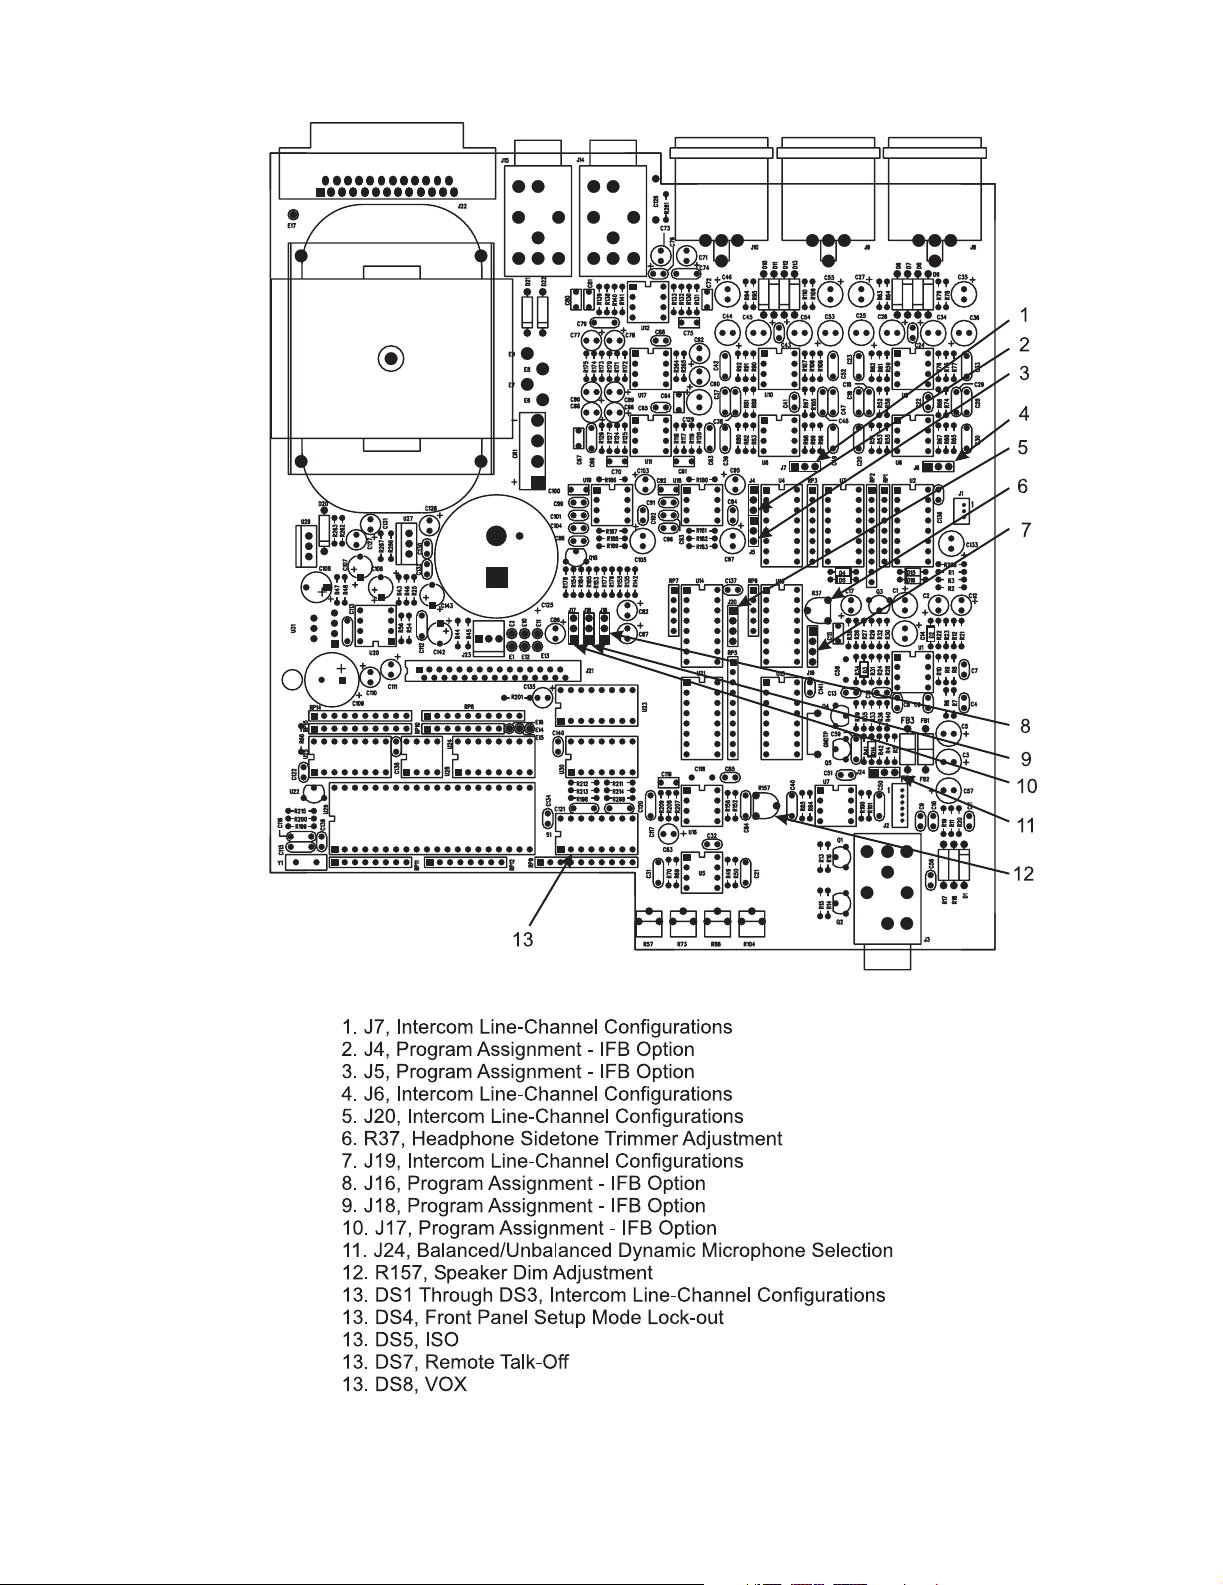
Figure 2.2
Internal DIP switches, jumpers and level trimmers.
2-4 CSI-200 User Instructions
Page 25
Table 2.3
DIP SWITCHES JUMPERS
DS1 DS2 DS3 J6 J7 J19 J20
Configuration 1: Two 2-wire lines (CH 1& CH 2). (Default configuration.)
Off Off Off Pins 2 & 3 shorted Pins 2 & 3 shorted Pins 2 & 3 shorted Pins 2 & 3 shorted
Configuration 2: Three or four 2-wire lines (CH 1, CH 2, CH 3, CH 4).
Off Off On Pins 2 & 3 shorted Pins 2 & 3 shorted Pins 2 & 3 shorted Pins 2 & 3 shorted
Configuration 3: One 2-wire line (CH 1); One 4-wire line (CH B).
Off On Off Pins 2 & 3 shorted Pins 1 & 2 shorted Pins 2 & 3 shorted Pins 1 & 2 shorted
Configuration 4: Two 2-wire lines (CH1 & CH2); One 4-wire line (CH B).
Off On On Pins 2 & 3 shorted Pins 1 & 2 shorted Pins 2 & 3 shorted Pins 1 & 2 shorted
Configuration 5: Two 2-wire lines (CH 3 & CH4); One 4-wire line (CH A).
On Off On Pins 1 & 2 shorted Pins 2 & 3 shorted Pins 1 & 2 shorted Pins 2 & 3 shorted
Configuration 6: Two 4-wire lines (CH A & CH B).
On On On Pins 1 & 2 shorted Pins 1 & 2 shorted Pins 1 & 2 shorted Pins 1 & 2 shorted
Internal programming for the various intercom line configurations.
NOTE
See Table 3.1for a summary of how the channel selector buttons work for the various
configurations. The MCE325 is typically supplied with a termination plug inserted into J10. This
plug terminates CH 3 and CH 4 with 200 ohms to prevent oscillation when these channels are not
used. When the channels are used, this termination plug should be removed.
Front Panel Setup Mode Lock-out (DS4)
DIP switch DS4 may be set to lock out the front panel programming and prevent changes. Front
panel programming is described in Section 3, Operation.
ISO (DS5)
The MCE325 may be used with an RTS Model VCP6A, VCP12A, or VCP12B Control Station to
permit private conversation between the MCE325 operator and a camera operator. When ISO
mode is engaged, either talk, or talk and listen (depending on the setting of DS5) for all other
channels connected to the MCE325 will be muted, and a private line will be established between
the MCE325 operator and the camera operator. See “ISO Connection” for wiring information.
Remote Talk-off (DS7)
The MCE325 is capable of generating and transmitting an inaudible, 24 kHz signal on an
intercom channel. This signal is used to turn off the microphones on any remote stations on the
channel (stations with remote talk-off feature only). This feature is useful when an unattended
user station with an activated microphone is introducing unnecessary noise into a line. DIP switch
DS7 enables/disables this feature. When remote talk off is enabled, the talk-off signal is activated
using the CALL button on the front panel. (for Operation see “Using the Talk-Off Feature”.)
VOX (DS8)
DIP switch DS8 turns the voice activated microphone circuit on or off. Voice activation can be
used with the panel microphone, a headset, or a remote microphone connected at the rear panel.
(There is no adjustment for VOX sensitivity.)
2-5
Page 26

Program Assignment – IFB Option (J4, J5, J16-J18)
Jumper J4 assigns PROGRAM A to two-wire CH 3 or four-wire CH B with interrupt during talk
(IFB A). Jumper J5 assigns PROGRAM B to CH 4 with interrupt during talk (IFB B).
(PROGRAM B is not used in four-wire mode.)
Jumpers J16, J17, and J18 assign the mono mix of both program inputs to the left headphone,
right headphone, and speaker respectively. Program volume to the headphones and speaker is
controlled by the PGM VOL control on the front panel.
See Table 2.2 for Jumper settings. See Figure 2.2 for locations of jumpers.
Balanced/Unbalanced Dynamic Microphone Selection (J24)
The MCE 325 may be used with headsets having either a balanced or unbalanced dynamic
microphone. The MCE325 is pre-programmed for use with an unbalanced microphone by
shorting J24 pins 2 and 3. For balanced microphones, remove the shorting jumper and reinstall it
to short pins 1 and 2.
Headphone Sidetone Trimmer Adjustment (R37)
The headphone sidetone trimmer (R37) adjusts the loudness of your own voice heard in your
headset when the microphone is on and the speaker is off. (It does not affect the actual level heard
on the intercom lines.) This trimmer is preset so that your voice level in the headphones will be
approximately ¾ of the intercom line level. To prevent feedback, this signal is automatically
turned off when the external speaker is turned on with the SPKR ON switch.
Speaker Dim Adjustment (R157)
When an external speaker is used, switching the microphone on will cause the speaker level to
attenuate. The level of attenuation may be adjusted with the speaker dim trimmer (R157). The
minimum attenuation of 6 dB is preset at the factory (R157 fully clockwise). The range of
adjustment is –6 dB to –40 dB.
Mechanical Installation
Dimensional requirements for the various mounting configurations are illustrated in Section 6.
Also allow an additional 4.0 inches (102 mm) of rear panel clearance for connectors.
If the headset connector is remotely located (See “External Headset”), allow space between the
cable and interfering sources such as TV monitors, power supplies and equipment with internal
power supplies. The MCE325 has no special ventilation space requirements.
Assembly of optional mounting components is shown in Figure 2.3.
2-6 CSI-200 User Instructions
Page 27

Figure 2.3
Mounting configurations.
2-7
Page 28

Electrical Installation
AC Power and Fuse
The Model MCE325 is pre-wired for either 115 or 230 VAC operation, and the appropriate fuse is
already installed. The MCE325 uses a 0.5A Slo-Blo fuse for 115 volt operation, or a 0.25A SloBlo fuse for 230 volt operation. (A fused external DC source may be used instead of AC power if
desired. (See “External DC Power Source”.)
Intercom Lines J8, J9, and J10
General
Intercom line connectors J8 and J9 are parallel-wired for loop-through connection to other
intercom stations. These connectors are used for connection of two-wire lines to channels one and
two (full-duplex operation), or for connection of four-wire channel A output (channel A input is
connected at the auxiliary connector).
Intercom line connector J10 is used for connection of two-wire lines to channels three and four
(full-duplex operation), or for connection of four-wire channel B output (channel B input is
connected at the auxiliary connector).
Connector Pin-outs
Table 2.4
PIN # FUNCTION
1 Common (low side of line)
2 Two-wire CH 1 or four-wire CH A high output
3 Two-wire CH 2 or four-wire CH A low output
Table 2.5
PIN # FUNCTION
1 Common (low side of line)
2 Two-wire CH 3 or four-wire CH B high output
3 Two-wire CH 4 or four-wire CH B low output
Connectors J8 and J9.
Connection J10
Four-wire Output Termination
Figure 2.4
4-wire output terminations.
When four-wire outputs are used, termination resistors must be installed for proper operation. The
output amplifiers are current sources, and the output level is determined by the terminating
2-8 CSI-200 User Instructions
Page 29

resistor values. These resistors would normally be installed in the cable connector, but may be
placed at any point in the signal path. Recommended values are shown in X.
Program Inputs, J14 and J15
The PROGRAM A and B inputs accept line-level (0 dBu nominal), balanced audio. The program
inputs are connected using ¼-inch stereo phone plugs.
Figure 2.5
SECTION FUNCTION
Tip Program high
Ring Program low
Sleeve Common
Connectors J14 and J15.
The MCE325 must be internally programmed to assign the program inputs to the intercom lines,
headphones, or speaker output (see “Program Assignment”). Program volume to the headphones
and speaker is controlled by the PGM VOL control on the front panel.
External Speaker, J27
The SPEAKER OUTPUT jack provides a bridging-type output for an external speaker (8 ohms
minimum). The external speaker is connected using a ¼-inch phone plug.
Figure 2.6
Connector J27.
CAUTION
SECTION FUNCTION
Tip Speaker plus
Ring Speaker minus
Sleeve No connection
The MCE325 provides a bridging-type speaker output. DO NOT LET EITHER SPEAKER
LEAD CONTACT GROUND.
The external speaker is turned on and off by the front panel SPKR ON switch.
Auxiliary Connector, J22
Four-Wire Channel A and B Input
The four-wire channel A and channel B inputs are connected at the auxiliary connector as
follows:
Table 2.6
PIN # FUNCTION
8 Four-wire channel A high
21 Four-wire channel A low
9 Four-wire channel B high
22 Four-wire channel B low
Auxiliary connector, J22.
The four-wire inputs must be assigned, using internal programming jumpers J19 and J20, before
they can be used (as previously described in “Intercom Line-Channel Configurations (DS1-DS3,
J6, J7, J19 & J20).”
2-9
Page 30

Key outputs – Expanded IFB Option
Four logic-type outputs are available at pins 6, 7, 19, and 20 of the auxiliary connector:
Table 2.7
PIN # FUNCTION
6 CH 1 or four wire CH A key output
7 CH 3 or four-wire CH B key output
19 CH 2 key output
20 CH 4 key output
Auxiliary connector, J22.
There are internal pull-up resistors on the CH 3 and CH 4 key outputs. Pressing the CH 3 or CH 4
talk button will result in a logic high to low transition at the corresponding key output. (Logic
high is approximately 13 VDC; Logic low is less than 2 VDC.) There are no internal pull-up
resistors on the CH 1 and CH 2 key outputs. These outputs will “float” until externally loaded.
The channel three and four key outputs may also be used to expand the IFB function, allowing
any one of several MCE325 User Stations to interrupt a single-point program source and talk on
the interrupted channel. For example, if one MCE325 is operating with PROGRAM A assigned to
channel three, the channel three key output of a second MCE325 User Station (with no program
connected) can be directly connected to the channel three key output of the first MCE325;
activating channel three for talk from either station will now interrupt the program source and
permit that station to talk on channel three.
Remote Microphone Switch
A remote microphone switch may be connected at the auxiliary connector. Connect mic switch
high to pin 25; connect mic switch low to pin 10 or 11. When the switch is closed, the microphone
will turn on, and the front panel MIC ON LED will illuminate. When the remote switch is off, the
microphone may be turned on from the front panel. When the remote switch is on however, the
microphone cannot be turned off from the front panel.
ISO Connection
To connect an RTS Model VCP6A, VCP12A, or VCP12B ISO Control Panel to the MCE325,
connect the unswitched microphone output of the MCE325 (pins 1 and 14 of the auxiliary
connector) to the four-wire input of the VCP Control Panel; connect the four-wire output of the
VCP Control Panel to either a four-wire input or a program input of the MCE325; connect the
logic contact output of the VCP Control Station to the ISO input of the MCE325 (pin 12 of the
auxiliary connector); connect VCP common to pin 11 of the auxiliary connector.
External Headset
An external headset may be connected to the auxiliary connector. (See “Headset Requirements”.)
Connect headphone left to pin 5, headphone right to pin 18, and headphone common to pin 17.
Connect microphone high to pin 4; connect microphone low to pin 16. The external headset
connections are wired in parallel with the front panel dynamic headset connector; therefore, use
only one at a time.
In the headset connecting cable, prevent coupling between the microphone and headphone leads
by using a shielded twisted pair for the microphone, and a separate shielded twisted pair for the
headphones. Do not allow headphone common to contact microphone low. Tie the headphone
shield to headphone common. The headset cable can be made longer when the microphone and
headphone pairs are physically separated. The wider the separation, the longer the allowable cable
length. Estimated maximum usable headphone cable lengths are as follows:
Single cable, two shielded twisted pairs: 10 feet (3.05 m). Dual-ribbed cable, two shielded twisted
pairs: 30 feet (9.14 m).
2-10 CSI-200 User Instructions
Page 31

Separate shielded twisted pair cables: 50 feet (15.24 m). Balanced microphone input: up to 100
feet (30.48 m).
External Electret Microphone
An external electret microphone may be connected at the auxiliary connector and used in place of
a front-panel gooseneck microphone. Connect microphone high/bias to pin 15 and connect
microphone low to pin 2. When using an external microphone, do not connect a front-panel
gooseneck microphone.
Unswitched Microphone Output
The microphone audio is provided as an unswitched, balanced output at the auxiliary connector.
The in-phase signal is available at pin 1; the inverted-phase is available at pin 14.
External DC Power Source
The MCE325 may be powered from an external DC power supply in the 10 to 25 volt range (500
mA minimum).
If the external supply is in the 10 to 15 volt range, connect the positive lead to pin 13 of the
auxiliary connector and connect the minus lead to pin 10 or 11. A 0.5 Amp slo-blo fuse should be
connected in-line for 17 to 24 volt operation.
Remote Speaker Mute Control
When the MCE325 is used with an external speaker, the speaker may be muted from a remote
location. Applying a logic low signal to pin 25 of the auxiliary connector will cause muting.
Connect circuit common to pin 11.
Front Panel Headset Connections
Headset Requirements
Use headphones with an impedance of 25 ohms or greater. Low impedance 8 ohm headphones are
not recommended. Headphones with good acoustic isolation (20 to 40 dB) improve
communication in high ambient noise environments, and allow the user to use the headphones at a
less tiring, lower volume.
Headset Connections
Dynamic-microphone headset connector: XLR-6 type receptacle.
Table 2.8
PIN # FUNCTION
1 Balanced mic low/unbalanced mic common
2 Balanced/unbalanced mic high
3 Headphone/mic switch common
4 Headphone left
5 Headphone right
6 Mic Switch high
Dynamic-microphone headset connector.
2-11
Page 32

Carbon-microphone headset connector: ¼-inch, tip-ring-sleeve phone jack.
Table 2.9
SECTION FUNCTION
Tip Carbon microphone
Ring Headphone
Sleeve Common/ground
Carbon-microphone headset connector.
2-12 CSI-200 User Instructions
Page 33

General
S ECTION
C
HAPTER
3
O
PERATION
The front panel buttons have different functions when the MCE325 is switched from operating
mode to setup mode. Legends on the buttons indicate their operating mode functions; legends
under the buttons indicate their setup mode functions. All of the front panel buttons were preprogrammed for a certain type of operation. This is the default configuration. Operation for the
default configuration is described first, and is then followed by front panel programming
instructions to alter the operation.
Operating Instructions
Momentary/Latching Button action
The channel selector buttons and the MIC ON button feature a special momentary/latching dualaction: if a button is pressed and released quickly it will “latch” (turning “on” if off or turning
“off” if on); if the button is pressed and held slightly longer, the action will be momentary and the
button will turn off when released. All other buttons are latching-only (press to activate, press to
release).
NOTE
The latching action can be disabled through the front panel programming.
LED Indicators
LED indicators are provided for each button to indicate current status. The LED can provide up to
four indications: continuously off, continuously on, short blink (50% on, 50% off) and long blink
(90% on, 10% off).
Channel Selection
Table 3.1 summarizes the operation of the channel selector buttons for the various intercom line
configurations. Basically, four-wire intercom lines always use one TALK and one LISTEN
button for intercom communication, as do two-wire lines when the station has been programmed
for two-channel operation.
When the station is operated in four-channel mode, however, each two-wire intercom line uses
only one channel selector button to control both talk and listen, and the MCE325 is preprogrammed so that a channel is activated for both talk and listen when the button is pressed. The
3-1
Page 34

NOTE
NOTE
button action can be changed, via the front panel programming, so that the button controls talk
only, with listen either always on or always off.
Panel Mic/Headset Mic Selection
The PANEL MIC button selects either panel microphone (LED on) or headset microphone (LED
off).
Microphone On/Off
The MIC ON button turns the microphone on (LED on) or off (LED off).
The MCE325 can be programmed, via the front panel, so that the microphone will automatically
turn on whenever a channel is activated for talk. The MCE325 may also be internally
programmed for voice-activated microphone (VOX) as previously described in Section 2.
Speaker On/Off
The SPKR ON button turns the external speaker on (LED on) or off (LED off).
Volume Adjustment
Table 3.1 summarizes the operation of the volume controls for the various intercom line
configurations. The MCE325 is pre-programmed for stereo operation; CH 1 (VOL 1) adjusts the
level to the left headphone and CH 2 (VOL 2) adjusts the level to the right.
The MCE325 can be programmed, via the front panel, for monaural operation if desired.
NOTE
The PGM VOL control adjusts the monaural mix of both program inputs to both headphones and
to the external speaker. It does not affect the program volume on the intercom lines.
Front Panel Sidetone Nulling Trimmer Adjustment
When the MCE325 is used with two-wire lines, the station operator’s voice signal is not only
transmitted onto the intercom lines, but also echoed back into the MCE325 receive circuits. This
can result in acoustic feedback when the MCE325 is used with an external speaker. The sidetone
nulling trimmers are used to null, or subtract, the station operator’s voice signal from the rest of
the received signal to prevent this feedback. (NOTE: This is not necessary in four-wire systems
since transmit and receive use separate circuits.) A trimmer is provided for each of the four
channels. The trimmers are factory-preset for maximum nulling of the microphone signal when
an ideal 200-ohm resistance terminates each intercom channel; however, the trimmers may
require slight readjustment after the MCE325 has been installed to compensate for variations
from the ideal.
To adjust the sidetone nulling trimmers:
1 Turn the speaker switch on (even if an external speaker is not connected). This will turn off the
internal, true sidetone trimmer (see note below).
2 Turn on the microphone.
3 Activate one talk button at a time, and speak into the microphone. Slowly increase the volume,
and note the level of your voice in the headphones or speaker. Adjust the corresponding
sidetone nulling trimmer to minimize your voice signal. Repeat for each channel being used,
making sure that only one channel is activated at a time.
There is also an internal, true sidetone trimmer, which allows the station operator to hear his or
her voice when using headphones. This sidetone signal is turned off when the speaker switch is
3-2 CSI-200 User Instructions
Page 35

turned on to prevent feedback. See “Headphone Sidetone Trimmer Adjustment (R37)” for further
details.
Sending and Receiving Call Signals
To call a channel:
1 Press the CALL button; the CALL LED’s will flash to indicate “call signal ready”.
2 Press and hold the talk button for the channel to be called; the call signal will be transmitted as
long as the talk button is held.
3 When a response is received, release the talk button to turn off the call signal.
Receiving a call:
When there is an incoming call, the indicator LED above the appropriate channel selector button
will flash.
Using the Talk-Off Feature
The talk-off feature deactivates the mic switches of all remote user stations on a selected channel.
To use talk-off:
1 Press and release the CALL button three times in rapid succession; the CALL LED’s will turn
on to indicate “talk-off signal ready”.
2 Momentarily press the talk button for the channel to be deactivated. This will cause the talk-off
signal to be transmitted.
3 Release the talk button to end the talk-off signal transmission.
Front Panel Programming
Activating Setup Mode
Press and hold the CALL button for 5 seconds: the TALK 1, LISTEN 1, TALK 2, LISTEN 2,
PANEL MIC, SPKR ON, and MIC ON LED’s will begin to flash. This is the main menu.
Menu Selection/Ending Setup
The submenu names are listed under the switches. Press the desired switch to access the submenu
for that switch. Press the CALL button from a submenu to return to the main menu; press the
CALL button again to exit from the main menu to the operating mode.
NOTE
If no submenu is selected from the main menu within 12 seconds after program mode activation,
the programming mode will time out, and the MCE325 will return to normal operation. If a
submenu is selected, however, the unit will remain in programming mode until intentionally
exited.
Submenus
The following paragraphs describe each of the submenus. The default, or factory pre-programmed
setting, is also indicated for each submenu.
3-3
Page 36

Channel ID
The MCE325 can be programmed so that when someone is talking on an intercom channel, the
corresponding listen button LED will flicker as they talk to provide a visual indication of which
channel is talking. With the Channel ID submenu selected, press each TALK button to select or
deselect Channel ID. The button’s LED will indicate the Selected mode as follows:
Short LED blink: Channel ID disabled. (default).
Long LED blink: Channel ID enabled.
Four-channel Listen
When the MCE325 is operating in four-channel mode, each channel selector button may be
individually programmed for one of three types of operation. With the Four-channel Listen
submenu activated, press each channel selector button one or more times to select the desired type
of operation as follows:
Short LED blink (90% on, 10% off): Button must be pressed to talk or listen (default).
Long LED blink (50% on, 50 % off): Listen will always be on; button must be pressed to talk.
LED off: listen will always be off; button must be pressed to talk.
Mono
The headphone output may be configured for either monaural or stereo operation. With the Mono
submenu selected, press the Mono button one or more times to select the type of headphone
output as follows:
Long LED blink: (50% on, 50 % off): Stereo (default).
Short LED blink: (90% on, 10 % off): Monaural.
Call Disable
Call disable prohibits incoming or outgoing call indication and signaling on selected channels.
With the Call Disable submenu selected, press each talk button to select the desired operation as
follows:
Short LED blink (90% on, 10 % off): Call function enabled (default).
Long LED blink (50% on, 50% off): Call function disabled.
Button Lock
Button lock permits all buttons (except CALL) to be individually programmed for one of three
types of operation. With the Button Lock submenu selected, press each button one or more times
to select the desired type of operation as follows:
Short LED blink (90% on, 10% off): No button lock (default).
Long LED blink (50% on, 50% off): Button locked in the “on” position.
LED off: Button locked in the “off” position.
Latch Disable
Latch disable may be used to prohibit latching action for individual channel selector buttons and
the MIC ON button. With the Latch Disable submenu selected, press each channel selector button
or the MIC ON button one or more times to select the desired type of operation as follows:
Short LED blink (90% on, 10% off): Latching enabled (default).
3-4 CSI-200 User Instructions
Page 37

Long LED blink (50% on, 50% off): Latching disabled.
Instant Mic
Talk buttons may be individually programmed to automatically activate the microphone when
pressed. With the Instant Mic submenu selected, press each talk button one or more times to select
the desired type of operation as follows:
Short LED blink (90% on, 10% off): Instant mic off (default).
Long LED blink (50% on, 50% off): Instant mic on.
Reset
To restore the original programming, hold down the CH 1 talk button for about two seconds while
powering up the MCE325.
Table 3.1
VOLUME CONTROL USAGE CHANNEL SELECTOR BUTTON USAGE
CH 1 (VOL 1) CH 2 (VOL 2) 1 TALK 1 LISTEN 2 TALK 2 LISTEN
Configuration 1: Two -2wire lines (CH 1 & CH 2). (Default configuration.)
CH 1 CH 2 CH 1 TALK CH1 LISTEN CH 2 TALK CH 2 LISTEN
Configuration 2: Three or four 2-wire lines (CH 1, CH 2, CH 3, CH 4).
CH 1 & CH 3 CH 2 & CH4 CH 1 TALK &
Configuration 3: One 2-wire line (CH 1); One 4-wire line (CH B).
CH 1 CH B CH 1 TALK CH 1 LISTEN CH B TALK CH B LISTEN
Configuration 4: Two 2-wire lines (CH 1 & CH 2); One 4-wire line (CH B).
CH 1 CH 2 & CH B CH 1 TALK &
Configuration 5: Two 2-wire lines (CH 3 & CH 4); One 4-wire line (CH A).
CH A & CH 3 CH 4 CH A TALK CH A LISTEN CH 3 TALK &
Configuration 6: Two 4-wire lines (CH A & CH B).
CH A CH B CH A TALK CH A LISTEN CH B TALK CH B LISTEN
Front panel control usage for the various intercom line configurations.
LISTEN
LISTEN
CH 2 TALK &
LISTEN
CH 2 TALK &
LISTEN
CH 3 TALK &
LISTEN
CH B TALK CH B LISTEN
LISTEN
CH 4 TALK &
LISTEN
CH 4 TALK &
LISTEN
3-5
Page 38

3-6 CSI-200 User Instructions
Page 39

Preventive Maintenance
Clean the unit and verify its performance periodically.
Factory Support Information
Factory support information is located on the first page of this manual.
S ECTION
C
HAPTER
4
M
AINTENANCE
Corrective Maintenance
WARNING: Hazardous voltages exist inside the MCE325. Attempting diagnosis, repair,
or adjustment with the AC line connected could result in serious injury or death. These
servicing instructions are for qualified personnel only.
Access
1 Reference the AS6464 drawing in section 6. Remove the four long screws (item 4) and the two
short screws (item 5).
2 Lift off the top cover.
3 Pull the front panel slightly forward to clear the carbon mic jack on the main circuit board. Lift
the front panel slightly while sliding the back panel toward the rear and out of the lower case.
The MCE325 may now be operated for troubleshooting.
NOTE
when reassembling the bottom cover, make sure the rubber button on the inside of the bottom
cover (item 7) is toward the front of the unit.
Front Panel Removal
1 Unplug the panel mic (J1) and dynamic-mic headset (J2) connectors from the main circuit
board.
4-1
Page 40

2 The ribbon connector from the front panel board to the main board is attached at both ends with
locking connectors. To unlock the connector, pull the outer shell away from the circuit board.
Then, pull the ribbon cable out.
Cleaning
Clean the front panel and case with alcohol or a mild solution of detergent and water, and then
wipe off detergent residue with a damp rag. Clean the circuit board (if necessary) with a
tetraflouroethane product such as Flux-Off® CZ by Chemtronics®. Use eye protection and avoid
breathing the vapors with these solvents. Also, avoid getting the solvent in any of the
potentiometers.
Test and Adjustment Procedures
Notes
• All AC voltages are RMS unless otherwise specified.
• All input and output levels were measured using an AC voltmeter calibrated for
1 mW = 0.775V at 600 ohms, but with the 600 ohms in the circuit (0 dBu).
• The following procedures involve changing the MCE325 programming. It may be useful to
note the current positions of all jumpers and DIP switches so that they can be returned to their
proper positions after testing.
• The inside of the top cover contains a location diagram for the programming jumpers and DIP
switches. Place it next to the MCE325 during testing for convenient reference.
• Test procedures are written to be performed in the order presented.
Test Equipment
•Variac
• 15 MHz Oscilloscope
•AC Voltmeter
• Frequency Counter
•DC Voltmeter
• Balanced Audio Generator
• 400 Hz to 30 kHz bandpass filter with +40 dB of gain
Power Supply Test
1 Set a variac to 117 VAC, 60 Hz, and connect the MCE325 to the variac. Observe that each
LED blinks on in sequence, and then all LED’s are off.
2 Measure the voltage across the secondary of T1 (between test points E7 and E8 on the main
circuit board).
V
= 18 ±1.8 VAC
sec
3 Measure the DC voltage across the “+” and “-“ terminals of bridge rectifier CR1.
V
= 23 ±2.3 VDC
CR1
4-2 CSI-200 User Instructions
Page 41

4 Measure the ripple.
V
= 140 mVp-p
ripple
5 Measure the regulated DC voltage at U26 pin 2. (There should be no ripple.)
V
6 Measure the mid-voltage source at U17 pin 7.
V
U17-7
7 Measure the +5 V source at the output of U27 pin 2.
V
= 13.85 ±0.3 VDC
U26-2
= 6.93 ±0.3 VDC
= 5.0 ±0.3 VDC
U27-2
Initial Configuration
1 Set all internal jumpers and DIP switches as follows:
DIP Switches: Set all DIP switches, except DS3, to the default settings listed in Table 2.1. Set
DS3 to on. (This places the MCE325 in four-channel mode. Refer to Figure 1.11 for names of
buttons in standard four-channel mode.)
Jumpers: Set all jumpers, except J24, to the default settings listed in Table 2.2. Set J24 to the
balanced mic position (pins 1 and 2 shorted).
2 Connect a 200-ohm termination resistor across each of the four intercom channels:
CH 1: J8 pins 1 and 2
CH 2: J8 pins 1 and 3
CH 3: J10 pins 1 and 2
CH 4: J10 pins 1 and 3
3 Set all front panel buttons to off.
NOTE
4 Set all volume controls to minimum.
Keying Output Test
1 Connect two 47 k ohm resistors: one from the key 1 output (J22 pin 6) to the +14 VDC supply;
and one from the key 2 output (J22 pin 19) to the +14 VDC supply.
The cathode of D22 serves as a convenient connection point for the +14 VDC supply. (Refer to
the AS6245 drawing in Section 6 for the location of D22.) The key 1 and key 2 outputs require
external pull-up resistors. The key 3 and key 4 outputs have internal pull-up resistors (RP2B
and RP2D respectively) and do not require external pull-ups.
Figure 4.1
Auxiliary connector, J22.
4-3
Page 42

2 Set the MIC ON button to on. Set all other front panel buttons to off.
3 Check for 13 VDC minimum at the key 1 output.
4 Turn CH 1 TALK on and check for less than 2 VDC at the key 1 output.
5 Repeat steps 3 and 4 for the other channels:
CH2 TALK: key 2 out (J22 pin 19)
CH3 TALK: key 3 out (J22 pin 7)
CH4 TALK: key 4 out (J22 pin 20)
6 Remove the 47 kohm pull-up resistors when finished.
USMB (Un-Switched Microphone Balanced) Frequency Response and Level Check
1 Set all front panel buttons to off.
2 Connect a signal generator to the DYN MIC HEADSET jack mic input (J2 pins 1 & 2).
3 Connect a 600 ohm resistor across the USMB output (J22, pins 1 and 14).
4 Connect an AC voltmeter across the 600 ohm resistor.
5 Verify the output levels for the input frequencies and levels in Table 4.2.
6 Remove the 600 ohm resistor across the USMB output.
Frequency Response and Level Check, Mic to Line
Four-Channel, Two-Wire Mode
1 Activate the MIC ON button. (All other front panel buttons should be off.)
2 Connect an AC voltmeter across the channel 1 output. The signal generator should still be
connected to the dynamic mic input.
3 Activate the CH 1 TALK button.
4 Verify the output levels for the input frequencies and levels in Table 4.3.
5 Repeat for channels 2 through 4 by connecting the AC voltmeter across the appropriate output,
activating the appropriate TALK button, and measuring the output level:
Table 4.1
TALK BUTTON OUTPUT
CH 2 J8, pins 1 and 3
CH 3 J10, pins 1 and 2
CH 4 J10, pins 1 and 3
Table 4.2
INPUT
FREQUENCY INPUT LEVEL OUTPUT LEVEL
1 kHz -55 dBu (1.4 mV)
100 Hz -55 dBu (1.4 mV)
Talk button vs. output.
USMB frequency response and level check.
–45 dBu (4.35 mV)
–25 dBu (43.5 mV)
–45 dBu (4.35 mV)
–25 dBu (43.5 mV)
-1 ±3 dBu (0.49 – 0.98 VAC)
2.5 ±2 dBu (0.83 – 1.32 VAC)
2 ±2 dBu (0.75 – 1.2 VAC)
-0.5 ±3 dBu (0.51 – 1.03 VAC)
4.2 ±2 dBu (0.98 – 1.55 VAC)
4.2 ±2 dBu (0.98 – 1.55 VAC)
4-4 CSI-200 User Instructions
Page 43

Table 4.2
10 kHz -55 dBu (1.4 mV)
USMB frequency response and level check.
–45 dBu (4.35 mV)
–25 dBu (43.5 mV)
-5.7 ±3 dBu (0.28 – 0.57 VAC)
2.2 ±2 dBu (0.79 – 1.26 VAC)
2.5 ±2dBu (0.83 – 1.32 VAC)
NOTE
Table 4.3
INPUT
FREQUENCY
1 kHz -45 dBu -0.8 ±2 dBu (0.56 – 0.89 VAC)
100 Hz -45 dBu -0.8 ±2 dBu (0.56 – 0.89 VAC)
100 kHz -45 dBu 0.8 ±2 dBu (0.56 – 0.89 VAC)
Mic to line response; 4-channel, 2-wire mode.
INPUT
LEVEL OUTPUT LEVEL
Two-Channel, Four-Wire Mode
1 Remove the 200 ohm terminations from intercom channels 1 through 4.
2 Program the MCE325 to be in two-channel, four-wire mode. (See Table 2.3, configuration 6
for switch settings. See Figure 1.11 for names of buttons in standard two-channel mode.)
3 Connect 200 ohm termination resistors across the four-wire A and four-wire B channels:
Four-Wire A: J8 pins 2 and 3
Four-Wire B: J10 pins 2 and 3
Normally, the four-wire outputs would be terminated with 600 ohms for four-wire operation,
but 200 ohms are used for testing purposes.
4 Set the MIC ON button to on. Set all other front panel buttons to off.
5 Connect an AC voltmeter across the Four-Wire A output.
6 The signal generator should still be connected to the mic input. Set it to 1 kHz, -45 dBu.
NOTE
7 Activate CH 1 TALK.
8 The output level should read –0.8 dBu ±2 dBu (0.56 – 0.89 VAC)
9 Connect the AC voltmeter across the Four-Wire B output.
10Turn off CH 1 TALK and activate CH 2 TALK.
11The output level should read –0.8 dBu ±2 dBu (0.56 – 0.89 VAC)
12Remove the 200 ohm termination resistors.
Sidetone Null Test and Adjustment
This procedure verifies sidetone null operation and optimizes nulling for an ideal 200 ohm line
termination. Since actual intercom line impedance may vary from the ideal, the MCE325 may
have to be readjusted slightly during actual use.
1 Reprogram the MCE325 to be in four-channel, two-wire mode (Table 2.3, configuration 2).
2 Reconnect 200 ohm termination resistors across each of the four intercom channels.
3 Set the MIC ON button to on. Set all other front panel buttons to off.
4 The signal generator should still be connected to the mic input. Set it to 1 kHz, -45 dBu.
5 Activate the CH 1 TALK button.
6 Monitor the AC signal level at U5 pin 7.
7 Adjust R57 (Sidetone 1 on front panel) for maximum null (minimum signal level) at U5 pin 7.
The signal should be 0.025 VAC or less.
4-5
Page 44

8 Repeat for channels 2 through 4 by activating the TALK buttons, connecting to the test points
and adjusting the potentiometers as indicated in Table 4.4.
True Sidetone Adjust
1 Configure the DYN MIC HEADSET jack for stereo mode (See Section 3, “MONO”)
2 Set all front panel buttons to off.
3 Connect 51 ohm load resistors across the left headphone output (J2 pins 3 and 4) and right
headphone output (J2 pins 3 and 5).
4 Connect an AC voltmeter across the left headphone output.
5 Remove the signal generator from the mic input, and connect it across intercom channel 1.
Adjust the generator output to –1 dBu (0.69 VAC), 1 kHz.
6 Activate the CH 1 TALK button, and adjust the CH 1-3 volume control (R1) until you measure
11.2 dBu (2.82 VAC) across the left headphone output.
7 Disconnect the signal generator from intercom channel 1. Adjust the generator for minimum
output, and reconnect it across the DYN MIC HEADSET jack mic input (J2 pins 1 & 2).
Readjust the generator output level to –45 dBu, 1 kHz.
8 Turn on the MIC ON button.
9 Adjust R37 (sidetone) on the MCE325 main board to obtain 8.7 dBu (2.1 VAC) at the left
headphone output.
Level and Frequency Response Check, Intercom Channel to Headphone
1 Set all front panel buttons to off.
2 Remove the signal generator from the mic input, and reconnect it across intercom channel 1.
3 Adjust the signal generator output to –1 dBu, 1 kHz.
4 Preset the CH 1-3 volume control to the 2 o’clock position.
5 Activate the CH 1 TALK button. The left headphone output level should be 11.2 ±2 dBu (2.2
to 3.6 VAC).
6 Adjust the CH 1-3 volume control to measure 11.2 dBu (2.8 VAC) at the left headphone
output. Check for no distortion or clipping in the output.
7 Adjust the signal generator output to –1 dBu, 100 Hz. The left headphone output should read
10.2 dBu ±2 dBu (1.9 to 3.2 VAC)
8 Adjust the signal generator output to –1 dBu, 10 kHz. The left headphone output should read
7.8 dBu ±2 dBu (1.5 to 2.4 VAC).
9 Repeat the test for channels 2 through 4. For channel 3, continue to use the CH 1-3 volume
control and monitor the left headphone output. For channels 2 and 4, use the CH2-4 volume
control and monitor the right headphone output.
Table 4.4
TALK BUTTON TEST POINT POTENTIOMETER
CH 1 U5 pin 7 R57 (Sidetone 1)
CH 2 U5 pin 1 R73 (Sidetone 2)
CH 3 U7 pin 1 R88 (Sidetone 3)
CH 4 U7 pin 7 R104 (Sidetone 4)
Channel 1-4 sidetone trimmer adjust.
4-6 CSI-200 User Instructions
Page 45

Level and Frequency Response Check, Intercom Channel to Speaker
1 Set all front panel buttons to off. Set all volume controls to minimum.
2 Connect an 8 ohm load across the speaker output (J27, tip and ring)
3 Connect an AC voltmeter and an oscilloscope across the speaker output.
4 Connect the signal generator to intercom channel 1, and adjust the generator output to –1 dBu,
1 kHz.
5 Set the SPKR ON and CH 1 TALK buttons to on.
6 Rotate the CH 1-3 volume control (R1), and check that the speaker output level reaches +18
dBu (17.4 Vp-p) before clipping.
7 Set the CH 1-3 volume control to get +15 dBu (4.4 VAC) at the speaker output. The volume
control should be approximately at the 2 o’clock position.
8 Activate speaker muting by grounding J22 pin 25 to pin 10. The speaker output level should
drop to 5 mV or less, and the SPKR LED should turn off. Remove the ground connection.
9 Activate speaker dim by grounding U15 pin 9.
10Adjust R157 to the maximum clockwise position. The speaker output should be –5.5dB ±1 dB
below the level set in step 7.
11Adjust R157 to the maximum counter-clockwise position. The speaker output should be –39.5
dB ±2 dB below the reference level set in step 7.
12Reset R157 to the maximum clockwise position, and remove the speaker dim ground (U15 pin
9).
13Set the signal generator to –1 dBu, 100 Hz. The speaker output should be 10.8 dBu ±2 dBu.
14Set the signal generator to –1 dBu, 10 kHz. The speaker output should be 17.5 dBu ±2 dBu.
Level and Frequency Response, Program to Headphones and Speaker
Program A to Left Headphone
1 Set all front panel buttons to off. Set all volume controls to minimum.
2 Set program jumpers J16, J17 and J18 to assign PROGRAM A and PROGRAM B inputs to the
headphones and speaker (pins 1 & 2 shorted on all three jumpers).
3 Remove the signal generator from channel 1, and reconnect it to the PROGRAM A input (J14
tip and ring).
4 Set the signal generator to 0 dBu, 1 kHz.
5 Set the PGM VOL control to maximum.
6 Measure the level at the left headphone output. It should be 1.3 dBu ±2 dBu.
7 Set the signal generator to 0 dBu, 100 Hz. The left headphone output should be 0.8 dBu ±2
dBu.
8 Set the signal generator to 0 dBu, 10 kHz. The left headphone output should be –3.8 dBu ±2
dBu.
9 Reset the generator to 0 dBu, 1 kHz.
10Remove jumper J16 (program not assigned to left headphone). Verify that the signal level
drops at least 35 dB from the reference level in step 9.
4-7
Page 46

11Restore jumper J16 to short pins 1 & 2.
Program B to Right Headphone
1 Remove the signal from the PROGRAM A input, and connect it to the PROGRAM B input.
2 Measure the level at the right headphone output (J2, 3 & 5). It should be 1.3 dBu ±2 dBu.
(Program volume at maximum.)
3 Set the signal generator to 0 dBu, 100 Hz. The right headphone output should be 0.8 dBu ±2
dBu.
4 Set the signal generator to 0 dBu, 10 kHz. The right headphone output should be –3.8 dBu ±2
dBu.
5 Reset the generator to 0 dBu, 1 kHz.
6 Remove jumper J17 (program not assigned to right headphone). Verify that the signal level
drops at least 35 dB from the reference level in step 2.
7 Restore jumper J17 to short pins 1 & 2.
Program to Speaker
1 Connect the AC voltmeter across the 8 ohm load at the speaker output
2 Set the SPKR ON button to the on position.
3 Measure the level at he speaker output. It should be 6 dBu ±2 dBu. (Program volume at
maximum.)
4 Set the signal generator to 0 dBu, 100 Hz. The speaker output should be 1.3 dBu ±2 dBu.
5 Set the signal generator to 0 dBu, 10 kHz. The speaker output should be 7.3 dBu ±2 dBu.
6 Reset the generator to 0 dBu, 1 kHz.
7 Remove jumper J18 (program not assigned to speaker). Verify that the signal level drops at
least 35 dB from the reference level in step 3.
8 Restore jumper J18 to short pins 1 & 2.
IFB Test
IFB B
1 Set all front panel buttons to off. Set all volume controls to minimum.
2 Move the J5 jumper to short pins 1 and 2 (IFB B assigned to channel 4).
3 Check the output level across intercom channel 4. It should be –9.8 dBu ±2 dBu.
4 Turn on the CH 4 TALK and MIC ON buttons. The channel 4 output should drop at least 45
dB from the reference level in step 3.
5 Turn off the CH 4 TALK and MIC ON buttons.
6 Ground the Key 4 input (short J22 pin 20 to pin 10). The channel 4 output should drop at least
45 dB from the reference level in step 3.
7 Remove the Key 4 ground.
8 Move the J5 jumper to short pins 2 and 3.
4-8 CSI-200 User Instructions
Page 47

IFB A
1 Move the J4 jumper to short pins 1 and 2 (IFB A assigned to channel 3).
2 Remove the signal from PROGRAM B input, and connect it to the PROGRAM A input. Set
the signal generator to 0 dBu, 1 kHz.
3 Check the output level across intercom channel 3. It should be –9.8 dBu ±2 dBu.
4 Turn on the CH 3 TALK and MIC ON buttons. The channel 3 output should drop at least 45
dB from the reference level in step 3.
5 Turn off the CH 3 TALK and MIC ON buttons.
6 Ground the Key 3 input (short J22 pin 7 to pin 10). The channel 3 output should drop at least
45 dB from the reference level in step 3.
7 Remove the Key 3 ground.
8 Move the J4 jumper to short pins 2 and 3.
Level and Frequency Response Check, Four-Wire Input to Headphone
Four-Wire A Input to Left Headphone
1 Set all front panel buttons to off. Set all volume controls to minimum.
2 Remove the signal generator from the Program A input, and connect it to the Four-Wire A
input (AUXILIARY connector J22, pins 8 and 21). Set the generator to 0 dBu, 1 kHz.
3 Move jumper J19 to short pins 3 & 4 (Four-Wire A input always on).
4 Set the CH 1-3 volume control to measure 0 dBu at the left headphone output. (The control
should be at about the 2 o’clock position.)
5 Set the signal generator to 0 dBu, 100 Hz. The left headphone output should be –0.9 dBu ±2
dBu.
6 Set the signal generator to 0 dBu, 10 kHz. The left headphone output should be –4.7 dBu ±2
dBu.
7 Move jumper J19 to short pins 2 & 3 (Four-Wire A input off).
Four-Wire B input to Right Headphone
1 Remove the signal from the Four-Wire A input, and connect it to the Four-Wire B input (J22,
pins 9 & 22).
2 Move jumper J20 to short pins 3 & 4 (Four-Wire B input always on).
3 Set the CH 2-4 volume control to measure 0 dBu at the right headphone output. (The control
should be at about the 2 o’clock position.)
4 Set the signal generator to 0 dBu, 100 Hz. The right headphone output should be –0.9 dBu ±2
dBu.
5 Set the signal generator to 0 dBu, 10 kHz. The right headphone output should be –4.7 dBu ±2
dBu.
6 Move jumper J20 to short pins 2 &3 (Four-Wire B input off).
4-9
Page 48

Panel Mic to Channel Test
1 Turn all front panel buttons off. Set all volume controls to minimum.
2 Remove the signal from the Four-Wire B input and reconnect it to the panel mic input (J28 tip
and ring, it is easiest to connect to the back of the connector.).
3 Set the signal generator to –25 dBu, 1 kHz.
4 Turn on the CH 1 TALK, MIC ON and PANEL MIC buttons.
5 Check the channel 1 output. It should be –0.9 dBu ±2 dBu.
Carbon Mic to Channel Test
1 Turn off the PANEL MIC and MIC ON buttons. (Only the CH 1 TALK LED should be on.)
2 Connect a 470 ohm resistor across the CARBON MIC HEADSET jack (J3 tip and ring). The
MIC ON LED should turn on.
3 Remove the signal from the panel mic input, and reconnect it to the CARBON MIC
HEADSET jack.
4 Set the signal generator to 11.2 dBu, 1 kHz.
5 Check the channel 1 output. It should be –0.9 dBu ±2 dBu.
6 Remove the 470 ohm resistor from the carbon mic input.
VOX Test
1 Remove the signal from the CARBON MIC HEADSET jack, and reconnect it to the DYN
MIC HEADSET jack mic input (J2 pins 1 & 2).
2 Set the generator to –45 dBu, 1 kHz.
3 Set DIP switch DS8 to the on position (VOX enabled), and note that the MIC ON LED turns
on.
4 Adjust the signal generator output level to zero, and note that the MIC ON LED turns off.
5 Reset DS8 to off.
Mic Kill Receive Test
1 Set all buttons to off.
2 Remove the signal from the DYN MIC HEADSET jack mic input, and reconnect it to intercom
channel 1.
3 Adjust signal generator to –5 dBu, 24 kHz (check frequency with frequency counter).
4 Set the MIC ON button to on.
5 Activate the CH 1 TALK button. The MIC ON LED should turn off.
6 Attenuate the signal input by 20 dB. Try turning on the MIC ON button. It should not turn on.
7 Attenuate the signal an additional 10 dB. Try turning on the MIC ON button. It should turn on.
8 Adjust signal generator to –5 dBu at 22.320 kHz.
9 Try turning the MIC ON button on and off. It should turn on and off as usual.
10Adjust the signal generator to –5 dBu at 23.520 kHz.
4-10 CSI-200 User Instructions
Page 49

11Try turning the MIC ON button on. It should not stay on.
12Adjust signal generator to –5 dBu at 25.680 kHz.
13Try turning the MIC ON button on and off. It should turn on and off as usual.
14Adjust signal generator to –5 dBu at 24.480 kHz.
15Try turning the MIC ON button on. It should not stay on.
16Remove the signal generator from channel 1.
Mic Kill Transmit Test
1 Set all front panel buttons to off.
2 Connect a frequency counter an AC meter to the intercom channel 1 output.
3 Transmit a mic kill signal on intercom channel 1 (tap the CALL button 3 times, then press and
hold the CH 1 TALK key).
4 Check that the signal on the channel 1 output is between 23.7 to 23.9 kHz at –9.8 dBu ±2 dBu.
5 Release the CH 1 TALK button.
Call Transmit Test
1 Set all front panel buttons to off.
2 Transmit a call signal on intercom channel 1 (tap the CALL button, and while the call LED is
flashing, press and hold the CH 1 TALK key).
3 Check that the signal on the channel 1 output is between 19.9 to 20.1 kHz at –9.8 dBu ±2 dBu.
4 Release the CH 1 TALK button.
Call Receive Test
1 Set all buttons to off.
2 Reconnect the signal generator to intercom channel 1.
3 Adjust signal generator to –5 dBu, 20 kHz (check frequency with frequency counter).
4 Check that the CALL and CH 1 TALK LED’s are flashing.
5 Attenuate the signal input by 20 dB, and check that the LED’s are still flashing.
6 Attenuate the signal an additional 10 dB. The LED’s should stop flashing.
7 Adjust signal generator to –5 dBu, 18.600 kHz.
8 Verify that the LED’s do not flash.
9 Adjust signal generator to –5 dBu, 21.400 kHz.
10Verify that the LED’s do not flash.
11Adjust signal generator to –5 dBu, 19.600 kHz.
12Verify that the LED’s do flash.
13Adjust signal generator to –5 dBu, 20.400 kHz.
14Verify that the LED’s do flash.
15Remove the signal generator and frequency counter.
4-11
Page 50

ISO Test
1 Set DIP switch DS3 to off (two-channel, two-wire mode).
2 Set DIP switch DS5 to on (talk muted during ISO).
3 Set all TALK and LISTEN buttons to on.
4 Connect a 100 ohm resistor from the ISO input (J22 pin 12) to circuit common (J22 pin 10).
Observe that the MIC ON LED turns on and the channel 1 and 2 TALK buttons turn off.
5 Remove the 100 ohm resistor across the ISO input.
6 Reset DIP switch DS3 to on and DS5 to off.
Remote Mic Switch Test
1 Set all buttons to off.
2 Connect a 100 ohm resistor from the remote mic switch input (J22 pin 25) to circuit common
(J22 pin 10), and observe that the MIC ON LED turns on.
3 Remove the 100 ohm resistor.
Program Lockout Test
1 Set DIP switch DS4 to on (front panel setup lockout enabled).
2 Press and hold the CALL button for ten seconds, and verify that the MCE325 does not enter
program mode.
3 Reset DS4 to off.
Noise Checks
1 Connect a 150 ohm load across the dynamic mic input (J2 pins 1 and 2).
2 Connect an 8 ohm load across the speaker output.
3 Connect 51 ohm loads across the left headphone output (J2 pins 3 & 4) and right headphone
output (J2 pins 3 &5).
4 Terminate each intercom channel into 200 ohms.
5 Set the MIC ON button to on.
6 Set the SPKR ON button to on.
7 Set all other front panel buttons to off.
8 Set all volume controls to minimum.
Note: Noise measurements in the following steps were made using a 30 kHz low pass filter
with +20 dB of gain inserted between the AC voltmeter and the MCE325.
9 Set the CH 1-3 volume control to maximum. Measure noise across the left headphone output. It
should measure -44 dBu or less.
10Set the CH 1-3 volume control to minimum and set the CH 2-4 volume control to maximum.
Measure noise across the right headphone output. It should measure –44 dBu or less.
11Set the CH 2-4 volume control to minimum. Measure noise across the speaker output. The
meter should read –44 dBu or less.
4-12 CSI-200 User Instructions
Page 51

NOTE
12Turn on the SPKR ON button. The meter should read –38 dBu or less. Turn off the SPKR ON
button.
Noise measurements in the following steps were made using a 400 Hz to 30 kHz bandpass
filter with +40 dB of gain.
13Turn on the MIC ON switch. Measure noise at U1 pin 1 (mic preamp out). The voltmeter
should read –26 dBu or less.
14Turn on the PANEL MIC button. The meter should read –37 dBu or less.
15Turn all buttons off.
16Measure noise at U12 pin 7 (program A preamp out). The voltmeter should read –51 dBu or
less.
17Measure noise at U12 pin 1 (program B preamp out). The voltmeter should read –51 dBu or
less.
18Measure noise across intercom channels 1 through 4. All should measure –50 dBu or less.
4-13
Page 52

4-14 CSI-200 User Instructions
Page 53

Packaging Assembly (9000-6464-00)
S ECTION
C
HAPTER
5
P
ARTS
L
ISTS
Table 5.1
Item No. Description RTS Part No.
Reference PD6464 Drawing, Section 6
1 User Manual, MCE325 User Station 9350-6464-00
2 Label, Warning 9170-6739-00
3 Final Assy, MCE325 9010-6464-00
4 Assy, 200-ohm Termination Plug 9020-6793-00
5 Keycap, Blank 2705-0020-00
Keycap, Printed (TALK 3) 9150-6643-09
Keycap, Printed (TALK 4) 9150-6643-10
Keycap, Printed (IFB 1) 9150-6643-11
Keycap, Printed (IFB 2) 9150-6643-12
Keycap, Printed (LISTEN 3) 9150-6643-13
Keycap, Printed (LISTEN 4) 9150-6643-14
Keycap, Printed (SSA 1) 9150-6643-15
Keycap, Printed (SSA 2) 9150-6643-16
Keycap, Printed (PAGE) 9150-6643-10
6 Keycap, Stem 4501-0064-00
Final Assembly, MCE325 (9010-6464-00)
Table 5.2
Item No. Description RTS Part No.
Reference AS6464 Drawing, Section 6
1 Front Panel Assy, MCE325 9020-6261-00
2 Back Panel Assy, MCE325 9020-6262-00
3 Case, MCE/MCS 9060-6260-00
4 MCE/MCS Case Screw 9160-6305-00
5 Screw, #4-40 x 1/4 1008-4081-00
6 Valox Film, 0.010” Thick N/A
7 Rubber Stick-on Button 4501-5012-00
8 Label, Programming and FCC Notice 9170-6776-00
9 Lug, Solder, #16 1003-0003-00
5-1
Page 54

Front Panel Assembly (9020-6261-00)
Table 5.3
Reference AS6261 Drawing, Section 6
Item No. Description RTS Part No.
1 Bezel, MCE325 9070-6261-00
2 PC Board Assy, Front Panel, MCE325 9030-6246-00
3 Bushing Adapter 9110-6273-00
5 Keycap Stem 4501-0064-00
6 Knob, Channel Volume, MCE325 2703-0033-00
7 Knob, Program Volume, MCE325 2703-0034-00
8 Lightpipe, Button Indicator 4501-0061-00
9 Connector Insert, 6-pin Female (J2) 2018-0077-00
10 Plug, Panel Microphone 4501-0063-00
11 Lightpipe, Call Indicator 4501-0062-00
12 Screw, Thread Forming 51856-003
13 Connector Housing, 3-pin (P1) 59958-003
14 Phone Jack with Metal Bushing (J28) 2013-0048-00
15 Connector Housing, 6-pin (P2) 59958-006
16 Contact, Housing 59958-200
17 Flex Cable, 0.050” Centers 2515-0013-00
20 Keycap, Printed (TALK 1) 9150-6643-01
21 Keycap, Printed (LISTEN 1) 9150-6643-02
22 Keycap, Printed (TALK 2) 9150-6643-03
23 Keycap, Printed (LISTEN 2) 9150-6643-04
24 Keycap, Printed (CALL) 9150-6643-05
25 Keycap, Printed (PANEL MIC) 9150-6643-06
26 Keycap, Printed (SPKR ON) 9150-6643-07
27 Keycap, Printed (MIC ON) 9150-6643-08
5-2 CSI-200 User Instructions
Page 55

Back Panel Assembly (9020-6262-00)
Table 5.4
Reference AS6262 Drawing, Section 6
Item No. Description RTS Part No.
1 PC Board Assy, Main 9030-6245-00
2 Heatsink Assy 9020-6324-00
3 Panel, Rear 9080-6262-00
4 Jack, Phone, 3 conductor, double closed circuit (J27) 2013-0003-00
5 Connector Housing (P23) 57767-203
6 cord, AC Power, Gray 2504-0004-00
7 Strain Relief, Flexible 2509-0025-00
8 Fuse, 0.5A, 250V Slo-blo 50547-015
9 Fuse Cap 57074-006
10 Fuse Holder body w/mtg Nut 2802-0003-00
11 Terminal, Wire Joint, Nylong 2017-0013-00
12 Screw, #4-40 x ¼ 1008-4023-00
13 Nut, Hex Kep, #4-40 1007-0001-00
15 Nut, Hex Kep, #4-40 1007-0002-00
16 Lug, Solder, #16 51378-002
17 Shrink Tubing LP
Heatsink Assembly (9020-6324-00)
Table 5.5
Reference 9020-6324-00 Drawing, Section 6
Item No. Description RTS Part No.
1 Heatsink, Model MCE325 9180-6324-01
2 IC LM4752T 511386000S
3 Adj. Regulatro, 3 Terminal, LM317T 53290000
4 Insulator 57896000
5 Washer, Nylon Shoulder 1006004000
6 Washer 50013035
7 Washer, Compression 1006004100
8 Screw PH, Cross 51845040
9 Thermal Compound 51741000
Main PC Board Assembly (9030-6245-01)
Table 5.6
Ref No. Description RTS Part No.
C1 Capacitor, EL, 100µF, 25V 51821524
C10 Capacitor, CM, 0.1µF, 50V 52676113
C100 Capacitor, Mylar, 1nF, 100V 1514R1022L
C101 Capacitor, CM, 0.1µF, 50V 52676113
C102 Capacitor, CM, 0.1µF, 50V 52676113
C103 Capacitor, EL, 10µF, 50V 51821110
Reference 9027-6245-01 Drawing, Section 6
5-3
Page 56

Table 5.6
C104 Capacitor, CM, 0.1µF, 50V 52676113
C105 Capacitor, EL, 100µF, 25V 51821524
C106 Capacitor, EL, 4.7µf, 25V 51821621
C107 Capacitor, EL, 4.7µf, 25V 51821622
C108 Capacitor, EL, 100µF, 25V 51821524
C109 Capacitor, EL, 1000µF, 25V 51821526
C11 Capacitor, CM, 0.1µF, 50V 52676113
C110 Capacitor, CM, 0.1µF, 50V 52676113
C111 Capacitor, CM, 0.1µF, 50V 52676113
C112 Capacitor, EL, 220µF, 50V 52157534
C113 Capacitor, EL, 220µF, 50V 52157534
C115 Capacitor, CD, 10pF, 500V 52157502
C116 Capacitor, CD, 10pF, 500V 52157502
C117 Capacitor, CD, 10pF, 500V 52157502
C118 Capacitor, CM, 0.1µF, 50V 52676113
C119 Capacitor, Mylar, 0.01µF, 50V 52719007
C12 Capacitor, EL, 10µF, 50V 51821110
C120 Capacitor, CD, 100pF, 100V 1501R1011L
C121 Capacitor, CD, 10pF, 500V 52157502
C122 Capacitor, CM, 0.1µF, 50V 52676113
C125 Capacitor, EL, 4700µF, 35V 1513R4784G
C126 Capacitor, CD, 0.1µF, 500V 1510R1042Q
C127 Capacitor, EL, 10µF, 50V 51821110
C128 Capacitor, EL, 10µF, 50V 51821110
C129 Capacitor, EL, 100µF, 25V 51821524
C13 Capacitor, CM, 0.1µF, 50V 52676113
C130 Capacitor, CM, 0.1µF, 50V 52676113
C131 Capacitor, EL, 10µF, 50V 51821110
C132 Capacitor, CM, 0.1µF, 50V 52676113
C133 Capacitor, EL, 100µF, 25V 51821524
C134 Capacitor, CM, 0.1µF, 50V 52676113
C135 Capacitor, EL, 22µF, 50V 51821640
C136 Capacitor, CM, 0.1µF, 50V 52676113
C137 Capacitor, CM, 0.1µF, 50V 52676113
C138 Capacitor, CM, 0.1µF, 50V 52676113
C139 Capacitor, CM, 0.1µF, 50V 52676113
C14 Capacitor, EL, 100µF, 25V 51821524
C140 Capacitor, CM, 0.1µF, 50V 52676113
C141 Capacitor, CM, 0.1µF, 50V 52676113
C142 Capacitor, EL, 4.7µf, 25V 51821623
C143 Capacitor, EL, 4.7µf, 25V 51821624
C15 Capacitor, Mylar, 150pF, 100V 52157332
C16 Capacitor, CM, 0.1µF, 50V 52676113
C17 Capacitor, EL, 1µF, 50V 51821106
C18 Capacitor, CD, 100pF, 100V 1501R1011L
C19 Capacitor, CD, 100pF, 100V 1501R1011L
Reference 9027-6245-01 Drawing, Section 6
5-4 CSI-200 User Instructions
Page 57

Table 5.6
C2 Capacitor, EL, 10µF, 50V 51821110
C20 Capacitor, CD, 100pF, 100V 1501R1011L
C21 Capacitor, CD, 100pF, 100V 1501R1011L
C22 Capacitor, CM, 0.1µF, 50V 52676113
C23 Capacitor, CD, 10pF, 500V 52157502
C24 Capacitor, CM, 0.1µF, 50V 52676113
C25 Capacitor, EL, 22µF, 50V 51821640
C26 Capacitor, EL, 47µF, 16V 51821068
C27 Capacitor, EL, 22µF, 50V 51821640
C28 Capacitor, CD, 100pF, 100V 1501R1011L
C29 Capacitor, CD, 100pF, 100V 1501R1011L
C3 Capacitor, EL, 100µF, 25V 51821524
C30 Capacitor, CD, 100pF, 100V 1501R1011L
C31 Capacitor, CD, 100pF, 100V 1501R1011L
C32 Capacitor, CM, 0.1µF, 50V 52676113
C33 Capacitor, CD, 10pF, 500V 52157502
C34 Capacitor, EL, 47µF, 16V 51821068
C35 Capacitor, EL, 22µF, 50V 51821640
C36 Capacitor, EL, 22µF, 50V 51821640
C37 Capacitor, CD, 100pF, 100V 1501R1011L
C38 Capacitor, CD, 100pF, 100V 1501R1011L
C39 Capacitor, CD, 100pF, 100V 1501R1011L
C4 Capacitor, CM, 1nF, 50V 52676101
C40 Capacitor, CD, 100pF, 100V 1501R1011L
C41 Capacitor, CM, 0.1µF, 50V 52676113
C42 Capacitor, CD, 10pF, 500V 52157502
C43 Capacitor, CM, 0.1µF, 50V 52676113
C44 Capacitor, EL, 22µF, 50V 51821640
C45 Capacitor, EL, 47µF, 16V 51821068
C46 Capacitor, EL, 22µF, 50V 51821640
C47 Capacitor, CD, 100pF, 100V 1501R1011L
C48 Capacitor, CD, 100pF, 100V 1501R1011L
C49 Capacitor, CD, 100pF, 100V 1501R1011L
C5 Capacitor, EL, 100µF, 25V 51821524
C50 Capacitor, CD, 100pF, 100V 1501R1011L
C51 Capacitor, CM, 0.1µF, 50V 52676113
C52 Capacitor, CD, 10pF, 500V 52157502
C53 Capacitor, EL, 22µF, 50V 51821640
C54 Capacitor, EL, 47µF, 16V 51821068
C55 Capacitor, EL, 22µF, 50V 51821640
C56 Capacitor, CM, 0.1µF, 50V 52676113
C57 Capacitor, EL, 22µF, 50V 51821640
C58 Capacitor, CM, 0.1µF, 50V 52676113
C59 Capacitor, CD, 100pF, 100V 1501R1011L
C6 Capacitor, CM, 1nF, 50V 52676101
C60 Capacitor, EL, 10µF, 50V 51821110
Reference 9027-6245-01 Drawing, Section 6
5-5
Page 58

Table 5.6
C61 Capacitor, Mylar, 1nF, 100V 1514R1022L
C62 Capacitor, EL, 10µF, 50V 51821110
C63 Capacitor, CD, 100pF, 100V 1501R1011L
C64 Capacitor, Mylar, 1nF, 100V 1514R1022L
C65 Capacitor, CM, 0.1µF, 50V 52676113
C66 Capacitor, EL, 10µF, 50V 51821110
C67 Capacitor, Mylar, 1nF, 100V 1514R1022L
C68 Capacitor, EL, 10µF, 50V 51821110
C69 Capacitor, CD, 100pF, 100V 1501R1011L
C7 Capacitor, CM, 1nF, 50V 52676101
C70 Capacitor, Mylar, 1nF, 100V 1514R1022L
C71 Capacitor, EL, 10µF, 50V 51821110
C72 Capacitor, Mylar, 1nF, 100V 1514R1022L
C73 Capacitor, EL, 10µF, 50V 51821110
C74 Capacitor, CD, 100pF, 100V 1501R1011L
C75 Capacitor, Mylar, 1nF, 100V 1514R1022L
C76 Capacitor, CM, 0.1µF, 50V 52676113
C77 Capacitor, EL, 10µF, 50V 51821110
C78 Capacitor, EL, 10µF, 50V 51821110
C79 Capacitor, CD, 100pF, 100V 1501R1011L
C8 Capacitor, CM, 0.1µF, 50V 52676113
C80 Capacitor, Mylar, 1nF, 100V 1514R1022L
C81 Capacitor, Mylar, 1nF, 100V 1514R1022L
C82 Capacitor, EL, 1µF, 50V 51821106
C83 Capacitor, EL, 10µF, 50V 51821110
C84 Capacitor, CD, 100pF, 100V 1501R1011L
C84 500PF 52157018
C85 Capacitor, CM, 0.1µF, 50V 52676113
C86 Capacitor, EL, 10µF, 50V 51821110
C87 Capacitor, EL, 10µF, 50V 51821110
C88 Capacitor, CM, 0.1µF, 50V 52676113
C89 Capacitor, EL, 10µF, 50V 51821110
C9 Capacitor, CM, 0.1µF, 50V 52676113
C90 Capacitor, EL, 10µF, 50V 51821110
C91 Capacitor, CM, 0.1µF, 50V 52676113
C92 Capacitor, Mylar, 1nF, 100V 1514R1022L
C93 Capacitor, CM, 0.1µF, 50V 52676113
C94 Capacitor, CM, 0.1µF, 50V 52676113
C95 Capacitor, EL, 10µF, 50V 51821110
C96 Capacitor, CM, 0.1µF, 50V 52676113
C97 Capacitor, EL, 100µF, 25V 51821524
C98 Capacitor, CM, 0.1µF, 50V 52676113
C99 Capacitor, CM, 0.1µF, 50V 52676113
CR1 Bridge Rectifier, 4A, 50VRMS 1601097000
D1 Diode, 1N4004 50745005T
D10 Diode, 1N4004 50745005T
Reference 9027-6245-01 Drawing, Section 6
5-6 CSI-200 User Instructions
Page 59

Table 5.6
D11 Diode, 1N4004 50745005T
D12 Diode, 1N4004 50745005T
D13 Diode, 1N4004 50745005T
D14 Diode, 1N914B 160109140B
D15 Diode, 1N914B 160109140B
D16 Diode, 1N914B 160109140B
D2 Diode, 1N914B 160109140B
D20 Diode, 1N4004 50745005T
D21 Diode, 1N4004 50745005T
D22 Diode, 1N4004 50745005T
D3 Diode, 1N914B 160109140B
D4 Diode, 1N914B 160109140B
D5 Diode, 1N914B 160109140B
D6 Diode, 1N4004 50745005T
D7 Diode, 1N4004 50745005T
D8 Diode, 1N4004 50745005T
D9 Diode, 1N4004 50745005T
FB1 #73 SHIELD BEAD 2404000100
FB2 #73 SHIELD BEAD 2404000100
FB3 #73 SHIELD BEAD 2404000100
FB4 #73 SHIELD BEAD 2404000100
J1 Connector, 3-pin 59958103
J10 Connector, Audio 59893001
J14 Jack, PC Mt., 3/8 2013004900
J15 Jack, PC Mt., 3/8 2013004900
J16 Header, 3-pin 2007009900
J17 Header, 3-pin 2007009900
J18 Header, 3-pin 2007009900
J19 Header, 4-pin 2007013400
J2 Connector, 6-pin 59958106
J20 Header, 4-pin 2007013400
J21 Connector 2006009600
J22 Connector, D-Sub, 25-pin 2004004000
J23 Header, 3-pin 2007011800
J24 Header, 3-pin 2007009900
J3 Jack, PC Mt., 3/8 2013004900
J4 Header, 3-pin 2007009900
J5 Header, 3-pin 2007009900
J6 Header, 3-pin 2007009900
J7 Header, 3-pin 2007009900
J8 Connector, Audio 59893001
J9 Connector, Audio 59892001
Q1 Transistor, 2N5087 1602508700
Q10 Transistor, 2N5460 1602546000
Q2 Transistor, 2N5210 1602521000
Q3 Transistor, 2N5484 1602548400
Reference 9027-6245-01 Drawing, Section 6
5-7
Page 60

Table 5.6
Q4 Transistor, 2N5210 1602521000
Q5 Transistor, 2N5210 1602521000
R1 Resistor, CF, 1K Ohm, 5%, 1/8W 52154060
R10 Resistor, MF, 3.01K Ohm, 1%, 1/8W 54034301
R100 Resistor, CF, 22K Ohm, 5%, 1/8W 524154028
R101 Resistor, CF, 10K Ohm, 5%, 1/8W 52154036
R104 Trimpot, 10K Ohm, Linear 1409006000
R105 Resistor, MF, 60.4K Ohm, 1%, 1/8W 54035604
R106 Resistor, MF, 20K Ohm, 1%, 1/8W 54035200
R107 Resistor, MF, 60.4K Ohm, 1%, 1/8W 54035604
R108 Resistor, MF, 20K Ohm, 1%, 1/8W 54035200
R109 Resistor, CF, 100 Ohm, 5%, 1/8W 52154084
R11 Resistor, CF, 620 Ohm, 5%, 1/8W 52154065
R110 Resistor, CF, 100K Ohm, 5% 1/8W 52154012
R117 Resistor, MF, 20K Ohm, 1%, 1/8W 54035200
R118 Resistor, MF, 10K Ohm, 1%, 1/8W 54035100
R119 Resistor, MF, 20K Ohm, 1%, 1/8W 54035200
R12 Resistor, CF, 1K Ohm, 5%, 1/8W 52154060
R120 Resistor, MF, 10K Ohm, 1%, 1/8W 54035100
R124 Resistor, MF, 20K Ohm, 1%, 1/8W 54035200
R125 Resistor, MF, 10K Ohm, 1%, 1/8W 54035100
R126 Resistor, MF, 20K Ohm, 1%, 1/8W 54035200
R127 Resistor, MF, 10K Ohm, 1%, 1/8W 54035100
R13 Resistor, CF, 22K Ohm, 5%, 1/8W 524154028
R130 Resistor, MF, 20K Ohm, 1%, 1/8W 54035200
R131 Resistor, MF, 10K Ohm, 1%, 1/8W 54035100
R132 Resistor, MF, 20K Ohm, 1%, 1/8W 54035200
R133 Resistor, MF, 10K Ohm, 1%, 1/8W 54035100
R135 Resistor, CF, 10K Ohm, 5%, 1/8W 52154036
R138 Resistor, MF, 20K Ohm, 1%, 1/8W 54035200
R139 Resistor, MF, 10K Ohm, 1%, 1/8W 54035100
R14 Resistor, CF, 22K Ohm, 5%, 1/8W 524154028
R140 Resistor, MF, 20K Ohm, 1%, 1/8W 54035200
R141 Resistor, MF, 10K Ohm, 1%, 1/8W 54035100
R142 Resistor, CF, 10K Ohm, 5%, 1/8W 52154036
R15 Resistor, CF, 22K Ohm, 5%, 1/8W 524154028
R152 Resistor, CF, 200 Ohm, 5%, 1/8W 52154077
R153 Resistor, CF, 220K Ohm, 5%, 1/8W 52154004
R153 160K 52154007
R154 Resistor, CF, 47K Ohm, 5%, 1/8W 52154020
R155 Resistor, CF, 47K Ohm, 5%, 1/8W 52154020
R156 Resistor, CF, 100K Ohm, 5% 1/8W 52154012
R156 Resistor, MF, 20K Ohm, 1%, 1/8W 54035200
R157 Trimpot, 20K Ohm, Linear 57148407
R16 Resistor, CF, 22K Ohm, 5%, 1/8W 524154028
R17 Resistor, CF, 100 Ohm, 5%, 1/4W 52154305
Reference 9027-6245-01 Drawing, Section 6
5-8 CSI-200 User Instructions
Page 61

Table 5.6
R170 Resistor, CF, 10K Ohm, 5%, 1/8W 52154036
R171 Resistor, CF, 10K Ohm, 5%, 1/8W 52154036
R172 Resistor, MF, 201 Ohm, 1%, 1/8W 54032301
R173 Resistor, CF, 100K Ohm, 5% 1/8W 52154012
R174 Resistor, MF, 201 Ohm, 1%, 1/8W 54032301
R175 Resistor, CF, 100K Ohm, 5% 1/8W 52154012
R176 Resistor, CF, 22K Ohm, 5%, 1/8W 524154028
R177 Resistor, CF, 100K Ohm, 5% 1/8W 52154012
R178 Resistor, CF, 1M Ohm, 5%, 1/8W 52154988
R18 Resistor, CF, 100 Ohm, 5%, 1/4W 52154305
R180 Resistor, CF, 1K Ohm, 5%, 1/8W 52154060
R181 Resistor, CF, 2.7 Ohm, 5%, 1/8W 52154122
R182 Resistor, CF, 22K Ohm, 5%, 1/8W 524154028
R183 Resistor, CF, 10 Ohm, 5%, 1/8W 52154108
R184 Resistor, CF, 22K Ohm, 5%, 1/8W 524154028
R185 Resistor, CF, 100K Ohm, 5% 1/8W 52154012
R186 Resistor, CF, 1K Ohm, 5%, 1/8W 52154060
R187 Resistor, CF, 2.7 Ohm, 5%, 1/8W 52154122
R188 Resistor, CF, 22K Ohm, 5%, 1/8W 524154028
R189 Resistor, CF, 10 Ohm, 5%, 1/8W 52154108
R19 Resistor, CF, 620 Ohm, 5%, 1/8W 52154065
R198 Resistor, CF, 270K Ohm, 5%, 1/8W 52154002
R199 Resistor, CF, 10K Ohm, 5%, 1/8W 52154036
R2 Resistor, Cf, 2K Ohm, 5%, 1/8W 52154053
R20 Resistor, CF, 100K Ohm, 5% 1/8W 52154012
R200 Resistor, CF, 2.2M Ohm, 5%, 1/8W 52154980
R201 Resistor, MF, 3.01K Ohm, 1%, 1/8W 54034301
R207 Resistor, CF, 100K Ohm, 5% 1/8W 52154012
R208 Resistor, CF, 10K Ohm, 5%, 1/8W 52154036
R209 Resistor, CF, 1K Ohm, 5%, 1/8W 52154060
R21 Resistor, CF, 47K Ohm, 5%, 1/8W 52154020
R211 Resistor, CF, 22K Ohm, 5%, 1/8W 524154028
R212 Resistor, CF, 270K Ohm, 5%, 1/8W 52154002
R213 Resistor, CF, 270K Ohm, 5%, 1/8W 52154002
R214 Resistor, CF, 10K Ohm, 5%, 1/8W 52154036
R215 Resistor, CF, 100K Ohm, 5% 1/8W 52154012
R22 Resistor, CF, 22K Ohm, 5%, 1/8W 524154028
R23 Resistor, CF, 22K Ohm, 5%, 1/8W 524154028
R24 Resistor, CF, 100K Ohm, 5% 1/8W 52154012
R26 Resistor, CF, 5.1M Ohm, 5%, 1/8W 52154698
R261 Resistor, CF, 22K Ohm, 5%, 1/8W 524154028
R262 Resistor, MF, 3.01K Ohm, 1%, 1/8W 54034301
R263 Resistor, MF, 201 Ohm, 1%, 1/8W 54032301
R264 Resistor, CF, 220K Ohm, 5%, 1/8W 52154004
R265 Resistor, CF, 220K Ohm, 5%, 1/8W 52154004
R266 Resistor, MF, 909 Ohm, 1%, 1/8W 54032909
Reference 9027-6245-01 Drawing, Section 6
5-9
Page 62

Table 5.6
R267 Resistor, MF, 201 Ohm, 1%, 1/8W 54032301
R268 Resistor, CF, 200 Ohm, 5%, 1/8W 52154077
R269 Resistor, CF, 10K Ohm, 5%, 1/8W 52154036
R27 Resistor, CF, 200 Ohm, 5%, 1/8W 52154077
R28 Resistor, CF, 22K Ohm, 5%, 1/8W 52154010
R29 Resistor, CF, 5.1M Ohm, 5%, 1/8W 52154698
R3 Resistor, CF, 100 Ohm, 5%, 1/8W 52154084
R30 Resistor, CF, 100K Ohm, 5% 1/8W 52154012
R31 Resistor, CF, 5.1M Ohm, 5%, 1/8W 52154698
R32 Resistor, CF, 100K Ohm, 5% 1/8W 52154012
R33 Resistor, CF, 15K Ohm, 5%, 1/8W 52154032
R34 Resistor, CF, 22K Ohm, 5%, 1/8W 524154028
R35 Resistor, CF, 100K Ohm, 5% 1/8W 52154012
R36 Resistor, CF, 10K Ohm, 5%, 1/8W 52154036
R37 Trimpot, 10K Ohm, w/knob 57148406
R38 Resistor, CF, 100 Ohm, 5%, 1/8W 52154084
R39 Resistor, Cf, 2K Ohm, 5%, 1/8W 52154053
R4 Resistor, CF, 100K Ohm, 5% 1/8W 52154012
R40 Resistor, CF, 30K Ohm, 5%, 1/8W 52154025
R41 Resistor, CF, 470K Ohm, 5%, 1/8W 52154996
R42 Resistor, CF, 100K Ohm, 5% 1/8W 52154012
R43 Resistor, MF, 20K Ohm, 1%, 1/8W 54035200
R44 Resistor, CF, 2.7 Ohm, 5%, 1/8W 52154122
R45 Resistor, CF, 2.7 Ohm, 5%, 1/8W 52154122
R46 Resistor, MF, 20K Ohm, 1%, 1/8W 54035200
R47 Resistor, MF, 20K Ohm, 1%, 1/8W 54035200
R48 Resistor, CF, 10K Ohm, 5%, 1/8W 52154036
R49 Resistor, CF, 22K Ohm, 5%, 1/8W 524154028
R5 Resistor, CF, 100K Ohm, 5% 1/8W 52154012
R50 Resistor, CF, 10K Ohm, 5%, 1/8W 52154036
R51 Resistor, CF, 22K Ohm, 5%, 1/8W 524154028
R52 Resistor, CF, 47K Ohm, 5%, 1/8W 52154020
R53 Resistor, CF, 22K Ohm, 5%, 1/8W 524154028
R54 Resistor, MF, 20K Ohm, 1%, 1/8W 54035200
R55 Resistor, CF, 22K Ohm, 5%, 1/8W 524154028
R57 Trimpot, 10K Ohm, Linear 1409006000
R58 Resistor, MF, 60.4K Ohm, 1%, 1/8W 54035604
R59 Resistor, MF, 20K Ohm, 1%, 1/8W 54035200
R6 Resistor, CF, 1K Ohm, 5%, 1/8W 52154060
R60 Resistor, CF, 100K Ohm, 5% 1/8W 52154012
R61 Resistor, MF, 60.4K Ohm, 1%, 1/8W 54035604
R62 Resistor, MF, 20K Ohm, 1%, 1/8W 54035200
R63 Resistor, CF, 100 Ohm, 5%, 1/8W 52154084
R64 Resistor, CF, 100K Ohm, 5% 1/8W 52154012
R65 Resistor, CF, 22K Ohm, 5%, 1/8W 524154028
R66 Resistor, CF, 47K Ohm, 5%, 1/8W 52154020
Reference 9027-6245-01 Drawing, Section 6
5-10 CSI-200 User Instructions
Page 63

Table 5.6
R67 Resistor, CF, 22K Ohm, 5%, 1/8W 524154028
R68 Resistor, CF, 22K Ohm, 5%, 1/8W 524154028
R69 Resistor, CF, 22K Ohm, 5%, 1/8W 524154028
R7 Resistor, MF, 301 Ohm, 1%, 1/8W 54034150
R70 Resistor, CF, 10K Ohm, 5%, 1/8W 52154036
R73 Trimpot, 10K Ohm, Linear 1409006000
R74 Resistor, MF, 60.4K Ohm, 1%, 1/8W 54035604
R75 Resistor, MF, 20K Ohm, 1%, 1/8W 54035200
R76 Resistor, MF, 60.4K Ohm, 1%, 1/8W 54035604
R77 Resistor, MF, 20K Ohm, 1%, 1/8W 54035200
R78 Resistor, CF, 100 Ohm, 5%, 1/8W 52154084
R79 Resistor, CF, 100K Ohm, 5% 1/8W 52154012
R8 Resistor, MF, 301 Ohm, 1%, 1/8W 54034150
R80 Resistor, CF, 22K Ohm, 5%, 1/8W 524154028
R81 Resistor, CF, 47K Ohm, 5%, 1/8W 52154020
R82 Resistor, CF, 22K Ohm, 5%, 1/8W 524154028
R83 Resistor, CF, 22K Ohm, 5%, 1/8W 524154028
R84 Resistor, CF, 22K Ohm, 5%, 1/8W 524154028
R85 Resistor, CF, 10K Ohm, 5%, 1/8W 52154036
R88 Trimpot, 10K Ohm, Linear 1409006000
R89 Resistor, MF, 60.4K Ohm, 1%, 1/8W 54035604
R9 Resistor, MF, 301 Ohm, 1%, 1/8W 54034150
R90 Resistor, MF, 20K Ohm, 1%, 1/8W 54035200
R91 Resistor, MF, 60.4K Ohm, 1%, 1/8W 54035604
R92 Resistor, MF, 20K Ohm, 1%, 1/8W 54035200
R94 Resistor, CF, 100 Ohm, 5%, 1/8W 52154084
R95 Resistor, CF, 100K Ohm, 5% 1/8W 52154012
R96 Resistor, CF, 22K Ohm, 5%, 1/8W 524154028
R97 Resistor, CF, 47K Ohm, 5%, 1/8W 52154020
R98 Resistor, CF, 22K Ohm, 5%, 1/8W 524154028
R99 Resistor, CF, 22K Ohm, 5%, 1/8W 524154028
RP1 Resistor Network, 100K Ohm X4, No Common, 1.1W 1411100302
RP10 Resistor Network, 100K Ohm X4, No Common, 1.1W 1411100302
RP11 Resistor Network, 100K Ohm X4, No Common, 1.1W 1411100302
RP12 Resistor Network, 100K Ohm X4, No Common, 1.1W 1411100302
RP14 Resistor Network, 680 Ohm X 5, No Common, 1.5W 1411680000
RP15 Resistor Network, 680 Ohm X 5, No Common, 1.5W 1411680000
RP2 Resistor Network, 22K Ohm X 9, Pin 1 Common, 1.5W 1411220201
RP3 Resistor Network, 100K Ohm X4, No Common, 1.1W 1411100302
RP5 Resistor Network, 22K Ohm X 9, Pin 1 Common, 1.5W 1411220201
RP6 Resistor Network, 10K Ohm X 4, Pin 1 Common, 0.9W 1411100204
RP7 Resistor Network, 10K Ohm X 4, Pin 1 Common, 0.9W 1411100204
RP8 Resistor Network, 22K Ohm X 9, Pin 1 Common, 1.5W 1411220201
RP9 Resistor Network, 22K Ohm X 9, Pin 1 Common, 1.5W 1411220201
S1 Switch, DIP, Low Profile 1909000200
T1 R-Core XFMR 9020653400
Reference 9027-6245-01 Drawing, Section 6
5-11
Page 64

Table 5.6
U1 IC, Dual Low-noise Op-Amp, NE5532N 53295000
U10 IC, Dual Low-noise Op-Amp, NE5532N 53295000
U11 IC, Dual Low-noise Op-Amp, TLO76 1603013500
U12 IC, Dual Low-noise Op-Amp, TLO77 1603013500
U13 IC, Analog Switch, CD4053BE 46638P1
U14 IC, Analog Switch, CD4053BE 46638P1
U15 IC, Analog Switch, CD4053BE 46638P1
U16 IC, Dual Low-noise Op-Amp, TLO78 1603013500
U17 IC, Dual Low-noise Op-Amp, NE5532N 53295000
U18 IC, Audio Amp, LM386 53281000
U19 IC, Audio Amp, LM387 53281000
U2 IC, Analog Switch, CD4053BE 46638P1
U20 IC, Reference, LM833 1603083300
U21 IC, Analog Switch, CD4053BE 46638P1
U22 IC, Undervoltage Sense, MC33064P-5 1603013700
U23 IC, UCN5821A 160358210A
U24 IC, UCN5821A 160358210A
U25 IC, UCN5821A 160358210A
U27 IC, Voltage Regulator, LM317 53290000
U28 IC, EEPROM, 1024 Bit, 93C56AN NA 1603013800
U29 Assy. Software, Version 1.6 9020634816
U3 IC, Analog Switch, CD4053BE 46638P1
U30 IC, Quad 2-input NAND, 4093B 160340930B
U4 IC, Analog Switch, CD4053BE 46638P1
U5 IC, Dual Low-noise Op-Amp, TLO72 1603013500
U6 IC, Dual Low-noise Op-Amp, TLO73 1603013500
U7 IC, Dual Low-noise Op-Amp, TLO74 1603013500
U8 IC, Dual Low-noise Op-Amp, TLO75 1603013500
U9 IC, Dual Low-noise Op-Amp, NE5532N 53295000
XJ16 Jumper 2515001001
XJ17 Jumper 2515001001
XJ18 Jumper 2515001001
XJ19 Jumper 2515001001
XJ20 Jumper 2515001001
XJ24 Jumper 2515001001
XJ4 Jumper 2515001001
XJ5 Jumper 2515001001
XJ6 Jumper 2515001001
XJ7 Jumper 2515001001
XU1 IC Socket, 8-Pin 53041002
XU29 IC Socket, 40-Pin 53041308
Y1 Crystal, 4MHz, 20pF 3301000700
Reference 9027-6245-01 Drawing, Section 6
WASHER FLAT 52186006
4-40X1/4 1008402300
4-40X3/8 1008403500
5-12 CSI-200 User Instructions
Page 65

PC Board Assembly, Front Panel (9030-6246-00)
Table 5.7
Ref No. Description RTS Part No.
R1-R3 Pot, 10K Ohm, Audio 1406003901
DS9 LED, Super Bright, Red 1801001900
DS1-DS8 LED, Super Bright, Yellow 1801002200
S1-S8 Keyswitch, No LED 1911004300
J1 Connector 2006009600
Reference AS6246 Drawing, Section 6
5-13
Page 66

5-14 CSI-200 User Instructions
Page 67

S ECTION
C
HAPTER
6
D
IAGRAMS
6-1
Page 68

6-2 CSI-200 User Instructions
Page 69

Date: 7/23/01 Time : 05:20:45 PM
Title: D:\TEMP\AS6246_01B.cal
Page 70

Date: 7/23/01 Time : 05:27:24 PM
Title: D:\TEMP\AS6245_01D.cal
Page 71

Date: 7/23/01 Time : 05:21:25 PM
Title: D:\TEMP\AS6261_01C.cal
Page 72

Date: 7/23/01 Time : 05:22:16 PM
Title: D:\TEMP\AS6262_01C.cal
Page 73

Date: 7/19/01 Time : 02:05:07 PM
Title: C:\home\cms\benedil\view\9020-6324_01.DWG
Page 74

Date: 7/23/01 Time : 05:23:05 PM
Title: D:\TEMP\AS6464_01G.dwg
Page 75

Date: 7/23/01 Time : 05:23:33 PM
Title: D:\TEMP\BD6464_01A.cal
Page 76

Date: 7/23/01 Time : 05:24:13 PM
Title: D:\TEMP\IS6718_01A.cal
Page 77

Date: 7/23/01 Time : 05:24:51 PM
Title: D:\TEMP\OD6355_01A.cal
Page 78

Date: 7/23/01 Time : 05:25:30 PM
Title: D:\TEMP\OD6355_02A.cal
Page 79

Date: 7/23/01 Time : 05:26:07 PM
Title: D:\TEMP\OD6355_03A.cal
Page 80

Date: 7/23/01 Time : 05:26:42 PM
Title: D:\TEMP\OD6355_04A.cal
Page 81

Date: 7/23/01 Time : 05:03:09 PM
Title: c:\home\cms\benedil\view\9000-6464_01.CAL
Page 82

5
4
3
2
LOC
REV
A RELEASE TO FACTORY CK 12/7/00
DESCRIPTION
1
REVISIONS
ECO. NODRFT CHKR APP DATE
73521
FRONT PANEL
+
1
2
3
C9
C136
14
15
4
5.1M
100/25
1nF MONO
100/25
R13
22K
R16
22K
C10
R31
C1
100/25
+
.1/50
+7V
C5
C3
C4
+
5.1M
5.1M
.1/50
+14V
Q1
2N5087
R14
22K
R15
22K
R26
R29
C13
D
C
SN37A-14B
B
A
J28
M-114B
PANEL (SHT2,6D)
MIC
JACK
DYN
HEADSET
JST-B-6B-ZR
100 1/4W
CARB
MIC
CONN
J3
+7V
R22
22K
HMS/PMS
(SHT3,2D)
R
1
2
3
T
4
S
5
J2
1
2
3
4
5
6
R18
1
RB
2
TB
3
4
5
RP2I
22K
100 1/4W
R23
22K
+14V
1 10
R
T
S
1
2
3
MIC PROGRAMMING
UNBAL
BAL
929647-01-03
FB4
#73
FB2
#73
C57
+
22/50
R17
U2
4053
12
13
2
1
5
3
11
10
9
5
P1
REM MIC
MIC LO
MIC HI
(SHT2,2C)
HP L
(SHT2,2C)
HP R
UNBAL/BAL
FB3
#73
FB1
#73
+14V
C56
.1/50
+14V
X0
X1
Y0
Y1
Z0
Z1
XX
YY
ZZ
6
J1
JST-B-3B-ZR
(SHT2,1D)
(SHT2,1D)
(SHT2,1D)
J24
1
2
3
R4
100K
R5
100K
R11
620
R19
620
.1/50
167
.1/50
X
Y
Z
8
R2
2K
100
(SHT2,1D)
R20
100K
+7V
Q3
J305
R32
+
R34
22K
R1
1K
R3
R7
301
1%
R6
1K
R9
301
1%
NE5532
R27
200
R30
100K
1N914
C14
100/25
+4.5V
C2
+
10/25
PM HI
DIFF MIC PRE AMP (+20dB)
C7
6
5
NE5532
R10
3.01K
1%
+7V
CARB MIC
Q2
2N5210
D1
1N4004
R24
100K
MIC PRE/LIMITER
+14V
84
3
+
U1A
2
-
R28
22K
C15
1nF
+7V
D2
100K
D3
1N914
2N5210
+14V
Q4
C16
.1/50
R35
100K
R33
15K
1nF MONO
R8
3.01K
1%
-
U1B
1
7
+
C6
1nF MONO
(SHT3,1B)
CARBON MIC SENSE
C11
.1/50
C8
.1/50
+
1/50
(SHT2,4D)
R36
10K
C17
R21
12K
10/25
USM
+7V
R12
1K
C12
+
R38
100
(SHT3,2D)
+14V
KEY3
(SHT2,1D)
R37
10K TRIMPOT
LIN
4
(SHT3,
(SHT3,
TC3
1 7
(SHT2,6D)
SIDETONE
2D)
2D)
RP2F
22K
D4
1N914
TC1
TC2
(SHT2,7A)
PGMB
1 3
+14V
+14V
12
RP2A
22K
D15
1N914
D16
1N914
(SHT2,6B)
PGMA
(TO CH 3)
ON
OFF
929647-01-03
IFB B
(TO CH 4)
ON
OFF
929647-01-03
TC4
(SHT3,2D)
RP2B
22K
C58
.1/50
14
RP1C
RP1D
IFB A
J5
RP2C
22K
RP1B
KEY1
(SHT2,1D)
KEY2
(SHT2,1D)
J4
1
2
3
1
2
3
1 5
+14V
3 4
5 6
7 8
100K
+7V
RP3C
RP3B
RP3D
D5
1N914
RP2D
22K
R39
2K
R40
30K
3Vpp
+7V
5 6
3 4
7 8
100K
RP2E
22K
+7V
16
+14V
(SHT2,1D)
C59
100pF
470K
ORCAD GENERATED DRAWING
FILE NAME:
12
13
2
1
5
3
11
10
9
(IFB-A)
U4
4053
12
13
11
10
R41
+14V
X0
X1
Y0
Y1
Z0
Z1
XX
YY
ZZ
6
(IFB-B)
X0
X1
Y0
2
Y1
1
Z0
5
Z1
3
XX
YY
9
ZZ
6
KEY4
+14V
167
+14V
U3
4053
TALK CH.1/4W-A
X
14
PROGRAMMING
929647-01-03
LSN2
TALK CH.4
2WIRE
4WIRE
LSN1
(SHT3,7D)
4WIRE A
CALL 2
(SHT3,5D)
LISTEN
BUFFER
CH.2
(SHT2,6C)
(SHT3,7D)
LSN3
(SHT2,6C)
(SHT3,7D)
4WIRE B
PROGRAMMING
929647-01-03
(SHT3,5D)
(SHT3,1A)
TALK
Y
15
CH.2
TALK
Z
4
CH.3/
4W-B
2WIRE
4WIRE
8
167
X
14
Y
15
Z
4
8
LSN4
(SHT2,5C)
(SHT3,7D)
R42
100K
D14
1N914
Q5
2N5210
J/IC_GROUP/ECAD/SCHEMATIC/6245
3
(SHT3,5D)
J6
3
2
1
(SHT3,5D)
LISTEN BUFFER
J7
CALL 4
LISTEN
BUFFER
CH.4
VOX REC
CALL 1
LISTEN BUFFER
CALL 3
CH.3
3
2
1
7
TL072
R100
22K
7
TL072
+14V
1
TL072
+14V
CH.1
U5A
R69
22K
1
TL072
U7B
C50
100pF
U5B
R49
22K
R84
22K
+
-
C21
R65
22K
84
+
-
C31
100pF
R80
22K
U7A
R96
22K
100pF
5
6
R51
22K
+
-
100pF
3
2
84
C47
5
6
.1/50
+
-
C40
100pF
C41
3
2
R101
10K
C19
100pF
R50
10K
C28
100pF
.1/50
+7V
C37
100pF
+7V
C22
R70
10K
+7V
100pF
R85
10K
100pF
TALK
BUFFER
CH.4
100pF
C29
100pF
+7V
C48
+7V
C18
TALK
BUFFER
CH.1
R67
22K
+7V
C38
R98
22K
R53
22K
R82
22K
TL072
47K
+7V
R66
47K
TALK
BUFFER
CH.2
47K
+7V
TALK
BUFFER
CH.3
R97
47K
R52
TL072
R81
6
5
6
5
2
3
2
3
-
U8B
+
-
U6B
+
-
U6A
+
8 4
-
U8A
+
8 4
R99
22K
THESE DRAWINGS AND SPECIFICATIONS ARE THE
PRPOERTY OF TELEX COMMUINCATIONS, INC.AND
SHALL NOT BE REPRODUCED, COPIED, OR USED
FOR ANY PURPOSE WITHOUT EXPRESS WRITTEN
CONSENT.
2
CHANNEL 1
BILAT
+14V
NE5532
R58
60.4K
1%
10K TRIMPOT VM
LIN
CHANNEL 2
R74
1%
CHANNEL 3
R89
60.4K
1%
10K TRIMPOT VM
LIN
CHANNEL 4
BILAT
CHK.
20.0K
BILATCONN
20.0K
BILAT
+14V
NE5532
20.0K
NE5532
R106
20.0K
1%
R59
1%
5
6
R75
1%
R90
1%
5
+
U10B
6
-
SCALE
3
2
3
2
10pF
+
U9B
-
C52
APP.
+
U9A
-
C33
10pF
+
U10A
-
84
84
R62
20.0K
1%
1
C23
10pF
R77
20.0K
1%
7
NE5532
R92
20.0K
1%
1
C42
10pF
R108
20.0K
1%
7
60.4K
60.4K
R73
60.4K
R107
1%
R104
R61
1%
R57
R76
1%
R91
1%
R88
DR.
DATE
CK
60.4K
10K TRIMPOT VM
LIN
R105
60.4K
1%
10K TRIMPOT VM
LIN
+7V
C20
100pF
R55
22K
C32
.1/50
1
+14V
+7V
C30
100pF
R68
22K
7
TL072
+7V
C39
100pF
R83
22K
C51
.1/50
1
TL072
+14V
+7V
C49
7
60.4K
100pF
C24
.1/50
C43
.1/50
+
+
C36
+
22/50
1N4004
+
C53
22/50
47/16
D12
1N4004
Title
C25
22/50
47/16
D6
1N4004
+
47/16
D8
C44
22/50
47/16
D10
1N4004
C54
+
+
C34
+
+14V
C26
+14V
+14V
C45
+14V
D9
1N4004
R109
100
R110
100K
D13
1N4004
R63
100
R64
100K
D7
1N4004
R78
100
R79
100K
R94
100
R95
100K
D11
1N4004
C27
+
22/50
C35
+
22/50
C46
+
22/50
C55
+
22/50
NOTES: SEE SHEET 3 OF 3
SCHEMATIC DIAGRAM
J8
NC3FDH
1
2
3
J9
NC3MDH
1
2
3
J10
NC3FDH
1
2
3
COM
CH 1
CH 2
LOOP
THRU
COM
CH 3
CH 4
7/15/01
MOTHERBOARD MCE325
DO NOT SCALE DRAWING
P/N
TELETELEXX
COMMUNICATIONS, INC.
BURNSVILLE, MINNESOTA
SIZE
PLANT DIST:
D
DWG. NO.
Sheet
1
1
9027624501
of
3
B.E.
Page 83

5
544332211
+14V
X0
12
X1
13
Y0
2
Y1
1
Z0
5
Z1
3
11
XX
10
YY
9
ZZ
6
+14V
167
X0
X1
Y0
Y1
Z0
Z1
XX
YY
ZZ
6
(SHT3,7D)
LSN4
(SHT1,4A)
J20
R156 20K
+
TL072
167
X
Y
Z
8
J19
929647-01-04
1
2
3
4
C137
.1/50
X
14
Y
15
Z
4
8
+7V
-
6
U16B
+
5
U13
4053
14
15
4
C84
500pF
7
C141
.1/50
X0
12
X1
13
Y0
2
Y1
1
Z0
5
Z1
3
11
XX
10
YY
9
ZZ
SPKR DIM
ADJUST
(MIN=6dB
MAX=26dB)
(R3)
+14V
167
6
RP6D
15
10K
(R1)
VOL 1
PGM
VOL
(R2)
VOL 2
(SEE SD6246)
10K AUDIO POT
3 REQD
U15
4053
X
14
Y
15
Z
4
8
RP6B
10K
RP6A
10K
RP6C
10K
MOLEX FFC
39-51-3304
12
10K
RP7B
13
10K
RP7C
14
10K
RP7D
15
10K
R157
20K TRIMPOT
LIN
13
12
14
J21
+
10/25
30
29
28
27
26
25
24
23
22
21
22
C86
+
(SHT1,6B)
USM
C87
10/25
PGM L
(6A)
MONO SW
PGM R
(6A)
+7V
C143
4.7uF
C142
4.7uF
R25
10K
+7V
R176
22K
R184
22K
10K
20K
+7V
R48
R43
20K
R170
10K
.1/50
2N5460
Q10
.1/50
R46
NE5532
R177
100K
C91
C99
C100
R185
100K
1nF
C98
.1/50
5
6
270pF
3
2
3
2
+14V
84
+
-
R47
20K
C113
+14V
C112
270pF
+14V
C92
1nF
R178
1M
84
+
-
R54
20K
84
+
U17A
-
R171
10K
C101
.1/50
U33B
7
LM833
U31A
1
LM833
1
C93
.1/50
C88
.1/50
.1/50
(SHT3,5D)
C107
4.7uF
C106
4.7uF
301
301
C102
.1/50
R172
1%
R174
1%
C108
100uF
USMB
C89
+
10/25
C90
+
10/25
4
2
U18
3
C94
618
+14V
MONO
4
2
U19
3
618
+14V
17-25VDC SOURCE
R173
100K
R175
100K
7
LM386
5
R181
C95
10/25
+
R180
1K
7
LM386
5
C103
10/25
+
R186
1K
U34
6 7
INA OUTA
5
BIAS
3
VCC
C109
1000uF
2.7
.1/50
.1/50
OUTBINB
LM4752/TO
4
C110
-4dBu NOM
(+6dBu pK)
C97
100/25
+
R182
22K
C96
C105
100/25
+
R187
2.7
R188
22K
C104
12
R44
2.7
0.1uF
R183
10
R189
10
J23
MLSS100-3
1
2
3
R45
2.7
C111
0.1uF
SPKR MUTE
REM MIC
+18V IN
4W-B LO
4W-A LO
KEY4
KEY2
HP COM
MIC LO
PM HI
(SHT1,8D)
(SHT1,8C)
REAR PANEL
P23
1
2
3
NOTES: SEE SHEET 3 OF 3
+14V IN
COM
COM
4W-B HI
4W-A HI
KEY3
KEY1
MIC HI
CHS GND
PM COM
HP L
HP R
ISO
SPKR JACK
MN-114B
1
2
3
4
5
J27
E1
E2
J22
745783-3
13
25
12
24
11
23
10
22
9
21
8
20
7
19
6
18
5
17
4
16
3
15
2
14
1
R
T
S
1 10
929647-01-04
16
RP5D
22K
R153
R154
47K
R155
47K
+7V
+7V
1
2
3
4
U14
4053
12
13
2
1
5
3
11
10
9
15
R152
200
C83
10/25
+7V
C61
D D
4W-A LO
(1D)
4 WIRE A IN
0dBu NOM
(-10dBu TO
+8dBu)
4W-A HI
(1D)
4W-B LO
(1D)
4 WIRE B IN
0dBu NOM
(-10dBu TO
C C
B B
A A
+8dBu)
(1D)
PROGRAM A
J14
SN37A-14B
PROGRAM B
J15
SN37A-14B
4W-B HI
(SHT1,1C)
S
T
S
R
1
RB
2
TB
3
T
4
5
R
1
RB
2
TB
3
4
5
10/25
10/25
10/25
10/25
C60
+
C62
+
C66
+
C68
+
10/25
10/25
10/25
10/25
C71
+
C73
+
C77
+
C78
+
R117
20.0K
1%
C63
100pF
R119
20.0K
1%
+7V
R124
20.0K
1%
C69
100pF
R126
20.0K
1% RP7A
+7V
R130
20.0K
1%
C74
100pF
R132
20.0K
1%
+7V
R138
20.0K
1%
C79
100pF
R140
20.0K
1%
+7V
TL072
R120
10.0K
1%
R127
10.0K
1%
TL072
R133
10.0K
1%
TL072
R141
10.0K
1%
TL072
1nF
1nF
1nF
6
5
1nF
2
3
C72
6
5
C81
2
3
-
U11B
+
C64
1nF
C67
-
U11A
+
8 4
C70
1nF
10.0K
-
U12B
+
C75
1nF
R139
10.0K 1%
-
U12A
+
8 4
C80
1nF
R118
10.0K
1%
R125
10.0K
1%
R131
1%
7
1
+14V
PGM ASSIGN
TO HDST L
PGM ASSIGN
TO HDST R
7
C65
.1/50
1
(SHT3,2D)
(SHT3,2D)
C76
.1/50
+14V
LIST3
LIST2
(SHT1,6B)
(-6dBu NOM)
RP5G
22K
(SHT1,5B)
R135
10K
R142
10K
PGMB
929647-01-03
929647-01-03
J16
ON
OFF
J17
ON
OFF
(SHT3,2D)
LIST1
(SHT3,2D)
4W-B LSN
(-6dBu NOM)
RP5C
22K
1 8
+14V
PGMA
(SHT3,2D)
(SHT3,2D)
C82
+
1/50
1
2
3
1
2
3
STC
RP5A
22K
SPKR ON
SPKR DIM
(SHT3,2D)
1 4
LIST4
+14V
RP5H
22K
(4D)
(4B)
SIDETONE
(SHT1,6A)
4W-A LSN
RP5B
22K
1 2
(1D)(SHT1,6D)
(SHT1,4B)
(SHT3,7D)
(SHT1,4C)
(SHT3,7D)
1 9
RP5F
22K
PGM L
PGM R
LSN1
(SHT1,4D)
(SHT3,7D)
RP5I
22K
1 3
TC2
(SHT3,2D)
LSN3
LSN2
(1D)(SHT1,5A)
(SHT3,2D)
TC4
+14V
17
RP5E
22K
160K
PGM ASSIGN
TO SPEAKER
929647-01-03
J18
1
2
3
R56
0
Title
PAGE
2MCE325MOTHER BOARD
DWG. NO.
9027624501
REV
A
Page 84

5
544332211
U23
1 16
+5V
CALL LIGHT MUX
R198
RP2H
22K
100K
10
11
1
270K
VOX IN
1 9
+14V
C85
.1/50
TL072
1 8
D D
14
15
HOT
4
10K
X
Y
Z
R208
12
13
+14V
16
768
+7V
U30C
8
9
4093
U30D
4093
1 2
0.5A SBLO
1 2
NEUTRAL
X0
X1
Y0
Y1
Z0
Z1
XX
YY
ZZ
2
3
F1
EARTH
3
12
13
2
1
5
3
11
10
9
C117
10pF
R207
-
U16A
+
8 4
U21
4053
C118
C C
B B
.1/50
C119
.01/50
MYLAR
R209
1K
AC PLUG
REAR PANEL MOUNTED
C134
.1/50
(2A)
(SHT1,4D)
LSN1
(SHT1,4C),(SHT2,5C)
LSN2
(SHT1,4B),(SHT2,6C)
LSN3
(SHT1,4B),(SHT2,5C)
LSN4 CALL CTL2
CALL CTL1
CALL CTL2
RP2G
22K
+14V
7
2
1
14
,(SHT2,5D)
(TO 2D)
(TO 2D)
C120
100pF
U30A
4093
R211
22K
R213
270K
T1
TO-10R-RT
15VA
3
15VAC
15VAC
+5V
.1/50
R199
10K
R212
270K
(SHT2,1D)
E6
C140
E7
E9
+5V
+5V
C121
10pF
+18V IN
E8
U30B
5
6
4093
R214
10K
KBL005
- +
4
17-25VDC SOURCE
D21
1N4004
CR1
1
50VRRM
4.0A
3
(SHT2,3C)
(SHT1,4D)
(SHT1,4C)
(SHT1,4C)
(SHT1,4B)
4
U28
93C56
2
LM317T
+
C138
.1/50
C125
4700/35
MONO
CALL 1
CALL 2
CALL 3
CALL 4
(2B)
DSW5
DSW7
4 3
ANALOG MID
VOLTAGE
R261
22K
+5V
+5V
+5V
O I
1
S
2
C
- +
5 8
SOURCE
D20 1N4004
HEATSINK
3
INAOUT
R262
C126
.1/500
+7V
U26
C139
U29
3
28
27
26
25
24
23
22
21
29
30
31
32
33
34
35
36
37
2
NE5532
2
1
3.01K
1%
40
VPP
VDD
PC0
PC1
PC2
PC3
PC4
PC5
PC6
PC7
PD0/RDI
PD1/TDO
PD2/MISO
PD3/MOSI
PD4/SCK
PD5/SS
TCMP
PD7
TCAP
IRQ
VSS
20
2 1
7
U17B
(SHT1,1D)
+14V IN
1N4004
R263
301
1%
+
C127
10/25
.1/50
OSC1
OSC2
PA0
PA1
PA2
PA3
PA4
PA5
PA6
PA7
PB0
PB1
PB2
PB3
PB4
PB5
PB6
PB7
RESET
U22
MC33064
IN RSET
-
6
+
5
D22
39
38
11
10
9
8
7
6
5
4
12
13
14
15
16
17
18
19
1
MC68HC7058
GND
3
+
C128
10/25
GND TP
R264
220K
R265
220K
+14V
4.00MHz
+
SOURCE
.1/50
+5V
C129
100/25
C130
Y1
R215
100K
C122
.1/50
LM317T
3
INAOUT
R266
U27
R200
2.2M
1 2
R268
200
2
R267
1
909
1%
301
1%
+
C131
10/25
C132
.1/50
C115
10pF
C116
10pF
+5V
C135
22/50
R201
3.01K
RP10B 100K
RP10A 100K
RP10C
RP10D
RP11D 100K
RP11C 100K
RP11B 100K
RP11A
RP12A 100K
RP12B 100K
RP12C 100K
RP12D 100K
+4.5V
(TO ELECTRET PANEL
MIC VIA NETWORK)
+
C133
100/25
+
1%
1 2
7 8
5 6
3 4
1 2
1 2
3 4
5 6
7 8
SOURCE
34
56
100K
100K
78
100K
19
SOURCE
+5V
(TO DIGITAL IC'S)
CLK D0
2
DI
6
STR
7
EN
5
DO
3
.
8
GND
UCN5821A
U24
1 16
CLK D0
2
DI
6
STR
7
EN
5
DO
3
.
8
GND
UCN5821A
U25
1 16
CLK D0
2
DI
6
STR
7
EN
5
DO
3
.
8
GND
UCN5821A
RP8A
12
RP9H
22K
22K
17
RP8B
13
RP9F
22K
22K
18
VCC
VCC
RP8C
14
22K
RP9G
22K
D1
D2
D3
D4
D5
D6
D7
D1
D2
D3
D4
D5
D6
D7
D1
D2
D3
D4
D5
D6
D7
VCC
12
15
14
13
12
11
10
9
4
15
14
13
12
11
10
9
4
RP8D
15
RP9A
22K
E14
+5V
RP14A 680
RP14B 680
15
RP14C 680
14
RP14D 680
13
RP14E 680
12
RP15B 680
11
RP15C 680
10
RP15D 680
9
RP15E 680
4
RP8E
16
22K
RP9B
13
22K
(7D)
+5V
+5V
22K
(5D)
(5D)
TC1
TC2
TC3
TC4
SPKR ON
HMS/PMS
STC
SPKR DIM
LIST1
LIST2
LIST3
LIST4
CALL CTL1
E15
(AUDIBLE)
1 2
3 4
5 6
7 8
9 10
3 4
5 6
7 8
9 10
RP8F
17
22K
RP9C
14
22K
DSW5
DSW7
VOX IN
RP9D
15
E16
18
22K
RP8G
22K
(SHT1,6D)
(SHT1,6D)
(SHT1,6A)
(SHT1,5A)
(SHT2,6B)
(SHT1,8B)
(SHT2,6D)
(SHT2,6B)
(SHT2,6D)
(SHT2,7C)
(SHT2,7C)
(SHT2,6B)
(7D)
(7D)
+14V
E10 E11
E12
RP8H
19
22K
RP9E
16
22K
+5V
+14V
+5V
110
110
R269
10K
E13
RP8I
22K
RP9I
22K
N.C.
+5V
+17-25VDC
39-51-3304
MOLEX FFC
1
2
3
4
5
6
7
8
9
10
39-51-3304
MOLEX FFC
11
12
13
14
15
16
17
18
19
20
OFF
VOX REC
(SHT1,4A)
J21
MIC ON
SPKR ON
PANEL MIC
CALL LIGHT
CH 4
CH 3
CH 2
CH 1
CALL RED
J21
MIC ON
SPKR ON
PANEL MIC
CALL LIGHT
CH 4
CH 3
CH 2
CH 1
REM MIC
CARB MIC
ISO
SPKR MUTE
1
2
3
4
5
6
7
8
K40-8S
16
15
14
13
12
11
10
9
ON
(SHT1,8D)
S1
FRONT
PANEL
LEDS
FRONT
PANEL
SWITCHES
(SHT2,1D)
(SHT1,7C)
(SHT2,1D)
(SHT2,1D)
A A
2. CAPACITANCE VALUES ARE SHOWN IN MICROFARADS/VOLTS.
1. ALL RESISTORS ARE CARBON FILM,1/8W,5%.
NOTES: UNLESS OTHERWISE SPECIFIED
Title
PAGE
3MOTHER BOARD MCE325
DWG. NO.
9027624501
REV
A
Page 85

Date: 7/23/01 Time : 05:19:08 PM
Title: D:\TEMP\SD6246_01A.cal
 Loading...