

Page 1

© Copyright, Televés, S.A.
Récepteur Numérique Terrestre Manuel d’utilisation
Digital Terrestrial TV Receiver User manual
“Free To Air”
Ref. 7288
Page 2

Page 3

Manuel d’utilisation
“DTR-7288
”
3
FRANCAIS
Sommaire . . . . . . . . . . . . . . . . . . . . . . . . . . . . . . . . . . . . . . . . . . . . . . . . . . . . . . . . . . . . . . . . . . . Pag.
1.- Précautions . . . . . . . . . . . . . . . . . . . . . . . . . . . . . . . . . . . . . . . . . . . . . . . . . . . . . . . . . . . . . . . . . . . . . . . 4
2.- General information . . . . . . . . . . . . . . . . . . . . . . . . . . . . . . . . . . . . . . . . . . . . . . . . . . . . . . . . . . . . . . . . . 5
2.1.- Informations générales . . . . . . . . . . . . . . . . . . . . . . . . . . . . . . . . . . . . . . . . . . . . . . . . . . . . . . . 5
2.2.- Au déballage . . . . . . . . . . . . . . . . . . . . . . . . . . . . . . . . . . . . . . . . . . . . . . . . . . . . . . . . . . . . . . . 5
2.3.- Opérations générales du DTR 7288 . . . . . . . . . . . . . . . . . . . . . . . . . . . . . . . . . . . . . . . . . . . . . 5
3.- Description des panneaux et contrôles . . . . . . . . . . . . . . . . . . . . . . . . . . . . . . . . . . . . . . . . . . . . . . . . . 6
3.1.- Télécommande . . . . . . . . . . . . . . . . . . . . . . . . . . . . . . . . . . . . . . . . . . . . . . . . . . . . . . . . . . . . . 7
4.- Installation du DTR 7288 . . . . . . . . . . . . . . . . . . . . . . . . . . . . . . . . . . . . . . . . . . . . . . . . . . . . . . . . . . . . . 8
4.1.- Connexion . . . . . . . . . . . . . . . . . . . . . . . . . . . . . . . . . . . . . . . . . . . . . . . . . . . . . . . . . . . . . . . . . 8
5.- Menu information . . . . . . . . . . . . . . . . . . . . . . . . . . . . . . . . . . . . . . . . . . . . . . . . . . . . . . . . . . . . . . . . . . . 9
6.- Installation . . . . . . . . . . . . . . . . . . . . . . . . . . . . . . . . . . . . . . . . . . . . . . . . . . . . . . . . . . . . . . . . . . . . . . . . 10
6.1.- Recherche des chaînes . . . . . . . . . . . . . . . . . . . . . . . . . . . . . . . . . . . . . . . . . . . . . . . . . . . . . . 10
6.2.- Configuration du système . . . . . . . . . . . . . . . . . . . . . . . . . . . . . . . . . . . . . . . . . . . . . . . . . . . . 11
6.3.- Verrouillage parental . . . . . . . . . . . . . . . . . . . . . . . . . . . . . . . . . . . . . . . . . . . . . . . . . . . . . . . . . 13
6.4.- Valeurs d'usine . . . . . . . . . . . . . . . . . . . . . . . . . . . . . . . . . . . . . . . . . . . . . . . . . . . . . . . . . . . . . 13
7.- Fonctions générales d'affichage . . . . . . . . . . . . . . . . . . . . . . . . . . . . . . . . . . . . . . . . . . . . . . . . . . . . . . . . 14
7.1.- Sélection des chaînes . . . . . . . . . . . . . . . . . . . . . . . . . . . . . . . . . . . . . . . . . . . . . . . . . . . . . . . . . 14
7.2.- Rappel de la dernière chaîne visionnée. . . . . . . . . . . . . . . . . . . . . . . . . . . . . . . . . . . . . . . . . . . . 14
7.3.- Mode TV et Radio . . . . . . . . . . . . . . . . . . . . . . . . . . . . . . . . . . . . . . . . . . . . . . . . . . . . . . . . . . . 14
7.4.- Mode TV et VCR . . . . . . . . . . . . . . . . . . . . . . . . . . . . . . . . . . . . . . . . . . . . . . . . . . . . . . . . . . . . 14
7.5.- Information sur las chaînes . . . . . . . . . . . . . . . . . . . . . . . . . . . . . . . . . . . . . . . . . . . . . . . . . . . . 15
7.6.- Contrôle Volume et Audio . . . . . . . . . . . . . . . . . . . . . . . . . . . . . . . . . . . . . . . . . . . . . . . . . . . . . 15
7.7.- Liste de favoris . . . . . . . . . . . . . . . . . . . . . . . . . . . . . . . . . . . . . . . . . . . . . . . . . . . . . . . . . . . . . 15
8.- Configuration des chaînes . . . . . . . . . . . . . . . . . . . . . . . . . . . . . . . . . . . . . . . . . . . . . . . . . . . . . . . . . . . . 16
8.1.- Configuration des canaux . . . . . . . . . . . . . . . . . . . . . . . . . . . . . . . . . . . . . . . . . . . . . . . . . . . . . 16
8.2.- Canaux favorits . . . . . . . . . . . . . . . . . . . . . . . . . . . . . . . . . . . . . . . . . . . . . . . . . . . . . . . . . . . . . 16
8.3.- Déplacement de canaux . . . . . . . . . . . . . . . . . . . . . . . . . . . . . . . . . . . . . . . . . . . . . . . . . . . . . . 17
8.4.- Blocage de canaux . . . . . . . . . . . . . . . . . . . . . . . . . . . . . . . . . . . . . . . . . . . . . . . . . . . . . . . . . . 17
8.5.- Renommer une chaîne . . . . . . . . . . . . . . . . . . . . . . . . . . . . . . . . . . . . . . . . . . . . . . . . . . . . . . . . 18
8.6.- Effacer une chaîne . . . . . . . . . . . . . . . . . . . . . . . . . . . . . . . . . . . . . . . . . . . . . . . . . . . . . . . . . . . 18
8.7.- Type de chaînes . . . . . . . . . . . . . . . . . . . . . . . . . . . . . . . . . . . . . . . . . . . . . . . . . . . . . . . . . . . . . 18
9.- EPG (Guide électronique des programmes) . . . . . . . . . . . . . . . . . . . . . . . . . . . . . . . . . . . . . . . . . . . . . . 19
10.- Date/Heure . . . . . . . . . . . . . . . . . . . . . . . . . . . . . . . . . . . . . . . . . . . . . . . . . . . . . . . . . . . . . . . . . . . . . . 19
10.1.- Ajustement de l’horloge . . . . . . . . . . . . . . . . . . . . . . . . . . . . . . . . . . . . . . . . . . . . . . . . . . . . . . 19
10.2.- Programmation d’évènements . . . . . . . . . . . . . . . . . . . . . . . . . . . . . . . . . . . . . . . . . . . . . . . . 19
11.- Jeux . . . . . . . . . . . . . . . . . . . . . . . . . . . . . . . . . . . . . . . . . . . . . . . . . . . . . . . . . . . . . . . . . . . . . . . . . . . 20
Description des connecteurs . . . . . . . . . . . . . . . . . . . . . . . . . . . . . . . . . . . . . . . . . . . . . . . . . . . . . . . . . . . . 21
Afficheur de la façade avant . . . . . . . . . . . . . . . . . . . . . . . . . . . . . . . . . . . . . . . . . . . . . . . . . . . . . . . . . . . . . 22
Glossaire . . . . . . . . . . . . . . . . . . . . . . . . . . . . . . . . . . . . . . . . . . . . . . . . . . . . . . . . . . . . . . . . . . . . . . . . . . . . 22
Caractéristiques techniques . . . . . . . . . . . . . . . . . . . . . . . . . . . . . . . . . . . . . . . . . . . . . . . . . . . . . . . . . . . . . 23
Menu en arborescence . . . . . . . . . . . . . . . . . . . . . . . . . . . . . . . . . . . . . . . . . . . . . . . . . . . . . . . . . . . . . . . . . 24
Garantie . . . . . . . . . . . . . . . . . . . . . . . . . . . . . . . . . . . . . . . . . . . . . . . . . . . . . . . . . . . . . . . . . . . . . . . . . . . 47
Page 4
Manuel d’utilisation
“DTR-7288
”
4
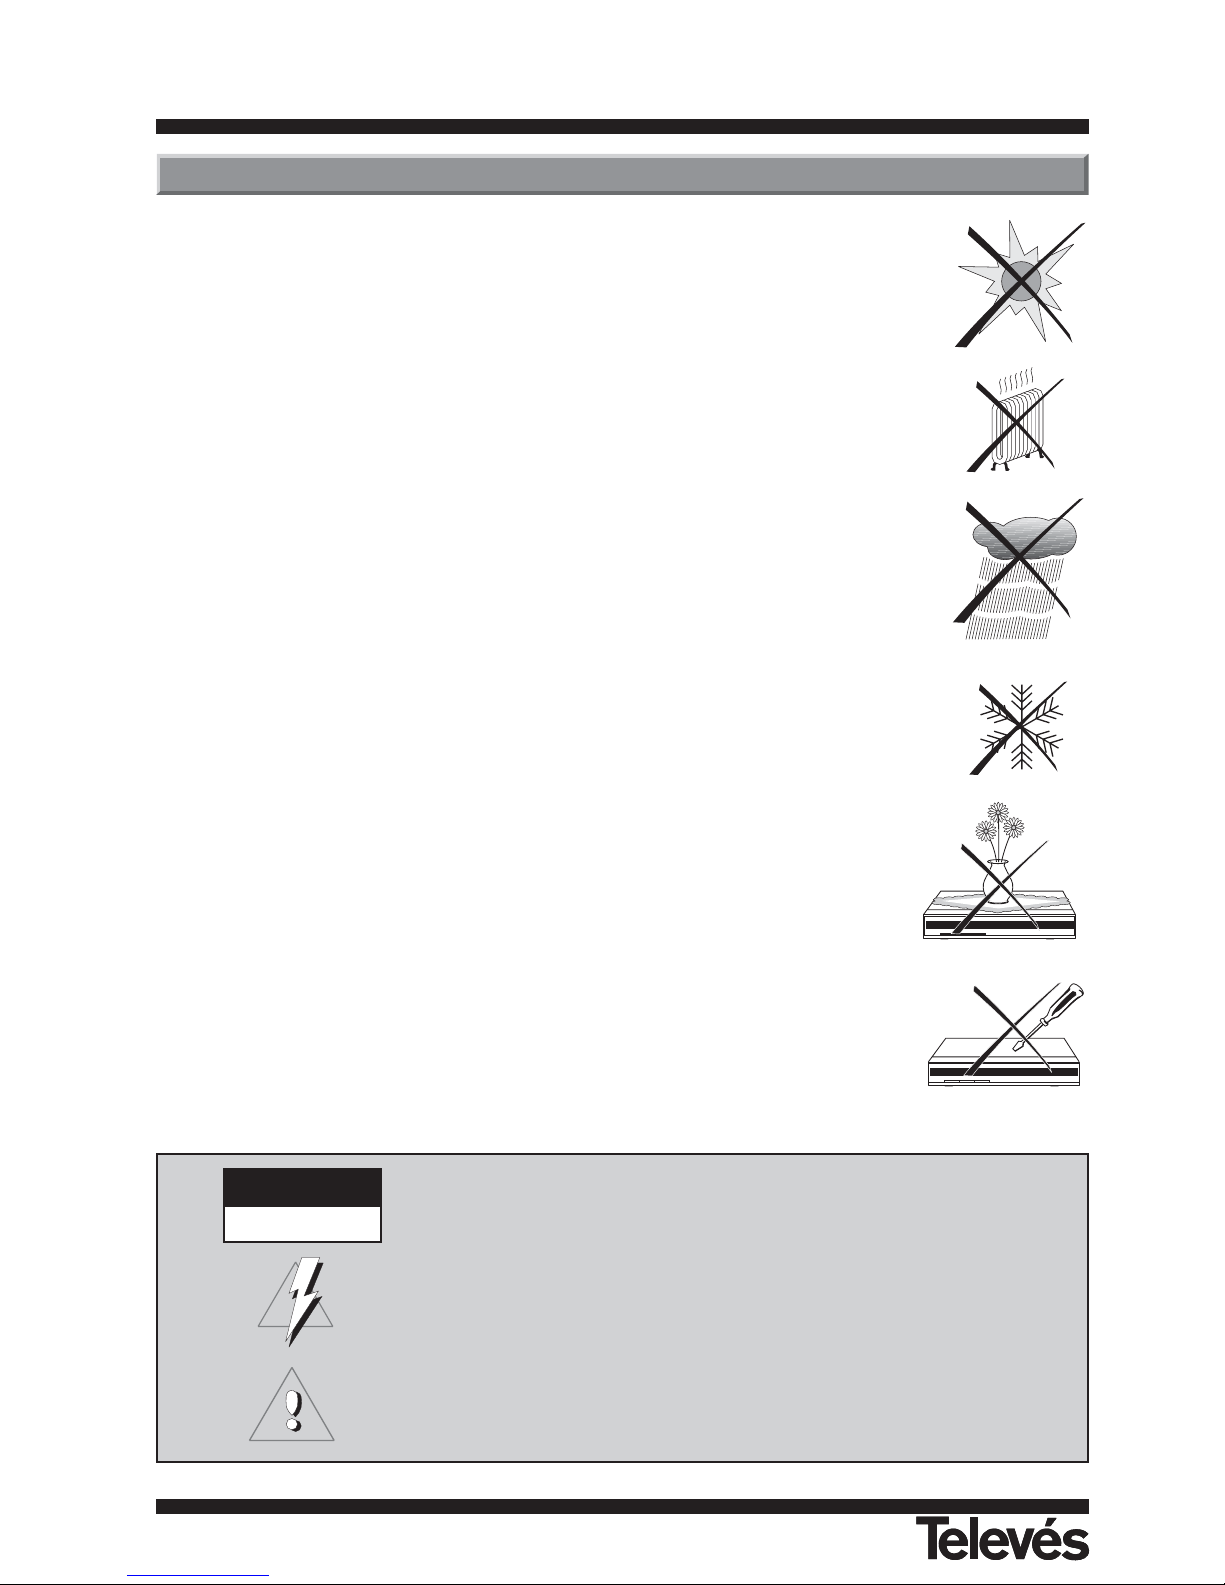
< 5°C
> 80 %
> 50°C
WARNING
RISK ELECTRICAL SHOCK
DO NOT OPEN
POUR REDUIRE LES RISQUES DE DECHARGES ELECTRIQUES, NE PAS RETIRER LE CAPOT.
AUCUNE PARTIE INTERIEURE NE PEUT ETRE REPAREE PAR L’USAGER.
POUR UNE REPARATION, CONSULTER UN TECHNICIEN QUALIFIE.
Ce symbole indique un "voltage dangereux" dans le produit pouvant présenter un
risque de décharges électriques ou de dommages personnels.
Ce symbole indique qu’il existe des instructions importantes pour ce produit.
Le récepteur que vous venez d’acquérir a été construit conformément aux normes
internationales de securités.
Veiller à suivre les conseils de sécurités qui suivent.
ALIMENTATION:
90 - 240 V~ 50/60 Hz.
SURCHARGE:
Ne pas surcharger prises, prolongateurs ou adaptateurs pour éviter tous risques
d’incendie ou de décharges électriques.
LIQUIDES:
Ne pas verser de liquide sur le récepteur.
PETITS OBJET:
Eviter la proximité de petits objets métalliques. Ils pourraient entrer par les
rainures de ventilation du récepteur et causer de graves dommages.
NETTOYAGE:
Débrancher le récepteur du réseau avant de le nettoyer.
Utiliser un chiffon doux, légèrement humidifié à l’eau (sans détergents) pour
nettoyer la coque extérieure du récepteur.
VENTILATION:
Placer le récepteur dans un endroit bien ventilé avec les rainures à decouvers.
Eviter l’exposition au soleil et à toutes sources de chaleurs.
Ne pas empiler d’autres appareils par dessus.
CONNEXIONS:
Effectuer uniquement les connexions recommandées pour éviter de possibles
dommages.
CONNEXION AU TV OU VCR:
Etteindre le récepteur avant de le connecter ou deconnecter a un TV ou VCR.
SI VOUS N’AGISSEZ PAS AINSI, CELA POURRAIT ENDOMMAGER LE TV
Ou VCR.
ENDROIT:
Placer le récepteur dans un local intérieur protéger des décharges, pluies ou
soleil.
Placer le récepteur en position horizontale.
1.- Précautions
Page 5
Manuel d’utilisation
“DTR-7288
”
5
FRANCAIS
Entièrement MPEG2, conforme DVB
Audio numérique avec support AC-3 par SPDIF
Menu simple et intuitif
Divers fonctions d'édition de chaînes (favorite,
déplacement, blocage, re-titrage, effacement et type).
Intègre la fonction Classement Automatique des Chaînes
- LCN (Logical Channel Number)
Jusqu'à 2000 programmes
Téléchargement simple et rapide du software à travers le
port RS-232
Système de transfert de données Plug-and-play (DTR à
DTR)
Fonction programmateur, s'allume et s'éteint
automatiquement à travers les fonctions (quotidien,
hebdomadaire, mensuel, une fois)
Permet le choix du type de canal en VHF (7 ou 8 MHz)
Système automatique de déplacement de canaux
réservés
Guide Electronique Des Programmes (EPG)
Télétexte OSD (DVB ETS 300 706) et support fonction
sous-titre
Support télétexteVBI
Sortie Multi Video - CVBS, RGB
Accepte SCPC/MCPC
Affichage à l'écran 256 couleurs
Conversion automatique PAL/NTSC
Sauvegarde automatique de la dernière chaîne
Dispose de 7 jeux différents
Le DTR 7288 vous permet de visionner une grande variété de programmes terrestres.
Ce manuel d'utilisation couvre l'installation du DTR 7288 et les pas nécessaires pour la programmation des différentes
configuration.
Il explique également les utilisations spécifiques disponible seulement sur ce DTR 7288 en détail, vous permettant de
profiter pleinement de cet appareil.
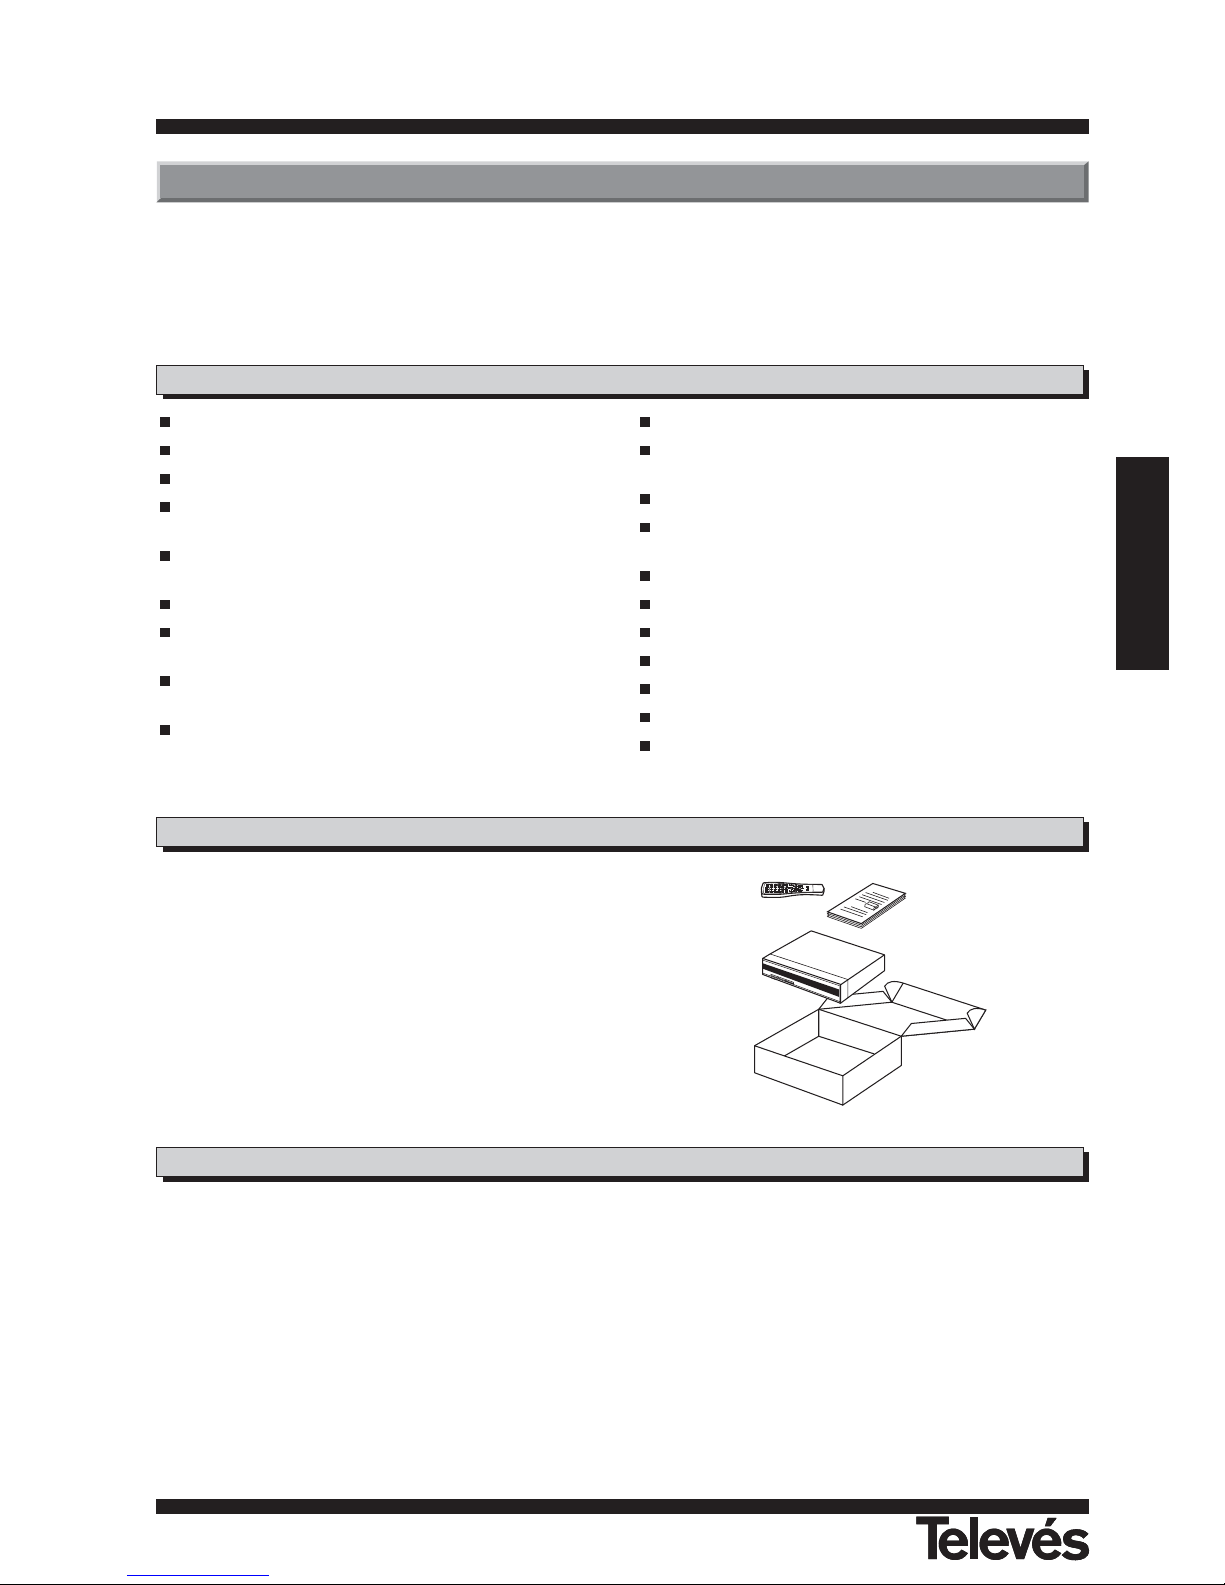
Déballer le récepteur et assurer vous qu'aucun élément ne manque:
- 1 x Récepteur numérique terrestre ref.7288
- 1 x Télécommande
- Manuels d'utilisation
- 2 x Piles “AAA”
2.- General Information
2.1.- Informations générales
2.2.- Au déballage
A travers ce manuel vous allez apprendre à utiliser les opérations de tous les jours de votre DTR 7288 en utilisant une série
de programmes et menus s'affichant à l'écran. Ces menus vous aiderons à obtenir le meilleur de votre DTR 7288, en vous
guidant pour l'installation, organisation des canaux, le visionnage et bien d'autres fonctions.
Toutes les fonctions peuvent être utilisées en utilisant les touches de la télécommande, et quelques fonctions sont
accessibles en utilisant les boutons de la façade avant.
A tout moment, quand vous utilisez les menus, si vous voulez retourner au mode TV, appuyez sur la touche TV/AV.
Attention, vous devez être conscient qu'un nouveau logiciel peut changer la fonctionnalité du DTR 7288.
Si vous éprouvez des difficultés à utiliser votre DTR 7288, consultez s'il vous plait, la section appropriée de ce manuel, ou
appelez votre revendeur ou un conseiller de service à la clientèle.
2.3.- Opérations générales du DTR 7288
Page 6
Manuel d’utilisation
“DTR-7288
”
6
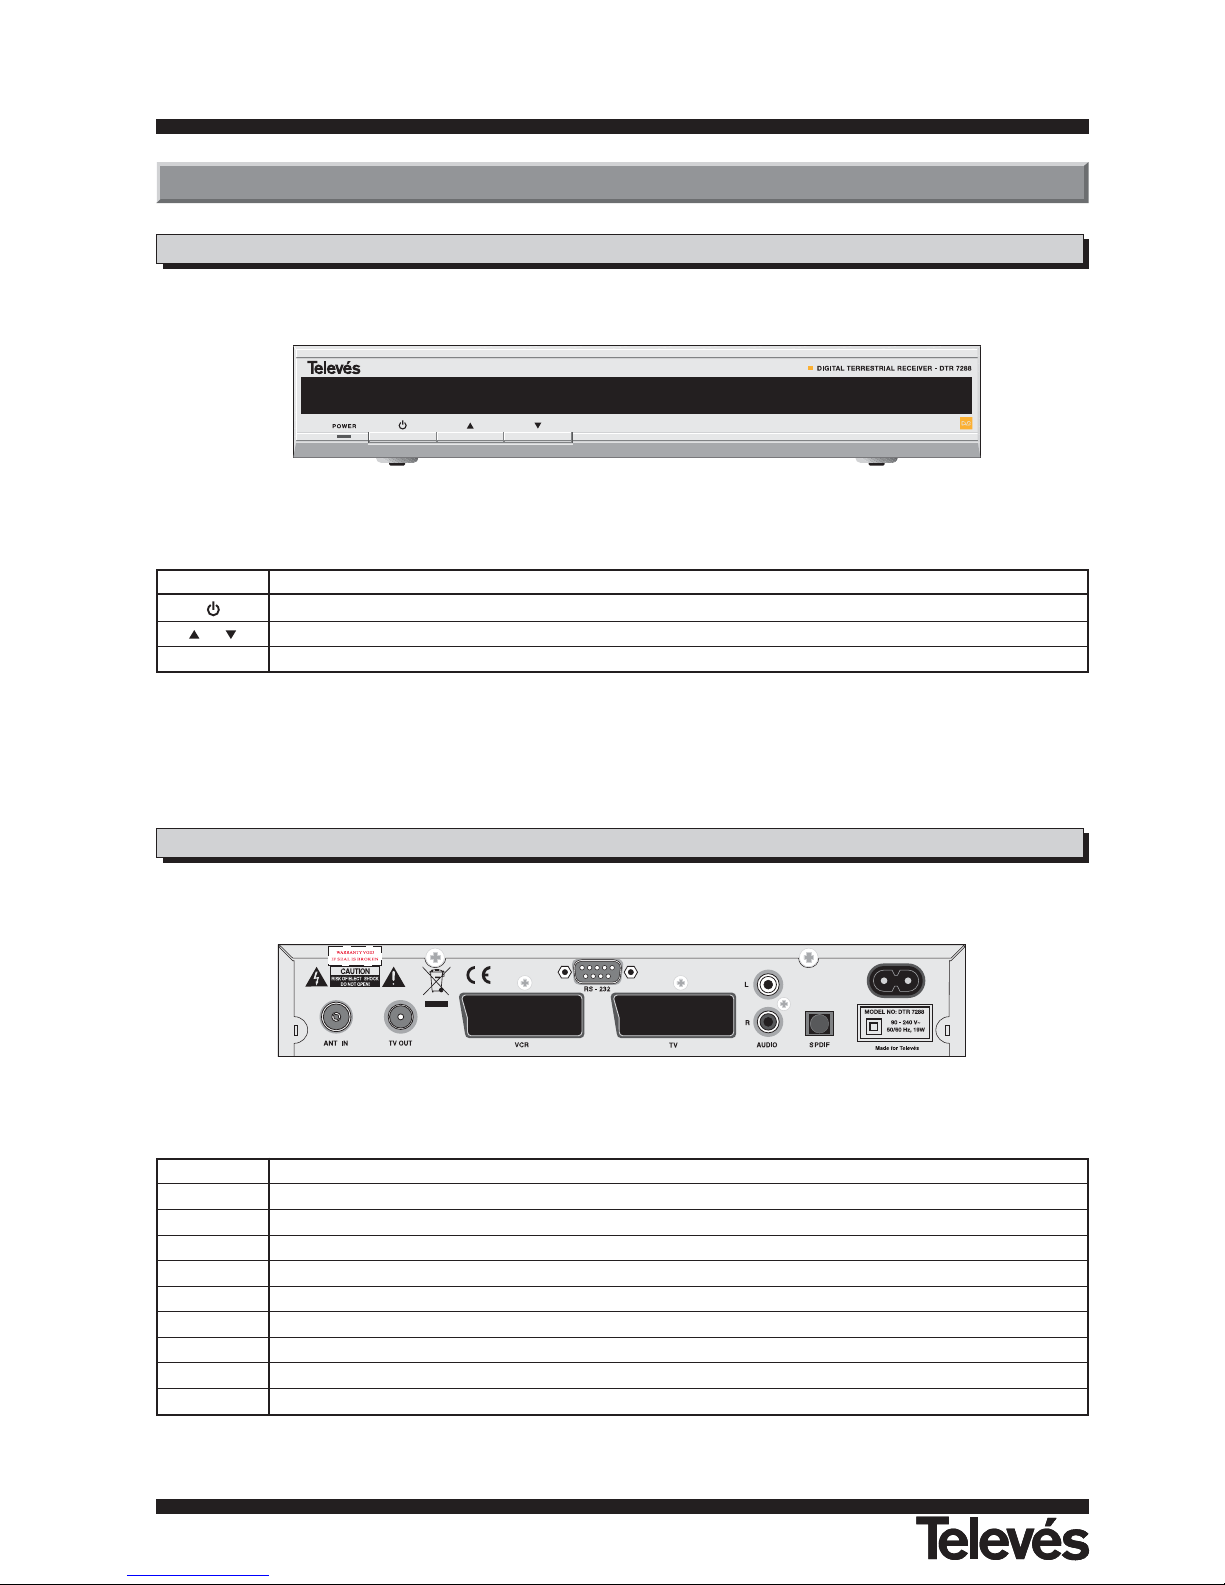
Facade avant
Panneau arrière
Touche Fonction
Mise en veille ON/OFF du DTR.
/
Pour monter ou descendre dans la liste des programmes.
Display En mode normal, montre le numéro du programme; En mode stand-by, montre l’heure actuelle
Nombre Fonction
ANT IN
Entrée du signal de l’antenne terrestre
TV OUT Sortie du signal de l’antenne terrestre pour connecter a un TV, VCR.
VCR Pour connecter un VCR à travers un prise péritel.
TV Pour connecter un TV à travers un prise péritel.
AUDIO R Sortie audio (canal droit).
AUDIO L Sortie audio (canal gauche).
S/PDIF Sortie optique SPDIF
RS232 Connexion à un port série (RS232).
MAINS Connection a l'alimentation
3.- Descripction des panneaux de contrôles
Page 7

Manuel d’utilisation
“DTR-7288
”
7
FRANCAIS
3.1.- Télécommande
Touche Fonction
Mise en veille ON/OFF du DTR
Permet de couper le son en regardant une chaîne
0 ... 9
Entre le numéro voulu dans le menu ou sélectionne la chaîne à
visionner.
TV/RADIO Commute entre le mode TV et le mode Radio.
FAV Affiche la liste des chaînes favorites.
INFO Montre les informations sur la chaîne en cours.
MENU Appuyer sur cette touche pour accéder au menu à l'écran.
/ Changer ver le haut/bas un page dans la liste des chaînes.
OK
Exécute l'icône sélectionné dans le menu à l'écran, ou accepte
la valeur désirée dans n'importe quel mode.
PR+ / PR-
En visionnant une chaîne, change celle-ci, ou déplace sur
l'icône suivant ou précédent dans le menu.
/
En visionnant une chaîne, ajuste le volume, ou déplace sur
l'icône gauche ou droit dans le menu.
EXIT Revient dans le menu précédent ou sort totalement du menu.
AUDIO
En visionnant une chaîne, commute entre les différentes
langues audio.
EPG Affiche l'EPG.
Sélectionne les différents modes audio.
TV/AV Commute entre les modes TV et AV.
Commute entre les modes télétexte et sous-titre.
SCAN Commence une recherche automatique.
Retour au canal précédent.
UHF Impossible sur ce modèle
POSITION Impossible en mode normal
Note: Les touches de couleur rouge, verte, jaune et bleue ont des fonctions
secondaires qui ne sont pas décrites ici et qui peuvent apparaitre dans les
divers menus.
Page 8
Manuel d’utilisation
“DTR-7288
”
8
Cette partie explique l'installation du DTR 7288.
Référez vous au manuel fournit avec l'appareil pour l'installation de léquipement exterieur tel que l'antenne.
En ajoutant ce nouvel équipement, soyez sûr de vous rapporter aux parties relatives du manuel pour l'installation.
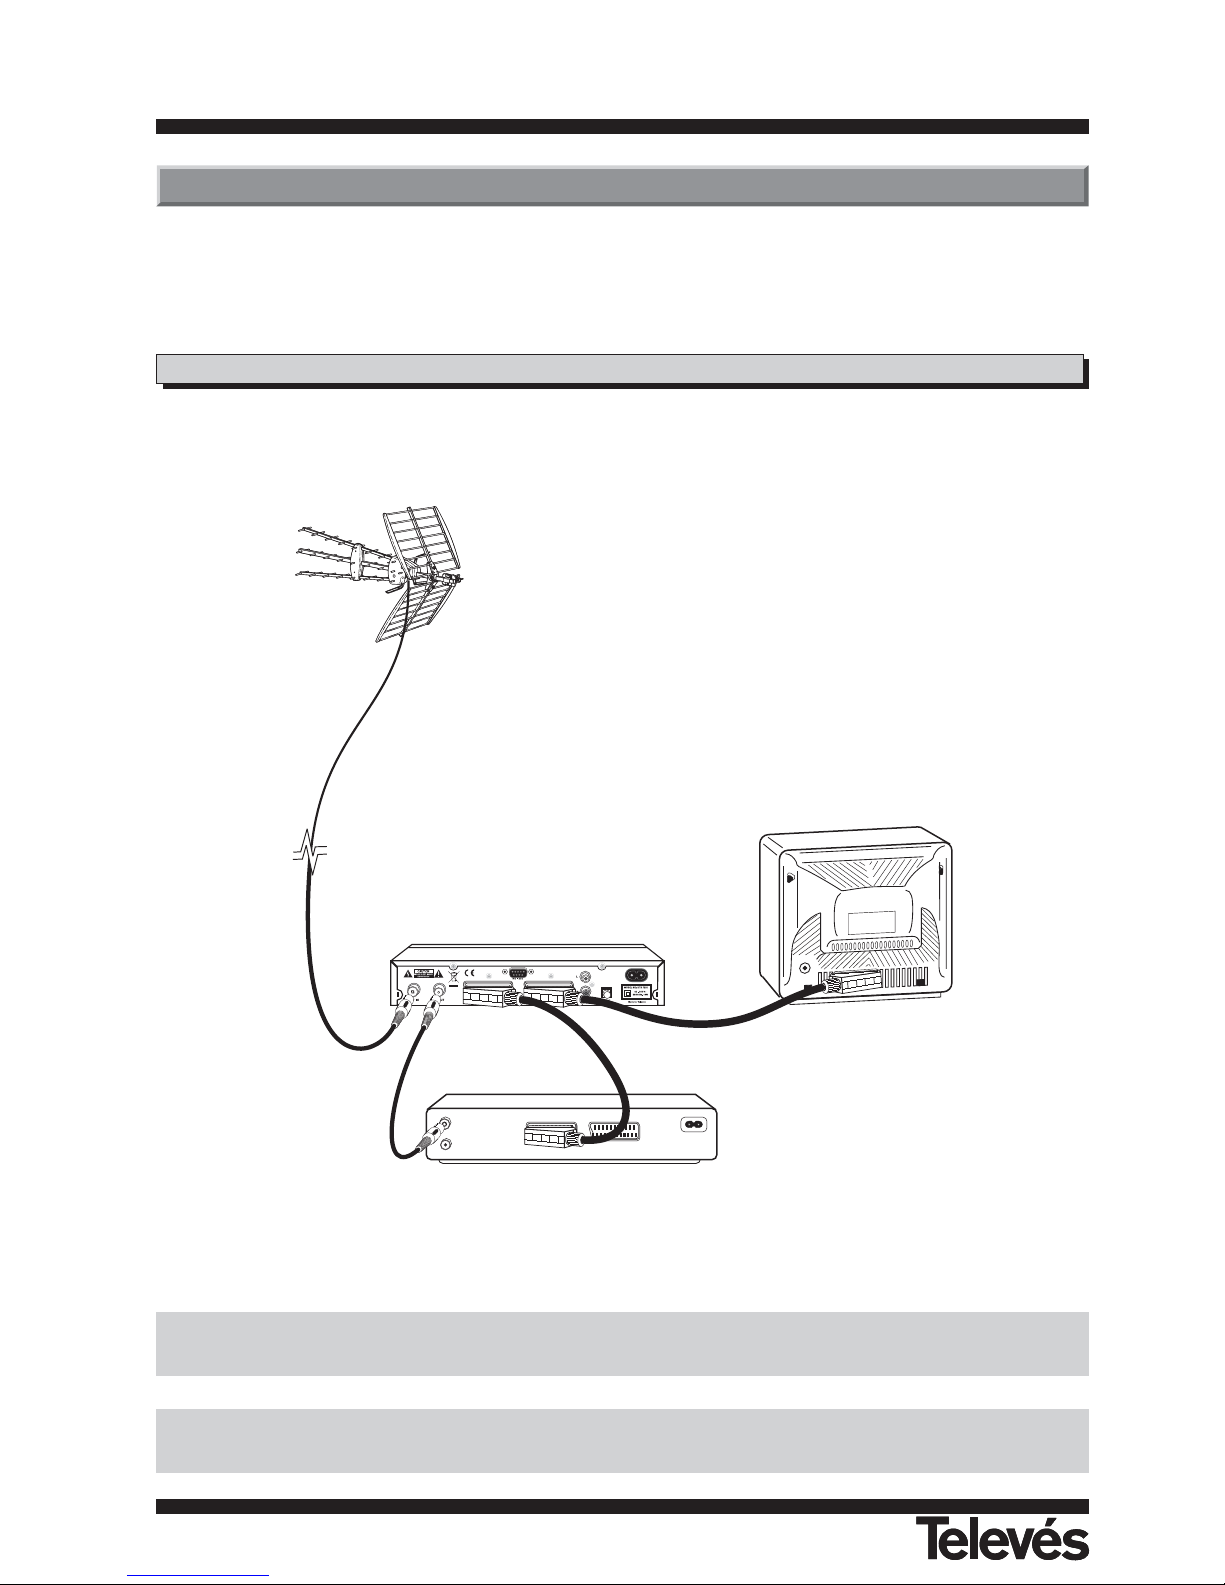
4.1.- Connexion
DTR-7288
TV
Ne pas allumer le récepteur tant que toutes les connexions ne sont pas effectuées.
Tous les câbles utilisés pour la connexion aux récepteurs seront de type coaxial.
4.- Installation du DTR 7288
VCR
Page 9
Manuel d’utilisation
“DTR-7288
”
9
FRANCAIS
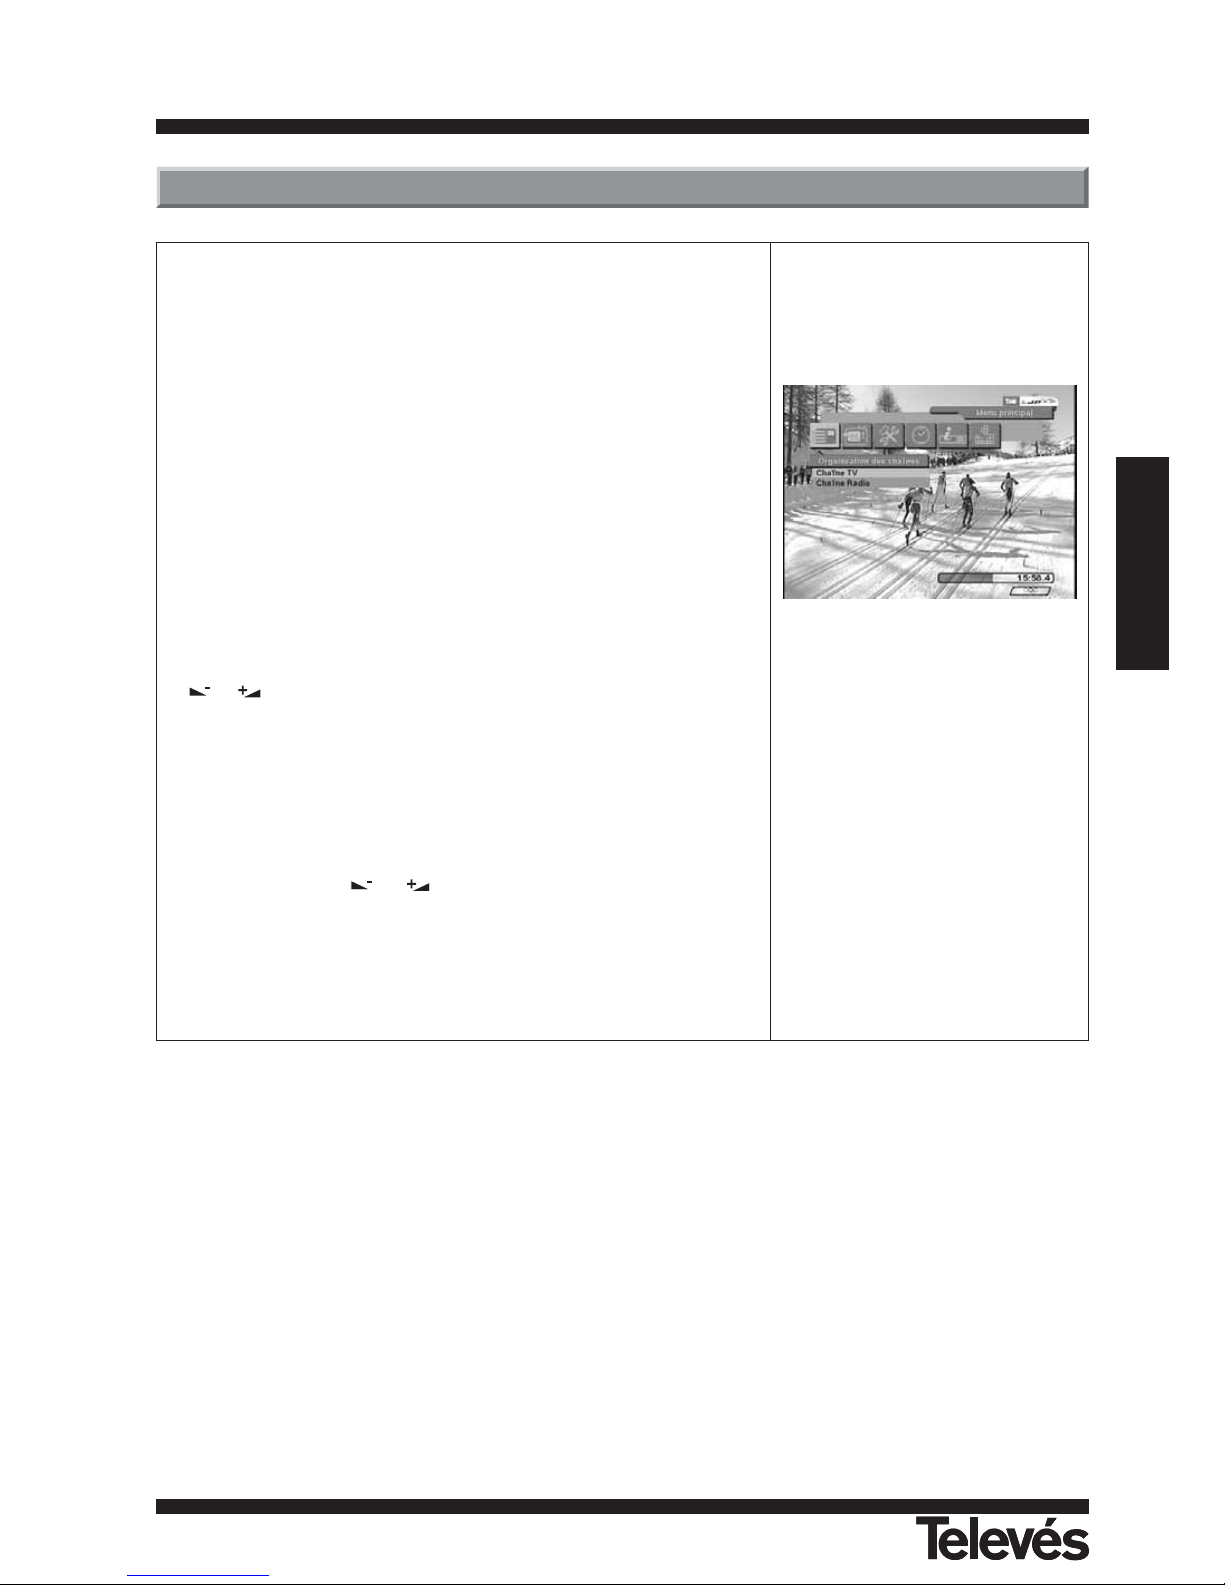
Une fois que vous avez installé et connecté les câbles au DTR 7288, le
menu apparaît.
Ce menu est constitué de 6 sous menus détaillés ci-dessous.
- Organisation des chaînes
- Guide des programmes
- Installation
- Date/Heure
- Information récepteur
- Jeux
Pendant l'installation, la touche OK confirme la sélection et les touches
/
montrent le bas de la list.
Vous pouvez également utiliser les touches numériques de la
télécommande pour entrer la valeur désirée.
Utilisez les touches PR+, PR- pour passer d'une ligne à une autre.
Utilisez les touches
/
pour vous déplacer de menu en sous-
menus et vous déplacer du côté gauche ou du côté droit.
Pour sortir du menu système à tout moment, appuyez sur la touche EXIT
de la télécommande.
5.- Menu Information
Page 10
Manuel d’utilisation
“DTR-7288
”
10
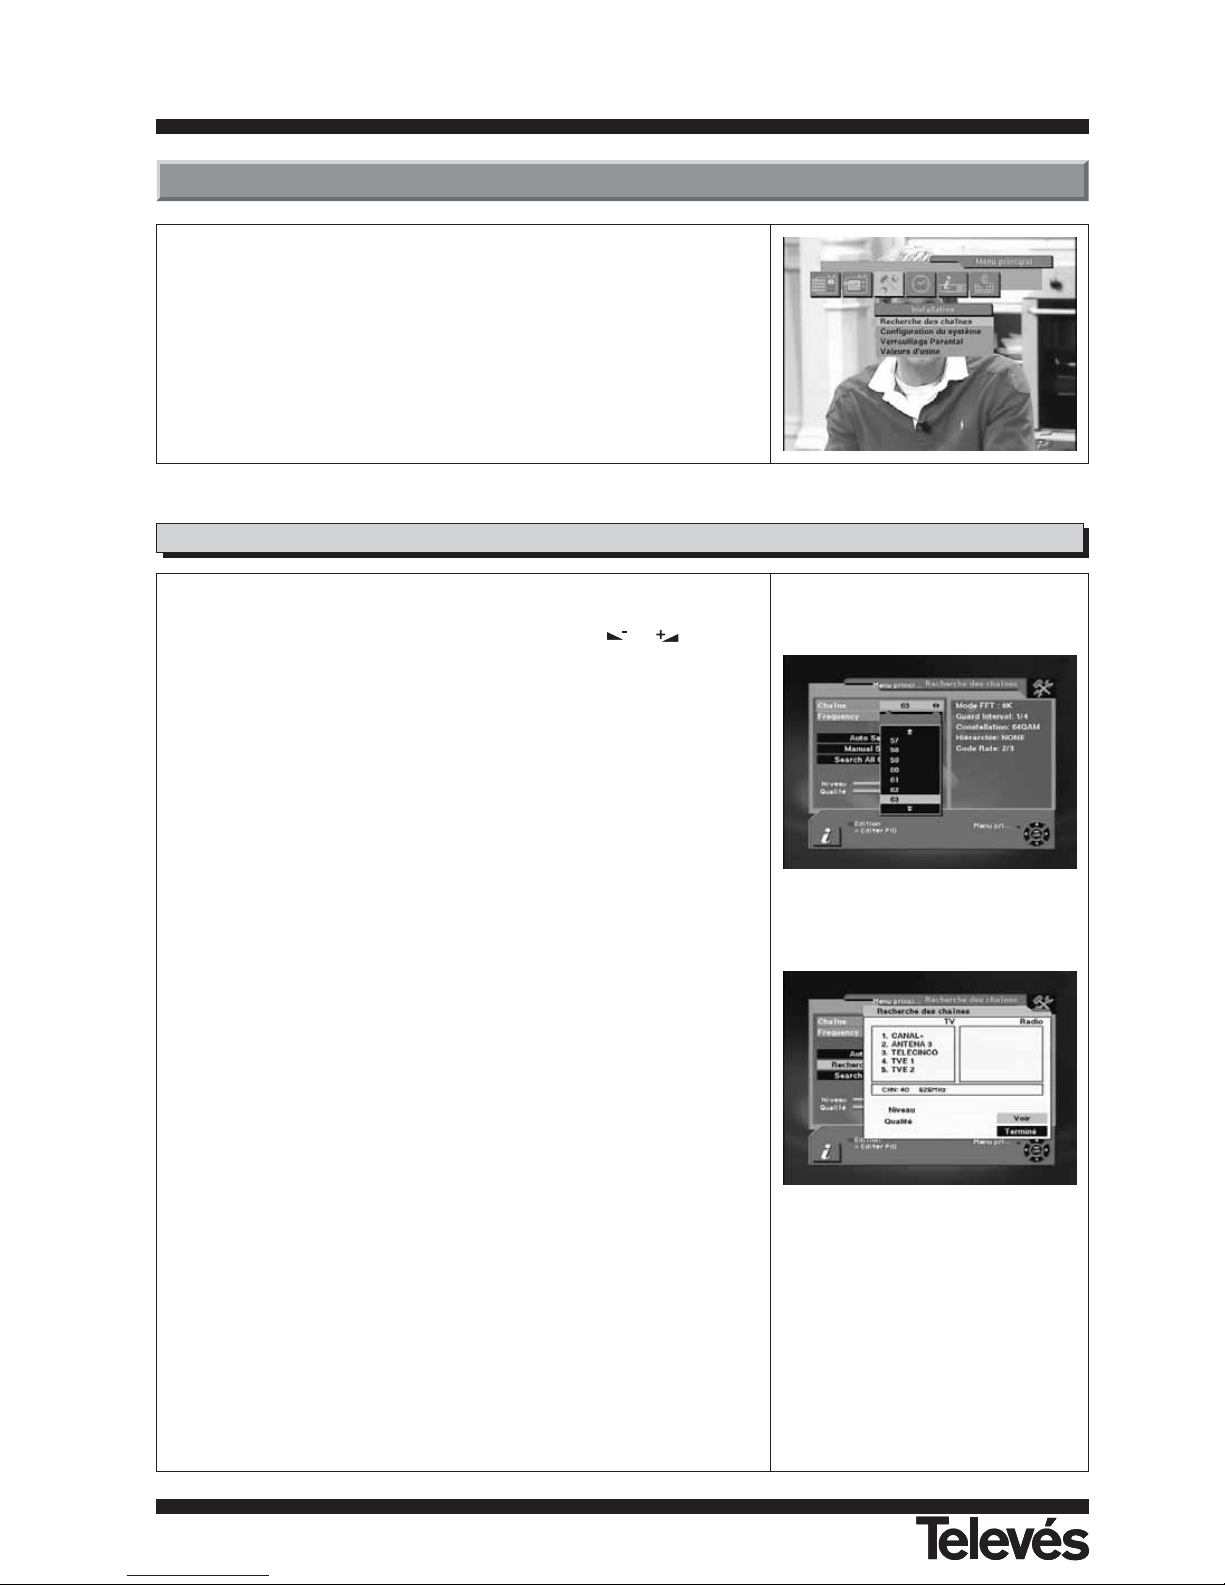
1.- Canal:
- Sélectionner le canal désiré en utlisant les touches
/
. Pressez
la touche OK quand le vous vous trouvez sur le canal désiré dans la
liste.
2.- Fréquence:
- Edite la fréquence désirée. Pour accéder à cette option, il est nécessaire
d'appuyer sur la touche rouge de la télécommande.
Sur le côté droit de l'écran, l'information (mode Fft, intervalle de garde,
Constellation, Hiérarchie et vitesse de symbole) concernant le canal
sélectionné, sera disponible une fois que le signal est accroché.
3.- Recherche automatique:
- Effectue une recherche automatique, qui débute sur le canal 2 et se
termine sur le canal 69.
- Recherche par Opérateur: Effectue une recherche sur les
canaux de l'opérateur appartenant au
canal sélectionné.
4.- Recherche manuelle:
- Recherche un canal: Réalise la recherche d'un canal déterminé,
sélectionné précédemment dans la liste de
canaux.
5.- Recherche de tous les canaux:
- Effectue une recherche de tous les canaux (codés et clairs).
- Recherche canaux en clairs: Réalise une recherche des canaux
en clairs.
DTR 7288 recherchera automatiquement les chaînes TV et Radio.
Pendant ce processus vous pouvez voir la liste des chaînes trouvées
dans la fenêtre de recherche de l'écran.
Une fois la recherche des canaux terminée, le curseur se placera
automatiquement sur COMPLET.
Maintenant, appuyez sur la touche OK.
6.- Installation
Ce menu est constitué de 4 sous-menus détaillés ci-dessous.
- Recherche des chaînes
- Configuration du système
- Verrouillage parental
- Valeur d'usine
6.1.- Recherche des chaînes
Page 11
Manuel d’utilisation
“DTR-7288
”
11
FRANCAIS
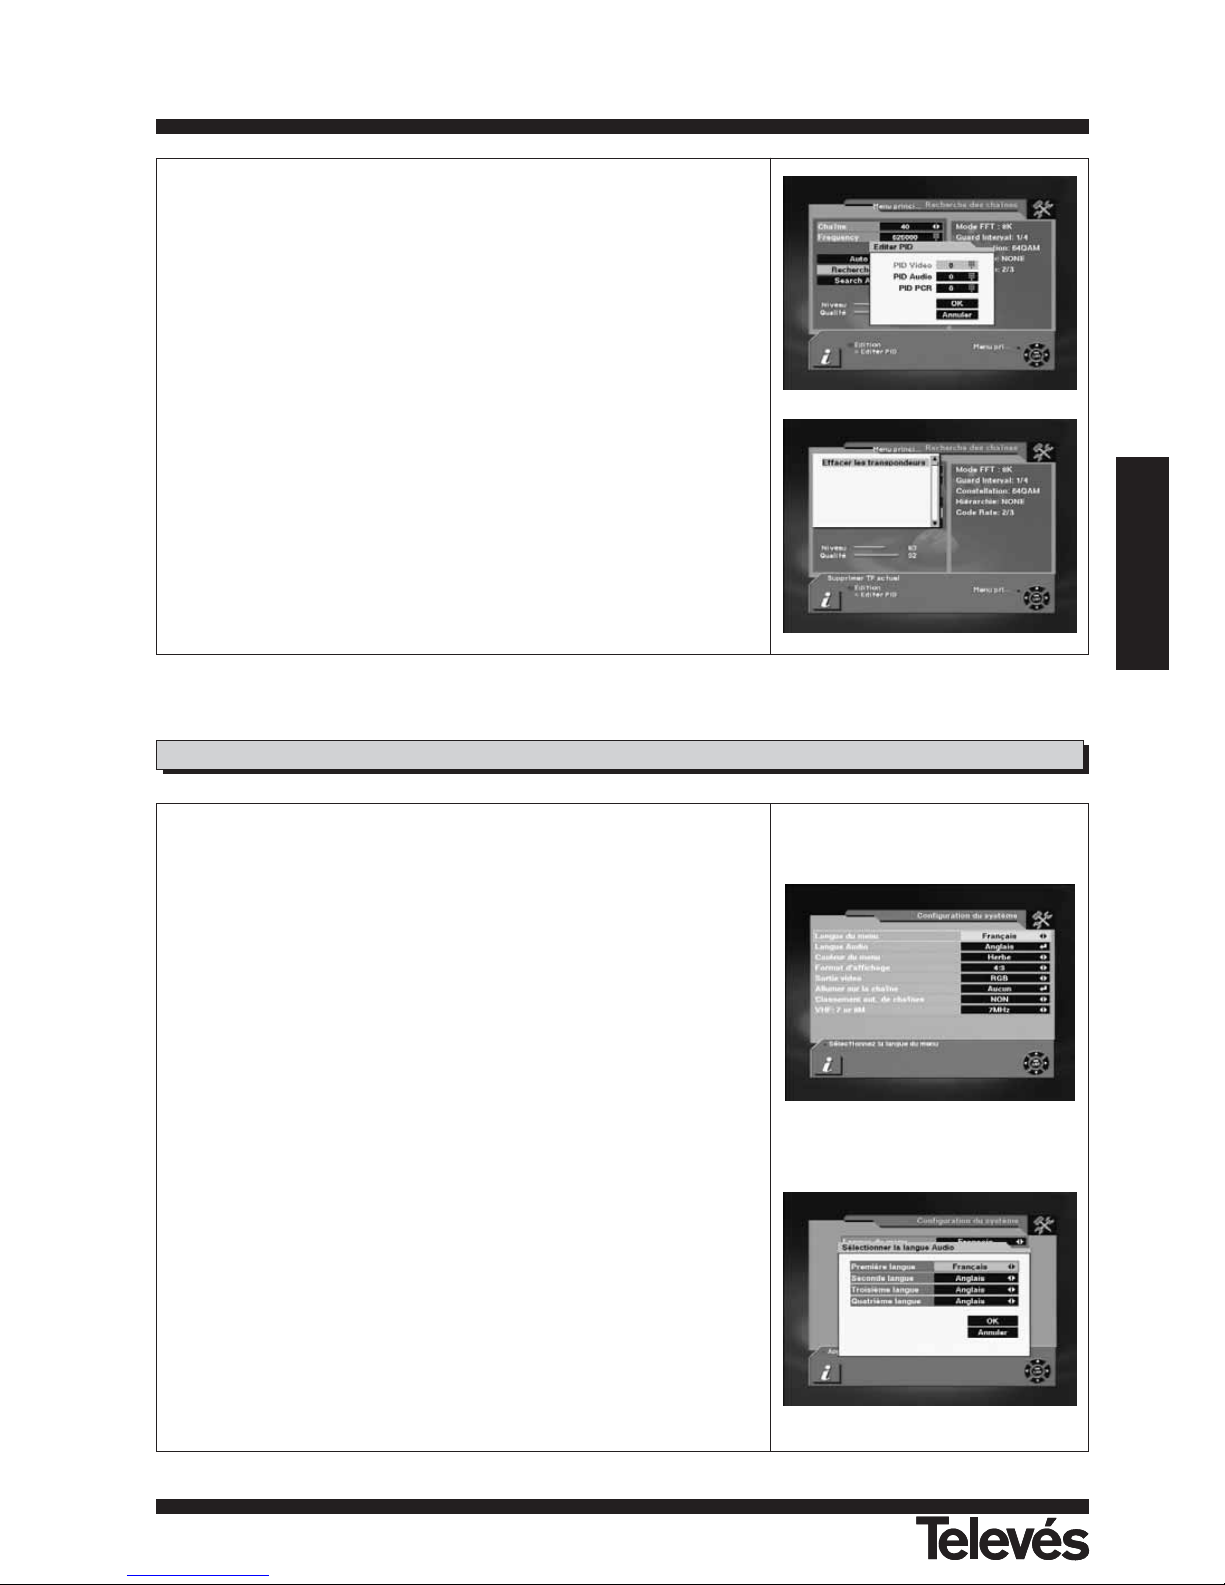
6.- Editer PID:
- Si vous voulez paramétrer le PID (Packet Identifier) manuellement,
sélectionnez TP dans la page de “Recherche des chaînes" et appuyez
sur la touche vert de la télécommande pour afficher la fenêtre de
réglage du PID.
- Le menu de réglage du PID s'affiche. Entrez les valeurs correctes et
appuyez sur OK.
7.- Effacer CH:
- Si vous voulez effacer une chaîne, sélectionnez la et appuyez sur la
touche MENU de la télécommande pour afficher la fenêtre
correspondante. Puis sélectionnez la commande Effacer les
transpondeurs. Un message de confirmation s'affichera.
Mode édition: Si vous voulez éditer des données préprogrammées comme
la fréquence, appuyez sur la touche mode Edition (Touche de couleur
rouge) sur la télécommande pour afficher la fenêtre correspondante. Vous
pouvez alors bouger dans les colonnes pour changer la valeur.
Ce menu vous permet de paramétrer votre appareil comme bon vous
semble.
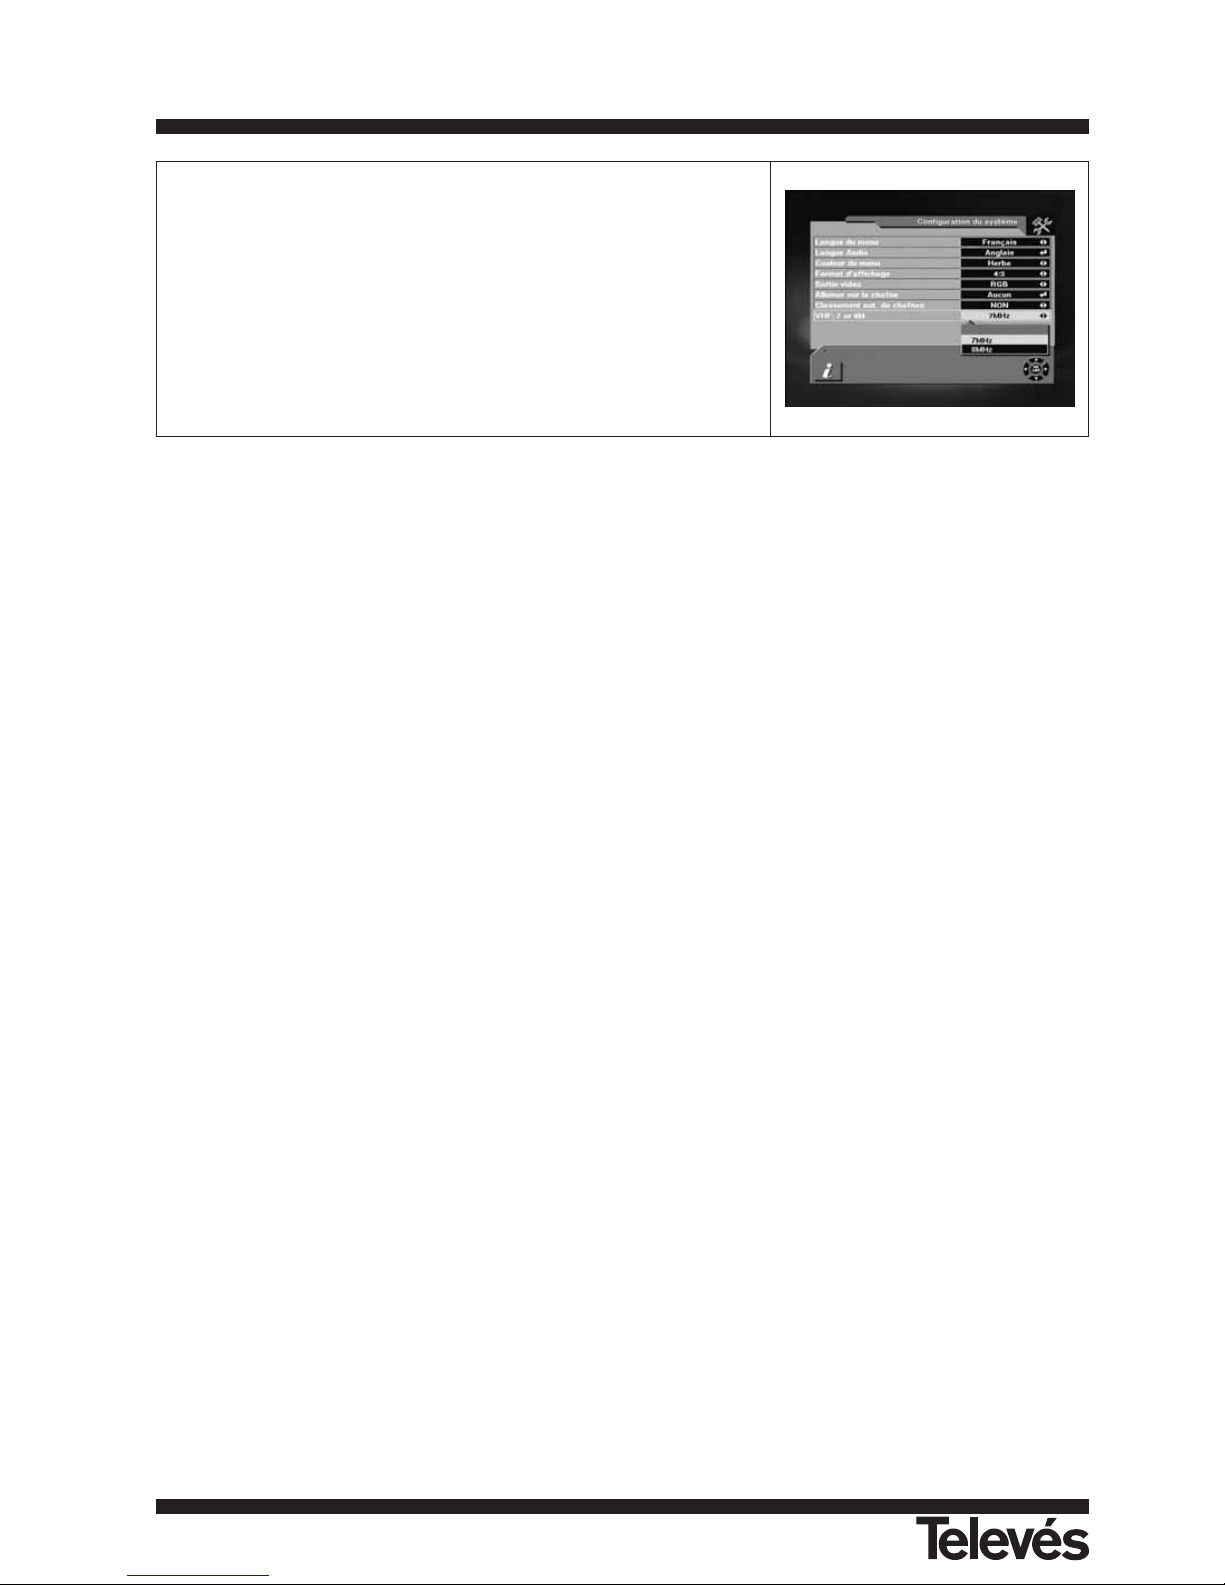
1.- Langue OSD :
- Ici, vous pouvez sélectionner la langue désirée.
2.- Langue Audio:
- Sélectionnez la langue audio prioritaire désirée sous condition que
celle-ci soit supportée par la chaîne.
3.- Couleur du menu:
- Cette option permet de personnaliser la couleur (herbe, nuit, Ocean,
vin) du fond de menu de votre récepteur.
4.- Format d'écran:
- Si votre TV support le format 16:9 et que la chaîne sélectionnée est
émise en 16:9, select 16:9.
5.- Sortie Video:
- Si votre SCART supporte le RVB, sélectionnez RVB. Sinon,
sélectionnez CVBS.
6.- Commencer sur la chaîne:
- Si vous appuyez sur OK, alors, la liste des chaînes s'affiche. Vous
pouvez sélectionner une chaîne de cette liste. La chaîne sélectionnée
démarera lorsque vous allumerez votre DTR 7288.
6.2.- Configuration du système
Page 12
Manuel d’utilisation
“DTR-7288
”
12
7. - Classement Automatique des Chaînes:
- Cette option permet d'activer ou de désactiver le mode de classement
des chaînes définies par l'opérateur.
8. - VHF: 7 ou 8 MHz
Cette option permet de sélectionner la largeur de bande appropriée
(7 ou 8 MHz) pour la réception des signaux en VHF.
Page 13
Manuel d’utilisation
“DTR-7288
”
13
FRANCAIS
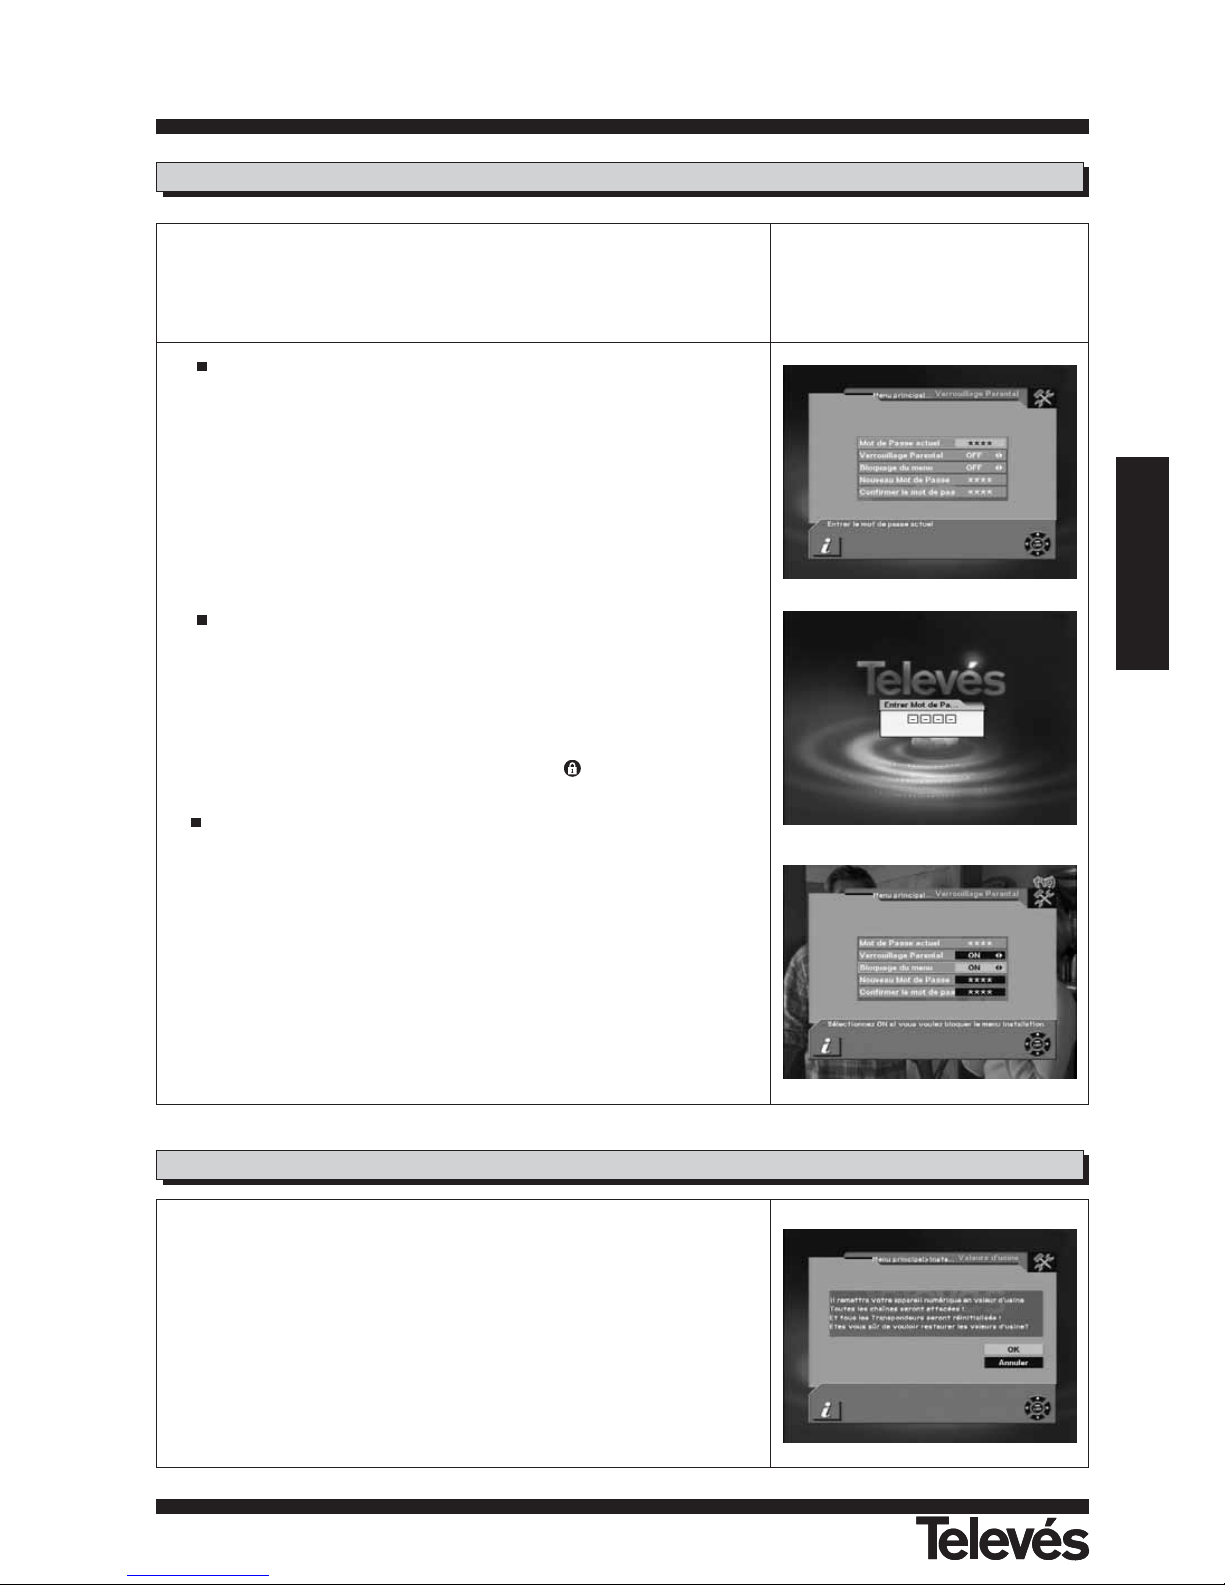
Cette fonction vous permet de bloquer une chaîne avec un mot de passe de
façon à ce que vos enfants ne puissent pas accéder à cette chaîne.
Vous pouvez également protéger vos données d'installation et vos
information en utilisant Le verrouillage d'installation.
Comment changer le mot de passe
1.- Entrez le mot de passe actuel.
2.- Sélectionnez ON sur Verrouillage parental.
3.- Entrez le nouveau mot de passe.
4.- Confirmez le nouveau mot de passe en le retappant une nouvelle fois.
Note: Le mot de passe par défaut est 0000.
Attention: Une fois que vous avez changé le mot de passe, veillez bien à
vous en souvenir.
Comment utiliser le verrouillage parental
1.- Pour activer la fonction Verrouillage parental, allez sur la page
d'Organisation des canaux TV.
2.- Appuyez sur la touche Verrouillage (Touche de couleur bleue) sur la
télécommande.
3.- Sélectionnez la chaîne que vous voulez verrouiller.
4.- Appuyez sur la touche OK quand le symbole est affiché.
Comment utilisé le verrouillage d'installation
1.- Entrez le mot de passe actuel
2.- Sélectionnez ON sur Verouillage installation
3.- Srtez de ce menu
4.- Sélectionnez n'importe quel menu et appuyez sur OK sur la
télécommande .
5.- Alors, la fenêtre de Sélection du mot de passe s'affiche.
6.- Sans rentrer le mot de passe correct, vous ne pouvez démarrer aucun menu.
Note: Le mot de passe par défaut est 0000
Warning: N'oubliez pas votre mot de passe
Si vous voulez faire revenir le DTR 7288 dans les conditions d'origine,
sélectionnez Valeur d'usine et appuyez sur la touche OK.
Alors, un message d'avertissement s'affiche.
Pour confirmer, sélectionnez OK.
Attention: En sélectionnant valeur d'usine, vous perdrez toutes les
données et informations, précédemment installées.
6.3.- Verrouillage parental
6.4.- Valeur d'usine
Page 14
Manuel d’utilisation
“DTR-7288
”
14
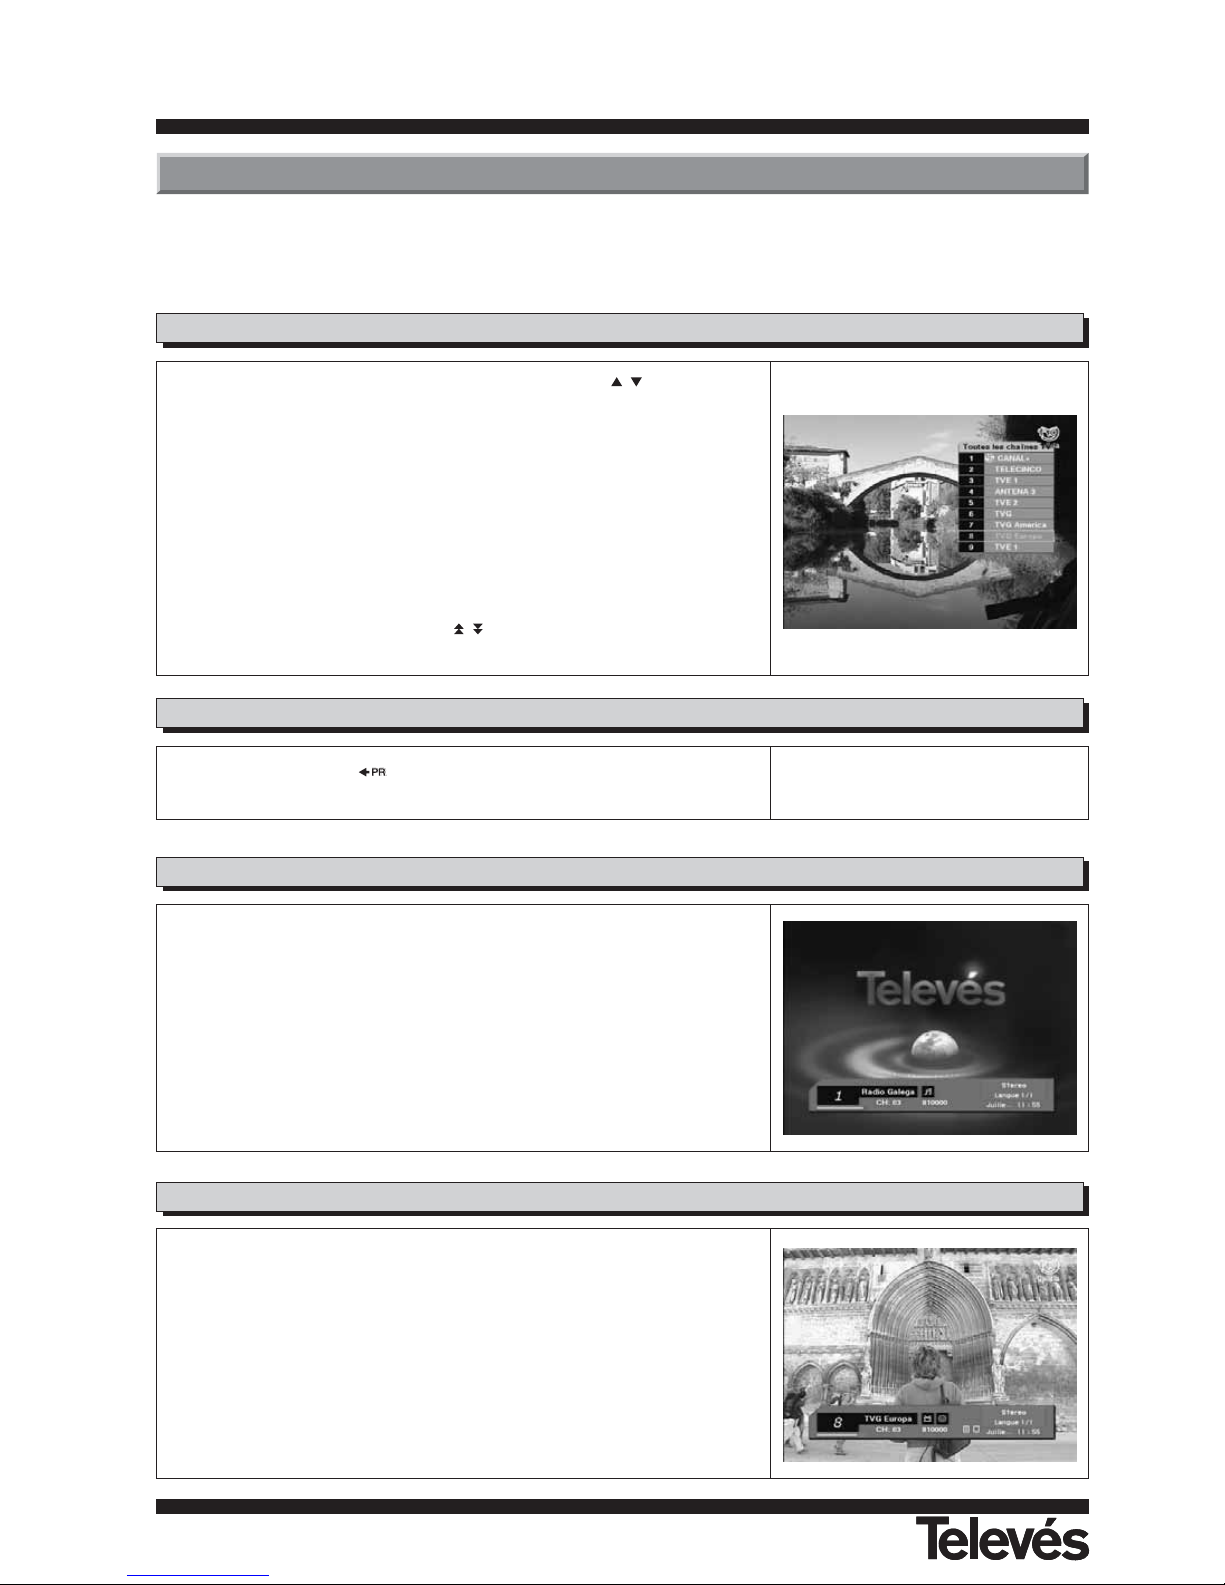
Si vous voulez changer de chaîne, utilisez las touches sur la façade
avant ou les touches PR+, PR- de la télécommande ou les touches
numériques.
En plus de la fonction classique ci-dessus, DTR 7288 fournit une fonction
plus simple pour le changement de canal.
Pendant le visionnage, appuyez sur la touche OK de la télécommande. Une
liste de canaux s'affiche sur la droite de l'écran. Si vous appuyez sur la
touche EXIT la liste des canaux disparaît.
Pour sélectionner une chaîne, allez sur la liste des chaînes et placez le
curseur sur le canal désiré. Puis, appuyez sur la touche OK pour visionner
la chaîne sélectionnée.
Si vous appuyez sur les touches de la télécommande, la liste des
canaux change page par page.
7.1.- Sélection des chaînes
Appuyez sur la touche de la télécommande pour revenir sur la dernière
chaîne que vous avez visionnée.
7.2.- Rappel de la dernière chaîne visionnée
Pendant que vous visionnez une chaîne TV, appuyez sur la touche
TV/RADIO de la télécommande pour basculer entre les modes TV et Radio.
7.3.- Mode TV et Radio
7.- Fonctions générales d'affichage
Ce qui suit, décrit les fonctions basiques de votre DTR 7288 pendant que vous regardez la TV terrestre ou écoutez la radio
terrestre.
Pendant le visionnage, les informations correspondantes à la chaîne seront affichées en bas de l'écran si vous appuyez sur
la touche INFO de la télécommande.
La touche TV/AV de la télécommande vous permet de basculer entre les
modes terrestre à TV ou VCR.
- Appuyez une fois pour basculer en mode TV.
- Appuyez deux fois pour basculer en mode VCR.
- Appuyez trois fois pour revenir au mode terrestre.
7.4.- ModeTV et VCR
Page 15
Manuel d’utilisation
“DTR-7288
”
15
FRANCAIS
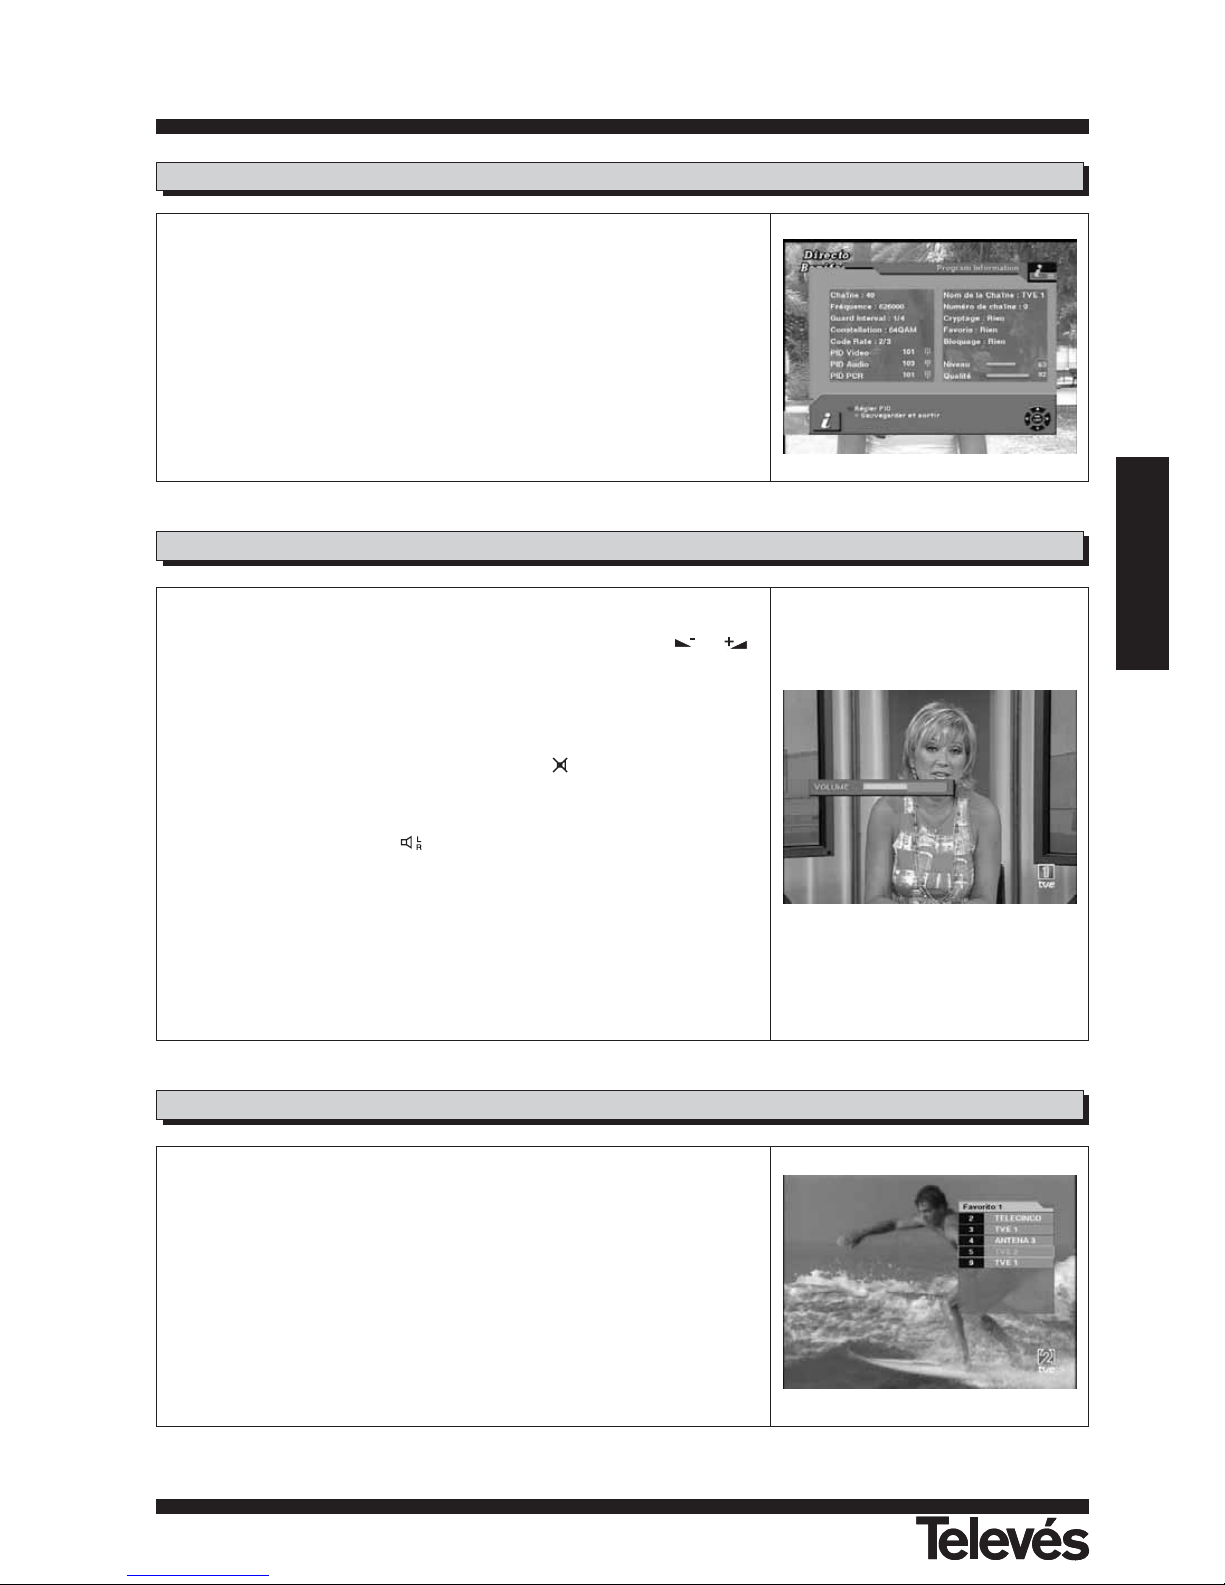
A chaque fois que vous changez de chaînes, vous recevez des informations
relatives au programme pendant quelques secondes.
Pendant le visionnage d'une chaîne, vous pouvez voir les informations
relatives à cette chaîne à tout moment en appuyant sur la touche INFO de
la télécommande.
7.5.- Information sur las chaînes
1.- Contrôle du volume
- Pour augmenter ou diminuer le volume, utilisez les touches
/
de la télécommande.
Note: Televes a 18 niveau de volume pouvant être controllé par le niveau
de volume de votre TV.
2.- Mute
- Pour couper le son, appuyez sur la touche de la télécommande.
Pour faire revenir le son, apuyez sur cette touche une nouvelle fois.
3.- Contrôle Audio
- Appuyez sur la touche de façon répétitive pour sélectionner une
des trois configuration Audio possibles (gauche, droite et stéréo).
- La configuration Audio sera affichée dans l'information sur les chaînes.
4.- Sélection de la langue
- Appuyer sur la touche AUDIO de la télécommande de façon répétitive
pour sélectionner les différentes langues Audio. Cela dépend de la
transmission Audio du signal.
7.6.- Contrôle Volume et Audio
Pour créer un groupe de liste de favoris, appuyez sur la touche FAV de la
télécommande.
Vous pouvez accéder au groupe de favoris suivant en appuyant une
nouvelle fois sur la touche FAV.
La méthode pour grouper les canaux préférés est expliquée dans le
paragraphe 8.2.- Chaîne favorite.
7.7.- Liste de favoris
Page 16
Manuel d’utilisation
“DTR-7288
”
16
8.2.- Chaîne favorite
8.1.- Organisation des chaînes
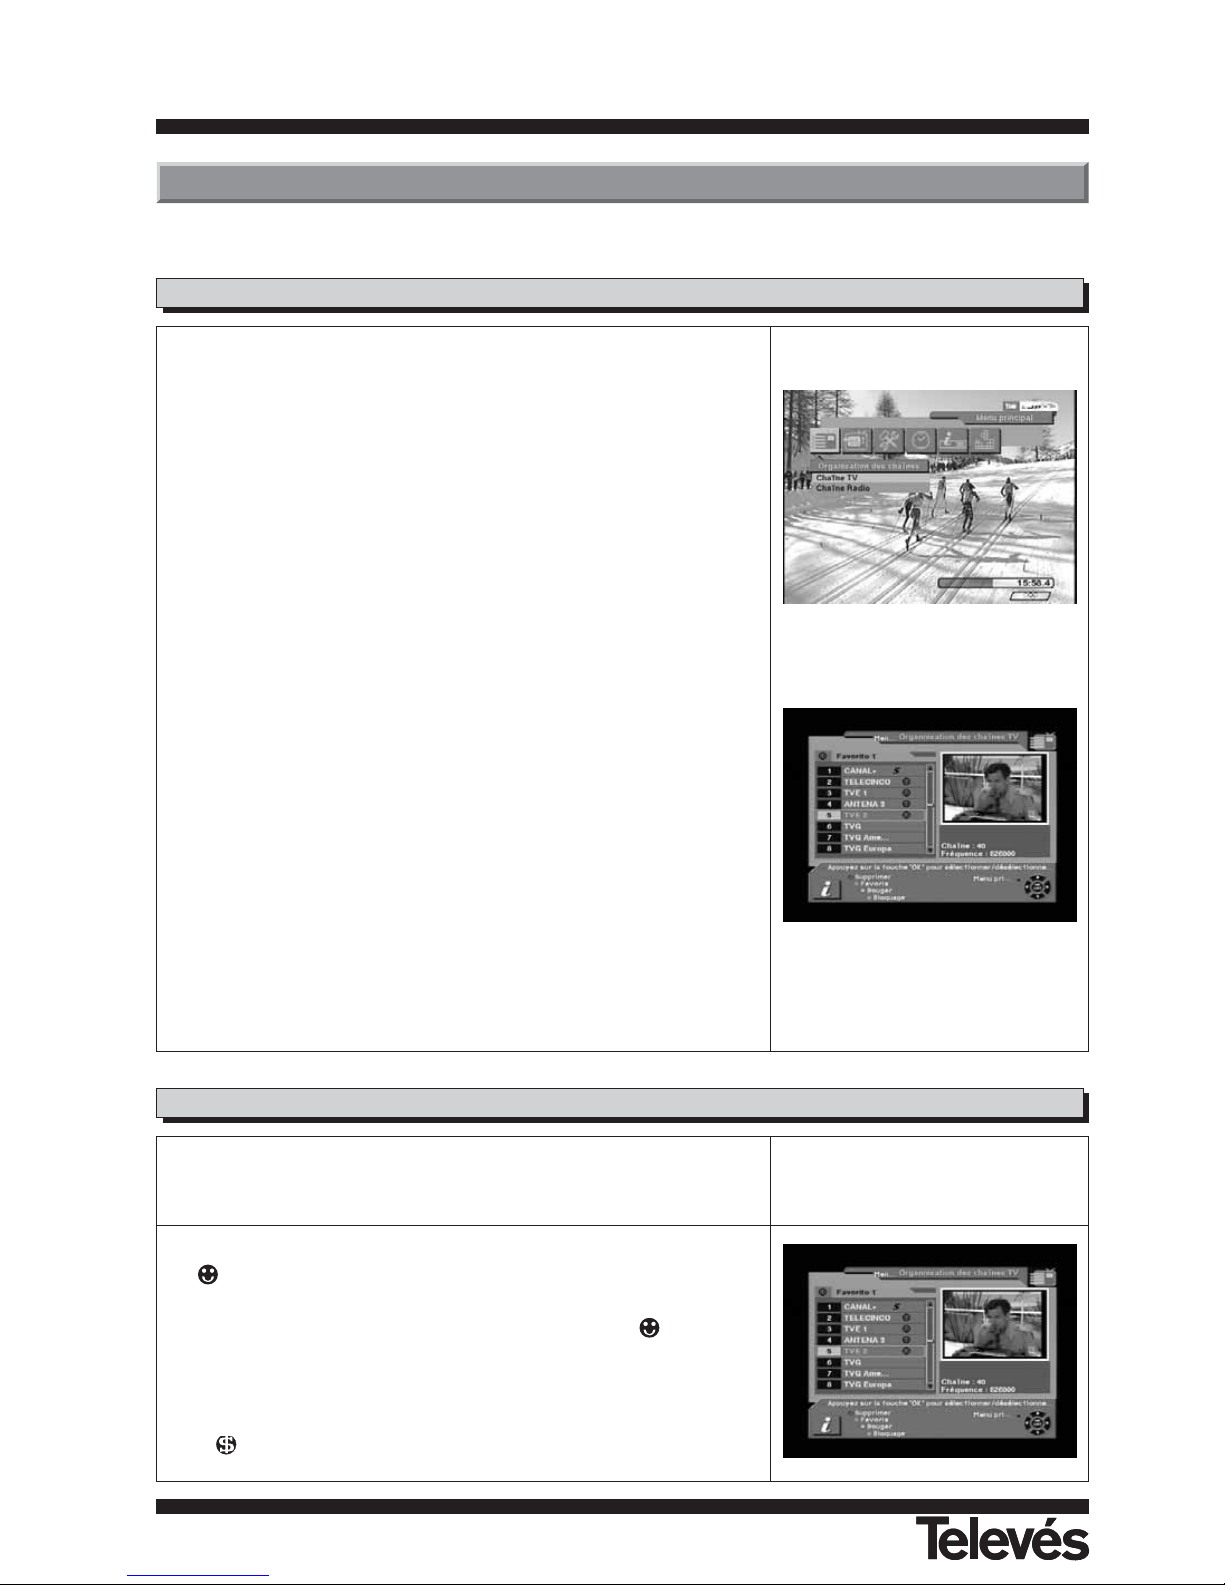
Quand vous sélectionnez le Organisation des chaînes, la liste favorite par
défaut est affichée à l'écran en tant que Favorite 1, pour alterner entre les
autres listes, appuyer sur la touche verte.
- Sélectionnez votre chaîne préférée puis appuyez sur la touche OK. Alors
s'affiche à côté du nom de la chaîne sélectionnée.
- Si vous voulez enlever le nom de la chaîne de votre liste de chaînes
favorites, appuyez sur la touche OK une nouvelle fois, Alors disparaît.
- Après la sélection de vos chaînes favorites, appuyez sur la touche EXIT
deux fois pour sauvegarder les données et appuyez sur la touche FAV de
façon répétitive pour voir si chaque groupes de favoris ont été correctement
sélectionnés.
- Représente une chaîne cryptée
8.- Organisation des canaux
Le Organisation des chaînes est constitué des chaînes TV et Radio.
Attention : Les fonctions « Déplacer » et « Classer » ne sont disponibles
que si la fonction « Classement Automatique des Chaînes » est
désactivée.
Note: Etant donné que l'utilisation des chaînes radio est la même que celle
des chaînes TV, dans ce manuel, seule l'organisation des chaînes TV
sera expliquée.
Du côté gauche du menu chaînes TV, vous pouvez voir la liste des canaux.
Du côté droit, vous pouvez voir la chaîne en cours en petit image (1/9 du
mode taille normal).
Vous pouvez voir également l'information de la chaîne sous cette
incrustation.
Quand vous changez le curseur d'une chaîne à l'autre, l'incrustation change
automatiquement.
Vous pouvez utiliser les touches de couleur de la télécommande comme cidessous:
1.- Mode effacement (Touche rouge)
2.- Mode favoris (Touche verte)
3.- Mode déplacer (Touche jaune)
4.- Mode bloquer (Touche bleue)
En pressant la touche MENU de la télécommande, le menu commande
apparaîtra.
Le Organisation des chaînes TV a 3 commandes détaillées ci-dessous:
1.- Renommer un groupe de favoris
2.- Renommer
3.- Type
Cette fonction vous permet non seulement de visionner les canaux, mais également de les manipuler afin de les
organiser comme bon vous semble.
Page 17
Manuel d’utilisation
“DTR-7288
”
17
FRANCAIS
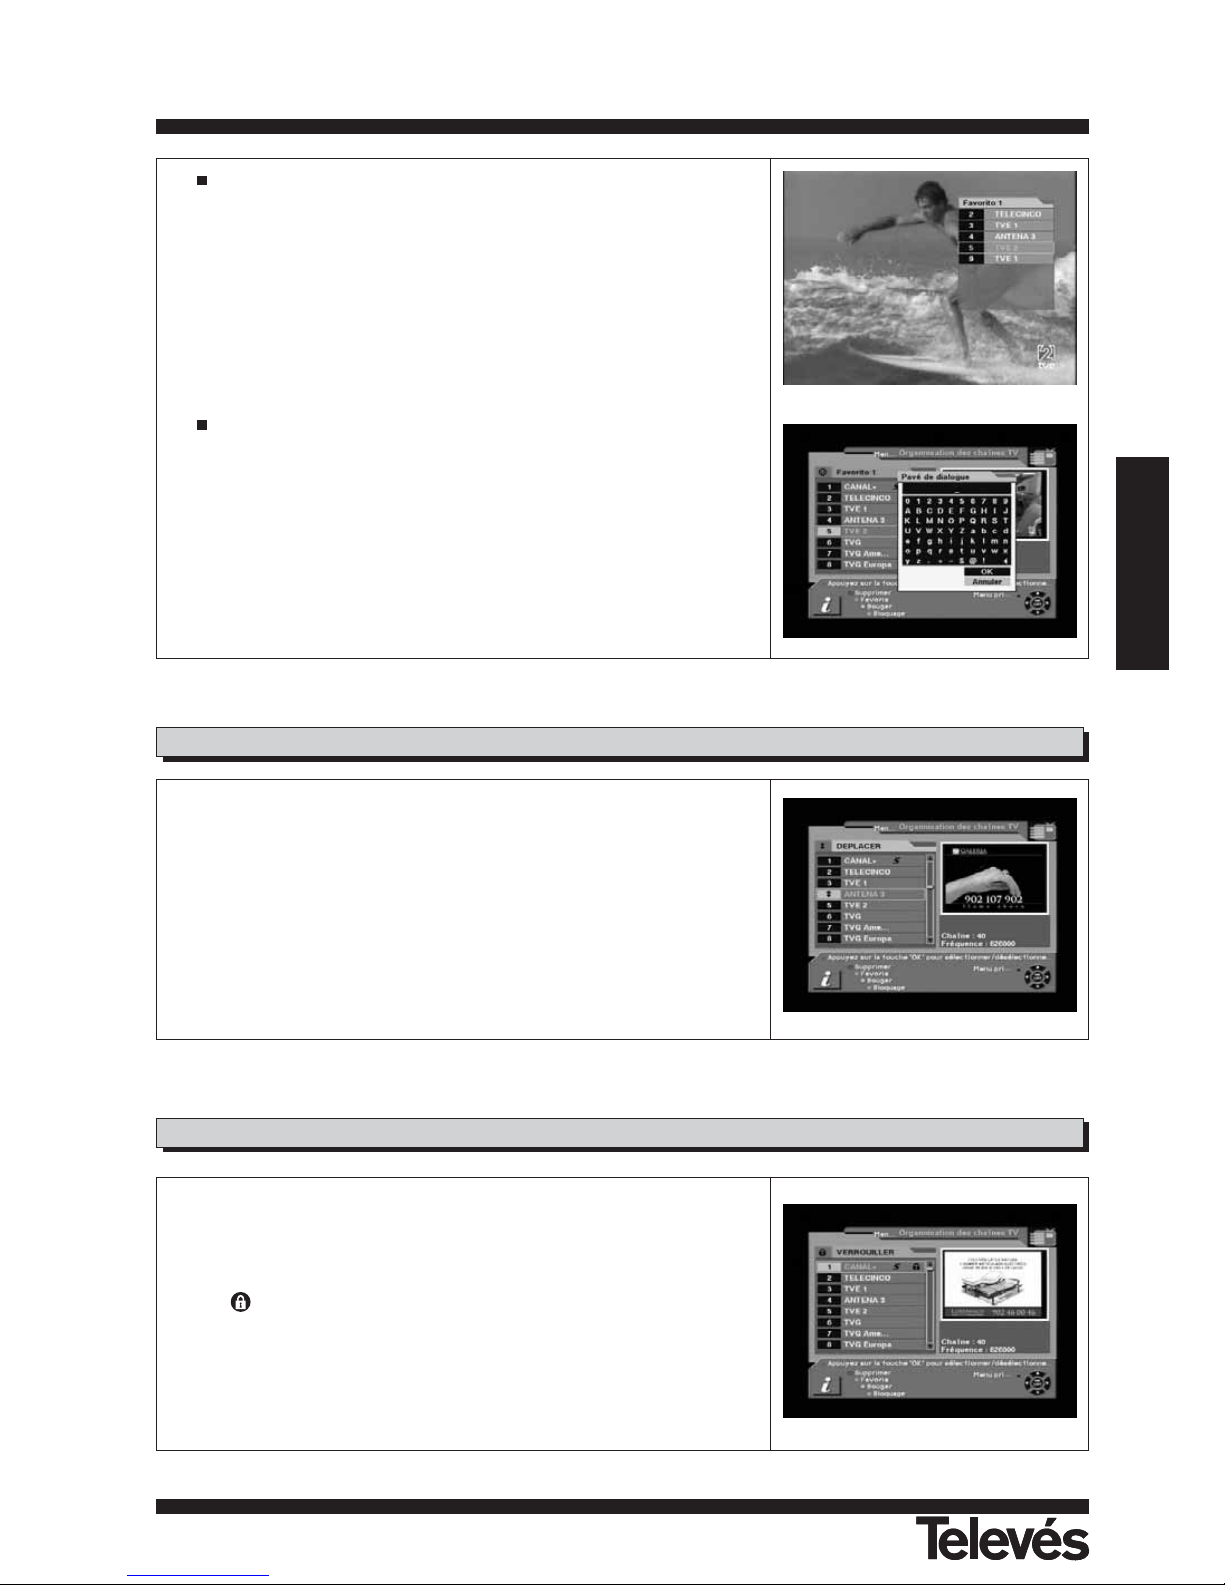
Comment créer un groupe de favoris
1.- Quand vous entrez dans le Organisation des chaînes, le groupe favoris
par défaut est affiché à l'écran en tant que Favorite 1.
2.- Si vous pressez la touche Favoris (Touche de couleur verte) sur la
télécommande, un nouveau groupe de favoris sera crée en tant que
Favorite 2.
Comment éditer le nom d'un groupe de favoris
1.- Dans le mode favoris, appuyez sur la touche MENU puis la fenêtre de
commande s'affiche à l'écran.
2.- Sélectionnez "Renommer un groupe de favoris" dans la fenêtre de
commande.
3.- Vous pouvez éditer le nom en utilisant le pavé numérique.
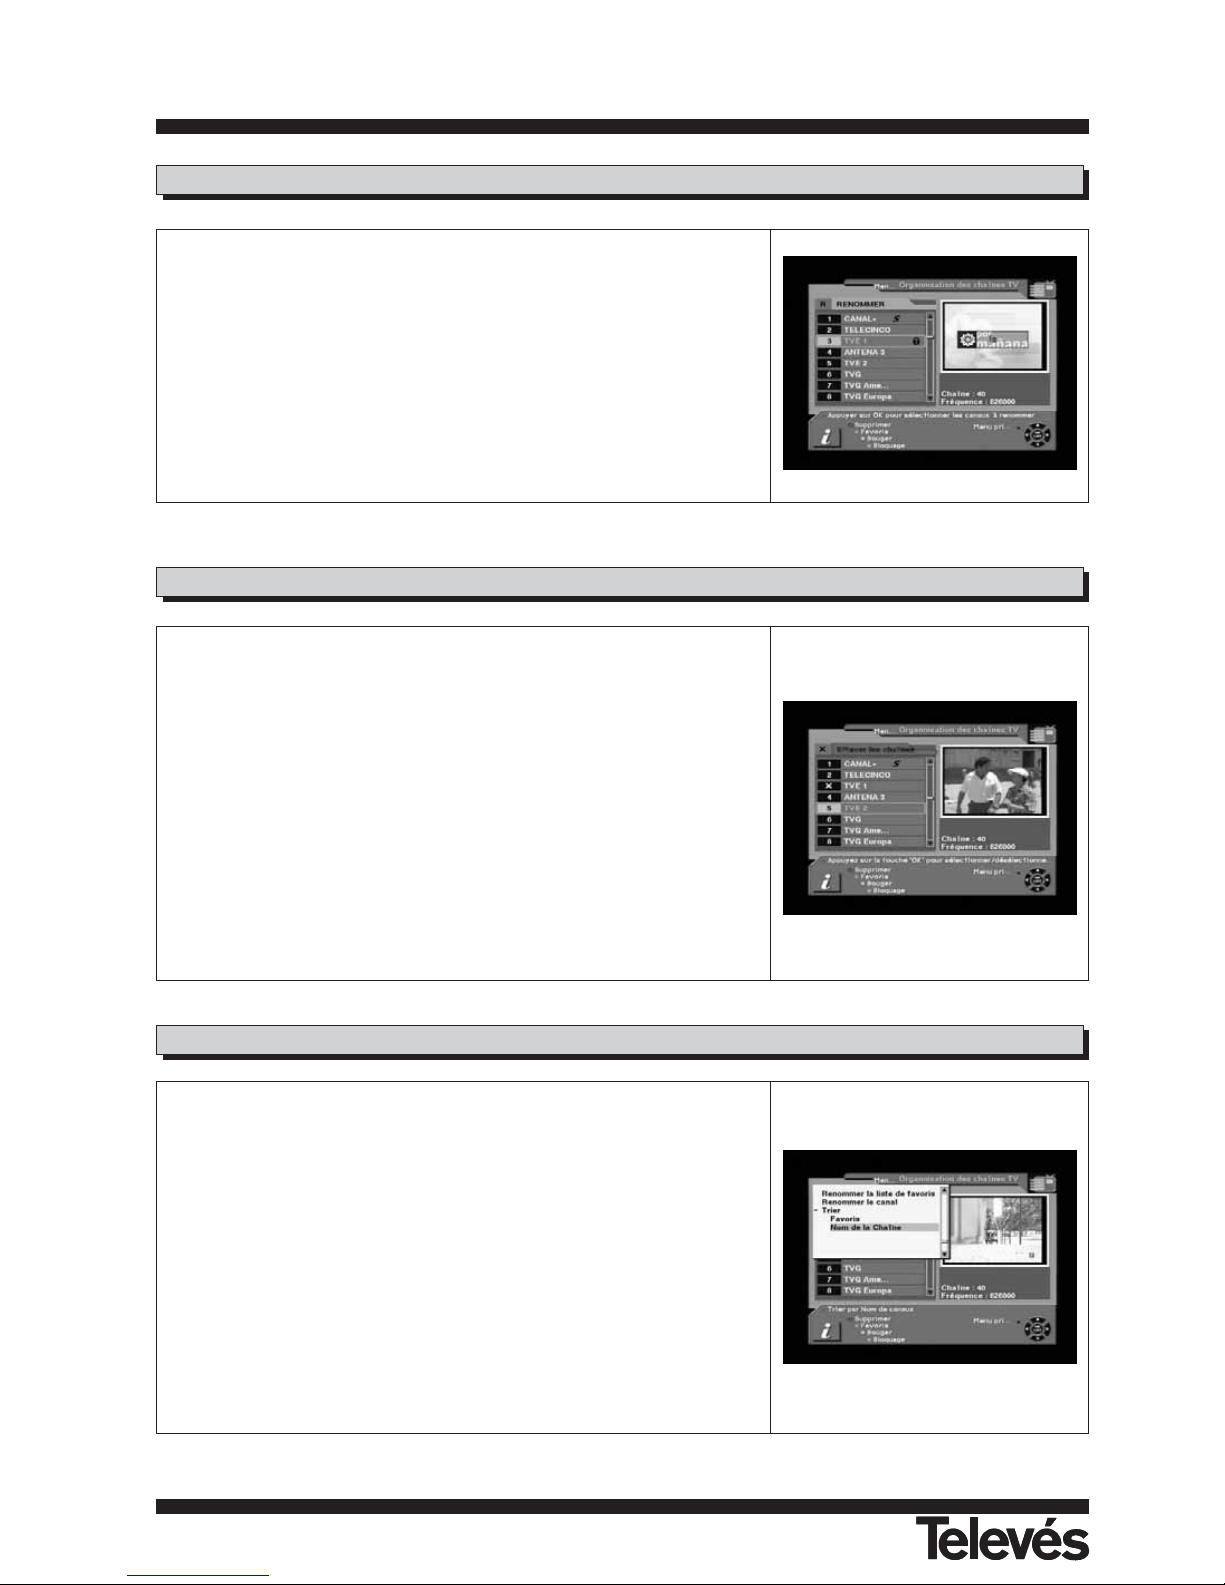
8.4.- Blocage de canaux
Dans la page de Gestion des chaînes TV, Appuyez sur la touche Bloquer
(Touche de couleur bleue).
Cette commande vous permet de bloquer un chaîne. En premier, sélectionnez
la chaîne que vous voulez bloquer, et appuyez sur la touche OK. Alors, cet
icone s'affichera à côté de la chaîne sélectionnée.
Note: Pour executer cette fonction, vous devriez activer le Contrôle parental à
l'avance.
8.3.- Déplacement de canaux
Attention : Cette fonction n'est disponibles que si la fonction « Classement
Automatique des Chaînes » est désactivée.
Dans la page de Gestion des chaînes TV, Appuyez sur la touche Déplacer
(Touche de couleur jaune).
Sélectionnez une chaîne en appuyant sur la touche OK et déplacez le
curseur à l'endroit où vous voulez déplacer la chaîne sélectionnée et appuyez
sur OK. Alors, la chaîne sélectionnée se déplacera à l'endroit indiqué.
Vérifiez que le numéro de canal a changé dans la liste de canaux.
Page 18
Manuel d’utilisation
“DTR-7288
”
18
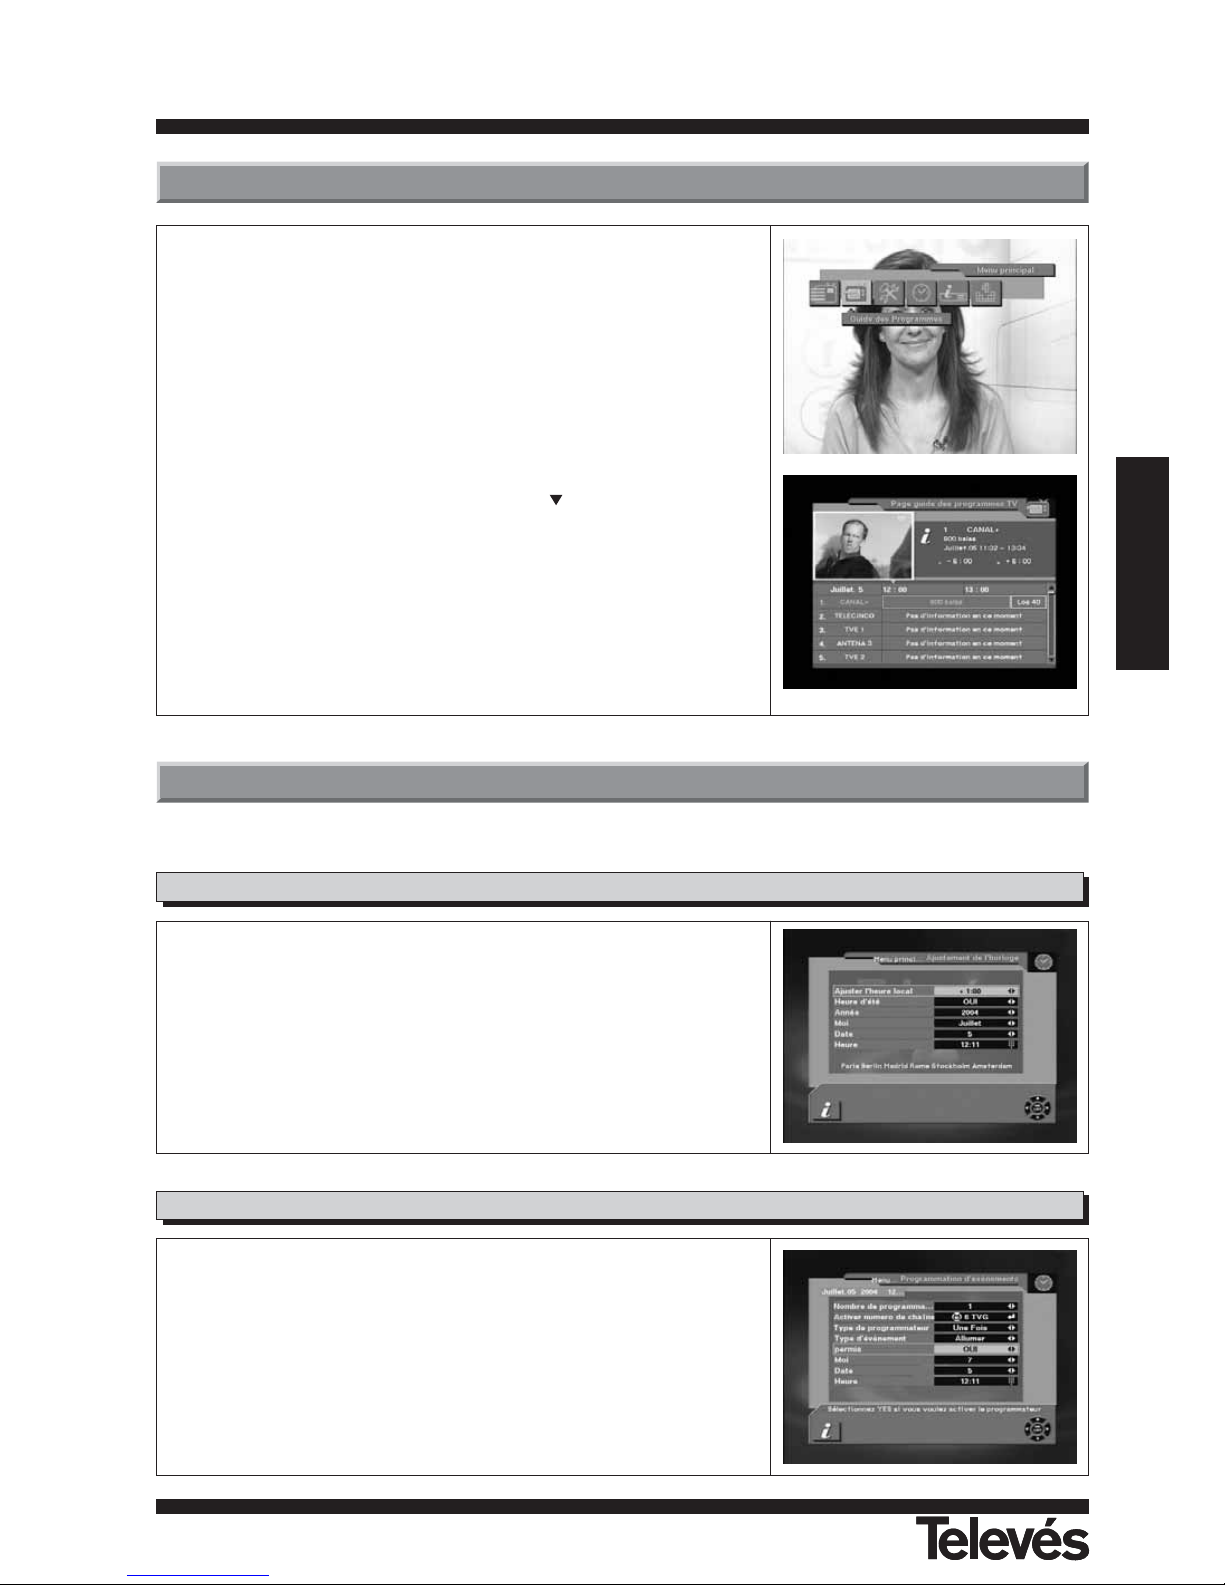
8.7.- Type de chaînes
Attention : Cette fonction n'est disponibles que si la fonction « Classement
Automatique des Chaînes » est désactivée.
Dans la page principale, appuyez sur la touche MENU, et sélectionnez Type
dans le menu commande.
Ce menu Type a une sous commande et vous permet de classer les chaînes
comme bon vous semble.
Vous pouvez classer les chaînes par favorites et nom de CH. Placez le
curseur sur la ligne désirée, puis appuyez sur OK.
Vérifiez que les canaux ont été correctement ordonnés dans la liste de
canaux.
Note: Le gestionnaire des chaîne radio a les mêmes fonctions que le
gestionnaire des chaînes TV.
8.6.- Effacer une chaîne
Dans le Gestionnaire des canaux, vous pouvez entrer dans le mode
d'effacement de canaux, si vous appuyez sur la touche Effacer (Touche de
couleur rouge). Puis, si vous pressez de nouveau cette touche de façon
répétitive, les options suivantes apparaîtront Effacer transpondeur ---> Effacer
tout ---> Effacer une seule chaîne.
Cette commande vous permet d'effacer une chaîne de façon permanente.
Sélectionnez en premier la chaîne que vous voulez effacer; le numéro de
celle-ci sera marqué avec le symbole "X". Si vous voulez annuler la sélection,
appuyez sur OK une nouvelle fois, alors, le symbole disparaîtra..
Si vous décidez d'effacer la chaîne, appuyez sur la touche EXIT puis OK.
Vérifiez que le canal a bien été supprimé dans la liste de canaux.
Attention: La chaîne effacée na pourra être retrouvée sans une nouvelle
recherche.
8.5.- Renommer une chaîne
Dans la page principale, appuyez sur la touche MENU, puis sélectionnez
l'option Renommer dans le menu commande.
Cette commande vous permet de renommer une chaîne. En premier,
sélectionnez la chaîne à renommer et appuyez sur la touche OK, alors, une
fenêtre représentant un clavier box s'affiche. Entrez le nom désiré.
Vérifiez que le nom a bien été changé dans la liste de canaux.
Page 19
Manuel d’utilisation
“DTR-7288
”
19
FRANCAIS
Habituellement l'information de l'horloge est envoyée automatiquement par
satellite mais parfois, celle-ci est erronée. Dans ce cas, vous pouvez ajuster
l'horloge en utilisant cette fonction.
Vous pouvez ajuster l'heure tout comme vous pouvez paramétrer le programmateur de diverses manières
Il peut être activé en "Allumer" et/ou en "Eteindre".
Vous pouvez paramètrer le programmateur en quotidien, hebdomadaire,
mensuel ou une fois.
10.- Date/Heure
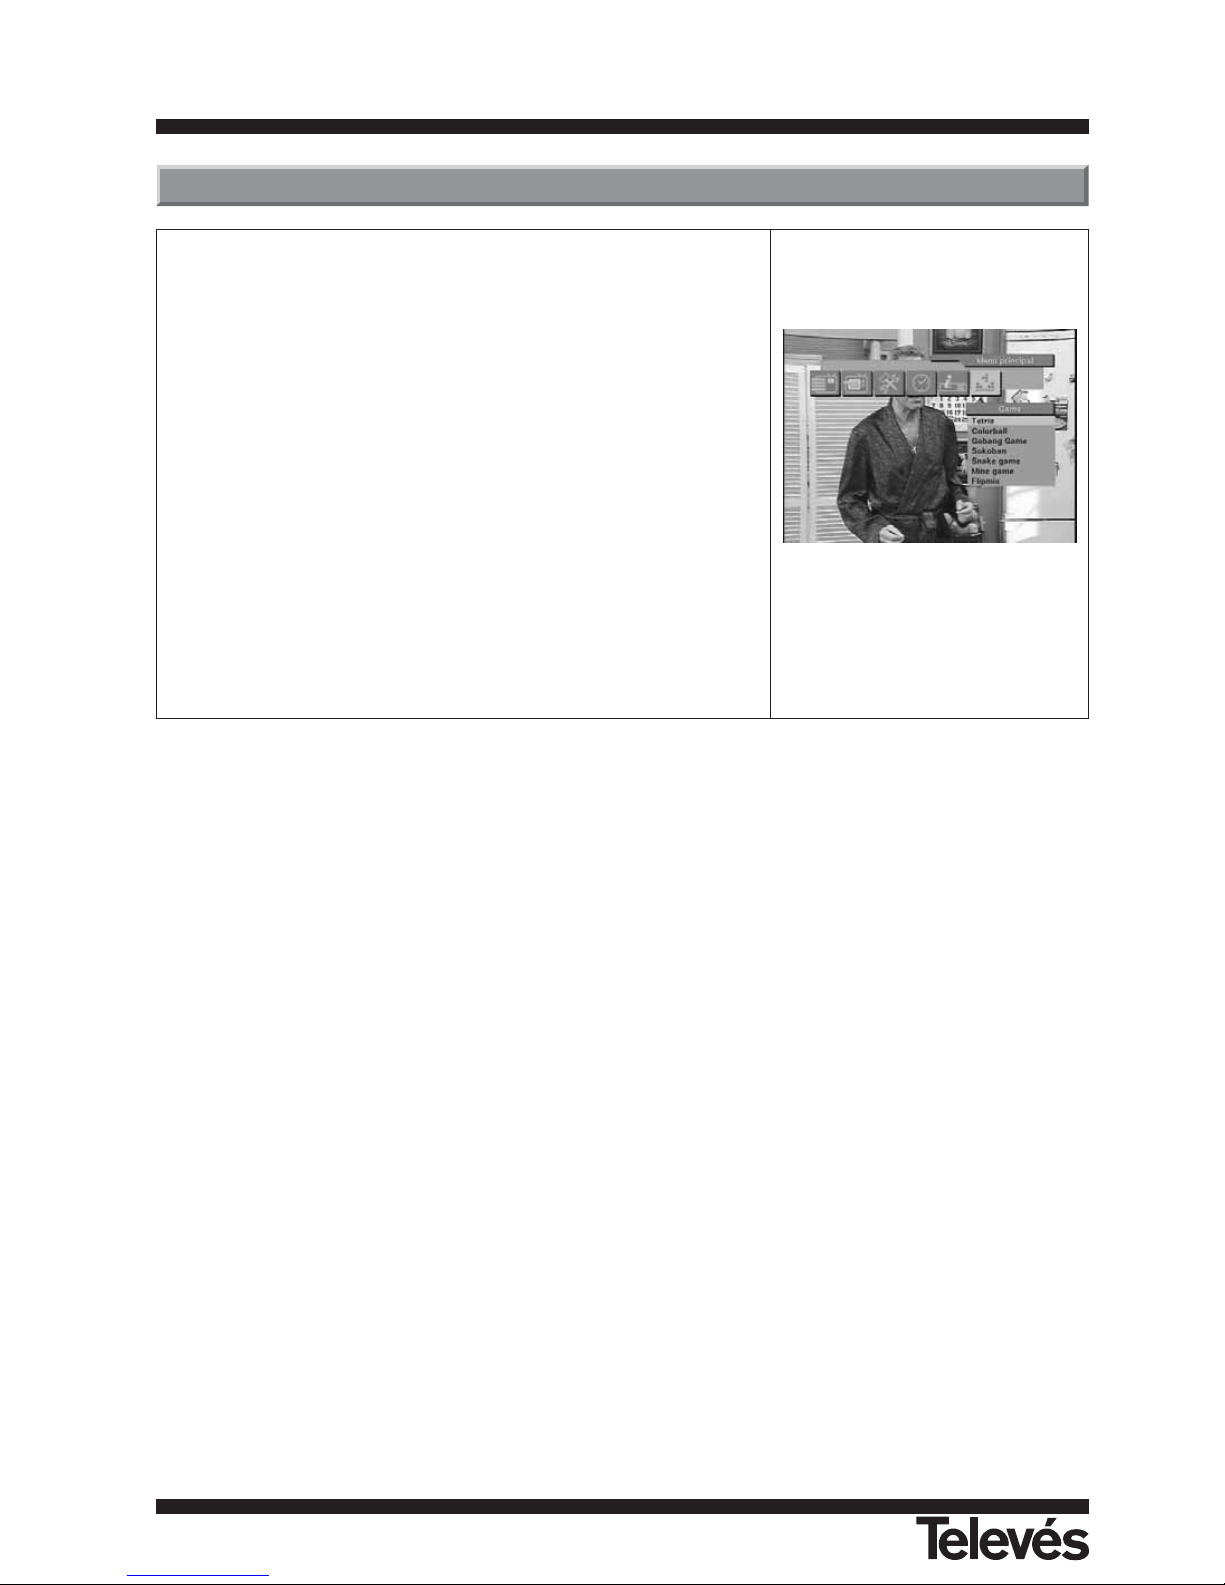
9.- EPG (Guide électronique des programmes)
DTR 7288 fournit la fonction EPG pour vous permettre l'accès au guide TV
(ou guide radio si vous écoutez les chaînes radio) montrant les titres et autres
informations sur le programmes en cours, sur les programmes suivants ou sur
d'autres chaînes. Cette information est uniquement disponible si la chaîne
visionnée envoie l'information réseau.
Pour voir les données EPG, appuyez sur la touche EPG pendant que vous regardez
une chaîne ou sélectionnez le Guide des programmes dans la page principale.
La fenêtre EPG s'affiche.
Vous pouvez voir l'image de la chaîne en incrustation; la liste des chaîne sur la
gauche et l'agenda des programmes pour la chaîne sélectionnée a droite.
L'heure relative aux programmes est également affichée.
Sélectionnez une chaîne et placez le marqueur à la période du nom du
programme qui détail l'information que vous voulez connaître. Alors, vous
pouvez voir un bouton bleu, si il y a une information relative à la chaîne.
Appuyez sur Détail (Touche de couleur bleue), pour afficher la fenêtre de
détail de l'information.
Si vous voulez vérifier la précédente ou la prochaine information de la chaîne,
appuyez sur la touche +6:00 (Touche de couleur jaune) ou sur la touche -6:00
(Touche de couleur verte).
Note: Un message 'Pas d’information en ce moment" indique que la chaîne
en question n'envoie pas l'information EPG.
10.1.- Ajustement de l'horloge
10.2.- Programmation d’évènements
Page 20
Manuel d’utilisation
“DTR-7288
”
20
11.- Jeux
Ce menu permet de sélectionner un des sept jeux disponibles sur
l'adaptateur.
- Tetris
- Colorball
- Gobang Game
- Sokoban
- Snake Game
- Mine Game
- Flipmix
Sélectionner un des jeux à l'aide des touches PR+, PR- puis presser OK.
Pour jouer suivre les indications affichées sur l'écran.
Pour sortir de n'importe quel jeu appuyer sur la touche EXIT.
Page 21
Manuel d’utilisation
“DTR-7288
”
21
FRANCAIS
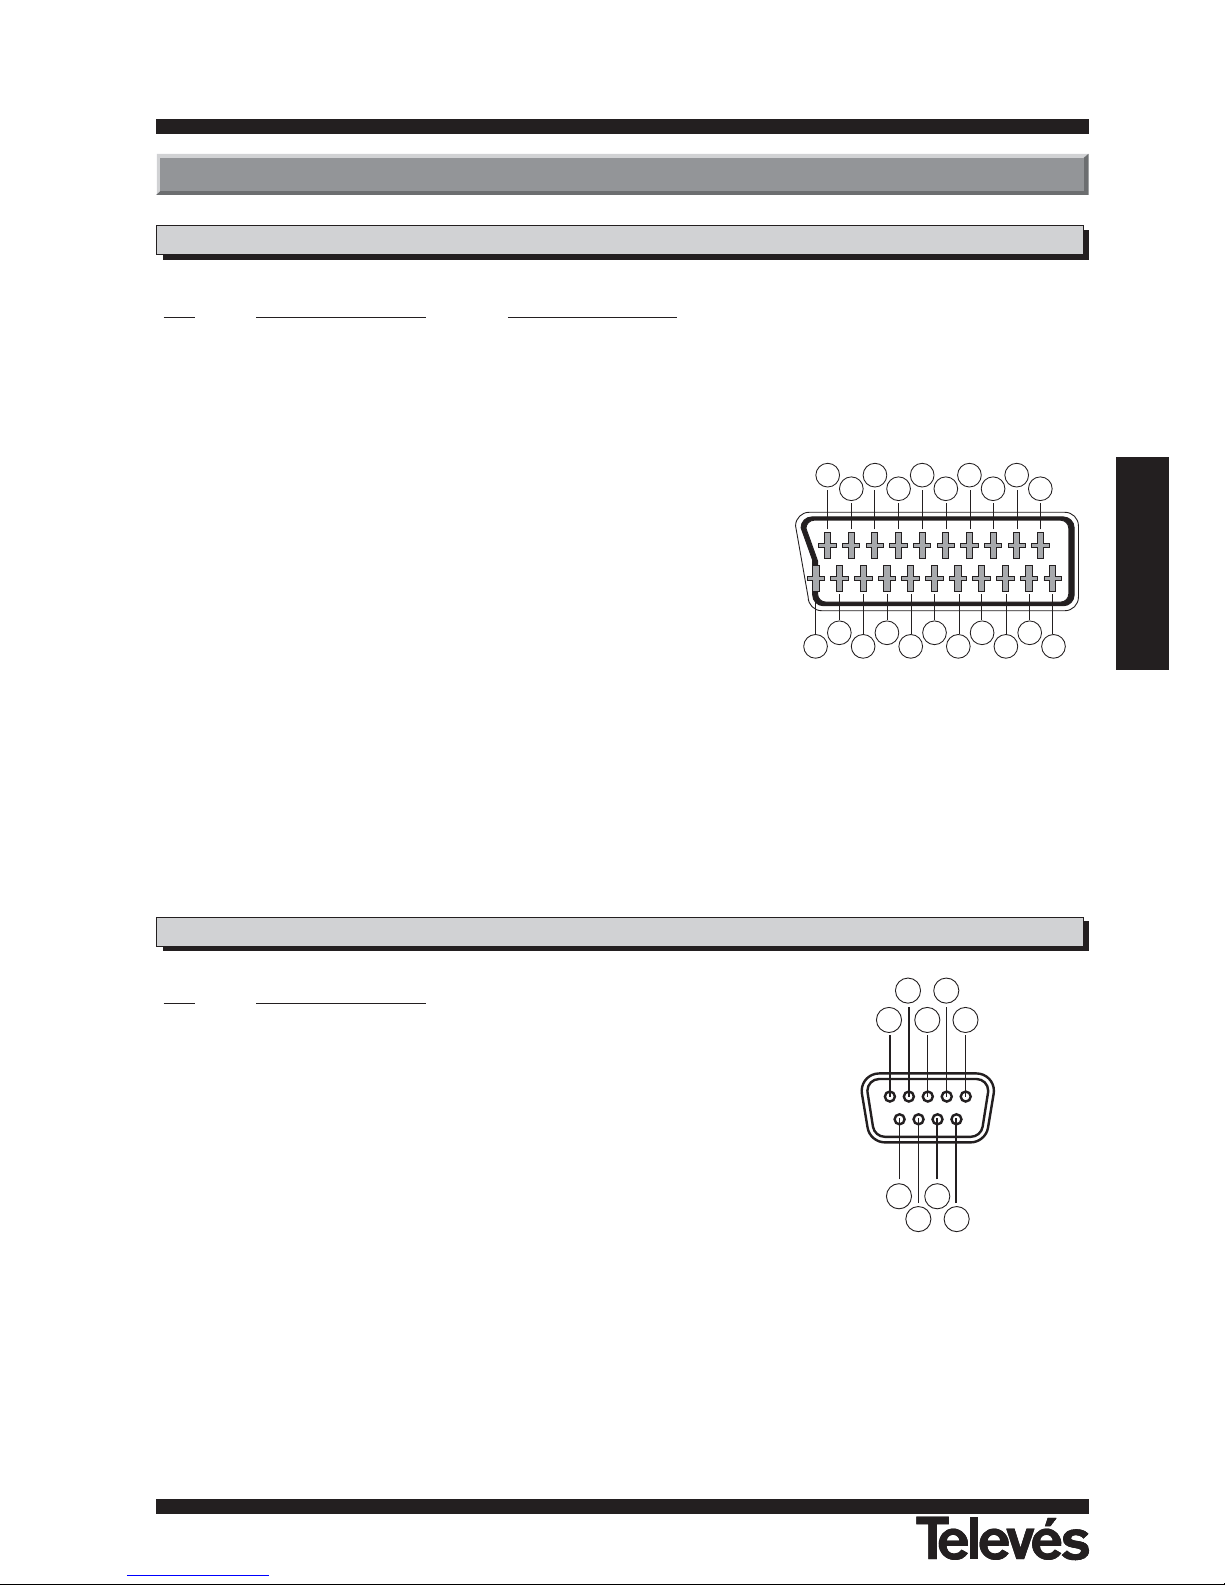
PIN Descripción
1 N/C
2 RXD (Entrée données)
3 TXD (Sortie données)
4 N/C
5 Masse
6 N/C
7 N/C
8 N/C
9 N/C
201816
14
12
1086
4
2
1
3
5
7
9
11
13
15
17
19
21
1 3 5
2 4
6 8
7 9
RS 232
PIN TV VCR
1 Sortie audio (D) Sortie audio (D))
2 N/C Entrée audio (D)
3 Sortie audio (G) Sortie audio (G
4 Masse audio Masse audio
5 Masse bleue Masse bleue
6 N/C Entrée audio (G)
7 Sortie bleue Entrée bleue
8 Tens. commutac. Tens. commutac.
9 Masse verte Masse verte
10 N/C N/C
11 Sortie verte Entrée verte
12 N/C N/C
13 Masse rouge Masse rouge
14 Masse “Fast Blanking” Masse “Fast Blanking”
15 Sortie rouge Entrée rouge
16 Sortie “Fast Blanking” Entrée “Fast Blanking”
17 Masse video Masse video
18 Masse video Masse video
19 Sortie video Sortie video
20 N/C Entrée video
21 Masse Masse
Description des connecteurs
Peritel (SCART)
Page 22
Manuel d’utilisation
“DTR-7288
”
22
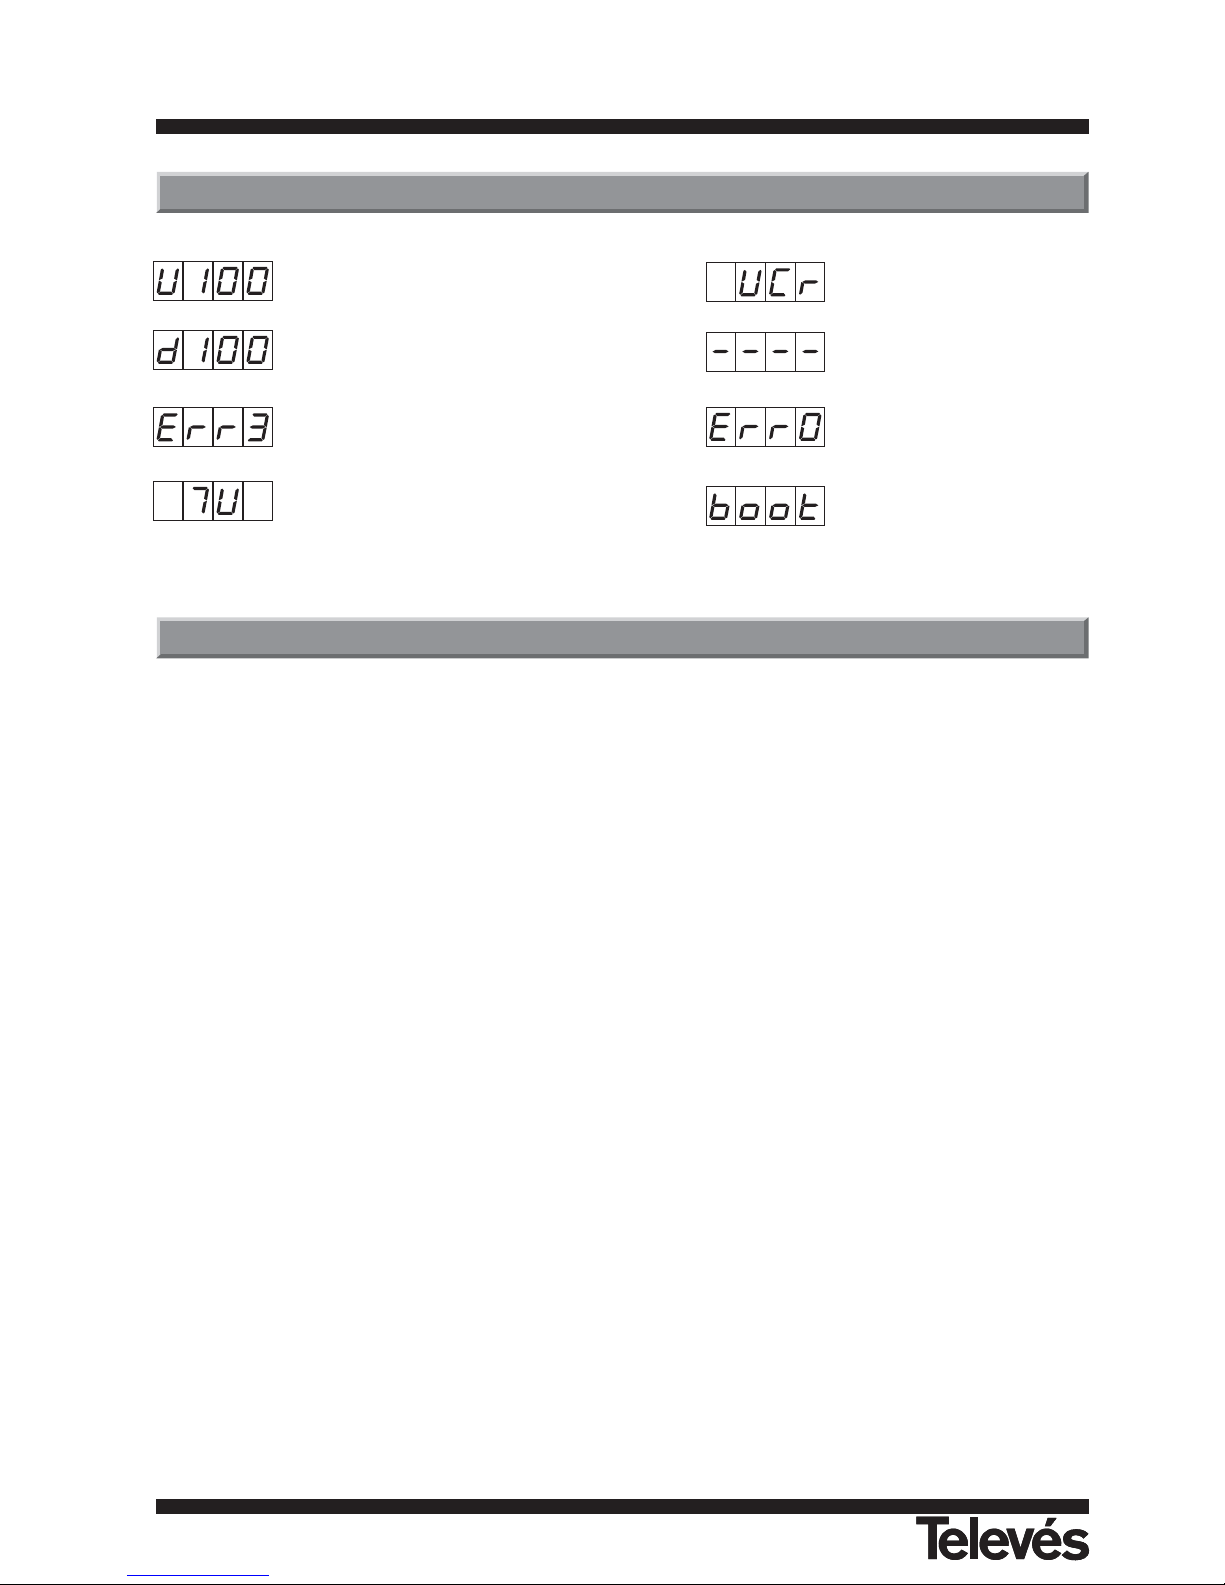
Afficheur de la façade avant
PROCÉDURE D'UPLOAD
PROCÉDURE DE DOWNLOAD
ERREUR DANS LES DONNÉES TRANSMISES
MODE TV
MODE VCR
SYSTÈME EN ATTENTE
ERREUR FLASH ROM
BOOT DU SYSTÈME
Explication des termes et abréviations utilisés dans ce manuel
• DVB : Digital Video Broadcasting.
Consorcium de divers organismes internationaux ayant pour objectif la réalisation de standart au
niveau mondial dans la télévision numérique.
• EPG : Electronic Programme Guide (Guide électronique des programmes ).
Guide proposé à l’utilisateur indiquant les évenements émis sur chaque programmes, les horaires
d’émission et une description du contenu des programmes.
• Fast Blanking : Signal envoyé par la Péritel qui contrôle l’état RGB du téléviseur.
• FTA : Free To Air
Programmes émis en clair sans codage.
• Letterbox : Un des modes de présentation sur les téléviseurs 4:3, pour avoir un aspect 16:9.
• MPEG 2 : Famille de standart de compression audio/video utilisé pour le DVB.
• OSD : Affichage à l’écran.
• VCR : Video Casette Recorder.
Enregistreur de cassette vidéo.
Glossaire
Page 23

Manuel d’utilisation
“DTR-7288
”
23
FRANCAIS
1. Syntoniseur et canal
Connecteur entrée 1 x IEC (femelle)
Connecteur sortie 1 x IEC (male)
Fréquence d'entrée 47 à 68 MHz, 174 à 230 MHz et 470 à 860 MHz
Fréquence d'entrée/sortie 47 à 860 MHz
Niveau de signal -75 à -20 dBmV
Impédance à l’entrée 75 Ohm
Largeur de bande (UHF) 8 MHz
Largeur de bande (VHF) 7 ou 8 MHz
Type de modulation COFDM
Mode de transmission 2K FFT, 8K FFT
Constellations 16QAM, 64QAM
Code rate 1/2, 2/3, 3/4, 5/6, 7/8
Intervalle de garde 1/4, 1/8, 1/16, 1/32
2. Vidéo numérique
MPEG-2 compatible
Profil et niveau MPEG-2 MP @ ML
Débit vidéo 60 Mbps
Format d’image 4:3, 16:9
3. Audio numérique
MPEG-1/2 Audio layer 1, 2
Mode audio Mono, Dual, joint stéréo, stéréo numérique
Fréquence 20 Hz ~ 20 KHz
Débit d’échantillonnage 32, 44.1, et 48 KHz
4. Mémoire
Mémoire Flash 2 Mbytes
Mémoire RAM 8 Mbytes
5. Entrée/sortie A/V et données
SCART TV x 1, VCR x 1
Sortie vidéo RGB TV x 1 (Socle péritel)
Sortie vidéo CVBS 2 x Socle péritel (TV, VCR)
Sortie audio analogique RCA x 2 (L-CH x 1, R-CH x 1)
2 x Socle péritel (TV, VCR)
Sortie audio numérique S/PDIF x 1
Interface de données RS232C, SUB-D à 9 conducteurs
6. Alimentation
Tension à l’entrée AC 90 - 240 V, 50 Hz
Type Conmut.
Consommation électrique 19 W Max.
7. Caractéristiques physiques
Dimensions (LongxLargxProf) 260 mm x 45 mm x 165 mm
Poids 1 Kg
8. Spécifications d’utilisation
Temp. de fonctionnement 0 °C ... +45°C
Temp. de stockage -10 °C ... +50 °C
Caractéristiques techniques
Page 24
Manuel d’utilisation
“DTR-7288
”
24
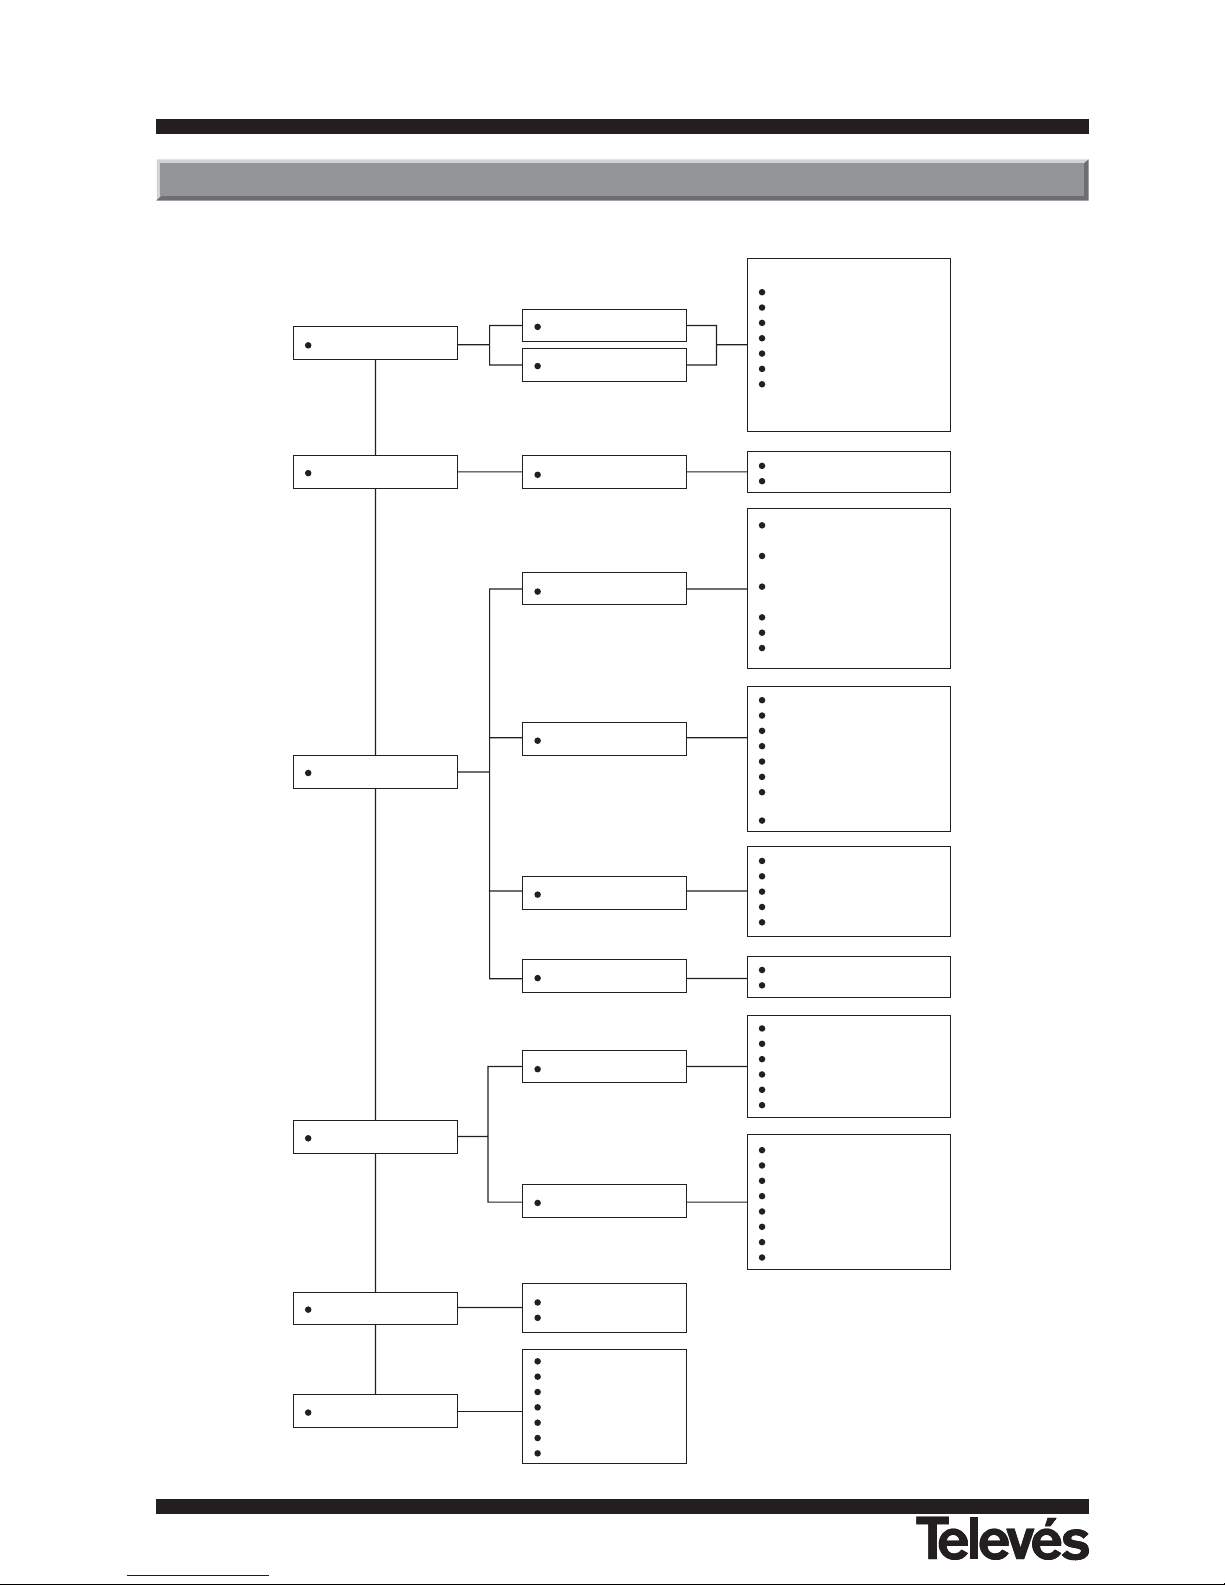
Menu en arborescence
Organisation chaînes
Guide des Programmes
Installation
Date/Heure
Information récepteur
Chaîne TV
Chaîne Radio
Guide des Programmes
Recherche des chaînes
Configuration système
Verrouillage Parental
Valeurs d'usine
Ajustement de l'horloge
Program. d'évènements
Version de S/W
Version de H/W
Chaîne TV / Chaîne Rádio
Supprimer
Favoris
Bouger
Bloquage
Renommer la liste de favoris
Renommer le canal
Trier
- Favoris
- Nom de la chaîne
Auto Search
- Recherche réseau
Manual Search
- Recherche d'un canal
Search All Channels
- Search FTA
Effacer les transpondeurs
Edition
Editer PID
+ 6:00
- 6:00
Langue du menu
Langue Audio
Couleur du menu
Format d'affichage
Sortie video
Allumer sur la chaîne
Classement Automatique
des Chaînes
VHF: 7 ou 8 MHz
Mot de Passe actual
Verrouillage Parental
Bloquage du menu
Nouveau Mot de Passe
Confirmer le mot de pas
OK
Annuler
Ajuster l'heure local
Heure d'été
Année
Moi
Date
Heure
Nombre de programma ...
Activer numero de chaîne
Type de programmateur
Type d'évènement
Permis
Moi
Date
Heure
Jeux
Tetris
Colorball
Gobang Game
Sokoban
Snake Game
Mine Game
Flipmix
Page 25

User manual
“DTR-7288
”
25
ENGLISH
INDEX . . . . . . . . . . . . . . . . . . . . . . . . . . . . . . . . . . . . . . . . . . . . . . . . . . . . . . . . . . . . . . . . . . . . . . Pg.
1.- Safety measures . . . . . . . . . . . . . . . . . . . . . . . . . . . . . . . . . . . . . . . . . . . . . . . . . . . . . . . . . . . . . . . . . . . 26
2.- General Information . . . . . . . . . . . . . . . . . . . . . . . . . . . . . . . . . . . . . . . . . . . . . . . . . . . . . . . . . . . . . . . . 27
2.1.- Main Features . . . . . . . . . . . . . . . . . . . . . . . . . . . . . . . . . . . . . . . . . . . . . . . . . . . . . . . . . . . . . . 27
2.2.- Unpacking . . . . . . . . . . . . . . . . . . . . . . . . . . . . . . . . . . . . . . . . . . . . . . . . . . . . . . . . . . . . . . . . . 27
2.3.- General Operation of the DTR 7288 . . . . . . . . . . . . . . . . . . . . . . . . . . . . . . . . . . . . . . . . . . . . . 27
3.- Description of panels and controls . . . . . . . . . . . . . . . . . . . . . . . . . . . . . . . . . . . . . . . . . . . . . . . . . . . . . 28
3.1.- Remote control unit . . . . . . . . . . . . . . . . . . . . . . . . . . . . . . . . . . . . . . . . . . . . . . . . . . . . . . . . . . 29
4.- Installation of the DTR 7288 . . . . . . . . . . . . . . . . . . . . . . . . . . . . . . . . . . . . . . . . . . . . . . . . . . . . . . . . . . . 30
4.1.- Connecting the receiver. . . . . . . . . . . . . . . . . . . . . . . . . . . . . . . . . . . . . . . . . . . . . . . . . . . . . . . . 30
5.- Menu Information . . . . . . . . . . . . . . . . . . . . . . . . . . . . . . . . . . . . . . . . . . . . . . . . . . . . . . . . . . . . . . . . . . . 31
6.- User Installation . . . . . . . . . . . . . . . . . . . . . . . . . . . . . . . . . . . . . . . . . . . . . . . . . . . . . . . . . . . . . . . . . . . 32
6.1.- Channel Search . . . . . . . . . . . . . . . . . . . . . . . . . . . . . . . . . . . . . . . . . . . . . . . . . . . . . . . . . . . . 32
6.2.- System Setting . . . . . . . . . . . . . . . . . . . . . . . . . . . . . . . . . . . . . . . . . . . . . . . . . . . . . . . . . . . . . 33
6.3.- Parental Lock . . . . . . . . . . . . . . . . . . . . . . . . . . . . . . . . . . . . . . . . . . . . . . . . . . . . . . . . . . . . . . . 35
6.4.- Factory Default . . . . . . . . . . . . . . . . . . . . . . . . . . . . . . . . . . . . . . . . . . . . . . . . . . . . . . . . . . . . . 35
7.- General Viewing Function . . . . . . . . . . . . . . . . . . . . . . . . . . . . . . . . . . . . . . . . . . . . . . . . . . . . . . . . . . . . . 36
7.1.- Select Channel . . . . . . . . . . . . . . . . . . . . . . . . . . . . . . . . . . . . . . . . . . . . . . . . . . . . . . . . . . . . . . 36
7.2.- Previous Channel Recall . . . . . . . . . . . . . . . . . . . . . . . . . . . . . . . . . . . . . . . . . . . . . . . . . . . . . . . 36
7.3.- TV & Radio Mode . . . . . . . . . . . . . . . . . . . . . . . . . . . . . . . . . . . . . . . . . . . . . . . . . . . . . . . . . . . 36
7.4.- TV & VCR Mode . . . . . . . . . . . . . . . . . . . . . . . . . . . . . . . . . . . . . . . . . . . . . . . . . . . . . . . . . . . . . 36
7.5.- Channel Information . . . . . . . . . . . . . . . . . . . . . . . . . . . . . . . . . . . . . . . . . . . . . . . . . . . . . . . . . 37
7.6.- Volume & Audio Control . . . . . . . . . . . . . . . . . . . . . . . . . . . . . . . . . . . . . . . . . . . . . . . . . . . . . . 37
7.7.- Favourite List . . . . . . . . . . . . . . . . . . . . . . . . . . . . . . . . . . . . . . . . . . . . . . . . . . . . . . . . . . . . . . 37
8.- Channel Manager . . . . . . . . . . . . . . . . . . . . . . . . . . . . . . . . . . . . . . . . . . . . . . . . . . . . . . . . . . . . . . . . . . . 38
8.1.- Channel Manager . . . . . . . . . . . . . . . . . . . . . . . . . . . . . . . . . . . . . . . . . . . . . . . . . . . . . . . . . . . 38
8.2.- Favourite Channel . . . . . . . . . . . . . . . . . . . . . . . . . . . . . . . . . . . . . . . . . . . . . . . . . . . . . . . . . . . 38
8.3.- Move Channel . . . . . . . . . . . . . . . . . . . . . . . . . . . . . . . . . . . . . . . . . . . . . . . . . . . . . . . . . . . . . . 39
8.4.- Lock Channel . . . . . . . . . . . . . . . . . . . . . . . . . . . . . . . . . . . . . . . . . . . . . . . . . . . . . . . . . . . . . . 39
8.5.- Rename Channel . . . . . . . . . . . . . . . . . . . . . . . . . . . . . . . . . . . . . . . . . . . . . . . . . . . . . . . . . . . 40
8.6.- Delete Channel . . . . . . . . . . . . . . . . . . . . . . . . . . . . . . . . . . . . . . . . . . . . . . . . . . . . . . . . . . . . . 40
8.7.- Sort Channel . . . . . . . . . . . . . . . . . . . . . . . . . . . . . . . . . . . . . . . . . . . . . . . . . . . . . . . . . . . . . . . 40
9.- EPG (Electronic Program Guide) . . . . . . . . . . . . . . . . . . . . . . . . . . . . . . . . . . . . . . . . . . . . . . . . . . . . . . . 41
10.- Timer . . . . . . . . . . . . . . . . . . . . . . . . . . . . . . . . . . . . . . . . . . . . . . . . . . . . . . . . . . . . . . . . . . . . . . . . . . . 41
10.1.- Time Adjust . . . . . . . . . . . . . . . . . . . . . . . . . . . . . . . . . . . . . . . . . . . . . . . . . . . . . . . . . . . . . . . 41
10.2.- Time Reservation . . . . . . . . . . . . . . . . . . . . . . . . . . . . . . . . . . . . . . . . . . . . . . . . . . . . . . . . . . . 41
11.- Games . . . . . . . . . . . . . . . . . . . . . . . . . . . . . . . . . . . . . . . . . . . . . . . . . . . . . . . . . . . . . . . . . . . . . . . . . . 42
Connector PIN designations . . . . . . . . . . . . . . . . . . . . . . . . . . . . . . . . . . . . . . . . . . . . . . . . . . . . . . . . . . . . 43
Front Panel Display . . . . . . . . . . . . . . . . . . . . . . . . . . . . . . . . . . . . . . . . . . . . . . . . . . . . . . . . . . . . . . . . . . . . 44
Glossary of terms . . . . . . . . . . . . . . . . . . . . . . . . . . . . . . . . . . . . . . . . . . . . . . . . . . . . . . . . . . . . . . . . . . . . . 44
Technical specifications . . . . . . . . . . . . . . . . . . . . . . . . . . . . . . . . . . . . . . . . . . . . . . . . . . . . . . . . . . . . . . . . 45
Menu Tree of DRT 7288 . . . . . . . . . . . . . . . . . . . . . . . . . . . . . . . . . . . . . . . . . . . . . . . . . . . . . . . . . . . . . . . . . 46
Guarantee . . . . . . . . . . . . . . . . . . . . . . . . . . . . . . . . . . . . . . . . . . . . . . . . . . . . . . . . . . . . . . . . . . . . . . . . . . . 47
Page 26
User manual
“DTR-7288
”
26
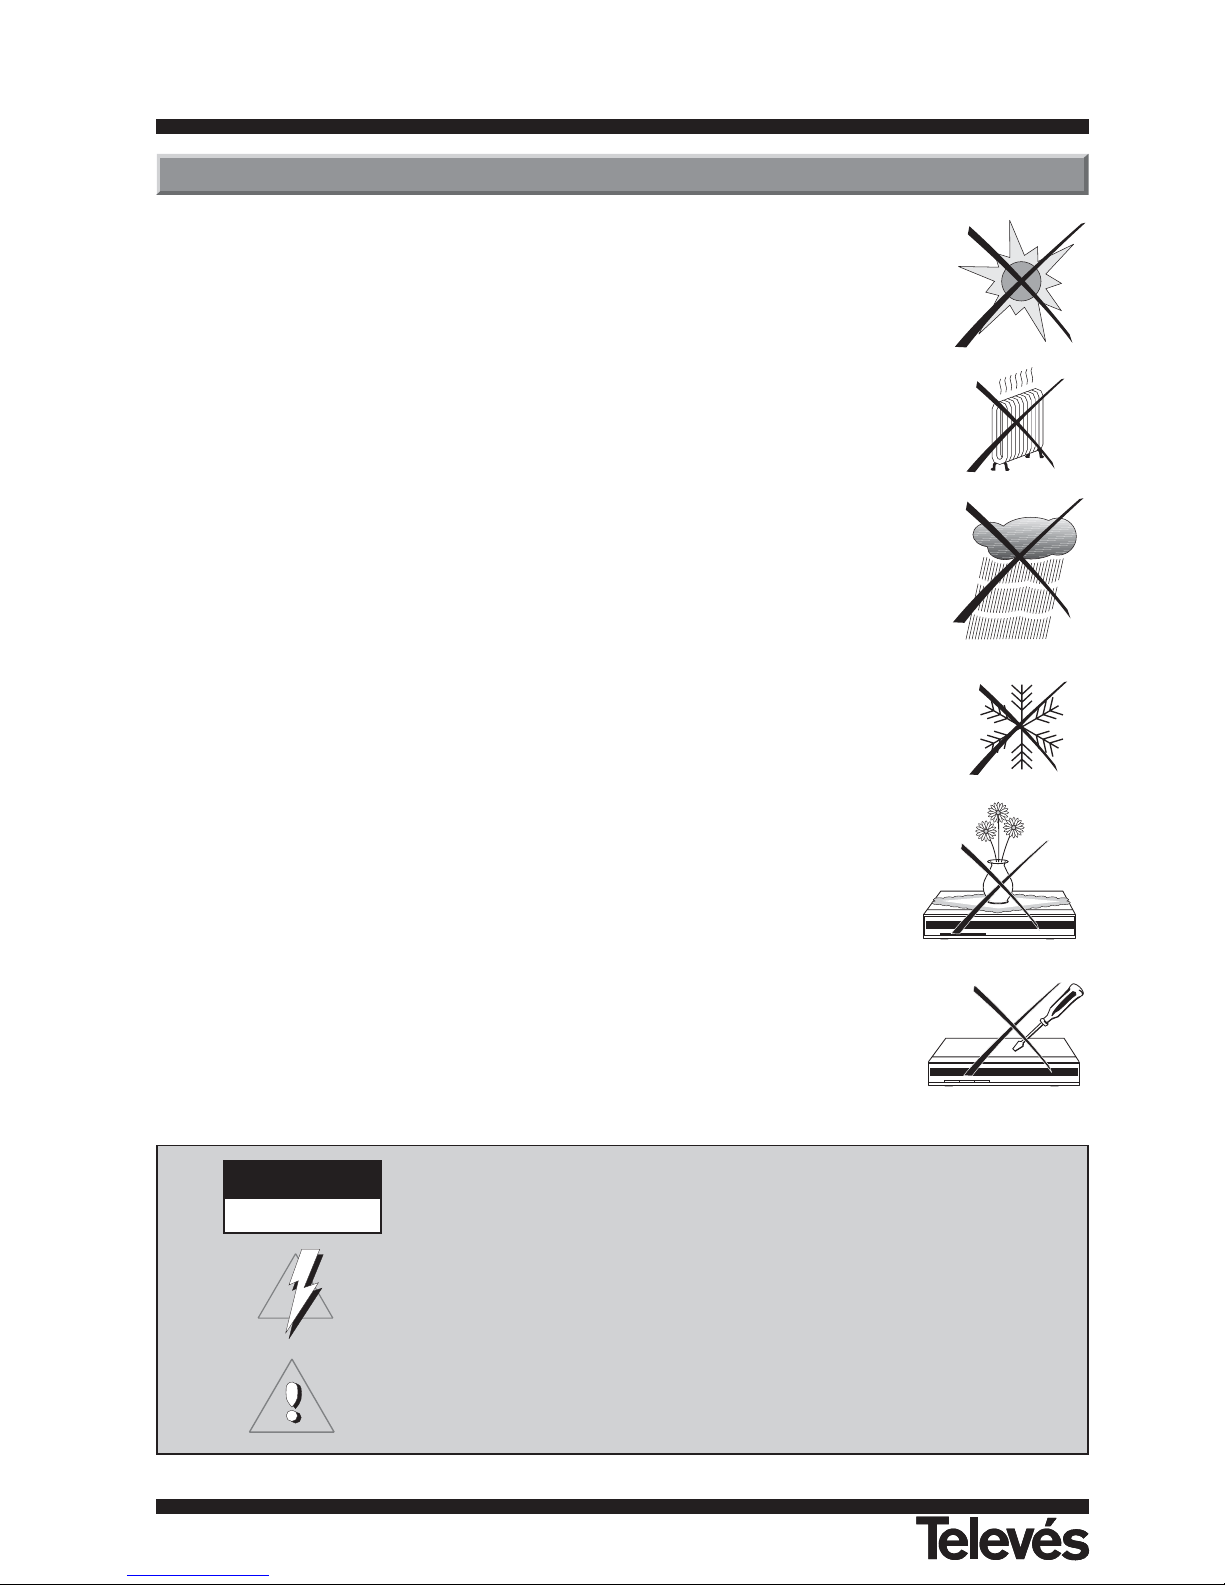
The Receiver that you have just purchased has been manufactured to meet
international safety standards. We recommend that you carefully read the safety
instructions below.
POWERING:
90 - 240 V~ 50/60 Hz.
OVERLOAD:
Do not overload the mains sockets, extenders or adapters to avoid a fire hazard
or electric shock.
LIQUIDS:
Do not wet or splash the receiver.
Do not place objects or containers with liquids on top of or beside the
equipment.
SMALL OBJECTS:
Avoid placing small metalic objects close to the unit. These could accidentally
enter through the ventilation slots of the Receiver and cause serious damage.
CLEANLINESS:
Unplug the Receiver from the mains before beginning to clean it.
Use a slightly damp, soft cloth (no detergent) to clean the outside of the unit.
VENTILATION:
Place the Receiver in a well-ventilated area so that the slots are not blocked in
any way. Avoid exposure to the sun, to other sources of heat or flames.
Do not place on top of other equipment.
CONNECTIONS:
Only carry out the recommended connections to avoid any possible damage.
TV or VCR CONNECTION:
Switch the Receiver off before connecting or disconnecting it to a TV or VCR.
IF THIS IS NOT DONE, THE TV OR VCR COULD BE DAMAGED.
LOCATION:
The Receiver should be kept inside where it is protected against lightening, rain
and direct sunlight.
Install the Receiver in horizontal position.
1.- Safety measures
WARNING
RISK ELECTRICAL SHOCK
DO NOT OPEN
TO AVOID THE RISK OF AN ELECTRIC SHOCK, DO NOT TAKE THE COVER OFF.
THE RECEIVER CANNOT BE REPAIRED BY THE USER.
PLEASE CONSULT QUALIFIED PERSONNEL ONLY.
This symbol indicates that there is the risk of an electric shock.
This symbol indicates that there are some important instructions for this particular
product.
< 5°C
> 80 %
> 50°C
Page 27
User manual
“DTR-7288
”
27
ENGLISH
Fully MPEG2, DVB compliant
Digital Audio with AC-3 support by SPDIF
User Friendly and easy-to-use Menú system
Various channel editing functions (favorite, moving,
locking, renaming, deleting and sorting)
It supports the automatic ordering of channels - LCN
(Logical Channel Number)
Stores up to 2000 programs
Easy and fast software upgrade through RS-232 port
Plug-and-play data transfer system (DSR to DSR)
Timer function, automatically turns On/Off by setting
function (daily, weekly, monthly, one time)
It lets the user select the VHF bandwidth (7 or 8 MHz)
Automatic reserved channel moving system
Electronic Program Guide (EPG)
OSD Teletext (DVB ETS 300 706) and Subtitle function
support
VBI Teletext support
Multi video output - CVBS, RGB
SCPC/MCPC receivable
256 color On-Screen-Display
Automatic PAL/NTSC conversion
Automatic last channel saving
7 different games are available
The DRT 7288 allows you to view a variety of terrestrial programs.
This user's guide covers the installation of the DTR 7288 and the necessary steps to operate various features.
It also explains special features available only in this DTR 7288 in detail, and will allow you to take full advantage of these
features
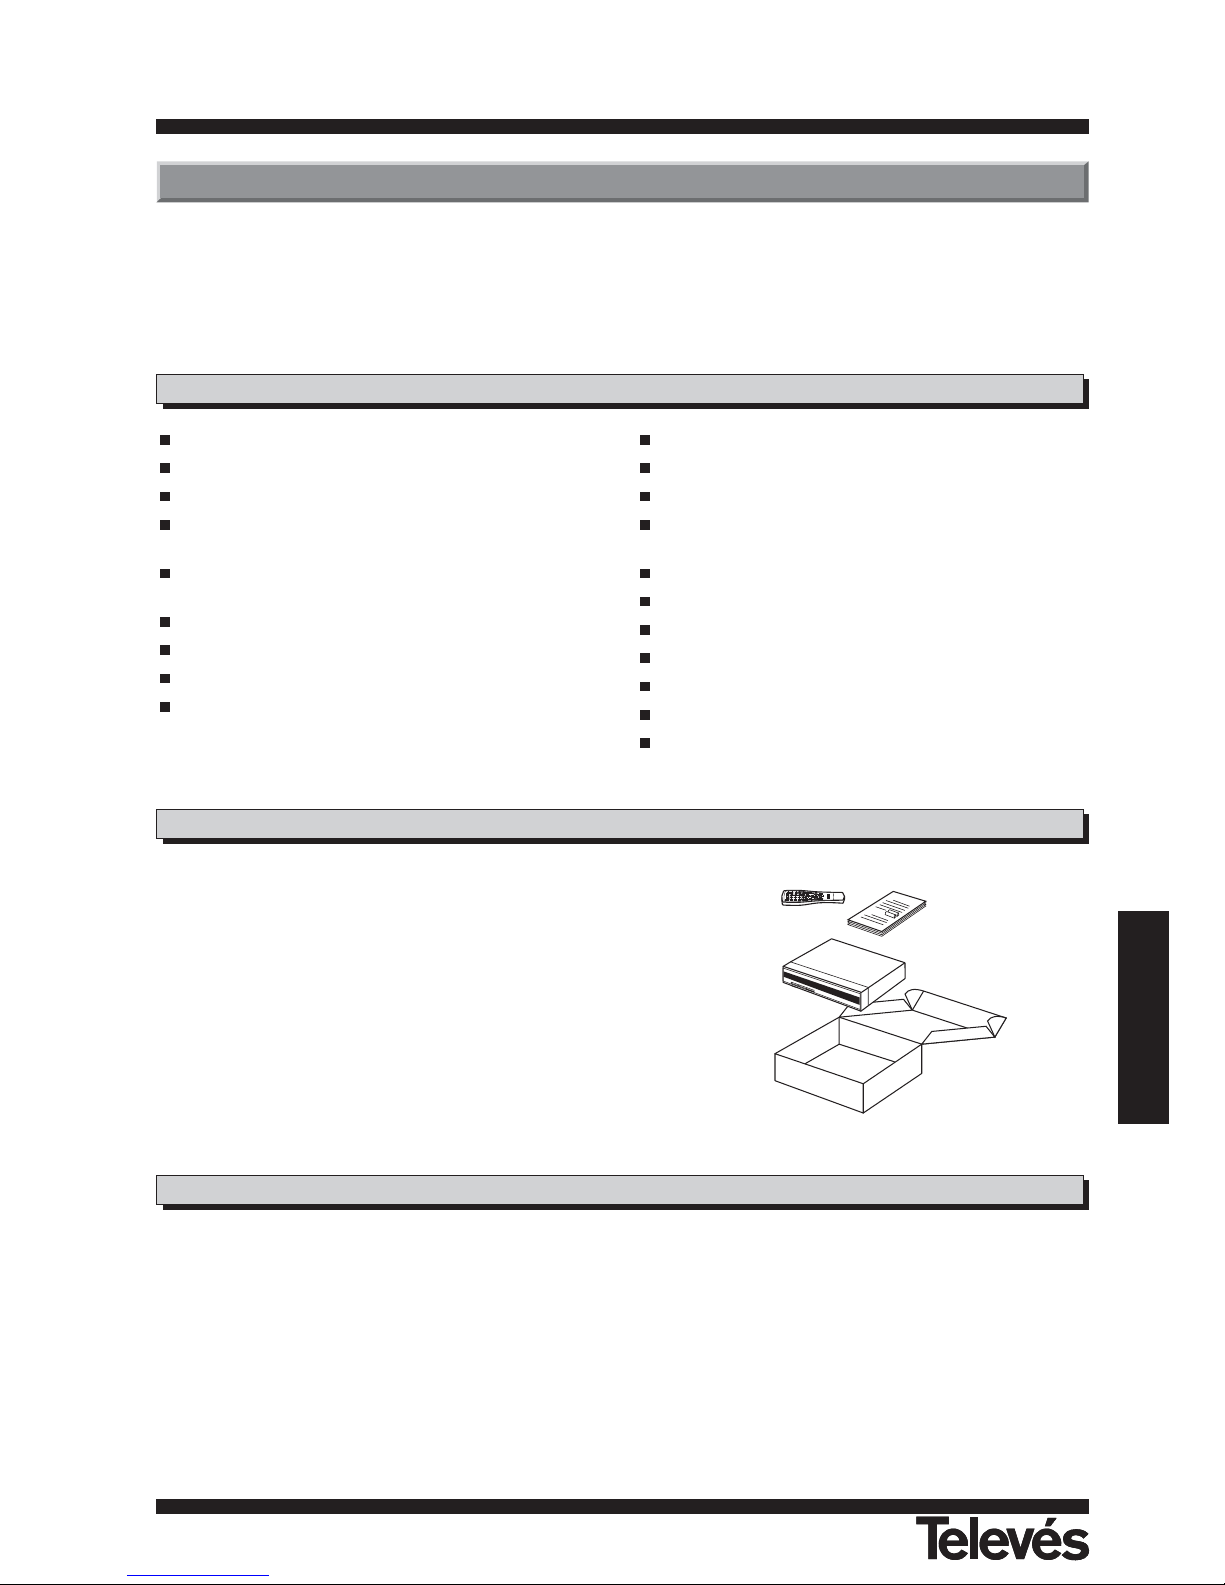
Unpack the DTR 7288 and check to make sure that all of the
following items are included in the packaging.
- 1 x Remote Control Unit (RCU)
- User's manual
- 2 x AAA batteries
- 1 x DTR 7288
2.- General Information
2.1.- Main Features
2.2.- Unpacking
Throughout this manual you will notice that the everyday operation of your DTR 7288 is based on a series of user friendly on
screen display and menus. These menus will help you get the most from your DTR 7288, guiding you through installation,
channel organizing, viewing and many other functions.
All functions can be carried out using the buttons on the RCU, and some of the functions can also be carried out using the
buttons on the front panel.
If at any time when using the menus you want to return to the normal TV mode, press the TV/AV button.
Please be aware that new software may change the functionality of the DTR 7288.
Should you experience any difficulties with the operation of your DTR 7288, please consult the relevant section of this
manual, or alternatively call your dealer or a customer service adviser.
2.3.- General Operation of the DTR 7288
Page 28
User manual
“DTR-7288
”
28
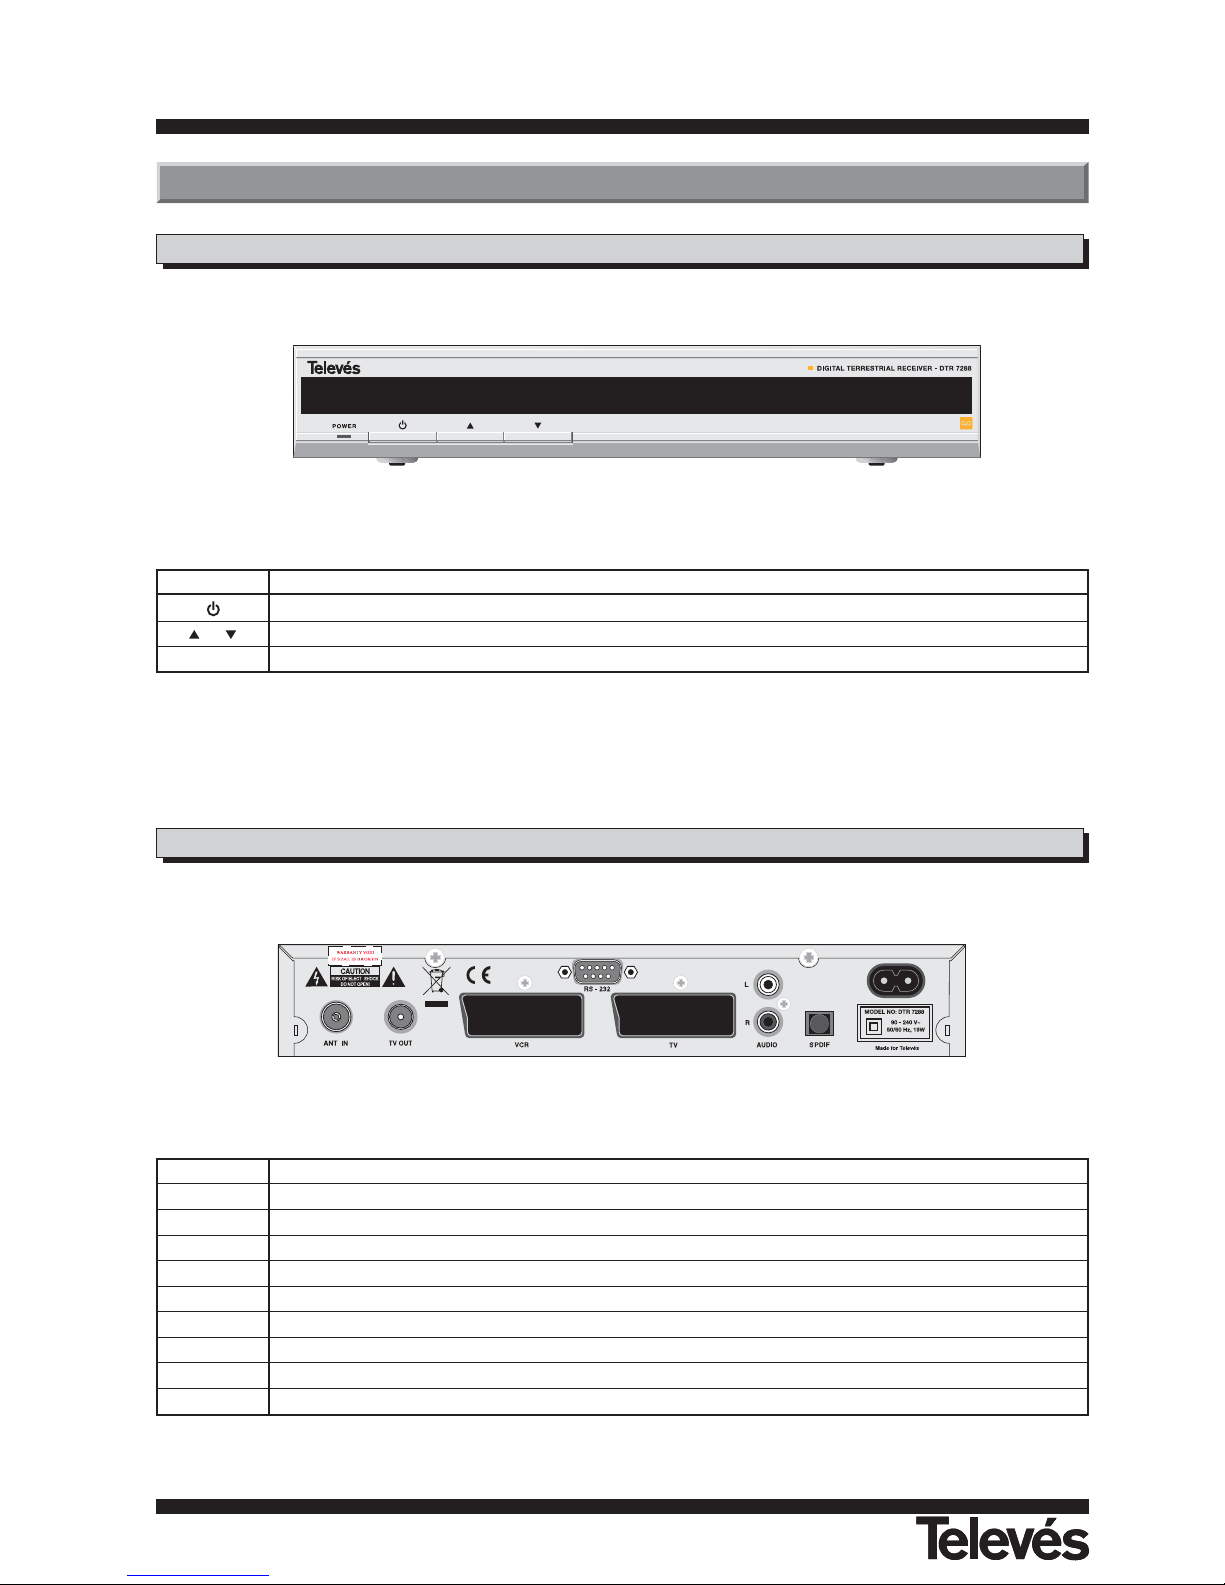
Front panel
Rear panel
Button Function
Switches between normal mode and standby.
/
To step up and down through the channels. To select the different elements in the menus.
Display In normal mode this displays the channel number; in standby it displays the time.
Name Function
ANT IN
The input of the terrestrial antenna’s signal.
TV OUT Output of the RF signal to connect it to a TV or VCR.
VCR To connect a VCR via a SCART connector.
TV To connect a TV via a SCART connector.
AUDIO R Audio output (right channel).
AUDIO L Audio output (left channel).
S/PDIF Digital audio optic output.
RS232 Serial port connection.
MAINS Connect to power
3.- Description of panels and controls
Page 29
User manual
“DTR-7288
”
29
ENGLISH
3.1.- Remote control unit
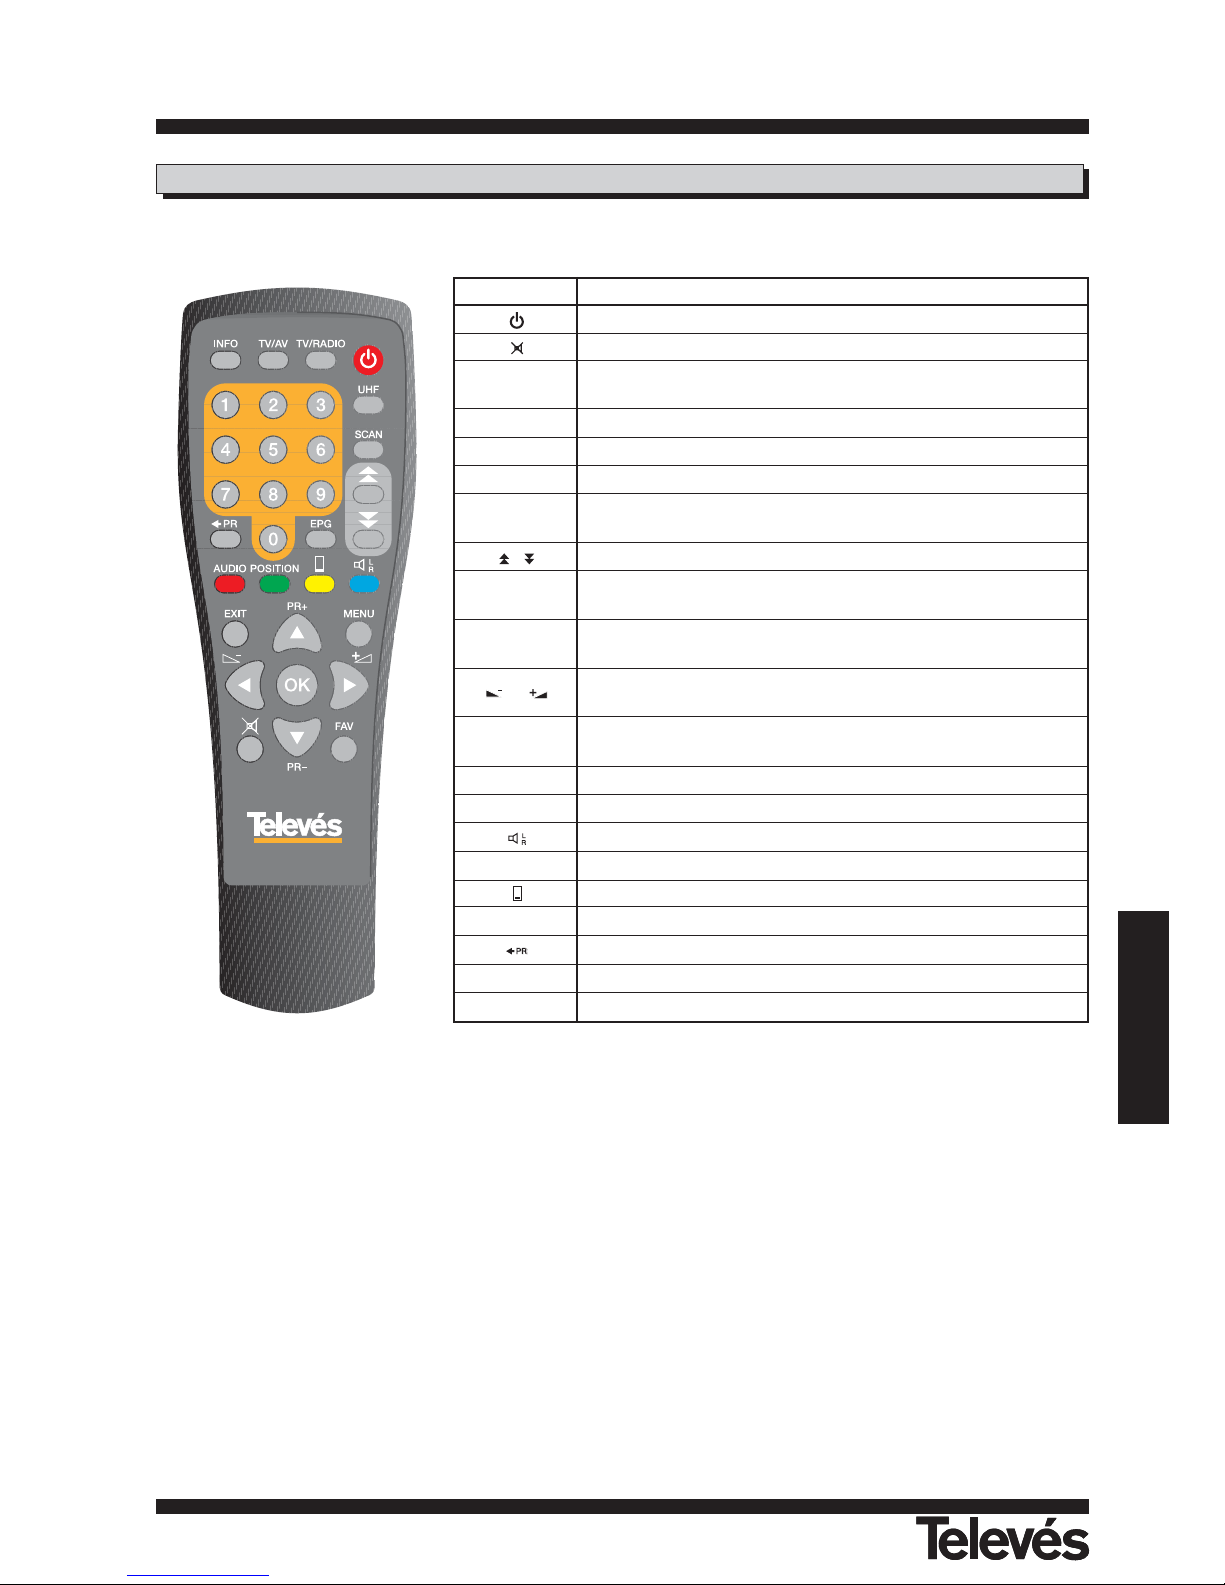
Button Function
Tums powers ON/OFF of the DTR.
When watching a channel mutes the sound.
0 ... 9
Enter number of the required Menú item or select a channel
number to watch.
TV/RADIO Switches between the TV and Radio channels.
FAV Display the favourite channel list.
INFO Shows information of the current channel.
Menú
Press this key one time to run Menú on screen and call
command box.
/ Moves up/down a page in the channel list.
OK
Executes the selected item in the Menú screen, or enters the
desired value in any input mode.
PR+ / PR-
When watching a channel, change channels, or moves to the
next higher or lower item in the Menú.
/
When watching a channel, adjust the volume, or move to the
left or right item in Menú.
EXIT
Returns to the previous Menú on the Menú screen or escape
from the Menú.
AUDIO When watching a channel, switches the audio languages.
EPG Calls up the EPG.
Selects the different audio modes.
TV/AV Switches between TV or AV mode.
Switches to teletext or subtitle mode.
SCAN Starts an automatic search.
Previous Channel Recall.
UHF Non functional on this model
POSITION Non functional when watching a channel
Note: The buttons in red, green, yellow and blue color have secondary functions
that are not described here and that can appear in various menus.
Page 30
User manual
“DTR-7288
”
30
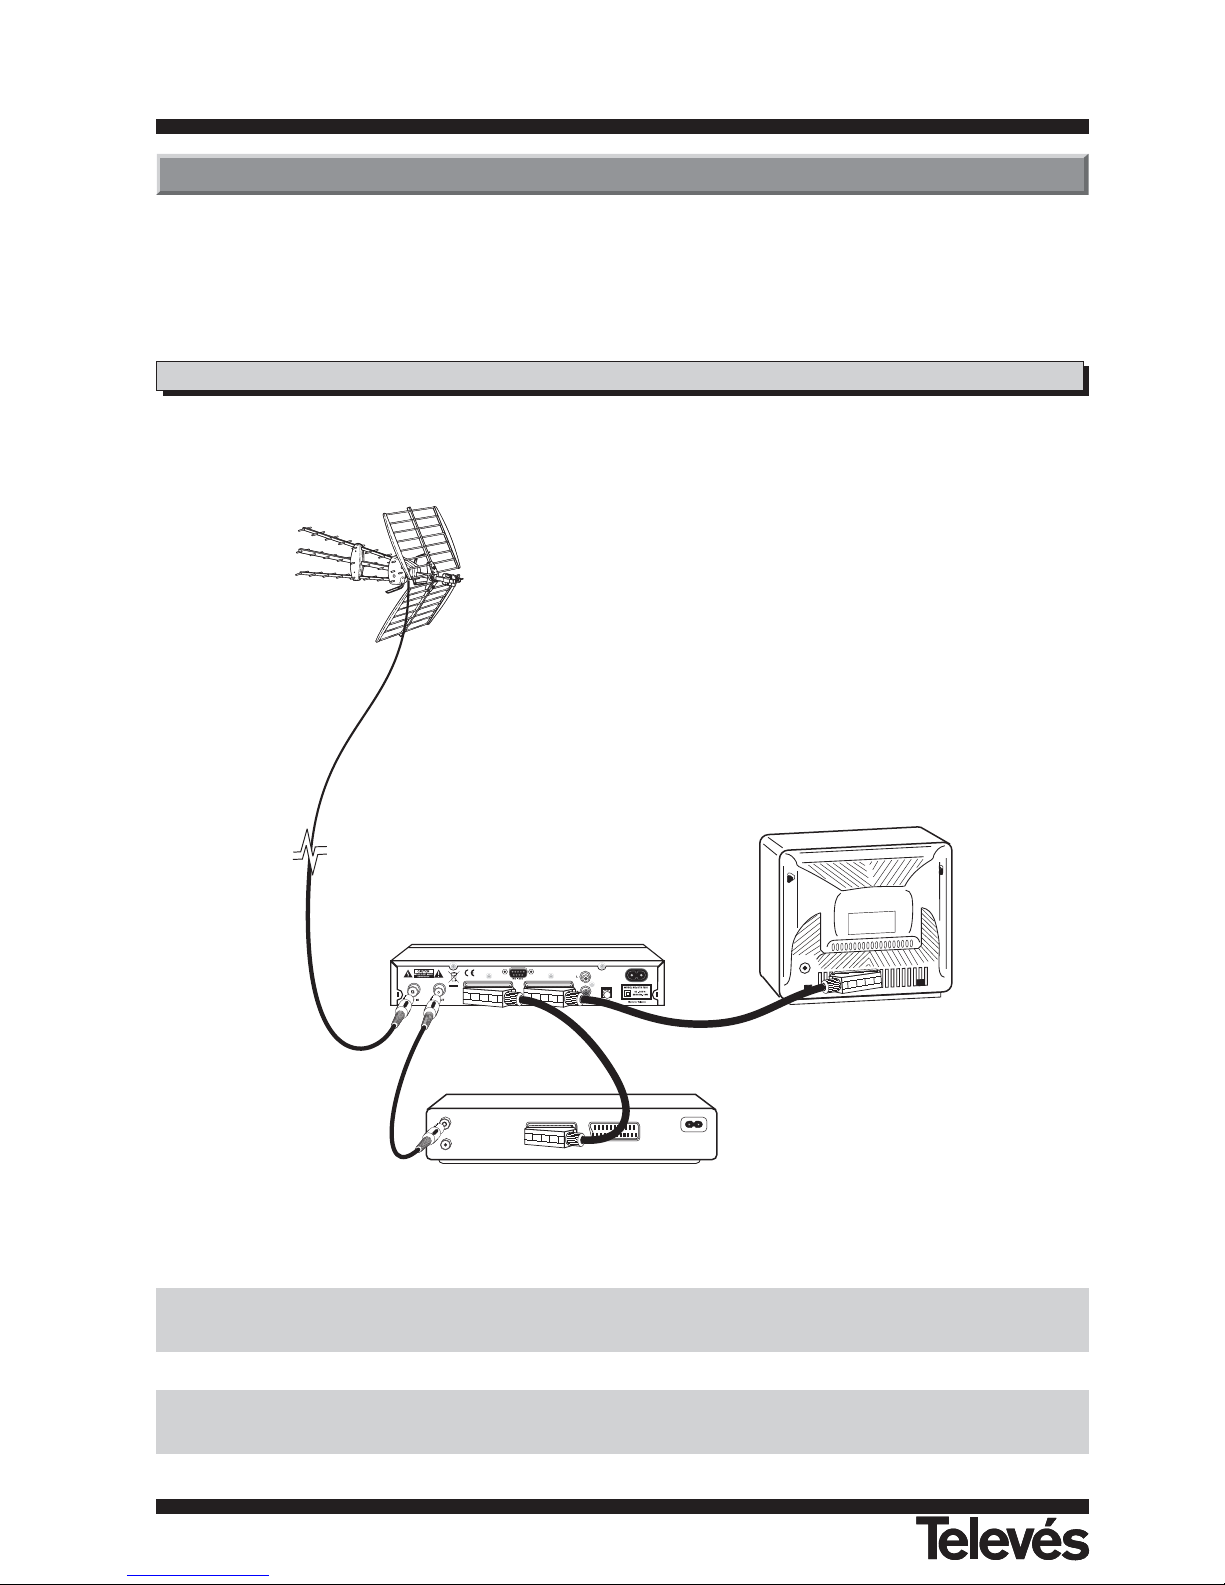
This section explains the installation of DTR 7288.
Refer to the manuals supplied with the equipment for the installation of outdoor equipment such as the antenna.
When adding new equipment, be sure to refer to the related parts of the manual for the installation.
4.1.- Connecting the receiver
DO NOT PLUG the Receiver into the mains until you have finished connecting it to all the other equipment.
Note: All of the cables used in the connections with the Receivers will be shielded.
4.- Installation of DTR 7288
DTR-7288
TV
VCR
Page 31
User manual
“DTR-7288
”
31
ENGLISH
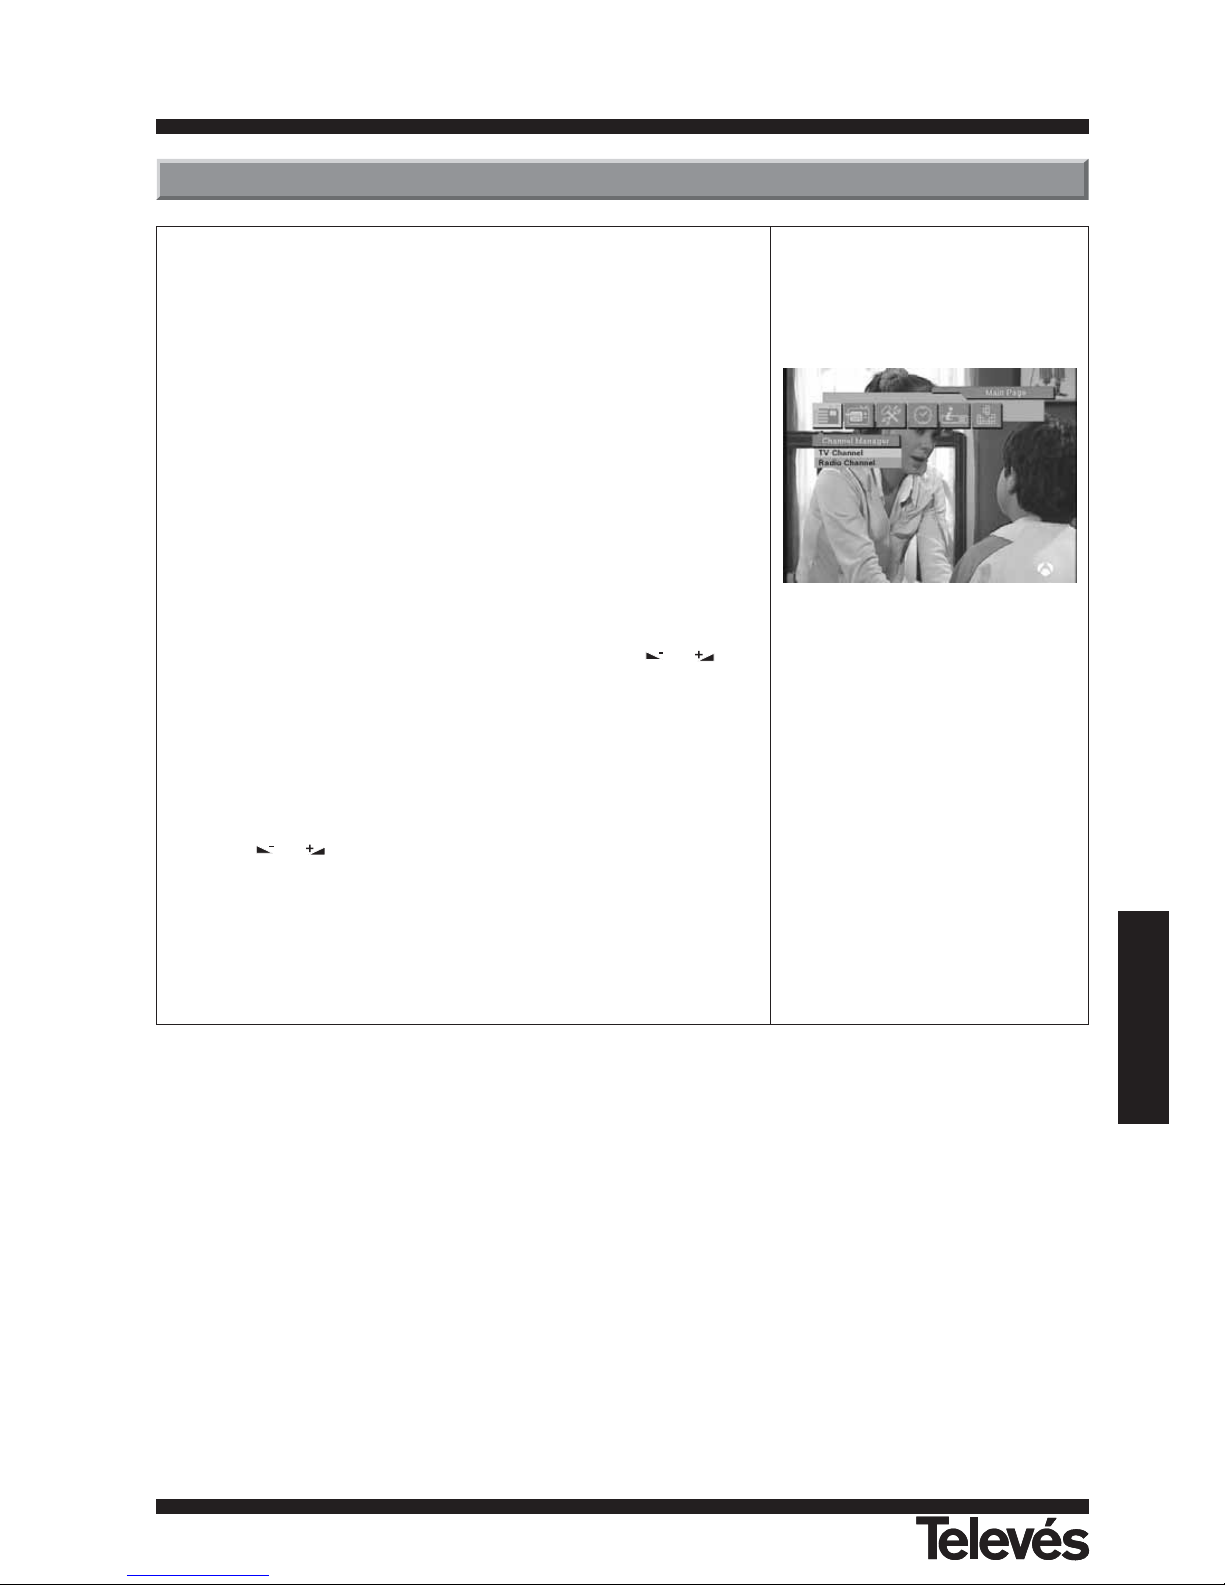
Once you have installed and connected the cables of the DTR 7288, the
Menú will is displayed.
This Menú consists of 6 main menus as shown below.
- Channel Manager
- Program Guide
- User Installation
- Timer
- Receiver Information
- Games
During the installation the OK key confirms a selection and
/
key
shows the Drop Down List Box.
You can also use the numeric keys on the RCU to enter a numeric value.
Use the PR+, PR- key to move up or down from one line to another line.
Use the
/
keys to move from main Menú to sub Menú and move
from left side to right side or vice versa.
To escape the Menú system at anytime, press EXIT key on the RCU.
5.- Menu Information
Page 32
User manual
“DTR-7288
”
32
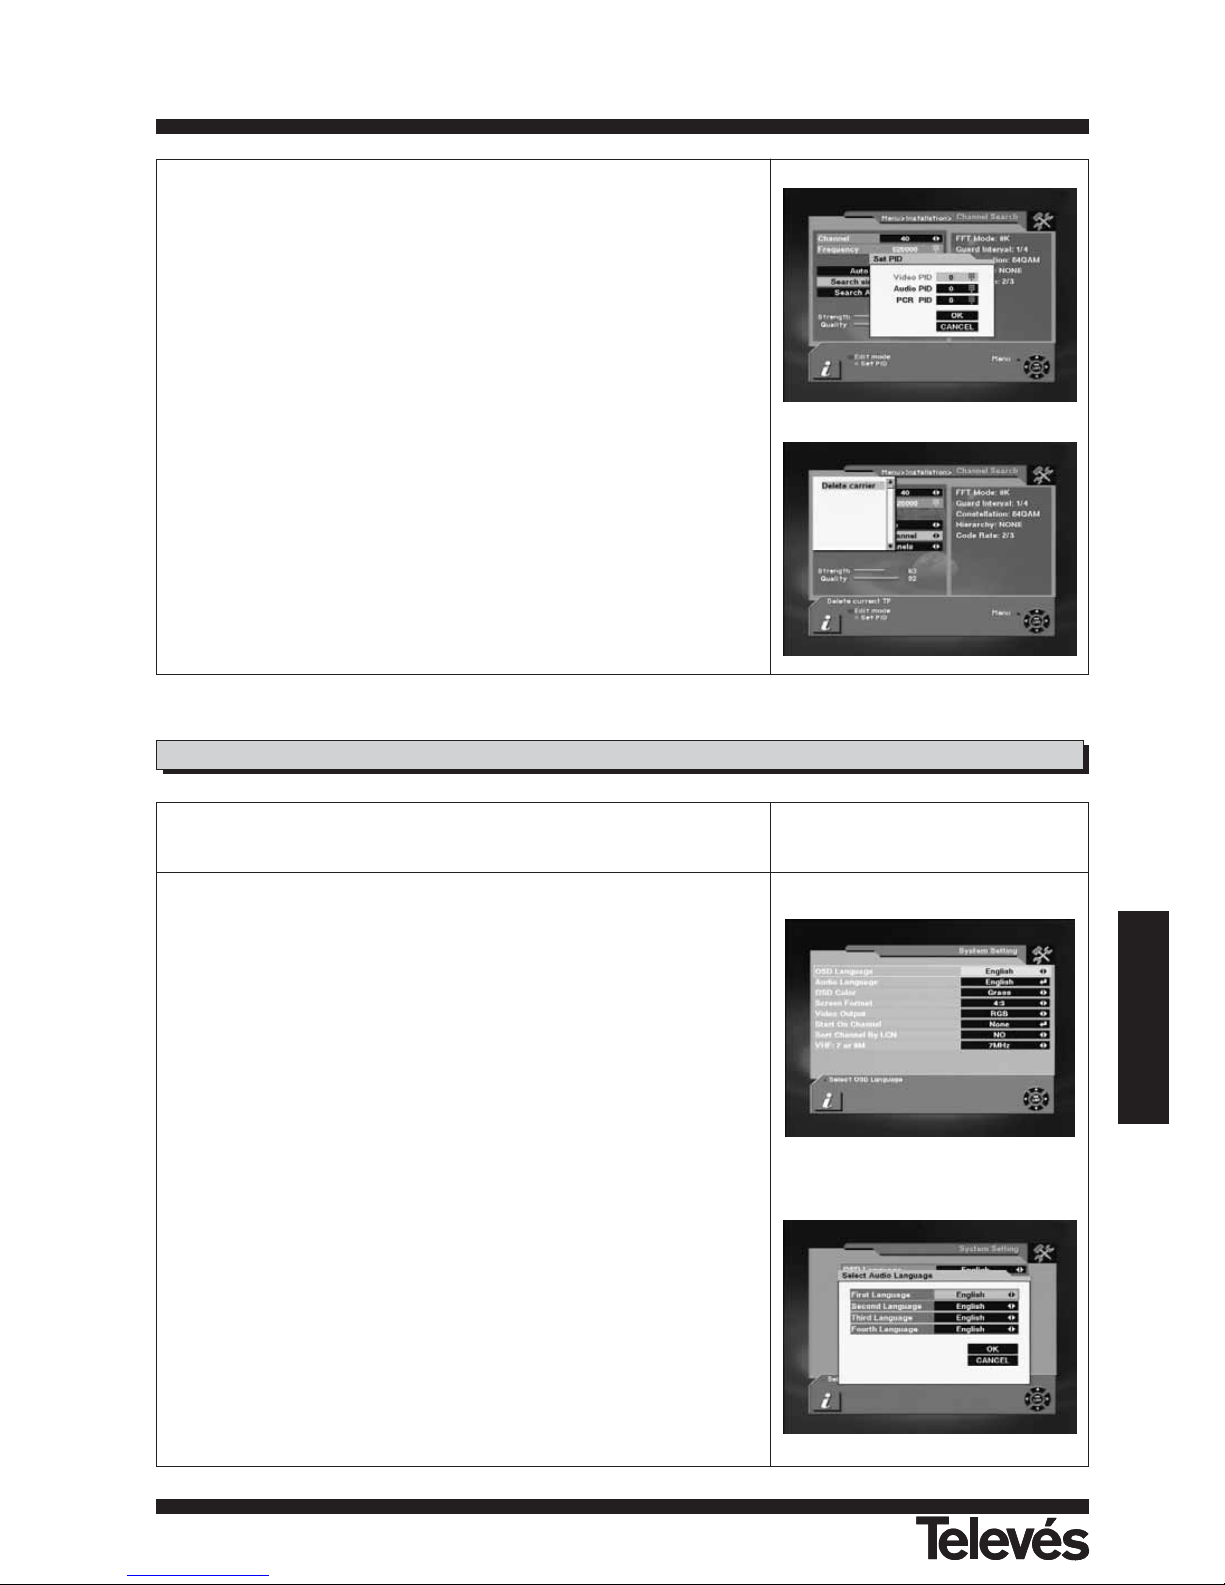
1.- Channel:
- Select desired Channel using
/
keys. Pressing the OK key will
display a Down List Box which also lets you select the desired channel.
2.- Frequency:
- Edit the desired frequency. To access this option, it is necessary to
press the red button on the remote control.
On the right-hand part of the screen, the information (Fft mode, guard,
constellation, hierarchy and code rate) of the selected channel will
appear once the signal has been received.
3.- Automatic Search:
- Carries out an automatic search, beginning with channel 2 and finishing
with channel 69.
- Network Search: Carries out a search of the channels of the
selected channel operator.
4.- Manual Search:
- Search a channel: Carries out a search of a specific channel, that
has been previously selected in the channel
list.
5.- Search all channels:
- Carries out a search of all the channels (scrambled and free).
- Search free channels: Carries out a search of the free channels.
DTR 7288 will automatically search channels for TV and Radio. During
this procedure you can see a list of the previously searched channels in
the Searched List Box on the screen.
On completion of searching channels, the cursor will be placed on
COMPLETE automatically.
Now press OK button.
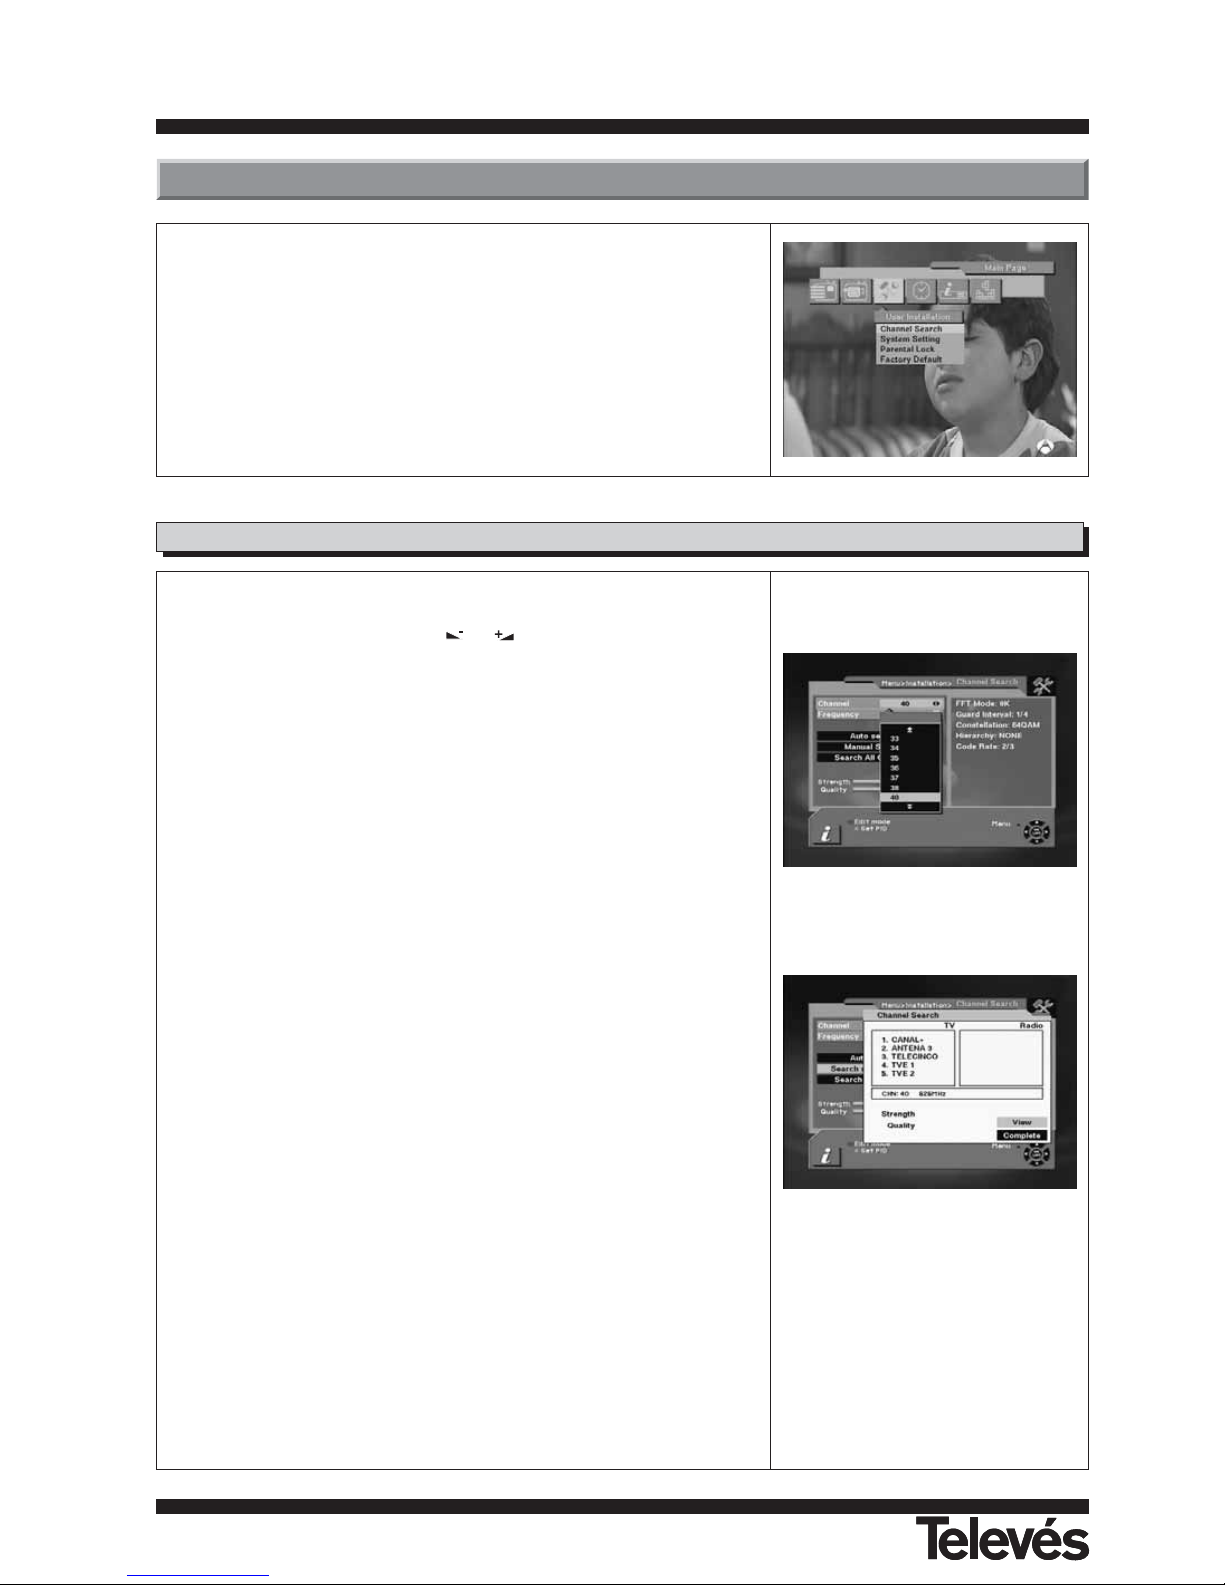
6.- User Installation
This Menú consists of 4 sub-menus as shown below.
- Channel Search
- System Setting
- Parental Lock
- Factory Default
6.1.- Channel Search
Page 33
User manual
“DTR-7288
”
33
ENGLISH
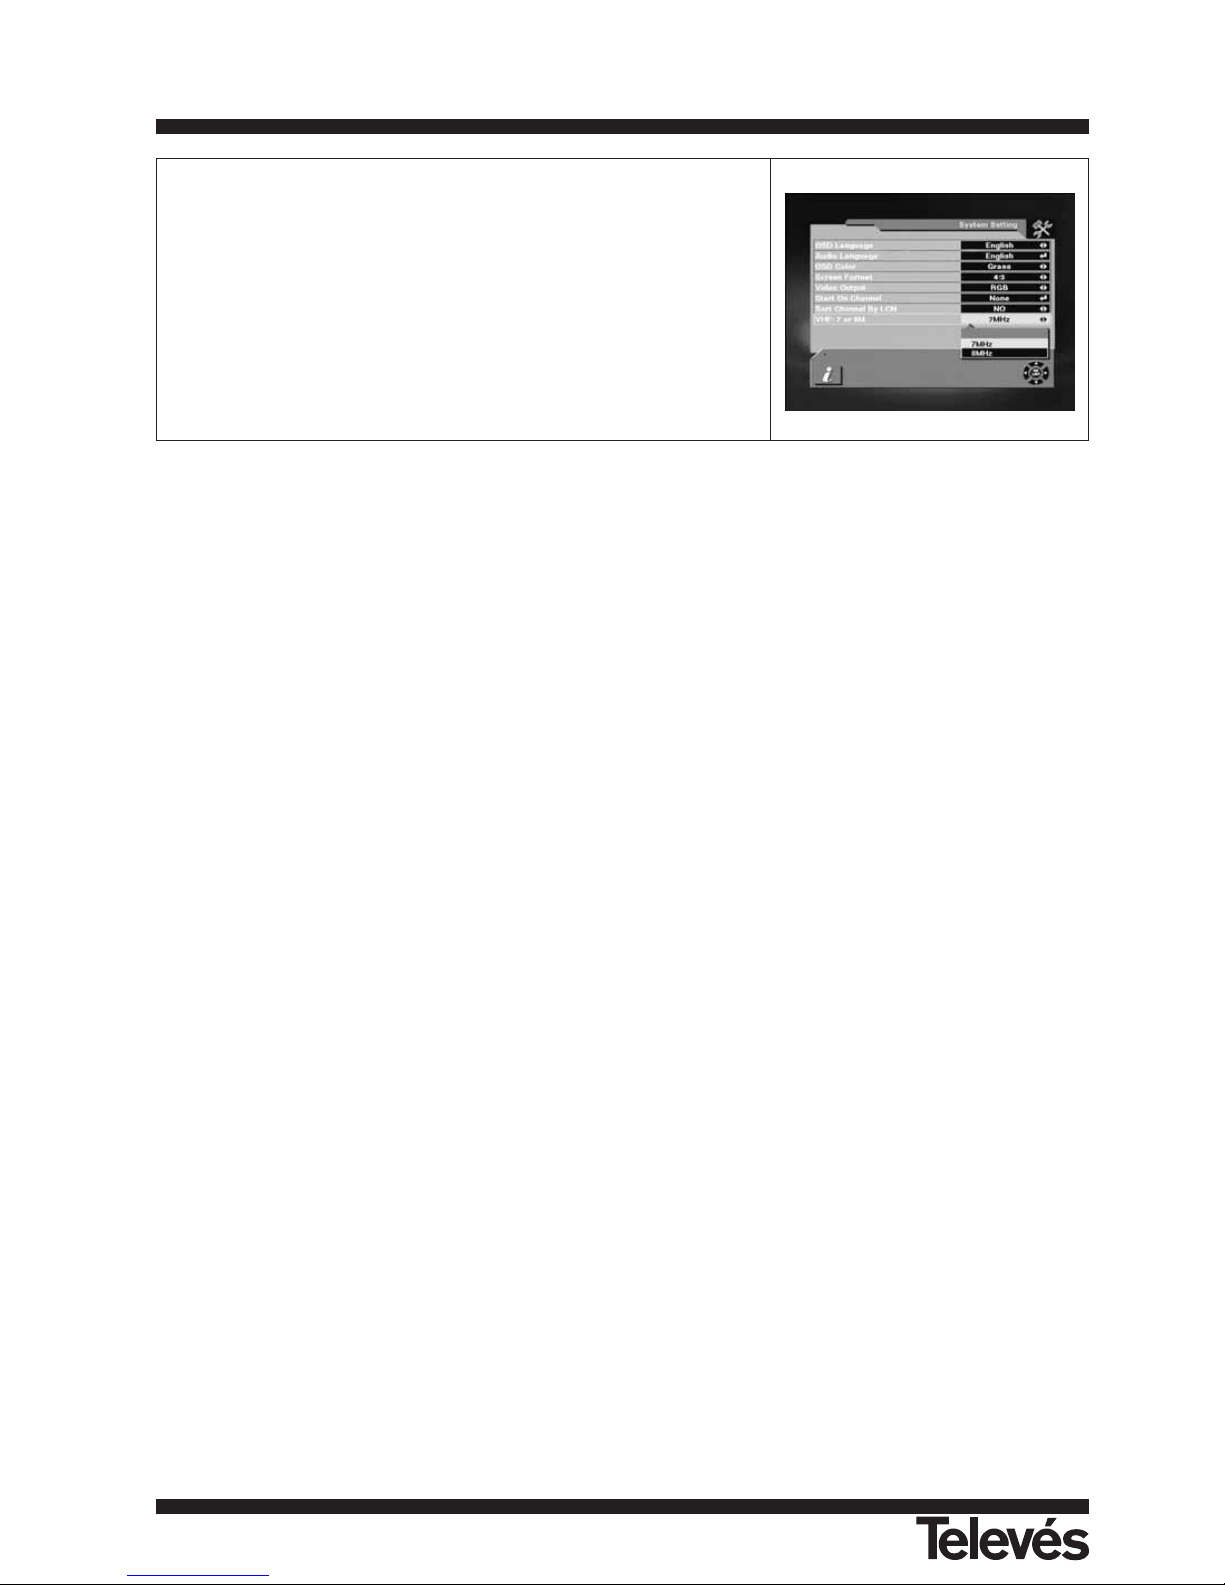
6.- Set PID:
- If you want to set PID (Packet Identifier) manually, select TP in the
"Channel Search Page" and press MENU key on the RCU to display the
command box.
- Then select SET PID command and press OK. The set PID Menú will be
displayed. Enter the correct value and select OK.
7.- Delete CH:
- If you want to delete a Channel, please select the Channel which you
want to delete and then press MENU key on the RCU to display the
command box. Then select Delete CH command. A confirm message
box will be displayed.
Edit Mode: If you want to edit preprogrammed data such as Frequency,
please press EDIT mode key (Red color key) on the RCU to display the
command box. You can then move into those columns to change the value.
The System Setting Menú allows you to set items depending on your
environment.
1.- OSD Language:
- Lets you select the desired language.
2.- Audio Language:
- Select the desired audio language to be in top priority under the
condition that this language is supported by the channel.
3.- Menú color:
- This option allows you to personalize the color (grass, night, ocean,
wine) of bottom of OSD Menú of its receiver.
4.- Screen Format:
- If your TV supports 16:9 screen format and selected channel provides
16:9 format program, select 16:9.
5.- Video output:
- If your SCART supports RGB control, select RGB. Otherwise select
CVBS.
6.- Start On Channel:
- If you press OK key, then the channel list is displayed. You can select
one channel from the list. The selected channel starts whenever you
turn on DTR 7288.
6.2.- System Setting
Page 34
User manual
“DTR-7288
”
34
7. - Sort Channel by LCN:
- This option lets the user enable or disable the automatic ordering of
channels as defined by the operator.
8. - VHF: 7 or 8 MHz
This option lets the user select the appropriate bandwidth (7 or 8 MHz)
for the reception of VHF signals.
Page 35
User manual
“DTR-7288
”
35
ENGLISH
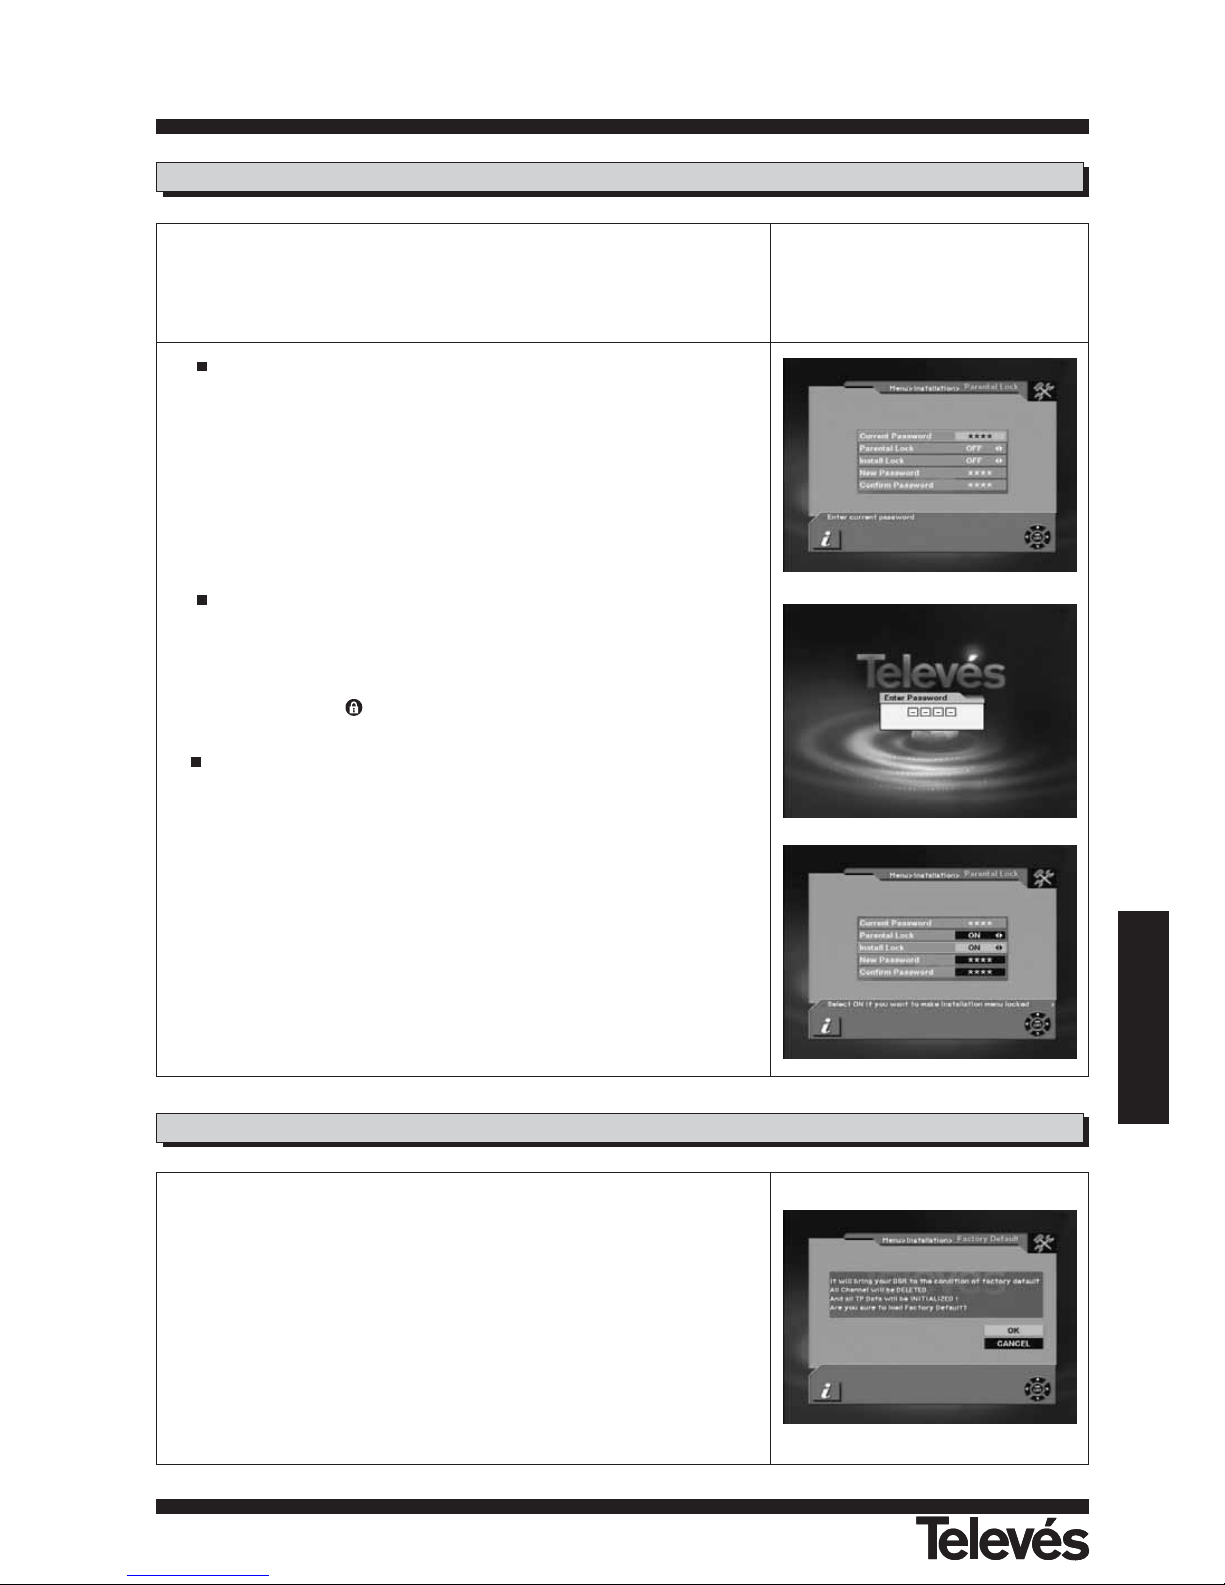
This function allows you to lock the channel with a password in order to
prevent children from accessing the channel.
You can also protect your installed data and information using the Install
Lock.
How to change the Password
1.- Enter the current password.
2.- Select ON of Parental Lock.
3.- Enter new password.
4.- Confirm your new password entering new password again.
Note: Default password is 0000.
Warning: Once you change the password, please keep it safely.
How to use Parent Lock
1.- To activate parent lock function, go to the TV channel Manager Page.
2.- Press Lock key (Blue color key) on the RCU.
3.- Select the channel which you want to Lock.
4.- Press OK then symbol is displayed.
How to use Install Lock Enter the current password.
1.- Enter the current password
2.- Select ON of Install Lock
3.- Exit this Menu.
5.- Select any Menu and press OK on the RCU .
6.- Then the Enter Password box will be displayed.
7.- Unless you enter the correct password, you can not run any Menú.
Note: Default password is 0000
Warning: Do not forget your password
If you want to bring DTR 7288 back to the factory default condition, select
Factory Default and press the OK key.
Then a warning message will be displayed.
To confirm, select OK.
Warning: On selecting factory default you will lose all of data and
information, which was previously installed.
6.3.- Parental Lock
6.4.- Factory Default
Page 36
User manual
“DTR-7288
”
36
If you want to select channel, use key on the front panel or PR+, PR-
key on the RCU or numeric keys.
In addition to the above normal function, DTR 7288 provides more
convenient channel change function.
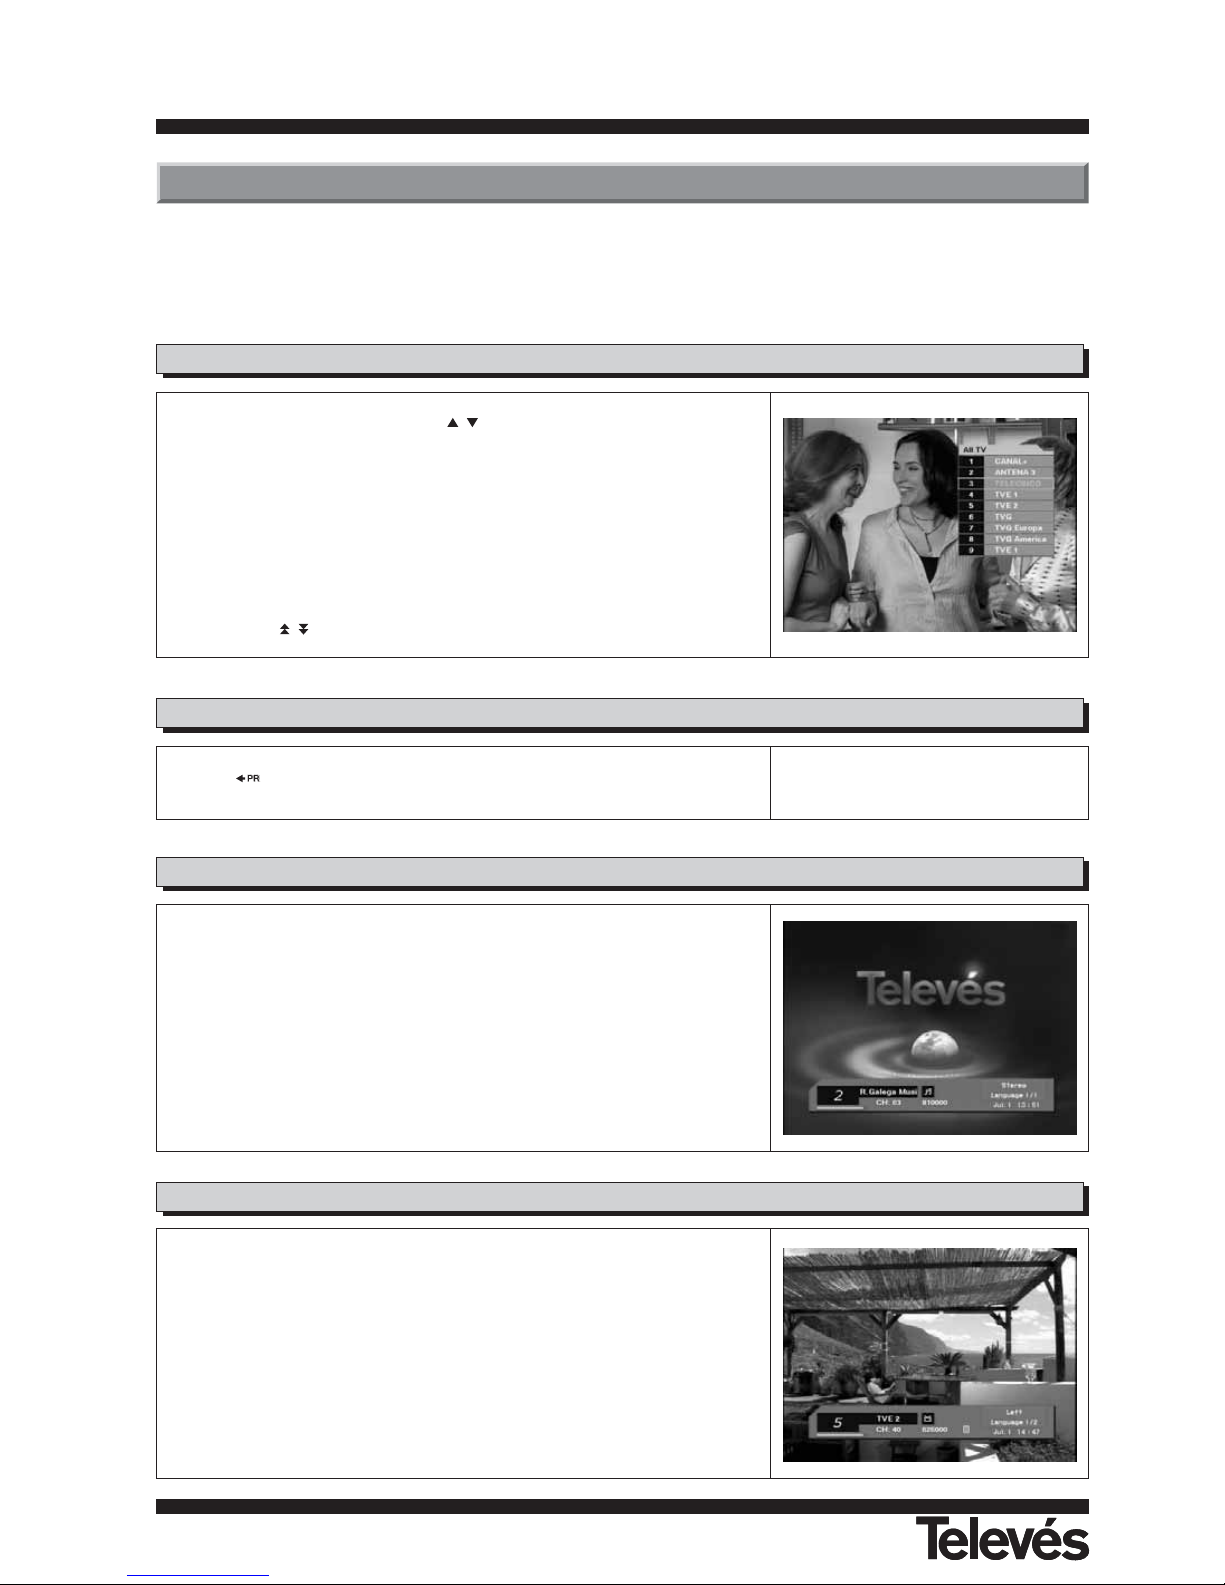
While watching, press OK key on the RCU. A channel list will be displayed
on the right side of the screen. If you press EXIT key, the channel list will
disappear.
To select a channel, go up or down this channel list and place the cursor on
a desired channel. Then, press OK key to watch the selected channel.
If you press key on the RCU, the channel list will scroll page by page.
7.1.- Select Channel
Press key on the RCU to move to the previous channel you watched.
7.2.- Previous Channel Recall
While viewing a TV channel, press the TV/RADIO key on the RCU to toggle
between TV and Radio modes.
7.3.- TV & Radio Mode
7.- General Viewing Function
The following describes the basic functions of your DTR 7288 while watching terrestrial TV or listening to terrestrial radio.
While watching, the current channel information will be shown on the screen if you press the INFO button on the RCU.
The TV/AV key on the RCU lets you change the mode from terrestrial to TV
or VCR.
- Press once to move to the TV mode.
- Press twice to move to VCR mode.
- Press three times to move back to terrestrial mode.
7.4.- TV & VCR Mode
Page 37
User manual
“DTR-7288
”
37
ENGLISH
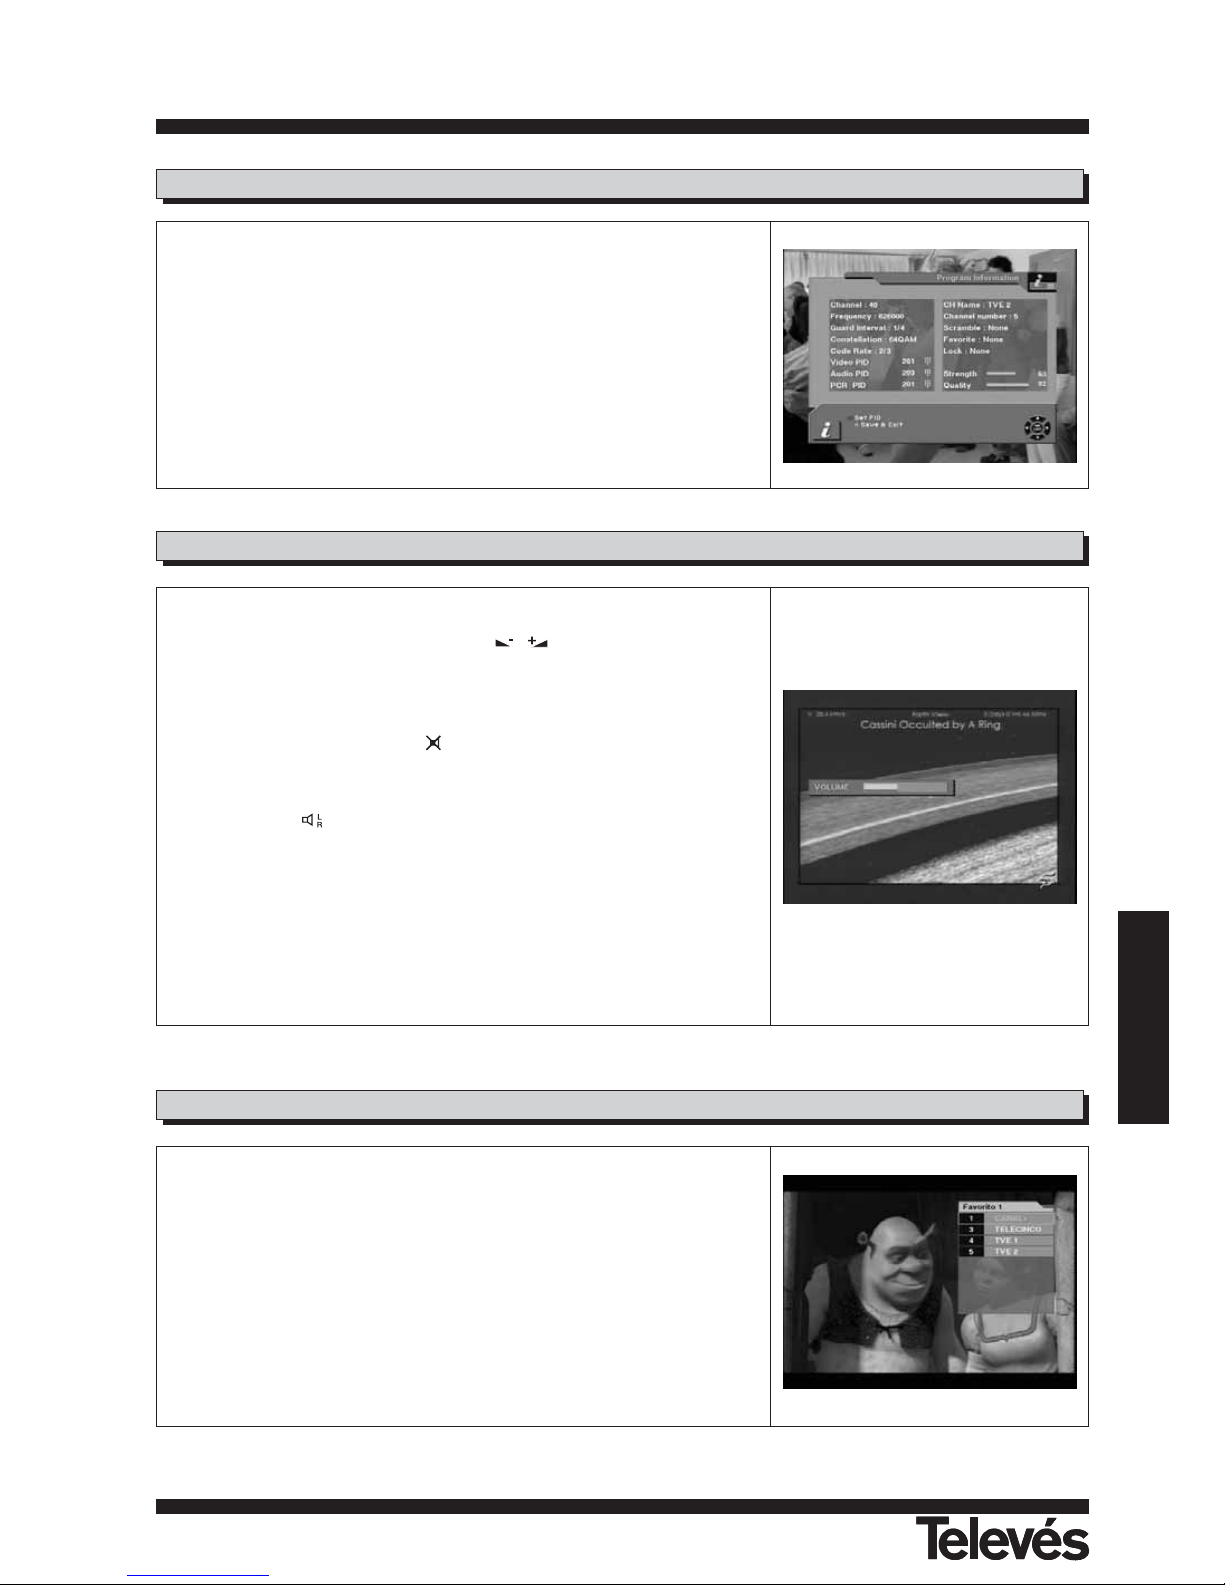
Every time you change channels, you will receive program information for a
few seconds.
While watching the channel you can see the current channel information at
anytime by pressing the INFO key on the RCU.
7.5.- Channel Information
1.- Volume Control
- To increase or decrease volume, use Key on the RCU.
Note: DTR 7288 has 18 volume levels and this can be controlled from the
volume level of your TV.
2.- Mute
- To mute the sound, press button on the RCU. To bring back the
normal sound, press this key once again.
3.- Audio Control
- Press the key repeatedly to select one of three possible Audio
settings (Left, Right and Stereo)
- The current audio setting will be displayed in the channel information
4.- Language Selection
- Press the AUDIO key on the RCU repeatedly to select audio language.
This is dependent on the transmission of audio signal.
7.6.- Volume & Audio Control
To create a favorite group list press FAV key on the RCU.
You can access the next favorite group when you press FAV key again.
The method to group favorite channels is explained in the Favorite Channel
(See paragraph 8.2.- Favorite channel).
7.7.- Favourite List
Page 38
User manual
“DTR-7288
”
38
8.2.- Favorite Channel
8.1.- Channel Manager
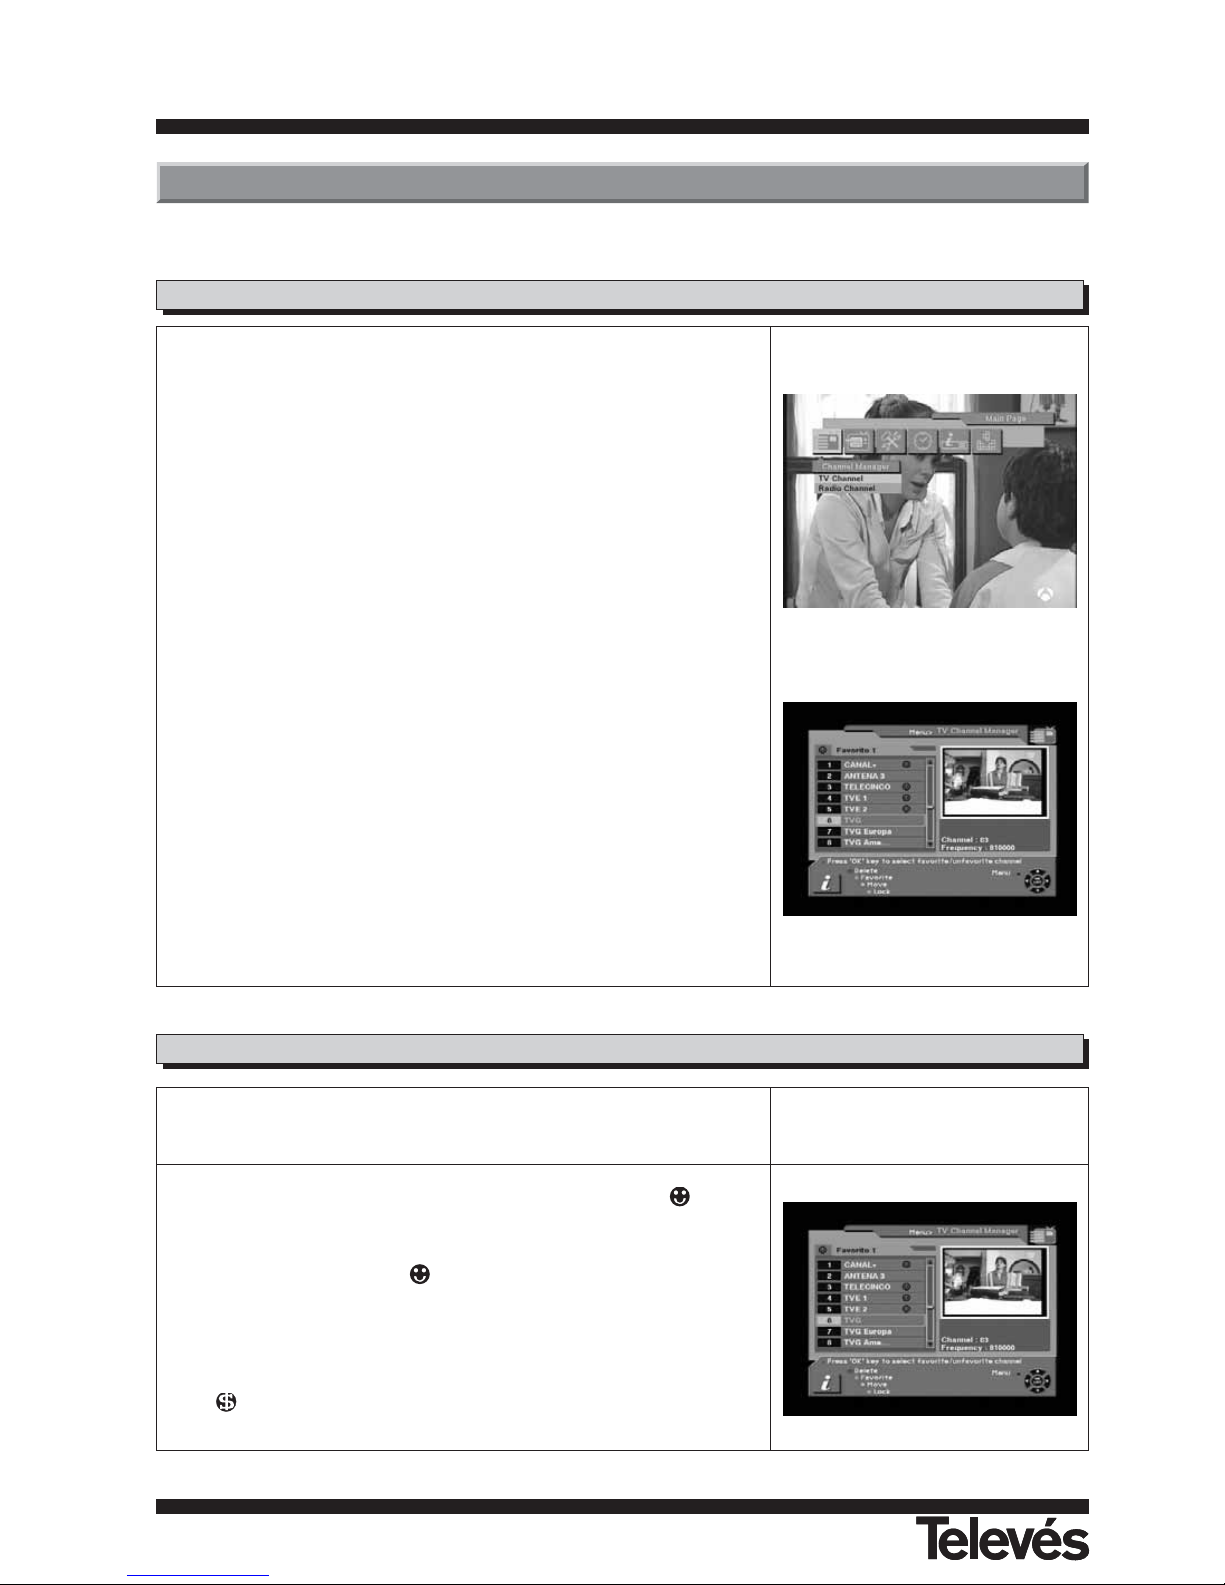
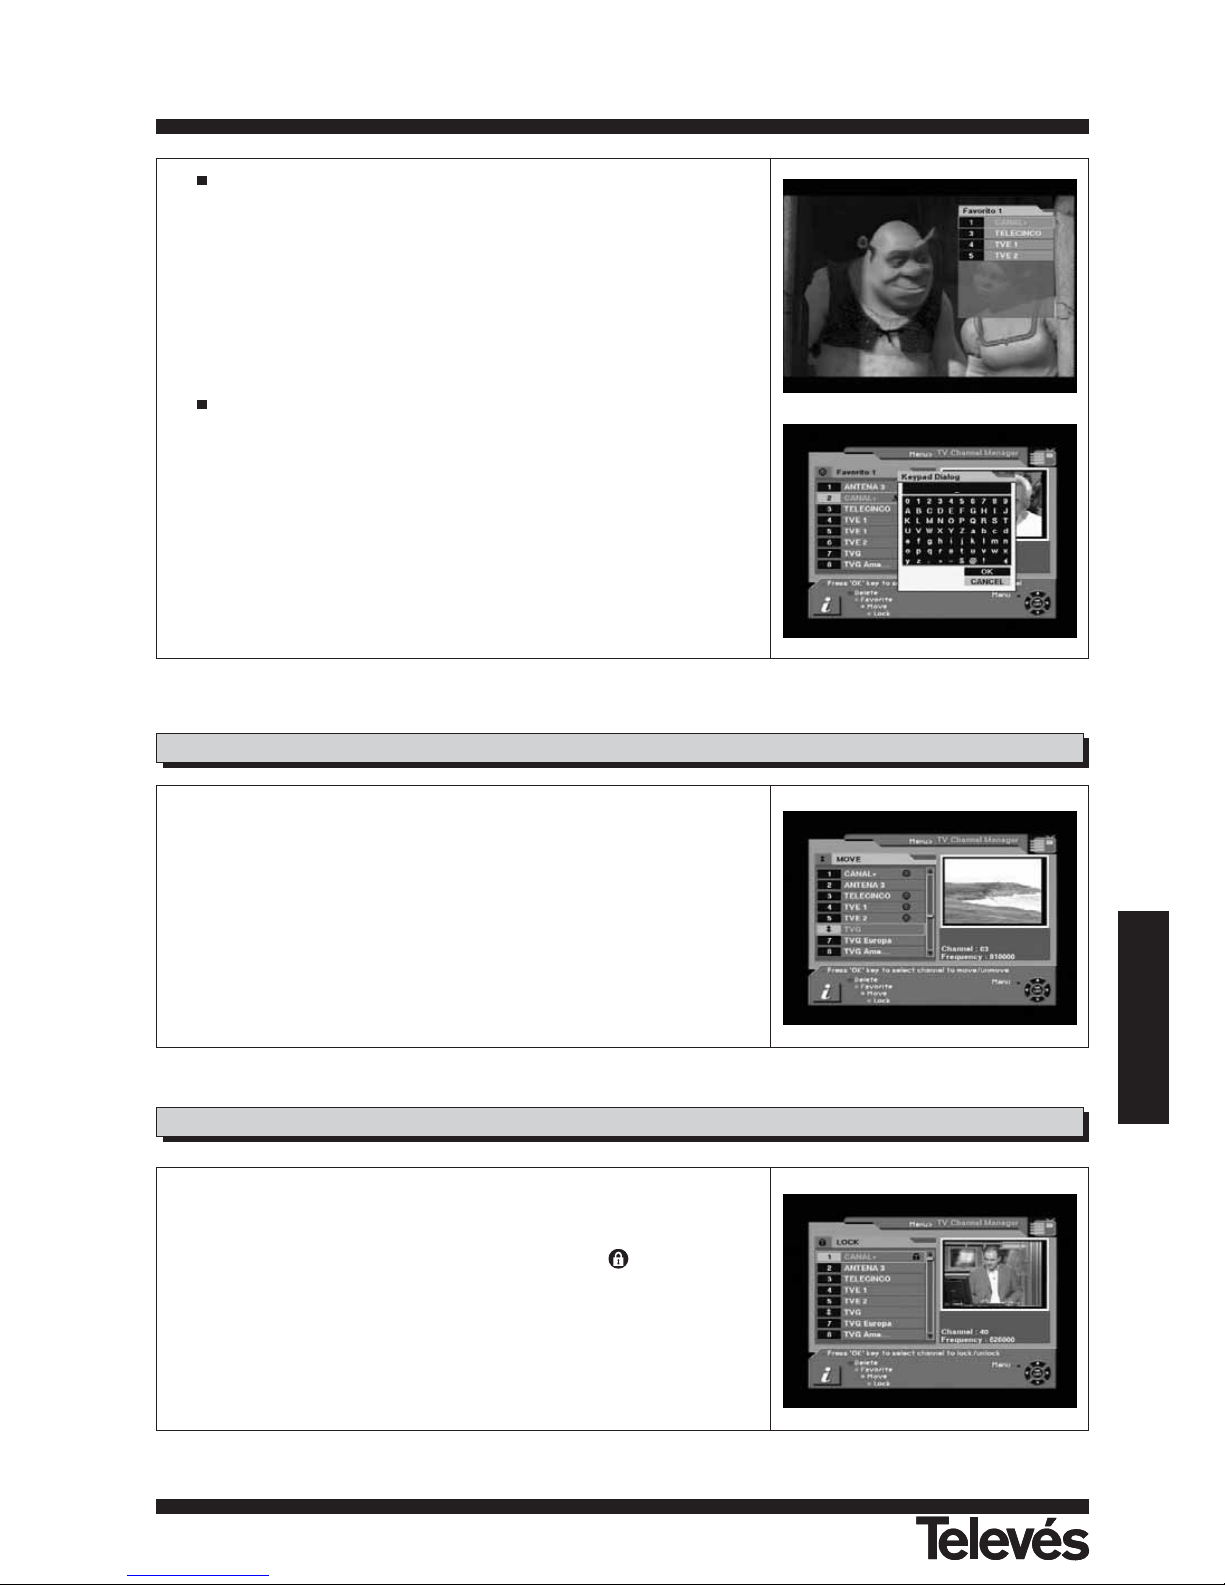
When you select channel manager, default favorite list will be shown on
screen as Favorite 1.
- Select your favorite channel and then press OK key. Then will be
marked next to your selected channel name.
- If you want to remove the channel name from the favorite channel list, press
OK key once again, then the mark will disappear.
- After the selection of favorite channels press EXIT key twice to save data
and press FAV key repeatedly to see if each of the favorite groups are
properly selected.
- Represents scrambled channel
8.- Channel Manager
Channel manager consists of TV channel and Radio channel.
Warning: The functions "Move" and "Sort" are only available when the
option "Logical Channel Number (LCN)" is disabled.
Note: Since the usage of Radio Channel is same as that of TV channel, in
this manual only TV Channel manager is explained.
On the left side of the TV channel Menú, you can see the channel list.
On the right side, you can watch the current channel in small Picture in
Graphic (PIG) mode (1/9 size of the normal mode).
You can also see channel information under the PIG screen.
When you move the cursor from one channel to another, the PIG will
change accordingly.
You can use those color keys on the RCU as below.
1.- Delete mode (Red key)
2.- Favorite mode (Green key)
3.- Move mode (Yellow key)
4.- Lock mode (Blue key)
Pressing the Menú key on the RCU will display the command Menú.
TV channel manager has 3 commands as shown below;
1.- Rename Favorite group
2.- Rename
3.- Sort
This function not only allows you to watch channels but also do a lot of interesting and useful things.
Page 39
User manual
“DTR-7288
”
39
ENGLISH
How to make a favorite group
1.- When you enter channel manager, the default favorite group will be
shown once on the screen as Favorite 1.
2.- If you press FAV key (Green color key) on the RCU, a new favorite group
will be created as Favorite 2.
How to edit the name of a Favorite group
1.- In the favorite mode, press MENU key on the RCU then the command
box will be displayed on the screen.
2.- Select "Rename Favorite group" in the command box.
3.- You can edit the name by using the keypad.
8.4.- Lock Channel
In the TV channel manager page, press Lock key (blue color key) on the RCU.
This Lock command allows you to lock the channel. First select the channel,
which you want to lock, and press OK key. Then this will be marked
beside the selected channel name.
Note: To perform this function, you should set up the Parental Lock in
advance.
8.3.- Move Channel
Warning: This function is only available when the option "Logical Channel
Number (LCN)" is disabled.
In the TV channel manager page, press Move key (Yellow color key) on the
RCU.
Select a channel by pressing OK key and move the cursor to the location
where you want to move the selected channel and press OK key. Then, you
will find that the selected channel has moved to the desired location.
Check whether the channel number has changed on the channel list.
Page 40
User manual
“DTR-7288
”
40
8.7.- Sort Channel
Warning: This function is only available when the option "Logical Channel
Number (LCN)" is disabled.
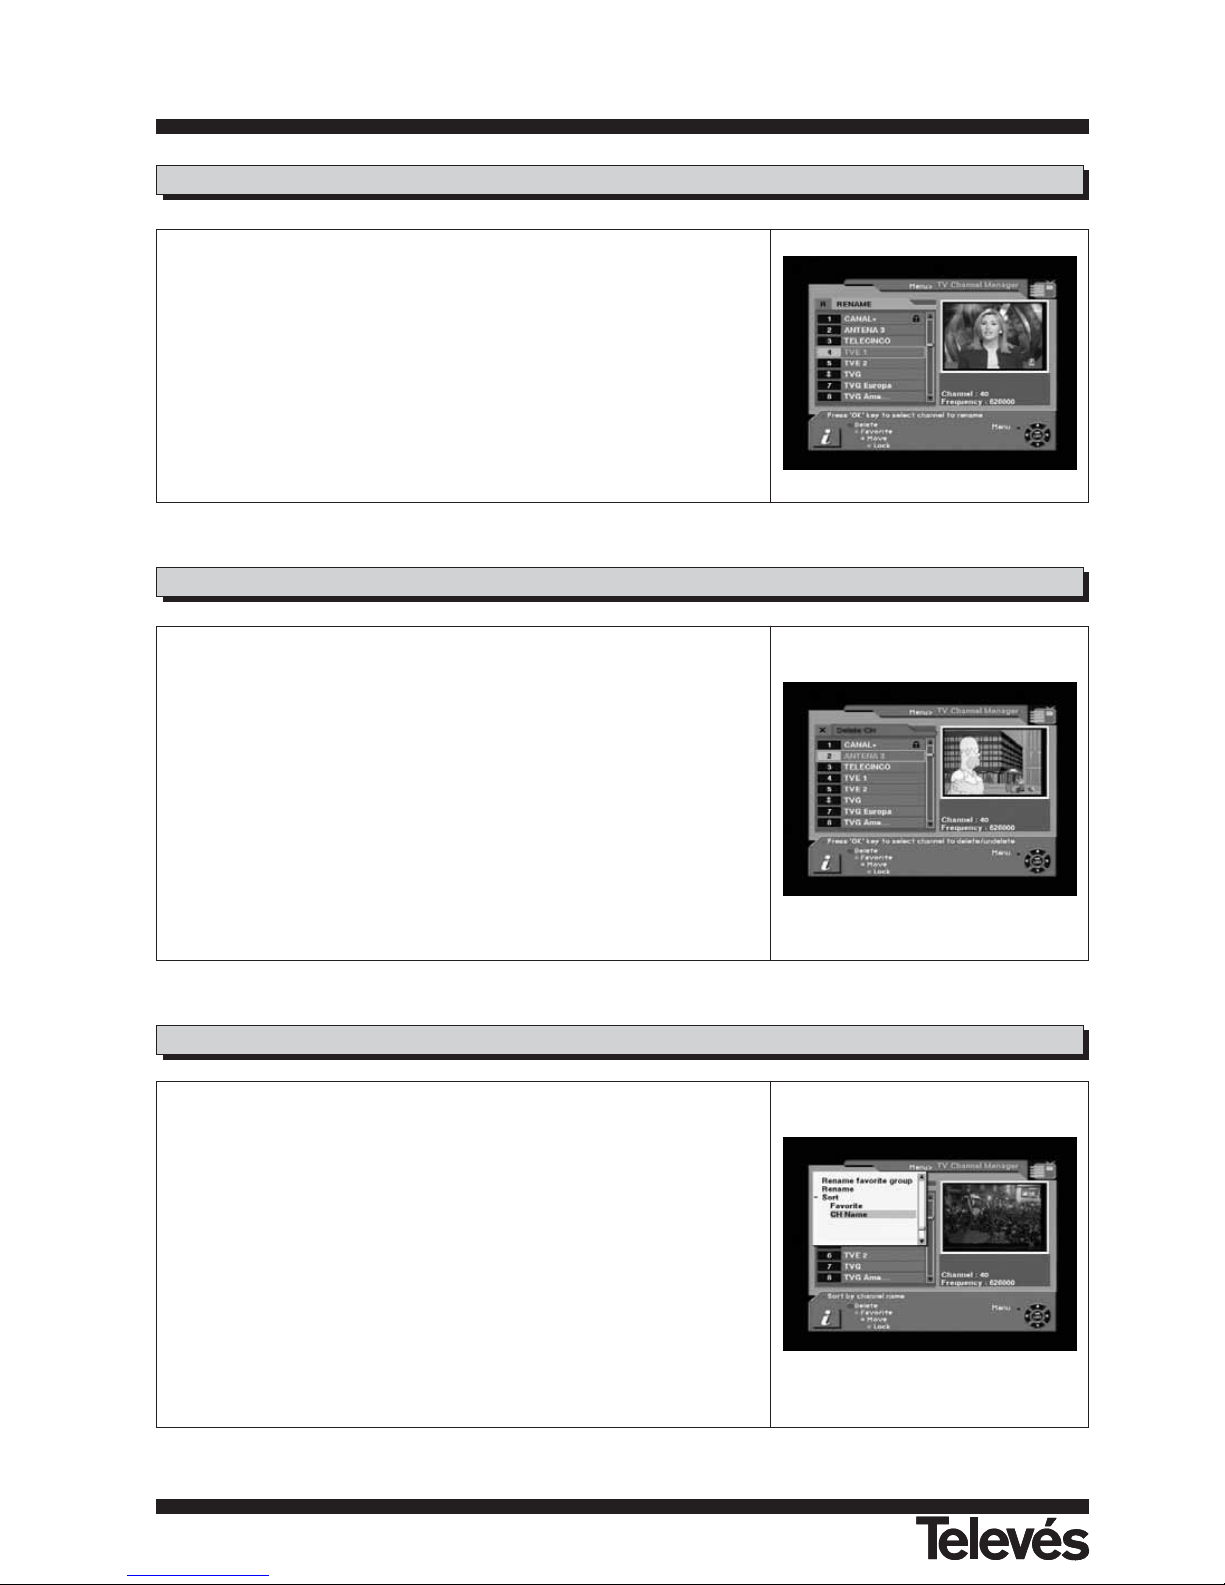
In the Main Page, press MENU key on the RCU, and select Sort on the
command Menú.
This Sort Menú has a sub command and it allows you to sort the channels, as
you like.
You can sort the channels by Favorite and CH name. Place the cursor on the
desired line, and then press OK key.
Check whether the channels are sorted properly on the channel list.
Note: Radio Channel Manager has the same operation as TV channel
Manager.
8.6.- Delete Channel
In the Channel manager, you can enter Delete mode, if you press Delete key
(Red color key) on the RCU. Then, if you press Delete key (Red color key)
repeatedly, the mode will cycle through Delete channel carrier -> Delete All ->
Delete single CH.
This Delete command allows you to delete the channel permanently. First
select the channels, which you want to delete; the selected channel number
will be marked to "X". If you cancel the selection, press OK key again, then
the marked number will be back.
If you decide to delete, press EXIT key and then press OK to delete.
Check whether the channel number is deleted on channel list.
Warning: The deleted channel cannot be recovered unless you search again.
8.5.- Rename Channel
In the Main Page, press MENU key on the RCU, and then select Rename on
the command Menú.
This Rename command allows you to rename the channel. First select the
channel to be renamed and press OK key, then a Keypad dialog box will be
displayed. Enter the desired name.
Check whether the channel name is changed on the channel list.
Page 41
User manual
“DTR-7288
”
41
ENGLISH
Usually you get the information real time from the satellite automatically but
sometimes they transmit wrong information. In that case, you can adjust the
real time using this function.
You can adjust the real time as well as you can program the timer in various ways.
Timer can be activated by "Turn ON" and/or "Turn OFF" Option.
- Timer allows you to program the various timer functions.
- You can set the timer daily, weekly, monthly or once
10.- Timer
9.- EPG (Electronic Program Guide)
DTR 7288 provides EPG function for you to get access to the TV Guide (or
Radio Guide if you are listening to radio channels) that will show the titles and
other information of the current and next programs on different channels. The
information is only available from the network to which the channel you are
watching.
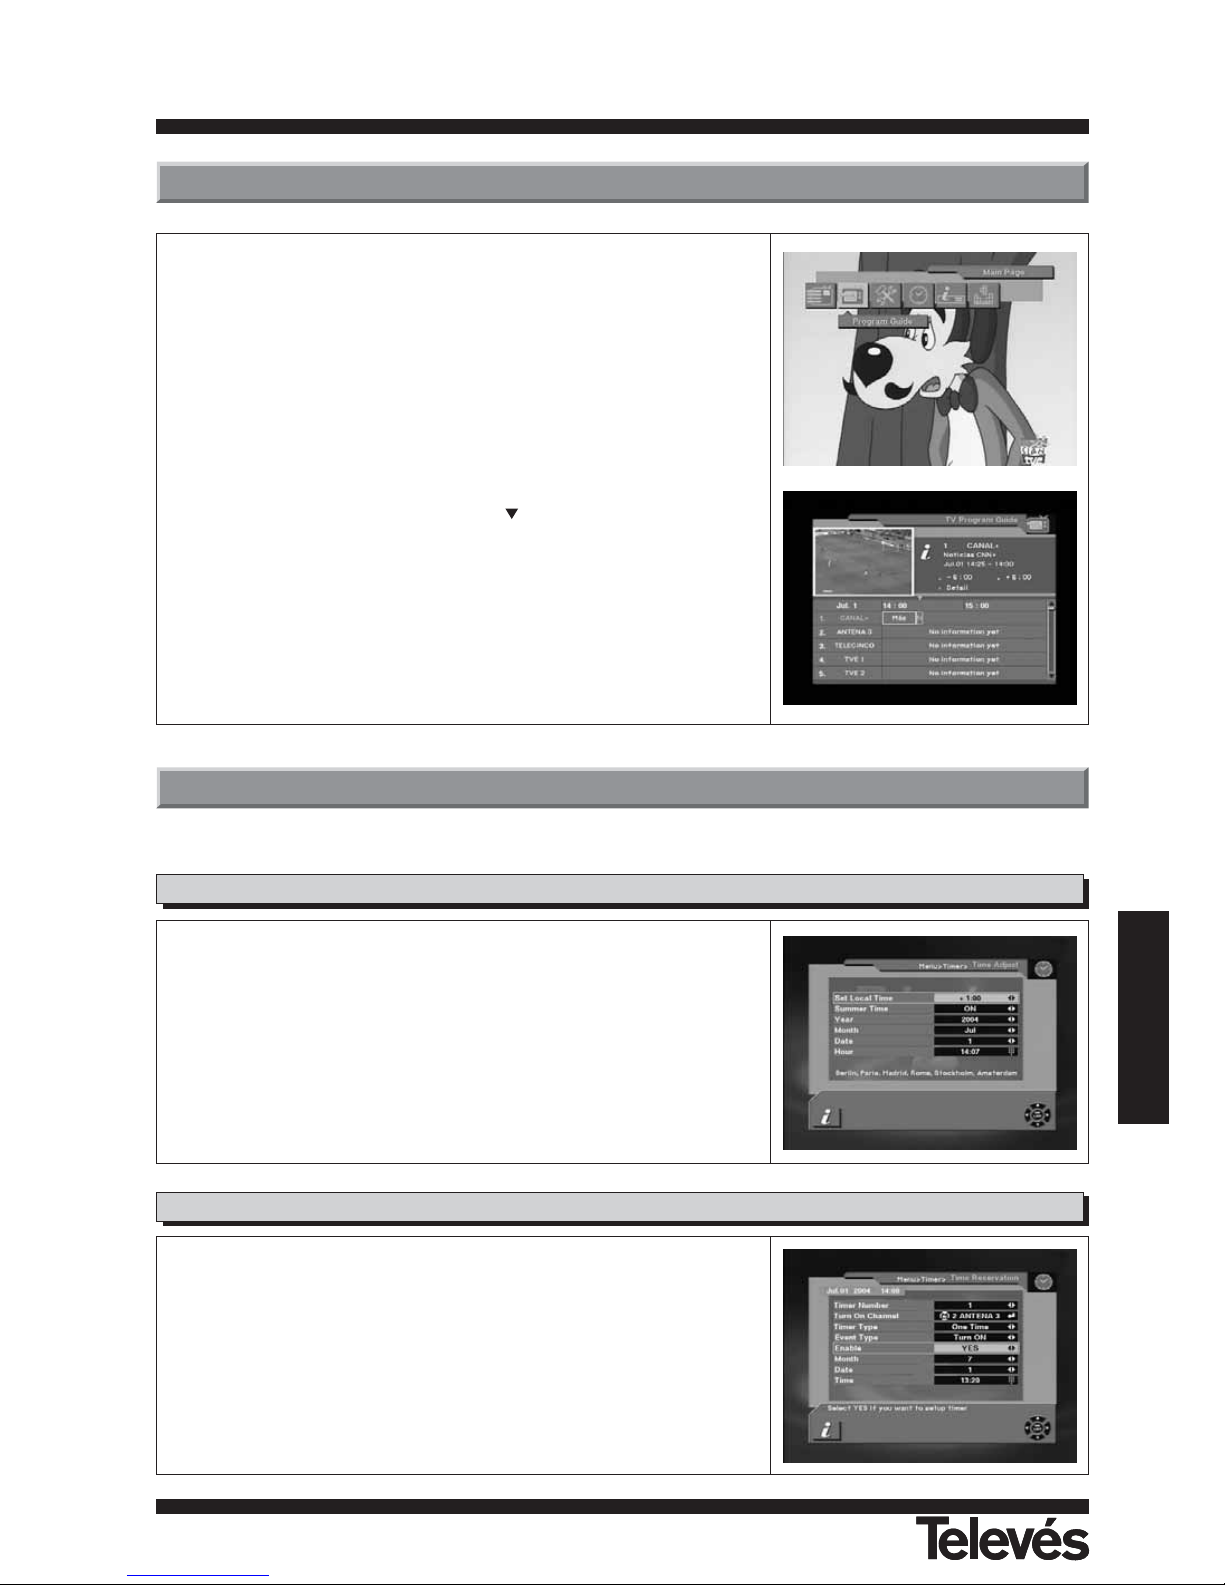
To see the EPG data, press EPG key on your RCU when watching a channel
or select Program Guide in the Main Page.
The EPG box will be displayed.
You can see the channel in the PIG screen; channel list on the left side and
Program schedule for selected channel will be displayed on the right side. The
time related to the program schedule is also displayed.
Select one channel and placing the mark on the time of Program name
which detail information you want to know. Then you can see blue button, if
there is detail information of the channel. Press Detail (Blue color key) key on
the RCU, for the detail information box to be displayed.
If you want to check the previous or next information of the channel, please
press +6:00 key (Yellow color key) or -6:00 key (Green color key) on the RCU.
Note: A 'No information yet" message will be shown if the selected channel
does not provide EPG data.
10.1.- Time Adjust
10.2.- Time Reservation
Page 42
User manual
“DTR-7288
”
42
11.- Games
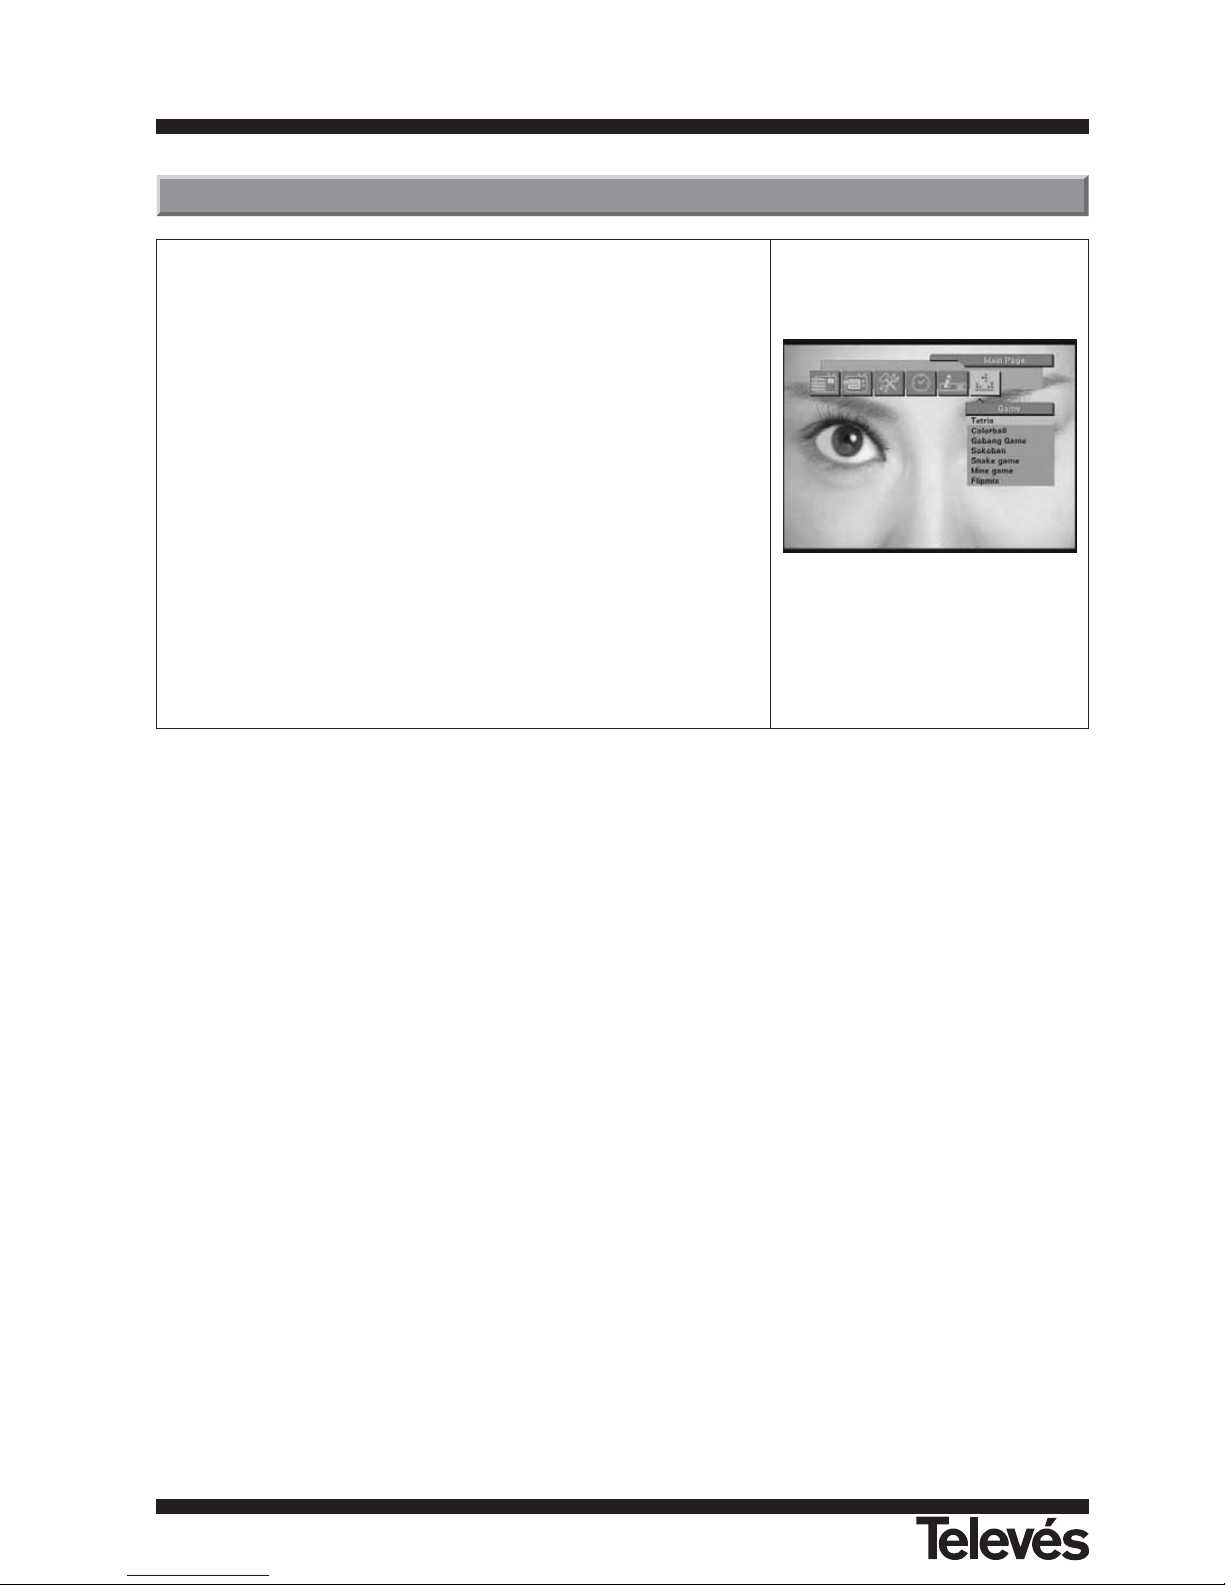
Through this menu you can choose any of the 7 games available.
- Tetris
- Colorball
- Gobang Game
- Sokoban
- Snake Game
- Mine Game
- Flipmix
Choose one of the games by pressing PR+, PR- and then OK.
To play follow the instructions that appear on the screen.
To quit the game just press EXIT.
Page 43
User manual
“DTR-7288
”
43
ENGLISH
PIN TV VCR
1 Audio Out Right Audio Out Right
2 N/C Audio In Right
3 Audio Out Left Audio Out Left
4 Audio ground Audio ground
5 Blue Ground Blue Ground
6 N/C Audio In Left
7 Blue Out Blue In
8 Function Control Out Function Control In
9 Green Ground Green Ground
10 N/C N/C
11 Green Out Green In
12 N/C N/C
13 Red Ground Red Ground
14 Fast Blanking Ground Fast Blanking Ground
15 Red Out Red In
16 Fast Blanking Out Fast Blanking In
17 CVBS ground CVBS ground
18 CVBS ground CVBS ground
19 CVBS Out CVBS Out
20 N/C CVBS In
21 Ground Ground
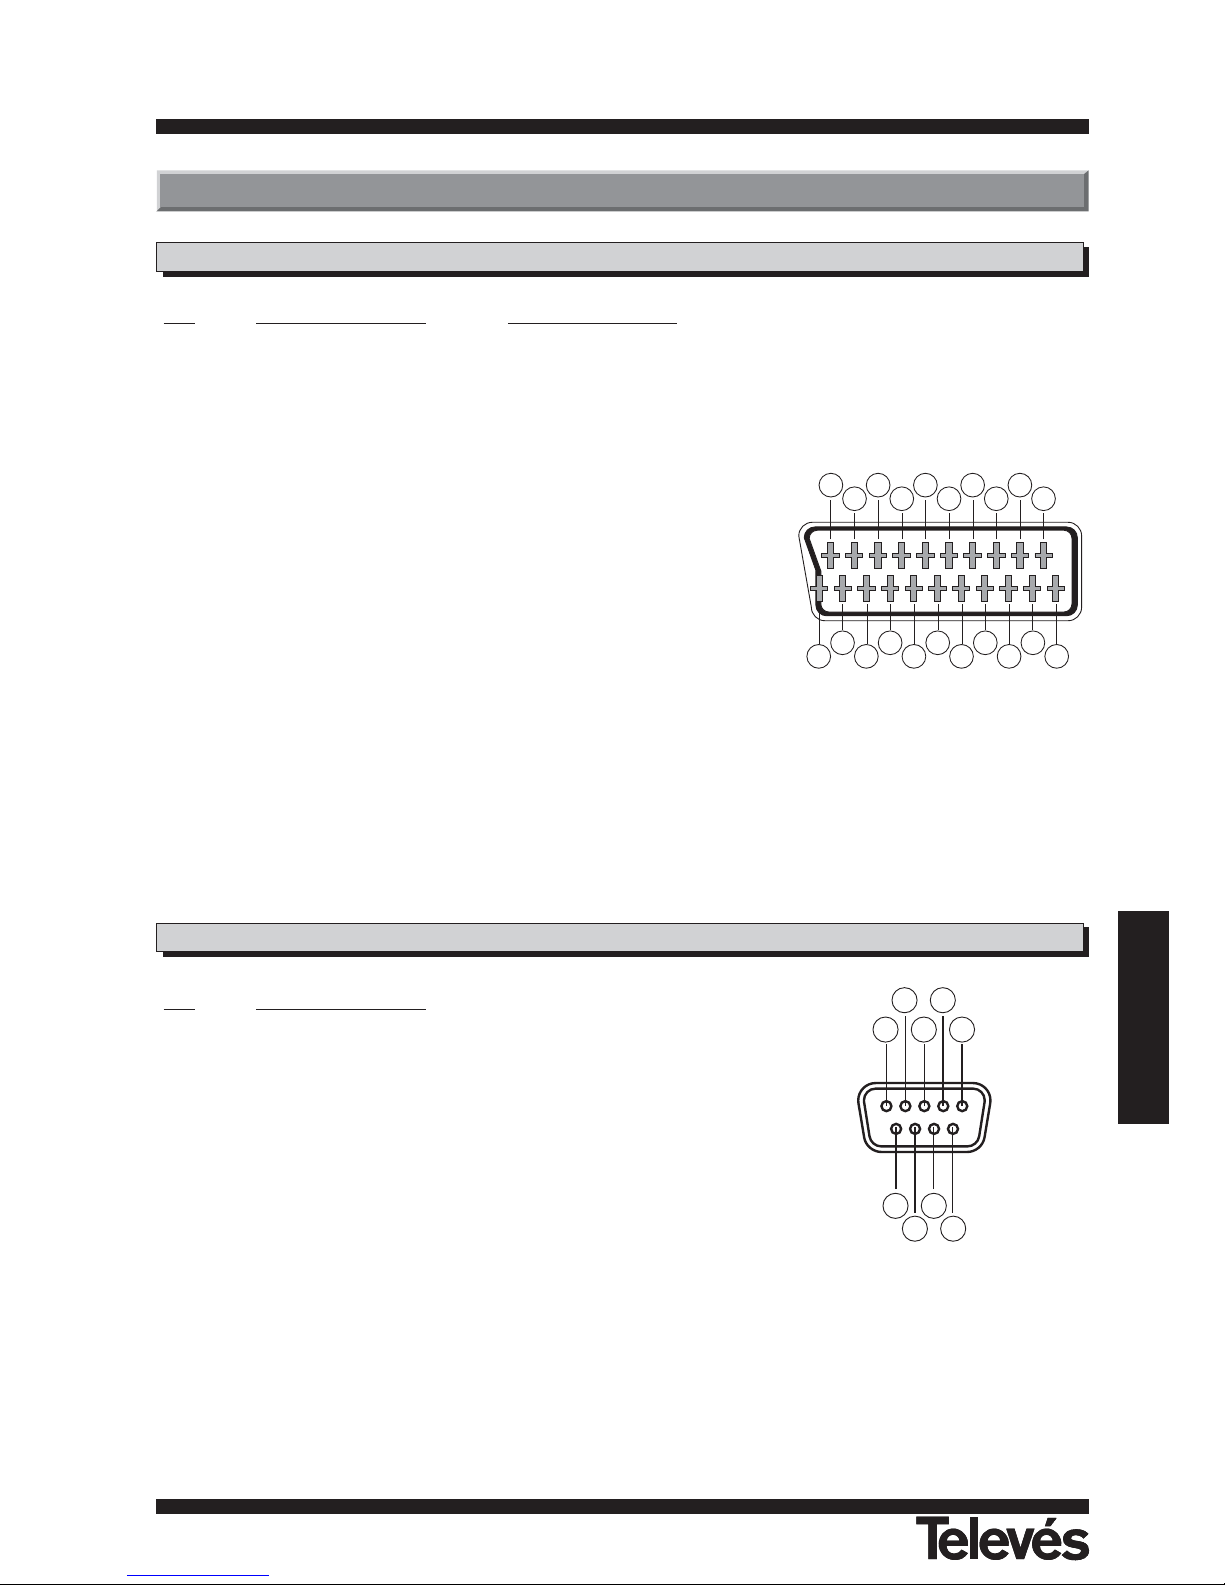
PIN Description
1 N/C
2 RXD (Receive Data)
3 TXD (Transmit Data)
4 N/C
5 Ground
6 N/C
7 N/C
8 N/C
9 N/C
201816
14
12
1086
4
2
1
3
5
7
9
11
13
15
17
19
21
1 3 5
2 4
6 8
7 9
Connectors PIN designations
SCART connectors
RS 232
Page 44
User manual
“DTR-7288
”
44
Here you can find a brief and simple explanation of some of the terms used in this User Manual.
• DVB : Digital Video Broadcasting.
Consortium of different international organisms and companies with the common aim of creating
global standards geared towards the development of digital television.
• EPG : Electronic Programme Guide.
Guide that provides the user with the list of programmes that will be shown in each channel, their times
and some information on their subject matter.
• Fast Blank : Signal sent by the SCART that controls the status of the TV’s RGB.
• FTA : (Free To Air) Free channels, in other words, not scrambled
• Letter Box : One of the ways of displaying the programmes that are transmitted in 16:9 format on 4:3 television
screens.
Two black bands appear on the top and bottom of the screen to create a window with the ratio that is
needed.
• MPEG 2 : Family of digital audio/video compression standards used by the DVB.
• OSD : OnScreen Display.
System that shows the onscreen menus.
• VCR : Video Cassette Recorder.
Glossary of terms
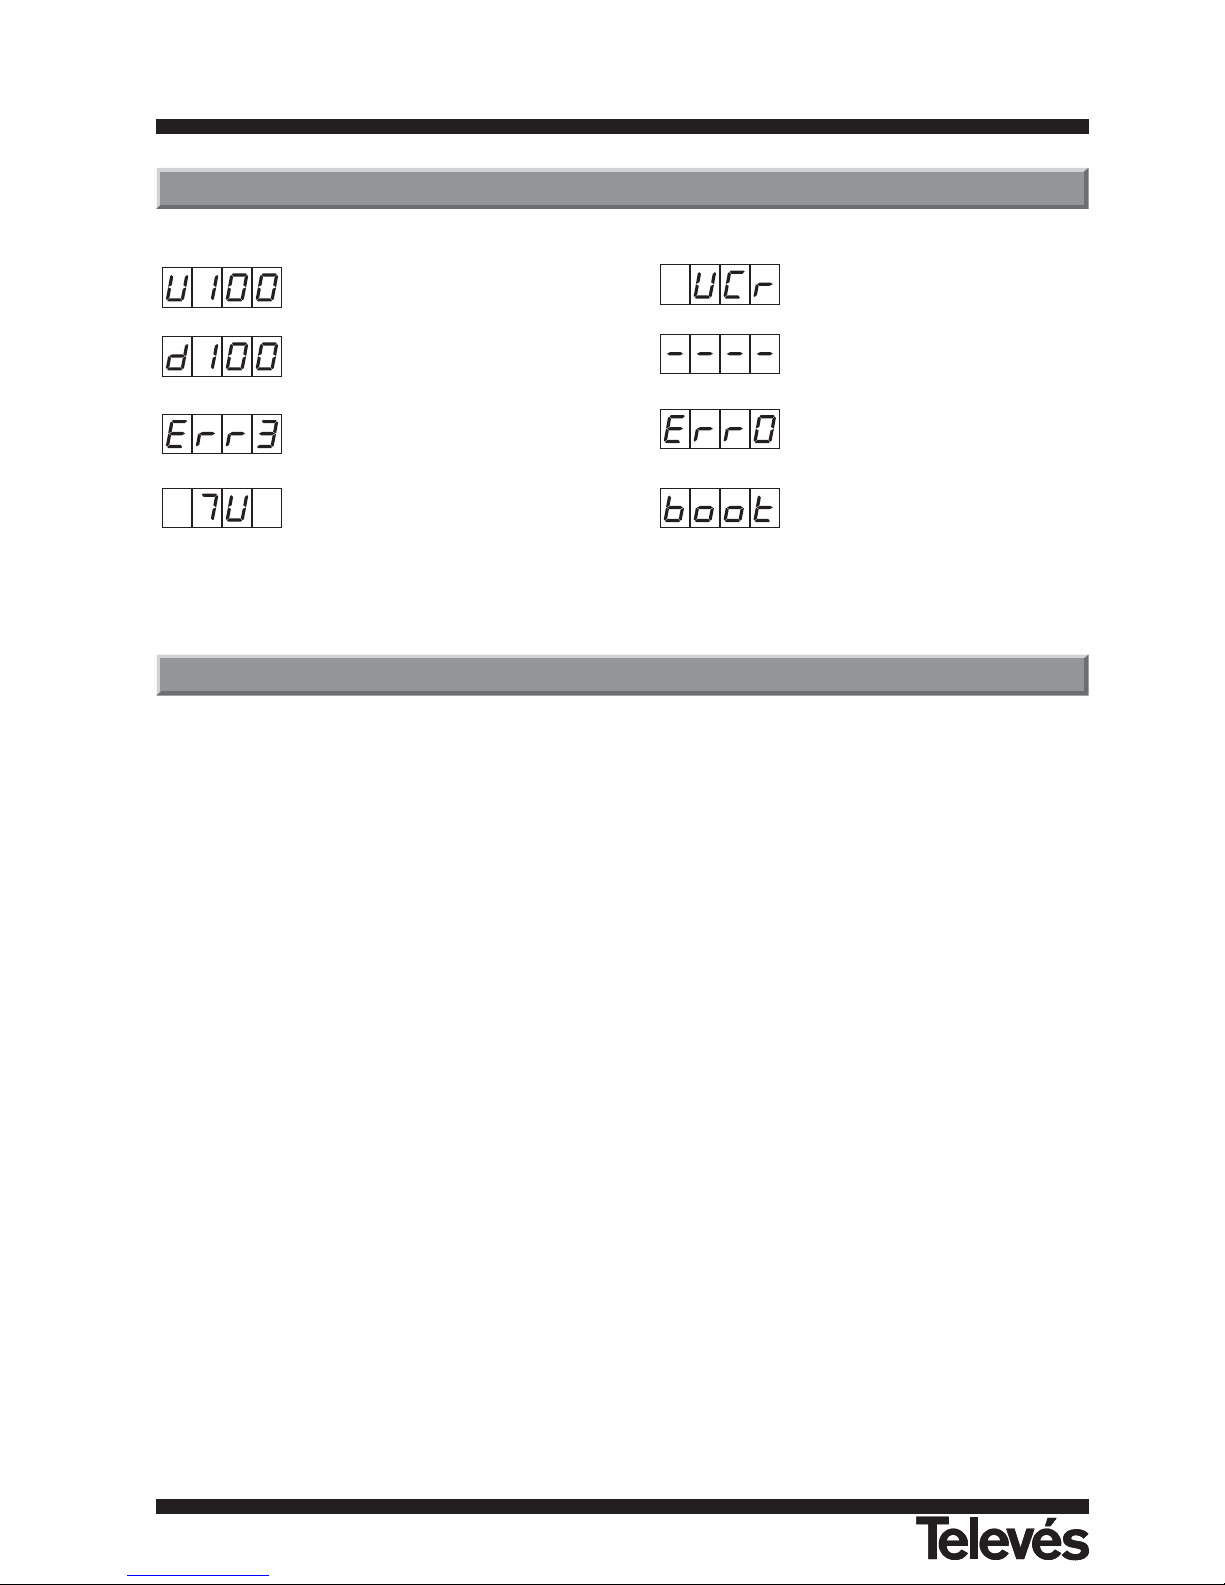
Front Panel Display
UP LOAD PROCEDURE
DOWN LOAD PROCEDURE
ERROR IN DATA TRANSMITTING
TV MODE
VCR MODE
SYSTEM WAITTING
FLASH ROM ERROR
SYSTEM BOOTING
Page 45

User manual
“DTR-7288
”
45
ENGLISH
Technical specifications
1. Tuner & channel
Input Connector 1 x IEC (female)
Output Connector 1 x IEC (male)
Input frequency 47 to 68 MHz, 174 to 230 MHz and 470 to 860 MHz
Input/output frequency 47 to 860 MHz
Signal Level -75 a -20 dBmV
Input Impedance 75 Ohm
Bandwidth (UHF) 8 MHz
Bandwidth (VHF) 7 or 8 MHz
Wave form COFDM
Transmission mode 2K FFT, 8K FFT
Constellations 16QAM, 64QAM
Code rate 1/2, 2/3, 3/4, 5/6, 7/8
Guards intervals 1/4, 1/8, 1/16, 1/32
2. Digital Video
MPEG-2 compatible
Profile & level MPEG-2 MP @ ML
Video bit rate 60 Mbps
Aspect ratio 4:3, 16:9
3. Digital Audio
MPEG-1/2 Audio layer 1, 2
Audio mode Mono, Dual, Joint Stereo, Stereo for digital
Frequency response 20 Hz ~ 20 KHz
Sampling rate 32, 44.1, and 48 KHz
4. Memory
Flash memory 2 Mbytes
RAM memory 8 Mbytes
5. A/V & data in/out
SCART TV x 1, VCR x 1
RGB video out TV x 1 (SCART socket)
CVBS video out 2 x SCART socket (TV, VCR)
Analog audio out RCA x 2 (L-CH x 1, R-CH x 1)
2 x SCART socket (TV, VCR)
Digital audio out S/PDIF x 1
Data interface RS232C, 9Pin SUB-D
6. Power supply
Input voltage AC 90 - 240 V, 50 Hz
Type Conmut.
Power consumption 19W Max.
7. Physical specification
Size (W x H x D) 260 mm x 45 mm x 165 mm
Weight about 1 Kg
8. Environment
Operating temperature 0 °C ... +45°C
Storage temperature -10 °C ... +50 °C
Page 46
User manual
“DTR-7288
”
46
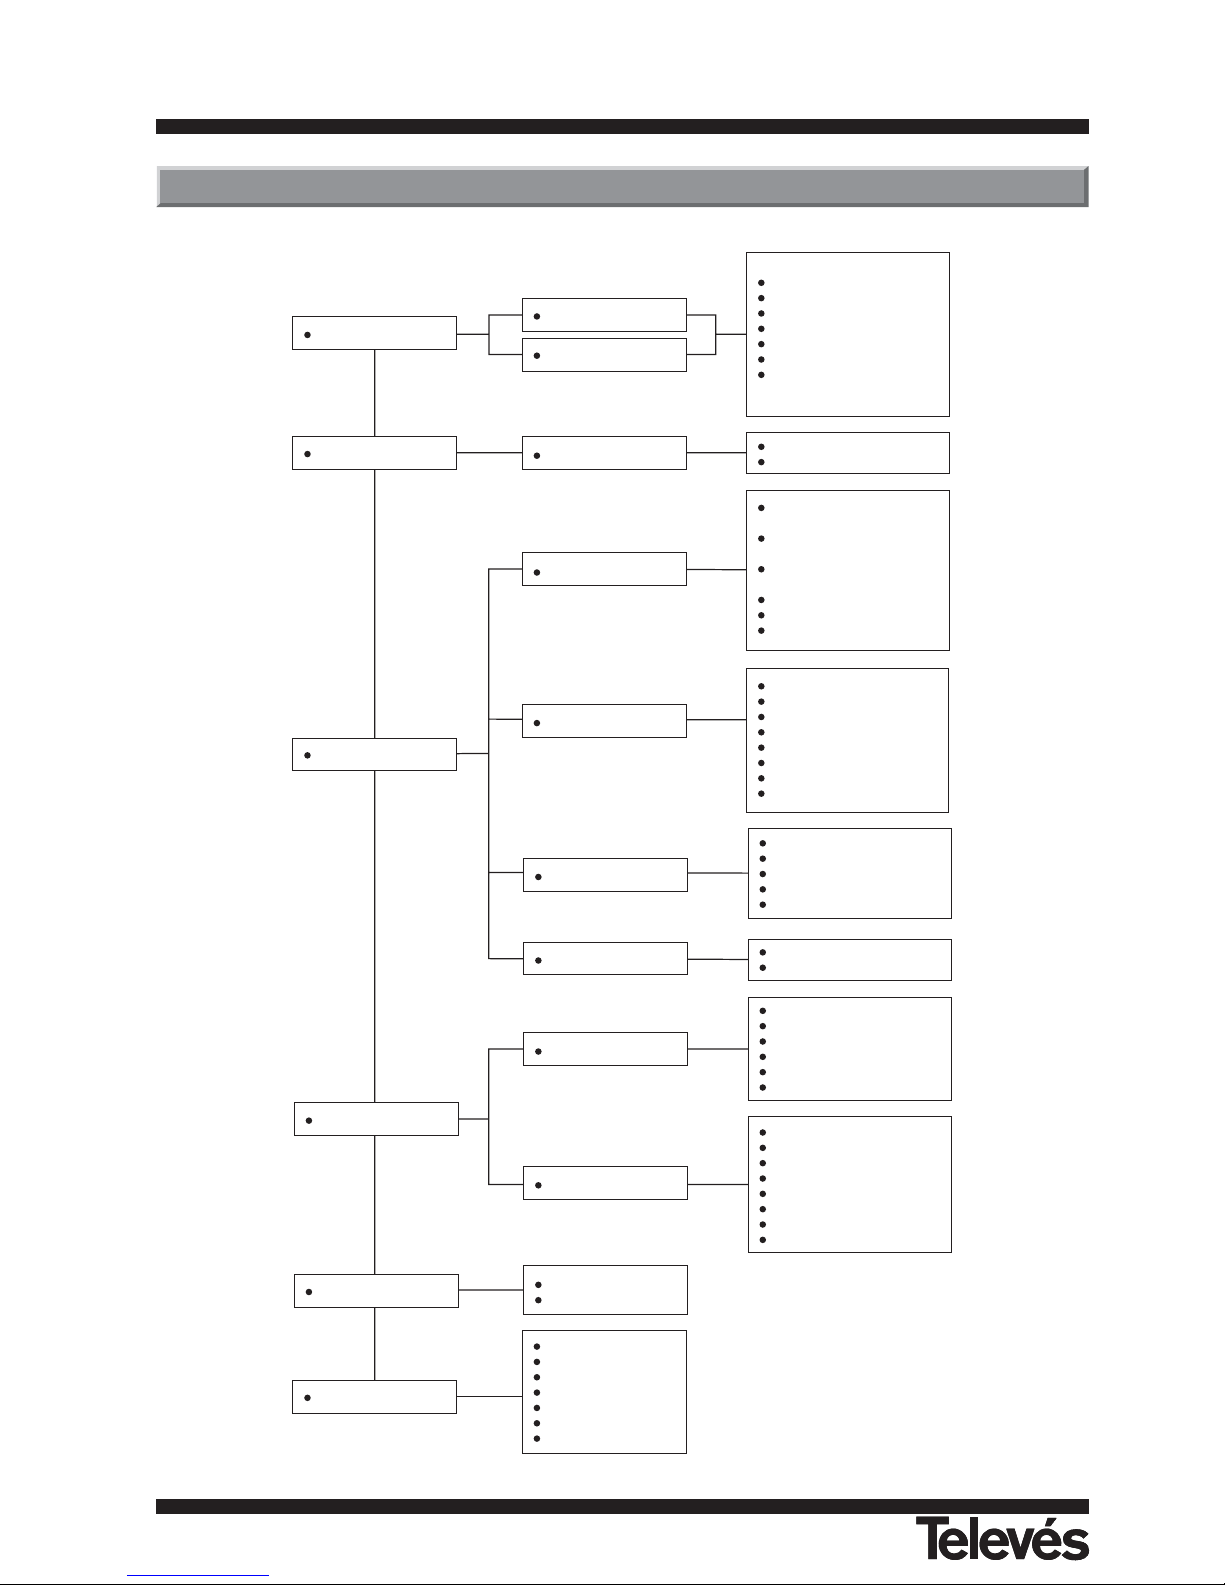
Menu Tree of DRT 7288
Channel Manager
Program Guide
User Installation
Timer
Receiver Information
TV Channel
Radio Channel
Program Guide
Channel Search
System Settings
Parental Lock
Factory Default
Time Adjust
Time Reservation
S/W version
H/W version
TV Channel / Radio Channel
Delete
Favorite
Move
Lock
Rename favorite group
Rename
Sort
- Favorite
- Channel name
Auto Search
- Search Network
Manual Search
- Search Single Channel
Search All Channels
- Search FTA
Delete carrier
Edit mode
Set PID
+ 6:00
- 6:00
OSD Language
Audio Language
Menu Color
Screen Format
Video Output
Auto Start
LCN
VHF: 7 or 8 MHz
Current Password
Parental Lock
Install Lock
New Password
Confirm Password
OK
Cancel
Set Local Time
Summer Time
Year
Month
Day
Hour
Timer Number
Turn ON Channel
Timer Type
Event Type
Enable
Month
Day
Time
Games
Tetris
Colorball
Gobang Game
Sokoban
Snake Game
Mine Game
Flipmix
Page 47
“DTR-7288
”
Guarantee
Televés S.A. offers a two year guarantee, beginning from the date
of purchase for countries in the EU. For countries that are not part
of the EU, the legal guarantee that is in force at the time of
purchase is applied. Keep the purchase invoice to determine this
date.
During the guarantee period, Televés S.A. complies with the
guarantee by repairing or substituting the faulty equipment.
The harm produced by improper usage, wear and tear,
manipulation by a third party, catastrophes or any other cause
beyond the control of Televés S.A. is not included in the guarantee.
Garantie
Televés S.A. offre une garantie de deux ans calculée à partir de la
date d’achat pour les pays de l’U.E. Pour les pays non membres
de l’U.E., la garantie appliquée sera celle en vigueur du point de
vue légal au moment de la vente. Conservez votre facture d’achat
afin d’attester de cette date.
Pendant la période de garantie, Televés S.A. prend en charge les
avaries dues à un défaut du produit ou de fabrication. Televés
assume cette garantie en réparant ou en échangeant l’appareil
défectueux.
Ne sont pas couverts par la garantie les dommages provoqués par
une utilisation incorrecte, usure normale d’utilisation, manipulation
par des tiers, catastrophes ou toute cause hors du contrôle de
Televés S.A.
47
Traitement des appareils électriques et électroniques en fin de vie
(Applicable dans les pays de l'Union Européenne et aux autres pays européens disposant de systèmes de collecte sélective).
Ce symbole, apposé sur le produit ou sur son emballage, indique que ce produit ne doit ras être traité avec les déchets ménagers. Il doit
être remis à un point de collecte approprié pour le recyclage des équipements électriques et électroniques. En s'assurant que ce produit
est bien mis au rebus de manière appropriée, vous aiderez à prévenir les conséquences négatives potentielles pour l'environnement et la
santé humaine. Le recyclage des matériaux aidera à conserver les ressources naturelles. Pour toute information supplémentaire au sujet
du recyclage de ce produit, vous pouvez contacter votre municipalité, votre déchetterie ou le magasin où vous avez acheté le produit.
Disposal of Old Electrical & Electronic Equipment
(Applicable in the European Union and other European countries with separate collection systems).
This symbol on the product or on its packaging indicates that this product shall not be treated as household waste. Instead it shall be
handed over to the applicable collection point for the recycling of electrical and electronic equipment. By ensuring this product is
disposed of correctly, you will help prevent potential negative consequences for the environment and human health, which could
otherwise be caused by inappropriate waste handling of this product. The recycling of materials will help to conserve natural resources.
For more detailed information about recycling of this product, please contact your local city office, your household waste disposal service
or the shop where you purchased the product.
Page 48
VIGO
VALENCIA
OPORTO
LISBOA
MADRID
ZARAGOZA
MURCIA
MÁLAGA
SEVILLA
GIJÓN
LUGO
OURENSE
CANTABRIA
GUIPÚZCOA
LEÓN
BURGOS
ÁLAVA
NAVARRA
LA RIOJA
HUESCA
TARRAGONA
SEGOVIA
GUADALAJARA
ÁVILA
CUENCA
TOLEDO
CIUDAD REAL
TERUEL
CASTELLÓN
BADAJOZ
CÓRDOBA
HUELVA
CÁDIZ
JAÉN
GRANADA
ALMERÍA
ALBACETE
ALICANTE
SALAMANCA
PALENCIA
ZAMORA
VALLADOLID
GIRONA
PALMA DE
MALLORCA
BALEARES
CANARIAS
TENERIFE
LAS PALMAS
SUCURSALES
DELEGACIONES
FÁBRICAS
SORIA
CÁCERES
ZAMORA N
CEUTA
MELILLA
BILBAO
A CORUÑA
SANTIAGO
BARCELONA
ASTURIAS
Rúa B. de Conxo, 17
15706 SANTIAGO DE COMPOSTELA
Tel. 981 52 22 00 Fax 981 52 22 62
[email protected] www.televes.com
MADRID C.P. 28005
Paseo de los Pontones 11
Tfnos.: 91 474 52 21 /91 474 52 22
Fax: 91 474 54 21
[email protected]
MÁLAGA C.P. 29006
C/ La Boheme 55
Pol. Ind. Alameda 2
[email protected]
MURCIA C.P. 30010
Polígono Conver - C/ Rio Pliego 22
Tfnos.: 968 26 31 44 /968 26 31 77
Fax: 968 25 25 76
[email protected]
PALMA DE MALLORCA C.P.
07007
Ferrer de Pallares 45. bajo D.
Tfno.: 971 24 70 02
Fax: 971 24 53 42
[email protected]
PAMPLONA C.P. 31007
Avda. Sancho el Fuerte 5
Tfno.: 948 27 35 10
Fax: 948 17 41 49
[email protected]
SEVILLA C.P. 41008
Pol. Ind. Store - C/ A-6. Nave 5
Tfnos.: 95 443 64 50 /95 443 58 00
Fax: 95 443 96 93
[email protected]
A CORUÑA C.P. 15011
Gregorio Hernández 8.
Tfnos.: 981 27 47 31 /981 27 22 10
Fax: 981 27 16 11
[email protected]
ALMERÍA C.P. 04008
Campogrís 9.
Tfno.: 950 23 14 43
Fax: 950 23 14 43
[email protected]
BADAJOZ C.P. 06010
C/Jacobo Rodríguez,
Pereira, nº11-Oficina
Tfno.: 924 20 74 83
Móvil: 670 70 21 93
Fax: 924 20 01 15
[email protected]
BARCELONA C.P. 08940
C/ Sant Ferrán, 27
Cornellá - Barcelona
Tfnos.: 93 377 08 62 /93 474 29 50
Fax: 93 474 50 06
[email protected]
BILBAO C.P. 48150
Iberre kalea, módulo 16, pabellón 15-B
Sangroniz-Sondika
Tfnos.: 94 471 12 02 /94 471 24 78
Fax: 94 471 14 93
[email protected]
RReedd CCoommeerrcciiaall NNaacciioonnaall
RReedd CCoommeerrcciiaall IInntteerrnnaacciioonnaall
TELEVES ELECTRONICA PORTUGUESA
MAIA - OPORTO
Via . Dr Francisco Sa Carneiro. Lote 17.
ZONA Ind. MAIA 1. Sector-X MAIA. C.P. 4470 BARCA
Tel.: 351 22 9418313
Fax: 351 22 9488719/9416180
[email protected]
LISBOA
C.P. 1000 Rua Augusto Gil 21-A.
Tel.: 351 21 7932537 Fax: 351 21 7932418
[email protected]
TELEVES FRANCE S.A.R.L.
1 Rue Louis de Broglie
Parc d'Activités de l'Esplanade
77400 St Thibault des Vignes FRANCE
Tél.: +33 (0)1 60 35 92 10
Fax: +33 (0)1 60 35 90 40
[email protected]
TELEVES ITALIA S.r.l.
S.op.Viale Liguria 24
20068 Peschiera Borromeo (MI) Italia
Tel.: (+39)-0251650604 (RA)
Fax: (+39)-0255307363
[email protected]
TELEVES MIDDLE EAST FZE
P.O. Box 17199
JEBEL ALI FREE ZONE DUBAI,
UNITED ARAB EMIRATES
Tel.: 9714 88 343 44 Fax: 9714 88 346 44
[email protected]
TELEVES UNITED KINGDOM LTD
Unit 11 Hill Street, Industrial State
CWMBRAN, GWENT NP44 7PG.
(United Kingdom)
Tel.: 44 01 633 87 58 21
Fax: 44 01 633 86 63 11
[email protected]
BURGOS C.P. 09188
C/Real, s/n, San Adrián de Juarros
Tfno.: 947 56 04 58
Móvil: 670 73 75 86
[email protected]
GIJÓN C.P. 33210
C/Japón, 14
Tfnos.: 985 15 25 50 /985 15 29 67
Fax : 985 14 63 89
[email protected]
JAÉN C.P. 23007
Hermanos Pinzón, 8-bajo
Tfnos.: 953 29 50 40 /953 29 52 11
Móvil: 636 984489
Fax: 953 29 52 10
[email protected]
LAS PALMAS C.P. 35006
Gral. Mas de Gaminde 26
Tfnos.: 928 23 11 22 /928 23 12 42
Fax: 928 23 13 66
[email protected]
LOGROÑO C.P. 26004
San Prudencio 19. bajo
Tfno.: 941 23 35 24
Fax: 941 25 50 78
[email protected]
Miembro de número del
ER 224/1/94
Empresa
Registrada
TENERIFE C.P. 38108
Avda. El Paso, 25 Los Majuelos- La Laguna
Tfnos.: 922 31 13 14 /922 31 13 16
Fax: 922 31 13 33
[email protected]
VALENCIA C.P. 46022
Plaza Jordi San Jordi s/n
Tfnos.: 96 337 12 01 /96 337 12 72
Fax: 96 337 06 98
[email protected]
VIGO C.P. 36204
Escultor Gregorio Fernández, 5
Tfnos.: 986 42 33 87 /986 42 40 44
Fax: 986 42 37 94
[email protected]
VALLADOLID C.P. 47008
C/ Arrecife 12
Tfno.: 983 22 36 66
Fax: 983 22 36 66
[email protected]
ZARAGOZA C.P. 50002
C/ Monasterio de Alahón 1-3
Tfno.: 976 41 12 73
Fax: 976 59 86 86
[email protected]
 Loading...