

Page 1
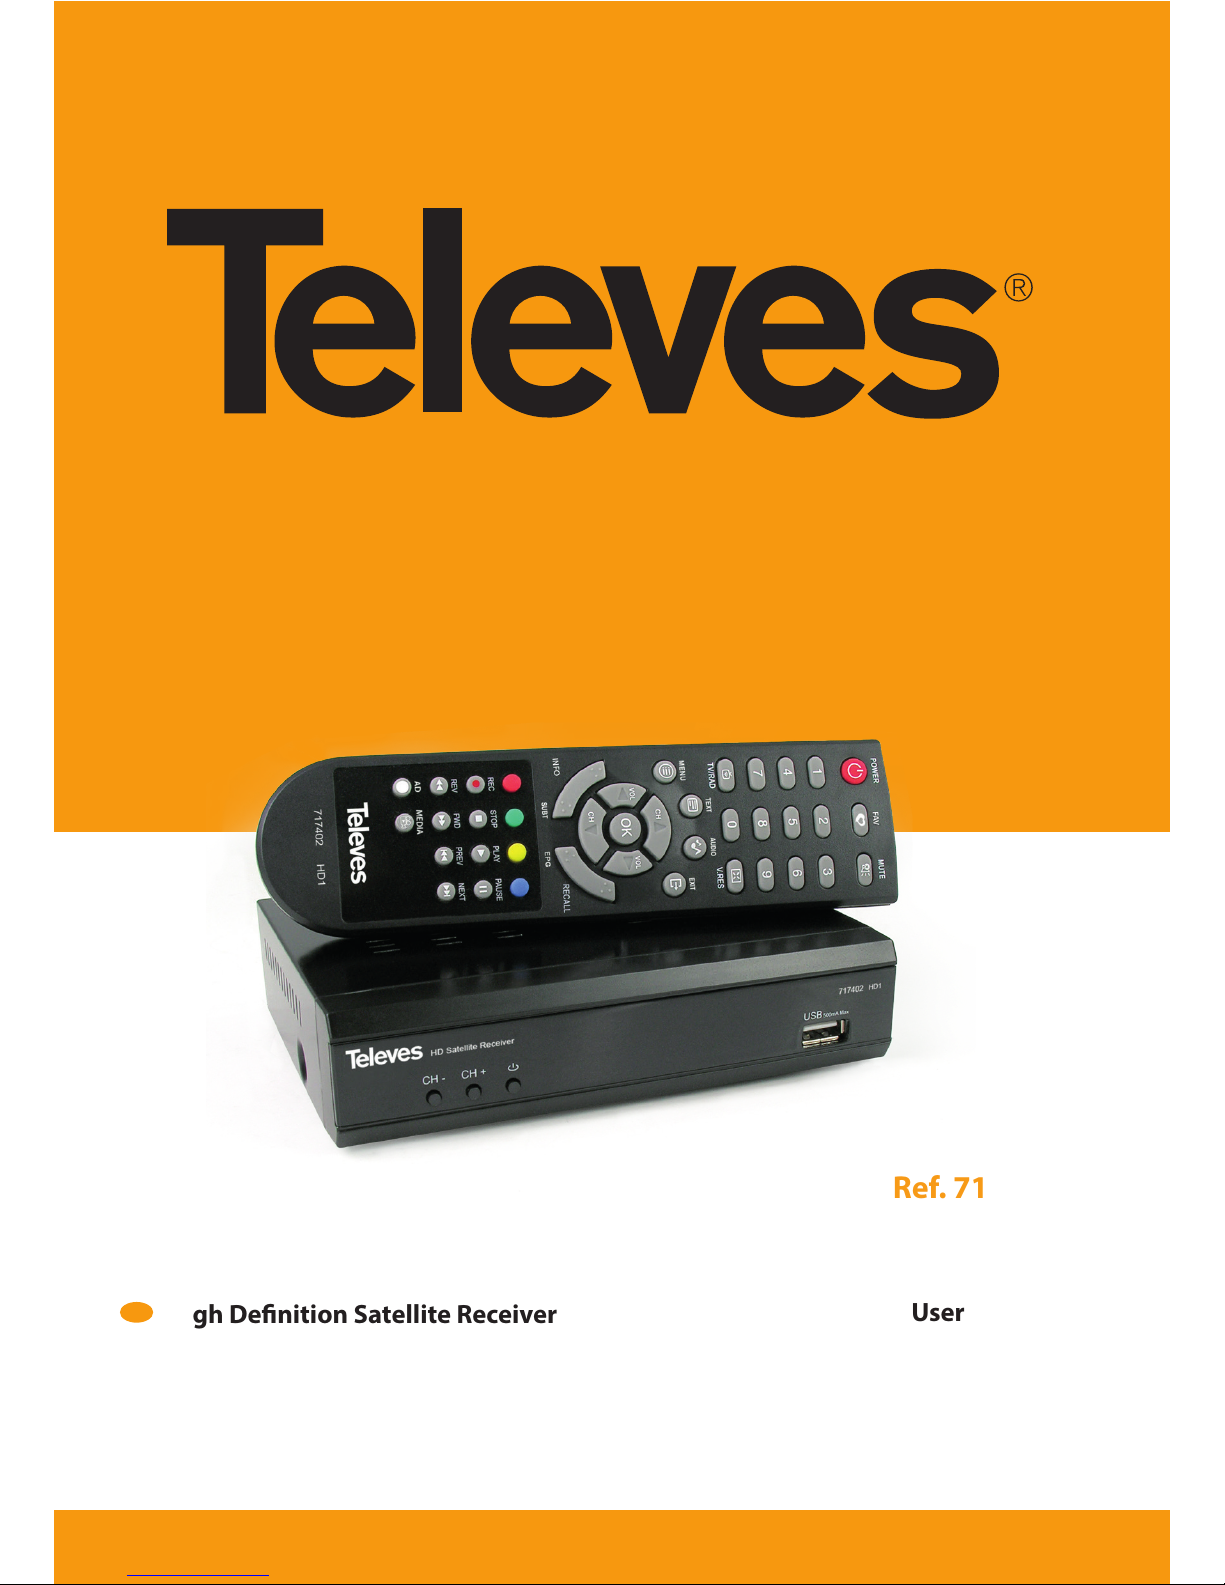
High Denition Satellite Receiver
Ref. 717402
User Manual
www.televes.com
EN
Page 2

Page 3

EN
ENGLISH
Table of contents
1. Safety recommendations .............................................................. 5
2. General Information ................................................................... 6
2.1. Summary of features ............................................................. 6
2.2. Package contents ................................................................. 6
2.3. General Operation ................................................................ 6
3. Description of connections ............................................................. 6
3.1. Remote control unit .............................................................. 7
4. Installation of equipment .............................................................. 8
5. Setting-up ............................................................................. 8
6. First steps ............................................................................. 9
7. Basic functions ........................................................................ 11
7.1. Power ............................................................................ 11
7.2. TV or Radio selection ............................................................. 11
7.3. Channel selection ................................................................ 11
7.4. Channel information ............................................................. 11
7.5. Channel List ...................................................................... 11
7.6. Volume and Mute ................................................................ 11
7.7. Audio Language ................................................................. 11
7.8. EPG - Electronic Program Guide ................................................... 11
7.9. Teletext .......................................................................... 12
7.10. Subtitle ......................................................................... 12
7.11. Main Menu ..................................................................... 12
8. Edit Channel ........................................................................... 13
8.1. TV Channel List ................................................................... 13
8.1.1. Favorite .................................................................... 13
8.1.2. Lock ....................................................................... 13
8.1.3. Skip ........................................................................ 13
8.1.4. Move ...................................................................... 14
8.1.5. Edit ........................................................................ 14
8.1.5.1. Sort ................................................................ 14
8.1.5.2. Edit ................................................................ 14
8.1.5.3. Delete .............................................................. 14
8.2. Radio Channel List ............................................................... 14
8.3. Delete All ........................................................................ 15
9. Installation ............................................................................ 15
9.1. Antenna Connection ............................................................. 15
9.2. Satellite List ...................................................................... 16
Page 4

4
High Denition Satellite Receiver
9.3. Antenna Setup ................................................................... 16
9.4. Single Satellite Search. . . . . . . . . . . . . . . . . . . . . . . . . . . . . . . . . . . . . . . . . . . . . . . . . . . . . . . . . . . . . 18
9.5. Multi Satellite Search. . . . . . . . . . . . . . . . . . . . . . . . . . . . . . . . . . . . . . . . . . . . . . . . . . . . . . . . . . . . . . 18
9.6. TP List ............................................................................ 19
10. System Setup ......................................................................... 20
10.1. Language ....................................................................... 20
10.2. TV System ...................................................................... 20
10.3. Local Time Setting .............................................................. 21
10.4. Timer Setting ................................................................... 21
10.5. Parental Lock ................................................................... 21
10.6. OSD Setting ..................................................................... 22
10.7. Favorite ......................................................................... 22
10.8. Other ........................................................................... 22
11. Tools . . . . . . . . . . . . . . . . . . . . . . . . . . . . . . . . . . . . . . . . . . . . . . . . . . . . . . . . . . . . . . . . . . . . . . . . . . . . . . . . . 23
11.1. Information ..................................................................... 23
11.2. Factory Setting . . . . . . . . . . . . . . . . . . . . . . . . . . . . . . . . . . . . . . . . . . . . . . . . . . . . . . . . . . . . . . . . . . 23
11.3. Othello ......................................................................... 23
11.4. Sudoku ......................................................................... 24
11.5. Sofware - Update ............................................................... 24
11.5.1. Upgrade By USB .......................................................... 24
11.5.2. Save Channel List ........................................................ 24
11.5.3. Load Channel List ........................................................ 24
11.6. Remove USB device safely ....................................................... 24
12. Technical specications .............................................................. 25
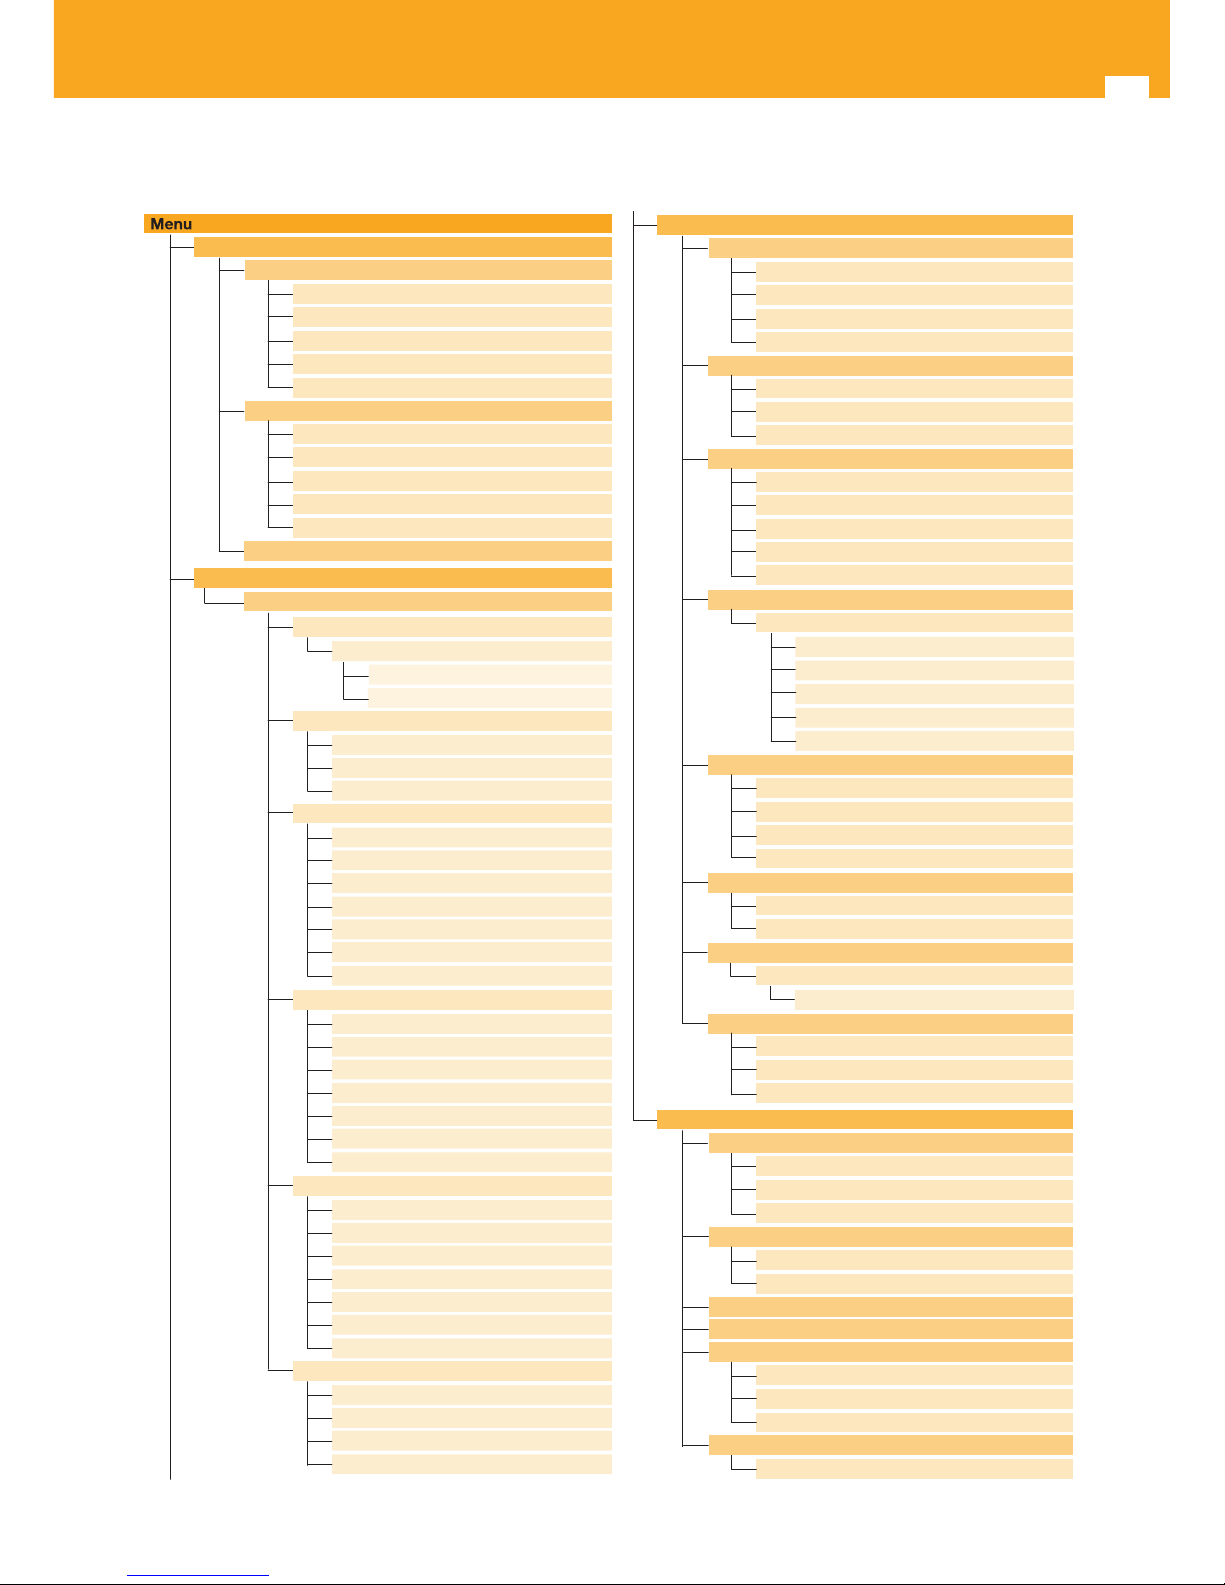
13. Menu structure ...................................................................... 26
14. Connectors description .............................................................. 27
Page 5
5
EN
1. Safety recommendations
Caution Statements
1. Read these instructions.
2. Keep these instructions.
3. Heed all warnings.
4. Follow all instructions.
5. Do not use this apparatus near water.
6. Clean only with a dry cloth.
7. Do not block any ventilation openings. Install in accordance
with the manufacturer’s instructions.
8. Do not install near any heat sources such as radiators, heat
registers, stoves, or other apparatus (including ampliers)
that produce heat.
9. Protect the power cord from being walked on or pinched
particularly at plugs, convenience receptacles, and the point
where they exit the apparatus.
10. Only use attachments/accessories specied by the
manufacturer.
11. Unplug this apparatus during lightning storms or when
unused for long periods of time.
12. Refer all servicing to qualied service personnel. Servicing is
required when the apparatus has been damaged in any way,
such as power-supply cord or plug is damaged, liquid has
been spilled or objects have fallen into the apparatus, the
apparatus has been exposed to rain or moisture, does not
operate normally, or has been dropped.
Warning
Reduce the risk of re or electric shock, do not expose this
apparatus to rain or moisture.
Apparatus shall not be exposed to dripping or splashing and
no objects lled with liquids, such as vases, shall be placed on
the apparatus.
Safe operation
Power requirements for this product are 100-240V~ 50/60Hz.
Should any liquid or object fall into the equipment, please
refer to qualied personnel for service.
To disconnect the equipment from the mains pull the plug
never the cable.
It is strongly recommended not to connect the equipment to
the mains until all connections have been done.
The socket outlet shall be installed near the equipment and
shall be easily accessible.
Do not take the cover o the equipment without disconnecting
it from the mains.
Safe installation
Ambient temperature should not be higher than 45°C.
Do not place the equipment near heat sources or in a highly
humid environment.
Do not place the equipment in a place where it can suer
vibrations or shocks.
Please allow air circulation around the equipment.
Do not place naked ames, such as lighted candles on or near
the product.
Symbology
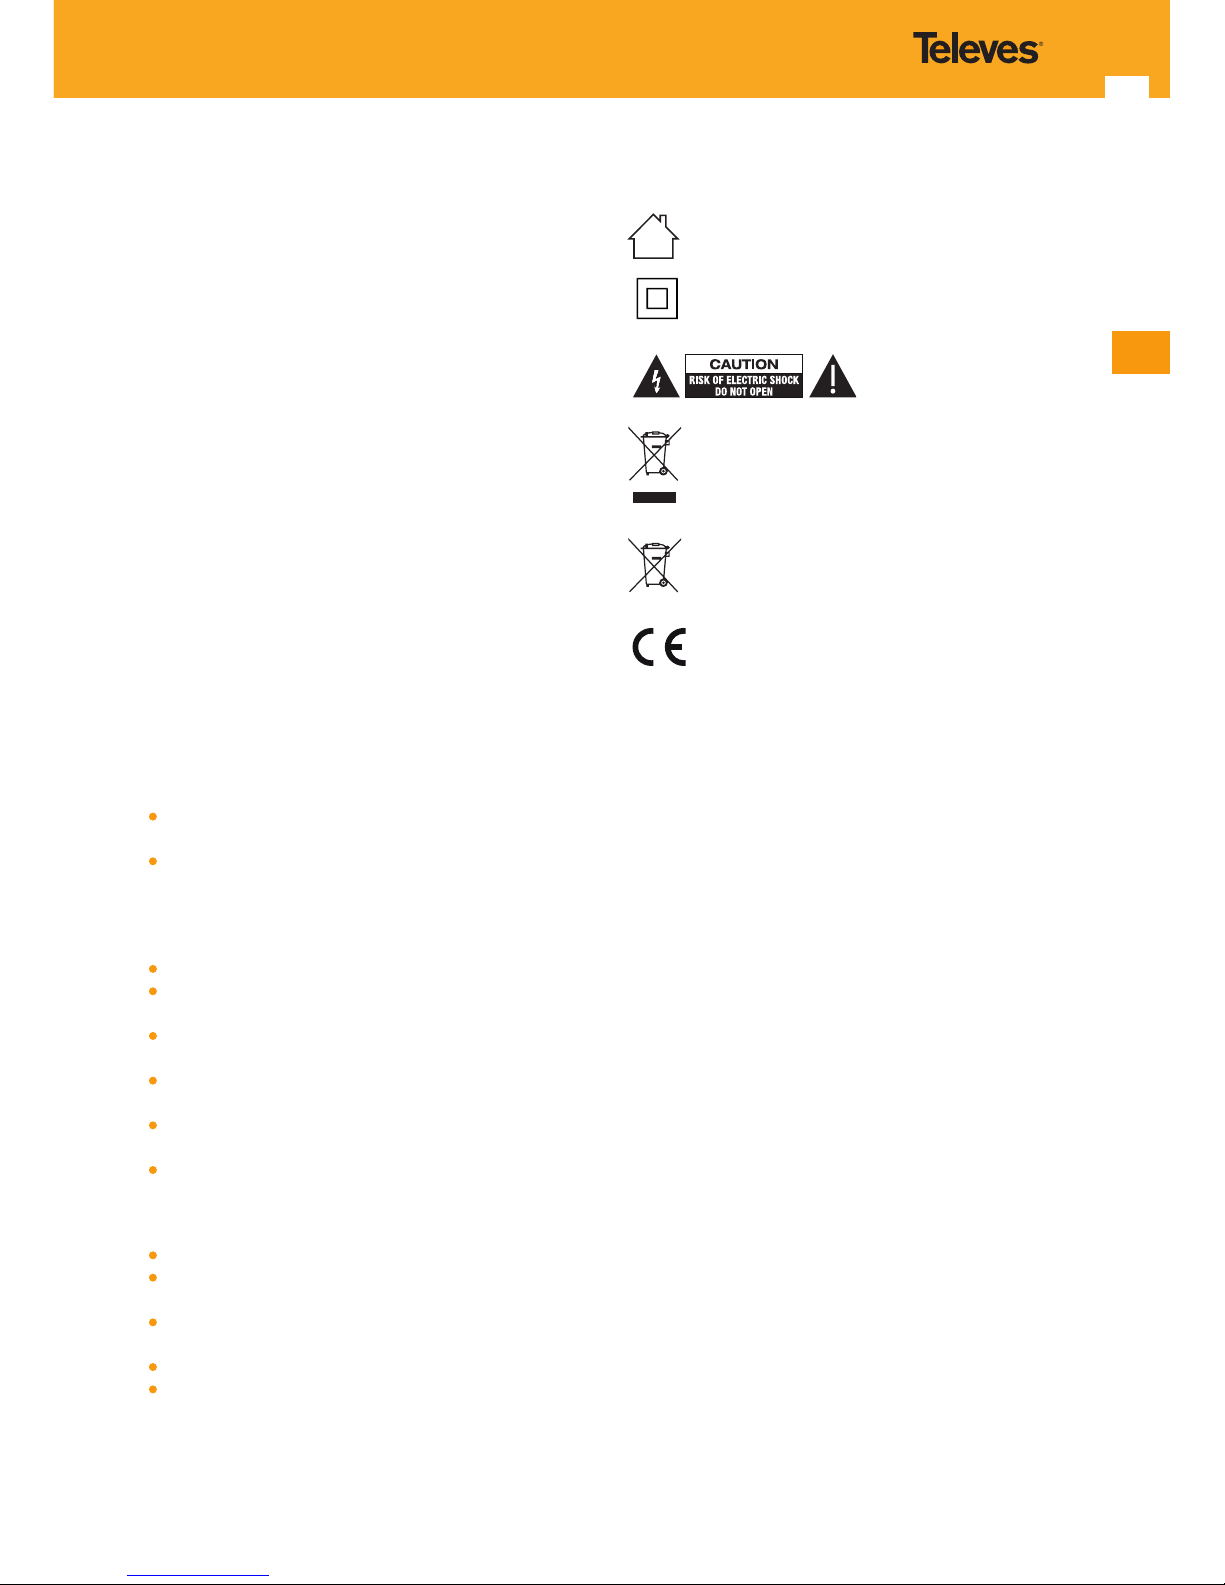
Equipment designed for indoor use.
This symbol indicates that the power supply of the
equipment complies with the safety requirements
for class II equipment.
Caution, risk of electrical
shock.
The present product can not be treated as normal
household waste, it must be delivered to the
corresponding collection point for waste electrical
and electronic equipment (RAEE).
The equipment contains a recyclable battery, before
the RAEE is deposited in the collection facilities, the
battery must be removed and deposited separately
for proper management.
The equipment complies with the CE mark
requiremen
ts.
Page 6
6
High Denition Satellite Receiver
2. General Information
The Digital Satellite TV Receiver ref.717402 is a product
that lets you view a variety of programs supplied by one
or more satellites.
This manual explains how to install this receiver and the
steps needed to use its various functions.
For the installation of the receiver, as for its correct use, be
sure to read the manual and save it for future reference.
2.1. Summary of features
DVB-S and DVB-S2 FTA satellite receiver
MPEG2 and MPEG4/H.264 compatible
Up to 5000 programmes can be stored
Guided Initial installation
Pre-programmed channel list
DiSEqC 1.2 and USALS compatible
LNB unicable (SCR1 and SCR2) compatible
HDMl output
Scart output (CVBS)
SPDIF output (Coaxial)
USB port
4 digit display
Time display
User friendly menu
8 Favourite Lists
Timer function
Electronic Programme Guide (EPG)
Supports OSD, Teletext and Subtitle (standard and TXT)
Parental lock (Menu and Channels)
Automatically saves the last programme.
Quick and easy software upgrading via USB
Save and load channel list via USB
Games
Low power consumption.
Slim size
2.2. Package contents
Verify that the following parts are included in the package:
- 1 x HD Satellite receiver ref. 717402.
- 1 x Remote control unit.
- 1 x Power Adapter.
- 2 x Batteries “AAA”.
- 1 x User manual.
2.3. General Operation
Throughout this manual you will see that the use of this
receiver is based on a variety of menus easy to use.
These menus will help you enjoy your Televes receiver,
guiding for: Edit Channel, Installation, System setup, Tools
... and many other functions.
It is necessary to note that new software may change
the functionality of the receiver.
3. Description of connections
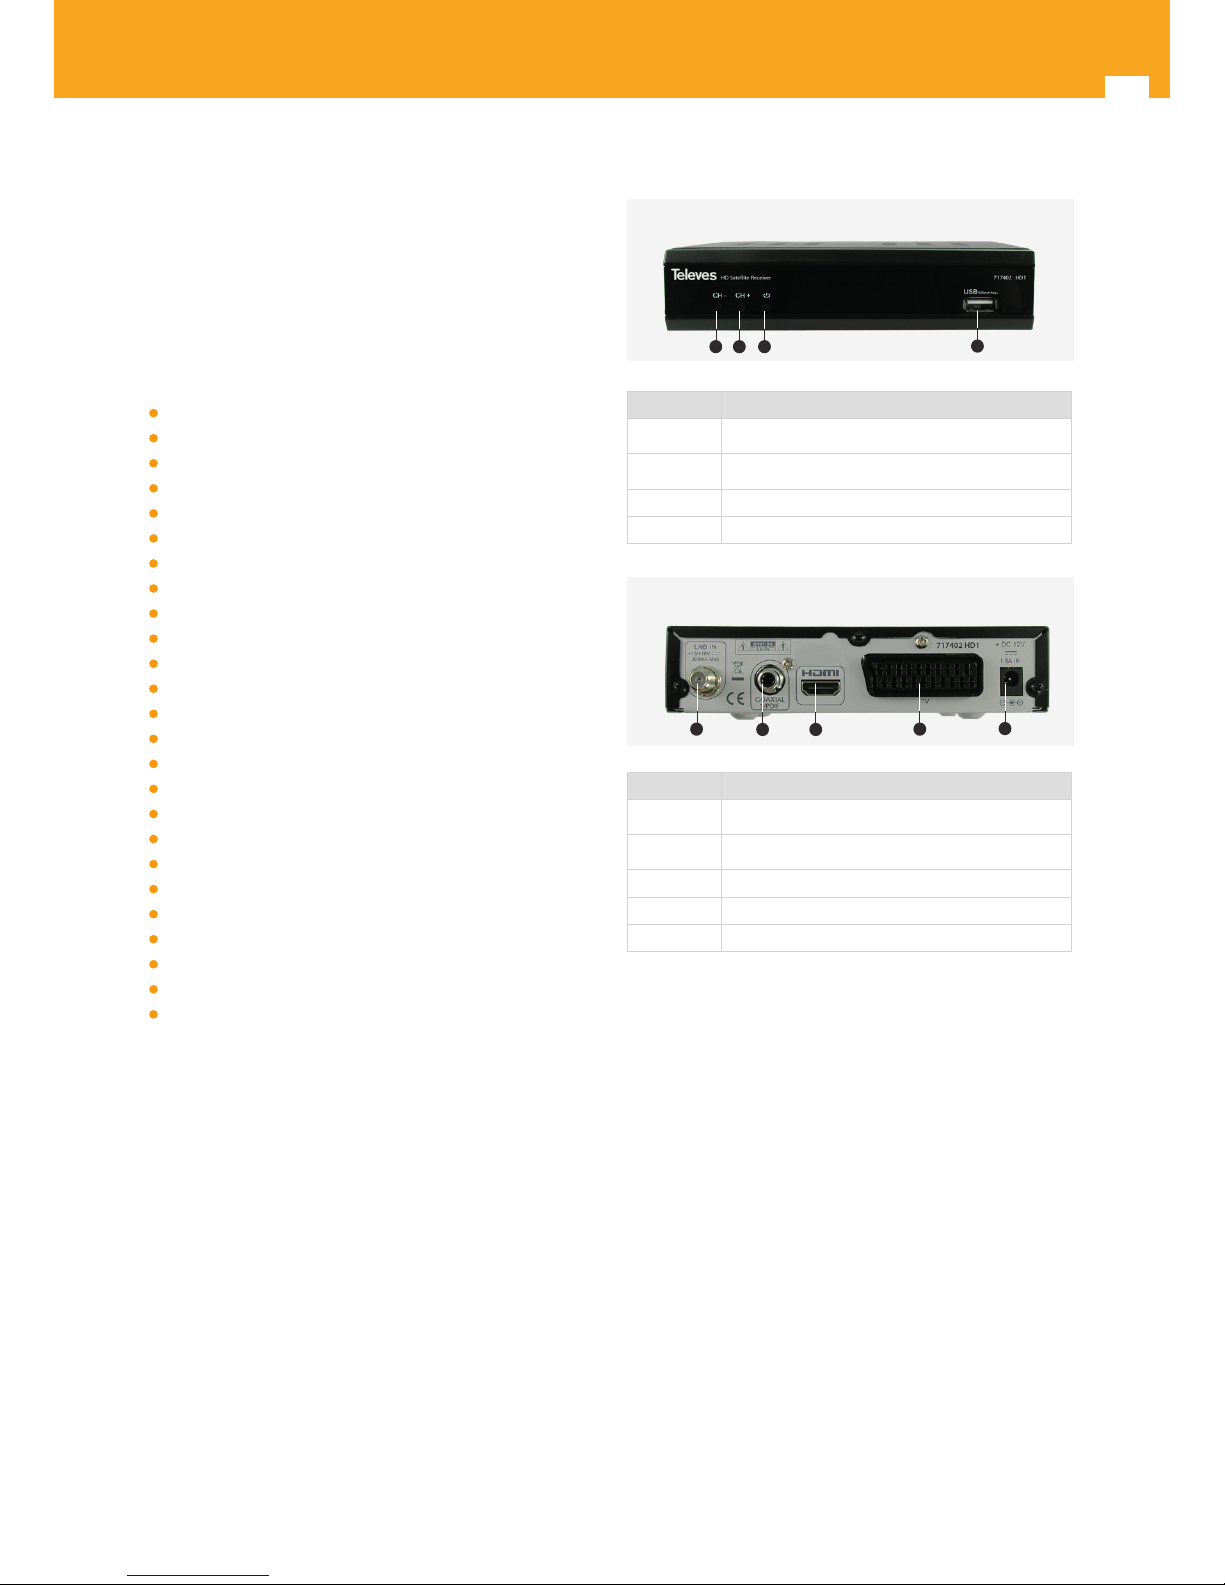
Nº Description
1 CH- key
2 CH+ key
3 Power key
4 USB port
Nº Description
1 LNB IN
2 Coaxial S/PDIF
3 HDMI
4 SCART T V-OUT
5 DC-IN 12V
1 2
3
4
Front Panel
Rear Panel
1
2
4
5
3
Page 7
7
EN
3.1. Remote Control Unit
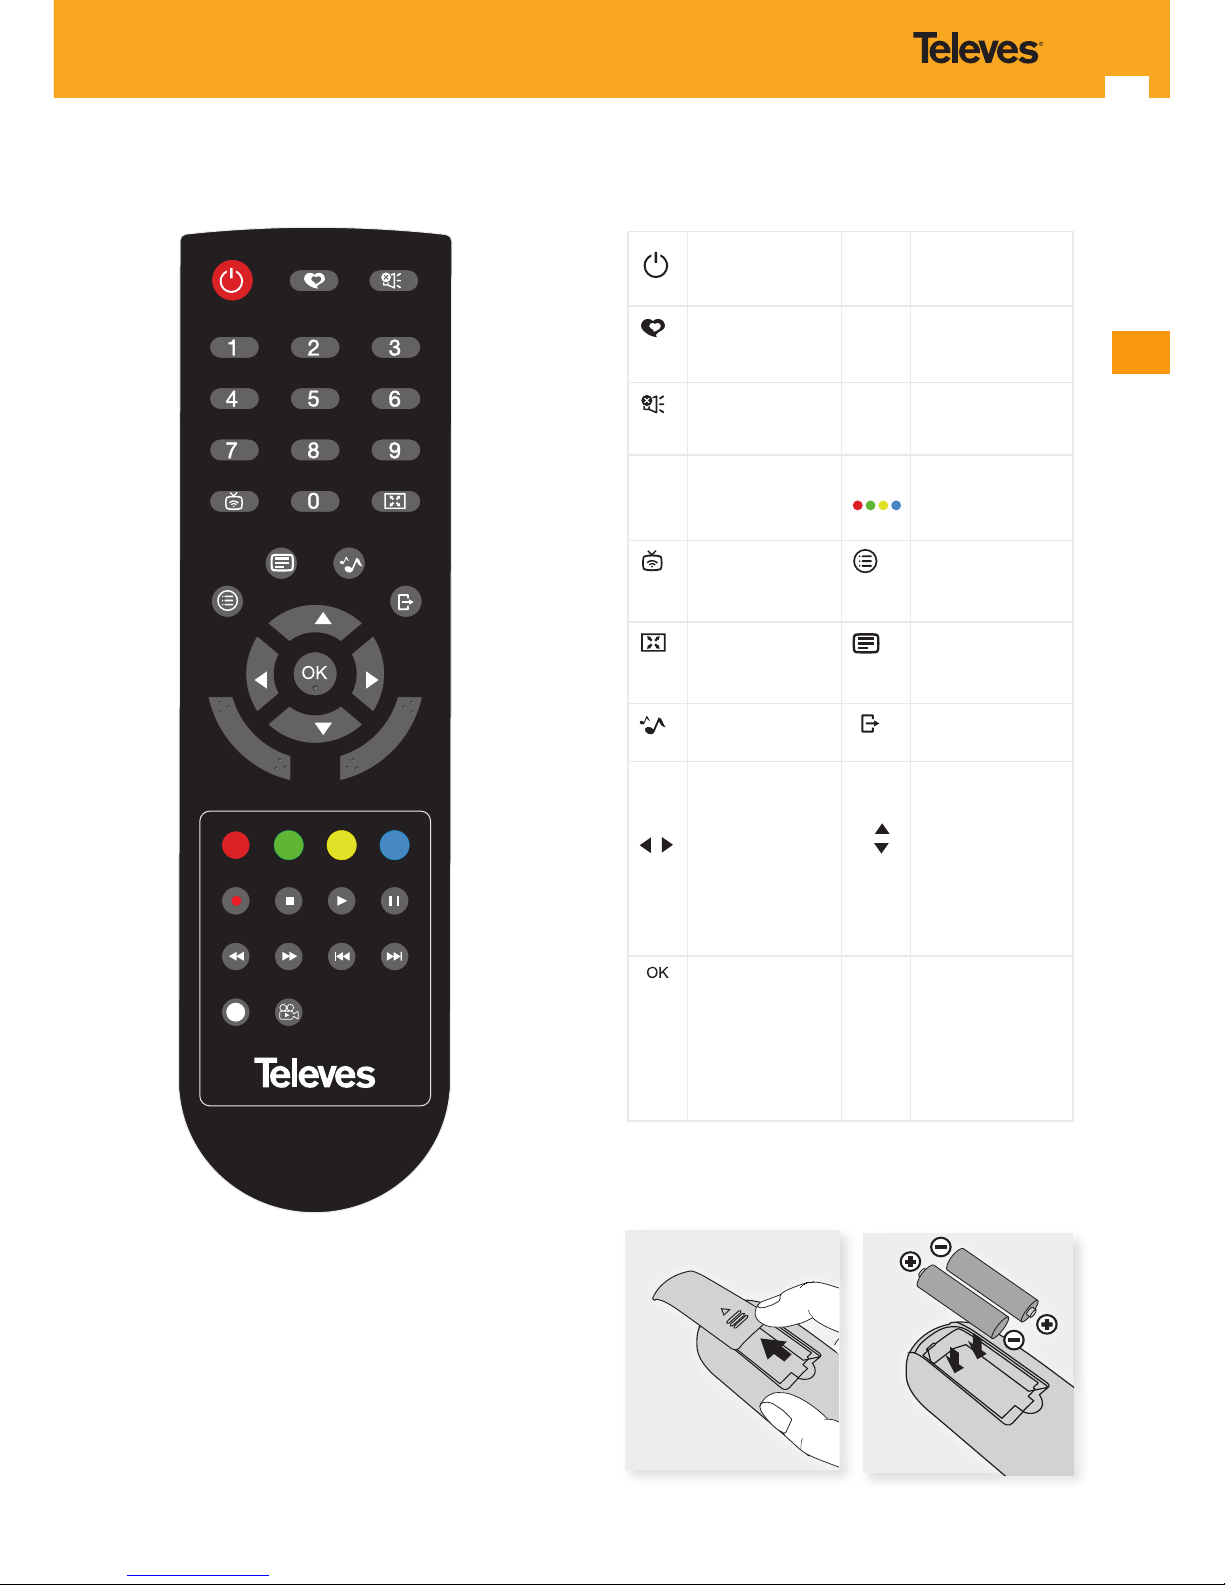
Switches between
“power ON”and
“STANDBY” mode.
INFO
Shows information of
the current channel.
Enables favorite
channels lists. SUBT
Enables the Subtitle
function of a program,
when available.
Press this key to
temporarily switch
o the sound.
EPG
Enables the Electronic
Program Guide (EPG).
0 ... 9
To select a desired
program number.
Direct data entry on
the menu.
CH
CH
Keys that are
functional as the
menu in question.
Switches between
TV and RADIO
channels.
Shows the main menu
on screen.
Select video
resolutions.
Activates teletext
for the displayed
channel.
Selects dierent
audio options.
To return to the
previous menu used.
CH
VOL
VOL
OL
Adjusts volume in TV
and Radio modes.
Lets you choose
from dierent
congurations of the
selected option (in
the case of the
questions to be
conrmed).
CH
CH
C
H
Changes channel (UP/
DOWN) in TV or
Radio modes.
Lets you move
through the dierent
options in each menu.
Executes the option
selected on the
menu or enters the
desired value in any
input mode.
In normal mode
shows the channel
list.
Note: The “REC, STOP, PLAY, REV, FWD, PREV, NEXT, AD and
MEDIA” keys don’t execute any function on this receiver.
INFO
CH
CH
VOL VOL
POWER
MUT E
TV/RAD
V.RES
EXIT
MEN U
MEDIA
EPG
AUDIO
AD
SUBT
REC ALL
TEXT
FAV
REC STOP PLAY PAUSE
REV FWD PREV NEXT
717402 HD1
- Do not throw used batteries into household
waste nor to the re.
- Keep batteries away from heat, sunlight and re.
Page 8
8
High Denition Satellite Receiver
4. Installation of equipment 5. Setting-up
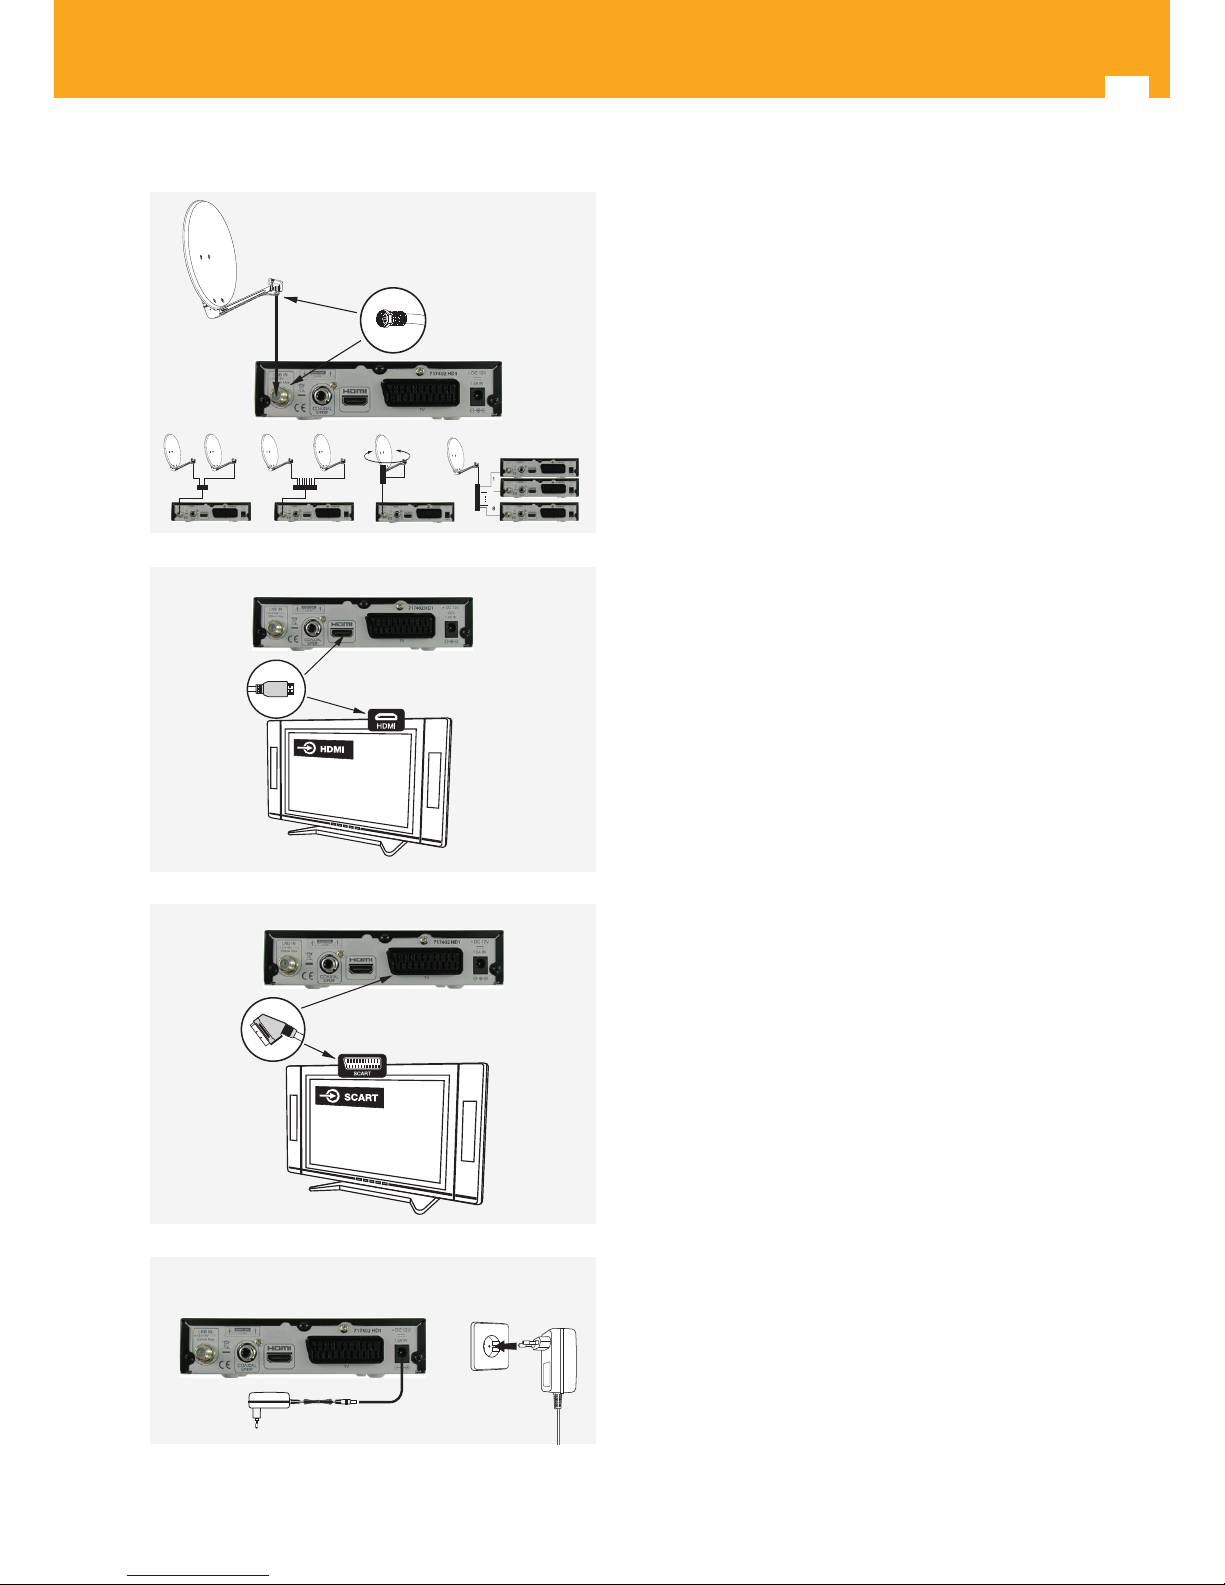
Dierent types of TVs and other devices can be connected
to your receiver 717402.
This manual lists the most common ways to connect it. If
you have any problem connecting your receiver please
contact your dealer.
There are two ways for connect this HD receiver to your TV:
• via SCART or
• via HDMI (High Denition).
If your TV has an HDMI connector, use this type of
connection as you will get the best image quality.
When the connection is made using a SCART cable, the
receiver 717402 may provide signal CVBS (Composite
video).
Attention: For Scart TV to provide video signal (CVBS),
the selected video resolution must be 480i or 576i.
Connect the signal from the antenna to the HD receiver
717402 (simple installation).
- Connect the video and audio signals between this
receiver and the TV set by means of a SCART or a HDMI
extender.
- Turn-on the equipments.
- Power the receiver using its main adapter unit.
- Televés recommends an HDMI cable category 2 (high
speed).
- All cables used to wire the receiver will be shielded.
- Do not plug the mains adapter of the receiver until all
the other connections have been made.
Page 9
9
EN
6. First steps
After made all the connections, please plug the power
adapter.
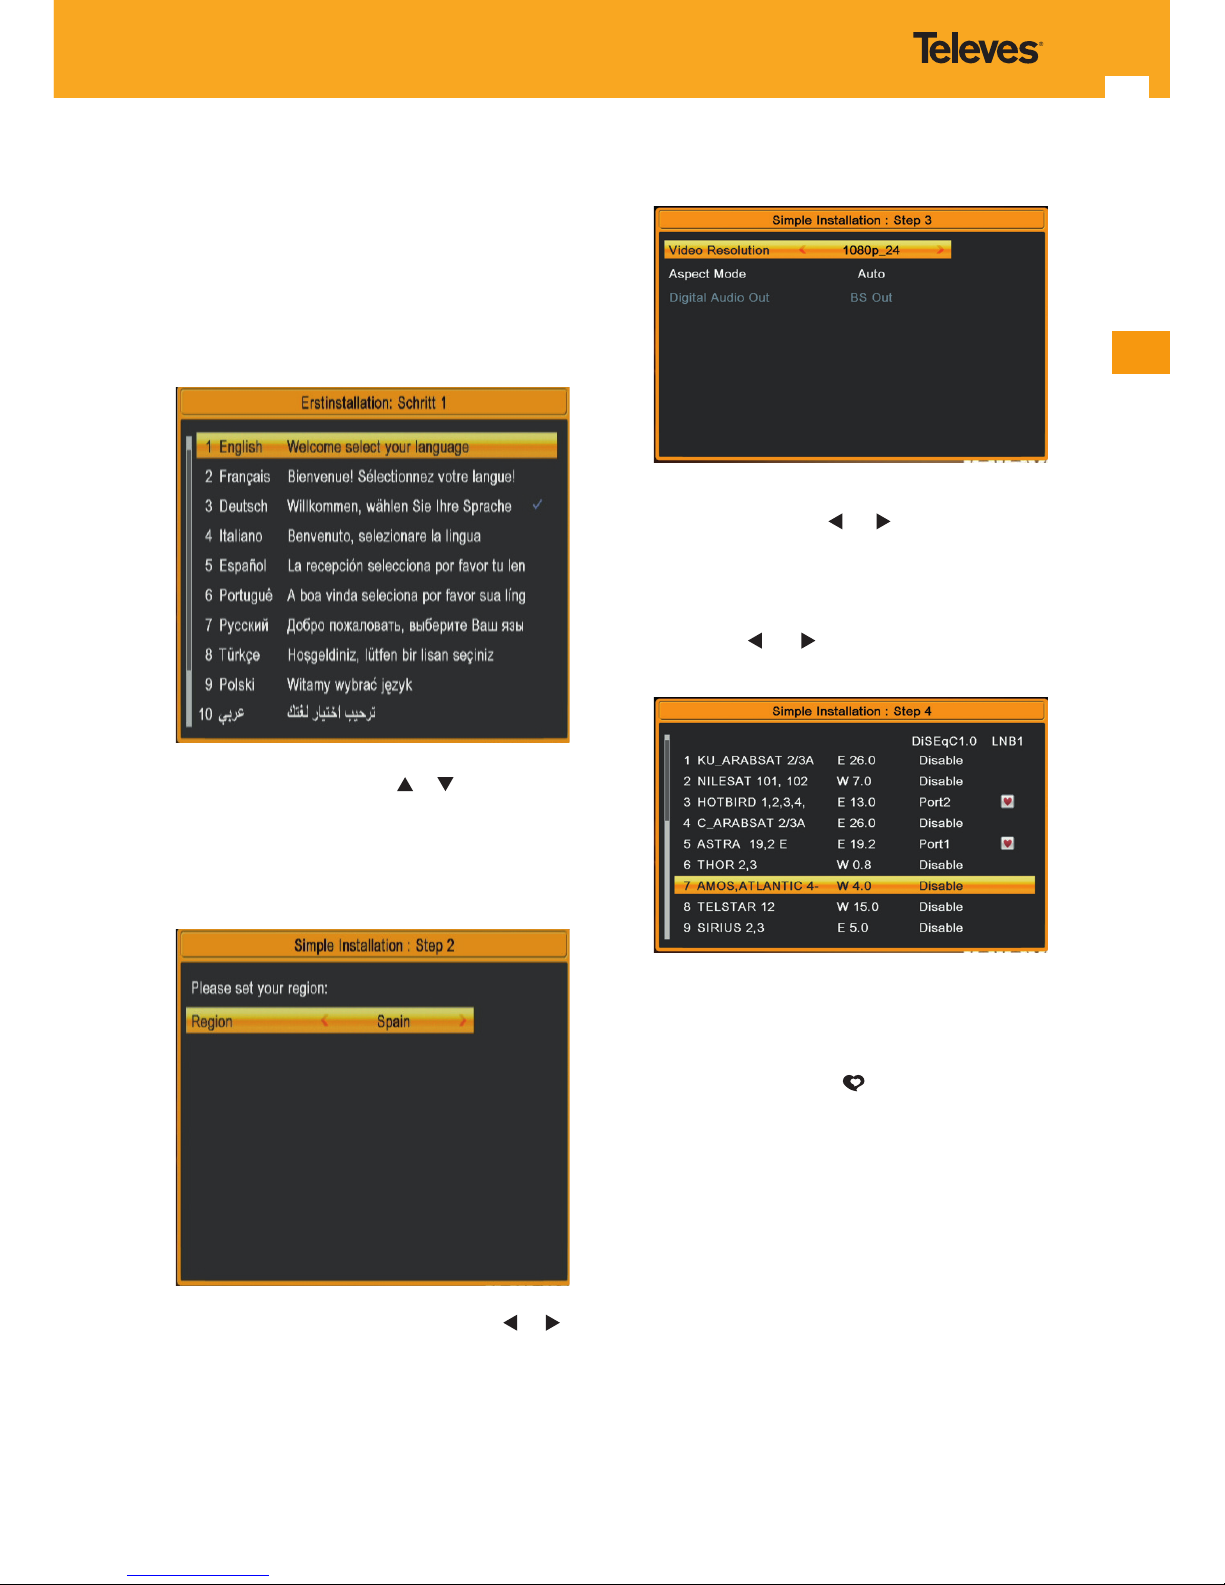
The “Simple Installation” screen is activated automatically
and will guide you in conguring the menus and in
searching channels.
First you must select the language (Step 1) in which you
want to display on-screen menus.
- Select the language in which menus are displayed on
screen using the cursor keys or .
- Press OK to select and press the blue key to acess the
next screen.
On the next screen you must set your region (country)
where the receiver is installed.
- Select the country using the cursor keys or and
press the blue key to access the next screen.
Note: Location must be correct because of this data
depends a correct indication of the time displayed on the
menus.
Now, you can select the “Video Resolution” and the TV
“Aspect Mode”.
- Video Resolution - Select the desired video resolution
using the cursor keys or . The available options
are: By Source; By Native TV; 480i; 480p; 576i; 576p;
720p_50; 720p_60; 1080i_25; 1080i_30; 1080p_24;
1080p_25 and 1080p_30.
- Aspect Mode - Select the desired format using the
cursor keys
or . The available options are: Auto;
4:3PS; 4:3LB and 16:9.
In this screen you can select and edit all the satellites that
you want to be present at your installation.
Select the desired satellite displayed on screen using the
cursor keys , and press OK to conrm. It will be marked
with the following symbol:
- Press the red key (of remote control) to edit an existing
satellite.
- Press the green key (of remote control) to add a new
satellite.
- Press the yellow key (of remote control) to delete an
existing satellite.
- Press the blue key to conrm the values and continue.
Page 10

10
High Denition Satellite Receiver
Now in this step (5) you will see the following question:
“Are you want to save all settings? Yes or No”
If you select Ye s the receiver save all the settings already
made and present a default channel list.
If you select No the receiver returns to step 1.
Page 11
11
EN
7. Basic functions
7.1. Power
Press Power Key to enter in the Standby mode.
In Standby mode, press Power Key again to call back the
unit and go on play the previous channel.
You can also disconnect the device’s main power to end
the Standby state.
7.2. TV or Radio selection
While watching a TV channel, press TV/RAD key to switch
to Radio mode.
In Radio mode, press TV/RAD key to switch to TV mode.
7.3. Channel selection
- To change the channel, use CH /CH keys, or the
numeric keypad (0 ... 9) of the remote control.
- In addition, the receiver features another way to
change the channel in a simple and visual manner.
While watching TV or Radio channel, press the OK
key on the remote control. The list of channels will be
displayed. Select a new channel from the list with the
keys
and then press OK key.
- You can return to the last channel you were watching
by pressing RECALL.
7.4. Channel information
- Each time you change the channel, you will see
information about it for a few seconds at the bottom
of the screen (banner).
- While watching a channel, you can view this
information at any time by pressing the INFO key on
the remote control.
- If you press the INFO key again, you can see more
information: Channel name, Satellite, Transponder
(frequency, polarity and symbol rate), PIDs (Audio,
Video and PCR), signal intensity and signal quality.
- In addition to indicating the number and name of the
channel, current time, start time and ending both the
current and the next event, the “banner” may have the
following icons: SUB.T; TTX and EPG.
- The EPG information is only available when provided by
the supplier.
7.5. Channel List
In full screen, press OK key to enter “Channel List”
Press / key to change satellite.
Press
/ key to move highlight and press OK key to play
the highlighted channel.
Press Exit key to exit the channel list.
7.6. Volume and Mute
Volume control
- To increase or decrease the volume, use VOL
/ VOL
keys of remote control.
- The volume can also be controlled through the volume of
your TV.
Mute
- To mute the sound, press MUTE key on the remote
control.
- To restore the sound, press this key once more.
- You can also restore the sound by pressing either the
VOL- or VOL+ on the remote control unit.
7.7. Audio language
- Press Audio to see the audio options available on this
channel.
- Select the desire option from the list with the keys
and then press OK key.
- Modify the audio mode (Stereo, Mono, Left or Right)
with the keys
or .
Note: If transmission has not several audios, then the
default option will be displayed and no changes will be
allowed.
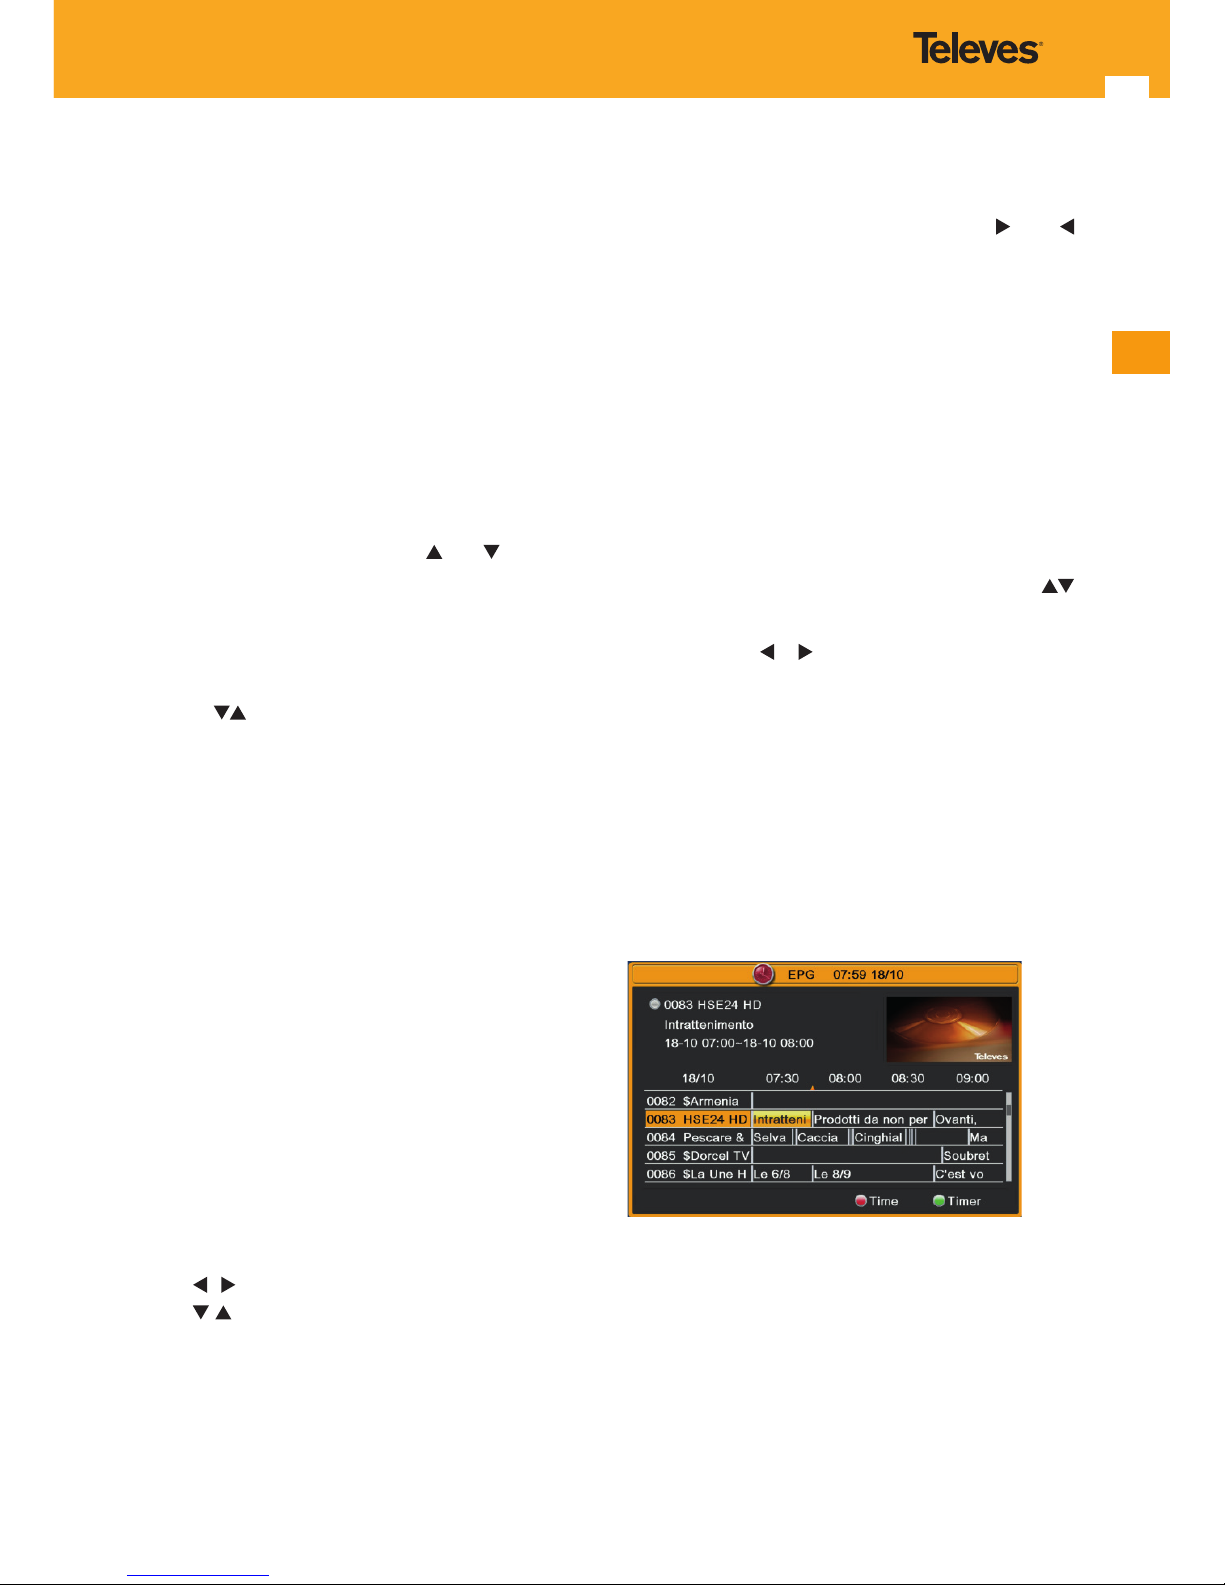
7.8. EPG – Electronic Program Guide
This receiver provides the “Electronic Program Guide” for
the user to access the TV guide (and also radio guide),
which displays information on current programming (or
subsequent) of dierent channels such as name, start
time, end time, a brief summary...
Press EPG key to display EPG screen.
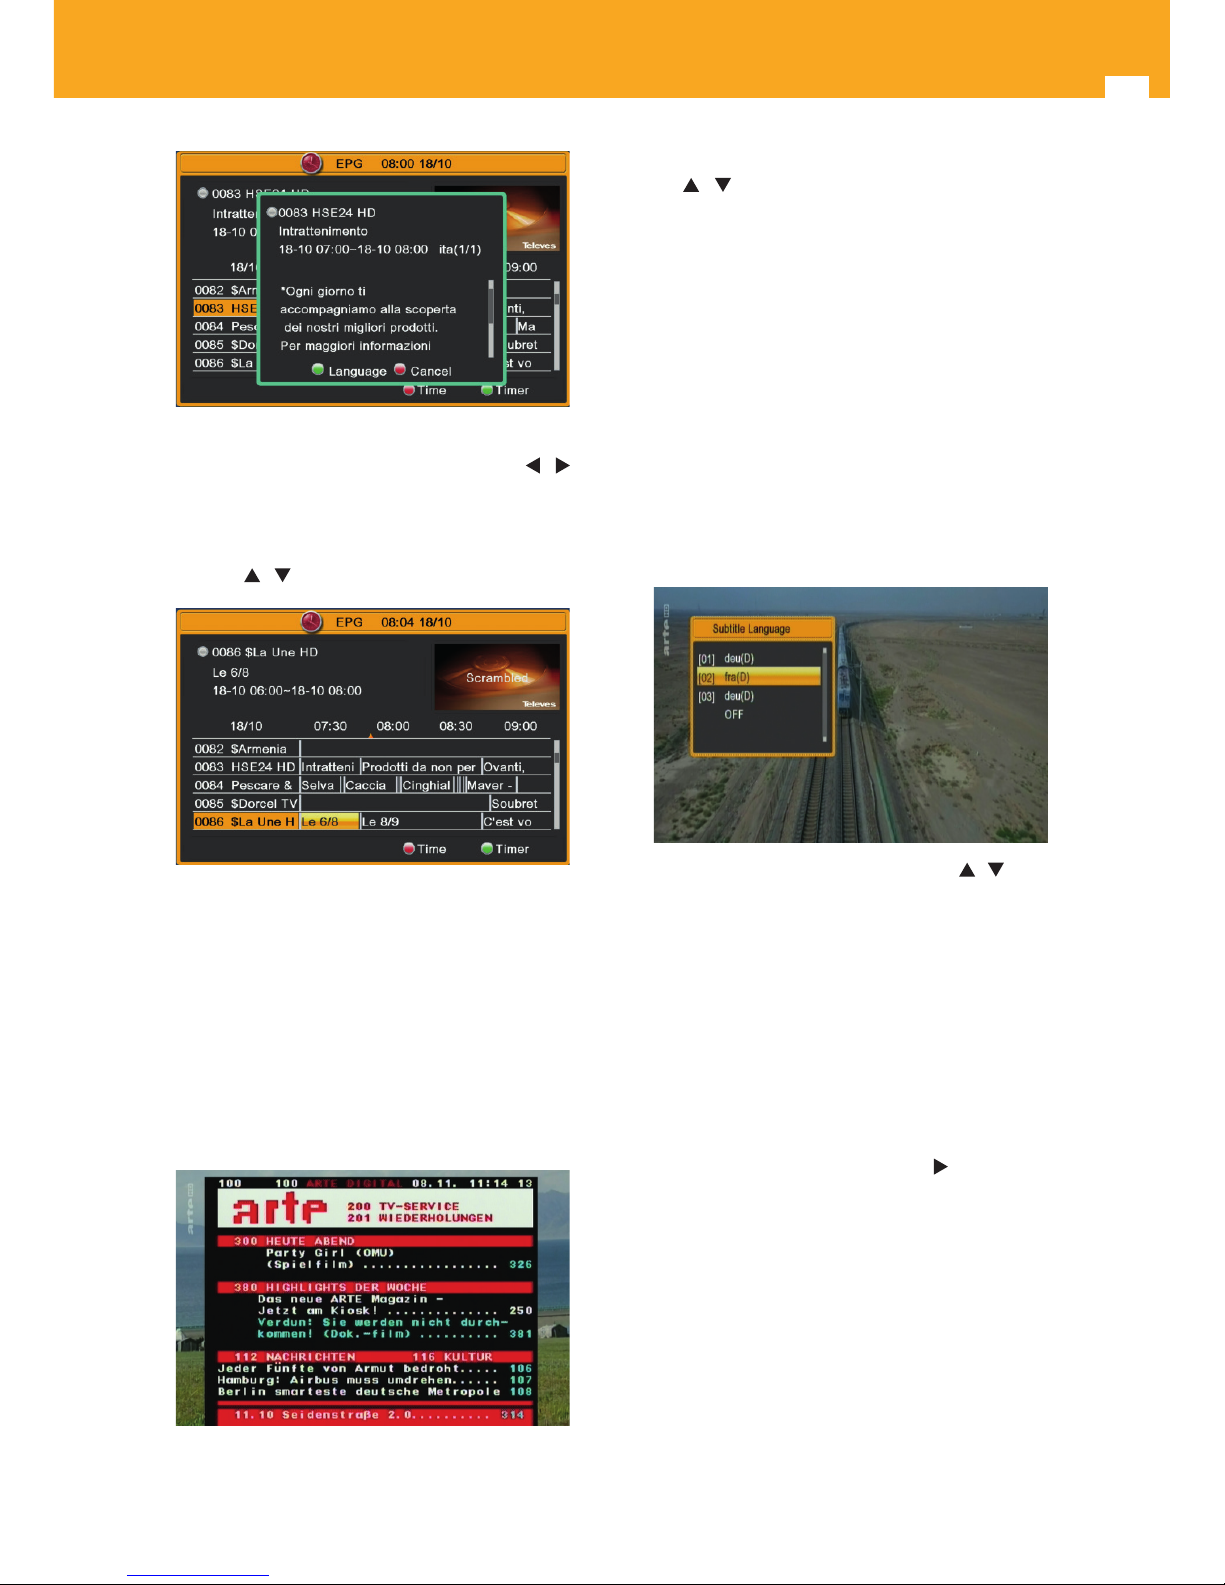
Press OK key in each item to see more detail information
and press Red key to cancel.
Page 12
12
High Denition Satellite Receiver
1. Press Red key in EPG menu to display “Time Bar”
Menu. In “Time Bar” menu, you can press / to
select “back/current time/last program or –0:30/
next program or +0:30/-2:00/+2:00/last day/next
day”.
2. Press
/ key to channel change.
3. Press Green key in EPG menu to open timer menu.
You can save a timer as he want.
4. In EPG menu, press Exit to close EPG screen.
7.9. Teletext
The 717402 allows you to select all teletext services
provided by the service provider.
- To activate Teletext, press the TEXT key on the remote
control.
- If you press OK key repeatedly, makes the background
transparent to see the image at the same time as the
Teletext.
- Teletext services are displayed in the usual way. Use
the
/ keys to move forward or backward page by
page, or directly enter the page number on the keypad.
- Even if your TV does not have Teletext decoder, you
can view it on the screen since the 717402 is able to
generate the teletext automatically.
- To exit teletext, press the TEXT or EXIT key.
- If the channel has no teletext information, it will show
“No Data” on the screen.
7.10. Subtitle
If the transmission oers this service, subtitles are
displayed at the bottom of the screen. If the transmission
doesn’t have this service, it shows the “No Data” message.
- Press SUBT key in full screen, you can switch subtitle
on or o.
- Select subtitle language available using / keys and
press OK key to conrm.
Note: Not all suppliers provide subtitles service.
7.11. Main Menu
- Press MENU key to activate the main menu.
- This main menu includes the followings submenus:
- Edit Channel
- Installation
- System Setup
- Tools
- Select the desire submenu with the
key or press OK
to accept.
- Press EXIT or MENU to exit to previous menu, and
nally exit the menus.
Page 13
13
EN
8. Edit Channel
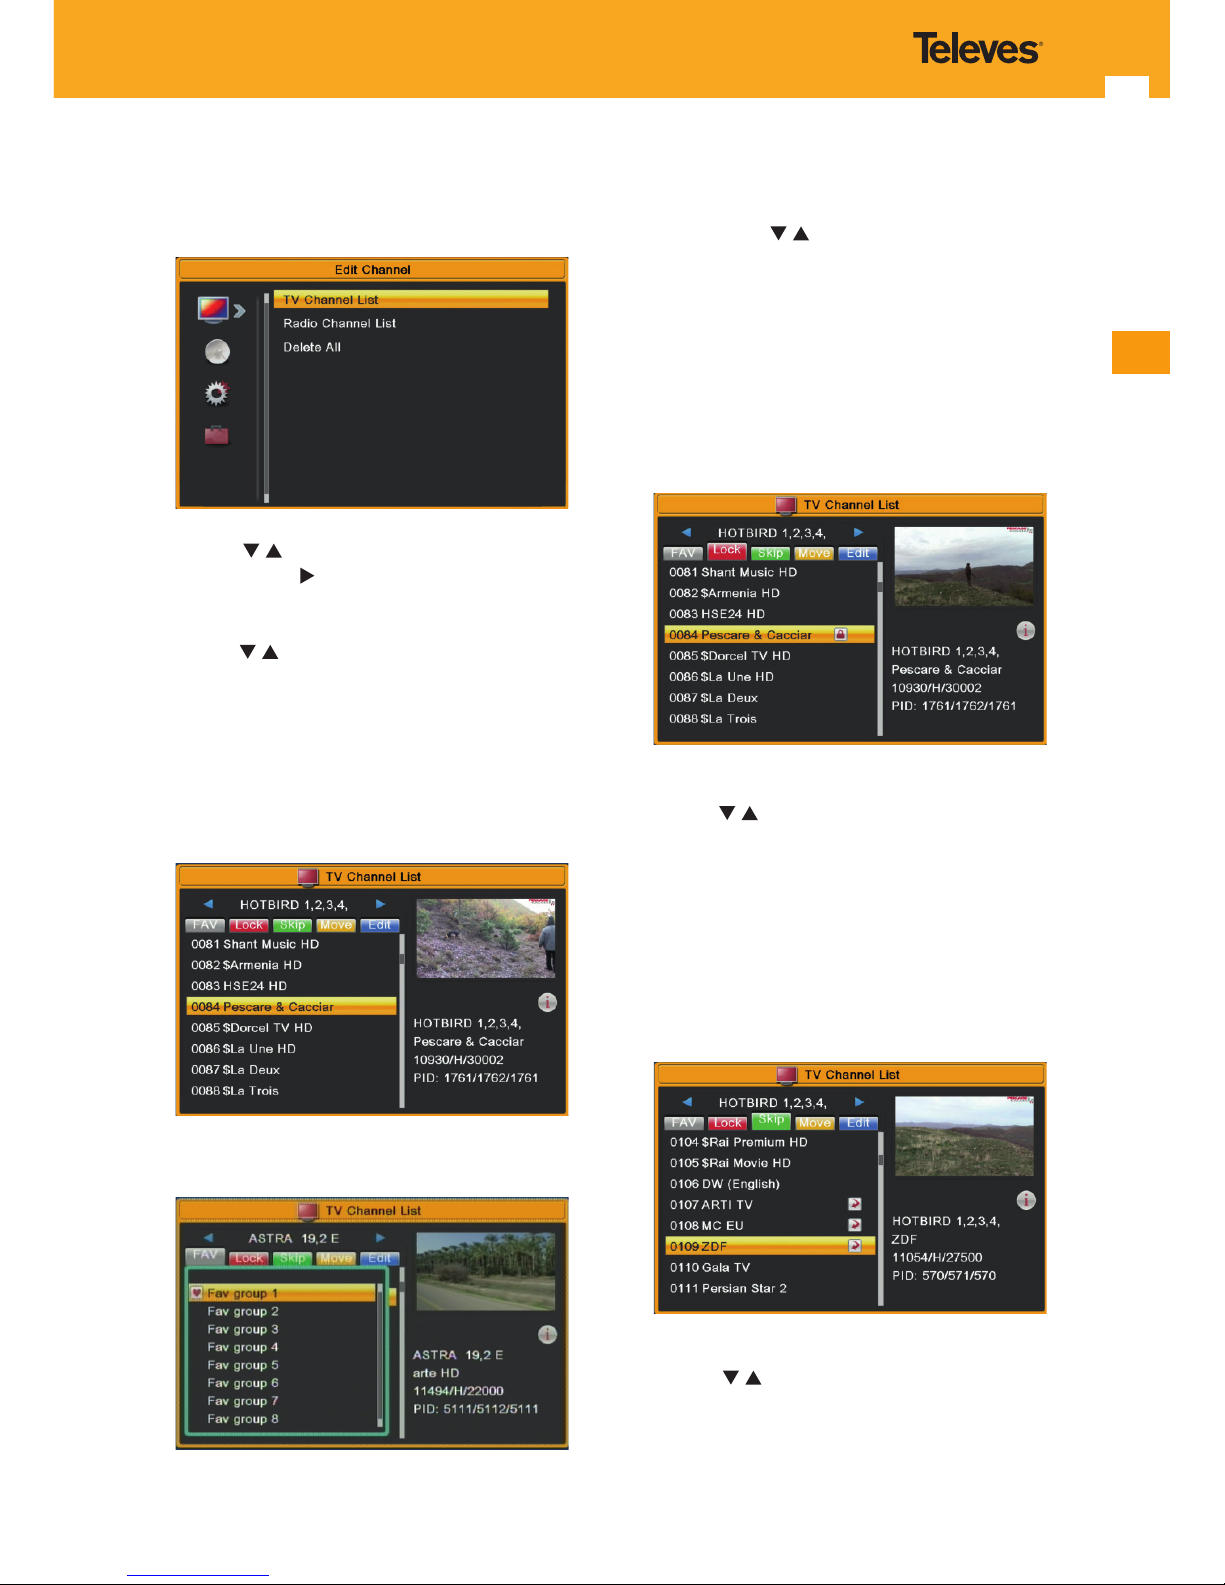
When you press MENU key to enter menu, there will
display the picture like below:
1. Press / key to select the Edit Channel submenu.
2. Press OK or
key to enter the “Edit Channel”. If
Menu Lock is “On”, it will display an dialogue for user
to key in password. The default Password is “0000”.
3. Press
/ key to select the desire submenu among:
“TV Channel List”, “Radio Channel List” or “Delete
All”. Press OK to conrm.
4. Press Exit or Menu key to go back to main menu.
8.1. TV Channel List
When you enter to “TV Channel List” menu, there will
display the screen like below.
8.1.1. Favorite
1. Pressing FAV key, then pressing OK key to open the
“Favorite” window like picture.
2. You can move highlight between 8 favorite groups
by pressing
/ key and press OK key to make a
favorite mark in the left side of the selected Favorite
group.
3. Pressing [OK] key on the marked Favorite group to
cancel the exist favorite mark.
4. After marking, pressing Exit key to go back to “TV
Channel List” , there will show a favorite mark beside
the marked channel.
8.1.2. Lock
1. Press Red key to enter lock mode.
2. Press
/ key to move the highlight and press OK
key, it will display a dialogue to ask you to input
password. The default password is “0000”. If you
input the correct password you can see a “lock
mark” in the right side of the highlighted channel.
3. After save and exit menu, the receiver will request
you to input the password while you want to watch
the locked channel.
8.1.3. Skip
1. Press Green key to enter skip mode.
2. Press
/ key to move the highlight and press
OK to make a “skip mark” in the right side of the
highlighted channel.
3. After save and exit menu, the channel will be skip
while user change channel in the full screen.
Page 14
14
High Denition Satellite Receiver
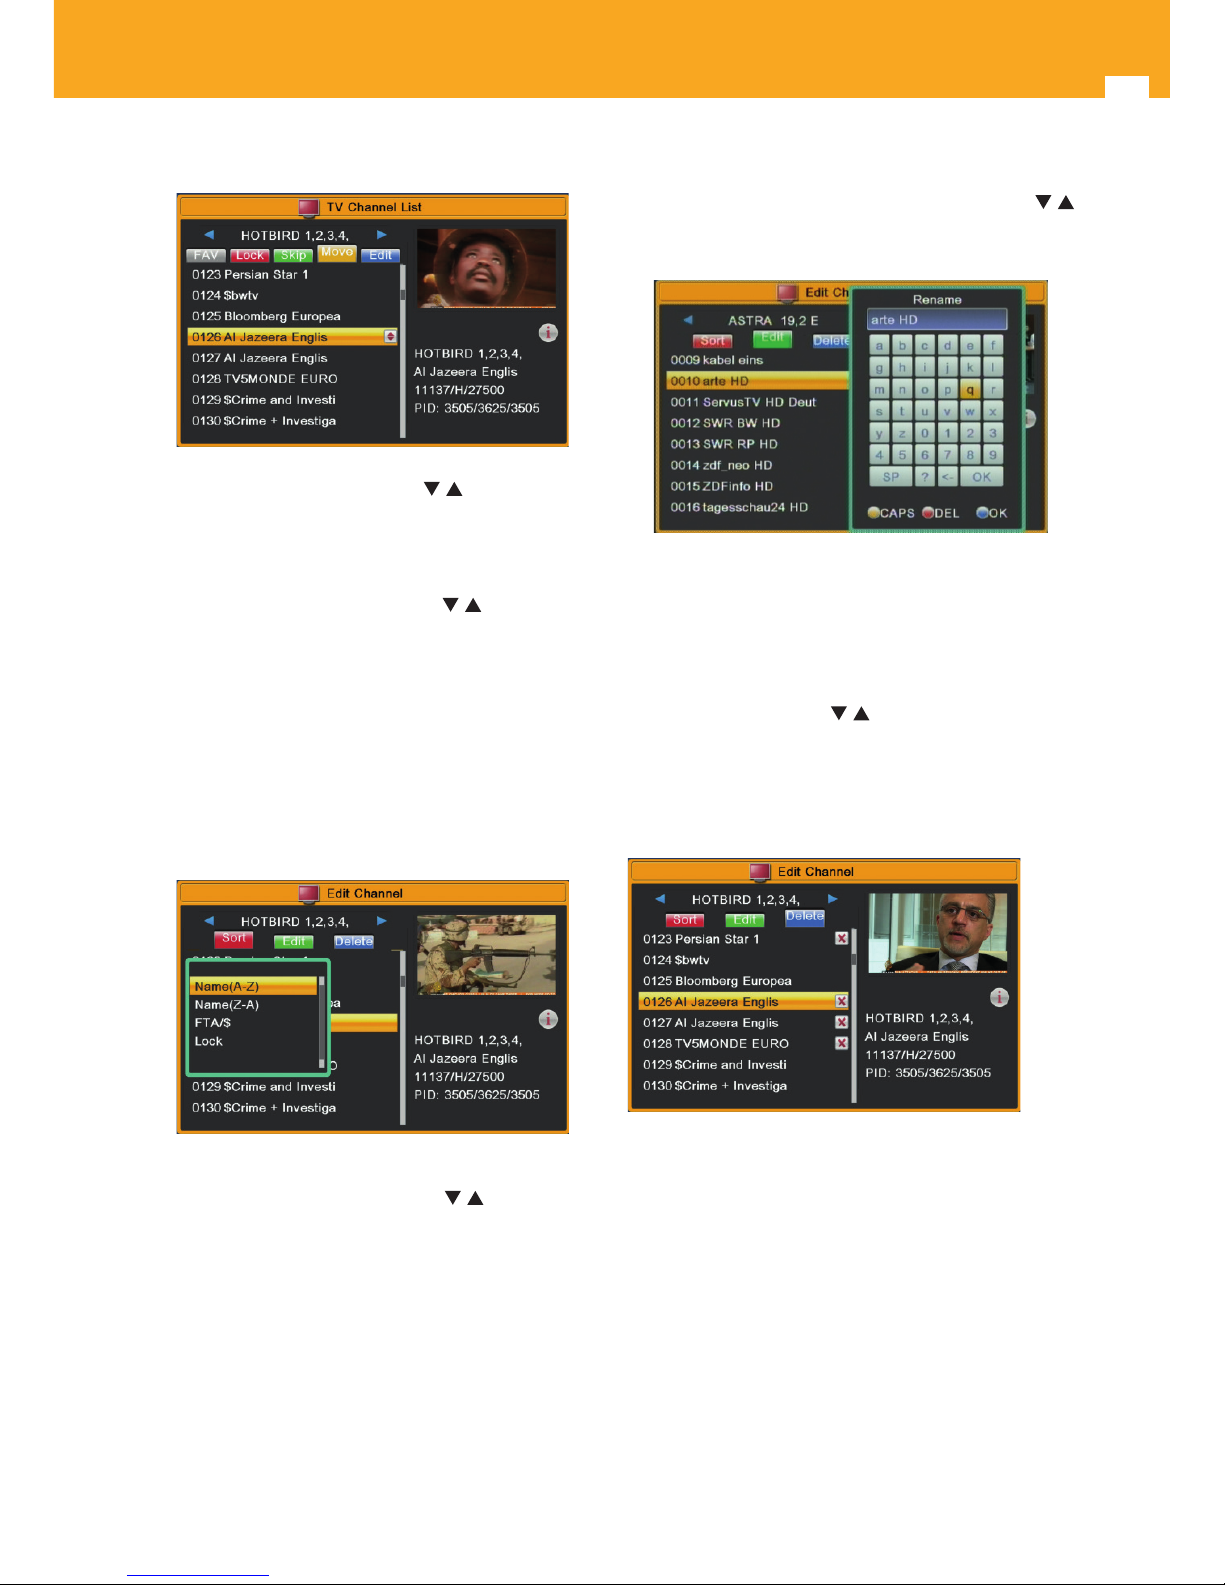
8.1.4. Move
1. Press Yellow key, then press / key to move the
highlight and press OK key to make a mark. There
will show a “moving mark” in the right side of the
selected channel like above.
2. You can move the selected channel to the position
that you want to place by press
/ key. And press
OK key to conrm your decision.
8.1.5. Edit
1. Press Blue key to open “Edit” menu.
2. Press Exit key to exit “Edit Channel” menu. If you
do modication in “Edit Channel” menu, the system
will show up a message box to inquire you whether
saving or not when exit.
8.1.5.1. Sort
Press Red key to open the “Sort” window like above. There
are four kinds of sorting ways. Press
/ key to move
highlight and press OK key to conrm your selection.
The four kinds of sorting way are:
Name (A-Z): Sorting by name “A to Z” (ignore “$”
symbol).
Name (Z-A): Sorting by name “Z to A” (ignore “$”
symbol).
FTA/$: Sort channel through free and scramble
sequence. Free channel will in the front of channel list
and scramble channel ($) will at the end of channel list
Lock: Accumulated all locked channels and list in the
last of TV Channel List.
8.1.5.2 Edit
In “Edit Channel” menu, press Green key then press
/
key to move the highlight and press OK key to open the
“Rename” window. It shows the window like below.
1. Press Yellow key to enable/disable CAPS LOCK.
2. Press Red key to delete the char on the cursor.
3. Press Blue key to save.
8.1.5.3. Delete
Press Blue key, then press
/ key to move the highlight
and press OK key to make a delete mark in the right side
of the highlighted channel.
After save and exit “Edit Channel” menu, the marked
channel will be deleted.
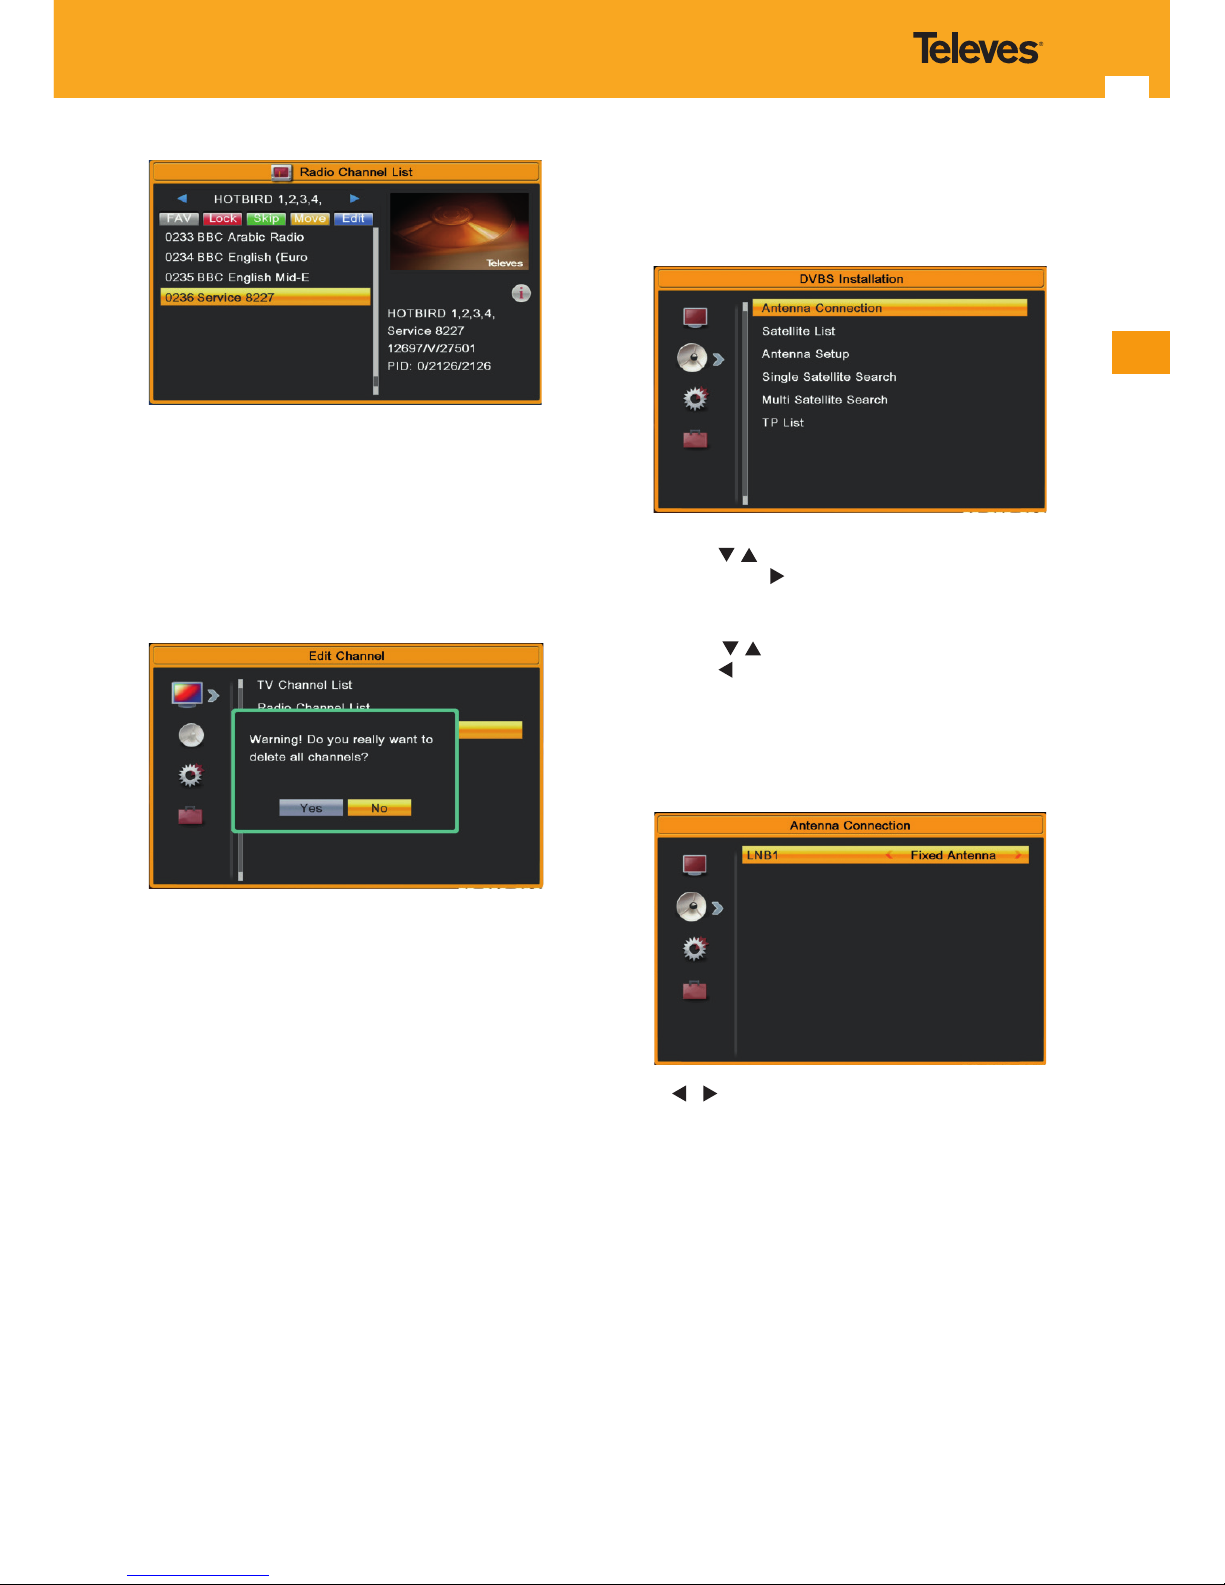
8.2. Radio Channel List
Basically, the operation of “Radio Channel List” is same
as “TV Channel List”, but there is one point dierent: In
“Radio Channel List” mode, there is no video information,
so it will always display “Televes” logo in the right side
preview window.
Page 15
15
EN
8.3. Delete All
To delete all channels from the list of your receiver, select
the “Delete all” option and press OK.
- Conrm delete the list of channels by moving the
cursor to “Yes ” and press OK.
- To watch the channels you will need to perform a new
search.
- If you select “No” or press Exit key, you can exit the
function directly without any action.
9. Installation
When you press Menu key to enter menu, there will
display the picture like below:
1. Press / key to select menu
2. Press OK or key to enter the “Installation”. If Menu
Lock is On it will display a dialogue for user to key in
password. The default Password is “0000”
3. Press
/ key to select menu items
4. Press key or Exit key to go back to main menu.
9.1 Antenna Connection
When you enter to “Antenna Connection” menu, there will
display the screen like below:
Press / key to select LNB. The options available are:
Fixed Antenna / Motor Antenna.
Page 16
16
High Denition Satellite Receiver
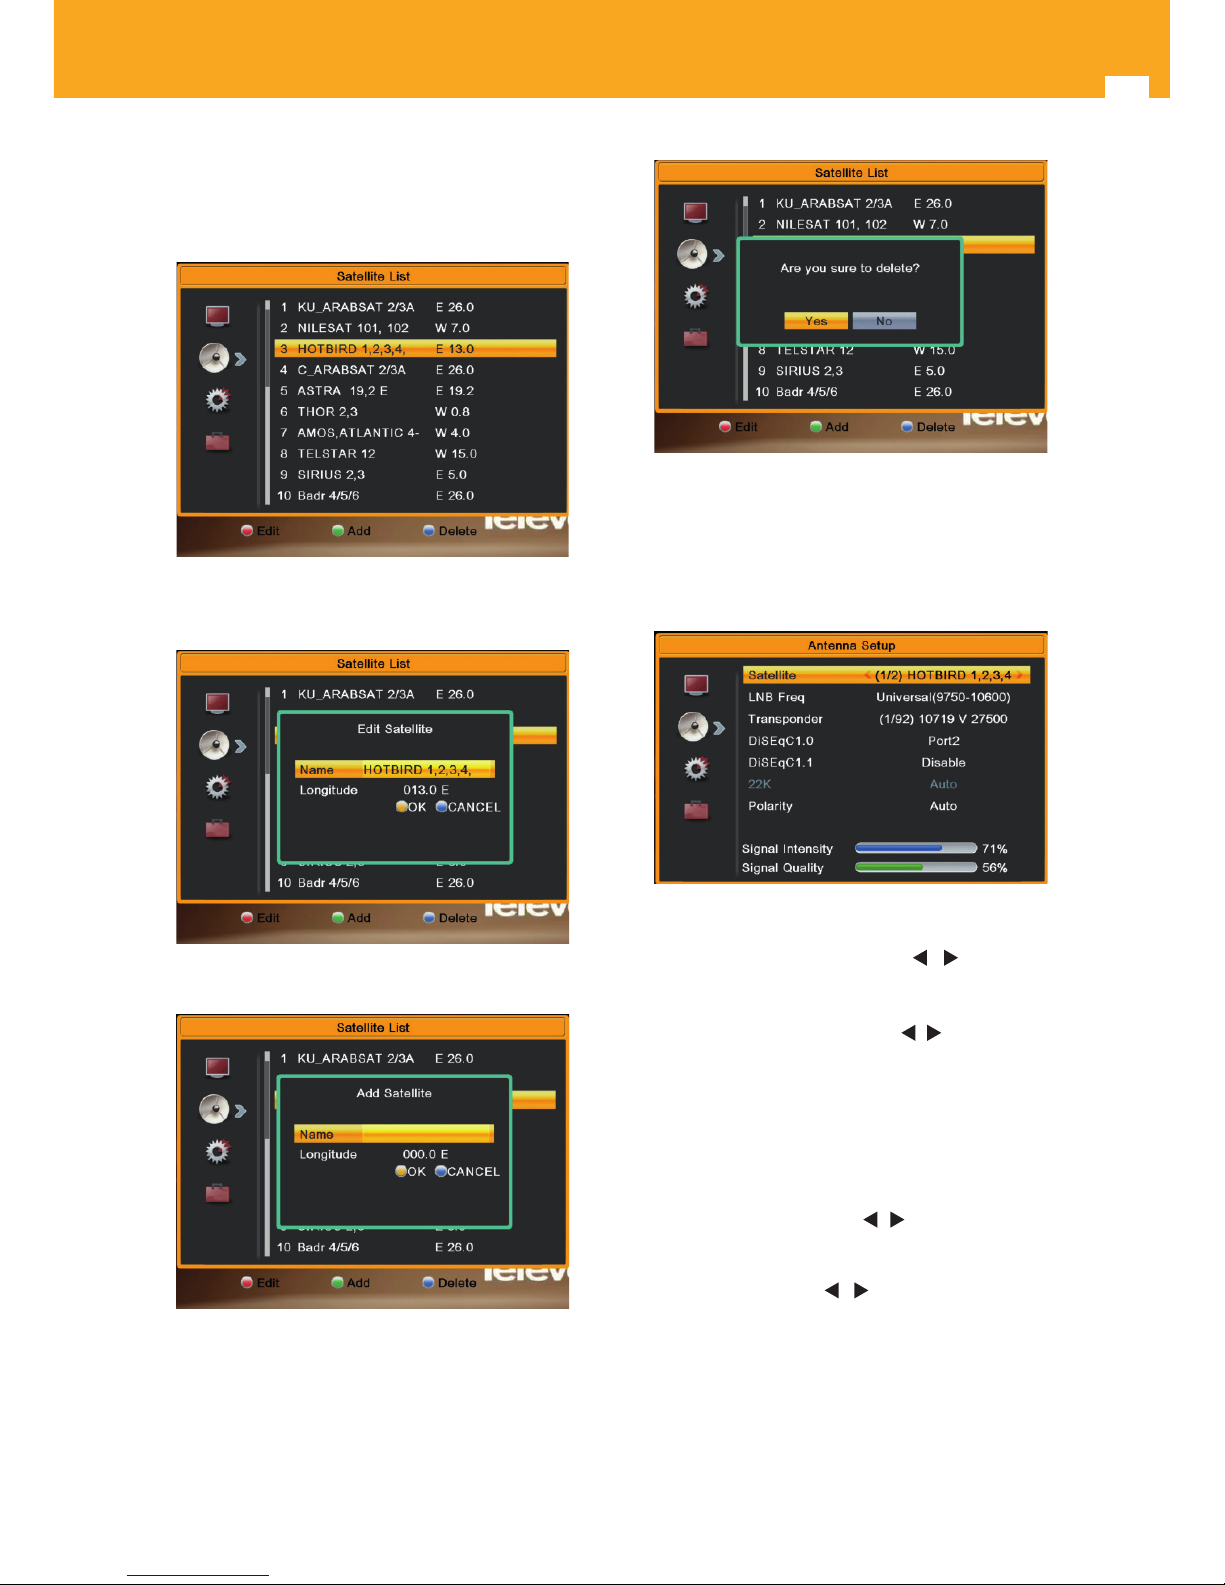
9.2 Satellite List
When you enter to “Satellite List” menu, there will display
the screen like below: (Press OK key to select satellite).
1. Press Red key, to enter edit satellite menu. You can
edit Satellite name and satellite longitude.
2. Press Green key, to enter add satellite menu.
3. Press Blue key, will appear: “Are you sure to delete?”.
Select “Yes” to delete the satellite that highlight
focus on. Select “No” to cancel the operation.
9.3. Antenna Setup
Fixed Antenna:
If you select “Fixed Antenna” in “Antenna Connection”
menu, there will display the screen like below:
In Antenna Setup mode:
1. Satellite: In this item, press
/
key to switch
Satellites and press OK key to enter satellite list for
you select directly.
2. LNB Freq: In this item, press
/
key to select the
parameter. The options available are: 5150; 5750;
5950; 9750; 10000; 10050; 10450; 10600; 10700;
10750; 11250; 11300; 5150-5750; 5750-5150;
Universal (9750-10550); Universal (9750-10600);
Universal (9750-10700); Universal (9750-10750);
Unicable (9750-10600); Unicable (10200-10200);
JESS (9750-10600).
3. DiSEqC1.0: You can use
/ key to switch options.
There are several options for your selection: Disable
/ Port1 / Port2 / Port3 / Port4.
4. 22K: You can use
/
key to switch “ON / O”.
When this item is switched to ON”, receiver will
receive TV and radio input signal from 22K port. If
the item is switched to “O”, the receiver will receive
all signal from 0K port.
Note: If you choose LNB Freq. “Universal”, you
cannot modify 22K.
Page 17
17
EN
5. Polarity: In “Polarity” item, please press / key
to switch between the follwing options: “Auto”, “H”
and “V”.
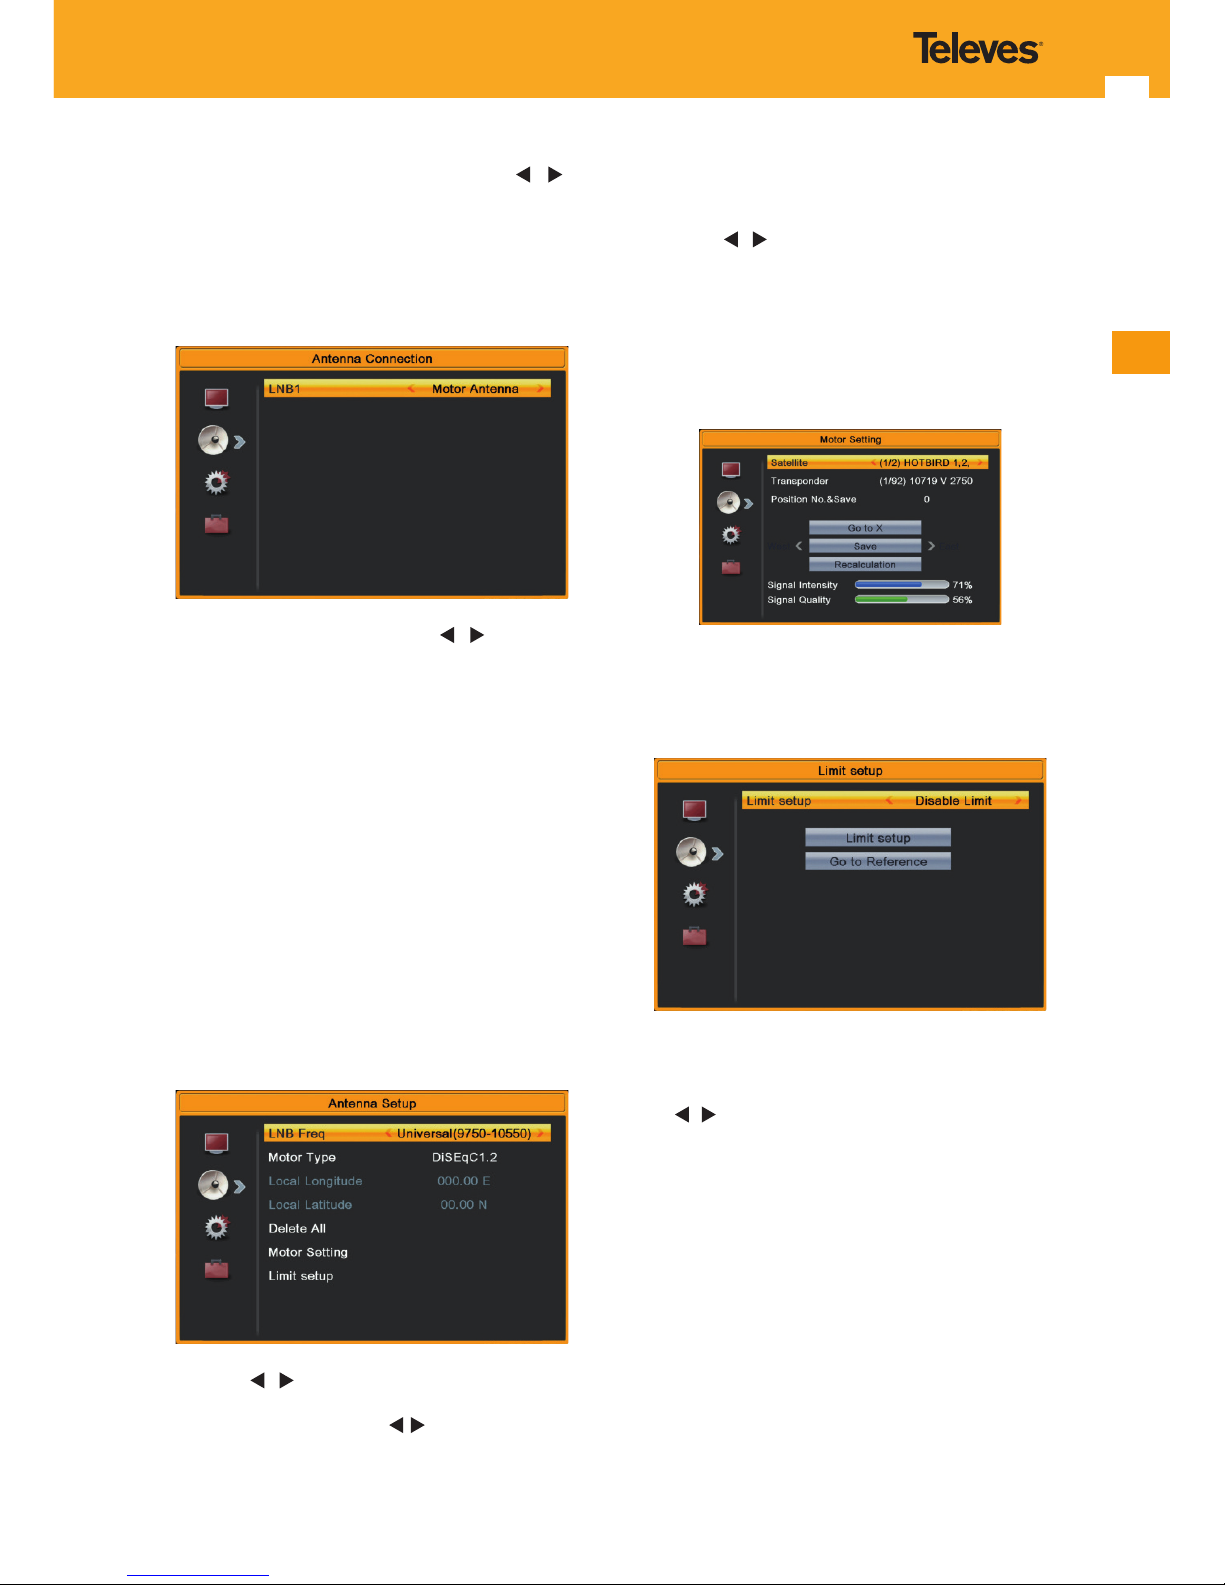
Motor Antenna
If you select “Motor Antenna” in “Antenna Connection”
menu, there will display the screen like below:
1. LNB Freq: In this item, press
/
key to select
between the parameters: 5150; 5750; 5950; 9750;
10000; 10050; 10450; 106 00; 10700; 10750; 11250;
11300; 5150-5750; 5750-5150; Universal (9750-
10550); Universal (9750-10600); Universal (9750-
10700); Universal (9750-10750).
2. Motor Type: Please select between: “DiSEqC1.2” or
“USALS”.
3. Local Longitude/Local Latitude: If you select
“USALS”, “Local Longitude / Local Latitude” is
available. Press OK and number key to input.
4. Delete All: This operation will delete all satellite
positions. It will display a dialogue “Are you sure…”.
If you select “Yes”, it will clear all position. Select “No”
to cancel the operation. This item is only valid in
“DiSEqC1.2” Mode.
5. Motor Type: If you select “DiSEqC1.2”, “Local
Longitude / Local Latitude” is not available. It will
show the screen like below:
• Press
/
key or OK key to change satellite or
transponder.
• Position No.&Save: Press
/
key or number key to
select or input Position No.
• Go to X: Press OK key to open a list. You can go to X
or go to reference.
• After select “Satellite” and ”Position No & Save”, you
can move the highlight to “West/Save/East” line and
press
/ to move the dish and press OK to save
the position.
• Move the highlight to “Recalculation” and press OK
key to recalculate.
• Set the satellite’s longitude and local longitude /
local latitude, USALS can move dish automatically.
Move the highlight to “Motor Setting” and press OK
key, it will show the screen like below:
Switching the satellite to move the dish to the right
place.
6. Limit Setup:
• When you set “limit setup” to “West Limit/ East
Limit”, you can move the highlight to “Limit Setup”
line and move the dish to west or east by pressing
/
key manually.
• When you are moving to the target place, press OK
key to save the point.
Page 18
18
High Denition Satellite Receiver
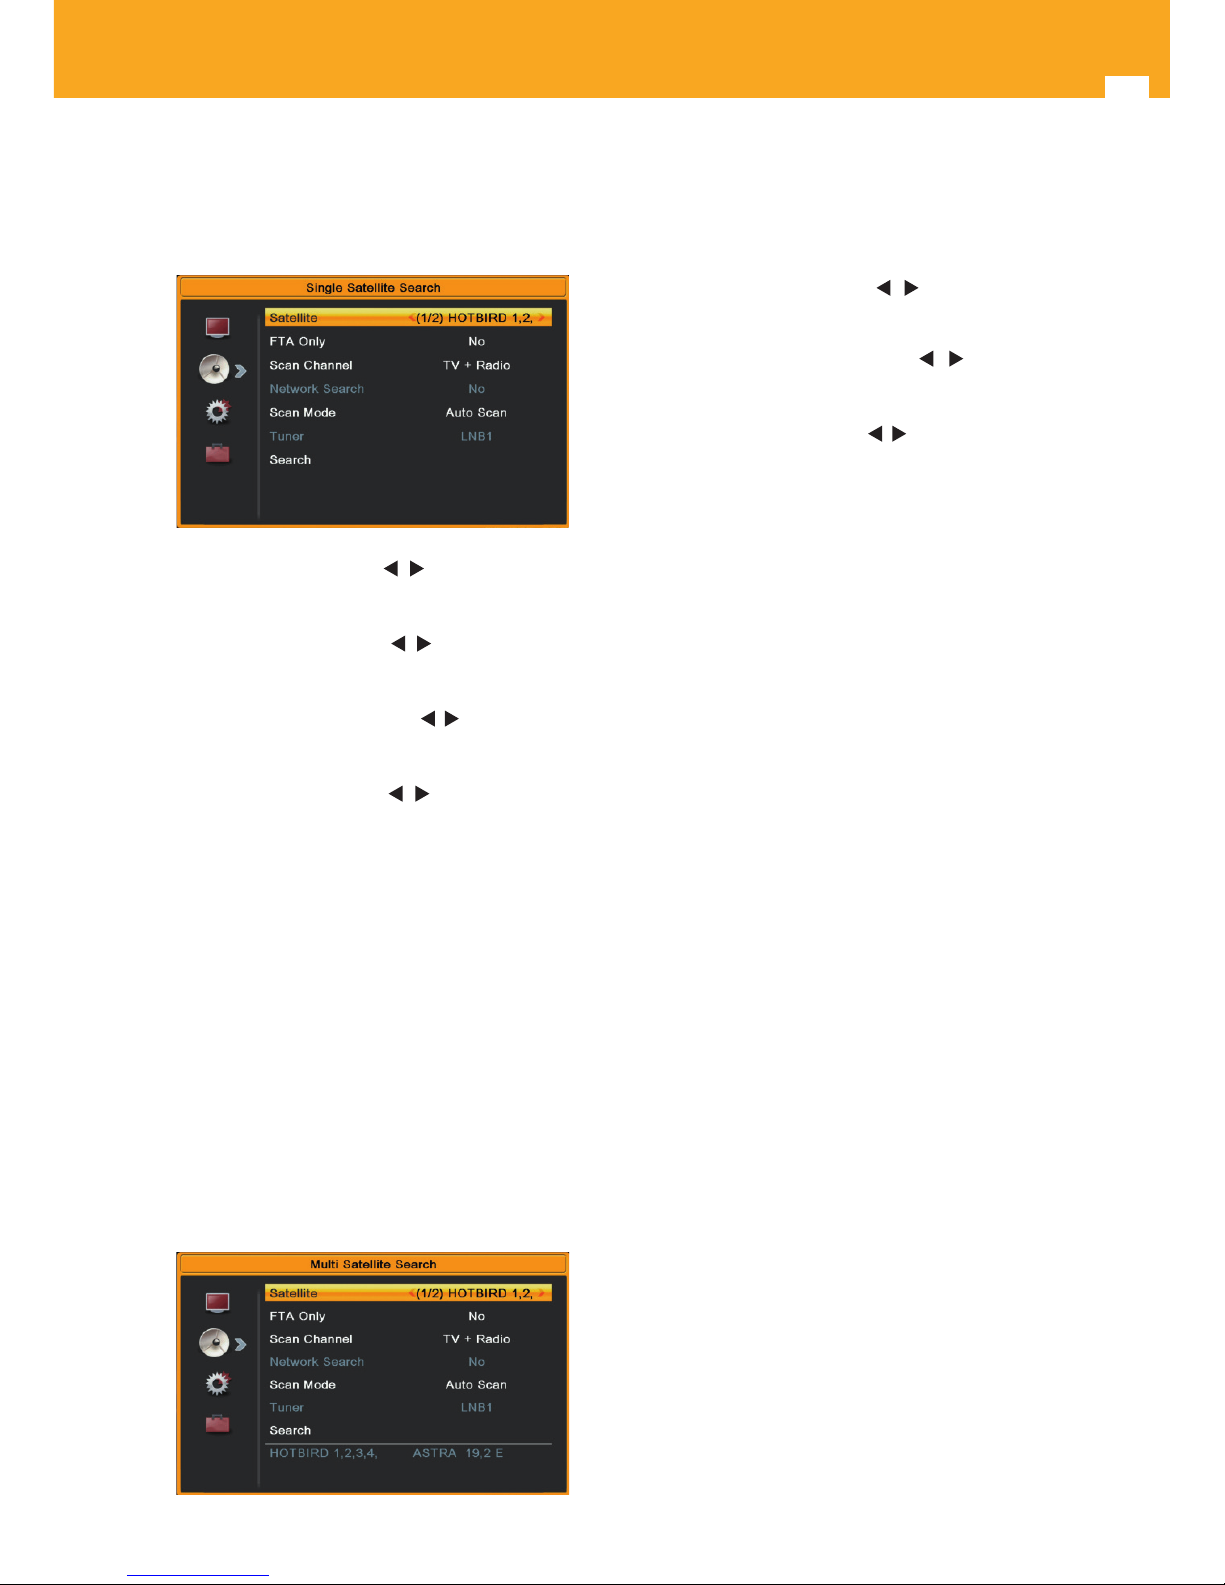
9.4. Single Satellite Search
When you enter to “Single Search” menu, there will display
the screen like below:
1. In “Satellite” item, press
/
key to select satellite,
which you want to scan. Otherwise, press OK key to
open the “satellite list” for you to select directly.
2. In “FTA Only” item, press
/
key to select scan all
channels or just scan free channels. If you select
“Yes”, it will scan free channels only.
3. In “Scan Channel” item, press
/
key to select scan
TV + Radio Channels, or just TV channels or just
Radio channels.
4. In Network Search, press
/ key to select whether
network search or not.
Note!
You can only do network search when you select
“Preset Scan”.
5. In “Scan Mode” item, you can select “Auto Scan” to
blind scan or select “Preset Scan” to scan all preset
TPs.
6. Moving the highlight to “Search” item and press OK
key to start scanning. Next screen will display the
process and show the current scanning channel.
7. In the “Single Search” menu, press Exit key to draw
back from the scanning and meanwhile saving the
current value.
9.5. Multi Satellite Search
When you enter to “Multi Search” menu, there will display
the screen like below:
1. In “Satellite” item, press Ok key to see the selected
satellite. The system will use DiSEqC1.0 / DiSEqC1.2
/ USALS function to search satellite and scan
channels. It will scan all the satellite displaying in
the bottom box.
2. In “FTA Only” item, press
/
key to select scans
all channels or just scans free channels. If you select
“Yes”, it will scan free channels only.
3. In “Scan Channel” item, press
/
key to select
scans TV + Radio Channels, or just TV channels or
just Radio channels.
4. In Network Search, press
/
key to select whether
network search or not.
5. In “Scan Mode” item, you can select “Auto Scan” to
blind scan or select “Preset Scan” to scan all preset
TPs.
6. Moving the highlight to “Search” item and press OK
key to start scanning. Next screen will display the
process and show the current scanning channel.
7. In the “Multi Search” menu, press Exit key to draw
back from the scanning and meanwhile saving the
current value.
Page 19
19
EN
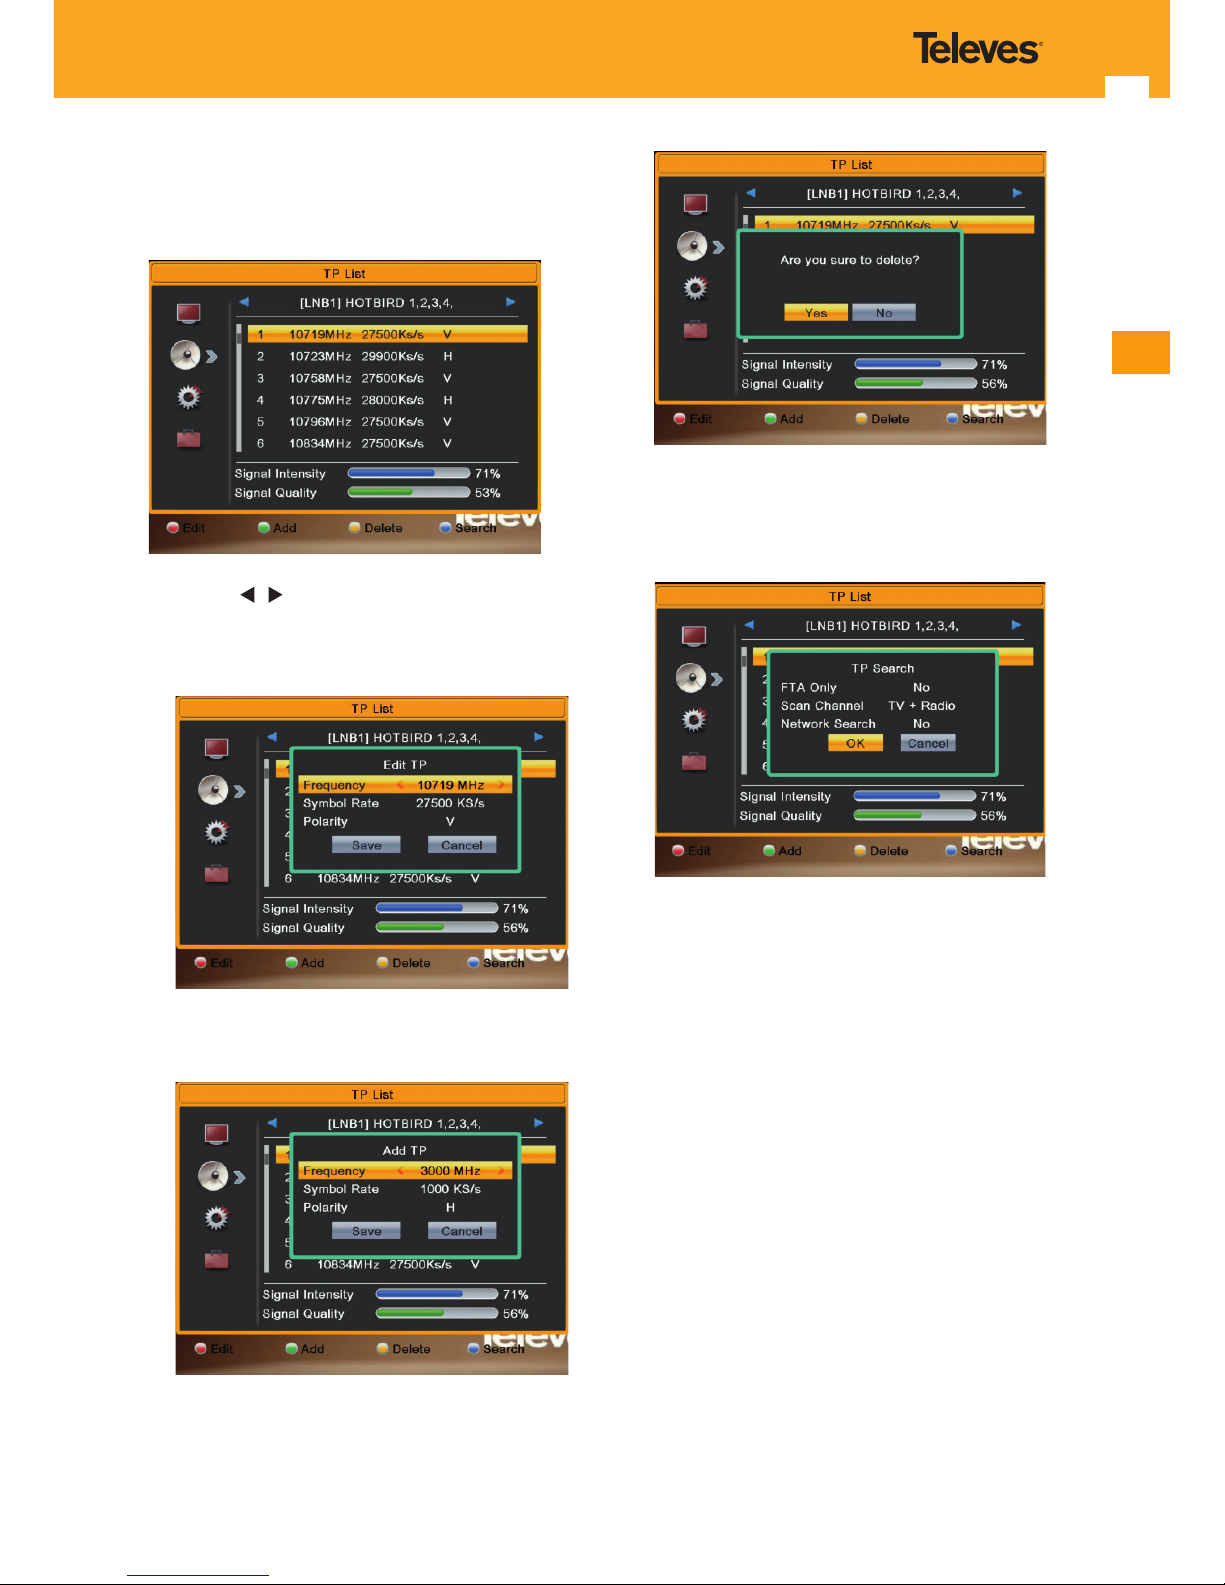
9.6 TP List
When you enter to “TP List” menu, there will display the
screen like below:
1. Press / key, to switch satellite.
2. Press Red key, to open edit TP menu. Now you can
edit TP info. Frequency: “3000~13450 MHz” , Symbol
Rate: “1000~45000Ks/s”.
3. Press Green key, to open new TP menu. You can add
a new TP.
4. Press Yellow key will open dialog box asking you
whether conrm to delete current TP. When select
“Yes”, you will delete the channel which highlight
focus on. When select “No”, it will cancel the
operation.
5. When you press Blue key will display a dialogue
box. You can select “FTA Only, Scan Channel,
Network Search” items, then move highlight to “Yes”
option and press OK to begin to search.
Page 20
20
High Denition Satellite Receiver
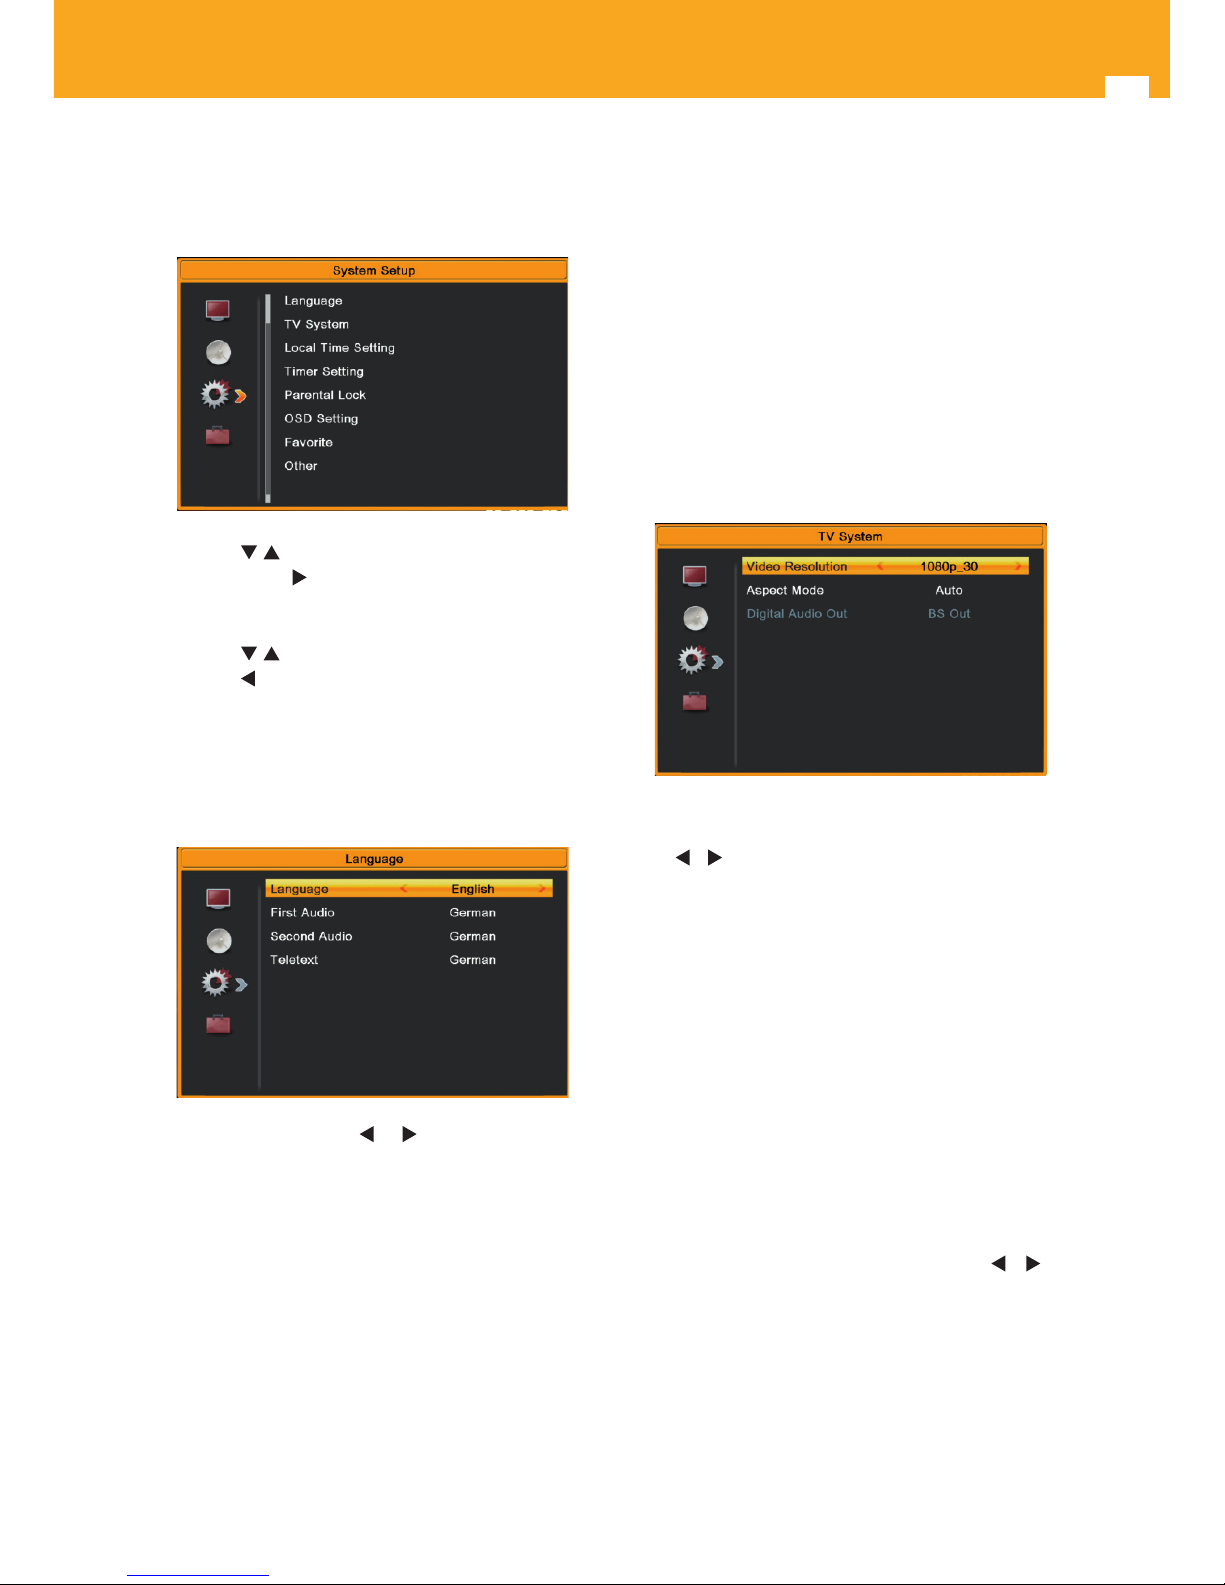
10. System Setup
When you press Menu key to enter menu, there will
display the picture like below:
1. Press / key to select menu.
2. Press OK or
key to enter the “Installation”. If Menu
Lock is “On”, it will display an dialogue for user to key
in password. The default Password is “0000”.
3. Press
/ key to select menu items.
4. Press
key or Exit key to go back to main menu.w
10.1. Language
When you enter to “Language” menu, you will see the
screen like below:
1. Language: press / key to select menu
languages, the selections of languages include:
English, spanish, french…
2. First Audio: Some channels have more than one
audio language for choosing; by this function you
can set the rst audio for this channel. If the playing
channel has the same audio as the “First Audio” you
set, system will play this audio language as default. If
the channel hasn’t the suited audio language, then
the system will compare automatically with second
audio language. The selections of audio languages
include: English, French, German, Russian, Arabic,
Portuguese, Turkish, Spanish, Polish and Italian.
3. Second Audio: If the channel has no correspond
audio with “First Audio” but have corresponded
audio with “Second Audio”, system will play the
second audio language as default. If no audio
language corresponds with the “Second Audio”,
then the default language of current channel will
be played automatically. The selections of audio
languages include: English, French, German,
Russian, Arabic, Portuguese, Turkish, Spanish, Polish
and Italian.
4. Teletext: You can set teletext language. If the
streams have this language you can see the teletext
in language you set.
5. Press Exit key to draw back from “Language” menu.
10.2. TV System
When you enter to “TV System” menu, you will see the
screen like below:
• Video Resolution is for switching the system output
video resolution. Move highlight on it and press
/ key, it will switch video resolution circularly
by the sequence 480i; 480P; 576i; 576P; 720P_50;
720P_60; 1080i_25; 1080i_30; 1080P_25; 1080P_30;
1080P_24. This eect is equal to press V.RES Key
under Full Screen and their last setting saving will
be ecient for each others. By Source means system
will set the video output resolution according to the
program it’s playing, dierent resolution programs
switching perhaps will makes TV screen ickering.
By Native TV means system will be according to
the HDMI TV’s max supported resolution to set its
resolution, if system is not connected to a HMDI TV,
it will set resolution to be default.
Attention: For Scart TV to provide video signal (CVBS),
the selected video resolution must be 480i or 576i.
• Aspect Mode is for switching the screen aspect
ratio mode. Now we provide below options: Auto;
4:3 PS; 4:3 LB and 16:9. You can press
/ key
to select each mode circularly. 16:9 will provide
user pillar box mode it means user use 16:9 TV to
display but need to see a 4:3 full display picture.
System will force press wide screen picture to be
narrow and there’re black band on left and right
site. Auto means system won’t do any aspect ration
translation, 16:9 picture source will be good display
on a 16:9 TV but will be too narrow on a 4:3 TV, and
4:3 picture source will be too wide in a 16:9 TV but
Page 21
21
EN
will be good display in a 4:3 TV.
• Digital Audio Out doesn’t allow editing. The “BS Out”
option is active by default.
• Press Exit key to draw back from “TV System” menu.
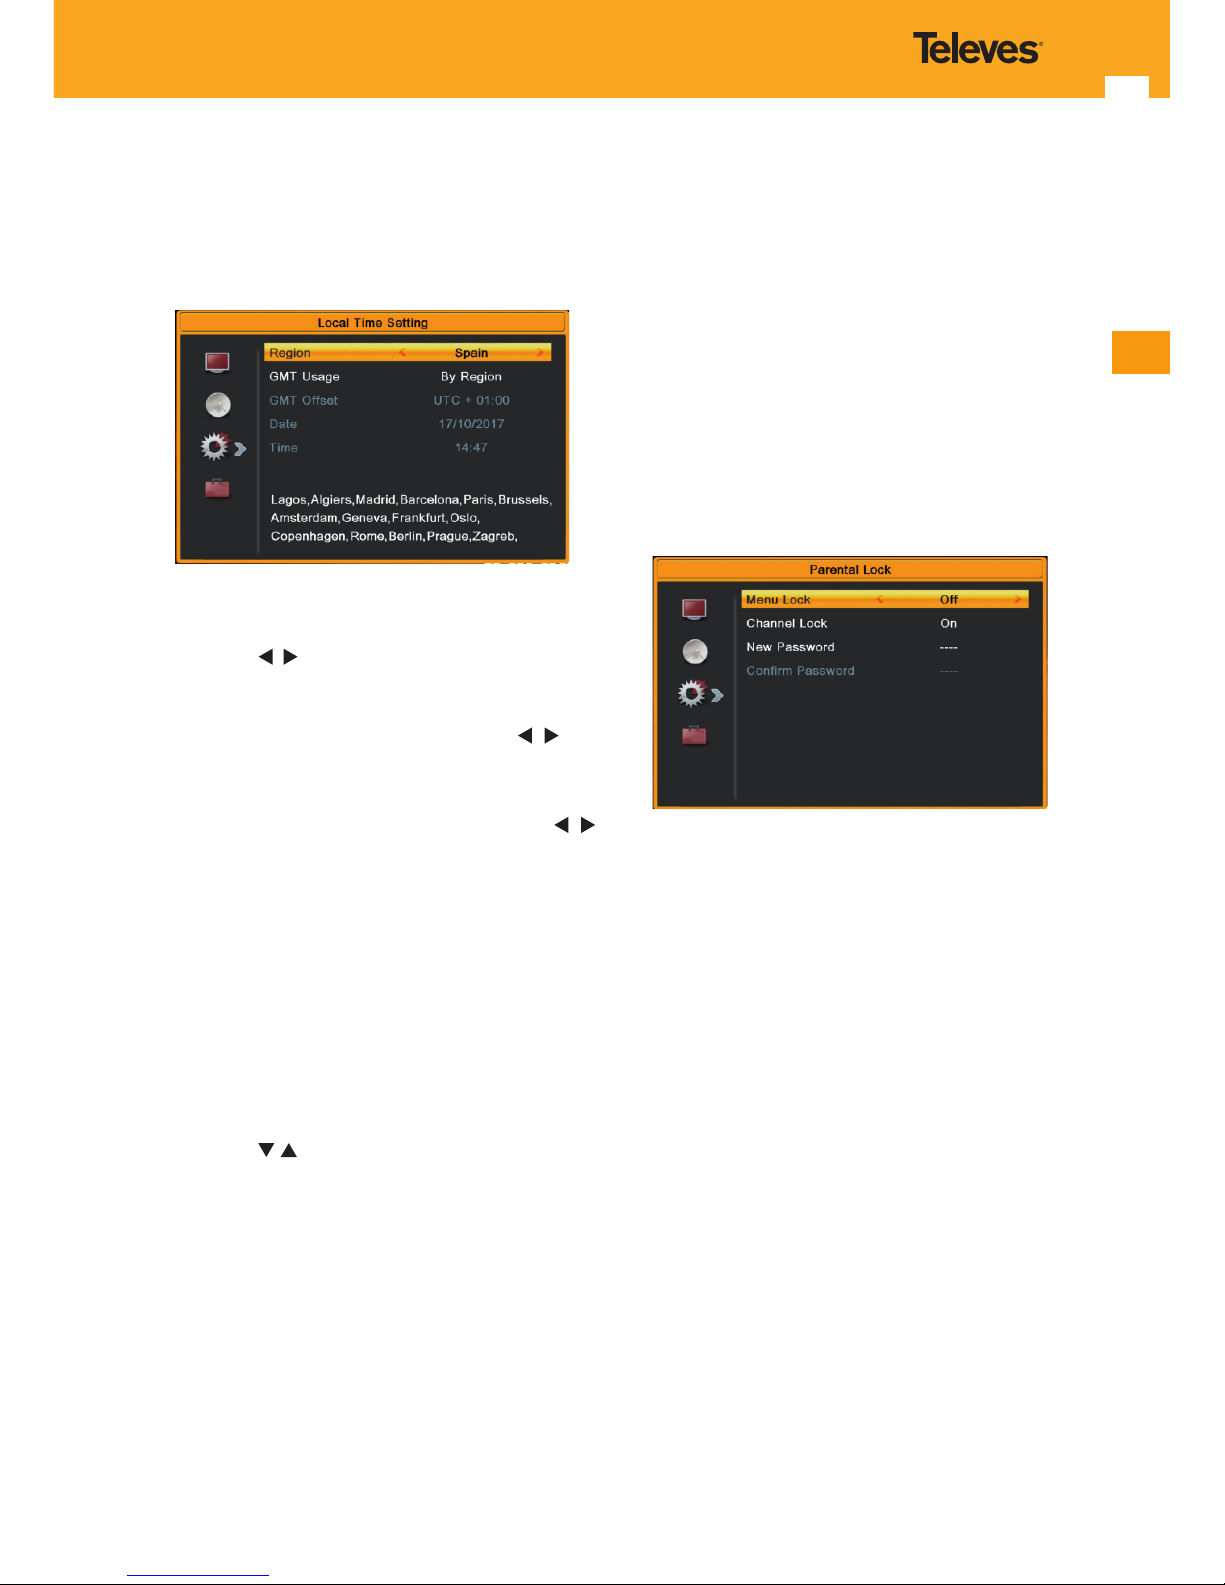
10.3. Local Time Setting
Region: Select your country if it´s available in the list.
GMT Usage: This item is use for open the usage of GMT.
You can press
/
keys to switch “By Region, User Dene
and O”.
1. The “GMT Oset” item is valid only when the setting of
“GMT Usage” is “User Dene”. You can press
/ keys
to switch “GMT Oset” value, and the range is “-11:30
~ +12:00”, increase each half hour progressively.
2. Date and Time items are valid only when the
setting of “GMT Usage” is “O”. You can press
/
keys to moving highlight and use number keys to
input directly.
i. If the current channel provides the correct
time information, you will see the current time
while you enter “Time” menu. If the channel
doesn’t provide time information, you have to
input the date and time information manually
3. Press Exit key to draw back from “Time” menu.
10.4. Timer Setting
Select “Timer Setting” item and press OK key to enter
“Timer list” menu.
You can press
/ key to select a timer, then press enter
key to open timer menu.
1. Current time information will display on the rst
column; if the current time is incorrect, please
modify the time information in “Time” item.
2. Timer Mode: There are several modes for Timer to
setting, include O, Once, Daily and weekly.
3. Wakeup Channel: press OK key to enter channel
list and select channel that you want to setting.
4. Wakeup Date: use number keys to input your
wakeup date.
5. On Time: use number keys to input your wakeup
time. Once the time’s up, no matter what the system
is in standby mode or in playing mode, the system
will automatically switch to the channel you want
and start to play.
6. Duration: After you set a time for “Duration” item,
once the time’s up, the system will automatically
switch to standby mode. If you want not work this
function, set the duration is 00:00.
Move the highlight to “Save” option and press OK key to
save timer. Select “Cancel” or press Exit key to cancel the
operation.
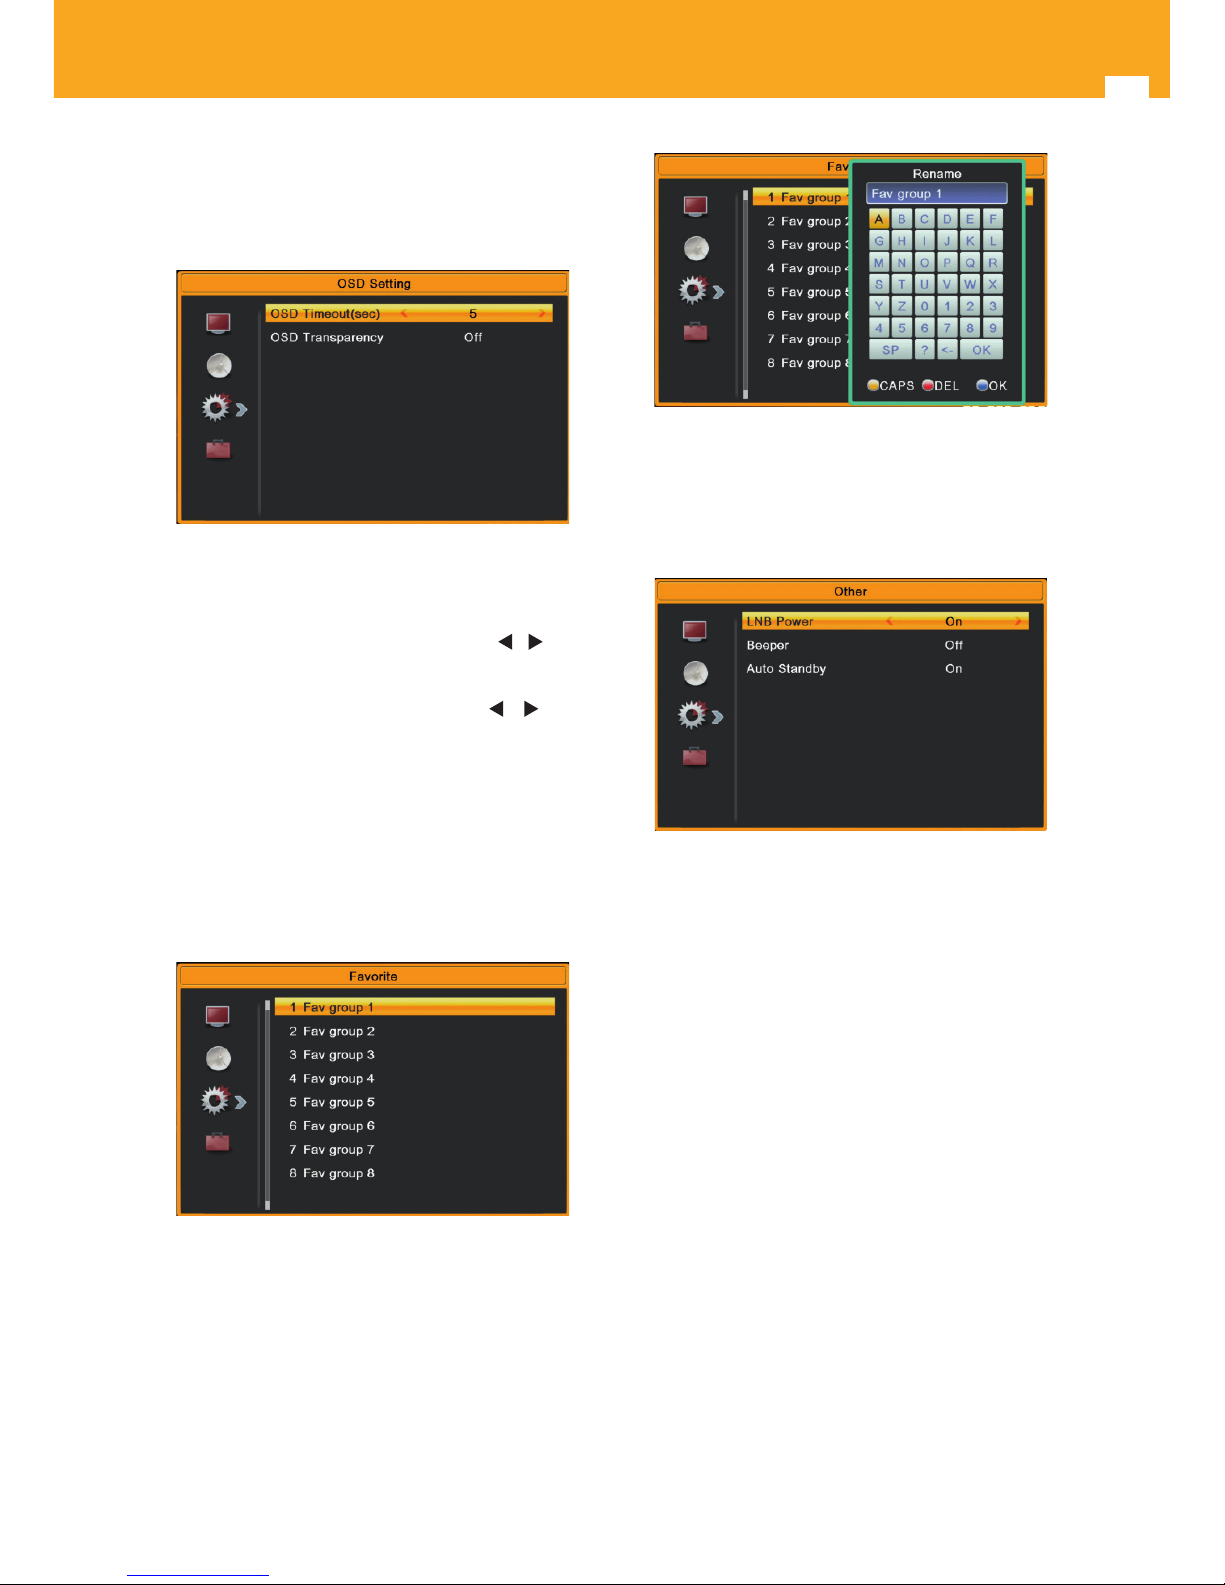
10.5. Parental Lock
1. In “Parental Lock” line, press OK key, there will pop
a dialogue for you to input the password. Default
password is “0000”. When you input the correct
password, you will see a screen like below.
2. Menu Lock determining that when users wish to
enter “Edit Channel/Installation/Sytem Setup/Tools”
menu, whether have to input Password or not. If the
setting of “Menu Lock” is “Yes” which means user
have to key in password, set “No” means unlock.
3. Channel Lock determining that when users wish
to play the lock channels, whether have to input
the password or not. If the setting is “Yes”, play the
channels with lock mark will show up a dialogue on
the screen and ask for the password. If the setting of
“Channel Lock” is “No”, the Lock function will invalid.
4. New Password is used for revising password; you
can input the new password in this item by using
number keys directly. After you lled in 4 digital
numbers, the highlight will auto skip to Conrm
Password and ask you to input the new password
again. If the password is correct, the screen will
show up a message of “Saving Data, Please Wait…”.
After nish saving and draw back to “System Setup”
menu, the revising is complete.
5. Press Exit key to draw back from the “Parental Lock”
menu.
Page 22
22
High Denition Satellite Receiver
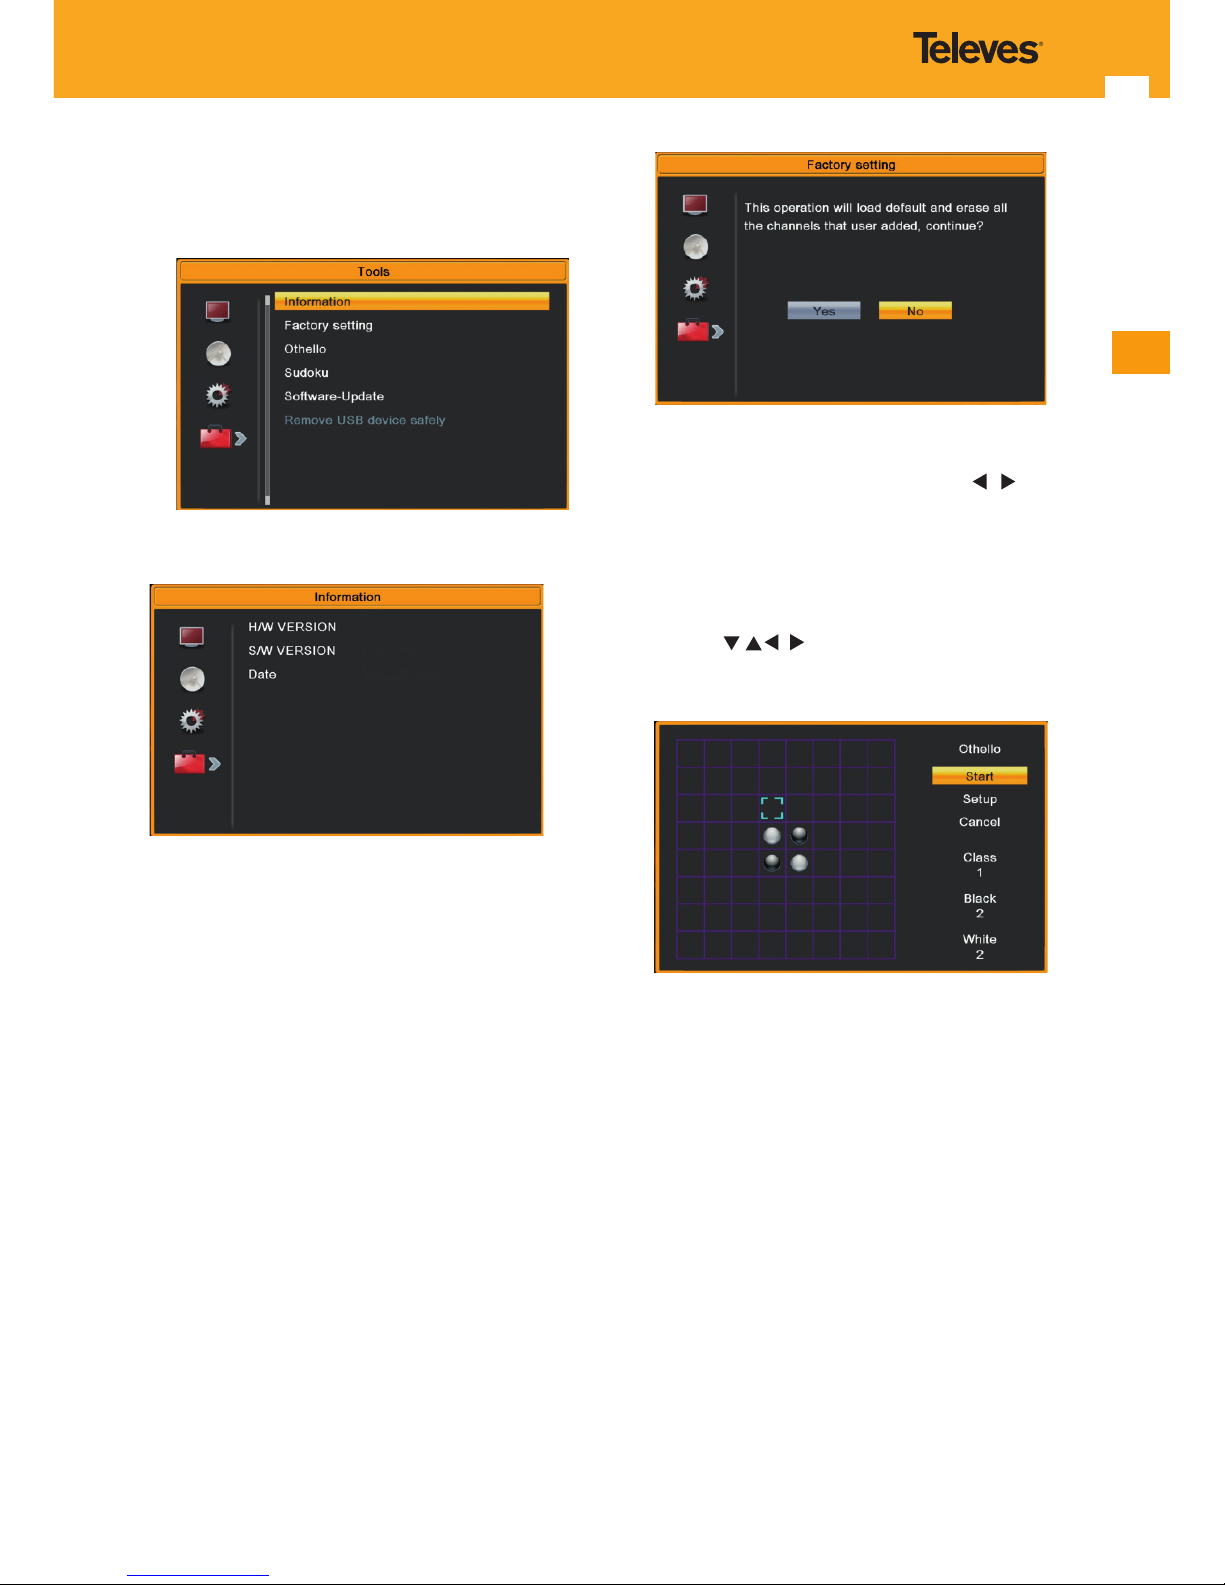
10.6. OSD Setting
When you input to “OSD Setting” menu, you will see a
screen like below:
1. OSD Timeout: When you switch channels in full
screen, there will show up some information about
current channel on the lower of the screen. And
regarding to the duration of these information
show up on the screen, you can press / key to
set the time. The range of the duration is “1 second
~ 10 seconds”.
2. OSD Transparency: You can press / key to
select the values. There are 5 levels of transparency,
10%, 20%, 30%, and 40% and “NO” (means no
transparency function).
3. Press Exit key to draw back from the “OSD Setting”
menu.
10.7. Favorite
When you input to “Favorite” menu, you will see a screen
like below:
When press OK key, you can rename the favourite group’s
name. It will display the dialogue like below:
1. Press Yellow key to enable/disable CAPS LOCK.
2. Press Red key to delete the char on the cursor.
3. Press Blue key to save.
10.8. Other
1. In “LNB Power”, there are two options, “On” and
“O”, for your selection. If the setting is “On”, the
receiver will supply power to satellite antenna. If the
setting is “O”, the receiver won’t supply power to
satellite antenna.
2. In “Beeper”, there are two options, “On” and “O”,
for your selection. If the setting is “On”, when enter
“Antenna Setup” menu, the receiver will make a
continuous sound when signal is locked, and make
a intermittent sound when signal is unlocked. If the
setting is “O”, enter “Antenna Setup” menu, the
receiver won’t make any sound.
3. In ”Auto standby”, you can set standby mode, if
user does not operate over 3 hours.
4. Press Exit to draw back from “Other” menu.
Page 23
23
EN
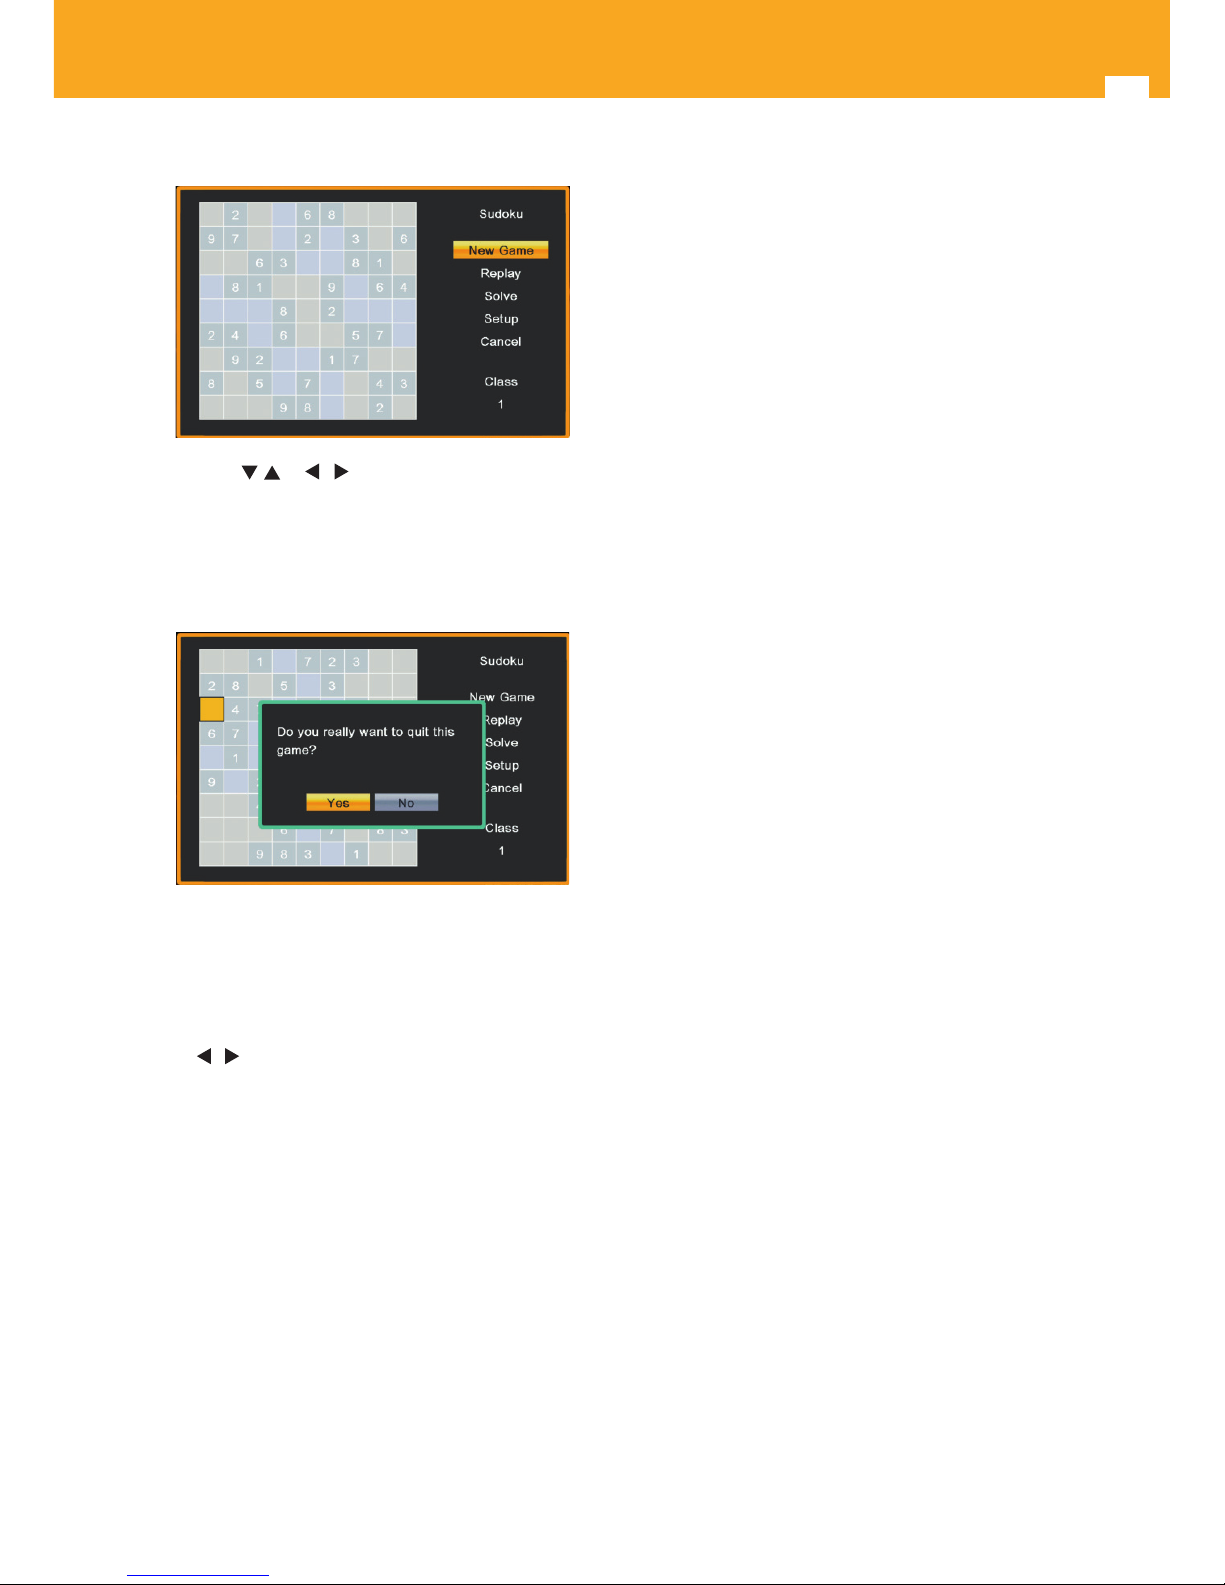
11. Tools
When you press Menu key to enter menu, there will
display the picture like below:
11.1. Information
When you enter to “Information” menu, you will see a
screen like above. The screen displays the followings
information:
- HW Version
- SW Version
- Date
Press Exit key to draw back from “Tools” menu.
11.2. Factory Setting
This menu allows you to delete all channels and return the
receiver to the initial state (factory default).
When you press OK key in the “Factory Setting” item:
1. It will display a message for digit the password.
2. It will show a warning message to inquiry you
“The operation will load default and erase all the
channels that user added, continue?”.
3. If you select “Yes” option, the all revised parameters
of the receiver will reset to default value. Please
carefully to using this function.
4. In step 1 and step 2, select “No” or press Exit key can
draw back from this item and without saving.
5. After factory default, the receiver displays the initial
installation.
6. First steps.
11.3. Othello
1. Moving highlight to “Setup” and press / keys to
select the game level (degree of diculty).
2. Moving highlight to “Start” and press OK key to start
the game.
3. Moving highlight to [Cancel] keys and press OK key
to draw back from the game.
4. Start on the game:
• / / — Use these keys to guide chessman
• OK — Set chessman
• Exit — Quit game
Page 24
24
High Denition Satellite Receiver
11.4. Sudoku
1. Press / or / to move highlight to the blank
grid.
2. Press number key to input number.
3. If you press Exit key, it will ask you to conrm as
below.
4. Select “Yes” to quit or [No] to play continuously
5. Select “New Game” to begin to play a new game.
6. Select “Replay” to play last game again.
7. Select “Solve” to see the result.
8. When you move the highlight to “Setup”, pressing
/ key to select class.
9. Select “Cancel” to exit.
11.5. Software-Update
When you enter to “Software-update” menu, you will see
a screen like above. The screen displays the followings
options:
- Upgrade by USB
- Save Channel List
- Load Channel List
11.5.1. Upgrade By USB
If you have a new software version and wish to update
your receiver 717402, please proceed as follows:
Copy the software in a empty memory stick (pen drive FAT
32 or NTFS) in the root directory.
Connect the memory stick to the receiver (front USB
connector).
Select “Upgrade by USB” option and press OK.
In “Upgrade File” select the correct le (.abs).
Then select START and press OK key to begin upgrade.
The update may take a few moments. Please wait.
Attention: The receiver 717402 shouldn´t be powered
o during the updating process.
Updating with unocial software implies a loss of
warranty.
11.5.2 Save Channel List
If you want to have your channel list on other receivers
without having to search, you can export it.
- Connect a memory stick (pen drive FAT 32 or NTFS) to
the receiver (front USB connector).
- Select “Save Channel List” option and press OK.
- The receiver shall save the channel list on the memory
stick.
- This process is almost instantaneous. Please wait.
11.5.3 Load Channel List
If you have an updated list of channels and wish to update
your receiver 717402 , proceed as follows:
- Copy the list in a memory stick (pen drive FAT 32 or
NTFS) in the root directory.
- Connect the memory stick to the receiver (front USB
connector).
- Select the “Load Channel List” option and press OK.
- Choose the le that you want to update on the
“Upgrade File”.
- Move the cursor to “Start” option and press OK.
-The update may take a few moments. Please wait.
11.6. Remove USB device safely
Please access this option before removing safely the USB
device from your receiver 717402.
Select this option and press OK key.
Now choose the USB disk and select OK to conrm.
The message “USB disk ... disconnected” will appear.
Page 25

25
EN
12. Technical specications
LNB / Tuner
Input connector: 1 x IEC 60169-24 (F-type female)
Input frequency: 950 - 2150 MHz
Demodulation: DVB-S (QPSK), DVB-S2 (QPSK and 8PSK)
Impedance: 75 Ω
FEC: 1/2, 2/3, 3/4, 5/6, 7/8, Auto
Symbol rate: 1- 45 Mbit/s
Input signal level: -65 to -25 dBm
Band selection 13V (Vertical), 18V (Horizontal), 22 kHz
LNB powering (13V
/18V ): 300 mA
DiSEqC control: Tone Burst, 1.0, 1.1, 1.2, USALS, SCR1 and
SCR2.
Video
Compatible with: MPEG-2 Video (MP@ML), MPEG-4 Video
(H.264)
Aspect ratio: 4:3 PS, 4:3 LB, 16:9 and Auto
Video resolution: 480i, 480p, 576i, 576p, 720p, 1080i,
1080p.
Audio
Audio decoder: MPEG layer I & II
Digital audio output (S/PDIF): Coaxial
Ambient Specications:
Operating temperature: -5 to 40 °C
HD receiver Power:
Input Voltage: 12V
Max. electrical consumption: 385mA (powering an
universal LNB)
Power Adapter:
Mains voltage 100-240V~ 50/60Hz
Output: 12V 1.5A
Type: Switched-mode
Power Consumption: Max. 3.8W
Physical Specications:
Dimension (W x H x D): 155 mm x 34 mm x 112 mm
Weight (approx.): 330 grs.
Page 26
26
High Denition Satellite Receiver
13. Menu structure
OSD Setting
Radio Channel List
Edit Channel
Installation
TV Channel List
DVBS installation
Fav
Lock
Skip
Move
Edit --- (Sort /Edit/Delete)
Fav
Lock
Skip
Move
Antenna Connection
LNB1
Fixed Antenna
Motor Antenna
Edit --- (Sort /Edit/Delete)
Delete All
Satellite List
Edit
Add
Delete
Antenna Setup
Satellite
LNB Freq
Transponder
DiSEqC 1.0
DiSEqC 1.1
22K
Polarity
Single Satellite Search
Satellite
FTA Only
Scan Channel
Network Search
Scan Mode
Tuner
Search
Multi Satellite Search
Satellite
FTA Only
Scan Channel
Network Search
Scan Mode
Tuner
Search
TP List
Edit
Add
Delete
Search
TV System
System Setup
Language
Language
First Audio
Second Audio
Teletext
Video Resolution
Aspect Mode
Digital Audio OUT
TV System
Video Resolution
Aspect Mode
Digital Audio OUT
Factory Setting
Tools
Information
H/W Version
S/W Version
Date
Factory Setting
Othello
Sudoku
Software-Update
Software-Update
Yes
No
Upgrade By USB
Disk Remove (OK, Cancel)
Save Channel List
Load Channel List
Region
Local Time Setting
GMT Usage
Timer Setting
1 O... 8 O
GMT Oset
Data
Time
Parental Lock
Menu Lock
Channel Lock
New Password
Other
LNB Power
Beeper
Auto Standby
Conrm Password
OSD Time out (sec)
OSD Transparency
Timer Mode
Favourite
1 Fav group 1... 8 Fav group 8
Rename (CAPS, DEL , OK)
Wake up Channel
Wake up Date
On time
Duration
OSD Setting
TV System
System Setup
Language
Language
First Audio
Second Audio
Teletext
Video Resolution
Aspect Mode
Digital Audio OUT
TV System
Video Resolution
Aspect Mode
Digital Audio OUT
Factory Setting
Tools
Information
H/W Version
S/W Version
Date
Factory Setting
Othello
Sudoku
Software-Update
Software-Update
Yes
No
Upgrade By USB
Disk Remove (OK, Cancel)
Save Channel List
Load Channel List
Region
Local Time Setting
GMT Usage
Timer Setting
1 O... 8 O
GMT Oset
Data
Time
Parental Lock
Menu Lock
Channel Lock
New Password
Other
LNB Power
Beeper
Auto Standby
Conrm Password
OSD Time out (sec)
OSD Transparency
Timer Mode
Favourite
1 Fav group 1... 8 Fav group 8
Rename (CAPS, DEL , OK)
Wake up Channel
Wake up Date
On time
Duration
Page 27
27
EN
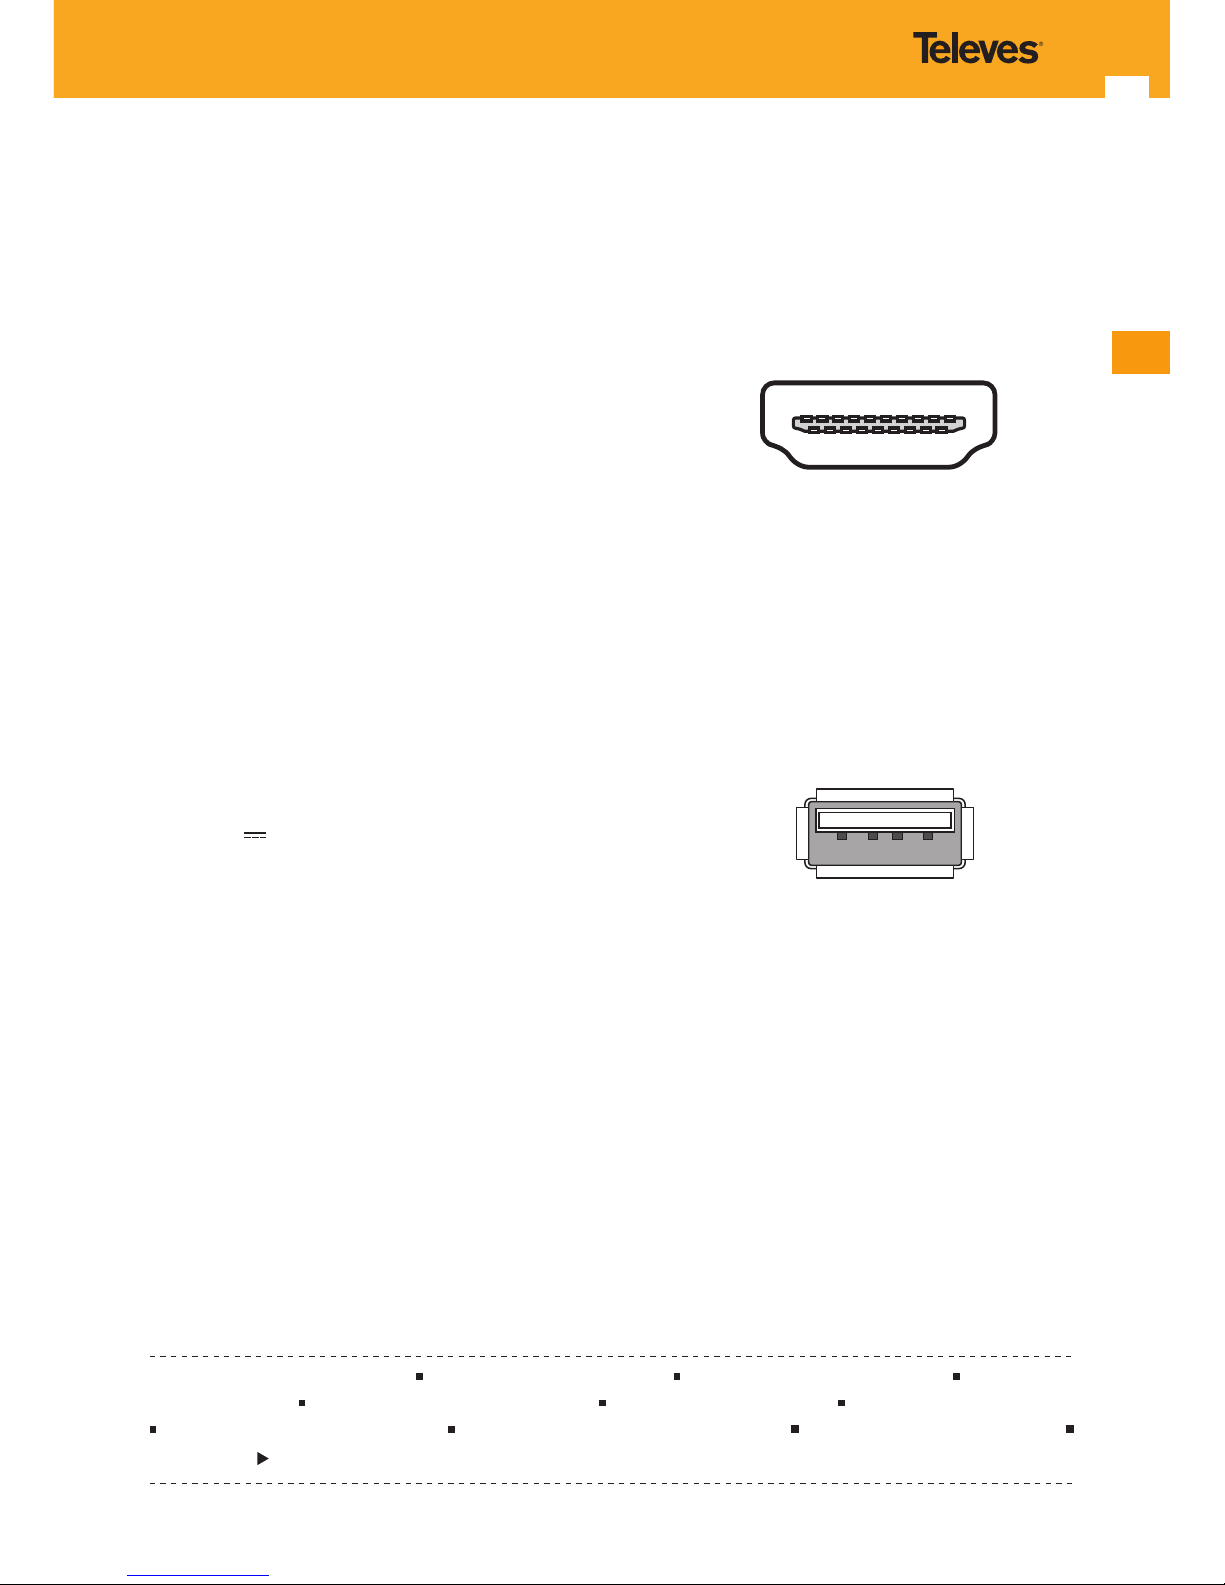
14. Connectors description
14.1 HDMI
PIN NAME PIN NAME
1 TMDS Data2+ 11 TMDS Clock Shield
2 TMDS Data2 Shield 12 TMDS Clock–
3 TMDS Data2– 13 CEC
4 TMDS Data1+ 14 Reserved (N.C. on device)
5 TMDS Data1 Shield 15 SCL
6 TMDS Data1– 16 SDA
7 TMDS Data0+ 17 DDC/CEC Ground
8 TMDS Data0 Shield 18 +5 V Power (max 50 mA)
9 TMDS Data0– 19 Hot Plug Detect
10 TMDS Clock+
14.2 USB connector
PIN NAME PIN NAME
1 +5V
3 Data USB +
2 Data USB - 4 GND (ground)
1 2 3 4
DECLARACIÓN DE CONFORMIDAD DECLARATION OF CONFORMITY DECLARAÇÃO DE CONFORMIDADE DECLARATION
DE CONFORMITE
DICHIARAZIONE DI CONFORMITÀ DEKLARACJA ZGODNOŚCI KONFORMITÄTSERKLÄRUNG
ΠΙΣΤΟΠΟΙΗΤΙΚΟ ΣΥΜΜΟΡΦΩΣΗΣ FÖRSÄKRAN OM ÖVERENSSTÄMMELSE ДЕКЛАРАЦИЯ СООТВЕТСТВИЯ
بيان المطابقة
https://doc.televes.com
Page 28

www.televes.com
717402_001_EN
 Loading...