

Page 1
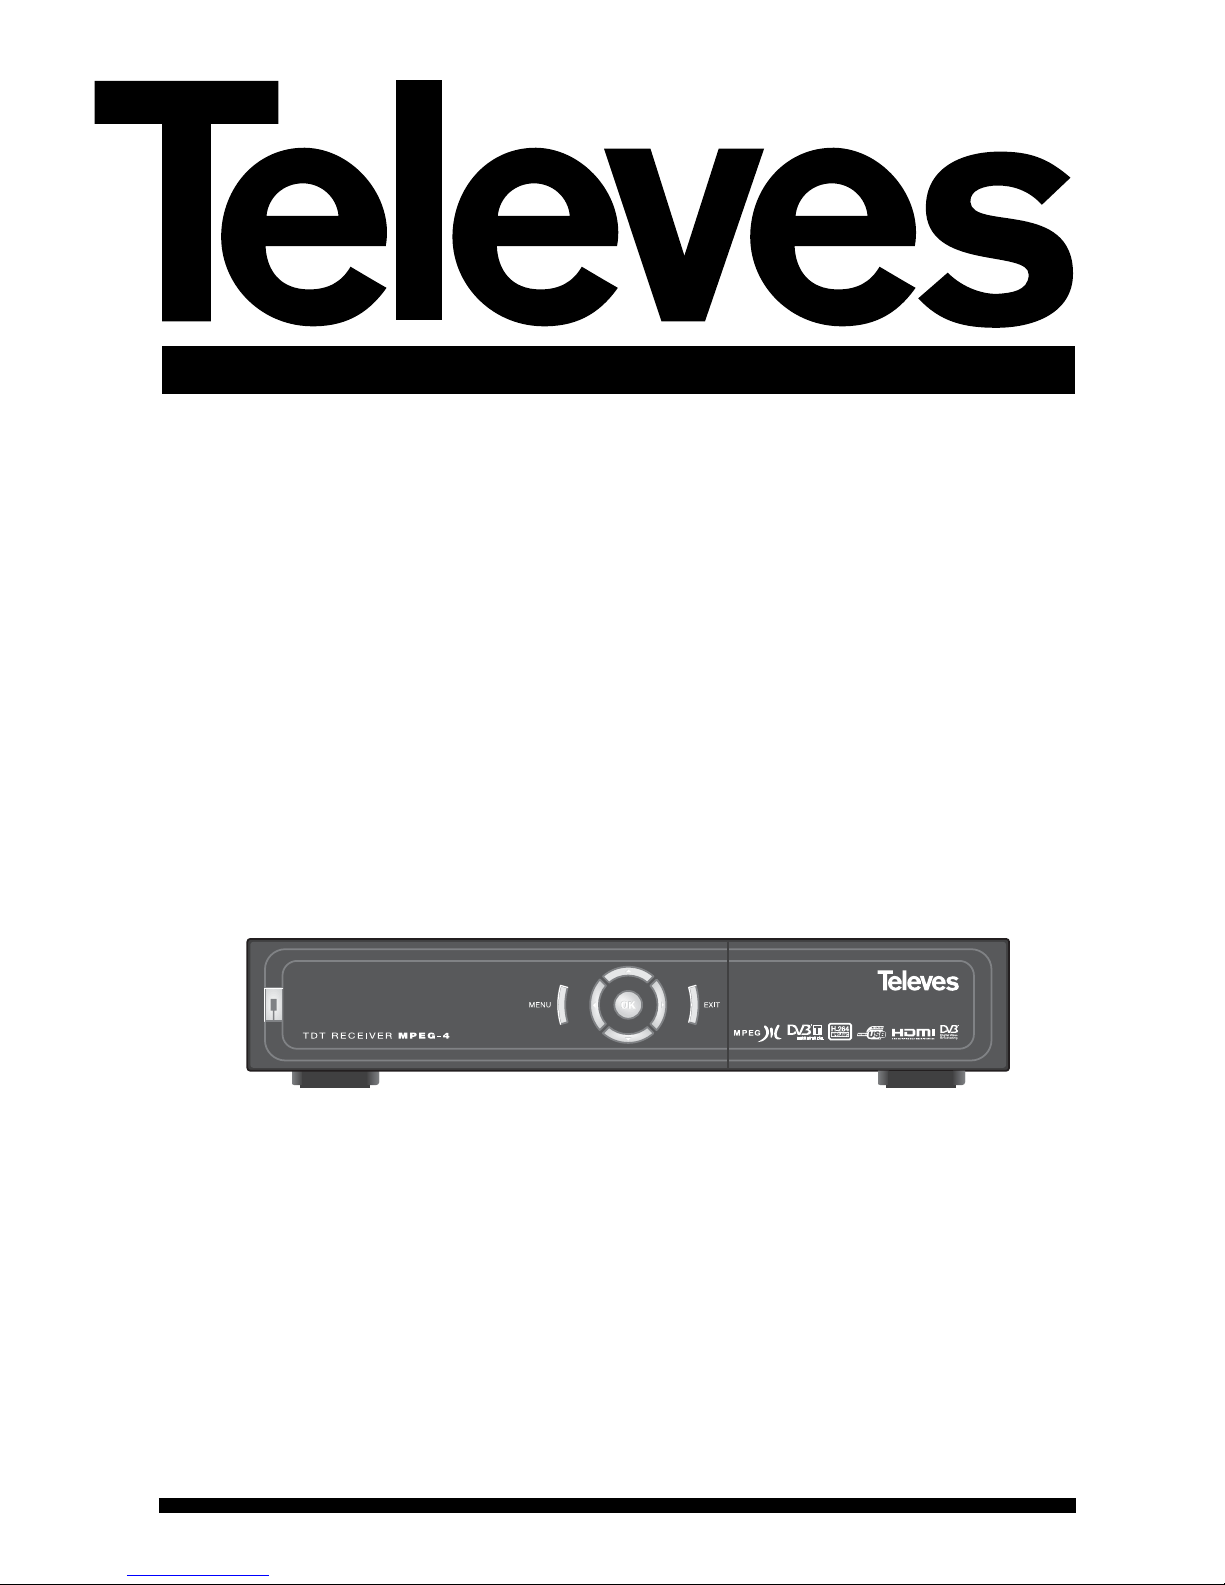
DVB-T Receiver
(MPEG4)
Ref. 7151
User Manual
© Copyright, Televés, S.A.
Page 2

Page 3

User manual
“DVB-T 7151
”
3
ENGLISH
CONTENTS Pag.
1.- Precautions . . . . . . . . . . . . . . . . . . . . . . . . . . . . . . . . . . . . . . . . . . . . . . . . . . . . . . . . . . . . . . . . . . . . . . . 4
2.- General information . . . . . . . . . . . . . . . . . . . . . . . . . . . . . . . . . . . . . . . . . . . . . . . . . . . . . . . . . . . . . . . . 5
2.1.- Main features . . . . . . . . . . . . . . . . . . . . . . . . . . . . . . . . . . . . . . . . . . . . . . . . . . . . . . . . . . . . . . . 5
2.2.- Contents . . . . . . . . . . . . . . . . . . . . . . . . . . . . . . . . . . . . . . . . . . . . . . . . . . . . . . . . . . . . . . . . . . 5
3.- Panel and Control Description . . . . . . . . . . . . . . . . . . . . . . . . . . . . . . . . . . . . . . . . . . . . . . . . . . . . . . . . 6
3.1.- Remote Control . . . . . . . . . . . . . . . . . . . . . . . . . . . . . . . . . . . . . . . . . . . . . . . . . . . . . . . . . . . . 7
4.- Equipment Installation . . . . . . . . . . . . . . . . . . . . . . . . . . . . . . . . . . . . . . . . . . . . . . . . . . . . . . . . . . . . . . . 8
4.1.- Connection to a TV . . . . . . . . . . . . . . . . . . . . . . . . . . . . . . . . . . . . . . . . . . . . . . . . . . . . . . . . . . . 8
5.- User´s Installation . . . . . . . . . . . . . . . . . . . . . . . . . . . . . . . . . . . . . . . . . . . . . . . . . . . . . . . . . . . . . . . . . . . 9
5.1.- Install . . . . . . . . . . . . . . . . . . . . . . . . . . . . . . . . . . . . . . . . . . . . . . . . . . . . . . . . . . . . . . . . . . . . . . 9
5.2.- Channel Search . . . . . . . . . . . . . . . . . . . . . . . . . . . . . . . . . . . . . . . . . . . . . . . . . . . . . . . . . . . . . . 9
5.3.- System Setting . . . . . . . . . . . . . . . . . . . . . . . . . . . . . . . . . . . . . . . . . . . . . . . . . . . . . . . . . . . . . . 10
5.4.- Parental Lock. . . . . . . . . . . . . . . . . . . . . . . . . . . . . . . . . . . . . . . . . . . . . . . . . . . . . . . . . . . . . . . . 11
5.5.- Factory Default . . . . . . . . . . . . . . . . . . . . . . . . . . . . . . . . . . . . . . . . . . . . . . . . . . . . . . . . . . . . . . 11
6.- Basic operating functions . . . . . . . . . . . . . . . . . . . . . . . . . . . . . . . . . . . . . . . . . . . . . . . . . . . . . . . . . . . . . 12
6.1.- Select a channel . . . . . . . . . . . . . . . . . . . . . . . . . . . . . . . . . . . . . . . . . . . . . . . . . . . . . . . . . . . . . 12
6.2.- Return to previous channel . . . . . . . . . . . . . . . . . . . . . . . . . . . . . . . . . . . . . . . . . . . . . . . . . . . . 13
6.3.- Volume and audio control . . . . . . . . . . . . . . . . . . . . . . . . . . . . . . . . . . . . . . . . . . . . . . . . . . . . . 13
6.4.- Favourites List . . . . . . . . . . . . . . . . . . . . . . . . . . . . . . . . . . . . . . . . . . . . . . . . . . . . . . . . . . . . . 13
7.- Manager . . . . . . . . . . . . . . . . . . . . . . . . . . . . . . . . . . . . . . . . . . . . . . . . . . . . . . . . . . . . . . . . . . . . . . . . . 14
7.1.- Channel Manager . . . . . . . . . . . . . . . . . . . . . . . . . . . . . . . . . . . . . . . . . . . . . . . . . . . . . . . . . . . . 14
7.2.- Favourites Channel . . . . . . . . . . . . . . . . . . . . . . . . . . . . . . . . . . . . . . . . . . . . . . . . . . . . . . . . . . 14
7.3.- Edit Favourites . . . . . . . . . . . . . . . . . . . . . . . . . . . . . . . . . . . . . . . . . . . . . . . . . . . . . . . . . . . . . 15
7.4.- Move Channels . . . . . . . . . . . . . . . . . . . . . . . . . . . . . . . . . . . . . . . . . . . . . . . . . . . . . . . . . . . . . 15
7.5.- Lock Channels . . . . . . . . . . . . . . . . . . . . . . . . . . . . . . . . . . . . . . . . . . . . . . . . . . . . . . . . . . . . . 15
7.6.- Rename Channels . . . . . . . . . . . . . . . . . . . . . . . . . . . . . . . . . . . . . . . . . . . . . . . . . . . . . . . . . . 16
7.7.- Delete Channels . . . . . . . . . . . . . . . . . . . . . . . . . . . . . . . . . . . . . . . . . . . . . . . . . . . . . . . . . . . . 16
7.8.- Sort Channels . . . . . . . . . . . . . . . . . . . . . . . . . . . . . . . . . . . . . . . . . . . . . . . . . . . . . . . . . . . . . . 16
8.- Electronic Programme Guide (EPG) . . . . . . . . . . . . . . . . . . . . . . . . . . . . . . . . . . . . . . . . . . . . . . . . . . . . 17
9.- Programme Events . . . . . . . . . . . . . . . . . . . . . . . . . . . . . . . . . . . . . . . . . . . . . . . . . . . . . . . . . . . . . . . . . 18
9.1.- Timer . . . . . . . . . . . . . . . . . . . . . . . . . . . . . . . . . . . . . . . . . . . . . . . . . . . . . . . . . . . . . . . . . . . . . 18
9.2.- Time Reservation . . . . . . . . . . . . . . . . . . . . . . . . . . . . . . . . . . . . . . . . . . . . . . . . . . . . . . . . . . . 18
10.- PVR . . . . . . . . . . . . . . . . . . . . . . . . . . . . . . . . . . . . . . . . . . . . . . . . . . . . . . . . . . . . . . . . . . . . . . . . . . . . 19
10.1.- Games . . . . . . . . . . . . . . . . . . . . . . . . . . . . . . . . . . . . . . . . . . . . . . . . . . . . . . . . . . . . . . . . . . 19
10.2.- Receiver information . . . . . . . . . . . . . . . . . . . . . . . . . . . . . . . . . . . . . . . . . . . . . . . . . . . . . . . . 19
10.3.- PVR . . . . . . . . . . . . . . . . . . . . . . . . . . . . . . . . . . . . . . . . . . . . . . . . . . . . . . . . . . . . . . . . . . . . . 20
10.4.- Picture Browser . . . . . . . . . . . . . . . . . . . . . . . . . . . . . . . . . . . . . . . . . . . . . . . . . . . . . . . . . . . 21
10.5.- USB Browser . . . . . . . . . . . . . . . . . . . . . . . . . . . . . . . . . . . . . . . . . . . . . . . . . . . . . . . . . . . . . 21
10.6.- Remove Disk . . . . . . . . . . . . . . . . . . . . . . . . . . . . . . . . . . . . . . . . . . . . . . . . . . . . . . . . . . . . . . 21
11.- Record/Play . . . . . . . . . . . . . . . . . . . . . . . . . . . . . . . . . . . . . . . . . . . . . . . . . . . . . . . . . . . . . . . . . . . . . 22
11.1.- TimeShift Function . . . . . . . . . . . . . . . . . . . . . . . . . . . . . . . . . . . . . . . . . . . . . . . . . . . . . . . . . 23
Terminological Glossary . . . . . . . . . . . . . . . . . . . . . . . . . . . . . . . . . . . . . . . . . . . . . . . . . . . . . . . . . . . . . . . . 24
Menu structure . . . . . . . . . . . . . . . . . . . . . . . . . . . . . . . . . . . . . . . . . . . . . . . . . . . . . . . . . . . . . . . . . . . . . . . 25
Technical Specifications . . . . . . . . . . . . . . . . . . . . . . . . . . . . . . . . . . . . . . . . . . . . . . . . . . . . . . . . . . . . . . . . 26
Guarantee . . . . . . . . . . . . . . . . . . . . . . . . . . . . . . . . . . . . . . . . . . . . . . . . . . . . . . . . . . . . . . . . . . . . . . . . . . . 27
Page 4
User manual
“DVB-T 7151
”
4
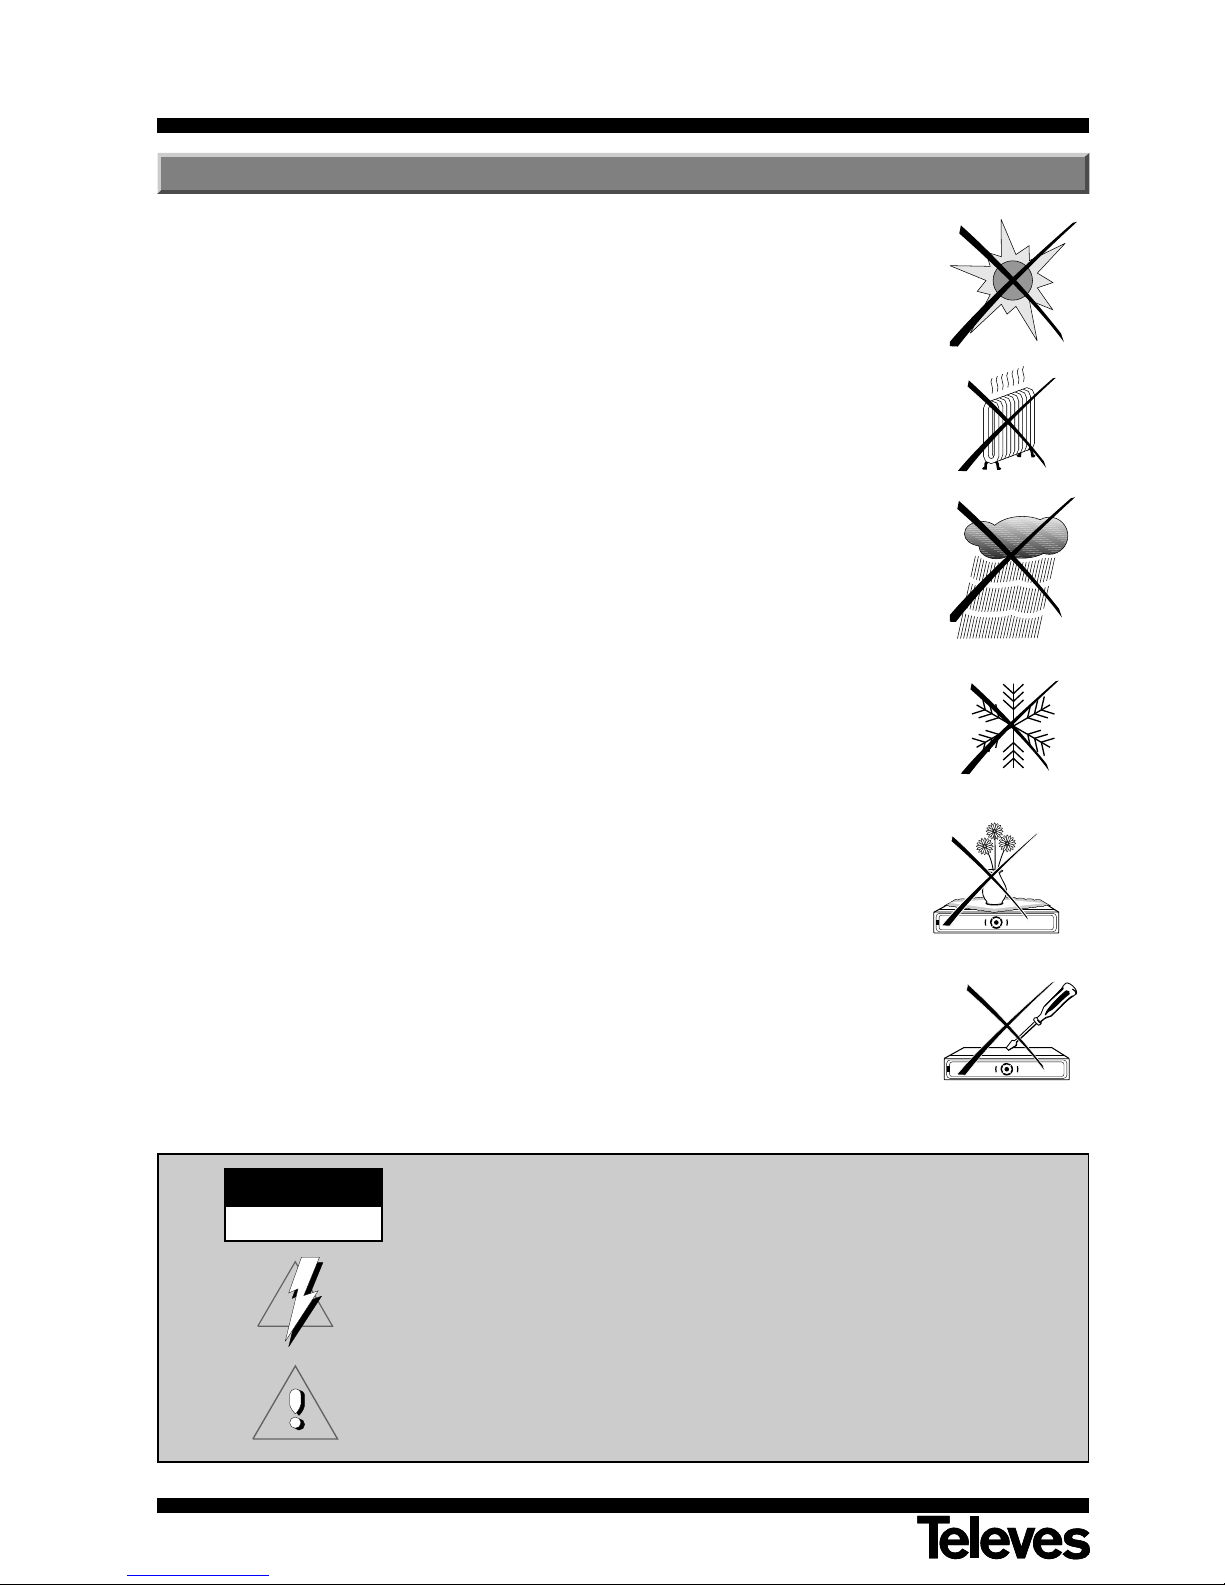
< 5°C
> 80 %
> 50°C
The Receiver you have just purchased has been manufactured to international safety
standards.
We recommend you to read the following safety tips carefully
ALIMENTATION:
175 - 250 V~ 50/60 Hz.
OVERLOAD:
Do not overload points, extension cords or adaptors to avoid fire and electric shock
risks.
LIQUIDS:
Do not expose the Receiver to water leakage or spray.
Do not place objects or vessels containing liquids on the equipment or near it.
SMALL OBJECTS:
Avoid the proximity of small metal objects to the equipment. These could slip
through the ventilation slots of the Receiver, causing it serious damage.
CLEANING:
Disconnect the Receiver from the power source before cleaning.
Use a soft rag, slightly moistened in water (without detergent) to clean the outside of
the Receiver.
VENTILATION:
Place the Receiver in a well-ventilated area so that the slots are not blocked in any
way. Avoid exposure to the sun, to other sources of heat or flames.
Do not place on top of other equipment.
CONNECTIONS:
Make only the recommended connections, in order to avoid possible damage to the
equipment.
CONNECTIONS TO TV/VCR:
Turn off the Receiver before connecting or disconnecting to a TV set or a VCR.
NOT DOING THIS may damage the TV or the VCR.
LOCATION:
Locate the Receiver in an interior room, safe from electrical discharges, rain or direct
sunlight.
Install the Receiver in horizontal position
1.- Precautions
WARNING
RISK ELECTRICAL SHOCK
DO NOT OPEN
IN ORDER TO REDUCE RISK OF ELECTRICAL DISCHARGE, DO NOT REMOVE THE LID.
THERE ARE NO USER-REPAIRABLE PARTS INSIDE THE MACHINE.
FOR ANY REPAIRS, CONTACT A QUALIFIED TECHNICIAN
This symbol indicates that “voltage levels are dangerous” within the product, and
that this presents a risk of electric shock or other personal harm.
This symbol indicates that there are important instructions for the use of this product
Page 5
User manual
“DVB-T 7151
”
5
ENGLISH
Compatible with MPEG2 and MPEG4/H.264
Prepared for USB PVR
HDMI Output (720p and 1080i)
Video Output – RGB/CVBS
Video Components Y, Pb and Pr
Two SCARTS (TV & VCR)
Channel Edition (OFF, Move, Lock and Favourites.
32 Lists of Favourite Channels
Supports OSD Teletex
Standard Subtitles and Teletex
EPG (Electronic Programme Guide)
Parental Lock
Return Function
Timer Function
VFD Display
Software update via USB or RS-232C
SPDIF Digital audio output (optical)
6 Games
This Guide will show that the daily use of this receiver is based on a group of menus and displays on the
screen that are very easy to use. These menus will help you to enjoy your receiver, since it will guide you
through the installation, the channel ordering, visualization and other functions.
All functions can be activaded using the keys located on the remote control and some of these functions
can also be activated using the buttons on the front display.
You must take into account that a new software can change the functionality of the receiver.
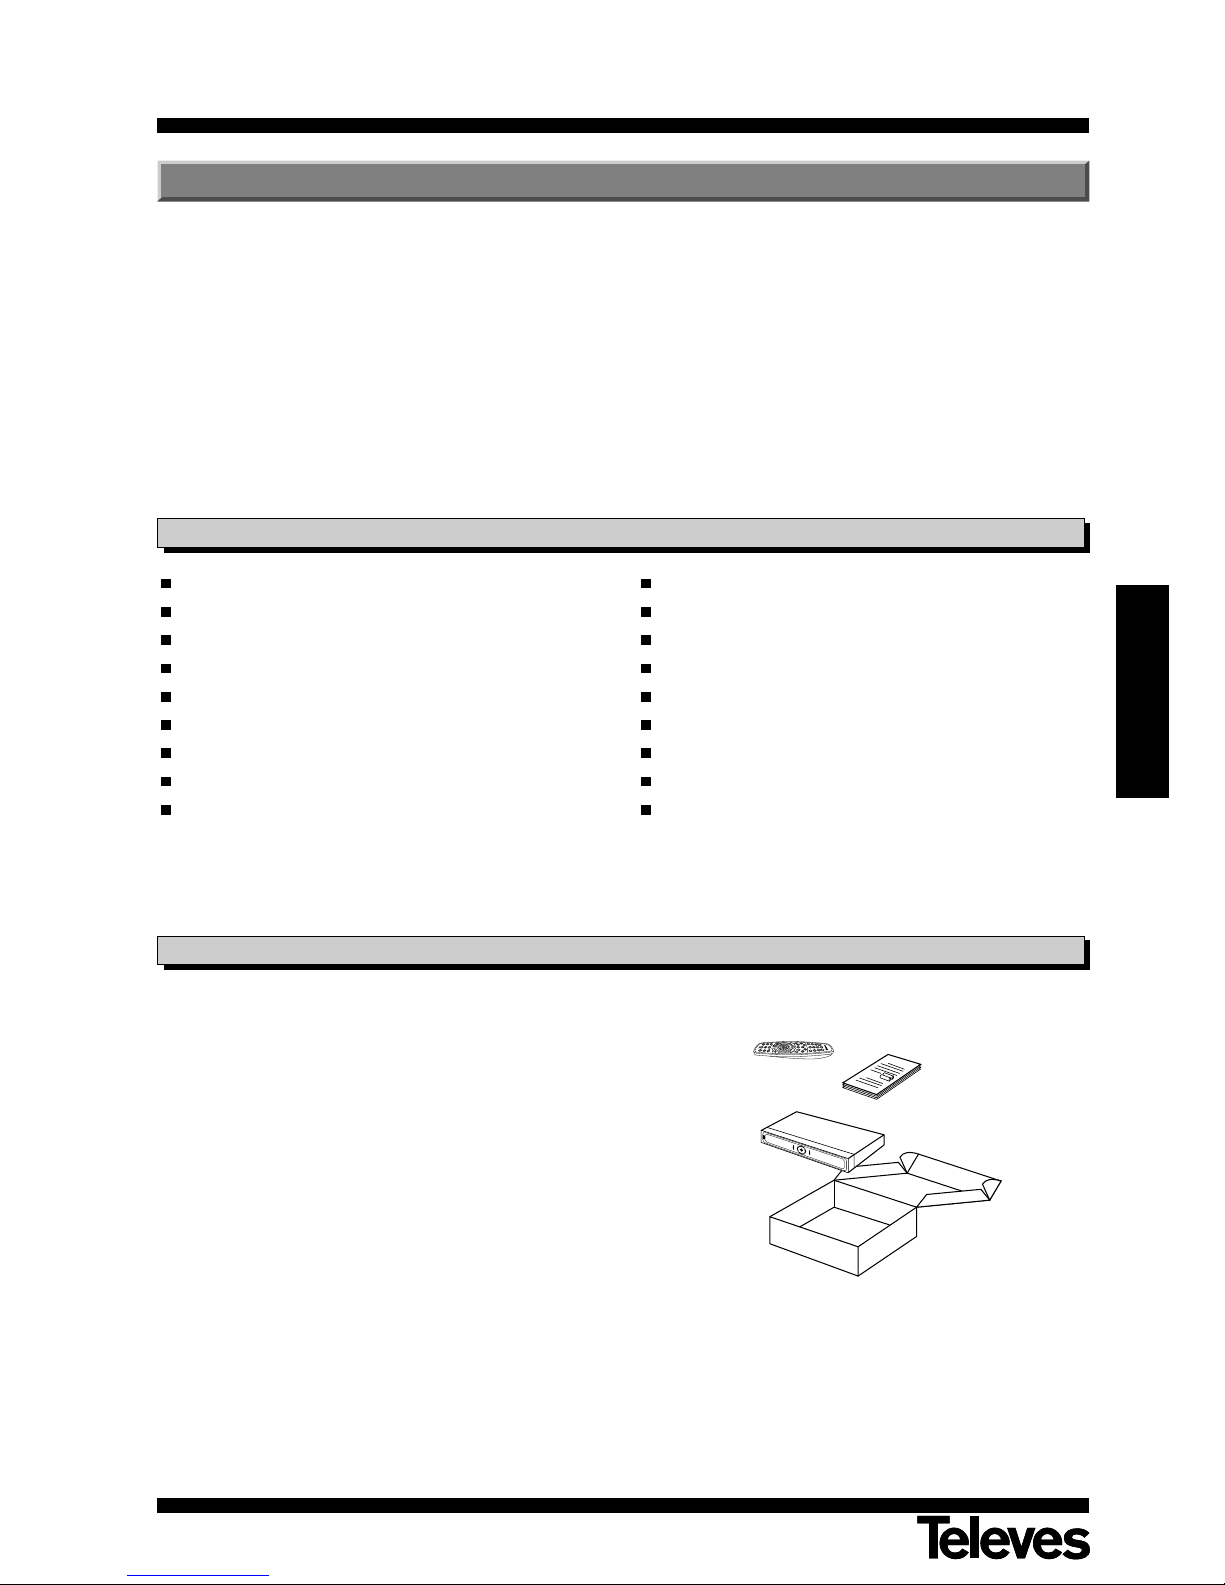
Check that the following components are included in the package:
- 1 x DVB-T Receiver ref.7151
- Intructions Manuals
- 1 x Remote Control
- 2 x “AAA” batteries
2.- General Information
2.1.- Main features
2.2.- Contents
Page 6
User manual
“DVB-T 7151
”
6
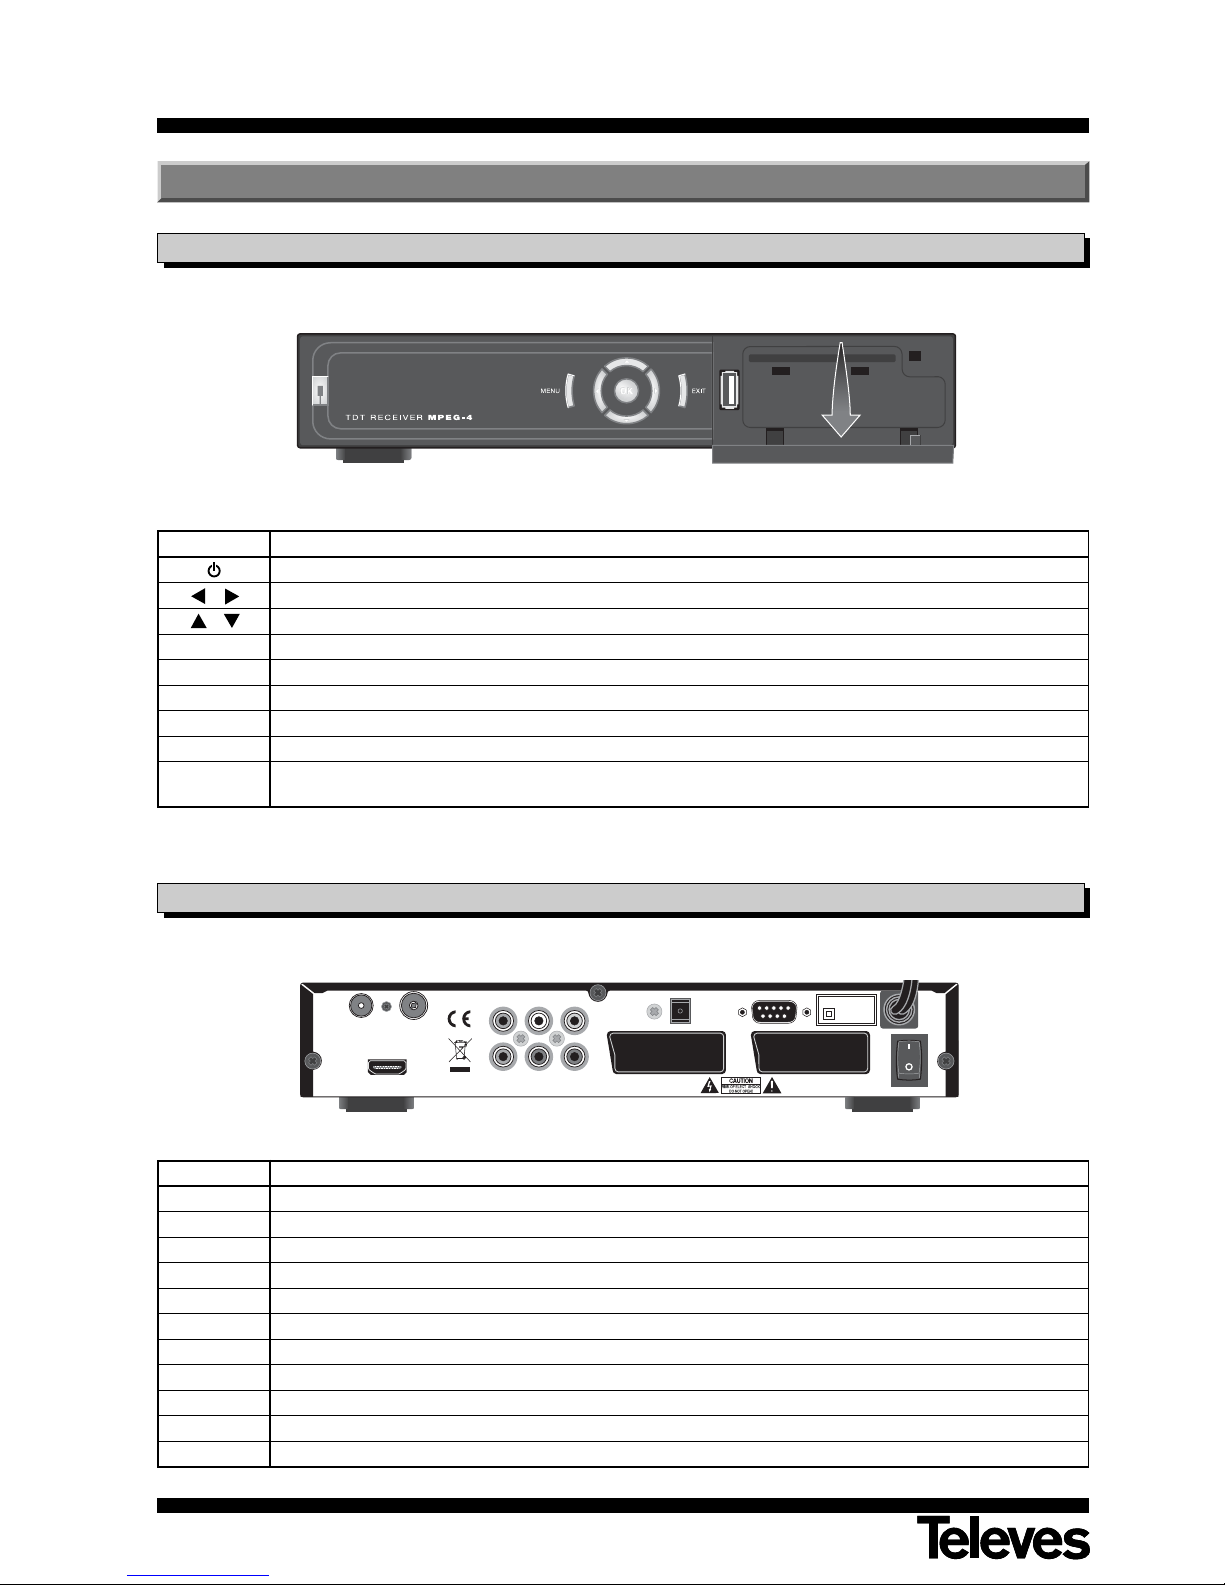
Name Function
ANT IN
Signal input of terrestrial antenna (power supply +5V/50 mA selectable by menu)
TV OUT RF Signal Output to connect it to a TV, a VCR or to other receiver.
HDMI Interface for signal connection in high definition.
AUDIO L/R Stereo analog audio output.
VIDEO Composite video output.
Y, Pb, Pr Component video output.
S/PDIF Digital audio output.
RS-232 Connection to a serial port (RS232) to update the software.
TV Video/Audio output to connect it to a TV via SCART.
VCR Audio/Video Input/Output to connect it to a VCR via SCART.
I/O ON/OFF switch.
Front Panel
Back Panel
Key Function
Switches between normal and standby operating mode.
/ Turns the volume down/up. Selects one element from the menu.
/ Selects an ascendent or descendent channel. Selects one element from the menu.
MENU Allows to access the main menu.
EXIT Returns to the previous menu on the menu´s screen or exit the menus.
OK Runs the selected option. Shows the general programme list.
USB USB Connector
Display Indicates the selected channel.
LED’s
Green: means signal presence in the antenna.
Red: means STANDBY mode.
3.- Panel and Control Description
TV OUT
ANT IN
(5V 50mA)
HDMI
YPbPr
LR VIDEOAUDIO
TV VCR
RS-232
S/PDIF
MODEL No: DVB-T 7151
175 - 250 V~
50/60 Hz
Max. 30W
Made for Televes
Page 7
User manual
“DVB-T 7151
”
7
ENGLISH
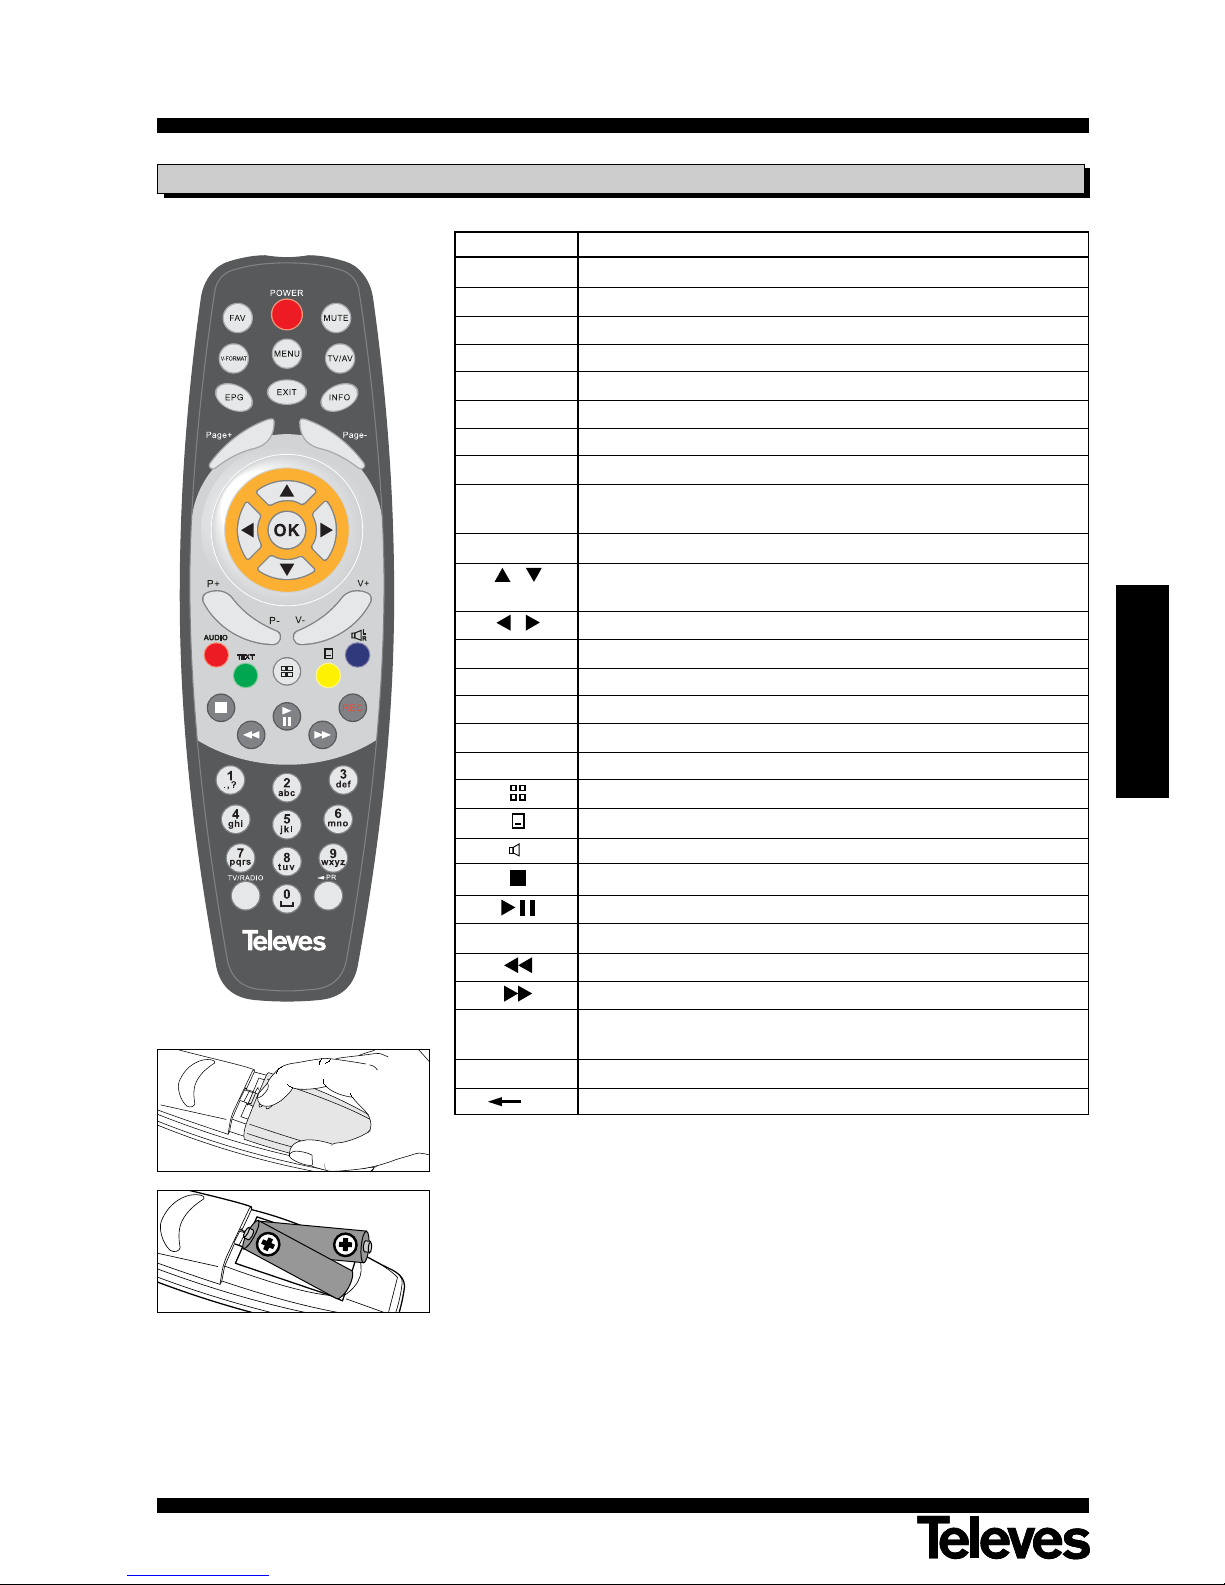
3.1.- Remote Control
Key Function
POWER Switches the receiver on and off.
FAV Shows the list of favourite channels.
MUTE Eliminates the sound.
V-FORMAT Changes the video output resolution.
MENU Activates the main Menu.
TV/AV Switches between TV or AV mode.
EPG Activates the EPG (Electronic Programme Guide).
EXIT Returns to the previous menu or exits the menu completely.
INFO Shows information about the current channel. Press this key
again for more details.
Page+/Page- Moves one page forward or back in the channel list.
/ Selects an ascendent or descendent channel. Selects one
element from the menu.
/ Turns the volume up/down. Selects one element from the menu.
OK
Runs the selected option. Shows the general programme list.
P+ / P- Selects an ascendent/descendent channel.
V+ / V- Turns the volume up/down.
AUDIO Selects the different audio languages that are available.
TEXT Activates the teletext function (if it is transferred).
Has several secondary functions depending on the menu.
Activates or deactivates the Subtitle Menu.
Audio channel selection (left, right, stereo).
Stops what is currently playing.
Plays/Stops a selected element.
REC Starts recording the selected programme.
Quick return in play mode (x2, x4, X8, x20).
Moves forward quickly in play mode (x2, x4, X8, x20).
0 ... 9 Direct insert of numeric data (such as, the number of a
programme).
TV/RADIO Switches between TV and Radio mode.
PR Returns to Previous Channel.
L
R
Make sure that the + and - poles of
the batteries match up with the
internal marks of the battery unit.
Note: The red, green, yellow and blue keys have secondary functions that are not
described here and that can appear in the different menus.
Notes:
- Point with the remote control directly at the receiver´s sensor.
- Do not expose the remote control or the receiver to an intense source of light,
such as, direct sunlight.
- Do not leave the control remote in an extremely wet or warm place.
- Do not spill water or place any wet element on the remote control. Normally
batteries last approximately one year under normal USE conditions.
Page 8
User manual
“DVB-T 7151
”
8
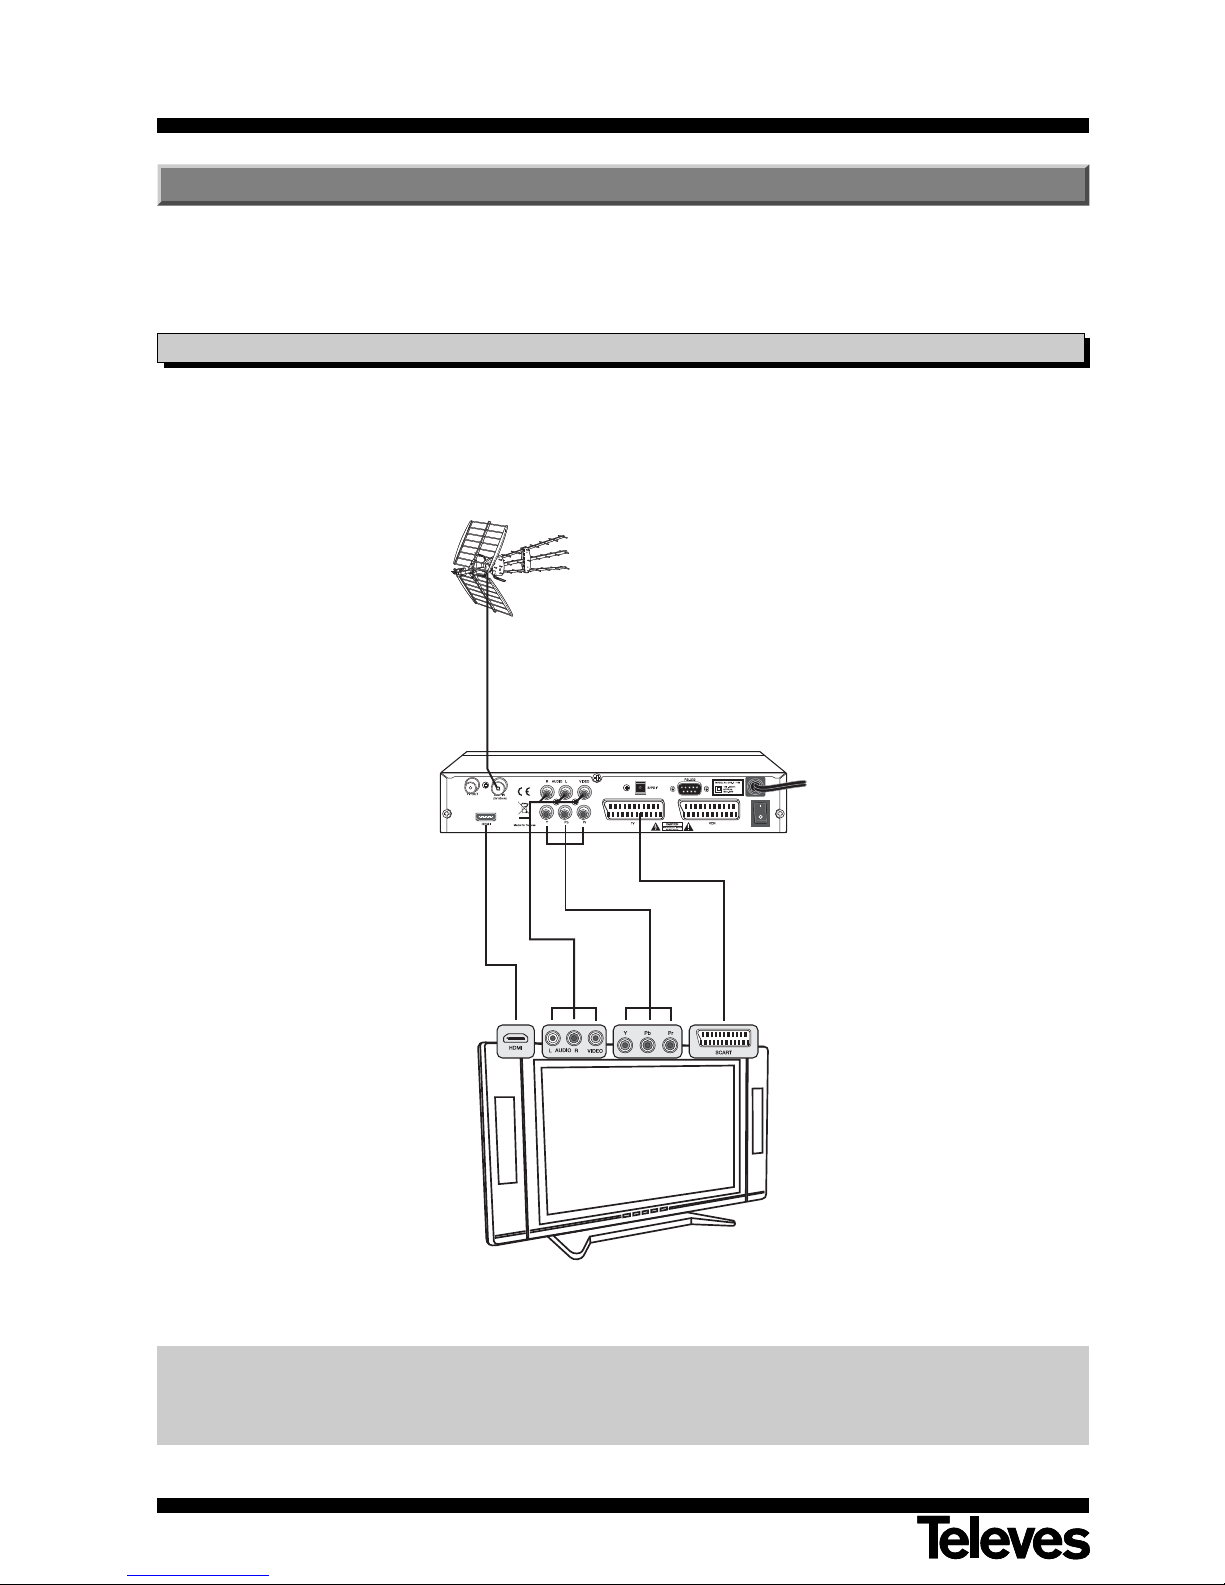
This section explains how to install the receiver to a TV or to other A/V equipments.
Read the manuals provided with the equipment to install external equipment, such as, the antenna.
To add any new equipment, read the corresponding part of the manual for its installation.
- Connect the antenna signal to the ANT IN connector of the receiver.
- Connect the audio and the video between the receiver and the TV using an SCART cable, RCA cables or a HDMI
connection.
4.1.- Connection to a TV
7151
TV
All cables used to connect the receivers will be shielded cables.
DO NOT PLUG IN the receiver to the electrical network untill all the connections of the unit are finished.
4.- Equipment Installation
Page 9
User manual
“DVB-T 7151
”
9
ENGLISH
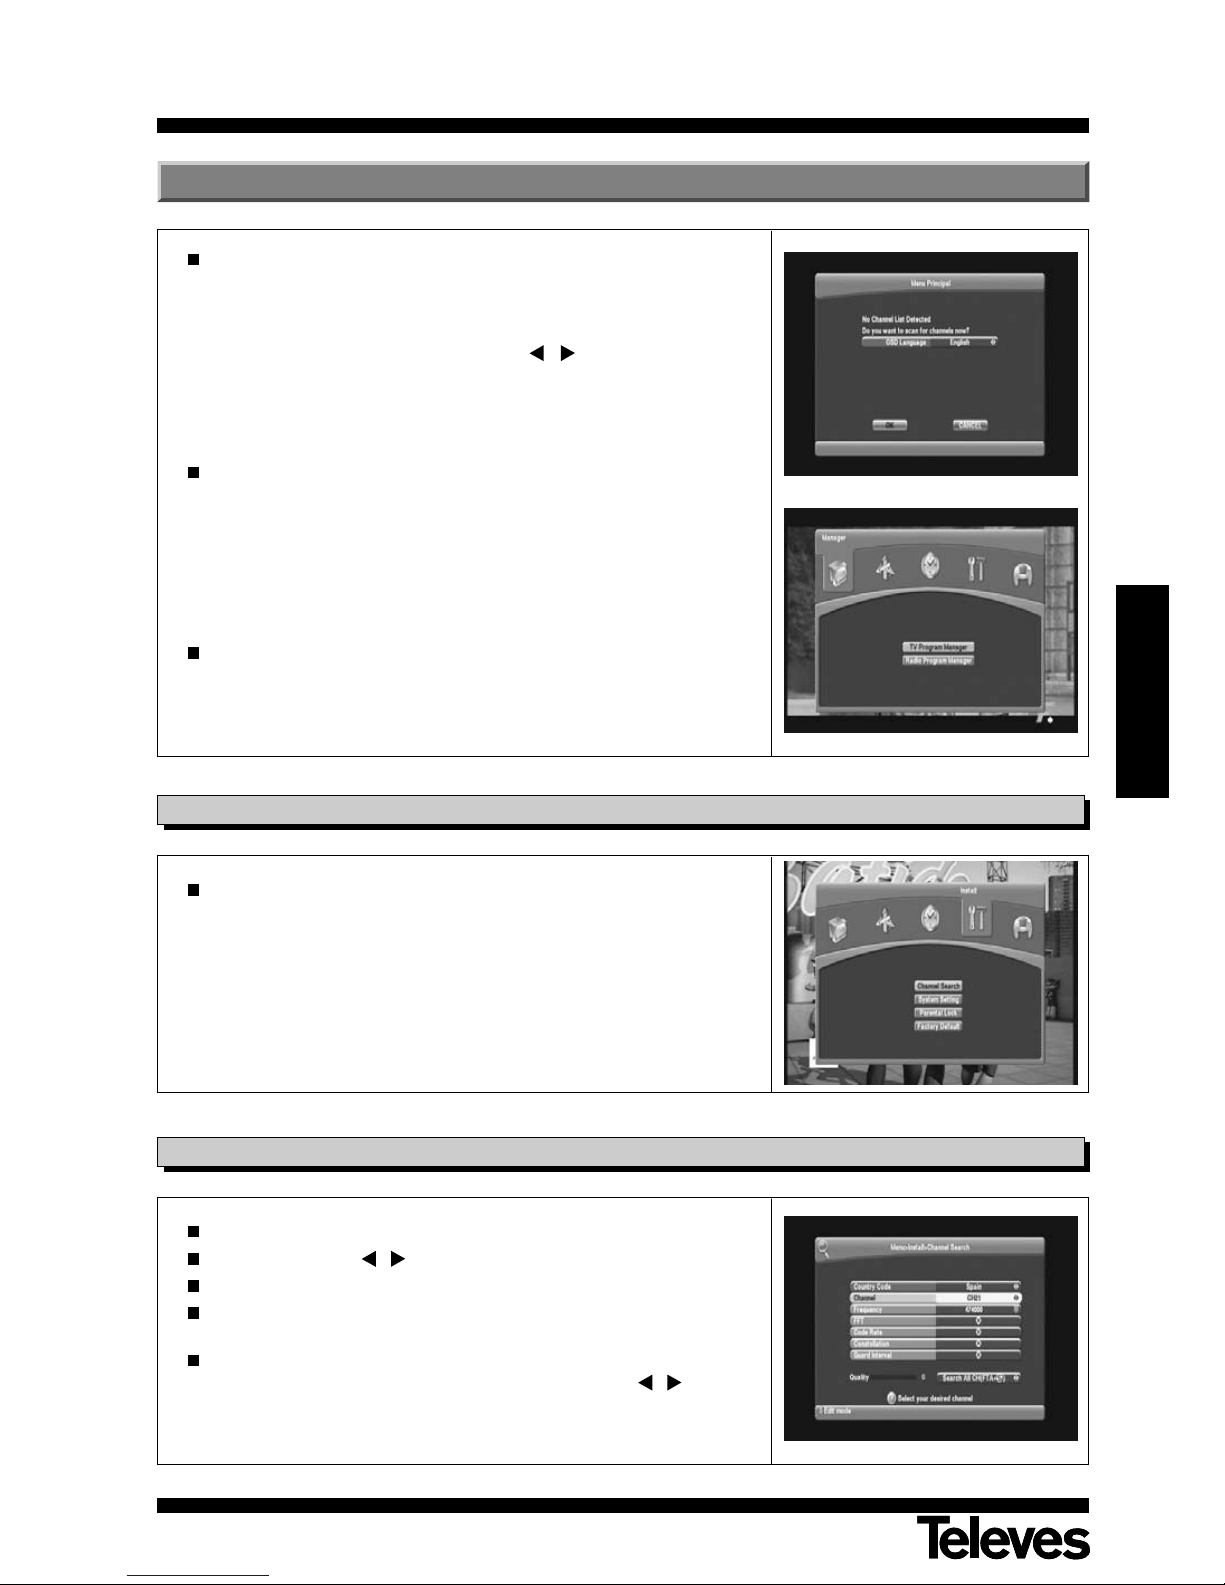
Once all connections have been made, connect the receiver and follow
the following instructions.
First of all a menu will appear, where you can select the OSD language
you want.
Select the language you wish using the
/
keys and press OK to
confirm.
The receiver will start searching automatically within the UHF band
(from 21 to 69).
The menu is divided into 5 sections:
- Manager
- Guide
- Timer
- Install
- PVR
During the installation, the OK key can be used to confirm the selection
and to show the channel list. You can also use the numeric keyboard to
insert a value directly.
Press the EXIT key to exit the menu.
This menu consists of 4 main submenus:
- Channel Search
- System Setting
- Parental Lock
- Factory Default
5.1.- Install
Country Code: select your country.
Channel: Press the
/
key to select the channels in a cyclical way.
Frequency: enter the frequency using the numeric keyboard.
FFT, FEC, Constellation, Guard Interval: they cannot be edited by the
user.
Search Channels: it allows you to search channels under the indicated
conditions. Select one of the following options using the
/
keys and
press the OK key.
5.2.- Channel Search
5.- User´s Installation
Page 10
User manual
“DVB-T 7151
”
10
- Search Network: search channels in the selected transponder.
- Search All channels: search all channels.
- Search 1 Channel: search within the selected channel.
The receiver will start searching automatically TV and Radio channels.
During this process you will be able to see the channels found on the list of
found channels.
Once the receiver has finished to search, the cursor places itself
automatically on “Watch”, press the OK key.
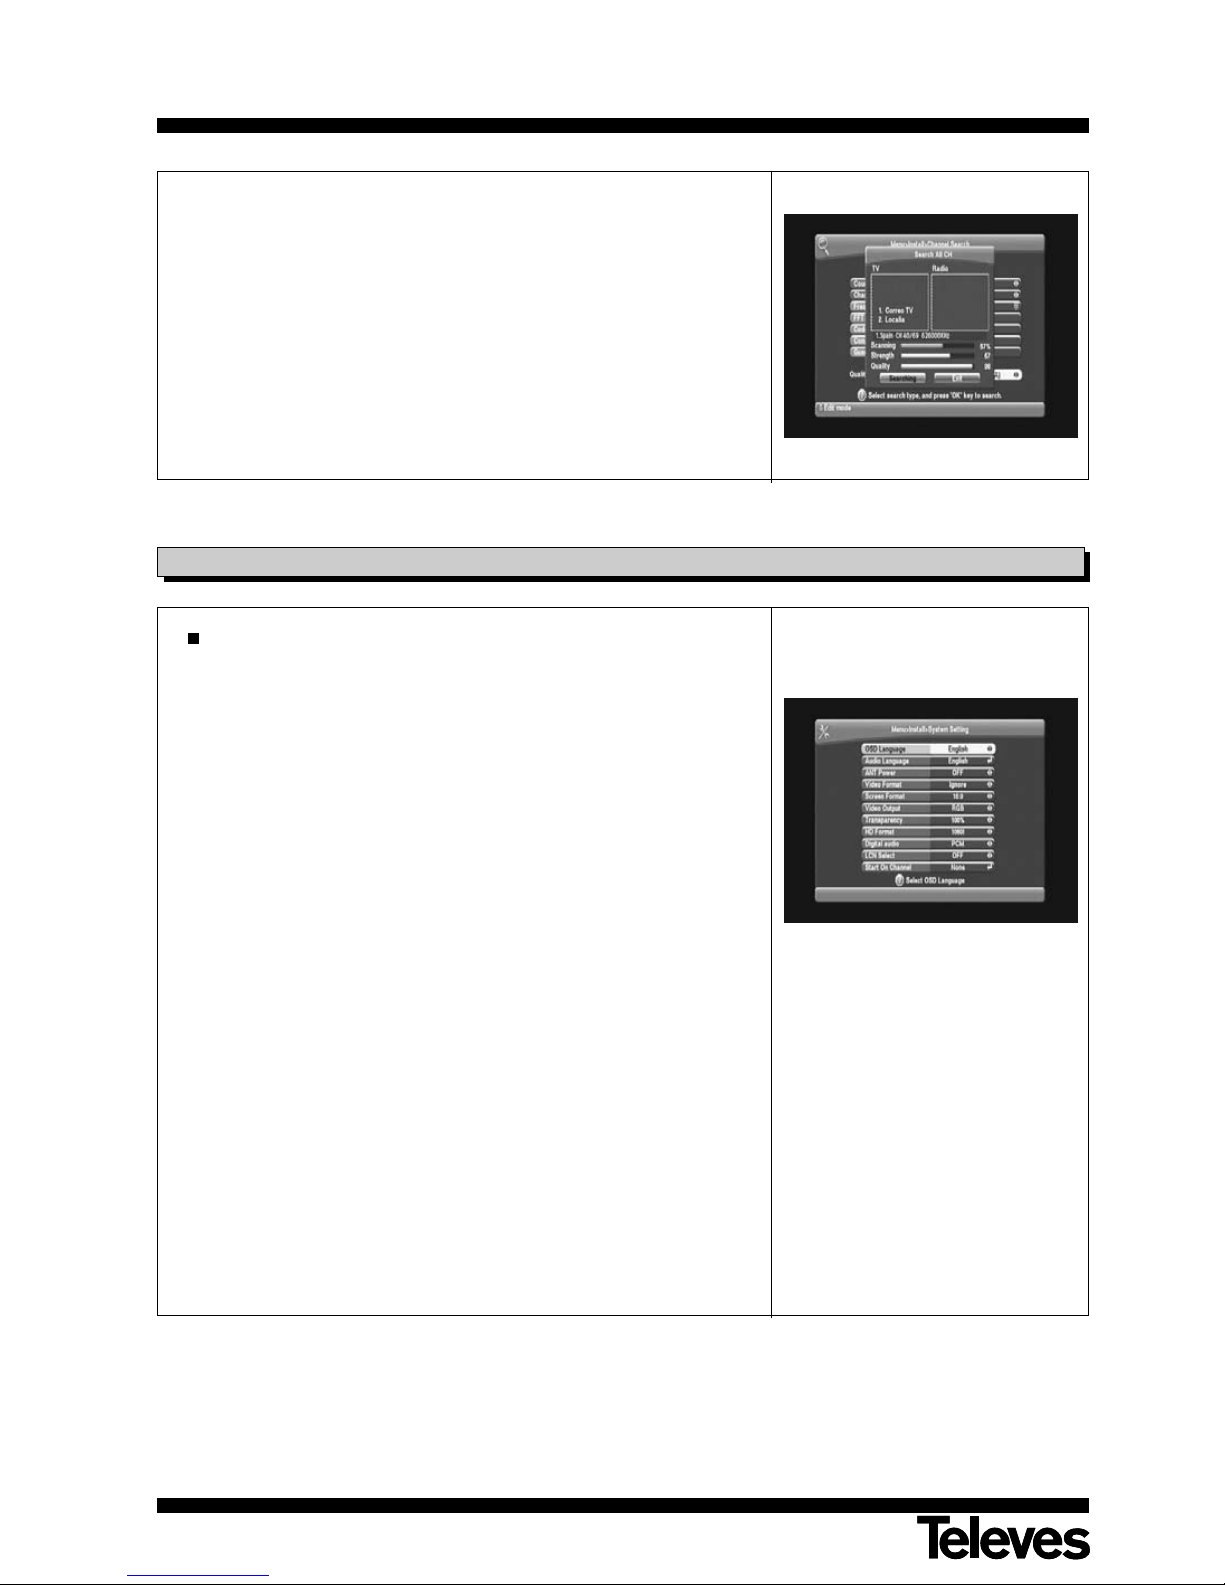
The System Setting menu allows you to modify the main options and
other parameters of the receiver to adapt it to its location.
- OSD Language: select the language you prefer for the menus.
- Audio language: select the language you prefer for the audio. This
language will be shown in a priority way if it is emitted by the channel.
- ANT Power: if you are using an active antenna (with amplifier) you
must activate this option to supply its amplifier with 5V/50mA power.
The power supply is carried out using the coaxial cable connected to
the ANT IN input of the receiver.
- Video Format: Select the video format you prefer between Letter Box,
Pan Scan, Combined and Ignore.
- Screen Format: select the screen format between 4:3 or 16:9.
- Video output: select between RGB and CVBS.
Note: The YPbPr output only works if the CVBS mode is selected.
- Transparency: it is used to indicate the transparency level applied to
the menus when they are active on the screen. Select the value you
wish between 10 and 100%.
- HD Format: select between 1080i and 720p.
- Digital Audio: select between PCM and RAW.
- LCN Select: it allows the user to activate or deactivate the mode to
organize channels set by the operator.
- Start On Channel: if you press the OK key the channel list will be
shown. Select a channel from the list. The selected channel will be
shown when turning on the receiver.
5.3.- System Setting
Page 11
User manual
“DVB-T 7151
”
11
ENGLISH
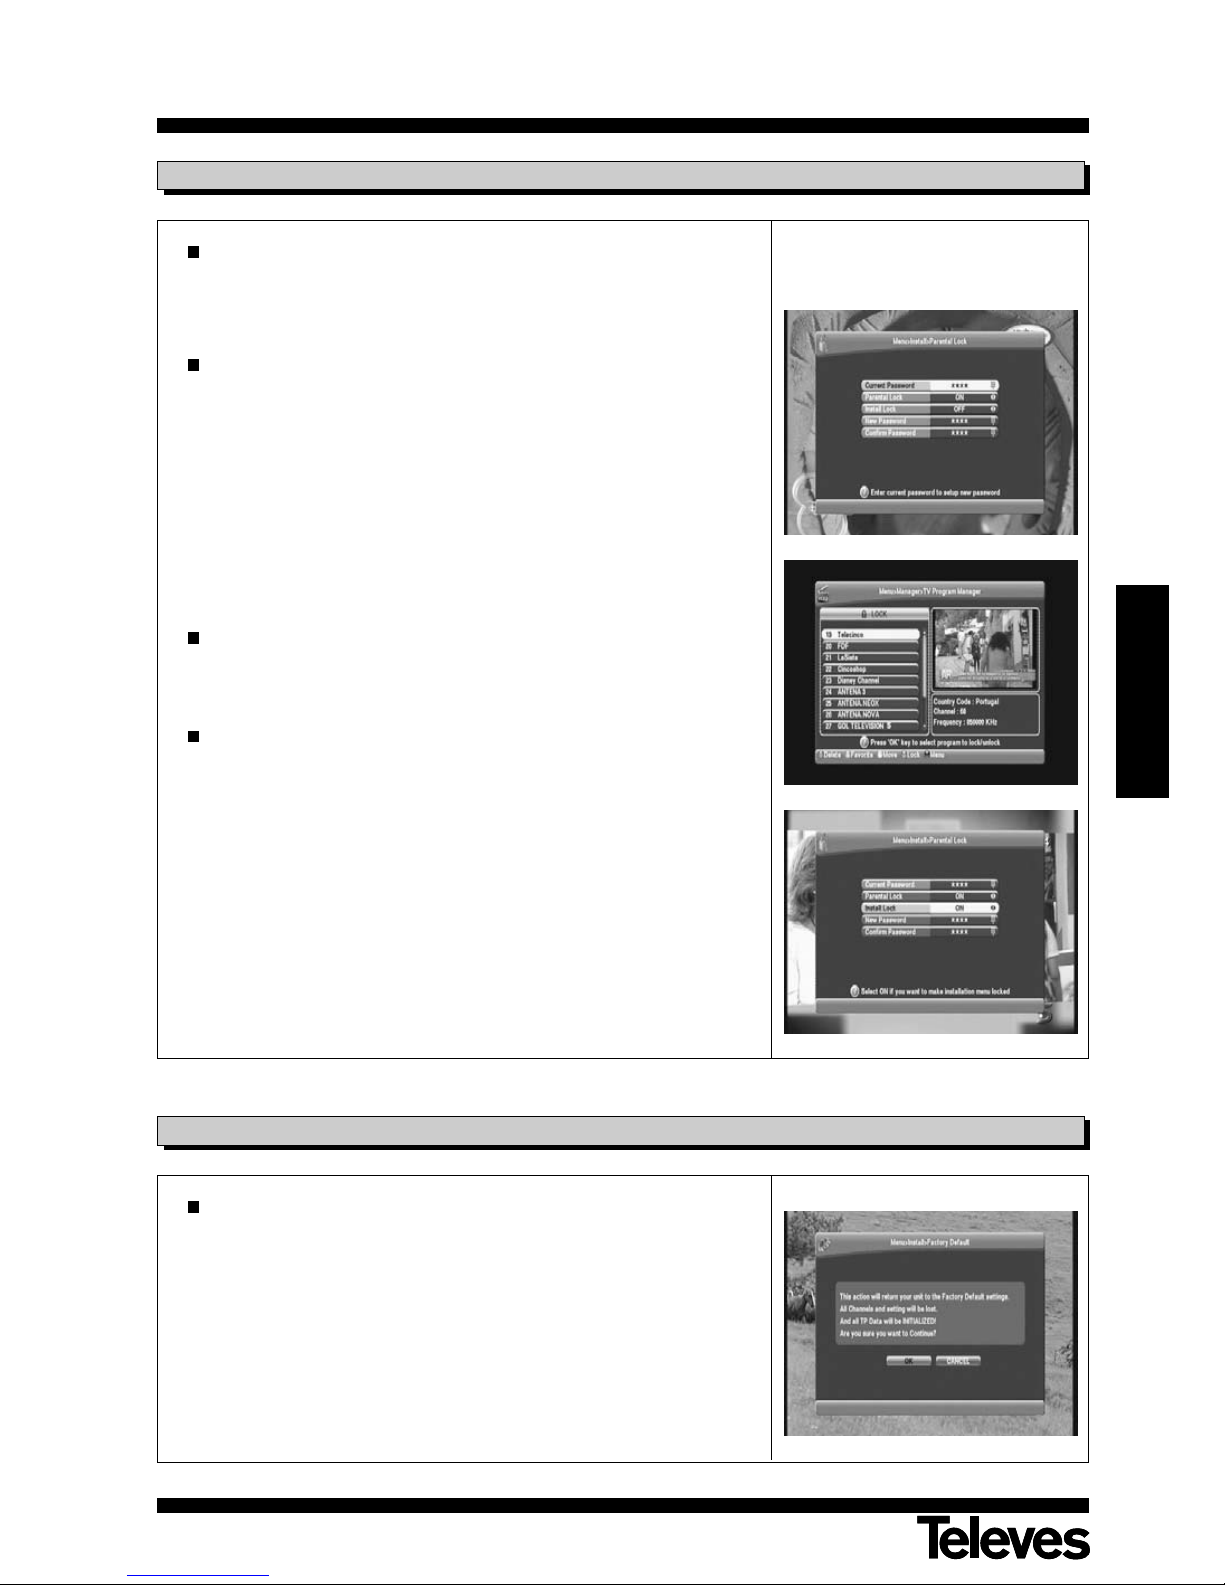
This option allows you to lock channels by using a password in order to
avoid kids or other people having access to contents that are not
appropiate for them. You can also lock the free access to the installation
data by using the “Install Lock” option.
How to change passwords:
- Enter the current password.
- Activate (ON) the “Parental Lock” option.
- Enter the new password.
- Enter again the new password to confirm it.
Note: By default, the password is 0 0 0 0.
Attention: Do not forget your new password once it has been
changed. You will not be able to access locked
programmes, the receiver and menus without it.
How to use the Parental Lock:
- Select the ON option if you want to activate the programme lock. To
lock programmes, see Section 7.5.- Programme Lock.
How to lock the installation:
- Enter the current password.
- Activate (ON) the “Install Lock” option.
- Exit this menu.
- Select any menu and press OK.
- A window asking you to enter your password will appear.
5.4.- Parental Lock
If you want to return the receiver to its initial status (status by default),
select “Factory Default” and press OK.
- A notice message will come up. To continue, select OK and press the
OK key.
Attention: All data and information entered by the user will be
automaticaly deleted and replaced with the configurations
preset by default.
5.5.- Factory Default
Page 12
User manual
“DVB-T 7151
”
12
Now this manual will describe the basic functions you can do while
watching TV programmes.
While you are watching a programme, the information window of this
programme will appear on the bottom of the screen if you press the
INFO key.
To select a channel use the
/
key on the front panel, the
/
keys on the remote control or the numeric keyboard (0-9). Besides the
normal operating function, the receiver offers other functions to select
channels.
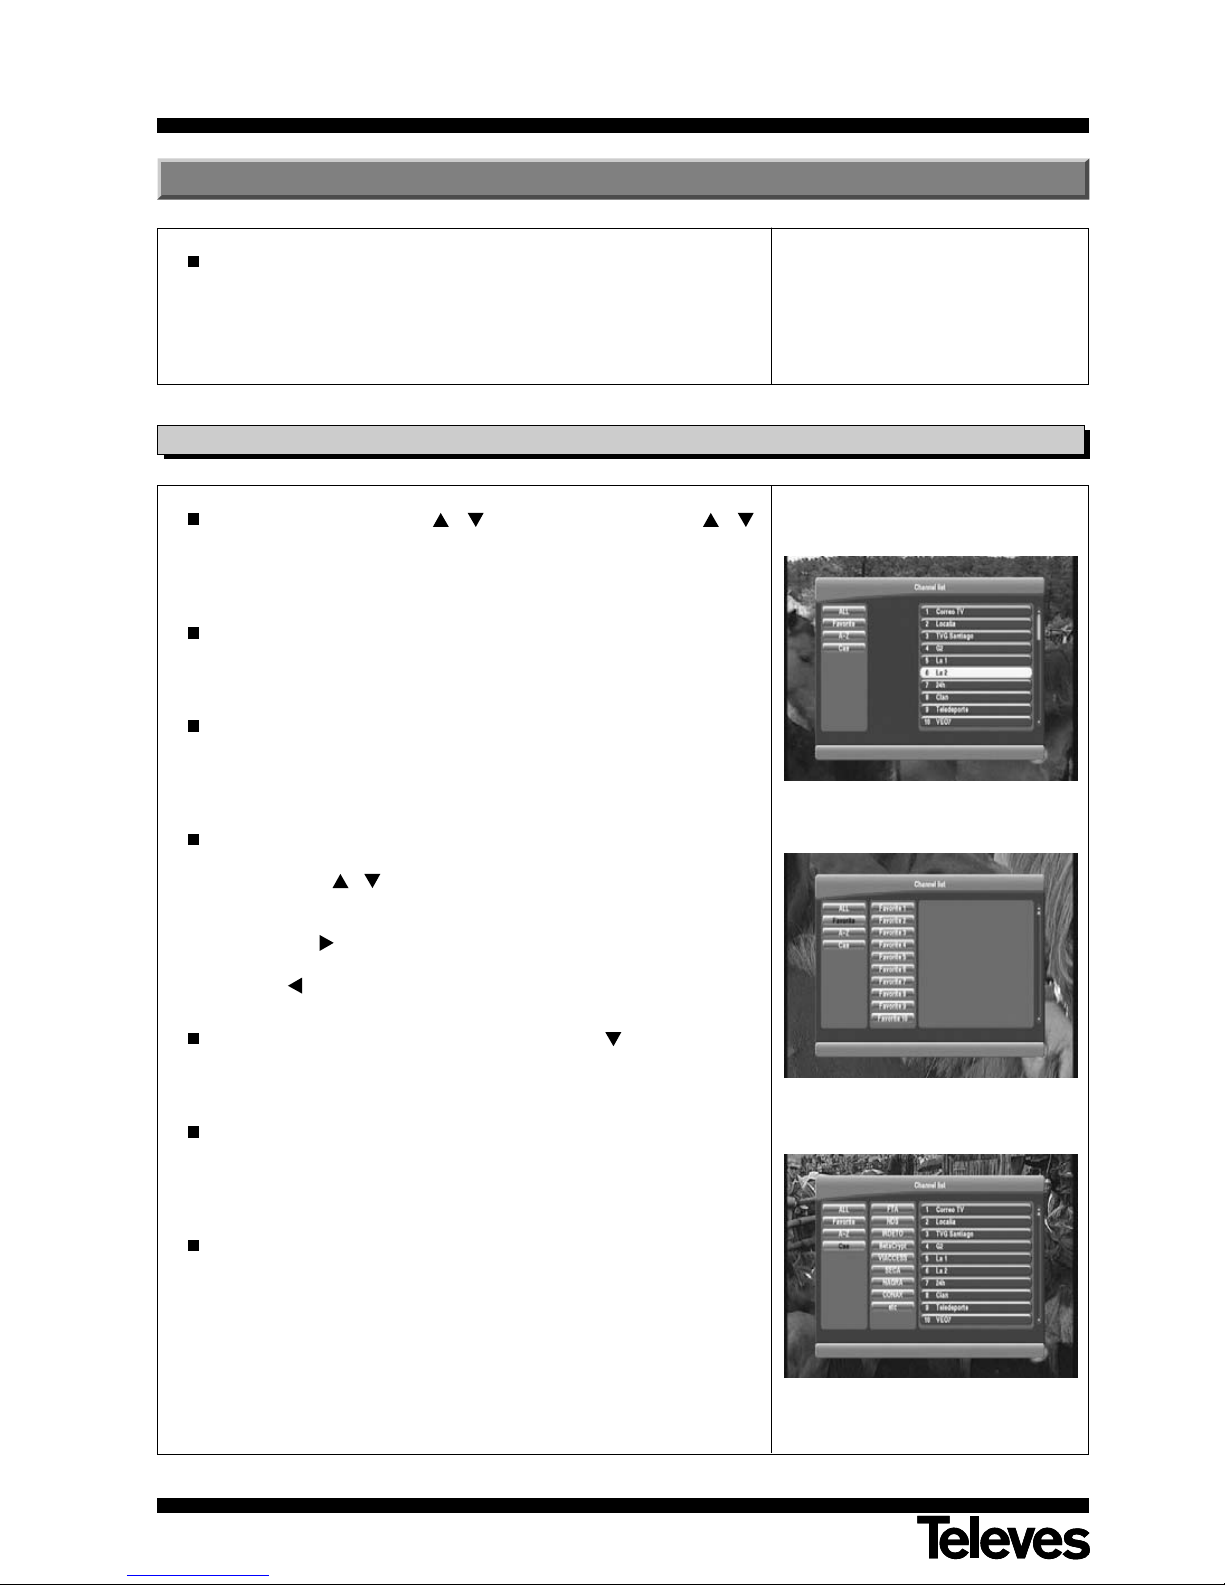
While watching a programme, press the OK key on the remote control.
The general programme list will appear on the screen. If you press the
EXIT key, the list will disappear.
To select a channel, scroll up and down through the list and place the
cursor on the channel you want. Press OK to visualize the channel. If
you press the Page+/Page- keys you will move page by page on the
channel list.
The functions to select the category (All, Favourite, A~Z, Cas) will be
shown on the upper left corner. The yellow cursor will move up and
down using the
/
keys. When you select one of the functions, such
us All, a list with the channels corresponding to that category will
appear on the right side. To switch from the function list to the channel
list, press the key. Move the cursor up and down to select a channel
and press OK to see it on the screen. To return the cursor to the function
list, press .
Move the cursor to the Favourite function using the key and 32 list of
favourites will be shown. If you have not selected any channel as
favourite in the “Channel List” section, these 32 lists will be empty.
When you use the A~Z function, 26 characters and “etc” will appear on
the central list. When selecting one of these characters, the right list will
show the channels whose name begins with that letter. If you press
“etc”, the other channels will be shown.
When you use the Cas function, several options to put the channels in
order will be shown on the central list. If you select “FTA”, all free
channels recorded on the receiver will be shown on the right list. The
other options show the list of channels coded in that system.
6.1.- Select a channel
6.- Basic operating functions
Page 13
User manual
“DVB-T 7151
”
13
ENGLISH
Press the
PR
key on the remote control to return to the last
channel you have visualized.
6.2.- Return to previous channel
Volume Control
To turn the volume up or down, use the V+/V- keys on the remote
control or the / keys on the remote control or on the front panel.
Note: The receiver has 32 volume levels. The volume can also be
adjusted through the control of your TV.
Mute
To eliminate the sound, press the MUTE key on the remote control. To
regain the volumen level, press this key again.
Audio control
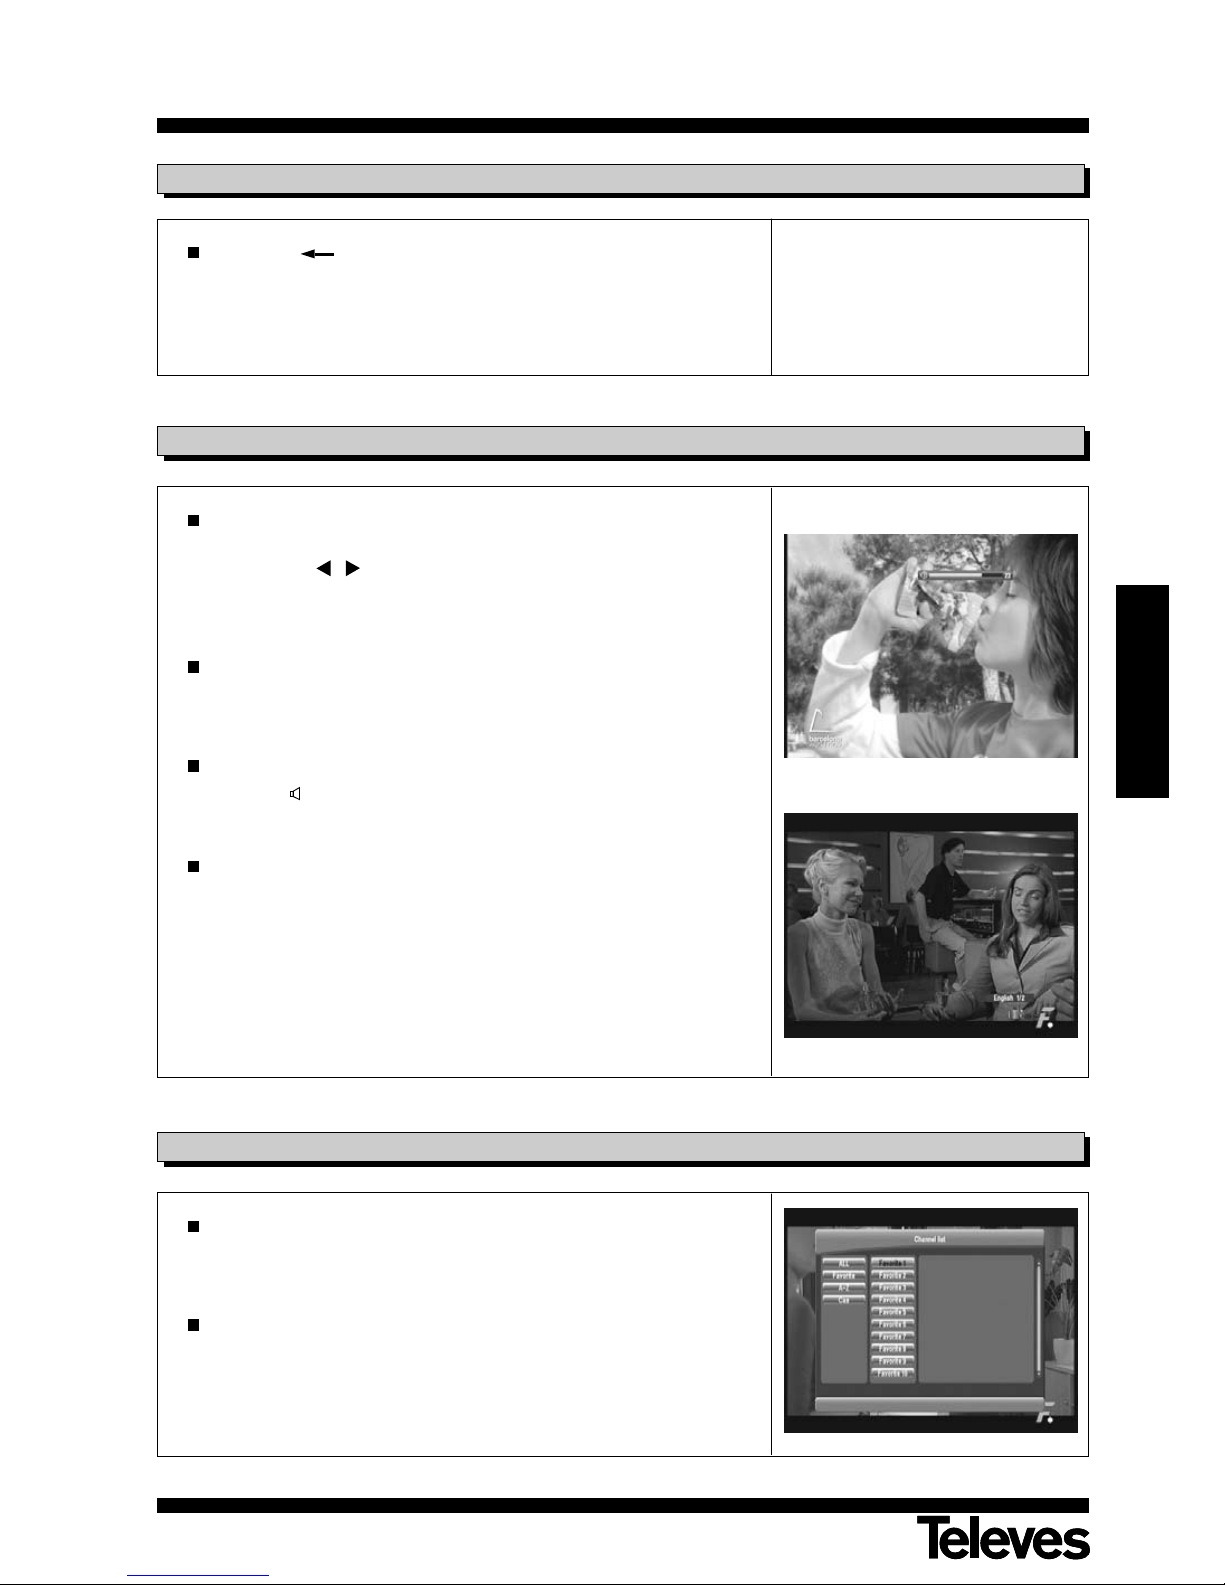
Press the key repeatedly to select one of the three modes for audio
output between Stereo, Left or Right.
Audio Selection
Press the AUDIO key repeatedly to select one of the audios available in
the programme. This function depends on whether the selected channel
supports several audios or not.
L
R
6.3.- Volume and audio control
To access the list of Favourite channels, press the FAV key.
Before accessing this list, you must assign channels to the favourites
lists on the “Channel List” menu. Otherwise, the lists will be empty.
The process to assign channels to the favourites lists is explained in
section. 7.2.- Favourites Channels.
6.4.- Favourites List
Page 14
User manual
“DVB-T 7151
”
14
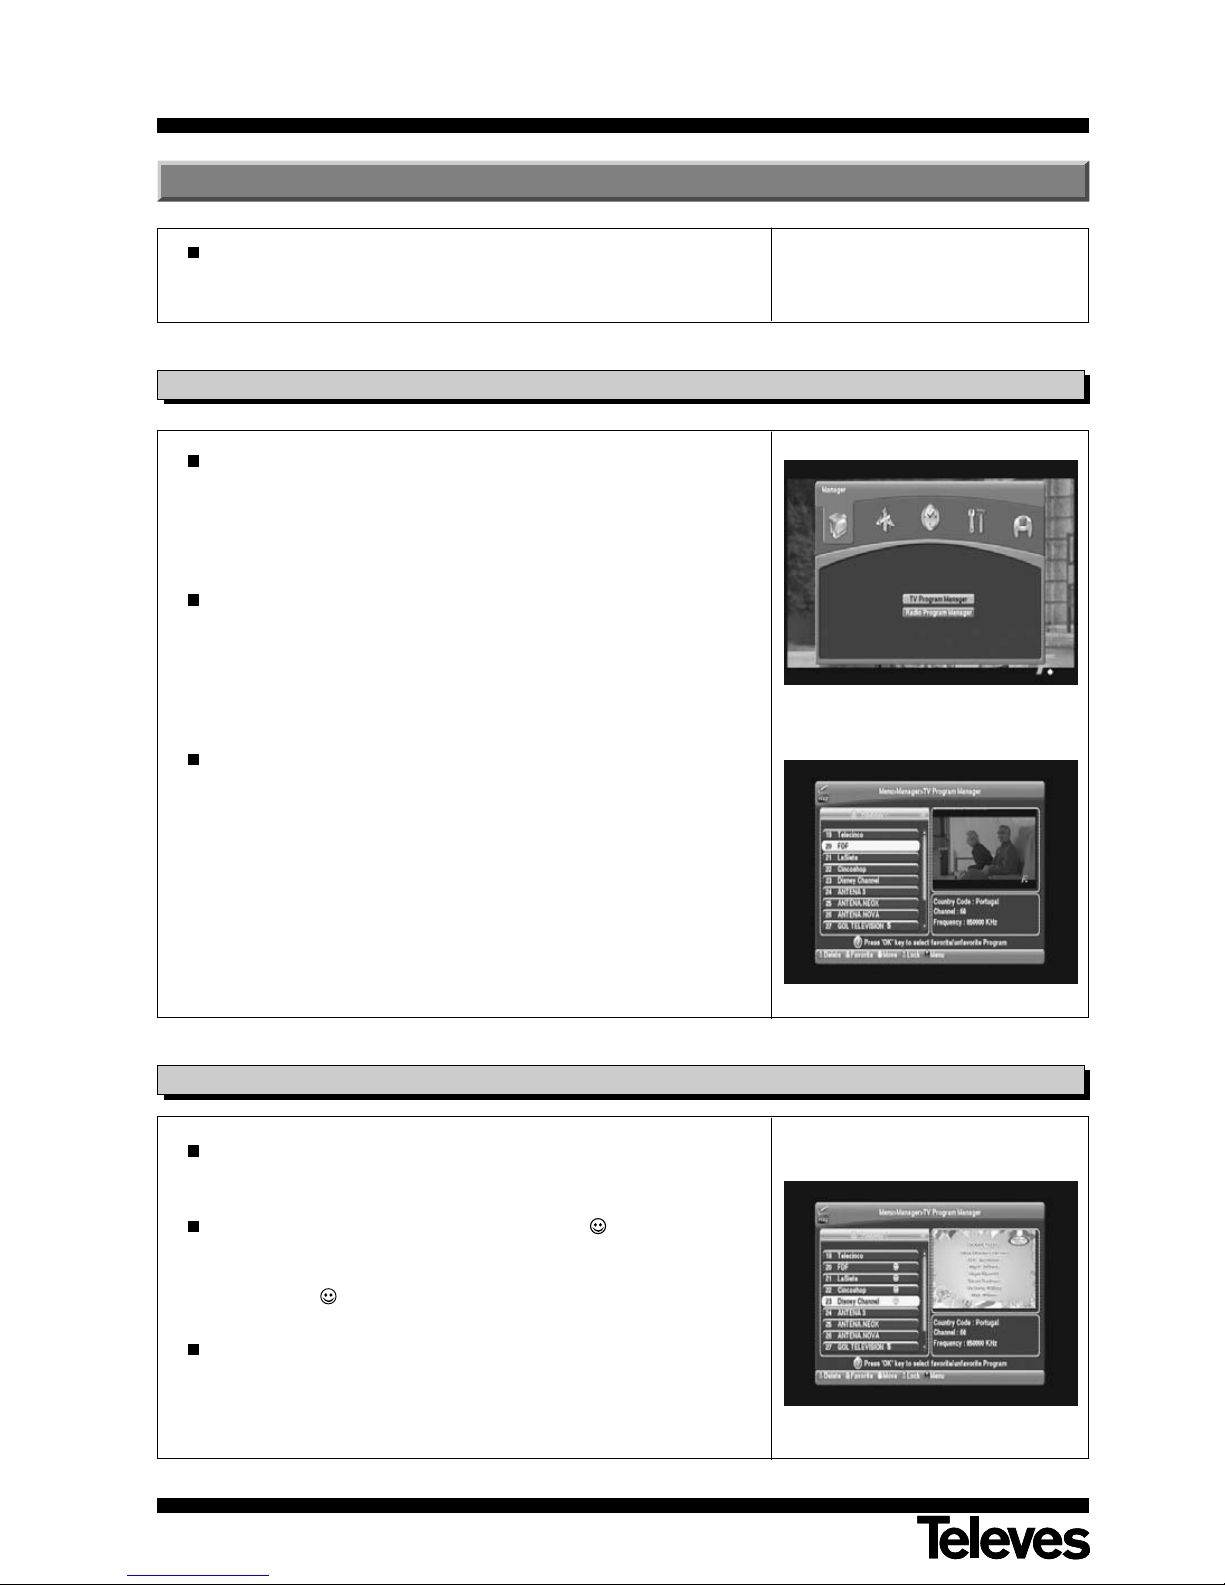
This menu consists of managing TV and Radio channels. Press the OK
key on the “TV Program Manager” option.
Note: Since the Radio channels are managed in the same way than the
TV channels, this manual will only explain how to manage the TV
channels.
The list of channels that are available on the receiver will appear on the
left side of the channel list menu. The image of the currently selected
channel will be shown in a small screen on the right side and the
information about the channel will appear on the bottom of the screen.
When the cursor switches from one channel to another, the image of the
little screen varies depending on the selected channel.
You can use the color keys on this menu as follow:
Red: Delete mode
Green: Favourites mode
Yellow: Move mode
Blue: Lock mode
Moreover, if you press the MENU key, you will access a submenu where
you can:
Rename favorite group
Rename
Sort (Favorite, Lock, Scramble, Program Name).
7.1.- Manager
When you select the “TV Program Manager” the list of Favorite 1 will
be shown by default.
Select your favourite channel and press OK. The icon will be shown
next to the name of the channel marked as favourite.
If you want the channel not to appear on the favourites list, press OK
again and the icon will disappear.
After selecting the favourite channels, press the EXIT key twice to save
the modifications. Press FAV to access the channel lists and check that
they have been created correctly.
7.2.- Favourites Channel
7.- Channel Manager
The receiver offers you the most powerful channel manager function
that exists nowadays. It will make posible to manage the unit in a more
interesting and usefull way.
Page 15
User manual
“DVB-T 7151
”
15
ENGLISH
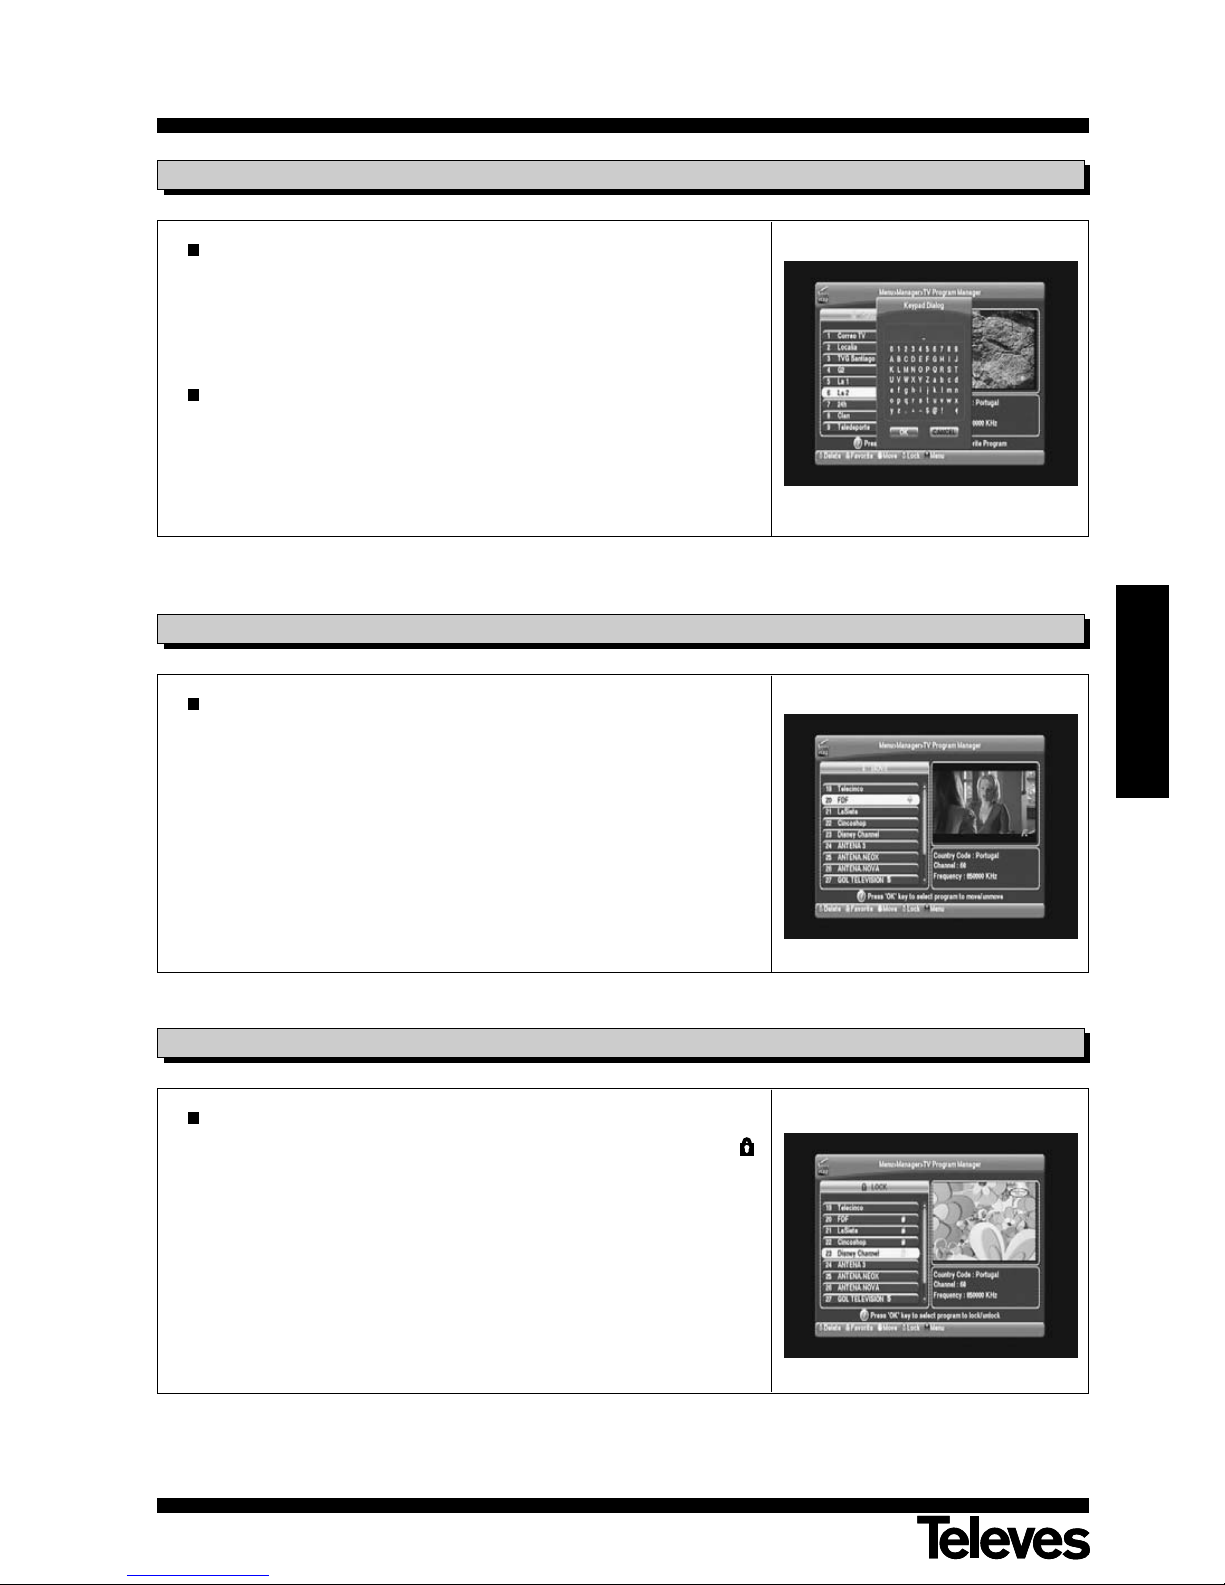
How to create Groups of Favourites
When you access the channel list, the group selected by default is
Favorite 1.
Press the green key to activate a list with the 32 groups of favourites
and select other one.
How to edit the name of the Groups of Favourites
Press the MENU key on the “TV Program Manager” menu. Then, a popup menu will appear.
Select the option “Rename favourite group” and press OK.
Write the new name for the group on the keyboard window.
7.3.- Edit Favourites
Press the yellow key on the channel list.
Select the channel that has to be moved by pressing OK on it, move to
the new location and press OK. The selected channel will be moved to
its new location on the list and the channel number will be consequently
updated.
7.4.- Move Channels
Press the blue key on the channel list.
Select the channel that has to be locked by pressing OK on it. The
icon will be shown next to the name of the channel marked. To unlock
the channel, press again the OK key on it.
Note: If you want this option to be functional, the Parental Control must be
activated (ON).
7.5.- Lock Channels
Page 16
User manual
“DVB-T 7151
”
16
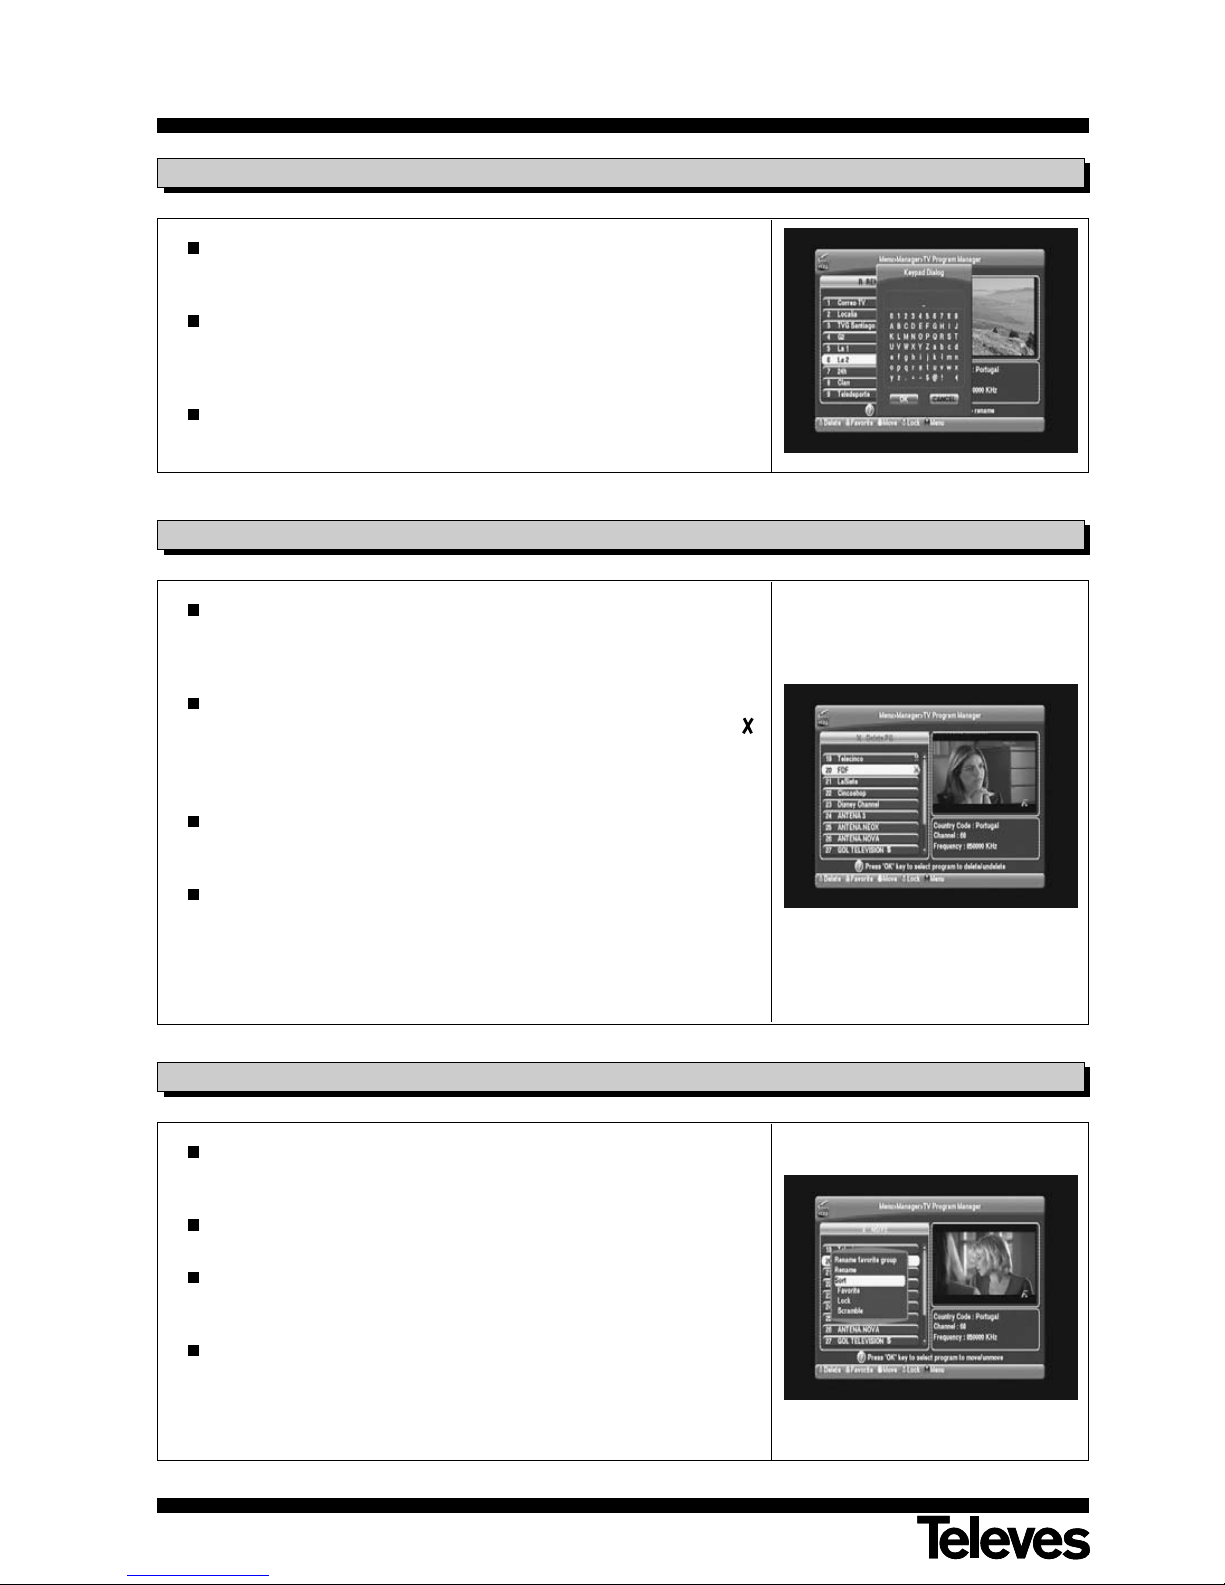
Press the MENU key on the channel list. Then, select Rename on the
pop-up menu.
This menu allows to change the channel´s name. First of all, select the
channel to be modified and press OK on it. Write the new name on the
keyboard window using both letters and numbers.
Check that the name has been changed and updated on the channel
list.
7.6.- Rename Channels
Press the red key on the channel list to access the “Delete Channels”
mode. If you press the red key repeatedly, you can switch among
“Delete Channel”, “Delete Programme” or “Delete All”.
This command makes possible to delete a channel in a permanent way.
First of all, select the channel to be deleted and press OK on it. The
icon will be shown next to the name of the channel marked. To eliminate
this mark, press again the OK key on it.
Press EXIT to delete the channel once and for all. Press OK on the
confirmation window to confirm.
Check that the channel has been deleted from the channel list.
Warning: Deleted channels cannot be regained unless you search
channels again.
Be careful when deleting channels.
7.7.- Delete Channels
Press the MENU key on the channel list. Then, select Sort on the popup menu.
This submenu allows to put the channel list in the order you want.
You can sort by Favorite, Lock, Scramble and Program Name. Place
the cursor on the line you want and press OK.
Check that the channels have been correctly put in order.
Warning: The Radio Channel List has the same functions than the TV.
7.8.- Sort Channels
Page 17
User manual
“DVB-T 7151
”
17
ENGLISH
8.- EPG (Electronic Programme Guide)
This receiver offers you the EPG function, so that you can access the TV
(or radio) Guide, which will show you the titles and other information
about the current and next programmes in the different channels.
This information is only available for the net channels that you are
watching.
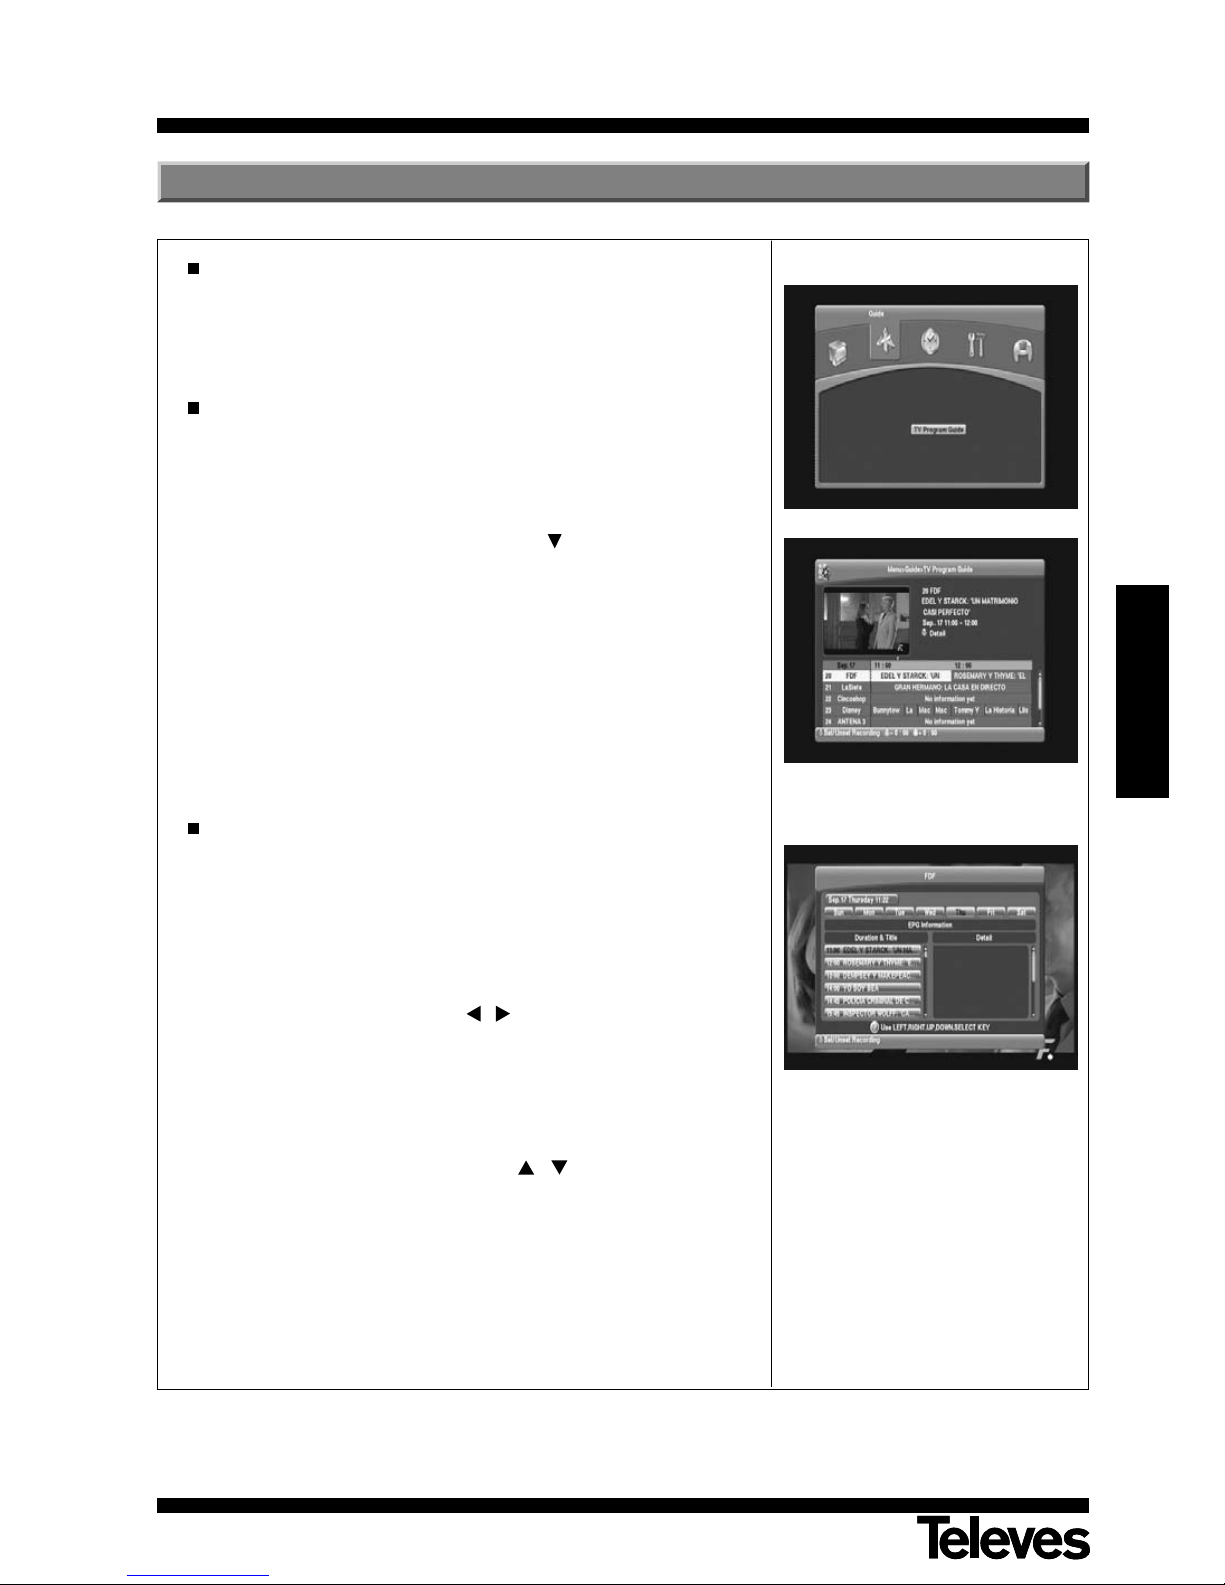
Press OK on the “TV Program Guide” option on the “Guide” menu or
press the EPG key on the remote control.
Now the EPG will appear. You can see the selected channel on the
small screen, the channel list on the left side and the programmes of the
selected channel on the right side. Time is shown depending on the
current programme.
Select one channel and move the time mark untill the programme you
want to get information about. For more details about it, press the blue
key and a new window with this information will appear (if it is available).
If you press the green or yellow key, you will be able to move the time
bar 6 hours forward or back.
Note: The message “No EPG data” will be shown when this information
is not available on the selected channel.
Special EPG of channel
In normal operating mode (watching a programme), you can see the
programmes that will be broadcasted by the current channel during the
whole week (including its name, length, contents, etc) by pressing the
INFO key twice.
You will see:
- Channel´s name on the upper side.
- Date on the upper left corner.
- You can see the programmes of a particular day of the week between
Sunday and Saturday using the / keys.
- The next line shows the EPG status. While searching information in
the current channel, it shows the message “Researching EPG
Information”. After searching, it shows the message “EPG
Information”.
- The next line shows “Duration and Title”. Here you will find the name
and lenght of the next programmes. You can scroll up and down
through the programme list using the
/
keys. At the same time,
you can see detailed information about the programme on the right
side of the window. If there is no data available, the message “No
Detail Information” will be shown.
Page 18
User manual
“DVB-T 7151
”
18
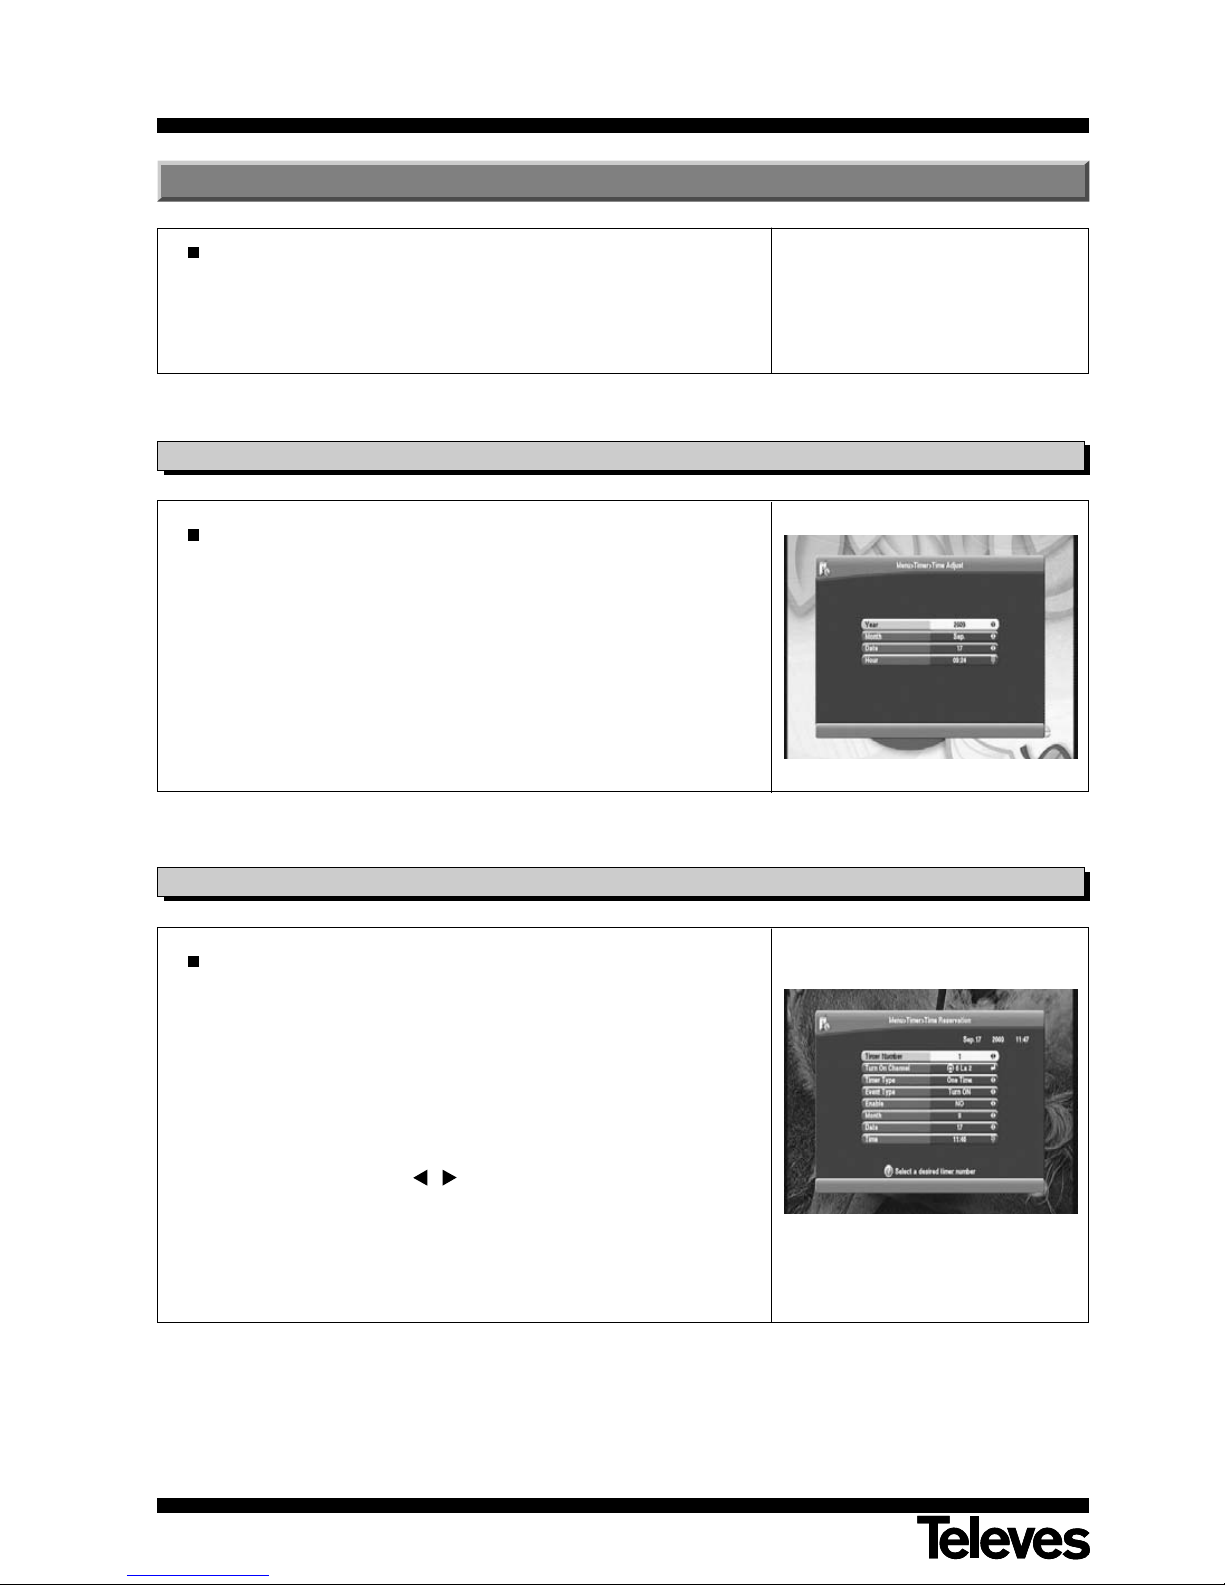
Press OK on the “Time Adjust” option on the “Timer” Menu.
Note: It is not possible to edit any option: Year, Month, Date and Time;
once this information has been sent by the service operator.
9.1.- Time Adjust
The receiver has a timer to turn it on and off automatically at a
previously set time. It has 10 locations where you can programme the
same number of events.
- You can select the channel in which it will be placed at turning on the
unit.
- You can adjust the timer to work Once, Daily, Weekly or Monthly.
- Indicate whether the event is to turn on or off the receiver.
- Press YES on the Activated section to activate the timer.
- Insert the date using the /
keys.
- Insert the start time of the event using the numeric keyboard.
9.2.- Timer Reservation
9.- Programme Events
This function makes possible to programme events in different ways.
Note: The receiver shows the time received from the information
provided by the service provider in the TV signal itself.
Page 19
User manual
“DVB-T 7151
”
19
ENGLISH
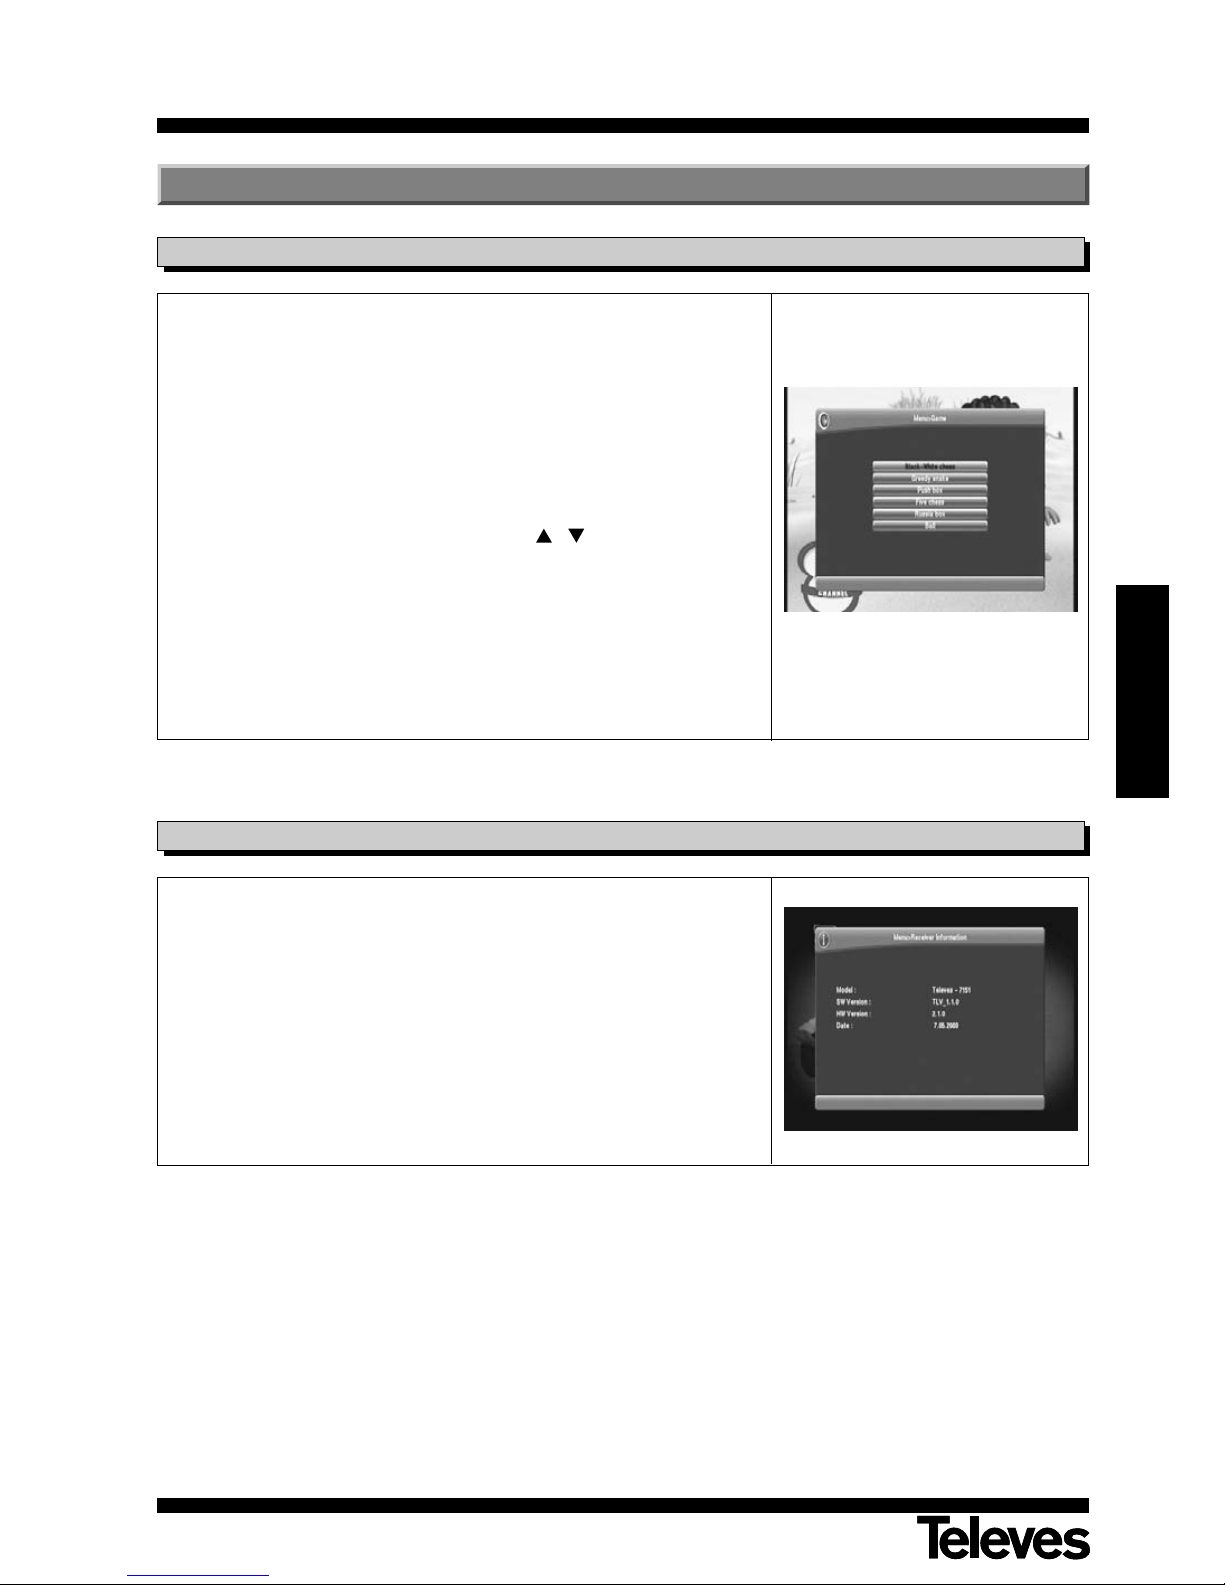
Here you can select one of the 6 games available in the receiver:
- Black-White chess
- Greedy snake
- Push Box
- Five chess
- Russia Box
- Ball
- Select one of the games available using the / keys and press OK to
accept.
- Follow the instructions shown on the screen to play. If you have any doubt,
press the INFO key for help.
- Press EXIT to exit the game at any time.
10.- PVR
10.1.- Game
In this menu you can get information about:
- Model
- SW version
- HW version
- Date
10.2.- Receiver information
Page 20
User manual
“DVB-T 7151
”
20
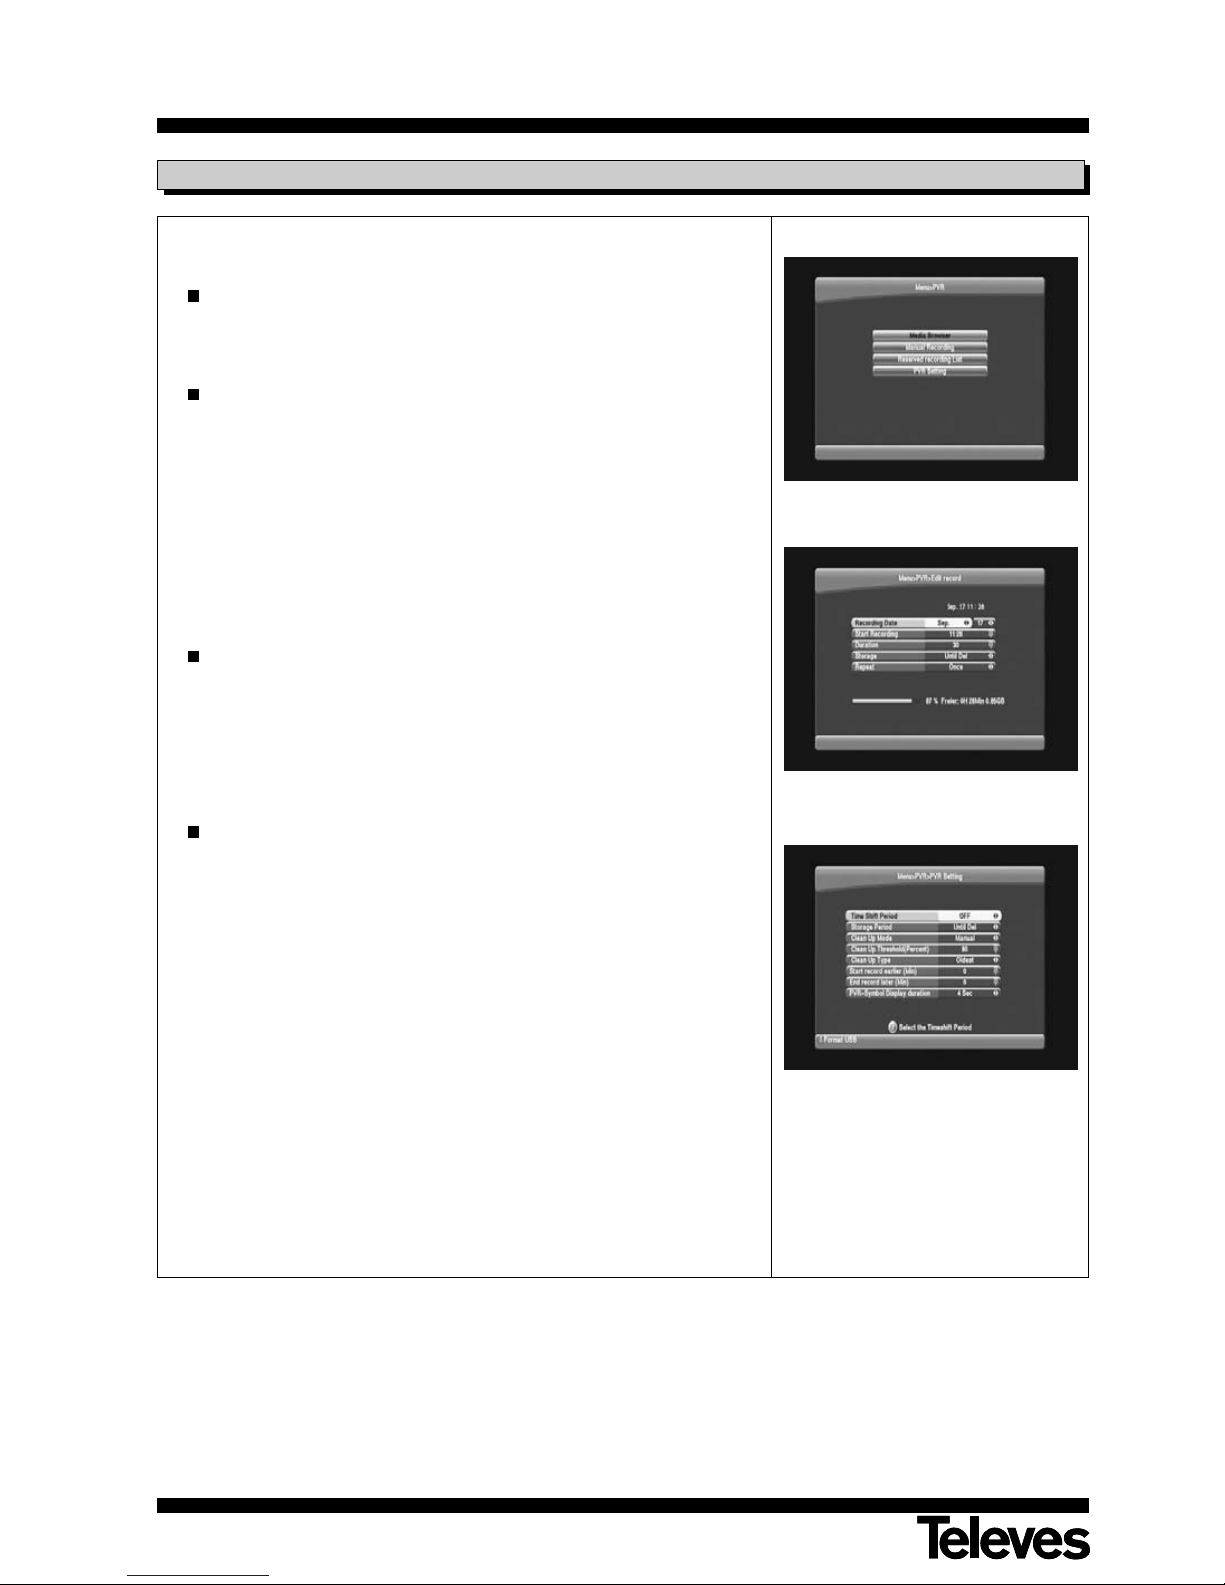
Options available if there is an external disk connected to the unit.
Media Browser
Shows the list of recordings saved in the disk. See section 11.“Record/Play”.
Manual Recording
It allows you to programme a recording manually.
- Select the programme to be recorded and press the red key.
- Indicate the date at which the element must be recorded, its start time,
the length of the recording, the storage time of the file, and how many
times the recording will be repeated.
- If you want to delete the recording, press again the red key on the
same programme and press OK to confirm.
- You can see the list of outstanding recordings if you press the INFO
key three consecutive times in normal mode.
Reserved Recording List
It shows the list of outstanding recordings.
- Press the red key to delete the selected recording and press OK to
confirm.
- To modify any of the recording data, press the green key.
PVR Setting
To configurate the PVR values, access this function.
- Time Shift Period
- Storage Period
- Clean Up Mode
- Clean Up Threshold (%)
- Clean Up Type
- Start record earlier (min)
- End record later (min)
- PVR-Symbol Display duration
Press the red key to format the disk connected to the USB port.
Note: This operation will delete all data contained in the disk.
10.3.- PVR
Page 21
User manual
“DVB-T 7151
”
21
ENGLISH
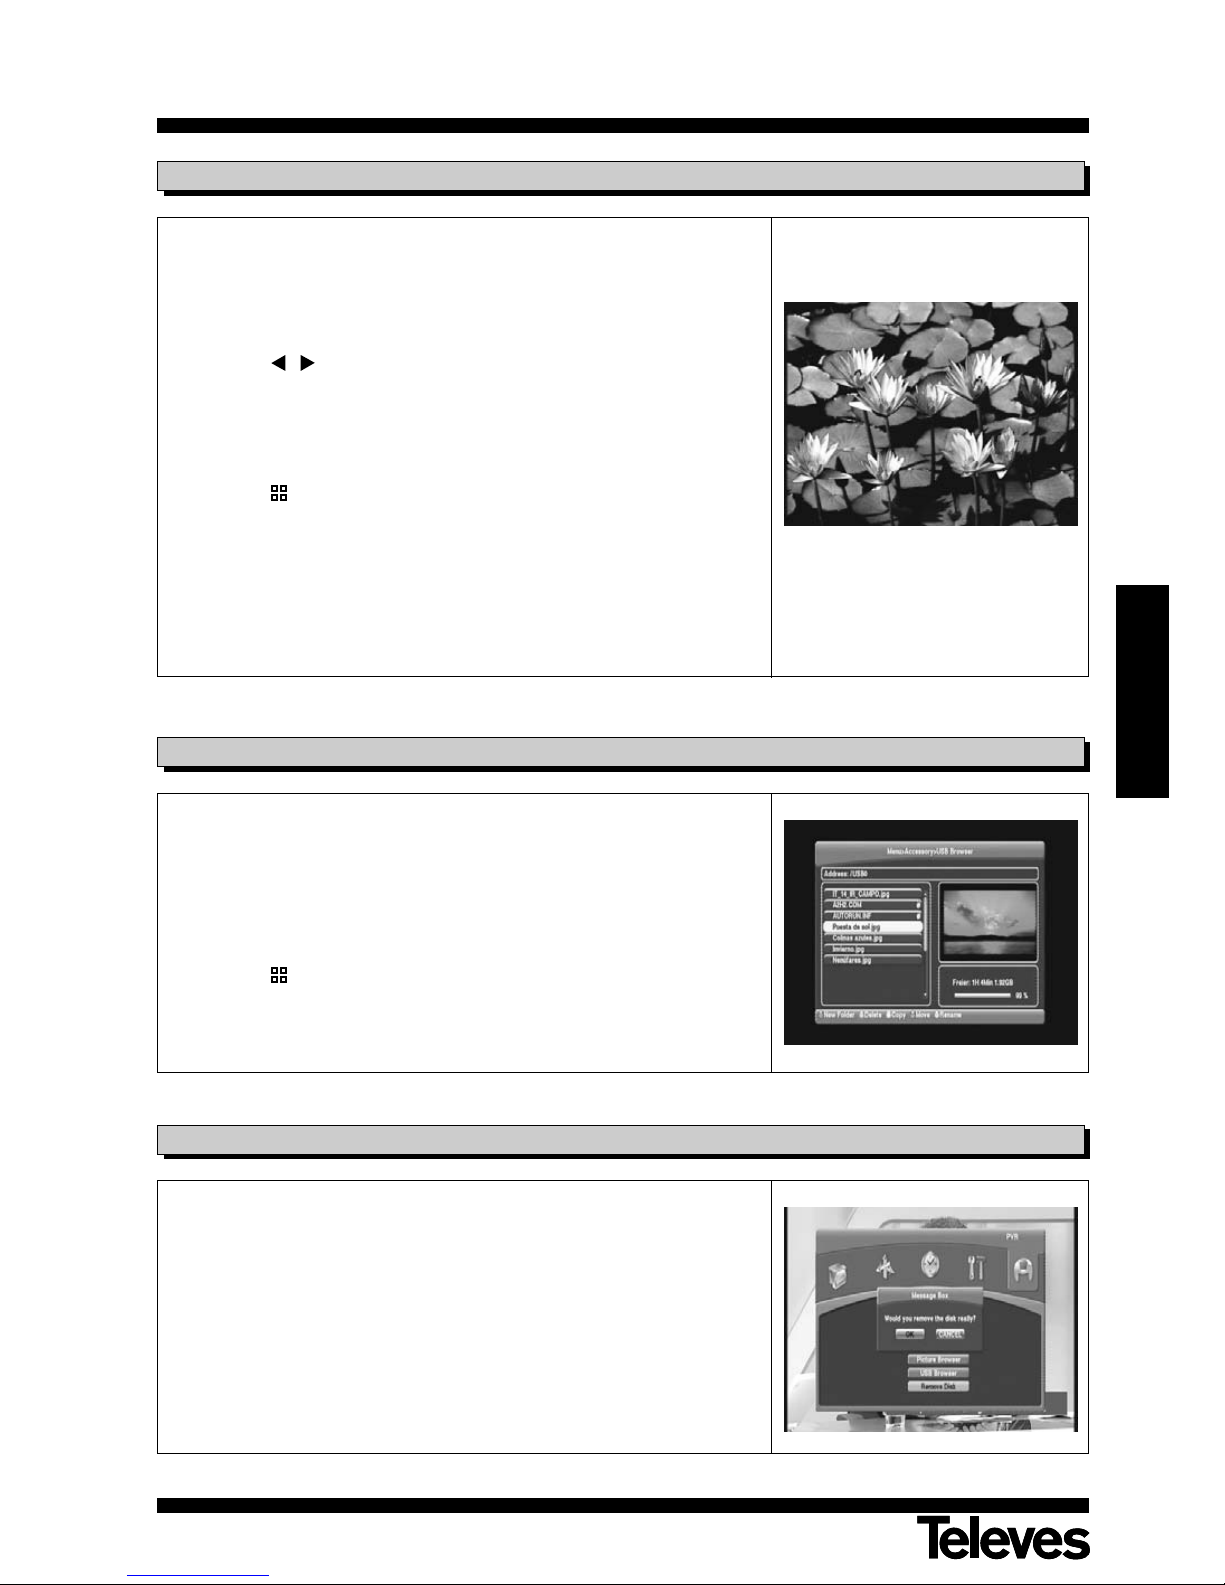
Option available if there is an external disk with JPG files connected to
the unit.
- Press OK on the “Picture Browser” option of the “PVR” menu to activate
the image viewer.
- Press the / keys to select the images.
- Press OK to visualize the image on full screen.
- Press the blue key to visualize the images in a continuous way.
- Press the yellow or green key to rotate the images in both directions.
- Press the red key to delete the selected image.
- Press the key to show an image mosaic.
- Press EXIT to exit the viewer
10.4.- Picture Browser
Option available if there is an external disk connected to the unit.
- Press the red key to create a new file in the disk.
- Press the green key to delete the selected element.
- Press the yellow key to copy a selected element.
- Press the blue key to move the selected element.
- Press the key to rename the selected element.
10.5.- USB Browser
Option available if there is an external disk connected to the unit.
- Press OK to dismantle the disk and remove it.
10.6.- Remove Disk
Page 22
User manual
“DVB-T 7151
”
22
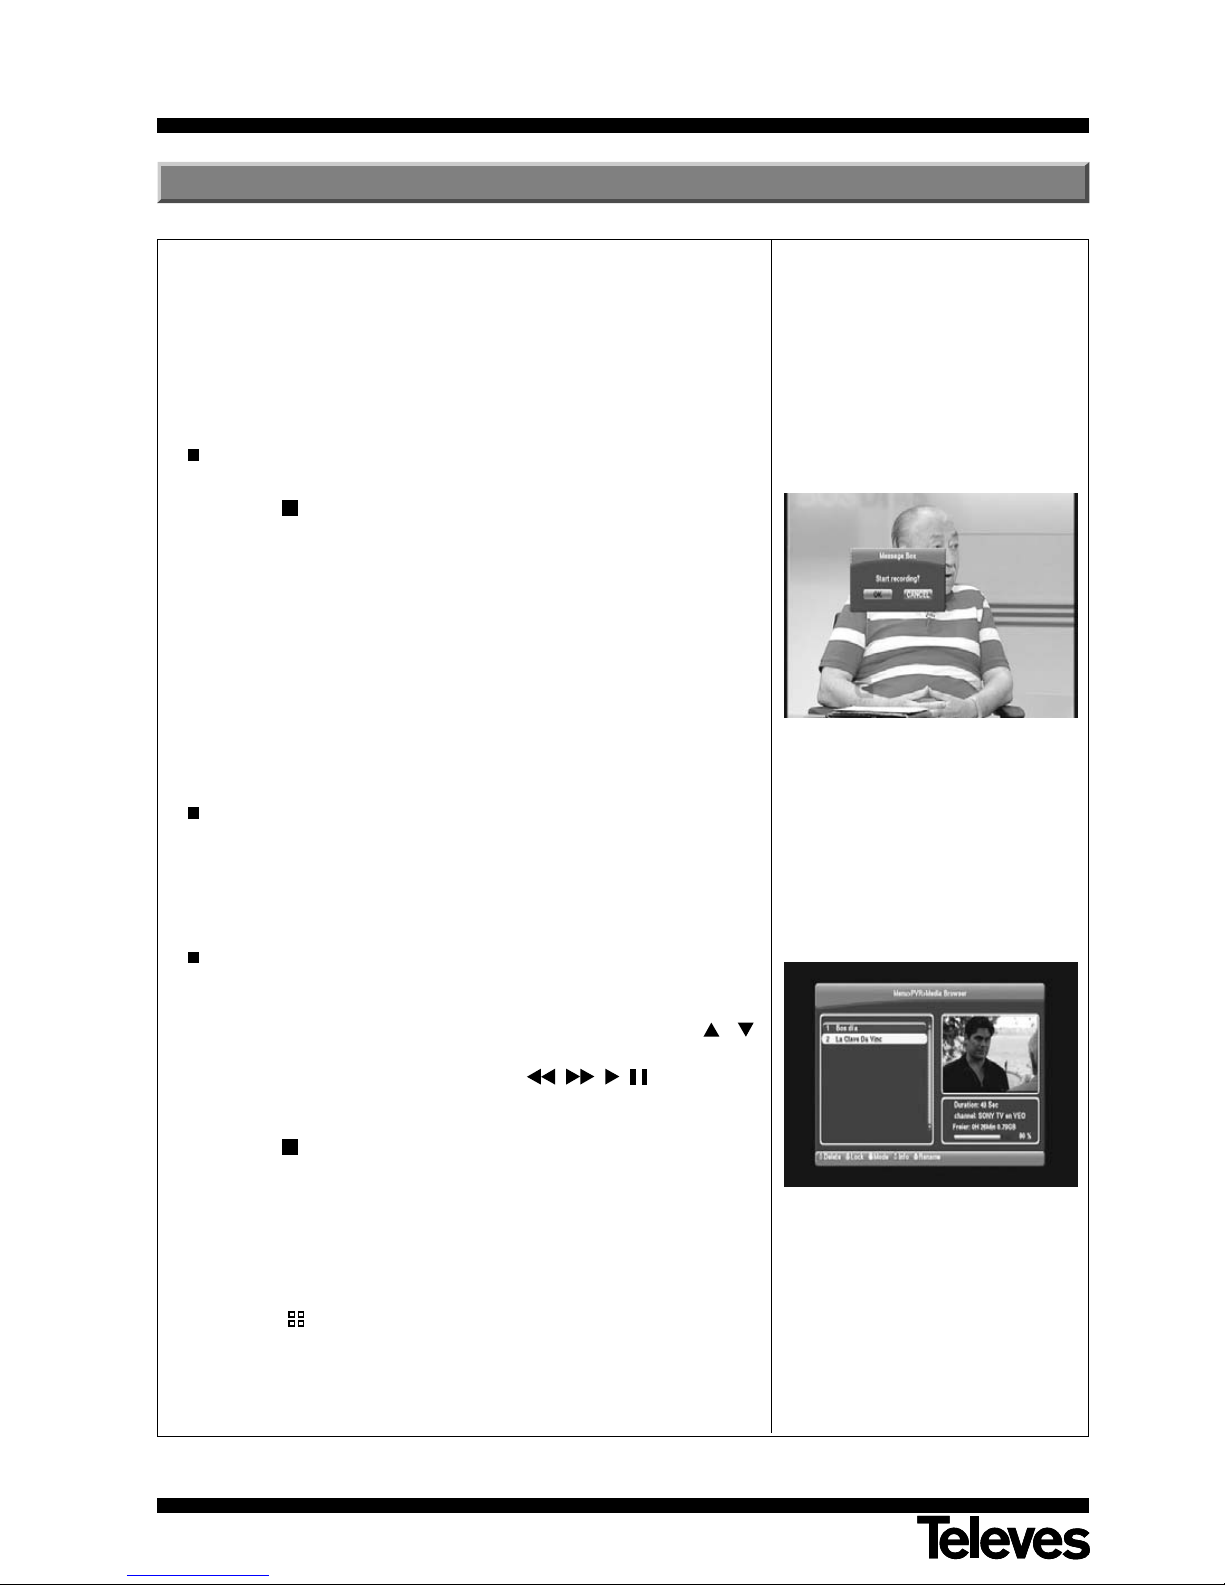
11.- Record/Play
This receiver allows you to record a programme on an external disk in two
different ways: one in real time and another using the “Timer” option.
To make this function available, there must be an external disk or a
pen drive (memory stick) with FAT 32 format and a capacity higher
than 2 GB.
When you connect a disk or pen drive to the receiver, the message “USB
inserted” will appear on the screen.
Recording in Real Time
- Press the REC key to record the programme you are watching.
- Press the key to stop recording. A message will appear on the screen
where you must confirm that you want to stop recording by pressing OK
on the “Stop the recording” option.
Notes:
- You cannot record more than one programme at the same time.
However, you can watch another programme that belongs to the same
multiplex.
- Once the recording has started and if it is not stopped, it will finish after
120 minutes (preset value that can be modified on the PVR-Setting
Menu.
Temporized Recording (manual).
- See Section “9.2.- Timer Reservation” to get information about how to
create events by indicating the recording start time, end time,
programme, etc.
Play
- Access the “Media Browser” option from the “PVR” menu to show the
list of recorded programmes.
- Select one of the recorded programmes from the list using the
/
keys and press OK to Play it.
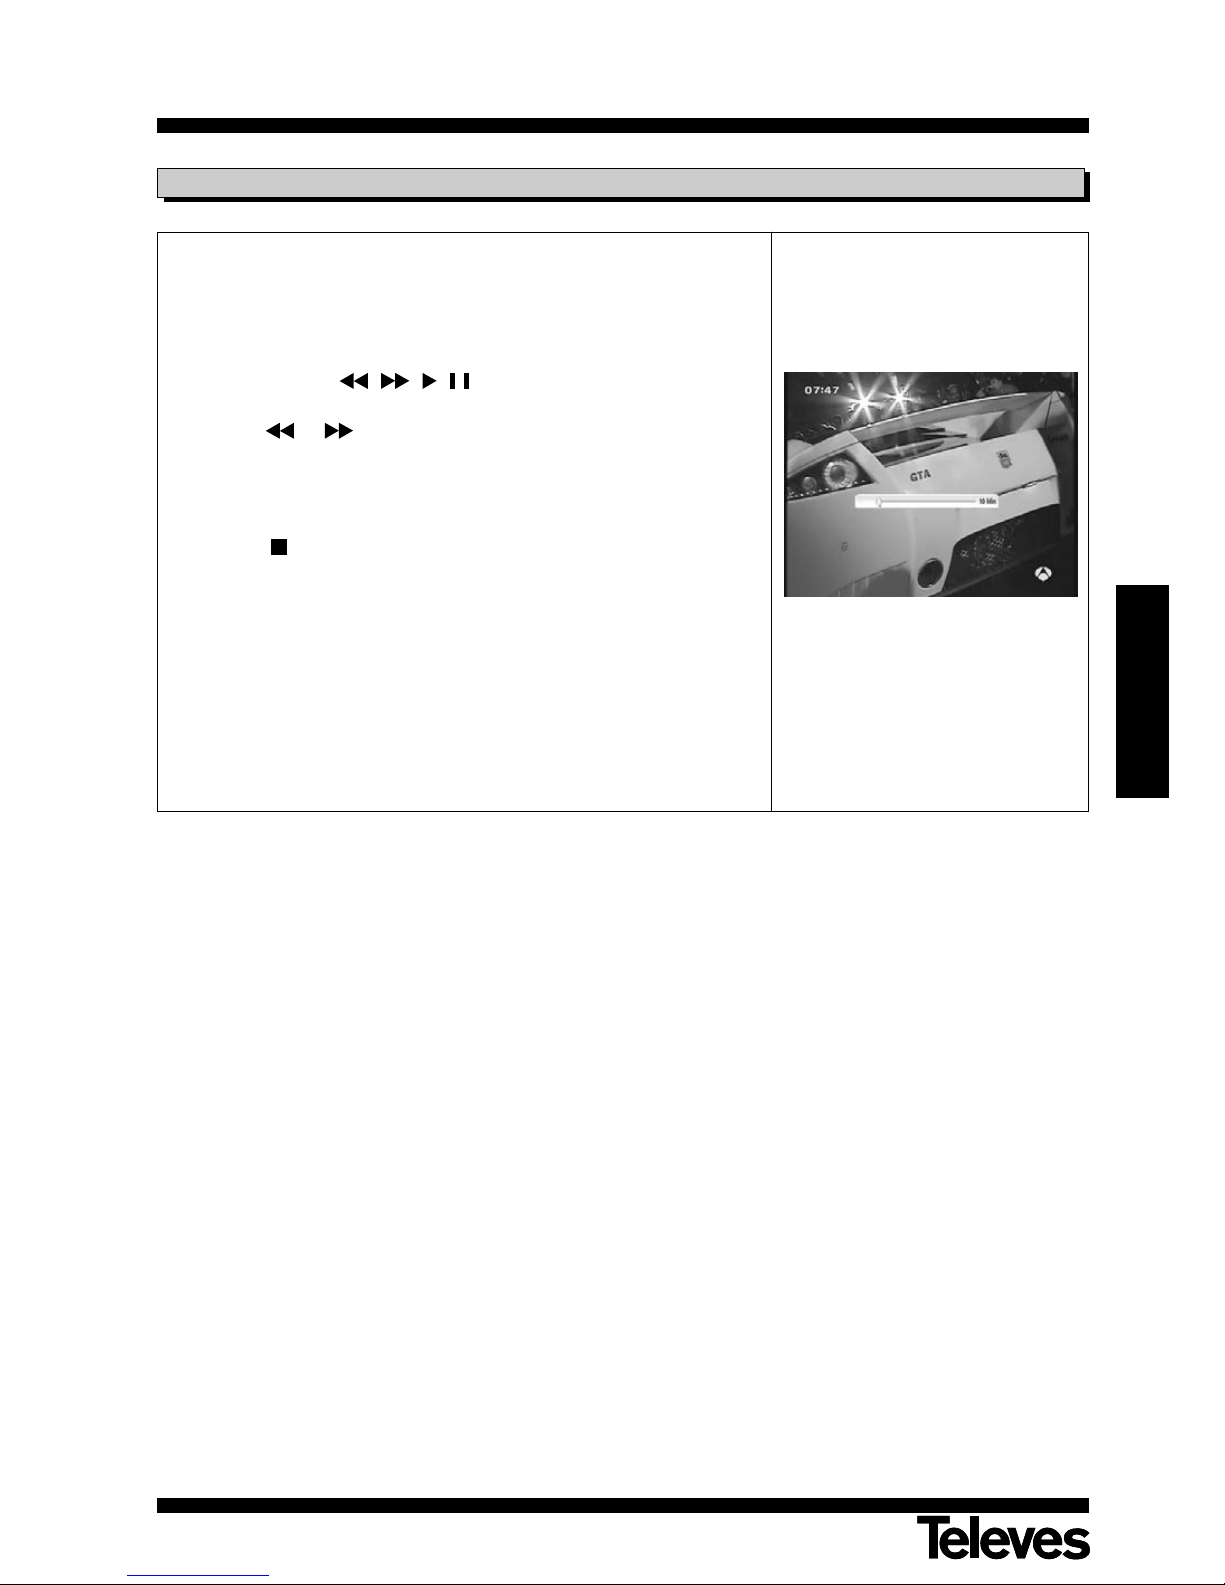
- When a programme is being played, the , , , keys can be
used to move forward or back in the time bar, move forward, make a
pause, etc.
- Press the key to stop playing.
- Press the red key to delete the selected recording.
- Press the green key to lock the selected recording. The “Parental Lock”
must be activated.
- Press the yellow key to show the list of recordings in list format or in
image mosaic format.
- Press the blue key to get information about the selected recording.
- Press the key to rename the selected element using the keyboard
shown on the screen.
Page 23
User manual
“DVB-T 7151
”
23
ENGLISH
Option available if there is an external disk connected to the unit.
Timeshift is the time that passes between the video in real time and the
video recorded in the hard disk.
- Press one of the , , , keys while you are watching a TV
programme. Select OK and press the OK key on the pop-up window.
- Use the or keys if you want to adjust the time bar to search
certain scenes.
- Press the INFO key to see the time bar and check how long the unit has
been recording and in which moment of the playing you are.
- To exit the TimeShift function and watch again the broadcast in real time,
press the key. A message will appear where you must confirm that you
want to stop the Time Shift function by pressing OK on the OK option.
Note: If you change programmes while the TimeShift function is being
run, you will lose all the information saved up to that moment and it
will continue recording the new programme.
The maximum time assigned to this function is 30 minutes.
11.1.- Time Shift Function
Page 24

User manual
“DVB-T 7151
”
24
Now the meaning of some terms and abbreviations used in this User´s Guide will be explained in a brief and easy way.
• DVB: Digital Video Broadcasting.
Group of different International Organizations and Companies aimed at establishing international
standards for the development of the Digital Television.
• EPG: Electronic Programme Guide
Guide that offers a list with the events that will be broadcasted by each programme, their broadcasting
time and a description of their contents.
• Letterbox: A way to show on 4:3 televisions programmes broadcasted with 16:9 format. In this case two black
bands will appear on the upper and lower part of the screen to create a window with this format.
• MPEG4: Group of digital audio/video compression standards used by the DVB.
• OSD: On Screen Display.
System of Menus on the screen.
• Digital: Sound converted into numeric values. You must use the SPIDF or HDMI connectors to have digital
sound. This connectors send the sound through several channels, instead of through only two as in the
analog system.
• JPEG: Joint Picture Expert Group
System of photographic data compression that makes possible a high compression with scarce loss of
quality.
• MP3: File format with an audio data compression system.
• PCM: Pulse Code Modulation
This system turns the analog signal into digital signal so that it can be treated later. This conversion is
carried out without compressing data.
• HDMI: High Definition Multimedia Interface.
High definition Multimedia Interface that makes possible to use standard, improved or high definition
video, as well as multichannel digital audio just in one cable.
• USB: Universal Serial Bus
Port used to connect peripheral elements.
• PVR: Personal Video Recorder
Interactive device for television recordings in digital format.
• SPDIF: Sony/Philips Digital Interface Format
Hardware Protocol to transfer digital stereo audio signals modulated in PCM between stereophonic
components and devices.
• Display VFD: Vacuum Fluorescent Display
Mechanism of certain electronic devices that makes possible to show information to the user.
Terminological Glossary
Page 25
User manual
“DVB-T 7151
”
25
ENGLISH
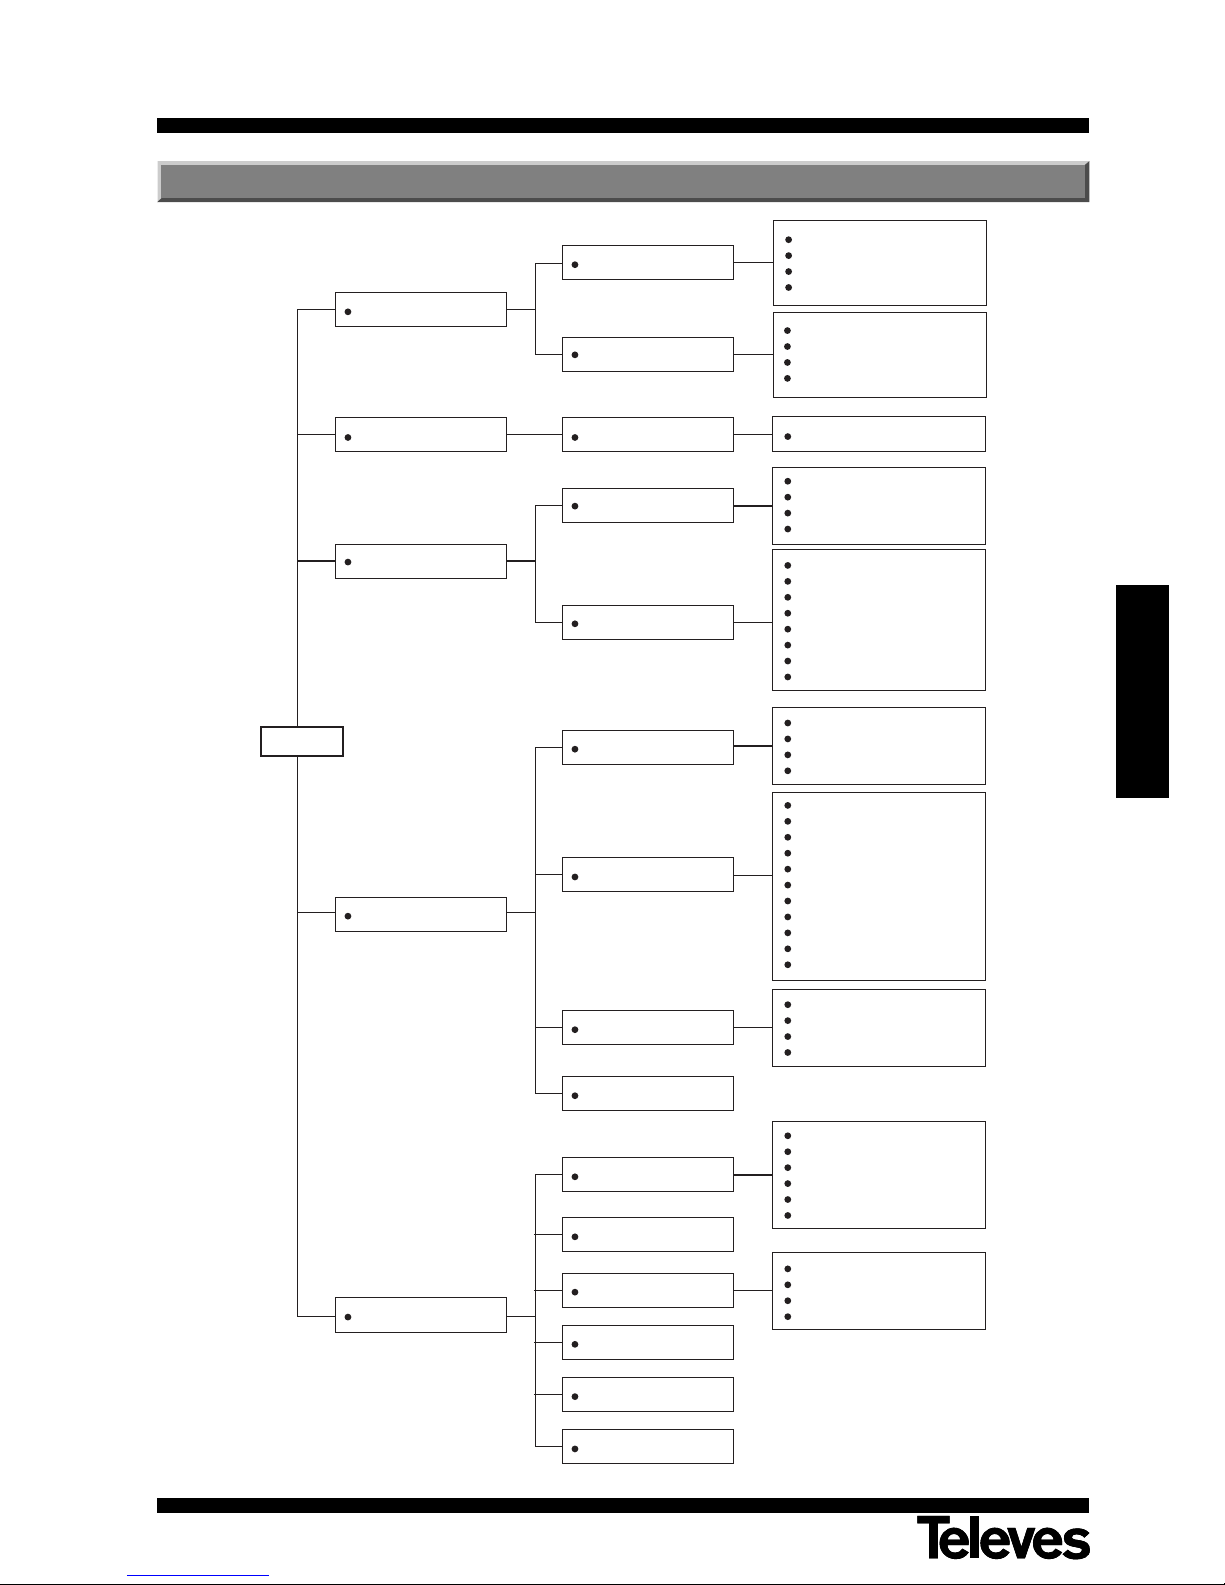
Menu Structure
Guide
Timer
Install
EPG
Year
Month
Date
Hour
Search 1/All CH (FTA)
Search 1/All CH ($)
Search 1/All CH (FTA+$)
Search Network
Manager
Delete
Favorite
Move
Lock
PVR
Black-White chess
Greedy snake
Push box
Five chess
Russia box
Ball
MENU
TV Program Guide
Time Reservation
Parental Lock
Radio Program Manager
Receiver Information
TV Program Manager
Delete
Favorite
Move
Lock
Time Adjust
Timer Number
Turn On Channel
Timer Type
Event Type
Enable
Month
Date
Time
Channel Search
System Setting
OSD Language
Audio Language
ANT Power
Video Format
Screen Format
Video Output
Transparency
HD Format
Digital Audio
LCN Select
Start On Channel
Password
Parental Lock
Install Lock
Change Password
Game
Factory Default
Media Browser
Manual Recording
Reserved Recording List
PVR Setting
PVR
Picture Browser
USB Browser
Remove Disk
Page 26

User manual
“DVB-T 7151
”
26
System capacity
Tuner
Input connector IEC 169-2, female
Output connector IEC 169-2, male
Frequency range 470 - 862 MHz
Input impedance 75 Ohm
Signal level 64QAM: -78.5dBm ~ -8.75dBm
16QAM: -84.1dBm ~ -8.75dBm
Antenna Supply 5VDC @ 50mA Max, overload protection
Decoder
Standard Demod. DVB-T (ETS 300 744)
Modulation OFDM
Bandwidth 7-8MHz
Carrier Mode 2K & 8K
FEC 1/2, 2/3, 3/4, 5/6, 7/8
Guard Interval 1/4, 1/8, 1/16, 1/32
Processor
CPU Frequency 266 MHz
Flash Memory 1PC 64Mbit/8MByte
SDRAM Memory 4PC 16X16Mbit/32Mbyte DDR
TS Demux
Demultiplexer MPEG2 ISO/IEC 13818-1
Input Bit Rate Max. 100Mbit/s
Video
Decoder MPEG2 ISO/IEC 13818-2 MP@ML,
H.264 (MPEG4 part 10) main & highprofile level 4.1/MPEG-2 MP@HL
Image Format 4:3, 16:9
Resolution 1920x1080, 1280x720, 720x480
Audio
Audio Decoder WMA-9, WMA-9 Pro, MPEG-1 layerI/II,
MPEG-2 layer II, MPEG-2 AAC,
MPEG-4 AAC LC 2ch/5.1ch
Type LEFT/RIGHT/STEREO/MONO
Sampling Rate 32, 44.1, and 48 KHz
AV Outputs
Video impedance 75 ohm
Video Level 1.0 Vp-p
Audio Freq. Rang 20 ~ 20KHz
Audio Impedance 600 ohm
Audio level 2V rms (5.6Vp-p)
General
Input voltage 175 - 250 V~, 50/60 Hz
Power consumption 30 W Max.
Temperature 0~40 ºC
Humidity <95 %
Technical Specifications
Page 27
User manual
“DVB-T 7151
”
27
ENGLISH
Guarantee
Televés S.A. offers a two year guarantee, beginning from the date of purchase for countries in the EU. For countries that are not part of the
EU, the legal guarantee that is in force at the time of purchase is applied. Keep the purchase invoice to determine this date.
During the guarantee period, Televés S.A. complies with the guarantee by repairing or substituting the faulty equipment.
The harm produced by improper usage, wear and tear, manipulation by a third party, catastrophes or any other cause beyond the control of
Televés S.A. is not included in the guarantee.
Disposal of Old Electrical & Electronic Equipment
(Applicable in the European Union and other European countries with separate collection systems).
This symbol on the product or on its packaging indicates that this product shall not be treated as household
waste. Instead it shall be handed over to the applicable collection point for the recycling of electrical and electronic
equipment. By ensuring this product is disposed of correctly, you will help prevent potential negative
consequences for the environment and human health, which could otherwise be caused by inappropriate waste
handling of this product. The recycling of materials will help to conserve natural resources. For more detailed
information about recycling of this product, please contact your local city office, your household waste disposal
service or the shop where you purchased the product.
Page 28

7151_000_UK
RED COMERCIAL - COMMERCIAL NETWORK
UNITED KINGDOM
TELEVES (UK) Ltd.
11 Hill Street Industrial Estate
Cwmbran, Gwent NP44 7PG
UNITED KINGDOM
Telephone: +44 1633 875821
Fax: +44 1633 866311
EMail: [email protected]
USA
TELEVES USA LLC.
9800 Mount Pyramid Court, Suite 400
80112 Englewood, CO
USA
Telephone : +1 303 256 6767
Fax : +1 303 256 6769
EMail: [email protected]
PORTUGAL
TELEVES ELECTRONICA PORTUGUESA
Via Dr. Francisco Sa Carneiro, Lote 17
Zona Ind. Maia 1 Sector X
4470 Barca-Maia-Porto
PORTUGAL
Telephone: +351 22 94 78900
Fax: +351 22 94 78900
EMail: [email protected]
ITALY
TELEVES ITALIA Srl.
Via Liguria 24
2068 Peschiera Borromeo (MI)
ITALIA
Telephone: +39 02 5165 0604
Fax: +39 02 5530 7363
EMail: [email protected]
MIDDLE EAST
TELEVES MIDDLE EAST FZE
P.O. Box 17199 Jebel Ali Free Zone
Dubai
UNITED ARAB EMIRATES
Telephone: +971 48 834 344
Fax: +971 48 834 644
EMail: [email protected]
CHINA
TELEVES CHINA
Unit 207-208, Building A, No 374
Wukang Rd, Xuhui District
200031 Shanghai
CHINA (P.R.C.)
Telephone: +86 21 6126 7620
Fax: +86 21 6466 6431
EMail: [email protected]
Rúa Benéfica de Conxo, 17
15706 - Santiago de Compostela
ESPAÑA (SPAIN)
Tel: +34 981 52 22 00 - Fax: +34 981 52 22 62
[email protected] - www.televes.com
Sucursales / Distributors
Para conocer nuestra red de sucursales en el mundo, le rogamos consulte en nuestra pagina web
Please visit Televés web site to find your nearest Official Distributor
FRANCE
TELEVES FRANCE Sarl
1 Rue Louis de Broglie
Parc d'Activités de l'Esplanade
77400 St. Thibault des Vignes
FRANCE
Telephone: +33 1 6035 9210
Fax: +33 1 6035 9040
EMail: [email protected]
GERMANY
PREISNER KOMMUNIKATIONSTECHNIK GmbH
An den Kiesgruben 6, 73240 Wendlingen
DEUTSCHLAND
Telephone: +49 7024 55358
Fax: +49 7024 6295
EMail: [email protected]
Miembro de número del
ER 224/1/94
Empresa
Registrada
Oficinas Centrales / Head Office
Delegaciones / Subsidiaries
 Loading...