

Page 1

`
v6.2
GPS Navigation Suite for:
BlackBerry™ devices
Available on the Verizon® network
To see whether your device is supported, visit:
http://www.telenav.com/products/tn/devices/verizon.html
User’s Guide
Page 2

Copyright
© 2011 TeleNav GPS Plus™ is a trademark and TeleNav® is a registered trademark of T eleNav, Inc., Sunnyvale,
California in the United States and may be registered in o ther countries. No p art of this manual may be reproduced,
transmitted, copied, or stored in any storage medium, for any purpose, without p rior written consent from TeleNav, Inc.
TeleNav, Inc. hereby grants the right to download o ne copy of this manual o nto a hard drive for perso nal use. This
manual is copyrighted and contains proprietary i nformation that is subject to change with out notice. For more
information, visit www.telenav.com
© 2008 - 2011 Tele Atlas. All rights reserved. This material is proprietary and the subject of copyright
protection and other intellectual property rights owned by or licensed to Tele Atlas North America, Inc. T he
use of this material is subject to the terms of a license agreement. You will be held liable for any
unauthorized copying or disclosure of this material.
The BlackBerry and RIM families of related marks, images, and symbols are the exclusive properties
and trademarks or registered trademarks of Research In Motion Limited.
Revision History
Version Date Released Description of Changes Author
6.2a 11/1/2011 Initial release. Daisy Luu
.
6.2b 5/2/12013
Removed Open Table
(no longer supported).
Daisy Luu
Page 3

Table of Contents
1.
Welcome...........................................................................................................................................................7
2. Safety and Legal Notices................................................................................................................................9
3. Device Controls.............................................................................................................................................10
Navigation on Non-Touch Devices....................................................................................................................11
4. Getting Started with TeleNav GPS Plus.....................................................................................................11
Software Installation........................................................................................................................................... 11
Network Access.................................................................................................................................................. 12
5. Launching TeleNav GPS Plus......................................................................................................................12
6. Common Features.........................................................................................................................................14
Address Pattern Recognition............................................................................................................................. 14
BlackBerry Universal Search............................................................................................................................. 15
Search Bar.......................................................................................................................................................... 15
7. Speech Input..................................................................................................................................................16
8. Using a Bluetooth Headset..........................................................................................................................17
9. Drive To Menu................................................................................................................................................17
Getting Driving Directions................................................................................................................................... 18
Resume Trip................................................................................................................................................ 18
Home............................................................................................................................................................ 18
My Favorites................................................................................................................................................ 18
Category............................................................................................................................................... 20
Create New Category.......................................................................................................................... 21
Delete or Rename a Category............................................................................................................. 22
Recent Places..............................................................................................................................................22
Address........................................................................................................................................................ 23
Contacts....................................................................................................................................................... 23
Places ..........................................................................................................................................................24
Airport........................................................................................................................................................... 25
Other Ways to Get Directions............................................................................................................................ 25
Trip Confirmation Screen................................................................................................................................... 26
Editing Your Route...................................................................................................................................... 26
Edit Origin............................................................................................................................................. 26
Edit Destination ....................................................................................................................................26
Edit Route Settings............................................................................................................................... 26
© 2011 TeleNav, Inc. Page 3 of 64
Page 4

Moving to the Nearest Street...................................................................................................................... 27
Audible Guidance Tones.............................................................................................................................27
Audio Replay ............................................................................................................................................... 27
Miss a Turn?................................................................................................................................................ 27
Navigation Views................................................................................................................................................28
3D Moving Map........................................................................................................................................... 28
2D Moving Map........................................................................................................................................... 28
On-Screen Navigation Icons..............................................................................................................................30
Navigation Menu Options................................................................................................................................... 30
Places ..........................................................................................................................................................31
Map .............................................................................................................................................................. 32
Directions (Route Summary) ...................................................................................................................... 33
Traffic Summary.......................................................................................................................................... 33
Report Traffic Camera and Police Trap .....................................................................................................34
Avoiding Traffic................................................................................................................................................... 35
From Traffic Summary................................................................................................................................ 35
From Traffic Alert......................................................................................................................................... 36
10. Places Menu...................................................................................................................................................37
Using Places....................................................................................................................................................... 37
Search by Category.....................................................................................................................................38
Define a Location......................................................................................................................................... 39
Sorting Options................................................................................................................................................... 39
Sort by Relevance....................................................................................................................................... 39
Sort by Distance.......................................................................................................................................... 39
Sort by Rating.............................................................................................................................................. 39
Sort by Popularity........................................................................................................................................ 39
Map Results.................................................................................................................................................40
Sponsored Results.............................................................................................................................................41
Most Popular Category ...................................................................................................................................... 42
Search for Gas by Price.....................................................................................................................................42
Ratings................................................................................................................................................................ 43
Submit Your Own Rating............................................................................................................................ 43
11. Maps & Traffic Menu.....................................................................................................................................44
Map Menu Options............................................................................................................................................. 44
© 2011 TeleNav, Inc. Page 4 of 64
Page 5

Traffic Cameras and Speed Traps............................................................................................................. 44
Check Traffic....................................................................................................................................................... 45
Other Ways to View a Map................................................................................................................................ 45
12. Local Apps .....................................................................................................................................................46
Movies................................................................................................................................................................. 46
Weather............................................................................................................................................................... 47
Commute Alerts.................................................................................................................................................. 48
Create New Alert.........................................................................................................................................48
13. TeleNav Menu Options .................................................................................................................................49
About................................................................................................................................................................... 49
Abo ut Te le Nav G PS P l us.....................................................................................................................................49
Support Info ................................................................................................................................................. 49
Your PIN Number........................................................................................................................................ 49
Dia gno st ic Too ls...................................................................................................................................................50
Settings ...............................................................................................................................................................51
Profile........................................................................................................................................................... 51
General........................................................................................................................................................ 51
Navigation.................................................................................................................................................... 51
Audio............................................................................................................................................................ 52
Side Key....................................................................................................................................................... 52
Opt-In Features ...........................................................................................................................................52
Bluetooth On....................................................................................................................................................... 53
Feedback............................................................................................................................................................ 53
Feedback for Places....................................................................................................................................54
14. Share Address...............................................................................................................................................54
15. Suspending TeleNav GPS Plus...................................................................................................................56
Making a Phone Call from TeleNav GPS Plus................................................................................................. 56
Taking an Incoming Call..................................................................................................................................... 56
TeleNav GPS Plus Options from Device Contact List...................................................................................... 57
Calendar and E-mail Events.............................................................................................................................. 57
16. Exiting TeleNav GPS Plus............................................................................................................................57
17. Removing TeleNav GPS Plus......................................................................................................................58
18. The TeleNav GPS Plus Pre-Planning Website...................................................................................... .....59
Changing your PIN number............................................................................................................................... 59
19. Error Conditions............................................................................................................................................60
© 2011 TeleNav, Inc. Page 5 of 64
Page 6

20. FAQs................................................................................................................................................................61
21. Customer Support.........................................................................................................................................64
22. TeleNav Services Warranty..........................................................................................................................64
© 2011 TeleNav, Inc. Page 6 of 64
Page 7

1. Welcome
TeleNav GPS Plus™ utilizes the integration of GPS position dete rmination technolo gy, the Java™ programm ing
environment, and access to your wireless ca rrier’s data net work. Supported Bla ckBerry devi ces provide both the Java
environment and access to the wireless netwo rk. Depending on your subscripti on, the TeleNav GPS Plus application
provides:
GPS navigation that punctually guides you turn-by-turn to any desti nation address in t he Continenta l U.S
and Canada. If you miss a turn or get off-track, TeleNav GPS Plus will cal culate a new rout e for you.
Up to three routes to choose from before your trip, with estimated times for each route to put you in control
of navigation.
Navigation features such as Lane Assist to help you d etermine whi ch lane(s) to be in at a mu lti-lane
highway junction or an intersection. View traffic came ra locations o n your navigation m ap, as well as the
legal speed limit.
Audio and visual traffic alerts while driving or viewing m aps, as well a s traffic rerouting capabil ities to
minimize delays on your trip.
The ability to enter destination addresses b y keying or spea king directly into th e device, enteri ng them on
the TeleNav GPS Plus website, or by pulling your contacts from the device’s Contacts list. Optionally, you
can input a remote origin and receive Driving Dire ctions from that ori gin address to th e selected destinatio n
address.
A Places feature that allows you to find businesses or points of interest near your current location, around a
Favorite, around an entered address, or around an airp ort. You can call the business first to che ck
availability of an item or get a reservation and then navigate to it. You can also save the address for use
later in the day.
Points-of-Interest search result ads that offer merchant revie w, deals, and re staurant menus (depe nds on
availability).
Maps of the area around your current location, a marked Favorite, or an add ress you enter man ually or
have previously entered. You can pan the map (adjust left/right/up/down), and zoom in or out. Maps and
points-of-interest are frequently updated for accura cy, at no additional charge to you.
The ability to set Daytime or Nighttime colors for your map or navigation screen s. You can also set this t o
“Auto” for automatic color adjustment throughout the day.
The ability to set up alerts for your daily commute and view any traffi c incident s on the map of the route.
A Movies feature to search for movies based on location or theaters.
Weather conditions and movie listi ngs for you r area.
The ability to personalize the application by selecting the use of U.S. customary or metric distance units, the
volume and map colors, etc.
© 2011 TeleNav, Inc. Page 7 of 64
Page 8
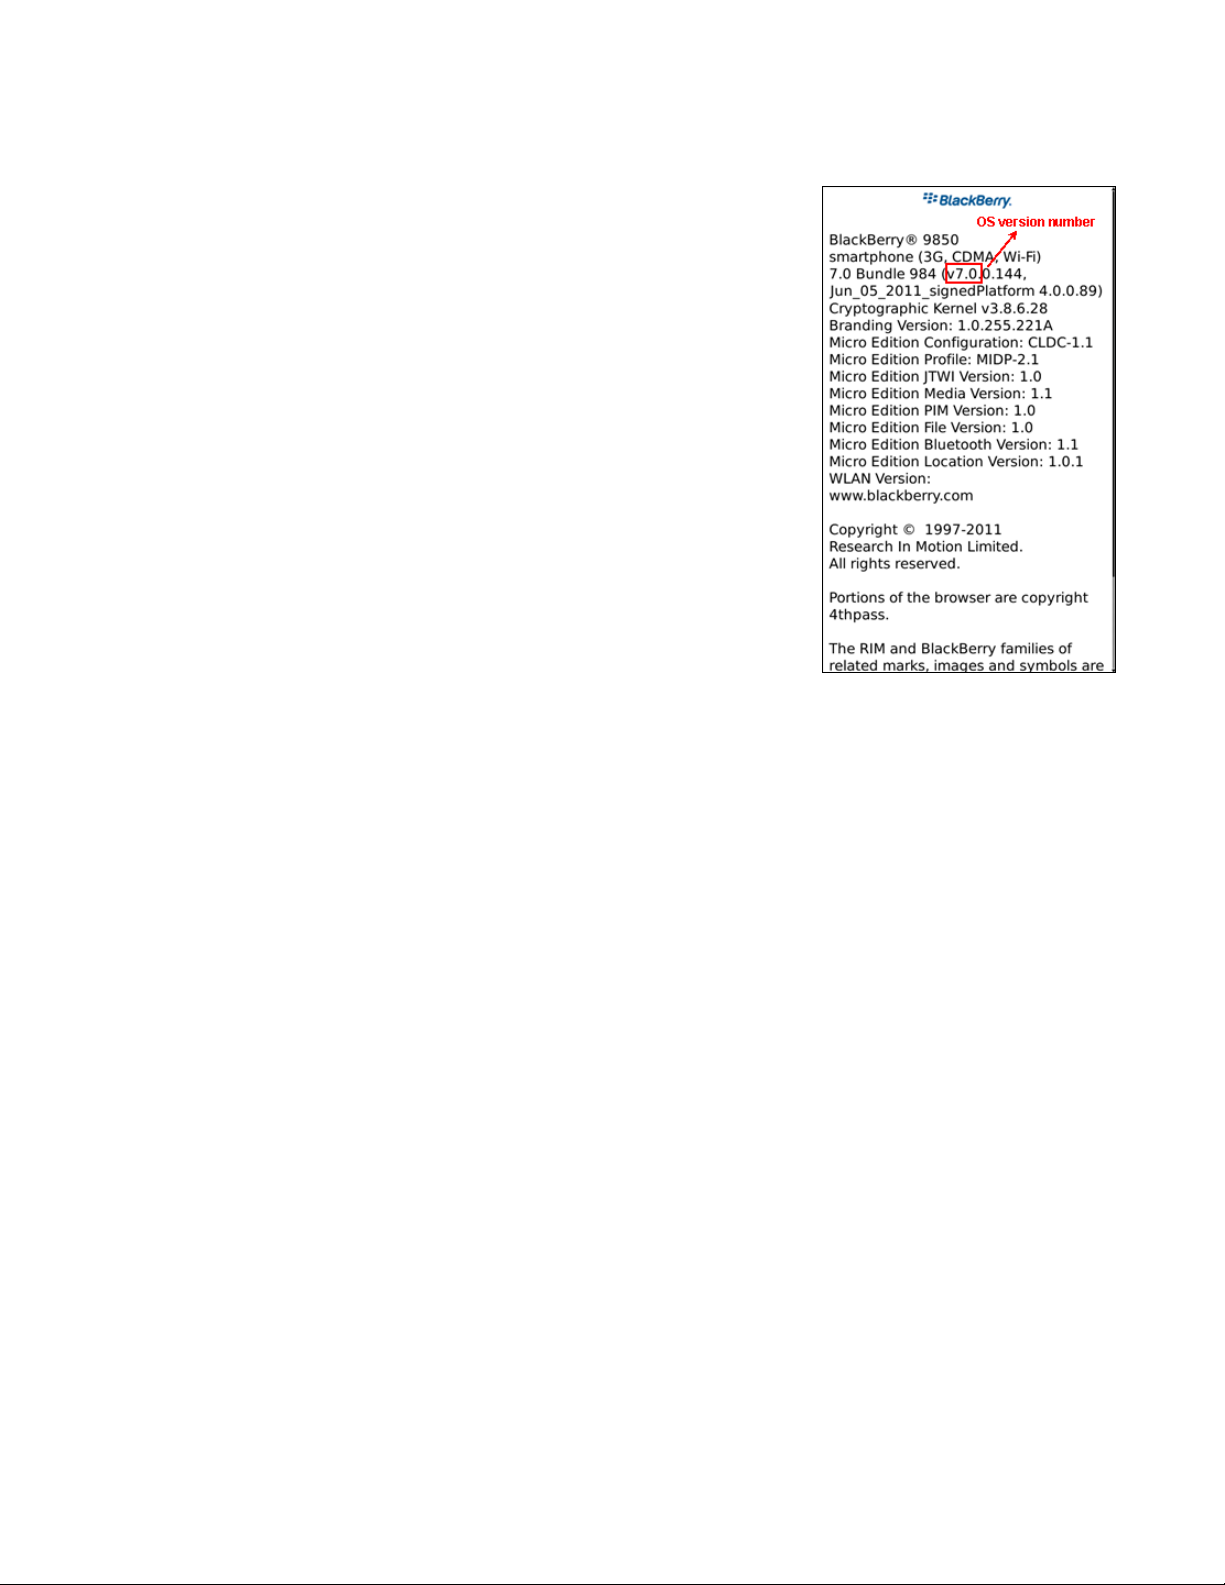
NOTE: Certain features are only su pport on BlackBe rry devices with OS 6.0 or
above (as noted throughout the User’s Guide). You ca n check your de vice’s OS,
though the location of this information may va ry dependin g on device. For
example, you can look in:
BlackBerry Main Menu >> Options (wrench) icon >> About
OR
BlackBerry Main Menu >> Options (wrench) icon >> Device >> About Device
Versions
Look for the version number right after your devi ce’s model numb er that indi cates
the OS.
© 2011 TeleNav, Inc. Page 8 of 64
Page 9

2. Safety and Legal Notices
Please read this section carefully before u sing Te leNav G PS Plus
TeleNav will not accept any responsibility whatsoever for accidents resulting from fail ure to observe common sense
precautions. Your personal judgment, traffic regulation s, and common se nse must alway s take preceden ce over any
driving direction produced by TeleNav GPS Plus.
WARNING: Keep your eyes on the road.
It is your responsibility as the vehicle operator to keep your eyes on the road and be an alert driver at all times,
ESPECIALLY when the vehicle is moving. The vehicle operator should not be distracted by the application displays,
audible cues, or manually interacting with the controls. When you n eed to enter data on your device using t he keyp ad or
study the display, please do so while the vehicle is parked, not while in motion. Should your ability to drive responsibly be
decreased, please turn off the device.
WARNING: Install the equipment safely .
If you are using a device mounting kit, make sure that it does not obscu re your vision. You m ay wish to charge the
device while using TeleNav GPS Plus. If so, make sure the charging cabl e does not interfere with a ny of the vehicle
controls.
WARNING: Drive safely and use common sens e.
The vehicle operator’s personal judgment, traffic regulation s, and common se nse must alway s take precedence over t he
instructions provided by TeleNav GPS Plus.
It is your responsibility as the vehicle operator to drive safely, observ e all traffic rule s, and above al l use your own
personal judgment while driving. If you feel that a ro ute suggested by the navig ation software i nstructs you to perform an
unsafe or illegal maneuver, places you in an unsafe sit uation, or ro utes you into an area which yo u consider un safe, do
not follow the instructions.
© 2011 TeleNav, Inc. Page 9 of 64
Page 10
3. Device Controls
Your BlackBerry device provides several different way s for you to contro l TeleNav GPS Plus an d input informatio n.
You may have a touch- or non-touch-screen device, in which case the controls may vary slightly. For information
about how to use your BlackBerry device and the appearance of specific key s, please refer t o the device user’s
manual.
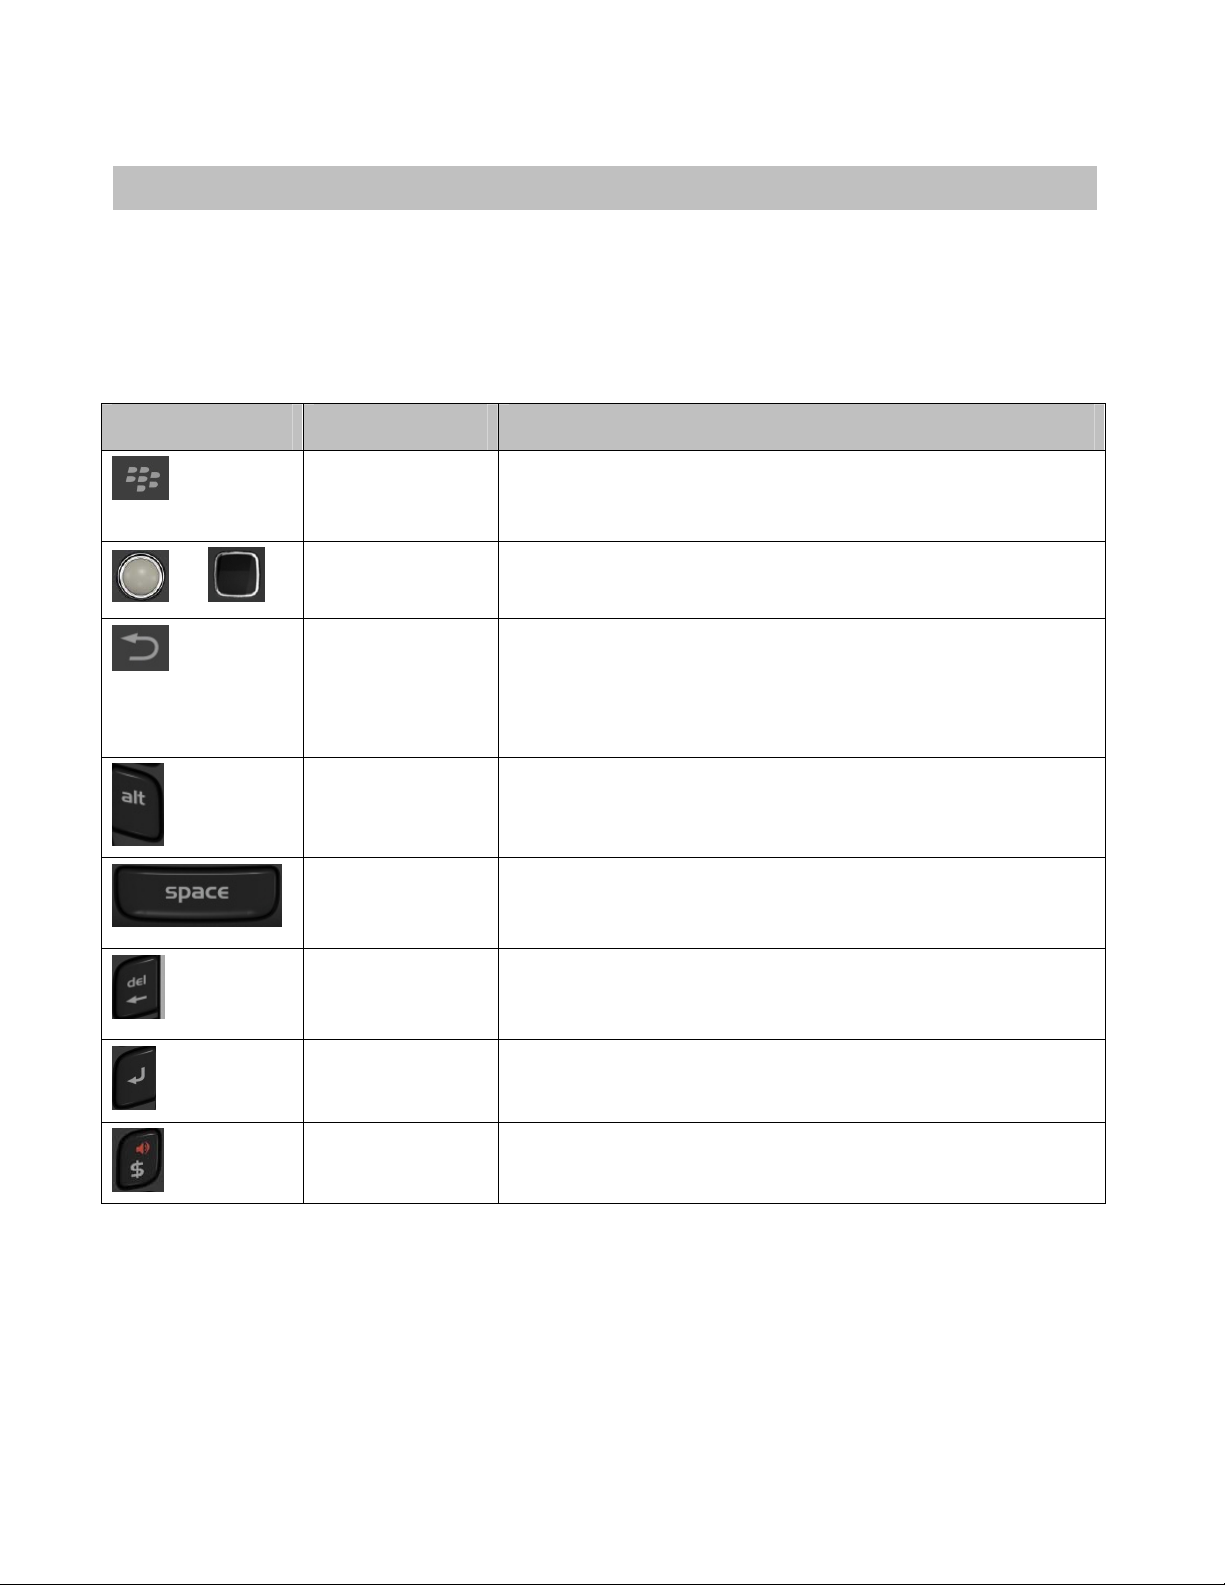
The screenshots in this User’s Guide are for a touch -screen BlackBerry. The table below explai ns the physical
device control keys most commonly referenced.
Key Name Function
or
Menu
Trackball/Trackpad
Escape
Alt
Space
Delete
Call up the menu in most TeleNav GPS Plus screen s for additional
functions to choose from. The menu options vary, depe nding on the
screen you are viewing.
Navigate through form fields, scroll, and pan maps. In this do cument,
this key will be referred to as the “trackpad.”
Go back to the previous screen. When you press Escape on the
TeleNav GPS Plus Main Menu, you will be putting the applicati on in
“Suspended” mode (running in the background) to access the
BlackBerry menus. Choose Menu >> Exit to completely exit the
application.
Toggle between typing letters, numbers, or sy mbols on the keyboard.
On devices with a physical keyboard, the Space key i s used to input
a voice command dictation. It also repeats the last audio prompt on a
navigation screen.
Delete text entry, individual addresses, or categories, such as in the
Favorites or Recent Places screens. To go back to the previo us
screen, use the Escape key instead.
Enter
Speaker
© 2011 TeleNav, Inc. Page 10 of 64
Toggle to the next entry field on a form. Also acts as an OK key.
Toggle Bluetooth on and off when viewing a navigation screen.
Page 11
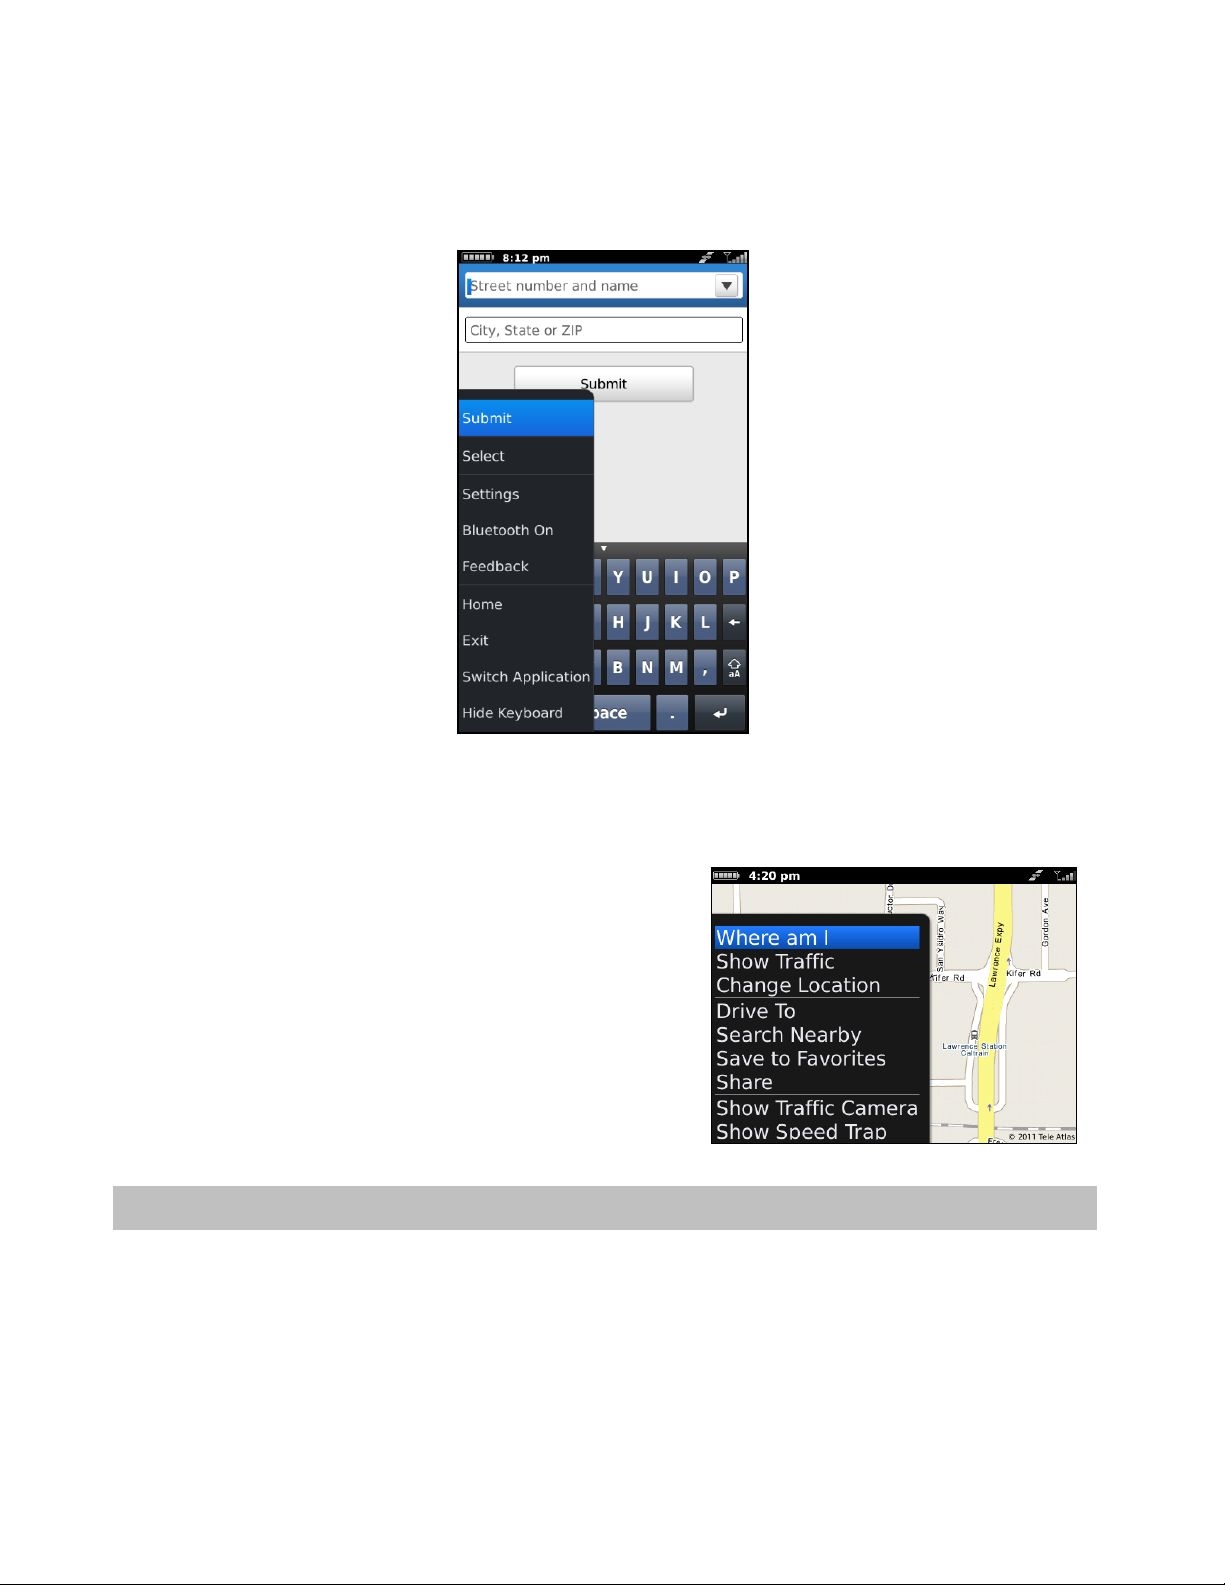
Choosing the Menu key or the trackpad while usin g the TeleNav GPS Plus ap plication may give yo u a variety of
options, depending on what screen you are on. The option s are discusse d in the appropri ate sectio ns below. The re is
usually an option to take you back to TeleNav Home to re duce the number of tim es you would have to press the
Escape key.
Navigation on Non-T ouch Devices
On non-touch BlackBerry devices, calling up the Menu would
usually give you navigation options on a screen. For exa mple, on a
Maps screen for a location, press Menu for the following options:
Where Am I – Center the map on your curre nt location.
Show/Hide Traffic – Toggle traffic flow on/off.
Change Location – Get a map for a different location.
4. Getting Started with TeleNav GPS Plus
The TeleNav GPS Plus application installed on your device re quires a Tele Nav GPS Plus subscription a nd means of
accessing the public Internet.
Software Inst allation
You can download TeleNav GPS Plus from the BlackBe rry App World. An annual subscription plan is available f or
purchase. The subscription plan is non-recurring, so yo u would need to rep urchase the plan ann ually to continue
using the app.
© 2011 TeleNav, Inc. Page 11 of 64
Page 12
Network Access
TeleNav GPS Plus uses the public Internet to access it s servers fo r mapping, routing, and search servi ces from your
device. If you are not using your BlackBerry for e-mail services, you will still ne ed to add an indivi dual BlackBerry email plan to have access to data services. There are three different network settings for you to select from. Wait 90
seconds after turning on your BlackBerry to allow these services options to register. These access methods are
automatically determined by TeleNav GPS Plus when it laun ches, but you can change th e settings in Settings menu
of TeleNav GPS Plus.
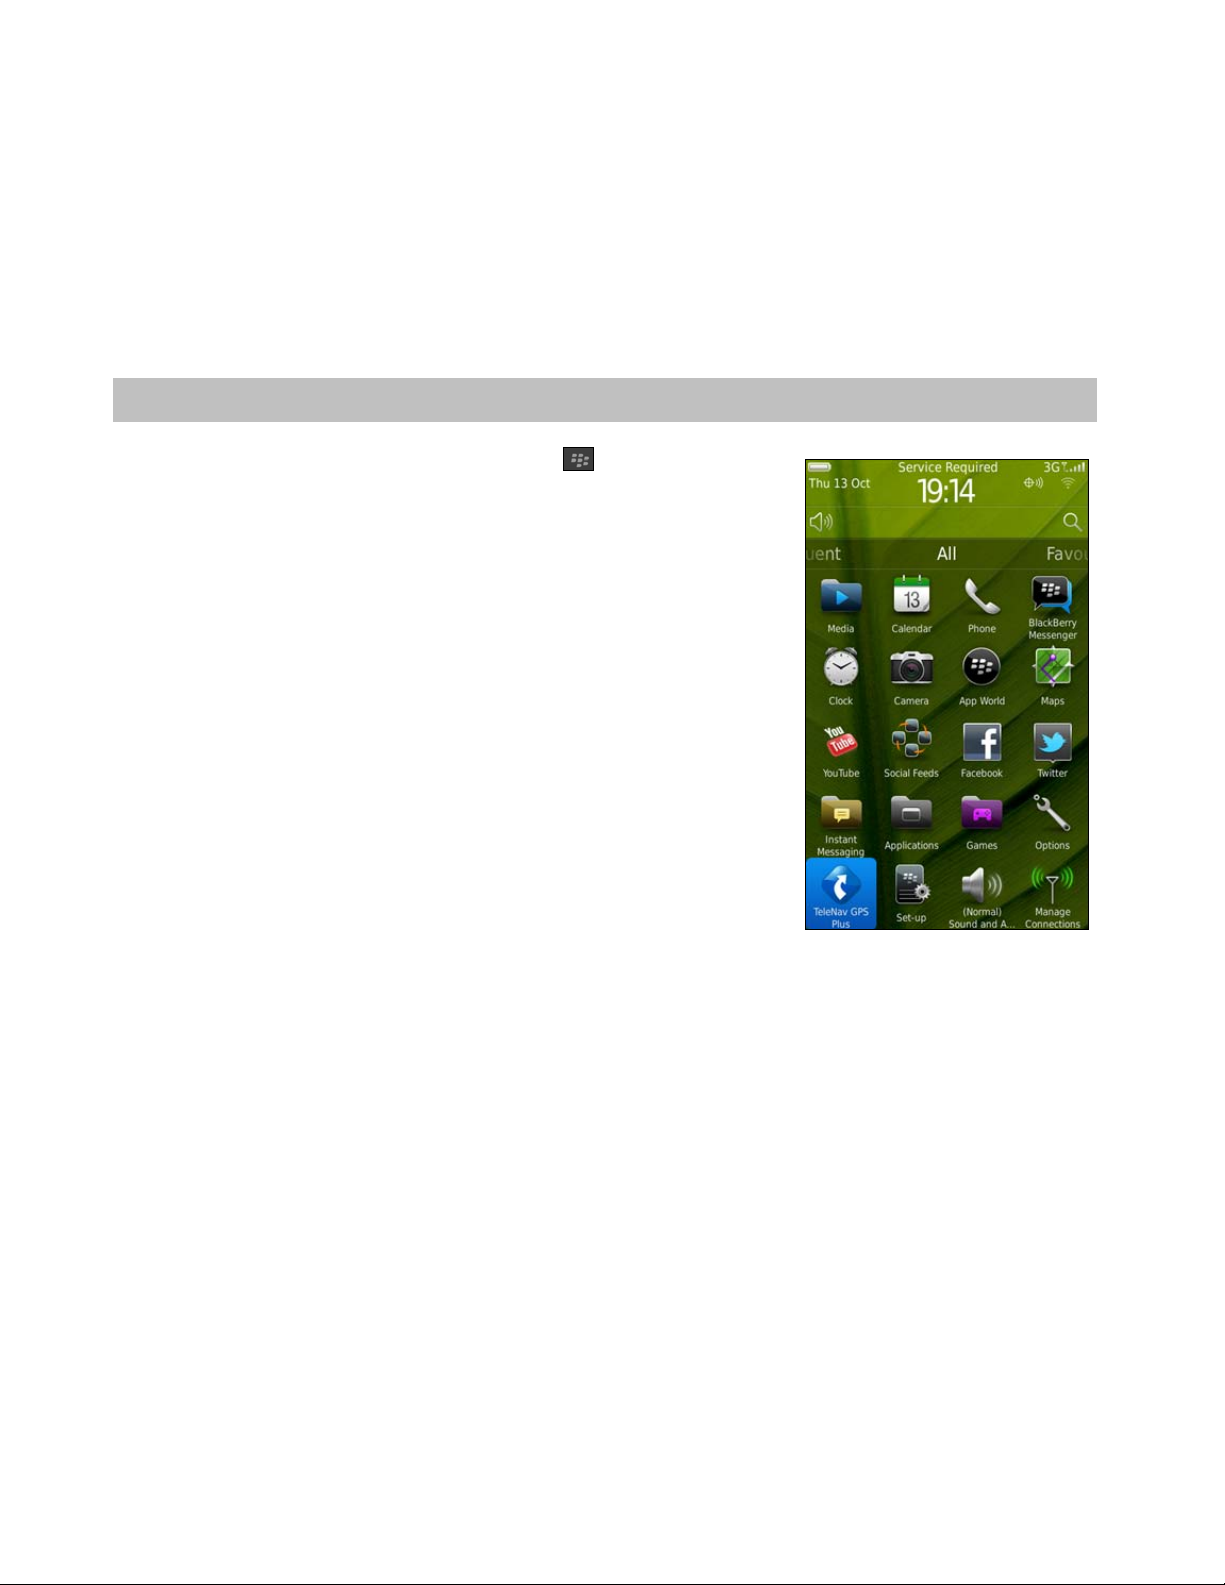
5. Launching TeleNav GPS Plus
1. On the BlackBerry main screen, press Menu >> Maximize Panel
to expose all the applications. Then choose “TeleNav GPS Plus. ”
2. The first time you launch TeleNav GPS Plus, the application may ask you for access permissio ns. Make any
changes to the Permissions screen. TeleNav recommends accepting the default values.
3. Choose Menu >> Save when you are done. Then choose Do wnload to begin downloading the application
to your device.
© 2011 TeleNav, Inc. Page 12 of 64
Page 13

4. The splash screen briefly appears, followed by the Terms of Use. If
you agree to the terms and conditions, ch oose Accept t o continue.
During your first use of TeleNav GPS Plus, the devic e will download th e audible and grap hical cont ent needed to
build the displays and produce audible messages.
NOTE: Do not interact with the BlackBerry while this download is underway. Wait for it to finish. When the download
is completed, you will see the TeleNa v GPS Plus Main M enu.
NOTE: If Tele Nav GPS Plus indi cates that it cann ot reach the se rvers, the most li kely reason is th at your carrier d ata
service plan is not yet active. You may need to cont act your carrier to ex tend your service agre ement. You will not b e
able to progress beyond this point until your acco unt is returned to current stat us. You may also see an importa nt
message from TeleNav GPS Plus regarding up grades, scheduled d owntime, pending accou nt expiration, et c.
When the device reaches the TeleNav GP S Plus servers with a v alid and active ph one number an d PIN, the device
will be registered to use TeleNav GPS Plus and will not present any of t he above screens ex cept the splash and
Terms of Use screens in the future. Visiting http://my.telenav.com
and changing your PIN will require you to repeat
the above registration process.
© 2011 TeleNav, Inc. Page 13 of 64
Page 14

6. Common Features
Address Pattern Recognition
Address Pattern Recognition allows you to use the Tele Nav GPS Plus Application fe atures in conjuncti on with the
BlackBerry Native Applications.
NOTE: This feature is only a vailable on Blac kBerry devices running OS 6 and above.
1. Choose an address from your BlackBerry Person al Informatio n
Manager, such as Calendar and Contacts, or Message
Applications.
2. A menu will appear with the following options:
Search Nearby
Map It
Share Address
Drive To
3. Choose an option to launch TeleNav GPS Plus.
© 2011 TeleNav, Inc. Page 14 of 64
Page 15
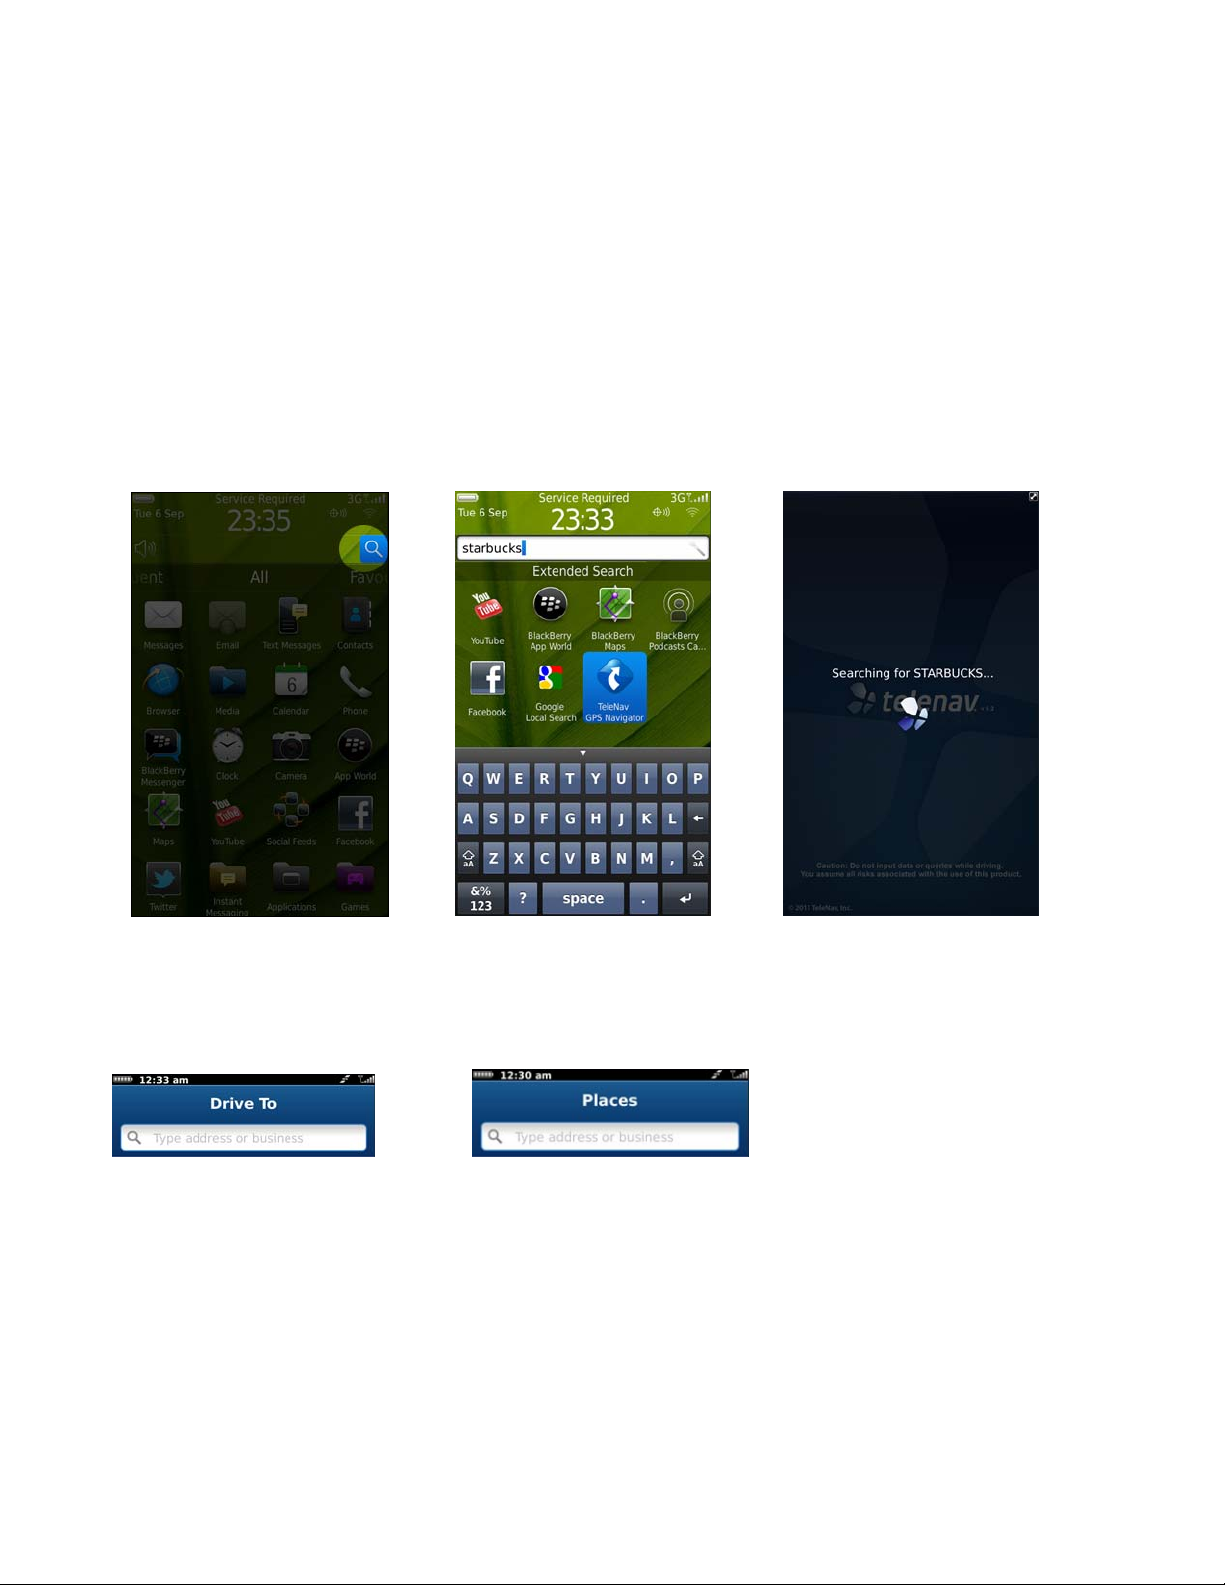
BlackBerry Universal Search
This feature allows you to enter an address or business f rom the Search ba r on the BlackBerry hom e screen and
then launch TeleNav GPS Plus to get Drive To directions t o the location.
NOTE: This feature is only a vailable on Blac kBerry devices running OS 6 and above.
1. Choose the Magnifying Glass icon on the BlackBerry Ho me Screen to call up t he Search bar.
2. Enter an address or business from the Blac kBerry hom e screen, and then choose the Tele Nav GPS Plus
app.
3. TeleNav GPS Plus will launch and search for th e destination that you typed i nto the BlackBerry Univ ersal
Search bar.
Search Bar
The Search bar at the top of the Home, Drive To, and Pla ces screens lets you quickly and conveni ently key in an
address or business. For example, you ca n type in “coffee” or a specific address to drive to.
© 2011 TeleNav, Inc. Page 15 of 64
Page 16
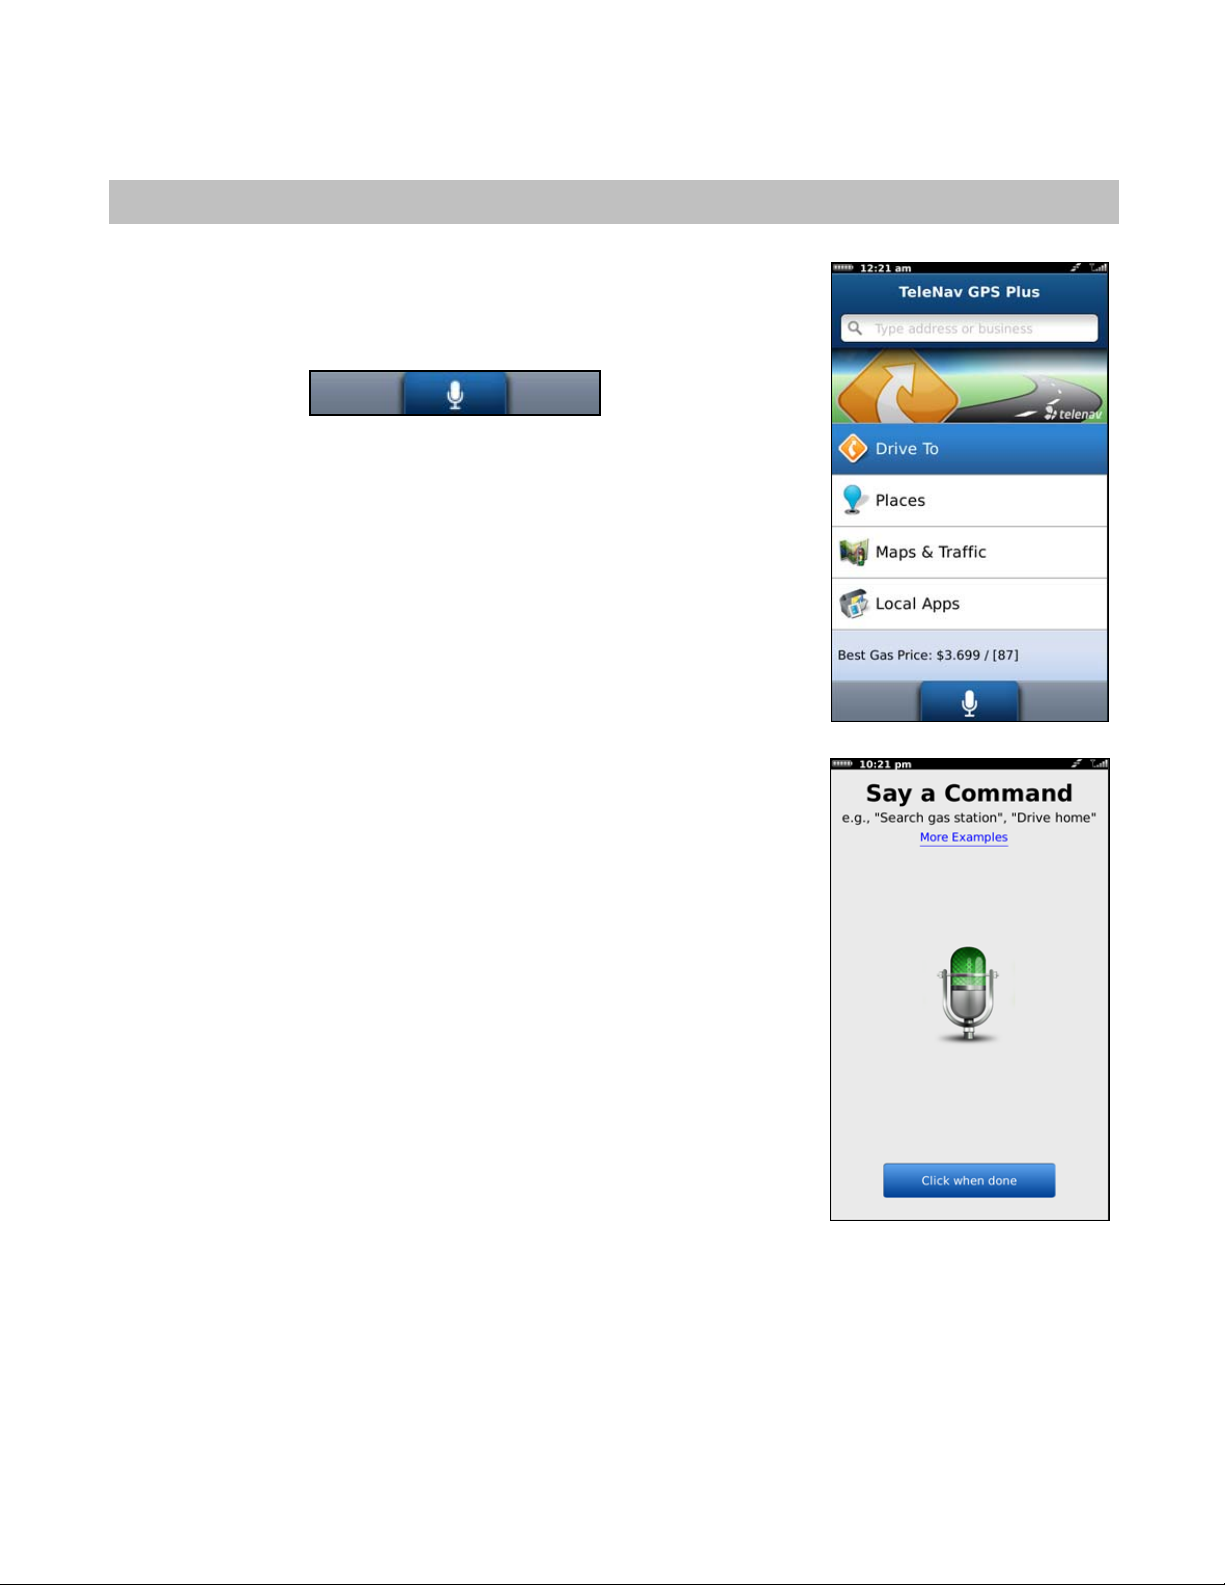
7. Speech Input
Instead of typing in an address or other keywo rd, or choosing a menu on screen,
you can use the voice-recognition system to speak in a command, address, and/or
keyword.
1. Choose the Speech Input icon.
2. Following the on-screen prompts to say a command, address, and/or
keyword.
3. Wait for the application to react, or choose Click when done.
4. The appropriate screen will then appear. For example: If you say “Map
here,” TeleNav GPS Plus will display a map of your locati on as if you had
chosen Maps & Traffic from the Home screen.
© 2011 TeleNav, Inc. Page 16 of 64
Page 17
8. Using a Bluetooth Headset
You can use a Bluetooth headset within the TeleNav GPS Plus application fo r features such a s Drive To navigation
instructions, or to call or speak in an address. You must first pair your Bluetooth headset from the BlackBerry menu
before turning it on within TeleNav GPS Plus.
1. From the BlackBerry Main Menu, go to Options (the wrench icon) >> Networks and Conne ctions >> Bluetooth
Connections.
2. Make sure Bluetooth is set to “On.” Choose Add New Device and then Search. The BlackBerry will search for
nearby Bluetooth devices.
3. Find the device name in the Select Device results list. You may need to follow the pairing instru ctions and
provide a password if asked, depending on your specific Blueto oth device.
4. Once the device is paired, launch TeleNav GPS Plus (Menu >> TeleNav GPS Plus).
5. Make sure your Bluetooth device is powered ON. Then choose a destination in the Drive T o menu.
6. Once you are on the navigation screen, if you are using a non-touch-screen BlackBerry with a phy sical
keyboard, press the Speaker key
headset. If you are using a touch-screen BlackBerry, cho ose Menu >> Bluetooth On.
NOTE: If your Bluetooth headset is off, you will see a pop-up reminding you to turn it on. You shoul d see a small
Bluetooth icon at the top of the screen indicating that audio i s being routed to the headset. On a non -touch-screen
BlackBerry, press the Speaker key
If you exit the TeleNav GPS Plus application, you will need to toggle Bluetooth back on when you return to the navigati on
screen.
on the BlackBerry. Audio will now be routed through your Bluetooth
again on the navigation screen to toggle off the Blueto oth mode.
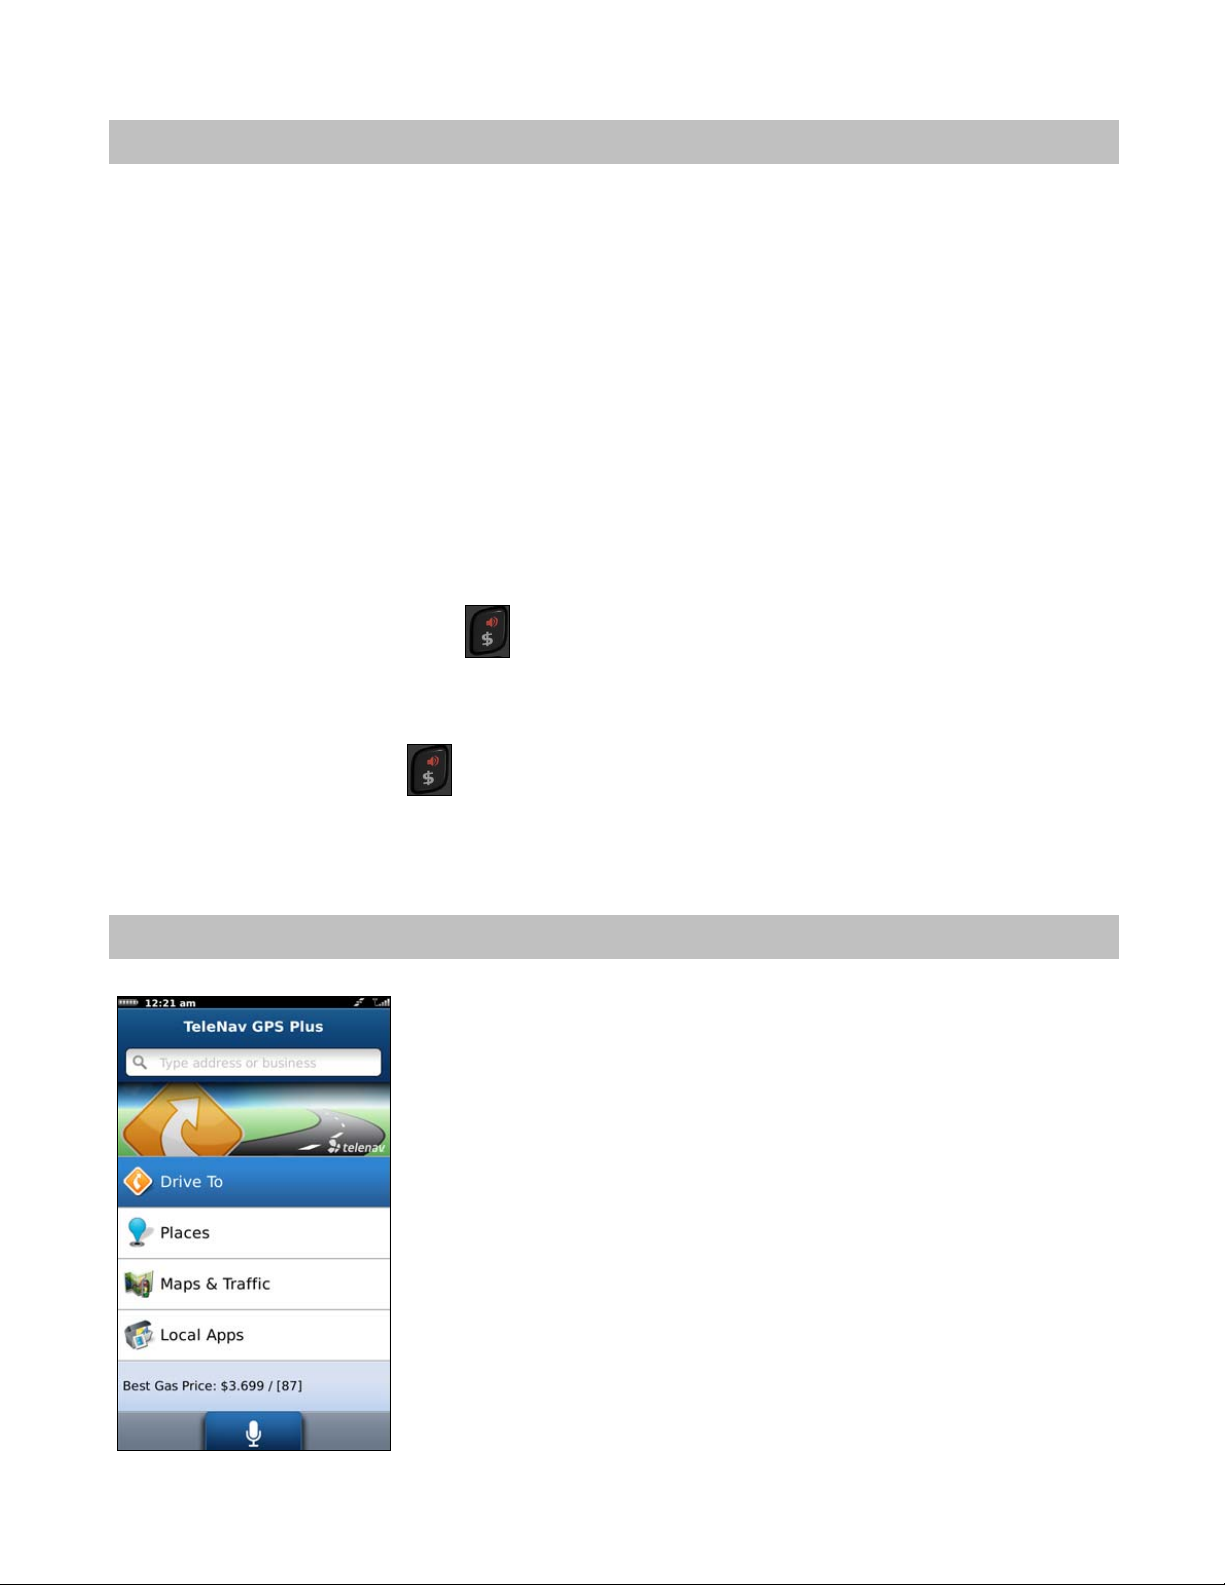
9. Drive To Menu
From the TeleNav GPS Plus Home screen (referred to in this guide as the Home
screen), use Drive To and choose from a variety of ways to navig ate to an
address.
The bar along the bottom of the Home Screen shows a briefing of the local
weather, new movies, and any TeleNav announcements.
NOTE: You can return to the Home scre en from most screens in TeleNav GPS
Plus by pressing the Menu key and choosing Home.
© 2011 TeleNav, Inc. Page 17 of 64
Page 18

Getting Driving Directions
To use the Drive To menu, do the following ste ps:
1. Choose Drive To from the Home screen.
2. Choose one of the following options from the Drive To menu as shown in
the illustration to the right and discussed b elow.
Resume Trip – This option appears if you r last navigation session
was interrupted before you arrived at you r destination. Choo se
“Resume” to navigate to the destination from your current location.
Home – Get directions from any location to your hom e address.
My Favo rites – Choose a F avorite place to get direction s to it. These
are addresses that you have found and saved in the pa st.
Recent Places – You can get directions to a Recent Place that yo u
have navigated to. See page 22
for more details.
Address – Enter a st reet address by typing or speaking.
Contacts – Choose saved conta cts from your device’s A ddress Book.
Places – Search the direct ory for businesses such a s restaurants, h otels, gas stations , etc. Sort businesse s
by user popularity or distance. Once you find what you a re looking for, you can get audible and visual
driving or walking directions.
Airport – Quickly find airports by 3 -letter code or city n ame. Airports closest to your curre nt location are
automatically suggested.
After you choose an address, the Trip Confirmation screen will appear. If you want to change your starting point,
destination, or route settings, choose the box at the top of the screen. You will be taken to the Route screen, where you
can choose an option to edit. See “Trip Confirm ation” on page 26
for more information.
Resume Trip
This option appears if you have previously interrupted a navigation session. Your destinatio n and route settings are
saved if you exit navigation while on a route so that you may easily resume the trip later. The settings for a paused trip
will clear if you begin a new route.
Home
This option allows you to quickly get directions from your currently location to your home address. The first time you
choose Home, you will be asked to type in the st reet address of yo ur home.
My Favorites
Favorites are places that you have saved in the past so y ou can quickly access them. Many us ers save their work
address as a Favorite so they can easily reuse the a ddress later.
© 2011 TeleNav, Inc. Page 18 of 64
Page 19
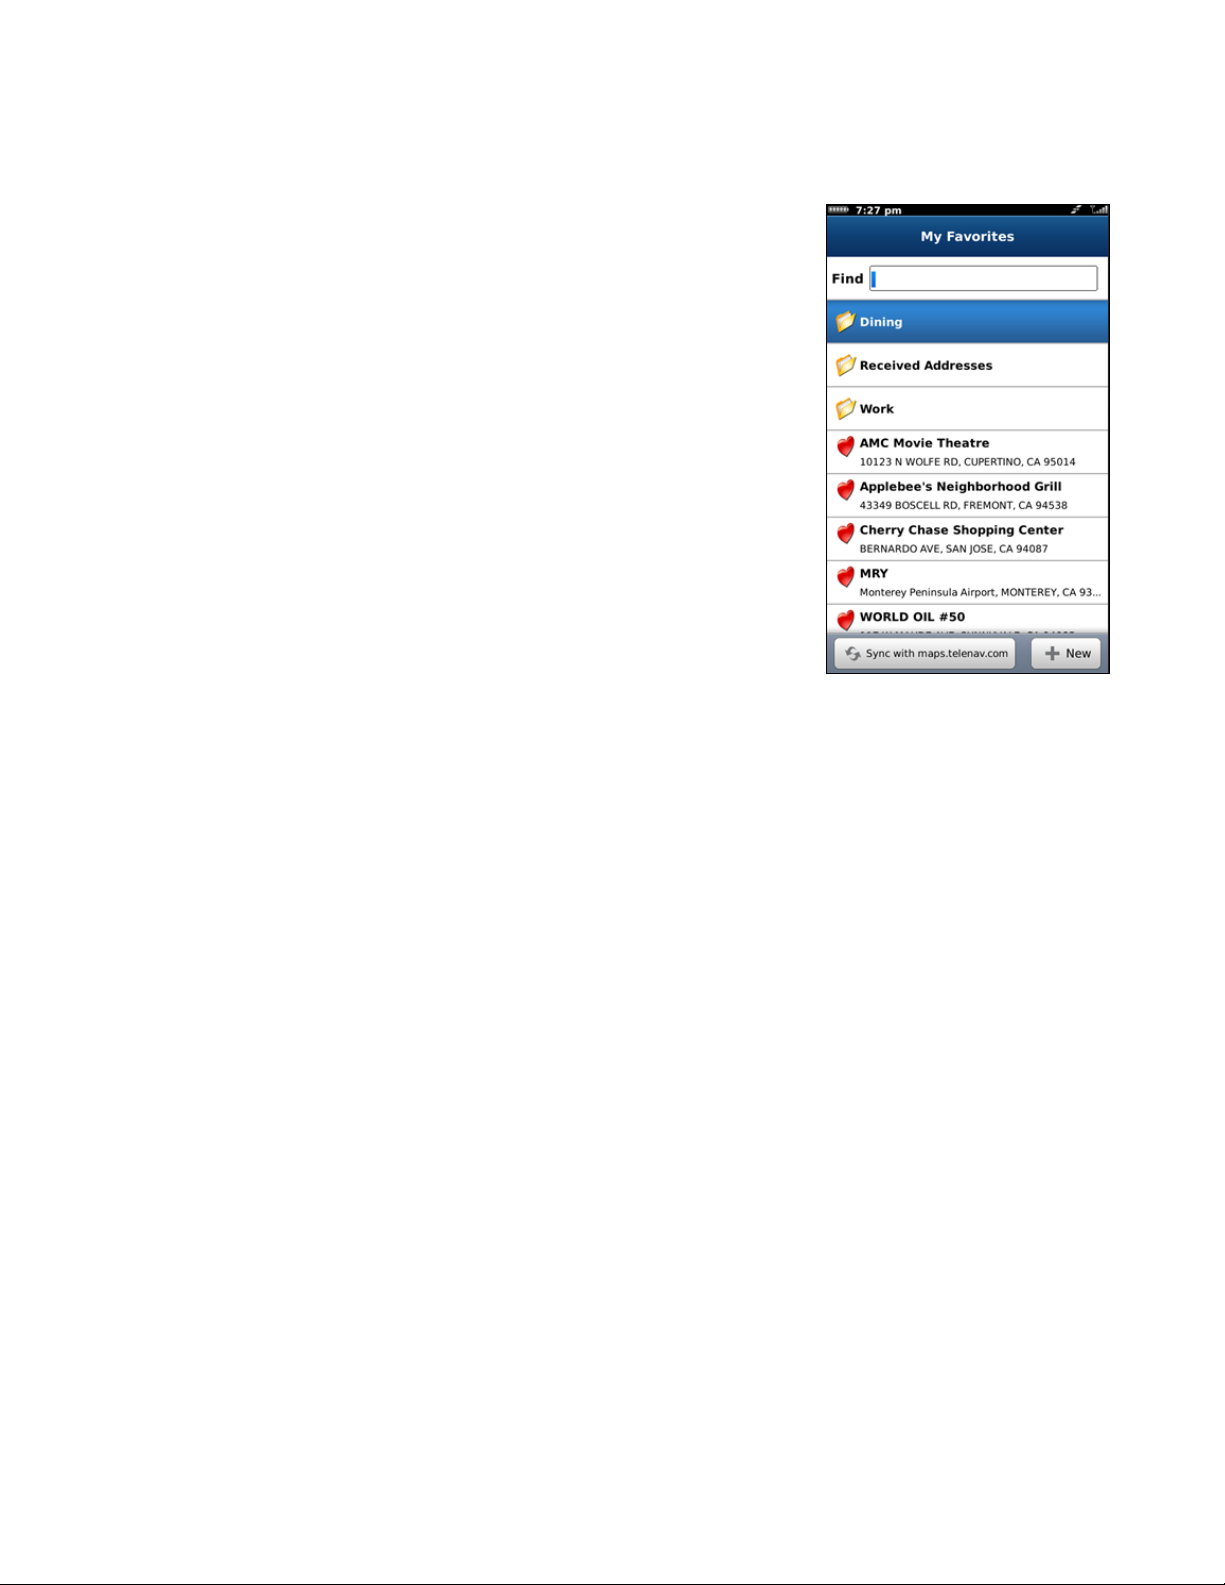
Your Favorites list can grow to an unlimited length. If your Favorites list is long, it may be easier to use the Find function
to find your desired Favorite. To use the Fi nd function, enter one or more alph anumeric characters in the Fi nd field. As
you type, the closest match(es) will appear at the top of the list.
You have the following options on this screen:
User-Created Categori es – These are fol ders that you ca n create
when you save or edit a favorite. For exa mple, when yo u save an
airport or coffee shop, you can create a category for that type of
place.
Received Addresses – This folde r contains addresses that other
users have shared with you.
NOTE: You can delete favorites from this category, but the category
itself may not be deleted or renamed.
Individual Favorites – These are rep resented by the he art icon.
Highlight a Favorite and then press the Menu key or click the
trackpad for additional options:
o Drive To – Get driving directions to this location.
o Call – Call the business (if there is a phone num ber listed with
the Favorite).
o Map – Plot this location on a map.
o Edit – Edit the name, address, or category the favorite is located in (See Category bel ow).
o Delete – Delete the Favorite from the list.
o Rate – Submit your rating for this location.
Share – Share the address with co ntacts from you r device’s conta ct list or by providing recip ients’ phone
numbers (choose up to 10 at once).
NOTE: Depending on the F avorite, not all o f these options may be a vailable.
© 2011 TeleNav, Inc. Page 19 of 64
Page 20

Category
This option allows you to organize where a location should be store d.
1. In My Favorites, highlight an individual Favorite from the list.
2. Press the Menu key and choose Edit. The Edit Favorite screen appears.
3. Choose the Category field.
4. On the Categories screen, check the category folder in the list to add the
location to the folder. You may choose as many categori es as you wo uld
like.
5. Choose Done. You will be taken back to the Edit Favorite screen.
© 2011 TeleNav, Inc. Page 20 of 64
Page 21

Create New Category
1. In My Favorites, highlight an individual Favorite from the list.
2. Press the Menu key and choose Edit. The Edit Favorite screen appears.
3. Choose the Category field.
4. On the Categories screen, choose New Category.
5. On the next screen, enter a category name and choose Save.
© 2011 TeleNav, Inc. Page 21 of 64
Page 22

Delete or Rename a Category
You can delete or rename a category th at you have created in My Favorit es (the default “Received Addresses” category,
which stores addresses other u sers may have sha red with you, ca nnot be delet ed or renamed).
1. Choose Drive To >> My Favorites.
2. Highlight the category that you want to rename or delete. Then press Menu >> Rename or Menu >> Delete.
You have the following delete options:
Category Only – Delete just the category. All favorites will be moved o ut of it and appear o n the Favorites
screen.
Category & Fav orites – Delete the categ ory and all favorites in it. This deletes the favorites in this category
only. If a favorite is also saved under a different category, this action does not del ete it there.
Cancel – Close the pop-up a nd go back to the My Favorit es screen.
Recent Places
Recent Places are addresses used rece ntly for navigatio n. When an address in th e
list is used, it is promoted to the head of the list.
Your Recent places list can grow to an unlimited length. I f you have a larg e Recent
Places list, it may be easier to use the Find function to find your desi red Recent
Place. To use the Find function, enter one or more alph anumeric characte rs in the
Find text box. As you type, the closest match(es) will appear at the top of the list.
1. You can choose a location in Recent Places and press the Menu key for the following options.
Drive To – Get driving directions to this location.
Call – Call to the business (if there is a phone num ber listed with th e Recent Place).
Map – Plot this location on a map.
Save – Save the Recent Place to your Favorites list to easily locate it later.
Delete – Delete the Recent Place from the list.
Rate – Submit your rating for this location.
Share – Share the address with co ntacts from you r device’s conta ct list or by providing recip ients’ phone
numbers (choose up to 10 at once).
NOTE: Depending on the Recent Place, not all of these optio ns may be avail able.
2. In the Recent Places screen, choose your desired location to begin navigation.
© 2011 TeleNav, Inc. Page 22 of 64
Page 23

Address
Enter a street address by typing in the appropriate field s. The address is automatically save d to your Recent Places list.
1. On the Drive To menu, choose Address.
2. Type in a street address or speak it (see page 16
speech input).
NOTE: When typing, partial entry (5 or more letters) i s okay for the stre et
name. You can also leave the Address fiel d blank and just in put a city and
state or zip code to use the address of the cit y’s center. I f you are typi ng,
nearby cities or addresses that you have recently visited will be
automatically suggested as you enter charact ers. To save time, you can
choose the suggestions before you finish t yping.
3. Choose Submit when you are finished typing.
4. TeleNav GPS Plus checks to see if the address that you entered can be found. TeleNav GPS Plus prompt s you
to modify the address if the address is too new to be found in t he mapping dat abase or if the stre et number
cannot be found for some other reason, for examp le, if the street numb er does not exist. Th e application may
also propose an address closest to the range of your entry.
for more information on
NOTE: You can edit your route whil e in navigation m ode. See “Editin g Your Route” on page 26
for further details.
Contacts
Quickly find addresses that you have saved in your devi ce’s contact list. If you have a large contact list, it may b e easier
to use the Find function to find your desired addre ss. To use the Find f unction, enter a Fi rst or Last nam e of a contact i n
the Find text box. As you type, the closest match(es) will app ear at the top of th e list.
© 2011 TeleNav, Inc. Page 23 of 64
Page 24

1. On the Drive To menu, choose Contacts.
2. In the Contacts screen, choose a contact to get navigation directions.
Places
TeleNav GPS Plus offers a full national business directory. Search by typing in a keyword or by choosing a cate gory in
the extensive directory.
1. On the Drive To menu, choose Places.
Type in a business name or speak it (see page 16
for more information on
speech input). You can also choose a cate gory such as ATM,
Food/Coffee, Gas, Grocery, or Lodging.
2. When a business that matches your criteria appears, choose it to get
navigation directions to that address.
See the Places Menu on page 37
for more details about this feature.
© 2011 TeleNav, Inc. Page 24 of 64
Page 25

Airport
Quickly find airports by Airport Code or City Name.
1. In the Airport screen, type or speak the three-letter abbreviation of the
airport, or type the whole name of the airport (see page 16
information on speech input).
NOTE: Airports nearest to your desti nation will be suggested in the drop-
down box. As you type, matching airports will also be suggested. You can
choose one of the suggestions to save time.
2. Choose Submit to get navigation directions to the airport.
for more
Other Ways to Get Directions
TeleNav GPS Plus allows you to get directions to an address in a number of ways.
1. Open your device’s contact list to choose a contact with a validly formatted postal add ress – example : street
number and street name, city, state, zip code (option al). Choose Menu >> Drive To.
2. Use the Search option on the Home screen and search for a Point of Interest (POI). Then Drive To t hat location.
© 2011 TeleNav, Inc. Page 25 of 64
Page 26

T rip Confirmation Screen
Moments after you choose a Drive To location, the T rip Confirmation screen
appears. TeleNav GPS Plus calculates what it beli eves to be an optim al route to
your destination and offers up to three routes f or your trip, ba sed on your sele cted
Route Style.
Editing Your Route
TeleNav GPS Plus assumes that you want to start from your current location, but
you can edit your route.
1. Choose the route detail box at the top of the screen for editing options.
2. After you are finished, choose Get Route to get directions.
NOTE: You can also make adj ustments to you r route style in Menu >> Settings >>
Navigation (see page 51
Edit Origin
This option lets you choose a street address othe r than your current locati on from
which to start your route.
1. Choose the Origin field on the Route screen. This menu is almost
identical to the Drive To menu.
2. Use the menu to choose a new starting point.
Edit Destination
This option lets you change your destination to a different street address.
for details).
1. Choose the Destination field on the Route screen.
2. Use the menu to choose a new ending point for the trip.
Edit Route Settings
Choose the Route Settings field on the Route screen and then choo se one of the followin g to edit your route style:
© 2011 TeleNav, Inc. Page 26 of 64
Page 27

Fastest - This default Route Style finds the fastest driving route.
Shortest - This Route Style may or may not take more time to drive, but it shows yo u the shorte st distance.
Prefer Streets - Use streets instea d of highways if possi ble.
Prefer Highway - Use highway s instea d of streets if po ssible.
Pedestrian - Find walking directions.
NOTE: The “Pedest rian” rout e style may m ake your walking rout e easier, for e xample by allo wing you to take
advantage of going the wrong way do wn one-way street s. As always, use you r common se nse to determine t he
safety of any route.
When you choose one of the above options, you will see a screen where you can select what to avoid on your rout e.
Choose an option, and then choose Done.
NOTE: This screen doe s not appear if you selected “Pe destrian” as your Route St yle.
Moving to the Nearest Street
If you are not directly on a street, for example you are in a la rge parking lot o r driveway, you will se e a screen that sh ows
TeleNav GPS Plus’s best estimate of where you are with guidance on how to move t o the first street.
Audible Guidance Tones
TeleNav GPS Plus delivers spoken audible directions as you drive. A preparatory audible tone is typical ly heard no less
than 30 seconds before reaching a turn, and an action audibl e tone is typically heard no le ss than 10 seconds bef ore
reaching a turn. The preparatory audible tone may not be sounded if t he distance t o the next turn only allows time for th e
action tone.
The lead times for the audible guidance tone s are increase d proportionally to your d riving spee d. This allows mo re time
for changing lanes before a turn if y ou are driving at hig hway speeds as o pposed to driving m ore slowly on l ocal streets.
A Preference setting determines whether street names are in cluded in the m essages or not. Enablin g street names
increases packet data usage.
Audio Replay
To repeat an audio prompt during navigation, press th e top navigation bar.
Miss a Turn?
Whenever you miss a turn, turn the wrong way, tu rn too early or too l ate, or otherwise get off the planned ro ute to your
destination, the TeleNav GPS Plus automatically creat es a new route to your desi red destination, audibly announce,
“Rerouting,” and give you a new set of instruction s.
If you realize you have missed a turn or have otherwi se gotten off the route, just keeping driving. T eleNav GPS Plus
detects your current location and recalculat es a new set o f driving direction s to get you back on tra ck.
It may take approximately 15 to 30 seconds for TeleNav GPS Plus to update your route. If during this process you make
additional deviations from your current rout e, TeleNav GPS Plus may have to contact its servers for anot her new rout e.
Since TeleNav GPS Plus requires access your carrier’s network, if you are off route a nd outside of the ca rrier’s coverage
area, you must return to your carrier’s coverage ar ea in order for TeleNav GPS Plus to re calculate your route.
© 2011 TeleNav, Inc. Page 27 of 64
Page 28

Navigation Views
3D Moving Map
A 3-dimensional map with turn icons (default).
This view allows you to see how the road ahead is organized, similar t o the
perspective of a bird flying above the route. You ca n see the route to yo ur
destination as a blue overlay on one of the road s with white tria ngles leading you i n
the correct direction. Orange arrows mark any upcoming turn s.
The name of the street that you are currently on is di splayed at the bott om of the
screen. The street name for your next turn is shown at th e top.
2D Moving Map
The 2D view allows you to see how the road network is organized, similar to the
perspective of a cartographer looking down on a map.
The name of the street you are currently on is displayed at the b ottom of the
screen. The street name for your next turn is shown at th e top.
© 2011 TeleNav, Inc. Page 28 of 64
Page 29

In 3D and 2D moving maps, you can zoom in or out while navigating by usin g - and +. You can also pan the map up,
and 3
down, left, and right by using your finger or the trackpad. You may see a small network activity indicator comprised of
two arrows in the upper right corn er of the display when you ch ange map sca le factor.
The content on the 3D Moving Map navigation view is explained bel ow.
Name of the
street you
will
turn onto
Next turn.
Also tap here
to replay the
Total distance
and estimated
time of arrival
last audio
prompt.
Directional
Distance until
next turn
heading.
Also tap here
to switch
between 2D
Zoom in
D
Upcoming
Zoom out
ross street
c
Name of the
street you
are on
View traffic
summary of
route
Search for
siness
bu
along route
View map
summary of
route
View text
summary of
ute
ro
© 2011 TeleNav, Inc. Page 29 of 64
Page 30

On-Screen Navigation Icons
The following table explains some of t he icons that y ou may see during a n avigation sessi on when viewi ng a 2D or 3D
Map.
Icon Name Function
Lane Assist
Speed Limit
Traffic Alert
Traffic Cameras/
Police Traps
Navigation Menu Options
The Lane Assist feature is designed t o help you dete rmine whic h
lane(s) to be in at a multi-lane highway junction or an
intersection. As you approach a turn or junction, the Lane Assist
graphic will be displayed on the screen wit h correct lane s
highlighted for your route. Lane Assist is shown at the bot tom of
the screen.
The legal speed limit will be displayed on t he screen for major
roads and highways. The Speed Limit icon will show a red
outline if you are exceeding the posted limit.
When you are viewing moving maps during navigation and have
set Traffic Alerts to “On” in Menu >> Settings >> Navigation >>
Traffic Incident Alert, an icon will appear on the map if there is an
accident less than 15 miles ahead of your current route. You will
see the distance along the route until the incide nt and hear an
audio warning.
You will see an icon when you are approaching a traffic camera
or a reported Police Trap. Traffic came ra and police tra p data is
reported by users of TeleNav GPS Plus and a 3
rd
-party provider.
Navigation options appear at the bottom of the navigatio n screen and are
described in the sections below.
When you arrive at your destination, Choose Menu >> Home to return to the
TeleNav GPS Plus Main Menu, or simply press the Escape key.
© 2011 TeleNav, Inc. Page 30 of 64
Page 31

The Navigation menu has the following opt ions:
Places
Use the Places menu to find the desired location s along your navigation route.
For example, find every Mexican restaurant on you r route betwe en San
Francisco and Sacramento.
After you have entered a keyword for your search or selected from the available
categories, you have the following sear ch options:
Up Ahead – Find points of interests a long the rout e near your
current location.
Near Destination – Fi nd points of inte rest near yo ur destinati on.
The results screen displays either the number of mile s from your current location
(if you chose Up Ahead), or the number of miles from your destination (if you
chose Near Destination). Choose a restaurant from th e Search Along li st to get
driving directions from your current location to the resta urant.
Choose the Map button
to view the points of interest on a
map along your route.
You can change the sorting options (by Relevance, Dist ance, or
Rating), or page through the Search Results list by u sing the buttons
along the bottom of the screen.
© 2011 TeleNav, Inc. Page 31 of 64
Page 32

Map
The entire route from your starting l ocation to your destin ation is drawn on a m ap,
complete with the latest traffic alerts and tr affic flow information. Th e route is
displayed as a blue line connecting the Start and Finish fl ags. Tap the Di rections
button at the top of the page to see a listing of turns. Tap the Traffic button to see
a list of traffic details by road segment.
Highways and major roads with traffic flow informati on are color-coded by speed in
each direction of travel:
Speed Road Color
> 50 mph Green
30 – 50 mph Yellow
< 30 mph Red
Unknown No color
1. Choose the traffic icon to hide or show traffic (depends on availability).
2. Use the “+” and “-” keys or a pinching motion to zoom in and out of the map. Slide your finger along the map to
pan.
NOTE: To go back, press the Escape key.
The following are some icons you may see depi cting different type s of incident s:
Accident
Congestion
Construction
Incident or
events
© 2011 TeleNav, Inc. Page 32 of 64
Page 33

Directions (Route Summary)
A text listing of every turn for this navigation session from your starting l ocation to
your destination, along with mini turn icons.
Tap on a segment to view a turn-by-turn map of that segment.
Traffic Summary
Displays overall delay from traffic, a summary of i ncidents o n the route, and the
average speed for each segment where available. You can tap on any line to view
more details.
Below is an explanation of what you will see on the T raffic Alert screen:
Incidents (triangle icon s) – Total numbe r of remaining incident s
directly along the route. The color of the triangle i ndicate s incident
severity:
Color Severity
Yellow Only Minor incidents
Orange At least one Major incident,
no severe incidents
NOTE: “N/A” is displa yed for segments wit hout traffic flow inf ormation (u sually local street s) or segments fa rther than
200 miles away.
Red At least one Severe incident
Trip Time – Estimated time the entire trip will take, incl uding any traffic delays.
Mph/Kph – Average speed on that road segment.
Street – The street or highway name of the road segment.
© 2011 TeleNav, Inc. Page 33 of 64
Page 34

If you tap an incident line, you can view the details. Below i s an explanation of what
you will see on the Traffic Detail screen:
Average Speed Bar – Average speed of a segment on a scale of 0 to
the maximum-posted speed for that segment.
Incident Detail – Each incident is displayed with the f ollowing:
-Incident graphic detailing the type of incident
-Location
-Additional comments
Report Traffic Camera and Police Trap
Traffic Camera and Police Trap data is generated by Tel eNav GPS Plus users an d
rd
-party provider. To report a Traffic Camera or a Speed Trap, choose Menu >>
a 3
”Report Traffic Camera” or “Report Police Trap” during a navigation sessio n. On
devices with physical keyboards, you can press the shortcut keys C an d T,
respectively.
© 2011 TeleNav, Inc. Page 34 of 64
Page 35

Avoiding T raffic
From Traffic Summary
While you are in a navigation session, you can choo se to re-route st arting from the
Traffic Summary screen to avoid traffic congestion.
1. During navigation, choose Traffic at the bottom of the screen.
2. Tap on a line to view traffic details for a particular segment.
Minimize Delays – Reroute to minimize traffic del ays for the entire
current route.
Avoid Segment (this o ption appears when you tap on a segment
with an incident detail) – Reroute to avoid the select ed segment.
NOTE: Press the Escape key to go back t o the navigation screen.
© 2011 TeleNav, Inc. Page 35 of 64
Page 36

3. The Suggested Route screen shows the proposed new route, outlining the
original (blue) and suggested route (gre en), as well as listing the e stimated
time saved.
Choose Accept to generate a navigation session for th e new route.
Choose Cancel to go back to the Traffic Summary screen.
From Traffic Alert
When you hear an audio warning about a traffi c incident durin g your navigation
session, you can re-route directly from this screen to avoi d congestion ahead.
1. During navigation, an audio warning sounds to alert you to traffi c incident s
along your route. An alert icon appears at the right of the map, showing
severity and distance to the incident.
(Audio) “Accident 0.5 miles ahead
on Lawrence Expressway; 1 lane
closed. Tap the traffic alert to avoid.”
2. Tap the traffic alert icon on the device. The application automatically
calculates a route to avoid all incident s within a 1 5-mile range.
© 2011 TeleNav, Inc. Page 36 of 64
Page 37

10. Places Menu
The Places menu provides you with a few different ways to find the ad dresses and
phone numbers of businesses such as restaurant s, hotels, and ga s stations.
If the search succeeds, a list of businesses will appear. These businesses will be
near your current position or near the location you chos e.
Once you find what you are looking for, you can get audi ble and visual drivi ng or
walking directions, view a map of the location, or save t he location to y our
Favorites list. You can also place a call to make reservations.
Using Places
To use the Places feature, do the following steps:
1. From the Home screen, choose Places.
2. The Places screen will appear.
3. You can search for a business by typing in or speaking a keyword (see
page 16
also search by Category.
Choose the text input field to type in keywords.
Choose the Speech Input icon to say keywords.
Choose More to search through an extensive category list.
4. A list of nearby results will be displayed. Most of these results will be
ordered by “Relevance,” which is a combination of best mat ch and
distance. Make a selection from the list.
for more information on how to use on speech input ). You can
© 2011 TeleNav, Inc. Page 37 of 64
Page 38

Search by Category
1. Choose a Category on the Places screen. A list of nearby results will be
displayed. These results are usually ordered by “Relevan ce,” which is a
combination of best match and di stance.
NOTE: If you choose Food/Coffee or Gas, a list of options will appear
before any results are displayed.
2. Make a selection from the list.
3. The Results screen appears with details about your selection. The
screen shows: a) the name of the business, b) the distanc e from the
search point, c) the street address, d) the phone num ber (if available ),
and e) user-submitted ratings for the business.
4. You can choose from the following options. Depending on the business
that you view, not all of the options may be available.
Rate – Submit your own rati ng for the busi ness by choosing th e
rating bar with the stars (see “Rating s” on page 43
).
Call – Call the location by choosing the ph one number (option only
available if there is a phone number shown on t he Resu lts screen).
NOTE: When the call ends, you will be returned to the Results
screen. The calling option will not be available if you are already on
another call.
Feedback – Choose the F eedback button to give y our input about
this location (see “Feedback” on page 53
).
Drive To – Get driving direction s (this optio n will take you to the T rip
Confirmation screen).
Map – View a map of the area surrounding the business address
(See “Map Results” on page 40
).
Share – Share the address with co ntacts from you r device’s conta ct
list or with recipients whose phone number you provide (see “Share
Address” on page 54
).
Save – Save the location to your Favorites.
© 2011 TeleNav, Inc. Page 38 of 64
Page 39

Define a Location
The default search is around your current location, but you can specify a different
search origin.
1. After you have selected a search category, a pop-up appears, allowing
you to select another location than your current. Choose the Change
Location button.
2. The Choose Location screen appears. Choose a new location to conduct
your search.
Sorting Options
You have a variety of options to sort your search result s. On the Search Re sults
screen, choose the Sorting Options box.
Sort by Relevance
This is the default sorting option. “Sort by Releva nce” is not valid for “Gas by P rice”
or “Food/Coffee” searches.
Sort by Distance
Sort the businesses in your Search Results screen by order of dista nce to your
chosen location.
Sort by Rating
Sort the businesses in your Search Results screen by the amount of st ars they
received from user ratings.
Sort by Popularity
For businesses such as restaura nts, sort the list by th ose that have receiv ed the
highest popularity points. See “Most Popular Category” on page 42
explanation of how popularity points are cal culated.
for an
© 2011 TeleNav, Inc. Page 39 of 64
Page 40

Map Results
You can view your search results plotted o n a map. On the Search Result s screen, choose the Map icon. From
the Map Results screen, you can also choo se a corresponding n umber to view more details about a particular point of
interest.
On the Map Results screen, choose 1-9 to center o n a certain locati on. Choose the
Back
or Forward arrows (or the 0 key on non-touch devices) to
view more results.
Points of interests are ordered based on how they we re sorted on the Search
Results page. If sorted by distance, the #1 point of interest is the on e closest to the
search location. If sorted by rating, the #1 point of interest i s the one with the
highest rating.
If you are viewing the Map Results screen from the Addres s Details screen, the
search result number for that point of interest i s highlighted by default. For
example, if you are looking at the third search result and cho ose Map, the third
result appears in the center of the page.
You can also press the + and – keys to zoom in and out or use the t rackpad to pa n
the map. Zooming out may allow you to view more re sults on the pag e.
© 2011 TeleNav, Inc. Page 40 of 64
Page 41

Sponsored Result s
1. Icons next to business names in the Search Results list indicate that more
information is available in the Details screen.
2. The Sponsored Results (Details) screen shows business details and
descriptions. The tabs you see may vary, depen ding on what is avail able for
the business.
Browse any deals or promotions that the business may be offering.
View menus for restaurant searches.
© 2011 TeleNav, Inc. Page 41 of 64
Page 42

Most Popular Category
You can search for the most popular food/coffee places.
1. In the Places screen, choose the Food/Coffee category, and then choose
Most Popular.
2. The Most Popular search results screen displays items that are freque ntly
given higher star ratings. By default, results are sort ed by the number of
points they have received (popularity). Items with no points or negative
points are not displayed.
Popularity is calculated by the user-generated ratings, av eraged by consid ering the
scores of the ratings and the number of users that hav e rated the location. A
location accrues points based on how many sta rs it is given by TeleNav GPS Plus
users. When a location consistently achieves above-average rati ngs, its popularity
count increases. Negative ratings lower the popul arity count of the loca tion.
See “Ratings” on Page 43
for more information.
Search for Gas by Price
You can search for the cheapest gas pri ces around your cu rrent location or another locati on that you specify.
1. Choose Places in the Home screen.
2. Choose Gas.
3. Choose Any to search all categories, or choose a fuel grade.
4. The Search Results screen displays with a list of gas stations sorted by pric e.
5. Choose a gas station to go to its Details screen. The date the price was last updated is al so listed.
6. On the Details screen, you can Drive To, Map, or Save the location to your Favorites. You can also share the
address with a friend.
© 2011 TeleNav, Inc. Page 42 of 64
Page 43

Ratings
Locations with star ratings next to them indicate those for which you can view the
average rating by other users. You can also submit your own rating for this
location, indicated by the number of stars (the range is from 1 to 5).
Submit Your Own Rating
1. In the Search Results screen, choose a location.
2. In the Details screen, choose the ratings icon.
3. In the Rating screen, choose a rating from 1 to 5 stars.
NOTE: If you choose the “Rate Thi s” option for a locati on that you have al ready
rated, the original rating is displayed by def ault. If you submit a m odified rating, the
old rating is excluded from the average and rep laced with the n ew rating, and the
number of reviews remains the same.
© 2011 TeleNav, Inc. Page 43 of 64
Page 44

11. Maps & T raffic Menu
The Maps & Traffic Menu shows you a map of your curre nt location.
You can zoom in or out using + and –, or by pinching the screen. To pan the map,
use the trackpad of the device or your finger.
Map Menu Options
You have the following options on the menu when viewing a ma p:
Current Location – Center the map back on your current location.
Show/Hide Traffic – View or hide the traffic co nditions for your current
map area (see “Check Traffic” section below).
Show /Hide Traffic Camera – View or hide the locations of traffic
cameras in the area.
Search – Search for point s of interest near the l ocation displ ayed on
the map.
NOTE: Pressing the Menu key lets you change the lo cation and get a map for a
different area.
Traffic Cameras and Speed Traps
Traffic cameras are represented on the map by thi s icon:
© 2011 TeleNav, Inc. Page 44 of 64
Page 45

Check T raffic
On the Maps & Traffic screen, you can check traffic con ditions around a cert ain area.
1. Choose Maps & Traffic on the Home screen.
2. The map of your last known location appears. Choose the Traffic icon to
display traffic flow information.
NOTE: You can zoom in or out using + and –, or by pinching the screen.
Zoom levels range from 1 (closest) to 9 (farthest). Use yo ur finger or the
trackpad to pan the map. When you zoom or pan, there may be brief activity
to fetch the updated map. If no traffic information appears on the map, try
zooming out to show a larger area. Traffic flow information will only appear for
large roads such as highways.
Other Way s to View a Map
There are several ways in which you can view a map an d traffic information:
1. From the Maps & Traffic option in the Home screen. A map of your last known location is automati cally
displayed when you choose this option. To view a ma p of a different a rea, choose Menu >> Change Location.
You can view a map of: the address you set as your Home, a F avorite Place, a Recent Plac e, an Address you
type or speak in, a Contact from your device’s contacts list, a Place (business), or an Airport.
2. From the “Map” option for Favorites and Recent Places in the Drive To menu. For example, from the Home
screen, choose Drive To >> My Favorites >> highlight a Favorite >> Menu key >> Map.
3. From the “Map” option for any location that you have found using the Places menu option. For exa mple, from
the Home screen, choose Places. Search the category f or your desi red location an d then choose Map in the
Details screen for the location that you found.
© 2011 TeleNav, Inc. Page 45 of 64
Page 46

12. Local Apps
The Local Apps menu lets you search for movie li stings, check your loca l weather
conditions, and manage your commute alerts di rectly from your handset.
Movies
Get movie listings, show times, and detailed information for m ovies playing nea r
your current location or a location that you choo se.
1. Type in a movie name, or leave the Movie field blank.
2. Use your current location, or choose Where to select a different location.
3. Choose When if you want listings for another day.
4. Choose Search to get the listings that match your criteria.
© 2011 TeleNav, Inc. Page 46 of 64
Page 47

5. Choose a movie from the Search Results list to view more information. A
red “Ticket” icon next to certain theaters allows you to buy movie ti ckets
through Fandango directly from your device.
Weather
Check the weather conditions f or your current lo cation or for another l ocation that you select. You can also see t he
extended weekly forecast.
1. Go to Local Apps >> Weather.
2. The weather condition for your current location is displayed, along with the
forecast for the next six days.
3. Choose Menu >> Change Location to view weather for another city.
© 2011 TeleNav, Inc. Page 47 of 64
Page 48

Commute Alerts
You can set up traffic alerts (20 maximum) for frequent commutes. Get a text
message, e-mail, or alert within TeleNav GPS Plus that gives you traffic informati on
and estimated delay time for the route that your specify. You can also sync your
Commute Alerts with the TeleNav GPS Plus website at http://my.telenav.com
1. Go to Local Apps >> Commute Alerts.
2. A list of your alerts is displayed in the order they were created. Highlight an
alert and press the Menu key for additional option s:
View Current Map – View this route on a map, co mplete with any
traffic incidents and flow information.
Edit Alert – Edit details of the alert, including o rigin, destination, rout e
settings, time and frequency of commute, and notifi cation preferences.
Turn Off Alert – Save the alert in the list, but turn notification off. This
option only appears if notifications were enabled wit h the alert.
Delete Alert – Delete the alert from the list.
Create Copy – Create another copy of th e alert (useful for when you
would like to create a similar alert and do not want to re-type all the
information).
Create Reverse Alert – S wap your Ori gin and De stination add resses.
.
Create New Alert
To set up a new commute alert, do the followi ng:
1. Go to Local Apps >> Commute Alerts and choose the New button at the
lower-right of the screen.
2. In the Commute Alert screen, fill out the following information:
Route Name – Assign a name for the rout e (e.g., “Home to Work”).
Maximum 15 characters. If you do not assign a name, the street
address of the origin will be used as default.
Origin – Select a location for your starting point (default is your current
location).
Destination – Select a location for your ending point.
Route Settings – Choose Fastest, Shortest, Prefer Streets, Prefer
Highways, and what to avoid (Carpool/HOV Lanes, Tolls, or T raffic
Delays).
Time – Set a time to trigger the alert.
Frequency – Choose Once, Daily, Weekly (select a specific day of t
week), Mon-Fri, or Weekends.
Notification – Choose Text Message, E-mail, or Alert Within TeleNav
GPS Plus to be notified of your Commute Alert.
he
3. Choose Save when you are finished.
© 2011 TeleNav, Inc. Page 48 of 64
Page 49

13. T eleNav Menu Options
The following are additional options you can call u p by choosing Menu on the Home screen of TeleNav GPS Plus.
About
Find important information about TeleNav GPS Plus a ccount such as the ve rsion number you a re using and you r PIN.
You can quickly find contact information for TeleNav Customer Supp ort or offer you r feedback for the application.
About TeleNav GPS Plus
This menu option shows the exact version of Tel eNav GPS Plus that is on your devi ce. Knowing the exact version of
your software may be helpful if you ever have to call TeleNav GPS Plus Te chnical Support.
Support Info
Find contact information for TeleNav GPS Plus Custom er Support here. On ce you are on the Supp ort screen, you can
quickly call Customer Support or view additional support informati on from your device’ s Internet browser.
Your PIN Number
View your PIN number. Your PIN is used to log into TeleNav GPS Plus at http://my.telenav.com for pre-planning.
© 2011 TeleNav, Inc. Page 49 of 64
Page 50

Diagnostic Tools
This screen displays the following info rmation, which may be requested by a su pport represent ative for troubl eshooting
purposes:
Phone Number
Service Plan Code
GPS Status
Network Status
Location Permission
Netguard Setting
Data Roaming Status
Airplane Mode
Data Service
Battery Level
© 2011 TeleNav, Inc. Page 50 of 64
Page 51

Settings
Go to Menu >> Settings for options on setting your preferences and other fe atures.
Be sure to choose Save to keep any changes you have made.
Profile
In Menu >> Settings >> Profile, you can edit the following:
Phone – This field cannot be chan ged. It is displayed f or reference purpose s.
First/Last Name – Edit your name here. Thi s name will be di splayed to use rs when you share ad dresses
with them.
Email – Edit your e-mail here. Your e-mail address is used to send important messages about TeleNav
GPS Plus account, as well as any commute alert e-mails you have cre ated.
NOTE: You must confirm your e-mail befo re it can be used for Commute Alerts or Fe edback Confirmation.
General
In Menu >> Settings >> General, you can edit the following:
Distance Units – Miles/feet or kilometers/meters.
Navigation
In Menu >> Settings >> Navigation, you can edit the follo wing:
Route Style – Fastest, Shortest, Prefer Streets, Prefer Highway, or Pedest rian. By default, all ro utes are
“Fastest” to minimize traffic delays. You can choose “Ask me each tri p” for a reminde r pop-up each ti me
you choose navigation.
Map Color – Choose from Daytime, Nighttime, or Auto. Nighttime colors have greater contrast to let you
better see the navigation screen in the dark. Choo se “Auto” to have the navigation maps autom atically
switch between Daytime and Nighttime colors.
Avoid – Choose what to av oid on your rout e: HOV/Carpool lanes, To lls, and Traffic Delay s. You can make
multiple selections.
© 2011 TeleNav, Inc. Page 51 of 64
Page 52

Map Style – Choose between 3D or 2D moving maps.
Backlight – Choose whet her the devi ce’s backlight shou ld be Always On, On at Turns, or Devi ce Default.
The “On at Turn” option turns the backlig ht on when a turn is approa ching. This can save batte ry life.
“Device Default” follows the setti ngs fr om the Bla ckBerry me nu in Opti ons >> Display >> S creen Displ ay.
Speed Limit – Show or hide the spee d limit along a st reet or highway duri ng navigation.
Lane Assist – Show or hide lane assist arrows during navigation. These icons are arrows that indicate
which direction each lane on a street or highway will take you.
Traffic Incident Aler ts – On or Off. If this feature i s On, audio and visual traffic alerts will appear on the 2D
or 3D Moving Maps screen if there is a traffic incident on the route ahead.
Traffic Camer a – On or Off. By default, this feature is Off. If you choose On, the locations of traffic cameras
will appear on the map or the 2D or 3D Moving Maps during navigation.
Speed Trap – On or Off. By default, this feature is Off. If you choose On, the locations of speed traps will
appear on the map or the 2D or 3D Moving Maps durin g navigation.
Audio
In Menu >> Settings >> Navigation Audio, you can edit the follo wing:
Audio Guidance – With Street Names, Without St reet Names, or No A udio.
Side Key
Set up the Side Key on your BlackBerry device for quick access to the TeleNav GPS Plus appli cation.
Opt-In Features
In Menu >> Settings >> Opt-In Features, you can edit th e following:
Message from Merchant – Turn messages from sponsors on or off.
Deals – Turn notification of deals such as holiday sales on or off.
Menu – Turn restaurant menus on or off.
Sponsored Results – Choose whether to see sponsors at the top of each search results list in Places.
© 2011 TeleNav, Inc. Page 52 of 64
Page 53

Bluetooth On
On touch-screen devices, go to Menu >> Bluetooth On to route audio through your
Bluetooth when using the TeleNav GPS Plus application. On non-touch-scre en
devices, you can use the Speaker key
Bluetooth on and off. See page 17
Bluetooth device with your BlackBerry.
for instructions on how to first pair your
during a navigation session to toggle
Feedback
TeleNav GPS Plus is always striving to give you the b est user experi ence.
You can give Feedback from any page in TeleNav GPS Plus by holdin g down the “F” key for two seconds on a device
with a physical keyboard, or by pressing Menu >> Feedback in Drive To, Places, Maps & Traffic, or Local Apps screens.
© 2011 TeleNav, Inc. Page 53 of 64
Page 54

Feedback for Places
You can also give feedback on a Details screen from a Places search. This allows you to specifi cally provide comments
and suggestions for improvement to the information o n the business g enerated by the se arch.
While viewing a Places detail screen, choose the Feedback button. Then enter your comments on the Feedback screen
and check any relevant selections. Choose Save to submit your feedback.
14. Share Address
You can send addresses to friends as a text message from different menus within TeleNav GPS Plus. Friends who are
also using TeleNav GPS Plus will receive the address in their My Favorites >> Received Addre sses folder. Although the
following example shows how to do this from Recent Places, the steps will be the same no matter where you encounter
this feature.
1. After highlighting any address or place, press the Menu key and choose
Share. You can also choose Share when viewing the d etails screen of a
Places search.
© 2011 TeleNav, Inc. Page 54 of 64
Page 55

2. Choose a contact in “Select from Contacts,” or type in phone numbers
using “Enter Phone Numbers.” Choose Done.
3. This screen allows you to change any of the following:
Label – This field is optional. Give the ad dress a name for easi er
identification, such as “My Home.”
Send To – Choose this field add or remov e a contact or phone
number. You can choose contacts from your devi ce’s contact list or
type in up to 10 phone numbers.
4. Choose Send when you are finished. The selected recipient s will receiv e
a text message with the shared address.
© 2011 TeleNav, Inc. Page 55 of 64
Page 56

15. Suspending T eleNav GPS Plus
Making a Phone Call from T eleNav GPS Plus
You can Call In to a location that you have found in a Places search such as a
restaurant or a hotel or make reservations or check for availability. Simply choose
the phone number on the search detail screen for a bu siness.
T aking an Incoming Call
When you are using TeleNav GPS Plus and your device re ceives an incoming call,
your device rings and displays a scree n that gives you th e option to Answer the
call or Ignore the call.
If you ignore the call, the TeleNav GPS Plus application resumes and continues
with the function that you were using before the call came in.
If you answer the call, TeleNav GPS Plus will be operating but “suspended.” After
the call, press the Escape key to end the call. At this point, TeleNav GPS Plus
should resume from its suspended state. If you are n avigating and have gott en off
the route, TeleNav GPS Plus will say “Rerouting” and obtain a new route for you.
NOTE: When TeleNav GPS Plus briefl y uses the data network, incoming calls
may be blocked. When you are on an incoming call, TeleNav GPS Plus is still
running and will periodically colle ct a GPS fix from the internal GPS receive r. When
this fix is taken, there may be a very brief loss of intelligibility on the received audio
from the caller.
© 2011 TeleNav, Inc. Page 56 of 64
Page 57

T eleNav GPS Plus Options from Device Cont act List
You can interact with TeleNav GPS Plus from your device’s Contact List. Choose
Contacts from the BlackBerry Main Menu, highlight a contact, a nd press Menu for
the following options:
Drive To – Launch navigatio n in TeleNav GPS Plus to get driving
directions to your contact.
Search Nearby – Launch Places to find busin esses ar ound the
Contact’s address.
Map It – Plot the Contact’s a ddress on a map.
Share Address – Share the Contact’ s address with oth er Contacts
from your device or with recipients whose phone numbers you
provide.
Calendar and E-mail Events
When a scheduled calendar event occurs, or an e-mail m essage arrives while you are using Te leNav GPS Plus, a popup notification will appear. You can interact with the Calendar or e-mail event by Opening it, or you can Dismiss it. If you
Open the application associated with the notification, TeleNav GPS Plus will conti nue to run in the background. If you are
in a navigation session, the audio directions will continue to be announced, unless you are on a call.
16. Exiting T eleNav GPS Plus
To exit the TeleNav GPS Plus application, do the following:
1. In any menu, press the Menu key.
2. Choose Exit.
© 2011 TeleNav, Inc. Page 57 of 64
Page 58

17. Removing T eleNav GPS Plus
You do not need to remove TeleNav GPS Plus if you are installi ng a new version, but if you choose to do so, y ou can
remove the application directly from the device.
1. In the BlackBerry Main Menu, go Options (the wrench icon) >> Device >> Application Man agement.
2. Wait for the Applications list to load, and then choose TeleNav GPS Plus from the list .
3. Choose Delete.
© 2011 TeleNav, Inc. Page 58 of 64
Page 59

18. The T eleNav GPS Plus Pre-Planning Website
You can use many of TeleNav GPS Plus’s features on the TeleNav GPS Plus we bsite. To access t he website, go to
http://my.telenav.com
Route planning for planning a trip by ent ering the starti ng and destin ation addresse s (this do es not update
information on your device).
The Directory (Places menu) for finding restaurants, hotels, stores, schools, government offices, etc. You
can also get addresses, phone numbers, maps, and directions.
Contact Customer Support.
Add an address and save it to the My Favorites list on your device. The next tim e you launch the Tele Nav
GPS Plus application on your device, the new address will appear in yo ur My Favorites and Recent Places
lists after you manually sync it on the device.
NOTE: Favorites cre ated on the websit e will only sh ow up in your M y Favorites li st on the de vice after you
choose the “Sync with Website” option on the F avorites page in T eleNav GPS Plus.
Manage addresses in your My Favorites and Recent Place s lists (both of whi ch update informati on on your
device). You can also delete addresses you no longer need.
Manage an independent Web address book (saved to y our Web address boo k only, not saved to y our
device).
. You can do the following:
View addresses you shared with others.
Update your personal information including your home and work a ddresses and y our e-mail ad dress.
Change your PIN number.
Set up Commute Alerts and sync them with your device.
Enable or disable e-mails from TeleNav GPS Plus, including ma rketing e-mails and Commute Ale rts.
If you need to migrate your account to a different phone number, plea se call TeleNav Cu stomer Care at
1-888-353-6284. For security reasons, you cannot perform this change unassisted.
Changing your PIN number
1. In an Internet browser, go to the TeleNav GPS Plus Web site at http://my.telenav.com.
2. Enter your phone number and PIN to log in.
3. Click on the My Settings tab and choose “Change PIN” on the left navigation bar.
4. Enter your current PIN number and your new PIN number.
5. Click Save.
NOTE: You can find your current PIN number by sel ecting Menu >> About >> Your PIN Number:
© 2011 TeleNav, Inc. Page 59 of 64
Page 60

19. Error Conditions
Account cancelled or Account no t found
You do not have a valid TeleNav GPS Plus account. Contact TeleNav GPS Plus Customer Care at
1-888-353-6284.
GPS signal weak, Cannot get GPS signal, or No GPS data
Move to an area where your device has a clearer view of the sky and can still connect with your dev ice. Please note that
some car windshields that ha ve heat-reflective coati ngs may reduce the qua lity of the GPS signal. Y our device should
announce when you have adequate GPS signal again.
Low battery
The GPS will not work if the device’s battery charge level is below about 15%. Starting with a f reshly charged standard
battery, we have used TeleNav GPS Plus for around 4 hours before it became ne cessary to conn ect the chargi ng cable.
If you get a low battery warning, connect a charging cable as soon as possibl e. In some cases, you may n eed to wait a
while for the battery to become sufficiently charged so that the GPS receiver will work.
Network signal weak
If the carrier network signal is weak, move to an area where reception is better and try the function that requires network
access again.
TeleNav GPS Plus encountered an error
TeleNav GPS Plus is having technical problems with the spe cific request that you mad e. This can be due t o an address
that it cannot find, or mapping data that does not allow ro uting from where you are to where you want to go. In thi s case,
try to use a nearby address.
TeleNav GPS Plus not available
If you get an advisory message that TeleNav GPS Plus is not available, exit the TeleNav GPS Plu s application and then
re-launch it. If the problem recurs, it may be due to a temporary TeleNav GPS Plu s server outage.
Unable to generate a route
TeleNav GPS Plus could not generate a route between the two endpoi nts of the route. This m ay be a temporary error if
you have a weak GPS signal when establishing the origin but may be caused by errors in t he map data in the a rea
around the destination.
Unable to reach TeleNav GPS Plus server
You may see this message for several different reason s: a) your data plan is not active, b) y our WIX servi ces are not
enabled, c) you are outside of coverage, d) the data netwo rk is currently experien cing difficulties, or
e) the TeleNav GPS Plus server is not acknowledging your device’s attempt to communicate.
You should call TeleNav Customer Support at 1-888-353-6284.
During the installation process, what happens if I get a “Cannot conn ect to serv er” message?
If you see the above error during the installatio n and login proces s, most likely your B lackBerry needs to be configured to
allow the GPS Navigator application to use the data network. Please follow these simple steps from the BlackBerry
home screen:
1. In the BlackBerry Main Menu, go Options (the wrench icon) >> Device >> Application Management.
2. Wait for the Applications list to load, and then choose TeleNav GPS Plus from the list.
3. On the Application Properties screen, choose Edit Permissions.
4. Set the application settings for “Connections”, “Interactions” and “Use r Data” to “All ow” and save y our change s.
© 2011 TeleNav, Inc. Page 60 of 64
Page 61

Your account has expired
You do not have a valid TeleNav GPS Plus account. Order TeleNav GPS Plus by calling TeleNav Customer Support at
1-888-353-6284.
20. FAQs
Why do I need the carrier’s data serv ice?
The data plan allows you to access nationwide routes, maps, and Places content from the Tel eNav GPS Plus servers
using the data communication features of you r device. These services are different from you r cellular airtime. T o order a
data plan from your wireless carrier, please contact their cust omer support di rectly.
How long after I apply for the data serv ice until I can use my TeleNav GPS Plus sy stem?
With data, you should be able to start using the T eleNav GPS Plus ap plication rig ht after it has been do wnloaded.
Does TeleNav GPS Plus use up my voice plan minu tes?
TeleNav GPS Plus uses data to provide its navigation functions. Using data does not use any of yo ur voice minutes.
However, calling business from the Places men u does use voice minut es.
Why do I need a PIN number?
Your 4-digit PIN is used to log in to the pre-planning website.
You may need a four-digit PIN to log in to TeleNav GPS Plus for the very first time. You will also need this number to
access the pre-planning website. Your PIN is uniq ue to your account and identifies that your acco unt is active.
How do I find my PIN number?
Your PIN can be found in the About menu. See Page 49
http://my.telenav.com
How do I increase or decrease the voice promp t volume and contr ol the backlighting?
The backlight can be controlled from within TeleNav GPS Plus’s Menu >> Settings >> Navigation >> Backlight menu.
Speaker volume can also be controll ed with the volum e buttons on the right-hand side of the device. If the sp eaker
volume is set to at least mid-range and you are still not receiving audio prompts, verify that your device profile is not set
to vibrate or quiet. To change your profile settings, choose the So unds icon on the Bl ackBerry Main Menu (it l ooks like a
loudspeaker) and make sure your Sound Profile is set to “Normal (Active). ”
How do I conserve battery life on my device?
Set the backlight to “On at Turns” in Menu >> Settings >> Navigatio n >> Backlight menu. This option turns the
backlight on only when a turn is approaching.
Why don’t I hear audio navigation prom pts when I am using a Bl uetooth head set?
If you are using a Bluetooth headset with a non-tou ch-screen BlackBerry, be sure to pre ss the Speaker key
device while in navigation mode so that you will be abl e to hear the audio p rompts. A Bluetooth symbol will be sh own in
the upper-left corner of the screen if you have redirected the a udio through a Blu etooth headset. If you are u sing a touchscreen device, choose Menu >> Bluetooth On within the application. Y ou may first need to pair yo ur Bluetooth with the
device (see page 17
.
for instructions).
for details. You can use this PIN for pre-planning on
on the
Why can’t I get the “Call in Address” feature to work for enteri ng an address?
If you have never placed a call on your new device, the “Call in Add ress” feature may not work. T o resolve this issue,
simply place a call from the device’s Applicati ons menu. When prompted, type in your home area code and continue
with the call. The “Call in Address” feature will now work after you re-launch TeleNav GPS Plus.
© 2011 TeleNav, Inc. Page 61 of 64
Page 62

How accurate is the GPS?
GPS accuracy can range from 20m (approx. 65 ft) to 100m (approx. 328 ft). Most of the time, the GPS is accurate to less
than 50 meters (approx. 164 ft).
What are ideal conditions for GPS navigation?
Ideally, a device with a GPS receiver needs a clear view of the sky, star ting from about five to ten de grees above the
horizon. Solid or massive obstructions can redu ce accuracy or block GPS signal s, and may cause extended initializatio n
time (time to first GPS fix). Common obstructions include tall buildings, covered parking lots, tun nels, trees, and t errain
features.
If you are parked in a covered parking lot or near a tall building, it is recommended th at you move to an open a rea and
then begin to use TeleNav GPS Plus.
Why does GPS not work near buildings and other tall objects?
Your device requires signals from GPS satellites in order to work, so it needs a clear view of the sky. Dense materials
(such as concrete, rock, steel, heavy wood), tall buildings, terrain features (like mountains, ridges, and cliffs), and large
trees can block or degrade GPS signals a nd may make it impo ssible to det ermine your location.
GPS satellites are not always immediately overhead and could be anywhere i n the skies at any tim e, even low on t he
horizon; however, there are enough satellites in orbit so that four or more will be view of your device if not blocked by
large objects, terrain, or dense materials.
How do I know that my device is receiving GPS sign als?
TeleNav GPS Plus alerts you if your device is not receiving GPS signals. If this ha ppens, move to a n area where there is
a clear view of the sky so your device can re ceive GPS signals fro m space.
What happens if I’m using TeleNav GPS Plus for driving directions and I lose the GPS signal while driving
across a bridge or through a tunnel or lose the GPS signal for so me other reason?
TeleNav GPS Plus remembers the speed at which you were driving before losing t he GPS signal. Tele Nav GPS Plus
continues to give you driving directions based o n an estimate of the pr ojected distance t hat you may have trav eled at
your last recorded rate of speed. TeleNav GPS Plus recalcul ates your current po sition when you re gain a GPS signal
and adjusts your driving directions acco rdingly.
Will I be able to get a route when there is no GPS?
Smartly-cached map data on your handset allows you to navigate and get turn-by-tu rn re-routing directi ons even when
you have traveled a small distance outside the carrier’s coverage area.
How do I delete my list of “Recent Places?”
You may remove multiple addresses by logging i nto your TeleNav GP S Plus account onlin e at http://my.telenav.com
. In
Recent Places, check the addresses you want to remove. You may also do thi s from your handset by choosing Delete
All in the Recent Places menu.
I have recently changed phone numbers. Ho w do I move my subscription over to my ne w phone number?
Contact your carrier to change the phone number.
How do I reinstall the application on my device?
Contact your carrier to obtain the latest build for TeleNav GPS Plus.
How often are your maps updated?
Our maps are updated quarterly.
I noticed there are stars next to some re staurants I hav e viewed or saved. Ho w is popularity rated?
Popularity is calculated by the user-generated ratings, av eraged by conside ring the scores of the rati ngs and the numb er
of users that have rated the location. A location accrues points base d on how many star s it is given by TeleNav GPS
Plus users. When a location consistently achieves abov e-average ratin gs, its popularity cou nt increases. Ne gative
ratings lower the popularity count of the location.
© 2011 TeleNav, Inc. Page 62 of 64
Page 63

How long are ratings kept?
Ratings expire after two years.
TeleNav GPS Plus is freezing up on me. How do I fix this?
If TeleNav GPS Plus is freezing, power your device off for about 20 seconds before turning it ba ck on. Once you’ ve done
this, try launching TeleNav GPS Plus again. If you are still expe riencing issu es, please conta ct your carrier.
The application sometimes freezes on the splash scr een. Ho w can I fix this?
You can fix application freezing on the splash screen by changing th e application permissi ons to allow fo r “Connection s,
Interactions, and User Data.” Follow the instructions on page 60
to adjust permission settings.
If for some reason the application is still freezing on the splash screen, please remov e and re-install the application on
your device.
Why can’t I change permission settings on my device?
If a device is on a BlackBerry Enterprise Server, you will usually not be able to change permi ssion settings d ue to the
restrictions set by your company or administrator. If you get a prompt upon lau nching the appli cation that permissi on
settings need to be changed, please conta ct your company’s IT a dministrato r so that they ca n make these ch anges to
the BlackBerry Enterprise Server.
© 2011 TeleNav, Inc. Page 63 of 64
Page 64

21. Customer Support
Send an email with your questions or comments to T eleNav GPS Plus Customer Support, o r enter a comment throug h
the TeleNav GPS Plus Web site. We will promptly reply to your inquiries.
Toll Free Customer Support Line: 1-88-Tel eNav-4 (1-888-353-6284)
Fax: 408-245-0238
care@telenav.com
www.telenav.com
TeleNav, Inc.
1130 Kifer Road
Sunnyvale, CA 94086
22. T eleNav Services W arranty
The content and Java application services provided by TeleNav is provided “as is” and “as available” without warranties
of any kind, either expressed or implied, including but not limited to any warranties of merchantability or fitness for
particular use, or non-infringement. You acknowledge that your use of the TeleNav service is at your sole risk and you
agree that the service and the information provided are without warranty of any kind by TeleNav.
TeleNav does not warrant the availability, accuracy, completeness, currentness, or reliability of the services available
from TeleNav, or the service itself. Unavailability, errors, omissions, or inaccurate data may result from unreliable data
due to equipment failure or other technical problems beyond the control of TeleNav, and TeleNav does not warrant the
services in any respect due to suc h circumst ances b eyond its control.
Although certain information provided to yo u by Tel eNav may be obtained or compiled from sources TeleNav believes to
be reliable, TeleNav cannot and does not guarantee the accuracy, validity, kindness, or co mpleten ess of any i nformation
made available to you for any particular purpose. Under no circumstances, including negligence, will TeleNav or any of
its affiliates, directors, officers or employees, or any third party be liable for any direct, indirect, incidental, special or
consequential damages that results from your use or your inability to use the services. You acknowledge that this
limitation applies to all content information or other services available from TeleNav, and whether or not TeleNav has
notice of the possibility of such damages, and whether or not to circumstances giving rise to such damages may have
been within the control of TeleNav.
Some states do not allow the exclusion of certain warranties, so some of the above exclusions may not apply to you. In
those states, liability is limited to the fullest extent allowed by law.
By using the service, you agree to indemnify TeleNav and its parents, subsidiaries, affiliate s, officers and employees and
hold them harmless from any and all claims and expenses, including reasonable attorney’s fees, asserted third party due
to, or arising out of your use of the service and t he site.
TeleNav Inc.
1130 Kifer Road
Sunnyvale, CA 94086
T: 408.245.3800
F: 408.245.0238
www.telenav.com
© 2011 TeleNav, Inc. Page 64 of 64
 Loading...