

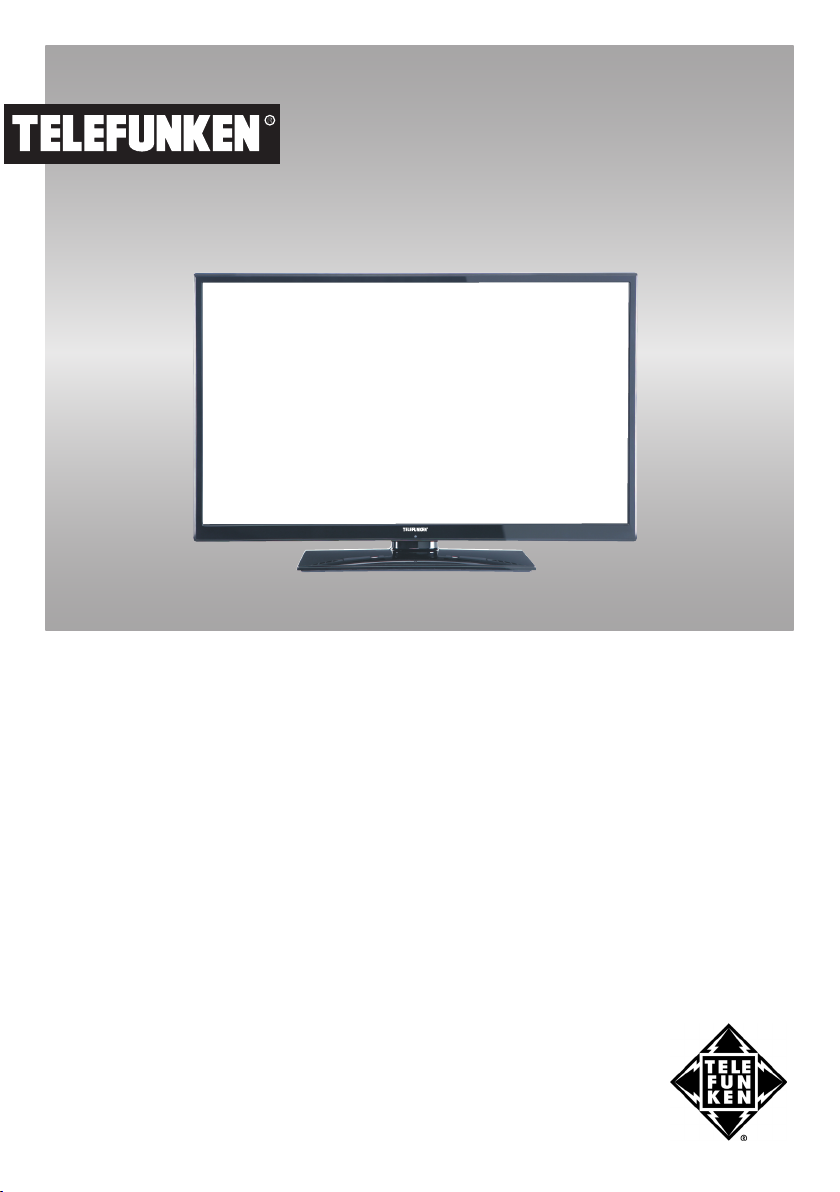
Telefunken L32H125A3 INSTRUCTION MANUAL
R
LCD TV
Bedienungsanleitung
InsTruCTIon ManuaL
MoDE D‘EMPLoI
L32H125A3
Contents
Safety Precautions ............................................... 31
Preparation ....................................................... 31
Intended Use .................................................... 31
Power source .................................................... 31
Positioning the TV ............................................. 31
Power cord and plug ......................................... 32
Moisture and Water .......................................... 32
Ventilation ......................................................... 32
Heat sources and Flames ................................. 32
Headphone Volume .......................................... 32
Wall Mounting (optional) ................................... 32
LCD Screen ...................................................... 32
Cleaning............................................................ 32
Accessories included ............................................ 33
Environmental Information ................................... 33
TV - Features ....................................................... 33
Viewing the TV .................................................... 34
TV Control button & Operation ............................. 34
Viewing remote control ........................................ 35
Using a Conditional Access Module ..................... 37
Standby Notications ............................................ 37
Installing the Batteries to the Remote................... 38
Connect Power & Antenna/Cable/Satellite ........... 38
Switching On/Off ................................................... 38
First Time Installation............................................ 38
Aerial Installation .............................................. 39
Cable Installation .............................................. 39
Satellite Installation ........................................... 40
Using the Channel List ......................................... 40
Sorting Channel List ......................................... 40
Media Playback via USB Input ............................. 40
Media Browser Menu ........................................ 41
Using MENU button in Media Browser Mode ... 41
Changing Image Size: Picture Formats ................ 41
Quick Menu .......................................................... 41
Menu Features and Functions ...............42-43-44-45
Electronic Programme Guide (EPG) .................... 46
Connectivity Functions ......................................... 46
Teletext ................................................................. 50
Using SatcoDX Feature ........................................ 50
Software Upgrade................................................. 50
Troubleshooting & Tips ......................................... 51
Internet Connection Not Available / DLNA Mode Not
Operating .............................................................. 51
PC Typical Display Modes ................................... 52
Specications .............................................................53
Licence Notications............................................. 53
Supported File Formats for USB Media Browser . 54
Supported DVI Resolutions .................................. 55
Appendix: Nero MediaHome Installation .............. 56
Safety Precautions
Please read these instructions fully
before installing or operating.
Preparation
Place the device on a solid even surface. For
ventilation, leave a free space of at least 10 cm
all around the set. To prevent any fault and unsafe
situations, do not place any objects on top of
the set. Use this device in moderate climates.
Operation temperature and operation humidity:
5ºC up to 45ºC, 85% rel. humidity max. (not blocking
ventilation openings).
Intended Use
This device is used to receive and display TV
programmmes.The different connection options
make an additional expansion of the reception and
display sources possible (various external devices).
This device is only suitable for the operation in
dry interiors. This appliance is intended solely
for private domestic use and may not be used for
industrial and commercial purposes. We exclude
liability in principle, if the device is not used as
intended, or unauthorized modications have been
made. To operate your LED TV in extreme ambient
conditions may cause the damage of the device.
WARNING: Never let people (including children)
with physical, sensory or mental abilities or lack of
experience and / or knowledge unsupervised use
electrical device!
Children may not recognize dangers right! The
swallowing of batteries can be fatal. Keep batteries
always out of reach of small children. If a battery is
swallowed, immediately seek medical attention. Keep
the packaging lms out of reach of children. Risk of
suffocation.
Power source
• The TV should be operated only from a 220-240 V
AC, 50 Hz outlet.
Warning: Do not leave your TV in standby or
•
operating mode when you leave your house.
Positioning the TV
• For ventilation, please leave a clear space of at least
10cm all around the TV.
•Do not block the ventilation openings.
•Do not place the TV on sloping or unstable surfaces,
the TV may tip over.
• To prevent damage to the TV, do not place any
objects on top of the TV.
• Only use the TV in moderate climates.
English - 31 -

Power cord and plug
• The power cord plug should be easily accessible.
In case of storms and lightning, when going on
holiday, or when the TV is not used for a long period
of time disconnect the power cord from the mains
power socket.
• The mains plug is used to disconnect TV set from the
mains and therefore it must remain readily operable.
•Do not place the TV, furniture, etc. on the power
cord or pinch the cord.
• Handle the power cord by the plug, do not unplug
the TV by pulling the power cord.
• Never touch the power cord/plug with wet hands
as this could cause a short circuit or electric shock.
• Never make a knot in the power cord or tie it with
other cords.
• Power cords should be placed in such a way that
they are not likely to be stepped on or driven over.
• A damaged power cord/plug can cause re or give
you an electric shock. When damaged it must be
replaced, this should only be done by qualied
personnel.
Moisture and Water
•Do not use this TV in a humid or damp place (avoid
bathrooms, the sink in the kitchen, and near the
washing machine).
•Do not expose this TV to rain or water, as this may
be dangerous.
•Do not place objects lled with liquids, such as
ower vases, on top of the TV. Avoid from dripping
or splashing.
• If any solid object or liquid falls into the cabinet,
unplug the TV and have it checked by qualied
personnel before operating it any further.
Ventilation
• The slots and openings on the TV set are intended
for ventilation and to ensure reliable operation.
• To prevent overheating, these openings must not be
blocked or covered in anyway.
Heat sources and Flames
•Do not expose the TV to direct sunlight
or other heat sources.
• The TV should not be placed near to
open ames and sources of intense
heat such as an electric heater.
• Ensure that no open ame sources, such as lighted
candles, are placed on top of the TV.
Headphone Volume
• Excessive sound pressure from earphones
and headphones can cause hearing loss,
please take care.
English - 32 -
Wall Mounting (optional)
• To prevent injury, this TV must be securely attached
to the wall in accordance with the installation
instructions (if the option is available).
LCD Screen
• Occasionally, a few non-active pixels may appear
on the screen as a xed blue, green or red point.
Please note that this does not affect the performance
of your product.
• Take care not to scratch the screen with ngernails
or other hard objects.
Cleaning
• Before cleaning, unplug the TV from the wall socket.
•Do not use liquid or aerosol cleaners. Only use a
soft, dry cloth.
Environmental Information
This television is designed to consume less energy
to save environment. You not only help to save the
environment but also you can save money by reducing
electricity bills thanks to the energy efciency feauture
of this TV. To reduce energy consumption, you should
take the following steps:
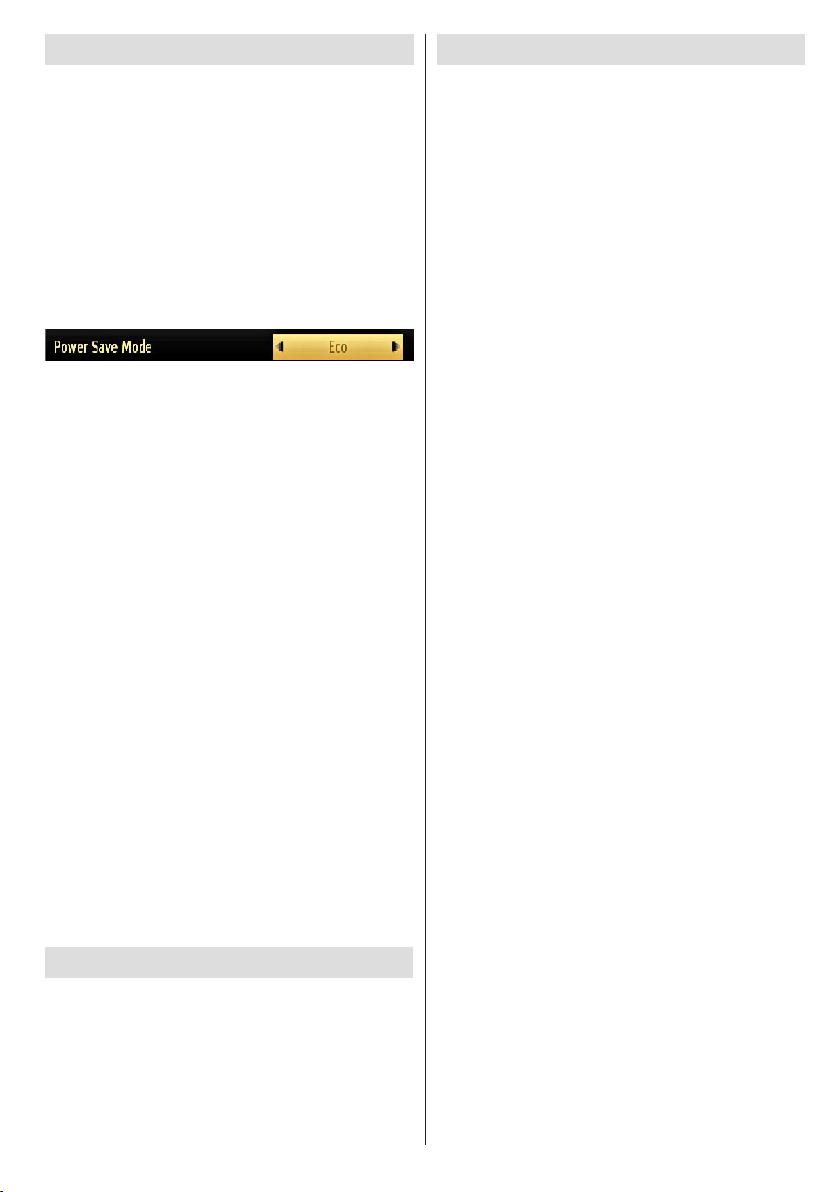
You can use Power Save Mode setting, located in the
Picture Settings menu. If you set Power Save Mode
as Eco, the TV will switch to energy-saving mode
and luminance level of TV set will be decreased to
optimum level. Note that some picture settings will be
unavailable to be changed when the TV is in Power
Save Mode.
If Picture Off is selected, “Screen will be off in 15
seconds.” message will be displayed on the screen.
Select PROCEED and press OK to continue. The
screen will be off in 15 seconds. If you disable Power
Save Mode, Picture mode will be automatically set
to Dynamic.
When the TV is not in use, please switch off or
disconnect the TV from the mains plug. This will also
reduce energy consumption.
Disconnect power when going away for longer time.
It is highly recommended to activate Power Save Mode
setting to reduce your annual power consumption. And
also it is recommended to disconnect the TV from the
mains plug to save energy more when you do not use.
Please helps us to save environment by following
these steps.
Repair Information
Please refer all servicing to qualied personnel. Only
qualied personnel must repair the TV. Please contact
your local dealer, where you have purchased this TV
for further information.
TV - Features
• Remote controlled colour LED TV.
• Fully integrated digital/cable/satellite TV
(DVB-T/C/S-S2).
• 2 HDMI connectors for digital video and audio.
This connection is also designed to accept high
denition signals.
• 2 USB inputs.
• 10000 programmes.
• OSD menu system.
• Scart socket for external devices (such as video, video
games, audio set, etc.).
• Stereo sound system.
• Teletext, fastext, TOP text.
• Headphone connection.
• Automatic programming system.
• Forward or backward manual tuning.
• Automatic power down after up to six hours.
• Sleep timer.
• Child lock.
• Automatic sound mute when no transmission.
• NTSC playback.
• AVL (Automatic Volume Limiting).
• PLL (Frequency Search).
• PC input.
• Plug&Play for Windows 98, ME, 2000, XP, Vista,
Windows 7.
• Game Mode.
• Picture off function.
• Ethernet (LAN) for Internet connectivity and service.
• HbbTV.
• DLNA.
Accessories included
Remote Control
Batteries: 2 x AAA
Instruction Book
Side AV Connection Cable
Nero Media Home CD
English - 33 -
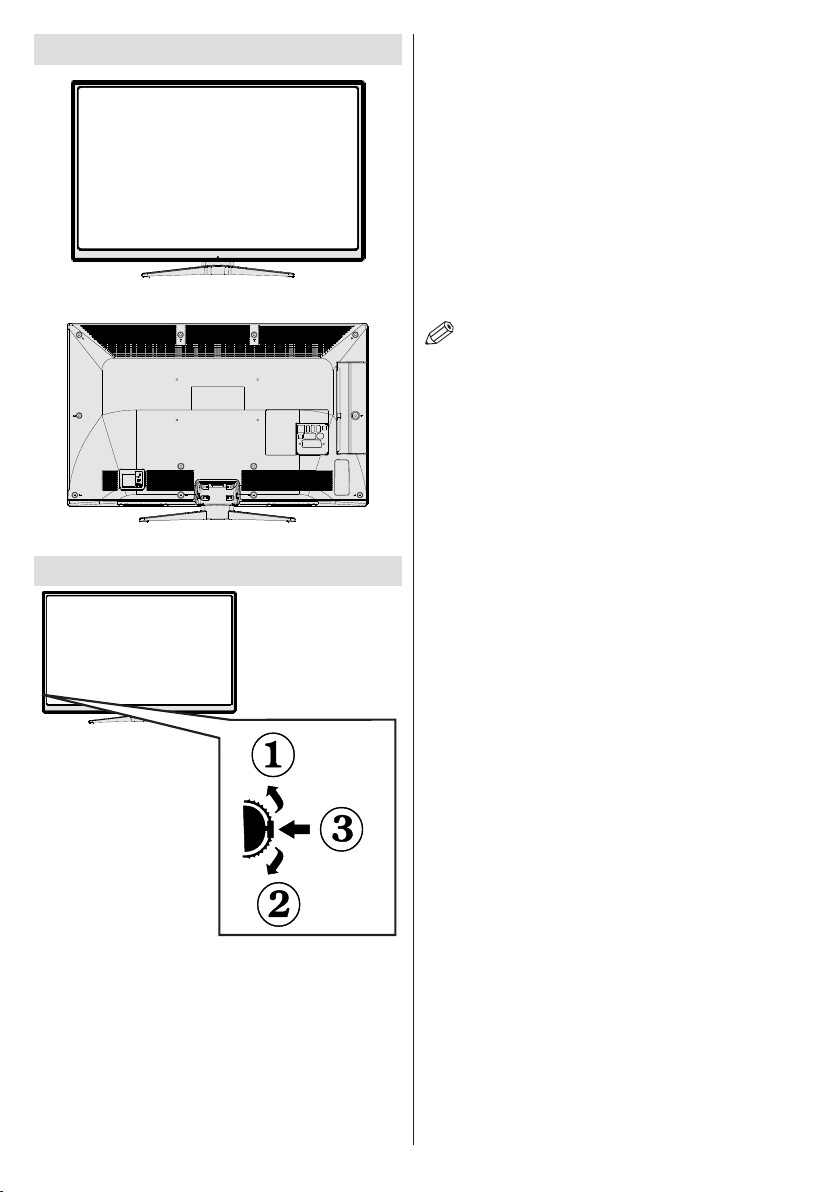
Viewing the TV
TV Control button & Operation
To change volume: Increase the volume by pushing
the button up. Decrease the volume by pushing the
button down.
To change channel: Press the middle of the button,
the channel information banner will appear on screen.
Scroll through the stored channels by pushing the
button up or down.
To change source: Press the middle of the button
twice, the source list will appear on screen. Scroll
through the available sources by pushing the button
up or down.
To turn the TV off: Press the middle of the button
down and hold it down for a few seconds, the TV will
turn into standby mode.
NOTE: You can move the switch, upward or
downward to change the volume. If you want to
change the channel, press the middle of the switch
once (Position 3) and then move upward or downward.
If you press the middle of the switch once more, the
source OSD will be displayed. To select desired
source, move the switch upward or downward and
release. If you press the middle of the switch and
hold for a few seconds, the TV will switch to standby
mode. The Main menu OSD cannot be displayed via
the control buttons on the TV.
1. Up direction
2. Down direction
3. Programme/Volume / AV / Standby-On selection
switch
The Control switch allows you to control the Volume/
Programme/ Source and Standby-On functions of
the TV.
English - 34 -
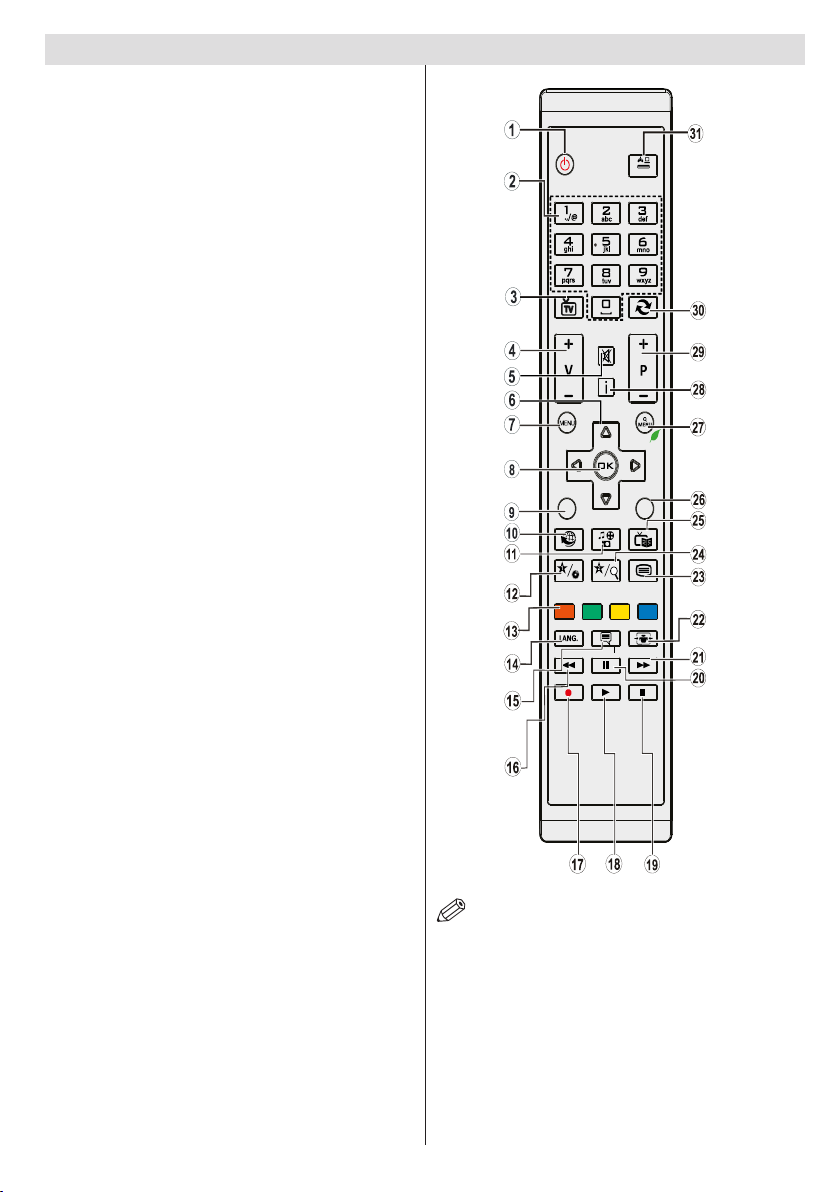
Viewing remote control
SOURCE
.
EXIT
BACK
TV
1. Standby
2. Numeric buttons
3. TV-AV / Channel List / DVB-T/C
4. Volume up/down
5. Mute
6. Navigation buttons
7. Menu on/off
8. OK / Channel List / Hold (in TXT mode)
9. Return/Back/Index page (in TXT mode)
10. Internet Portal
11. Media Browser
12. My button 1 / Youtube link (*)
13. Coloured Buttons
14. Mono-Stereo Dual I-II / Audio-Subtitle Language
15. Subtitle on-off / Subtitle (in Media Browser
mode)
16. Fast Rewind (in Media Browser mode)
17. No Function
18. Play (in Media Browser mode)
19. Stop (in Media Browser mode)
20. Pause (in Media Browser mode)
21. Fast Forward (in Media Browser mode)
22. Image size
23. Teletext / Mix
24. My button 2 (**)
25. Electronic Programme Guide
26. Exit
27. Quick menu
28. Info / Reveal (in TXT mode)
29. Programme Up-Down
30. Previous programme
31. AV / Source selection
- Switches to TV source if pressed on another
source
- Switches between DVB-T and DVB-C channel
lists (if available)
NOTE: The Remote Control range is approximately
7m / 23ft.
Using My button 1 (*)
This button’s main function is to run Youtube link.
However, if you want to change this function, you can
press MY BUTTON 1 for ve seconds when on a desired
source, channel or link, until the “MY BUTTON IS SET”
message is displayed on the screen. This conrms
that the selected MY BUTTON is now associated with
the selected function. Note that if you perform rst time
English - 35 -
installation, MY BUTTON 1 will return to its default
function.
Using My Button 2 (**)
This button’s main function is to switch between
DVB-T, DVB-C and DVB-S broadcasts. However, if
you press MY BUTTON 2 for ve seconds, you can
set a function to it as described in My Button 1.
Note that if you perform first time installation, MY
BUTTON 2 will return to its default function.
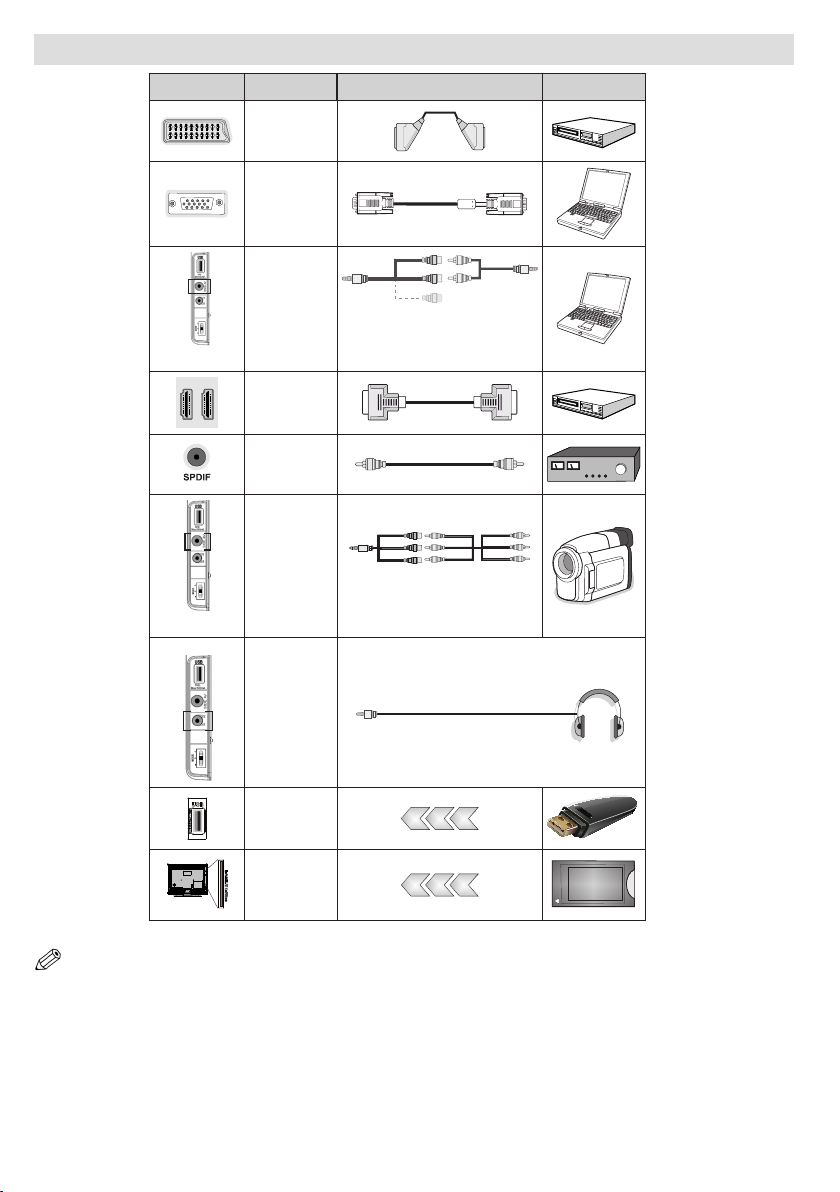
Viewing the Connections
Connector Type Cables Device
Connection
Connection
PC/YPbPr
Connection
SIDE AV
Connection
(side&back)
Connection
Connection
SIDE AV
HEADPHONE
Scart
(back)
VGA
(back)
Audio
(side)
HDMI
SPDIFF
(back)
Side AV
(side)
Side Audio/Video
Connection Cable
(Supplied)
AV Connection
Cable (supplied)
PC Audio Cable
(Not supplied)
Headphone
Connection
(side)
USB
Connection
(side)
CI
Connection
(side)
CAM
module
NOTE: When connecting a device via the Side AV input, you must use the supplied connection cables to enable connection.
See the illustrations above. | YPbPr can be used only when you connect a device that has a YPbPr output through the PC
input with YPbPr to PC cable (YPbPr to PC cable is not supplied). When the connection is made, switch to YPbPr source.
To enable PC audio, you will need to use PC/YPBPR AUDIO CONNECTION WHITE & RED inputs. | If an external device
is connected via the SCART socket, the TV will automatically switch to AV mode.| When receiving DTV channels (Mpeg4
H.264) or while in Media Browser mode, output will not be available via the scart socket. | When using the wall mounting
kit (optional), we recommend that you plug all your cables into the back of the TV before mounting on the wall. | Insert or
remove the CI module only when the TV is SWITCHED OFF. You should refer to the module instruction manual for details of
the settings. Insert the CAM and then the viewing card to the slot that is located in the terminal cover at the rear side of the
TV. The module should be correctly inserted, it is impossible to insert fully if reversed. The CAM or the TV terminal may be
damaged if the CAM is forcefully inserted.
English - 36 -
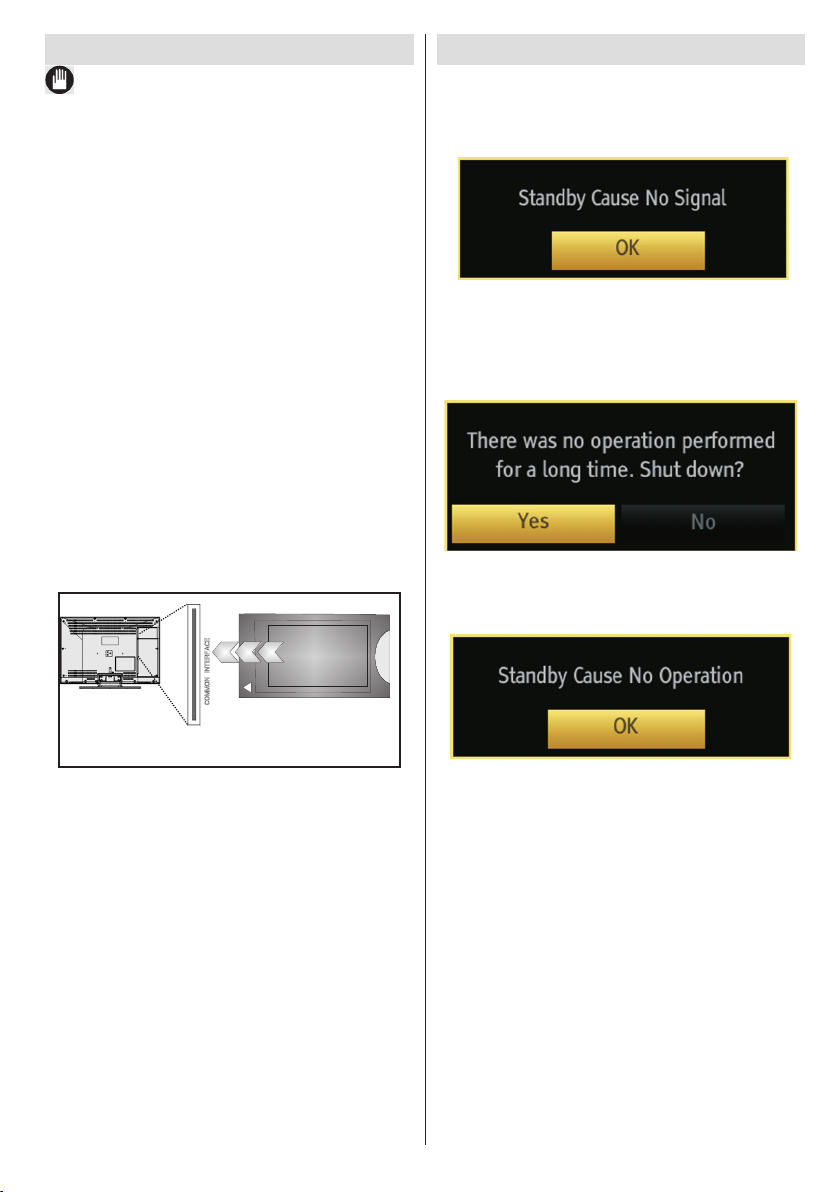
Using a Conditional Access Module
IMPORTANT: Insert or remove the CI module only
when the TV is SWITCHED OFF.
In order to watch certain digital channels, a conditional
access module (CAM) can be necessary. This module
must be inserted in the CI slot of your TV.
1. Obtain the Conditional Access Module (CAM) and the
viewing card by subscribing to a pay channel company,
then insert those to the TV using the following procedure.
2. Insert the CAM and then the viewing card to the
slot that is located in the terminal cover at the rear
side of the TV.
3. The CAM should be correctly inserted, it is
impossible to insert fully if reversed. The CAM or
the TV terminal may be damaged if the CAM is
forcefully inserted.
4. Connect the TV to the mains supply, switch on
and then wait for few moments until the card is
activated.
5. When no module is inserted, “No Common
Interface module detected” message appears
on the screen.
You can refer to the module instruction manual for details
of the settings.
StandbyNotications
If the TV does not receive any input signal (e.g. From
an aerial or HDMI source) for 5 minutes, the TV will
go into standby. When you next switch-on the TV, the
following message will be displayed:
When the Auto Tv Off timeout is reached, the following
message will be displayed on the screen. Select YES
to shut down the TV. Select NO to cancel. The TV
will switch off as well, if you do not make a selection
on this screen.
If the TV has been left on and not been operated for
4 hours, the TV will go into standby. When you next
switch-on, the following message will be displayed:
CAM
module
English - 37 -
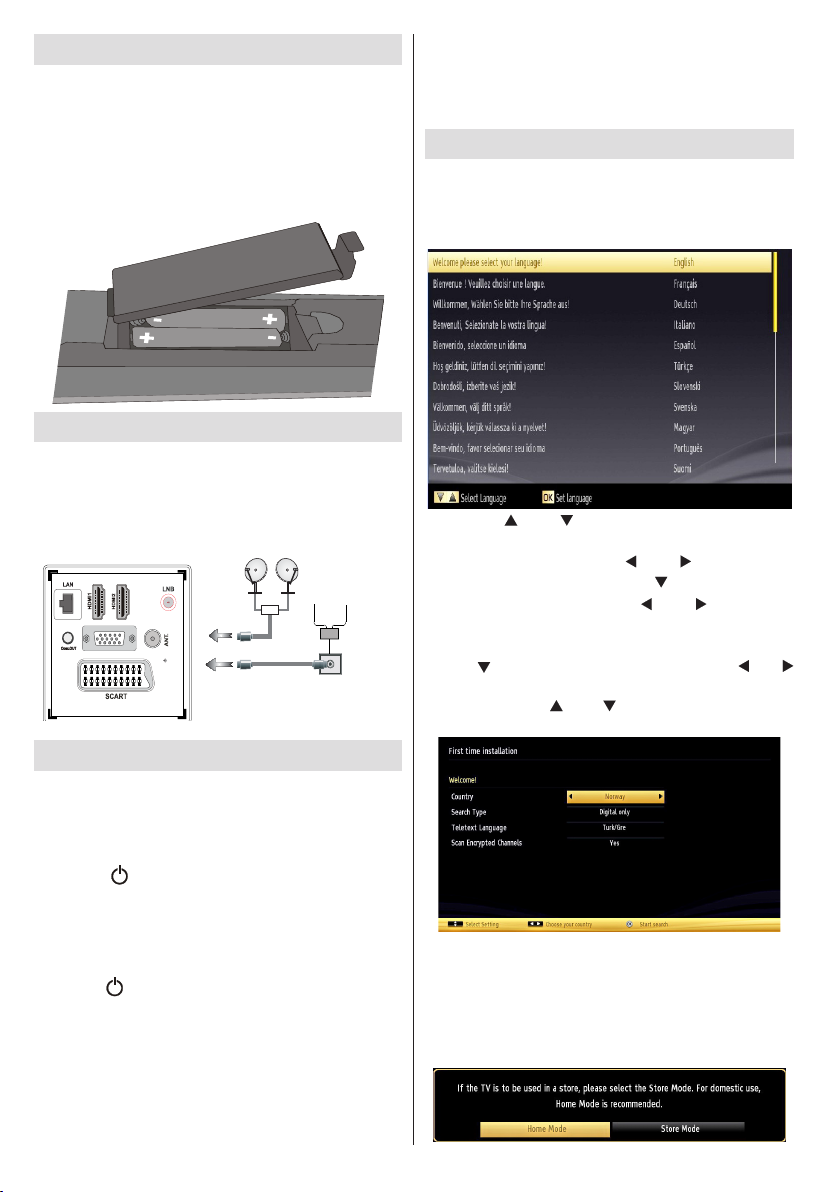
Installing the Batteries to the Remote
SPDIF
VGA
13Vdc /18V dc
300mAMax.
Aerial or Cable
Satellite
DiSEqC
Switch
1. Lift the cover on the back of the remote upward
gently.
2. Install two AAA batteries. Make sure to match the +
and - ends of the batteries in the battery compartment
(observe the correct polarity.
3. Replace the cover.
Connect Power & Antenna/Cable/Satellite
IMPORTANT: The TV set is designed to operate on
220-240V AC, 50 Hz socket. After unpacking, allow
the TV set to reach the ambient room temperature
before you connect the set to the mains. Plug the
power cable to the mains socket outlet.
Switching On/Off
To Switch the TV On
Connect the power cord to the 220-240V AC, 50 Hz.
Then the standby LED lights up.
To switch on the TV from standby mode either:
Press the “
the remote control.
Press the control switch located on the left side of the
TV. The TV will then switch on.
To Switch the TV Off
Press the “ ” button on the remote control or press and
hold the control switch on the TV, so the TV will switch
to standby mode.
To power down the TV completely, unplug the
power cord from the mains socket.
” button, P+ / P- or a numeric button on
English - 38 -
Note: When the TV is switched to standby mode,
standby LED can blink to indicate that features such
as Standby Search, Over Air Download or Timer is
active. The LED can also blink when you switch on
the TV from standby mode.
First Time Installation
When turned on for the rst time, the “language
selection” menu appears. The message “Welcome
please select your language!” is displayed in all
language options listed alphabetically.
Press the “ ” or “ ” button to highlight the required
language, press OK button to select. “First Time
Installation” appears. Use “
the required country, and press “ ” button to select
Search Type (Optional). Use“
desired search type. Available search types are Digital
and analog, digital only and analog only. When set,
press “
” to select Teletext Language. Use “ ” or “
” button to set the “Teletext Language” and select “Scan
Encrypted” using “ ” or “ ” button. You can set Scan
Encrypted as Yes if you want to scan coded stations.
Default PIN code can change depending on the
selected country. If you are asked to enter a PIN code
for viewing a menu option, use one of the following
codes: 4725, 0000 or 1234.
Press OK button on the remote control to continue and
the following message will be displayed on the screen.
” or “ ” button to set
” or “ ” to set the
 Loading...