


FRANCAIS
MODE D’EMPLOI CADRE PHOTOS NUMERIQUES
TELEFUNKEN DPF 15002
I. Découvrez et installez votre cadre ........................................................ 2
1. Contenu de la boîte ........................................................................................................... 2
2. Schéma du cadre .............................................................................................................. 2
3. Installation ........................................................................................................................... 2
II. Utilisez votre cadre ................................................................................... 3
1. Sélection de la langue ....................................................................................................... 3
2. Lecture d’une carte mémoire ou d’une clé USB .......................................................... 3
3. Copie de photos vers la mémoire interne ..................................................................... 3
4. Suppression de photos .................................................................................................... 4
III. Sélection du type de fichiers à lire ......................................................... 5
1. Les photos .......................................................................................................................... 5
2. Les vidéos ........................................................................................................................... 5
3. La musique ......................................................................................................................... 5
IV. Les réglages .............................................................................................. 5
1. Configuration Photo .......................................................................................................... 6
2. Réglages musique ............................................................................................................. 7
3. Réglages vidéo .................................................................................................................. 7
4. Configuration Calendrier .................................................................................................. 8
V. Pour aller plus loin .................................................................................... 8
VI.
Instructions de sécurité ........................................................................... 8
Garantie ...................................................................................................... 9
VII.
Caractéristiques techniques ........................................................... 11
VIII.
Document non contractuel soumis à modifications en cas d’erreurs typographiques (Mktg0909)
1
FRANCAIS
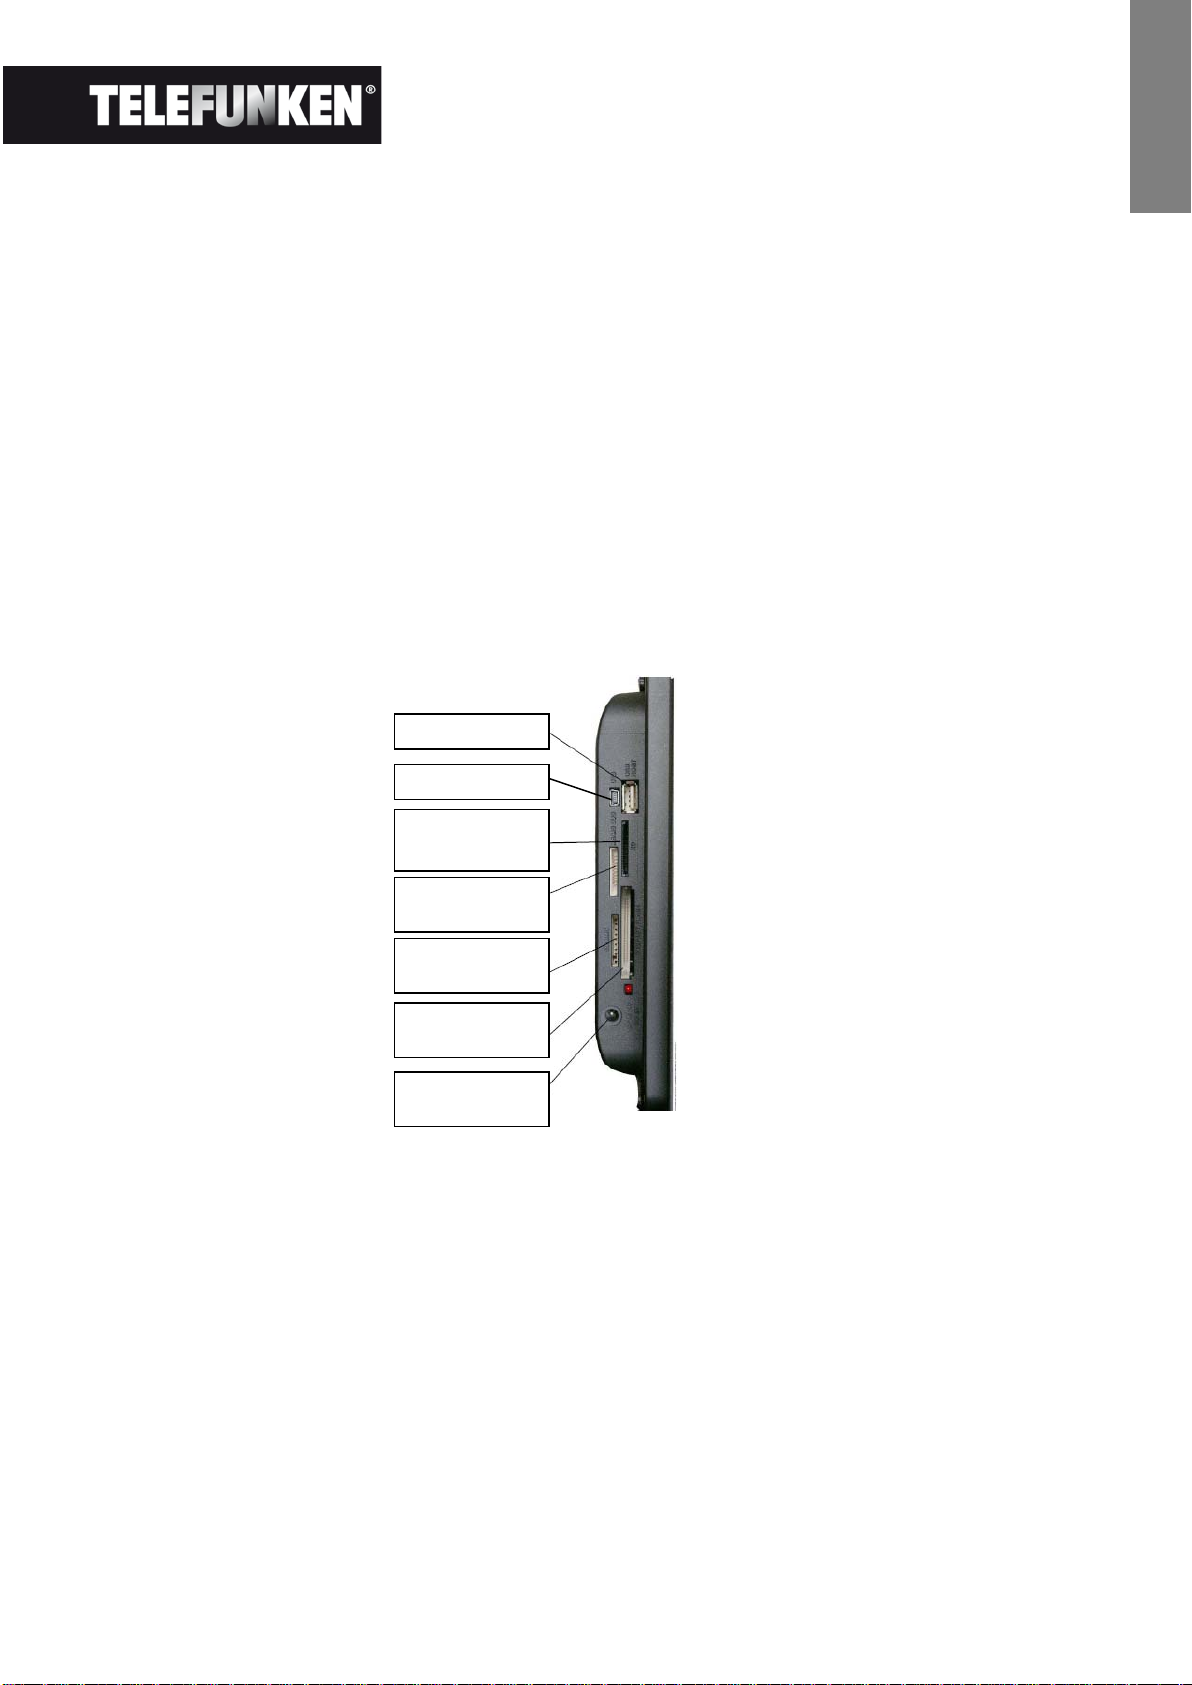
Port USB HOST
cartes MS
Emplacement
cartes SD/SDHC
cartes CF
Alimentation
secteur
I. Découvrez et installez votre cadre
Vous venez d’acheter un cadre photo numérique TELEFUNKEN DPF 15002 et nous vous en
remercions. Avant d’utiliser votre appareil, veuillez consulter le présent mode d’emploi et le conserver
afin de pouvoir vous y reporter ultérieurement.
1. Contenu de la boîte
- 1 Cadre photo numérique
- 1 Adaptateur secteur
- 1 Télécommande
- 1 Pied ajustable
- 1 Chiffonette
2. Schéma du cadre
Mini port USB
Emplacement
Cartes XD
Emplacement
Emplacement
3. Installation
- Sortez votre cadre et ses accessoires de leur emballage
- Otez le film plastique de protection sur la façade du cadre
- Tirez sur la languette plastique destinée à protéger les contacts de la télécommande
- Installez le pied du cadre en le faisant coulisser dans l’emplacement prévu au dos du cadre
- Posez le cadre à l’endroit souhaité en tirant vers vous le pied ajustable
- Connectez le cordon secteur au cadre à l’emplacement prévu à cet effet.
- Branchez votre cadre sur une prise de courant. Votre cadre se met en route
automatiquement.
Document non contractuel soumis à modifications en cas d’erreurs typographiques (Mktg0909)
2

FRANCAIS
II. Utilisez votre cadre
1. Sélection de la langue
Une fois le diaporama lancé, appuyez sur la touche « EXIT » de la télécommande pour afficher l’écran
de menu principal puis appuyez sur le bouton « SETUP ».
A l’aide des touches « DROITE/GAUCHE » de la télécommande, sélectionnez l’icône des langues, puis
appuyez sur « ENTER ».
Sélectionnez votre langue à l’aide des touches « HAUT/BAS » de la télécommande puis appuyez sur la
touche « SLIDESHOW » de la télécommande pour relancer le diaporama.
2. Lecture d’une carte mémoire ou d’une clé USB
Si votre cadre est éteint :
- Insérez votre carte ou votre clé USB à l’emplacement prévu à cet effet.
- Mettez votre cadre sous tension : Le diaporama lit automatiquement le contenu de votre carte
mémoire ou de votre clé USB.
Si votre cadre est allumé :
- Appuyez sur la touche « EXIT» de votre télécommande pour afficher l’écran de menu principal.
- A l’aide des touches « DROITE/GAUCHE » de votre télécommande, sélectionnez l’icône de
sélection des cartes (située en bas à gauche) puis appuyez sur « ENTER ».
- Sélectionnez la carte souhaitée avec les touches « DROITE/GAUCHE » de votre télécommande
et appuyez sur « ENTER » pour valider votre choix. Le menu principal s’affiche de nouveau ;
Appuyez sur la touche « SLIDE SHOW » pour lancer le diaporama.
Si votre support (carte, clé ou mémoire interne ) contient de la musique le diaporama sera lu sans la
musique. Pour activer la musique durant le diaporama, appuyez sur la touche « Enter » de la
télécommande.
3. Copie de photos vers la mémoire interne
Il existe deux méthodes pour copier des images de votre carte mémoire vers la mémoire interne du
cadre.
- Copier vos fichiers à partir du gestionnaire de fichiers
Si vous utilisez cette méthode, vous pourrez sélectionner les fichiers à copier quel que soit leur type
(Photo, audio, vidéo)
Document non contractuel soumis à modifications en cas d’erreurs typographiques (Mktg0909)
3

FRANCAIS
A partir de l’écran de menu principal, sélectionnez l’icône « Dossiers » à l’aide des touches
« DROITE/GAUCHE » de la télécommande et appuyez sur la touche « ENTER ». La liste de tous les
fichiers présents sur votre support s’affiche. Sélectionnez les fichiers à copier à l’aide des touches
« HAUT/BAS » de votre télécommande, et validez la sélection de chaque fichier en appuyant sur la
touche « Sélection » (représentée sur la télécommande par un carré coché). Appuyez sur la touche
« SETUP » de votre télécommande puis sélectionner l’icône « Copier » à l’aide des touches
« DROITE/GAUCHE ». Appuyez sur « ENTER » puis sélectionnez la ligne « Copier sélectionnés».
Appuyez sur la touche « ENTER ». Sélectionnez « Confirmer » ou « Annulez » puis appuyez sur
« ENTER ».
- Copier vos photos à partir du mode vignettes
Avec cette méthode, vous pouvez copier une sélection de photos en ayant la possibilité de les
redimensionner à la définition du cadre afin d’optimiser la capacité de la mémoire interne.
1. A partir du menu principal, sélectionnez l’icône « Photo » et appuyez sur « ENTER ». Les images
s’affichent sous forme de vignettes.
2. Sélectionner les images à copier à l’aide des touches « DROITE/GAUCHE-HAUT/BAS » et la
touche « Sélection » (représentée sur la télécommande par un carré coché).
3. Appuyez sur la touche « SETUP » puis sélectionnez l’icône « Copier » à l’aide des touches
« DROITE/GAUCHE ». Appuyez sur « ENTER » et choisissez « Copier tout » ou « Copier
sélectionnés »
4. Appuyez sur « ENTER ». Vous pouvez à présent confirmer, annuler ou bien copier les images en
les redimensionnant à la définition du cadre. Faites votre sélection puis appuyez sur la touche
« ENTER »
4. Suppression de photos
Vous pouvez supprimer des photos qui se trouvent dans la mémoire interne de votre cadre.
- Supprimez vos fichiers à partir du gestionnaire de fichiers
Si vous utilisez cette méthode, vous pourrez sélectionner les fichiers à supprimer quel que soit leur
type (Photo, audio, vidéo)
- A partir de l’écran de menu principal, sélectionnez l’icône « Dossiers » à l’aide des touches
« DROITE/GAUCHE » de la télécommande et appuyez sur la touche « ENTER ». La liste de tous
les fichiers présents sur votre support s’affiche. Sélectionnez les fichiers à supprimer à l’aide
des touches « HAUT/BAS » de votre télécommande, et validez la sélection de chaque fichier en
appuyant sur la touche « Sélection » (représentée sur la télécommande par un carré coché).
Appuyez sur la touche « SETUP » de votre télécommande puis sélectionner l’icône « Effacer
fichiers » à l’aide des touches « DROITE/GAUCHE ». Appuyez sur « ENTER » puis sélectionnez
la ligne « supprimer sélectionnés ». Appuyez sur la touche « ENTER ». Sélectionnez
« Confirmer » ou « Annulez » puis appuyez sur « ENTER ».
4
Document non contractuel soumis à modifications en cas d’erreurs typographiques (Mktg0909)

FRANCAIS
- Supprimer vos photos à partir du mode vignettes
Avec cette méthode, vous pouvez supprimer une sélection ou toutes les photos de la mémoire interne.
1. A partir du menu principal, sélectionnez l’icône « Photo » et appuyez sur « ENTER ». Les images
s’affichent sous forme de vignettes.
2. Sélectionner les images à supprimer à l’aide des touches « DROITE/GAUCHE-HAUT/BAS » et
la touche « Sélection » (représentée sur la télécommande par un carré coché).
3. Appuyez sur la touche « SETUP » puis sélectionnez l’icône « Effacer fichiers » à l’aide des
touches « DROITE/GAUCHE ». Appuyez sur « ENTER » et choisissez « Supprimer tout » ou
« Copier sélectionnés »
4. Appuyez sur « ENTER ». Vous pouvez à présent confirmer ou annuler. Faites votre sélection
puis appuyez sur la touche « ENTER »
III. Sélection du type de fichiers à lire
1. Les photos
- Quelle que soit le type d’affichage en cours, il vous suffit d’appuyer sur la touche
« SLIDESHOW » de la télécommande pour lancer le diaporama photo.
2. Les vidéos
- Appuyez sur la touche « Exit » pour afficher l’écran principal.
- A l’aide des flèches « Gauche/Droite » de la télécommande, sélectionnez l’icône « Vidéo ».
- Appuyez sur la touche « Enter » : la lecture commence
3. La musique
- Appuyez deux fois sur la touche « Exit » pour afficher l’écran principal.
- A l’aide des flèches « Gauche/Droite » de la télécommande, sélectionnez l’icône « Musique ».
- Appuyez sur la touche « Enter » : la lecture commence.
IV. Les réglages
Pendant le diaporama, appuyez sur la touche « EXIT » de la télécommande pour afficher le menu
principal, puis appuyez sur la touche « SETUP ».
Vous pouvez alors régler les paramètres suivants :
- La langue
- L’ordre de classement des fichiers
(De la photo la plus récente copiée dans la mémoire interne à la plus ancienne, de la plus
ancienne copiée dans la mémoire interne à la plus récente, ou par nom de fichier)
Document non contractuel soumis à modifications en cas d’erreurs typographiques (Mktg0909)
(vous indique l’ordre dans lequel vos photos sont affichées.
5

FRANCAIS
- Réinitialiser le cadre
- Afficher la version du logiciel interne du cadre
1. Configuration Photo
Lorsque vous êtes dans le menu principal, sélectionnez l’icône « Photo » et appuyez sur « ENTER ».
Les vignettes s’affichent.
Appuyez sur « SETUP » pour afficher le menu photo. Vous pouvez alors régler les paramètres suivants :
- L’ordre de classement des photos
- La copie des photos (si vous lisez une carte mémoire ou une clé USB)
- La suppression des photos (si vous lisez les images de la mémoire interne. Par souci de
sécurité, il n’est pas possible de supprimer les images d’une carte mémoire ou d’une clé USB)
- La réinitialisation du cadre
- La sélection du type de support à lire
- La taille d’affichage
- L’activation de l’affichage multiple
- Les effets de transition
- La durée d’affichage des images
- La luminosité, le contraste, la saturation et la teinte de l’écran
Pour tous ces réglages, sélectionnez l’icône désirée, appuyez sur « ENTER », choisissez le réglage
souhaité à l’aide des touches « HAUT/BAS » et appuyez sur « EXIT »
Lorsque vous êtes dans le mode diaporama, si vous appuyez sur la touche « SETUP », le menu qui
s’affiche permet d’accéder à :
- La rotation de l’image
- Le zoom
- La copie des photos (si vous lisez une carte mémoire ou une clé USB)
- La suppression des photos (si vous lisez les images de la mémoire interne. Par souci de
sécurité, il n’est pas possible de supprimer les images d’une carte mémoire ou d’une clé USB)
Le réglage de la luminosité, du contraste, de la saturation et de la teinte de l’écran
-
NOTE : Vous avez également directement accès au zoom et à la rotation par deux boutons situés sur
la télécommande.
Document non contractuel soumis à modifications en cas d’erreurs typographiques (Mktg0909)
6

FRANCAIS
2. Réglages musique
Lorsque vous êtes dans le menu principal, sélectionnez l’icône « Musique » à l’aide des touches
« DROITE/GAUCHE » de votre télécommande puis appuyez sur «ENTER».
Appuyez sur « SETUP » pour accéder au menu de réglage.
Vous pouvez paramétrer :
- L’ordre de classement des fichiers
- La copie des fichiers (si vous lisez une carte mémoire ou une clé USB)
- La suppression des fichiers (si vous lisez les fichiers de la mémoire interne. Par souci de
sécurité, il n’est pas possible de supprimer les fichiers d’une carte mémoire ou d’une clé USB)
- La réinitialisation du cadre
- La sélection du type de support à lire
- Le type de lecture
- La sélection d’un morceau musical comme alarme
Sélectionnez le paramètre à ajuster à l’aide des touches « DROITE/GAUCHE » de la télécommande.
Appuyez sur « ENTER » puis ajustez le réglage avec les touches « HAUT/BAS ».
Appuyez sur « ENTER » pour confirmer et passer au paramètre suivant.
3. Réglages vidéo
Lorsque vous êtes dans le menu principal, sélectionnez l’icône « Vidéo » à l’aide des touches
« DROITE/GAUCHE » de votre télécommande puis appuyez sur «ENTER».
Appuyez sur « SETUP » pour accéder au menu de réglage.
- L’ordre de classement des fichiers
- La copie des fichiers (si vous lisez une carte mémoire ou une clé USB)
- La suppression des fichiers (si vous lisez les fichiers de la mémoire interne. Par souci de
sécurité, il n’est pas possible de supprimer les fichiers d’une carte mémoire ou d’une clé USB)
- La réinitialisation du cadre
- La sélection du type de support à lire
- Le type de lecture
Sélectionnez le paramètre à ajuster à l’aide des touches « DROITE/GAUCHE » de la télécommande.
Appuyez sur « ENTER » puis ajustez le réglage avec les touches « HAUT/BAS ».
Appuyez sur « ENTER » pour confirmer et passer au paramètre suivant.
7
Document non contractuel soumis à modifications en cas d’erreurs typographiques (Mktg0909)

FRANCAIS
4. Configuration Calendrier
Lorsque vous êtes dans le menu principal, sélectionnez l’icône « Horloge » à l’aide des touches
« DROITE/GAUCHE » de la télécommande pour accéder à ce menu et appuyez sur «ENTER ».
Appuyez sur la touche « SETUP » pour accéder aux réglages :
- Le mode veille
- L’activation de l’alarme
- L’heure de l’alarme
- L’horloge
- La date
-
Sélectionnez le paramètre à ajuster à l’aide des touches « DROITE/GAUCHE » de la télécommande.
Appuyez sur « ENTER » puis ajustez le réglage avec les touches « HAUT/BAS ».
Appuyez sur « ENTER » pour confirmer et passer au paramètre suivant
V. Pour aller plus loin
Il est possible de transférer des fichiers dans le cadre en reliant celui-ci à votre micro-ordinateur. Pour
en savoir plus, vous pouvez télécharger le mode d’emploi complet sur le site :
http://www.telefunken-digicadre.com
VI. Instructions de sécurité
Manipulez le cadre photo numérique avec précaution et évitez de toucher l’écran ; les traces de doigts
sont difficiles à enlever.
Placez toujours le cadre photo numérique sur une surface plane et stable pour éviter qu’il ne tombe et
ne soit endommagé.
Évitez d’exposer le cadre photo numérique au soleil ou aux températures élevées car ceci peut
endommager le cadre ou réduire sa durée d’utilisation. Ne le placez pas près de sources de chaleurs
telles que les radiateurs, les chauffages d’appoints… Ne positionnez pas le cadre face aux rayons du
soleil pour éviter les reflets.
Évitez d’exposer le cadre photo numérique à la pluie, l’eau ou l’humidité. Ne le placez pas dans un
évier ou dans un bassin où il pourrait entrer en contact avec l’eau.
Ne placez jamais d’objets lourds ou coupants sur le cadre, l’écran ou l’alimentation du cadre.
Veillez à ne pas brancher le cadre photo numérique sur une prise ou un cordon à l’alimentation trop
puissante. Ceci pourrait provoquer une surchauffe, un feu ou un choc électrique.
Veillez à l’emplacement du cordon d’alimentation ; celui-ci ne doit pas être piétiné ou en contact avec
d’autres objets. Ne placez pas le cordon sous un tapis. Vérifiez régulièrement l’état du cordon pour
éviter tout dommage. Si le cordon est endommagé, débranchez-le et remplacez-le.
Document non contractuel soumis à modifications en cas d’erreurs typographiques (Mktg0909)
8
 Loading...