


ENGLISH
DIGITAL PICTURE FRAME INSTRUCTIONS
TELEFUNKEN STYLE SERIES
(DPF 7901, DPF 7331, DPF 9321, DPF 10331)
I. Learn about and install your frame ........................................................ 2
1. Box contents ...................................................................................................................... 2
1. Frame diagrams ................................................................................................................. 2
2. Installation ........................................................................................................................... 3
II. Use your frame .......................................................................................... 3
1. Selecting a language ......................................................................................................... 3
2. Reading a memory card or a USB key .......................................................................... 3
3. Copying photos to the internal memory ........................................................................ 4
4. Deleting photos .................................................................................................................. 5
III. Selecting the type of files to play ........................................................... 6
1. Photos ................................................................................................................................. 6
2. Videos (only on DPF 7911, DPF 7331, DPF 9331, DPF 10331) ................................. 6
3. Music (only on DPF 7911, DPF 7331, DPF 9331, DPF 10331) .................................. 6
IV. Settings ...................................................................................................... 7
1. Photo settings .................................................................................................................... 7
2. Calendar settings ............................................................................................................... 9
3. Video settings (only on DPF 7911, DPF 7331, DPF 9331, DPF 10331) .................. 11
4. Music settings (only on DPF 7911, DPF 7331, DPF 9331, DPF 10331) ................. 12
5. System settings ............................................................................................................... 13
V. Connecting to a computer .................................................................... 14
Safety instructions .................................................................................. 15
VI.
Warranty ................................................................................................... 16
VII.
Specifications .................................................................................... 18
VIII.
1
Non contractual document subject to change in case of typographical errors (Mktg0609)

ENGLISH
"Up" key
"Down" key
Rotate
Zoom
I. Learn about and install your frame
Thank you for your recent purchase of a TELEFUNKEN "STYLE Series" digital photo frame. Before
using your device, please consult these operating instructions and keep them so you may refer to them
later on.
1. Box contents
- 1 digital photo frame
- 1 AC adaptor
- 1 remote control
- 1 dust cloth
1. Frame diagrams
Control buttons
Exit
Copy/Delete
"Left" key
Slideshow
Stop
On/Off button
Wall hanger
Adjustable stand
Mini USB port
USB port
SD/MMC card port
XD card port
MS, MSPro, MS Duo, MS Pro
Duo card port
Power input plug
Settings
On/Off
Mute
Volume
"Right" key
Non contractual document subject to change in case of typographical errors (Mktg0609)
2
ENGLISH
2. Installation
- Take your frame and its accessories out of their packaging.
- Remove the plastic film protecting the front of the frame.
- Pull the plastic tab protecting the contacts in the remote control.
- Stand the frame in the desired location, pulling the adjustable stand towards you (see diagram
above).
- Connect the electrical cord to the frame in the space provided.
Plug your frame into an outlet. Your frame will start up automatically.
II. Use your frame
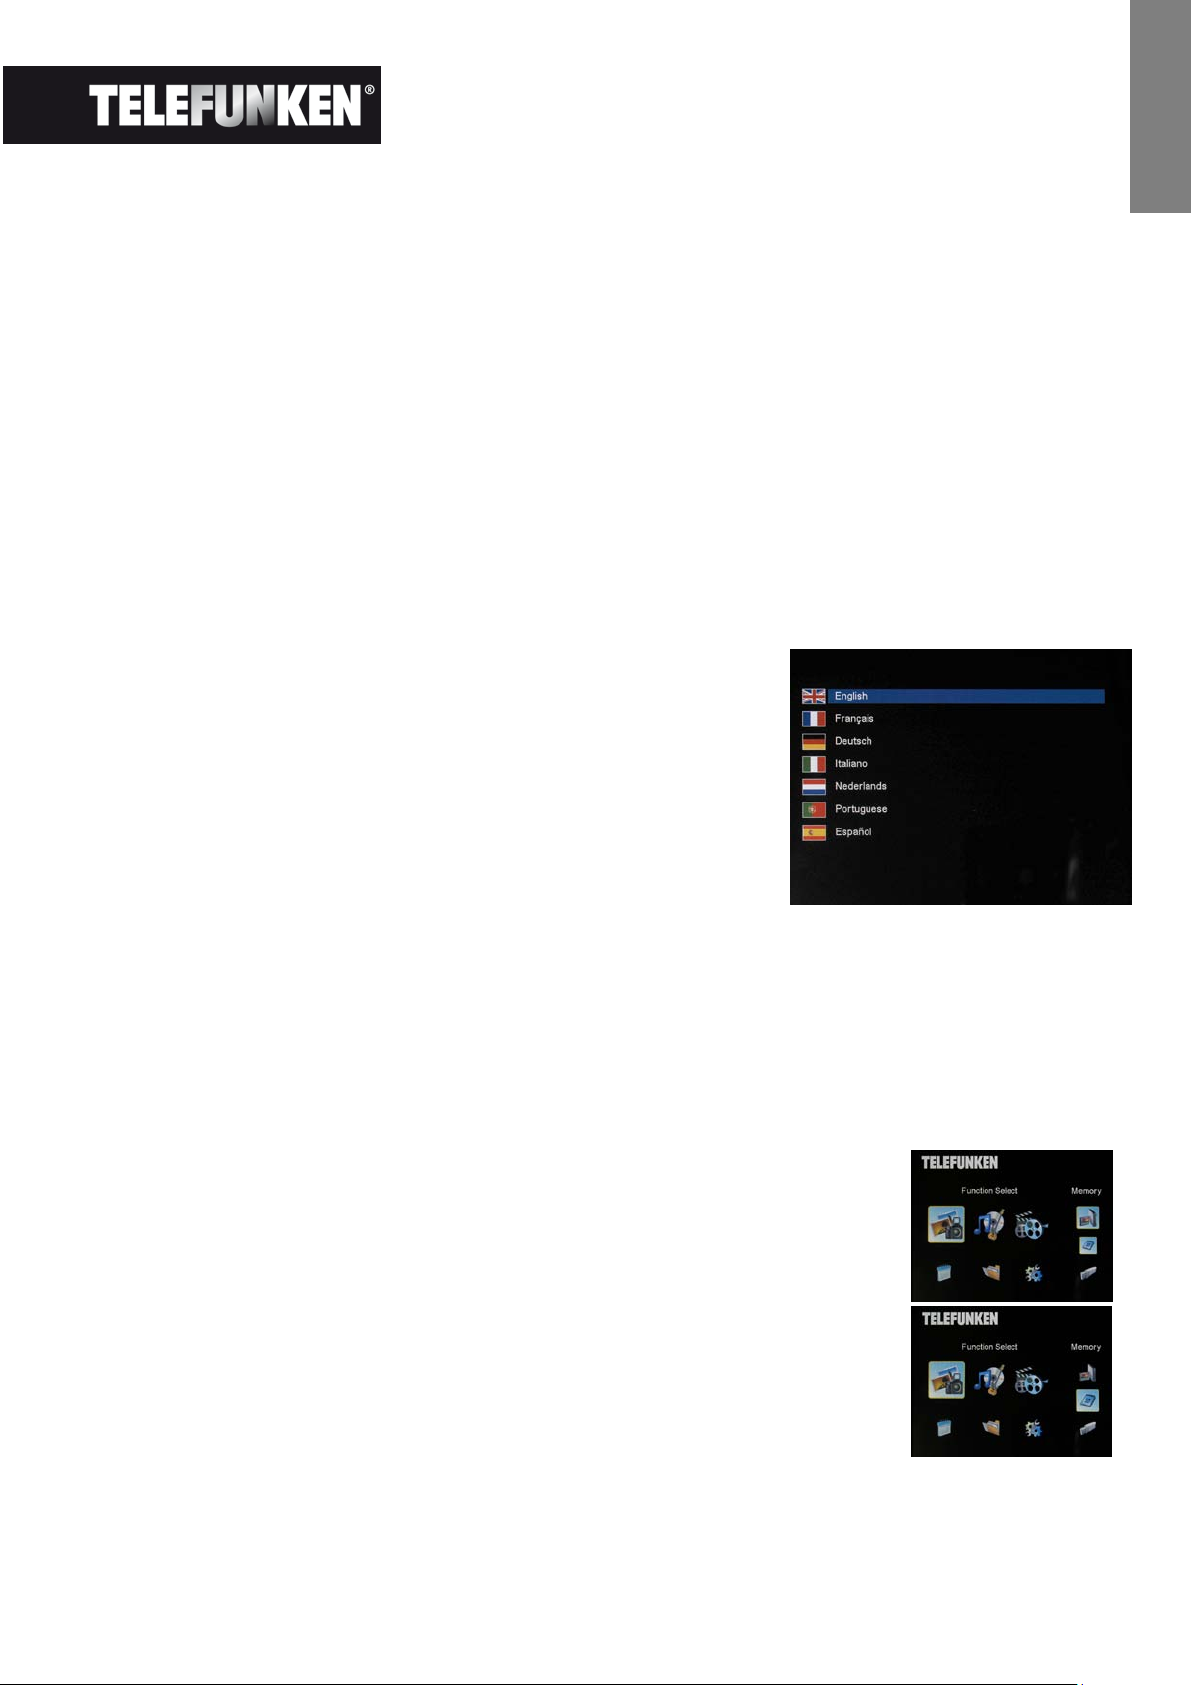
1. Selecting a language
During its first use, the frame will display an initial screen allowing
you to choose the language.
- Select your language using the arrow keys on the remote
control, then press "ENTER".
Once you have selected your language, your frame will begin to
read the photos contained in its internal memory.
2. Reading a memory card or a USB key
If your frame is off:
- Insert your card or USB key in the space provided.
- Switch on your frame: The slideshow will automatically play the contents of your memory card
or USB key.
If your frame is on:
- Press the "Exit" key on your remote as many times as necessary for the
mode selection screen to come up
- Using the “Up /Down” keys on your remote, select the card or key you
want to read (The top icon for internal memory, or the icons for memory
card or USB key)
Press the “Enter” key on your remote to confirm your choice, then the
“Slideshow” key to launch the slideshow.
If your media (memory card, USB key or built-in memory) contains music and if
you want to play a musical slideshow, press the ”Enter” key during the
slideshow. The digital frame will display “Slide with music”.
3
Non contractual document subject to change in case of typographical errors (Mktg0609)
ENGLISH
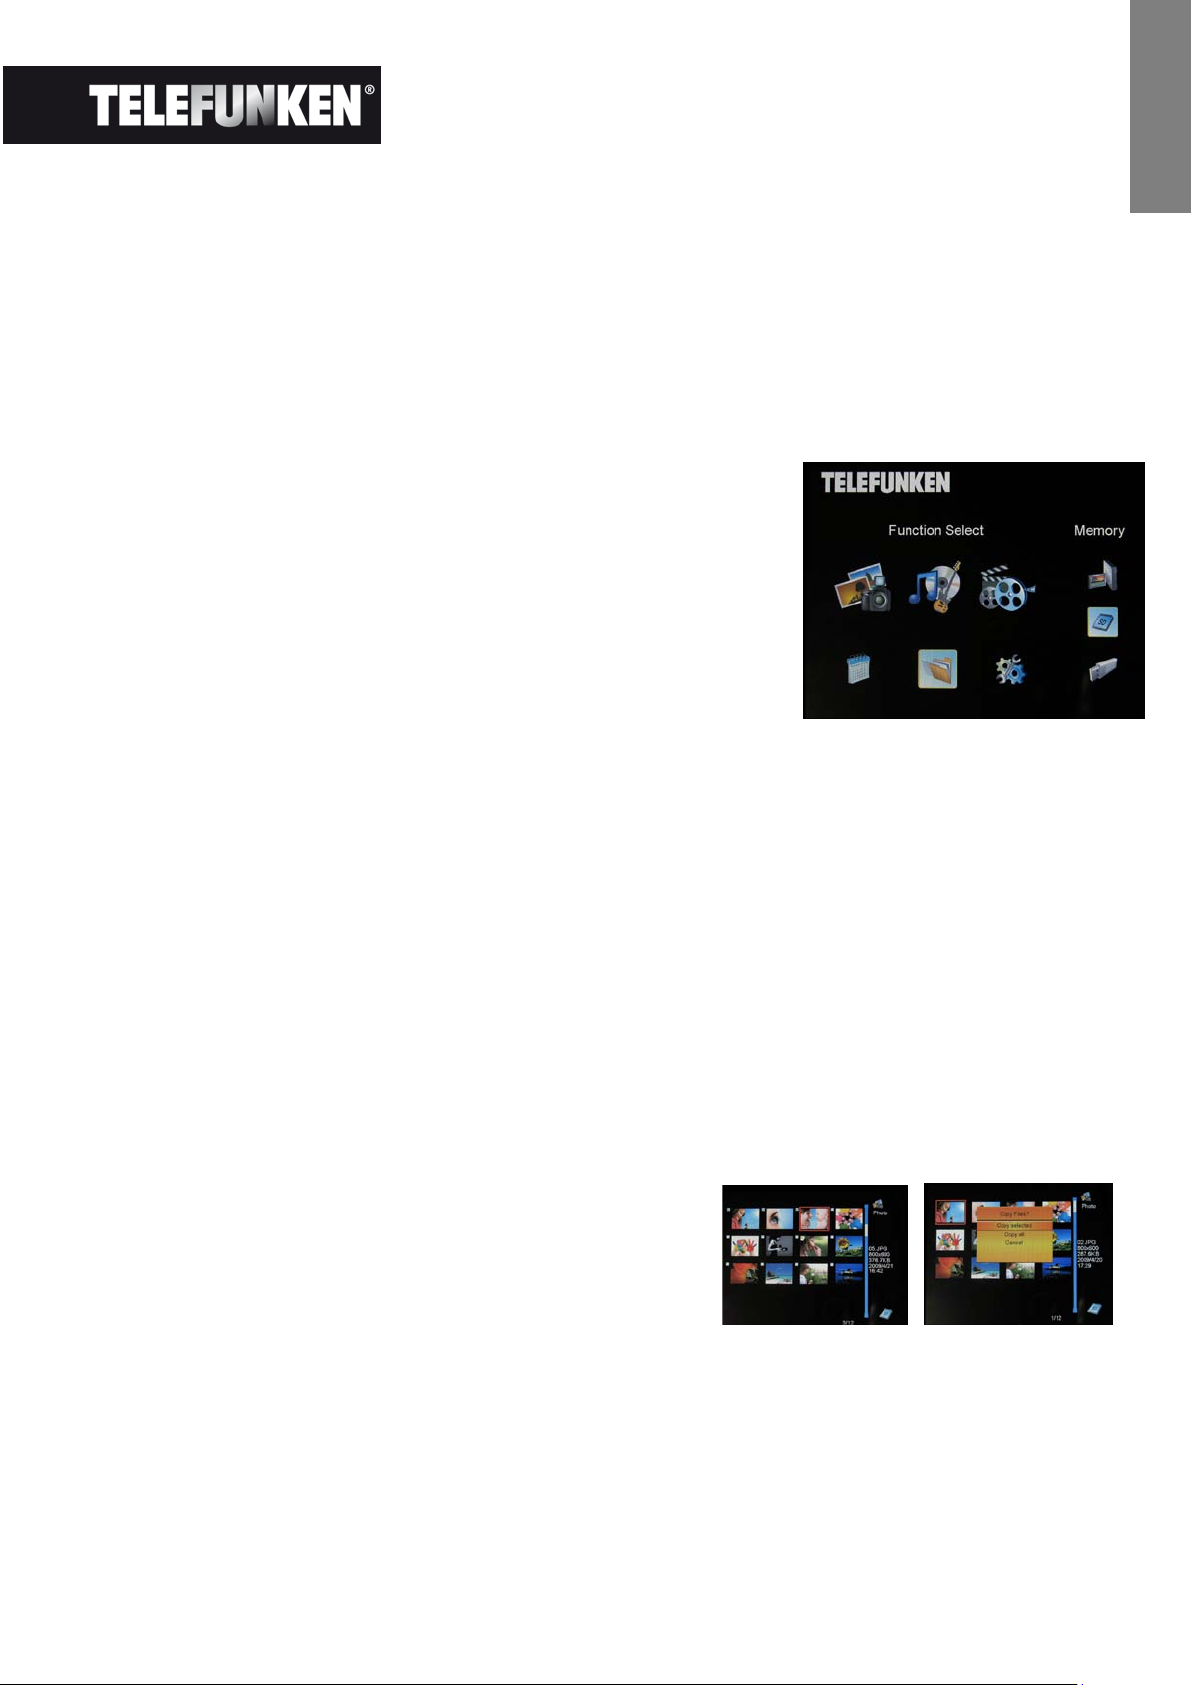
3. Copying photos to the internal memory
There are two methods for copying images from your memory card to the frame's internal memory.
- Copy your photos from the file manager
If you use this method, you can only copy files one at a time, and you will not be able to resize them to
the frame's resolution.
- Press the "Exit" key on your remote as many times as necessary for the mode selection screen
to come up .
- Using the "Left/Right" keys on the remote, select the "Files"
icon and press "Enter".
- Select the photo (or music or video file for versions 7911,
7331, 9331 & 10331) using the "Up/Down" keys on the
remote, and press the "Copy/Del" key. The screen will
display "Copy file? YES/NO". Choose the desired option and
press "Enter". Your file has been copied.
- Copy your photos from the thumbnail mode
Using this method, you can copy all or a selection of photos, with the ability to resize them to the
frame's resolution in order to optimize internal memory capacity.
1. Press the "Exit" key on your remote as many times as necessary for the mode selection screen
to come up.
2. Select the removable medium (memory card or USB key) storing the photos to be copied using
the "Up/Down" keys on the remote. Press "Enter".
3. Using the "Left/Right" keys, select photo mode and press "Enter". The slideshow will then
launch.
4. Press the "Exit" key on the remote to access the thumbnails.
5. Press the "Copy/Del" key. The screen will display "Copy files?" Select "Yes" and press
"Enter".
6. The thumbnails will again be displayed, with a small
white square in the upper right corner of each. Select
the photos to be copied using the "Left/Right -
Up/Down" keys on the remote, pressing "Enter" for
each photo you wish to select. The small white
square then shows a tick mark for each image you select. (If you choose “Copy all”, all the
white squares show a tick mark)
4
Non contractual document subject to change in case of typographical errors (Mktg0609)
ENGLISH
7. Press the "Copy/Del" key. Next, select the directory into which you
want to copy your images, then press "Enter"
8. The screen will show a dialog box asking you if you want to resize your
images. (To automatically resize all your photos without passing through
this screen, see p. 9.)
9. Select the desired option using the "Up/Down" keys on the remote and
confirm the choice by selecting "Confirm". Press "Enter". Your photos
are now copied into the internal memory and sized to the frame's
resolution
4. Deleting photos
You can delete photos that are in your frame's internal memory.
- Delete your photos from the file manager
If you use this method, you can only delete one file at a time.
1. Press the "Exit" key on your remote as many times as
necessary for the mode selection screen to come up
2. Using the "Left/Right" keys on the remote, select the "Files"
icon and press "Enter".
3. Select the photo (or music or video file for versions 7911,
7331, 9331, 10331) using the "Up/Down" keys on the remote,
and press the "Copy/Del" key. The screen will display
"Delete file? YES/NO". Choose the desired option and press
"Enter". Your file has been deleted.
- Delete your photos from the thumbnail mode
With this method, you can delete all or a selection of photos in the internal memory.
1. Press the "Exit" key on your remote as many times as necessary for the mode selection screen
to come up.
2. Select the internal memory using the "Up/Down" keys on the remote. Press "Enter".
3. Using the "Left/Right" keys, select the photo mode and press "Enter". The slideshow will then
launch.
4. Press the "Exit" key on the remote to access the
thumbnails.
5. Press the "Copy/Del" key. The screen will display
"Delete?" Select "Yes" and press "Enter".
6. The thumbnails will again be displayed, with a small
white square in the upper right corner of each. Select the photos to be
5
Non contractual document subject to change in case of typographical errors (Mktg0609)

ENGLISH
copied using the "Left/Right - Up/Down" keys on the remote, pressing "Enter" for each photo
you wish to select. The small white square then shows a tick mark for each image you select. (If
you choose “Delete all”, all the white squares show a tick mark)
7. Press the "Copy/Del" key, then press "Enter".
8. The screen will display "Delete?"
9. Select the desired option using the "Up/Down" keys on the remote.
Press "Enter". Your photos have now been deleted from the internal
memory
III. Selecting the type of files to play
1. Photos
- Press the "Exit" key twice to display the main screen.
- Using the "Left/Right" arrows on the remote, select the "Photo"
icon.
- Press the "Enter" key: playing will begin.
2. Videos (only on DPF 7911, DPF 7331, DPF 9331, DPF 10331)
- Press the "Exit" key twice to display the main screen.
- Using the "Left/Right" arrows on the remote, select the "Video"
icon.
- Press the "Enter" key: playing will begin.
- Press the "Right" arrow key once to fast forward, then press a
second time to return to play mode.
- Press the "Left" arrow key once to rewind, then press a second time
to return to play mode.
- Press the "Enter" key to pause playback, and press a second time to resume.
- Press the "Vol +" or "Vol -" keys to adjust the sound level.
3. Music (only on DPF 7911, DPF 7331, DPF 9331, DPF 10331)
- Press the "Exit" key twice to display the main screen.
- Using the "Left/Right" arrows on the remote, select the "Music"
icon.
- Press the "Enter" key: playing will begin.
- Press the "Enter" key to pause playback, and press a second time
to resume.
- Press the "Vol +" or "Vol -" keys to adjust the sound level.
6
Non contractual document subject to change in case of typographical errors (Mktg0609)

ENGLISH
- You can change the various musical effects (see p. 12) by pressing the "Rotate" key on the
remote.
- You an also change the different playback modes (see p. 12) by pressing the "Zoom" key on
your remote.
NORM.: Play once
• : Repeat once
• : Loop
: Random play
IV. Settings
On the main screen, select the "Settings" icon using the
"Left/Right" and "Up/Down" keys on your remote to access the
different settings for your frame.
If you wish, you can also access the settings menu by simply
pressing the "Setup" key on your remote.
When you are in the settings menus, the "Up/Down" keys on the
remote allow you to select the parameter to adjust, and the
"Left/Right" keys allow you to choose the appropriate setting for
the selected parameter.
1. Photo settings
In order to access this menu, select the "Photo settings" option using the "Up/Down" keys on the
remote, then press "Enter". The screen to the right will appear:
You will then be able to change settings using the arrow keys on
the remote:
- Display mode
Select the "Display mode" option onscreen using the
"Up/Down" keys on the remote, then use the "Right/Left" keys
to choose:
. Slideshow: images scroll by one after the other
. Thumbnails: the images display as thumbnails. (Note: When
your frame is in this mode, you can access slideshow or single display by pressing the "Enter" key
once.)
. Single: A single photo displays
7
Non contractual document subject to change in case of typographical errors (Mktg0609)

ENGLISH
- Display ratio
Select the "Display ratio" option onscreen using the "Up/Down" keys on the remote, then use the
"Right/Left" keys to choose:
. Fit screen: the photo remains in its original format (a 4:3 photo in a 16:9 frame will leave 2 black
spaces along the sides).
. Crop for full-screen: the photo is centred and cropped accordingly to occupy the entire screen.
. Full-screen: the photo is altered in order to occupy the full screen.
- Duration of slideshow
Select the "Image display time" option onscreen using the "Up/Down" keys on the remote, then use
the "Right/Left" keys to choose:
. 5 s
. 15 s
. 30 s
. 60 s
. 5 min
. 15 min
- Slideshow loop
Select the "Repeat slideshow" option onscreen using the "Up/Down" keys on the remote, then use the
"Right/Left" keys to choose:
. Once: the slideshow is played once.
. Repeat: the slideshow plays in a loop.
- Transition effects
Select the "Transition effects" option onscreen using the "Up/Down" keys on the remote, then use the
"Right/Left" keys to choose from the following effects:
. Random, Snake, Partition, Eraser, Blinds, Random lines, Grid, Cross-fade, Spiral, Close.
- Multiple display
This mode lets you display several images simultaneously (2, 3 or 4 images depending on their
orientation).
Select the "Multiple display" option onscreen using the "Up/Down" keys on the remote, then use the
"Right/Left" keys to choose:
. Off
. On
- Clock
Activating this function lets you display the time in the upper left corner of your frame during the
slideshow.
Select the "Clock" option onscreen using the "Up/Down" keys on the remote, then use the
"Right/Left" keys to choose:
. Off
. On
8
Non contractual document subject to change in case of typographical errors (Mktg0609)

ENGLISH
- Image resizing
This option lets you resize your images to the resolution of the frame (480 x 234 for
DPF 7901 and DPF 7911; 800 x 600 for DPF 7321, DPF 7331, DPF 9321, DPF 9331 and DPF 10331).
Resizing optimises internal memory space so you can store over 10,000 images in the internal memory
without losing visual quality.
(For example: a 5-megapixel image occupying 1.5 MB will now only take up approximately 80 K after
resizing.)
Select the "Resizing" option onscreen using the "Up/Down" keys on the remote, then use the
"Right/Left" keys to choose:
. Off
. On
- Automatic cropping
If your images are not in a format proportional to your picture frame, black spaces will appear at the top
and bottom of your 4:3 frame (if your images are 16:9 or 3:2), or along the sides for your 16:9 frame (if
your images are 4:3).
If you have activated resizing, you can activate the automatic cropping function when you copy images
to your frame in order to display your images without distortion or blank spaces.
Select the "Crop while copying" option onscreen using the "Up/Down" keys on the remote, then use
the "Right/Left" keys to choose:
. Off
. On
- Automatic resizing
If image resizing is activated, by default a screen asking if you want to resize your images will appear
when you copy them. Automatic resizing mode will allow the frame to resize all your images without
passing through this selection screen. As a result, all your images will be resized without your
intervention.
Select the "Indicate process while copying" option onscreen using the "Up/Down" keys on the remote,
then use the "Right/Left" keys to choose:
. Off
. On
2. Calendar settings
If you want to display the calendar on your frame, press the "Exit" key on
your remote as many times as necessary to display the mode selection
screen. Use the "Right/Left" keys to select the calendar icon and press
"Enter".
9
Non contractual document subject to change in case of typographical errors (Mktg0609)

ENGLISH
When you are in the settings menu, select the line using the "Up/Down"
keys on the remote in order to access this menu and press "Enter".
You can then make adjustments using the remote's arrow keys:
- Calendar display mode
This mode allows you to display:
. A monthly calendar
. A daily calendar
. A clock
In the calendar display modes, slideshow images scroll to the side.
In clock mode, only the time and date are displayed.
Select the "Display mode" option onscreen using the "Up/Down" keys on the remote, then use the
"Right/Left" keys to choose the mode desired.
- Date
Select the "Date" option onscreen using the "Up/Down" keys on the remote, then:
- Use the "Right/Left" keys to set the month
- Press the "Down" key to select day
- Press the "Right/Left" keys to set the day
- Press the "Down" key to select year
- Press the "Right/Left" keys to set the year
To return to the previous parameter, press the "Up" key on the remote.
- Time display mode (12- or 24-hour)
Select the "Clock mode" option onscreen using the "Up/Down" keys on the remote, then press the
"Right/Left" keys to choose 12- or 24-hr format.
- Time
Select the "Clock time" option onscreen using the "Up/Down" keys on the remote, then:
- Use the "Right/Left" keys to set the hour
- Press the "Down" key to select minutes
- Press the "Right/Left" keys to set the minutes
To return to the previous parameter, press the "Up" key on the remote.
- Alarm status
(only on DPF 7911, DPF 7331, DPF 9331, DPF 10331)
This setting lets you activate or disable the alarm.
Select the "Alarm status" option onscreen using the "Up/Down" keys on the remote, then press the
"Right/Left" keys to choose "On" or "Off".
10
Non contractual document subject to change in case of typographical errors (Mktg0609)

ENGLISH
- Alarm time
(only on DPF 7911, DPF 7331, DPF 9331, DPF 10331)
To set the time for the alarm, select the "Clock time" option onscreen using the "Up/Down" keys on
the remote, then:
- Use the "Right/Left" keys to set the hour
- Press the "Down" key to select minutes
- Press the "Right/Left" keys to set the minutes
To return to the previous parameter, press the "Up" key on the remote.
- Alarm frequency
(only on DPF 7911, DPF 7331, DPF 9331, DPF 10331)
Select the "Alarm frequency" option onscreen using the "Up/Down" keys on the remote, then press the
"Right/Left" keys to choose:
. Once
. Everyday
. Monday-Friday
. Weekend
3. Video settings (only on DPF 7911, DPF 7331, DPF 9331, DPF 10331)
In the settings menu, select the "Video settings" line using the "Up/Down"
keys on your remote and press "Enter".
In this menu you can choose:
- Display mode
Select the "Display mode" option onscreen using the "Up/Down" keys on
the remote, then press the "Right/Left" keys to choose:
. Original dimensions: your video will display in its original format
. Full-screen: your video will display in 4:3 for DPF models 7331, 9321 and 10331, or in 16:9 for DPF
models 7901 and 7911
- Playback mode
Select the "Playback mode" option onscreen using the "Up/Down" keys on the remote, then press the
"Right/Left" keys to choose:
. Once: your video will only play once
. Repeat: your video will play in a loop
- Automatic play
Activating automatic play lets you play your video files automatically, as soon as video mode is
selected.
11
Non contractual document subject to change in case of typographical errors (Mktg0609)

ENGLISH
Select the "Automatic play" option onscreen using the "Up/Down" keys on the remote, then press the
"Right/Left" keys to choose:
. On
. Off
4. Music settings (only on DPF 7911, DPF 7331, DPF 9331, DPF 10331)
In the settings menu, select the "Music settings" line using the "Up/Down" keys on your remote, and
then press "Enter".
You can set:
- Playback mode
Select the "Playback mode" option onscreen using the "Up/Down" keys on
the remote, then press the "Right/Left" keys to choose:
. Once: each piece will only play once
. Repeat once: each piece will play twice
. Repeat: the pieces will play in a loop
. Random: the pieces will play randomly
- Musical effects
Your TELEFUNKEN frame has an equalizer to adapt the sound to the type of music being listened to.
Select the "Equalizer" option onscreen using the "Up/Down" keys on the remote, then press the
"Right/Left" keys to choose:
. Normal
. Rock
. Pop
. Classical
. Mellow
. Jazz
- Equalizer display during playback
When playing a music file, you can display the equalizer on the screen of your TELEFUNKEN frame.
Select the "Equalizer" option onscreen using the "Up/Down" keys on the remote, then press the
"Right/Left" keys to choose:
. On
. Off
- Automatic play
Activating automatic play lets you play your audio files automatically, as
soon as audio mode is selected.
Select the "Automatic play" option onscreen using the "Up/Down" keys on the remote, then press the
"Right/Left" keys to choose:
. On
. Off
12
Non contractual document subject to change in case of typographical errors (Mktg0609)

ENGLISH
5. System settings
This menu allows you to set the operating parameters of your frame.
- Language
You can change the operating language for your frame at any time in this
menu.
Select the "Language" option onscreen using the "Up/Down" keys on the
remote, then press the "Right/Left" keys to choose:
. French
. German
. Italian
. Dutch
. Portuguese
. Spanish
. English
- Brightness
Select the "Brightness" option onscreen using the "Up/Down" keys on the remote, then press the
"Right/Left" keys to adjust the brightness.
- Contrast
Select the "Contrast" option onscreen using the "Up/Down" keys on the remote, then press the
"Right/Left" keys to adjust the contrast.
- Colour saturation
Select the "Saturation" option onscreen using the "Up/Down" keys on the remote, then press the
"Right/Left" keys to adjust the saturation.
- Tint
Select the "Tint" option onscreen using the "Up/Down" keys on the remote, then press the
"Right/Left" keys to adjust the tint.
- Programmed automatic start-up
This setting lets you activate or disable programmed automatic start-up for your TELEFUNKEN frame.
Select the "Start-up" option onscreen using the "Up/Down" keys on the remote, then press the
"Right/Left" keys to choose:
. On
. Off
- Programmed start-up time
Select the "Automatic start-up time" option onscreen using the "Up/Down" keys on the remote, then:
- Press the "Right/Left" keys to set the hour
- Press the "Down" key to select minutes
13
Non contractual document subject to change in case of typographical errors (Mktg0609)

ENGLISH
- Press the "Right/Left" keys to set the minutes
Press the "Up" key to go back.
- Programmed automatic shutdown
This setting lets you activate or disable programmed shutdown for your TELEFUNKEN frame.
Select the "Shutdown" option onscreen using the "Up/Down" keys on the remote, then press the
"Right/Left" keys to choose:
. On
. Off
- Programmed automatic shutdown time
Select the "Automatic shutdown time" option onscreen using the "Up/Down" keys on the remote, then:
- Press the "Right/Left" keys to set the hour
- Press the "Down" key to select minutes
- Press the "Right/Left" keys to set the minutes
Press the "Up" key to go back.
- Frequency of automatic start-up and shutdown
Select the "Shutdown" option onscreen using the "Up/Down" keys on the remote, then press the
"Right/Left" keys to choose:
. Once
. Everyday
. Monday-Friday
. Weekend
- Rebooting your frame
If the frame is handled incorrectly, it may be useful to reset the frame to its default settings. To do so,
select the "Reset" option onscreen using the "Up/Down" keys on the remote, then press the "Enter"
key.
Note: After rebooting, the language selection screen will appear during the following start-up, just as it
did for its first use.
V. Connecting to a computer
It is possible to transfer files into the frame by connecting it to your personal computer. To do so,
connect your frame to the computer with a USB cable (mini-USB port on the frame, and standard
USB port for the computer), then turn on your frame: the frame's screen will show "PC connection..."
Return to normal operation after disconnecting
On your computer, the following dialog box will appear:
14
Non contractual document subject to change in case of typographical errors (Mktg0609)

ENGLISH
- Click "Open folder and display files" in order to view the contents of the internal memory.
The following screen will appear:
Open the directory storing the files you want to transfer to the frame, and place them in the desired
folder using "copy/paste" or "drag and drop".
Caution! Photos transferred in this way will not be resized.
- Disconnect the USB cable: your frame will restart automatically.
VI. Safety instructions
Handle the digital photo frame with care, and avoid touching the screen; fingerprints are difficult to
remove.
Always set the digital photo frame on a flat and stable surface to prevent it from falling and being
damaged.
Avoid exposing the digital photo frame to the sun or high temperatures, as these may damage the
frame or reduce its operational life. Do not place it near heat sources like radiators or space heaters. Do
not position the frame facing direct sunlight in order to avoid reflections.
Avoid exposing the digital photo frame to rain, water, or moisture. Do not place it in a sink or basin
where it may come in contact with water.
15
Non contractual document subject to change in case of typographical errors (Mktg0609)

ENGLISH
Never place heavy or sharp objects on the frame, the screen, or the frame's power supply.
Make sure not to plug the digital photo frame into an outlet or cord with a power supply that is too high.
This may cause overheating, a fire, or electrical shock.
Be careful of the location of the power cord; it must not be walked on or come in contact with other
objects. Do not place the cord under a rug. Regularly check the condition of the cord to prevent
damage. If the cord is damaged, unplug it and replace it.
Ventilation
The openings and spaces for memory cards allow the frame to vent.
To ensure optimal use of the frame and to prevent overheating, these openings must not be covered or
blocked.
Keep the digital frame at a sufficient distance from the wall to ensure it vents.
Do not place the digital photo frame on a bed or sofa so that it does not overheat. Caution!
Never remove the plastic cover on the back of the frame. The digital photo frame has electrical circuits
and you could be hurt if you touch them.
Do not try to repair the digital photo frame by yourself.
VII. Warranty
The warranty does not cover damage caused if you (or any unauthorized person) tried to repair the
frame.
If the frame is emitting smoke, noise, or an unusual smell, immediately turn it off and unplug it. Contact
your store.
If you do not use the digital frame for a while, make sure to unplug the power cord.
The warranty concerns the digital photo frame and does not include the accessories. The following are
considered accessories:
The power supply unit,
The remote control (according to model).
However, these accessories may be ordered from our technical division:
By email:
Warranty period
This digital frame is under warranty for 12 months. The warranty period begins on the date the frame is
purchased.
The warranty must be proven by presenting the original invoice or receipt on which the date and model
purchased appear.
Coverage
A defective digital frame must be returned complete to your distributor with an explanation.
If this digital frame presents a defect during the warranty period, the authorized After-Sales Service will
repair any defective component or manufacturing defect. The After-Sales Service will unilaterally decide
whether to repair or replace the digital frame, in part or in whole.
The initial purchase date will determine the starting date for the warranty period.
If the digital frame is repaired or exchanged by our After-Sales Service, the warranty period is not
extended.
assistance@sopeg.fr
16
Non contractual document subject to change in case of typographical errors (Mktg0609)
 Loading...