

Page 1

Page 2
User Manual: CH1700/7500/7600
Notice to Boat Manufacturer, Installer, and Boat Operator
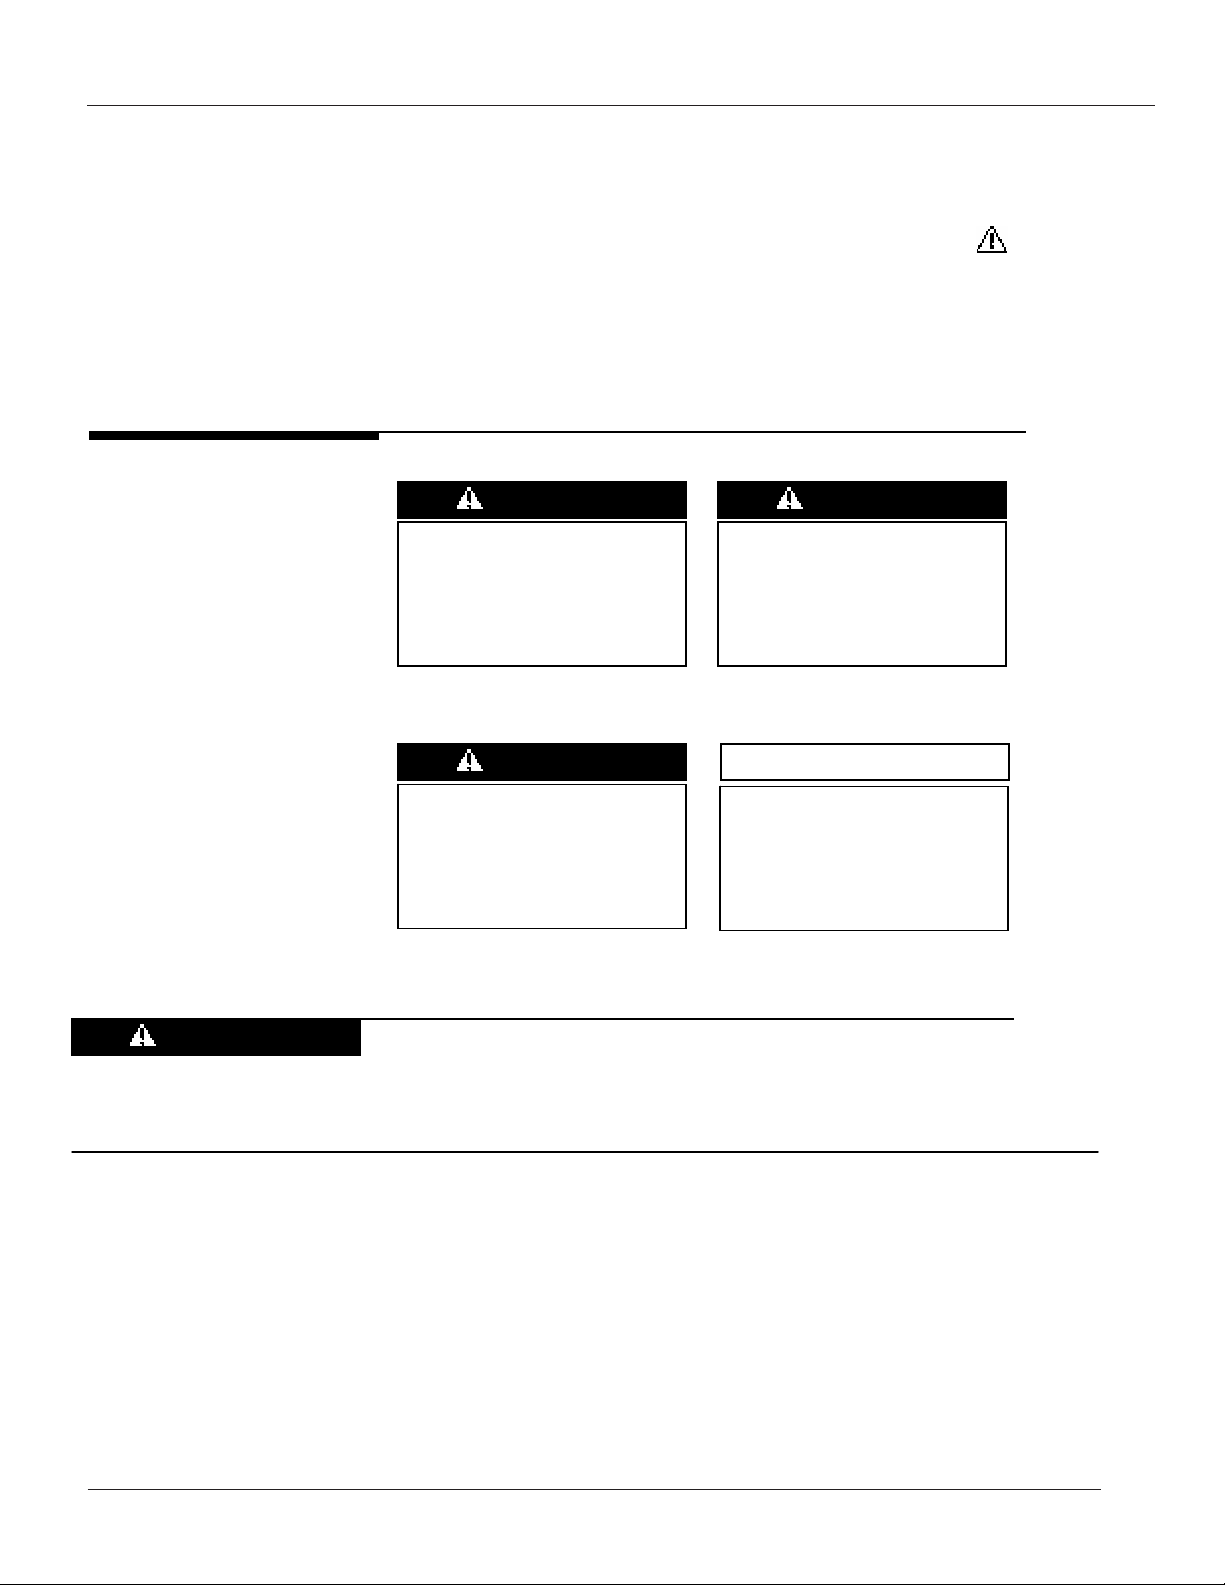
Throughout this manual, Warnings and Cautions (accompanied by the International Hazard Symbol ) are used
to alert the manufacturer or installer to special instructions concerning a particular service or operation that may
be hazardous if performed incorrectly or carelessly.
Warnings alone do not eliminate dangers, nor are they a substitute for safe boat handling and proper accident
prevention measures.
Observe these alerts carefully!
These “safety alerts” alone,
cannot eliminate the hazards
that they signal. Strict
compliance to these special
instructions when installing,
operating or performing
maintenance and using
common sense are the most
effective accident prevention
measures.
Immediate hazards which
DANGER
WILL result in severe
personal injury or death.
WARNING
Hazards or unsafe
practices which COULD
result in severe personal
injury or death.
NOTICE
to proper installation,
operation or maintenance,
but is not hazard-related.
For example:
CAUTION
CAUTION
Hazards or unsafe
practices which COULD
result in injury, product
and/or property damage.
Do not tighten cable hangers or clamps to the extent that
Information that is important
they crush or stress the cables in any way. Doing so may
impair the function of the cable.
The information contained in this manual is believed to be accurate at the time of going to print but no responsibility,
direct or consequential, can be accepted for damage resulting from the use of this information. The manufacturer
reserves the right to make changes, without notice, to any of its products.
ISCH7500_Rev2 (2)
Page 3
User Manual: CH1700/7500/7600
INTRODUCTION
This Teleflex Marine Control provides both shift and throttle operation for inboards, outboards, and
inboard/outboards.
We recommended the use of Teleflex TFXtreme™ engine cables.
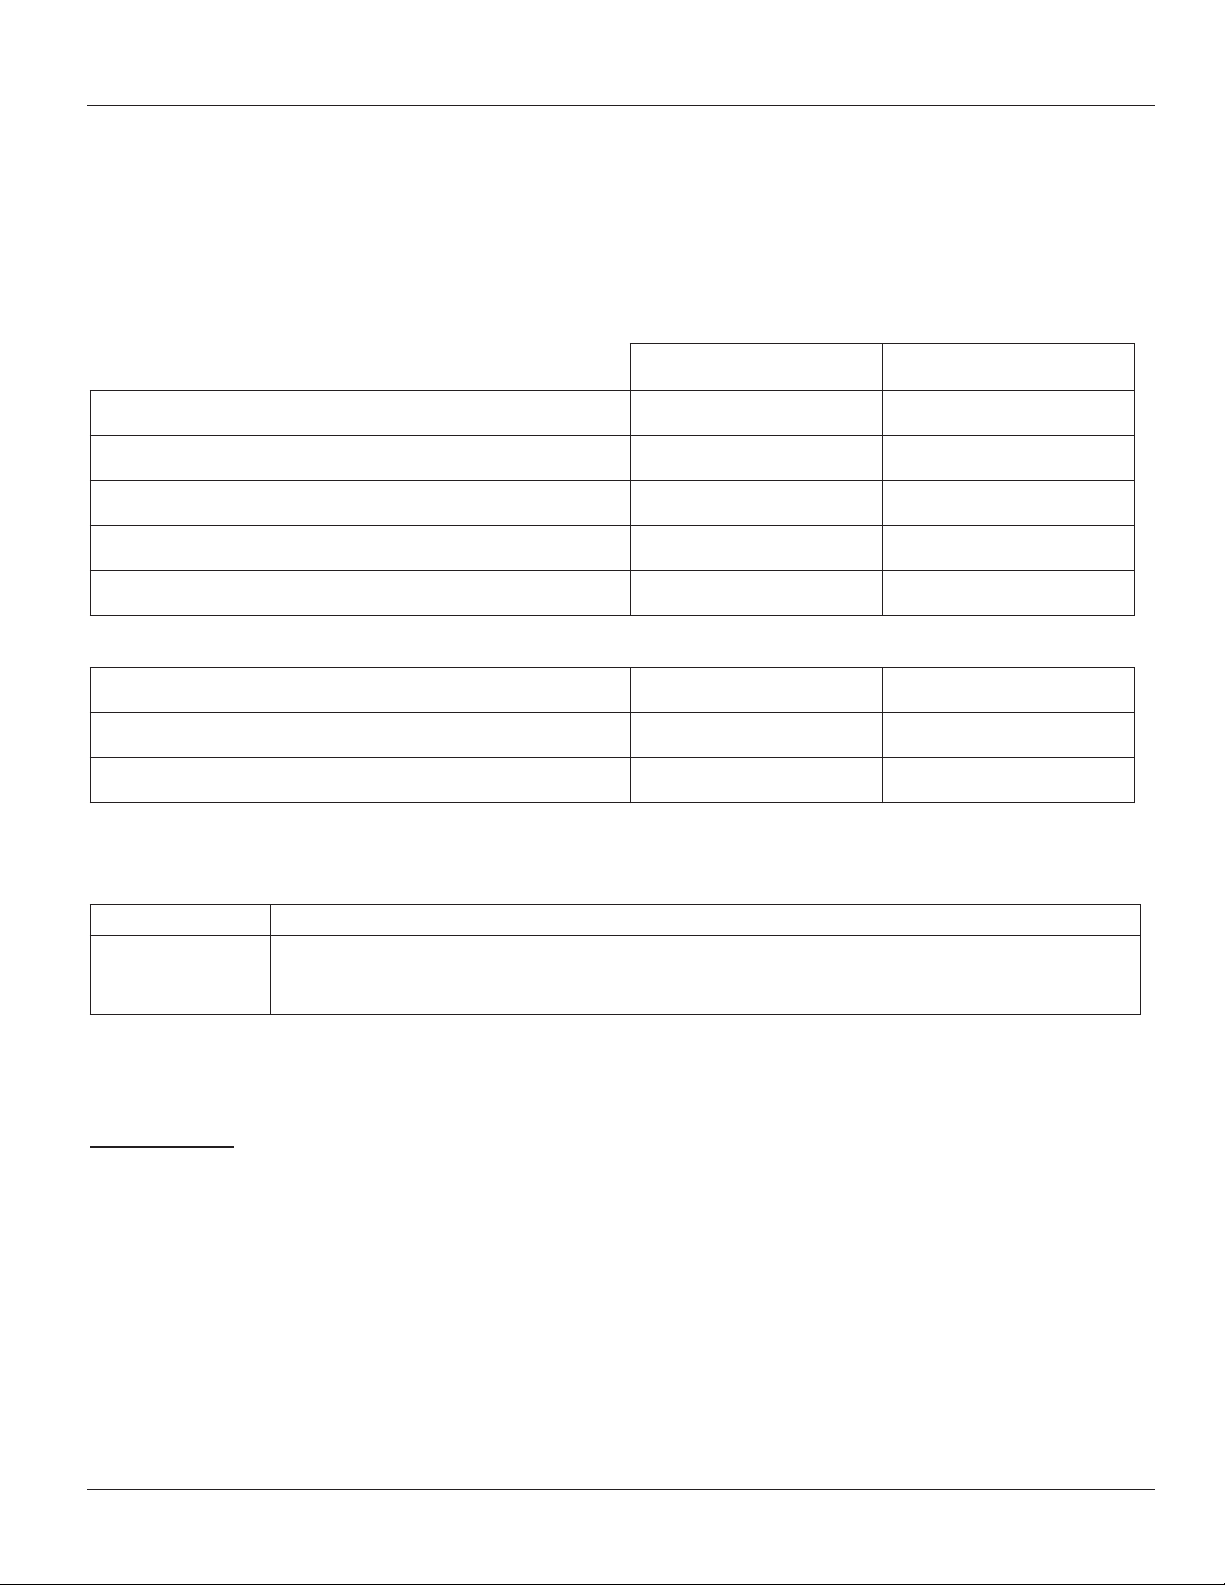
Control Features
Single Lever Shift and Throttle Operation
Neutral Throttle Warm-Up
Neutral Throttle Interlock
Neutral Safety Switch (to prevent starting in gear)
Friction Adjust Screw (to prevent throttle "creep")
Control Options
Trim Switch
Trim & Tilt Switch
Emergency Ignition Interrupt Switch & Lanyard
Other Parts Required for Installation
Quantity Part
2
Control Cables
Check section 2 of installation instructions for routing and length. Teleflex TFXtreme™ cables
are recommended.
Side Mount
CH1700
9
Top Mount
CH7500 / CH7600
9
99
9
9
9
Option Option
Option Option
Option
Option
9
9
n/a
Adaptability
Control Cable
This control will connect to ANY current 3300-/OEM-type control cable. A cable nest kit (also known as a
quick-connect adapter; part #212151-001), which mates to the engine’s shift and throttle cable, is included
with this control. Unique cable nests, which are required for Mercury Gen II Engines only, are included with
the control connection kit.
ISCH7500_Rev2 (3)
Page 4
Page 5
User Manual: CH1700/7500/7600
INSTALLATION
Section 1: Location of Control
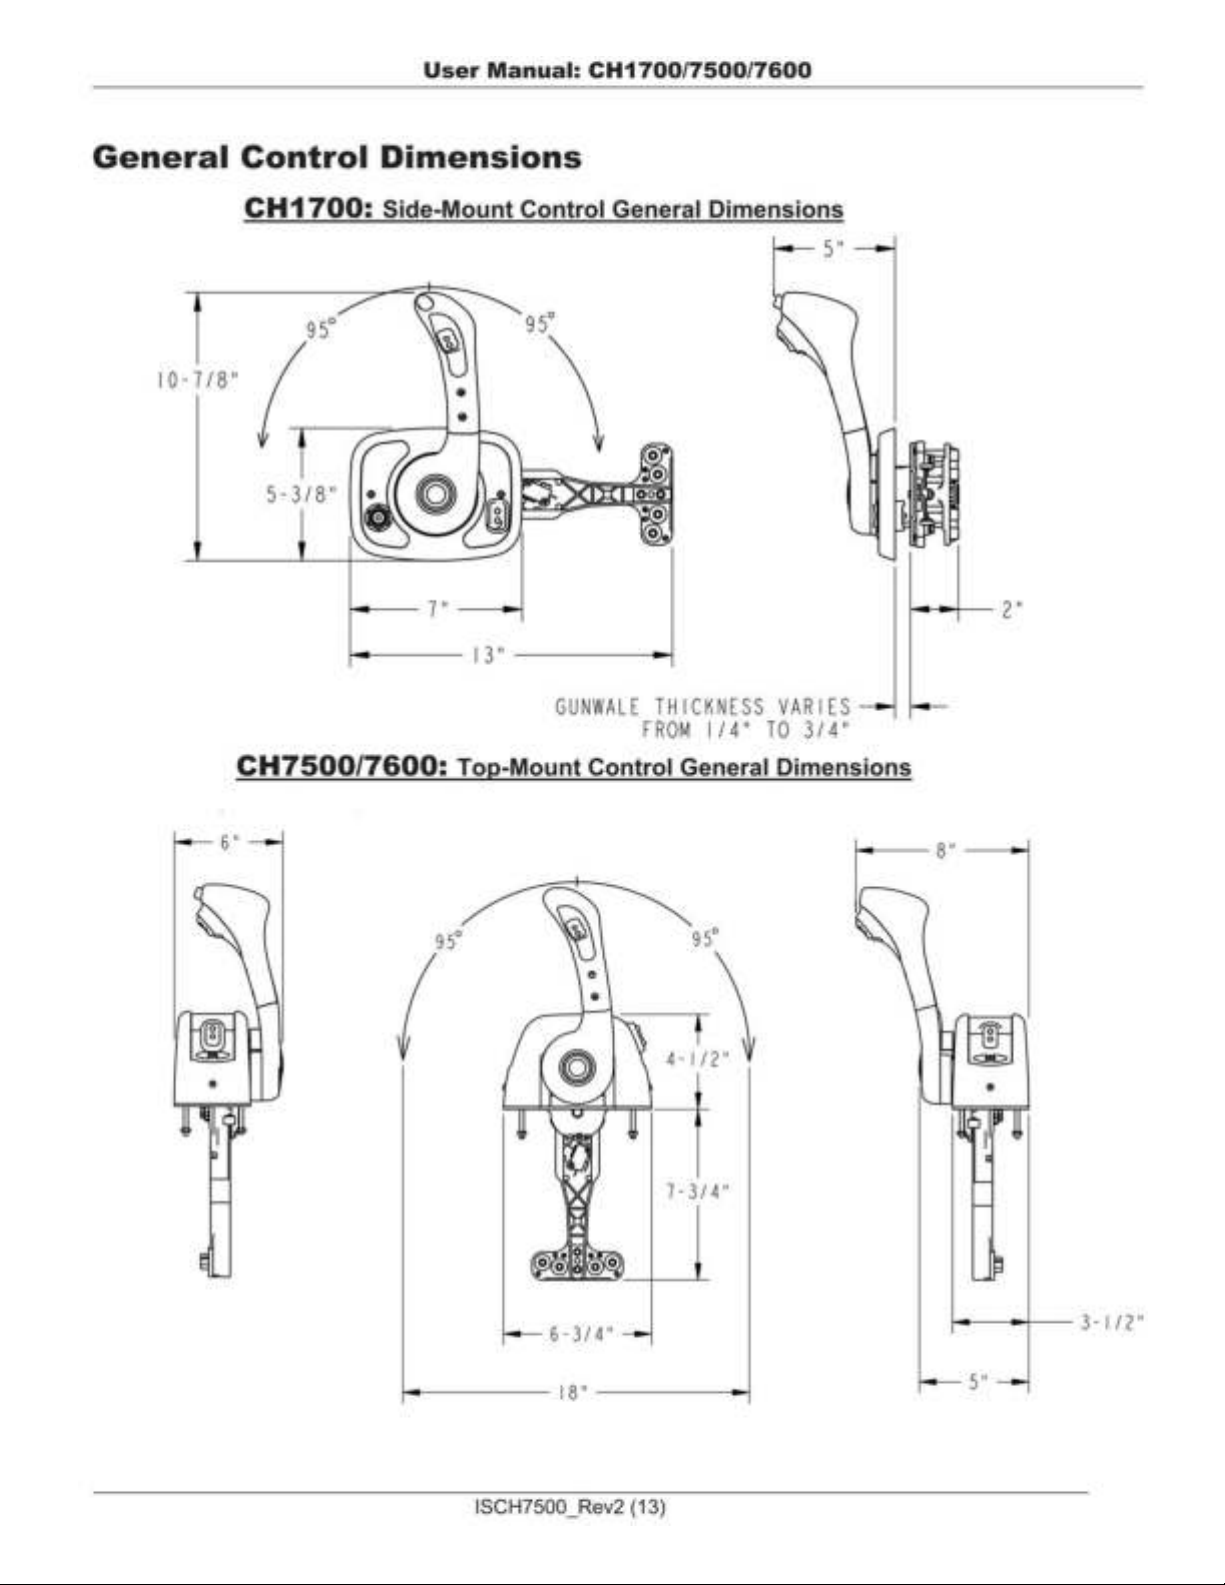
1.1 Allow adequate clearance for hand lever swing (forward and reverse positions).
1.2 Allow adequate clearance under the console or in the gunwale for the cables AND allow a minimum of 36”
from the cable nest connection with no restraint. When supporting the cables beyond 36”, do not tie or
clamp tightly.
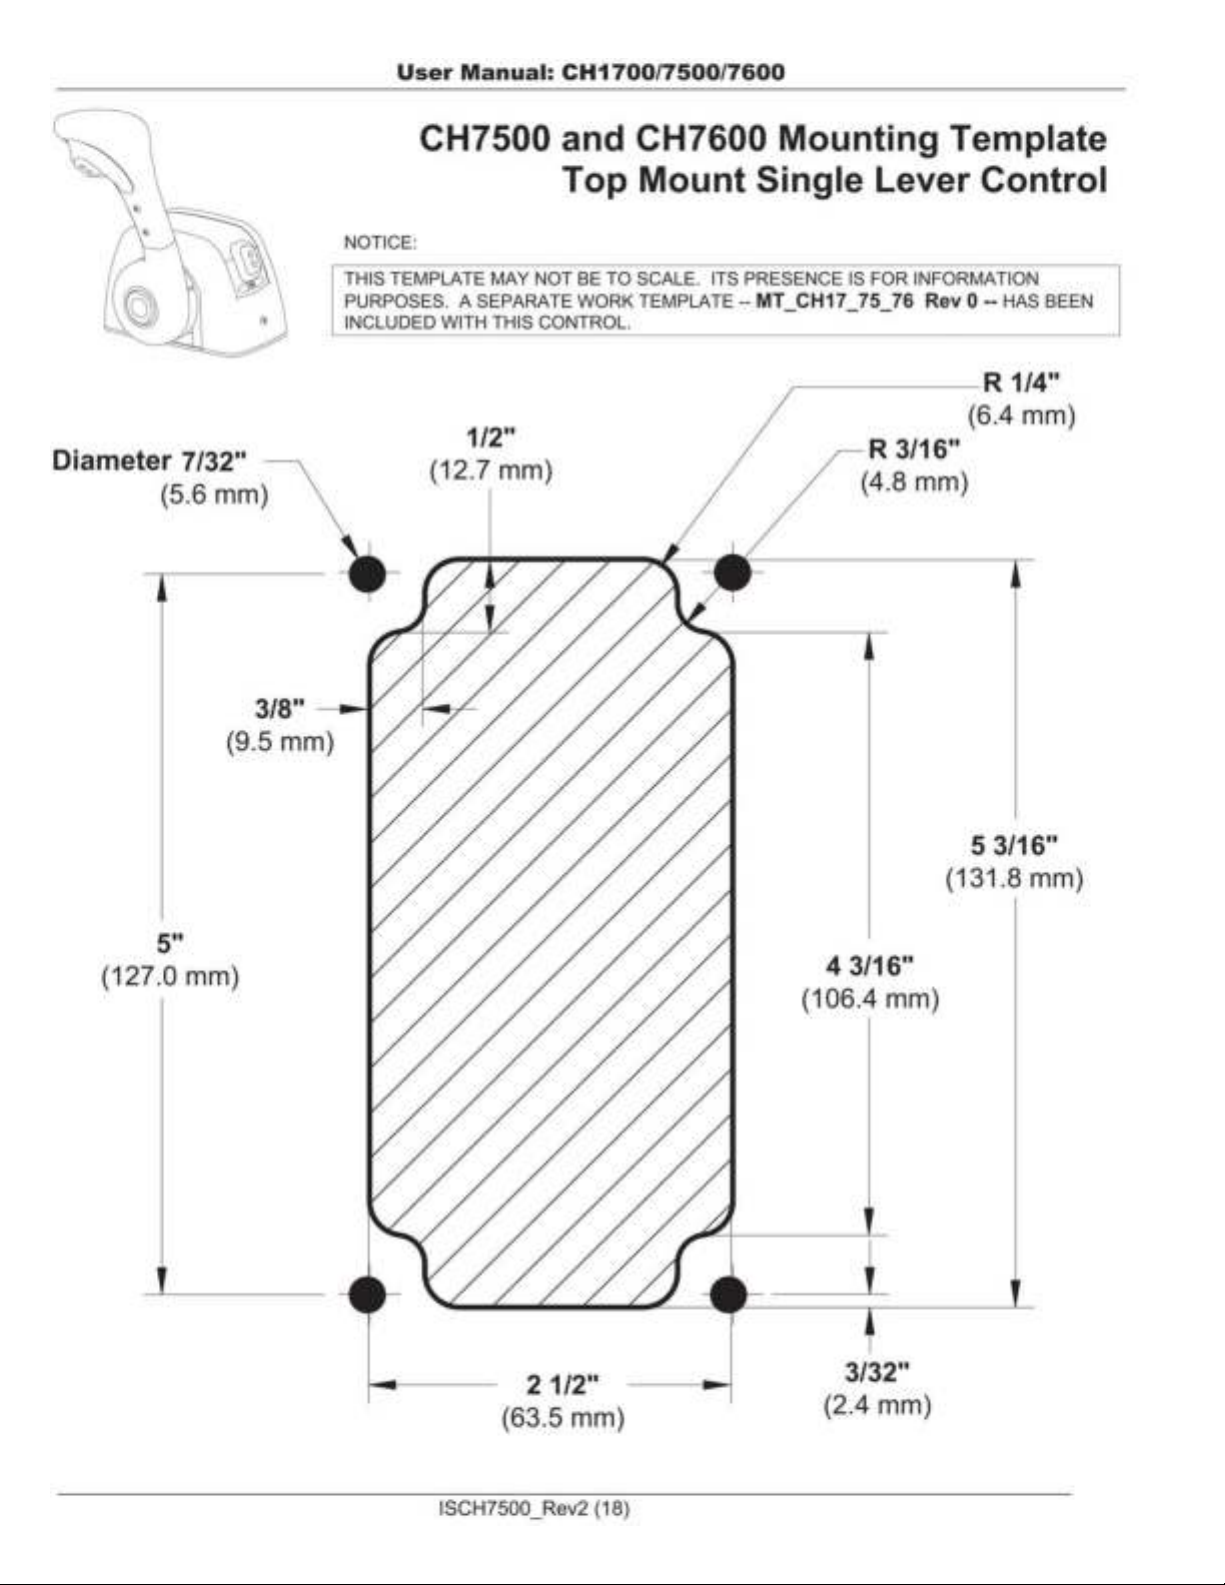
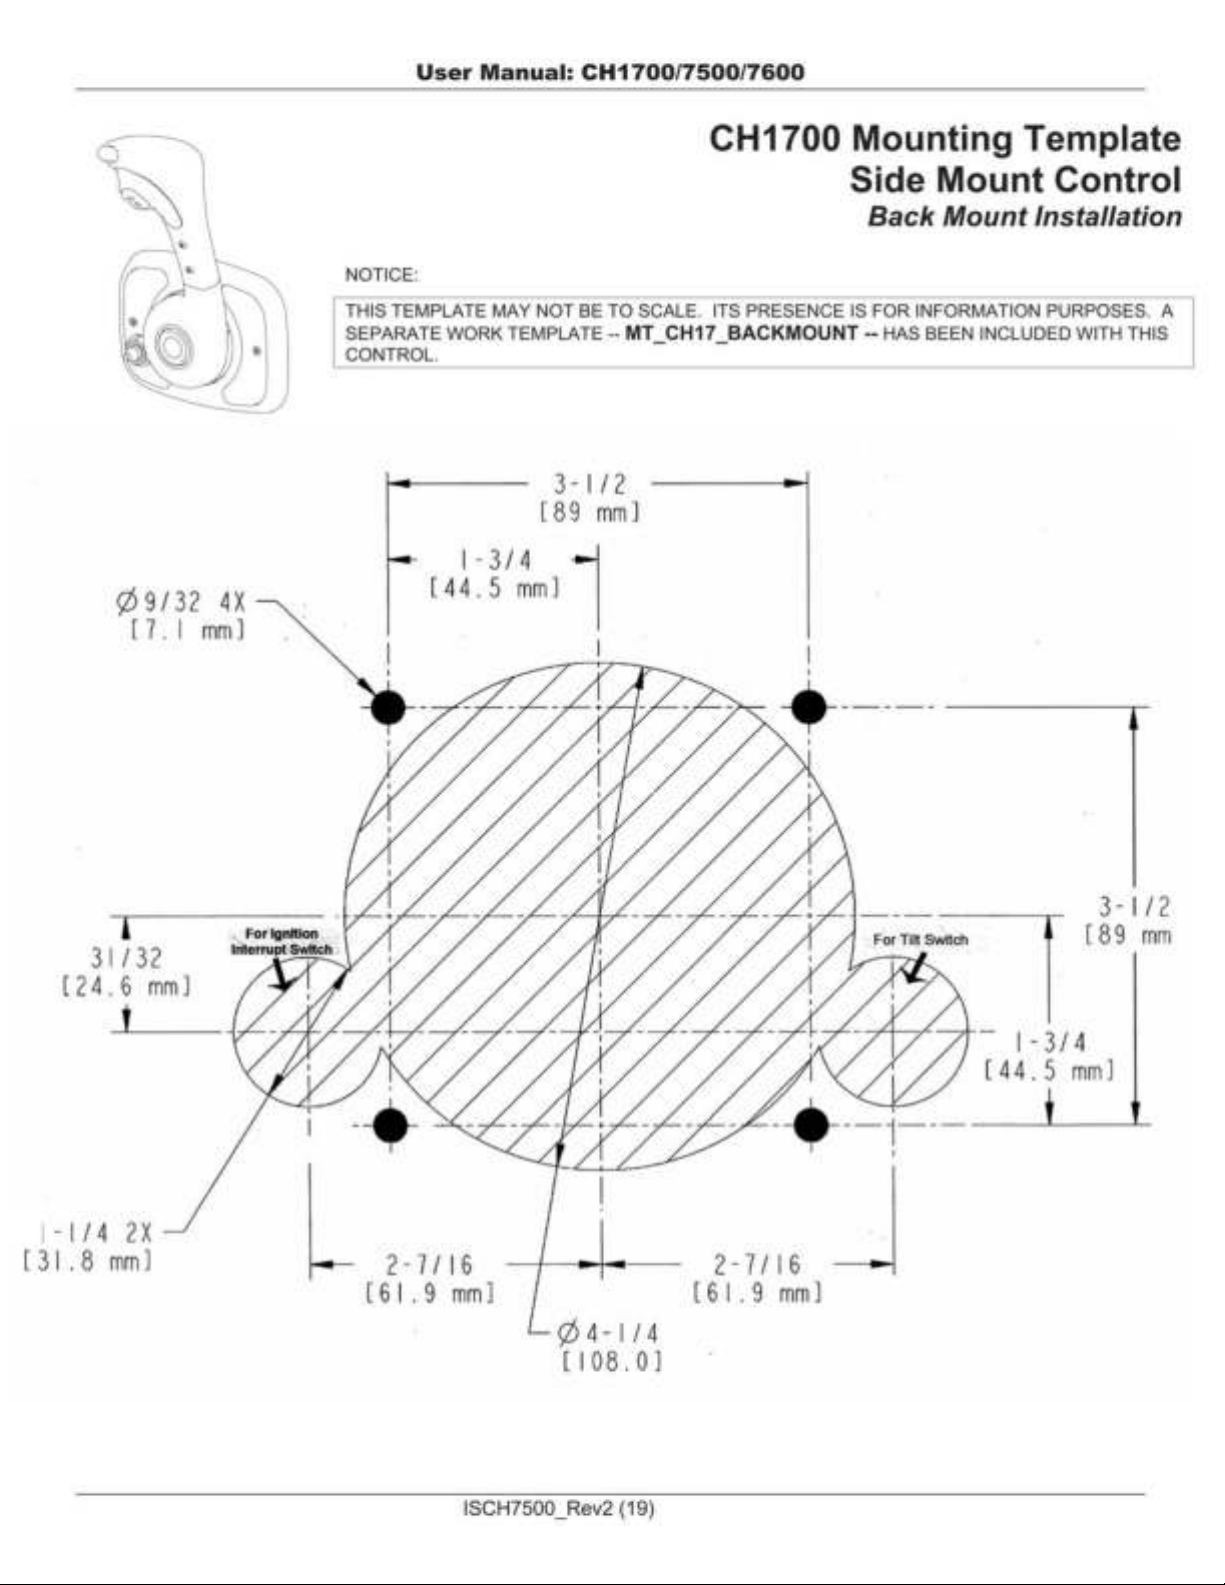
1.3 After a suitable location for the control is determined, use the separate mounting template.
1.4 Closely follow the instructions provided on the template. Cut & drill the mounting holes required.
On all models, the cover will have to be removed to expose the mounting holes.
Tools for Installation
Phillips head screwdrivers Power drill 5/8” or 16mm deep well socket
Standard slot screwdriver 7/32” & 17/64” drill bits Ratchet wrench
Saber saw 3/8” box end wrench
4¼ “ Hole Saw (optional) Multimeter (optional)
Section 2: Measuring the Cables
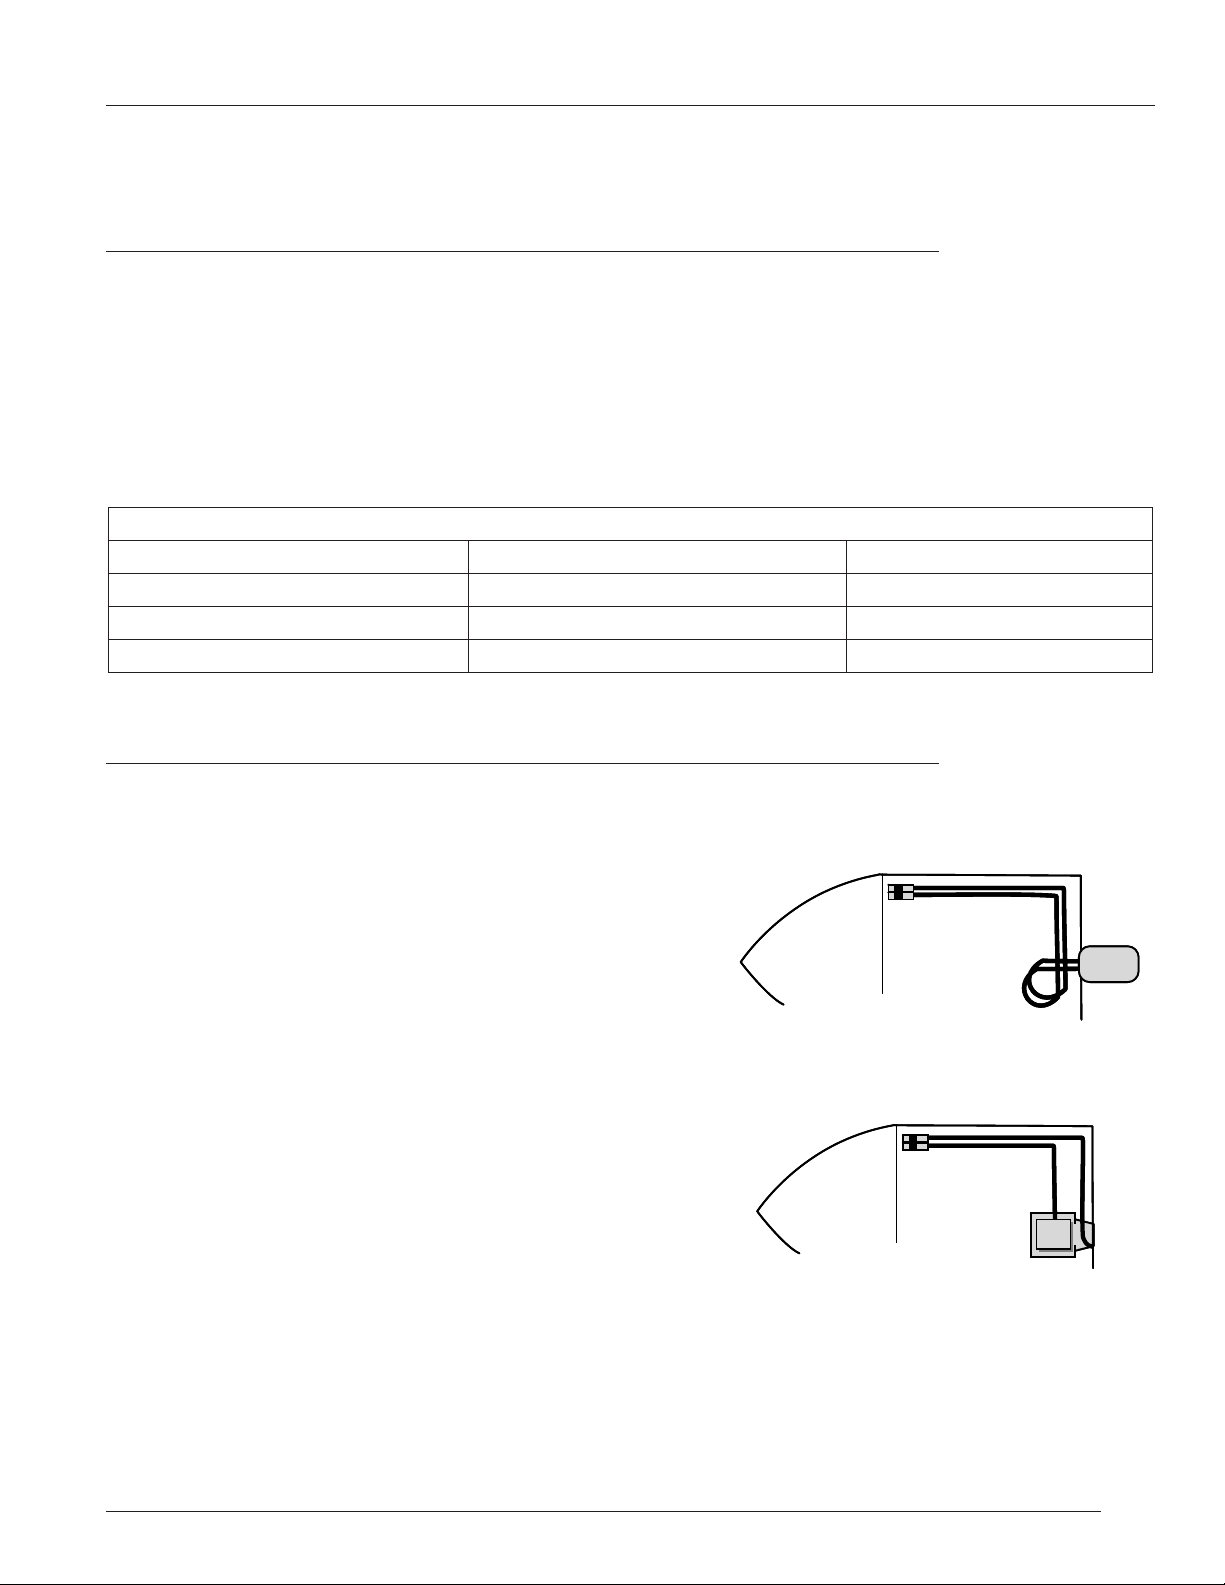
Measure the cable routing path from the control head connection to the engine connection.
Outboards:
Measure from the control connection -- along an unobstructed cable
routing --to the center of the outboard engine.
Add four (4) feet to the measurement to allow for a loop which
provides unrestricted engine movement. Round UP to the next
whole foot and order the required cable part number.
(Last two digits of the Teleflex cable number equal the length of the
cable in feet.)
Inboards & Stern Drives:
Measure from the control connection -- along an unobstructed cable
routing -- to the SHIFT or THROTTLE connection. Round this
dimension UP to the next whole foot and order the required cable
part number.
(Last two digits of the Teleflex cable number equal the length of the
cable in feet.)
ISCH7500_Rev2 (5)
Page 6
User Manual: CH1700/7500/7600
Section 3: Shift & Throttle Cable Connection - Control End
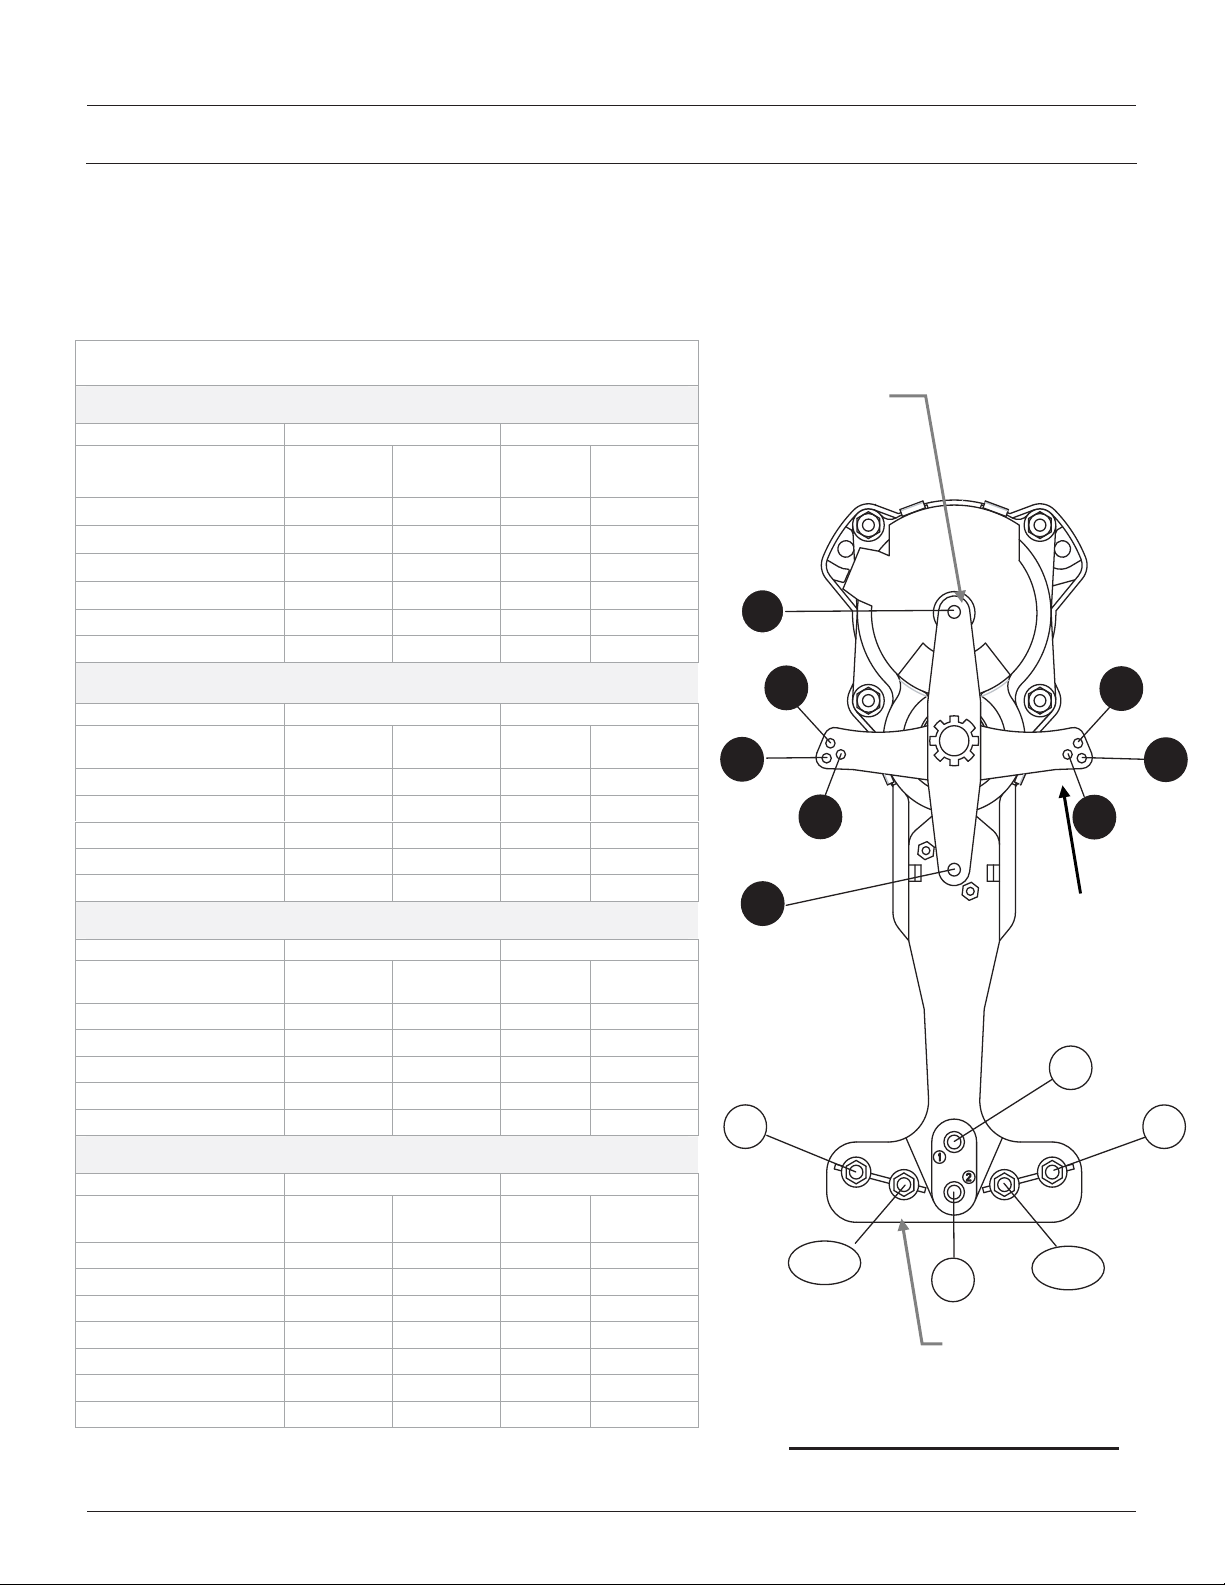
xPUSH / PULL refer to the direction of cable motion to shift into "forward" or to "open" the throttle
x Refer to the appropriate manufacturer’s manual for shift and throttle direction and adjustments
xNumbered holes on mechanism chassis correspond to holes in shift and throttle levers
(for example: connect cable mount to hole 4 on chassis and cable end fitting to hole 4 on lever)
x Cables and wiring should be pre-installed on control before final mounting is made
Cable Connection Guide
PUSH to OPEN THROTTLE
CH1700/ CH7600 CH7500
MANUFACTURER
MERCURY18 & 25 HP # 1 # 1
JOHNSON / EVINRUDE # 1 # 1
BRP/OMC I/O # 1 # 1
YAMAHA 90HP & UP # 1 # 1
US MARINE # 1 # 1
SUZUKI # 1 # 1
MANUFACTURER
MERCURY I/O & O/B
VOLVO I/O
YAMAHA 70HP & UNDER
HONDA
NISSAN/TOHATSU
MANUFACTURER
VOLVO I/O & INBOARDS
3300 CABLES
MERCURY18 & 25 HP
EVINRUDE / JOHNSON
INBOARDS
MANUFACTURER
3300 CABLES
MERCURY
EVINRUDE/JOHNSON
HONDA/NISSAN/SUZUKI
TOHATSU/ US MARINE
YAMAHA
INBOARDS
CABLE
NEST KIT
PULL to OPEN THROTTLE
CH1700/ CH7600 CH7500
CABLE
NEST KIT
# 2 # 2 # 2 # 2
# 2 # 2 # 2 # 2
# 2 # 2 # 2 # 2
# 2 # 2 # 2 # 2
# 2 # 2 # 2 # 2
PUSH for FORWARD SHIFT
CH1700/ CH7600 CH7500
CABLE
NEST KIT
# 3 # 3 # 4 # 4
# 3 # 3 # 4 # 4
# 5/6 # 6 # 7/8 # 7
# 5/6 # 5 # 7/8 # 8
# 3 # 3 # 4 # 4
PULL for FORWARD SHIFT
CH1700/ CH7600 CH7500
CABLE
NEST KIT
# 4 # 4 # 3 # 3
# 7/8 # 7 # 5/6 # 6
# 7/8 # 8 # 5/6 # 5
# 4 # 4 # 3 # 3
# 4 # 4 # 3 # 3
# 4 # 4 # 3 # 3
# 4 # 4 # 3 # 3
THROTTLE
LEVER
THROTTLE
LEVER
SHIFT
LEVER
SHIFT
LEVER
CABLE
NEST KIT
# 1 # 1
# 1 # 1
# 1 # 1
# 1 # 1
# 1 # 1
# 1 # 1
CABLE
NEST KIT
CABLE
NEST KIT
CABLE
NEST KIT
THROTTLE
LEVER
THROTTLE
LEVER
SHIFT
LEVER
SHIFT
LEVER
Throttle
Lever
1
3
6
5
2
3
5/6
2
Cable Nest
Bracket
Cable Mounting Diagram
4
77
8
Shift
Lever
1
4
7/8
ISCH7500_Rev2 (6)
Page 7
User Manual: CH1700/7500/7600
Section 3: Shift & Throttle Cable Connection - Control End
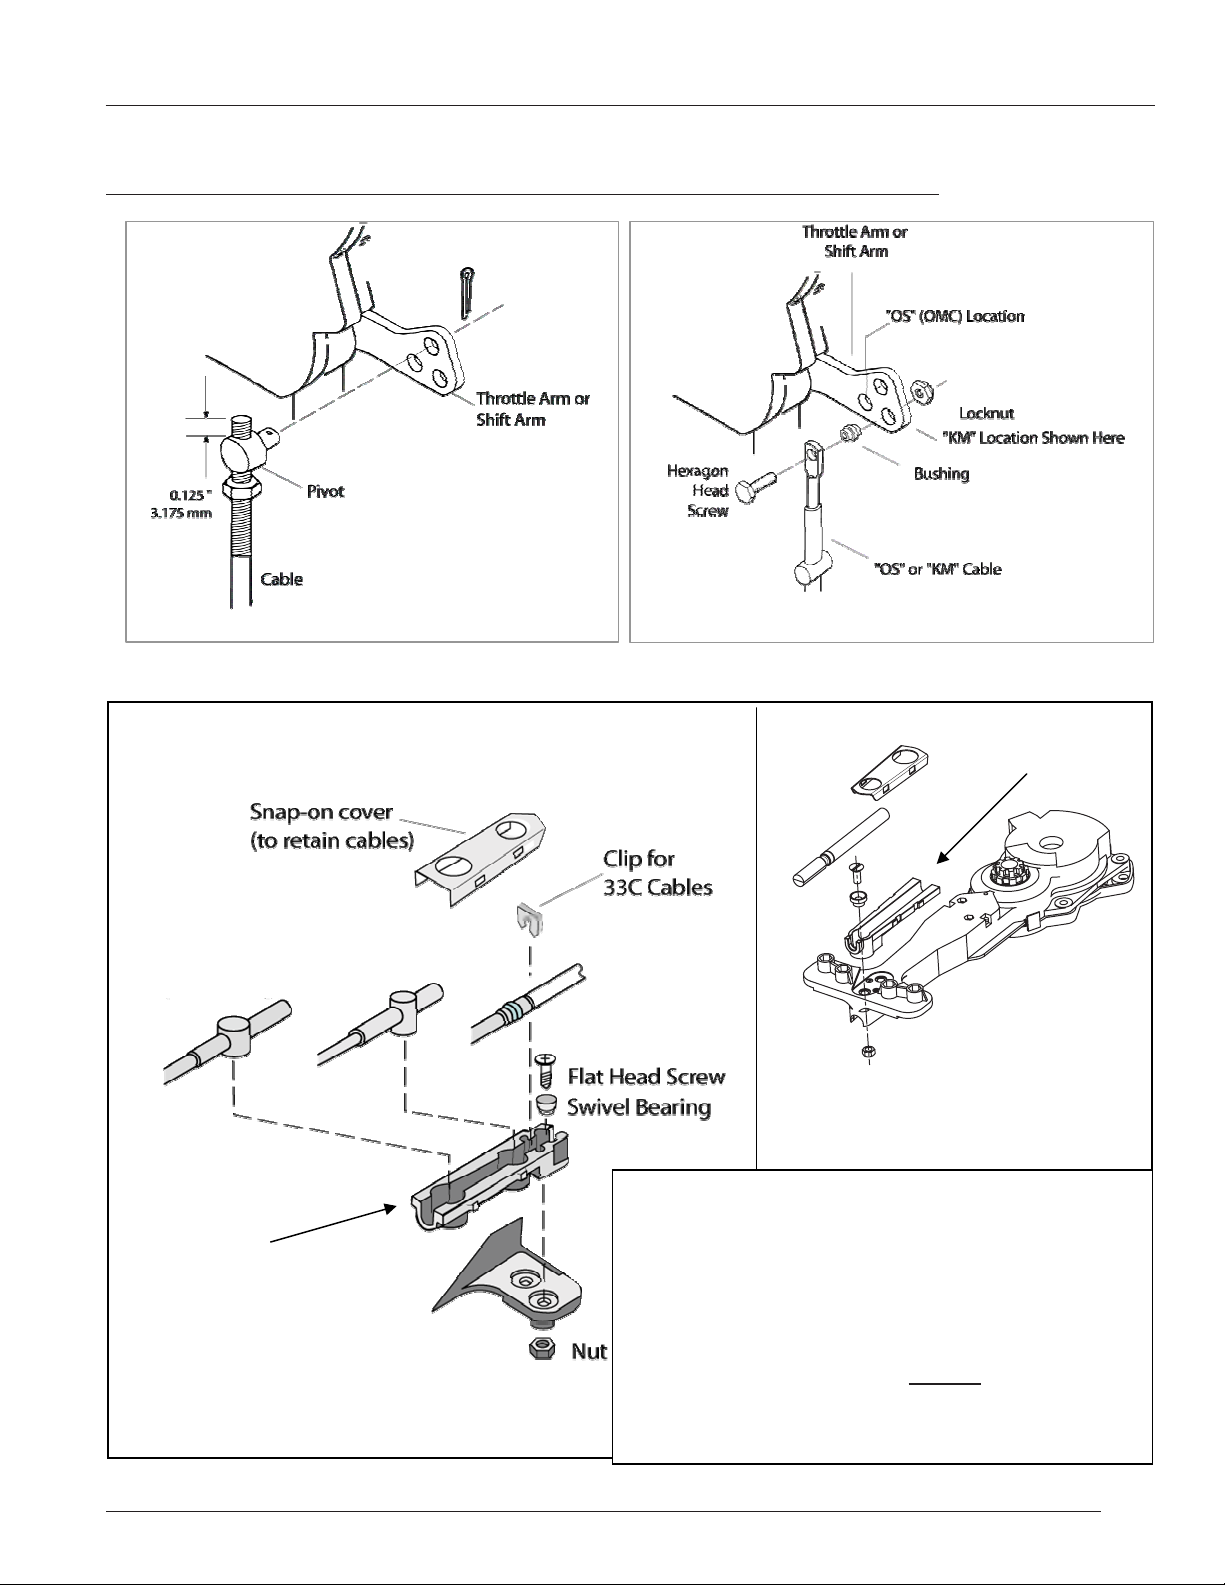
Shift Arm Cable Terminal Connection for 33 C Cable
33C Cable
Mercury
Note: Nest is black
in color.
BRP/OMC
Shift Arm Cable Terminal Connection for “OS” is
BRP/OMC/Johnson and Evinrude and “KM” is Mercury
Note: For GEN II,
nest is neutral in
color.
New
Mercury Gen II
Nest Kit
Cable End Options
¾33C (Universal) (note black nest color)
¾BRP/OMC/JOHNSON/EVINRUDE (note black
nest color)
¾MERCURY (note black nest color)
¾MERCURY GEN II (note neutral
Each cable type connects differently.
ISCH7500_Rev2 (7)
nest color)
Page 8
User Manual: CH1700/7500/7600
E
Section 4: Shift & Throttle Cable Connection - Engine End
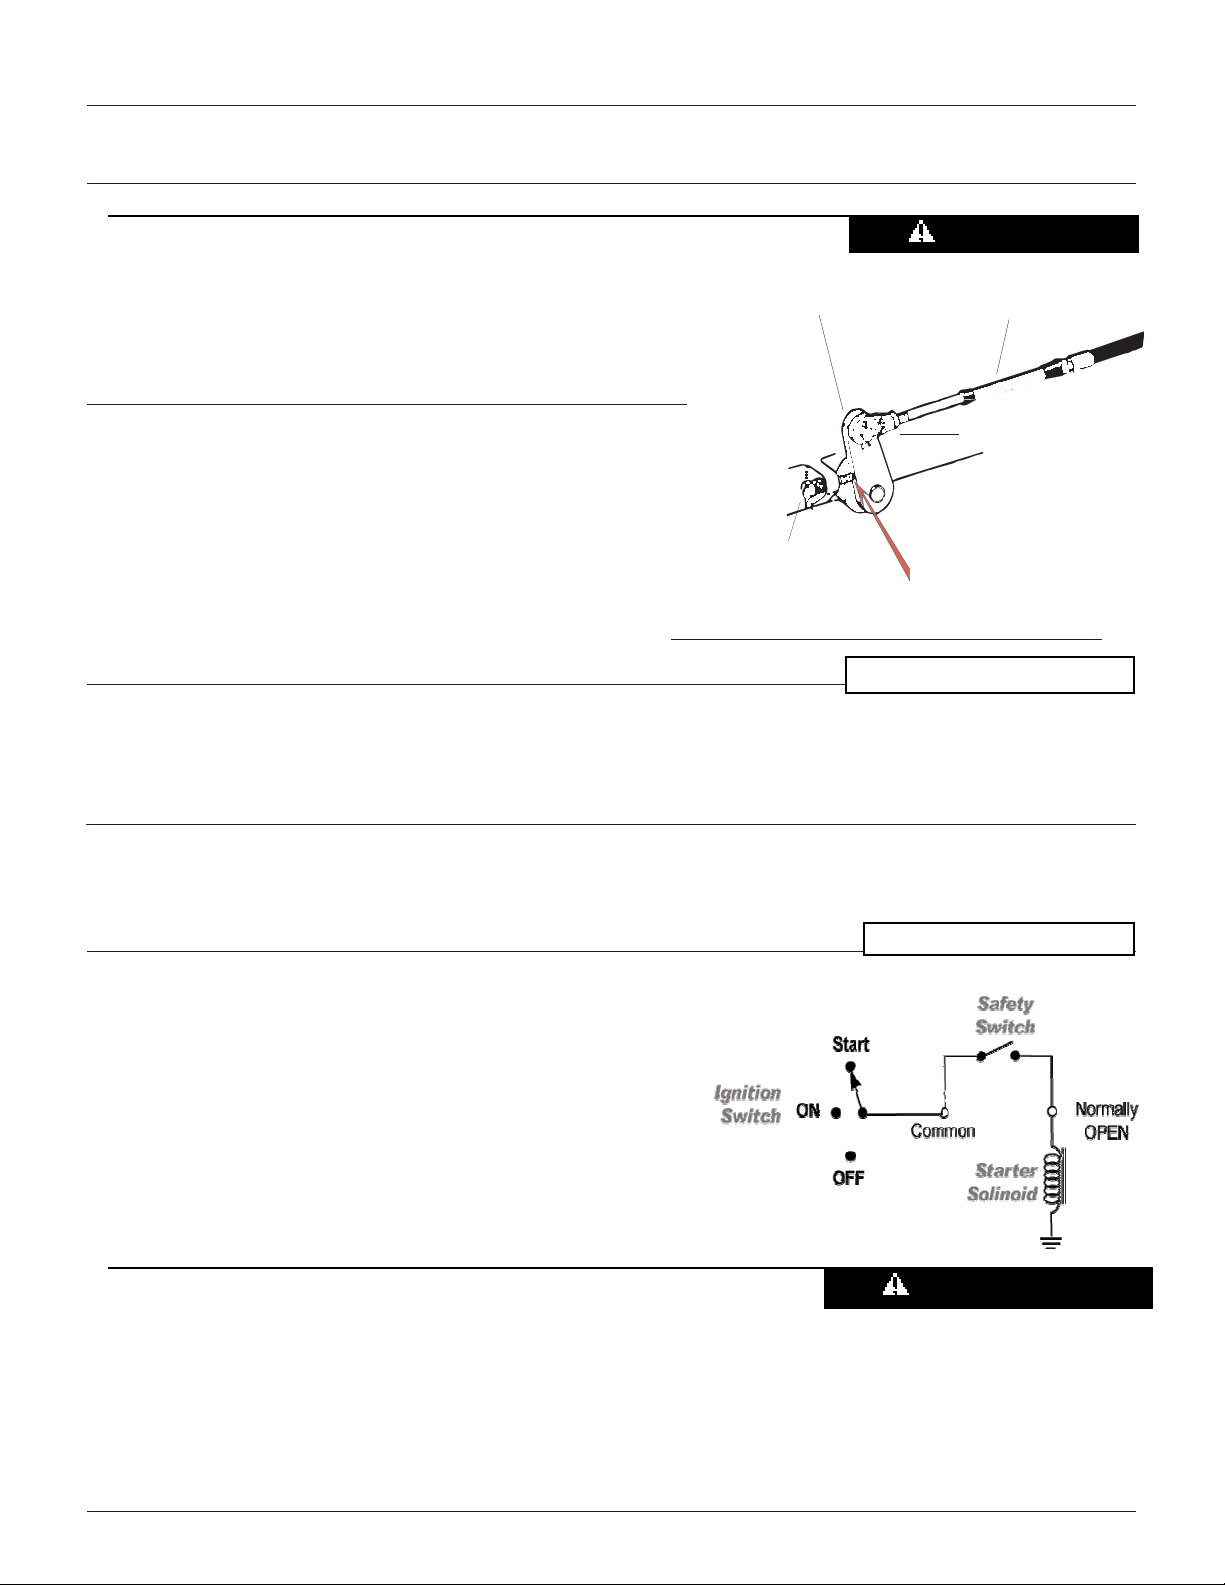
The throttle cable must be disconnected from the motor before making motor
idle adjustments.
Adjustment of the motor idle while the throttle cable is
connected to the motor may cause jamming action against the
idle stop. As a result, the control may not function properly
and damage to the control, the cable and/or the motor may
occur.
Engine Throttle Lever
4.1 Make sure the Control is in NEUTRAL DETENT.
4.2 The Engine Throttle Lever should rest lightly against the
“Idle Stop” on the carburetor.
4.3 Connect the Throttle Cable to the Engine Throttle Lever.
Please Note: This figure does not represent any particular engine.
Idle Stop
Throttle Cable must be free of load (NO LOAD) when throttle lever is in the
idle position to prevent hard shifting.
Section 5: Electrical Connections
Caution
Throttle Cable
(33C shown)
Throttle Cable Terminal
MINIMUM PRESSURE HERE
NOTICE
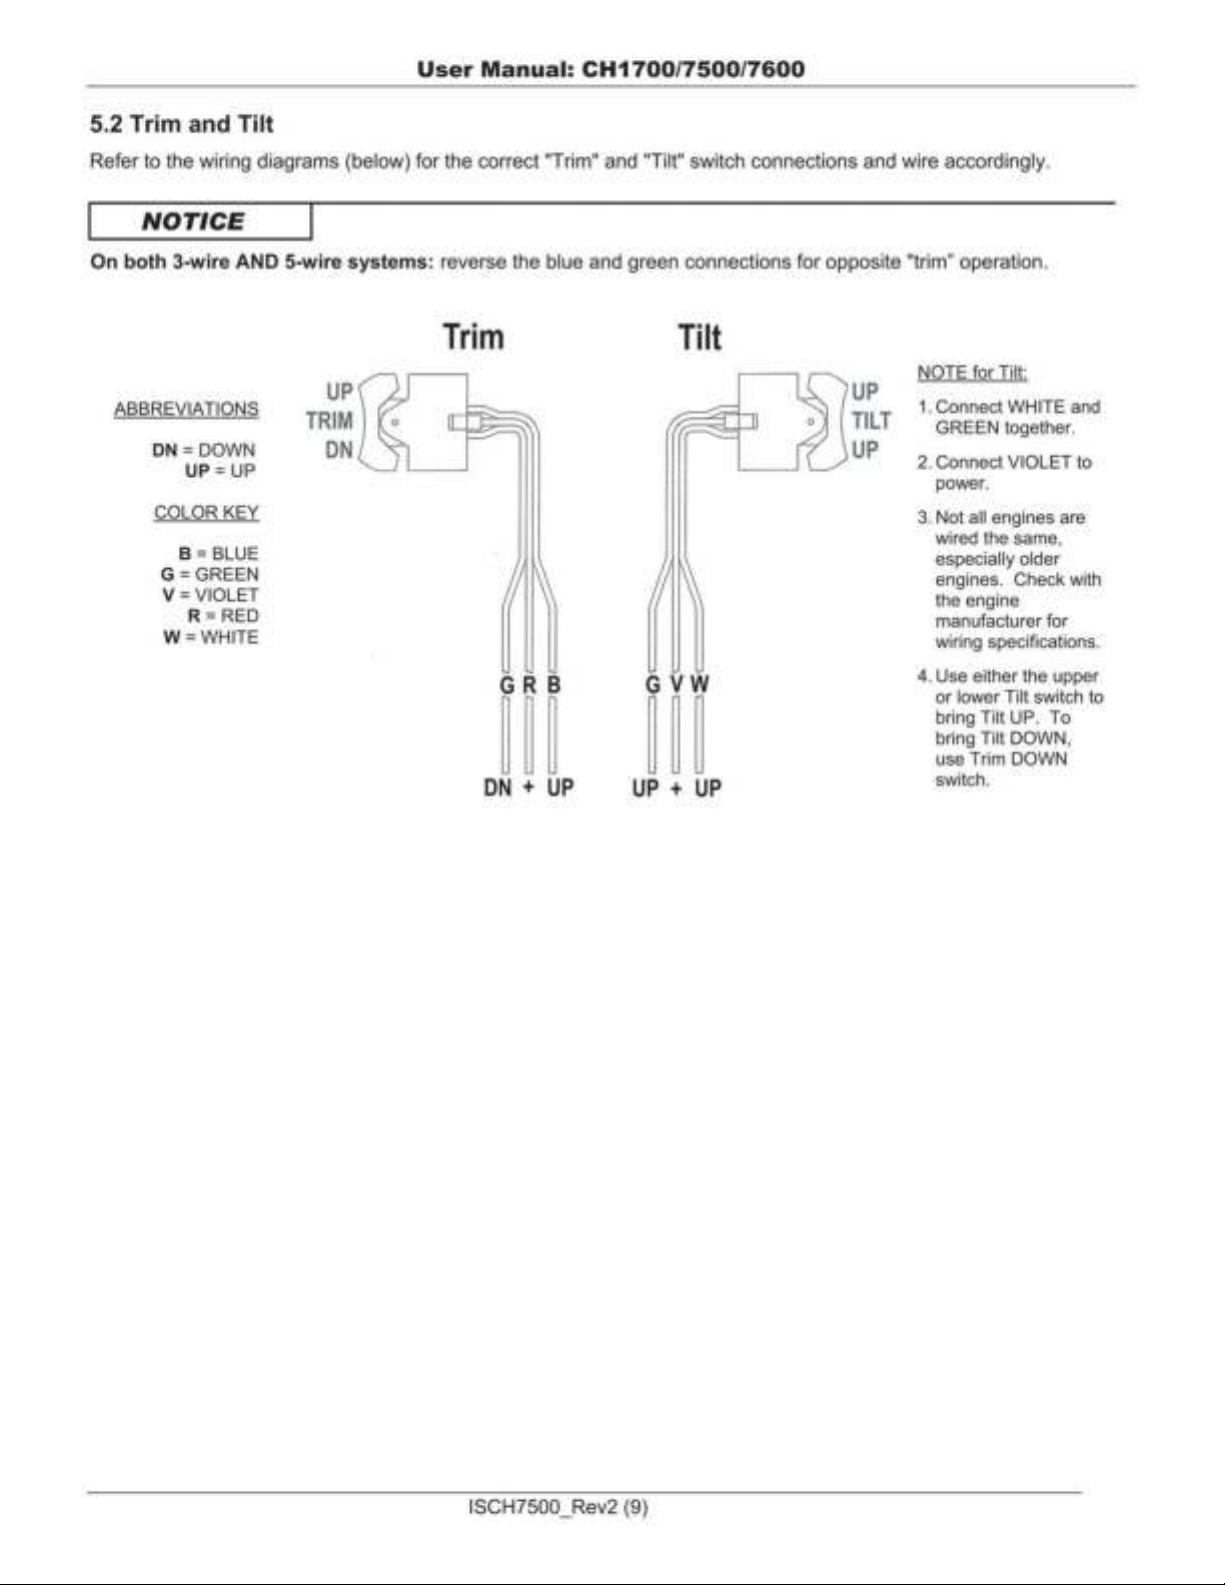
5.1 Neutral Safety Switch
This control is provided with a Neutral Safety Switch. This switch is used to prevent the engine from
starting in gear.
NOTIC
Use a battery-powered test light or test meter to check continuity.
5.1.1 With the Control in NEUTRAL, connect one wire of the
tester to the common terminal, and one wire to the
"NO" (Normally Open) Terminal. The test light MUST
light.
5.1.2 Connect the neutral safety switch between the ignition
switch (start lead) and the starter solenoid
Use a multi-meter or continuity tester to make sure that there is
electrical continuity only when the control is in neutral position.
When the control is in forward or reverse gear there must not be
electrical continuity. The multimeter or tester should show an open
circuit.
Caution
ISCH7500_Rev2 (8)
Page 9
Page 10
User Manual: CH1700/7500/7600
(
D
(
N
Clip
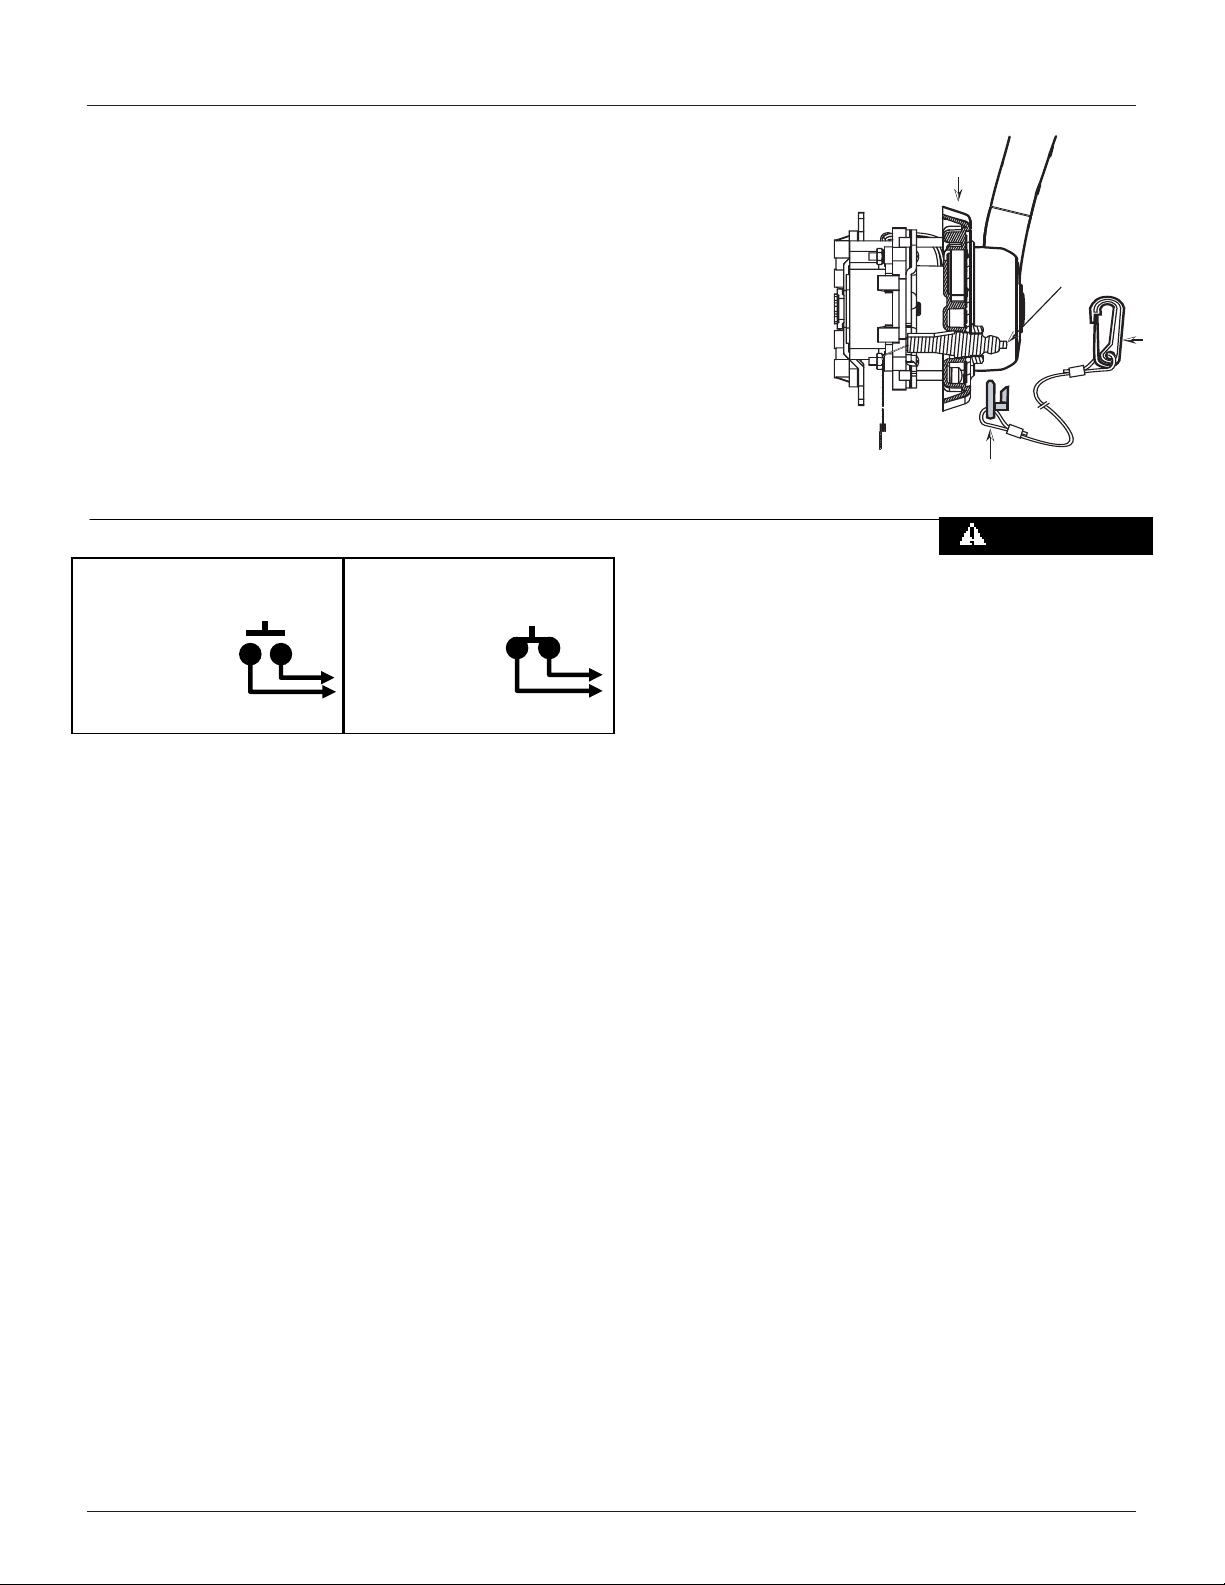
5.3 Ignition Interrupt Switch
This switch includes a lanyard clip which holds the plunger of the Switch in
position to allow engine operation. A lanyard extends from the clip and is
connected securely to the operator. If the operator moves away from the
controls, the clip is pulled free, releasing the plunger and stopping the
engine.
5.3.1 Operation of the Ignition Interrupt Switch
¾ Before each motor start, check that the Lanyard Fork Clip is properly
seated over the switch and rotates freely.
¾ Inspect the lanyard. If it is cut, worn or frayed, it must be replaced.
¾ Start the engine.
¾ Test the switch by pulling the lanyard fork clip free from the switch.
The engine should stop.
Emergency
Ignition Interrupt
Switch
Inboard
Normally OPE
Emergency
Ignition Interrupt
Switch
Outboard
Normally CLOSE
If engine fails to stop, recheck all wiring. Should
the engine fail to start or stop, or resume running
with the lanyard fork removed, consult your local
marine dealer for assistance. Do not change the
length of the lanyard or use another
manufacturer’s lanyard on this interrupt switch.
Either may affect switch operation. Misuse,
misapplication, unauthorized modifications, or
incorrect installation of this safety devise could
result in serious bodily injury or death.
Bezel
Plunger
Lanyard
Snap
Lanyard
Fork
Clip
WARNING
5.3.2 Installation Instructions for the Ignition Interrupt Switch
All wiring, connections and terminations should be done in accordance with ABYC Spec E 11-03.
Before drilling, check behind the gunwale or panel for sufficient clearance and space around wires
tubes, pipes and other obstructions.
¾ If installing the switch as a retro fit, remove the 4 mounting screws that retain the bezel. Remove the
bezel. Overlay the cutout template supplied in the kit. If the cutout profile does not match the
template, cutout the gunwale to suit the template profile.
¾ If installing the control for the first time, use the template to cutout the gunwale.
¾ Insert the switch from the rear of the gunwale or from the front. Your choice will depend on the
design of your boat and access to the cavity between to hull and the gunwale.
¾ Orient the switch according to the diagram before inserting the switch into the space provided in the
control mounting plate, the cutout and into the bezel.
¾ Insert the 4 mounting screws through the bezel cutout and into the control mounting plate.
¾ Assemble the bezel Insert onto the bezel and add the Interrupt Switch retaining nut. Torque to 40 –
50 inch pounds (3.5 to 4 foot-pounds)
¾ Insert the lanyard clip under the Interrupt Switch plunger. Pull firmly on the lanyard to verify that the
clip snaps free. Ensure the nut remains tight, re-torque if necessary. Reattach the lanyard clip to the
switch.
¾ Complete the Interrupt Switch wiring into the engine electrical circuit according to the instructions
below.
¾ Complete all testing of the Interrupt Switch function according to the instructions on the following
page(s).
ISCH7500_Rev2 (10)
Page 11
User Manual: CH1700/7500/7600
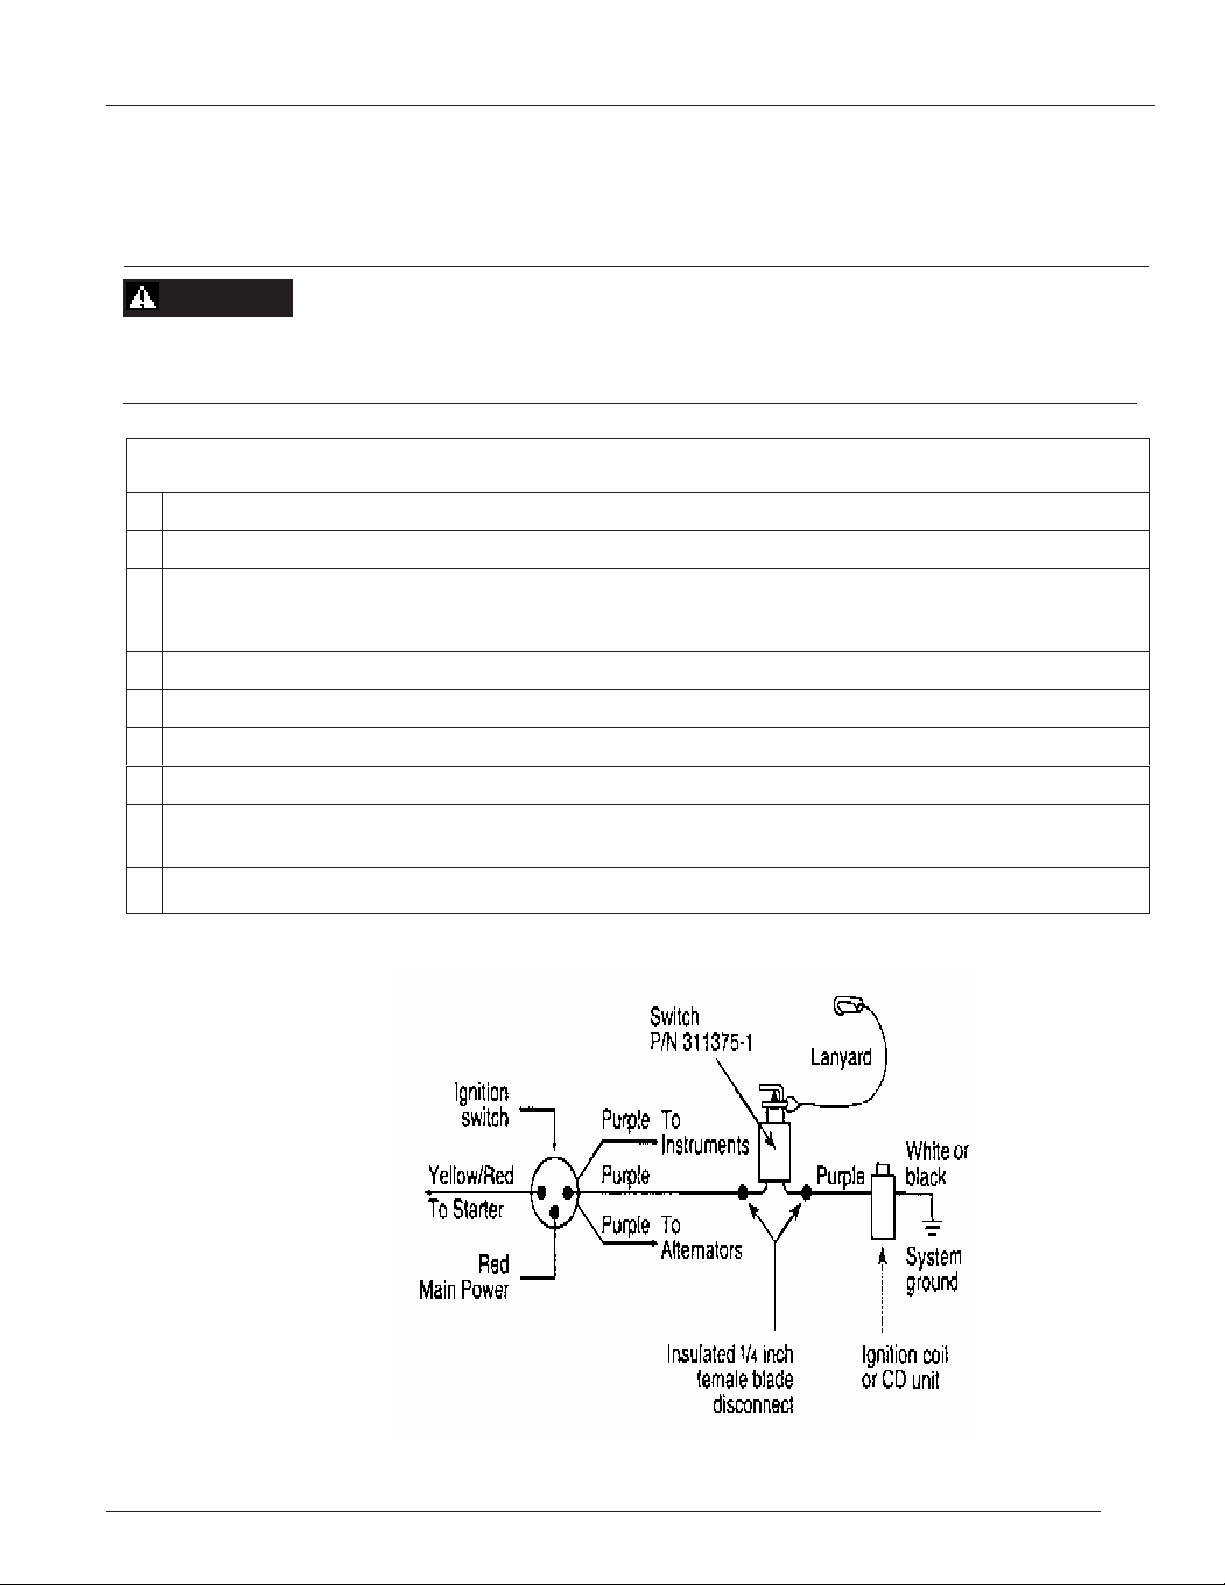
5.3.3 Electrical Connections: I/O or Inboard Use
Use 16 AWG Purple stranded, insulated marine quality wire for IO or inboard applications. (Type HDT,
THW, UL 1426 or equivalent.)
WARNING
Be sure this wire goes directly to the coil and not to the instrument or alternator circuit. Selecting the
incorrect wire will result in improper switch operation which could lead to serious injury.
I/O or Inboard Use ONLY (Normally OPEN)
1. Disconnect all batteries and any auxiliary on-board or dockside power supplies.
2. Locate the purple ignition switch-to-coil wire; See Diagram A below.
Cut the purple wire, strip the ends and install two (2) insulated crimp-on 1/4 inch female disconnect terminals. A
3.
crimping tool designed for insulated terminals MUST be used.
4. Attach the female disconnects to each of the male terminals on the Interrupt Switch
5. Recheck all connections.
6. Install Lanyard with the Fork Clip seated on the Plunger.
7. Reconnect battery.
Start engine. If engine does not start: disconnect battery, recheck all electrical connections, reconnect battery, and
8.
restart engine.
9. Remove Lanyard. Engine should stop immediately.
Diagram A
I/O and Inboard Wiring
(basic wiring; no specific manufacturer)
ISCH7500_Rev2 (11)
Page 12
User Manual: CH1700/7500/7600
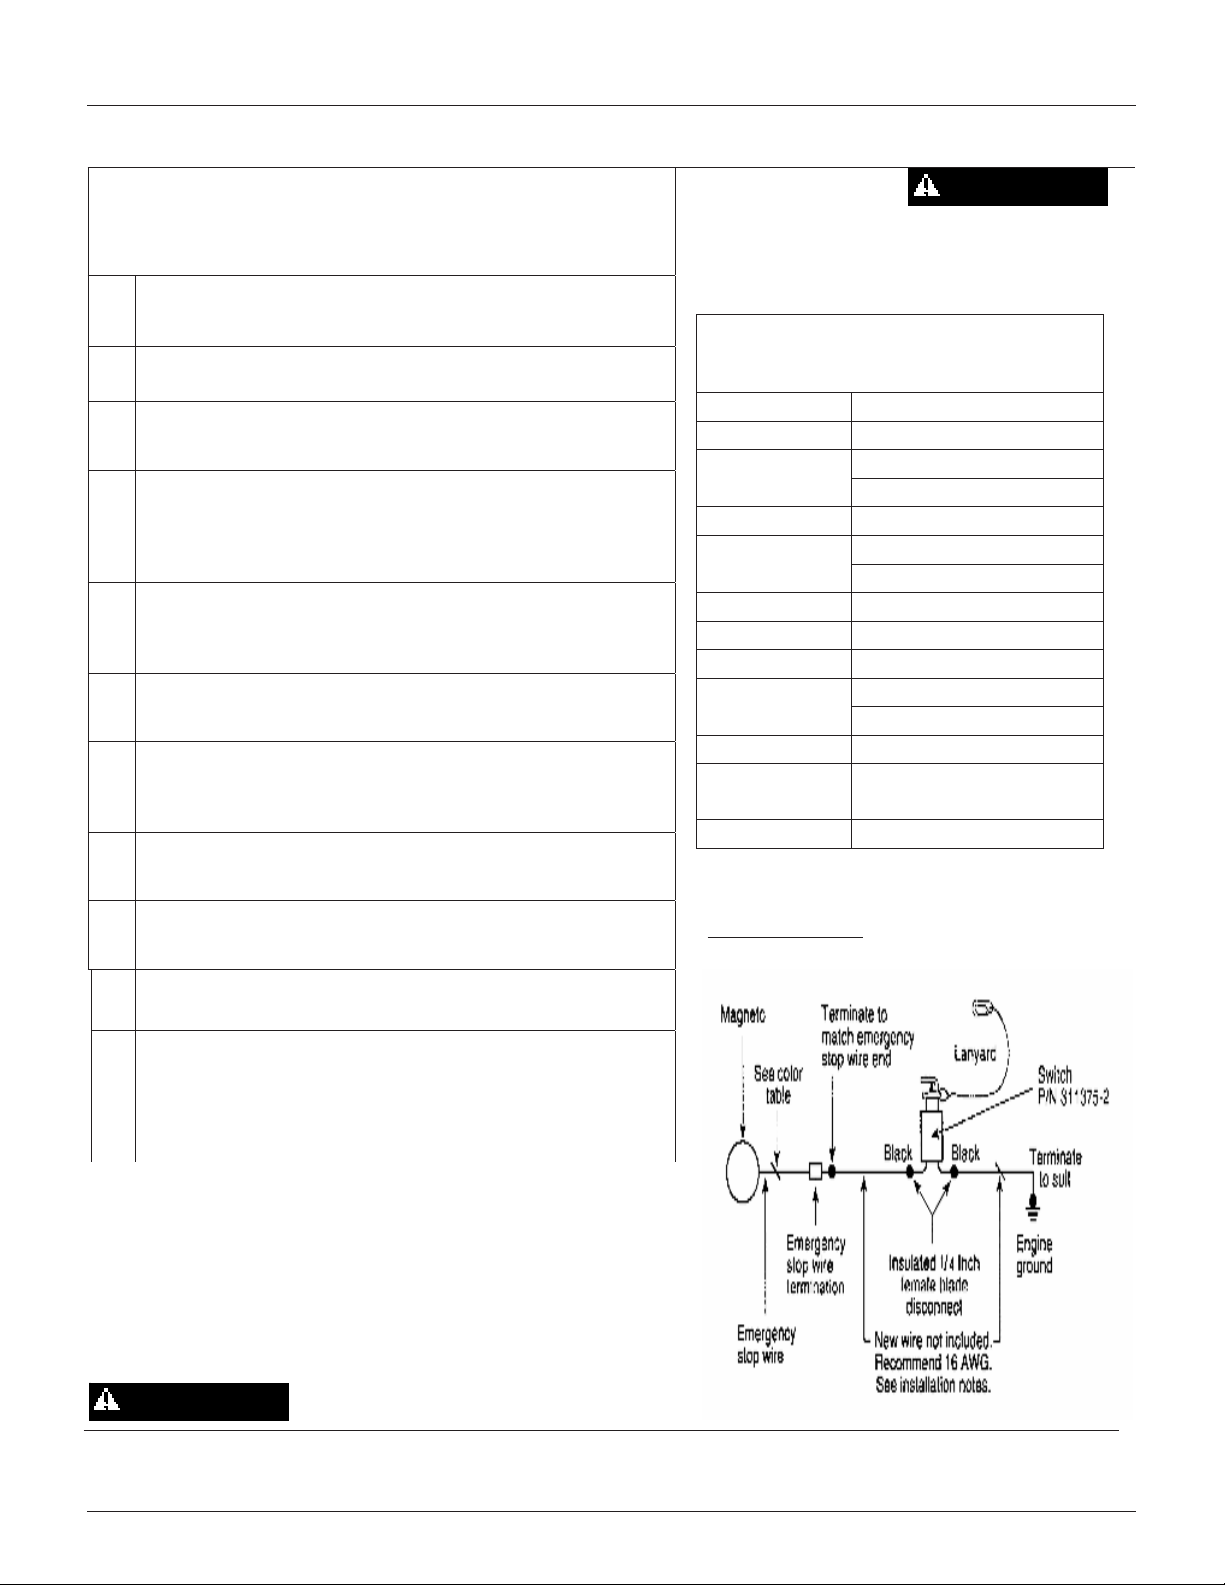
5.3.4 Electrical Connections: Outboard Use
Outboard Use ONLY (Normally CLOSED)
Use 16 AWG Black stranded, insulated marine quality wire for all
outboard applications. (Type HDT, THW, UL 1426 or equivalent.)
Disconnect all batteries and any auxiliary on-board or dockside power
1.
supplies.
2. Remove Engine Cover
Locate the correct color emergency stop wire for your motor. (See
3.
Reference Table 1 at right.)
Measure and cut two lengths of black 16 AWG marine quality wire of
sufficient length to connect one Interrupt Switch terminal to the
4.
Emergency Stop Wire and the other terminal to a System Ground. (See
Diagram B at right.)
Strip one end of each wire and crimp on an insulated 1/4 inch female
5.
disconnect terminal. A crimping tool designed for insulated terminals
MUST be used.
Attach the female disconnects to each of the male terminals on the
6.
Interrupt Switch.
Attach the other end of one wire to the Emergency Stop Wire, using a
7.
suitable insulated wire connecting device. (See Reference Table 1 and
Diagram B.)
Attach the other end of the second wire to the ground point, using a
8.
suitable insulated wire connection device as shown in Diagram B at right.
Recheck all connections. Install the Lanyard with the Fork Clip seated
9.
over the Plunger
This interrupt switch is
CAUTION
designed for use with
outboard motors equipped with grounding type
emergency stop circuits only!
Reference Table 1
Wire Color Table
for Late Model Outboards
Engine Color
Daihatsu Solid Brown
Evinrude Black w/ Yellow Stripe
Before 1969 Solid Blue
Force Solid White
Johnson Black w/ Yellow Stripe
Before 1969 Solid Blue
Mariner Black w/ Yellow Stripe
Mercury Black w/ Yellow Stripe
Nissan Solid Brown
OMC Black w/ Yellow Stripe
Before 1969 Solid Blue
Suzuki Solid Brown
US Marine
Blue w/ Black Stripe or
Solid Blue
Yamaha Black w/ Yellow Stripe
Diagram B
Outboard Wiring
10. Replace engine cover and reconnect battery.
Start engine. If engine does not start: a) disconnect battery; b) remove
engine cover; c) recheck all electrical connections; d) replace engine
11.
cover; and e) restart engine.
Remove Lanyard. Engine should stop immediately
CAUTION
If engine fails to stop, recheck all wiring. Should the engine fail to start or stop or resume running with the lanyard fork
removed, consult your local marine dealer for assistance.
ISCH7500_Rev2 (12)
Page 13
Page 14
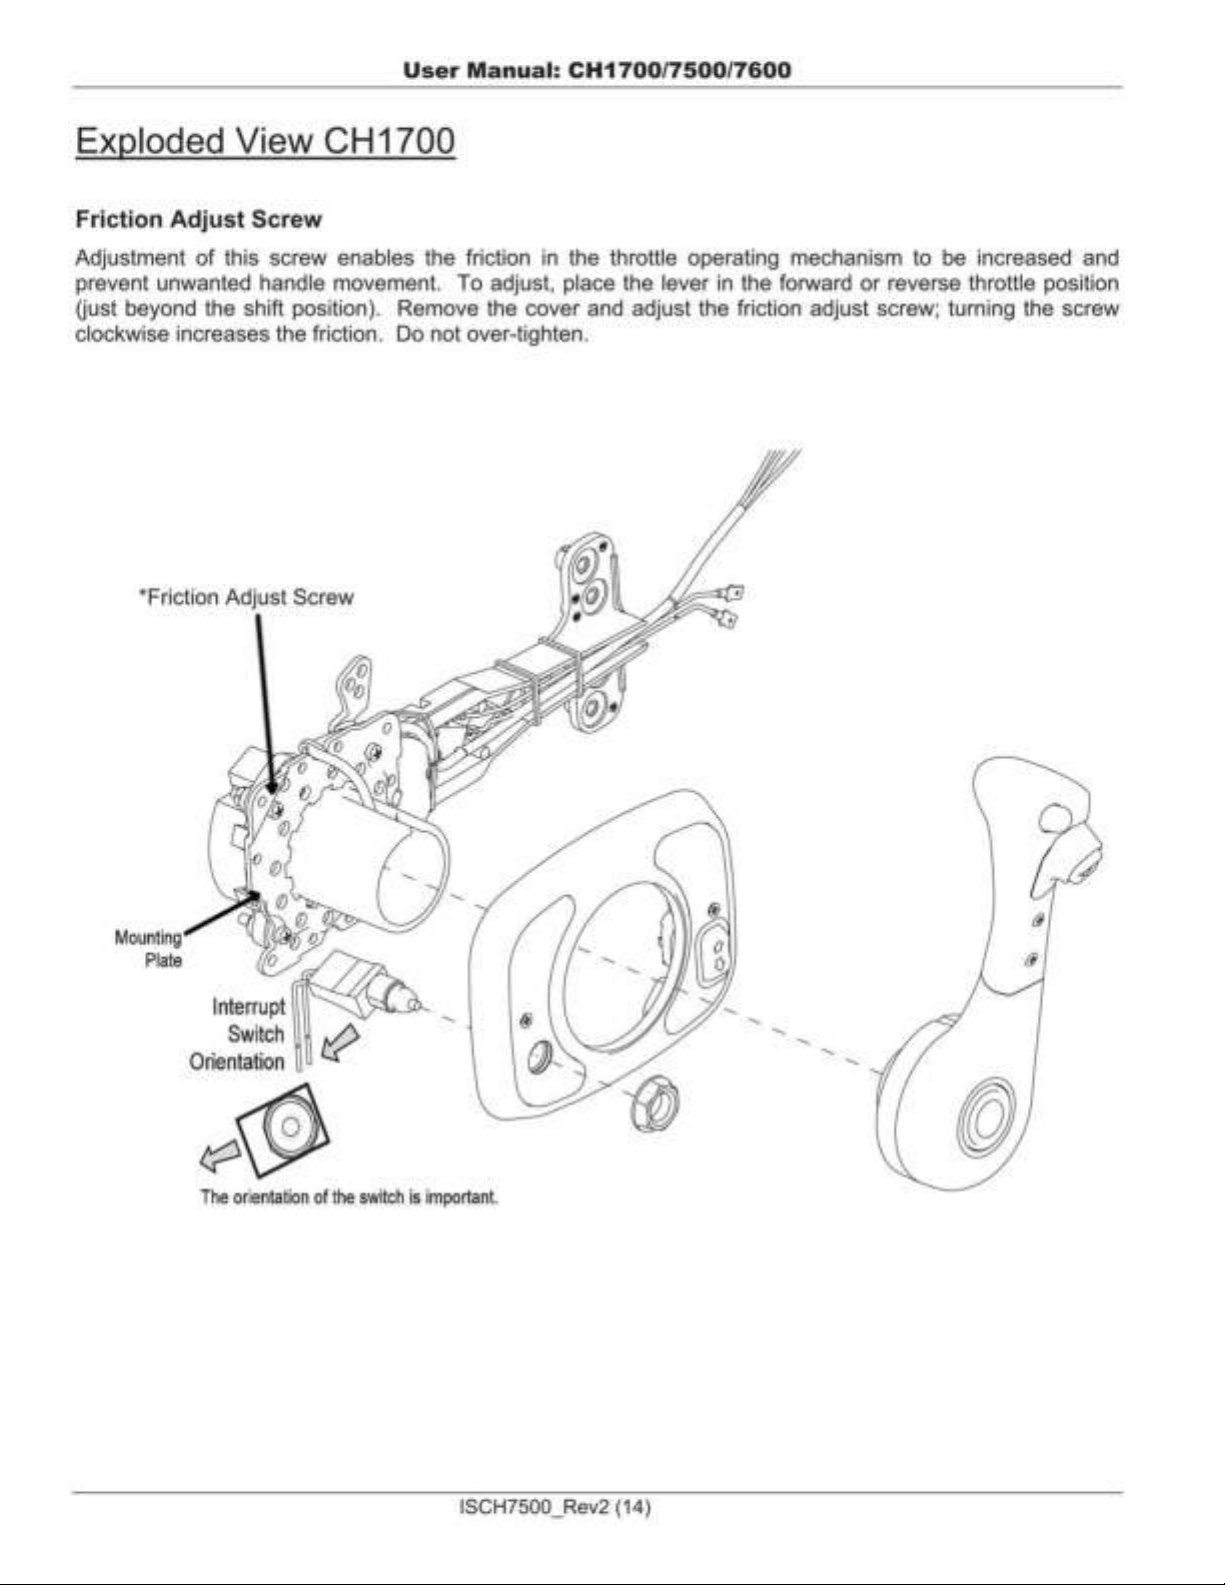
Page 15
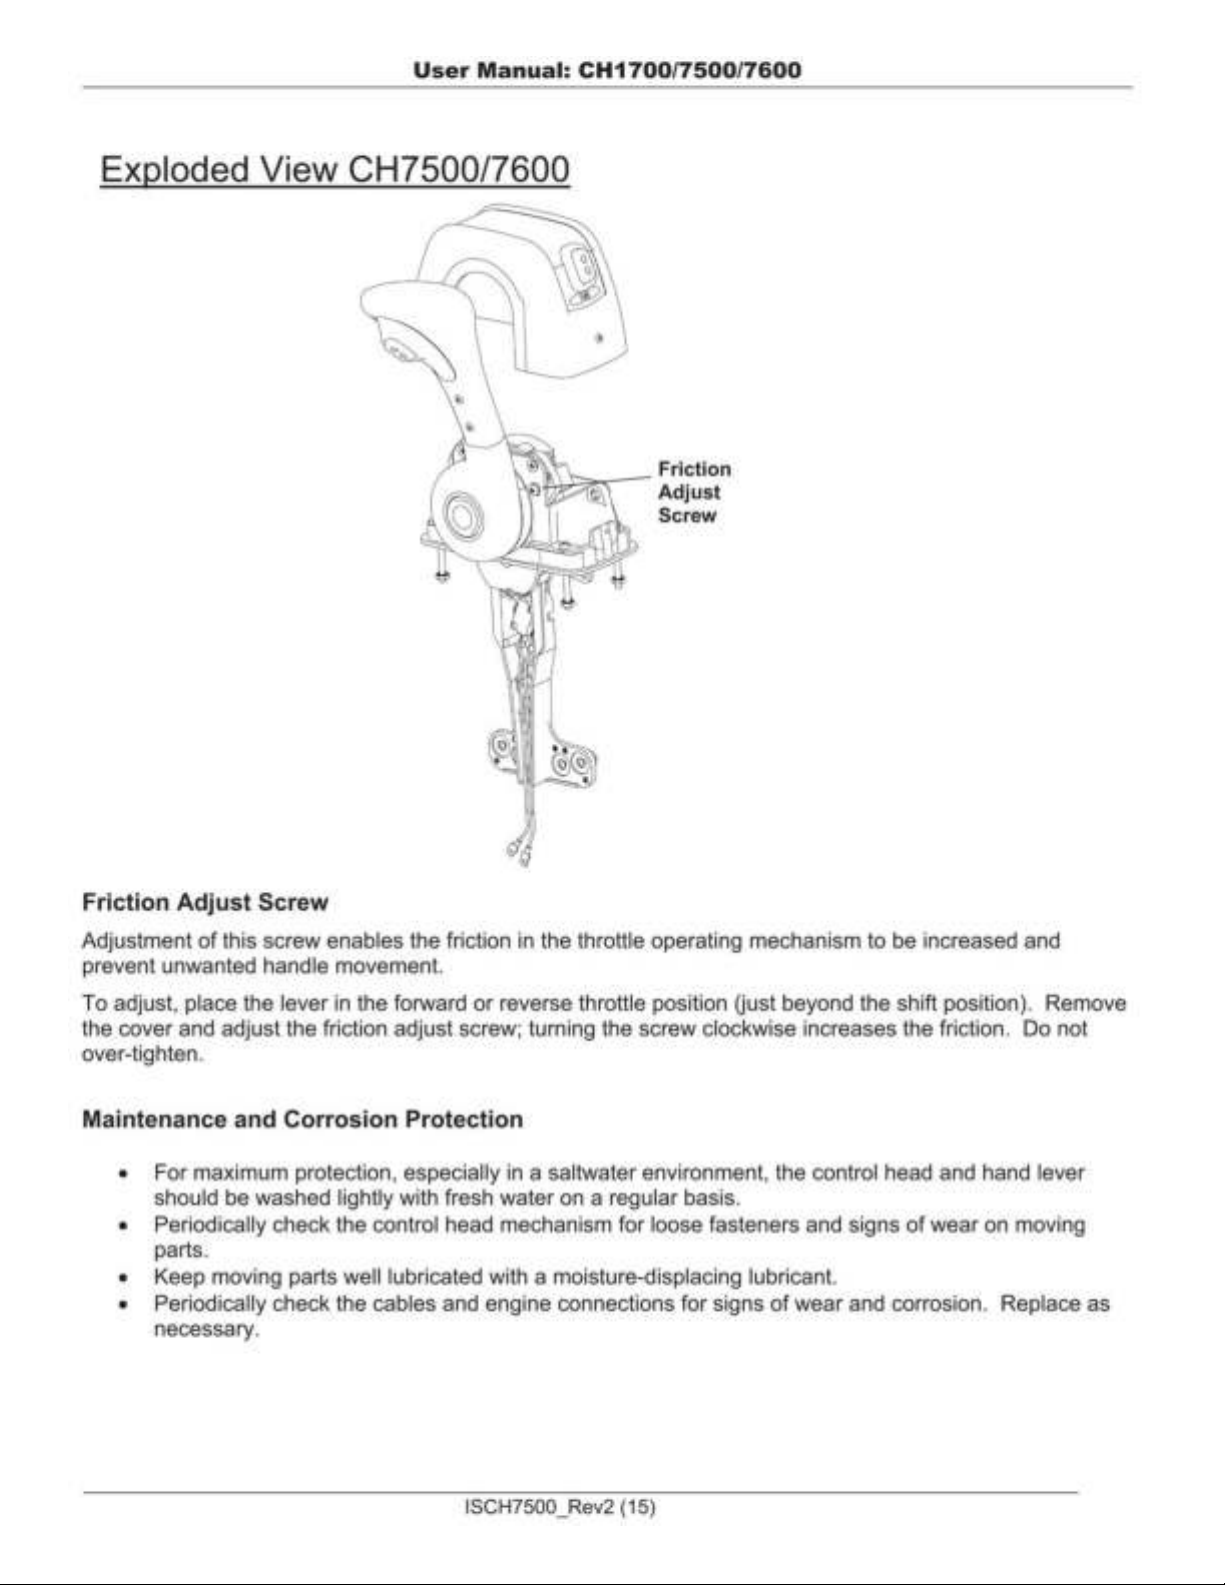
Page 16
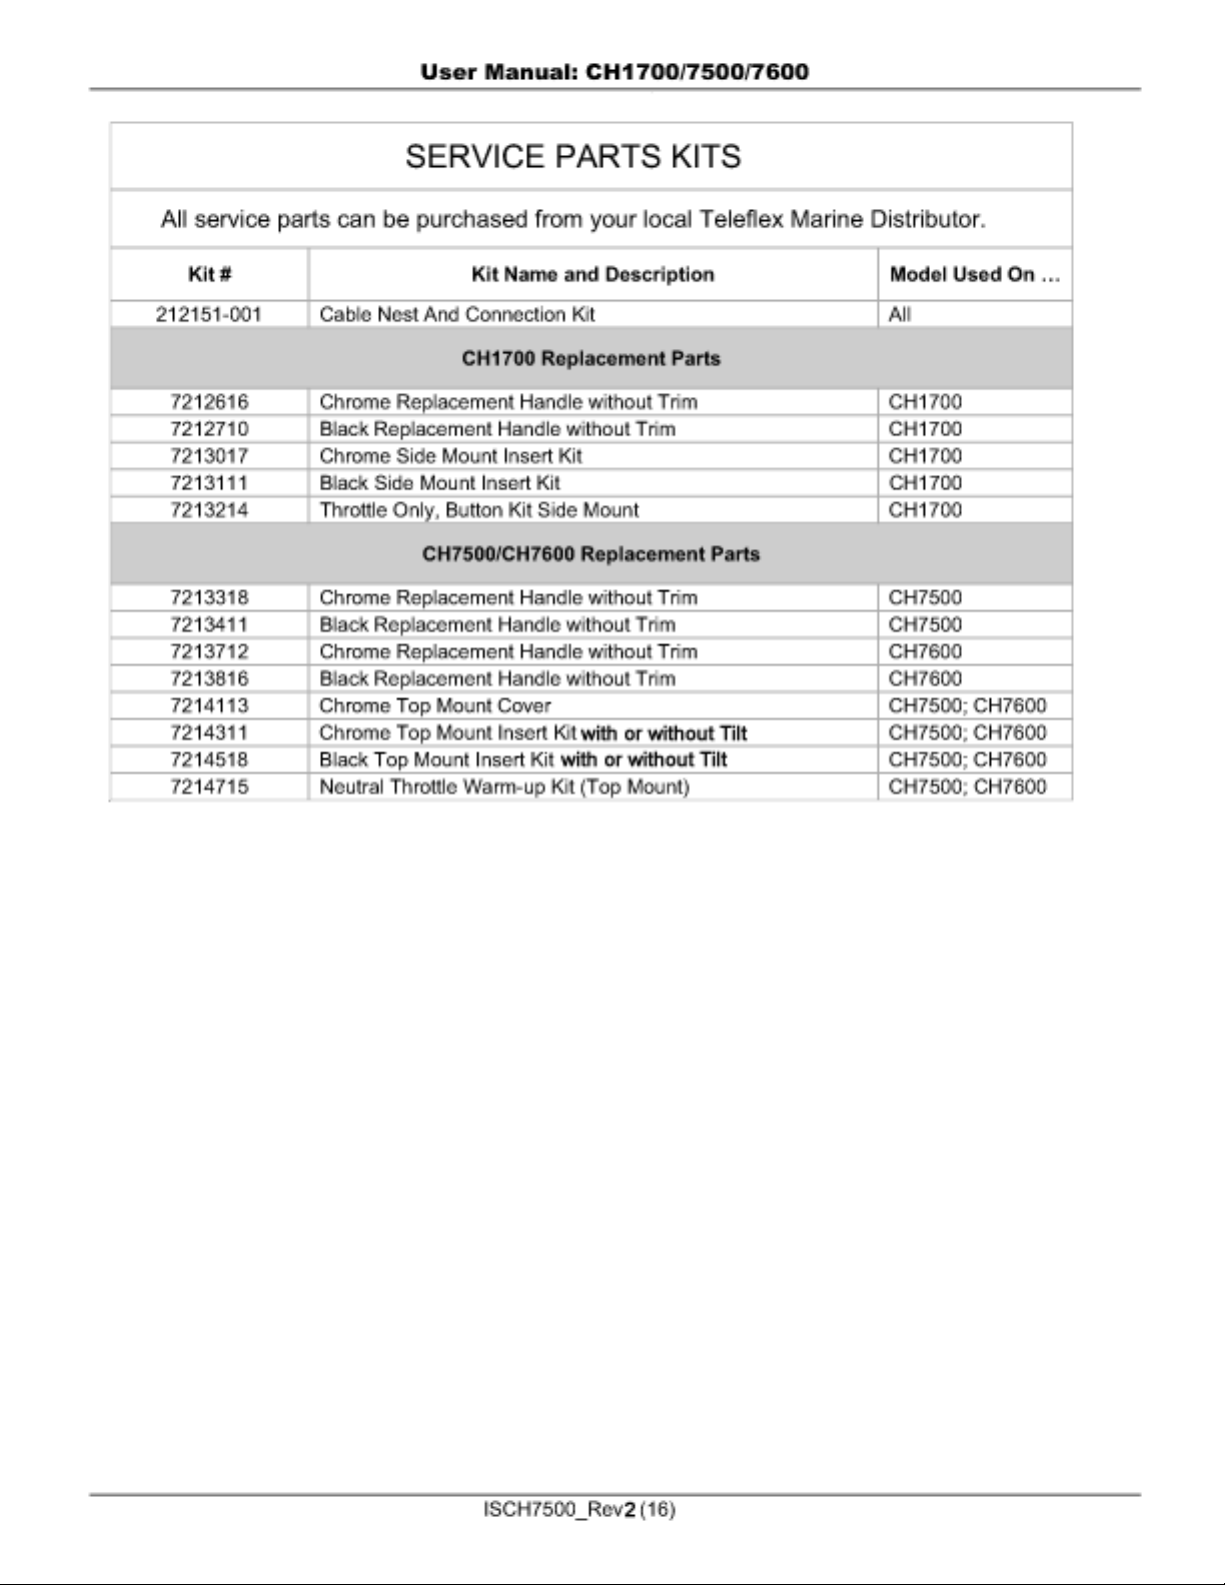
Page 17
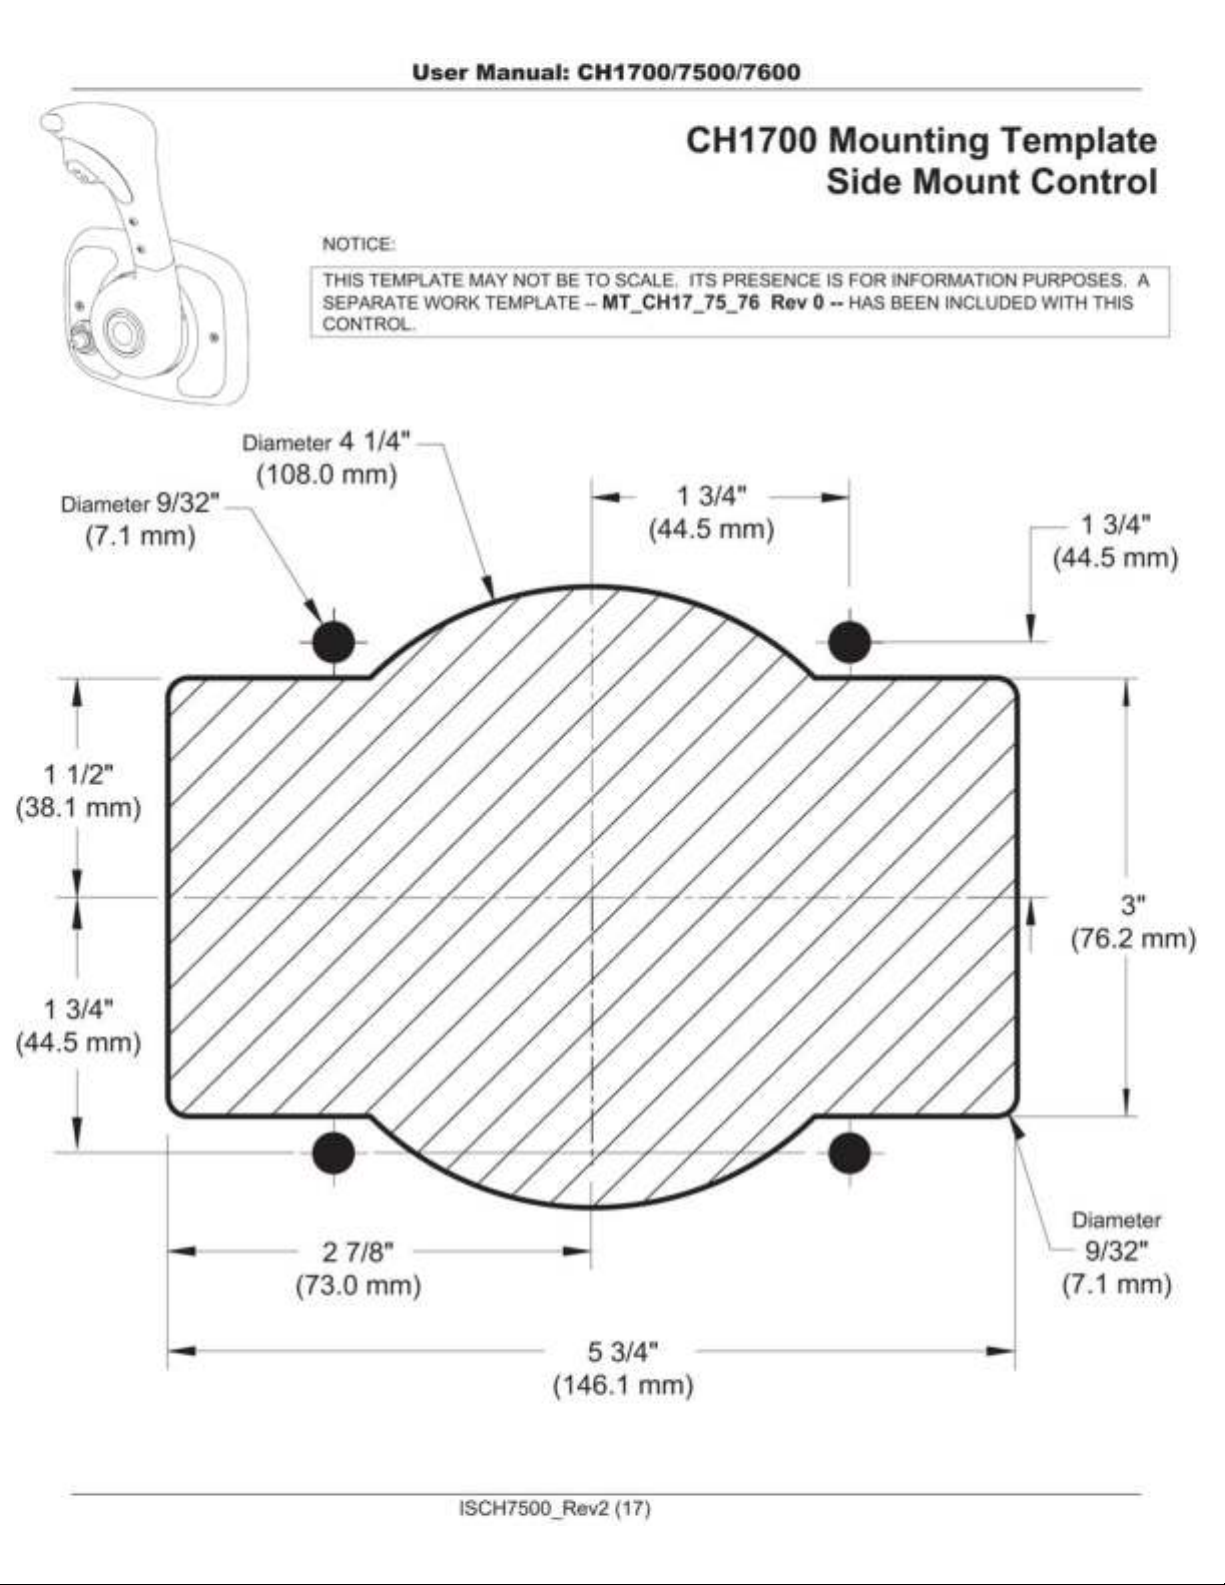
Page 18
Page 19
Page 20

User Manual: CH1700/7500/7600
CH1700/CH7500/CH7600
Mechanical Engine Controls
(Patent No. D508,227; D510,310; D510,311; D510,558; D510,559, D510,557)
User Manual
Operation & Instructions
Part Number: ISCH7500_Rev2
January, 2006
APPLICABLE STANDARDS
ABYC P-14, Propulsion Control Systems
USCG 33 CFR Part 183, Subpart “L”, “Start in Gear Protection”
SAFE BOATING STATEMENT
This device meets or exceeds the applicable ABYC, ISO, and
USCG safe boating rules, regulations, standards, and
guidelines.
SAFE BOATING ON THE WEB
U.S. Coast Guard: www.uscg.mil
U.S. Power Squadron: www.usps.org
American Boat & Yacht Counsel: www.abycinc.org
Teleflex Marine
640 North Lewis Road
Limerick, PA 19468
Phone: 610 495 7011
FAX: 610 495 7470
www.teleflexmarine.com
Teleflex Marine is a division of Teleflex Incorporated
©2005, Teleflex Inc.
ISCH7500_Rev2 (20)
 Loading...