

Page 1

Sapphire Reference Manual V1.4
An RF tester for the Bluetooth® 5 LE standard, compatible with
TLF3000.
June 14, 2017
Page 2

TELEDYNE LECROY
1 Contents
1 Contents ........................................................................................................................ 2
2 Overview. ....................................................................................................................... 8
3 Control. .......................................................................................................................... 9
3.1 Overview ................................................................................................................. 9
3.2 Native language ...................................................................................................... 9
3.3 Sapphire GUI ........................................................................................................ 10
3.4 Standalone ........................................................................................................... 10
4 Operating Modes. ........................................................................................................ 10
4.1 Overview ............................................................................................................... 10
4.2 Phy layer tester ..................................................................................................... 10
4.3 Signal Generator ................................................................................................... 10
4.4 Signal Analyzer ..................................................................................................... 11
4.5 Advertise/Scan ...................................................................................................... 11
4.6 Standalone ........................................................................................................... 11
5 Launching the Sapphire GUI. ....................................................................................... 11
6 Anatomy of the Sapphire GUI. ..................................................................................... 12
6.1 Overview ............................................................................................................... 12
6.2 Toolbar ................................................................................................................. 13
6.2.1 Open and save .............................................................................................. 13
6.2.2 Screen capture .............................................................................................. 14
6.2.3 Zooming ......................................................................................................... 14
6.2.4 Run and clear ................................................................................................ 15
6.2.5 Help ............................................................................................................... 15
6.2.6 Exit ................................................................................................................ 16
6.3 Monitor panel ........................................................................................................ 16
6.3.1 Overview ........................................................................................................ 16
6.3.2 Output power ................................................................................................. 16
6.3.3 Input power .................................................................................................... 16
6.3.4 Input port ....................................................................................................... 17
6.3.5 Input attenuation ............................................................................................ 17
6.4 Status bar ............................................................................................................. 17
6.4.1 Overview ........................................................................................................ 17
6.4.2 Overload indicator .......................................................................................... 17
2 TLF3000 Sapphire Reference Manual V1.4
Page 3

TELEDYNE LECROY
6.4.3 DUT connection status ................................................................................... 18
6.4.4 Error message text......................................................................................... 18
6.5 Mode tabs ............................................................................................................. 18
6.6 Mode control panel ............................................................................................... 18
6.7 Graphics area ....................................................................................................... 18
6.8 Scripting/tabular results area ................................................................................ 19
7 Signal Generator Mode. ............................................................................................... 19
7.1 Overview ............................................................................................................... 19
7.2 RF connections ..................................................................................................... 20
7.3 Programming the packetized LE signal ................................................................. 20
7.3.1 Overview ........................................................................................................ 20
7.3.2 Carrier frequency ........................................................................................... 21
7.3.3 Amplitude ....................................................................................................... 21
7.3.4 Modulation ..................................................................................................... 21
7.3.5 Payload .......................................................................................................... 22
7.3.6 Payload length ............................................................................................... 23
7.3.7 Packet interval ............................................................................................... 23
7.3.8 Packet count .................................................................................................. 23
7.3.9 Dirty transmitter ............................................................................................. 23
7.3.10 Supplemental ................................................................................................. 26
7.3.11 Digital output .................................................................................................. 28
7.4 Programming the modulated interferer signal ........................................................ 29
7.4.1 Overview ........................................................................................................ 29
7.4.2 Carrier frequency ........................................................................................... 30
7.4.3 Amplitude ....................................................................................................... 30
7.4.4 Modulation ..................................................................................................... 30
7.4.5 Digital output .................................................................................................. 31
7.5 Programming the in-band CW signal..................................................................... 31
7.5.1 Overview ........................................................................................................ 31
7.5.2 Frequency ...................................................................................................... 32
7.5.3 Amplitude ....................................................................................................... 32
7.6 Programming the out-of-band CW signal .............................................................. 33
7.6.1 Frequency ...................................................................................................... 33
7.6.2 Amplitude ....................................................................................................... 33
3 TLF3000 Sapphire Reference Manual V1.4
Page 4

TELEDYNE LECROY
7.7 Hardware trigger ................................................................................................... 34
7.7.1 Overview ........................................................................................................ 34
7.7.2 Starting the signal generator via digital input lines ......................................... 34
7.7.3 Pausing the signal generator via digital input lines ......................................... 35
7.7.4 Resuming the signal generator via digital input lines ...................................... 35
7.7.5 Stopping the signal generator via digital input lines ........................................ 36
7.7.6 Saving and restoring settings ......................................................................... 36
8 Signal Analyzer Mode. ................................................................................................. 36
8.1 Overview ............................................................................................................... 36
8.2 RF connections ..................................................................................................... 37
8.3 Programming data collection ................................................................................. 37
8.3.1 Overview ........................................................................................................ 37
8.3.2 Programming the measurements to be performed ......................................... 39
8.3.3 Programming which RF Phys to collect .......................................................... 40
8.3.4 Programming which RF channels to collect ................................................... 41
8.3.5 Programming which packet lengths to collect................................................. 42
8.3.6 Programming which access address to collect ............................................... 43
8.3.7 Programming de-whitening of the packet ....................................................... 44
8.3.8 Programming the termination criterion ........................................................... 45
8.3.9 Selecting the RF input port ............................................................................. 47
8.3.10 Adjusting the RF frontend attenuation ............................................................ 47
8.4 Controlling data analysis and presentation ............................................................ 47
8.4.1 Overview ........................................................................................................ 47
8.4.2 Selecting the measurement group to display ................................................. 48
8.4.3 Filtering the displayed results by RF phy ........................................................ 49
8.4.4 Filtering the displayed results by RF channel ................................................. 50
8.4.5 Filtering the displayed results by packet length .............................................. 51
8.4.6 Understanding the results table ..................................................................... 52
8.4.7 Controlling the graphical data ........................................................................ 53
8.4.8 Screen update period ..................................................................................... 59
8.5 Adjusting test limits ............................................................................................... 59
8.6 Saving and restoring settings ................................................................................ 60
8.7 Saving current results table and graphics ............................................................. 60
8.8 Notes on measured quantities............................................................................... 61
4 TLF3000 Sapphire Reference Manual V1.4
Page 5

TELEDYNE LECROY
8.8.1 Power measurements .................................................................................... 61
8.8.2 Modulation measurements ............................................................................. 61
8.8.3 Drift and carrier offset measurements ............................................................ 63
8.8.4 In-band emission measurements ................................................................... 63
9 Phy Tester Mode. ......................................................................................................... 64
9.1 Overview ............................................................................................................... 64
9.2 Communicating with the DUT ............................................................................... 65
9.2.1 Overview ........................................................................................................ 65
9.2.2 Hardware connections ................................................................................... 66
9.2.3 Protocol settings ............................................................................................ 66
9.3 DUT supported features ........................................................................................ 67
9.4 RF connections ..................................................................................................... 68
9.5 Run modes and termination criteria ...................................................................... 69
9.5.1 Monitoring activity on the digital IO connector ................................................ 70
9.6 Building a test script .............................................................................................. 71
9.6.1 Overview ........................................................................................................ 71
9.6.2 Test definition window .................................................................................... 71
9.6.3 Selecting the test type .................................................................................... 72
9.6.4 Selecting which channels are tested .............................................................. 75
9.6.5 Selecting which packet lengths are tested ..................................................... 76
9.6.6 Selecting how many packets are used in the test ........................................... 76
9.6.7 Selecting the wanted signal level for receiver tests ........................................ 77
9.6.8 Configuring C/I receiver tests ......................................................................... 80
9.6.9 Configuring blocker receiver tests .................................................................. 87
9.6.10 Configuring receiver intermodulation tests ..................................................... 92
9.6.11 Configuring the receiver PER report integrity tests ......................................... 96
9.6.12 Textual input of test parameters ..................................................................... 96
9.7 Test duplication ..................................................................................................... 97
9.8 Test script window ................................................................................................ 97
9.9 Saving and recalling test scripts ............................................................................ 98
9.10 Running a test script ............................................................................................. 98
9.11 Viewing the results ................................................................................................ 99
9.11.1 Overview ........................................................................................................ 99
9.11.2 Filtering by RF channel number ................................................................... 100
5 TLF3000 Sapphire Reference Manual V1.4
Page 6

TELEDYNE LECROY
9.11.3 Filtering by packet length ............................................................................. 101
9.11.4 Selecting the quantity to be plotted .............................................................. 101
9.11.5 Receiver blocking tests ................................................................................ 105
9.11.6 Receiver intermodulation tests ..................................................................... 106
9.12 Saving results ..................................................................................................... 107
9.13 List of supported tests ......................................................................................... 108
10 Advertise/Scan mode. ............................................................................................ 110
10.1 Overview ............................................................................................................. 110
10.2 RF connections ................................................................................................... 111
10.3 Programming the advertise/scan mode ............................................................... 112
10.3.1 Overview ...................................................................................................... 112
10.3.2 Programming the advertise/scan packets .................................................... 112
10.3.3 Programming the advertising channels to use.............................................. 114
10.3.4 Programming the number of packets to transmit .......................................... 115
10.3.5 Programming the transmitter measurements to be performed ..................... 116
10.3.6 Programming the packet transmission levels ............................................... 117
10.3.7 Programming the termination criterion ......................................................... 119
10.3.8 Programming the test limits .......................................................................... 120
10.3.9 Setting the RF input port .............................................................................. 120
10.3.10 Adjusting the RF frontend attenuation ...................................................... 120
10.4 Controlling data analysis and presentation .......................................................... 121
10.4.1 Overview ...................................................................................................... 121
10.4.2 Selecting the measurement group to display ............................................... 122
10.4.3 Filtering the displayed results by RF advertising channel ............................. 123
10.4.4 Filtering the displayed results by signal transmission level ........................... 124
10.4.5 Understanding the results table ................................................................... 125
10.4.6 Controlling the graphical data ...................................................................... 126
10.4.7 Screen update period ................................................................................... 130
10.5 Saving and restoring settings .............................................................................. 131
10.6 Saving current results table and graphics ........................................................... 131
11 Standalone Mode ................................................................................................... 131
11.1 Overview ............................................................................................................. 131
11.2 Connectivity ........................................................................................................ 131
11.3 Memory stick contents ........................................................................................ 132
6 TLF3000 Sapphire Reference Manual V1.4
Page 7

TELEDYNE LECROY
11.3.1 Generating the Moreph30.rfcapp file ............................................................ 133
11.3.2 Generating the Sapphire.sta file ................................................................... 133
11.3.3 Standalone test script file format .................................................................. 133
11.4 Control ................................................................................................................ 134
12 Native Language Programming .............................................................................. 134
7 TLF3000 Sapphire Reference Manual V1.4
Page 8

TELEDYNE LECROY
2 Overview.
TLF3000 is a wideband, ultra-high dynamic range 2.4 GHz software-defined receiver, signal
analyzer and signal generator. It captures and analyzes the entire 2402-2480 MHz band
simultaneously. It can also generate arbitrary waveforms occupying the band 2395-2485
MHz with a maximum peak level of 0 dBm. Additionally, it includes a CW signal generator
covering 25MHz to 6GHz with an output level of -50 dBm to -28 dBm
Sapphire is a Bluetooth® 5 LE application for the TLF3000 software-defined receiver, signal
analyzer and signal generator. The Sapphire application can:
1. Perform all phy level tests as specified in Bluetooth Low Energy RF Phy Test
Specification (with minor restrictions). Testing beyond the limits of the specification is
also supported.
2. Act as a signal generator, creating all necessary signals for receiver testing including
signals outside the specification as well as supplemental data for AoA/AoD testing.
Signals as weak as -120 dBm can be generated for testing long range modes.
3. Act as a signal analyzer, performing transmitter tests on conducted or off-air signals
without knowledge of the payload format or hopping sequence. Test coverage
includes AoA/AoD supplemental data.
4. Generate advertising or scan request packets to provoke activity from items on a
production line and analyze the captured packets.
The application has been honed for speed. The ability to perform in-band emission tests
over the entire 2.4 GHz band in just a few milliseconds is particularly impressive. T h is is
possible due to TLF3000unique parallel architecture.
A key feature of the unit is its ability to perform C/I, receiver selectivity and intermodulation
tests without the need for additional test equipment. This is possible due to TLF3000 ultralinear wideband signal generator. This permits both wanted and interfering signals to be
generated through the same signal path. The high linearity and low noise floor ensure that
there is ample dynamic range to encompass both the wanted and interfering signals.
Furthermore, high fidelity filtering of the interfering signals ensures that they are correctly
bandlimited and that unwanted sidebands are not responsible for test failures; this is
frequently overlooked when external test equipment is used to provide these signals. The
single signal path also removes the need for time consuming and laborious calibration of
signal combiners as well as eliminating the need to ensure that the injected interfering and
wanted signals do not generate intermodulation products before arriving at the DUT.
Unique to TLF3000 is a 25 MHz t o 6 GHz signal generator. This enables the majority of the
receiver blocking performance to be explored prior to committing the DUT for formal
inspection at a test house with its associated costs.
8 TLF3000 Sapphire Reference Manual V1.4
Page 9

TELEDYNE LECROY
Control method
Interface
USB
Ethernet
Digital IO
Native language
Sapphire GUI
Standalone
The Sapphire application is highly parameterised, permitting it to be configured for different
scenarios. For example:
1. The unit will function with arbitrary access addresses, allowing multiple devices to be
tested simultaneously without cross-talk.
2. The unit may be controlled directly from a host machine via USB or Ethernet, or
operated stand-alone with digital IO used to start, stop and report test results.
3. The DUT may be controlled directly from the unit or via a common host platform.
3 Control.
3.1 Overview
Sapphire can be controlled in three ways:
Table 1: Methods of Controlling Sapphire
3.2 Native language
The TLF3000 supervisor program and Sapphire application can be controlled via a simple
native language. The native language provides a convenient means of controlling Sapphire
for high level host languages, such as Python. The native language exposes all the features
supported by Sapphire.
The native language relies on three control channels:
1. Command Control channel. Transfers commands from the host to Sapphire.
2. Command Response channel. Contains the response from Sapphire for the
command issued on the Command Control channel. There is one response for every
command issued.
3. Data channel. Transfers asynchronous data from Sapphire to the host.
If a USB interface is used, then these three channels map to three USB endpoints. If an
Ethernet interface is used, then the first two channels map to one TCP/IP socket whilst the
data channel maps to a second TCP/IP socket.
It is possible to utilise both the USB and Ethernet interfaces simultaneously.
9 TLF3000 Sapphire Reference Manual V1.4
Page 10

TELEDYNE LECROY
Mode
DUT control
Test control
Tx Test
Rx Test
Phy layer
Serial
Script
Signal generator
None
User
Signal analyzer
None
User
Advertise/Scan
None
Signalling
Standalone
Serial
Digital IO
3.3 Sapphire GUI
A GUI is shipped with the Sapphire application. This permits the application to be controlled
via a host running Windows, Linux or OS X. The GUI connects to the TLF3000 either over
USB or Ethernet. The GUI exposes the majority of the Sapphire functionality.
The GUI may also be used to generate test script files in a format which can be used by
native language programs.
3.4 Standalone
By placing the Sapphire image on a USB memory stick and attaching it to the TLF3000 USB
port, it is possible to run Sapphire without the need for a host computer. In this mode of
operation, the test script to be executed is contained on the USB memory stick. Control of
Sapphire is accomplished by toggling digital IO and pass/fail results are communicated back
by Sapphire setting digital IO.
4 Operating Modes.
4.1 Overview
Sapphire has five operating modes:
Table 2: Sapphire operating modes overview.
4.2 Phy layer tester
The phy layer mode executes tests in accordance with the Bluetooth 5 LE RF Phy Test
Specification. The tests to be performed are entered into a script which is then executed by
Sapphire. The DUT is automatically controlled by Sapphire via a serial interface.
All tests are fully parameterised, permitting exploration of margi n against the Bluetooth 5
specification or datasheet figures.
4.3 Signal Generator
The signal generator mode permits manual control over all the signal sources used in the
Bluetooth 5 LE RF Phy Test Specification. Any combination of the following signals can be
generated simultaneously:
10 TLF3000 Sapphire Reference Manual V1.4
1. Packetized LE test signal
Page 11

TELEDYNE LECROY
2. Continuously modulated GFSK signal
3. In-band CW signal
4. Out-of-band CW signal.
All signal sources are fully parameterised.
4.4 Signal Analyzer
The signal analyzer mode monitors all 40 LE channel simultaneously. Any packets which
match a specified access address are captured and analyzed in accordance with the
Bluetooth 5 LE RF Phy Test Specification. Tests include the in-band emissions test, which
can be completed in as little as 2.5 ms.
If the captured packet is not a standard test packet, then an ‘off-air’ mode can be selected
which performs accurate approximations to the standard Bluetooth 5 LE RF tests but which
is agnostic to the packet payload. This permits RF test to be performed on live links.
The signal analyzer mode also permits the capture of raw IQ data.
4.5 Advertise/Scan
The advertise/scan mode permits RF testing of devices when there is no access to either
HCI or direct test mode. In this mode of operation, the DUT is provoked by Sapphire issuing
advertising or scan request packets. The sensitivity of the DUT can be deduced from the
signal level required to provoke a response, whilst the transmitter quality is ascertained by
analysing the packets sent by the DUT.
4.6 Standalone
The standalone mode permits Sapphire to be run without a USB or Ethernet connection. In
this mode of operation, the Sapphire image and test script are held on a memory stick which
is attached to the USB port of the TLF3000. The supervisor program on the TLF3000 will
automatically launch the Sapphire application which will then execute the test script held on
the memory stick. Control of the Sapphire application and signalling of pass/fail are
accomplished by the use of digital IO.
5 Launching the Sapphir e GUI.
In order to communicate with the TLF3000 unit, it is necessary to attach it to a host computer
via USB or Ethernet (or both). An Ethernet connection is only possible if the host computer
and TLF3000 unit reside on the same subnet. The TLF3000 IP address can be changed by
connecting it to a host computer via USB and using the Application Loader.
To launch the Sapphire GUI it is first necessary to run Application Loader. This should result
in the following screen being displayed:
11 TLF3000 Sapphire Reference Manual V1.4
Page 12
TELEDYNE LECROY
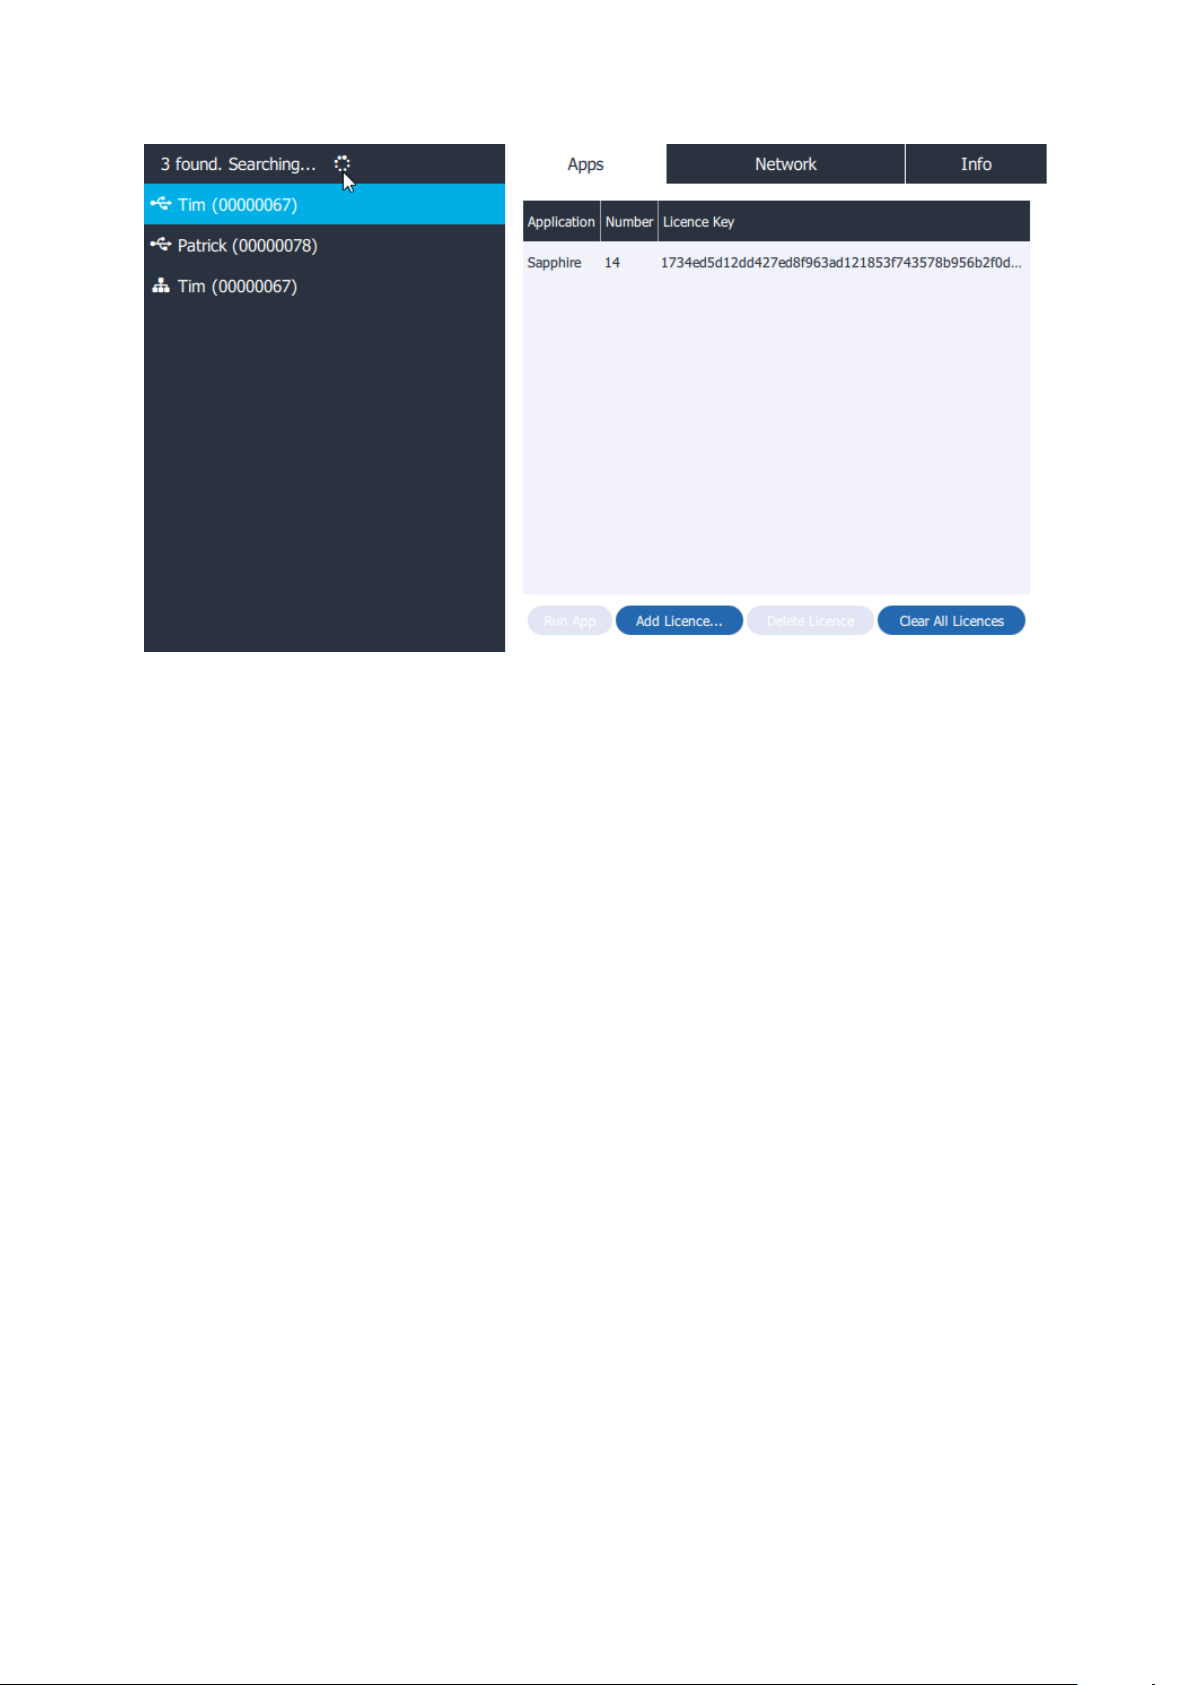
Figure 1: Application Loader main screen.
This screen indicates that the following TLF3000 devices have been discovered:
1. Serial number 00000067 connected via USB (highlighted)
2. Serial number 00000078 connected via USB
3. Serial number 00000067 connected via Ethernet (this device is shown twice)
The right hand side of the window has three tabs:
1. Apps. Shows which applications are licensed to run on this unit. It also permits the
loading of new licence keys.
2. Network. Shows the current network settings and permits these to be modified.
3. Info. Provides more information about the unit and permits the unit’s friendly name to
be modified. It also provides a means of updating the firmware on the unit.
To launch the Sapphire application open the “Apps” tab and then either:
1. Double click on the Sapphire application
2. Highlight the Sapphire application and then click the “Run App” button.
On launching the application, the searching cursor should stall, the fan on the TLF3000 unit
will start to spin and after a few seconds the Sapphire GUI will load.
6 Anatomy of the Sapphir e GUI.
6.1 Overview
The Sapphire GUI is composed of the following elements:
12 TLF3000 Sapphire Reference Manual V1.4
Page 13
TELEDYNE LECROY
1. A tool bar along the top of the window
2. A monitor panel to the right of the window
3. A status bar at the bottom of the window
4. Mode tabs located immediately underneath the tool bar
5. A mode control panel to the left of the window
6. A graphics area
7. A scripting/tabular results area below the graphics area
Figure 2: Sapphire GUI
6.2 Toolbar
The toolbar contains the following elements:
6.2.1 Open and save
Opens and loads a settings file. Settings are saved individually for each mode of
operation. The appropriate settings file is automatically selected on the basis of the
current mode tab.
13 TLF3000 Sapphire Reference Manual V1.4
Page 14

TELEDYNE LECROY
Saves the settings or results. Settings are saved individually for each mode of operation.
The choice as to whether settings or results are saved is determined by the file extension
which is selected. This tool can also be used to save test scripts in the format required
by the native programming language.
6.2.2 Screen capture
Saves the current graphics area as an image file. A variety of image file formats are
supported.
Takes a screen shot of the GUI and saves as an image file. A variety of image file
formats are supported.
6.2.3 Zooming
Activates the cross-hair cursor which permits zooming within in the graphics area.
Depress the left mouse button whilst dragging the cursor to select the area to be
displayed. Clicking the right mouse button within the graphics area will give a list of
additional zoom options.
Zooms out within the graphics area. Clicking the right mouse button within the graphics
area will give a list of additional zoom options.
Pans within the graphics area. Hold down the left mouse button and drag to pan
anywhere within the graphics display.
14 TLF3000 Sapphire Reference Manual V1.4
Page 15
TELEDYNE LECROY
Pans along the x-axis within the graphics area. Hold down the left mouse button and
drag horizontally. This is particularly useful for examining long waveforms.
Pans along the y-axis within the graphics area. Hold down the left mouse button and
drag vertically.
6.2.4 Run and clear
Causes the currently selected mode to run. NOTE: the signal generator will not output
energy until this is clicked.
Stops the currently selected mode running. A running operation will automatically be
aborted if a different mode of operation is selected.
Clears the current results history. Not applicable in signal generator mode.
6.2.5 Help
Displays the online documentation in a pop-up window.
Displays version information.
15 TLF3000 Sapphire Reference Manual V1.4
Page 16

TELEDYNE LECROY
6.2.6 Exit
6.3 Monitor panel
6.3.1 Overview
The purpose of the monitor panel is to permit the user to quickly ascertain whether:
1. There is RF energy being emitted from the unit
2. There is RF energy being received by the unit
Whenever the unit or DUT appears to be unable to receive, the monitor panel should always
be the first item to examine. Many problems can be quickly resolved with the information that
it displays.
The monitor panel also determines which RF port is being used and provides manual control
of the receiver front-end attenuation (not accessible in phy tester mode).
6.3.2 Output power
The output power gauge shows the energy being emitted by the TLF3000. The gauge is only
approximate and should not be used for accurate measurements.
The red arc indicates the overload region. If an overload does occur, this will be evident by
the ‘Output Power (dBm)’ label turning red and a warning message being displayed in the
status bar.
The output power gauge only shows the energy being emitted within the 2.4 GHz ISM band.
Energy from the out-of-band CW blocker is not included, even if its frequency lies within the
2.4 GHz ISM band.
6.3.3 Input power
The input power gauge shows the energy incident on the selected TLF3000 input port. The
gauge is only approximate and should not be used for accurate measurements.
The red arc indicates the overload region. If an overload does occur, this will be evident by
the ‘Input Power (dBm)’ label turning red and a warning message being displayed in the
status bar. It may be possible to remove a receiver overload condition by:
1. Adding additional receiver front-end attenuation using the control at the bottom of the
monitor panel (not accessible in phy tester mode)
16 TLF3000 Sapphire Reference Manual V1.4
Page 17

TELEDYNE LECROY
2. Swapping to the ‘Tx/Rx’ RF port ff the ‘Monitor In’ RF port is being used. It is also
necessary to indicate which RF port is being used by setting the switch at the bottom
of the monitor panel.
The input power gauge only shows energy within the 2.4 GHz ISM band. F-bar filters at the
front of the receiver chain ensure other energy is eliminated and cannot block the receiver.
6.3.4 Input port
The input port switch selects which of the two RF input ports will be used:
1. The ‘Monitor In’ port is suitable for off-air monitoring and has a noise figure of 6 dB.
In benign environments no additional receiver front-end attenuation should be
required. However, in environments with strong Wi-Fi activity, it may be necessary to
add receiver front-end attenuation to prevent overload conditions.
2. The ‘T x/Rx’ port is suitable for conducted measurements. If the DUT is capable of
outputting more than +10 dBm, it may be necessary to add receiver front-end
attenuation to prevent overloading the receiver.
6.3.5 Input attenuation
These controls are used to select the receiver front-end attenuation. The attenuation may be
adjusted by:
1. Moving the slider
2. Using the up/down arrows on the spin box
3. Typing a numeric value into the spin box text area
The available attenuation range is 0 to 31.5 dB in steps of 0.5 dB.
6.4 Status bar
6.4.1 Overview
The status bar at the bottom of the window is divided into three areas:
1. Overload indicator
2. DUT connection status
3. Error message text
6.4.2 Overload indicator
The overload indicator will turn red when an overload condition occurs on either the transmit
output or the selected receiver input port. The text of the message will indicate where the
overload condition is occurring.
17 TLF3000 Sapphire Reference Manual V1.4
Page 18

TELEDYNE LECROY
6.4.3 DUT connection status
The DUT connection status message indicates whether the Sapphire application believes it
currently has communication with a DUT via a serial interface.
6.4.4 Error message text
The error message text reflects the last error detected by the Sapphire application running
on the TLF3000unit. This message is cleared when either the ‘Run’ or ‘Clear’ buttons are
pressed, or when a different operating mode is selected.
6.5 Mode tabs
The operating mode is selected by the tabs immediately underneath the tool bar. The
following operating modes can be selected:
1. Phy tester
2. Signal generator
3. Signal analyzer
4. Advertise/Scan
In addition, it is possible to display a page showing the health of the TLF3000 unit.
Whenever a new mode of operation is selected, any currently running tests are aborted.
6.6 Mode control panel
For each operating mode, a mode control panel is displayed to the left of the window. This
panel allows the user to define the parameters for the current operating mode. The contents
of the mode control panel are mode-specific.
In the case of the phy tester, signal analyzer and advertise/scan modes, the mode control
panel is divided into two tabs:
1. Collection. This tab contains parameters which determine what data will be collected
and how it will be collected.
2. Analysis. This tab contains parameters which determine how results from the
collected data will be displayed.
6.7 Graphics area
For the phy tester, signal analyzer and advertise/scan modes of operation, a graphical
representation of the results are displayed in the graphics area. Which results are displayed
and how they are displayed are determined by the settings in the “Analysis” tab on the mode
control panel.
18 TLF3000 Sapphire Reference Manual V1.4
Page 19

TELEDYNE LECROY
For the signal generator mode, the graphics area provides a visual indication of which
signals have been programmed. Note that the graphics area only shows what has been
programmed; to make the programmed signals appear at the transmitter port, the ‘Play’
button within the tool bar must be activated.
6.8 Scripting/tabular results area
In the phy tester mode, the region below the graphics area is used for construc ting and
displaying test scripts. This area also indicates whether the tests have been run, and if so,
whether they passed or failed.
In the signal analyzer and advertise/scan modes, the region below the graphics is used to
display tabular results. Which results are displayed is determined by settings on the
‘Analysis’ tab in the mode control panel. The results tables also contain test limits which can
be adjusted by the user. Tests that fail the limits are highlighted. The contents of the
graphics display area can also be controlled by highlighting rows within the results table.
The scripting/tabular results area is not used in signal generator mode.
7 Signal Generator Mode.
7.1 Overview
The signal generator is able to produce any combination of the following signals:
1. Packetized LE test signal
2. Continuously modulated GFSK signal
3. In-band CW signal
4. Out-of-band CW signal.
The mode control panel on the left hand side of the screen lists the signals which can be
gener ated. The switch to the left of the signal name programs the signal on or off. Although a
signal may be programmed on, no output is generated from the unit until the ‘Play’ button in
the tool bar is activated.
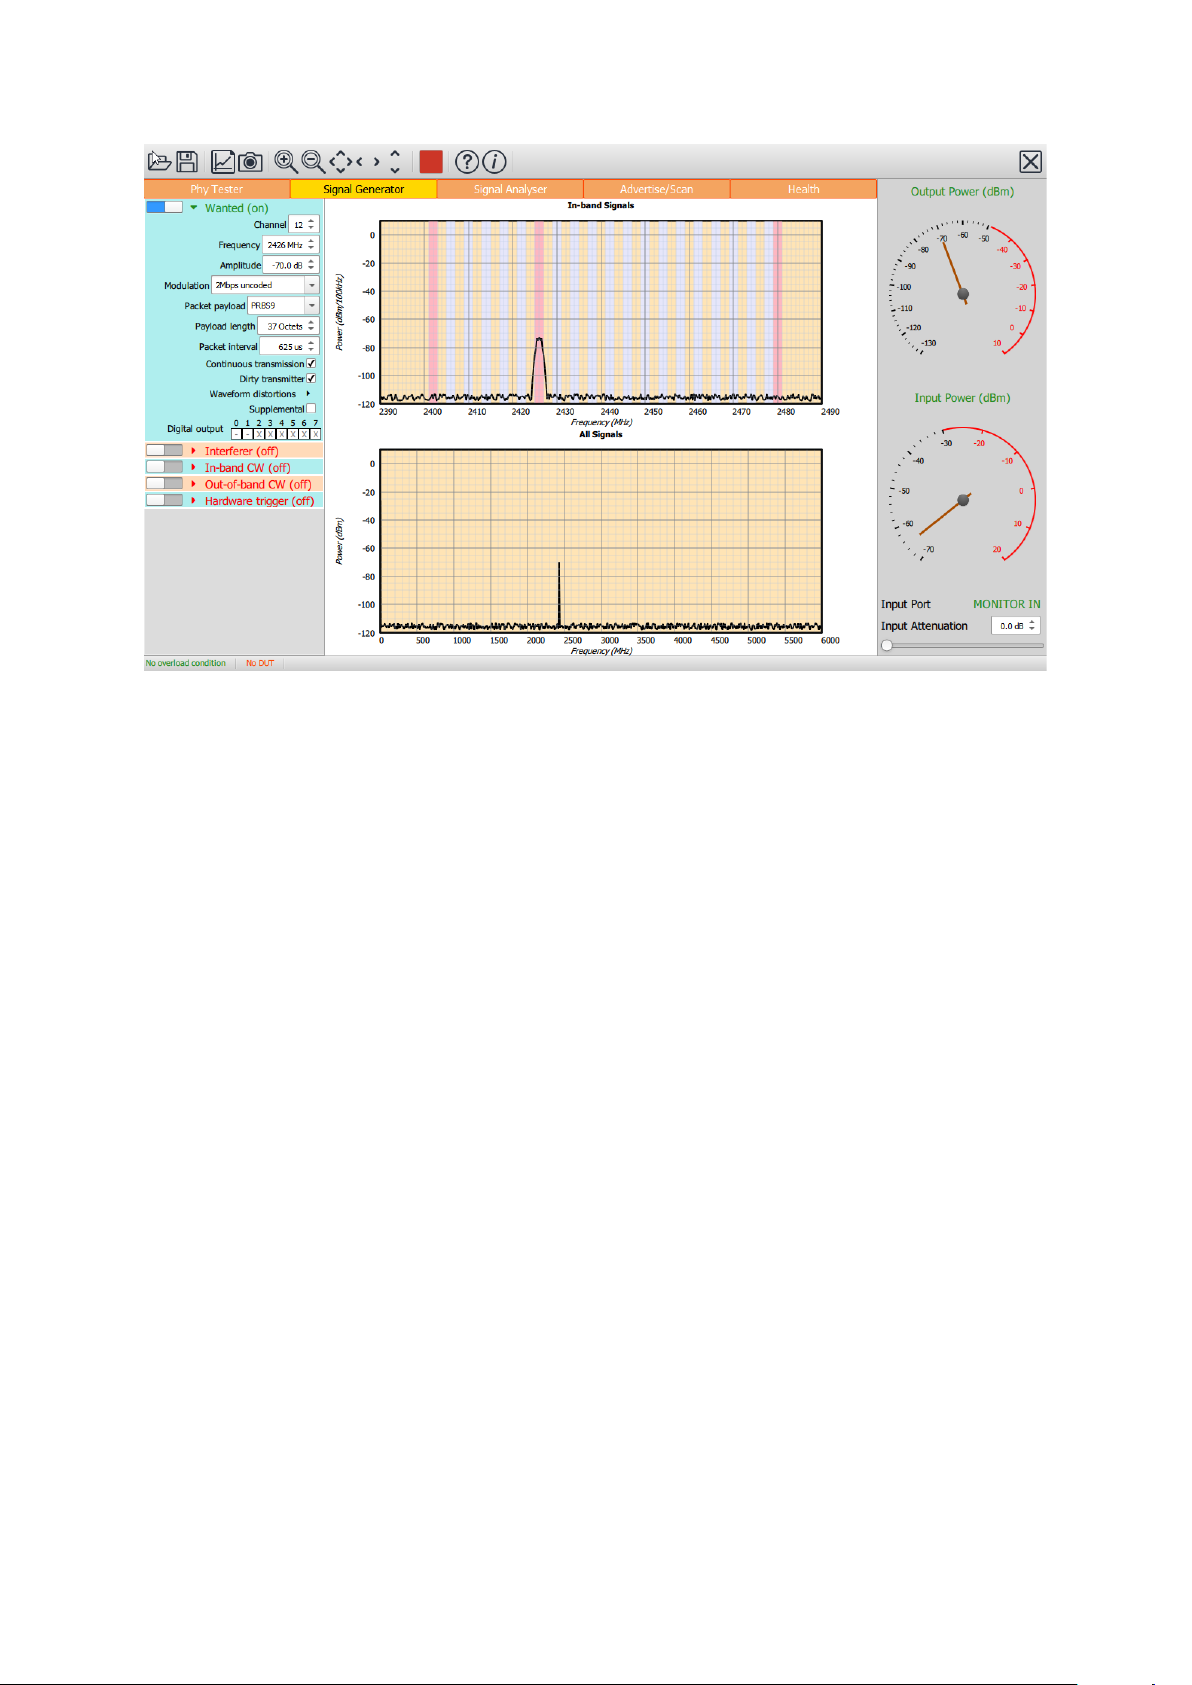
The top graph in the graphics window shows a symbolic representation of signals generated
within the 2.4 GHz ISM band. The graphics assume a resolution bandwidth of 100 kHz,
hence the displayed levels for modulated signals will be slightly lower than their programmed
levels. The LE channels are emphasised by alternating colour bars. Advertising channels are
further highlighted.
The bottom graph in the graphics window shows a symbolic representation of the signals
generated between DC and 6 GHz. The graphics assume a resolution bandwidth greater
than modulation bandwidth, hence all signals appear at their programmed levels.
19 TLF3000 Sapphire Reference Manual V1.4
Page 20
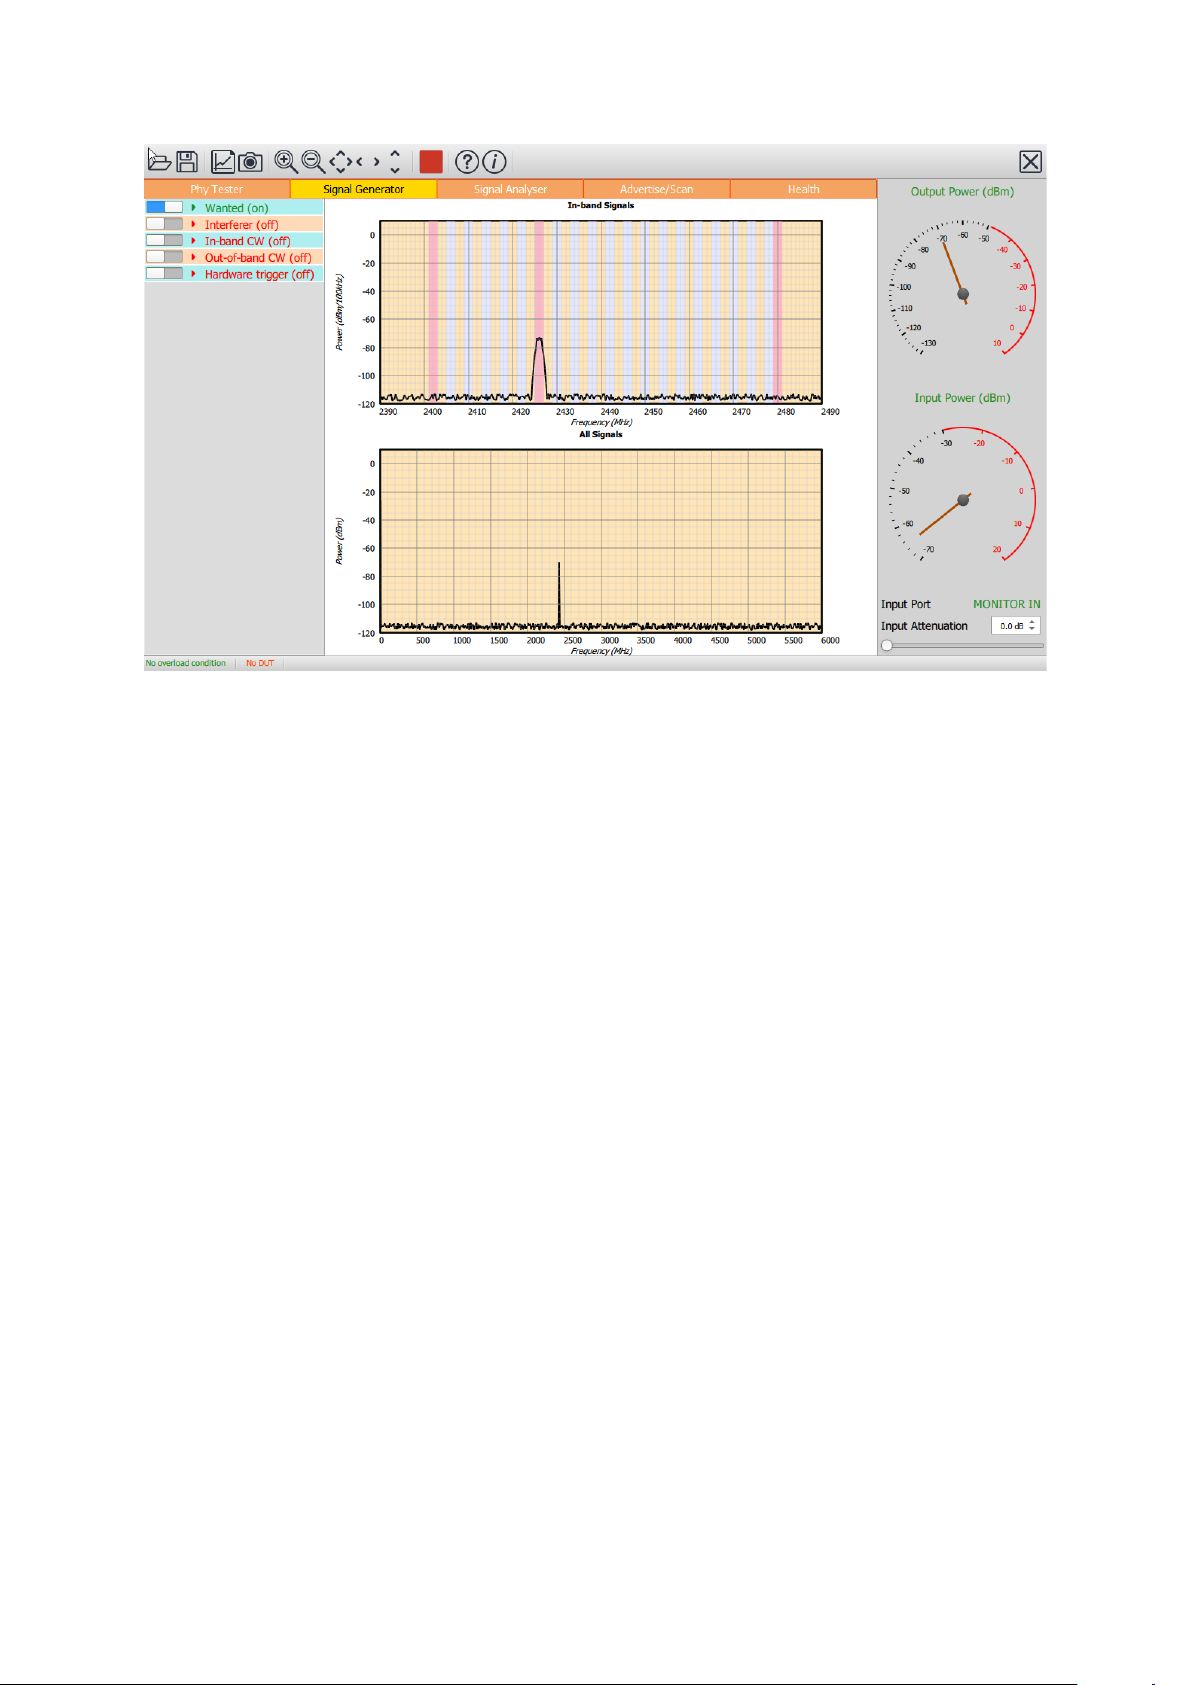
TELEDYNE LECROY
Figure 3: Sapphire GUI in signal generator mode.
7.2 RF connections
The signal generator output is on the Tx/Rx port.
7.3 Programming the packetized LE signal
7.3.1 Overview
Many of the parameters governing the packetized LE signal are programmable, however,
the access address is fixed at the test address of 0x71764129. If greater flexibility in defining
a packetized LE signal is required, then the user should use Tanzanite, a LE Traffic
Generator application compatible with TLF3000.
To turn the packetized LE signal on or off, toggle the switch to the left of the ‘Wanted’ text.
To program the packetized LE signal, expand the ‘Wanted’ signal menu by clicking on it:
20 TLF3000 Sapphire Reference Manual V1.4
Page 21
TELEDYNE LECROY
Figure 4: Programming the packetized LE signal.
7.3.2 Carrier frequency
The frequency of the carrier can be set to anyone of the 40 LE channels either by:
1. Using the channel number spin box
2. Using the frequency spin box
As with all spin boxes, adjustment can be performed either by using the up/down arrows or
by entering a numeric value into the text field.
7.3.3 Amplitude
The amplitude of the wanted signal can be adjusted from -120 dBm to 0 dBm. The total
combined output power of the unit within the 2.4 GHz ISM band is 0 dBm. Therefore, if other
signals are active, the maximum output power for the wanted signal will be reduced to
maintain the peak output power within the 0dBm limit.
7.3.4 Modulation
The modulation may be set to anyone of the Bluetooth 5 LE RF phys:
1. 2 Mbps, GFSK
2. 1 Mbps, GFSK
3. 500 kbps, s=2 spreading, GFSK
4. 125 kbps, s=8 spreading, GFSK
21 TLF3000 Sapphire Reference Manual V1.4
Page 22

TELEDYNE LECROY
b7 b6 b5 b4 b3 b2 b1
b0
Payload
0 0 0 0 0 0 0 0
PRBS9
0 0 0 0 0 0 0 1
11110000
0 0 0 0 0 0 1 0
10101010
0 0 0 0 0 0 1 1
PRBS15
0 0 0 0 0 1 0 0
11111111
0 0 0 0 0 1 0 1
00000000
0 0 0 0 0 1 1 0
00001111
0 0 0 0 0 1 1 1
01010101
The 1 Mbps, 500 kbps & 125 kbps signals are all bandlimited to 2 MHz, whilst the 2 Mbps
signals are bandlimited to 4 MHz.
Each packet has a power ramp time of 2 µs followed by 2 µs of unmodulated carrier prior to
the preamble. At the end of each packet there is a further 2 µs of unmodulated carrier prior
to a 2 µs ramp down. These parameters are in full compliance with the Bluetooth 5 LE RF
PHY Test Specification.
Modulation index, carrier offset, drift, drift rate and symbol timing can all be adjusted by
enabling the dirty transmitter mode.
If the modulation scheme is changed to or from 2 Mbps, then the packet interval may be
automatically updated.
7.3.5 Payload
The packet payload can be set to any one of the following (least significant bit first):
1. PRBS9 sequence, as defined in the Direct Test Mode section of the Bluetooth 5 Core
Specification
2. 11110000 repeated
3. 10101010 repeated
4. 11111111 repeated
5. 00000000 repeated
6. 00001111 repeated
7. 01010101 repeated
8. PRBS15 sequence, as defined in the Direct Test Mode section of the Bluetooth 5
Core Specification
The choice of payload also defines the first octet of the packet header:
Table 3: Choice of payload defining first octet of the packet header.
If other payloads are required, then the user should use Tanzanite, a Bluetooth LE traffic
generator application compatible with TLF3000.
22 TLF3000 Sapphire Reference Manual V1.4
Page 23

TELEDYNE LECROY
7.3.6 Payload length
The payload length can be adjusted between 0 and 255 octets. Altering the payload length
may result in the packet interval changing. If the packet length exceeds the packet interval,
then the packet interval will be rounded up to the next multiple of 625 µs.
7.3.7 Packet interval
The minimum packet interval is dependent on both the payload length and the modulation
scheme. For a 2 Mbps packet with no payload, the minimum packet interval is 74 µs. The
maximum packet interval is 100 ms.
The packet interval may change automatically if either the payload length or the modulation
scheme is changed. If this occurs, then the packet interval will be set the lowest multiple of
625 µs which encompasses the entire packet.
7.3.8 Packet count
The signal generator can be set to transmit LE packets continuously or a finite number of
packets can be specified. The specification of a finite number of packets is useful if it is
desired to measure the PER on a receiving DUT.
No packets are transmitted from the unit until either:
1. The ‘Run’ button in the tool bar is pressed
2. The ‘Run’ button in the tool bar is pressed and the signal generator is triggered by
toggling lines on its digital interface
If a finite number of packets have been specified, then the signal generator will continue to
run even after the all the packets have been transmitted. To generate another sequence of
packets it is necessary to either:
1. Stop the signal generator by activating the ‘Stop’ button in the tool bar and then
restarting the signal generator using the ‘Run’ button
2. Toggling digital lines to stop the generator and then toggling digital lines to restart the
signal generator
The minimum number of packets which can be set is 1. If not in continuous mode, the
maximum number of packets which can be sent is 63500.
7.3.9 Dirty transmitter
7.3.9.1 Overview
By selecting dirty transmitter mode, it is possible to control:
1. Modulation index
2. Carrier offset
3. Carrier drift magnitude
23 TLF3000 Sapphire Reference Manual V1.4
Page 24

TELEDYNE LECROY
4. Carrier drift rate
5. Symbol timing error
The carrier drift is applied in accordance with the Bluetooth 5 LE RF Phy Test Specification:
1. The carrier drift at the start of each packet is zero
2. The carrier drift follows a sinusoidal variation whose frequency is determined by the
drift rate parameter
3. The magnitude of the sinusoidal variation is determined by the drift magnitude
parameter
4. Successive packets have the sign of the carrier drift reversed
The GUI holds two different sets of waveform distortions. One set is applied to 2 Mbps
modulated waveforms whilst the other set is applied to 1 Mbps, 500 kbps & 125 kbps
modulated waveforms.
Clicking on the ‘Waveform distortions’ button will pop-up the dirty transmitter dialog which
displays the waveform distortion table which is currently in use:
Figure 5: Dirty transmitter dialogue box displaying the waveform distortion table currently in
use.
The transmitted signal is divided into groups of 50 packets. The first 50 packets are
transmitted using the distortions defined in the first row of the waveform distortion table, the
second 50 packets are transmitted using the distortions defined in the second row of the
waveform distortion table, etc. Once all the rows in the waveform distortion table have been
exhausted, the first row is reused.
Each individual distortion specified in the waveform distortion table can be adjusted using
the associated spin box, either by using the up/down arrows or by entering a numeric value
into the text field. The parameters can be varied over the following ranges:
24 TLF3000 Sapphire Reference Manual V1.4
Page 25

TELEDYNE LECROY
Parameter
2 Mbps
1 Mbps, 500 kbps & 125
kbps
Carrier offset
±500 kHz
±250kHz
Modulation index
0.4 to 0.6
0.4 to 0.6
Drift magnitude
±150 kHz
±78 kHz
Drift rate
0 to 2440 Hz
0 to 2440 Hz
Symbol timing error
±100 ppm
100 ppm
Table 4. Ranges over which the transmit distortions may be varied.
7.3.9.2 Editing the waveform distortion table
A row in the table can be selected by left or right clicking on the packet group number in the
first column. Once a row in the packet group table has been selected, an edit menu can be
popped-up by right clicking anywhere in the selected row.
The edit row permits the following operation to be performed:
1. Copy. The contents of the selected row are copied into the waveform distortion
clipboard
2. Paste. The contents of the waveform distortion clipboard are copied into the selected
row (this option is only available if the waveform distortion clipboard is not empty)
3. Remove. The selected row is deleted from the waveform distortion table.
4. Clear All. The entire waveform distortion table is deleted. Once the table has been
cleared, a new entry can be inserted by clicking immediately underneath the table
header.
5. Insert above. A new entry is inserted above the selected row. The new entry has no
distortions and a modulation index of 0.5.
6. Insert below. A new entry is inserted below the selected row. The new entry has no
distortions and a modulation index of 0.5.
7. Duplicate. The selected row is duplicated.
A new row can be inserted at the end of the waveform distortion table by clicking
immediately below the last row. The new entry has no distortions and a modulation index of
0.5.
7.3.9.3 Dirty transmitter dialog buttons
The buttons along the bottom of the dirty transmitter dialog perform the following functions:
1. Reset. The contents of the waveform distortion table are reset to the values they held
when the dirty transmitter dialog was popped up and all edits are discarded.
2. Restore defaults. The contents of the waveform distortion table are reset to the
values specified in the Bluetooth 5 LE RF Phy Test Specification.
3. Apply. The current contents of the waveform distortion table will be used for all future
transmissions and the dirty transmitter dialog is closed.
25 TLF3000 Sapphire Reference Manual V1.4
Page 26

TELEDYNE LECROY
4. Cancel. Any edits to the waveform distortion table are discarded and the dirty
transmission dialog is closed. All future transmissions will use the waveform
distortions which were present prior to the dirty transmitter dialog being popped-up.
5. Open. The waveform distortion table will be loaded from an XML file.
6. Save. The currently displayed waveform distortion table will be saved to an XML file.
7.3.10 Supplemental
7.3.10.1 Overview
If “Supplemental” is selected then a supplemental will be added to the end of the packet. For
AoD operation, the supplemental phase is modulated to simulate the switching between
antenna. It is possible to control:
1. Supplemental length
2. AoA or AoD mode
3. Length of switching slots
4. Antenna switching pattern
5. Number of antenna
6. Antenna phases (as seen by the DUT)
Abrupt switching between the transmit antenna would result in large sidebands being
imposed on the wanted signal. The Sapphire application avoids the introduction of
sidebands of modulating the amplitude of the signal during the switching slots as well as the
phase. As a consequence, a 1 Mbps signal with supplemental remains within a 2 MHz
bandwidth, whilst a 2 Mbps signal with supplemental remains within a 4 MHz bandwidth. The
Sapphire application is able to perform 180° phase shifts between successive transmit
antenna whilst maintaining these bandwidths.
Clicking on the “Antenna phases” button will pop-up the antenna phases dialog which
displays current supplemental definition. The dialog includes a graph showing how the
transmitter phase will be modulated over the length of the supplemental.
26 TLF3000 Sapphire Reference Manual V1.4
Page 27
TELEDYNE LECROY
Figure 6: Supplemental Antenna Selection
7.3.10.2 Editi ng the supplemental parameters
The length of the supplemental is defined by a spin box showing the length in 8 µs slots. The
minimum length is 2 x 8 µs slots (guard interval + reference interval + switching/sampling
slots) and the maximum length is 20 x 8 µs slots.
The slot type can be toggled between ‘A’ and ‘B’ by clicking on the displayed slot type. Type
‘A’ slots are 1 µs long (i.e. 1 µs switch and 1 µs sample) whilst type ‘B’ are 2 µs long (i.e. 2
µs switch and 2 µs sample).
The mode of operation can be set to either AoA or AoD. Switching between modes is
achieved by clicking on the displayed mode. If AoA is selected, then the phase of the
27 TLF3000 Sapphire Reference Manual V1.4
Page 28

TELEDYNE LECROY
supplemental is not modulated and the only relevant parameter is the supplemental length.
In this instance all other parameters in the dialog are hidden.
In AoD mode the number of transmit antenna can be selected using a spin box. The
minimum number permissible is 2 and the maximum 63. If the number of sampling slots is
less than the number of antenna, then not all antennas will be used.
The antenna switching pattern can be toggled between ‘A’ and ‘B’ by clicking on the
displayed pattern. Antenna switching pattern ‘A’ corresponds to the sequence:
1 2 3 4 . . . 1 2 3 4 . . . 1 2 3 4 . . .
whilst antenna switching pattern ‘B’ corresponds to the sequence:
1 2 3 4 . . . n-4 n-3 n-2 n-1 n n-1 n-2 n-3 n-4 . . . 4 3 2 1 2 3 4 . . .
7.3.10.3 Editi ng the antenna phases
A spin box is displayed for each antenna phase. The antenna phases are entered in units of
degrees. Any value from -360° to +360° can be entered.
For short supplemental lengths or large numbers of transmit antenna, there may be more
transmit antenna than sampling slots. In this instance not all the transmit antenna may be
used.
7.3.10.4 Antenna phases dialog buttons
The buttons along the bottom of the antenna phases dialog perform the following functions:
1. Reset. All supplemental parameters and antenna phases are reset to the values they
held when the antenna phases dialog was popped up and all edits are discarded.
2. Restore defaults. The supplemental parameters and antenna phases are reset to RF
Creations default values.
3. Apply. The current supplemental parameters and antenna phases will be used for all
future transmissions and the antenna phases dialog is closed.
4. Cancel. Any edits to the supplemental parameters or antenna phases are discarded
and the antenna phases dialog is closed. All future transmissions will use the
supplemental parameters and antenna phases which were present prior to the
antenna phases dialog being popped-up.
5. Open. The supplemental parameters and antenna phases will be loaded from an
XML file.
6. Save. The currently displayed supplemental parameters and antenna phases will be
saved to an XML file.
7.3.11 Digi tal output
To enable other test equipment to be synchronised with Sapphire’s transmissions, it is
possible to toggle digital output lines when a packet is being transmitted. The selected lines
will be low between transmissions and go high during the transmission.
28 TLF3000 Sapphire Reference Manual V1.4
Page 29
TELEDYNE LECROY
The TLF3000 unit has 8 digital output lines. Lines 2 to 7 are available for signalling packet
transmission. Lines are selected by toggling ‘X’ to ‘1’ in the appropriate box.
If a digital output line is specified as monitoring both wanted signal transmissions and
modulated interferer transmissions, then the state of the line is the logical OR of the two
signals.
The IO voltage for the lines may be either:
1. An internal 3.3 V generated supply
2. An external supply in the range 1.2 V to 5.0 V
The selection of the IO voltage is performed under ‘Hardware trigger’
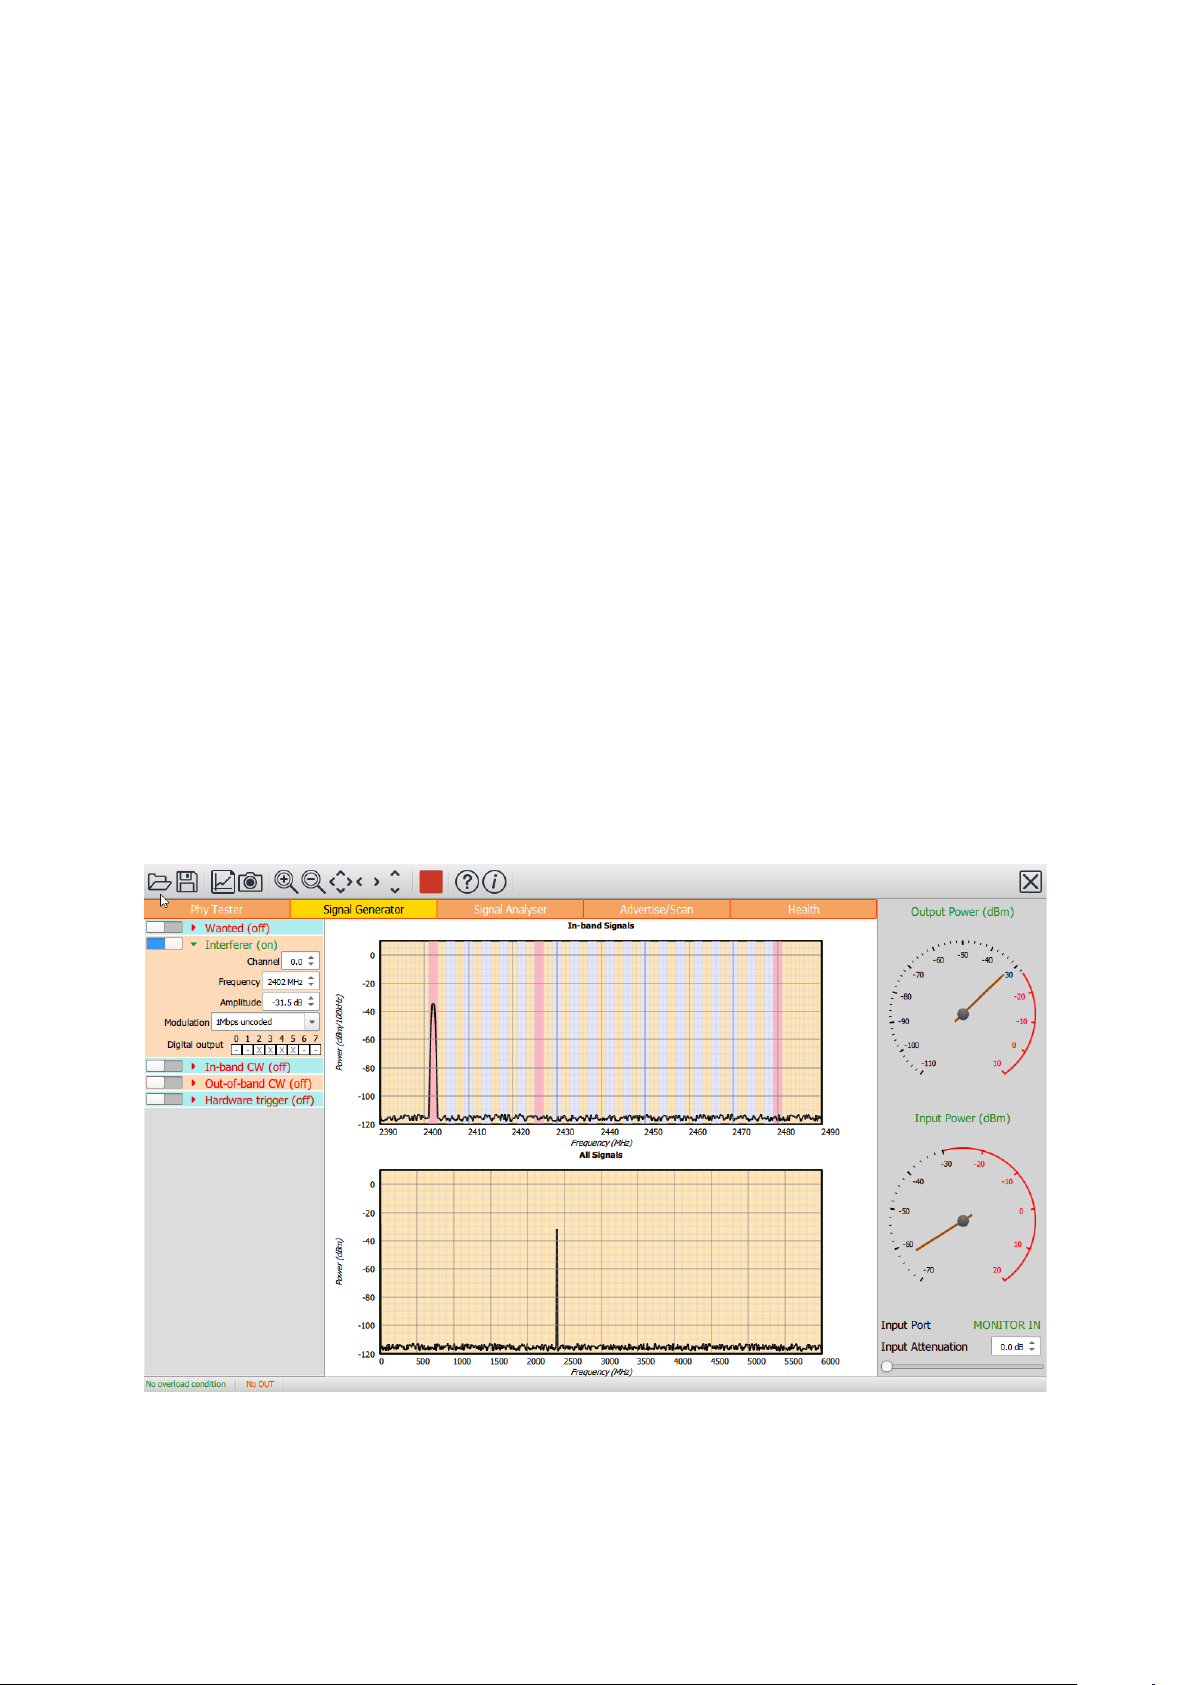
7.4 Programming the modulated interferer signal
7.4.1 Overview
Sapphire can generated a continuously modulated interferer signal. This signal is required to
perform receiver C/I and intermodulation tests.
To turn the modulated interferer signal on or off, toggle the switch to the left of the ‘Interferer’
text.
To program the modulated interferer signal, expand the ‘Interferer’ signal menu by clicking
on it:
Figure 7: Programming the modulated interferer signal.
29 TLF3000 Sapphire Reference Manual V1.4
Page 30

TELEDYNE LECROY
7.4.2 Carrier frequency
The frequency of the carrier can be set by:
1. Using the channel number spin box
2. Using the frequency spin box
As with all spin boxes, adjustment can be performed either by using the up/down arrows or
by entering a numeric value into the text field.
If 1 Mbps, 500 kbps or 125 kbps modulation is selected, then the carrier frequency can be
set to any integer MHz between 2395 MHz and 2485 MHz inclusive. Odd MHz frequencies
do not coincide with LE channels, so are donated by LE channels plus 0.5. Channel
numbers are extended beyond the range 0 to 40 to encompass frequencies outside the
range 2402 to 2480 MHz.
If 2 Mbps modulat ion is selected, then the carrier frequency can be set to any value between
2396 MHz and 2486 MHz inclusive, in steps of 2 MHz. Channel numbers are extended
beyond the range 0 to 40 to encompass frequencies outside the range 2402 to 2480 MHz.
If the receiver intermodulation tests are being performed on channels near the band edges,
then the required frequency for the modulated interferer signal may fall outside the 24022480 MHz band. For large values of the frequency separation parameter ‘n’ (as defined in
the Bluetooth 5 LE RF Phy Test Specification), the required frequency may also fall outside
the 2395MHz to 2485MHz range supported by the Sapphire application. Under these
circumstances it will not be possible to perform the intermodulation test. This is one of two
areas where the test coverage of the Sapphire application is not compliant with the Bluetooth
5 LE RF Phy Test Specification. However, the intermodulation test has to be performed with
the interfering signals both above and below the wanted signal. The Sapphire application
can always perform the test cases where the interferer signals lie within the 2.4 GHz band.
When the interfering signals lie outside the 2.4 GHz band, it is highly likely that they will
suffer some attenuation from the receiver’s front-end filtering. Therefore it is unlikely that a
device will pass the intermodulation test when the interfering signals lie within the 2.4 GHz
band, but fail when the interfering signals lie outside the 2.4 GHz band.
7.4.3 Amplitude
The amplitude of the modulated interferer signal can be adjusted from -120 dBm to 0 dBm.
The total combined output power of the unit within the 2.4 GHz ISM band is 0 dBm.
Therefore, if other signals are active, the maximum output power for the modulated interferer
signal will be reduced to maintain the peak output power within the 0 dBm limit.
7.4.4 Modulation
The modulation may be set to anyone of the Bluetooth 5 LE RF phys:
1. 2 Mbps, GFSK
2. 1 Mbps, GFSK
30 TLF3000 Sapphire Reference Manual V1.4
Page 31

TELEDYNE LECROY
3. 500 kbps, s=2 spreading, GFSK
4. 125 kbps, s=8 spreading, GFSK
The 1 Mbps, 500 kbps & 125 kbps signals are all bandlimited to 2 MHz, whilst the 2 Mbps
signals are bandlimited to 4 MHz. T he suppression of sidebands outside the band limit is
extremely high. This is essential to ensure that the wanted signal is not being swamped by
sidebands from the modulated interfering signal during C/I tests.
If the modulation is changed to 2 Mbps, then the carrier frequency will automatically be
altered if it is not a multiple of 2 MHz.
No transmitter distortions are applied to the modulated interfering signal. To apply
transmitter distortions to the interfering signal, use Tanzanite, the TLF3000 Bluetooth LE
traffic generator application.
7.4.5 Digital output
To enable other test equipment to be synchronised with Sapphire’s transmissions, it is
possible to toggle digital output lines when the modulated interferer signal is being
transmitted. The selected lines will be low prior to transmission and go high during the
transmission.
The TLF3000unit has 8 digital output lines. Lines 2 to 7 are available for signalling
modulated interferer transmission. Lines are selected by toggling ‘X’ to ‘1’ in the appropriate
box.
If a digital output line is specified as monitoring both wanted signal transmissions and
modulated interferer transmissions, then the state of the line is the logical OR of the two
signals.
The IO voltage for the lines may be either:
1. An internal 3.3 V generated supply
2. An external supply in the range 1.2 V to 5.0 V
The selection of the IO voltage is performed under ‘Hardware trigger’
7.5 Programming the in-band CW signal
7.5.1 Overview
Sapphire can generate an in-band (i.e. 2395 MHz to 2485 MHz) CW interferer signal. This
signal is required to perform receiver intermodulation tests.
To turn the in-band CW interferer signal on or off, toggle the switch to the left of the ‘In-band
CW’ text.
To program the in-band CW interferer signal, expand the ‘In-band CW’ signal menu by
clicking on it:
31 TLF3000 Sapphire Reference Manual V1.4
Page 32

TELEDYNE LECROY
Figure 8: Programming the in-band CW interferer signal.
7.5.2 Frequency
The frequency of the in-band CW interferer signal can be set by:
1. Using the channel number spin box
2. Using the frequency spin box
As with all spin boxes, adjustment can be performed either by using the up/down arrows or
by entering a numeric value into the text field.
The frequency can be set to any integer MHz between 2395 MHz and 2485 MHz inclusive.
Odd MHz frequencies do not coincide with LE channels, so are donated by LE channels plus
0.5. Channel numbers are extended beyond the range 0 to 40 to encompass frequencies
outside the range 2402 to 2480 MHz.
7.5.3 Amplitude
The amplitude of the in-band CW interferer signal can be adjusted from -120 dBm to 0 dBm.
The total combined output power of the unit within the 2.4 GHz ISM band is 0 dBm.
Therefore, if other signals are active, the maximum output power for the in-band CW
interferer signal will be reduced to maintain the peak output power within the 0dBm limit.
32 TLF3000 Sapphire Reference Manual V1.4
Page 33

TELEDYNE LECROY
7.6 Programming the out-of-band CW signal
Sapphire can generate an out-of-band CW interferer signal. This signal is required to
perform receiver blocking tests.
To turn the out-of-band CW interferer signal on or off, toggle the switch to the left of the ‘Outof-band CW’ text.
To program the out-of-band CW interferer signal, expand the ‘Out-of-band CW’ signal menu
by clicking on it:
Figure 9: Programming the out-of-band CW interferer signal.
7.6.1 Frequency
The frequency of the out-of-band CW interferer signal can be set by using the frequency spin
box. The frequency can be set to any integer MHz between 24 MHz and 6 GHz.
The Bluetooth 5 LE RF Phy Test Specification requires that the blocker frequency be swept
from 30 MHz to 12.75 GHz. The Sapphire application cannot provide the blocker frequencies
above 6 GHz. The 6 GHz upper limit does encompass the second harmonic of the 2.4 GHz
band, therefore it is unlikely that a device which passes the blocking test below 6 GHz will
fail above 6 GHz. However, this one of the two areas where the test coverage of the
Sapphire application does not meet the full Bluetooth 5 LE RF Phy Test Specification.
7.6.2 Amplitude
The amplitude of the out-of-band CW interferer signal can be adjusted from -50 dBm to -28
dBm.
33 TLF3000 Sapphire Reference Manual V1.4
Page 34

TELEDYNE LECROY
The amplitude of the out-of-band CW interferer signal does not impact the maximum
amplitude of the in-band signals. The energy of the out-of-band CW interferer signal is
excluded from the power indicated by the ‘Output power’ gauge in the monitor panel.
7.7 Hardware trigger
7.7.1 Overview
The signal generator output can be started or stopped by toggling the ‘Play’ button on the
toolbar. It is also possible to start or stop the signal generator by toggling digital input lines.
This feature is useful if the signal generator must be synchronised with other test equipment.
To enable control of the signal generator from the digital input lines, toggle the switch to the
left of the ‘Hardware trigger’ text.
To program the hardware trigger feature, expand the ‘Hardware trigger’ menu by clicking on
it:
Figure 10: Programming the hardware trigger feature.
7.7.2 Starting the signal generator via digital input lines
The hardware trigger menu contains an item labelled ‘Start’, to the right of which is a table of
two rows and 8 columns. Each column in the table represents a digital input line. The top
row in the table indicates the state the digital input lines must be in prior to the signal
generator starting. The bottom row in the table indicates the state the digital input lines must
be in after the signal generator has started. A ‘0’ indicates the corresponding line must be
34 TLF3000 Sapphire Reference Manual V1.4
Page 35

TELEDYNE LECROY
low, a ‘1’ indicates the line must be high and an ‘X’ indicates ‘don’t care’. If the digital input
lines transition from a state which matches the ‘before’ row to a state which matches the
‘after’ row and the signal generator was in the stopped state, then the signal generator will
be started.
When the digital signal generator is started, all the selected signals are turned on. The signal
generator will then start to issue the specified number of LE packets, if the ‘Wanted’ signal
has been selected.
7.7.3 Pausing the signal generator via digital input lines
The hardware trigger menu contains an item labelled ‘Pause’, to the right of which is a table
of two rows and 8 columns. Each column in the table represents a digital input line. The top
row in the table indicates the state the digital input lines must be in prior to the signal
generator pausing. The bottom row in the table indicates the state the digital input lines must
be in after the signal generator has paused. A ‘0’ indicates the corresponding line must be
low, a ‘1’ indicates the line must be high and an ‘X’ indicates ‘don’t care’. If the digital input
lines transition from a state which matches the ‘before’ row to a state which matches the
‘after’ row and the signal generator was in the running state, then the signal generator will be
paused.
When the digital signal generator is paused, all the selected signals are turned off. If the
‘Wanted’ signal has been selected, then the number of LE packets already transmitted is
remembered.
7.7.4 Resuming the signal generator via digital input lines
The hardware trigger menu contains an item labelled ‘Resume’, to the right of which is a
table of two rows and 8 columns. Each column in the table represents a digital input line.
The top row in the table indicates the state the digital input lines must be in prior to the signal
generator resuming. The bottom row in the table indicates the state the digital input lines
must be in after the signal generator has resumed. A ‘0’ indicates the corresponding line
must be low, a ‘1’ indicates the line must be high and an ‘X’ indicates ‘don’t care’. If the
digital input lines transition from a state which matches the ‘before’ row to a state which
matches the ‘after’ row and the signal generator was in the paused state, then the signal
generator will resume operation..
When the digital signal generator resumes operation, all the selected signals are turned on.
If the ‘Wanted’ signal has been selected, then the signal generator will start transmitting the
number of packetized LE signals which were remaining when the previous ‘Pause’ was
issued.
35 TLF3000 Sapphire Reference Manual V1.4
Page 36

TELEDYNE LECROY
7.7.5 Stopping the signal generator via digital input lines
The hardware trigger menu contains an item labelled ‘Stop’, to the right of which is a table of
two rows and 8 columns. Each column in the table represents a digital input line. The top
row in the table indicates the state the digital input lines must be in prior to the signal
generator stopping. The bottom row in the table indicates the state the digital input lines
must be in after the signal generator has stopped. A ‘0’ indicates the corresponding line must
be low, a ‘1’ indicates the line must be high and an ‘X’ indicates ‘don’t care’. If the digital
input lines transition from a state which matches the ‘before’ row to a state which matches
the ‘after’ row then the signal generator will stop, irrespective of the state it was previously in.
When the digital signal generator is stopped, all the selected signals are turned off. If the
‘Wanted’ signal has been selected, then the number of LE packets transmitted is reset to
zero.
7.7.6 Saving and restoring settings
The current collection, analysis and limit settings can be saved by clicking the ‘Save’ button
on the toolbar. Select the ‘Signal generator settings (*.sgs)’ file type to save the current
settings.
An existing signal generator settings file (*.sgs) can be opened using the ‘Open’ button on
the toolbar.
The signal generator settings file (*.sgs) is an XML file. It is not recommended that this file
be edited manually. If it needs to be modified, open it from the signal generator, modify the
required parameters and re-save.
8 Signal Analyzer Mode.
8.1 Overview
In signal analyzer mode, the Sapphire application is able to analyze incoming signals against
the Bluetooth 5 LE RF Phy Specification. The application is able to analyze both conducted
and off-air signals. The analysis can be performed on LE test packets or can be payload
agnostic. All 40 LE channels are monitored simultaneously, as are all four of the LE RF phys
defined in Bluetooth 5. Hence there is no requirement to program the signal analyzer to look
on a specified channel or to look for a specified phy. The signal analyzer accumulates
results separately for each channel, modulation scheme and packet length. This permits the
results to be filtered and displayed in a number of different ways.
The left hand mode control panel is divided into two separate tabs:
1. Collection. This tabs contains the parameters which define which signals will be
collected and processed.
2. Analysis. This tabs contains the parameters which define how the captured results
will be displayed.
36 TLF3000 Sapphire Reference Manual V1.4
Page 37

TELEDYNE LECROY
The central graphics area is used to plot the results in a manner defined by the parameters
under the analysis tab.
Below the analysis tab is a results table which displays statistics of the test quantities
defined in the Bluetooth 5 LE RF Phy Test Specification. These results are filtered by the
parameters set under the ‘Analysis’ tab in the mode control panel. If no results are displayed
this may be because the analysis filter settings are inconsistent with the packet being
received.
The receiver port and front-end attenuation are set using the controls in the monitor panel on
the right hand side of the window.
Data collection is started/stopped by toggling the ‘Play’ button in the toolbar.
The ‘Clear’ button in the toolbar will discard all results which have been collected.
Figure 11: Sapphire GUI signal analyzer mode.
8.2 RF connections
The signal analyzer can monitor signals on either the ‘Tx/Rx’ port or the ‘Monitor In’ port.
See section 8.3.9 on setting the RF input port.
8.3 Programming data collection
8.3.1 Overview
The data to be collected is determined the settings of the parameters under the ‘Collection’
tab of the mode control panel on the left hand side of the window.
37 TLF3000 Sapphire Reference Manual V1.4
Page 38

TELEDYNE LECROY
It is possible to select:
1. Which Bluetooth 5 LE test quantities are to be measured
2. Which Bluetooth 5 LE phys are of interest
3. Which RF channels are of interest
4. Which packet l engths are of interest
5. The access address of the packets to be analyzed
6. Whether the packets to be analyzed are whitened
7. When the data analysis should terminate
38 TLF3000 Sapphire Reference Manual V1.4
Page 39

TELEDYNE LECROY
8.3.2 Programming the measurements to be performed
Sapphire divides the Bluetooth LE RF phy transmitter test measurements into five groups:
1. Power measurements, which includes:
a. P
b. Pk - P
2. Modulation characteristics, which includes:
a. ΔF1
b. ΔF1
c. ΔF2
d. ΔF2
e. ΔF2
f. ΔF2
3. Drift and carrier off set measurements, which includes:
a. Fo
b. F
c. |F
d. |F
e. |F
4. In-band emissions, which includes:
a. Ftx± 2MHz or Ftx±(4,5)MHz for 2 Mbps
b. F
c. Number of exceptions
d. Maximum exception
5. AoA/AoD
avg
avg
max
avg
max
avg
/ ΔF1
avg
99.9%
max
n
– F0 | or |F3 – Fo | for 125 kbps
1
– Fn |
0
– F
n
n-5
± (3+n)MHz or Ftx±(6+n)MHz for 2 Mbps
tx
avg
| or |Fn – F
| for 125 kbps
n-3
Each of these groups of measurements can be individually selected under the ‘Collect’ menu
of the ‘Collection’ tab.
If the ‘waveform’ item is selected, then raw IQ data for the last packet analyzed is also
saved. The raw IQ data is 32x oversampled, as per the Bluetooth 5 LE RF Phy Test
Specification. Although it is possible to alter the oversampling ratio using the native
language, this is currently not supported in the Sapphire GUI. If the ‘waveform’ item is
selected, the volume of data which needs to be transferred to the host is large. This may
have an impact on the rate at which packets can be analyzed. If it is important to analyze
packets as fast as possible, then it is advisable to disable collection of raw IQ data.
The Bluetooth 5 LE RF Phy Test Specification requires the use of test packets. These
packets have the 0x71764129 access address, a predefined header and one of 8 possible
payloads. To enable less restrictive testing, Sapphire supports an ‘Off-air’ analysis mode.
The ‘Off-air’ analysis mode is header and payload agnostic, but still provides good
approximations to the quantities defined in the Bluetooth 5 LE RF Phy Test Specification.
The ‘Off-air’ mode also performs analyzes of the packet’s preamble, access address,
header, payload and CRC. Any LE packet can be analyzed in the ‘Off-air’ mode. The ‘Off-air’
mode does impose a greater processing load on the TLF3000 unit.
39 TLF3000 Sapphire Reference Manual V1.4
Page 40

TELEDYNE LECROY
Results for the “Off-air” mode are held separately from those of the conventional test packet
mode. If both off-air and conventional test packet results have been collected, make sure
that analysis tab ‘Off-air’ mode has been set accordingly to ensure the anticipated results are
displayed.
Figure 12: Sapphire GUI signal analyzer mode.
8.3.3 Programming which RF Phys to collect
The ‘Modulation’ menu permits selection of which RF Phys are to be collected and
processed. One or more of the following can be selected:
1. 2 Mbps, GFSK
2. 1 Mbps, GFSK
3. 500 kbps, s=2 spreading, GFSK
4. 125 kbps, s=8 spreading, GFSK
The results for each RF Phy are accumulated separately.
40 TLF3000 Sapphire Reference Manual V1.4
Page 41

TELEDYNE LECROY
Figure 13: Programming which RF phys to collect.
8.3.4 Programming which RF channels to collect
The ‘Channel’ menu permits the RF channels on which data is to be collected and
processed to be defined. Note: these are RF channel numbers, not LE channel indices.
The required RF channels can be selected by either:
1. Ticking the individual channel boxes
2. Using the quick channel group selection buttons:
a. Clear all
b. Select all
c. Primary advertising
d. Data/Secondary advertising
3. Entering a textual description
The textual description must be of the form:
: a
, b
: b
: b
a
start:astep
stop
start
step
stop
, …
This implies that all channels from a
channels from b
is unity, then a
If a
step
is equal to a
If a
step
start
to b
stop
in steps of b
stop
start:astep
then a
: a
can be abbreviated toa
stop
start:astep
start
: a
to a
step
stop
in steps of a
stop
will be selected, plusall
step
, etc.
: a
start
stop
can be abbreviated toa
.
start.
41 TLF3000 Sapphire Reference Manual V1.4
Page 42

TELEDYNE LECROY
Figure 14: Programming which RF channels to collect.
8.3.5 Programming which packet lengths to collect
The ‘Packet length’ menu permits the LE packet lengths for which data is to be collected and
processed to be defined.
Due to memory restrictions, individual packet lengths cannot be specified. Instead, the range
of possible packet lengths is divided up into 32 groups, each group spanning 8 contiguous
packet lengths.
The required packet lengths are selected by ticking the corresponding boxes. If all packet
lengths are of interest, then clicking t h e ‘All’ box at the bottom of the menu will select all
packet length groups.
42 TLF3000 Sapphire Reference Manual V1.4
Page 43

TELEDYNE LECROY
Figure 15: Programming which packet lengths to collect.
8.3.6 Programming which acc ess ad dr e ss to co llect
Sapphire’s signal analyzer will only collect and process packets with a specified access
address. The access address to use is defined under the ‘Access Address’ menu.
Changing the access address can be useful under the following circumstances:
1. When it is necessary to collect and analyze off-air packets
2. When multiple test units are running simultaneously on a production line or
characterisation rig and it is desired to minimise cross-interference
Note that Sapphire completely decouples the use of the test access address (0x71764129)
from the contents of the packet. Sapphire can analyze any packet with the test access
address, or can analyze test packet with access addresses other than the test access
address.
The access address menu allows direct selection of either the advertising access address of
the test access address through check boxes. It is also possible to enter an arbitrary access
address by directly editing the text field at the bottom of the menu. Sapphire does not make
any checks between the arbitrary access address entered by the user and the constraints on
access addresses set out in the Bluetooth 5 Core Specification.
43 TLF3000 Sapphire Reference Manual V1.4
Page 44

TELEDYNE LECROY
Figure 16: Programming which access address to collect.
8.3.7 Programming de-whitening of the packet
The Bluetooth 5 RF Phy Test Specification uses un-whitened test packets with the test
access address (0x71764129). However, if it is desired to analyze packets off-air, it is likely
that these will have had whitening applied. It is therefore necessary to inform the Sapphire
data collection whether to expect whitened or un-whitened packets.
The selection of whether to process the packets as whitened or un-whitened is done via the
single checkbox under the ‘Dewhitening’ menu.
44 TLF3000 Sapphire Reference Manual V1.4
Page 45

TELEDYNE LECROY
Figure 17: Programming de-whitening of the packet.
8.3.8 Programming the termination criterion
Once the signal analyzer has been started by toggling the ‘Play’ button in the toolbar, it will
continue to collect, process and display data until either:
1. The ‘Stop’ button in the toolbar is toggled
2. The stop condition has been set to ‘Stop on test failure’ and a test limit is failed
The ‘Stop on test failure’ condition is set by the single checkbox under the ‘Stop condition’
menu.
The test limits are shown in the results table. The penultimate column of the results table
displays the lower limit and the final column the upper limit. They can be altered by changing
the values in the spin boxes, either by using the up/down arrows or by entering numeric text
directly.
Some limit values are shared between different modulation schemes whilst others are
specific to a modulation scheme. The table below shows whether limits values are shared or
are specific for each test category and modulation scheme:
45 TLF3000 Sapphire Reference Manual V1.4
Page 46

TELEDYNE LECROY
Test
Modulation
2 Mbps
1 Mbps
500 kbps
125 kbps
Power
Shared
Shared
Shared
Shared
Modulation
2Mbps specific
Shared
Shared
125 kbps
specific
Drift & car rier
offset
Shared
Shared
LR specific
LR specific
In-band
emissions
2 Mbps
specific
Shared
Shared
Shared
Table 4: Table expressing whether limits values are shared or specific for each test category
and modulation scheme.
The limit values shown in the results table apply to the modulation scheme currently selected
in the ‘Modulation’ menu under the ‘Analysis’ tab.
When a limit fail is detected, and the stop condition has been set to ‘Stop on test failure’,
then the GUI will automatically alter its graphics and tabular display to reflect the quantity
that failed. It is possible that a rogue packet will fail more than one test limit, so the data
displayed may only partially reflect the reason why the packet failed.
If waveform collection has been enabled under the ‘Collect’ menu, then the IQ data
displayed refers to the packet which failed. This provides an invaluable mechanism for
catching rogue packets, particularly when monitoring links off-air, and then determining
where in the packet the problem occurred.
46 TLF3000 Sapphire Reference Manual V1.4
Figure 18: Programming the termination criterion.
Page 47

TELEDYNE LECROY
8.3.9 Selecting the RF input port
The signal analyzer can monitor signals on either the ‘Monitor In’ RF port or the ‘Tx/Rx’ RF
port. The selection of which port is used is made clicking the port displayed towards the
bottom of the monitor panel.
The Monitor In port is designed for monitoring signals off-air. The Tx/Rx por t is designed for
conducted measurements.
If the monitor panel shows a lack of RF input energy, check that the DUT is connected to the
same RF port as selected by the label at the bottom of the monitor panel.
8.3.10 Adjusting the RF frontend attenuation
The RF frontend attenuation is set via either:
1. The slider at the bottom of the monitor panel
2. The spin box at the bottom of the monitor panel
The RF frontend attenuation can be set between 0 and 31.5 dB in steps of 0.5 dB.
To set the RF attenuation, the ‘Input Power’ gauge on the monitor panel must be examined.
This shows both the current input signal level (the position of the needle) and the point at
which saturation of the TLF3000 receiver will occur (the red arc). The RF attenuation should
be adjusted such that the input signal level is just below the saturation level.
If too little attenuation is applied, then there is a danger that the TLF3000 receiver will be
overloaded. An overload condition on the receiver is indicated by:
1. The needle on the ‘Input Power’ gauge on the monitor panel entering the region of
the red arc (the input power measurement is only approximate so this is only a rough
guide)
2. The title of the ‘Input Power’ gauge on the monitor panel turning red
3. The text ‘Rx overload’ appearing in red within the status bar at the bottom of the
window
If too much attenuation is applied, then the test results may become unreliable. In order to
calculate the frequency deviation within a packet, an FM demodulation process is employed.
The quality of the output of the FM demodulation process is critically dependent on the
signal-to-noise ratio of the signal at the input to the demodulator. If too much attenuation is
applied, then the signal to be analyzed will be pushed down towards the TLF3000 receiver
noise floor and the accuracy of the test results will be compromised.
8.4 Controlling data analysis and presentation
8.4.1 Overview
The Sapphire application accumulates results independently for each:
1. LE RF phy
47 TLF3000 Sapphire Reference Manual V1.4
Page 48

TELEDYNE LECROY
2. LE RF channel
3. Packet length group
In addition, results are accumulated separately for the ‘Off-air’ mode. The ‘Analysis’ tab in
the mode control panel determines how these results are filtered and displayed. If no results
are displayed, then it is possible that the current analysis filter does not correspond to any of
the packets which have been collected.
The ‘Measurement’ menu under the ‘Analysis’ tab determines which group of measurements
will be displayed.
The displayed results are filtered according to the settings of the ‘Modulation’, ‘Channel’ and
‘Packet length’ menus.
The graphics area shows a plot of one of the test quantities. This may be selected either
through the ‘Plot’ menu or by highlighting a row in the results table. The ‘Plot’ menu also
defines the format of the plot.
The results table shows the filtered results for the selected measurement group. It also
contains the test limits.
8.4.2 Selecting the measurement group to display
Sapphire divides the Bluetooth LE RF phy transmitter test measurements into five groups:
1. Power measurements, which includes:
a. P
b. Pk - P
2. Modulation characteristics, which includes:
a. ΔF1
b. ΔF1
c. ΔF2
d. ΔF2
e. ΔF2
f. ΔF2
3. Drift and carrier offset measurements, which includes:
a. Fo
b. F
c. |F
d. |F
e. |F
4. In-band emissions, which includes:
a. Ftx± 2MHz or Ftx±(4,5)MHz for 2 Mbps
b. F
c. Number of exceptions
d. Maximum exception
5. AoA/AoD
avg
avg
max
avg
max
avg
/ ΔF1
avg
99.9%
max
n
– F0 | or |F3 – Fo | for 125 kbps
1
– Fn |
0
– F
n
n-5
± (3+n)MHz or Ftx±(6+n)MHz for 2 Mbps
tx
avg
| or |Fn – F
| for 125 kbps
n-3
48 TLF3000 Sapphire Reference Manual V1.4
Page 49

TELEDYNE LECROY
The Sapphire GUI displays the results from just one of these measurement groups at any
one time. The selection of which measurement group to display is accomplished through the
‘Measurement’ menu under the ‘Analysis’ tab.
The Sapphire application stores results separately for the ‘Off-air’ mode. The ‘Off-air’ check
box in the ‘Measurement’ menu is used to select results which were collected in the ‘Off-air’
mode.
If no results are displayed, then it is possible that no packets have been received or that the
analysis measurement group selected is incompatible with the choice of collection
measurement group(s).
Figure 19: Selecting the measurement group to display.
8.4.3 Filtering the displayed results by RF phy
The displayed results are filtered by the RF phy. Only the results from one RF phy can be
displayed at any one time. This restriction is due to the fact that different test limits are
applicable to the different RF phys.
The RF phy filter is accessible from the ‘Modulation’ menu under the ‘Analysis’ tab. There is
a separate checkbox for each RF phy.
49 TLF3000 Sapphire Reference Manual V1.4
Page 50

TELEDYNE LECROY
Figure 20: Filtering displayed results by RF phy.
8.4.4 Filtering the displayed results by RF channel
The displayed results can be filtered by RF channel number. This facility may be useful
when monitoring a live link and it is suspected that there is a problem with packet transfer on
a particular RF channel. It also provides a simple means of comparing test results on
different RF channels.
The RF channels used to filter the results are selected via the ‘Channel’ menu under the
‘Analysis’ tab. Note that the filtering is by RF channel number and not LE channel index.
The required RF channels can be selected by either:
1. Ticking the individual channel boxes
2. Using the quick channel group selection buttons:
a. Clear all
b. Select all
c. Primary advertising
d. Data/Secondary advertising
3. Entering a textual description
The textual description must be of the form:
: a
, b
: b
: b
a
start:astep
stop
start
step
This implies that all channels from a
channels from b
start
to b
stop
, …
stop
start
in steps of b
to a
step
in steps of a
stop
, etc.
will be selected, plusall
step
50 TLF3000 Sapphire Reference Manual V1.4
Page 51

TELEDYNE LECROY
If a
is unity, then a
step
start:astep
: a
can be abbreviated toa
stop
start
: a
stop
.
If a
step
is equal to a
stop
then a
start:astep
: a
can be abbreviated toa
stop
start.
Figure 21: Filtering displayed results by RF channel.
8.4.5 Filtering the displayed results by packet length
The displayed results can be filtered by packet length. This provides a simple facility for
monitoring transmitter quality as a function of packet length.
Due to memory restrictions, individual packet lengths cannot be specified. Instead, the range
of possible packet lengths is divided up into 32 groups, each group spanning 8 contiguous
packet lengths.
The packet length filtering is specified via the ‘Packet length’ menu under the ‘Analysis’ tab.
The required packet lengths are selected by ticking the corresponding boxes. If all packet
lengths are of interest, then clicking t h e ‘All’ box at the bottom of the menu will select all
packet length groups.
51 TLF3000 Sapphire Reference Manual V1.4
Page 52

TELEDYNE LECROY
Figure 22: Filtering displayed result by packet length.
8.4.6 Understanding the results table
The results table contains a summary of the results obtained from the selected
measurement group when filtered by the selected RF phy, RF channel and packet length.
The first column in the table contains the quantities defined in the Bluetooth 5 LE RF Test
Specification which are members of the currently selected measurement group.
The second column in the table contains the number of packets which have contributed to
the results for each measured quantity.
The third and fourth columns contain the minimum and maximum values which have been
observed for each measured quantity.
The fifth column contains the average value of the measured quantity overall packets. If the
units of the measured quantity are dBm or dB, then the average is the average of the dB
values, not an average of the powers or linear ratios.
If the measured quantity is a scalar quantity, i.e. it has a single value per packet, then the
last measured value is displayed in the sixth column.
For scalar quantities with test limits, the lower limit is contained in column seven and the
upper limit in column eight.
52 TLF3000 Sapphire Reference Manual V1.4
Page 53

TELEDYNE LECROY
Figure 23: The results table.
When the selected filters include more than one RF channel or packet length group, then the
displayed values of minimum, maximum and average are the minimum, maximum and
average overall packets which satisfy the selected filtering parameters.
If no measurement is available, then the symbol ‘-’ is used to fill the corresponding table cell.
If a cell exceeds one of its test limits, the n th at cell is highlighted in red.
It is possible to select a row in the table by clicking on it. Once a row has been selected, the
corresponding quantity will be plotted in the graphics areas. The format of the plot is
controlled by the ‘Plot’ menu under the ‘Analysis’ tab.
8.4.7 Controlling the graphical data
8.4.7.1 Overview
The graphical data being displayed is controlled by the ‘Plot’ menu under the ‘Analysis’ tab.
The left hand combo box lists all the quantities which are measured for the current
measurement group (which is selected under the ‘Measurement’ menu of the ‘Analysis’ tab).
These are the same quantities as displayed in the first column of the results table. The
quantity to be plotted can be selected either through the combo box or by highlighting the
appropriate row in the results table.
The right had combo box under the ‘Plot’ menu determines how the measured quantity is to
be plotted. Options may include:
1. vs channel
2. vs RF phy
3. vs packet length group
4. as a histogram
5. vs time (not available for in-band emission measurements)
6. vs frequency (only available for in-band emission measurements)
The screen update period can also be altered via the ‘Plot’ menu.
53 TLF3000 Sapphire Reference Manual V1.4
Page 54

TELEDYNE LECROY
8.4.7.2 vs channel:
The quantity to be plotted is shown as a function of the RF channel number. For each RF
channel the following quantities are displayed:
1. minimum observed value (bottom of pink bar)
2. average value (junction of red and pink bars)
3. maximum observed value (top of red bar)
Figure 24: Results vs channel
8.4.7.3 vs RF phy:
The quantity to be plotted is shown as a function of the RF phy. For each RF phy the
following quantities are displayed:
1. minimum observed value (bottom of pink bar)
2. average value (junction of red and pink bars)
3. maximum observed value (top of red bar)
54 TLF3000 Sapphire Reference Manual V1.4
Page 55

TELEDYNE LECROY
Figure 25: Results vs RF phy.
8.4.7.4 vs packet length group:
The quantity to be plotted is shown as a function of the packet length group. For each packet
length group the following quantities are displayed:
1. minimum observed value (bottom of pink bar)
2. average value (junction of red and pink bars)
3. maximum observed value (top of red bar)
55 TLF3000 Sapphire Reference Manual V1.4
Page 56

TELEDYNE LECROY
Figure 26: Results vs packet length group.
56 TLF3000 Sapphire Reference Manual V1.4
Page 57

TELEDYNE LECROY
8.4.7.5 Histogram
A histogram of the plotted quantity is displayed.
Figure 27: Results plotted as a histogram.
8.4.7.6 vs time
This option is not available for in-band emission tests.
The measured quantity is shown by the blue lines on the plot. The plot corresponds to the
value(s) obtained from the last packet on which the selected quantity was measurable. If
waveform collection has been enabled (‘Collect’ tab, ‘Measurement’ menu) then either the
frequency deviation or the packet power will also be displayed in red. The waveform data will
only be displayed if the quantity to be plotted was measurable on the last received packet.
57 TLF3000 Sapphire Reference Manual V1.4
Page 58

TELEDYNE LECROY
Figure 28: vs time.
8.4.7.7 vsfrequency
This option is only available for in-band emission tests.
When the vsfrequency option is selected for in-band emission tests, additional options
become available:
1. Plotting of the in-band emission results for every MHz in the 2.4 GHz ISM band (1
MHz spectrum)
2. Plotting of the 100 kHz resolution measurements which were summed to yield the inband emission results at every 1 MHz (100 kHz spectr um)
For each spectrum it is possible to plot:
1. Current in-band emission results (orange line)
2. Maximum in-band emission results (red line)
3. Minimum in-band emission results (green line)
58 TLF3000 Sapphire Reference Manual V1.4
Page 59

TELEDYNE LECROY
Figure 29: In-band emissions vs frequency.
8.4.8 Screen update period
The ‘Plot’ menu contains a slider which can be used to alter the rate at which the results
table and graphics are updated.
The fastest update period possible is around 50 ms, typically limited by the host screen
refresh rate. However, if substantial processing is required by Sapphire – for example, the
transfer of raw IQ data at 32x oversampling for a 256 byte 125 kbps packet – then the
specified update rate may not be achievable.
The slowest update rate is 2 seconds. This gives the user time to assimilate the displayed
results and waveform data before the next update.
8.5 Adjusting test limits
The test limits are shown in the results table. The penultimate column of the results table
displays the lower limit and the final column the upper limit. They can be altered by changing
the values in the spin boxes, either by using the up/down arrows or by entering numeric text
directly.
Some limit values are shared between different modulation schemes whilst others are
specific to a modulation scheme. The table below shows whether limit values are shared or
are specific for each test category and modulation scheme:
59 TLF3000 Sapphire Reference Manual V1.4
Page 60

TELEDYNE LECROY
Test
Modulation
2 Mbps
1 Mbps
500 kbps
125 kbps
Power
Shared
Shared
Shared
Shared
Modulation
2 Mbps
specific
Shared
Shared
125 kbps
specific
Drift & carrier
offset
Shared
Shared
LR specific
LR specific
In-band
emissions
2 Mbps
specific
Shared
Shared
Shared
Table 5: Table showing whether limit values are shared or are specific for each test category
and modulation scheme.
The limit values shown in the results table apply to the modulation scheme currently selected
in the ‘Modulation’ menu under the ‘Analysis’ tab.
8.6 Saving and restoring settings
The current collection, analysis and limit settings can be saved by clicking the ‘Save’ button
on the toolbar. Select the ‘Signal analysis settings (*.sas)’ file type to save the current
settings.
An existing signal analysis settings file (*.sas) can be opened using the ‘Open’ button on the
toolbar.
The signal analysis settings file (*.sas) is an XML file. It is not recommended that this file be
edited manually. If it needs to be modified, open it from the signal analyzer, modify the
required parameters and re-save.
8.7 Saving current results table and graphics
The current graph and results table can be saved as an image by clicking the “Graph” button
on the toolbar. The range of possible graphics formats includes:
1. Windows bitmap files (*.bmp)
2. Joint photographic expert group files (*.jpg)
3. Portable network graphics files (*.png)
4. Portable bitmap files (*.pbm)
5. Portable graymap files (*.pgm)
6. Portable pixmap files (*.ppm)
7. X11 bitmap files (*.xbm)
8. X11 pixmap files (*.xpm)
60 TLF3000 Sapphire Reference Manual V1.4
Page 61

TELEDYNE LECROY
Bluetooth 5 RF Phy Test Specification
Sapphire
Output power tests are only specified for
1Mbps packets
Output power tests are available for all
Bluetooth 5 RF phys
Tests should be performed on a spectrum
Tests are performed using the same filters
tests
P
should be measured over at least the
central 60% of the packet
P
is measured over the central 7/8ths of
the packet
Bluetooth 5 RF Phy Test
Specification
Sapphire
Modulation tests are only
& 125 kbps
Modulation tests are available for all Bluetooth 5 RF phys
Oversampling rate at least 32x
Oversampling rate 32x
Filter shape for 1 Mbps & 125
8.8 Notes on measured quantities
8.8.1 Power measurements
analyzer with a 3MHz RBW
avg
as specified for the modulation and drift
avg
Table 6: Power measurements compared between Bluetooth test specification and
Sapphire.
8.8.2 Modulation measurements
specified for 2 Mbps, 1 Mbps
kbps should be at least:
±650 kHz @ -3 dB
±1 MHz @ -14 dB
±2 MHz @ -44 dB
61 TLF3000 Sapphire Reference Manual V1.4
Page 62

TELEDYNE LECROY
Filter for 1 Mbps & 125 kbps to
Filter shape for 2 Mbps should
Filter for 2 Mbps to have less
have less than 0.5 dB peak-topeak ripple between ±550 kHz
be at least:
±1.3 MHz @ -3 dB
±2 MHz @ -14 dB
±4 MHz @ -44 dB
than 0.5 dB peak-to-peak
ripple between ±1.1 MHz
Table 7: Modulation measurements compared between Bluetooth test specification and
62 TLF3000 Sapphire Reference Manual V1.4
Sapphire.
Page 63

TELEDYNE LECROY
Bluetooth 5 RF Phy Test
Specification
Sapphire
Drift and carrier offset tests are only
specified for 2Mbps, 1Mbps & 125kbps
Drift and carrier offset tests are available for all
Bluetooth 5 RF phys
Specifications for measurement filters
See filters defined for modulation
measurements.
Bluetooth 5 RF Phy Test
Specification
Sapphire
Modulation tests are only
specified for 2 Mbps & 1 Mbps
Modulation tests are available for all Bluetooth 5 RF phys
RBW of 100 kHz
Accurate Gaussian response with 3 dB bandwidth of 100
Average detector
Sweep time of 100 ms
Assuming 400 points per sweep for a spectrum analyzer
typical of the period when the Bluetooth specification was
The ΔF2
packet on which this quantity could be calculated to ΔF1
avg
/ ΔF1
current entry in the results table shows the ratio of ΔF2
avg
for the last packet on which this
avg
for the last
avg
quantity could be calculated, with the restriction that both packets had the same RF phy, RF
channel and lay in the same packet length group. The maximum, minimum and average
values of ΔF2
avg
/ ΔF1
are updated whenever a new value of ΔF2
avg
avg
/ ΔF1
can be
avg
calculated.
The ΔF2
99% current entry in the results table shows the frequency corresponding to the
max
99.9 percentile for all ΔF2 measurements made over all packets collected. The maximum,
minimum and average values are updated at the end of each packet. TheΔF2
99% value
max
will only be displayed once at least 100 ΔF2 measurements have been made.
8.8.3 Drift and carrier offset measurements
Table 8: Drift and carrier offset measurements compared between Bluetooth test
specification and Sapphire.
8.8.4 In-band emission measurements
kHz
63 TLF3000 Sapphire Reference Manual V1.4
Page 64

TELEDYNE LECROY
first written, this gives an averaging time of 2.5 ms per
point
Maximum hold over 10
Maximum hold starts prior to the packet power ramp up
down or 2.5 ms, whichever is longer.
sweeps
Table 9: In-band emission measurements compared between Bluetooth test specification
The maximum exception row in the results table will only indicate exceptions that exceed the
-20 dBm absolute limit.
and continues until the end of the packet power ramp
and Sapphire.
9 Phy Tester Mode.
9.1 Overview
In phy tester mode, the Sapphire application directly controls the DUT and executes an
editable test script which define which of the Bluetooth 5 LE RF Phy Test Specification tests
are to be performed.
Communication to the DUT is via one of the following protocols:
1. Direct test mode (2-wire)
2. H4
3. H5 (3-wire)
4. BCSP
The application is capable of running all of the Bluetooth 5 LE RF Phy Test Specification
tests, with the following caveats:
1. Blocking tests cannot be performed above 6 GHz. The Bluetooth 5 LE RF Phy Test
Specification states that blocking frequencies up to 12.75 GHz should be used. Since
this limit includes the second harmonic of the 2.4 GHz ISM band, it is unlikely that a
DUT which passes at frequencies below 6 GHz will fail at frequencies above 6 GHz.
2. The CW blocker has a relatively high harmonic content. A notch filter is used to
reduce the harmonic content falling within the 2.4 GHz ISM band. However, care
should be exercised to ensure that blocking failures are not due to harmonics of the
blocker landing on the wanted signal. Such care should always be exercised with
blocking tests, irrespective of the test equipment being used.
3. Some intermodulation tests require the interferers to be placed a significant distance
outside the 2.4 GHz ISM band. The TLF3000 unit is not always capable of generating
these interferers. However, the Bluetooth 5 LE RF Phy Test Specification requires
that the intermodulation test be performed with the interferers both above and below
the wanted signal. The TLF3000 unit can always generate the interferer signals for
the case where they lie within the 2.4 GHz ISM band. When they are switched to lie
outside the 2.4 GHz band they will become attenuated by the frontend filtering of the
DUT. It is therefore unlikely that a DUT will pass the intermodulation test with the
64 TLF3000 Sapphire Reference Manual V1.4
Page 65

TELEDYNE LECROY
interfering signal inside the 2.4 GHz ISM band, but fail when the interfering signals
are placed outside the 2.4 GHz ISM band.
The Sapphire application allows the Bluetooth 5 LE RF Phy Test Specification tests to be
expanded to include:
1. Testing on different RF channels
2. Testing with different packet lengths
3. Testing over a different number of packets
4. Testing with a different wanted signal level or over a sweep of wanted signal levels
5. Testing with different interferer signal levels or over a sweep of interferer signal levels
6. Testing with different blocker frequencies
Test termination criteria can be set allowing PER searches to be performed.
9.2 Communicating with the DUT
9.2.1 Overview
Sapphire supports communications with the DUT over a serial interface. The control of this
interface is governed by the settings in the ‘DUT control’ menu under the ‘Collection’ tab.
The status bar indicates whether the Sapphire application currently believes it has
communications with a DUT.
Figure 30: Communicating with the DUT.
65 TLF3000 Sapphire Reference Manual V1.4
Page 66

TELEDYNE LECROY
Pin
Signal
Direction
1
Vio
Input/Output
2
Vio
Input/Output
9
RTS
Output
10
TX
Output
17
CTS
Input
18
RX
Input
19
Gnd
-
20
Gnd
-
9.2.2 Hardware connections
The serial interface connection can be either
1. via the digital IO connector on the rear of the TLF3000 unit
2. via a comport accessible from the host
The pinout of the digital IO connector on the rear of the TLF3000 unit is:
Table 10: Pinout of the digital IO connector on the rear of TLF3000.
Vio is the voltage level which is used for signalling. This can either be supplied by the
TLF3000 unit or the DUT. If it is supplied by the TLF3000 unit, then it is fixed at 3.3 V. If it is
supplied by the DUT, then it must be in the range 1.2 V to 5.0 V. Whether Vio is supplied by
the TLF3000 unit or the DUT is determined by the setting of the ‘External IO voltage’
checkbox in the ‘DUT control’ menu under the ‘Collection’ tab. It is essential that this
checkbox is set to the correct state prior to the DUT being attached.
9.2.3 Protocol settings
All protocol settings are contained in the ‘DUT control’ menu under the ‘Collection’ tab.
The DUT may be communicated with using any one of the following protocols:
1. Direct test mode (also known as 2-wire mode)
2. H4
3. H5 (also known as 3-wire mode)
4. BCSP (a Qualcomm/CSR proprietary mode)
The protocol is selected from the ‘Interface’ combo box. Selecting the protocol will
automatically set appropriate defaults for all other serial link parameters.
Other link parameters which may be set are:
1. Baud rate. Supported baud rates are 50, 75, 110, 134, 150, 300, 600, 1200,
1800, 2400, 9600, 19200, 38400, 57600, 115200 and 230400. An automatic
baud rate detection features is also supported. Additional baud rates can be
added on request.
2. Hardware handshaking
3. Software flow control (not supported for H5 or BCSP)
4. Number of stop bits
66 TLF3000 Sapphire Reference Manual V1.4
Page 67

TELEDYNE LECROY
5. Parity bits
6. CRC (H5 and BCSP only, not yet supported)
9.3 DUT supported features
In order for Sapphire to determine which tests are applicable to the DUT, it is necessary to
establish which features the DUT supports. The DUT supported features can be entered in
the ‘DUT type’ menu of the ‘Collection’ tab.
Parameters which are required are:
1. The role of the DUT. This may be one of:
a. Central
b. Peripheral
c. Broadcaster
d. Observer
This information is required to ascertain whether the DUT has both a transmitter and
receiver and which channels these operate on.
2. Support for advertising extensions
3. Support for data length extensions
4. Maximum supported octets in an advertising packet. Permissible range is 37 to 255.
This is only required if advertising extensions are supported.
5. Maximum supported octets in a receive packet. Permissible range is 27 to 251. This
is only required if data length extensions are supported and advertising extensions
are not supported.
6. Maximum supported receive time. Minimum permissible value is 328µs. This is only
required if data length extensions are supported and advertising extensions are not
supported.
7. Maximum supported octets in a transmit packet. Permissible values are 27 to 251.
This is only required if data length extensions are supported.
8. Maximum supported transmit time. Minimum permissible value is 328 µs. This is onl y
required if data length extensions are supported.
9. Support for 2 Mbps phy.
10. Support for long range (coded) phys.
11. Support for stable modulation index.
12. Support for angle of arrival processing.
13. Support for angle of departure processing.
At the bottom of the ‘DUT type’ menu is a button labelled ‘Query DUT’. This can be used to
request the supported features information be obtained directly from the DUT over the serial
link. It also provides a simple means to establish that communications with the DUT are
working. Although the majority of the supported features information can be obtained from
the DUT using the query button, it may not be possible to ascertain the DUT role.
67 TLF3000 Sapphire Reference Manual V1.4
Page 68

TELEDYNE LECROY
Figure 31: DUT supported features.
9.4 RF connections
For phy layer testing the DUT is connected to the Tx/Rx RF port.
Sapphire needs an estimate of the cable loss between the Tx/Rx port and the DUT at 2.4
GHz. This is necessary to compensate for receiver power levels and to adjust transmitter
output levels. The cable loss is entered under the ‘Cable loss’ menu of the ‘Collection’ tab.
The value can be entered either by using the slider or the spin box. Permissible values are
between 0 dB and 5 dB.
The cable loss value is also used to compensate the blocker level. Since the cable loss
value is only applicable at 2.4 GHz and the blocker frequency can be anywhere from 24 MHz
to 6 GHz, the compensation is extremely rough. However, given the accuracy of the blocker
signal level and the relatively low levels of cable attenuation, this is not normally an issue.
68 TLF3000 Sapphire Reference Manual V1.4
Page 69

TELEDYNE LECROY
Figure 32: Entering the cable loss value.
9.5 Run modes and termination criteria
The operation of the phy layer tester can be modified by using the options available in the
‘Run mode’ menu under the ‘Collection’ tab. Available options are:
1. Only test against limits. When performing receiver tests a number of packets are sent
to the DUT and then the DUT queried to determine how many arrived uncorrupted.
The test limit is typically around 30% PER. In many cases it is not necessary to send
the full number of packets to determine whether the 30% PER test limit will be
exceeded or passed. If ‘Only test against limits’ is checked, Sapphire will attempt to
minimise test time by only sending the minimum number of packets required to
determine whether the test will pass. However, in doing so, the accuracy to which the
true PER can be determined is compromised.
2. Run to completion. If the run to completion option is checked, then Sapphire will
always perform all the tests which have been specified. If this option is not checked,
then Sapphire will terminate execution of the test script as soon as a test failure is
detected. An exception to this rule is when PER searches are being performed, either
by sweeping the level of the wanted signal or the interfering signals. In these
instances as soon as the test fails Sapphire will move to the next test item.
3. Reorder tests. There is a small time advantage in performing all the transmitter tests
first followed by the receiver tests. If reorder tests is checked, then Sapphire will
perform transmitter tests followed by receiver tests. If it is not checked, the Sapphire
will perform the tests in the order that they appear in the test script.
4. Loop tests. If loop test is checked, then once the test script is exhausted it will be rerun. This facility is useful for tracking down errors which occur infrequently.
69 TLF3000 Sapphire Reference Manual V1.4
Page 70

TELEDYNE LECROY
State
Meaning
0
Set line low when condition is
true
1
Set line high when condition is
true
X
Ignore this line
-
Line not available for this
function
Figure 32. Run modes and termination criteria.
9.5.1 Monitoring activity on the digital IO connector
It is possible to monitor the activity of the phy layer tester via the digital IO connector on the
rear panel of the TLF3000 unit. The settings in the ‘Digital outputs’ menu under the
‘Collection’ tab control the state of the output lines. Two options are available:
1. Running. Sets the state of the output lines to indicate when the phy layer tester is
running.
2. Pass. Sets the state of the output lines to indicate pass or fail when the phy layer
tester terminates.
For each option there are 8 boxes denoting the how the 8 output lines should be configured.
The contents of each box can be toggled by clicking on it. The four possible states for each
box are:
The voltage level of the lines will be determined by the setting of ‘External IO voltage’ in the
‘DUT control’ menu.
70 TLF3000 Sapphire Reference Manual V1.4
Table 11: Possible states of the output lines.
Page 71

TELEDYNE LECROY
Figure 33: Monitoring activity on the digital IO connector.
9.6 Building a test script
9.6.1 Overview
The test script will be displayed at the bottom of the window below the graphics area. On
entering the phy layer tester the script will be empty. To commence building a test script,
click on ‘click to add test’. This will open up a pop-up window where the test contents can be
defined.
9.6.2 Test definition window
The pop-up test definition window permits any one of the Bluetooth 5 LE RF Phy Test
Specification tests to be selected. Various parameters for each test can also be modified.
The test definition window consists of:
1. A yellow bar containing drop down menus which can be used to select the test to be
performed.
2. A list of expandable menus which can be used to alter parameters defining the test.
3. A ‘Restore Defaults’ button which can be used to reset the test parameters to the
values defined in the Bluetooth 5 LE RF Test Specification.
4. An ‘Apply’ button which will add a new test to the end of the test script or save the
edits to an existing test.
5. A ‘Cancel’ button which will discard all information which has been entered into the
test definition window. If a new test was being created, then it will be discarded. If an
existing test was being edited, then the edits will be discarded.
71 TLF3000 Sapphire Reference Manual V1.4
Page 72

TELEDYNE LECROY
Figure 34: Test definition window.
9.6.3 Selecting the test type
The test type is selected by using the drop down menus in the yellow bar at the top of the
test definition pop-up window.
If the test number if known, then it may be selected directly by using the left hand drop down
menu. The number and type of tests which are displayed in the menu will be dependent on
what features the DUT supports. It is therefore essential to ensure that the DUT properties
are set correc tly prio r to creating a test script.
72 TLF3000 Sapphire Reference Manual V1.4
Page 73

TELEDYNE LECROY
Figure 35: Selecting the test type if the test number is known.
If the test number is not known, then the second drop down menu may be used to select the
test by its name.
Figure 36: Selecting the test type if the test number is not known.
73 TLF3000 Sapphire Reference Manual V1.4
Page 74

TELEDYNE LECROY
Having selected a test by its name, it may be necessary to refine the test selection by
specifying the modulation scheme using the two remaining menus:
Figure 37: Refining the test selection by specifying the modulation scheme, 1.
Figure 38: Refining the test selection by specifying the modulation scheme, 2.
74 TLF3000 Sapphire Reference Manual V1.4
Page 75

TELEDYNE LECROY
9.6.4 Selecting which chan nel s are te st ed
To select which RF channels the test is to be performed on, expand the ‘Channels’ menu.
The RF channels can be selected by clicking on the checkboxes.
Groups of RF channels can be selected using the toggle buttons at the bottom left:
1. Clear all. All RF channels will be deselected.
2. Select all. All RF channels which are supported by the DUT will be selected.
3. Primary advertising. The primary advertising channels will be selected.
4. Data/Secondary advertising. The data and secondary advertising channels supported
by the DUT will be selected.
5. Specification channels. The RF channels defined for the test in Bluetooth LE RF Phy
Test Specification will be selected.
It is also possible to select the RF channels by entering text into the text field at the bottom
of the menu. The required format for the text is described in section 8.6.12.
Figure 39: Selecting which channels are tested.
75 TLF3000 Sapphire Reference Manual V1.4
Page 76

TELEDYNE LECROY
9.6.5 Selecting which packet lengths are tested
To select which packet lengths the test is to be performed on, expand the ‘Packet Lengths’
menu.
The wanted packet lengths can be selected by clicking on the checkboxes.
Groups of packet lengths can be selected using the toggle buttons at the bottom left:
1. Clear all. All packet lengths will be deselected.
2. Select all. All packet lengths which are supported by the DUT will be selected.
3. Specification. The packet lengths specified for the test in Bluetooth LE RF Phy Test
Specification will be selected.
It is also possible to select the packet lengths to be used by entering text into the text field at
the bottom of the menu. The required format for the text is described in section 8.6.12.
Figure 40: Selecting which packet lengths are tested.
9.6.6 Selecting how many packets are used in the test
To select how many packets are used in the test, expand the ‘Number of packets’ menu.
If the ‘Specification’ checkbox is ticked, then the number of packets as defined in the
Bluetooth 5 LE RF Test Specification will be used. This value will be shown in the spin box.
The spin box will not be editable whilst the ‘Specification’ checkbox is ticked.
76 TLF3000 Sapphire Reference Manual V1.4
Page 77

TELEDYNE LECROY
If the ‘Specification’ checkbox is cleared, then the number of packets can be entered into the
spin box, either by using the up/down arrows or by entering a numeric value directly into the
text field.
When per formi ng ‘quick look’ receiver tests, it is frequently useful to reduce the number of
packets from the 1500 specified in the Bluetooth 5 LE RF Phy Test Specification. By using a
reduced number of packets, it becomes possible to explore a greater range of other
parameters.
Figure 41: Selecting how many packets are used in the test.
9.6.7 Selecting the wanted si gn al level for receiver tests
To select the wanted signal level to be used for receiver tests, expand the ‘Wanted Signal
Level’ menu.
If the ‘Specification’ checkbox is ticked, then the wanted signal level as defined in the
Bluetooth 5 LE RF Test Specification will be used. This value will be shown in the spin box.
The spin box will not be editable whilst the ‘Specification’ checkbox is ticked. The wanted
signal level will also be shown on the signal level gauge at the bottom of the menu.
77 TLF3000 Sapphire Reference Manual V1.4
Page 78

TELEDYNE LECROY
Figure 42: Wanted signal levels shown at the bottom of the menu.
If the ‘Specification’ checkbox is cleared, then the wanted signal level can be entered into
the spin box, either by using the up/down arrows or by entering a numeric value directly into
the text field. If the cursor is placed directly over the red bar in the signal level gauge, then a
‘+’ will appear adjacent to the cursor. By holding down the left mouse button it is then
possible to drag the red bar to set the wanted signal level. Wanted signal levels must be in
the range -110 dBm to +5 dBm. The resolution of the wanted signal level is 0.1 dBm.
78 TLF3000 Sapphire Reference Manual V1.4
Page 79

TELEDYNE LECROY
Figure 43: Setting the wanted signal level.
If it is desired to sweep the wanted signal level over a range of values, for example, to
perform a PER search, then tick the ‘Swept’ checkbox. If interfering signals have been
programmed to have swept levels, then it is not possible to sweep the wanted signal level.
The wanted signal level power sweep is defined by the numbers displayed in the three spin
boxes:
1. Maximum Power. This indicates the power level at which the sweep will start. The
sweep will be from the maximum wanted signal power towards the minimum wanted
signal power. The maximum power cannot be above +5 dBm and must be greater
than or equal to the minimum power. The resolution of the maximum power is
0.1dBm.
2. Power Step. This is the step size that the sweep will take from the maximum power
towards the minimum power. The step size cannot be less than 0.5 dB. The
resolution of the step size is 0.1dB.
3. Minimum Power. This indicates where the power sweep should terminate. The last
wanted signal power to be test will be greater than or equal to the minimum power.
The minimum power cannot be below -110 dBm and must be less than or equal to
the maximum power. The resolution of the minimum power is 0.1 dBm.
If maximum input signal level tests are being performed, the direction of the sweep is
reversed and the roles of maximum power and minimum power are swapped.
The red bar in the signal level gauge indicates the range selected by the maximum and
minimum powers. This entire range may not be explored during the sweep since the actually
values tested are dependent on the selection of the step size.
79 TLF3000 Sapphire Reference Manual V1.4
Page 80

TELEDYNE LECROY
If the cursor is placed over one of the limits of the red bar, then it will change to a double
headed cursor. It is then possible to hold down the left mouse button and drag the edge of
the red bar to adjust either the minimum or maximum power.
If the cursor is placed over the body of the red bar, then a ‘+’ will appear adjacent to the
cursor. It is then possible to hold down the left mouse button and drag the entire sweep
range up or down the gauge.
Figure 44: Setting a wanted signal level range.
9.6.8 Configuring C/I receiver tests
9.6.8.1 Overview
In order to perform C/I receiver tests, it is necessary for Sapphire to know where the image
frequencies of the DUT receiver lie. The location of the image frequencies alter the level of
the interfering signal which must be generated.
The C/I receiver tests can take a long time to perform. Frequently it is only a few offsets of
the interferer signal from the wanted signal that are interest. It is possible to individually
select which interferer offset frequencies are used.
Most LE devices will greatly exceed the Bluetooth 5 LE RF Phy Specification C/I test.
Sapphire therefore contains the ability to adjust the interferer signal level as well as the
ability to sweep it over a range of values.
80 TLF3000 Sapphire Reference Manual V1.4
Page 81

TELEDYNE LECROY
9.6.8.2 Specifying the DUT image frequencies
To set the DUT image frequency, expand the ‘C/I Image Frequency’ menu.
The spin box labelled ‘Image frequency’ determines the offset of the DUT’s image frequency.
The image frequency can be set to any value from 0 MHz to 100 MHz in steps of 1 MHz.
The step size is limited to a resolution of 1 MHz to be compatible with the resolution of the
interfering signal offset. Sapphire implicitly assumes that the image frequency offset is the
same for all LE RF channels.
For each of the LE RF channels it is possible to specify whether high-side or low-side mixing
is employed by the DUT. With high-side mixing the image will appear above the wanted
signal, whilst with low-side m ixing the image will appear below the wanted signal. The choice
between high- and low-side mixing can be made by:
1. Toggling the individual checkboxes for each LE RF channel
2. Using the toggle buttons are the bottom left of the window:
a. ‘All channels low-side mix’ will set low-side mix for all LE RF channels
b. ‘All channels high-side mix’ will set high-side mix for all LE RF channels
3. By entering a text string into the text field at the bottom of the window. The format of
this text string is defined in section 8.6.12.
Figure 45: Specifying DUT image frequencies.
81 TLF3000 Sapphire Reference Manual V1.4
Page 82

TELEDYNE LECROY
9.6.8.3 Selecting the C/I receiver test offset frequencies
To select which offsets of the interferer from the wanted signal are to be explored, expand
the ‘C/I Frequency Offsets’ menu.
The interfering signal can be placed up to 81 MHz from the wanted signal with a resolution of
1 MHz. If the interferer signal is placed outside the range 2395 MHz to 2485 MHz then the
test will be silently ignored.
The C/I interferer signal frequency offsets can be set by:
1. Individually ticking the checkboxes for each frequency offset
2. Using the toggle buttons located at the bottom left of the window:
a. Clear All. Removes all C/I interferer offset frequencies
b. Select All. Ticks all C/I interferer offset frequencies
c. Forc e symmetry. Ensures that the interferer frequency offsets that lie below
the wanted signal are an image of the interferer frequency offsets that lies
above the wanted signal.
3. Entering a text string directly into the text field at the bottom of the window. The
format for this text string is described in section 8.6.12.
Positive C/I frequency offsets correspond to the interferer being at a higher frequency than
the wanted signal. Negative C/I frequency offsets correspond to the interferer being at a
lower frequency that the wanted signal.
82 TLF3000 Sapphire Reference Manual V1.4
Page 83

TELEDYNE LECROY
Figure 46: Selecting the C/I receiver test offset frequencies.
9.6.8.4 Selecting the interferer signal level for C/I receiver tests
To select the interferer signal levels to be used in the C/I receiver tests, expand the ‘C/I
Interferer Levels’ menu.
At the top of the window is graphical display of the C/I levels which have been selected. This
has been provided so that the plausibility of the selected parameters can be seen at a
glance.
Below the graphical display, the C/I levels are shown in a tabular form, similar to that of the
Bluetooth 5 LE RF Phy Test Specification.
Below the table is a ‘Specification’ checkbox. If this check box is ticked, then the C/I values
in the table and displayed on the graph are those defined in the Bluetooth 5 LE RF Phy Test
Specification. The spin boxes within the table are disabled when the ‘Specification’ checkbox
is ticked.
83 TLF3000 Sapphire Reference Manual V1.4
Page 84

TELEDYNE LECROY
Figure 47: Interferer signal level for C/I receiver tests.
To enable the C/I levels to be adjusted, the ‘Specification’ checkbox must be cleared. Once
the checkbox has been cleared, the following controls are accessible:
1. The individual spin boxes in the last column of the table can be used to adjust the C/I
values. Each value can be adjusted from -80 dB to +40 dB with a resolution of 0.1
dB.
2. An offset can be applied to all the C/I levels in the table by using the ‘Offset’ spin box
below the table. The offset can be varied from -80 dB to +20 dB. However, many
offsets may results in signals levels which cannot be generated by the TLF3000 unit.
When Sapphire encounters signal levels which cannot be generated the test is
ignored and execution moves to the next test.
3. The offset to be applied to all the C/I levels in the table is also shown by the red bar
in the gauge at the bottom of the window. It is possible to adjust the offset by clicking
on the gauge. Alternatively, if the cursor is placed over the red bar, then a ‘+’ symbol
84 TLF3000 Sapphire Reference Manual V1.4
Page 85

TELEDYNE LECROY
will appear adjacent to the cursor. It is then possible to hold down the left mouse
button and drag the red bar.
Figure 48: Changing the signal level for C/I receiver tests.
If it is desired to perform the C/I receiver tests over a range of interfering signal levels, then
the ‘Swept’ checkbox must be ticked. It is only possible to sweep the interferer signal level if
the wanted signal is not being swept.
The sweep of interferer levels is accomplished by applying a swept offset to all the values in
the C/I table. It is not possible to specify individual sweeps for each row of the table. If this
facility is required, then multiple C/I tests should be placed in the test script, each test
configured to execute one row in the C/I table.
The offset level sweep is defined by the numbers displayed in the three spin boxes:
85 TLF3000 Sapphire Reference Manual V1.4
Page 86

TELEDYNE LECROY
1. Maximum Offset. This indicates the offset at which the sweep will start. The sweep
will always be from the maximum C/I towards the minimum C/I. The maximum offset
cannot be above +20 dB and must be greater than or eq ual to the minimum offset.
The resolution of the offset is 0.1 dB.
2. Offset Step. This is the step size that the sweep will take from the maximum C/I
towards the minimum C/I. The step size cannot be less than 0.5 dB. The resolution of
the step size is 0.1dB.
3. Minimum Offset. This indicates where the C/I sweep should terminate. The last
interferer signal level to be tested will be greater than or equal to the signal level
defined by this offset. The minimum offset cannot be below -80 dB and must be less
than or equal to the maximum offset. The resolution of the minimum offset is 0.1 dB.
The red bar in the signal level gauge indicates the range selected by the maximum and
minimum offsets. This entire range may not be explored during the sweep since the actually
values tested are dependent on the selection of the step size.
If the cursor is placed over one of the limits of the red bar, then it will change to a double
headed cursor. It is then possible to hold down the left mouse button and drag the edge of
the red bar to adjust either the minimum o r ma ximum offset.
If the cursor is placed over the body of the red bar, then a ‘+’ will appear adjacent to the
cursor. It is then possible to hold down the left mouse button and drag the entire sweep
range up or down the gauge.
86 TLF3000 Sapphire Reference Manual V1.4
Page 87

TELEDYNE LECROY
Figure 49. Figure 49: Selecting a range of signal levels for C/I receiver tests.
9.6.9 Configuring blocker receiver tests
To configure the blocker frequencies and levels to be used in the blocker receiver tests,
expand the ‘Blocker’ menu.
At the top of the window is graphical display of the blocker levels which have been selected.
This has been provided so that the plausibility of the selected parameters can be seen at a
glance.
Below the graphical display, the blocker levels are shown in a tabular form, similar to that of
the Bluetooth 5 LE RF Phy Test Specification. The range of blocker frequencies is
subdivided into a number of segments, each segment occupy one row of the table. The
second column shows the frequency at the start of the segment, the third column the step
87 TLF3000 Sapphire Reference Manual V1.4
Page 88

TELEDYNE LECROY
size that will be used to move the blocker through the segment and the fourth column
denotes the end of the segment. The final column specifies the blocker level to be used for
the segment.
Below the table is a ‘Specification’ checkbox. If this check box is ticked, then the blocker
frequencies and levels in the table and displayed on the graph are those defined in the
Bluetooth 5 LE RF Phy Test Specification. Editing of the table is disabled when the
‘Specification’ checkbox is ticked.
Figure 50: Blocker frequencies and levels.
To enable the blocker levels to be adjusted, the ‘Specification’ checkbox must be cleared.
Once the checkbox has been cleared, the following controls are accessible:
1. The individual spin boxes in the last column of the table can be used to adjust the
blocker values. Each value can be adjusted from -55 dBm to -25 dBm with a
resolution of 0.1 dB.
2. An offset can be applied to all the blocker levels in the table by using the ‘Offset’ spin
box below the table. The offset can be varied from -40 dB to +20 dB. However, many
offsets may results in blocker levels which cannot be generated by the TLF3000 unit.
When Sapphire encounters signal levels which cannot be generated the test is
ignored and execution moves to the next test.
88 TLF3000 Sapphire Reference Manual V1.4
Page 89

TELEDYNE LECROY
The offset to be applied to all the blocker levels in the table is also shown by the red bar in
the gauge at the bottom of the window. It is possible to adjust the offset by clicking on the
gauge. Alternatively, if the cursor is placed over the red bar, then a ‘+’ symbol will appear
adjacent to the cursor. It is then possible to hold down the left mouse button and drag the
red bar.
Clearing the ‘Specification’ checkbox also permits the blocker frequencies to be adjusted.
The st art, step and stop frequencies within the table can now be adjusted using the
associated spin box. The segments within the table are always held in order of increasing
frequency. The minimum start frequency is 24 MHz for the first segment or 1 MHz above the
stop frequency of the previous segment. The maximum stop frequency is 6 GHz for the last
segment or 1 MHz below the start frequency of the subsequent segment. Step sizes can be
varied from 1 MHz to 1 GHz. The resolution of all blocker frequency parameters is 1 MHz.
It is also possible to remove or add blocker frequency segments. To do so, highlight a
frequency segment by clicking on the segment number in the first column. If the right mouse
button is held down then a pop-up menu will appear with the following options:
1. Delete. The highlighted row will be deleted.
2. Insert above. A new frequency segment will be inserted above the highlighted
segment.
3. Insert below. A new frequency segment will be inserted below the highlighted
segment.
89 TLF3000 Sapphire Reference Manual V1.4
Page 90

TELEDYNE LECROY
Figure 51: Removing or adding blocker frequencies and levels.
If it is desired to perform the blocker receiver tests over a range of blocker signal levels, then
the ‘Swept’ checkbox must be ticked. It is only possible to sweep the blocker signal level if
the wanted signal is not being swept.
The sweep of blocker levels is accomplished by applying a swept offset to all the values in
the blocker table. It is not possible to specify individual sweeps for each frequency segment
of the table. If this facility is required, then multiple blocker tests should be placed in the test
script, each test configured to execute one frequency segment.
The offset level sweep is defined by the numbers displayed in the three spin boxes:
1. Minimum Offset. This indicates the offset at which the sweep will start. The sweep
will always be from minimum blocker level to maximum blocker level. The minimum
offset cannot be below -40 dB and must be less than or equal to the maximum offset.
The resolution of the offset is 0.1 dB.
90 TLF3000 Sapphire Reference Manual V1.4
Page 91

TELEDYNE LECROY
2. Offset Step. This is the step size that the sweep will take from the minimum blocker
level to the maximum blocker level. The step size cannot be less than 0.5 dB. The
resolution of the step size is 0.1 dB.
3. Maximum Offset. This indicates where the blocker sweep should terminate. The last
blocker level to be tested will be less than or equal to the signal level defined by this
offset. The maximum offset cannot be above +20 dB and must be greater than or
equal to the minimum offset. The resolution of the minimum offset is 0.1 dB.
The red bar in the signal level gauge indicates the range selected by the maximum and
minimum offsets. This entire range may not be explored during the sweep since the actually
values tested are dependent on the selection of the step size.
If the cursor is placed over one of the limits of the red bar, then it will change to a double
headed cursor. It is then possible to hold down the left mouse button and drag the edge of
the red bar to adjust either the minimum or maximum offset.
If the cursor is placed over the body of the red bar, then a ‘+’ will appear adjacent to the
cursor. It is then possible to hold down the left mouse button and drag the entire sweep
range up or down the gauge.
91 TLF3000 Sapphire Reference Manual V1.4
Page 92

TELEDYNE LECROY
Figure 52: Selecting a range of blocker frequencies and levels.
9.6.10 Configuri ng r eceiver intermodulation tests
To configure the parameters to be used in the receiver intermodulation tests, expand the
‘Intermodulation Spacings and Levels’ menu.
At the top of the window is graphical display of the interferer levels and frequencies which
have been selected. This has been provided so that the plausibility of the selected
parameters can be seen at a glance. The graph is constructed as follows:
1. Wide bars are used to indicate continuously modulated interferer signals
2. Narrow bars are used to indicate CW interferers
3. The bars are colour coded as:
a. Green: interferer spacing N = 3
b. Blue: interferer spacing N = 4
92 TLF3000 Sapphire Reference Manual V1.4
Page 93

TELEDYNE LECROY
c. Red: int erferer spacing N = 5
4. The interferer frequencies are shown below the wanted signal. The test will be
performed for the interferer frequencies both below and above the wanted signal.
Below the graphical display are a series of checkboxes to select the frequency offsets of the
interfering signals. The frequencies of the interfering signals are related by:
F
wanted
= 2 Fcw - F
modulated
and:
| F
where: F
F
modulated
wanted
modulated
– FCW| = N
is the frequency of the wanted signal
is the frequency of the continuously modulated interfering
signal
FCW is the frequency of the CW interfering signal
N is the parameter selected by the checkboxes
The Bluetooth 5 LE RF Phy Test Specification does not provide a default value for the
parameter N. Sapphire adopts the default value of 3.
The interferer signal levels are displayed in a spin box and a signal gauge at the bottom of
the window. The CW interferer and the continuously modulated interferer are always
constrained to have the same signal level.
Below the checkboxes which select the parameter N is a ‘Specification’ checkbox. If this
check box is ticked, then the interferer signal levels are those defined in the Bluetooth 5 LE
RF Phy Test Specification.
93 TLF3000 Sapphire Reference Manual V1.4
Page 94

TELEDYNE LECROY
Figure 53: Entering interferer signal levels.
If the ‘Specification’ checkbox is cleared, then the interferer signal levels can be entered into
the spin box, either by using the up/down arrows or by entering a numeric value directly into
the text field. If the cursor is placed directly over the red bar in the signal level gauge, then a
‘+’ will appear adjacent to the cursor. By holding down the left mouse button it is then
possible to drag the red bar to set the interferer signal levels. Interferer signal levels must be
in the range -80 dBm to 0 dBm. The resolution of the interferer signal levels is 0.1 dBm.
94 TLF3000 Sapphire Reference Manual V1.4
Page 95

TELEDYNE LECROY
Figure 54: Selecting interferer signal levels over a range of values.
If it is desired to sweep the interferer signal levels over a range of values then tick the
‘Swept’ checkbox. If wanted signal has been programmed to have swept levels, then it is not
possible to sweep the interferer signal levels.
The interferer signal level power sweep is defined by the numbers displayed in the three spin
boxes:
1. Minimum Power. This indicates the power level at which the sweep will start. The
sweep will always be from the minimum interferer signal power towards the
maximum interferer signal power. The minimum power cannot be below -80 dBm and
must be less than or equal to the maximum power. The resolution of the minimum
power is 0.1 dBm.
2. Power Step. This is the step size that the sweep will take from the minimum power
towards the maximum power. The step size cannot be less than 0.5 dB. The
resolution of the step size is 0.1 dB.
3. Maximum Power. This indicates where the power sweep should terminate. The last
interferer signal power to be test will be less than or equal to the maximum power.
95 TLF3000 Sapphire Reference Manual V1.4
Page 96

TELEDYNE LECROY
The maximum power cannot be above 0dBm and must be greater than or equal to
the minimum power. The resolution of the maximum power is 0.1 dBm.
The red bar in the signal level gauge indicates the range selected by the maximum and
minimum powers. This entire range may not be explored during the sweep since the actually
values tested are dependent on the selection of the step size.
If the cursor is placed over one of the limits of the red bar, then it will change to a double
headed cursor. It is then possible to hold down the left mouse button and drag the edge of
the red bar to adjust either the minimum or maximum power.
If the cursor is placed over the body of the red bar, then a ‘+’ will appear adjacent to the
cursor. It is then possible to hold down the left mouse button and drag the entire sweep
range up or down the gauge.
9.6.11 Configuri ng the receiver PER report integrity tests
When running the receiver PER report integrity tests it is possible to configure the number of
integrity checks to perform. To access this parameter, expand the ‘Integrity Count’ menu.
If the ‘Specification’ check box is ticked, then 3 integrity checks will be performed as defined
in the Bluetooth 5 LE RF Phy Test Specification.
If the ‘Specification’ check box is cleared, then the spin box displaying the number of
integrity checks becomes enabled. The number of integrity checks can be changed to any
number between 1 and 100 inclusive.
Figure 55: Configuring the receiver PER report integrity tests.
9.6.12 Textual input of test parameters
Many of the menus for configuring the test parameters permit the input of text strings to
define ranges of parameter values. These textual descriptions must be of the form:
: a
, b
: b
: b
a
start:astep
stop
start
step
96 TLF3000 Sapphire Reference Manual V1.4
stop
, …
Page 97

TELEDYNE LECROY
This implies that all values from a
from b
If a
If a
start
is unity, then a
step
is equal to a
step
to b
in steps of b
stop
start:astep
then a
stop
step
: a
start:astep
start
to a
in steps of a
stop
, etc.
can be abbreviated toa
stop
: a
can be abbreviated toa
stop
will be selected, plusall values
step
: a
stop
.
start.
start
9.7 Test duplication
Running any of the modulation characteristics tests will automatically generate results for the
corresponding carrier offset and drift tests. This occurs since the packets the DUT must
transmit for the carrier offset and drift tests are a subset of those required for the modulation
characteristic tests. Furthermore, the test channels used for modulation characteristic
measurements are the same as those required for carrier offset and drift measurements. It is
therefore unnecessary to explicitly include the carrier offset and drift tests within the test
script if the corresponding modulation characteristics test are present.
Running any of the in-band emission tests will automatically generate results for the
corresponding output power tests. This occurs since the packet types used in the two tests
are identical. However, the test channels for in-band emission tests are not always the same
as those for output power tests. Where there is overlap in the test channels, the overlapping
channels can be excluded from the output power tests if the corresponding in-band
emissions tests are included in the test script.
9.8 Test script window
The test script displayed at the bottom of the window underneath the graphics area. Each
row in the table represents one test in the test script. The columns in the table contain:
1. Column 1 contains the test script number as defined in the Bluetooth LE RF Phy Test
Specification
2. Column 2 contains the test script title, providing a textual description of the test
3. Column 3 indicates the modulation scheme which will be used for the test
4. Column 4 indicates the test status:
a. ‘?’ indicates that the test has not been run and no results are available
b. indicates that the test is currently being run
c. ‘’ indicates that the test has been run and the test limits have been passed
d. ‘’ indicates that the test has been run and at least one test limit has failed
When a test is running it is highlighted in the test script window.
By clicking on a test number the test entry will be expanded to show the parameters defining
the test configuration.
Tests can be added to the te st script b y clicking on the ‘click to add test’ text at the bottom of
the test script. To edit a test, double click the entry in the test script. To delete a test, double
click on the entry and then select ‘Discard’ in the test definition pop-up window.
97 TLF3000 Sapphire Reference Manual V1.4
Page 98

TELEDYNE LECROY
Figure 56: The test script window.
9.9 Saving and recalling test scripts
The current test script can be saved by clicking the ‘Save’ button in the toolbar. The test
script can be saved in two formats:
1. Test script file (*.tsf). This is an XML file containing the test script. These files can be
read back into the Sapphire GUI. Test script files should never be edited manually.
To edit a test script file, read it back into the Sapphire GUI, edit it and then save it
again. This format also contains all the settings contained in the ‘Collection’ and
‘Analysis’ tabs.
2. Text file ( *. txt). This an ASCII text file representation of the test script. The format of
this file is that used by the Sapphire native programming language.
To recall a test script, click the ‘Open’ button in the toolbar and filter by test script files (*.tsf).
9.10 Running a test script
In order to run a test script the following steps must be taken:
1. Sapphire must be told how to communicate with the DUT by setting the parameters
in the ‘DUT control’ menu under the ‘Collection’ tab. If a test script is loaded from a
test script file, then these parameters will be read in from the file.
2. Sapphire must be informed which features the DUT supports by setting the
parameter in the ‘DUT type’ menu under the ‘Collection’ tab. If a test script is loaded
from a test script file, then these parameters will be read in from the file.
98 TLF3000 Sapphire Reference Manual V1.4
Page 99

TELEDYNE LECROY
3. The cable loss between the TLF3000 unit and the DUT must be entered in the ‘Cable
loss’ menu under the ‘Control’ tab. If a test script is loaded from a test script file, then
these parameters will be read in from the file.
4. The termination criteria must be set in the ‘Run mode’ menu under the ‘Control’ tab. If
a test script is loaded from a test script file, then these parameters will be read in
from the file.
5. A test script must either be entered manually (see section 9.6) or loaded from a file
using the ‘Open’ button in the toolbar.
6. The DUT must be physically connected to the TLF3000 unit by:
a. RF cable connected to the Tx/Rx port
b. Serial cable connected to the digital IO port (or to the host computer if the
serial communications is to be via the host)
c. If appr opriate, an IO voltage may also be connected to the digital IO port
Once these steps have been taken, the test script can be executed by pressing the ‘Play’
button in the toolbar.
While the test script is executing the GUI will display the following:
1. The test currently being run will be highlighted in the test script panel
2. The status of the test being run will change from ‘?’ to ‘’
3. The graphics window will plot one of the quantities being tested
After each test in the test script terminates, its displayed status will change to either:
1. ‘’ to indicate that all test limits associated with test passed
2. ‘’ to indicate that one or more the test limits associated with the test failed
When the test script terminates execution the ‘Stop’ but t on in the toolbar will revert to the
‘Play’ button. If appropriate, an error message will be displayed in the status indicating why
the test script terminated.
If the test script terminates due to a test limit failure, then the graphics window will plot
quantity which failed.
9.11 Viewing the results
9.11.1 Overview
Once a test script has be run, the results can be view using the controls under the ‘Analysis’
tab.
The results which are plotted in the graphics area can be filtered by:
1. RF channel number
2. Packet length
99 TLF3000 Sapphire Reference Manual V1.4
Page 100

TELEDYNE LECROY
9.11.2 Filtering by RF channel number
To filter the displayed results by RF channel number, expand the ‘Channels’ menu under the
‘Analysis’ tab. The required RF channels can be selected by:
1. Ticking the individual channel checkboxes
2. Using the toggle buttons at the bottom left of the window:
a. Clear all. All RF channels will be deselected.
b. Select all. All RF channels which are supported by the DUT will be selected.
c. Primary advertising. The primary advertising channels will be selected.
d. Data/Secondary advertising. The data and secondary advertising channels
supported by the DUT will be selected.
e. Specification channels. The RF channels defined for the test in Bluetooth LE
RF Phy Test Specification will be selected.
3. Entering a text string in the text field at the bottom of the window. The required format
of the text string is described in section 8.6.12.
If the quantity to be displayed is to be plotted against RF channel number, the RF channel
filter settings are ignored.
Figure 57: Filtering by RF channel number.
100 TLF3000 Sapphire Reference Manual V1.4
 Loading...