

Page 1

MANUAL ADDENDUM
MODEL M201E
AMMONIA ANALYZER
(For use with the M200E Operators Manual, P/N 04410)
TELEDYNE ADVANCED POLLUTION INSTRUMENTATION
(TELEDYNE-API)
9480 CARROLL PARK DRIVE
SAN DIEGO, CA 92121-5201
TOLL-FREE: 800-324-5190
FAX: 858-657-9816
TEL: 858-657-9800
E-MAIL: api-sales@teledyne.com
WEB SITE: www.teledyne-api.com
Copyright 2006-2012 05206H DCN5910
Teledyne Advanced Pollution Instrumentation
07 May 2012
Page 2

Page 3

ABOUT THIS MANUAL
This manual is an addendum that supplements the M200E NOx Analyzer manual, p/n 04410; it
includes document(s) as listed below.
Part No. Name/Description
M201E Spare Parts List (in Section 6.0)
06185H
Note: Please refer to our Website or Sales for more
recent updates.
NOTE
We recommend that this manual and the M200E manual be read in their
entirety before any attempt is made to operate the instrument.
REVISION HISTORY
M201E, MANUAL ADDENDUM, PN 05206
Date
07 May 2012 H 5910 Updated specs and valve port labels
14 May 2010 G 5731 Administrative additions
17 Nov 2009 F 5588
To Rev DCN Change Summary
Added thermoco uple replacement
instructions
Updated catalytic cartridge illustration
Updated pneumatic diagrams
Updated Spare Parts List Rev E to F
05206H DCN5910 i
Page 4

This page intentionally left blank.
ii 05206H DCN5910
Page 5
Teledyne API Model M201E NH3 Analyzer Operator Manual M201E Ammonia Analyzer
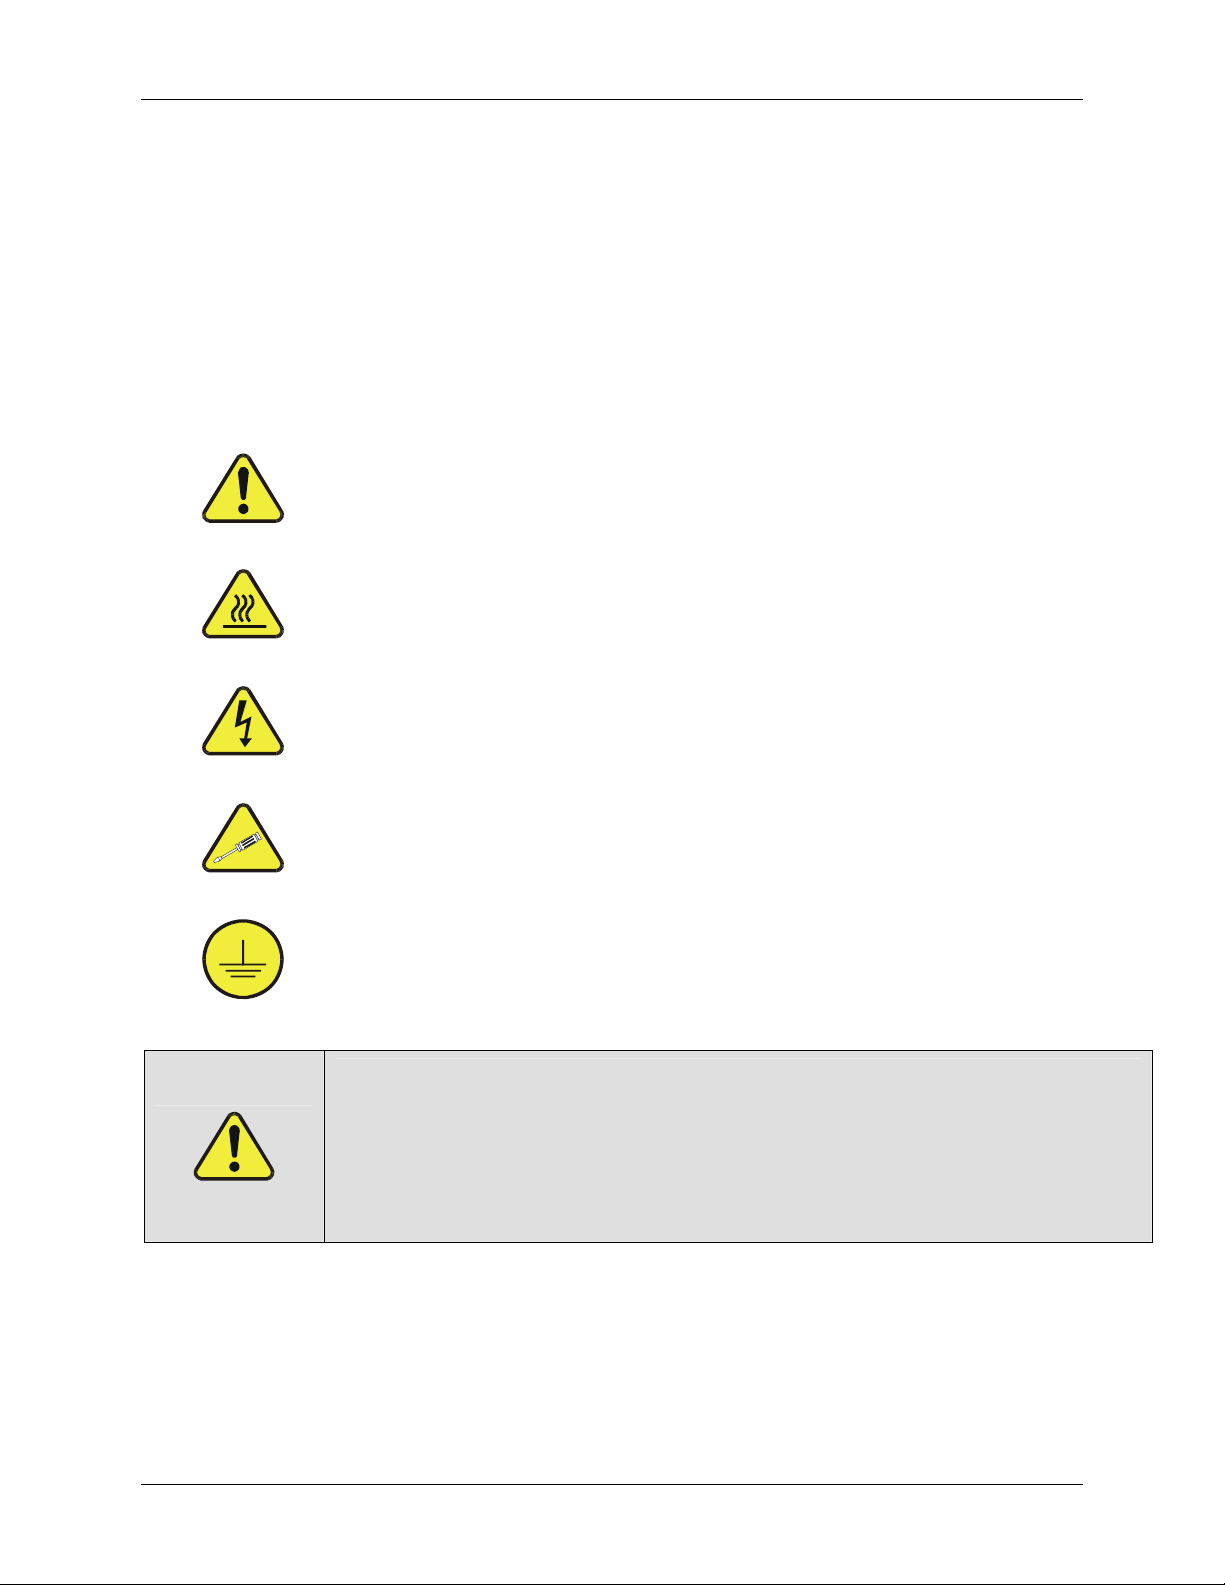
SAFETY MESSAGES
Your safety and the safety of others is very important. We have provided many safety messages
throughout this manual; please read these messages carefully.
A safety message alerts you to potential hazards that could hurt you or others. Safety messages
are associated with a safety alert symbol. These symbols are found in both the M200E and
M201E manuals and are also located inside the instrument. The definition of these symbols is
described below:
GENERAL WARNING/CAUTION: Refer to the instructions for details on the
specific danger.
CAUTION: Hot Surface Warning
WARNING: Electrical Shock Hazard
Technician Symbol: All operations marked with this symbol are to be performed
by qualified maintenance personnel only.
Electrical Ground: This symbol inside the instrument marks the central safety
grounding point for the instrument.
CAUTION The analyzer should only be used for the purpose
and in the manner described in this manual.
If you use the analyzer in a manner other than that for which
it was intended, unpredictable behavior could ensue with
possible hazardous consequences.
05206H DCN5910 iii
Page 6

This page intentionally left blank.
iv 05206H DCN5910
Page 7

TABLE OF CONTENTS
1.0 M201E AMMONIA ANALYZER .............................................................7
1.1 Theory of Operation...................................................................................................... 10
1.1.1 Minim
1.1.2 Purging the Reaction Cell..................................................................................... 12
1.2
1.3 Sa
1.4 M201E Analyzer Specifications................................................................................... 14
Special Considerations For Ammonia Measurement ................................................... 12
mple Filtration........................................................................................................... 13
2.0 CALIBRATION PROCEDURE .............................................................15
2.1 Zeroing The Analyzer................................................................................................... 16
2.2 Spanning The Analyzer With Nitric Oxide Gas........................................................... 17
2.3 Spanning The Analyzer With Ammonia Gas ............................................................... 20
3.0 CONFIGURABLE ANALOG OUTPUT OVERVIEW ...........................25
3.1 Analog Output - Electronic Configuration ................................................................... 27
3.2 Analog Output Signal Type and Range Selection ........................................................ 28
3.3 Selecting Auto Or Manual Analog Output Calibration ................................................29
3.4 Manually Calibrating Analog Output Signal Levels .................................................... 32
3.5 Analog Output Recorder Offset Adjustment ................................................................34
4.0 MAINTENANCE SCHEDULE...............................................................35
4.1 M501 NH3, Maintenance ............................................................................................. 35
4.2 Replacing the Catalytic Cartridge................................................................................. 36
4.3 Replacing the Thermocouple........................................................................................ 37
4.4 AutoZero Flow Check................................................................................................... 39
5.0 ALARMS AND CAUTIONS ..................................................................41
5.1 Alarm ............................................................................................................................ 41
5.2 Caution.......................................................................................................................... 41
6.0 M201E SPARE PARTS LIST ...............................................................43
7.0 CALCULATING MOLY CONVERTER EFFICIENCIES ......................47
7.1 Purpose:......................................................................................................................... 47
7.2 TOOLS:......................................................................................................................... 47
7.3 PARTS:......................................................................................................................... 47
7.4 PROCEDURE............................................................................................................... 47
izing PMT Drift.......................................................................................... 11
LIST OF FIGURES
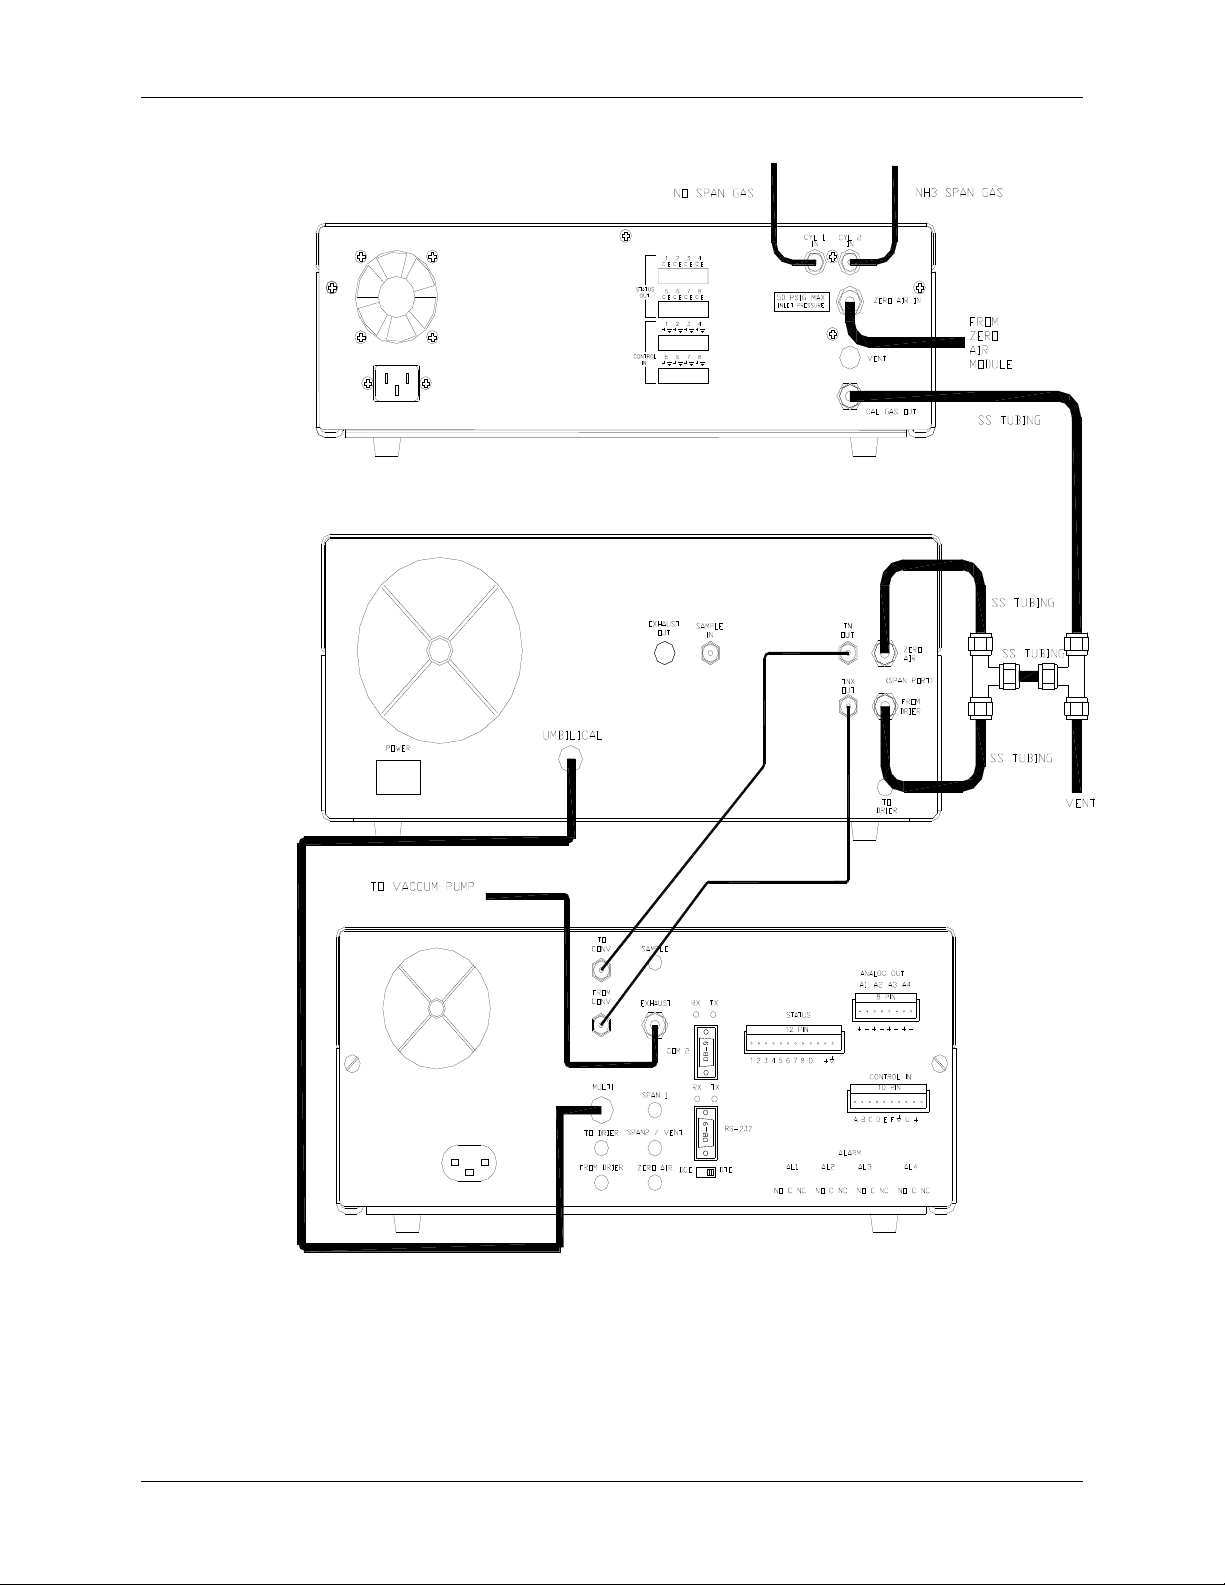
Figure 1-1. M201E Pneumatic Connection Diagram with External Calibrator Option (ECO)...... 8
Figure 1-2. M201E and M501 NH
Figure 1-3. M201E and M501 NH3, with Zero and Span Valve Options Pneumatic Flow.......... 10
Figure 3-1. Analog Output Connector.......................................................................................... 25
Figure 3-2. Analog Output Signal T
Figure 3-3. Auto Or Manual Analog Output Calibration ............................................................. 30
Figure 3-4. Analog Output Group Calibration
Figure 3-5. Setup For Calibrating Analog Output Signal Levels
05206H DCN5910 v
, Pneumatic Flow.................................................................... 9
3
ype ....................................................................................... 28
.............................................................................. 31
................................................. 32
Page 8

Figure 3-6. Analog Output Manual Calibration............................................................................ 33
Figure 3-7. Analog Output Recorder Offset Calibration.............................................................. 34
Figure 4-1. Catalytic Cartridge..................................................................................................... 36
Figure 4-2. Thermocouple Location............................................................................................. 37
Figure 5-1. M201E Functional Block Diagram
............................................................................ 42
LIST OF TABLES
Table 1-1. M201E Operating Specifications ................................................................................ 14
Table 2-1. Zero Calibration Procedure – Zero Gas Through the SAMPLE Port ......................... 16
Table 2-2. Zero Calibration Procedure - Zero Gas Through ZERO Port .....................................17
Table 2-3. NO Calibration Procedure – NO Gas Through the SAMPLE Port............................. 18
Table 2-4. NO Calibration Procedure - NO Gas through the SPAN Port.................................... 19
Table 2-5. Confirming Ammonia Converter Efficiency............................................................... 21
Table 2-6. NH3 Calibration Procedure – NH3 Gas Through The SAMPLE Port........................ 22
Table 2-7. NH3 Calibration Procedure – NH3 Gas through the SPAN Port................................ 23
Table 3-1. Analog Output Data Default Settings.......................................................................... 25
Table 3-2. Analog Output Pin-Outs.............................................................................................. 26
Table 3-3. Analog Output Voltage Range Min/Max.................................................................... 27
Table 3-4. Analog Output Current Loop Min/Max ...................................................................... 27
Table 3-5. ZERO/SPAN Analog Output Signal Calibration Tolerances...................................... 32
Table 4-1. Preventative Maintenance Schedule............................................................................ 35
Table 4-2. M501 NH3, Converter Rebuild Parts List.................................................................... 36
Table 4-3. Analyzer Flow Check.................................................................................................. 39
vi 05206H DCN5910
Page 9

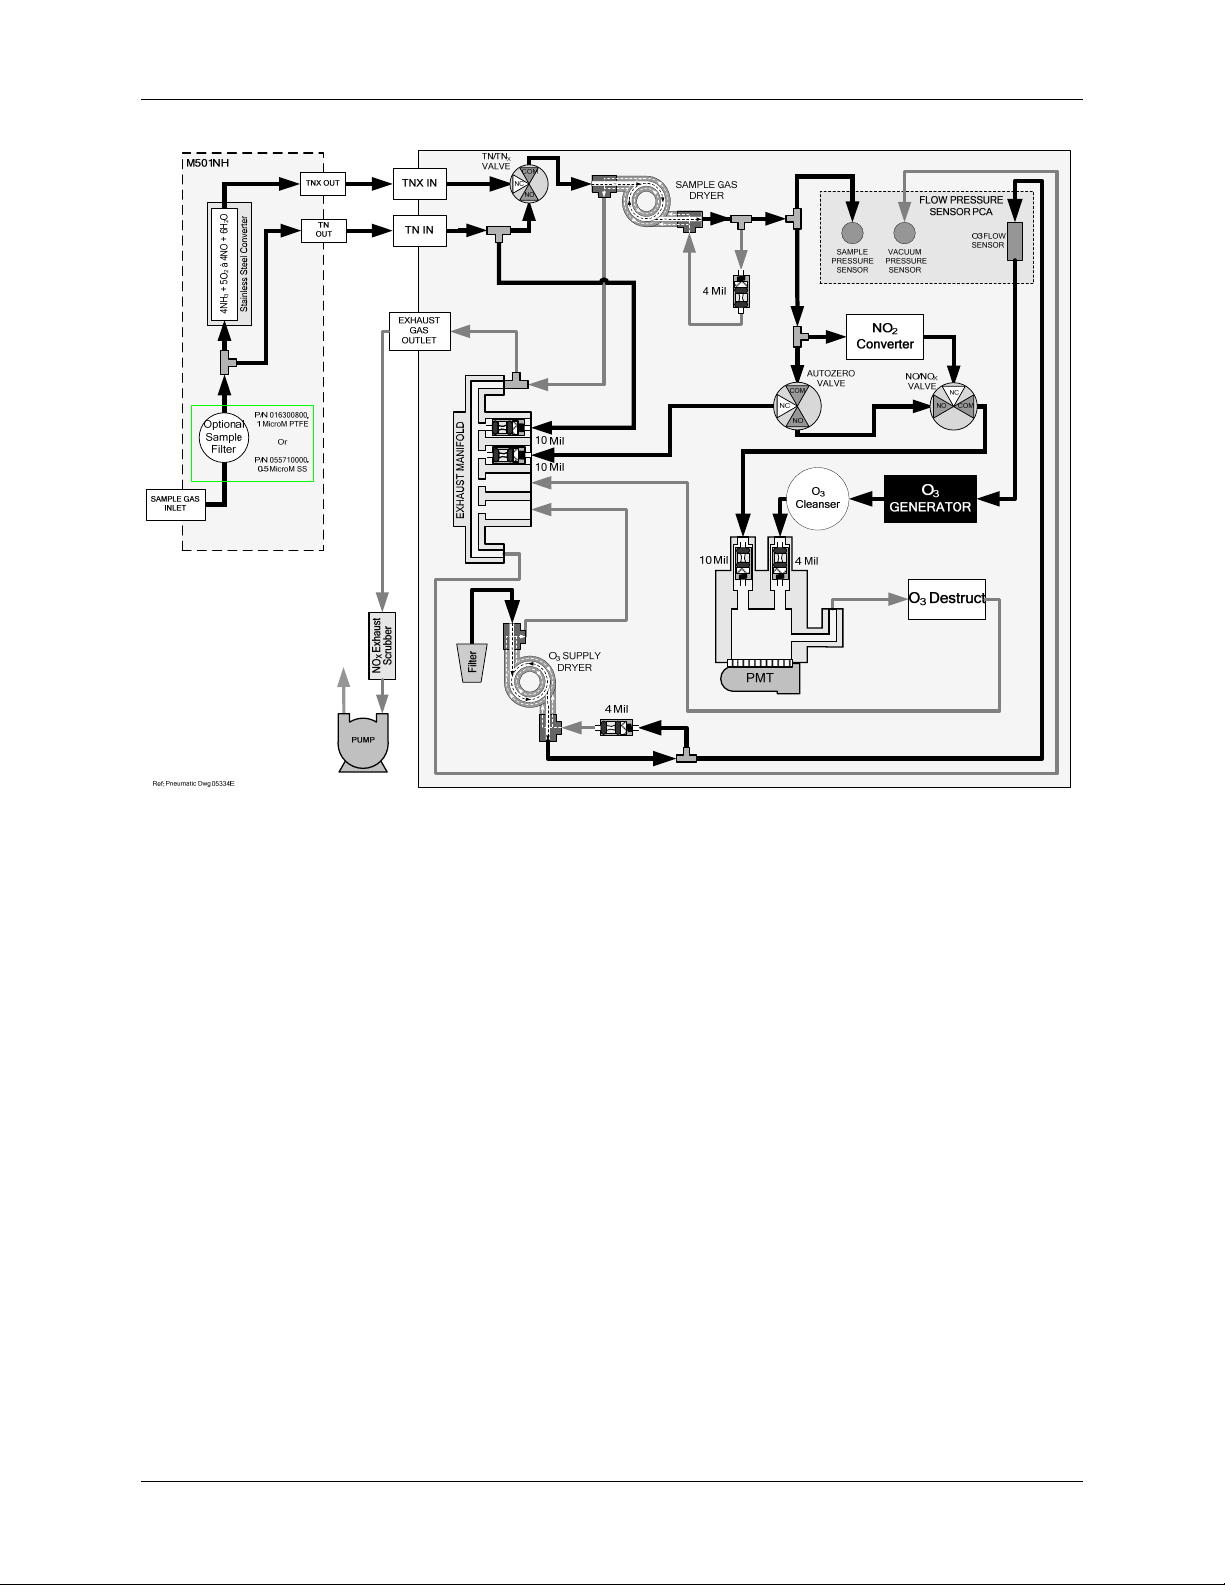
1.0 M201E AMMONIA ANALYZER
This manual is to be used in conjunction with the M200E NOx Analyzer
manual, p/n 04410 supplied with this instrument. It is important that you
familiarize yourself with the workings of the NOx analyzer before proceeding
with NH3 measurements.
The M201E ammonia analyzer consists of a modified M200E nitrogen oxide
analyzer and an M501 NH3, ammonia converter. The analyzer measures the
following individual gas concentrations: TNx (NH
and NO in the sample gas.
and NOx), NOx (NO and NO2)
3
The
ammonia concentration is calculated by subtracting the NOX
reading from the TNx measurement.
The
nitrogen dioxide concentration is calculated by subtracting the NO
reading from the NOx measurement.
The instrument is available in three pneumatic configurations:
The M201E with External Calibrator Option (ECO) is shown in Figure
1-1.
The basic system is shown in Figure 1-2.
The M201E with Zero/Span valves is shown in Figure 1-3.
Note: For an M201E analyzer with Zero/Span option you must connect the
umbilical cord P/N 02255 between the analyzer and the external M501 NH3,
converter assembly.
If the analyzer is purchased without the Zero/Span option t hen the zero and span
calibration gases must be individually applied to the sample port. Remember, the
gases must be clean/dry and supplied at ambient pressure.
CAUTION
Do not pressurize the Sample/Span/Zero port above ambient
05206H DCN5910 7
Page 10
M201E Ammonia Analyzer Teledyne API Model M201E NH3 Analyzer Operator Manual
Figure 1-1. M201E Pneumatic Connection Diagram with External Calibrator Option (ECO)
8 05206H DCN5910
Page 11
Teledyne API Model M201E NH3 Analyzer Operator Manual M201E Ammonia Analyzer
Figure 1-2. M201E and M501 NH3, Pneumatic Flow
05206H DCN5910 9
Page 12

M201E Ammonia Analyzer Teledyne API Model M201E NH3 Analyzer Operator Manual
Figure 1-3. M201E and M501 NH3, with Zero and Span Valve Options Pneumatic Flow
1.1 THEORY OF OPERATION
The Teledyne-API Model M201E analyzer measures ammonia by oxidizing it to
nitric oxide by the following reaction:
+ 5O2 4NO + 6H2O
4NH
3
The resulting nitric oxide is then measured by the chemiluminescent reaction with
ozone. Consult Section 10.1 in the M200E manual (provided with this
instrument) for more details on the nitric oxide measurement.
The analyzer uses two converters to oxidize the different sample gases. A high
temperature catalytic converter, the M501 NH3,, converts NH3 and NOx into NO
creating the TN
analyzer and consisting of heated molybdenum, converts all of the NOx in the
sample to NO producing the NOx channel. The nitric oxide channel is measured
while bypassing both the M501 NH
operated in reflux mode, is installed prior to the molybdenum converter and the
AutoZero valve. The drier removes ammonia and water from the switched
stream. The ammonia would have otherwise been converted by the molybdenum
channel. A second converter, housed inside the M201E
x
, and molybdenum converter. A Nafion® drier
3
10 05206H DCN5910
Page 13

Teledyne API Model M201E NH3 Analyzer Operator Manual M201E Ammonia Analyzer
and registered as NOx. This location provides the drier with continuous flow,
thereby allowing it to stabilize faster.
Note: Due to the Nafion® drier, the analyzer has a maximum am monia range of
2.0 PPM.
The calculated gas concentrations, ammonia and nitrogen dioxide, are computed
from the differences between the measured channels, as outlined in the following
equations:
NO (Nitric Oxide) Concentration = Measured
TNx (Total Nitrogen) Concentration = Measured (NH3 + N02 + NO)
NOx (Total Nitrogen – Ammonia) Concentration = Measured (NO2 + NO)
NH3 (Ammonia) Concentration = Calculated as follows:
[(TNx - NOx) / (NH3_CE_FACTOR1)]
NO2 (Nitrogen Dioxide) Concentration = Calculated as follows:
[(NOx – NO) / (NO2_CE_FACTOR1)]
Note: The nitrogen dioxide efficiency factor (NO2_CE_FACTOR1) must be
calculated by conducting a GPT (gas phase titration) as described in Section
8.3.3 of the M200E manual and Section 7.0 of this manual. This value gives a
good indication of how well the molybdenum is converting nitrogen dioxide into
nitric oxide. In a properly functioning analyzer the value should be close to 1.0. It
is recommended that the molybdenum efficiency be checked every three months.
The ammonia converter efficiency factor (NH3_CE_FACTOR1) is discussed in
more detail in Section 2.3 of this manual. The conversion efficiency of the M501
NH3, should be checked prior to starting long term tests. Both efficiency factors
can be accessed through the analyzer VARS MENU.
The actual formula for computation of the gas concentrations is more
complicated than the above equations, as it includes sample, reaction cell
pressure changes and averaging the PMT signal. Then the zero offset and
slopes are applied to the separate channels (TNx, NOx, NO) to determine the
concentrations. Concentration compensation occurs while the variable
TP_FACTOR under the VARS MENU is switched ON. Otherwise the displayed
concentration is uncompensated. It is recommended that the variable
TP_FACTOR remain on at all times.
1.1.1 Minimizing PMT Drift
In order to account for PMT drift in the analyzer, the AutoZero valve switches
once a minute allowing the analyzer to read zero background. The AutoZero
valve directs the sample gas stream to completely bypass the reaction cell, while
simultaneously filling the reaction cell with Ozone for dark noise measurement.
This is then subtracted as a measurement offset from the raw PMT concentration
05206H DCN5910 11
Page 14

M201E Ammonia Analyzer Teledyne API Model M201E NH3 Analyzer Operator Manual
signal. This process improves zero baseline stability by minimizing the effect of
PMT sensor drift.
1.1.2 Purging the Reaction Cell
As with many chemical reactions the conversion of ammonia in the presence of
other oxides of nitrogen is complicated. It is important to note that the valve
DWELL time for an AZERO measurement has a default setting of 8 seconds.
Shortening this value may not allow enough time to properly purge the reaction cell
of excess nitric oxide from the previous measurements.
In the molybdenum converter operating at 315oC the following significant reactions
are taking place:
Mo + NO2 MoO3 + NO ~100% Efficiency
The M501 NH3, ammonia converter operates at 825oC. At this high temperature,
several reactions occur:
NO NO Loss = ~ 3%
NO2 NO Efficiency = ~97%
NH3 NO Efficiency = ~97%
NH3 NO2 Efficiency = ~5%
As can be seen from the above reactions, the calculation of the ammonia
concentration and overall calibration of the instrument must be done carefully, if
accurate ammonia concentrations are to be measured.
1.2 SPECIAL CONSIDERATIONS FOR AMMONIA MEASUREMENT
Ammonia is a difficult gas to measure due to its chemical characteristics. The
gas tends to adsorb onto surfaces and diffuse into many materials. The following
precautions should be observed when designing ammonia sampling systems and
connecting them to the M201E analyzer:
Do NOT use copper tubing or fittings designed for household plumbing.
Use ONLY Chromatography grade (cleaned, passivated) stainless steel
tubing.
Use ONLY Glass tubing for sample inlet manifold.
ALWAYS keep the tubing from the M702SS calibrator to the analyzer as
short as possible. USE stainless steel tubing throughout, especially from the
ammonia calibration bottle to the calibrator.
If possible HEAT the sample line and DRY the sample gas.
Sample filters Will cause response delays on both the rise and fall of the
sample signal.
12 05206H DCN5910
Page 15

Teledyne API Model M201E NH3 Analyzer Operator Manual M201E Ammonia Analyzer
These rules apply also to your calibrator’s internal plumbing. It is highly
recommended that you use a M702SS calibrator in conjunction with the M 201E.
The calibrator has stainless steel plumbing throughout. The M700 calibrator
contains Teflon tubing and internal MFC’s that can be affected by the ammonia
gas, therefore, the M700 calibrator is not recommend for use with the M201E
analyzer. It is important to keep the sampling system well maintained.
1.3 SAMPLE FILTRATION
The instrument can be provided with an optional stainless steel sample filter P/N
05571. For minimum response time operation, the instrument should be supplied
with clean sample gas at ambient pressure.
An additional filter resides in the M201E pneumatic pathway. The filter is a
¼” diameter stainless steel sintered filter used to protect the reaction cell flow
control orifice from plugging. This filter will plug rapidly if contaminated sample
gas is not filtered before entering the analyzer.
NOTE: In situations where the sample gas is known to be contaminated with
particulate material it is advisably to add extra filtration. However, it must be
noted that the response time is directly extended through filter additions.
05206H DCN5910 13
Page 16

M201E Ammonia Analyzer Teledyne API Model M201E NH3 Analyzer Operator Manual
1.4 M201E ANALYZER SPECIFICATIONS
Table 1-1. M201E Operating Specifications
Ranges
Measurement Units
Noise at Zero1
Noise at Span1
Lower Detectable
2
Limit
Zero Drift
3, 6
Span Drift6
Lag Time
Rise Time
4
Fall Time4
Sample Flow Rate
Linearity
Temp Range
Dimensions HxWxD
Weight, Analyzer
Weight, Converter
Weight, Pump
Power, Analyzer
Power, Analyzer5
Power, Pump
Power, Pump CEMark5
Environmental
Analog Output
Analog Output
Resolution
Serial I/O
Status Option
1
As defined by USEPA
2
Defined as twice the zero noise level
3
At constant temperature and voltage
4
When pneumatics are conditioned with NH3 overnight and the gases (zero air to NH3) are manually
switched at the sample inlet at the rear of the M501.
5
Electrical rating for CE Mark Compliance
6
Applies when sampling NH3; better results expected for NO/NOx gas measurements.
0-50 to 0-2000 ppb in 1 ppb increments (selectable, independent
, NO, NO2, NOx ranges supported)
NH
3
PPB, PPM, microgram/m
<
0.5 ppb RMS
<
1.0% of reading above 50 ppb
3
, milligram/m3 (user selectable)
1 ppb RMS
2 ppb / 24 hours
<
1.0% FS Range / 24 hours
40 seconds
90% 300 seconds
90% 300 seconds
3
1000 cm
500 cm
/min + 10% (500 cm3/min bypass to vacuum manifold,
3
/min to reaction cell)
NO calibration 1% of full scale
NH
calibration 2% of full scale
3
o
15-40
C
7” x 17” x 23.6” (18cm x 43cm x 61cm)
43 lbs (20 kg)
24 lbs (11 kg)
16 lbs (7 kg)
100V ~50/60 Hz, 120V ~60 Hz, 220V ~50Hz, 240V ~50 Hz, 125
watts
230V ~50 Hz, 125 watts
110V ~60 Hz, 220V ~50 Hz, 240V ~50 Hz, 295 watts
230 V ~50 Hz, 2.5 A peak
Installation Category Pollution Degree 2, Over-voltage Category II
4 user configurable outputs, each can be configured as
0.1, 1V, 5V or 10V. Three outputs convertible to 4-20mA isolated
current loop.
1 part in 4096 of selected full-scale voltage (12 bit)
1x RS-232, 1 x RS-485 or RS-232 or Ethernet(optional).
Communication speed: 300 – 115200 baud (user selectable)
8 status outputs from opto-isolators, 7 defined, 1 spare
14 05206H DCN5910
Page 17

2.0 CALIBRATION PROCEDURE
This section begins with a high-level overview of the calibration procedure for the
M201E analyzer. Details are provided starting in Section 2.1:
First, take the time to read the M200E manual to familiarize yourself with
the Chemiluminescence process. It is important to remember that the
analyzer is merely measuring different levels of nitric oxide sample gas on
three separate channels (TN
dioxide concentrations are then calculated using this information.
Assemble the M201E analyzer according to the pneumatic configurations
outlined in Figure 1-1. Remember: DO NOT pressurize the sample, span or
zero ports (Zero/SPAN valves are optional) during calibration. Allow the
analyzer to pull the gas through the system using the vacuum pump.
, NOx, NO). The ammonia and nitrogen
x
CAUTION!
If the presence of ozone is detected at any time, call Teledyne API Customer Service as
soon as possible:
800-324-5190 or email: api-customerservice@teledyne.com
Next, zero the analyzer using an approved zero air source, such as, bottled
zero air, nitrogen or zero air generated by a Teledyne-API M701 zero air
source. This sets the zero offset for the three individual channels
(TNx_OFFS, NOx_OFFS, NO_OFFS). Confirm that all displayed
concentrations read zero.
Span the analyzer using bottled nitric oxide gas diluted to a level set to 80%
of the expected sample range, preferably using a M702 Calibrator. This
sets the slope for the three individual channels (TN
_SLOPE, NOx_SLOPE,
x
NO_SLOPE). Confirm that displayed concentrations TNx , NOx and NO
display the correct span concentration.
If you haven’t done so recently, conduct a GPT (gas phase titration) and
confirm the molybdenum is functioning accordingly. Section 8.3.3 of the
M200E manual outlines the GPT procedure. Section 7.0 of this manual
consists of a service note for checking the molybdenum converter. There
should be no reason to adjust the molybdenum efficiency factor on a new
analyzer. If a diluted bottled of
nitrogen dioxide gas is used to determine
the molybdenum efficiency, allow enough time for the span value to
stabilize. Nitrogen dioxide exhibits similar hold up issues as ammonia gas.
Therefore, it may take a number of hours before the NO
reading
x
stabilizes.
Span the analyzer using bottled
ammonia gas diluted to a level set to 80%
of the expected sample range, preferably using a M702 Calibrator. Note:
05206H DCN5910 15
Page 18

Calibration Procedure Teledyne API Model M201E NH3 Analyzer Operator Manual
The first time bottled ammonia is connected to the gas dilution system,
regulator/calibrator, the TNx reading may take a number of hours to
stabilize.
2.1 ZEROING THE ANALYZER
The analyzer can be zeroed by either applying zero air straight to the sample port
or through the optional Zero/Span valves, if installed. It is important to remember
that if the analyzer was previously sampling ammonia gas, prior to conducting a
Zero calibration, it will take some period of time before the zero baseline is
reached. The process of zeroing the analyzer consists of delivering dry zero air
to the analyzer. The operator then manually zeros the TNx and NOx channels
individually through the user interface. The following Tables outline the steps
necessary to zero the analyzer.
Table 2-1. Zero Calibration Procedure – Zero Gas Through the SAMPLE Port
Important: Each channel (TNx and NOx) must be zeroed individually
Step No. Action Comment
1. Press CAL The M201E enters the calibrate mode from sample
mode. Confirm zero gas is flowing past the sample
port.
2. Channel Selection Press TNX or NOx then Press ENTR.
3. Range Selection Press LOW or HIGH range then Press ENTR.
Always calibrate the LOW range, section 3.0 below.
4. NH3 STB Reading Wait for the displayed stability reading to fall below
1.0 PPB. The lower the stability reading the better the
zero value.
5. Press ZERO If you change your mind after pressing ZERO, you
can still press EXIT without zeroing the instrument.
You don’t have to enter concentration values. The
analyzer knows to apply 0 PPB.
6. Press ENTR Pressing ENTR actually adjusts the Offset value for
the selected channel.
7. Press EXIT The M201E returns to sampling mode.
8. Check
Concentrations
/Offsets
16 05206H DCN5910
All displayed concentrations should read zero. The
offset values should be close to zero (-20 to 150 mv)
Page 19

Teledyne API Model M201E NH3 Analyzer Operator Manual Calibration Procedure
Table 2-2. Zero Calibration Procedure - Zero Gas Through ZERO Port
Step No.
Action Comment
1. Press CALZ The M201E enters the calibrate mode from sample
mode. The zero gas is supplied through the ZERO
inlet port on the rear panel of the M501 NH3,.
2 Table 2.1 Follow Steps 2 to 8 in Table 2-1.
Notes:
Since the zero gas concentration is defined as 0 ppb, it is not necessary to
enter the expected concentration values.
Both the TNx and NOx channels must be zeroed individually. When you
zero the NOx channel both the offsets for NOx and NO are configured. All
readings should display zero following this action.
It is recommended that the calibration of both the TNx and NOx channels
be done at one time.
Always confirm that excess zero air is flowing past the sample or zero
port, if the Zero/Span option is present, on the rear of the M501 NH3,
converter. There should always be some excess flow. If insufficient flow is
supplied to the analyzer ambient gas will be entrained and the zero offset
values will be incorrect. However, it is important not to over pressurize the
analyzer.
It is a good idea to allow the analyzer to sample zero gas for extended
periods following zero calibration. Large drifts can signify leaks or indicate
an issue with the zero air source.
2.2 SPANNING THE ANALYZER WITH NITRIC OXIDE GAS
The analyzer can be spanned by either applying nitric oxide gas straight to the
Sample port or through the Zero/Span valve option, if installed. It is important to
remember that if the analyzer was previously sampling ammonia gas, prior to
conducting a nitric oxide span calibration, it will take some period of time before
the TNx channel stabilizes. The process of spanning the analyzer consists of
diluting bottled gas, using a calibrator and delivering to the analyzer. The
05206H DCN5910 17
Page 20

Calibration Procedure Teledyne API Model M201E NH3 Analyzer Operator Manual
_
operator then manually spans the TNx and NOx channels individually through the
user interface. The following Tables outline the manual steps necessary to span
the analyzer.
Table 2-3. NO Calibration Procedure – NO Gas Through the SAMPLE Port
Important: Each channel (TNx and NOx) must be Spanned individually
Step No. Action Comment
1. Press CAL The M201E enters the calibrate mode from sample
mode. Confirm that excess NO gas is flowing past the
sample port.
2. Channel Selection Press TNX or NOx then Press ENTR.
3. Range Selection Press LOW or HIGH range then Press ENTR.
Always calibrate the LOW range, Section 3.0below.
4. Press CONC If NOx was chosen previously then the following will
be displayed:
NOx NO CONV Exit
Press NOx, If you are delivering 450 PPB of NO then
Enter 450 PPB, Press ENTR.
Repeat the same steps for NO.
Press EXIT
Once stability has been achieved,
Press SPAN, ENTR, EXIT
NOTE: Both NO
and NO should read 450 PPB.
x
___________________________________________
If TNx was chosen previously then the following will
be displayed:
TNx CONV Exit
Press TNx enter 450 PPB, Press ENTR
Press EXIT
Once stability has been achieved,
Press SPAN, ENTR, EXIT
should read 450 PPB.
TN
x
5. Check Slopes The slopes should be close to 1.0 +/- 0.300
18 05206H DCN5910
Page 21

Teledyne API Model M201E NH3 Analyzer Operator Manual Calibration Procedure
Table 2-4. NO Calibration Procedure - NO Gas through the SPAN Port
Step No.
Action Comment
1. Press CALS The M201E enters the calibrate mode from sample
mode. The NO gas is supplied through the SPAN inlet
port on the rear panel of the M501 NH3,.
2 Table 2.3 Follow Steps 2 to 5 in Table 2-3.
Notes:
Both the TNx and NOx channels must be spanned individually with nitric
oxide gas. When you span the NOx channel both the NO and NOx
concentrations must be manually inputted.
It is recommended that the calibration of both the TNx and NOx channels
be done at the same time.
Always conf irm that SPAN gas is flowing past the sample or span port on
the rear of the M501 NH3, converter. There should always be some
excess flow. If insufficient flow is supplied to the analyzer ambient gas will
be entrained and the span values will be incorrect. However, it is important
not to over pressurize the analyzer.
It is a good idea to allow the analyzer to sample span gas for extended
periods following span calibration. Large drifts can signify leaks or indicate
an issue with the span gas source.
If after spanning with nitric oxide, the analyzer slopes are out of range
conduct the following:
Confirm the gas sources are good. Usually the bottle is certified to
a known level of nitric oxide. The bottle should be balanced with
nitrogen. Try not to use the same regulator for nitric oxide as was
used on ammonia. This also holds for the tubing between the
different bottles and the mixing source (calibrator).
Confirm the zero reading is good by delivering Zero gas.
Confirm that the concentration delivered to the analyz er is equal to
what you entered under the CONC menu NOx and TNx.
Leak check both the M501 NH3, and analyzer together.
Using section 11.6.5 of the M200E manual confirm that the PMT
sensor hardware calibration is set correctly.
05206H DCN5910 19
Page 22

Calibration Procedure Teledyne API Model M201E NH3 Analyzer Operator Manual
2.3 SPANNING THE ANALYZER WITH AMMONIA GAS
The most important criterion an individual can avail themselves of when spanning
an analyzer with ammonia gas is “patience”. Ammonia is a very sticky gas and
the response of the analyzer/calibration system depends on a number of factors.
The following lists some important points the user should be aware of when
calibrating:
Is this the first time the analyzer/calibration system has seen ammonia gas
in the last couple of days? If so, spanning to a fixed value will take
considerably longer than normal: possibly 12 hours to completely stabilize.
Is the tubing that is delivering span gas from the calibration bottles , made
of stainless steel? Is the tubing from the rear of the calibrator to the
analyzer, made of stainless steel? Where possible use stainless steel
tubing.
Note: The operator is responsible for delivering a set amount of ammonia
to the analyzer, calculating the converter efficiency of the M501 NH3, and
entering the efficiency value through the user interface, if required.
Is the environment where the analyzer resides undergoing large
temperature swings (+/- 5 C about the norm Temperature)? If so the
sample line can absorb and desorb ammonia at concentration rates that
are distinguishable to the analyzer. If possible, heat the sample line to a
constant maximum ambient temperature. Otherwise the FILT_SIZE = 42
Samples variable located under the VARS MENU can be lengthened.
However, lengthening the filter size slows the rise/fall response time of the
analyzer.
Does the sampling environment contain large amounts of particulates? If
so, it may be necessary to add the sampling filter option. As outlined
previously, this will affect the analyzer response.
One method to increase the response of both the sampling system and
the analyzer is to flow a larger concentration of ammonia gas through the
pneumatics for a couple of hours. For example, if the expected range is
500 PPB of ammonia, then flowing 1.0 PPM speeds up the absorption
which occurs throughout the pneumatics. The long delays in
ammonia
response occur when the analyzer hasn’t sampled the gas for some time.
Ammonia desorbs from the pneumatics, these surfaces need to be
rewetted before span stability is achieved.
Prior to conducting the ammonia calibration, confirm that the ammonia
converter efficiency is initially set to 1.000 using the following menu key
selections:
20 05206H DCN5910
Page 23

Teledyne API Model M201E NH3 Analyzer Operator Manual Calibration Procedure
Table 2-5. Confirming Ammonia Converter Efficiency
Step No. Action Comment
1. Press CAL The M201E enters the calibrate mode from Sample
mode.
2. Channel Selection Press TNX then Press ENTR.
3. Range Selection Press LOW range then Press ENTR.
4. Press CONC The following will be displayed:
TNx CONV Exit
Press CONV enter 1.0000, Press ENTR
Press EXIT, EXIT
05206H DCN5910 21
Page 24

Calibration Procedure Teledyne API Model M201E NH3 Analyzer Operator Manual
Table 2-6. NH3 Calibration Procedure – NH3 Gas Through The SAMPLE Port
Step No. Action Comment
1. Generate a known
level of NH3 gas
using a calibration
gas source
Monitor the TNx concentration until it has stabilized;
this signifies that both the NOx and NH3 gases have
stabilized. This could range from 20 minutes to
several hours depending on whether the analyzer /
calibration system has recently been subjected to
ammonia gas.
2. NH3 Conversion
efficiency
calculation
When the TNx channel is stable, note the
concentration of NH3 displayed. The calculation for
the NH3 Conversion efficiency is:
(Displayed NH3 concentration) divided by
(Delivered NH3 concentration)
Example: The operator is delivering 450 PPB of NH3.
The displayed concentration for NH3 is 440 PPB then
the efficiency factor = 440/450 = 0.9777
3. Press CAL The M201E enters the calibrate mode from Sample
mode.
4. Channel Selection Press TNX then Press ENTR.
5. Range Selection Press LOW range then Press ENTR.
6. Press CONC Since TNx was chosen previously, then the following
will be displayed:
TNx CONV Exit
Press CONV enter 0.9777, Press ENTR
Press EXIT, EXIT
Note: In the example outlined above, the displayed
ammonia
concentration is being increased by 2.27%. Newer M501 NH3, converters
should have efficiency values very close to 1.00. Depending on the
operator’s acceptable level of error, it may not be necessary to change the
efficiency factor from 1.00. Therefore, calibration with nitric oxide gas is all
that is required.
The efficiency factor may also be changed by entering the VARS MENU
and editing NH3_CE_FACTOR1 = 1.0000.
22 05206H DCN5910
Page 25

Teledyne API Model M201E NH3 Analyzer Operator Manual Calibration Procedure
Table 2-7. NH3 Calibration Procedure – NH3 Gas through the SPAN Port
Step No.
Action Comment
1. Press CALS The M201E enters the calibrate mode from Sample
mode. The ammonia gas is supplied through the
SPAN inlet port on the rear panel of the M501 NH3,.
Calculate the Efficiency factor as outlined in Steps 2
in table 2.5.
2 Table 2.5 Follow Steps 4 to 6 in table 2.5.
Note: The response time of the analyzer increases when using the Zero/Span
valve option.
05206H DCN5910 23
Page 26

Calibration Procedure Teledyne API Model M201E NH3 Analyzer Operator Manual
This page intentionally left blank.
24 05206H DCN5910
Page 27

3.0 CONFIGURABLE ANALOG OUTPUT OVERVIEW
There are three different methods to extract concentration data from the E-Series
analyzers. By one method, the operator can set up an iDas (internal data
acquisition) configuration either through the user display or using TAPI’s window s
based software called APICOM. The analyzer stores data internally, which is
available later for download through the RS-232 or Ethernet port. The second
method involves the use of hyperlink where the user sends text based commands,
to retrieve data, through the RS-232 port. With the third method, the operator can
interface a strip chart recorder and/or data-logger to the ana lyzer analog outputs.
The following sections outline the steps necessary to calibrate and configure the
analog outputs.
There are four analog outputs on the rear of the analyzer. The default
configurations of the M201E analog outputs are as follows:
Table 3-1. Analog Output Data Default Settings
ANALYZER
M201E
A1 A2 A3 A4
TNxCNC1
5 Volts 5 Volts 5 Volts 5 Volts
500 PPB 500 PPB 500 PPB 500 PPB
CHANNEL DEFAULT SETTING
NH3CNC1 NOCNC1
NO2CNC1
To access these signals attach a strip chart recorder and/or data-logger to the
appropriate contacts of the analog output connecter on the rear panel of the
analyzer.
ANAL OG O UT
A1 A2 A3 A4
+ - + - + - + -
Figure 3-1. Analog Output Connector
05206H DCN5910 25
Page 28

Configurable Analog Output Overview Teledyne API Model M201E NH3 Analyzer Operator Manual
Table 3-2. Analog Output Pin-Outs
PIN ANALOG OUTPUT VOLTAGE SIGNAL CURRENT SIGNAL
1 V Out I Out +
2
3 V Out I Out +
4
5 V Out I Out +
6
7 V Out N/A
8
A1
A2
A3
A4
Ground I Out -
Ground I Out -
Ground I Out -
Ground N/A
Additionally A1, A2 and A3 may be equipped with optional 0-20 mA current loop
drivers. The 4-20 mA option is not available on A4.
Note: In actuality the analog output configuration of the analyzer may be different
than stated above. The outputs can be configured differently at the factory
depending on whether they were assigned during the procurement of the product.
It is possible to check the configuration of the analyzer by accessing the ANALOG
I/O CONFIGURATION through the DIAG menu.
The analyzer operates in Dual Mode during gas detection. This means each of the
measured concentrations can have two separate slopes and offsets, one for the
low range and one for the high range. Though uncommon, a user may dec ide to
calibrate the analyzer with nitric oxide at, for example, 100 PPB using the LOW
range and then perform another calibration at 450 PPB using the HIGH range.
Through the analog outputs the user can then assign analog output A1 to
TNxCNC1 and output A2 to TNxCNC2. Gases with the “1” designation use the
slope and offset for the LOW range, while gases with the “2” designation will use
the slope and offset for the HIGH range. It is recommended that both the LOW and
HIGH ranges be calibrated at the same time. Independent of whether the HIGH
range is actually being outputted to the analog outputs.
26 05206H DCN5910
Page 29

Teledyne API Model M201E NH3 Analyzer Operator Manual Configurable Analog Output Overview
3.1 ANALOG OUTPUT - ELECTRONIC CONFIGURATION
The final step in configuring the analyzer’s four analog output channels is to set the
electronic signal type and range of each channel. This consists of:
Selecting an output type for A1 – A4 (voltage or current if an optional
current output driver has been installed) and the signal level that matches
the input requirements of the recording device attached to the channel.
Calibrating the electr onic circuitry of the output channel. For each channel
this can be done either automatically or manually.
Adding a bipolar recorder offset to the signal if required.
In its standard configuration the analyzer’s Analog Outputs can be set for the
following DC voltage signal levels. Each range is usable from -5% to + 5% of the
rated range.
Table 3-3. Analog Output Voltage Range Min/Max
RANGE SPAN
0-0.1 VDC -0.005 VDC 0.105 VDC
0-1 VDC -0.05 VDC 1.05 VDC
0-5 VDC -0.25 VDC 5.25 VDC
0-10 VDC -0.5 VDC 10.5 VDC
MINIMUM OUTPUT MAXIMUM OUTPUT
The default offset for all ranges is 0 VDC.
The following DC Current output options are also available from the factory:
Table 3-4. Analog Output Current Loop Min/Max
RANGE SPAN MINIMU M OUTPUT MAXIMUM OUTPUT
2-20 mADC 1 mADC 21 mADC
4-20 mADC 3 mADC 21 mADC
The default offset for all ranges is 0 mADC.
05206H DCN5910 27
Page 30

Configurable Analog Output Overview Teledyne API Model M201E NH3 Analyzer Operator Manual
A
A
3.2 ANALOG OUTPUT SIGNAL TYPE AND RANGE SELECTION
To select an analog output signal type (DC voltage or current) for one of the
analyzer analog output channels press SETUP - MORE -DIAG - 818…ENTERNEXT…NEXT:
FROM ANALOG I/O CONFI GURA TION ME NU
Press SET> to sel ect the channel
DATA_ OUT_2 RANGE: 5V
DATA_ OUT_2 OVERRANG E: ON
DATA_ OUT_2 REC OFS : 0 mv
DATA_ OUT_2 AUTO CAL: ON
DATA_ OUT_2 CALIBRATED: YES
DATA_ OUT_2 OUTPUT: ON
DATA_ OUT_2 DATA: NO
DATA_OUT_2 SCALE: 500 PPB
DATA_ OUT_2 PRECISI ON: 1
DATA_ OUT_2 UPDATE: 5 S EC
Then Press EDIT t o conti nue
parameter:
CNC1
2
DIAG
PREV NEXT ENTR EXIT
DIAG AIO
< SET SET> CAL EXIT
DIAG AIO DATA_OUT_2: 5V, NH3CNC1, CAL
< SET SET> EDIT EXIT
DIAG AIO DATA_OUT _2 RANGE: 5V
SET> EDIT EXIT
DIAG AIO DATA_OUT_2 RANGE: 5V
0.1V 1V 5V 10 V CURR ENTR EXIT
These Keys set
the Si g nal Level
of the selected
channel
NALOG I / O CONFI GURATION
OUTS CALIBRATED: NO
Press SET> to select the Analog
Output channel to be configur ed:
DISPLAYED AS = CHANNEL
DATA_OUT_1 = A1
DATA_OUT_2 = A2
DATA_OUT_3 = A3
DATA_OUT_4 = A4
Then Press EDIT to co ntin ue
Pressing ENTR re c or ds
an d r eturns to the previous me n u
Pressing EXI T ignores the new setting
an d r eturns to the previous me n u
t he new sett i ng
Figure 3-2. Analog Output Signal Type
28 05206H DCN5910
Page 31

Teledyne API Model M201E NH3 Analyzer Operator Manual Configurable Analog Output Overview
3.3 SELECTING AUTO OR MANUAL ANALOG OUTPUT CALIBRATION
The analog outputs configured for voltage mode can be calibrated either
automatically or manually. In its default mode the instrument is configured for
automatic calibration. Note: manual calibration should only be used for the 0.1V
range or in cases where the outputs must be closely matched to the
characteristics of the recording device. Outputs configured for automatic
calibration can be calibrated as a group or individually.
To select auto-calibration for a particular channel press the following:
05206H DCN5910 29
Page 32

Configurable Analog Output Overview Teledyne API Model M201E NH3 Analyzer Operator Manual
O
O
O
FROM ANALOG I/O CONFIGURATIO N MENU
DIAG ANALOG I / O CONFIGURATION
PREV NEXT ENTR EXIT
DIAG AI
< SET SET> CAL EXIT
DIAG AIO DATA_OUT_2: 5V, NH3CNC1, CAL
< SET SET> EDIT EXIT
DIAG AIO DATA_OUT_2 RANGE: 5V
SET> E DIT EXIT
AOUTS CALIBRATED: NO
Exit to Return
to the main
Sample Dis play
Press SET> to s elect the Analog Output
channel to be conf igured:
DISPLAYED AS = CHANNEL
DATA_OUT_1 = A1
DATA_OUT_2 = A2
DATA_OUT_3 = A3
DATA_OUT_4 = A4
Then Press EDIT to con tinue
Toggles the Aut o
Cal Mode
ON/ OFF for this
Analog Output
channel only .
DIAG AI
< SET SET> EDIT EXIT
DIAG AI
< SET SET> EDIT EXIT
DIAG AIO DATA_OUT_2 AUTO CAL: ON
DIAG AIO DATA_OUT_2 AUTO CAL: ON
ON ENTR EXIT
DATA_OUT_2 OVERRANGE: ON
DATA_OUT_2 REC OFS: 0 mv
< SET SET> E DIT EXIT
Pressing ENTR records
and r eturns to the previous menu
Pressing EXI T ignores the n ew set ting and
re turns to the pr evious menu
the new setting
Figure 3-3. Auto Or Manual Analog Output Calibration
30 05206H DCN5910
Page 33

Teledyne API Model M201E NH3 Analyzer Operator Manual Configurable Analog Output Overview
_
A
A
To calibrate the output channels as a group press the following, (Note: this is the
recommended calibration approach):
Exit at Any
Time to Return
to the main
DIAG Menu
FROM ANALOG I/O CONFIGURATION ME NU
DIAG
PREV NEXT ENTR EXIT
NALOG I / O CONFIGURATION
DIAG AIO
< SET SET> CAL EXIT
DIAG AIO AUTO CALIBRATING DATA_OUT _1
AUTO CALIB RAT ING DATA_OU T _2
AUTO CALIB RAT I N G DATA
DIAG AIO AOUTS CALI BRATED: YES
< SET SET> CAL EXIT
OUTS CALI BRATED: NO
…
OUT_4
Figure 3-4. Analog Output Group Calibration
If AutoCal h as been manually
t ur ne d of f for any channe l th e
message f or that channel will be
NOT AUT O CAL DAT A_OUT _1
similar to:
Exit t o Return
to the I/O
Configuration
Menu
05206H DCN5910 31
Page 34

Configurable Analog Output Overview Teledyne API Model M201E NH3 Analyzer Operator Manual
R
3.4 MANUALLY CALIBRATING ANALOG OUTPUT SIGNAL LEVELS
The analog outputs in voltage mode can be manually calibrated to closely match
the characteristics of the data recorder. Outputs configured for 0.1V full scale
should always be calibrated manually.
Calibration is done through the instrument software in conjunction with a v oltmeter
connected across the output terminals. Adjustments are made using the front
panel keys. First the zero-point is set then the span-point.
The software allows this adjustment to be made in 100, 10 or 1 count increments.
Table 3-5. ZERO/SPAN Analog Output Signal Calibration Tolerances
Full Scale Adjust Zero Within Span Voltage Adjust Span Within
0.1 VDC ±0.0005V 90 mV ±0.001V
1 VDC ±0.001V 900 mV ±0.001V
5 VDC ±0.002V 4500 mV ±0.003V
10 VDC ±0.004V 4500 mV ±0.006V
See Table 6-8 for pin
assignments on the
for ANALOG
connector located on
the instruments rear
panel
VDC
+DC Grnd
V OUT +
V OUT -
ANALYZE
V IN +
V IN -
Recording
Device
Figure 3-5. Setup For Calibrating Analog Output Signal Levels
32 05206H DCN5910
Page 35

Teledyne API Model M201E NH3 Analyzer Operator Manual Configurable Analog Output Overview
G
A
A
O
–
g
To make these adjustments the auto calibration feature “DATA_OUT_1 AUTO
CAL: OFF” must be turned off for each output channel then press the following:
FROM ANALOG I/O CONFIGURATION MENU
Press SET> to select the Analog Output
channel to be confi gured:
DISPLAYED AS = CHANNEL
DATA_OUT_1 = A1
DATA_OUT_2 = A2
DATA_OUT_3 = A3
DATA_OUT_4 = A4
Then Press EDIT to continue
Press SET Until
These keys
increment/decrement the
ZERO/SPAN D-to-A converter
output by
100, 10 or 1 counts
respectively.
Continue adjustments until the
voltage measured at the
output of the analyzer and/or
the input of the recording
device matches the value in
the upper right hand corner of
the display to the tolerance
listed previously.
The analyzer display WILL
NOT CHANGE. Only the
voltage reading of your volt
meter will chan
e.
DIA
PREV NEXT ENTR EXIT
DIAG AIO
< SET SET> CAL EXIT
DIAG AIO DATA_OUT_1 :5V, TNXCNC1, NO CAL
< SET SET> EDIT EXIT
DIAG AIO DATA_OUT_1 RANGE: 5V
SET> EDIT EXIT
DIAG AIO DATA_OUT _1 CALIBRATED: N
< SET CAL EXIT
NALOG I / O CONFIGURATION
OUTS CA LIBRATED: NO
DIAG AIO DATA_OUT_1 VOLT
U100 UP10 UP DOWN DN10 D100 ENTR EXI T
DIAG AIO DATA_OUT_1 VOLT–S : 4500 mV
U100 UP10 UP DOWN DN10 D100 ENTR EXIT
DIAG AIO DATA_OUT_1 CA LIBRATED: YES
< SET CAL EXIT
Z : 0 mV
EXIT ignores the
new setting.
ENTR accepts
new setting.
the
Figure 3-6. Analog Output Manual Calibration
05206H DCN5910 33
Page 36

Configurable Analog Output Overview Teledyne API Model M201E NH3 Analyzer Operator Manual
A
A
3.5 ANALOG OUTPUT RECORDER OFFSET ADJUSTMENT
An offset can be added to individual output channels by pressing the following:
Press SET Until
FROM ANALOG I/O CONFIGURATION MENU
DIAG
PREV NE XT ENTR EXIT
DI AG AIO
SET> CAL EXIT
DI AG AIO DATA_OUT_2 : 5V, NH3CNC1, CAL
< SET SET> EDIT EXIT
DI AG AIO DATA_OUT_2 RANGE: 5V
SET> EDIT EXIT
NALOG I / O CONFIGU RATIO N
OUTS CALIB RATED:NO
Press SET> to select the A nalog O utput
ch annel to be con fi gu re d:
DISPLAYE D AS = CHANNEL
DATA_OUT_1 = A1
DATA_OUT_2 = A2
DATA_OUT_3 = A3
DATA_OUT_4 = A4
Then Press EDIT to continue
These Keys set
the Recorder
of the s elected
Offset
channel
DIAG AIO DATA_O UT_2 REC OFS: 0 m V
< SET SET> EDIT EXIT
DIAG AIO RE CO RD OFFSET: 0 MV
+ 0 0 0 0 ENTR EXIT
Pressing ENTR re cords the new setting
and returns to the previous menu
Pressing EXIT ignores
returns to the previous menu
Figure 3-7. Analog Output Recorder Offset Calibration
t he new setti ng and
34 05206H DCN5910
Page 37

4.0 MAINTENANCE SCHEDULE
The maintenance requirements of the M201E are the same as a standard M200E
NO
analyzer but with additional maintenance items (Table 4-1). Please refer to
x
Section 13 in the M200E Operator Manual for the M200E maintenance schedule
and for maintenance and repair procedures.
The M201E requires the following additional maintenance items.
Table 4-1. Preventative Maintenance Schedule
Item Maintenance Interval Reference Section
NO
molybdenum converter
2
M501 NH
Reaction Cell Clean annually or as necessary Section 9.3.9 M200E Manual
AutoZero flow check Quarterly as needed Section 4.4 of this manual.
Converter
3
Test Every Three Months
Section 8.2.3 M200E Manual
Section 4.1of this manual.
4.1 M501 NH
The M501 NH3 external converter is operated at 825 ºCelsius. Because of this the
stainless steel ¼” tube internal to the converter slowly oxidizes and may require
replacement. Over time the converter’s efficiency will degrade, due to aging of
the internal catalyst. This is characterized by a CONV value on the TNx channel
of < 0.8 or > 1.2, despite the converter being at temperature. The efficiency of the
converter should be checked quarterly. The converter should be cleaned out on a
yearly basis by removing the outer tube and shaking the fine dust particles from
both the outer and inner tubes. This is also a good time to replace the catalyst
screen, if necessary.
The following procedure describes how to disassemble and replace converter
parts. The various parts in the converter become delicate and brittle after
prolonged exposure to high temperatures. It is therefore a good idea to have a
complete set of replacement parts on hand before starting, as listed in Table 4-2.
MAINTENANCE
3
05206H DCN5910 35
Page 38

Maintenance Schedule Teledyne API Model M201E NH3 Analyzer Operator Manual
Table 4-2. M501 NH3 Converter Rebuild Parts List
Part No. Description
KIT000193 RETROFIT, M501NH INNER TUBE w/SCREEN
KIT000139 REBUILD, CERAMIC BUSHINGS, M501NH
HE0000007 CERAMIC HEATER, 220W@60V M501XX
4.2 REPLACING THE CATALYTIC CARTRIDGE
1. Turn off power to the converter and allow to cool. IT IS VERY IMPORTANT
THAT THE CONVERTER BE COOL BEFORE ATTEMPTING ANY
DISASSEMBLY OR REPAIRS.
CAUTION VERY HOT
Will cause severe burns – disassembly while hot will
2. Remove the chassis cover of the M501 NH3, remove the aluminum cover over
the oven, remove the two U-shaped hold down clamps.
damage other converter components. Allow sufficient
time to cool.
3. Disconnect the 1) stainless steel and 2) PTFE tubes from the converter
cartridge.
4. Loosen the nut holding the cartridge assembly in the U-shaped angle bracket
mounted on the chassis floor.
5. Gently lift and tilt the converter assembly out of the U-shaped bracket and
slide the assembly out of the oven.
6. Loosen the ¼” SS tube fitting nearest the hold-down bracket; this fitting holds
the central tube in the converter. Replace the tube that is part of KIT000193.
7. Re-assemble the converter by doing the above steps in reverse order.
Figure 4-1. Catalytic Cartridge
36 05206H DCN5910
Page 39

Teledyne API Model M201E NH3 Analyzer Operator Manual Maintena nce Schedule
4.3 REPLACING THE THERMOCOUPLE
The following instructions provide the necessary information to replace the
existing thermocouple. Figure 4-2 is provided for reference.
You must obtain the following replacement parts kit from T-API:
010820000 , Type K thermocouple
You will need the following tools:
Nutdriver, 5/16
Nutdriver, 11/32
Diagonal Cutter
Philips head Screwdriver #2
CAUTION
Avoid damage to the unit: use only Type K thermocouple in
the M501 NH3, converter. It can be distinguished by its wire
colors: red and yellow. If you have any other thermocouple,
do NOT install it; call T-API to obtain the correct part.
Figure 4-2. Thermocouple Location
Once you have the right tools and parts, replace the thermocouple as follows:
1. Ensure power is removed from the
been operational you will need to wait for at least 2 hours for the Converter oven to
cool before continuing with the replacement of the thermocouple.
05206H DCN5910 37
M501 NH3, Converter. If the Converter has
Page 40

Maintenance Schedule Teledyne API Model M201E NH3 Analyzer Operator Manual
2. Remove the cover from the Converter chassis.
3. Unscrew the (4) nuts that secure the front panel to the chassis. They are located just
behind the Front Panel along the top.
4. Lower the Front Panel to gain easier access to the end of the quartz tube.
5. Unscrew the (3) nuts that secure the inner cover protecting the Heater Block and
quartz tube. Remove this cover.
6. Cut the tie-wrap that secures the thermocouple to the fitting at the end of the quartz
tube.
7. Loosen the Teflon fitting at the end of the quartz tube taking care not to put any
stress on the tube, and slide the fitting off the tube.
8. Remove the thermocouple.
9. Disconnect the thermocouple wires from the Temperature Controller noting that the
‘Yellow’ wire goes to pin 1 and the ‘Red’ wire goes to pin 2.
10. The thermocouple should slide into the Heater Block.
11. Replace the Tie-Wrap Hold-Down.
12. Form the thermocouple wire so that it rests in the cavity with little movement.
13. Connect the (2) wires of the thermocouple to the Temperature Controller. The
“yellow” wire should be connected to pin 1 and the “red” wire should be connected to
pin 2.
14. At this point, all connections have been made, both electrically and pneumatically. A
leak check should be performed on the Converter to verify that all connections are
leak free. If a leak is detected, the leak should be resolved before continuing.
15. Install the inner cover of the Heater Block and secure with the (3) nuts. Close the
Front Panel and secure with the (4) nuts. Install the top cover on the Converter
chassis.
16. The Converter is now ready for the application of power. You will be looking for an
indication from the Temperature Controller that it is functioning correctly and driving
the heater to the desired “set” temperature. Apply power now.
17. After the Converter comes to the regulated temperature, perform the Auto Tune
function to tune the Temperature Controller to the new thermocouple.
18. After the Auto-Tune process is completed, verify that the “process” temperature is
indicating that the desired temperature is stable and being regulated.
The converter is now ready for operation.
38 05206H DCN5910
Page 41

Teledyne API Model M201E NH3 Analyzer Operator Manual Maintena nce Schedule
4.4 AUTOZERO FLOW CHECK
Since the M201E is an ammonia analyzer, the flow through t he AutoZero orifice is
especially important. Check the AutoZero flow as follows:
1. This procedure should be performed with the sample pump running.
2. Remove the top cover of the analyzer. Locate the vacuum manifold at the
center rear of the chassis. Locate the 1/8” tube fitti ng located on the very left
side, as viewed from the rear of the analyzer. It will have a label of “0.010”
indicating the flow orifice installed.
3. Remove the fitting and attach a calibrated flowmeter to the block fitting capable
of measuring in the range of 500 cc/min. The flowmeter should indicate a flow
of 500 cc/min 10%.
4. If the flow is outside this range (most likely lower, due to plugging):
1. Turn off the sample pump and instrument.
2. Remove the 1/8” pipe-to-tube fitting and remove the ¼” sintered filter (p/ n
FL0000001). This filter is meant to protect the orifice; it will usually
become plugged and need replacement rather than the orifice. Rep lace
the filter, and then re-assemble the manifold. Restart the sample pump
and recheck the flow.
Table 4-3. Analyzer Flow Check
M501 NH3, Converter sample flow check
Note: Connect both the Teflon tubes between analyzer and converter
GAS PORT Expected Flow (cc/min)
“Sample In” 1000 +/- 10 %
Analyzer sample flow check
Note: Disconnect both the Teflon
tubes between analyzer and converter
GAS PORT Expected Flow (cc/min)
“To Conv”
1000 or 500, +/- 10 % When the analyzer is sampling
TNx only, the bypass flow is
0
measured. Therefore, the flow
alternates between 500 and
1000 cc/min. This is the NOx
channel.
“From Conv” 500 +/- 10% This is the TNx channel.
05206H DCN5910 39
Page 42

Maintenance Schedule Teledyne API Model M201E NH3 Analyzer Operator Manual
This page intentionally left blank.
40 05206H DCN5910
Page 43

5.0 ALARMS AND CAUTIONS
A functional block diagram of the analyzer is shown in Figure 5-1.
5.1 ALARM
During initial warm up the internal Zero/Span factor y option may exhibit a “Block
Temperature” warning. This can be cleared once the block temper ature stabilizes
at 50 degrees Celsius. The block temperature is the actual temper ature of the IZS
block manifold inside the M501 NH3, converter. If the block temperature warning
exhibits a negative number such as (-37), then the umbilical cord is probably not
attached or the Thermistor has become disconnected.
5.2 CAUTION
Be aware that the ammonia converter operates at 825 degrees Celsius. Do not
flow highly flammable gases through the M201E analyzer. When the analyzer is
not in use, it is advisable to turn off the M5 01 NH3,. If the converter hasn’t been
powered for an extended period of time it is recommend that the analyzer be
operated overnight prior to use.
Before spanning the analyzer it is good practice to observe the NORM PMT
signal. Its value should be equal to twice the concentration of the delivered span
gas. A common error made during calibration is to span the analyzer with either
too low a gas concentration or an incorrect value entered into the CONC menu
for TNx and NOx. Commonly this will cause a slope value much greater than
one.
Note: Always zero then span as a basic rule of thumb.
05206H DCN5910 41
Page 44

Alarms and Cautions Teledyne API Model M201E NH3 Analyzer Operator Manual
KEYBOARD/DISPLAY
DIGITAL
ANALOG
THERMOCOUPLE
I/O
I/O
ANALOG
OUTPUTS
OZONE
CLEANSER
OZONE
GENERATOR
MOTHERBOARD
PREAMP
PHOTONS
REACTION
CELL
NO/NOx
VALVE
MOLYBDENUM
CONVERTER
STD
BUS
RCELL
PRESSURE
AUTOZERO
VALVE
SAMPLE
PRESSURE
CPU
VACCUM BLOCK
RS-232
OZONE
DESTRUCT
VACUUM
PUMP
NAFION DRIER
DFU FILTER
NAFION DRIER
SCRUBBER
NH3
TNx / NOx
VALVE
M501NH
NH3 CONVERTER
SAMPLE MANIFOLD
Figure 5-1. M201E Functional Block Diagram
42 05206H DCN5910
Page 45

6.0 M201E SPARE PARTS LIST
While this section lists the spare parts for the M201E, it is recommended that you refer to
our Website or Sales for updates.
M201E Spare Parts List, Source: PN 06185H (DCN5494)
Part Number Description
000940100 CD, ORIFICE, .003 GREEN
000940400 CD, ORIFICE, .004 BLUE
000940500 CD, ORIFICE, .007 ORANGE
000940600 CD, ORIFICE, .010 BROWN
002730000 CD, FILTER, 665NM (KB)
005960000 AKIT, EXP, 6LBS ACT CHARCOAL (2 BT=1)
005970000 AKIT, EXP, 6LB PURAFIL (2BT=1)
009690200 AKIT, TFE FLTR (FL19) ELEM, 47MM, (100)
010820000 ASSY, THERMOCOUPLE, HICON, M501
011630000 HVPS INSULATOR GASKET (KB)
013140000 ASSY, COOLER FAN (NOX/SOX)
014080100 ASSY, HVPS, SOX/NOX
016680600 PCA, O3 GEN DRIVER, NOX, E SERIES
018080000 AKIT, DESSICANT BAGGIES, (12)
025070000 ASSY, IZS VALVE HEATER, M501NH
025250000 ASSY, VALVE/THERM, M501NH
037860000 ORING, TEFLON, RETAINING RING, 47MM (KB)
039700100 HEATER, BAND, TYPE K, DUAL VOLTAGE(KB)
040010000 ASSY, FAN REAR PANEL, E SERIES
040030800 PCA, PRESS SENSORS (2X), FLOW, E (NOX)
040400000 ASSY, HEATERS/THERMAL SWITCH, RX CELL
041710000 ASSY, CPU, CONFIGURATION, "E" SERIES * (USE WITH DOC 053150100)
041800500 PCA, PMT PREAMP, VR, M200E/EM/EH
041920000 ASSY, THERMISTOR, M200E (KB)
042580000 PCA, KEYBOARD, E-SERIES, W/V-DETECT
042680100 ASSY, VALVE (SS), M200E
043220000 TUBING, CERAMIC, .25OD X .156 ID
043220100 THERMOCOUPLE INSULATING SLEEVE, M501NH *
043940000 PCA, INTERFACE, ETHERNET, E-SERIES
044100000 MANUAL, OPERATORS, M200E
045230100 PCA, RELAY CARD, E SERIES
04550010A ASSY, ORIFICE HOLDER, 4 MIL
04550030A ASSY, ORIFICE HOLDER, 10 MIL, (NOX) (KB)
05206H DCN5910 43
Page 46

M201E Spare Parts List Teledyne API Model M201E NH3 Analyzer Operator Manual
M201E Spare Parts List, Source: PN 06185H (DCN5494)
Part Number Description
046030000 AKIT, CH-43, 3 REFILLS
048620200
049310100 PCA, TEC DRIVER, PMT, M100/200, E SERIES
051211000 ASSY, O3 DESTRUCT W/FTGS (MNFLD - EXH) *
052060000 MANUAL, 201E STDL ADDENDUM
052930200 ASSY, BAND HEATER TYPE K, M200EX
053150100 DOC, w/SOFTWARE, M201E* (USE WITH ACROSSER CPU 041710000)
053950000 MANUAL, OPERATORS, M200E w/M201E ADDEND
055710000 ASSY, FLT, INLINE SS, 3/8” CONN, 0.5 MIC
058021100
062390000 ASSY, MOLY GUTS w/WOOL, M101E/M200EX
062420200
062870000 CPU, PC-104, VSX-6150E, ICOP *(KB) (MUST USE WITH 058021100 MB)
063570100 DOM, w/SOFTWARE, M201E * (USE WITH ICOP CPU 062870000)
CH0000037 PURACARB AMMONIA
CP0000014 CONTROLLER, TEMP, W/PG-08 (CN262)
DS0000025 DISPLAY, E SERIES (KB)
FA0000006 FAN, 115VAC (KB)
FL0000001 FILTER, SS
FL0000003 FILTER, DFU (KB)
FL0000034 FILTER, DISPOSABLE, PENTEK (IC-101L)(KB)
FT0000010 CONNECTOR-ORING, SS, 1/8" (HK)
HE0000007 CERAMIC HEATER, 220W@60V M501XX
HW0000005 FOOT
HW0000020 SPRING
HW0000030 ISOLATOR, M100/M200 A/E/H/U
HW0000031 FERRULE, SHOCKMOUNT
HW0000036 TFE TAPE, 1/4" (48 FT/ROLL)
HW0000101 ISOLATOR
HW0000416 COVER, CRYDOM RELAYS, RL9, 19 and 20
HW0000453 SUPPORT, CIRCUIT BD, 3/16" ICOP
KIT000095 AKIT, REPLACEMENT COOLER, A/E SERIES
KIT000219 KIT, 4-20MA CURRENT OUTPUT (E SERIES)
KIT000253 ASSY and TEST, SPARE PS37, E SERIES
KIT000254 ASSY and TEST, SPARE PS38, E SERIES
OR0000001 ORING, 2-006VT *
OR0000002 ORING, 2-023V
OR0000025 ORING, 2-133V
OR0000027 ORING, 2-042V
OR0000034 ORING, 2-011V FT10
PCA, SERIAL INTERFACE, w/ MD, E SERIES (USE WITH ACROSSER CPU
041710000)
PCA, E-SERIES MOTHERBD, GEN 5-ICOP (ACCEPTS ACROSSER OR ICOP
CPU)
PCA, SER INTRFACE, ICOP CPU, E- (OPTION) (USE WITH ICOP CPU
062870000)
44 05206H DCN5910
Page 47

Teledyne API Model M201E NH3 Analyzer Operator Manual M201E Spare Parts List
M201E Spare Parts List, Source: PN 06185H (DCN5494)
Part Number Description
OR0000039 ORING, 2-012V
OR0000044 ORING, 2-125V
OR0000083 ORING, 105M, 1MM W X 5 MM ID, VITON
OR0000086 ORING, 2-006, CV-75 COMPOUND(KB)
OR0000094 ORING, 2-228V, 50 DURO VITON(KB)
RL0000015 RELAY, DPDT, (KB)
RL0000019 SSRT RELAY, TA2410, CE MARK
RL0000020 SSRT RELAY, TD2410, CE MARK
SW0000040 PWR SWITCH/CIR BRK, VDE CE (KB)
SW0000051 SWITCH, POWER CIRC BREAK VDE/CE, w/RG(KB
SW0000058 SWITCH, THERMAL/450 DEG F
WR0000008 POWER CORD, 10A
05206H DCN5910 45
Page 48

M201E Spare Parts List Teledyne API Model M201E NH3 Analyzer Operator Manual
This page intentionally left blank.
46 05206H DCN5910
Page 49

7.0 CALCULATING MOLY CONVERTER EFFICIENCIES
7.1 PURPOSE
To provide instructions on how to calculate the efficiency of a Moly converter
when using a GPT method of testing converters, by using the US EPA method,
where the actual concentration of ozone is not a factor in the accuracy of the
calculation of the converter efficiency. This procedure is based on the Code of
Federal Regulations, Title 40, Chapter I, subchapter C, Part 50, Appendix F.
7.2 TOOLS
API M700 calibrator with O3 Gen option (or equivalent)
7.3 PARTS
NONE
7.4 PROCEDURE
1. For the sake of numbers to input into this note, we have chosen 450 PPB NO
gas as our reference point, you don’t have to pick these values, they are just an
example. There is also an assumption that the analyzer has a good calibration
done @ 450 PPB NO span gas. If this is not the case, then once you are done
with the leak check on the analyzer input your 450 PPB NO span gas and
calibrate the analyzer.
NOTE: for the GPT to be performed correctly, there must be a minimum of 10%
MORE NO than O3 produced. For example, if the Ozone produced is 400 PPB
then the NO used must be 440 or more. Typically 450 PPB NO is made and 400
PPB of Ozone is produced.
2. Leak check machine to ensure that there are no leaks in the analyzer.
3. If you have input a CE factor into the instrument firmware (this would be in the
CAL-CONC-CONV-SET menu) other than 100%, change this back to 100% for
the duration of this test.
4. The first gas check is to test to see how much the converter is eating NO gas or
out gassing NO gas. Bypass the converter in the machine, by placing a short
piece of tubing in place of the converter. Perform a straight dilution with NO gas
and air as a diluent gas. Input this 450 PPB NO gas into the analyzer, allow the
machine to stabilize, and write down the NOx value on your data sheet on line 3.
05206H DCN5910 47
Page 50

Calculating Moly Converter Efficiencies Teledyne API Model M201E NH3 Analyzer Operator Manual
5. Remove the converter bypass and install the converter back into the NOx sample
stream, such that the NO sample goes through the converter again and allow the
machine to stabilize. Write down your NOx value on your data sheet on line 4
AND line 6 of the data sheet.
6. Note the NO value and input that on line 9 of the data sheet.
7. Subtract line 3 from line 4 and write that number down on line 5. The spec on the
data sheet is the value that we use here in house, and your spec might be a bit
higher. We have found that on NEW Moly converters this spec is a good one
that predicts a good performing Moly converter, but in an older converter might
eat a bit more NO, and this would be acceptable. If it is a constant value, or
changes little over time, this is not a problem the machine will calibrate this out.
8. The next step is to perform your GPT. Generate the same 450 PPB NO gas and
input 400 PPB of O3 (or generate 450 PPB NO and 400 PPB NO2, if that’s what
your calibrator says). Allow the machine to stabilize for 10 minutes and then
write down the NOx value on line 7 and the NO value on line 10.
9. Subtract line 7 from line 6 and put that onto line 8
10. Subtract line 10 from line 9 and put that onto line 11
11. Put the number from line 8 into the letter A on line 12 and put the number from
line 11 into the letter B on line 12.
12. Divide A by B and multiply it by 100 and put it into letter C on line 12.
13. Put the number in letter C onto the C on line 13 and subtract that value from 100
and put it into letter D on line 13. this is the converter efficiency.
14. This value should be >96%. For CEMS applications, a CE of <96% might be
acceptable, depending on application and the guideline set up by the regulatory
agency. In any application, check with your regulatory agency to see what the
minimum CE factor is before replacing the converter.
48 05206H DCN5910
Page 51

MOLY TEST DATA SHEET
Line # TEST RESULT
2 LEAK-CHECK (WHEN HOT) YES / NO
3 NO
RESPONSE (MOLY BYPASSED) __________
X
4 NO
RESPONSE (MOLY IN-LINE) __________
X
5 OUT-GASSING / EATING (NO – NOX) __________ (>-5 PPB, <5
PPB)
6 (NOx
) (NOX mode, O3 off) __________ PPB
ORIG
7 (NOx
) (NOX mode, O3 on) __________ PPB
REM
8 NO
NOx
ORIG;
LOSS (9A - 10B) __________ (A) (<4% of
X
ex: for
450PPB
4% is 18PPB)
9 (NO
) (NO mode, O3 off) __________ PPB
ORIG
10 (NO
) (NO mode, O3 on) __________ PPB
REM
11 NO
(9B - 10A) __________ (B)
2
(>300PPB)
12 Efficiency LOSS [ (
A / B ) x 100 ] = [ ( ____A____ / ____B____ ) x 100 ] =
____C____%
13 Total Conv Eff [ 100% – C ] = 100% - ____C_____ = _____D_____ % ( > 96%)
05206H DCN5910 49
 Loading...