

Linea
™
CL
Camera User’s Manual
sensors |
cameras
| frame grabbers | processors | software | vision solutions
2k, 4k, 8k and 16k Monochrome CMOS Line Scan
P/N: 03-032-20206-02
www.teledynedalsa.com

Notice
Revision
Description
Date
00
Initial release.
April 6, 2014.
01
8K and 16K models descriptions and features added .
December 4, 2 014
-Updated manual format and corrected errors.
© 2015 Teledyne DALSA
All information provided in this manual is believed to be accurate and reliable. No
responsibility is assumed by Teledyne DALSA for its use. Teledyne DALSA reserves the right
to make changes to this information without notice. Reproduction of t his m anual in whole or
in part, by any means, is prohibited without prior permission having been obtained from
Teledyne DALSA .
Microsoft and Windows are registered trademarks of M icro soft Corporation in the United
States and other countries. Windows, Windows 7, Windows 8 are trademarks of Microsoft
Corporation.
All other trademarks or intellectual property mentioned herein belong to their respective
owners.
Document Number: 03-032-20206-02
02 -Maximum line rate for the 16K model revised from 50 kHz to 48 kHz.
-16K responsi vity revised to 66 DN from 80 DN.
-8K and 16K mass revised to < 36 0 g from < 250 g.
-16K power dissipation revised to < 11 W from < 14 W.
July 16, 2015
About Teledyne DALSA
Teledyne DALSA is an international high performance semiconductor and electronics
company that designs, develops, manufactures, and markets digital imaging products and
solutions, in addition to providing wafer foundry services.
Teled y n e DALSA Digital Imaging offers the widest range of machine vision components in
the world. From industry-leading image sensors through powerful and sophisticated
cameras, frame grabbers, vision processors and software to easy-to-use vision appliances
and custom vision modules.

Contents
LINEA™ CL SERIES OVERVIEW ...................................................................... 4
DESCRIPTION ................................................................................................ 4
CAMERA HIGHLIGHTS ....................................................................................... 5
Key Features ......................................................................................... 5
Programmability ..................................................................................... 5
Applications ........................................................................................... 5
PART NUMBERS AND SOFTWARE REQUIREMENTS ....................................................... 6
CAMERA SPECIFICATIONS OVERVIEW ..................................................................... 7
Compliance, EMI Certifications ................................................................. 8
SUPPORTED INDUSTRY STANDARDS ....................................................................... 9
GenICam™ ............................................................................................ 9
ASCII COMMANDS .......................................................................................... 9
RESPONSIVITY ............................................................................................. 10
Effective Quantum Efficiency: ................................................................ 11
LINEA CL CAMERA SETUP ............................................................................ 12
SYSTEM PRECAUTIONS AND CLEANING ................................................................. 12
Precautions ......................................................................................... 12
Cleaning the Device .............................................................................. 12
Electrostatic Discharge and the CMOS Sensor .......................................... 12
RECOMMENDED SYSTEM REQUIREMENTS ............................................................... 12
SETUP STEPS: OVERVIEW ................................................................................ 13
Step 1: Install and Configure Frame Grabber and Softw are ....................... 13
Step 2: Connect Camera Link and Power Cables ....................................... 13
Step 3: Establish Communication with the Camera ................................... 16
USING CAMEXPERT WITH LINEA CL CAMERAS ............................................ 18
CamExpert Panes ................................................................................. 18
Creating a Camera Configuration File in the Host...................................... 20
CAMERA OPERATION ................................................................................... 21
FACTORY SETTINGS ....................................................................................... 21
TYPICAL SETUP AND EVALUATION ....................................................................... 22
Optical Configuration ............................................................................ 22
Camera Timing & Control ...................................................................... 22
Acquiring an Image .............................................................................. 22
CHECK CAMERA AND SENSOR INFORMATION .......................................................... 23
Verify Temperature and Voltage ............................................................. 23
Camera Configuration Selection Dialog .................................................... 24
SET BAUD RATE ........................................................................................... 26
CAMERA LINK CONFIGURATION .......................................................................... 27
Pixel Format ........................................................................................ 28
INTERNAL TEST IMAGE GENERATOR ..................................................................... 28
CALIBRATING THE CAMERA ............................................................................... 29
Flat Field Parameters ............................................................................ 30
TRIGGER MODES .......................................................................................... 32
EXPOSURE CONTROLS .................................................................................... 33
Linea CL Series Camera Contents • 1

GAIN AND BLACK LEVEL (OFFSET) ...................................................................... 37
BINNING .................................................................................................... 38
PIXEL READOUT DIRECTION (MIRRORING MODE) .................................................... 39
AREA OF INTEREST (AOI) SETUP ....................................................................... 40
SAVING AND RESTORING CAMERA SETTINGS .......................................................... 43
Camera Configuration Selection Dialog .................................................... 43
CAMERA FIRMWARE UPDATES ............................................................................ 45
DOWNLOAD A LI ST OF CAMERA PARAMETERS .......................................................... 45
FILE ACCESS VIA T H E CAMEXPERT TOOL ............................................................... 46
RESETTING THE CAMERA ................................................................................. 47
TECHNICAL SPECIFICATIONS ...................................................................... 48
MECHANICAL SPECIFICATIONS ........................................................................... 48
2K and 4K Cameras .............................................................................. 48
8K and 16K Cameras ............................................................................ 49
ADDITIONAL NOTES ON LINEA CL IDE NTIFICATION AND MECHANICAL ............................. 50
EMC DECLARATIONS OF CONFORMITY ................................................................. 50
ADDITIONAL REFERENCE INFORMATION .................................................... 53
OPTICAL CONSIDERATIONS .............................................................................. 53
Illumination ......................................................................................... 53
Light Sources ....................................................................................... 53
Lens Modeling ...................................................................................... 54
Magnification and Resolution ................................................................. 54
SENSOR HANDLING INSTRUCTIONS ..................................................................... 55
Electrostatic Discharge and the Sensor ................................................... 55
Protecting Against Dust, Oil and Scratches .............................................. 55
Cleaning the Sensor Window ................................................................. 56
APPENDIX A: GENICAM COMMANDS ............................................................ 57
CAMERA INFORMATION CATEGORY ...................................................................... 57
Camera Information Feature Descriptions ................................................ 57
CAMERA CONTROL CATEGORY ........................................................................... 60
Camera Control Feature Descriptions ...................................................... 60
I/O CONTROLS CATEGORY ............................................................................... 61
I/O Control Feature Descriptions ............................................................ 61
FLAT FIELD CATEGORY .................................................................................... 62
Flat Field Feature Descriptions ............................................................... 62
IMAGE FORMAT CONTROL CATEGORY ................................................................... 63
Image Format Control Feature Description .............................................. 63
TRANSPORT LAYER CATEGORY ........................................................................... 65
Transport Layer Descriptions ................................................................. 65
DEVICE STREAMING REGISTERS ......................................................................... 66
Start – End Command Requirements ...................................................... 66
FILE ACCESS CONTROL CATEGORY ...................................................................... 66
File Access Control Feature Descriptions .................................................. 66
APPENDIX B: AS CII COMMANDS ................................................................. 68
ACCESSING THE THREE LETTER COMMANDS (TLC) .................................................. 68
Port Configuration ................................................................................ 68
Notes on Using Alternatives to HyperTerminal .......................................... 69
ASCII TO GENCP ......................................................................................... 69
Disabling the Esc Key for Direct Access to ASCII Commands ...................... 69
2 • Contents Linea CL Series Camera

Commands .......................................................................................... 70
APPENDIX C: ERROR AND WARNING MESSAGES ......................................... 82
OPERATIONAL ERROR CODES ............................................................................ 83
APPENDIX D: CAMER A, F RAME GRABBER COMMUNICATION ....................... 84
Setting Up Communication between the Camera and the Frame
Grabber ......................................................................................... 84
APPENDIX E: CAMERA LINK CONNECTOR INFORMATION ............................ 86
DATA CONNECTOR: CAMERA LINK ...................................................................... 86
Full Configuration ................................................................................. 87
Camera Link Bit Definitions.................................................................... 89
Camera Control Configuration ................................................................ 90
CAMERA LINK DRIVE CAPABILITY ....................................................................... 90
Input Signals, Camera Link.................................................................... 90
Output Signals, Camera Link Clocking Signals .......................................... 91
CONTACT INFORMATION ............................................................................. 92
SALES INFORMATION ...................................................................................... 92
TECHNICAL SUPPORT ...................................................................................... 92
Linea CL Series Camera Contents • 3
Linea™ CL Series Overview
Description
Teledyne DALSA introduces a new CMOS camera family with the 2K, 4K, 8K, and 16K resolution
Linea monochrome cameras. These new camera models use Teledyne DALSA's single line, 7.04
µm x 7.04 µm (2k, 4k, 8k) or 3.52 µm x 3.52 µm (16k) pixel array, delivering both speed and
responsivity at a competitive price.
The Linea CL linescan is a new affordable single line, camera delivering both speed and
responsivity at a competitive price. Th is small, low power camera is designed for application s such
as materials grading and inspection, transportation s a fety, automated optical inspection and
general purpose machine vision.
The Linea CL camera, is one of a new series of affordable easy to use digital cameras specifically
engineered for industrial imaging applications requiring embedded image processing and improved
network integration. Linea CL provides features to cycle a user defined sequence of imaging
setups, features providing line & frame triggers, image transfer-on-demand, all part of a
comprehensive camera package.
Linea uses industry standard CameraLink protocol to dependably capture and transfer images from
the camera to the host PC.
4 • Linea™ CL Series Overview Linea CL Series Camera

Camera Highlights
Teledyne DALSA introduces a new CMOS camera family with the 2K, 4K, 8K, and 16K resolution
Linea monochrome cameras. These new camera models use Teledyne DALSA's single line, 7.04
µm x 7.04 µm (2k, 4k, 8k) or 3.52 µm x 3.52 µm (16k) pixel array, delivering both speed and
responsivity at a competitive price.
These small, affordable, low power cameras are designed for applications such as materials grading
and inspection, transportation safety, automated optical inspection and general purpose machine
vision.
Key Features
• High speed: up to 80 kHz (2k, 4k, 8k) and 48 kHz (16k)
• 2048, 4096, 8192, and 16,384 pixel resolutions
• Compact camera body
Programmability
• Multiple regions of interest for calibration and data reduction
• 8 bit or 12 bit output
• Small flat field and lens shading correction
• 8 programmable coefficient sets
• GenICam or ASCII compliant interfacing
Applications
• Automated optical inspection
• Security systems
• High performance sorting systems
• Materials grading and inspection syste ms
• Web inspection
• General purpose machine vision
Linea CL Series Camera Linea™ CL Series Overview • 5
Part Numbers and Software Requirements
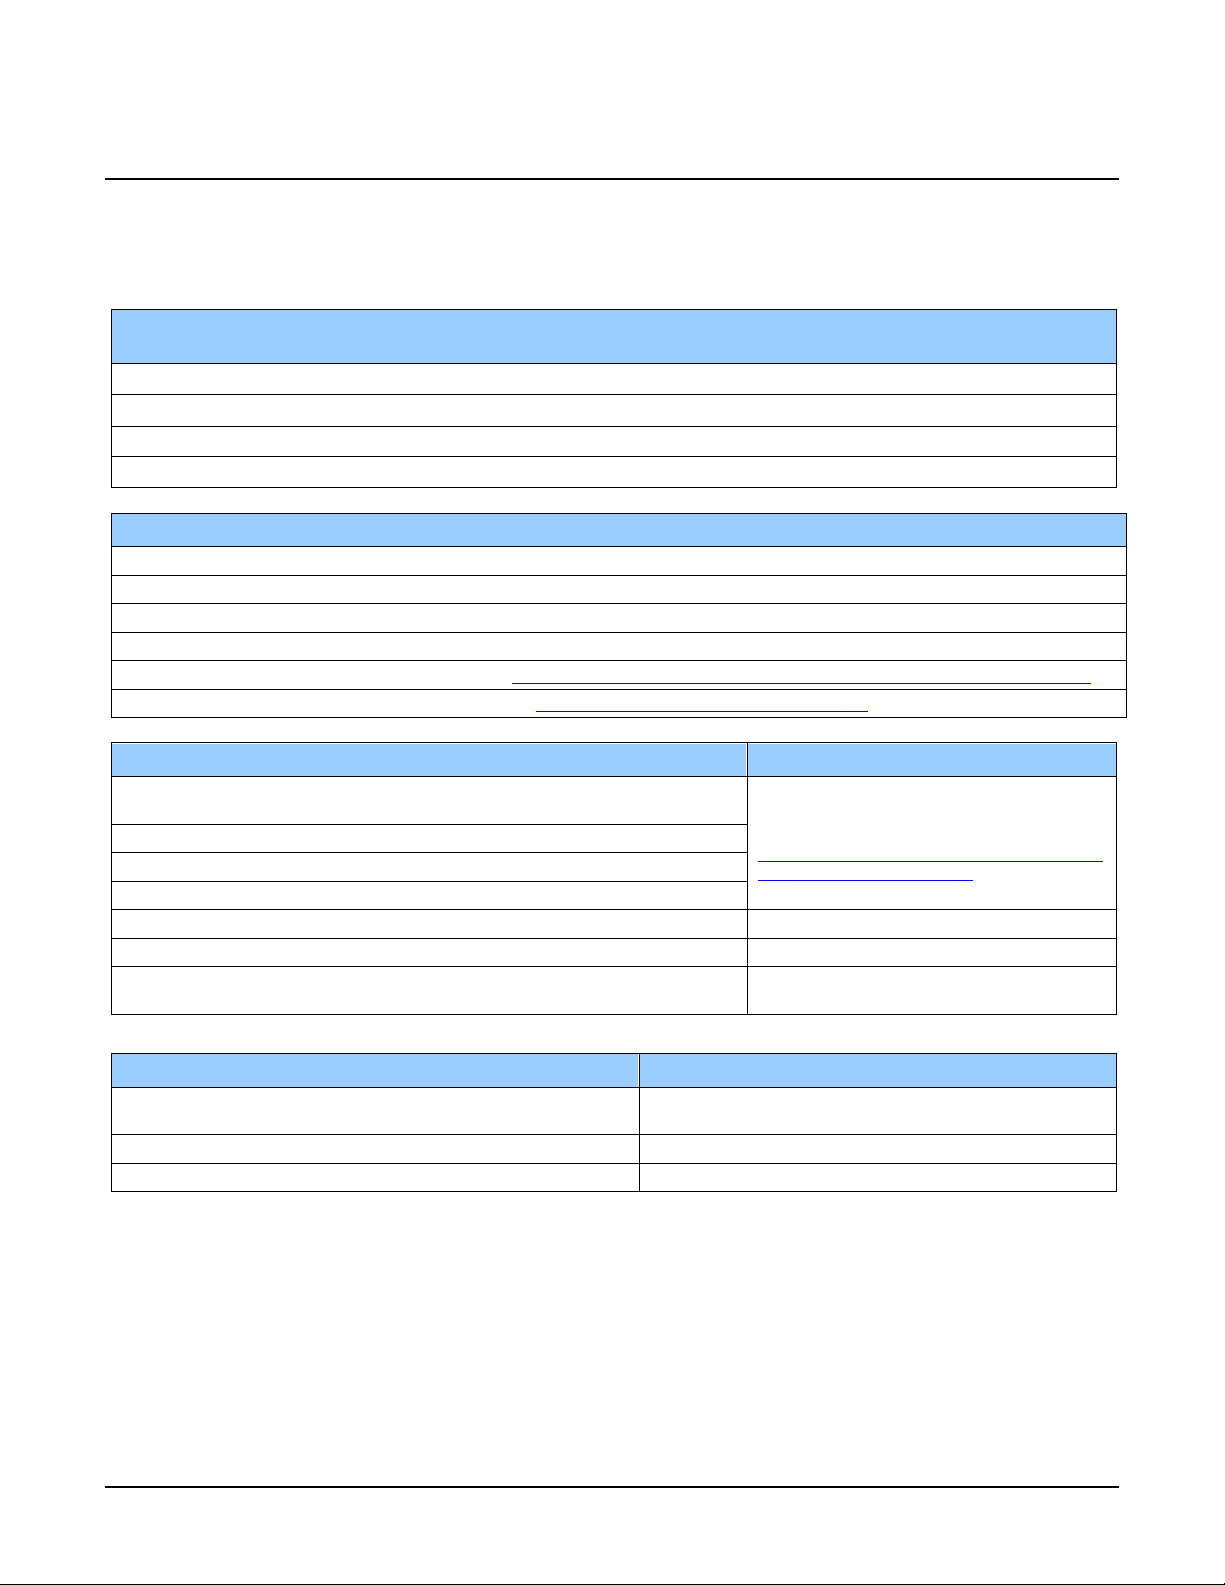
This manual covers the Linea CL models summarized below. New models area added to this
manual as they are released by Teledyne DALSA.
Camera Resolution Pixel size
Linea 2K CL 2048 x 1 7.04 x 7.04 µm
Linea 4k CL 4096 x 1 7.04 x 7.04 µm
Linea 8k CL 8192 x 1 7.04 x 7.04 µm
Linea 16K CL 16384 x 1 3.52 µm x 3.52 µm
Max. Line Rate Lens Mount
(threaded)
80 kHz M42 x 1 LA-CM-02K08A-xx-R
80 kHz M42 x 1 LA-CM-04K08A- xx -R
80 kHz M72 x 1 LA-CM-08K08A- xx -R
48 kHz M72 x 1 LA-CM-16K05A- xx -R
Camera Accessories Order Number
2K and 4k M42 x 1 to F-mount adapter for 12mm BFD lens, he avy d uty with clip AC-LA-00115-xx-R
2K and 4k M42 x 1 to C-mount adapter for 12 mm BFD lens AC-LC-00001-xx-R
8k and 16k M72 x 0.75 F, F-mount adapter 12 mm BFD lens, heavy duty AC-LN-0001-xx-R
8k and 16k Linea Heatsink AC-MS-00108-xx-R
For a list of accessories go to http://www.teledynedalsa.com/imaging/products/cameras/accessories/
Optical filters are available from http://www.midwestopticalsystems.com/
Teledyne DALSA Software Platform
Sapera LT version 7.50 or higher
includes CamExpert GUI application
Sapera provides everything needed to develo p imag ing applicatio ns .
Camera Firmware Embedded within camera
GenICam™ support (XML camera descrip tio n file ) Embedded within camera
Sapera Processing Imaging Developm e nt Libr ary
(available for Windows or Linux - sold separ a te ly):
Available for free download:
http://www.teledynedalsa.com/imaging/pr
oducts/software/sapera/lt/
Contact Teledyne DALSA Sales
Product Number
Third Party GenICam GenCP Software Requirements
Support of GenICam GenApi version 2.3 General acquisition and control. File access: firmware,
Support of GenICam XML schema version 1.1
GenICam™ support — XML camera description file Embedded within Linea CL
FFC, configuration data, upload & download.
6 • Linea™ CL Series Overview Linea CL Series Camera
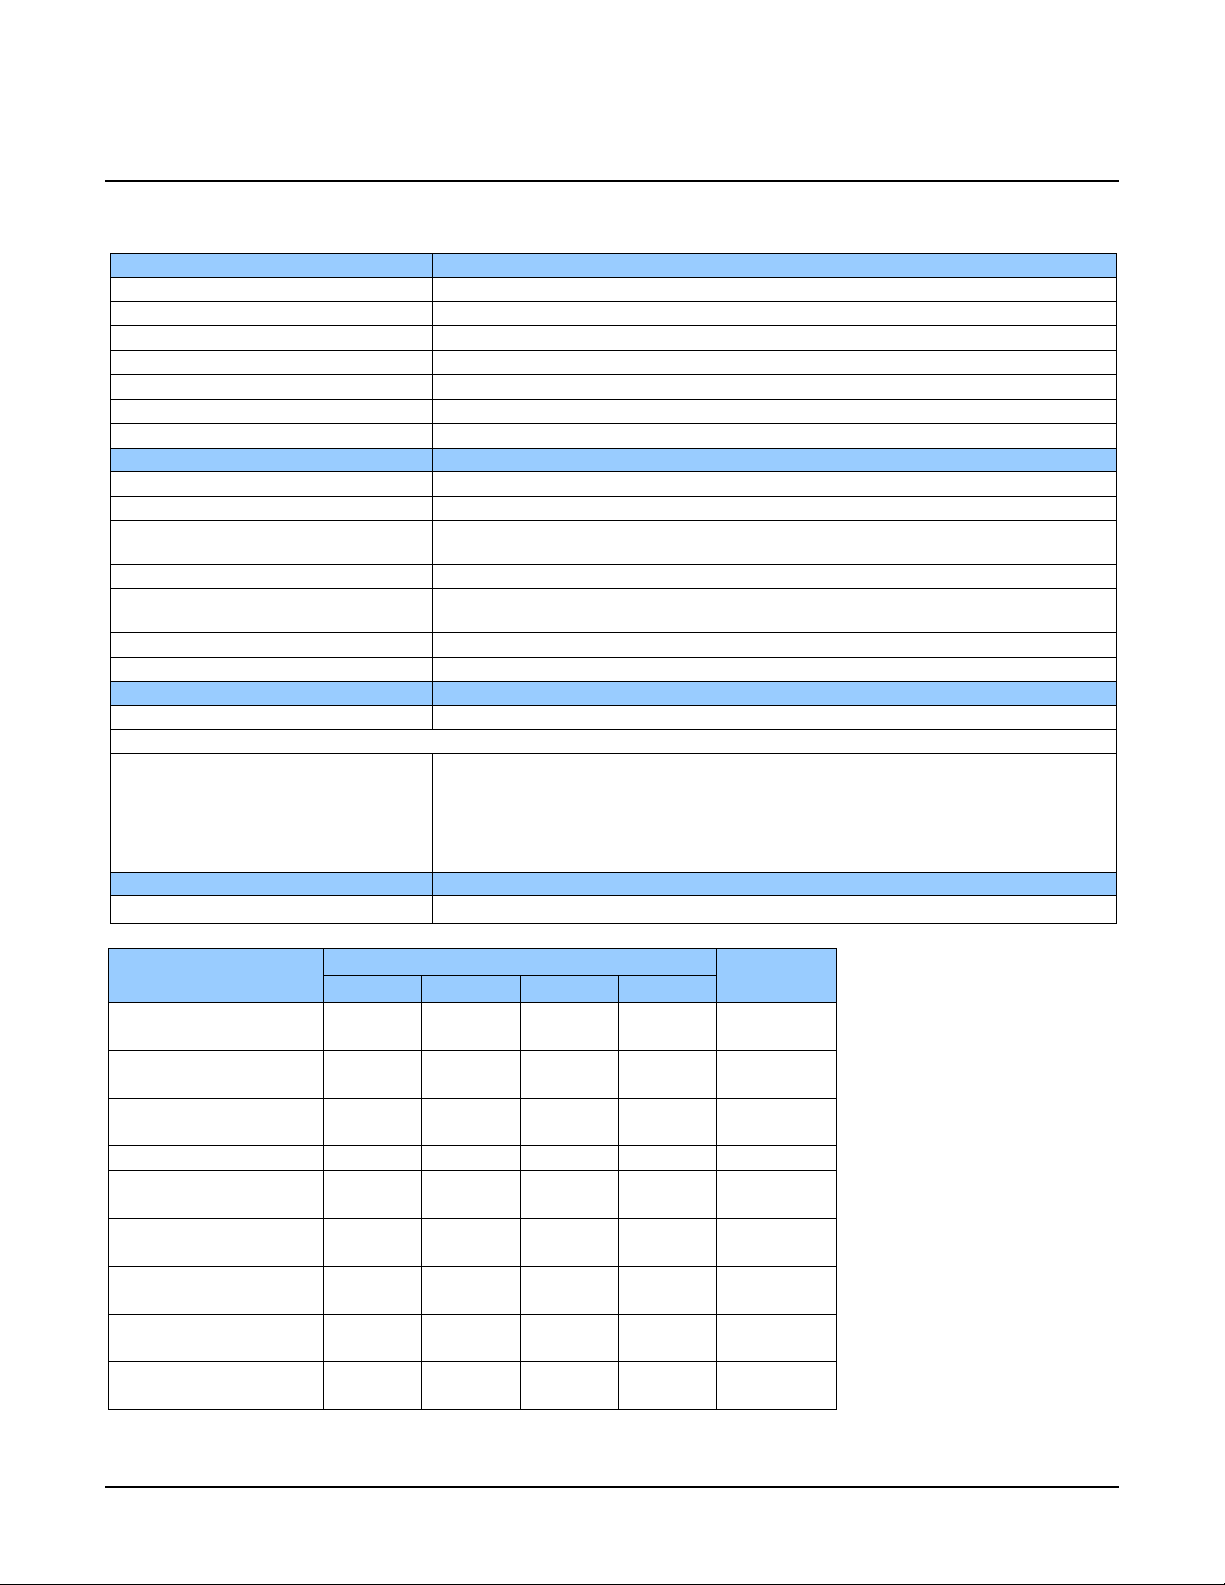
Specifications
Performance
Imager Format
High speed CMOS line scan
Resolution
2048, 4096, 8192, and 16,384 pixels
Pixel Size
7.04 µm x 7.04 µm (2k, 4k, 8k) and 3.52 µm x 3.52 µm (16k)
Pixel Fill Factor
100 %
Line Rate
Up to 80 kHz (2k, 4k, 8k) and up to 48 kHz (16k)
Exposure Time
4 µs to 3 ms
Bit Depth
8 bit or 12 bit, selectable
Connectors and Mechanicals
Control & Data Interface
Base, Medium, Full, and Deca Camera Link configur ati o ns (2 x SDR-26)
Power Connector
Hirose 6-pin male circular
+12 V to + 24 V DC (+11.4 V to +25.2 V maximum limits), 8k and 16k
Power Dissipation
< 4.5 W (2k and 4k), < 8 W (8k), < 11 W (16k)
76.0 mm (W) x 76.0 mm (H) x 36.7 mm (D) (8k and 16k)
Mass
< 190 g (2k and 4k), < 360 g (8k and 16k)
Operating Temp
0 °C to 65 °C, front plate temperature
Optical Interface
Sensor to Camera Front Distance
12 mm
Sensor Alignment (aligned to sides of camera)
Θ z
± 0.3°
Compliance
Regulatory Compliance
CE, FCC, and RoHS; GenICam
Operating Ranges
Performance
Notes
dB
DN* rms
DN / (nJ / cm2)
Gain Nominal range
1x to 10x
1x to 10x
1x to 10x
1x to 10x
DN
@ 50% Sat
DN
nJ / cm2
pJ / cm2
Camera Specifications Overview
Power Supply + 5 V to + 24 V DC (+4.8 V to +25.2 V maximum limits), 2k and 4k
Size 62.0 mm (W) x 62.0 mm (H) x 30.9 mm (D) (2k and 4k)
Θ y (parallelism)
x
y
z
Dynamic Range
Random Noise
Broadband Responsivity
DC Offset
PRNU
FPN
SEE
0.08° or 100 µm
± 300 µm
± 300 µm
± 300 µm
2K 4K 8K 16K
> 60 > 60 > 60 > 60
< 3.75 < 3.75 < 3.75 < 3.75 FFC enabled
320
7 7 7 7 FFC enabled
< 1.5% < 1.5% < 1.5% < 1.5%
< 7 < 7 < 7 < 7
12.5 12.5 12.5 46.9
320 320 80
NEE
11.7 11.7 11.7 51
Linea CL Series Camera Linea™ CL Series Overview • 7

Operating Ranges
Performance
Notes
Antiblooming
(x Saturation)
DN
2K 4K 8K 16K
> 100 > 100 > 100 > 100
Integral non-linearity
*DN = digital number
Test Conditions:
• Values measured using 12-bit @ 1x gain.
• 10 kHz line rate.
• Light source: broadband, quartz halogen, 3250 K with 700 nm IR cut-off filter.
• Front plate temperature: 45º C.
1.5 % 1.5 % 1.5 % 1 .5 %
Compliance, EMI Certifications
Compliance Directives Standards ID Overview
EN55032 (2012) Electromagnetic compatibil ity of multime dia
EN55011 (2009) with A1(2010) Industrial, scientific and medic al e quipment —
EN 61326-1 (2013) Electrical equipment for measurement, co ntrol and
CE
FCC
RoHS
For im ages of the Linea CL certificates see the EMC Declarations of Conformity section.
EN 55024 (2010) Information technology equipment —
CISPR 11 Industrial, scientific and medic al e quipment —
CISPR 32 Electromagnetic compatibil ity of multime dia
Part 15, class A
Compliancy as per European directive 2004 /105 /EC
equipment — Emission requirements
Radio-frequency disturbance characteristics —
Limits and methods of measurement
laboratory use — EMC requirements —
Part 1: General requirements
Immunity characteristics —
Limits and methods of measurement
Radio-frequency disturbance characteristics —
Limits and methods of measurement
equipment - Emission requirements
8 • Linea™ CL Series Overview Linea CL Series Camera

Supported Industry Standards
GenICam™
Linea cameras are GenICam™ compliant. They implement a superset of the GenICam™ Standard
Features Naming Convention specification V1.5.
This description takes the form of an XML device description file respecting the syntax defined by
the GenApi module of the GenICam™ specification. The camera uses the GenICam™ Generic
Control Protocol (GenCP V1.0) to communicate over the Camera Link serial port.
For more information see www.genicam.org
Teledyne DALSA recommends using Sapera CamExpert as your Camera Link compliant camera
interface application. CamExpert is the camera interfacing tool supported by the Sapera library and
comes bundled with SaperaLT. Using CamExpert is the simplest and quickest way to send
commands to and receive information from the camera.
Sapera uses the GenICam™ Generic Control Protocol (GenCP V1.0 ) to communicate with the
camera over the Camera Link serial port. When communications ar e first estab lished , Sapera
downloads the GenICam™ XML Description file. This file details how to access and control the
camera.
.
ASCII Commands
As an alternative to the CamExpert (or equivalent) GUI, you can communicate with this camera
using ASCII-based commands. Using a terminal emulating program, establish a serial port
connection with the c amera.
In the ASCII interface press the ESC key; the communication mode w ill be switched into the ASCII
command mode other than the GenICam mode.
A complete list of the commands and a description of how to access them can be found in Appendix
B: ASCII Commands.
Linea CL Series Camera Linea™ CL Series Overview • 9

Responsivity
The responsivity graph describes the sensor response to different wavelengths of light (excluding
lens and light source characteristics).
10 • Linea™ CL Series Overview Linea CL Series Camera

Effective Quantum Efficiency:
The quantum efficiency graph describes the fraction of photons at each wavelength that contribute
charge to the pixel.
Linea CL Series Camera Linea™ CL Series Overview • 11
Linea CL Camera Setup
System Precautions and Cleaning
Precautions
Read these precautions and this manual before using the camera.
Do not open the housing of the camera. The warrant y is voided if the housing is
opened.
• Confirm that the camera’s packaging is undamaged before opening it. If the packaging is
damaged please contact the related logistics pers onnel.
• Keep the camera’s front plate temperature in a range of 0 °C to 65 °C during operation.
• Do not operate the camera in the vicinity of strong electromagnetic fields. In addition, avoid
electrostatic charging, violent vibration, and excess moisture.
• Though this camera supports hot plugging, it is recommended that you power down and
disconnect power to the camera before you add or replace system components.
Cleaning the Device
To clean the device, avoid electrostatic charging by using a dry, clean absorbent cotton cloth
dampened with a small quantity of pure alcohol. Do not use methylated alcohol.
To clean the surface of the camera housing, use a soft, dry cloth. To remove severe stains use a
soft cloth dampened with a small quantity of neutral detergent and then wipe dry. Do not use
volatile solvents such as benzene and thinners, as they can damage the surface finish.
Electrostatic Discharge and the CMOS Sensor
Image sensors and the camera bodies housing are susce ptible to damage from electrostatic
discharge (ESD). Electrostatic charge introduced to the sensor window surface can induce charge
buildup on the underside of the window. If this occurs , the charge normally dissipates within 24
hours and the sensor returns to normal operation.
Recommended System Requirements
To achieve best system performance, the following minimum requirements are recommended:
• High bandwidth frame grabber. For example, Teledyne DALSA Xtium-CL series frame
grabbers: http://www.teledynedalsa.com/imaging/products/fg/#digital-cameralink
• Operating systems: Refer to frame grabber documentation for supported platforms.
.
12 • Linea CL Camera Setup Linea CL Series Camera
Camera Link frame grabber up to receive the standard 8-bit full mode.
computer chassis, before handling the camera hardware..
increased emission or decreased immunity and performance of the camera.
Setup Steps: Overview
Take the following steps in order to setup and run your camera system. They are described briefly
below and in more detail in the sections that follow.
1. Install and Configure Frame Grabber and Software
2. Connect Camera Link and Power Cables
3. Establish communication with the camera
Step 1: Install and Configure Frame Grabber and Software
Teledyne DALSA recommends its Xtium-CL series frame grabbers or equivalent. Follow the
manufacturer’s installation instructio ns.
For additional information on configuring fra me grabbers, see Appendix D: Camera, Frame Grabber
Communication.
Note: By default, Camera Link mode is set to the standard 8-bit full mode which
allows operation of up to 80 kHz (2k, 4k, 8k) or 48 kHz (16K) line rate. Set your
A GenICam™ compliant XML device description file is embedded within the camera firmware
allowing GenICam™ compliant application to know the camera’s capabilities immediately after
connection.
Installing Sapera LT gives you access to the CamExpert GUI, a GenICam™ compliant application.
Sapera LT is available free of charge for download from the Teledyne Dalsa
website.
Step 2: Connect Camera Link and Power Cables
The camera uses two Camera Link SDR26 cables transmitting the Camera Link Base, Medium, or
Full configuration.
• Connect the Camera Link cables from the camera to the frame grabber installed on the
computer.
• Connect a power cable from the camera to a power supply that can provide a constant
voltage from +5 VDC to +24 VDC (2k and 4k) or +12 VDC to +24VDC (8k and 16k).
WARNING! Grounding I nstr uctions
Static electricity can damage electronic components. It’s critical that you discharge
any static electrical charge by touching a grounded surface, such as the metal
Note: the use of cables types and lengths other than those spe cified may result in
For more information on Camera Link connector specifications, see Appendix E: Camera Link
Connector Info rma tion.
Linea CL Series Camera Linea CL Camera Setup • 13
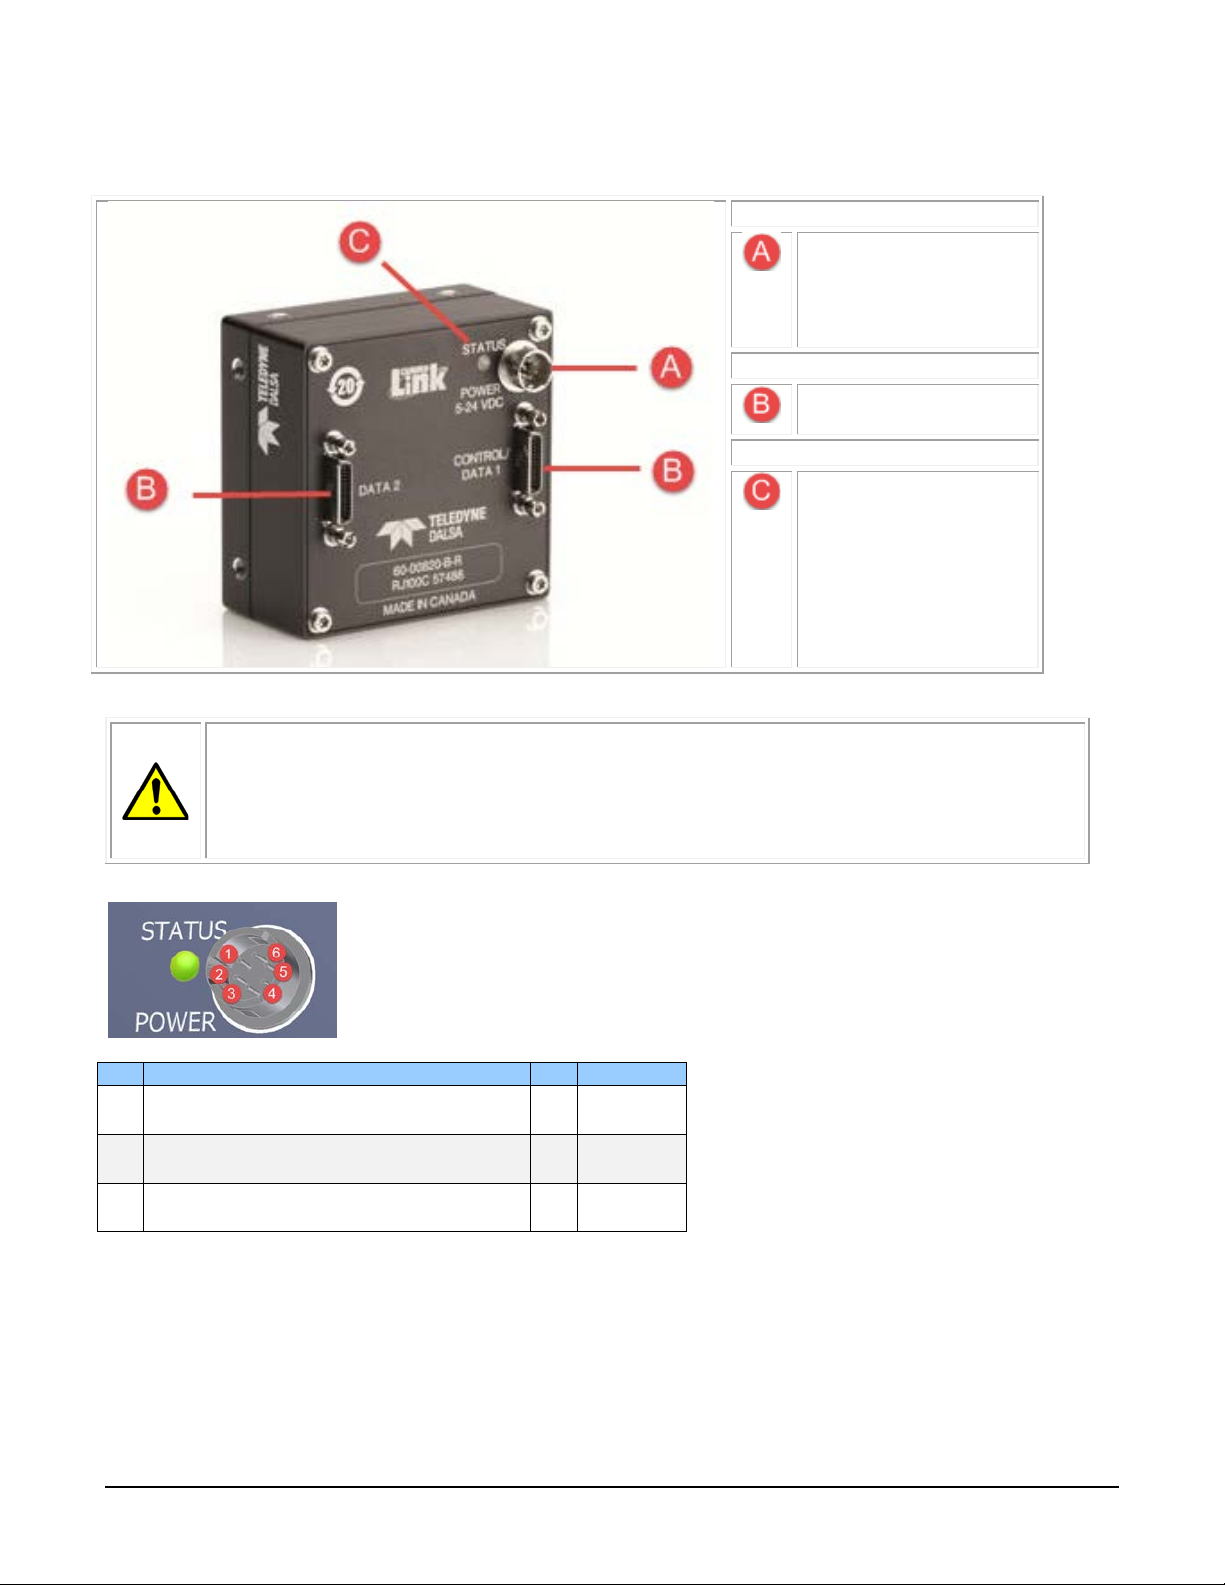
The following figure of the Linea CL back end shows connector and LED locations. See the
Power
Hirose 6-pin
(8k and 16k)
Control & Data
Camera Link 26-pin
SDR26 connectors
Status
Diagnostic LED
Pin
Description
Pin
Description
+12 V to +24 V DC (8K and 16K)
+12 V to +24 V DC (8K and 16K)
+12 V to +24 V DC (8K and 16K)
Mechanical Specifications section for details on the connectors and camera mounting dimensions.
• +5V to +24V DC
(2k and 4k)
• +12V to +24V DC
Power Connector
WARNING! Grounding I nstr uctions
It is extremely important that you apply the appropriate voltages to your camera.
Incorrect voltages may damage the camera. Input voltage re quirements: +5 VDC to
+24 VDC (2k and 4k models), 1 Amp. +12 VDC to +24 VDC (8K and 16K models),
2 Amp. Before connecting power to the camera, test all pow er supplies.
Hirose 6-pin Circular Male (Mating Part: HIROSE HR10A-7P-6S)
1 +5 V to +24 V DC (2K and 4K)
2 +5 V to +24 V DC (2K and 4K)
3 +5 V to +24 V DC (2K and 4K)
4 GND
5 GND
6 GND
14 • Linea CL Camera Setup Linea CL Series Camera
Use high-quality supplies in order to minimize noise.
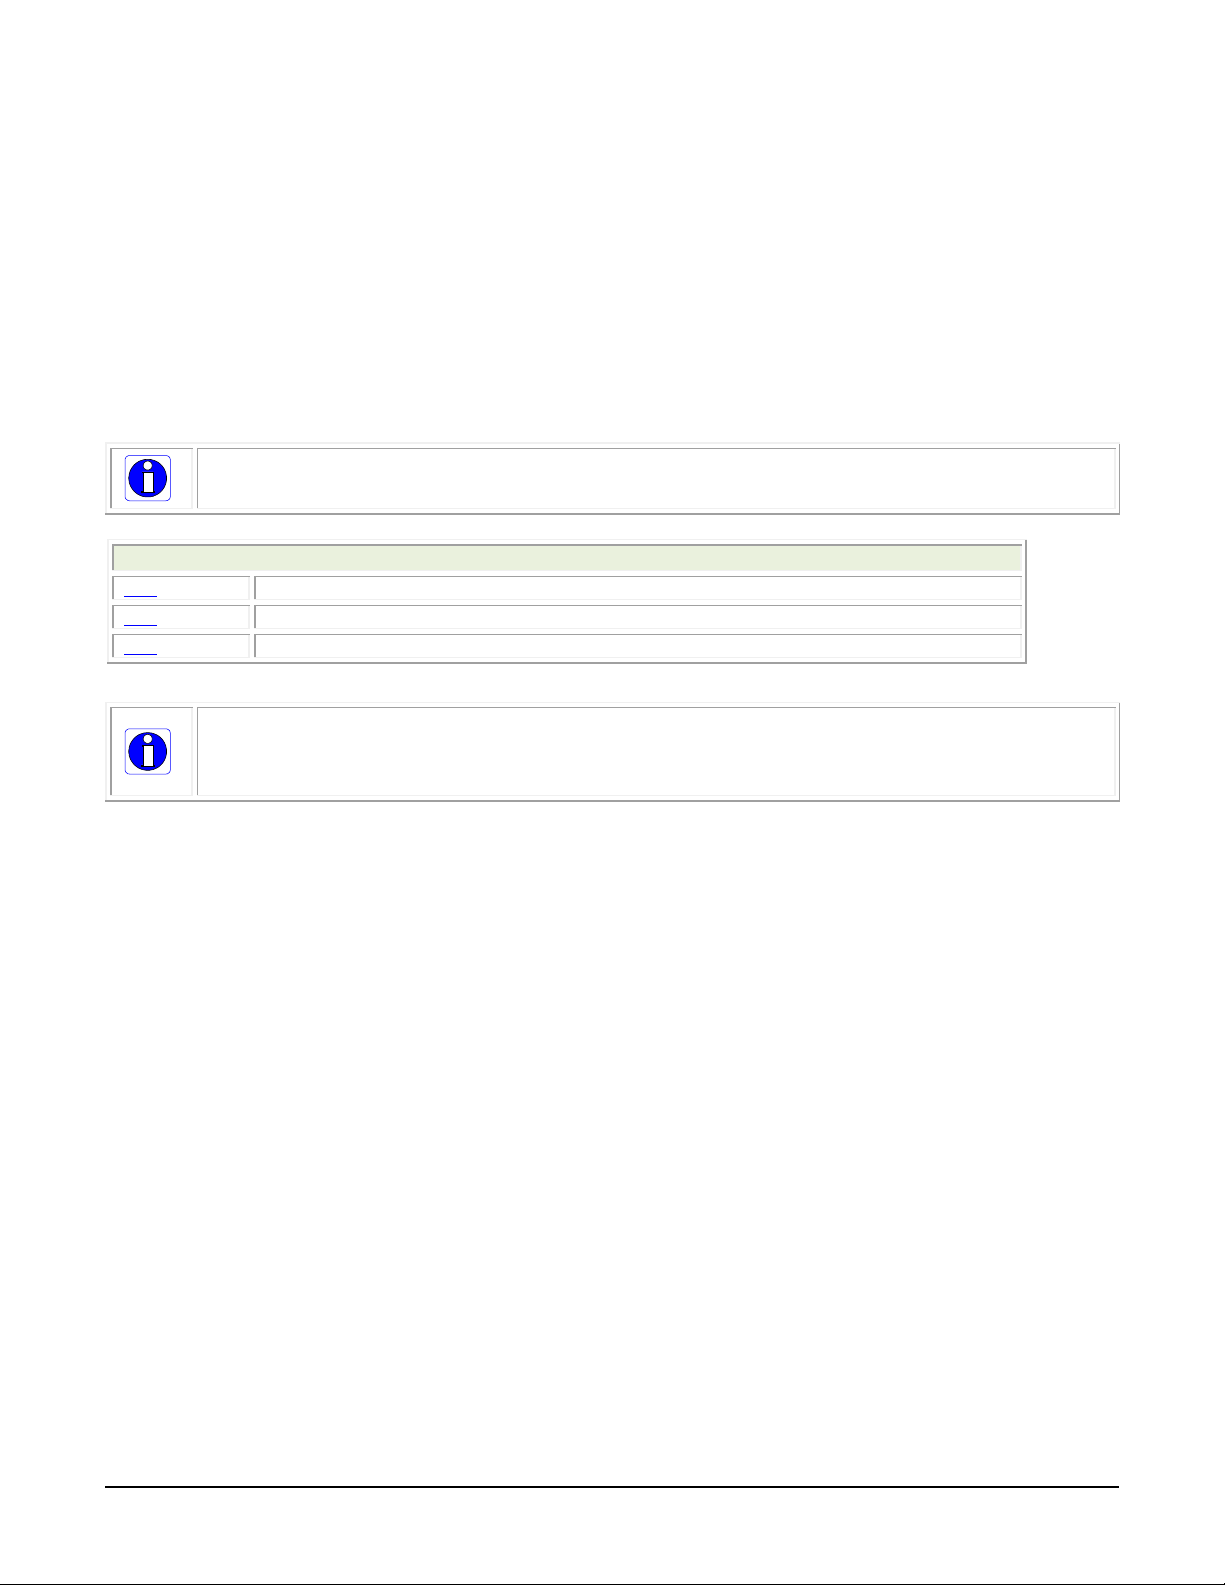
LED is off
No power or hardware malfunction
Blinking Green
Powering up or ca lib r a ting
Green
Ready
Error. Check the built-in self test (BiST) register for the s p ec ific error
The camera meets all performance specifications using standard switching power supplies,
although well-regulated linear supplies provide optimum performance.
WARNING: When setting up the camera’s power supplies follow these guidelines:
• Apply the appropriate voltages.
• Protect the camera with a 1 amp slow-blow fuse between the power supply
and the camera.
• Do not use the shield on a multi-conductor ca ble fo r ground.
• Keep leads as short as possible in order to reduce voltage drop.
•
Note: If your power supply does not meet these requirements, then the camera
performance specifications are not guaranteed.
Power over Camera Link
The Linea 2k and 4k Camera Link cameras are Power over Camera Link (PoCL) compatible*, but
are not compliant with the full PoCL specification as their operation is dependent on the frame
grabber used. These cameras exceed the 4 W PoCL power specification, but some frame grabbers,
such as the Xtium frame grabber from Teledyne Dalsa, are able to supply sufficient power for the
camera’s operation.
PoCL can be enabled from within CamExpert. Be sure to connect the power supply to the Xtium
frame gabber in the PC.
PoCL power can only be supplied through the Data 1 (base) camera link port.
* The 8K and 16K models do not support PoCL.
Camera Status LED
The Linea CL has one multicolor LED to provide a simple visible indication of camera state. The
table below summarizes the operating states of the camera and the corresponding LED states.
When more than one condit io n is active, the LED indicates the condition with the highest priority.
LED State Definition
Red
Linea CL Series Camera Linea CL Camera Setup • 15
Step 3: Estab lish Commun ication with the Camera
Commands.
The camera is designed to power up with a GenICam-compliant interfa ce. CamExpert
provides an easy-to-use GUI that can be used to set up and operate the camera.
The camera also comes with Teledyne DALSA’s three letter command (TLC) interface
option, which can be accessed using a suitable terminal program such as
HyperTerminal™. If you want to use the TLC interface, refer to Appendix B: ASCII
To establish communication with the camera:
1. Power on the camera
2. Connect to the frame grabber
3. Connect to the camera
Power on the camera
Turn on the camera’s power supply. You may have to wait while the camera readies itself for
operation. The camera must boot fully before it will be recognized by the camera interface
application (for example, CamExpert) — the LED displays steady green once the camera is ready.
Connect to the frame grabber
1. Start Sapera CamExpert (or equivalent Camera Link compliant application) by double
clicking the desktop icon created during the software installation.
2. CamExpert will search for installed Sapera devices. In the Devices list area on the left side,
the connected frame grabber will be shown.
3. Select the frame grabber device by clicking on the name.
Note: The first time you set up the camera you will need to establish a communication
link between the camera and frame grabber.
16 • Linea CL Camera Setup Linea CL Series Camera
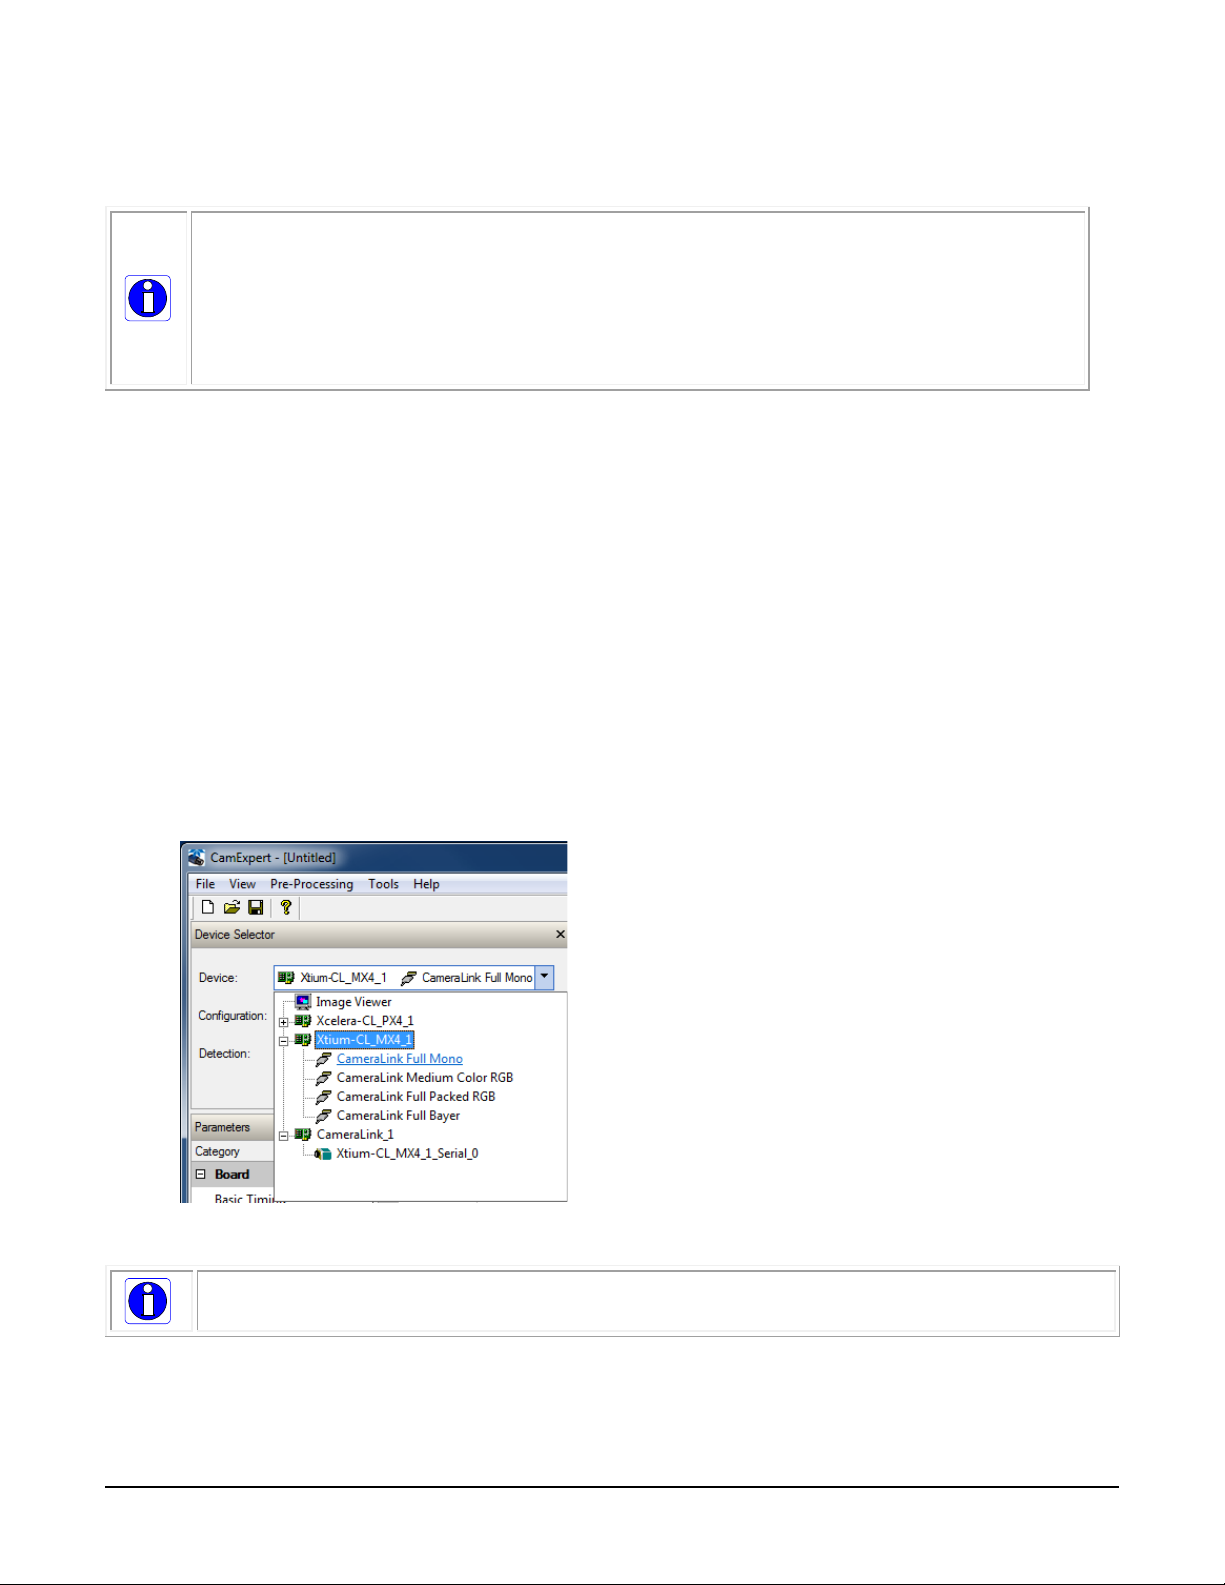
Connect to the camera
1. Start a new Sapera CamExpert application (or equivalent Camera Link compliant interface)
by double clicking the desktop icon created during the software installation.
2. In CamExpert, for Teledyne DALSA frame grabbers, the camera appears below the Board
category.
Check LED Status
If the camera is operating correctly at this point, the diagnostic LED is steady green.
Software Interface
All the camera features can be controlled through the CamExpert interface. For example, under the
Camera Control menu in the camera window you can cont rol the line rate and exposure times.
Operate the Camera
At this point you will be ready to start operating the camera to acquire images, set camera
functions, and save settings.
Linea CL Series Camera Linea CL Camera Setup • 17
Using CamExpert with Linea CL Cameras
The Sapera CamExpert tool is the interfacing tool for GenCP compliant Camera Link cameras, and
is supported by the Sapera library and hardware. When used with a Linea CL camera, CamExpert
allows a user to test most of the operating modes. Additionally CamExpert saves the Linea CL user
settings configuration to the c amera or saves multiple configura tions as individual camera
parameter files on the host system (*.ccf).
An important component of CamEx pert is its liv e acquisition display win dow which allows
immed iate verification of timin g or contro l parameters w ithout the need to run a separate
acquisition program.
Click on any parameter and a short description is displayed below the Category pane. The same
conte xt sensitive help is available by clicking on the button then click on a camera
configuration parameter. Click on the button to open the help file for more descriptive
information on CamExpert.
Note: The examples shown may not entirely reflect the features an d pa ra m eter s a vailable from
the camera model and camera mode used in your applica tion.
CamExpert Panes
The various areas of the CamExpert tool are described in the figure below. Device Categories and
Parameter features are displayed as per the device’s XML description file. The number of
parameters shown is dependent on the View mode selected (Beginner, Expert, Guru – see
description below).
18 • Using CamExpert with Linea CL Cameras Linea CL Series Camera
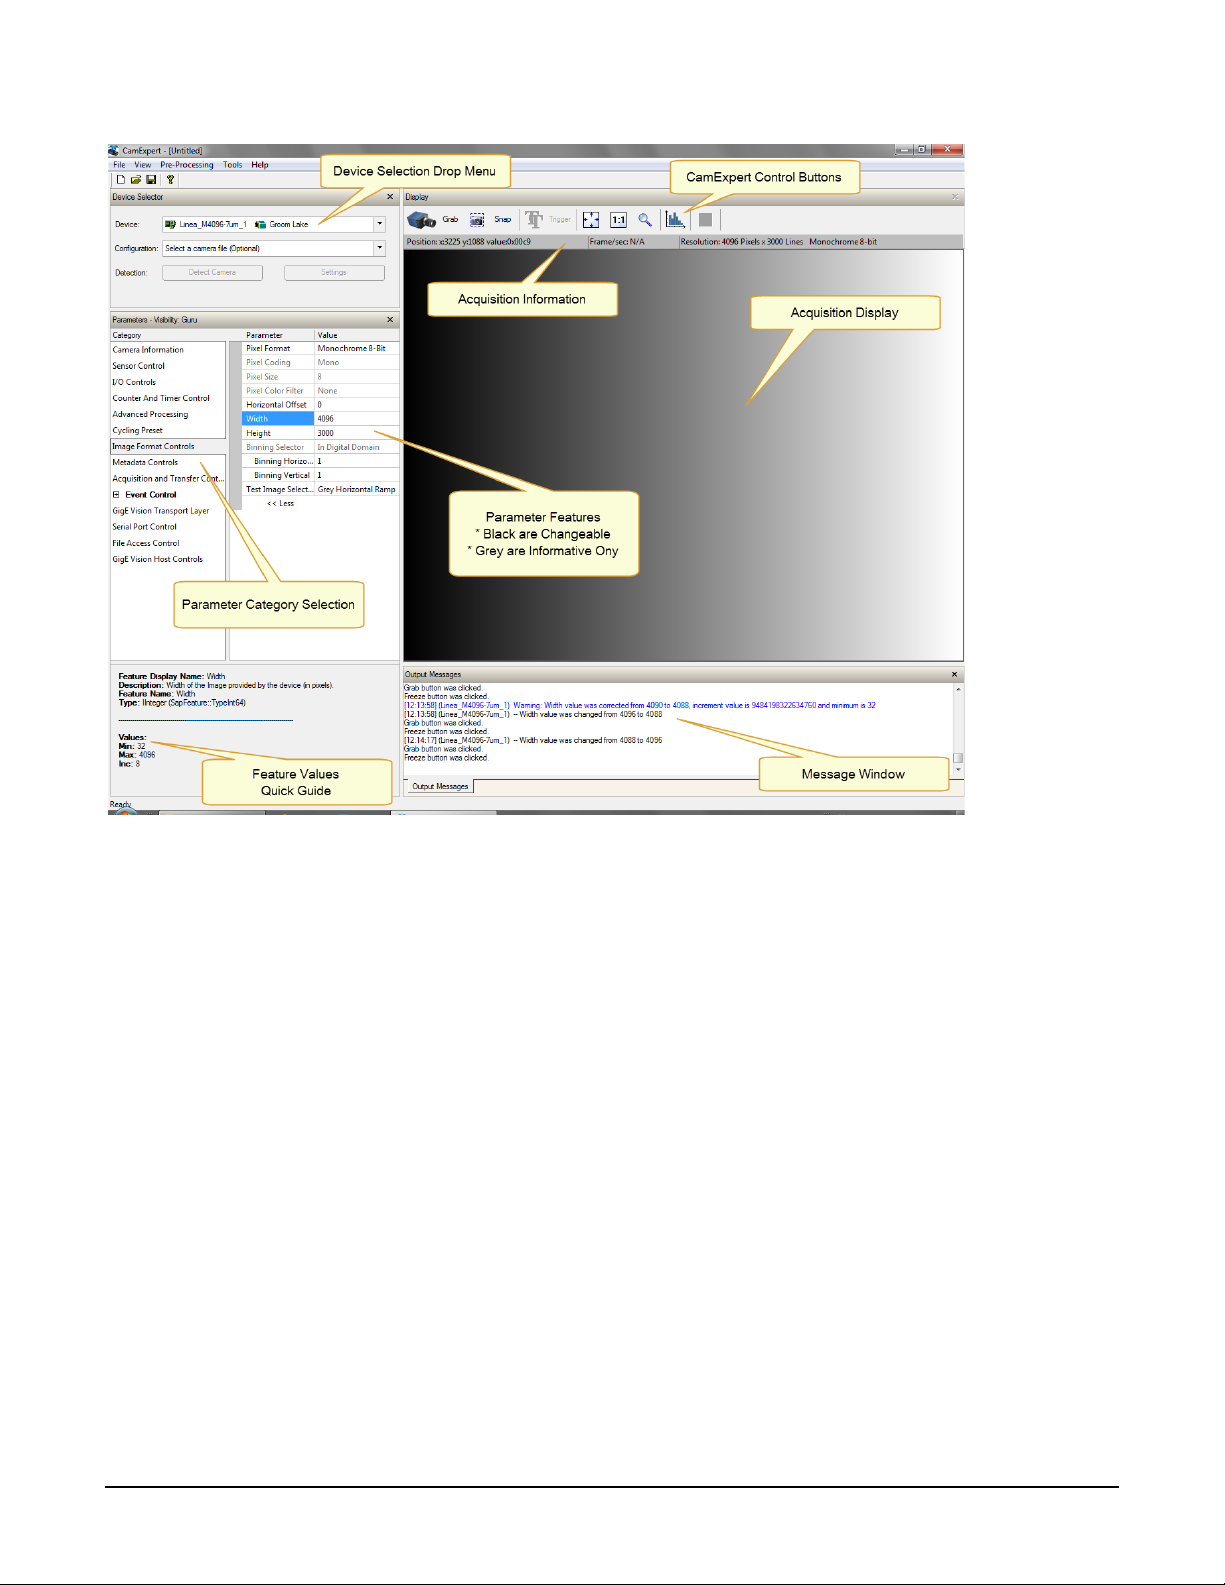
• Device Selector pane: View and select from any installed Sapera acquisition device. After a
device is selected, CamExpert will only present parameters applicable to that device. Optionally
select a camera file included with the Sapera installation or saved by the user.
• Parameters pane: Allows viewing or changing all acquisition parameters supported by the
acquisition device. CamExpert displays parameters only if those parameters are supported by
the installed device. This avoids confusion by eliminating parameter choices when they do not
apply to the hardware in use.
• Display pane: Provides a live or single frame acquisition display. Frame buffer parameters are
shown in an information b ar above the image window.
• Control Butto ns: The Display pane includes CamExpert control buttons. These are:
Linea CL Series Camera Using CamExpert with Linea CL Cameras • 19
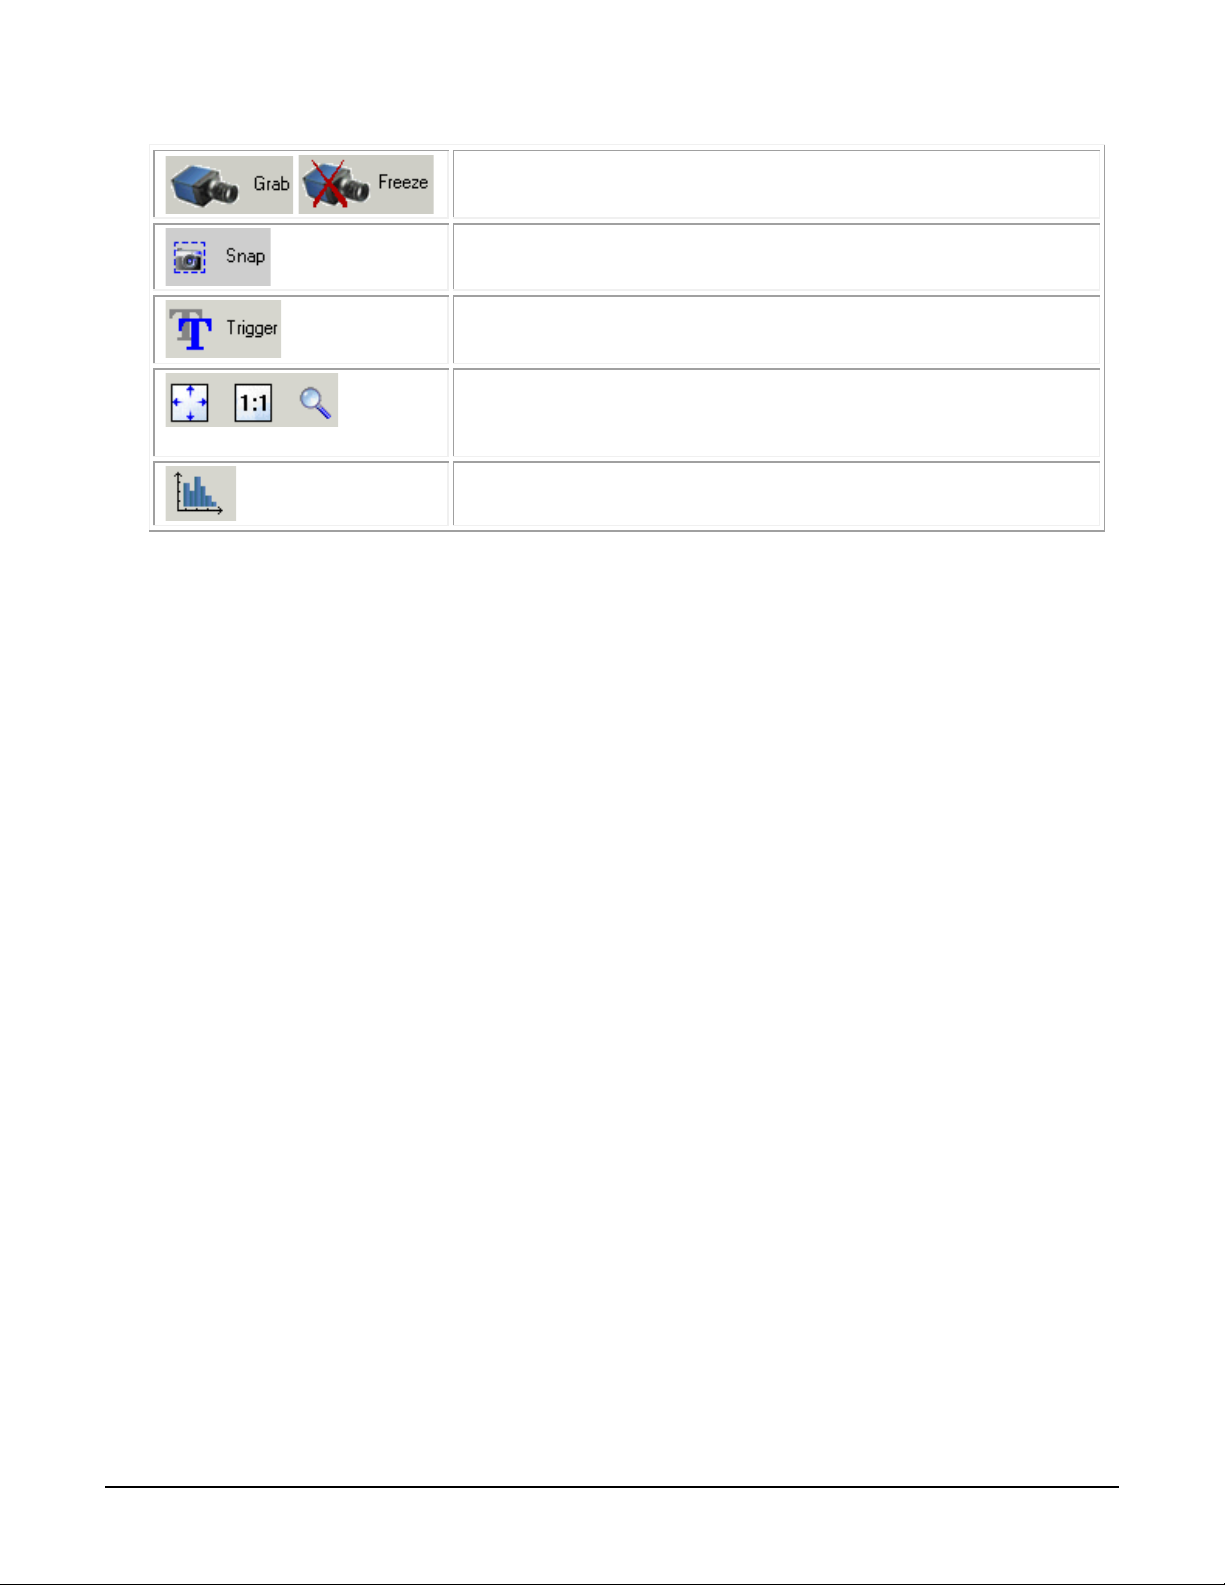
Acquisition control button:
Click once to start live grab, click again to stop.
Single frame grab:
Click to acquire one frame from device.
Software trigger button:
With the I/O control parameters set to Trigger Enable d / Softwa r e Tr igg e r
type, click to send a single software trigger comm and .
CamExpert display contro l s:
(these do not modify the frame buffer data)
Stretch (or shrink) image to fit, set image display to original size, or zoom
the image to any size and ratio. This does not affect the acquisition.
Histogram / Profile tool:
Select to view a histogram or line/column prof i le dur ing liv e acq uis ition.
• Output pane: Displays messages from CamExpert.
CamExpert View Parameters O p tion
All camera features have a Visibility attribute which defines its requirement or complexity. The
states vary from Beginner (features required for basic operation of the device) to Guru (optional
features required only for complex operations).
CamExpert presents camera features based on their visibility attribute. CamExpert provides quick
Visibility level selection via controls below each Category Parameter list [ << Less More >> ]. The
user can also choose the Visibility level from the View ∙ Parameters Options menu.
Creating a Camera Configuration File in the Host
• When using the Teledyne DALSA Sapera SDK – the CCF is created automatically via a save.
• When using a 3
automatic. Simply follow the 3
• If the SDK is based on GenAPI 2.3 or lower, the user must call the command
DeviceFeaturePersistenceStart before using the SDK Save Came ra method and the command
DeviceFeaturePersistenceEnd at the end of the save function.
rd
party SDK application, if that SDK supports GenAPI 2.4, then the process is
rd
party Save Camera method as instructed.
20 • Using CamExpert with Linea CL Cameras Linea CL Series Camera

Camera Operation
The following sections describe typical operations performed with the camera. The descriptions rely
on the feature-based Camera Link GenCP protocol, using the Sapera CamExpert application. If you
are using a different application, the display configuration will differ but the category, parameter
(feature) names and possible values remain the same. References to related ASCII commands are
provided.
Factory Settings
The camera has been calibrated and configured at the factory to be ready for operation when first
powered up. The camera ships and powers up for the first time with the following factory settings:
• Camera Link Full, 8 bit pixels
• Internal trigger, line rate 10 kHz
• Internal exposure control, exposure time 50 µs
• 1x horizontal an d ver tical binning
• Offset 0, Gain 1x (lowest value)
• Flat field calibration is not active as this feature is dependent on your light source and lens.
Linea CL Series Camera Camera Operation • 21

Typical Setup and Evaluation
Optical Configuration
Typically, the first thing you want to do is to evaluate the camera’s image quality under operating
conditions similar to those that you are likely to use in your application. To do this, take the
following steps:
• The illumination, lens magnification, and focus should be set up as per you applicat ion .
• Getting the magnification right is best accomplished by setting the object-to-sensor
distance. Use the formula lens focal length x (2 + 1/magnification + magnification) to
calculate this distance. Magnificat ion equ als the sensor pixel size (7.04 µm or 3.52 µm ) /
(your object pixel size in µm).
• The approximate position of the sensor is at the first groove on the side of the camera case
from the front face of the camera.
Camera Timing & Control
It is easiest and quickest to evaluate the camera using the internal timing setups for line rate and
exposure time. The camera starts up in the default configuration of camera link full, 10 kHz line
rate and 50 µsec exposure time.
• If this line rate is too slow fo r your application, you will get a compressed image in the scan
direction. To increase the line rate, use the Internal Line Rate parameter in the Camera
Control category.
• Adjust the exposure time; refer to the Exposure Controls section.
• Set your camera direction: refer to the Pixel Readout Direction (Mirroring Mode) section.
Acquiring an Image
You can now begin imaging . Unless you have an application employing lots of light, the image is
likely to be too dark.
• Use the system gain to adjust the camera output to achieve the desired response. The
system gain range is from 1x to 10x. Refer to the Gain and Black Level (Offset) section.
• Once you have a suitable response, you can now focus the lens.
• The image may be darker at the edges due to lens vignetting, but this will be improved once
the camera is calibrated.
• Calibration is performed using a white reference where your object is normally located.
Refer to the Calibrating the Camera section. When calibrated, you should see an image from
the camera that is flat field corrected with the lens at the target level you set.
You are now ready to evaluate the image quality of the Linea camera under your operating
conditions.
22 • Camera Operation Linea CL Series Camera
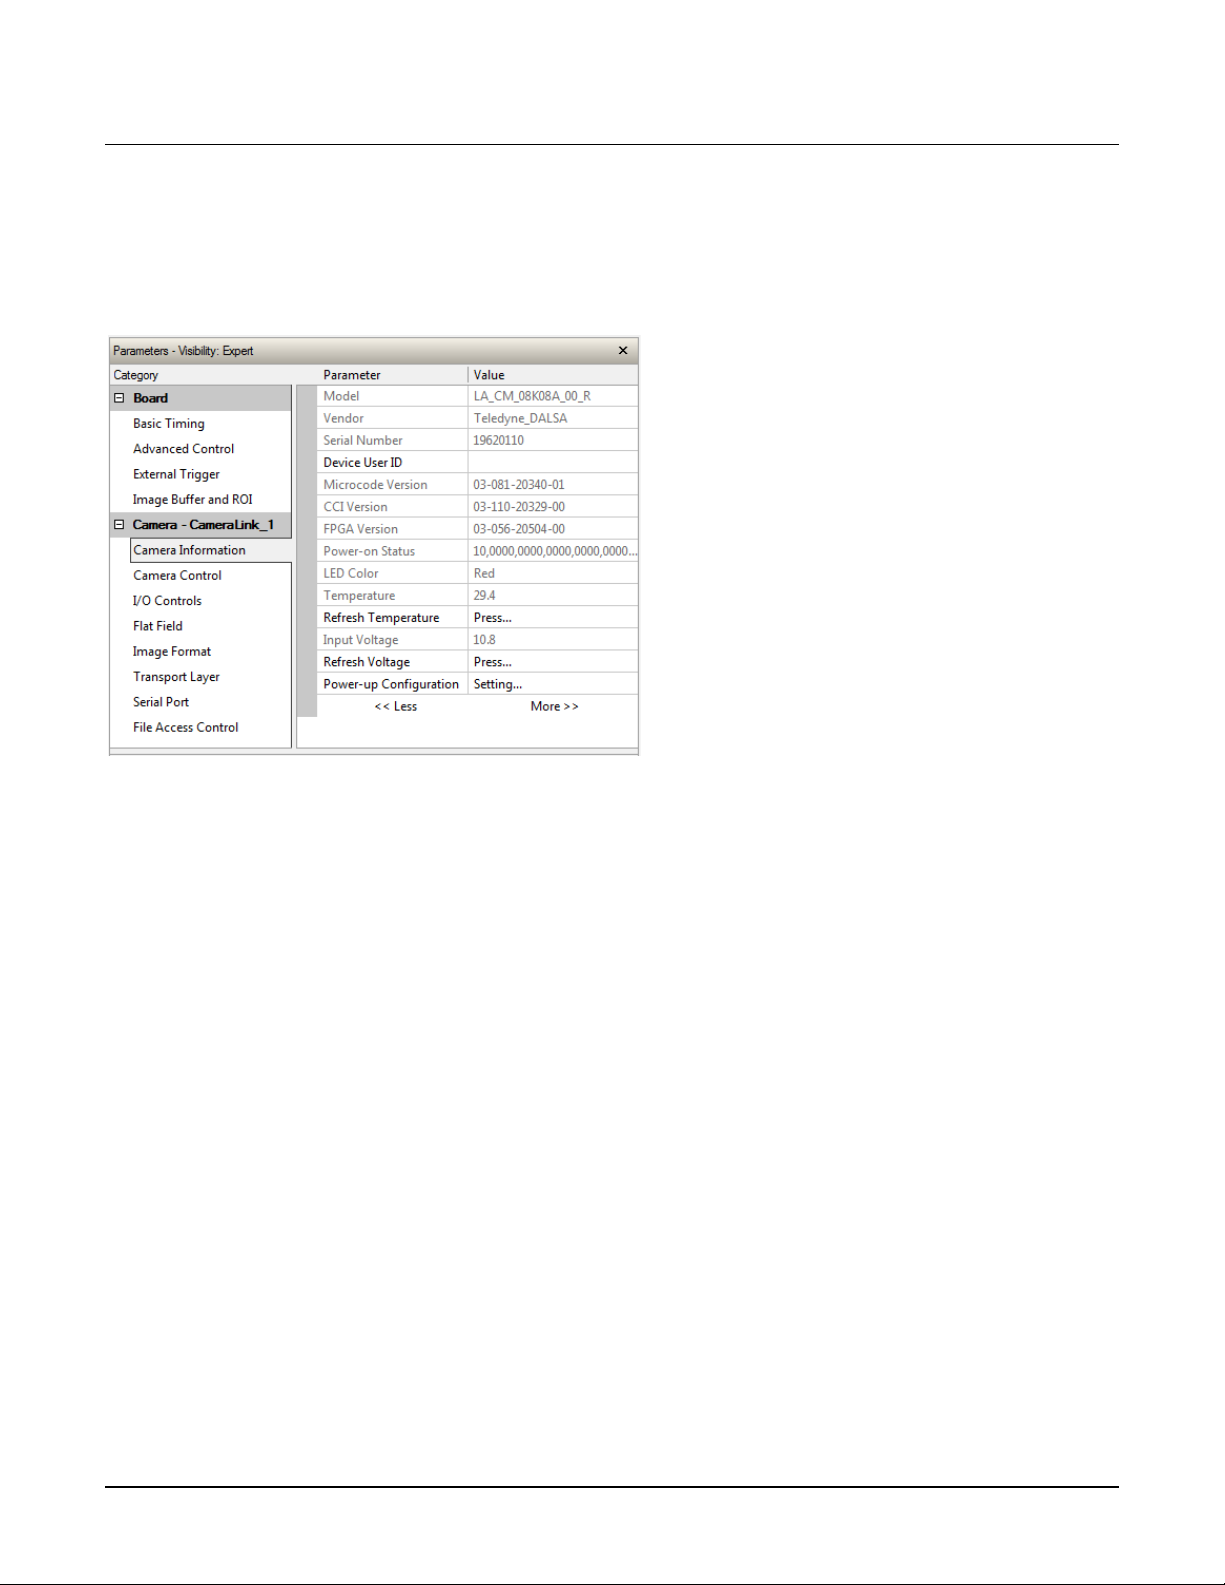
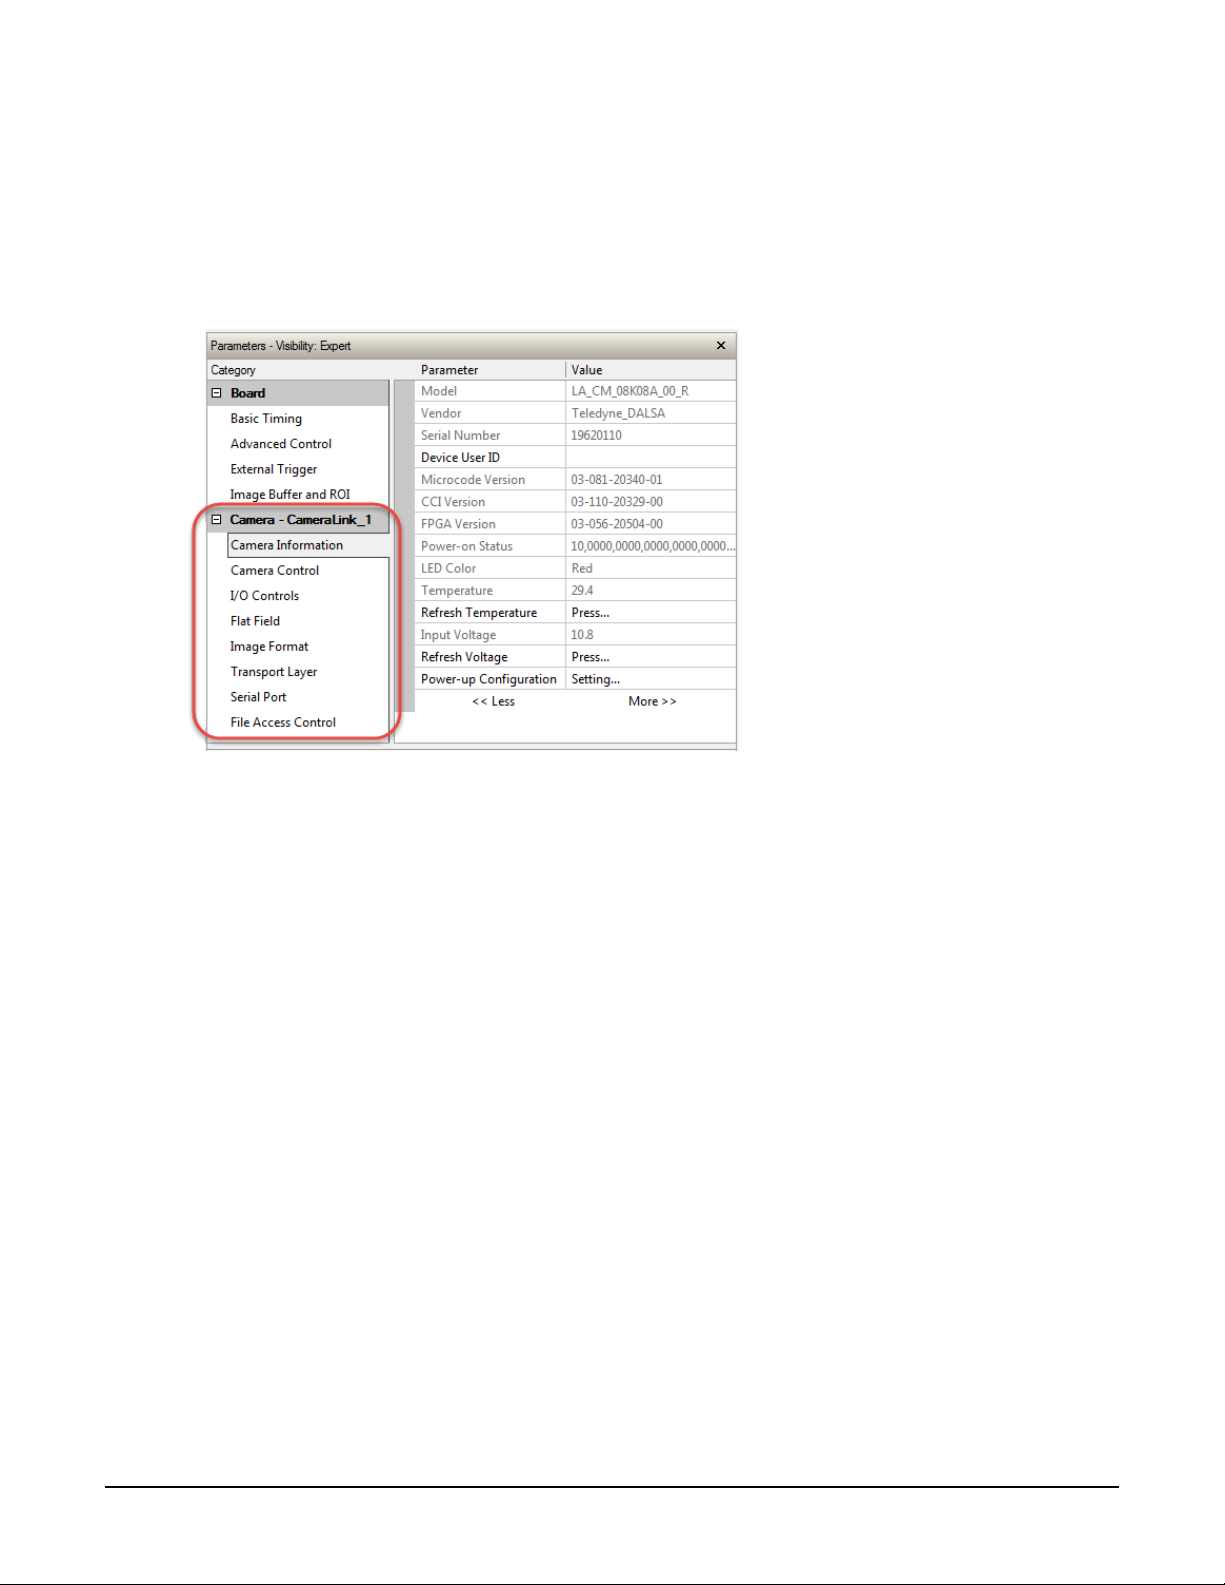
Check Camera and Sensor Information
Camera and sensor information can be retrieved via a controlling application—for example, the
CamExpert GUI shown in the following examples. Parameters such as camera model, firmware
version, sensor characteristics, and so forth, are read to uniquely identify the connected device.
The Camera Information category groups these parameters.
Verify Temperature and Voltage
To determine the voltage and temperature at the camera, use the Refresh Voltage and Refresh
Temperature features.
The temperature returned is the internal temperature in degrees Celsius. For proper operation this
value should not exceed 80 °C. If the camera exceeds the designated temperature it will stop
imaging and the LED will turn red. After you have diagnosed and remedied the issue use the
Restart Camera function.
The parameters used to select, load and save user sets are grouped together under the Camera
Information category. There are 8 user sets available and one factory set.
Linea CL Series Camera Camera Operation • 23
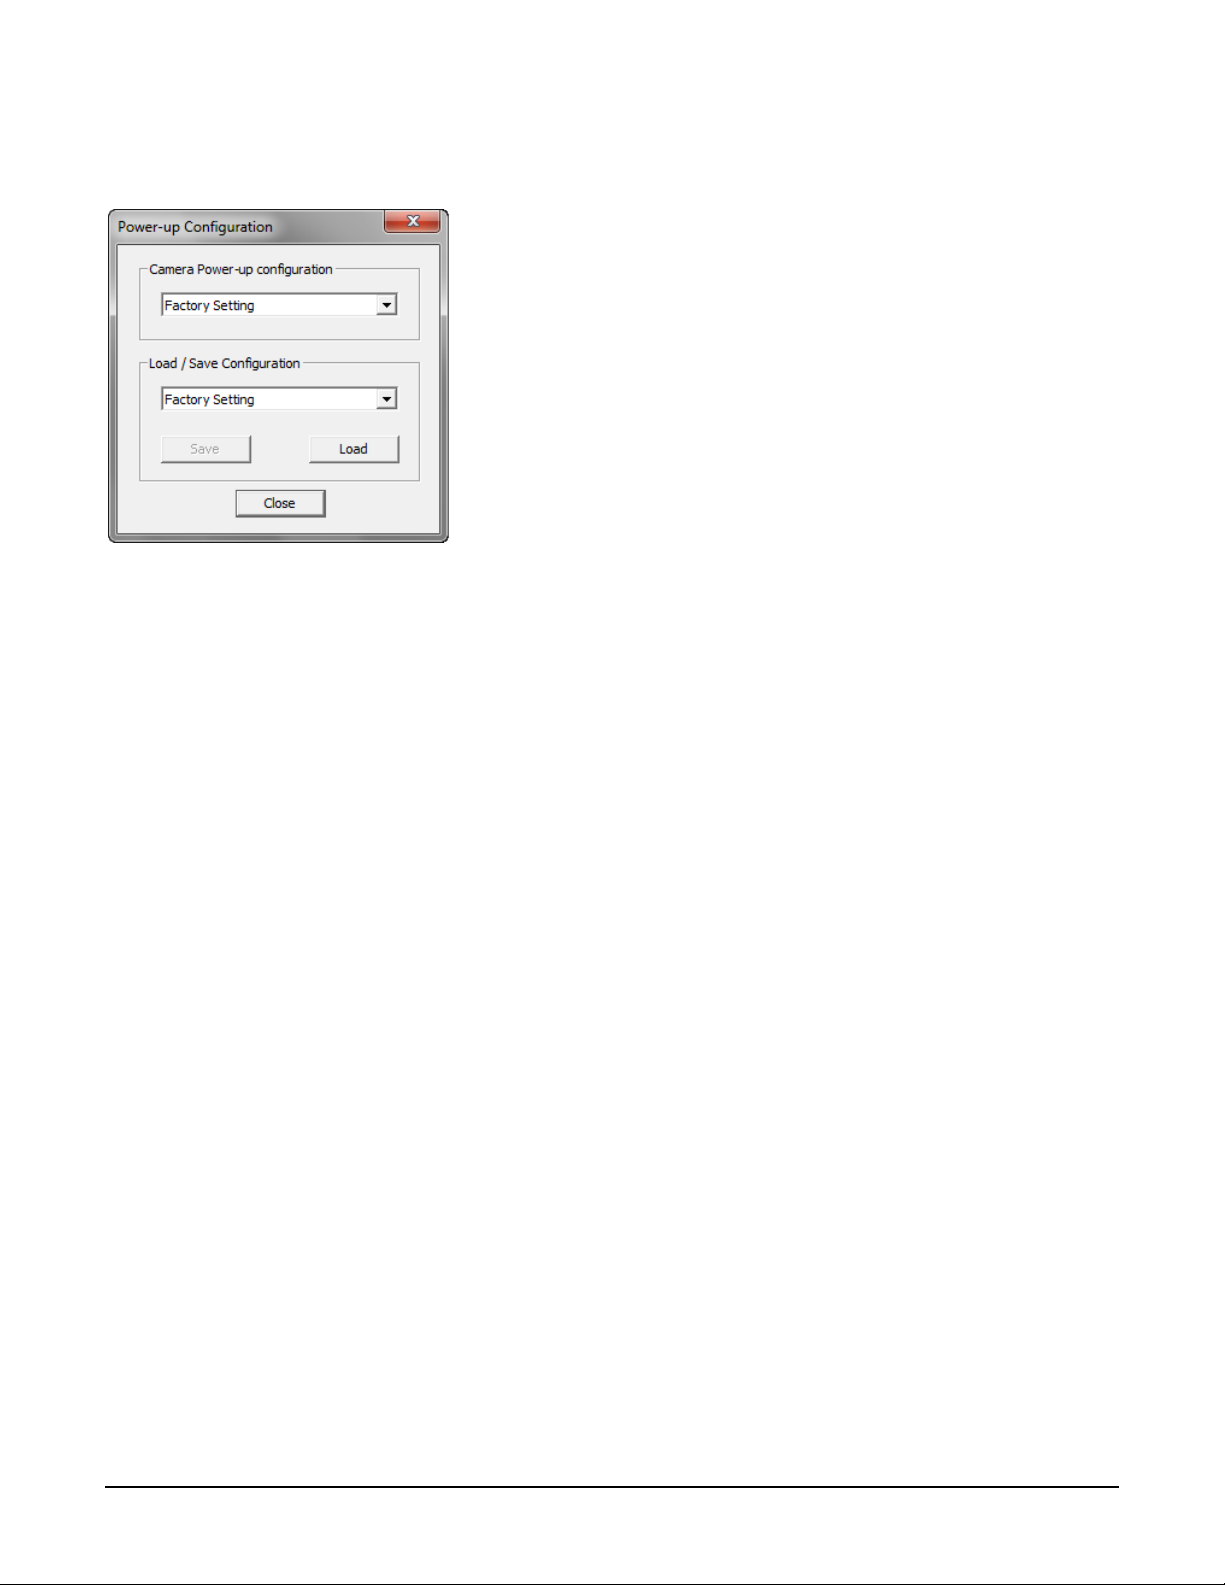
Camera Config uration Selection Dialog
CamExpert provides a dialog box which combines the features to select the camera power up state
and for the user to save or load a camera state from Linea CL memory.
Camera Power-up Configuration
Either the Factory or one of the User Settings can be used as the default setting and is the set
loaded when the camera is reset of powered up.
The first drop list selects the camera configuration state to load on power-up (see feature
UserSetDefaultSelector). The user chooses from one factory data set or one of 8 possible user
saved states.
User Set Configuration Mana g em en t
The user setting is the saved set of camera configurations that you can customize, resave, and
restore. By default the user settings are shipped with the same settings as the factory set.
The second drop list allows the user to change the camera configuration anytime after a power-up
(see feature UserSetSelector). To reset the camera to the factory configuration, select Factory
Setting and click Load. To save a current camera configuration, select from User Set 1 through
User Set 8, and click Save. Select a saved user set and click Load to restore a saved configuration.
Active Settings for Current Operation
The active setting for the current operation is the set of configurations that are active while the
camera is currently running, including all unsaved changes you have made to the settings before
saving them.
These active settings are stored in the camera’s volatile memory and will be lost and cannot be
restored if the camera resets, is powered down, or loses power.
To save these settings for reuse the next time you power up or reset the camera, or to protect
against losing them in the case of power loss, you must save the current settings. Once saved, the
current settings become the selected User Set.
24 • Camera Operation Linea CL Series Camera
Related ASCII Commands
usd
user set default
usl
user set load
uss
user set save
measurement can be used to set the applied voltage to the camera.
User Setting
The command User Set Save saves the current settings to non-volatile memory as a Use r Set.
The camera automatically restores the last saved user settings when it powers up.
To restore the last saved user settings, select the User Set parameter you want to restore and
then select the User Set Load parameter.
Factory Settings
The factory setting is the camera settings that were shipped with the camera and which loaded
during the camera’s first power-up. To load or restore the original factory settings, at any time,
select the Factory Setting parameter and then select the User Set Load parameter.
Note: By default, the user settings are set to the factory settings.
section).
Note: The voltage displayed is the camera’s input voltage. The voltage measurement
feature of the camera provides results within 1% of the actual voltage. The
Linea CL Series Camera Camera Operation • 25
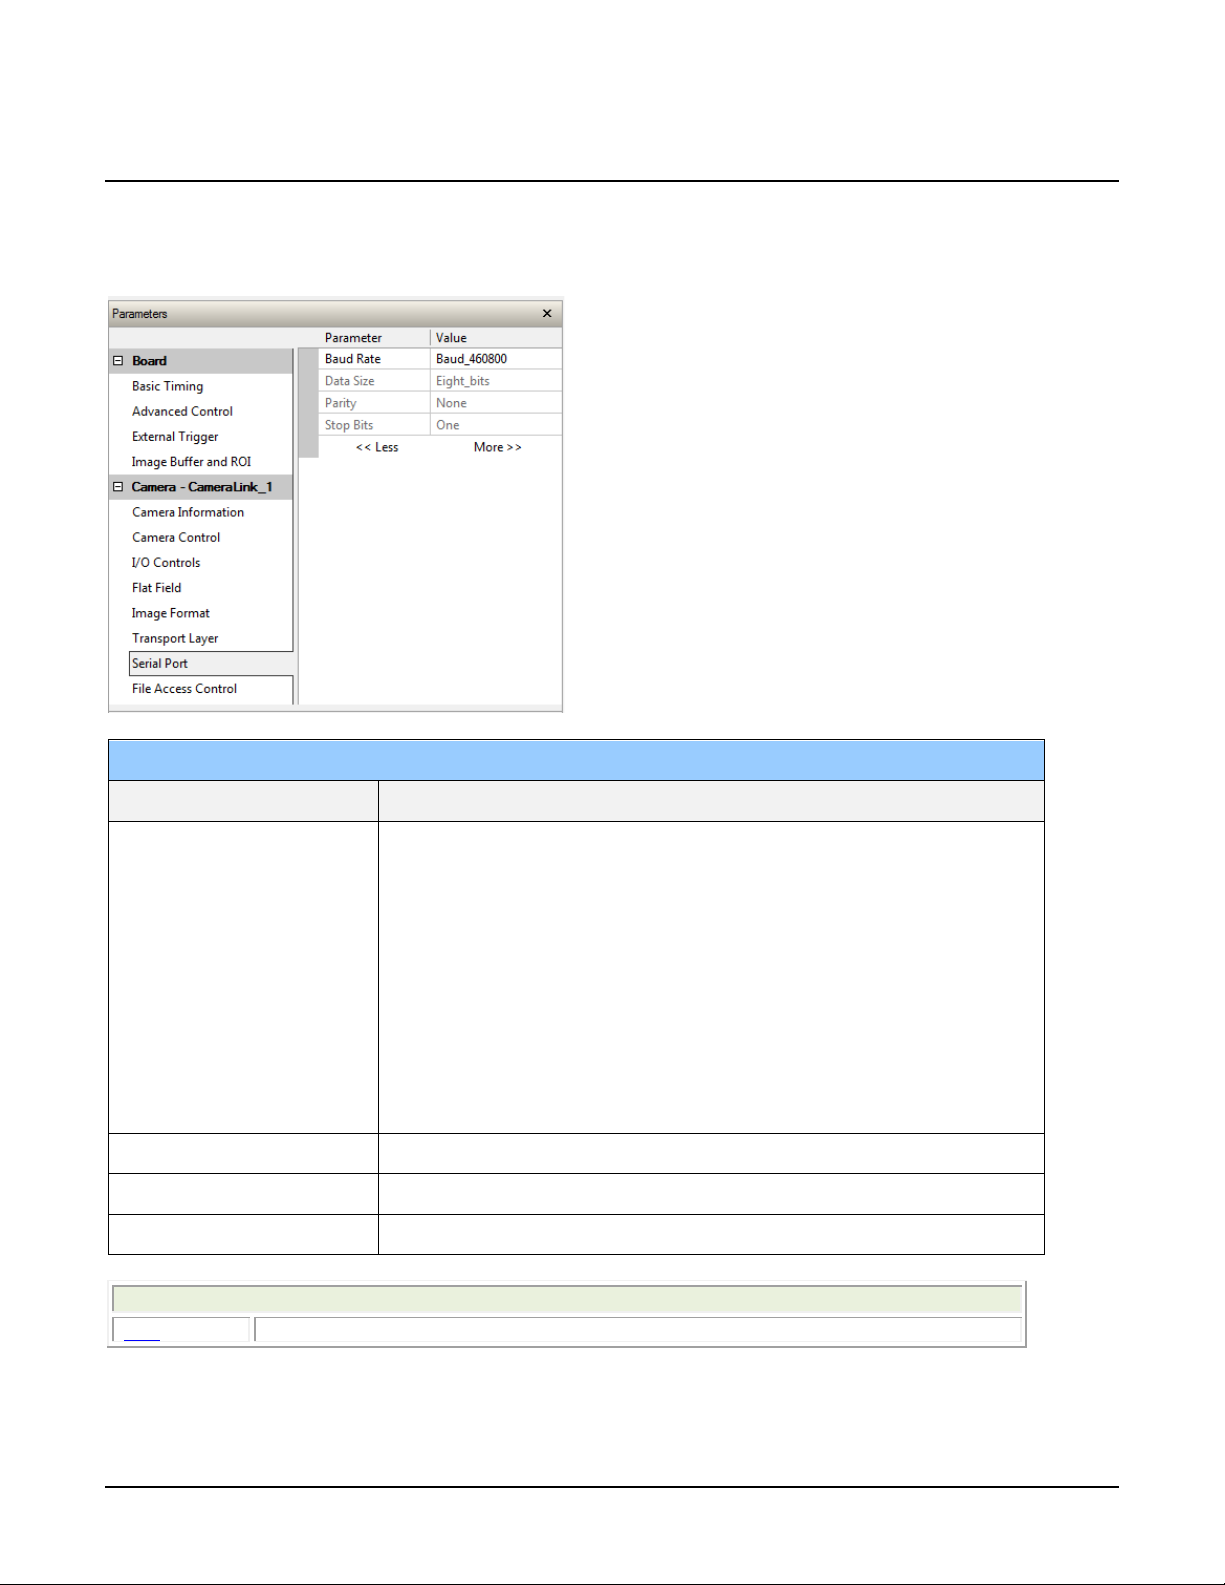
Set Baud Rate
Serial Port
Parameter
Description
achieve these baud rates.
Related ASCII Commands
sbr
set baud rate
The baud rate sets the speed (in bits per second—bps) of the serial communication port and is
available as part of the Serial Port category.
Baud Rate Sets the baud rate used by the camera’ s s er ia l port. Possible values
are:
• 9600 (factory default)
• 19200
• 57600
• 115200
• 230400*
• 460800*
Note: During connection, by default, CamExpert automa tic ally sets the
camera to maximum allowable baud.
*A Teledyne DALSA PX4 or equivalent frame gra bber is r equired to
Data Size 8 (read-only)
Parity None (read-only)
Number of Stop Bits 1 (read-only)
26 • Camera Operation Linea CL Series Camera
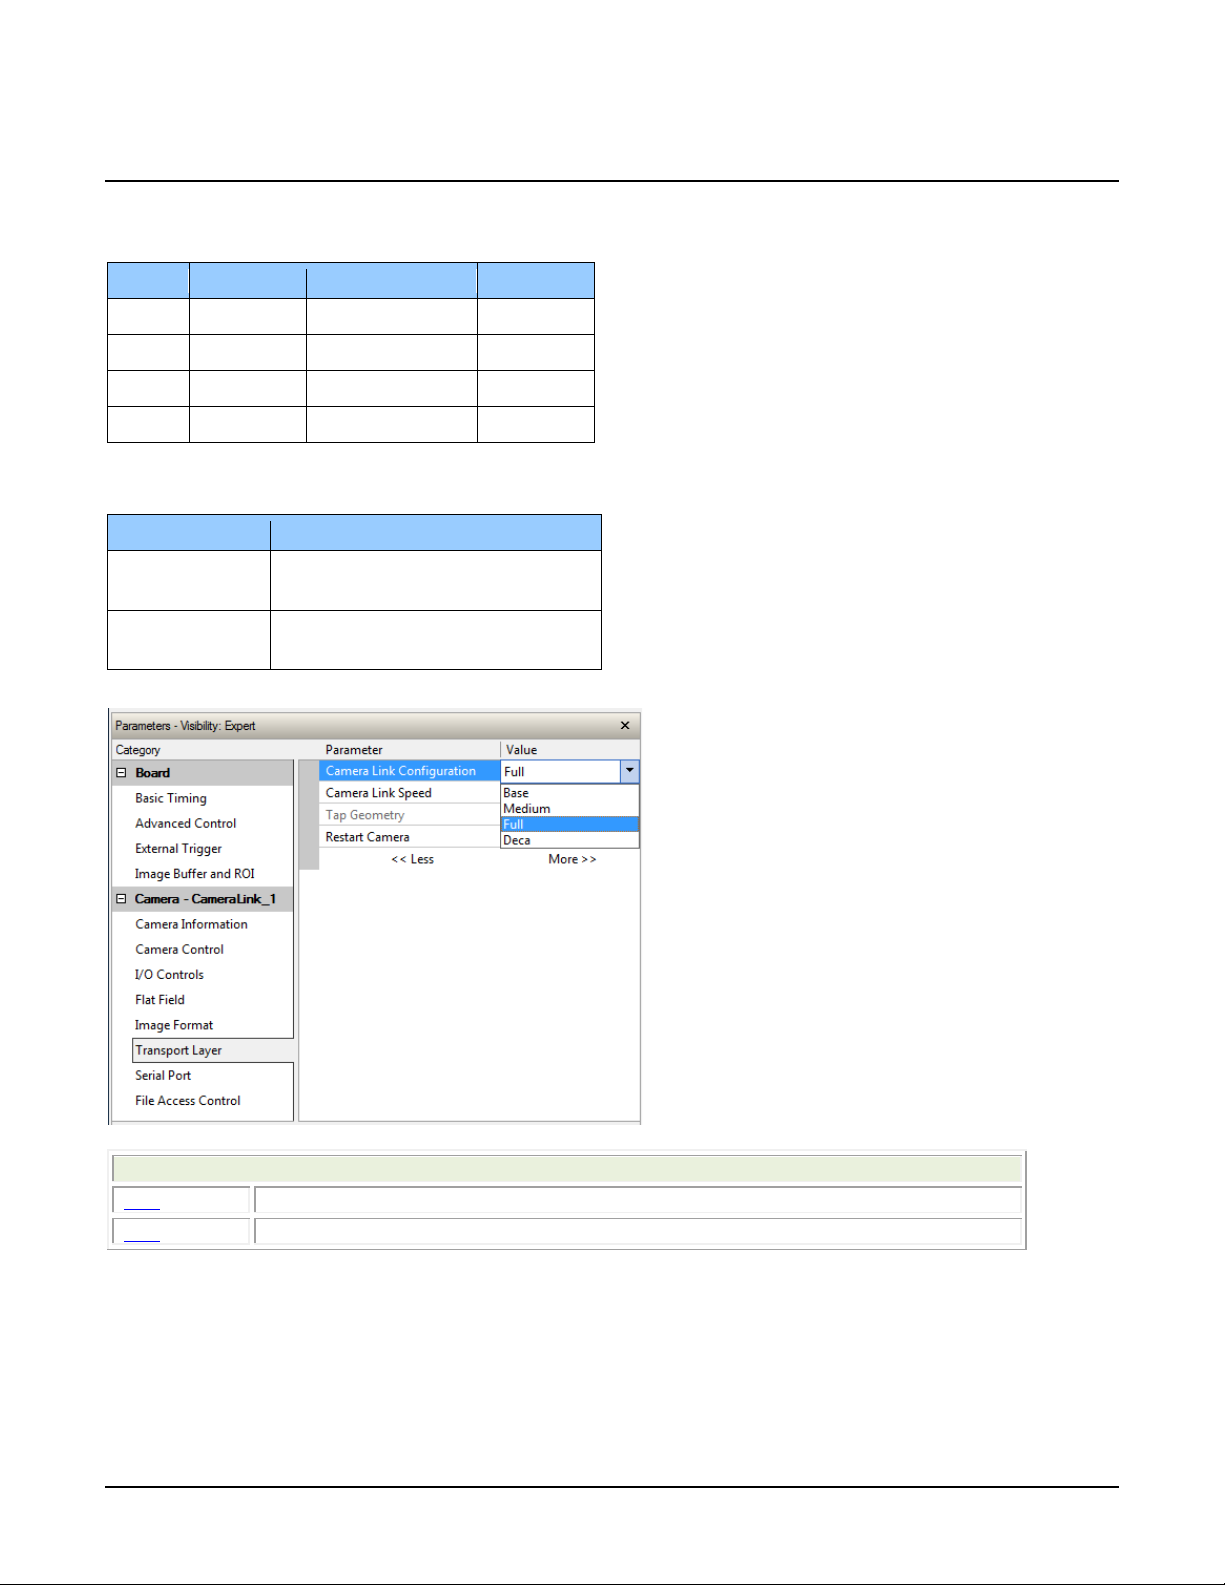
Name
Taps
Bits Per Pixel
Cables
Base
2
8, 12
1
Medium
4
8, 12
2
Full 8 8
2
Deca*
10 8 2
Camera Model
Available Camera Link Speeds
2K, 4K, and 8K
77 MHz
50 MHz
16K
85 MHz
62 MHz
Related ASCII Commands
clm
camera link mode
spf
set pixel format
Camera Link Configuration
The following Camera Link configurations are available:
*8k and 16k models only
Available Camera Link speeds are model dependent:
The Camera Link Configuration feature is available in the camera’s Transport Layer category:
Linea CL Series Camera Camera Operation • 27

Pixel Format
Parameter
Description
Pixel Format
Sets the sensor pixel format. Possible values are:
configurations.
Related ASCII Commands
spf
set pixel format
Parameter
Description
Use the Pixel Format feature, found in the Image Format category, to select the format of the
pixel to use during image acquisition as either Mono 8 or Mono 12 bit depth.
Image Format
• Mono 8*
• Mono 12
*Only available format for Full Camera Link
Internal Test Image Generator
The Linea CL camera includes a number of internal test patterns which easily confirm camera cable
connections or dr iver installations, without the need for a camera lens or proper lighting. The
patterns are subject t o Linea CL processing such as Binning functions.
Use CamExpert to easily enable and select any test pattern from the drop menu while the camera
is not in acquisition mode. Select live grab to see the pa ttern output.
The Test Pattern feature is available in the Image Format category:
Image Format
Test Pattern Enable camera sensor test pattern. Possible values are:
28 • Camera Operation Linea CL Series Camera

Off
Ramp
Alternating
Fixed Pattern
Fixed Value
Fixed Value
32(2)
Related ASCII Commands
svm
set video mode
Important Note: to ensure best res ults , the conditions under which you calibrate the
operating conditions as possible.
1381(86)
Image is from the camera sensor.
Image is filled horizontally w ith an image that goes from th e
darkest possible value to the brigh te s t.
Alternating values. For 12-bit outpu t, pixel values alternate
between 1381 (0x565) and 2746 (0x ABA). For 8-bit outpu t,
pixel values alternate between 86 (0x56) and 172 (0xA C).
8 pixel cycling pattern. For 12-b it output, the patter n is
0x120|0x020|0x130|0x 030|0x140|0x040|0x15 0| 0x050. For
8-bit output, the patte r n is
0x12|0x02|0x13|0x03|0x14|0x04|0x15|0x05.
Fixed Grey Value. For 12-b it output: pixel valu e = 1381
(0x565). For 8-bit output: pixel value = 86 (0x56).
Fixed Grey Value. For 12-bit ou tput: pixel value = 32 (0x20) .
For 8-bit output: pixel value = 2 (0x2).
Calibrating the Camera
camera (for example, temperature and illuminat ion) should be as close to the actual
The goal of c alibration is for the camera to produce a uniform output image at a desired level while
imaging a uniform white object under conditions equal to the optical se tup for the user’s
application. Flat field coefficients consist of an offset and gain for each pixel. These are the first
user corrections applied to the image. The flat fie ld coefficients are saved and loaded with the user
set.
• Configure the camera to the required exsync and exposure timing, plus adjust the light level
for normal operation.
• Set the system gain to a value that best suits the application.
• The lens should be at the required magnification and aperture and be focused.
• As the white reference is located at the object plane, any markings or contaminants on its
surface (that is, dust, scratches, smudges) will end up in the calibration profile of the
camera. To avoid this, use a clean white plastic or ceramic material rather than trying to
rely on a paper reference. (Ideally, the white object will be moving during the calibration
process, as the averaging process of the camera will diminish the effects of any small
variation in the white reference.)
• Adjust the system gain until the peak intensity is at the desired DN level and then calibrate
the fixed pattern noise (FPN). Use a lens cap to ensure that no light reaches the sensor.
• Once complete, remove the lens cap and perform a photo response non-uniformity (PRNU)
calibration using the desired target value (in DN). You want all the pixels t o match. This
target value should be higher than the peak values you saw w hile first setting up the
camera.
Linea CL Series Camera Camera Operation • 29

• After several seconds the PRNU calibration will end and the correction coefficients will be
enabled. The system gain remains as first set.
• The coefficients and gain parameters, timing and control configuration ca n be stored in any
one of eight user sets and automatically retrieved at power-up or by user selection.
CamExpert has a default timeout of 20 seconds per command, which is too
short for the FFC calibration to run fully. You can change the default timeout by
setting a command line argument in the short-cut:
• Right-click on the short-cut in the start menu and select Properties.
• In the Target field, add the switch –timeout 60 (See below)
This increases the command timeout to 60 seconds.
Note that you must include a chara cter space between the clo sing
quotation mark in the target and the hyphen before the timeout value.
• Repeat for desktop short-cut
Flat Field Parameters
This Flat Field category contains a number of features that are used to correct image distortion due
to lens vignetting and uneven illumination.
30 • Camera Operation Linea CL Series Camera

Flat Field
to 0 and gains to 1x).
preferable to us e the “Basic” algorithm if possible.
12 bit: 0 to 4095 DN
Possible values: 2048 or 4096
calibrate different regions sequentially.
Default value is 0 DN for each pixel
Default 1x
Parameter
Mode Off – Flat field correction coeffic ients are not applied.
Calibration Algor ithm Basic – Direct calculation of coefficien ts based on curren t a verage line
Calibration Target After calibration all pixels will be scaled to outpu t this level
Calibration Sample Size Number of lines to a verage when calibrating.
ROI Offset X Together with “ROI Width”, specifies the range of pixels to be calibrated.
Description
On – Flat field correction coefficien ts are applied.
Initialize – Sending this value will r es e t a ll current coef ficients (offsets
values and target.
Low Pass Filter – A low pass filter is first ap plied to the curre nt
average line values before calculating the coefficients. Use this
algorithm if the calibration tar g et is not uniform white or it is not
possible to defocus the image. Bec a use of the low pass f ilter this
algorithm is not ab le to correct pixel-to-pixel variations and so it is
Range depends on pixel format:
• 8 bit: 0 to 255 DN
•
Pixel coefficien ts outside this ra nge are not changed . It is possible to
ROI Width Width of ROI, in pixels.
Calibration FPN Save average line (of “Calibration Sample Size” row s). This is the first
user correction applied – it is subtracted from each line.
This feature may not be of use to many users as the camera already
subtracts true “dark current” , but it may be useful for some to provide a
per pixel offset correction.
• Range 0 to 511 DN, 12 bit
•
Calibration PRNU Use “Correction Algorithm” to ca lc ulate the per pixel gain to achieve the
specified target outpu t.
• Range 0 to 15.9998x
•
Linea CL Series Camera Camera Operation • 31

Trigger Modes
I/O Controls
Parameter
Description
signal is the Camera L ink control line CC1 .
Related ASCII Commands
sem
set exposure mode
The camera’s image exposures are initiated by a trigger event. The trigger event is either a
programmable internal signal used in free running mode, an external input used for synchronizing
exposures to external triggers, or a programmed function call message by the controlling
computer. These triggering modes are described below.
The Trigger Mode feature is available in the camera’s I/O Controls category:
Trigger Mode
• Off: Internal trigger (trigger disabled): The camera freerunning mode has a programmable internal timer for line rate
and a programmable exposure period.
• On: External trigger (trigger enabled): Exposures are
controlled by an external trigger signal. The external trigger
32 • Camera Operation Linea CL Series Camera

Description
Line Rate
Exposure Time
Trigger Source
Exposure
programmable
Exposure
programmable
Exposure
Exposure Controls
Exposure control is defined as the start of exposure a nd ex posure duration. Exposure control
modes define the method and timing of controlling the sensor integration period. The integration
period is the amount of time the sensor is exposed to incoming light before the video line data is
transmitted to the controlling computer .
The camera can grab images in one of three ways, as described in the following table.
Internal Programmable
External Programmable
External Trigger Width
Internal, programmable Internal
Controlled by EXSYNC pulse Internal
Controlled by EXSYNC pulse External (EXSYNC) External
Internal
External
You determine the three imaging modes using a combination of the Exposure Time Source
parameters (including I/O parameters), Exposure Time and Internal Line Rate parameters.
• The feature Exposure Time Source selects the controlling method for the exposure.
• The start of exposure can be driven by an internal timer signal, an external trigger signal, or a
software function call.
• For External Trigger signals, the relationship between an external line trigger and the exposure
period is only applicable while the external line trigger does not exceed the maximum allowable
line rate.
• If the external line rate exceeds the maximum line rate allowed for a mode, the camera will
continue to output data at its maximum line rate. Though no image artifacts associated with
over-speed will occur, you may notice that under over-speed conditions the image will appear
compressed and the apparent distance travelled will be reduced.
The relevant exposure control features are grouped in the Camera Control category:
Linea CL Series Camera Camera Operation • 33

Camera Control
Parameter
Description
running): that is, the line trigger is disa bled (Trigger Mode off).
Width
the exposure duration.
be set to Timed.
Related ASCII Commands
ssf
set sensor framerate
sem
set exposure mode
set
set exposure time
Programmable Exposure
1
Programmable Exposure
1
Programmable Line Time
> 1
µ
s
Programmable Exposure
1
Sensor Readout
2
Sensor Readout
2
Sensor Readout
2
LVAL delay
3
LVAL
Internal Line
Rate
Camera line rate in a range from 300 Hz up to 80 kHz (2k, 4k, 8k) or 48 kHz
(16k).
This feature is only available when the camera is in Internal Mode (free
Exposure Time
Source
Set the operation mode for the c a m er a ’ s exposure. Trigger Wid th is only
available when Trigger Mo de is enabled.
Trigger
Uses the width of the current line trigger signal pulse to control
Timed The exposure duration time is set using the Exposur e Tim e
feature and th e exposure starts with the Line Start even t.
Exposure Time Sets the exposure time (in microseconds). Exposure Time Source feature must
Internal Programmable Exposure
The Linea CL in the Internal Programmable Exposure mode is the default free- running mode with
the external trigger off and internal exposure control. This mode is not synchronized to an external
signal. Line rate is the dominant factor when adjusting the line rate or exposure time. When setting
the line rate, exposure time will decrease, if necessary, to accommodate the new line rate. When
adjusting the exposure time the range is limited by the line rate. has the following features:
• The Trigger Source feature (see I/O Control category) selects an internal signal as trigger.
• Programmable internal trigger, where the maximum line rate limit is related to the Exposure
Time feature.
• Exposure duration is user programmable (exposure maximum is dependent on the line rate).
Minimum exposure (in µs) is model dependent.
1. Exposure time > 4µs (2K, 4K, 8K) or 2µs (16K)
2. Sensor readout time = 12.5µs (2K, 4K, 8K) or 20.8µs (16K)
3. LVAL delay = ~14.5µs (2K, 4K), 26µs (8K) or 41µs (16K)
34 • Camera Operation Linea CL Series Camera

Programmable Exposure
1
Programmable Exposure
1
Line Time
>
1
µ
s
Programmable Exposure
1
Sensor Readout
2
Sensor Readout
2
Sensor Readout
2
LVAL delay
3
LVAL
CC
1
To calculate the maximum line rate:
Maximum line rate =
(𝑒𝑥𝑝𝑜𝑠𝑢𝑟𝑒 𝑡𝑖𝑚𝑒+𝑙𝑜𝑤 𝑡𝑖𝑚𝑒∗)
1
*Exposure time must be greater than 4 µs, and low time greater than 1 µs (2K, 4K and 8K models)
or greater than 2 µs (16K model)
GenICam parameters to set:
• I / O Controls > Trigger Mode > Off
• Camera Control > Internal Line Rate > user value
• Camera Control > Exposure Time > user value
External Programmable Exposure
The External Programmable Exposure mode is similar to Internal Programmable except for the
exposure start being an external user input.
• The TriggerSource feature (see I/O Control category) selects an external signal line as trigger.
• Line rates and exposure limits are as defined for Internal Programmable Exposure.
• The falling edge of the EXSYNC (CC1) signal triggers the start of the internal exposure.
1. Exposure time > 4µs (2K, 4K, 8K) or 2µs (16K)
2. Sensor readout time = 12.5µs (2K, 4K, 8K) or 20.8µs (16K)
3. LVAL delay = ~14.5µs (2K, 4K), 26µs (8K) or 41µs (16K)
GenICam parameters to set:
• I / O Controls > Trigger Mode > On
• Camera Control > Exposure Time Source > Timed
• Camera Control > Exposure Time > user value
Linea CL Series Camera Camera Operation • 35

External Trigger Width Exposure
Exposure =
X
1
Line Time
>
1
µ
s
Sensor Readout
1
LVAL delay
2
LVAL
CC
1
X
1
X
2
X
3
Exposure
=
X
2
Sensor Readout
1
Exposure
=
X
3
Sensor Readout
1
the case when running internal exposure control.
An alternative external trigger mode allows the external signal width to control the exposure
duration. Line readout time remains similar to programmable exposure modes.
• EXSYNC (CC1) sets both the line period and the exposure time.
• The EXSYNC high duration sets the exposure time and the falling edge triggers the s ta rt of
exposure.
1. Sensor readout time = 12.5µs (2K, 4K, 8K) or 20.8µs (16K)
2. LVAL delay = ~14.5µs (2K, 4K), 26µs (8K) or 41µs (16K)
Note:
Maximum line rate =
(𝑒𝑥𝑝𝑜𝑠𝑢𝑟𝑒 𝑡𝑖𝑚𝑒+𝑙𝑜𝑤 𝑡𝑖𝑚𝑒∗)
1
*Exposure time must be greater than 4 µs, and low time greater than 1 µs (2K, 4K and 8K models)
or greater than 2 µs (16K model)
Warning! When running external line rate and external exposure time, the line rate
must not exceed 1 / (exposure time + low time). Under these conditions the
exposure time will become indeterminate and result in image artifacts. This is not
GenICam parameters to set:
• I / O Controls > Trigger Mode > On
• Camera Control > Exposure Time Source > Trigger Width
36 • Camera Operation Linea CL Series Camera

Camera Control
Single value added to each pix el. Apply a digital addition after an FPN correction: ± 1/ 8
12-bit mode
available range is -512 to +511.
8-bit mode
available range is -32 to +31.
Floating point dig ital multiplier applied to each pix e l. Set the gain as a n a m p lification
factor applied t o the video signal across all pixels: 1x to 1 0x.
Related ASCII Commands
ssb
set sensor blacklevel
ssg
set sensor gain
Gain and Black Level (Offset)
The gain and black level controls can make small compensations to the a cquisition in situations
where lighting varies and the lens iris can not be eas ily adjusted. Optima l gain and black level
adjustments maximizes t he Linea CL dynamic range for individual imaging situations.
Use the Offset and Gain features to maximize the use of the output dynamic range (especial ly
when pixel format is less than 12 bits). Typical use is to subtract minimum pixel value expected
and then adjust the gain to up the maximum pixel value to approach full scale.
Features and limitations are described be low.
• Black Level offset is expressed as a digital number providing a +/- offset from the factory
setting. The factory setting optimized the black level offset for maximum dynamic range und er
controlled ideal dark conditions.
• Digital Gain is expressed as a multiplication factor. Note that increasing digital gain does not
increase the low level resolution and increases the sensor noise proportionately.
The parameters that control gain and black level are grouped together in the Camera Control
category.
Offset
Gain
of available range. Positive values may be used to measure dark noise.
Depending on the the pixel for ma t, different offset ranges a r e a vailable:
Linea CL Series Camera Camera Operation • 37

Binning
Binning is the combining of two or more image sensor pixels to form a new combined pixel. A
binned image using the same exposure settings as a non-binned image will show an improved
signal-to-noise ratio, reduced scanning times (due to lower spatial resolution) and save as a
smaller image file size compared with a non-binned image, at the expense of lower image
resolution.
In 2 x 2 binning, 4 physical pixe ls on the sensor are combined into one image pixel. This operating
mode is ideal for applications that require faster acquisition and processing times and require
greater signal collection.
For this camera, the default binning value is 1 x 1,
The Binning Vertical and Binning Horizontal features in the Image Format category
represents the number of horizontal pixels that will be combined (added) together.
38 • Camera Operation Linea CL Series Camera

Image Format
must be combined (added) together: 2.
that must be combined (added) together.
Related ASCII Commands
sbh
set binning horizontal
Image Format
Parameter
Description
Line Mirroring
Off: All pixels are read out from left to right.
On: All pixels are read out from right to left.
Related ASCII Commands
smm
set mirroring mode
Parameter
Binning Vertic a l This feature represents the number of vertical photo-sensitive cells tha t
Binning Horizontal This feature represents the number of horizon tal photo-sensitive cells
Description
Pixel Readout Direction (Mirroring Mode)
The Line Mirroring feature, in the Image Format category, sets the tap readout from left to right or
from right to left. This feature is especially useful if you want to mount the camera “upside down.”
Linea CL Series Camera Camera Operation • 39

Area of Interest (AOI) Setup
Full Image Width
AOI 1
AOI
2
AOI 3
AOI
4
AOI
2 Offset
AOI
3 Offset
AOI 4 Offset
AOI
1
AOI 2
AOI 3
AOI
4
Resulting Output Image Width
The Area of Interest (AOI) feature can be used to reduce the amount of image-data output from
the camera. Use this feature when there are areas in the image that contain unneeded information.
An example where you would use this feature is in an application that is inspecting several
separated lanes of objects with one camera and the image between the lanes can be ignored.
The AOI feature allows from one to four specific areas of the pixel line to be specified where image
data will be output. Since the AOI feature reduces the amount of data output, this has the
additional benefit of allowing the cameras to operate at higher EXSYNC rates when using base or
medium camera link modes.
For example, in the 4K camera model, if the total number of pixels for the specified AOI`s is less
than 1 K when using base Camera Link mode at 77 MHz, the maximum EXSYNC rate can be 80
kHz; versus 56 kHz if all 4K pixels were output.
Note: The setup of AOI is alw a ys with respect to th e sensor. Therefore, if you are using the
mirroring mode with AOI , be awa r e that pixel one will be on the right side of the displayed image.
The AOI commands are grouped in the Image Format category.
To set up an AOI for the camera:
• The AOI mode must first be in the off position.
• Use the AOI Count to select the total number of AOIs desired to a max of 4.
• To set up each AOI individually use the AOI Selector to point to the AOI to be set up.
• AOI Offset X is used indicate the starting pixel of the AOI.
• AOI Width is used to indicate the width of the AOI.
40 • Camera Operation Linea CL Series Camera

Linea CL Series Camera Camera Operation • 41

To initiate operation of the AOI once setup:
Related ASCII Commands
sac
set AOI count
sad
set AOI selector, offset and width
sam
set AOI selector, offset and width
• The AOI mode must be changed to Active.
• Be sure to set the frame grabber image width to the sum of all AOI w idths set up in the
camera.
42 • Camera Operation Linea CL Series Camera

Saving and Restoring Camera Settings
The parameters used to select, load and save user sets are grouped together under the Camera
Information category. There are 8 user sets available and one factory set.
Camera Config uration Selection Dialog
CamExpert provides a dialog box which combines the features to select the camera power up state
and for the user to save or load a camera state from Linea CL memory.
Camera Power-up Configuration
Either the Factory or one of the User Settings can be used as the def a ult setting and is the set
loaded when the camera is reset of powered up.
The first drop list selects the camera configuration state to load on power-up (see feature
UserSetDefaultSelector). The user chooses from one factory data set or one of 8 possible user
saved states.
User Set Configuration Mana g em en t
The user setting is the saved set of camera configurations that you can customize, resave, and
restore. By default the user settings are shipped with the same settings as the factory set.
The second drop list allows the user to change the camera configuration anytime after a power-up
(see feature UserSetSelector). To reset the camera to the factory configuration, select Factory
Setting and click Load. To save a current camera configuration, select from User Set 1 through
User Set 8, and click Save. Select a saved user set and click Load to restore a saved configuration.
Active Settings for Current Operation
The active setting for the current operation is the set of configurations that are active while the
camera is currently running, including all unsaved changes you have made to the settings before
saving them.
These active settings are stored in the camera’s volatile memory and will be lost and cannot be
restored if the camera resets, is powered down, or loses power.
To save these settings for reuse the next time you power up or reset the camera, or to protect
against losin g them in the case of power loss, you must save the current settings. Once saved, the
current settings become the selected User Set.
Linea CL Series Camera Camera Operation • 43

User Setting
Related ASCII Commands
usd
user set default
usl
user set load
uss
user set save
The command User Set Save saves the current settings to non-volatile memory as a Use r Set.
The camera automatically restores the last saved user settings when it powers up.
To restore the last saved user settings, select the User Set parameter you want to restore and
then select the User Set Load parameter.
Factory Settings
The factory setting is the camera settings that were shipped with the camera and which loaded
during the camera’s first power-up. To load or restore the original factory settings, at any time,
select the Factory Setting parameter and then select the User Set Load parameter.
Note: By default, the user settings are set to the factory settings.
44 • Camera Operation Linea CL Series Camera

Type
File
Device Firmware
Microcode
XML
XML
Miscellaneous
FPGA Code
CCI
Warning! The camera firmware file versions must all be compatible or the
questions before proceeding.
Camera Firmware Updates
The user can upload new firmware using the File Access Control features via Sapera CamExpert.
To update the camera firmware several files must be updated. Files include the following:
camera risks becoming inoperable. Only after all required files are uploaded to
the camera can the camera be reset to activate the new firmware.
Before updating any firmware files verify that the file versions are correct. If
in doubt, contact your Teledyne DALSA representa tive if you have any
Download a List of Camera Parameters
For diagnostic purposes you may want to download a list of all the parameters and values
associated with the camera. To do this use the File Access Control
• Select “Miscellaneous” file type
• In the “File selector” drop down box select “CameraData” .
• Click “Download”.
• Save the text file and send the file to Teledyne DALSA customer support if required.
features via Sapera CamExpert:
Linea CL Series Camera Camera Operation • 45

File Access via the CamExpert Tool
• In the File Access Category, click on the “Setting…” button to open the File Access Control
dialog.
• From the file type drop menu, select the file type that will be uploaded to the Linea CL. This
CamExpert tool allows quick firmware changes or updates.
• From the File Selector drop menu, select the Linea CL memory location for the uploaded data.
This menu presents only the applicable data locations for the selected file type.
• Click the Browse button to open a typical Windows Explorer window.
• Select the specific file from the system drive or from a network location.
• Click the Upload button to execute the file transfer to the Linea CL.
• Note that firmware changes require a device reset command from the Transport Layer Controls.
46 • Camera Operation Linea CL Series Camera

Transport Layer
Parameter
Description
Restart Camera
Resets the camera and puts in the default settings, including a
9600 baud rate.
Related ASCII Commands
rc
reset camera
Resetting the Camer a
The Restart Camera feature, part of the Transport Layer category, resets the camera. The camera
resets with the default settings, including a bau d rate of 9600.
If camera detection is enabled, Teledyne DALSA frame grabber serial port settings are by default
configured to auto-detect and maximize the baud rate . To verify the setting, use the Sapera
Configuration utility, or in CamExpert use the Tools > Camera Detection > Settings menu
command to open the Communication Settings dialog.
Linea CL Series Camera Camera Operation • 47

Technical Specifications
Mechanical Specifications
2K and 4K Camera s
48 • Technical Specifications Linea CL Series Camera

8K and 16K Cameras
Linea CL Series Camera Technical Specifications • 49

Additional Notes on Linea CL Identification and Mechanical
Identification Label
Linea CL cameras have an identification label applie d to the back side, with the following information:
• Model Part number
• Serial number
• 2D Barcode
• CE and FCC logo
• “Made in Canada” Statement
EMC Declarations of Conformity
50 • Technical Specifications Linea CL Series Camera

Linea CL Series Camera Technical Specifications • 51

52 • Technical Specifications Linea CL Series Camera

Additional Reference Information
Optical Considerations
This section provides an overview to illumination, light sources, filters, lens modeling, and lens
magnification. Ea ch of these components contribute to the successful design of an imaging
solution.
Illumination
The amount and wavelengths of light required to capture useful images depend on the particular
application. Factors include the nature, speed, and spectral characteristics of objects being imaged,
exposure times, light source characteristics, environmental and acquisition system specifics, and
more. The Teledyne DALSA Web site, http://mv.dalsa.com/
potentially complicated issue. Click on Knowledge Ce nter and then select Application Notes and
Technology Primers. Review the sections of interest.
, provides an introduction to this
It is often more important to consider expos ure than illumination. The total amount of energ y
(which is related to the total number of photons reac hing the s ensor) is more important than the
rate at which it arrives. For example, 5µJ/cm
the same as exposing an intensity of 5W/cm
2
can be achieved by exposing 5mW/cm2 for 1ms just
2
for 1µs.
Light Sources
Keep these guidelines in mind when selecting and setting up light source:
• LED light sources are relatively inexpensive, provide a uniform field, and longer life span
compared to other light sources. However, they also require a camera with excellent sensitivity.
• Halogen light sources generally provide very little blue relative to infrared light (IR).
• Fiber-optic light distribution systems generally transmit very little blue relative to IR.
• Some light sources age such that over their life span they produce less light. This aging may
not be uniform—a light source may produce progressively less light in some areas of the
spectrum but not others.
Linea CL Series Camera Additional Reference Information • 53

Lens Modeling
h
hm'
=
OD
f
m
'
=
OD
f
h
h ''
=
OD
mm
m
m 45
100
10
=
µ
µ
)450.0(450 mmmOD =
Any lens surrounded by air can be modeled for camera purposes using three primary points: the
first and second principal points and the second focal point. The primary points for a lens should be
available from the lens data sheet or from the lens manufacturer. Primed quantities denote
characteristics of the image side of the lens. That is, h is the object height and h′ is the image
height.
The focal point is the point at which the image of an infinitely distant object is brought to focus.
The effective focal length (f′) is the distance from the second principal point to the second focal
point. The back focal length (BFL) is the distance from the image side of the lens surface to the
second focal point. The object distance (OD) is the distance from the first principal point to the
object.
Primary Points in a Len s System
Magnification and Resolution
The magnification of a lens is the ratio of the image size to the object size:
Where m is the magnification, h’ is the image height (pixel
size) and h is the object height (desired object resolutio n
size).
By similar triangles, the magnification is alternatively given by:
These equations can be combined to give their most usef ul form :
This is the governing equation for many objec t and image
plane parameters.
Example: An acquisition system has a 512 x 512 element, 10µm pixel pitch area scan camera, a lens
with an effective focal length of 45mm, and requires that 10 0µm in the object space correspond to
each pixel in the image sensor. Using the preceding equation, the object distance must be 450mm
(0.450m).
54 • Additional Reference Information Linea CL Series Camera

Sensor Handling Instructions
This section reviews proper procedures for handling, cleaning, or storing the Linea CL camera.
Specifically the camera sensor needs to be kept clean and away from static discharge to maintain
design performance.
Electrosta tic Discharg e a n d the Sensor
Cameras sensors conta i n i n g integrated electronics are susceptible to damage from electrostatic
discharge (ESD).
Electrostatic cha rge introduced to the sensor window surface can induc e charge buildup on the
underside of the window that cannot be readily dissipated by the dry nitrogen gas in the sensor
package cavity. With charge buildup, pro blems such as higher image lag or a highly non-uniform
response may occur. The charge normally dissipates within 24 hours and the sensor returns to
normal operation.
Important: Charge buildup will affect the camera’s flat-field correction calibration. To avoid an
erroneous calibration, ensure that yo u perfo r m fla t-f ie ld corr e c tio n only af ter a charge buildup has
dissipated over 24 hours.
Protecting Ag ainst Dust, Oil an d Scra tch es
The sensor window is part of the optical path and should be handled l ike other optical components,
with extreme care.
Dust can obscure pixels, producing dark patches on the sensor response. Dust is most visible when
the illumination is col l imated. The dark patches shift position as the angle of illumination changes.
Dust is normally not visible when the sensor is pos itioned at the exit port of an integrating sphere,
where the illumination i s diffuse.
Dust can normally be removed by blowing the window surface using a compressed air blower,
unless the dust particles are being held by an electrostatic charge, in which case either an ionized
air blower or wet cleaning is necessary.
Oil is usually introduced during handling. Touching the surface of the window barehanded will leave
oily residues. Using rubber finger cots and rubber gloves can prevent oil contamination. However,
the friction between the rubber and the window may produce electrostatic charge that may
damage the sensor. To avoid ESD damage and to avoid introducing oily residues, avoid touching
the sensor.
Scratches can be caused by improper handling, cleaning or storage of the camera. When handling
or storing the camera without a lens, always install the protective cap. Scratches diffract incident
illumination. When exposed to uniform illumination, a sensor with a scrat ched window will normally
have brighter pixels adjacent to darker pixels. The location of these pixels changes with the angle
of illumination.
Linea CL Series Camera Additional Reference Information • 55

An important note on window blemishes
When flat field correction is performed, window cleanliness is paramount. The figure below shows
an example of what can hap p en if a blemish is present on the sensor window when flat field
correction is performed. The blemish will cast a shadow on the wafer. FFC will compensate for this
shadow by increasing the gain. Essentially FFC will create a white spot to compensate for the dark
spot (shadow). As long as the angle of the incident light remains unchanged then FFC works well.
However when the angle of incidence changes signif icantly (i.e. whe n a lens is added) then the
shadow will shift and FFC will makes things worse by not correcting the new shadow (dark spot)
and overcorrecting where the shadow used to be (white spot). While the dark spot can be
potentially cleaned, the white spot is an FFC ar tifact that can only be corrected by another FFC
calibration.
Cleaning the Sensor Window
Even with careful handli n g , the sensor window may need cleaning. The following steps describe
various cleaning tec hniques to clean minor dust particles to accidental finger touches.
• Use compressed air to blow off loose particles. This step alone is usually sufficient to clean the
sensor window. Avoid moving or shaking the compressed air container and use short bursts of
air while moving the camera in the air stream. Agitating the container will cause condensation
to form in the air stream. Long air bursts will chill the sensor window causing more
condensation. Condensation, even when left to dry naturally, will deposit more particles on the
sensor.
• When compressed air cannot clean the sensor, Dalsa reco m mends using lint-free ESD-safe
cloth wipers that do not contain particles that can scratch the window. The Anticon Gold 9”x 9”
wiper made by Milliken is both ESD safe and suitable for class 100 environments. Another ESD
acceptable wiper is the TX4025 from Texwipe.
• An alternative to ESD-safe cloth wipers is Transplex swabs that have desirable ESD properties.
There are several varieties available from Texwipe. Do not use regular cotton swabs, since
these can introduce static charge to the window surface.
• Wipe the window carefully and slowly when using these products.
56 • Additional Reference Information Linea CL Series Camera

Appendix A: GenICam Commands
This appendix lists the available GenICam camera features. Access these features using the
CamExpert interface.
Features listed in the description table but tagged a s Invisible are typically reserved for Teledyn e
DALSA Support or third party software usage, and not typically required by end user applications.
Camera Information Category
Camera information can be retrieved via a controlling application. Parameters such as camera
model, firmware version, etc. are read to uniquely identify the connected Linea CL device. These
features are typically read-only. GenICam applications retrieve this information to identify the
camera along with its characteristics.
The Camera Information Category groups information spe cific to the individual camera. In this
category the number of features shown are identical whether the view is Beginner, Expert, or Guru.
Features listed in the description table but tagged a s Invisible are usually for Teledyne DALSA or
third party software usage—not typically needed by end user applications.
Camera Information Feature Descriptions
The following table describes these parameters along with their view attribute. Additionally the
Standard column will indicate which parameter is a member of the custom DALSA Features Naming
Convention (denoted by DFNC), versus the Ge nI C am Standard Features Naming Convention (SFNC
not shown).
Linea CL Series Camera Appendix A: GenICam Commands • 57

Display Name Feature & Values Description Standard
& View
Vendor DeviceVendorName Displays the device vendor name. (RO) Beginner
Model DeviceModelName Displays the device model name. (RO) Beginner
CCI Version DeviceVersion Displays the device version. This tag will also highlight
if the firmware is a beta or custom design. (RO)
FPGA Version DeviceManufacturerInfo This f ea tu re provides extended manufacturer
information about the device, such as the firmware
design type. (RO)
Microcode Version DeviceFirmwareVersion Displays the currently loaded firmware version
number. Firmware files have a unique number and
have the .cbf file extension. (RO)
Seria l N umber DeviceID Displays the device’s f actory set camera serial
number. (RO)
Device User ID DeviceUserID Feature to store a user-programmable ide ntifier of up
to 15 characters. The default factory setting is the
camera serial number. (RW)
Power-on User Set UserSetDefaultSelector Selects the camera configuration set to load and make
active on camera power-up or reset. The camera
configuration sets are stored in camera non-volatile
memory. (RW)
Factory Factory Load factory default feature settings.
UserSet1 UserSet1 Select the user defined configuration Us er Set 1 as t he
Power-up Configuration.
UserSet2 UserSet2 Select the user defined configuration Us er Set 2 as t he
Power-up Configuration.
UserSet3 UserSet3 Select the user defined configuration UserSet 3 as the
Power-up Configuration.
UserSet4 UserSet4 Select the user defined configuration UserSet 4 as the
Power-up Configuration.
UserSet5 UserSet5 Select the user defined configuration Us er Set 5 as the
Power-up Configuration.
UserSet6 UserSet6 Select the user defined configuration Us er Set 6 as the
Power-up Configuration.
UserSet7 UserSet7 Select the user defined configuration UserSet 7 as the
Power-up Configuration.
UserSet8 UserSet8 Select the user defined configuration UserSet 8 as the
Power-up Configuration.
User Set Selector UserSetSelector Selects the camera configuration set to load feature
settings from or save current feature settings to. The
Factory set contains default camera feature settings.
User camera configuration sets contain features
settings previously sav ed by the user. (RW)
Factory Set Factory Select the default camera feature settings saved by
the factory.
Beginner
Beginner
Beginner
Beginner
Beginner
Beginner
Beginner
UserSet 1 UserSet1 Select the User Defined Configuration space User Set 1
UserSet 2 UserSet2 Select the User Defined Configuration space User Set 2
UserSet 3 UserSet3 Select the User Defined Configuration space UserSet 3
UserSet 4 UserSet4 Select the User Defined Configuration space UserSet 4
to save to or load from features settings previously
saved by the user.
to save to or load from features settings previously
saved by the user.
to save to or load from features settings previously
saved by the user.
to save to or load from features settings previously
saved by the user.
58 • Appendix A: GenICam Commands Linea CL Series Camera

UserSet 5 UserSet5 Select the User Defined Configuration space UserSet1
UserSet 6 UserSet6 Select the User Defined Configuration space User Set 2
UserSet 7 UserSet7 Select the User Defined Configuration space UserSet 3
UserSet 8 UserSet8 Select the User Defined Configuration space UserSet 4
Load User Set UserSetLoad Loads the camera configuration set specified by the
Save User Set UserSetSave Saves the current camera configuration to the user
Power-on Status deviceBISTStatus R eturn the status of the device Built-In Self test.
Device Temperature DeviceTemperature Displays the device temperature in degrees Celsius Beginner
Refresh Temperature refreshTemperature Gets the current device tem p er at ure and refreshes
Input Voltage deviceInputVoltage Displays the device power input voltage. DFNC
Refresh Voltage refreshVoltage Gets the current device input voltage and refreshes
LED Color deviceLEDColor Displays the current status LED state. DFNC
Good Green Camera status OK.
Blink Green BlinkGreen Camera is currently powerering-up or busy.
BIST Error Red Camera built-in self-test failure.
License Key securityUpgrade License key for CCI feature up grade. DFNC
to save to or load from features settings previously
saved by the user.
to save to or load from features settings previously
saved by the user.
to save to or load from features settings previously
saved by the user.
to save to or load from features settings previously
saved by the user.
User Set Selector feature, to the camera and makes it
active. (W)
set specified by the User Set Selector feature. The
user sets are located on the camera in non-volatile
memory. (W)
Possible return valu es are device-specific.
the DeviceTemperature value.
the deviceInputVoltage value.
Beginner
DFNC
Beginner
DFNC
Beginner
Beginner
DFNC
Beginner
Beginner
Guru
Linea CL Series Camera Appendix A: GenICam Commands • 59

Camera Control Category
Refresh measured line rate
refreshMeasureLineRate
Updates the measureLineRate value.
The Linea CL camera controls, as shown by CamExpert, groups sensor specific features. This group
includes controls for line rate, exposure time, and so forth. Parameters in gray are read only, either
always or due to another feature being disabled. Parameters in black are user set in CamExpert or
programmable via an imaging application.
Features listed in the description table but tagged a s Invisible are usually for Teledyne DALSA or
third party software usage—not typically needed by end user applications.
Camera Control Feature Descri pt i o ns
The following table describes these features along with their view attribute. Additionally the
Standard & View column will indicate which feature is a member of the custom DALSA Features
Naming Convention (indicated by DFNC), versus the GenICam Standard Features Naming
Convention (SFNC not shown).
Display Name Feature & Values Description Standard
& View
Sensor Color Type sensorColorType Defines the c amer a sens or color type. < RO > Beginner
Monochrome Monochrome Sensor color type is monochrome.
Internal Line Rate AcquisitionLineRate Specifies the camera internal line rate, in Hz. Beginner
Measured Line Rate measureLineRate Displays the line rate provided to the camera by
Measured CC1 measureCC1Rate Displays the CC1 signal rate provided to the
Exposure Time Source ExposureMode Sets the operation mode for the camera’s
Timed Timed The exposure duration time is set using the
Trigger Width TriggerWidth Uses the width of the trigger signal pulse to control
Exposure Time ExposureTime Sets the expos u re time (in microseconds) when the
Measured Exposure Time measureExposureTime Displays the exposure time used by the camer a
Refresh Measured Exposure
Time
refreshMeasuredExposureTime Updates the measuredExposureTime value. DFNC
either internal or extern al so u rce < RO >
camera. < RO >
exposure.
Exposure Time feature and the exposure starts
with a LineStart event.
the exposure duration. Use the Trigger Activation
feature to set the polarity of the trigger. The
Trigger Width setting is applicable when the
LineStart trigger is enabled and a signal is selected
as trigger source.
Exposure Mode feature is s et to Timed .
sensor.
DFNC
DFNC
Beginner
DFNC
Beginner
DFNC
Beginner
Beginner
Beginner
DFNC
Beginner
Beginner
Offset BlackLevel Analog black le v el (off s et) in DN . Controls the black
Gain Gain Sets the gain as an amplification factor applied to
60 • Appendix A: GenICam Commands Linea CL Series Camera
level as an absolute physical value. This represents
Beginner
a DC offset applied to the video signal.
Beginner
the image.

Beginner
Beginner
Beginner
I/O Controls Category
The Linea CL I/O controls, as shown by CamExpert, groups features used to configure exter na l
inputs and acquisition actions based on those inputs, plus ca m era output signals to other devices.
Parameters in gray are read only, either always or due to another parameter being disabled.
Parameters in black are user set in CamExpert or programmable via an imaging application.
Features listed in the description table but tagged a s Invisible are usually for Teledyne DALSA or
third party software usage—not typically needed by end user applications.
I/O Control Featu re Desc ri ptio ns
The following table describes these features along with their view attribute and minimum camera
firmware version required. Additionally the Standard & View column will indicate which parameter
is a member of the DALSA Features Naming Convention (indicated by DFNC), versus the GenICam
Standard Features Naming Convention (SFNC not shown).
Display Name Feature & Values Description Standard
& View
Trigger Selector TriggerSelector Displays the type of trigger to configure with the
LineStart LineStart Selects a trigger starting the capture of a single
Trigger Mode TriggerMode Controls the enable state of the selected trigger.
Off Off The selected trigger is turned off.
On On The selected trigger is turned act ive.
Trigger Source TriggerSource Diplays the internal signal or physical input line
CC1 CC1 CC1 used as the external trigger source.
various Trigger features. <RO>
line.
used as the trigger source. <RO>
The selected trigger must have its TriggerMode
set to ON.
Linea CL Series Camera Appendix A: GenICam Commands • 61

Flat Field Category
DFNC
Off
Off
Flat field corr ection is disabled.
On
On
Flat field corr ection is enabled.
Initialize
Initialize
Reset all FPN coefficients to 0 and all flat field
coefficients to 1.
DFNC
DFNC
DFNC
2048
Lines_2048
Average 2048 lines.
4096
Lines_4096
Average 4096 lines.
ROI Offset X
flatfieldCalibrationROIOffset
Set the starting point of a regio n of int ere s t wher e
a flat field calibration will be performed
DFNC
Beginner
ROI Width
flatfieldCalibrationROIWidth
Sets the width of the region on interest where a
flat field calibration will be performed
DFNC
Beginner
Calibrate FPN
flatfieldCalibrationFPN
Initiates the FPN calibration process.
DFNC
Beginner
Calibrate PRNU
flatfieldCalibrationPRNU
Initiates the PRNU or Flatfield process.
DFNC
Beginner
Calibrate PRNU Status
flatfieldCalibrationPRNUStatus
Returns the PRNU calibration status.
DFNC
Good
Good
Calibration successful.
Clipping
Clipping
Coefficients are clipped to minimum or maximum
value.
Time Out
ExsyncTimeOut
Calibration failed due to time out.
Too Many Outliers
TooManyOutliers
Calibration failed because the image is too noisy.
The Linea CL Flat Field controls, as shown by CamExpert, groups features used to calibrate the
camera’s flat field correction coefficients. Parameters in black are user set in CamExpert or
programmable via an imaging application.
Features listed in the description table but tagged a s Invisible are usually for Teledyne DALSA or
third party software usage—not typically needed by end user applications.
Flat Field Feature Descriptions
The following table describes these features along with their view attribute. Additionally the
Standard & View column will indicate which parameter is a member of the DALSA Features Naming
Convention (indicated by DFN C), versus the GenICam Standard Features Naming Convention
(SFNC not shown).
Display Name Feature & Values Description Standard
& View
Mode flatfieldCorrectionMode Displays the type of trigger to configure with the
various Trigger features. <RO>
Beginner
Calibration Algorithm flatfieldCorrectionAlgorithm Selects the algorithm to use for calibration of flat
field co effic ients.
Basic Basic Direct calculation of coefficients based on average
line values and target value.
Low Pass Filter LowPass A low pass filter is first applied to the average line
values before calculating the coefficients. Use this
algorithm if the calibration target is not uniformly
white or it is not possible to defocus the image.
Because of the low pass filter this algorithm is not
able to correct pixel-to-pixel variations and so it is
preferable to use the “Basic” algorithm.
CalibrationTarget flatfieldCalibrationTarget Sets the target pixel value for the gain (PRNU)
calibration. Ranges are:
8-bit output: 0-255
12-bit output: 0-4095
CalibrationSampleSize flatfieldCalibrationSampleSize Sets the number of line to average dur ing a flat
field calibration.
Beginner
Beginner
Beginner
Beginner
62 • Appendix A: GenICam Commands Linea CL Series Camera

Beginner
Beginner
Beginner
0x120|0x020|0x130|0x030|0x140|0x040|0x150|0x050.
Beginner
Beginner
Beginner
Image Format Control Category
The Linea CL Image Format controls, as shown by CamExpert, groups parameters used to
configure camera pixel format, image cropping, and the binning function, Additionally a feature
control to select and output a camera internal test image simplifies qualifying a camera setup
without a lens.
Parameters in gray are read only, either always or due to another parameter being disabled.
Parameters in black are user set in CamExpert or programmable via an imaging application.
Features listed in the description table but tagged a s Invisible are usually for Teledyne DALSA or
third party software usage—not typically needed by end user applications.
Image Format Control Feature Descri ption
The following table describes these features along with their view attribute. Additionally the
Standard & V iew column will indicate which parameter is a member of the DALSA Features Naming
Convention (indicated by DFN C), versus the GenICam Standard Features Naming Convention
(SFNC not shown).
Display Name Feature & Values Description Standard &
View
Pixel Coding PixelCoding Output image pixel coding format of the sensor . < RO >
Mono Mono Monochrome format.
Pixel Color Filter PixelColorFilter Indicates the typ e of color f ilte r app lie d to the ima ge. <
None None No filter applied on the sensor.
Test Pattern TestImageSelector Selects the type of test image output by the camera.
Off Off Image is from the camera sensor.
Ramp Ramp Image is filled horizontally w ith an image that goe s from
Alternating A5 Alternating value s . For 12-bit outp ut, p ixel values
Fixed Pattern Each_Tap_Fixed 8 pixel cycling pattern. For 12-bit output, the pattern is
RO >
the darkest possible value to the brightes t.
alternate between 1381 (0x565) and 2746 (0xABA). For
8-bit output, pixel values alternate between 86 (0x56 )
and 172 (0xAC).
Fixed Value
1381(86)
Fixed Value 32(2) All_1 Fixed Grey Value. For 12-bit output: pixel value = 32
Vertical Binning BinningVertical Number of vertical photo-sensitive cells to combine
Horizontal Binning BinningHorizontal Number of horizontal photo-sensitive ce lls to combine
Line Mirroring ReverseX Horizontal image flip function.
Linea CL Series Camera Appendix A: GenICam Commands • 63
All_1365 Fixed Grey Value. For 12-bit output: pixel value = 1381
For 8-bit output, the pattern is
0x12|0x02|0x13|0x03|0x14|0x04|0x15|0x05.
(0x565). For 8-bit outp ut: pixel v alue = 86 (0x56).
(0x20). For 8-bit output: pixel value = 2 (0x2).
together. This increases the intensity of the pixel s but
reduces the vertical resolution of the imag e .
together. This increases the intensity of the pixel s but
reduces the horizontal resolution.

Off
Off
Video output in normal order
On
On
Video output in a reverse order
Pixel Format PixelFormat Output image pixel coding format of the sensor..
Beginner
Beginner
Beginner
Beginner
Beginner
Beginner
DFNC
DFNC
DFNC
DFNC
DFNC
Mono8 Mono8 Mono8: Monochrome 8-Bit.
Note: Camera Link Full configurations s upp or t this
format only.
Mono12 Mono12 Mono12: Monochrome 12-Bit
Note: Camera Link Base or Medium configurations c an
use this format.
Width Width Width of the Image provided by the device (in pixels).
Height Height Height of the Image provided by the device (in lines).
Horizontal Offset OffsetX Horizontal offset from the Sensor Origin to the Area Of
Interest (in pixels).
Width Width Width of the Image provided by the device (in pixels).
Height Height Height of the Image provided by the device (in lines).
Multiple AOI Mode multipleROIMode Enable the Multiple ROI (Regio n of Interest) per image
feature. The ROI Count is set by the Multiple ROI Count
feature.
Off Off Single AOI per image.
Active Active The AOI per image feature is active.
AOI Count multipleAOICount Specifies the number of AOIs (Area of Interest)
available for the X axis.
AOI Selector multipleAOISelector Select an AOI (Area of Interest) when Multiple AOI
Mode is enabled. Selector range is from 1 to the
MultipleAOICount value.
AOI Offset X multipleAOIOffsetX Horizontal offset (in pixels) from the origin to the
selected AOI (Area of Interest)
AOI Width multipleAOIWidth Width of the selected AOI (Area of Interest) provided by
the device (in pixels). Increment val ue is devic e
dependent.
Expert
Expert
Expert
Expert
Expert
64 • Appendix A: GenICam Commands Linea CL Series Camera

Restart Camera
DeviceReset
Used to restart the camera, warm reset
Beginner
XML Major Version
DeviceManifestXMLMajorVersion
Together with DeviceMa nif estXMLMinorVersion
file versio n (RO )
XML Minor Version
DeviceManifestXMLMinorVersion
Together with DeviceMa nif estXMLMajorVersion
file version (RO)
Invisible
Last GenCP Status
genCPStatus
If a feature read or write fails then Sapera only
Reading this feature clears it
Refresh GenCP Status
refreshGenCPStatus
Updates the genCPStatus value.
Camera Link
Configuration
ClConfiguration
Camera Link Output configuration.
Beginner
Base
Base
Camera Link Base configuration.
Medium
Medium
Camera Link Medium configuration.
Full
Full
Camera Link Full configuration.
Deca
Deca
Camera Link Deca configuration.
Camera Link Speed
clDeviceClockFrequency
Set the camera link clock rate
Beginner
77MHZ
Speed_77MHZ
2K, 4K and 8K models only.
50MHZ
Speed_50MHZ
2K, 4K and 8K models only.
85MHZ
Speed_85MHZ
16K model only.
62MHZ
Speed_62MHZ
16K model only.
Tap Geometry
DeviceTapGeometry
(RO)
Transport Layer Category
The Linea CL Transport Layer, as shown by CamExpert, groups features for Camera Link
configuration. Parameters in gray are read only, either always or due to another parameter being
disabled. Parameters in black are user set in CamExpert or programmable via an imaging
application.
Features listed in the description table but tagged a s Invisible are usually for Teledyne DALSA or
third party software usage—not typically needed by end user applications.
Transport Layer Descriptions
The following table describes these features along with their view attribute. Additionally the
Standard & View column will indicate which parameter is a member of the DALSA Features Naming
Convention (indicated by DFN C), versus the GenICam Standard Features Naming Convention
(SFNC not shown).
Display Name Feature & Values Description Standard
& View
specifies the GenICam™ feat ur e description XML
specifies the GenICam™ feat ur e description XML
returns that it fails – read this feature to get the
actual reason for the failure
Returns the last error
Invisible
DFNC
Invisible
DFNC
Beginner
Beginner
Linea CL Series Camera Appendix A: GenICam Commands • 65

Device Streaming Registers
Invisible
Invisible
Invisible
Invisible
Invisible
Invisible
FPGA Code
FPGA Code
Upload new FPGA to the camera which will
execute on the next camera reboot cycle.
Micro Code
Micro Code
Upload new micro codeto the camera which will
execute on the next camera reboot cycle.
CCI
CCI
Upload new CCI to the camera which will
execute on the next camera reboot cycle.
XML
XML
Upload new XML to the camera which will
execute on the next camera reboot cycle.
Start – End Command Requirements
Important: Every start command must have a corresponding end command. If not the
camera can be in an unpredictable state. This pertains to
DeviceRegistersStreamingStart, DeviceRegistersStreamingEnd,
DeviceFeaturePersistenceStart, and DeviceFeaturePersistenceEnd.
Display Name Feature & Values Description Standard
& View
Device Registers
Streaming Start
Device Registers
Streaming End
Device Feature
Streaming Start
Device Feature
Streaming End
Register Check DeviceRegistersCheck Performs an explicit register set validation for
Registers Valid DeviceRegistersValid States if the current register set is valid and
DeviceRegistersStreamingStart Announces the start of registers streaming without
immediat e checking for c onsistency.
DeviceRegistersStreamingEnd Announces end of registers streaming and performs
validation for registers consistency before activating
them.
DeviceFeaturePersistenceStart Announces the start of feature streaming without
immediat e checking for c onsistency.
DeviceFeaturePersistenceEnd Announces end of feature streaming and performs
validation for feature consistency before activating
them.
consistency.
consistent.
File Access Control Category
The File Access control in CamExpert allows the user to quickly upload various data files to the
connected Linea CL. The supported data files are for Linea CL firmware updates and Flat Field
coefficients.
Features listed in the description table but tagge d as Invisible are usually for Teledyne DALSA or
third party software usage—not typically needed by end user applications.
File Access Control Feature Descriptions
Display Name Feature & Values Description Standard
File Selector FileSelector Selects the file to access. The file types which
are accessible are device-dependent.
& View
Guru
66 • Appendix A: GenICam Commands Linea CL Series Camera

User Set
User Set
Use UserSetSelector to specify which user set to
access.
Factory FlatField coefficients
Factory FlatField
coefficients
Use UserSetSelector to specify which user
flatfield to access.
User FPN
Use UserSetSelector to specif y whi ch use r FPN
to access.
CameraData
Download camera information and send for
customer support.
Guru
Guru
Guru
Guru
Guru
Guru
Guru
Guru
Guru
File Operation Selector FileOperationSelector Selects the target operation for the selected file
in the device. This operation is executed w hen
the File Operation Execute feature is called.
Open Open Select the Open operation - executed by
FileOperationExecute.
Close Close Selec t the Close oper a tio n - executed by
FileOperationExecute
Read Read Select the Read ope r a tio n - executed by
FileOperationExecute.
Write Write Se le c t the Write ope ration - executed by
FileOperationExecute.
Delete Delete Select the Delete operatio n - executed by
FileOperationExecute.
File Operation Execute FileOperationExecute Executes the operation selected by File
Operation Selector on the selected file.
File Open Mode FileOpenMode Selects the access mode used to open a file on
the device.
Read Read Select READ only open mode
Write Write Select WRITE only open mode
File Access Buffer FileAccessBuffer Defines the intermediate access buffer that
allows the exchange of data between the device
file storage and the application.
File Access Offset FileAccessOffset Controls the mapping offset between the device
file storage and the file access buffer.
File Access Length FileAccessLength Controls the mapping length between the device
file storage and the file access buffer.
File Operation Status FileOperationStatus Displays the file operation execution status.
(RO)
Success Success The last file operation has completed
successfully.
Failure Failure The last file operation has completed
unsuccessfully for an unknown reason.
File Unavailable FileUnavailable The last file operation has complete d
unsuccessfully because the file is currently
unavailable.
File Invalid FileInvalid The last file operation has complete d
unsuccessfully because the selected file in not
present in this camera model.
File Operation Result FileOperationResult Displays the file operation result. For Read or
Write operations, the number of successfully
read/written bytes is returned. (RO)
File Size FileSize Represents the size of the selected file in bytes.
Linea CL Series Camera Appendix A: GenICam Commands • 67

Appendix B: ASCII Commands
The following commands can be used to control the Teledyne DALSA Linea cameras.
Accessing the Three Letter Commands (TLC)
To access the TLC an ASCII-based communications inter face a pplication, such as H yperTerminal.
Additionally it is possible to use the functions of clserxxx.dll or clallserial.dll as defined in
the Camera Link Specification. The following figure illustrates the Serial DLL hierarchy as
mentioned in t he Cam era Lin k Specification.
Port Configuration
Baud: 9,600
Bits: 8
Parity: None
Stop bits: 1
Flow Control: None
Echo typed characters locally.
Rules
• The interface is not case sensitive
• One command and argument(s) per line
• To enter a floating point number prefix it with a “F” – for example “ssg 0 f1.5”
• Error codes returned are the same as the GenICam™ interface – see Diagnostics | Error
Codes
• Follow each command with the carriage return character – 0x0D
68 • Appendix B: ASCII Commands Linea CL Series Camera

Note: the HyperTerminal application is not ava ilable on the Windows 7 OS.
DeviceFeaturePersistenceStart, and DeviceFeaturePersistenceEnd.
1. Cycle power to the camera: by either a) issuing the reset camera command (rc), or b)
powering the camera OFF and then ON.
2. Load the ASCII interface using the required port configuration settings.
3. Wait for a stable status LED color (green or red) before proceeding. Note that all ent ries in
HyperTerminal wi ll be ignore d until a stable LED color is obtained.
4. In case of HyperTerminal, press the <ESC> key.
5. Once <ESC> has been entered the USER prompt appears.
The camera responds to a simple ASCII-based protocol. A carriage return <CR> ends each
command.
Example: to return the current detector settings
gcp <CR>
A complete list of the available detector commands, their format and parameters can be displayed
by sending the help (h) command.
Notes on Using Alternatives to HyperTerminal
• If you are using interfaces other than HyperTerminal, the ASCII character, ESC, is decimal
27 and needs to be issued. From the command line insert ESC by us ing ALT+2+7 of the
activated Num-Pad. In some cases this needs to be followed by a carriage return or a
linefeed to send this to the camera.
• In ASCII the ESC character may look like this: “←”.
ASCII to GenCP
To switch from the ASCII-command interface to the GenCP interface, the camera must be either
reset (RC) or the power must be cycled. Note that GenCP and ASCII commands cannot be
accessed simul ta n eousl y.
Alternatives to HyperTerminal
The following alternative ASCI I-interfaces have been tested and shown to work with this
camera: PuTTY and TeraTerm. Note that PuTTY does not have Xmodem capability while
TeraTerm does. Xmoden is required to update code in the camera.
Disabling the Esc Key for Di r ect Access to AS C I I Co mmands
By default the Esc key is enabled and an Esc key sequence has to be issued in order to access the
ASCII commands. Using the DEK 1 command the need to issue an Esc key is disabled and access
to the ASCII commands are available immediately upon camera boot up. Note: access to GENCP is
no longer available with the Esc key disabled unless a DEK 0 command is issued and the camera
re-booted.
Linea CL Series Camera Appendix B: ASCII Commands • 69

Commands
Argument(s)
# of lines to average
• 2048
• 4096
Description
Calibrate user FPN dark flat field coefficients
Argument(s)
Mode
0. Base
3. Deca (8k and 16k models)
Description
Camera Link Mode
Argument(s)
Frequency
0. 77 MHz (2k, 4k, 8k), 85 MHz (16k)
1. 50 MHz (2k, 4k, 8k), 62 MHz (16k)
Description
Camera Link clock frequency
CCF: Calibrate User FPN
Display
Name
Mnemonic CCF
Calibrate Us e r FP N
CLM: Camera Link Mode
Display
Name
Mnemonic CLM
Camera Link Mode
CLS: Camera Link Speed
Display
Name
Camera Link Speed
1. Medium
2. Full
Mnemonic CLS
70 • Appendix B: ASCII Commands Linea CL Series Camera

Argument(s)
Algorithm
0. Basic
1. Low-pass Filter
# of lines to average
• 2048
• 4096
Target
0 to 4095 DN in 12 bit mode
0 to 255 DN in 8 bit mode
Description
Calibrate user PRNU flat field coefficients
Notes
• Perform flat field calibration using the average of <# lines>.
line rate, the longer it will take.
Argument(s)
Mode
0. Esc key is enabled
1. Esc key is disabled
Description
Allow the use of the Esc key to be disabled so that upon boot-up the camera
GENCP cannot be accessed.
Notes
To access the GenCP, you have to first issue the DEK 0 command in order to
enable the ESC key. Then reboot the camera.
CPA: Calibrate Flatfield
Display
Name
Mnemonic CPA
Calibrate Flatfield
• With filter algorithm this average line is then smoothed and outlier
pixels are interpolated. Use this feature if your white reference is not
featureless.
• Adjust pixel gain such that output will be <target>.
• The target is first divided by horizontal binning factor and gain and
then the offset is subtracted. Therefore the output will go to the
target.
• Because the PRNU can be less than 1, the target may be below the
current maximum value.
• Coefficients are saved and loaded with user set (e.g. USS / USL)
• The cpa command takes several seconds to complete. The slower the
DEK: Disable Esc Key
Display
Name
Mnemonic DEK
Disable Esc Key
will directly enter the ASCII command mode. With the Esc key disabled the
Linea CL Series Camera Appendix B: ASCII Commands • 71

FFM: Flatfield Mode
Argument(s)
Mode
0. Disable use of user FPN and PRNU flat
user PRNU coefficients to one.
Description
Set flat field mode
Argument(s)
Description
Display current value of camera configuration parameters
Notes
Model LA_CM_02K08A_00_R
CPA ROI 1-2048
Display
Name
Mnemonic FFM
Flatfield Mode
GCP: Display Camera Configuration
Display
Name
Mnemonic GCP
Display Came r a C on figuration (Get Camera Parameters)
Microcode 03-081-20320-01
CCI 03-110-20316-01
FPGA 03-056-20487-01
Serial # 12035699
BiST: Good
DefaultSet 1
Ext Trig Off
Line Rate 11250 [Hz]
Meas L.R. 11250 [Hz]
Max L.R. 22058 [Hz]
Exp. Mode Timed
Exp. Time 44444 [ns]
Meas E.T. 44444 [ns]
Max E.T. 88000 [ns]
Test Pat. 0:Off
Vert. Bin 1
Hor. Bin 1
Flat Field Off
Offset 0
System Gain 1.00
Mirror Off
AOI Mode: Off
CL Speed 77MHz
CL Config Full
Pixel Fmt 8 bits
field correction coefficients.
1. Enable use of user FPN and PRNU flat
field correction coefficients.
2. Reset user FPN coefficients to zero and
72 • Appendix B: ASCII Commands Linea CL Series Camera

Mnemonic
GET
Argument(s)
<’parameter>
Description
The “get” command displays the current value(s) of the feature specified in
output from the “gcp” command.
GET: Get Value
Display
Name
Get Value
the string parameter. Note that the parameter is preceded by a single quote
“’”. Using this command will be easier for control softw a re than parsing the
Linea CL Series Camera Appendix B: ASCII Commands • 73

H:Help
Argument(s)
Description
Display list of three letter commands (2K he lp screen shown)
Notes
USER>h
vv - Input Voltage
Display
Name
Mnemonic H
Help
LA (03-081-20315-00 ): Command Line Interpreter Jan 15 2014,
17:46:53
ccf - Calibrate User FPN <2048|4096>
clm - Camera Link Mode <0:Base 1:Med 2:Full>
cls - Camera Link Speed <0 - 77MHz, 1 - 50MHz>
cpa - Calibrate Flatfield <0:basic 1:filter><2048|4096><DN
target>
dek - disable ESC key <0/1>
ffm - Flat Field Mode <0:Off 1:On 2:Initialiaze>
gcp - Display Camera Configuration
get - Get value '<string>
h - Help
? - help '<string>
lpc - Load Pixel Coefficients <set 0-8>
rc - Reset Camera
roi - Set Flatfield ROI <1st pixel> <last pixel>
rpc - Reset Flatfield Coefficients
sac - Set AOI Count <value 1-4>
sad - Set AOI Selector, Offset and Width <selector 1-AOI Count>
<1st pixel> <width >= 40>
sam - Set AOI Mode <1-enable, 0-disable>
sbh - Horizontal Binning <1|2>
sbr - Set Baud Rate <9600|57600|115200|230400|460800>
sbv - Vertical Binning <1|2>
sem - Exposure Mode <0:Int 1:Ext>
set - Exposure Time <ns>
smm - Mirroring <0:Off 1:On>
spf - Pixel Format <0:8 bits 2:12 bits>
ssb - Offset <DN>
ssf - Internal Line Rate <Hz>
ssg - Gain <0:System> f<gain>
stm - External Trigger <0:Off 1:On>
sui - Set User ID
svm - Test Pattern <0-6>
usd - Default User Set <0-8>
usl - Load User Set <0-8>
uss - Save User Set <1-8>
vt - Temperature
74 • Appendix B: ASCII Commands Linea CL Series Camera

Argument(s)
Set selector
0. Factory set
1-8. User sets
Description
Load user set
Notes
• Loads FPN coefficients and PRNU coefficients from a user set ( only
coefficeints, no other camera parameters)
Argument(s)
Description
Resets the camera to the saved user default settings. These settings are
saved using the usd command.
Notes
The micro-controller reboots:
• Baud rate set to 9600
Argument(s)
First pixel
1 to 2048 (2K)
1 to 16,384 (16K)
Last pixel
1 to 2048 (2K)
1 to 16,384 (16K)
Description
Flat field region of interest
Notes
• Specifies the pixels that CCF and CPA will calibrate
• Last pixel must be greater than or equal to first pixel
LPC: Load Pixel Coeff icients
Display
Name
Mnemonic LPC
Load Pixel Coefficients
RC: Reset Camera
Display
Name
Mnemonic RC
Reset Camera
• Load any file updates
• Clear over temperature condition
• Perform st art up ca me ra tests (BiST)
• Load FPGA code
• Configure FPGA and sensor.
• Load default user set
ROI: Set Flatfield ROI
Display
Name
Mnemonic ROI
Set Flatfield ROI
1 to 4096 (4K)
1 to 8192 (8K)
1 to 4096 (4K)
1 to 8192 (8K)
o Pixel coefficients outside this region are not changed
Linea CL Series Camera Appendix B: ASCII Commands • 75

RPC: Reset Flatfield Coefficients
Argument(s)
Description
Reset all user FPN values to zero and all user PRNU coefficients to one
Notes
Argument(s)
Number of AOI’s
1 to 4
Description
Set AOI Counter
Argument(s)
Selector
1 to 4
Offset
1 to AOI Count – any pixel can be starting pixel
Width
No less than 40 pixels
Description
Define an AOI
Notes
• Must not overlap with an already existing AOI
Argument(s)
Mode
0. Off / Disable
1. Active / Enable
Description
Set AOI mode
Notes
Argument(s)
Binning
1. Single pixel
2. Binning of 2 pixels
Description
Set horizontal binning
Display
Name
Mnemonic RPC
Reset Flatfield Coefficients
SAC: Set AOI Count
Display
Name
Mnemonic SAC
Set AOI Count
SAD: Set AOI Selector
Display
Name
Mnemonic SAD
Set AOI Selector
SAM: Set AOI Mode
Display
Name
Mnemonic SAM
Set AOI Mode
SBH: Set Binning Horizontal
Display
Name
Mnemonic SBH
Set Binning Horizontal
76 • Appendix B: ASCII Commands Linea CL Series Camera

Argument(s)
Baud rate
9600
921600*
Description
Set baud rate
Notes
• Send command and then change speed of HyperTerminal
these baud rates.
Argument(s)
1. Single pixel
2. Binning of 2 pixels
Description
Set vertical binning
Argument(s)
Mode
0. Internal (“Timed”)
1. External (“PulseWidth”)
Description
Set exposure time mode
Notes
• In internal mode the exposure time is controlled by the SET command
• When CC1 signal falls line is read
SBR: Set Baud Rate
Display
Name
Mnemonic SBR
Set Baud Rate
• *A PX4 or equivalent frame grabber is required in order to achieve
SBV: Set Binning Vertical
Display
Name
Mnemonic SBV
Set Binning Vertical
57600
115200
230400*
460800*
SEM: Set Exposure Mode
Display
Name
Mnemonic SEM
Set Exposure Mode
• In external mode the se nsor is exposed while CC1 signal is high
• External mode is only available when the t rigger mode is also
external (STM 1)
• SEM 1 overrides internally generated independent exposure times
Linea CL Series Camera Appendix B: ASCII Commands • 77

SET: Set Exposure Time
Argument(s)
Exposure time
4, 000 to 3, 332, 000 [ns]
Description
Set internal exposure time in nanoseconds – 22.2 ns (2k, 4k, 8k) or 37 ns
resolution (16k).
Notes
For 2k, 4k 8k models:
For 16k models:
Line time > ( Exposure time + 1, 000 ns )
Line time > ( Exposure time + 2, 000 ns )
Argument(s)
Mode
0. Off
1. Image is flipped on the horizontal axis
Description
Set mirroring mode
Argument(s)
Selector
0. 8 bits
2. 12 bits
Description
Set pixel format
Notes
12-bit pixel format is only available with Base or Medium Camera Link
Configurations.
Argument(s)
Offset
8 bit
12-bit
-32 to 31
-512 to 511
Description
Set contrast offset – single value added to all pixels after PRNU/flat field
coefficients (before gain).
Notes
• Range changes depending on pixel format (SPF)
Display
Name
Mnemonic SET
Exposure Time
SMM: Set Mirroring Mode
Display
Name
Mnemonic SMM
Mirroring
SPF: Pixel Format
Display
Name
Pixel Format
Mnemonic SPF
SSB: Set Sensor Blacklevel
Display
Name
Mnemonic SSB
Offset
78 • Appendix B: ASCII Commands Linea CL Series Camera

Argument(s)
Line rate
1 to 80, 000 [Hz], 2k, 4k, and 8k models
1 to 48, 000 [Hz], 16k model
Description
Set internal line rate in Hz
Notes
For 2k, 4k 8k models:
For 16k models:
Line time > ( Exposure time + 1, 000 ns )
Line time > ( Exposure time + 2, 000 ns )
Argument(s)
Gain
<0:System> f<gain>
Description
Use the system gain to adjust the camera output to achieve the desired
response. The system gain range is from 1x to 10x.
Notes
To enter a floating point number prefix it with a “F” – for example “ssg 0
f1.5”
Argument(s)
Mode
0. Internal
1. External
Description
Set trigger mode
Notes
• In internal mode line rate is controlled by SSF command
• Exposure time equals high time of EXSYNC on signal on CC1
SSF: Set Sensor Framerate
Display
Name
Mnemonic SSF
Internal Line Rate
SSG: Set Sensor Gain
Display
Name
Mnemonic SSG
Gain
STM: Set Trigger Mode
Display
Name
Mnemonic STM
External Trigger
• In external mode readout starts on falling edge of CC1 signal and is
available only when STM = 1 (external trigger on)
Linea CL Series Camera Appendix B: ASCII Commands • 79

SVM: Set Video Mode
Argument(s)
Mode
0. Sensor Video
6. All_32
Description
Select test pattern
Notes
Argument(s)
Set selector
0. Factory set
1-8. User sets
Description
Select user set to load when camera is reset
Notes
• The settings include all those listed by the GCP command plus the
user FPN coefficients, and user PRNU coefficients
Argument(s)
Set selector
0. Factory set
1-8. User sets
Description
Load user set
Notes
• Loads and makes current all the settings listed by the GCP command
plus the user FPN coefficients, and user PRNU coefficients
Argument(s)
Set selector
1 to 8
Description
Save user set
Notes
• Saves all the current settings listed by the GCP command plus the
user FPN coefficients, and user PRNU coefficients
Display
Name
Mnemonic SVM
Test Pattern
USD: User Set Default
Display
Name
Mnemonic USD
Default User Set
1. Ramp
2. No used
3. 1381_2746
4. Each_tap_fixed
5. All_1381
USL: User Set Load
Display
Name
Mnemonic USL
Load User Set
USS: User Set Save
Display
Name
Mnemonic USS
Save User Set
80 • Appendix B: ASCII Commands Linea CL Series Camera

Argument(s)
Description
Display internal temperature in degrees Celsius
Notes
• Measured with an accuracy of ± 1.5 ºC.
Argument(s)
Description
Display supply voltage
Notes
• Measured with an accuracy ± 0.1 V.
VT: View Temperature
Display
Name
Mnemonic VT
Temperature
VV: View Voltage
Display
Name
Mnemonic VV
Voltage
Linea CL Series Camera Appendix B: ASCII Commands • 81

Appendix C: Error and Warning
Definition
BiST Flag
I2C error
1
Unable to configure fpga
10
Unable to configure fpga
100
EXT_SRAM Failure
1000
ECHO_BACK Failure
1,0000
FLASH_TIMEOUT
10,0000
FLASH_ERROR
100,0000
NO_FPGA_Code
1000,0000
NO_COMMON_SETTINGS
1,0000,0000
NO_FACTORY_SETTINGS
10,0000,0000
NO_USER_SETTINGS
100,0000,0000
NO_FLAT_FIELD Corrections
1000,0000,0000
NO MISC corrections
1,0000,0000,0000
NO_FPN Correction
10,0000,0000,0000
NO_FPN Correction
100,0000,0000,0000
NO_PRNU Correction
1000,0000,0000,0000
NO_FEED Through Correction
1,0000,0000,0000,0000
NO_LINEARITY Correction
10,0000,0000,0000,0000
SYNC_ERROR
100,0000,0000,0000,0000
OVER_TEMPERATURE
1000,0000,0000,0000,0000
SPI Failure
1,0000,0000,0000,0000,0000
NO_USER_FPN
10,0000,0000,0000,0000,0000
PLL_LOCK_FAILED
100,0000,0000,0000,0000,0000
INVALID_CCI
1000,0000,0000,0000,0000,0000
No LUT
1,0000,0000,0000,0000,0000,0000
Incompatible FPGA code
10,0000,0000,0000,0000,0000,0000
Messages
BiST: Built in Self Test
The BiST error flags are binary flags with each bit being indepe ndent from each other. The
message from the BiST should be “Good” meaning everything is functioning correctly but if a
hardware failure does occur in the camera one or more these flags could be set. Any of these
errors will result in the status light turning red.
82 • Appendix C: Error and Warning Messages Linea CL Series Camera

Code
Description
0X8002
Invalid Parameter
0xC01C
CPA_TOO_MANY_OUTLIERS
0x401E
USER_FPN_CLIPPING
0x401F
FLAT_FIELD_CLIPPING
Operational Error Codes
Linea CL Series Camera Appendix C: Error and Warning Messages • 83

Appendix D: Camera, Frame Grabber Communication
Setting Up Communication between the Camera and the Frame Grabber
Teledyne DALSA Camera Link cameras support the GenCP Camera Link standards.
To configure Teledyne DALSA Gen CP Ca m e ra Li n k Cam e ras :
1. Install the Teledyne DALSA frame grabber in the host computer; refer to the hardware
installation manual.
2. Install Sapera LT and the Teledyne DALSA frame grabber driver.
3. Connect the camera to the frame grabber; refer to the camera installation manual.
4. Power up the camera and wait until the status LED is solid green.
5. Run the Sapera Configuration utility and select the frame grabber serial port connected to
the camera. Set Teledyne DALSA camera detection to Automatic Detection and
Baudrate to Auto Detect & Maximize.
6. If the camera will be configured using three-letter text commands via a terminal program,
then set COM port mapping (optional) to an available COM port (for example, COM2).
84 • Appendix D: Camera, Frame Grabber Communication Linea CL Series Camera

7. Start the CamExpert application. In the Device tab, select an available CameraLink mode.
8. Modify the camera and frame grabber parameter settings as required. At present, when
using GenCP cameras, the camera and frame grabber parameters must be adjusted
separately. Test the image acquisition by clicking the Grab button.
9. Save the frame grabber configuration to a new *.ccf file.
Linea CL Series Camera Appendix D: Camera, Frame Grabber Communication • 85

Appendix E: Camera Link
Data 2
Control / Data 1
Camera
Right Angle
Connector
Channel Link
Camera
Right Angle
Connector
Channel Link
1 1 inner shield
1 1 PoCL
14
14
inner shield
14
14
inner shield
2
25
Y0- 2 25
X0-
15
12
Y0+
15
12
X0+ 3 24
Y1- 3 24
X1-
16
11
Y1+
16
11
X1+
4
23
Y2- 4 23
X2-
17
10
Y2+
17
10
X2+ 5 22
Yclk-
5
22
Xclk-
18 9 Yclk+
18 9 Xclk+
6
21
Y3- 6 21
X3-
19 8 Y3+
19 8 X3+ 7 20
100 ohm
7
20
SerTC+
20 7 terminated
20 7 SerTC-
8
19
Z0- 8 19
SerTFG-
21 6 Z0+
21 6 SerTFG+
9
18
Z1- 9 18
CC1-
22 5 Z1+
22 5 CC1+
10
17
Z2-
10
17
CC2+
23 4 Z2+
23 4 CC2-
11
16
Zclk-
11
16
CC3-
24 3 Zclk+
24 3 CC3+
12
15
Z3-
12
15
CC4+
25 2 Z3+
25 2 CC4-
13
13
inner shield
13
13
inner shield
26
26
inner shield
26
26
PoCL
Connector Information
Data Connector: Camera Link
The camera uses two Camera Link SDR26 cables transmitting the Camera Link Base, Medium, or
Full configuration. T he figure below shows t he SDR2 6 Camera Link Connector and the tables that
follow list the Camera Link Base, Medium, and Full configurations.
For detailed information on Camera Link please refer to the Camera Link Road Map available from
the Knowledge Center on the Teledyne DALSA Web site:
(http://www.teledynedalsa.com/mv/knowledge/appnotes.aspx
Camera Link Connector
).
Connector
*Exterior Overshield is connected to the shells of the connectors on both ends. Unused pairs should be terminated in 100 ohms at both ends
of the cable. Inner shield is connected to signal ground inside camera
Frame Grabber
Signal
Connector
Frame Grabber
Signal
86 • Appendix E: Camera Link Connector Information Linea CL Series Camera

Connector 1: Channel link X
Connector 2: Channel link Y
Connector 3: Channel link Z
Grabber Pin
Bit Name
Grabber Pin
Bit Name
Grabber Pin
Bit Name
Tx0/Rx0
D0(0)
Tx0/Rx0
D3(0)
Tx0/Rx0
D6(0)
Tx1/Rx1
D0(1)
Tx1/Rx1
D3(1)
Tx1/Rx1
D6(1)
Tx2/Rx2
D0(2)
Tx2/Rx2
D3(2)
Tx2/Rx2
D6(2)
Tx3/Rx3
D0(3)
Tx3/Rx3
D3(3)
Tx3/Rx3
D6(3)
Tx4/Rx4
D0(4)
Tx4/Rx4
D3(4)
Tx4/Rx4
D6(4)
Tx5/Rx5
D0(7)
Tx5/Rx5
D3(7)
Tx5/Rx5
D6(7)
Tx6/Rx6
D0(5)
Tx6/Rx6
D3(5)
Tx6/Rx6
D6(5)
Tx7/Rx7
D1(0)
Tx7/Rx7
D4(0)
Tx7/Rx7
D7(0)
Tx8/Rx8
D1(1)
Tx8/Rx8
D4(1)
Tx8/Rx8
D7(1)
Tx9/Rx9
D1(2)
Tx9/Rx9
D4(2)
Tx9/Rx9
D7(2)
Tx10/Rx10
D1(6)
Tx10/Rx10
D4(6)
Tx10/Rx10
D7(6)
Tx11/Rx11
D1(7)
Tx11/Rx11
D4(7)
Tx11/Rx11
D7(7)
Tx12/Rx12
D1(3)
Tx12/Rx12
D4(3)
Tx12/Rx12
D7(3)
Tx13/Rx13
D1(4)
Tx13/Rx13
D4(4)
Tx13/Rx13
D7(4)
Tx14/Rx14
D1(5)
Tx14/Rx14
D4(5)
Tx14/Rx14
D7(5)
Tx15/Rx15
D2(0)
Tx15/Rx15
D5(0)
Tx15/Rx15
Not Used
Tx16/Rx16
D2(6)
Tx16/Rx16
D5(6)
Tx16/Rx16
Not Used
Tx17/Rx17
D2(7)
Tx17/Rx17
D5(7)
Tx17/Rx17
Not Used
Tx18/Rx18
D2(1)
Tx18/Rx18
D5(1)
Tx18/Rx18
Not Used
Tx19/Rx19
D2(2)
Tx19/Rx19
D5(2)
Tx19/Rx19
Not Used
Tx20/Rx20
D2(3)
Tx20/Rx20
D5(3)
Tx20/Rx20
Not Used
Tx21/Rx21
D2(4)
Tx21/Rx21
D5(4)
Tx21/Rx21
Not Used
Tx22/Rx22
D2(5)
Tx22/Rx22
D5(5)
Tx22/Rx22
Not Used
Tx23/Rx23
Not Used
Tx23/Rx23
Not Used
Tx23/Rx23
Not Used
Tx24/Rx24
LVAL
Tx24/Rx24
LVAL
Tx24/Rx24
LVAL
Tx25/Rx25
FVAL
Tx25/Rx25
FVAL
Tx25/Rx25
FVAL
Tx26/Rx26
Not Used
Tx26/Rx26
Not Used
Tx26/Rx26
Not Used
Tx27/Rx27
D0(6)
Tx27/Rx27
D3(6)
Tx27/Rx27
D6(6)
Tap 1 bits are D0(x)...Tap 8 bits are D7(x)
Full Configuration
8 bits Camera Link Ful l Configuration
Camera/Frame
Camera/Frame
Camera/Frame
Linea CL Series Camera Appendix E: Camera Link Connector Information • 87

80 bit Camera Link Deca Configuration, 10 tap/8-bit mode
Connector 1: Channel link X
Connector 2: Channel link Y
Connector 3: Channel link Z
Grabber Pin
Bit Name
Grabber Pin
Bit Name
Grabber Pin
Bit Name
Tx0/Rx0
D0(0)
Tx0/Rx0
D3(2)
Tx0/Rx0
D6(5)
Tx1/Rx1
D0(1)
Tx1/Rx1
D3(3)
Tx1/Rx1
D6(6)
Tx2/Rx2
D0(2)
Tx2/Rx2
D3(4)
Tx2/Rx2
D6(7)
Tx3/Rx3
D0(3)
Tx3/Rx3
D3(5)
Tx3/Rx3
D7(0)
Tx4/Rx4
D0(4)
Tx4/Rx4
D3(6)
Tx4/Rx4
D7(1)
Tx5/Rx5
D0(5)
Tx5/Rx5
D3(7)
Tx5/Rx5
D7(2)
Tx6/Rx6
D0(6)
Tx6/Rx6
D4(0)
Tx6/Rx6
D7(3)
Tx7/Rx7
D0(7)
Tx7/Rx7
D4(1)
Tx7/Rx7
D7(4)
Tx8/Rx8
D1(0)
Tx8/Rx8
D4(2)
Tx8/Rx8
D7(5)
Tx9/Rx9
D1(1)
Tx9/Rx9
D4(3)
Tx9/Rx9
D7(6)
Tx10/Rx10
D1(2)
Tx10/Rx10
D4(4)
Tx10/Rx10
D7(7)
Tx11/Rx11
D1(3)
Tx11/Rx11
D4(5)
Tx11/Rx11
D8(0)
Tx12/Rx12
D1(4)
Tx12/Rx12
D4(6)
Tx12/Rx12
D8(1)
Tx13/Rx13
D1(5)
Tx13/Rx13
D4(7)
Tx13/Rx13
D8(2)
Tx14/Rx14
D1(6)
Tx14/Rx14
D5(0)
Tx14/Rx14
D8(3)
Tx15/Rx15
D1(7)
Tx15/Rx15
D5(1)
Tx15/Rx15
D8(4)
Tx16/Rx16
D2(0)
Tx16/Rx16
D5(2)
Tx16/Rx16
D8(5)
Tx17/Rx17
D2(1)
Tx17/Rx17
D5(3)
Tx17/Rx17
D8(6)
Tx18/Rx18
D2(2)
Tx18/Rx18
D5(4)
Tx18/Rx18
D8(7)
Tx19/Rx19
D2(3)
Tx19/Rx19
D5(5)
Tx19/Rx19
D9(0)
Tx20/Rx20
D2(4)
Tx20/Rx20
D5(6)
Tx20/Rx20
D9(1)
Tx21/Rx21
D2(5)
Tx21/Rx21
D5(7)
Tx21/Rx21
D9(2)
Tx22/Rx22
D2(6)
Tx22/Rx22
D6(0)
Tx22/Rx22
D9(3)
Tx23/Rx23
D2(7)
Tx23/Rx23
D6(1)
Tx23/Rx23
D9(4)
Tx24/Rx24
LVAL
Tx24/Rx24
D6(2)
Tx24/Rx24
D9(5)
Tx25/Rx25
FVAL
Tx25/Rx25
D6(3)
Tx25/Rx25
D9(6)
Tx26/Rx26
D3(0)
Tx26/Rx26
D6(4)
Tx26/Rx26
D9(7)
Tx27/Rx27
D3(1)
Tx27/Rx27
LVAL
Tx27/Rx27
LVAL
TxCLKIn/RxCLKOut
Pixel Clock
Pixel Clock
TxCLKIn/RxCLKOut
Pixel Clock
Tap 1 bits are D0(x)...Tap 10 bits are D9(x)
Camera/Frame
Camera/Frame
Camera/Frame
88 • Appendix E: Camera Link Connector Information Linea CL Series Camera

Configuration
Pixel Format
Port A
Bits 0 thru 7
Port B
Bits 0 thru 7
Port C
Bits 0 thru 7
Pixels (1, 3, 5, ... 4093, 4095)
Pixels (2, 4, 6, ... 4094, 4096)
Pixels (2,4,6, ... 4094, 4096)
Medium
Configuration
T0
Pixel Format
Port A
Bits 0 thru 7
Port B
Bits 0 thru 7
Port C
Bits 0 thru 7
Port D
Bits 0 thru 7
Port E
Bits 0 thru 7
Port F
Bits 0 thru 7
4093)
4096)
Full
Configuration
T0
Pixel Format
Port A
Port B
Port C
Port D
Port E
Port F
Port G
Port H
4086, 4094)
4088, 4096)
Camera Link Bit Definitions
BASE
T0
Mono 8 Tap 1 LSB..B it 7
Mono 12 Tap 1 LSB.. Bit 7
Pixels (1, 3, 5, ... 84093,
4095)
Mono 8 Tap 1
LSB..Bit 7
Pixels (1,
5, 9, ...
4089,
Mono 12 Tap 1
LSB.. Bit 7
Pixels (1,
5, 9, ...
4091,
4095)
Tap 2
LSB..Bit 7
Pixels (2, 6,
10, ... 4090,
4094)
Tap 1
Bits
8,9,10,11
Pixels (1, 5,
9, ... 4091,
4095)
Tap 2
Bits
8,9,10,11
Pixels (2, 6,
10, ... 4092,
Tap 2 LSB..Bit7
Tap 1 Bits 8,9,10,11
Pixels (1, 3, 5, ... 4093,4095)
Tap 2 Bits 8,9,10,11
Tap 3
LSB..Bit 7
Pixels (3, 7,
11, ... 4091,
4095)
Tap 2
LSB..Bit 7
Pixels (2, 6,
10, ... 4092,
4096)
Tap 4
LSB...Bit 7
Pixels (4, 8,
12, ... 4092,
4096)
Tap 4
LSB…Bit 7
Pixels (4, 8,
12, ... 4090,
4094)
xxxxxxx
Tap 2 LSB..Bit 7
Pixels (2,4,6, ... 4094, 4096)
xxxxxxxx Xxxxxxxx
Tap 3
LSB…Bit 7
Pixels (3, 7,
11, ... 4089,
4093)
Tap 3
Bit 8,9,10,11
Pixels (3, 7,
11, ... 4089,
4093)
Tap 4
Bits
8,9,10,11
Pixels (4, 8,
12, ... 4090,
4094)
Mono 8
Linea CL Series Camera Appendix E: Camera Link Connector Information • 89
LSB…Bit 7
Tap 1
LSB…
Bit 7
Pixels (1, 9,
17, ...
4081, 4089)
LSB…Bit 8
Tap 2
LSB…
Bit 7
Pixels (2,
10, 18, ...
4082, 4090)
LSB…Bit 8
Tap 3
LSB…
Bit 7
Pixels (3,
11, 19, ...
4083, 4091)
LSB…Bit 8
Tap 4
LSB…
Bit 7
Pixels (4,
12, 20, ...
4084, 4092)
LSB…Bit 8
Tap 5
LSB…
Bit 7
Pixels (5,
13, 21, ...
4085, 4093)
LSB…Bit 8
Tap 6
LSB…
Bit 7
Pixels (6,
14, 22, ...
LSB…Bit 8
Tap 7
LSB…Bit 7
Pixels (7,
15, 23, ...
4087, 4095)
LSB…Bit 8
Tap 8
LSB…
Bit 7
Pixels (8,
16, 24, ...

Deca
Configuration
T0
Pixel Format
Port A
Port B
Port C
Port D
Port E
Port F
Port G
Port H
Port I
LSB…
Bit 8
Port K
LSB…
Bit 8
4096)
Tap 9
LSB…
Bit 7
Pixels
(9, 19,
29, ...
4089)
Tap 10
LSB…
Bit 7
Pixels
(10, 20,
30, ...
4090)
Signal
Configuration
CC1
EXSYNC
CC2
Spare
CC3
Spare
CC4
Spare
Cable Length
Frame Grabber (Manufacturer / Part Number)
7 meter
TeledyneDALSA Xcelera-CL PX4 / OR-X4C0-XPF00
10 meter
TeledyneDALSA Xtium-CL PX4 / OR-Y4C0-XPX00
LSB…
Bit 7
Mono 8 Tap 1
LSB…
Bit 7
Pixels
(1, 11,
21, ...
4081,
4091)
LSB…
Bit 8
Tap 2
LSB…
Bit 7
Pixels
(2, 12,
22, ...
4082,
4092)
LSB…
Bit 8
Tap 3
LSB…
Bit 7
Pixels (3,
13, 23,
... 4083,
4093)
LSB…
Bit 8
Tap 4
LSB…
Bit 7
Pixels
(4, 14,
24, ...
4084,
4094)
LSB…
Bit 8
Tap 5
LSB…
Bit 7
Pixels (5,
15, 25, ...
4085,
4095)
LSB…
Bit 8
Tap 6
LSB…
Bit 7
Pixels
(6, 16,
26, ...
4086,
LSB…
Bit 8
Tap 7
LSB…Bit
7
Pixels
(7, 17,
27, ...
4087)
LSB…
Bit 8
Tap 8
LSB…
Bit 7
Pixels
(8, 18,
28, ...
4088)
Camera Control Configuration
For additional Camera Link documentation refer to the Teledyne DALSA Web site’s
Center application notes.
Knowledge
Camera Link Drive Capability
The camera link cable driv e capability on the cameras can reach up to 10 meters. This capability
has been tested using a number of frame grabbers (l isted in the table below) and was tested using
standard Camera Link cables. The cable length drive achieved on the various frame grabbers is as
follows:
Input Signal s , Camera Link
The camera accepts control inputs through the Cam era Link SDR26F connector. The cam e ra sh i p s
in internal sync, and internally programmed integration.
EXSYNC (Line Readout Trigger)
Line rate can be set internally using the GenICam features. The external control signal EXSYNC is
optional and enabled through the user interface. This camera uses the falling edge of EXSYNC to
trigger pixel readout.
90 • Appendix E: Camera Link Connector Information Linea CL Series Camera

Note: The EXSYNC signal is measured at CC1 and will give a “true” measurement (i.e.
48 kHz (16k).
LVAL (high)
Outputting valid line
DVAL
Not used
STROBE (rising edge)
Valid data
FVAL
Set to 0
The EXSYNC signal tells the camera when to integrate and readout the image. It can be either an
internally generated signal by the camera, or it can be supplied externally via the serial interface.
Depending upon the mode of operation the high time of the EXSY NC signal can represent the
integration period.
within the measurement resolution of 22.2 ns (2k, 4k, 8k) or 37 ns r esolution (16k))
even though the camera will only trigger at a maximum of 80 kHz (2k, 4k, and 8k) or
Output Signals, Camera Link Clocking Signals
These signals indicate when data is valid, allowing you to clock the data from the camera to your
acquisition system. These signals are part of t he Ca mera Link configuration and you should refer to
the Camera Link Implementation Road Map, available at our Knowledge Center
location of these signals.
Clocking Signal Indicates
, for the standard
Linea CL Series Camera Appendix E: Camera Link Connector Information • 91

Contact Information
Sales Information
Visit our web site:
Email:
Canadian Sales
Teledyne DALSA — Head office
605 McMurra y Road
Waterloo, Ontario, Canada, N2V 2E9
Tel: 519 886 6000
Fax: 519 886 8023
USA Sales European Sales
Teledyne DALSA — Billerica office
700 Technology Park Drive
Billerica, Ma. 01821
Tel: (978) 670-2000
Fax: (978 ) 670-2010
sales.americas@teledynedalsa.com
Asian Sales
Teledyne DALSA Asia Pacific
Ikebukuro East 13F
3-4-3 Higashi Ikebukuro,
Toshima-ku, Tokyo, Japan
Tel: +81 3 5960 6353
Fax: +81 3 5960 6354
sales.asia@teledynedalsa.com
www.teledynedalsa.com/mv
mailto:info@teledynedalsa.com
Teledyne DALSA — Montreal office
880 Rue McCaffrey
Saint-Laurent, Quebec, Canada, H4T 2C7
Tel: (514) 333-1301
Fax: (514 ) 333-1388
Teledyne DALSA GMBH
Lise-Meitner-Str. 7
82152 Krailling (Munich), Germany
Tel: +49 – 89 89545730
Fax:+49 – 89 895457346
sales.europe@teledynedalsa.com
Shanghai Industrial Investment Building
Room G, 20F, 18 North Cao Xi Road,
Shanghai, China 200030
Tel: +86-21-64279081
Fax: +86-21-64699430
Technical Support
Submit any support question or request via our web site:
Technical support form via our web page:
Support requests for imaging product insta llations,
Support requests for imaging applications
Camera support information
Product literature and driver updates
92 • Contact Information Linea CL Series Camera
http://www.teledynedalsa.com/mv/support
 Loading...