


Clarity Controls
Teledyne Foxy 200
FC ENG
Code/Rev.: M165/70B
Date: 12/21/2016
Phone: +420 251 013 400 DataApex Ltd.
Fax: +420 251 013 401 Petrzilkova 2583/13
clarity@dataapex.com 158 00 Prague 5
www.dataapex.com The Czech Republic

Clarity®, DataApex®and
®
are trademarks of DataApex Ltd. Microsoft®and Windows
TM
are
trademarks of Microsoft Corporation.
DataApex reserves the right to make changes to manuals without prior notice. Updated manuals can be
downloaded from www.dataapex.com.
Author: DM

Teledyne Foxy 200 Table of Contents
Contents
1 Teledyne Foxy 200 Control Module 1
2 Requirements 2
3 Installation Procedure 3
3.1 Teledyne Foxy 200 fraction collector communication 3
3.2 Clarity Configuration 4
4 Using the control module 6
4.1 Method Setup - FC - Fraction Table 7
4.2 Method Setup - FC - Vial Numbers 12
4.3 Hardware Configuration 14
4.4 Device Monitor 15
4.5 Data Acquisition window 17
4.6 DataApex UNI Setup 18
5 Report Setup 20
6 Troubleshooting 21
- i -

Table of Contents Clarity Controls
To facilitate the orientation in the Teledyne Foxy 200 manual and Clarity chromatography
station, different fonts are used throughout the manual. Meanings of these fonts are:
Instrument (blue text) marks the name of the window to which the text refers.
Open File(italics) describes the commands and names of fields in Clarity, parameters that can
be entered into them or a window or dialog name (when you already are in the topic describing
the window).
WORK1 (capitals) indicates the name of the file and/or directory.
ACTIVE (capital italics) marks the state of the station or its part.
The bold text is sometimes also used for important parts of the text and the name of the Clarity
station. Moreover, some sections are written in format other than normal text. These sections are
formatted as follows:
Note: Notifies the reader of relevant information.
Caution: Warns the user of possibly dangerous or very important
information.
▌ Marks the problem statement or trouble question.
Description: Presents more detailed information on the problem, describes its causes,
etc.
Solution: Marks the response to the question, presents a procedure how to remove it.
- ii -
Teledyne Foxy 200 1 Teledyne Foxy 200 Control Module
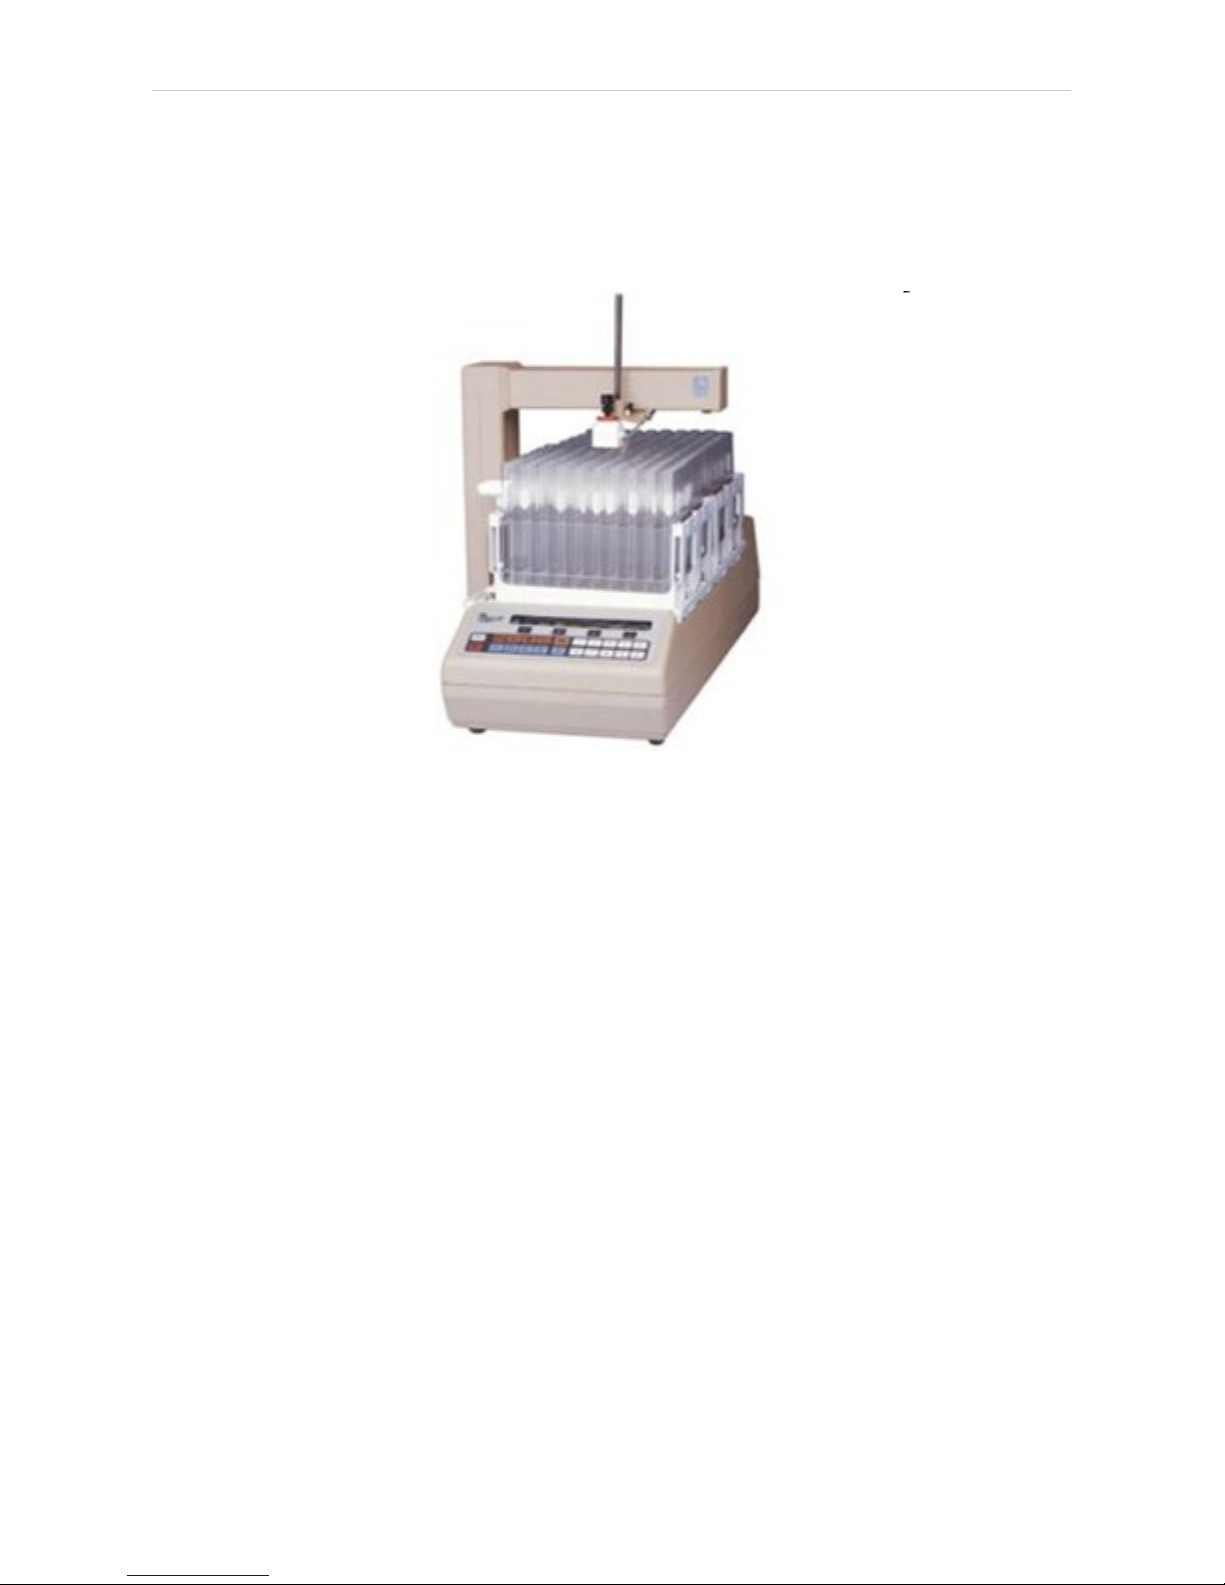
1 Teledyne Foxy 200 Control Module
This manual describes the setting of the Teledyne Foxy 200 fraction
collector. The control module enables direct control of the instrument over
serial line.
Fig 1: Teledyne Foxy 200 fraction collector
Direct control means that the fraction collector can be completely
controlled from the Clarity environment. The Instrument method
controlling the analysis conditions will be saved in the measured
chromatograms.
The control is performed via the UNI Ruby control module and the
Teledyne Foxy 200 script.
- 1 -

Teledyne Foxy 200 2 Requirements
2 Requirements
l Free serial COM port in the PC.
Note: Modern computers usually have only one (if any) serial (COM) port
installed. To use more devices requiring the RS232 port, the MultiCOM
adapter (p/n MC01) is available.
l Serial DB9F-DB25M cable (p/n SK12).
Note: Cables are not part of Clarity Control Module. It is strongly
recommended that you order the required cables together with the
Control Module.
- 2 -
Teledyne Foxy 200 3 Installation Procedure
3 Installation Procedure
3.1 Teledyne Foxy 200 fraction collector communication
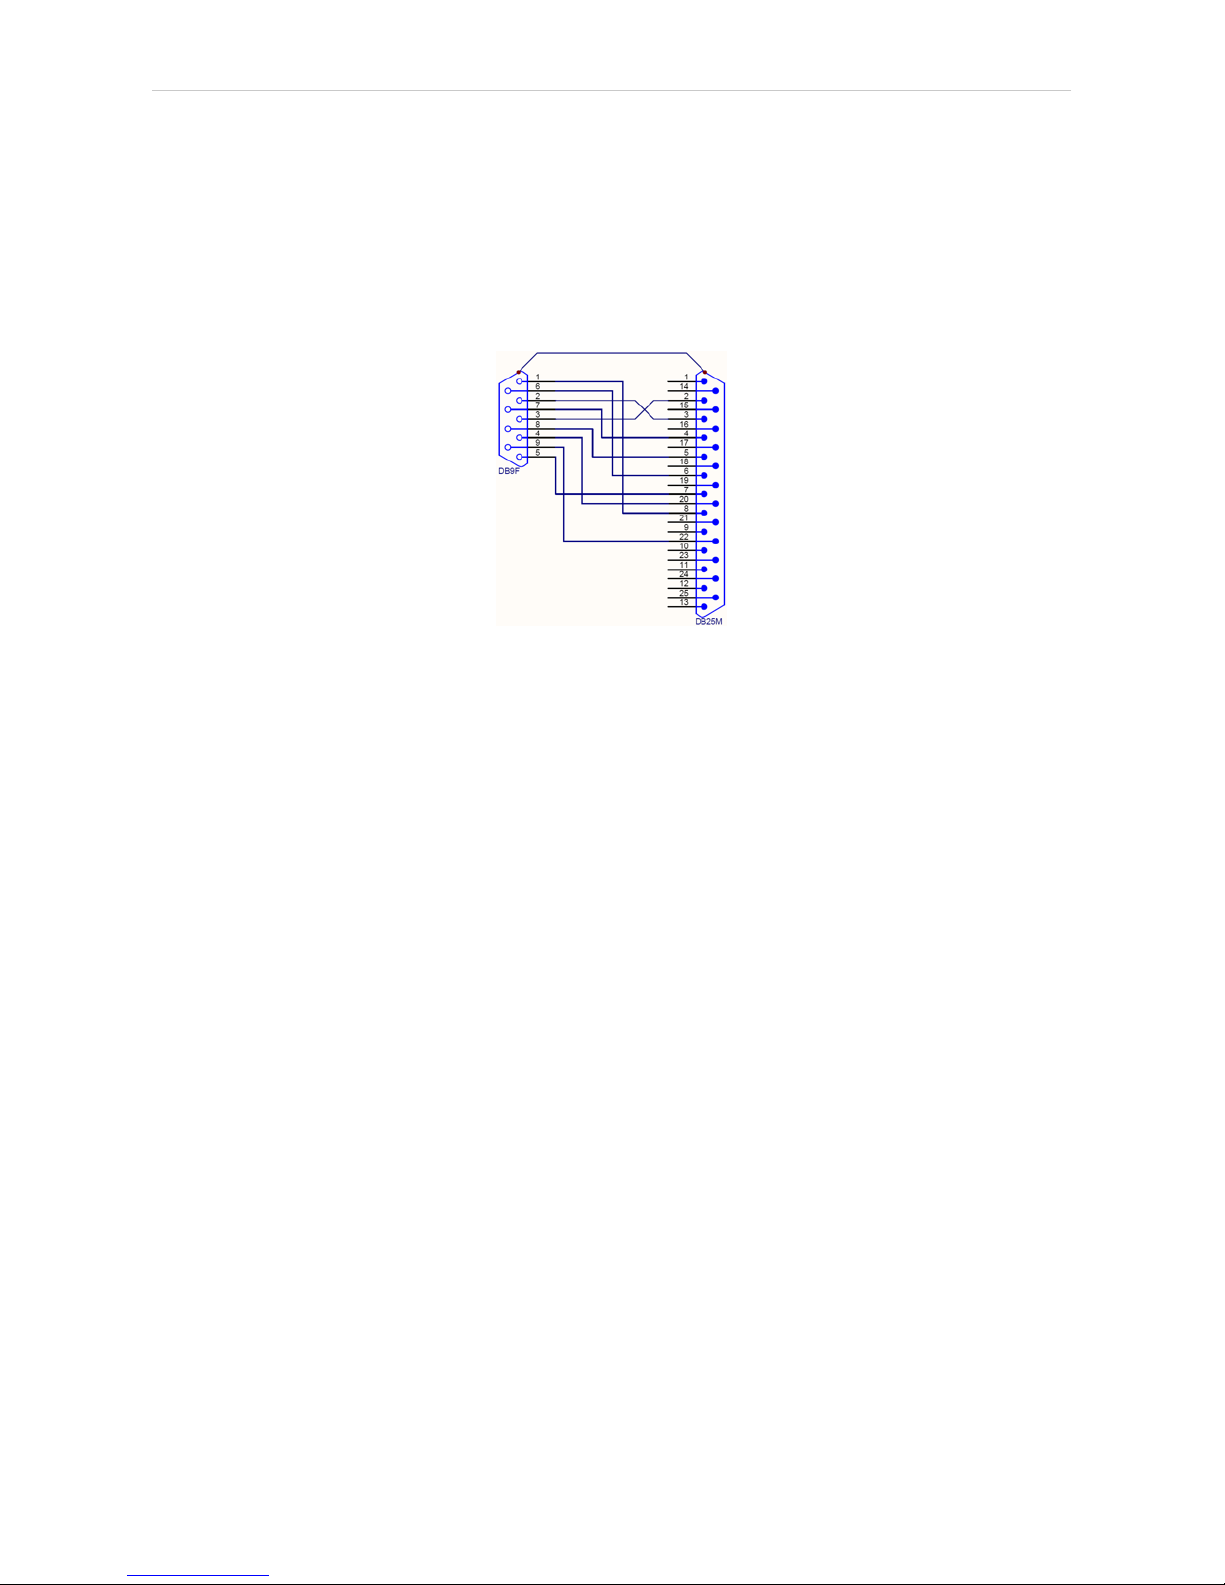
The Teledyne Foxy 200 is controlled by serial (RS232) communication.
It uses a serial DB9F-DB25M straight cable (p/n SK12) described in the
picture below.
Fig 2: Serial DB9F-DB25M cable
On top of that, the fraction collector must be switched to the same Baud
Rate as set in Clarity and the ID=5 to work with the control module. To do
so, start the fraction collector and load the Program A, then select the Edit
A option. Select page 3 from the Edit submenu and set the Serial function,
then set the Baud Rate as desired and ID to 5 in the next screen.
- 3 -
3 Installation Procedure Clarity Controls
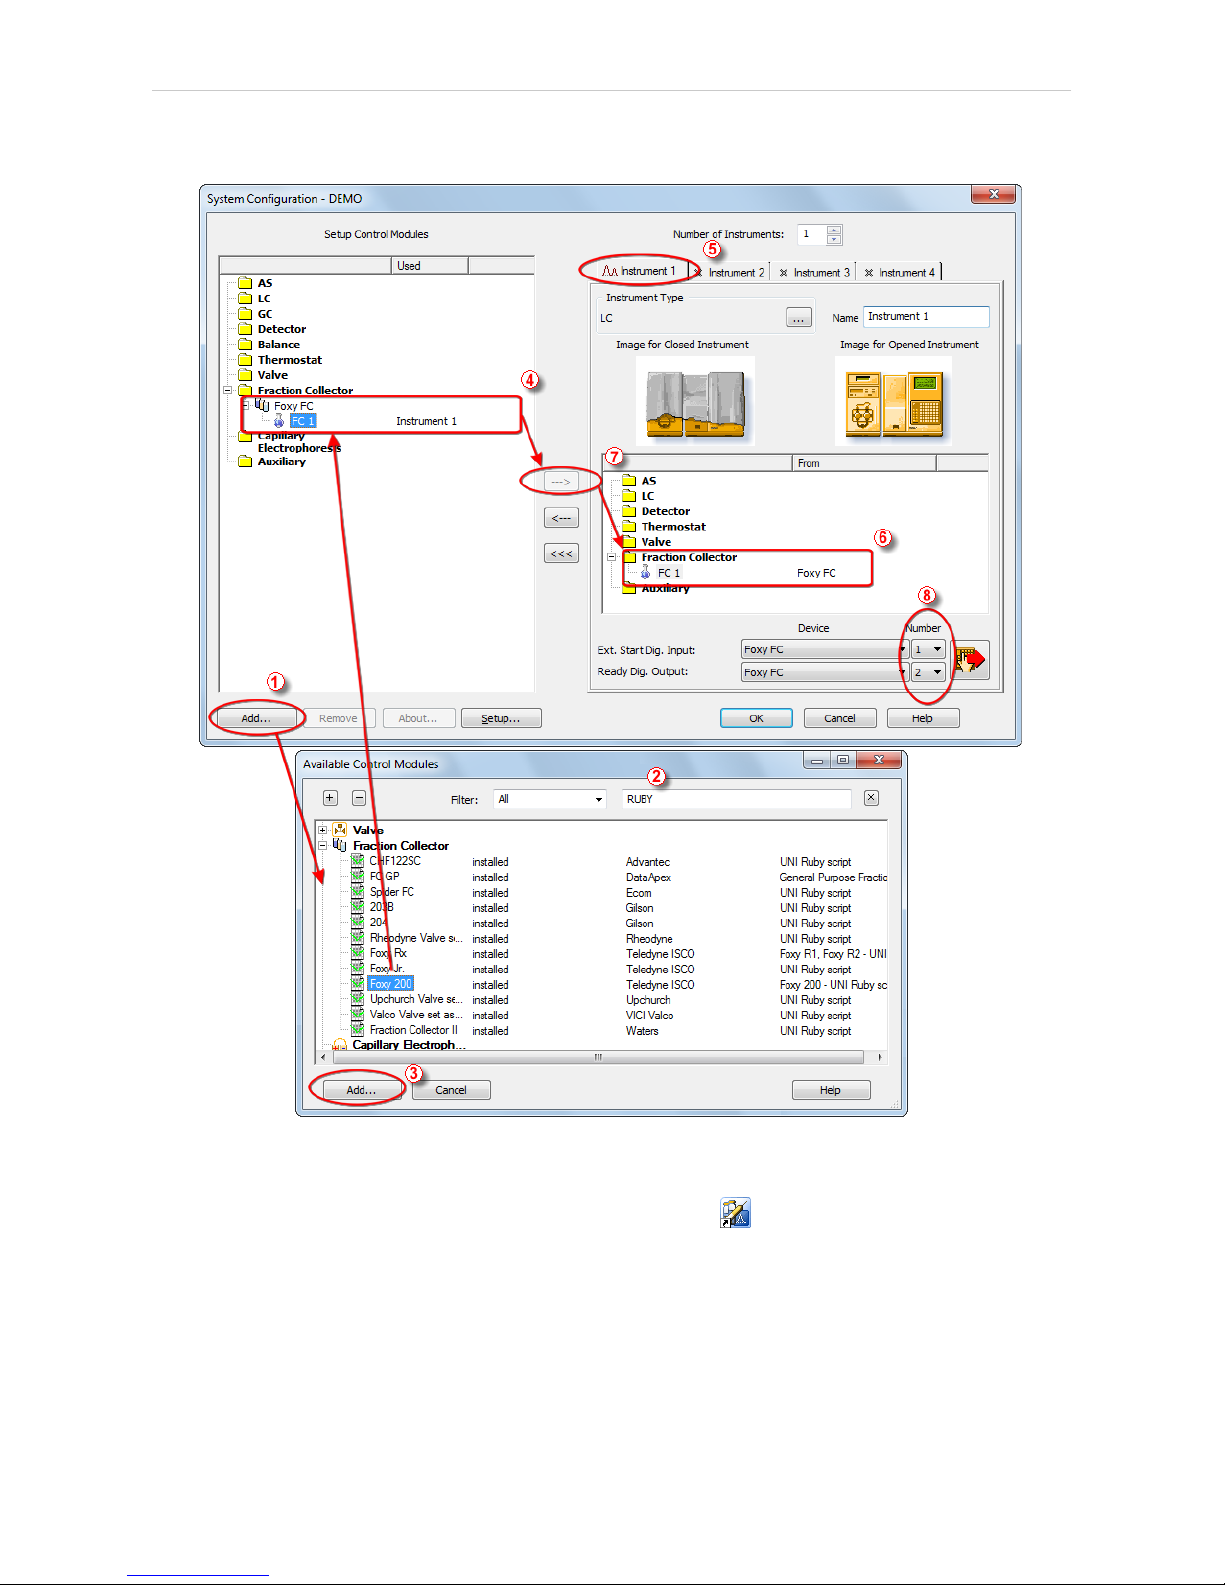
3.2 Clarity Configuration
Fig 3: How to Add UNI Ruby module
l
Start the Clarity station by clicking on the icon on the desktop.
l Invoke the System Configuration dialog accessible from the Clarity
window using the System - Configuration... command.
l Press the Add button (① on Fig 3 on pg 4.) to invoke the Available Control
Modules dialog.
l You can specify the search filter ② to simplify the finding of the driver.
- 4 -

Teledyne Foxy 200 3 Installation Procedure
l Select the correct item and press the Add (③ on Fig 3 on pg 4.) button.
Each device with already created UNI profile should have its own item
named accordingly in the Available Control Modules dialog.
l The DataApex UNI Setup dialog will appear.
Fig 4: DataApex UNI Setup
l Set the correct communication Port and click on the AutoDetect button to
establish communication with the device.
l You may fill in the custom Device Name.
Note: The DataApex UNI Setup dialog is described in detail in the chapter
"DataApex UNI Setup" on pg 18.
l The Teledyne Foxy 200 item ④ will appear in the Setup Control Modules
list of the System Configuration dialog.
l Drag the appropriate item from the Setup Control Modules list on the left
side to the desired Instrument tab ⑤ on the right side ⑥, or click on the
button ⑦ .
l Set the Ext. Start Dig. Input and Ready Dig. Output numbers ⑧ for your
acquisition card according to the wires used for synchronization.
- 5 -

Teledyne Foxy 200 4 Using the control module
4 Using the control module
After adding and setting up the new device one or more new tabs will
appear in the Method Setup dialog depending on the type of the
instrument. A new Teledyne Foxy 200 fraction collector section enabling
the monitoring of the current fraction collector state will be also created in
the Device Monitor window.
- 6 -

4 Using the control module Clarity Controls
4.1 Method Setup - FC - Fraction Table
The Method Setup - FC - Fraction Table tab is used for setting the
automatic fraction collection program of the Teledyne Foxy 200 fraction
collector. The actions of the fraction collector can be displayed in Data
Acquisition window or Chromatogram window, click the right mouse
button on the graph, choose Properties… to open the Graph Properties
dialog and check the Show Events option.
Fig 5: Method Setup - FC - Fraction Table
Flow Rate
Sets the flow rate of the liquid phase going to the fraction collector. This
parameter, together with the Fraction Volume parameter from the Fraction
Table , helps to prevent collection vial overflowing. Flow rate units are
taken from the Instrument Method Sending dialog.
Delay Volume Detector - Valve
Sets the volume of the tubing between the detector and waste/collect
valve of the fraction collector. Volume units are devised from the Flow
Rate Units set in the Instrument Method Sending dialog.
The delayed volume is displayed in the Data Acquisition window as a
vertical line trailing the signal front.
Delay Volume Valve - Vial
Sets the volume of the tubing between the waste/collect valve and the vial
in the fraction collector tray. Volume units are devised from the Flow Rate
Units set in the Instrument Method Sending dialog. If the fraction collector
has no waste/collect valve, this field should be left empty and he total
- 7 -

Teledyne Foxy 200 4 Using the control module
tubing volume between the detector and fraction collector tray should be
typed into the Delay Volume Detector - Valve field.
Fraction Table
Allows to set the fraction collector behavior. The table rows are run in time
order, the time intervals should not overlap. If time interval on any row
ends while the fraction collector is collecting, the collection will be
terminated. Fraction collection based on negative peaks is not supported in case you would like to perform such fraction collection it is necessary to
invert the detector signal prior to setting up the method.
Name
This name will be displayed in the Special Results table for all
fractions collected in the given interval.
Start Time [min]
Beginning of the time interval where the Signal Condition will be
evaluated. See the description of Signal Condition below.
Stop Time [min]
End of the time interval where the Signal Condition will be evaluated.
When the Stop Time is reached, the fraction collection will be
terminated regardless on the current Signal Condition state. See the
description of Signal Condition below.
Fraction Volume
Collected amount can be collected to one or more vials/fractions. The
Fraction Volume value should be lower or equal to the vial volume to
prevent vial overflow. If the collected volume exceeds the set value,
the vial will be automatically changed. Fraction Volume units are
devised from the Flow Rate Units set in the Instrument Method
Sending dialog.
Detector Signal
Selects the detector used for triggering the collection of fractions
according to the Signal Condition in the fraction table. Each row of the
table can be related to a different detector signal. Only the signals that
are enabled using the Enabled checkbox on the Method Setup -
Acquisition tab of the particular detector will work in the Fraction table.
Signal Condition
Signal Condition is evaluated within time interval set for each row in
the Fraction Table . If these conditions are met more than once in a
given time interval, the fraction collection will be performed more than
once swapping the vial after each collection stop. If the start conditions
are not met in the interval defined on fraction table row, the fraction
collection will not occur in given time interval.
None - The fractions are collected in the defined time interval ruled by
Start Time and Stop Time regardless of signal course.
Level - The fraction collection:
- 8 -

4 Using the control module Clarity Controls
l starts when the detector signal increases above the Level Start
l stops when the detector signal decreases below the Level Stop
Slope - The fraction collection:
l starts when the first derivative of the detector signal increases above
the Slope Start
l stops when the first derivative of the detector signal first decreases
and then increases above the negative of the Slope Stop. Following
image displays the course of the first derivative of the signal and
demonstrates Slope Stop activation. Read carefully the values of the
slope in all End Fraction points and the course of the first derivative
before it reaches these End Fraction points.
Fig 6: Fist derivate course
Note: It is strongly recommended not to use Slope Signal Condition for fraction
collection based on noisy detector signal.
Start L+S End L+S - The fraction collection:
l starts when both start signal conditions are fulfilled simultaneously,
detector signal increases above Level Start value and also the first
derivative of the detector signal increases above Slope Start value. If
only one of the start signal conditions is fulfilled the fraction collection
will not start.
l stops when both stop signal conditions are fulfilled simultaneously,
detector signal decreases below Level Stop value and also the first
derivative of the detector signal first decreases and then increases
- 9 -

Teledyne Foxy 200 4 Using the control module
above the negative of the Slope Stop value. If only one of the stop
signal conditions is fulfilled the fraction collection will not stop.
Start L+S End L or S - The fraction collection:
l starts when both start signal conditions are fulfilled simultaneously,
detector signal increases above Level Start value and also the first
derivative of the detector signal increases above Slope Start value. If
only one of the start signal conditions is fulfilled the fraction collection
will not start.
l stops when any of the stop signal conditions is fulfilled (whatever
occurs first), detector signal decreases below Level Stop value or the
first derivative of the detector signal first decreases and then increases
above the negative of the Slope Stop value. If none of the stop signal
conditions is fulfilled the fraction collection will not stop before Stop
Time is reached.
Start L or S End L+S - The fraction collection:
l starts when any of the start signal conditions is fulfilled (whatever
occurs first), detector signal increases above Level Start value or the
first derivative of the detector signal increases above Slope Start
value. If none of the start signal conditions is fulfilled the fraction
collection does not start.
l stops when both stop signal conditions are fulfilled simultaneously,
detector signal decreases below Level Stop value and also the first
derivative of the detector signal first decreases and then increases
above the negative of the Slope Stop value. If only one of the stop
signal conditions is fulfilled the fraction collection does not stop.
Start L or S End L or S - The fraction collection:
l starts when any of the start signal conditions is fulfilled (whatever
occurs first), detector signal increases above Level Start value or the
first derivative of the detector signal increases above Slope Start
value. If none of the start signal conditions is fulfilled the fraction
collection does not start.
l stops when any of the stop signal conditions is fulfilled (whatever
occurs first), detector signal decreases below Level Stop value or the
first derivative of the detector signal first decreases and then increases
above the negative of the Slope Stop value. If none of the stop signal
conditions is fulfilled the fraction collection does not stop before Stop
Time is reached.
Filter
Sets the data filter on the detector signal defined on the given row of
the fraction table. Default value of 1 means no filtering of data will be
- 10 -

4 Using the control module Clarity Controls
performed, value of X means each X data points received will be
averaged to 1 point used for fraction start/end conditions detection.
The reaction to the fulfilled start/stop signal condition will be delayed
the higher the Filter value is set, mainly on detectors with low data
rate.
Note: Filter settings influence the value that should be set the Slope Start and
Slope Stop columns. To get the correct trigger value for the Slope Start or
Slope Stop using the Show Slope/Level tool in the Chromatogram
window, it is necessary to set the Global Bunching value in the
Integration Table to the same value as the desired filter.
- 11 -

Teledyne Foxy 200 4 Using the control module
4.2 Method Setup - FC - Vial Numbers
The Method Setup - FC - Vial Numbers tab is used for setting the behavior
of the Teledyne Foxy 200 fraction collector.
Fig 7: Method Setup - FC - Vial Numbers
Start Vial Number
Vial Number
Sets the number of the vial where the first collected fraction will be stored.
The current vial number is incremented each time the Next signal is
activated. The vial number is stored in the Results Table.
Reset at
Specifies the conditions of the current vial number setting to Start Vial
Number in three different situations:
l Each Run - the vial number is reset at the start of each acquisition.
l Start Sequence - the vial number is reset only at the start of a
sequence.
l Open Instrument - the vial number is reset only once, when the
Instrument is opened.
Last Vial Number
Vial Number
Sets the number of the last available vial. The Teledyne Foxy 200 fraction
collector can set the tray used in the DataApex UNI Setup dialog, so the
value range of this field is limited.
- 12 -

4 Using the control module Clarity Controls
After Last Vial
Specifies the action executed when current vial number exceeds the Last
Vial Number.
l Waste - the acquisition continues, but the fraction table is ignored and
the samples are automatically discarded.
l Shutdown - the acquisition is immediately stopped and the analysis
aborted.
Vial Change Options
Waste During Vial Change
This option prevents spilling when the vial is changed during collection. It
temporary stops the fraction collection before changing the vial and
restarts it again when the vial is swapped. The vial is changed in the
middle of the wasting interval; the volume wasted during vial change can
be specified in the Volume field. Volume units are the ones set in the
Instrument Method Sending dialog. This functionality is not applicable
(even if checked) when Collect All option is selected.
Change Vial when Collecting and Peak Top is Detected
If enabled, the vial is automatically swapped when the peak top is
detected during collection. Be aware this option is not applied if the active
row in the Fraction Table is set to None in the Signal Condition column.
Collect All
When checked, fractions are collected during the whole course of the
analysis, regardless of the settings in the Fraction Table. The FC module
then sends the Next Vial command only , which makes this mode of
operation suitable for a fraction collector without a waste position. Collect
All mode does not permit Waste During Vial Change.
The maximum amount of eluent collected in a single vial is limited by the
value in Vial Volume field. Once this volume is filled, it begins collecting
into the next successive vial.
Note: With Collect All option the valve is not controlled.
Warning: Once error message " Vial number exceeded last vial number " is
displayed, it means that the FC was already at the last position when
command Next Vial was received. Collecting stops at position which is
equal to the Last Vial Number - 1 because it's the last possible position
to collect (due to Waste). Correct appropriatelyyour method.
- 13 -

Teledyne Foxy 200 4 Using the control module
4.3 Hardware Configuration
The Hardware Configuration dialog (invoked by using the FC Status
button from the Method Setup - FC dialog) displays the configuration of
the Teledyne Foxy 200 , namely the communication type and its
parameters.
Fig 8: Hardware Configuration
- 14 -

4 Using the control module Clarity Controls
4.4 Device Monitor
The window with the fraction collector status can be invoked by the
Monitor - Device Monitor command from the Instrument window or using
the Device Monitor icon.
Device Monitor - Fraction Collector
Fig 9: Device Monitor - Fraction Collector
Current Position
Displays whether the fraction collector is currently wasting or the position
to which it is currently collecting.
Next
Moves the collection vessel one vial forward. Using this button while the
collector is performing its program set on the Method Setup - FC - Fraction
Table tab during an analysis run immediately overrides the automatic
collection program. To return to the automatic program, use the Resume
Method button.
Collect / Waste
The description on the button changes according to the state in which the
fraction collector is - while it is collecting, the Waste button forces the
fraction collector to stop collecting, while it is in a waste cycle, the Collect
button will force the collector to start collecting. Using any of the two
actions while the collector is performing the program set on the Method
Setup - FC - Fraction Table tab during an analysis run, immediately
overrides the automatic collection program. To return to the automatic
program, use the Resume Method button.
Position To Go
Allows to set the position to which the fraction collector should be
switched. The switching itself is performed using the Go To Position
button. This feature is only present for fraction collectors which support
addressing particular collection vessels.
Resume Method
Resumes the actions of the automatic fraction table set on the Method
Setup - FC - Fraction Table tab. If the fraction collector is collecting at that
- 15 -

Teledyne Foxy 200 4 Using the control module
moment, it will start a waste cycle and then resume the function of the
fraction table.
- 16 -

4 Using the control module Clarity Controls
4.5 Data Acquisition window
Fig 10: Data Acquisition window
The Data Acquisition window can display the fractions in the graph using
the background color and also the start and stop fraction events and
marker of the Fraction Delay. To see the fractions and markers right click
on the graph, select Properties… to open the Graph Properties dialog and
check the Show Events checkbox.
When the Fraction Delay is set, there will be two colors present in the
graph - lighter and darker red. The lighter red color shows the expected
duration of the fraction (which Clarity only presumes based on data points
it got so far), while the darker red color shows the placement of the real
fractions.
Note: The Fraction Delay in the picture will appear if the Delay Volume field in
the Method Setup - FC - Fraction Table dialog is set to a nonzero value.
- 17 -

Teledyne Foxy 200 4 Using the control module
4.6 DataApex UNI Setup
The appearance of the DataApex UNI Setup dialog depends on the
presence of the selected Ruby Script - if the script is not present, only the
Ruby Script field is visible.
Fig 11: DataApex UNI Setup
Ruby Script
Displays the selected Ruby Script. The correct
TELEDYNEISCOFOXY200FC.RB script for the Teledyne Foxy 200
instrument can be found in the UTILS/UNI_ DRIVERS/ TELEDYNE
subdirectory (accessible through the button) of the Clarity
installation folder (C:\CLARITY\BIN by default).
Port
Defines the communication port used, possible values dependent on the
type of communication of the device and/or available ports in the PC.
AutoDetect
It is used for verifying the device communication over the serial port
selected above.
Instrument Name
Allows you to set the custom name of the instrument. This name (entered
into the Value column) will be used throughout the Clarity station.
Device Type
Displays the subtype of the fraction collector.
Baud Rate
Sets the Baud Rate communication parameter for the Teledyne Foxy 200
fraction collector. Available values are 110, 300, 600 , 1200 , 2400 , 4800,
9600 , 19200 and 38400 baud. Please note that the value set in the
- 18 -

4 Using the control module Clarity Controls
DataApex UNI Setup dialog must be the same as the one set on the
fraction collector.
Rack Selection
Allows the user to select the correct rack type installed on the Teledyne
Foxy 200 fraction collector. The Teledyne Foxy 200 fraction collector
supports two racks but both settings can be read from the fraction collector
itself by using the Autodetect button.
Note: The setting of the racks to be used is performed in the Method A of the
fraction collector and cannot be changed from the side of Clarity - this is
the limitation of the fraction collector communication protocol.
- 19 -

Teledyne Foxy 200 5 Report Setup
5 Report Setup
The fraction collector section on the method report can be enabled by
checking the Instrument Control checkbox on the Method tab of the Report
Setup dialog.
Fig 12: Report Setup
All of the parameters set in the Method Setup - FC - Fraction Table and
Method Setup - FC - Vial Numbers tabs are reported, as well as the
custom FC Name and other parameters set in the DataApex UNI Setup
dialog.
- 20 -

Teledyne Foxy 200 6 Troubleshooting
6 Troubleshooting
When the solution to a problem cannot be found easily, a recording of the
communication between Clarity and the fraction collector will significantly
help DataApex support.
The data recording can be enabled by adding or amending the
COMMDRV.INI file in the Clarity installation directory (C:\CLARITY\CFG
by default). The file can be edited in any text editor (e.g. Notepad). The
following section should be edited or added:
[COM1]
echo=on
textmode=on
filename=CommDrvCOM1_%D.txt
reset=off
Note: Instead of COM1, type the communication port used to communicate with
the Teledyne Foxy 200 fraction collector. This port number is displayed
when the FC Status button in the Method Setup - FC dialog is invoked.
Note: %D (or %d) in the filename parameter means that the log will be created
separately for each day. The reset=off parameter disables deleting the
content of the log each time the station is started during the same day.
The created *.TXT files will be of great help in the diagnosis of not
documented errors and communication issues.
- 21 -
 Loading...