

Page 1

1
Table of Contents
1.Security
··························· ··························· ··························· ··························· ··························· ················
5
2.Getting Started
··························· ··························· ··························· ··························· ··························· ··
6
2.1.1.Installing and uninstalling SIM card
··························· ··························· ··························· ············
6
2.1.2.Charging the battery
··························· ··························· ··························· ··························· ··········
7
2.2.Connecting to the Network
··························· ··························· ··························· ··························· ····
7
2.2.1.SIM card
··························· ··························· ··························· ··························· ··························· ·····
7
2.2.2.Connecting to the network
··························· ··························· ··························· ···························
8
3.Contacts
··························· ··························· ··························· ··························· ··························· ···············
8
4.Messaging
··························· ··························· ··························· ··························· ··························· ···········
9
4.1.Write message
··························· ··························· ··························· ··························· ·······················
9
4.2.Inbox / Outbox/ Drafts/Sentbox
··························· ··························· ··························· ····················
10
4.3.Security inbox
··························· ··························· ··························· ··························· ·······················
10
4.4.Templates
··························· ··························· ··························· ··························· ··························· ··
10
4.5.Broadcast Messages
··························· ··························· ··························· ··························· ············
10
4.6.Voice mail service
··························· ··························· ··························· ··························· ··········
10
4.7.SMS backup
··························· ··························· ··························· ··························· ····················
11
4.8.Options(Settings)
··························· ··························· ··························· ··························· ···········
11
Page 2

2
5.Call logs
··························· ··························· ··························· ··························· ··························· ··············
11
6.Multimedia
··························· ··························· ··························· ··························· ··························· ·········
12
6.1.Images
··························· ··························· ··························· ··························· ··························· ·
12
6.2.Video Recorder
··························· ··························· ··························· ··························· ···············
12
6.3.udio player
··························· ··························· ··························· ··························· ······················
13
6.4.Video Player
··························· ··························· ··························· ··························· ····················
14
6.5.FM radio
··························· ··························· ··························· ··························· ··························
14
6.6.Sound Recorder
··························· ··························· ··························· ··························· ·············
15
7.Camera
··························· ··························· ··························· ··························· ··························· ················
16
8.Bluetooth
··························· ··························· ··························· ··························· ··························· ···········
16
9.File Manager
··························· ··························· ··························· ··························· ··························· ·····
16
10.Organizer
··························· ··························· ··························· ··························· ··························· ·········
17
10.1.Calendar
··························· ··························· ··························· ··························· ························
17
10.2.Alarm
··························· ··························· ··························· ··························· ··························· ··
17
10.3.World Clock
··························· ··························· ··························· ··························· ··················
17
10.4.Torch
··························· ··························· ··························· ··························· ··························· ··
17
10.5.Calculator
··························· ··························· ··························· ··························· ······················
17
10.6.STK
··························· ··························· ··························· ··························· ··························· ·····
18
Page 3

3
11.Settings
··························· ··························· ··························· ··························· ··························· ············
18
11.1.Call settings
··························· ··························· ··························· ··························· ··················
18
11.2.Phone settings
··························· ··························· ··························· ··························· ·············
19
11.3.Display
··························· ··························· ··························· ··························· ··························
19
11.4.Security
··························· ··························· ··························· ··························· ·························
20
11.5.Connections
··························· ··························· ··························· ··························· ··················
21
11.6.Shortcut settings
··························· ··························· ··························· ··························· ··········
21
12.Games
··························· ··························· ··························· ··························· ··························· ···············
21
12.1.Snake
··························· ··························· ··························· ··························· ··························· ·
21
13.User Profile
··························· ··························· ··························· ··························· ··························· ·····
21
14.Browser
··························· ··························· ··························· ··························· ··························· ············
23
15.Appendix
··························· ··························· ··························· ··························· ··························· ··········
23
16.Health
··························· ··························· ··························· ··························· ··························· ···············
24
Page 4

4
Manual Statements
2016. Thank you for selecting our mobile p hone. This user guide will provide you with the general info rmation an d
operation instructions.
Note:
Use only accessories approved by the phone manufacturer to ensure safety. Failing to comply with this
will violate the terms and conditions of the warranty.
If the contents and d isplays described in th is user guide d o not matc h the actual operation o f the phone
set, please use the display of the actual phone set. We reserved the rights t o change the mechanisms of the
phone without notice.
Protect your environment! We strive to produce products in compliance with global environmental
standards. Please consult your local authorities for proper disposal.
Page 5

5
General Information
1. Security
Emergency call
In any country, you can dial 112 (or other emergency call number) for emergency help.
Note: Based on the nature of cellular networking, the success of t he emergency call cannot be guaranteed.
Safety Precautions
Before using your phone, please read the following important information to eliminate or redu ce any possibility
causing damage and personal injury.
Do not use wireless phones while driving.
Switch off wireless devices in aircraft.
Do not use mobile phones at refueling point. Don’t use near fuel or chemicals.
Follow regulations or rules in hospital and health care facilities. Switch phone off.
Only qualified service personnel can install or repair this device.
Use only approved accessories and batteries.
Do not expose your phone to extreme high temperatures above+60℃(+140 F).
Page 6

6
Battery Information
Information Charging and Discha rging
The charger is designed to be used in temperatures between 0 to 40℃.
Do not charge the phone in wet and damp conditions.
We strive to produce products in compliance with global environmental standards.
When a charger is not in use, disconnect it from the power source. Do not leave the battery
connected a charger for longer than 12 hours, since overcharging may shorten its life.
Tips for Battery
Do not disassemble or modify the battery by yourself.
Do not short-circuit the battery.
Do not dispose of batteries in fire.
If you smell anything strange from th e battery or find that the battery is overheated, you should
stop using it immediately and contact the authorized Service Center in your region.
2. Getting Started
2.1.1. Installing and uninstalling SIM card
Switch off the phone; remove the back co ver, battery and other external power source. Fit the SIM card into the
Page 7

7
SIM card slot.
2.1.2. Charging the battery
Plug the charger into the socket on the side of your phone. Connect the c harger to an AC wall socket. The blinking
of the b attery level icon indicates the bat tery is being c harged. When t he blinking stops, it ind icates the c harging
is finished
During charging, the phone and charger will feel warm to the touch. This is normal.
Warning:
The operating ambient temperature of the charger is 0
C-50C. Do not use it when the temperature
exceeds this limit.
Use only chargers ap proved by the phone manufacturer to ensure safety. Failing to comply with this will
violate the terms and conditions of the warranty.
2.2. Connecting to the Ne twork
2.2.1. SIM card
Please insert available Subscriber Identity M odule (SIM) card into your p hone before using it. SIM card is supplied
Page 8

8
by your network carrier. All the informatio n related to network connection is recorded on the SIM card, so are the
contact information such as n ames, phone numbers and SMS that you set to st ore on the SIM. You can take out
the SIM card from the phone and insert it into another GSM phone to use it. M ost new phones will recognize the
SIM card automatically.
2.2.2. Connecting to the network
After the SIM card is unlocked, you phone will automatically search for the registered network or other local
available network. Once connected, the name of the network carrier will appear on the top of the screen.
You phone is now in Standby mode, ready for making and receiving call
Main menu
3. Contacts
You c an save a p hone number in the memories of S IM cards or phone. Select a contact in the contact list window
and press LS K to p erform:
Page 9

9
V iew contact: View the detail of the c urrent contact.
N ew: Create a new contact inside phonebook.
S MS: Directly input the SMS and send it to the searched p hone number.
Call: Call the current contact.
Delete: Delete the current contact.
Dele te multiple: Delete all the marked contacts in one t ime.
Dele te all: Delete all contacts.
Imp ort/Export: Export the contacts from SIM card & phone memory / Import the backup from
memory card.
Send vCard: Send a vCard via SMS or Bluetooth.
Add to blacklist: Add the current contact to black list and b lock the same number to call you.
O thers:You can setup the speed dial number and check the Memory status.
4. Messaging
You can send and receive the SMS as well as use Cell Location Display with t his function.
4.1. Write message
Edit contents, Insert phone number and others.
Send: Insert the number of the contacts and then send SMS / M MS to this number.
Page 10

10
4.2. Inbox / Outbox/ Draf ts/Sentbox
This function is used to check messages in Inbox/ Outbox/ Drafts /Sentbox.
4.3. Security inbox
You can create a security message inside this folder, user to open it, must need the password, t he default
password is “0000”
4.4. Templates
Some message templates given inside this menu.
4.5. Broadcast Messages
Look up the broadcast messages.
4.6. Voice mail service
This is similar to the Answer machine. You may transfer the incoming c all that you fail to answer duly to your
Voice mail server, where the caller can leave message.
Page 11

11
4.7. SMS backup
Import or Export the message which is saved in your phone or memory card.
4.8. Options(Settings)
You can check the SMS Settings, MMS settings, push message, and Message capacity.
5. Call logs
With this fun ction, you can view the information of Missed calls、Dialed calls、Received calls、Rejected calls and
also you can clean all these records via Delete Call Logs. Enter into any histo ry interface, Select anyone logs,
Press LSK Key to enter the Option list:
Details: View the detail of the current call.
Call: Call the current numb er.
W rite message: Directly input the SMS or MMS and send it to the current nu mber.
A dd to contacts: save to phonebook.
A dd to blacklist: A dd the number to black list and block the same number to call you.
Delete: Delete the current logs.
Delete all: Delete all the current logs.
Page 12

12
6. Multimedia
6.1. Images
You can view the photos snapped with the camera through this function.
6.2. Video Recorder
M ore options: You can switch t o Camera mode; modify the Effect, Contrast, Brightness and
others.
Camcord er Settings: Set u p the video recorder.
Page 13
13
6.3. Audio player
You can enjoy the music with this function. You can use the fo llowing keys during the play.
Key
Function
Left direction Ke y
Press to switch to a previous song with cursor. Press and hold: go
backwards
Right direction
Key
Press to switc h to a next song with cursor. Press and hold: go forwards
OK Key
Press to play/pause the Audio.
Up
、
Down key
Press to volume up and down.
Page 14
14
6.4. Video Player
You can play the video with this function. You can use the following keys d uring the play.
Key
Function
Left key
Press to go backwards. Press and hold to continuously go
backwards.
Right key
Press to g o forwards. Press and hold to continuously go forwards.
OK Key
Press to play/pause the video.
Up、Down key
Press to volume up and down.
6.5. FM radio
You can listen the FM radio with th is phone, also you can record t he FM radio station which do you want record.
Auto search and save: Search and save the channels.
Page 15

15
Channel List: P lay, edit or delete the saved channels.
Save: Save current playing frequency into channel list.
Manual search: Search the radio by manual.
Open speaker: Playing FM in loudspeaker mode. (I t active when headset inserted only)
Background play: Return the standby interface and keep paying FM radio.
Record: Record the currently-hearing FM.
Timing record: You can set up that the FM ( one channel which you selected) will record at a specific
time with this function.
Record file List: View the record ed files list.
Help: You can get the operation guide in here.
6.6. Sound Recorder
You can take a recorder in this function. After record, access Options:
S tart recording: Select this option to reco rd the sound.
R ecord file List: V iew the currently-selected sound files.
File format: You can choose the format (AMR, or WAV) for record file .
Page 16

16
7. Camera
With this function, you can snap. Press O K Key to snap under the view-finding window. Enter Camera Option,
Your options include:
Image viewer: Enter in the album folder.
More options: You can modify the DC/DV mod e, Effect, Contrast, Brightness, W hite Balance
and others.
S ettings: You can select different S ize, Quality, Banding and others.
8. Bluetooth
B luetooth: Open or close the Bluetooth
Bluetooth visibility: Open or close the visibility.
Paired device: Show the device which is connected
Device n ame: Show off the name of Bluetooth.
B luetooth file Storage: You can select Storage memory card.
H elp: You can read some help information from it.
9. File Manager
The File Manager lists the all the files stored in your memory card.
Page 17

17
10. Organizer
10.1. Calendar
The screen will highlight the date of today after displays the monthly calendar when you enter in the calendar
function.
Add new s chedule: Select Menu→Add new schedule→Write the schedule details→Select Store.
10.2. Alarm
You can set up that the alarm clock will ring at a specific time with this function.
10.3. World Clock
You can view the current local time of various countries.
10.4. Torch
Turn on or turn off the torch light here.
10.5. Calculator
Press OK Ke y t o view the calculation results. Press the up, down, left, right and OK key to select +, -, *, /, =
respectively. Press Clear to delete the figure.
Page 18

18
10.6. STK
SIM Card support is required in this service.
11. Settings
11.1. Call s ettings
Dua l SIM Se ttings: You can set your phone network status, including Standby mode, Reply by original
SIM, Set SIM name.
Call d ivert: Divert an inc oming call to a designated p hone number under th e presetting condition. This
function can be launched or closed.
Call waiting: The n etwork will inform you for a newly incoming call during the c all. Please contact with
your network operator to launch or close the function because the function requires the network support.
Call barring: Set up the right of calling and answering. This funct ion requ ires the network support. You
can launch or close the function.
B lack list: You can check the blacklist in here, and also can set t he feature whether need to act on
calling or messaging.
Others: The settings item include Call time minute reminder, Auto redial, Vibration when connected,
Reject By SMS and Auto Call Record.
Page 19

19
11.2. Phone settings
You can customize your favorite phone functions based on your interest with this function.
Dat e & Time: Yo u can set time, date and the format for your phone.
Language settings:Set the current system language.
Auto power on/off:Phone can power on/off according to your preset time.
Pow er management: You can check t he battery’s power.
R estore factory settings: You c an recover the phone into the initial settings with this function. The
default password is: 0000.
11.3. Display
Animation effect: Set the power-On o r power-Off animations.
W allpaper settings: Set an image as wallpaper.
Id le display settings: On, it will be displayed in t he standby interface.
S creen saver settings: Set th e default screen saver animation.
B rightness: Adjust the displaying contrast.
Backlight: Set the backlight time.
Keypad backlight time: S et the duration for keypad backlight.
Page 20

20
11.4. Security
The phone lock password, SIM card password and PIN2 support 4-8digit n umbers, do not support other
characters. The default password of the phone when leaving the factory is 0000.
The PUK /PUK2 are required to input if you want to unlock the S IM card. The PUK/PUK2 is provided by the
network operator.
PIN lock: open or close the PIN lock function. When PIN lock is launched, the PIN shall be input upon
each power-on.
Mod ify PIN2: Input the correct PIN 2 . Just can be change.( The SIM2 security setup is same to the
SIM1 security setup.)
Phone locked: Open or close th e phone lock function. When th e ph one lock is launched, the phone lock
password shall be input upon each power-on.
Mod ify the ce ll phone password: You c an change the phone password.
Privacy protect: If you select these modules for Data security, you must input the correct password
when you want to view these modules.
Auto keypad lock: Set the default time to lock the keypad.
Lock screen by end-key: Ac tivate, in the idle mode, you can use the power-key to lock the screen.
Mobile tracker: You can track your phone when the phone lost; The default password is “00 00”
Page 21

21
11.5. Connections
N etwork account: choice the network settings for data account before you want t o use internet.
GPR S Service: Enable/disable the GPRS network.
Data connection settings: You can control the internet acc ess as “always co nnect” or “Co nnect when
needed”..
N etwork selection: choice the modes of searching the phone network, including Auto and Man ual
modes.
11.6. Shortcut se ttings
You can set the direction key designated menu.
12. Games
12.1. Snake
Eat the red points as more as you can for higher score b y using the snakes.
13. User Profile
Enter in the function; display the profile mode list including: Normal, S ilent, Meeting, Outdoor and Flig ht
mode.
Page 22

22
A ctivate: Press OK key to activate the profile mode.
S ettings: Customize the profile mode as following:
R ename: Change the profile mode’s name.
Ring settings:
SIM1/2 Incoming Call : Set the ringtone for t he SIM1/2 inc oming call. You can also select ringtone
from Memory card.
SIM1/2 message: Select the ringtone for t he SIM1/2 message. You can also select the
ringtone from Memory card.
A djust volume:Set the volume for Caller V olume, Message Volume, Ala rm & calendar
ringtone, Call volume, Powe r ringtone.
Ring Type: Set the ring type such as Ringtone, Vibrat e, Mute, Vibrate th en ring, Ring and
Vibrate.
O ther alert rin gs: Select the Key tone, Battery low alert, Power ringtone, Dial tone.
Note 1: After plugging in the headset, ringtone will o utput from t he headset as well as the phone, when there is
incoming call or message.
Note 2: At t he flight m ode, Phone won’t be received any signal; you can activate flight mode in this menu.
Page 23

23
14. Browser
I nternet Browser.
O ption: You can enter the Homepage and modify the default settings, like t he Account settings.
15. Appendix
The phone cannot be turned on: When the battery is very low, the phone may not be turned on properly.
Please charge the battery.
My call is p icked up b y another phone: Check if call divert is set. If it is set, your incoming calls may be
diverted to other numbers or devices.
No service
If you are in an area not covered by your network, or if a physical obstacle is present, suc h as in an enclosed area,
the message “No service” will be displayed on your Standby screen and you will n ot be able to make or receive
calls. You can try move closer to a window for better reception.
For emergency onl y: When you are outside your network but inside other network, you can only make
emergency call.
Page 24

24
No Valid S IM card: Your SIM card is locked or it has an error. Please insert the right SIM c ard or contact your
service provider.
Enter PUK code: After three consecutive incorrect PIN c ode entries, the co de is blo cked, and you need the PUK
code to unblock it. Contact your service provider.
16. Health
P lease read these simple guidelines.
Your phone is designed not to exceed the limits of emission of radio waves recommended by
international guidelines.
SAR (specific absorption rate) is the measurement of body-absorbed RF quantity when the phone is in
use. SAR value is ascertained according to the highest RF level generated during laboratory tests.
SAR
SAR
Compliance
Compliance
Page 25

25
The SAR value of the phone may depend on factors such as proximity to the network tower, use of
accessories or other accessories.
Use a wireless hands-free s
y
stem(headphone,headset)with a lowpower Bluetooth emitter.
Please keep your calls short and use SMS whenever more convenient. This advice applies especially to
children, adolescents and pregnant women
Prefer to use your cell phone when the signal quality is good.
People having active medical implants should preferably keep the cell phone at least 10 cm away from
the implant.
Maintain a preferable distance of 10 mm from the device.
SAR
SAR
Recommendations
Recommendations
Page 26

1
1 Introducción
1.1 Instalación de las tarjetas SIM y la batería
1.2 Carga de la bat ería
1.3 Configuración de la red
2 Método de entrada
2.1 Introducir números e Idioma Ingles
2.2 Inserción de un símbolo.
3 Navegación en el menú
FIGO A2 40 Duos
Contenido
Page 27

2
3.1 Historial de llamadas
3.2 Guía telefónica
3.3 Internet
3.4 Multimedia
3.5 Mensajes
3.6 Extras
3.7 Diversión
3.8 Configuraciones
1. Introducción
1.1 Instalación de las tarjetas SIM y la bater ía
Step 1: Asegurese que el Dispositivo Movil este apagado
Step 2: Remueve la Parte Trasera del Dispositivo
Step 3: Remueve la batería
Step 4: Deslizar las tarjetas SIM en las bandejas de la tarjeta SIM
Page 28

3
Step 5: Vuelva a colocar la batería y la cubierta posterior del teléfono
1.2 Carga de la batería
El nivel actual de la batería se m uestra enl a esquina superior derecha de la pantalla.
El teléfono le avise de un ni vel bajo de bater ía c on una notificación en la pantalla y e l tono de alerta.
El icono de la baterí a en pantalla indic ará c uando el dispositivo se está c argando.
Sólo use l a batería suministrada con el dispositivo.
Encienda siempre e l teléfono antes de retirar la batería.
No aplaste, perfore ni ponga un alto grado de presión en la batería. Esto puede c ausar un corto ci rcuito
Step 6: Enciende el equipo y comprobar el estado de la red
La batería de litio suministrada con su teléfono móvil se puede poner en uso inmediatamente después de haber sido
desempaquetado.
interno, ocasionando un sobrecale ntamiento.
Page 29

4
1.3 Configuración de la red
Una vez que la tarjeta S IM y la bat ería se insertan correctamente, podrá encender el dispositivo. El teléfono celular
2. Método de entrada
2.1 Introducción de números y Inglés
2.2 Inserción de un símbolo
configurará automáticamente todos los parámetros de red necesarios para emitir llamadas, texto y utilizar datos 2G.
La FIGO A240 Duo ofrece varios idiomas de entrada, incluyendo Inglés, español y portugués; Para cambiar entre los
idiomas, pulse la t ecla #.
El ingreso de números, se puede tocar y mantener el número deseado en el teclado de marcac ión.
Al pulsar la tecla * lanzará un menú de símbolos.
Page 30

5
3. Navegación e n el menú
3.1 Historial de llamadas
Puede ver la lista siguientes opciones del menú de historial de llamadas:
o Todas las llamadas
o Llamadas perdidas
o
Llamadas Marc adas
o Llamadas recibidas
o Rechazado los pedidos
o Eliminar t odo
o Duración de las llamadas
o Contador GPRS
Page 31

6
3.2 Guía telefónica
Desde este menú puede agregar, ver, editar y eliminar contactos.
3.3 Internet
3.4 Multimedia
o Vista de imágenes
o Grabador de vídeo
o Video
El dispositivo puede almacenar hasta 1 00 números de teléfono diferentes.
Internet es el navegador de Internet predeterminado.
Puede visitar cualquier sitio web que introducir la URL. También puede establecer una página de inicio, marcadores y
guardar cualquier página para verlas sin conexión.
Para volver a visitar un sitio web, puede seleccionar "Historial".
Puede ver la lista siguiente desde el menú multimedia:
Le permite capturar imágenes nuevas, o ver los que están almacenados en la tarjeta S D.
Permite capt ar nuevos vídeos y almacenarlos en la tarj eta S D.
Page 32

7
Le permite ver videos almacenados en la t arjeta SD, calcular el uno capturado con la
o FM Radio
o Grabador de Sonido
3.5 Mensajes
o Bandeja de entrada
o Bandeja de salida
o Borradores
o Enviados
cámara de 2 megapíxeles.
Puede utilizar la aplicac ión como una radio FM tradicional con sintonización automática y
canales guardados.
Utilice esta función para grabar archivos de audio. El teléfono es compatible con formato
WAV y AMR.
Puede enviar y recibir mensajes de texto desde esta aplicación. Si la memoria de mensajes de t exto está llena, un icono
de mensaje parpadeante aparecerá en la parte superior de la pantalla.
Durante el ingreso de la interfaz de mensajes, verá las siguientes opciones de menú:
Escribe un mensaje
Page 33

8
o
Caja de Seguridad
o Plantillas
o Mensajes de difusión
o Servidor de Correo de Voz
3.6 Extras
Puede ver la lista siguiente desde el menú de extras:
o Alarma
o Calendario
o Calculadora
o Reloj Mundial
o
Libro electronico
o Cronómetro
o Antorcha
Bluetooth
Page 34

3.7 Diversión
Puede ver la lista siguiente desde el menú Diversión:
o Empuja La Caja
o Facebook
o
Yahoo
o Google
o Twitter
3.8 Configuraciones
o Configuración de doble SIM
o Desvío
Clasico juego de Empujar la Caja
Acceso Fac il a su cuenta de F acebook
Acceso Fac il a la Pagina de Yahoo
Acceso directo al busc ador de google
Acceso directo a su cuenta de twitter
Configuración de llamadas:
En el menú de ajustes de llamadas que son capaces de establecer lo siguiente:
9
Page 35

o
Llamada en espera
o Bloqueo de llamadas
o Ocultar ID
Junto con la siguiente configuración avanzada:
o Llame a minuto Tiempo Recordatorio
o
Rellamada automática
o Vibración c uando se conecta
o Rechazar por SMS
o Registro de llamada automática
o El t iempo y la fecha:
o Ajustes o Idioma:
o Configuración de acceso directo:
Configuración de Teléfono:
Ajuste la fecha y la hora actual c on el formato correcto
Selecciona tu Idioma
Seleccionar los accesos directos para ac ceder a aplicaciones y funciones de la pantalla de
inicio
10
Page 36

o
Auto Power Prendido/Apagado
Seleccione automático de encendido o apagado veces
o Estado o de la batería
o Restaurar configurac ión de fábrica
Ver el porcentaje de carga de la B atería
ADVERTENCIA: Serán eliminados todos los datos almacenados en el dispositivo. La contraseña es 1234
Any changes or modifications not expressly approved by the party
could void the user's authority to operate the equipment.
The device complies with part 15 of the FCC Rules.
(1)This device may not cause harmful interference,and(2)
including interference that may cause undesired operation.
Limpiar el dispositivo y restaurar t odos los ajustes de fábrica.
FCC Caution
responsible for compliance
Operation is subject to the following two conditions:
this device must accept any interference received,
11
Page 37
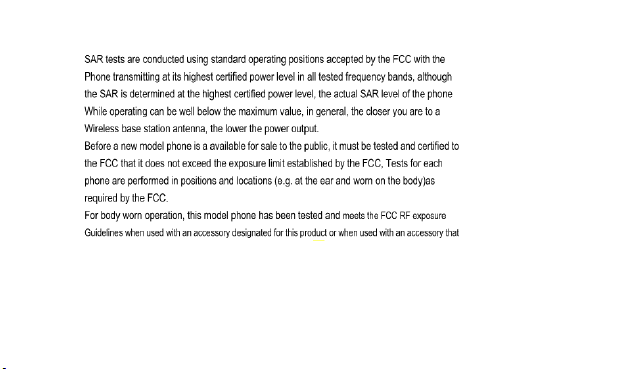
Contains no metal and that positions the handset a minimum of 15mm from the body.
 Loading...