

Page 1

x
WFM4000 and WFM5000
Waveform Monitors
ZZZ
User Manual
*P077243802*
077-2438-02
Page 2

Page 3

xx
WFM4000 and WFM5000
Waveform Monitors
ZZZ
User Manual
Revision A
www.tektronix.com
077-2438-02
Page 4

Copyright © Tektronix. All rights reserved. Licensed software products are owned by Tektronix or its subsidiaries or suppliers, and are
protected by na
tional copyright laws and international treaty provisions.
Tektronix pro
previously published material. Speci fications and price change privileges reserved.
TEKTRONIX and TEK are registered trademarks of Tektronix, Inc.
ducts are covered by U.S. and foreign patents, issued and pending. Information in this publication supersedes that in all
Contacting Tektronix
Tektronix, Inc.
14150 SW Karl Braun Drive
P.O. Box 500
Beaverton, OR 97077
USA
For product information, sales, service, and technical support:
In North America, call 1-800-833-9200.
Worldwide, visit www.tektronix.com to find contacts in your area.
Page 5

Warranty
Tektronix warrants that this product w ill be free from defects in materials and workmanship for a period of one (1) year from the date of
shipment. If any such product proves defective during this warranty period, Tektronix, at its option, either will repair the defective
product without charge for parts and labor, or will provide a replacement in exchange for the defective product. Parts, modules and
replacement products used by Tektronix for warranty work may be new or reconditioned to like new performance. All replaced
parts, modules and products become the property of Tektronix.
In order to obtain service under this warranty, Customer must notify Tektronix of the defect before the expiration of the warranty period
and make suitable arrangements for the performance of service. Customer shall b e responsible for packaging and shipping the
defective product to the service center designated by Tektronix, with shipping charges prepaid. Tektronix shall pay for the return of the
product to Customer if the shipment is to a location within the country in which the Tektronix service center is located. Customer shall
be responsible for paying all shipping charges, duties, taxes, and any other charges for products returned to any other locations.
This warranty shall not apply to any defect, failure or damage caused by improper use or improper or inadequate m aintenance and
care. Tektronix shall not be obligated to furnish service under th is warranty a) to repair damage resulting from attempts by personnel
other than Tektronix representatives to install, repair or service the product; b) to repair damage resulting from improper use or
connection to incompatible equipment; c) to repair any damage or malfunction caused by the use of non-Tektronix supplies; or
d) to service a product that has been modified or integrated with other products when the effect of such modification or integration
increases the time or difficulty of s ervicing the product.
THIS WARRANTY IS GIVEN BY TEKTRONIX WITH RESPECT TO THE PRODUCT IN LIEU OF ANY OTHER WARRANTIES,
EXPRESS OR IMPLIED. TEKTRONIX AND ITS VENDORS DISCLAIM ANY IMPLIED WARRANTIES OF MERCHANTABILITY OR
FITNESS FOR A PARTICULAR PURPOSE. TEK TRONIX’ RESPONSIBILITY TO REPAIR OR REPLACE DEFECTIVE PRODUCTS
IS THE SO L E AND EXCLUSIVE REMEDY PROVIDED TO THE CUSTOMER FOR BREACH OF THIS WARRANTY. TEKTRONIX
AND ITS VENDORS WILL NOT BE LIABLE FOR ANY INDIRECT, SPECIAL, INCIDENTAL, OR CONSEQUENTIAL DAMAGES
IRRESPECTIVE OF WHETHER TEKTRONIX OR T HE VENDOR HAS ADVANCE NOTICE OF THE POSSIBILITY OF SUCH
DAMAGES.
[W2 – 15AUG04]
Page 6

Page 7

Table of Contents
General Safety Summary . ... . ... . ... . ... .. ... . . . ... .. ... . ... . ... . ... . ... . ... . ... . ... . ... .. ... . . . ... .. ... . ... . ... . ... . ... . ... . ... . ... . iii
Environmental Considerations........................................................................................................ v
Preface ................................................................................................................................. vi
Key Features .....................................................................................................................vi
Instrument Options............................................................................................................. viii
Where to Find More Information................................................................................................. ix
Conventions Used in this Manual . ... .. ... . ... . ... . ... . ... . ... . ... . ... . ... .. ... . . . ... .. ... . ... . ... . ... . ... . ... . ... . ... . ... .. ... . ix
Installation.............................................................................................................................. 1
Before Installation................................................................................................................ 1
Connecting Power and Powering On/Off. . . . ... . ... . ... . ... . ... . ... . . . ... . ... . ... . ... . ... . ... . ... . ... . ... . ... . . . ... . ... .. . . ... . . 3
Battery Power ....................................................................................................................3
Installing in a Video System
Getting Acquainted With Your Instrument . . .. ... .. ... . ... . ... . ... . ... . ... .. ... . ... . ... . ... . ... .. ... . . . ... .. ... . ... . ... . ... . ... .. ... . . 6
Instrument Display ...............................................................................................................6
Front-Panel Controls .. . ... . ... .. ... . ... . ... . ... . ... .. ... . ... . ... . ... .. ... . ... . ... . ... . ... .. ... . ... . ... .. ... . ... . ... . ... . ... .. ... .9
Rear-Panel Connectors ... .. ... . ... . ... .. ... . . . ... .. ... . ... . ... . ... . ... . ... .. ... . ... . ... . ... . ... .. ... . . . ... .. ... . ... . ... . ... . ... 11
Selecting a Display.............................................................................................................. 14
Setting Display Parameters..................................................................................................... 15
Selecting Signal Inputs. . ... . ... . ... . ... .. ... . ... . ... . ... . ... .. ... . ... . ... . ... . ... .. ... . ... . ... . ... . ... .. ... . ... . ... . ... . ... .. ... 16
Setting 4-Tile and Full-Tile Modes. ... .. ... . ... . ... . ... . ... .. ... . ... . ... . ... . ... .. ... . ... . ... . ... . ... . ... .. ... . ... . ... . ... . ... .. 16
Setting Gain, Sweep, and Magnification ....................................................................................... 18
Using Waveform/VectorDisplay Overlay....................................................................................... 20
Using Presets ................................................................................................................... 21
Freezingthe Display ............................................................................................................ 22
Setting Line Select Mode ....................................................................................................... 24
Configuring Your Instrument .................................................................................................... 25
Using Online Help............................................................................................................... 26
Adjusting Headphone Volume and Source.. .. ... . ... . ... . ... . ... .. ... . . . ... .. ... . ... . ... . ... . ... . ... .. ... . . . ... .. ... . ... . ... . . 28
Checking Chroma/Luma Delay (Lightning Display) ................................................................................. 29
Checking Gamut...................................................................................................................... 32
Setup for Gamut Checks........................................................................................................ 32
Checking RGB Gamut .......................................................................................................... 33
Checking Composite Gamut.................................................................................................... 35
Checking Luma Gamut ......................................................................................................... 36
Automating Gamut Checks ..................................................................................................... 37
Adjusting Gamut Limits ......................................................................................................... 38
Timing Display ........................................................................................................................ 39
Monitoring Audio...................................................................................................................... 44
Configuring Audio Inputs . ... . ... .. ... . ... . ... .. ... . ... .. ... . ... . ... . ... .. ... . ... . ... .. ... . ... .. ... . ... . ... . ... .. ... . ... .. ... . ... 44
Selecting Audio Input . . ... . ... . ... . ... .. ... . ... . ... . ... . ... . ... .. ... . . . ... .. ... . ... . ... . ... . ... .. ... . ... . ... . ... . ... . ... .. ... . .. 45
Checking Audio Level and Phase . ... . ... . ... . ... . ... . ... . ... . ... .. . . ... . ... . ... . ... . ... . ... .. . . ... . ... . ... .. . . ... . ... . ... . ... . 46
Table of Content
..................................................................................................... 4
s
WFM4000 and WFM5000 Waveform Monitors User Manual i
Page 8

Table of Content
Monitoring Safe Area Graticule ...................................................................................................... 48
Using Alarms.......................................................................................................................... 51
Upgrading Instrument Software...................................................................................................... 56
Index
s
Monitoring for
Safe Area Graticule............................................................................................. 48
ConfiguringAlarms.............................................................................................................. 51
Monitoring Al
arms............................................................................................................... 55
ii WFM4000 and WFM5000 Waveform Monitors User Manual
Page 9

General Safety S
ummary
General Safet
Review the following safety precautions to avoid injury and prevent damage to this product or any products connected to it.
To avoid potential hazards, use this product only as specified.
Only qualified personnel should perform service procedures.
To Avoid Fire or Personal Injury
Use proper power cord. Use only the power cord specified for this product and certified for the country of use.
Ground the product. This product is grounded through the grounding conductor of the power cord. To avoid electric
shock, the grounding conductor must be connected to earth ground. Before making connections to the input or output
terminals
Observe al
product m anual for further ratings information before making connections to the product.
Do not apply a potential to any terminal, including the common terminal, that exceeds the maximum rating of that terminal.
Power disconnect. The power cord disconnects the product from the power source. Do not block the power cord; it
must remain accessible to the user at all times.
Do not operate without covers. Do not operate this product with covers or panels removed.
Do not operate with suspected failures. If you suspect that there is damage to this product, have it inspected by
qualifie
of the product, ensure that the product is properly grounded.
lterminalratings.
d service personnel.
y Summary
To avoid fire or shock hazard, observe all ratings and markings on the product. Consult the
Avoid e
Replac
Rechar
Use pro
xposed circuitry.
e batteries properly.
ge batteries properly.
per AC adapter.
Do not touch exposed connections and components when power is present.
Replace batteries only with the specified type and rating.
Recharge batteries for the recommended charge cycle only.
Use only the AC adapter specified for this product.
Do not operate in wet/damp conditions.
Do not operate in an explosive atmosphere.
Keep product surfaces clean and dry.
vide proper ventilation.
Pro
proper ventilation.
Refer to the manual’s installation instructions for details on installing the product so it has
WFM4000 and WFM5000 Waveform Monitors User Manual iii
Page 10

General Safety S
Terms in This Manual
These terms may appear in this manual:
WARNING. Warning statements identify conditions or practices that could result in injury or loss of life.
CAUTION. Caution statements identify c onditions or practices that could result in damage to this product or other property.
Symbols and Terms on the Product
These terms may appear on the product:
DANGER indicates an injury hazard immediately accessible as you read the marking.
WARNING indicates an injury hazard not immediately accessible as you read the marking.
CAUTION indicates a hazard to property including the product.
The following symbol(s) may appear on the product:
ummary
iv WFM4000 and WFM5000 Waveform Monitors User Manual
Page 11

Environmental C
onsiderations
Environmenta
This section provides information about the environmental impact of the product.
Product End-of-Life Handling
Observe the following guidelines when recycling an instrument or component:
Equipment Recycling. Production of this equipment required the extraction and use of natural resources. The
equipment may contain substances that could be harmful to the environment or human health if improperly handled at the
product’s end of life. In order to avoid release of such substances into the environment and to reduce the use of natural
resources, we encourage you to recycle this product in an appropriate system that will ensure that most of the materials are
reused or recycled appropriately.
The symbol shown below indicates that this product complies with the European Union’s requirements according to Directive
2002/96/EC on waste electrical and electronic equipment (WEEE). For information about recycling options, check the
Support/Service section of the Tektronix Web site (www.tektronix.com).
l Considerations
orate Materials
Perchl
This product contains one or more type CR lithium coin cell batteries. According to the state of California, CR lithium ion cells
are classi fied as perchlorate materials and require special handling. See www.dtsc.ca.gov/hazardouswaste/perchlorate
for additional information.
Restriction of Hazardous Subs tances
This product has been classified as Monitoring and Control equipment, and is outside the scope of the 2002/95/EC RoHS
ctive.
Dire
WFM4000 and WFM5000 Waveform Monitors User Manual v
Page 12

Preface
Preface
This manual describes the installation and basic operation of the following instruments:
WFM5000 series waveform monitors
WFM4000 series waveform monitors
Key Features
Tektronix waveform monitors can help you monitor SD SDI or HD SDI signals. The following table includes key features of
these instruments.
Feature Description
Flexible tile displays: Full,
TandemVu®, and Quad Tile
Thumbnail display
Presets
Full digital processing
Waveform display Traditional waveform displays allow signals to be overlaid or paraded.
Timing display TIming display shows the timing relationship between video input and the external
Vector display Traditional and Lightning Vector displays are available. The latter shows both
Gamut monitoring Arrowhead, Diamond, and Split Diamond displays offer us
Picture area
Audio monitoring
Status screens The following status displays provide content st
Quad TIle (4-Tile): View four measurement displays at once, one in each tile.
TandemVu®: Patented display allows you to overlay the Waveform and
Waveform and Lightning displays, plus Picture Thumbnail, in a single, full-tile display.
Full: View a Waveform measurement display that is active in tile 1 full screen.
Thumbnail display of the picture in the selected Waveform, Gamut, Audio, or Vector
measurement displays.
Customizable presets allow you to quickly save and recall commo
configurations.
Full digital processing allows for accurate, repeatable, drift-free operation that
surpasses traditional analog designs.
Waveform/Vector or Waveform/Lightning overlay display is
reference.
luma and chroma amplitudes, as well as quantifying interVector display with Composite and Component Compass Rose graticules, and
Vector/Waveform and Lightning/Waveform overlay; as well as gain, sweep, and
magnification controls.
thresholds so that you c an set monitoring limits appropriate to a specific operation.
Gamut monitoring is fully integrated with the alarm logging and reporting capabilities.
Support for standard and custom Safe Graticules of Picture displays for monitoring
the incorrect placements of graphics and logos. Two Sa
Title graticules are supported.
Lissajous display lets you monitor audio channel inp
Support and options for viewing and monitoring both l
pairs for A E S and embedded audio, and many popular audio scales, including
BBC scales.
Provides Audio Control Packet information, which is ancillary data used to describe
the number of channels, audio frame rate, and audio
atus: Alarm, Event/Error Log, Video
Session, Audio Session, and Audio Control.
also available.
channel timing. Includes
er-selectable gamut
fe Area graticules and Safe
uts.
evels of normal channel
channel delay.
Vector or
nly used
vi WFM4000 and WFM5000 Waveform Monitors User Manual
Page 13

Feature Description
Error tracking
Configurable alarms and error logging.
Ground closure Signal sent out of the GCI port of the instrument for a remote notification that an
alarm conditi
on occurred.
Preface
WFM4000 and WFM5000 Waveform Monitors User Manual vii
Page 14

Preface
Instrument Options
Yo u can add the following service options to any instrument:
Option C3. Adds 3 years of Calibration Service.
Option C5. Adds 5 years of Calibration Service.
Option D1. Adds a Calibration Data Report.
Option D3. Adds 3 years of Calibration Data Report (when ordered with option C3).
Option D5. Adds 5 years of Calibration Data Report (when ordered with option C5).
Option R3. Adds 3 years of Repair Service (including the period under warranty).
Option R5. Adds 5 years of Repair Service (including period under warranty).
viii WFM4000 and WFM5000 Waveform Monitors User Manual
Page 15

Where to Find More Information
Item Purpose Location
User manual (this manual)
Installation
and procedures for
instrument operation
Preface
procedures
Online help
Specifications and
performance verification
technical reference
WFM, WVR, and AMM
Management Information
Database technical
reference
Service manual Optional manual
In-depth instrument
operation an
Specifications and
procedures for checking
instrument performance
Programming
commands for WFM,
WVR, and AMM
instruments
supporting module-level
servicing of the
instrument
Conventions Used in this Manual
lowing icons are used throughout this manual:
The fol
ce Step
Sequen
d UI help
WFM4000 and WFM5000 Waveform Monitors User Manual ix
Page 16

Preface
x WFM4000 and WFM5000 Waveform Monitors User Manual
Page 17

Installation
To install your instrument in a cabinet, rack, or carrying case, follow the instructions that are included with the optional
accessory kits that are available for each type of installation.
CAUTION. Do not install this instrument in any cabinet except those that are listed in the Accessories table. Attempting to
do so can damage the instrument and the cabinet.
If you install your instrument in a custom application, such as a console, be sure to provide adequate airflow. Do not
block the ventilation holes.
CAUTION. Failure to provide adequate airflow to the instrument could cause the instrument to shut down. If the airflow is
blocked and the instrument does not shut down, the instrument could be seriously damaged.
Before Installation
Unpack the instrument and check that you have received all of the items listed as standard accessories. You may want to
save the shipping carton
Installation
and packing materials (including the anti-static bag) in case you need to ship the instrument.
Accessories
The table below shows which items are standard accessories and which items are optional accessories. Check the Tektronix
Web site (www.tektronix.com) for the mo st current information on accessories.
Tektronix part
Accessory Standard Optional
WFM4000 and WFM5000 Waveform Monitors Quick Start Reference
WFM4000 and WFM5000 Waveform Monitors Release Notes
WFM4000 and WFM5000 Waveform Monitors Product
Documentation CD kit
This CD contains the following documents in PDF format. (All
documents are in English unless noted otherwise):
User Manual (English, Japanese, Chinese)
Specifications and Performance Verification Technical Reference
System Integrator Technical Reference
WFM, WVR, AMM Management Information Database (MIB)
Technical Reference
Power Plug and Adapter
NOTE. See the International Power Plugs list that follows this table
for the type of power plug included with your instrument
WFM4000 and WFM5000 Waveform Monitors Service Manual
WFM50F01, Portable cabinet with handle, feet, and front panel cover
●
●
●
●
●
●
number
071-2476-XX
077-2444-XX
020-2918-XX
Not applicable
077-2442-XX
WFM50F01
WFM4000 and WFM5000 Waveform Monitors User Manual 1
Page 18

Installation
Accessory Standard Optional
WFM50F02,Dua
series
WFM50FGM Anton Bauer battery adapter mounting plate for the
WFM4000 and WFM5000
l rackmount for the WFM5000 series and WFM4000
●
●
Tektronix part
number
WFM50F02
WFM50FGM
NOTE. Batter
Anton Bauer
For use with the WFM50FGM.
Anton Bauer Battery Charger for the WFM4000 and the WFM5000.
For use with the Anton Bauer Battery Pack.
WFM50FVM Sony IDX battery adapter mounting plate
NOTE. Bat
WFM50FSC
y and charger must be ordered separately.
Battery Pack for the WFM4000 and the WFM5000.
tery and charger not available.
Soft carrying case for the WFM5000 and WFM4000.
●
●
●
●
146-0156-00
016-2005-0
WFM50FVM
WFM50FSC
0
International Power Plugs. Your instrument was shipped with one of the following power cord options. Power cords for
use in North America are UL listed and CSA certified. Cords for use in areas other than North America are approved by at
least one authority acceptable in the country to which the product is s hipped.
Opt. A0 – North America power
Opt. A1 – Universal EUR power
Opt. A2 – U nited K ingdom power
Opt. A 3 – Australia power
Opt. A5 – Switzerland power
Opt. A6 – Japan power
Opt. A10 – China power
Opt. A11 – India power
Opt. A99 – No power cord and AC adapter
2 WFM4000 and WFM5000 Waveform Monitors User Manual
Page 19

Connecting Power and Powering On/Off
AC Power Requirements
The instrument operates from an A C line frequency of 50 or 60 Hz, over the range of 100-240 Volts, without the need for
configuratio
to the Specifications and Performance Verification document on the Product Documentation CD for additional information
on power and environmental requirements.
Connect the supplied power cord to the AC adapter and then connect it to the rear panel power connector. After you connect
the power su
n, except the power cord. (See page 2, International Power Plugs.) The typical power draw is 22 Watts. Refer
pply to your power source, the instrument will not turn on until you perform the following procedure.
Powering On/Off the instrument
The Power button performs the following functions when connected to a 12 V DC input.
Press the Power buttontoturnontheinstrument.
Press the Power button again to turn off the instrument.
Battery Power
Installation
This instrument can be powered by a 12 V DC input or by a 14.4 V standard camera battery. If you are using a battery
with this instrument, read the following battery safety notices. This instrument was designed to be used with an Anton
Bauer ba
CAUTION. Before using the Anton Bauer Power Tap feature, refer to the product information included with the battery. If that
information is not available, contact the battery manufacturer for information.
WARNING. Fire
other than the provided AC adapter, ensure that it has a current limiting device (such as a fuse) below 50 Amps.
WARNING. Risk of personal injury and/or property damage from falling instrument. This instrument was not designed to be
used with batteries
may make the unit too heavy in the back, causing the instrument to tip backward.
ttery. It can also be used with a Sony IDX battery.
can cause personal injury and/or property damage. To prevent risk of fire, when using a 12 V DC source
of a different shape or weight than the battery available for this product from Tektronix. Other batteries
WFM4000 and WFM5000 Waveform Monitors User Manual 3
Page 20

Installation
Installing in a Video System
The instrument can operate almost anywhere in the distribution system. Refer to the following diagrams for serial digital
system inputs.
For monitoring the video bit stream
at the end of a link
If the instrument is placed at the end of a
link, this s
etup can be used.
1. Connect a ca
2. Termin a te t
connector you will use on the instrument.
3. Connect the cable from the serial source
output to the one of the SDI inputs on the
rear panel
NOTE. See the Specifications and
Performance Verification manual on the
Product D
allowed cable lengths.
ble to a serial signal source.
he loop-through on the SDI
of the instrument.
ocumentation CD for maximum
For monitoring within an operating
link
If the instrument is installed to monitor
an operating link, the destination receiver
and the connecting cable serve as the
termination. This monitoring connection
checks the performance of the entire
path. The return loss of the instrument is
sufficiently high that, in most cases, the
destination r eceiver sets the system return
loss.
4. Connect a cable to a serial signal source.
5. Connect the other end of that cable to
one of the SDI inputs on the rear panel
of the instrument.
6. Connect a cable from a serial receiver to
the SDI loop-through on the instrument.
4 WFM4000 and WFM5000 Waveform Monitors User Manual
Page 21

Installation
Line Termination
Your instrument uses passive loop-through analog and reference inputs. Accordingly, the loopthrough inputs must be
terminated externally. It is important that this external termination meets accuracy and return loss requirements. Terminations
for loop-throughs on SDI or reference connectors in end-of-link setups must be 75 Ω and DC coupled (good return loss
extends to DC). An appropriate termination would be a 75 Ω End of Line terminator, Tektronix part number 011-0163-XX.
Compatibility of BNC Center Pins
Most video equipment BNC connectors, whether 50 Ω or 75 Ω,usea50Ω standard center pin. Some laboratory 75 Ω BNC
connectors
50 Ω standard (large diameter) center pins.
Do not use connectors or terminators with the smaller center pins. They could cause intermittent connections.
use a smaller diameter center pin. The BNC connectors on the instrument are designed to work with the
WFM4000 and WFM5000 Waveform Monitors User Manual 5
Page 22

Getting Acquain
ted With Your Instrument
Getting Acqua
Instrument Display
This instrument supports the following displays:
Waveform: Normal, Display Overlay modes
Vector: Normal, SDI—> Composite, Lightning, Display Overlay modes
Gamut: Arrowhead, Diamond, Split Diamond
Picture
Audio: Bars, Lissajous, or both
Status: Timing Display, Alarm Status, Event/Error Log, Video Session, Audio Session, Audio Control
Picture Thumbnail Display
The picture thumbnail feature displays the thumbnail of the picture in the selected measurement display. This allows you to
view the modified picture without losing visibility of the selected display.
When the instrument is in Full-tile m ode, pressing the Th umbnail button makes the Thumbnail display appear over a part of
cted measurement display. When the instrument is in 4-Tile mode, pressing the Thumbnail button displays the
the sele
thumbnail image in tile 1. If a picture display is present in one of the four tiles, then no thumbnail picture will be displayed.
inted With Your Instrument
1. Push one of the measurement buttons to
a measurement of your choice.
select
2. To d is p
3. Pus
NOTE. The Picture Thumbnail is available
r all displays except Picture.
fo
lay the picture thumbnail, toggle
the Thumbnail button until it is lit.
The thumbnail option can also be
ted from the CONFIG > Display
selec
Settings > Thumbnail menu.
htheThumbnail button again to turn
off the picture thumbnail.
6 WFM4000 and WFM5000 Waveform Monitors User Manual
Page 23

Getting Acquain
tedWithYourInstrument
To Determine Status At-a-Glance
The Status Bar, located at the bottom of the instrument display, shows the instrument status and the monitored signal
information. The following table describes the display elements shown on the status bar.
Display element Description
Input Format
Reference S ource Text indicating the source of the current reference. Possible references are: External, Internal.
Current Input Text indicating the selected input. Possible inputs are: SDI A and SDI B. Also indicates if the
EDH or CRC Error A one-line area that is visible if EDH or CRC errors are present.
RGB Gamut Error A one-line area that is visible if RGB gamut errors are present.
Text indicating the format of the signal on the selected input or whether signal is missing or
unlocked.
Also indicates format and whether the reference is missing or unlocked.
current input is not in Auto mode and is unlocked.
NOTE. Because RGB and Composite Gamut messages appear on the same line in the
display, if both R GB and Composite Gamut errors are present at the same time, the message
"RGB and Cmpst Gamut" will appear.
Composite Gamut Error A one-line area that is visible if Composite gamut (Arrowhead) errors are present.
NOTE. Because RGB and Composite Gamut messages appear on the same line in the
display, if both R GB and Composite Gamut errors are present at the same time, the message
"RGB and Cmpst Gamut" will appear.
Luma Gamut Errors A one-line area that is visible if Luma errors are present.
Alarm/Error Indicator An icon visible when alarms of types other than those in the four readouts just listed occur.
Date and Time
FreezeStatus Aniconvisiblewhenthetraceofthedisplayisintheactivefrozenstate.
Instrument Name
Audio Status
Timecode Readout A readout showing the selected time-code value.
Low Battery Indicator
Readout of the date and time (set in CONFIG > Utilities).
Name assigned to the instrument in the CONFIG > Utilities menu.
A 16-character string indicating the selected audio input or the embedded audio channel
status, when embedded audio is the selected input, In the latter case, each character shows
the status of a specific channel: - for not present and p for present.
Appears when the battery level has no more than 10 minutes of operating power remaining.
WFM4000 and WFM5000 Waveform Monitors User Manual 7
Page 24

Getting Acquain
Status Bar Icons
Display icons Description
ted With Your Instrument
Warning - Appears when an error or an alarm that is mapped to the user interface triggers.
Alarms Muted - Appears when the alarms are muted from the STATUS pop-up menu.
Alarms Disabled - This text appears in the Status Bar when Alarms are disabled from the Configuration
menu.
Freeze Active - Appears when the display is frozen.
Battery Low - This icon appears only on instruments using an external battery as a power source. This
icon appears when the battery has 10 minutes or less of operating power remaining.
8 WFM4000 and WFM5000 Waveform Monitors User Manual
Page 25

Front-Panel Controls
Getting Acquain
tedWithYourInstrument
NOTE. Some of t
instrument, press the CONFIG button. In the Configuration menu, select the Utilities submenu. The View Instruments
Options entry lists the options installed on your instrument.
he controls that this section covers are option-dependent. For a list of the options that are installed on your
Three Levels of Control
You control the instrument on three levels:
Frequently changed settings. The front-panel buttons control the most commonly changed parameters. The knobs are
used to adjust levels and make selections.
Display specific settings. Pop-up menus control parameters that are specific to the displayed options. The pop-up
menus control less frequently changed parameters such as the waveform display mode (for example, changing the
waveform display mode from RGB to YPbPr). To display a pop-up menu, press and hold the desired Display button
for about a second.
Instrument-wide settings. The parameters in the Configuration menu are instrument-wide settings. The configuration
menu controls settings that are changed only occasionally, s uch as changing waveform color or setting the network
address.
Layout and Usage
The primary front panel elements shown below are described in the table that follows. The Usage Procedure column in the
table refers you to a procedure in this manual that explains how to use the element. A reference of None means that the
t is an indicator only or has no associated procedure.
elemen
Control element or group Usage procedures
Display selection buttons
Display buttons
Gain, Sweep, and Mag buttons Setting gain, sweep, and magnification (See page 18.)
WFM4000 and WFM5000 Waveform Monitors User Manual 9
Controlling the display (See page 6.)
Selecting a display (See page 14.)
Setting display parameters (See page 15.)
Page 26

Getting Acquain
ted With Your Instrument
Control elemen
Preset button
Input Selecti
Line Select b
EXT REF button
Freeze button
Help button
Configura
Up/Down/
General
Vertica
Power button
Main button
on buttons
utton
tion button
Left/Right Arrow keys and SEL button
knob
l and Horizontal knobs
torgroup
Usage procedur
Using presets
Selecting sig
Setting line
Selecting s
Freezing th
Using onli
Configuri
Demonstr
Demonst
page 25.)
Used to position waveforms when displayed in full screen.
When the Audio display is active, use the Horizontal knob to
the headphone volume.
adjust
to turn the instrument on or off.
Press
s to 4-Tile (Quad Tile) mode and to the USB drive.
Acces
Demonstrated in 4-Tile and Full-Tile Modes (See page 16.)
es
(See page 21.)
nal inputs (See page 16.)
select mode (See page 24.)
ignal inputs (See page 16.)
e d isplay (See page 22.)
ne help (See page 26.)
ng your instrument (See page 25.)
ated in Setting Display Parameters (See page 15.)
rated in To Select/Adjust a Parameter (See
10 WFM4000 and WFM5000 Waveform Monitors User Manual
Page 27

Rear-Panel Connectors
The following figure shows the rear panel.
Power Requirements When Using an AC Converter
Getting Acquain
tedWithYourInstrument
A single-phase power source with one
current-carrying conductor at or near
round (the neutral conductor).
earth-g
The powe
50 or 60 Hz, and an operating voltage
range must be from 100 to 240 VAC,
contin
System
conductors live with respect to ground
(such as phase-to-phase in multiphase
syste
power sources.
NOTE. Only the line conductor is fused for
current protection. The fuse is internal
overand self-resetting.
r source frequency must be
uous.
s with both current-carrying
ms) are not recommended as
WFM4000 and WFM5000 Waveform Monitors User Manual 11
Page 28

Getting Acquain
Video Input Connectors
ted With Your Instrument
All SDI inputs
compensated for 75 Ω and require
termination.
1. Ref Loop. A synchronization input.
The input sig
burst, analog composite video, or
analog tri-level for HD. Requires 75 Ω
terminatio
2. SDI A. The Digital A component serial
digital input is compensated for 75 Ω and
requires termination.
3. SDI B. The Digital B component serial
digital input is compensated for 75 Ω and
requires termination.
are passive inputs
nal can be analog black
n.
AES IN Connector
1. This BNC connector supports AES IN
o input.
audi
12 WFM4000 and WFM5000 Waveform Monitors User Manual
Page 29

Getting Acquain
tedWithYourInstrument
Ground Closure Interface Connector Pin Assignment
The ground closure interface (GCI) connector uses ground closures for remote control and indicating to external equipment
when alarms have occurred. The input of LTC is through the GCI connector. The GCI connector is a 15-pin D-type c onnector
with socket contacts.
Table 1: Remote Port
Characteristic Performance requirement Reference information
Connector Pin Assignments
1GND(In)
2 Reserved (I/O)
3 Reserved (I/O)
4 Reserved (In)
5 Reserved (In)
6GND(In)
7TimeCodePositive(LTCIn)
8 Time Code Negative (LTC In)
9 Ground Closure (Alarm Out)
10 Preset 1 (In)
11 Preset 2 (In)
12 Preset 3 (In)
13 Preset 4 (In)
14 Preset 5 (In)
15 Preset 6 (In)
Hex Binary
Pins 15,
14, 13,
12, 11,
10
F 111111
E XX1110 Preset 1 No action
D XX1101 Preset 2 No action
C
B XX1011 Preset 3
A XX1010 No action
9 XX1001 No action
8 XX1000 Preset 8
7
6 XX0110 Preset 6
5
4 XX0100 Preset 4
3 XX0011 Preset 3
2 XX0010 Preset 2
1 XX0001 Preset 1
0 XX0000 Unused
N/A
N/A
XX1100
XX0111 Preset 4 Preset 7
XX0101 Preset 5
101111 Preset 5
011111 Preset 6
Direct
mode
selection
none
Encoded
mode
selection
No action
SDI B
SDI A
N/A
N/A
Ethernet Connecto r
The instrument provides a 10/100
BaseT Ethernet interface. The
Ethernet connector is a standard
RJ-45 connector.
WFM4000 and WFM5000 Waveform Monitors User Manual 13
Page 30

Getting Acquain
ted With Your Instrument
Selecting a Display
Perform the following procedure to select a display from the front panel of the instrument.
1. Push a button corresponding to the
display that you want to view:
WFM - display of video waveform
PICT - display of the picture
generated by the video signal
GAMUT - display selectable for
three proprietary Tektronix views for
checking the gamut of an SDI signal
VECTOR - display of Vector plots of
color signals
AUDIO - display of level (meters) and
of a phase (plot) for monitoring audio
signals
STATUS - Extensive views of signal
status, Error Log, and Timing display
MAIN - provides access to USB
drive, 4-Tile mode, and Full-tile mode
The selected display will appear.
14 WFM4000 and WFM5000 Waveform Monitors User Manual
Page 31

Setting Display Parameters
You can set up the display parameters using the pop-up menus. In general, they control only settings specific to the active
display type. For example, the pop-up menu for the Waveform display enables you to set the Display Mode.
The pop-up menu will appear when selected (see the procedure that follows), unless it is not appropriate for the current
instrument setting (for example, trying to display the Gamut menu when viewing a composite input signal).
1. Push and hold the display button for
which the settings need to be set or
modified.
2. When the menu pops up, navigate
through and make your selections as
described in the steps that follow.
Getting Acquain
tedWithYourInstrument
3. Use the right and left keys to traverse
between the menu panels.
4. Use the up/down arrow keys to select
the parameters in a menu.
5. Press SEL to set the selected parameter.
The VECTOR display with the Bar Ta rgets
set to 75% is shown.
NOTE. The selections in a pop-up menu
can change depending on the settings.
WFM4000 and WFM5000 Waveform Monitors User Manual 15
Page 32

Getting Acquain
ted With Your Instrument
Selecting Signal Inputs
You can connect SDI (Serial Digital Interface) signals and select them for display. Depending on your instrument model
and the options installed on it, you can also connect High Definition (HD) component signals and Standard Definition
(SD) component signals.
To Select an SDI Input
1. Connect digital component video signals
to the SDI A and SDI B inputs on the
rear panel.
HD (WFM5000
instrument automatically detects
whether input is HD or SD.
SD (WFM4000 series): Connect SD
signal onl
2. Press the Input button corresponding
to the input that you want (SDI Input A
shown).
3. Select a d
isplay to view the input.
series): The
y.
Setting 4-Tile and Full-Tile Modes
You ca n
the same time. Each display will appear in one of four tiles on the display screen. Full-tile mode allows you to view the
display in tile 1 at full screen.
access the 4-Tile and Full-Tile functions from the MAIN button. 4-Tile mode allows you to view four displays at
When you press the MAIN button, a pop-up menu will appear allowing you access to the 4-Tile and Full-Tile settings. To set
instrument to view four tiles simultaneously, perform the following procedure.
up the
1. Pres
2. Press the up or down arrow key to
16 WFM4000 and WFM5000 Waveform Monitors User Manual
s and hold the MAIN button to view
the pop-up menu.
navigate to Tile Display and then press
ight arrow key to highlight 4-Tile.
the r
This will select 4-Tile mode and the
screen will display four separate tiles.
Page 33

Getting Acquain
tedWithYourInstrument
3. Press the down a
Tile Config., and then press the right
arrow key to select Tile 1.Onlya
waveform (WFM
viewed in this tile.
NOTE. The Tile Config. menu option is
only availab
4. Press the down arrow key to highlight
5. Press the left arrow key to return to the
6. Press the down arrow key to highlight
le when 4-Tile mode is selected.
Tile 2, and t
key to navigate to the submenu. The
available displays will be shown in the
submenu. S
display in tile 2 using the up and down
arrow keys.
tile selec
Tile 3,an
key to navigate to the submenu. The
available displays will be shown in the
submenu
display in tile 3 using the up and down
arrow keys.
tion menu.
. Select the one you want to
rrow key to highlight
button) display can be
hen press the right arrow
elect the one you want to
d then press the right arrow
7. Press the down arrow key to highlight
and then press the right arrow
Tile 4,
key to navigate to the submenu. The
available displays will be shown in the
nu. Select the one you want to
subme
display in tile 4 using the arrow keys.
NOTE. Switch between Full-Tile and 4-Tile mode by pressing the MAIN button.
Navigating Be tween Tiles
Once you have configured the four tiles in your instrument, you can navigate between tiles by pressing the measurement
button related to the type of display in the tile. You can configure the display of any active tile by pressing and holding the
ated measurement button to bring up its pop-up menu.
rel
Navigating between tiles of different display types. If you have a waveform display in tile 1, press the WFM button,
and tile 1 will be outlined by a blue line. This indicates that the tile is active. If you then want to activate another display in a
different tile, press the related front panel button. For example, if you have a vector display in tile 2, pressing the VECTOR
button will activate tile 2. The blue line will move from tile1totile2,indicatingthattile2isnowtheactivetile.
WFM4000 and WFM5000 Waveform Monitors User Manual 17
Page 34

Getting Acquain
ted With Your Instrument
Navigating between tiles of the same display type. If the same measurement display is shown in two separate
tiles, pressin
is shown in tile 3 and tile 4, pressing the PICT button will alternately make tile 3 and then tile 4 active.
g the releated measurement button will activate first one and then the other tile. For example, if a Picture display
Configuring displays in different tiles. You ca n configure the display of any active tile by pressing and holding the
related measurement button to bring up its pop-up menu. For example, if you want to configure a waveform display in tile 1,
press the WFM button to activate tile 1, and then press and hold the WFM button to view the WFM pop-up menu. You can
then select or change configurable settings.
NOTE. Read about which displays are activated by which front panel buttons in the Instrument Display section of this
manual. (See page 6.)
Setting Gain, Sweep, and Magnification
You can set the gain, sweep mode, and sweep rate using the GAIN, SWEEP, and MAG buttons. W hen you use the
Waveform/Vector (WFM & VEC) Display Overlay feature, Gain, Sweep, and Magnifi cation apply to the active display. A lit
nel button denotes an active display.
front-pa
NOTE. Gain, Sweep, and Magnification do not apply to all display types.
To Set Gain
1. Select the WFM measurement. (See
page 14, Selecting a Display.)
2. Press and hold the GAIN button to
display the gain settings.
3. If you enable VAR Gain, set the gain
using the GENERAL knob.
4. If you select Gain Settings, choose the
gain (x2, x5, x10) of your choice.
18 WFM4000 and WFM5000 Waveform Monitors User Manual
Page 35

To Set Sweep
1. Press the WFM button. The default
display style is Parade.
2. Press and hold the Sweep button to
display the sweep settings.
3. Select the setting (1 Line or 1 Field) of
your choice.
NOTE. If the Waveform display style is set
to Overlay, the menu selections will include
2Lineand2Field.
To Set Magnification
1. Press the WFM button.
2. Press and hold the MAG button to
display th
e magnification settings.
Getting Acquain
tedWithYourInstrument
3. Select th
x30) of your choice.
e setting (Best View, x10, x20,
WFM4000 and WFM5000 Waveform Monitors User Manual 19
Page 36
Getting Acquain
ted With Your Instrument
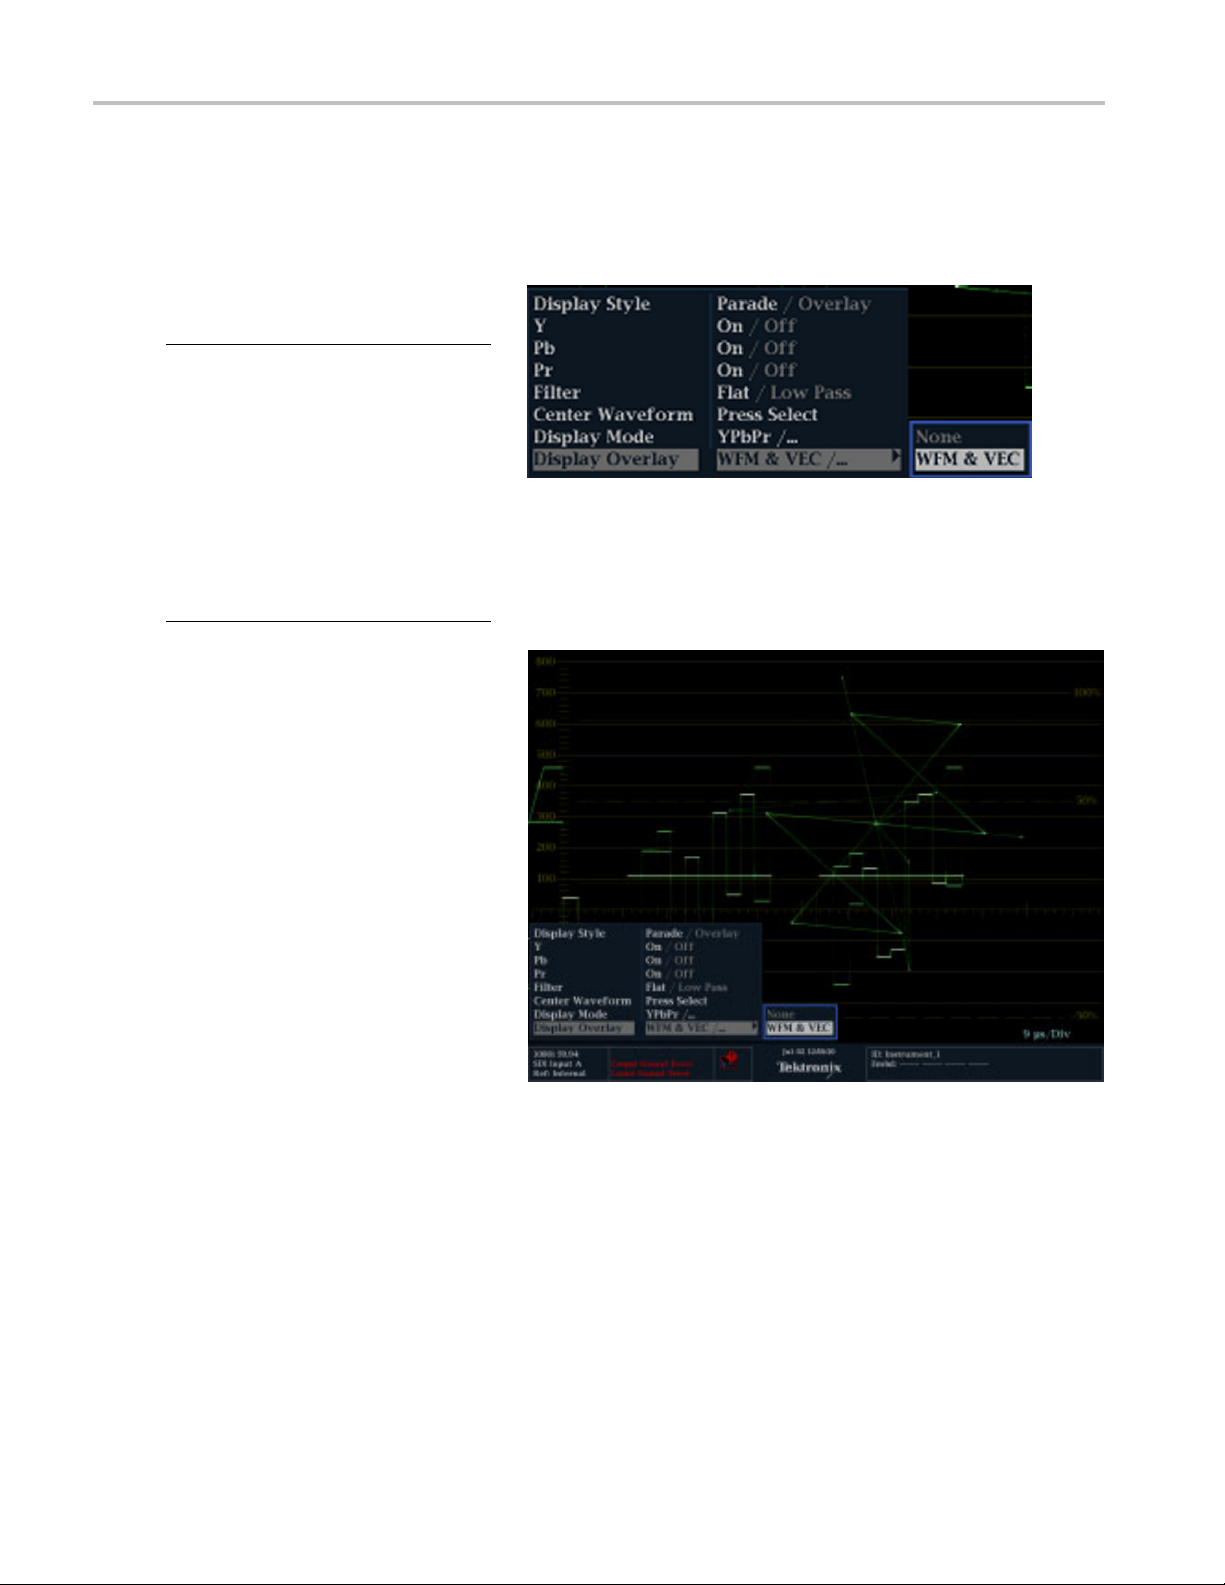
Using Waveform/Vector Display Overlay
Tan d emVu® is a patented display that allows you to overlay the Waveform and Vector or Waveform and Lightning displays,
plus Picture Thumbnail, in a single, full-tile display. You can then view waveform and vector displays, or waveform and
Lightning displays, at the same time. This feature allows you maximum visibility of each trace.
To set up WFM/Vector display
overlay
NOTE. Yo u c a
on the WFM display or the WFM display over
the Vector display. Both overlay options are
selected in
want to overlay the Lightning display, first
select Lightning from the Vector menu, and
then proce
The follow
the Vector over WFM overlay. To set up the
WFM over Vector overlay, select the Vector
button in
1. Press an
the WFM display and the WFM pop-up
menu.
2. In the pop-up menu, navigate to Display
Overla
The Vector display will be overlaid on the
WFM display.
3. Press the WFM button to dismiss the
pop-u
n o verlay the Vector display
the display pop-up menus. If you
ed to select overlay.
ing procedure shows how to set up
stead of the WFM button.
d hold the WFM buttontoview
y and select WFM & VEC.
p menu.
20 WFM4000 and WFM5000 Waveform Monitors User Manual
Page 37

Using Presets
Presets let you save up to eight custom setups for later recall. You can also recall a factory predefined setup.
To Recall an Existing Preset
1. Press the PRESE T button b riefly and the
display buttons on the bottom of the front
panel will li
will appear at the bottom of the display
screen.
2. Press the lit display button that
correspond
screen.
The front panel setup will switch to the
saved pres
pressed.
ght up and named presets
s to the named preset on the
et corresponding to the button
Getting Acquain
tedWithYourInstrument
To Recall
1. Press and hold the PRESET button to
display the preset menu.
2. Select Recall Preset > Recall Factory
Preset.
The front panel setup will revert to the
default factory settings.
the Factory Preset
WFM4000 and WFM5000 Waveform Monitors User Manual 21
Page 38

Getting Acquain
ted With Your Instrument
To Save a Setup to a Preset
1. Set up the instrument according to your
requirements.
2. From the Preset menu, select Save
Preset and select the name to which you
want to map the new preset. This name
corresponds to one of the six numbered
preset buttons.
The setup will be stored for later recall.
Freezing the Display
Freeze allows you to capture the current image for traces (waveform, gamut, and vector), as well as picture, status, and
audio dis
plays. This function is useful for comparing sources or capturing transient events.
NOTE. For waveform displays, the captured image is shown in a different color to distinguish it from the live image. For all
displays, the instrument continues to log error status in the background while the display is frozen.
To Select the Freeze Display Mode
1. Push and hold the FREEZE button to
display the pop-up menu.
2. Use the navigation keys to select the
desired mode, and then press SEL to set
the Freeze display mode:
Live Only allows you to keep a
frozen image, but not display it.
Frozen Only allowsyoutosee
artifacts in the frozen trace m ore
easily.
Live + Frozen allows comparisons
and matching. (Status and Audio
displays do not support this mode.)
To Halt Display Update
Push the FREEZE button to stop a display update. For most displays, this will stop updates.
22 WFM4000 and WFM5000 Waveform Monitors User Manual
Page 39

To Delete the Freeze Display
1. Select the frozen display that you want
to delete.
2. Press and hold the FREEZE button to
display the pop-up menu. By default, the
Delete Image (Clear) will be selected.
Getting Acquain
tedWithYourInstrument
3. Press SEL to
The pop-up menu automatically
disappears when the frozen image is
deleted.
To Save a Di
You can capture a full screen image of any display, whether the instrument is in Full or 4-Tile mode, using the following procedure.
1. Configure the display you want to
capture.
2. Press and hold the MAIN button to
display the pop-up menu.
3. Use the down arrow to navigate to Save
Display to USB.
4. Press the SEL button and follow the
on-screen instructions.
delete the frozen image.
splay to a USB Device
Usage Tips
To adjust this setting, select Display Settings > Freeze Effects from the CONFIG menu.
Cursors track the live trace, so they may not be correctly registered on a frozen trace. If you change parameters such as
tion, sweep rate, or gain, then the cursors may not be accurate relative to a frozen trace.
posi
WFM4000 and WFM5000 Waveform Monitors User Manual 23
Page 40

Getting Acquain
ted With Your Instrument
Setting Line Select Mode
To Toggle Line
1. Select the measurement display for
which you want to set the Line Select
mode.
2. Press the LINE SEL button to toggle
Line Select mode On or Off. When On, it
displays the line information.
3. Press the left or right arrow key to select
F1 (field 1), F2 (field 2), or All.
4. The line and field information will appear
at the bottom of the display screen.
5. Turn the GENERAL knob to select the
line you w ant to view.
Select Mode
24 WFM4000 and WFM5000 Waveform Monitors User Manual
Page 41

Configuring Your Instrument
The Configuration menu is used to change the instrument settings that are changed occasionally such as printer settings. To
change a setting, you must first highlight it. The following procedures help you to navigate through the configuration menu.
To Traverse the Menu Panes
Getting Acquain
tedWithYourInstrument
1. Press the CON
Configuration menu.
The Configuration menu is displayed on
the top or bo
2. Use the left/right arrow keys to m ove the
selection back and forth among panels.
The select
outline.
FIG button to display the
ttom half of the screen.
ed, active pane has a blue
To Select/Adjust a Parameter
3. Use the up/down arrow keys (or the
General knob) to move the selection
down the menu entries in the
up and
selected pane.
Notice which pane is active. The
cted, active menu item is highlighted
sele
by a white menu bar; and the selected
item in the inactive pane is highlighted
ray menu bar.
by a g
ss the SEL button (or right-arrow key)
4. Pre
to toggle between and set the desired
parameter settings.
5. If the menu item selected results in the
b icon appearing in the menu, use
kno
the General knob to adjust the selected
parameter.
WFM4000 and WFM5000 Waveform Monitors User Manual 25
Page 42

Getting Acquain
ted With Your Instrument
Using Online Help
The online help is both a quick and an exclusive reference for instrument operation details. The online help is:
Context-sensitive. The topic displayed depends on what is displayed when the online help is selected or what control is
operated after help is selected.
Navigable. The Contents and Topic Selector panes, along with Links within the topics, provide access to topics.
To Display and Navigate Online
Help
1. Press HELP.
2. Use the GENERAL knob or the up/down
arrow keys
Contents (entries never change).
3. Press SEL to select the highlighted
category.
to highlight an entry in the
4. Press th
selection to the Topic Selector pane
(entries change with the selection made
in step
5. Use the
up/down arrow keys to select among the
topics listed for the heading selected in
step 2
6. Press
e right-arrow key to move
s2and3).
GENERAL knob and the
.
SEL to display the selected topic.
26 WFM4000 and WFM5000 Waveform Monitors User Manual
Page 43
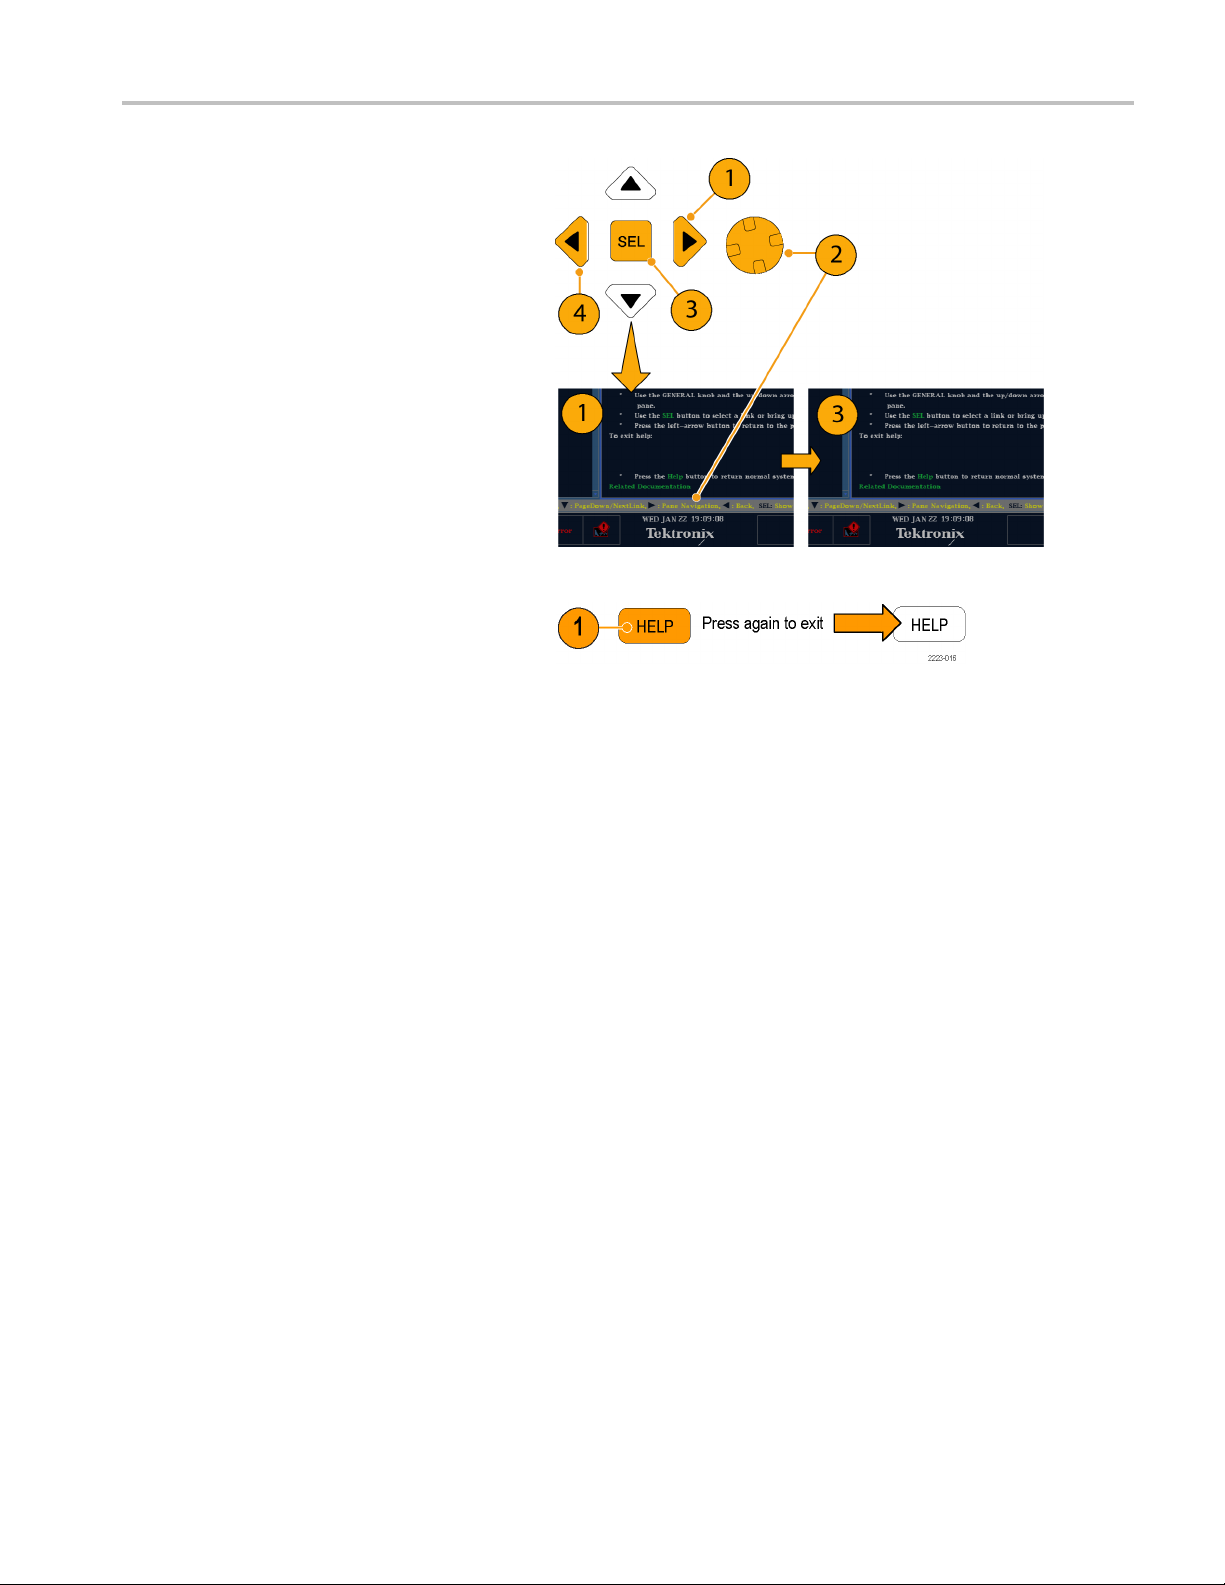
To Follow a Link Within a Help
Topic
1. Press the right-arrow key to move
selection to the Topic pane.
2. Highlight a link using the GENERA L
knob or the up/down arrow key.
3. Press SEL to jump to the linked-to topic.
4. Press the left-arrow key to go back to the
previous topic.
To Get Context Sensitive Help
Getting Acquain
tedWithYourInstrument
1. When a m enu
menu setting for which you want help
information, press the HELP button, and
helponth
2. You can al
turn) a control for which you want help
information and the help topic pane will
display
3. Press HE
is displayed, select the
at setting will appear.
so operate (press, select, or
help on the control you used.
LP again to exit online help.
WFM4000 and WFM5000 Waveform Monitors User Manual 27
Page 44

Getting Acquain
ted With Your Instrument
Adjusting Headphone Volume and Source
When an audio tile is active, the headphone volume can be adjusted using the Horizontal knob. To adjust the audio source,
perform the following procedure.
NOTE. The headphone icon appears at the bottom of the Audio display.
WARNING. To avoid hearing damage, always turn the volume down to the minimum before you put on headphones,
and then turn it up slowly.
1. Press the AUDIO button to bring up the
audio display or make an existing audio
display active in 4-Tile m ode.
2. Press and hold the AUDIO button to
display the Audio menu.
3. Select Phase/Headphone Pair, and
then select the headphone source of
your choice.
28 WFM4000 and WFM5000 Waveform Monitors User Manual
Page 45

Checking Chroma
/Luma Delay (Lightning Display)
Checking Chro
The Lightning display can be used for interchannel timing measurements. When the color-difference signal is not coincident
with luma, the transitions between the c olor dots will deviate from the center mark of a delay scale. The amount of deviation
represents the relative signal delay between luma and the color-difference signal.
1. Connect a signal containing color bar
information, terminating the signal
properly.
2. Press and hold the VECT button to
display the signal and the Vector pop-up
menu.
ma/Luma Delay (Lightning Display)
WFM4000 and WFM5000 Waveform Monitors User Manual 29
Page 46

Checking Chroma
3. Use the arrow keys and the SEL button
to set the menu in the steps that follow.
4. Set the Display Type to Lightning.
5. Set BAR TARGETS to match y our input
signal.
6. Select Center Waveform, and press
SEL if you want to center the waveform.
/Luma Delay (Lightning Display)
7. Press the VECT button to close the
pop-up menu.
8. Determine where transitions intersect the
delay scales and derive the timing error
in nanoseconds, as deflected from the
center mark:
The center mark of the nine marks
spanning each green-magenta
transition is the zero error point.
Alignment to a mark towards black
means the color-difference signal
lags with respect to luma.
Alignment to a mark towards white
means the color-difference signal
leads the luma signal.
The upper half of the display
measures the Pb to Y timing; the
bottom half measures the Pr to Y
timing.
30 WFM4000 and WFM5000 Waveform Monitors User Manual
Page 47

The + tic marks on the graticule indicate the following timing errors:
Checking Chroma
/Luma Delay (Lightning Display)
Tic mark SD timing error (ns) HD timing error (ns)
0marks 0 0 0
1st 20 2 1
2nd 40
3rd 74
4th 148
1
Luma sample
2
Chroma sample
1
2
5
13.5 6.75
27 13.5
1080p 50, 59.94
, 60 (dual link
formats) tim ing error (ns)
2.5
WFM4000 and WFM5000 Waveform Monitors User Manual 31
Page 48

Checking Gamut
Checking Gamu
Signals that are legal and valid i n one signal representation may not be legal in another representation. Specifically, signals
which are legal in the Digital YCbCr representation may not be legal if transcoded to RGB or encoded to NTSC/PAL.
Any signal that fails this test is considered outofgamut.
Your instrument supports multiple displays and alarms to detect outofgamut signals. The displays and their uses are as
follows:
Diamond for checking that SDI signals conform to legal RGB gamut space
Split Diamond separates the upper and lower diamonds to show excursions below black; otherwise it is identical to
the Diamond display
Arrowhead for checking if an SDI signal is legal for composite color space
Diamond, Split Diamond, and Arrowhead have adjustable thresholds. If the signal goes outside the area defined by the
thresholds, the signal is outofgamut. If these limits are exceeded, the instrument can generate alarms if configured to do so.
t
Setup for Gamut Checks
1. Connect a video signal and terminate it
properly.
2. Select the input corresponding to the
signal connected.
3. Press and hold the GAMUT button
play the signal and the GAMUT
to dis
pop-up menu.
32 WFM4000 and WFM5000 Waveform Monitors User Manual
Page 49

4. Use the arrow keys and SEL button to
set the menu to one of these three gamut
displays:
Checking Gamut
Diamond. Use t
o detect, isolate,
and correct RGB component gamut
errors.
Split Diamond. Use to reveal
hard-to-find
Arrowhead.
black gamut errors.
Use to detect composite
gamut errors, without employing a
composite encoder.
5. Press the GAMUT button to close the
menu.
Checking RGB Gamut
The Diamond display effectively shows
how the R
it a good tool for detecting gamut errors.
The instrument converts the Y, P
compone
to R, G, and B to form the Diamond display.
To predictably display all three components,
they mu
and black, 0 V.
For a signal to be in gamut, all signal vectors
must l
Conversely, if a signal vector extends outside
the diamond, it is outofgamut. The direction
of an e
which signal is excessive. Errors in green
amplitude affect both diamonds equally,
whil
top diamond and red errors affect only the
bottom diamond.
, G, and B signals relate, making
nts recovered from the serial signal
st lie between peak white, 700 mV,
ie within the G-B and G-R diamonds.
xcursion outofgamut indicates
e blue amplitude errors affect only the
and P
b,
r
WFM4000 and WFM5000 Waveform Monitors User Manual 33
Page 50

Checking Gamut
1. Perform the Setup for Gamut Checks
procedure. Select Diamond in step 4.
(See page 32.)
2. Compare the si
determine out-of-gamut components,
and note the following:
The intensity of a vector indicates its
duration.
A momentary o
appears as a faint trace. Long
duration violations show as a bright
trace.
Seethefollowingstepforsomesample
out-of-gamut signals.
3. Consider the following examples when
evaluating for outofgamut components:
A. Example A:
R-Ok
G > 700 mV
B-Ok
B. Example B:
R-Ok
G-Ok
B > 700 mV
C. Example C:
R-Ok
G - Ok, 350 mV
B<0mV
gnal to the display to
ut-of-gamut condition
Usage Notes
Diamond display, monochrome signals appear as vertical lines. Nonlinear component processing, such as from a
On the
gamma corrector that alters white balance, can cause deviations along the vertical axis.
To isolate gamut bright-ups, try the following:
Use the LINE SEL button to select individual lines
Use the PICT display to examine the signal (turn on gamut bright-ups in the Display Settings submenu of the
Configuration menu)
Use the Arrowhead % setting (found in the Gamut Thresholds submenu of the Configuration menu) to specify a
centage of the screen to ignore for gamut violations.
per
34 WFM4000 and WFM5000 Waveform Monitors User Manual
Page 51

Checking Composite Gamut
The Arrowhead gamut display plots luminance (Y) against chrominance (C) to check if the composite signal adheres to
standard gamut. NTSC and PAL Arrowhead displays (75% Color bars) show the values of the graticule lines. The arrowhead
shape of the g raticule results from overlaying the standard limits for luminance and luminance-plus-peak chrominance.
Checking Gamut
1. Perform the Setup for Gamut Checks
procedure. Select Arrowhead in step 4.
(See page 32.)
2. Compare the signal to the display to
determine out-of-gamut composite
components, noting the following:
Signals exceeding the luminance
amplitude gamut extend above the
top horizontal limit (top electronic
graticule line).
Signals exceeding the luminance-
pluspeak chrominance amplitude
gamut extend beyond the upper and
lower diagonal limits.
The bottom horizontal line shows the
minimum allowed luminance level of
7.5 IRE for NTSC and 0 mV for PAL.
WFM4000 and WFM5000 Waveform Monitors User Manual 35
Page 52

Checking Gamut
Usage Notes
To adjust the IRE level limits, do the procedure Adjusting Gamut Limits. (See page 38, Adjusting Gamut Limits.)
To automate this check, do the procedure Automating Gamut Checks. (See page 37, Automating Gamut Checks.)
Checking Luma Gamut
Luma limit thresholds can be configured for identifying luma exceeding threshold limits. They apply to both the incoming
SDI and to the
automatically account for the presence or absence o f setup. The thresholds are affected by your choice of setup or no
setup for the Arrowhead display.
arrowhead representation of the SDI input as a composite signal. By defining these levels in percent, they
1. Perform the
procedure. Select Arrowhead in step 4.
(See page 32.)
2. Compare the signal to display to
determine
the following:
The adjustable thresholds are
indicated by the dark blue horizontal
graticul
The thre
of percent of full scale.
The range for the Upper limit is 90%
to 108%.
The range to the Lower Limit is -6%
to +5%.
er useful Arrowhead function is a measure of how well the active v ideo signal is using the dynamic range of the video
Anoth
channel. A properly adjusted signal should be centered in the arrowhead graticule and have transitions that approach
all the limits.
Setup for Gamut Checks
out-of-gamut luminance. Note
e lines.
sholds are defined in terms
36 WFM4000 and WFM5000 Waveform Monitors User Manual
Page 53

Automating Gamut Checks
You can use alarms to automatically monitor for out-of-gamut conditions:
1. Press the CONFIG button to display the
Configuration menu.
2. Use the arrow keys and SEL button to
select Alarms and then Video Content.
Checking Gamut
3. Use the arrow keys to move to each of
m that you want to set. Press
the alar
SEL button to toggle the alarm on (X) or
off.
4. When yo
move to the Return box and select it.
u have configured the Alarms,
WFM4000 and WFM5000 Waveform Monitors User Manual 37
Page 54

Checking Gamut
5. Check that Enable Alarms is set to On
in the Alarms m enu before leaving the
Alarms menu.
NOTE. For information on Alarms, press the
HELP button while Alarms is selected in the
configuratio
n menu.
6. Press CONF
IG to exit the m enu.
Adjusting Gamut Limits
1. Press the CONFIG button to display the
Configura
2. Use the l
button to select Gamut Thresholds.
3. Press the SEL button to enter the
submenu, and then use the arrow keys
and SEL
when indicated) to select and set the
various thresholds.
Note th
to defaults.
tion menu.
eft/right arrow keys and SEL
button (and General knob,
at you can also reset thresholds
38 WFM4000 and WFM5000 Waveform Monitors User Manual
Page 55

Timing Display
The Timing display is a Tektronix proprietary display that simplifies measuring the timing difference between two signals
as the timing is corrected. You can access this display from the STATUS button. Using the Timing display enables you
to easily compare and correct the timing between two signals. (See Figure 1.)
Timing Display
Figure 1: Timing display
Timing Display Elements
Input Signal Indicator: A single circle representing timing of input signal relative to the reference.
Reference Ind icato r: A cross-hair indicator centered in the display represents the reference signal.
Vertical Offset: The timing difference between the reference and input signal.
Horizontal Offset: The timing difference between the reference and input signal.
Relative to: Indicates the chosen zero point for the timing display.
2
LinkBtoLinkA:Indicates the timing reference relationship when the instrument is in simultaneous input mode.
(Available with WFM4000 models only)
1
More complex timing relationships display multiple circles. See Timing Displays for Simple Versus Complex Timing.(Seepage40.)
2
Rear Panel is the default setting, where offset is shown as zero when the input and reference are at the same timing at the rear
panel of the instrument. If you select Saved Offset, you can save the timing from one signal, and then display the timing relative
to that saved offset.
1
WFM4000 and WFM5000 Waveform Monitors User Manual 39
Page 56

Timing Display
Timing Pop-up Menu
Once you have selected Timing Measure from the STATUS button pop-up menu, pop-up menu enables you to save a timing
setting for comparison with another signal and specify the zero point of the timing display.
To save the timing of the current input as an offset to the timing display, use the Save Offset menu entry. The current timing
becomes the zero point for the saved offset mode of the timing display. This applies to both the cross-hair target in the
middle of the display and the numeric readouts.
NOTE. You cannot save the timing offset if either the input or reference is missing or unlocked. You also cannot save a
reference when in internal mode. Saving an offset in these conditions would lead to misleading results so it is not allowed by
the instrument. A warning message will appear on the screen if you attempt to save the offset when it is not allowed.
Save Offset allows you to measure the timing between inputs or to match multiple signals. To select the defi nition for the zero
timing offset, use the Relative To: menu entry to select one of the following:
Rear Panel means the timing offset will be shown as zero when the two signals are timed down at the rear of the
instrument.
Saved Offset means that the timing will be shown as zero offset when the input signal matches the timing of the signal
that was present when the offset was saved using the Save Offset menu entry.
This selection changes both the numeric readouts and the target in the middle of the timing display.
Timing Displays for Simple Compared to Complex Timing
The num
and input signals.
Integer multiples of reference rates. If you are timing input signals with rates that are integer multiples of the reference
rates, the instrument can measure the timing deterministically and displays the relationship as one circle (offset) relative
to the cross-hair. (See Figure 2.)
ber of circles, with each representing a time offset, varies with the complexity of the timing between the reference
Figure 2: Timing display of integer multiples of reference rates
40 WFM4000 and WFM5000 Waveform Monitors User Manual
Page 57

Timing Display
Such cases include timing an NTSC input (multiplier of 1) or a 525 SDI input whose frame time is 33.36 ms (multiplier of 2),
against an NTSC
reference, which has a frame time of 66.73 ms.
Non-integer multiples of reference rates. If you time input rates that are not integer multiples of the reference rates,
the instrument cannot measure the timing deterministically, so it displays the relationships as several circles. Each circle
represents a possible timing offset measurement relative to the reference cross-hair. Display emphasis is given to the circle
that times closest to zero offset and the numerical readouts track this pair. (See Figure 3.)
Figure 3: Timing display of non-integer multiples of reference rates
Nondeterministic cases include timing of slow rate inputs against fast frame-rate references or when timing video against
film rates.
le relationships.
Multip
a reference of NTSC/59.94 Hz:
The different rates result in timing relationships between the signals that repeat once for every four fields of the input
and five frames of the reference.
Because this allows for five possible ways to measure timing between these two signals, the timing display shows four
es, with emphasis and readouts as previously described above.
circl
For a case where multiple relationships would display, consider an input of 1080p/23.98 Hz with
WFM4000 and WFM5000 Waveform Monitors User Manual 41
Page 58

Timing Display
Supported Video Formats
The following table shows w hich video formats are supported. If a specific format is only suported by a specific instrument
model, it is referenced in a footnote.
Table 2: Supported video formats
Supported
formats 59.94 Hz 50 Hz 50 Hz 59.94 Hz 60 Hz 23.98 Hz 24 Hz 50 Hz 59.94 Hz 60 Hz
483i, 59.94 Hz
(525), BT601
576i, 50 Hz
(625), BT601
720p,
23.98 Hz
720p, 24 Hz
720p, 25 Hz
720p,
29.97 Hz
720p, 30 Hz
720p, 50 Hz
720p,
59.94 Hz
720p, 60 Hz
1035i,
59.94 Hz
1035i, 60 Hz
1080i, 50 Hz
1080i,
59.94 Hz
1080i, 60 Hz
1080p,
23.98 Hz
1080p, 24 Hz
1
External reference inputs
NTSC PAL 720p 1080p/sF 1080i
xx x
xx x
xx x
1
1
1
xx x
xx x
xx x
1
1
1
xx x
xx
xxx x
1
1
xx x
xx x
1
1
1
xx x
xx x
xx
1
1
xx x
xxx x
1
xx x
1080p, 25 Hz
1
1080p,
29.97 Hz
1
1080p, 30 Hz
1
1080sf,
23.98 Hz
1
1080sf, 24 Hz
1
xx x
xxx x
xx x
xx
xx x
42 WFM4000 and WFM5000 Waveform Monitors User Manual
Page 59

Timing Display
Table 2: Supported video formats (cont.)
External reference inputs
Supported
formats 59.94 Hz 50 Hz 50 Hz 59.94Hz 60 Hz 23.98 Hz 24 Hz 50 Hz 59.94 Hz 60 Hz
1080sf, 25 Hz
1
NTSC PAL 720p 1080p/sF 1080i
xx x
1080sf,
29.97 Hz
1
1080sf, 30 Hz
1
1
Available with the WFM5000 only.
xx
xx
WFM4000 and WFM5000 Waveform Monitors User Manual 43
Page 60
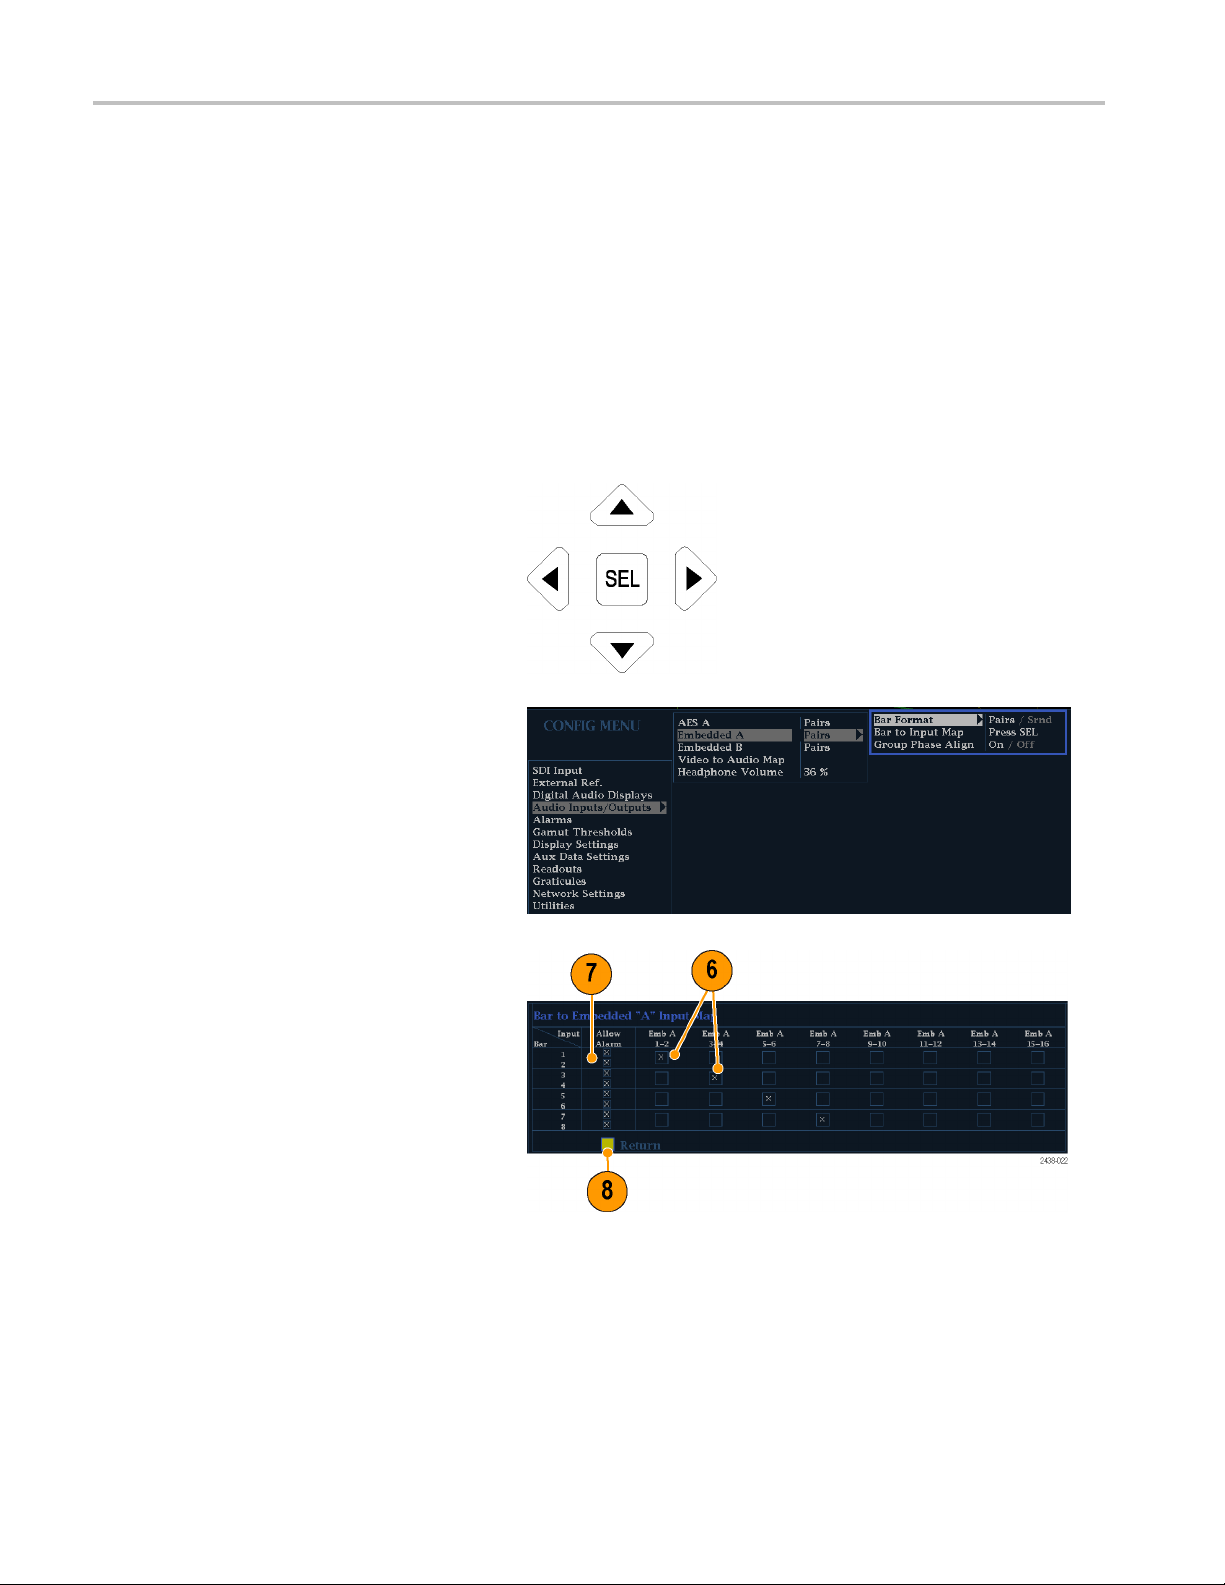
Monitoring Audi
o
Monitoring Audio
Your instrument provides several methods for monitoring audio signals. It can measure levels, phase, and phase correlation.
Yo u can specify meter ballistics and scales, set test and peak program indicator levels, and specify how phase is displayed.
Configuring Audio Inputs
Audio inputs
monitoring procedures in this section. The first procedure will help you configure the inputs. After you have completed that
procedure, check that the alarms are configured as you want them. (See page 44, Monitoring Audio.) Your setup here
determines
To set up a n A
1. Press the C
Configuration menu.
2. Use the Arrow keys and SEL button to
make selections in the steps that follow.
3. Select A
4. Select t
are initially set to factory defaults. As a result, you may need to con fi gure them before performing the audio
, in part, which audio-signal characteristics are displayed.
udio Input:
ONFIG button to display the
udio Inputs/Outputs.
he input to be confi gured.
5. Select Bar to Input Map and specify
which i nput pair should be displayed in
each bar pair.
6. Specify which inputs will be allowed to
generate alarms.
7. Select the Return box to return to the
Configuration menu.
8. Repeat steps 4 through 7 for other audio
uts, as needed.
inp
44 WFM4000 and WFM5000 Waveform Monitors User Manual
Page 61

Selecting Audio Input
Select the audio input to be monitored from the front-panel AUDIO button pop-up menu.
1. Press and hold the Audio button to open
the Audio display and popup the Audio
menu.
Monitoring Audi
o
2. Use the Ar
make selections in the steps that follow.
3. Select Audio Input and then select one
of the audio input options shown.
row K eys and SEL button to
WFM4000 and WFM5000 Waveform Monitors User Manual 45
Page 62

Monitoring Audi
o
Checking Audio Level and Phase
Level meters are vertical bar graphs on which the height of the bar indicates the amplitude of the audio program in the
corresponding input channel. You can change the input and turn on and off the Phase display from the Audio pop-up
menu. Other meter characteristics such as ballist ics, scale units, and program and test levels are configured through the
Configuration menu.
Your instrument can d isplay phase of one input pair as a Lissajous pattern, and display c orrelation of all pairs.
To Check Level
1. Open the audio display and select an
input. (See
page 45.)
2. Check the l
audio levels, which are displayed
according to the selected meter ballistics.
Each bar di
evel meter bars for current
splays three colors:
Green–Ind
the test level
Yellow – Indicates audio levels
between the test and peak program
level
Red–Ind
the peak program level
icates audio levels below
icates audio levels above
To Check Phase
1. Open the audio display. (See page 45.)
Use the
make selections in the steps that follow.
2. Select Aux Display and then select
Phase Display to turn it on.
3. Select the Phase Style. Choose
eithe
orientation for the Lissajous signal.
Arrow keys and SEL button to
raLissajous Soundstage or X-Y
4. Select the phase pair that has to be
displayed from the Phase/Headphone
.
Pair
the Audio Input to match the signal
5. Set
that you are checking.
46 WFM4000 and WFM5000 Waveform Monitors User Manual
Page 63
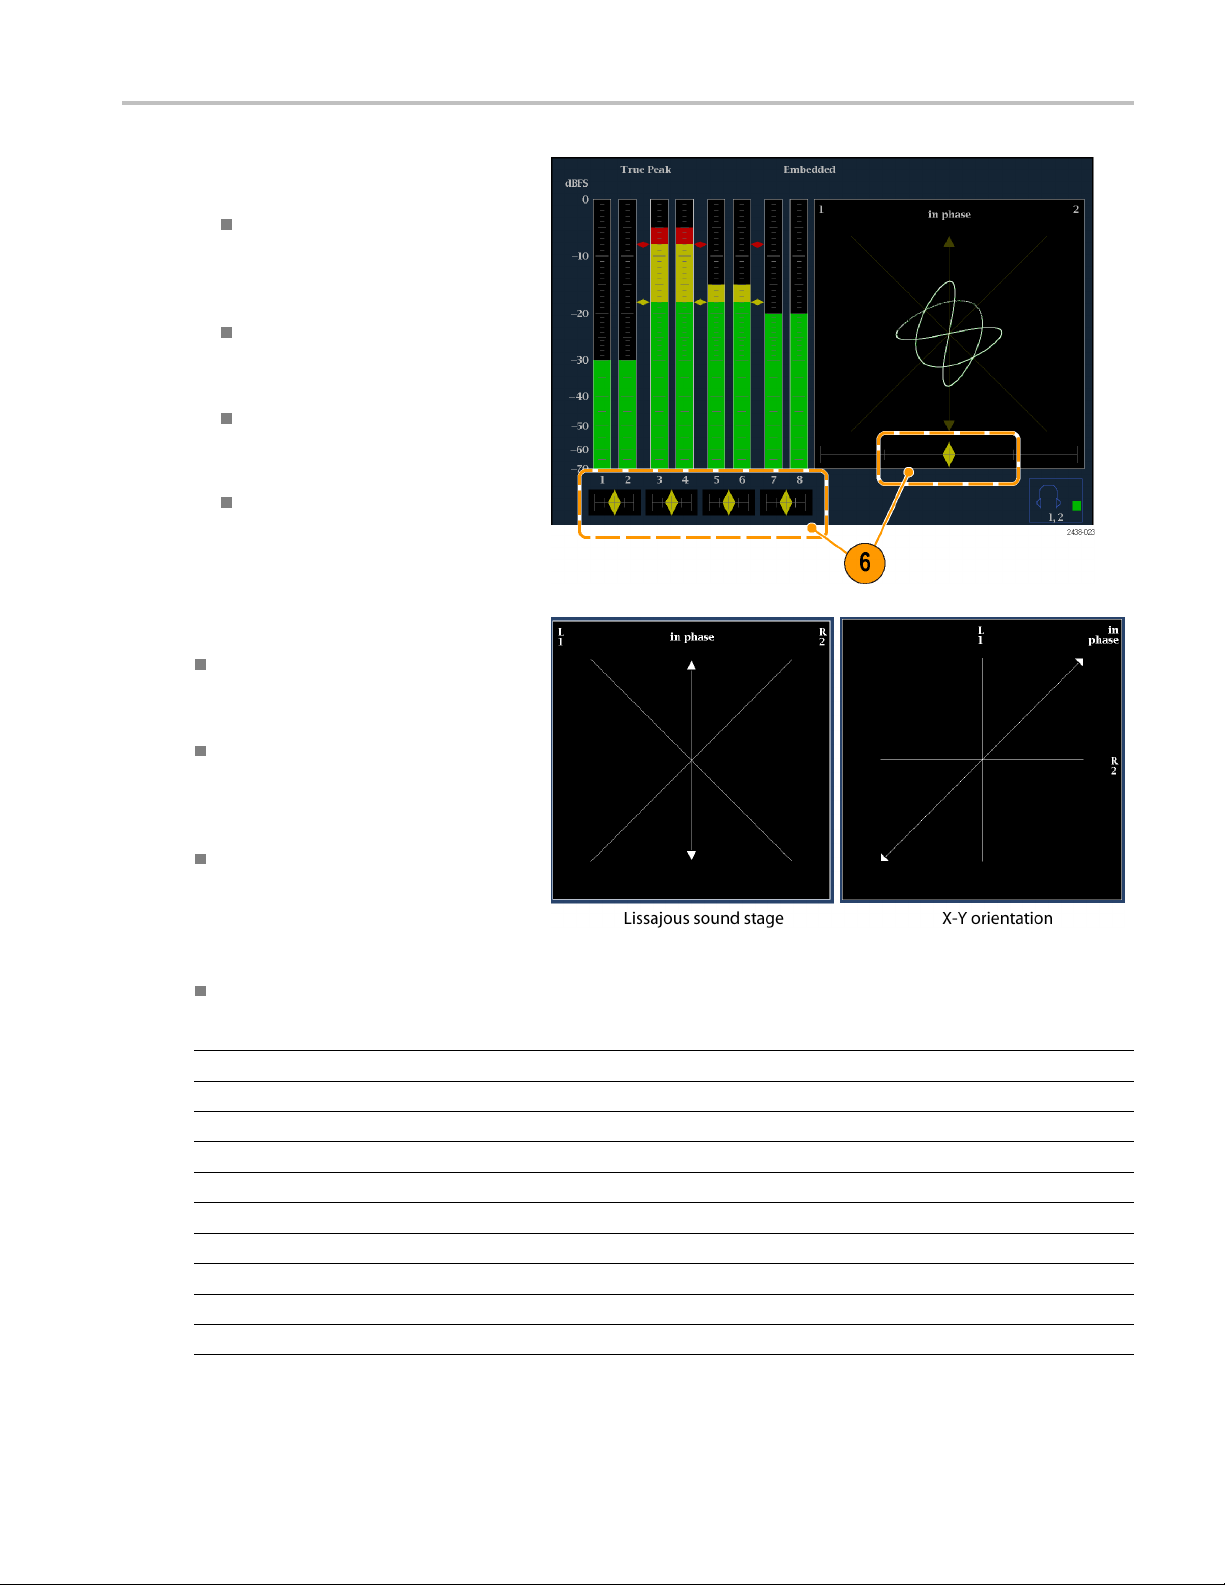
6. Check for Phase c orrelation of the
signals, noting the following:
Phase correlation meters are located
under the appr
one is duplicated under the phase
display.
For correlated signals, the indicator
will be green
right.
For uncorrelated signals, the
indicator will be yellow and will tend
to stay in t
opriate bars and
and will move to the
he middle.
Monitoring Audi
o
For antico
up when the other goes down), the
indicator will be red and will move
to the left
rrelated signals (one goes
.
Usage Notes
The Lissajous or phase display is a plot
of one channel against another on an
orthogonal pair of axes.
Soundstage plots the two channels
at 45 degree angles, with the mono
combination appearing on the vertical
axis, like a left-right image in a studio.
X-Y plots left-channel data on the
vertical axis and right channel data on
the horizontal axis, emulating the X-Y
display of an oscilloscope.
The following response times of the correlation meters can be set from the Configuration menu.
Speed setting Response averaging time (s) Speed setting Response averaging time (s)
1 0.0167 11 3.0
2 0.0333 12 3.5
3 0.0667 13 4.0
4 0.1333 14 4.5
5
6 0.5333 16
7
8 ( default)
9 2.0 19 7.0
10 2.5 20
0.2667 15 5.0
5.5
1.0 17 6.0
1.5 18 6.5
7.5
WFM4000 and WFM5000 Waveform Monitors User Manual 47
Page 64

Monitoring Safe
Area Graticule
Monitoring Sa
Your instrument can also display Safe Action and Safe Title graticules, allowing you to monitor incorrect placements of
graphics, logos, and other branding elements. This will help you ensure that those items do not obscure text or essential
action. SMPTE and ITU standards are supported.
fe Area Graticule
Monitoring for Safe Area Graticule
To dis p la y g
settings in the Con figuration menu and turn on up to four Safe Area graticules, each with independent settings, in the
Picture menu.
To Co nfigur
Before using Safe Area Graticules, configure
them from the Configuration menu by
performing the following steps:
1. Press the CONFIG button to display the
2. Use the arrow keys and SEL button to
3. Select Graticules and then select Safe
raticules for monitoring incorrect placements of nonessential elements relative to essential ones, set global
eSafeAreaGraticules
Configuration menu.
make selections in the steps that follow.
Area G raticule Standard.
4. Choose from the SMPTE or ITU
standards.
The selection you choose will be the
graticule used when AUTO is chosen
for any of the four Safe Area Graticules,
accessed in the Picture menu.
48 WFM4000 and WFM5000 Waveform Monitors User Manual
Page 65
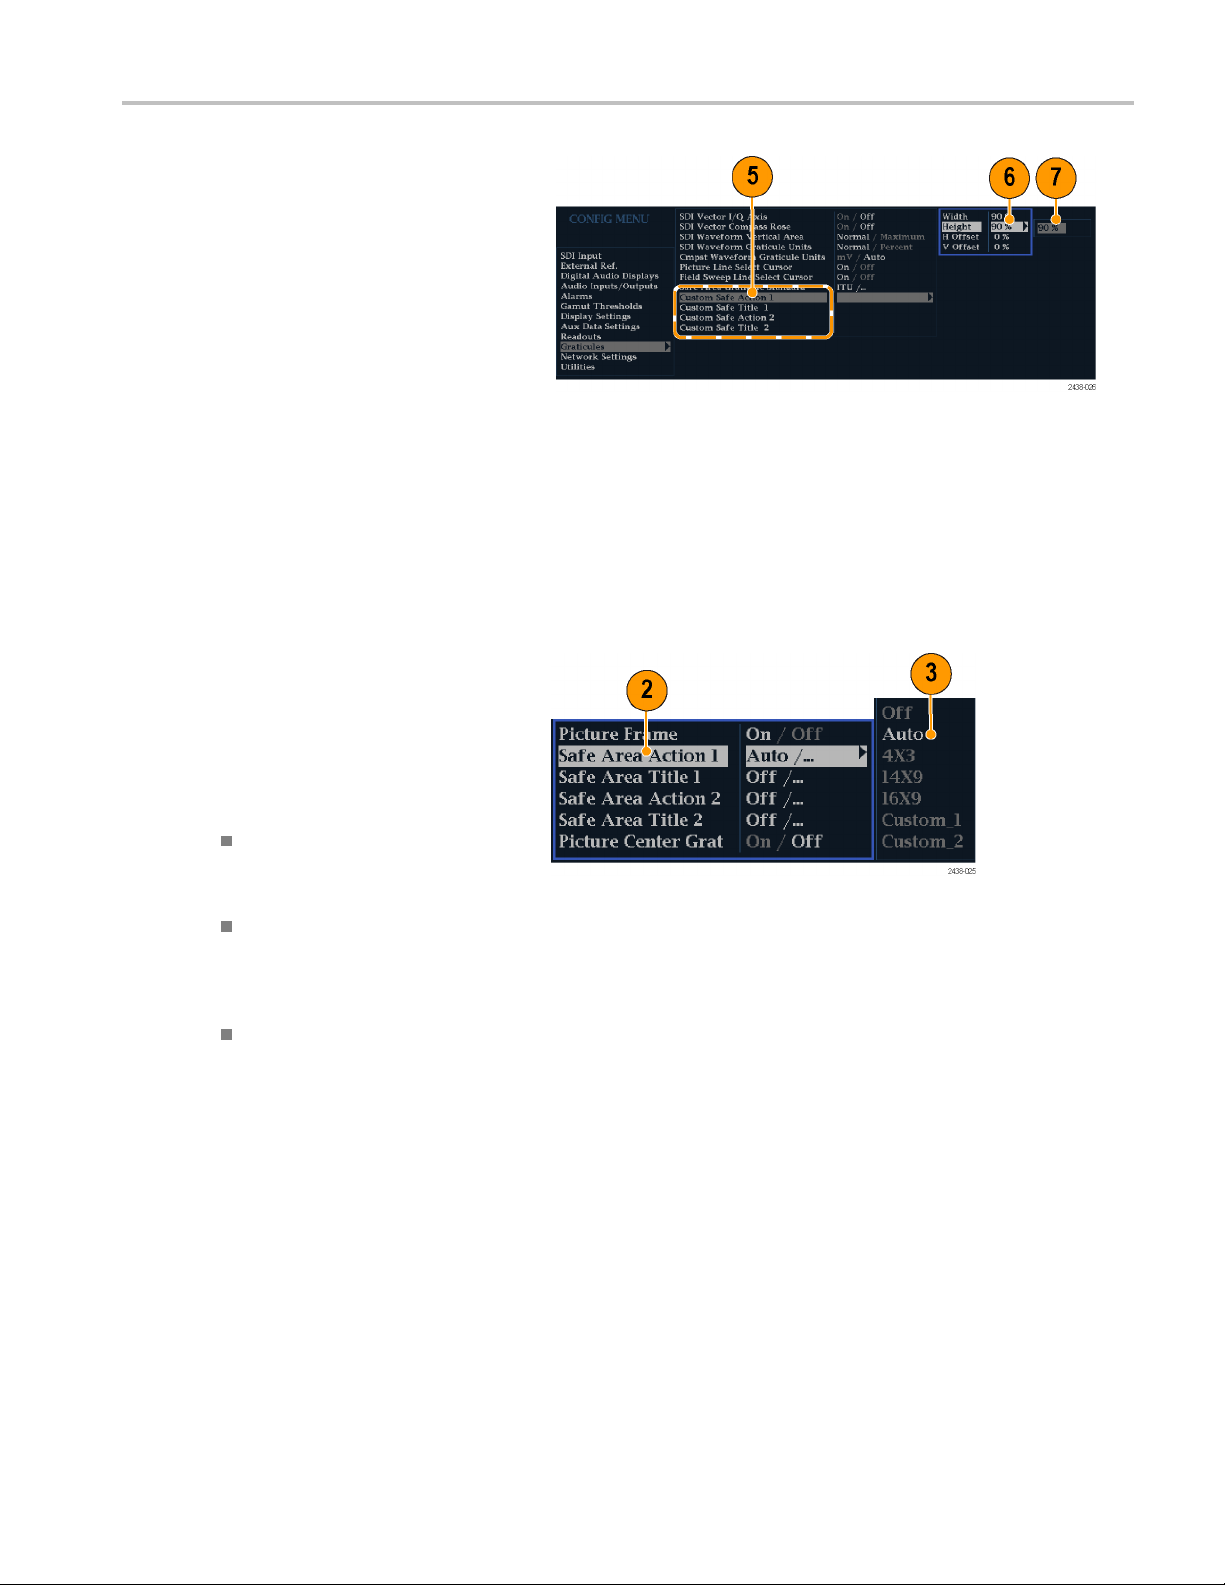
5. If you want to set the Height, Width, and
Offsets of the title and action areas for
Custom Safe Gr
select the title or action to change.
6. Select the parameter.
7. Set the percentage level for each of the
parameters.
Parameters a
screen height or width, and you can
watch the graticules update on the
screen as yo
The c ustom parameters you set will be
used when Custom_1 or Custom_2 is
chosen for
Graticules accessed in the Picture menu.
8. Press the CONFIG button again to close
the Configuration menu.
aticules 1 and 2, first
re set as a percentage of
u change them.
any of the four Safe Area
Monitoring Safe
Area Graticule
To Displa
1. Press and hold the PICT button to
2. Select Safe Area Action 1.
3. Select one of the following:
4. Repeat step for each Safe Area
ySafeAreaGraticules
display the Picture menu.
Auto to let the instrument
automatically select the size
and offsets of the safe area.
4x3, 14x9,or16x9 to set the safe
area size and offsets appropriate
for these aspect ratios based on the
selected standard.
Custom_1 or Custom_2 to set the
safe area size and offsets to match
the custom settings in the Graticules
Configuration menu. (See the
procedure To C on figure Safe Area
Graticules, step 5.)
selection.
5. Press the PICT button again to close the
pop-up menu.
WFM4000 and WFM5000 Waveform Monitors User Manual 49
Page 66

Monitoring Safe
Usage Notes
Area Graticule
The Safe Action Area denotes the
maximum image area within which all
significant action should be contained;
the Safe Title Area denotes the
maximum image area within which all
significant titles should be contained.
Safe Area Graticules can globally
be configured to comply to accepted
standards in the Configuration menu.
Custom selections for vertical and
horizontal size and offset of the Save
Areas can be set in the Configuration
menu.
50 WFM4000 and WFM5000 Waveform Monitors User Manual
Page 67

Using Alarms
Alarms can be configured so that your instrument automatically monitors parameters and reports when those parameter
limits are exceeded. The procedures that follow describe how to configure response types for individual alarms, how to
enable them, and how to monitor them.
Configuring Alarms
Alarms may need to be configured in the Configuration menu. Alarms are initially set to factory defaults, which can be
restored by pressing the PRESET button on the front-panel of your instrument, selecting Recall Preset > Recall Factory
Preset, and
performing the audio monitoring procedures. (See page 44, Monitoring Audio.)
You can select alarms, set error conditions to be monitored, and the notification method for an error event for the following
categories:
then pressing the SEL button. Follow the first procedure of this section (if alarm configuration is needed) before
Using Alarms
Video C ont
Video Format
SDI Inpu
General
ent
t
Audio
To Set Allowed Alarm Responses
1. Press the CONFIG button to display the
Configuration menu.
2. Use the arrow keys and SEL button to
make selections in the steps that follow.
3. Select Alarms.
4. Navigate to the alarm category that
you want to configure. In the example
to the right, Video Format alarms is
highlighted.
5. Note that the alarms in the category
you select appear to the right as you
highlight the alarm category. Press SEL
to display a table that allows you to set
the responses for individual alarms.
AES and Emb
Embedded
General
Audio Specific
edded
WFM4000 and WFM5000 Waveform Monitors User Manual 51
Page 68

Using Alarms
6. For each alarm l
the SEL button to enable (when enabled,
there is an X in the box) or disable
(when disable
page 53, Possible Alarm Responses.)
7. Navigate to h ighlight the Return box,
and press the SEL buttontoreturntothe
Configuratio
8. Repeat steps
many types of alarms as you want.
To Set Ala rm
1. Press the CONFIG button to display the
Configuration menu.
2. Use the arrow keys and SEL button to
make selections in the steps that follow.
3. Select Alarms.
4. Navigate to Set all alarms to this mask.
5. Press SEL to display a table for setting
the allowed alarm responses that will be
applied to all the alarm categories.
isted in the table, press
d, the box is blank) it. (See
n menu.
4through7toconfigure as
Responses Globally
6. For each alarm listed in the table, press
the SEL button to enable (when enabled,
there is an X in the box) or disable
(when disabled, the box is blank) it. (See
page 53, Possible Alarm Responses.)
7. Navigate to h ighlight the Return box,
and press the SEL buttontoreturntothe
Configuration menu.
This sets alarms for all alarm categories
to the setting on the global mask.
52 WFM4000 and WFM5000 Waveform Monitors User Manual
Page 69

Using Alarms
Possible Alarm Responses
For each available alarm, you can select up to four of the responses listed. If you do not select a notification method for
an error, you will not be notified when the error occurs.
Screen Text/Icon. An icon appears on the display. This notification method is disabled when the Configuration menu is
open. This option also enables alarm reporting with color on the Status screen.
Logging. The instrument makes an entry in the Event Log. Refer to Status Display in the Display Information section
of the User Technical Reference manual.
Ground Closure. The instrument sends a signal out the Remote port for a remote notification that an alarm condition
occurred. You must enable the Remote Control Port in the Communications submenu of the Configuration menu
before notifications can be sent.
NOTE. You can monitor alarm status. (See page 55, Monitoring Alarms.)
To Enable Alarms
The channels for which you enable alarms
trigger your previously defined alarm
response
Alarm Responses.)
s. (See page 51, To Set Allowed
1. Press the CONFIG button to display the
Configuration menu.
2. Use the arrow keys and SEL button to
make se
3. To glob
Enable Alarms and toggle it to On.This
turns on all alarms that are individually
enable
switch them on and off without changing
their individual settings (see step 4).
4. Additionally, for Audio inputs, you must
enab
To start, select Audio Inputs/Outputs in
the Configuration menu.
5. Select each input shown in the box to
ind
example, AES A is selected.
lections in the steps that follow.
ally enable all alarms, select
d and provides a quick way to
le alarms individually by channels.
ividually enable its alarms. In this
WFM4000 and WFM5000 Waveform Monitors User Manual 53
Page 70

Using Alarms
6. For each of the AES and Embedded
7. Navigate to each box for each alarm that
8. Select the box, and press the Return
inputs, select Bar to Input Map and
press the SEL b
to Input map menu.
youwanttoallow.PresstheSE L button
to enable (when enabled, there is an X
in the box) or disable (when disabled,
the box is blank) it for each channel
displayed.
button to return to the Configuration
menu.
utton to display the Bar
To Set Limits or Qualifications
Some a la
condition that triggers the alarm.
1. Select Digital Audio Displays > Alarm
2. Set the following alarm levels that trigger
rms require a threshold setting or
Thresholds from the Confi g menu.
m when exceeded:
an alar
mples: number of consecutive
Clip Sa
samples at the all-high level.
Mute Samples: number of
consecutive all-zero sam p les.
Silence Level: the level below which
o is considered not present.
audi
nce Duration: the length of audio
Sile
silence time allowed.
Over Level: the too-loud audio level.
Over Duration: the length of time limit
for the too-loud audio.
54 WFM4000 and WFM5000 Waveform Monitors User Manual
Page 71

Monitoring Alarms
After defining and enabling alarms, you can quickly check if any error condition exists by looking for the notification you
defined (text, icon, or logging). (See page 8, Status Bar Icons.) Selecting the Ground Closure output response can help you
notice alarms that you may miss if the notification is text or icon only. Ground Closure c an be used to drive an external alarm
when one or more alarms are triggered. (See page 51, To Set Allowed Alarm Responses.)
If you want to check the condition of a specificalarm,presstheSTATUS button. In the Status menu, select Display Type
and then select Alarm Status. One or more of the following will appear:
Indicator Description
Disabled (gray) Alarm is not selected for reporting, but will still show if the
OK (green) Alarm is enabled for reporting and has not detected errors
Error (yellow) Alarm condition cleared for less than 5 seconds.
Error (red)
Using Alarms
error is present.
for at least 5 seconds.
Alarm triggered now.
WFM4000 and WFM5000 Waveform Monitors User Manual 55
Page 72

Upgrading Instr
ument Software
Upgrading Ins
System Upgrade (CONFIG > Utilities > System Upgrade) is used to upgrade the system software of this instrument. You
can upgrade the instrument software using a PC or through the USB drive on the instrument. An Ethernet connection is
required for either upgrade option. The following procedures explain how to do both.
NOTE. The data-transfer utility for upgrading the instrument runs on these PC systems: Windows 98, Windows NT 4.0,
Windows ME, Windows 2000, and Windows XP. The data-transfer utility also requires Winsock 2.0, an ethernet interface,
and that 10 MB of free disk space be present on the PC system.
USB Upgrade
Download the latest version of the instrument
software t
performing the following procedure:
1. Using an Ethernet connection on a PC,
2. Find the D
3. Enter your instrument model number in
o a U SB memory device by
navigate to the Tektronix Web site at
ww.tektronix.com.
http://w
ownloads heading located on
the right-hand side of the Web page.
the top field, select Software from the
wn menu in the bottom field, then
drop-do
click Go.
trument Software
4. Click on Sort by DATE to find the most
the r ecent software release.
5. Download the file and save it to a USB
y device that is compatible with
memor
your instrument.
6. Save the package into a directory named
WfmUpgrd.
56 WFM4000 and WFM5000 Waveform Monitors User Manual
Page 73

Download the firmware onto your instrument
from the USB memory device by performing
the following
procedure:
Upgrading Instr
ument Software
7. Insert the USB
containing the WfmUpgrd folder with the
firmware.pkg file into the USB drive of
the instrume
8. Press CONFIG
Upgrade > Upgrade Options > USB
Upgrade.
9. Press the right arrow key to highlight
Press SEL and then press the SEL
buttontos
When the software upgrade completes,
reboot the instrument by disconnecting
the power s
Power button.
memory device
nt.
> Utilities > System
tart the upgrade process.
upply and then pressing the
Network Upgrade
1. Repeat step 1 through step 4 in the
previous procedure.
2. Download the selected software to a PC.
3. Click the downloaded archive and extract
the arc hived files into a directory of your
choice.
4. Extract the following files: transfer.exe,
firmware.pkg and readme.txt.
5. From t
he CONFIG > NETWORK
SETTINGS menu, write down the
number listed for the IP Address.This
ess will also appear on the update
addr
screen.
WFM4000 and WFM5000 Waveform Monitors User Manual 57
Page 74
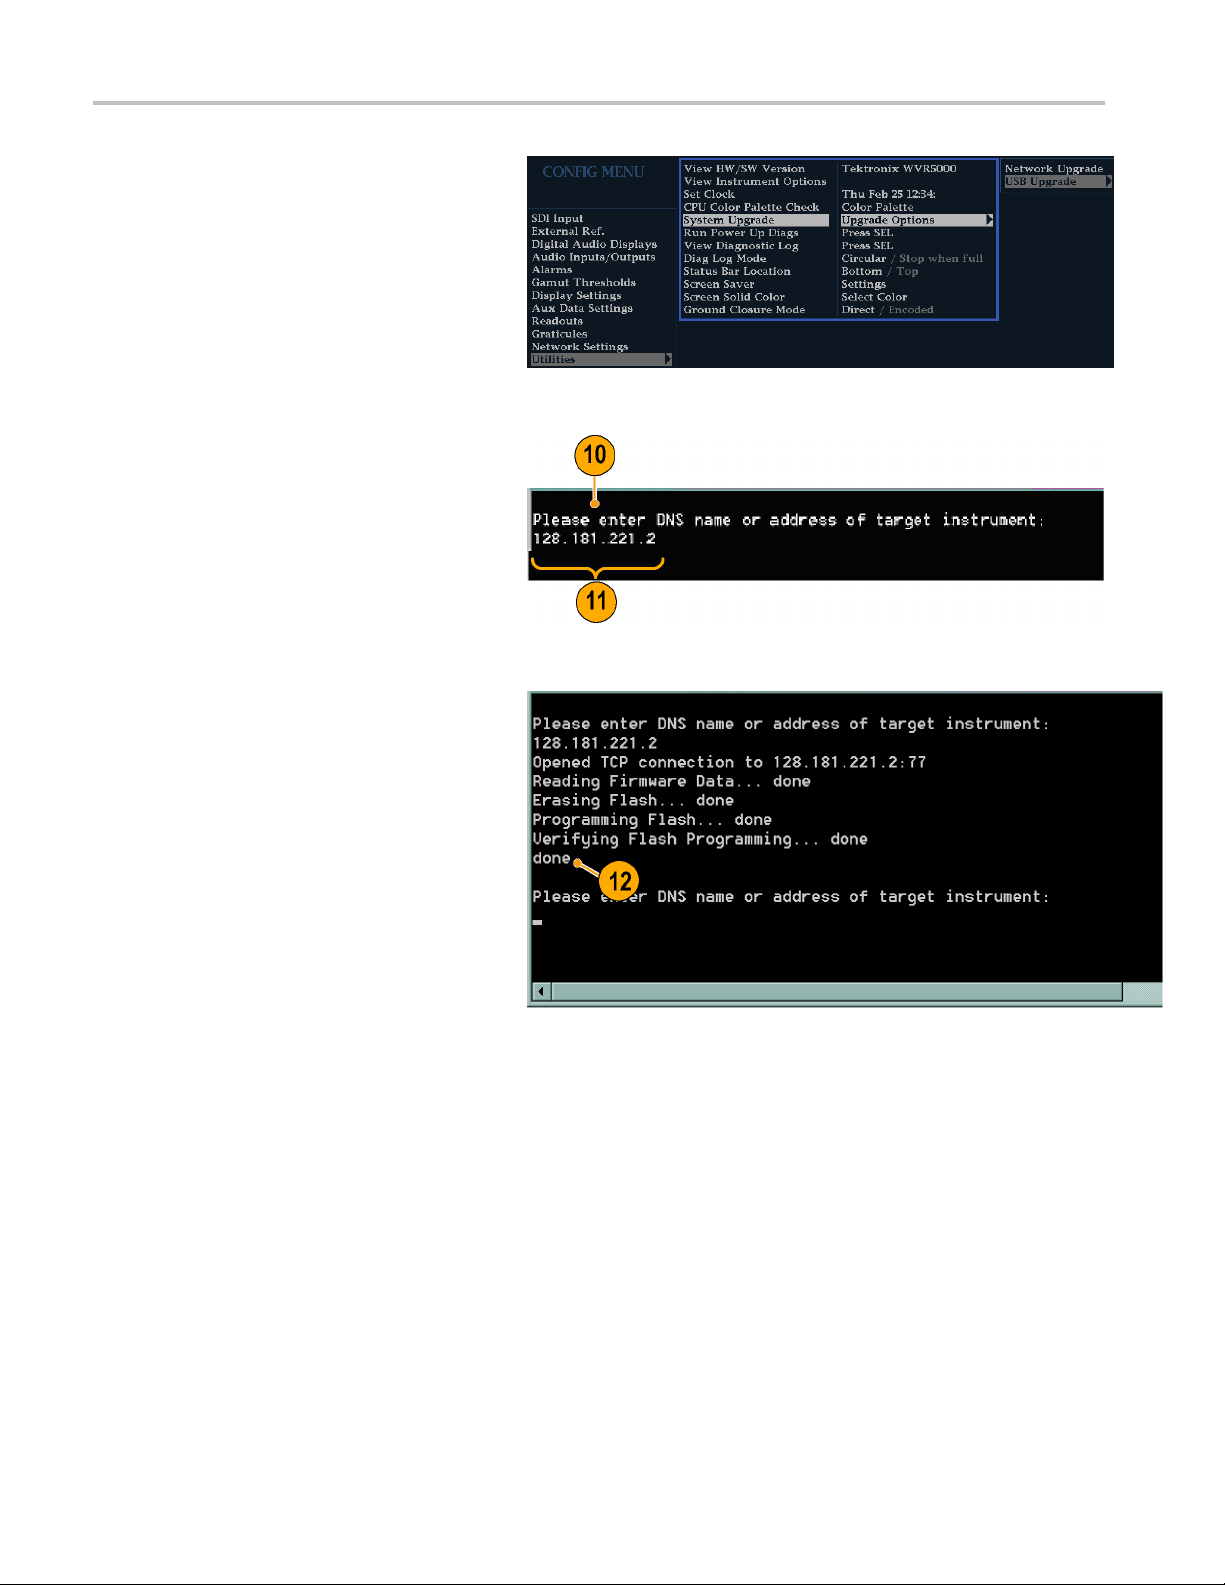
Upgrading Instr
6. On the instrument, press CONFIG >
7. To continue with the upgrade, press the
ument Software
Utilities > System Upgrade > Upgrade
Options > Netw
press the SEL button. This displays the
System S o ftware Upgrade window.
right-arrow
press SEL.
The monitor display goes to black and
displays up
ork Upgrade and then
key to select Continue and
grade progress information.
8. On the PC, do
file to launch the transfer program. T his
displays the window shown at right.
9. Type the network address (for example:
128.181.
instrument you want to update. Make
sure to delete any leading zeroes, as
shown in t
Press Enter.
10. The transfer utility displays done when
the software upgrade completes.
When th
reboot the instrument by disconnecting
the power supply and then pressing the
Power b
uble-click the transfer.exe
221.002) or DNS name of the
he example.
e software upgrade completes,
utton.
11. To update another instrument, type the IP
ess of that instrument at the prompt
addr
and press Enter on your PC keyboard to
start the software upgrade. If you will not
pdating another instrument, press
be u
Enter to exit the transfer utility.
58 WFM4000 and WFM5000 Waveform Monitors User Manual
Page 75

Upgrading Instr
ument Software
Upgrading Multiple Instruments
You can upgrade several instruments in one session, one at a time, if you have determined their addresses. To upgrade,
use the Windows Command Prompt. Enter the following line in a Command Prompt window (substituting the addresses
of your machines):
transfer.exe 192.181.115.1 192.181.115.2 19 2.181.115.3
Separate the addresses with a space.
Alternatively, you can use file redirection to input the IP addresses to the transfer.exe utility. To do this, create a text file
containing a carriage-return delimited list of IP addresses or DNS names for the instruments to be updated. If you c reated a
text file named HOSTS.TXT, you would enter the following command to update a group of instruments:
transfer.exe < HOSTS.TXT
Verifying the Upgrade
After you h
To v er i fy
NOTE. See the Readme.txt file that is included with the software-upgrade package to determine whether all of the current
Configuration menu and instrument-mode settings were preserved through upgrading.
ave completed the software upgrade, the instrument will reboot and come up in an operational mode.
the functional performance of your instrument, perform the Incoming Inspection procedures.
WFM4000 and WFM5000 Waveform Monitors User Manual 59
Page 76

Upgrading Instr
ument Software
60 WFM4000 and WFM5000 Waveform Monitors User Manual
Page 77

Index
Index
Symbols and Numbers
4-Tile
using thumbnail display, 6
4-tile mode,
16
A
Accessories
documents, 1
optional,
power cords, 2
standard, 1
AES connec
Alarms
categories of, 51
configuri
enabled globally and
remote m
status display, 55
to enable, 53
to monit
to set alarms globally, 52
to set allowed responses, 51,
to set limits or qualify, 54
Applications
checki
Arrowhead display, 32
compo
Audio
configuring and monitoring, 44
config
selecting an input, 45
Audio input
sele
Audio inputs
allow alarms for, 44
che
check phase, 46
map bars to input, 44
io level
Aud
checking, 44, 46, 51
Audio phase
ch
1
tor, 12
ng and using, 51
individually, 53
onitoring of, 55
or, 55
53
ng Chroma/Luma
delay, 29
site gamut, 35
uring inputs, 44
cting, 45
ck level, 46
ecking, 46
B
Basic operati
Battery
on, 6
optional, 3
safety, 3
C
Calibration
service options, viii
Chroma/Lu
Composite gamut
Configurat
Connecting AC power, 3
Connecting signals
Connector
Connecto
Controls, front panel, 9
ma delay, 29
diamond display, 35
ion m enu, 25
Line term
Compatibility, 5
AES, 12
Ethernet, 13
ground c
LTC , 13
Power, 11
Video i
ination, 5
r(s)
losure, 13
nput, 12
D
Delete Frozen Image, 23
nd display, 32
Diamo
checking RGB gamut, 33
construction of the diamond
cule, 33
grati
Display
4-tile, 16
-tile, 16
full
how to select, 14
how to set parameters, 15
htning, 29
Lig
overlay, 20
status bar icons, 8
mbnail, 6
Thu
using a, 6
Documentation
nventions used in, ix
co
purposes of, ix
Documents
included, 1
E
Errors
status indicators, 7
Ethernet connector, 13
F
Factory de
Features
Freeze, 22
Front-panel controls
Frozen O
Full-tile mode, 16
faults
how to set, 21
list of ke
layout an
levels of, 9
y, vi
d index to usage
procedures, 9
nly (Freeze function), 22
G
Gain
how to s
how to set, 18
Gamut
arrow
checking, 32
diamond display, 33
Gamut
checking RGB gamut, 33
composite arrowhead
General alarms
configure, 51
nd closure interface, 13
Grou
elect, 18
head display, 35
display
lay, 35
disp
H
Headphone volume
adjusting, 28
rizontal Offset
Ho
Timing display, 39
WFM4000 and WFM5000 Waveform Monitors User Manual 61
Page 78

Index
How to
configure and mo
audio, 44
configure and use alarms, 51
configure your
control the display, 6
determine status, 7
find more info
freeze the display, 22
monitor alarms, 55
monitor safe
navigate between tiles, 17
save a display to USB, 23
select a dis
select an input, 16
set display parameters, 15
set gain an
set line select mode, 24
set to factory default
settings,
set up 4-tile mode, 16
use online help, 26
use prese
ts, 21
nitor
instrument, 25
rmation, ix
area, 48
play, 14
d sweep, 18
21
I
Information
where to find more, ix
Inputs
How to s elect, 16
Installation, 1
BNC con
Connecting power, 3
In a serial video system, 4
Line-t
shipping package contents, 1
lling software, 56
Insta
nector compatibility, 5
ermination
requirements, 5
L
Lightning display, 29
Lightning display overlay, 20
ts
Limi
gamut, 32
Line Select mode
to set, 24
how
Lissajous display, 47
Lissajous sound stage
se style, 47
pha
Live + Frozen O nly (Freeze
function), 22
ve Only (Freeze function), 22
Li
LTC, 13
Luma/Chroma de
lay, 29
M
Magnification, 19
Manuals
conventions
Menu
CONFIG, 25
Monitoring
task description, 44
used in, ix
Audio
O
Online help, 26
context s e
displaying, 26
how to use, 26
navigati
Operation
Basic, 6
control l
Optional accessories, 1
Options
power co
Overlay
waveform/vector display, 20
nsitive, 27
ng, 26
evels (types), 9
rds, 2
P
mbers
Part nu
user manual, 1
Phase (audio)
e channel pair, 46
choos
correlation meter response
times, 47
m channel pair, 46, 47
custo
select display style, 46
Pop-up menus, 15
r
Powe
AC requirements, 3
battery, 3
ecting, 3
Conn
Connector, 11
Power cord options, 2
sets
Pre
how to save and recall, 21
Product description, vi
Q
ad Tile mode, 16
Qu
R
Rear-panel
Layout and description, 11
Recall
settings (presets), 21
Repair
service opti
RGB gamut
diamond display, 33
ons, viii
S
Safe area
to monitor for compliance, 48
to set custom parameters, 49
Safe area g
Safety Summary, iii
Save
Saving a display to USB, 23
SDI input connectors, 12
Selectin
Selecting signal inputs, 16
Service
Signal connection
Split Diamond display, 32
Standard accessories, 1
Status
Status bar, 7
Status button
Sweep, 18
System Upgrade
raticules
description of, 50
to choose a standard, 48
to display
settings
options
Line-termination
docume
power cord, 2
deter
Timin
Util
,49
(presets), 21
g audio input, 45
, viii
ements, 5
requir
nts, 1
mining, 7
g display, 39
ities, 56
T
Termination
Requirements for, 5
mbnail display, 6
Thu
Timing
Chroma/Luma delay, 29
62 WFM4000 and WFM5000 Waveform Monitors User Manual
Page 79

Index
Timing display
description, 3
horizontal offset, 39
supported video formats, 41
Timing measur
relative to, 40
save offset, 40
simple compa
complex, 40
9
ement
red to
U
Upgrading software, 56
USB
savingadispla
Using alarms
task description, 51
y to, 23
V
Vector
display, 29
Vector display overlay, 20
Video input
connectors, 12
W
Waveform display overlay, 20
X
X-Y
phase s tyle,
47, 50
WFM4000 and WFM5000 Waveform Monitors User Manual 63
 Loading...